

Fillmaster Systems, LLC Fillmaster Filtration, FMD 3400, FMD 3600, FMD 2600 Installation Instructions And Service Manual
INSTALLATION
,
INSTRUCTIONS
AND SERVICE
GUIDE
FILLMASTER
FILTRATION
®
GIVE
THIS TO PHARMACY MANAGER
FILLMASTER® SYSTEMS, LLC
www.fillmastersystems.com
619-596-9900 FAX 619-596-8700
TOLL FREE 1-888-284-7873
PO BOX 711537
SANTEE
CA 92072-1537

Fillmaster
Pharmacy Water Purification and Dispensing System
Installation Instructions and Service Guide
Model Fillmaster
®
Filtration Assembly with Model FMD 3400, 3600 , and 2600 dispenser
IMPORTANT INFORMATION
Welcome to the Fillmaster
facilitate installation and continued life of your new system. Average installation time is about one hour. Before beginning
the installation process, please review this guide and examine all the contents of your shipment.
If you have questions about installation steps, please call customer service at (619) 596-9900. Most situations
can be explained over the phone.
The Fillmaster
System is an Advanced Reverse Osmosis Water Purification and Dispensing System. When properly
installed and maintained (See page 11 for recommended routine maintenance) the system will provide a long life of
constant pharmacy grade measured water. Keep in mind that you may use the Air Gap Faucet located near the sink as a
source of healthy drinking water. You may dispense non-measured water with the faucet or measured water with the
dispenser. Mount your dispenser at a convenient location anywhere in the pharmacy.
Be careful not to overturn the valves on the 2600 dispenser. Follow the arrows indicating the proper way to turn the
valve knobs for filling and dispensing. Don’t forget to maintain a service schedule. Use the last page of this service guide
to write down the date when the system was installed and each time you perform any service to the system. Change the
filters and clean the system frequently. NOTE: The filters must be replaced every 12 months at a minimum. As an
added value service, we can ship the filters automatically every 12 months to you. If you would like this service please
indicate on the product registration form.
Please return your product registration form promptly! This form is needed to activate the product warranty. We
need this so we can keep constant communication with you for product bulletins and updates regarding your Fillmaster
system.
Please install as directed. Any variance from the steps outlined in this guide may void the warranty. Please consult with
our customer service department before making any modifications.
NOTE: Professional installers, plumbers and contractors:
You must make this service guide available to the Pharmacy Manager where the unit is installed.
®
Family! This illustrated guide contains step-by-step instructions and service information to
®
FILLMASTER
SYSTEMS, LLC
Customer Service
619-596-9900 FAX 619-596-8700
TOLL FREE 1-888-284-7873
www.fillmastersystems.com
PO BOX 711537
SANTEE, CA 92072-1537

CONDITIONS FOR USE
This Reverse Osmosis (RO) Pharmacy Water Purification and Dispensing System has been designed for serviceability
and ease of installation and constructed with the finest materials available. Using these guidelines and paying close
attention to the parameters outlined within the “conditions for use” will ensure a successful installation. To insure the
system continues to operate at the optimum level, it is necessary to have a routine maintenance and replacement
schedule. The frequency at which the filters need changing will depend upon the quality of the feed water supply and the
level of system usage. Filters must be replaced at least every 12 months, and the membrane every 24 months.
Familiarity with RO installations and city, state, and local plumbing codes is important. In case there is a conflict between
this manual and your local plumbing code, you must follow your local plumbing code.
MEMBRANE: THIN FILM COMPOSITE (TFC)
SOURCE WATER SUPPLY
Community/Private Chlorinated/Non-Chlorinated
System 242 – 690 kPa (35 – 100 psig)
Temperature
pH Range 3.0 to 11.0
Maximum TDS Range 2000 mg/L
Turbidity <1.0 NTU
Silt Density Index <4.0 SDI
CHEMICAL PARAMETERS
Hardness ( CaCO3 ) 350 mg/L (<20 grains/gallon U.S.)
Iron ( Fe ) <0.1 mg/L
Manganese ( Mn ) <0.05 mg/L
Hydrogen Sulfide ( H2S ) <0.00 mg/L
Chlorine ( Cl2 ) <2.0 mg/L
4 - 38 C (40 - 100 F)
CAUTION
DO NOT USE THIS SYSTEM WHERE WATER IS MICROBIOLOGICALLY UNSAFE OR WITH
WATER OF UNKNOWN QUALITY.
This water treatment system is for use on potable water supplies only.
Source water exceeding Chemical Parameters requires pretreatment.
1
NOTE
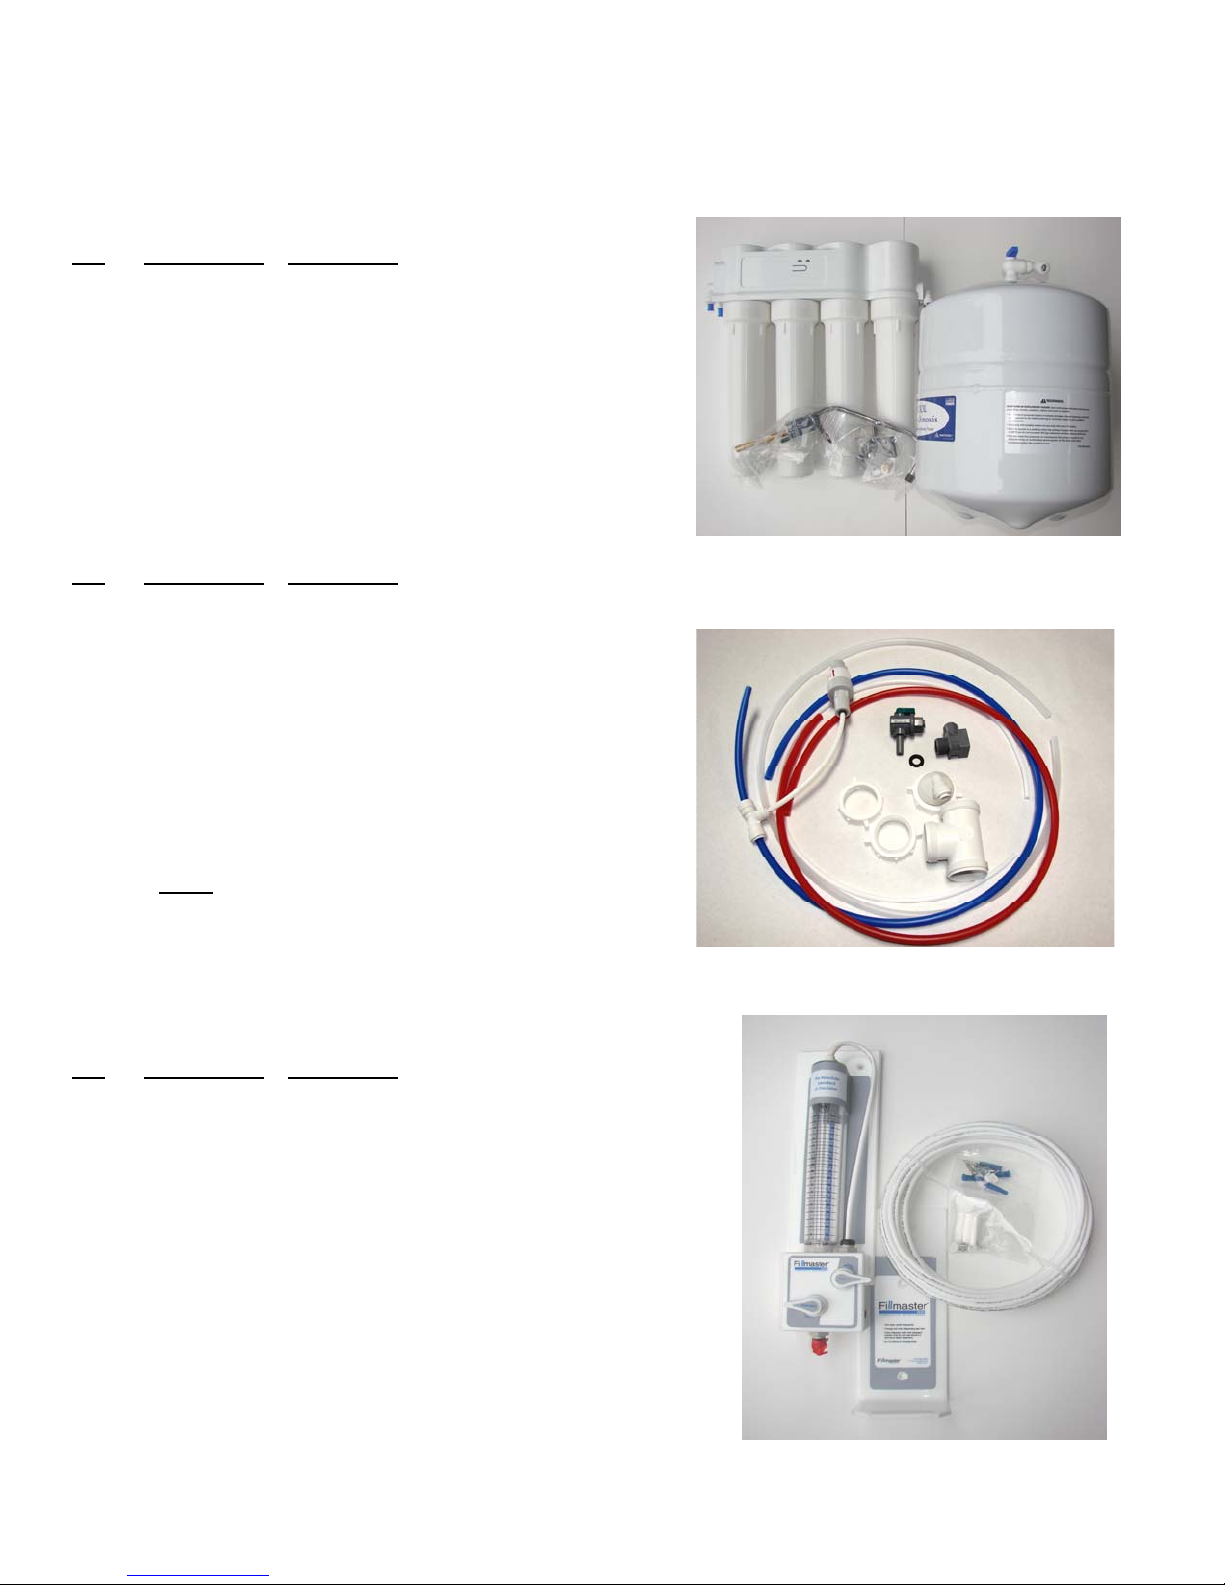
PARTS LIST
Use the following list of components to ensure that all parts are included with your system while familiarizing yourself with
the items before installation.
Qty Part Number Description
1 FAUC1360 Air Gap Faucet
1 FITT2206 Faucet Adapter 3/8” x 7/16”
1 TANK1400 Water Storage Tank (reservoir)
1 MANI1201 FMF Fillmaster® Filtration System
Qty Part Number Description
1
1 EZFA2400 EZ Faucet Adapter Kit
1 TUBE2355 3/8” Blue Tubing, 48” long
1 FITT2209 Reducing Tee inserted
1 TUBE2353 3/8” Clear Tubing, 48” long
1 TUBE2354 3/8” Red Tubing, 48” long
1 TUBE2350 1/4” White Tubing, 36” long
DRAN1350 DLA-12 Drain Line Adapter Package
1 REGU2200* 50 PSI Regulator
1 FLOW1253 1/4” FLR Red Tubing
*[ONLY for systems with FMD 3400 and 3600 Dispenser]
Qty Part Number Description
1 20126 FMD 2600 Fillmaster
1 TUBE2351 1/4” White Parflex Tubing, 50’ long
Dispenser
1 BAGG2300 Installation Hardware Bag (see page 5)
Note: If you order two or more Dispensers you will receive
an additional 25 feet of ¼” White Tubing and
Hardware bag, per dispenser.
Fillmaster System Components
FillmasterTubing and Fitting Kit
Fillmaster Dispenser, Tubing and Hardware
2
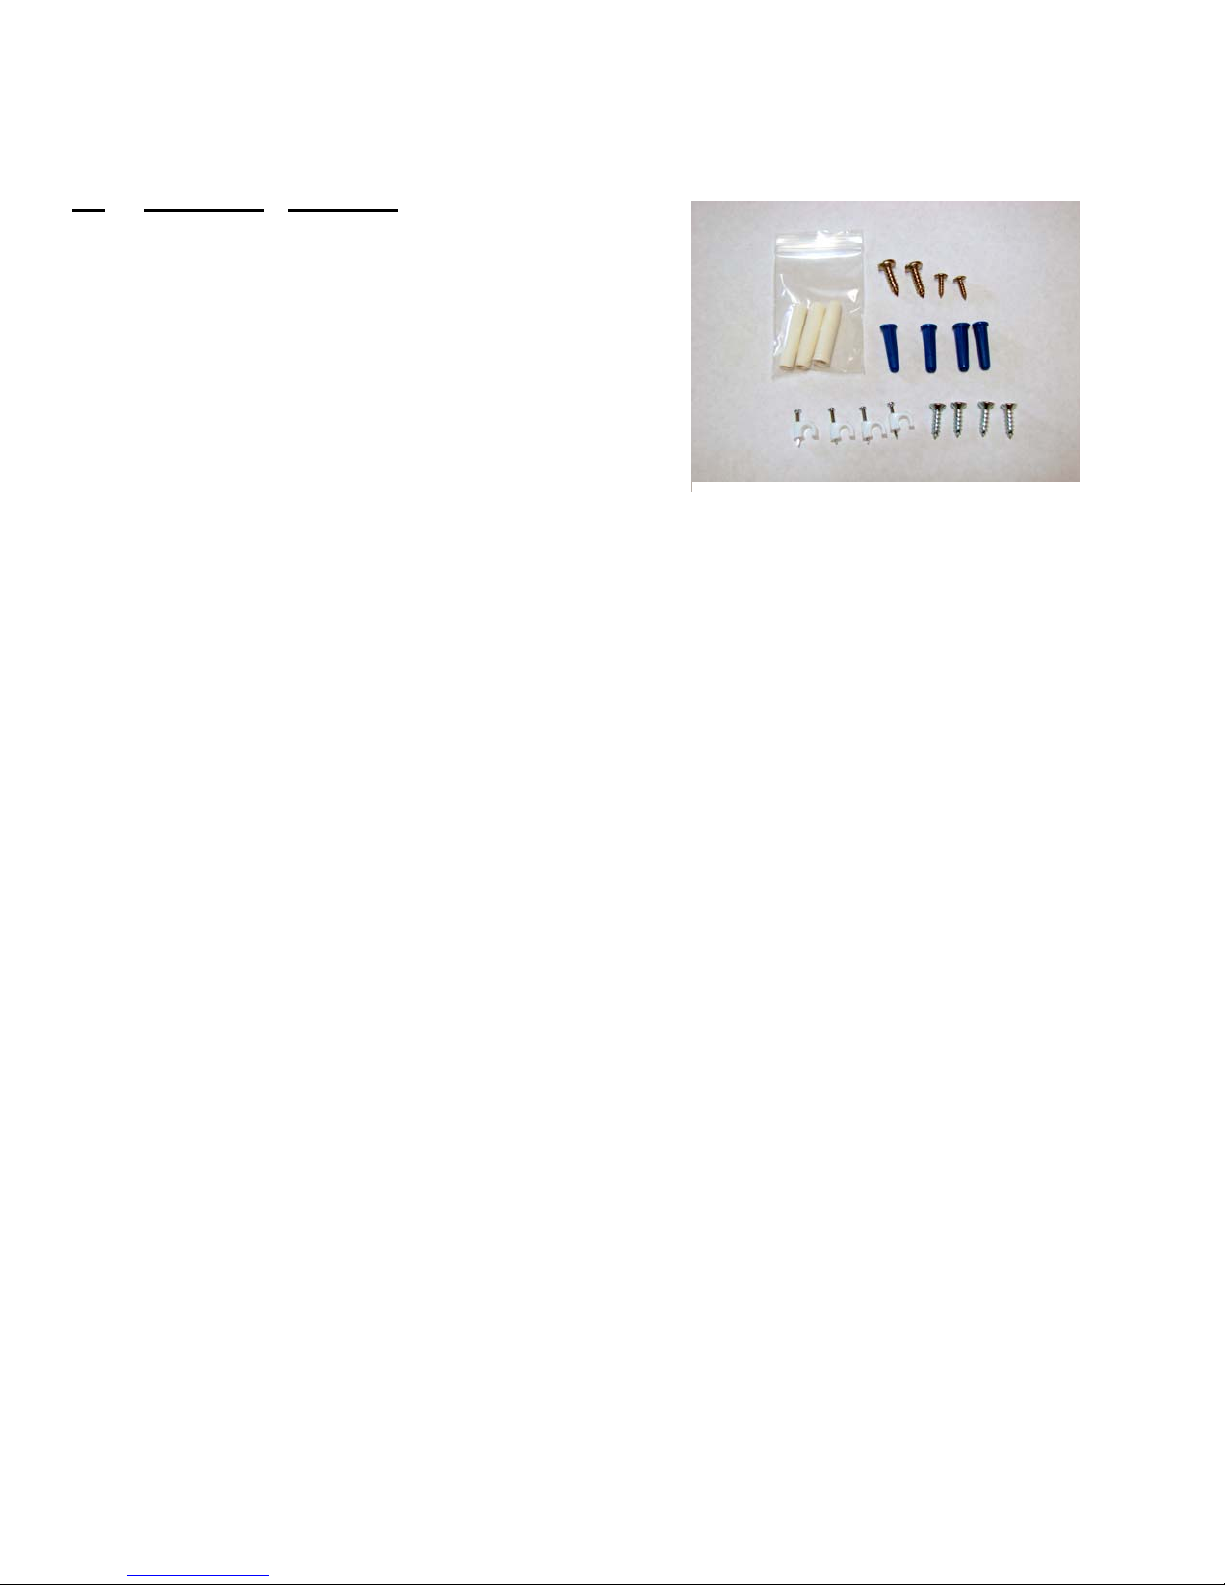
PARTS LIST (continued)
Qty Part Number Description
3 TIPP2310 Dispensing Tip Package
4 ANCH2301 Hallow Blue Wall Anchors
2 SCRE1300 Fillmaster® filltration Mounting Screws
4 SCRE2303 Dispen ser Mounting Screws
2 SCRE2304 Dispen ser Assembly Screws
4 CABL2302 Dispenser Tubing Staples
OTHER FILLMASTER
Fillmaster 3400 and 3600 – Dispenser
Designed as an addition to the Fillmaster® dispenser product line, the fully computerized, battery-operated
Fillmaster
dispensing. By using the electronic dispenser, pharmacists increase prescription integrity by greatly reducing the
possibility of human error while dispensing prescriptions.
Script Scanner - Bar Code Scanner
The Script Scanner is a pager-sized, plug-in modular upgrade to the Fillmaster® 3600 dispenser. Users simply
scan a prescription’s NDC bar code in front of the dispenser, and the Fillmaster 3600 displays the product name
and required water quantity. The prescription is then dispensed at the touch of a button. The Script Scanner’s
database contains proprietary and generic oral drug types by manufacturers including Bristol-Meyers Squibb Co.,
Apothecon, SmithKline Beecham, Eli Lilly & Co. and many others.
For more information about these or any other FILLMASTER
department at (888) 284-7873 or our website www.fillmastersystems.com
®
3400 and 3600 dispenser employ multiple microprocessors to provide accurate and even-flow
®
PRODUCTS
®
Installation Hardware Bag Contents
SYSTEMS, LLC products, please contact our sales
3
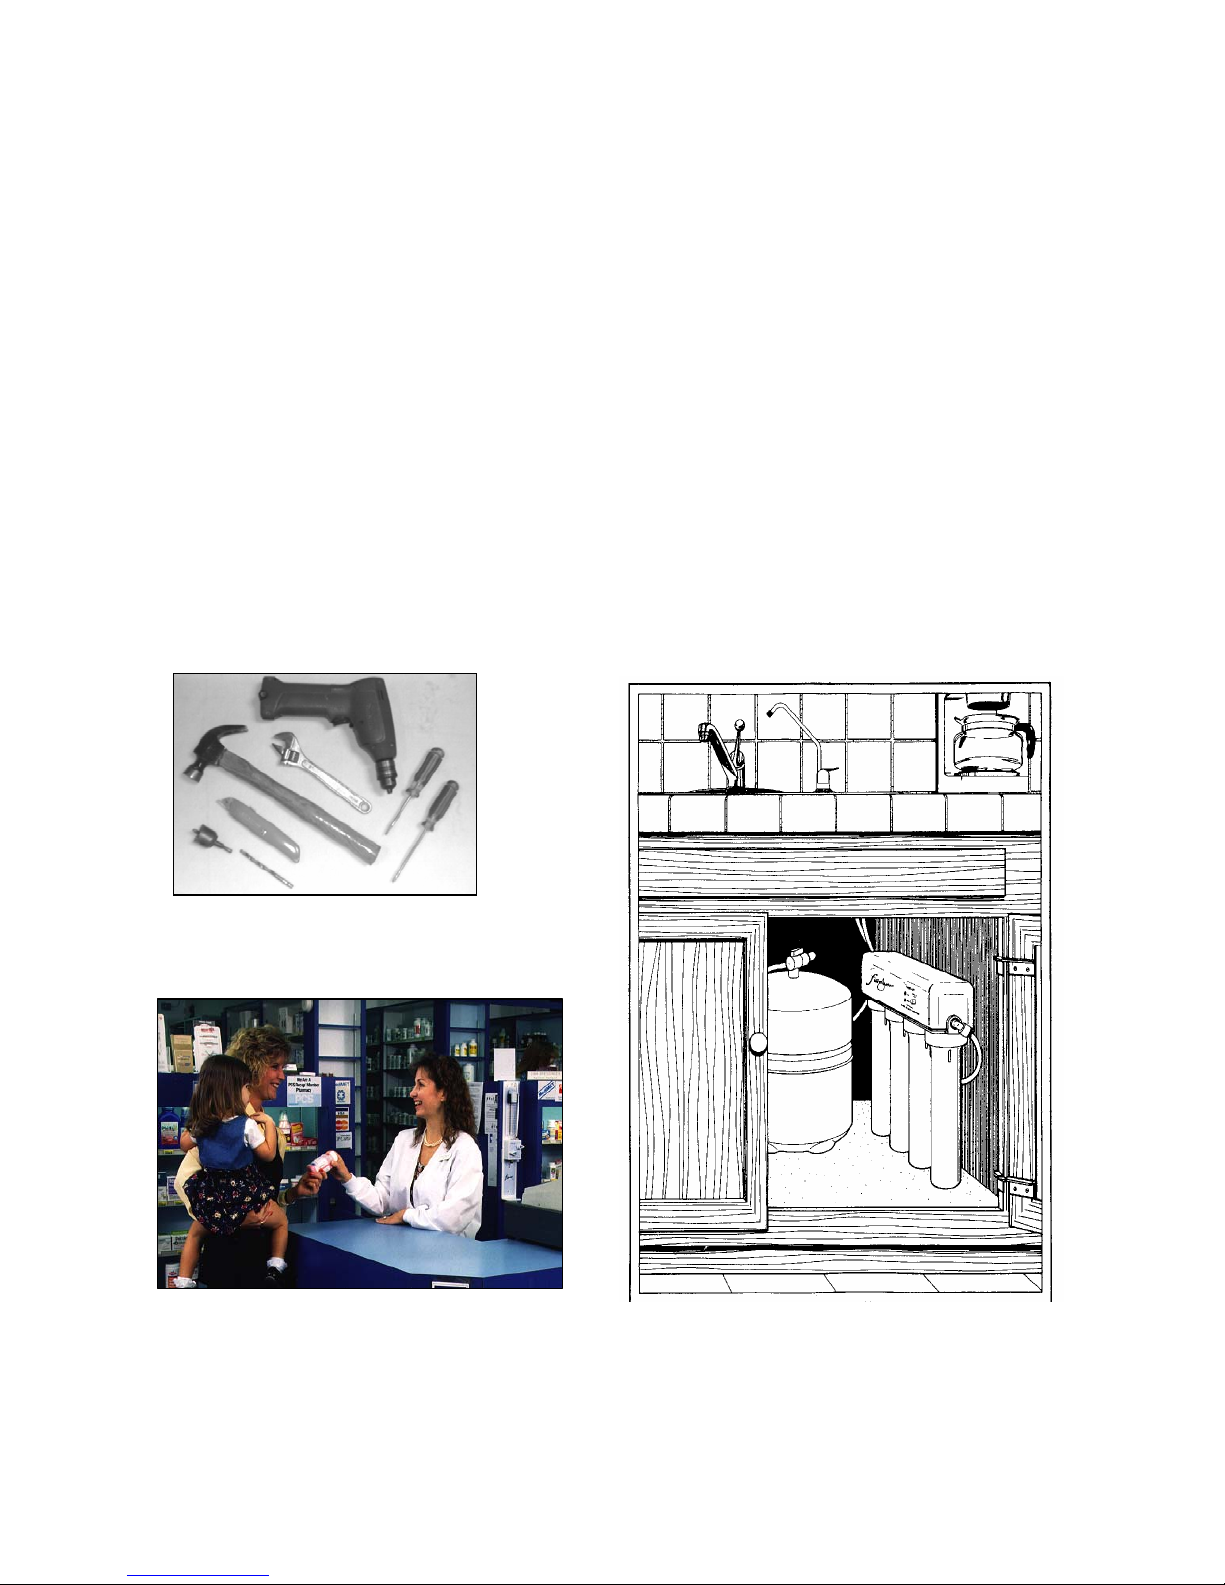
PRELIMINARY INSTALLATION STEPS
1. Examine the cold water feed line, usually located underneath the pharmacy sink. You will be installing an In-Line
Adapter and Ball Valve on the cold water line.
2. Determine the location for the Fillmaster
underneath the pharmacy sink inside the cabinet. Mount the filter unit on the right side of the cabinet if possible. The
Water Storage Tank should fit inside the cabinet as well. If the tank does not fit, place as close as possible to the
filtration system.
3. Determine the location of the Fillmaster
The end cap of a prescription bay, or close to your consulting counter are generally excellent locations for maximum
convenience. When mounting the dispenser, be conscious of varying heights among your staff. The ideal height for
mounting the dispenser is 66’’ from the floor to the top of the dispenser.
4. Determine the location of the Air Gap Faucet. If you have an unused knockout in your sink, the faucet will fit there. If
not, you will need to drill a 1¼” diameter hole through the counter next to the sink.
5. Assemble installation tools: Electric Drill with ¼” and ½” drill bits, Hack Saw, Small Adjustable Wrench, Hammer,
Flat Blade Screwdriver, Phillips Screwdriver, Razor Knife and a 1¼” Hole Saw or Spade Bit to drill a hole for the
faucet.
Filtration System. In most pharmacies the Fillmaster filter unit will fit
Dispenser. The dispenser requires a flat, vertical surface at least 24” high.
Installation Tools
Typical Fillmaster
Dispenser location.
Standard location for Fillmaster Filtration System
and Water Storage Tank.
4
 Loading...