

4
Major Function Modes
[M]
6
Workout Mode
FILActive
FCD006
38-980
FCA011CH
38-131
38-048
www.fila.com/watch
1
Design of the Watch
Thank you for purchasing this watch.
Please read this manual thoroughly before using the watch!
[L]
LIGHT
[M]
MODE
LIGHT Button [L]
• Press to turn ON the EL backlight for about 3 seconds.
• At Home Time Mode, Hold to enter Night Mode.
(Press once to exit)
• Hold to change fields in Workout Mode.
Mode Button [M]
• Press to select among the functional displays.
• Hold to enter the setting mode.
• Hold to fast exit to function modes when you are several levels
down the menu.
• Press to exit setting or go back one level up the menu.
• Hold to change fields in Workout Mode.
Start/Stop Button [S/S]
• Press to move forward.
• Press to increase watch data.
• Press to Start / Stop Workout / Chronograph.
VIEW Button [V]
• Press to enter sub-modes or workout view.
• Press to make selection / confirmation.
• Hold to change fields in Workout Mode.
Lap/Reset Button [L/R]
• Press to move backward.
• Press to decrease watch data.
• Press to take laps in the Workout Mode.
• Hold to clear the workout data.
2
Specifications
GPS
• 5 fully customized profiles (Running, Cycling, Hiking, User-1,
User-2) for fast workout setup
• 2 configurable workout views (screens) for each profile
• 3 programmable fields for each view
• Auto Lap (lap taken by distance)
• 99 laps per workout
Interval Workout Features
• Total 4 programmable interval steps
• Intensity level of each step can be selected among 6 levels
• Each step time can be pre-set
• Repetition pre-settable
• Visual and audio alerts during step advance
• Result can be saved and reviewed at History
Hardware Features
• Super compact, small size and light weight
• Ergonomic body and strap design for comfortable wearing
• BLE (Bluetooth) chest strap
• EL backlight
• Rechargeable lithium polymer battery
• Bluetooth communications with iOS and Android phones
Other Features
• Programmable heart rate zone with high / low limit alerts
3
Install the [App]
To fully utilize the Watch, you need to use with the [App];
FilaGPS. Please visit our website for app information:
www.fila.com/watch, or download directly from the App Store or
Google Play.
User
MANUAL
ST / STP
LAP / RESET
FM-726.1
[S/S]
[V]
VIEW
[L/R]
FilaGPS
TO START: Please set up all info requested in the app SETTINGS.
Incorrect or missing information can result in inaccurate workout
activity recordings.
The Main Unit can store up to 30 days of data, however, we
suggest that you sync your data to the FilaGPS app at least
once a week.
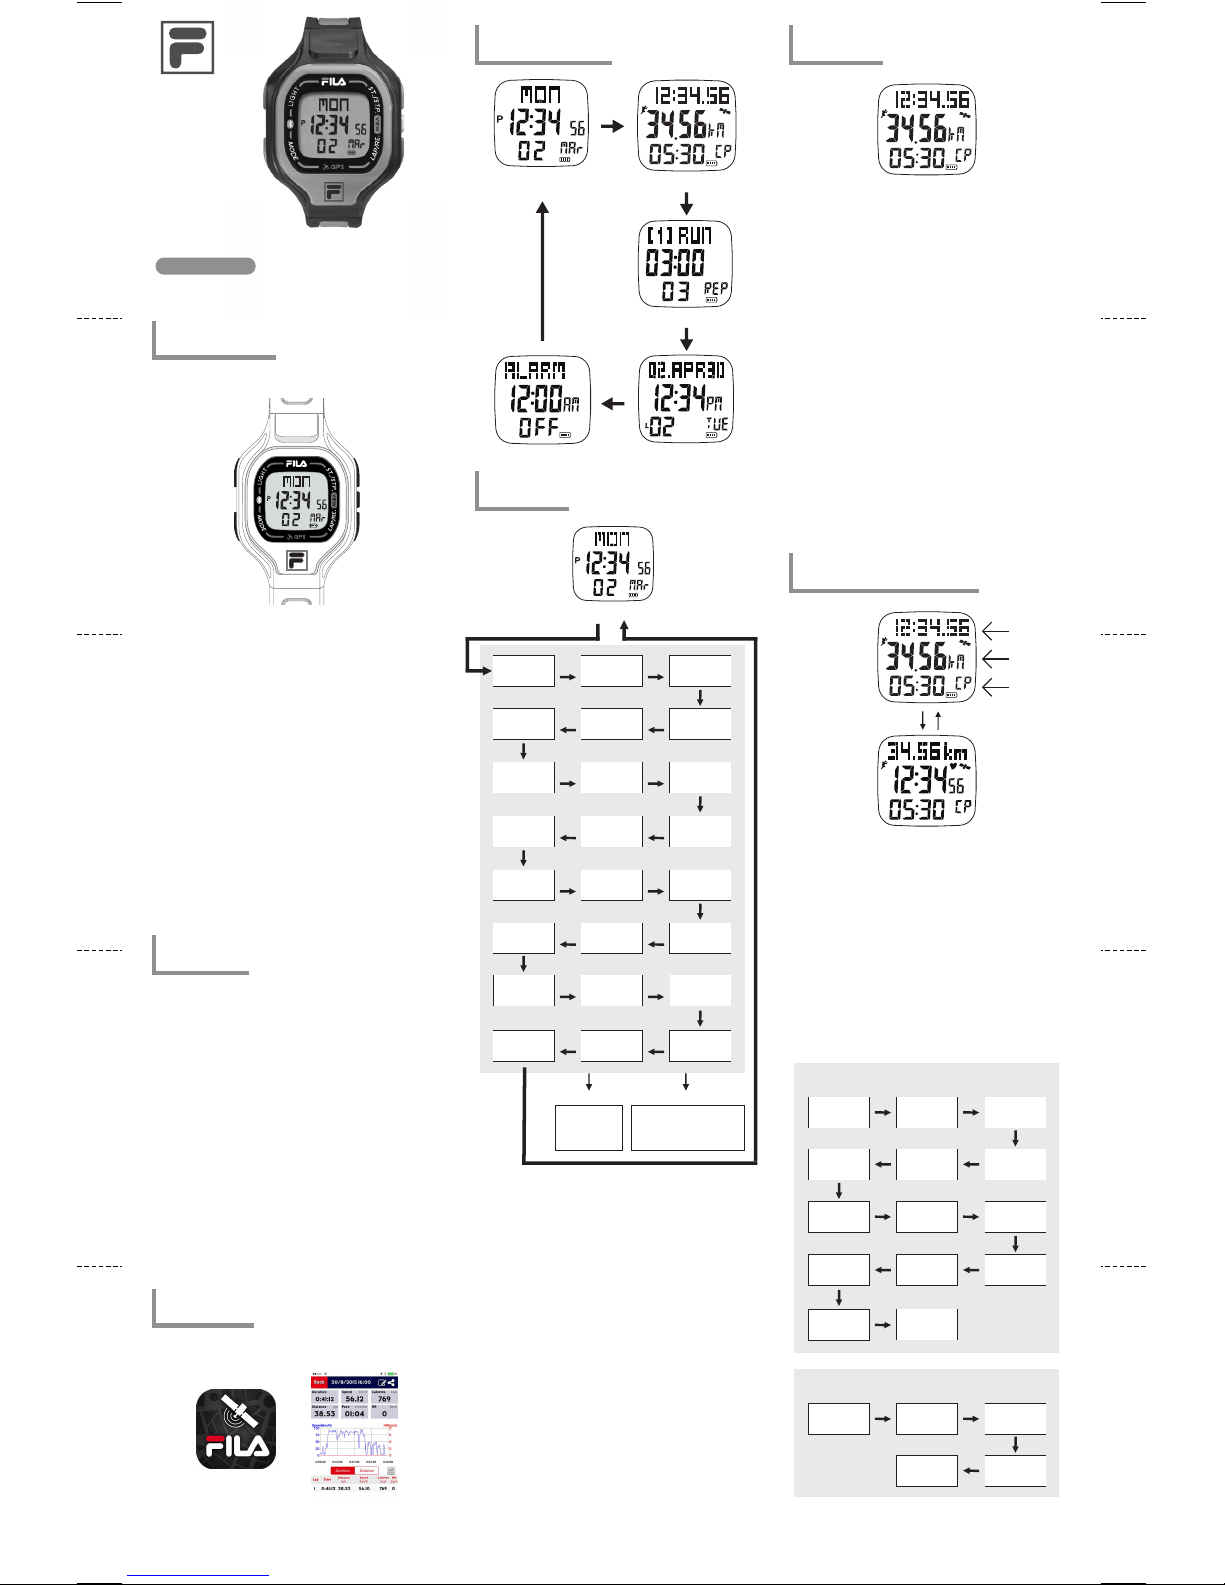
Clock Mode
Workout mode
[M]
[M]
Interval mode
[M]
[M]
App
Paring
MinuteHour
MonthYear
Time 2Units
Auto Lap
On/Off
Minimum
WeightGender
LanguageReset
History mode
GPS Sync
Clock On/Off
[V]
Second
Day
[V]
Format
View Scroll
On/Off
[V]
Maximum
Heart Rate Zone
Key Tone
On/Off
[V]
Contrast
hold [S/S] / hold [L/R]
Increase the number
at a higher speed
[V]
Alarm mode
5
Setting Modes
Clock Mode Display
hold [M]
Paring
Auto Lap
Distance
Alert
On/Off
[V]
[V]
[V]
[V] [V]
[V] [V]
[V] [V]
[V] [V]
[V] [V]
[V] [V]
Heart Rate Zone
[V] [V]
[V] [V]
[S/S] / [L/R]
Increase /
Decrease
the number
HR Chest Strap
Heart Rate Zone
General Setting
• Press and Hold [M] button for 3 seconds to enter settings mode.
• Press the [S/S] or [L/R] buttons to adjust the value (Increase or
Decrease) of the flashing setting. Hold [S/S] or [L/R] buttons
to adjust the value faster.
• Press [V] to confirm the value and move to the next setting.
Function Setting
• GPS Clock Sync (ON/OFF) : Enable the watch to use GPS to set
the time automatically. The current time will not change until
the next time the watch is connected to the GPS satellites. If the
setting is OFF, the next screens will ask you to set the time
and date ( Seconds, Minutes, Hour, Year, Month and Day ).
• DST (ON/OFF): Turn ON this feature if daylight saving time is start.
(Only when GPS Clock sync is set ON)
• 12/24 Hour Format: Select between 12 or 24 hour format.
• Dual Time: Set the second time zone.
• Unit: Select the perferred unit between Metric (MET)/ Imperial (IMP).
• Auto Lap - Distance and ON/OFF: Allows you to automatically
record a new lap at a preset distance.
• Scroll (ON/OFF): Auto scroll between two preset screen in workout
mode. See chapter 6 to set the display data.
• Maximum and Minimum Heart Rate Zone
• Heart Rate Zone Alert On/OFF
• Gender (M/F)
• Weight
• Keytone (ON/OFF): Button “beep” sound
• Contrast (1-16): Change the screen brightness
NOTE: When the setting is completed, Press and Hold [M] to exit
the setting display. The Watch will also exit the setting display if
NO key-stroke has been activated for 1 minute.
Workout mode
How to start the Workout Mode
• Press [M] in the Clock mode to enter the Workout mode.
• Press [S/S] to Start/Stop the Workout. Heart Rate and
GPS is turned ON automatically at start.
Mark Laps
• Press [L/R] to take Laps. The maximum number of laps
for a single workout session is 99.
Reset Workout / Navigation
• When workout has been stopped, hold [L/R] until you
see the SAVED popup message to reset workout. This
clears the current session of workout data and prepares
you to start another new workout. Workout data are
recorded and stored in the memory at reset.
• See chapter 10 to check your workout history.
How to change the Workout view
• Press [V] to select among the 2 preset displays. These
2 displays will be shown in sequence when the Scroll
function has been turned ON. Each display stays for
about 3 seconds.
• See chapter 5 to turn Scroll ON/OFF.
NOTE: See next chapter to select the Workout profiles,
customize the data display and review the workout history.
NO key-stroke has been activated for 1 minute.
7
Workout Mode- Workout Profile
Line 1
Line 2
Line 3
[V]
Workout mode
How to select Workout Profile
• Hold [L/R] to view 5 workout profile.
• When the desire workout profile appear on screen,
release the [L/R] to confirm and select the profile.
How to customize the Workout view data
• Hold [L] to select the Line 1 profile, release the [L] to
confirm.
• Hold [V] to select the Line 2 profile, release the [V] to
confirm.
• Hold [M] to select the Line 3 profile, release the [M] to
confirm.
How to reset and save the Workout data
• Hold [L/R] to save and reset when workout mode stop.
• The screen show “Saved!”
Line 1 and Line 3
Altitude Calories Distance
Lap No. Heart Rate Duration
Lap Time
Time
Latitude
Pace
(Average)
Speed
(Current)
Longitude
Line 2
Distance Duration Heart Rate
Speed Pace
Pace
(Current)
Speed
(Average)
8
Workout Mode - GPS & Heart Rate Monitor
11
Alarm Mode
14
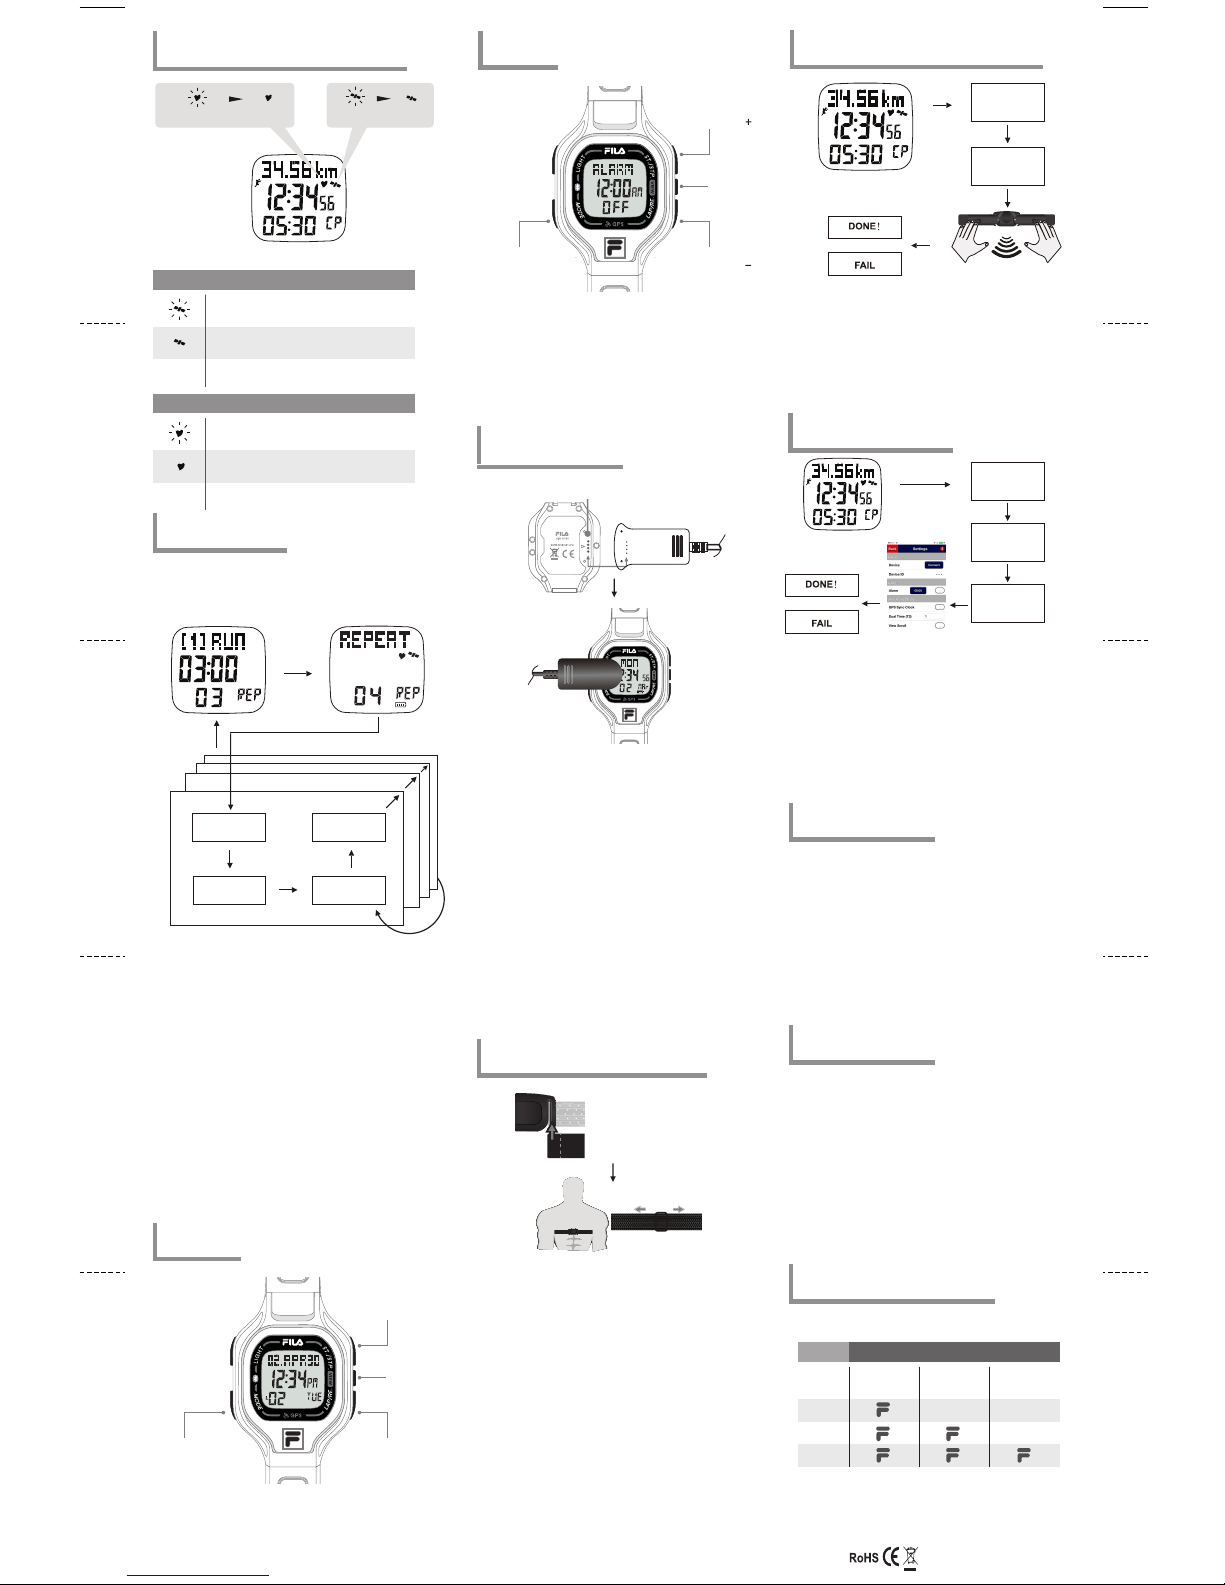
Heart Rate Monitor Function: Strap Pairing
Fixing the
Heart Rate Signal
Heart Rate
Fixed
Fixing with
GPS
GPS Fixed
Workout mode
GPS Status indicator
When GPS is collecting satellite information, an
“Satellite” icon is flashing at the top right for most
of the workout views.
If the GPS has a 2D/3D location located, a fixed
“Satellite” icon will be shown.
If the GPS loses contact with satellites and cannot
fix its position, no“Satellite”icon will be appeared.
Heart Rate indicator
When the watch are searching the heart rate signal
from the heart rate chest strap, a “Heart Rate” icon
is flashing at the top right.
If the Heart Rate signal are received, a fixed
“Heart Rate” icon will be shown.
If the heart rate signal is loses contact with heart
rate chest strap and cannot fix ,no “Heart Rate”
icon will be appeared.
9
Interval Mode - Timer
Each timer in the series can be set to a predetermined length of
time, turned ON or OFF, and assigned an activity - RUN, JOG,
WALK, REST, FAST, MED, or SLOW. A total of 4 timers can be
set in the series, and then automatically repeated.
HOLD [M]
[V][M]
Next Timer
[V]
ON/OFF
[V]
Activity Minutes
Interval mode
How to select Workout Profile
• PRESS & HOLD [M] button for 3 seconds to enter the Timer
Settings Mode.
• PRESS [S/S] or [L/R] buttons (increase/decrease) to adjust
the number of times you want the series of timers to repeat.
PRESS [V] to confirm.
• PRESS the [S/S] or [L/R] buttons to turn the 1st timer ON or
OFF, select the activity label, adjust the minutes, and finally
adjust the seconds. PRESS [V] to confirm the value after
each one.
• Repeat the above steps for all 4 additional timer options.
Timers that are turned ON will run in the series. Timers
turned OFF will be ignored. After adjusting all the Timers you
will exit out of the Timer settings menu. To exit the settings
menu early, PRESS & HOLD [M].
Using the Timer
• PRESS [S/S] button to start or stop counting.
• PRESS [L/R] button to reset timers to 0 after counting
has stopped.
• PRESS [V] button to view the different timers.
10
History Mode
HOLD [M]
Delete History
Viewing History
• Press [S/S] to select one of the saved workouts.
• Press [V] button to view Time/Lap, Distance/Duration, Average
Speed/ Calories, Average Pace/Calories, Maximum HR/ Average
HR) and saved LAPS. Press [S/S] button to change the LAP
shown.
[V]
Seconds
[V]
[V]
[S/S]
VIEW next recorded Workout
[V]
VIEW next
recorded Workout
[L/R]
VIEW next recorded Workout
[S/S]
Turn Alarm ON or OFF
Adjust Setting Value ( )
[V]
Accept Entry &
go to next setting
HOLD [M]
Enter Alarm Setup
Setting the Alarm
• Press & Hold [M] button for 3 seconds to enter the Alarm
setting Mode.
• Press [S/S] or [L/R] to adjust the hour and then the minutes.
• Press [V] to confirm for each value.
Using the Alarm
• Press [S/S] button to turn the Alarm ON or OFF.
12
Charge the Battery
USB Cable
Contacts Point
GPS SYSTEM
The watch has a built-in rechargeable battery. It is IMPORTANT
to charge the watch for at least 3 hours before using. The
battery can be fully charged/discharged 500 times.
With a fully charged battery (depending on GPS and EL
Backlight usage), the GPS battery will perform as follows:
• Without Active GPS: Up to 1 year
• With Active GPS: Up to 12 Hours
NOTE
To prevent corrosion or damage, ensure that there is no
contamination, sweat, moisture or dirt between the contacts of
the charging cable and the back of the watch by gently wiping
the back of the watch with a dry cloth.
Connecting the Charging Cable & the Watch
• Align the 4 contacts at the back of the watch with the
4 prongs on the charging cable.
• Make sure that the clip is securely positioned.
• Plug the USB end of the cable into your computer or
charging source.
13
Fasten the Chest Strap on one's chest
Insert the elastic band into the hoke at
the end of the chest strap.
Center the Chest Strap against your chest as high under
your breasts as comfortable. Adjust the Chest Strap with the
elastic band comfortably and allow for normal breathing.
NOTE
• Wetting the contacts with water or saliva can increase the
conductivity.
• Make sure that the contacts are made firm contact with the user's
skin during measurement.
• Clean the contacts occasionally by moist paper towel, and wipe it
dry with dry paper to remove grease.
• Use the Chest Strap in a place within 3 meters from the Watch,
otherwise the Watch CANNOT receive the data from the Chest
Strap.
WARNING
• DO NOT adjust the Chest Strap too tight, it may hinder the blood
circulation and breathing.
• Avoid doing any awkward motion during measurement, it may
create an inaccurate heart rate reading.
[L/R]
Adjust Setting Value ( )
HOLD [M]
Clock Mode
or
Strap Pairing
Every Chest Strap (HRM) is assigned a unique ID when it was
manufactured in the factory. The watch has to be paired up with it
before use. This is to avoid interference with other users who are
using the same equipment. Pairing has been done in the factory.
Should you replace the HRM with a new one, you have to pair the
new strap again.
To do the pairing, Hold [M] under Clock mode to enter Pair Strap.
PRESS [S/S] to start pairing.
15
Pair the Watch to the [App]
HOLD [M]
Clock Mode
or
APP:
WATCH:
APP:
WATCH:
For more details about the app, please refer to the FULL VERSION
user manual, located on our website: www.fila.com/watch
16
Care and Maintenance
• This watch contains electronic components. Never attempt
to open the case or remove the back cover.
• Avoid exposing the watch to extreme temperature,
chemicals which will damage the watch.
• Keep the watch away from the conditions of strong electric
field and static electricity.
• Avoid rough usage or severe impact. The watch is designed
to withstand impact under normal use. It is advisable to
subject it to severe impact or rough usage.
• Clean your watch occasionally with a soft moistened cloth
only. Avoid using chemicals, especially soap as the
waterproof gasket will corrode.
• Store the watch in a dry place when it is not in use.
17
Precautions for Straps
• Exposure to water often makes a strap fragile and it may
soon tear.
• Don’t apply perfume or moisturizers around your wrist as
the chemicals can erode the metal, leather and plastic of
watch straps.
• The strap’s condition will depend on the owner’s wearing
habits as well as the climate of the place where the person
lives. An original replacement on straps is possible to be
re-ordered through an authorized service center.
• PU straps are usually very hardwearing, please wash them
with mild soapy water only.
• There may be discoloration for light color and transparent
straps after normal wear for some time.
• In case if there is any severe or persistent skin reaction, such
as severe redness, itching, rash or hives, you should stop
wearing this watch, and consult your doctor.
18
Precautions for Water Resistance
All FILA watches are designed to withstand use as indicated on
the below chart.
Indication
Level of
resistance
3ATM
(30 meters)
5ATM
(50 meters)
10ATM
(100 meters)
• Water damage may occur if the push buttons are pressed
under water.
• Should water or condensation appear in the watch, please
check the watch immediately as corrosion of electronic
parts can occur inside the case.
Click on Connect
In the Settings menu, click on Connect > to open the
PAIR screen.
PRESS & HOLD the [M] button on the Watch to enter
the MENU. Once the word PAIR APP appears in the
display, QUICK PRESS the button again.
At the same time, tap "PAIR" in the app screen to start
the PAIR process.
It may take a few moments to PAIR the device. The
word SUCCESS will appear in the display and your
device is ready!
Water-related use
Light spray
perspiration,
light rain, etc
FILA™ is trademark of FILA Luxembourg and
used under licence by LONGITUDE LIMITED.
[S/S]
Touch the contacts
with both hand
[V]
[S/S]
Bathing,
etc
Pair?
Strap
Pairing...
Strap
Pair?
Strap
Pair?
App
Pairing...
Strap
Swimming,
etc
 Loading...