

FILA FILActive 38-901, FILActive 38-902 User Manual
FCA011CH
www.fila.com/watch
FM-747.2
38-901&902
FILActive
Manual
User
www.fila.com/watch

Table of Content
Part A :
1. Design of the Fila Tracker 901 Pro & Tracker 902
2. Specifications
3. How to use the Band and Clips
4. Getting Started: Overview
5. Getting Started: Install the [App]
Part B: (Tracker 901 Pro)
6. Getting Started: Activate the Fila Tracker 901 Pro
7. Getting Started: Check the Battery Status
8. Pair the Tracker 901 Pro to the mobile [App]
9. Menu Options
10. Modes of Options
10.1 Modes of Options - Time
10.2. Modes of Options - Daily
10.3. Modes of Options - Step
10.4. Modes of Options - Distance
10.5. Modes of Options - Calories
11. Workout Mode
11.1 Workout Mode - Record Display
12. Sleeping Mode

Part C: (Tracker 902)
13. Getting Started: Activate the Fila Tracker 902
14. Pair the Tracker 902 to the mobile [App]
15. Menu Options
16. Modes of Options
Part D:
17. App: Fila Tracker
18. App: Main Page
18.1 App: Main Page - Steps
18.2 App: Main Page - Distance
18.3 App: Main Page - Calories
18.4 App: Main Page - Active Time
19. App: Summary
20. App: Sleep Time
21. App: Setting your tracker via your device
21.1:
Setting Up Your Own Profile
21.2: Alarm Setting
21.3: Daily Goals
21.4: Workout Goals
21.5: General Settings
21.6: App: Wristband Settings
22. Reports
23. Workouts History
24. Care and Maintance
25. Precautions for Water Resistance
Design of Fila Tracker 901 Pro & Tracker 902
1
Thank you for selecting the Fila Tracker 901 Pro and Tracker 902
[Tracker]. This User Guide is the recommended source of
information about your [Tracker]. Please read it carefully and follow
all the instructions.
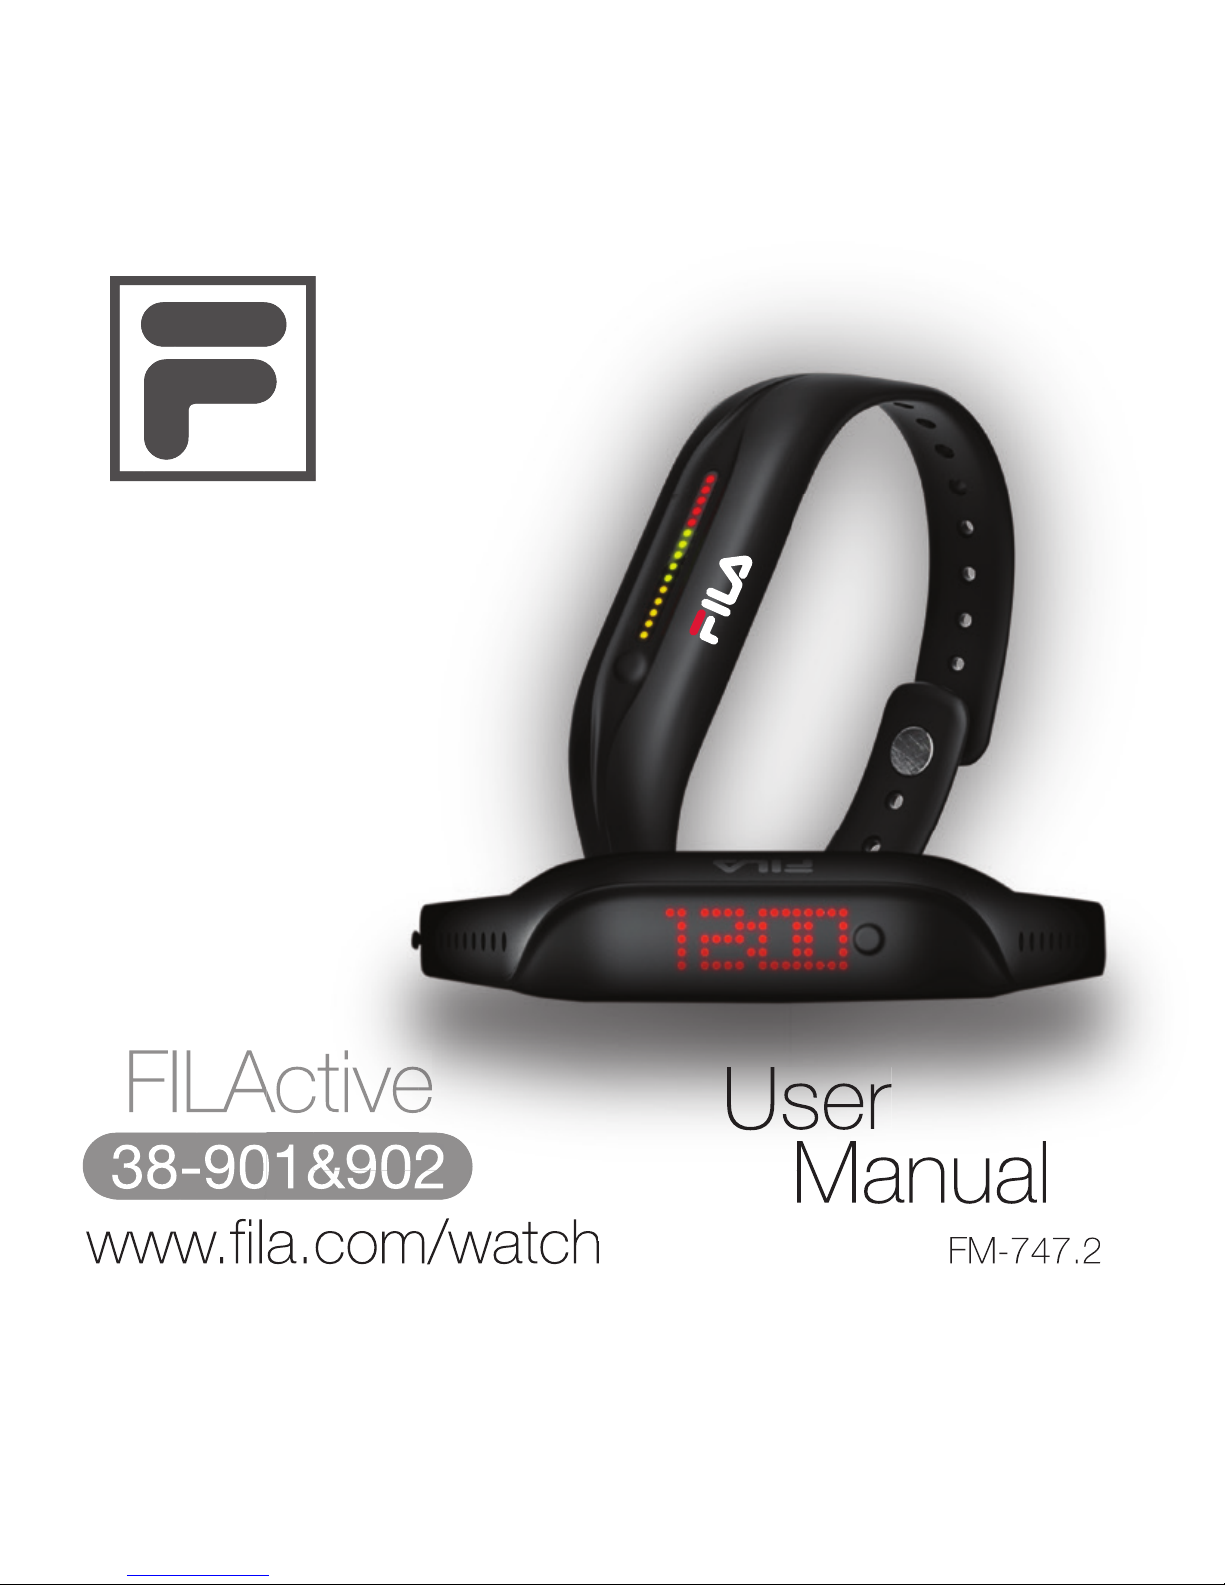
Simple & Easy-to-Use:
The [Tracker] has only one mode button to control all functions.
Mode
button
Mode
button
Tracker 901 Pro Tracker 902
Specifications
2
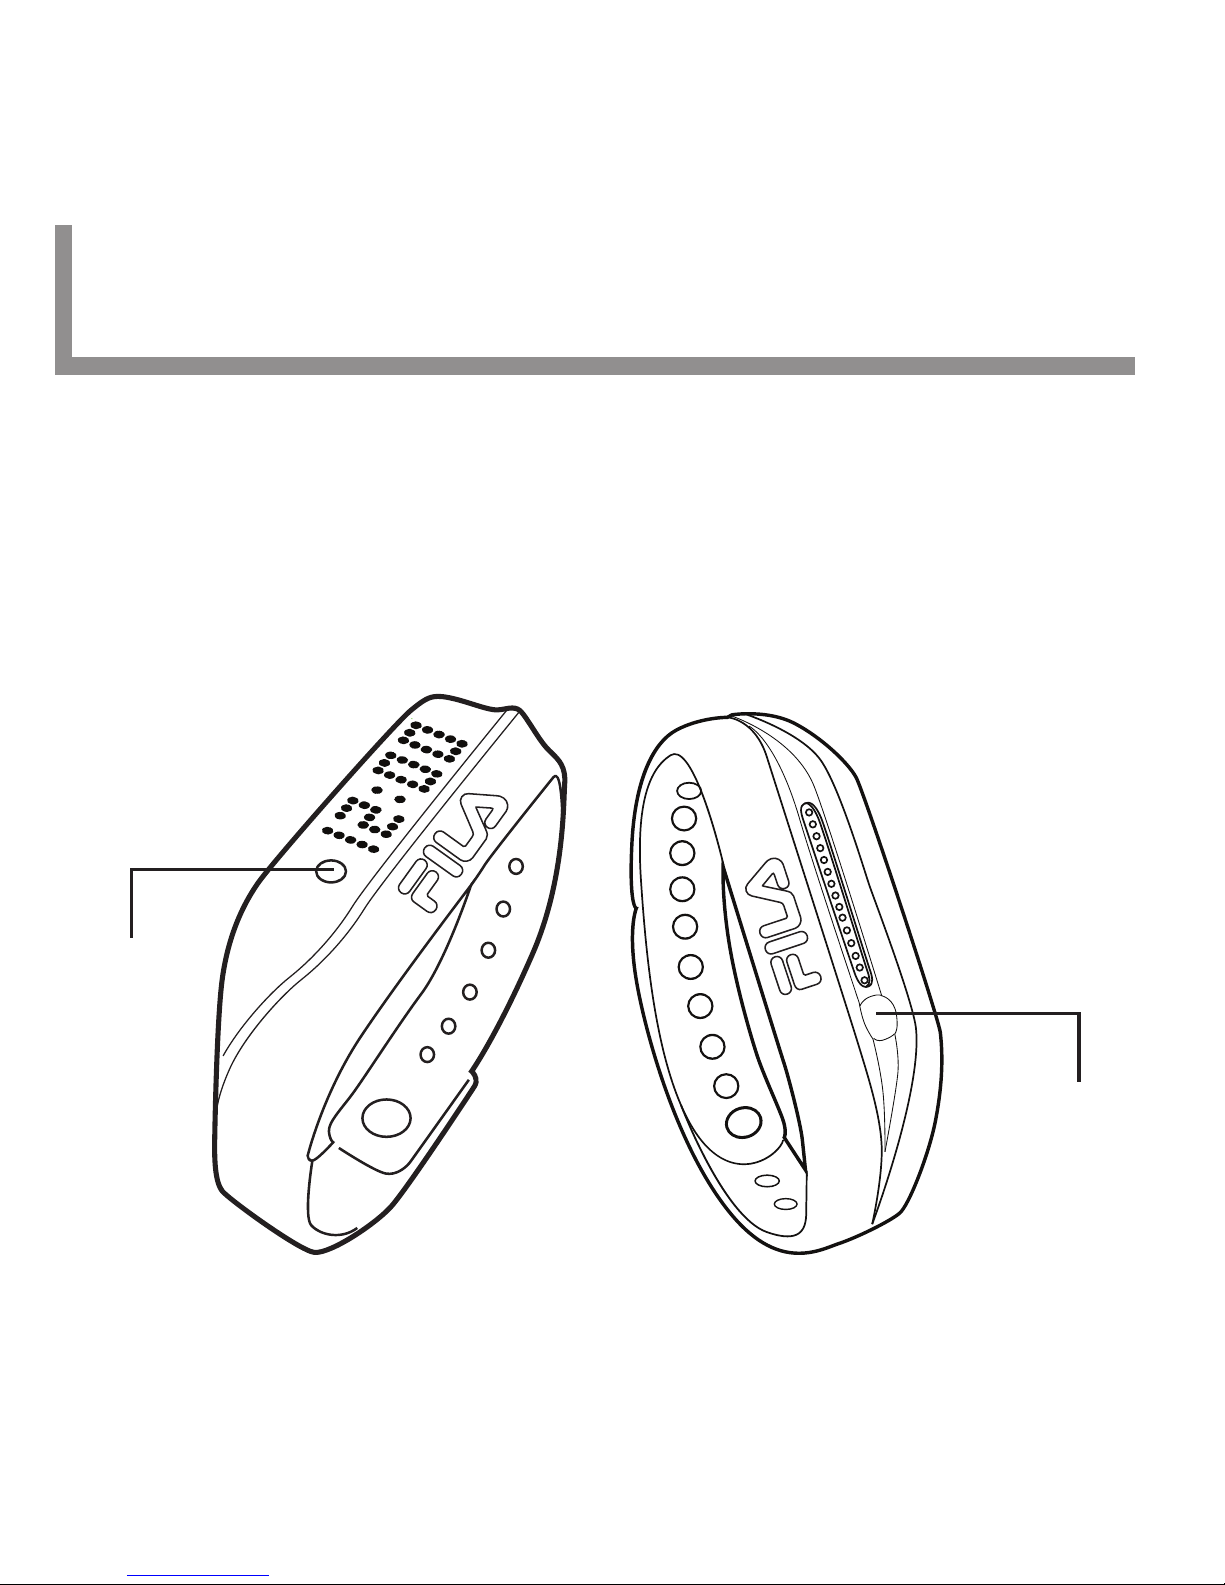
The [Tracker] can be worn on the wirst (in the Silicon Wrist
Band) or you can pop it in the Micro-Clip and wear it
pedometer-style on your waist belt or in your pocket.
Silicon Wrist Band (1)
[SWB]
Main Unit (1)
[MU]
USB Charging Clip (1) Micro-Clip for waist (1)
[Clip]
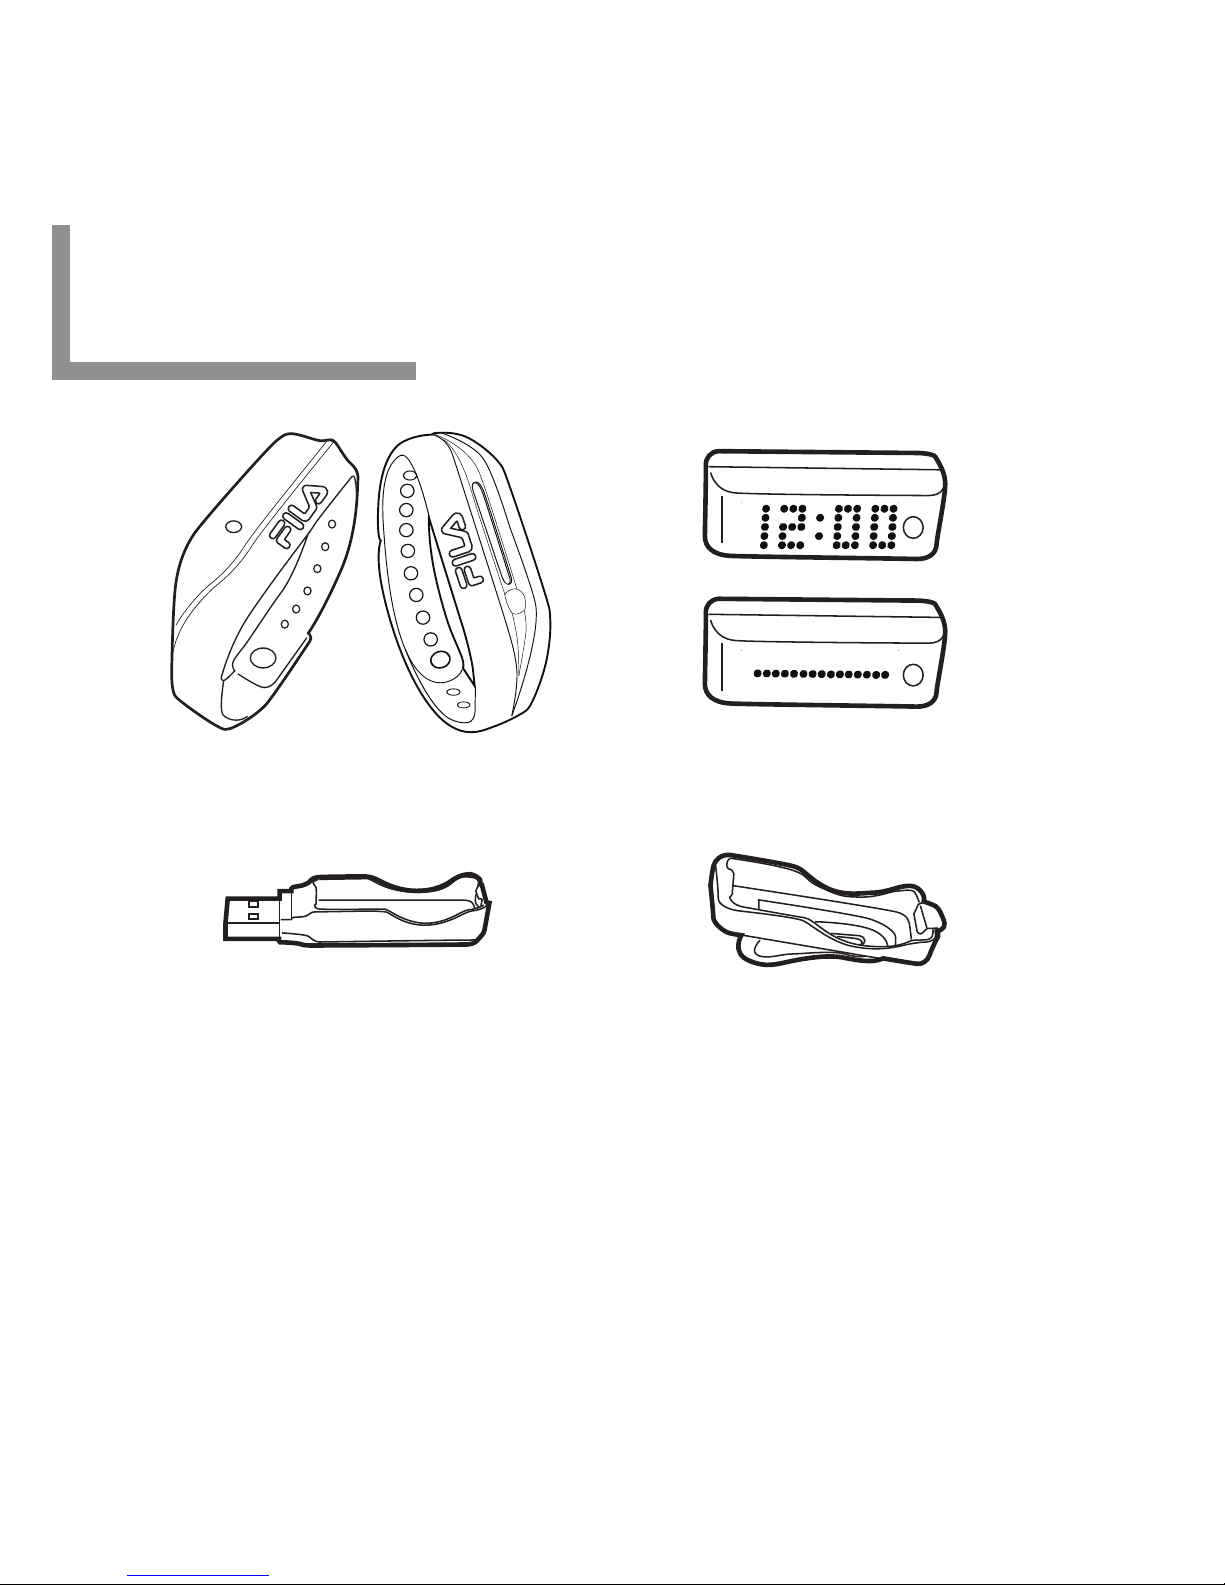
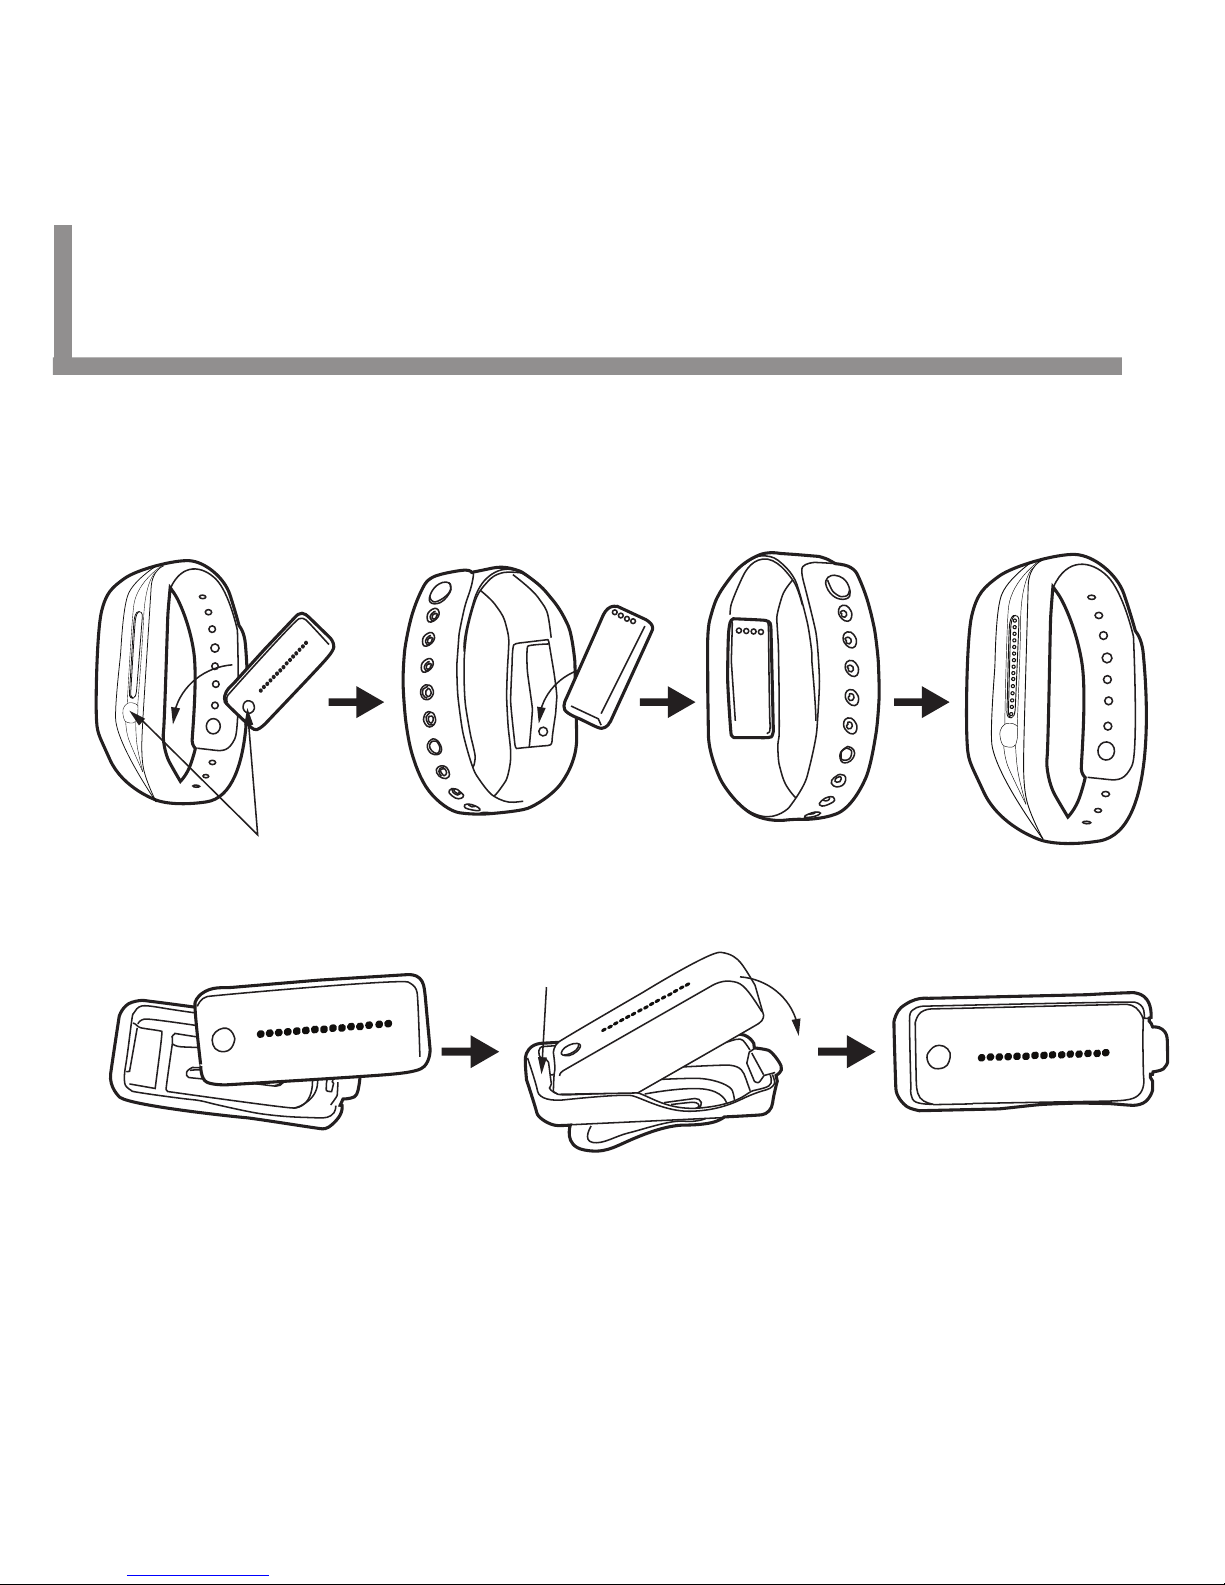
How to place the [MU] into the [SWB]
Place the [MU] into the socket of the [SWB]. Make sure to align
the mode button with the indented button area of the [SWB].
How to place the [MU] into Micro-Clip [Clip]
Place one end of the [MU] into the Clip and snap the other side
into place.
How to Use the Band and Clips Tracker 901 Pro
3
3
How to Use the Band and Clips Tracker 902
How to place the [MU] into the [SWB]
Place the [MU] into the socket of the [SWB]. Make sure to align
the mode button with the indented button area of the [SWB].
How to place the [MU] into Micro-Clip [Clip]
Place one end of the [MU] into the Clip and snap the other side
into place.

How to remove the [MU] from the [Clip]
Press the small lever to remove the [MU] from the [Clip].
How to attach and remove the [MU] from the USB Charging Clip
Follow the same instructions to insert and remove the Main Unit into /
from the USB Charging Clip. However, please make sure you
ALIGN THE TWO CONNECTION POINTS ON THE MAIN UNIT
WITH THE TWO CONNECTION POINTS ON THE USB
CHARGING CLIP!
Press the lever
• The maximum input current for USB charger is 500mA.
How to Use the Band and Clips
(continued)
Press the lever

STEP 1
Install the app, Fila Tracker [App] on your compatible device
Before you can setup your [Tracker] or transfer data from your
[Tracker] to the [App], you need to install the [App] on your
Bluetooth® Smart Ready device.
STEP 2
Activate the [Tracker]
The [Tracker] is shipped in OFF mode. To activate your [Tracker],
simply Press & Hold the button for 3 seconds.
STEP 3
Check the Battery Status
The [Tracker] may need a recharge before use. Please check the
Battery Status and, if needed, charge the Main Unit.
STEP 4
The [Tracker] must be PAIRED to the [App]
Make sure Bluetooth® is enabled on your phone. PRESS & HOLD the
button (on the [Tracker]) to enter the MENU. Once the word PAIR
green light appears in the display, QUICK PRESS the button again. It
may take a few moments to PAIR the device. The word DONE will
appear in the display and your device is ready!
Getting Started: Overview
4
To fully utilize the [Tracker], you need to use with the [App]. Please
visit our website for [App] information: www.fila.com/watch, or
download directly from the App Store or Google Play.
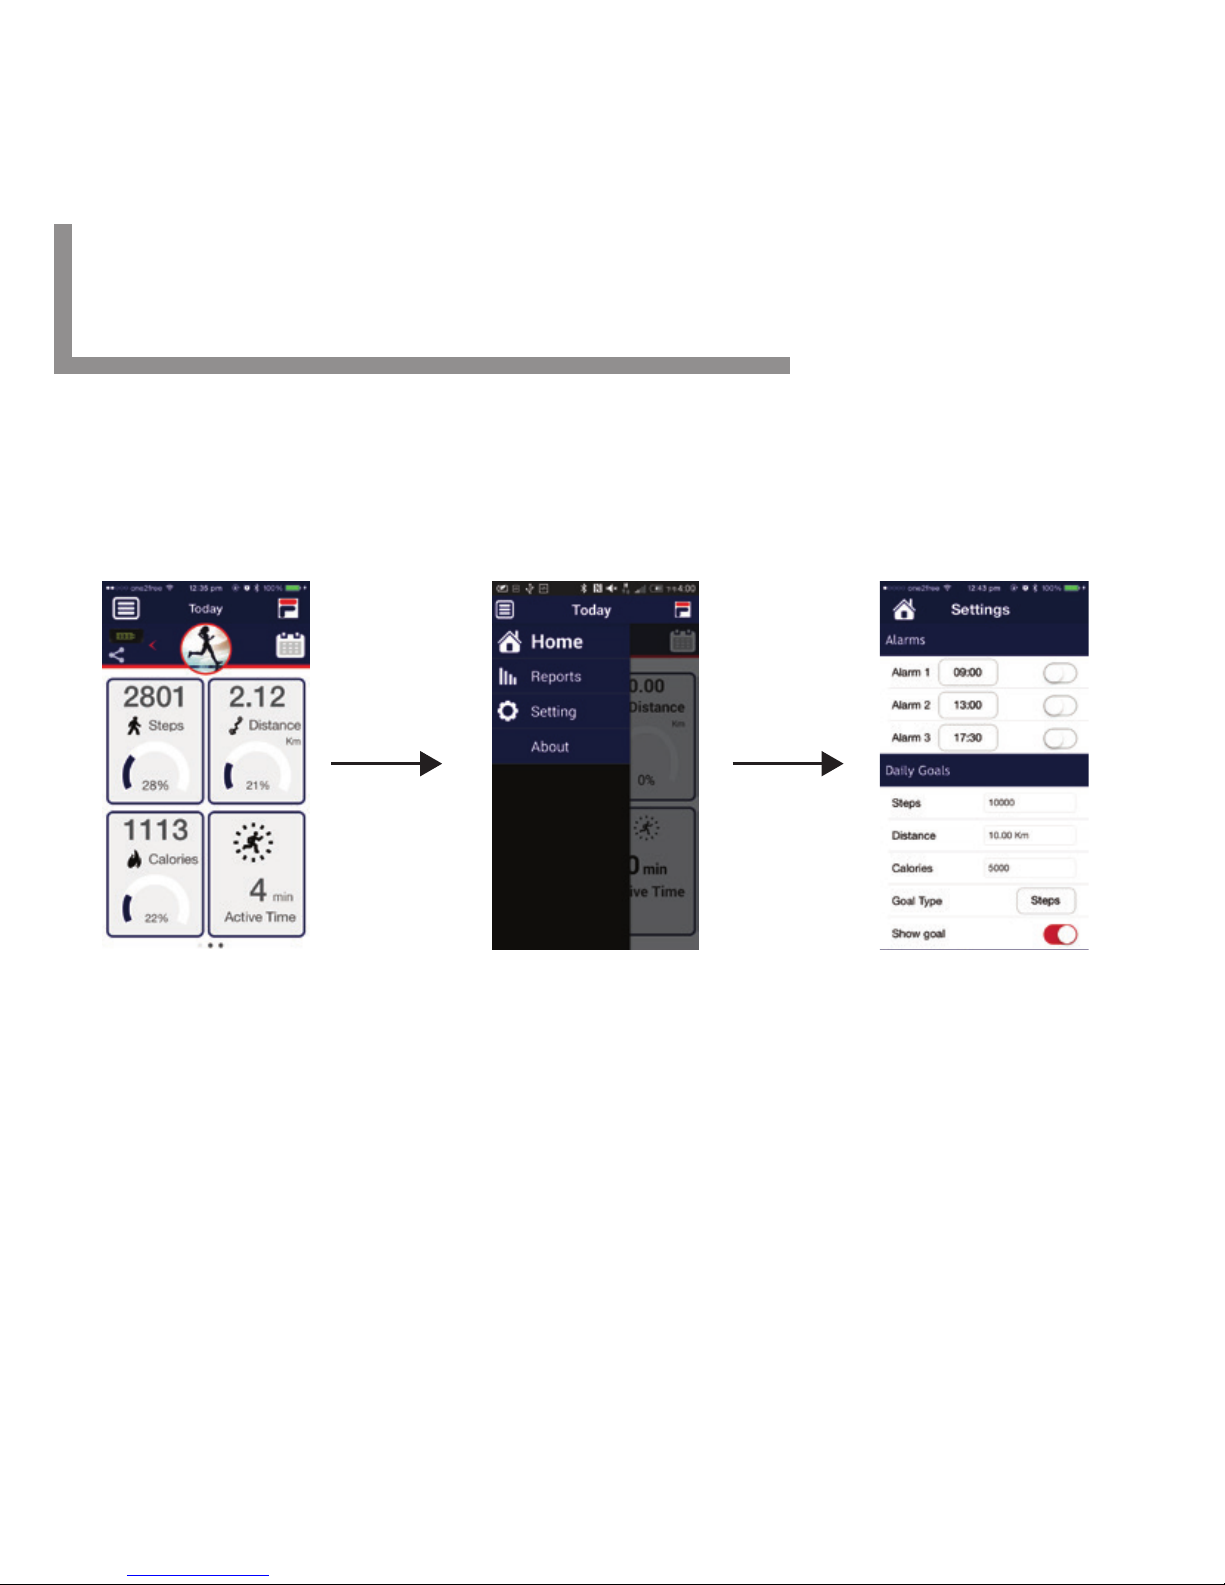
TO START: Please set up all info requested in the [App] SETTINGS.
Incorrect or missing information can result in inaccurate workout
activity recordings.
The Main Unit can store up to 30 days of data, however, we
suggest that you sync your data to the [App] at least
once a week.
Main Page Menu Settings Page
Getting Started: Install the App
5

Getting Started: Activate the Fila Tracker
TURN YOUR BAND ON
Fila Tracker 901 Pro is shipped in OFF
mode. To activate, simply PRESS & HOLD
the button for 3 seconds. Hi!
TURN YOUR BAND OFF
To conserve the battery’s lifetime during long
periods of inactivity, please turn your band
OFF.
NOTE: If nothing appears in the display, this could mean that the
battery is fully drained and needs to be recharged immediately.
PRESS & HOLD the button to enter the
MENU. Once the word OFF appears in
the display, QUICK PRESS the button again.
SEE U LATER!
6 Tracker 901 Pro
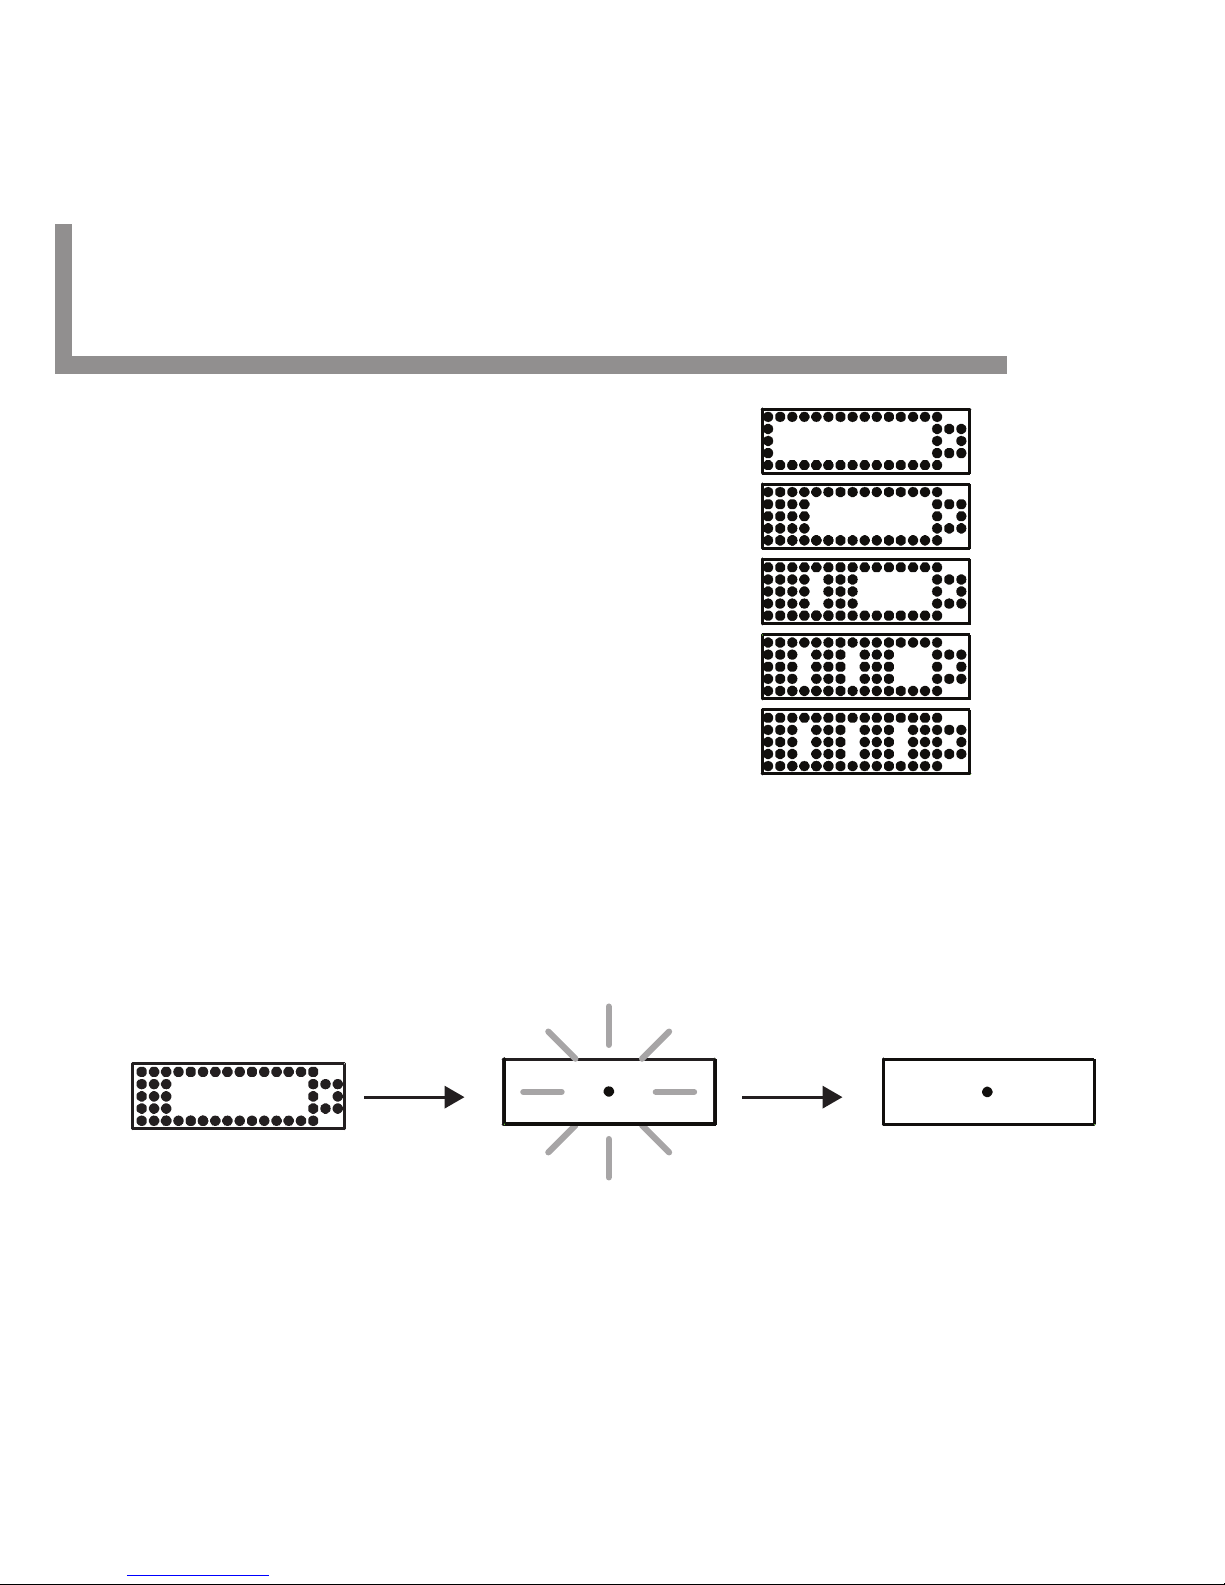
Getting Started: Check the Battery Status
PRESS & HOLD the mode button until
the word MENU appears in the display.
After a few seconds, the battery icon will
appear in the screen. The battery status
icons are as follows:
With a fully charged battery, the Tracker 901 Pro will last for
approximately 7 days with normal use. When your battery starts
running low, please recharge as soon as possible. It will take 1-2
hours to fully charge your battery.The following screens will appear
on the Main Unit display when charging:
0-20%
21-40%
41-60%
61-80%
81-100%
When the dot stops
blinking, the charge is
complete.
After a few seconds,
a blinking dot will appear in
the display. Charging is now in
progress.
The Battery Icon will
appear in the display.
7 Tracker 901 Pro
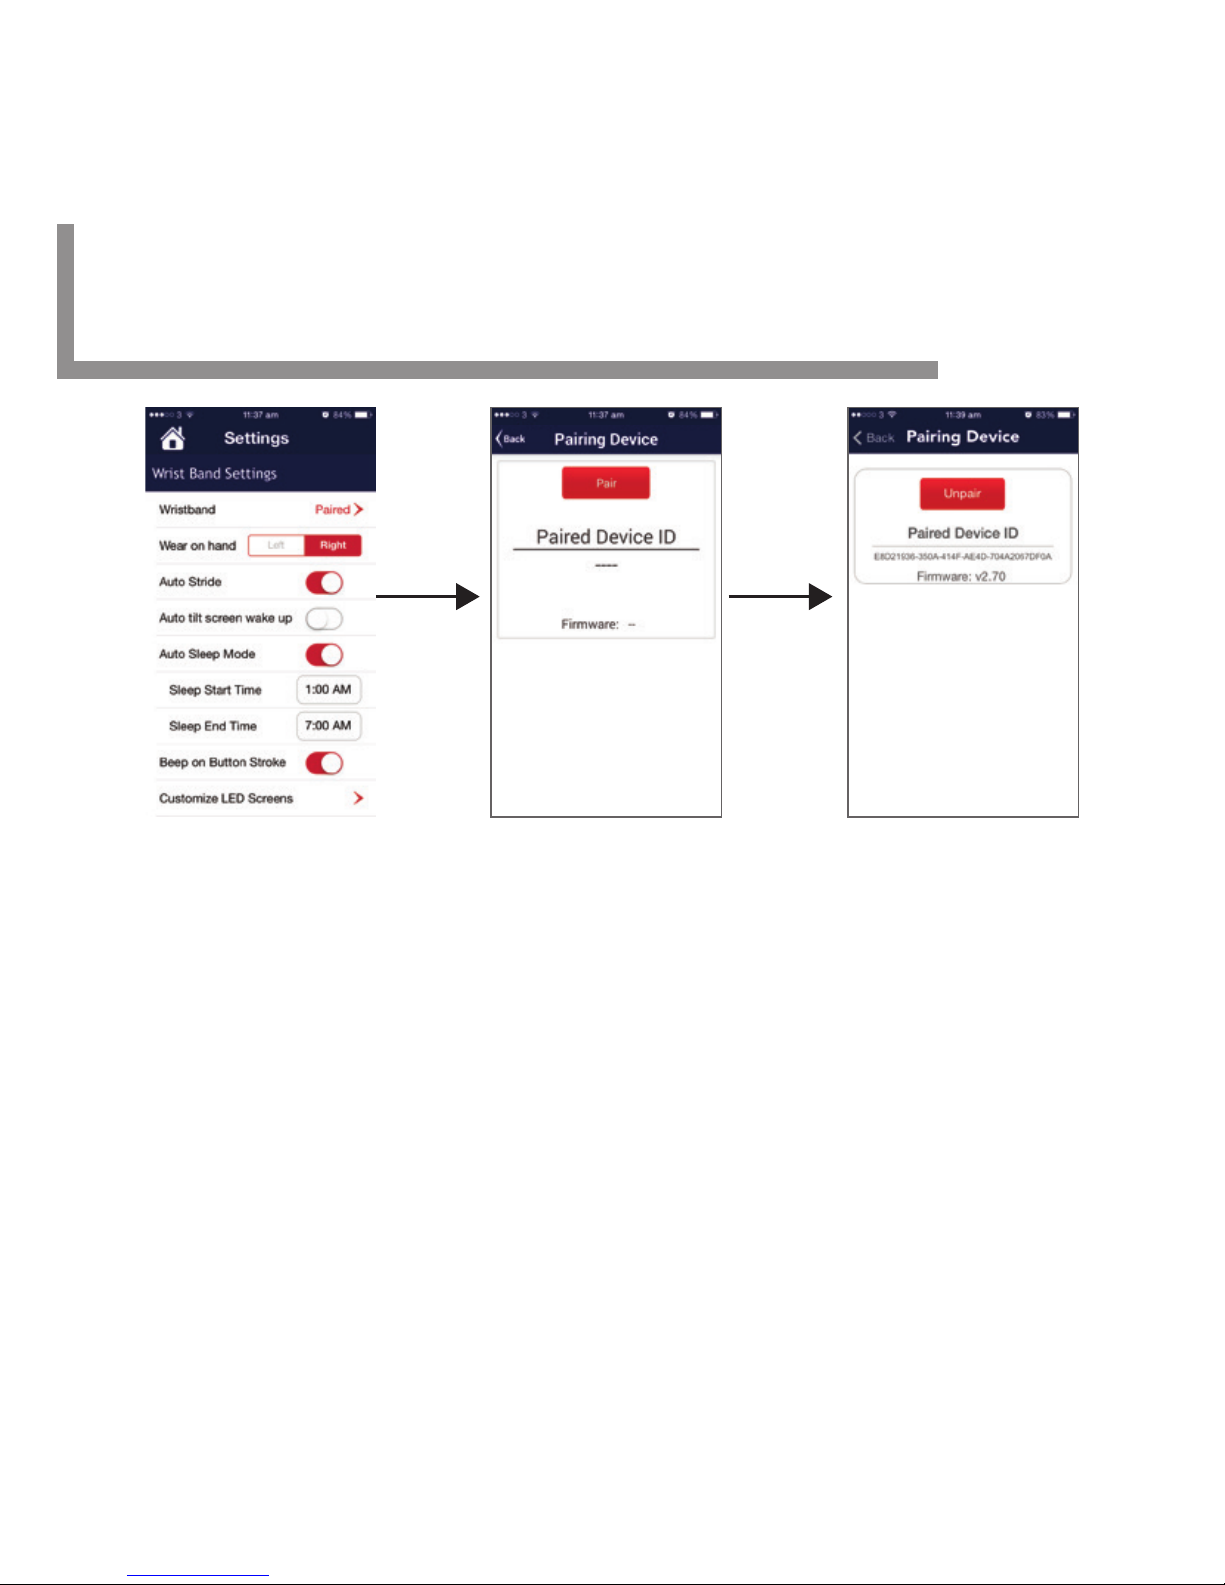
Pair the Tracker 901 Pro to the App
APP: In the Settings menu, click on Wristband Not Paired > to
open the PAIR screen.
BAND: PRESS & HOLD the button (on the [Tracker]) to enter the
MENU. Once the word PAIR
appears in the display, QUICK PRESS the button again.
APP: At the same time, tap "PAIR" in the [App] screen to start
the PAIR process.
BAND: It may take a few moments to PAIR the device. The word
DONE will appear in the display and your device is ready.
8 Tracker 901 Pro
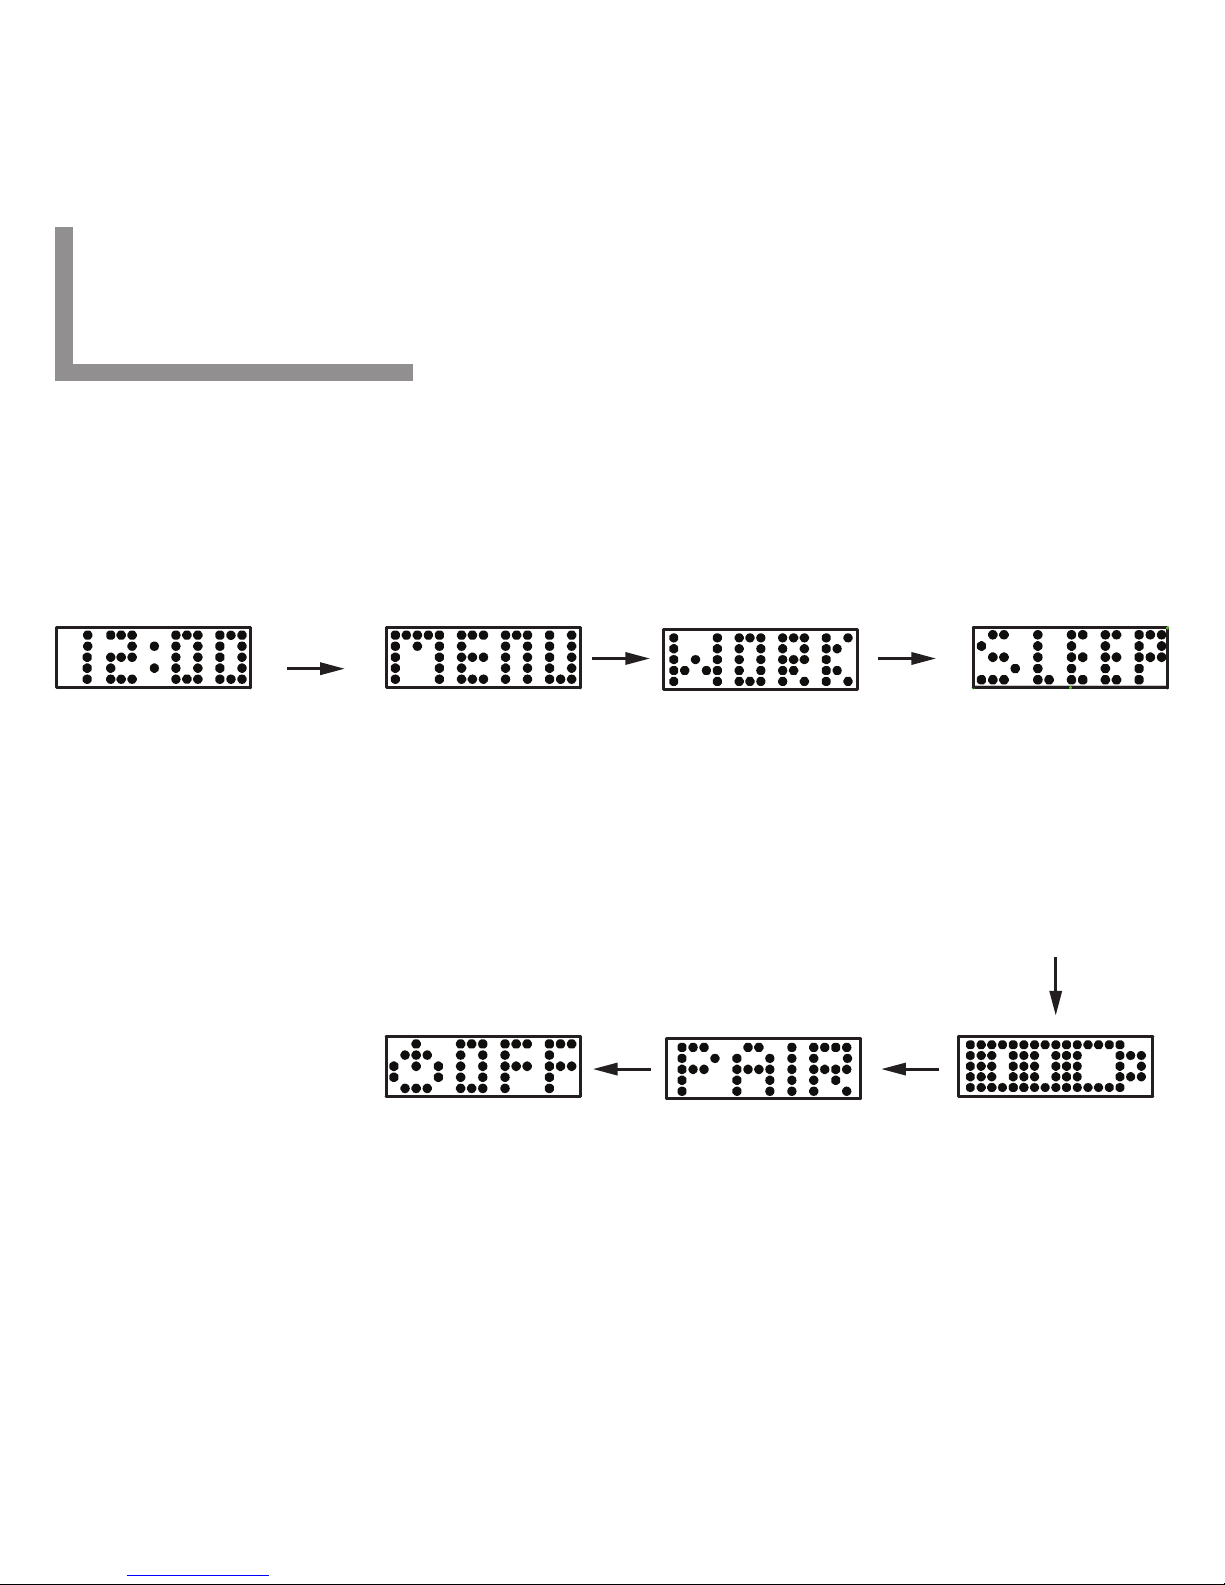
You have already started to become familiar with the MENU
options. To enter the MENU, simply PRESS & HOLD the button
and release. When the option you want appears in the display,
QUICK PRESS the button again.
This function allows
you to record data
for a specific workout
(i.e. morning walk, hike,
jog at park, etc).
This function allows
you to manually tell
your watch when you
are going to sleep I
wake up.
MENU
BATTERY STATUSPAIR BAND TO APPTURN BAND OFF
Hold [M]
Menu Options (Tracker 901 Pro)
WORKOUT SLEEP TIME
9 Tracker 901 Pro
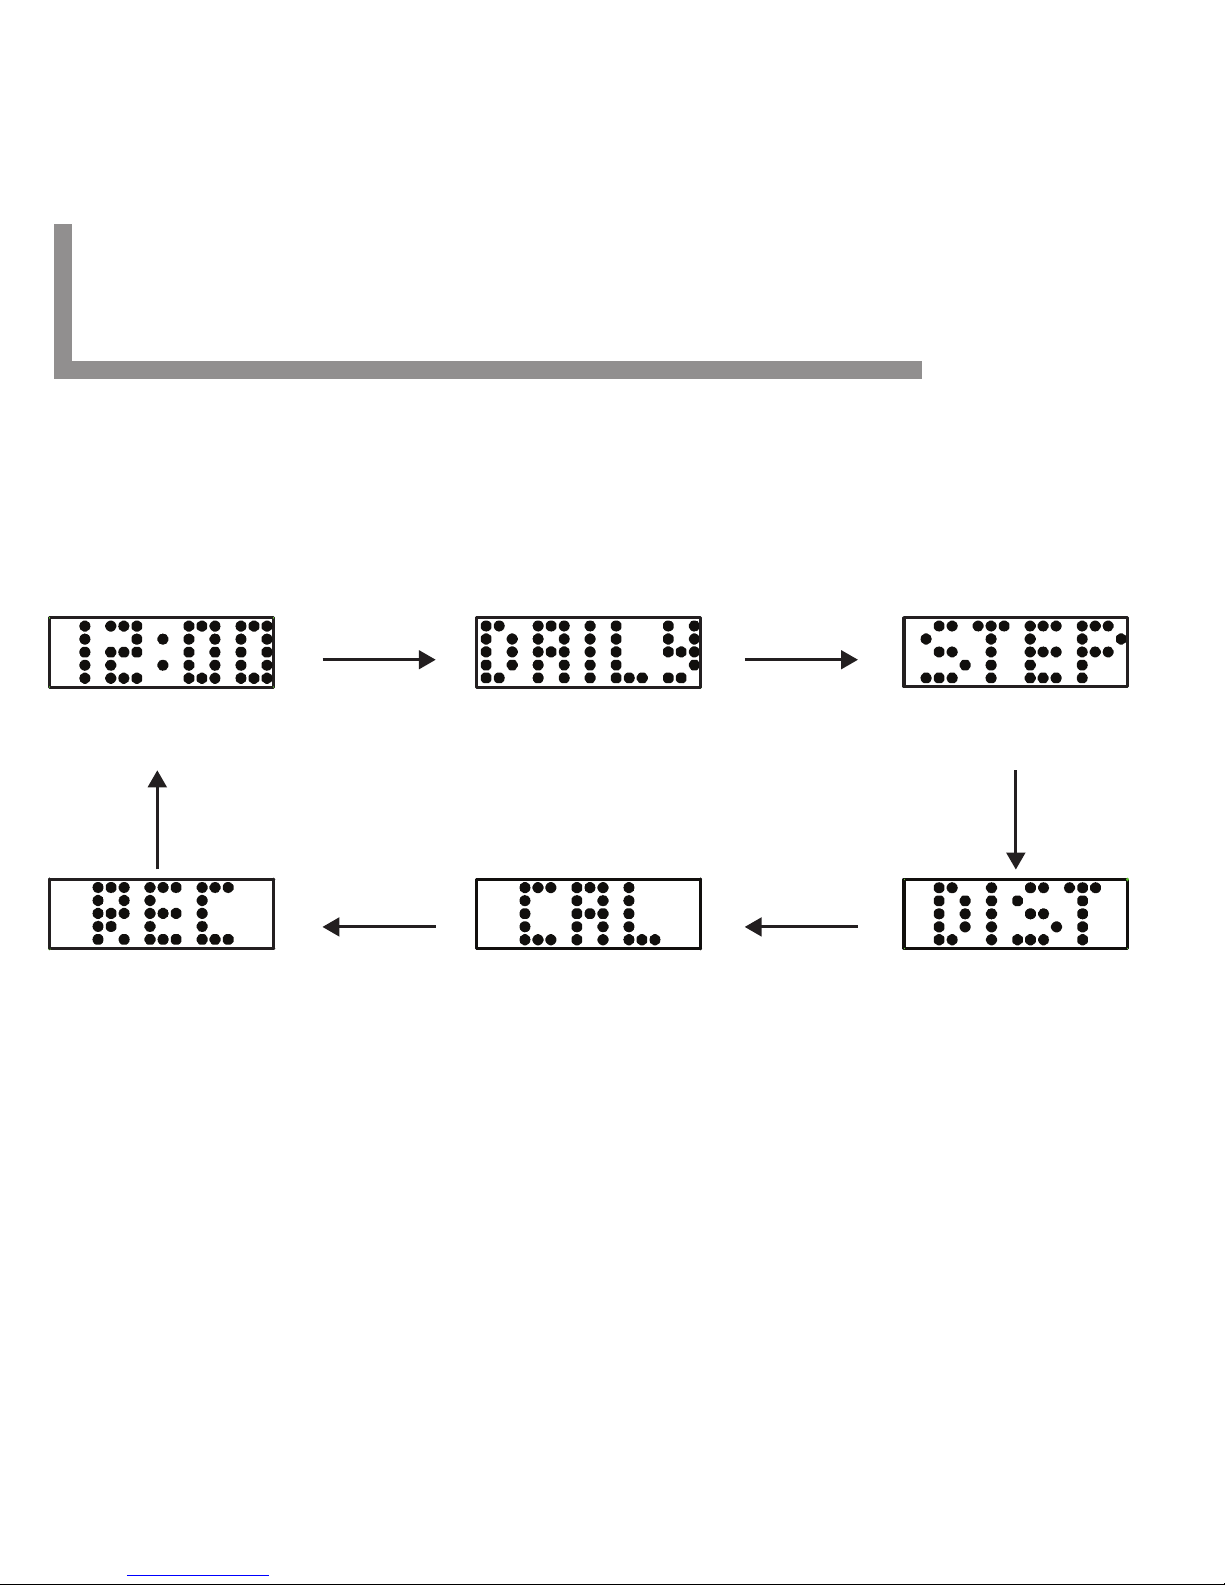
Daily Mode
Record Mode
[M] [M]
[M]
[M][M]
[M]
Time Mode
Steps Mode
Distance ModeCalories Mode
CUSTOMIZE YOUR BAND DISPLAY
In the settings portion (of the app), you can customize the band
display options to show only the activities you want to view!
Once set, PRESS the button to toggle through the modes:
Modes of Options
10 Tracker 901 Pro
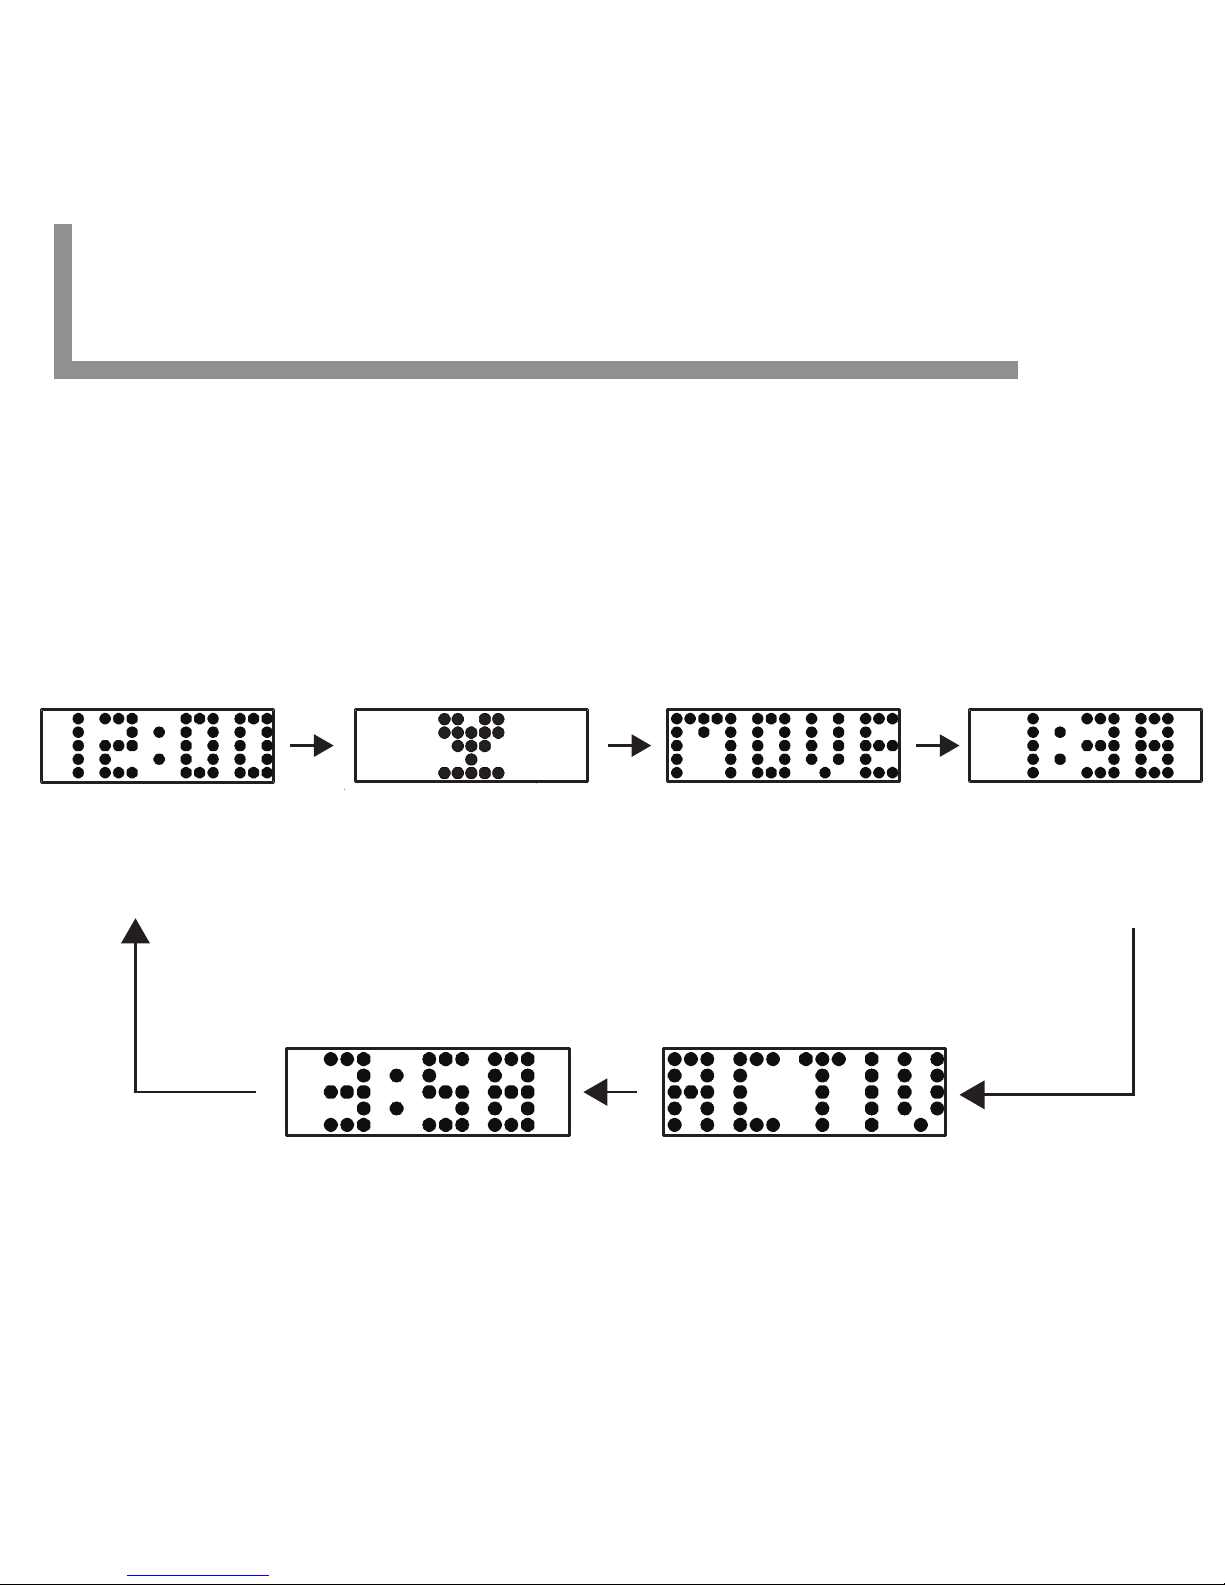
Modes of Options - Time
10.1 Tracker 901 Pro
Press the Mode button once, the Fila Tracker 901 Pro will display
Time Mode information.
- When the Current Time display doesn’t appear, press the mode
button until the Current Time display appears.
-
Under Time Mode, the display will scroll in the sequence as below:
Note: MOVE Time and ACTIVE Time displays can be customized
to show via the [App]. For more details, please refer to Chapter 21.6.
Accumulative time for the Active time
for the whole day
Current time Daily goal level Accumulative time
of the movement
of the whole day
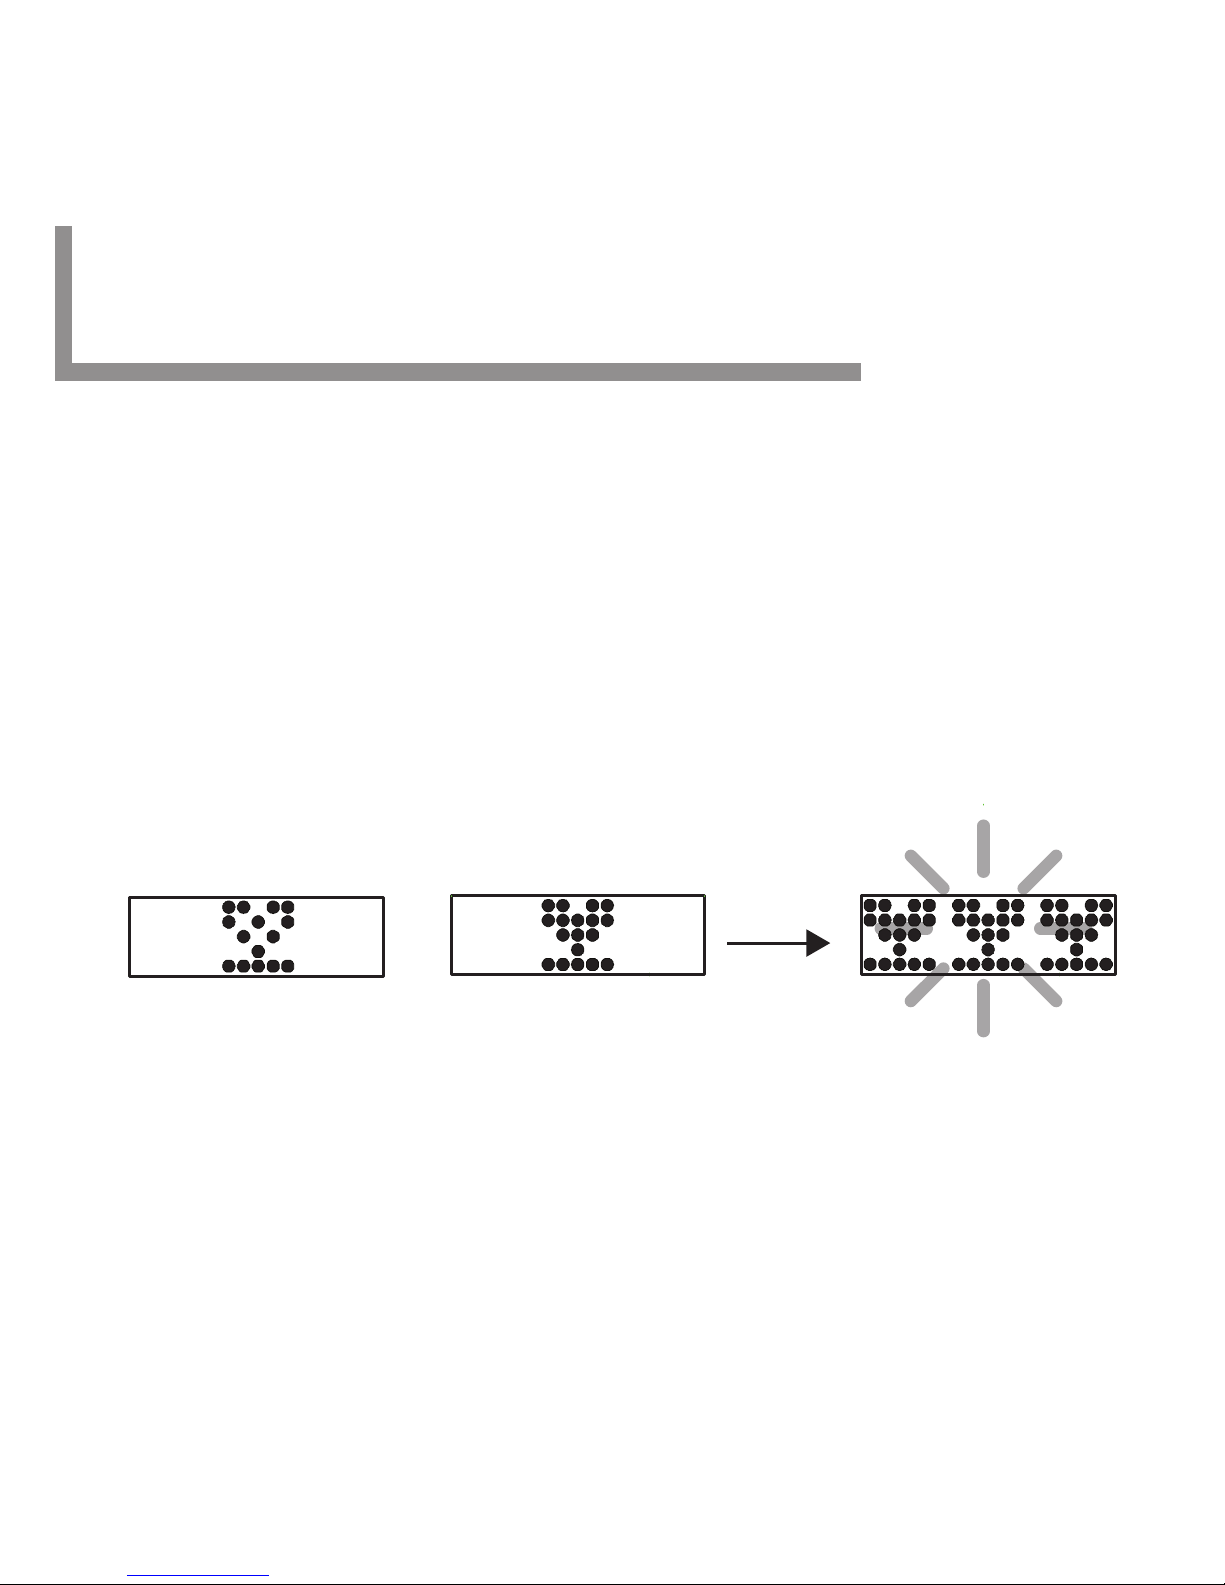
Modes of Options - Time (Continued)
Note: Goal type options can be customized via app. For details,
please refer to Chapter 21.3.
Display your goal progress in steps, distance or calories.
There are 5 displays showing your performance level.
One Hollow Cup – Achieved Daily goal level less than 10%
One Solid Cup – Achieved Daily goal level between 10% and 40%
Two Solid Cup – Achieved Daily goal level between 40% and 70%
Three Solid Cup – Achieved Daily goal level between 70% and
below 100%
Three Flashing Solid Cup – Achieved Daily goal level 100% or more
100%
Daily goal level
10%
Daily goal level
Less than 10%
Please note that the Move Time is the total time of the movement.
The Active Time will be collected and accumulated when the
movement is more intense and vigorous like jogging and running.
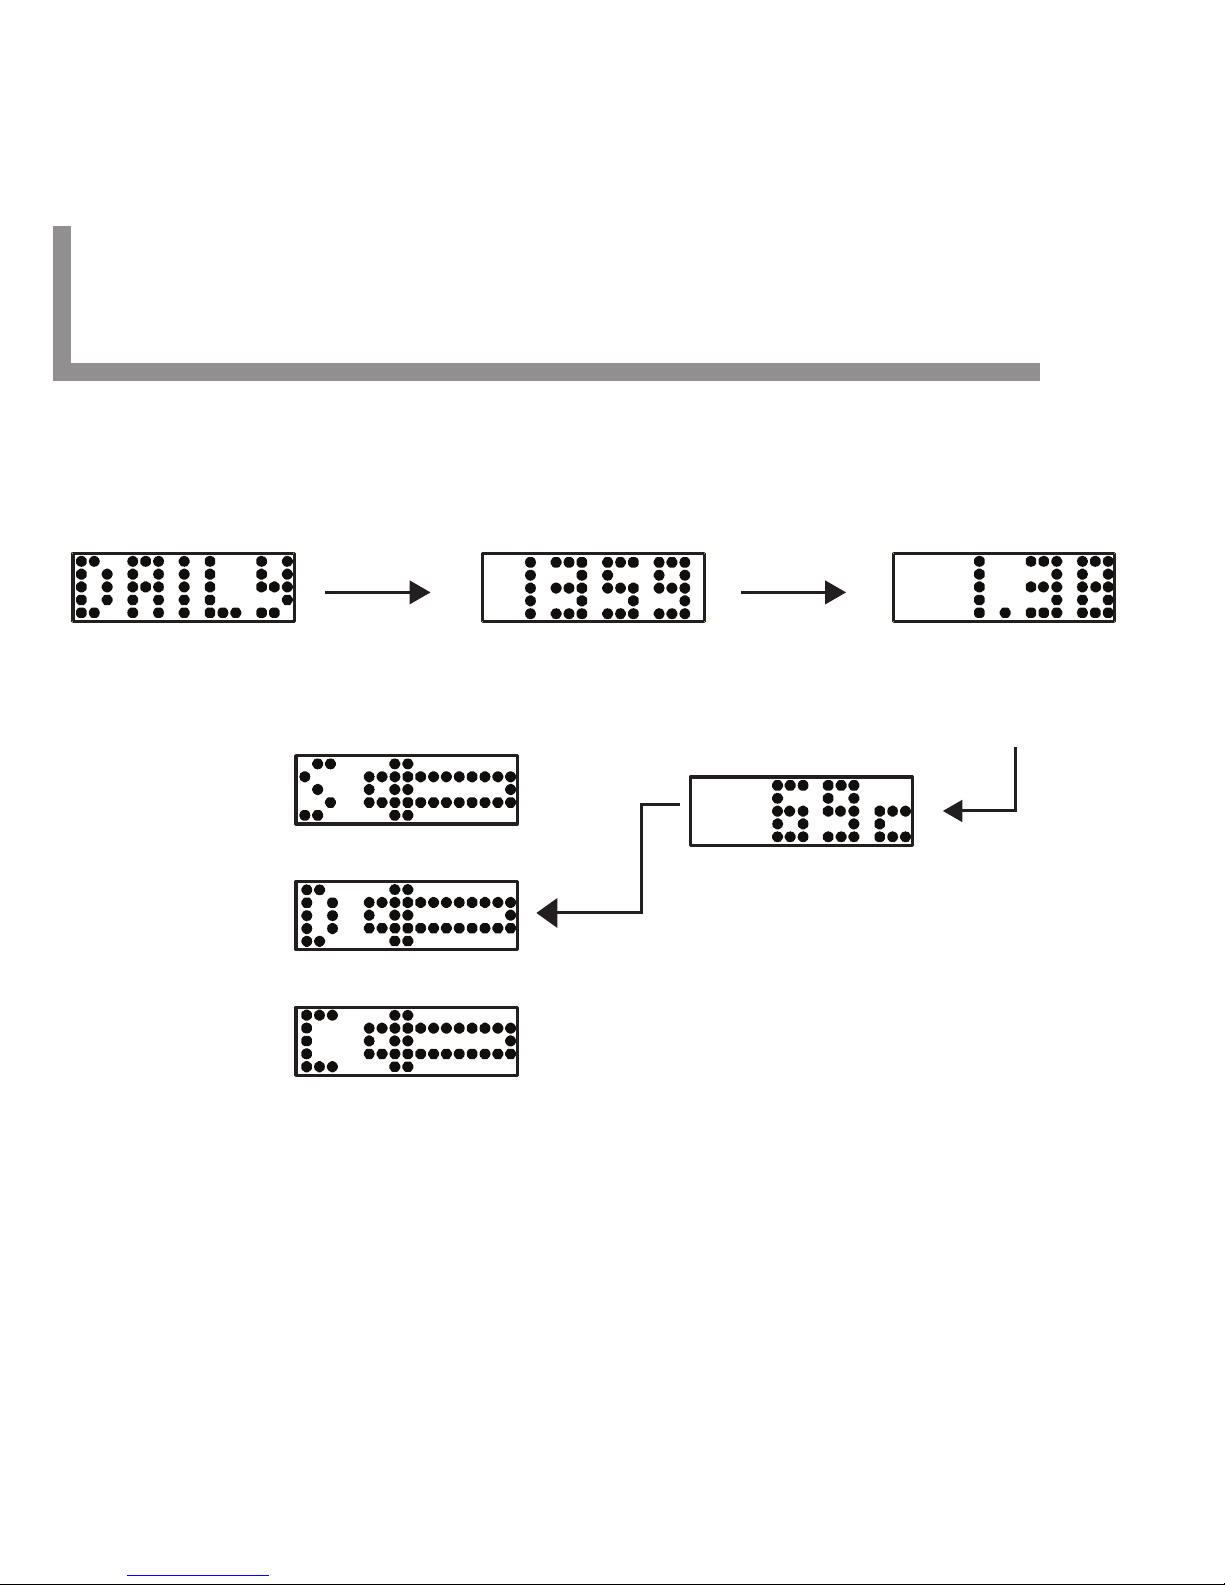
Modes of Options - Daily
10.2 Tracker 901 Pro
Press the mode button once again, the following display will scroll
on the screen.
DAILY activity legend Total accumulative number of
steps taken per day
Total accumulative distance
travelled per day
Accumulative calorie
consumed per day
Goal Progress Bar -
Indicate the extent
to reach the daily goal
or
or
Note: Daily Display has to be switched ON in the [App]. Otherwise,
this display will not appear on your Tracker 901 Pro. For more
details, please refer Chapter 21.6 Custom Settings. Goal Progress Bar
will be shown only when Show Goal is set to ON. For more details,
please refer to Chapter 21.3 Daily Goals.
 Loading...