

FILA FILActive 38-152 User Manual
(FRONT)
FILActive
38-152
FCA011CH
38-131
www.fila.com/watch
1
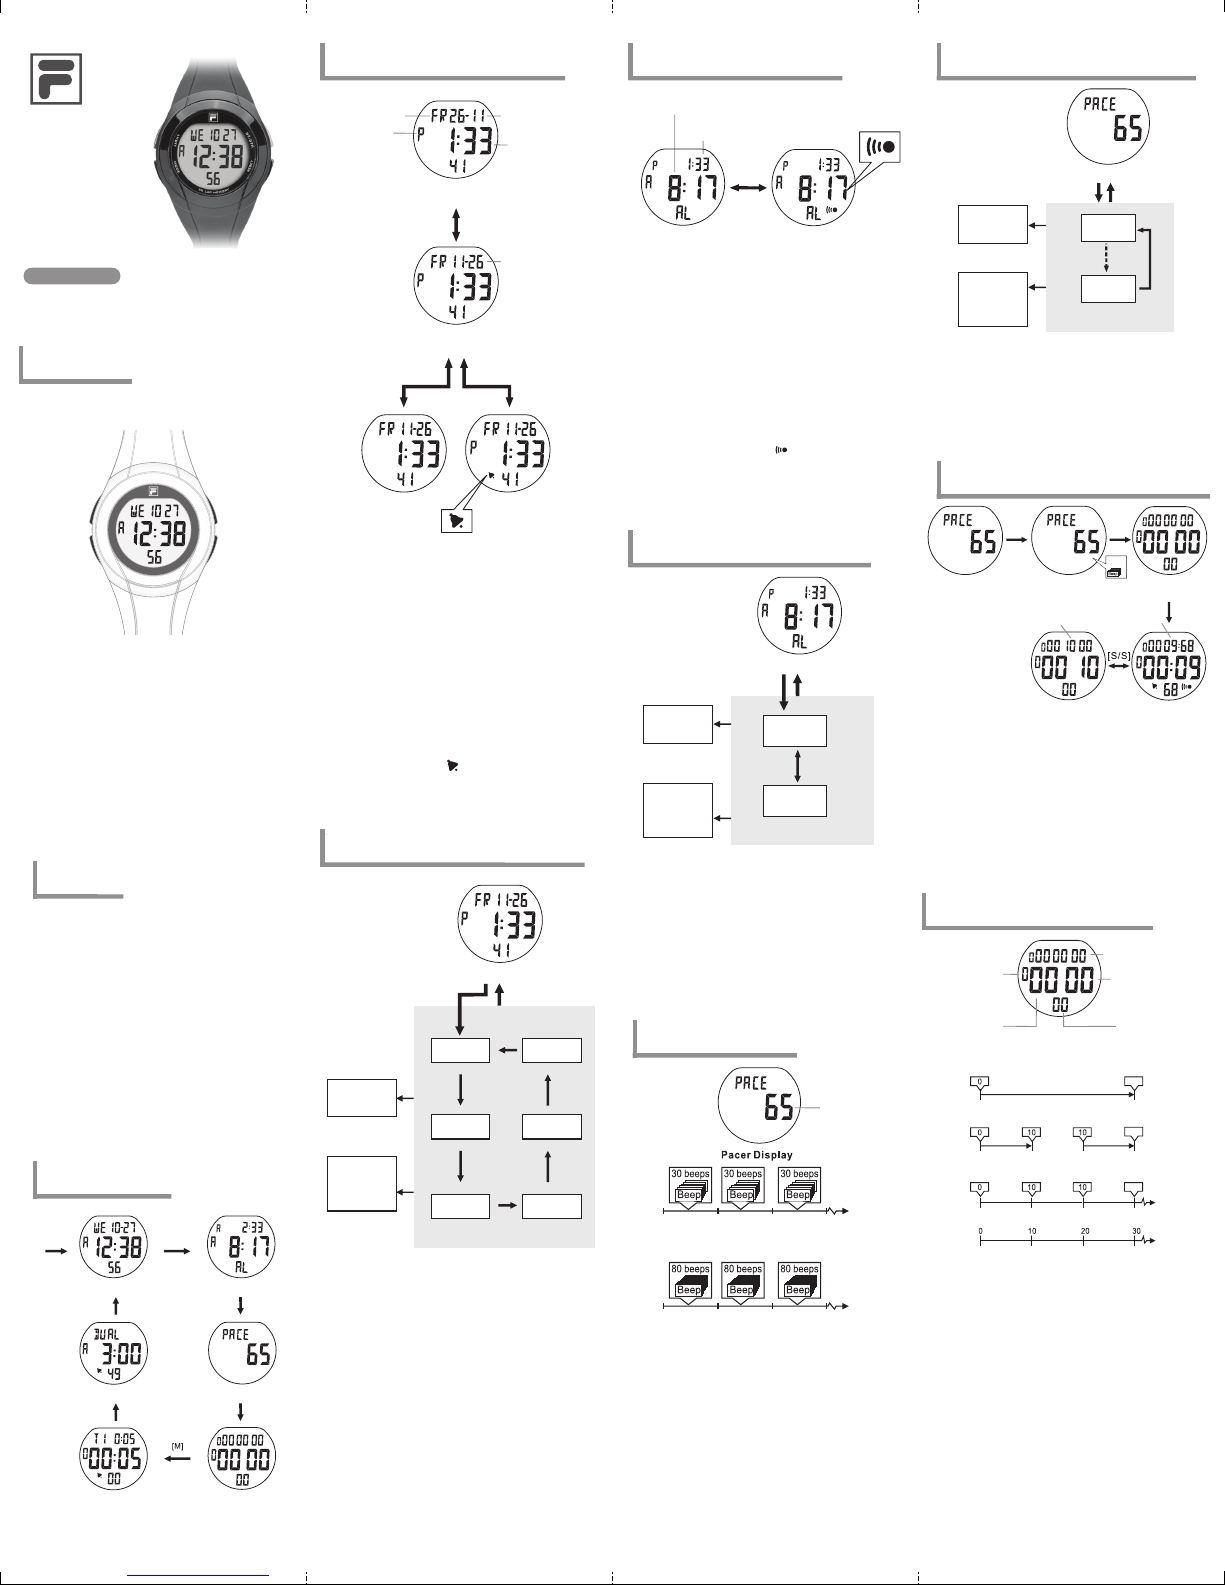
Design of the Watch
Thank you for selecting the Fila Watch. This User Guide is the
recommended source of information about your Watch.
Please read it carefully and follow all the instructions.
[EL]
[M]
EL Button [EL]
• To turn on the EL back light for about 3 seconds.
Mode Button [M]
• Change to different modes.
• To decrease the setting value.
Lap/Reset Button [L/R]
• To view and activate 'lap' or 'reset' function during Chronograph
Mode.
• To select between different timer displays. To load or clear the
starting value for the timer(s).
• To activate the 'start' or 'stop' Pacer function during Pacer mode.
• To set the hourly chime function ON or OFF.
• To increase the setting value.
Start/Stop Button [S/S]
• To 'start' or 'stop' the Chronograph Mode and Timer Mode.
• To select among the setting items during setting display.
• To switch between 12 and 24 hour format.
2
Specifications
Current Time Mode
• Time System: am, pm, hour,
minute
• Time Format: 12-hour or
24-hour
• Calendar: Month date and day
of week display
(Auto-Calendar function for
leap year and day of week)
Alarm Mode
• Daily alarm and hourly chime
• Alarm sound: 20 seconds
Chronograph Mode
• Resolution: 1/100 second
• Measuring Range: 9 hours
minutes 59 minutes 59.99
seconds
• Lap memory: 50 lap memories
3
Major Function Modes
User
MANUAL
T
H
G
I
L
M
O
D
E
5
Y
0
R
L
O
A
M
P
E
M
FM-755.1
[S/S]
S
T
O
P
T
E
S
E
R
[L/R]
Countdown Timer
• Timer: 4 timers
• Resolution: 1 second
• Measuring Range:
23 hours 59 minutes
• Timer Sounds: the Watch
will beep once when a
timer counts to the last 1
and 0 second.
Pacer Mode
• Setting Range:
40 bpm to 180 bpm
• Setting step: 5 bpm
Dual Time Mode
• Time System: AM, PM,
hour, minute, second
Back Light
• Back Light Type:
Electro-Luminescent(EL)
back light
[M]
Current Time Mode Daily Alarm Mode
[M][M]
Dual Time Mode Pacer Mode
[M][M]
CountdownTimer Mode Chronograph Mode
4
Current Time Mode - Current Time Display
day of week
AM/PM
indicator
12 hours Display
Chime OFF
date
(day, month)
current time
(hour, minute,
secord)
hold [S/S]
date
(day, month)
12 hours Display
Chime OFF
[S/S] [L/R]
24 hours Display Hourly chime ON
hourly
chime
indicator
Current Time Display
When the Current Time Mode is selected, the Watch will show the
following items on the display:
• The day of week and date of the current time are exhibited on
the 1st row of the display.
• The current time (hour, minute) is exhibited on the 2nd row of
the display.
• The current time (second) is exhibited on the 3rd row of the
display.
How to Switch between 12 and 24 hour format
• To switch between month-day and day-month format, hold
down the [S/S] button following the adjacent diagram.
To Set the Hourly Chime ON/OFF
• To set the hourly chime between ON or OFF, press the [L/R]
button following the adjacent diagram.
• When the chime indicator ' ' is appeared on the display, the
chime is ON. During the hourly chime is ON, the Watch will
sound 'beep beep' every hour on the hour (e.g. 1:00 00, 2:00
00, 3:00 00)
5
Current Time Mode - Setting the Current Time
Current Time Mode
hold [M] [M]
[S/S]
second day
[L/R]
Increase
the number
[S/S]
[S/S]
monthminute
hold [L/R]
Increase
the number
at a higher
speed
How to Set the Current Time
• To select the setting display, hold down the [M] button for
2 seconds in the Current Time Mode, and then the 'Second'
digits will start flashing.
• In setting display, press the [S/S] button to move the flashing
following the adjacent diagram to select among different
settings.
• During one of the settings (minute, hour, year, month, day) is
flashing, press the [L/R] button to change the number (hold
down the button to change the number at a higher speed).
• When the second digits start flashing, press the [L/R] button to
reset them to zero.
• When the setting is completed, press the [M] button once to
exit the setting display. The Watch will also exit the setting
display if NO key-stoke has been activated for 1 minute.
[S/S]
[S/S]
hour year
Setting Sequence
[S/S]
6
Daily Alarm Mode - Daily Alarm Mode
alarm time
(hour, minute)
current time
(hour, minute)
[L/R]
Daily Alarm OFF
Daily Alarm Mode
• This Watch includes a daily alarm function for the current time.
• When the daily alarm is ON, the Watch will beep for 20
seconds at the alarm time every day.
Daily Alarm Display
When the Daily Alarm Mode is selected, the Watch will show the
following items on the display:
• The current time (hour, minute) is exhibited on the 1st row of
the display.
• The daily alarm time (hour, minute) is exhibited on the 2nd row
of the display.
To Set the Daily Alarm ON/OFF
• To set the daily alarm between ON and OFF, press the [L/R]
button in the Daily Alarm Display.
• When the daily alarm indicator ' ' is appeared, the daily
alarm is ON.
To Test the Daily Alarm Sound
• To test the alarm sound, hold down the [S/S] button in the
Daily Alarm Display. The Watch will beep as long as the
button is hold.
7
Daily Alarm Mode - Setting the Daily Alarm
Daily Alarm Display
Daily Alarm ON
daily
alarm
indicator
Daily Alarm Display
[L/R]
Increase
the number
hold [L/R]
Increase
the number
at a higher
speed
How to Set the Daily Alarm
• To select the setting display, hold down the [MODE] button for
2 seconds in the Daily Alarm Mode, and then the 'minute'
digits will start flashing.
• In setting display, press the [S/S] button to move the flashing
following the adjacent diagram to select among different
settings.
• During one of the settings (minute, hour) is flashing, press the
[L/R] button to change the number; hold down the [L/R] button
to change the number at a higher speed.
• When the setting is completed, press the [M] button once to
exit the setting display. The Watch will also exit the setting
display if NO key-stoke has been activated for 1 minute.
8
Pacer Mode - Pacer Display
0 1 2 3 minutes
start
hold [M] [M]
minute
[S/S]
hour
Setting Sequence
pacer beeping
rate (in beats
per minute)
Example 1: Set 30 as the Pacer Beeping Rate.
0 1 2 3 minutes
start
Example 1: Set 80 as the Pacer Beeping Rate.
Pacer Mode
• This Watch includes a pacer function which generate regular
beeps at a pre-defined rate. That pre-defined rate can be set
within in a range from 40 to 180 beats per minute (bpm).
• The pacer will sound more beeps within a minute for a higher
bpm rate (e.g. 80) setting than a lower bpm rate (e.g. 30)
setting.
Pacer Mode
• When the Pacer Display is selected, the beeping rate is
exhibited on the 2nd row of the display.
How to Use the Pacer
• When the pacer has been set with a beeping rate, for example
65 bpm, press the [L/R] button once will start the beeping.
• During the Watch is beeping, press the [L/R] button once again
to stop the beeping.
9
Pacer Mode - Setting the Pacer Beeping Rate
Pacer Display
[L/R]
Increase
the number
hold [L/R]
Increase
the number
at a higher
speed
To Set the Pacer Beeping Rate
• To select the setting display, hold down the [M] button for 2
seconds in the Pacer Display, and then the beeping rate digits
will start flashing.
• In the setting display, press the [L/R] button to change the
number; hold down the button to change the number at a
higher speed.
• When the setting is completed, press the [M] button once to
exit the setting display. The Watch will also exit the setting
display if NO key-stoke has been activated for 1 minute.
10
Pacer Mode - Using the Watch as a Pacer Watch
hold [M] [M]
40
5 bpm
per step
180
Setting Sequence
[L/R] [M]
65 beeps/
minute
Pacer Mode
Pacer OFF
How to Use the Watch as a Pacer Watch
To use the Watch as a pacer watch following the below steps:
• When the pacer Display is selected, press the [L/R] to turn on
the pacer function.
• When Pacer function is on, press the [M] button to switch the
display to Chronograph Mode, and then press the [S/S]
button once will start the pacer and chronograph function at
the same time.
• Then the watch will became a Pacer Watch which the
chronograph is counting and the pacer is beeping at the
pre-defined rate.
• During the Pacer Watch is counting and beeping, press the
[S/S] button once will stop the beeping and counting.
11
Chronograph Mode - Chronograph Mode
accumulative
running time
(hour)
accumulative
running time
(minute)
1. Elapsed time
[S/S] [S/S]
2. Accumulative elapsed time
[S/S] [S/S] [S/S] [S/S]
3. Lap times
[S/S] [L/R]
time
Chronograph Mode
This Watch includes a stopwatch function which measures:
• Elapsed time, accumulative elapsed time (multi-phase elapsed
time) and Lap time (get a elapsed time without stopping the
counting).
The measuring capacity of the chronograph:
• Measuring unit: 1/100 second.
• Measuring range: 9 hours, 59 minutes and 59.99 second.
• Lap Memory: a maximum of 50 laps.
Chronograph Display
When the Chronograph Display is selected, the Watch will show the
following items on the display:
• During the chronograph is counting: The current lap time and
the accumulative elapsed respectively.
NOTE: The current lap time will be the same as the accumulative
elapsed time for lap 1.
• During the chronograph is stopped: The current lap time and lap
number are exhibited on the 1st row, and the accumulative
elapsed time is exhibited on the 2nd row.
• During the Lap Display is displaying: The current lap number
and the lap time is exhibited on the 1st and 2nd row respectively.
Pacer Mode
Pacer ON
stop
counting
Chronograph Mode
Pacer Watch Stopped
Chronograph Display
'All Zero'
lap 1
lap 2 lap 3
[L/R] [L/R]
Elapsed time, Accumulative
Elapsed time and Lap time
Chronograph Mode
counting
Chronograph Mode
Pacer Watch Started
current lap
running time
accumulative
running time
(second)
accumulative
running time
(1/100 second)
[S/S]
(BACK)
12
Chronograph Mode - Using the Chronograph
hold [L/R]
All Zero Display
elapsed time
(stop counting)
[S/S]
elapsed time
(counting)
[S/S]
Stop Counting Display
Counting Display
[L/R]5 seconds
lap number
lap time
Lap Time Display
How to Measure Elapse Time
• During the 'All Zero' Display, press the [S/S] button once will
start the counting, and press the [S/S] button again will stop
the counting.
• The elapsed time between the above 2 key-stokes will be
exhibited on the 1st row of the display. Repeat the above
key operations to get the accumulative elapsed time.
How to Get a Lap Time
• When the chronograph is counting, press the [L/R] button to
get and view the Lap Display for 5 seconds. In the Lap
Display, the current lap number and lap time will appear on
the 1st and 2nd row of the display respectively.
• After the 5 seconds, the Watch will return to counting
display automatically. Then the new lap time and the
accumulative elapsed time will be exhibited on the 1st and
2nd row of the display respectively. Repeat the above key
operations to get another lap time.
How to Recall/Reset the Lap Time
During the chronograph is stopped:
• Press the [L/R] button one by one to review the recorded lap
times, or
• Hold down the [L/R] button for about 2 seconds to clear the
lap time, and reset the display to 'All Zero' display.
13
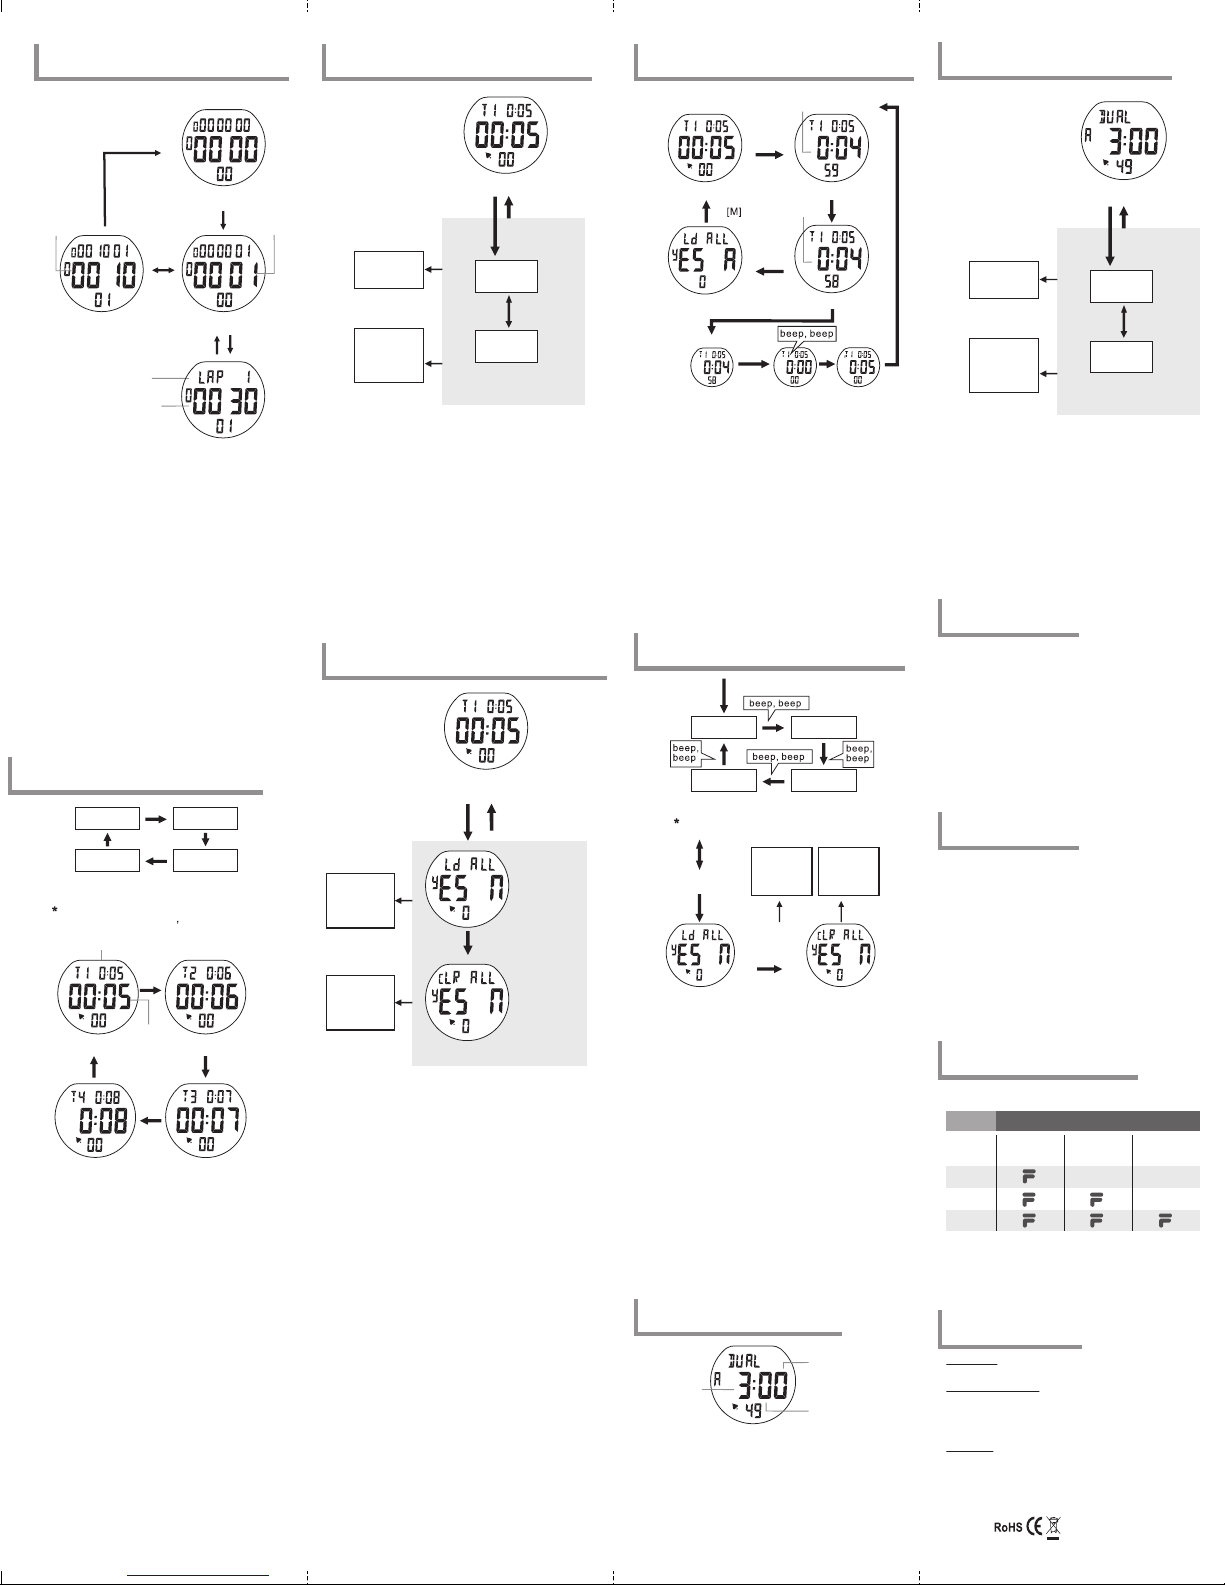
Countdown Timer Mode - Countdown Timer Display
Timer 1* Timer 2*
Timer 3*Timer 4*
Multi-Timer Counting Sequence
If Timer 1, 2, 3 or 4 which set 0:00 as
the starting value, that timer will be
starting value (hour, mintue)
[L/R]
counting
Timer 1 Display Timer 2 Display
time
[L/R] [L/R]
[L/R]
Timer 4 Display Timer 3 Display
Countdown Timer Mode
Countdown Timer Mode
• This Watch includes 4 countdown timers. They are Timer 1, 2, 3
and 4. Using one timer (Single Timer) which can run normal timer
function. But combines two or more timers (Multi-Timer) can
extend the timer function to measure multi-phase elapse time.
• The measurement unit of these timers is 1 second, and the starting
value of these timers can be set up to a maximum of 23 hours and
59 minutes.
• When a timer which set 0:00 as the starting value, that timer will be
excluded from the counting sequence.
• When the timer is started, the Watch will count repeatingly unless it
is topped by pressing the [S/S] button. During the counting, the
Watch will beep once when a timer counts to the last 1 and 0
second
Single Timer and Multi-Timer
• When using Single Timer (one timer), it must excludes other timers
from the counting sequence by setting their start value at 0:00.
• When using Multi-Timer, it is counting on a sequence which starts
the counting from Timer 1 to another timers following the adjacent
diagram.
How to Select Different Timer Display
• To select different countdown timer display during the timer is
stopped, press the [L/R] button one by one following the adjacent
diagram.
• When using Multi-Timer, it is counting on a sequence which starts
the counting from Timer 1 to another timers following the adjacent
diagram.
14
Countdown Timer Mode - Setting the Countdown Timer
Countdown Timer Display
hold [M] [M]
[L/R]
Increase
the number
hold [L/R]
Increase
the number
at a higher
speed
How to Set the Countdown Timer
• The following paragraphs will instruct the procedure for setting the
timer 1. Ever so, setting the other timers will work on the similar
procedure.
• To select the setting display, hold down the [M] button for 2
seconds in the Timer 1 Display, and then the 'Minute' digits start
flashing on the display.
• In setting display, press the [S/S] button to move the flashing
following the adjacent diagram to select among different settings.
• When one of the settings (minute, hour) is flashing, press the [L/R]
button to change the number (hold down the button to change the
number at a higher speed).
• When the setting is completed, press the [M] button once to exit
the setting display. The Watch will also exit the setting display if NO
key-stoke has been activated for 1 minute.
15
Countdown Timer Mode - Loading and Resetting the Timer
Countdown Timer Display
[M]
Confirm the
loading or
resetting
Setting Sequence
Stop Counting
hold
[L/R]
hold
[L/R]
minute
hour
[L/R]
[S/S]
load the
timer(s) into
the counting
sequence
[L/R]
About the
loading or
resetting
reset all
starting
values to
zero
Setting Sequence
How to Load the Timers
• If the starting value has been set for the timer(s), they must be
loaded into the counting sequence before it is ready for counting.
• To load the timer(s) into counting sequence, hold down the [L/R]
button in Timer Display (when the timer is stopped) until the 'Ld
ALL' indicator appeared following the adjacent diagram.
• When the 'Ld ALL' indicator is appeared, press the [M] or [L/R] to
confirm or abort the loading.
• If the Timer Display is returned after the loading, the timer(s) is
returned after the loading, the timer(s) is ready to count.
How to Reset the timers
• During the 'Ld ALL' indicator is appeared, hold down the [L/R]
button until the 'cLR ALL' indicator appeared following the
adjacent diagram.
• When the 'cLR ALL' indicator is appeared, press the [M] or [L/R]
to confirm or abort the resetting
• If the Timer has been reset, all starting values will be reset to 0:00.
16
Countdown Timer Mode - Using the Single Timer
counting
[S/S]
Timer 1 Display
Counting Display
How to Use the Single Timer
• When using one timer only (Single Timer), excludes other timers
by setting their starting values to 0:00.
• Once the starting value has been set for the last timer, it must be
loaded into the counting sequence before it is ready for counting.
Check previous chapter 15 for more detail on how to load the
starting value into the counting sequence.
• Press the [S/S] button to start the counting. The counting will be
restarted automatically when it reaches zero unless the counting is
stopped by pressing the [S/S] button.
How to Re-load the Timer
• To re-load the timer to its original starting value during the timer is
stopped, perform the loading process following the previous
chapter 15.
Timer Alarm Sound
• During the counting, the Watch will beep once when a timer
counts to the last 1 and 0 second.
17
Countdown Timer Mode - Using the Multi-Timer
Counting Display
stop
counting
hold
[L/R]
Stop Counting Display
[S/S]
Zero Display
Counting
Display
[S/S]
Timer 1* Timer 2*
Timer 4* Timer 3*
Multi-Timer Counting Sequence
If Timer 1, 2, 3 or 4 which set 0:00 as
the starting value, that timer will be
[S/S]
Confirm the
The counting
is stopped
loading or
resetting
hold [L/R]
hold
[L/R]
Load the
Starting Values
How to Use the Multi-Timer
• To use the Multi-Timer function which combines two or more
timers to measure multi-phases elapse time, it must set the
starting value for each timer.
• Once the starting value has been set for the timer(s), they must be
loaded into the counting sequence before it is ready for counting.
Check the previous chapter 15 for more detail on how to load the
timer into the counting sequence.
• Pressing the [S/S] button will start the counting sequence. The
Multi-Timers will starts the counting from Timer 1 to another
timers following the adjacent diagram. Pressing the [S/S] button
once again will stop the counting.
• The Watch will count repeatingly unless it is stopped by pressing
the [S/S] button.
Timer Alarm Sound
• During the counting, the Watch will beep once when a timer
counts to the last 1 and 0 second.
How to Re-load/Reset the Starting Values
• To re-load or reset the Starting Values during the timer is paused,
perform the loading or resetting process which mentioned in the
adjacent diagram to re-load or reset the starting vales.
18
Dual Time Mode - Dual Time Mode
dual time
(hour)
Abort the
loading or
resetting
[M] [L/R]
Reset the
Starting Values
dual time
(second)
dual time
(minute)
Dual Time Mode
Dual Time Mode
• This Watch includes a dual time which show the current time of
the second time zone.
• The second digits are same as the one of current time.
Dual Time Display
• When the Dual Time Display is selected, the dual time (hour,
minute, second) is exhibited on the 2nd row of the display.
19
Dual Time Mode - Setting the Dual Time
[S/S]
Dual Time Mode
hold [M] [M]
[L/R]
Increase
the number
minute
hold [L/R]
Increase
the number
at a higher
speed
To Set the Dual Time
• To select the setting display, hold down the [M] button for 2
seconds in the Dual Time Mode, and then the 'Minute' digits start
flashing.
• In the setting display, press the [S/S] button to select the flashing
(setting item) as shown in the diagram.
• When one of the settings (minute, hour) is flashing, press the [L/R]
button to change the number; hold down the button to change
the number at a higher speed.
• When the setting is completed, press the [M] button once to exit
the setting display. The Watch will also exit the setting display if
NO key-stoke has been activated for 1 minute.
20
Care and Maintenance
• This watch contains electronic components. Never attempt
to open the case or remove the back cover.
• Avoid exposing the watch to extreme temperature,
chemicals which will damage the watch.
• Keep the watch away from the conditions of strong electric
field and static electricity.
• Avoid rough usage or severe impact. The watch is designed
to withstand impact under normal use. It is advisable to
subject it to severe impact or rough usage.
• Clean your watch occasionally with a soft moistened cloth
only. Avoid using chemicals, especially soap as the
waterproof gasket will corrode.
• Store the watch in a dry place when it is not in use.
21
Precautions for Straps
• Exposure to water often makes a strap fragile and it may
soon tear.
• Don’t apply perfume or moisturizers around your wrist as
the chemicals can erode the metal, leather and plastic of
watch straps.
• The strap’s condition will depend on the owner’s wearing
habits as well as the climate of the place where the person
lives. An original replacement on straps is possible to be
re-ordered through an authorized service center.
• PU straps are usually very hardwearing, please wash them
with mild soapy water only.
• There may be discoloration for light color and transparent
straps after normal wear for some time.
• In case if there is any severe or persistent skin reaction, such
as severe redness, itching, rash or hives, you should stop
wearing this watch, and consult your doctor.
22
Precautions for Water Resistance
All FILA watches are designed to withstand use as indicated on
the below chart.
Indication
Light spray
Level of
perspiration,
resistance
light rain, etc
3ATM
(30 meters)
5ATM
(50 meters)
10ATM
(100 meters)
• Water damage may occur if the push buttons are pressed
under water.
• Should water or condensation appear in the watch, please
check the watch immediately as corrosion of electronic
parts can occur inside the case.
23
Precautions for Battery
Battery Life
The battery in your FILA watch is estimated to last for 2 years.
Battery Replacement
If the watch is out of battery, you are recommended to go to the
authorized FILA service center for correct battery replacement in
order to retain a valid warranty and avoid any damage on the
water resistance function.
WARNING!
Always keep watch batteries away from children. If swallowed,
contact a doctor immediately. Batteries contain chemical
substances. They should be disposed of properly according to
local regulations.
hour
Setting Sequence
Water-related use
Bathing,
etc
FILA™ is trademark of FILA Luxembourg and
used under licence by LONGITUDE LIMITED.
[S/S]
Swimming,
etc
 Loading...