

FILA FILActive 38-131 User Manual
File: 38-131_manual_eng_op.ai
19-12-2015
(FRONT)
Paper size: 210mm(W) x 280mm(H)
Finish size: 70mm(W) x 70mm(H)
FCA011CH
www.fila.com/watch
FM-754.1
38-131
FILActive
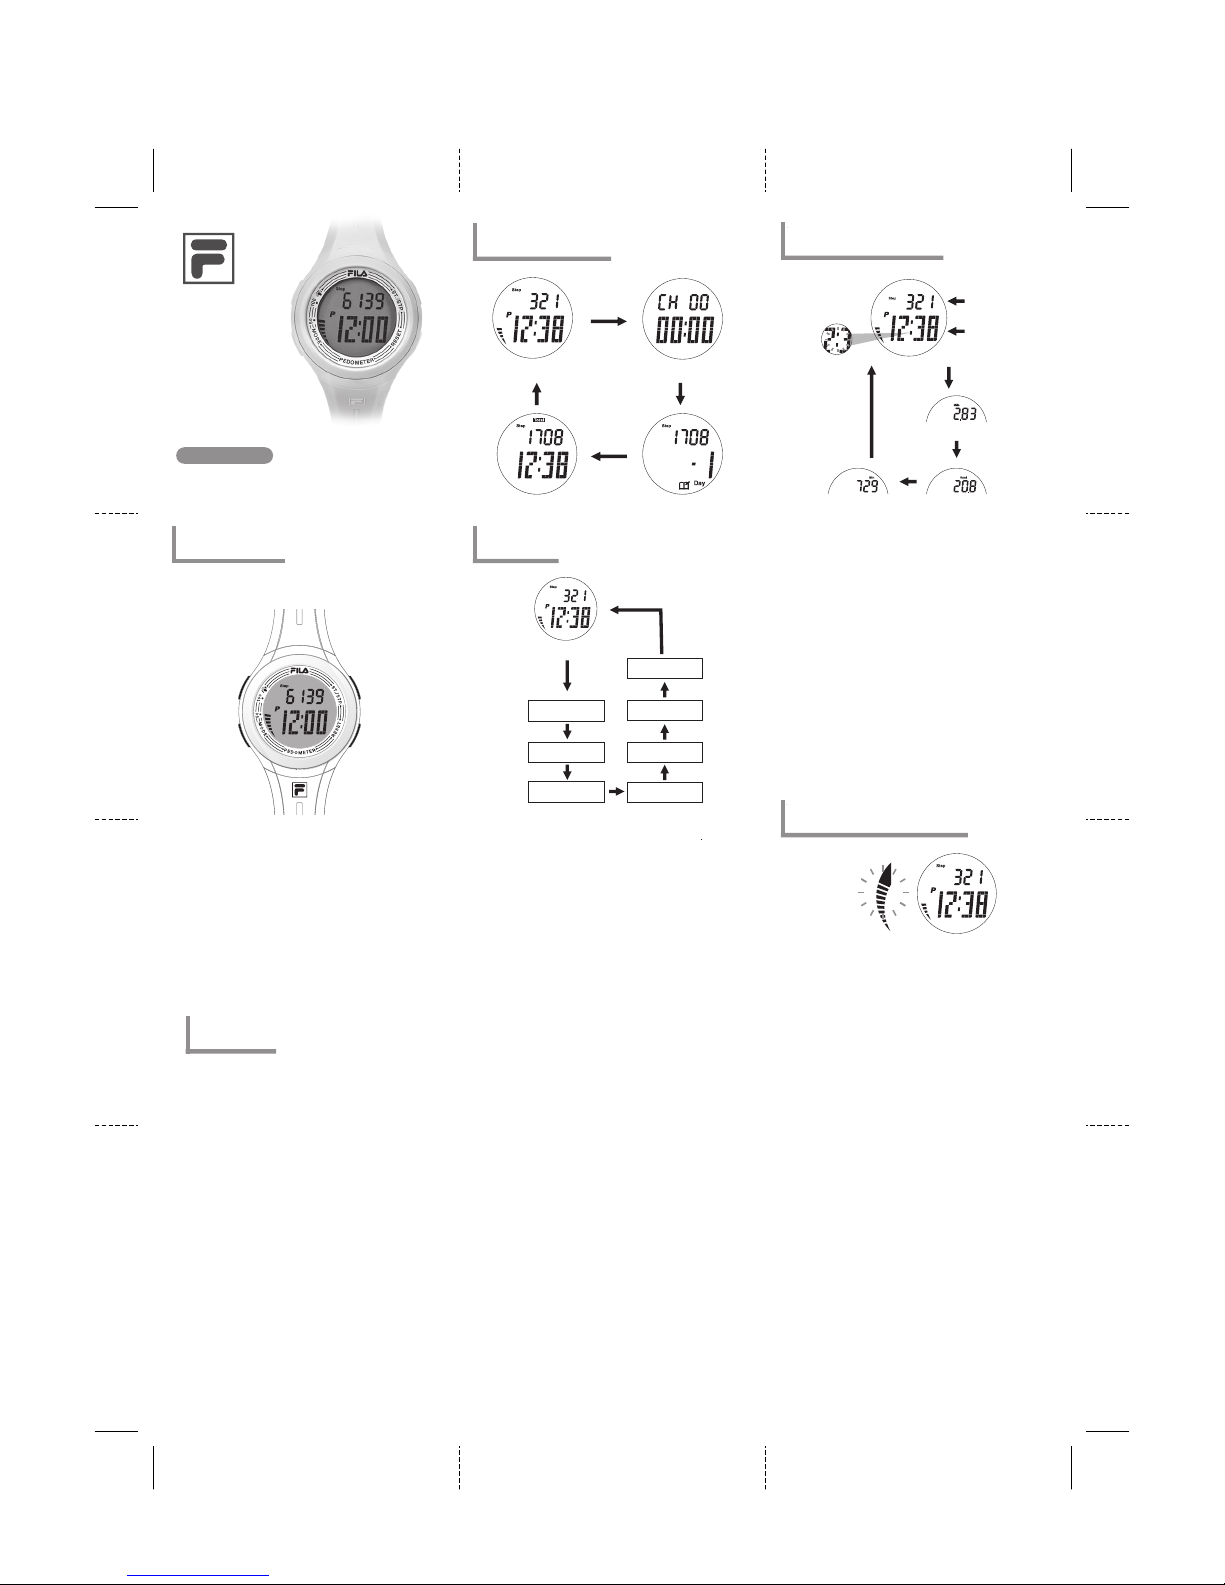
Design of the Watch
1
Thank you for selecting the Fila Watch. This User Guide is the
recommended source of information about yo ur Watch.
Please read it carefully and follow all the instructions.
[EL]
[M]
[S/S]
[L/R]
EL Button [EL]
• To turn on the EL back light.
Mode Button [M]
• Change to different modes.
• To decrease the setting value.
Reset [R]
• To select among sub modes: Step, Distance, Calorie and
Exercise Time.
• To reset the counter.
• To increase the setting value.
Start/Stop Button [S/S]
• To 'start' or 'stop' the pedometer and chronograph.
• Hold to enter the setting mode: time, unit, step length, weight
and the target number of steps.
Major Function Modes
3
Exercise Mode Chronograph Mode
Odometer Mode Daily Record Mode
[M]
[M]
[M][M]
How to make the setting
• In Exercise Mode, hold the [S/S] button to enter the setting
selection
• Press the [S/S] button to move the display among different
settings
• When the target setting is displayed, press the [R] button to
increase or switch the setting. Hold the [R] button to increase
the setting faster. Press the [M] button to decrease the setting,
hold it to decrease the setting faster.
• To exit the setting mode, press the [S/S] button until you return
to the Exercise mode.
NOTE
• If no button is pressed for 1 minute, it will return to the exercise
mode automatically.
• Select the desired metric or imperial unit first before using and
recording data. All data in the Exercise, Daily Record and
Odometer modes will be reset to 0 if the user changes the unit
(metric and imperial).
Press [R] to increase or press [M] to decrease the setting.
Hold [R] or [M] to make the setting faster.
Exercise Mode
hold
[S/S]
[S/S]
[S/S]
[S/S]
[S/S]
[S/S]
[S/S][S/S]
Setting Mode
4
Hour Format
12/24 hr
Hour
Target Step
Weight
Stride length
Unit
Metric/Imperial
Minute
[R]
[R]
[R]
[R]
Exercise Mode - Pedometer
5
1st row
2nd row
Distance view
Calories view
Exercise Time
view
Pedometer
ON
Exercise Mode
Target steps
accomplished
Workout Gauge Display
• To monitor your workout, a 10-segment indicator at the left of
the watch shows the percentage of your preset target steps
accomplished. (Check chapter 3.0 for detailed setting )
• When the target steps (100%) are done, the 10-segment
indicator will flash with a 30-second ‘beep beep‘ audio alert.
NOTE
• The Pedometer and Chronograph can be synchronized.
• If the number of target steps is greater than 1000, it is
adjusted at a multiple of 1000.
• If the number of target steps is less than 1000, it will be
adjusted at a multiple of 100.
Exercise Mode - Workout Gauge
6
Specifications
2
Current Time Mode
• Time System: am, pm, hour,
minute
• Time Format: 12-hour or 24-hour
Exercise Mode
• Daily Countable Steps Range:
0-99999 steps
• Distance display:
0-999.99 km / 0-999.99 mile
• Exercise Timer: 0- 99999 min
• Calorie Burnt Range:
0-9999.9 calorie
• Memory: 7 days and current day
• 10- segment workout gauge
• Unit selection: Metric
(Kg,Km)/Imperial (Lb,Mile)
Chronograph Mode
• Resolution: 1 second
• Measuring Range: 99 hours 59
minutes and 59 seconds
• Synchronization with pedometer
Daily Record Mode
• Past 7-day records
• Steps, Distance, Calories
and Exercise time records
Odometer Mode
• Accumulated values of
Steps, Distance, Calories
and Exercise time records
Back Light
• Back Light Type:
Electro-Luminescent (EL)
back light
Power Saving Mode
• Low battery indication
Exercise Mode Display
• The sub-views: Steps, Distance, Calories and Exercise
time will be exhibited in the 1st row of the display.
• Press the [R] button to select the sub-views.
• The current time (hour and minute) is exhibited in the 2nd
row of the display.
• Hold the [R] button to erase the data in the Exercise
mode.
Pedometer
• In the exercise mode, press the [S/S] button to start or
stop the pedometer.
• When the pedometer is ON, the colon will flash. It stops
flashing and stays steadily ON when the pedometer is
stopped.
NOTE
• The Pedometer and Chronograph can be synchronized.
• If the synchronization is turned ON, turning ON or OFF the
Pedometer or Chronograph will activate or stop the other
one simultaneously.
• To synchronize the Pedometer and Chronograph, please
check chapter 7.
MANUAL
User
38-131
FILA™ is trademark of FILA Luxembourg and
used under licence by LONGITUDE LIMITED.
[R]
[S/S]
[S/S]
[S/S]
Hold
[R]
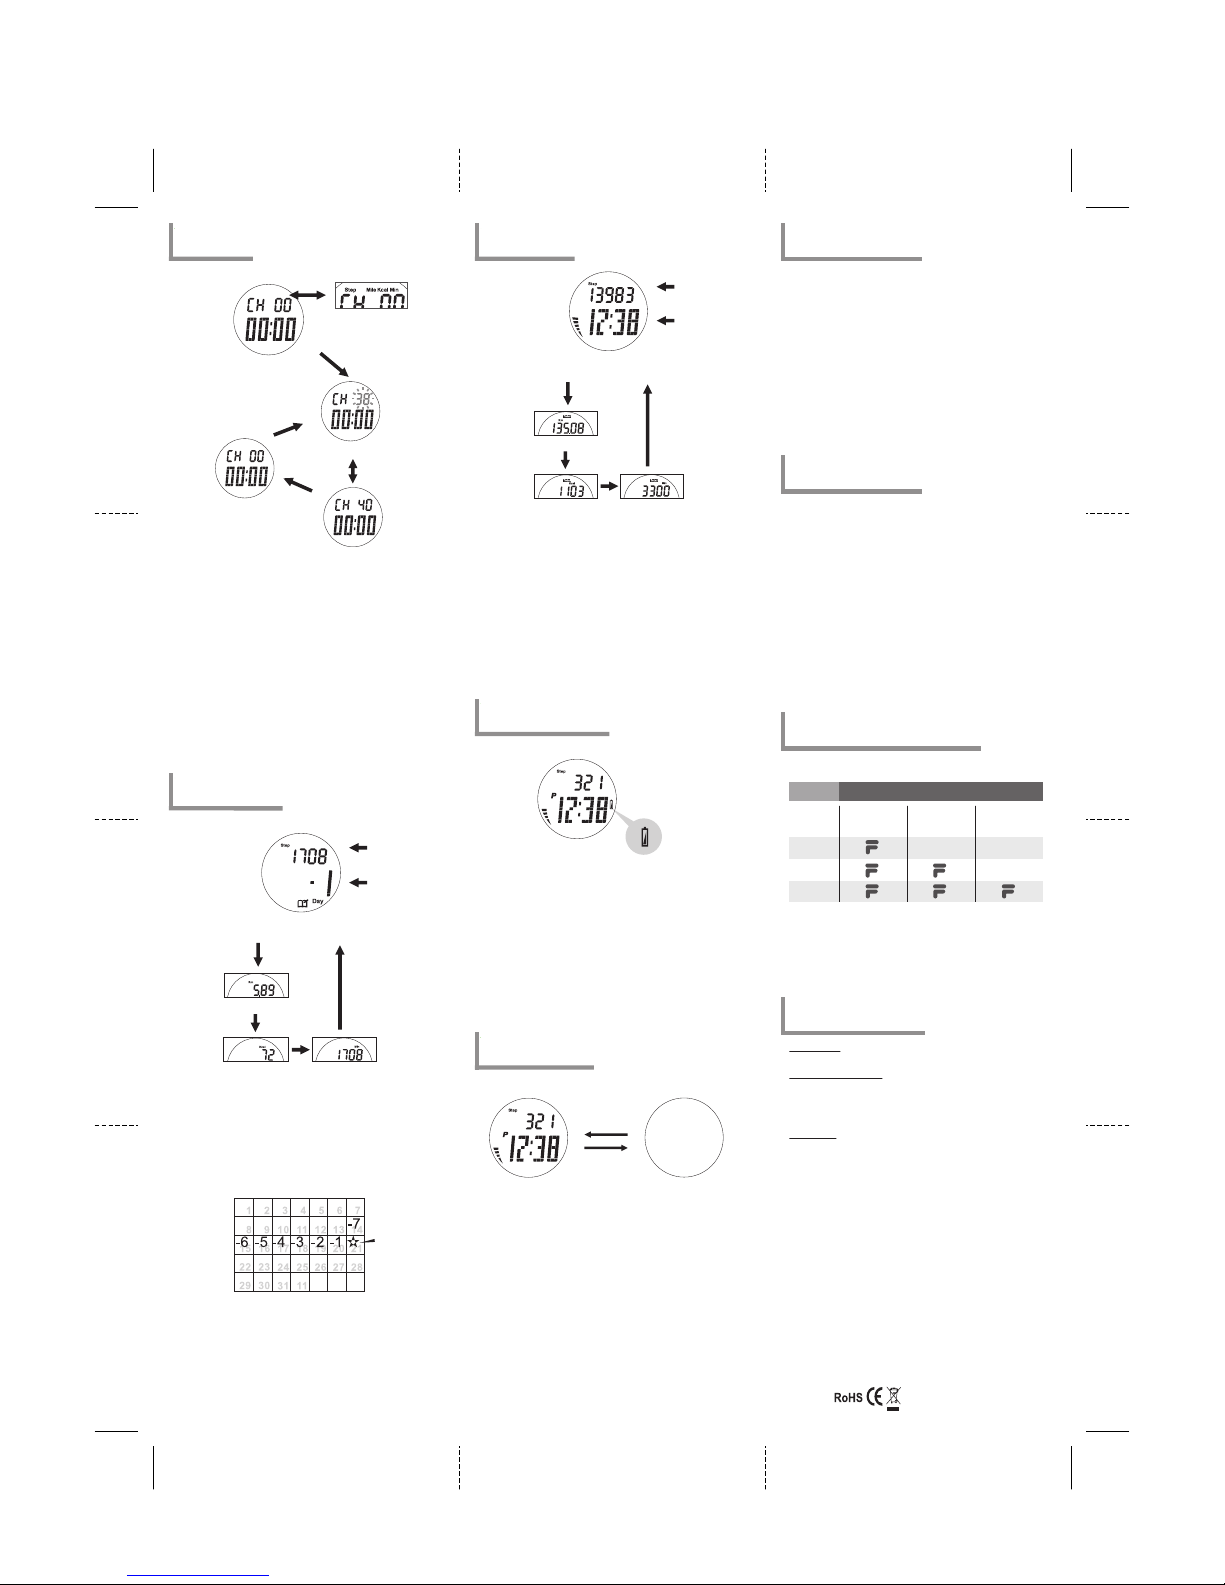
Chronograph Mode
Synchronize ON
Chronograph START
Chronograph STOP
Chronograph RESET
Chronograph Mode Display
• Press the [S/S] button to start or stop counting.
• When the stopwatch is stopped, hold the [R] button to reset
the stopwatch.
Synchronize with pedometer
• In the chronograph mode, press the [R] button to start or stop
synchronization with the pedometer.
• When the synchronization is turned ON, the start/stop
operation of the stopwatch will also start/stop the pedometer
simultaneously.
• When the synchronization is turned OFF, the stopwatch and
pedometer are running independently of each other.
NOTE
• When the synchronization is turned ON, RESETTING the
stopwatch will also reset the current pedometer counter.
Chronograph
7
Record Mode Display
• You can review the exercise records for the past 7 days and
current day.
• The sub-views: Steps, Distance, Calories and Exercise time will
be exhibited in the 1st row of the display.
• Press the [R] button to select the sub-views.
• The day (-1 – -7 ) is exhibited in the 2nd row of the display.
• Press the [S/S] button to select the record for the past 7 days.
Daily Record Mode
8
Current day
Example of daily record
[R]
[R]
[R]
[R]
Daily Record Mode
(Step view)
Distance view
Calories view Exercise time view
1st row
2nd row
Daily Record Mode
(Step view)
Distance view
Calories view Exercise time view
1st row
2nd row
Odometer Mode Display
• You can review the accumulated values of all counters.
• The sub-views: Steps, Distance, Calories and Exercise time are
exhibited in the 1st row of the display in sequence.
• Press the [R] button to select the sub-views
• The current time is exhibited in the 2nd row of the display.
• Hold the [R] button to reset all counters. This will clear the
current data, daily records and reset all the odometer counters.
Odometer Mode Display
Stride - 80 cm (30 inch)
Weight - 45 kg (100 lb)
Target Step - 5000
Odometer Mode
9
Low Battery
Indication
Low Battery Detection
• When the battery-low indicator appears on the display, it
means that the capacity of the battery is low. It is
recommended to replace it with a new one.
• However, if the appearance of battery-low indicator is caused
under very cold condition, the indicator will disappear when
normal temperature returns.
NOTE
• It is recommended to replace the battery by a certified service
agency because this watch contains delicate electronic
sensors and components.
• All records will be cleared when the battery is replaced.
Low Battery Indication
10
Hold [R]
[R], [S/S]
or [M] button
Power Saving Mode
• This Watch has a Power Saving Function which can turn off the
LCD display so that the battery can last longer.
• In the Power Saving Mode, the watch function is working
normally. (i.e. The timekeeping function is running normally in
the Power Saving Mode.)
Power Saving Mode
• Stop the pedometer manually first.
• Hold the [R] button in the Exercise Mode for about 5 seconds
and the LCD display will be turned off.
• Press the [R], [M] or [S/S] key to turn on the LCD display. A “Bi”
sound will be heard when the display is on.
Power Saving Mode
11
Exercise Mode
Power Saving Mode
(LCD display turned off)
Goal progress Bar - Indicate the extent to reach the daily goal
(BACK)
• This watch contains electronic components. Never attempt
to open the case or remove the back cover.
• Avoid exposing the watch to extreme temperature,
chemicals which will damage the watch.
• Keep the watch away from the conditions of strong electric
field and static electricity.
• Avoid rough usage or severe impact. The watch is designed
to withstand impact under normal use. It is advisable to
subject it to severe impact or rough usage.
• Clean your watch occasionally with a soft moistened cloth
only. Avoid using chemicals, especially soap as the
waterproof gasket will corrode.
• Store the watch in a dry place when it is not in use.
Care and Maintenance
12
Precautions for Straps
• Exposure to water often makes a strap fragile and it may
soon tear.
• Don’t apply perfume or moisturizers around your wrist as
the chemicals can erode the metal, leather and plastic of
watch straps.
• The strap’s condition will depend on the owner’s wearing
habits as well as the climate of the place where the person
lives. An original replacement on straps is possible to be
re-ordered through an authorized service center.
• PU straps are usually very hardwearing, please wash them
with mild soapy water only.
• There may be discoloration for light color and transparent
straps after normal wear for some time.
• In case if there is any severe or persistent skin reaction, such
as severe redness, itching, rash or hives, you should stop
wearing this watch, and consult your doctor.
13
Precautions for Battery
15
Battery Life
The battery in your FILA watch is estimated to last for 2 years.
Battery Replacement
If the watch is out of battery, you are recommended to go to the
authorized FILA service center for correct battery replacement in
order to retain a valid warranty and avoid any damage on the
water resistance function.
WARNING!
Always keep watch batteries away from children. If swallowed,
contact a doctor immediately. Batteries contain chemical
substances. They should be disposed of properly according to
local regulations.
Precautions for Water Resistance
14
• Water damage may occur if the push buttons are pressed
under water.
• Should water or condensation appear in the watch, please
check the watch immediately as corrosion of electronic
parts can occur inside the case.
All FILA watches are designed to withstand use as indicated on
the below chart.
Indication
Bathing,
etc
Swimming,
etc
Light spray
perspiration,
light rain, etc
3ATM
(30 meters)
5ATM
(50 meters)
10ATM
(100 meters)
Water-related use
Level of
resistance
 Loading...