

Page 1
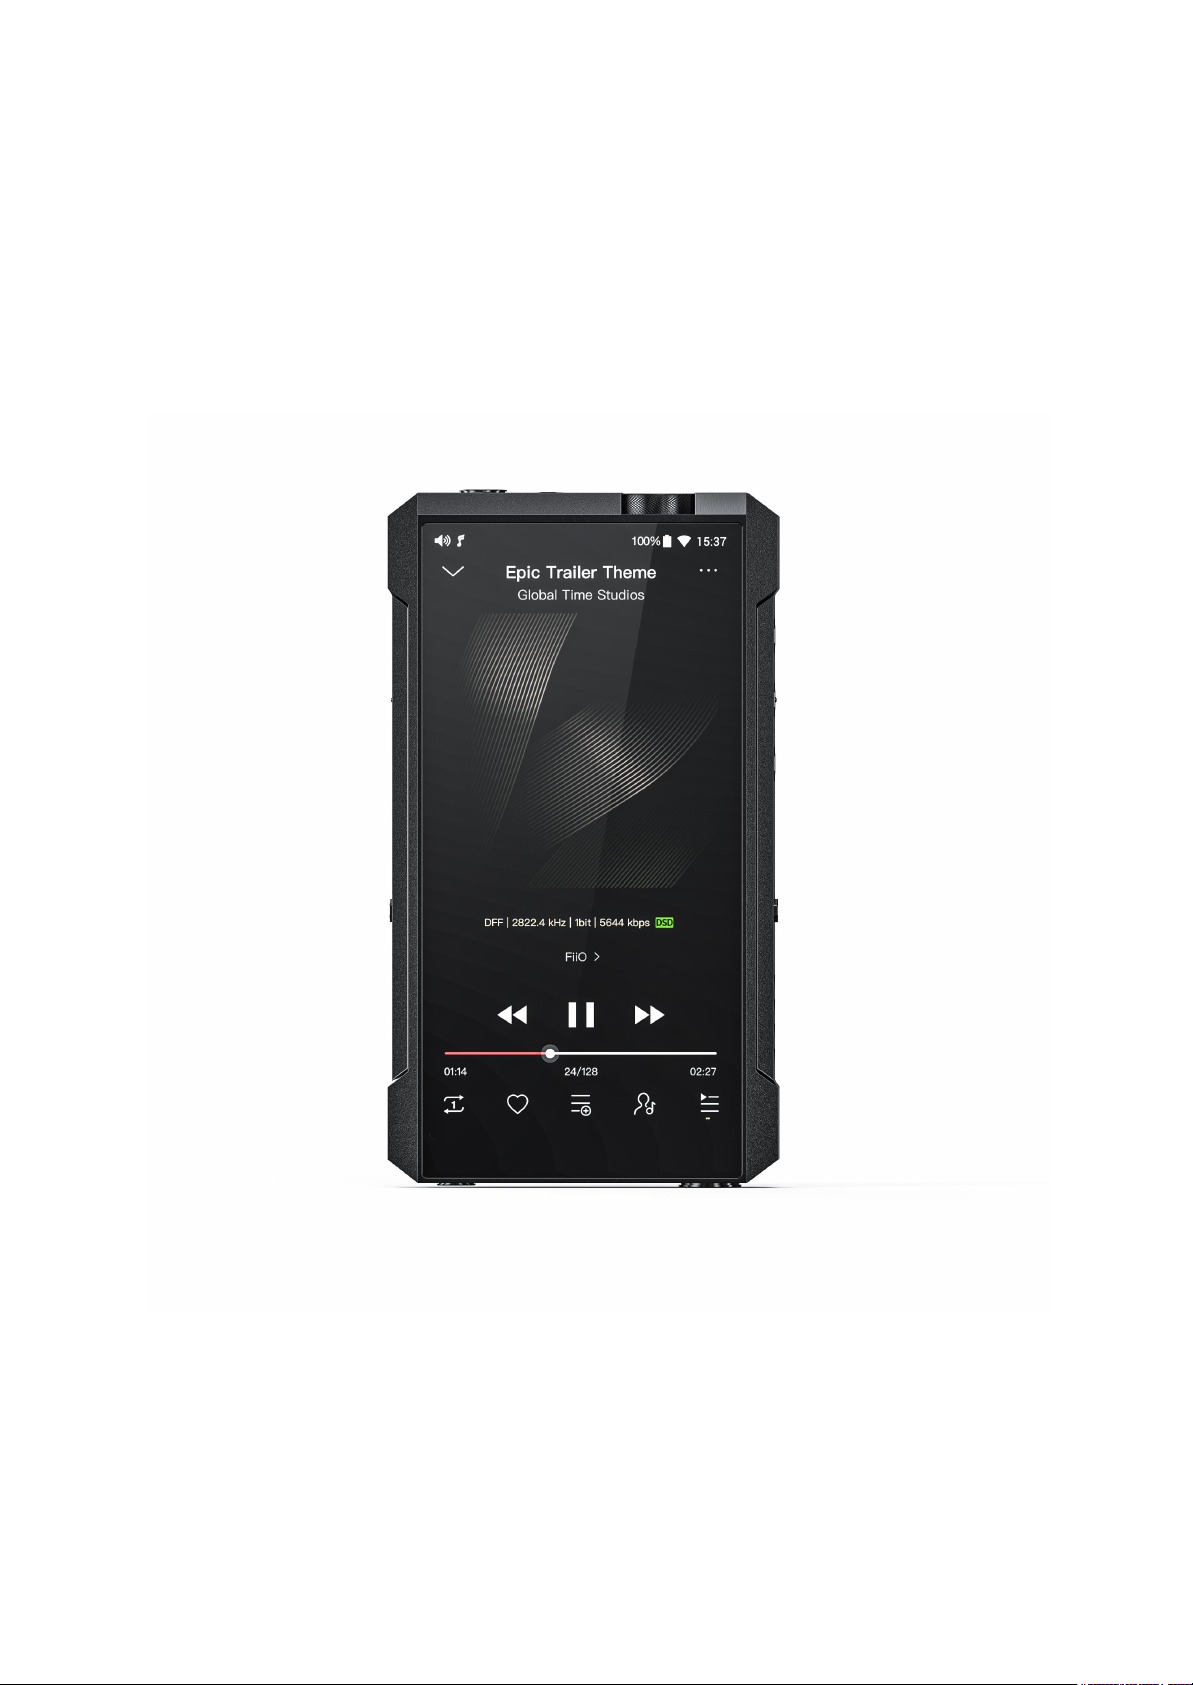
All the pictures below are for illustrations only. Specifics are subject to the actual product.
Page 2

Foreword
Thank you so much for purchasing FiiO's portable high resolution lossless music player M17.
We have prepared this complete user manual for you. We hope this manual can help you get
the hang of the M17 and unleash its full potential.
An introduction to FiiO M17
The smart desktop-class M17 is an entirely new chapter of FiiO digital audio players. Its
desktop-grade DAC, amplification, power supply, etc. give it the output power and sound
quality to rival and perhaps even surpass highly-regarded desktop systems – but in a
portable package.
The left and right audio channels each contain a desktop-class, 8-channel ES9038PRO
flagship DAC. This means that each audio channel has 8 parallel outputs summed together
for superior resolution and minimal distortion for extremely pure audio reproduction.
The desktop-class THX 788+ headphone amp has an output power of up to 3000mW per
channel with a lower output impedance – allowing it to more effortlessly power all kinds of
headphones.
Desktop-grade power supply and gain: the M17 contains two power supplies – a battery
power supply and a power supply powered by external DC power. Under battery power,
there are 4 gain levels: low, medium, high, and headphone mode. When under DC mode,
the enhanced over-ear headphone mode gain is unlocked which can go as high as 16dB in
balanced output.
Desktop-caliber internals: high-end TI OPA2211 op-amp, supercapacitor, ultra-low noise
LT3045 LDO, NDK femtosecond crystal oscillator, etc.
Desktop-level connectivity: not only supports commonly used 2.5mm/3.5mm/4.4mm
headphone outputs, but also adds6.35mm output, RCA coaxial port, USB3.0 and USB2.0
ports.
With desktop-grade configurations, the M17 will be your great partner on the road of music.
Page 3
Buttons and ports
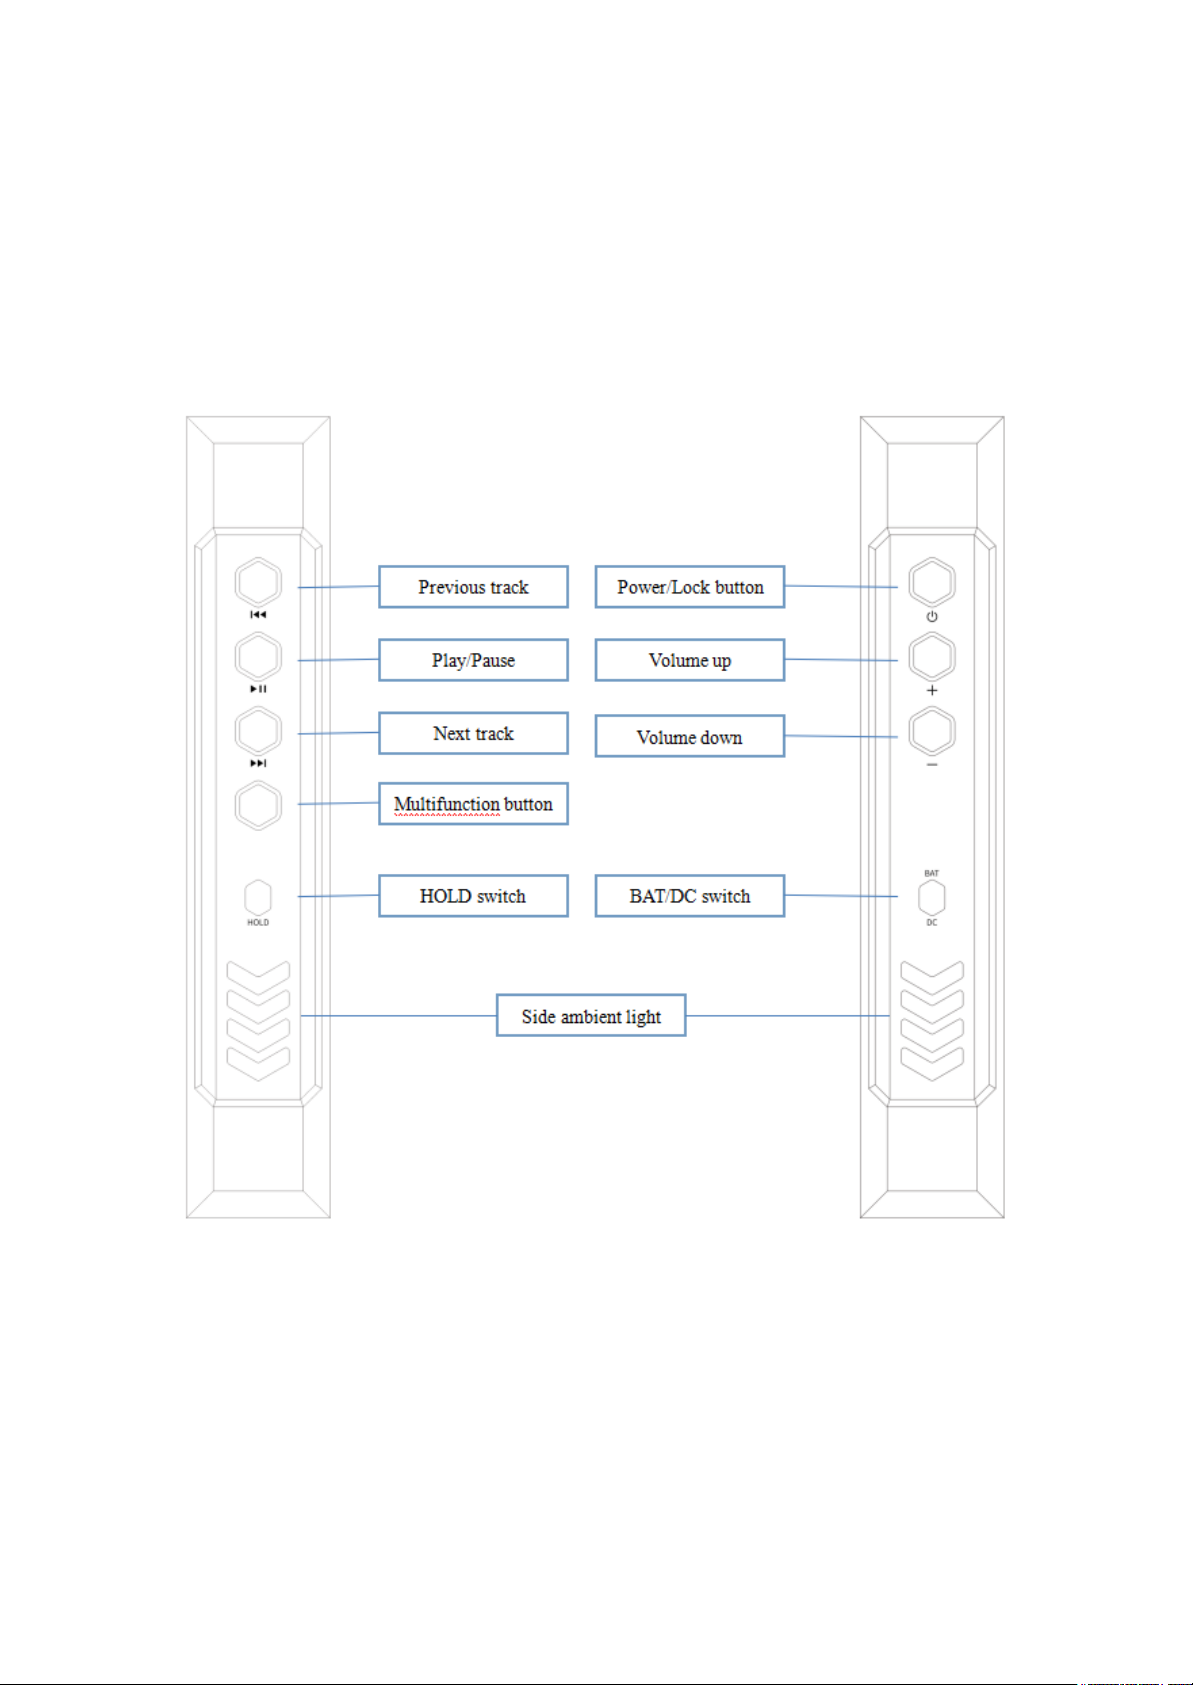
1. Pictorial guide to buttons and ports
(Pictures are for reference only. The real product may vary.)
Page 4
2. Instructions for buttons and ports
1) Power/Lockscreen: long press it for about 2 seconds when the device is off to turn it on;
long press it when the device is on the pop up the menu of reboot/shutdown; short press it
when the device is on to turn off/wake up the screen; long press it for about 10 seconds to
reset the device.
2) Volume up/down: press the volume up button to increase the volume, press the volume
down button to decrease the volume.
3) BAT/DC switch: when the switch is set to BAT, the system will use the battery as a power
source. When the switch is set to DC and the DC power adapter is connected(there is a
power adapter in the accessories of the M17), the system will switch to DC power supply. At
this time, the enhanced over-ear headphones mode will be added to the gain setting menu,
and the system will pop up a window to prompt it, please choose whether to switch
according to your needs. In the enhanced over-ear headphones mode, M17 will be able to
provide greater output power, suitable for high-impedance headphones.
4) Previous track: short press to play the previous track; long press to rewind.
5) Play/Pause: short press it when music is playing to pause the music; short press it when
music is paused to resume the playback.
6) Next track: short press to play the next track; long press to fast forward.
Page 5

7) Multi-function button: you can customize the multi-function buttons to select a frequently
used function for one-button quick start.
For example, you can set the button to add to favorites, random play, play/pause, switch
filter, switch equalizer, delete the currently playing song, switch to USB DAC mode, switch to
Bluetooth mode, no function, etc.
8) Hold switch: you can customize it. After turning it on, the buttons and knobs that are in the
off state will be locked.
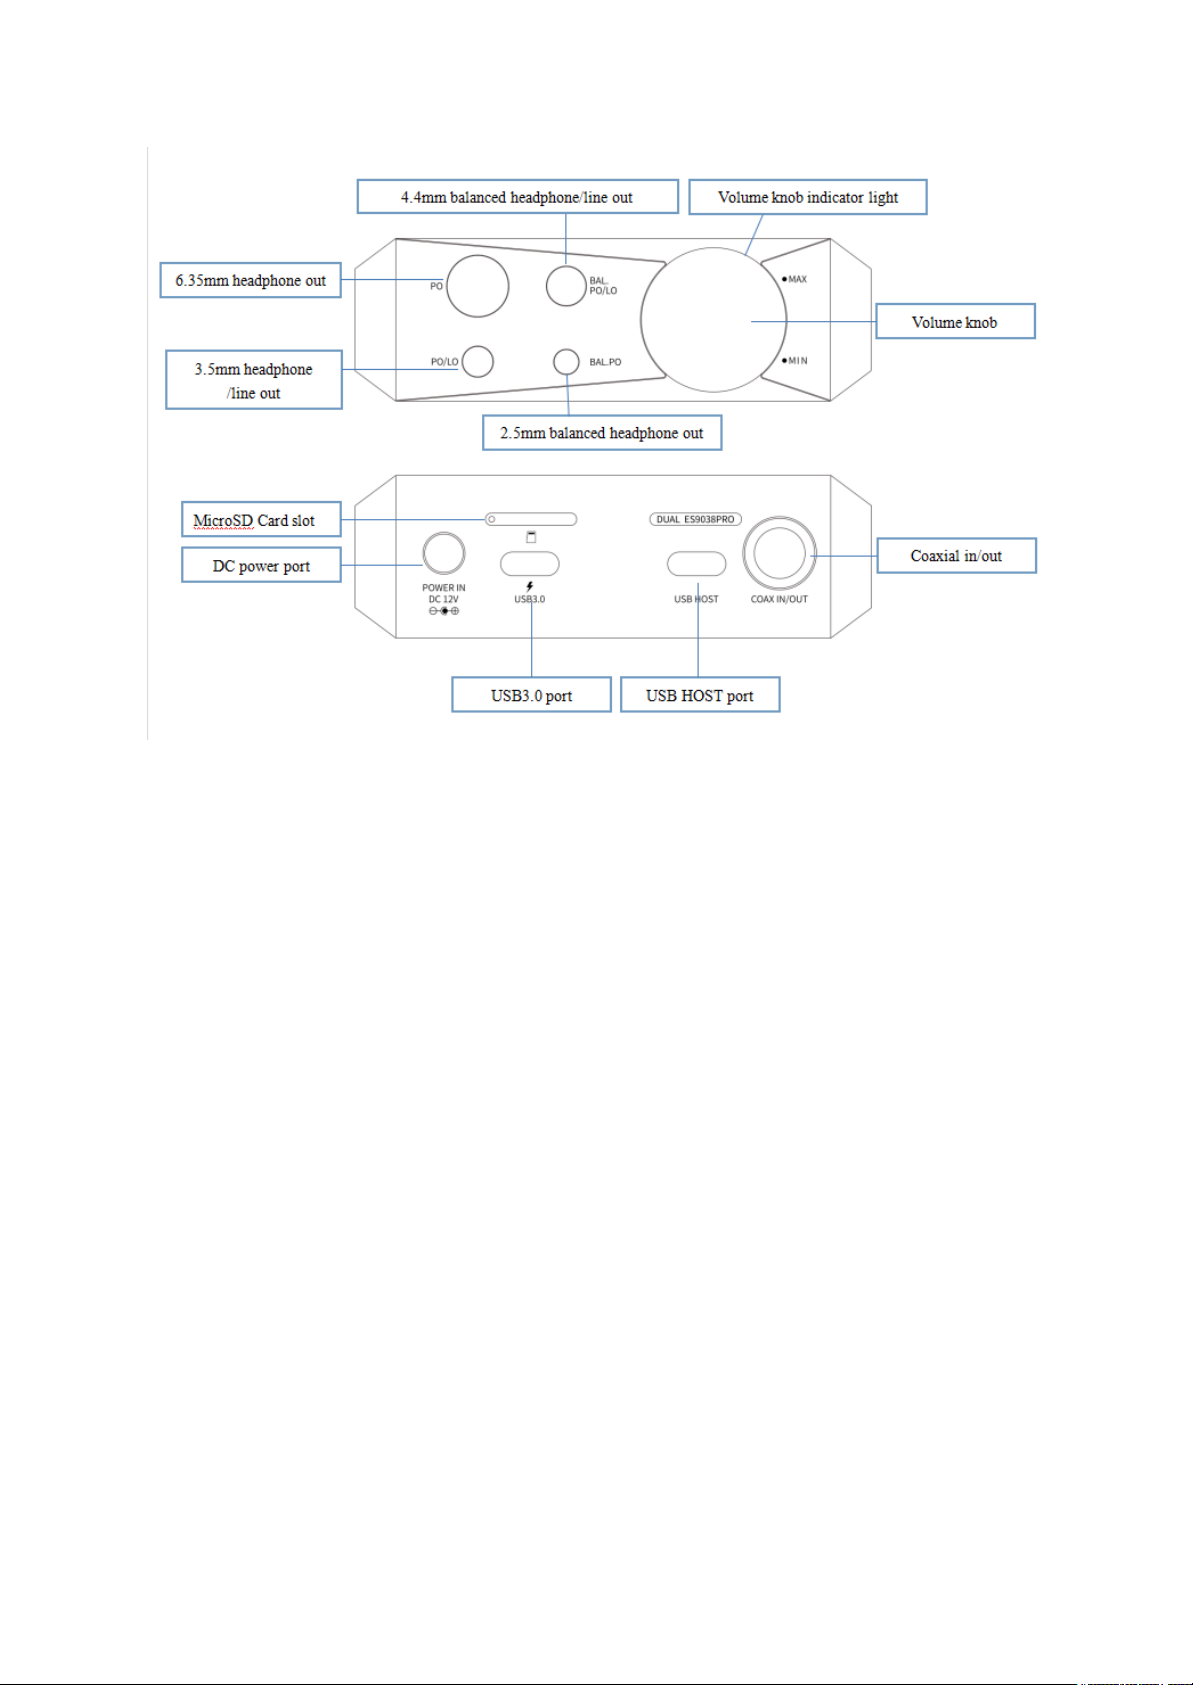
9) DC power port: 12V DC power supply port, after connecting to the power adapter and
turning the switch to DC, the hidden gain mode---enhanced over-ear headphones mode will
be triggered
10) Micro SD Card slot: supports one TF card (micro SD card), theoretically up to 2TB
expansion.
11) USB 3.0 port: supports data transfer with computers, USB DAC, USB Audio output, USB
OTG, USB charging and other functions
12) USB HOST (2.0): supports USB Audio output and USB OTG, but does not support
functions such as connecting to a computer or charging.
13) Coaxial in/out: the M17 coaxial port supports output and input of coaxial signals.
14) 6.35mm headphone out: supports 6.35mm headphone output.
15) 3.5mm headphone/line out:supports 3.5mm headphone/line-out output.
16) 4.4mm balanced headphone/line out: supports 4.4mm balanced headphone/line-out
output.
17) 2.5mm balanced headphone out: supports 2.5mm balanced headphone output.
18) Volume knob: the M17 uses the volume knob to adjust the volume by default. At this
time, the volume button cannot adjust the volume. If you need to switch, you can enter
Settings-Global, click "Volume Adjusting Mode", select "Adjust by Volume button" or "Adjust
by Volume Knob".
The priority of the M17 output port
1. When the PO 3.5mm, 6.35mm, 2.5mm and 4.4mm are output at the same time, the output
will be given priority in the order of insertion; if the 6.35 and 3.5 earphones are inserted at
the same time, both ports have output, and the status bar will display two icons (The same is
true for LO); 2.5 and 4.4 are the same as 6.35 and 3.5.
2. When both balanced and single-ended headphones are plugged in, the first plugged-in
headset will have a sound, and the status bar will only display the first plugged-in headset
icon.
3. The SPDIF output is controlled by a separate switch. The analog output (PO/LO) and
SPDIF digital output can be output at the same time.
Page 6
4. According to the Android system's own processing method, Bluetooth transmission and
analog output (including SPDIF) will follow the principle of post-access priority.
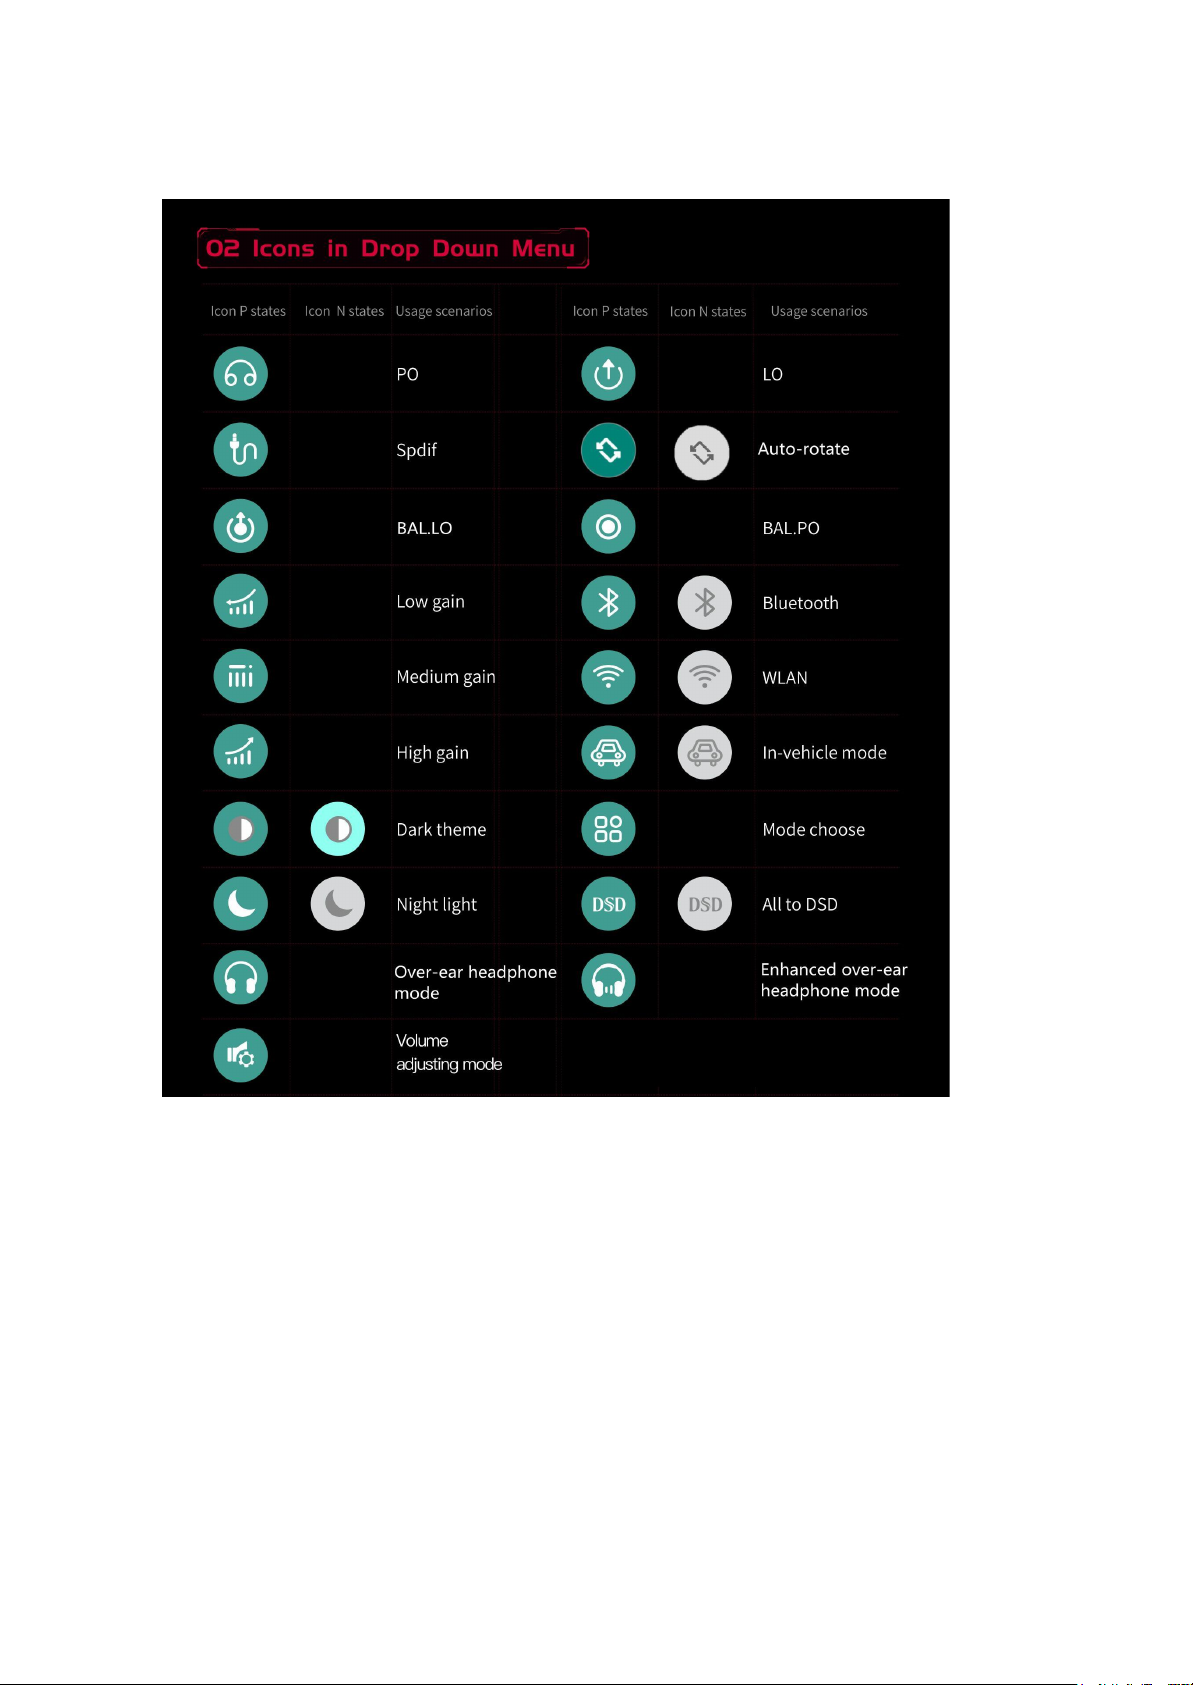
Status bar and display page
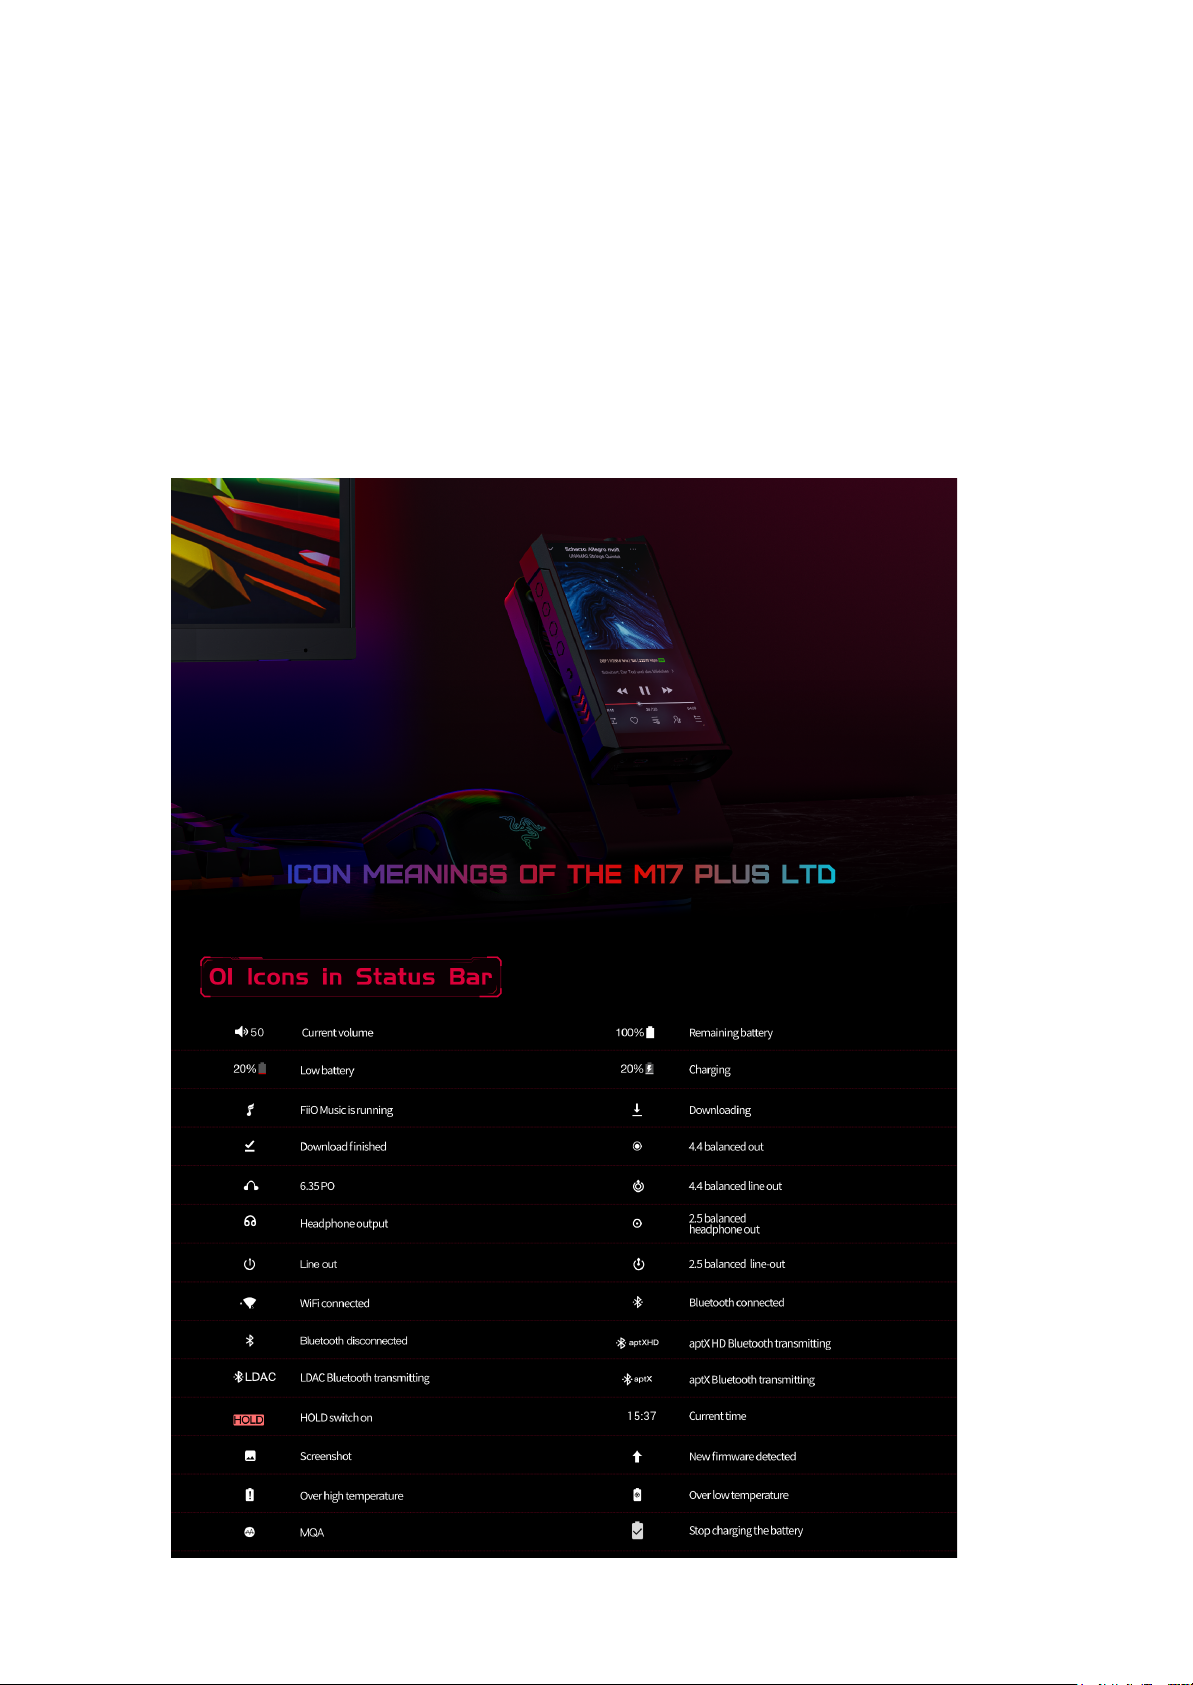
1. Status bar
The status bar on the top screen shows the working states of the M17.
Page 7
Page 8
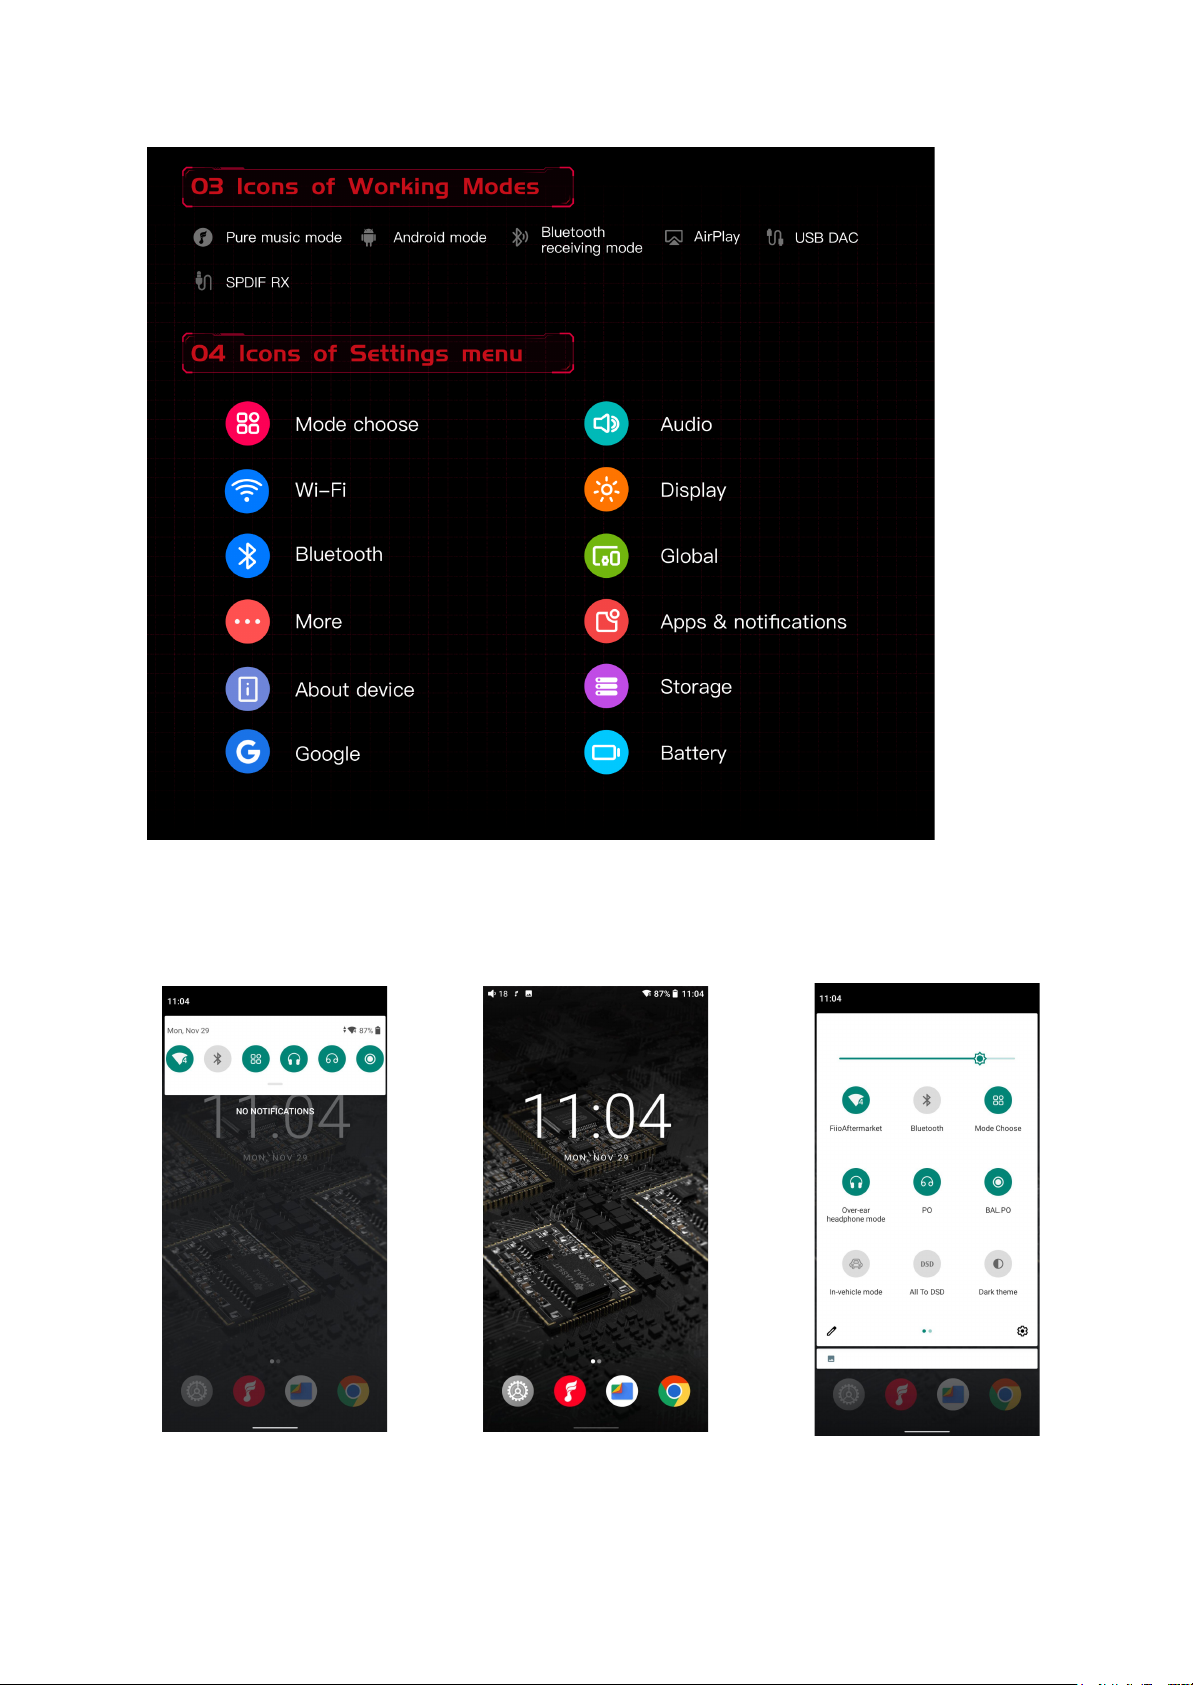
2. Homepage and drop-down menu
Page 9
Instructions for entry-level functions
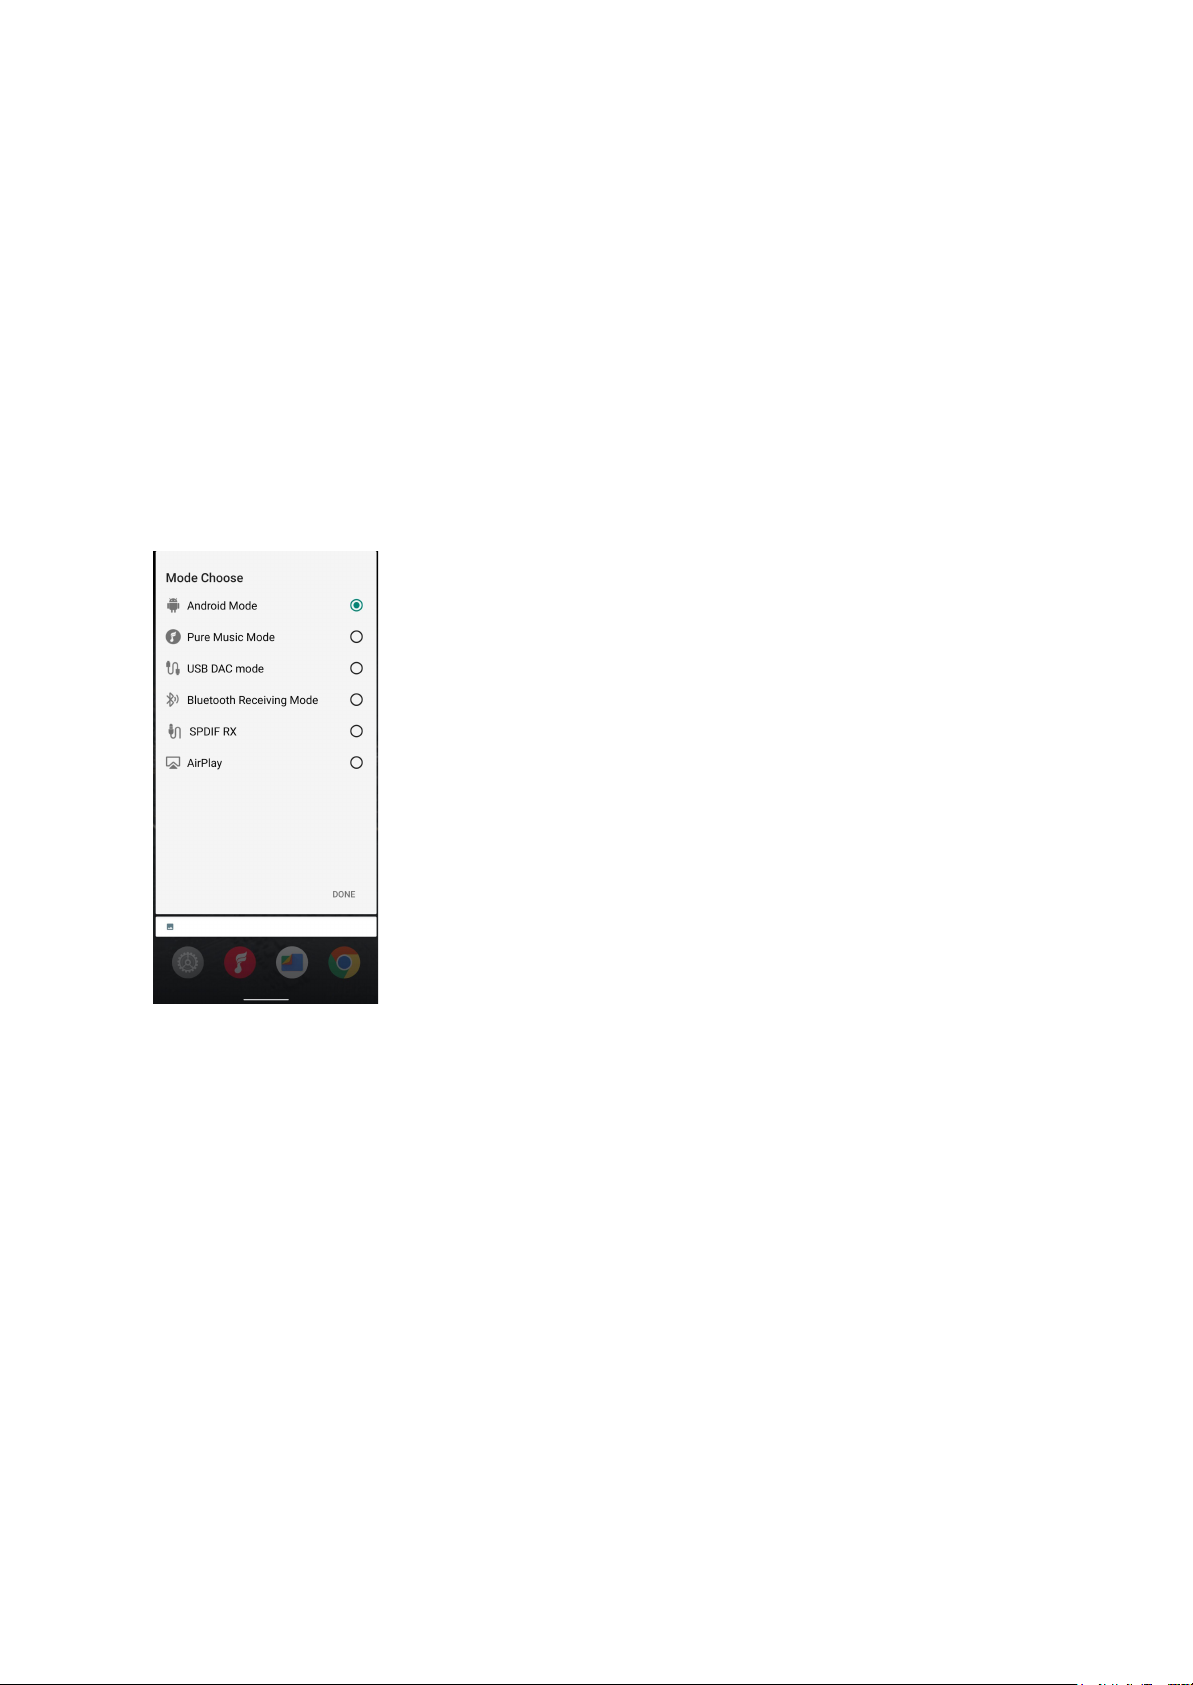
1. Six working modes
The M17 has 6 independent working modes: Android mode, Pure Music mode, Bluetooth
Receiving mode, USB DAC mode and AirPlay mode. It is defaulted to be the Android mode,
which can be switched to other working modes in the drop-down menu.
If the player is in other modes but not the Android mode, you can switch it to other modes
through the selection on the display, or tap Settings->Exit to go back to Android mode.
Android mode
Third party applications will be available at will. It can be switched to other modes on the
drop-down or settings menu.
Pure Music mode
Third party applications will be automatically disabled while the FiiO Music app will be
auto-enabled. It can be switched to other modes on the drop-down or settings menu.
Page 10
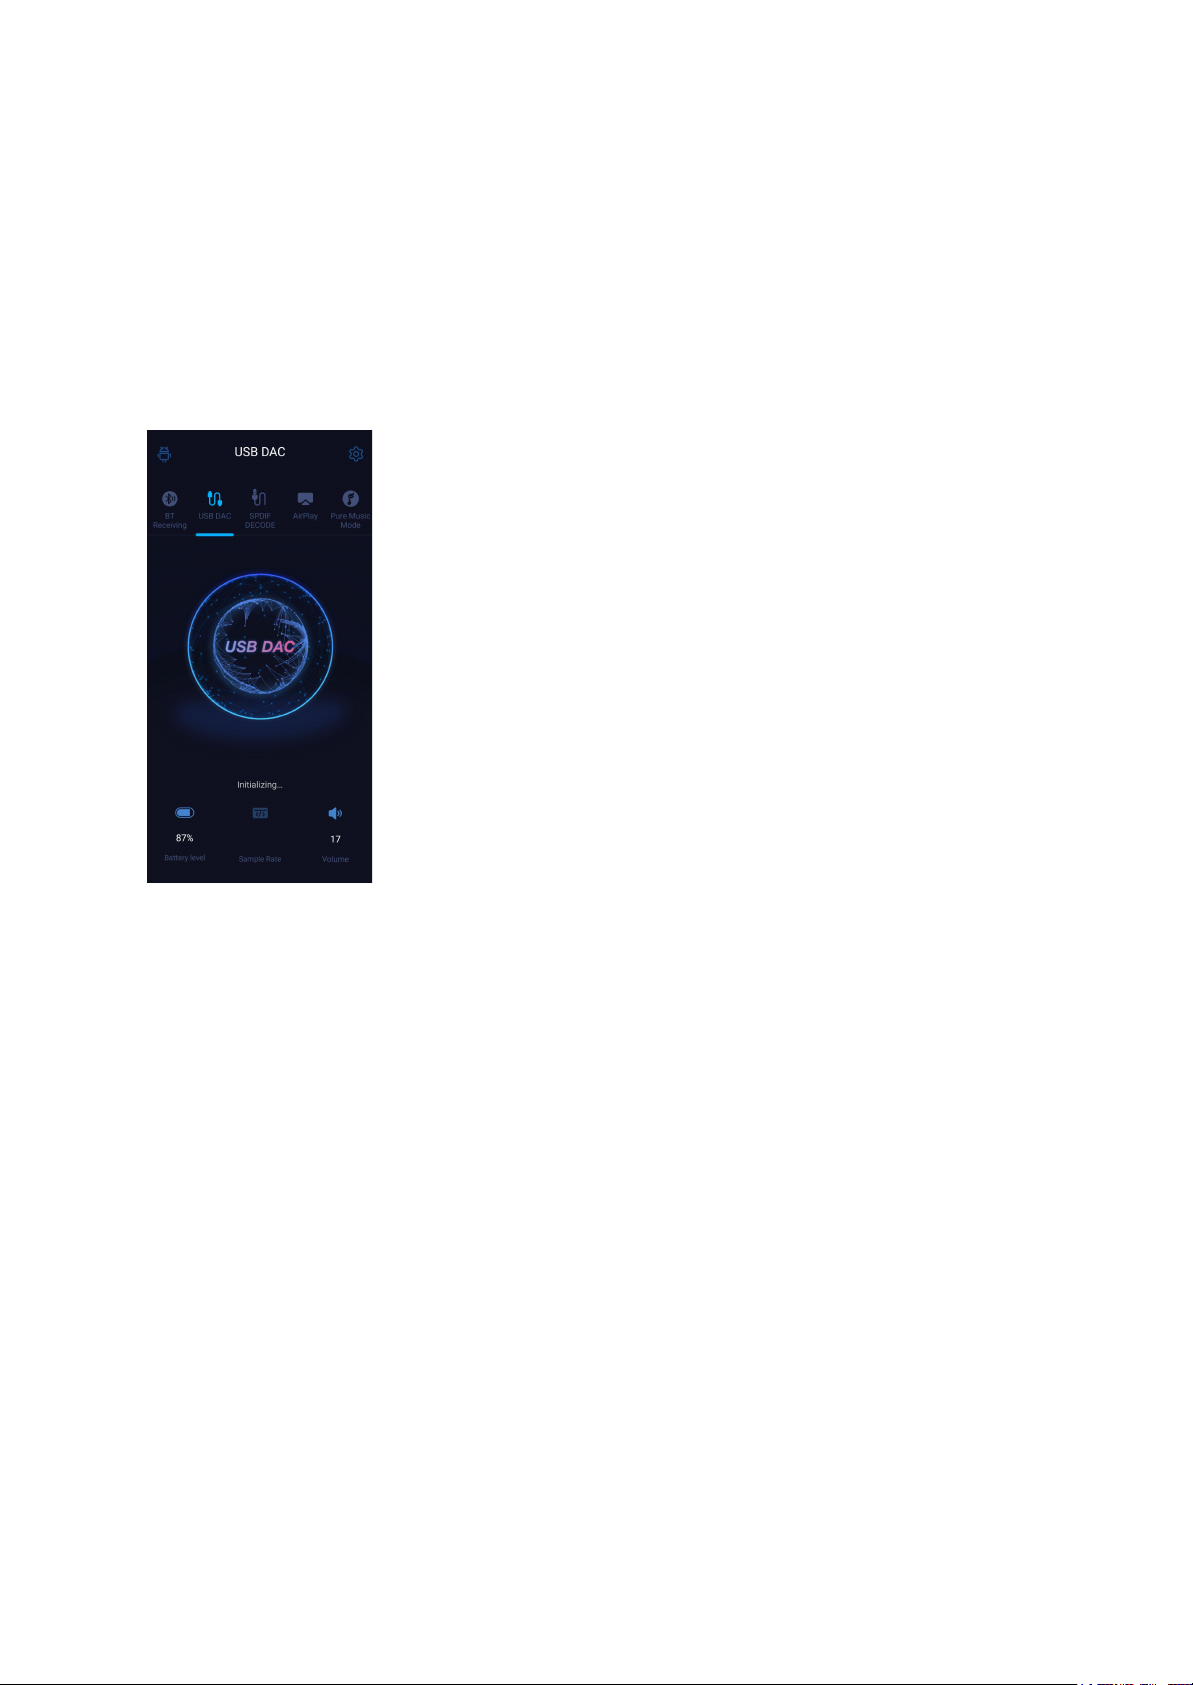
USB DAC mode
In USB DAC mode, the M17 can be connected to other devices like a computer, working as
a USB DAC/Amp. It can be switched to other modes on the drop-down or settings menu.
Notes: when the M17 is going to work in the USB DAC mode for the first time, FiiO's
exclusive USB DAC driver is required. Please download it on our website and follow relevant
instructions to install it.
Bluetooth Receiving mode
1. When switching to the Bluetooth Receiving mode for the first time, the M17 will
automatically enter the pairing state. The next time it enters Bluetooth Receiving mode, it will
reconnect to the last connected device automatically.
2. Go to the Bluetooth transmitting list of the mobile phone, and tap the M17 to complete the
connection.
-Force the device to enter pairing mode: Hold the Play/Pause button for about 3 seconds.
-Manually enter reconnecting mode: Short press the Play/Pause button when not in pairing
mode.
-Clear current pairing: Hold the Previous and Next track buttons at the same time for about 3
seconds.
Page 11
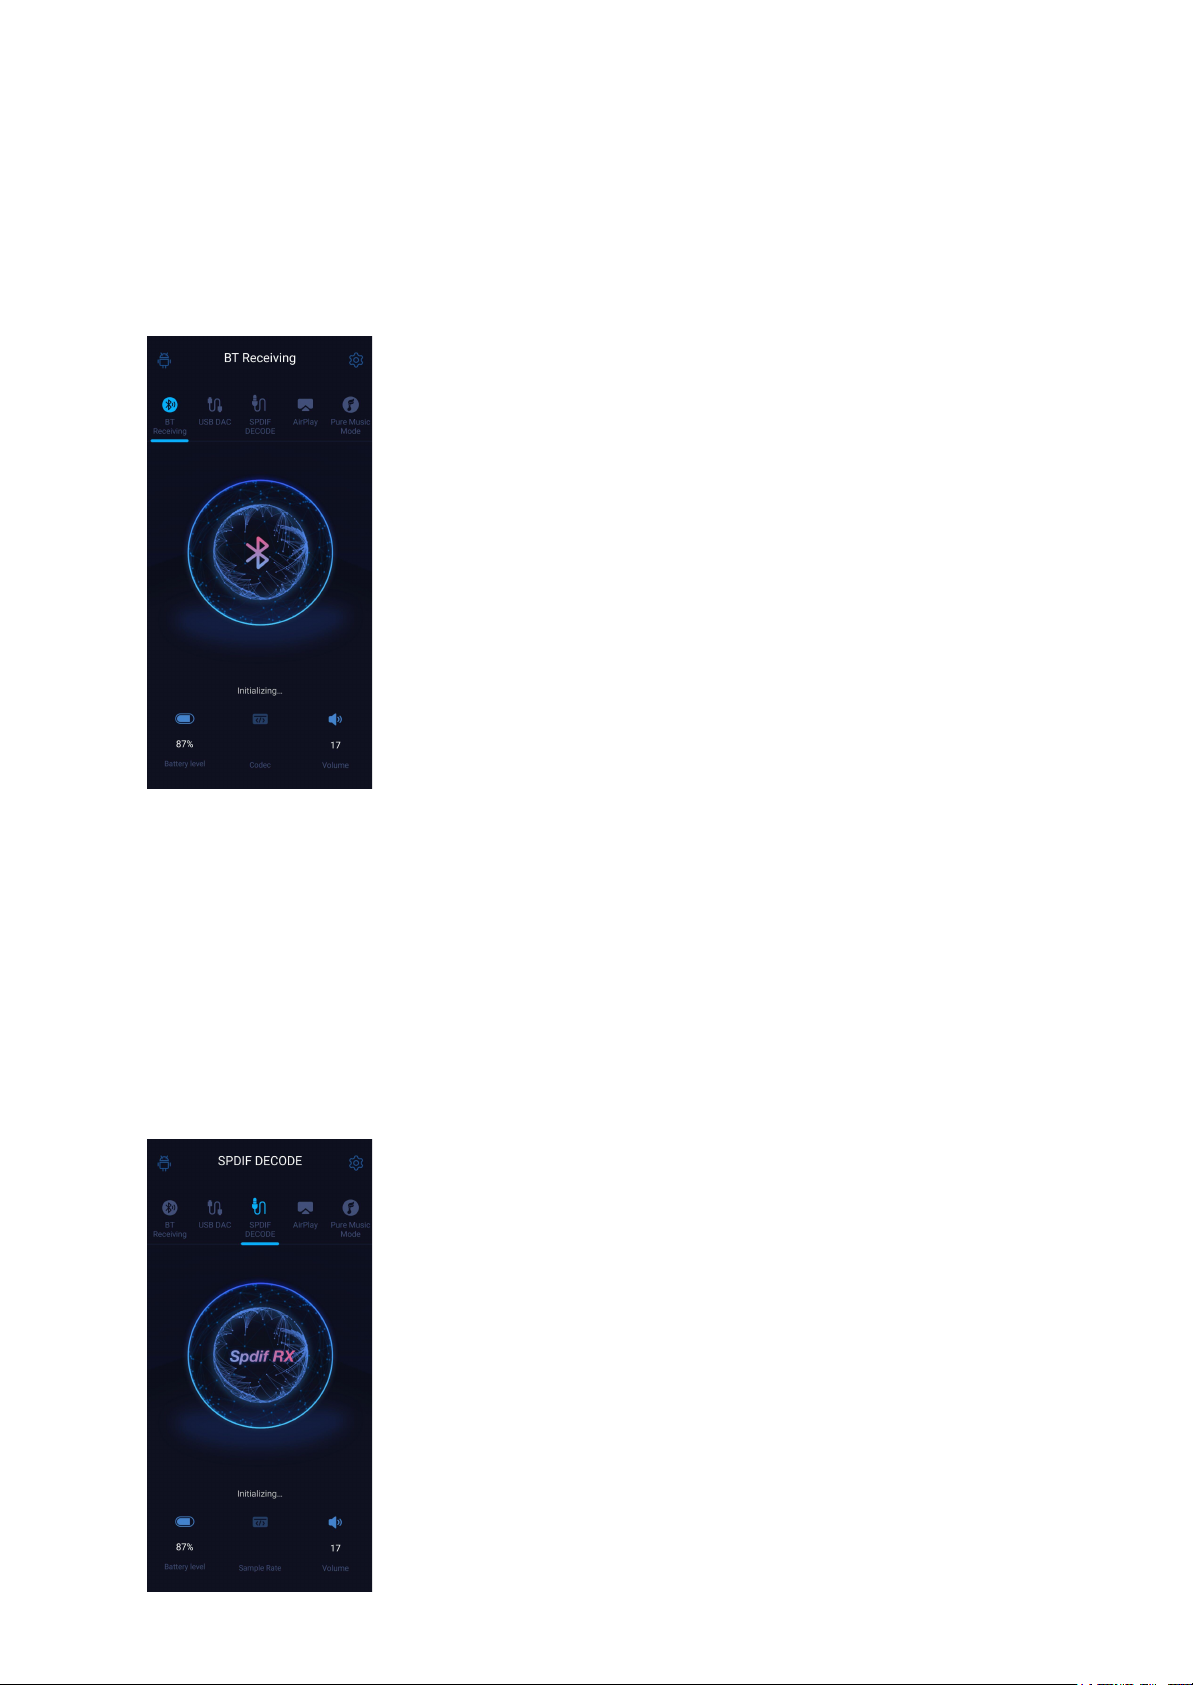
-Play/Pause: Short press the Play/Pause button.
-Previous/Next track: Short press the Previous/Next track button.
SPDIF RX mode
When switching to the SPDIF RX mode, the system will automatically enable the coaxial port
as coaxial input mode. At this time, the M17 will start to decode the input valid coaxial
signals.
Page 12
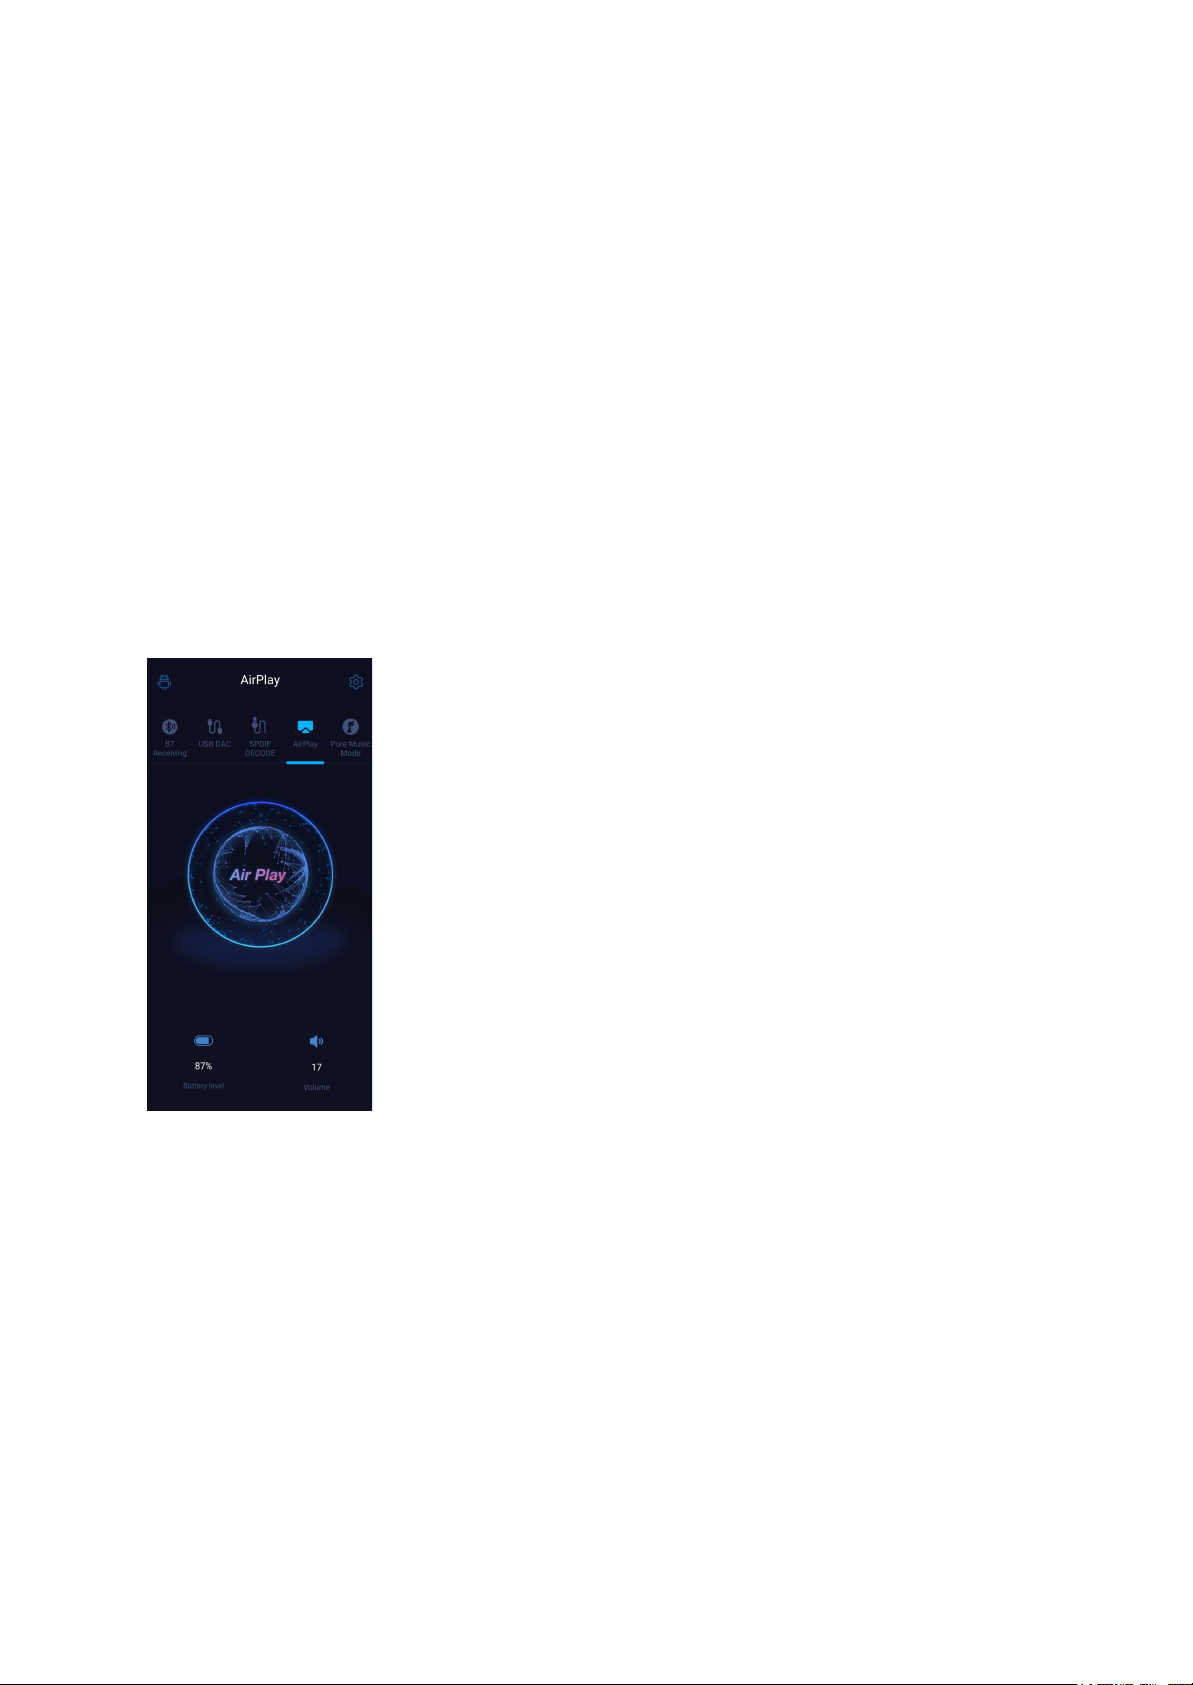
AirPlay
When working in AirPlay mode, the M17 requires a valid WiFi connection. Please confirm
that it is connected to an available network before entering AirPlay mode.
There are mainly 3 steps.
1. Make sure the M17 and your iOS devices are connected to the same WiFi network.
2. Switch the M17 to the AirPlay mode.
3. On the drop-down menu of the iOS device, choose the M17 as the playing device. So the
M17 can receive audio signals from the iOS device.
Page 13

2. How to access the storage/SD card after connecting the M17
to a computer?
Windows system
For Windows computers, it is driver-free. After connecting the M17 to the computer by the
included USB cable, the driver will be automatically installed. Then the FiiO M17 disk can be
directly seen on the computer
Mac system
Mac computers need a driver.
1. After connecting the M17 to the Mac computer, click the "NO NAME" folder emerging on
the desktop->double click Mac->Mac/MAC OS MTP Client->Android File Transfer.dmg. Drag
the "Android File Transfer.dmg" to the desktop of the computer.
2. Drag the "Android File Transfer" file to the "Applications" folder and wait for the completion
of the copy.
3. Enter "Applications", and double click the "Android File Transfer". Then
you can manage the files stored in the internal storage of the M17 or the Micro
SD card.
Notes: The M17 folder will directly pop up the next time it is being connected to the same
computer.
3. How to upgrade firmware?
The M17 supports online upgrade and local upgrade.
Page 14
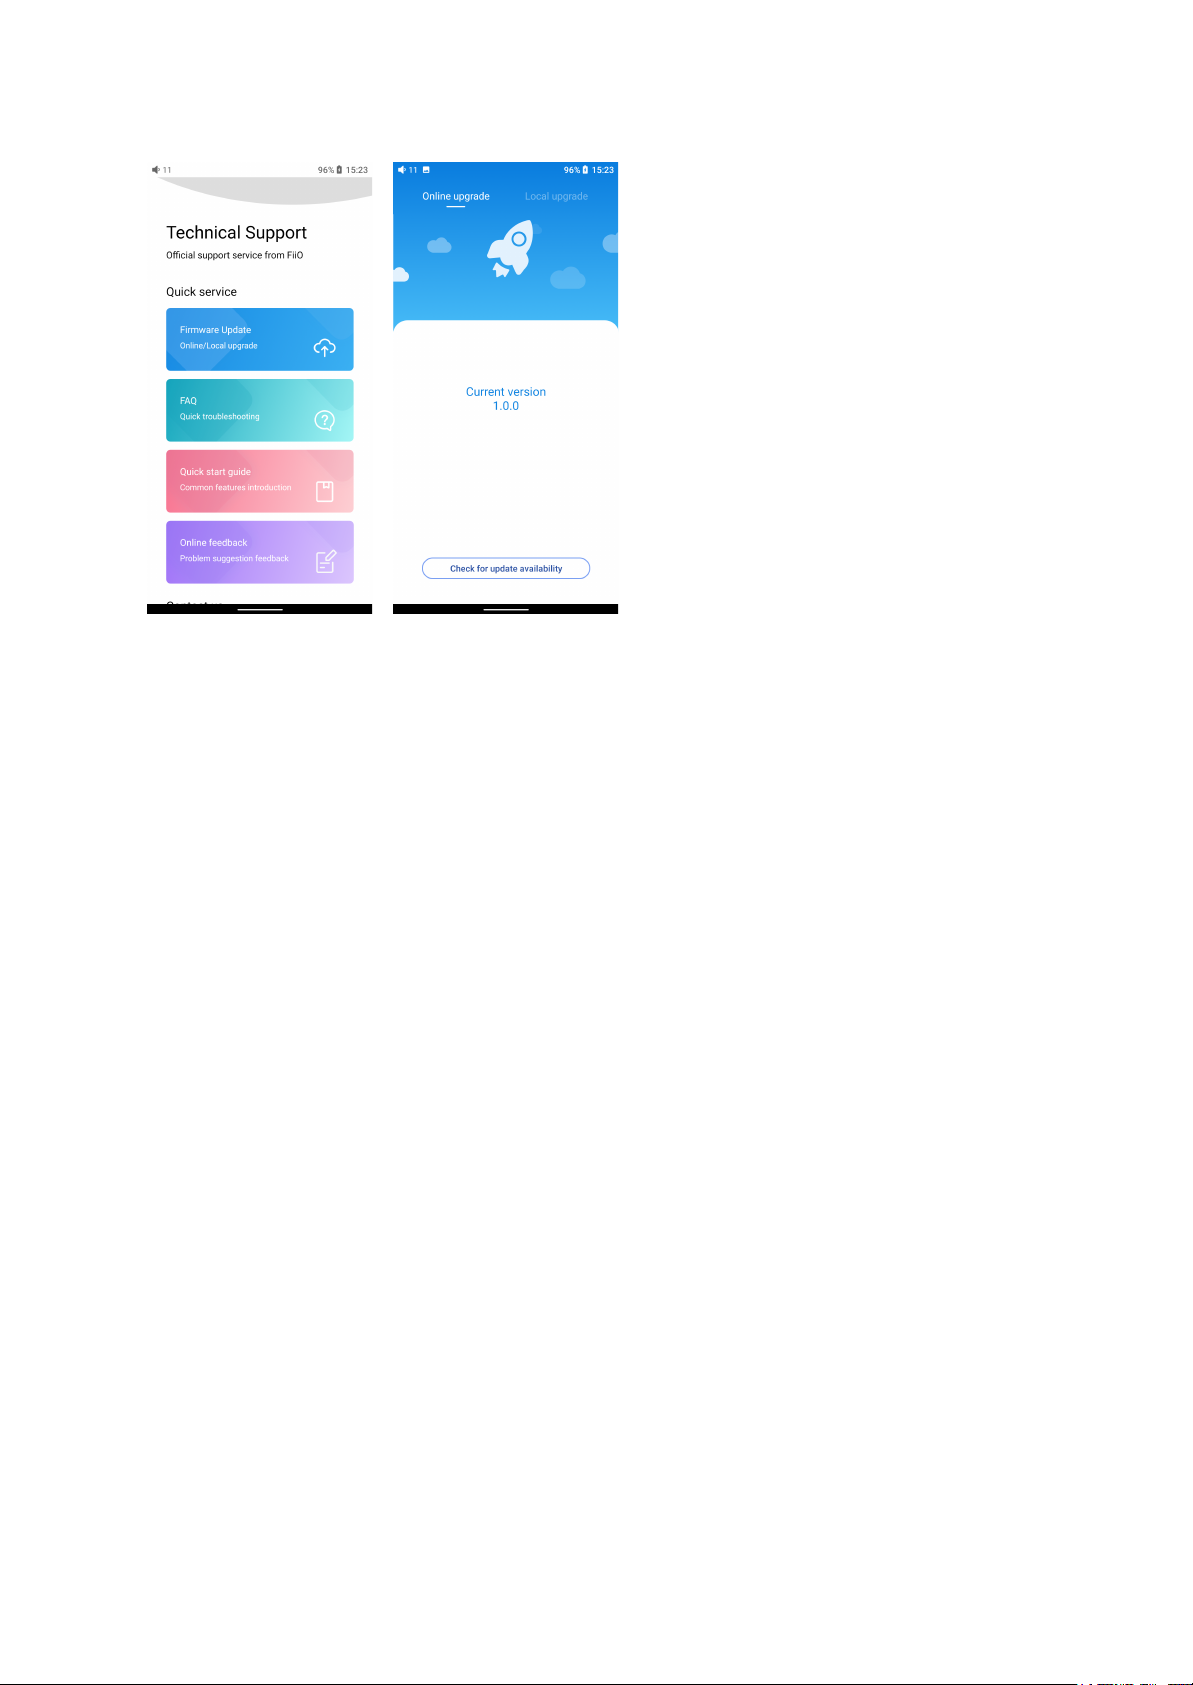
Online upgrade
If a new firmware is available and can be detected (with the M17 connected to an available
internet), an upgrade notification will show up in the notification center. Tap on it to enter the
update menu for the online upgrade. If there's no upgrade notification showing up, you can
go to the "Technical Support->Firmware Upgrade" menu, and tap the "Check for updates"
icon to check manually.
Local upgrade
Also, the M17 can be upgraded locally by a firmware package. Download the firmware
package file from FiiO website, and copy it to the internal storage of the M17 or an SD card.
Go to the "Technical Support->Firmware Upgrade->Local Upgrade" menu, and find the
firmware package file to start the upgrade.
Notes:
1. Do not unzip the firmware package file.
Page 15

2. Before the upgrade, ensure the power of the device is adequate (>30%) so to avoid
upgrade failure.
3. If the device goes to factory mode which cannot detect the firmware, the reason may be
that the firmware file is damaged. At this time, press the power button to reboot the device.
Re-download the firmware file and restart the upgrade.
4. How to install third-party apps?
There are two ways that are similar to mobile phones' to install applications.
Method 1: After connecting the device to a valid WiFi, go to FiiO market, Google Play or
other app markets to download and install the app directly.
Method 2 (Local installation): copy the APK file to the M17. Go to the file management menu
to find the file and install it.
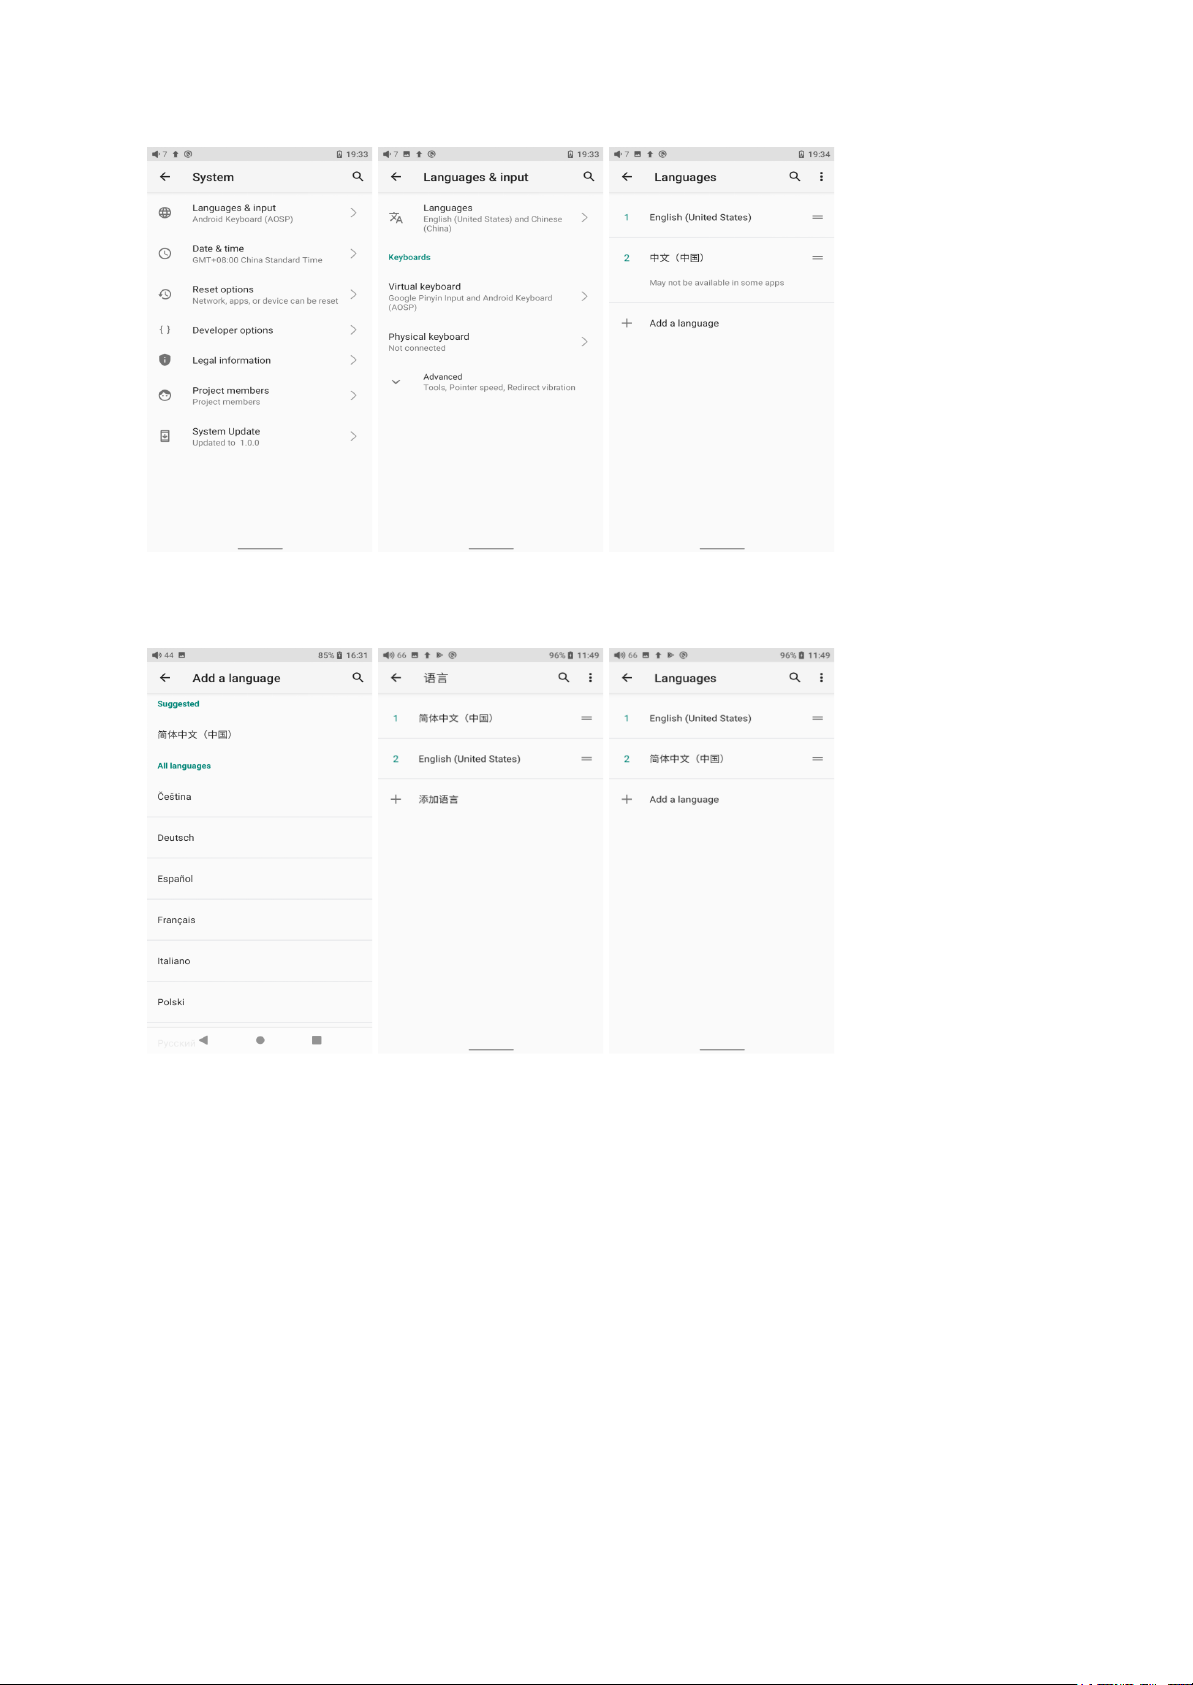
5. How to change the language?
Go to Settings->System->Languages and input->Languages->+ Add a language to choose
the intended language. Press the "=" icon on the right side and drag it to the first line to
select the language successfully.
The language of the FiiO Music app defaults to follow the system's. You can also go to FiiO
Music app-> Settings->Languages to choose the language independently.
Page 16
6. How to enable the USB DAC function?
MAC system
For Mac computers, the M17 runs driver-free.
Page 17
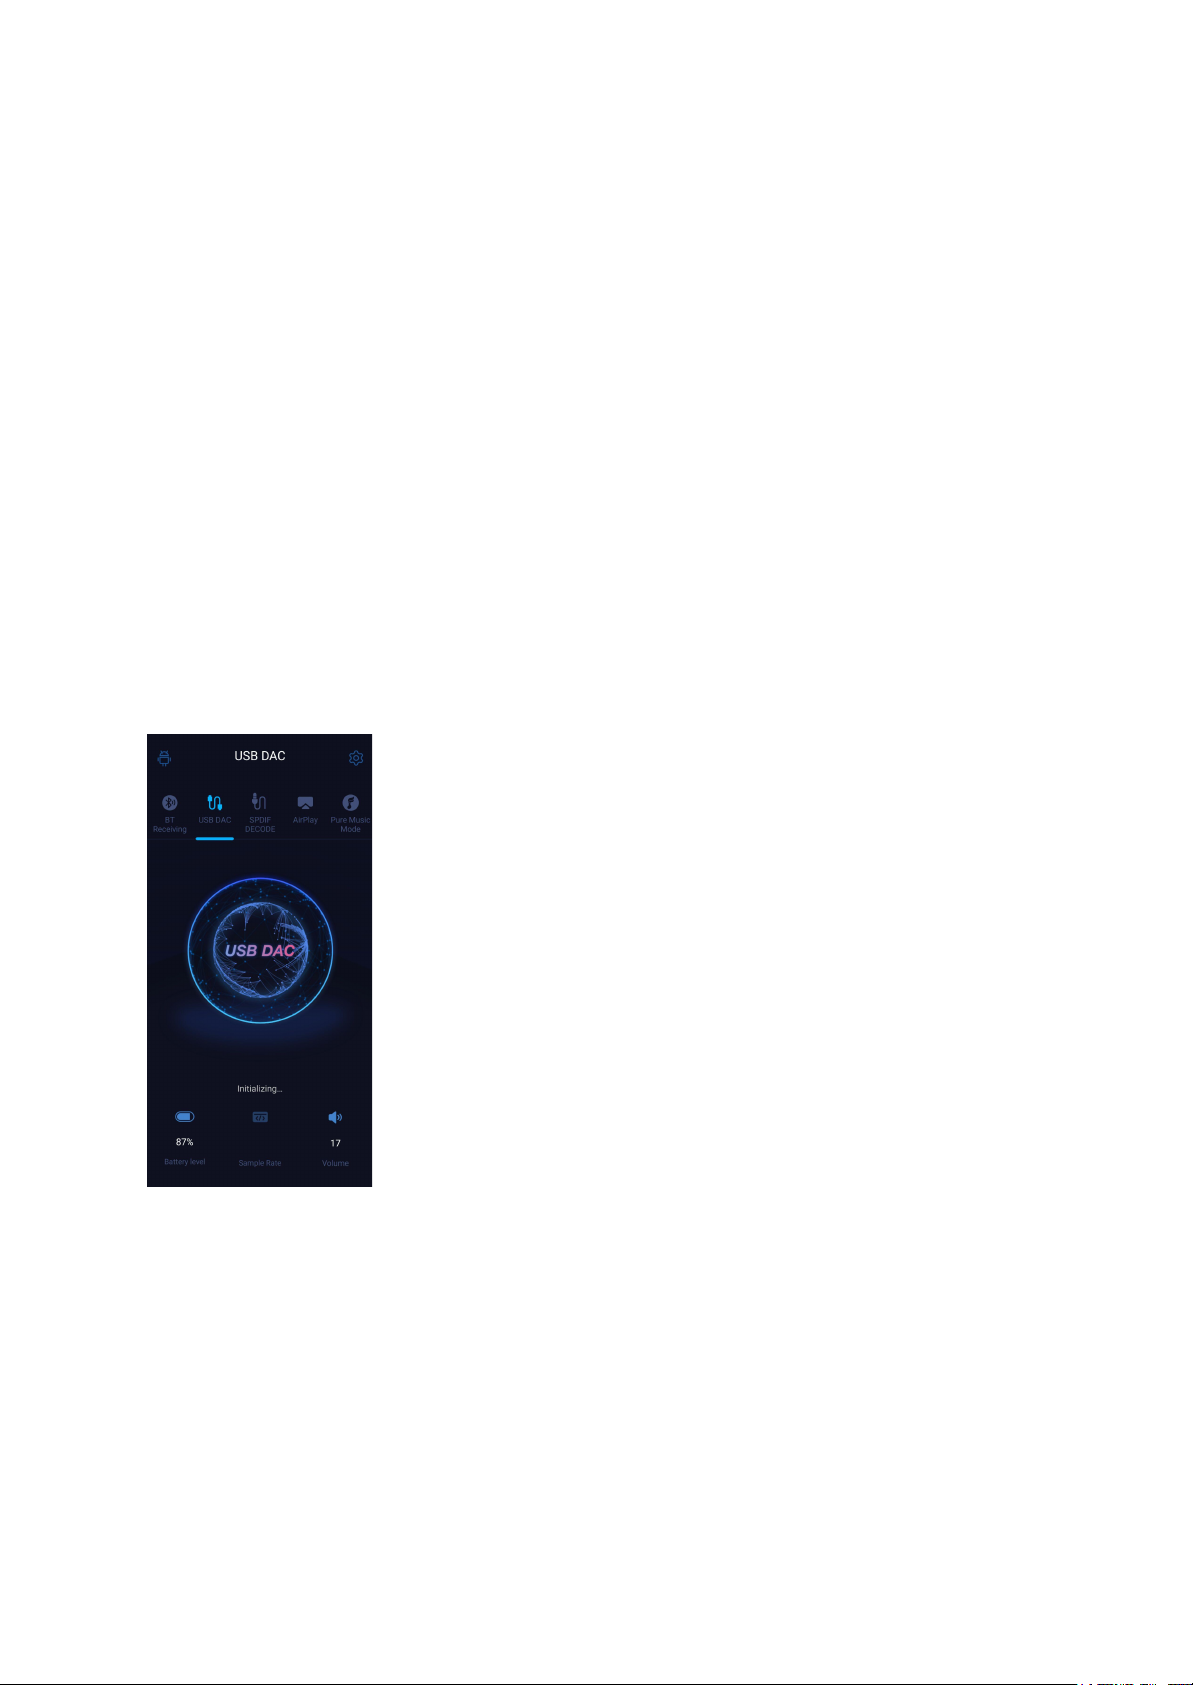
Windows system
For Windows computers, please make the settings as the followed steps.
1) Install the FiiO DAC driver on the computer first.
2) Switch the working mode of the M17 to USB DAC mode on the drop-down menu or go to
Settings->Mode choose menu to enter the USB DAC mode.
3) Connect the M17 to the computer by the USB port. Select the M17 as the audio input both
in the computer and the music app, so it can work.
Notes:
When in the USB DAC mode, the M17 does not support Bluetooth transmitting.
7. How to use the M17 as a Bluetooth transmitter?
Bluetooth transmitter instructions
Page 18
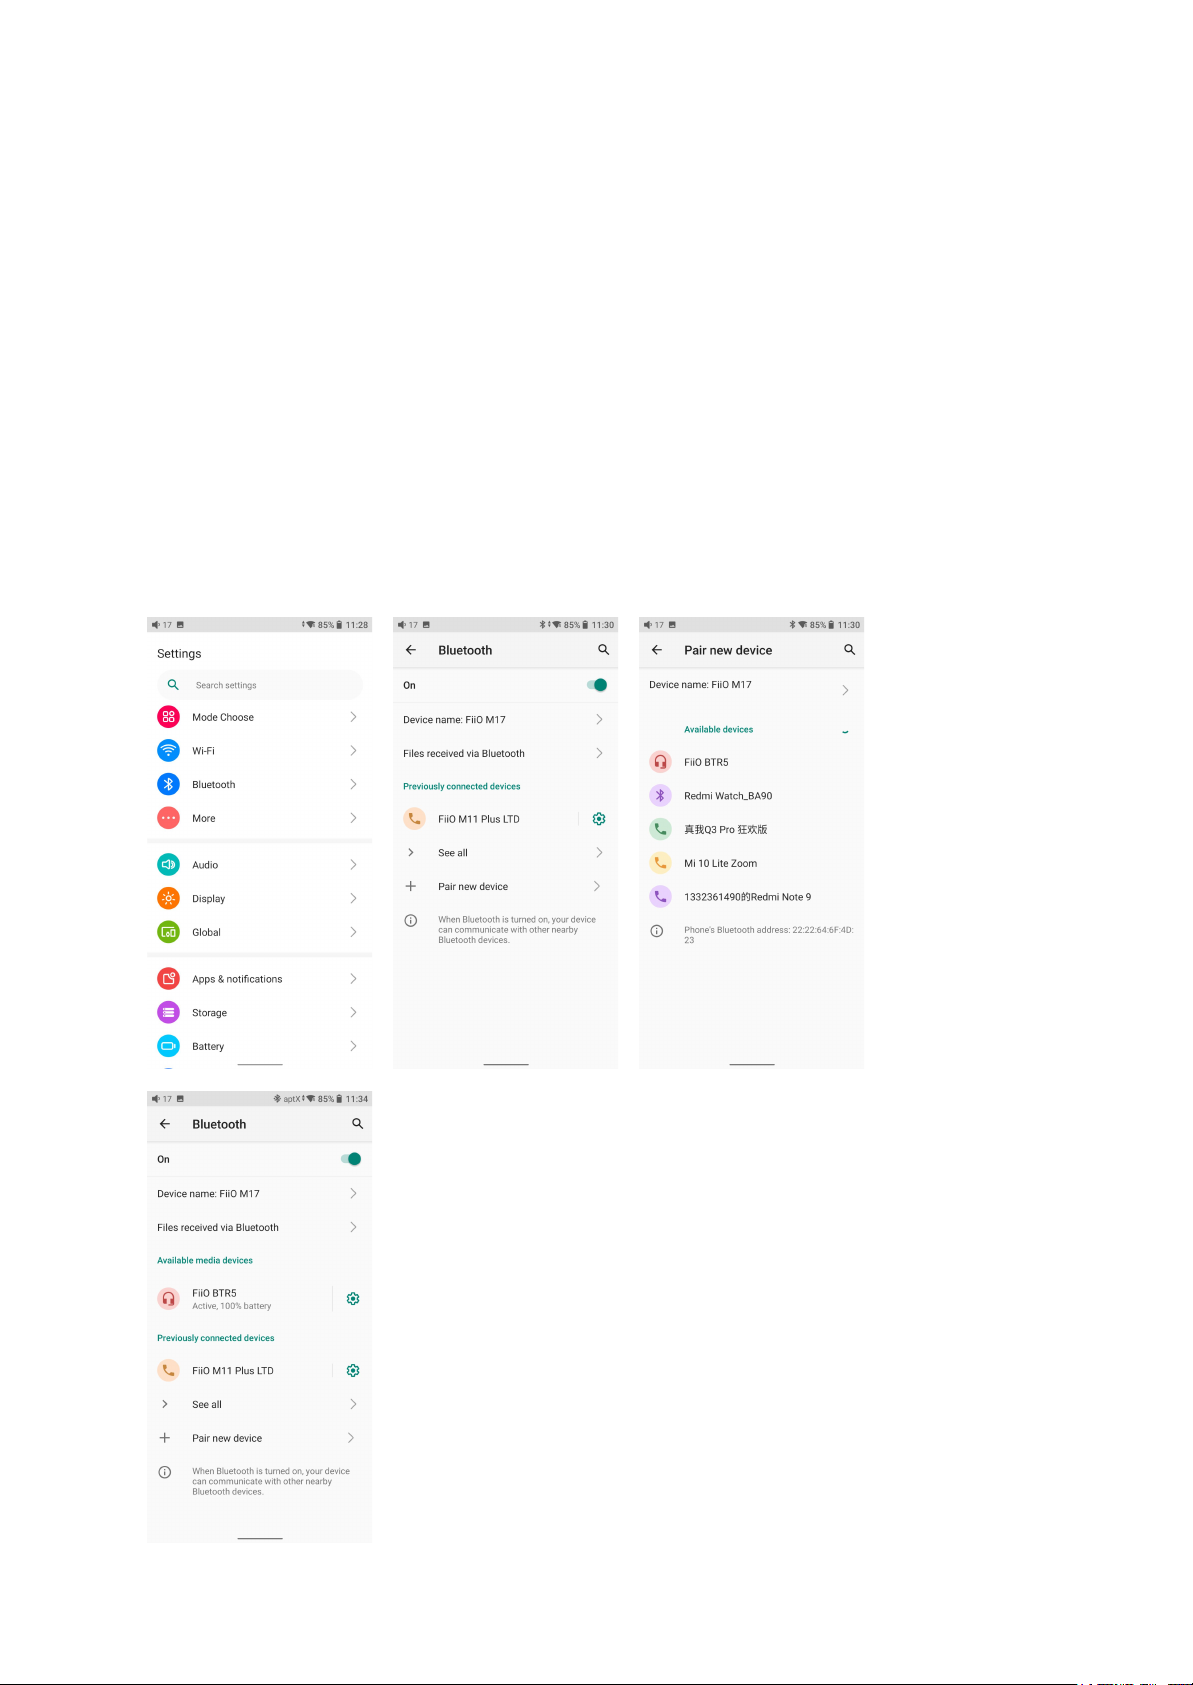
When being a Bluetooth transmitter connecting to new Bluetooth devices (such as Bluetooth
headphones, Bluetooth speakers), the M17 needs to pair with the Bluetooth device first.
Here are the steps.
1. Go to the Settings->Bluetooth menu to turn on the Bluetooth function.
2. Make the Bluetooth receiving device, such as Bluetooth earphones, enter the pairing
state. (Please refer to the user manual of the Bluetooth receiving device about how to enter
the pairing state.)
3. Go to the Bluetooth device list of the M17->Pair a new device to complete the connection.
4. Tap the intended device to start the connection. Successfully connected devices will be
displayed on the list of Available media devices with an "Active" prompt.
Page 19
What can be done if the M17 fails to connect to Bluetooth earphones?
If it fails to connect to Bluetooth earphones for the first time, please make sure the
earphones are in the pairing state (the connection will fail if the earphones are under
reconnecting state for the first-time connection). Go to the Bluetooth menu of the M17 to
start the connection.
What Bluetooth codecs does the M17 support? And how to switch the
Bluetooth codecs?
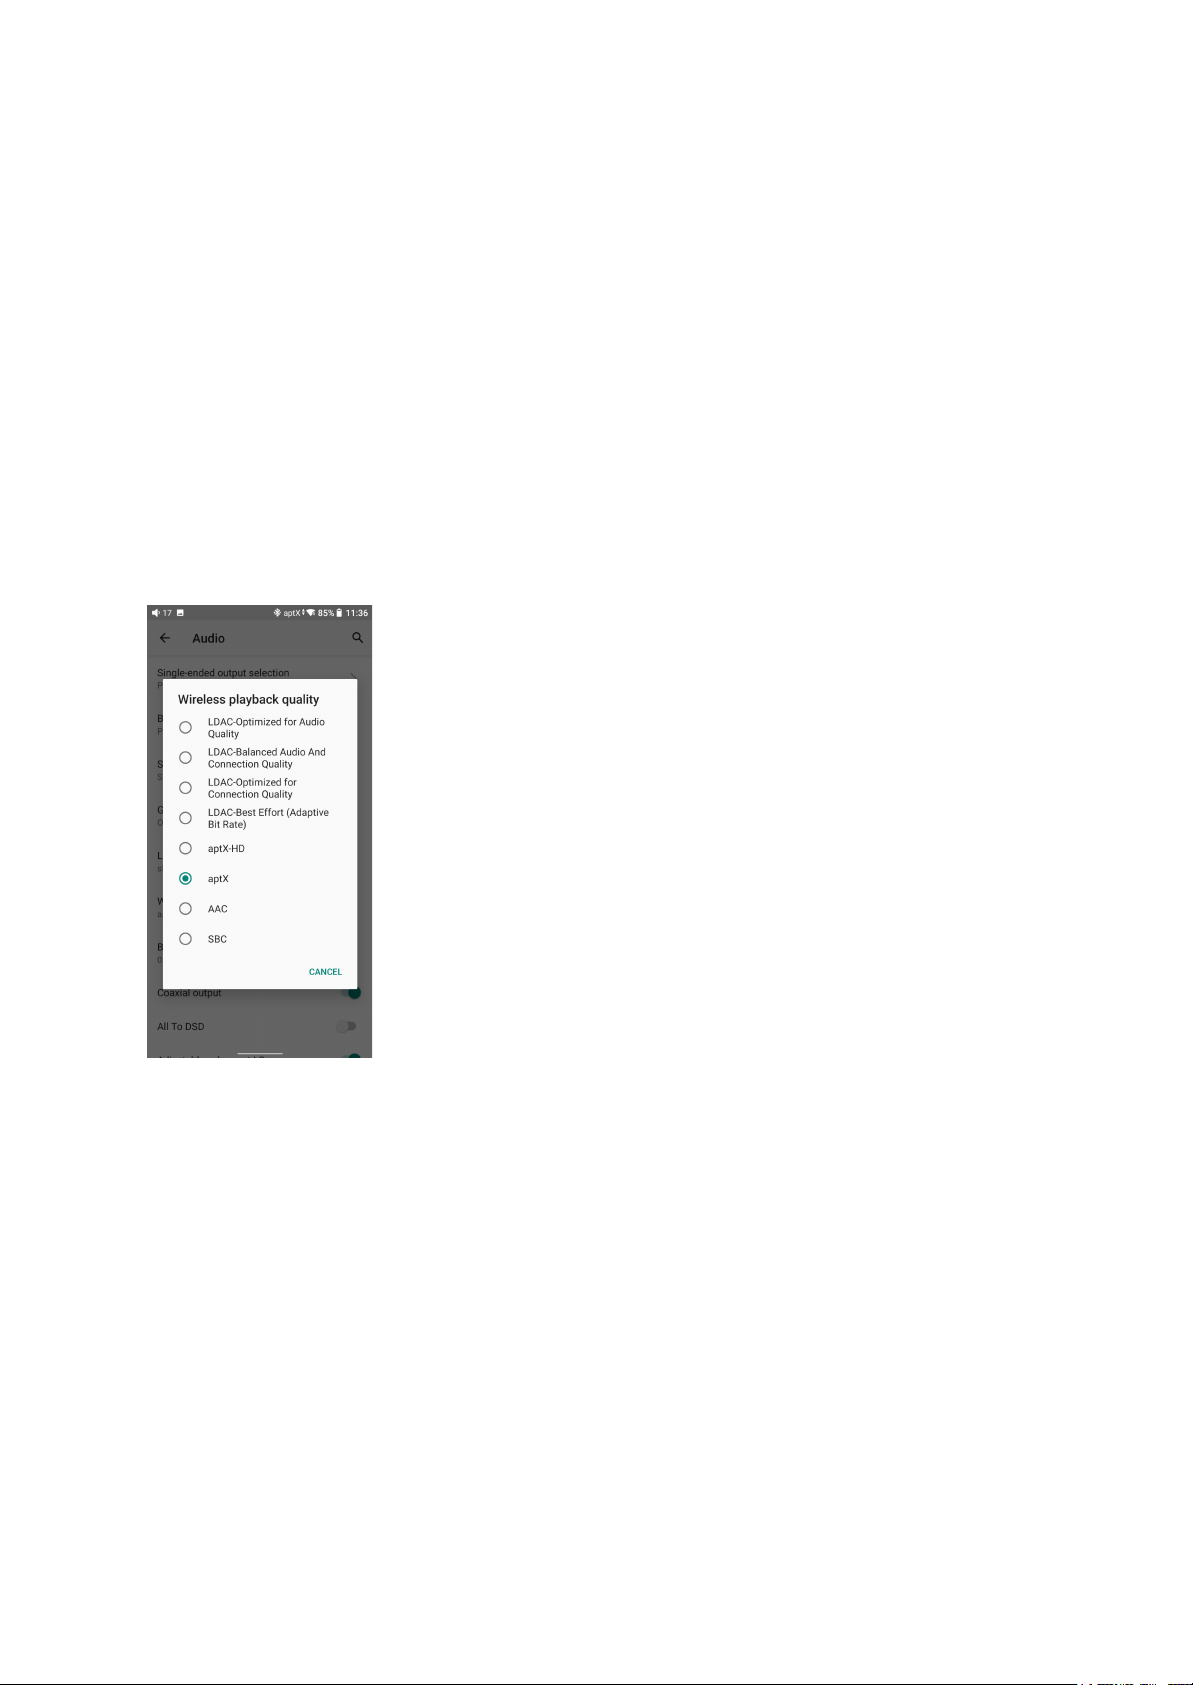
The M17 supports LDAC, aptX-HD, aptX, AAC and SBC which can be switched on
Settings->Audio->Wireless playback quality menu.
What can be done if the volume is too low when the M17 is connected to
AirPods?
Go to Settings->About phone, and continuously tap the "Build number" 7 times. Go back to
Settings->System->Developer options menu to turn off the"Disable absolute volume".
Disconnect and reconnect the two devices through Bluetooth.
Page 20
8. What power supply adapter is suggested to charge the M17?
1. Supports QC4.0, QC3.0, QC2.0, PD2.0, PD3.0 and other fast charging protocols, if the
adapter does not support the above protocol, it generally will not trigger the fast charge
function. It is recommended to use 5V 1-2A adapters for non-fast charging adapters. After
setting to UAC mode, inserting USB fast charging will not make it enter the fast charging
mode.
2. Supports a 5.5mm diameter DC round head 12VDC charger to power the whole machine.
3. When the DC voltage is too high and exceeds 16V, the system will automatically
disconnect the DC power supply.
4. When the DC and USB3.0 are plugged in at the same time, the system will detect whether
the USB is a Fast charge, it will use USB to charge the battery if the USB is a fast charge.
5. When the M17 is in UAC mode, it will not enter fast charging mode.
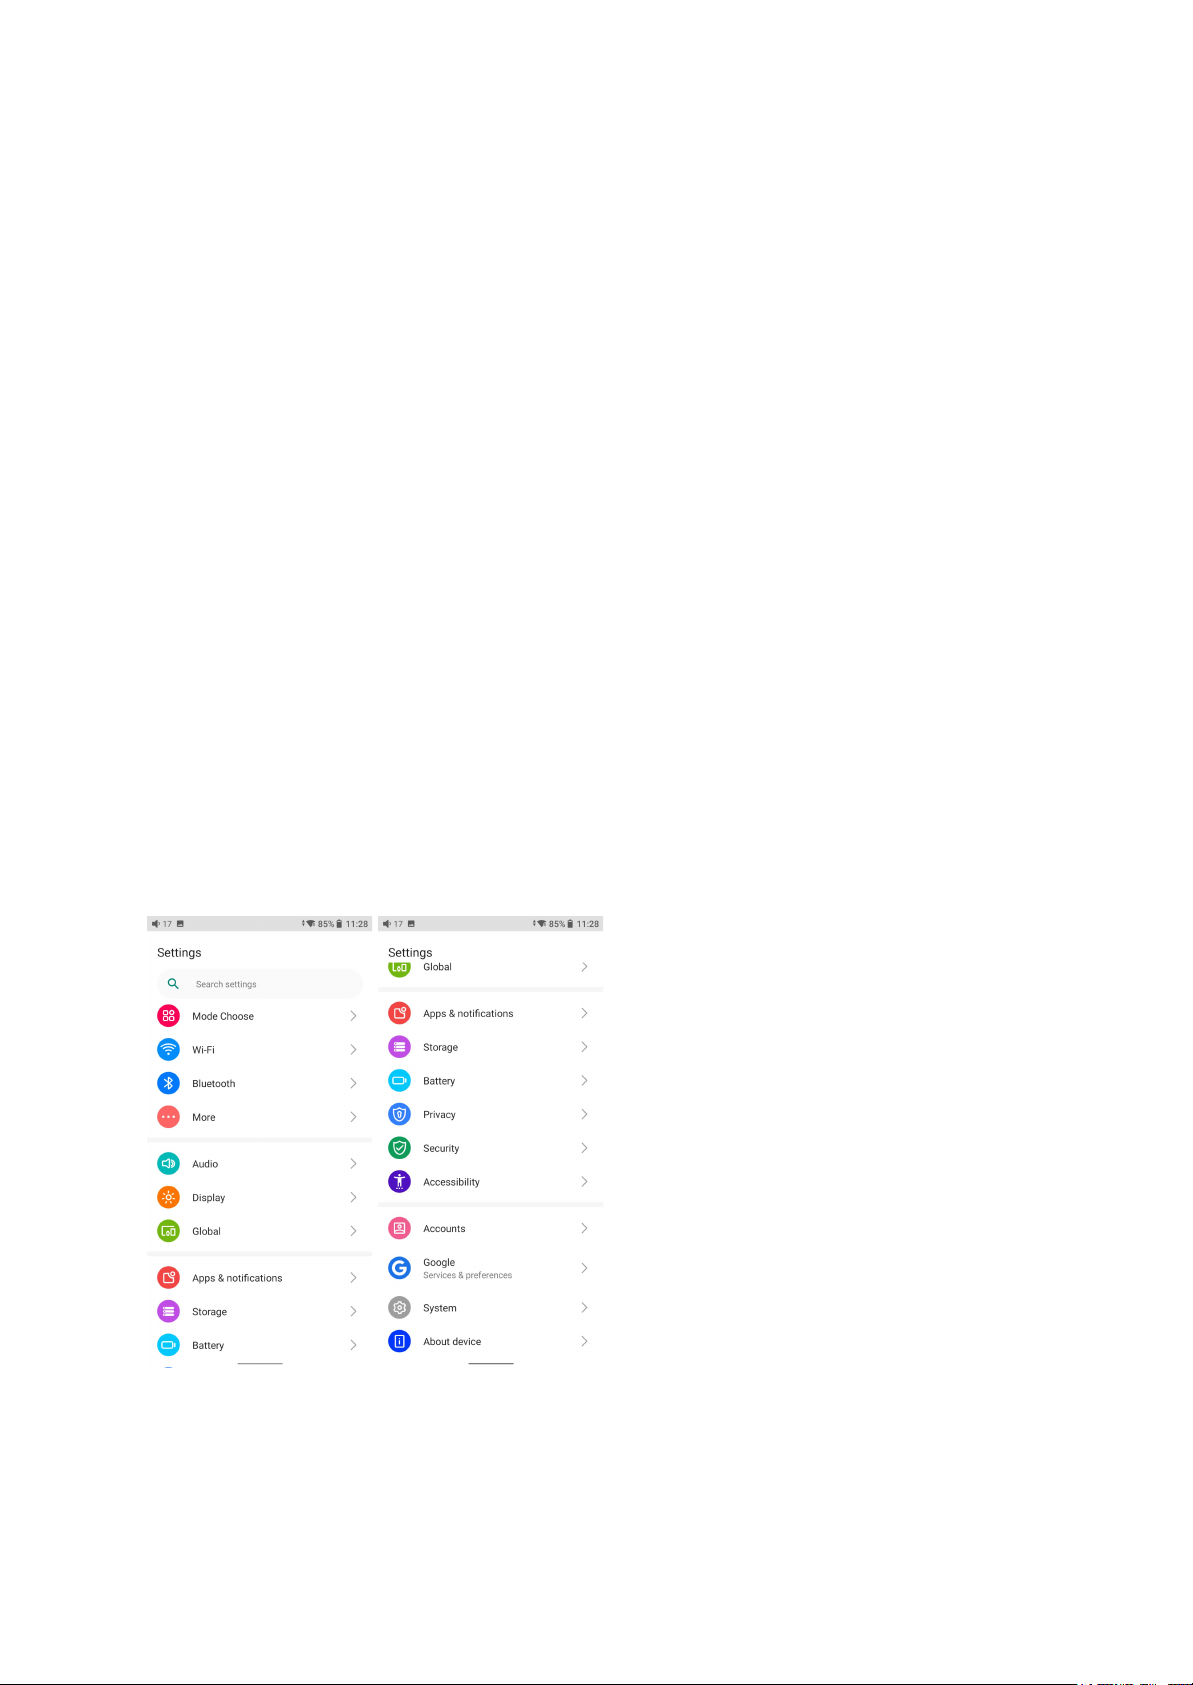
Introduction to system settings menu
Here is the system settings menu of the M17
Page 21
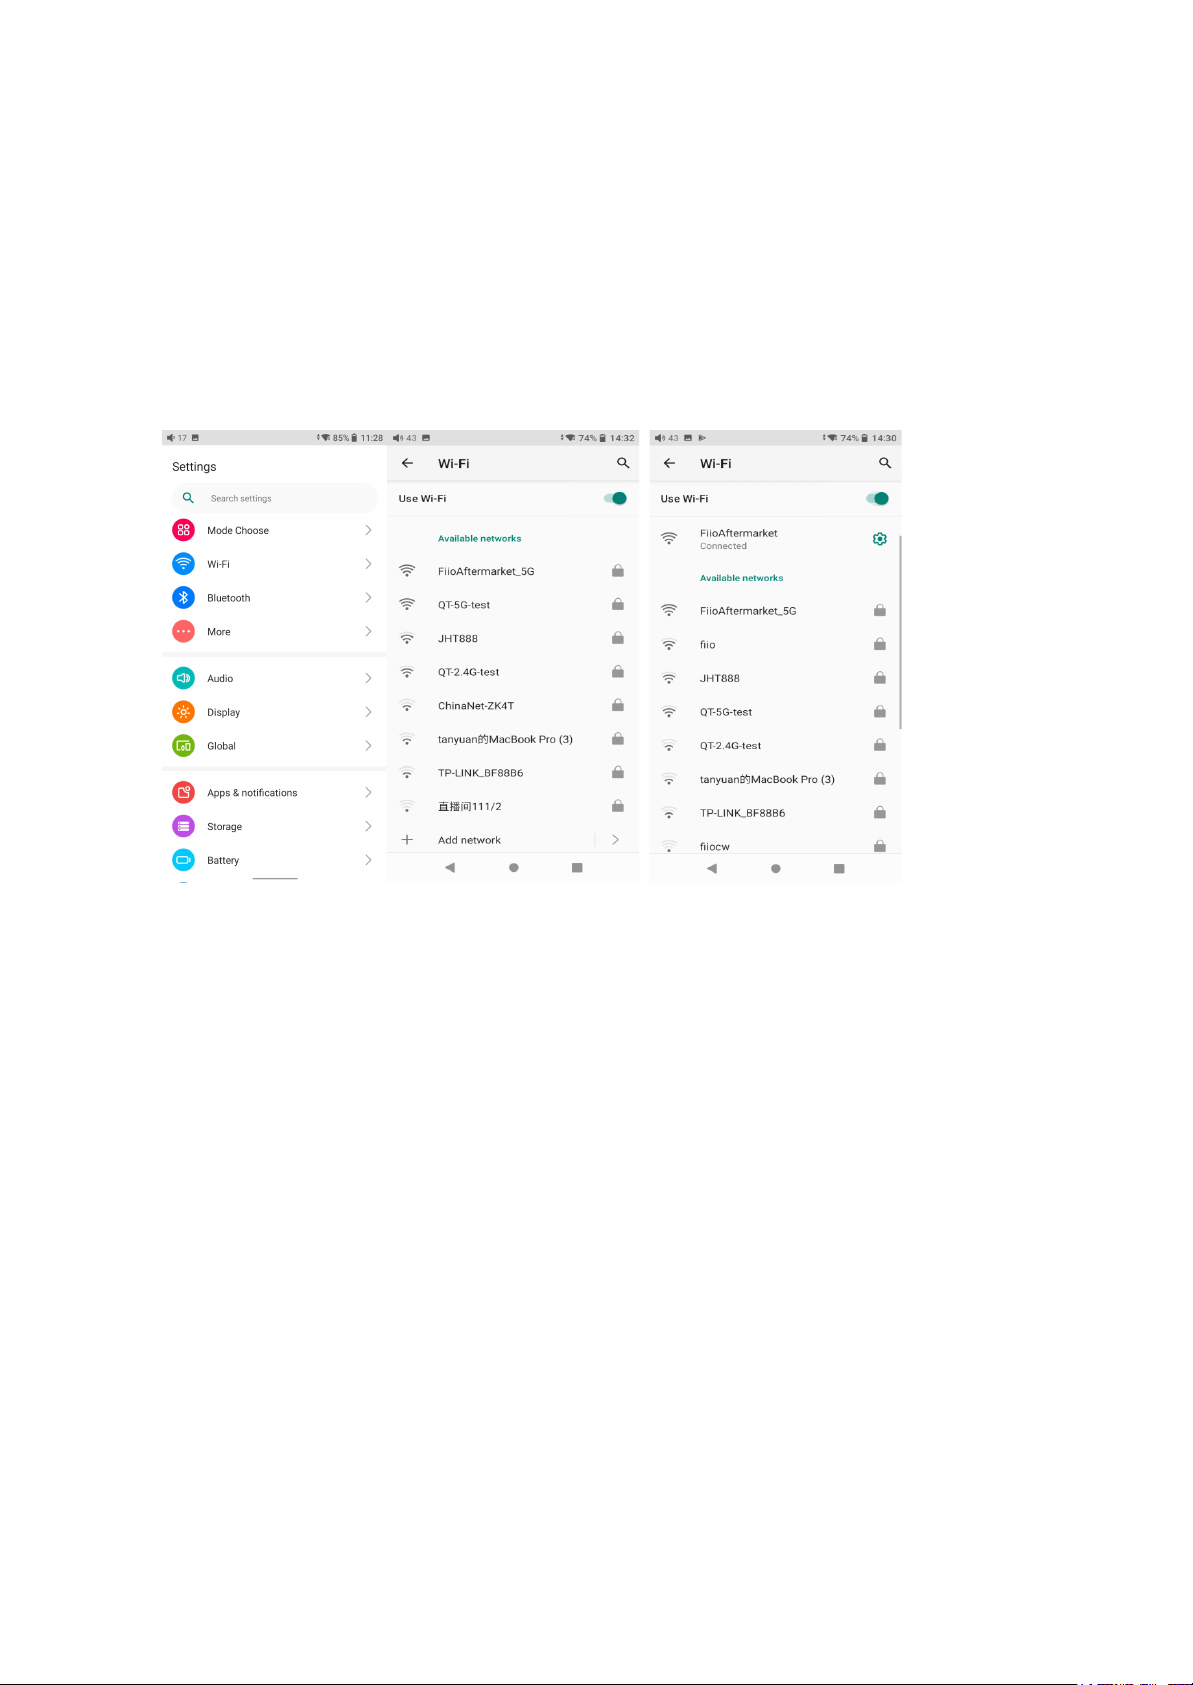
1. WiFi
The M17 supports a WiFi connection of 2.4/5G dual-band for music resources access. Here
are the steps to connect the M17 to a new WiFi device.
1) In the settings menu of the M17, tap "WiFi".
2) Turn it on. The M17 will automatically search for and list available WiFi devices nearby.
3) Tap the intended WiFi device and connect them.
2. Bluetooth
The M17 supports lots of Bluetooth codecs for both transmission and reception, allowing for
rich wireless connections.
Bluetooth transmitter instructions
When being a Bluetooth transmitter connecting to new Bluetooth devices (such as Bluetooth
headphones, Bluetooth speakers), the M17 needs to pair with the Bluetooth device first.
Here are the steps.
1. Go to the Settings->Bluetooth menu to turn on the Bluetooth function.
2. Make the Bluetooth receiving device, such as Bluetooth earphones, enter the pairing
state. (Please refer to the user manual of the Bluetooth receiving device about how to enter
the pairing state.)
3. Go to the Bluetooth device list of the M17->Pair a new device to complete the connection.
Page 22
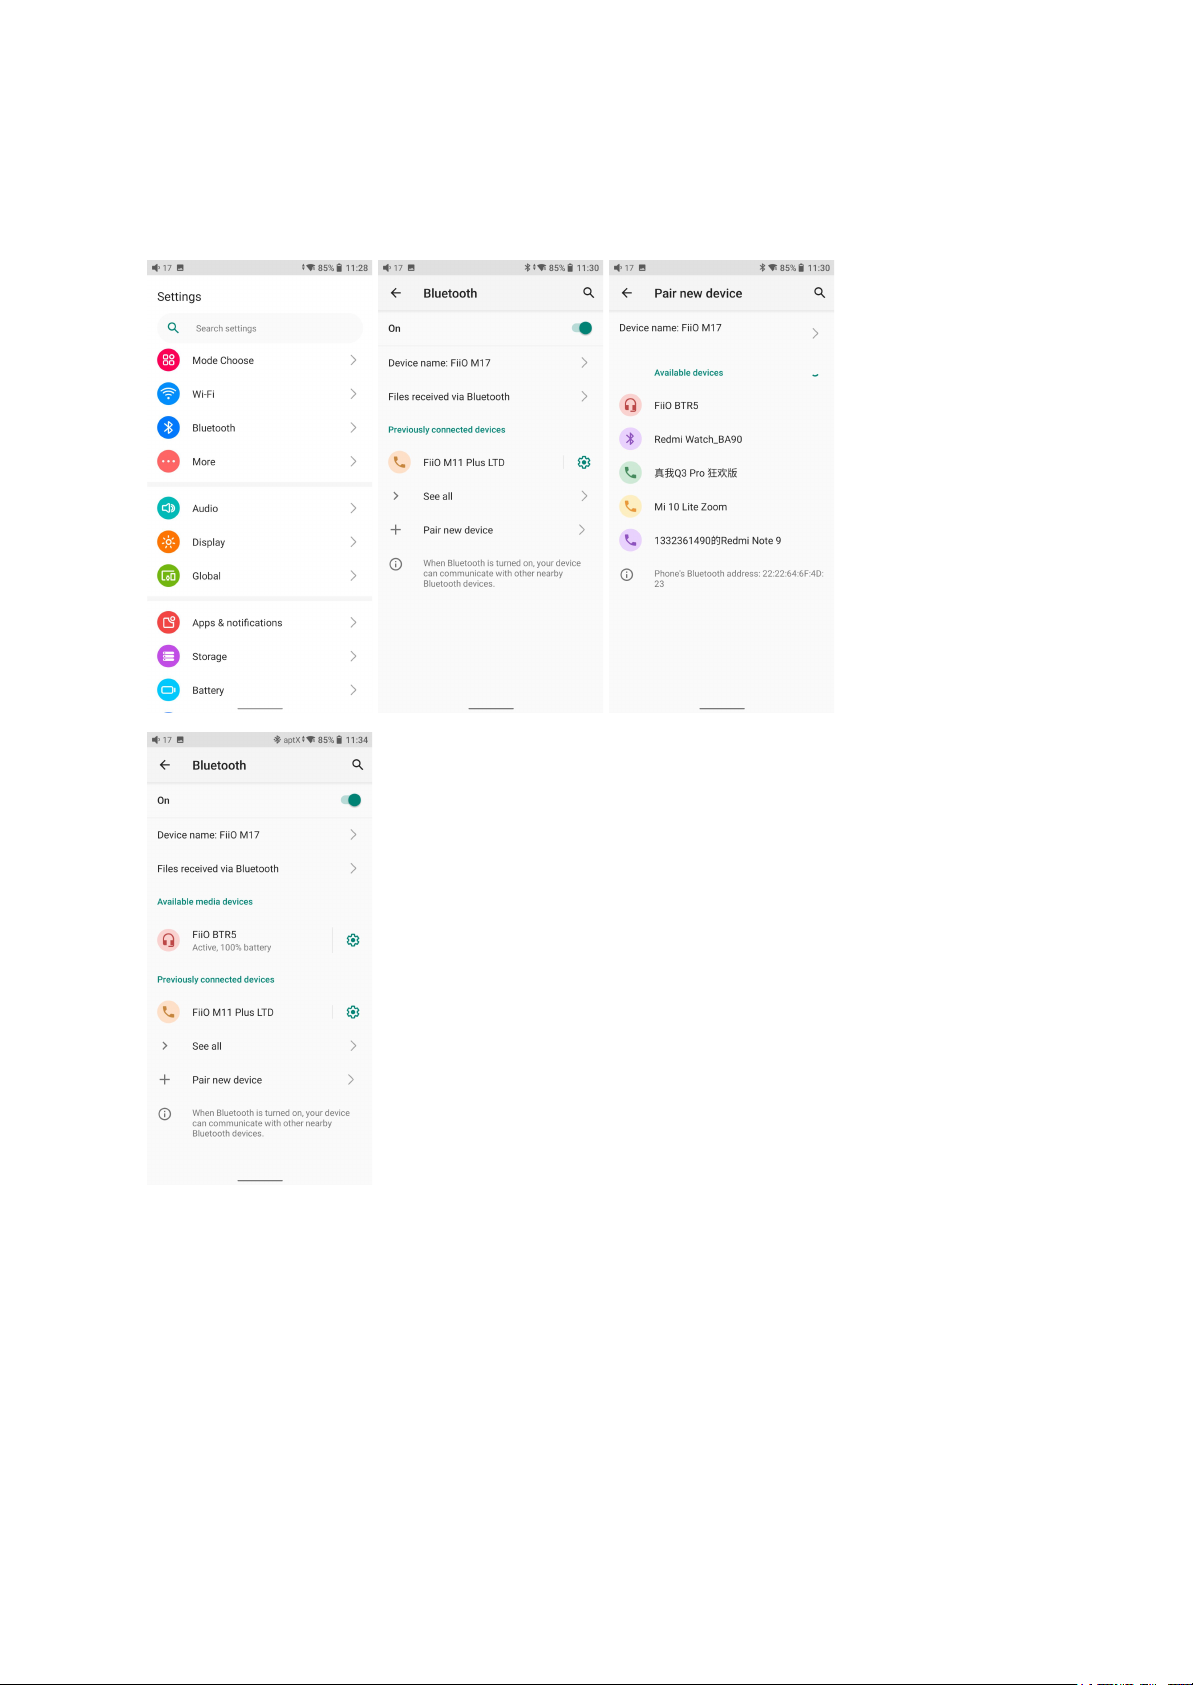
4. Tap the intended device to start the connection. Successfully connected devices will be
displayed on the list of Available media devices with an "Active" prompt.
Page 23
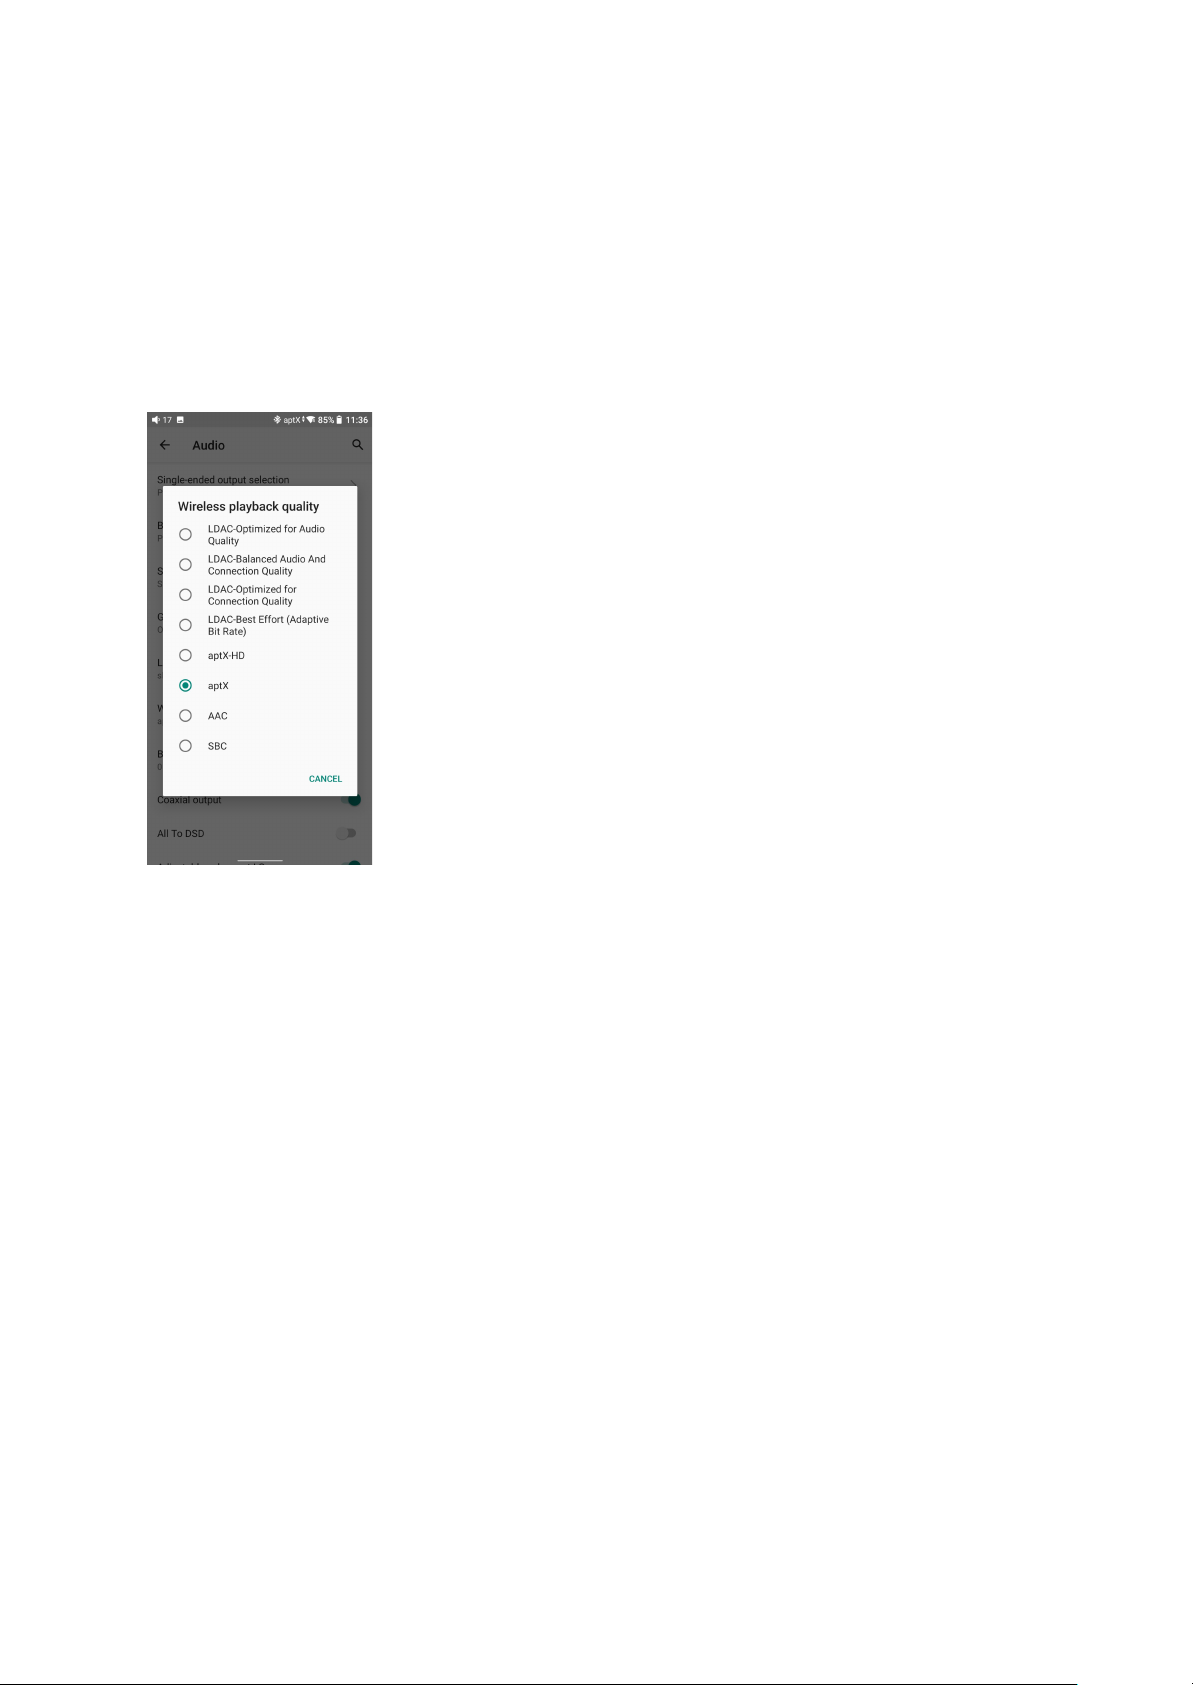
Before connecting to a Bluetooth device, you can select the Bluetooth codec you like in the
M17. Here are the steps.
1) Go to the Settings->Audio menu.
2) Tap Wireless playback quality-> choose the intended Bluetooth codec.
Note:
When the Bluetooth is enabled, the M17 will preferentially connect to the last-connected
available Bluetooth devices.
Bluetooth Receiving mode
1. When switching to the Bluetooth Receiving mode for the first time, the M17 will
automatically enter the pairing state. The next time it enters Bluetooth Receiving mode, it will
reconnect to the last connected device automatically.
2. Go to the Bluetooth transmitting list of the mobile phone, and tap the M17 to complete the
connection.
-Force the device to enter pairing mode: Hold the Play/Pause button for about 3 seconds.
Page 24
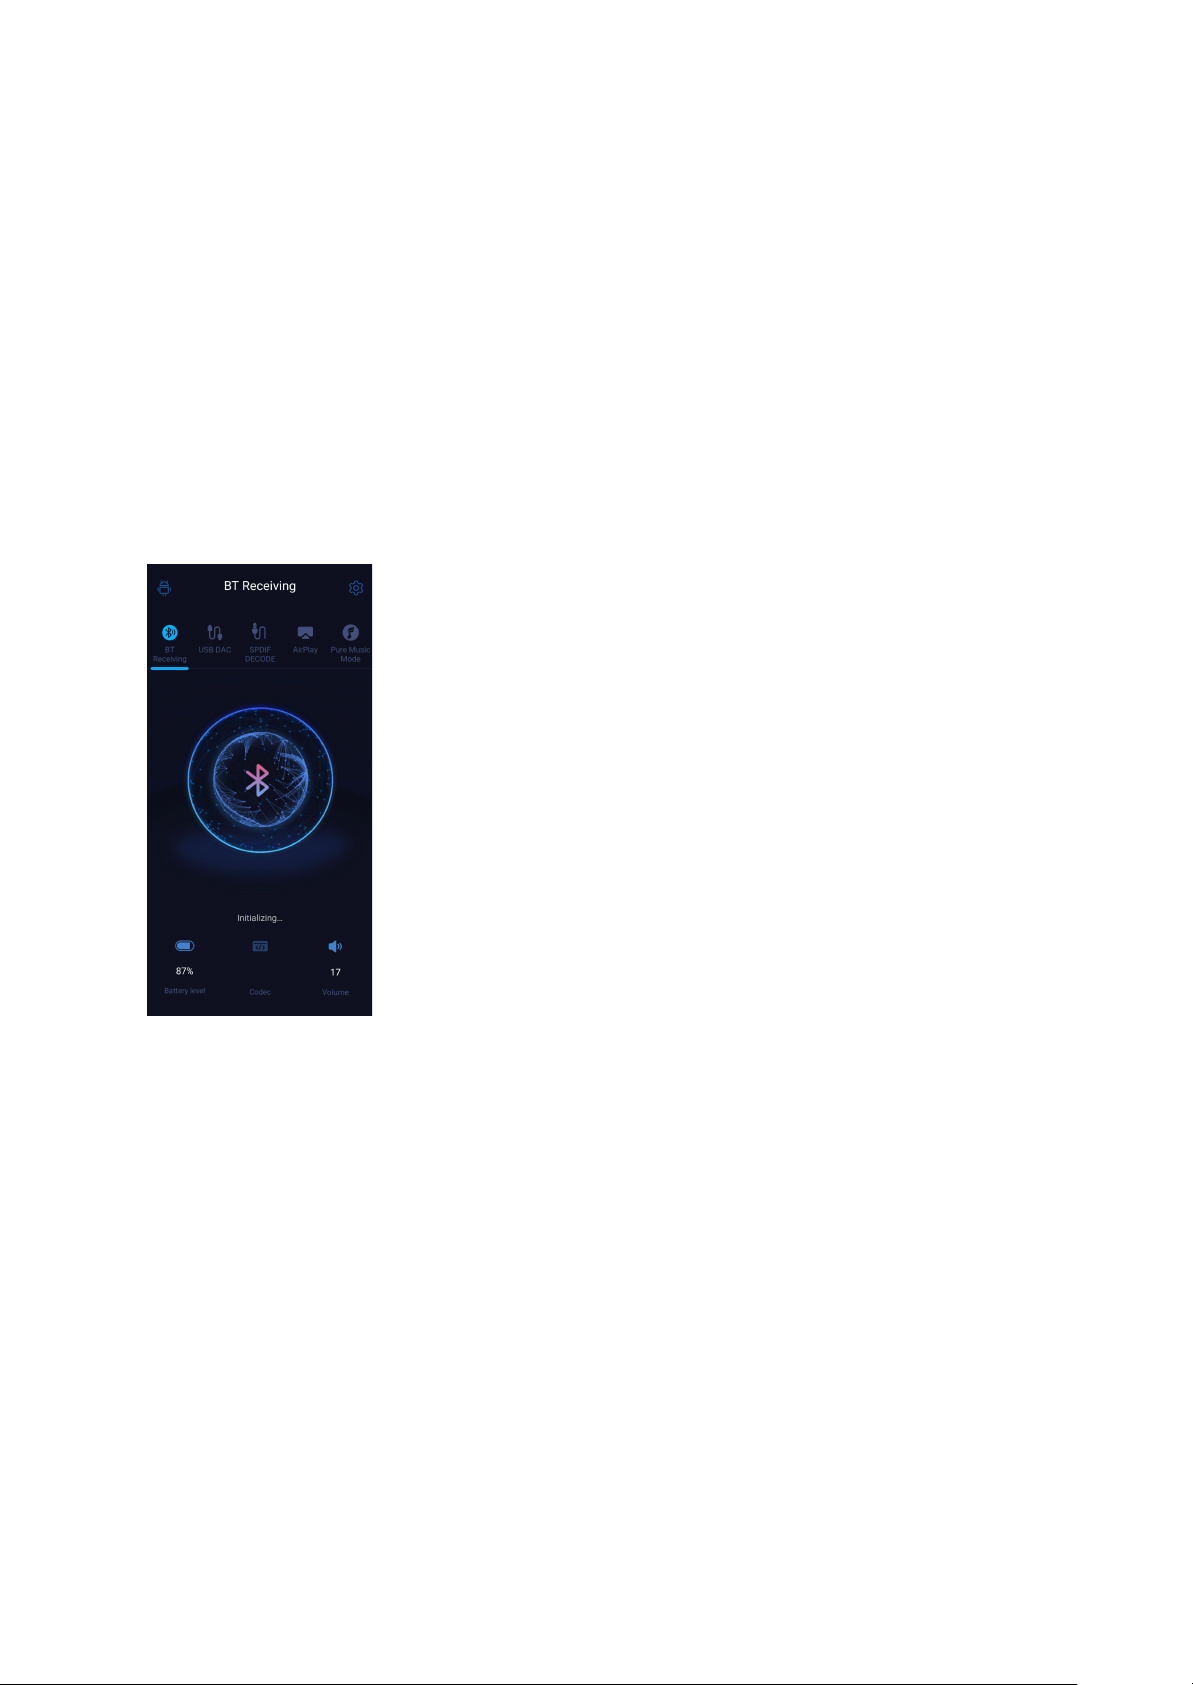
-Manually enter reconnecting mode: Short press the Play/Pause button when not in pairing
mode.
-Clear current pairing: Hold the Previous and Next track buttons at the same time for about 3
seconds.
-Play/Pause: Short press the Play/Pause button.
-Previous/Next track: Short press the Previous/Next track button.
Page 25
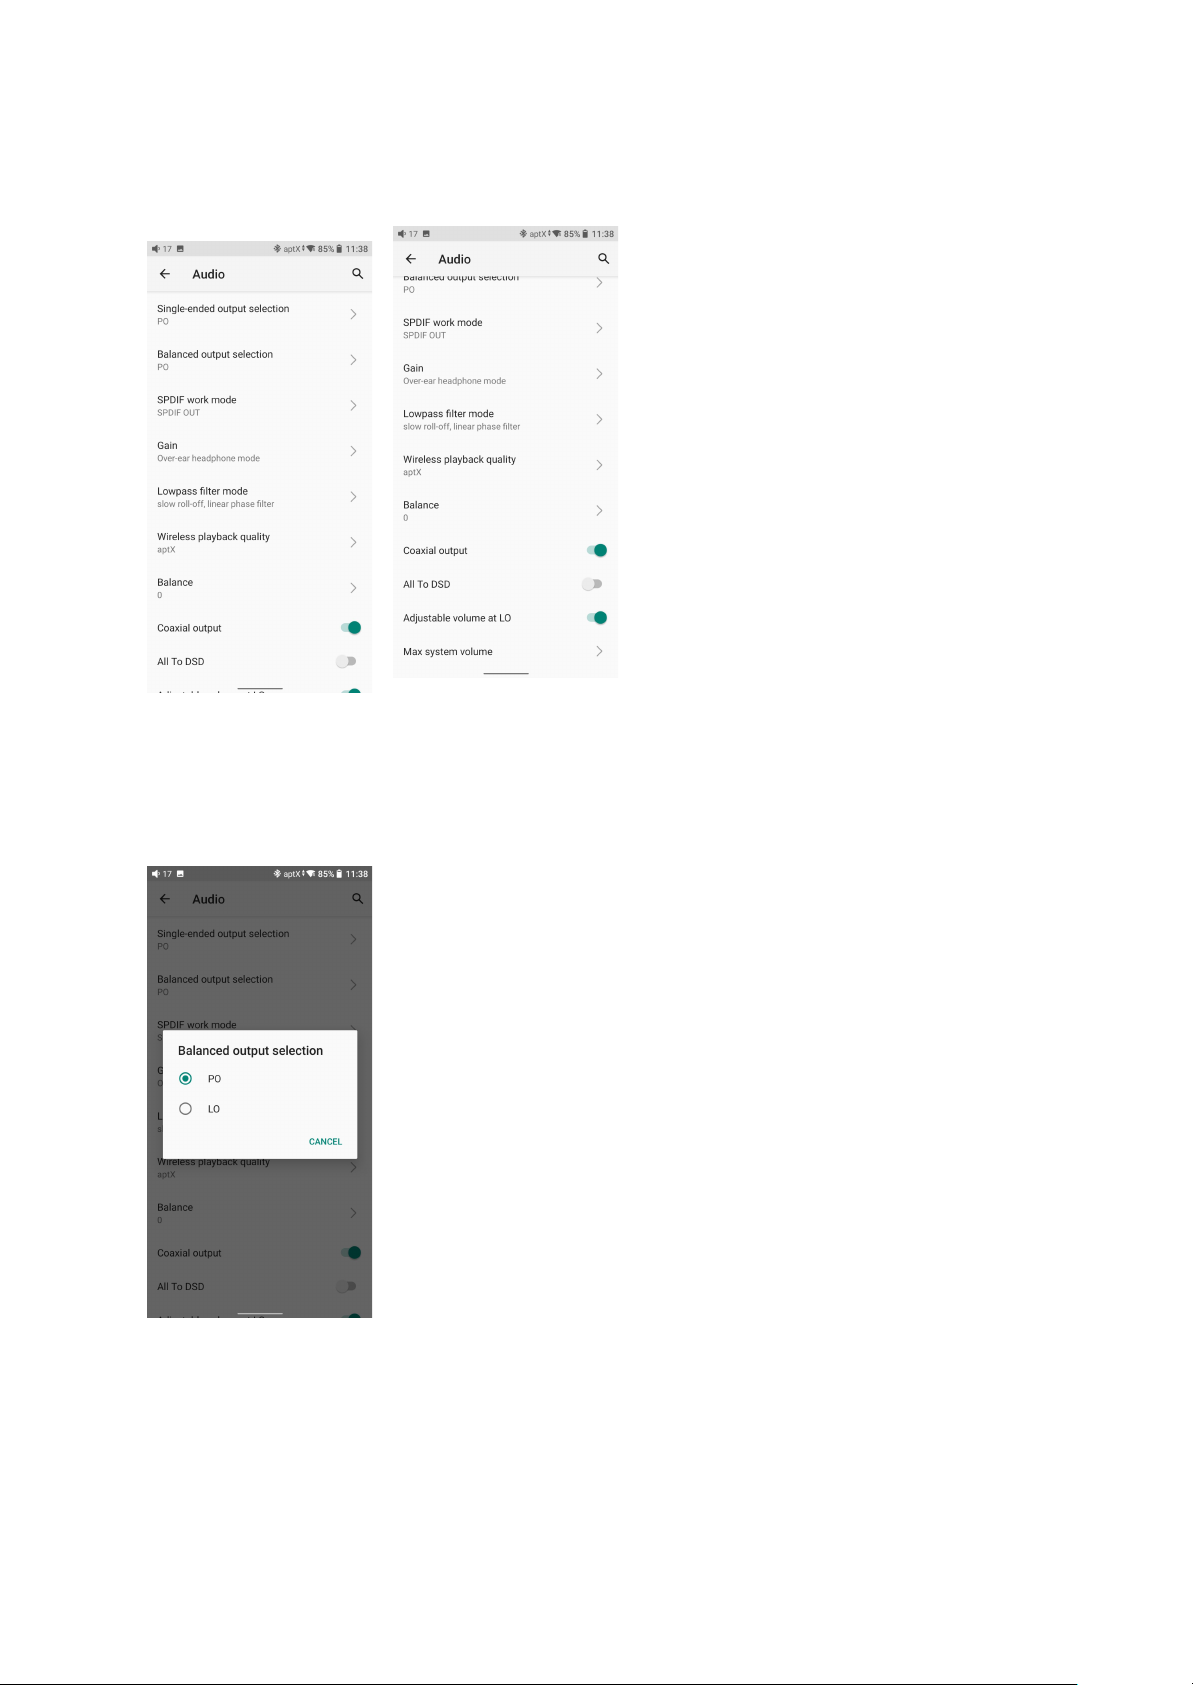
3. Audio
Output selection
Both PO and LO are available for 3.5mm and 4.4mm outputs.
Single-ended output selection
PO (Power output), generally used when connecting to earphones and speakers
Page 26
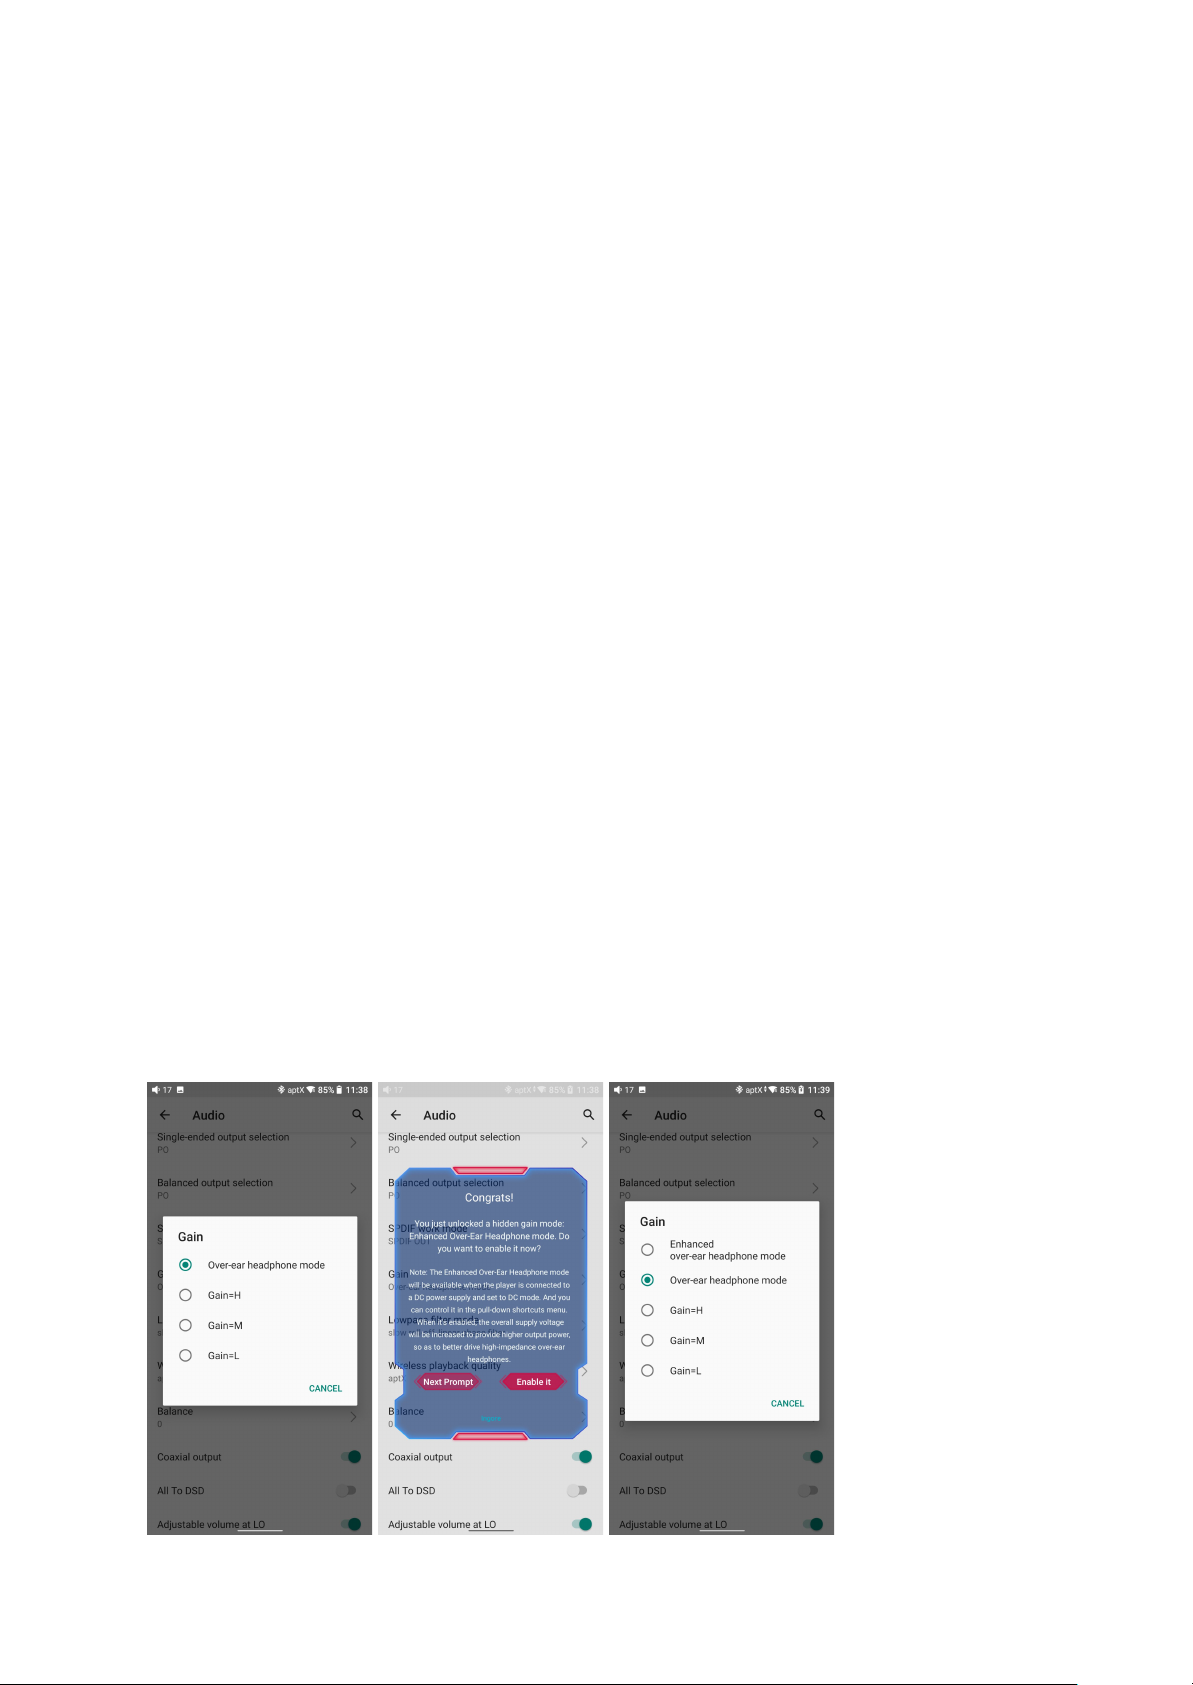
LO (Line out), generally used when connecting to power amplifiers
Balanced Output selection
PO (Power output), generally used when connecting to earphones and speakers with
balanced input
LO (Line out), generally used when connecting to power amplifiers with balanced input
SPDIF work mode
Switch the work mode of the coaxial in/out port
SPDIF IN: Coaxial decoding mode, M17 is used as a coaxial decoder.
SPDIF OUT: The M17 output to the coaxial decoder for decoding. (will not use M17's DAC
for decoding)
Gain
There are 4 levels, High, Medium Low and Over-ear headphone mode, corresponding to 4
levels of output voltages. You can select different Gains according to the earphones used.
When the switch is set to DC and the DC power adapter is inserted, you could switch to the
hidden Enhanced Over-ear headphone mode.
Page 27
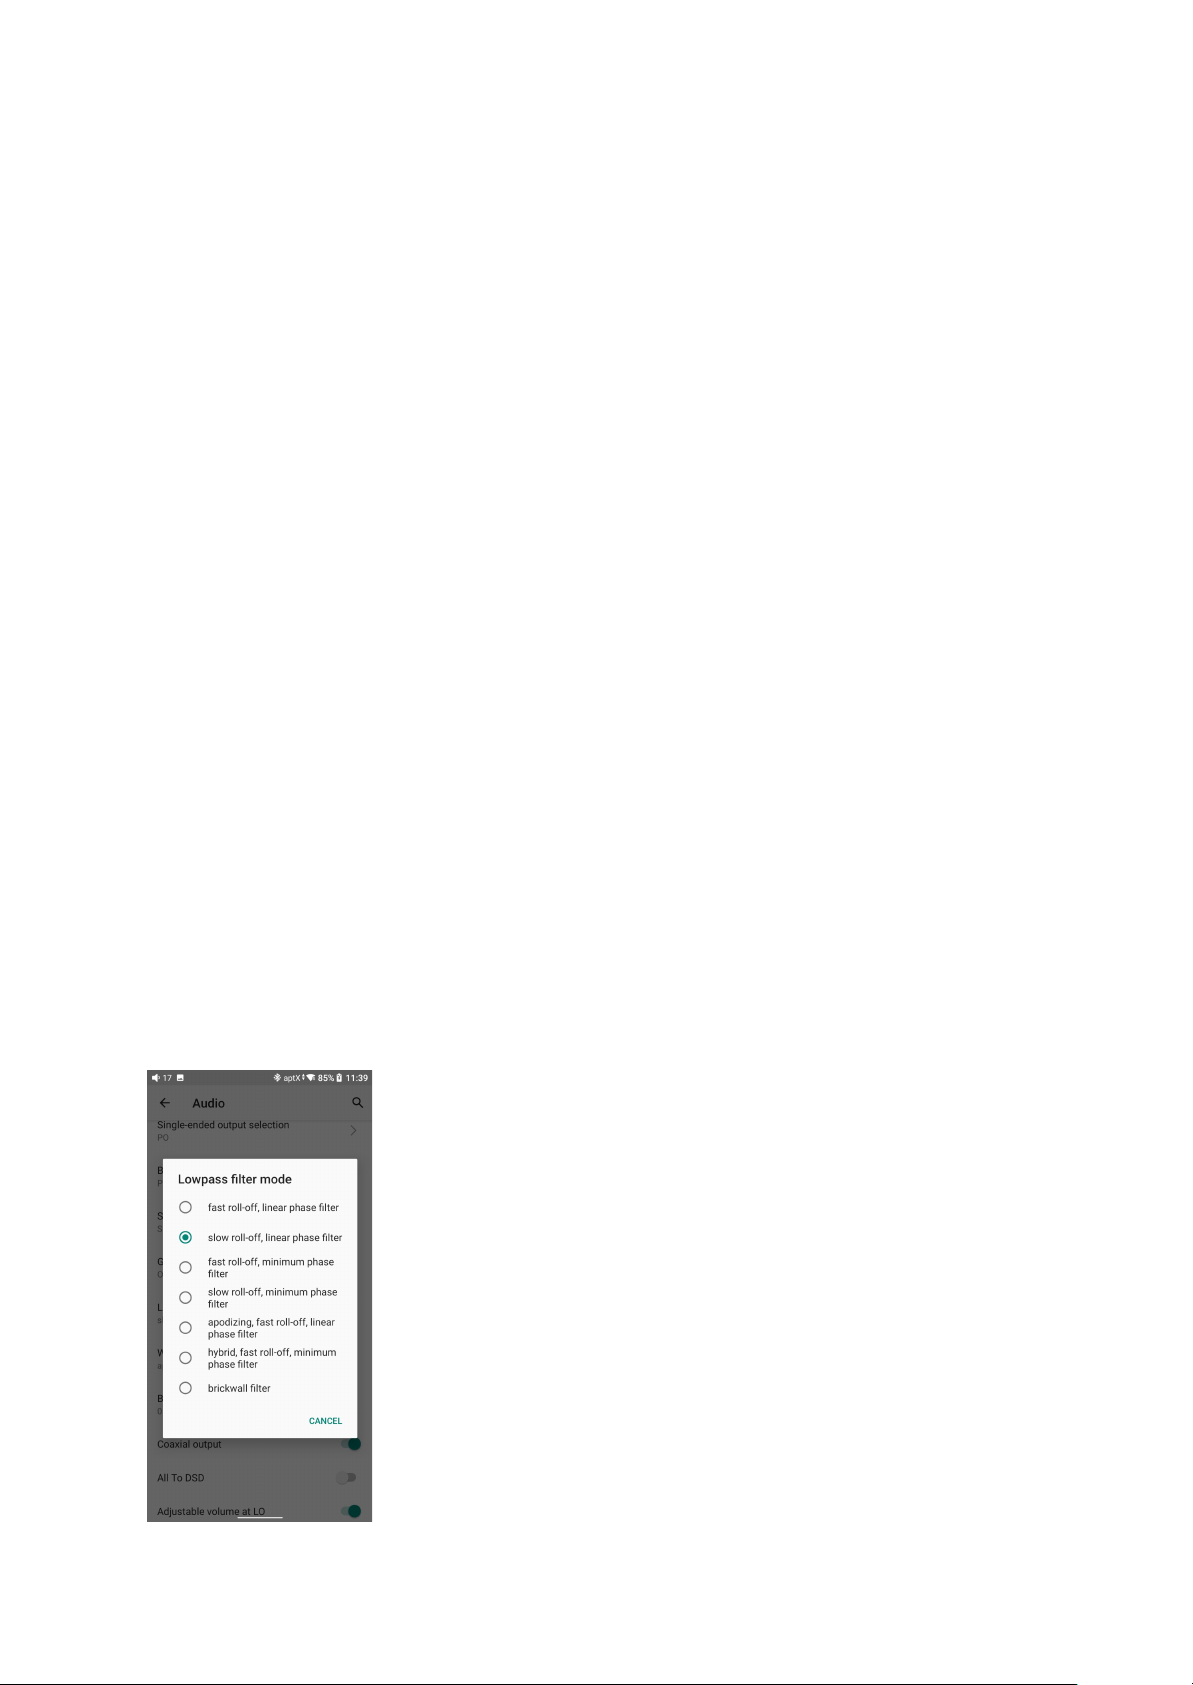
Lowpass filters
There are 7 different filters (internal configuration of the ES9038PRO) built in the M17 for
your preference.
Filters are the sound effects born with the chip, which only has slight adjustments for the
sound. Here are some introductions to different filters. These are only for reference since
actual listening also has something to do with the matched device.
1) fast roll-off, linear phase filter: Most Common filter with clean suppression and high
rejection, best for music with high transients. Provides crisp clean highs
2) slow roll-off, linear phase filter: coherent and clear sounds, positioned near the middle. It
is suitable for classical music.
3) fast roll-off, minimum phase filter: minimal Pre- Ringing, preferred for Imaging and
soundstage. No aliasing in frequency domain. Stronger bass than Linear Phase, clean highs
4) slow roll-off, minimum phase filter: non-symetrical filter designed to minimize pre-ringing.
Strong punchy bass with good transient attacks
5) apodizing fast roll-off, linear phase filter: Version of Linear phase fast roll-off filter
optimized to improve pre-ringing.
6) hybrid fast roll-off, minimum phase filter: Combination of Linear-phase and
Minimum-phase. Fast transient attack, strong punchy bass, crisp highs.
7) brickwall filter: one of the earliest designs, intended for highest suppression possible, with
high delay and pre-ringing.
Page 28
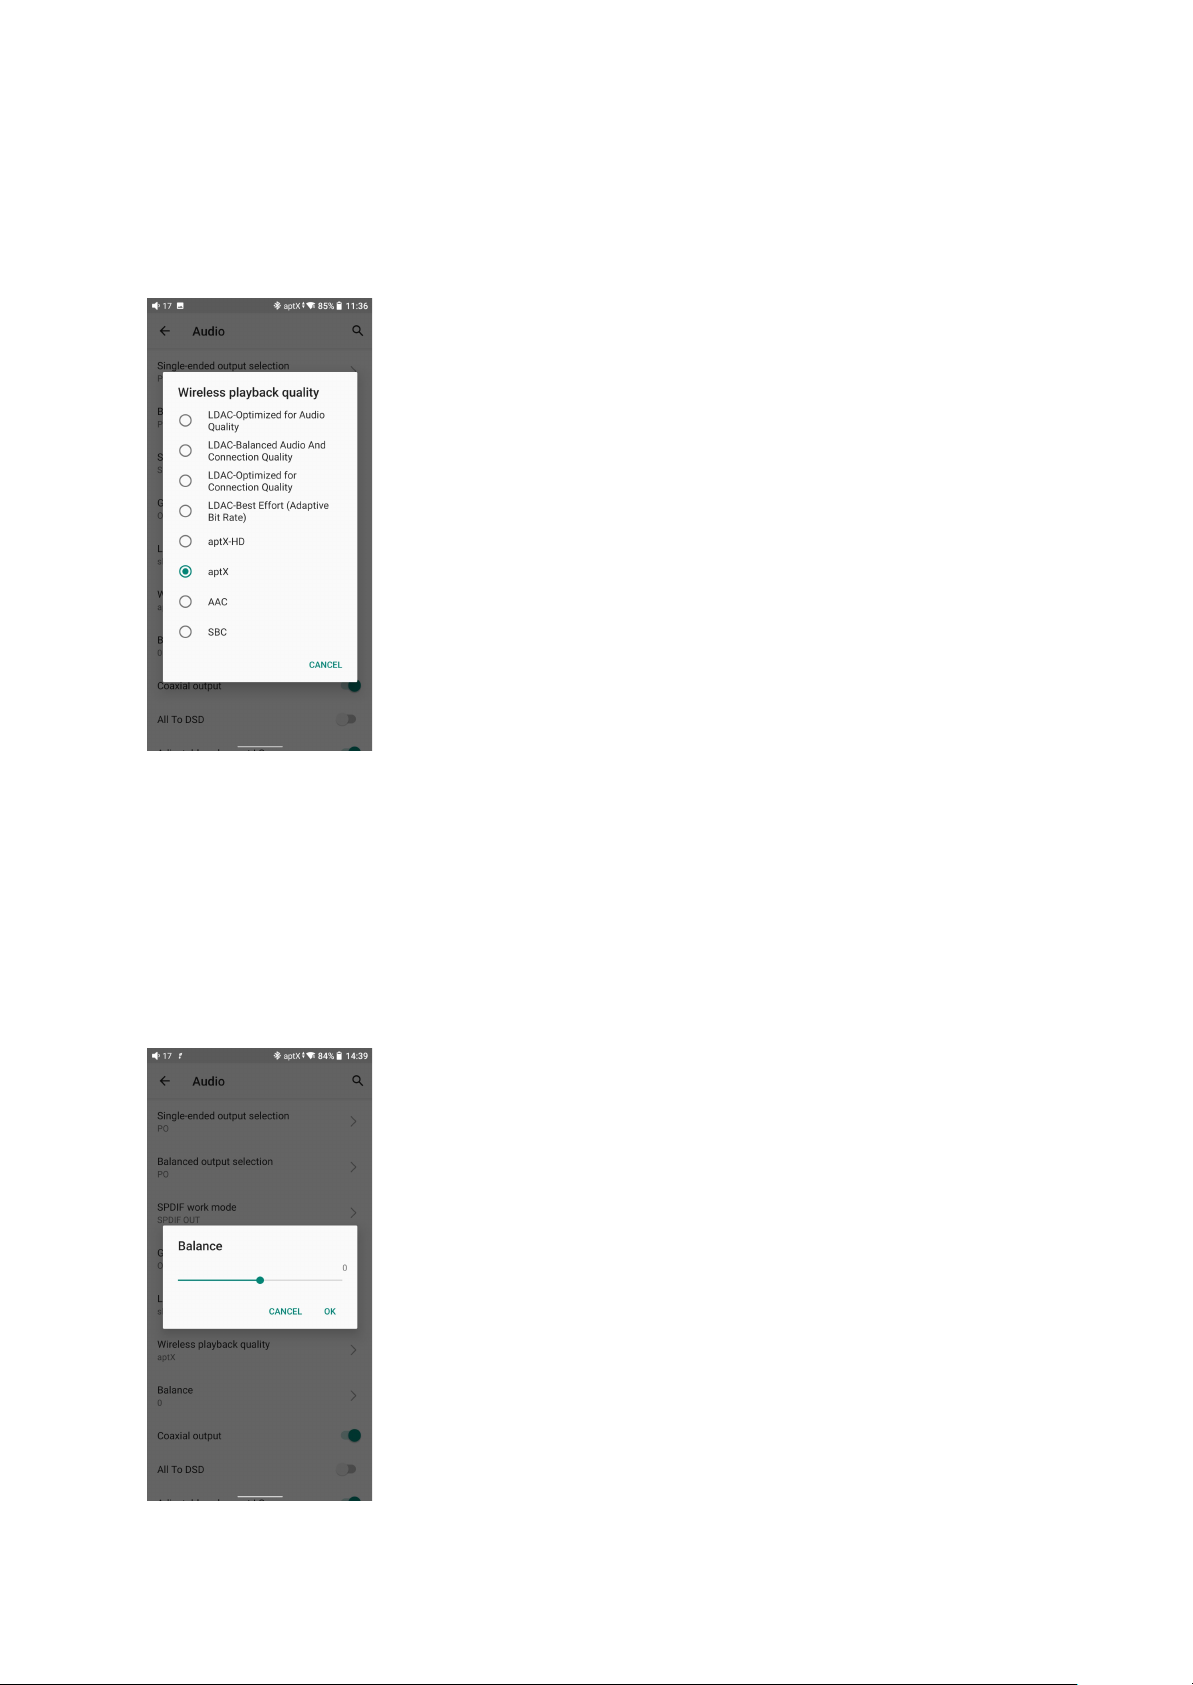
Wireless playback quality
The Bluetooth transmission takes the highest codec by default. You can choose the highest
codec supported for the Bluetooth connection by this option.
Balance
If there is any imbalance between the left and right channels when playing music, you can
adjust the channel balance here. It supports L20-R20 adjustment.
Page 29

Coaxial output
After switching the SPDIF work mode to SPDIF OUT, please turn on this switch before using
the coaxial output function.
All To DSD
When the All To DSD function is turned on, the PCM signals will be converted to DSD for
output with sound quality further improved.
【Principle】All To DSD is mainly about switching digital signals from PCM to DSD format. So
when making digital-to-analog conversion, it can use DSD format, enriching music styles
with clearer and natural sound quality. In addition, since the lowest format of the DSD is
DSD64, i.e. 4 times of the 44.1k/16bit (just looking at the data size), the All To DSD function
is upsampling the 44.1k/16bit audio signals. Third-party apps also support All To DSD.
【Notes】 When the All To DSD function is turned on, the CPU will consume more power,
which will shorten the playtime of the M17 with obvious heating on the body.
During the process of using, if you notice that the total battery life is much shorter than that
written on the specification table on our website, please check if the All To DSD function is
turning on. It is suggested to turn off the All To DSD function and follow the provided test
conditions to check the battery life of the M17 again.
Adjustable volume at LO
When it is turned on, the volume will be adjustable in LO mode. If it is turned off, the volume
will be fixed as maximum.
Max system volume
When the max system volume is set, the system volume will not go higher than the set
volume.
Page 30
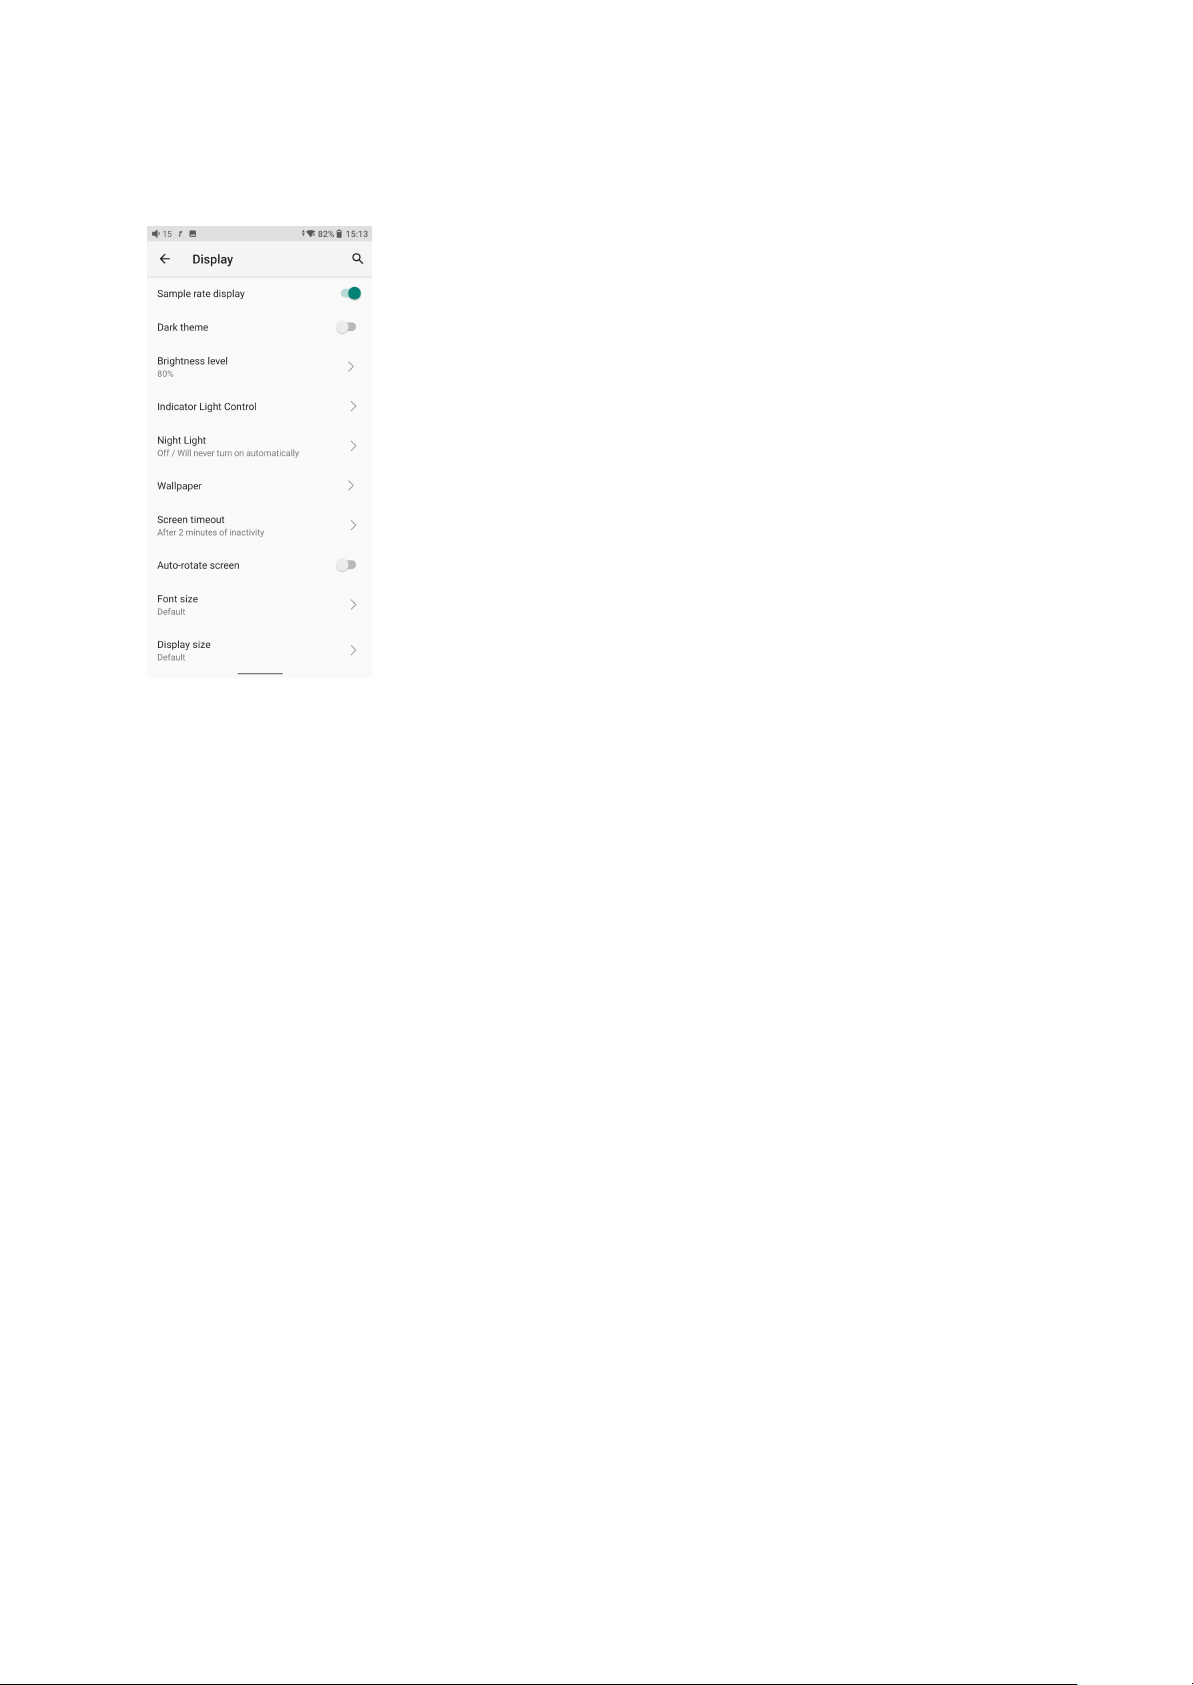
4. Display
The display settings consist of Sample rate display, Dark theme, Brightness level, Indicator
light control, Night light, Wallpaper, Screen timeout, Auto-rotate screen, Font size, Display
size, Screen saver and lock screen display. The following are detailed descriptions of some
common items.
Sample rate display
With it turned on, the sample rate of the currently playing song will be displayed.
Indicator light control
The brightness level and light color of the volume knob indicator light and the side ambient
light under working and charging status can be set in this menu.
Page 31
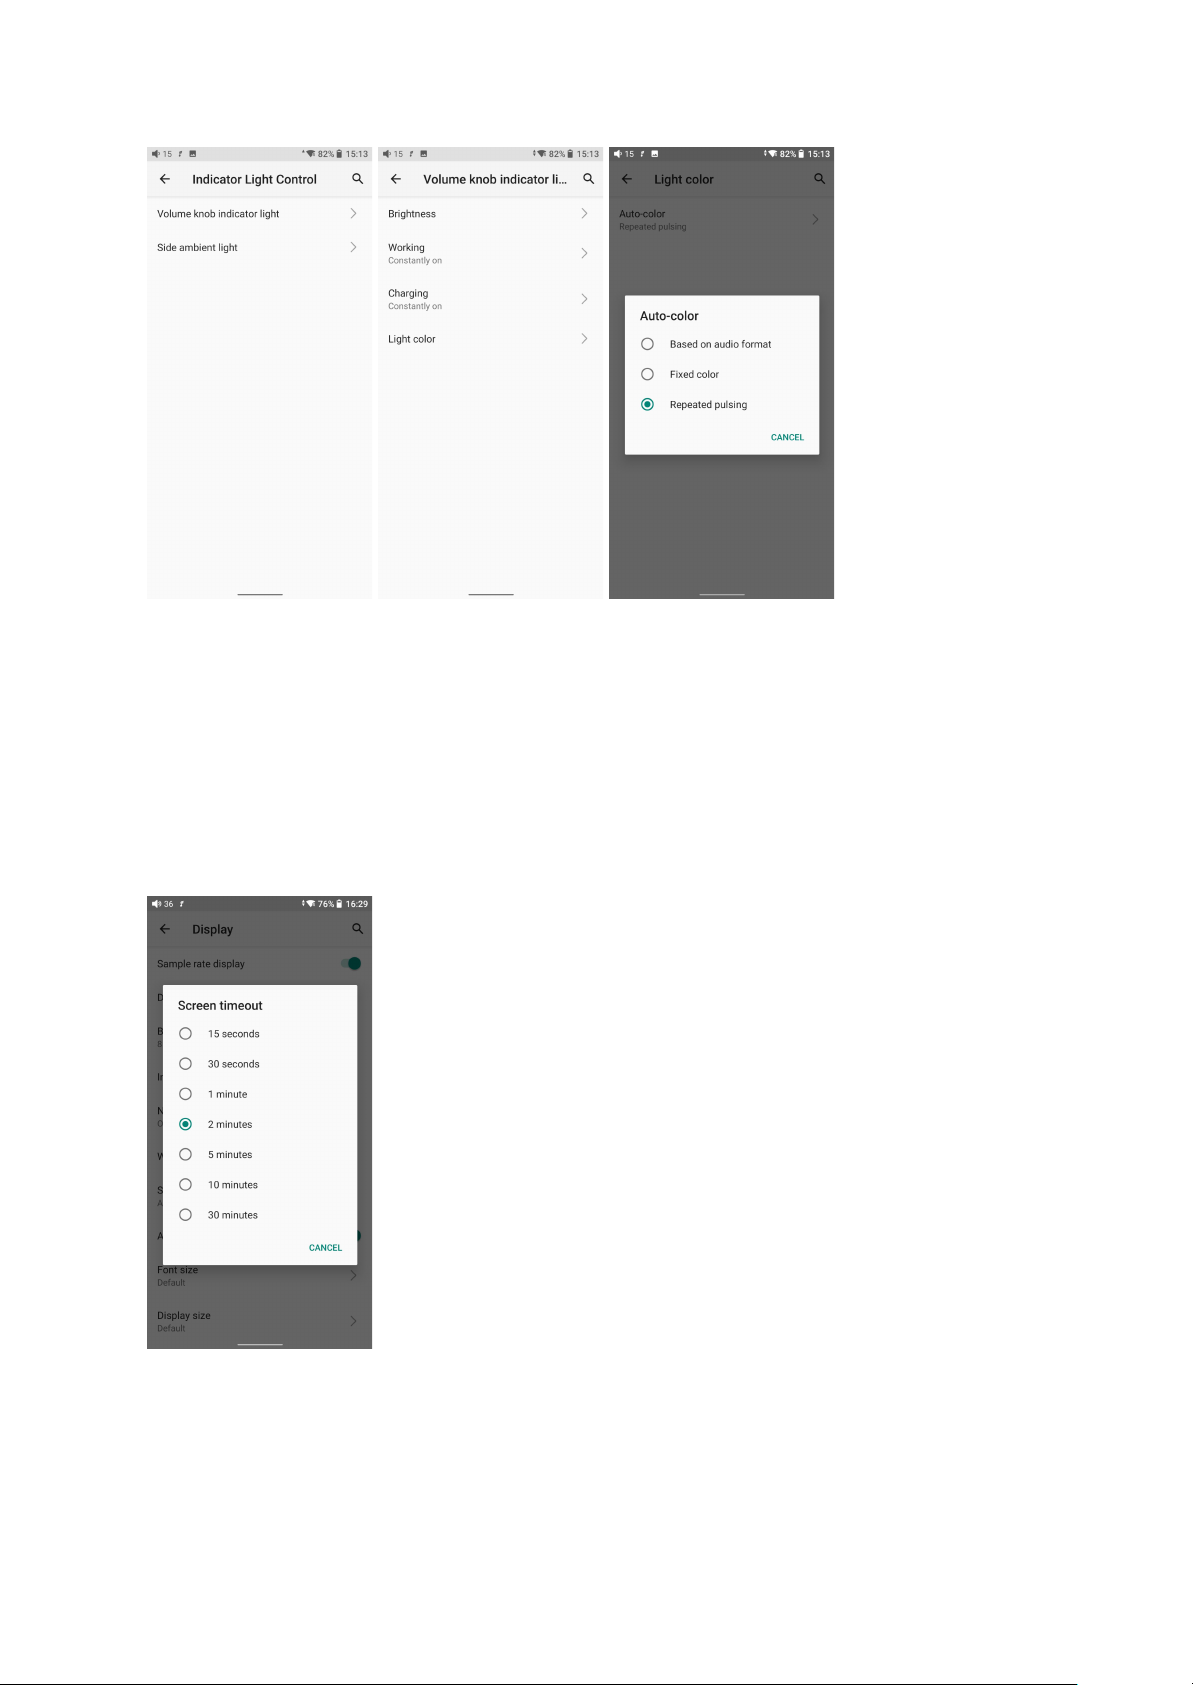
Screen timeout
This option is to set the time when the device will enter sleeping mode after inactivity. The
device will enter low power consumption mode after 10 minutes of sleeping. Short press the
Power/Lockscreen button to wake it up.
Page 32
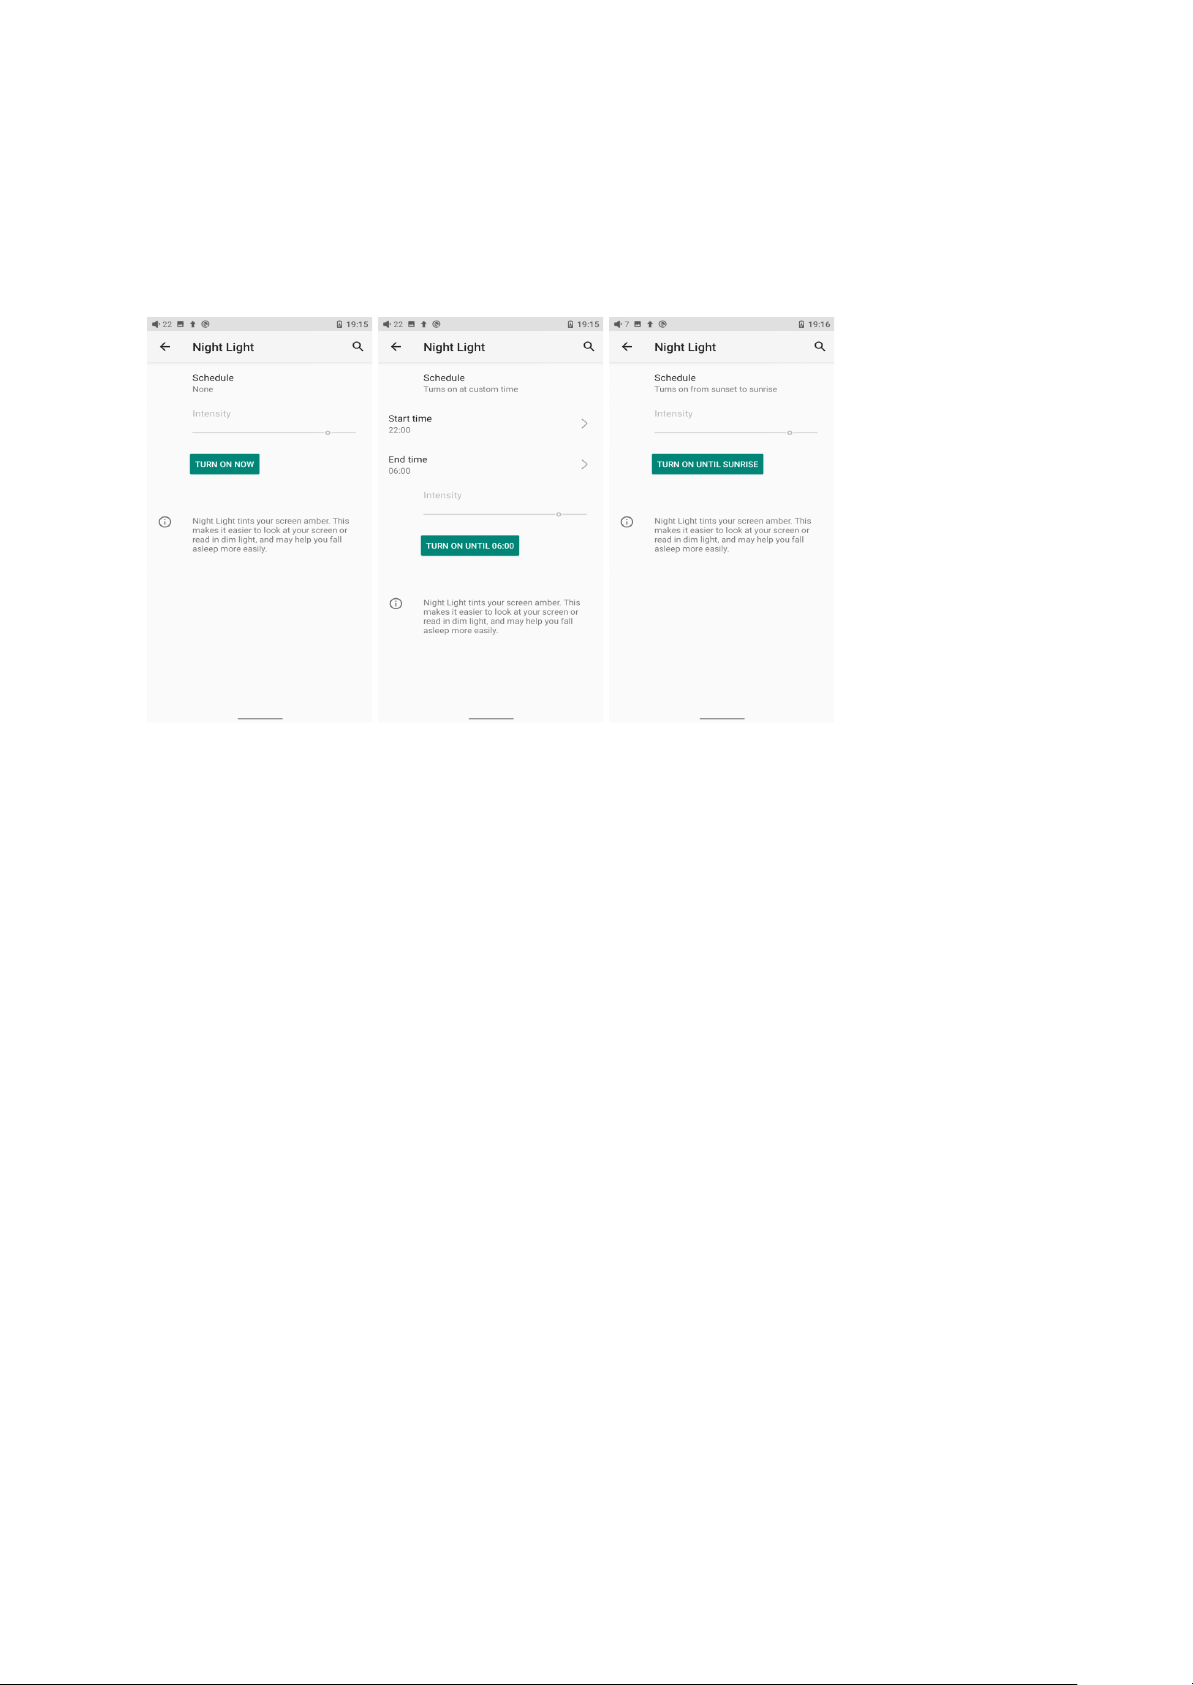
Night light
The color of the display screen will be adjusted in amber under Night light mode. You could
enable the Night light mode at a custom time, or from sunset to sunrise.
Auto-rotate screen
With it turned on, the screen can be automatically rotated like a smartphone thanks to the
gyroscope
Font size
There are four standards available, which respectively are small, default, large and largest.
Page 33
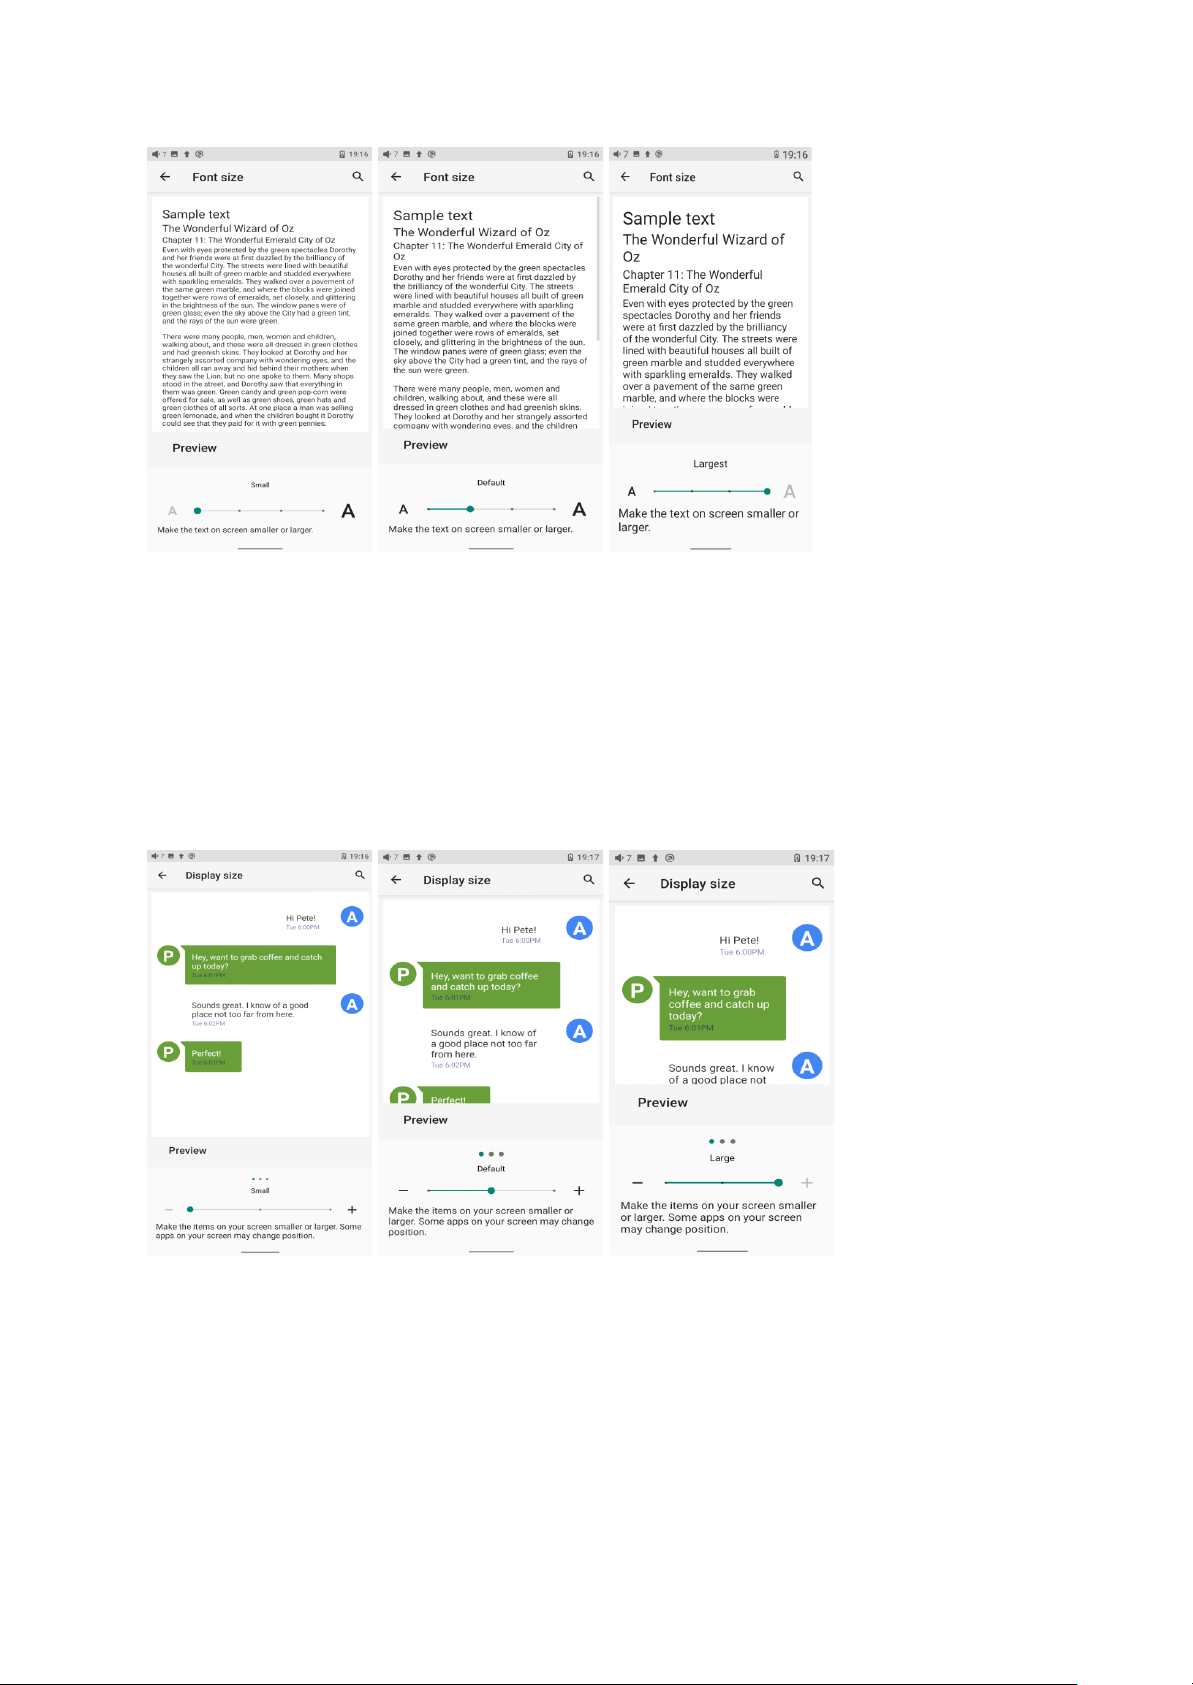
Display size
The display size corresponds to the size of the icons and texts displayed on the screen.
Page 34
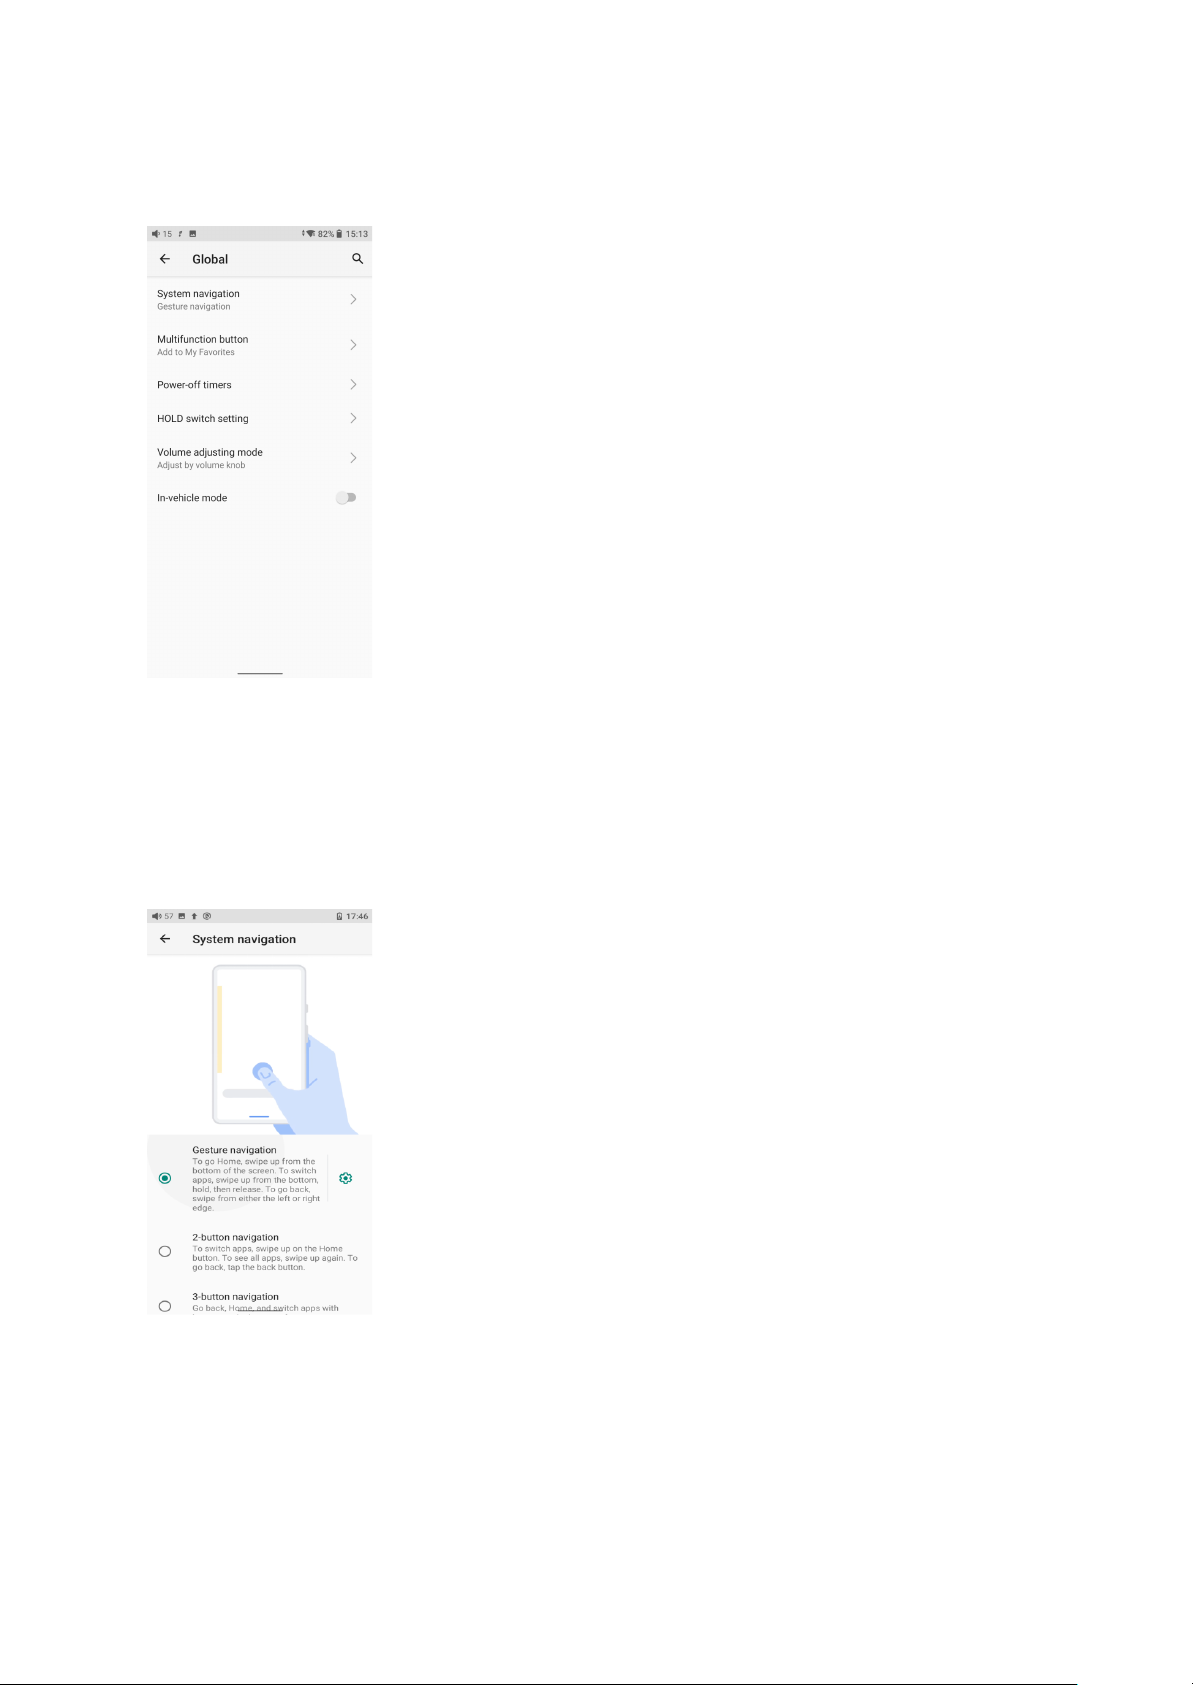
5. Global
System navigation
There are 3 navigation ways for your preference and needs, including Gesture navigation,
2-button navigation and 3-button navigation.
Page 35
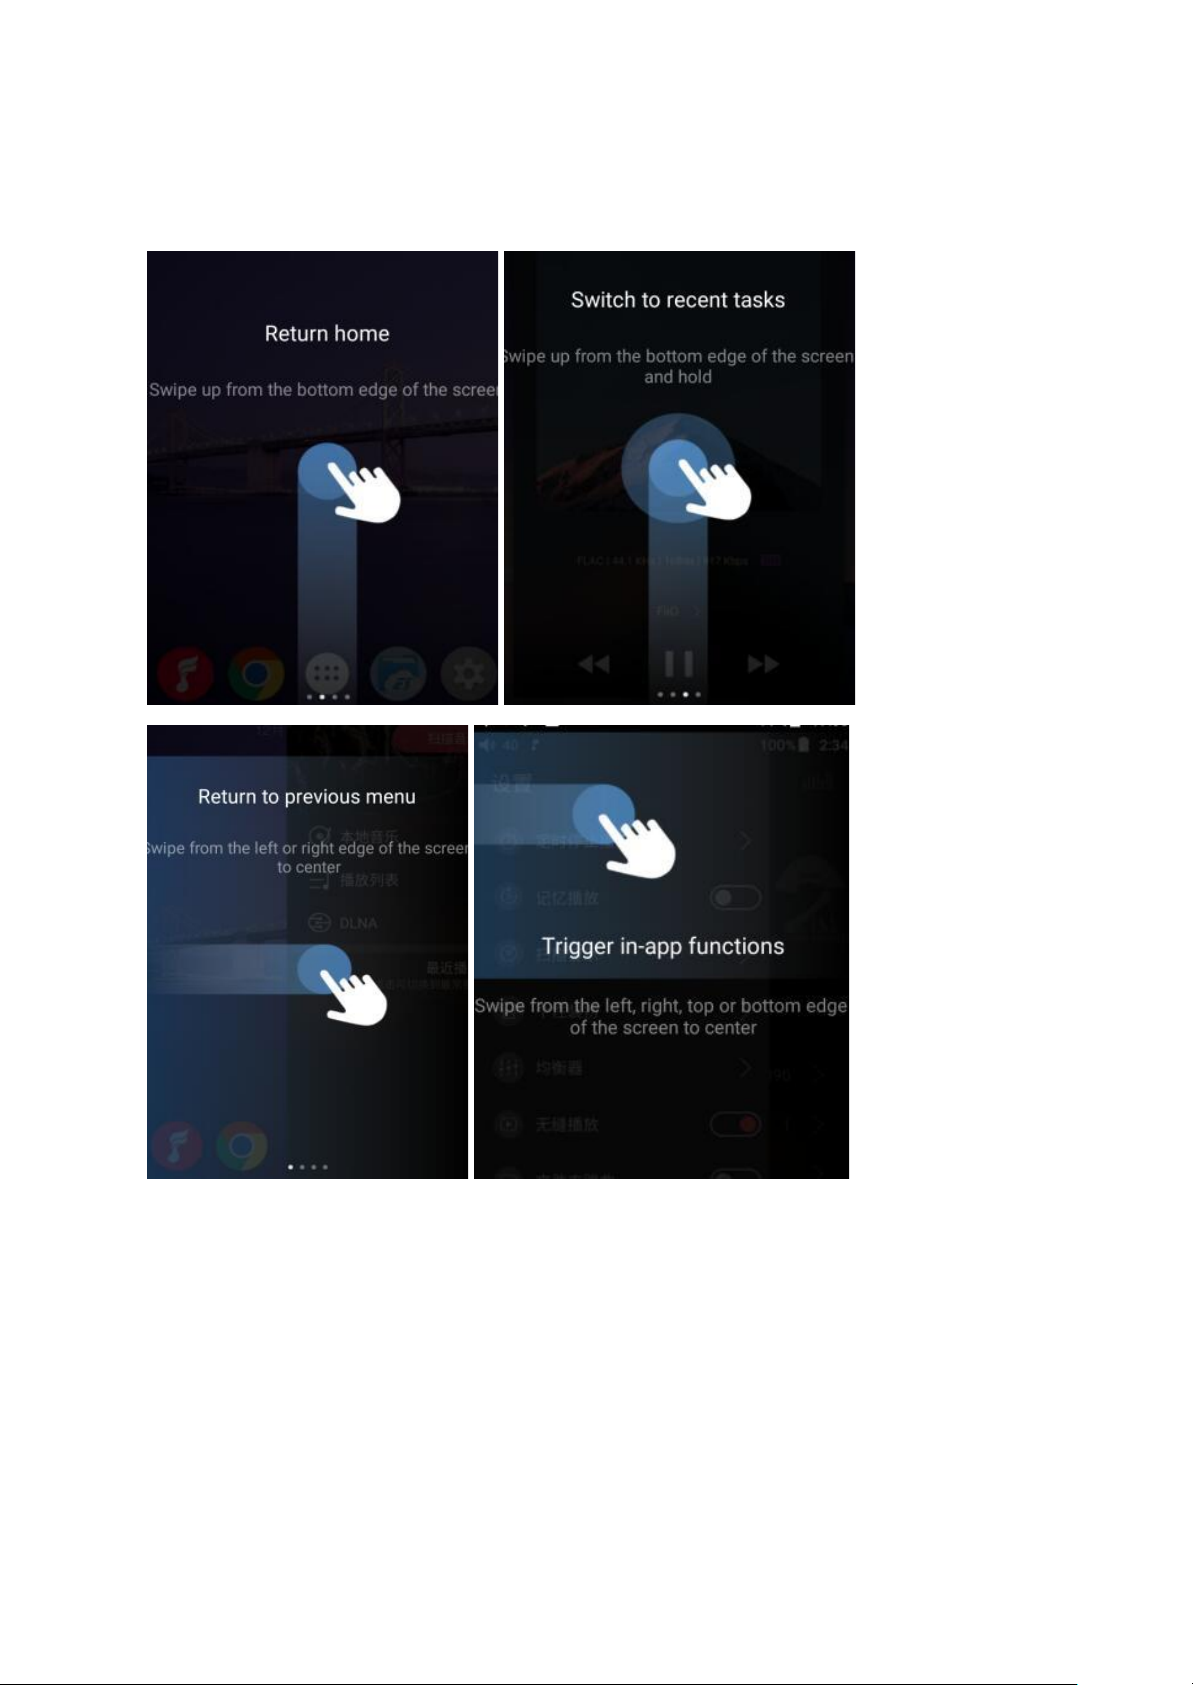
Gesture controls introduction
Multi-function button
To assign the function of the multifunction button on the left side.
You can customize the multi-function buttons to select a frequently used function for
one-button quick start.
Page 36
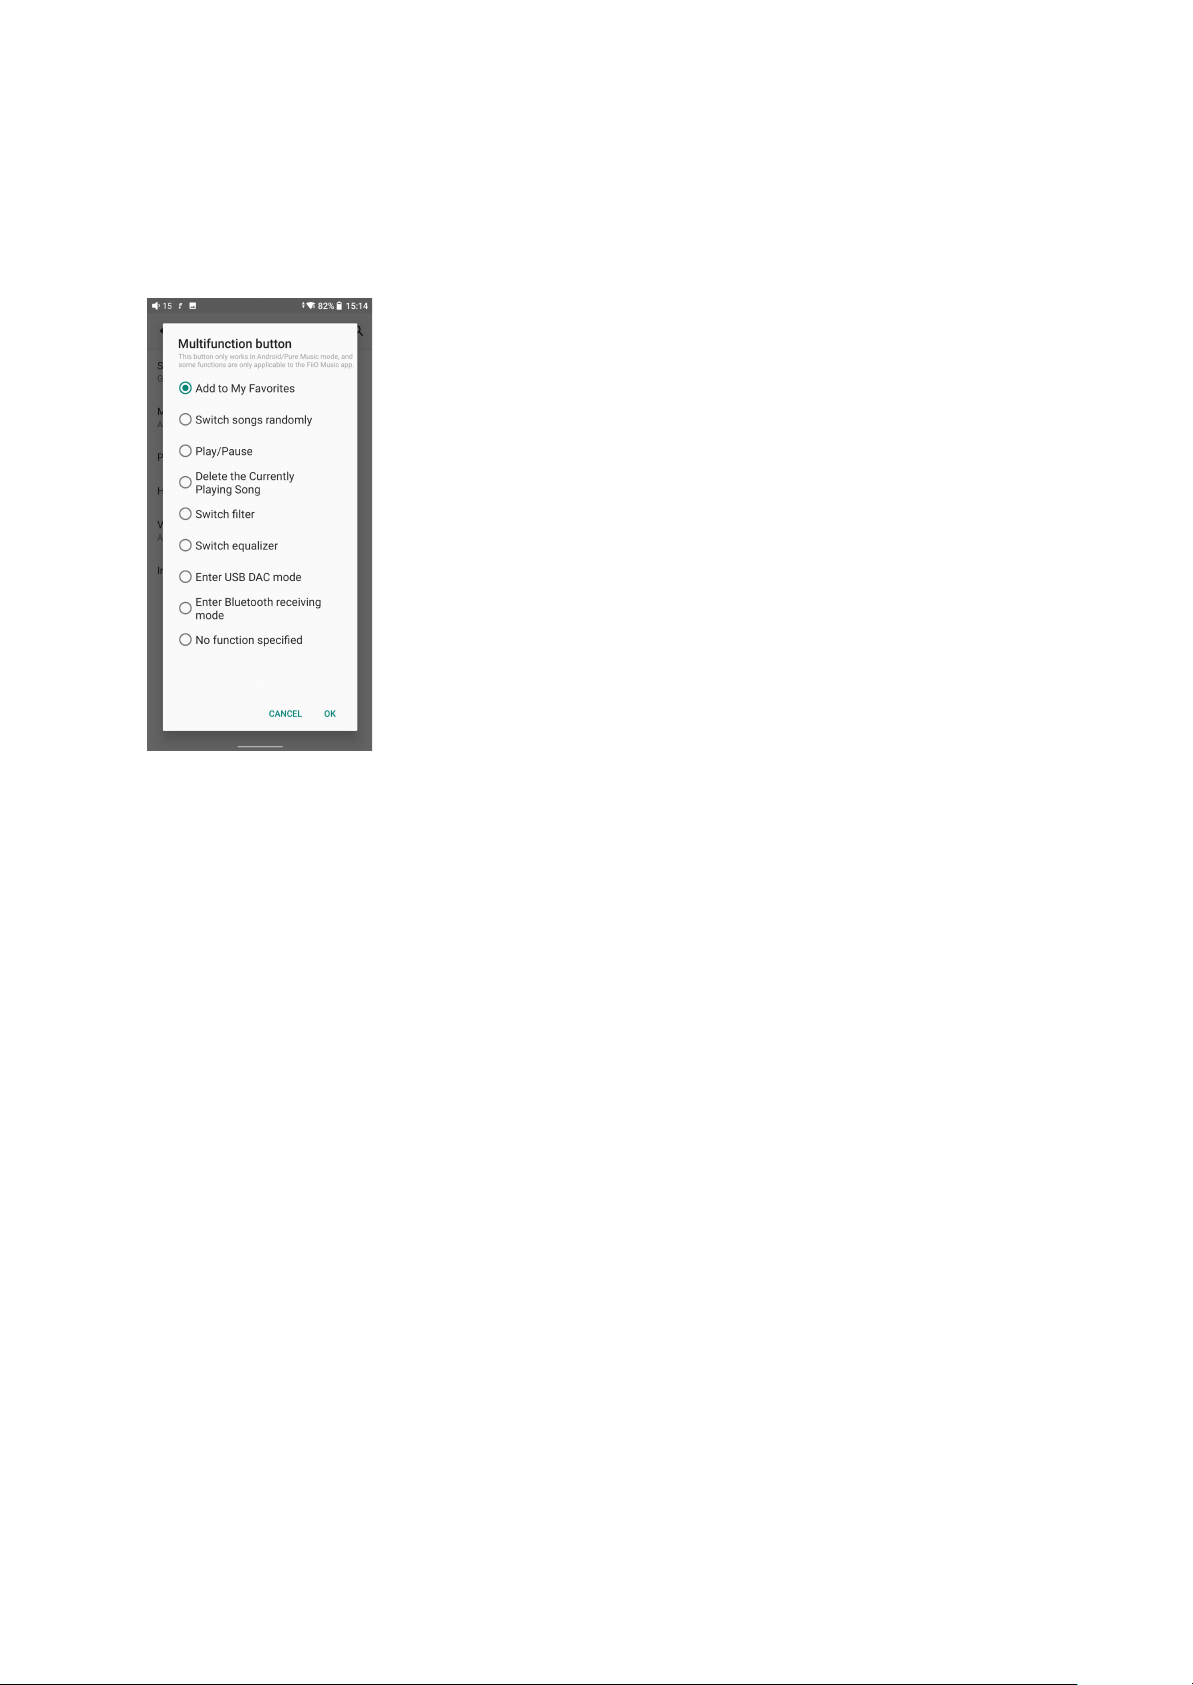
For example, you can set the button to add to favorites, random play, play/pause, switch
filter, switch equalizer, delete the currently playing song, switch to USB DAC mode, switch to
Bluetooth mode, no function, etc.
Power-off timer
There are two types of timer, Sleep and Idle poweroff.
Sleep
The device will automatically shut down when the time reaches the set value. It can be set to
any integer value between 0 and 120 minutes. (Note that if it is turned OFF, the sleep
shutdown function will be disabled.)
Idle poweroff
If the device is not working without any operation, it will automatically turn off once the timer
reaches the set value. It can be set to any integer value between 0 and 50 minutes. (Note
that if it is turned OFF, the idle shutdown function will be disabled.)
Page 37
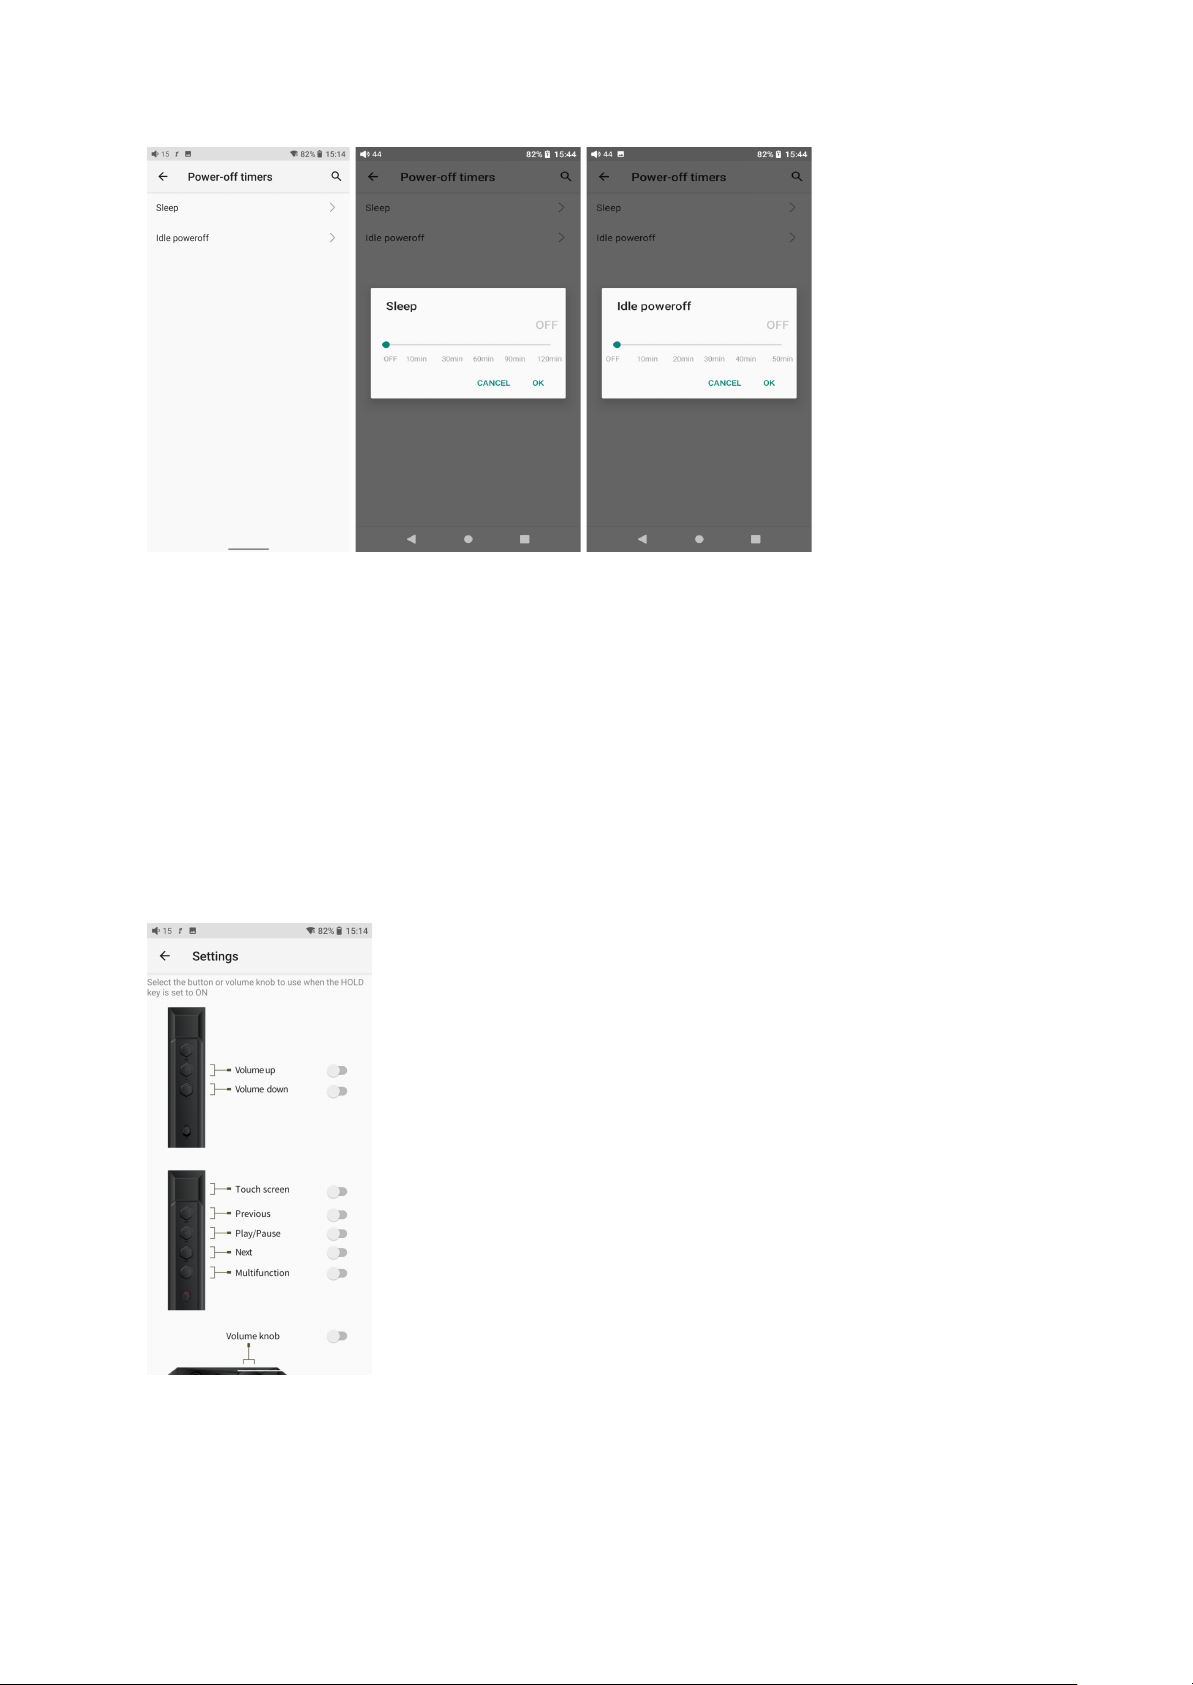
Hold switch setting
If the HOLD switch is turned on, you can enable/disable any buttons or the volume knob.
Page 38
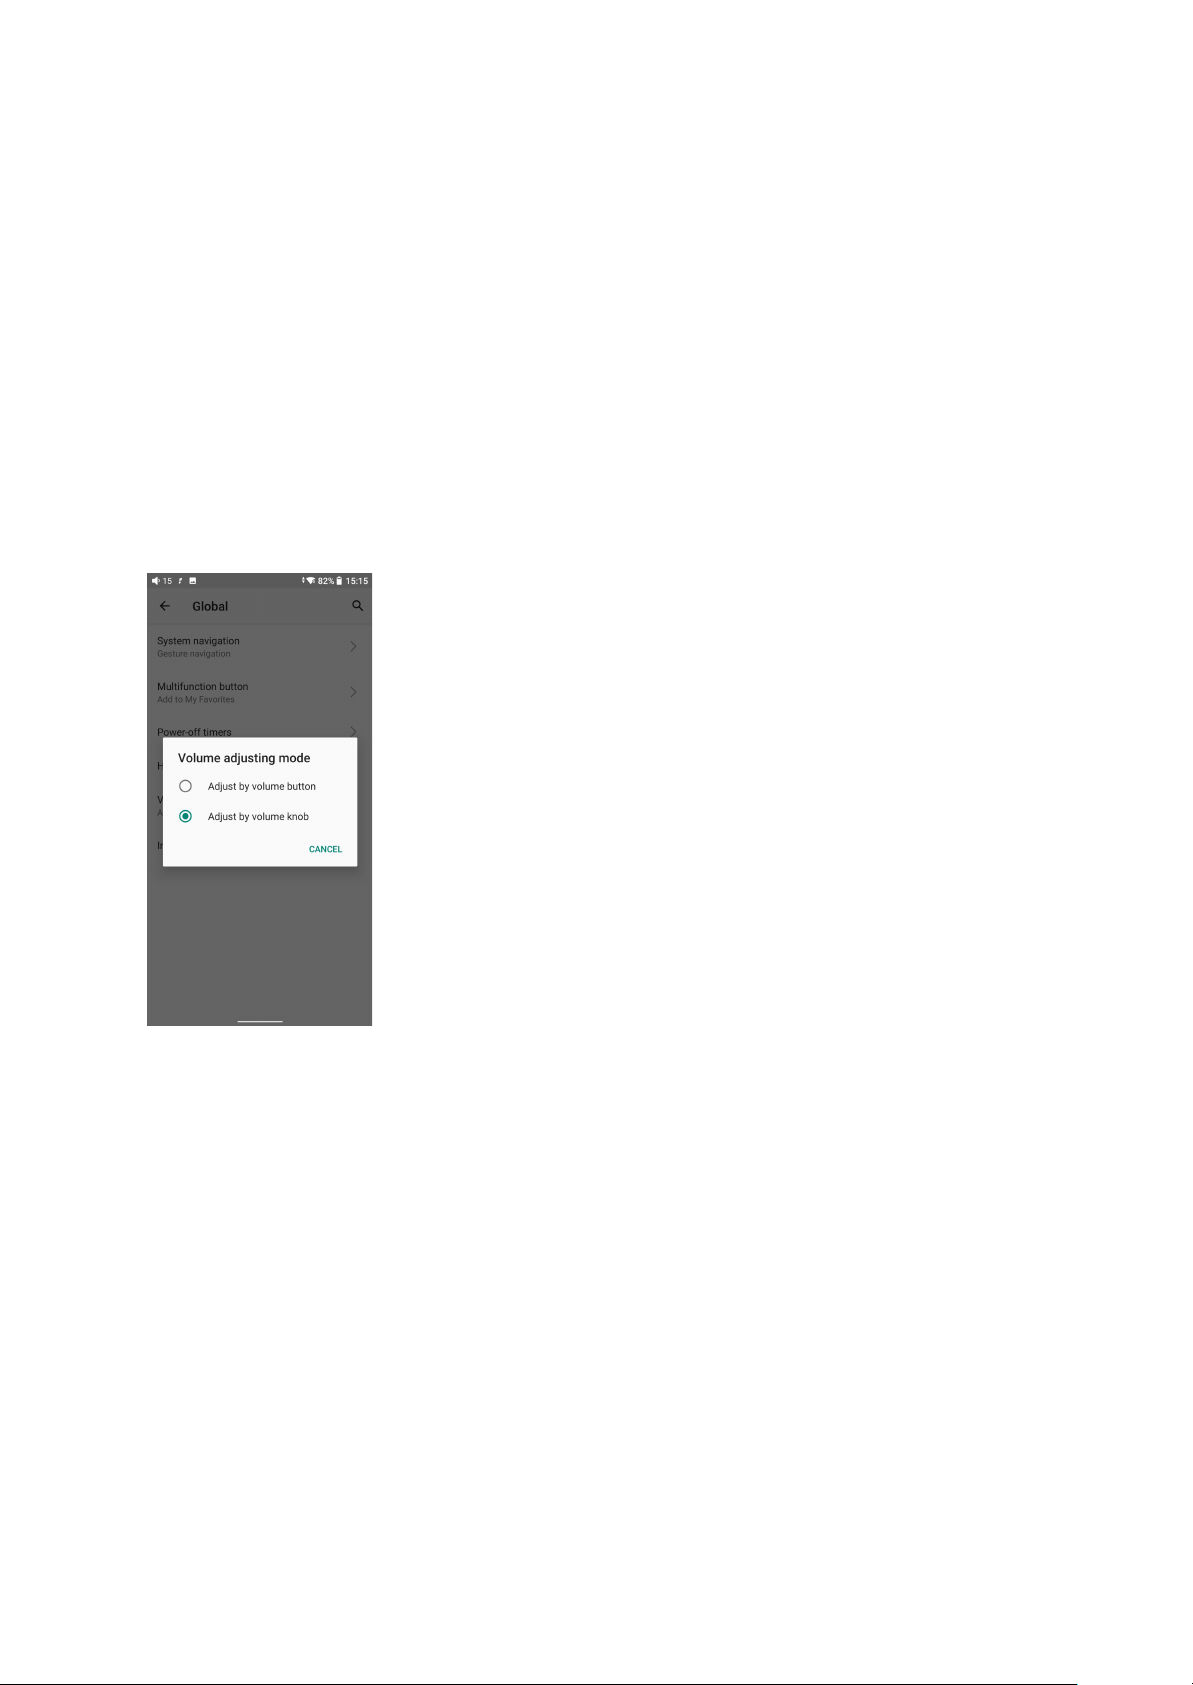
Volume adjusting mode
The M17 uses the volume knob for adjusting the volume by default. The volume button could
not adjust the volume at that time. You could switch this option to 'Adjust by volume button'
and the volume button could adjust the volume now. Please select the option according to
your need.
In-vehicle mode
【Principle】After turning on the In-vehicle mode, you can connect the USB 3.0 port of M17 to
the on-board USB port. And the M17 will power on automatically and switch to the In-vehicle
mode screen when the vehicle engine starts, and power off automatically when the vehicle
engine stops.
【How to set】Go to Settings->Global->In-vehicle mode, or the drop-down menu to turn on the
in-vehicle mode.
(Some onboard USB ports may encounter interruptions when connecting to the M17, in
which case you can try to use FiiO's USB isolator, the LA-UA1, to fix the problem.)
Page 39
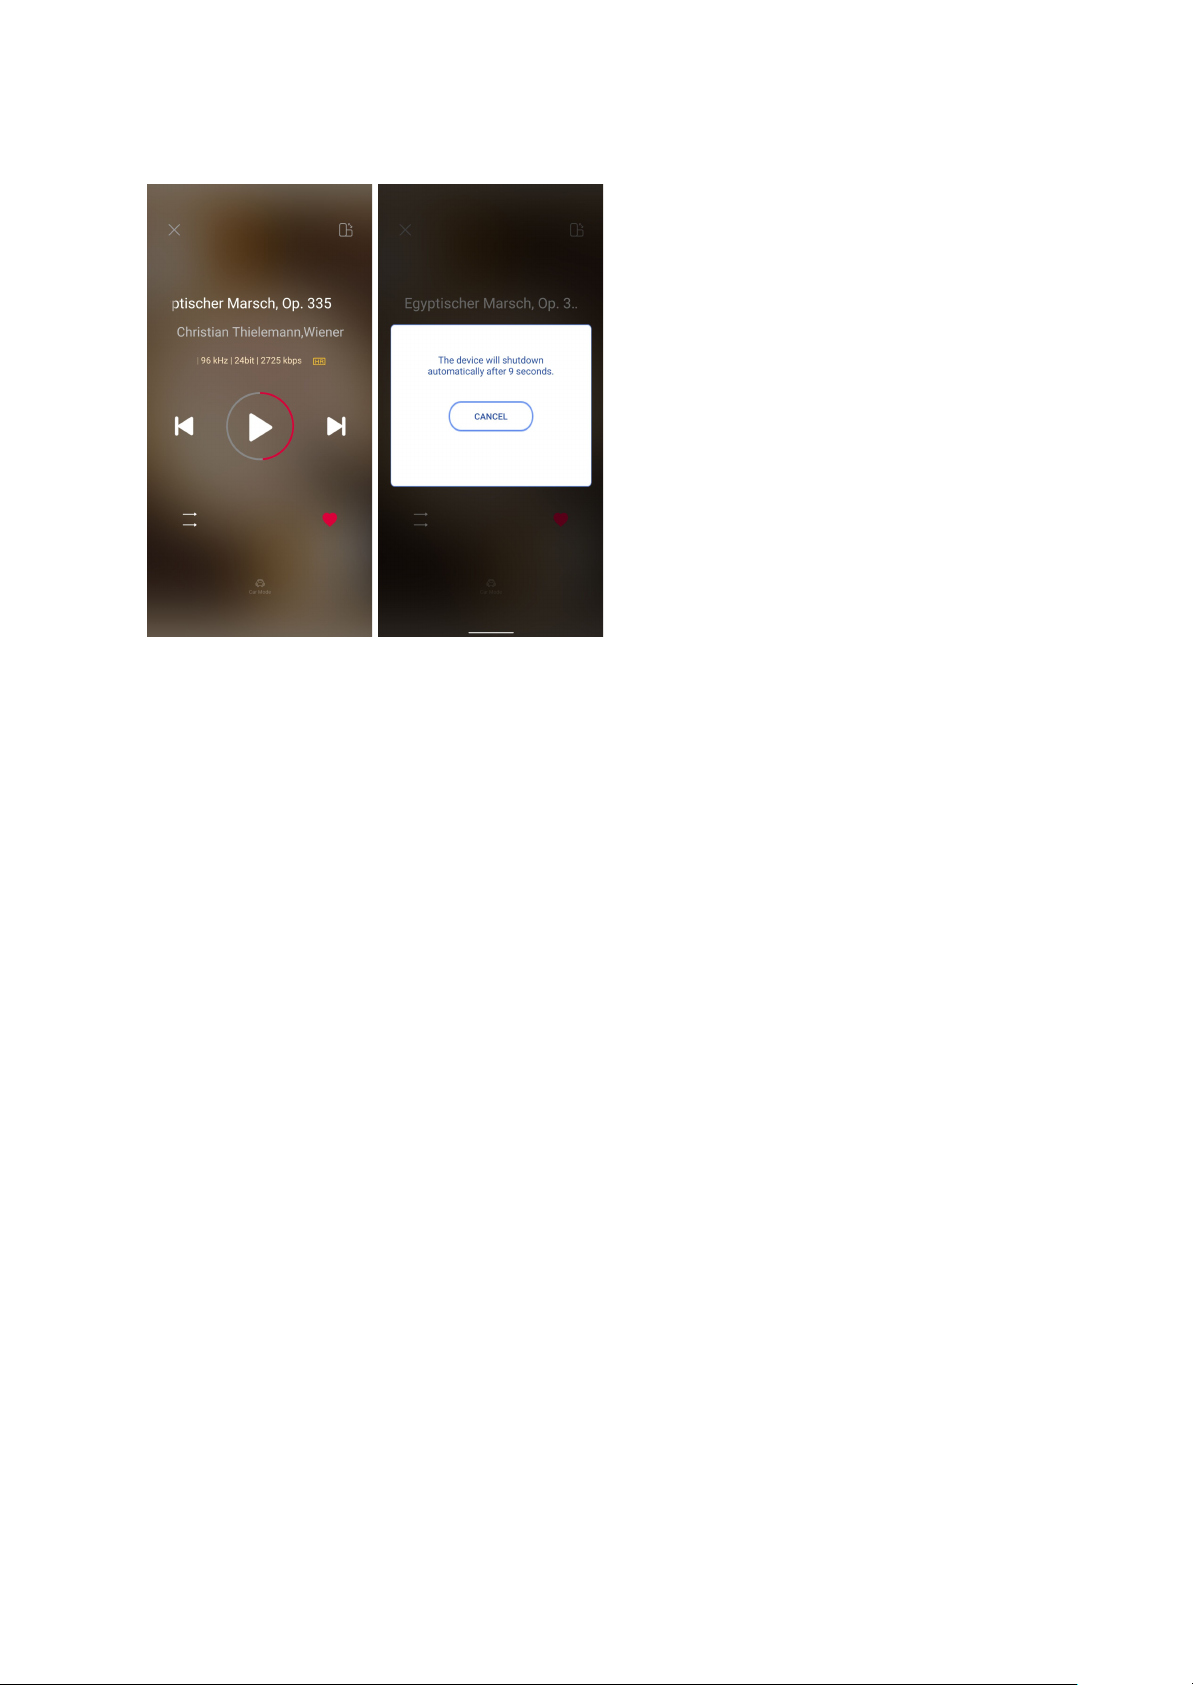
*The in-vehicle mode will only work for the USB 3.0 port in the M17.
Page 40
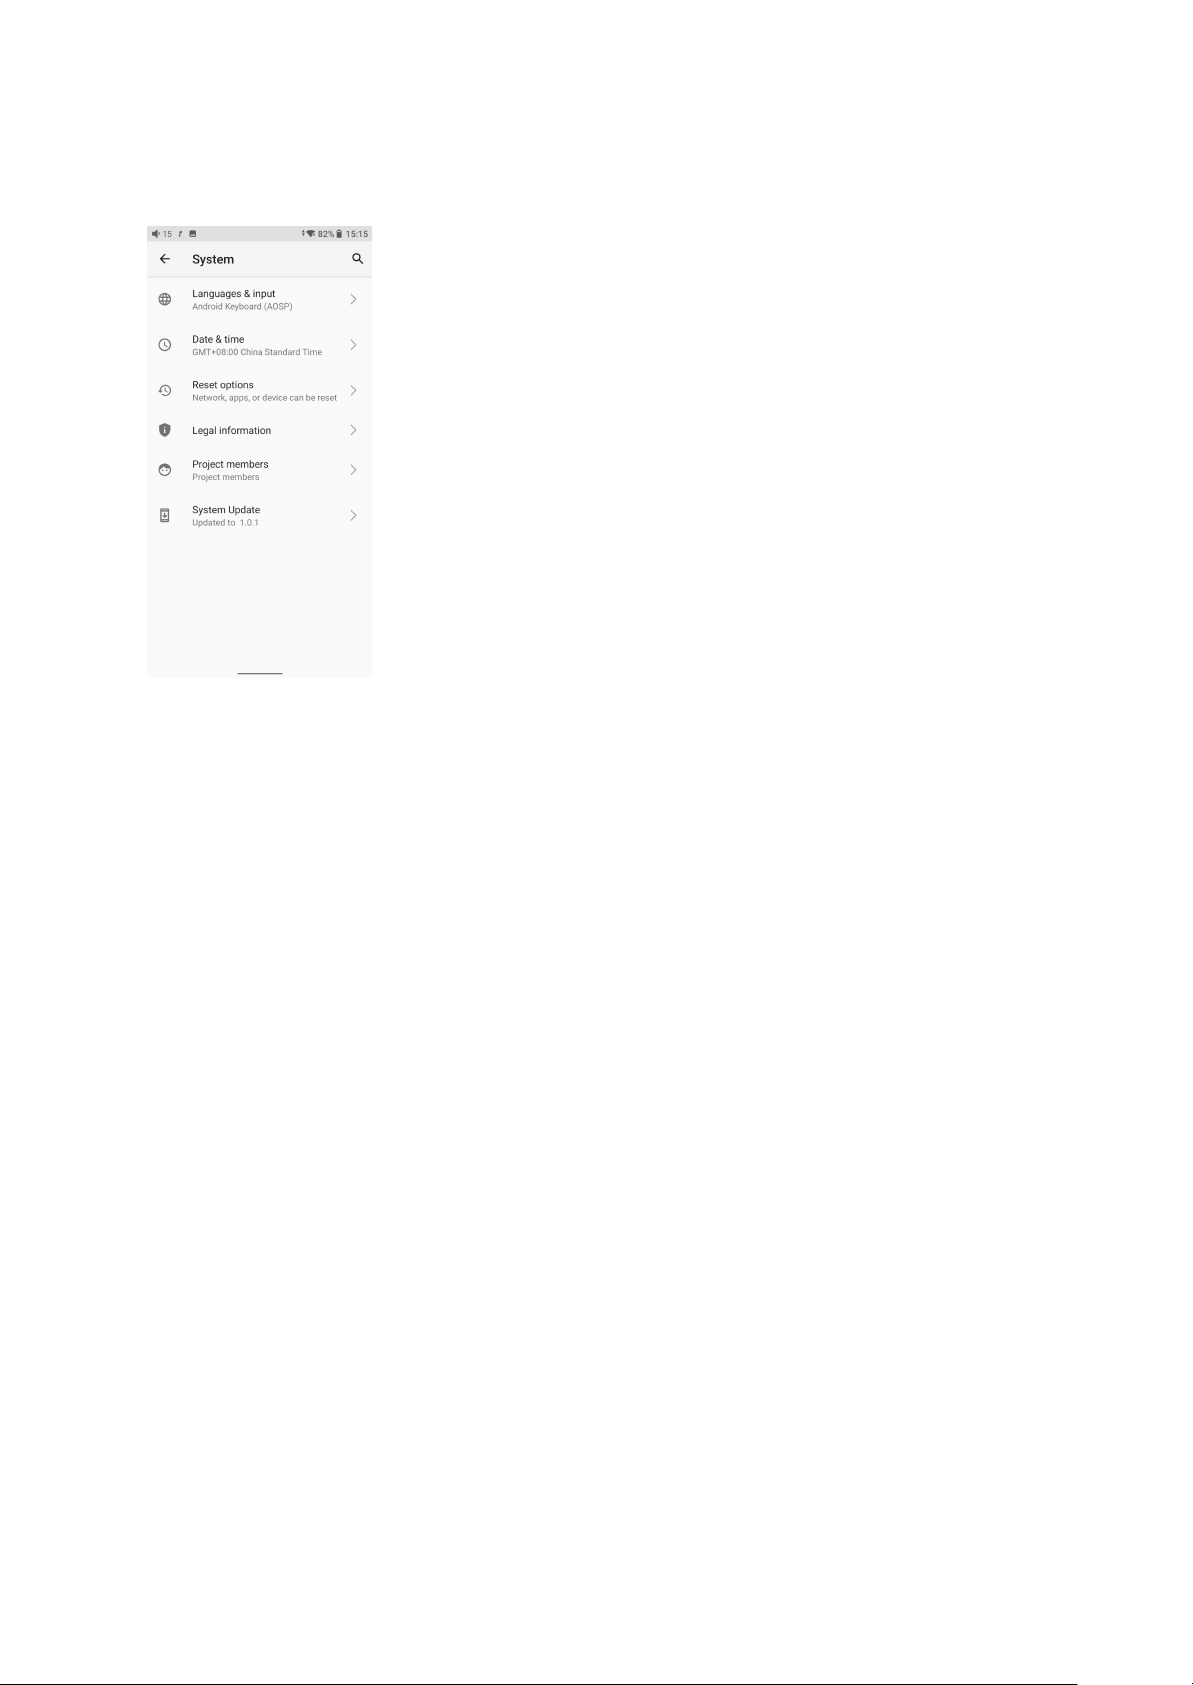
6. System
Languages & input
The first time the device starts up, you can choose an appropriate language from the prompt.
If you want to choose other languages, you can go to the Settings menu. Here are the
instructions.
1) Go to the menu of Settings-> System-> Languages & input-> Languages;
2) In the Languages page, tap Add a language;
3) Select a language;
Page 41
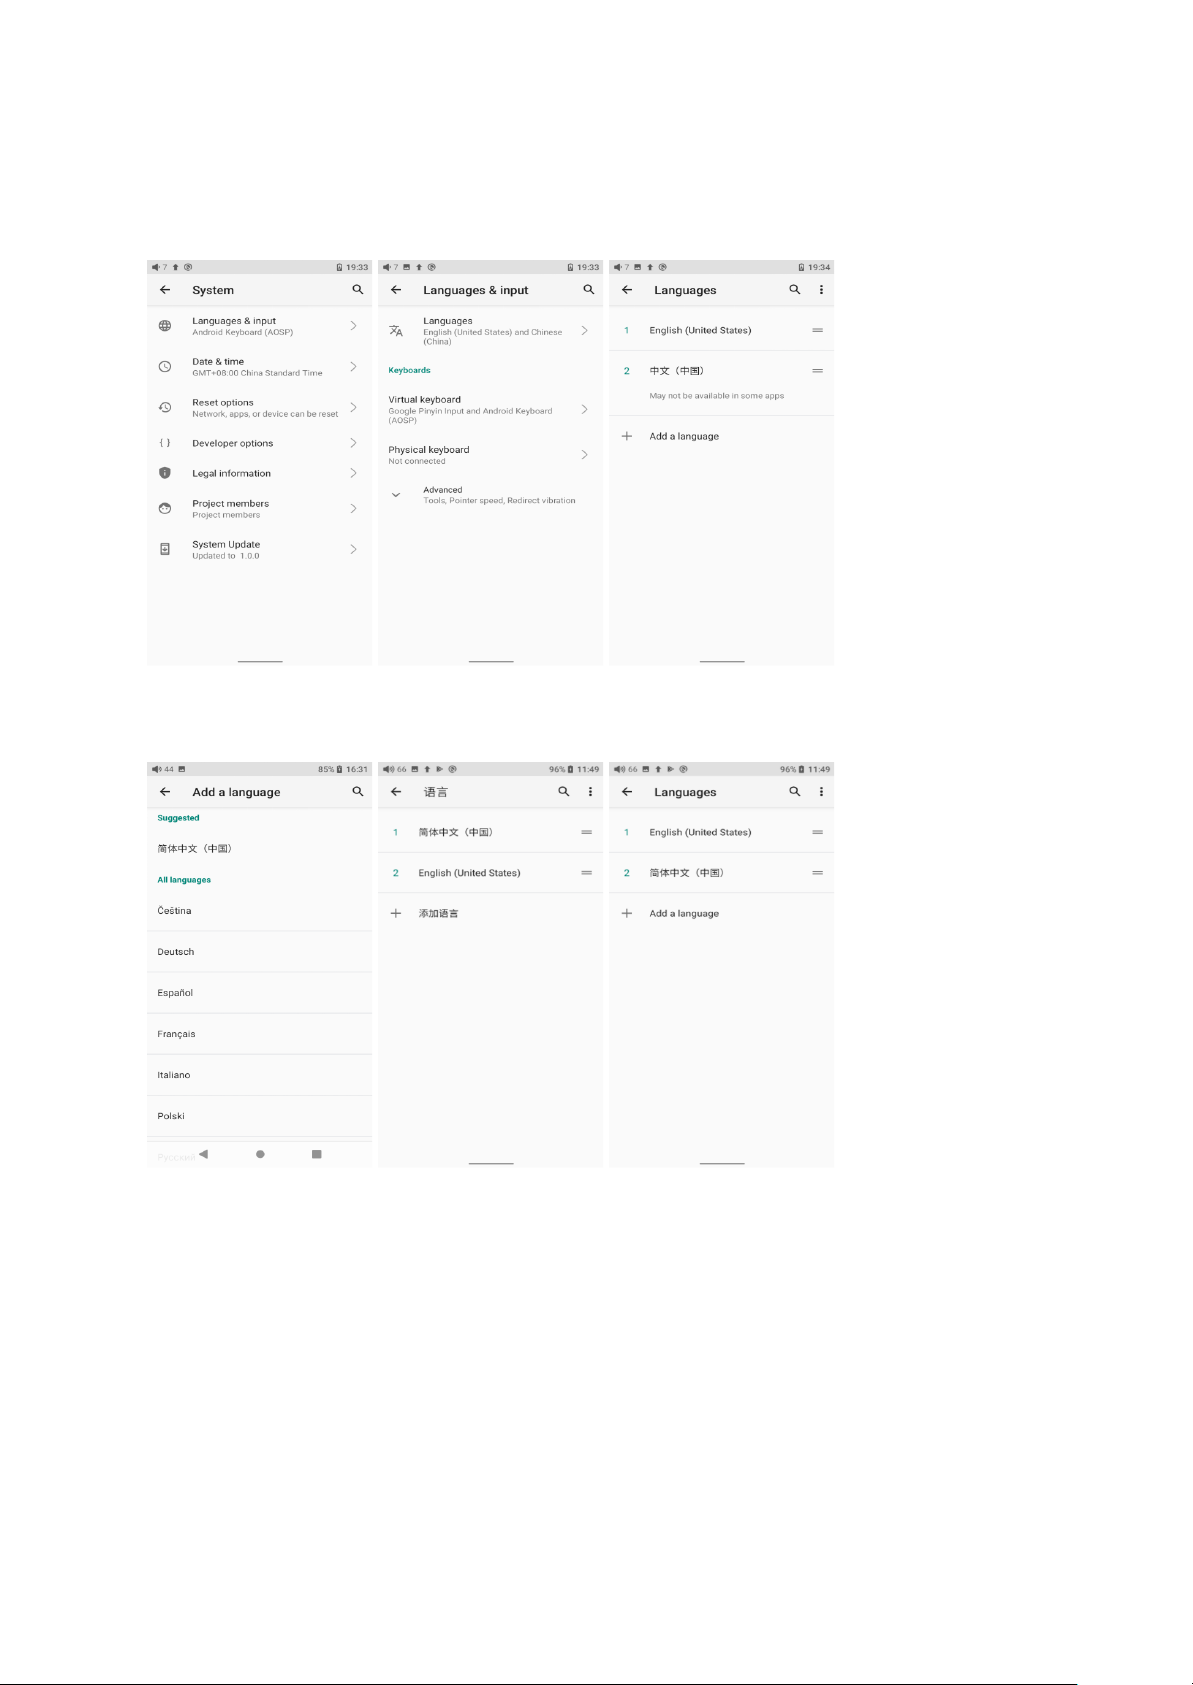
4) After selecting the language, hold the “=” icon on the right side of the target language and
drag it to the top, so to successfully select the language.
Reset options
"Reset WiFi, mobile & Bluetooth" will reset all network settings, including WiFi and Bluetooth.
Page 42
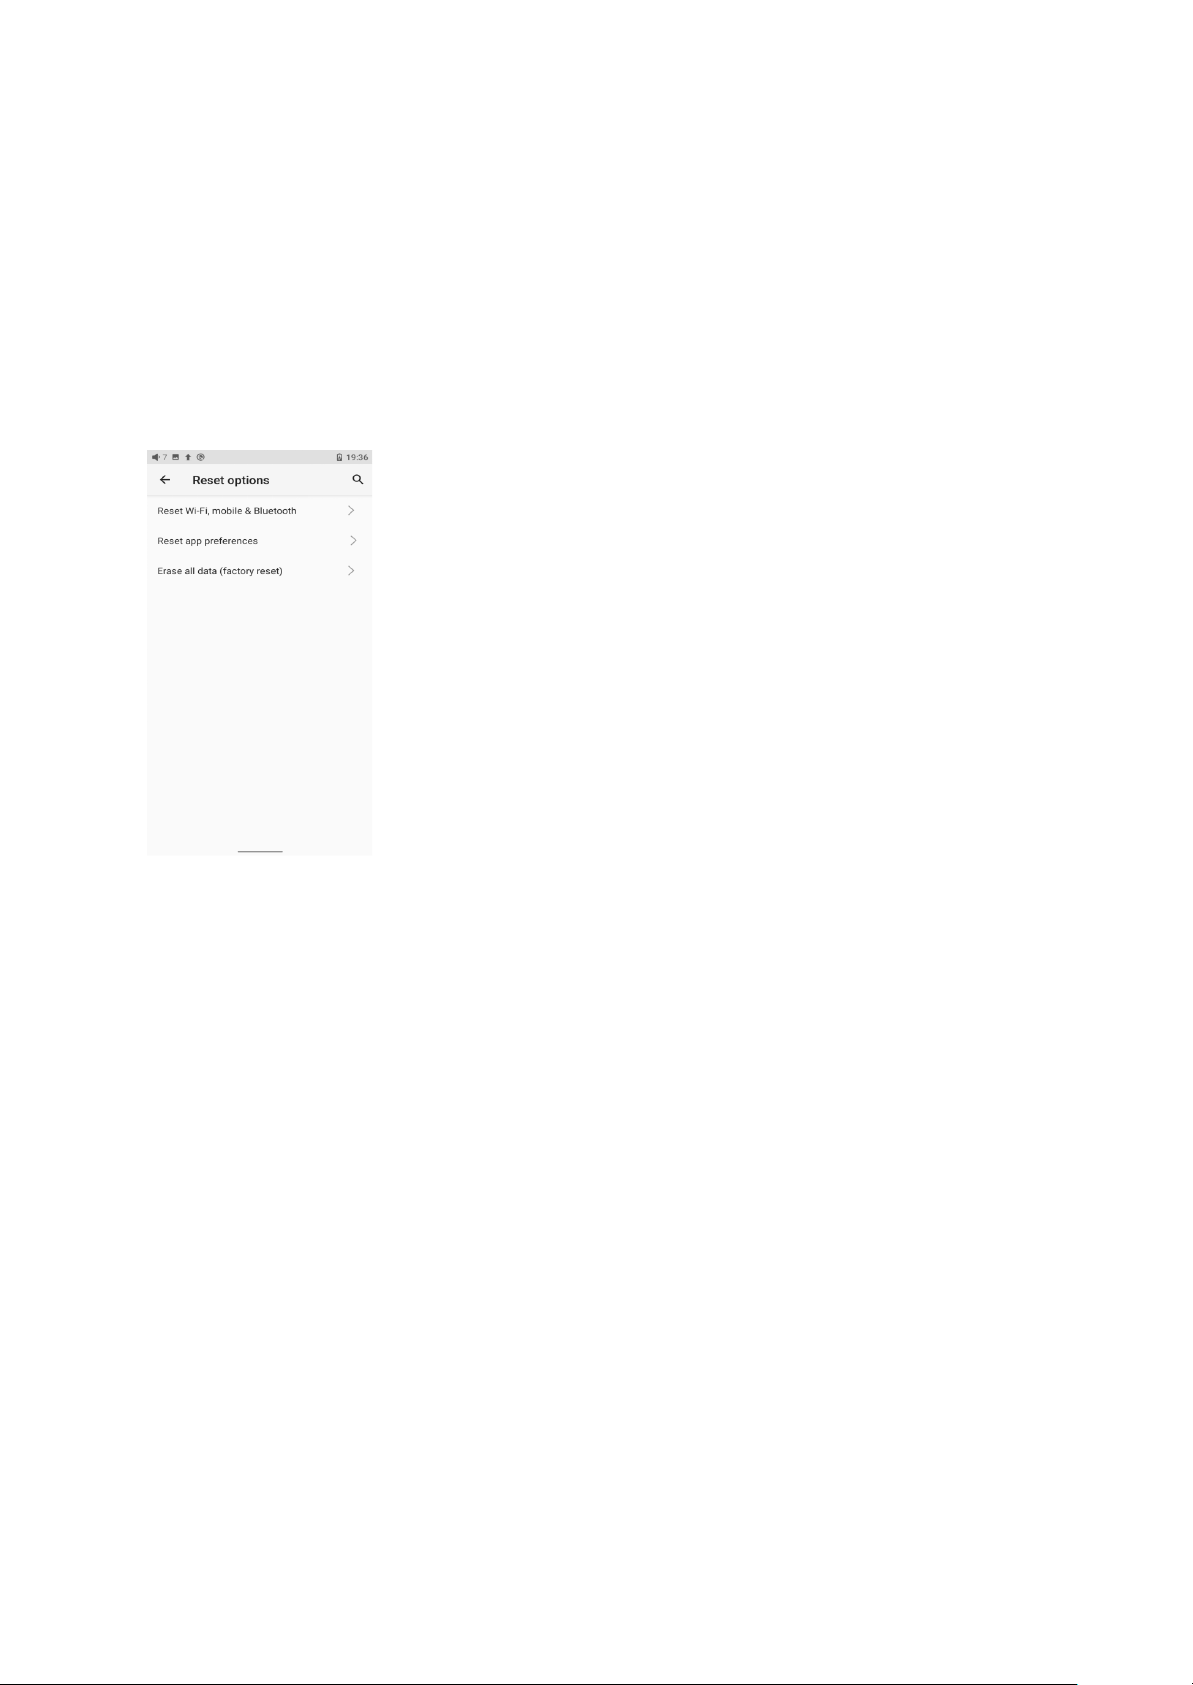
"Reset app preferences" will reset all preferences including the items shown in the following
picture.
"Erase all data", i.e. factory reset, will erase all data from your device's internal storage, and
all settings will be reset to default. Please back up your important data before resetting.
FiiO Music APP
The M17 has built in the FiiO Music app, a professional audio playing application specially
developing for Android-based systems and flagship-grade music players.
1. Homepage
FiiO Music APP will enter the homepage once it starts up as shown below.
Page 43
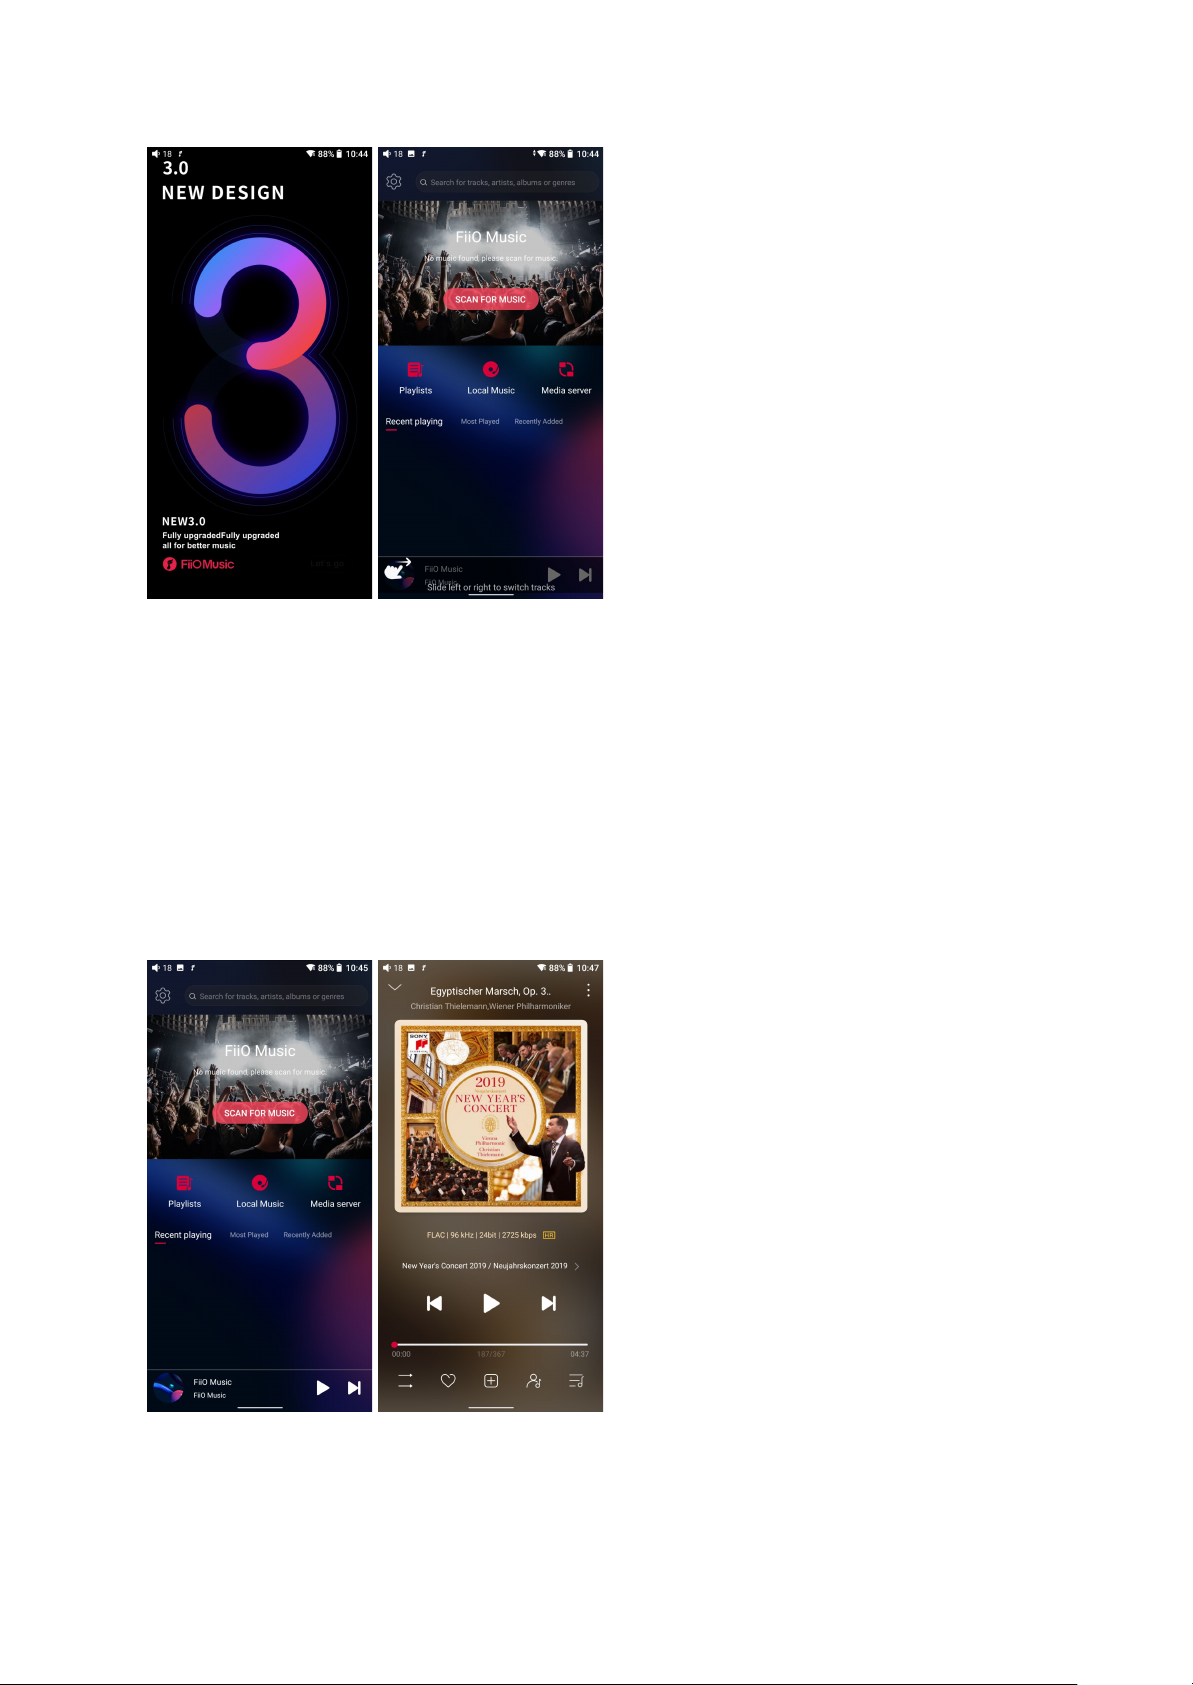
1) Settings icon: tap the icon to enter the settings page.
2) Playing menu: press the icon to enter the playing page.
3) Recently played: the list of recently played songs will be presented chronologically.
4) Frequently played: the list of recently played songs will be presented based on playing
frequencies.
5) Recently added: a list of recently added songs will be presented chronologically.
Page 44
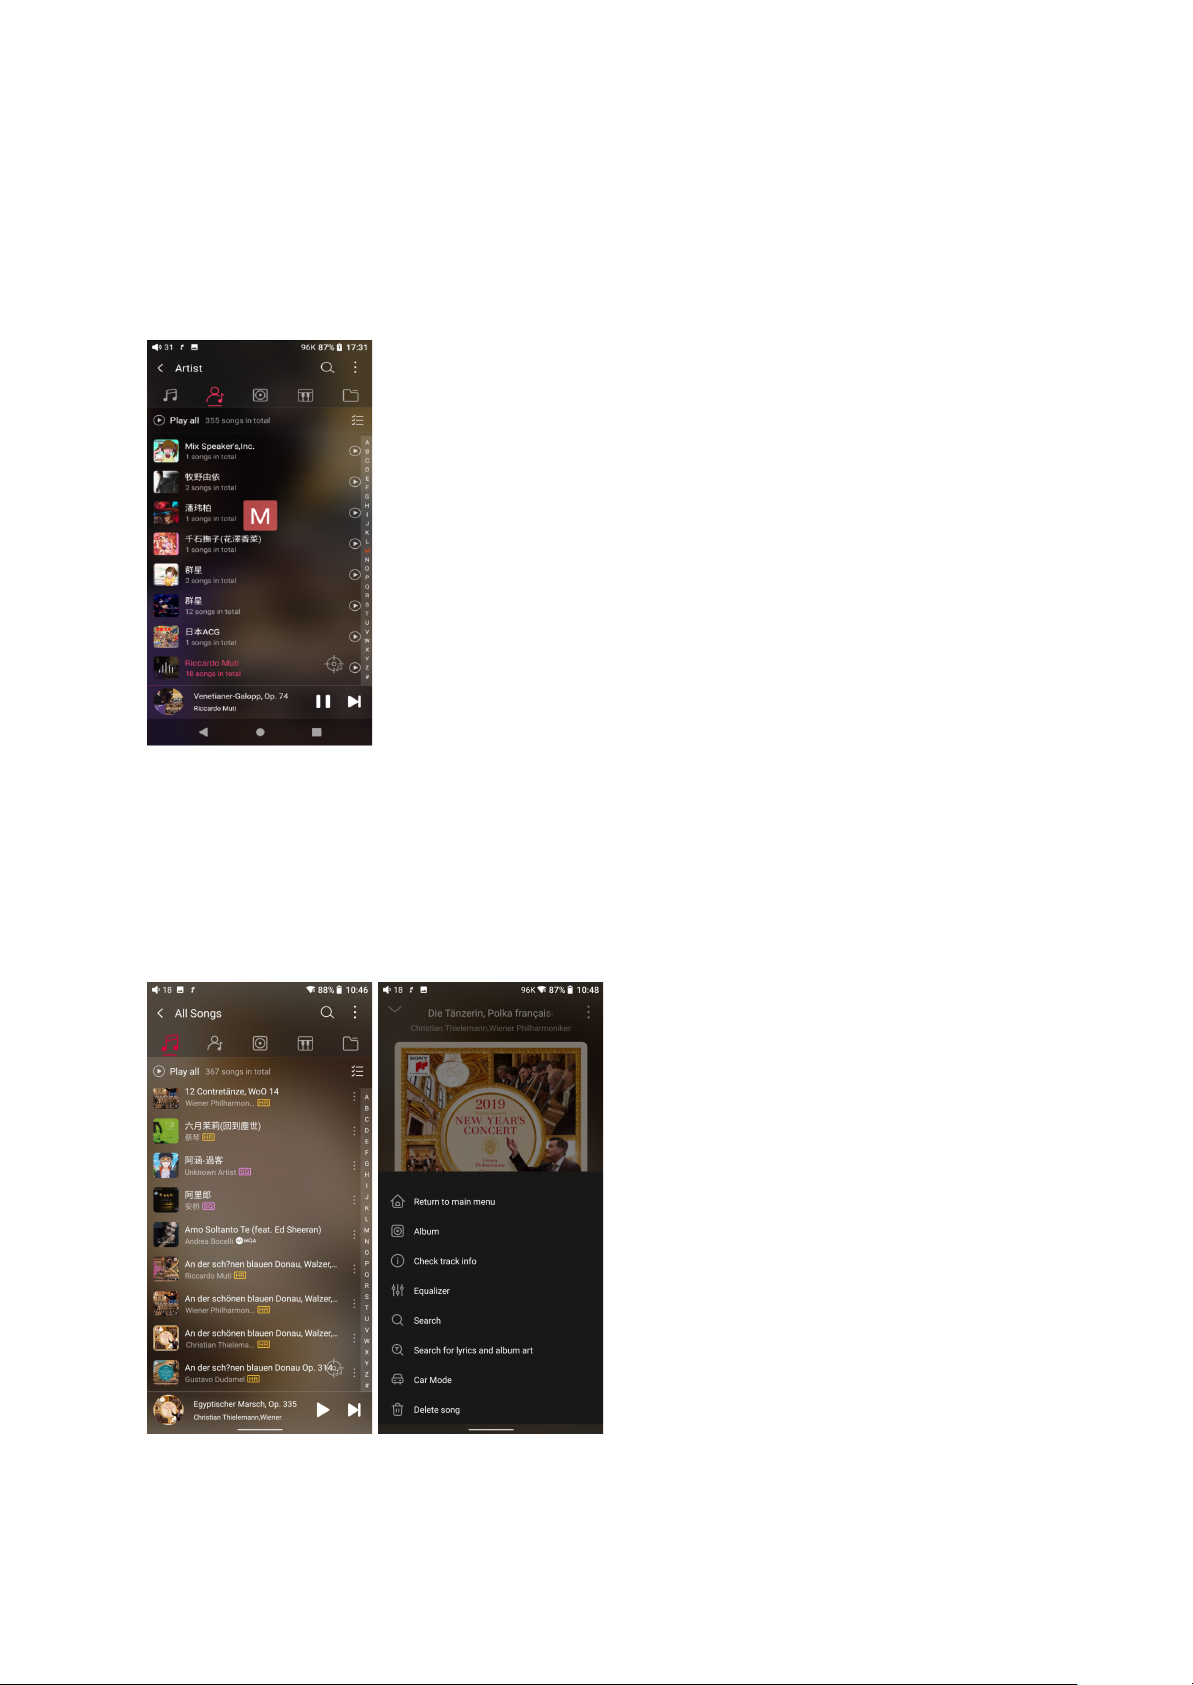
2. Quickly locate all songs
Slide the screen with your finger on the letter bar on the right side. A quick search icon will
show up in the middle of the screen. Sliding to corresponding initials and relieving your
finger, it will directly jump to the songs starting with the initial you have chosen.
3. All songs menu
Tap the icon at the right corner of each track to wake up the hidden menu. Then tap the icon
in the menu to perform corresponding operations.
Page 45
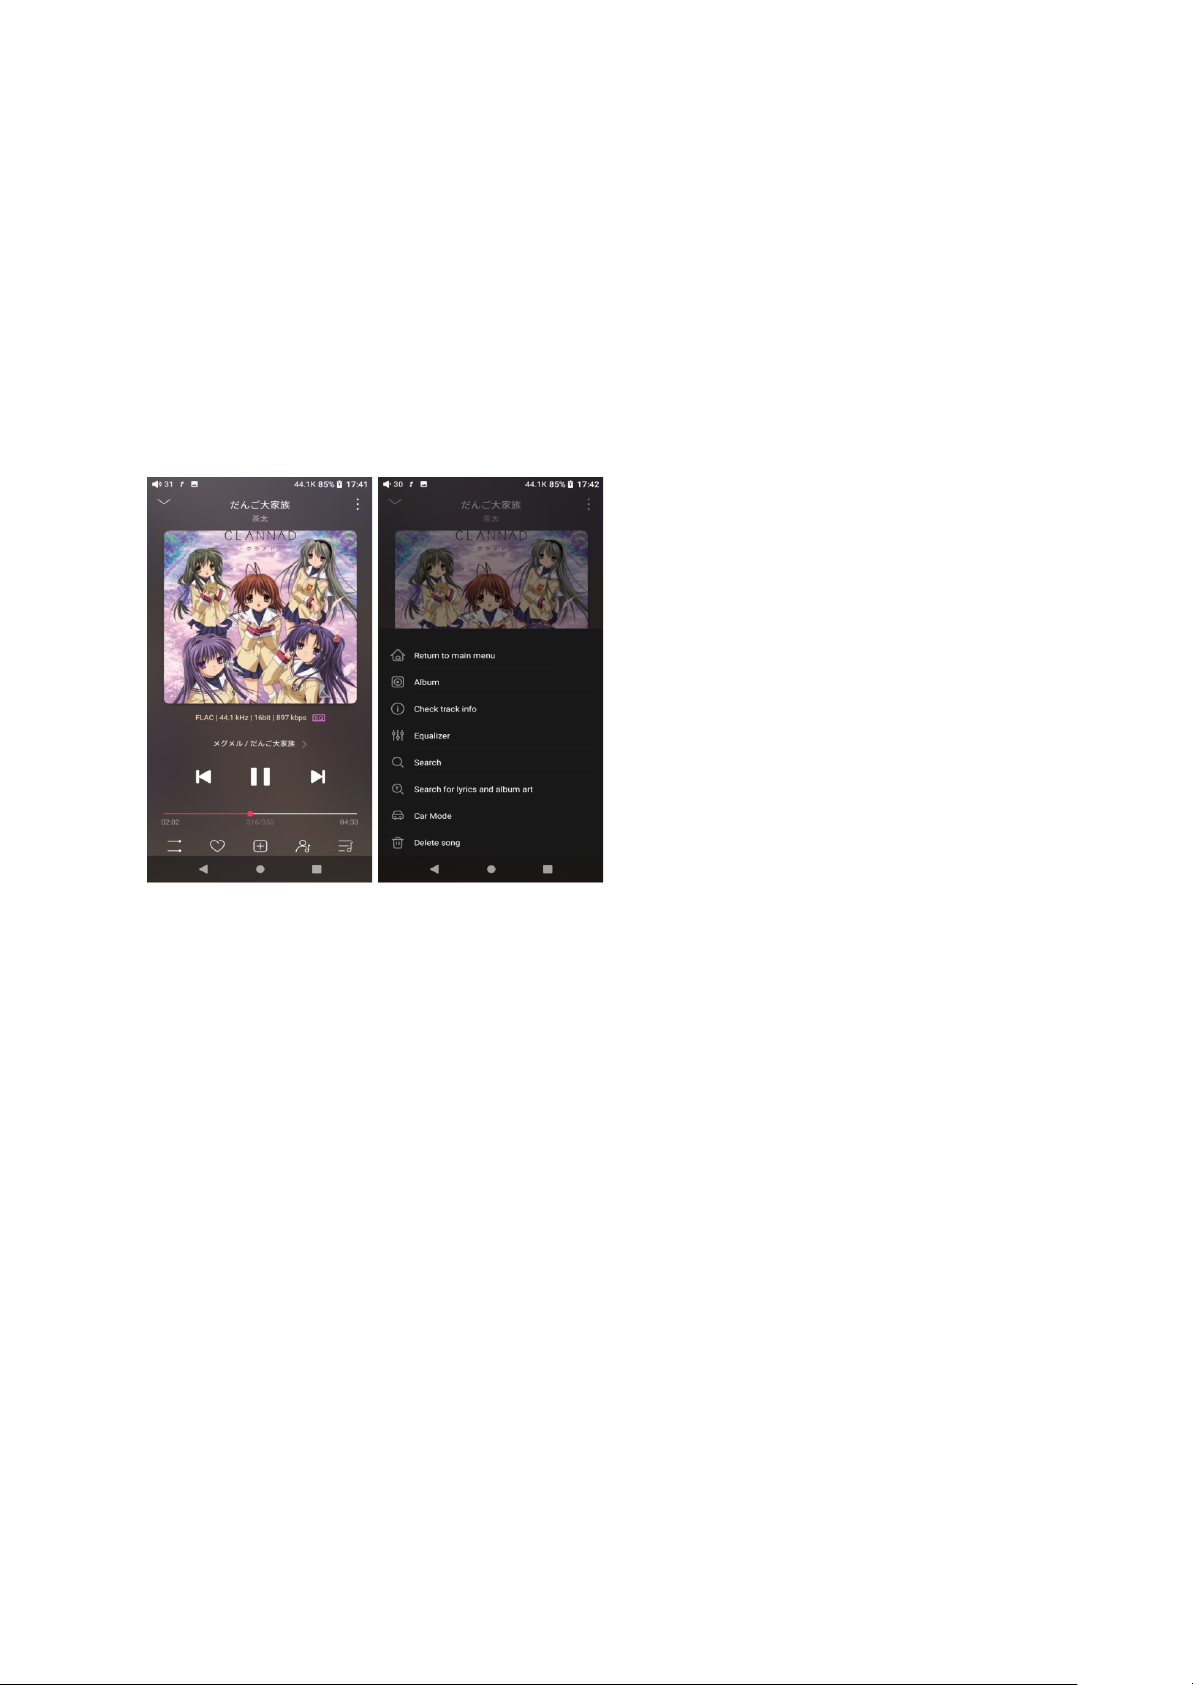
Tapping the hidden menu on the upper right corner of the screen, you can decide the way of
songs sorted as Sort by date added, Sort by filename and Sort by the first letter.
Bulk management: Play music, WiFi music transfer, Add to my favorites, Add to playlists,
Delete selected, and Exit bulk management.
4. Playing page
Switch page: by tapping the middle of the album cover, it will switch pages between the
album cover and lyrics circularly. Swipe left and right to switch songs.
Adjust volume: slide up/down on the volume touch panel or press the physical button to
increase/decrease the volume.
Playing progress: slide left and right on the progress bar below the album cover to quickly
adjust the progress of the now playing song.
jump to the corresponding part of the track now playing;
Notes: on the lyrics display page, you can adjust the song progress, lyrics timeline and font
size.
Page 46
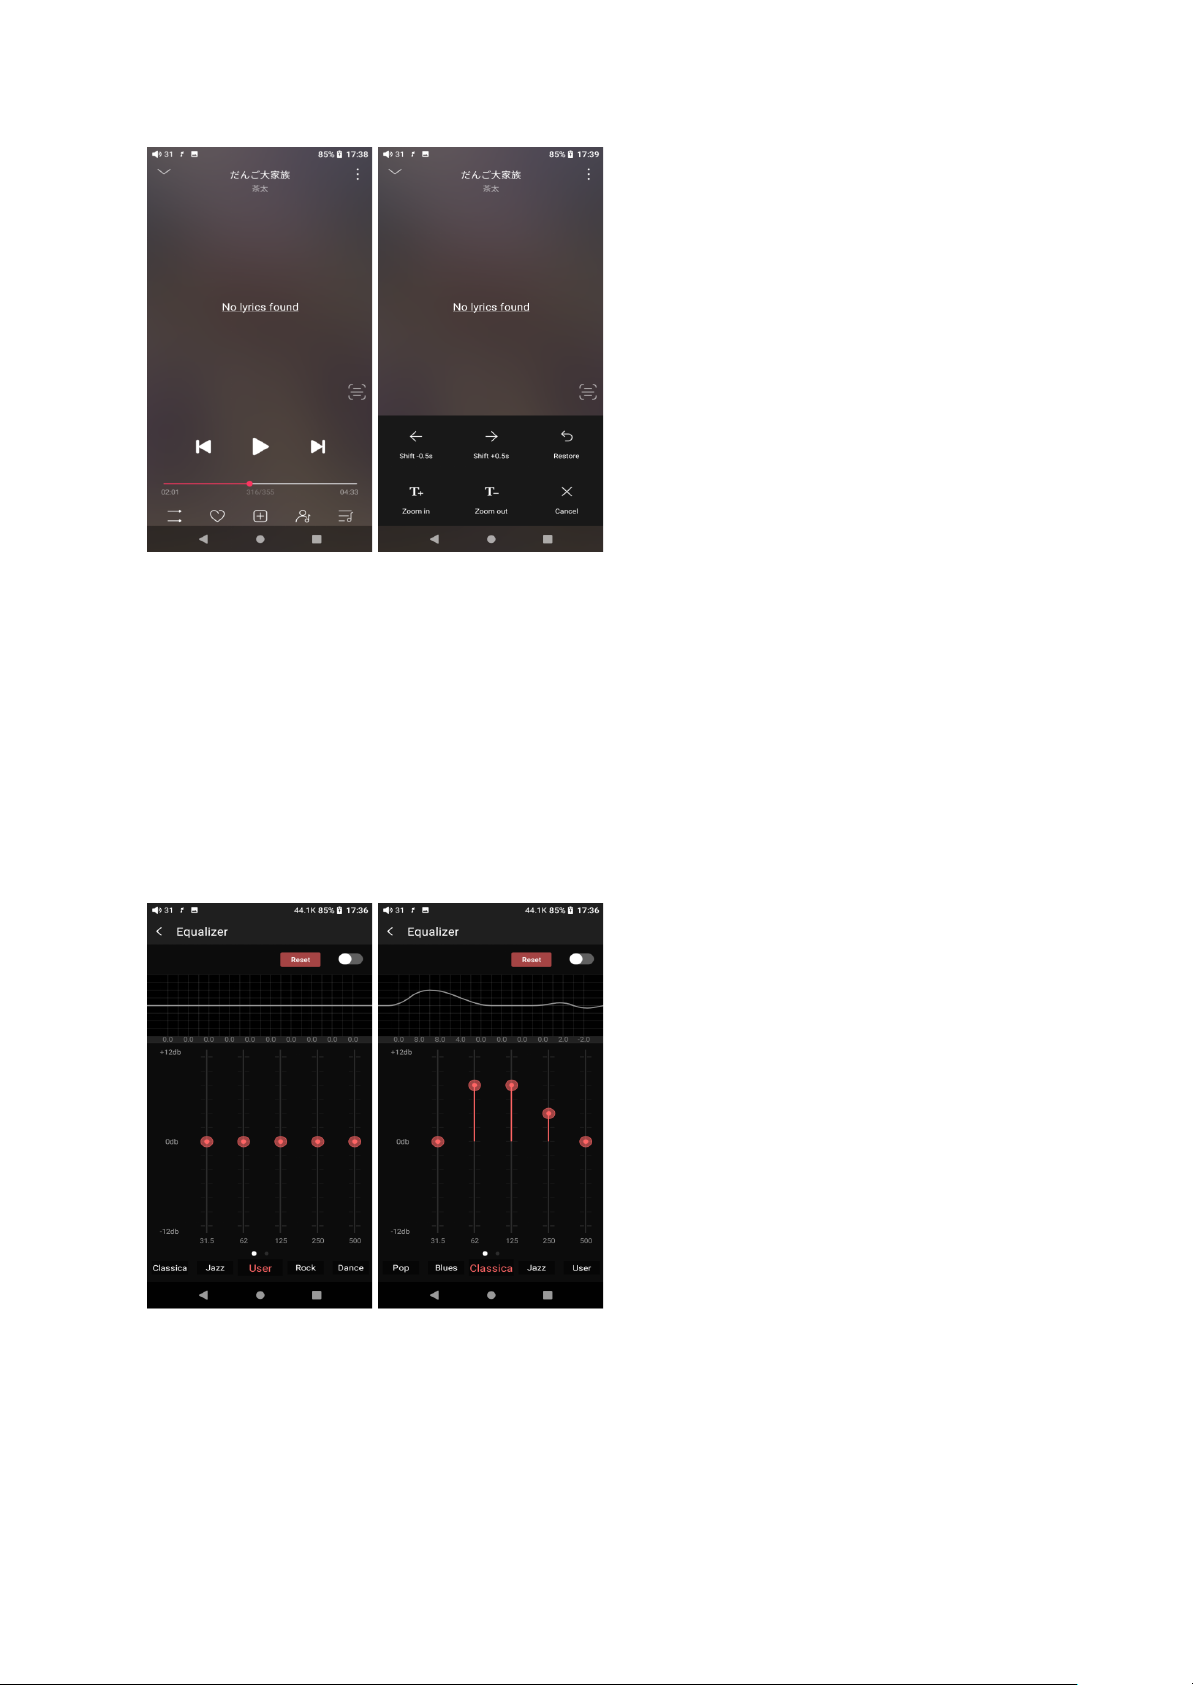
5. Equalizer
FiiO Music has a built-in equalizer, on which you can straightly choose the preset EQ for
listening, or adjust it through the 10 frequency bands within 20Hz~20kHz from -12 to +12 dB,
fully meeting personal music tastes.
Choose preset EQ: swipe left or right on the bottom of the screen to switch equalizer.
Page 47
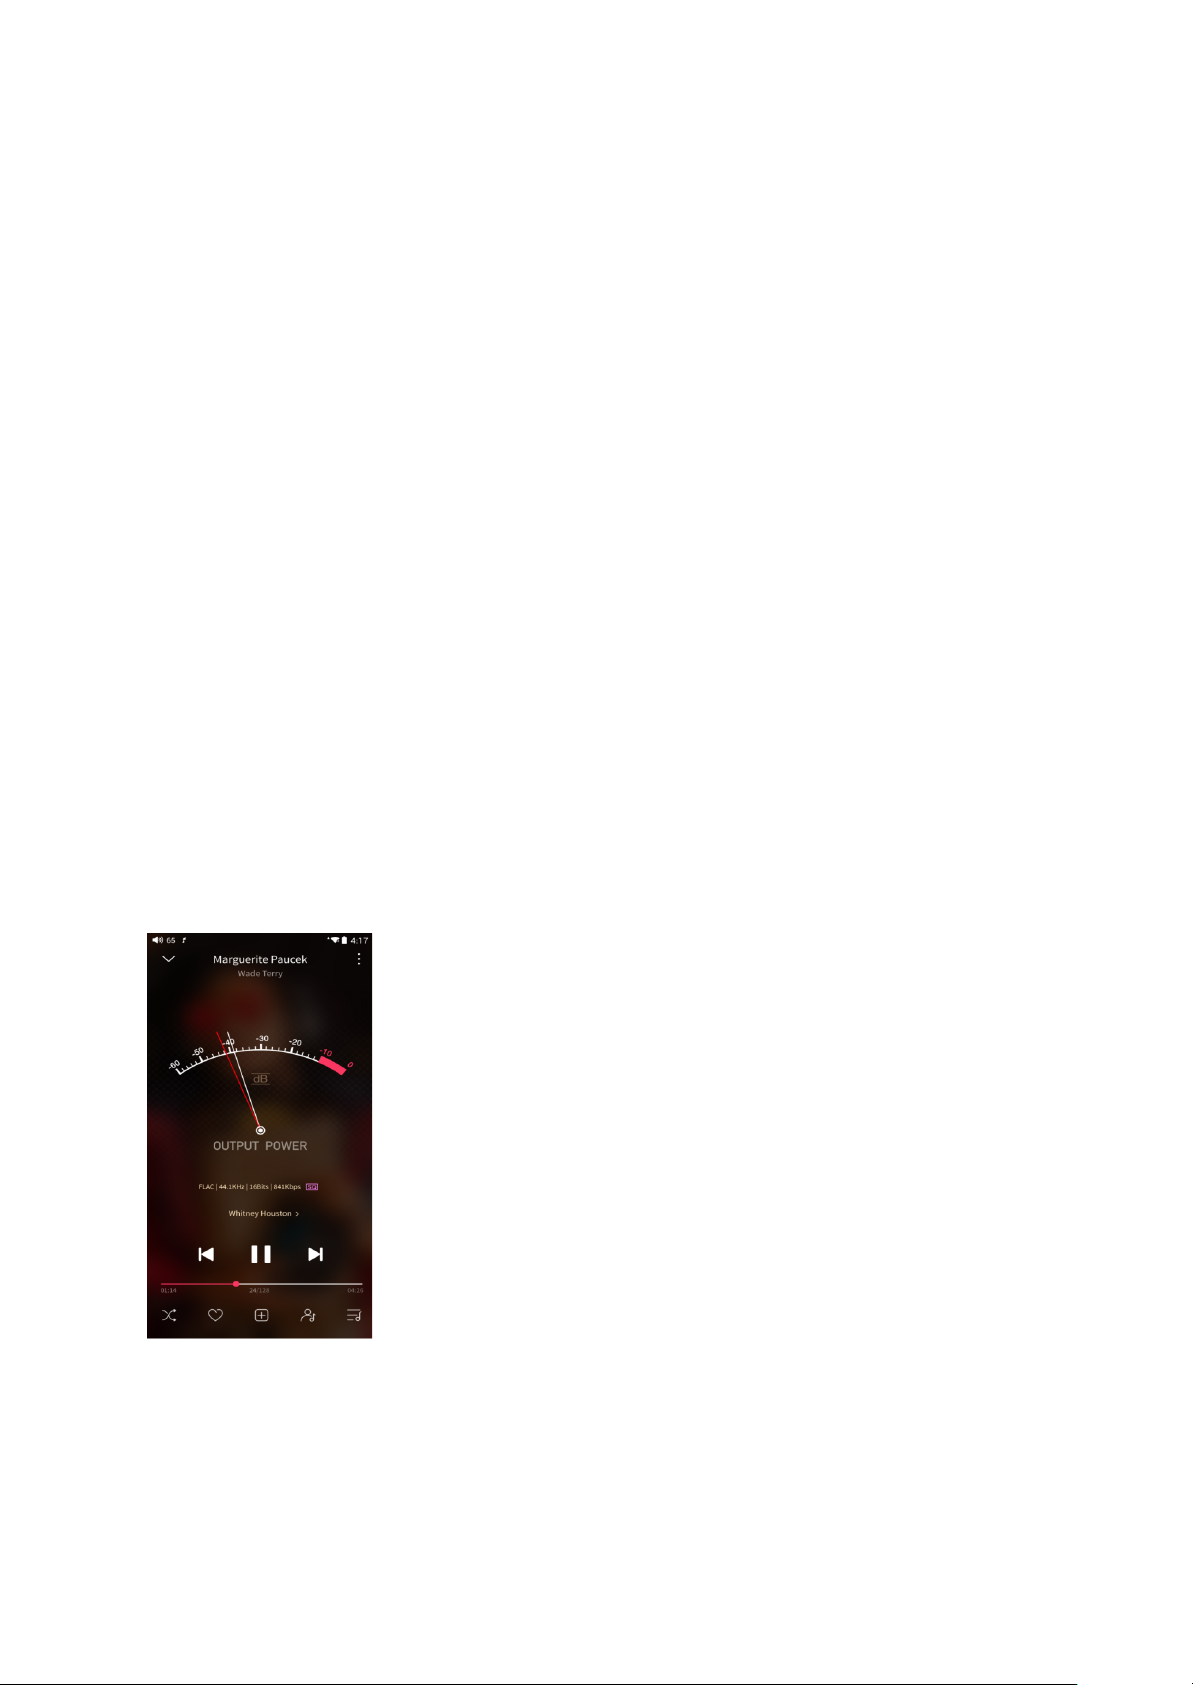
Customized EQ: drag the corresponding frequency band up and down to slightly adjust the
EQ curve (on the bands page, switch left and right to change the option). Successively
adjusting the EQ in need, it will immediately take effect.
Reset EQ: Tap the Reset button at the upper right corner to reset the present EQ.
Notes: if the system is reset to factory mode, all EQ settings will be reset to default.
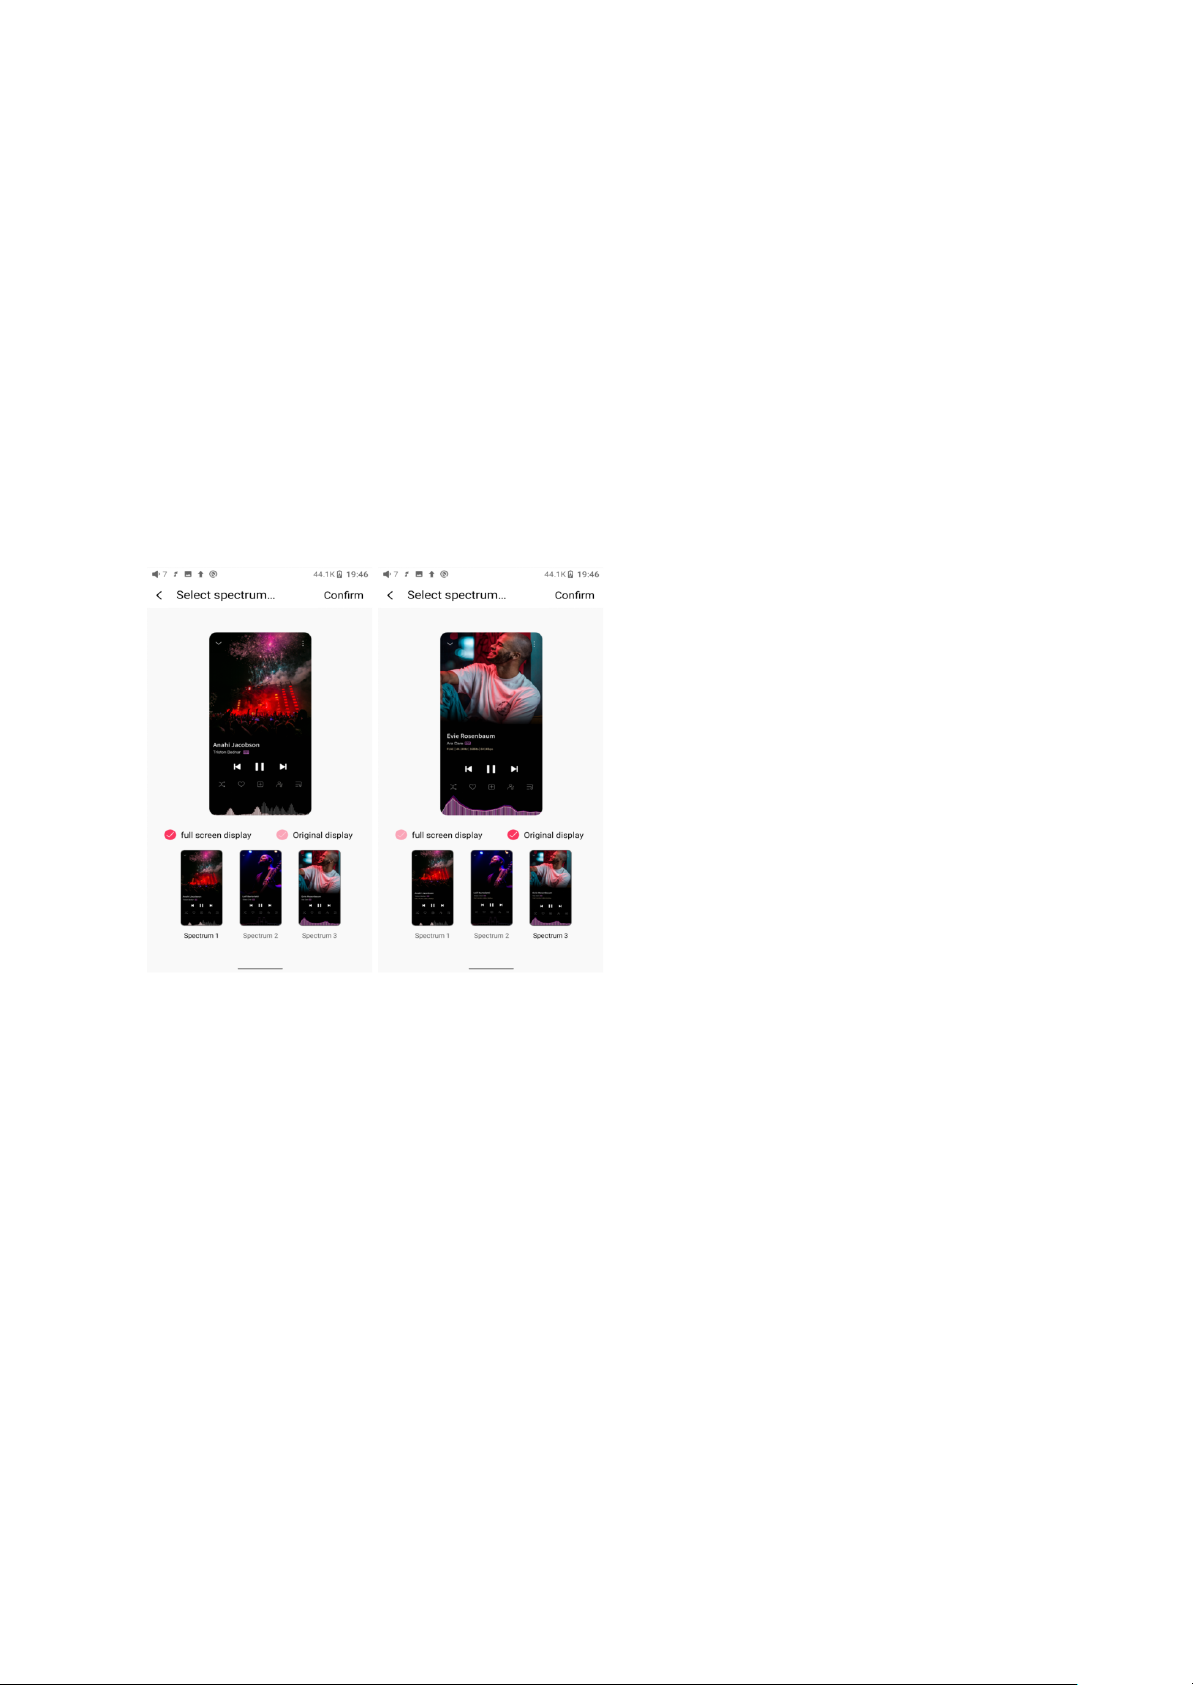
6. UV meter
There is a newly added UV meter (audio meter) with a dB threshold and dynamic pointer
displayed. Closing to the red threshold of 0dB means audio distortion.
How to enable it: tap the song cover on the now playing page to enter the UV meter
displaying page.
Page 48
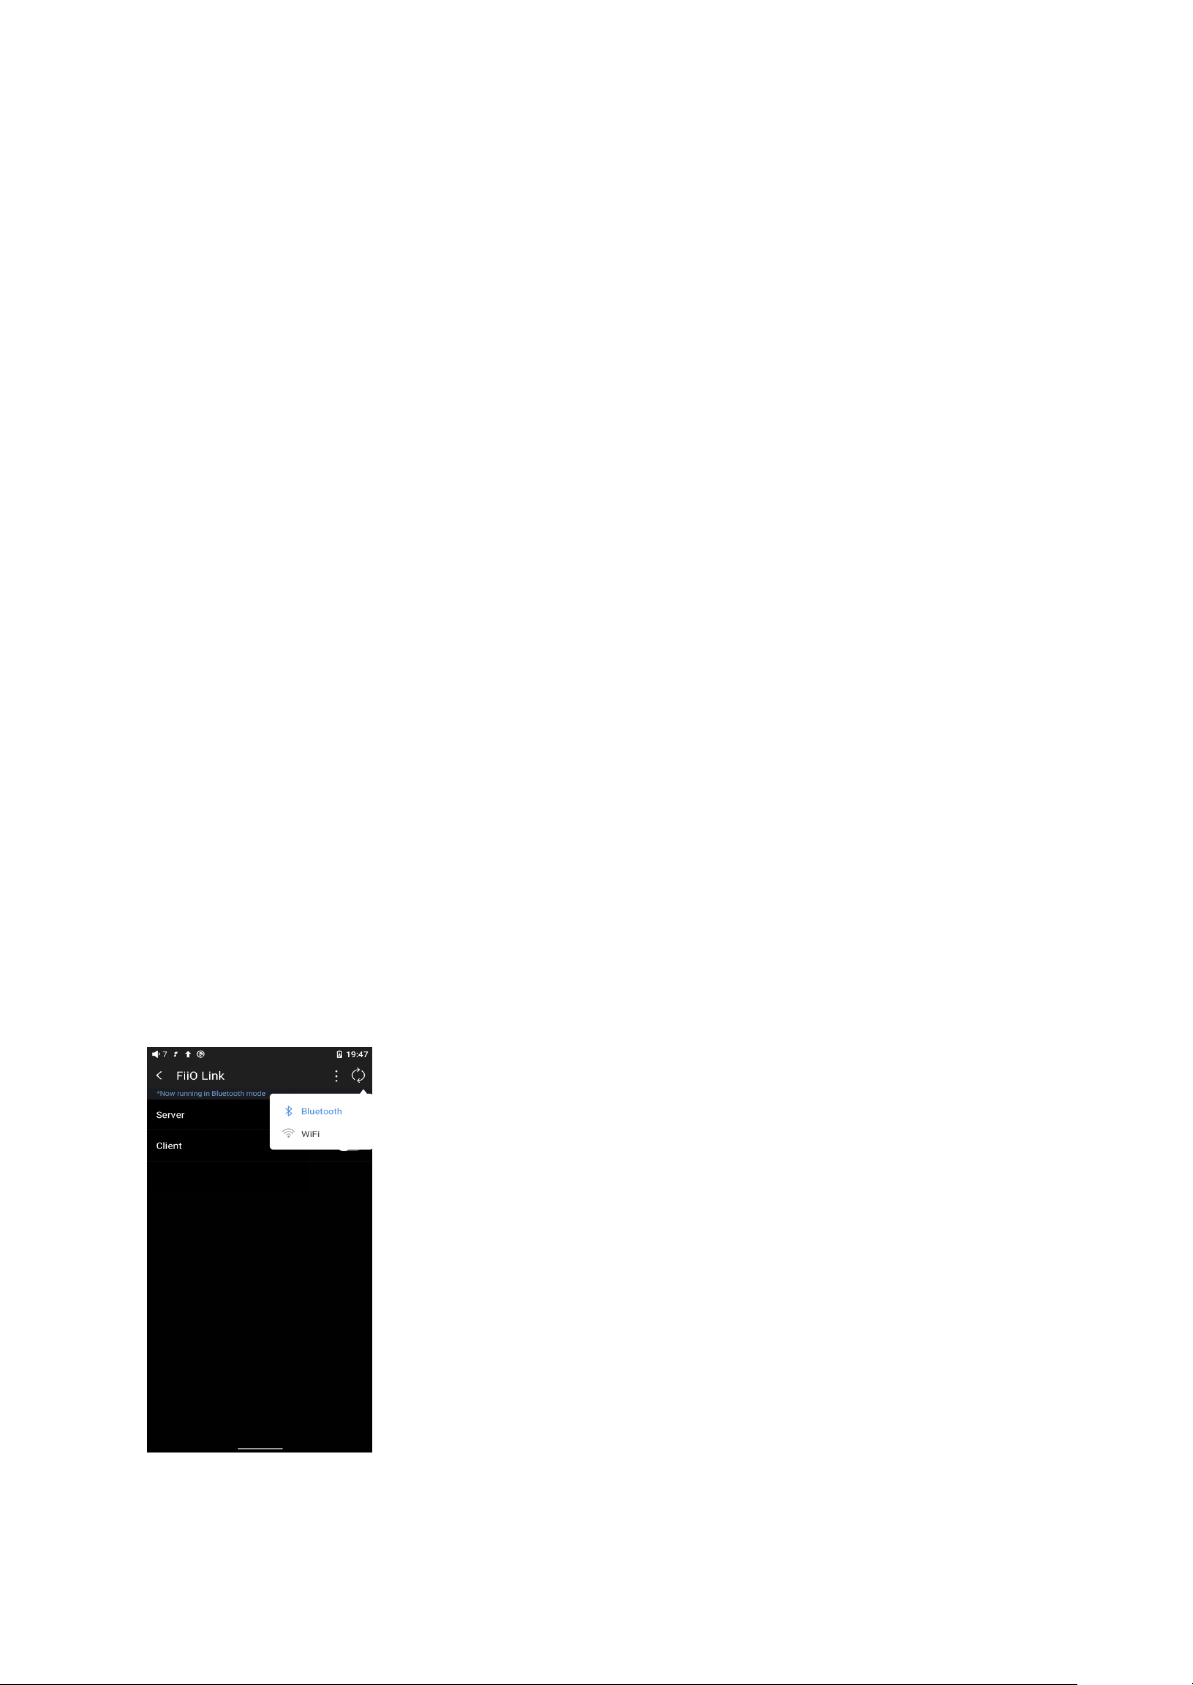
7. Frequency spectrum playing page
There is a newly added frequency spectrum mode in the now playing page, which has 3
built-in spectrum effects available. Besides, users can self-define Full screen display or
Original display for the spectrum mode.
How to enable it: go to the Settings menu in FiiO Music app->Theme->Now playing page.
Choose Spectrum display.
Square cover and large cover:
Page 49

FiiO Music app keeps upgrading and maintaining. For the newest instruction, please visit our
official forum:
https://forum.fiio.com/note/showNoteContent.do?id=202105071626425774349&tid=17
Instructions for commonly-used functions
1. Screenshot
The M17 supports screenshot: swipe down the screen with 3 fingers, or hold the power and
volume down button at the same time.
The screenshot is stored in FiiO M17\Files\Internal storage\Pictures\Screenshots.
2. USB Audio digital output
The M17 supports connecting to external decoders (USB Audio). Follow the steps to enable
it.
1) In the FiiO Music app, turn on the USB output
2) Use an OTG adapter cable to connect the M17 to the external decoder.
Page 50
3) Starting up the FiiO Music app or any music app, the M17 can work as a USB digital
device.
It supports most decoders on the market. For those unsupported, please turn off the USB
output in the FiiO Music app, or unplug and re-plug the USB device after exiting the FiiO
Music app to try playing again.
3. FiiO Link Bluetooth control
There are mainly 3 steps.
1) On the FiiO Music app of the M17, Settings->FiiO Link->┆ (on the upper right corner of
the display), choose Bluetooth as the Server.
2) Connect the M17 to the mobile phone through Bluetooth.
3) On the FiiO Music app of the mobile phone, Settings->FiiO Link->┆ (on the upper right
corner of the display), choose Bluetooth as the Client.
Notes: iPhones only support FiiO Link WiFi control but not Bluetooth.
Page 51
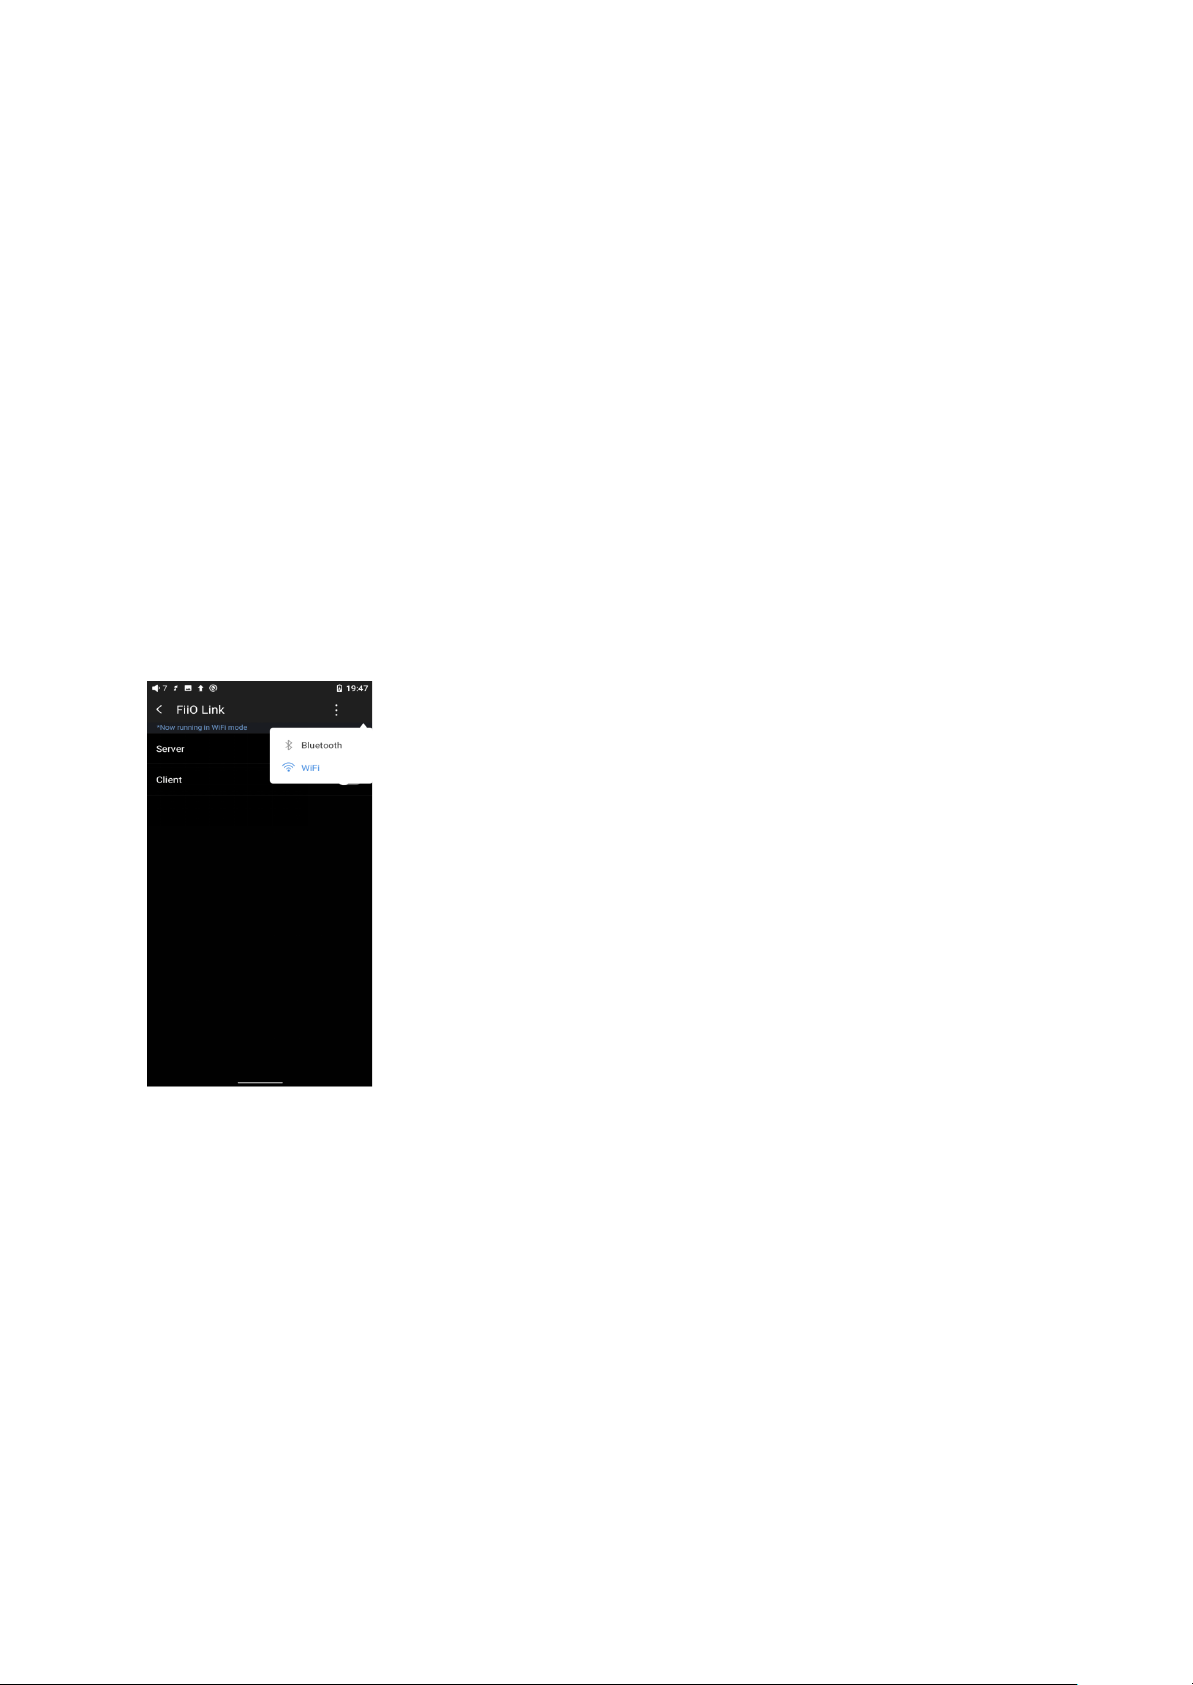
4. FiiO Link Wifi control
There are mainly 3 steps.
1. Make sure the M17 and your mobile phone are connected to the same WiFi network.
2. On the FiiO Music app of the M17, Settings->FiiO Link->┆ (on the upper right corner of the
display), choosing WiFi as the Server. Now an IP address will show up.
3. On the FiiO Music app of the mobile phone, Settings->FiiO Link->┆ (on the upper right
corner of the display), choosing WiFi as the Client. Input the IP address in the pop-up dialog
and complete the connection.
Notes: iPhones only support FiiO Link WiFi control but not Bluetooth.
5. How to use the DLNA function?
The DLNA function means the M17 can read and receive music files stored on the device
(name it Device A) which supports DLNA function through WiFi.
1. Make sure the M17 and Device A are connected to the same WiFi network.
Page 52

2. On the FiiO Music app of the M17, tap DLNA on the main menu and search for Device A
to play music of it.
Notes: If there are any devices that cannot use the DLNA function, please give us feedback
for further analysis. FiiO Music app does not support music transmission at present but only
music reception. We will consider adding the transmission function later.
6. How to use the coaxial function of M17?
M17 coaxial port supports output and input of coaxial signals.
Coaxial input:
Coaxial decoding mode, M17 is used as a coaxial decoder.
1. Switch the SPDIF work mode of M17 to SPDIF IN mode from Settings-Audio or go to the
drop-down or Settings menu of the M17, and choose the working mode as SPDIF RX mode.
2. Use coaxial cable to connect M17 and coaxial output device;
3. Connect the headphone to the M17 to use it.
Coaxial output:
this function will not use M17's DAC for decoding, but output to the coaxial decoder for
decoding.
1. Switch the SPDIF work mode of M17 to SPDIF OUT mode from Settings-Audio;
And please turn on 'Coaxial output' option before using the coaxial output function.
2. Use a coaxial cable with one side connected to M17 and the other side to a coaxial
decoder;
Page 53
3. When you use the FiiO Music, DSD OUT should give priority to DoP. If the coaxial
decoder doesn't support it, please select D2P mode.
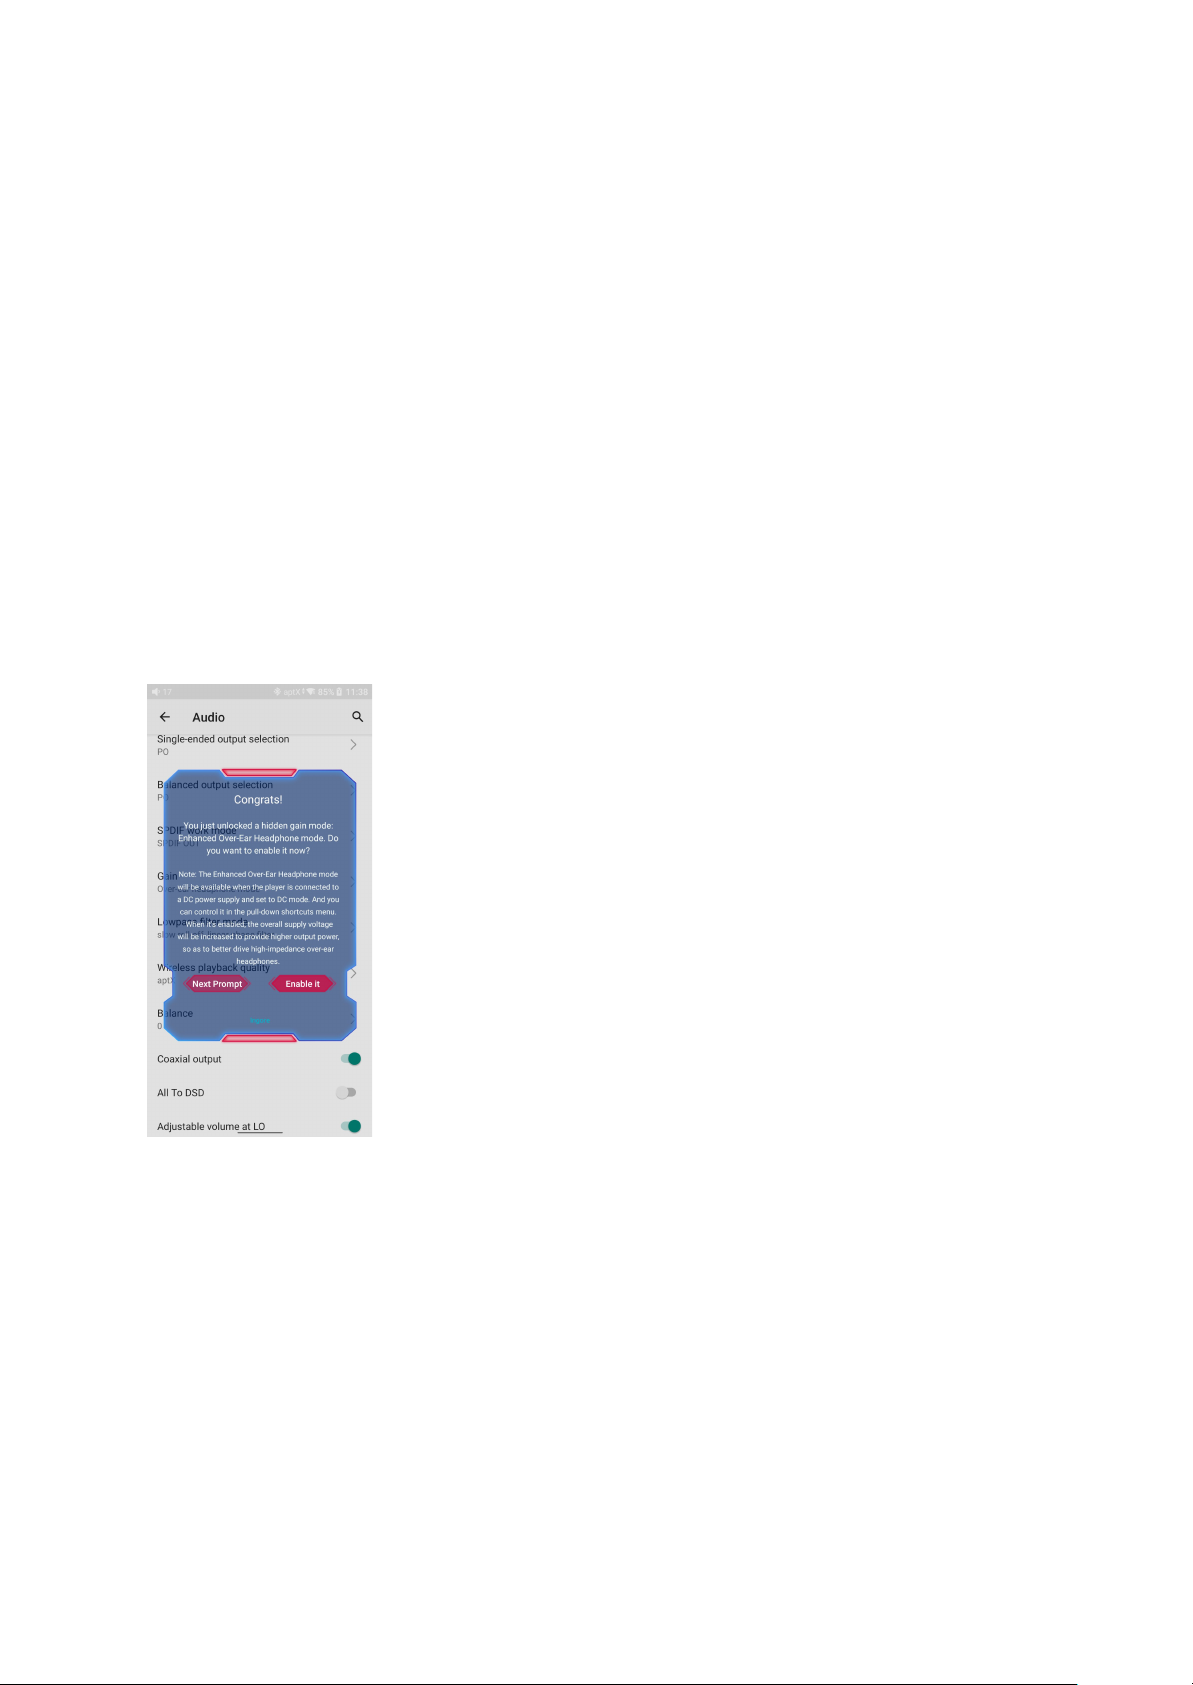
7. How to make M17 enter enhanced over-ear headphones
mode?
1. Connect M17 with the original power adapter of M17;
2. Switch the BAT/DC switch on the side of M17 to DC mode to enter the hidden
mode(enhanced over-ear headphones mode).
8. What can be done if I forget my password? How to enter
recovery mode?
The device needs to be reset from recovery mode if you forget the password.
Page 54
Turn off the device first. Hold the play/pause button then plug a USB cable into the USB 3.0
port for power supply. It will enter recovery mode after turning on. On the display, choose
"Wipe data/factory reset->Yes. You could switch the option via the volume +/- or play/pause
buttons. Then choose "Reboot system now" by pressing the power button to restart the
device.
Firmware upgrade, factory data reset and technical
support
1. How to upgrade firmware?
The M17 supports online upgrade and local upgrade.
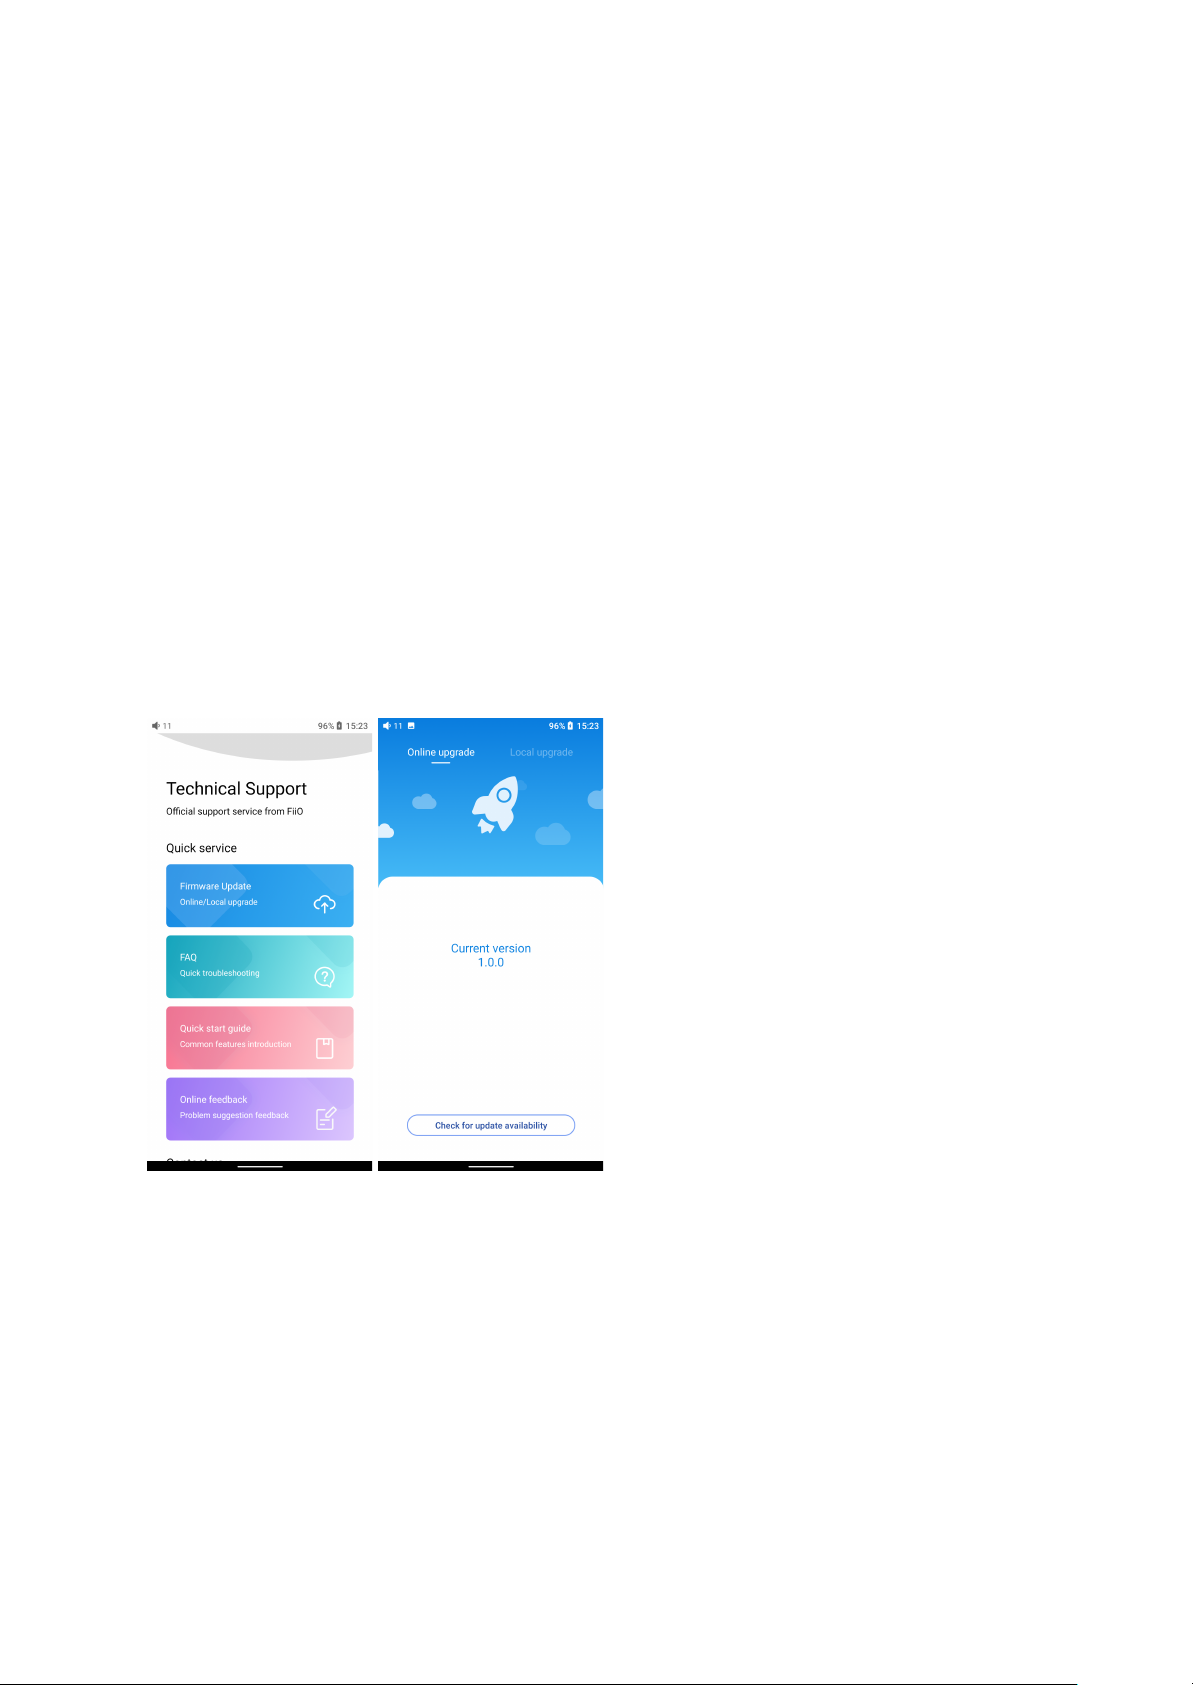
Online upgrade
If a new firmware is available and can be detected (with the M17 connected to an available
internet), an upgrade notification will show up in the notification center. Tap on it to enter the
update menu for the online upgrade. If there's no upgrade notification showing up, you can
go to the "Technical Support->Firmware Upgrade" menu, and tap the "Check for updates"
icon to check manually.
Page 55

Local upgrade
Also, the M17 can be upgraded locally by a firmware package. Download the firmware
package file from FiiO website, and copy it to the internal storage of the M17 or an SD card.
Go to the "Technical Support->Firmware Upgrade->Local Upgrade" menu, and find the
firmware package file to start the upgrade.
Notes:
1. Do not unzip the firmware package file.
2. Before the upgrade, ensure the power of the device is adequate (>30%) so to avoid
upgrade failure.
3. If the device goes to factory mode which cannot detect the firmware, the reason may be
that the firmware file is damaged. At this time, press the power button to reboot the device.
Re-download the firmware file and restart the upgrade.
2. Force to reboot
If something wrong happened to the device (stuck in the Welcome page, no response, etc.),
you can hold the Power and the Play button together for 10 seconds to force it to reboot.
3. Factory data reset
If there are some problems that happened to the device, performing the factory data reset
would help (In the menu of Settings->System->Reset options).
Notes: The "Factory data reset" will erase all data from the internal storage and reset the
device to defaults. Please backup corresponding files in advance.
Page 56
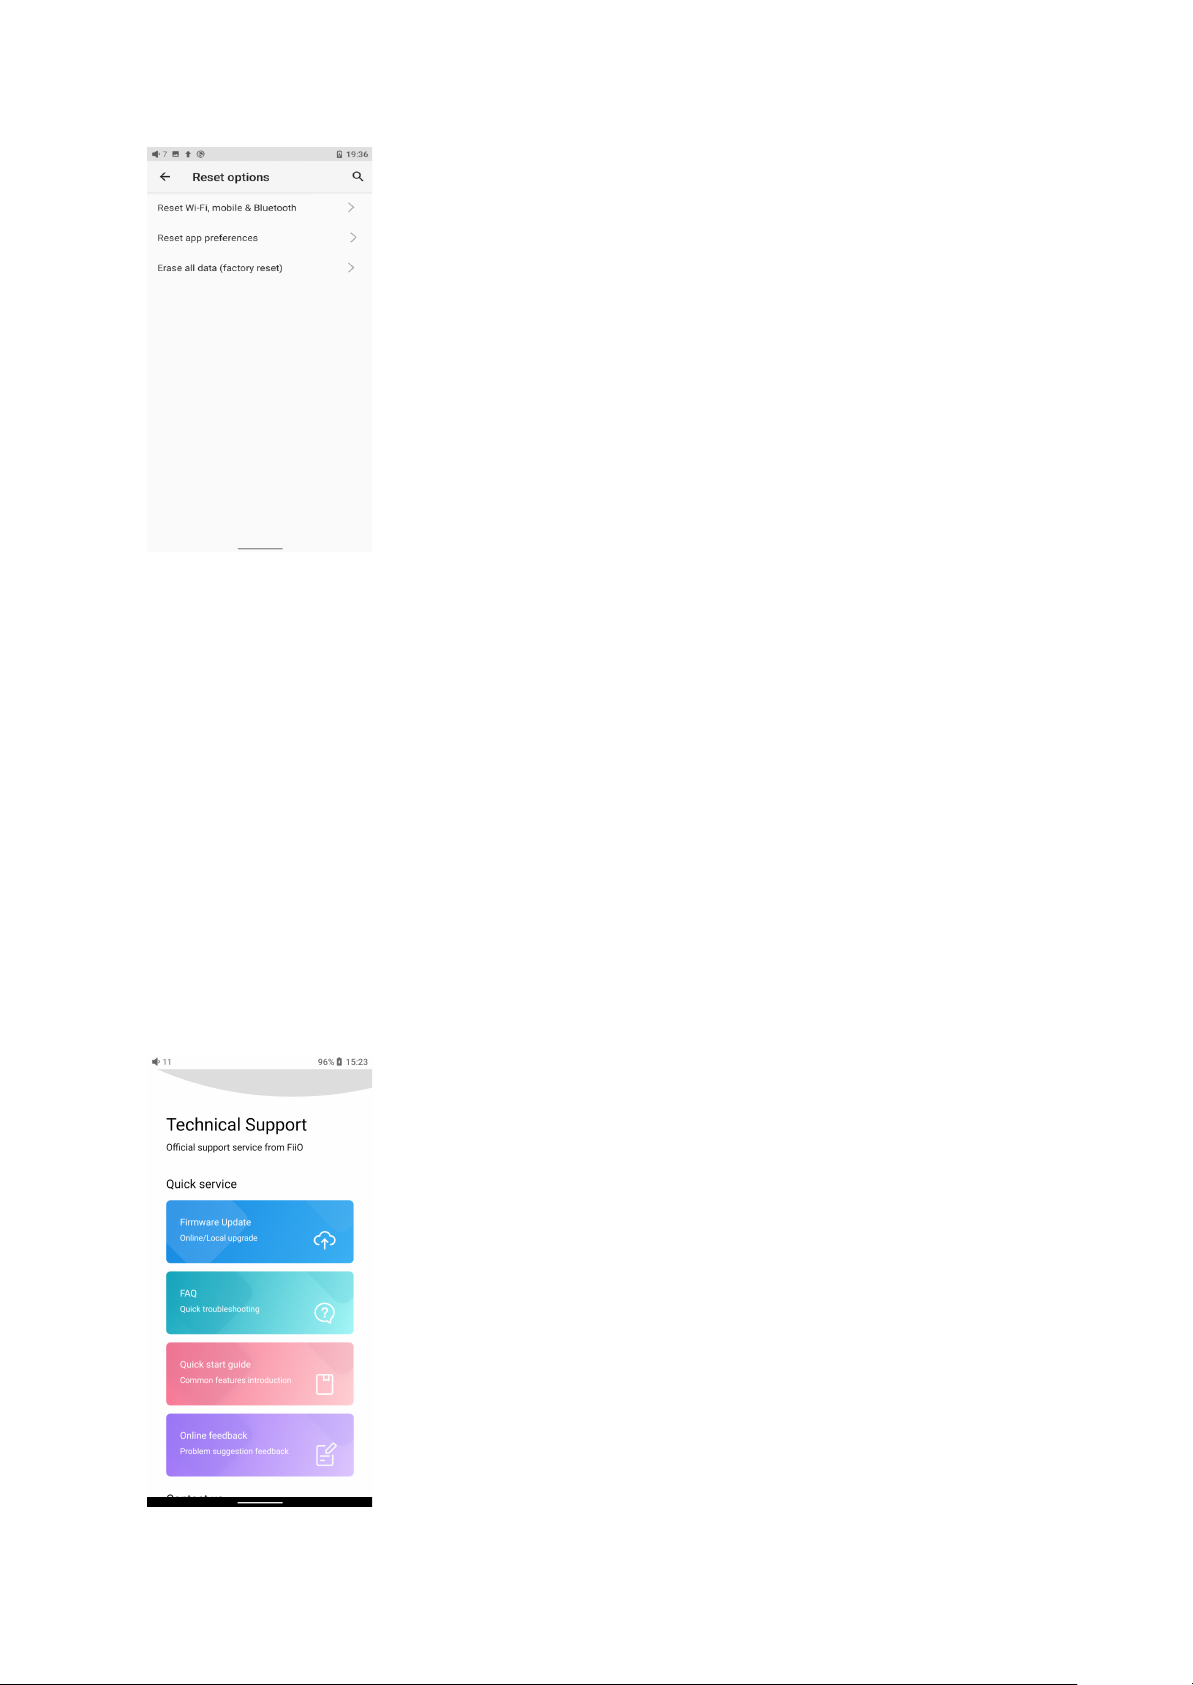
4. Technical support
1) On the homepage, tap Technical Support to enter the menu. Here are several
commonly-used functions and our contacts.
2) Firmware update: online and local upgrade are available.
FAQ (frequently asked questions): parts of frequently asked questions and corresponding
measures are listed.
3) Quick start guide: tap to check out the internal quick start guide of the M17.
4) Contact us: here shows our email address, Facebook, Twitter, etc.
 Loading...