

Page 1

P100
Portable LED Light
User Manual
Page 2

Table of Contents
What’s In The Box
Getting To Know The Light
Set Up And Basic Operation
Optional Accessories
Specifications
For Your Safety
Warranty
1
2
4
6
7
7
8
Page 3
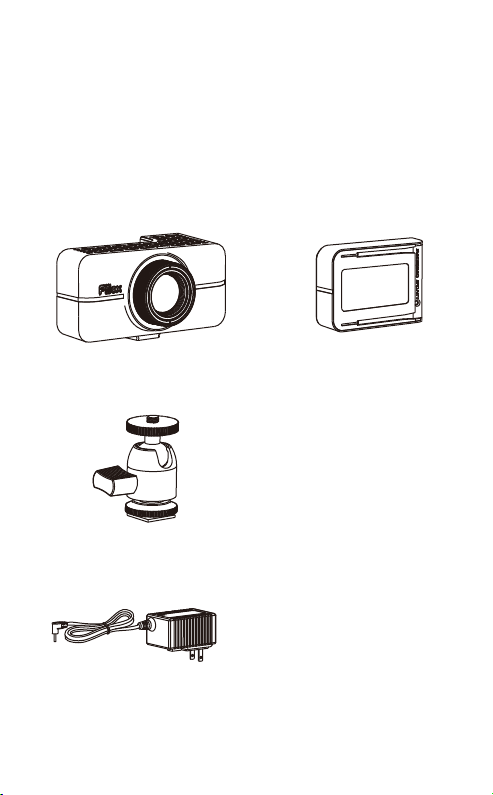
What’s In The Box
• Rechargeable Battery• P100 Light
• Cold Shoe w/ Mini Ball Head
• Power Charger
1
• User Manual
Page 4
Getting To Know
The Light
F
G
H
I
C
D
E
K
N
O
2
J
L
M
P
Page 5

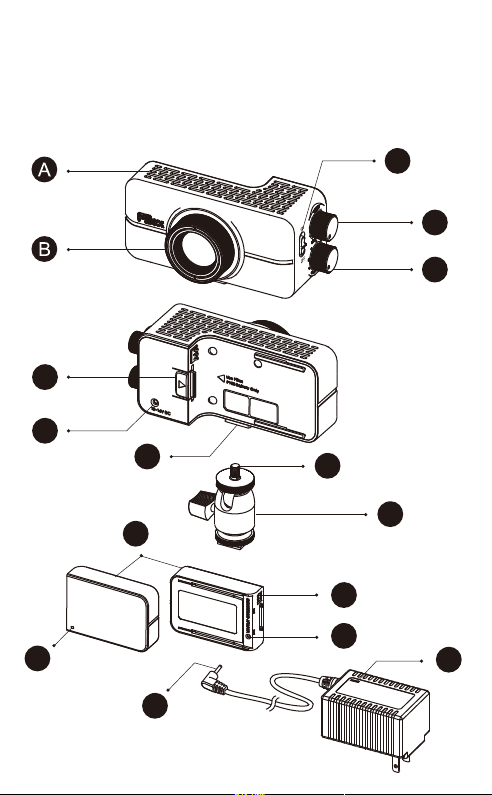
Air Vents
A
Beam Shaper
B
On/Off Switch
C
CCT Tuning Knob (3000-5600K)
D
Intensity Knob
E
Battery Lock
F
DC Power Input Jack
G
1/4” - 20 Female Accessory Mount
H
1/4” - 20 Male Thread
I
Cold Shoe w/ Mini Ball Head
J
Battery
K
Battery Pin
L
Power Charger Input Jack
M
Battery Indicator Light
N
Connector of Power Charger
O
P
Charge State Light
3
Page 6
Set Up And
Basic Operation
3
7
6
5
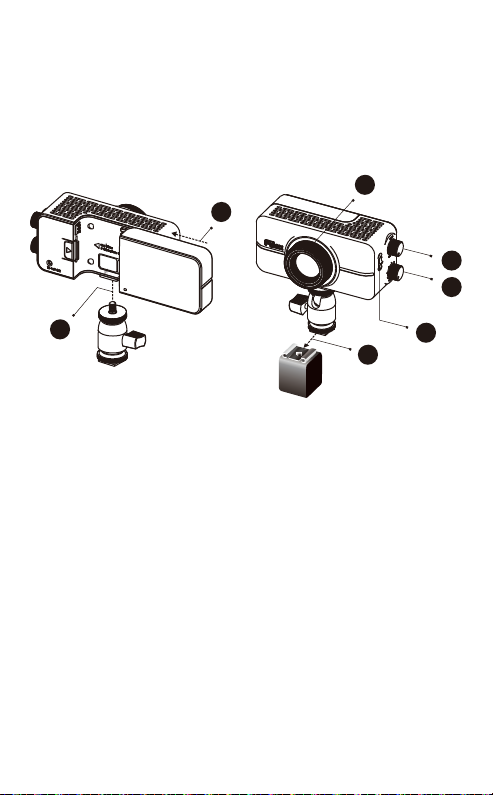
1
2
1
Insert 1/4” - 20 Male Thread (I) into 1/4” - 20 Female
Mount (H).
2
Mount P100 to the cold/hot shoe of your camera via
Cold Shoe w/ Mini Ball Head (J).
3
Slide Battery (K) into P100, or plug Connector of
Power Charger (O) into DC Power Input Jack (G).
P100 can be powered in two ways: with the provided
Fiilex Battery (K), or via an optional D-Tap Cable
connected to an external ba t tery source (not included).
4
Slide On/Off Switch (C) to turn on P100.
5
Adjust intensity with Intensity Knob (E).
6
Adjust the color temperature with CCT Tuning Knob (D).
7
Adjust beam angle with Beam Shaper (B).
4
4
Page 7

Remove Battery
Press Battery Lock (F) and slide Battery (K) away.
Charge
Plug Connector of Power Charger (O) into Power Charger
Input Jack (M) and plug the power charger into a standard
AC wall outlet. When charging, Charge State Light (P) on
power charger will show red. When charging is finished,
the light will become green.
Battery Indicator Light
The Battery Indicator Light (N), located on the back of the
battery, will show the user the remaining charge of the
battery by lighting one of the following colors:
Green = Battery 50-100%
Orange = Battery 20-50%
Red = Battery <20%
Battery Indicator Light (N) is an estimated measure, the
color status may fluctuate from time to time depending on
the intensity setting of the P100.
Note
P100 is powered by a rechargeable Li-ion battery. Use
*
only Fiilex approved batteries and chargers.
You must fully charge the battery for the first time. A
*
discharged battery recharges fully in approximately 3 hours.
Battery only charges through Power Charger Input Jack
*
(M) on battery.
For connection to an electrical supply not located in the
*
U.S., you must use an adapter of the proper
configuration for the power outlet. Use of the wrong
adapter and/or power configuration could result in
damage to the P100 and void your warranty.
5
Page 8
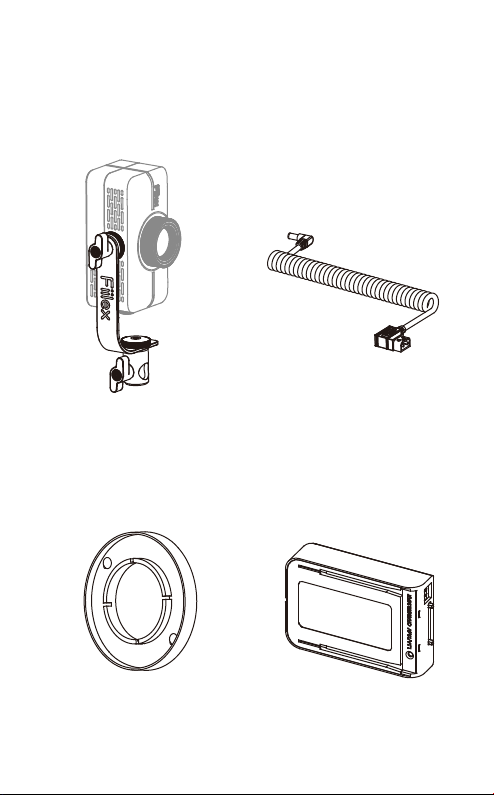
Optional Accessories
Half Yoke
P100 Accessory
Mount
D-tap Cable
Rechargeable
Battery
See website for additional accessories. www.fiilex.com
6
Page 9

Specifications
Size 5.8” (Length) × 2.8” (Width) × 2.8” (Height)
Light Weight 0.59 lb/ 270 g
LED Dense Matrix LED
Thermal Design Passive Cooling System (Without Fan)
CCT Range Continuous from 3000K to 5600K
CRI >90
Power Consumption 12W Max.
Input 10 to 16V DC
AC Adapter 100-240V AC, 50-60Hz (In) / 12V DC , Min.12W (Out)
Battery Li-ion/Rechargeable Battery/11.1V 2600mAh/29Wh
Operating Temperature 0 to 40 °C
For Your Safety
•Do not attempt to disassemble the body of P100.
•Do not install P100 in a damp or wet area.
•Do not cover the air vents.
•Use only the included power supply.
Failure to do so may cause damage to the LED light.
•Use only a soft, dry towel to gently clean the exterior of the light.
•Do not attempt to disassemble deform, solder, or heat
battery.
•Do not insert battery with different connector.
•Stop using battery if it expands or if temperature reaches
over 60°C or 140°F.
•Do not short circuit battery.
7
Page 10

1 Year Limited Warranty
Unless otherwise stated, your product is covered by a
one year parts and labor limited warranty. Fiilex
guarantees,to the original buyer,that this product
(Battery Not Included) is to be free of defects in both
workmanship and material for a period of one year from
the date of shipment. This warranty extends to all
products (Battery Not Included) which have proved
defective through normal use but excludes products that
have been disassembled, modified or misused by the
buyer or any other person. This warranty is in lieu of all
other warranties, and disclaims all warranties expressed
or implied, including any warranty of merchantability,
fitness for a particular purpose, or arising from the
course of dealing between the parties or usage of trade.
Returning an Item Under Warranty for Repair
It is necessary to obtain a Return Authorization Number
(RA#) from your dealer / point of purchase BEFORE any
units are returned for repair. Fiilex will make the final
determination as to whether or not the unit is covered by
warranty. Fiilex will replace or repair to proper working
condition any products that are returned under
warranty. Products repaired or replaced under warranty
are under warranty only for the remaining unexpired
period of time of the original warranty.
8
Page 11

Any product unit or part returned to Fiilex must be
packaged in a suitable manner to ensure the protection
of such product unit or parts. The package must be
clearly and prominently marked to indicate that the
package contains returned product units or parts with a
Return Authorization (RA#) number. All returned
product units or parts must be accompanied by a written
explanation of the alleged problem or malfunction.
Fiilex.com
1689 Regatta Blvd. Richmond, CA 94804
(510)620-5155 . [email protected]
Information and Specifications in this document are subject to change without notice. DiCon
Lighting, Inc. assumes no responsibility or liability for any error or inaccuracies that may
appear in this manual. Unlawful reproduction or distribution in any manner without the
written permission of DiCon Lighting, is strictly prohibited.
© DiCon Lighting 1996-2013 All Rights Reserved
9
Page 12

Fiilex.com
3
 Loading...