

fifthplay EnergySmart User Manual

fifthplay
EnergySmart
User Guide

© 2013 fifthplay nv. All rights reserved.

fifthplay EnergySmart - User Guide
3
CONTENTS
Introduction 9
What is fifthplay EnergySmart? 9
Installation 11
What do you need? 11
Getting started 11
Connecting the gateway 12
Connecting the gateway to the wireless network 15
Registering a new user 18
Activating fifthplay EnergySmart 18
Network 21
General 21
■ Personalising the network 21
■ Consulting an overview of all devices in your network 21
Rooms 21
■ Adding a new room 21
■ Editing the name of a room 21
■ Adding a schedule to a room 22
Groups 22
■ Adding a new group 22
■ Adding devices to a group 22
■ Editing a group 23
■ Adding a schedule to a group 23
■ Removing a group 23
Smart plugs 25
What do you need? 25

4
fifthplay EnergySmart - User Guide
Contents
Connecting the smart plugs 25
Adding smart plugs to the system 26
Configuring the smart plugs 28
Switching the smart plugs on and off 28
Adding the smart plugs to a room 29
Adding the smart plugs to a group 29
Creating a schedule 30
Amending an existing schedule 30
Removing an existing schedule 31
Allocating a schedule to a smart plug 31
Adding smart plugs to a schedule 31
Removing smart plugs from a schedule 32
Erasing the history of your smart plugs 32
ICY Smart thermostat 33
What do you need? 33
Connecting the ICY Smart thermostat with the gateway 33
Adding an ICY Smart thermostat to the system 34
Configuring the ICY Smart thermostat 35
Manually controlling the ICY Smart thermostat 37
Consulting the current temperature 37
About scheduling the ICY Smart thermostat 37
Editing a schedule 38
Viewing the consumption of the ICY Smart thermostat 38
Smart thermostat Honeywell Evo Touch 41
About the Smart thermostat Honeywell Evo Touch 41
■ Batteries 41
Installing your Smart thermostat Honeywell Evo Touch 41

fifthplay EnergySmart - User Guide
5
Contents
Connecting the Honeywell HGI80 communication module with the gateway 42
Adding your Smart thermostat Honeywell Evo Touch to the system 43
Configuring the Smart thermostat Honeywell Evo Touch 43
Manually controlling the Smart thermostat Honeywell Evo Touch 44
Consulting the current temperature 45
About scheduling the Smart thermostat Honeywell Evo Touch 45
Applying a schedule 48
Editing a schedule 48
Viewing the consumption of the Smart thermostat Honeywell Evo Touch 49
Smart thermostat DT-92 51
About the Smart thermostat DT-92 51
■ Batteries 51
Installing your Smart thermostat DT-92 51
Connecting the Honeywell HGI80 communication module with the gateway 52
Connecting the Smart thermostat DT-92 with the system 53
Configuring the Smart thermostat DT-92 54
Manually controlling the Smart thermostat DT-92 54
Consulting the current temperature 55
About scheduling the Smart thermostat DT-92 55
Applying a schedule 57
Editing a schedule 58
Viewing the consumption of the Smart thermostat DT-92 58
Smart meter 61
What do you need? 61
Adding the smart meter to the system 61
Configuring the smart meter 63
Viewing your consumption 63

6
fifthplay EnergySmart - User Guide
Contents
Conventional meter 65
What do you need? 65
Conventional meters 66
■ Electricity meters 66
■ Gas meters 66
Attaching the sensor to a conventional electricity meter 66
Attaching the sensor to a conventional gas meter 70
Connecting the sensor to the gateway 71
Installing the sensor 73
Viewing your consumption 75
Smart DIN rail module 77
What do you need? 77
Adding the smart DIN rail module to the system 77
Configuring the smart DIN rail module 78
Viewing the energy produced by the smart DIN rail module 79
Configuring the kWh counter 79
Consumption 81
Consulting the current consumption of a device 81
Viewing the consumption of a device 81
Comparing the consumption of your devices 82
Exporting the consumption of your devices 82
Automatically exporting your results 83
Tariffs 85
About adding tariffs 85
Altering the standard tariff 85
Adding a new tariff 86

fifthplay EnergySmart - User Guide
7
Contents
Removing a tariff 87
Calculating your projected cost savings 87
Messages 89
Reading messages 89
Deleting messages 89
Setting messages for unexpected consumption 90
Configuring messages for exceeded target consumption 90
Adding recipients 91
Editing recipients 91
Deleting recipients 92
Personal settings 93
Changing the language 93
Changing your email address 93
Changing your mobile phone number 93
Changing your address 93
Altering your notification preferences 94
Changing the name of your gateway 94
Receiving a warning when the gateway is offline 95
Setting your time zone 95
Renewing your voucher 95
Changing your password 96
Changing your user name 96
Smartphones and tablet computers 97
Installing the fifthplay app 97

8
fifthplay EnergySmart - User Guide
Contents
Troubleshooting 99
Gateway 99
Wireless internet 100
Smart plugs 101
ICY Smart thermostat 103
Smart thermostat Honeywell Evo Touch 104
Smart thermostat DT-92 105
Conventional meter 106
Messages 107
Support 107

fifthplay EnergySmart - User Guide
9
1 Introduction
1.1 What is fifthplay EnergySmart?
With fifthplay EnergySmart, you can collect and analyse important energy data about your home or
building in no time at all. This means that you will know exactly where your energy is being
consumed and you will be able to rapidly intervene to rein in excessive energy consumption. In
addition to energy consumption, you can also monitor energy production which allows you to
increase the performance of your solar panels, for instance.
fifthplay EnergySmart gives you a real-time view of the behaviour of hundreds of measuring points
at various sites. You will know immediately where energy is being consumed in excess.
fifthplay EnergySmart lets you analyse all of your data and view this in easy-to-use charts. This allows
you to save both time and money, because you know immediately where you need to intervene.
Several major advantages of fifthplay EnergySmart are:
■ available at all times and everywhere via the internet and your smartphone
■ user-friendly interface
■ advanced analytical functions for electricity, water and gas
■ dashboards which show real-time data
■ data can be exported in a variety of formats
■ automated reporting, alarm and notification services
■ remote monitoring and data logging by means of our proprietary fifthplay gateway tech-
nology.

10
fifthplay EnergySmart - User Guide
1 Introduction

fifthplay EnergySmart - User Guide
11
2 Installation
2.1 What do you need?
You will need the following to install the gateway:
■ gateway
■ internet modem or router
■ Ethernet cable
■ power cable
■ computer with internet connection
■ quick start guide
■ pen
■ screw driver and screws (to attach the gateway to the wall)
2.2 Getting started
1 Connect the gateway, see “Connecting the gateway” on page 12.
2 Register yourself as a new user, see “Registering a new user” on page 18.
3 Activate fifthplay EnergySmart, see “Activating fifthplay EnergySmart” on page 18.
4 Install your devices:
■ “Smart plugs” on page 25
■ “ICY Smart thermostat” on page 33
■ “Smart thermostat Honeywell Evo Touch” on page 41
■ “Smart thermostat DT-92” on page 51
■ “Smart meter” on page 61
■ “Conventional meter” on page 65
■ “Smart DIN rail module” on page 77
12
fifthplay EnergySmart - User Guide
2 Installation
2.3 Connecting the gateway
If you would like to connect your gateway to your wireless internet, go to “Connecting the gateway
to the wireless network” on page 15. The following instructions are for connecting the gateway to
your internet modem or router using an Ethernet cable.
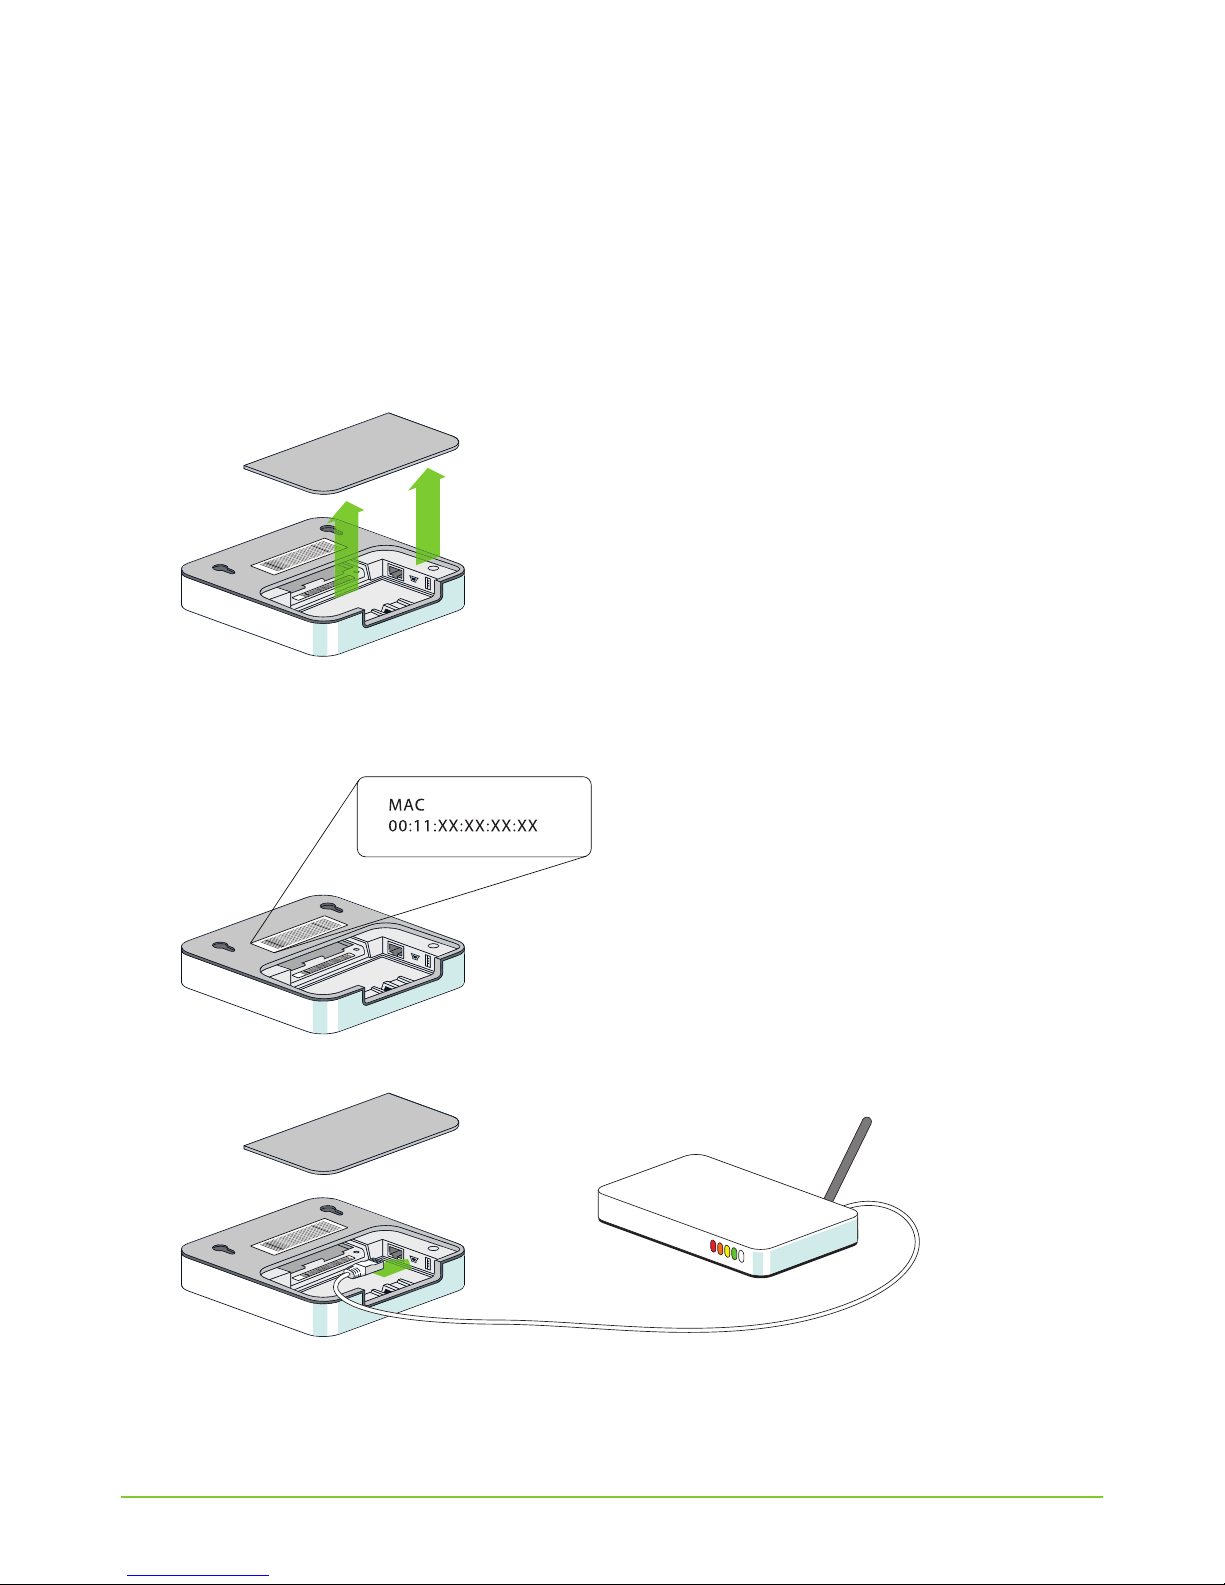
1 Open the cover on the underside of your gateway.
TIP: Make a note of the serial number and MAC address of your gateway. You will need these
when you register as a user.
2 Use the Ethernet cable to connect your gateway to your internet modem or router.

fifthplay EnergySmart - User Guide
13
2 Installation
3 Plug the network cable into your gateway.
4 Close the cover.
If you also want to install now is the time to connect
ICY Smart thermostat the external antenna. See “Connecting the ICY Smart
thermostat with the gateway” on page 33.
Smart thermostat
Honeywell Evo Touch,
the Honeywell HGI80 communication module, see
“Connecting the Honeywell HGI80 communication
module with the gateway” on page 42
Smart thermostat DT-92, the Honeywell HGI80 communication module, see
“Connecting the Honeywell HGI80 communication
module with the gateway” on page 52
a smart meter, the P1/USB cable or the RJ11 cable. See “Adding the smart
meter to the system” on page 61.
a conventional meter, the sensor. See “Connecting the sensor to the gateway” on
page 71.
14
fifthplay EnergySmart - User Guide
2 Installation
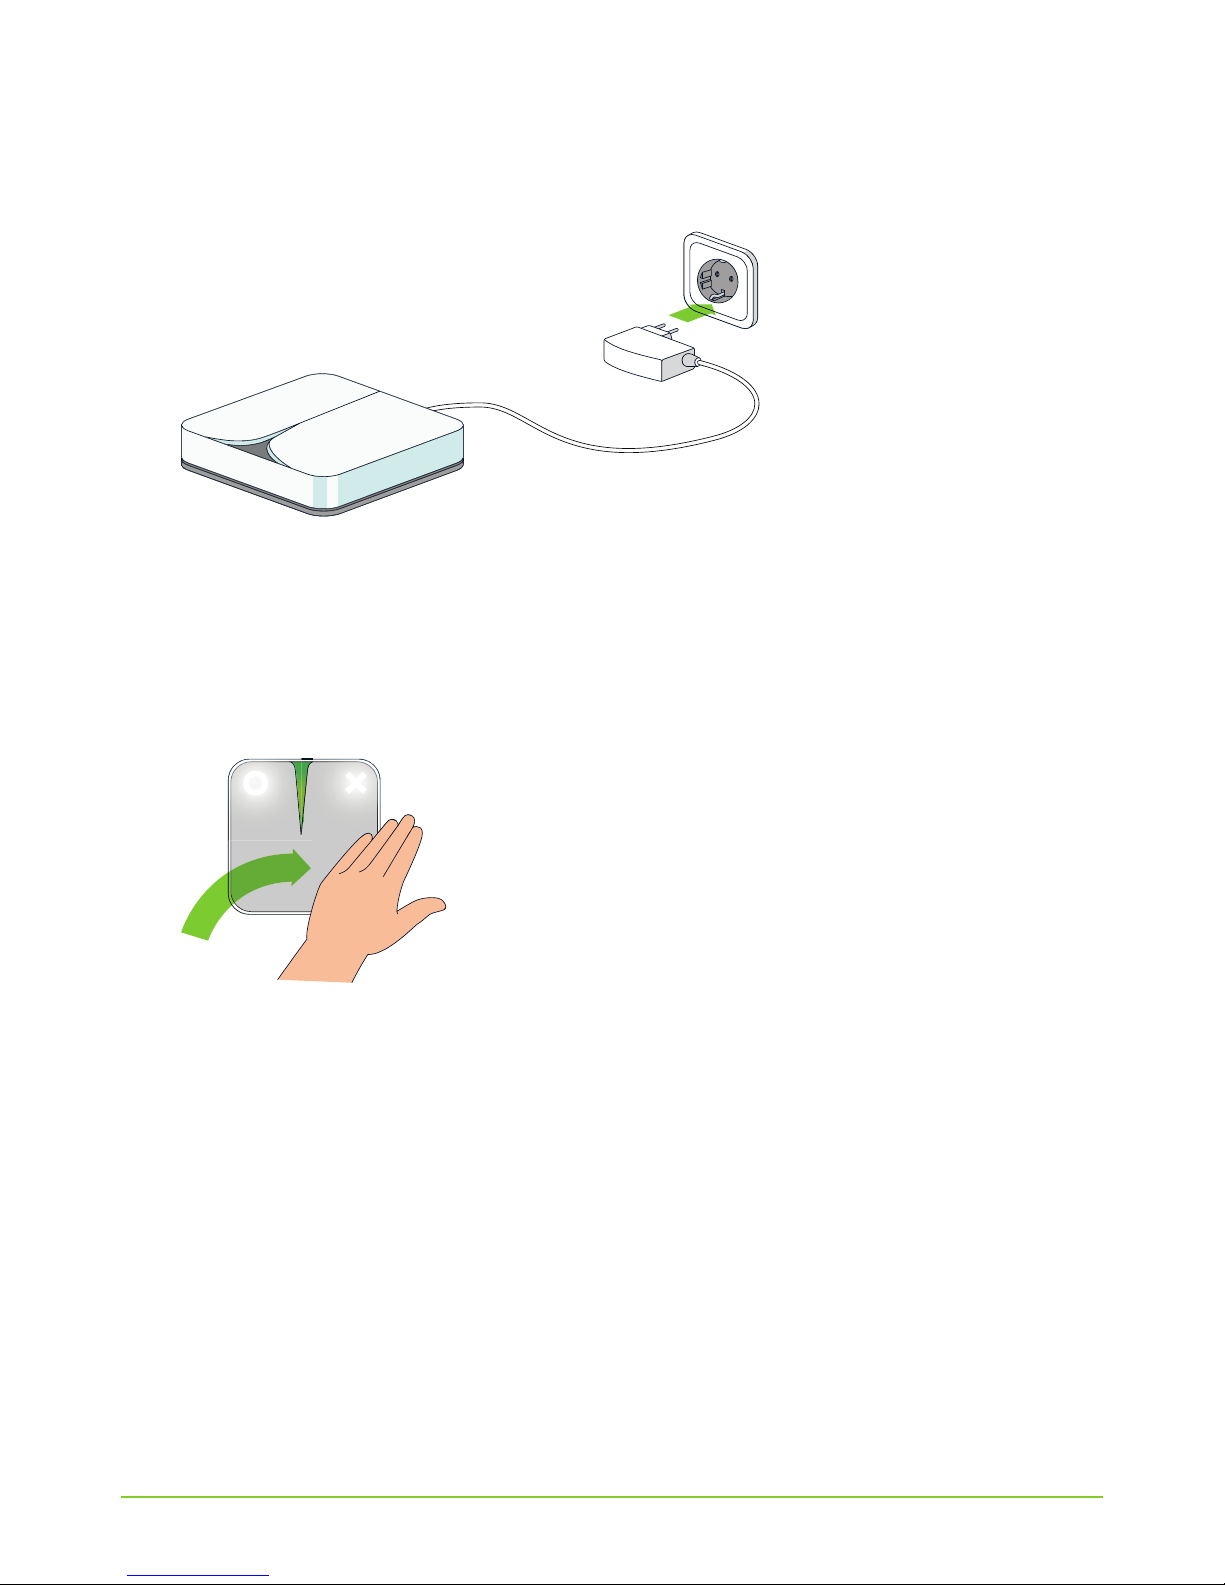
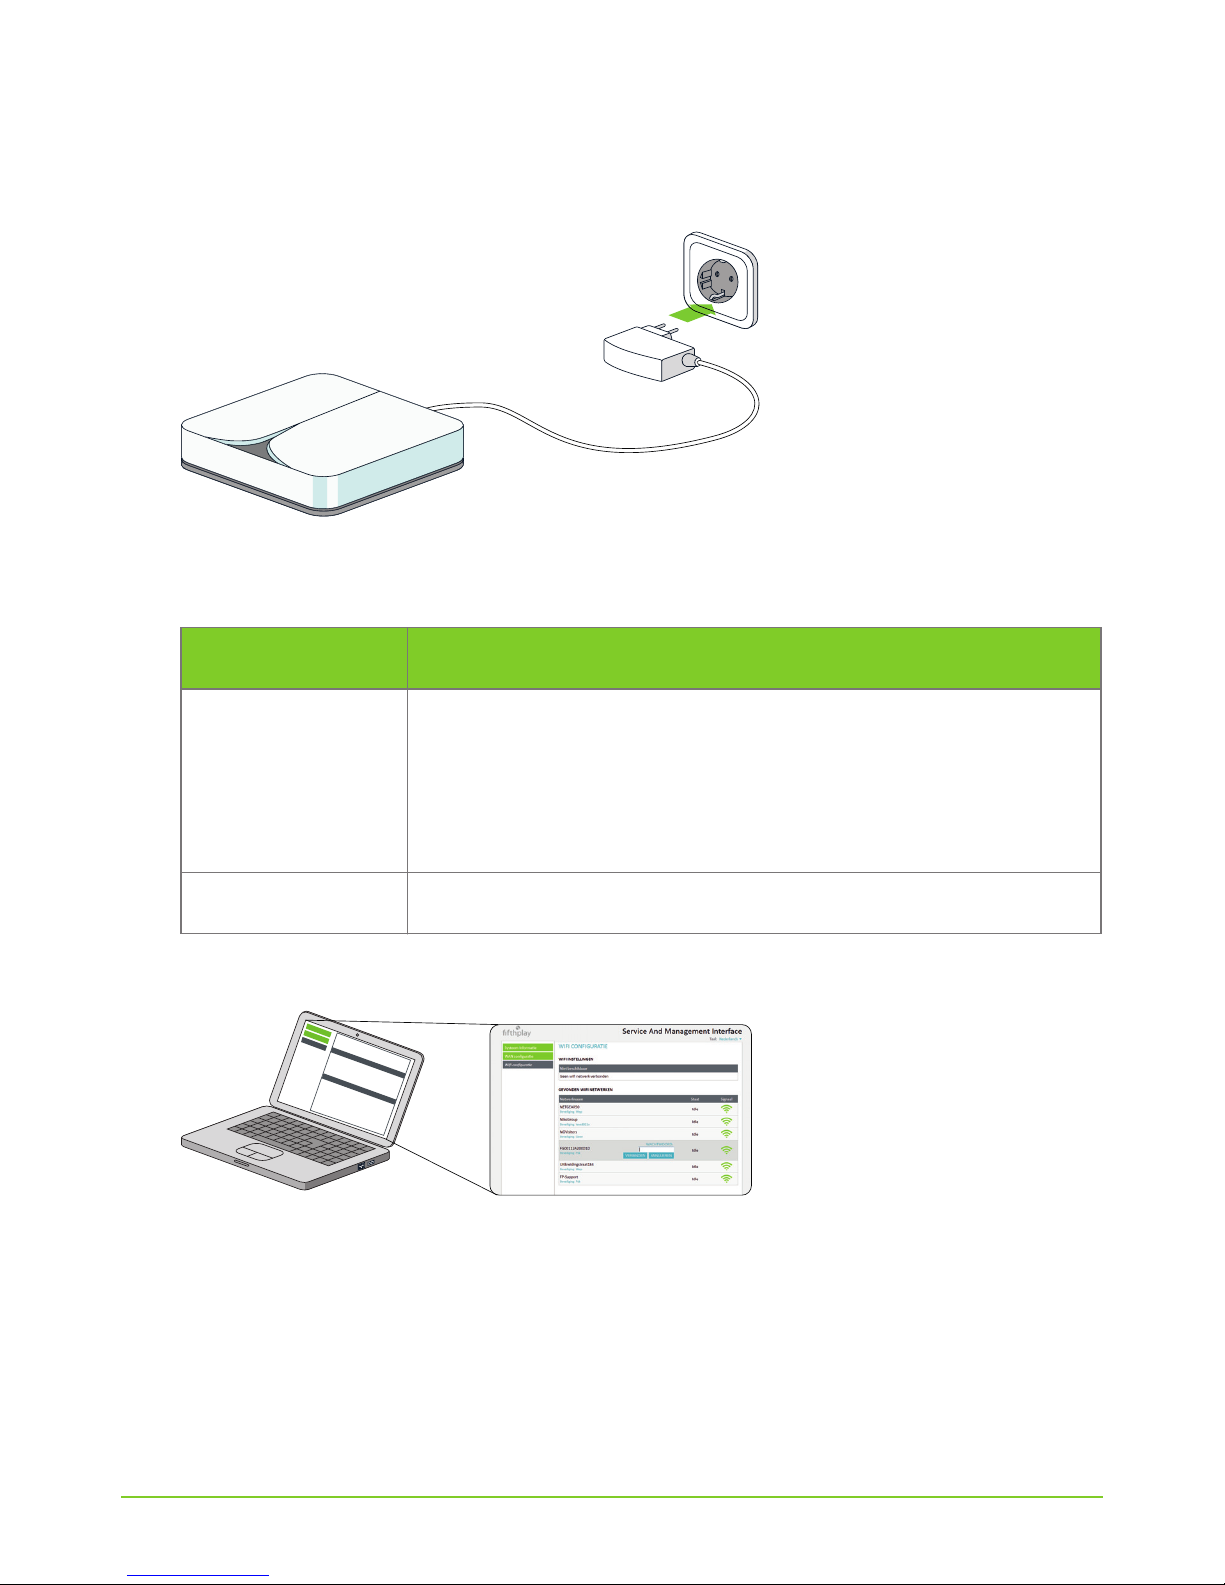
5 Insert the plug into to the wall outlet.
The led light on the gateway will begin to flash green. The gateway is starting up. You will now
hear a voice say “Your fifthplay device is starting up”. As soon as the led light stops flashing
and remains green, you are connected to the internet and your gateway is working correctly.
TIP: Move your hand over the gateway to hear the current status of your device.
fifthplay EnergySmart - User Guide
15
2 Installation
2.4 Connecting the gateway to the wireless
network
You can only do this if your gateway has a wireless (Wi-Fi) module.
NOTE: Before you can connect to the wireless network, you should connect your gateway to
your internet modem or router using the Ethernet cable. You can remove this cable again as
soon as your gateway has connected to the wireless internet.
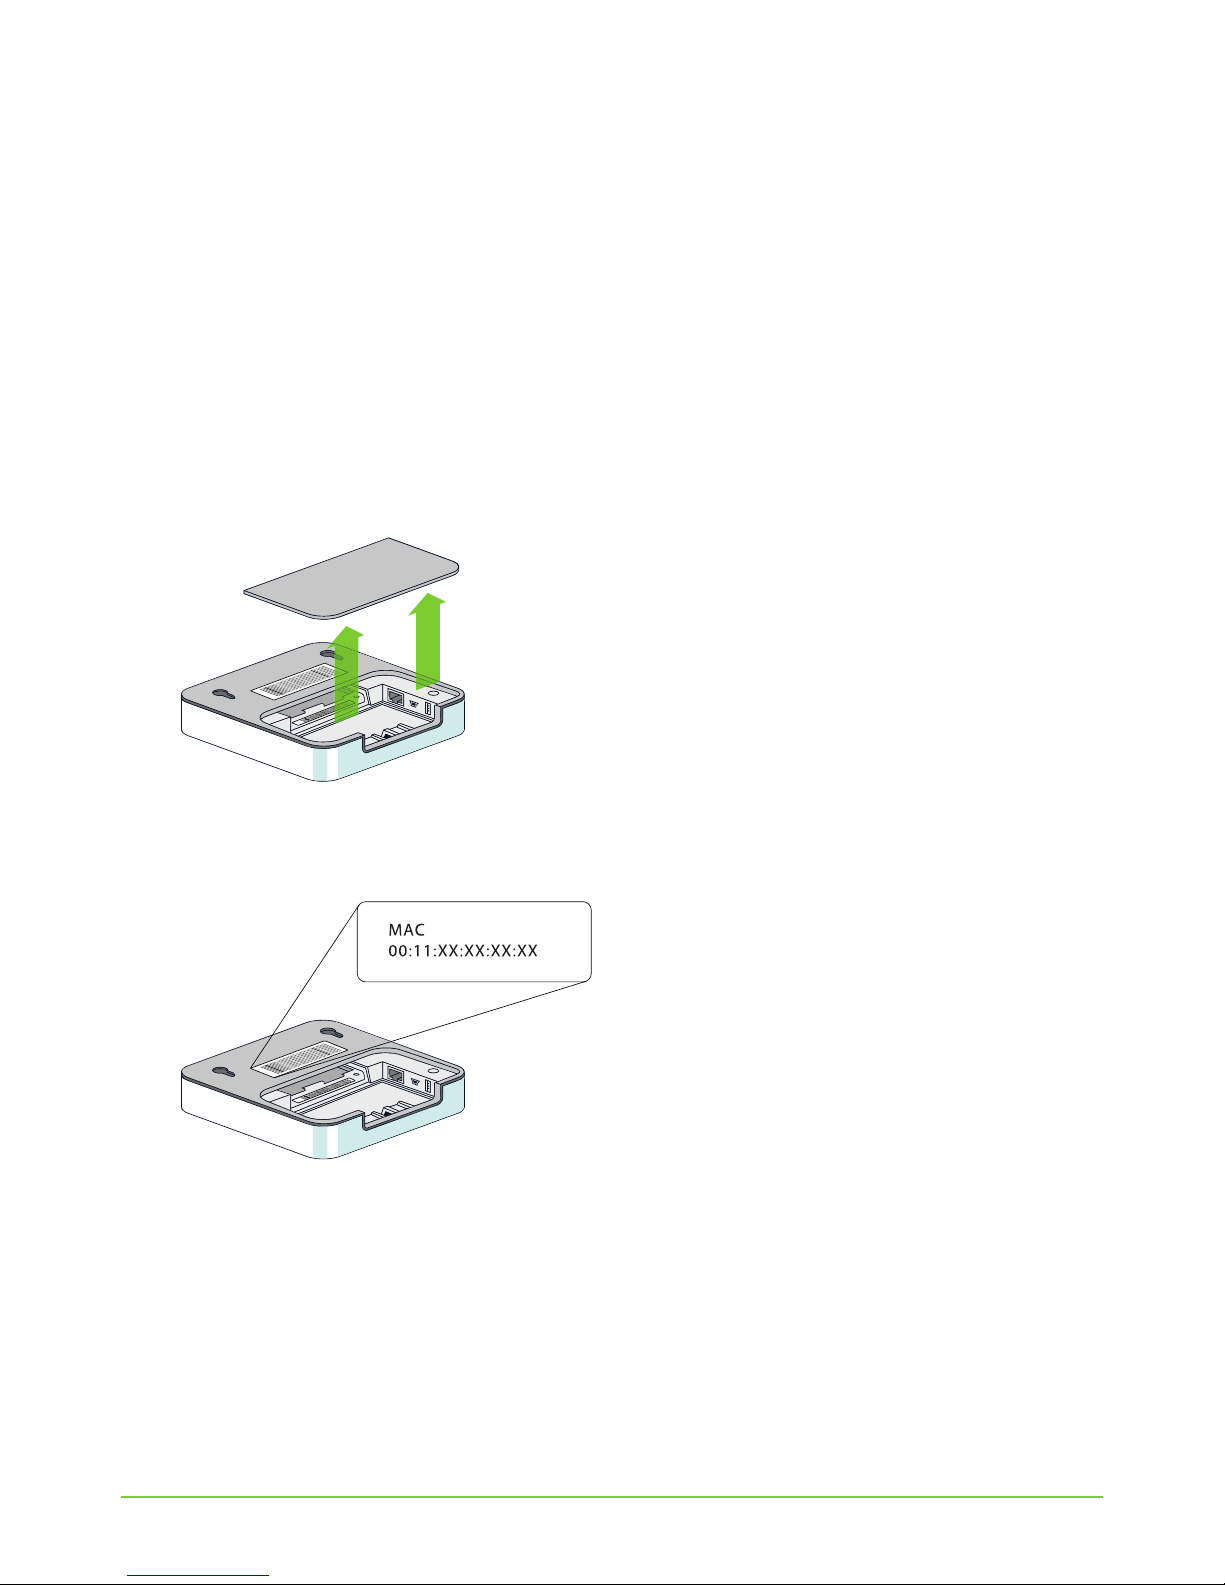
1 Open the cover on the underside of your gateway.
TIP: Make a note of the serial number and MAC address of your gateway. You will need these
when you register as a user.
16
fifthplay EnergySmart - User Guide
2 Installation
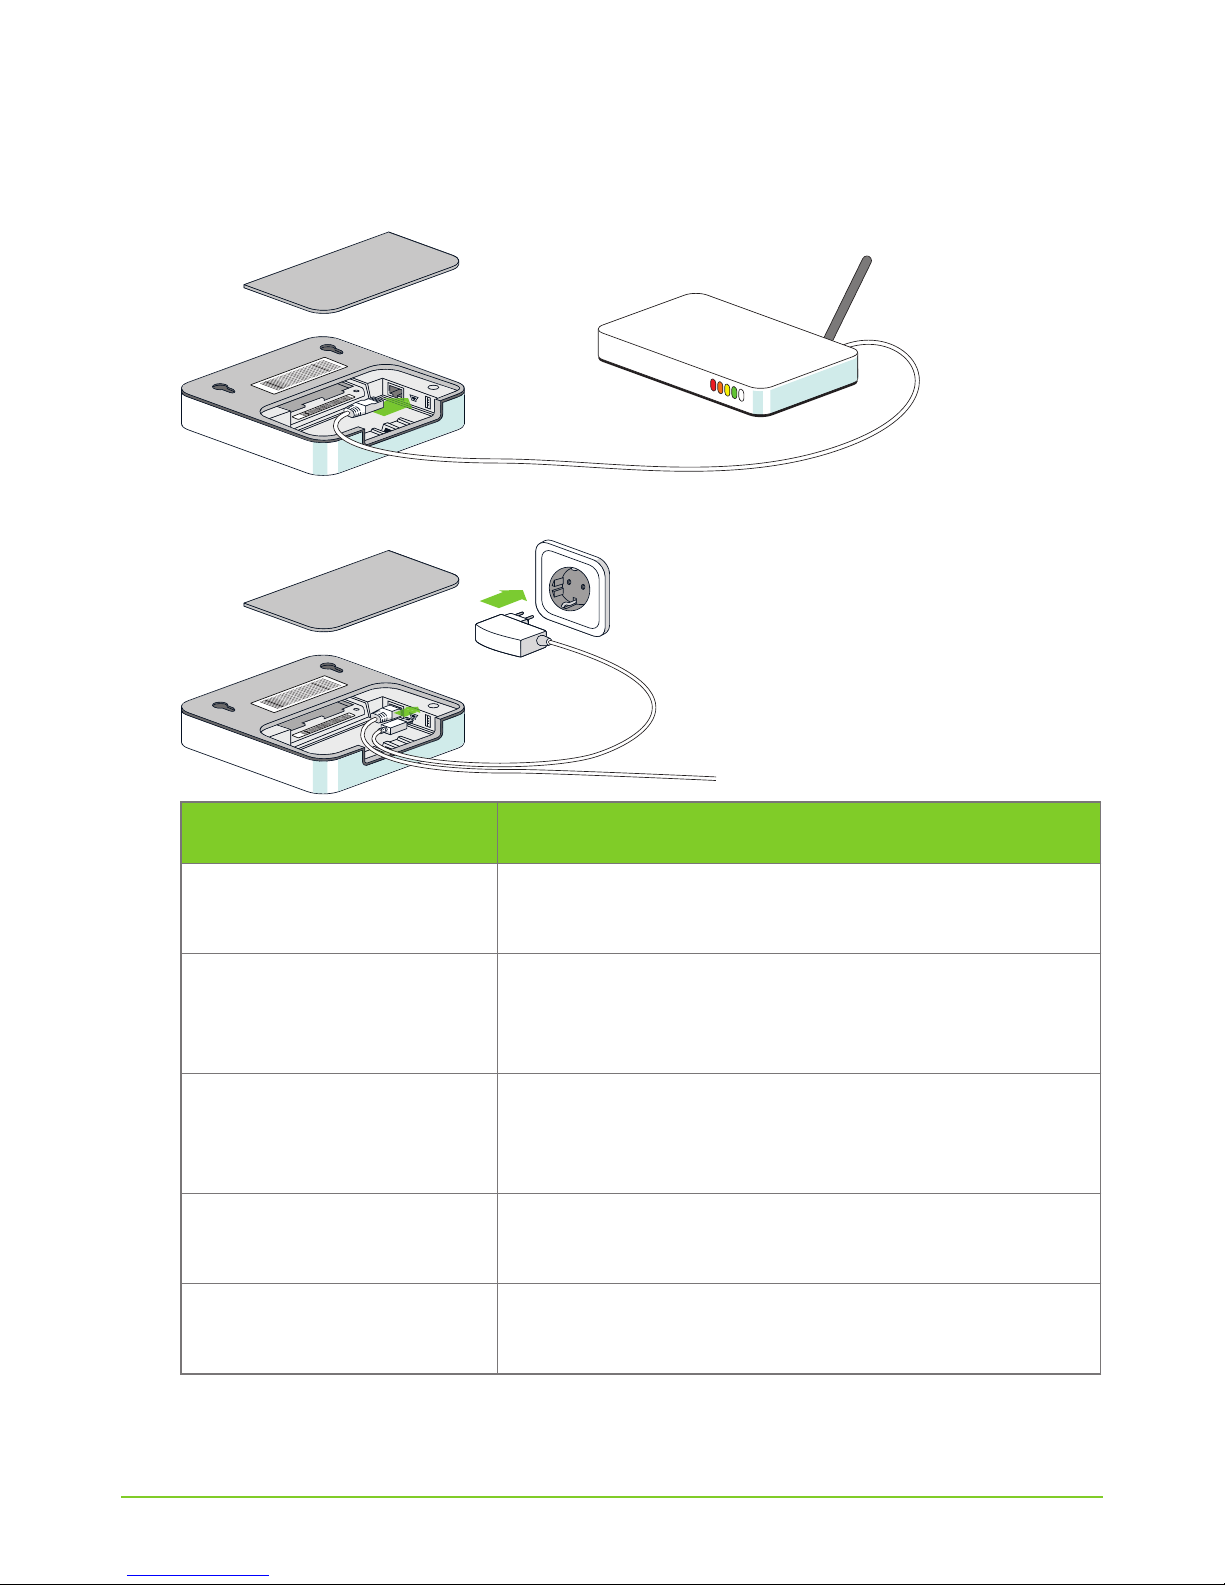
2 Use the Ethernet cable to connect your gateway to your internet modem or router.
3 Plug the network cable into your gateway.
If you also want to install now is the time to connect
ICY Smart thermostat the external antenna. See “Connecting the ICY Smart
thermostat with the gateway” on page 33.
Smart thermostat
Honeywell Evo Touch,
the Honeywell HGI80 communication module, see
“Connecting the Honeywell HGI80 communication
module with the gateway” on page 42
Smart thermostat DT-92, the Honeywell HGI80 communication module, see
“Connecting the Honeywell HGI80 communication
module with the gateway” on page 52
a smart meter, the P1/USB cable or the RJ11 cable. See “Adding the smart
meter to the system” on page 61.
a conventional meter, the sensor. See “Connecting the sensor to the gateway”
on page 71.
fifthplay EnergySmart - User Guide
17
2 Installation
4 Plug your gateway into the wall outlet.
5 Open the internet browser on your computer and type the following address so that your
gateway can make contact with your internet modem or router:
IMPORTANT: Only enter the digits and letters of your MAC address, without the colons.
6
Click Wi-Fi configuration.
7 Select the wireless network you would like to connect to from the list.
Operating system Address
Windows http://FP[MAC address of your gateway]
Example: http://FP00112A211DAD
If this address does not work, try putting .local at the end of the
address.
Example: http://FP00112A211DAD.local
Mac OS http://FP[MAC address of your gateway].local

18
fifthplay EnergySmart - User Guide
2 Installation
8 Enter your password.
9 When the status changes to ready, you are connected to the wireless network. You can now
remove the Ethernet cable from your gateway and your internet modem or router.
As soon as the led light on your gateway shines green, your gateway is connected to the wireless
network. You can now close the cover on your gateway.
2.5 Registering a new user
You should only perform this action if you do not yet have a user account. If you do have an account,
then you only need to install the gateway.
1 Visit my.fifthplay.com.
2 Click Register in the New user window.
3 Enter the following information:
■ Personal details
■ Login details
■ Gateway details
4
Click Register.
5 Read and accept the terms and conditions.
A confirmation screen will appear.
6 Check your email and click the activation link in the email from fifthplay EnergySmart to acti-
vate your account.
7 Now log in to the website as an existing user.
You are now registered as a user and signed in to the website.
2.6 Activating fifthplay EnergySmart
1 Choose settings > My settings and click the button.
2 Click Add a new voucher.

fifthplay EnergySmart - User Guide
19
2 Installation
3 Read and accept the terms and conditions.
4 Enter the voucher code.
5 Click Register.
fifthplay EnergySmart is now activated. You can now install devices and intelligently manage your
energy consumption.
Following steps:
■ “Smart plugs” on page 25
■ “ICY Smart thermostat” on page 33
■ Smart thermostat Honeywell Evo Touch
■ Smart thermostat DT-92
■ Smart meter
■ Conventional meter
■ Smart DIN rail module

20
fifthplay EnergySmart - User Guide
2 Installation

fifthplay EnergySmart - User Guide
21
3Network
3.1 General
Personalising the network
You can give a name to your network if you wish. This can be convenient if you use variousgateways
and want to easily identify your networks for instance.
1 Go to the Network tab and choose General > Network settings.
2 Enter the name that you want to give to your network in the Network name field.
3 Click Save.
Consulting an overview of all devices in your network
1 Go to the Network tab and choose General > Network overview.
An overview of all devices and your current status will appear.
2 Click the devices if you would like more details.
3.2 Rooms
Adding a new room
1 Go to the Network tab and click on the left-hand menu next to Rooms.
2 Enter the name for the new room in the Room details dialogue box.
EXAMPLE: Living room.
3 Click Save.
Editing the name of a room
1 Go to the Network tab and click Rooms.
2 Click next to the room for which you want to edit the name.
3 Edit the name of the room in the Room details dialogue box.
4 Click Save.

22
fifthplay EnergySmart - User Guide
3 Network
Adding a schedule to a room
You should already have created a schedule. To create a schedule, see “Creating a schedule” on
page 30.
1 Go to the Schedules tab and select General > Apply a schedule.
2 Select a schedule from the list.
3 Select the Room radio button.
4 Use the drop-down menu to select the room you want to add the schedule to.
NOTE: You can only select rooms to which you have already added smart plugs. To add smart
plugs to a room, see “Adding the smart plugs to a room” on page 29.
5 Click Schedule.
3.3 Groups
Adding a new group
1 Go to the Network tab and click in the left-hand menu next to Groups.
2 Enter the name for your new group in the Group details tab.
EXAMPLE: Lights.
3 If you want to be able to consult the group as a whole, then select the Visible on dashboard
check box.
4 Select the device that you want to add to the group in the Devices tab.
NOTE: You can still add other devices to the group later on.
5 Click Save.
Adding devices to a group
1 Go to the Network tab and click Groups.
2 Click next to the group that you want to add devices to.
3 Check the devices that you want to add to this group in the Devices tab.
4 Click Save.

fifthplay EnergySmart - User Guide
23
3 Network
Editing a group
1 Go to the Network tab and click Groups.
2 Click next to the group that you wish to edit.
3 Make the necessary amendments in the Group details tab.
4 Click Save.
Adding a schedule to a group
You should already have created a schedule. To create a schedule, see “Creating a schedule” on
page 30.
1 Go to the Schedules tab and select General > Apply a schedule.
2 Select a schedule from the list.
3 Select the Group radio button.
4 Use the drop-down menu to select the group that you want to apply the schedule to.
5 Click Schedule.
Removing a group
1 Go to the Network tab and click Groups.
2 Click next to the group that you want to remove.

24
fifthplay EnergySmart - User Guide
3 Network
fifthplay EnergySmart - User Guide
25
4 Smart plugs
4.1 What do you need?
You will need the following to install the smart plugs:
■ smart plugs
■ installed gateway
■ computer with internet connection
■ quick start guide
■ pen
4.2 Connecting the smart plugs
■ Did you buy the smart plugs in a package with your gateway? Then these are automati-
cally connected to each other.
■ Did you buy extra smart plugs? Then firstly you will have to connect these to the gateway,
see “Adding smart plugs to the system” on page 26.
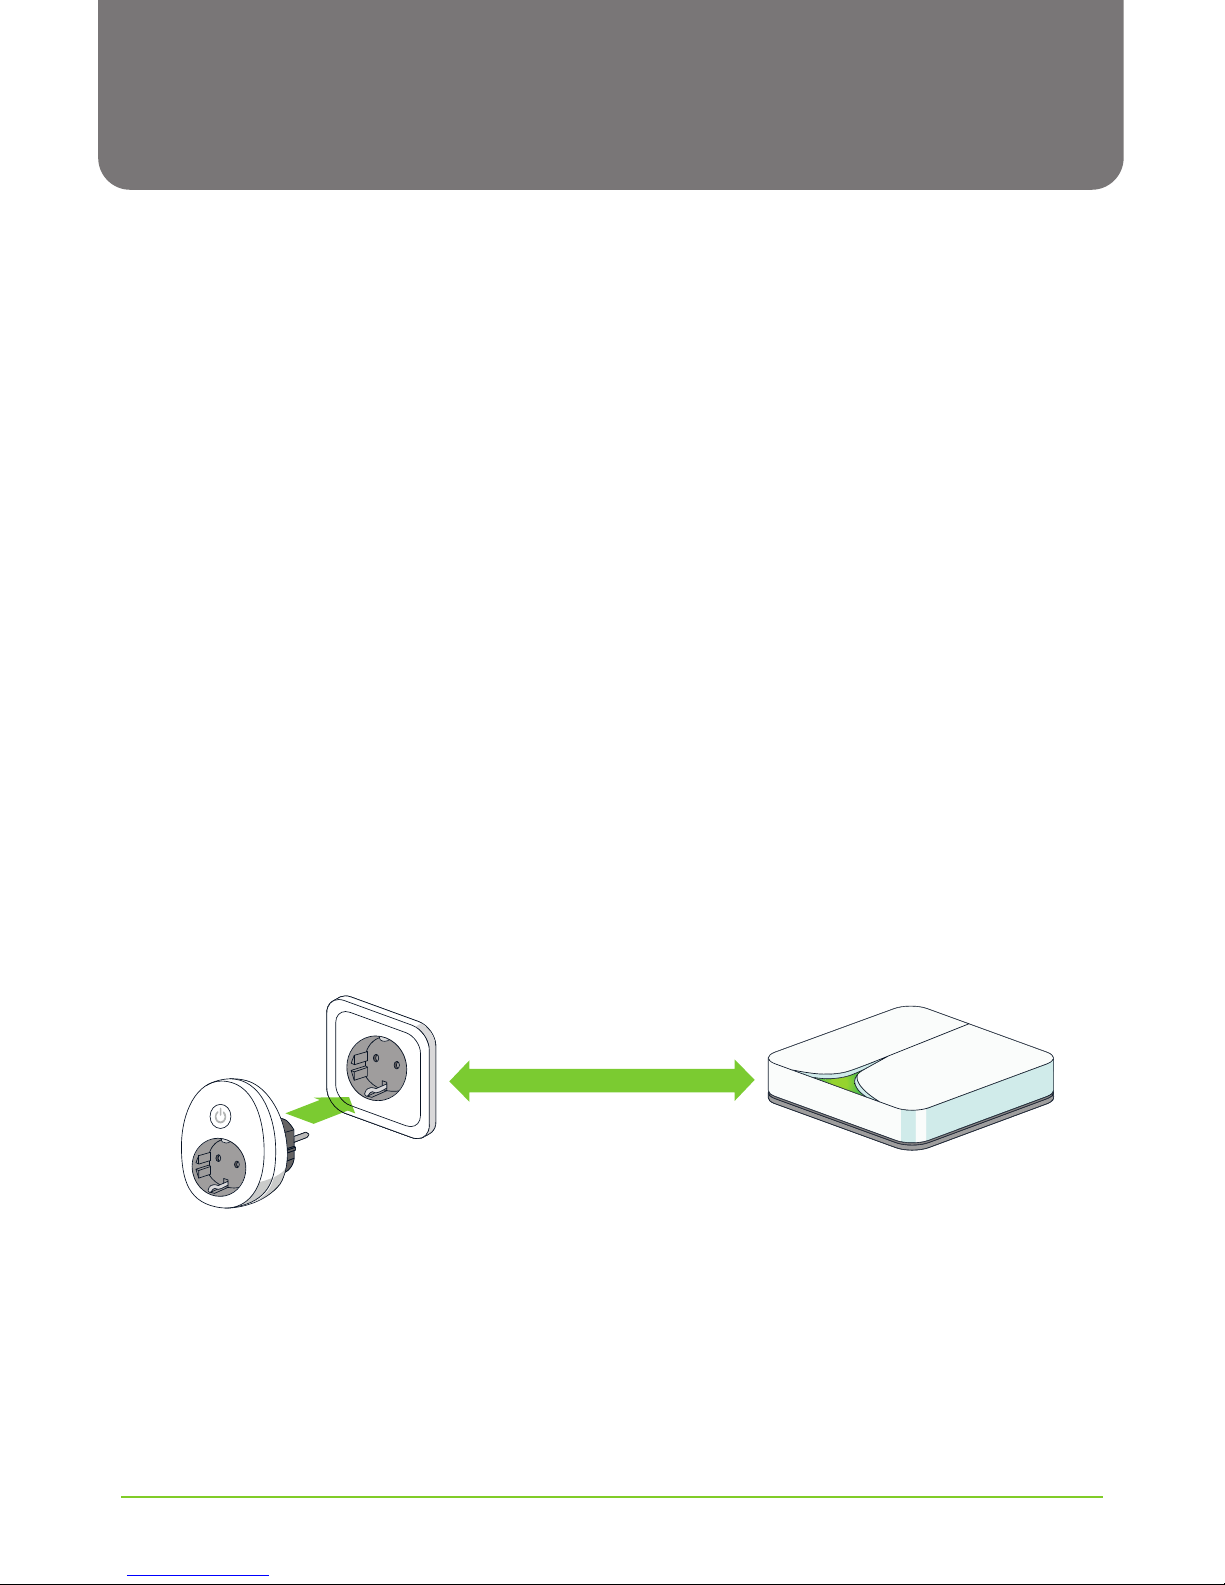
1 Plug the smart plugs into the wall outlet.
IMPORTANT: Ensure there is a distance of at least 1.6 meters between the gateway and
the smart plugs.
MIN DISTANCE 1.6 METERS

26
fifthplay EnergySmart - User Guide
4 Smart plugs
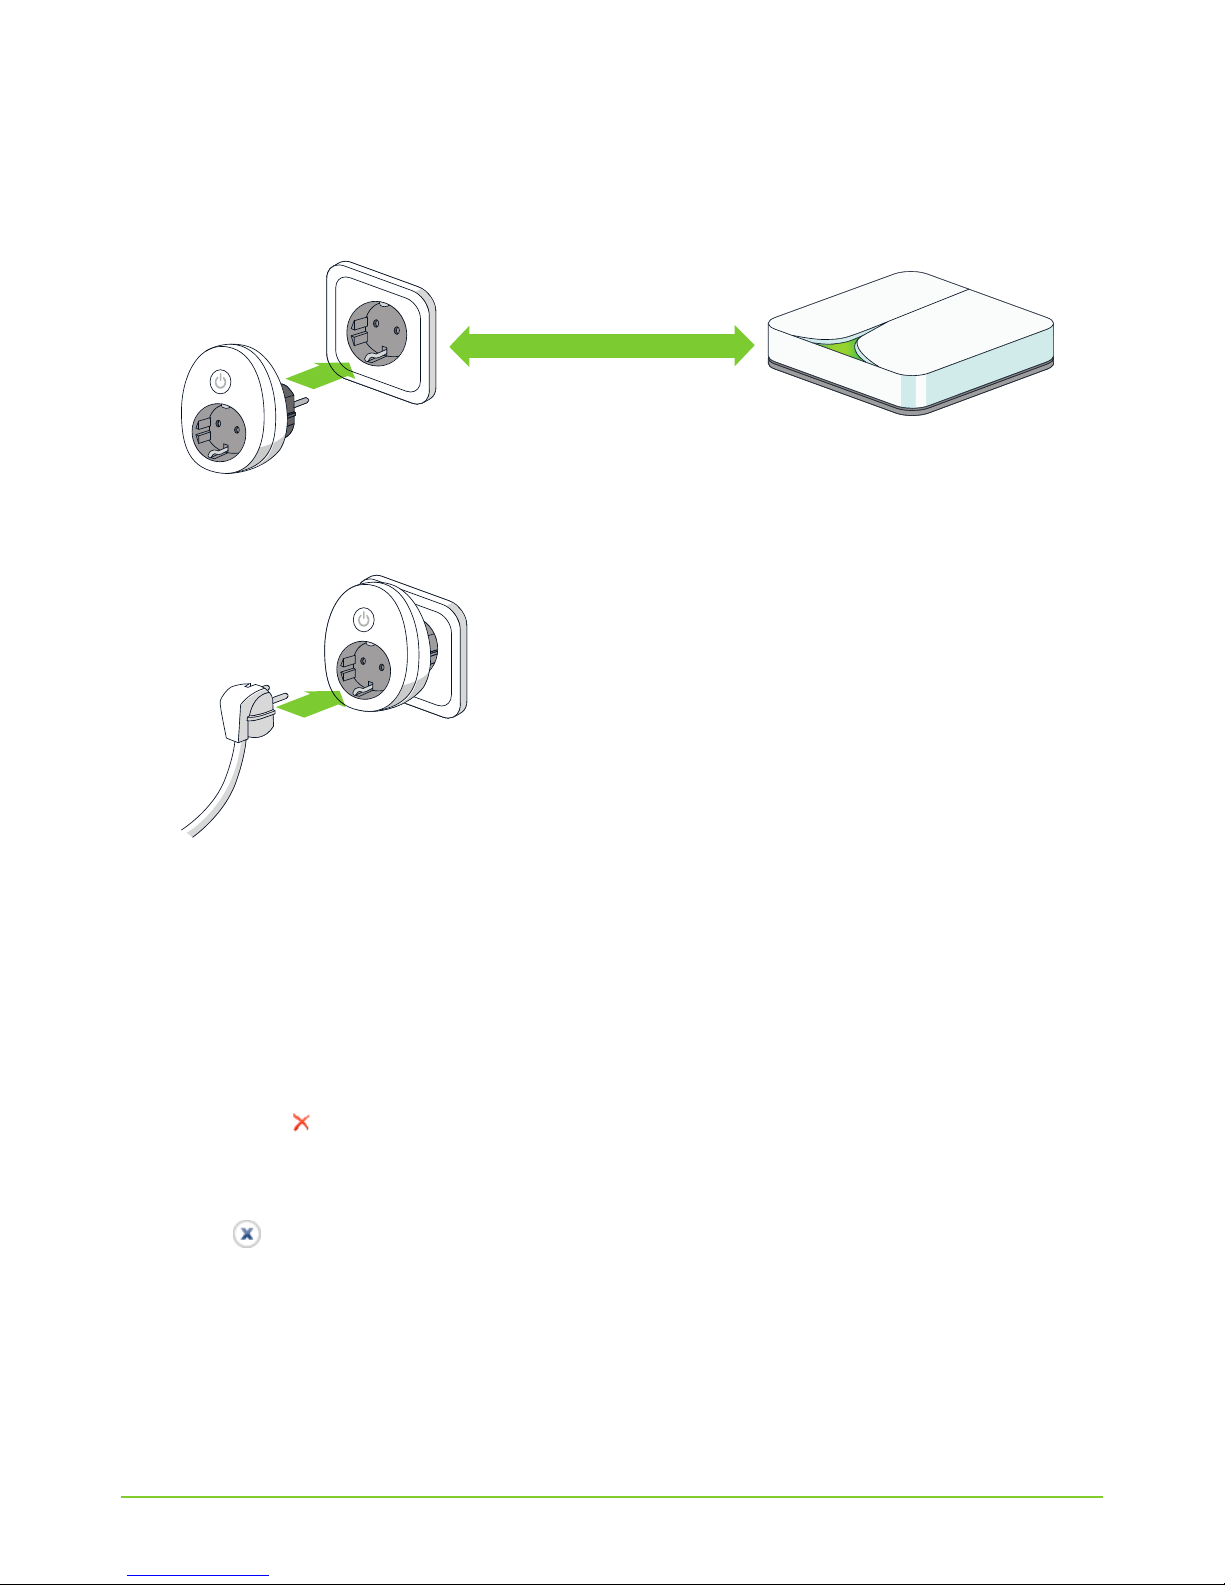
2 Plug the devices that you want to manage into the smart plugs.
3 Log in to the website.
4 Go to the Network tab and choose General > Network overview.
Here you will see which smart plugs are already connected to the gateway.
5 Select Groups > All devices to get an overview of all of your smart plugs.
6 Connect your smart plugs.
4.3 Adding smart plugs to the system
You only have to perform this task if you bought additional smart plugs for an existing gateway.
1 Note down the eight-digit serial number that is written on the rear of your smart plugs.
2 Plug the smart plugs into the wall outlet.
fifthplay EnergySmart - User Guide
27
4 Smart plugs
IMPORTANT: Ensure that there is a distance of at least 1.6 meters between the gateway
and the smart plugs.
A red light will shine. This will extinguish when the smart plugs are connected to the gateway.
3 Plug the devices that you want to manage into the smart plugs.
4 Visit my.fifthplay.com and log in.
5 Go to the Network tab and choose General > Add a plug.
6 Enter the eight-digit serial number of the smart plugs.
7 Click Add.
The plug will appear in the
Connectible plugs list for the time being.
NOTE: As long as the smart plugs are in the Connectible plugs list, you can still remove them
by clicking . As soon as the smart plugs have been connected to the gateway, you will no
longer be able to remove them.
8 Repeat steps 5 to 7 until you have added all of your smart plugs.
9 Click to close the window.
10 Go to the Network tab and select General > Network Overview.
Here you will see which smart plugs are already connected to the gateway.
11 Click Start automatic scan.
The smart plugs now appear with the
Active smart plugs.
MIN DISTANCE 1.6 METERS

28
fifthplay EnergySmart - User Guide
4 Smart plugs
4.4 Configuring the smart plugs
1 Go to the Network tab and choose Groups > All devices.
2 Click in the right-hand column, next to the smart plugs that you want to configure.
3 Enter the General settings in the Manage device dialogue box:
■ Name: The name that you want to give to your smart plug.
■ Serial number: Entered automatically.
■ Is a producer: Selected: only for devices which create their own electricity, for instance
solar panels.
■ Type: The type of device that the plug is used for.
■ Room: The room in which the plug is to be used.
■ Switchable: Selected: you can switch the plug on and off.
NOTE: If this check box is not selected, then you can only use the plug to measure the
consumption of a device.
■ Erase previously collected data: Selected: all data that was previously measured by this
smart plug will be erased.
TIP: Select this check box if you want to use the smart plug for another device and want to
start measuring again. The previously collected data will be erased and you will only see the
consumption of the device that is currently connected to this smart plug.
4 Click Save.
5 Click Close to close the dialogue box.
4.5 Switching the smart plugs on and off
You can use your smart plugs to remotely switch your devices on and off.
1 Go to the Network tab and choose Groups > All devices.
2 Click in the section smart plugs on the On or Off button in the Switch column to
switch a device on or off.
TIP: You can, if you wish, switch all devices on and off at the same time by clicking the button
On or Off in front of All devices. If you have created rooms or groups, you can also do this for
each room or group.

fifthplay EnergySmart - User Guide
29
4 Smart plugs
4.6 Adding the smart plugs to a room
You can group smart plugs in a room. This makes it easier to manage devices for each room.
You should already have created a room. To create a room, see “Adding a new room” on page 21.
1 Go to the Network tab page and choose Rooms > DefaultRoom.
Here you will find all of the smart plugs which have been connected to the gateway and which
have not yet been allocated to a room. As soon as you allocate them to a room, they will no
longer be visible in this list.
NOTE: Are you no longer able to select the name DefaultRoom because you have personalised
the name of this room already? Then choose the room at the top of the list.
2 Click in the right-hand column next to the smart plugs that you want to add to a room.
3 Select the room to which you want to add the smart plug in the Room field in the Manage
device
dialogue box.
4 Click Save.
5 Click Close.
4.7 Adding the smart plugs to a group
You can add smart plugs to a group to manage them more easily. For instance, you can create a
group called Lighting and categorize all of your lights within this group.
You should already have created a group. To create a group, see “Adding a new group” on page 22.
1 Go to the Network tab and choose Groups > All devices.
Here you will find all of the smart plugs which are connected to the gateway.
2 Click in the right-hand column next to the smart plugs that you want to add to a group.
3 Click the Manage device dialogue box on the Manage groups tab page.
4 In the Available groups list, select the group that you wish to allocate the smart plug to and
click to add the group to the
Allocated groups list.
NOTE: You can add a plug to more than one group.
5 Click Close.

30
fifthplay EnergySmart - User Guide
4 Smart plugs
4.8 Creating a schedule
1 Go to the Schedules tab and click in the left-hand column next to Schedule Plugs to cre-
ate a new schedule.
2 Enter the name of the new schedule and click Save.
3 Click and drag your mouse over the table in the Schedules tab to draw a frame across the
day(s) and time(s) when you want to apply a set-point.
4 Confirm when you want to apply this set-point and indicate its type in the dialogue box that
appears:
■ To: When the smart plug should be on. This is the standard value.
■ Off: When the smart plug should be off.
■ Standby killer: During this consumption the smart plug will switch itself off. For example:
When the smart plug for your TV registers a consumption that is lower than 15 Watts
between 1 am and 6 am, meaning that the TV is in standby mode, then the smart plug will
switch itself off.
5 Click the Added plugs tab on Add a plug to the schedule.
6 Select the smart plug(s) that you want to add.
7 Click Save.
4.9 Amending an existing schedule
You should already have created a schedule. To create a schedule, see “Creating a schedule” on
page 30.
1 Go to the Schedules tab and choose Schedule Plugs > [The schedule that you want to
amend]
.
2 Make any required alterations.
3 Click Save.
 Loading...