

Fifth Explorer 4250, Explorer 4250 HD, Explorer 4652 HD, Explorer 8300 SD, Explorer 8300 HD User Manual
...Page 1
Set Top Box
User Guide
Page 2

Table of Contents
• Safety Information
• Box Types
• Front Panel Overview
• Back Panel Overview
• The Remote Control
• Basic Operations
• High Denition Operations
• Advanced DVR Operations
• Technical Support
Page 3

Safety Information
Note to CATV System Installer
This reminder is provided to call the CATV system installer’s attention to Article 820-40 of
the NEC, which provides guidelines for proper grounding and, in particular, species that the
CATV cable ground shall be connected to the grounding system of the building, as close to the
point of cable entry as practical.
This symbol is intended to alert you that uninsulated voltage within this product may have sufcient magnitude to cause electric shock. Therefore, it is dangerous to make any kind of contact
with any inside part of this product.
Caution: To reduce the risk of electric shock, do not remove cover (or back). No user-service-
able parts inside. Refer servicing to qualied service personnel
This symbol is intended to alert you of the presence of important operating and maintenance
(servicing) instructions in the literature accompanying this product.
Read and Retain These Instructions
Read all of the instructions before you operate the set top box. Give particular attention to all
safety precautions. Retain the instructions for future reference.
Comply with all warning and caution statements in the instructions. Observe all warning and
caution symbols that are afxed with this set-top.
Comply with all instructions that accompany this set-top.
Placement
Place this set-top in a location that is close enough to an electrical outlet to accommodate the
length of the power cord.
Note: The Power cord is the mains power supply disconnect device.
Place this set-top on a stable surface. The surface must support the size and weight of this settop.
Page 4

Ventilation
This set-top has openings for ventilation that protect it from overheating. To ensure the reliability of the set-top, follow these guidelines to avoid obstructing the openings.
Do not place other equipment, lamps, books, vases with liquid, or any other object on top of this
set-top.
Do not place this set-top in or on the following locations:
- On a bed, sofa, rug, or similar surface
- Over a radiator or heat register
- In an enclosure, such as a bookcase or equipment race, unless the installation
provides proper ventilation
Cleaning the Set-Top
Before cleaning the set-top, unplug it from the electrical outlet. Use a damp cloth to clean this
set-top. Do not use a liquid cleaner or an aerosol cleaner. Do not use a magnetic/static cleaning
device (dust remover) to clean this set-top.
Object and Liquid Entry
Never push objects of any kind into this product through openings as they may touch dangerous
voltage points or short out parts that could result in a re or electric shock. Do not expose this
set-top to liquid or moisture. Do not place this set-top on a wet surface. Do not spill liquids on
or near this set-top.
Accessories
Do not use accessories with this set-top unless recommended by your cable service provider.
Overloading
Do not overload electrical outlets, extension cords, or integral convenience receptacles, as this
can result in a risk of re or electric shock. For equipment that requires battery power or other
sources to operate, refer to the operating instructions for that equipment.
Lightning and Power Surges
Ground (earth) your cable system to provide some protection against voltage surges and built up
static charges. Plug your set-top into a surge protector to reduce the risk of damage from lightning strikes and power surges. If you have questions call your cable service provider.
Page 5

Power Cord Protection
Arrange all power cords so that people cannot walk on the cords, place objects on the cords, or
place objects against the cords, which can damage the cords. Give particular attention to the
cords at the point at which the cord connects to the plug, at electrical outlets, and at the places
where the cords exit the set-top.
Power Sources
A label on this set-top indicates the correct power source for this set-top. Operate this set-top
only from an electrical outlet that has the voltage and frequency that the label indicates. If you
are unsure of the type of power supply to your residence, consult your cable service provider or
your local power company.
Power Cord Polarization
This set-top has a two-prong plug. Properly ground (earth) this set-top by inserting the plug
into a grounded electrical, two-socket outlet. If this plug is polarized, it has one wide prong and
one narrow prong. This plug ts only one way. If you are unable to insert this plug fully into
the outlet, contact an electrician to replace your obsolete outlet.
Servicing
Do not open the cover of this set-top. If you open the cover, your warranty will be void. Refer
all servicing to qualied personnel only. Contact your cable service provider for instructions.
Damage that Requires Service
For Damage that requires service, unplug this set-top from the electrical outlet. Refer to qualied personnel when any of the following occurs:
− There is damage to the power cord or plug
− Liquid enters the set-top
− There is exposure to rain water
− Operation is not normal (the instructions in this guide describe the proper operation)
− If you drop this equipment, or damage the cabinet of this set-top
− If this set-top exhibits a distinct change in performance
Upon completion of any service or repairs to this set-top (home terminal), the service technician
will perform safety checks to determine that the equipment is in proper operating condition.
Page 6

Box Types
The following is a list of Set-Top Box Types offered by FiFTH services. With each box listing is a brief de-
scription of the box capabilities. More information on these boxes will be covered later on in
the user guide.
EXPLORER 4250
The explorer 4250 is a basic set-top with limited viewing abilities and functions. This box will
give you access to all standard denition channels available by your cable service provider, as
long as you subscribe to them. This box has an interactive program guide which lets you scroll
through all of the channels and view upcoming programs for the next seven days. This box also
has the ability to order Pay-Per View movies by using the remote control. No phone line required.
EXPLORER 4250 HD
The explorer 4250 is a High Denition set-top. With this box you have the ability to view High
Denition programming. The set-top also has an interactive program guide and the ability to
order Pay-Per View movies. The box comes with multiple outputs, including a HDMI and composite (red, green, and blue), which t a variety of TVs.
EXPLORER 4652 HD
The explorer 4652 HD is the same as the 4250 HD.
EXPLORER 8300 SD
The explorer 8300 offers the same interactive program guide and Pay-Per View abilities as the
other set-tops, plus a whole lot more. This box has the ability to pause, rewind, fast-forward,
and record live TV. It also has the ability to record two programs at once. While recording two
programs, you can watch one of the programs being recorded, or watch a third program that
you have stored on the box’s hard drive. Once you have recorded a program, you can press the
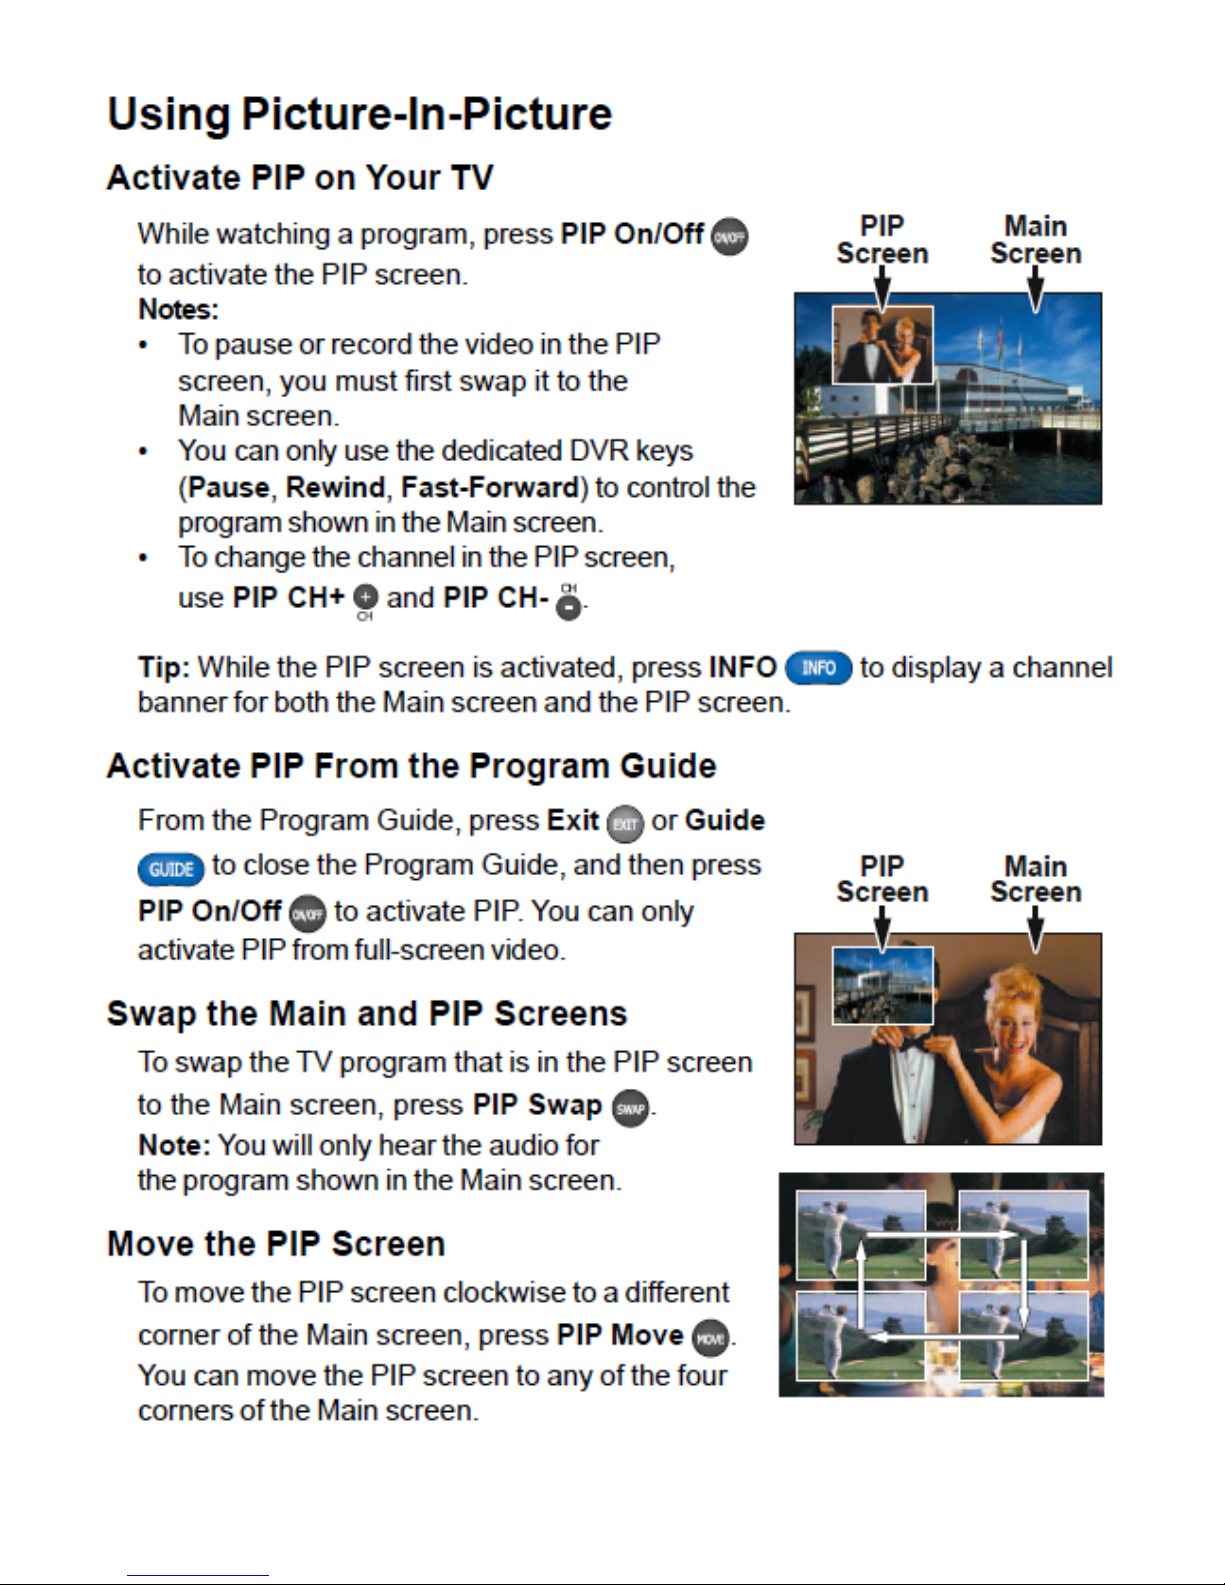
list button to view all saved programs. If that is not enough, the box also has built in Picture in
Picture. This gives you the ability to view two programs at the same time. One program takes
up most of the screen and has video and audio, the second is a small box with just video only.
EXPLORER 8300 HD
This box is the same as the 8300 SD with the exception of its ability to watch High Denition
programming. It has the same output conguration as the 4250. You get the best of both worlds
with this set-top.
EXPLORER 8652 HD
The explorer 8652 HD is the same as the 8300 HD.
Page 7
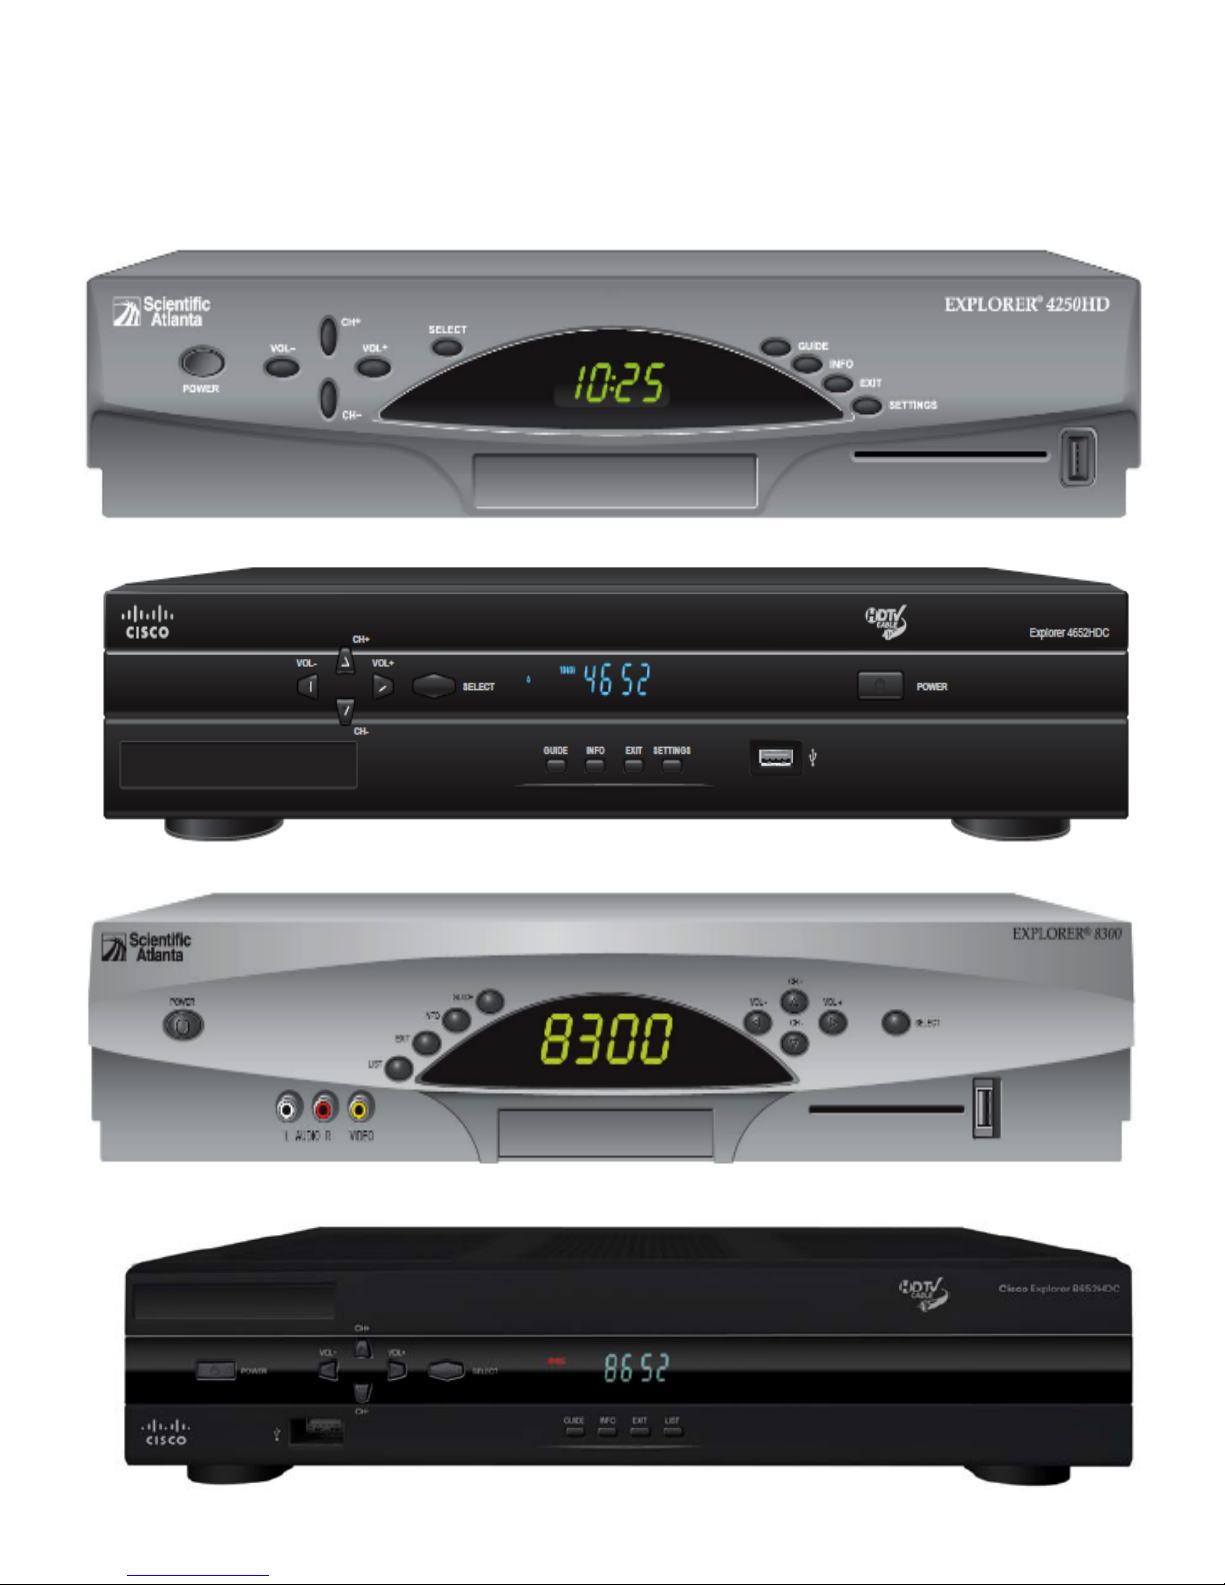
Front Panel Overview
This section shows the front panel for the 4250 HD and SD, 4652 HD, 8300 HD and SD, and
8652 HD series boxes.
Page 8
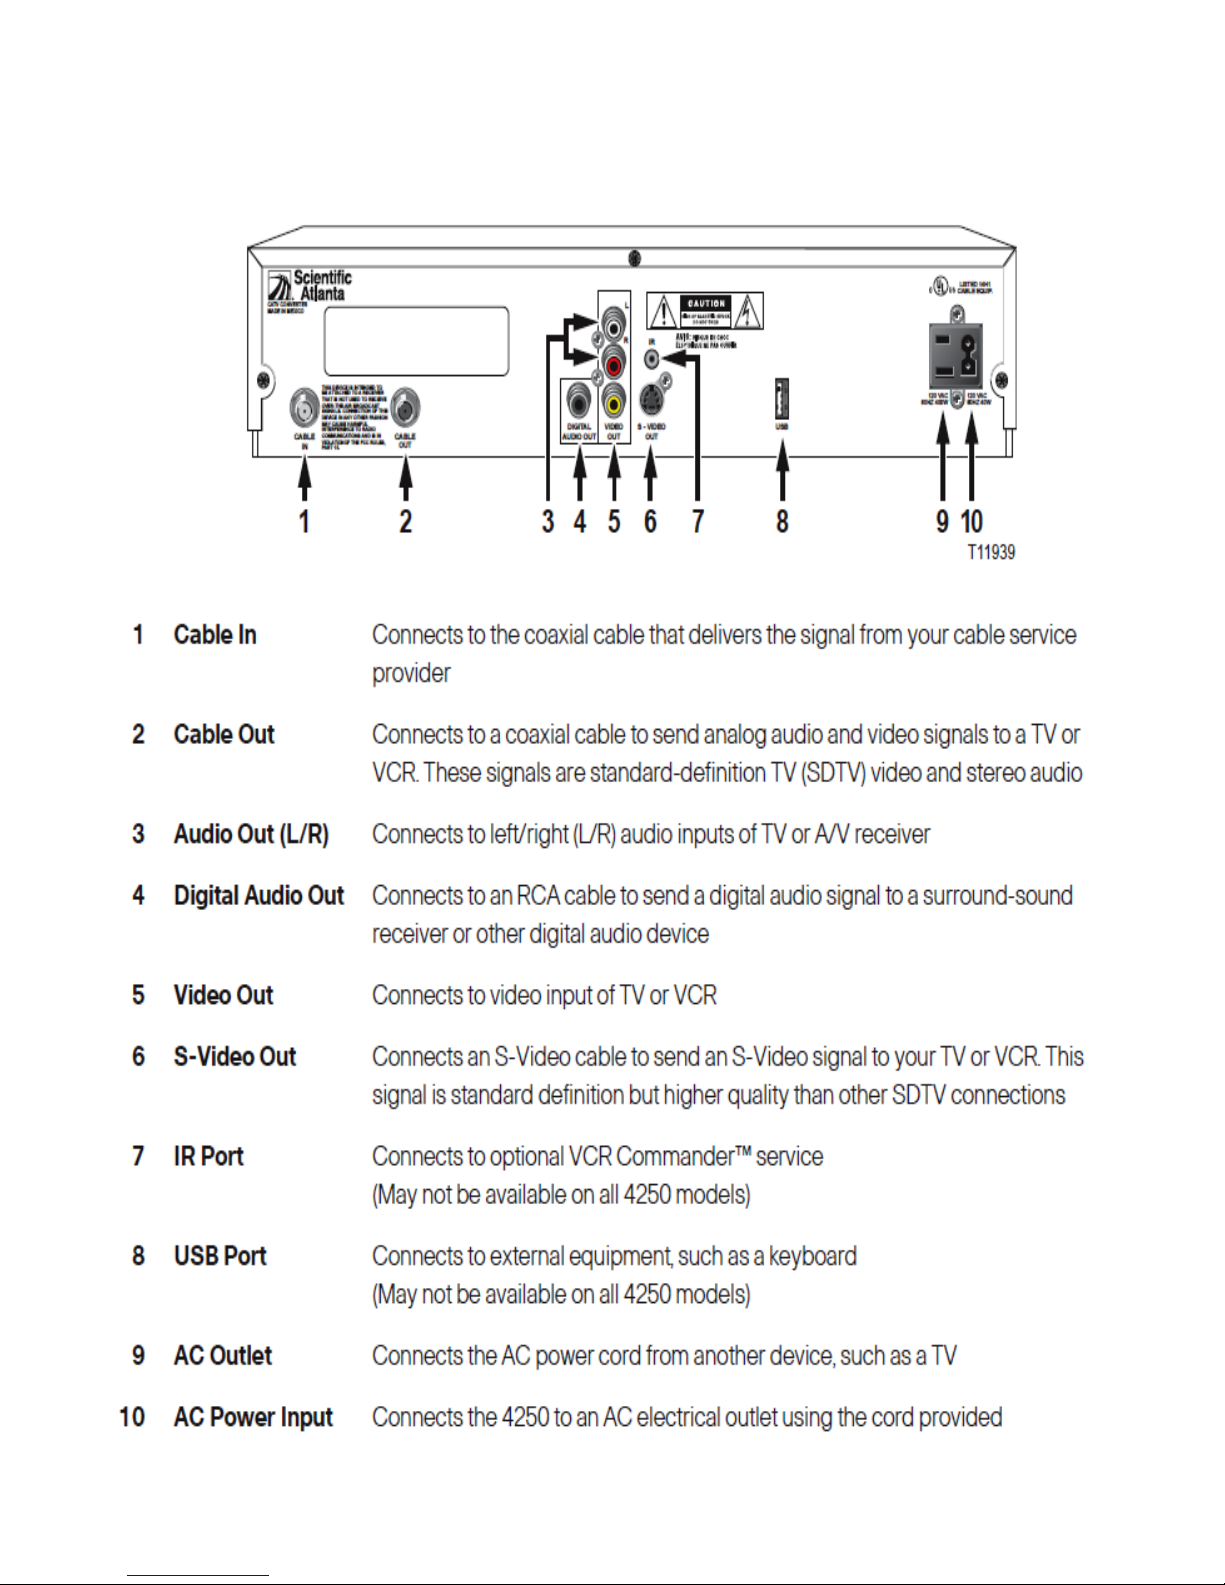
Rear Panel Overview
4250 SD Back Panel Connectors
Page 9
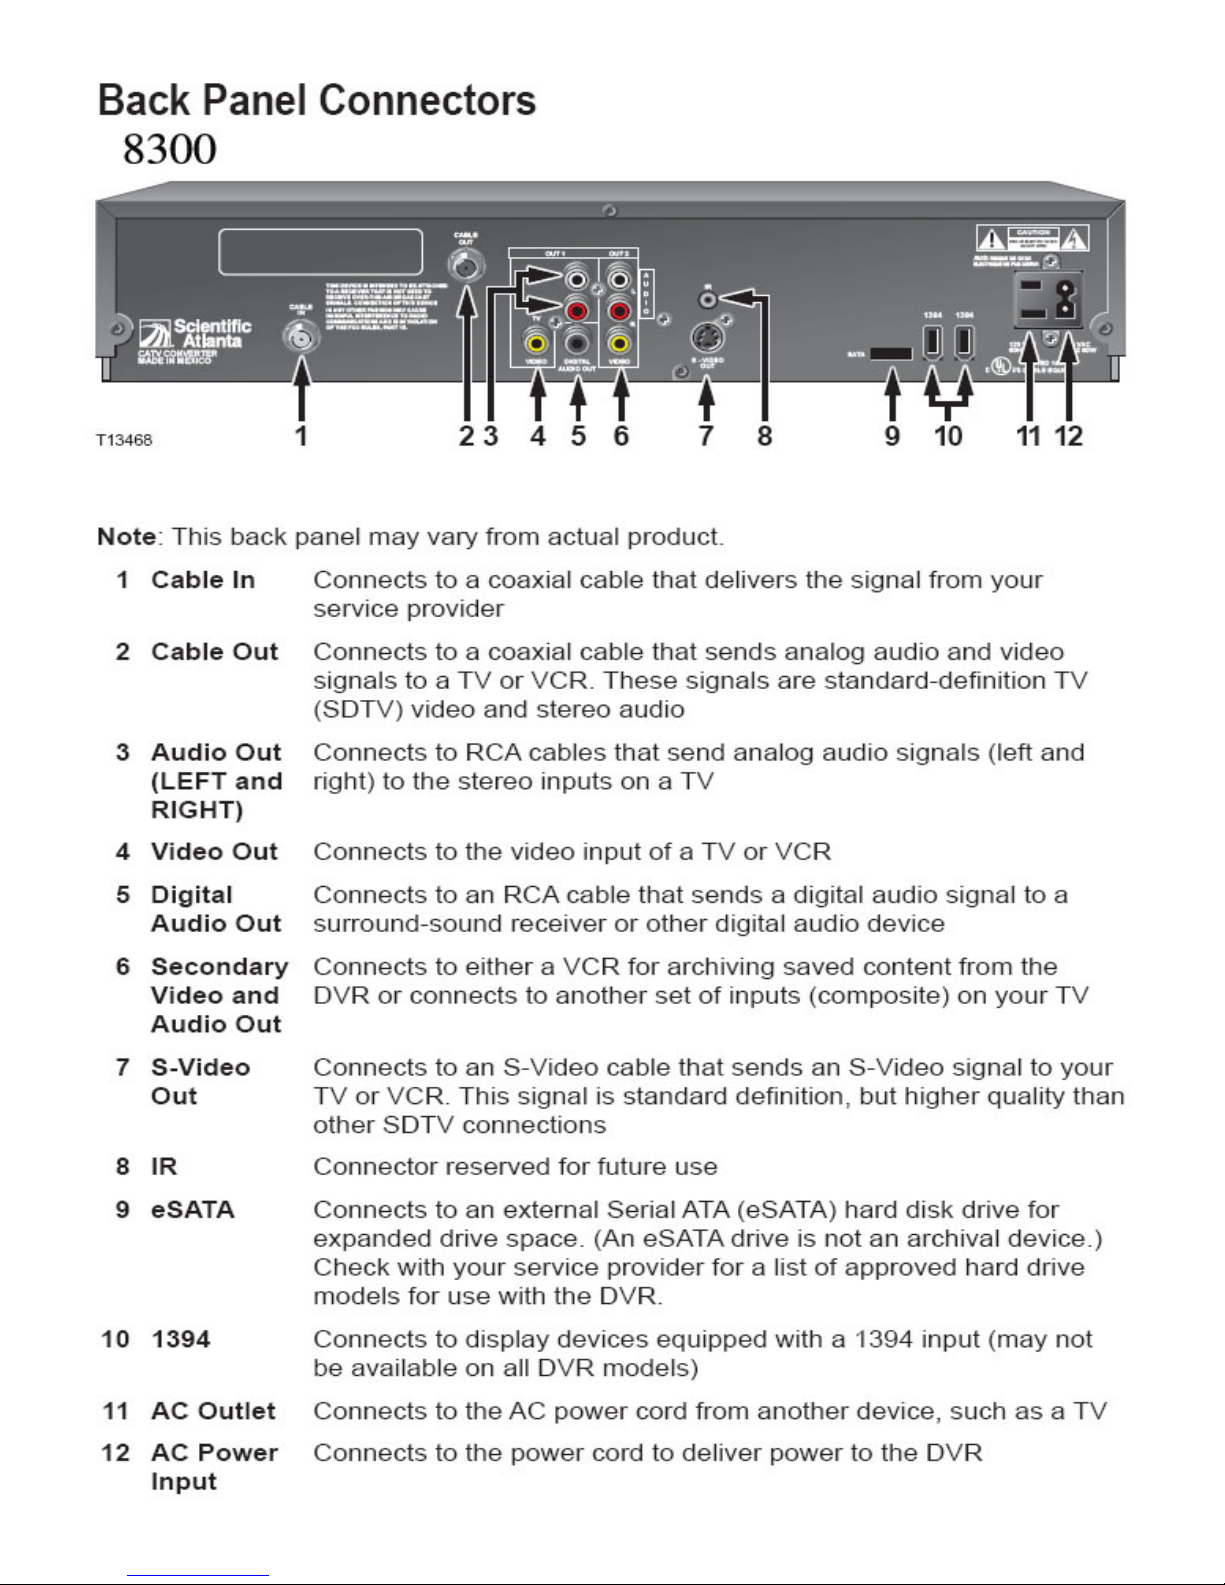
Page 10
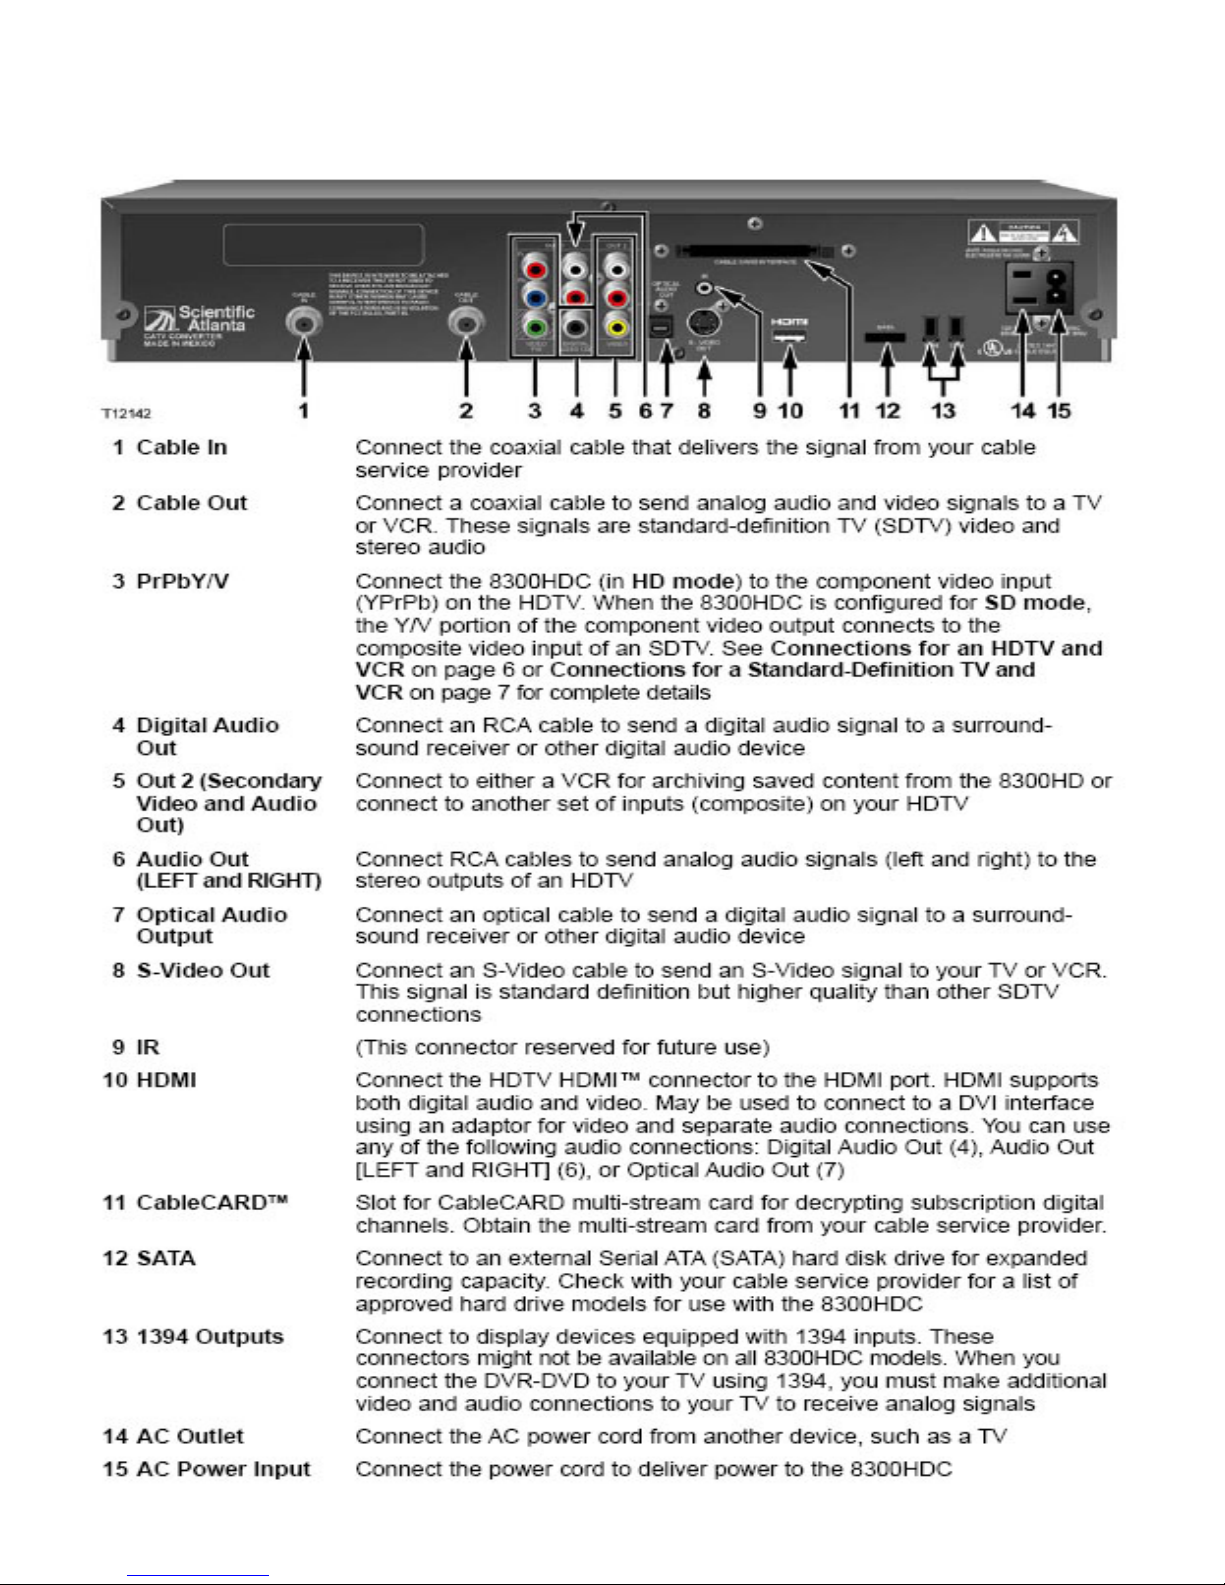
4250 and 8300 HD Back Panel Connectors
Page 11
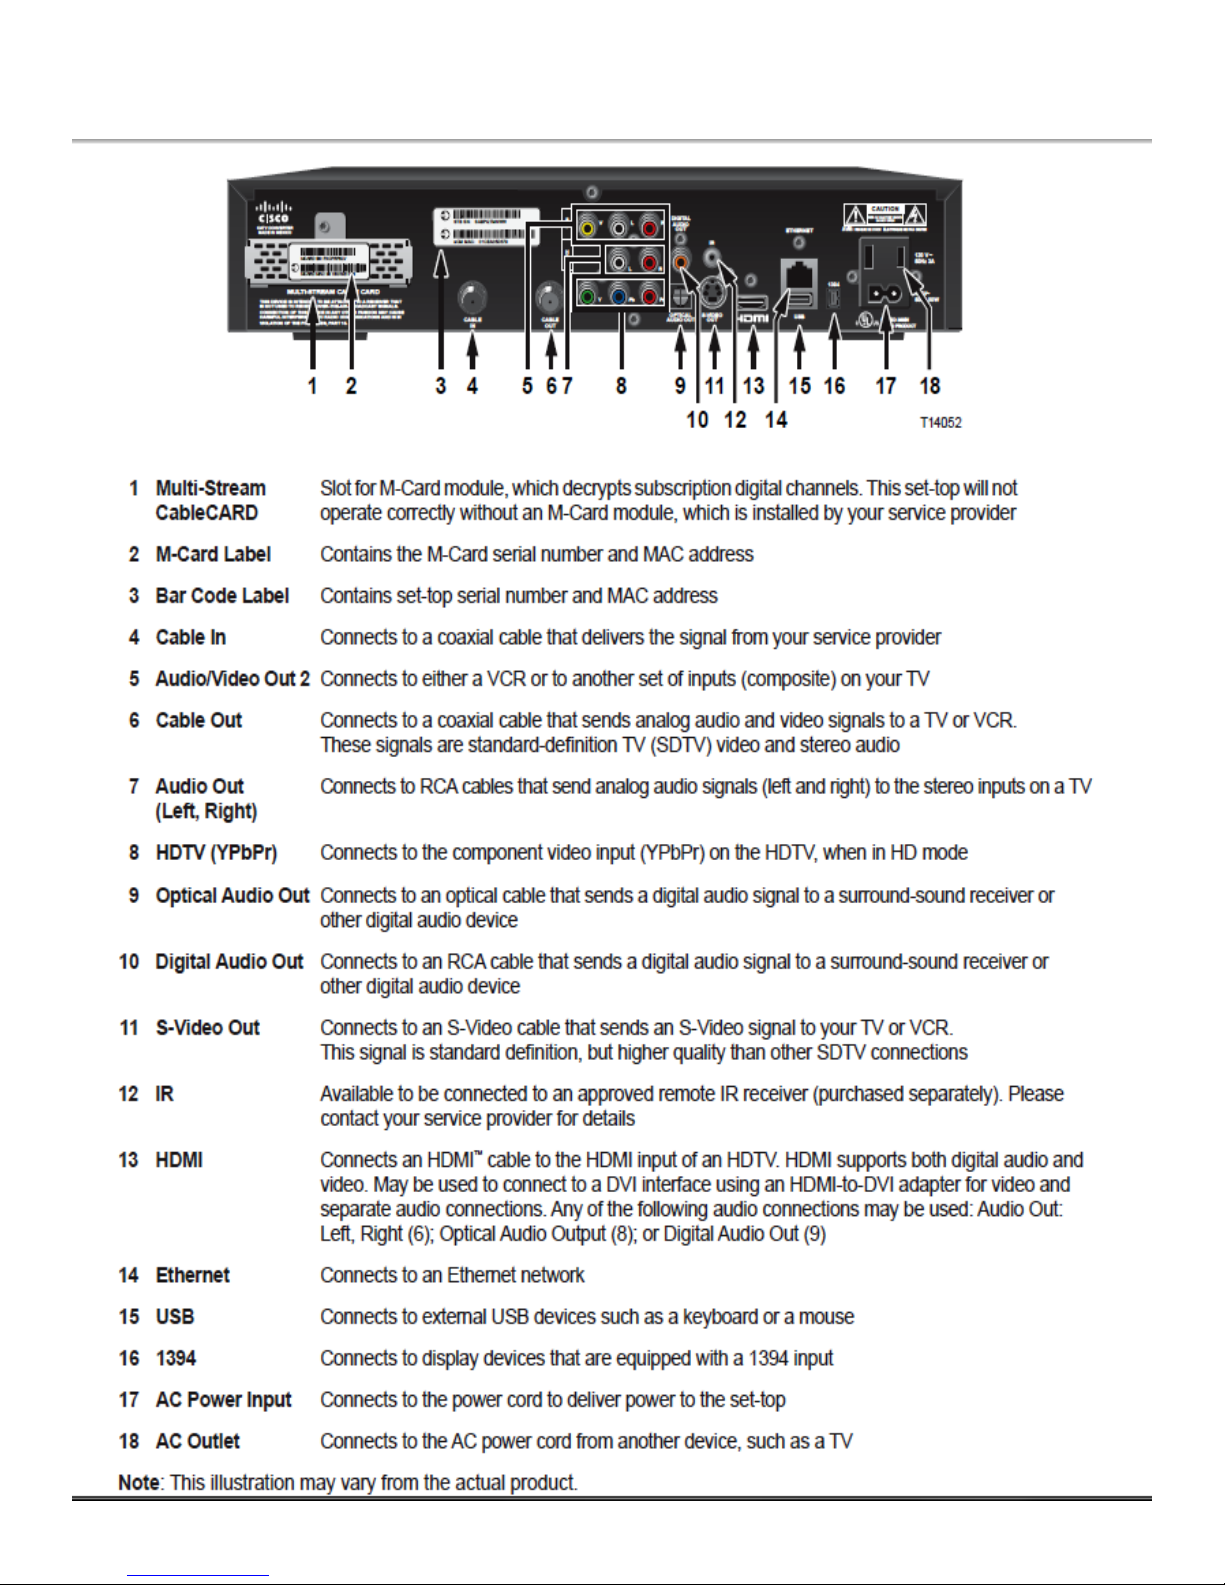
4652 Back Panel Connectors
Page 12
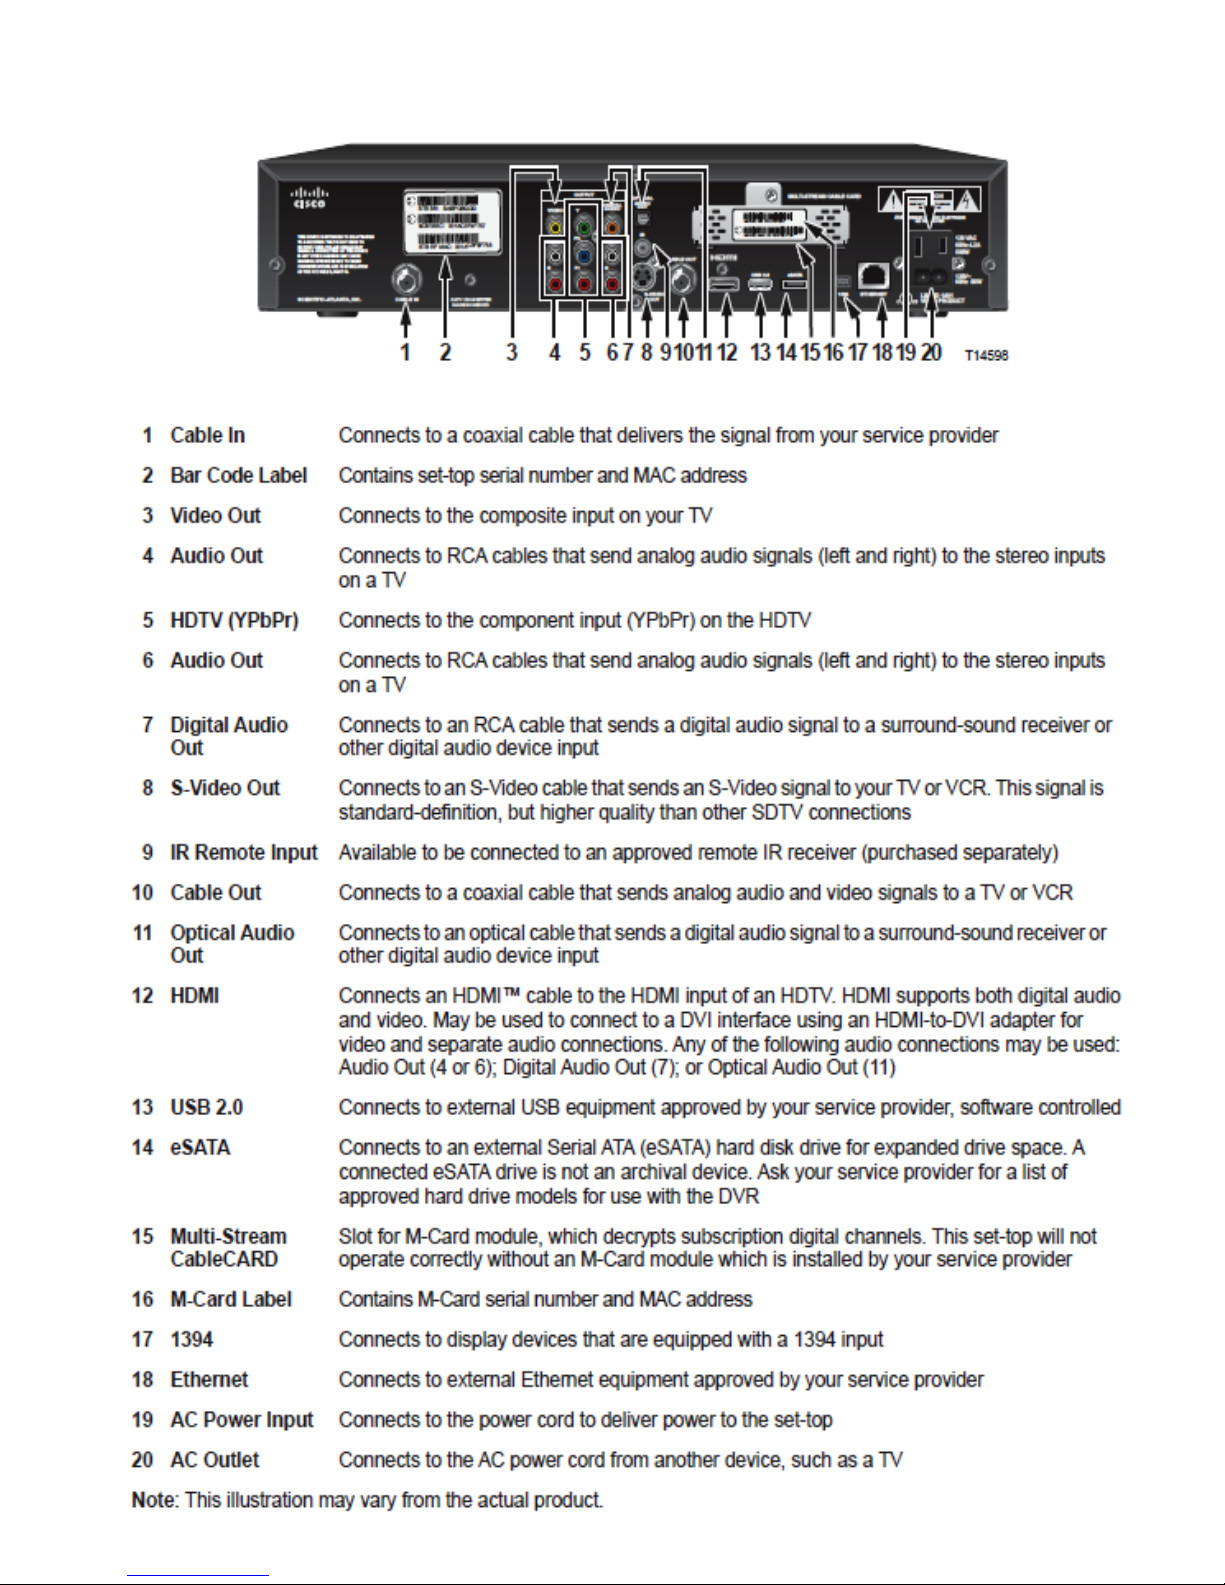
8652 Back Panel Connectors
Page 13
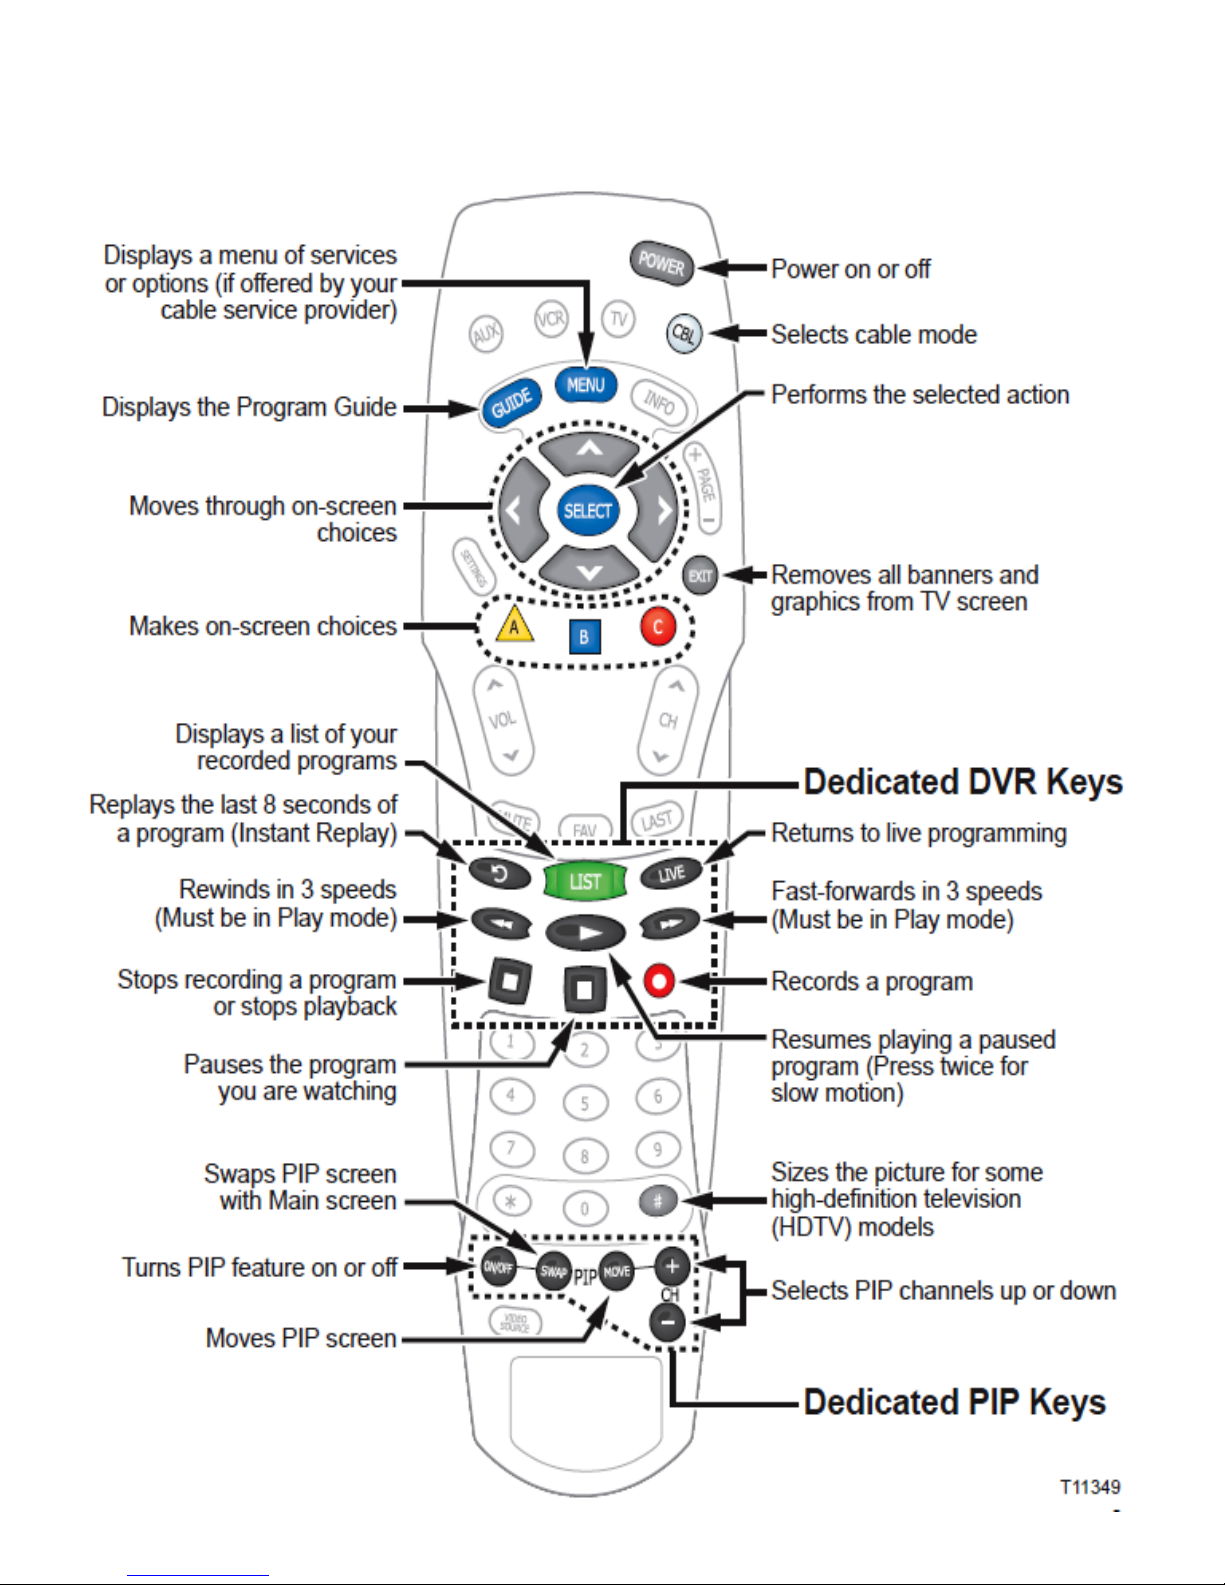
The Remote Control Model AT8560
This section is designed to show you the remote control and what each button does.
Page 14

Programming the Remote to Operate the TV Volume
• To program the Universal Remote to operate the volume on the TV, nd the codes for
your TV brand.
• Turn on the TV.
• Press and hold the SELECT and TV mode button until the mode buttons blink twice.
• Enter the rst setup code for the TV brand you are using. The mode buttons blink twice
to indicate that the code was accepted.
• Point the remote at the TV and press the Volume buttons to see if the code worked.
• If the code worked write it down and you are nished, if it did not work repeat the pro
cess using a different code, until you nd one that works.
• If none of the codes work, you can try using the code library.
Searching the Code Library
• Turn on the TV.
• Press and hold the SELECT and TV mode button until the mode buttons blink twice.
• Press 991. The TV mode button blinks twice.
• Point the remote at the TV and press the PLAY button. The remote will automatically
test each code in the library. The TV mode button will blink once for each code.
• As soon as the device powers off, press SELECT.
• Verify the new code by pressing the POWER.
• Did the TV power on again? If yes press SELECT to assign the code. If no, turn the
TV on, and press the Channel Up or Channel Down buttons to step forward or back to
the correct code. When the device turns off, press SELECT to assign the code.
• Go to Which Code Worked to identify the code that works the TV. After you identify
the code, write it down.
Which Code Worked
• Press and hold the SELECT and TV mode button until the mode buttons blink twice.
• Press 990. The TV mode button blinks twice.
• Press 1 and count the number of time the TV mode button Blinks. The number of blinks
indicates the rst digit in the code.
• Press 2 and count the number of time the TV mode button Blinks. The number of blinks
indicates the second digit in the code.
• Press 3 and count the number of time the TV mode button Blinks. The number of blinks
indicates the third digit in the code.
• Press 4 and count the number of time the TV mode button Blinks. The number of blinks
indicates the fourth digit in the code.
Page 15

• After all four numbers in the code are identied, all mode buttons blink three times.
• Write the code down.
Controlling TV and Set-Top Power with one button
• Press and hold the SELECT and CBL mode button until the mode buttons blink twice.
• Press 998. The CBL mode button blinks twice.
• Press the CBL mode button.
• Press the TV Mode button.
• Press the SELECT button to save the settings. All mode buttons blink three times.
• Press the POWER button to see if they both turn on and off at the same time.
Page 16
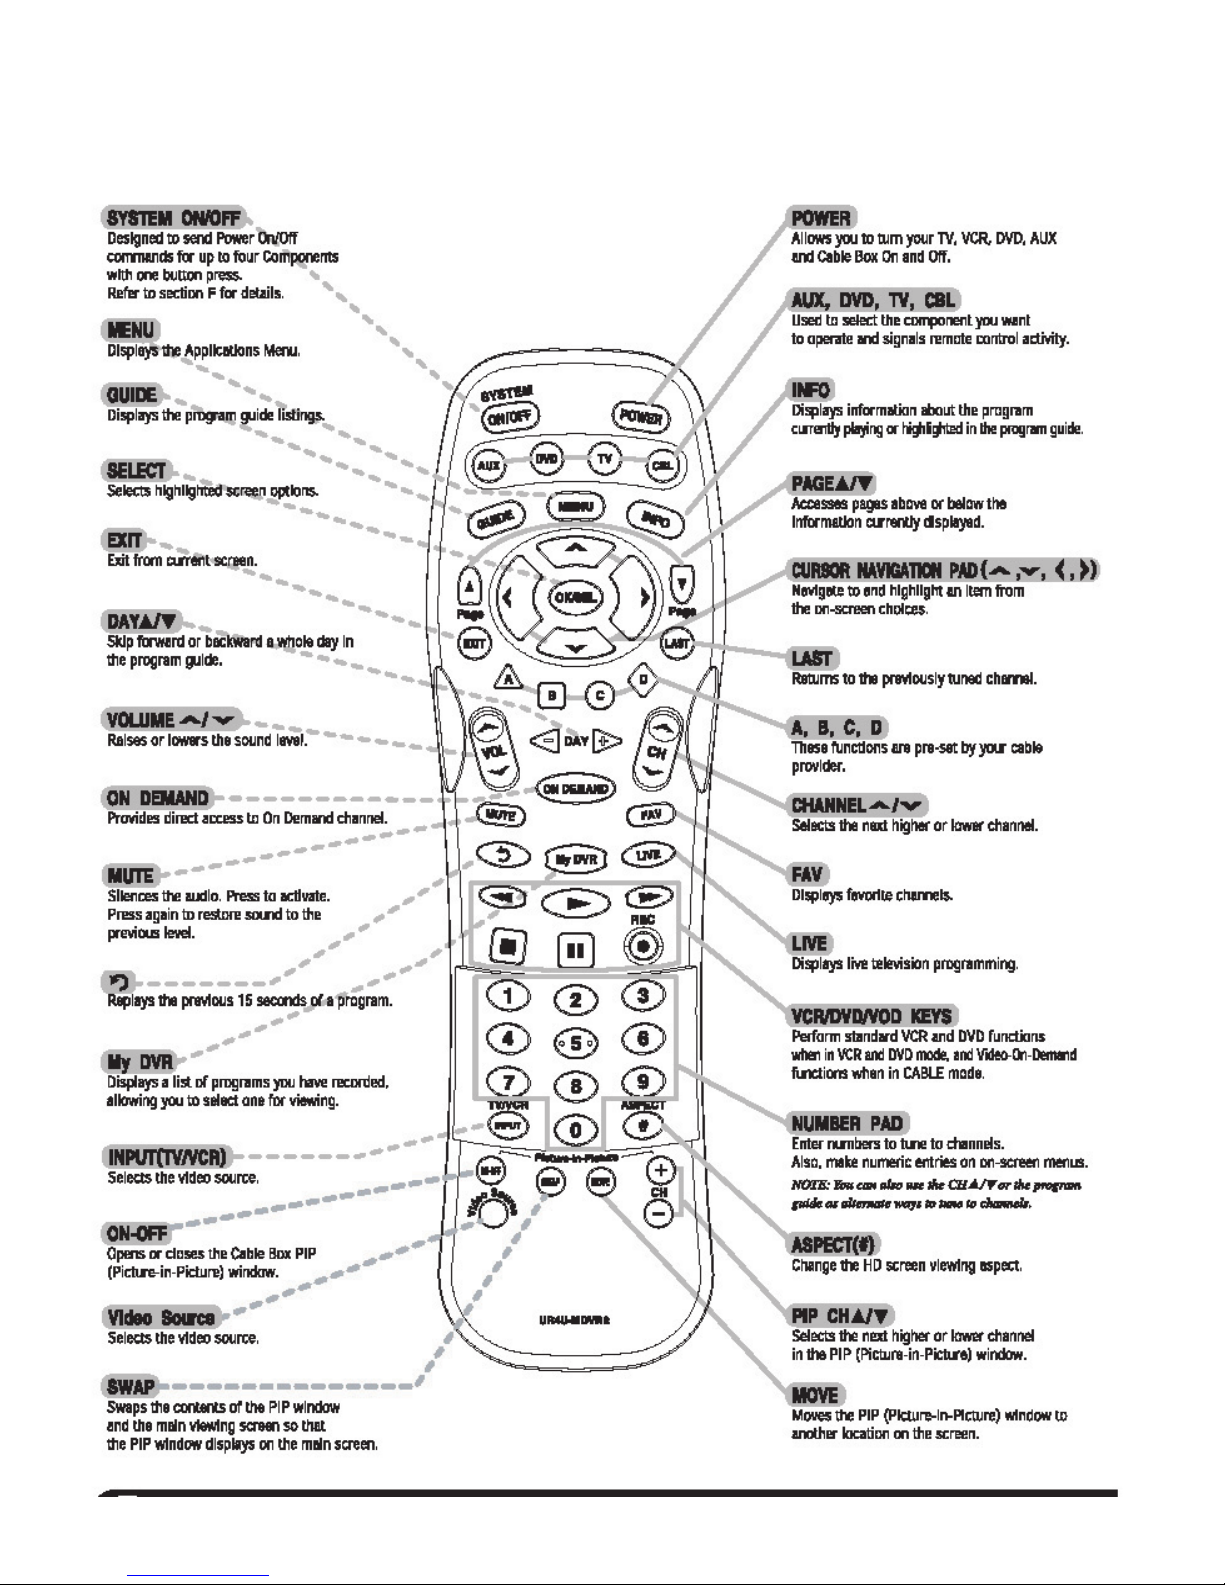
The Remote Control Model UR4U-MDVR2B
This section is designed to show you the remote control and what each button does.
Page 17

DEFAULT STATUS:
Component Default: CABLE
Channel Default: CABLE channel +/- and numbers operate through the CABLE box. You have the option of
controlling channel +/- and numbers through the TV, VCR or DVD. Refer to section G for programming steps.
Volume Default: CABLE volume +/- and mute operate through the TV. You have the option of controlling volume through the Cable box, VCR or DVD. Refer to section H for programming steps.
Programming the Remote Control
There are three ways you can program your remote control:
* Quick Set-Up Method
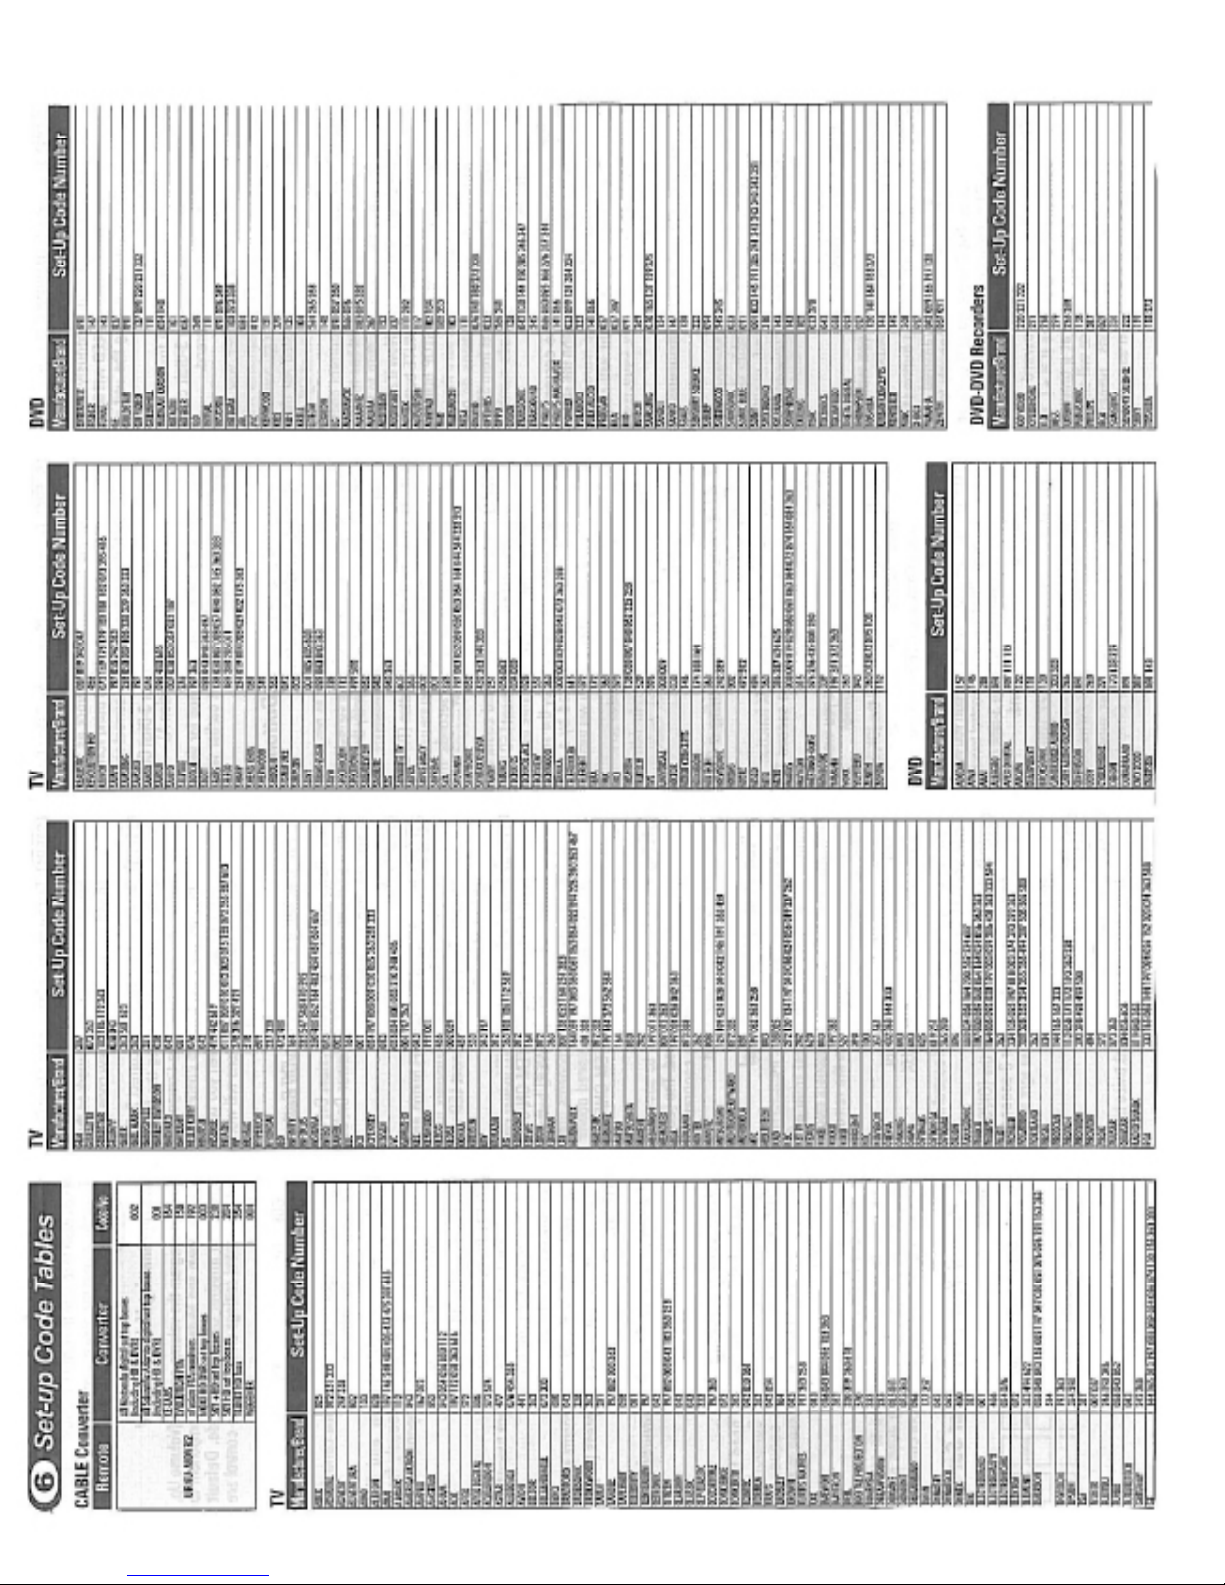
* The Pre-Programmed 3-Digit Code Method
* The Auto-Search Method
The Quick Set-Up Method is a unique new feature that enables the fastest and easiest set-up by using
one-digit codes for up to 10 major brands for each component.
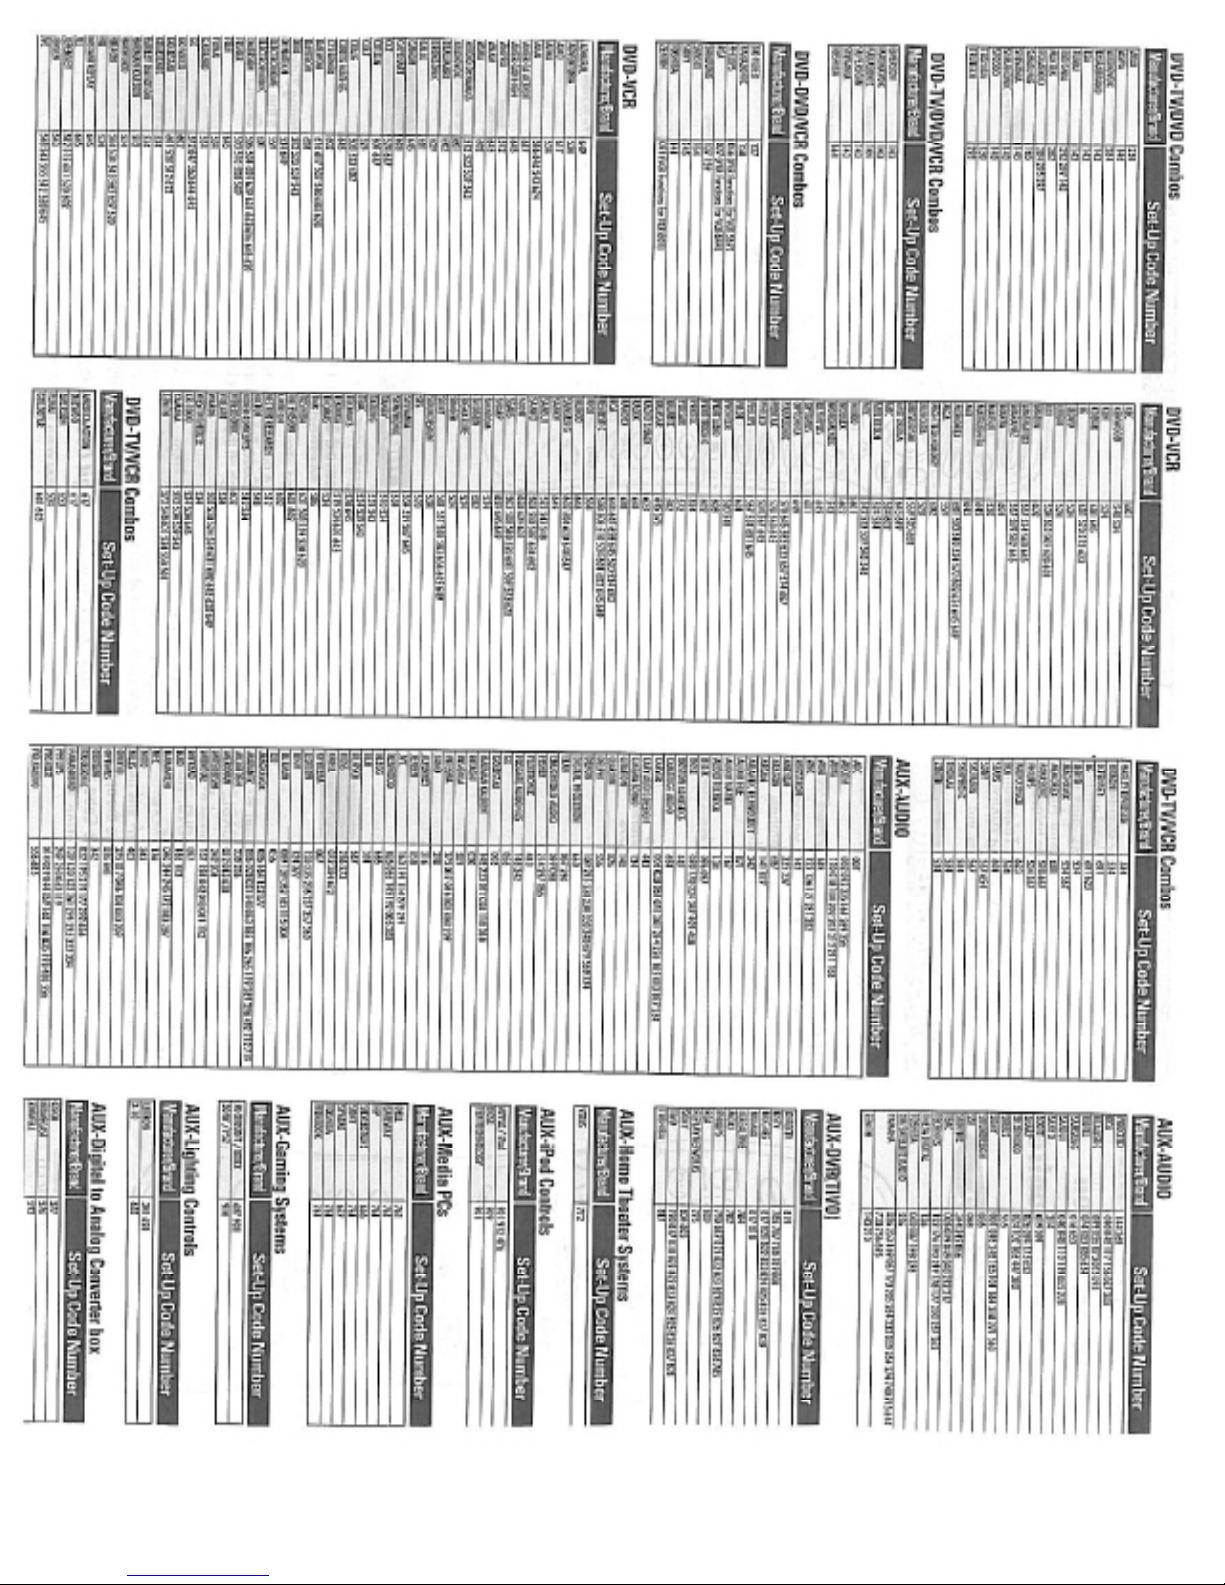
The Pre-Programmed Code Method allows you to setup all the buttons at once by entering 3-digit code
numbers that correspond to a particular Component’s manufacturer/brand, so it’s the fastest and
easiest of the two methods. (Code Tables are on the backside of this Instruction Sheet.) The AutoSearch Method scans through all the codes in the remote control, one at a time.
IMPORTANT SETUP NOTES:
This pertains to all programming steps. When you are in setup mode in each component, a component
LED will light up for 30 seconds. If you do not press a button within 30 seconds, the LED light will turn off
and exit setup mode and you will need to start over. When programming a combo unit, program as a VCR or
DVD rst.
A. Quick Set-Up Method
STEP 1 Turn on the device you want to program to program your TV, turn the TV on.
STEP 2 Point the remote at the TV and press and hold the TV key for 3 seconds. While Holding the TV key, the
TV LED will light off and on again. Begin to press the number keys, one at a time, starting
with 1, then 2, 3…0 until the TV turns off.
STEP3 Release the TV key to save the code. The TV LED will blink twice to conrm the code is stored.
Repeat these steps for your CBL, DVD, Aux, etc.
B. Pre-Programmed 3-Digit Code Method
STEP 1 Turn on the Component you want to program (TV, VCR, DVD or AUX).
STEP 2 Press the [COMPONENT] button (TV, DVD or AUX) to be programmed and [OK/SEL] button
simultaneously for 3 seconds. The Component LED will light for 30 seconds indicating the unit is ready to be
programmed.
STEP 3 Point the remote control toward the Component and enter the 3-digit code number assigned to your
brand.
*Note : If the 3-digit code number you just entered is correct, the Component will turn Off. If it did not turn Off,
continue entering code numbers listed for that brand until the Component turns Off.
STEP 4 After you’ve entered the correct code number and the Component has turned Off, press the [POWER]
button to turn the Component back On. Now it’s time to test the VOLUME and MUTE buttons for the TV (or
PLAY and STOP buttons for VCR and DVD) to make sure they all work. If any of the functions do not work as
they should, repeat from STEP 3 using the next 3-digit code number listed for that brand.
STEP 5 Once you have found the correct 3-digit code, save it by pressing the same [COMPONENT] button one
more time. The Component LED light will blink twice to conrm that the code was successfully stored.
Now, program the rest of your Components by repeating STEPS 1-5.
*Note : If the Pre-Programmed Method did not work, or if the Code Tables do not list your Component brand,
use the Auto- Search Method as explained in Section C.
Page 18

C. Auto-Search Method
STEP 1 Turn on the Component you want to program (TV, VCR, DVD or AUX).
STEP 2 Press the [COMPONENT] button (TV, DVD or AUX) to be programmed and [OK/SEL] button
simultaneously for 3 seconds. The Component LED will light for 30 seconds indicating the unit is ready to be
programmed.
STEP 3 Point the remote toward the Component and press the [CH ^] or [CH v] button one step at a time or
keep it pressed. The remote will emit a series of ON/OFF commands. Release the [CH ^] or [CH v] button as
soon as the Component turns Off.
STEP 4 Test functions. (Same as for 3-Digit Code Programming Method - Section A). If any of the functions do
not work as they should, repeat from STEP 3 using [CH ^] or [CH v] buttons to nd the correct code.
STEP 5 Save the code. (Same as for 3-Digit Code Programming Method - Section B). Now, repeat the AutoSearch Method for those Components you could not program earlier with the Pre-Programmed Method.
D. Finding a Component Button’s Setup Code Number
If you used the Auto-Search Method to program a Component, you may not know what the correct code
number is. Here is a way for you to identify the code number, so you can record it for future reference.
STEP 1 Press the [COMPONENT] button (TV, DVD or AUX) you want to verify and the [OK/SEL] button
simultaneously for 3 seconds. The Component LED will light for 30 seconds.
STEP 2 Press the [INFO] button and count the number of times the Component LED light blinks. This
number indicates the rst digit of the code, followed by the second and third, each separated by a one second
pause when the LED will turn off.
*Note : 10 blinks represents the number zero.
Example : One blink, (pause), eight blinks, (pause) and three blinks, indicates code number 183.
E AUX Function: Programming a 4 th Component
You can take advantage of the AUX function to program a 4th Component such as a second TV, VCR, DVD or
Audio Component.
STEP 1 Turn on the 4th Component you want to program (TV, VCR, DVD or Audio).
STEP 2 Press the [AUX] button and the [OK/SEL] button simultaneously for 3 seconds.The [AUX] Component
LED will light for 30 seconds.
STEP 3 Press the [COMPONENT] button you want to setup. Point the remote control toward the Component
and enter the 3-digit code number assigned to your brand.
*Note : If the 3-digit code number you just entered is the correct number, the Component will turn Off. If it did
not turn Off, continue entering code numbers listed for that brand until the Component turns Off
STEP 4 Test functions. (Same as for 3-Digit Code Programming Method - Section B). If any of the functions do
not work as they should, you need to nd a new code.
STEP 5 Once you have found the correct 3-digit code, save it by pressing the [AUX] button one more time. The
Component LED light will blink twice to conrm the code was stored. Now when you press the AUX button,
all the buttons will work with that 4th Component.
F. Programming the System On/Off Button
This allows you to program the System On/Off button so it can send up to four power On/Off commands with
one button press.
STEP 1 Press the [CBL] button.
STEP 2 Press the [SYSTEM ON/OFF] button and the [OK/SEL] button simultaneously for 3 seconds. The
[CBL] Component LED will light for 30 seconds.
STEP 3 Press the rst [COMPONENT] button you want to store in the [SYSTEM ON/OFF] button and then
the [POWER] button. Repeat this for other Components until you have stored all the desired power commands
into the [SYSTEM ON/OFF] button.
Page 19

STEP 4 Press the [CH ^] button to save the power commands you stored. The [CBL] button will blink twice to
conrm the commands have been saved.
G. Programming Channel Control
You can program the channel controls (Channel Up, Channel Down, Last and Numbers) from one Component
to operate in another Component mode. Default channel control settings on the remote control are as follows:
CBL : CBL TV : CBL DVD : DVD AUX : AUX
If you wish to operate the TV channel control in TV mode, use the following steps.
STEP 1 Press the [TV] button and the [OK/SEL] button simultaneously for 3 seconds. The [TV]
Component LED will light for 30 seconds.
STEP 2 Press the [VOL v] button.
STEP 3 Press the [TV] button again.
The Component LED will blink twice to conrm the programming. To return to original state: If you wish to
restore the CABLE channel control in TV mode, repeat the above steps but press [CBL] in STEP3.
H. Programming Volume Control
You can program the volume controls (Volume Up, Volume Down and Mute) from one Component to
operate in another Component mode. Default volume control settings on the remote control are as follows:
CBL: TV
TV: TV
DVD: TV
AUX : AUX
If you wish to operate the CBL volume control in CBL mode, use the following steps.
STEP 1 Press the [CBL] button and the [OK/SEL] button simultaneously for 3 seconds. The [CBL] Component
LED will light for 30 seconds.
STEP 2 Press the [VOL ^] button.
STEP 3 Press the [CBL] button. The Component LED will blink twice to conrm the programming.
To return to original state: If you wish to restore the TV volume control in CBL mode, repeat the above steps
but press [TV] in STEP 3.
I. Programming a Favorite Channel See on-screen Guide Menu.
J. Low Battery Warning
When the batteries are low and need to be replaced with fresh batteries, the Component LED lights will
blink 2 times in sequence whenever a [POWER] button is pressed to turn on equipment.
K. Memory Lock System
This remote control is designed to retain programmed memory for 10 years even after batteries are removed
from the remote control.
L. Record Your Component Set-up Codes
TV Set-up Code Number:
DVD Set-up Code Number:
AUX Set-up Code Number:
Page 20
Page 21
Page 22

Basic Operations
This section describes how to perform basic operations on the set-top.
Turning on the Box
There are two methods to turn on the box. You can press the power button located on the front
of the box, or you can press the power button on the remote.
Changing the Channel
There are several methods to change the channel on the set-top. The rst method is by pressing
the channel up or channel down button. There is one located on the remote control and one on
the front panel of the box. The second method to change the channel is by pressing the desired
channel number on the remote. The nal way to change the channel is by using the guide button to access the program guide. Once the guide is accessed, you can scroll through the channels and select the one you want by pressing the select button on the remote.
Adjusting the Volume
There are two methods to adjust the volume. The volume buttons on the front panel of the box
adjust the volume of the box. It ranges from 0 to 30. If the box ever loses power, the volume
goes back to the factory setting of 16. To increase the volume on the box, simply press the (volume +) button on the front panel. The second method to increase the volume is by increasing
the volume on the TV. Your set-top remote is a universal remote, which may have been programmed to your TV. If so, you can simply press the volume button on the remote to turn the
TV volume up or down. If the remote is not programmed to the TV, you can refer to the manual
that came with the remote for programming instructions, or call you cable service provider for
assistance.
What’s On TV?
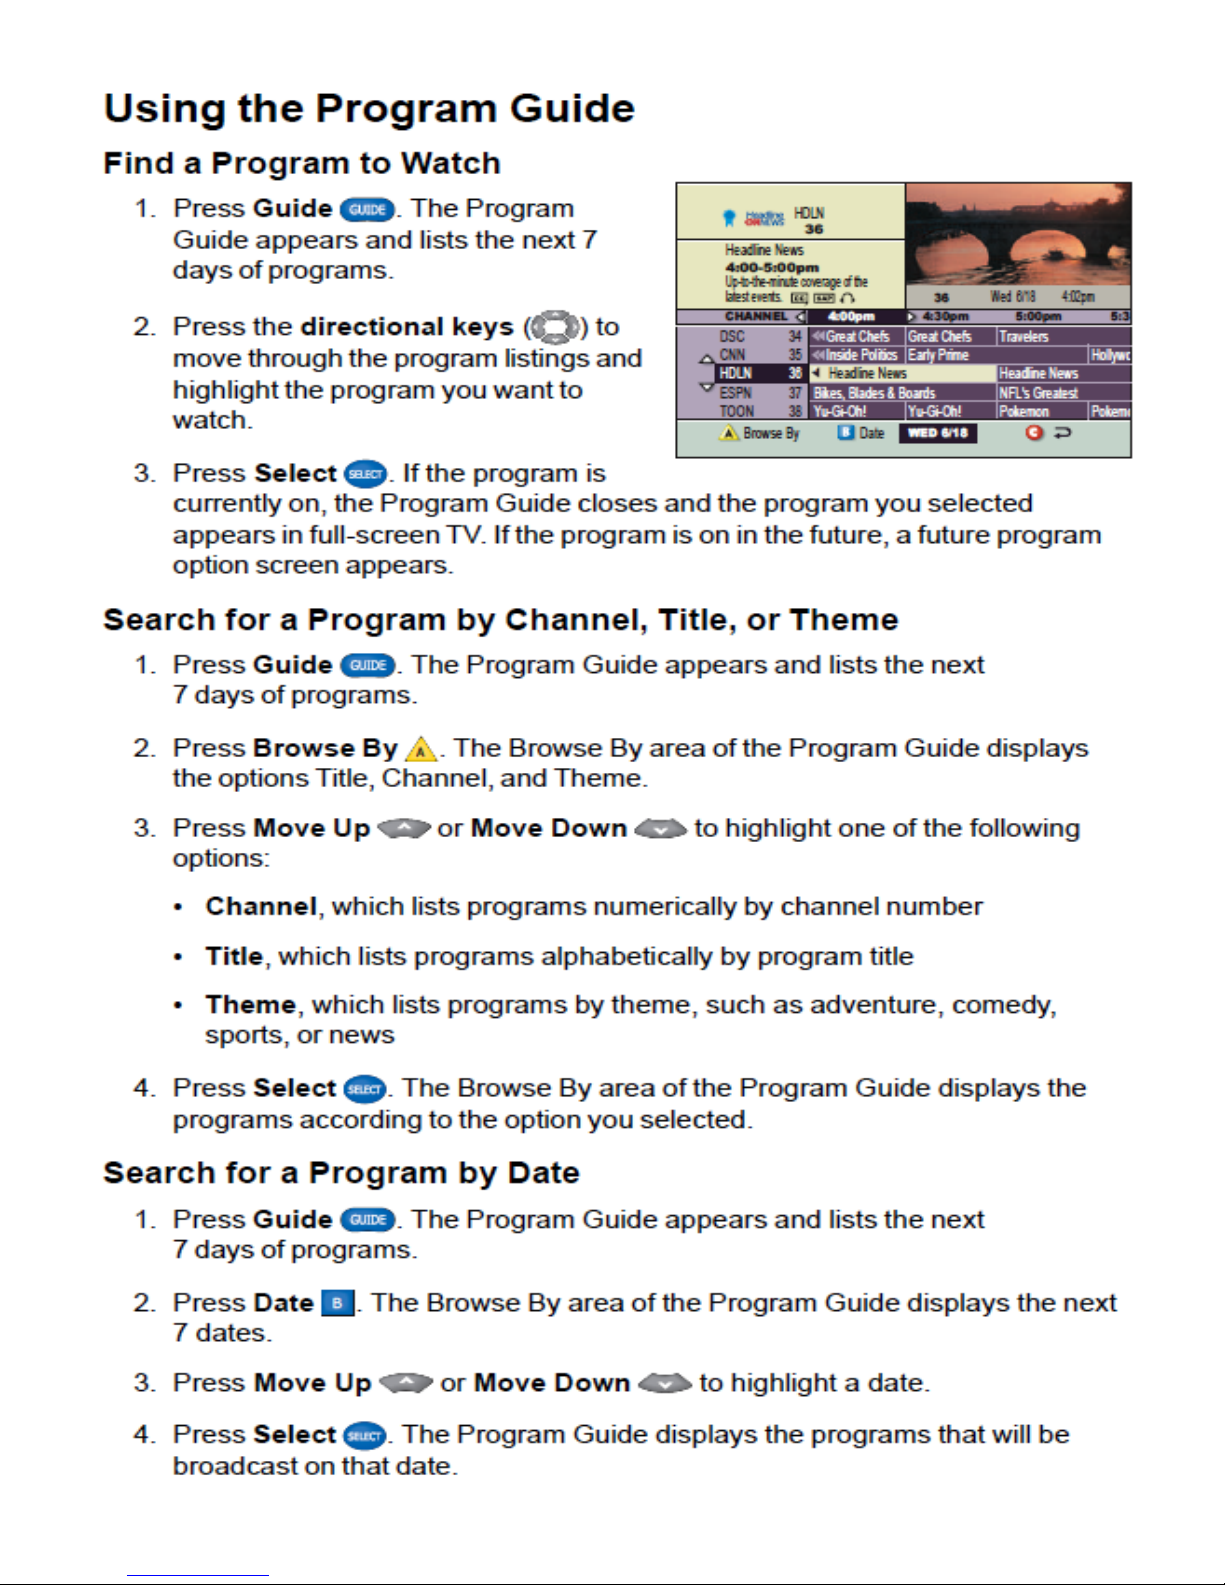
The set-top you are using contains an interactive program guide. This gives you the ability to
view the programs that are playing on each channel for the next seven days. The guide also
contains a brief description of each program, and the rating of each program. To access the
guide, simply press the Guide button on the remote. There is also one located on the front of
the box. Once the guide is up, you can use the arrow keys to move around in the guide. The
up and down keys change programs, and the left and right keys change the time. There are also
other keys that work in the guide. Look at the bottom of the guide to nd these keys and their
function. Once you nd the program you want to watch, press the select button, and the box
will tune to that channel. To exit the guide with out changing the channel, press the Exit button.
Page 23
Page 24

Settings
To access the settings of the set-top, press the Settings button located on the remote. This brings
up the Quick Settings Menu, where you will nd basic settings. To access the General Settings
Menu, press the Settings button a second time. This brings up a larger menu, where you will
nd things like parental control, favorites, and PPV information. To exit the menu, press the
Exit button.
Pay-Per View
Pay-Per View is a service that allows you to purchase a program for viewing. Once you purchase a program, the set-top stores this information, and reports it for billing. All set-tops offered by FiFTH Services have the ability to order Pay-Per View Movies.
To order a Pay-Per View, nd the program that you want to watch, and select it with the remote.
The Pay-Per View event guide gives you a short buy window at the start of the program. During this time you have the ability to purchase the program. If the Buy Window has passed, you
will not be allowed to purchase the program. To purchase a program during the Buy Window,
press the Buy Button (B). Once you select this, you will be asked to enter your Purchase Pin
Number. The Default Pin Number is: 0000 (four zeros). Enter the pin number and your order will be complete. If you wish to change your Purchase Pin Number, you can do this in the
General Settings Menu. If you forget your new pin number, you will have to call your service
provider (FiFTH) to have the pin reset.
Once you have ordered the Pay-Per View program you can cancel your order, but you can only
cancel within the rst ve minutes of the program’s start time. Once the Cancel Window has
expired, you will be billed for your purchase. To cancel a Pay-Per View purchase, enter the
General Settings Menu. From the settings menu, select PPV Purchase, select Pending, and select the program. Once you select the program you are asked if you want to cancel. To cancel
the purchase, press the (A) button.
Page 25
High Denition Operations
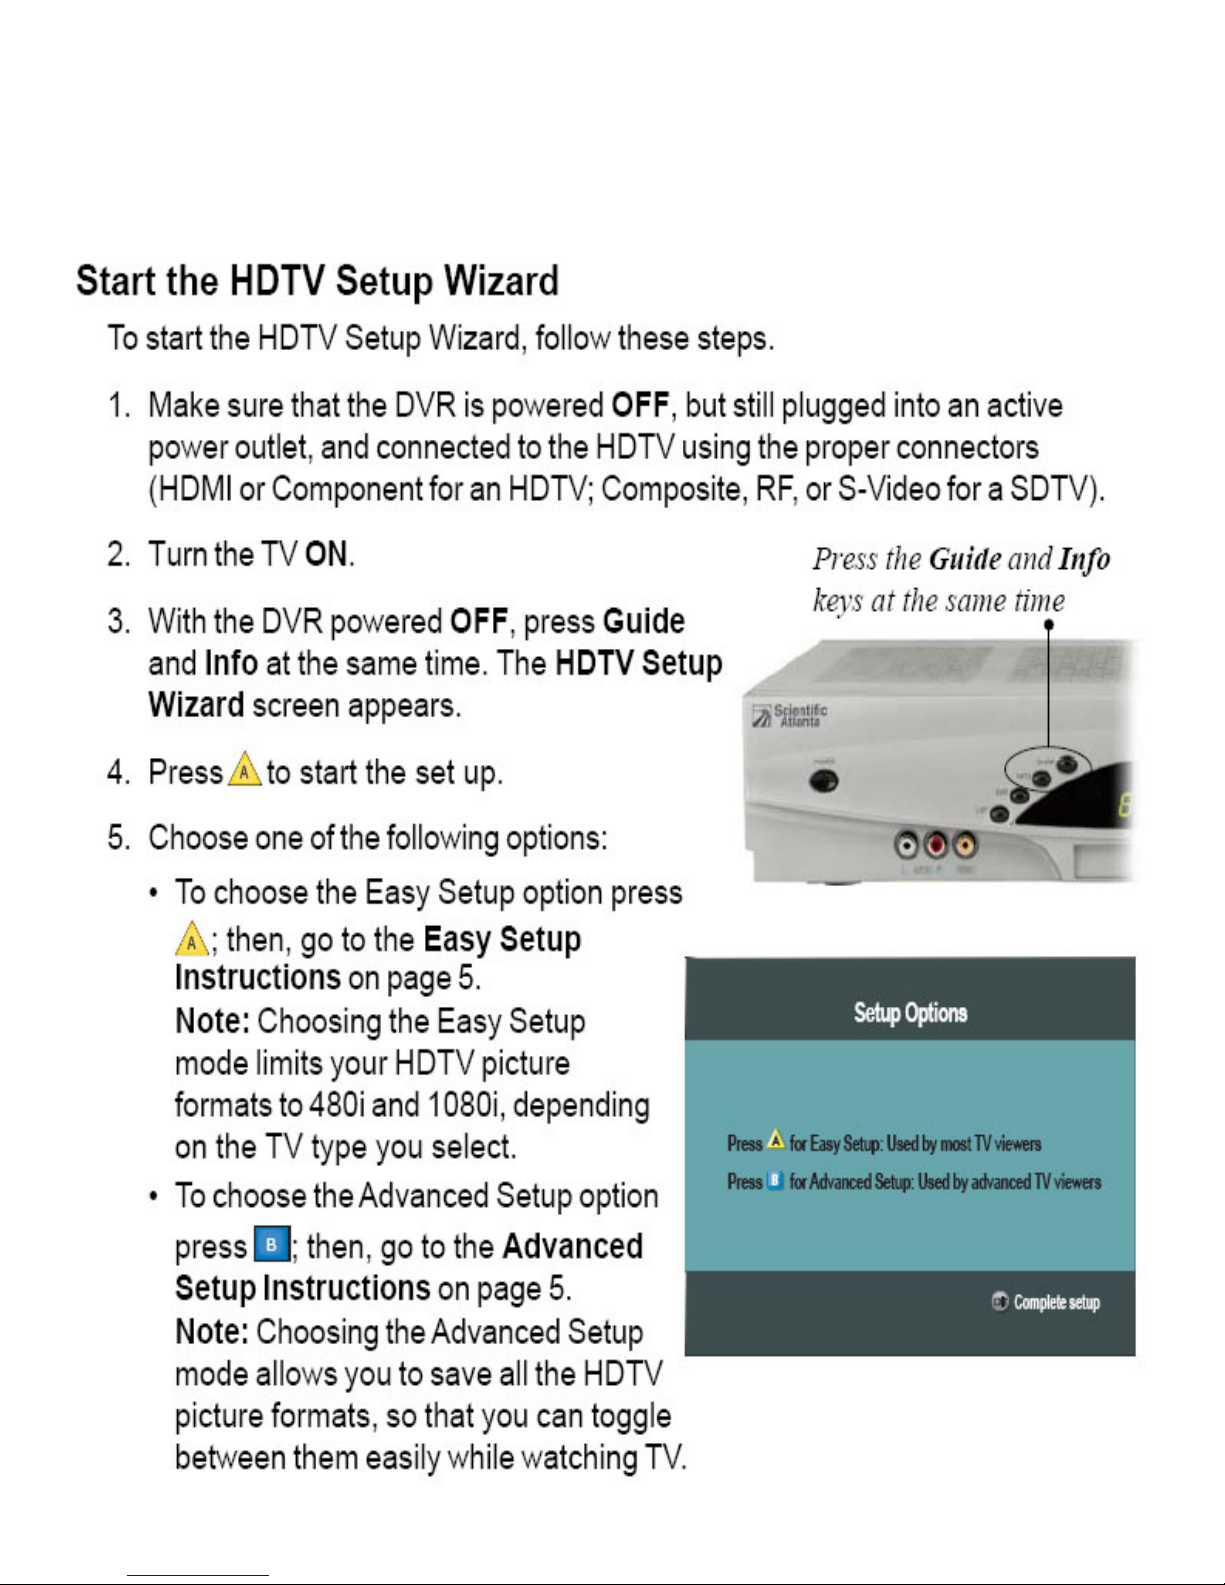
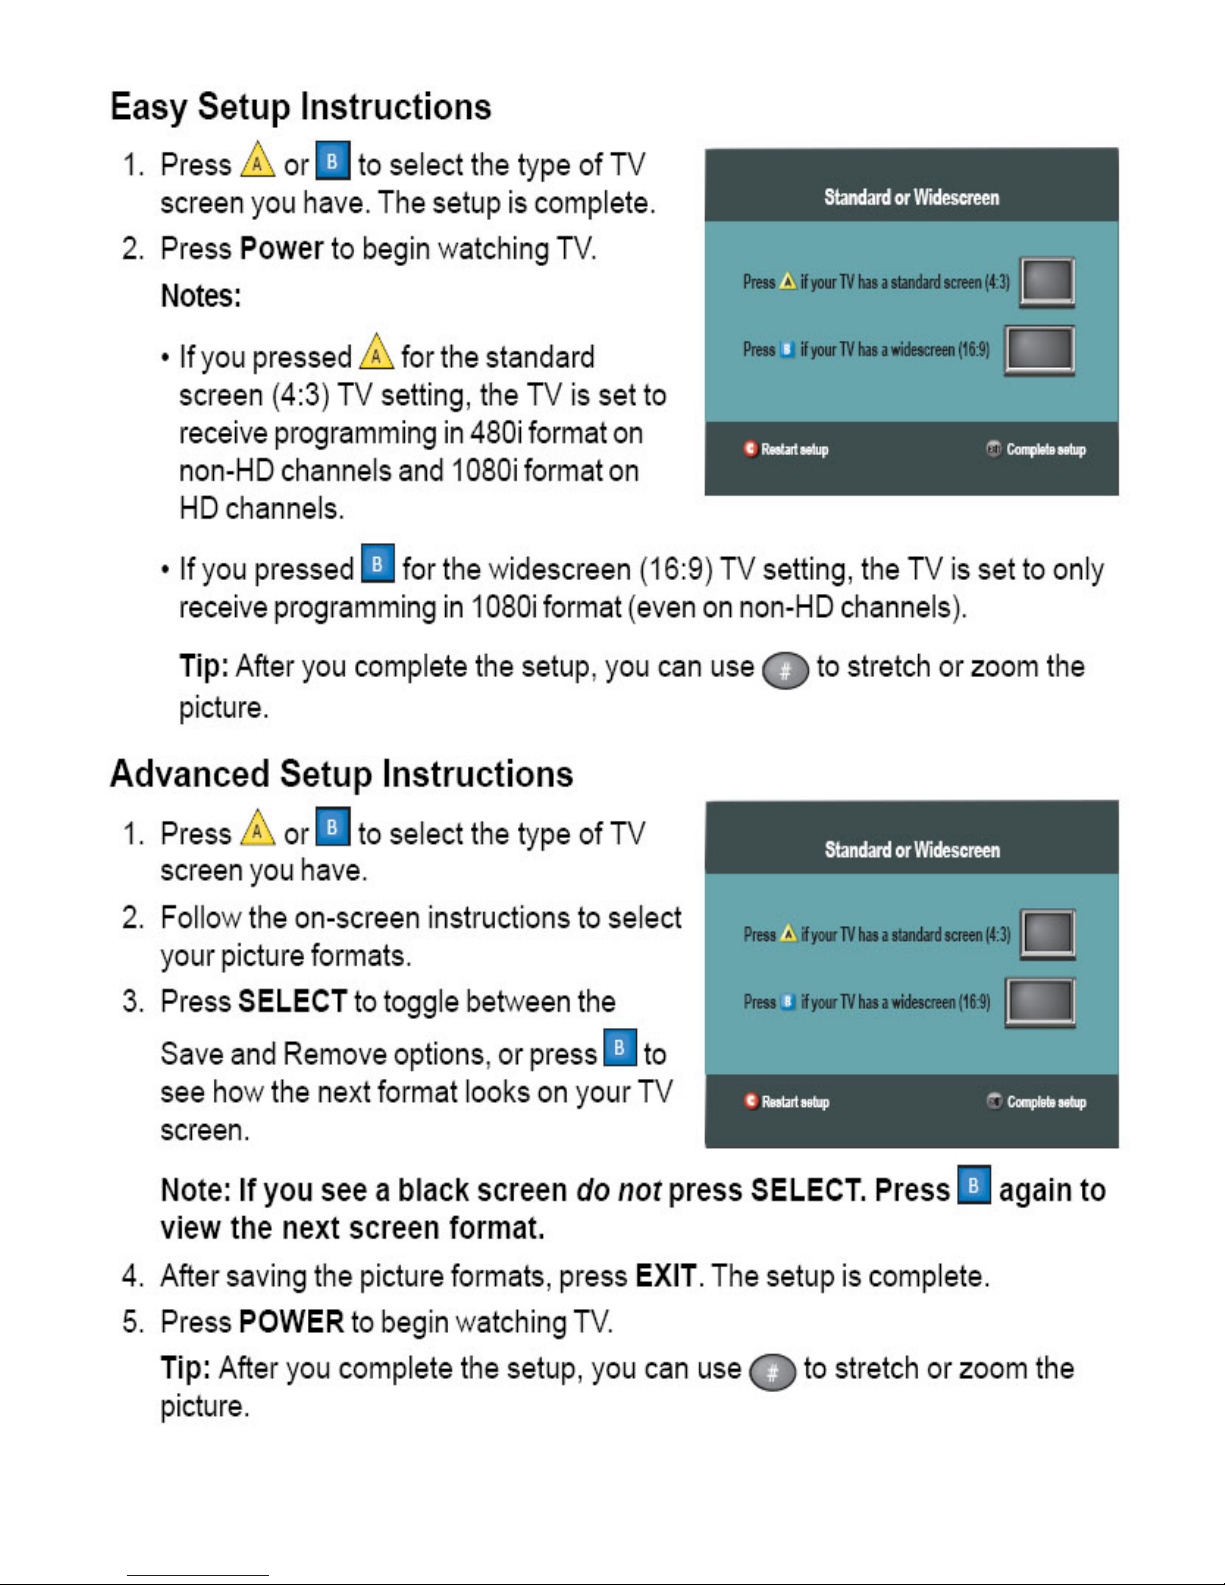
This section is designed to show you how to access the HDTV Setup Wizard. The wizard will
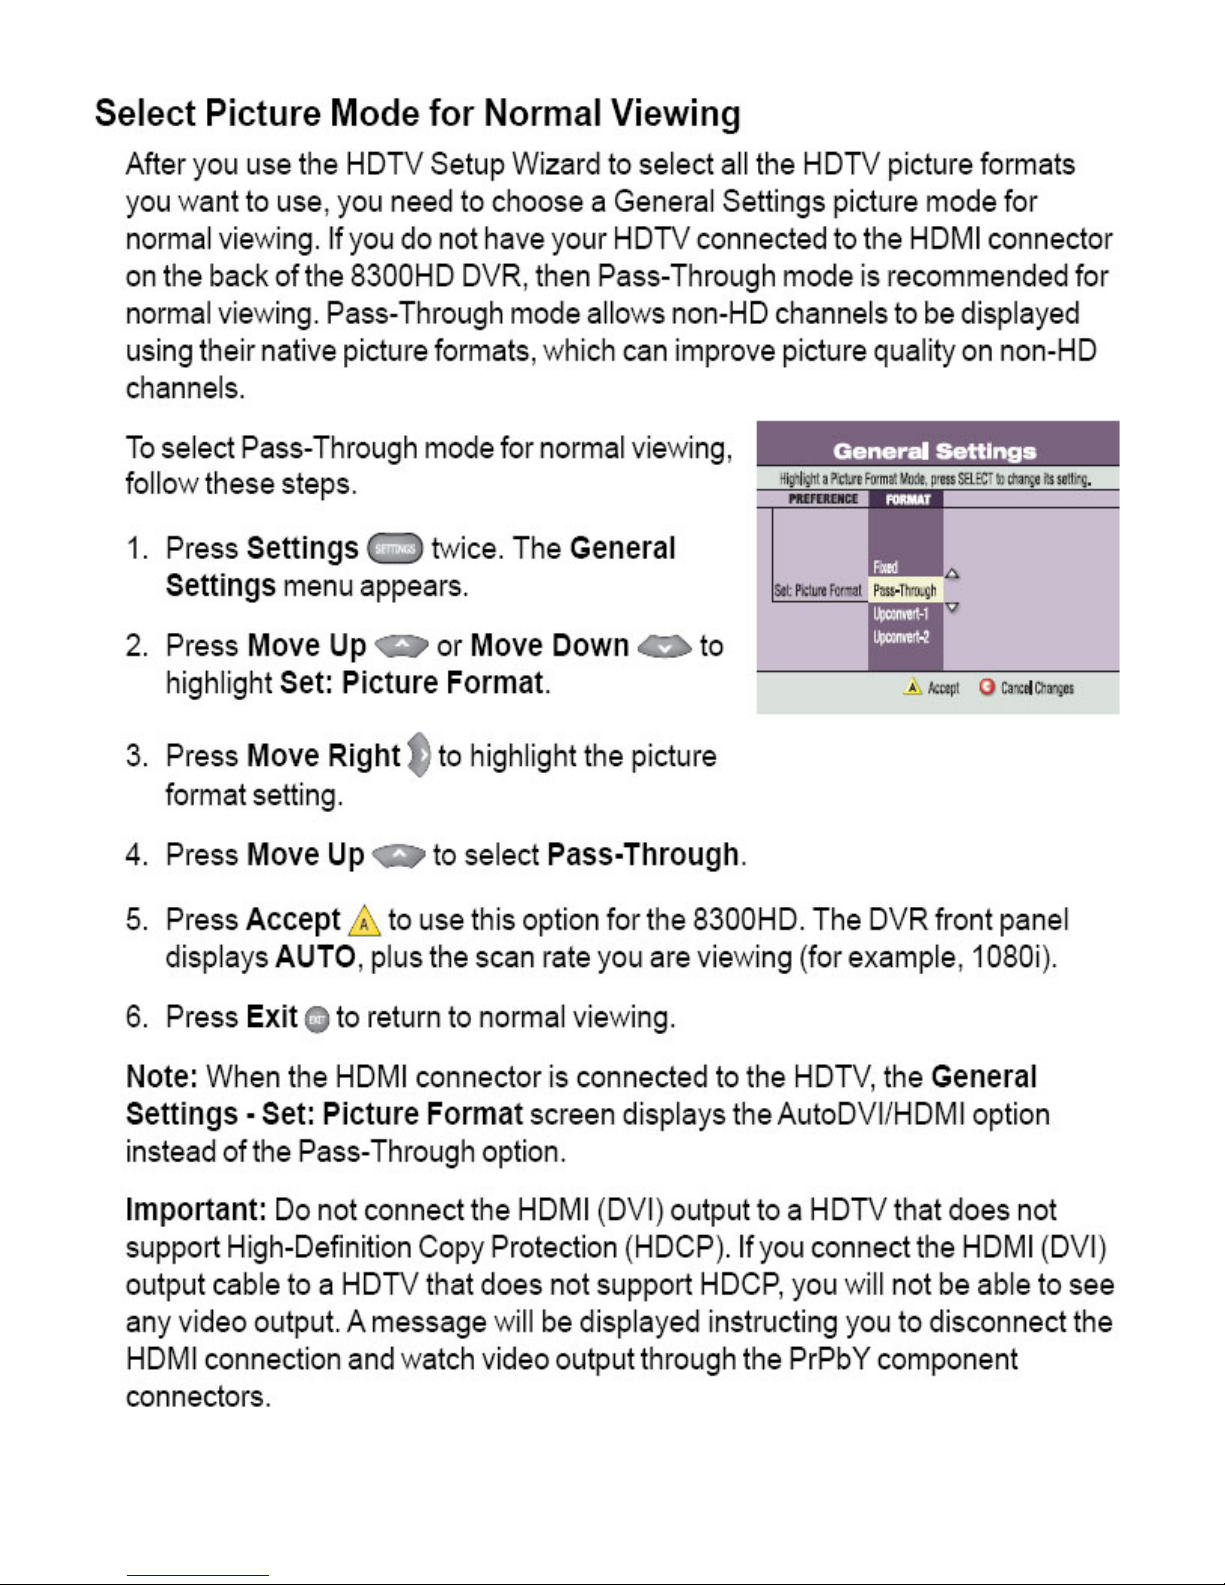
guide you through setting up your HD box. Once the box has been set up you can make changes to the settings by accessing the Settings menus.
Page 26
Page 27
Page 28
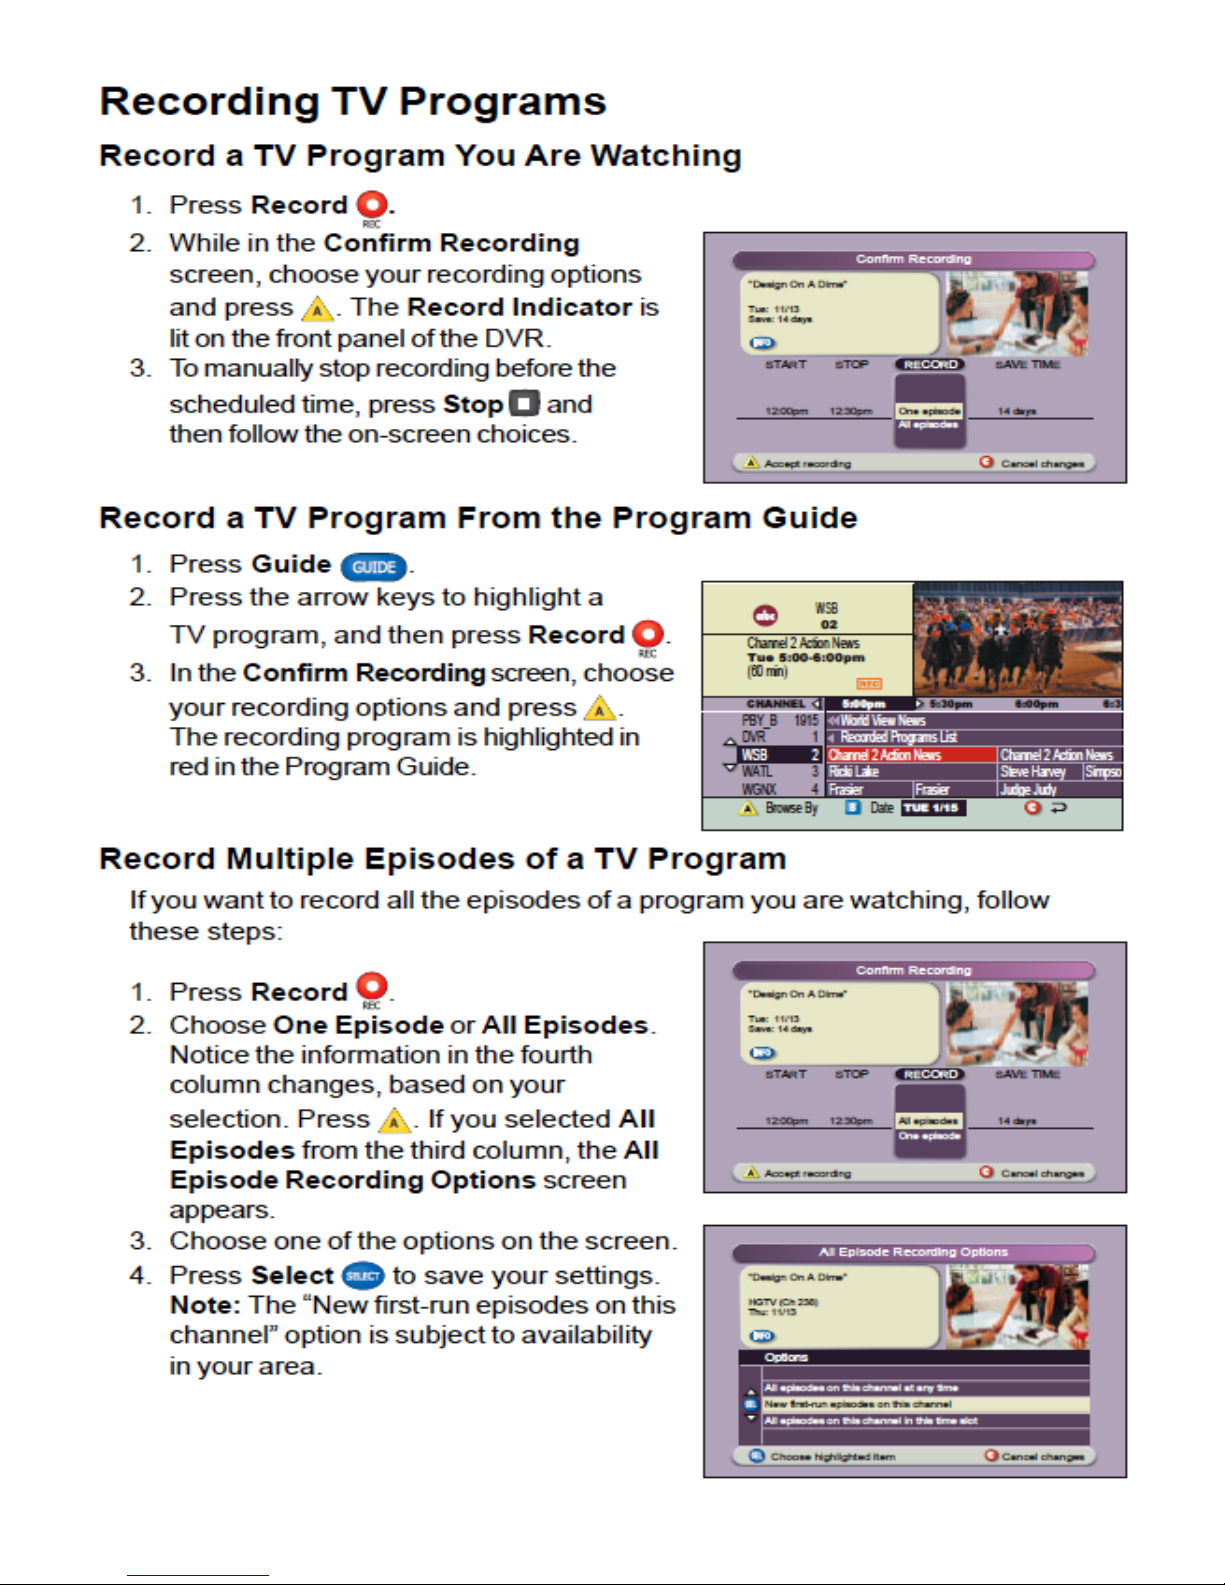
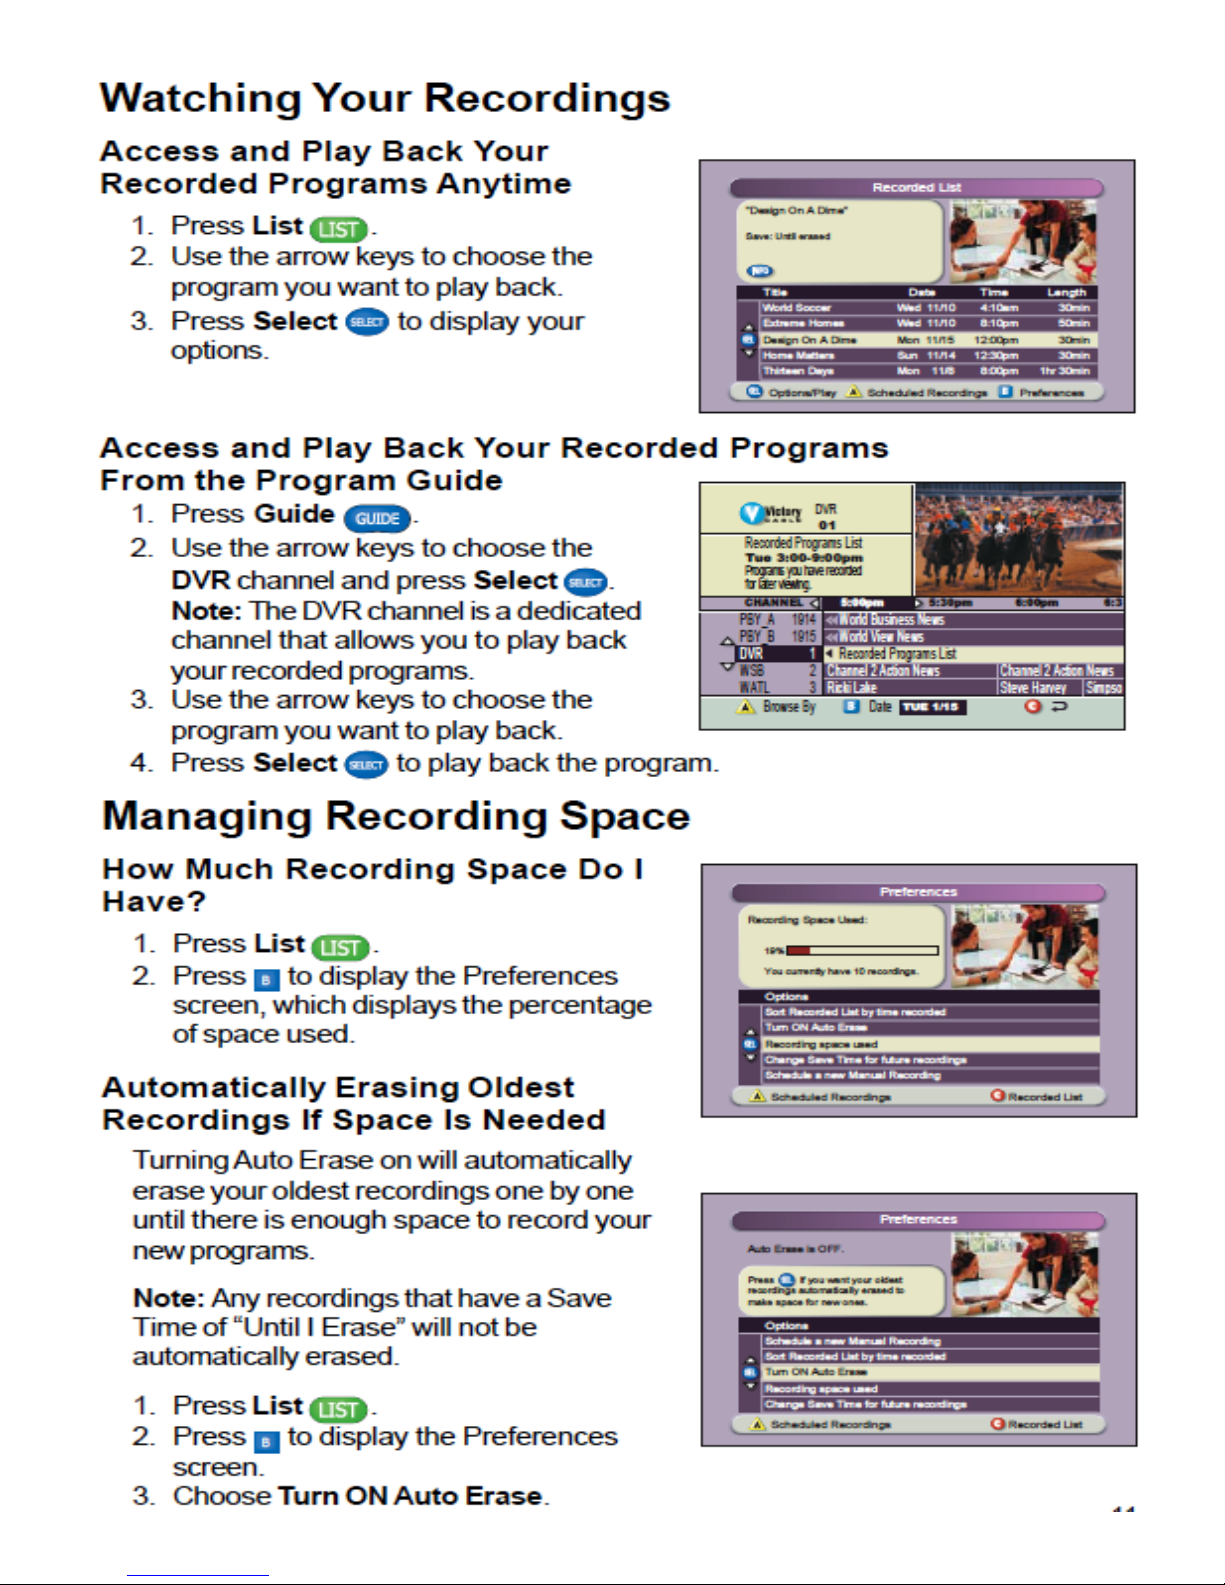
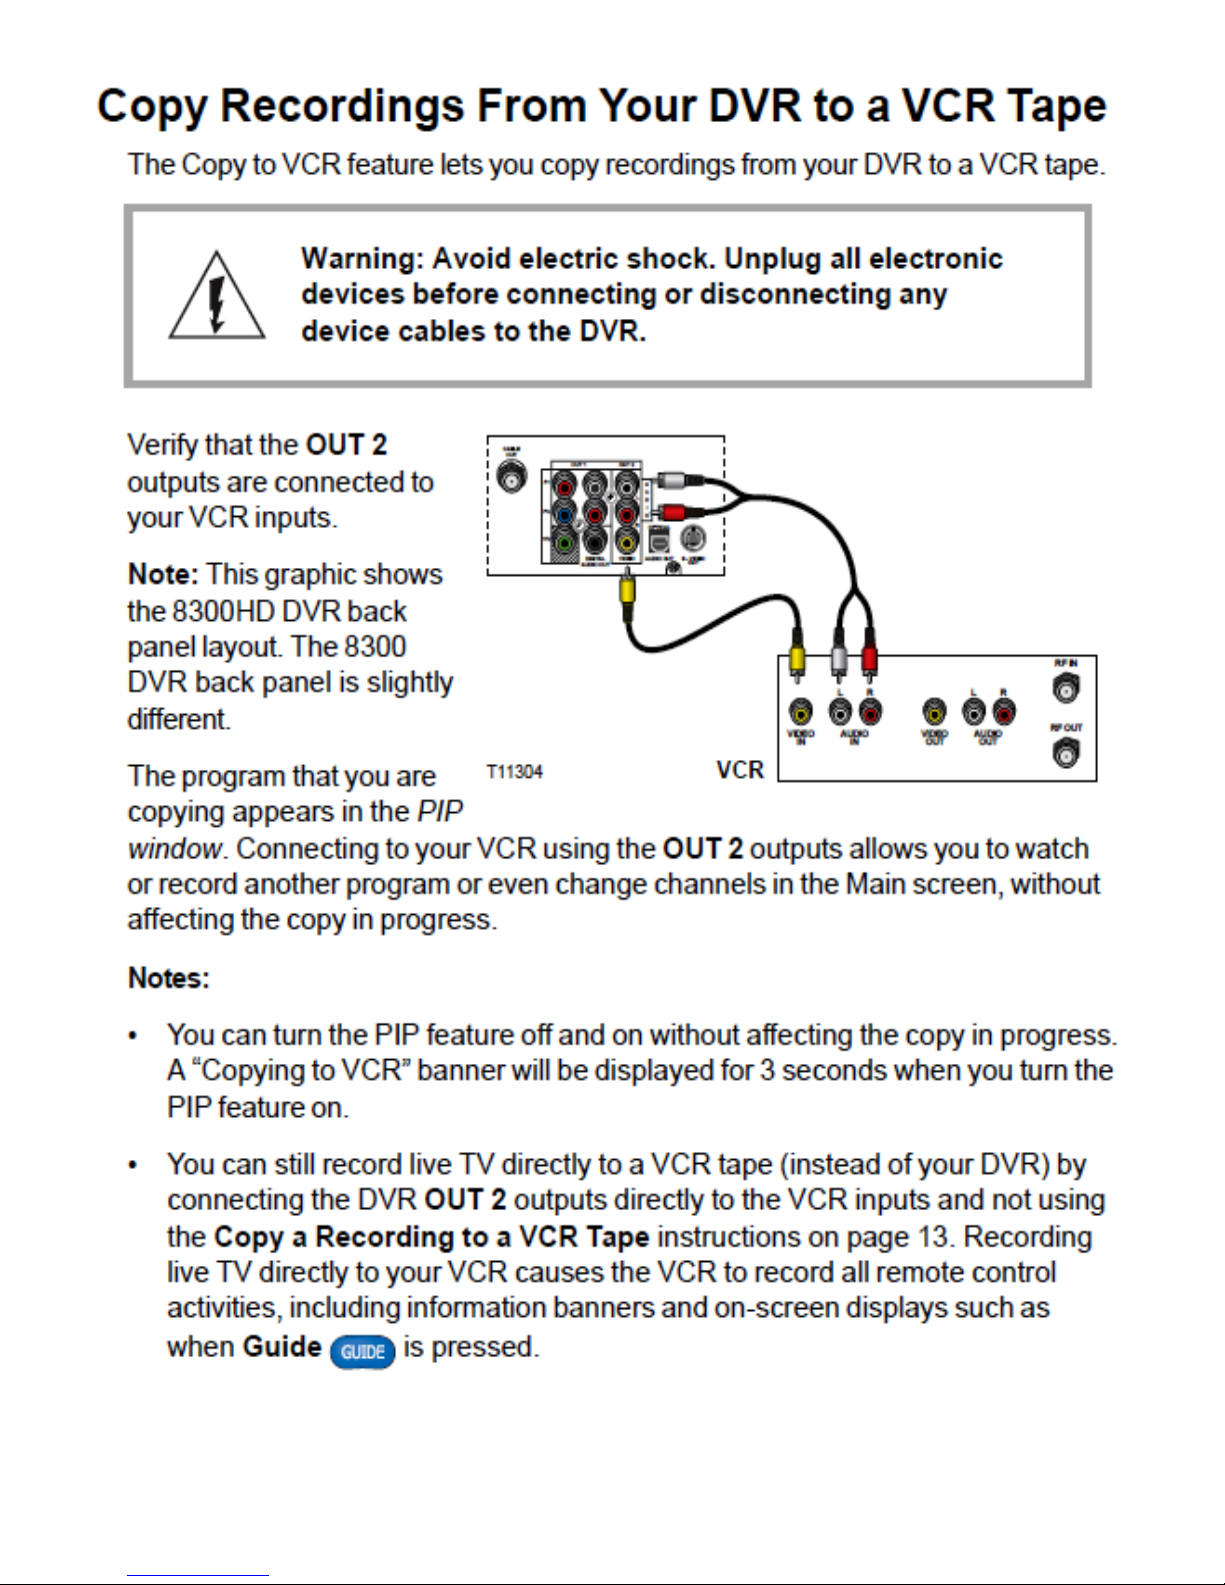
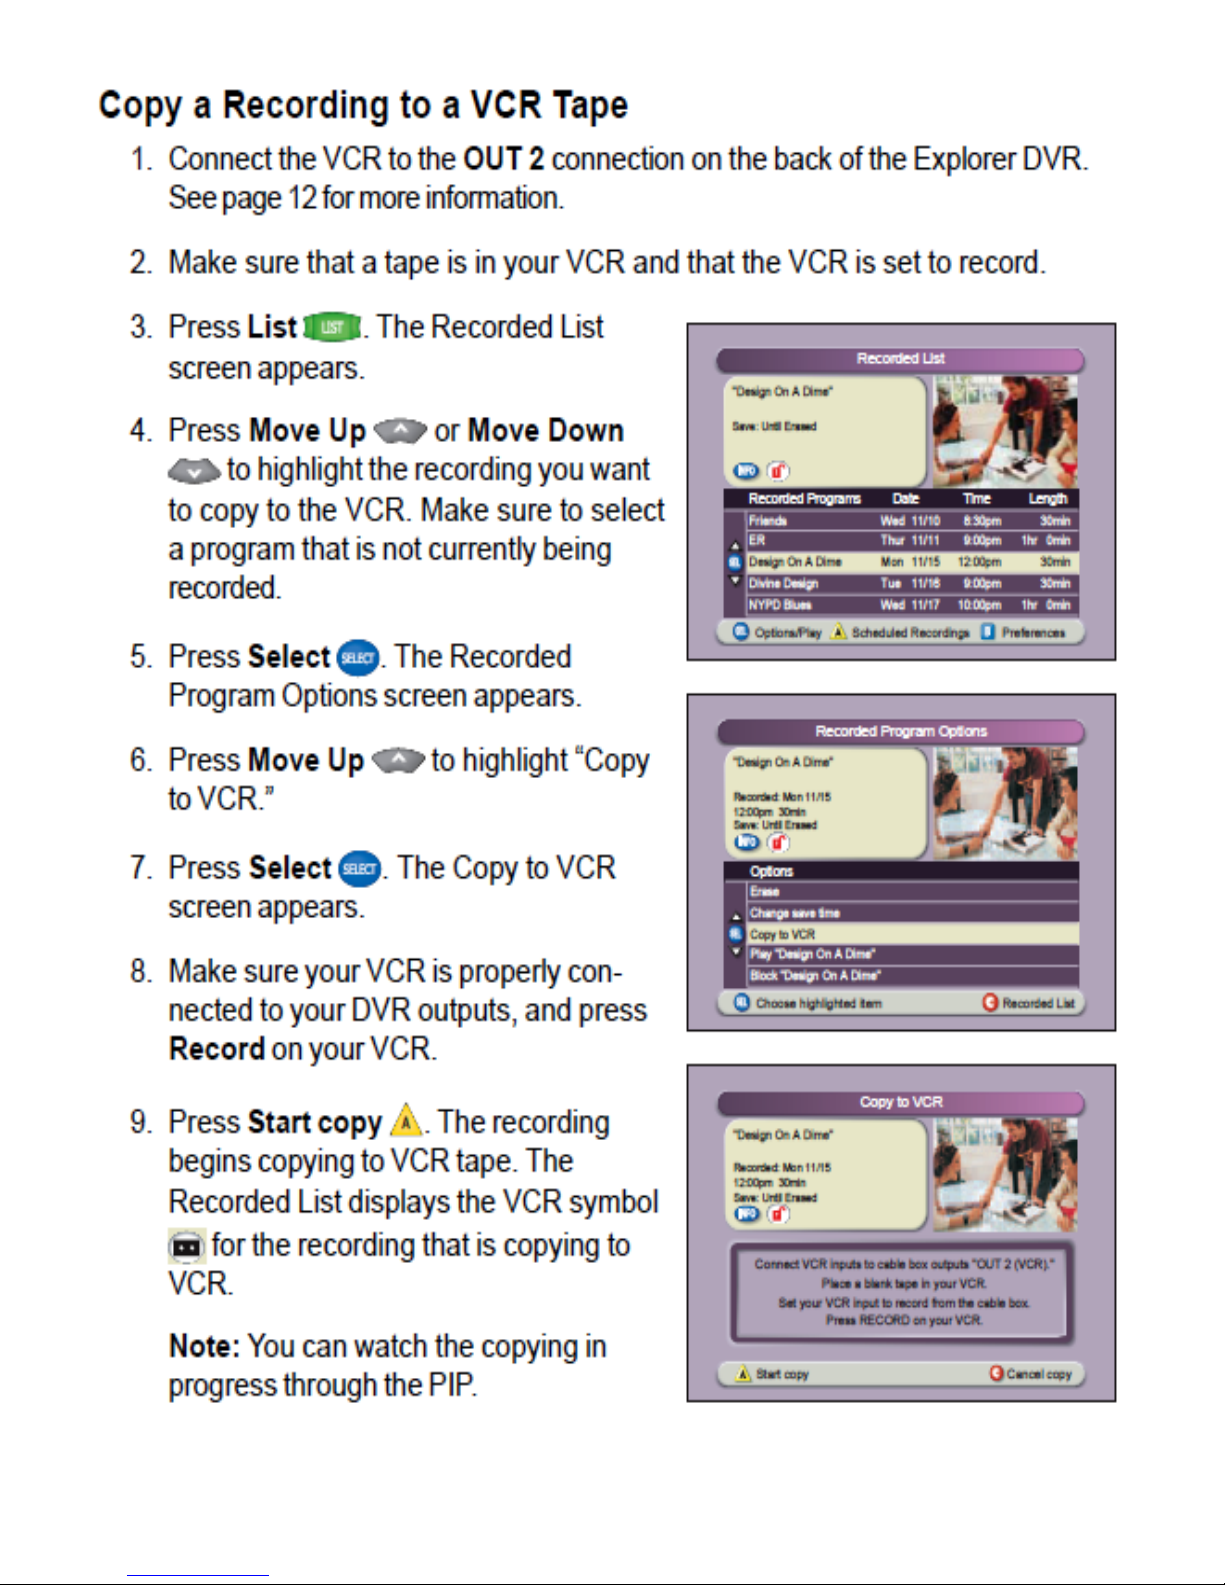
Advanced DVR Operations
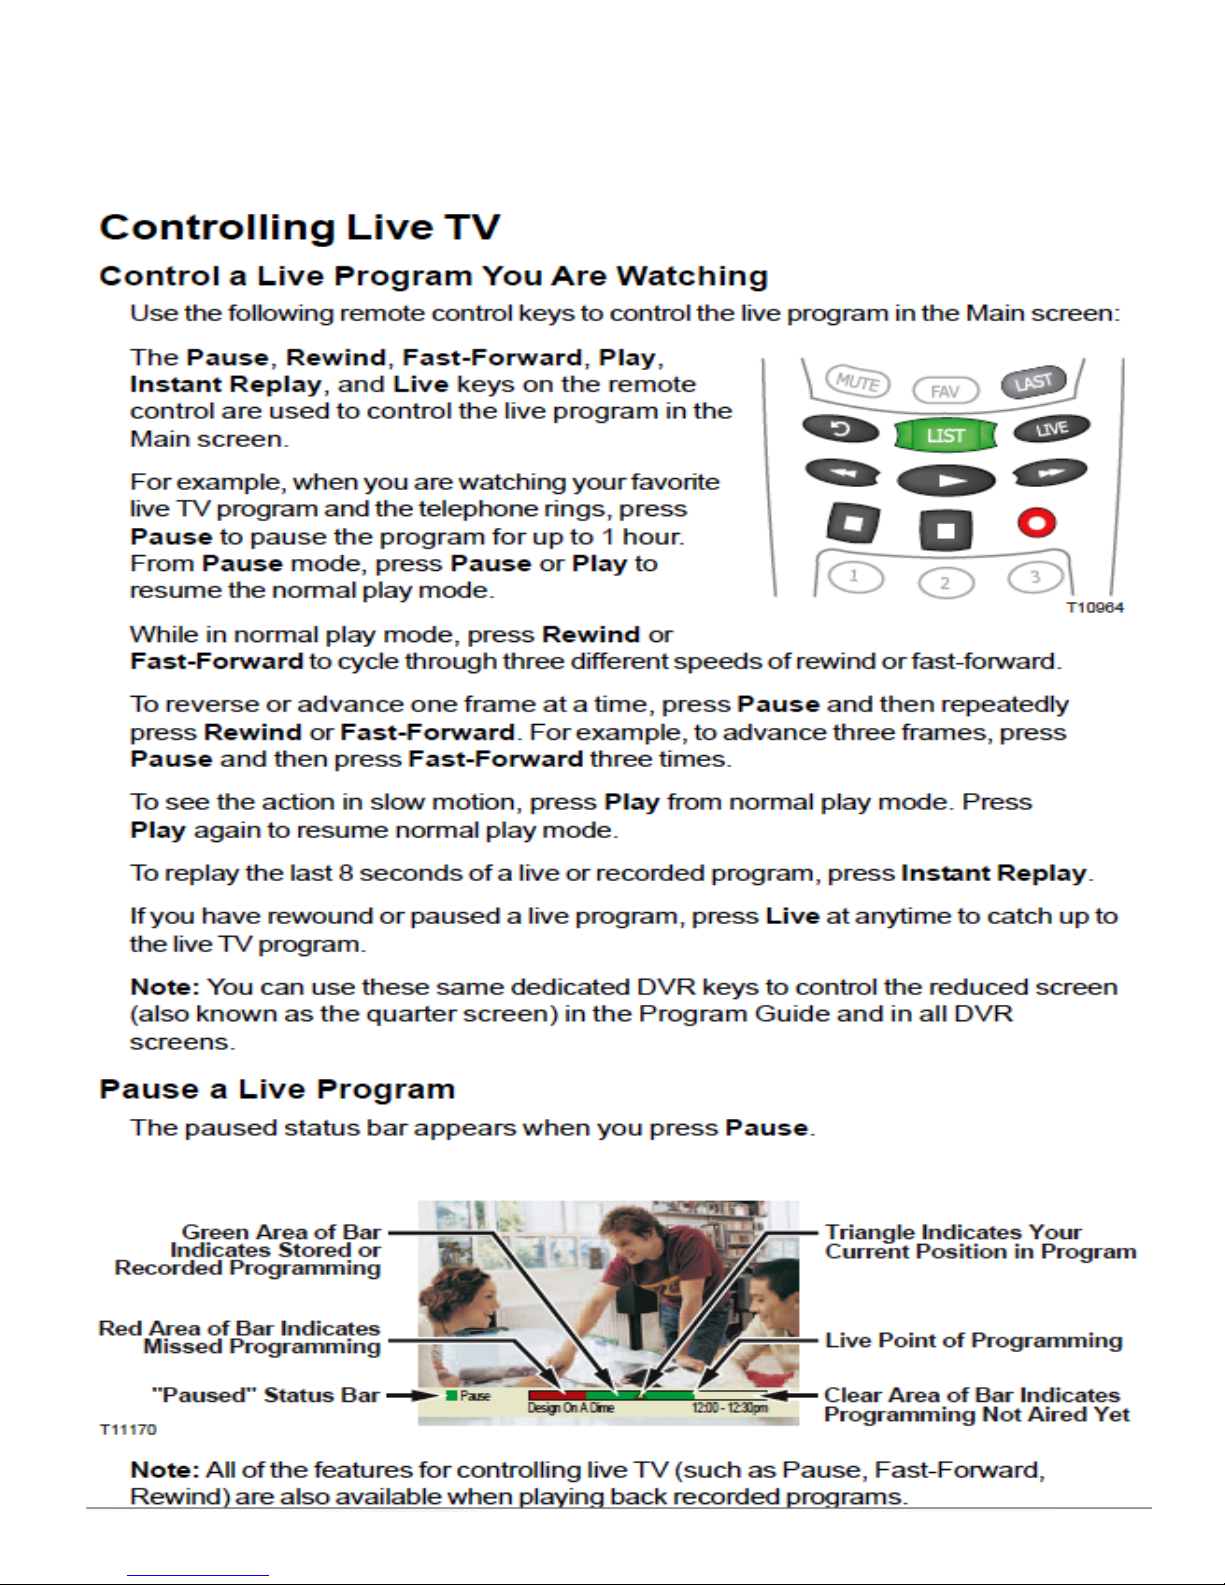
This section is designed to show you how to operate the Digital Video Recorder (DVR) functions on the 8300SD, 8300HD and 8652HD boxes.
Page 29
Page 30
Page 31
Page 32
Page 33
Page 34

Technical Support
Common problems such as picture freezing and loss of programming can be xed by power cycling the set top. To do this, simply unplug the box, wait 5-10 seconds and plug it back in. Wait
for the clock to display the correct time before pressing the power button.
*All set tops should be powered off when not in use, especially at night. This is when the set
tops perform software updates*
For “No Picture” problems, make sure the set top and TV are turned on, and the TV is on the
correct input. HD set tops should be connected to the TV using and HDMI input. To change
inputs on the TV, press the “Input” or “Source” button until you get a picture.
For all other problems Please call the Repair Center at (706) 678-0611 or if you have a Land
Line Phone through Wilkes Telephone and Electric Company, you can dial 611 for the Repair
Center.
For questions about your service or to make changes to your service, call us at 706-678-5005
If you have Internet Access, you can use the link below to access our web site, and click the
help button.
www.nu-z.net
Other information is also available online at www.cisco.com
Page 35

2 FiFTH
3 Analog Channel Guide
4 QVC
5 The CW Augusta
6 News Channel 6 - (WJBF Augusta)
7 ION TV
8 NBC Augusta WAGT
9 WCES PBS Wrens
10 WGN America
11 Fox 54 WFXG Augusta
12 News 12 WRDW - (CBS Augusta)
13 Lincoln County Government Television
14 The Weather Channel
15 CSpan
16 CSpan2
17 CNBC
18 MSNBC
19 Fox News Channel
20 CNN-HN
21 CNN
22 Fusion Network
23 Galavision
24 Univision
25 Do It Yourself Network
26 ESPN
27 ESPNews
28 ESPN Classic
29 ESPNU
30 ESPN2
31 Disney
32 Disney XD
33 ABC Family
34 Cartoon Network
35 Nickelodeon
36 HGTV
37 Spike
38 FX
39 A & E
40 History Channel
41 Discovery Channel
42 The Learning Channel
43 Travel Channel
44 USA
45 Bravo
46 Oxygen
47 Golf Channel
48 SportSouth
49 Fox Sports
50 TNT
51 TV Land
52 The NFL Network
53 E!
54 TBS
55 Hallmark
56 Animal Planet
57 National Geographic
58 The Inspirational Channel
59 TBN
60 TruTV
61 SyFy
62 Comedy Central
63 AMC
64 BET
65 Style
66 Women’s Entertainment
67 Disney Jr.
68 NBC Sports Network
69 VH-1
70 CMT
71 MTV
72 Food Network
73 Cooking Channel
74 Nick Jr.
75 Fox Sports 1
76 Lifetime
77 Lifetime Movie Channel
78 Lifetime Real Women
202 Outdoor Channel
203 Military Channel
204 H2
205 RFD TV
206 ESPN Desportes
207 Fit TV
208 Boomerang
209 Bloomberg
210 A & E Biography
211 The Science Channel
212 GAC
215 Turner Classic Movies
216 Gameshow Network
217 OWN Oprah Winfrey Network
218 Hub
219 Investigation Discovery
220 Destination America
221 BBC America
222 VH-1 Classic
Page 36

223 MTV Hits
300 Starz HD
301 Starz
302 Starz In Black
303 Starz Kids
304 Starz Cinema
305 Starz Edge
306 Encore
307 Encore Westerns
308 Encore Classic
309 Encore Mystery
310 Encore Black
311 Encore Action
315 Showtime HD
316 Showtime
317 Showtime Too
318 Showtime Showcase
319 Showtime Women
320 Showtime Extreme
321 Showtime Beyond
322 Showtime Next
323 Showtime Family
324 Flix
325 The Movie Channel
326 The Movie Channel Extra
335 HBO HD
336 HBO
337 HBO Comedy
338 HBO Family
339 HBO 2
340 HBO Signature
341 HBO Zone
345 Cinemax HD
346 Cinemax
347 More Max
348 Action Max
349 Thriller Max
350 Outer Max
351 Star Max
352 Max Latino
402 Outdoor HD
406 WJBF-DT
407 METV
408 WAGT-DT
411 WFXG-DT
412 WRDW-DT
413 WRDW-MYNETWORKTV
414 Destination America HD
415 Science Channel HD
416 The Hub HD
417 CNBC HD
418 MSNBC HD
419 FOX News HD
420 ID HD
423 Universal HD
426 ESPN HD
427 ESPNews HD
429 ESPNU HD
430 ESPN2 HD
431 Disney HD
432 Disney XD HD
433 ABC Family HD
434 Cartoon HD
436 HGTV HD
438 FX HD
439 A&E HD
440 History HD
441 Discovery Chanel HD
442 TLC HD
443 Travel Channel HD
444 USA HD
445 Bravo HD
446 Oxygen HD
447 Velocity HD
450 TNT HD
454 TBS HD
456 AP HD
457 National Geographic HD
460 truTV HD
461 SyFy HD
468 NBC Sports Network HD
472 Food Network HD
475 Speed HD
476 Lifetime HD
477 LMN HD
801 inDEMAND 1
802 inDEMAND 2
803 inDEMAND 3
804 inDEMAND 4
805 inDEMAND 5
806 inDEMAND 6
807 inDEMAND 7
821 Bangu (PPV)
901 Hit List
902 Pop Rhythmic
903 Dance/EDM
904 MCU
Page 37

905 Hip-Hop and R&B
906 Rap
907 Hip-Hop Classics
908 Throwback Jamz
909 R&B Classics
910 R&B Soul
911 Gospel
912 Reggae
913 Rock
914 Metal
915 Alternative
916 Adult Alternative
917 Rock Hits
918 Classic Rock
919 Soft Rock
920 Love Songs
921 Pop Hits
922 Party Favorites
923 Teen MC
924 Kidz Only
925 Toddler Tunes
926 Y2K
927 90’s
928 80’s
929 70’s
930 Solid Gold Oldies
931 Pop Country
932 Today’s Country
933 Country Hits
934 Classic Country
935 Contemporary Christian
936 Pop Latino
937 Music Urbana
938 Mexicana
939 Tropicales
940 Romances
941 Sounds of the Seasons
942 Stage & Screen
943 Soundscapes
944 Smooth Jazz
945 Jazz
946 Blues
947 Singers & Swing
948 Easy Listening
949 Classical Masterpieces
950 Light Classical
Page 38

12312013
 Loading...