

FiFiNe T669 User manual
CONTENTS
Install Operation
Computer set-up(windows&MAC OS)
Software Settings
Important Notice
. . . . . . . . . . . . . . . . . . . . . . . . . . . . .
. . . . . . . . . . . . . . . . . . . . . . . . . . . .
. . . . . . . . . . . . . . . . . . . . . . . . . . . . .
. . . . . . . . . . . . . .
3-7
7-13
13-14
15
CONTACT US
Get Social:
Facebook page:http://bit.ly/FifinePage
Contact Info:
E-mail:web@fifine.cc
Please take a few minutes to watch the video before you start using
the microphone.
Operation video:http://bit.ly/t669problemsolving
More product FAQs can be found on the website.
Company Website:https://fifinemicrophone.com/
Easily get a 2-year extended warranty with online registration
within 90 days of purchase.
1. Input the link : https://fifinemicrophone.com
2. Please roll down to the bottom of the page, fill in E-mail address
and submit it .
1
3. Check your inbox or spam to confirm subscription email.
4. After you click the button “Subscribe me to the list”and next
“manage your preferences” to finish registration, tell us the model
you are interested ,we will send you the the promo info/discount
code and 2-year warranty code as well.
PS: If you cannot update your preferences, just re-do the
subscription process.
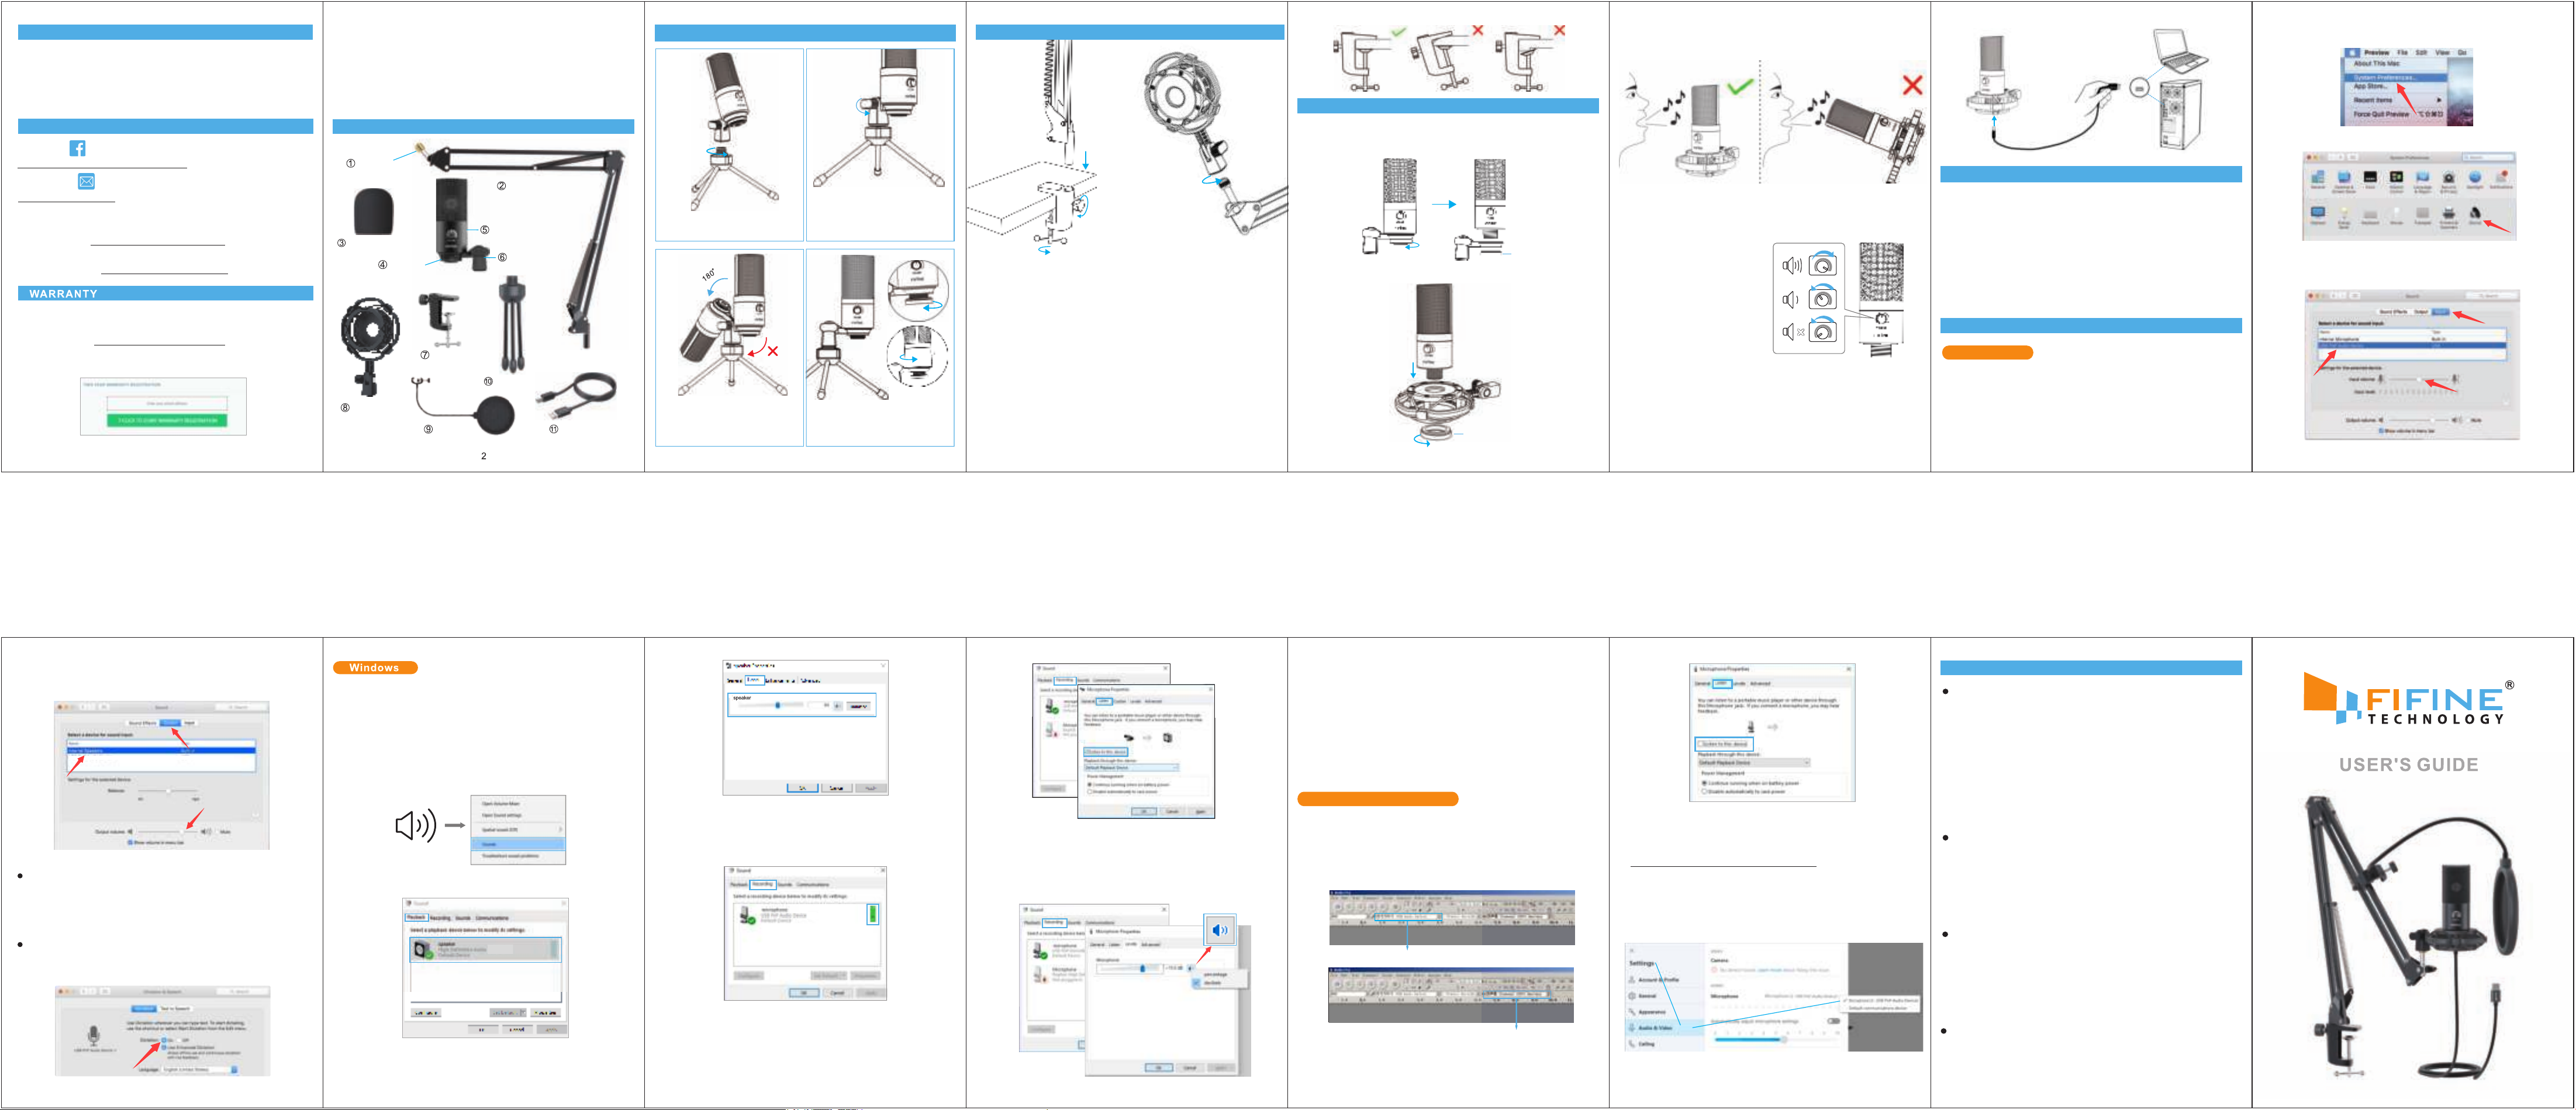
WHAT’S IN THE BOX?
3/8” to 5/8”
adapter
Desktop Boom Arm
Microphone
Windscreen Cap
Threaded
Metal Ring
C-Clamp
Shock Mount
Pop Filter
Pivot Mount
Tripod Stand
2.5M USB Cable
STAND INSTALLATION AND ADJUSTMENT
2. If necessary, adjust the
microphone’s angle with the pivot
1. Screw the pivot mount onto the
top of the metal tripod stand.
3. Pls Swing the microphone
counterclockwise, Swing the
microphone clockwise will
cause the bracket broken.
mount’s thumbscrew.(turn left for
loosen, turn right for tighten)
4. Screw the threaded metal
ring to adjust microphone
angle 360° horizontally
3
INSTALL MICROPHONE STAND ON TABLE
②
④
③
①
① Screw the lower part of the C-clamp until it is tight and secure.
② Insert the desktop boom arm into the hole
③ Fasten the screw
④ Fix shock mount with desktop boom arm
Mount to your desktop via the included C-clamp accurately:
Unscrew the C-clamp and slide it over the side of your desktop,
making sure that both the top of the C-clamp and the underside are
resting on flat surfaces.Overly rounded or overhanging desktop
edges do not make good mounting surfaces.
4
INSTALLATION QUICK GUIDE
1. Microphones can be connected to desktop boom arm via a shock
mount.
A. Unscrew the threaded metal ring from the microphone.
Threaded
Metal Ring
B. Connect the microphone to the shock mount
Threaded Metal Ring
56
2. Speak directly into the mic diaphragm (the side of the
microphone with the logo, not the top of the microphone).
3. Keep the volume all the way down when plugging the mic into usb
port,and gradually turn volume up for the perfect effect during
the use.
Volume Control
Volume up:
Clockwise(Turn right)
Volume down:
Counterclockwise(Turn left)
Mute:Counterclockwise
(Turn maximum left)
4. Connect to computer. Plug the microphone into rear back USB
port of your computer.
USB
SPECIFICATION
Power Supply: 5V
Polar Pattern: Uni-directional
Frequency Response: 20Hz-20KHz
Sensitivity: -43dB±3dB(at 1kHz)
Max.SPL: 130dB(at 1kHz≤1% T.H.D)
S/N Ratio: 78dB
Electrical Current: 70mA
COMPUTER SETUP
Apple MAC OS
1. Plug the free end of the provided USB cable into the USB port on
your computer. Your computer will automatically recognize the
USB device and install a driver.There may be no pop- up window or
message though.
7
2. To select the T669 as your audio input, first, open your System
Preferences.
3. Next, click Sound to display the Sound preference pane.
4. Click the Input tab and make certain "USB PnP Audio Device" is
selected as the default input device. Drag progress bar to adjust
volume of input.
8
5. If you need to output your voice from the 3.5mm headphone jack
of Macbook, choose the output from “Internal Speaker” option.
Drag progress bar to adjust volume of output.
NOTICE:
If you want to monitor your voice when using Macbook, you must
turn on any recording software first(Audacity for example), make
sure to click “Software Playthrough(on)”, then click the record
button to begin, otherwise you can not hear any sound when you
speak to the mic.
Choose the default Dictation&Speech software when you use the
speech to text in Macbook,click "On" under Dictation window, so
that your microphone can be recognized by the software.
910
Please wait for a few secs when first time operation, since driver of
microphone takes time to automatically install. There may be no
pop-up window or message though. (If plugging USB connector in
a different USB port, driver installs again).
After installation, you can test the mic by speaking to it. If the mic
picks up no sound, please follow procedures below.
1. Right-click the speaker icon at the bottom right of the screen.
Click "Sounds".
2.Confirm the loudspeaker is open.
Click the loudspeaker is being used-”Properties”--“levels”,drag
progress bar to adjust volume of output
3. Select the Recording tab, and choose “USB PnP Audio Device”
as the default device.When you speak to mic, bar-type icon will
turn green and bounce. If it remains unchanged, please reset
computer and replug in the USB port.If there’s still no “USB PnP
Audio Device” ,please contact FIFINE after service.
4. If you want to monitor your recording,click Microphone ”USB PnP
Audio Device”- “Properties”-”Listen”-click ” Listen to this device”-
”Apply”.No sound can be heard through earphone / computer
speaker, if you don’t follow this procedure.
NOTE:Click off “Listen to this device” when you are using any
recording software or chatting software(Skype).
1112
5. Double click the “USB PnP Audio Device" to open the Microphone
Properties window. Right click the speaker icon under the Levels
tab, change to decibels from percentage. To get the best sound of
the mic, please adjust the mic level during this range (+14.0 to
+20.0dB), when the output volume of the speaker is max.
Note:(Applicable forMAC and Windows)
1. If computer prompts that it’s unable to identify USB devices, please
restart computer and replug the microphone into other USB port.
2. If mic recognized but no sound comes out, please check whether
System Sound is mute and whether you have turned volume
control on microphone to minimum.
3. If mic recognized but not sound out,and your computer runs
windows 10, please go to settings>privacy>microphone and click
the Allow apps to access the microphone to ON then restart.
Recording Software Settings
1. We recommend to use the recording software - Audacity.
Make sure you have selected the correct input/output for the
software.
Notice: If this usb microphone doesn't work with the recording
software, please log out of the software first, then replug the mic
to the computer and log in the software again.
Input: USB PnP Audio Device
Output: Pls choose your output device as needed
2. Make sure to click off “Listen to this Device” in your computer
system when you are using any recording software,or else you
would hear duet of yourself just like too much echo.
13
3. There are several ways to improve the recording by using
Audacity. Come to FIFINEMICROPHONE.COM,find SUPPORT,
click the Tutoral Blogs or type the
https://fifinemicrophone.com/blogs/news directly to search the
better recording solution for your interested subject in our blogs.
4. For windows computers,we recommend audacity, and for Apple
computers, you can use Apple's own QuickTime player to test the
recording.
5. Applications setting“Skype”
①
③
②
14
IMPORTANT NOTICE
Setting your software levels
Correct adjustment of microphone level is important for optimum
performance. Ideally, the microphone level should be as high as
possible without overloading the input of your computer. If you
hear distortion, or if your recording program shows levels that are
consistently overloaded (at peak levels), turn the microphone
volume (or level) down, either through your control panel (or
system preferences) settings, or through your recording software.
If your recording program shows insufficient level, you can
increase the microphone gain either from the control panel (or
system preferences) settings or through your recording program.
Selecting software
You have many choices in recording software. Audacity,
available for free online at http://audacity.sourceforge.net/, is a
widely used software program that provides basic recording
software.
Note:The microphone must be plugged in first and secondly
turning on the recording software.
Positioning your microphone
It is important to position the microphone directly in line (on axis)
with the person speaking/ singing or instrument (or other sound
source) to achieve the best frequency response of the
microphone.For use in speaking/singing applications, the ideal
placement for the microphone is directly in front of the person
speaking/singing.
Protecting your microphone
Avoid leaving your microphone in the open air or in areas where
temperatures exceed 110° F (43° C) for extended periods.
Extremely high humidity should also be avoided.
15
T669
AM Version:20-IAM Version:20-IAM Version:20-I
 Loading...