

Page 1
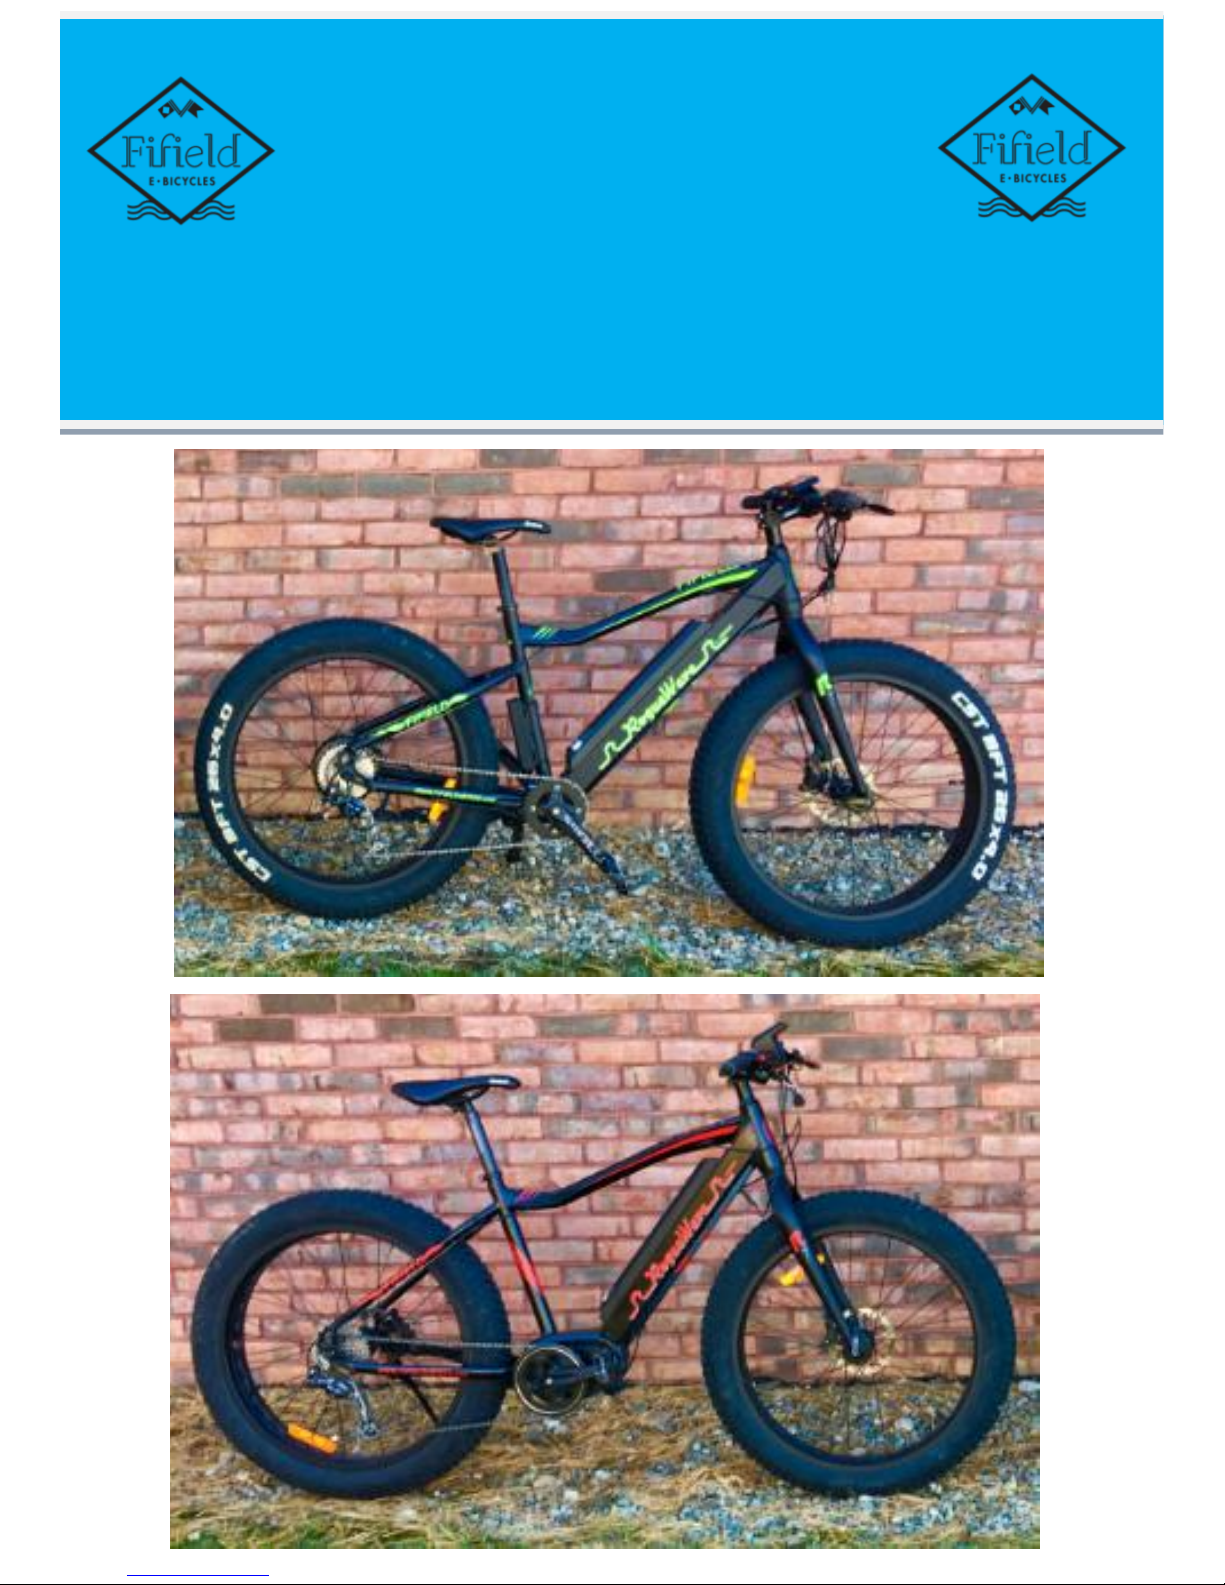
TABLE OF CONTENTS
i
Fifield Fat Tire
Owner’s Manual
THIS MANUAL CONTAINS IMPORTANT SAFETY, PERFORMANCE, AND
MAINTENANCE INFORMATION. READ THE MANUAL BEFORE TAKING YOUR
FIRST RIDE ON YOUR NEW ELECTRIC BICYCLE, AND KEEP THE MANUAL
HANDY FOR FUTURE REFERENCE.
Page 2
IMPORTANT: KEEP FOR FUTURE REFERENCE
ii
About this Owner’s Manual
It is important for you to
understand your new electric
bicycle (e-bike). Even if you have
ridden an e-bike before, it is
important for every person to read
this manual before riding – you’ll
know how to get better
performance, comfort, and
enjoyment from your new e-bike!
Please take the time to read
this manual while the battery is
being charged. It is the Owner’s
responsibility to carefully read all
of the contents of this manual and
to comply with all laws pertaining
to the operation of bicycles and/or
electric bicycles in your local
jurisdiction.
If the owner is unable to fully
understand this information please
contact Fifield Incorporated
directly for further explanation.
Register your Electric Bicycle
Due to recent federal
legislation an electric bike is no
longer classified as a motor
vehicle. However, various states
have differing laws about riding
them on the road. These
regulations may include but are
not limited to being at least 16
years of age and/or having a valid
drivers’ license. If you have any
questions regarding your states
legislation please consult with the
Laws web page or consult your
local department of motor vehicles
for clarification.
If you have further questions
about the operation of this e-bike,
consult your authorized dealer or
contact Fifield directly. It is
extremely important that you
follow the safety guidelines
contained in this manual in order
to ensure your maximum safety. If
you loan your bike to anyone make
sure they have also read and fully
understand this owner’s manual.
WARNING
Don't dismantle and repair parts
by yourself, please go to the
local distributor or the servicing
station if necessary.
CAUTION
Before riding your e-bike, you will
need to charge your battery fully
before using. Failure to do so
may damage the battery life and
performance.
Page 3

IMPORTANT: KEEP FOR FUTURE REFERENCE
iii
My bicycle model: _____________________________________________
My frame serial number: _________________________________________
My motor serial number: _________________________________________
My dealer and #: _______________________________________________
Date of purchase: ______________________________________________
Contact Fifield
[email protected] ∙ (781)-927-1511
72 Sharp Street, Hingham, MA 02043
Along with registering online, for your own benefit, please also enter
information about your bicycle below.
Welcome to the Fifield e-Bike family!
Keep for your records
Page 4

TABLE OF CONTENTS
iv
Before your first ride Pg. 1-5
Congratulations!
Know your electric bicycle
Specifications/Accessories
Check before riding
Taking off
Safe riding Pg. 6-7
Local riding laws
Safety precautions
Varying riding conditions
Assembly Pg. 8 - 11
Handlebars
Frame
Pedals
Registration
Instructions for Use Pg. 12 - 19
Switching ON/OFF
LCD display screen
Clearing the trip time and odometer
Pedal assist
Throttle
Gears
Integrated Bike Lock
Proper battery usage
Charging the battery
Maintenance Pg. 20 - 21
Wheels
Throttle
Rims
Spokes
Tires
Bike frame and handlebars
Brakes
General maintenance
Warranty Pg. 22
Fifield Limited Warranty
Page 5
BEFORE YOUR FIRST RIDE
1
Congratulations!
You are now the proud owner of a
Fifield Electric Bicycle!
Your electric bicycle is like any
other bike, but with electric pedal
assistance. The same
precautionary steps while biking
should be taken to prevent any
accidents or injuries.
“Electric” means that your ebike will assist you when you are
pedaling if you so choose. You may
also pedal normally with no
assistance at all or twist the
throttle to get moving with no
pedaling necessary.
The electric bicycles’ amount
of assistance will depend on what
level you set it to; the speed varies
from 0 to 5. The fastest speed this
bicycle travels is 20 MPH (32 Km/h).
Know your electric bicycle
If misused, the features of your
electric bicycle may cause you to
lose control of the e-bike. Before
riding in fast or more difficult
situations, learn the function and
performance of all the mechanisms
of your bike by riding at slower
speeds in a flat, empty space.
The maximum weight is 286lbs
(130 kg). When riding, please pay
attention to the weather and load
on your bike; if any changes are
noticed adjust your riding style
accordingly. When it is raining or
snowing, please increase braking
distance as a safety precaution.
This e-bike is not afraid of rain
or snow, but it cannot be
submerged in water. When water
submerges the motor it can cause
a short circuit to occur and
damage the electric apparatus.
Specifications
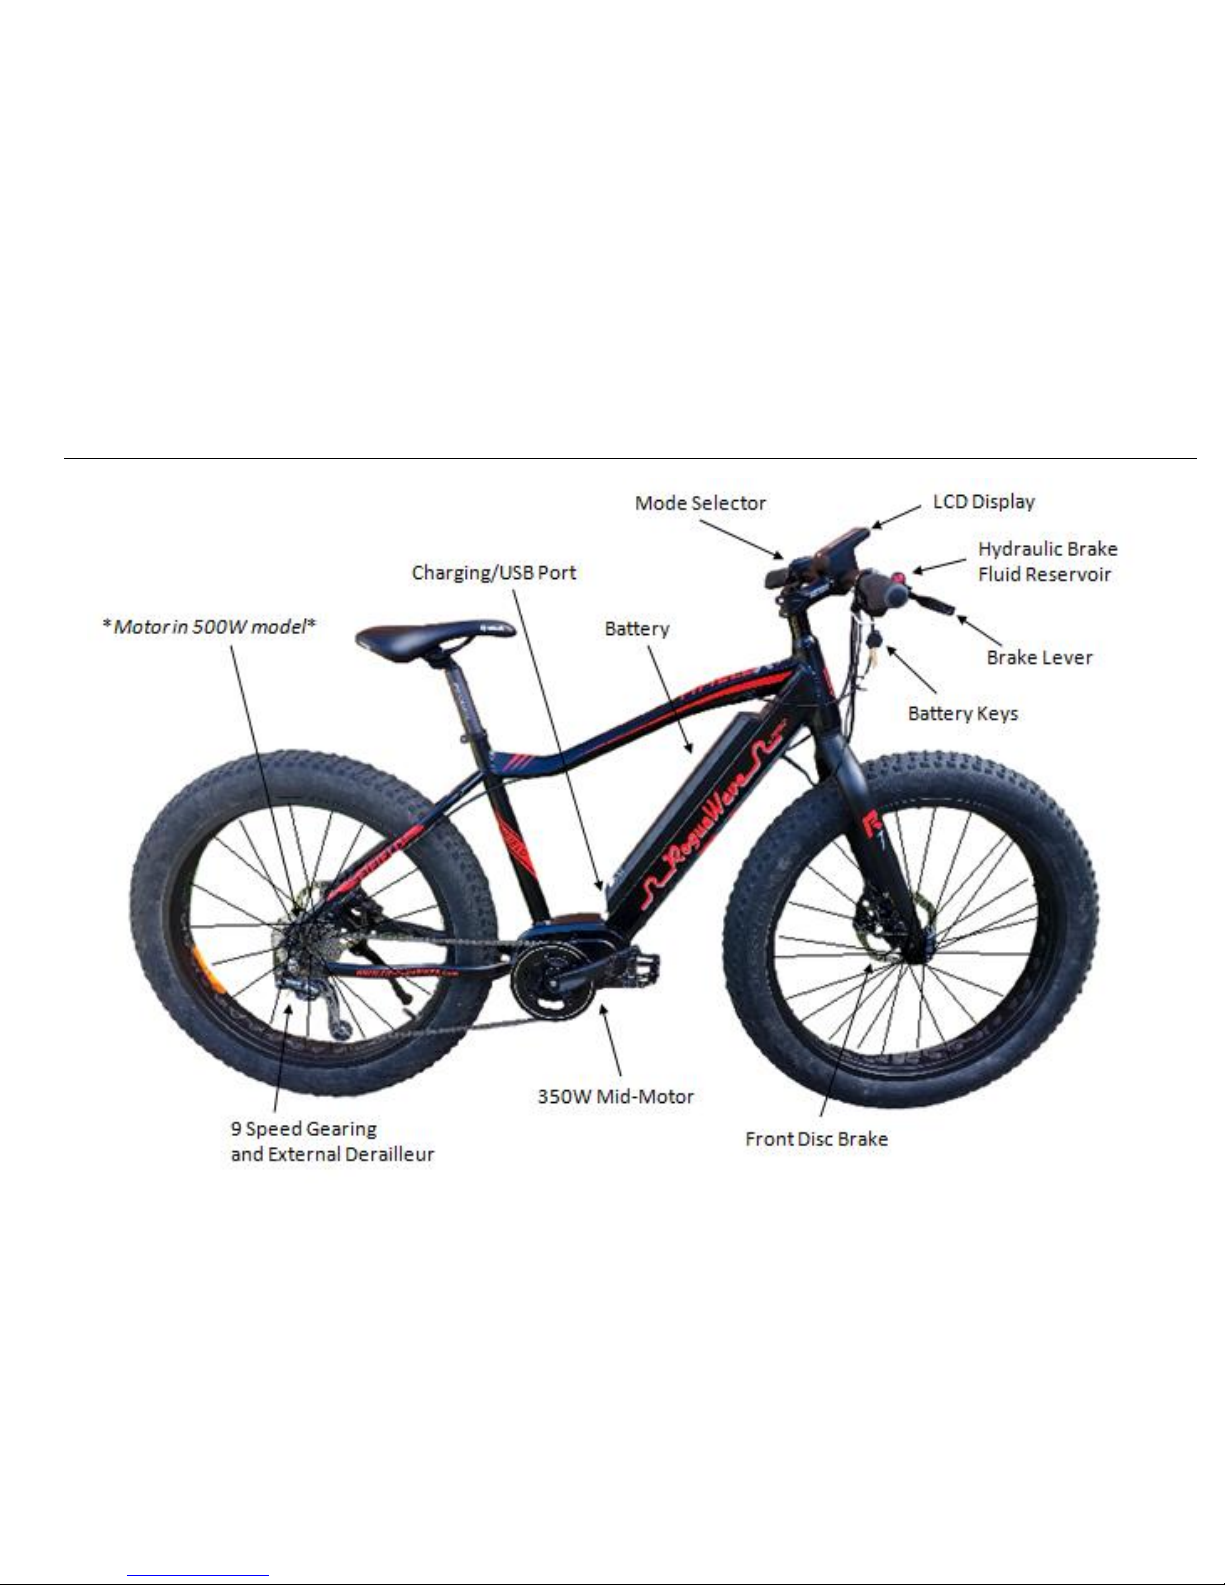
The Fat Tire comes standard with
either a 350W mid-drive motor, or
a 500W rear-hub drive motor.
The 36V / 13.4Ah battery is
integrated ito the bike frame and
powers the motor at assisted
speeds up to 20MPH.
Chain driven, the fat tire is
equipped with 9-speed Shimano
Alivio external gearing. This is
paired with front and rear
hydraulic disc brakes, along with
CST 4” tires.
The Fat Tire has an aluminum
frame and weighs in at
CAUTION
Charge your battery fully before
using.
Page 6

BEFORE YOUR FIRST RIDE
2
Accessories
The Fat Tire comes with an
adjustable kickstand that can be
extended or shortened.
A USB charging outlet can also
be found under theblack rubber
cover at the base of the battery,
labeled on page 3.
Page 7
BEFORE YOUR FIRST RIDE
3
Page 8
BEFORE YOUR FIRST RIDE
4
Check your e-bike before riding
everytime
Before operating your electric
bicycle, inspect it carefully to avoid
accidents or damage. Inspect your
bike completely before each ride.
Check wire connections to
make sure they are tight, make
sure wheels spin freely and arent
rubbing the brakes, monitor air
pressure in tires.
Turning the power on and then
accidentally twisting the throttle
can result in the e-bike lurching
forward and may cause an
accident, damage, or injury.
If the battery was removed,
place the battery back into its
location and be sure to lock it and
remove key. Check to see that the
battery is fully charged (battery
level indicated on screen) before
riding and check the air pressure of
the tires (45 – 50 psi). Be sure to
test the front and back brakes, as
well as the condition of the
handlebars and the front and back
wheels.
Make sure that everything is
fastened and secure. Be sure to
check that all quick releases are
locked and in good working order.
Taking off
As the bike starts, accelerate
slowly; do not try to get to your
maximum speed right away
because doing so could damage
the electric components.
If applied, the hand brake will
automatically cut the power to the
motor as well as release the
throttle. You should avoid using
the throttle while brakes are
being applied so that you do not
overload the motor. When starting
from an elevated path, pedal as
much as possible so that the
electric power will last longer.
Pedaling more than using solely
the throttle will lenghten the life of
the battery and motor.
Going downhill
When going downhill, please
do not turn the power off. If you
CAUTION
Always keep the power switched
OFF before riding. Turn on only
after you are ready to ride.
WARNING
Do not leave the key in the
battery lock while riding to avoid
breaking the key.
Page 9

BEFORE YOUR FIRST RIDE
5
turn the power off, it could easily
damage the controller and motor.
If you are not pedaling or using the
throttle, there will be no power
assist when traveling downhill.
As you continue to ride,
thebattery will continue to
decrease proportionally based on
the amount of power you are
using. As the battery decreases,
the bar will go down one by one. If
the bar goes out completely, you
can still pedal your e-bike just like
a regular bike. Be sure to charge
your battery when you get to an
electrical outlet.
To get the best distance out of
your electric bike, refrain from
excessive stop and go braking, and
coast as much as possible.
Page 10

SAFE RIDING
6
Always wear a helmet when
riding on the road or off road
terrain as a safety measure.
Local riding laws
Most state and local areas
have specific laws for cyclists.
Please check with your local
Department of Motor Vehicles for
clarification. Again, these e-bikes
are not considered motor vehicles,
but may be subject to additional
regulation based on the state you
live in. Some of the common laws
include mandatory lights and
reflectors on the bikes.
Safety precautions
Be sure to ride an appropriate
distance away from cars,
pedestrians, and other obstacles.
In addition, try to avoid potholes,
drain grates, and other
imperfections in the road which
may affect your ability to ride. A
bell is provided to alert others of
your approach.
OBEY all traffic laws relevant to
the operation of bicycles and
electric bicycles.
KEEP both hands on the
handlebars at all times and do NOT
hang objects from the handlebars.
RIDE predictably and in a straight
line. Never ride against traffic.
USE the correct hand signals when
turning or stopping. If you do not
know the proper hand signals, it is
important you learn them before
riding on the road.
USE extreme caution when you are
near other vehicles. Ride
defensively and assume that other
people on the road do not see you,
and be careful at intersections
when starting from a stopped
position.
DO NOT suddenly brake in the rain
or on slippery surfaces.
WEAR a helmet for your protection
and bright or reflective clothing to
make you more visible.
DO NOT wear lose clothing
because it can get caught in the
bicycle.
When going over train tracks, be
sure to ride perpendicular to the
tracks or walk your bicycle across.
Page 11

SAFE RIDING
7
Varying riding conditions
Wet conditions
Like any other moving object,
when it is wet or snowing, there is
less traction. This applies
specifically to the brakes on the
bike; they will not perform as well
as they do in dry climates. Be sure
to brake earlier because it will take
a longer distance to come to a full
stop. Ride at a slower speed and
try to be more visible.
Low visibility
Even though your bicycle
comes with headlights, rear lights,
and reflectors, in situations where
there is low lighting it may make it
difficult for people to see you. Be
sure to see and be seen in your
environment. Wear reflective and
bright colored clothing to enhance
visibility for others.
SAND/SNOW/MOUNTAIN
Riding
The fat tire bike has the
capability of ring in the sand, snow,
and on a mountain.
Sand
When riding in the sand. Keep
your bike in a low gear and keep
the bike moving. This will help you
float over the sand. DO NOT take
sharp turns, as the front wheel will
sink into the sand and cause you to
fall off the bike.
Snow
When riding in the snow,
remember that the 4” tires provide
grip, but unless they are studded,
ice will cause a loss of control.
Watch for ice and black ice. Similar
to sand riding, the bike will be able
to travel easily over packed and
powder snow. Keep in mind that
fast, jerky maneuvers will cause a
loss of bike control.
Mountain
The 4” fat tires give this bike
incredible traction through mud,
gravel, dirt, and rocks. However,
given the increased tire surface
are, it is important to avoid
pointed rocks, sticks, and curbs, as
these will tear the tire.
Page 12
ASSEMBLY
8
When the bike is delivered, it will come boxed partially assembled.
We highly recommend bringing it to a bike shop for professional
assembly.
1. Un-boxing
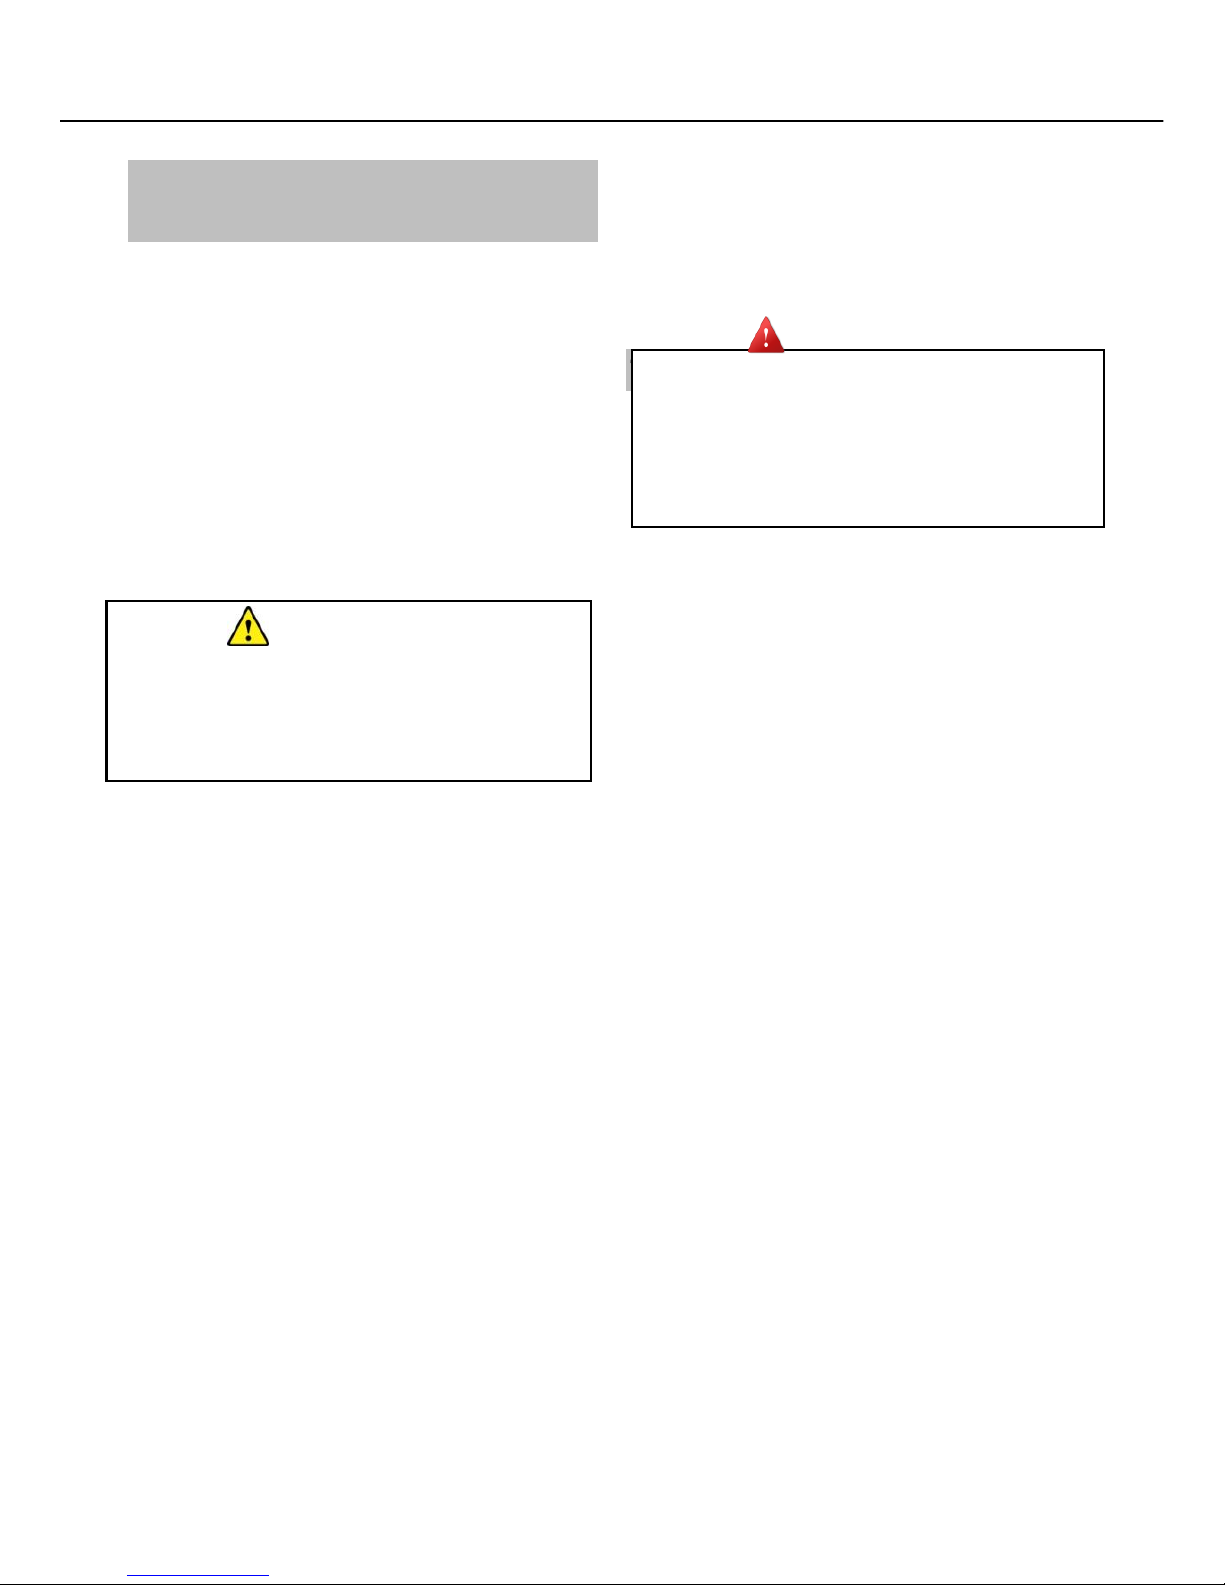
The bike will come with the front wheel detached and the handle
bars detached as well. The pedals will be separate as well. Inside the
box it will look like the image below.
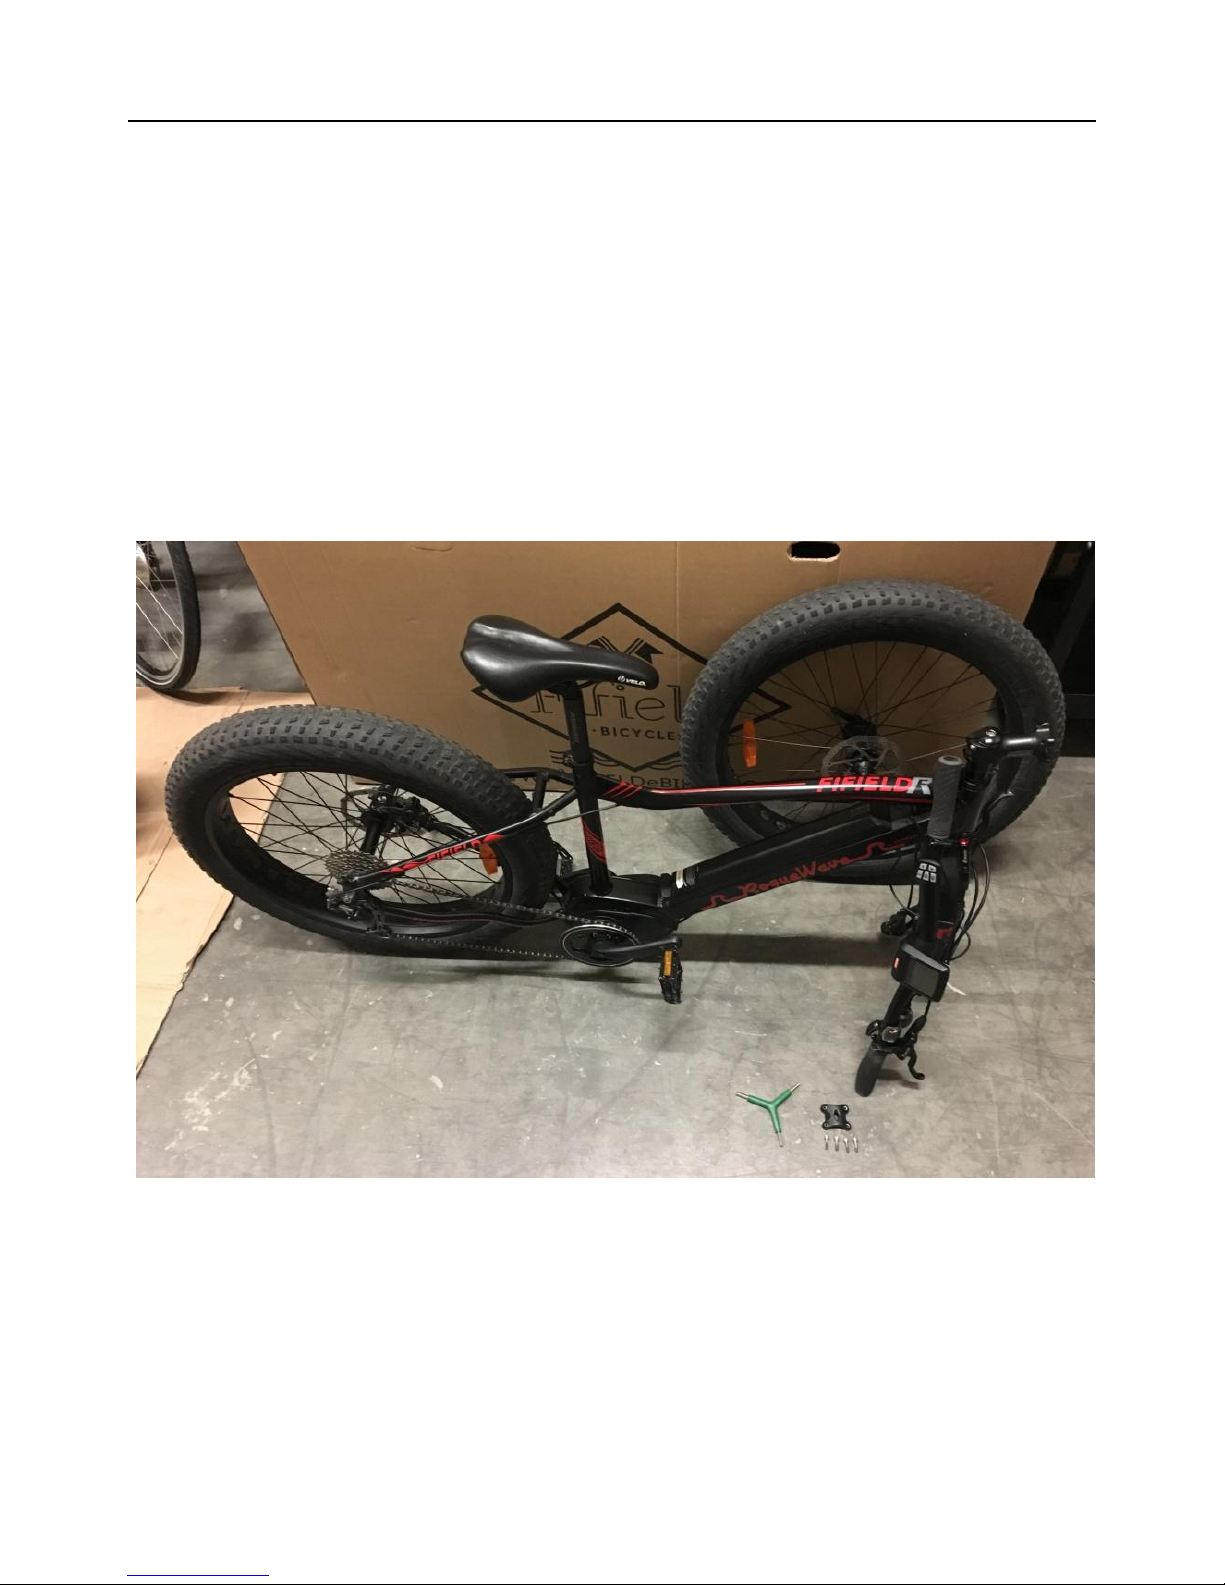
2. Next, use the depicted tool below to attach the handle bars using the
handle bar bracket. This is done by holding the handle bars in place,
and then using the 4 screws to hold it in place (see following image).
Page 13
ASSEMBLY
9
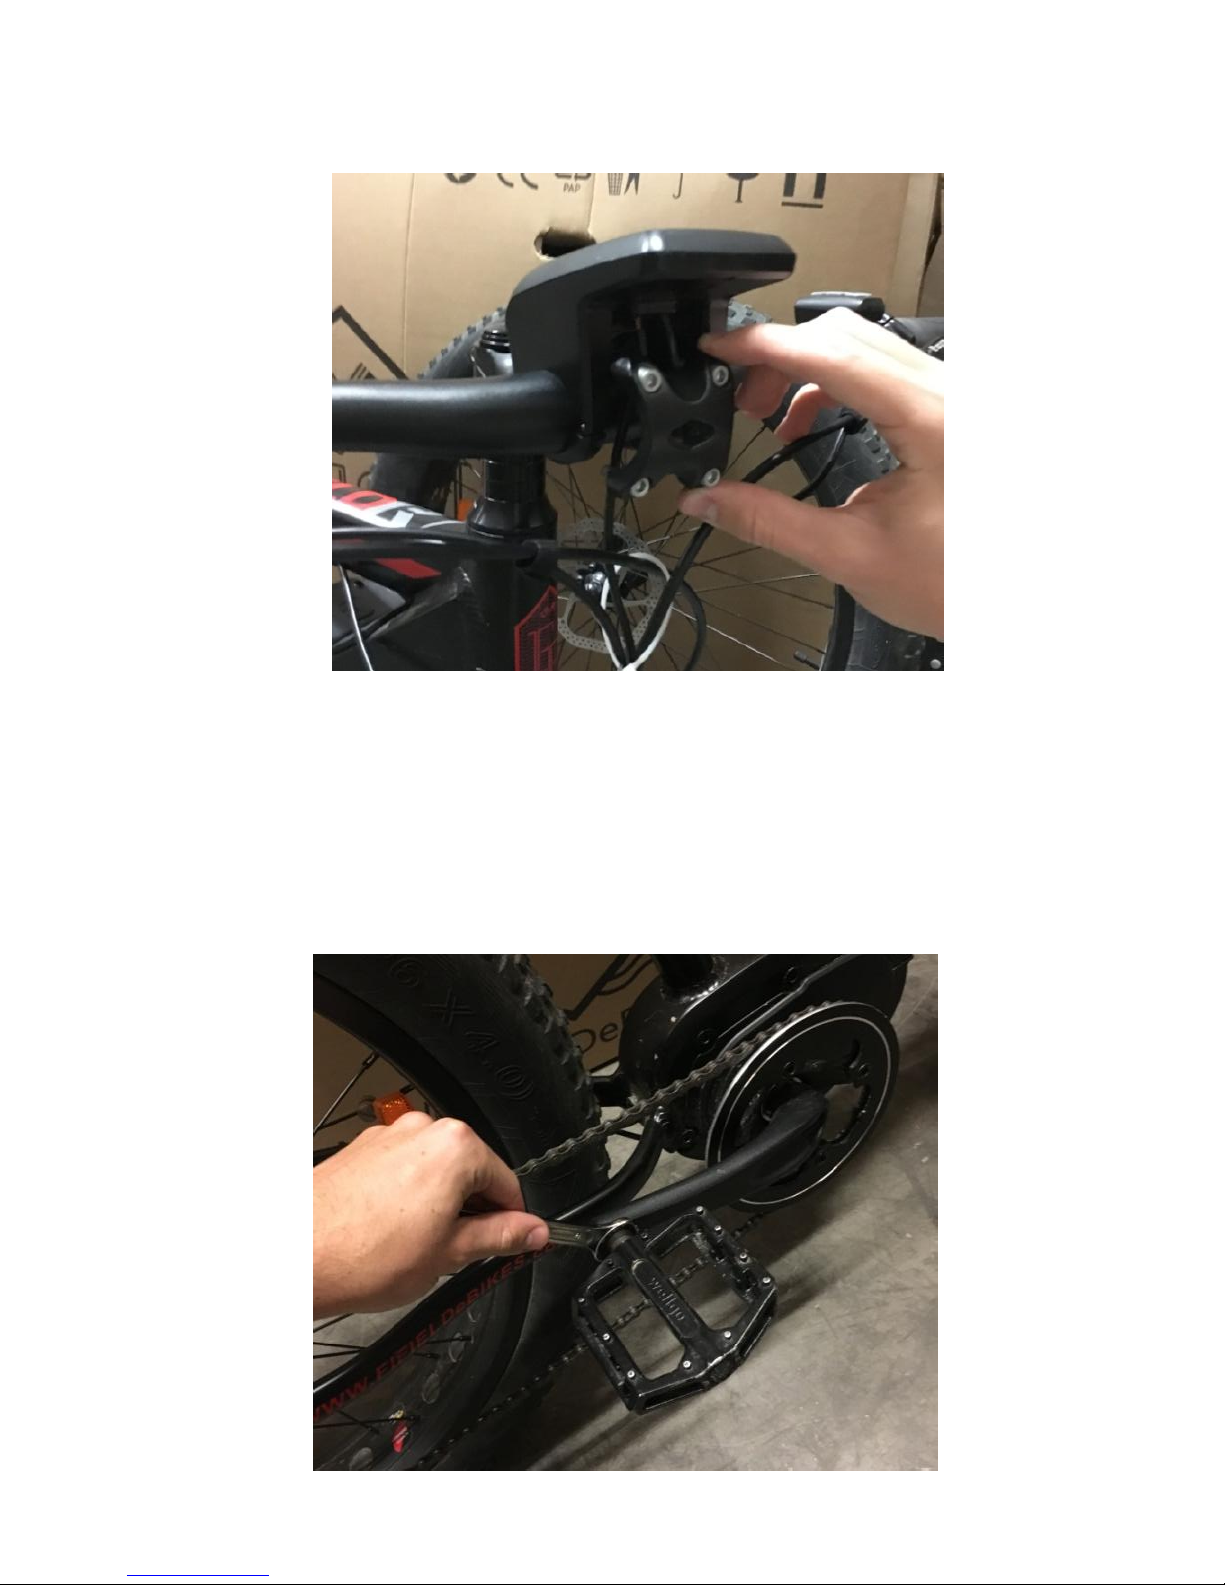
3. Pedals: The pedals will come in their own wrapping. Once unwrapped
look inside the threaded section to determine what side of the bike
the pedal goes on (depicted below). Attach the pedals by putting a
washer on the threaded part o the pedal and using the provided
wrench to tighten the pedals in their place.
4. Front Tire:
Page 14
ASSEMBLY
9
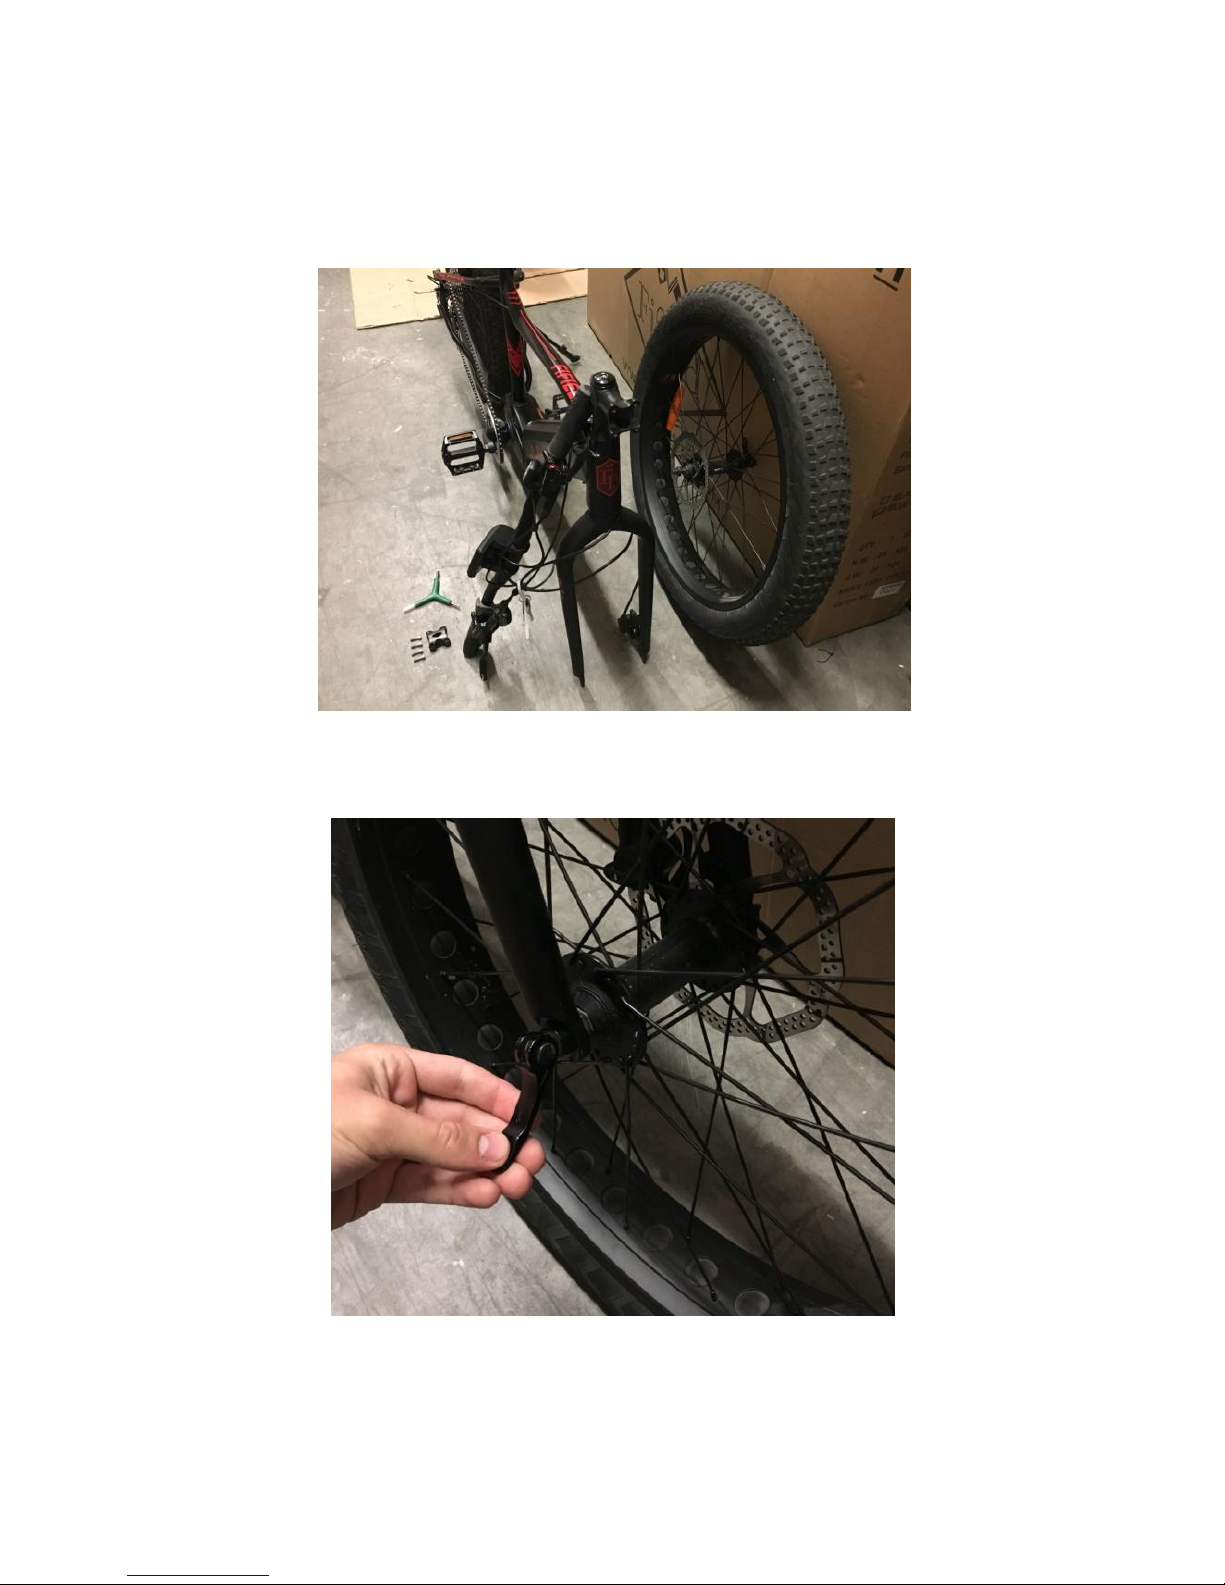
Attach the front tire by lining the disc rotor on the same side as the
brake caliper. Lift the front fork so it can come over the tire and rest
on the skewer that goes through the front tire.
5. Once the fork is resting on the skewer, tighten as needed. Make sure
it is firm, but loose enough to fold the right side lever inwards.
6. Registration: When assembly is complete, please refer to our website
(www.fifieldebikes.com) to register your new electric bicycle! On the
site, you will be prompted to answer a few brief questions and
provide two serial numbers. The first, the frame serial number is
10
Page 15

ASSEMBLY
11
located directly below the handlebars and above the front wheel on
the front headset of the bike. The battery serial number can be found
on the silver sticker on the battery itself.
Page 16
INSTRUCTIONS FOR USE
12
Switching ON/OFF
The fat tire comes with two varying LCD displays, depending on the
model (350W or 500W). Refer to your model show below.
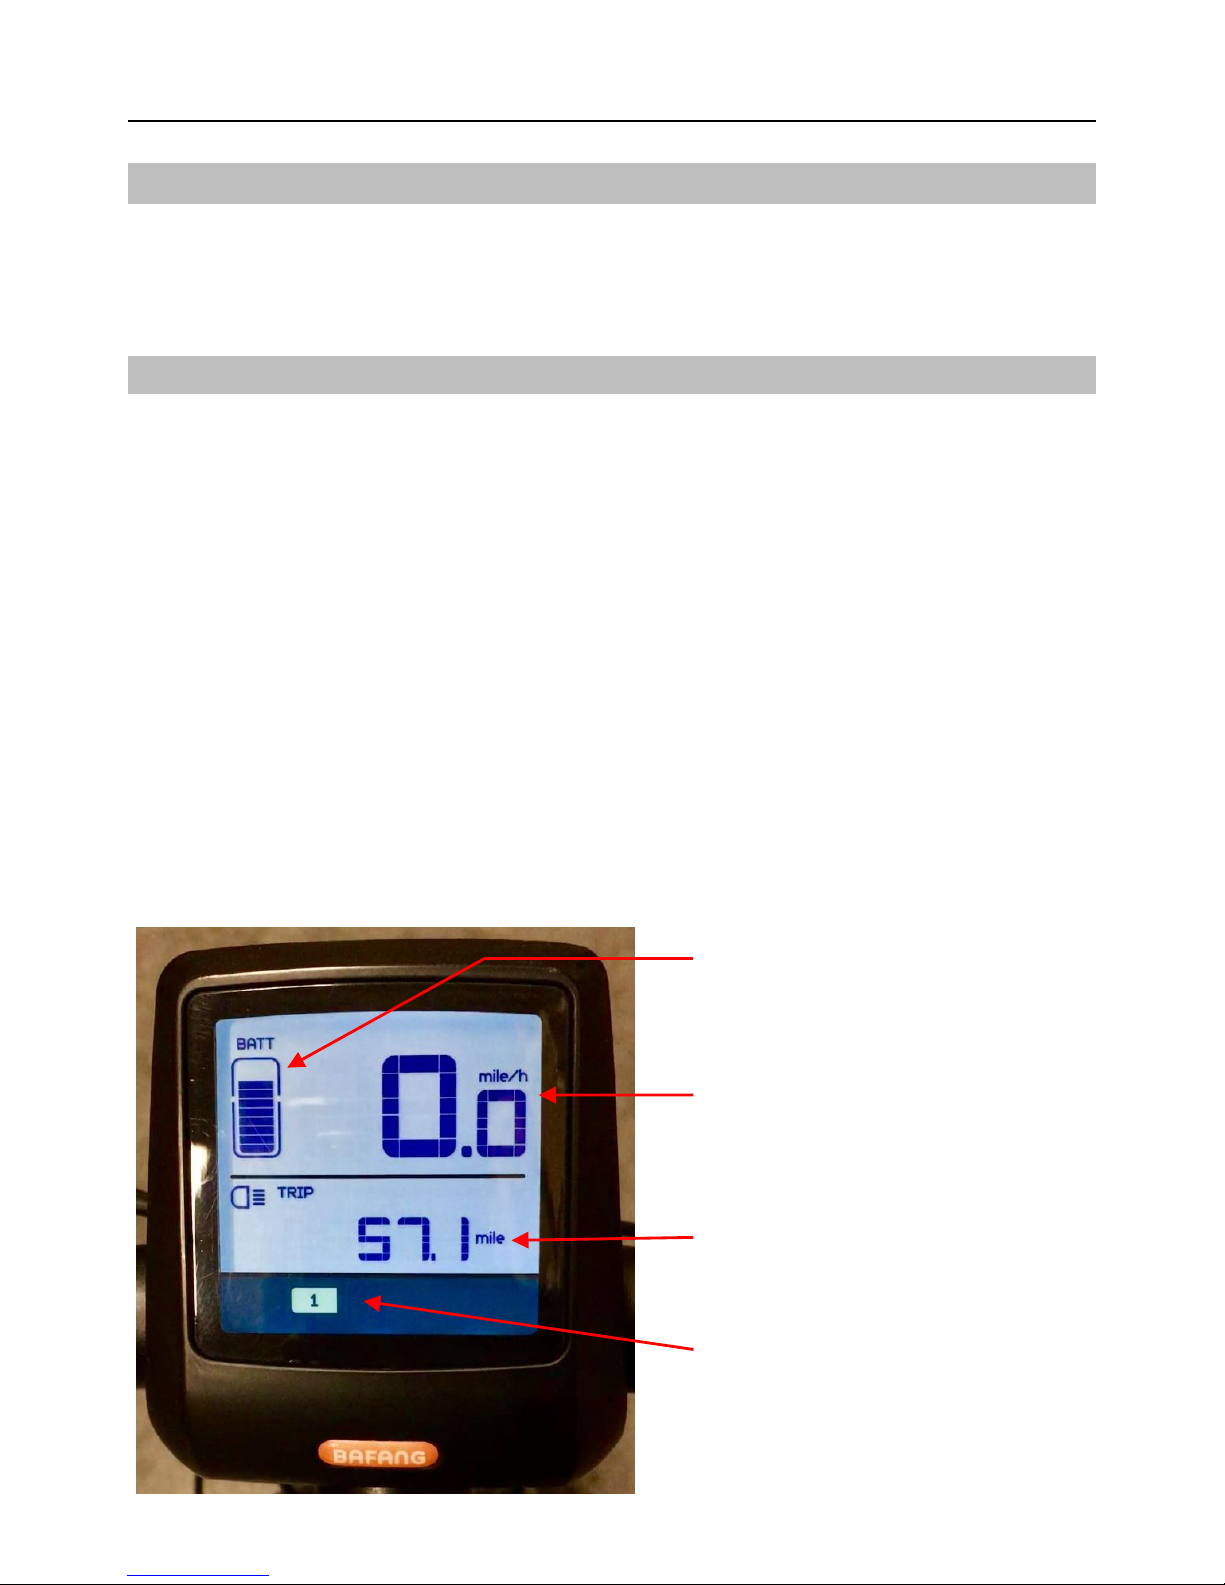
350W Mid-Drive Bike Display
This model has a Bafang Display located in the center of the
handle bars. On the left handle bar side there will be the controls to this
display.
To power on the bike, press and hold the IEC power symbol
button. The display will light up and this button can be released.
The backlight on this screen is automatic, hoer, to manually turn it on
or off, simply hold the light symbol.
The “I” symbol will aid you inscrolling through the trip distance, max
speed, average speed and general “information.”
When the e-bike is parked for more than 10 minutes, the display will
automatically shut down. Refrain from turning off the system while
riding.
Battery Level
Distance Traveled
Speed (MPH)
Pedal Assist Level
Page 17
ASSEMBLY
13
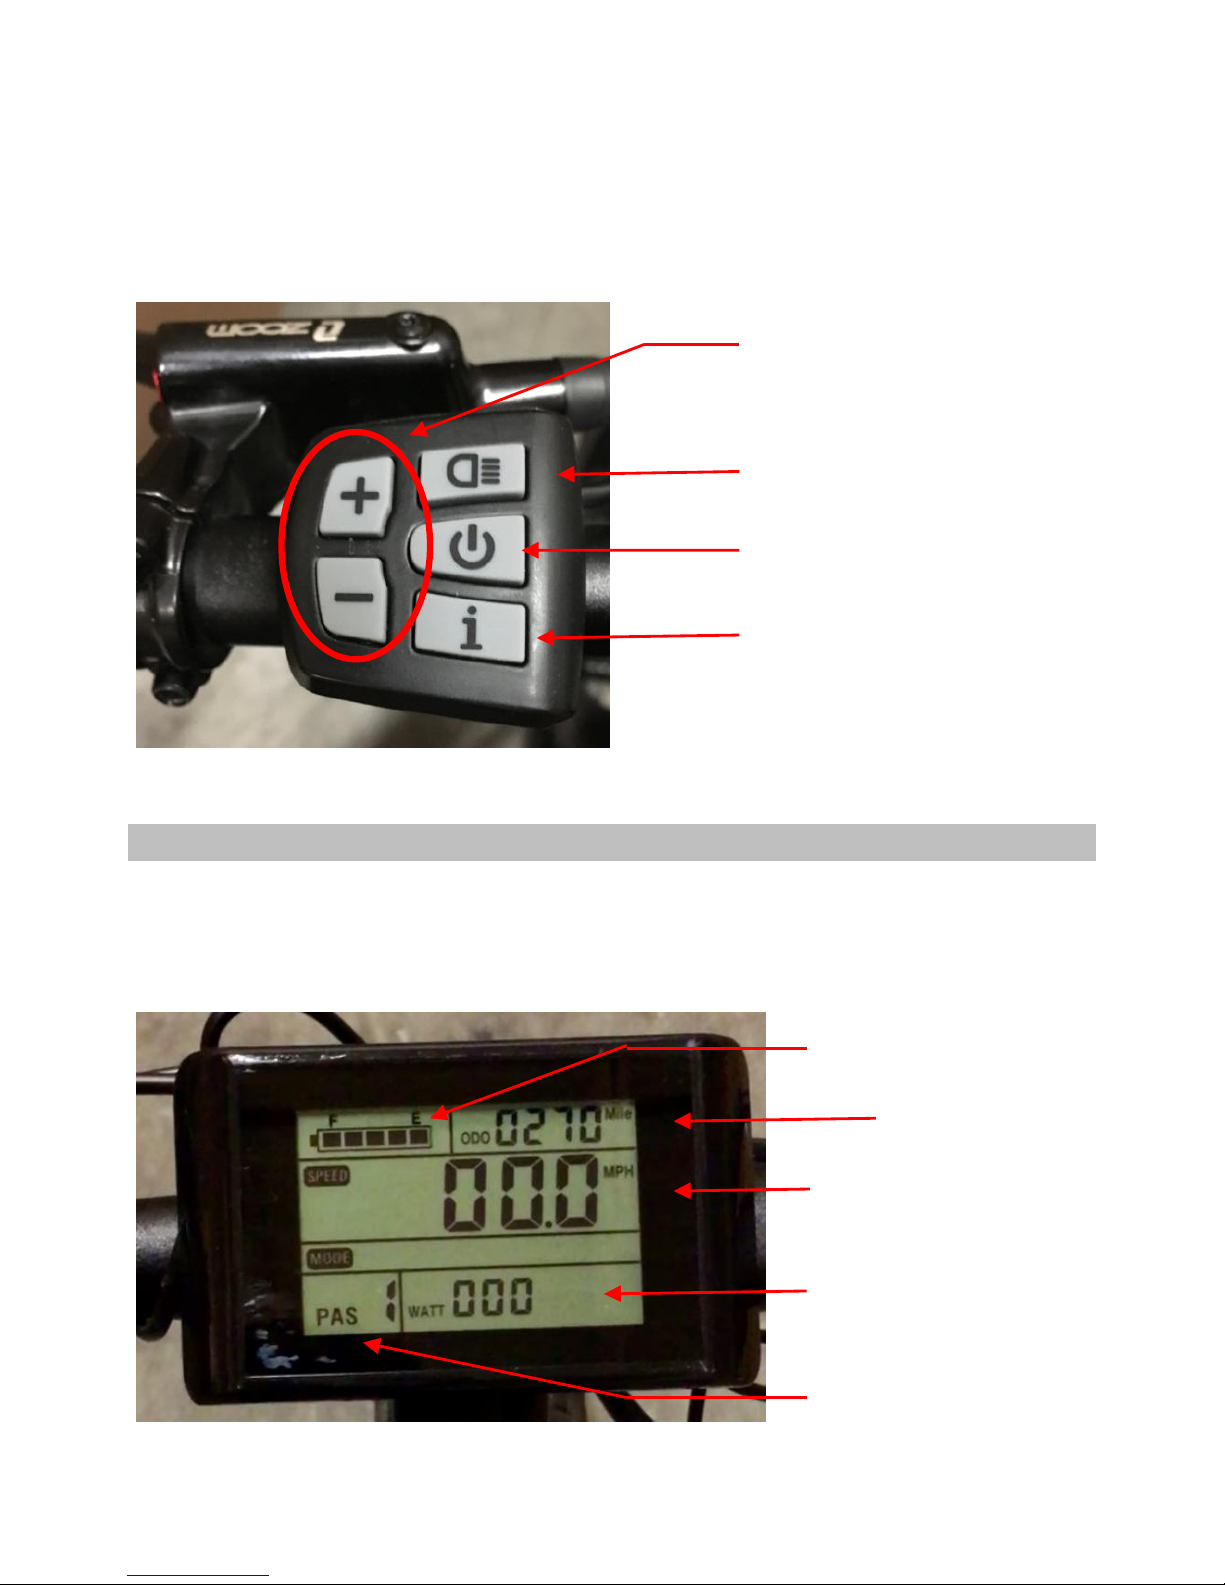
To increase pedal assist, use the controller on the left side handle bar.
Pressing the “+” button will increase the pedal assist, pressing the “-“
will decrease it. “0” pedal assist means the bike will provide no power
assistance.
500W Rear-Hub Motor
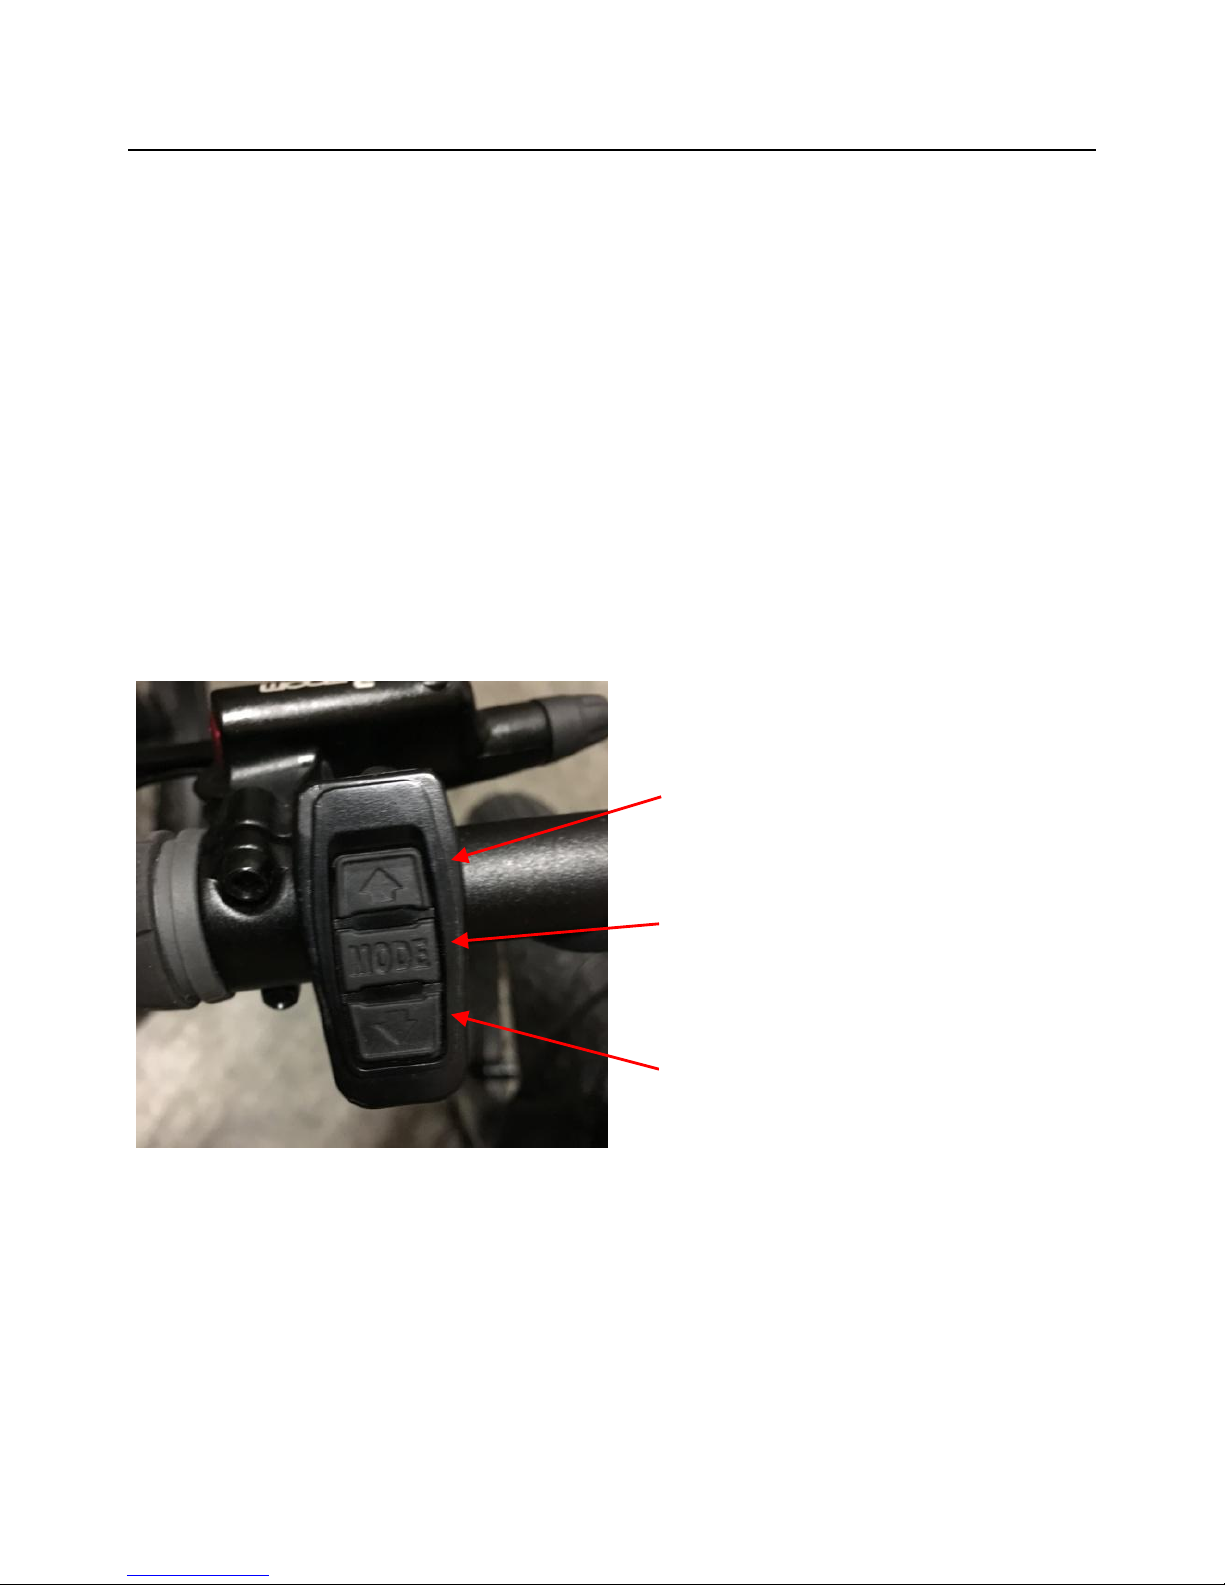
The 500W display is turned on by holding the “MODE” button on the left
hand controller.
Pedal Assist Adjustment
LCD Backlight
Power Button
Information scrolling
Pedal Assist Level
Watts being used
Speed (max/avg speed)
Odometer
Battery Level
Page 18
INSTRUCTIONS FOR USE
14
Pressing the “MODE” button will allow you to cycle through your
average speed, maximum speed, and trip distance.
To turn on the screen backlight, you must hold the “UP” arrow
and the “MODE” button at the same time.
To use the walk function of the bike (having the bike move while
you walk next to it), press and hold the “DOWN” arrow and the rear
wheel will spin 2-3mph to made walking with your bike easier.
The “UP” and “DOWN” arrows can be used to adjust the pedal
assist, just like the + and – buttons on the 350W model. The “0” means
the bike will give no pedal assistance; it will ride as a regular bike with the
9 speed gearing. Each level up from this will increase the amount of
power the bike assists you with while riding.
A diagram of the 500W model remote can be seen below.
Pedal Assist Adjustment
(increase)
Pedal Assist Adjustment
(decrease)
MODE button to power on
and cycle through statistics
Page 19
INSTRUCTIONS FOR USE
15
LCD Function Summary
The LCD screen provides a wide
range of functions and indicators
to the fit your needs. The indicated
contents are as follows:
Battery level indicator
Speed display
Trip distance and total distance
Cruise control (when walking)
Headlight on/off
Motor power (wattage)
Trip distance and total distance
Display Interface
After starting up the display,
the default setting will show
running speed. Press MODE to
change the information from
Running Speed to Average Speed,
Max Speed, Trip Distance, Total
Distance, and Trip Time.
Push Cruise Control
Press and hold DOWN or “-“ to
enable power assist while walking
the bicycle. Your bike will go at a
speed of 3.7 MPH (6 KMPH).
NOTE: This function can only be
used while pushing/walking the
electric bike by hand. Please do not
use this function while riding.
Power Assist Level Selection
Press “+” or “-“ to change
desired output of power. The
power ranges from 0-5. Level 0 will
supply no power to the pedal
assist and level 5 will supply the
maximum. The default value is
level 1 though you will be able to
shift freely at any time. Your
current level of power assist can
be seen in the bottom left corner
of the LCD screen labeled as
“PAS.”
Clearing the Trip Time and
Distance (350W Model)
1. Double click the “i” button
very fast (<0.3 seconds in-
between) to bring up a
settings menu.
2. A menu titles “tc-n” will
appear.
CAUTION
Try to avoid hitting the screen.
Do not try to modify the system
parameters as it may cause
malfunctions.
WARNING
Contact service center if an error
code is displayed. Do not attempt
to fix it yourself.
Page 20

INSTRUCTIONS FOR USE
15
3. Press the “+” button to
make the option “tc-y”
4. This means “trip clear –
yes”
5. Now double click the “I”
button very fast (<0.3
seconds in-between) to
select/return to the main
screen (Leaving the menu
unattended for 10 seconds
will automatically make it
return to the main screen).
6. Your max speed, trip
distance/time, and average
speed will all be reset.
Battery Indicator
The battery bars represent the
capacity of the battery. When the
battery is low the battery frame on
screen will flash to notify that it
needs to be recharged
immediately.
Error Code Information
If an error code appears, take
note of what code is displayed.
Contact a service center to get
your bicycle repaired. An error
code will be displayed in the
bottom right corner in place of the
normal “WATT” display.
For more information on the LCD
screen, refer to our website to
download the extended version of
the manual.
Pedal assistance
Your pedal assist will start
once you start to pedal and stop
once you stop peddling. You are
able to adjust the amount of
assistance on the LCD screen by
adjusting the + / - button. If you do
not want any assist, bring your
bike to a stop and power off the
system. If the handbrakes are
applied, the pedal assist will cut
automatically. You do not need to
turn the power off when going
downhill.
Gearing
The gear shift is located on the
right handle bar. There are 9
speeds available. In order to shift
between gears, simply pull the
trigger with your index finger to
increase the gear, or press in the
trigger under the handle to
decrease the gear. The
downshifting trigger can be
pressed in one click to downshift
once, or two clicks to downshift
twice, or three clicks to downshift
three times (initial gear being
greater than 3).
16
Page 21
INSTRUCTIONS FOR USE
15
Battery
Your battery should be
recharged after each use. The
battery is a 36V / 13.4 Amp lithium
ion battery The normal lifecycle of
the battery, if continuously
discharged and recharged, is about
3-5 years or 800-2000 recharges,
after which the storage capacity
will decline.
Again, be sure to fully charge the
battery before the first use.
The range in distance on a full
charge is approximately 25 – 35
miles depending on your weight
class and terrain. Higher weight
classes and uneven surfaces will
require more power than lighter
weights and flatter surfaces. This
equals to 5 – 6 hours of continuous
riding, again depending on your
weight class and terrain.
Battery performance is
affected by temperature, and will
perform better in warmer
temperatures. When the
temperature is below 32°F (0°C),
the battery current may decrease
by 1/3. Consequently, the travel
range in cold environments is less
than in warmer environments, but
will return to normal when it the
battery returns to room
temperature.
Frequent braking/starting,
riding uphill/against strong winds,
starting from a standstill, or riding
on rough/muddy roads will use
extra power and lower range.
Here a few tips to prolong the
battery life under these conditions:
Frequent braking/starting – try
to look ahead and coast rather
than stop and go frequently.
Riding uphill/against strong
winds – pedal to supplement the
battery power.
Starting from a standstill – use
pedals to help bring you up to
speed, not just the throttle.
When battery meter indicates low
power remaining, switch to
manual power and avoid using
the battery.
If the bicycle is being stored,
remove the battery and recharge
of production, please read the
charger manual in detail before
use.
WARNING
DO NOT use chargers or other
components on your e-bike other
than the ones which have been
approved and tested by this
company.
17
Page 22
INSTRUCTIONS FOR USE
18
Fifield is not responsible for any
damages caused by use of other
products not specifically designed
and tested for use with this electric
bicycle.
The battery chargers contain
sensitive electronics. Improper
use, dropping, or sudden jolts can
damage the charger and its
internal electronics.
Charging the battery
It is important that you charge
your battery after every use. This
will extend the total life of your
battery.
Read charger manual for
specific production details.
How to charge
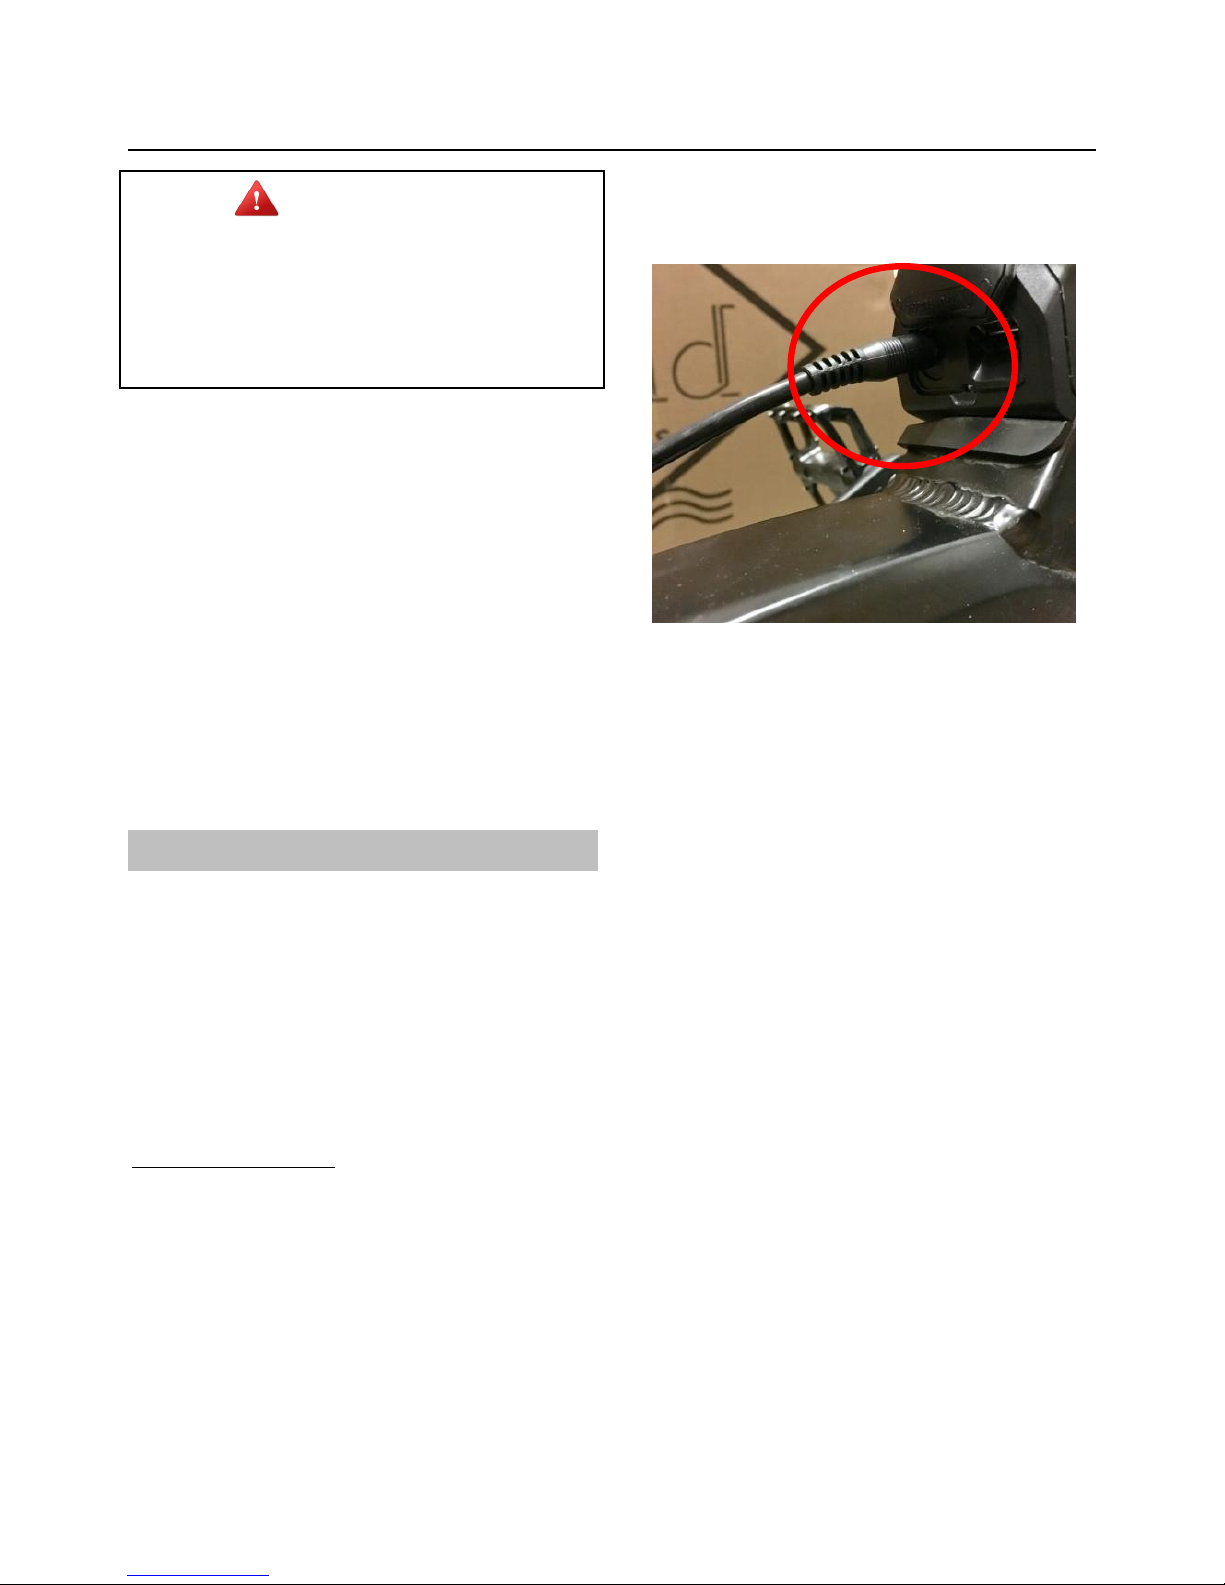
To charge, turn the bike off
and insert the plug of the charger
into the charging port. This can be
found on the left side of the main
bike frame. Simply remove the
black rubber cover to access the
power outlet (depicted below this
paragraph). Once this is complete,
insert the charger into the
electrical outlet.
The standard 120V wall outlet
in most homes is sufficient power
to charge the battery.
The light on the battery
charger will appear RED to show
that is not full. A full recharge
typically takes 3-4 hours. When the
battery is full, the light will change
from red to GREEN. You can
continue to charge for 1 – 2 more
hours after it turns green.
Unplug the power source from
the battery and then from the
electrical outlet. Store the charger
in a cool, dry place.
NOTE: After the light turns green,
the charger is in “trickle charge.”
This means that if plugged in, it will
continue to charge slowly and
maintain the charge. Doing this will
not harm the battery. For safety
WARNING
Do not attempt to access the
Lithium battery in any way. Doing
so may cause chemical, electric,
and/or fire hazards.
Page 23
INSTRUCTIONS FOR USE
18
and long battery life, unplug the
battery from the charger if you are
going to be gone for an extended
period of time.
Do not leave the charger plugged
into the battery for more than 10
hours to avoid overcharging and
potential damage to the battery.
Using your power source
incorrectly or leaving the charger
connected to the battery when
charging, the charger will become
warm. Be sure to keep the charger
away from any flammable objects.
On a normal charge cycle, the
charger may reach temperatures
up to 185°F (85°C).
Precautions while charging:
ALWAYS use the charger
according to the instructions
DO NOT use any charger other
than the one that came with
your e-bike. If you need a
replacement, please contact
Customer Service
DO NOT attempt to open or
repair your charger if it is
malfunctioning
AVOID any contact with liquids
when charging your battery. If a
plug or socket gets wet, dry it
completely before using
DO NOT put anything on top of
the charger while charging (to
allow proper ventilation).
BE SURE to keep out of the
reach of children
IF you smell a peculiar smell or
the temperature is too high, stop
charging immediately by
disconnecting the charger from
the wall.
WARNING
Do not submerge this bicycle.
This may cause a short circuit
which could lead to injury or
death.
19
Page 24

MAINTENANCE
20
Wheels
Wheels should be centered in
the fork or dropouts. If you hear
any irregular noises from the
wheels or brakes, the wheels
should be checked and repaired.
The wheels should rotate smoothly
without wobbling from side to
side.
Check the bearing play of the
hubs by lifting the bicycle and
spinning the wheel; it should
continue to spin for several turns
after you remove your hand. To
check the play of the hubs, try to
move the wheel from side to side
between the forks. If you detect
any substantial movement, or if
the wheel is difficult to turn, the
bearings must be adjusted or
replaced. Please contact a local
bicycle dealer to have the hub
bearings adjusted.
Rims
The Fat Tire comes with matte
black finish rims for a sleek look,
and to hold the CST 4” tires.
Tires
It is recommended that your
tire pressure is at least 40 psi.
Before every ride, make sure that
the tires are inflated according to
the pressure on the sidewall.
Improper tire pressure will make
riding more difficult, cause
excessive wear, and will result in
the premature failure of the tire.
The tires should be property
seated in the rim. The fitting of the
tire bead and rim bead should be
checked regularly. If the tube is
pinched between the rim and the
tire, the tube will pop and create a
hole in your tire.
Make sure that the tire is
not cracked or worn unevenly and
that it is without bulges. Also be
sure to check the valve stem to see
if it is straight in the rim. Irregular
tires should be replaced
immediately.
Bike Frame and Handlebars
Before each ride ensure
that the middle of the bike frame
and the handlebars are straight
and in the locked position. Be sure
to double check the locking clasp
of each to ensure nothing will be
moving on your ride. If there are
issues with the locking clasps or
collapse points are showing
movement bring to bicycle dealer
for repair.
Brakes
Riding with brakes and
cables that are worn or damaged,
Page 25

21
or wheels in poor condition, may
result in losing control of your
bicycle. Wet weather may hinder
the brake performance. Be sure
you allow for more distance to
safely stop in the wet or icy
conditions. Check before each ride
that your brakes are free of
obstacles, not leaking fluids, and
working properly before operating
your bicycle.
Battery
Never attempt to open the Lithium
battery in any way. If you are
having any issues with the battery,
please bring the bike to your local
bike mechanic for repairs.
General maintenance
Change the lubricating grease
of the front axle, back-shaft, and
pivot once every three months.
Pour a small amount of mineral oil
every half a year into the brake
pipe. Be sure to oil the chains and
sprockets to keep from rusting and
for smooth riding.
When cleaning your electric bike,
do not use a steady, direct, stream
of water from a hose. Use a wet
cloth instead to avoid short
circuiting any electric components.
Your electric bike has a durable
finish and does not need to be
waxed. Simply clean with mild
detergent and buff to restore its
original shine.
Page 26

LIMITED WARRANTY
22
Every new Fifield e-bicycle comes with our warranty. Once your Fifield e-Bike is registered with
Fifield e-Bicycle Incorporated, we provide each original retail purchaser a warranty against
defects in materials and workmanship, as stated below:
2 year
Frame
Electric motor, LCD, and controller
Battery pack (or 500 charges, whichever comes first)
This warranty applies to 2014 and newer model bicycles. Any other original part or component
shall be covered by the stated warranty of the original manufacturer. Any products not
specifically included above are hereby omitted. Any other original part or component shall be
covered by the stated warranty of the original manufacturer. Any products not specifically
included above are hereby omitted.
THIS WARRANTY DOES NOT COVER:
Normal wear and tear
Improper assembly
Improper follow-up maintenance
Installation of components, parts, or accessories not originally intended for or
compatible with the bicycle as sold
Damage or failure due to accident, misuse, abuse, or neglect
Damages resulting from failure to follow Instructions for Use and Warnings as
provided in the Owner’s Manual for the e-Bicycle
Damages resulting from improper charging of the battery pack or use of any charger
not supplied by Fifield e-Bicycles Incorporated
Labor charges for part replacement or changeover
This warranty is void in its entirety by any modification of the frame, fork, or components. This
warranty is expressly limited to the repair or replacement of a defective item, and said repair or
replacement is the sole remedy of the warranty. This warranty extends from the date of
purchase, is offered only to the original owner, and is not transferable. This warranty applies
only to Fifield Incorporated purchased through an authorized dealer or distributor. Fifield
Incorporated is not responsible for incidental or consequential damages. Some states do not
allow the exclusion of incidental or consequential damages, so the above exclusion may not
apply to you. Any claim against this warranty must be made through an authorized dealer or
distributor. Proof of purchase is required. A bicycle must be registered with Fifield
Incorporated before a warranty claim may be processed. Claims made outside the country of
purchase may be subject to fees and additional restrictions. Warranty, duration, and detail may
differ by frame type and/or by country. This warranty gives you specific legal rights, and those
rights may vary from place to place. This warranty does not affect your statutory rights. The
English version of the warranty shall prevail.
Page 27

23
Welcome to the family.
 Loading...