

Page 1
Network Scanner Guide
for Fiery X3e 50C-K
Read this manual before printing.
Keep readily available for reference.
User's Guide
Page 2

Introduction
Thank you very much for purchasing the Fiery X3e 50C-K.
This Network Scanner Guide includes the instructions necessary for utilizing the full range of functions, as well as safety precautions. Please take the time to read it carefully.
Please read this manual before performing any scanning operations or using the equipment in any way.
ACKNOWLEDGEMENTS:
• Fiery and Fiery Logo are registered trademarks of Electronics For Imaging, Inc. in the U.S. Patent and Trademark
Office and certain other foreign jurisdictions.
• Command WorkStation, WebTools, WebScan and EFI are trademarks of Electronics For Imaging, Inc.
• Microsoft, MS, Windows and MS-DOS are registered trademarks or trademarks of Microsoft Corporation in the United
States and / or other countries.
• Macintosh and PowerMac are registered trademarks or trademarks of Apple Computer, Inc. in the United States and /
or other countries.
• Adobe, Adobe Logo, Acrobat, Acrobat Logo, PostScript and PostScript Logo are registered trademarks or trademarks
of Adobe Systems, Inc.
• Other company names and product names used in this manual are the registered trademarks or trademarks of their
respective companies.
Copyright © 2004 Konica Minolta Business Technologies Inc.
EXEMPTION
• No part of this manual may be used or duplicated without permission.
• Manufacturer and Sales Company will have no liability for any influences caused by using the printing system and this
manual.
• The information written in this Network Scanner Guide is subject to change without prior notice.
1
Page 3

CONTENTS
Introduction ...................................................................................................................... 1
About this Manual ............................................................................................................ 4
Chapter 1 : Overview of the Scanning Features..................................................... 7
1-1 Classification of the Scanning Features ........................................................................ 8
What are Scanning Features? .............................................................................................. 8
Scan to E-Mail....................................................................................................................... 9
Scan to HDD....................................................................................................................... 11
Scan to FTP........................................................................................................................ 12
Scan to QUEUE.................................................................................................................. 14
1-2 Before Using ................................................................................................................... 15
Position / Description of the control panel........................................................................... 15
LCD Screen ........................................................................................................................ 17
1-3 Basic Operation..............................................................................................................18
Outline................................................................................................................................. 18
[Select Transmission Object] screen .................................................................................. 19
[Scanner setting basic] screen............................................................................................ 23
Inputting Text ...................................................................................................................... 25
Chapter 2 : Before Using the Scanning Features................................................. 27
2-1 Overview ......................................................................................................................... 28
2-2 Registering Destinations (E-Mail) ................................................................................. 29
Registration of E-Mail Address ........................................................................................... 29
Revision and Deletion of E-Mail Address............................................................................ 32
2-3 Registering Storage Locations (HDD) .......................................................................... 33
Registration of Box No........................................................................................................ 33
Revision and Deletion of Box No. ....................................................................................... 36
2-4 Registering Destinations (FTP)..................................................................................... 37
Registration of FTP server .................................................................................................. 37
Revision and Deletion of FTP server .................................................................................. 43
Chapter 3 : Using the Scanning Features .............................................................44
3-1 Activating the Scan Mode.............................................................................................. 45
3-2 Selecting the Destination .............................................................................................. 46
Selecting the Destination (E-Mail)....................................................................................... 47
Selecting the Storage Location (HDD)................................................................................ 56
Selecting the Destination (FTP).......................................................................................... 61
Selecting the Destination (QUEUE) .................................................................................... 66
3-3 Setting the Original Document...................................................................................... 67
2
Page 4

CONTENTS (continued)
3-4 Setting Scanner Features .............................................................................................. 68
FILE NAME......................................................................................................................... 69
COLOR MODE (COLOUR MODE)..................................................................................... 70
FILE FORM......................................................................................................................... 71
SCAN MODE ...................................................................................................................... 71
SCAN SIZE......................................................................................................................... 72
QUALITY............................................................................................................................. 74
LENS MODE.......................................................................................................................75
Full-Image Area .................................................................................................................. 78
Original Direction ................................................................................................................ 79
Original Document type ...................................................................................................... 80
3-5 Starting Scanning........................................................................................................... 82
3-6 Checking Status and Scanner Settings ....................................................................... 83
Tag Display of Operation Status ......................................................................................... 83
Check Settings for Scanning............................................................................................... 84
Change the current settings................................................................................................ 85
Chapter 4 : Importing the Scanned Data ...............................................................87
4-1 Retrieving in From HDD................................................................................................. 88
How to read in scanned data .............................................................................................. 88
How to delete scanned data ............................................................................................... 89
4-2 Images Scanned to FTP or E-mail ................................................................................ 90
4-3 Images Scanned to QUEUE........................................................................................... 91
How to use scanned data ................................................................................................... 91
How to delete scanned data ............................................................................................... 91
Chapter 5 : Key Operator Mode.............................................................................. 92
5-1 Key Operator Mode ........................................................................................................ 93
Switching the key operator mode........................................................................................ 93
5-2 Changing / Deleting the destination ............................................................................. 95
Chapter 6 : Troubleshooting ..................................................................................97
6-1 Cannot use the scanner................................................................................................. 98
When you cannot connect to the scanner........................................................................... 98
When you cannot scan ....................................................................................................... 98
Appendix .................................................................................................................. 99
Appendix-1 Product Specifications................................................................................... 100
Product Specifications of Scanning Features ................................................................... 100
Index ....................................................................................................................... 101
3
Page 5
About this Manual
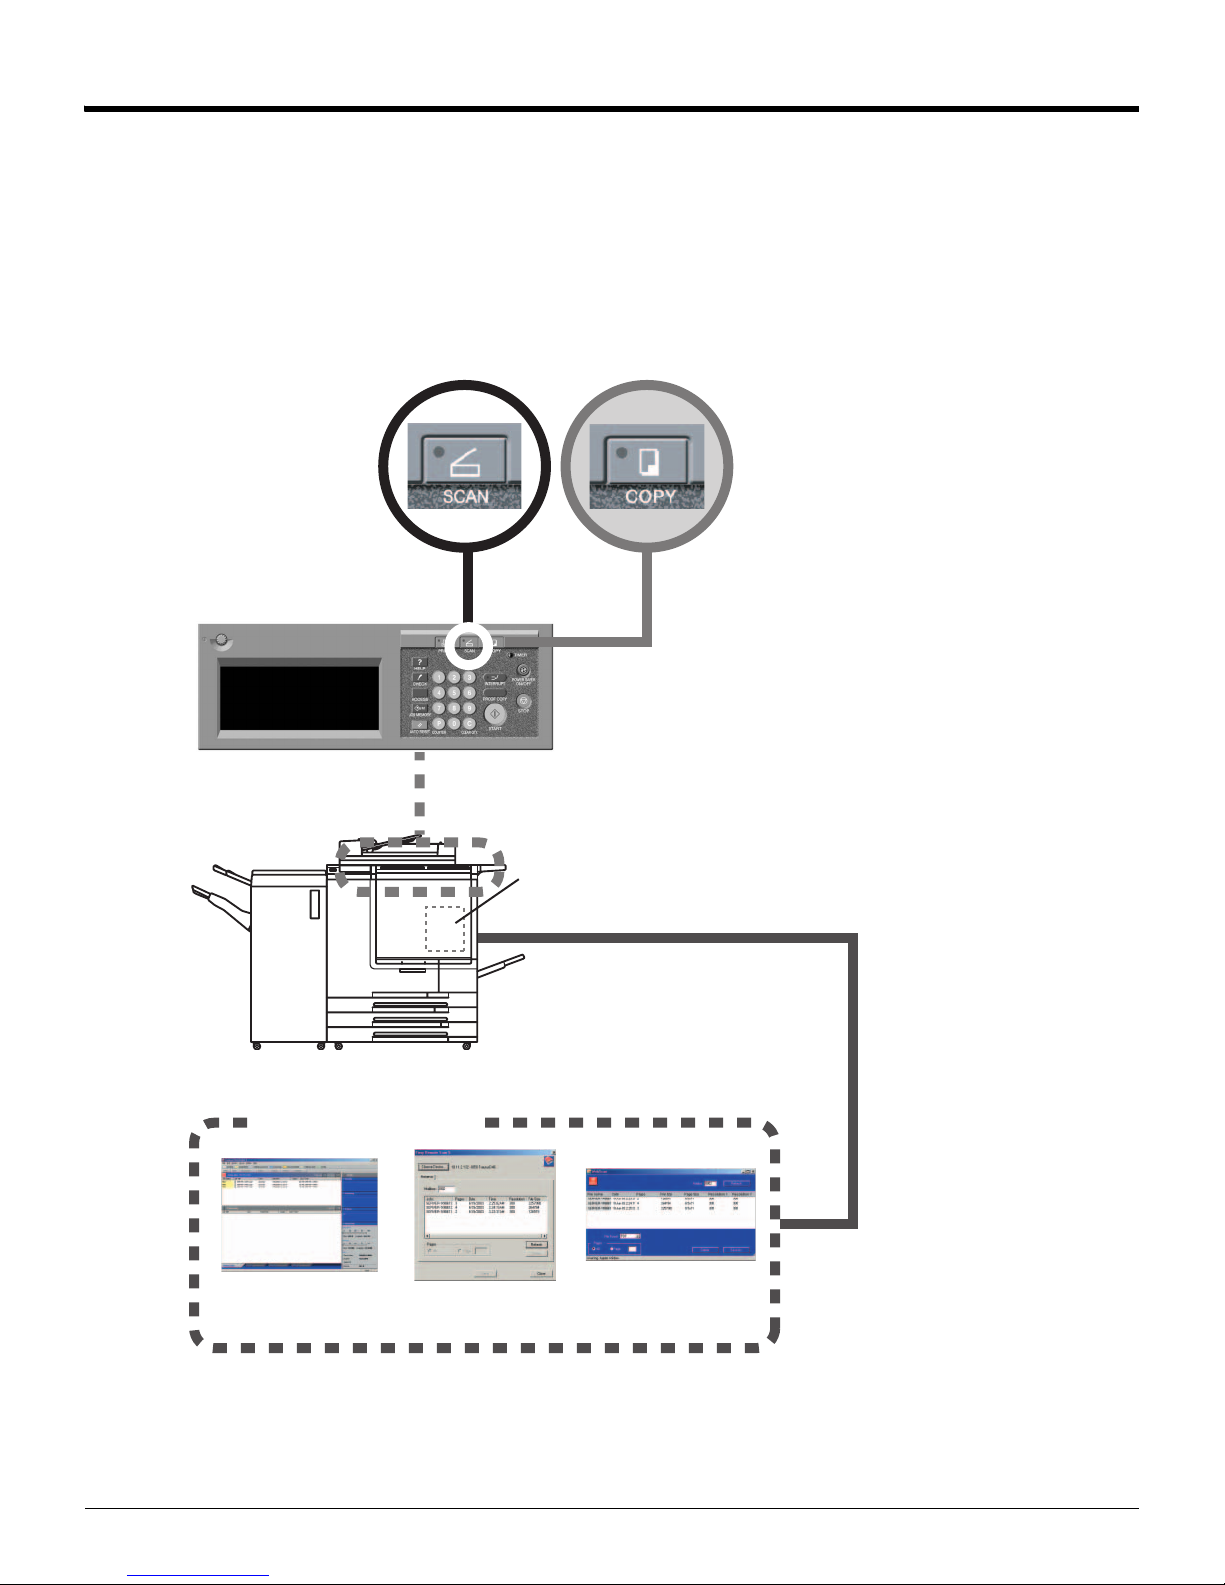
This is the manual for the Network/Scanner features of this Fiery X3e 50C-K Color Server.
This Chapter explains about the manual composition and conventions used in this Manual.
This manual assumes that the user is familiar with basic computer and copy machine operations. For detailed operations of Windows and Macintosh computers, please refer to the respective User’s Guides.
About other features of this Fiery X3e 50C-K Color Server, please refer to the respective User’s Guide.
This Manual
Copier's
User's Guide
Fiery X3e 50C-K
Print Controller
User's Guide
Utilities, Applications, etc.
Command
WorkStation
Application / Plug-in
Copier + Print Controller
Fiery Remote Scan
Fiery WebTools
-WebScan
4
Page 6

About this Manual (Continued)
Manual Composition
This manual is composed of the following 6 chapters:
Chapter 1 : Overview of the Scanning Features
Explains about the outline of the Scanner features and how to use the Control Panel.
Chapter 2 : Before Using the Scanning Features
Explains about operations for previously registrations of the destinations to transmit/store the scanning data.
Chapter 3 : Using the Scanning Features
Explains how to use the Network/Scanner features.
Chapter 4 : Importing the Scanned Data
Explains how to import the Scanned Data from the destinations to transmit/store into a computer.
Chapter 5 : Key Operator Mode
Explains about the key operator mode in relation to the Scanner features settings.
Chapter 6 : Troubleshooting
Explains about what to do if problems occur with scanner features.
Appendix
Explains about product specifications for the print controller.
Conventions Used in this Manual
The following abbreviations are used in this manual:
Notation of each product
• Fiery X3e 50C-K
Fiery X3e 50C-K Color Server → print controller
Others
• Network/Scanner features → Scanner features
Utility Tools of This Product
The Scanning system and the printing system use the following utility tools:
For detailed operations of these utility tools, please refer to the “Print Controller’s User’s Guide”.
• Command WorkStation Utility Application for job control. Using this application, control the scanning
data stored by Scan to QUEUE (p.14).
• Fiery Remote Scan application Application for operating the Remote Scanning function of the print controller.
Using this application, access scanned data on the copier’s hard drive and
transfer it to a FTP server or to an E-mail recipient as an attachment.
• Fiery Remote Scan plug-in Plug-in compliant to TWAIN. Using this application, access the scanned data
stored on the copier’s hard drive through compliant applications from a computer on a network.
• Fiery WebTools - WebScan Web Utilities for use with your Browser application. Using this utility, retrieve the
scanned data from the print controller.
5
Page 7
How to read this Manual
Whe
y
ou press [SCAN] b
h
e
t
e
y from [E-Mail],
, o
b
o
r
[COPY] b
Press [SCAN] b
e
Make sure that [E
-Mail] is selected.
se
l
.
y
[
]
l
ect an
smiss
b
j
]
[PR
I
][CO
SCA
N]
[S
lec
an
smiss
Ob
j
],
[
][QU
[
ansmission Object]
[Sel
ect Tansmi
ssi
on O
[
[
[
T
r
[
l
] [
l]
[
ect Tra
b
j
]
Shows an object and feature of a procedure.
About this Manual (Continued)
3-2 Selecting the Destination
Control Panel
he screen, you select the
e
On
sponded with your selection.
E-Mail:Å@ “Selecting the Destination (E-Mail)” on page 46.
HDD:Å@ “Selecting the Storage Location (HDD)” on page 55.
FTP:Å@ “Selecting the Destination (FTP)” on page 60.
QUEUE:Å@ “Selecting the Destination (QUEUE)” on page 66.
1.
utton, scanning features is activated and t
[SCAN]
Select
t
You can select multiple destinations. In this case, select the next destination after setting of items for the destination already selected and omit the procedure to press
already selected.
Reference
Reference
Reference
After the scanning operation, it is recommended to activate the printer mode or copy mode by pressing the
NT
[SCAN]
screen is displayed on the LCD screen.
[Se
screen (E-Mail)
ion
ect] [E-Mail],[HDD
Reference
button
utton of the control panel.
PY]
utton on the control panel.
ion O
ect
screen appears.
Select ansmission Object]
Title input]
Search a
ansmission Object]
FTP
utton not to clear the settings for the destination
[
bject]
r and set items corre-
EUE]
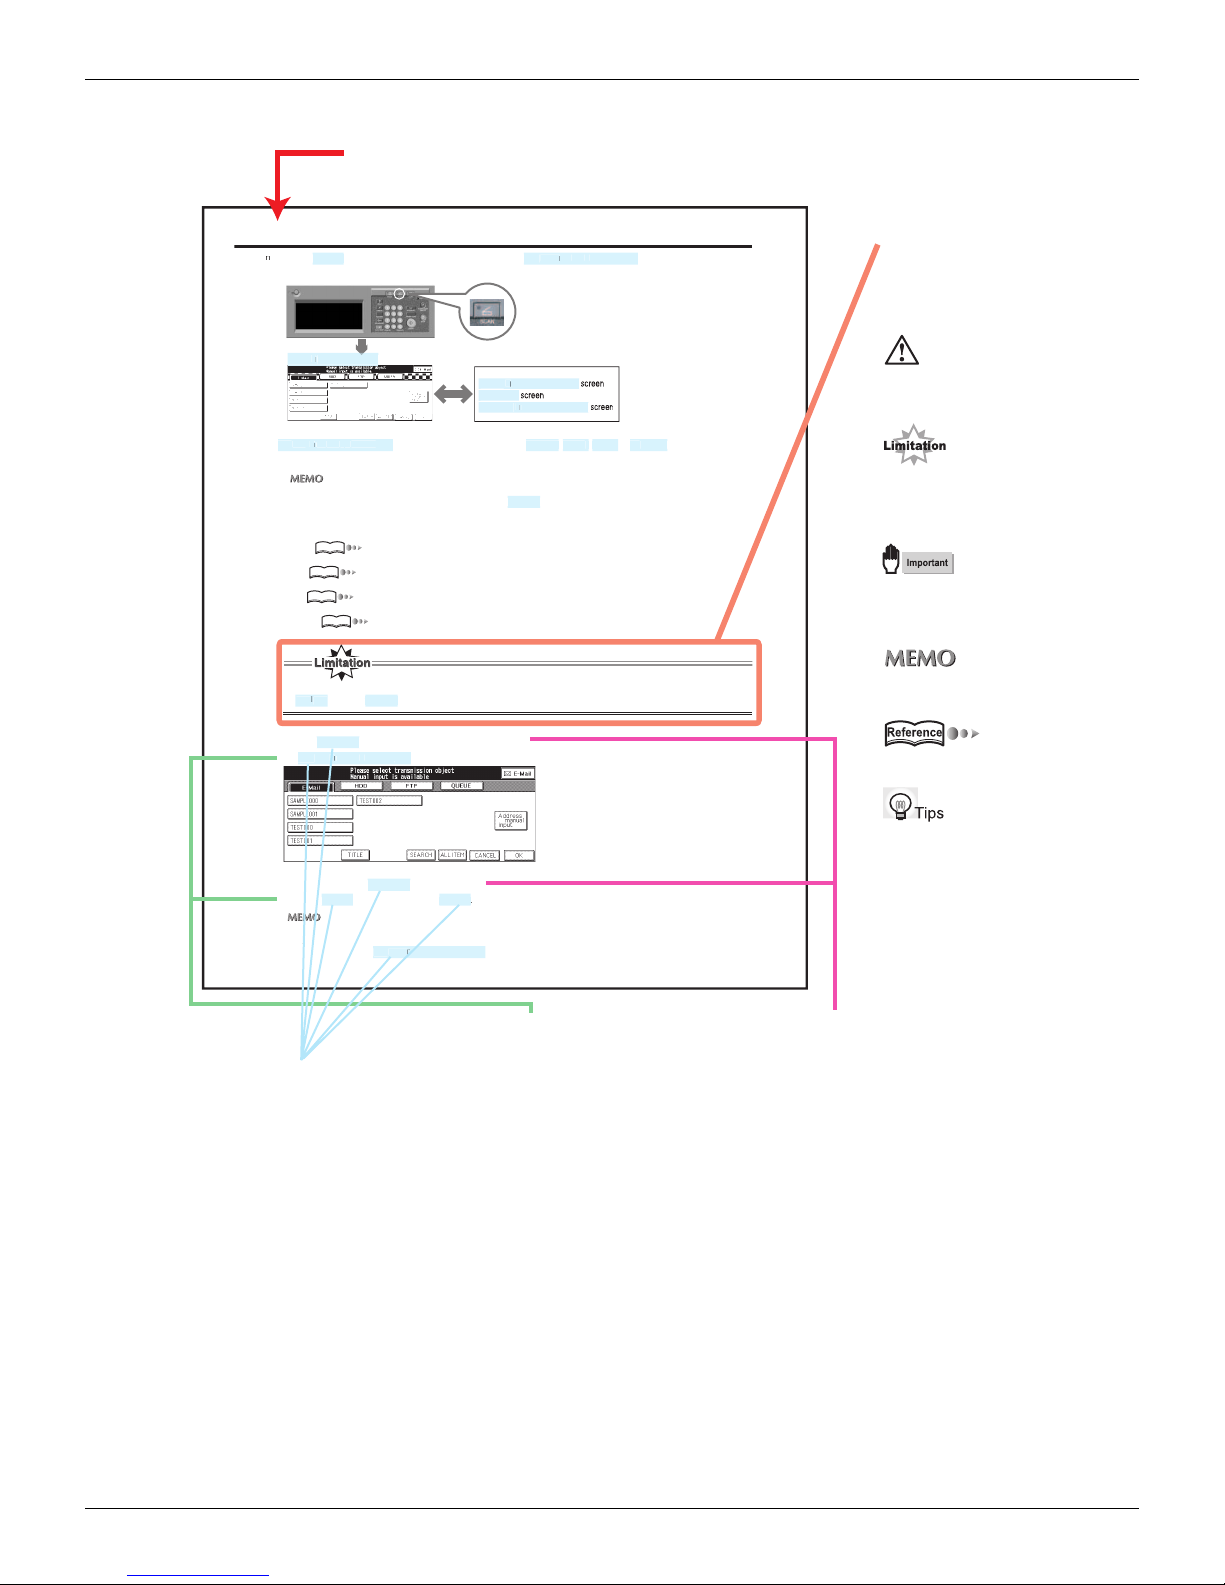
This document contains
call out spaces in the
body. Types of call out
shown in this way are as
follows.
Explains cautions and
restrictions or operating
hardware and software.
Explains function
principles and other
functions that cannnot
be used together.
Explains important
notices on operating
procedures.
Explanations to
supplement the body.
Shows a page to refer.
Refer to if necessary.
2.
When the is not
You can remove a selection of the transmission object you selected once by touching the same transmission
object once again. However,
FTP server on each screen. In this case, please operate it after removing selections
of those by touching the same.
E-Mai
E-Mail
ected, touch
E-Mai
ou cannot remove a selection after you have selected an E-Mail address / Box No. /
Sel
nsmission O
ect
Describes status
of hardware and
[ ] are used for the
terms displayed on
software when an
operation is done.
the screens.
This page does not exist in the document.
Hints and Advices on
operating procedures.
Describes operating
procedures.
6
Page 8

Chapter 1 : Overview of the Scanning Features
1-1 Classification of the Scanning Features ..................................... 8
1-2 Before Using ................................................................................ 15
1-3 Basic Operation...........................................................................18
7
Page 9
1-1 Classification of the Scanning Features
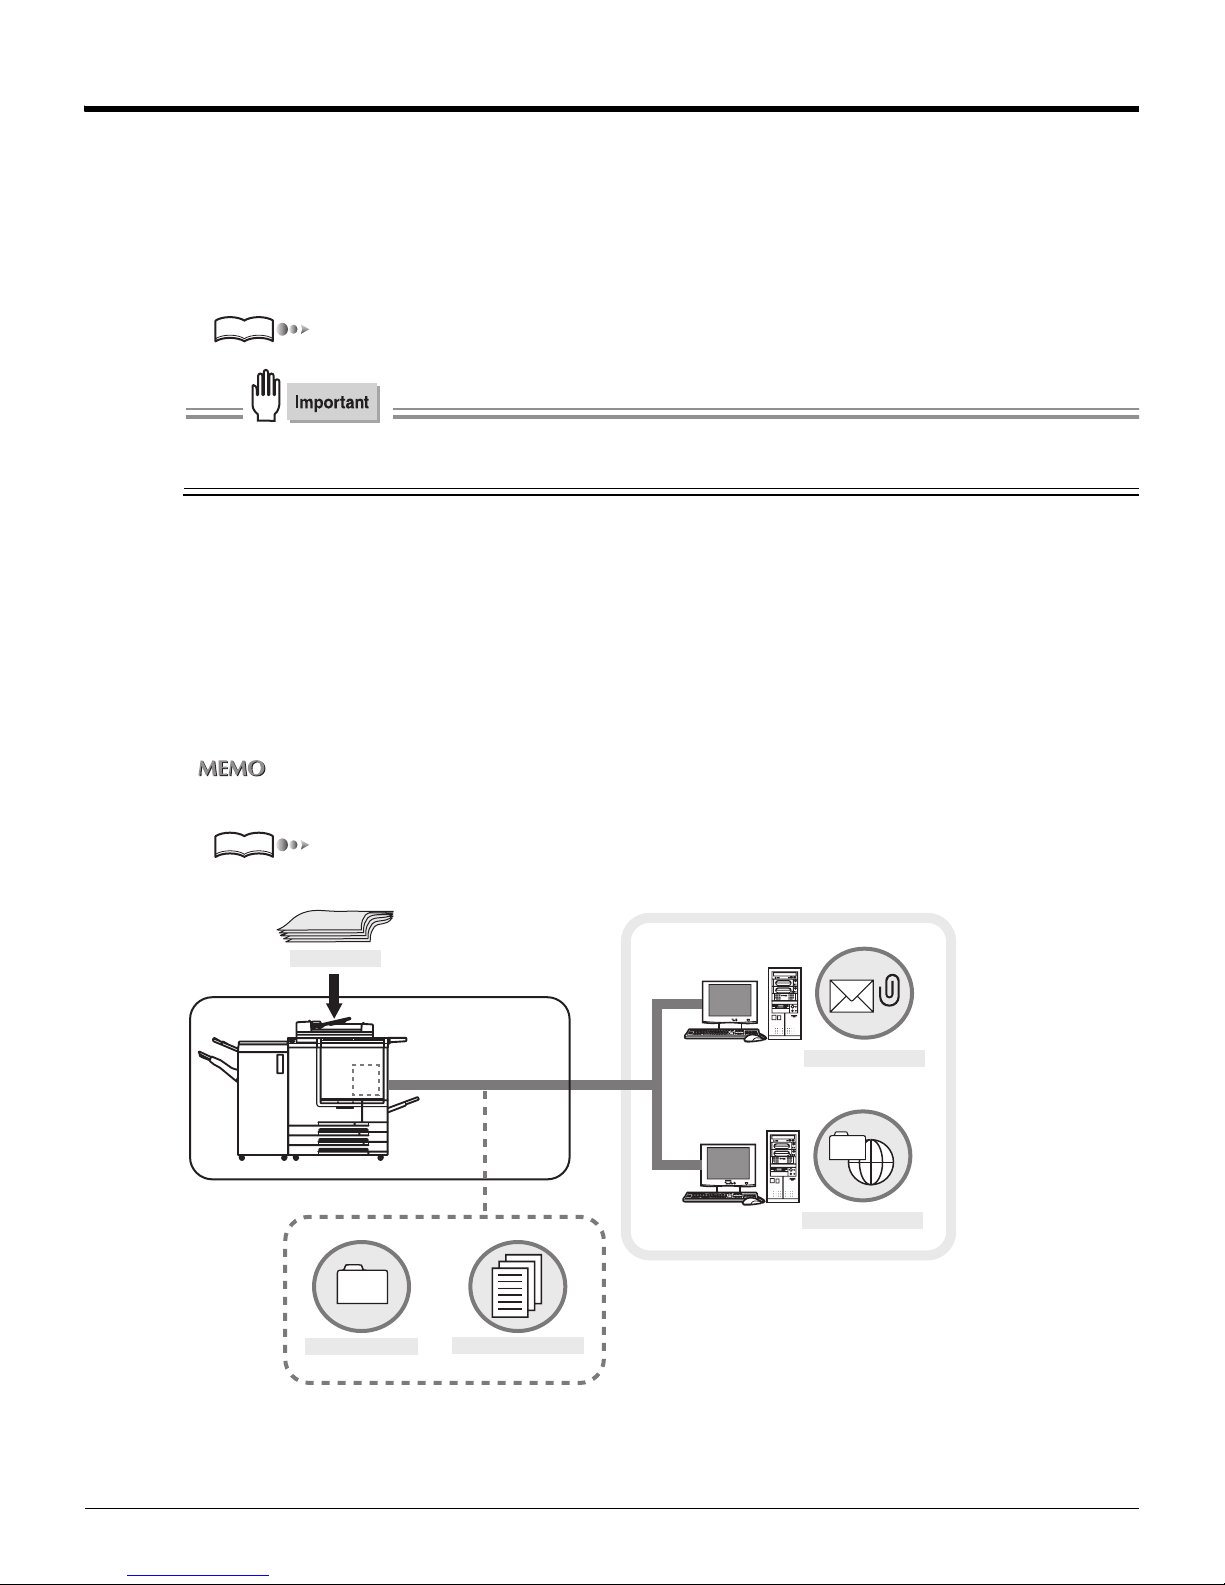
●What are Scanning Features?
The Scanning Features scan original document as image data (scanned data) from the copier's RADF or the platen glass to the
print controller’s hard drive and transmit/store the scanned data.
All original documents can be copied and scanned using the scanning features.
You can also scan and transmit/store at once with several size of the original documents.
Reference
“Original Document type” on page 80.
To use the scanning features, you must make network settings on the print controller. Please refer to the Print
controller’s User’s Guide for information about the network settings.
Four Types of the Scanning Features
According to the transmission object, scanning features fall into four groups:
• Scan to E-Mail: Transmit an E-Mail with an attachment file (scanned job) to the address you appoint.
• Scan to HDD: Save the scanned data to the HDD of the print controller.
• Scan to FTP: Upload the scanned data to the FTP server which you appoint.
• Scan to QUEUE: Store the scanned data as a queue on the print controller.
On scanning operation, you can select the transmission object. You can also select multiple objects in a single operation.
You can retrieve the scanned data saved with Scan to HDD from a computer on a network.
Reference
“Retrieving in From HDD” on page 88.
Original
Scanning
Scan to HDD
Copier +
Print Controller
Scan to QUEUE
MAIL Server
Scan to E-Mail
FTP Server
Scan to FTP
Internet
8
Chapter 1 : Overview of the Scanning Features
Page 10
1-1 Classification of the Scanning Features (Continued)
●Scan to E-Mail
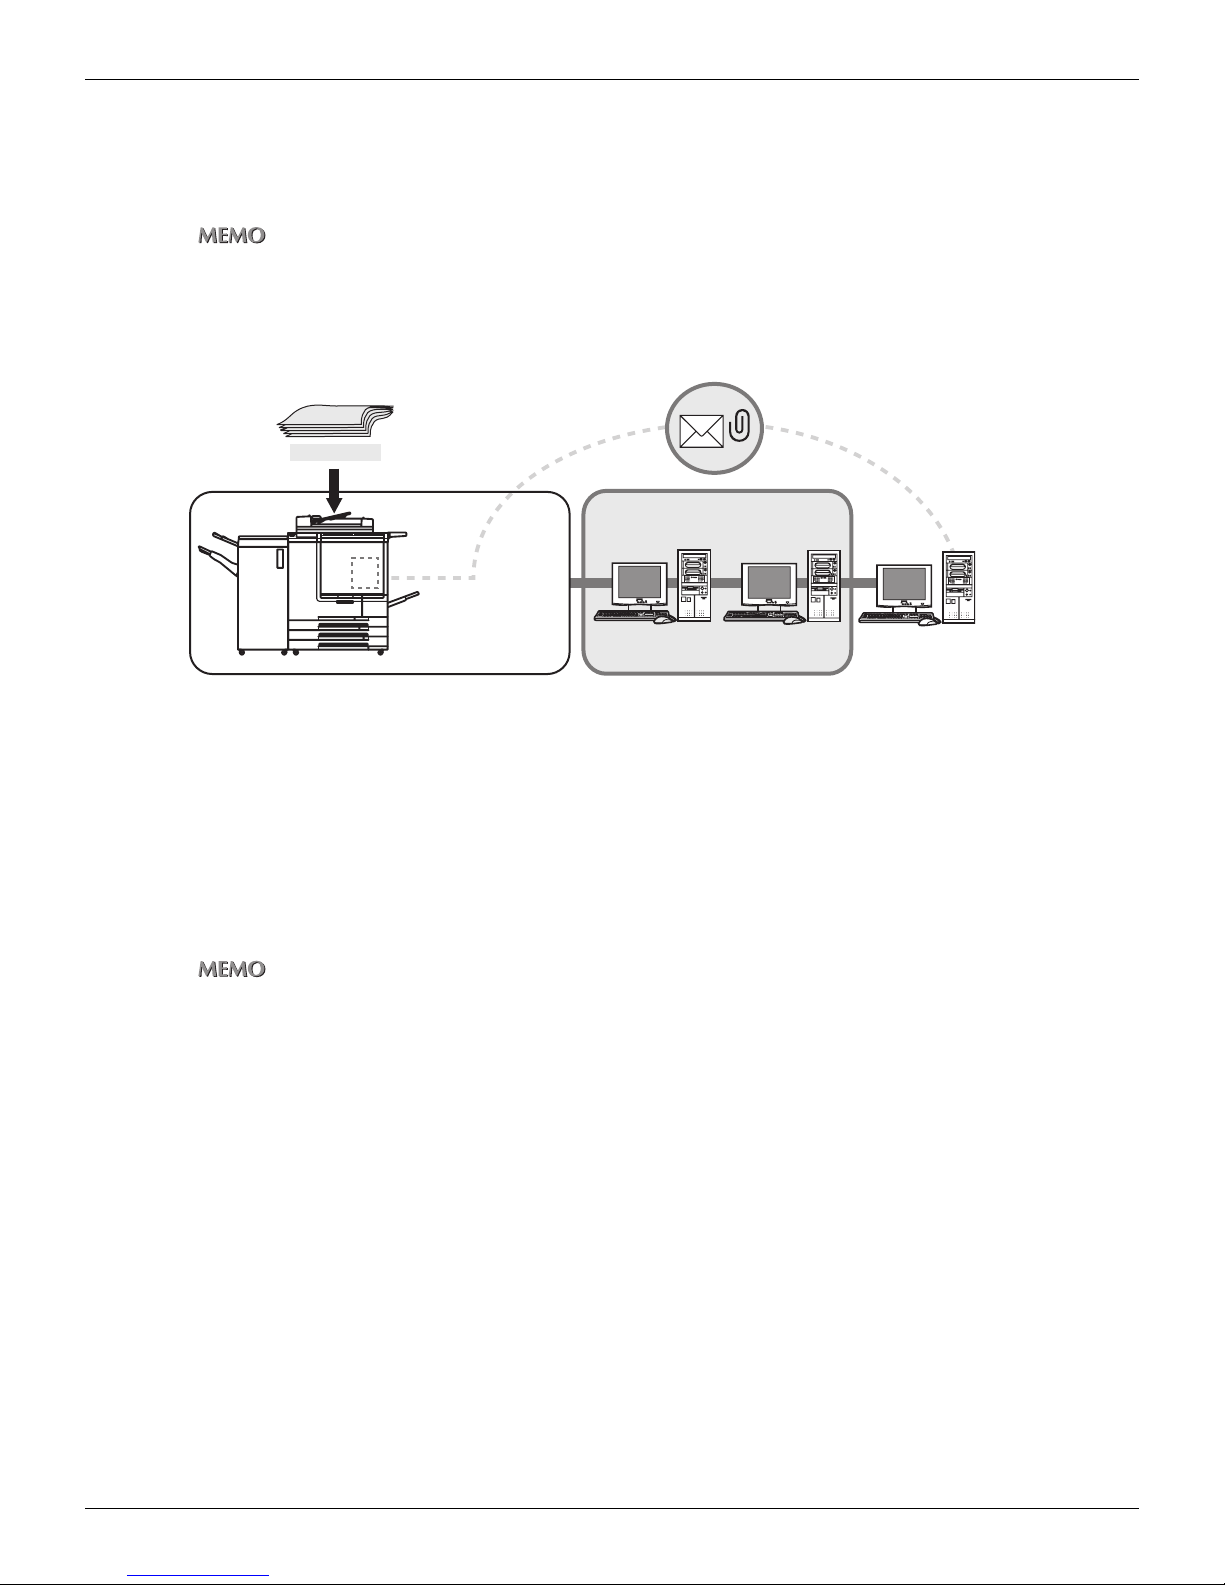
You can transmit the image data (scanned data) scanned from the copier's RADF or the platen glass as an attached file via EMail or send an E-Mail with a URL link to where the scanned data is stored.
Scan to E-Mail ensures that your message successfully reaches your internal (SMTP) server. However, problems
may be encountered on the internet or with the recipient’s server. Therefore, independent confirmation of receipt
is recommended.
Please refer to "Chapter 3 : Using the Scanning Features" (p. 44) about the procedures.
Original
Scan
POP ServerSMTP Server
Copier +
Print Controller
Internet
Transmission of an attached file
Scan to E-Mail transmits the scanned data as an attached file of an E-Mail.
Transmission of the URL
Scan to E-Mail will send an email with a URL link to the scanned data on the copier’s hard drive if the file size of the
scanned data exceeds a pre-established limit.
In this case, the scanned data is stored in the HDD of a print controller, and URL which shows the location automatically is
sent in an E-Mail.
For detail about restrictions on the transmission size, refer to "Print Controller User's Guide."
Items to set with Scan to E-Mail
E-Mail Address
Set the E-Mail addresses already by selecting an E-Mail address from the address registered or entering it manually.
For information about registering address, please refer to “Registering Destinations (E-Mail)” on page 29.
Title
The default word of Title is “ ’Filename’ has been scanned.”. However, you can change it at the time of operations.
For information about changing Title, please refer to “Setting the Title” on page 54.
File Form
Change the first sentence to “Attachments and stored data can be save as JPEG, TIFF or PDF files.
For information about changing file form, please refer to “FILE FORM” on page 71.
File Name
A name of an attached file / a file to store is generated automatically, but you can change it as needed.
For information about changing file name, please refer to “FILE NAME” on page 69.
9
Chapter 1 : Overview of the Scanning Features
Page 11
1-1 Classification of the Scanning Features (Continued)
The text of E-Mail
The following sentence is contained in the text of E-Mail automatically when transmitting a message as an attached file.
“The following documents has been scanned on the Fiery and attached to this email: Attachment(s) (File name)”
The following sentences are mentioned in the text of E-Mail automatically when transmitting a URL.
“The following documents has been scanned on the Fiery and can be downloaded from: URL(s)
Please download the document within 1 day. (Note: only if automatic deletion is set for 1 day)
Please download the document within 7 days. (Note: only if automatic deletion is set for 7 days. The length of
time the file resides on the Fiery is not mentioned if there is no automatic deletion.)”
• You cannot change the text of E-Mail from the control panel. For information about changing text, please refer
to the Print controller’s User’s Guide.
• When you use ''Scan to E-Mail'', the scanned data may be damaged due to the network condition or for some
other reason.
Be sure to check the scanned data for damage.
10
Chapter 1 : Overview of the Scanning Features
Page 12
1-1 Classification of the Scanning Features (Continued)
●Scan to HDD
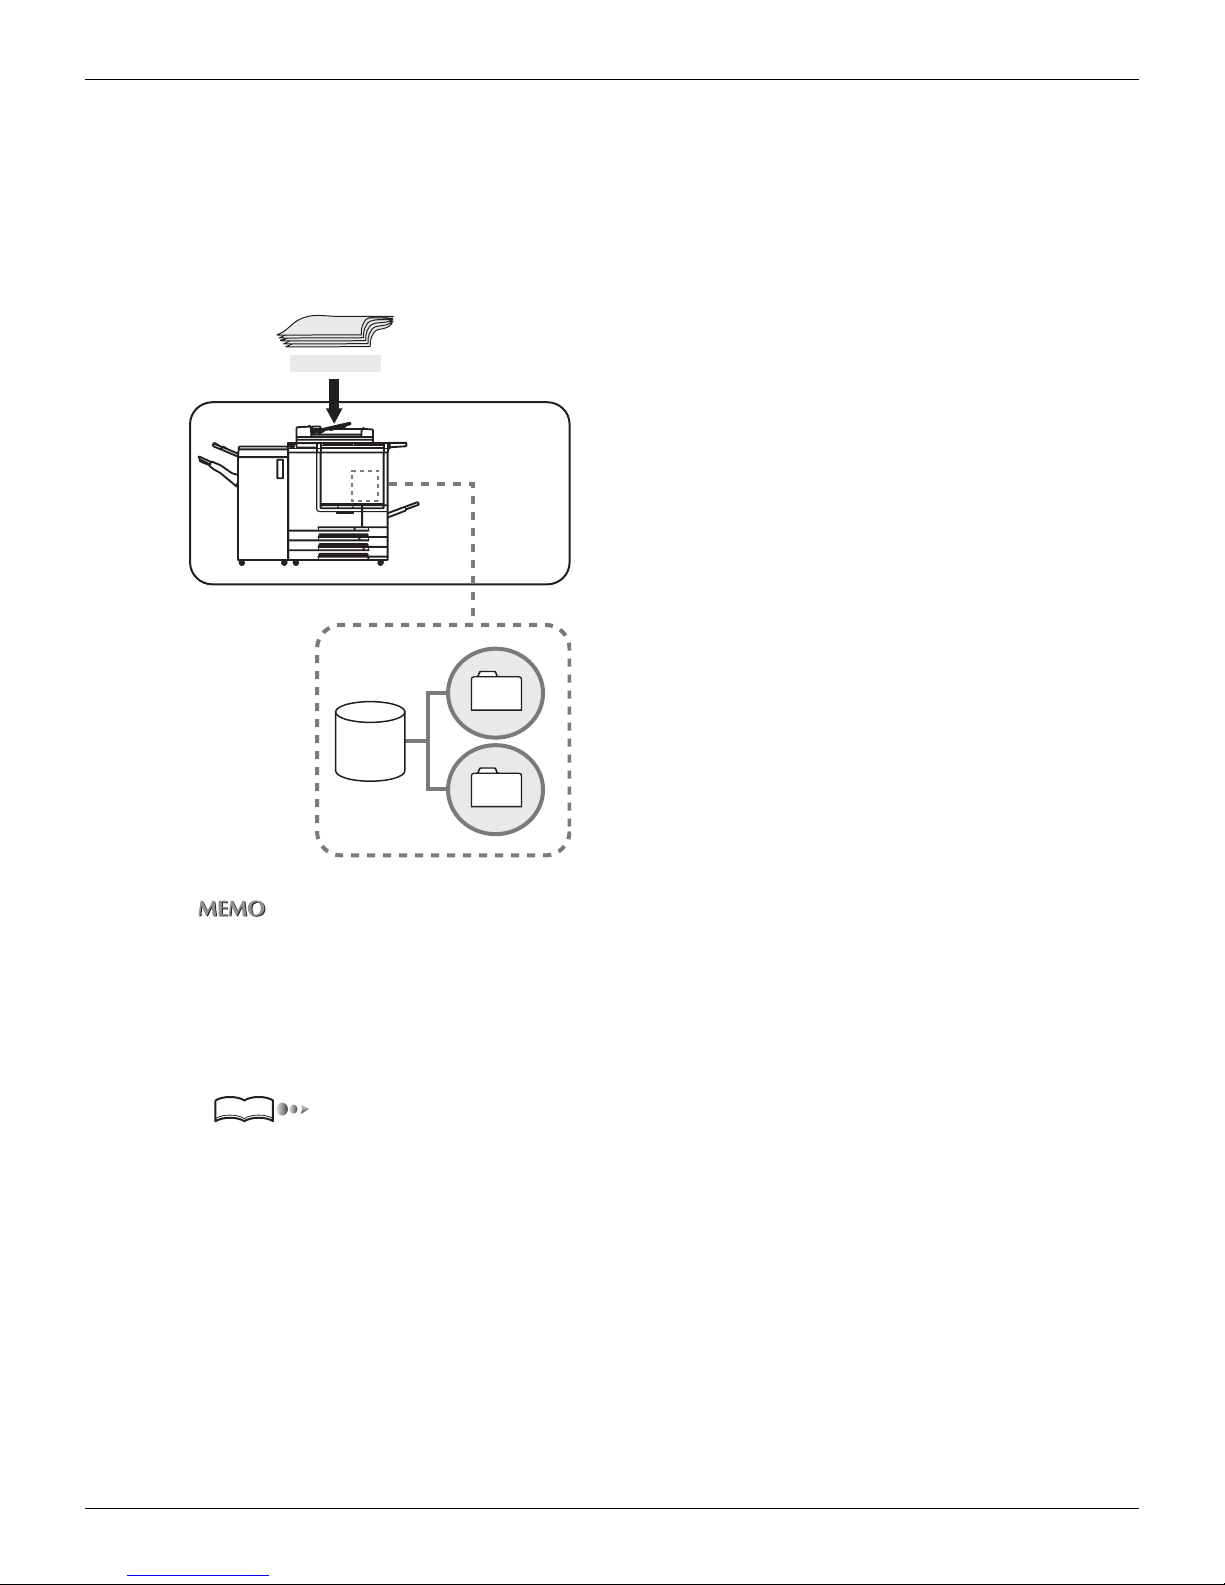
You can store the image data (scanned data) to the HDD of the print controller.
In the HDD there are boxes acting as folders and scanned data is saved in the selected box.
You can retrieve the data stored in a box with a computer on a network.
Please refer to "Chapter 3 : Using the Scanning Features" (p. 44) about the procedures.
Original
Scan
Copier +
Print Controller
HDD
There is no size limit for the scanned data that each box can store. The cumulative maximum file limit is dependent on the disk space of the Hard Drive.
Items to set for Scan to HDD
Box No.
Set a Box No., using numbers with less than four digits, or select a Box No. from those already registers.
Reference
“Selecting the Storage Location (HDD)” on page 56.
11
Chapter 1 : Overview of the Scanning Features
Page 13
1-1 Classification of the Scanning Features (Continued)
●Scan to FTP
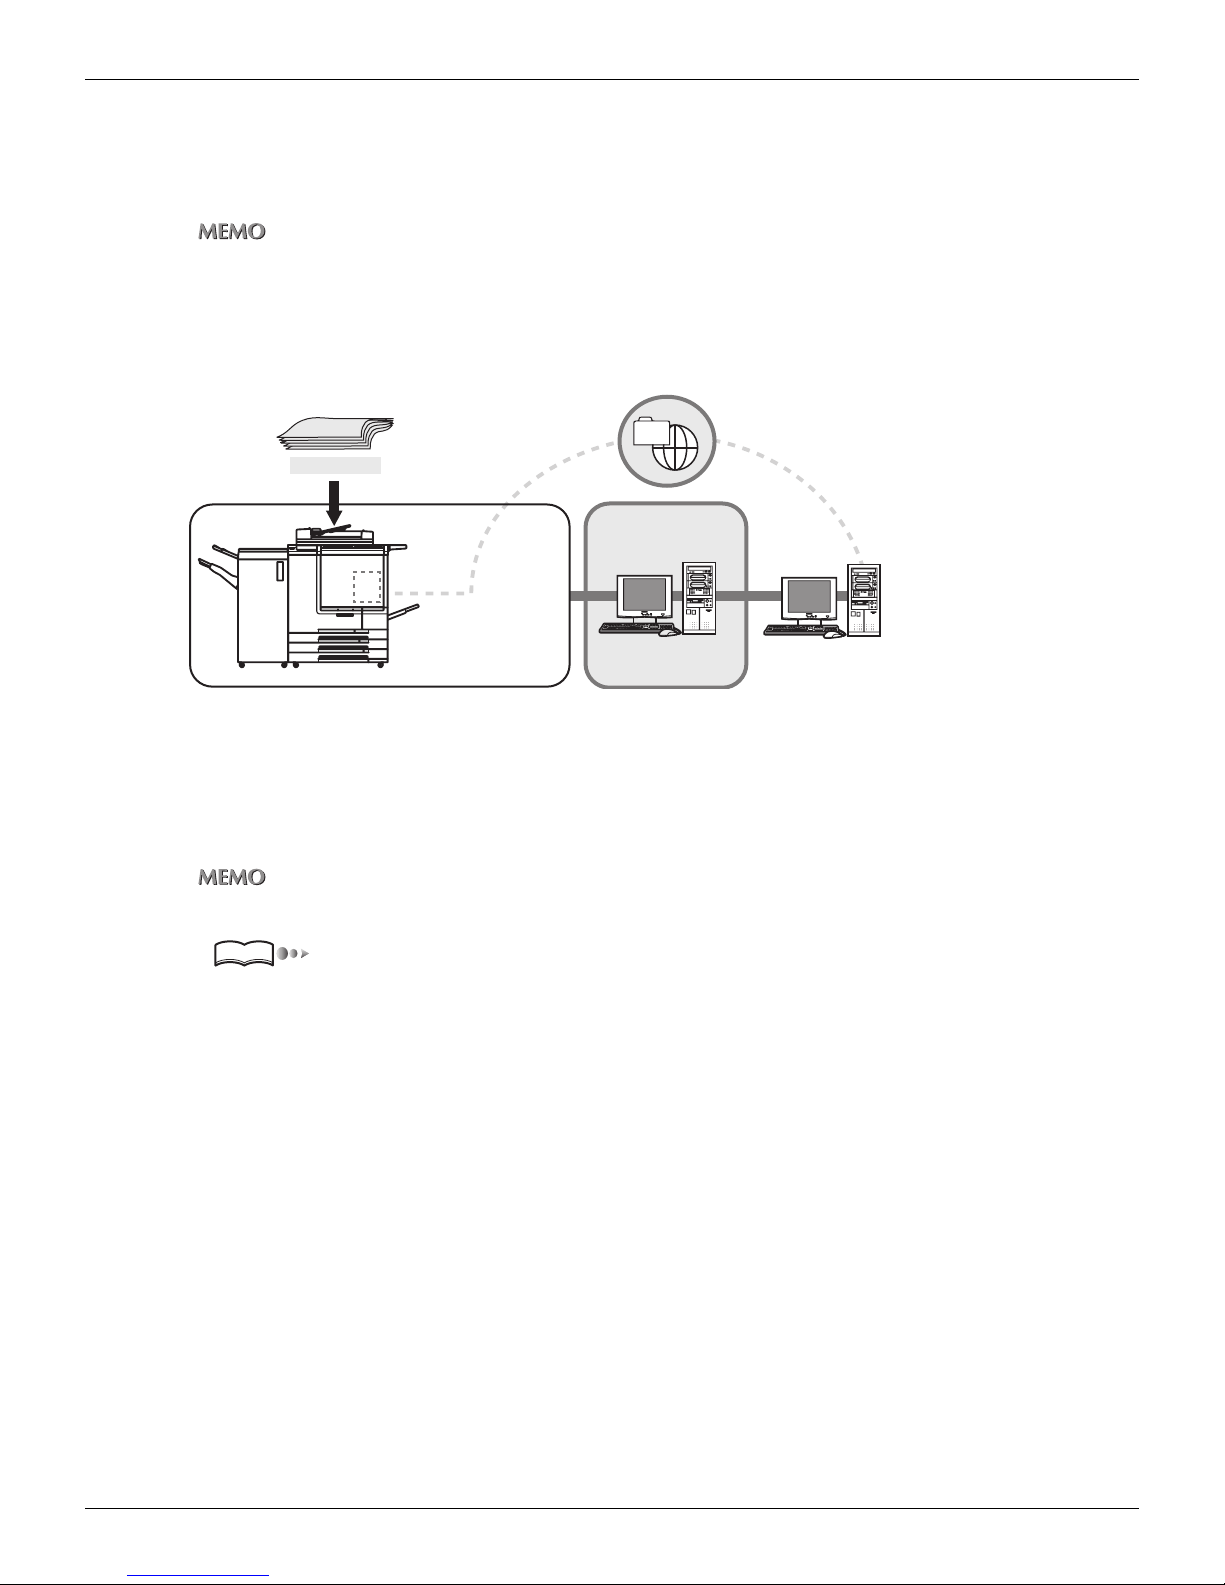
You can transmit the image data (scanned data) to FTP Server.
You can access the scanned data which you transmitted to FTP from a remote computer and download it.
• Log file about transmission of the scanned data to FTP is stored to the print controller.
• You can print Log file using Command WorkStation. For information about printing, please refer to the Print
Controller’s User’s Guide.
Please refer to "Chapter 3 : Using the Scanning Features" (p. 44) about the procedures.
Original
Scan
FTP Server
Copier +
Print Controller
Internet
Items to set with Scan to FTP
Profile Name
Set the profile name by selecting a profile name from the list of registered profile names or entering it manually.
For information about registering profile name, please refer to “Registration of FTP server” on page 37.
You can select / register a Profile that collected information to be necessary for connection to a FTP server.
Reference
Host Address
When there is not a registered profile you need, enter the host address manually.
For information about registering a host address (FTP server name / IP address), please refer to “Registration of FTP
server” on page 37.
File Path
When there is not a registered profile you need, enter the file path manually.
For information about registering a file path, please refer to “Registration of FTP server” on page 37.
Port Number
According to need, set the Port Number manually.
For information about setting a port number, please refer to “Registration of FTP server” on page 37.
Login (User Name)
Select a user name from those which have been registered in advance to be connected with the FTP server or set the
Login (User Name) manually.
“Selecting the Destination (FTP)” on page 61.
For information about registering a user name, please refer to“Registration of FTP server” on page 37.
12
Chapter 1 : Overview of the Scanning Features
Page 14

1-1 Classification of the Scanning Features (Continued)
Password
Select a password required for the login (User Name) or set the password that corresponds to login (User Name) manually.
For information about password registration, please refer to “Registration of FTP server” on page 37.
When you use ''Scan to FTP'', the scanned data may be damaged due to the network condition or for some otherreason.
Be sure to check the scan data for damage.
13
Chapter 1 : Overview of the Scanning Features
Page 15
1-1 Classification of the Scanning Features (Continued)
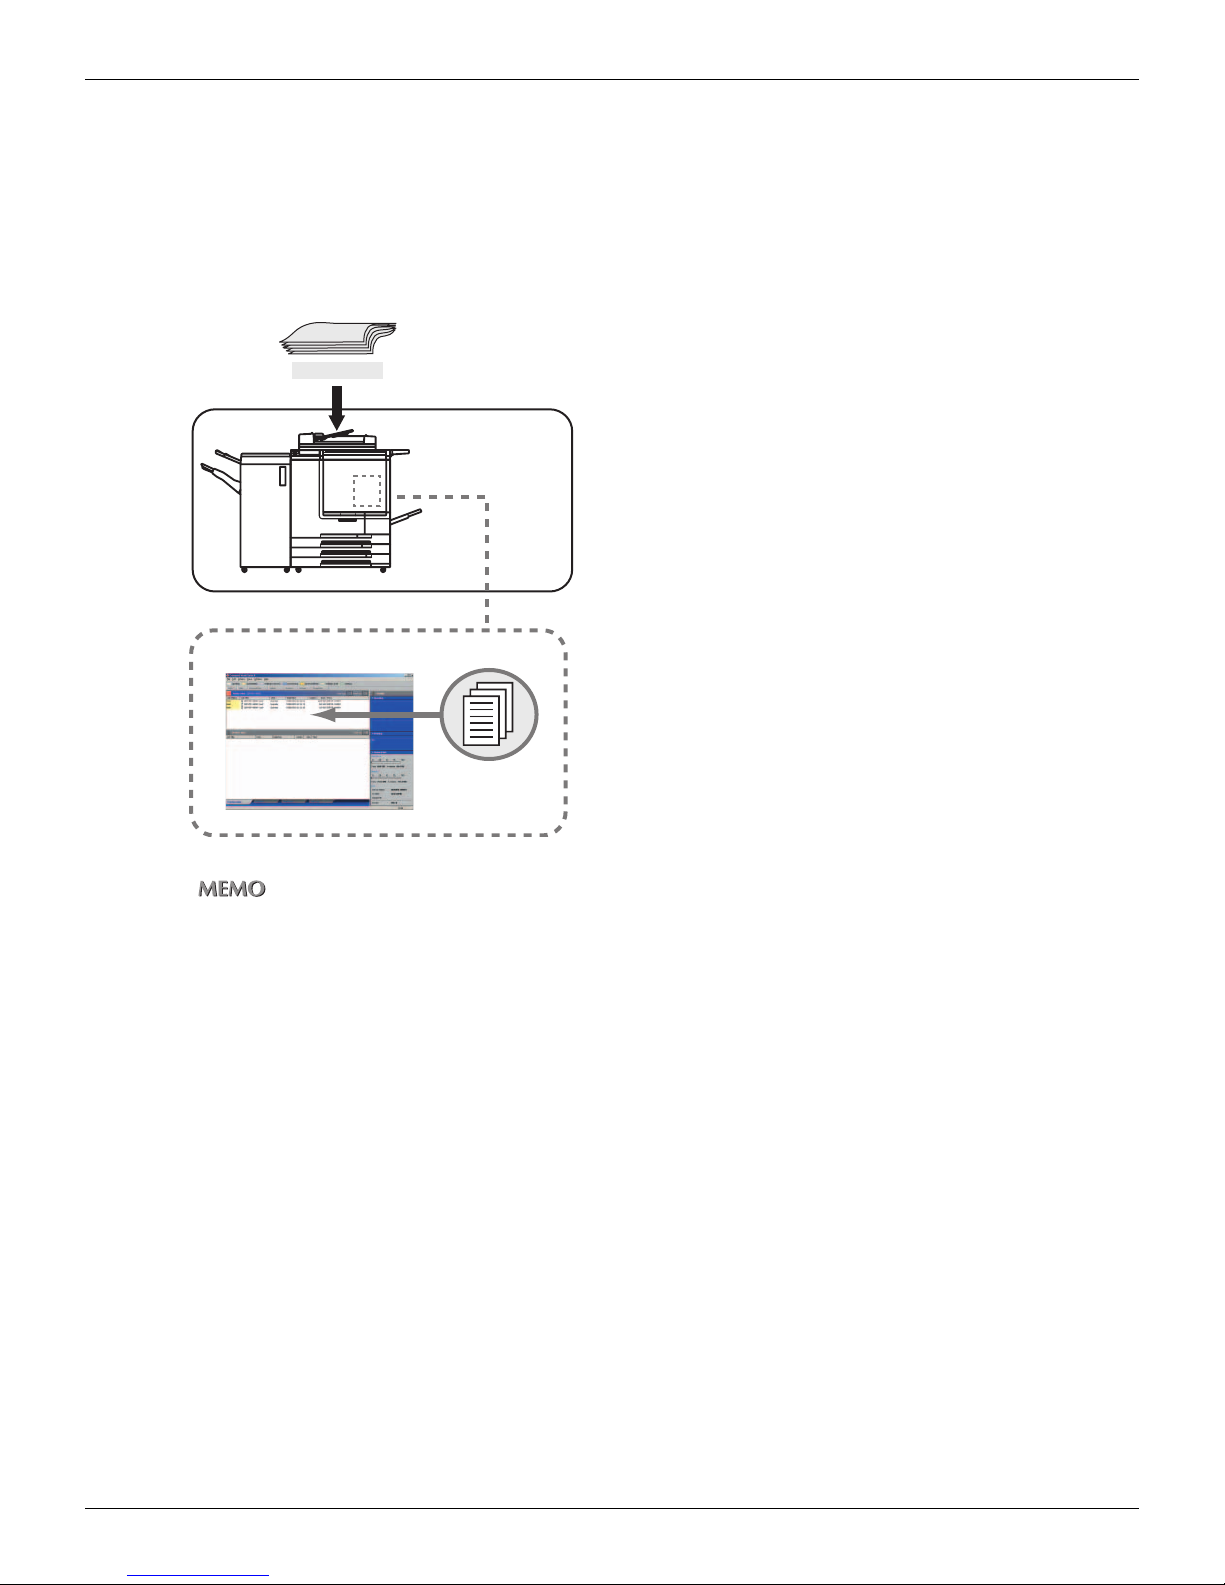
●Scan to QUEUE
You can store the image data (scanned data) as a PDF (Portable Document Format) file in the print controller which can be
used as data for a print job (queue).
You can edit or print the scanned data stored as a queue using Command WorkStation.
Please refer to "Chapter 3 : Using the Scanning Features" (p. 44) about the procedures.
Original
Scan
Copier +
Print Controller
QUEUE
• The version of PDF is 1.4.
• For information about Command WorkStation, please refer to the Print Controller’s User’s Guide.
14
Chapter 1 : Overview of the Scanning Features
Page 16
1-2 Before Using
0
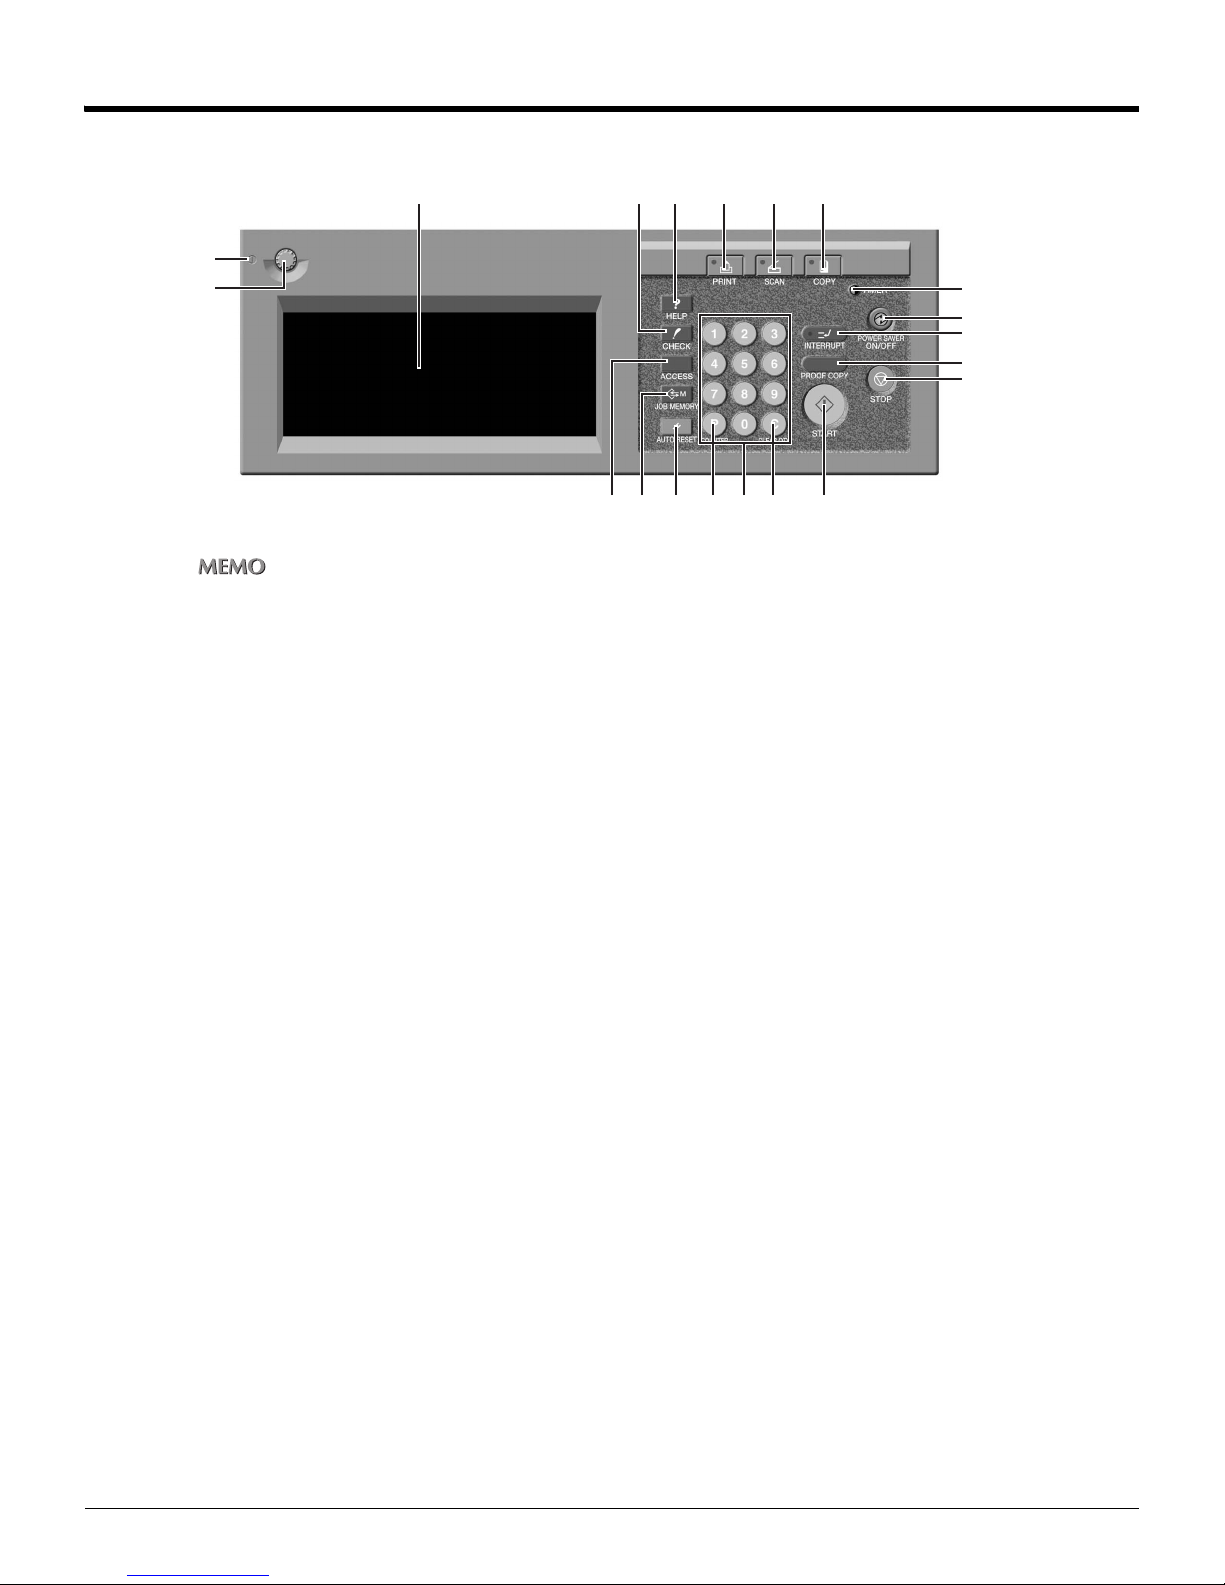
●Position / Description of the control panel
123456
20
19
For information about the details of each function, please refer to the Copier’s User’s Guide.
1. LCD screen
The LCD screen displays the print controller status, menus used for settings, selection items, and other such information.
To make settings, touch the key displayed on the screen.
7
8
9
1
11
12131415161718
2. [CHECK] button
This displays the [CHECK MODE] screen.
3. [HELP] button
This displays a screen with help for the currently selected function.
4. [PRINT] button
This switches the machine operation mode to printer mode.
5. [SCAN] button
This switches the machine operation mode to scanner mode.
6. [COPY] button
This switches the machine operation mode to copy mode.
7. [TIMER] button
This lights when the timer function is set.
8. [POWER SAVER ON/OFF] button
This activates the Power-saving mode when the copier is inactive, or activates timer interrupt mode when weekly timer
function is active.
9. [INTERRUPT] button
This stops printing in progress to allow copying.
10.[PROOF COPY] button
This prints one copy in order to confirm settings you made.
11. [STOP] button
This stops copy or print processing.
15
Chapter 1 : Overview of the Scanning Features
Page 17

1-2 Before Using (Continued)
12.[START] button
This resumes paused print processing or starts scanning.
13.[CLEAR QTY.] button
Clear the numeric characters entered.
14.KEYPAD
Enters numeric values.
15.[COUNTER] button
This displays the Counter Screen or accesses programming modes for setting special functions.
16.[AUTO RESET] button
This resets settings to their defaults.
17.[JOB MEMORY] button
This displays the screen for selecting job store/job recall functions.
18.[ACCESS] button
When you cannot copy due to limitations of the ECM password, press this button. This displays the screen to enter the
password. Input the right password, to copy.
19.Contrast Adjustment Dial
This is a dial to adjust the contrast of the LCD screen.
20.Power Indication light
This lights on / off according to the status of power supply.
16
Chapter 1 : Overview of the Scanning Features
Page 18
1-2 Before Using (Continued)
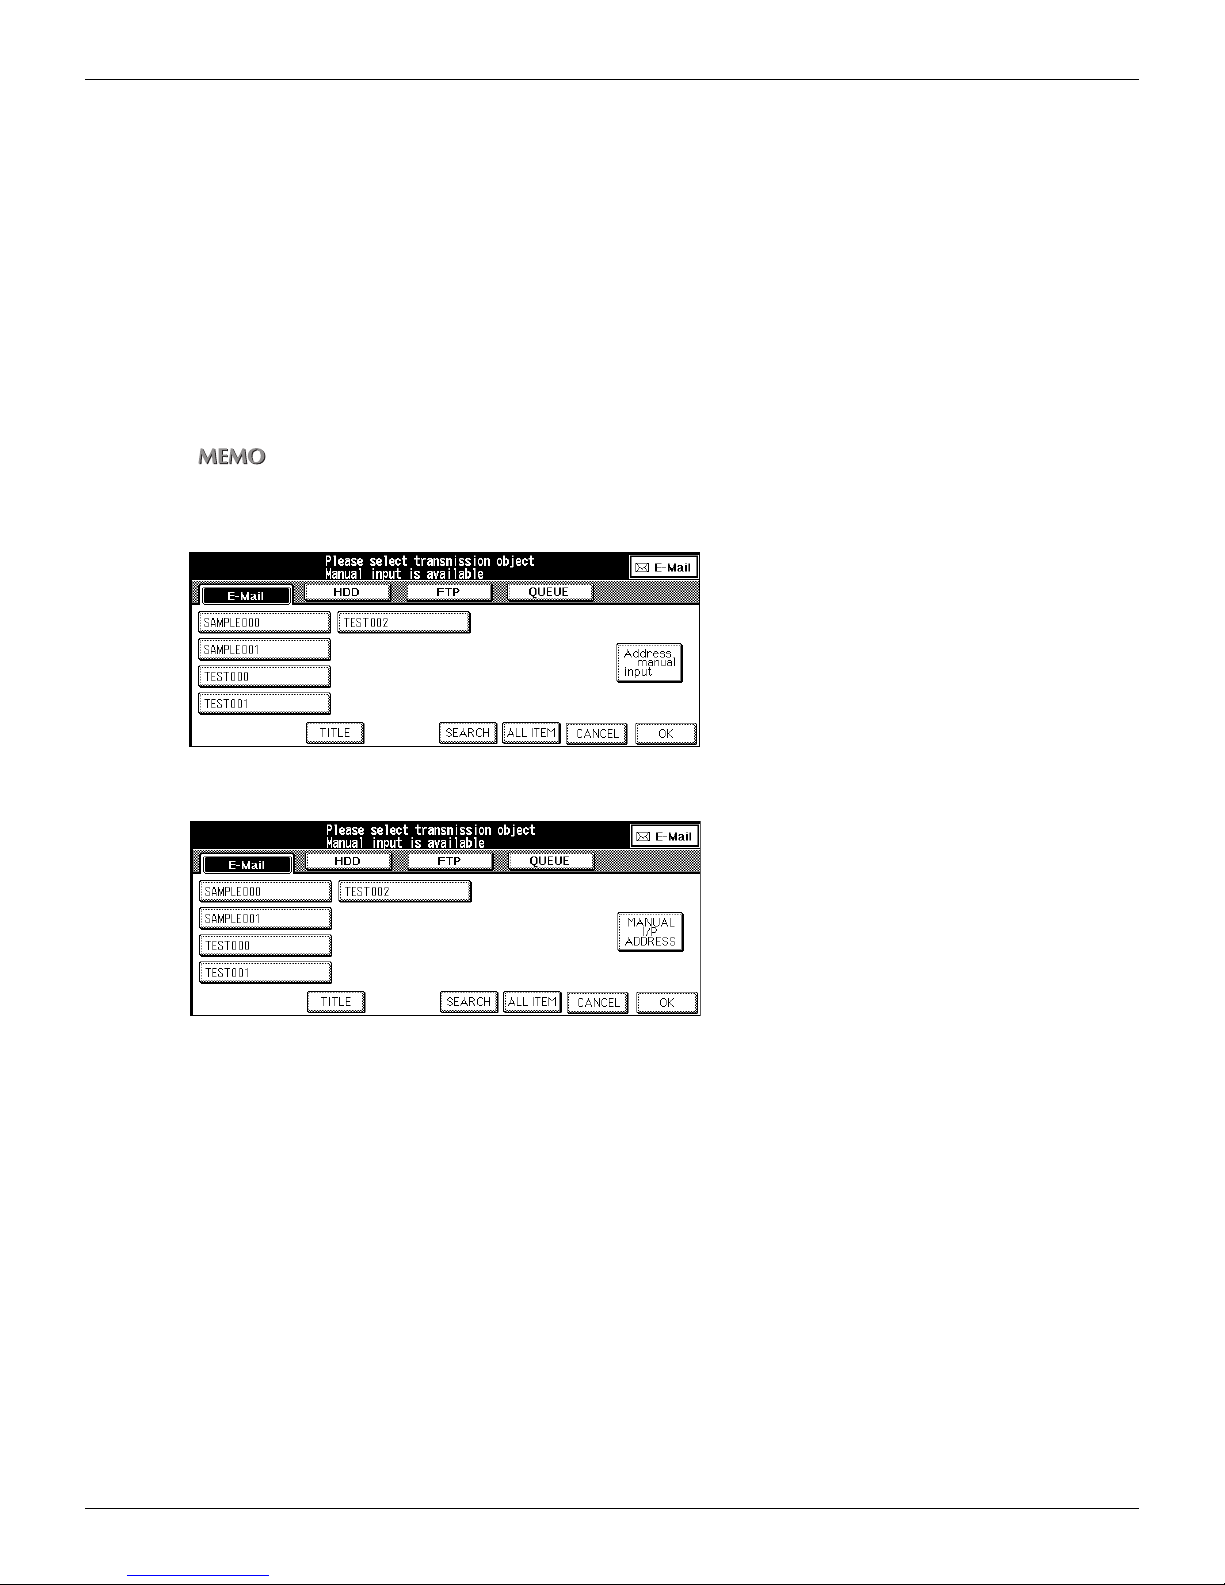
●LCD Screen
Select items by touching the appropriate key displayed on the LCD screen.
When you touch a key and open a setting screen, the selected key is displayed with its colors (black on white) reversed or
inverted (white on black).
Keys common to all setting screens
[OK]: The results of the operation are applied.
[CANCEL]: The results of the operation are cancelled.
With the copier started, if you press [SCAN] on the control panel, the [Select Transmission Object] screen is displayed on the
LCD screen.
The LCD screen display is different in the U.S.A. and in other countries.
• U.S.A.
• Others
\
17
Chapter 1 : Overview of the Scanning Features
Page 19
1-3 Basic Operation
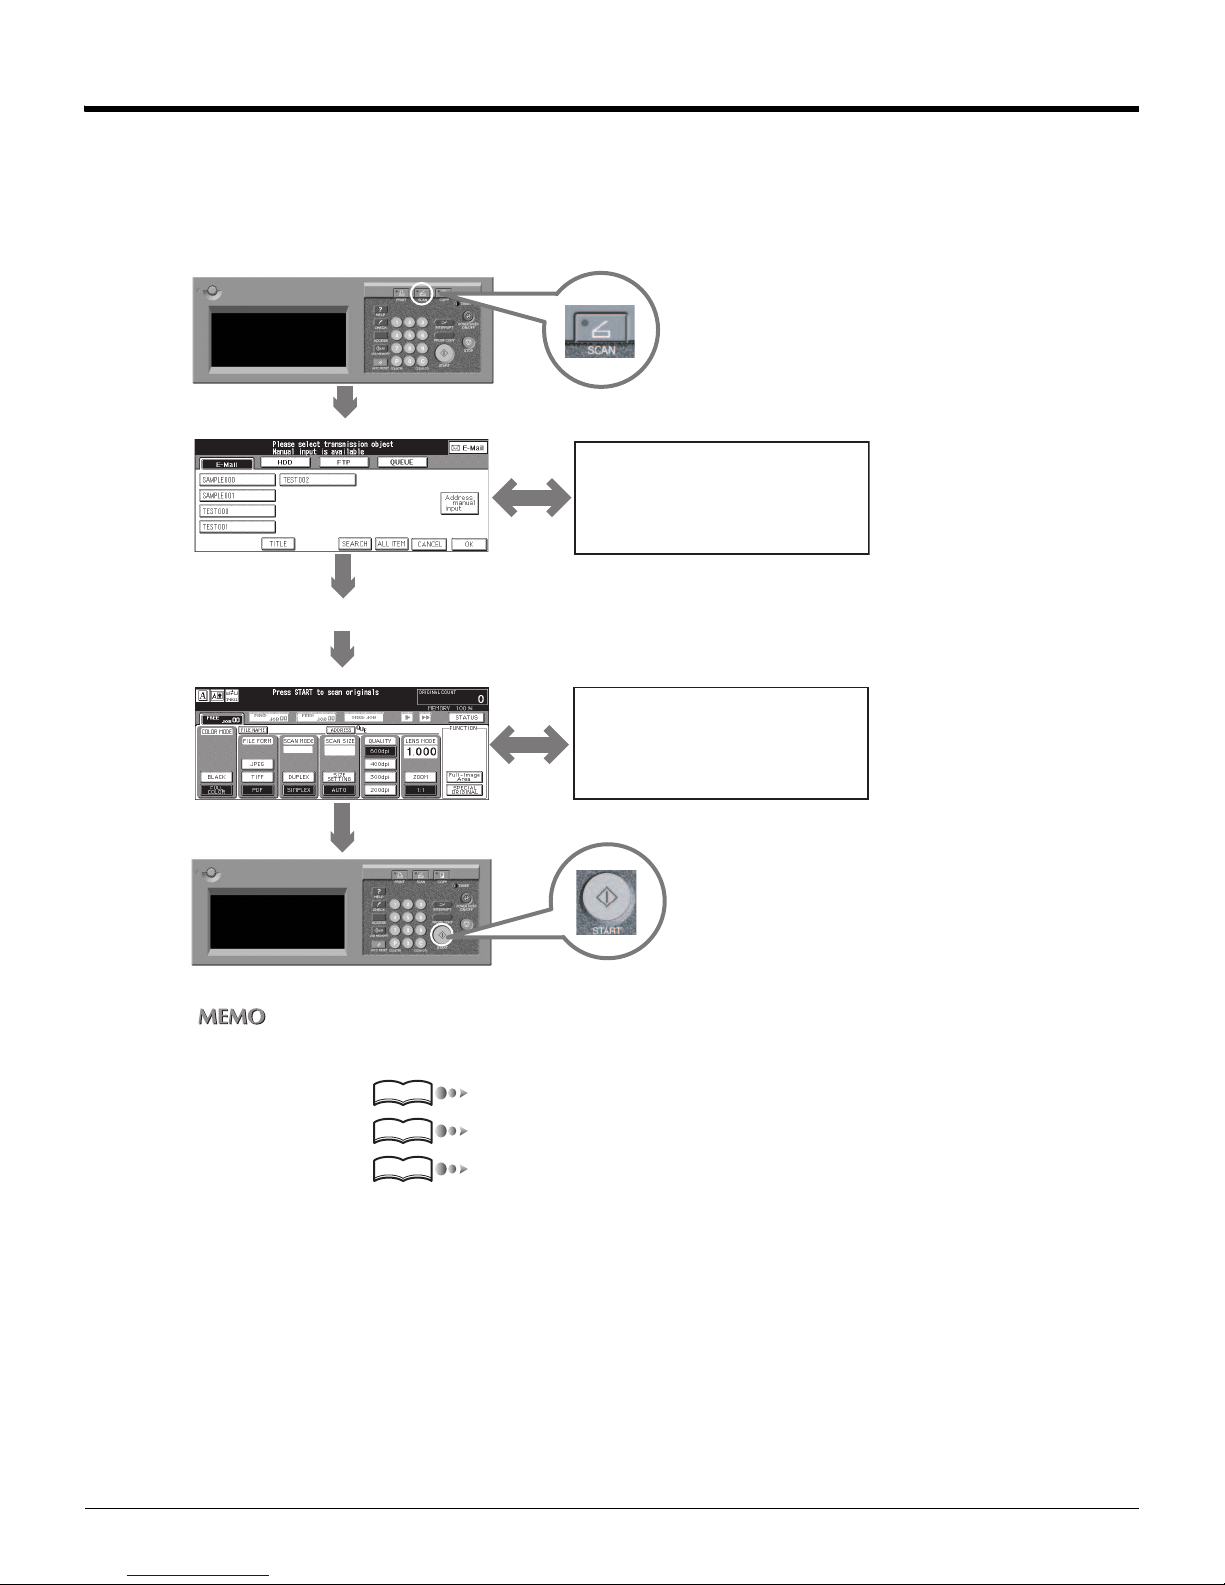
●Outline
Scanning operation uses the control panel of the copier.
A flow of basic operation is as follows.
Control Panel
[Select Transmission Object] screen
Set the original document
[Select Transmission Object] screen
[Title input] screen
[Search a Transmission Object] screen
[Scanner setting basic] screen
respective setting screen
Control Panel
For information about registering destinations, refer to the following pages.
• Scan to E-Mail: “Registering Destinations (E-Mail)” on page 29.
• Scan to HDD: “Registering Storage Locations (HDD)” on page 33.
• Scan to FTP: “Registering Destinations (FTP)” on page 37.
Reference
Reference
Reference
18
Chapter 1 : Overview of the Scanning Features
Page 20
1-3 Basic Operation (Continued)
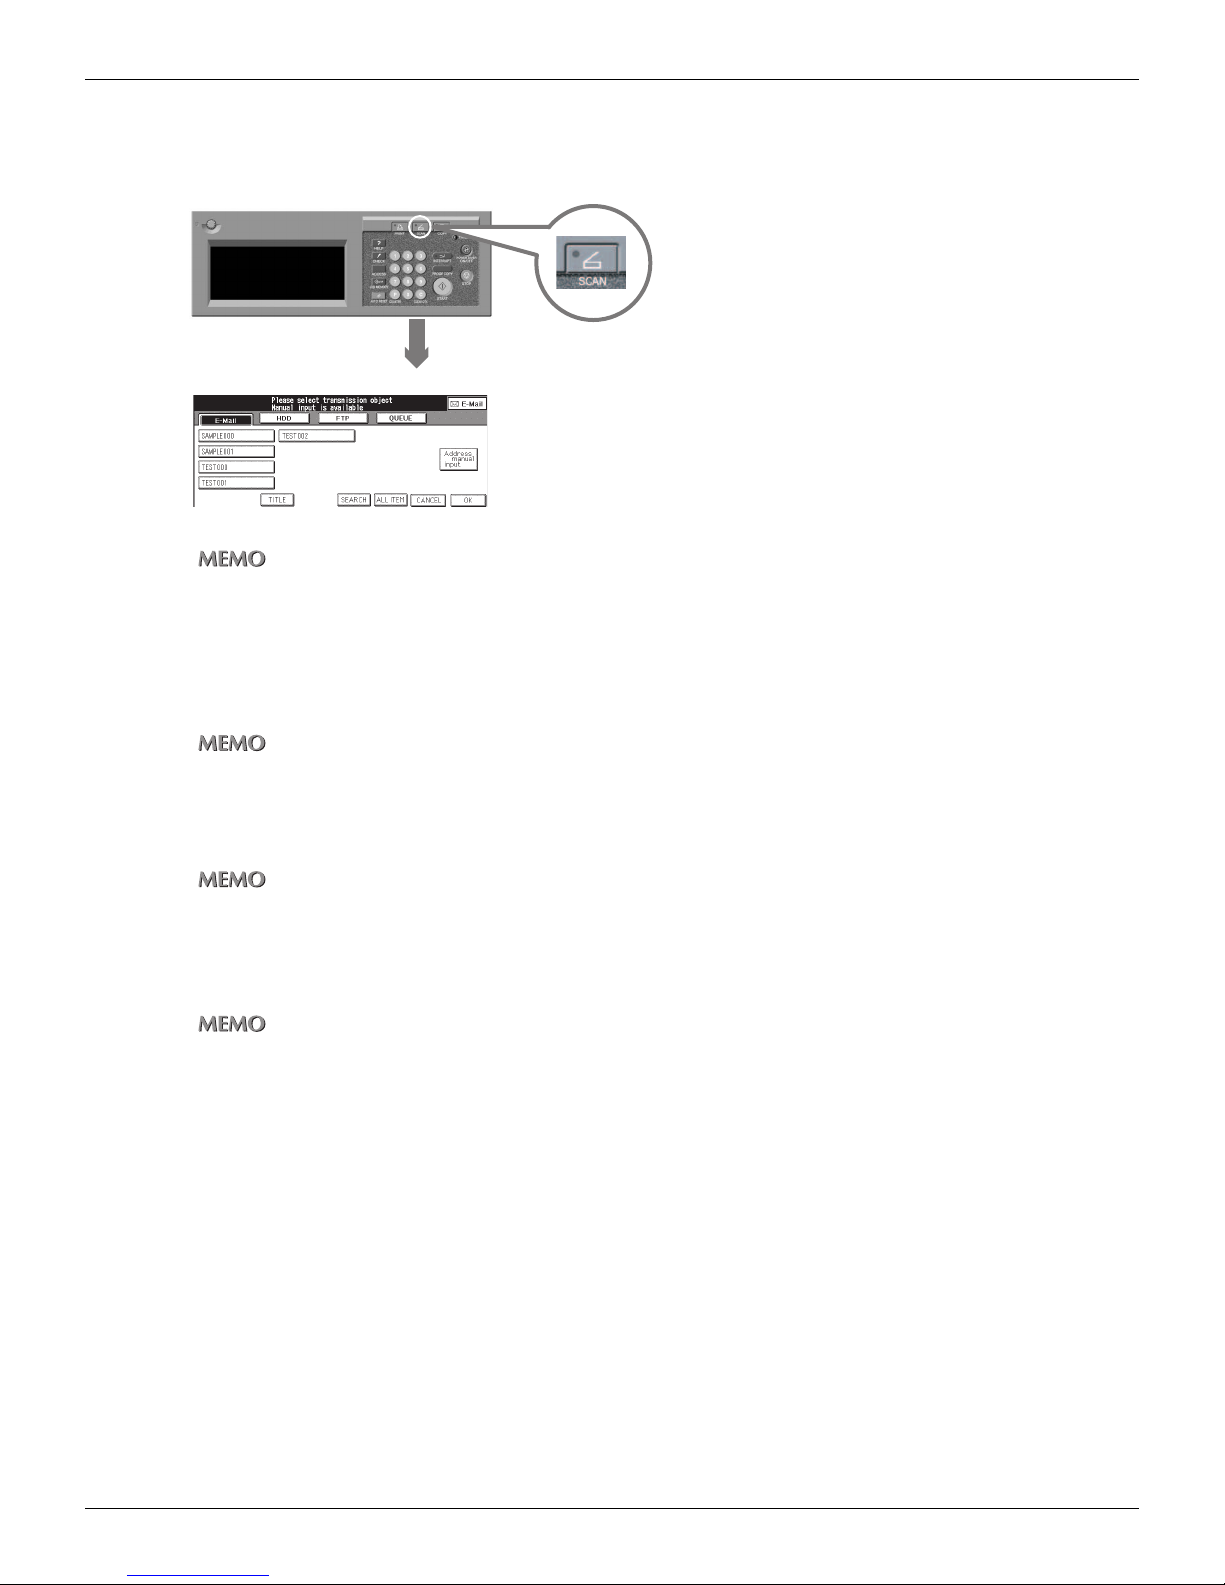
●[Select Transmission Object] screen
The [Select Transmission Object] screen is displayed when you push the [SCAN] button of the control panel.
Control Panel
[Select Transmission Object] screen
When you press [SCAN] of the control panel, the [E-Mail] is selected on the [Select Transmission Object] screen.
With the [Select Transmission Object] screen, you can select the transmission object for scanned data by touching the keys of
[E-Mail], [HDD], [FTP], or [QUEUE].
You can select multiple transmission objects to transmit/store the scanned data.
You can appoint more than one transmission object.
The [Select Transmission Object] screen is switched to a different screen according to the destination whenever you touch [EMail], [HDD] or [FTP].
• A screen is not replaced when you touch [QUEUE].
• You can exit the selected transmission object mode by touching the same button again.
The [Scanner setting basic] screen is displayed when you touch [OK] on the [Select Transmission Object] screen.
When you touch [ADDRESS] on the [Scanner setting basic] screen, the screen returns to the [Select Transmission Object] screen with settings you made.
In addition, you can search E-Mail address, Box No., or FTP server and list all of the registered destinations.
19
Chapter 1 : Overview of the Scanning Features
Page 21
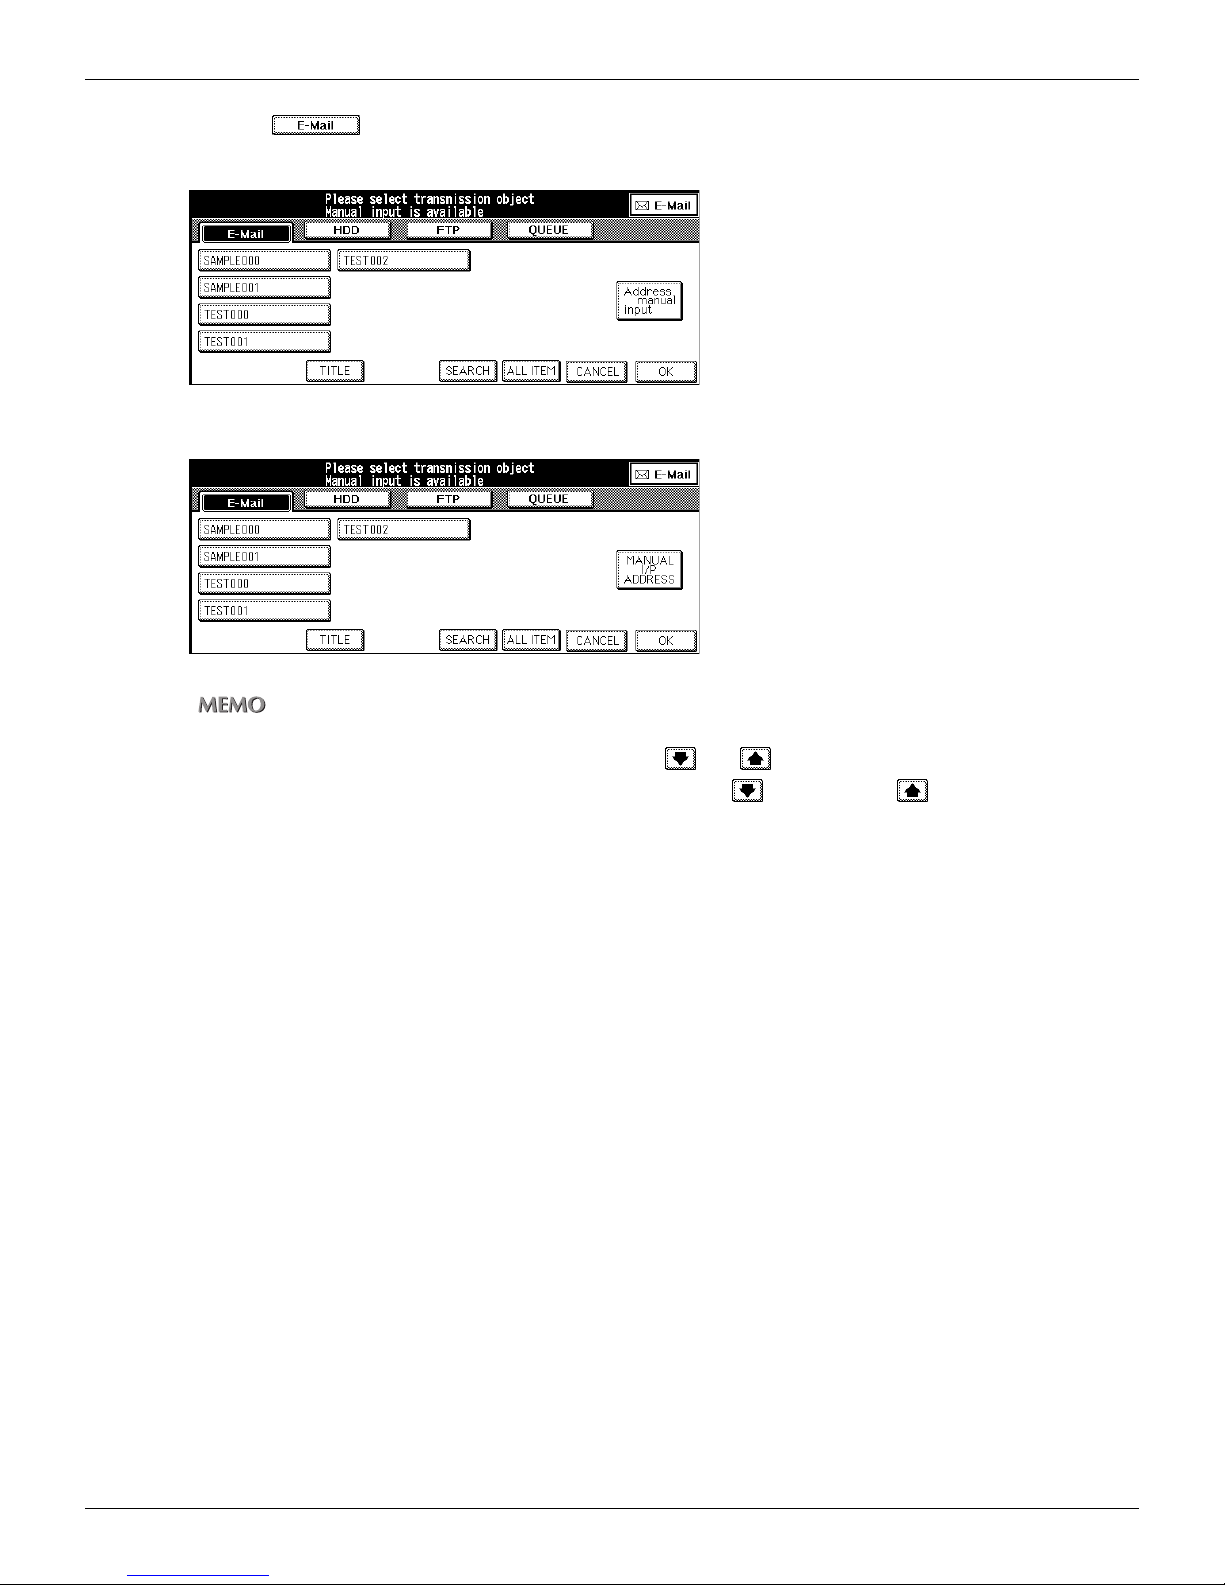
When you touch (or just after you pressed the [Scan] button of the control panel);
• U.S.A.
• Others
1-3 Basic Operation (Continued)
• Registered E-Mail addresses are displayed.
• When E-Mail addresses more than 12 are registered, and are displayed on the left lower part of the
screen.
returns.
The next screen is displayed when you touch . By pressing , the previous screen
20
Chapter 1 : Overview of the Scanning Features
Page 22
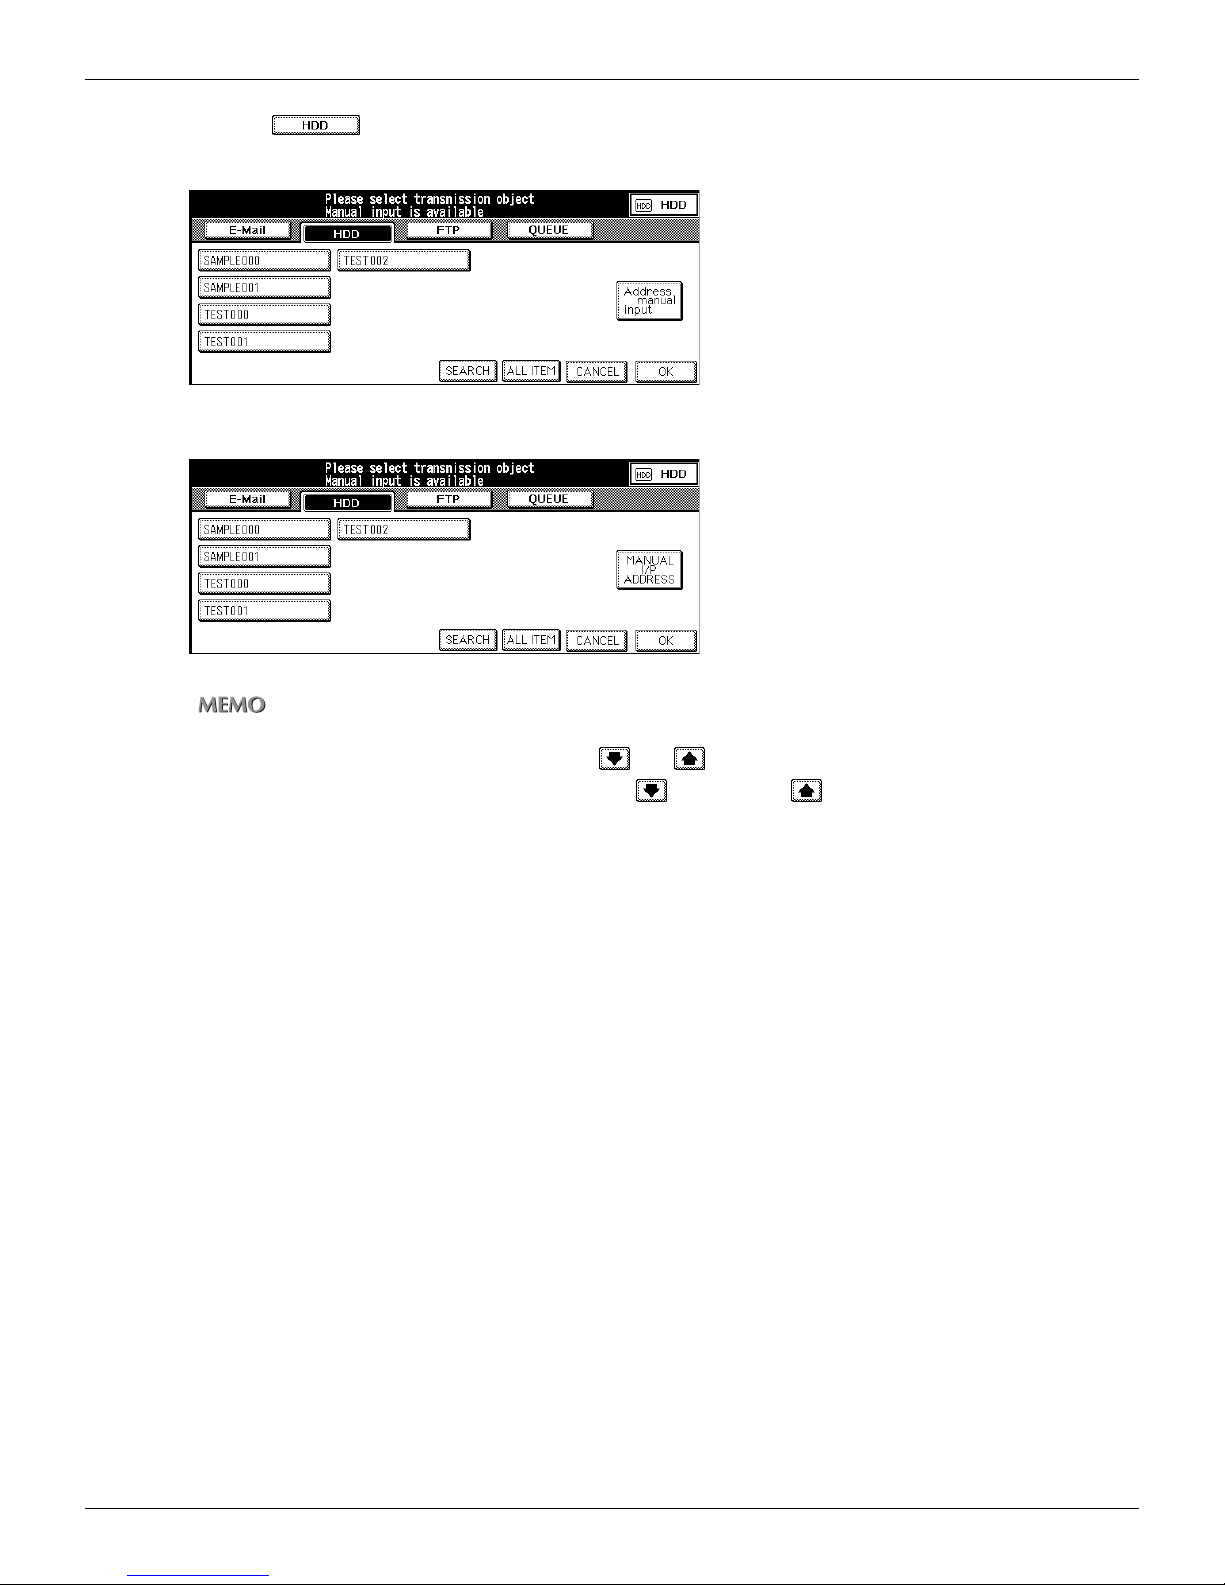
When you touch ;
• U.S.A.
• Others
1-3 Basic Operation (Continued)
• Registered Box Nos. are displayed.
• When more than 12 Box Nos. are registered, and are displayed on the left lower part of the screen.
The next screen is displayed when you touch . By pressing , the previous screen returns.
21
Chapter 1 : Overview of the Scanning Features
Page 23
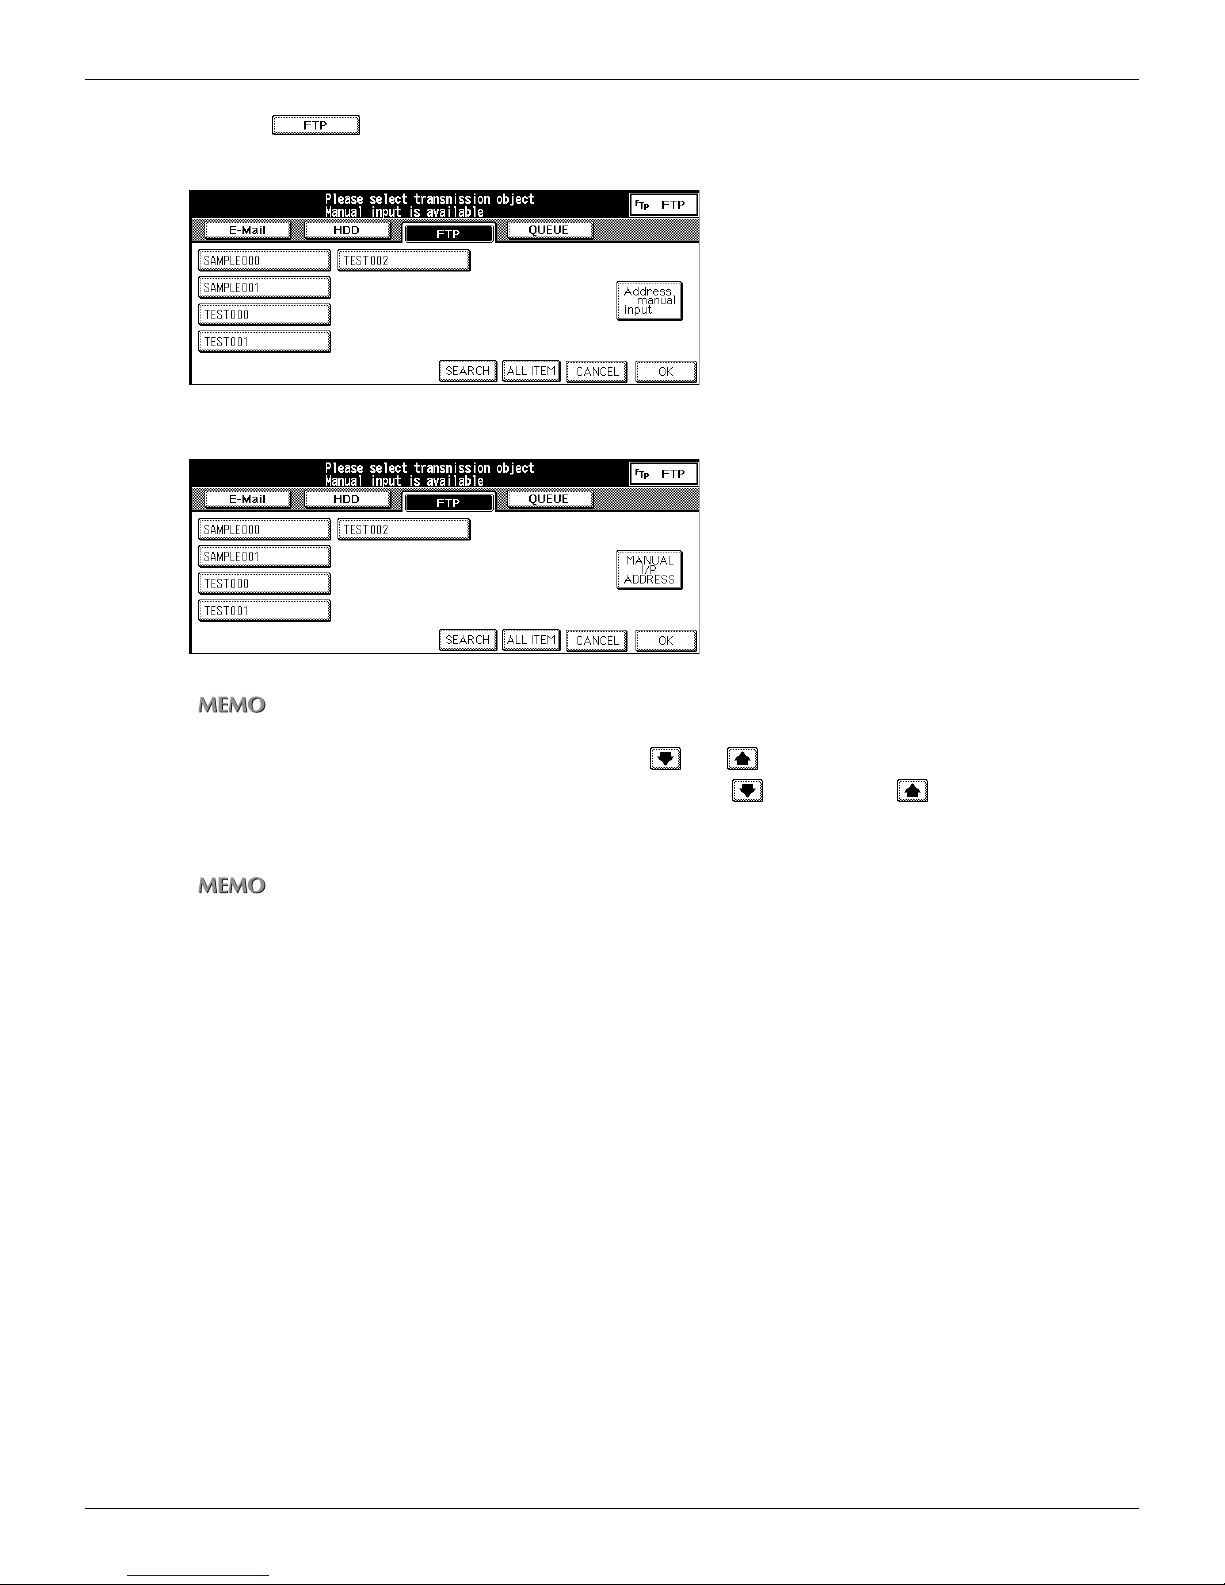
When you touch ;
• U.S.A.
• Others
1-3 Basic Operation (Continued)
• Registered Profile Names are displayed.
• When more than 12 Profile Names are registered, and are displayed on the left lower part of the
screen.
returns.
When you touched [QUEUE], the screen is not replaced.
The next screen is displayed when you touch . By pressing , the previous screen
22
Chapter 1 : Overview of the Scanning Features
Page 24
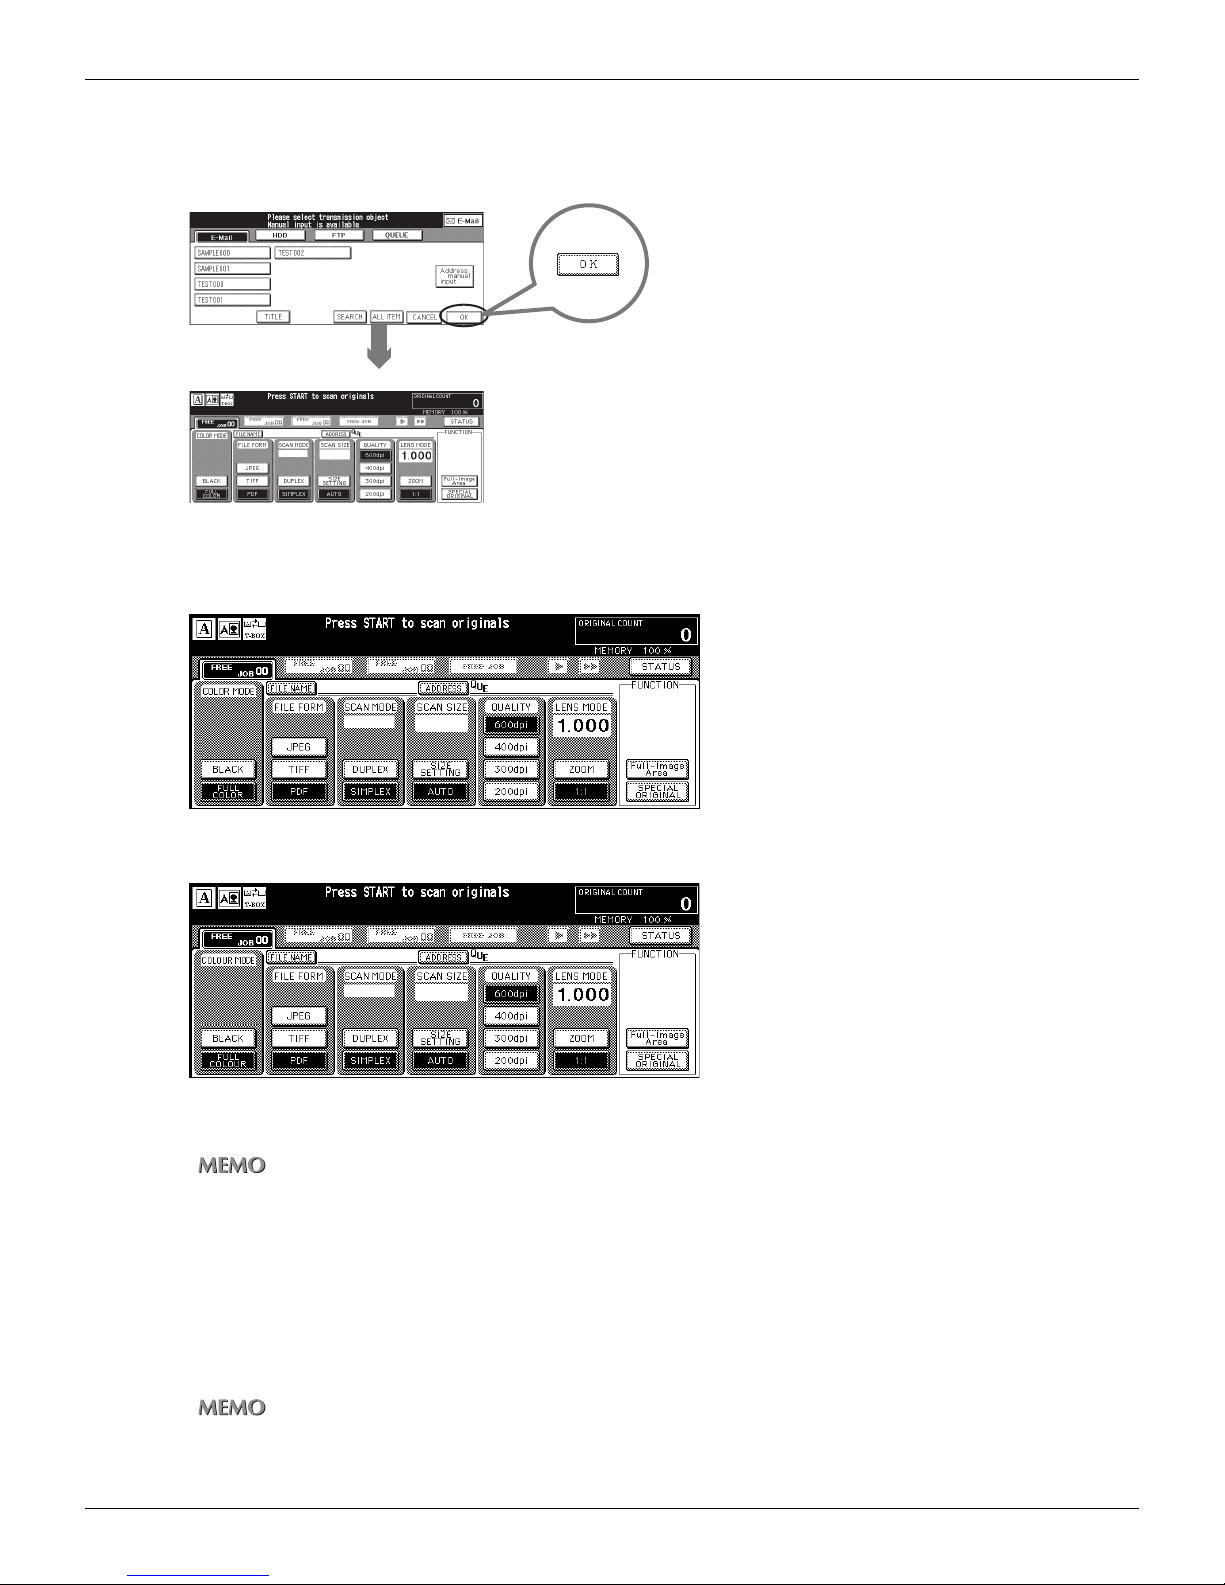
1-3 Basic Operation (Continued)
●[Scanner setting basic] screen
The [Scanner setting basic] screen is displayed when you touch [OK] on the [Select Transmission Object] screen.
[Select Transmission Object] screen
[Scanner setting basic] screen
On the [Scanner setting basic] screen, you can set various basic settings to scan the image data.
• U.S.A.
• Others
When you touch [ADDRESS], back to the [Select Transmission Object] screen with setting you made.
When the [Scanner setting basic] screen is displayed, you can return to the [Select Transmission Object] screen as
follows:
• Touch [CANCEL] on the LCD
• Press [AUTO RESET] button on the control panel
However, the [AUTO RESET] button cancels all of the settings that you made and displays the [Select Transmission Object] screen.
To execute scanning and transmission / storage, press [START] button of the control panel.
You can confirm current setting contents with the [Settings check mode] screen which appears when you press
[CHECK] button of the control panel.
23
Chapter 1 : Overview of the Scanning Features
Page 25

1-3 Basic Operation (Continued)
Items which can set with the [Scanner setting basic] screen are as follows:
FILE NAME
When you touch [FILE NAME], the [File Name Input] screen appears.
Any file name can be up to 26 alphanumeric characters long.
For information about a file name, please refer to “FILE NAME” on page 69.
COLOR MODE (COLOUR MODE)
You can select color mode (colour mode) for scanning [BLACK], [FULL COLOR] ([FULL COLOUR]) or [AUTO].
For information about color mode (colour mode), please refer to “COLOR MODE (COLOUR MODE)” on page 70.
FILE FORM
You can select the file form used for E-mail attachments, saved to the HDD or uploaded to a FTP server.
For information about file form, please refer to “FILE FORM” on page 71.
SCAN MODE
Use this feature to determine whether you scan the original document as a Duplex or Simplex.
For information about scan mode, please refer to “SCAN MODE” on page 71.
SCAN SIZE
Use this feature to determine whether scan size is detected automatically or set manually each time by the user.
For information about scan size, please refer to “SCAN SIZE” on page 72.
QUALITY
Use this feature to select the resolution of scanning.
For information about quality, please refer to “QUALITY” on page 74.
LENS MODE
Use this feature to determine whether to set the magnification ratio.
For information about lens mode, please refer to “LENS MODE” on page 75.
Full-Image Area (FUNCTION)
Normally, scans are made with an image data erasing margin at the top, bottom, left and right edges.
When you touch this feature, the document is scanned completely to the edges.
For information about full-Image area, please refer to “Full-Image Area” on page 78.
SPECIAL ORIGINAL (FUNCTION)
When you touch [SPECIAL ORIGINAL], the [SPECIAL ORIGINAL] screen appears.
For information about Special Original, please refer to “Original Direction” on page 79 and “Original Document type” on
page 80.
24
Chapter 1 : Overview of the Scanning Features
Page 26
1-3 Basic Operation (Continued)
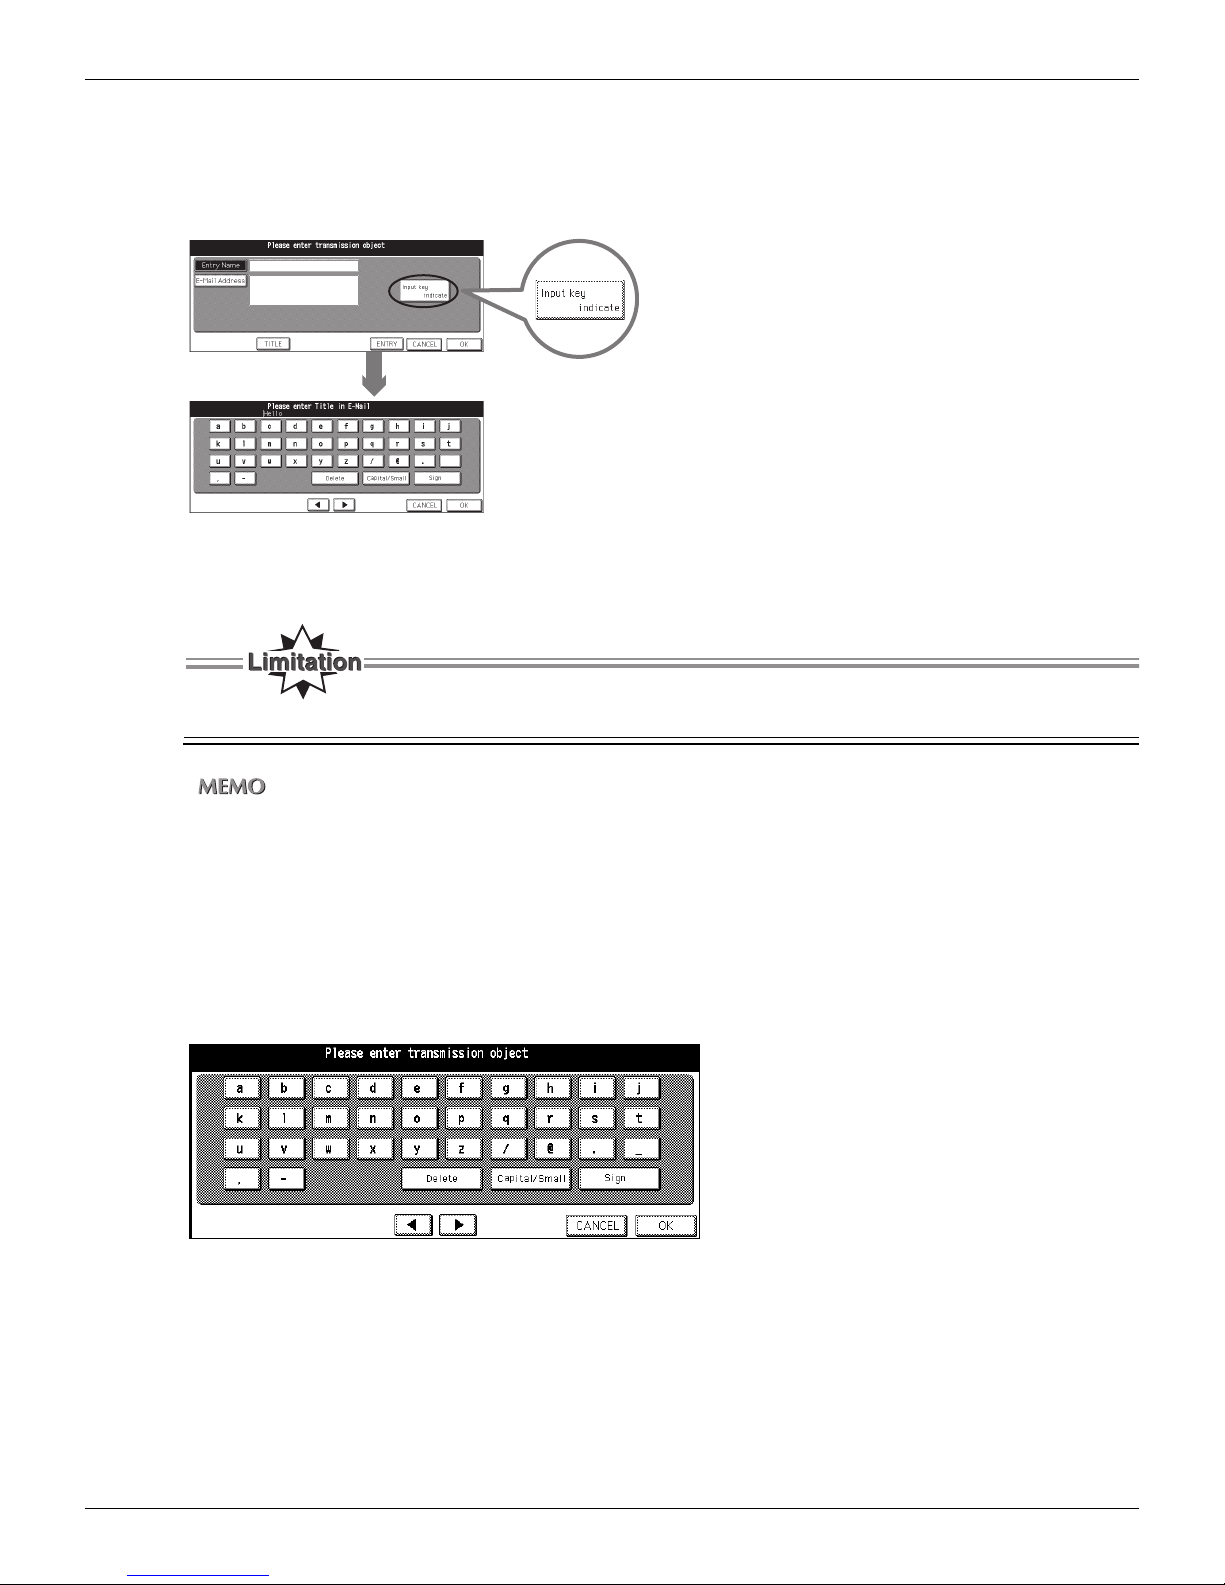
●Inputting Text
When inputting the Entry Name or E-Mail address, use the [Keyboard Input] screen that appears with you touch [Input key indicate].
[Transmission Address Input]
[Keyboard Input]
[Keyboard Input] screen
Using the [Keyboard Input] screen, you can input letters and special letters.
Use the KEYPAD of the control panel to input numbers.
To change the default layout of keyboard, please contact your service representative.
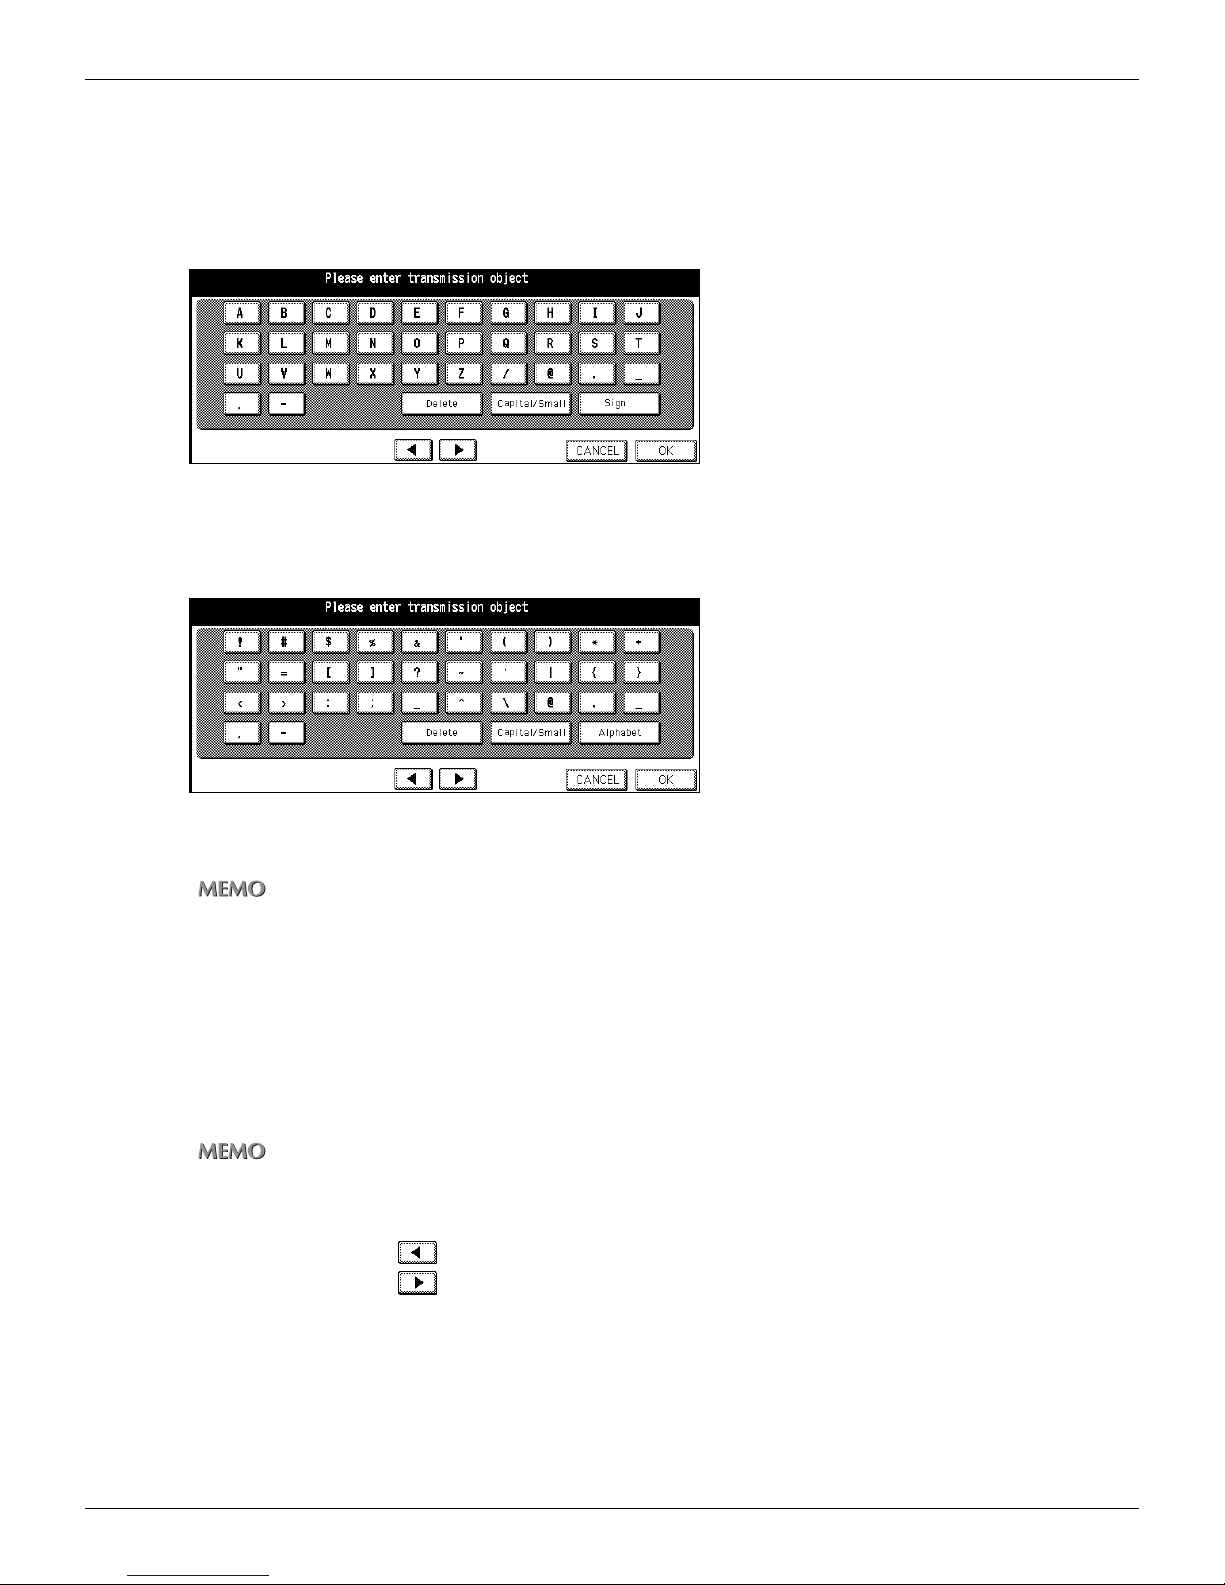
There are three kinds of Keyboard screen as follows.
• The [Lowercase letter input] screen
The [Lowercase letter input] screen appears when you touch [Input key indicate].
When the [Uppercase letter input] screen is displayed, the [Lowercase letter input] screen appears if you touch [Capital/Small].
When the [Symbol input] screen is displayed, the [Lowercase letter input] screen appears if you touch [Alphabet].
25
Chapter 1 : Overview of the Scanning Features
Page 27
1-3 Basic Operation (Continued)
• The [Uppercase letter input] screen
When the [Lowercase letter input] screen is displayed, the [Uppercase letter input] screen appears if you touch [Capital/Small].
When the [Symbol input] screen is displayed, the [Uppercase letter input] screen appears if you touch [Alphabet] first
and the [Capital/Small] next.
• The [Symbol input] screen
When the [Lowercase letter input] screen or the [Uppercase letter input] screen is displayed, the [Symbol input] screen
appears if you touch [Sign].
Inputting text
Use the KEYPAD of the control panel to input numbers.
1. Confirm that the [Keyboard Input] screen (Lowercase letter / Uppercase letter / Sym-
bol) you need appears.
If it is not a screen you need, replace the screen by touching the [Alphabet] / [Capital/Small] / [Sign]
2. Touch the letter keys on the LCD screen to input the letters.
Letters you input appear on the upper part of the screen.
• Caret “|”, representing an input position, flashes on and off in addition to the letters displayed on the upper part
of the screen.
• When you touch [Delete], a letter which is before the caret position is deleted at a time.
• When you touch the , a caret position moves left.
• When you touch the , a caret position moves right.
3. Confirm letters you inputted and touch [OK] on the LCD screen.
The screen returns to the screen that was displayed before touching the [Input key indicate].
Letters you input appear on the screen.
26
Chapter 1 : Overview of the Scanning Features
Page 28

Chapter 2 : Before Using the Scanning Features
2-1 Overview.......................................................................................28
2-2 Registering Destinations (E-Mail) .............................................. 29
2-3 Registering Storage Locations (HDD) ....................................... 33
2-4 Registering Destinations (FTP) ..................................................37
27
Page 29

2-1 Overview
This section offers instructions to register destinations of scanned data before using the scanning features.
You can register beforehand the following items:
• Scan to E-Mail: E-Mail address “Registering Destinations (E-Mail)” on page 29.
• Scan to HDD: Box No. “Registering Storage Locations (HDD)” on page 33.
• Scan to FTP: Profile Name “Registering Destinations (FTP)” on page 37.
Host Address
File Path
Login (User Name)
Password
Port No.
Scan to QUEUE needs no information to register.
Reference
Reference
Reference
28
Chapter 2 : Before Using the Scanning Features
Page 30
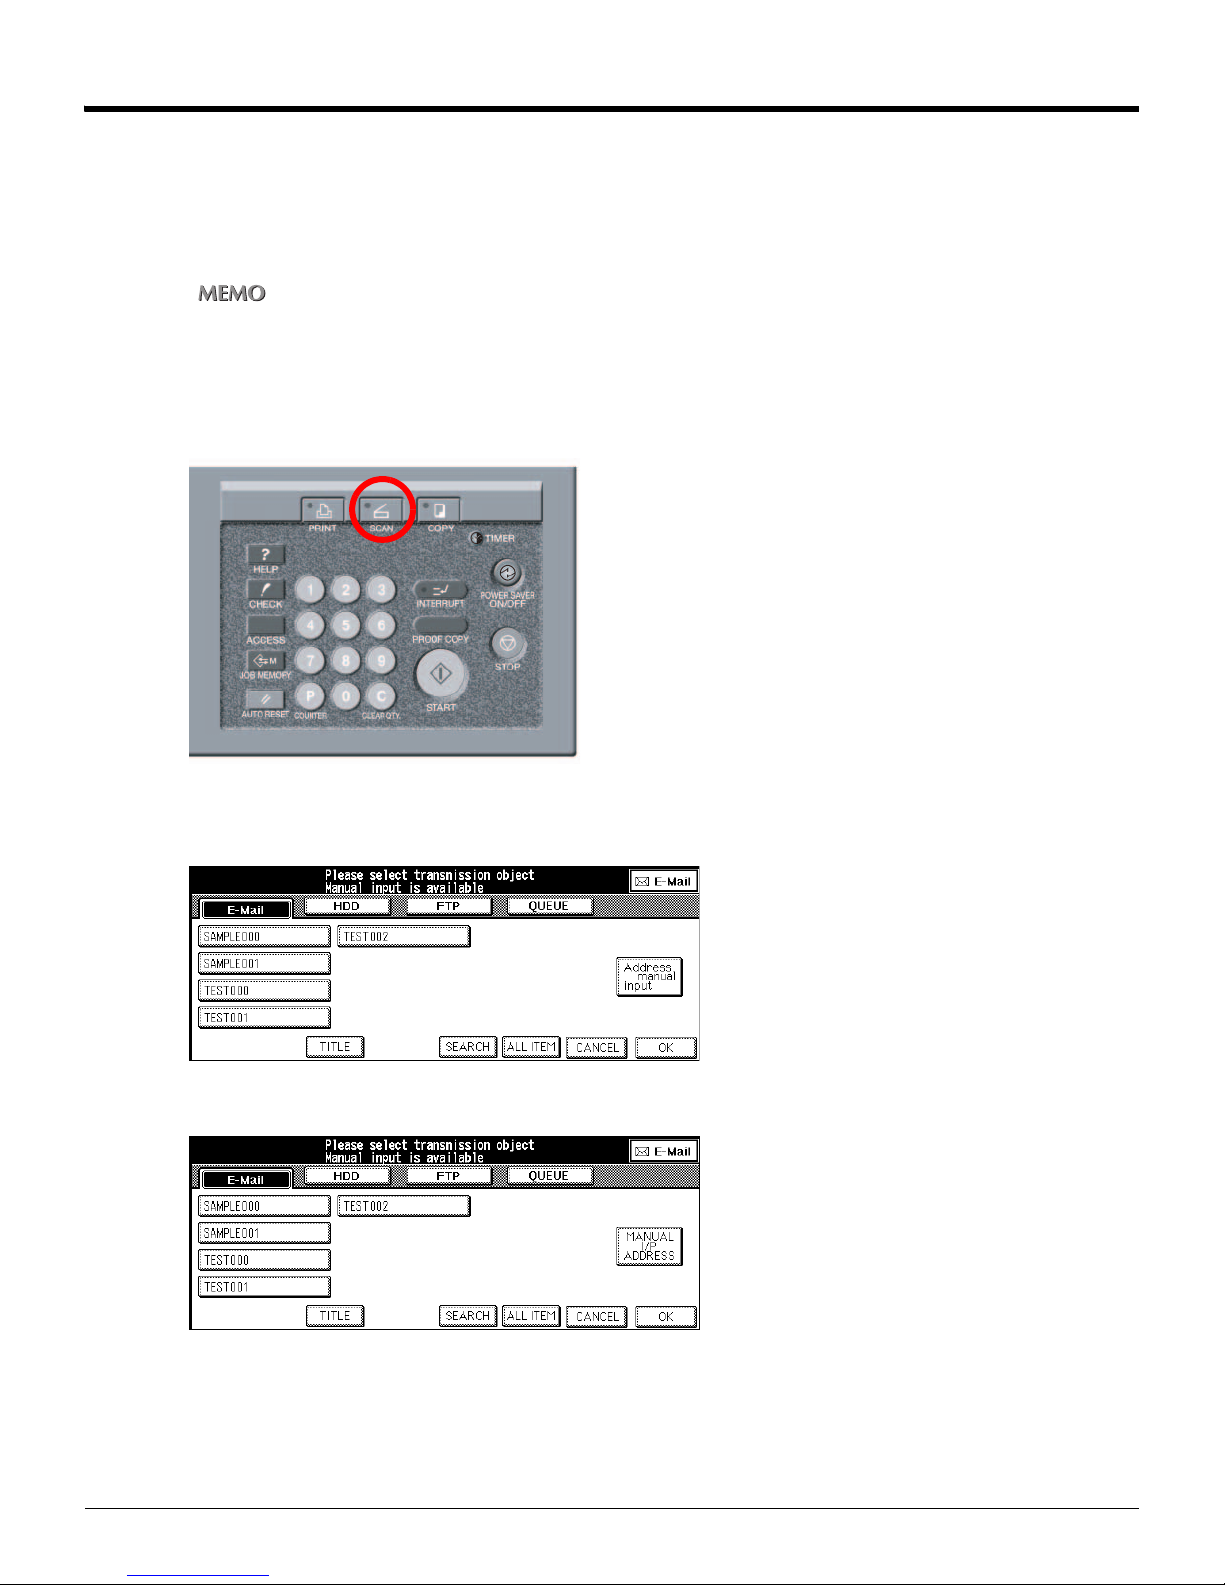
2-2 Registering Destinations (E-Mail)
You can register destinations for Scan to E-Mail beforehand.
Destination used with Scan to E-Mail is an E-Mail Address.
You can register E-Mail Address with the control panel or the Web Utility for the Copier.
This section explains how to register with the control panel.
For information about the Web Utility for the Copier, please refer to the Copier’s User’s Guide.
●Registration of E-Mail Address
1. Press [SCAN] button on the control panel.
The [Select Transmission Object] screen is displayed on the LCD screen.
• U.S.A.
• Others
29
Chapter 2 : Before Using the Scanning Features
Page 31
2-2 Registering Destinations (E-Mail) (Continued)
2. Make sure that [E-Mail] is selected.
If [E-Mail] is not selected, touch [E-Mail].
You can exit the selected transmission object mode by touching the same button again.
3. Touch [Address manual input] ([MANUAL I/P ADDRESS]).
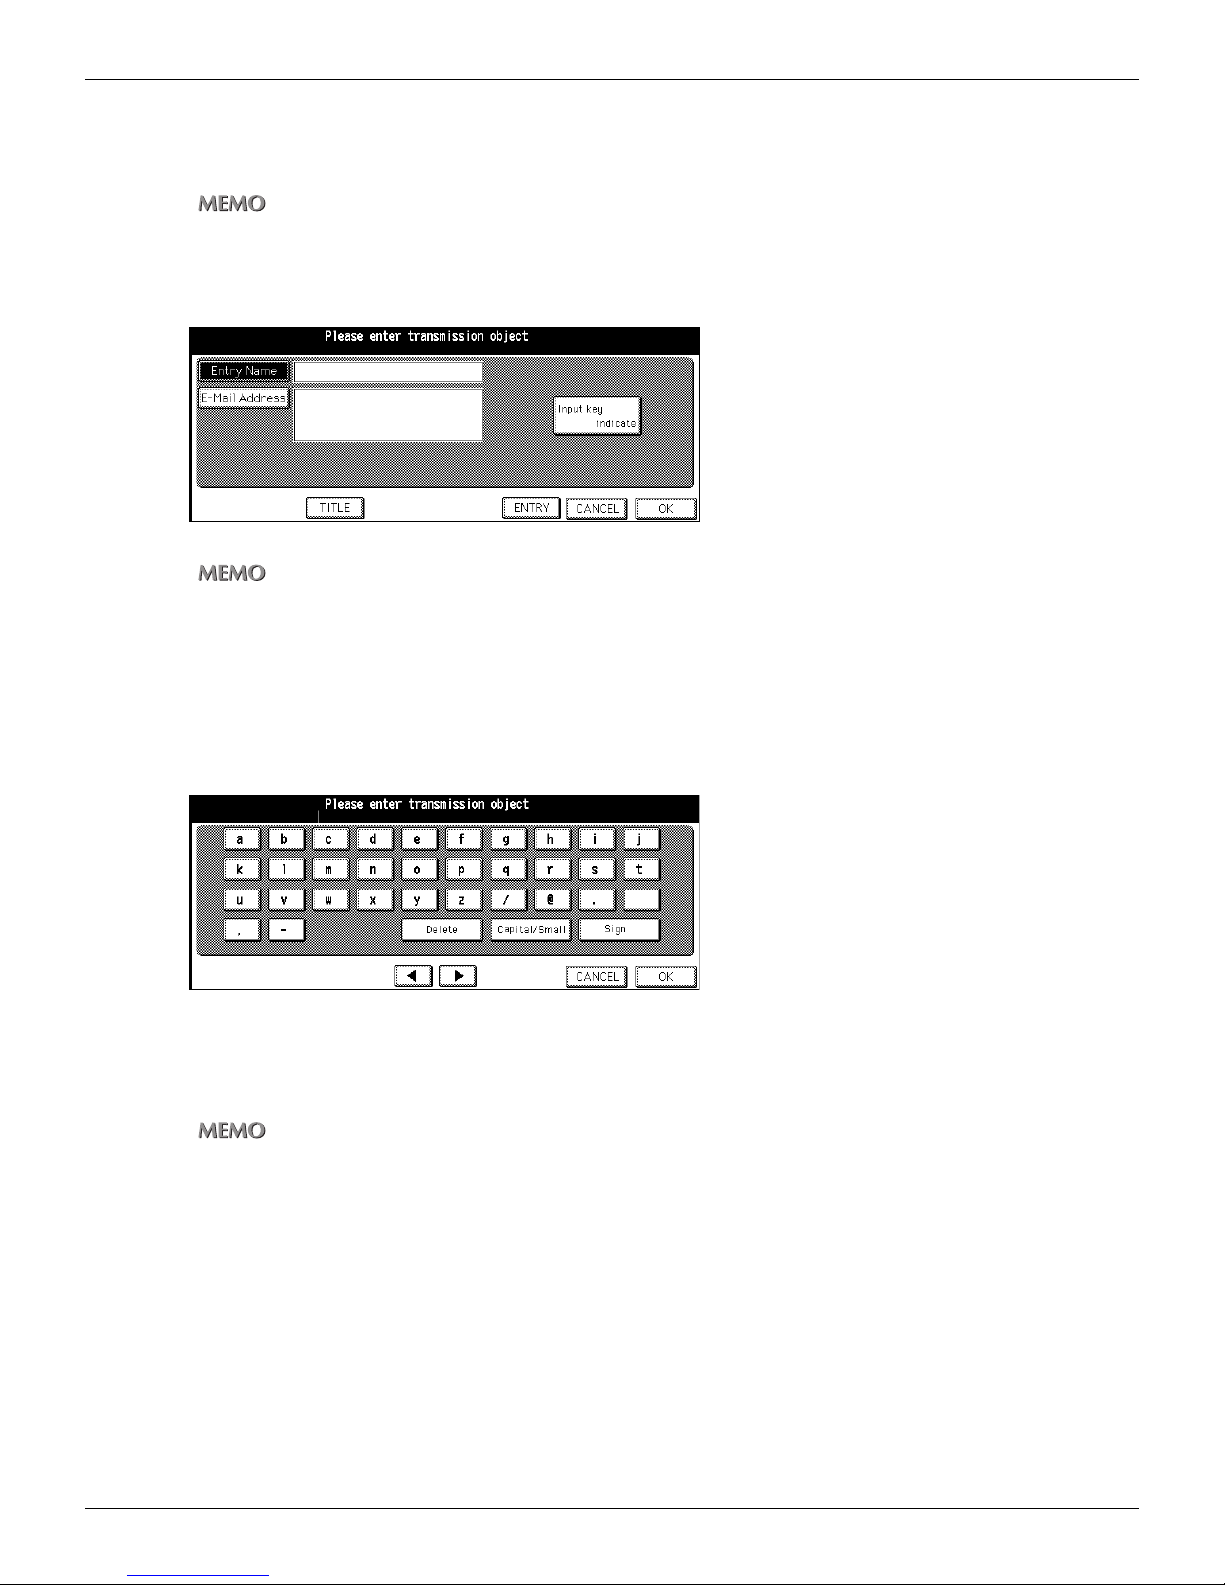
The [Transmission Address Input] screen appears.
If you select the [E-Mail] again after using the Scan to E-Mail without exiting the Scan mode, the Entry Name and
the E-Mail Address that you inputted before are displayed.
4. Make sure that [Entry Name] is selected.
When the [Entry Name] is not selected, touch [Entry Name].
5. Touch [Input key indicate].
The [Keyboard Input] screen appears.
6. Input the Entry Name and touch [OK].
The display returns to the [Transmission Address Input] screen.
The Entry Name you inputted appears on the [Transmission Address Input] screen.
• The Entry Name should not exceed 24 alphanumeric characters.
• Input number with the Keypad of the control panel.
• For information about inputting text, please refer to “Inputting Text” on page 25.
30
Chapter 2 : Before Using the Scanning Features
Page 32
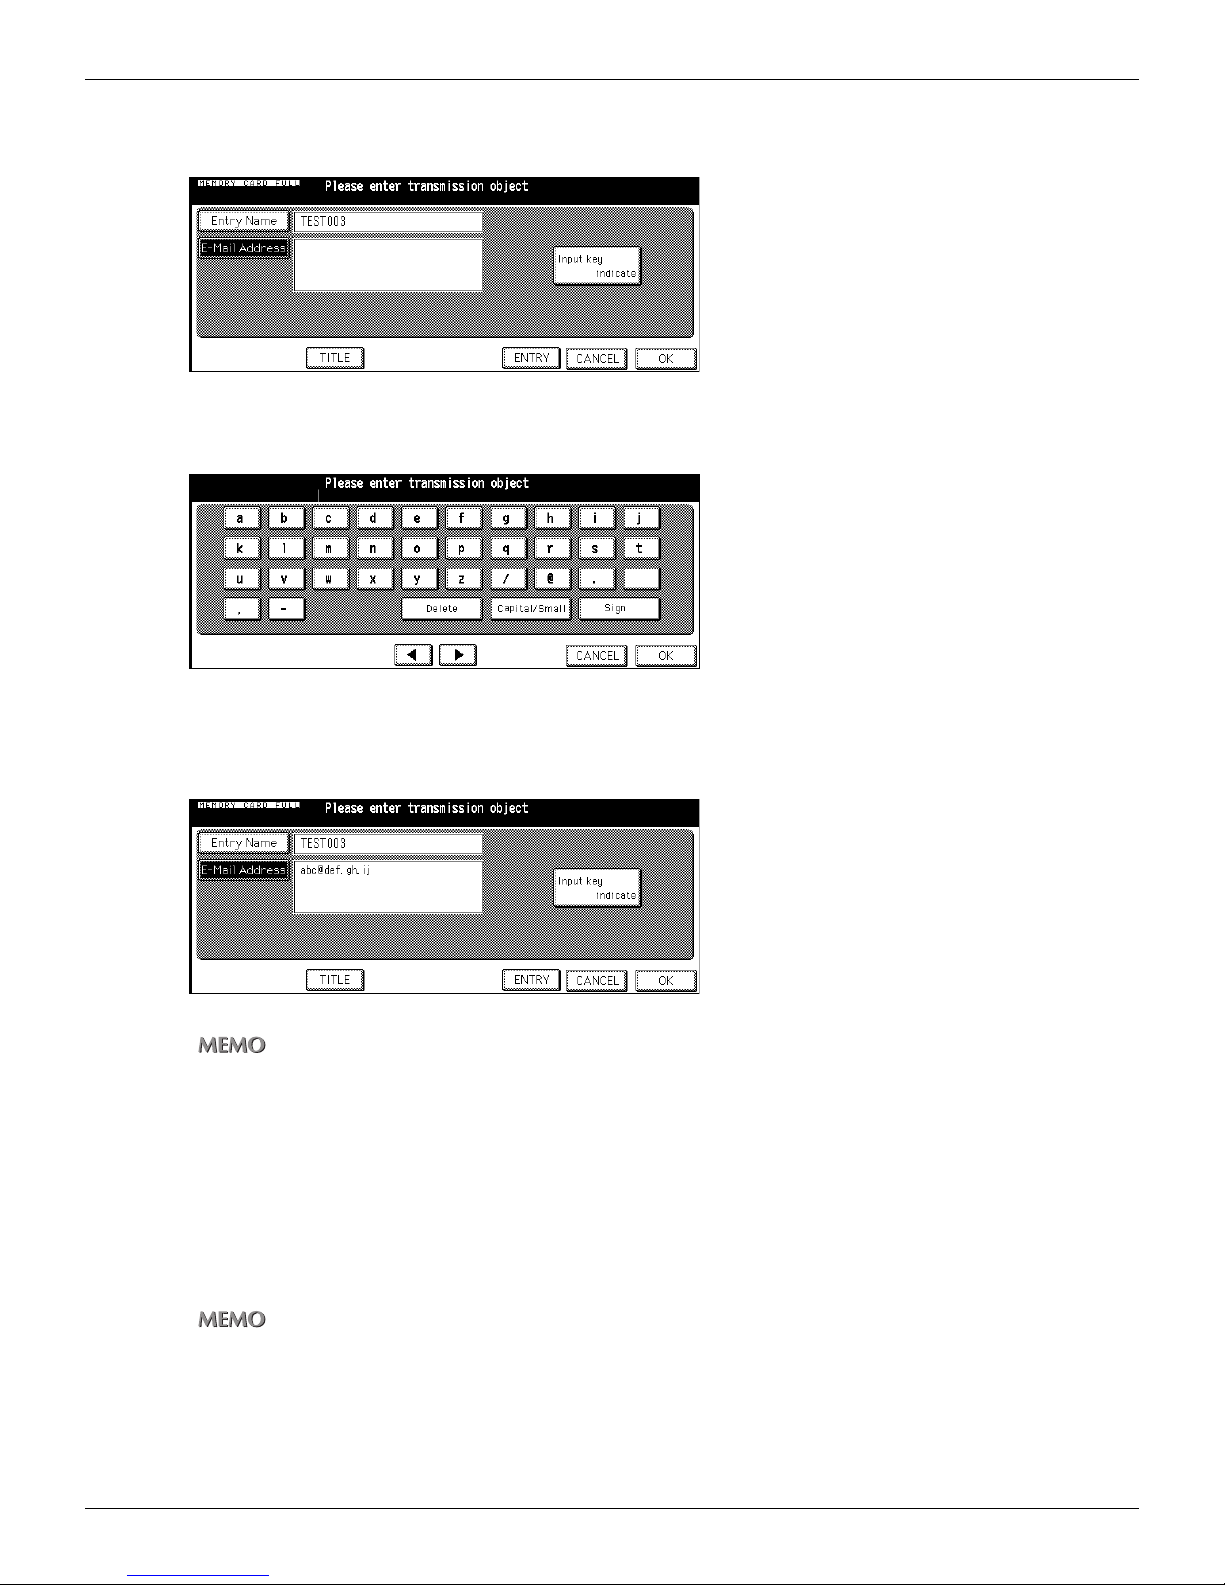
7. Touch [E-Mail Address].
The [E-Mail Address] is highlighted.
8. Touch [Input key indicate].
The [Keyboard Input] screen appears.
2-2 Registering Destinations (E-Mail) (Continued)
9. Input the E-Mail Address and touch [OK].
The display returns to the [Transmission Address Input] screen.
The E-Mail Address you inputted appears on the [Transmission Address Input] screen.
• Enter the E-Mail address in 54 alphanumeric characters. Only following marks can be used:
@, - (hyphen), _(underscore), (space)
• Input number with the Keypad of the control panel.
• For information about inputting text, please refer to “Inputting Text” on page 25.
10.Make sure the contents you input and touch [ENTRY].
The contents you set are saved.
The display returns to the [Select Transmission Object] screen (E-Mail).
The Entry Name you inputted appears on the LCD screen.
If no entry name is entered at the time of registration, the E-mail address is shown as the entry name.
31
Chapter 2 : Before Using the Scanning Features
Page 33

2-2 Registering Destinations (E-Mail) (Continued)
●Revision and Deletion of E-Mail Address.
Use the Web Utility for copier or Key Operator Mode to revise and delete a registered E-Mail Address.
Reference
About these Web Utility for copier, please refer to the Copier‘s User’s Guide.
“Changing / Deleting the destination” on page 95.
32
Chapter 2 : Before Using the Scanning Features
Page 34
2-3 Registering Storage Locations (HDD)
You can register storage locations for Scan to HDD, beforehand.
The storage location used with Scan to HDD is Box inside Hard Disk of the print controller.
You can register Box Nos. with the control panel or the Web Utility for the Copier.
This section explains how to enter from the control panel.
For information about the Web Utility for the Copier, please refer to the Copier’s User’s Guide.
Box numbers can be selected in the range of 0000 - 9999.
It is recommended to assign Box No. (from 0000 to 9999) to users and inform them about their allotted numbers in advance.
●Registration of Box No.
1. Press [SCAN] on the control panel.
The [Select Transmission Object] screen is displayed on the LCD screen.
• U.S.A.
• Others
33
Chapter 2 : Before Using the Scanning Features
Page 35
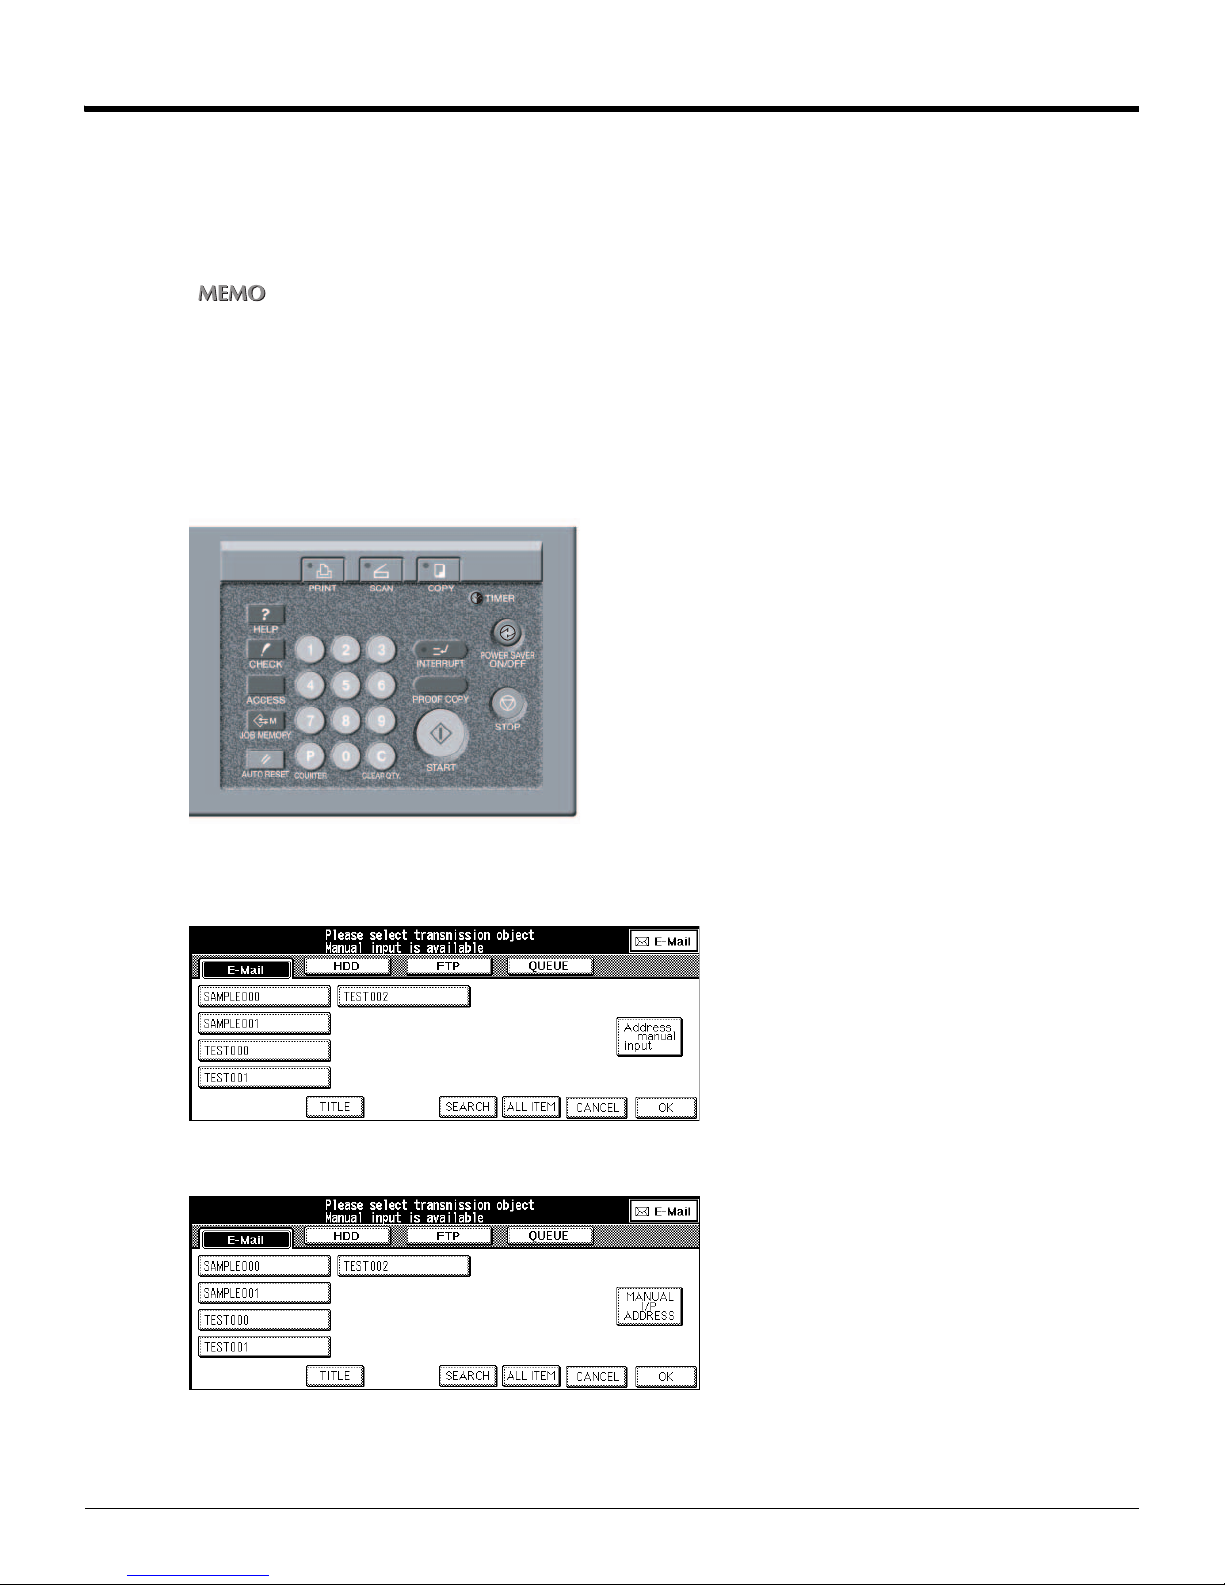
2. Touch [HDD].
The [Select Transmission Object] screen (HDD) appears.
If HDD storage locations are already registered, their entry name appears.
• U.S.A.
• Others
2-3 Registering Storage Locations (HDD) (Continued)
You can exit the selected transmission object mode by touching the same button again.
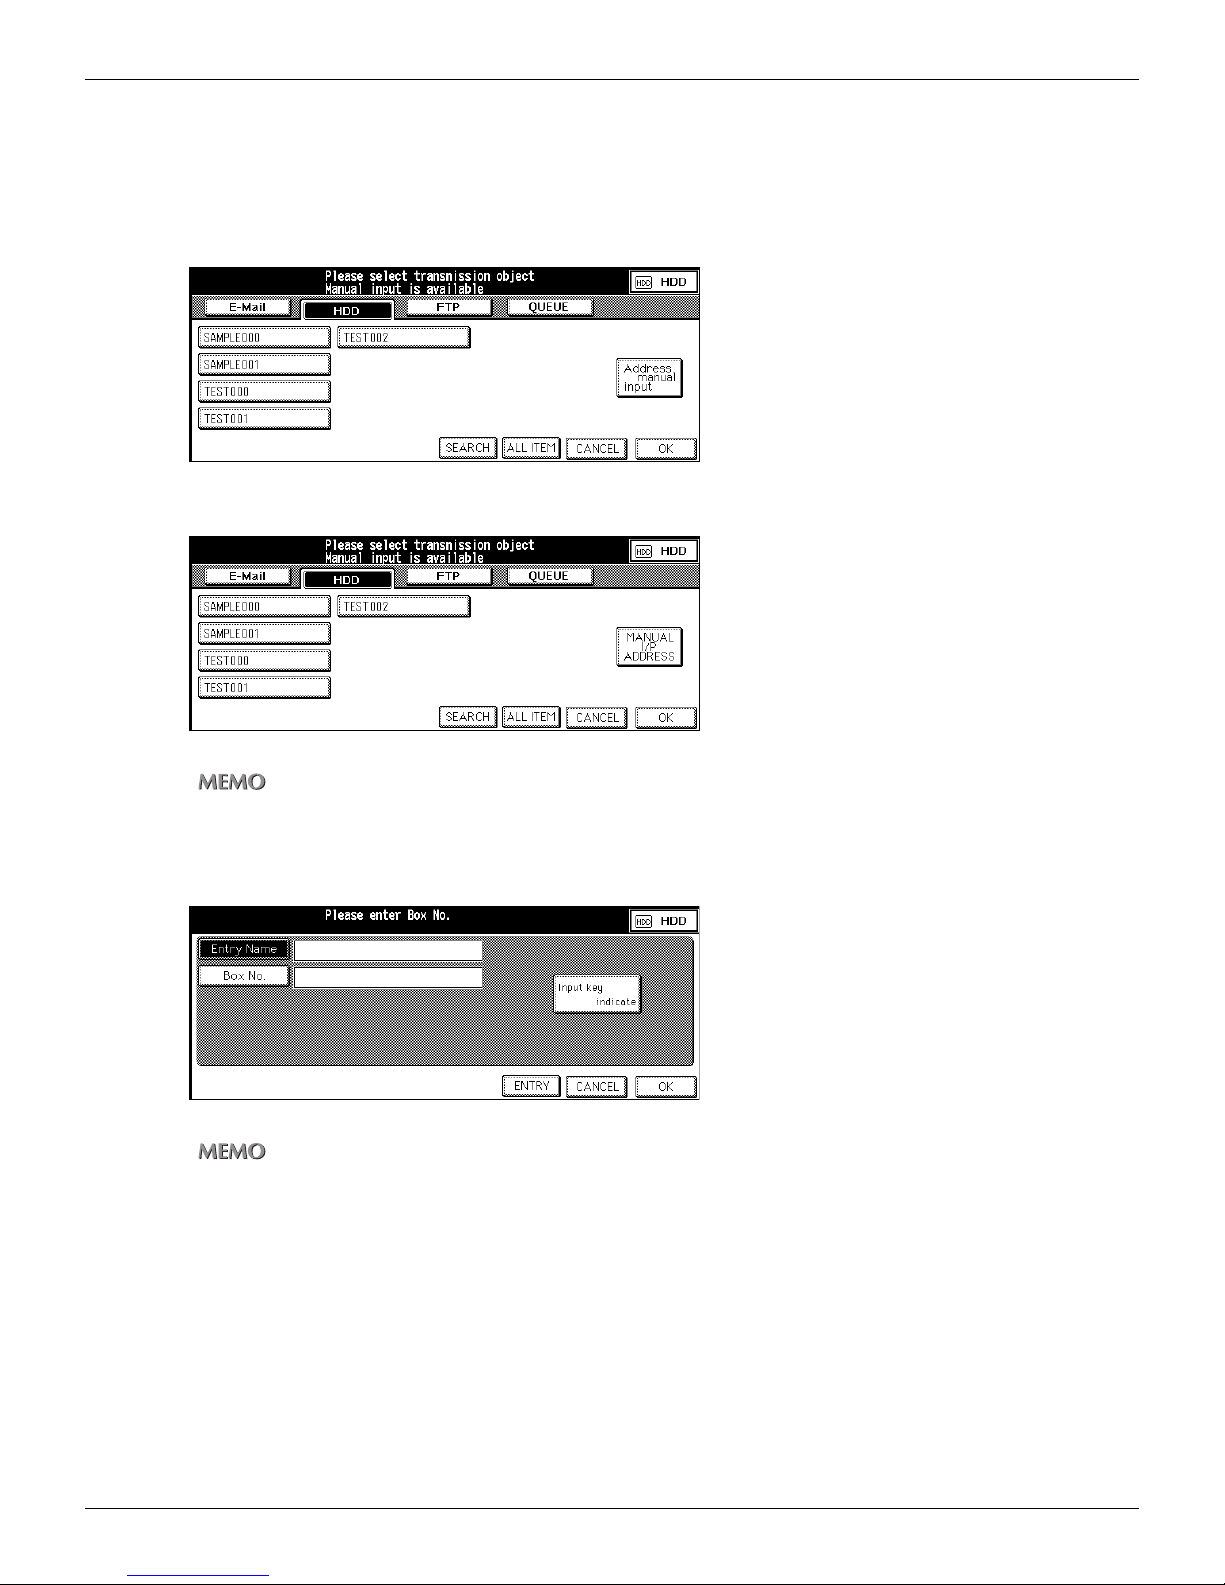
3. Touch [Address manual input] ([MANUAL I/P ADDRESS]).
The [HDD Box No. Input] screen appears.
If you select the [HDD] again after using the Scan to HDD without exiting the Scan mode, the Entry Name and the
Box No. which you input before are displayed.
4. Make sure that [Entry Name] is selected.
When the [Entry Name] is not selected, touch [Entry Name].
34
Chapter 2 : Before Using the Scanning Features
Page 36
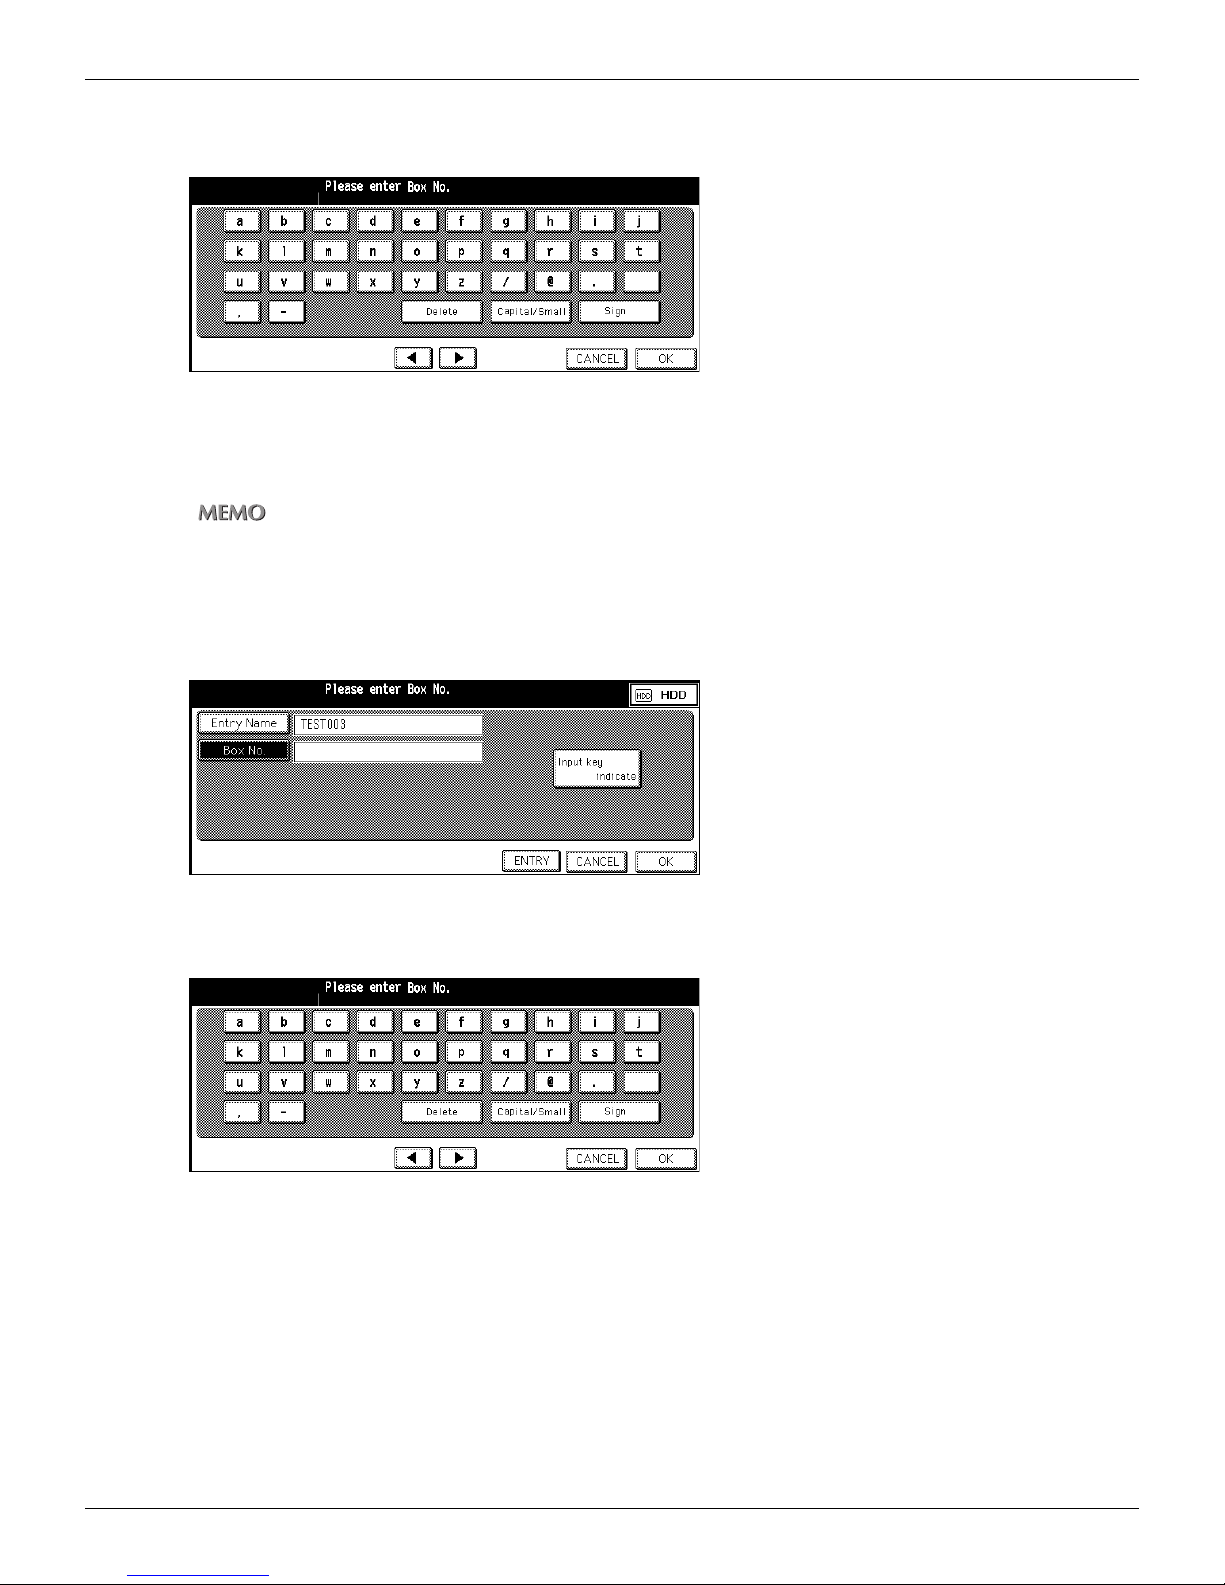
5. Touch [Input key indicate].
The [Keyboard Input] screen appears.
6. Input the Entry Name and touch [OK].
The display returns to the [HDD Box No. Input] screen.
The Entry Name you inputted appears on the [HDD Box No. Input] screen.
• The Entry Name should not exceed 24 alphanumeric characters.
• Input numbers with the Keypad of the control panel.
• For information about inputting text, please refer to “Inputting Text” on page 25.
7. Touch [Box No.].
The [Box No.] is highlighted.
2-3 Registering Storage Locations (HDD) (Continued)
8. Touch [Input key indicate].
The [Keyboard Input] screen appears.
35
Chapter 2 : Before Using the Scanning Features
Page 37
2-3 Registering Storage Locations (HDD) (Continued)
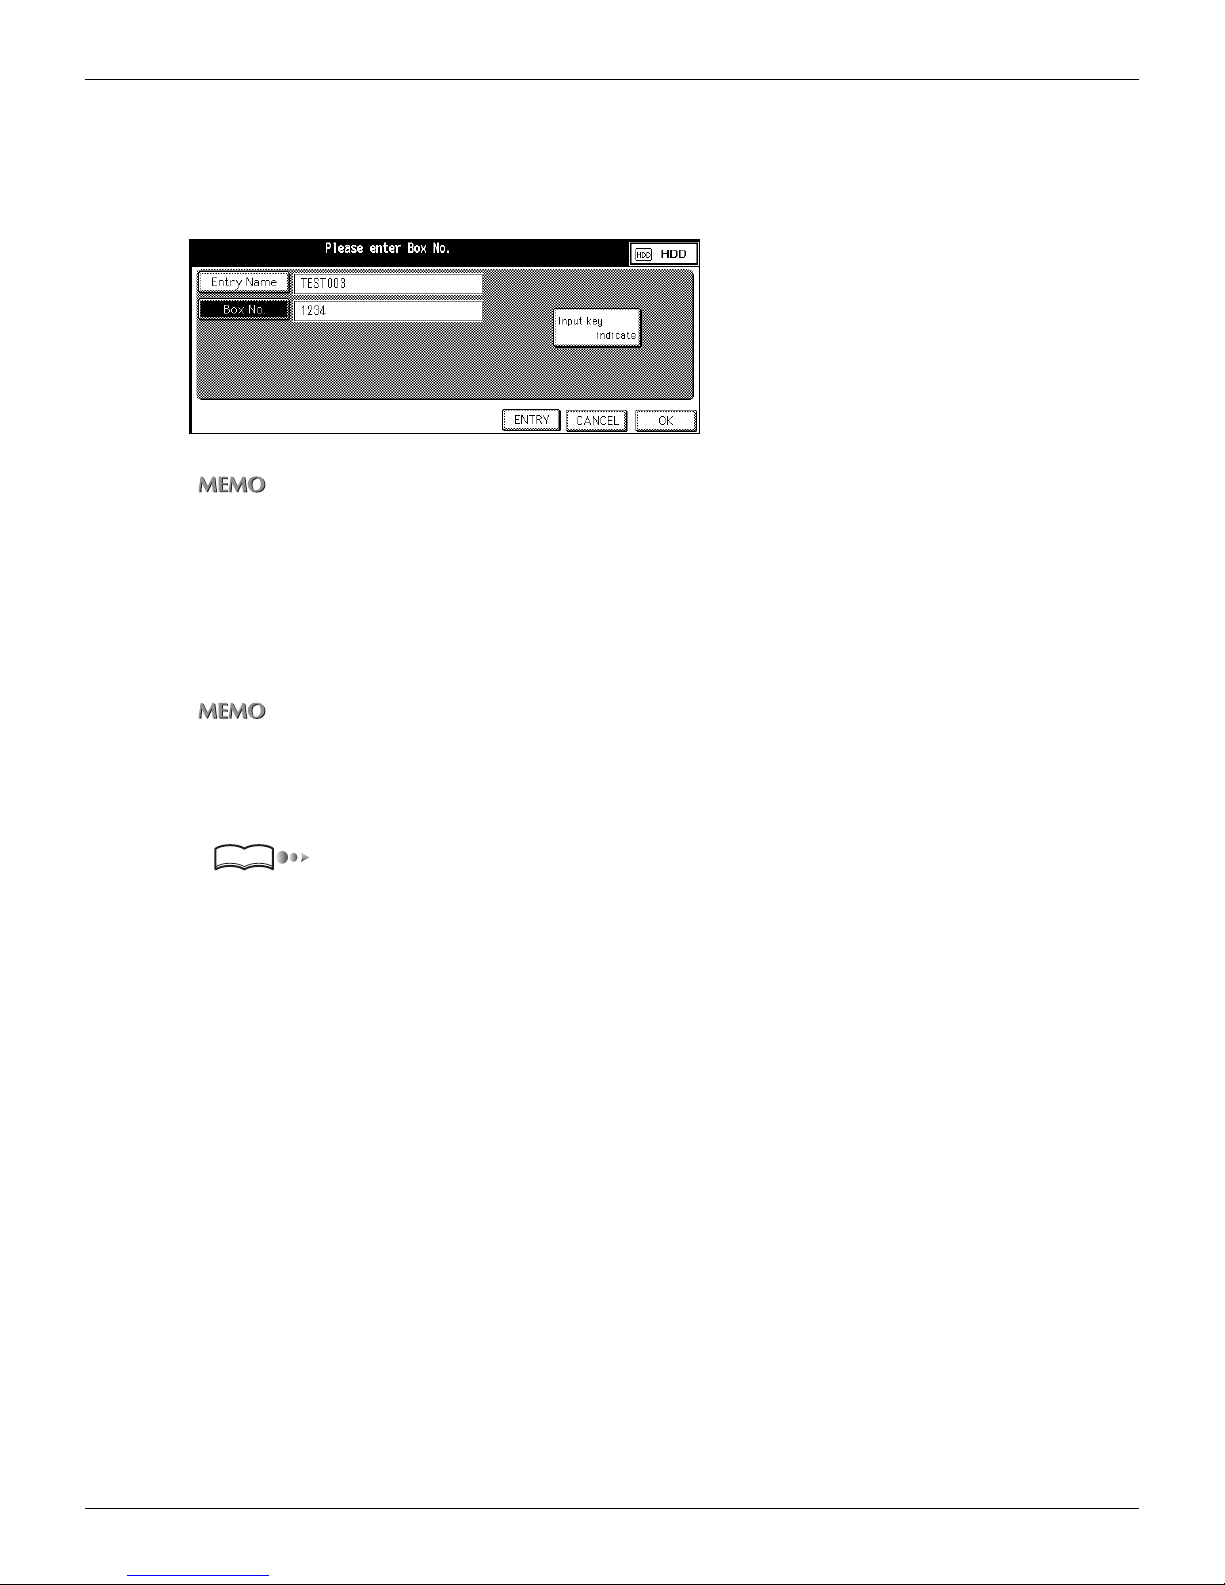
9. Input the Box No. with the KEYPAD of the control panel and touch [OK] on the LCD
screen.
The display returns to the [HDD Box No. Input] screen.
The Box No. you input appears on the [HDD Box No. Input] screen.
• Enter 4 digits of the Box No. into the space for Box No. If you enter "1" only, the Box No. is indicated as "0001".
• When numerals are entered, those numerals advance leftward one by one.
10.Confirm setting and touch [ENTRY].
The contents you set are saved.
The display returns to the [Select Transmission Object] screen (HDD).
The Entry Name you input appears on the LCD screen.
If no entry name is entered at the time of registration, the BOX No. is registered as an entry name.
●Revision and Deletion of Box No.
Use the Web Utility for copier or Key Operator Mode to revise and delete a registered Box No..
Reference
About the Web Utility for copier, please refer to the Copier‘s User’s Guide.
“Changing / Deleting the destination” on page 95.
36
Chapter 2 : Before Using the Scanning Features
Page 38
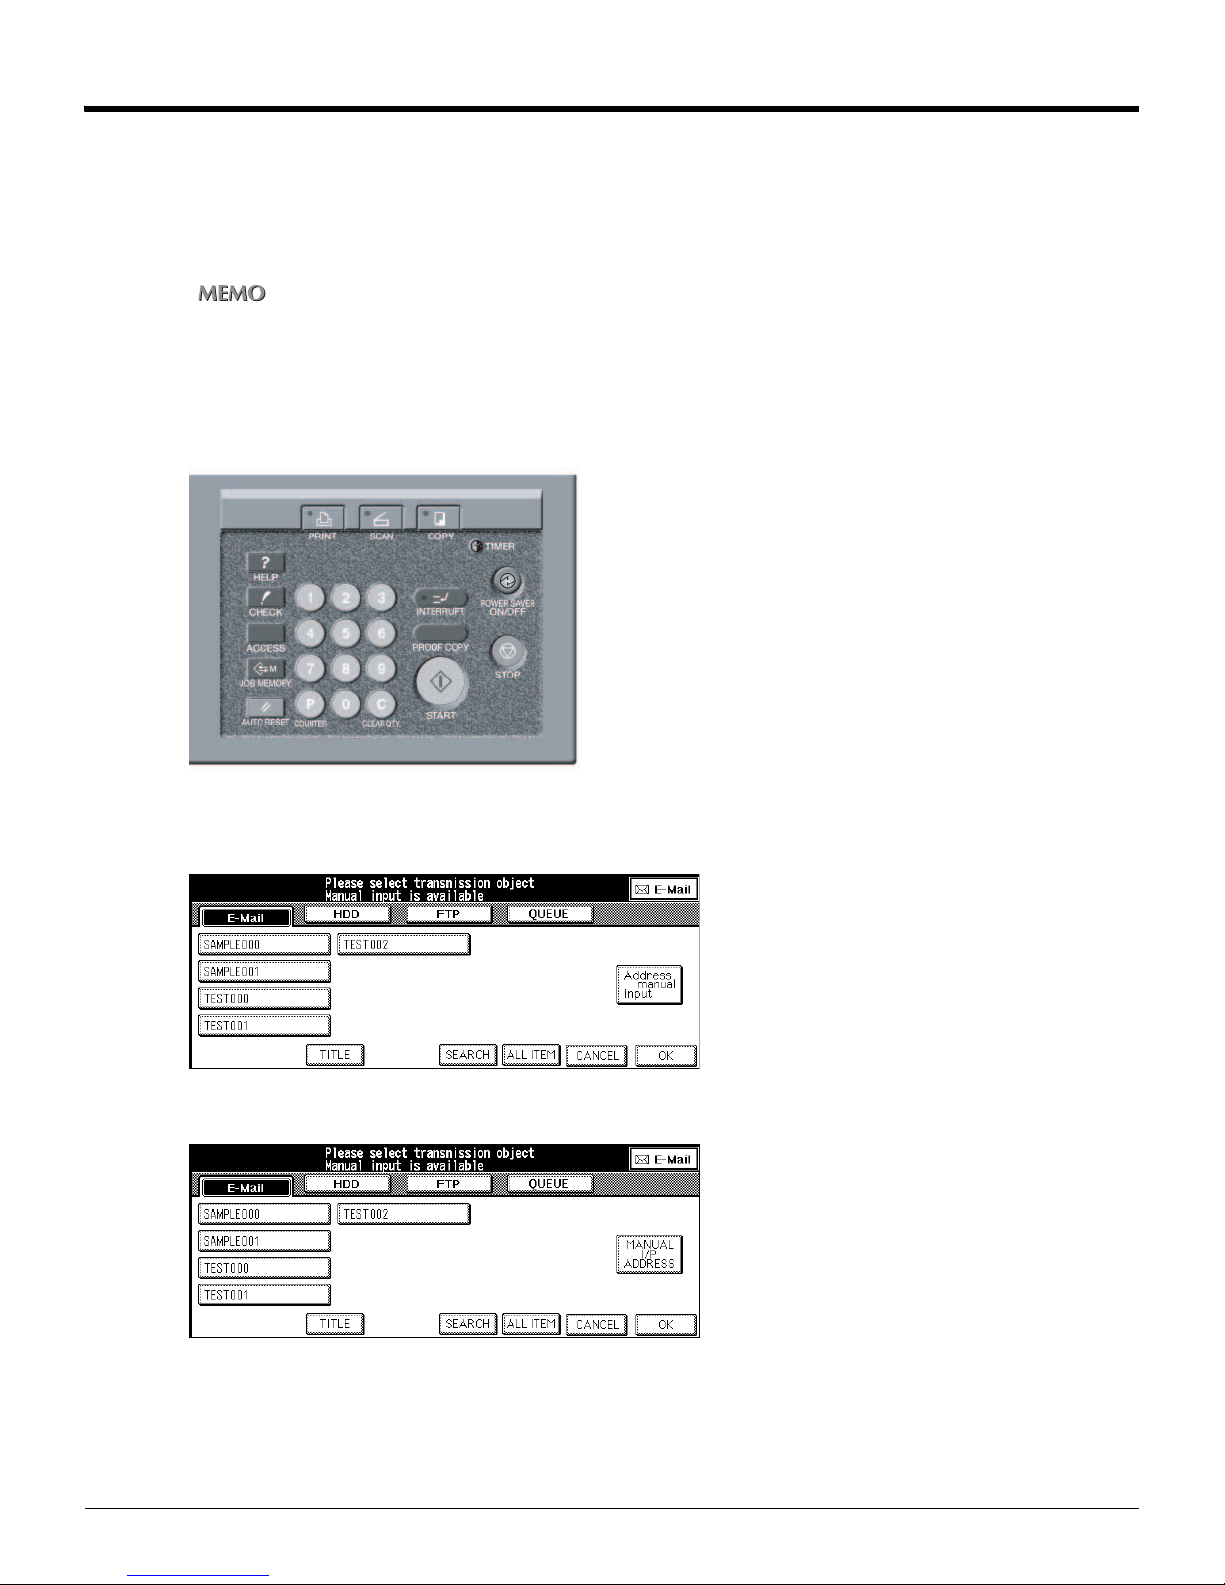
2-4 Registering Destinations (FTP)
You can register destinations for Scan to FTP, beforehand.
The Destination used with Scan to FTP is the FTP server.
You can register the FTP server with the control panel or the Web Utility for the Copier.
This section explains how to register with the control panel.
For information about the Web Utility for the Copier, please refer to the Copier’s User’s Guide.
●Registration of FTP server
1. Press [SCAN] button on the control panel.
The [Select Transmission Object] screen is displayed on the LCD screen.
• U.S.A.
• Others
37
Chapter 2 : Before Using the Scanning Features
Page 39
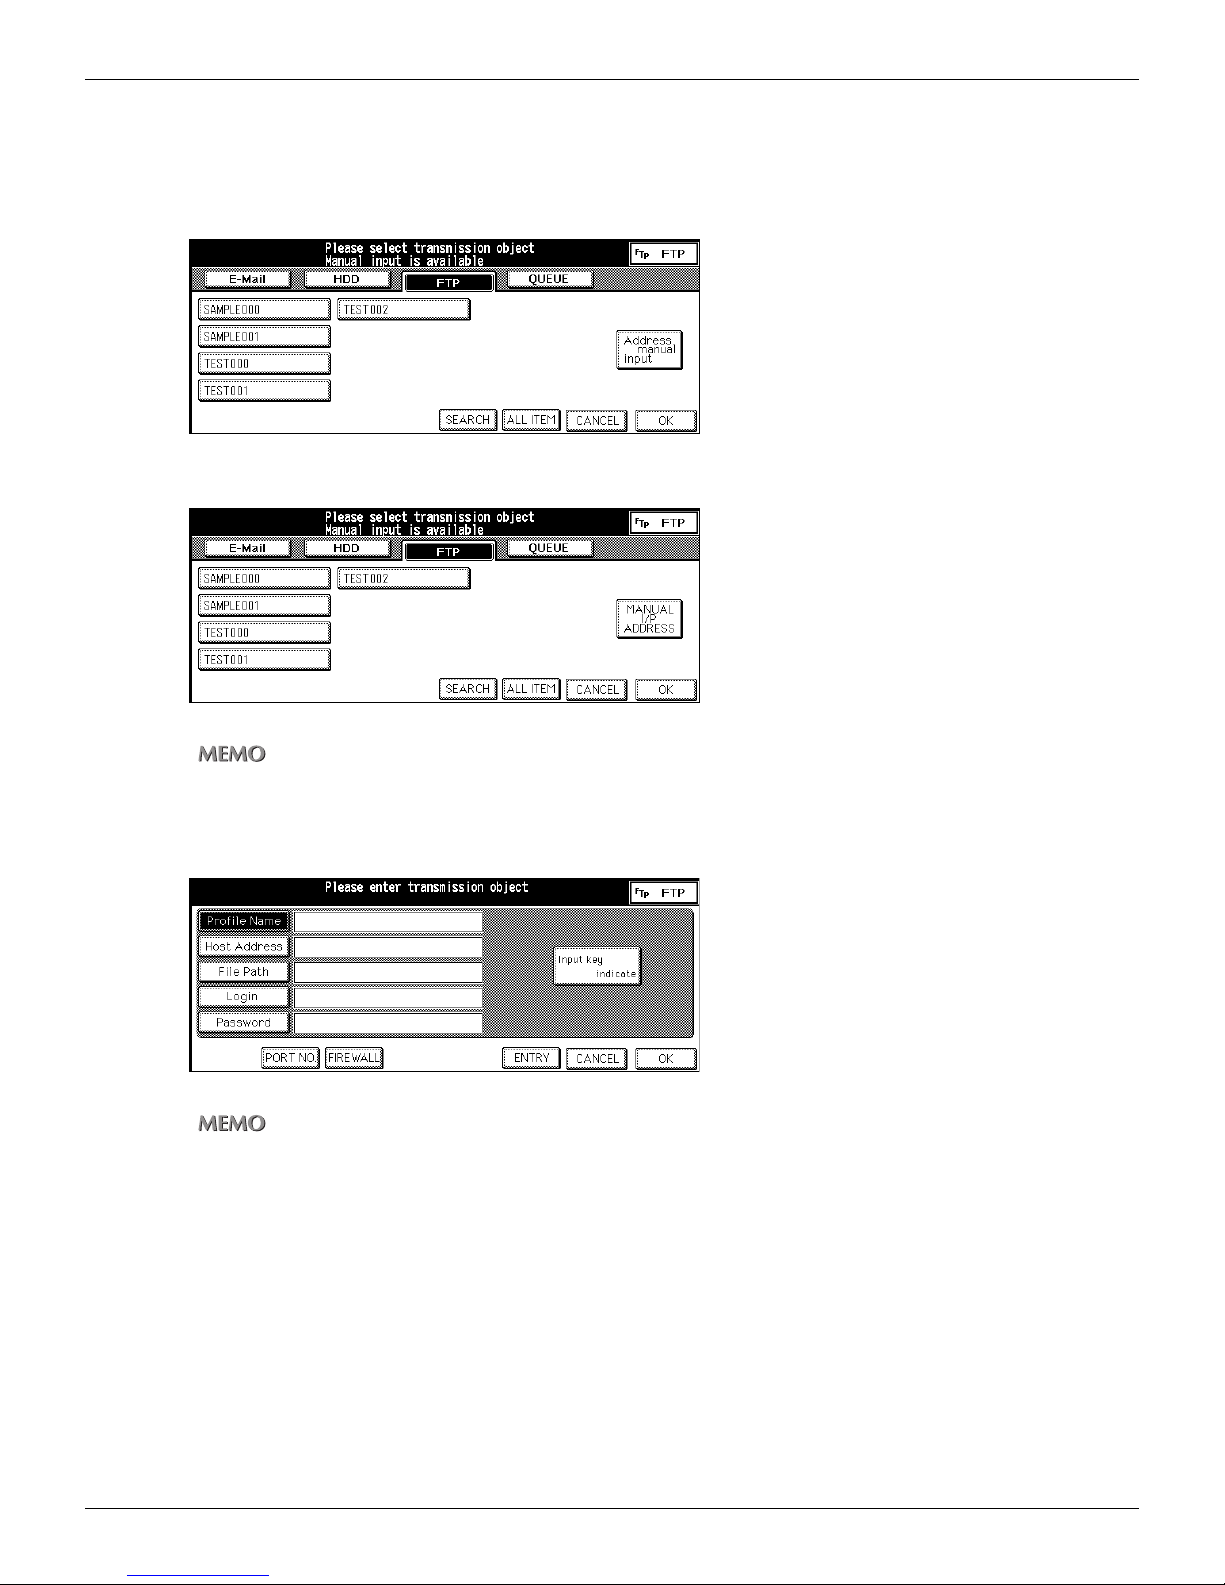
2. Touch [FTP].
The [Select Transmission Object] screen (FTP) appears.
If the destination (FTP) is already registered, the profile name appears.
• U.S.A.
• Others
2-4 Registering Destinations (FTP) (Continued)
You can exit the selected transmission object mode by touching the same button again.
3. Touch [Address manual input] ([MANUAL I/P ADDRESS]).
The [Transmission Address Input] screen appears.
If you select the [FTP] again after using the Scan to FTP without exiting the Scan mode, letters which you input
before are displayed.
4. Make sure that [Profile Name] is selected.
When the [Profile Name] is not selected, touch [Profile Name].
38
Chapter 2 : Before Using the Scanning Features
Page 40
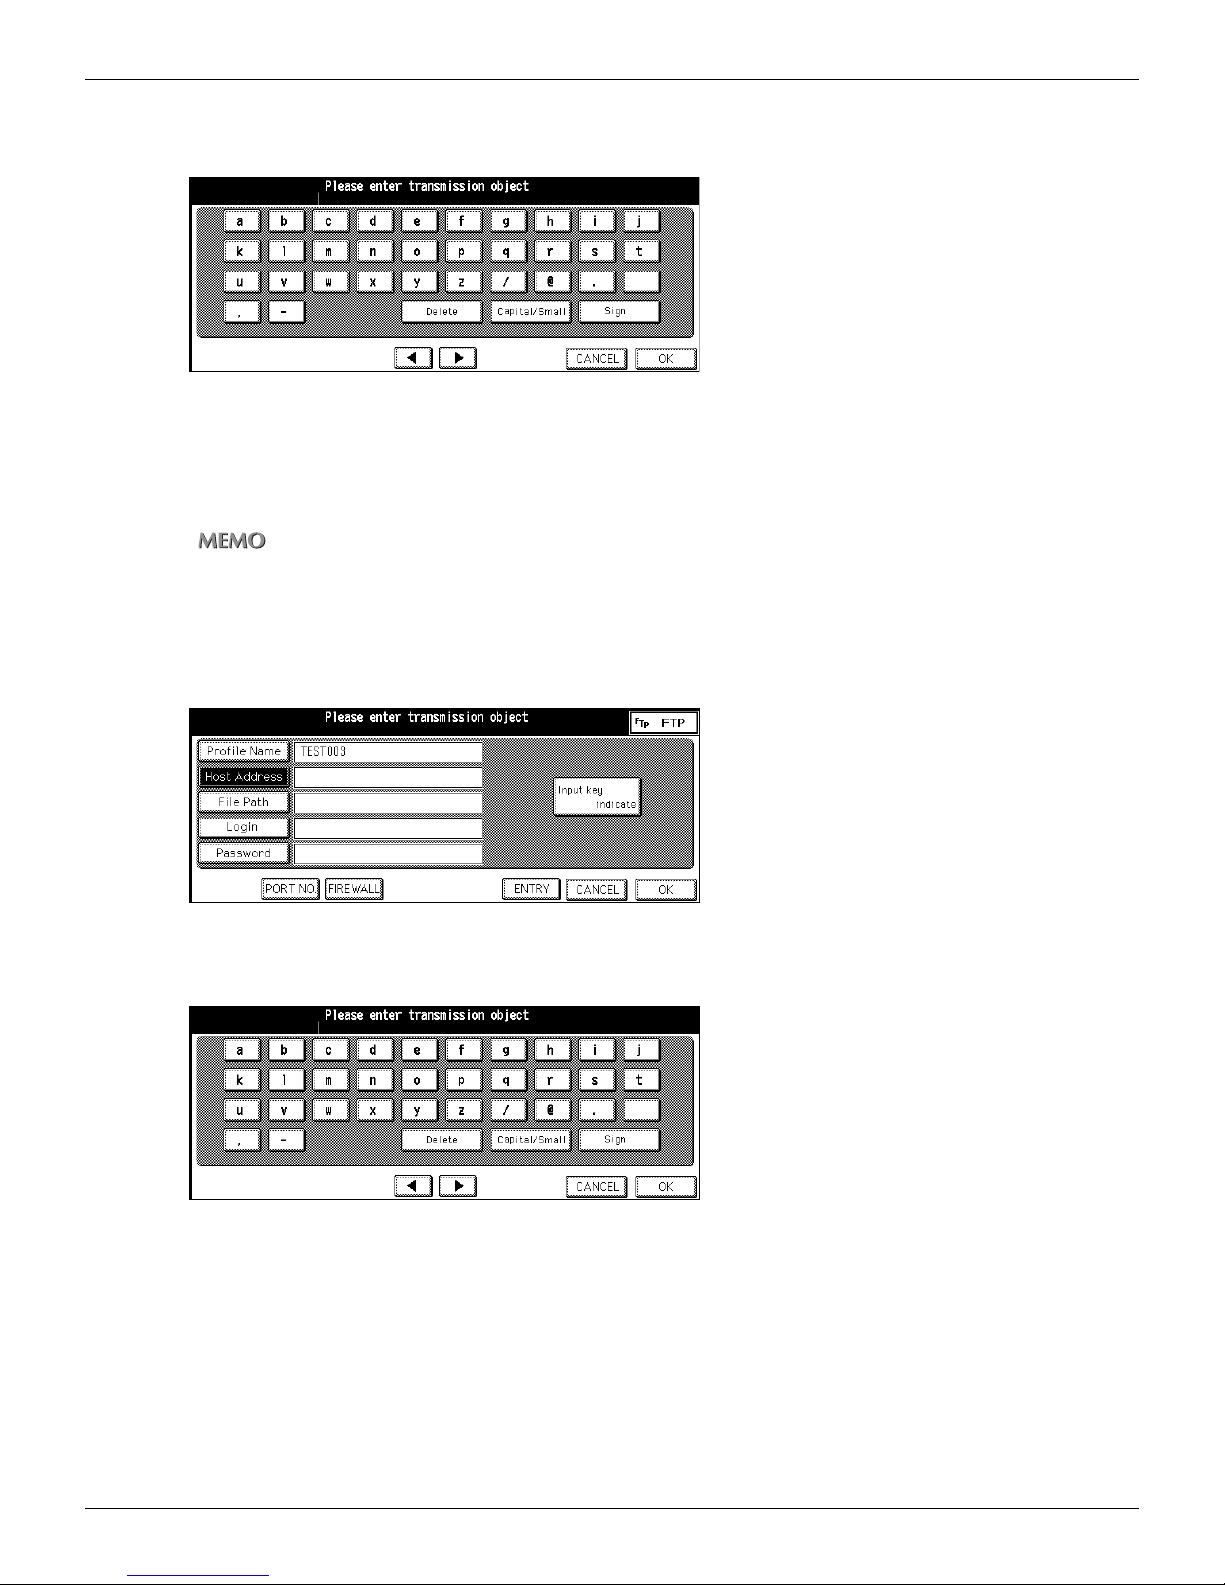
2-4 Registering Destinations (FTP) (Continued)
5. Touch [Input key indicate].
The [Keyboard Input] screen appears.
6. Input the Profile Name and touch [OK].
The Profile Name is the name displayed on the [Select Transmission Object] screen (FTP).
The display returns to the [Transmission Address Input].
The Profile Name you inputted appears on the [Transmission Address Input].
• The Profile Name should not exceed 10 alphanumeric characters.
• Input numbers with the Keypad of the control panel.
• For information about inputting text, please refer to “Inputting Text” on page 25.
7. Touch [Host Address].
The [Host Address] is highlighted.
8. Touch [Input key indicate].
The [Keyboard Input] screen appears.
39
Chapter 2 : Before Using the Scanning Features
Page 41
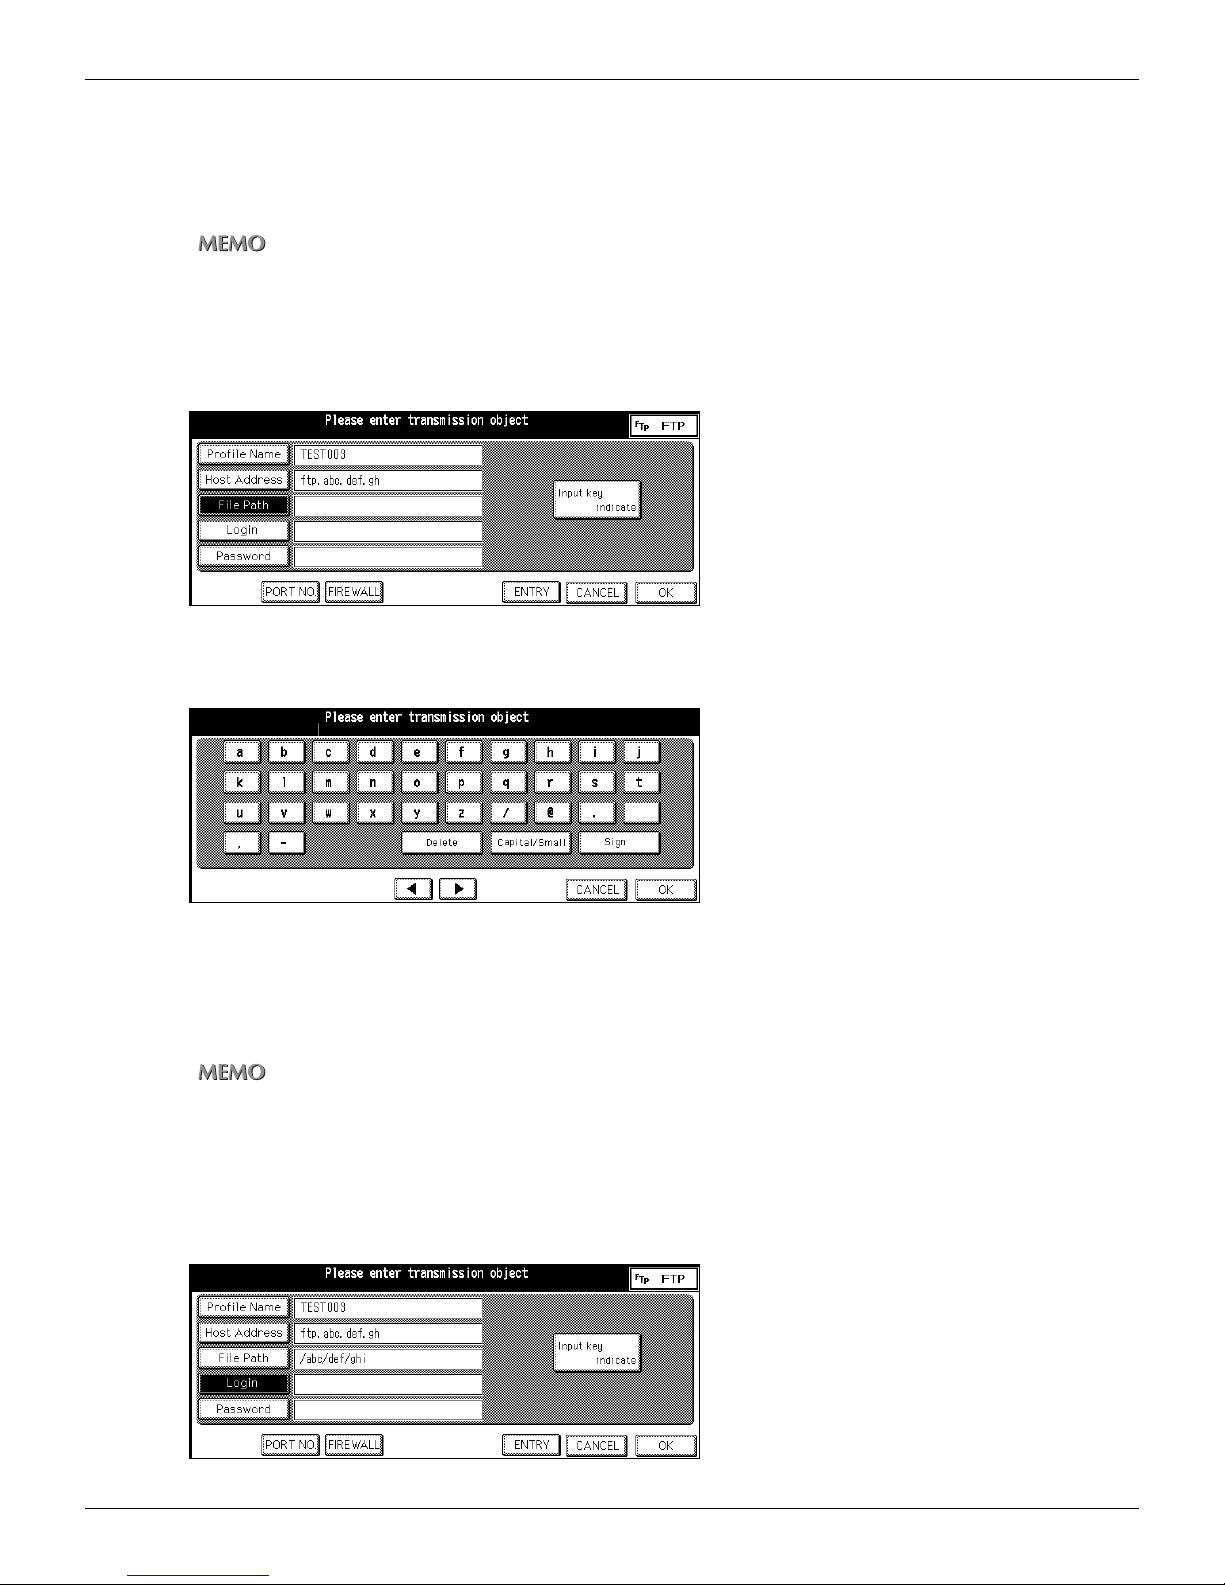
9. Input the Host Address and touch [OK].
Host address is the address of FTP server.
The display returns to the [Transmission Address Input].
The Host address you input appears on the [Transmission Address Input].
• The Host Address should not exceed 63 characters.
• Input number with the Keypad of the control panel.
• For information about inputting text, please refer to “Inputting Text” on page 25.
10.Touch [File Path].
The [File Path] is highlighted.
2-4 Registering Destinations (FTP) (Continued)
11. Touch [Input key indicate].
The [Keyboard Input] screen appears.
12.Input the File Path and touch [OK].
The File Path is the path to the directory inside FTP server.
The display returns to the [Transmission Address Input].
The File Path you input appears on the [Transmission Address Input].
• The File Path should not exceed 127 characters.
• Input numbers with the Keypad of the control panel.
• For information about inputting text, please refer to “Inputting Text” on page 25.
13.Touch [Login].
The [Login] is highlighted.
40
Chapter 2 : Before Using the Scanning Features
Page 42
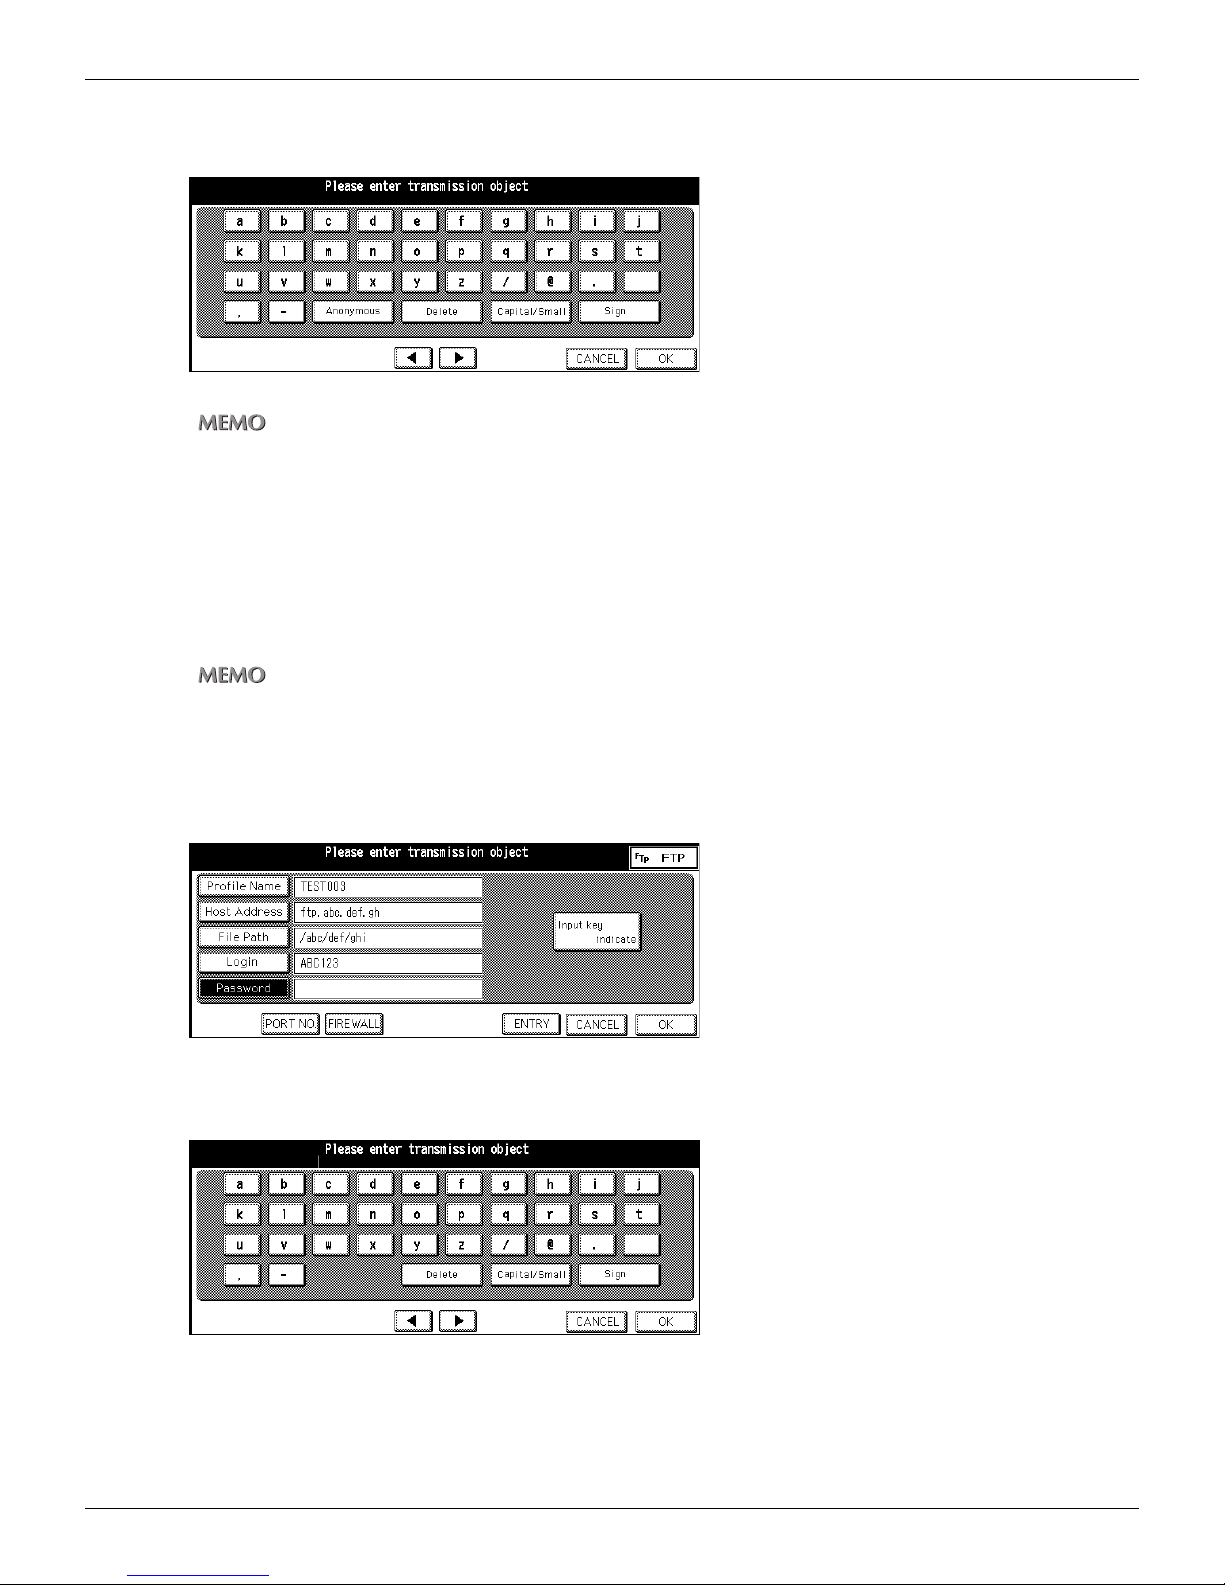
2-4 Registering Destinations (FTP) (Continued)
14.Touch [Input key indicate].
The [Keyboard Input] screen appears.
The [Anonymous] displayed does not appear on a usual keyboard screen.
15.Input the Login ID or touch [Anonymous] if the FTP server does not require user
authentication and touch [OK].
The Login ID is the user ID to access the directory inside FTP server.
When you touch [Anonymous], the word “Anonymous” is displayed on the upper part of the LCD screen.
After you touch the [OK], the display returns to the [Transmission Address Input].
The Login ID you input or “Anonymous” appears on the [Transmission Address Input].
• The Login ID should not exceed 47 characters.
• Input numbers with the Keypad of the control panel.
• For information about inputting text, please refer to “Inputting Text” on page 25.
16.Touch [Password].
The [Password] is highlighted.
17.Touch [Input key indicate].
The [Keyboard Input] screen appears.
41
Chapter 2 : Before Using the Scanning Features
Page 43
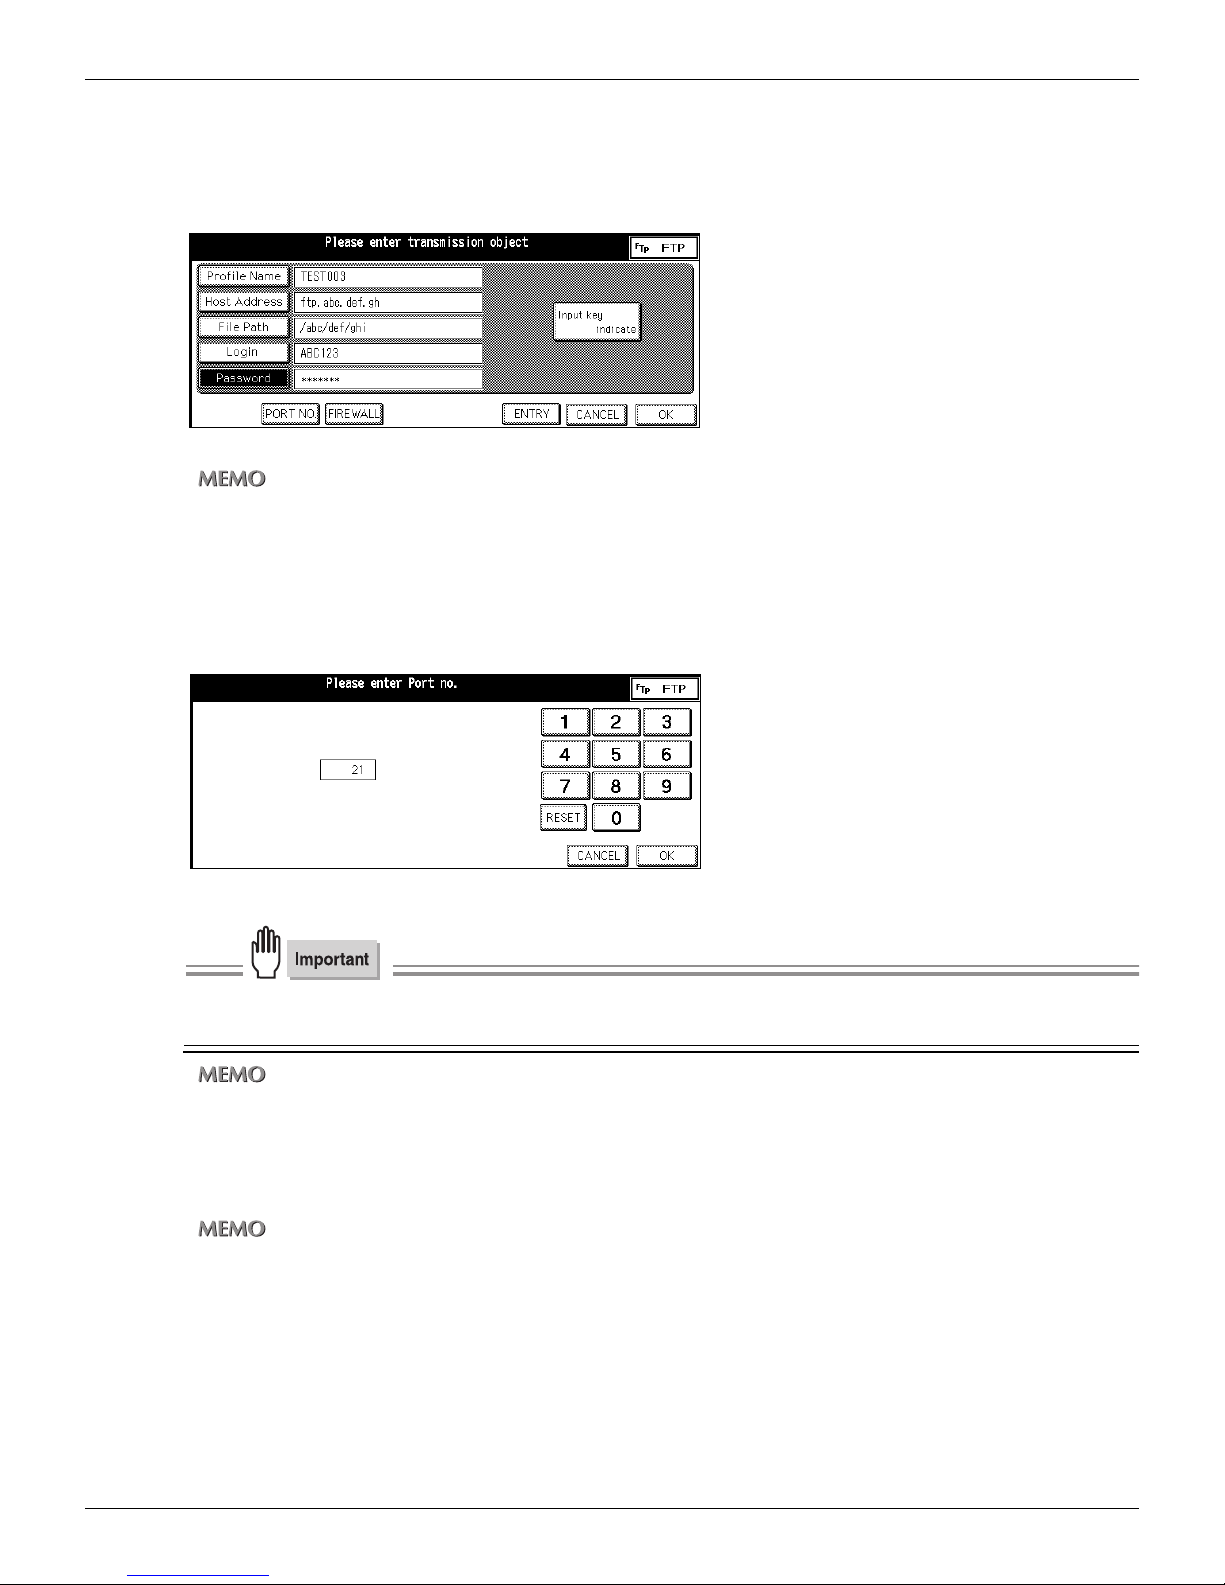
18.Input the Password and touch [OK].
Input the password corresponding to Login ID.
After you touch the [OK], the display returns to the [Transmission Address Input].
The Password you input appears with asterisk (*) on the [Transmission Address Input].
• The Password should not exceed 25 characters.
• Input numbers with the Keypad of the control panel.
• For information about inputting text, please refer to “Inputting Text” on page 25.
19.Touch [PORT NO.], if necessary.
The [Port No. Input] screen appears.
“21” is the default number.
2-4 Registering Destinations (FTP) (Continued)
“
Changing the port number improperly can create obstructions on the network. Do not change the port number
without instructions from the network administrator.
• You can set port number to 65535.
• Please change it only if necessary.
20.Input the PORT NO. with the numeric key on the LCD screen and touch [OK].
The display returns to the [Transmission Address Input] screen.
• The [Port No.] may be up to five characters.
• By the first input, the default value “21” is cleared.
• “21” and “00021” will be counted as a same value.
• When you touch [RESET], the value returns to the default value.
21.Touch [FIRE WALL], if necessary.
42
Chapter 2 : Before Using the Scanning Features
Page 44
2-4 Registering Destinations (FTP) (Continued)
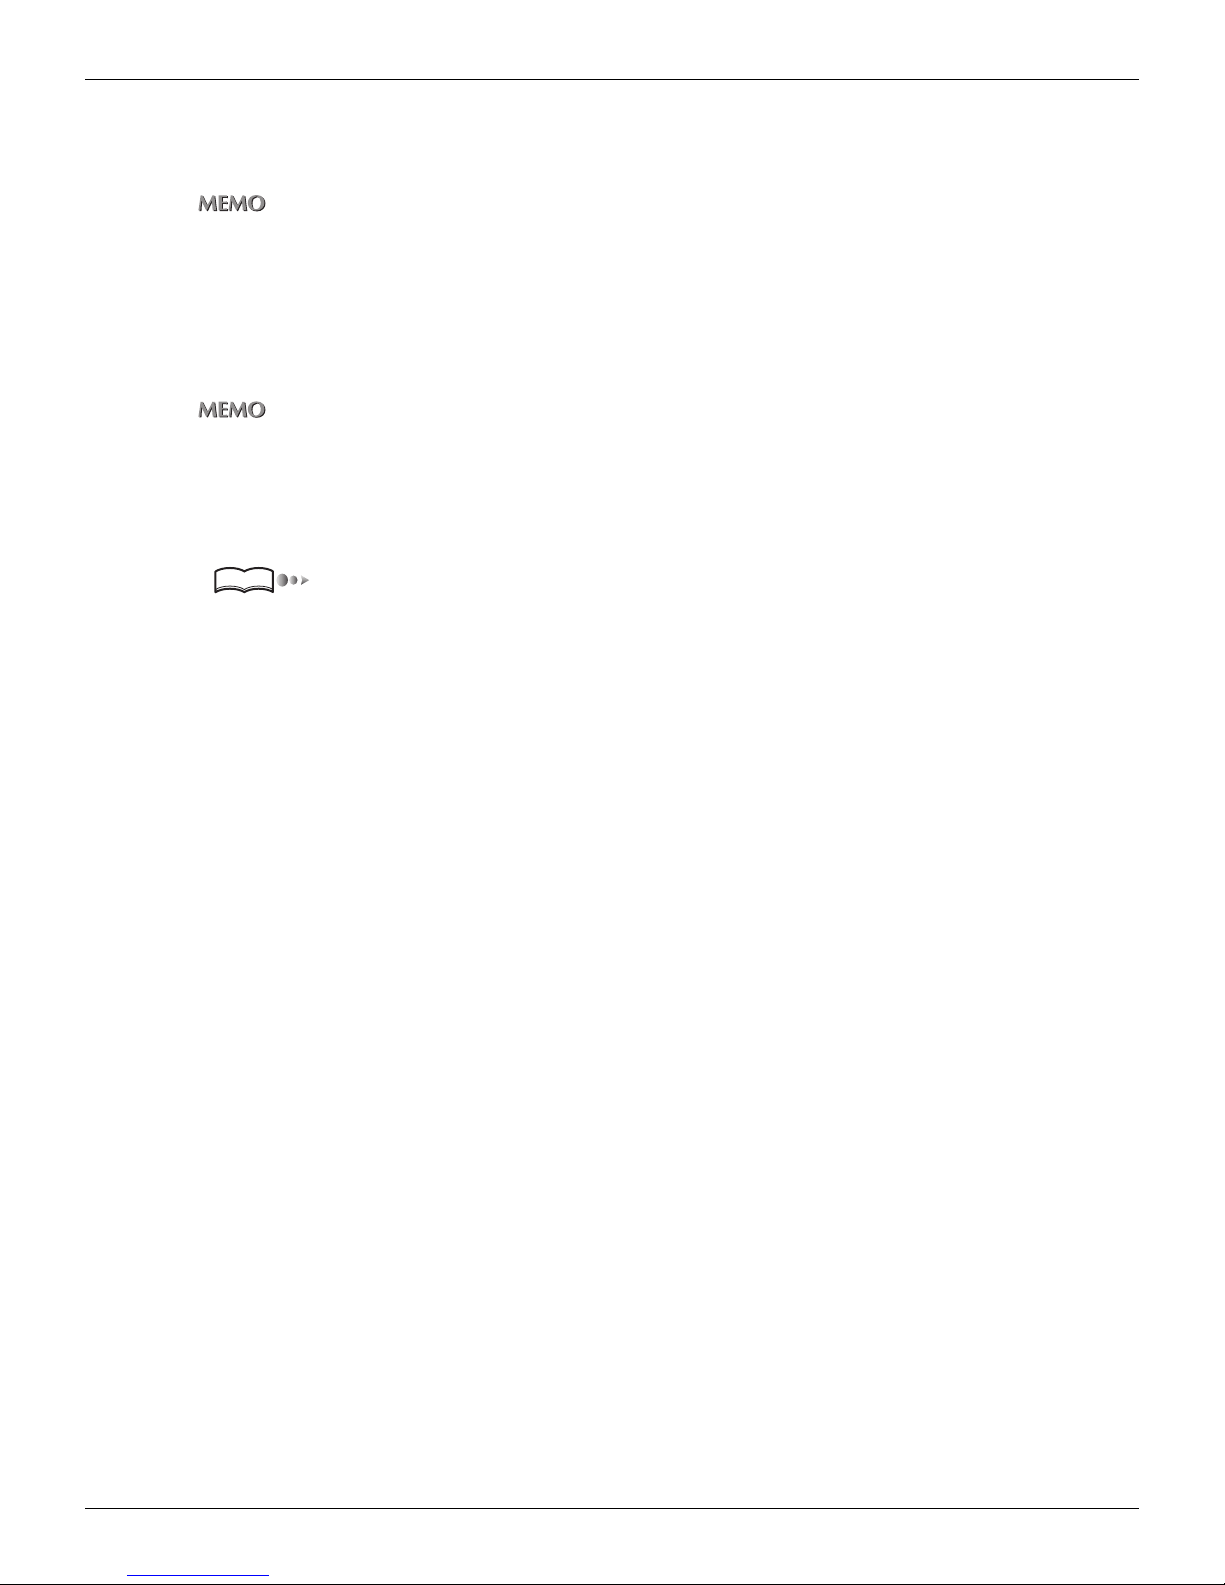
22.To use Firewall when transmitting, set to ON and touch [OK].
The display returns to the [Transmission Address Input] screen.
About how to use the [Firewall], please ask network administrator.
23.Confirm settings and touch [ENTRY].
The contents you set are saved.
The display returns to the [Select Transmission Object] screen (FTP).
The Profile Name you input appears on the LCD screen.
The [ENTRY] becomes effective when all keys ([Profile Name], [Host Address], [File Path], [Login] and [Password]) are input.
●Revision and Deletion of FTP server
Use the Web Utility for copier or Key Operator Mode to revise and delete a registered FTP server.
Reference
“Changing / Deleting the destination” on page 95.
43
Chapter 2 : Before Using the Scanning Features
Page 45

Chapter 3 : Using the Scanning Features
3-1 Activating the Scan Mode........................................................... 45
3-2 Selecting the Destination............................................................46
3-3 Setting the Original Document................................................... 67
3-4 Setting Scanner Features ........................................................... 68
3-5 Starting Scanning........................................................................82
3-6 Checking Status and Scanner Settings..................................... 83
44
Page 46
3-1 Activating the Scan Mode
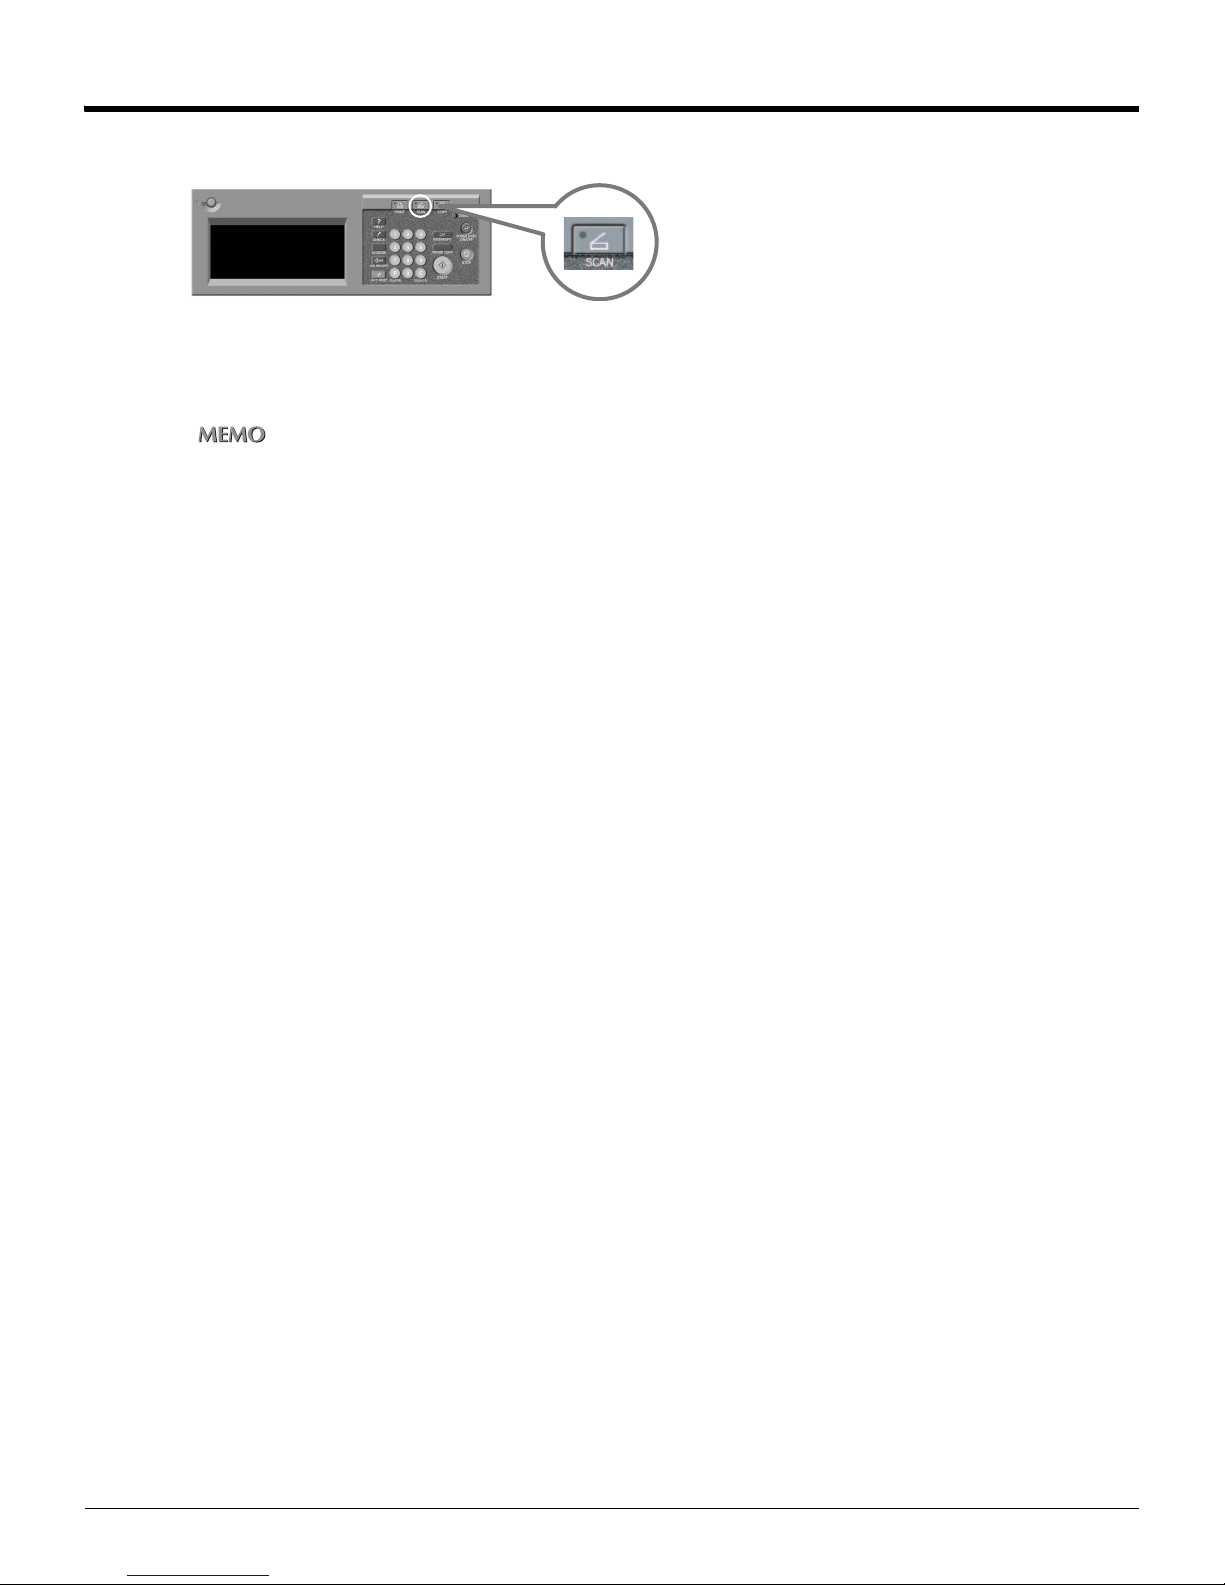
When you scan documents, first press [SCAN] on the control panel of the Copier.
Control Panel
You cannot activate the Scan Mode under the following situations:
• When an error message is displayed on the LCD screen.
For information about error messages, please refer to the “Copier‘s User’s Guide”.
45
Chapter 3 : Using the Scanning Features
Page 47
3-2 Selecting the Destination
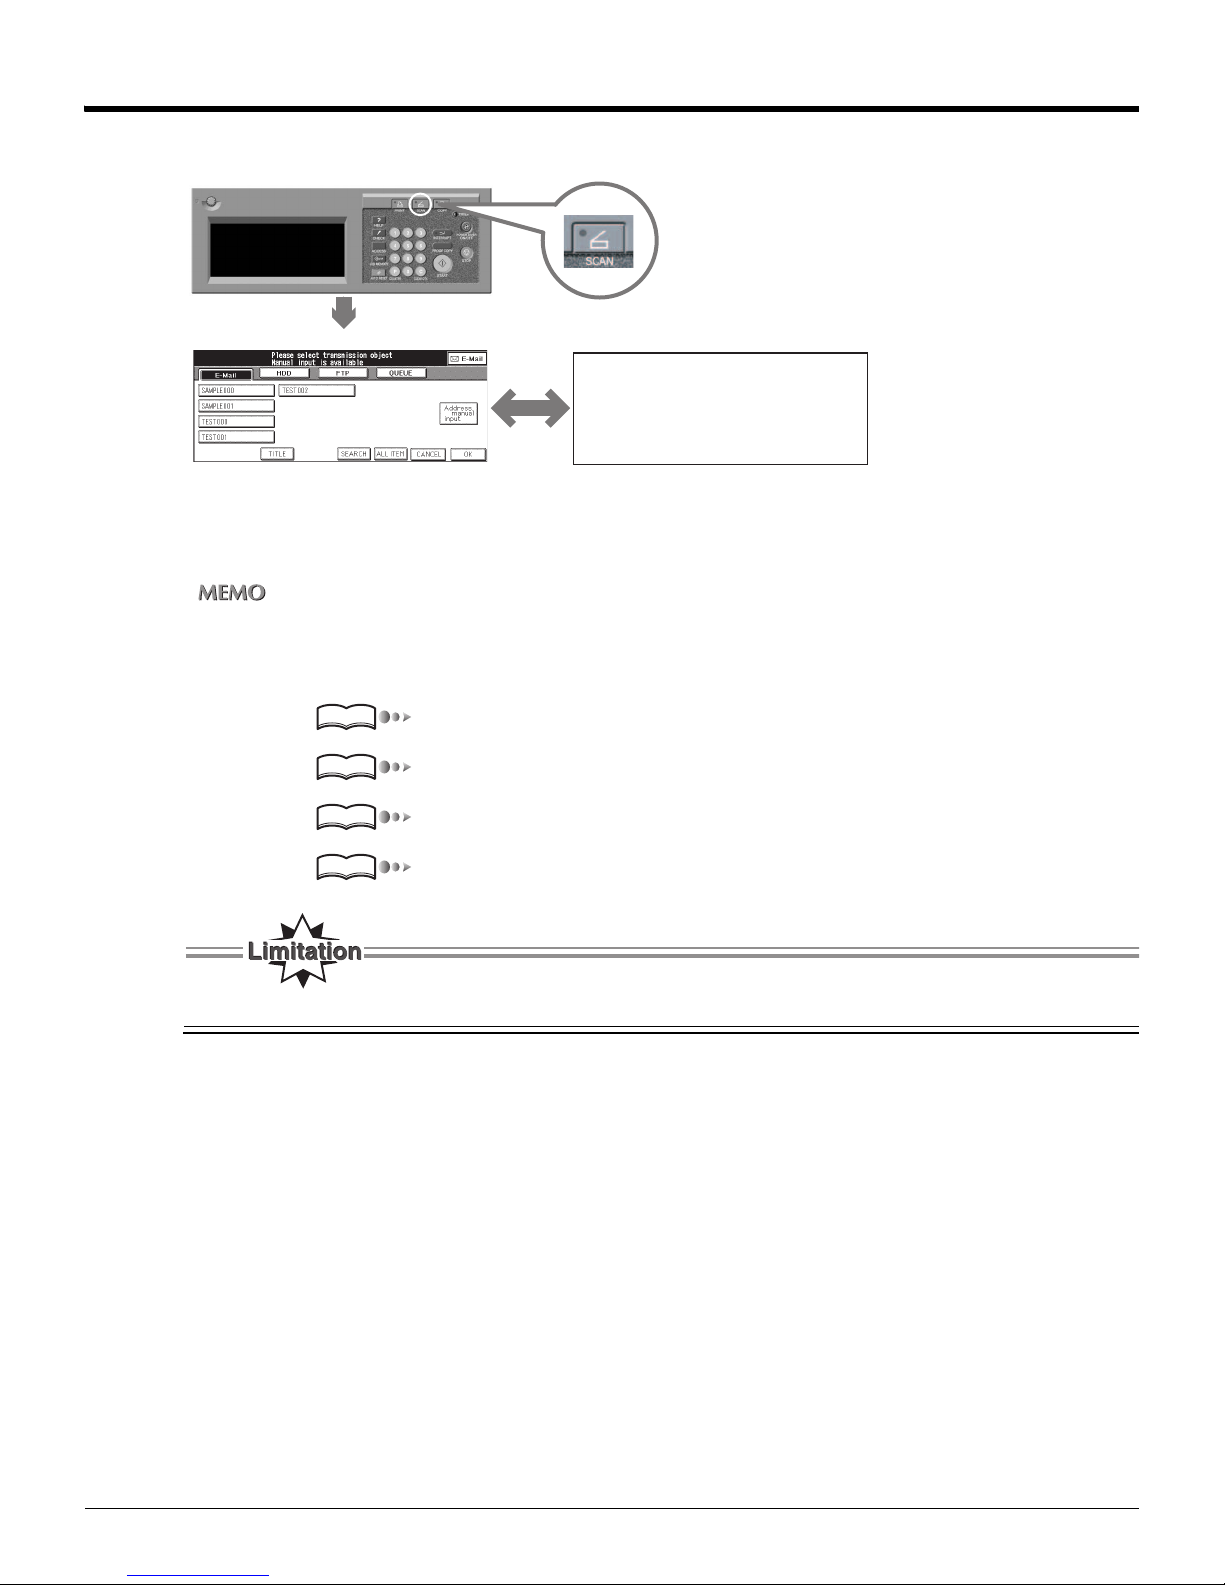
When you press [SCAN], scanning is activated and the [Select Transmission Object] screen appears.
Control Panel
[Select Transmission Object] screen (E-Mail)
[Select Transmission Object] screen
[Title input] screen
[Search a Transmission Object] screen
On the [Select Transmission Object] screen, you select the key from [E-Mail], [HDD], [FTP] or [QUEUE] and set items corresponding with your selection.
You can select multiple destinations. In this case, select the next destination after setting of items for the destination already selected. Omit the procedure to press [SCAN] to retain and edit the settings for the destination
already selected.
• E-Mail: “Selecting the Destination (E-Mail)” on page 47.
• HDD: “Selecting the Storage Location (HDD)” on page 56.
• FTP: “Selecting the Destination (FTP)” on page 61.
• QUEUE: “Selecting the Destination (QUEUE)” on page 66.
After the scanning operation, to activate the Copy mode by pressing the [COPY] button of the control panel.
Reference
Reference
Reference
Reference
46
Chapter 3 : Using the Scanning Features
Page 48

3-2 Selecting the Destination (Continued)
●Selecting the Destination (E-Mail)
The [E-Mail] is selected when the [Select Transmission Object] screen which appears by pressing the [SCAN] button of the control panel.
When you select the [E-Mail] (Scan to E-Mail), you can set the title and the address of E-mail and transmit the scanned data as
an attached file.
If the size of scanned data exceeds a limit set beforehand, URL which links to the location of scanning data is
sent by an E-Mail.
For detail about restrictions on the size of attached file, refer to "Print Controller User's Guide".
You can also select the other destinations for [HDD], [FTP], and/or [QUEUE] in a single scanning.
You can select the destinations (E-Mail Address) using the following method:
• Select from destinations already registered Page 48
• Select from destinations already registered using search Page 49
• Set the destination by manual input Page 51
Reference
Reference
Reference
For information about the title, please refer “Setting the Title” on page 54.
Total number of letters of addresses is up to 512 characters including "," and "(space)".
47
Chapter 3 : Using the Scanning Features
Page 49
Selecting from destinations already registered
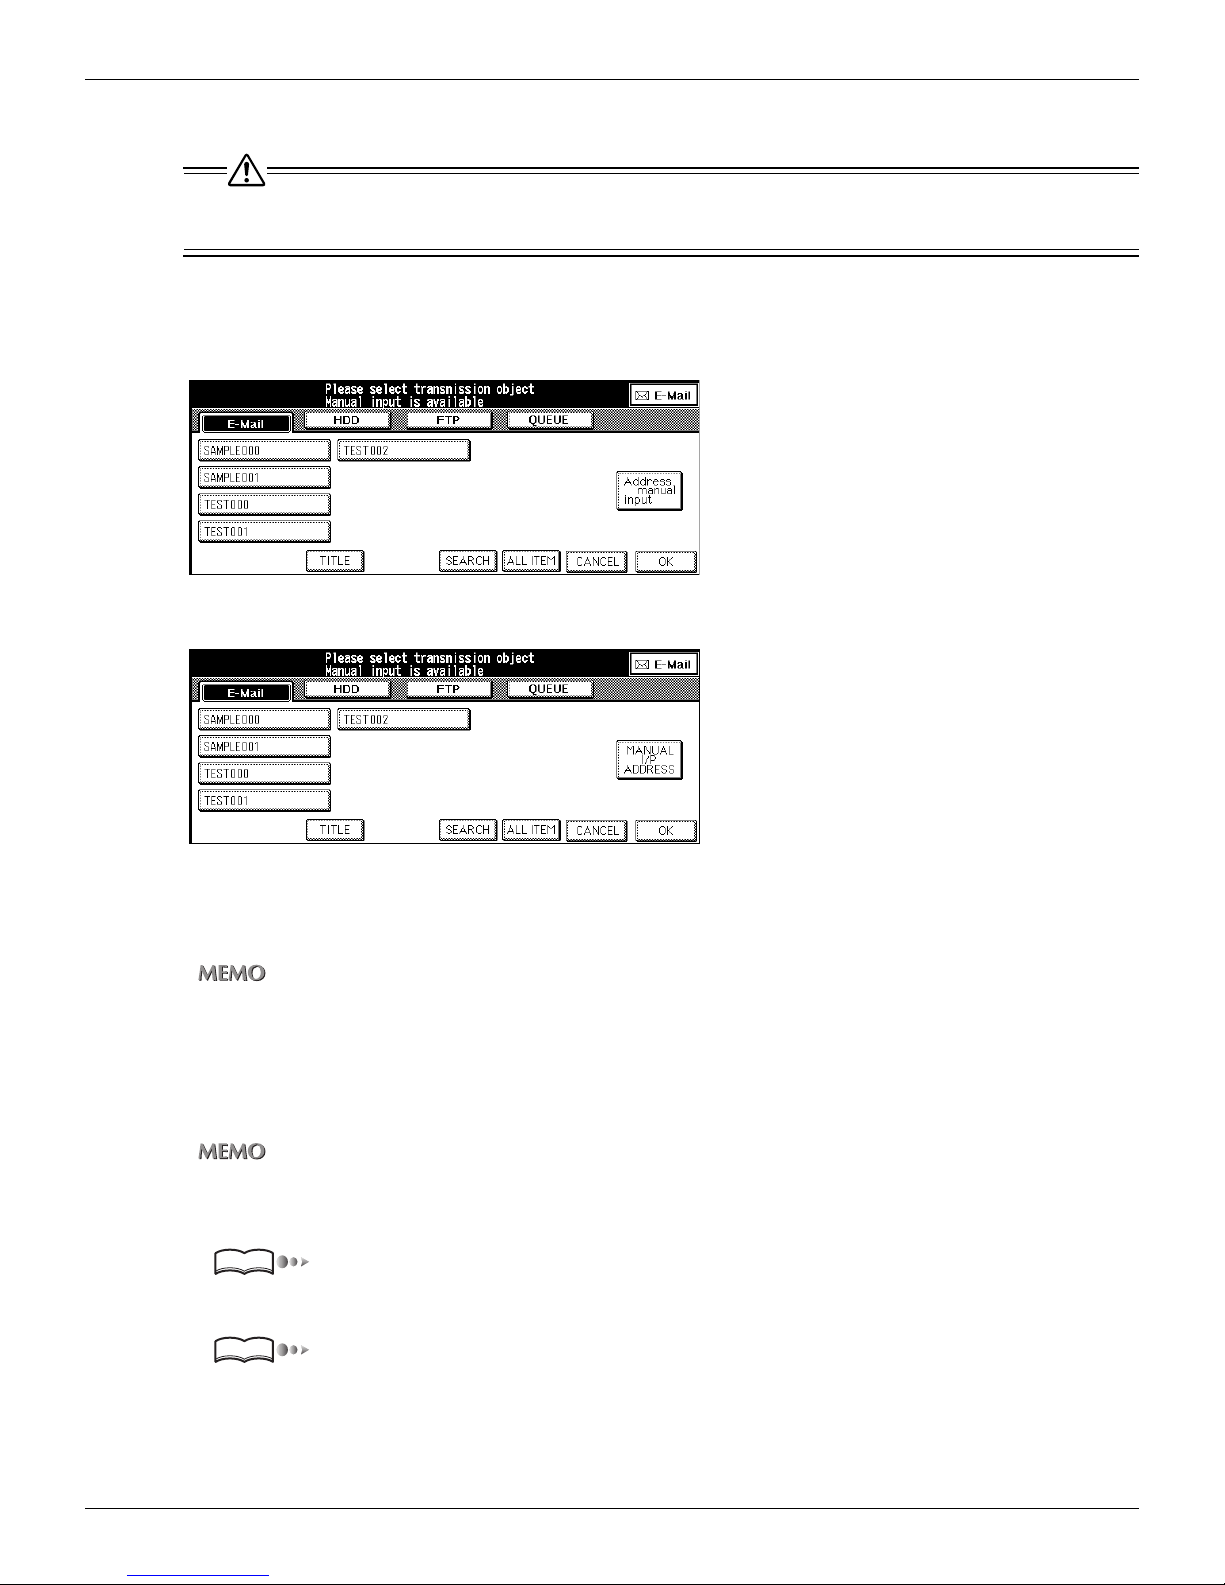
If you have selected the other transmission object or destination, skip the procedure 1 to retain and edit the settings you have made already.
1. Press [SCAN] button on the control panel.
The [Select Transmission Object] screen is displayed on the LCD screen.
• U.S.A.
• Others
3-2 Selecting the Destination (Continued)
2. Make sure that [E-Mail] is selected.
When the [E-Mail] is not selected, touch [E-Mail].
You can exit the selected transmission object mode by touching the same button again.
3. Select the Entry Name (E-Mail address) from the list.
Select the Entry Name (E-Mail address) from the list of registered addresses on the LCD screen.
Total number of letters of addresses is up to 512 characters.
To select more than one E-Mail address, please refer to “Setting multiple destinations” on page 55.
4. According to need, set the Title.
Reference
“Setting the Title” on page 54.
5. Set the original document.
Reference
“Setting the Original Document” on page 67.
48
Chapter 3 : Using the Scanning Features
Page 50
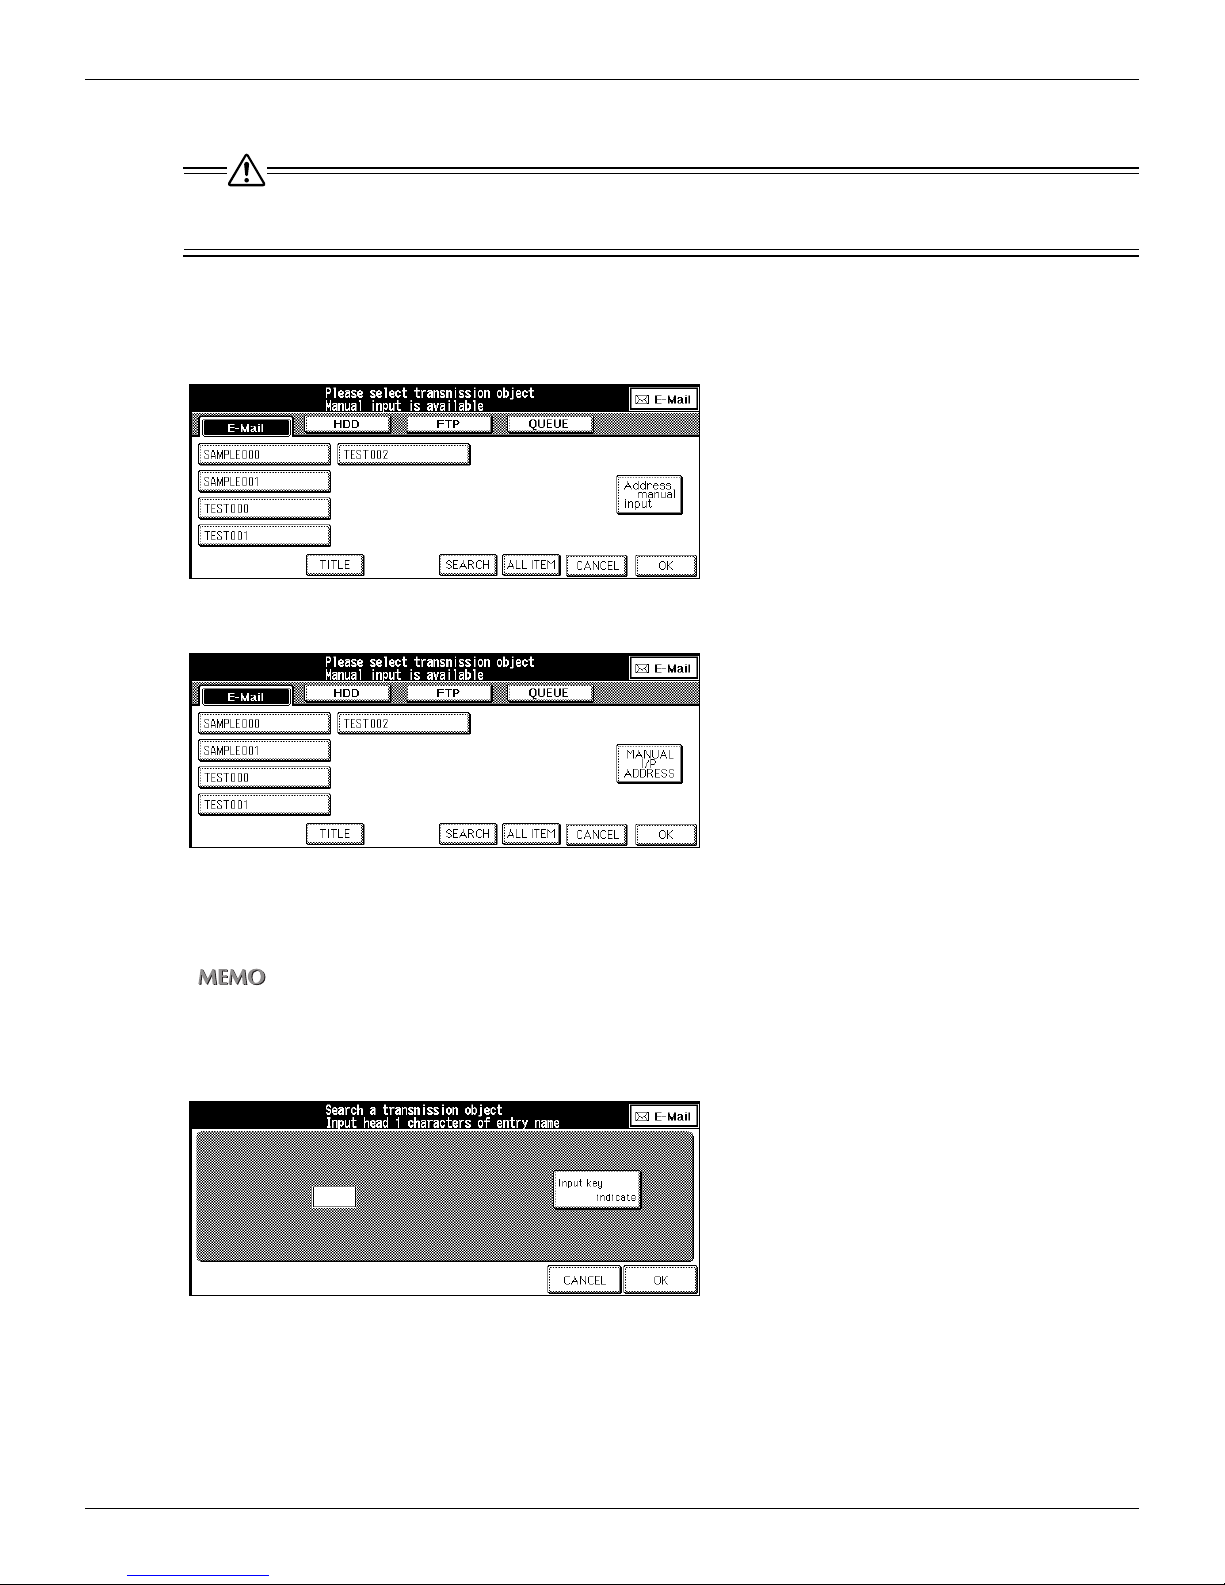
Selecting destinations already registered using Search
If you have selected the other transmission object or destination, skip the procedure 1 to retain and edit the settings you have made already.
1. Press [SCAN] button on the control panel.
The [Select Transmission Object] screen is displayed on the LCD screen.
• U.S.A.
• Others
3-2 Selecting the Destination (Continued)
2. Make sure that [E-Mail] is selected.
When the [E-Mail] is not selected, touch [E-Mail].
You can exit the selected transmission object mode by touching the same button again.
3. Touch [SEARCH].
[Search a Transmission Object] screen appears.
49
Chapter 3 : Using the Scanning Features
Page 51
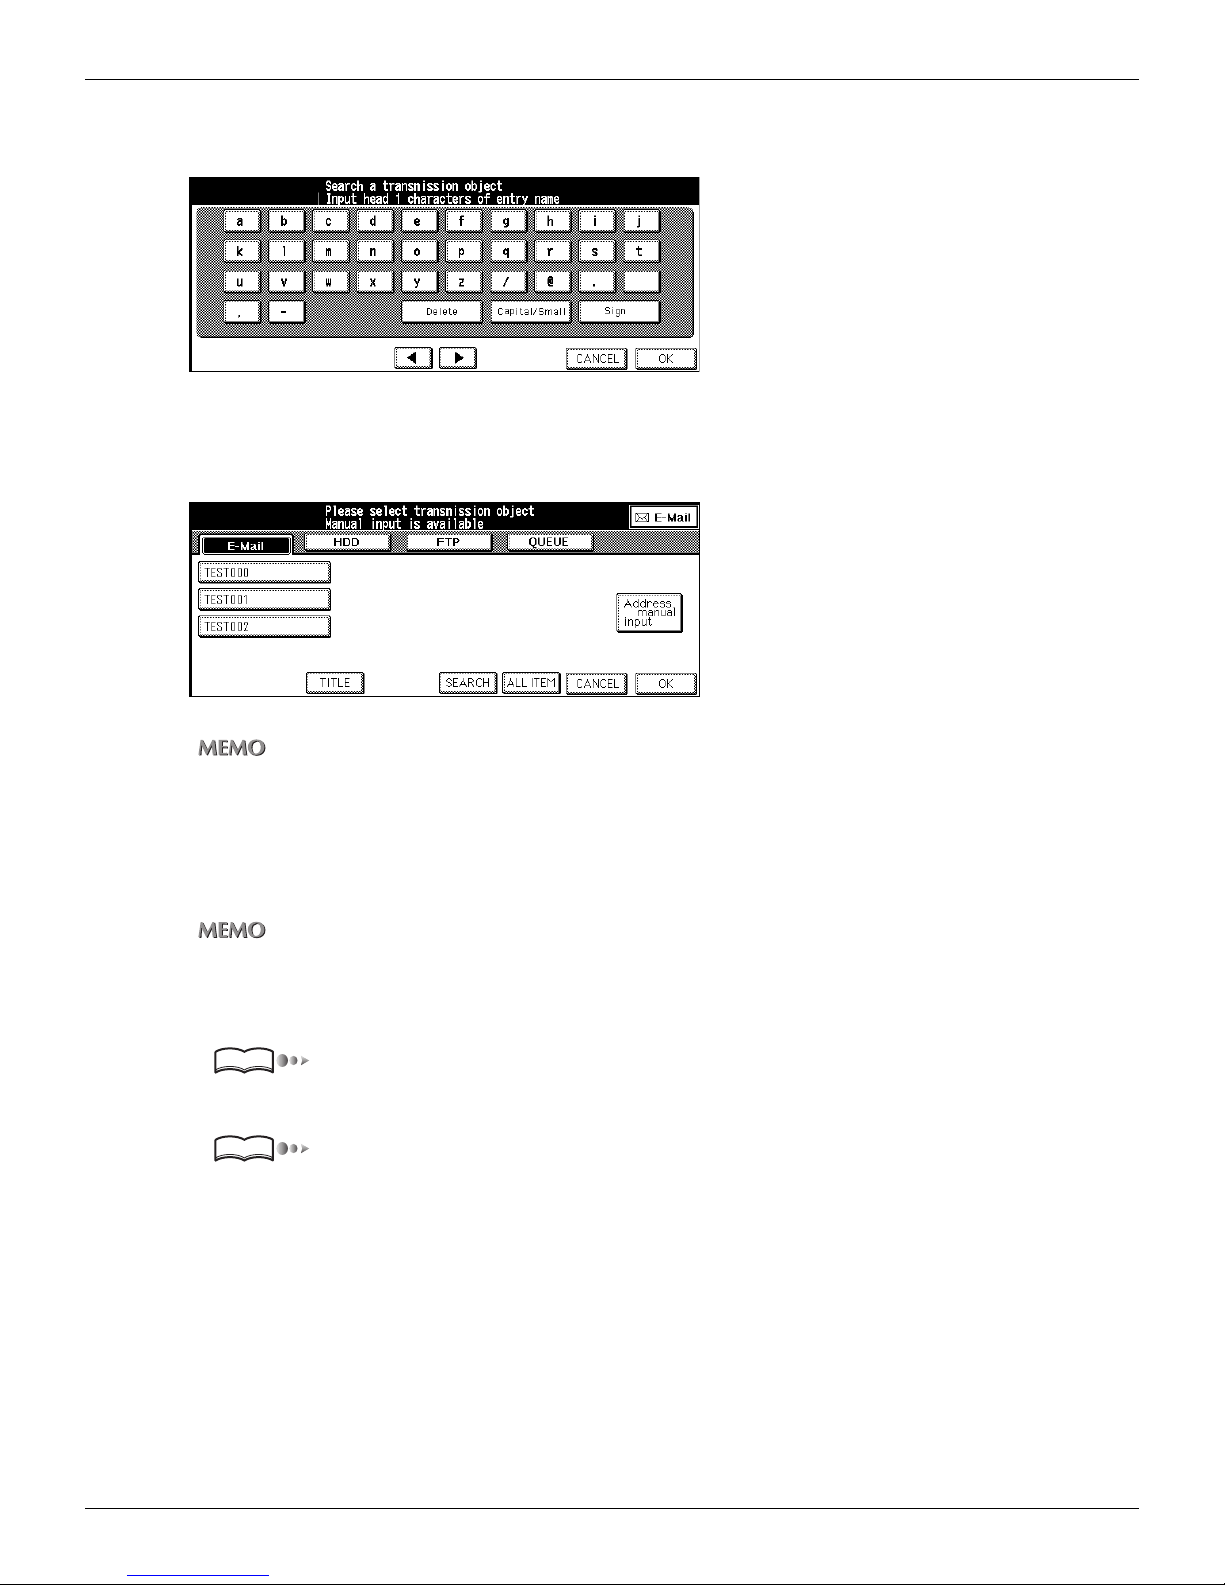
4. Touch [Input key indicate].
The [Keyboard Input] screen appears.
5. Enter the first letter of the Entry Name to search.
[Search results] screen appears.
The Entry Name corresponding the condition are listed on the LCD screen.
3-2 Selecting the Destination (Continued)
• Input numbers with the Keypad of the control panel.
• For information about inputting text, please refer to “Inputting Text” on page 25.
6. Select the Entry Name from the list.
Select the Entry Name from the list of search results on the LCD screen.
Total number of letters of addresses is up to 512 characters.
• To select more than one E-Mail address, please refer to “Setting multiple destinations” on page 55.
• At this stage, you can touch [ALL ITEM] to have all registered entry names displayed as before.
7. According to need, set the Title.
Reference
“Setting the Title” on page 54.
8. Set the original document.
Reference
“Setting the Original Document” on page 67.
50
Chapter 3 : Using the Scanning Features
Page 52
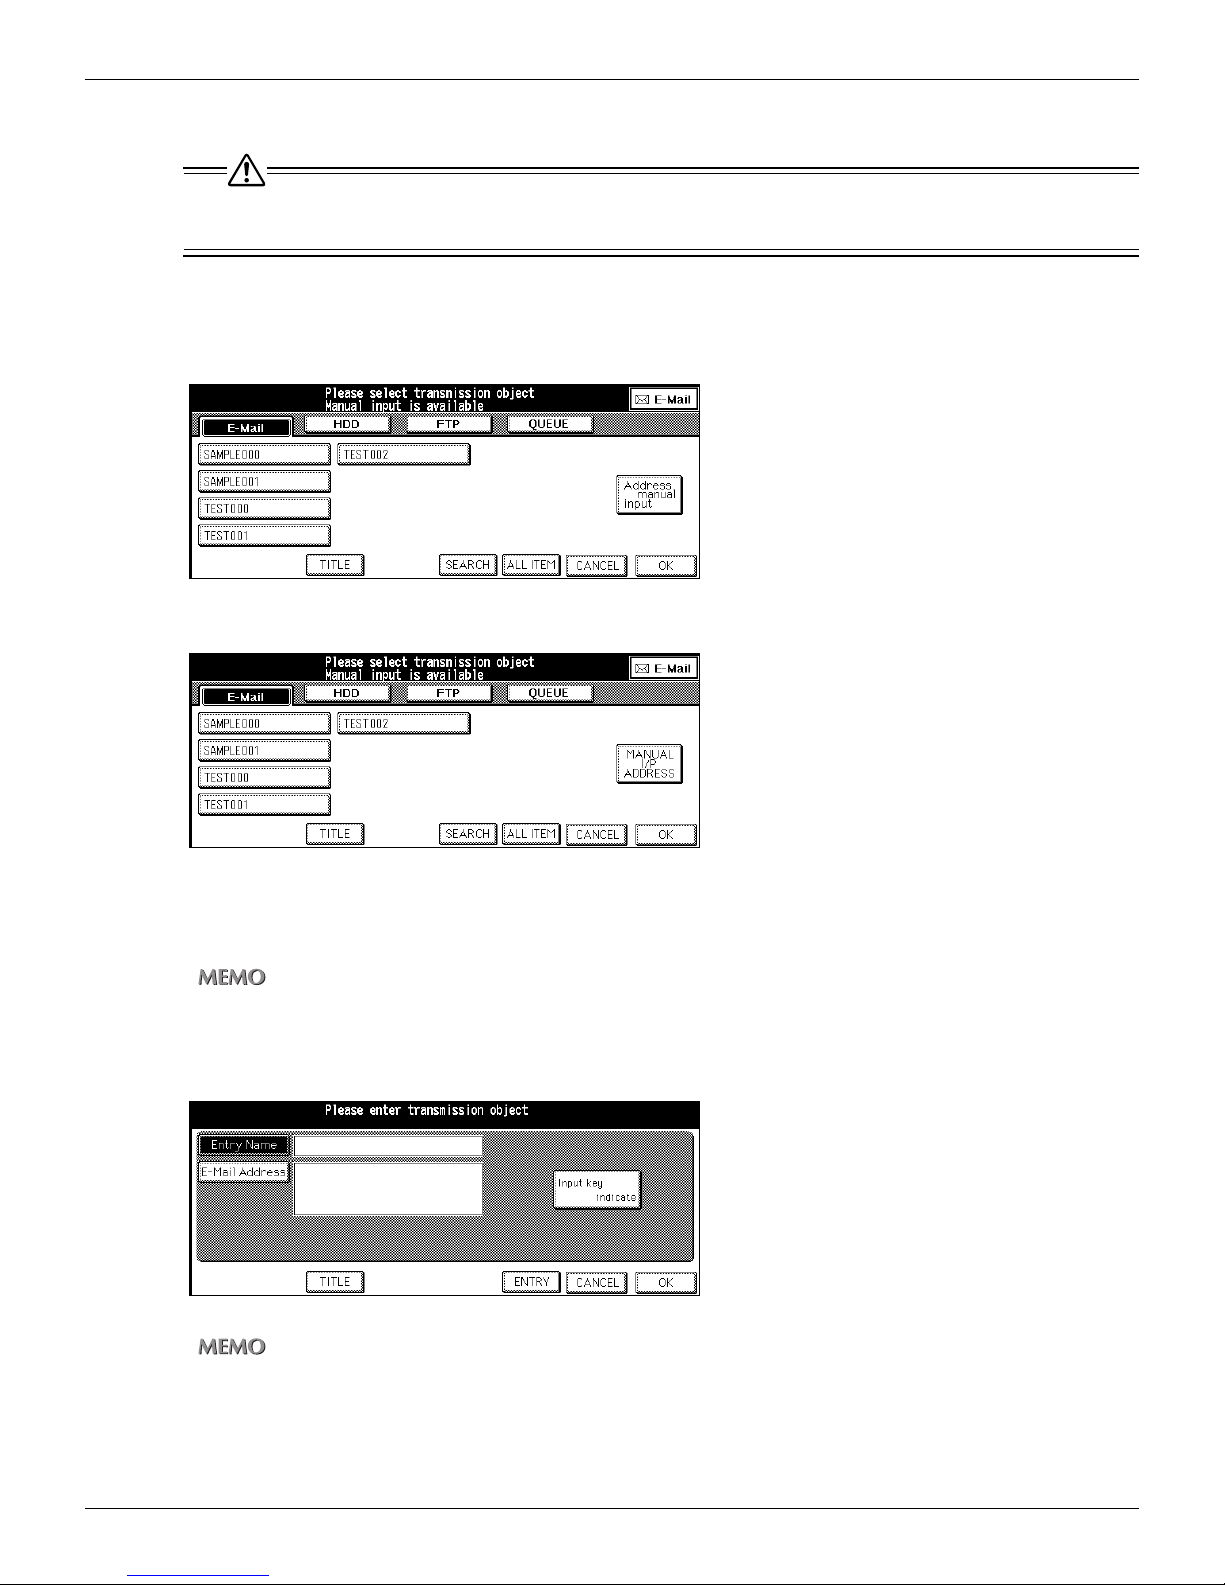
Setting the destination by manual inputting
If you have selected the other transmission object or destination, skip the procedure 1 to retain and edit the settings you have made already.
1. Press [SCAN] button on the control panel.
The [Select Transmission Object] screen is displayed on the LCD screen.
• U.S.A.
• Others
3-2 Selecting the Destination (Continued)
2. Make sure that [E-Mail] is selected.
When [E-Mail] is not selected, touch [E-Mail].
You can exit the selected transmission object mode by touching the same button again.
3. Touch [Address manual input] ([MANUAL I/P ADDRESS]).
The [Transmission Address Input] screen appears.
When you select the [E-Mail] again after using the Scan to E-Mail without escaping the Scan mode, the Entry
Name and the E-Mail Address which you input before are displayed.
4. Make sure that [Entry Name] is selected.
When [Entry Name] is not selected, touch [Entry Name].
51
Chapter 3 : Using the Scanning Features
Page 53
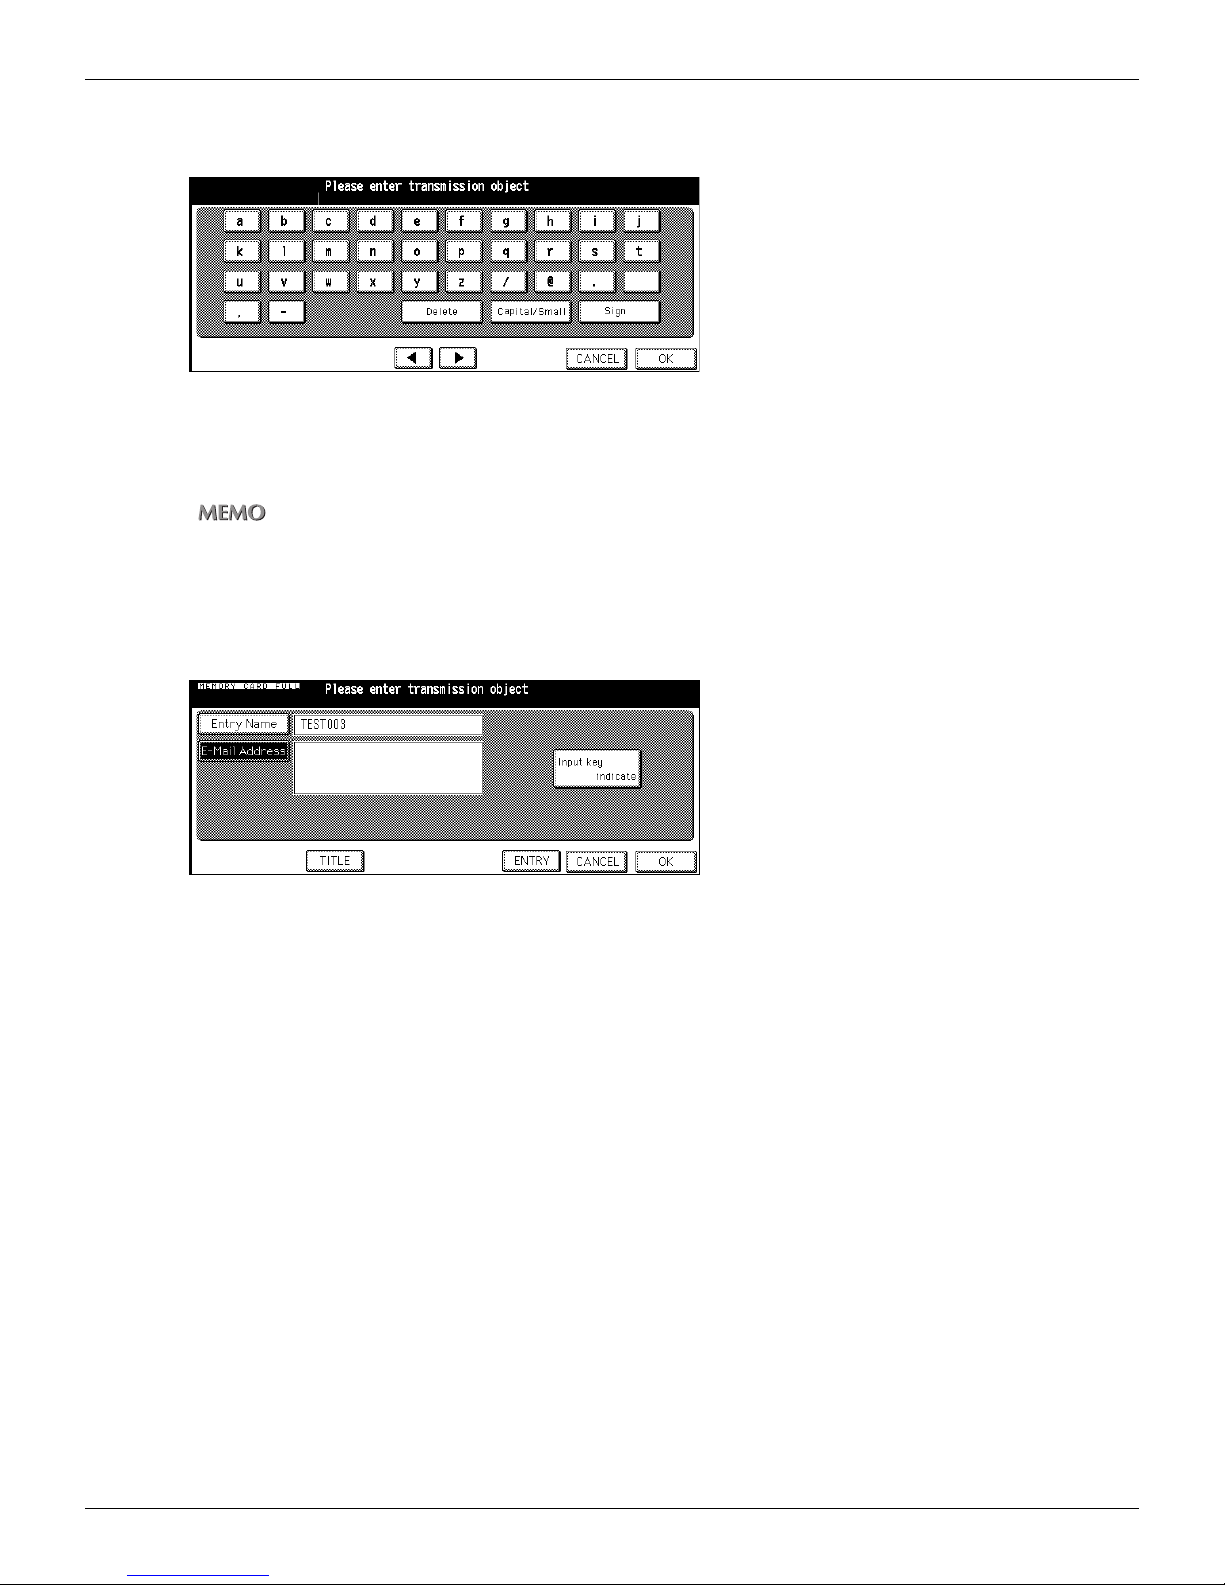
5. Touch [Input key indicate].
The [Keyboard Input] screen appears.
6. Input the Entry Name and touch [OK].
The display returns to the [Transmission Address Input] screen.
The Entry Name you inputted appears on the [Transmission Address Input] screen.
• The Entry Name should not exceed 24 alphanumeric characters.
• Input numbers with the Keypad of the control panel.
• For information about inputting text, please refer to “Inputting Text” on page 25.
7. Touch [E-Mail Address].
The [E-Mail Address] is highlighted.
3-2 Selecting the Destination (Continued)
8. Touch [Input key indicate].
The [Keyboard Input] screen appears.
52
Chapter 3 : Using the Scanning Features
Page 54
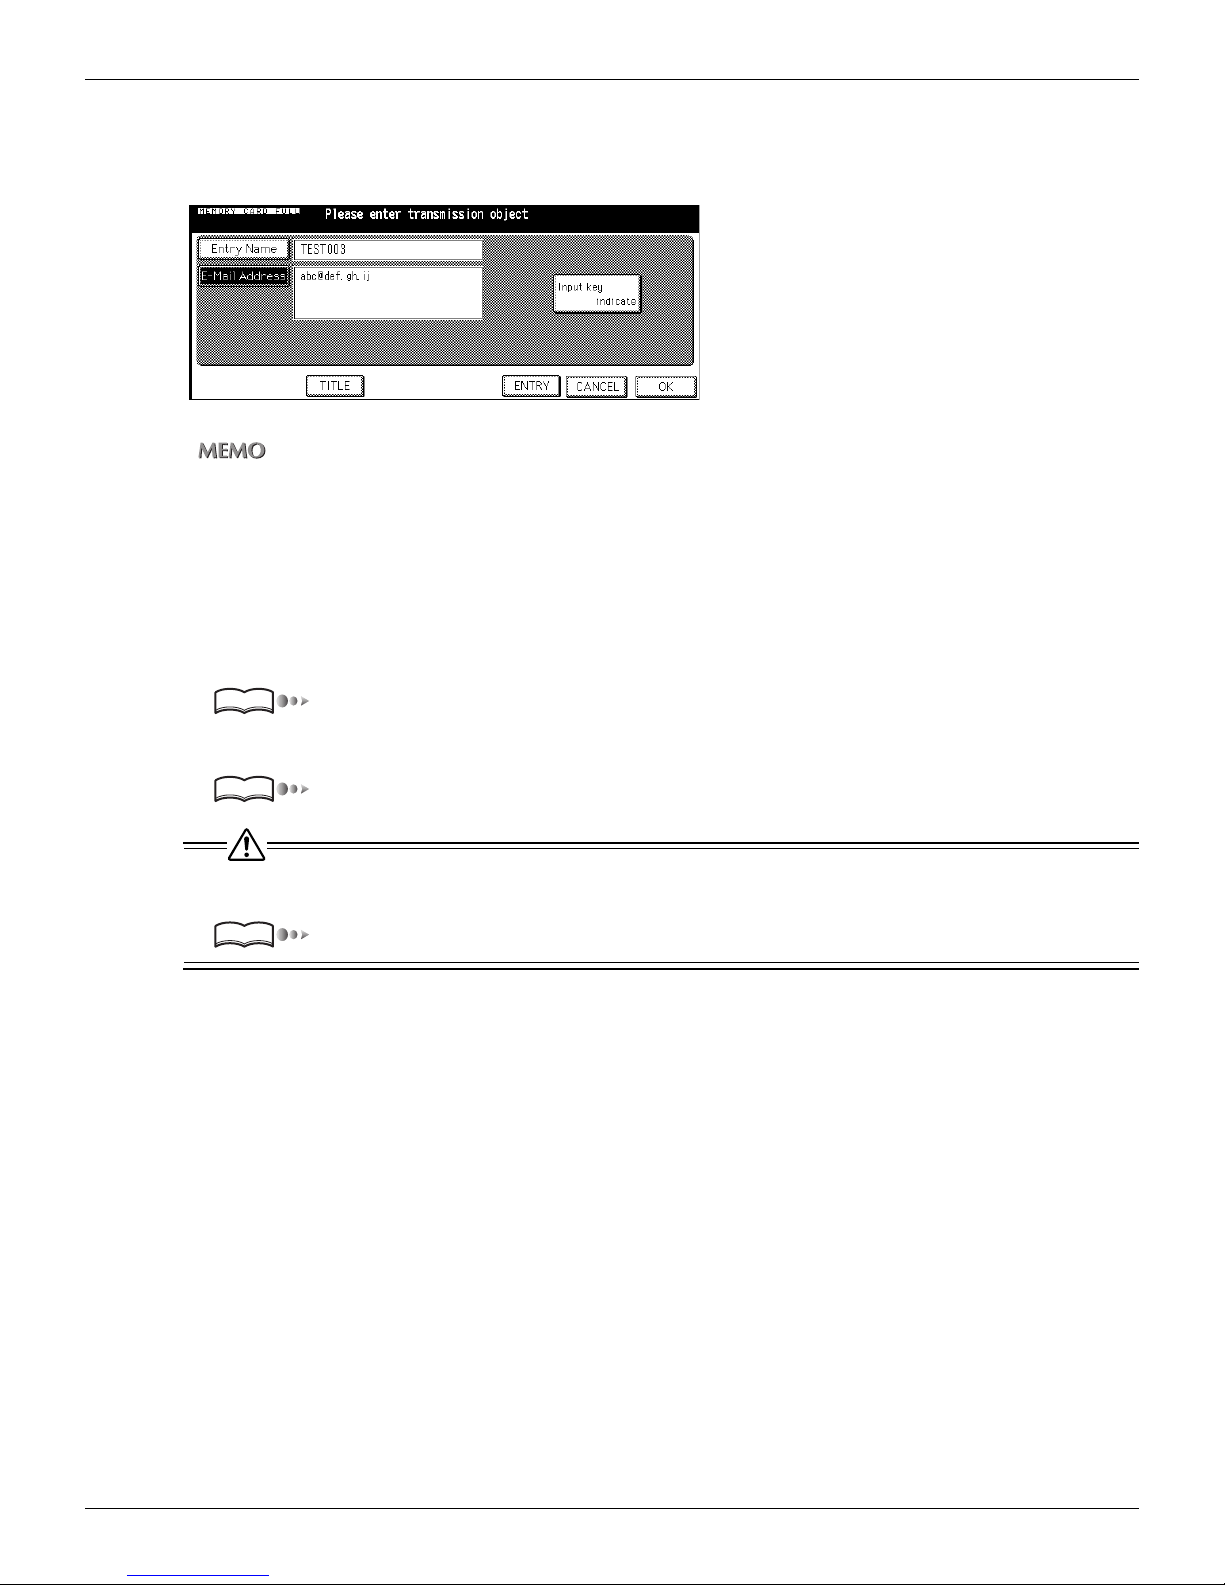
9. Input the E-Mail Address and touch [OK].
The display returns to the [Transmission Address Input] screen.
The E-Mail Address you input appears on the [Transmission Address Input] screen.
• Enter the E-Mail address in 54 alphanumerics. Only following symbols can be used:
@, - (hyphen), _(underscore), (space)
• Input numbers with the Keypad of the control panel.
• For information about inputting text, please refer to “Inputting Text” on page 25.
• About to select more than one E-Mail address, please refer to “Setting multiple destinations” on page 55.
• If you touch [ENTRY] at this stage, you can save the contents you inputted and the screen returns to the
[Select Transmission Object] screen on which the entry name you inputted is selected.
3-2 Selecting the Destination (Continued)
10.According to need, set the Title.
Reference
“Setting the Title” on page 54.
11. Set the original document.
Reference
An E-Mail Address you input by manual operation is not saved when you touch the [OK]. An E-Mail Address used
often should be registered when you touch the [ENTRY].
Reference
“Setting the Original Document” on page 67.
“Registering Destinations (E-Mail)” on page 29.
53
Chapter 3 : Using the Scanning Features
Page 55
3-2 Selecting the Destination (Continued)
Setting the Title
The Title of the E-Mail is " ’Filename’ has been scanned." (Default). However, when you select the [E-Mail] again after using
the Scan to E-Mail without escaping the Scan mode, the Title which you inputted before remains.
Change the Title as follows:
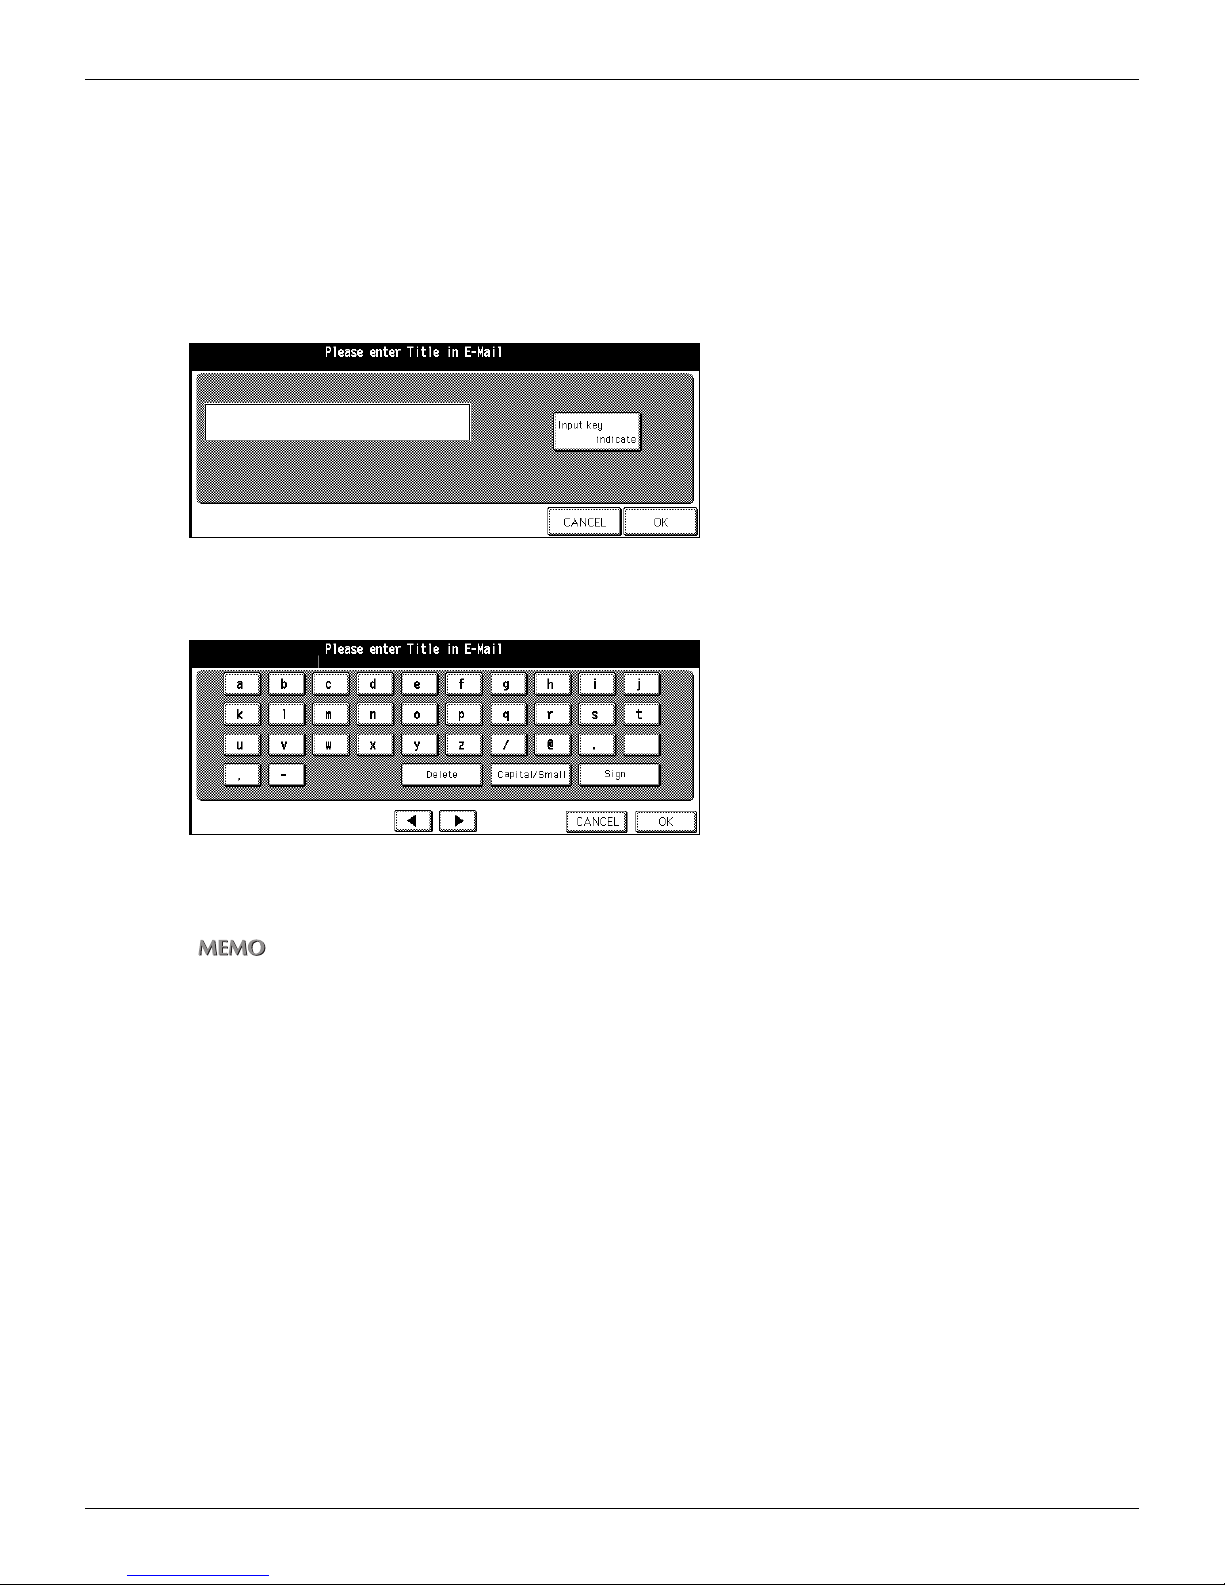
1. Touch [TITLE] on the [Select Transmission Object] screen (E-Mail) or the [Transmis-
sion Address Input] screen.
The [Title Input] screen appears.
2. Touch [Input key indicate].
The [Keyboard Input] screen appears.
3. Input the Title of the E-Mail Address and touch [OK].
The display returns to the [Select Transmission Object] screen or the [Transmission Address Input] screen.
• The Title should not exceed 45 alphanumeric characters.
• Input numbers with the Keypad of the control panel.
• For information about inputting text, please refer to “Inputting Text” on page 25.
54
Chapter 3 : Using the Scanning Features
Page 56
3-2 Selecting the Destination (Continued)
Setting multiple destinations
You can set multiple destinations with Scan to E-Mail.
Total number of letters of addresses is up to 512 characters.
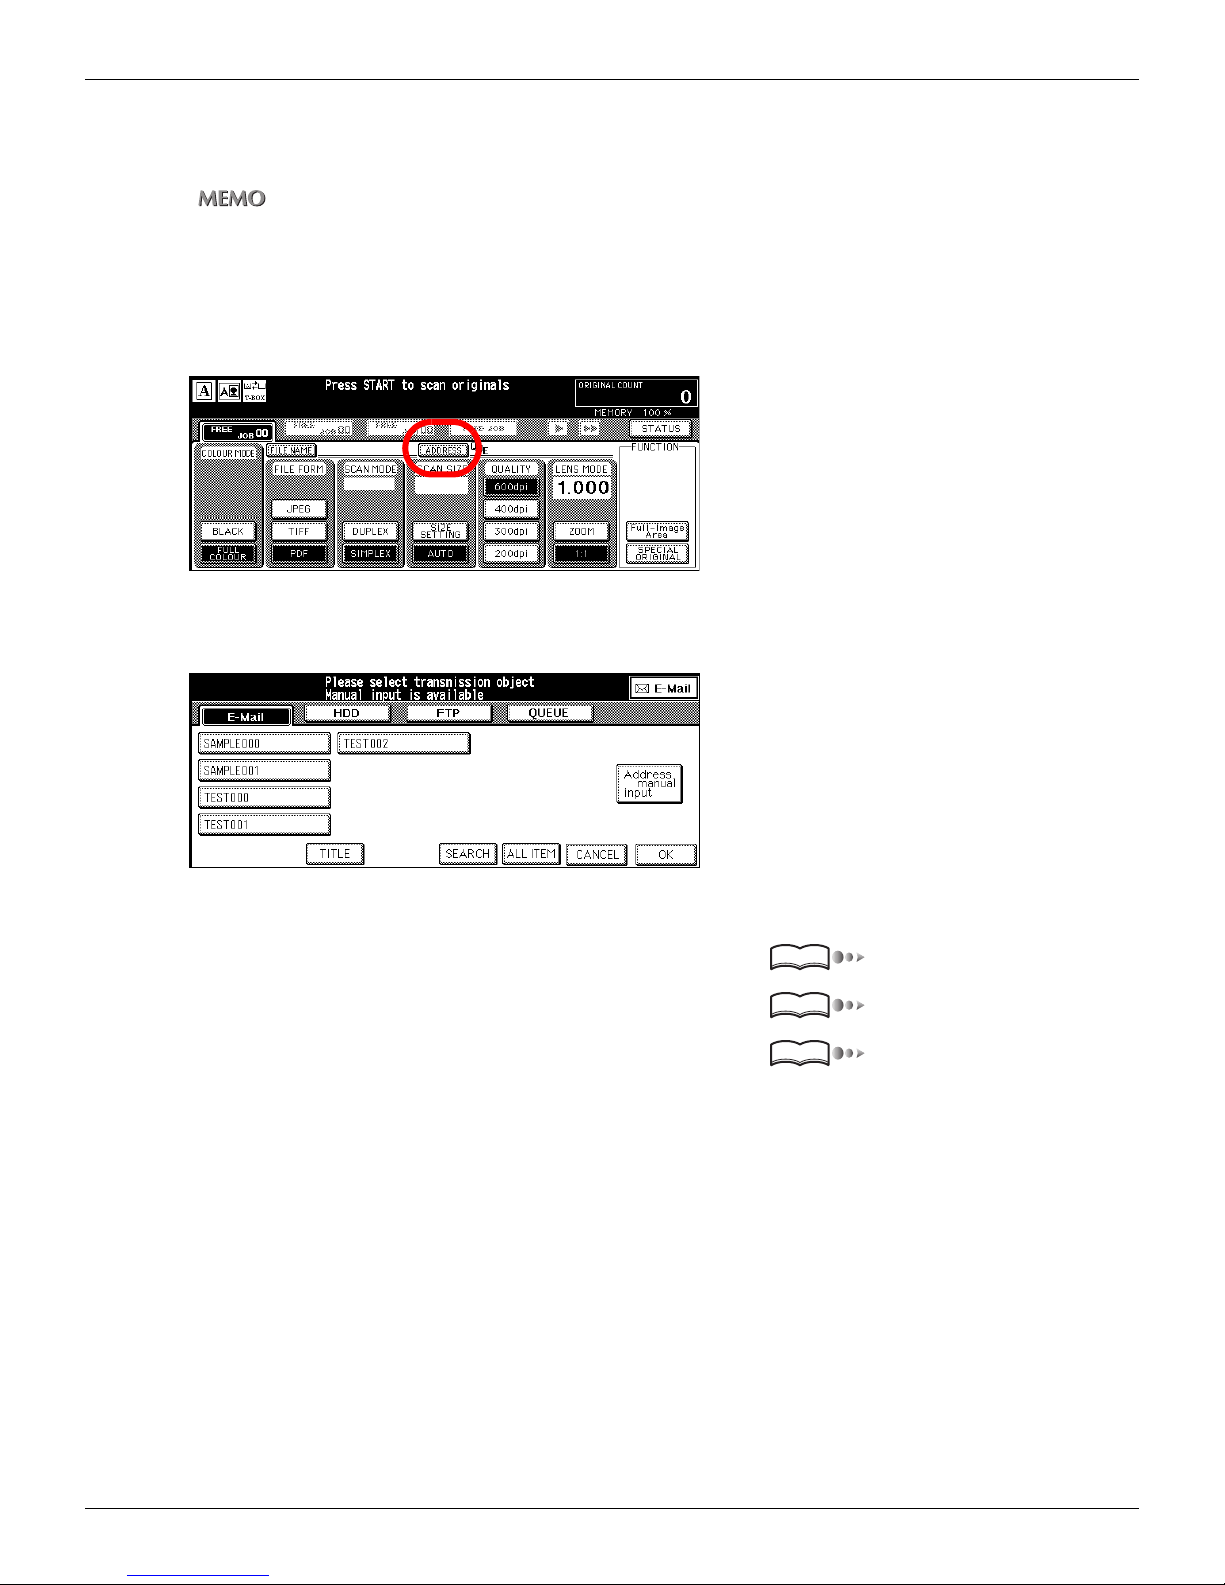
1. Touch [OK] on the [Select Transmission Object] screen (E-Mail), the [Transmission
Address Input] screen, or the [Search results] screen.
The [Scanner setting basic] screen appears.
2. Touch [ADDRESS].
The screen returns the [Transmission Address Input] screen.
3. Setting another E-Mail Address with the following procedures.
• select from the list of addresses registered Page 48
• select from the list of addresses registered with search Page 49
• set the address by manual inputting Page 51
Reference
Reference
Reference
55
Chapter 3 : Using the Scanning Features
Page 57
3-2 Selecting the Destination (Continued)
●Selecting the Storage Location (HDD)
When you select the [HDD] (Scan to HDD), you can store the scanned data by appointing the Box No. inside the print controller
with the KEYPAD of the Copier’s control panel.
You can select the destination (Box No.) as follows:
• Select the destination from destinations already registered Page 57
• Select the destination from destinations already registered with search Page 58
• Set the destination by manual inputting Page 60
Reference
Reference
Reference
You can select only one destination (Box No.).
56
Chapter 3 : Using the Scanning Features
Page 58
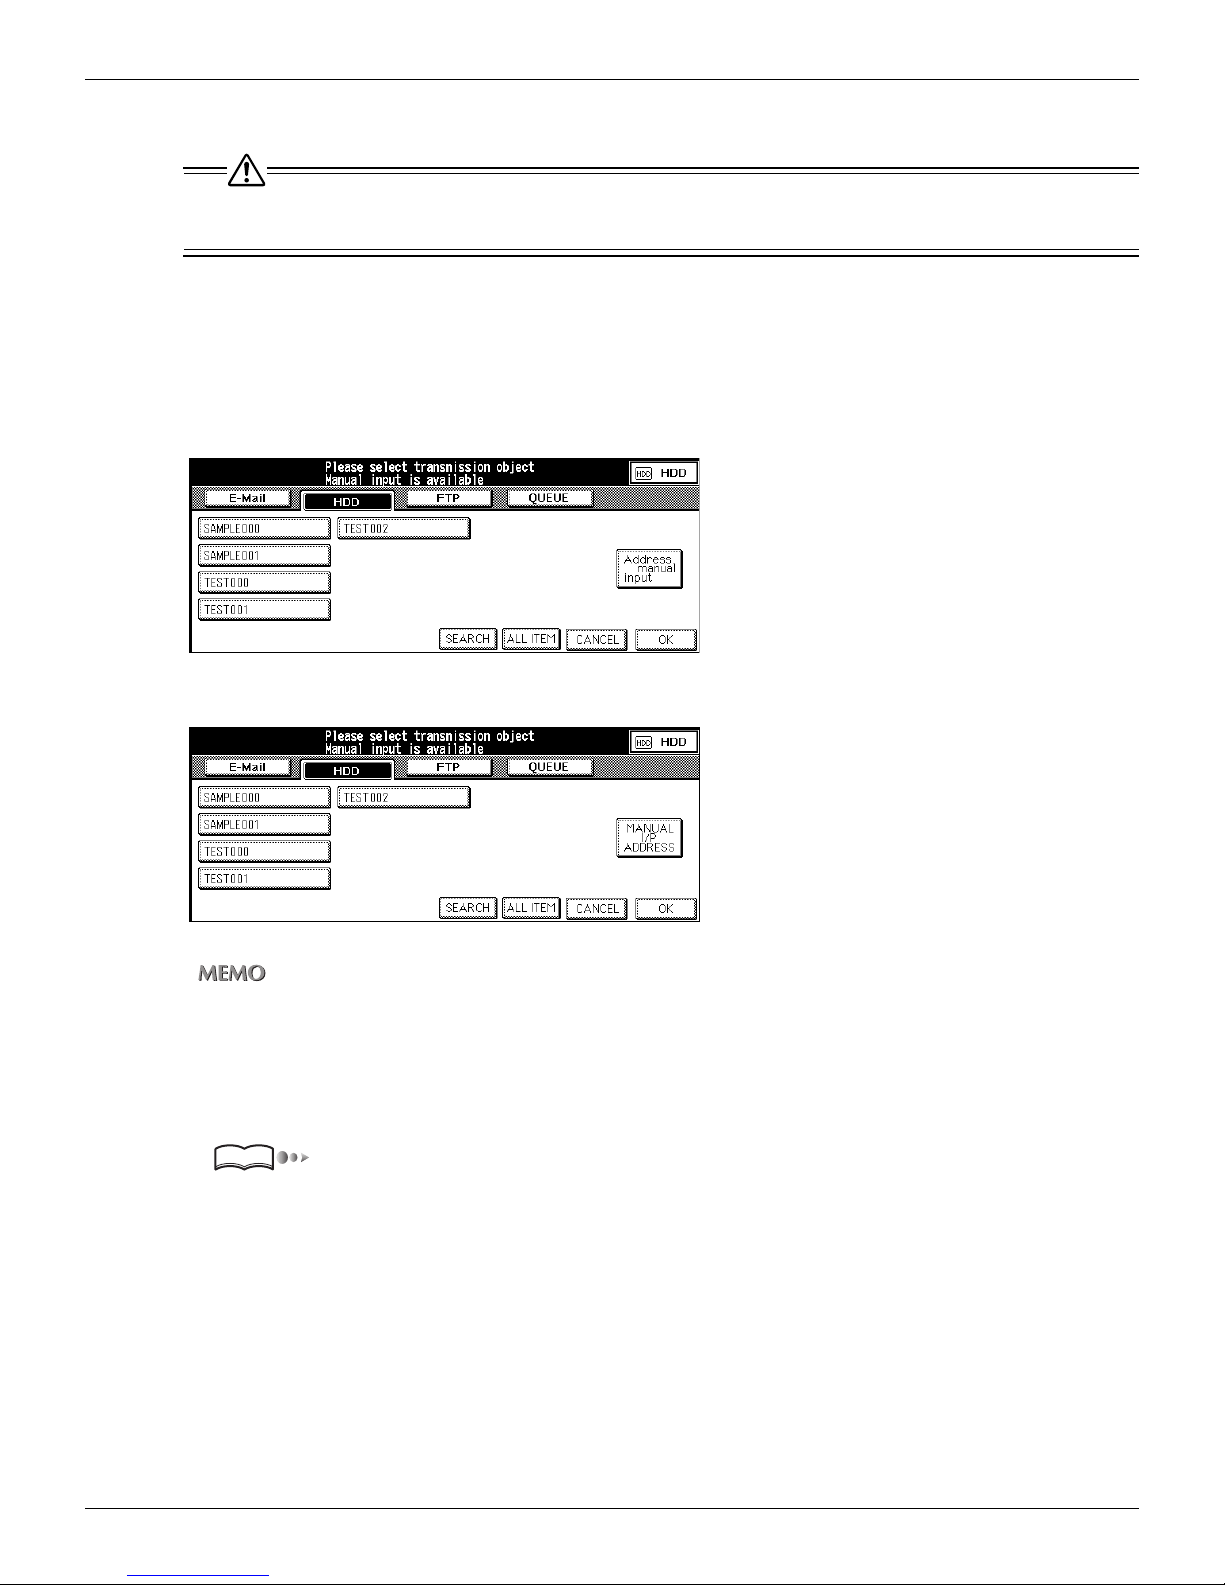
Selecting the destination from destinations already registered
If you have selected the other transmission object or destination, skip the procedure 1 to retain and edit the settings you have made already.
1. Press [SCAN] button on the control panel.
The [Select Transmission Object] screen (E-Mail) is displayed on the LCD screen.
2. Touch [HDD].
The [Select Transmission Object] screen (HDD) appears.
• U.S.A.
3-2 Selecting the Destination (Continued)
• Others
You can exit the selected transmission object mode by touching the same button again.
3. Select the Entry Name from the list.
Select the Entry Name from the list of registered Box No. on the LCD screen.
4. Set the original document.
Reference
“Setting the Original Document” on page 67.
57
Chapter 3 : Using the Scanning Features
Page 59
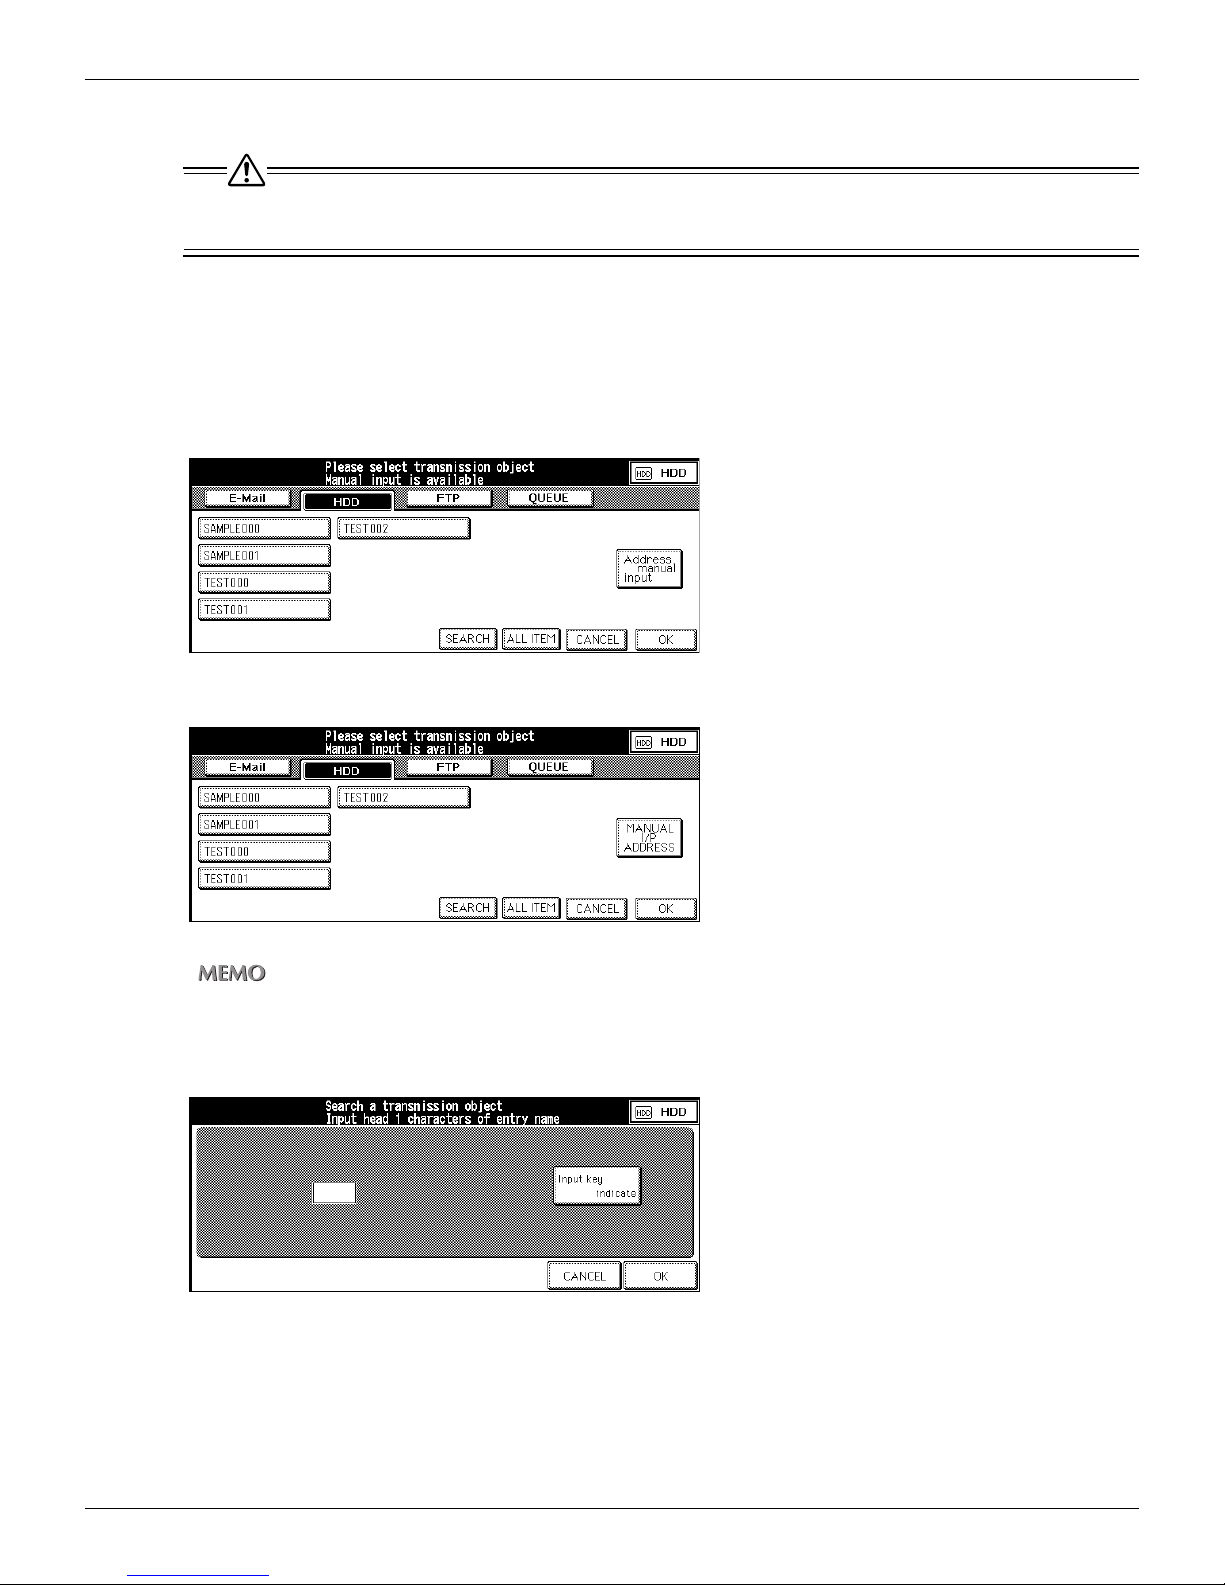
3-2 Selecting the Destination (Continued)
Selecting the destination from destinations already registered with Search
If you have selected the other transmission object or destination, skip the procedure 1 to retain and edit the settings you have made already.
1. Press [SCAN] button on the control panel.
The [Select Transmission Object] screen (E-Mail) is displayed on the LCD screen.
2. Touch [HDD].
The [Select Transmission Object] screen (HDD) appears.
• U.S.A.
• Others
You can exit the selected transmission object mode by touching the same button again.
3. Touch [SEARCH].
[Search a Transmission Object] screen appears.
58
Chapter 3 : Using the Scanning Features
Page 60
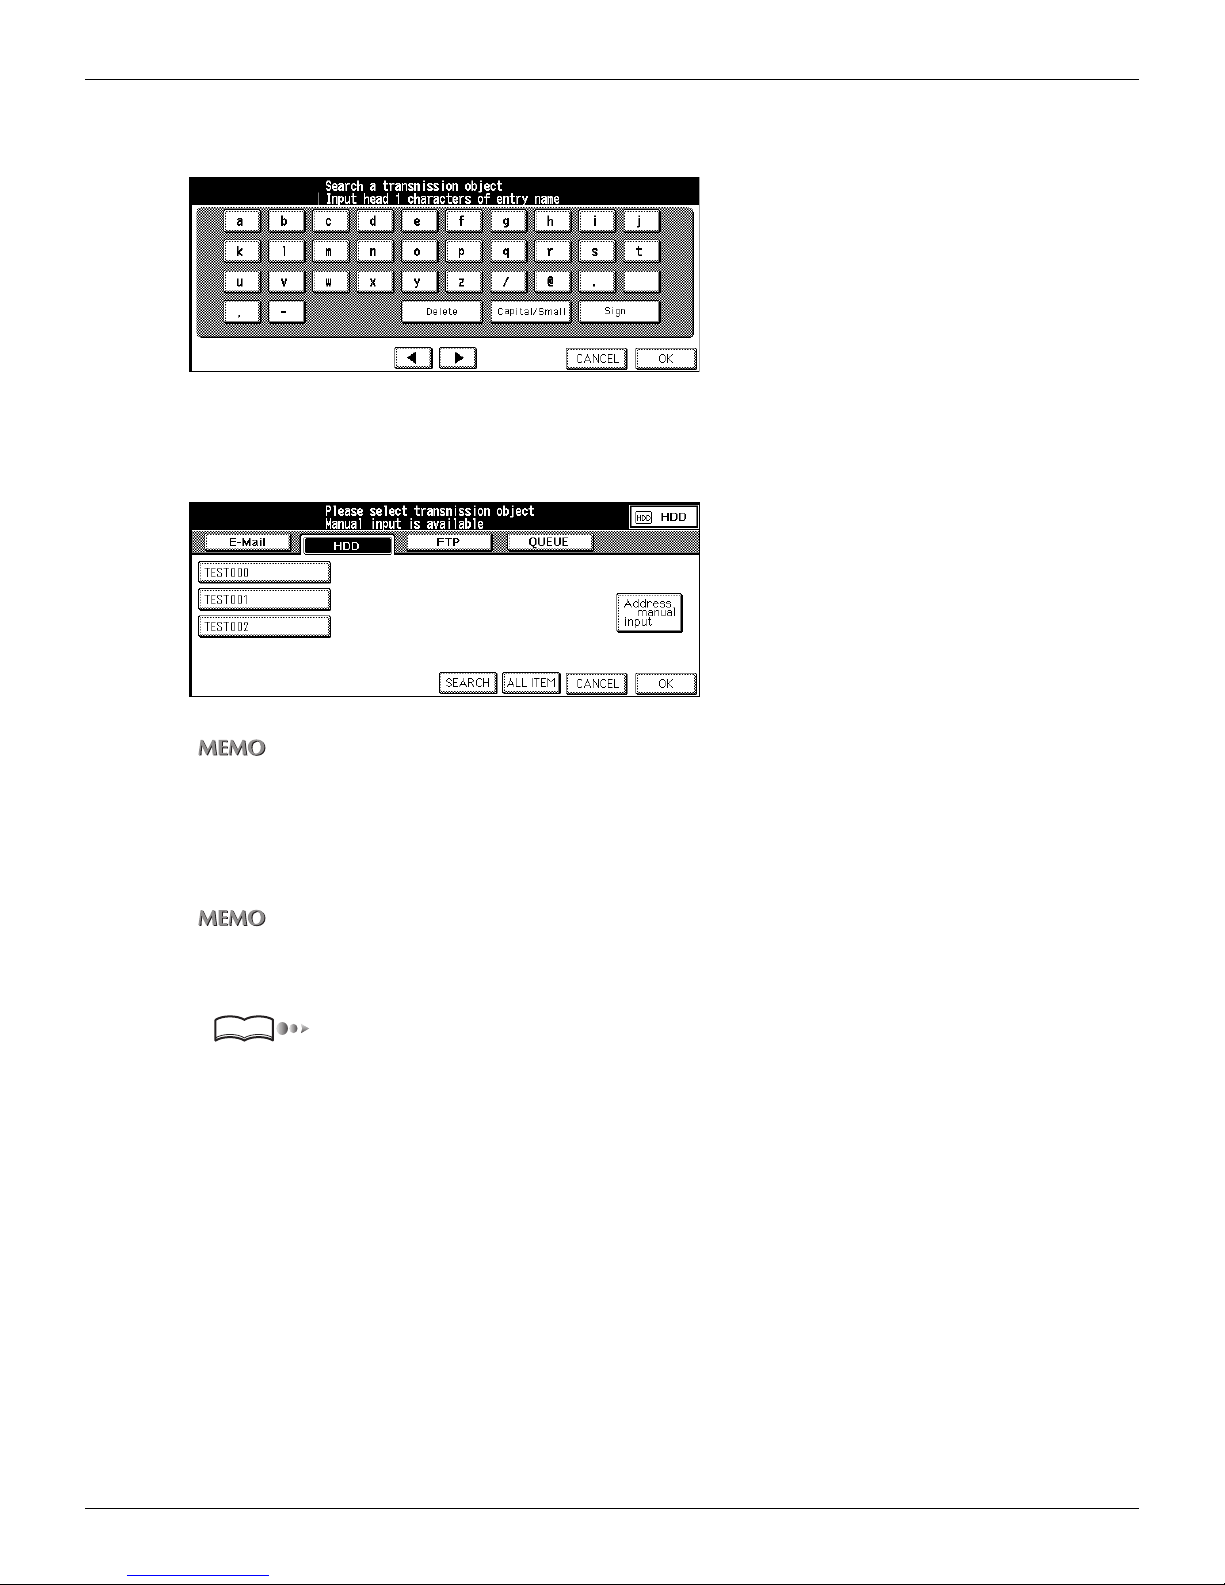
4. Touch [Input key indicate].
The [Keyboard Input] screen appears.
5. Enter the first letter of the Entry Name to search.
[Search results] screen appears.
The Entry Name corresponding the condition is listed on the LCD screen.
3-2 Selecting the Destination (Continued)
• Input numbers with the Keypad of the control panel.
• For information about inputting text, please refer to “Inputting Text” on page 25.
6. Select the Entry Name from the list.
Select the Entry Name from the list of search results on the LCD screen.
At this stage, you can touch [ALL ITEM] to have all registered entry names displayed as before.
7. Set the original document.
Reference
“Setting the Original Document” on page 67.
59
Chapter 3 : Using the Scanning Features
Page 61
3-2 Selecting the Destination (Continued)
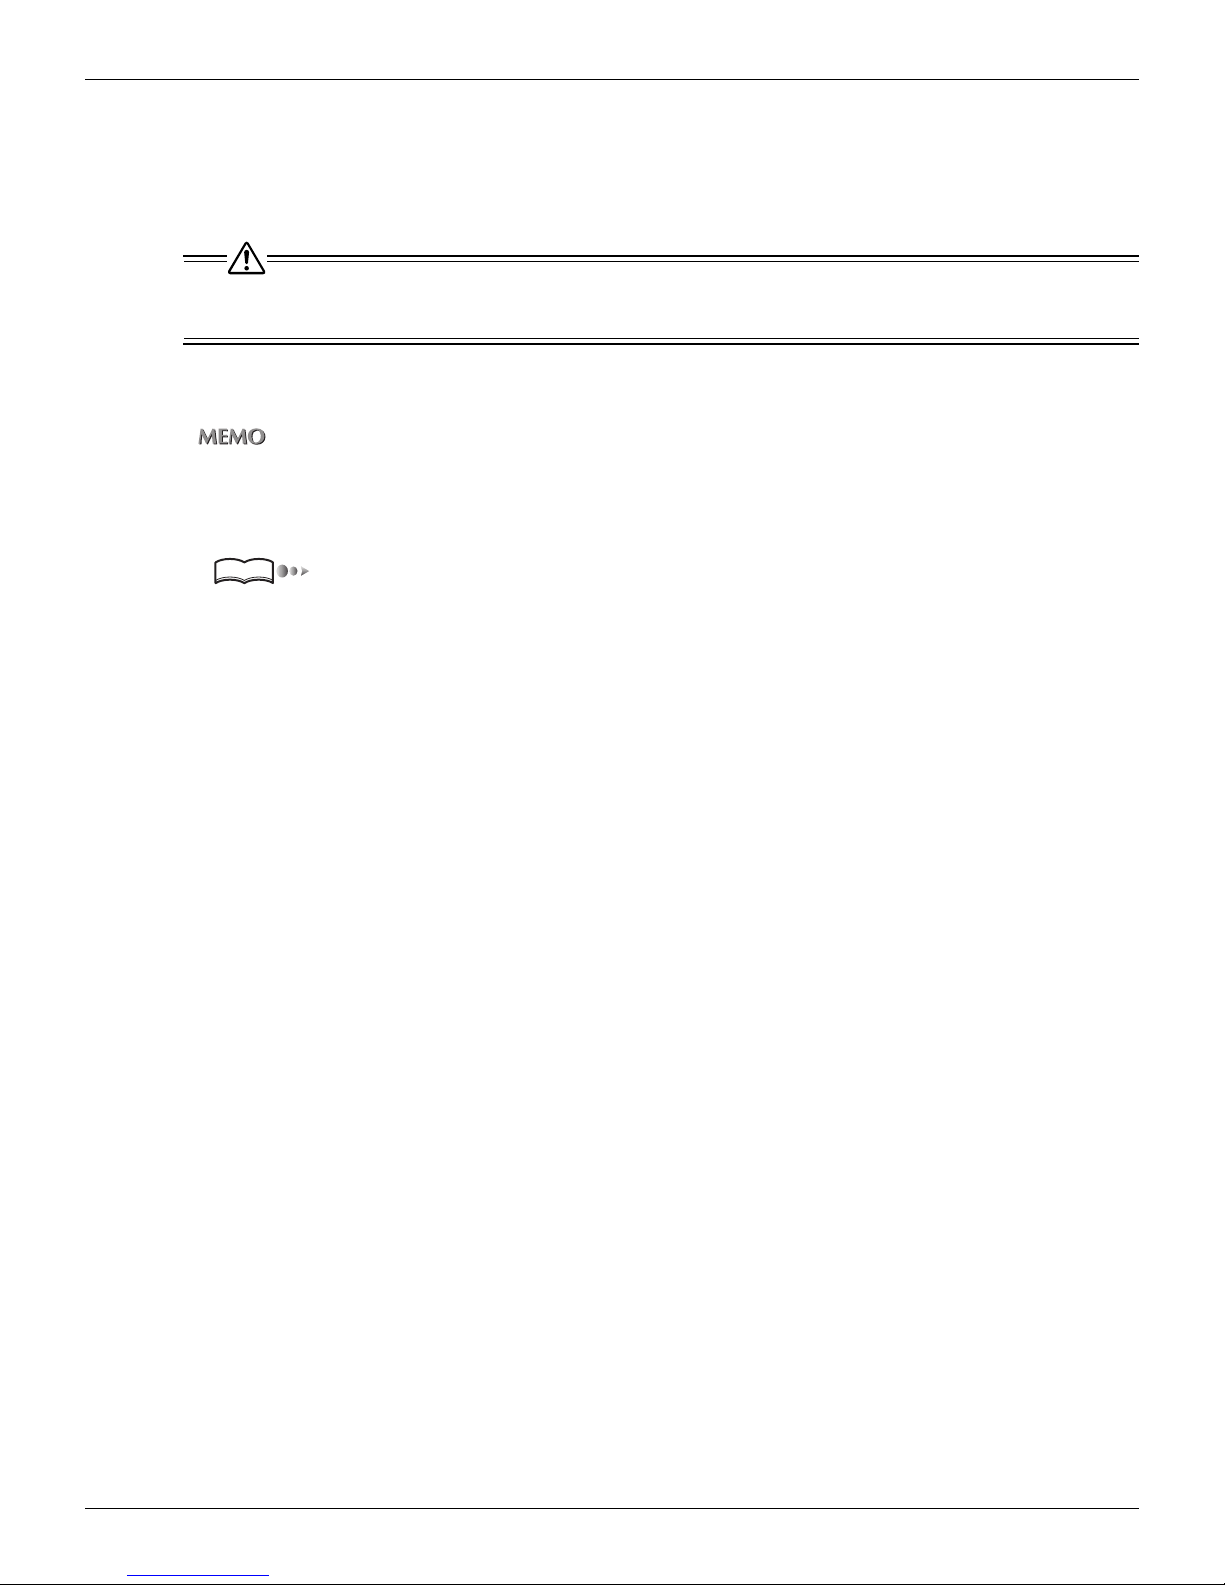
Setting the destination by manual inputting
1. Follow the same procedure from step 1. to 9. of “Registering Storage Locations
(HDD)” on page 33.
If you have selected the other transmission object or destination, skip the procedure 1 to retain and edit the settings you have made already.
2. Confirm your entry.
If you touch [ENTRY] at this stage, you can save the contents you inputted and the screen returns to the [Select
Transmission Object] screen on which the entry name you inputted is selected.
3. Set the original document.
Reference
“Setting the Original Document” on page 67.
60
Chapter 3 : Using the Scanning Features
Page 62
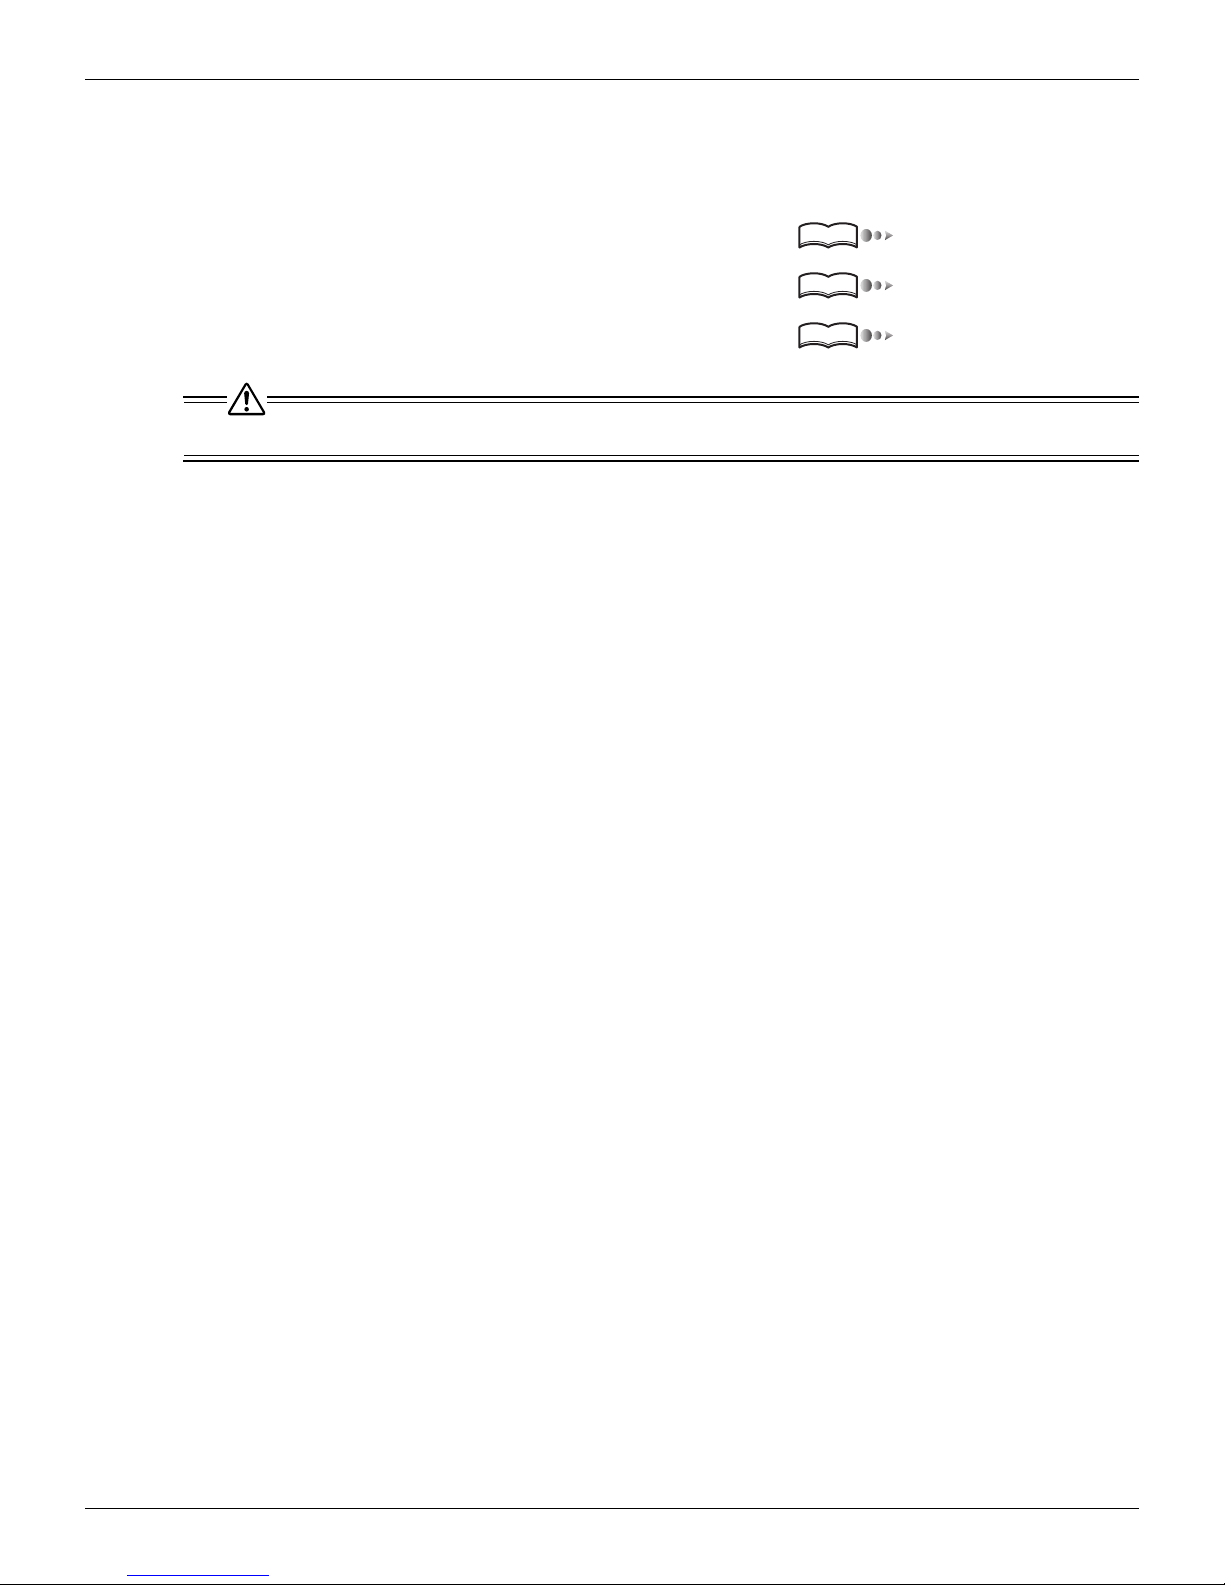
●Selecting the Destination (FTP)
When you select the [FTP] (Scan to FTP), you can upload the scanned data to a FTP server.
You can select the destinations (FTP server) as follows:
3-2 Selecting the Destination (Continued)
• Select from destinations already registered Page 62
• Select from destinations already registered with search Page 63
• Set the destination by manual inputting Page 65
Reference
Reference
Reference
You can select only one destination (FTP server).
For information about setting method of port number, please refer “Registration of FTP server” on page 37.
For information about the Firewall, please refer “Registration of FTP server” on page 37.
61
Chapter 3 : Using the Scanning Features
Page 63
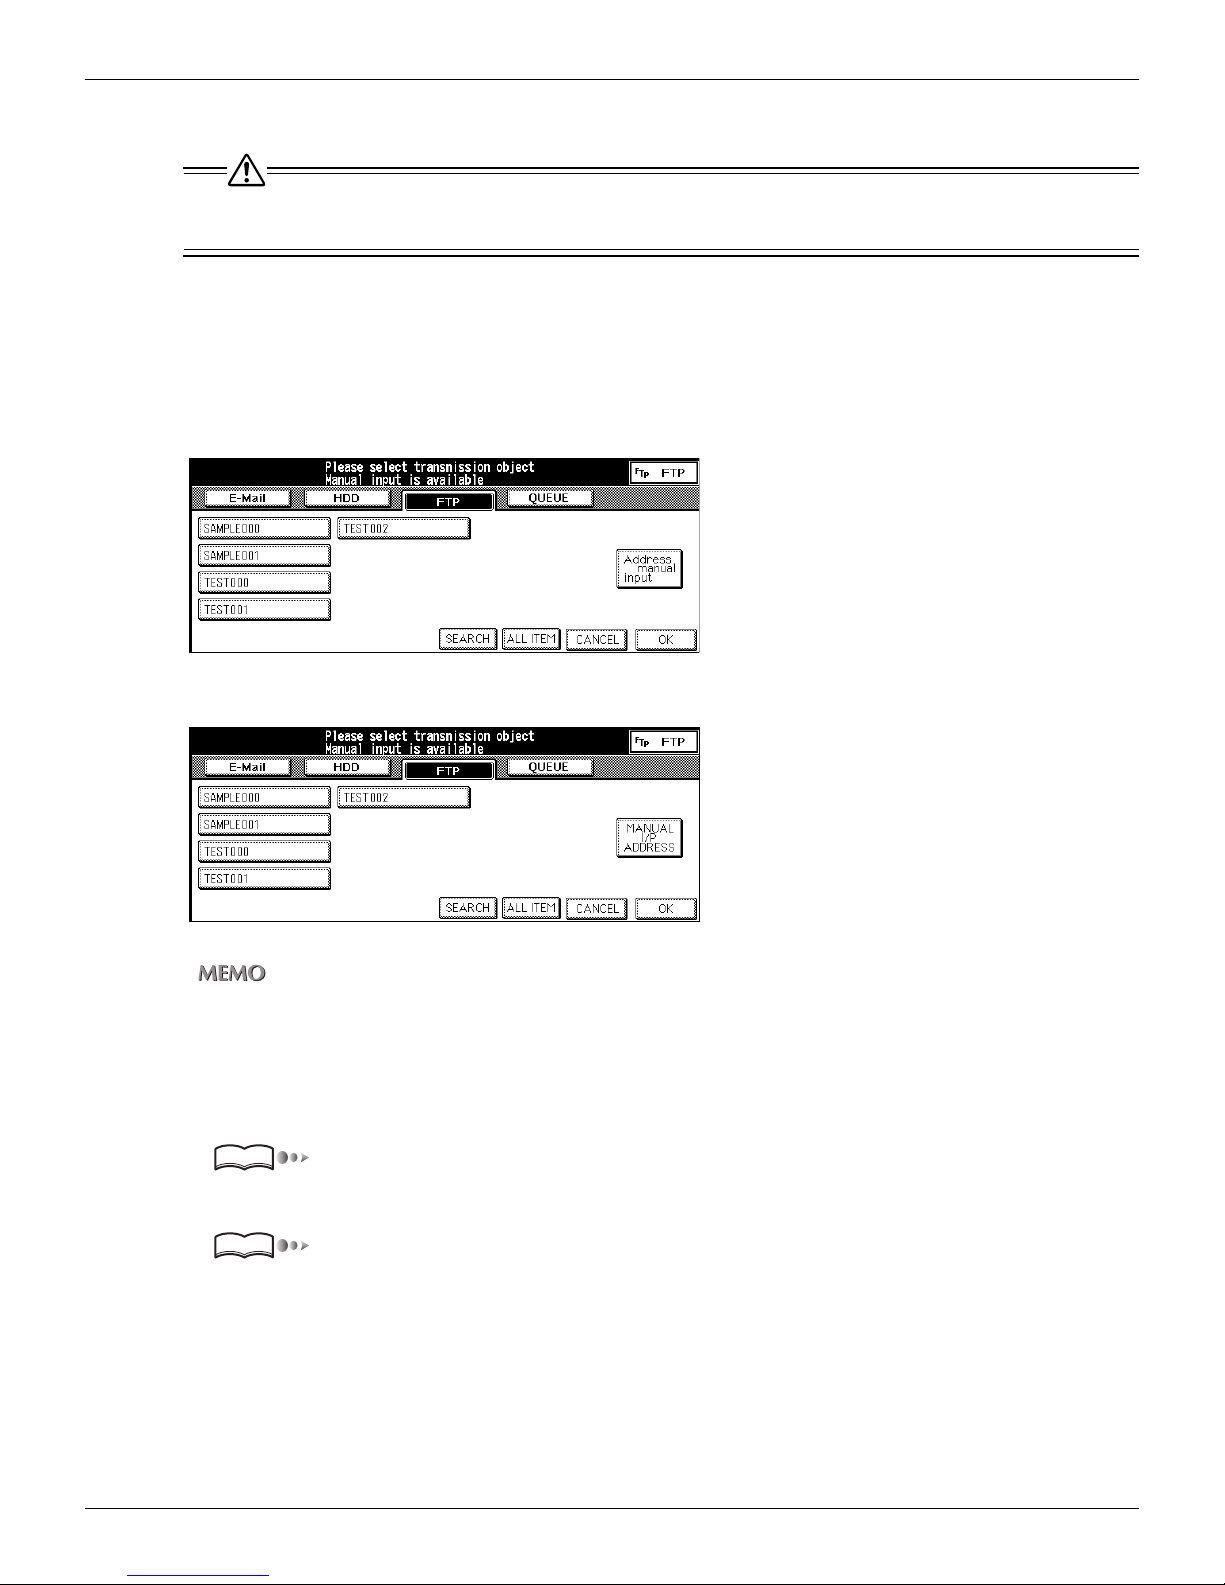
Selecting from destinations already registered
If you have selected the other transmission object or destination, skip the procedure 1 to retain and edit the settings you have made already.
1. Press [SCAN] button on the control panel.
The [Select Transmission Object] screen is displayed on the LCD screen.
2. Touch [FTP].
The [Select Transmission Object] screen (FTP) appears.
• U.S.A.
3-2 Selecting the Destination (Continued)
• Others
You can exit the selected transmission object mode by touching the same button again.
3. Select the Profile Name from list on the LCD screen.
Select the Profile Name from the list of registered profile Names on the LCD screen.
4. According to need, set the Port Number.
Reference
“Registration of FTP server” on page 37.
5. Set the original document.
Reference
“Setting the Original Document” on page 67.
62
Chapter 3 : Using the Scanning Features
Page 64
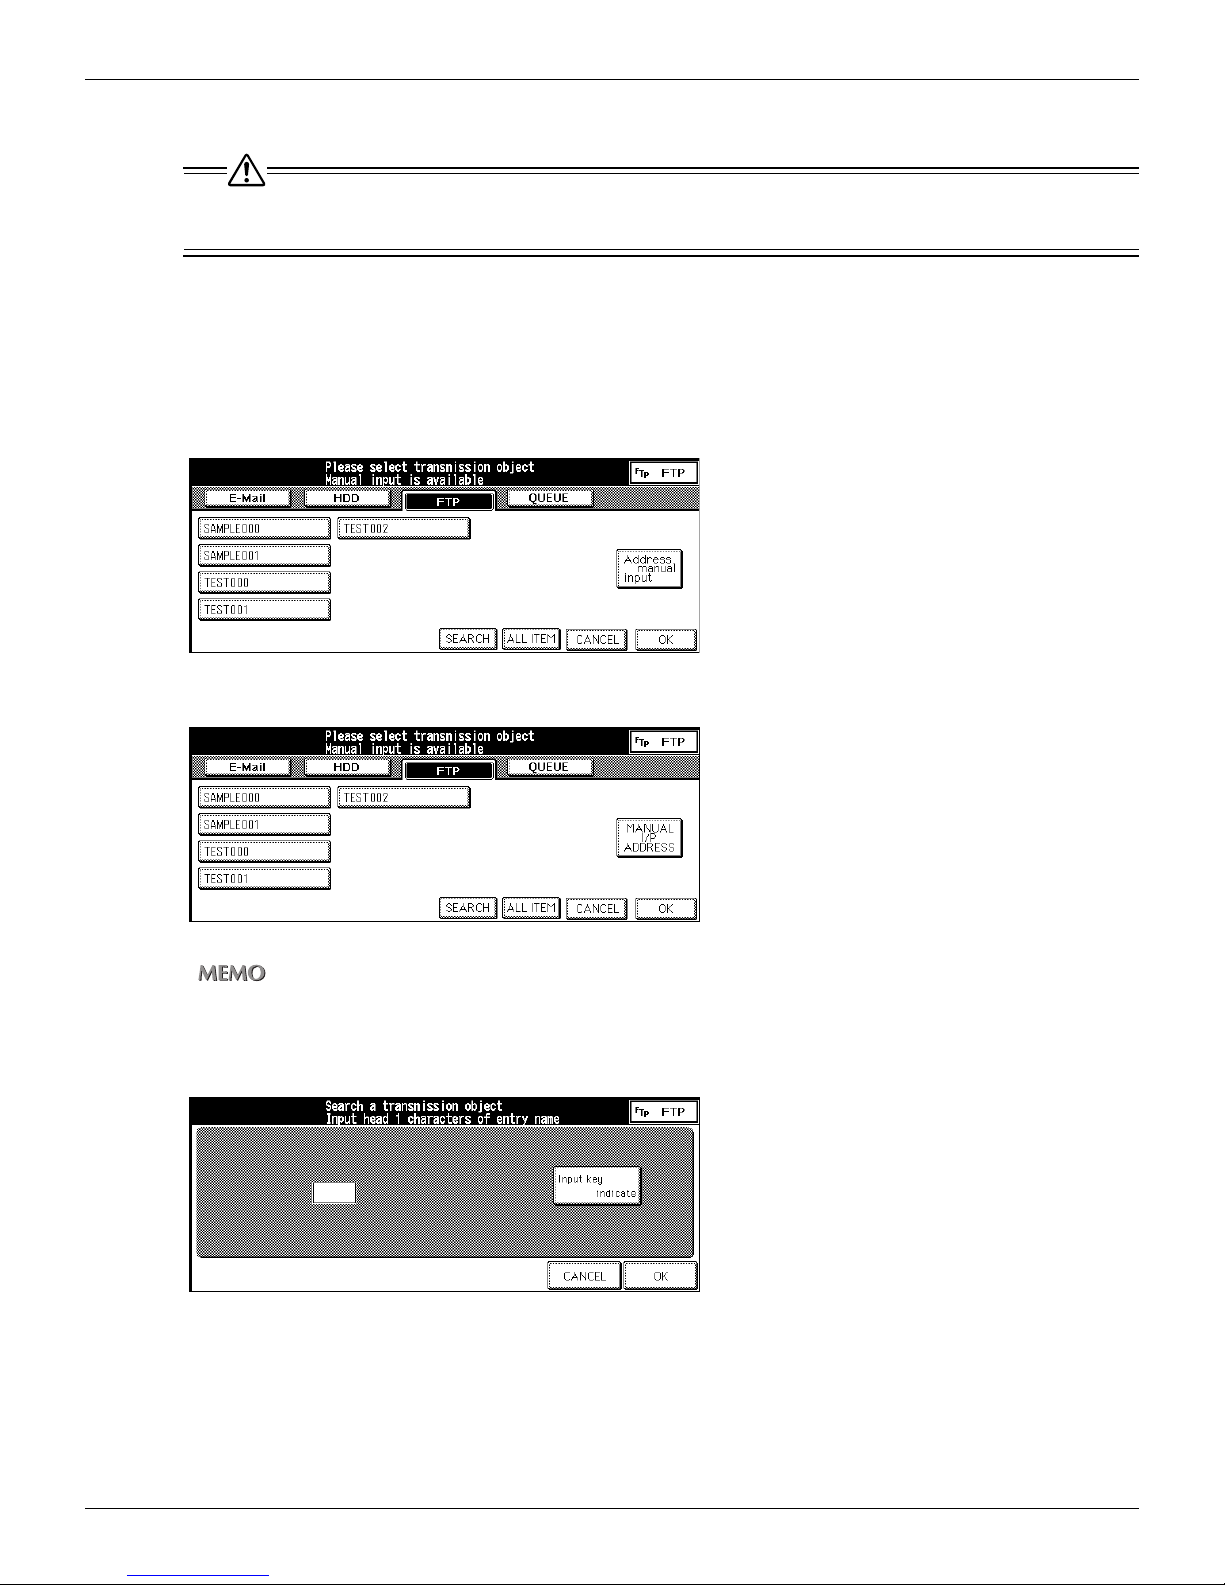
Selecting from destinations already registered with Search
If you have selected the other transmission object or destination, skip the procedure 1 to retain and edit the settings you have made already.
1. Press [SCAN] button on the control panel.
The [Select Transmission Object] screen is displayed on the LCD screen.
2. Touch [FTP].
The [Select Transmission Object] screen (FTP) appears.
• U.S.A.
3-2 Selecting the Destination (Continued)
• Others
You can exit the selected transmission object mode by touching the same button again.
3. Touch [SEARCH].
[Search a Transmission Object] screen appears.
63
Chapter 3 : Using the Scanning Features
Page 65
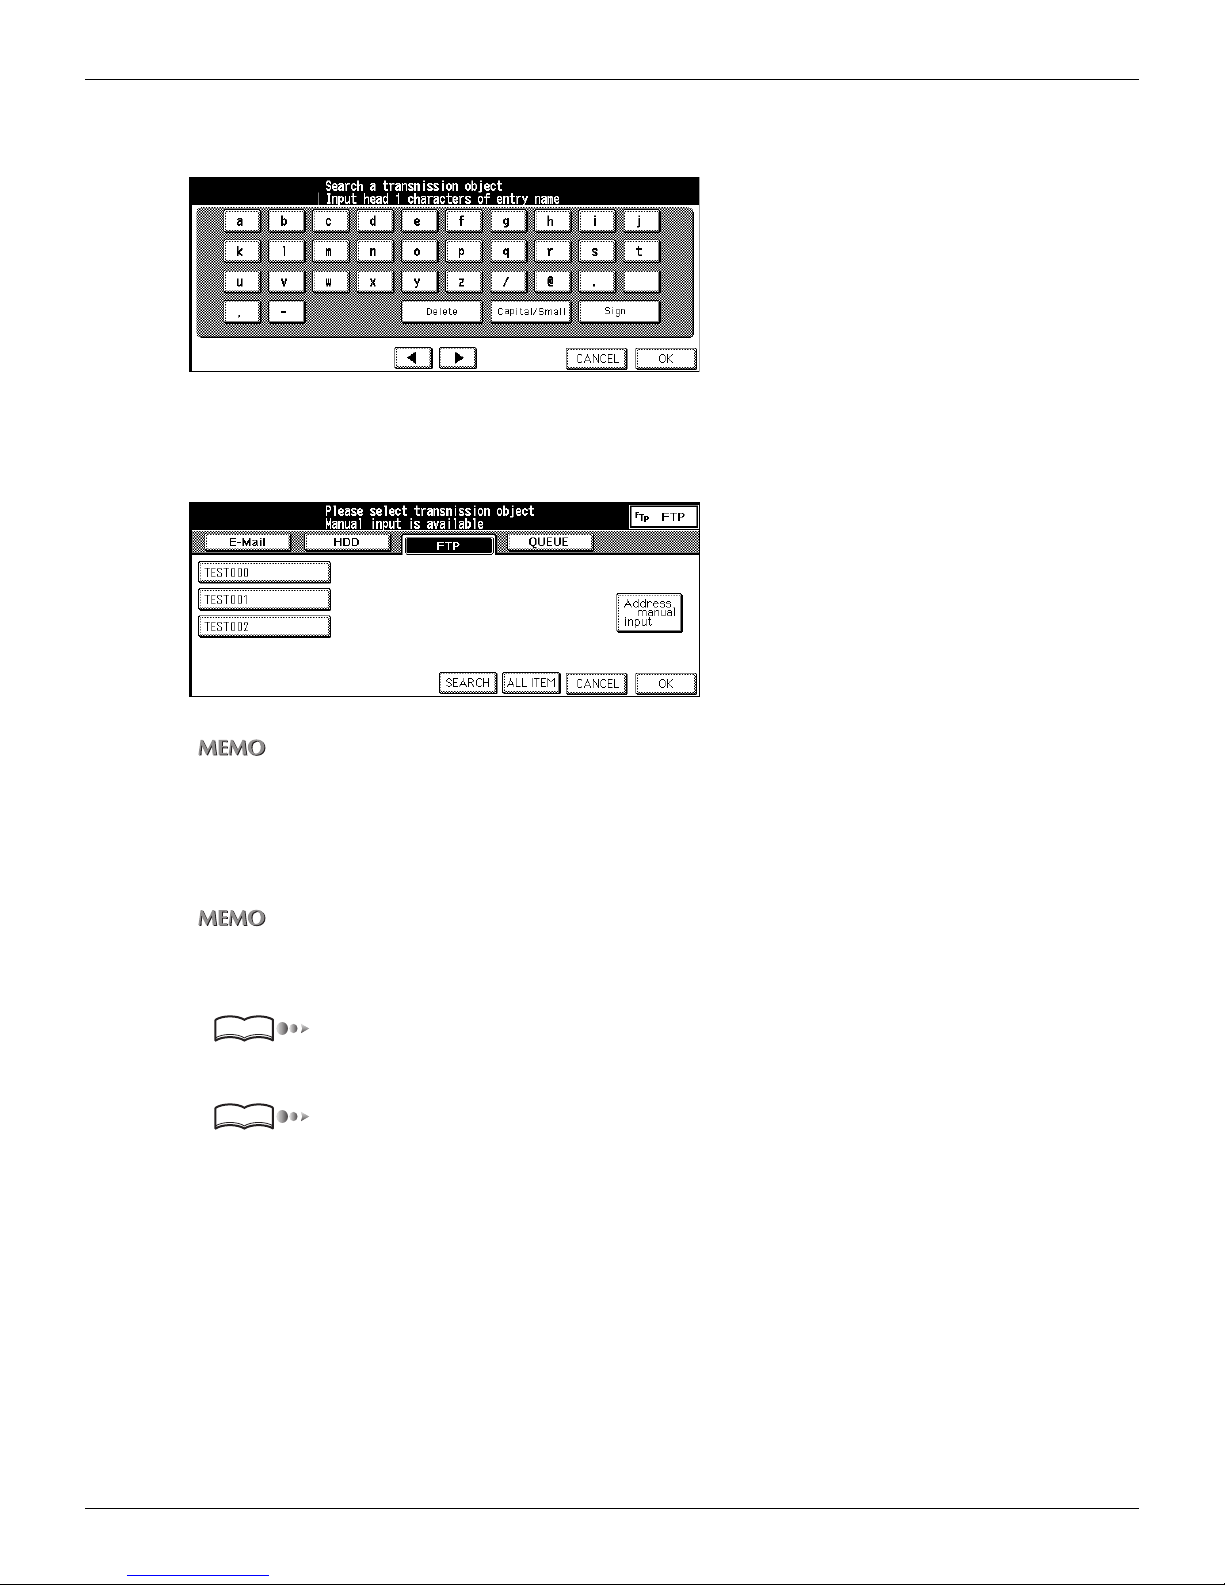
4. Touch [Input key indicate].
The [Keyboard Input] screen appears.
5. Enter the first letter of the Profile Name to search.
[Search results] screen appears.
The Profile Name corresponding the condition is listed on the LCD screen.
3-2 Selecting the Destination (Continued)
• Input numbers with the Keypad of the control panel.
• For information about inputting text, please refer to “Inputting Text” on page 25.
6. Select the Profile Name from the list on the LCD screen.
Select the Profile Name from the list of registered Profile Names on the LCD screen.
At this stage, you can touch [ALL ITEM] to have all registered Profile Name displayed as before.
7. According to need, set the Port Number.
Reference
“Registration of FTP server” on page 37.
8. Set the original document.
Reference
“Setting the Original Document” on page 67.
64
Chapter 3 : Using the Scanning Features
Page 66
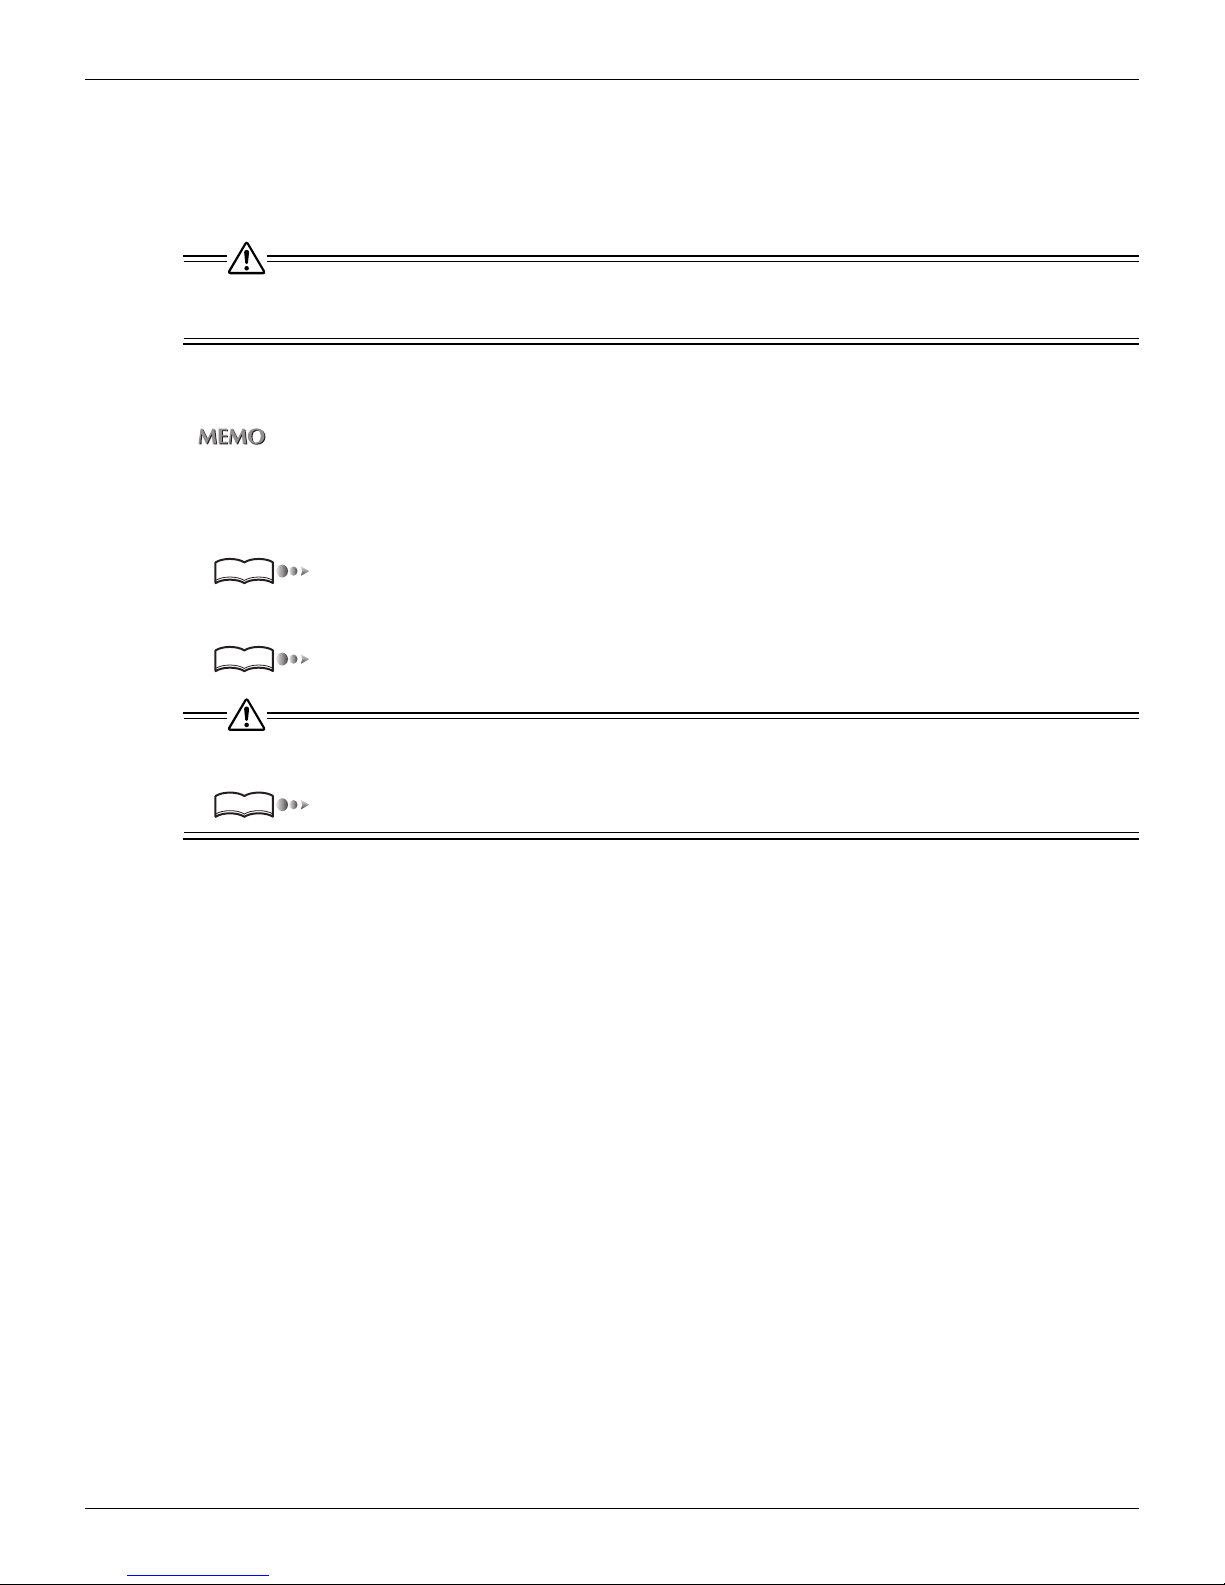
3-2 Selecting the Destination (Continued)
Setting the destination by manual inputting
1. Follow the same procedure from step 1. to 22 of “Registering Destinations (FTP)”
on page 37.
If you have selected the other transmission object or destination, skip the procedure 1 to retain and edit the settings you have made already.
2. Confirm your entry.
If you touch [ENTRY] at this stage, you can save the contents you inputted and the screen returns to the [Select
Transmission Object] screen on which the profile name you inputted is selected.
3. According to need, set the Port Number.
Reference
“Registration of FTP server” on page 37.
4. Set the original document.
Reference
An E-Mail Address you input by manual operation is not saved when you touch the [OK]. An E-Mail Address used
often should be registered when you touch the [ENTRY].
Reference
“Setting the Original Document” on page 67.
“Registering Destinations (FTP)” on page 37.
65
Chapter 3 : Using the Scanning Features
Page 67

3-2 Selecting the Destination (Continued)
●Selecting the Destination (QUEUE)
When you select the [QUEUE] (Scan to QUEUE), you can store the scanned data as a print job data inside the print controller.
1. Press [SCAN] button on the control panel.
The [Select Transmission Object] screen is displayed on the LCD screen.
2. Touch [QUEUE].
You can exit the selected transmission object mode by touching the same button again.
66
Chapter 3 : Using the Scanning Features
Page 68
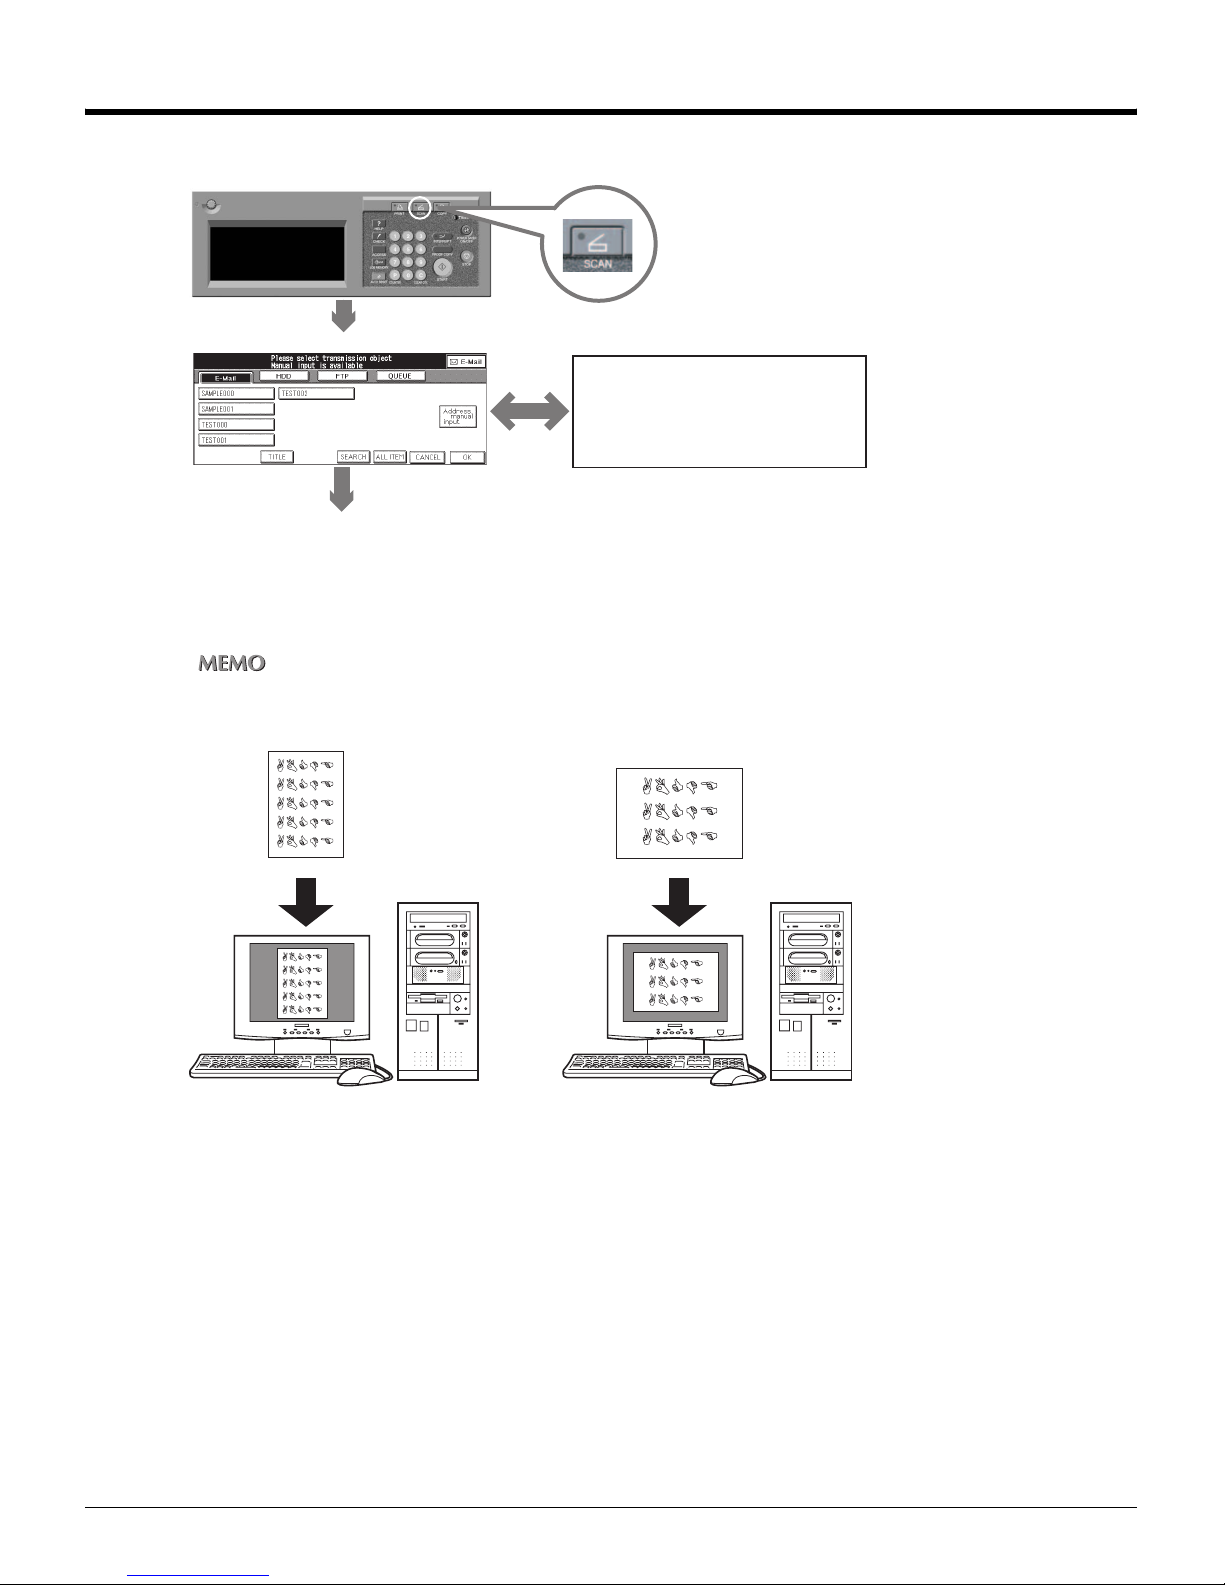
3-3 Setting the Original Document
After the setting on the [Select Transmission Object] screen, set the original document to the copier's RADF or the platen glass.
Control Panel
[Select Transmission Object] screen (E-Mail)
[Select Transmission Object] screen
[Title input] screen
[Search a Transmission Object] screen
Set the original document
Direction of the Originals
Depending on the direction you set the originals, the direction in which the applications read images will differ.
Paper sizes acceptable for scanning and the method of loading the original are the same as in the copy mode. For
details, refer to the “Copier's User's Guide”.
67
Chapter 3 : Using the Scanning Features
Page 69
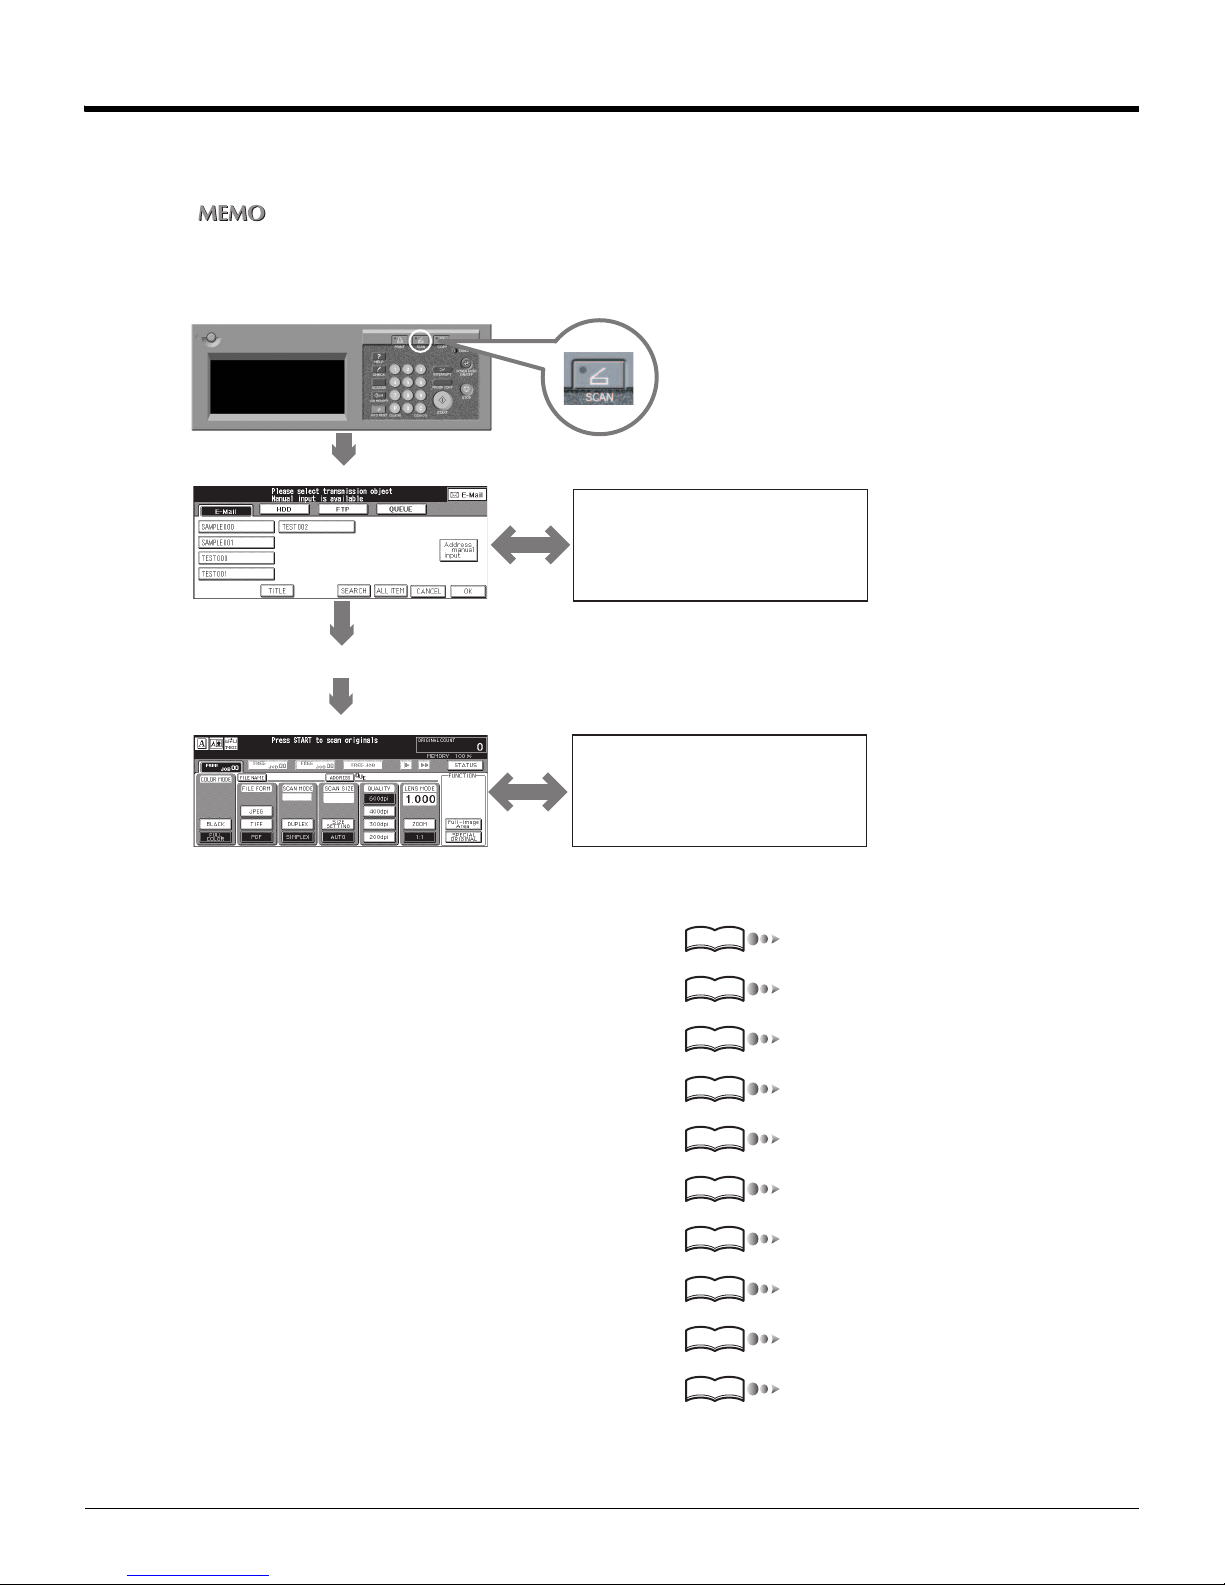
3-4 Setting Scanner Features
When you touch [OK], after the setting the original document to the copier's RADF or the platen glass, the [Scanner setting basic]
screen appears.
By touching the [Address] on the [Scanner setting basic] screen, it returns to the [Select Transmission Object]
screen.
Control Panel
[Select Transmission Object] screen (E-Mail)
[Select Transmission Object] screen
[Title input] screen
[Search a Transmission Object] screen
Set the original document
[Scanner setting basic] screen
respective setting screen
On the [Scanner setting basic] screen, you make various setting about scanning.
• FILE NAME Page 69
• COLOR MODE (COLOUR MODE) Page 70
• FILE FORM Page 71
• SCAN MODE Page 71
• SCAN SIZE Page 72
• QUALITY Page 74
• LENS MODE Page 75
• Full-Image Area (FUNCTION) Page 78
Reference
Reference
Reference
Reference
Reference
Reference
Reference
Reference
• Original Direction (SPECIAL ORIGINAL (FUNCTION)) Page 79
• Special Setting (SPECIAL ORIGINAL (FUNCTION)) Page 80
68
Reference
Reference
Chapter 3 : Using the Scanning Features
Page 70
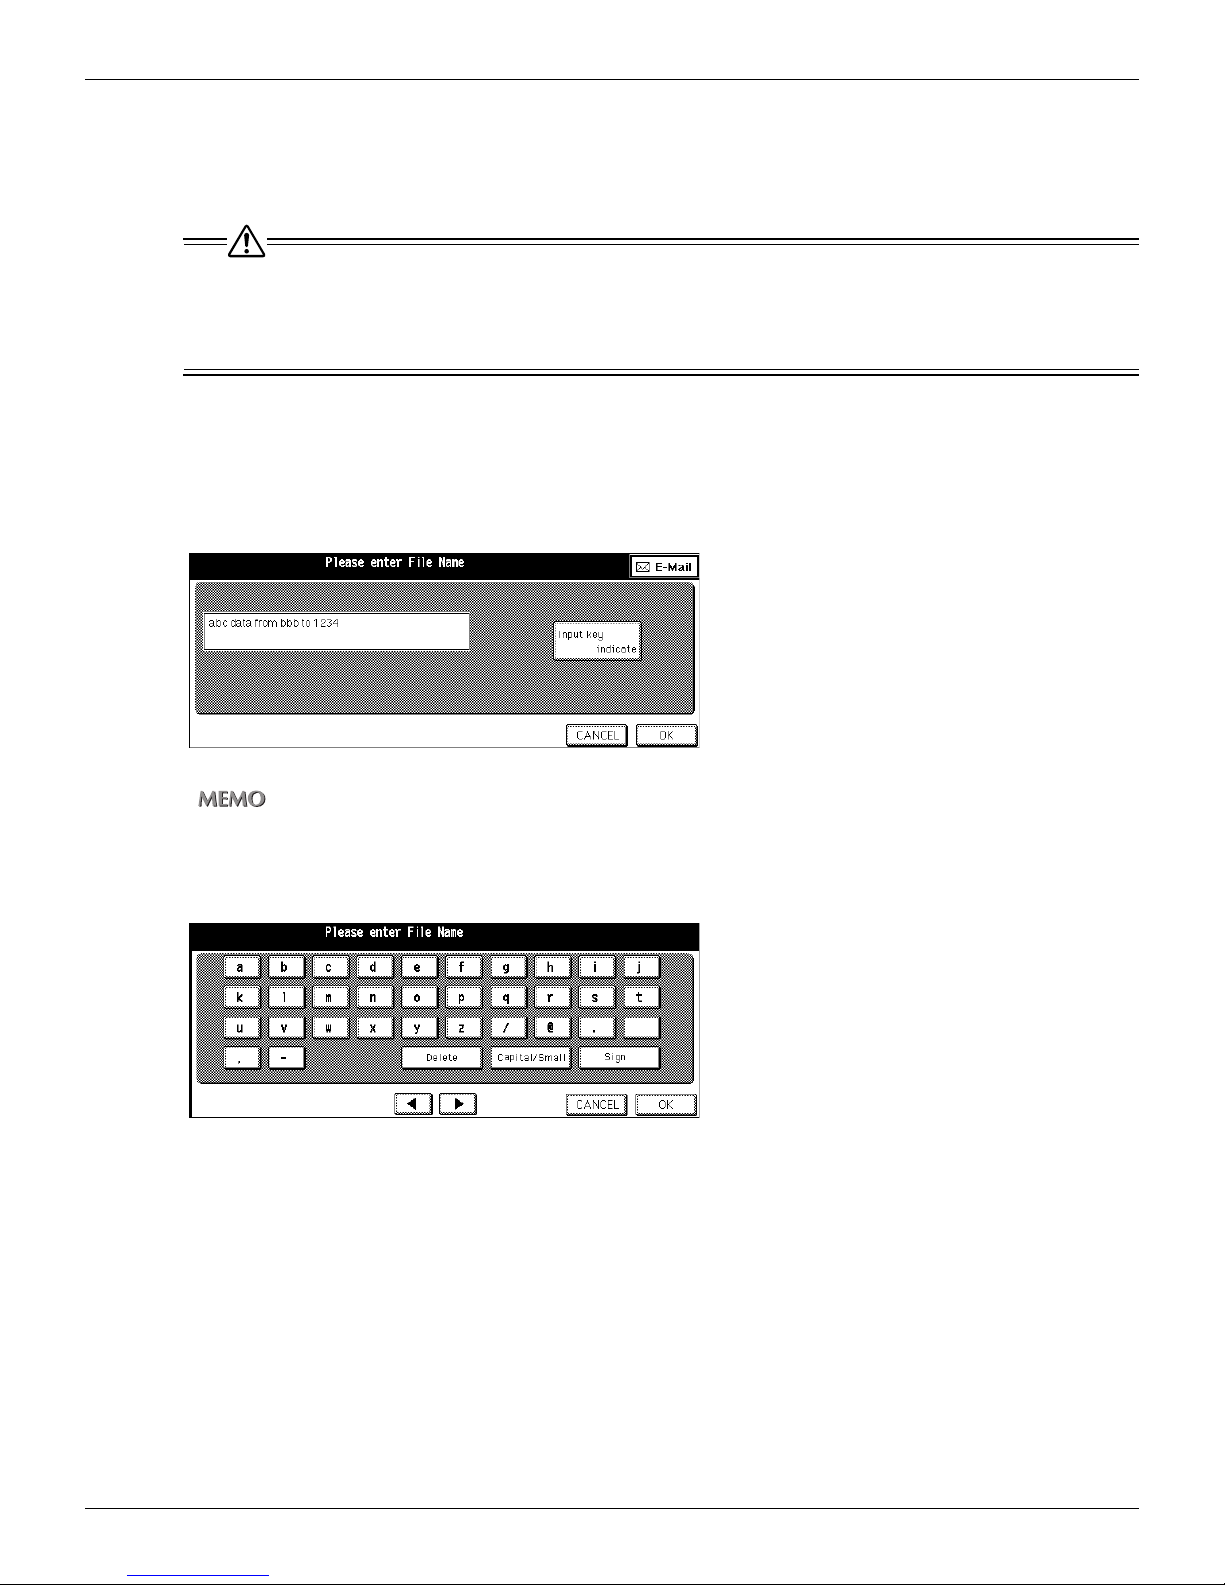
3-4 Setting Scanner Features (Continued)
●FILE NAME
When scanning, the file name is automatically entered. However, you can set / change the file name on the [Scanning setting
basic] screen.
The following characters cannot be used for file names. If any of these characters is used, it may give a serious
influence on the network or file system.
Unusable characters:
\ / : ;, * ? '' < > |
1. Touch [OK] on the [Select Transmission Object] screen.
The [Scanner setting basic] screen appears.
2. Touch [FILE NAME].
The [File Name Input] screen appears.
You can exit the selected transmission object mode by touching the same button again.
3. Touch [Input key indicate].
The [Keyboard Input] screen appears.
69
Chapter 3 : Using the Scanning Features
Page 71
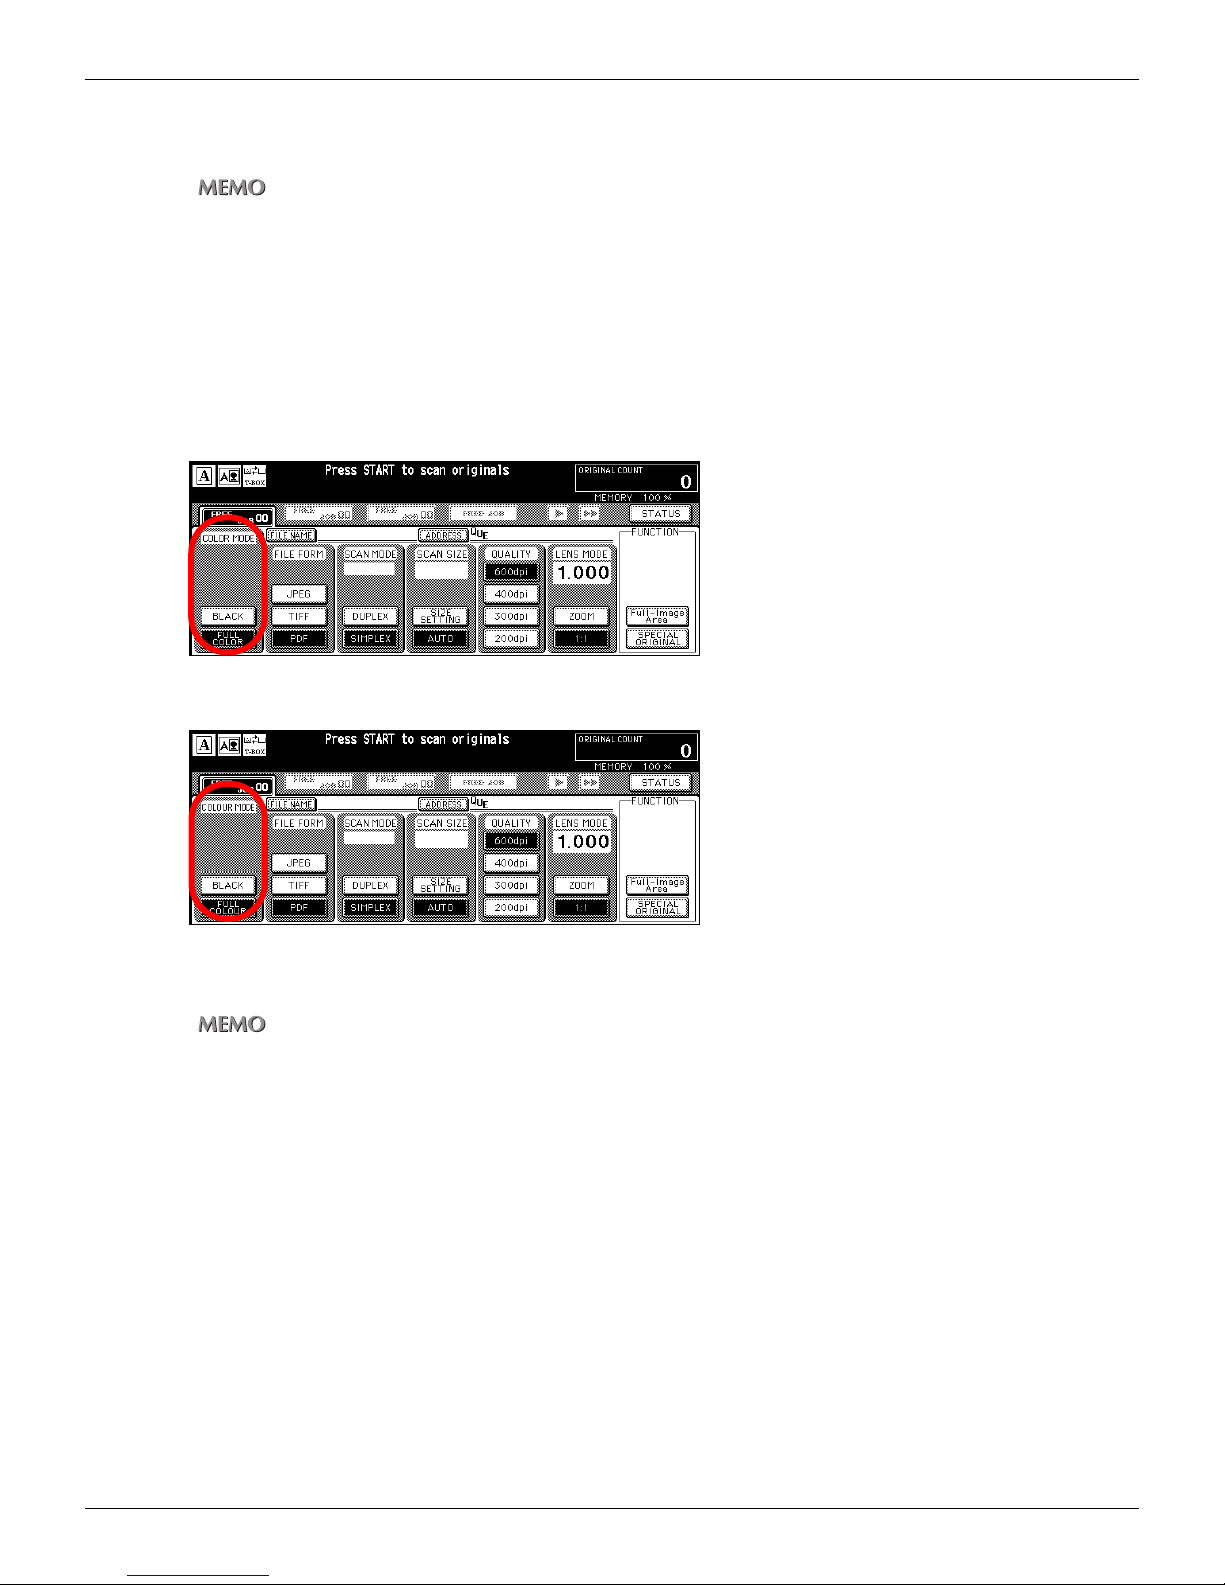
4. Input the File Name and touch [OK].
The display returns to the [Scanner setting basic] screen.
• The File Name should not exceed 26 alphanumeric characters.
• You cannot use a symbol other than "-", "_", ".", “(space)”.
• Input numbers with the Keypad of the control panel.
• For information about inputting text, please refer to “Inputting Text” on page 25.
5. Make sure the contents you input and touch [OK].
The display returns to the [Scanner setting basic] screen.
●COLOR MODE (COLOUR MODE)
• U.S.A.
3-4 Setting Scanner Features (Continued)
• Others
You can select the Color mode from [BLACK] or [FULL COLOR] ([FULL COLOUR]).
For JPEG, FULL COLOR (FULL COLOUR) only becomes possible.
70
Chapter 3 : Using the Scanning Features
Page 72
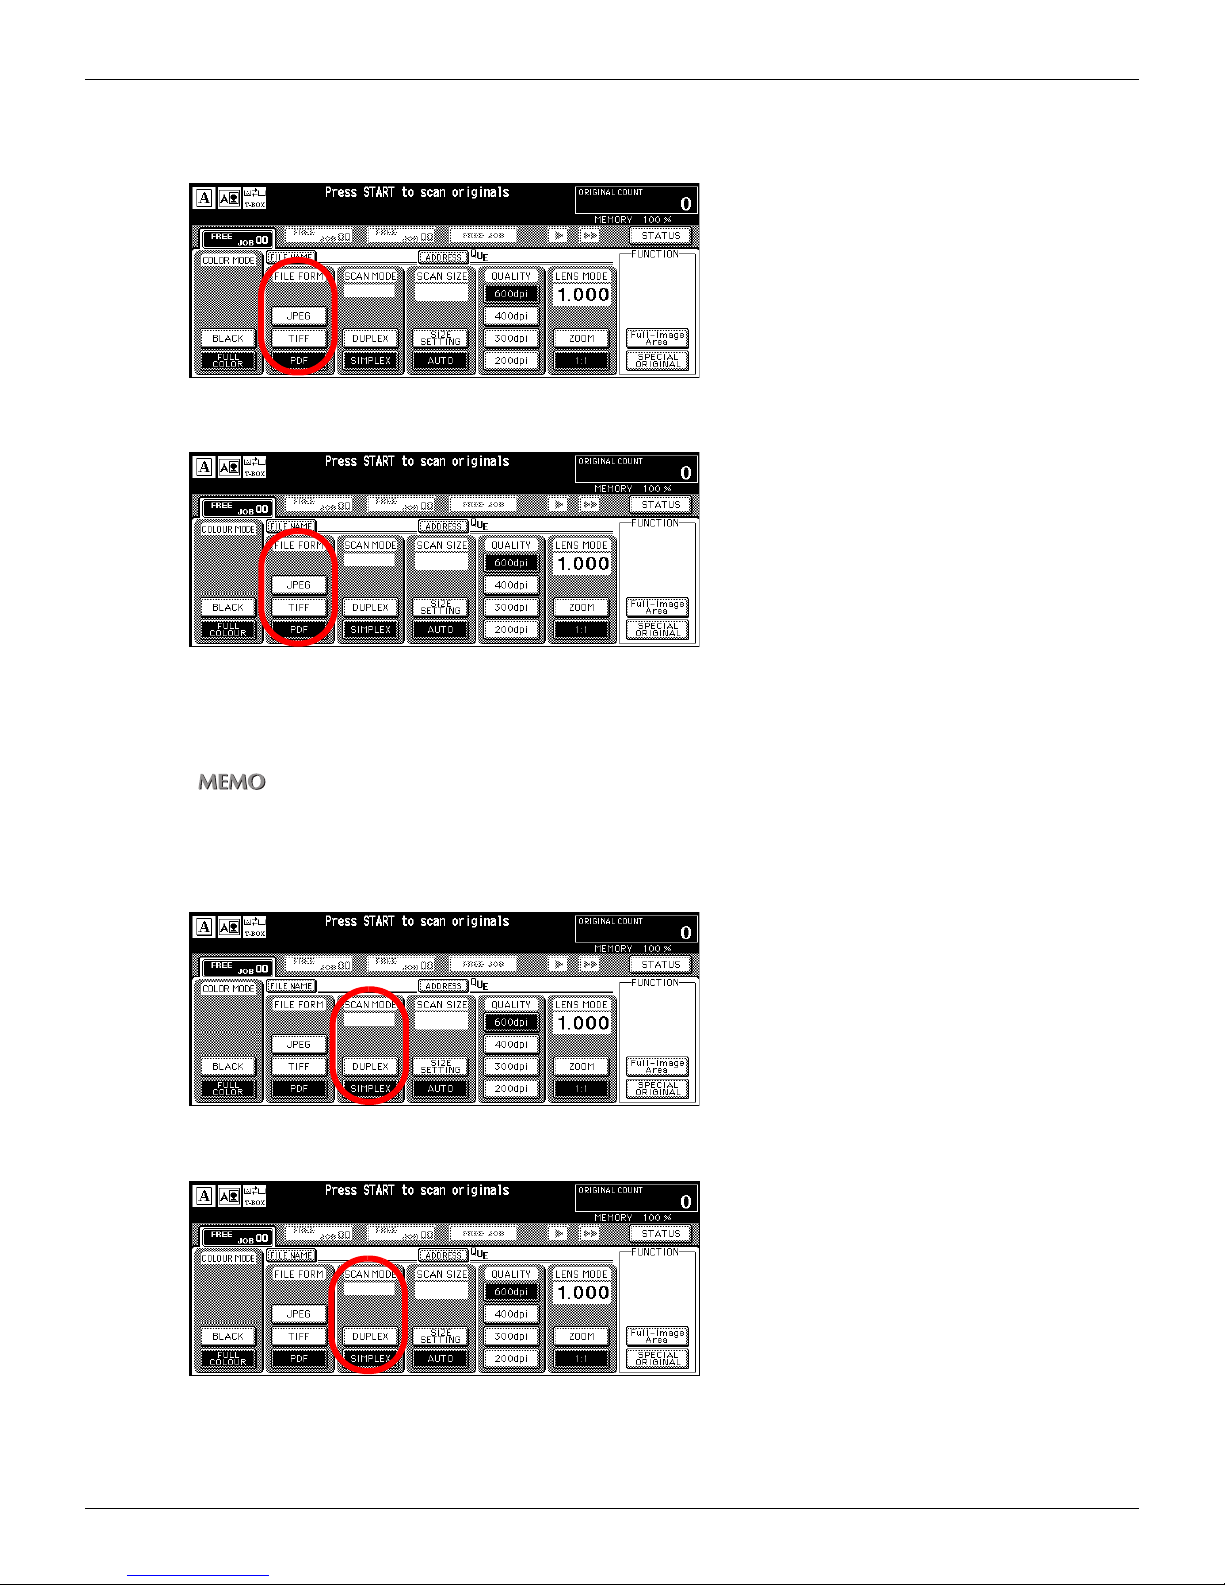
●FILE FORM
• U.S.A.
• Others
3-4 Setting Scanner Features (Continued)
You can select the file form from [JPEG], [TIFF] and [PDF].
When you scan multiple documents by one time, you cannot change file format individually.
For JPEG, FULL COLOR (FULL COLOUR) only becomes possible.
●SCAN MODE
• U.S.A.
• Others
Use this feature to determine whether the original document is Duplex or Simplex.
If the RADF is not installed, [Duplex] cannot be selected.
71
Chapter 3 : Using the Scanning Features
Page 73
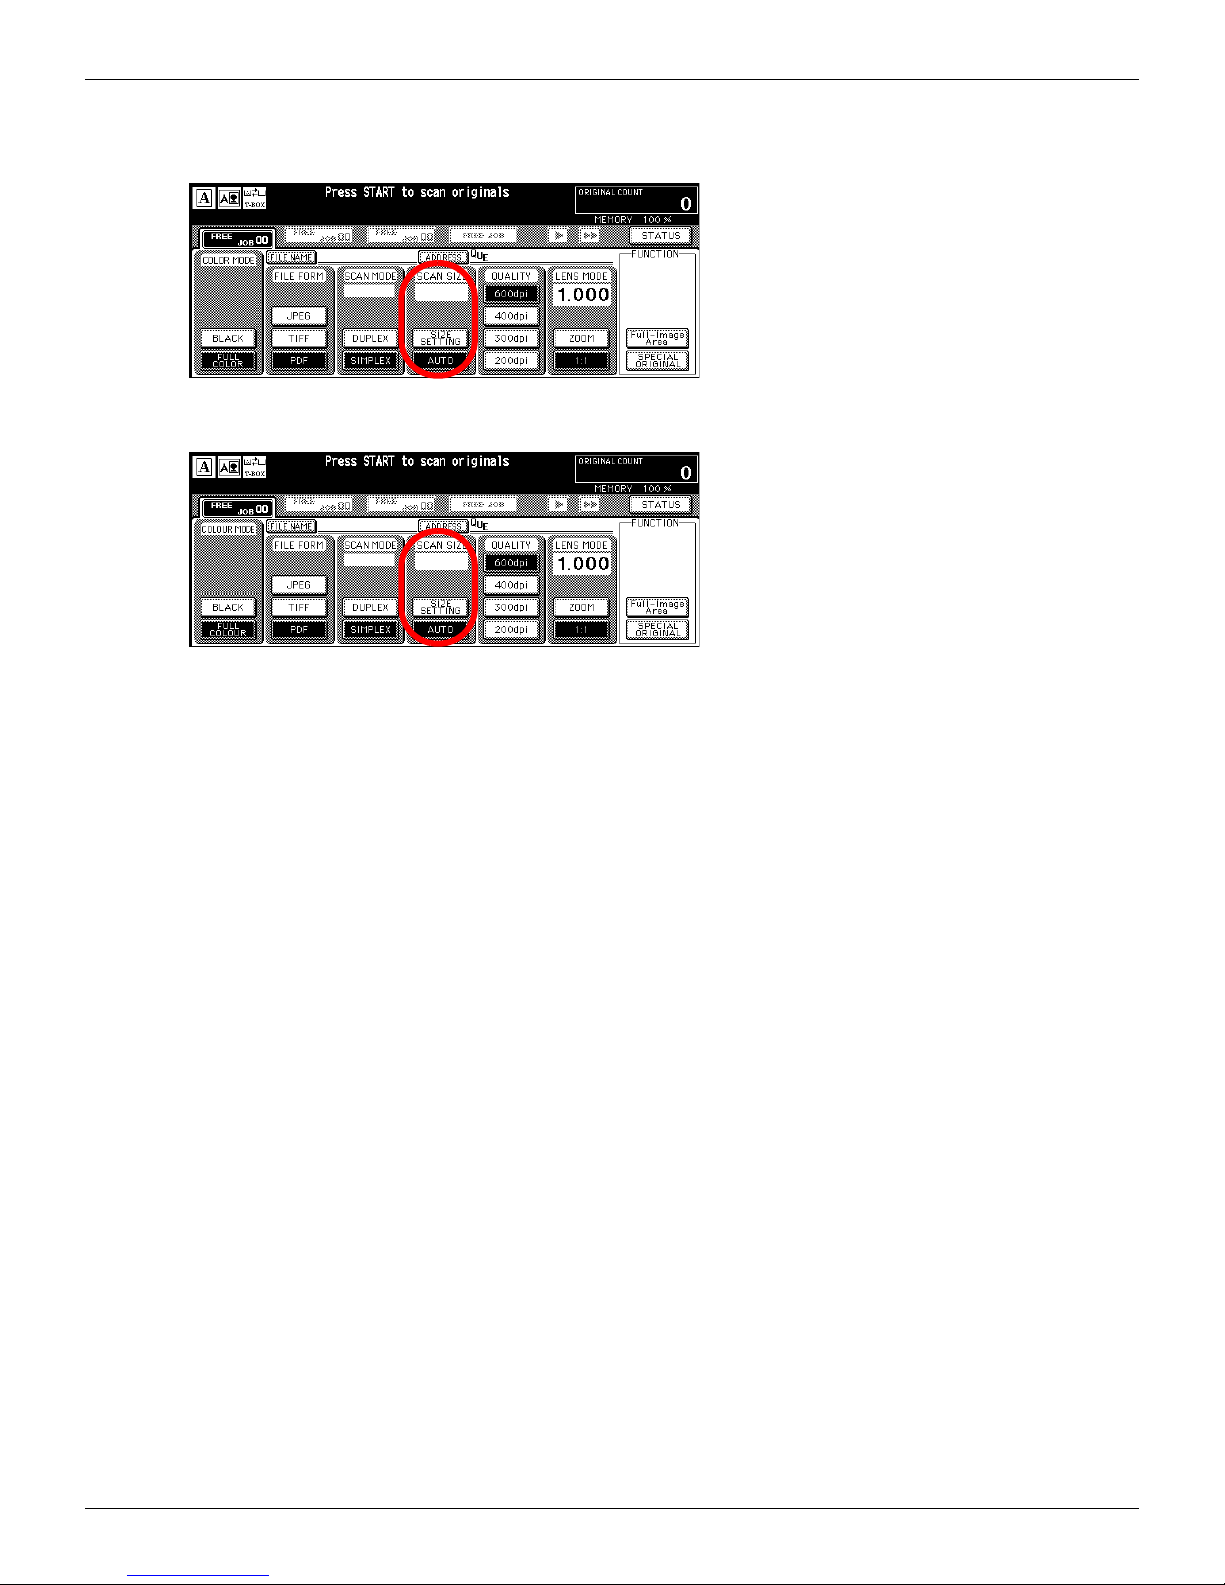
●SCAN SIZE
• U.S.A.
• Others
3-4 Setting Scanner Features (Continued)
Use this feature to set the scanning paper size.
You can select [AUTO] or [SIZE SETTING]. The default setting is [AUTO].
When [AUTO] is selected, the size of the original available to be read is the same as the default in the copy mode.
72
Chapter 3 : Using the Scanning Features
Page 74
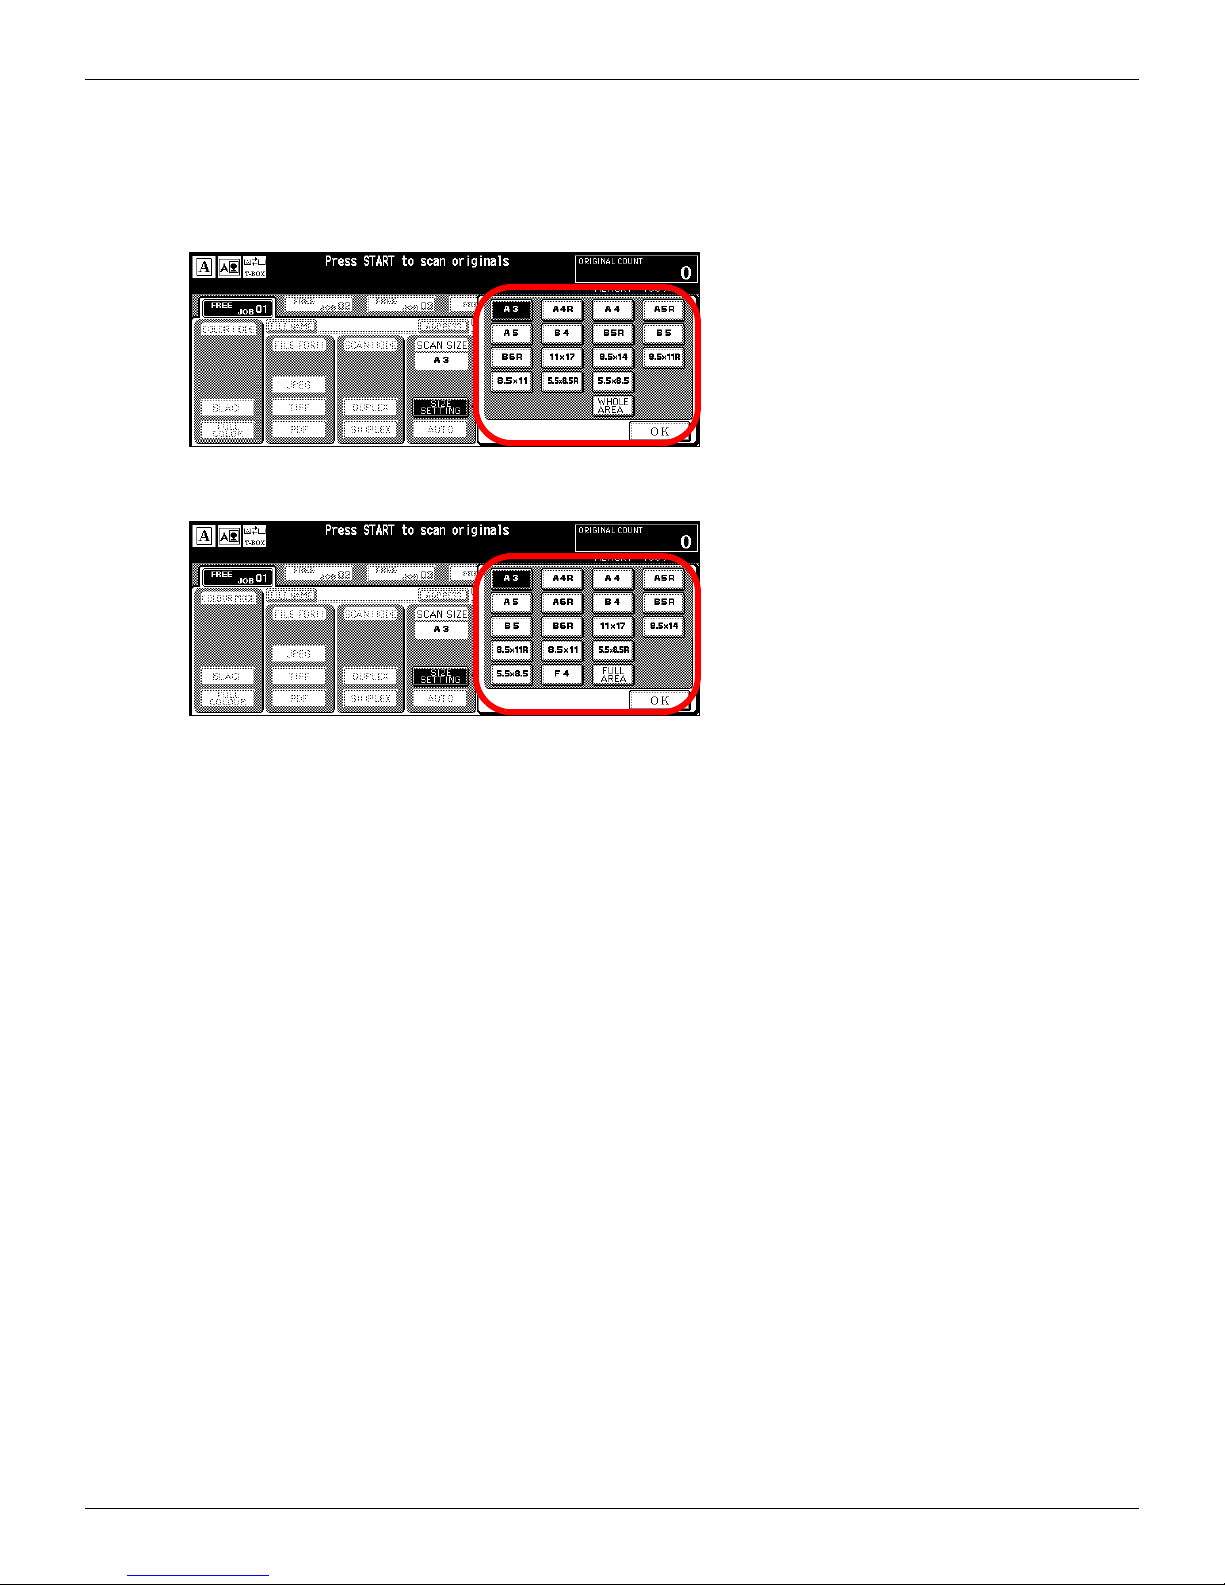
In case of [SIZE SETTING]:
1. Touch [SIZE SETTING].
Pop up screen appears.
• U.S.A.
• Others
3-4 Setting Scanner Features (Continued)
2. Select the paper size and touch [OK].
The display returns to the [Scanner setting basic] screen.
For example, when an A3 original is loaded and you select B5, then the scanning takes on the B5 frame.
Available paper sizes:
• U.S.A.
A3 / A4R / A4 / A5R / A5 / B4 / B5R / B5 / B6R / 11x17 / 8.5x14 / 8.5x11R / 8.5x11 / 5.5x8.5R / 5.5x8.5 / WHOLE AREA
• Others
A3 / A4R / A4 / A5R / A5 / A6R / B4 / B5R / B5 / B6R / 11x17 / 8.5x14 / 8.5x11R / 8.5x11 / 5.5x8.5R / 5.5x8.5 / F4 /
FULL AREA
73
Chapter 3 : Using the Scanning Features
Page 75
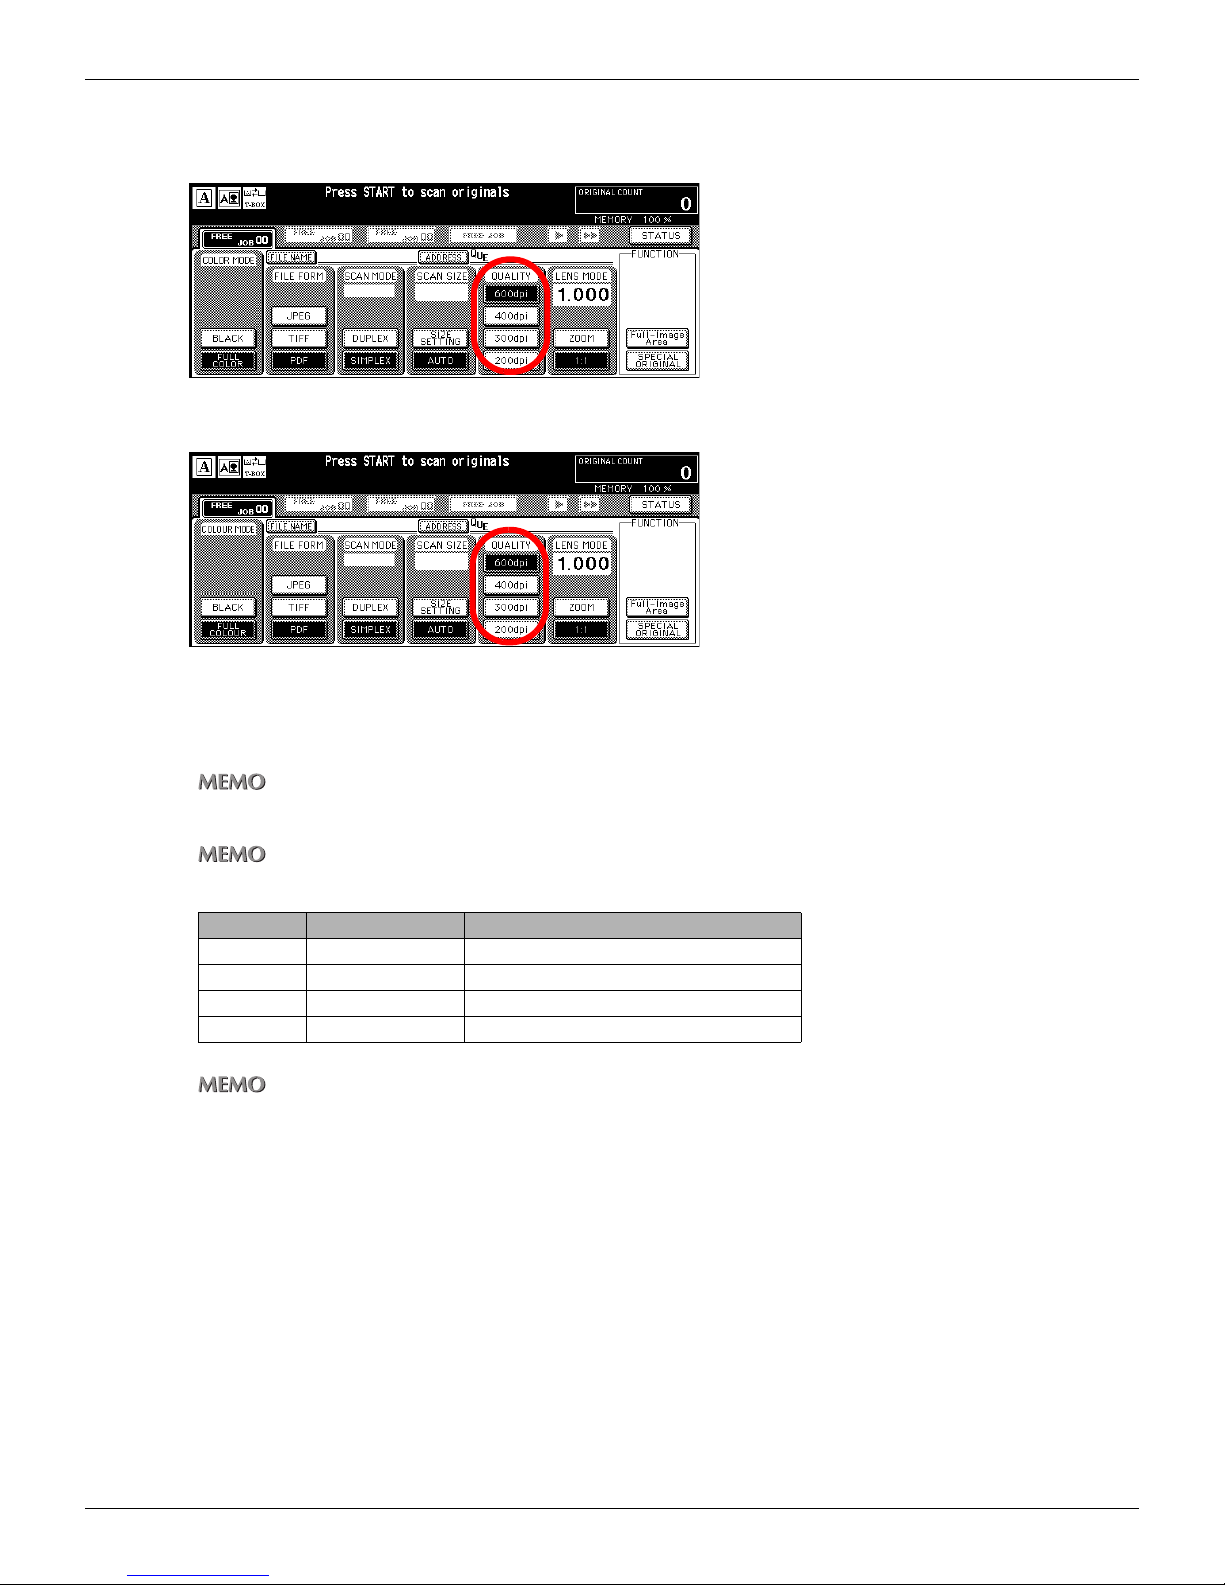
●QUALITY
• U.S.A.
• Others
3-4 Setting Scanner Features (Continued)
Use this feature to select the resolution.
You can select from [600dpi], [400dpi], [300dpi], or [200dpi].
If you need to change the default value of [QUALITY], please contact your service representative.
The following table shows how many originals can be scanned. (File Form; JPEG, TIFF, PDF)
Quality Data Size possible pages to read in
200dpi 420KB about 74,000 page
300dpi 810KB about 38,000 page
400dpi 1200KB about 24,000 page
600dpi 2300KB about 13,000 page
Data Size and No. of Originals available to be read depend on data actually scanned. Understand that the numbers in the table are intended only to serve as a rough guide for you.
74
Chapter 3 : Using the Scanning Features
Page 76
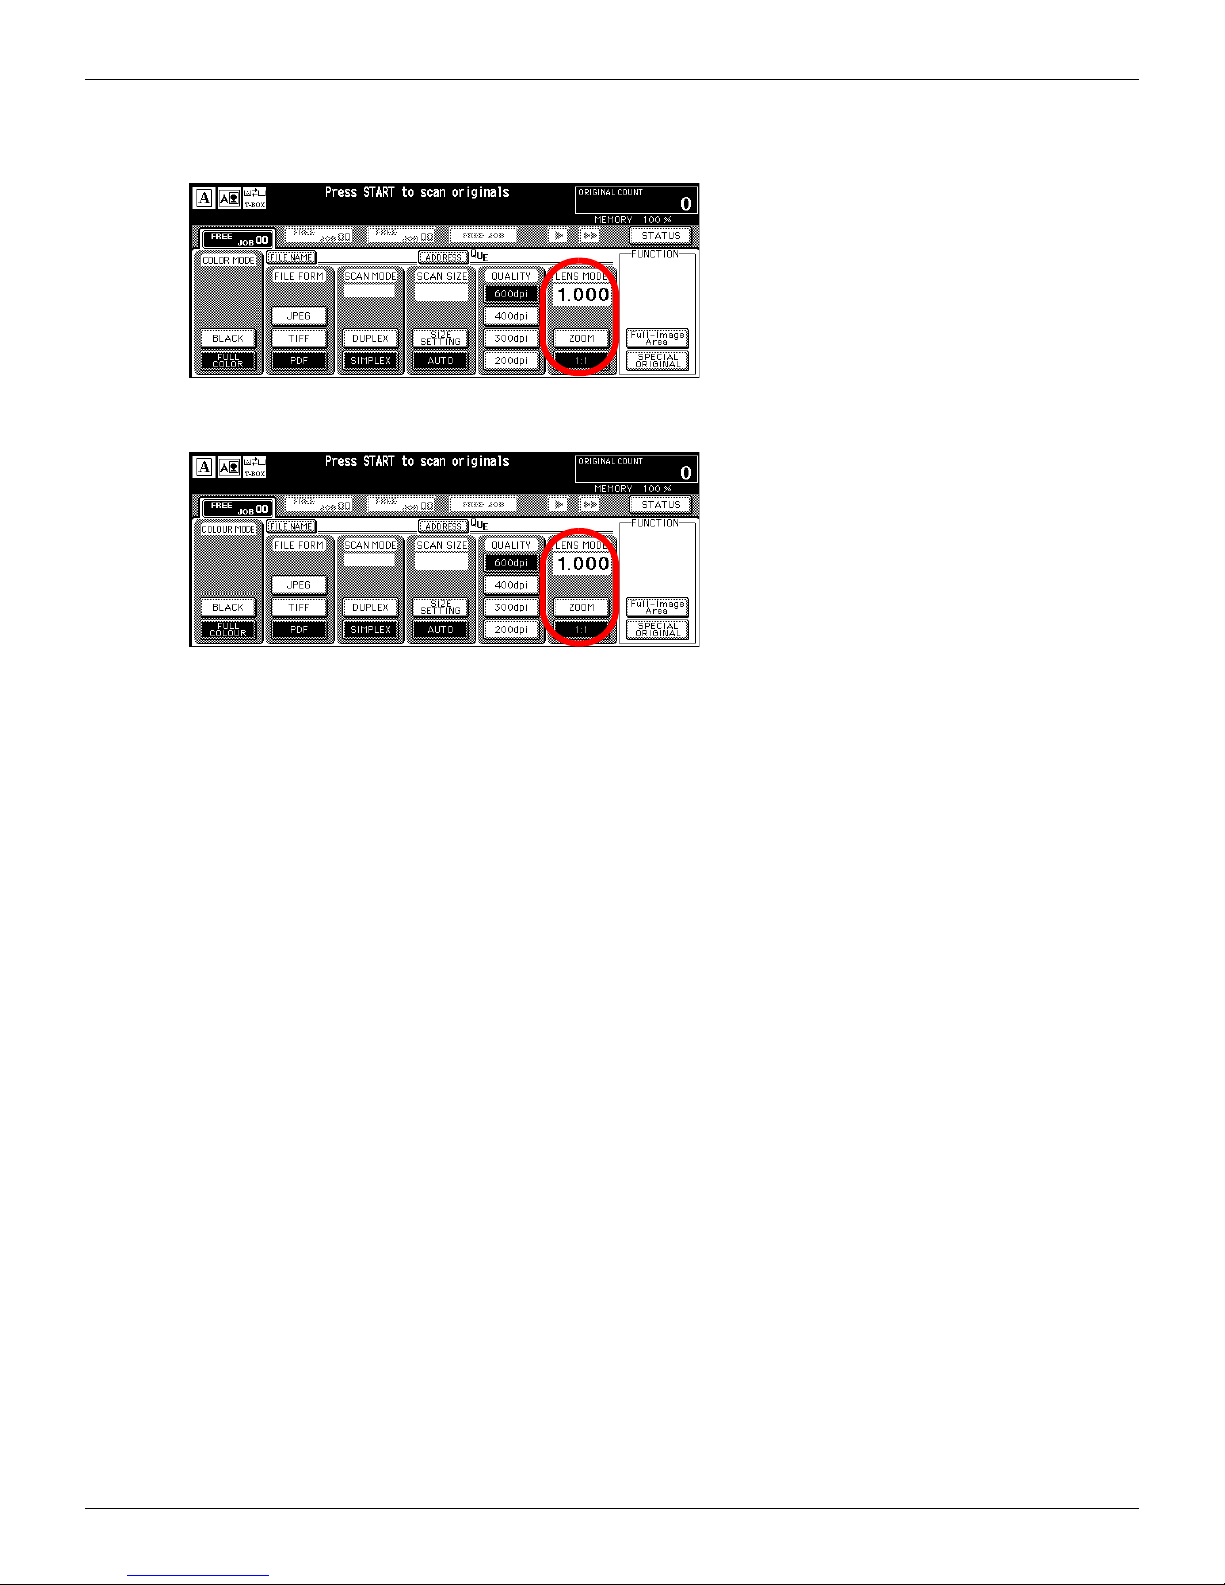
●LENS MODE
• U.S.A.
• Others
3-4 Setting Scanner Features (Continued)
Touch this key to change the magnification ratio at which the original document is read.
You can select [ZOOM] or [1:1]. The default setting is [1:1].
75
Chapter 3 : Using the Scanning Features
Page 77
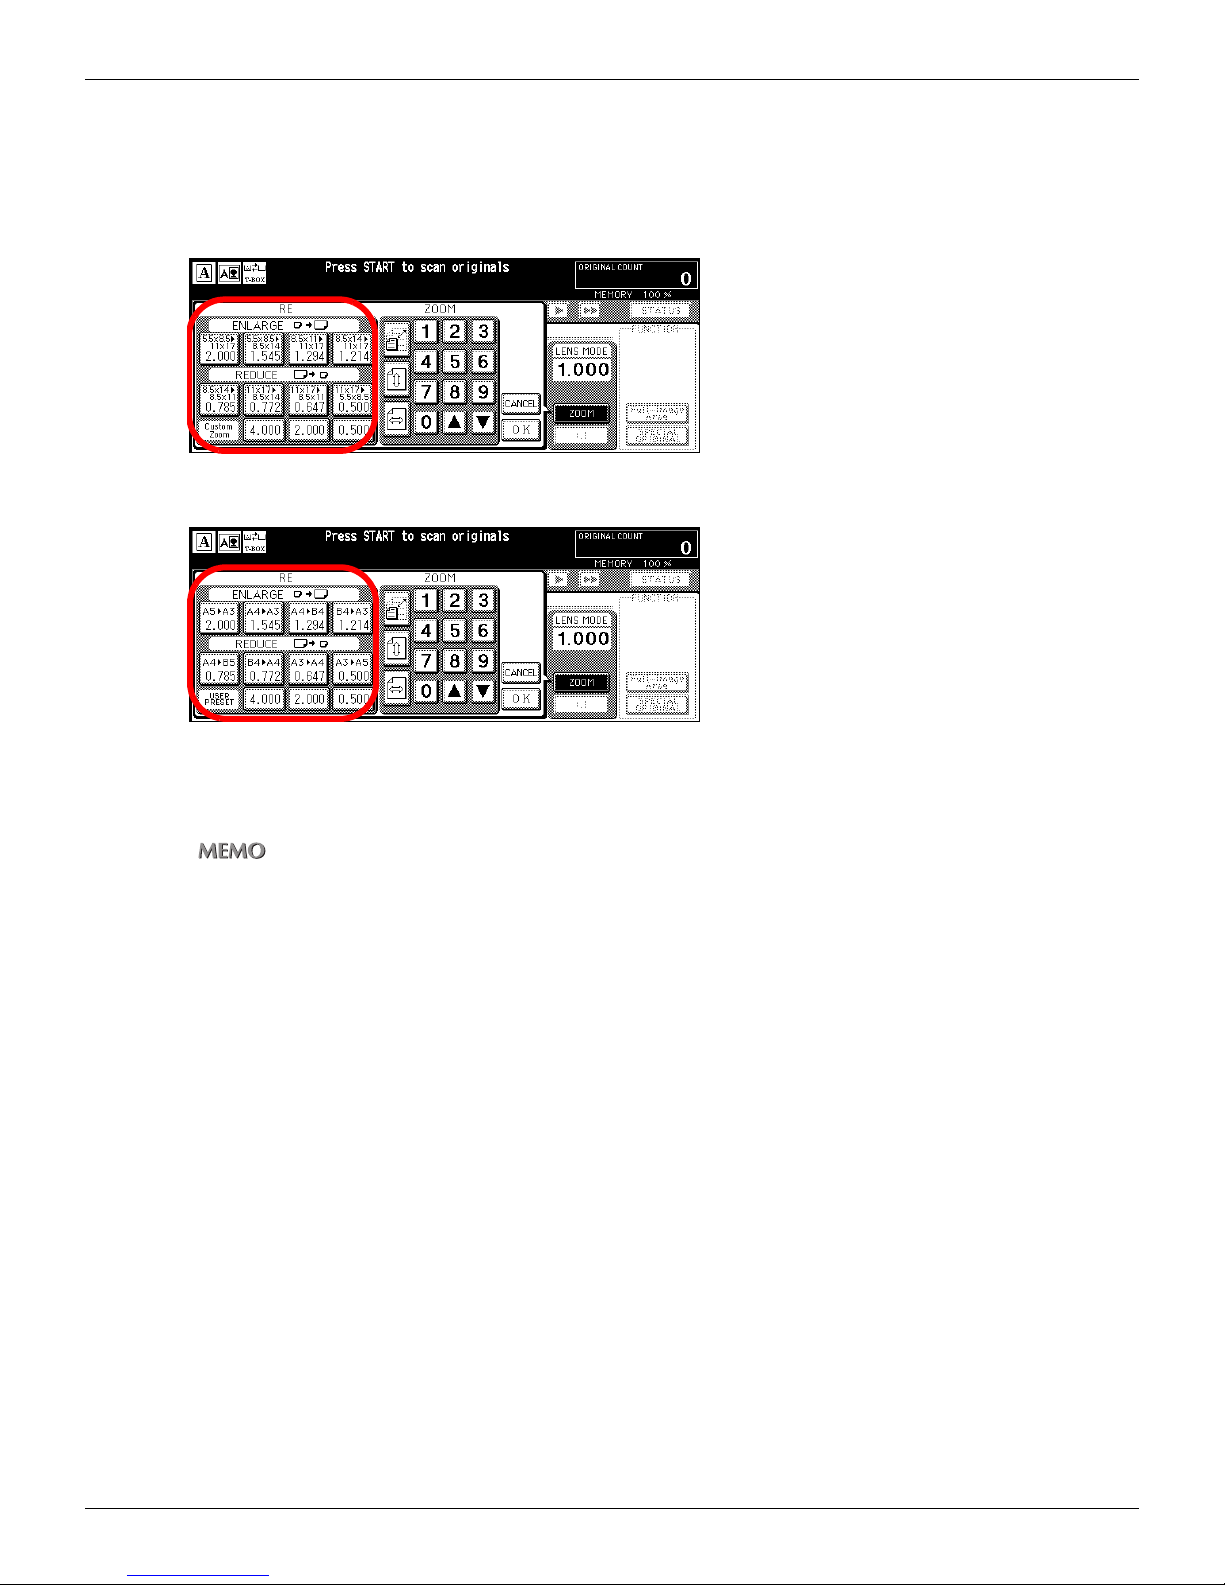
In case of [ZOOM]; fixed magnification ratios:
1. Touch [ZOOM].
Pop up screen appears.
• U.S.A.
• Others
3-4 Setting Scanner Features (Continued)
2. Select the fixed magnification ratios from [RE] groups and touch [OK].
The display returns to the [Scanner setting basic] screen.
The setting value of the fixed magnification ratios is the same as the default in the copy mode.
76
Chapter 3 : Using the Scanning Features
Page 78
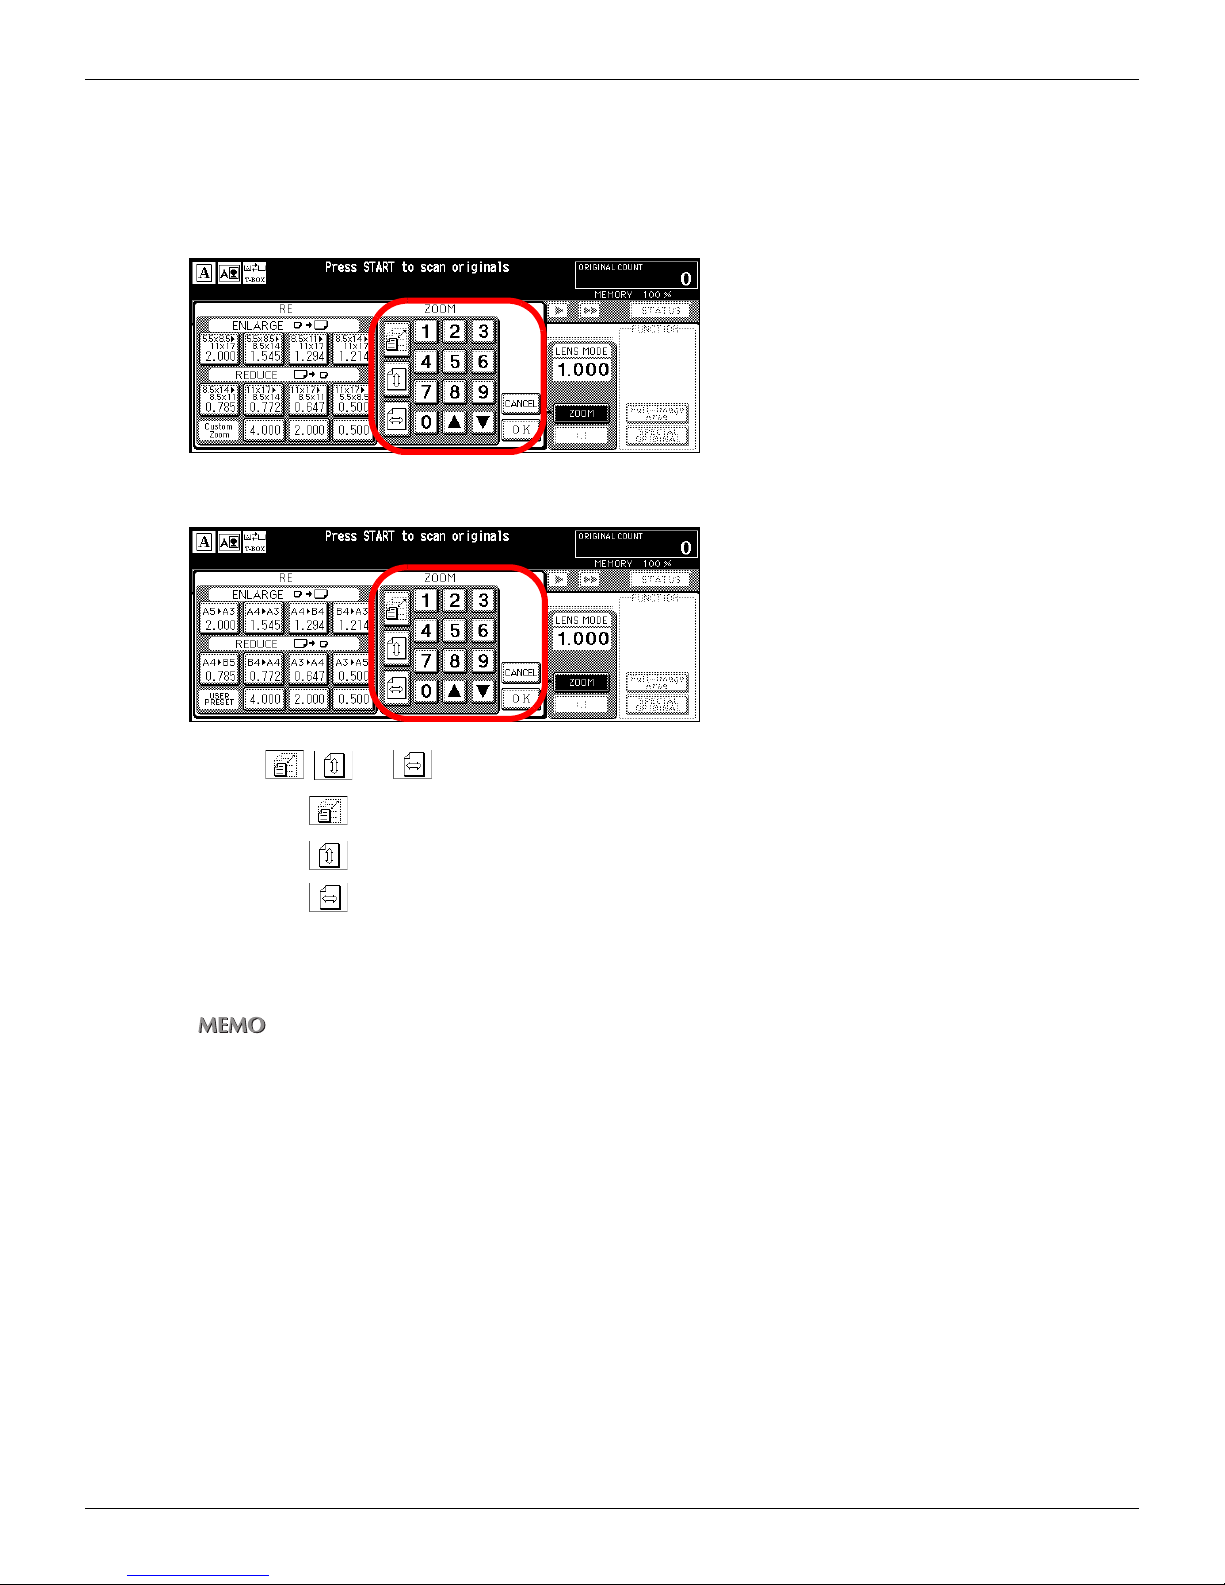
In case of [ZOOM]; optional magnification ratios:
1. Touch [ZOOM].
Pop up screen appears.
• U.S.A.
• Others
3-4 Setting Scanner Features (Continued)
2. Touch , or .
You can select to zoom with the same ratio.
You can select to set zoom with the ratio of vertical direction.
You can select to set zoom with the ratio of horizontal direction.
3. Input the ratio to zoom and touch [OK].
The display returns to the [Scanner setting basic] screen.
Optional magnification ratios Changes according to read-in resolution.
For 200 dpi : 75-400%
For 300 dpi : 75-400%
For 400 dpi : 38-400%
For 600 dpi : 25-400%
77
Chapter 3 : Using the Scanning Features
Page 79
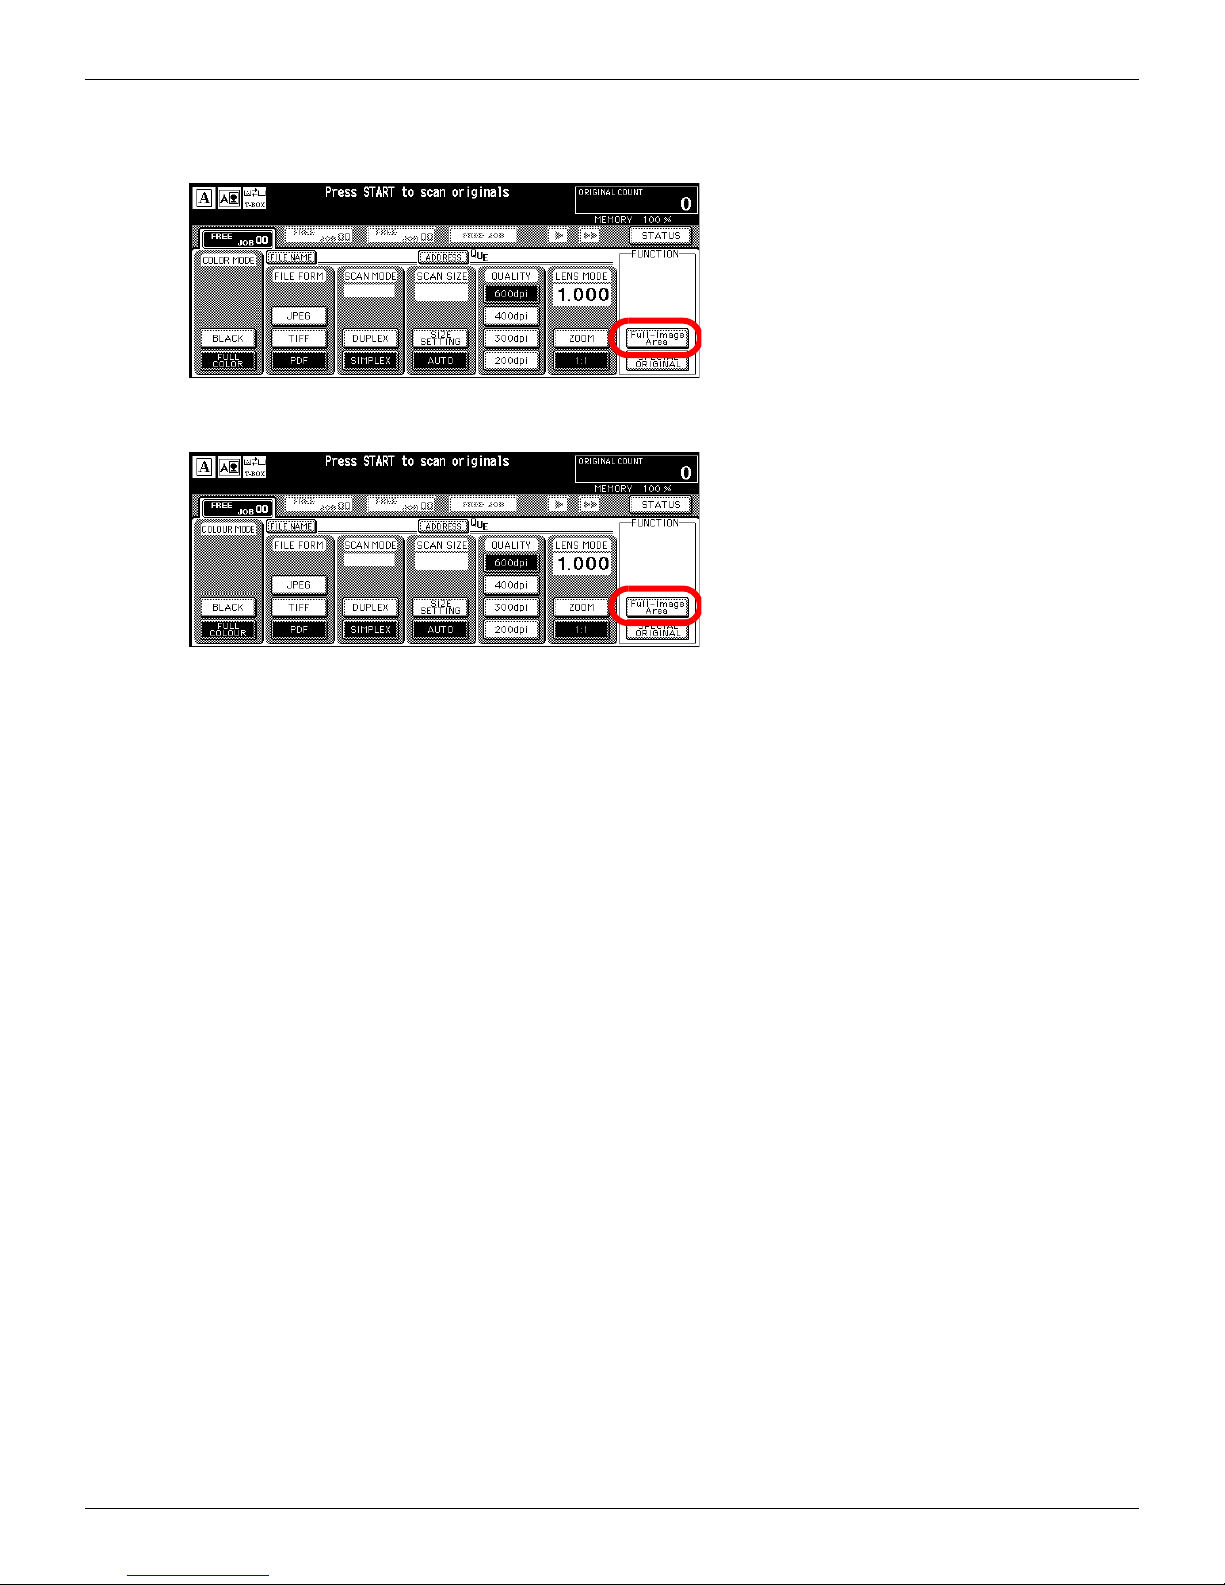
●Full-Image Area
• U.S.A.
• Others
3-4 Setting Scanner Features (Continued)
Normally, the scan is made with an image data erase some margin at the top, bottom, left and right edges.
In this mode, the document is scanned completely to the edges.
Use this feature to scan the document completely to the edges.
78
Chapter 3 : Using the Scanning Features
Page 80
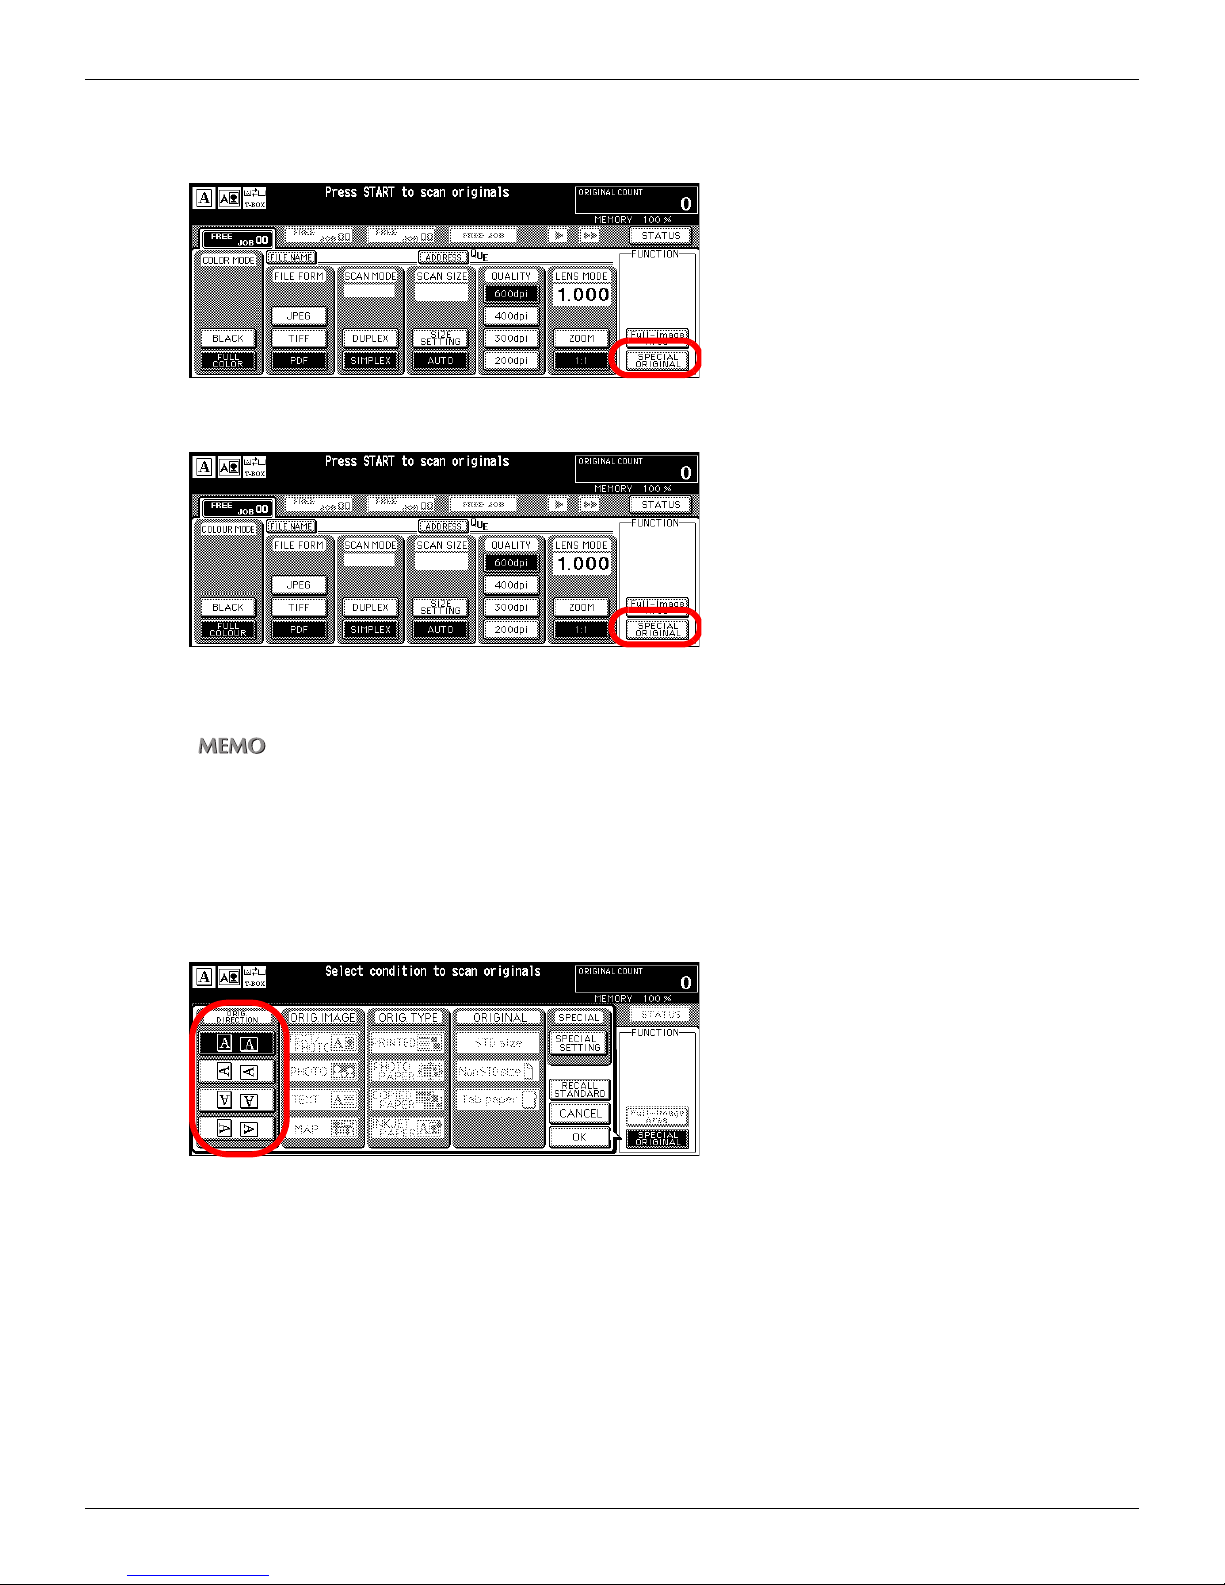
●Original Direction
• U.S.A.
• Others
3-4 Setting Scanner Features (Continued)
Use this feature to choose which direction to load the original.
Original direction may not be set depending on the file form.
PDF: Settable
JPEG: Not settable
TIFF: Not settable
1. Touch [SPECIAL ORIGINAL].
Pop up screen appears.
2. Select the orientation of the document to be scanned and touch [OK].
The display returns to the [Scanner setting basic] screen.
79
Chapter 3 : Using the Scanning Features
Page 81
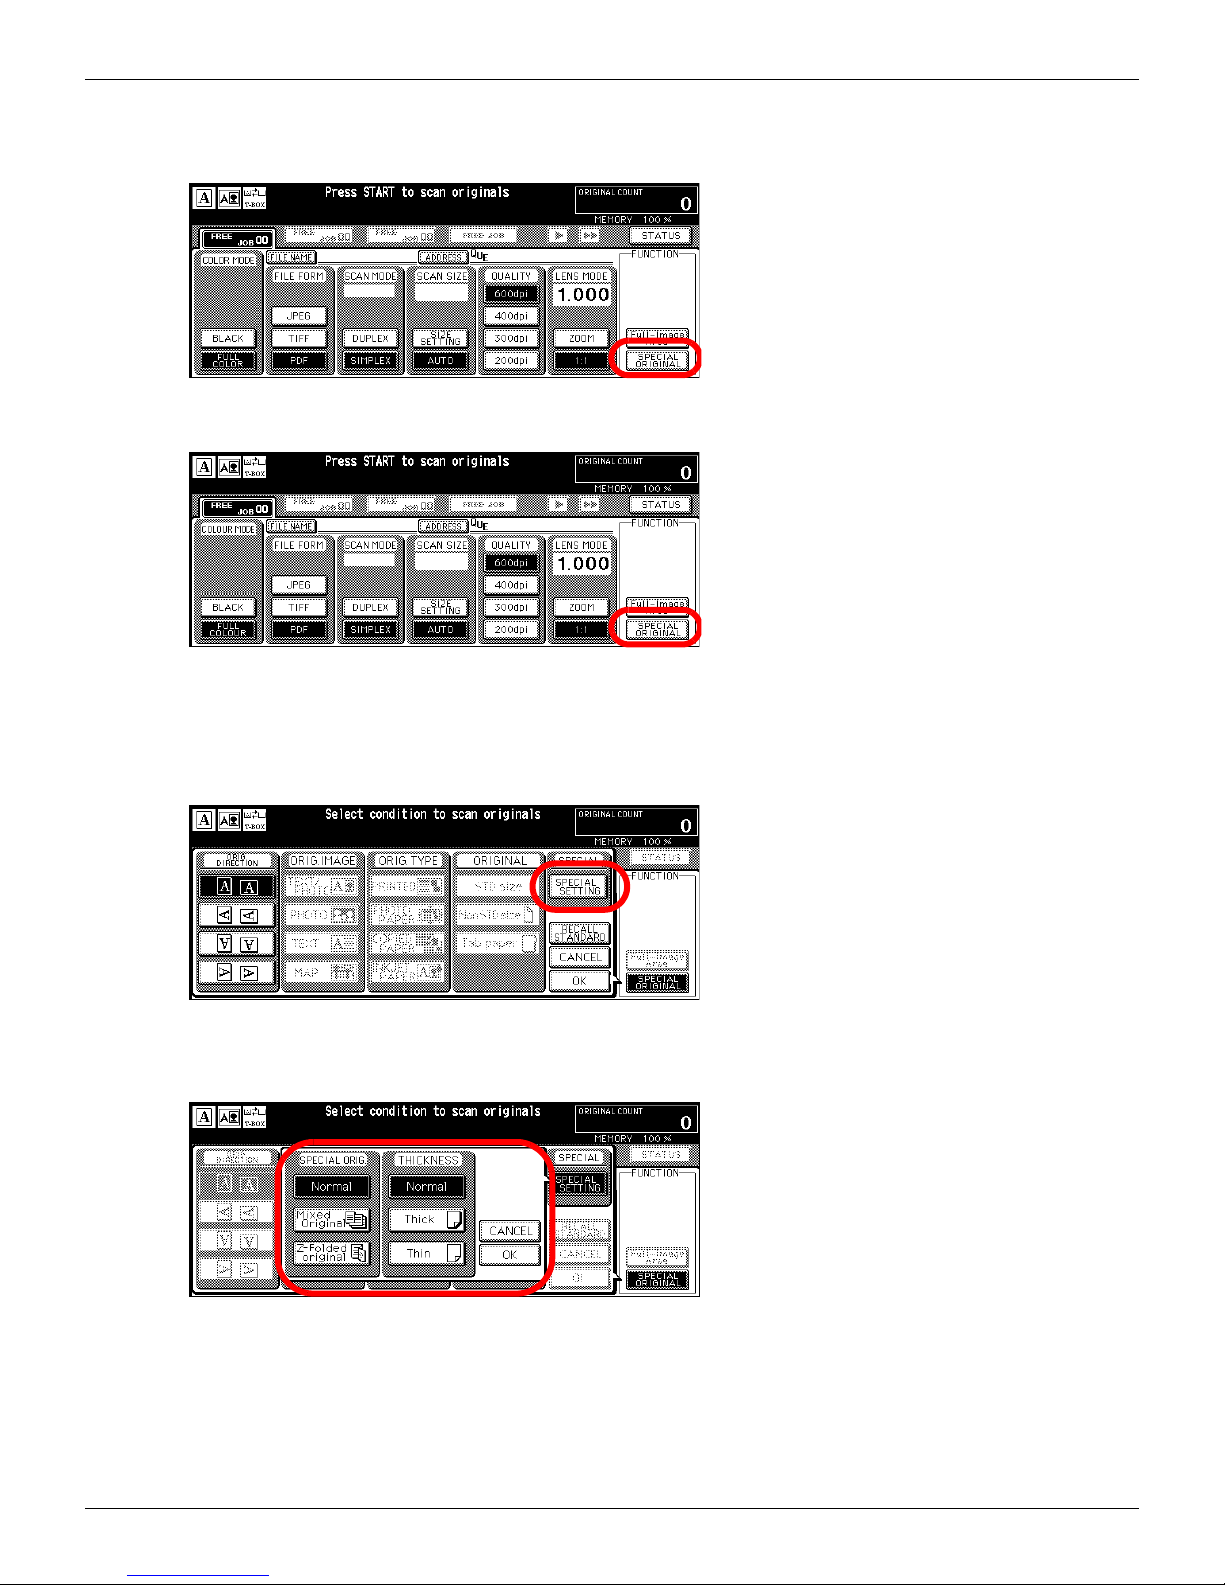
●Original Document type
• U.S.A.
• Others
3-4 Setting Scanner Features (Continued)
Use this feature to set the type of the original document.
1. Touch [SPECIAL ORIGINAL].
Pop up screen appears.
2. Touch [SPECIAL SETTING].
Pop up screen appears.
80
Chapter 3 : Using the Scanning Features
Page 82

3-4 Setting Scanner Features (Continued)
3. When you scan multiple originals of varying sizes, touch [Mixed Original]. When
you scan Z-folded originals, touch [Z-Folded Original].
In case of the same size originals or one piece of the original, make sure that the [Normal] is selected.
Mixed original cannot be implemented in the computer by the TWAIN plug-in function.
4. When originals are thick paper, touch [Thick]. When originals are thin paper, touch
[Thin].
In case of the normal paper, make sure that the [Normal] is selected.
5. Make sure the contents you select and touch [OK].
The display returns to the screen mentioned in procedure 1.
6. Touch [OK].
The display returns to the [Scanner setting basic] screen.
81
Chapter 3 : Using the Scanning Features
Page 83
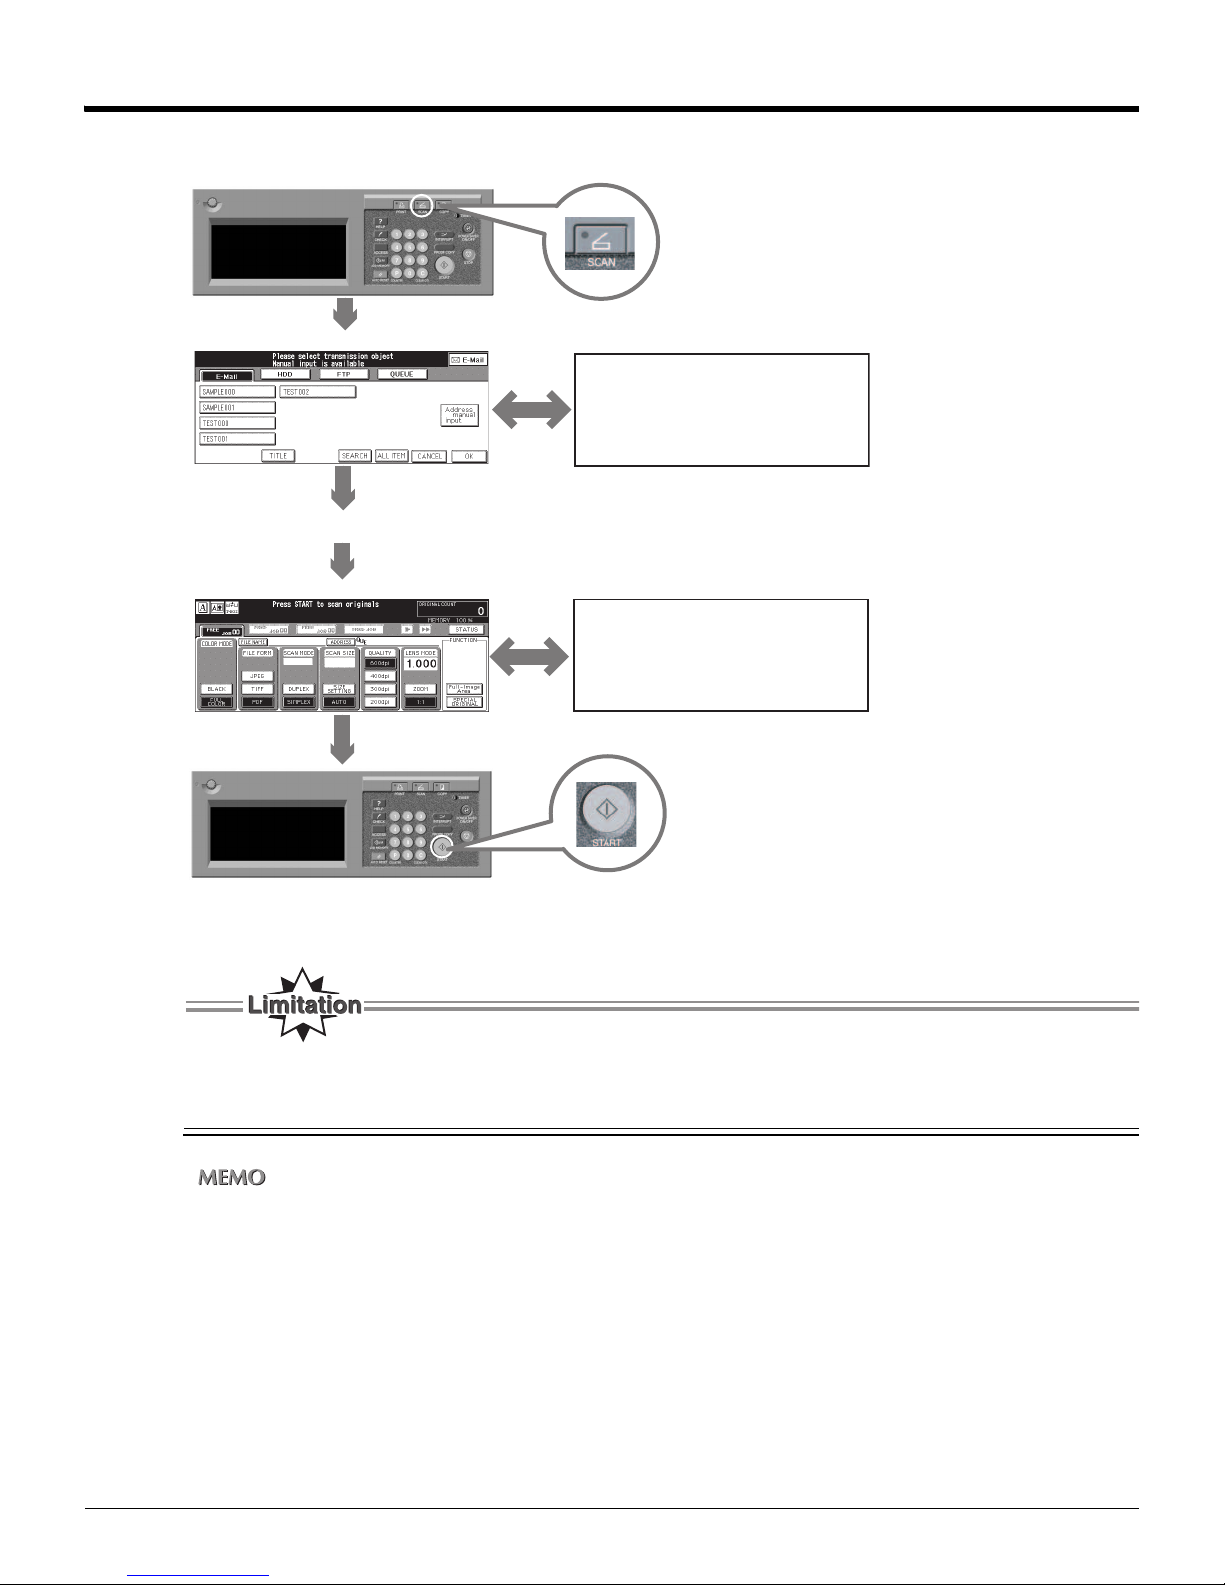
3-5 Starting Scanning
After having made necessary settings on the [Scanner setting basic] screen, press [START] on the control panel to start scanning.
Control Panel
[Select Transmission Object] screen
[Select Transmission Object] screen
[Title input] screen
[Search a Transmission Object] screen
Set the original document
[Scanner setting basic] screen
respective setting screen
Control Panel
After scanning start, the LCD screen returns to the [Select Transmission Object] ([Scanning base mode]) screen.
When the copier's control panel is in the scanner mode, no print jobs can be received and therefore no output is
produced. Put the control panel into the Copy mode by pressing [COPY] button when you do not need any scanning features.
If AUTO RESET is effective, the LCD screen returns to the Copy Mode automatically after setting time passed.
82
Chapter 3 : Using the Scanning Features
Page 84

3-6 Checking Status and Scanner Settings
●Tag Display of Operation Status
The following tags are displayed to show the scanning process:
SCANNER READING JOB
A scan job is being read.
SCANNER OUTPUTTING JOB
A scan job is being output to the print controller.
SCANNER WAITING JOB
A scan job has been read in but is waiting to be output because a print job is being output.
SCANNER INTERRUPTING JOB
The reading of a scan job is stopped.
SCANNER JAM JOB
A paper jam has been produced in the process of the reading in of a scan job.
When the copier's control panel is in the scanner mode, no print jobs are sent and therefore no output is produced. You are advised to put the control panel into the Copy mode by pressing [COPY] button when you don't
need any scanning features. If AUTO RESET is effective, the LCD screen returns to the Copy Mode automatically
after setting time passed.
83
Chapter 3 : Using the Scanning Features
Page 85
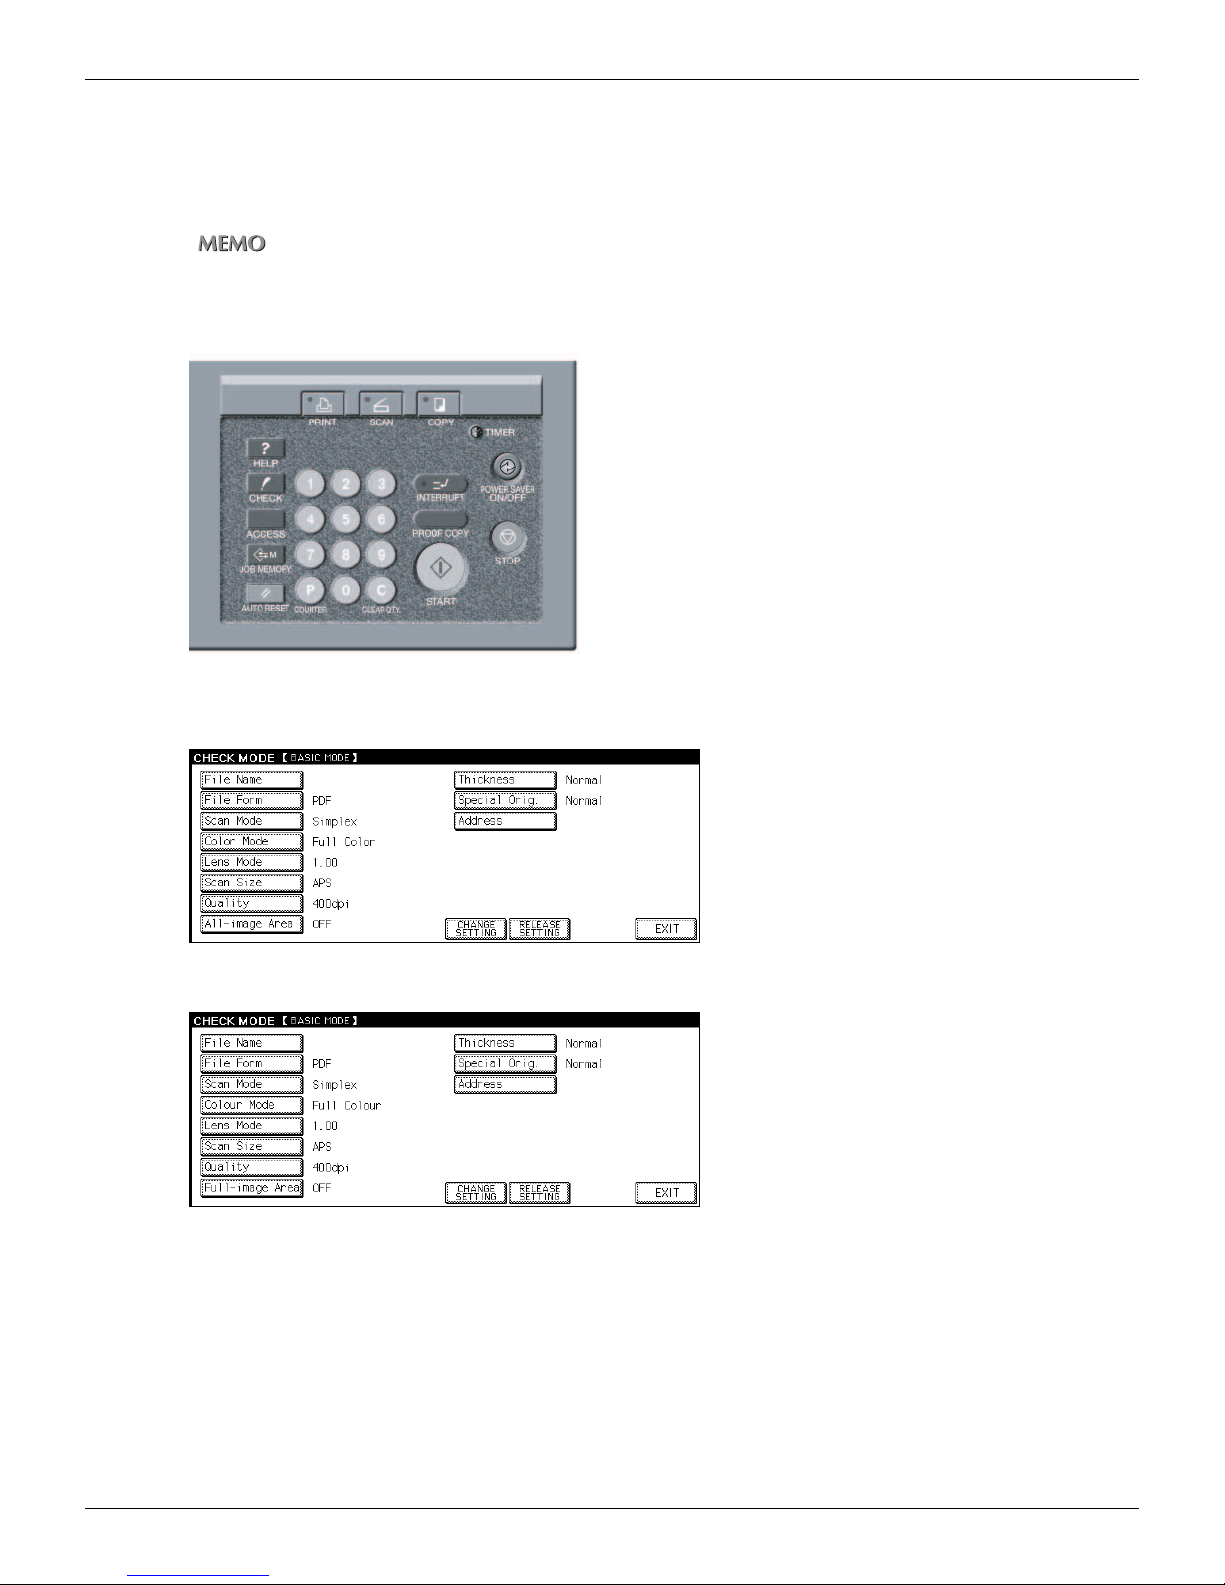
3-6 Checking Status and Scanner Settings (Continued)
●Check Settings for Scanning
You can check setting for scanning to list the contents of scanner settings on the LCD screen.
You can check those when the [Scanning setting basic] screen is displayed by the following procedures:
When a screen other than the [Scanning setting basic] screen is displayed, you cannot check the scanner setting.
1. Press [CHECK] button on the control panel.
The [CHECK MODE] screen is displayed.
• U.S.A.
• Others
This screen shows the current settings for scanning.
Using the [CHANGE SETTINGS], you can change the current settings.
84
Chapter 3 : Using the Scanning Features
Page 86
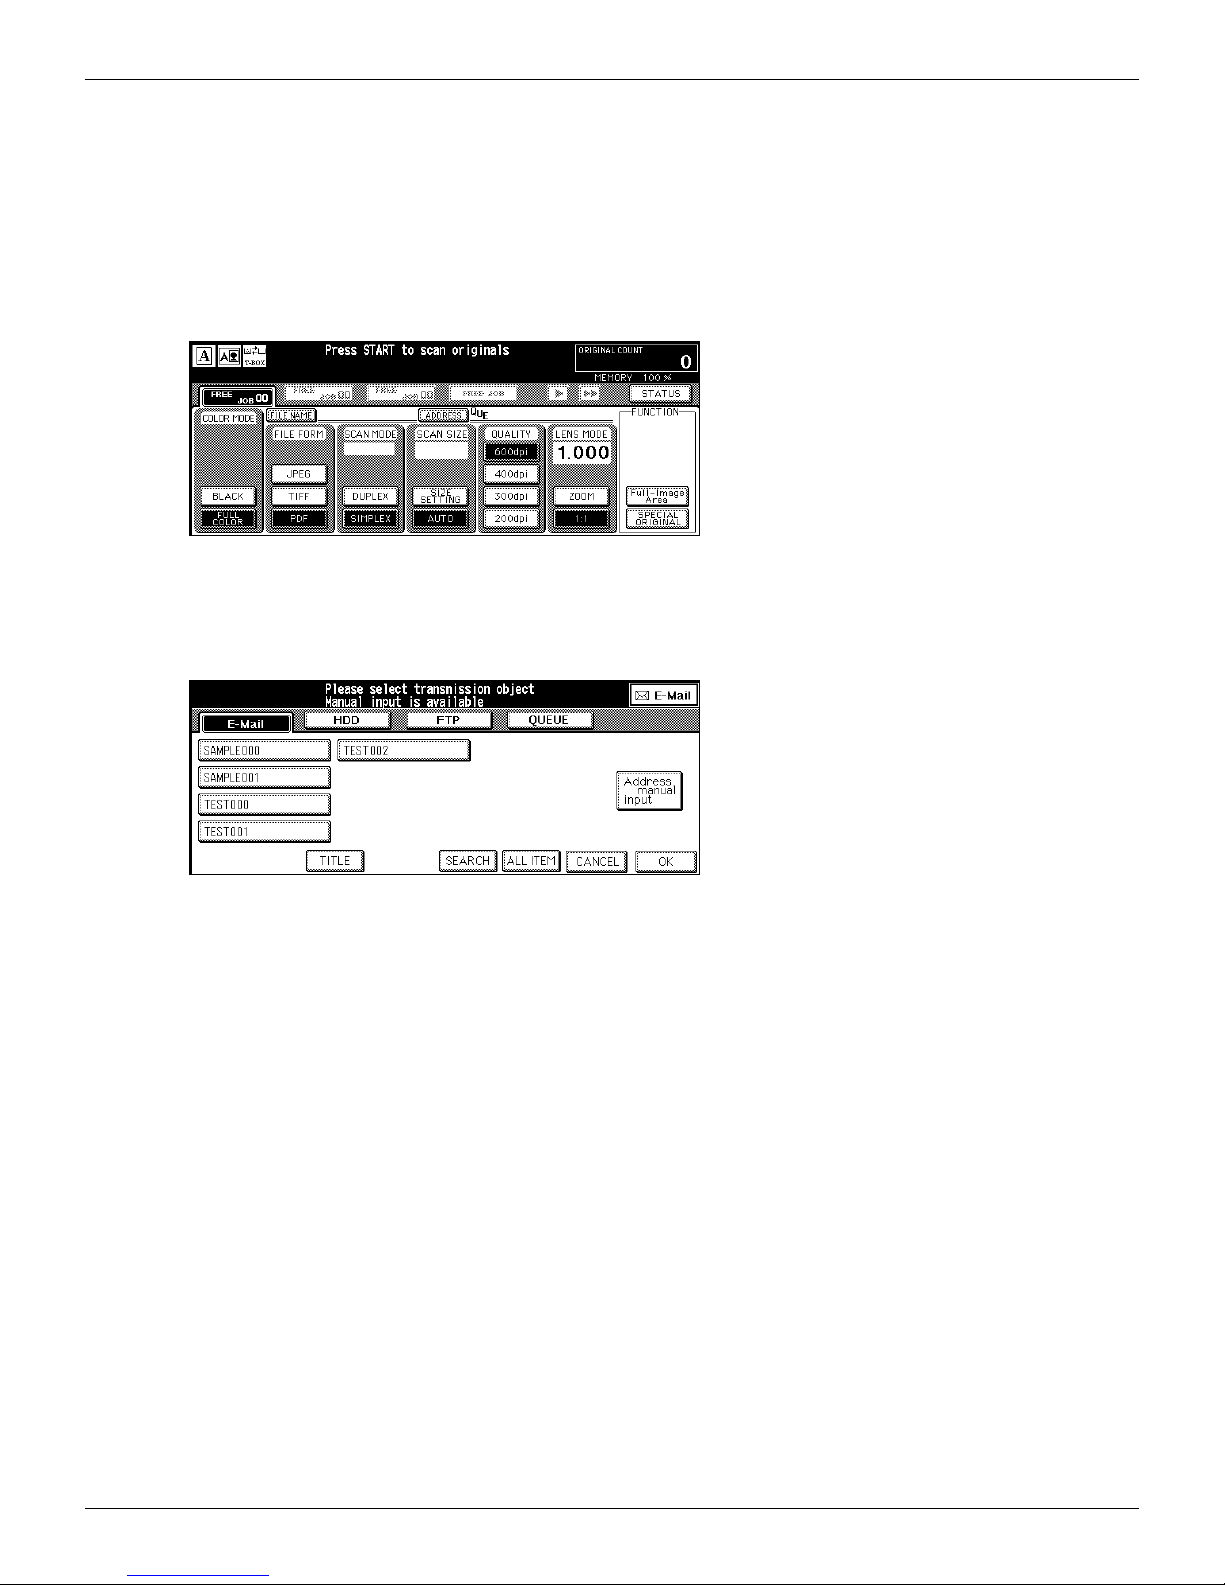
●Change the current settings
1. Touch the item to change settings.
Item selected turns into turn-over indication.
2. Touch [CHANGE SETTINGS].
When you select the item on procedure 1 that has settings on the [Scanner setting basic] screen, the [Scanner setting
basic] screen appears.
If you select the item on procedure 1 which does not have settings on the [Scanner setting basic] screen, setting screen
for an item appears.
For example : When you select [E-Mail Address], the [Select Transmission Object] screen appears and the [E-Mail] is
selected.
3-6 Checking Status and Scanner Settings (Continued)
85
Chapter 3 : Using the Scanning Features
Page 87
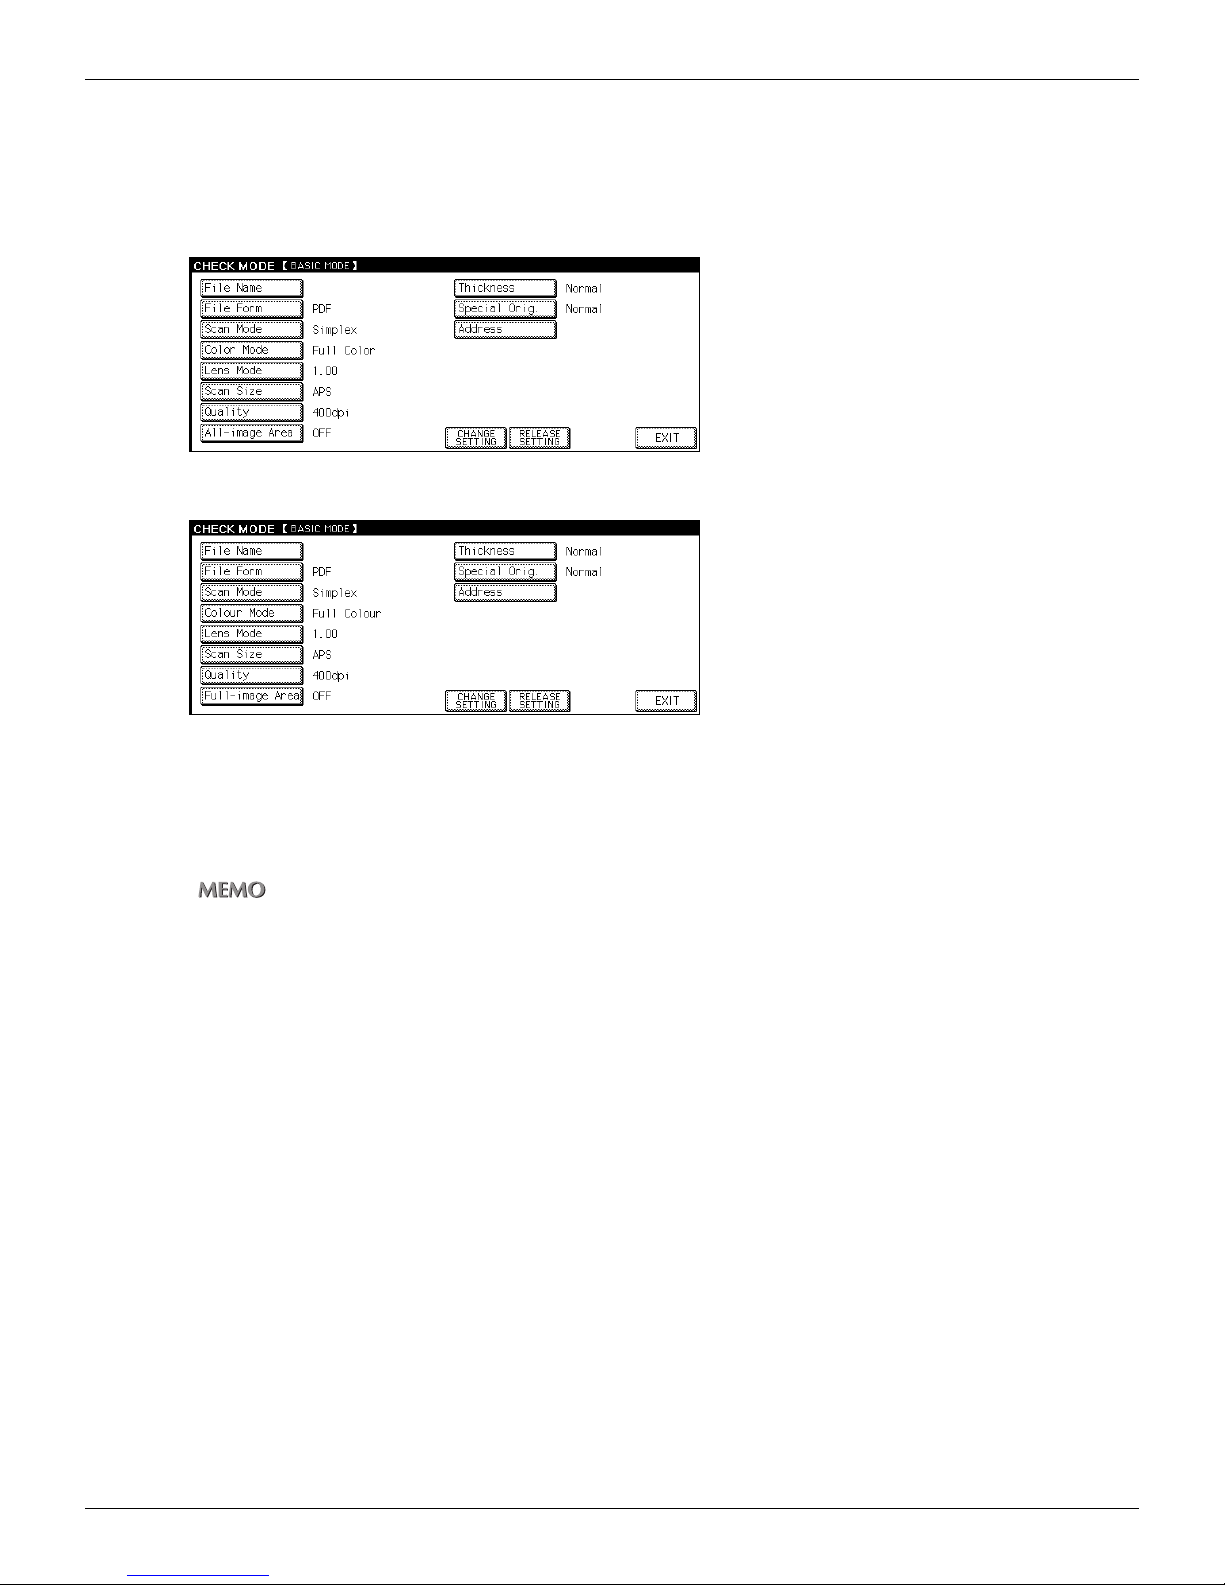
3-6 Checking Status and Scanner Settings (Continued)
3. Change settings and touch [OK].
When you select the item on procedure 1 that has settings on the [Scanner setting basic] screen, the screen returns to
the [CHECK MODE] screen.
Then, you can confirm the contents of settings you changed on procedure 2 on this screen.
• U.S.A.
• Others
If you select an item on procedure 1 which does not have settings on the [Scanner setting basic] screen, the screen
returns to the [Scanner setting basic] screen.
In this case, you can do usual procedures you need and scan the document.
You can also return to the [CHECK MODE] screen by pressing the [CHECK] button on the control panel.
When you change the other setting sequentially, follow the same procedure from step 1 to 3.
4. To exit the [CHECK MODE] screen, touch [EXIT].
86
Chapter 3 : Using the Scanning Features
Page 88

Chapter 4 : Importing the Scanned Data
4-1 Retrieving in From HDD ..............................................................88
4-2 Images Scanned to FTP or E-mail.............................................. 90
4-3 Images Scanned to QUEUE........................................................91
87
Page 89
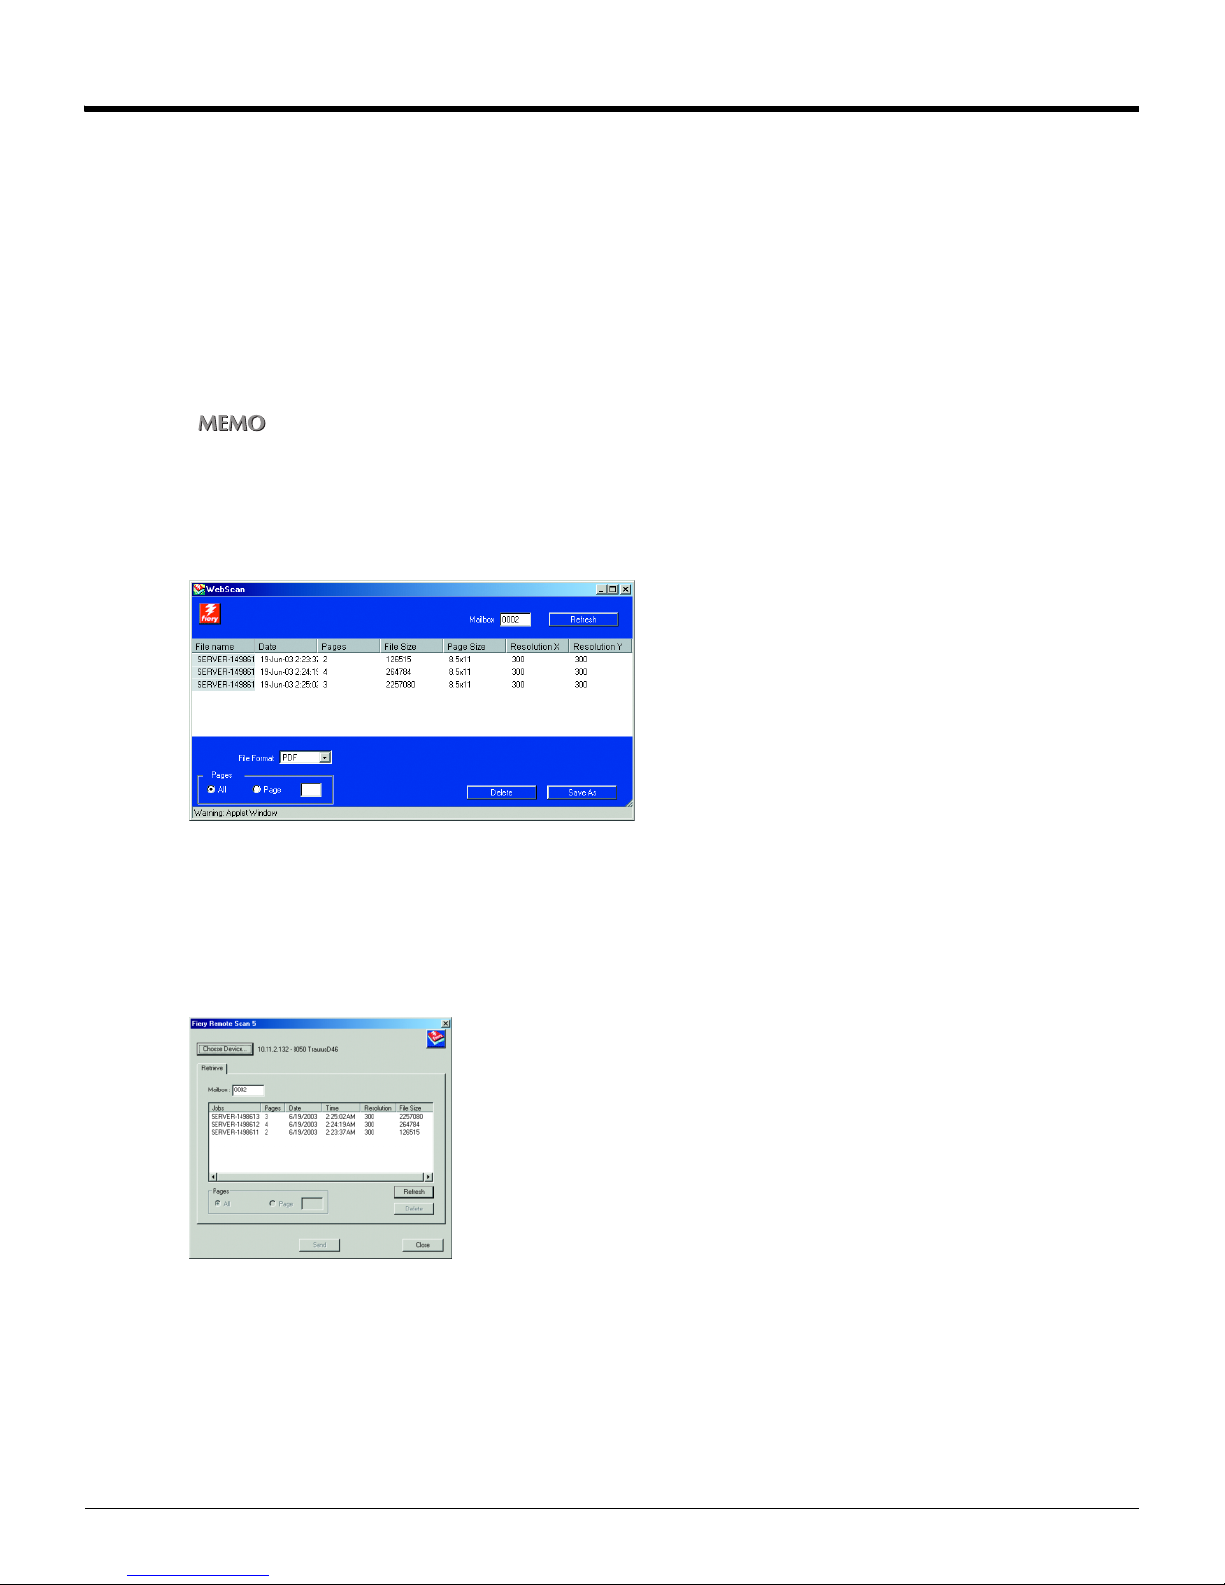
4-1 Retrieving in From HDD
How to read in scanned data
Use the Utility of the Copier to read in scanned data stored in HDD of the print controller.
You can import the scanned data with following ways:
• Read in scanned data through WebScan
• Read in scanned data through Fiery Remote Scan application
• Read in scanned data through TWAIN-compliant Fiery Remote Scan plug-in
In those utilities, “Mail Box” means “Box (No.)” on importing the scanned data.
For detailed operations of these utility tools, please refer to the “Print Controller’s User’s Guide”.
WebScan
WebScan is one of the “Fiery WebTools” that enables to use scanning features of the print controller through your Browser.
Start WebScan and set the Box No. to the column “MailBox area”, scan jobs (stored scanned data) are listed.
Select a scan job from the list and you can read it into your computer (local saving).
Fiery Remote Scan Application
Fiery Remote Scan is an application to use remote scanning features of the print controller.
Start Fiery Remote Scan application, login to the print controller and set the Box No. to the column “MailBox”. Scan jobs
(stored scanned data) are listed.
Select a scan job from the list. You can send it as attached file of an E-Mail, upload it to a FTP server and read it into your
computer (local saving).
88
Chapter 4 : Importing the Scanned Data
Page 90
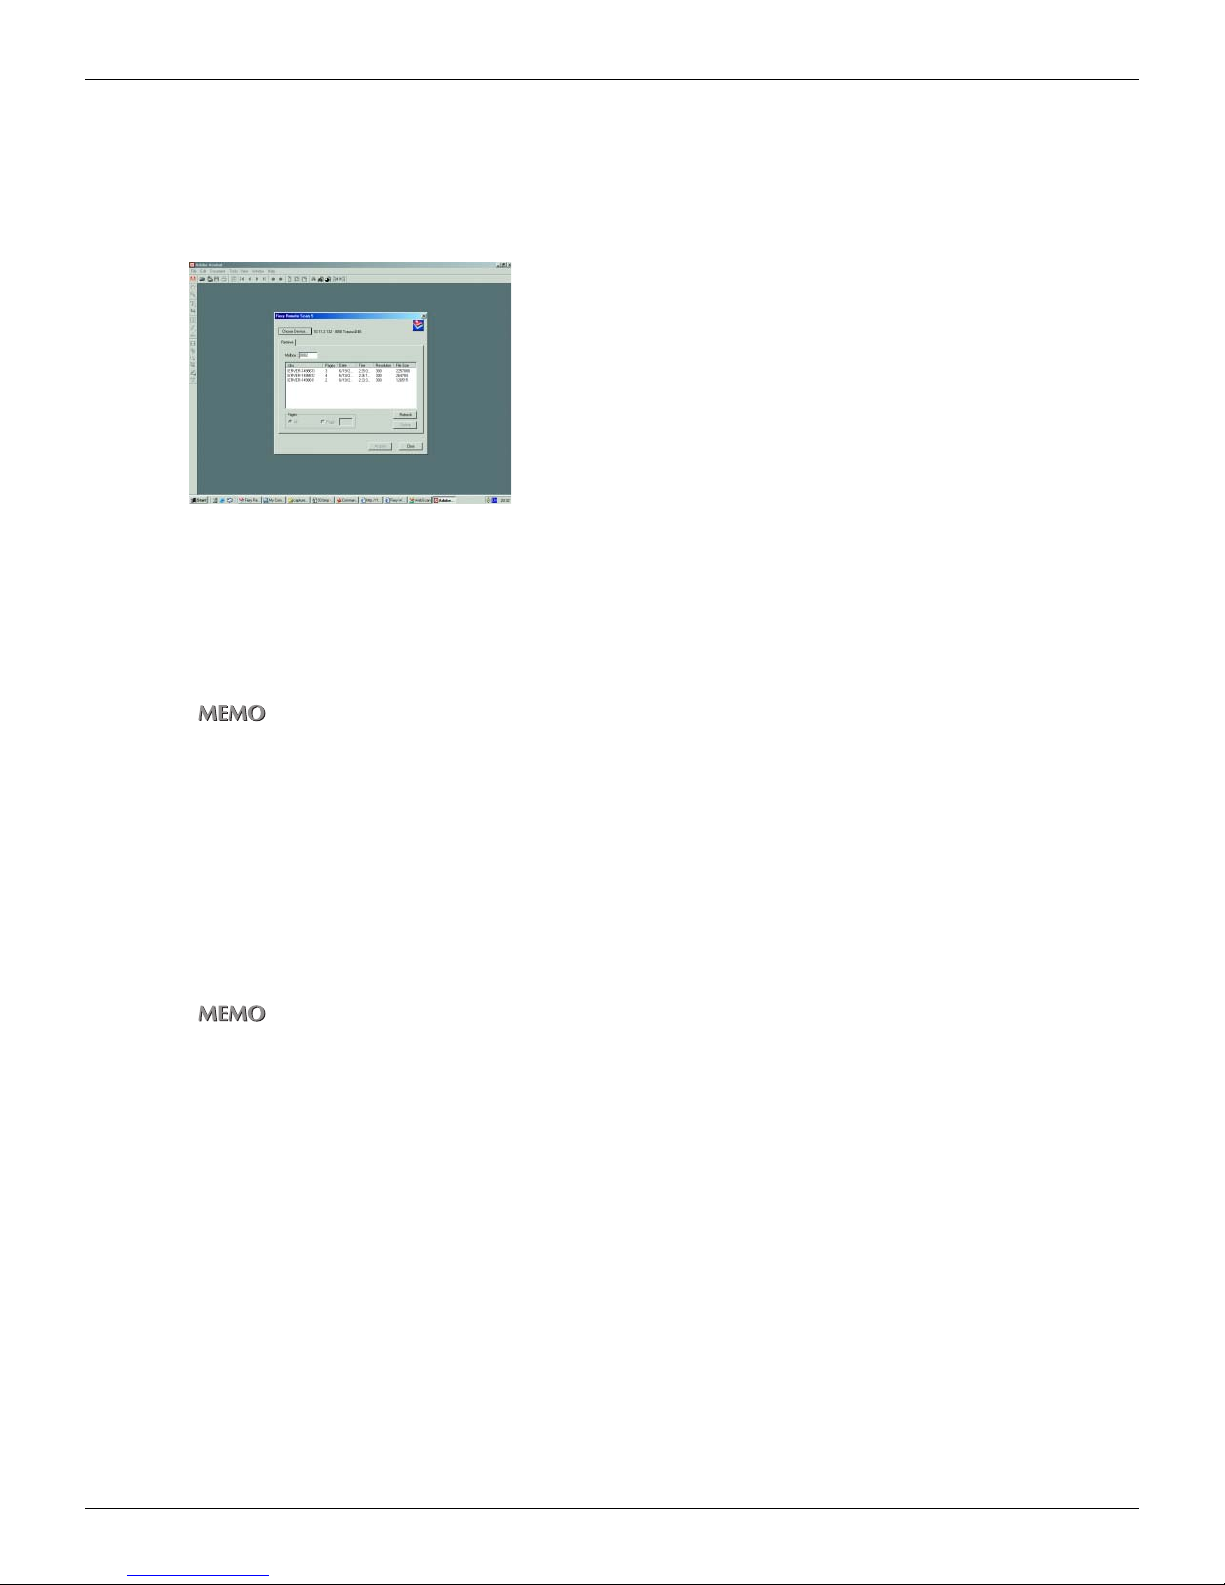
4-1 Retrieving in From HDD (Continued)
TWAIN-compliant Fiery Remote Scan plug-in
Fiery Remote Scan plug-in is compliant to TWAIN and you can use it from a TWAIN compliant application.
Start a TWAIN compliant application, select [File] - [Read] - [Fiery Remote Scan 5] (a command name is differed by applications), login to the print controller from the displayed dialog and set the Box No. to the column “MailBox”, scan jobs (stored
scanned data) are listed.
Select a scan job from the list and click the [IMPORT] button. You can read it into your computer (local saving).
●How to delete scanned data
The scanned data stored to HDD is automatically deleted by day or by week according to the setting of the print controller.
For information about the AUTO DELETE feature, please ask print controller administrator.
You can delete it manually as follows:
• Delete the scanned data using WebScan
• Delete the scanned data using Fiery Remote Scan application
• Delete the scanned data using TWAIN-compliant Fiery Remote Scan plug-in
• Delete the scanned data using Command WorkStation
In those utilities, “Mail Box” means “Box (No.)” on deleting the scanned data.
For detailed operations of these utility tools, please refer to the “Print Controller’s User’s Guide”.
WebScan
Fiery Remote Scan Application
TWAIN-compliant Fiery Remote Scan plug-in
List the scan job using the same procedures to read in scan job (stored scanned data), select a scan job to delete and click the
[DELETE] button.
Command WorkStation
Command WorkStation is a Utility Application for job control.
The administrator of the print controller can delete all the scanned data stored inside all Boxes at once.
89
Chapter 4 : Importing the Scanned Data
Page 91
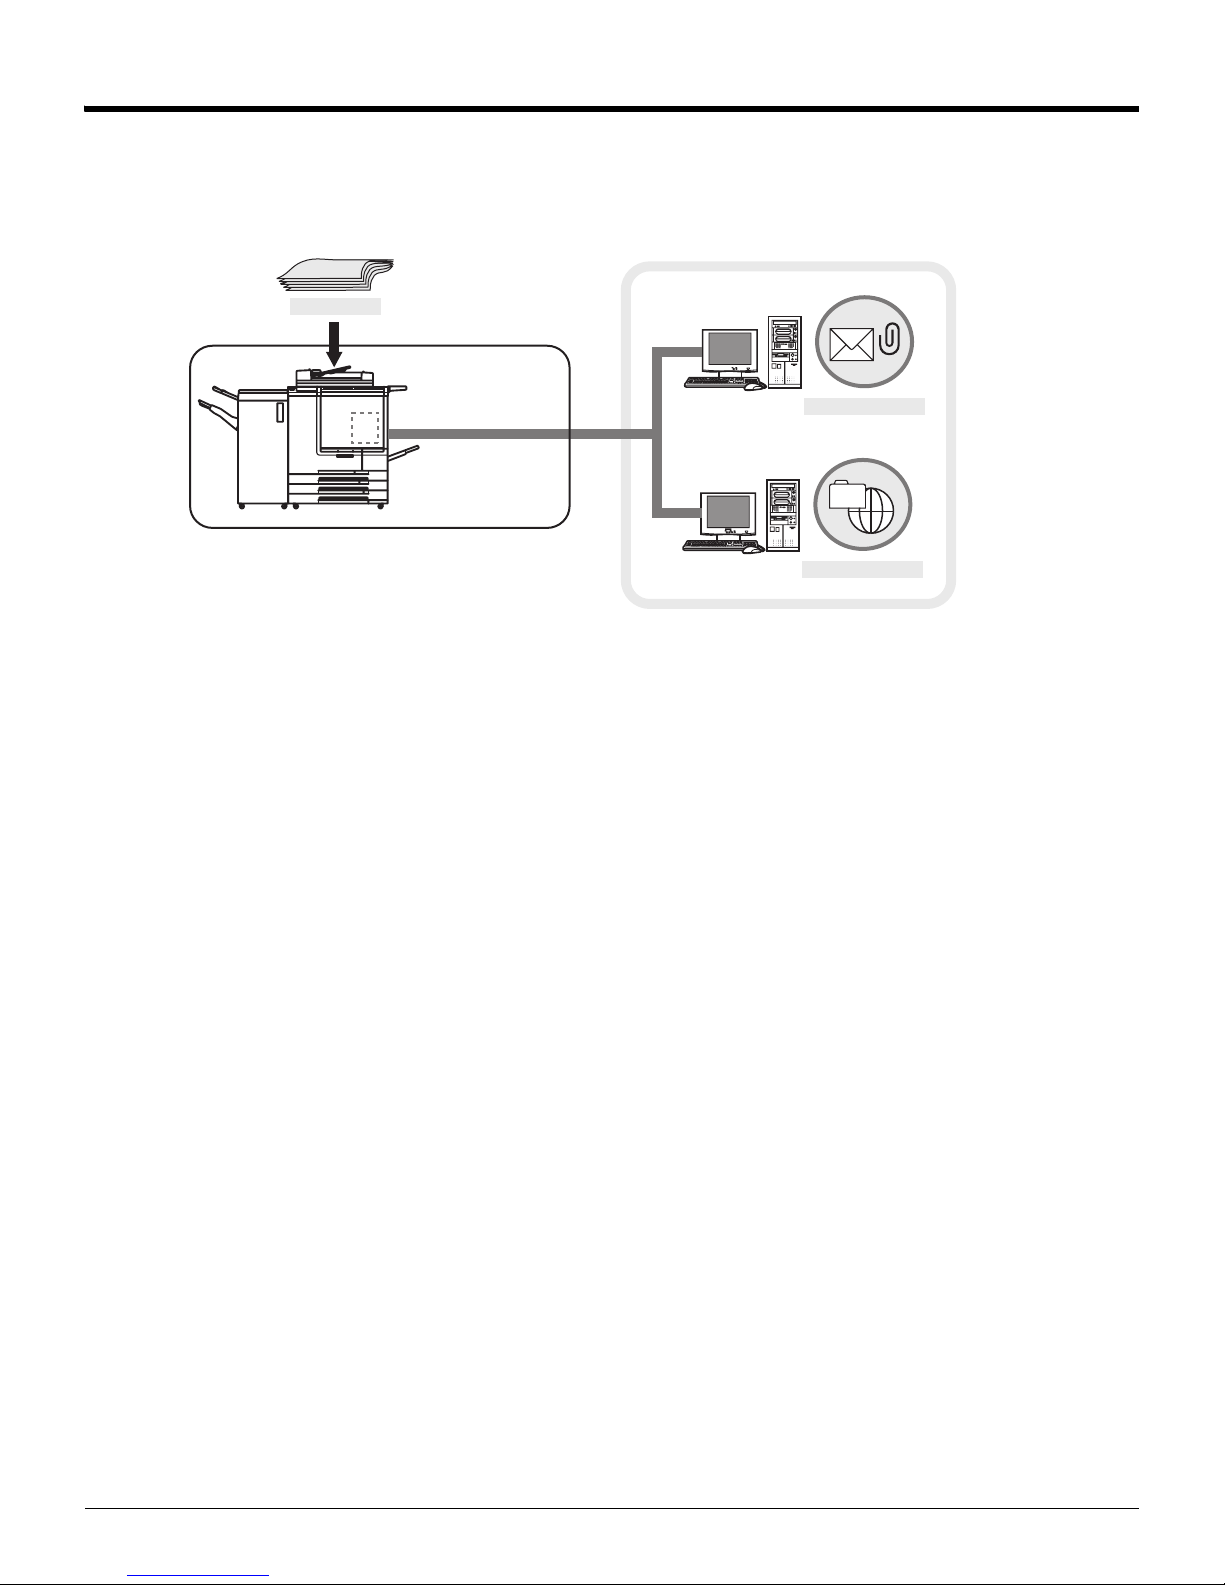
4-2 Images Scanned to FTP or E-mail
You can receive scanned data as attached file of an E-Mail through a Mail application.
You can download scanned data which is uploaded to FTP server through a FTP client application.
For detailed operations of those applications, please refer to the respective User’s Guides.
Original
Scan
Copier +
Print Controller
MAIL Server
Scan to E-Mail
FTP Server
Scan to FTP
Internet
90
Chapter 4 : Importing the Scanned Data
Page 92
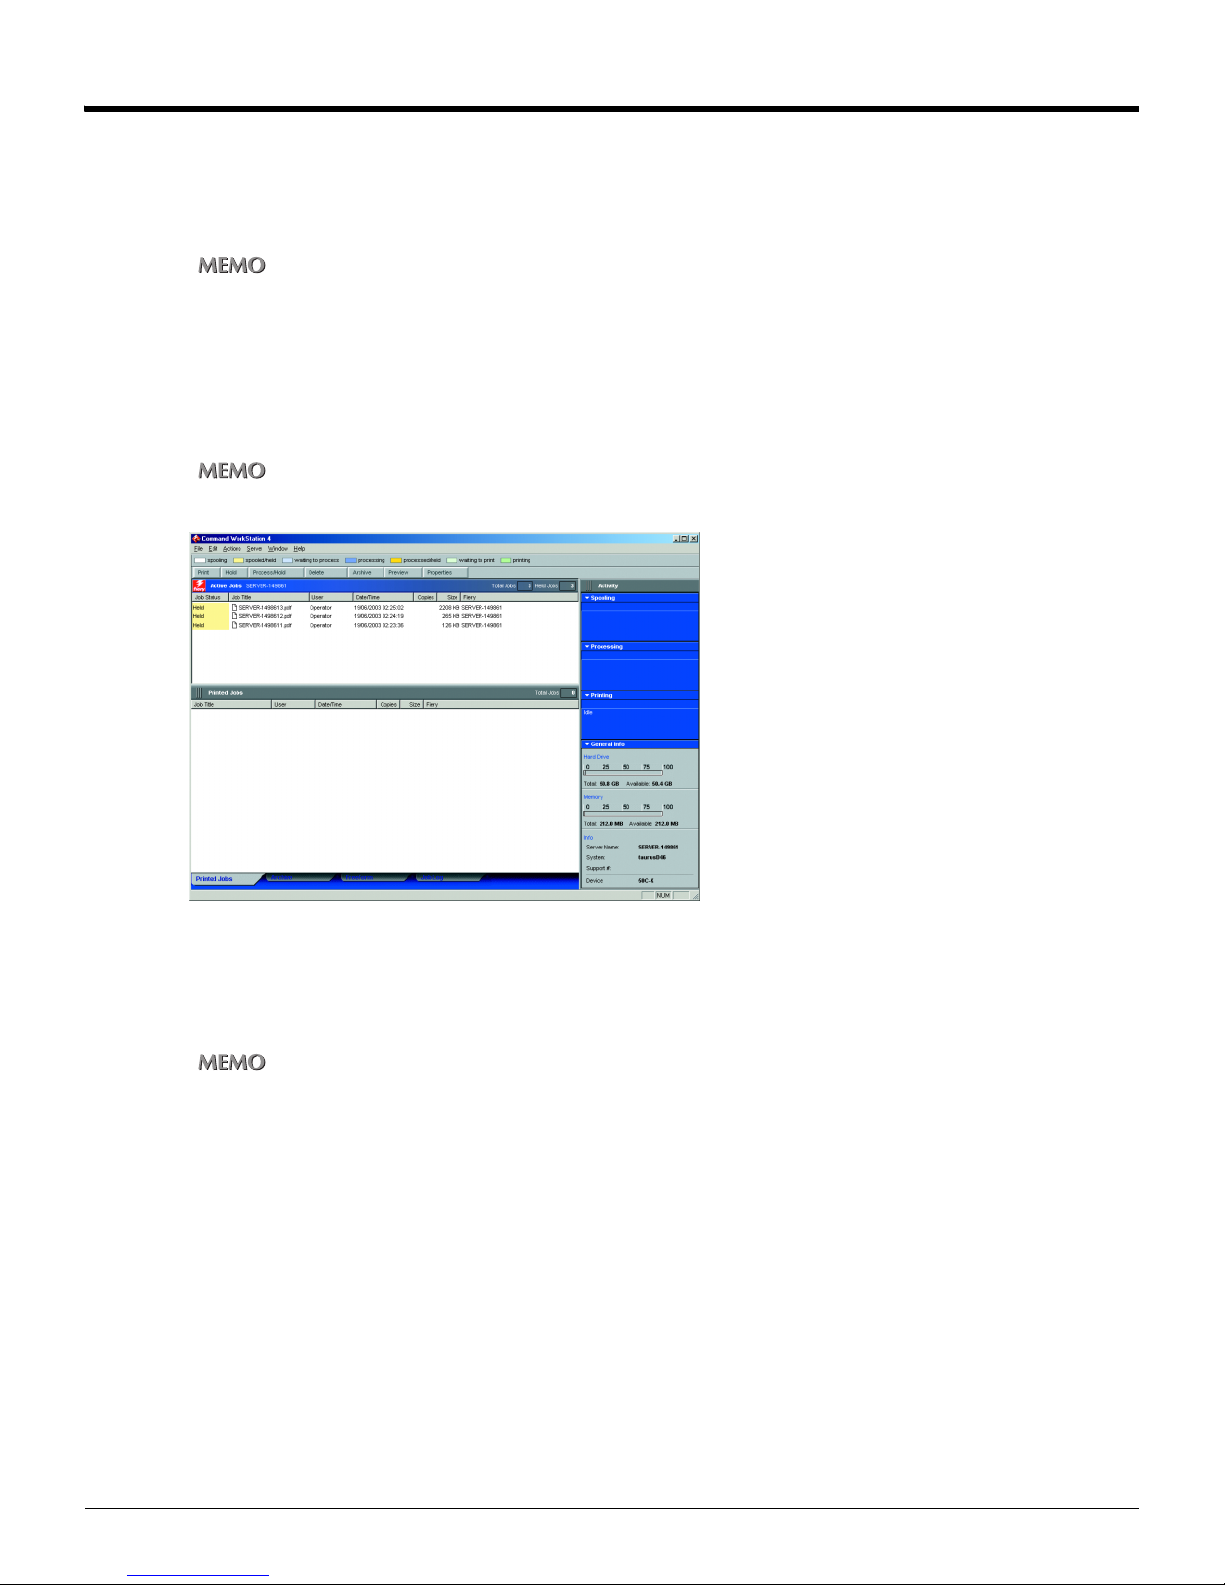
4-3 Images Scanned to QUEUE
●How to use scanned data
You can edit, print and save scanned data stored as a queue of the print controller from a computer on a network through Command WorkStation.
For detailed operations of Command WorkStation, please refer to the Print Controller’s User’s Guide.
Command WorkStation
Command WorkStation is a Utility Application for job control.
Start Command WorkStation, login to the server, and right-click a queue saved as a PDF file from the list in [Active Job], you
can select command of edit, print and save.
Scan to QUEUE stores scanned data as a Portable Document Format file.
●How to delete scanned data
You can delete scanned data stored as a queue of the print controller from a computer on a network through Command WorkStation.
For detailed operations of Command WorkStation, please refer to the Print Controller’s User’s Guide.
Command WorkStation
Right-click a queue saved as a PDF file from the list in [Active Job] and select [DELETE].
91
Chapter 4 : Importing the Scanned Data
Page 93

Chapter 5 : Key Operator Mode
5-1 Key Operator Mode .....................................................................93
5-2 Changing / Deleting the destination .......................................... 95
92
Page 94
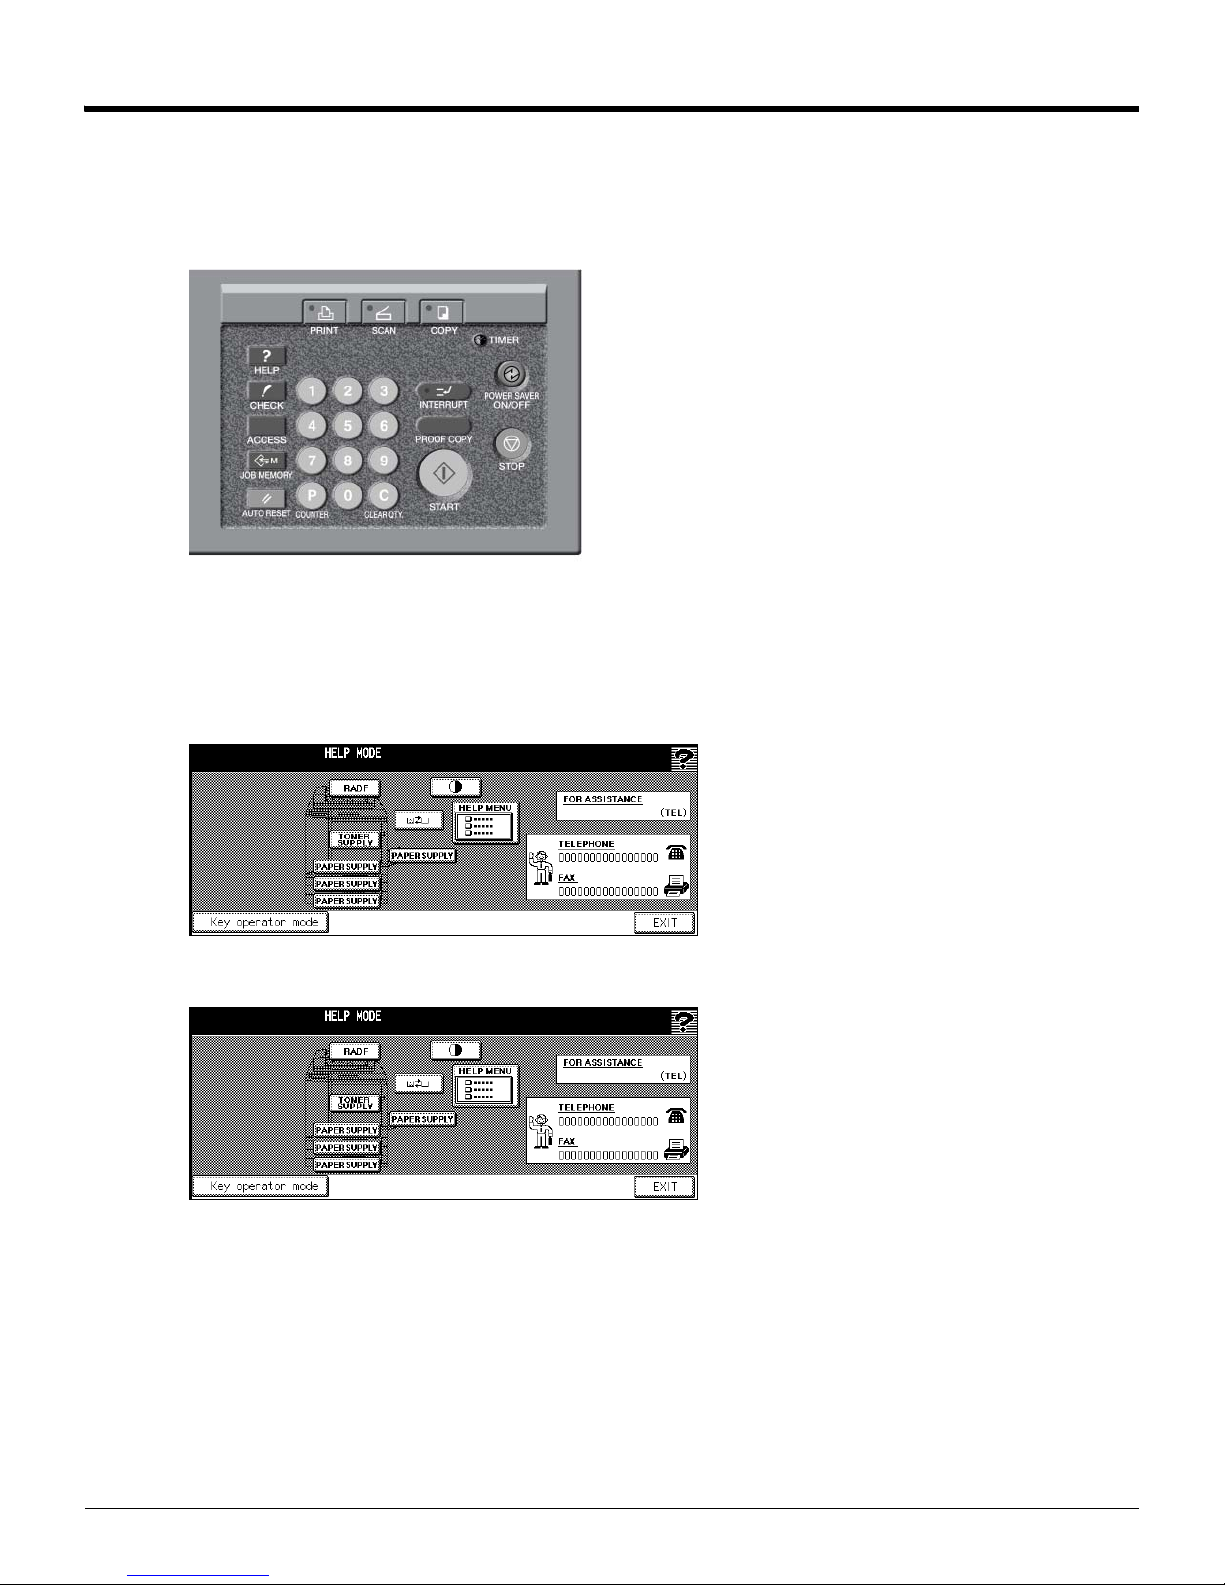
5-1 Key Operator Mode
The administrator can use the Key Operator Mode and change or delete the destination already registered in this mode.
●Switching the key operator mode
1. Press [COPY] button on the control panel.
The [Copy basic mode] screen is displayed.
2. Press [HELP] button on the control panel.
The [HELP MODE] screen appears.
• U.S.A.
• Others
3. Touch [KEY OPERATOR MODE].
93
Chapter 5 : Key Operator Mode
Page 95
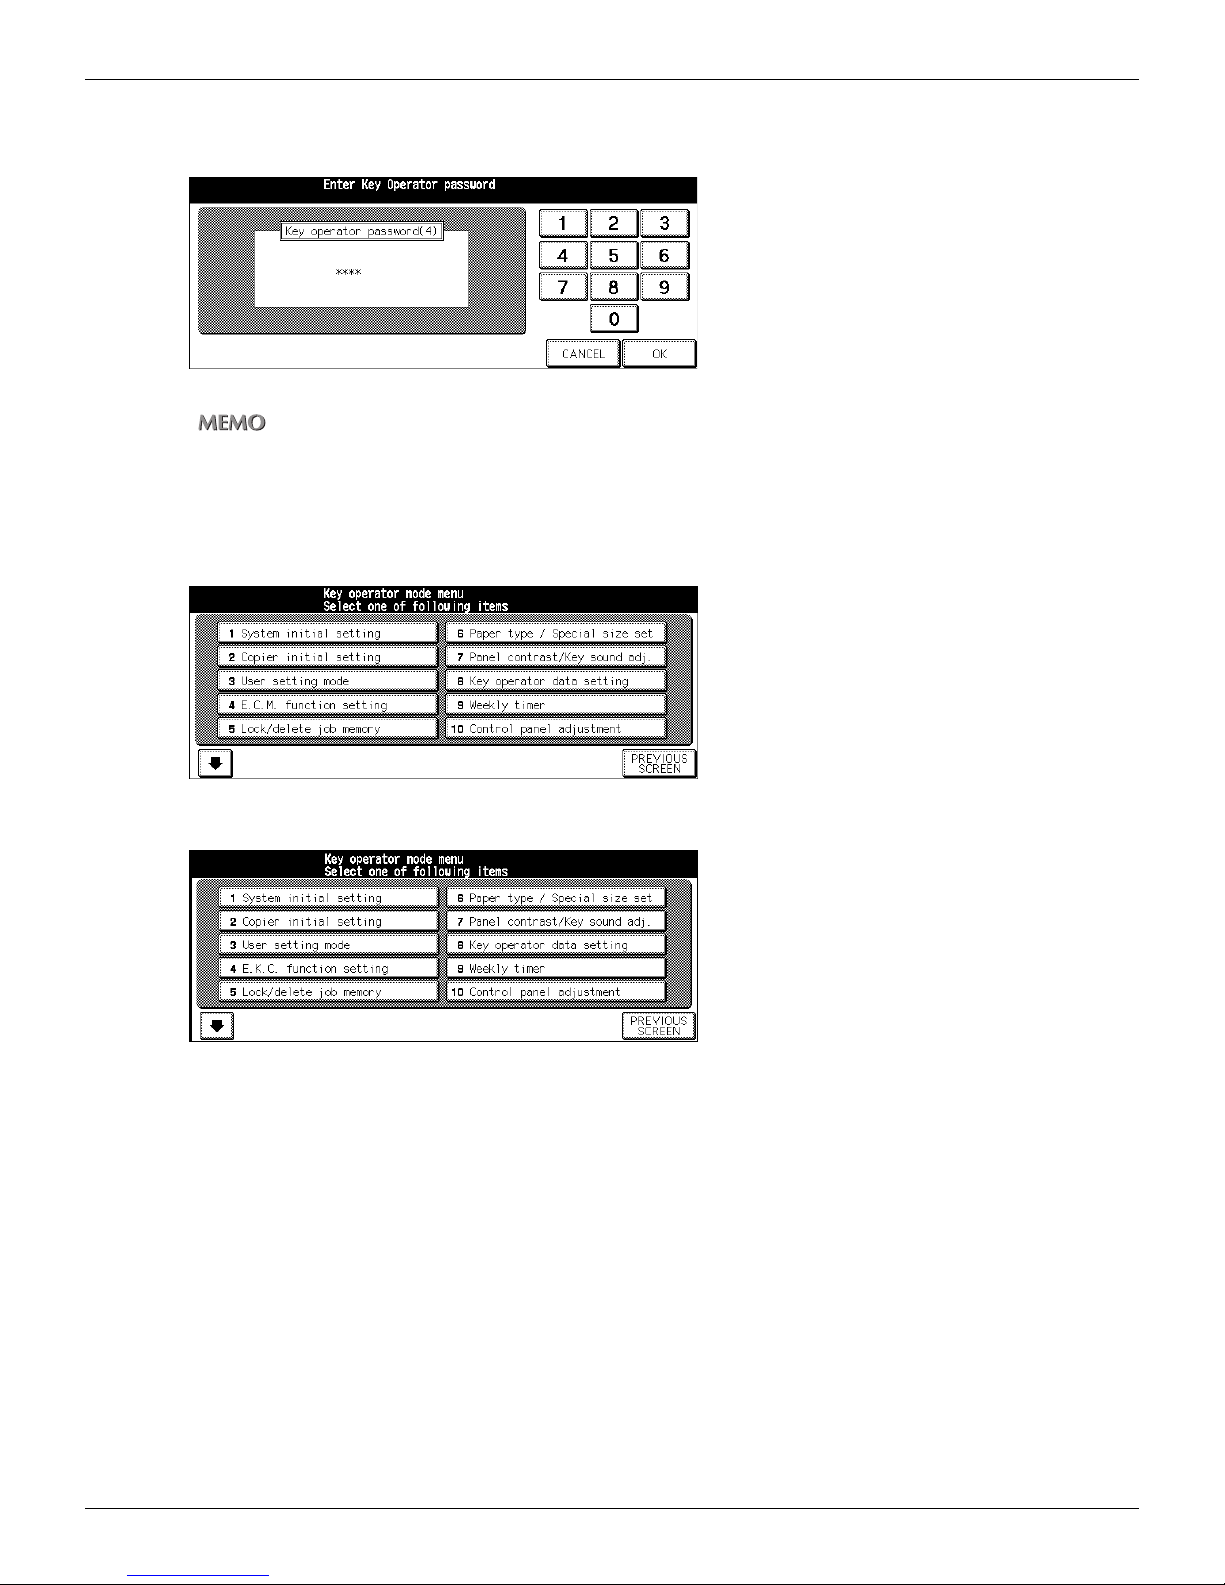
4. If a password is set, input the key operator password.
If a password is not set, follow the procedure of 5.
For details on passwords, refer to the “Copier’s User’s Guide”.
5. Touch [OK].
The [Key operator mode] screen appears to switch the key operator mode.
• U.S.A.
5-1 Key Operator Mode (Continued)
• Others
94
Chapter 5 : Key Operator Mode
Page 96
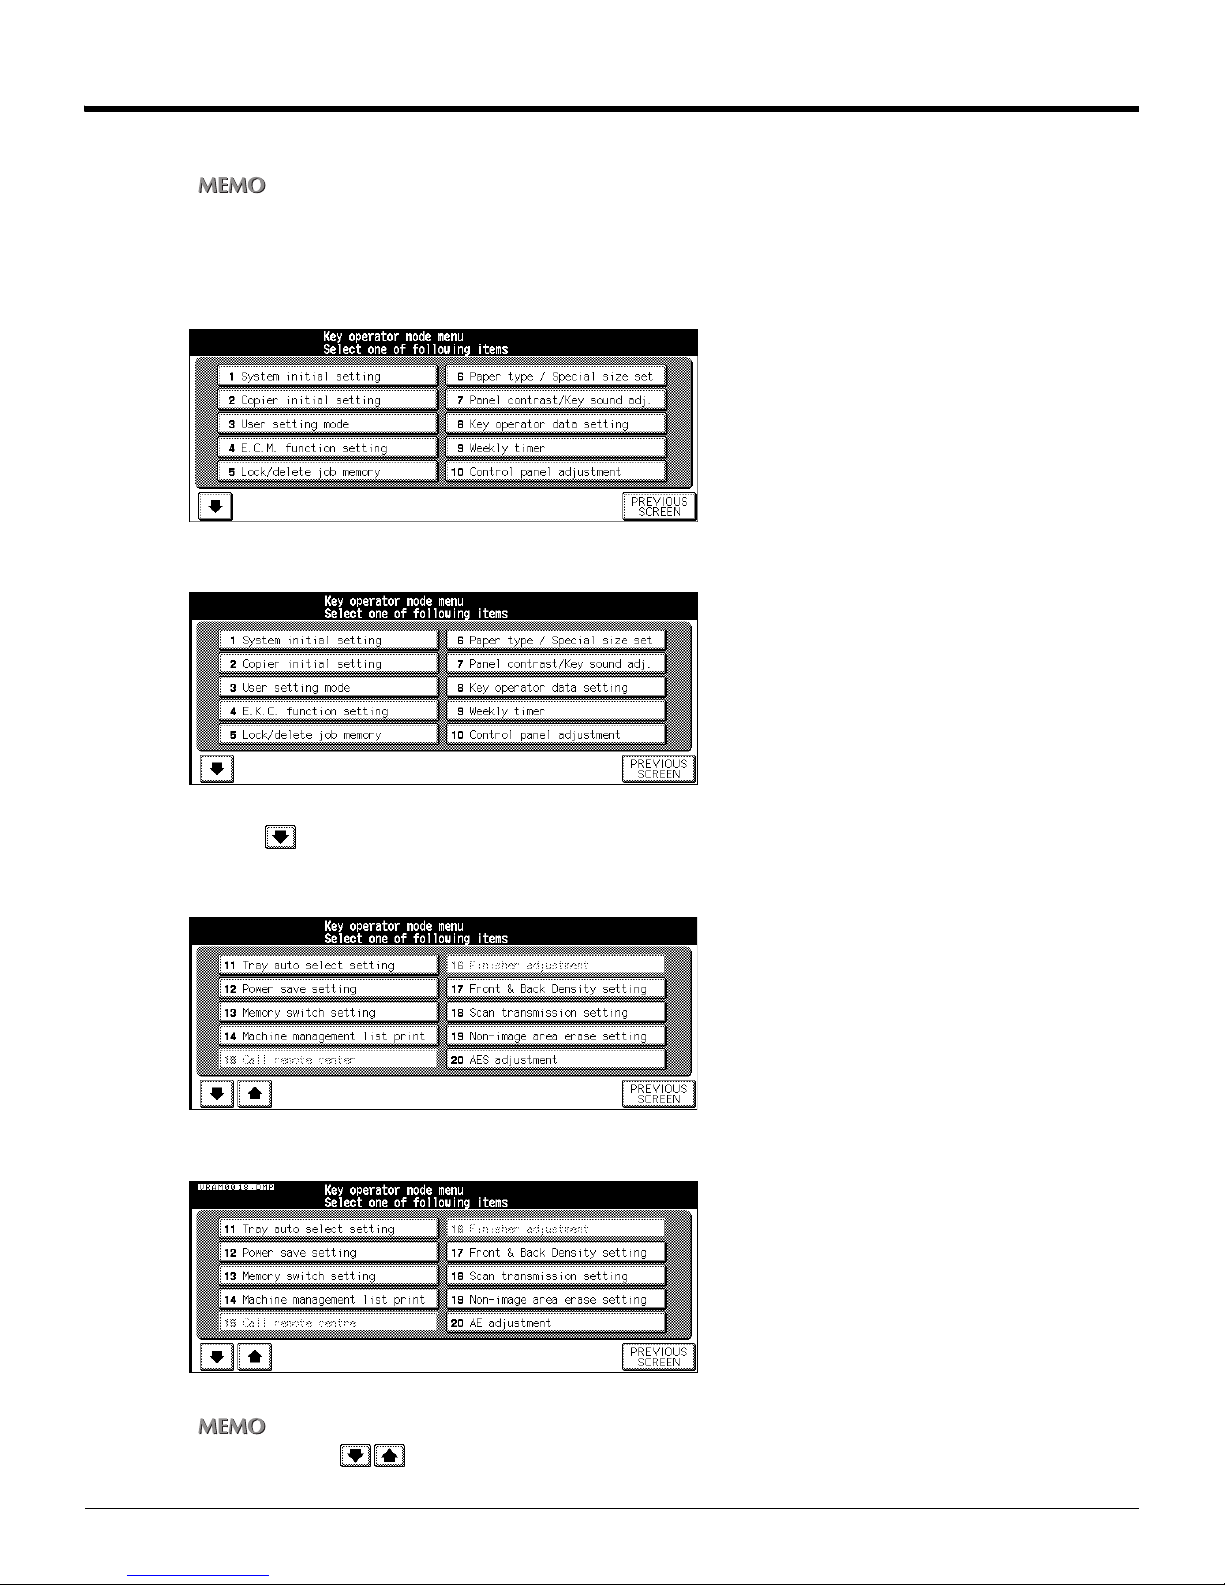
5-2 Changing / Deleting the destination
The administrator can change or delete the destination.
You can use the Web Utility for copier to revise and delete a registered Box No..
1. Display [Key operator mode] screen.
• U.S.A.
• Others
2. Touch and then touch [18. Scan transmission setting].
The [Scan transmission setting] screen appears.
• U.S.A.
• Others
By touching the , the next / before screen appears.
95
Chapter 5 : Key Operator Mode
Page 97

5-2 Changing / Deleting the destination (Continued)
3. Touch the destination to change or delete.
4. Touch [CHANGE] or [DELETE].
When you touch [CHANGE], you can change and register the destination manually with the same procedures as usual
registration.
When you touch [DELETE], the selected destination is deleted.
5. Touch [OK] to exit [Change / Delete Address] screen.
The screen returns to the [Key operator mode] screen.
96
Chapter 5 : Key Operator Mode
Page 98

Chapter 6 : Troubleshooting
6-1 Cannot use the scanner..............................................................98
97
Page 99

6-1 Cannot use the scanner
●When you cannot connect to the scanner
When an error message appears when attempting to access the scanner, perform the following checks:
Consult your network administrator for problems with or questions about your network settings.
1. Check whether the correct IP address of the scanner has been entered.
If the IP address is not correct, enter the correct one.
If the entered IP address is correct, go on to step 2.
2. From the DOS prompt run a ping test through the destination host to the IP address
of the scanner.
e.g. : C:\>ping 192.168.101.152
If the ping test fails, check whether the copier's main power is switched on, and also check the network cable for proper
connection.
If the ping test is successful, go on to step 3.
3. Check whether the IP router is correctly set.
If it is not correctly set, set it correctly.
If there is no problem in IP router setup, go on to step 4.
4. Trace the routing to the scanner to check whether there are any error conditions
within the network.
If any error conditions are found, eliminate them.
If no error is found and yet the connection to the scanner cannot be established, contact your service representative.
●When you cannot scan
When you cannot scan, check whether [3. E.C.M. function setting] ([3. E.K.C. function setting]) -[Switching the Scanner ON/
OFF] is [ECM ON] ([EKC ON]) on the Key Operator Mode. About the detail of [3. E.C.M. function setting] ([3. E.K.C. function
setting]), please refer to the Copier’s User’s Guide or Print Controller User’s Guide.
98
Chapter 6 : Troubleshooting
Page 100

Appendix
Appendix-1 Product Specifications ............................................... 100
99
 Loading...