

Fiery TASKalfa 3051ci, TASKalfa 3551ci, TASKalfa 4551ci, TASKalfa 5551ci, E100 Color Server Configuration
Page 1

Fiery
®
E100 Color Server
Configuration and Setup
Page 2

© 2011 Electronics For Imaging, Inc. The information in this publication is covered
under Legal Notices for this product.
45098233
27 June 2011
Page 3

CONTENTS
CONTENTS
CONTENTS 3
INTRODUCTION 7
Terminology and conventions 8
Battery information for the European Union and EEA 9
CONNECTING TO THE NETWORK 10
E100 on the network 10
Stages of installation on the network 11
Summary of E100 network installation 12
Network Server Setup requirements 13
Windows networks 13
AppleTalk networks 13
UNIX networks 14
PREPARING FOR E100 SETUP 15
Levels of access and control 15
Users and Groups 15
E100 print connections 18
WebTools 19
Additional security features 20
Controlling E-mail access to the E100 20
Restricting IP addresses, ports, and MAC addresses 20
Secure Printing 20
LDAP authentication 21
Secure Erase 21
Page 4

CONTENTS 4
Connecting network cable to the E100 21
Back view of the E100 21
Ethernet connection 22
About Setup 22
Setup from the copier touch panel 22
Setup from a network computer 23
SETTING UP THE COPIER TOUCH PANEL 24
E100 Setup from the copier touch panel 24
Accessing Setup options 25
Saving changes 25
Menu tabs 26
Jobs tab 26
Info tab 26
Too l s ta b 27
E100 Setup from the copier touch panel 28
LAN Security (802.1x) 30
SETTING UP THE E100 FROM A NETWORK COMPUTER 31
Accessing Configure from a network computer 31
Using Configure 32
SETUP OPTION REFERENCE 33
PS and PCL Setup options 33
Rip While Receive Setup option 35
SLP Setup options 35
Job Log Setup options 36
Page 5

CONTENTS 5
CONFIGURING WEBTOOLS 37
Configuring the E100 and computers for WebTools 37
ADMINISTERING THE FIERY CONTROLLER 38
Administrator functions 38
Setting passwords 39
Changing the E100 default language 39
Updating system and user software 39
Before updating the E100 39
System Updates 40
Check for Product Updates (Software Downloads Site) 42
Clearing the E100 43
Saving and restoring E100 settings 44
Saving and restoring the E100 configuration 44
Direct Mobile Printing 45
E100 Setup for Direct Mobile Printing 45
Additional Direct Mobile Printing requirements 46
Managing e-mail address books 47
Printing the Configuration page 50
Maintaining optimal E100 performance 51
Starting, shutting down, rebooting, and restarting the E100 52
TROUBLESHOOTING 53
Troubleshooting the E100 53
Runtime error messages 53
Cannot connect to the E100 with utilities 54
Cannot connect to the E100 with Command WorkStation 55
INDEX 57
Page 6

Page 7

INTRODUCTION
INTRODUCTION 7
This document describes how to set up network servers and user computers to use the
Fiery E100 Color Server so that users can print to it as a high-performance networked printer.
For general information about using the copier, your computer, software, or network, see the
documentation that accompanies those products.
Setting up the network environment correctly requires the presence and active cooperation of
the network administrator. Detailed instructions for configuring networks is beyond the
scope of this document. For information, see the documentation that accompanies your
network.
For information about supported operating systems and system requirements, see Welcome.
This document covers the following topics:
• Network connectors on the Fiery E100 Color Server
• Information specific to the Fiery E100 Color Server about setting up network servers
NOTE: For information about network servers, see the documentation that accompanies your
network.
• System security through access levels and passwords
• Setup of the Fiery E100 Color Server from the copier touch panel
• Setup of the Fiery E100 Color Server from a network computer
• Setup of the Fiery E100 Color Server to allow users to use WebTools
• Administration of the Fiery E100 Color Server
• Troubleshooting
Administrator functions described in other documentation are summarized on page 38.
Page 8
INTRODUCTION 8
Terminology and conventions
This document uses the following terminology and conventions.
Term or convention Refers to
Aero E100 (in illustrations and examples)
Copier TASKalfa XX50ci
E100 Fiery E100 Color Server
Titles in italics Other documents in this set
Windows Microsoft Windows XP, Windows Vista, Windows 7,
Windows Server 2003/2008/2008 R2
Topics for which additional information is available by starting
Help in the software
Tips and information
A warning concerning operations that may lead to death or injury
to persons if not performed correctly. To use the equipment safely,
always pay attention to these warnings.
A caution concerning operations that may lead to injury to persons
if not performed correctly. To use the equipment safely, always pay
attention to these cautions.
Operational requirements and restrictions. Be sure to read these
items carefully to operate the equipment correctly, and avoid
damage to the equipment or property.
Page 9

INTRODUCTION 9
Battery information for the European Union and EEA
This symbol indicates that the batteries and accumulators used in this product must be
disposed of separately from your household waste in accordance with EU Directive 2006/66/
EC (“Directive”) and local requirements.
If a chemical symbol is printed beneath the symbol shown, in accordance with the Directive,
this indicates that a heavy metal (Hg = Mercury, Cd = Cadmium, Pb = Lead) is present in this
battery or accumulator at a concentration above an applicable threshold specified in the
Directive.
Batteries and accumulators must not be disposed of as unsorted municipal waste. Users of
batteries and accumulators must use the available collection framework for the return,
recycling and treatment of batteries and accumulators.
If your product contains non-removable batteries, the entire product is already covered by the
EU WEEE (Waste Electrical and Electronic Equipment) Directive and should be handed over
to an authorized collection site for WEEE. The collection site will take appropriate measures
for the recycling and treatment of the product, including the batteries.
Customer participation in the collection and recycling of batteries and accumulators is
important to minimize any potential effects of batteries and accumulators on the environment
and human health due to substances used in batteries and accumulators.
In the EU, there are separate collection and recycling schemes for batteries and accumulators.
To find out more about recycling schemes for batteries and accumulators available in your
area, please contact your local city office, waste authority, or waste disposal facility.
Page 10

CONNECTING TO THE NETWORK 10
CONNECTING TO THE NETWORK
This chapter summarizes the stages in setting up the E100.
E100 on the network
When the E100 is connected to a network, it behaves as a networked printer. The E100
supports the following network protocols (rules that enable computers on a network to
communicate with each other):
• AppleTalk, Bonjour
• TCP/IP, which also includes the DHCP, FTP, HTTP, IMAP, IPP, IPv4, IPv6,
LDAP, LPD, NBT, POP3, Port 9100, SMB, SMTP, SNMP, SNTP, and SSL/TLS
protocols
These protocols can run concurrently on the same cable. Computers that use other protocols
can print through a server that uses one of the supported protocols. The E100 is auto-sensing,
and handles all connections simultaneously.
Page 11

CONNECTING TO THE NETWORK 11
Stages of installation on the network
Installation can be performed by a network or printing administrator. The stages of a
successful installation are:
1 Configuring the network environment
Configure network servers to provide users with access to the E100 as a networked printer.
For information about configuring network servers in Windows, Mac, and UNIX network
environments as they relate specifically to the E100, see page 13. For information about using
your network, see the documentation that accompanies your network.
2 Physically connecting the E100 to a functioning network
Prepare a network node for the E100. Obtain cable, route it to the location where the E100 is
to be installed, and attach the cable to the network connector of the E100. For details, see
page 21.
3 Setting up the E100
Configure the E100 for your printing and network environment (see page 31).
4 Preparing user computers for printing
Install the files needed for printing, install user software, and connect the user computers to
the network. The software installation is described in Printing.
5 Administering the E100
Monitor and maintain system performance and troubleshoot problems that may arise
(see “Administering the Fiery Controller” on page 38).
Page 12
Network server configuration
Network server
Connection
CONNECTING TO THE NETWORK 12
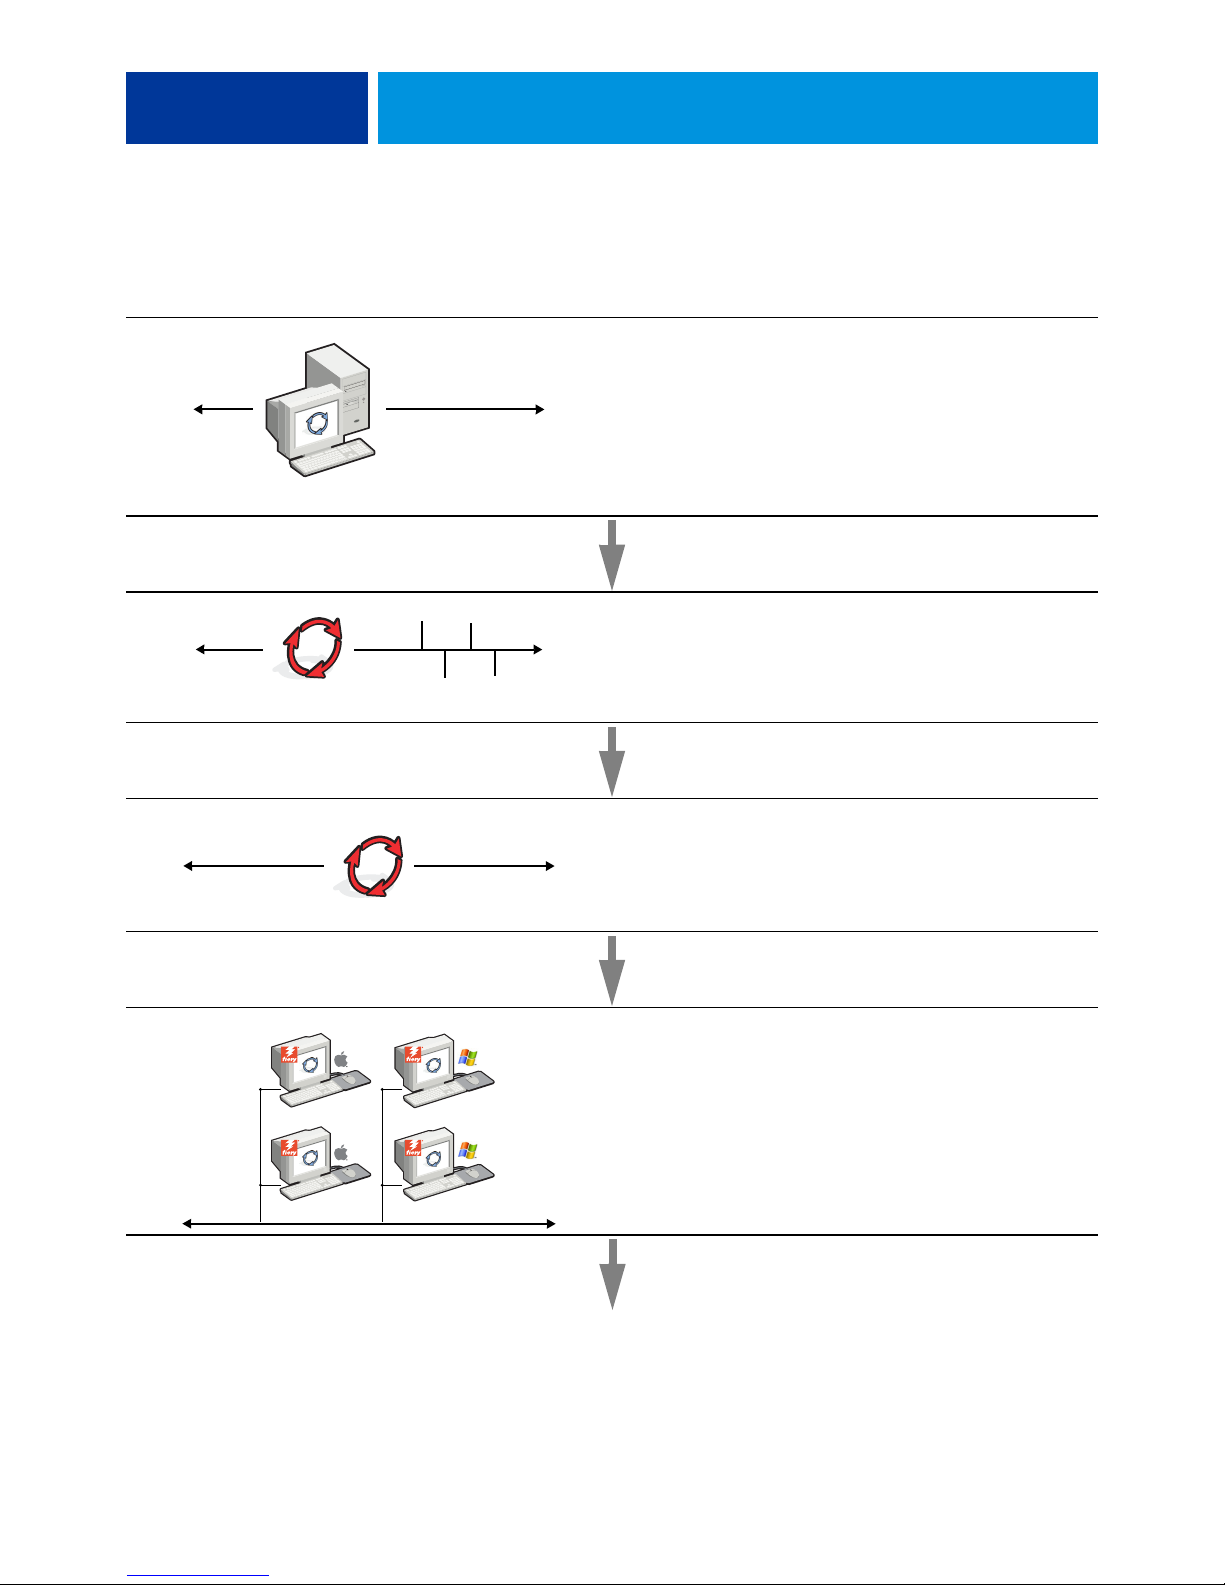
Summary of E100 network installation
Configure network servers to specify E100 Print queues
and E100 users.
Prepare a network node. Connect the E100 to the
network.
E100
E100 Setup
Client computer Setup
Configure default settings for the options in the Setup
menus.
At computers where users print to the E100:
• Install the appropriate printer files and connect to one
or more print connections.
• Install utilities and an Internet browser on computers
where users will use them.
• Verify the E100 in the list of printers.
E100 available on the network
Page 13

CONNECTING TO THE NETWORK 13
Network Server Setup requirements
This section provides basic information about configuring the E100 and using it on the
network. It does not explain network functions for printing in general. Only information
specific to the E100 is presented. Setting up the network environment correctly requires the
presence and active cooperation of the network administrator. Detailed instructions for
configuring networks is beyond the scope of this document. For information, see the
documentation that accompanies your network.
Configure the network and servers, and ensure that there is a live network connection before
you configure E100 network settings in Setup. This allows the E100 to query the network for
zones, servers, and server-based queues.
Whenever you change the configuration of the E100, copier, or network at your site, alter the
settings to correspond to the changed environment. Changing network or port settings may
require that you make changes to other Setup options, as well.
Windows networks
• The E100 requires a valid IP address, subnet mask, and gateway address.
Enter these addresses manually or use DHCP protocols to assign them dynamically. Make
sure the E100 name and address are listed in a domain name server (DNS) or hosts name
database used by your system.
If more than one E100 print connection is published (for example, if both the Print queue
and the Hold queue are published), consider creating a printer for each print connection, so
that users can print to each connection directly.
• Configure the E100 with the correct Windows domain name.
This is especially important for Windows printing, also known as SMB printing.
To use Microsoft Active Directory, you must assign the E100 to a domain. If you assign
the E100 to a workgroup, you cannot use Active Directory.
AppleTalk networks
AppleShare servers require no special configuration.
To allow Mac OS X computers to access Bonjour printers, you must enable Bonjour on the
E100.
Page 14

CONNECTING TO THE NETWORK 14
UNIX networks
• When you configure a UNIX workstation with the lpr protocol and connect to the E100 over a
TCP/IP network, you can print directly to the E100.
• Setting up UNIX workstations requires an administrator with root privileges. After the initial
configuration, UNIX users submit print jobs to a named printer.
• The E100 is a printer controller that understands lpr protocols.
• The E100 has a remote printer name you must use in order to communicate with it
successfully.
Regardless of the UNIX system you use, the name that you use for the remote printer (or rp in
the
/etc/printcap file) in configuring the network for the E100 must be one of the following:
print
hold
Computers on a TCP/IP network can print directly to the E100 as a remote printer, or can
print to a Windows Server 2003/Server 2008/Server 2008 R2 server or UNIX workstation
acting as a print server.
Page 15

PREPARING FOR E100 SETUP 15
PREPARING FOR E100 SETUP
To prepare for printing at your site, you must do some initial E100 configuration (or “Setup”)
to specify the network environment and the types of printing you do. Before you perform
Setup, decide the levels of access to implement, such as passwords and other security features
that the E100 offers. Because many of these security features are interconnected, review the
information in this chapter to plan for an effective security system, and then perform Setup
accordingly.
E100 Setup can be accessed two ways:
• From the copier touch panel (Application button > Fiery > Info tab > Server tab > Server
Setup). Setup from the copier touch panel contains basic network options to quickly get
your E100 on the network, ready for printing. For more information about Setup from the
copier touch panel, see page 24.
• From Configure (a utility available from remote networked windows computers).
Configure Setup allows you to use your keyboard to enter Setup options and provides
additional Setup options not available from the copier touch panel. For information about
accessing Configure, see page 31.
Levels of access and control
When you configure the E100 during Setup, you implement a particular level of control by
configuring these elements:
• Users and Groups
• Print connections
• Access to WebTools
Users and Groups
With Configure, you create users, assign passwords to users, create groups with particular
privileges, and assign users to the groups. Several groups are provided by default, and you can
create new groups. All users in a group have the same privileges.
In addition to assigning the users that you have created to a group, you can add users from
your organization’s global address list if you have LDAP services enabled on the E100.
The following discussion is an overview designed to help you prepare a security strategy.
For more information, including specific procedures, see Configure Help.
Page 16
PREPARING FOR E100 SETUP 16
User authentication
The term “user authentication” means that the E100 verifies that the user who is sending a
job belongs to a group, and that the group has printing privileges (“Print in B&W” or “Print
in Color and B&W”).
By default, the E100 does not enforce user authentication. That is, even if you assign
passwords to users and assign the users to groups, no authentication occurs unless you clear the
“Allow users to print without authentication” check box (in Configure > Users and Groups).
If this option is selected, anyone can print to the E100.
If you require users to specify their user name and password (that is, you have cleared the
“Allow users to print without authentication” check box), users must type this information in
the printer driver when they print. Users must specify their user name and password if they
create files from the printer driver for printing later (such as an e-mail attachment that will be
sent to the E100).
Because jobs that are sent through FTP do not require a printer driver, you can specify that
FTP jobs are authenticated (see Configure > Network > Services > FTP > Require Password
for Printing).
Passwords
When you create a new user in Configure > Users and Groups, you assign a password to the
user. In other areas of the system, you can also set passwords for these areas:
• Default admin user in the Administrators group
• Default operator user in the Operators group
By default, the Administrator password is set on the E100. Change the Administrator
password periodically to protect the E100 from accidental or malicious changes to Setup. For
more information, see “Setting passwords” on page 39.
Users in the Administrators and Operators groups have privileges in addition to the explicit
ones that you set when you create groups. Examples of these privileges are provided in the
following sections.
Page 17

PREPARING FOR E100 SETUP 17
Administrator privileges
Users in the Administrators group have the highest level of control. Administrator privileges
include:
• Configuring the E100 from Configure
• Adding and deleting groups
• Adding and deleting users
• Setting and changing passwords for users
• Deleting, printing, exporting, and viewing the Job Log
• Deleting, viewing, and modifying users’ print jobs
• Clearing the E100 of all job data
• Printing in black-and-white or color
• Publishing print connections
• Deleting fonts
• Controlling print jobs from the job management tools
• Overriding job settings
• Setting default settings for print options
• Calibrating the E100
Operator privileges
Users in the Operators group control print jobs from the job management tools, including
the following:
• Viewing the Job Log
• Deleting, viewing, and modifying other users’ print jobs
• Printing in black-and-white or color
Guest privileges (no password)
A user does not need a password to log on as a Guest from the job management tools. A Guest
can view the status of active jobs but cannot make changes to jobs or to the E100 state.
Page 18

PREPARING FOR E100 SETUP 18
E100 print connections
The E100 supports three print connections: Hold queue, Print queue, and Direct connection.
You enable, or “publish,” these print connections to users on the network when you configure
Printer Setup. All published connections are constantly checked for the presence of jobs. The
Print queue and Direct connection give users more direct access to the E100 than the Hold
queue. Therefore, do not publish the Print queue and the Direct connection in environments
where maximum control is required.
In addition, you can enable the Print queue, which is a storage area for the most recent jobs
from the Print queue. The Print queue allows users to reprint those jobs by using the job
management tools (for example, Command WorkStation).
NOTE: To use the utilities and WebTools, you must enable at least one print connection.
Hold queue
Jobs sent to the Hold queue are spooled to the E100 hard disk drive for printing at a later
time, or for reprinting. Because the Hold queue is a storage area, jobs sent to it cannot
proceed through the printing process until the operator intervenes using the job management
tools.
Print queue
The Print queue is the standard E100 queue. Jobs sent to the Print queue are processed and
printed in the order in which they are received. Jobs prioritized by an operator with the job
management tools and jobs sent via the Direct connection take priority over jobs sent to the
Print queue.
Direct connection
The Direct connection transmits jobs directly to the E100, but only when the E100 is idle. If
the E100 is busy, the job remains at the user’s computer until the E100 is ready. The job is
then processed as soon as the previous job is finished and before the next queued job is
processed.
In most cases, jobs sent to the Direct connection are not stored on the E100 hard disk, and
cannot be selected for reprinting, moving, or deletion. Therefore, the Direct connection
provides a measure of security for sensitive files. Jobs sent to the Direct connection do appear
in the Job Log, for accounting purposes.
Page 19

PREPARING FOR E100 SETUP 19
Some types of jobs printed to the Direct connection cause temporary files to be stored on the
E100 hard disk, but do not appear in any of the job management tools. These job types are:
• PDF jobs
• TIFF jobs
• Jobs with settings for any of the following print options:
– Reverse order printing (for large jobs)
– Booklet Maker
– Mixed Media
– Combine Separations
NOTE: To download fonts to the E100, you must publish the Direct connection.
WebTools
The E100 supports Internet or intranet access with WebTools from Windows and Mac OS
computers. To enable use of WebTools, see “Configuring WebTools” on page 37.
Home
Home provides you with current information about the jobs processing and printing on the
E100. To use this WebTool, you do not need a password. For more information, see Utilities.
Downloads
Downloads allows users to download installers for printer drivers and other software directly
from the E100. To use this WebTool, you do not need a password. For more information, see
Printing and Utilities.
Docs
Docs allows users to access, manage, and modify jobs on the E100, and submit jobs to the
E100. For more information, see WebTools Docs Help.
Configure
Configure allows you to view and modify E100 options from a network computer. This
function requires an Administrator password. For more information, see page 31.
Page 20

PREPARING FOR E100 SETUP 20
Additional security features
In addition to the traditional security features such as passwords, you can use these features to
keep the E100 secure:
•E-mail access
• IP addresses, ports, and MAC addresses
• Secure Printing
• LDAP authentication
• Secure Erase
Controlling E-mail access to the E100
Because you can allow users to print file attachments in e-mail messages sent to the E100, the
E100 accepts only valid attachments (for example, PostScript or PDF files). Typically, viruses
transmitted via e-mail require execution by the receiver. Attachments that are not valid files
are discarded by the E100.
Because file types such as .BAT, .VBS, and .EXE could launch harmful virus activity, the E100
does not process these file types. The E100 also ignores e-mails in RTF (Rich Text Format) or
HTML (Hypertext Markup Language) format, and any included JavaScript code.
You can define lists of authorized e-mail addresses on the E100. Any e-mail that the E100
receives from an e-mail address not in the authorized list is deleted. For more information, see
page 47.
Restricting IP addresses, ports, and MAC addresses
To restrict unauthorized connections to the E100, you can permit only users whose IP
addresses or MAC addresses are within a defined range. You can also close unnecessary ports
to reject inbound access from the network. Commands or jobs sent from unauthorized IP
addresses or ports are ignored by the E100.
Make sure that the Network Security option in Setup from the copier touch panel is selected.
If you deselect this option, IP address, ports, and Mac address filtering are disabled. For more
information, see page 29.
Secure Printing
This option allows the printing of highly sensitive or confidential files with user
authentication. A user printing a file with the printer driver assigns a password to the job. The
user must then enter the password at the copier to print the job. For more information about
how to print a secure job with a password, see Printer Driver Help.
Page 21
PREPARING FOR E100 SETUP 21
LDAP authentication
When you enable LDAP communication to retrieve names and other information for people
at your organization, you can specify the type of authentication. For more information, see
Configure Help.
Secure Erase
Secure Erase is an optional feature that allows you to securely erase a print job from the E100.
For more information about the Secure Erase feature, see the Secure Erase document that
accompanies your Fiery print controller.
Connecting network cable to the E100
This section includes an illustration of the E100 back panel, and provides information about
connecting the E100 to the network.
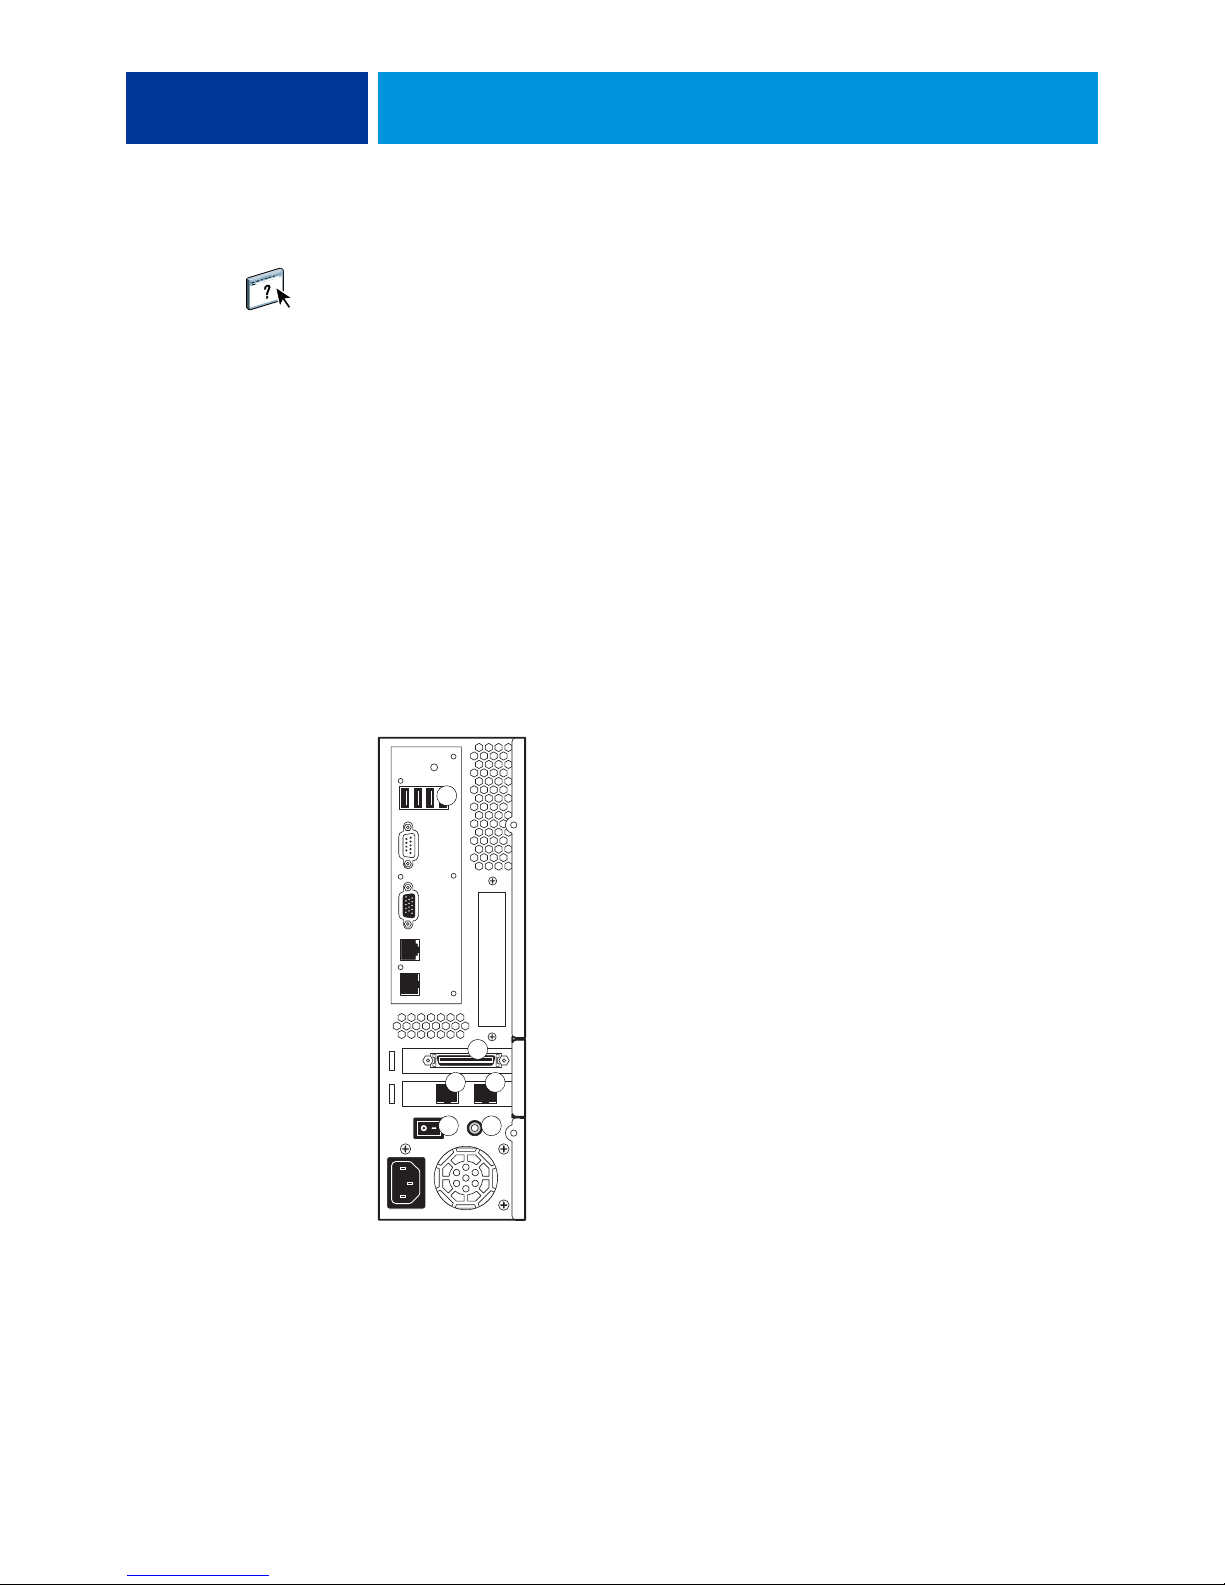
1 Power switch
2 Power button
3 Network port
(10/100/1000 BaseT)
Connect from the network to
this port.
4 Copier port
(10/100/1000 BaseT)
Connect from the copier to
this port.
5 Copier interface
6 USB ports
NOTE: The Network port and
Copier port can be used
interchangeably.
Back view of the E100
6
5
43
21
Page 22

PREPARING FOR E100 SETUP 22
Ethernet connection
For Ethernet connections, the E100 supports Unshielded Twisted Pair (UTP) cabling for
these network speeds:
• 10BaseT: Category 3 or higher
• 100BaseTX: Category 5 or higher (4-pair/8-wire, short-length)
• 1000BaseT: Category 5e or higher (4-pair/8-wire, short-length)
TO CONNECT TO THE NETWORK
1 Power off the copier and E100.
For information about the proper procedures, see page 52.
2 Connect the cable from the copier to the appropriate connector on the back of the E100.
3 Connect the network cable from the network to the appropriate network connector on the
back of the E100.
4 Power on the E100 and the copier.
About Setup
Setup configures the E100 to communicate with other devices and manage print jobs.
Perform Setup the first time you turn on the E100, after new system software is loaded, and
any time Server software is reinstalled. Then perform the remaining Setup options from
Configure. When the network or user printing environment changes, change the options
accordingly.
You can perform Setup from a networked computer using Configure or from the copier touch
panel. Configure Setup allows you to use your keyboard to enter Setup options. If you prefer
to use Configure to configure the E100, see “Accessing Configure from a network computer”
on page 31.
Setup from the copier touch panel
Perform initial Setup from the copier touch panel. After the initial Setup, you can change
Setup options from a network computer (page 31).
If you do not set options in the Setup menus, the E100 uses default settings. You must choose
settings appropriate for the printing environment at your site.
Page 23

PREPARING FOR E100 SETUP 23
Setup from a network computer
To set up the E100 from a network computer, use Configure (page 31). Access Configure
from WebTools or Command WorkStation.
Be sure to configure your copier to use network resources in a way that is compatible with the
E100 configuration, such as enabling DHCP and IPv6.
Page 24

SETTING UP THE COPIER TOUCH PANEL 24
SETTING UP THE COPIER TOUCH PANEL
Setup is recommended the first time the E100 is turned on after new system software is
installed. If you do not configure a particular Setup option, the E100 uses default settings.
Make sure that the settings are appropriate for the printing environment at your site.
E100 Setup from the copier touch panel
Setup allows you to configure the E100 to communicate with other devices and manage print
jobs sent to it.
This section describes using the copier touch panel to perform Setup. Additionally, you can
use Configure from a networked Windows computer to perform Setup. Configure Setup
allows you to use your keyboard to enter Setup options. If you prefer to use Configure to
configure the E100, see “Accessing Configure from a network computer” on page 31.
Page 25
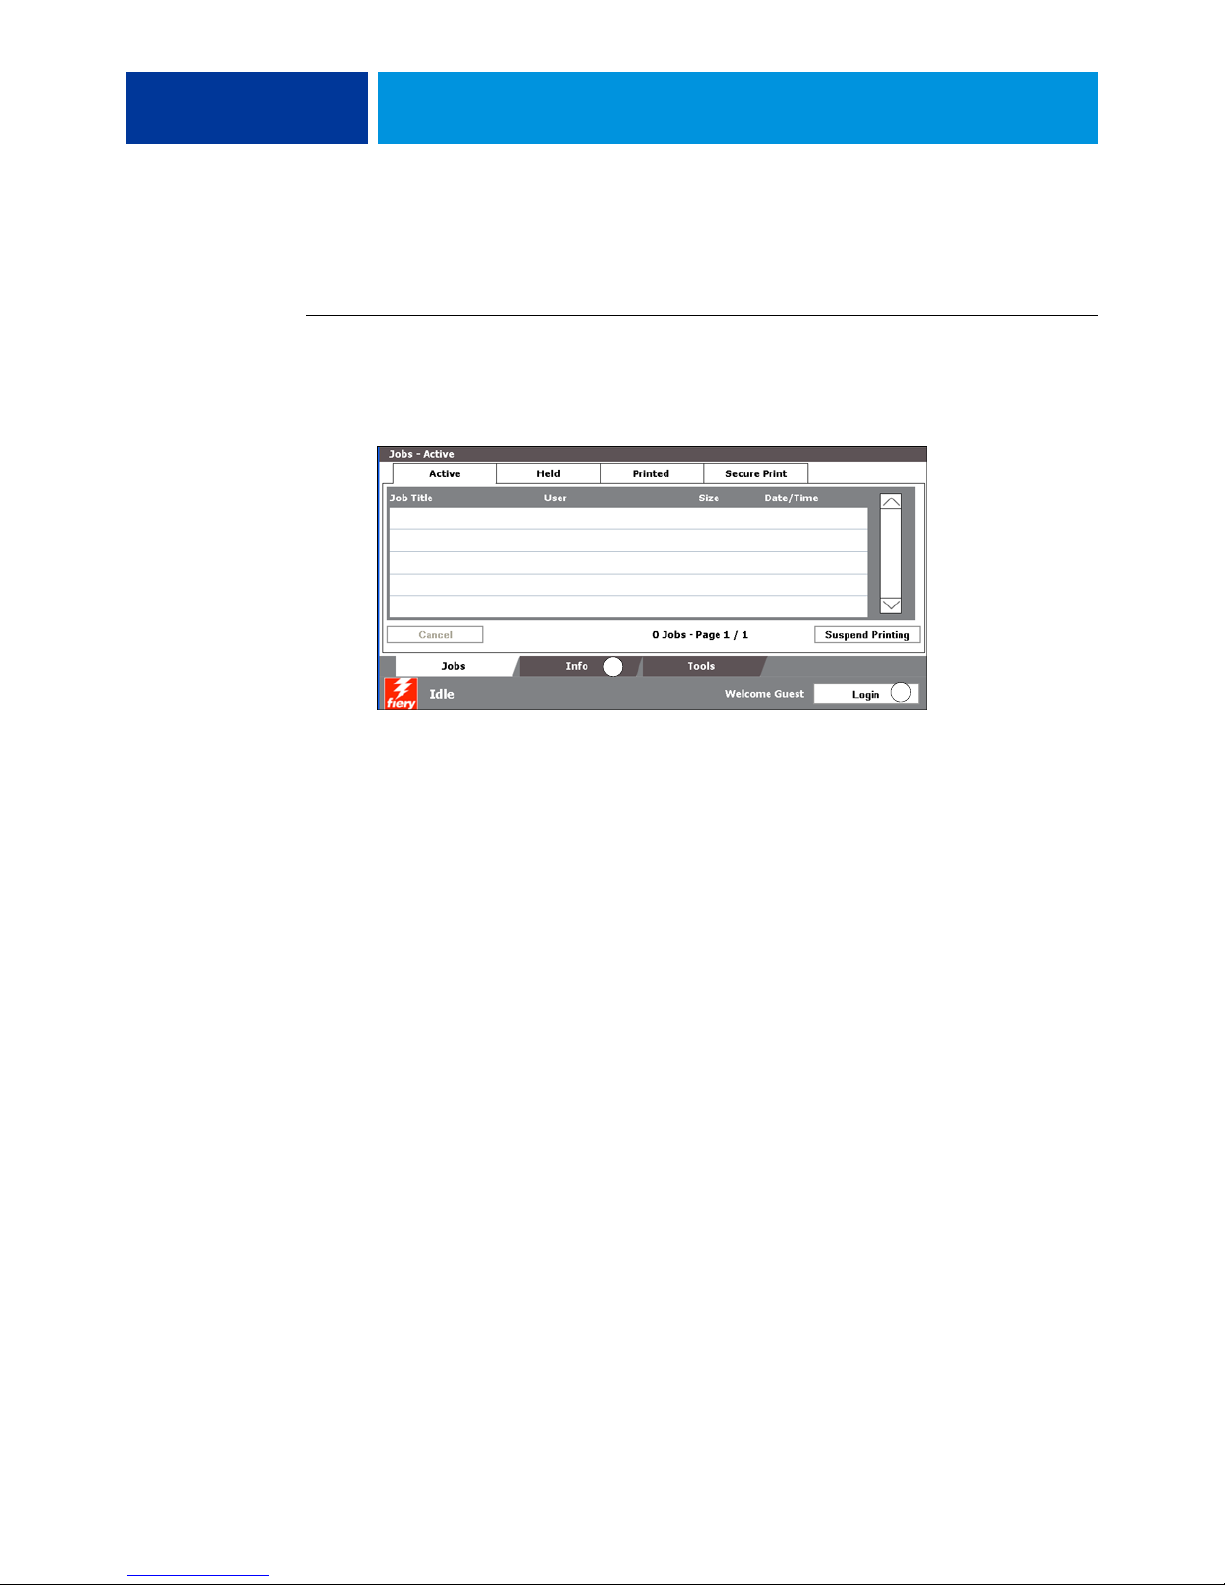
Accessing Setup options
1 Tab to access Setup menu
2 Login/Logout button
SETTING UP THE COPIER TOUCH PANEL 25
When you access Setup options, make sure that no one is printing to the E100.
TO ACCESS SETUP WHEN THE E100 IS IDLE
1 Press the Application button on the copier.
2 On the copier touch panel, press Fiery.
1
2
3 Make sure that the E100 is Idle.
If Printing or RIPping appears, the E100 is processing, and you must wait until the system
finishes and reaches Idle.
4 Press the Info tab, and from the Server tab press Server Setup.
5 Press the Password field, and use the keyboard on the copier touch panel to enter the
Administrator password.
6Press Login.
Saving changes
After you finish choosing the settings, press Save Changes at the bottom-right of the Server
Setup screen.
In order for the changes to take effect, you must reboot the E100.
Page 26

Menu tabs
SETTING UP THE COPIER TOUCH PANEL 26
In addition to performing Setup, the copier touch panel allows you to view status information
about jobs printed to the E100, print system pages, and set up printing.
The menu provides many of the same options available from Command WorkStation.
For information about the job management features (for example, working with jobs in
the Waiting area), see Utilities.
Jobs tab
From the Job tab, you can select jobs to print or delete. Waiting jobs can also be canceled.
You can also access the following commands:
Suspend Printing
Resume Printing
Secure Print
Server Setup
Suspend communication between the E100 and the copier. Use this command to interrupt
the current job so that you can perform maintenance tasks. Jobs continue to process on the
E100. After you complete the maintenance tasks, choose Resume Printing to continue
printing jobs from the E100.
Resume communication between the copier and the E100 after you select Suspend Printing.
Print a file with a secure password. For more information, see Printing.
Info tab
The Info tab contains the Server tab and Print Pages tab which allows you to view
information and print information about the E100.
Server tab
From the Info tab > Server tab you can view the E100 Server name, IP address, Version, Fiery
system software version, hard drive usage and amount of installed memory, and the E100
installed options. You can also access the following commands:
Server Setup allows you to configure the E100 so that it can be operational on your network.
Use Server Setup from the copier touch panel to perform minimum setup options to put the
E100 on the network. For information about Server Setup options, see page 28.
Use Configure to specify any remaining Setup options. Configure can be accessed from
WebTools or Command WorkStation. For information about how to access Configure, see
page 31.
Reboot Server
Allows you to restart, reboot, or shut down the E100. For more information, see page 52.
Page 27

SETTING UP THE COPIER TOUCH PANEL 27
Print Pages tab
From the Info tab > Print Pages tab you can print the following system pages and activity
logs:
PS/PCL Test Page: Allows you to confirm that the E100 is properly connected to the copier,
and provides color and grayscale samples to troubleshoot problems with the copier or the
E100. Settings on the Test Page may include: Server Name, color settings, printer model,
and date and time the Test Page was printed.
Configuration: Prints the Configuration page, which gives the current server and device
configuration. This page lists general information about the hardware and software
configuration of the E100, the current options for all Setup settings, information about the
current calibration, and the IP address of the E100.
Color Charts: Prints samples of the RGB, CMY, and PANTONE colors available from the
E100.
PS/PCL Font List: Prints a list of all fonts currently on the E100 hard disk.
Job Log: Prints a log of the last 55 jobs.
E-mail Log: Prints a log of recent e-mail activity that is useful to the network administrator.
NOTE: To print the E-mail Log, you must first enable the appropriate service. For E-mail
Services, see Configure Help.
Tools tab
The Tools tab allows the user to run system maintenance tools.
Calibrator: Calibrates the E100 using ColorCal. For more information, see Color Printing. If
an Administrator password has been set, you must enter it to access Calibrator.
Calibrator Settings: Allows you to configure Calibrator. For more information, see Color
Printing. If an Administrator password has been set, you must enter it to access Calibrator
Settings.
Cassette Alignment: Adjusts the placement of text and images on a page so that they are
correctly aligned on the sheet of paper, and both sides of a duplex sheet have the exact same
alignment. For more information about this function, see Utilities.
Page 28

SETTING UP THE COPIER TOUCH PANEL 28
E100 Setup from the copier touch panel
When you perform Server Setup from the copier touch panel, you configure the E100 to
receive jobs over the network systems that are used at your site, including setting network
addresses and names to be used by computers, servers, and the E100 when they communicate
with each other.
Before performing Server Setup, confirm that the E100 is connected to an active network.
The E100 queries the network for zones, servers, and server-based queues. If you perform
setup without a connected and functioning network, default settings are used that may not
meet your needs.
Configure options only for the network systems that are currently used at your site. If your
network requirements change, you can change these settings at any time. If the E100 is
configured to enable more than one protocol, it automatically switches to the correct protocol
when it receives a print job.
The submenus and options appear in sequence. Default values, where applicable, are
underlined. Words shown in italics indicate that a product- or site-specific value is displayed.
Server Name
Default server name
Enter a name for the E100 (up to 15 characters long). This is the name by which the E100
appears on the network.
NOTE: If you have more than one E100, do not assign them the same name.
Ethernet Speed
Auto, 10 Mbps Half-Duplex, 100 Mbps Half-Duplex, 10 Full-Duplex, 100 Full-Duplex
Choose the appropriate speed of the network. Choose Auto in any of these cases:
• The network speed is unknown.
• The network environment is mixed.
• The network uses 1Gbps.
IPv4 Address Type
Automatic, Manual
Choose whether to allow the E100 to obtain its Ethernet IP address automatically by
searching the network, or enter this information manually.
IP Address
127.0.0.1
If you choose Manual, enter the E100 IP address for Ethernet. This IP address, unlike an IP
address set automatically, remains the same if you restart the E100. You must change the
default to a valid address for your network.
Page 29

SETTING UP THE COPIER TOUCH PANEL 29
Subnet Mask
255.255.255.0
Set the subnet mask for printing with TCP/IP on your network.
Confirm the subnet mask setting with your network administrator before proceeding.
Gateway Type
Automatic, Manual
Choose the method for obtaining the gateway address for printing with TCP/IP.
Gateway Address
127.0.0.1
If you answered Manual to the previous option, set the gateway address for printing with
TCP/IP on your network.
Web Services
On, Off
Select On to make the WebTools available to users. TCP/IP must be enabled on the E100 and
user workstations. A Java-enabled Web browser and a valid IP address or DNS host name are
required for each user computer.
If Web Services is set to Off, Setup from the copier touch panel is not available. In this
instance, to enable Setup from the copier touch panel you must select Enable IPP from
WebTools Configure (Configure > Network > Services > Web [http]) and then reboot the
E100. For information about how to access WebTools Configure, see page 31.
Network Security
On, Off
Select Off if you have inadvertently closed a port and need to access the E100. If you set this
option to Off, the following features are disabled:
• IP Filtering
•Port Filtering
• Mac Addr Filtering
Login timeout
5 minutes, 10 minutes, 15 minutes, 30 minutes, 45 seconds, never
Specify the amount of time the E100 times out after you log on.
When you are done making changes, press Save Changes. The E100 requires a reboot in order
for any Setup changes to take affect.
Page 30

SETTING UP THE COPIER TOUCH PANEL 30
LAN Security (802.1x)
The E100 can seek authentication from an 802.1x authentication server (such as a RADIUS
server), often through an intermediate access point (an authenticator). The E100 seeks this
authentication at startup, or when the Ethernet cable is disconnected and reconnected. If the
E100 is successfully authenticated, it is allowed access to the network.
Press 802.1x Setup to access 802.1x Setup options.
Enable 802.1x Authentication
Off, On
Select this option to allow the E100 to seek authentication from an 802.1x authentication
server.
Select EAP Type
PEAP-MSCHAPv2, MD5-Challenge
Choose the type of EAP (Extensible Authentication Protocol).
User name, password
This information is what the E100 uses to request authentication from an 802.1x
authentication server.
Validate Server Certificate
Off, On
Select this option if you chose PEAP-MSCHAPv2 as the EAP type and want the E100 to use
a trusted root certificate when communicating with the authentication server.
If you want the E100 to validate the server certificate, place the certificate in the list of trusted
certificates of the E100. For more information, see Configure Help.
Page 31

SETTING UP THE E100 FROM A NETWORK COMPUTER 31
SETTING UP THE E100 FROM A NETWORK COMPUTER
After you perform initial Setup from the copier touch panel, you can change Setup options
from a network computer using Configure. To use Configure from a network computer,
you must know the E100 Administrator password.
Accessing Configure from a network computer
To set up the E100 from a network computer, use Configure. You can access Configure as
follows:
• WebTools from a supported Internet browser
• Command WorkStation
TO ENABLE ACCESS TO WEBTOOLS, ENSURE THAT THE FOLLOWING ITEMS ARE ENABLED
• A valid, unique IP address, subnet mask, and gateway address for the E100.
Print a Configuration page to acquire the E100 IP address (see page 50).
• Web Services (this is enabled by default).
TO ACCESS CONFIGURE FROM AN INTERNET BROWSER
1 Start your Internet browser and type the IP address of the E100.
2 Click the Configure tab on the E100 home page.
3 Click Launch Configure.
4 Log on with Administrator privileges.
Page 32
SETTING UP THE E100 FROM A NETWORK COMPUTER 32
TO ACCESS CONFIGURE FROM COMMAND WORKSTATION
1 Start Command WorkStation.
2 Log on with Administrator privileges.
3 Choose Configure from the Server menu.
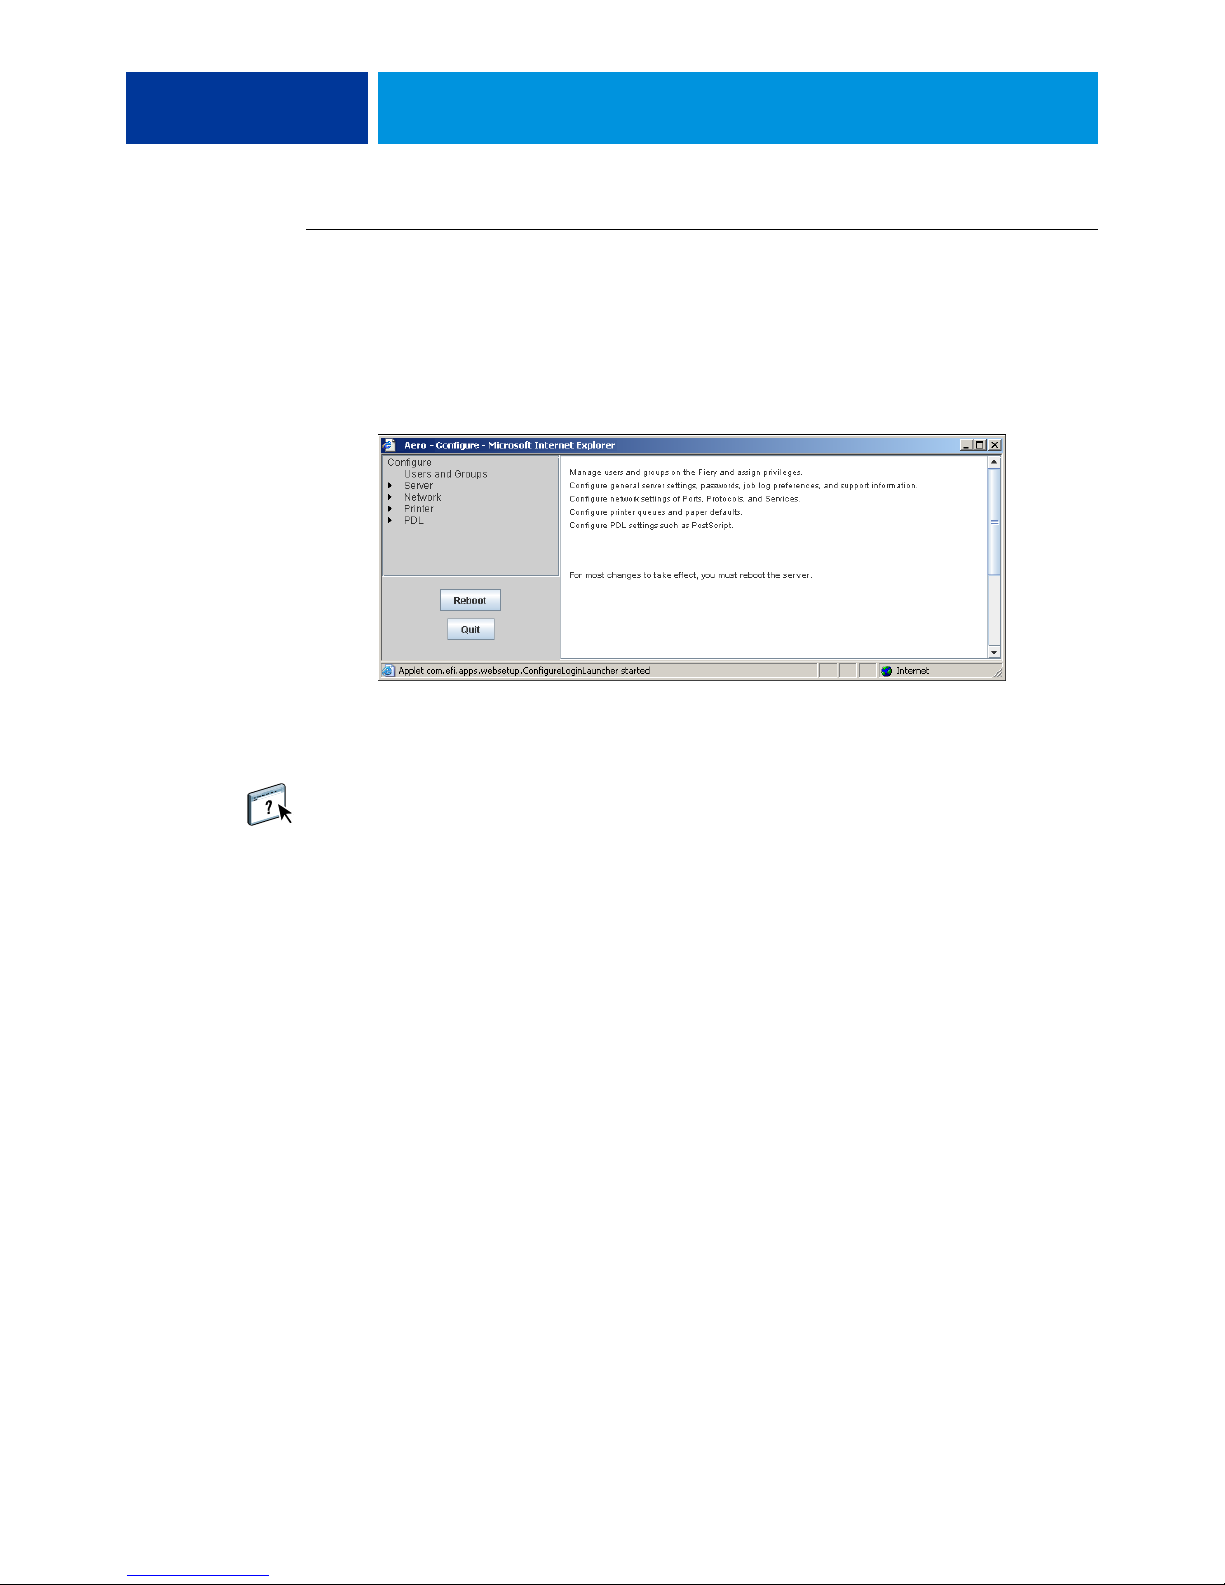
Regardless of the method you use, the following dialog box appears.
Using Configure
For information about using Configure and setting options, see Configure Help. Configure
Help can be accessed from WebTools Configure or Command WorkStation.
Page 33

SETUP OPTION REFERENCE 33
SETUP OPTION REFERENCE
This chapter describes the default settings that you can set for the following types of Setup
options:
• PS (PostScript) Setup and PCL Setup
• RIP While Receive
•SLP
•Job Log
Depending on the Setup method that you use (Configure or copier touch panel), not all
options are available. For more information about print options, see Printing.
For information about the Choose Server Language option, see page 39.
For setup options not listed this section, refer to Configure Help.
To determine the current Setup defaults, print the Server Configuration page from Command
WorkStation.
PS and PCL Setup options
• To access PS Setup options, choose Configure > PDL > PS.
• To access PCL Setup options, choose Configure > PDL > PCL.
Option Settings
(default is underlined)
Allow Courier Substitution Yes
Append CR to LF Yes, No
Brightness 100% Normal
, No Specify whether to substitute Courier for fonts that are unavailable
90% lighter, 95% light,
105% dark, 110% darker,
115% darkest
, 85% lightest,
Description
when you download files to the E100, or when you print a document
for which you do not have the corresponding printer font. If this
option is set to No, jobs with fonts that are unavailable on the E100
hard disk generate a PostScript error and do not print. This setting does
not apply to PDF files; font substitution occurs automatically in PDF
files.
Specify whether to append a carriage return to each line feed.
Choose the brightness for printed output.
Cache PDF and PS objects On, Off
Specify whether images in PDF and PS files are cached to reduce the
need to reprocess the same image in a file.
Page 34

SETUP OPTION REFERENCE 34
Option Settings
(default is underlined)
Copier Mode Gradation, Resolution Specify the default screen to print jobs.
Convert Paper Sizes No
Default Orientation Portrait, Landscape This PCL option determines whether the text or image will be oriented
Default Paper Sizes US, Metric (default is US in
Font Number 0-999 The font number designates the default font for the E100. To
, Letter/11x17->A4/A3,
A4/A3->Letter/11x17
the United States, Metric
elsewhere)
Description
Converts paper sizes in documents automatically to the default paper
sizes specified. For example, if you select Letter/11x17->A4/A3, a letter
size document is automatically printed on A4 paper.
This option works in conjunction with the Default Paper Sizes option.
For example, if Convert Paper Sizes is set to Letter/11
Default Paper Sizes is set to US, jobs are printed A4/A3 size. This also
includes E100 system pages such as the Start Page, Test Page, and Job
Log.
along the short edge of the paper (portrait) or along the long edge of
the paper (landscape).
Prints on US paper sizes (for example, Letter, Legal, 11
paper sizes (for example, A4 or A3) by default. When no page size is
defined within a PostScript file, jobs are printed on Letter paper if you
select US; A4 paper if you select Metric.
determine font numbers, print the internal PCL Font List. The
standard fonts are listed in order. The font numbers, however, are not
displayed.
x17->A4/A3, and
x17), or Metric
Font Pitch (char/in) 0.44-99.99 (default is 10.00) If the default PCL font selected in Font Number represents a fixed
pitch scalable font, determine the width of scalable type. Pitch is
measured by characters per inch, so 10-pitch type fits ten characters per
inch.
Font Size (pt) 4.0-999.75 (default is 12.00) If the default PCL font selected in Font Number represents a
proportionally spaced scalable font, determine the point size (height) of
the font.
Font Source Internal
Form Length (lines) 5-128 (default is 60) This option sets the number of lines to be printed per page in PCL
Offset Jobs On, Off
Paper Size for System Pages US, Metric (default is US in
Print Cover Page No
, Soft Font Specify the PCL font source to be enabled.
jobs.
Specify whether jobs are offset after they are printed. You must install a
finisher.
Specify the paper size that PCL system pages print on. System pages are
the United States, Metric
elsewhere)
, Before Job, After Job,
Before and After
pages that you print from the copier touch panel, such as the PCL Font
List.
Prints a cover page (job summary) with the name of the user who
sent the job, document name, server name, time the job was printed,
number of pages printed, and status of the job.
Page 35

SETUP OPTION REFERENCE 35
Option Settings
(default is underlined)
Print Master Yes, No
Print to PS Error Yes, No Specify whether the E100 should print the available portion of a
Use engine internal calibration Yes, No Select No if you want to disable the copier calibration and only use the
Symbol Set PC_8, Desktop
Roman_8...
,
Description
Select Yes to print a FreeForm master when created and printed to the
E100. The master is retained on the E100 after printing unless deleted
later. Select No only to process and hold a FreeForm master on the
E100.
print job when it encounters a PostScript error. Select Yes to print
the portion of the job that was processed before the error occurred;
select No to cancel the print job entirely when a PostScript error is
encountered. Leave this option at No unless you encounter printing
problems.
E100 calibration.
Choose the PCL symbol set that best matches the needs of users
printing to the E100.
Rip While Receive Setup option
• To access Enable RIP While Receive, choose Configure > Server > Jobs > Enable RIP While
Receive.
Option Settings
(default is underlined)
Description
Enable RIP While Receive On
, Off When RIP While Receive is enabled, a print job begins processing
and spooling as soon as the E100 is idle. Otherwise the print job
will begin processing only after it has completed spooling.
SLP Setup options
• To access SLP Setup options, choose Configure > Network > Services > SLP.
Option Settings
(default is underlined)
Enable SLP On
Scope default Define an additional Scope to be included with the published SLP
, Off Select On to register the E100 SLP services.
Description
services.
Page 36

SETUP OPTION REFERENCE 36
Job Log Setup options
• To access Job Log Setup options, choose Configure > Server > Job Log.
Option Settings
(default is underlined)
Enable auto export On, Off
Clear job log after exporting On, Off
Export job log via: Email, SMB
Require password to print job log On
Default page size Letter/A4, Tabloid/A3
, Off To require that users enter the Administrator password before
Description
Specify if you automatically want to export the Job Log. If you
select this option to On, specify a date and time for the export to
occur.
The Job Log will be exported as a CVS-format text file.
Select this option if you want to automatically clear the Job Log
after you export it.
NOTE: The Enable auto export option must be set to On to use
this option.
NOTE: The Enable auto export option must be set to On to use
this option.
If you select Email, enter the email address to send the Job Log. If
you select SMB, specify the SMB address, user name and
password. Click Verify to make sure your SMB information is
entered correctly.
printing the Job Log, select Require Password to Print Job Log.
Select the paper size for the printed Job Log.
Page 37

CONFIGURING WEBTOOLS 37
CONFIGURING WEBTOOLS
WebTools allow you to manage your E100 remotely from the Internet or from your
company’s intranet. The E100 has its own home page, from which you can select the
WebTool that you want to use.
For information about using WebTools, see Utilities. Also, for many of the WebTools, you can
consult the Help.
Configuring the E100 and computers for WebTools
WebTools provide access to many E100 functions via the Internet (or intranet), providing
additional flexibility in remote management. With WebTools enabled, you can access them
from a network computer.
WebTools is enabled by default.
TO ENABLE ACCESS TO WEBTOOLS, ENSURE THAT THE FOLLOWING ITEMS ARE ENABLED
• A valid, unique IP address, subnet mask, and gateway address for the E100.
Print a Configuration page to acquire the E100 IP address (see page 50).
• Web Services is enabled by default.
TO SET UP A COMPUTER TO ACCESS WEBTOOLS
1 Enable TCP/IP networking on the user computer.
2 Assign the computer a valid, unique IP address, subnet mask, and gateway address,
if required.
3 Install an Internet browser that supports the Java language and frames.
Make sure that Java is enabled. For more information about supported browsers and
WebTools requirements, see Welcome.
TO ACCESS WEBTOOLS
1 Start your Internet browser and type the IP address or DNS name of the E100.
The E100 home page appears.
2 Click the tab corresponding to the WebTool that you want to use.
Page 38

ADMINISTERING THE FIERY CONTROLLER 38
ADMINISTERING THE FIERY CONTROLLER
This chapter provides tips on managing E100 printing, performance, and security.
Administrator functions
Administration features are included with the user software and are built into the E100.
The following table describes where to find information about these features.
For this information See
Address books for E-mail Printing page 47
Administrator and Operator passwords page 39
Changing the E100 default language page 39
Clearing the E100 page 43
Configuration page page 50
Connecting the E100 to the network page 21
Job Log Setup Configure Help
Direct Mobile Printing page 45
Printing
Documentation for
your mobile device.
Network servers, setting up to manage and share printing services Documentation for
your network servers
Network servers, setting up with information specific to the E100 page 10
Optimizing E100 performance page 51
Printer default settings page 33
Printing
Publishing the Direct connection, Print queue, or Hold queue to users Configure Help
Saving and restoring E100 configuration settings page 44
Setting up printing, installing printer drivers, installing user software Printing
Starting, shutting down, rebooting, and restarting the E100 page 52
System and user software updates page 39
Troubleshooting E100 Setup page 53
WebTools page 37
Page 39
ADMINISTERING THE FIERY CONTROLLER 39
Setting passwords
You can set or change the passwords for users of the E100. Anyone who is a member of the
Administrators group can modify the Setup options and control the flow and order of print
jobs with the job management tools.
You can change the Administrator and Operator passwords from Configure or Command
WorkStation. For more information, see Configure Help. For information on how to access
Configure Help, see page 31.
The default administrator password is “Fiery.1”. For more information about Administrator
and Operator passwords and the access privileges they allow, see page 16.
Keep track of the passwords that you set.
Changing the E100 default language
If you need to change the default language displayed on the E100 you can do so from
Configure.
TO CHANGE THE E100 DEFAULT LANGUAGE
• Specify the language that you want to display on the E100 from Configure > Server > General
> Choose Server Language and click Apply.
Or select Configure > Server > General > Use Print Engine Language to allow the E100 to use
the language specified on the copier. If the copier language is not supported on the E100,
the E100 will use the default language, which is English.
Updating system and user software
Using the tools System Updates and Check for Product Updates (Software Downloads Site),
you can obtain updates to E100 System Software and User Software from a secure site on the
Internet (referred to throughout this documentation as the Update Server).
Before updating the E100
Keep in the mind the following before updating the E100 using System Updates or Check for
Product Updates:
• If the E100 is behind a firewall and unable to access the Internet, the site administrator can
configure a proxy server at the customer’s organization to allow the E100 to receive
updates (see page 41).
• While updates are being installed, you cannot print to the E100. Schedule the automatic
updates when no one plans to print. While updates are being installed, the E100 may need
to reboot several times.
Page 40

ADMINISTERING THE FIERY CONTROLLER 40
• The list that displays when you access Check for Product Updates (Software Downloads
Site) may include:
– Updates that are unavailable through System Updates and/or are not approved for all
users.
– Updates that may already be installed on some E100 print servers. To help you choose
the updates to download, compare the list displayed with the E100 print server’s
Configuration Page > Updates log.
System Updates
System Updates allows you to schedule regular inquiries to an Update Server on the Internet
for available E100 updates. The E100 checks automatically for updates by contacting the
Update Server periodically.
Access System Updates in the following ways:
• From a client computer through WebTools > Configure tab > Launch Configure
• From a client computer through Command WorkStation > Server menu > Configure >
Server > System Update
For detailed instructions, see “To schedule System Updates” on page 41.
Make sure to review “Before updating the E100” on page 39 before scheduling System
Updates.
Page 41

ADMINISTERING THE FIERY CONTROLLER 41
TO SCHEDULE SYSTEM UPDATES
1 Access System Update.
You can access System Updates from a client computer using WebTools or Command
WorkStation.
From a client using Command WorkStation From a client using WebTools
• Start Command WorkStation.
• Log on as Administrator with the appropriate
password.
• Choose Configure > Server > System Update.
• Launch a Web browser and type the IP
address or DNS name of the E100 and press
Enter.
• Click the Configure tab, and click Launch
Configure.
• Log on as Administrator with the
appropriate password.
• Choose Configure > Server > System
Update.
NOTE: While updates are being installed, you cannot print to the E100. Schedule automatic
updates when no one plans to print. The E100 may also need to reboot several times during
the update process.
2 Select “Enable System Updates.”
3 Specify how often the E100 contacts the Update Server.
This feature sets a schedule for installing updates.
4 If you use a proxy server to connect through a firewall to the Update Server, click Proxy
Settings, select Enable Proxy, and type the appropriate information in the following fields:
• Address: proxy server IP address
• Port: port used by the proxy server
• User Name: user name for accessing the proxy server
• Password: password for accessing the proxy server
5 In the Proxy Settings window, click Save.
6 Click Apply.
Page 42

ADMINISTERING THE FIERY CONTROLLER 42
Check for Product Updates (Software Downloads Site)
Check for Product Updates (also known as the Software Downloads Site) allows you to access
the Update Server to view and manually download all available updates for E100 System and
User Software. You can access Check for Product Updates from the Configure tab in
WebTools.
Check for Product Updates is especially useful if your E100 cannot access the Internet, is
behind a firewall, or is otherwise unable or not configured to seek and accept automatic
updates from the Update Server.
For detailed instructions, see “To install updates using Check for Product Updates” on
page 42.
Make sure to review “Before updating the E100” on page 39 before using Check for Product
Updates.
TO INSTALL UPDATES USING CHECK FOR PRODUCT UPDATES
1 Launch a Web browser, type the IP address or DNS name of the E100, and then press Enter.
2 Click the Configure tab, and then click Check for Product Updates.
A window appears listing available updates.
NOTE: The list that displays when you access Check for Product Updates may include:
• Updates that are unavailable through System Updates and/or are not approved for all
users.
• Updates that may already be installed on some E100 print servers. To help you choose
which updates to download, compare the list displayed with the E100 print server’s
Configuration Page > Updates log.
3 For each update that you want to download, click the file name under Download and then
select Save to download the update file to a location on the client computer.
When the update files have been downloaded, browse to the location of the update file on
the client computer and handle it according to the file type, circumstances, and site.
Page 43

ADMINISTERING THE FIERY CONTROLLER 43
Clearing the E100
The Clear Server command allows you to clear all queued print jobs from the E100 Print,
Hold, and Printed queues. Jobs can also be deleted, either individually or as a group, using
Command WorkStation. Clear Server also clears all jobs archived on the
E100 hard disk, the index of archived jobs, and all FreeForm masters.
TO CLEAR THE E100 FROM COMMAND WORKSTATION
• In Command WorkStation, choose Clear Server from the Server menu.
For more information, see Command WorkStation Help.
Back up your original data on your own media at the same time that you store and save data
on the E100 hard disk. Never damage or reset the E100 hard disk, and do not turn off the
system while accessing the hard disk. For instructions on how to turn on and turn off the
E100, see page 52.
If the E100 hard disk or system software experience technical difficulties, data stored and
saved on the E100 hard disk may be irretrievably lost. If problems with the hard disk occur,
extended storage of the following data cannot be assured:
•Third-party fonts
• Print jobs
• Color profiles, including profiles downloaded or edited with Spot-On
• Job notes and instructions
• Jobs edited with Impose
• Variable data documents
• E-mail Service Address Book
• E100 configuration information (list of all the settings in effect for the current Setup)
Page 44

ADMINISTERING THE FIERY CONTROLLER 44
Saving and restoring E100 settings
You can restore the E100 to a group of settings that you have already saved.
Saving and restoring the E100 configuration
You can save the current configuration of the E100 and restore it later, if necessary. To save
and restore settings, use Configure. For information, see Configure Help.
The following settings are saved:
• Settings made in Setup (except Server Name)
• Impose templates saved in the default directory for these files on the E100
• Address books
• Virtual printer settings
• Users and Groups information (login names and passwords)
•Custom spot colors
Page 45

ADMINISTERING THE FIERY CONTROLLER 45
Direct Mobile Printing
Direct Mobile Printing enables direct wireless printing to the E100 from supported mobile
devices. Supported mobile devices must be connected to the same wireless network subnet as
the E100 to print using Direct Mobile Printing.
E100 Setup for Direct Mobile Printing
Before using Direct Mobile Printing, configure the following settings in Configure:
• Server > Jobs:
Enable Printed Queue: Selected
• Network > Protocol > TCP/IP > Security:
Specify ports to enable or Enable Port Filtering: Selected
Available Ports > 5353 (Multicast DNS): Selected
• Network > Services > Web:
Enable IPP: Selected
• Network > Services > Bonjour:
Enable Bonjour: Selected
• Printer > General:
Publish Print Queue: Selected
Make sure that the E100 settings are configured as specified. Direct Mobile Printing will not
work if these settings are changed.
For more information about these settings, see Command WorkStation Help.
Page 46

ADMINISTERING THE FIERY CONTROLLER 46
Additional Direct Mobile Printing requirements
In addition, observe the following configuration requirements:
• You can print documents with a secure password using Fiery User Authentication (see
page 16).
• If Direct Mobile Printing is running on more than one E100, be sure to assign a distinct
Bonjour name to each E100.
User authentication problems will result if you have more than one E100 sharing the same
name.
• Make sure that the E100 is connected to a wireless access point on the network.
• Make sure that supported mobile devices are connected to the same wireless network as the
E100.
For more information about how to print using Direct Mobile Printing, see Printing.
Page 47

ADMINISTERING THE FIERY CONTROLLER 47
Managing e-mail address books
You can manage e-mail on the E100 by sending e-mail messages in a particular format to the
E100. Management features are overwriting the address book, adding new addresses,
removing addresses, and retrieving current addresses on the E100.
Users use the address books when they send attachment files to a particular e-mail address.
NOTE: E-mail messages can be sent only from an administrator account.
The E100 supports the following address books:
Admin allows members to modify the address book, get the current address book from
the E100, cancel a job, or receive the status of a job. However, membership in this address
book does not provide the same privileges as the Administrator password (page 39) does.
Print includes users who have print access. Only users whose e-mail addresses are in the
Print address book are authorized to submit jobs via e-mail to the E100. Unauthorized users
receive an e-mail reply that their job was not accepted by the E100 for printing.
NOTE: Perform LDAP Setup before setting this address book. For more information, see
Configure Help.
When a print job is submitted via e-mail, the E100 first checks the Print address book. If the
user’s e-mail address does not match any entry in the Print address book, the job does not
print. Instead, the user receives an e-mail stating that the print job was not accepted.
The default wildcard character “@” is stored in the Print address book. This allows any user
to print to the E100 until the administrator adds the first entry into the Print address book.
Page 48

ADMINISTERING THE FIERY CONTROLLER 48
To manage address books, send an e-mail to the E100 with commands in the Subject and
Message fields. The E100 responds by e-mail with information about each request, as
described in the following table.
To add or remove more than one address at a time, list the addresses on separate lines in the
message field of the e-mail.
Task Administrator
subject field
To r e t ri e ve
a specific
address book
To add an address
to an address book
To clear an address
book
#GetAddressBook
name of address book
For example:
#GetAddressBook Admin
#AddAddressTo
name of address book
For example:
#AddAddressTo Print
#ClearAddressBook name of
address book
For example:
#ClearAddressBook User
Administrator
message field
Address Book name of
name@domain
or
“display name” <name@domain>
E-mail response
subject field
address book
For example:
Address Book Admin
Added to Address Book
name of address book
For example:
Added to Address Book
Print
Address Book name of
address book cleared
or
Address Book name of
address book not cleared
For example:
Address Book User
cleared
E-mail response
message field
List of addresses in the
specified address book
List of addresses added
to the address book
The E100 also lists any
addresses that cannot
be added and includes
the reason.
If the address book is
not cleared, the reason
is given.
To delete an
address from an
address book
To receive help for
E100 e-mail
services
#DeleteAddressFrom
name of address book
For example:
#DeleteAddressFrom User
#Help RE: Help Provides
name@domain
or
“display name” <name@domain>
Removed from Address
Book name of address
book
For example:
Removed from
Address Book User
Deleted Address 1
Deleted Address 2
The E100 also lists any
addresses that cannot
be deleted and includes
the reason.
troubleshooting
e-mail syntax
Page 49

ADMINISTERING THE FIERY CONTROLLER 49
TO RETRIEVE AN ADDRESS BOOK FROM THE E100
1 Start your e-mail application.
2 Open a new message window.
3 Type the e-mail address of the E100 in the To line.
4 Type the command and the address book name in the Subject line.
For example, to retrieve the User address book, type “#GetAddressBook User.”
5 Send the message.
The return message includes the addresses of the specified address book.
6 Copy the addresses to a text file or save the message for your records.
TO RESTORE AN ADDRESS BOOK TO THE E100
1 Start your e-mail application.
2 Open a new message window.
3 Type the e-mail address of the E100 in the To line.
4 Type the command and the address book name in the Subject line.
For example, to restore the User address book, type “#GetAddressTo User.”
5 Copy the addresses to the body of the e-mail with each address on a separate line.
You can include nicknames. However, when a nickname or address is longer than one line,
edit it to fit on one line.
6 Send the message.
7 In the return e-mail message, confirm that the addresses were restored correctly.
Page 50

ADMINISTERING THE FIERY CONTROLLER 50
Printing the Configuration page
The Configuration page lists the settings in effect for the current Setup. After you have
performed Setup, print a Configuration page to confirm your settings. Post the current
Configuration page near the E100 for quick reference. Users need the information on this
page, such as the current printer default settings.
TO PRINT THE CONFIGURATION PAGE FROM COMMAND WORKSTATION
• In Command WorkStation, choose File > Print > Server Configuration.
or
• In Command WorkStation, select Device Center > General > Server Configuration > Complete
Summary > Print.
TO PRINT THE CONFIGURATION PAGE FROM THE COPIER TOUCH PANEL
1 Press the Application button on the copier.
2 On the copier touch panel, press Fiery.
3 Press the Info tab and press the Print Pages tab.
4 Press Configuration.
5Press Yes.
Page 51

ADMINISTERING THE FIERY CONTROLLER 51
Maintaining optimal E100 performance
The E100 does not require maintenance. Beyond the obvious requirements of servicing and
maintaining the copier and replenishing consumables, you can improve the overall
performance of your system by doing the following:
• Make the best use of your network connections.
Publish only connections that will be used. The E100 constantly checks all published
connections, even if they are inactive.
Review the published connections by printing a Configuration page. Eliminate the
connections that are not being used. It is easy to re-establish them when needed.
• Leave less urgent jobs to times when there is less network traffic or printing.
You can print recurring print jobs or jobs that are not urgent to the Hold queue. At low-traffic
times, the administrator or a user of the job management tools with Operator privileges can
move (or copy) all of the Hold queue jobs to the Print queue for printing.
• Reduce unnecessary network communication.
Large numbers of users running Fiery utilities, especially with frequent updates, may have a
significant effect on E100 performance.
• Make sure that you have adequate disk space on the E100.
Periodically review the list of jobs in the Hold queue, and the number of jobs being retained
in the Printed queue.
An administrator can print or delete jobs that are in the Print queue and Hold queue.
Consider printing or offloading inactive jobs. If disk space on the E100 is frequently low, you
can disable the Printed queue and choose not to publish the Hold queue (in Printer Setup).
To move or remove queued jobs, use the job management tools. When you free up disk space
by removing inactive jobs, new jobs are spooled and printed more quickly.
Page 52
ADMINISTERING THE FIERY CONTROLLER 52
Starting, shutting down, rebooting, and restarting the E100
This section describes how to start, shut down, reboot, and restart the E100 when necessary.
TO START THE E100
1 If the E100 is connected to the copier, wait for the Machine Tab to appear on the copier touch
panel.
2 Make sure the E100 power switch is set to ON (|). Press the power button once.
3 Wait approximately 1 minute as the E100 completes the startup sequence.
The LED display flashes intermittently and displays 00. It then flashes intermittently and
displays 00 continuously.
TO SHUT DOWN, RESTART, OR REBOOT THE E100 FROM THE COPIER TOUCH PANEL
1 Press the Application button on the copier.
2 On the copier touch panel, press Fiery.
3 Press the Info tab.
4 From the Server tab, press Reboot Server.
5 If prompted, enter your password.
6 Select Reboot System, Restart Server, or Shut Down System.
Wait for the E100 to shut down, reboot, or restart.
Page 53

TROUBLESHOOTING
Troubleshooting the E100
TROUBLESHOOTING 53
This chapter provides troubleshooting tips.
Startup diagnostics are described in the documentation for service technicians. Contact your
authorized service/support center if you see startup error messages on Command WorkStation
or if the E100 does not reach Idle.
Runtime error messages
For error messages related to canceling jobs and printing, including the Disk Full message and
alerts to load media, see Command WorkStation Help.
You can turn on PostScript error reporting as a print option from Mac OS applications.
Printer not found
Most failures to find a printer on the network are due to conflicting or missing name or
address settings for the E100. You must enter names in specific places. The required names
are:
• TCP/IP host name (also known as the DNS name), which is defined by your organization.
Enter the host name as the Server Name in E100 Setup.
• Remote printer (internal machine) name. Use one of the following:
print
hold
direct
OTE: If you change the DNS name (TCP/IP host name) of the E100, you must reconfigure
N
one of the utilities on each computer.
Page 54

TROUBLESHOOTING 54
For the appropriate name, see the following table.
In this location For this item TCP/IP networks See
Server Setup Server Name option Administrator defines
name
Windows hosts file host name DNS name
(TCP/IP host name)
Windows setup for
TCP/IP
UNIX /etc/printcap file
(BSD)
Solaris lpadmin queuename print, hold, or direct
Add New Server dialog box,
when configuring a utility
lpd host name DNS name
(TCP/IP host name)
Name of printer on lpd
host machine
rp line print, hold, or direct page 14
Server Name DNS name
print, hold, or direct
(TCP/IP host name)
Configure
Help
page 10
page 13
Utilities
Cannot connect to the E100 with utilities
If users cannot connect to the E100, check the following:
E100 Setup: The appropriate network protocol must be enabled, with the correct parameters
(for example, for TCP/IP, the IP address), and you must publish the Print queue or Hold
queue.
Check these settings quickly by printing a Configuration page.
On the client computer: The appropriate network protocols must be loaded.
Page 55

TROUBLESHOOTING 55
Cannot connect to the E100 with Command WorkStation
If you encounter a problem while connecting to the E100, an error message is displayed.
The problem can occur when:
• The E100 is initially turned on.
• The E100 restarts.
• You change settings affecting the server address and do not reconfigure the connection to
the server.
If you experience this problem, try the following solutions, in this order:
• Restart Command WorkStation and try to connect.
• Restart the E100.
Page 56

Page 57

INDEX
INDEX 57
Numerics
1000BaseT 22
100BaseTX 22
10BaseT 22
A
access levels, setting 15
Active Directory 13
administrator
functions 38
installing the server 11
password 39
privileges 17
Allow Courier Substitution option 33
Append CR to LF option 33
C
Cache PDF and PS objects option 33
changing
Administrator password 39
host name or DNS name 53
characters per inch 34
check for product updates 42
Clear job log after exporting option 36
Clear Server command 43
client setup
overview 11
WebTools 37
Color Charts 27
Command WorkStation
Configuration page 50
problems connecting to server 55
Setup from 31
Configuration page
printing 27, 50
troubleshooting connection problems 54
Configure (WebTool) 19
configuring a proxy server, system updates 41
connecting network cable 21
Convert Paper Sizes option 34
Courier font, substitution with 33
D
Default Paper Sizes option 34
Direct connection
described 18
required for downloading fonts 19
disk space 51
DNS (Domain Name Server)
implications of changing 53
listing server name 13
Docs WebTool 19
downloading fonts, Direct connection
requirement 19
Downloads (WebTool) 19
E
E-mail Log 27
Enable auto export option 36
Enable Auto IP Configuration option 28
Enable RIP While Receive option 35
error messages
runtime 53
Ethernet
Port Setup 28
speed 28
Ethernet connector 22
F
Font Number (PCL) option 34
font substitution 33
fonts
pitch 34
printer fonts on server 27
printing Font List 27
size 34
source 34
Form Length option 34
FreeForm master 35
Functions menu 26
Page 58

INDEX 58
G
Gateway Type option 29
gateway, assigning address automatically 29
H
Hold queue, described 18
Home (WebTool) 19
host name 53
host name, registering on network 13
I
improving server performance 51
Info command 26
installing
server on network 11
Internet, accessing server with WebTools 19
IP address
assigning automatically 28
assigning manually 28
for Ethernet Setup 28
static 28
J
Java to support Internet browser 37
Job Log
printing manually 27
Job Log, clearing jobs from 43
job management tools, deleting jobs with 43
L
line feed, PCL jobs 33
LPR (TCP/IP), UNIX 14
M
maintaining server performance 51
N
naming the server 28, 53
network
installation summary 11, 12
protocols supported 10
TCP/IP 12
P
PANTONE 27
Paper Size for System Pages option 34
paper size used by default 34
passwords
Administrator privileges 17
Administrator, changing 39
Operator privileges 17
setting 16
PDF files, font substitution in 33
Pitch option 34
Points option 34
Port Setup, Ethernet Setup 28
PostScript error 35
Print Cover Page option 34
Print Master option 35
Print queue, described 18
Print to PostScript Error option 35
Printed queue 18
printer
connection failure 53
not found 53
not in Chooser 53
printing
Configuration page 27
connections 18
cover page for each job 34
Font List 27
reprinting previously printed jobs 18
server information pages 26
protocols, network 10
proxy server 41
publishing connections, overview 18
Q
queues, clearing all 43
R
reprinting jobs 18
Resume Printing command 26
RJ-45 connector 22
O
Operator password privileges 17
Orientation option 34
Page 59

INDEX 59
S
server
back view showing connectors 21
maintaining and improving performance 51
naming 28
Setup 22
touch panel display 26
Server Name option
Server Setup 28
Setup
accessing 26
administrative functions 38
from a network computer 31
summary 24
Subnet Mask option 29
Suspend Printing command 26
Symbol Set option 35
system software
updating 39, 40, 41, 42
system software, updating 39
system updates 40
cautions 39
check for product updates 40
enabling a proxy server 41
scheduling 41
U
UNIX
on TCP/IP network 14
printcap file 54
remote printer name 54
updating the system 39, 40, 41, 42
using check for product updates 42
using system updates 40
W
WebTools
Configure 19
Docs 19
Downloads 19
Home 19
Windows printing, domain issues 13
T
TCP/IP
Ethernet Setup 28
host name 53
with UNIX workstations 14
terminology, general 8
touch panel display
accessing Setup 26
illustrated 26
troubleshooting
Command WorkStation connection
problems 55
connection to printer fails 53
Printer not found in the selection list of
utilities 54
Printer not found on network 53
twisted pair cable 22
 Loading...