

Page 1

Fiery SI Color Server
GETTING STARTED
for Xerox digital copier printers
Page 2

Copyright © 1996 Electronics for Imaging, Inc. All rights reserved.
This publication is protected by copyright, and all rights are reserved. No part of it may be reproduced or transmitted in any form or by any means for any purpose
without express prior written consent from Electronics for Imaging, Inc., except as expressly permitted her ein. Information in this document is subject to change
without notice and does not represent a commitment on the part of Electronics for Imaging, Inc.
The software described in this publication is furnished under license and may only be used or copied in accordance with the terms of such license.
Trademarks Notice
EFI, the EFI logo, Fiery, the Fiery logo, EFICOLOR and the EFICOLOR logo are trademarks registered in the U.S. Patent and Trademark Office. Fiery XJ,
Fiery XJe, Fiery XJ+, F iery SI, Fiery Driven, the F iery Driven logo, XJ RipChips, Rip-While-P rint, Continuous P rint, Command WorkStation, A utoCal, STARR
Compression, and Memory Multiplier are trademarks of Electronics for Imaging, Inc.
Xerox 5760, 5765, 5790, 5750, MajestiK, Regal, and all Xerox product names mentioned in this publication are trademarks of the Xerox Corporation.
Adobe, the Adobe logo, Adobe Illustrator, PostScript, Adobe Photoshop, Adobe Separator, and Adobe PageMaker, are registered trademarks of Adobe Systems
Incorporated, registered in certain jurisdictions. EPS (Encapsulated PostScript) is a trademark of Altsys Corporation. Apple, the Apple logo, AppleShare,
AppleTalk, EtherTalk, LaserWriter, and Macintosh ar e registered trademar ks, and M ultiF inder is a trademark of A pple Computer, Inc. Microsoft, MS, MS-DOS,
and Windows are registered trademarks of Microsoft in the US and other countries. QuarkXPress is a registered trademark of Quark, Inc. Times, Helvetica, and
Palatino are trademarks of Linotype AG and/or its subsidiaries. ITC Avant Garde, ITC Bookman, ITC Zapf Chancery, and ITC Zapf Dingbats are registered
trademarks of International Typeface Corporation. Ethernet is a registered trademark of Xerox Corporation. Farallon, PhoneNET PC, and PhoneNET Talk are
trademarks of Farallon Computing, Inc. COPS and COPSTalk are trademarks of CoOperative Printing Solutions, Inc. NetWare and Novell are registered
trademarks and Internetwork Packet Exchange (IPX) is a trademark of Novell, Inc. SyQuest is a registered trademark, in the United States and certain other
countries, of SyQuest Technology, Inc. UNIX is a register ed trademark of UNIX S ystem Laboratories, a wholly owned subsidiary of N o vell, I nc. PANTONE is a
registered trademark of Pantone, Inc.
All other terms and product names may be trademarks or registered trademarks of their respective owners, and are hereby acknowledged.
Legal Notices
APPLE COMPUTER, INC. (“APPLE”) MAKES NO WARRANTIES, EXPRESS OR IMPLIED, INCLUDING WITHOUT LIMITATION THE
IMPLIED WARRANTIES OF MERCHANTABILITY AND FITNESS FOR A PARTICULAR PURPOSE, REGARDING THE APPLE SOFTWARE.
APPLE DOES NOT WARRANT, GUARANTEE, OR MAKE ANY REPRESENTATIONS REGARDING THE USE OR THE RESULTS OF THE USE
OF THE APPLE SOFTWARE IN TERMS OF ITS CORRECTNESS, AC CURACY, RELIABILITY, CURRENTNESS, OR OTHER WISE. THE ENTIRE
RISK AS TO THE RESULTS AND PERFORMANCE OF THE APPLE SOFTWARE IS ASSUMED BY YOU. THE EXCLUSION OF IMPLIED
WARRANTIES IS NOT PERMITTED BY SOME STATES. THE ABOVE EXCLUSION MAY NOT APPLY TO YOU.
IN NO EVENT WILL APPLE, ITS DIRECTORS, OFFICERS, EMPLOYEES OR AGENTS BE LIABLE TO YOU FOR ANY CONSEQUENTIAL,
INCIDENTAL OR INDIRECT DAMA GES (INCLUDING DAMA GES FOR LOSS OF BUSINESS PR OFITS, BUSINESS INTERR UPTION, LOSS OF
BUSINESS INFORMATION, AND THE LIKE) ARISING OUT OF THE USE OR INABILITY TO USE THE APPLE SOFTWARE EVEN IF APPLE
HAS BEEN ADVISED OF THE POSSIBILITY OF SUCH DAMAGES. BECAUSE SOME STATES DO NOT ALLOW THE EXCLUSION OR
LIMITATION OF LIABILITY FOR CONSEQUENTIAL OR INCIDENTAL DAMAGES, THE ABOVE LIMITATIONS MAY NOT APPLY TO YOU.
Apple’s liability to you for actual damages from any cause whatsoever, and regardless of the form of the action (whether in contract, tort [including negligence],
product liability or otherwise), will be limited to $50.
Restricted Rights Legends
For defense agencies: Restricted Rights Legend. Use, reproduction, or disclosure is subject to restrictions set forth in subparagraph (c)(1)(ii) of the Rights in
Technical Data and Computer Software clause at 252.227.7013.
For civilian agencies: Restricted Rights Legend. Use, reproduction, or disclosure is subject to restrictions set forth in subparagraph (a) through (d) of the
commercial Computer Software Restricted Rights clause at 52.227-19 and the limitations set forth in Electronics for Imaging, Inc.’s standard commercial
agreement for this software. Unpublished rights reserved under the copyright laws of the United States.
Printed in the United States of America on recycled paper.
Part Number:
n/a
Page 3

CE Mark
The CE marking applied to this product symbolises Rank Xerox’s declaration of conformity with the following applicable directives of the European Union as of
the dates indicated.
January 1, 1996—Council Directive 70/80/CCO amended by Council Directive 93/68/EEO. Approximation of the laws of the member states related to low
voltage equipment.
January 1, 1996—Council Directive 59/336/EEC. Approximation of the laws of the member states related to electromagnetic compatibility.
A full declaration defining the relevant directives and referenced standards can be obtained from your Rank Xerox representative.
WARNING: In order to allow this equipment to operate in proximity to industrial, scientific, and Medical (ISM) equipment, the external radiation from
ISM equipment may have to be limited or special migration measures taken.
WARNING: This is a Class A product. In a domestic environment this product may cause radio interference, in which case the user may be required to
take adequate measures.
FCC Information
WARNING: FCC Regulations state that any unauthorized changes or modifications to this equipment not expressly approved by the manufacturer could void
the user’s authority to operate this equipment.
NOTE: This equipment has been tested and found to comply with the limits for a Class A digital device, pursuant to Part 15 of the FCC Rules. These limits are
designed to provide reasonable protection against harmful interference when the equipment is operated in a commercial environment. This equipment generates,
and uses, and can radiate radio frequency energy and, if not installed and used in accordance with the instruction manual, may cause harmful interference to radio
communications. Operation of this equipment in a residential area is likely to cause interference in which case the user will be required to correct the interference
at his own expense.
Industry Canada Class A Notice
This digital apparatus does not exceed the Class A limits for radio noise emissions from digital apparatus as set out in the interference-causing equipment standard
entitled, “Digital Apparatus” ICES-003 from Industry Canada.
Avis de Conformation Classe A d l’Industrie Canada
Le présent appareil numérique n’émet pas de bruits radioélectriques dépassant les limites applicables aux appareils numériques de la Classe A prescrites dans la
norme sur le matériel brouilleur, “Appareils Numériques” NMB-003 édictée par l’Industrie Canada.
Certificate by Manufacturer/Importer
This is to certify that the FC07 is shielded against radio interference in accordance with the provisions of VFG 243/1991. The G erman Postal Services have been
advised that this device is being put on the market and that they have been given the right to inspect the series for compliance with the regulations.
Electronics for Imaging, Inc.
Bescheinigung des Herstellers/Importeurs
Heirmit wird bescheinigt, dass der FC07 im Uebereinstimmung mit den Bestimmungen der VFG 243/1991 F unk-Entstort ist. Der Deutschen Bundespost wurde
das Inverkehrbringen dieses Geraetes angezeigt und die Berechtigung zur Ueberpruefung der Serie auf Einhaltung der Bestimmungen eingeraumt.
Electronics for Imaging, Inc.
RFI Compliance Notice
This equipment has been tested concerning compliance with the relevant RFI protection requirements both individually and on system level (to simulate normal
operation conditions). However, it is possible that these RFI Requirements are not met under certain unfavorable conditions in other installations. It is the user
who is responsible for compliance of his particular installation.
Dieses Geraet wurde einzeln sowohl als auch in einer Anlage, die einen normalen Anwendungsfall nachbildet, auf die Einhaltung der F unk-entstoerbestimmungen
geprueft. Es ist jedoch moeglich, dass die Funk-enstoerbestimmungen unter unguenstigen Umstaenden bei anderen Geraetekombinationen nicht eingehalten
werden. Fuer die Einhaltung der Funk-entstoerbestimmungen seigner gesamten Anlage, in der dieses Geraet betrieben wird, ist der Betreiber verantwortlich.
Compliance with applicable regulations depends on the use of shielded cables. It is the user who is responsible for procuring the appropriate cables.
Page 4

Einhaltung mit betreffenden Bestimmungen kommt darauf an, dass geschirmte Ausfuhrungen gebraucht werden. Fuer die beschaffung richtiger A usfuhrungen ist
der Betreiber verantwortlich.
Software License Agreement
Electronics for Imaging, Inc. grants to you a non-exclusive, non-transferable license to use the software and accompanying documentation (“S oftware”) included
with the Fiery SI Color Server you have purchased, including without limitation the PostScript
®
software provided by Adobe Systems Incorporated.
You may:
a. use the Software solely for your own customary business purposes and solely with Fiery SI;
b. use the digitally-encoded machine-readable outline and bitmap programs (“Font P rograms ”) provided with F iery SI in a special encrypted format (“Coded Font
Programs”) to r eproduce and display designs, styles, weights, and versions of letters, numerals, characters and symbols (“Typefaces”) solely for your own customary
business purposes on the screen of the Fiery SI or Macintosh monitor used with Fiery SI;
c. use the trademarks used by Electronics for Imaging to identify the Coded Font Programs and Typefaces reproduced therefrom (“Trademarks”); and
d. assign your rights under this Agreement to a transferee of all of your right, title and interest in and to Fiery SI provided the transferee agrees to be bound by all
of the terms and conditions of this Agreement.
You may not:
a. make use of the Software, directly or indirectly, to print bitmap images with print resolutions of 600 dots per inch or greater, or to generate fonts or typefaces
for use other than with Fiery SI;
b. make or have made, or permit to be made, any copies of the Software, Coded Font Programs, accompanying documentation or portions thereof, except as
necessary for use with the Fiery SI unit purchased by you; provided, however, that under no circumstances may you make or have made, or permit to be made,
any copies of that certain portion of the Software which has been included on the Fiery SI hard disk drive. You may not copy the documentation;
c. attempt to alter, disassemble, decrypt or reverse engineer the Software, Coded Font Programs or accompanying documentation.
d. rent or lease the Software.
Proprietary Rights
You acknowledge that the Software, Coded Font Programs, Typefaces, Trademarks and accompanying documentation are proprietary to Electronics for Imaging
and its suppliers and that title and other intellectual property rights therein remain with Electronics for Imaging and its suppliers. Except as stated above, this
Agreement does not grant you any right to patents, copyrights, trade secrets, trademarks (whether registered or unregistered), or any other rights, franchises or
licenses in respect of the Software, Coded Font Programs, Typefaces, Trademarks or accompanying documentation. You may not adapt or use any trademark or
trade name which is likely to be similar to or confusing with that of Electronics for Imaging or any of its suppliers or take any other action which impairs or reduces
the trademark rights of Electronics for Imaging or its suppliers. The trademar ks may only be used to identify printed output produced by the Coded Font P rograms.
At the reasonable request of Electronics for Imaging, you must supply samples of any Typeface identified with a trademark.
The MacApp software is proprietary to Apple Computer, Inc. and is licensed to Electronics for Imaging, Inc. for distribution only for use in combination with
Fiery SI software utilities.
Confidentiality
You agree to hold the Software and Coded Font Pr ograms in confidence, disclosing the Software and Coded F ont P rograms only to authorized users having a need
to use the Software and Coded Font Programs as permitted by this Agreement and to take all reasonable precautions to prevent disclosure to other parties.
Remedies
Unauthorized use, copying or disclosure of the Software, Coded Font Programs, Typefaces, Trademarks or accompanying documentation will result in automatic
termination of this license and will make available to Electronics for Imaging other legal remedies.
Limited Warranty And Disclaimer
Electronics for Imaging warrants that, for a period of ninety (90) days from the date of delivery to you, the Software under normal use will perform without
significant errors that make it unusable. Electronics for Imaging’s entire liability and your exclusive remedy under this warranty (which is subject to you returning
Fiery SI to Electronics for Imaging or an authorized dealer) will be, at Electronics for Imaging’s option, to use reasonable commercial efforts to attempt to correct
or work around errors, to replace the Software with functionally equivalent software, or to refund the purchase price and terminate this Agreement. Some states
do not allow limitations on duration of implied warranty, so the above limitation may not apply to you.
Page 5

Except for the above express limited warranty, Electronics for Imaging makes and you receive no warranties or conditions on the Products, express, implied, or
statutory, and Electronics for Imaging specifically disclaims any implied warranty or condition of merchantability or fitness for a particular purpose.
For warranty service, please contact your authorized service/support center.
EXCEPT FOR THE ABOVE EXPRESS LIMITED WARRANTY, ELECTRONICS FOR IMAGING MAKES AND YOU RECEIVE NO WARRANTIES
OR CONDITIONS ON THE SOFTWARE OR CODED FONT PROGRAMS, EXPRESS, IMPLIED, STA TUTORY, OR IN ANY OTHER PROVISION
OF THIS AGREEMENT OR COMMUNICATION WITH YOU, AND ELECTRONICS FOR IMAGING SPECIFICALLY DISCLAIMS ANY IMPLIED
WARRANTY OR CONDITION OF MER CHANT ABILITY OR FITNESS FOR A P AR TICULAR PURPOSE. Electronics for Imaging does not warrant that
the operation of the software will be uninterrupted or error free or that the Software will meet your specific requirements.
Limitation Of Liability
IN NO EVENT WILL ELECTRONICS FOR IMAGING OR IT S SUPPLIERS BE LIABLE FOR ANY DAMAGES, INCLUDING L OSS OF DATA, LOST
PROFITS, COST OF COVER OR O THER SPECIAL, INCIDENTAL, CONSEQUENTIAL OR INDIRECT DAMAGES ARISING FROM THE USE OF
THE SOFTWARE, CODED FONT PROGRAMS OR ACCOMPANYING DOCUMENTATION, HOWEVER CAUSED AND ON ANY THEORY OF
LIABILITY. THIS LIMITATION WILL APPLY EVEN IF ELECTRONICS FOR IMAGING OR ANY AUTHORIZED DEALER HAS BEEN ADVISED
OF THE POSSIBILITY OF SUCH DAMAGE. YOU ACKNO WLEDGE THAT THE PRICE OF FIERY SI XJ REFLECTS THIS ALLOCA TION OF RISK.
BECAUSE SOME ST ATES/JURISDICTIONS DO NOT ALLOW THE EXCLUSION OR LIMITATION OF LIABILITY FOR CONSEQUENTIAL OR
INCIDENTAL DAMAGES, THE ABOVE LIMITATION MAY NOT APPLY TO YOU.
Export Controls
You agree that you will not export or re-export the Software or Coded Font Programs in any form without the appr opriate United States and foreign government
licenses. Y our failure to comply with this provision is a material breach of this Agreement.
Government Use
Use, duplication or disclosure of the Software by the United States Government is subject to restrictions as set forth in subdivision (c) (1) (ii) of the Rights in
Technical Data and Computer Software clause at DFARS 252.227-7013 or in subparagraphs (c) (1) and (2) of the Commercial Computer Software—Restricted
Right Clause at 48 CFR 52.227-19, as applicable.
Third Party Beneficiary
You are hereby notified that Adobe Systems Incorporated, a California corporation located at 303 Almaden Blvd., San J ose, CA 95110 (“Adobe”) is a third-party
beneficiary to this Agreement to the extent that this Agreement contains provisions which relate to your use of the Fonts, the Coded F ont P rograms, the Typefaces
and the Trademarks licensed hereby. Such provisions are made expressly for the benefit of Adobe and are enforceable by Adobe in addition to Electronics for
Imaging.
General
This Agreement will be governed by the laws of the State of California.
This Agreement is the entire agreement held between us and supersedes any other communications or advertising with respect to the Software, Coded Font
Programs and accompanying documentation.
If any provision of this Agreement is held invalid, the remainder of this Agreement shall continue in full force and effect.
If you have any questions concerning this Agreement, please write to Electronics for Imaging, Inc., Attn: Licensing Dept. or see E lectronics for I maging’s web site
at www.efi.com.
Electronics for Imaging, Inc.
2855 Campus Drive
San Mateo, CA 94403
Page 6

Contents
Introduction
About the media pack
About the documentation
System requirements for Macintosh users
System requirements for Windows users
Networking requirements xi
System requirements for UNIX users
User software
xii
Installing user software on a Macintosh computer
Installing Macintosh software
Moving files to the appropriate locations 3
Color reference pages 4
Installing files from the Color Files folder 5
Loading monitor setup and separation files
Setting up the Fiery SI as a PostScript printer
Setting up the Fiery SI in the Chooser 8
ix
ix
x
x
xi
1
6
7
Installing user software on a PC-compatible computer
Installation overview
Installing Windows software
Using the Windows installer 10
Completing installation for Windows 3.1x 14
Completing installation for Windows 95 and Windows NT 19
Configuring the Chooser list
Setting up the Fiery SI as a PostScript printer
Setting up printing with Windows 3.1x 26
Setting up printing with Windows 95 34
Setting up printing with Windows NT 40
9
10
19
26
Page 7

viii Table of Contents
Installing additional Windows files
Installing the EFICOLOR folder files 45
Loading the monitor settings file for Fiery XJ Scan 46
Installing the Color Reference pages 47
45
Troubleshooting
On a Macintosh computer
On a Windows computer
49
49
Index
Page 8

ix About the media pack
Introduction
This manual describes how to install the user software for the Fiery SI Color Server™
and set up printing from Macintosh and PC-compatible computers. For information
on setting up network servers and clients to use the Fiery SI, see the
Guide
. For general information on using the color copier, your computer, your
application software, or your network, see the manuals that accompany those products.
Administrator
About the media pack
Your Fiery SI includes a media pack containing:
• User Software CD—printer drivers, printer files, utilities, color reference files you
can install directly onto Macintosh and PC-compatible computers
• Documentation set
About the documentation
This manual is part of a set, which also includes the following manuals for users and
system administrators:
• The
User Guide
manual describes how to use the software installed from the CD. It includes sections
on printing from Macintosh and PC-compatible computers and UNIX
workstations.
describes how to set printing options and print to the Fiery SI. This
• The
Fiery SI for the supported platforms and network environments. It also includes
guidelines for setting up UNIX, Windows NT, and NetWare servers to provide
PostScript printing services to clients.
•
Release Notes
user software and guidelines for their use
Administrator Guide
with information about changes in the current release of system and
explains basic configuration and administration of the
Page 9

x Introduction
System requirements for Macintosh users
For installation of user software, you need A CD-ROM drive. This can be either an
internal CD-ROM drive in your Macintosh or an external drive with the appropriate
cable and software to run on your computer.
To use the Fiery SI with a Macintosh computer, you need:
• Any Macintosh computer in the Macintosh II, Quadra, Centris, Performa, or Po wer
Macintosh families that has at least 4MB of RAM and EtherTalk® Phase 2 installed
• Apple System software version 7.0 or later
• Adobe® PostScript® Printer Driver version 8.0 or later, or Apple® LaserWriter®
driver version 7.0 or later; and PPD (PostScript Printer Description) files
(The current version of the Adobe PostScript Printer Driver and the PPD files are
included with the Fiery SI User Software.)
• To use Fiery XJ Scan™, Adobe Photoshop™ version 2.5 or later
• To use the paging feature of Fiery XJ Spooler, an alphanumeric pager and
PageNOW! software version 1.5 or later. PageNOW! is available from Mark/Space
Softworks: 1-800-799-1718. (United States and Canada only)
System requirements for Windows users
For installation of user software, you need A CD-ROM drive. This can be either an
internal CD-ROM drive in your PC or an external drive with the appropriate cable
and software to run on your computer.
To use the Fiery SI with an IBM PC or compatible, you need:
• An IBM PC or compatible with an 80386, 80486, or Pentium processor and at least
4MB of RAM
• A mouse that is supported by Windows
• MS-DOS version 5.0 or later
• Microsoft® Windows version 3.1 or later, Windows 95, or Windows NT
• To use Fiery XJ Scan, Adobe Photoshop version 2.5 or later
Page 10

xi System requirements for UNIX users
• To print to the Fiery SI from Windows, you need to use a PostScript printer driver
and PostScript Printer Description (PPD) file. These drivers and PPD files are
included with the User Software. Use the Adobe PostScript Printer Driver for
Windows version 3.0.1 with Windows 3.1x. Use version 4.1 with Windows 95.
Windows 3.1x users can use the PostScript Printer Driver that came with the
Windows3.1 system software; however, all Fiery SI printing features will not be
available.
• To print from computers running Windows NT, you can use the PostScript driver
delivered with the operating system, and the Fiery SI PPD file provided with the
User Software.
Networking requirements
For network use with Windows 3.x, you need:
• Farallon PhoneNET PC software version 3.1 or later (for AppleTalk) or
COPSTalk for Windows version 1.2f or later (for AppleTalk); or
SPX/IPX protocol (Novell), Ethernet, or Token Ring
For network use with Windows 95, you need:
• TCP/IP networking protocol or
SPX/IPX networking protocol (Novell)
For network use with Windows NT, you need TCP/IP networking protocol
IPX (Novell)
• With an IPX (Novell) network, you need a Novell file server running NetWare
software version 3.11 or later that supports Frame Ethernet 802.3 or 802.2, or
Ethernet II.
System requirements for UNIX users
To use the Fiery SI with a UNIX workstation, you need:
• Workstations with Standard TCP/IP Ethernet connectivity supporting the lpr
protocol in compliance with RFC 1179
• TCP/IP printing software that conforms to RFC1179 (Berkeley lpr protocol)
Page 11

xii Introduction
User software
The User Software CD includes:
Fiery XJ Scan
™
A plug-in module for Photoshop that enables you to scan images
from the copier directly into Photoshop.
Fiery XJ
Downloader
Enables you to print PostScript and Encapsulated PostScript files
™
directly to the Fiery SI without using the application in which
they were created. The Fiery XJ Downloader also enables you to
manage the printer fonts installed on the Fiery SI.
Fiery XJ
Spooler
™
Enables you to view the order and priority of print jobs,
customize printer settings for jobs, delete jobs, and move jobs
between queues. You can also use it to view job accounting
information.
Fiery XJ Print
Calibrator
™
Adobe
PostScript P rinter
Enables you to keep your Fiery SI’s colors at a consistent
performance level across time.
Enables you to print to the Fiery SI and supports all special
printing features and PostScript Level 2 features.
Driver
Printer Files Printer description files for popular applications that require them
in order for the Fiery SI to appear in the application’s Print and
Page Setup dialog boxes. The Fiery SI printer description files
provide information about the Fiery SI to applications and
printer drivers.
Screen Fonts
(Macintosh only)
Color Reference Enables you to print pages of reference pages so that you can view
Installs screen fonts for the 39 PostScript printer fonts installed
on the Fiery SI. For more information, see “Screen Fonts” on
page 3.
the range of colors available on your Fiery SI.
Page 12

1 Installing Macintosh software
I
lli
nsta
ng user
software on a
Macintosh
computer
‘The general steps for installing the Fiery SI user software from the CD and setting up
printing from a Macintosh computer are:
• Install the utilities and files.
• Move files to the appropriate locations.
• If you will be using Photoshop, install the EFICOLOR™ Separation Tables for your
Fiery SI.
• Copy additional color reference files from the User Software CD as needed.
• If you will be using Fiery XJ Scan, load the monitor settings file.
• Install the Adobe PostScript Printer Driver.
Installing Macintosh software
The Software Installer provides the following installation options:
• Utilities—Installs Fiery XJ Downloader, Fiery XJ Spooler, and Fiery XJ Print
Calibrator.
• EFICOLOR—Installs the files used by Photoshop to ensure high color quality.
• Photoshop Plug-ins—Installs Fiery XJ Scan.
• Color Reference—Installs the CMYK and PANTONE color reference pages.
• Screen Fonts—Installs the screen fonts that correspond to the printer fonts installed
on the Fiery SI hard disk.
TO
INSTALL SOFTWARE
1. If you are using an external CD-ROM drive, connect it to your Macintosh.
2. Insert the User Software CD or Disk 1.
3. Double-click to open the Installer folder.
:
Page 13
2 Installing user software on a Macintosh computer
4. Double-click the Installer icon.
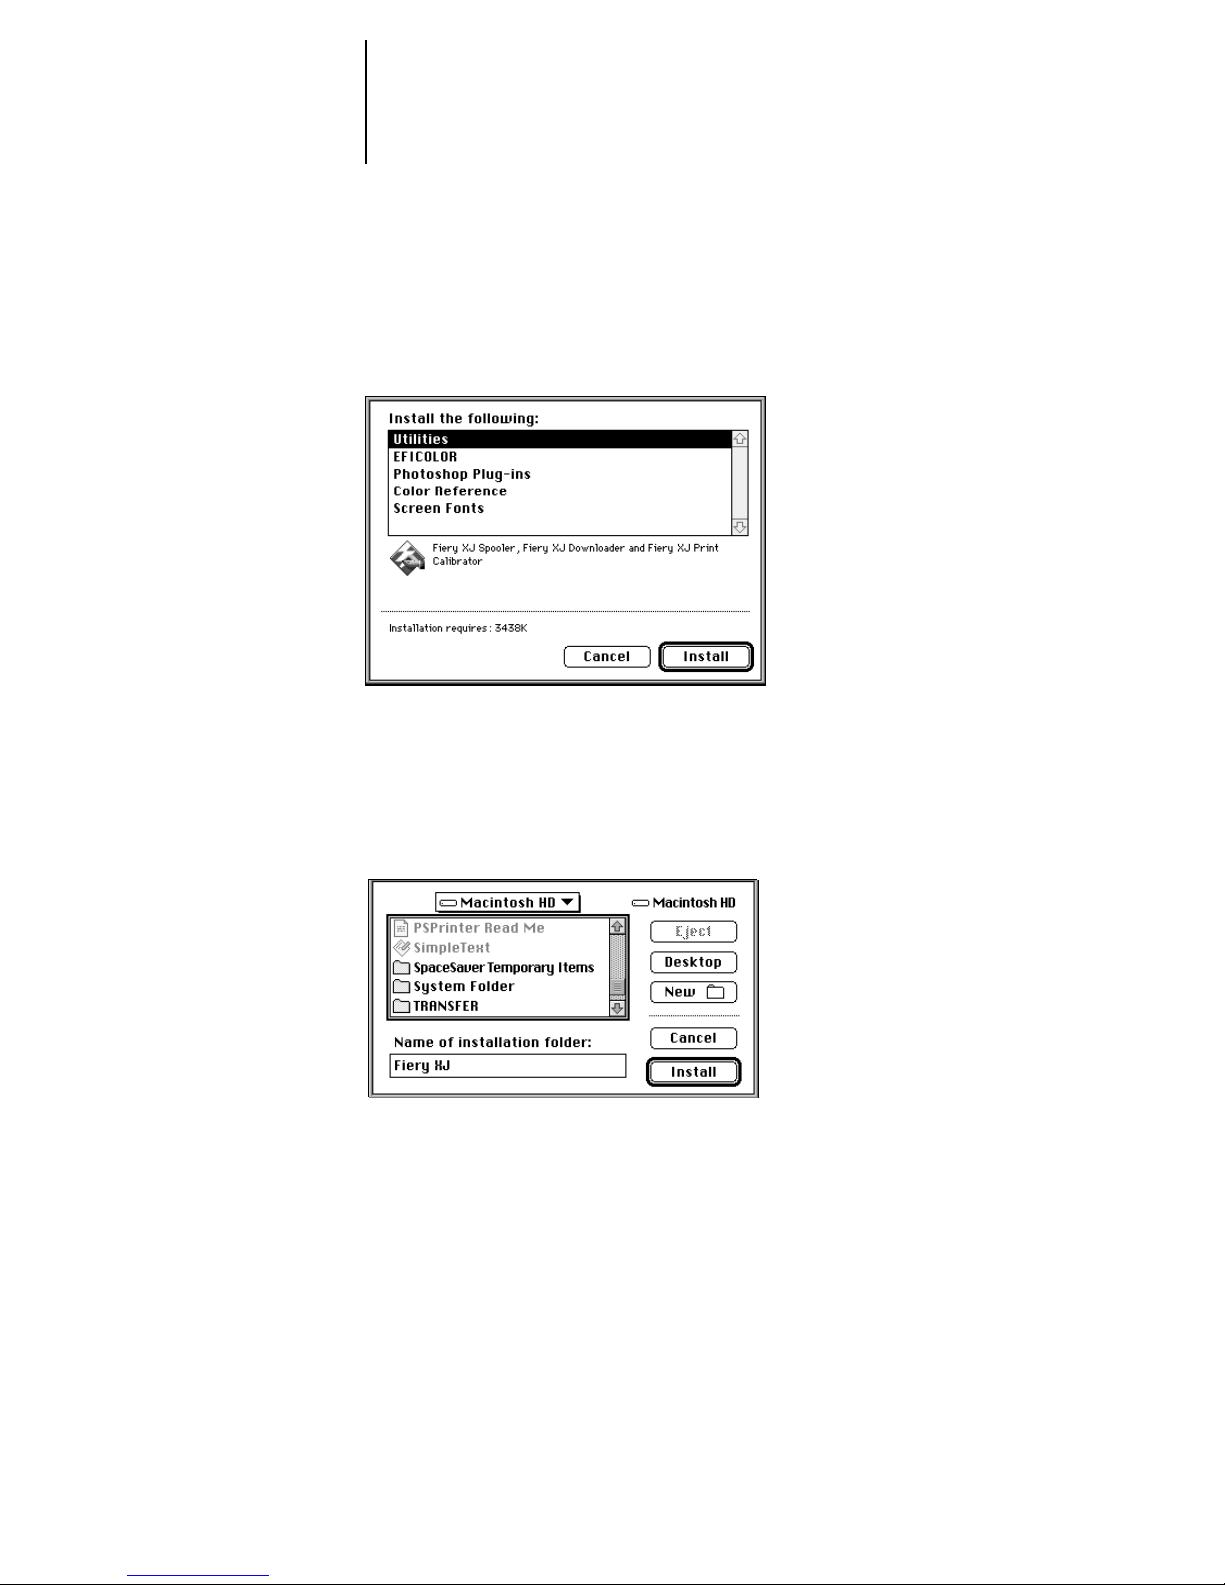
The installer window displays a list of the items that can be installed and the amount
of disk space required to install them.
5. Click to select the items you want to install. Command-click to select multiple
non-adjacent items; shift-click to select multiple adjacent items.
6. Click Install.
7. When prompted, specify where to install the software and click Install.
8. If you are installing from disks, insert the remaining disks when prompted.
9. When the installation is complete, click OK in the dialog box that appears.
10. Move files to the appropriate locations as described next.
Page 14

3 Installing Macintosh software
Moving files to the appropriate locations
After you install the Fiery XJ software, some files must be moved to the correct
location, and you might want to move others according to your Desktop structure.
Utilities
You can put the Utilities folder containing the Fiery XJ Downloader, Fiery XJ Spooler,
and Fiery XJ Print Calibrator wherever you like. You might want to keep them in the
folder with your other utilities.
Fiery XJ Scan
The following table indicates where to move the Fiery XJ Scan files in the Photoshop
Plug-ins folder.
If you will be using: Drag this file: To this location:
Photoshop 2.5
Photoshop 3.0
Fiery XJ Scan
Calibrated RGB Adobe Photoshop folder
Fiery XJ Scan
Calibrated RGB Adobe Photoshop folder
Plug-ins folder in the Adobe Photoshop
folder
Acquire/Export folder in the Plug-ins folder
inside the Adobe Photoshop folder
Screen Fonts
Regular, bold, italic, and bold italic versions of the following fonts are included with
the Fiery SI: Courier, Times, Helvetica, Helvetica Condensed, Helvetica Narrow, ITC
Avant Garde Gothic, Demi, ITC Bookman, New Century Schoolbook, and Palatino.
Also included are ITC Zapf Chancery, ITC Symbol, and ITC Zapf Dingbats.
For every PostScript font you want to use in a document, you must install at least one
point size of the screen font on your Macintosh. The more sizes and styles you install,
the greater the variety of type your Macintosh can display clearly. Each point size and
style occupies between 3K and 12K of disk space. It’s usually a good idea to install at
least the 10- and 12-point sizes of each font in the regular, bold, italic, and bold italic
versions.
Page 15

4 Installing user software on a Macintosh computer
OTE
N
:
If you have already been printing to a LaserWriter, most of the screen fonts
supplied with the Fiery SI are probably already installed on your computer. If they are,
you do not need to reinstall them.
You should install any screen fonts you want to use that are not already installed. If you
use a font management utility such as Suitcase II or Font Juggler, follow the
instructions included with the utility; if you don ’t use a font management utility , install
the screen fonts as described in your Macintosh documentation by dragging the files to
your System Folder.
Color reference pages
There are two folders containing color reference pages for use with the Fiery SI:
• Color Reference folder you can install using the installer
• Color Files folder you can copy from the User Software CD (or disks)
Moving files in the Color Reference folder
Put the Color Reference folder anywhere you like. It contains the following color
reference pages:
• CMYK Color Reference.ps—A PostScript file of the CMYK Color Reference pages
that you can download and print using the Fiery XJ Downloader or any other
application that supports printing PostScript files.
• Fiery Xerox 5760/65 Coated, Fiery Xerox 5760/65 Uncoated—PostScript files of
Pantone coated and uncoated colors for the MajestiK.
• Fiery Xerox 5790 Coated, Fiery Xerox 5790 Uncoated—PostScript files of Pantone
coated and uncoated colors for the Regal.
• Fiery Xerox 5750 Coated, F iery Xerox 5750 Uncoated —PostScript files of Pantone
coated and uncoated colors for the 5750.
Page 16

5 Installing Macintosh software
Installing files from the Color Files folder
Copy the additional files that you want from the Color Files folder on the User
Software CD to your hard disk. Many of the files are PostScript files that you can
download and print using the Fiery XJ Downloader or any other application that
supports printing PostScript files. You can put the Color Files folder anywhere you
like. It contains several color reference pages:
• Application Pages—This folder contains RGB Color Reference, a folder containing
files you can print from Microsoft Word 6.0 or later or PowerPoint 4.0 or later to
view available RGB colors.
• Colorcht.ps—A P ostScript version of the RGB, CMY, and PANTONE color charts
that you can also print from the Fiery SI Control Panel.
• Calibration Files—This folder contains a sample measurements file that you can use
with Fiery XJ Print Calibrator. It is for demonstration purposes and should not be
used to calibrate your Fiery SI.
Installing files from the EFICOLOR folder
Move the files in the EFICOLOR folder installed in the Fiery XJ folder as described in
this section. They are r equired to insur e proper colors when printing with the F iery SI.
The files in this folder are copier-specific.
INSTALL FILES FROM THE EFICOLOR FOLDER
TO
1. Open the EFICOLOR folder inside the Fiery XJ folder.
2. Drag the file in the ColorSync 2.0 folder that corresponds to your copier to the
ColorSync
Folder .
TM
Profiles folder inside the Pr eferences f older inside y our Macintosh System
If this folder does not exist, create it. Make sure that you name it ColorSyncTM Profiles.
If the name does not match exactly, applications will not be able to locate the profiles.
3. Drag the file in the EFICOLOR 2.0 folder that corresponds to your copier to the
ColorSyncTM Profiles folder
4. If you use Adobe Photoshop, open the Separation Tables folder.
Drag the Separation Tables that correspond to your copier into the Photoshop folder.
The Separation Tables enable you to get the best possible CMYK separations.
:
Page 17
6 Installing user software on a Macintosh computer
5. If you use Adobe Photoshop, drag the Calibrated RGB file into the Adobe Photoshop
folder.
You may have already installed this file if you installed Fiery XJ Scan.
Loading monitor setup and separation files
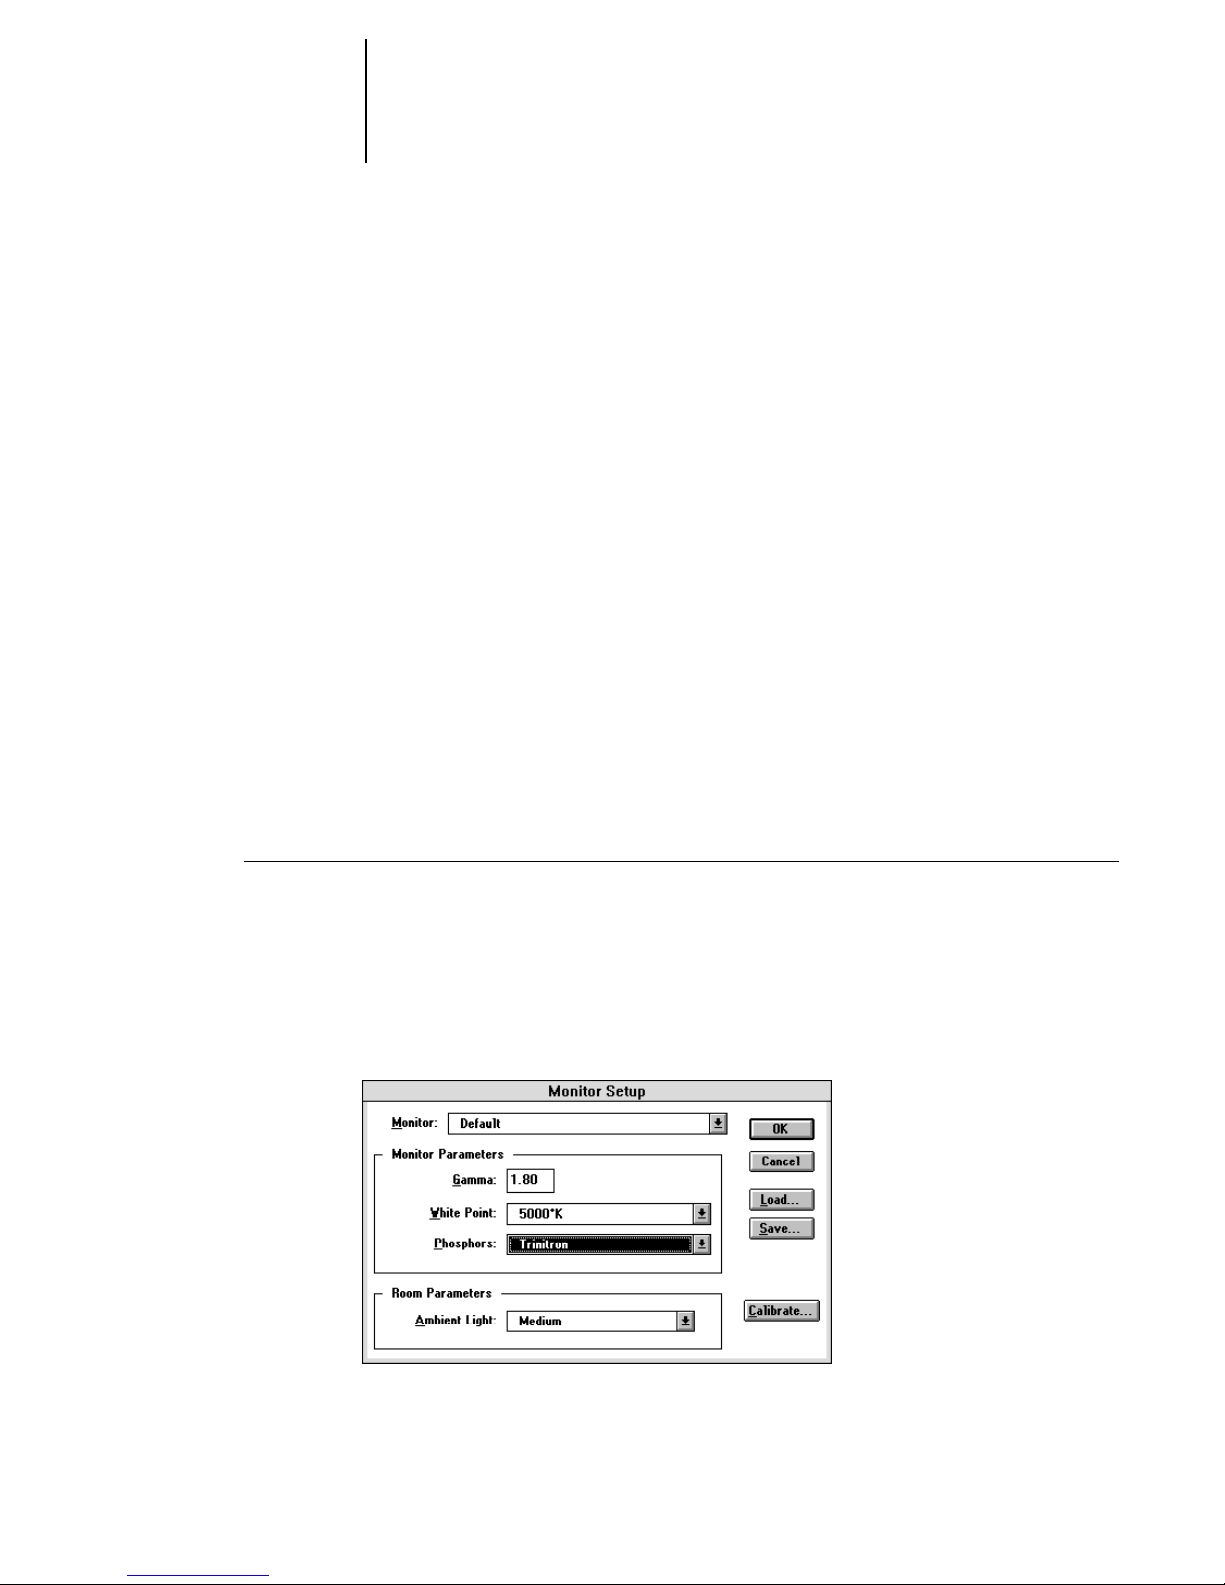
If you are using Adobe Photoshop, you should load the monitor setup file and the
Separation Tables into Photoshop.
LOAD MONITOR SETUP
TO
1. Start the Photoshop application.
2. Choose Preferences from the File menu.
3. Choose Monitor Setup from the Preferences sub-menu.
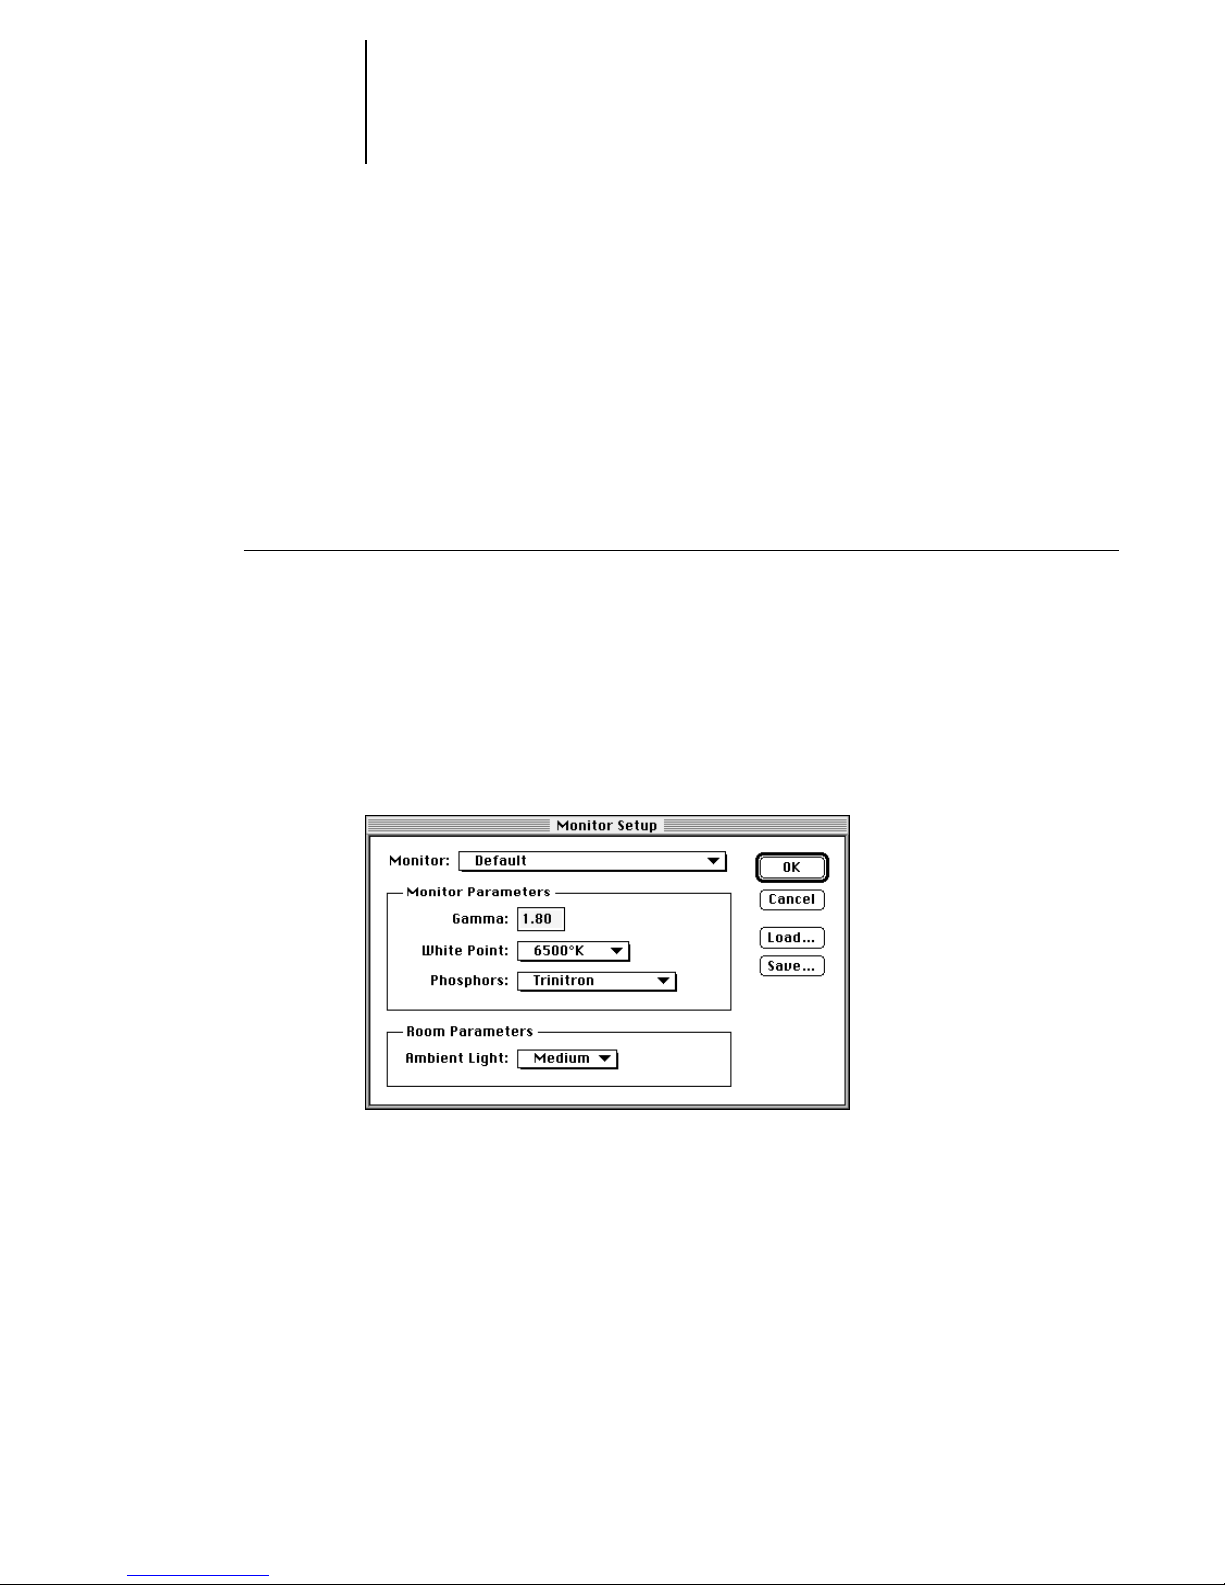
The Monitor Setup dialog box appears. For information about this dialog box, see
your Adobe Photoshop documentation.
4. In the Monitor Setup dialog box, click Load.
FILE AND SEPARATION TABLES:
5. Open the Adobe Photoshop folder, select the Calibrated RGB file, and click Open.
The Calibrated RGB file appears as the selection in the Monitor text box of the
Monitor Setup dialog box.
6. Under Room Parameters, set Ambient Light to High.
7. Click OK to apply the settings.
Page 18

7 Setting up the Fiery SI as a PostScript printer
8. Choose Preferences from the File menu, and choose Separation Tables from the
submenu.
9. Click Load, and in the dialog box that appears, select the separ ation table y ou w ant to
load. Click Open to load it.
The two separation tables are for Photographic (P) rendering and for Solid (S) color
rendering. Photographic rendering is best for photographs and other images where
tonal relationships are important. Solid color rendering is best when rendering
individual colors accurately is more important than preserving tonal relationships.
When you click OK, the Separation Tables dialog box appears with the name of the
separation table you loaded.
10. Click OK.
With the Calibrated RGB file and the separation table loaded, the EFICOLOR
conversion will be used for all separations until you load a different monitor setup and
separation table, even if you quit Photoshop and reopen it.
Setting up the Fiery SI as a PostScript printer
To set up the Fiery SI as a PostScript printer, you must install the printer file (PPD)
that corresponds to your printer and the Adobe PostScript Printer Driver (version 8.x
supports PostScript Level 2) provided on the User Software CD.
Printer drivers pro vide a way to communicate information on print jobs betw een your
applications and the Fiery SI (and any other PostScript printer connected to your
computer).
TO INSTALL THE PRINTER DRIVER:
1. Locate the Printer Files folder on the User Software CD.
2. Double-click the Installer icon.
3. Click OK in the welcome screen.
Page 19

8 Installing user software on a Macintosh computer
4. Click Install in the dialog box that appears.
This installs the Adobe PostScript Printer Driver, the printer description files that
correspond to your copier, and the Apple Chooser 7.3 (if you are using an earlier
version).
5. Click OK in the dialog box informing you that installation is complete.
If you operate the Fiery SI in a copy shop, quick print shop, or service bureau, you
might want to provide copies of the printer driver, printer description files, and
relevant documentation to customers. This ensures that jobs they create and print to
files are properly formatted for printing to the Fiery SI.
Setting up the Fiery SI in the Chooser
After you install the printer driver and printer description files, you need to set up the
Fiery SI in the Chooser in order to take full advantage of its features. This section
describes how to set up the Fiery SI with the Adobe PostScript Printer Driver.
TO SET UP THE FIERY SI IN THE CHOOSER:
1. Select Chooser from the Apple menu.
2. Click the PSPrinter icon.
3. Select the correct AppleTalk zone if necessary.
4. Select the name of your Fiery SI.
5. Click Setup.
The Adobe PostScript Printer Driver automatically selects the correct printer
description file for your Fiery SI.
6. Close the Chooser.
Page 20

lli
9 Installation overview
Insta
ng user
software on a
PC-compatible
computer
This chapter describes installing software and setting up printing from a
PC-compatible computer running Windows 3.1x, Windows 95, or Windows NT.
Installation overview
To use the Fiery XJ utilities with Windows 3.1x and AppleTalk, you must have
PhoneNET PC or COPSTalk installed to communicate with AppleTalk.
N
:
You may have to install or configure other programs or files before you can
OTE
install the user software.
The general steps for installing the Fiery SI user software are:
• Install the utilities and files using the Installer.
• Move files to the appropriate locations as necessary.
• If you will be using the utilities with Windows 3.1x and AppleTalk, add commands
to the AUTOEXEC.BAT file that enable you to select a Fiery SI from a Chooser-like
window within each Fiery XJ utility.
• If you will be using the utilities with Windows and an IPX/SPX or TCP/IP network,
configure the Chooser list. (This is sometimes done by your system administrator.)
• Install the PostScript Printer Driver you want to use.
• Set up the printer driver to communicate with the Fiery SI.
• If you will be using Adobe Pagemaker, move the printer description file for
applications to the appropriate location.
• If you will be using Photoshop, install the EFICOLOR Separation Tables for your
print device and the monitor setup file.
• If you will be using Fiery XJ Scan, load the monitor settings file.
This document was created with FrameMaker 4.0.4
Page 21

10 Installing user software on a PC-compatible computer
Installing Windows software
The Software Installer provides the following installation options:
• Utilities—Installs Fiery XJ Downloader, Fiery XJ Spooler, and Fiery XJ Print
Calibrator.
• Photoshop Plug-ins—Installs Fiery XJ Scan.
• EFICOLOR—Copies to your hard drive the files used by ColorSync and
Photoshop to ensure high color quality. Files in the EFICOLOR folder must be
moved or installed to special locations after the Software Installer has been run.
• Color Reference—Installs the CMYK and PANTONE color reference pages.
Using the Windows installer
INSTALL SOFTWARE
TO
1. Insert the User Software CD or Disk 1 in your computer.
2. In the Windows 3.1x or NT File Manager, double-click the icon for the CD-ROM to
3. Double-click to open the following folders: ENGLISH\INSTALLR\DISK1.
4. Double-click the SETUP (Windows 95) or SETUP.EXE (Windows NT or 3.1x) icon.
:
display its contents. If you have Windows 95, open the My Computer window and
double-click the icon for the CD drive .
Page 22
11 Installing Windows software
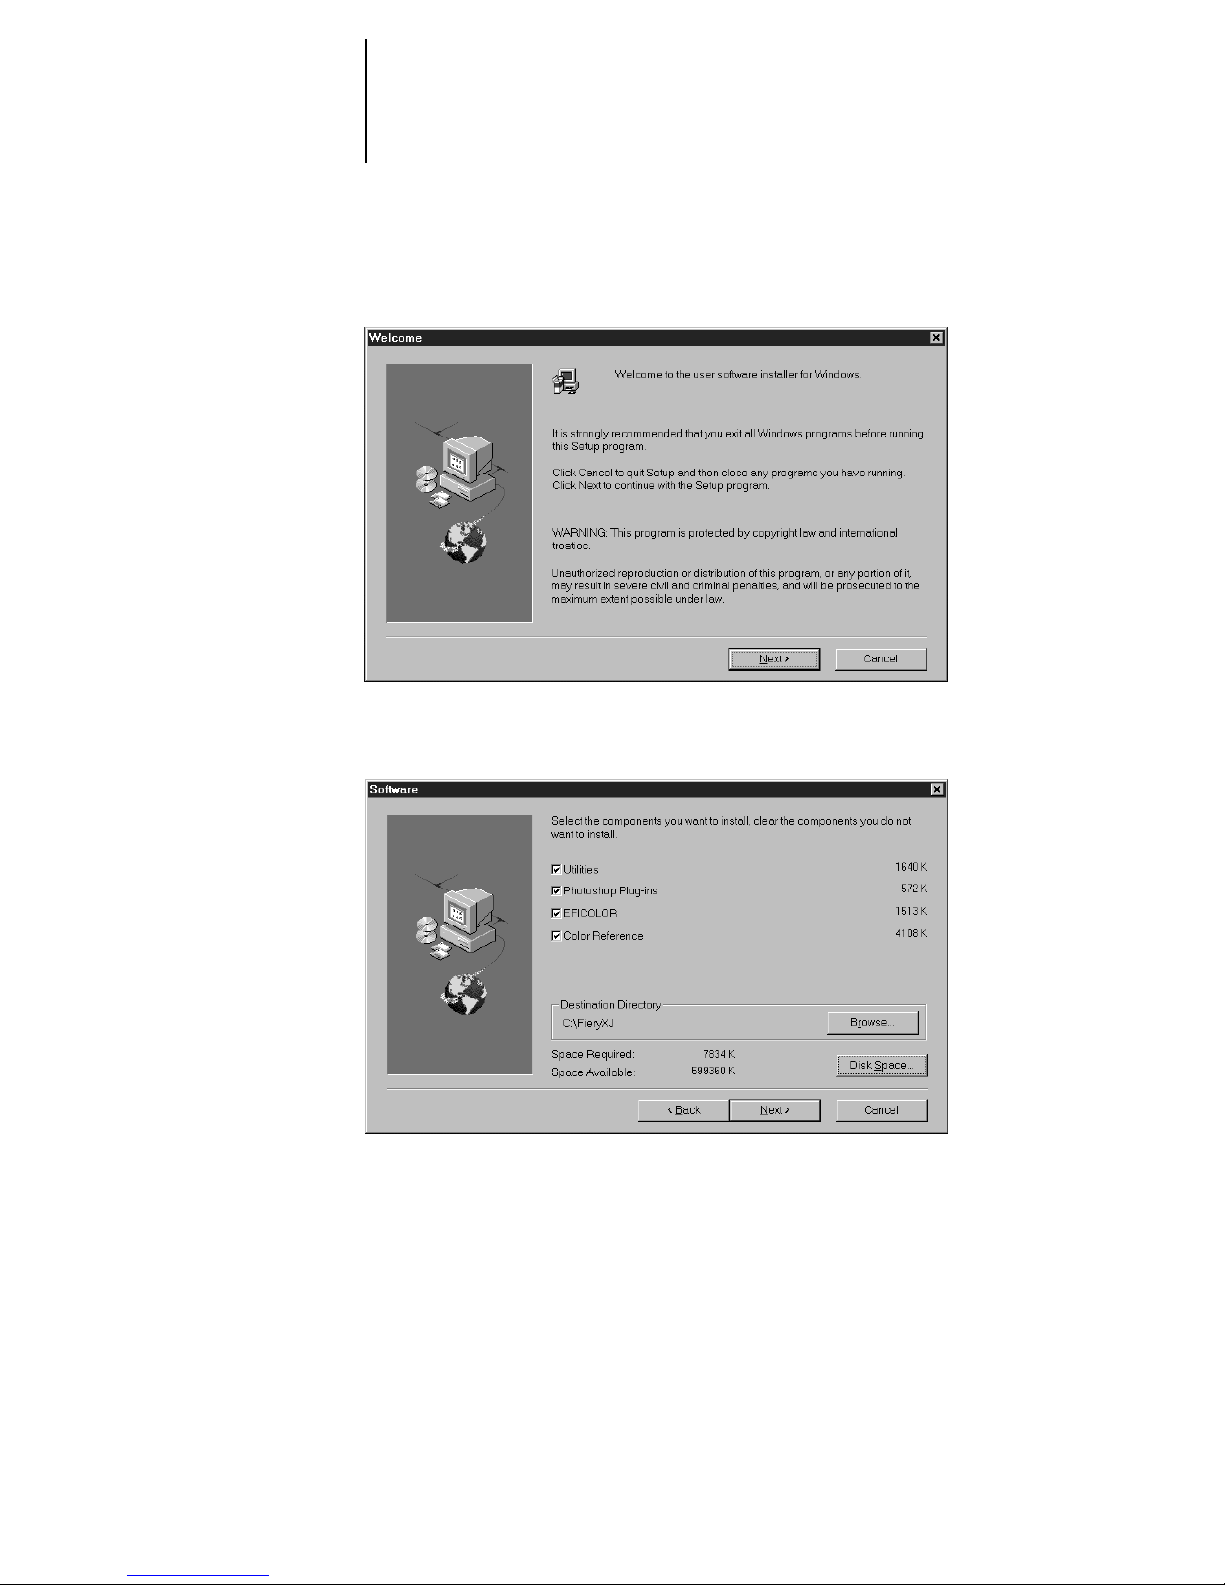
5. Click Next in the Welcome dialog box.
6. In the Software dialog box, select the items that you want to install and then click
Next.
Page 23
12 Installing user software on a PC-compatible computer
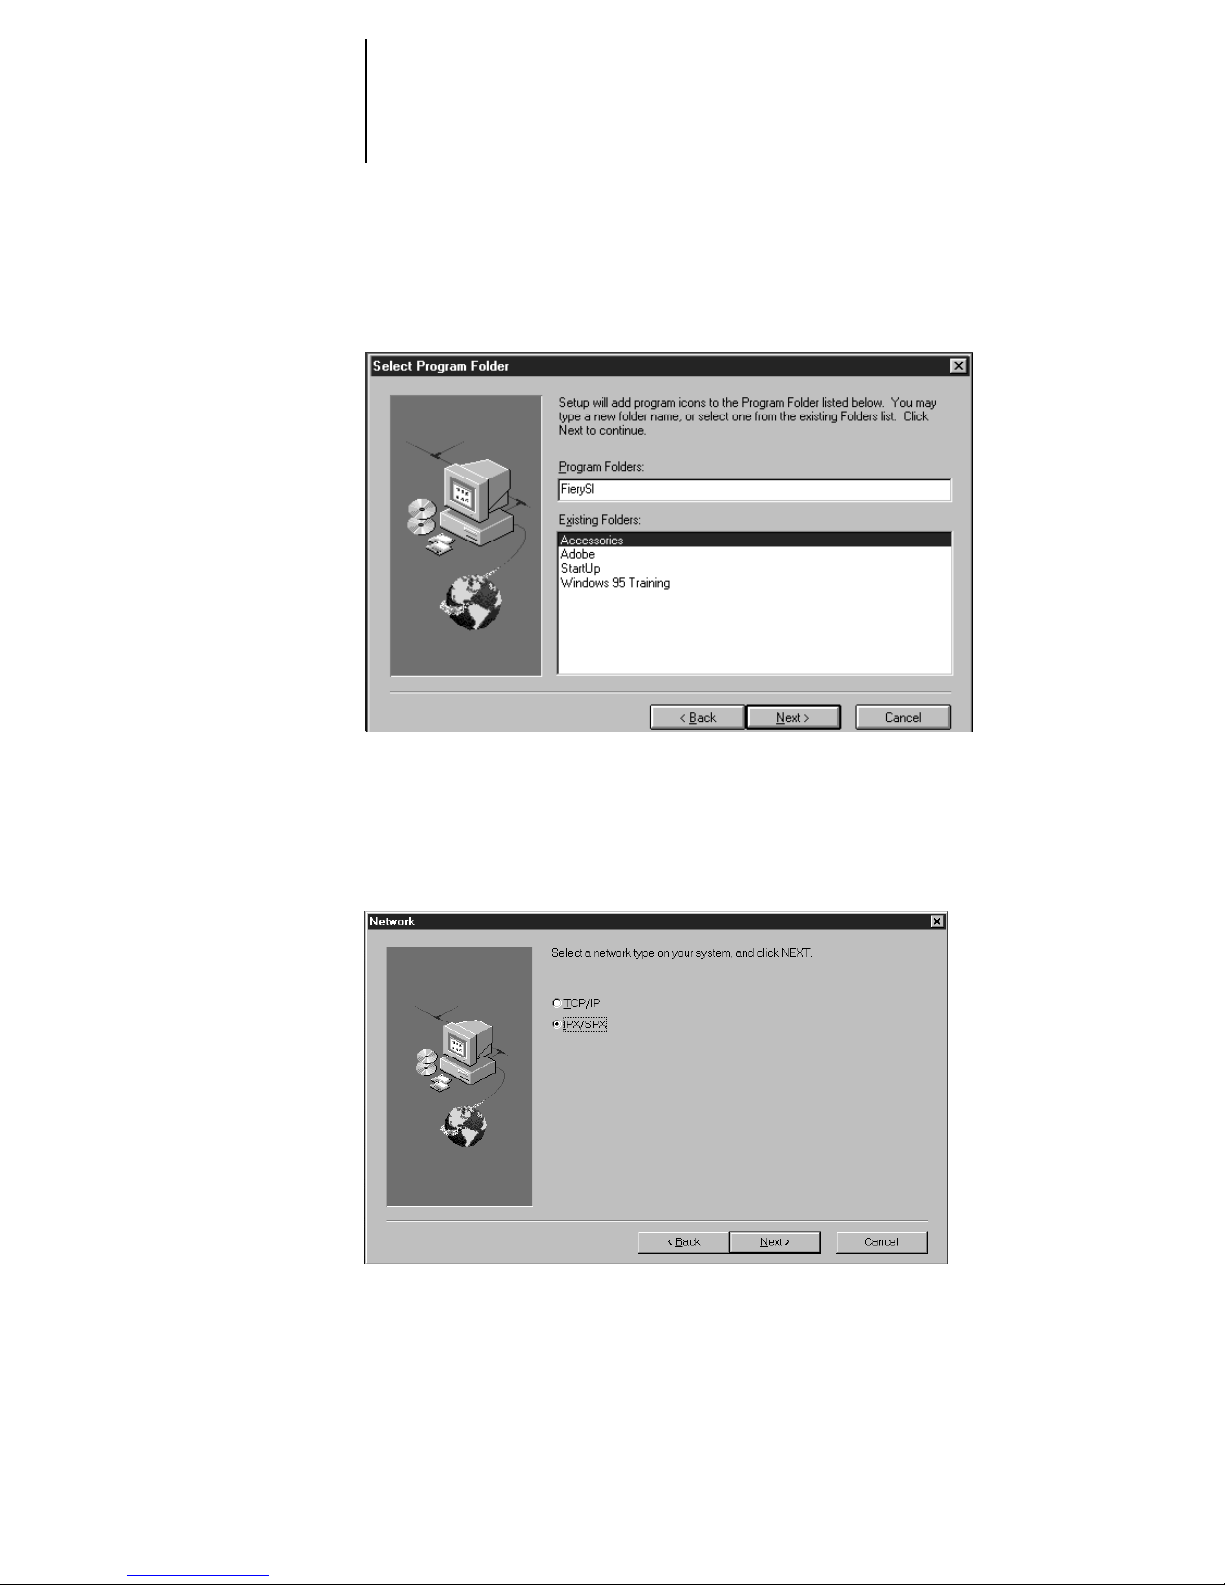
7. If you are installing the utilities, specify the name of the Program Folder in which to
install them, or click Next to use the default name.
8. If you are prompted, specify the network type. Select IPX/SPX if you are using
Windows 95; select TCP/IP if you are using Windows NT.
N
OTE
:
This dialog box is not displayed if you are using Windows 3.1x; the implied
network protocol is IPX/SPX.
Page 24
13 Installing Windows software
:
N
OTE
The network protocol you choose here will become the default when you
configure the utilities. If you choose TCP/IP (the default) and your networ k protocol is
IPX/SPX, you need to do two things after the installation: delete the
NET_WSCK.DLL file from the System folder in your active Windows folder, and
re-install the utilities, this time choosing IPX/SPX in the Network dialog box.
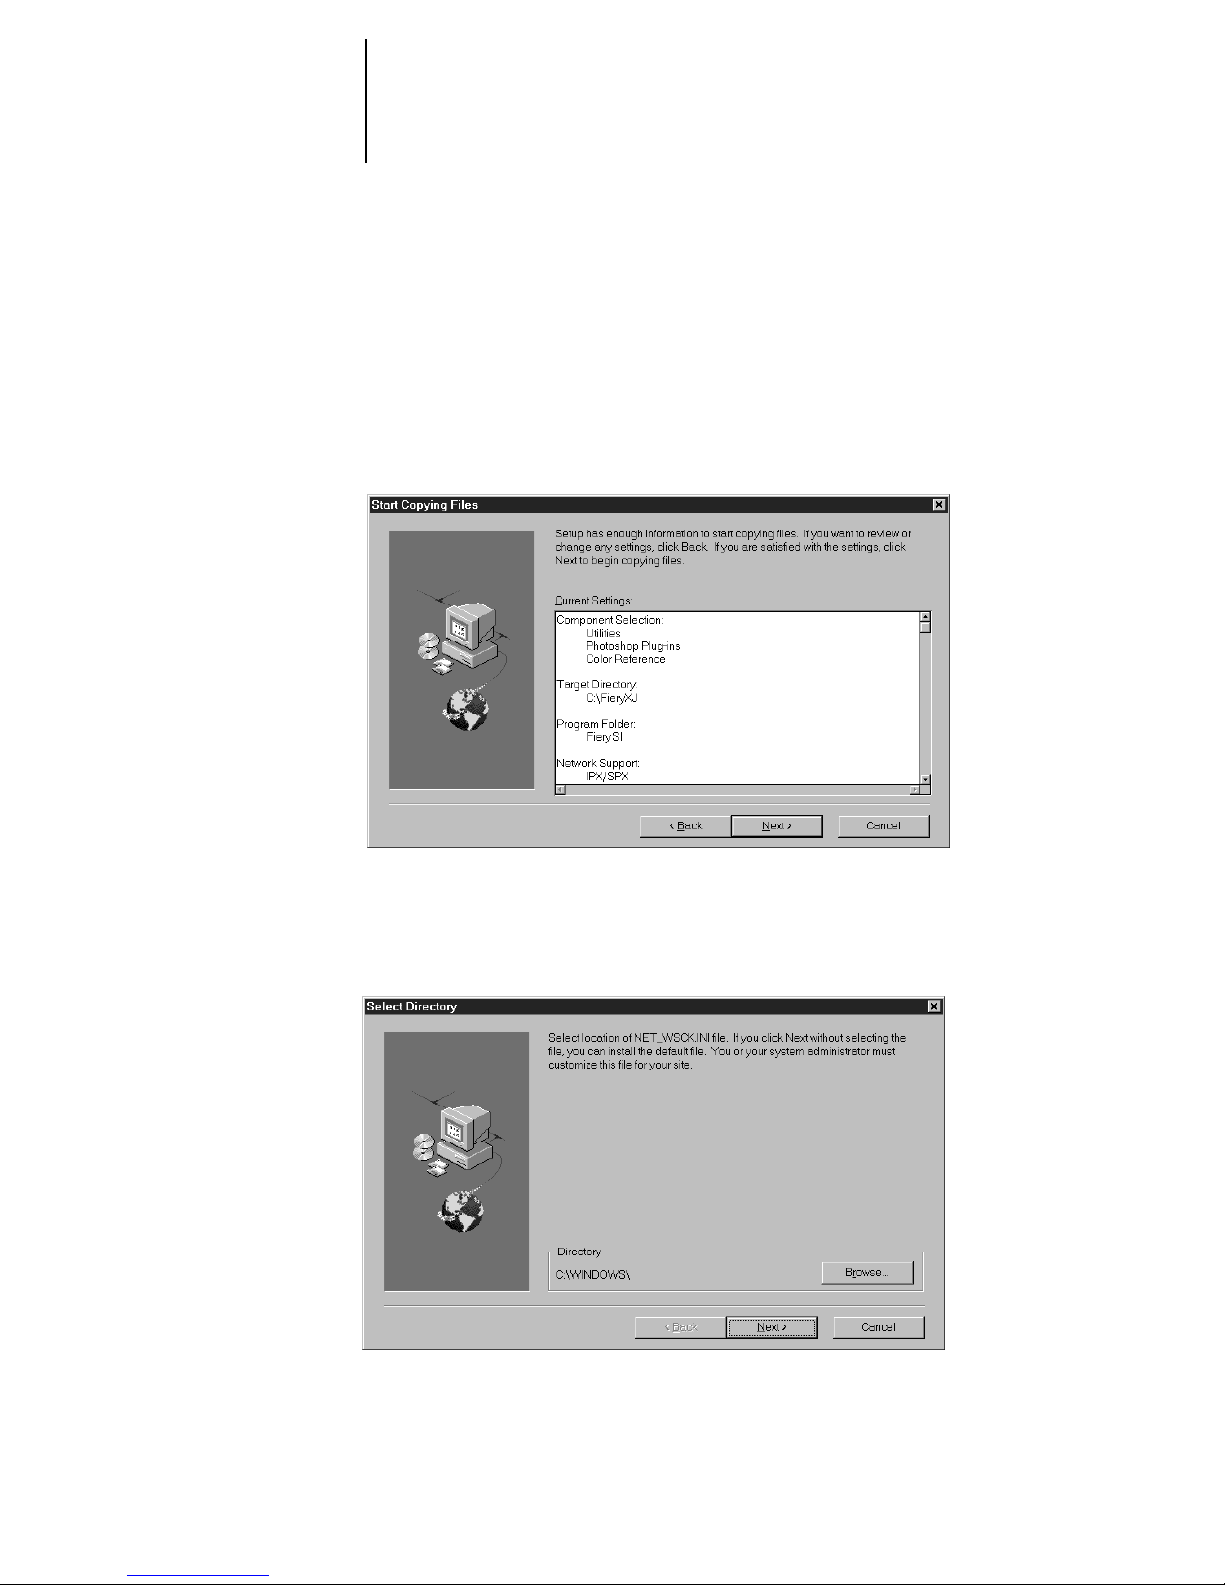
9. Verify the information in the Start Copying Files dialog box and then click Next.
The files are copied to your hard disk.
10. If you are prompted, click Br ow se or insert a flopp y disk with a NET_WSCK.INI file that
has been customized for your site.
Page 25

14 Installing user software on a PC-compatible computer
If you do not have a customized NET_WSCK.INI file, you can use the default file. If
you use the default file, make sure that you configure the Chooser list before you try to
use the utilities. See “Configuring the Chooser list” on page 19 for instructions.
11. Click OK when you are informed that installation is complete.
Completing installation for Windows 3.1x
After you install files on your PC, you need to perform the following procedures to use
the utilities.
• Copy the files in the FierySI\PLUGINS directory to the appropriate locations. For
instructions, see “Copying files to the appropriate locations:” on page 15.
• Copy the files in the FierySI\UTILS directory to the appropriate locations. (If you
have older files that will be rewritten, rename or back them up.) F or instructions, see
“Copying files to the appropriate locations:” on page 15.
• If you will be using the utilities with PhoneNET PC or COPSTalk, modify the
AUTOEXEC.BAT file. You can add commands to the AUTOEXEC.BAT file that
enable you to select a Fiery SI in a Chooser window from within each utility. For
instructions, see “To modify the AUTOEXEC.BAT file for Windows 3.1x and
AppleTalk:” on page 16.
• If you will be using the utilities with PhoneNET PC and Windows 3.1x, edit the
ABOTH.BAT file to run COMPAT.COM. ABOTH.BAT is a batch file that starts
PhoneNET PC when you start your computer. For instructions, see “To edit the
ABOTH.BAT file for Windows 3.1 with PhoneNET:” on page 18.
• If you will be using the utilities with Novell SPX/IPX, verify that you have the
correct information in your Chooser List. For instructions, see “Configuring the
Chooser list” on page 19.
• If you will be using the utilities with Novell SPX/IPX, verify that you have the
correct information in your NET.CFG file. This file was installed as part of your
installation of SPX/IPX. For instructions, see “To verify the information in the
NET.CFG file for Windows 3.1 and IPX:” on page 16.
Page 26

15 Installing Windows software
OPYING FILES TO THE APPROPRIATE LOCATIONS
C
1. Copy the PLUGINS files to the following locations:
To use: Drag these files: To this location:
:
Fiery XJ Scan
2. Open the UTILS folder.
XJSCAN.8BA PLUGINS subdirectory of the
Adobe Photoshop directory
CALRGB.AMS Adobe Photoshop directory
This folder contains utility applications and folders that enable utilities to be used with
AppleTalk and Novell (IPX/SPX) networks.
3. Delete the folder for the protocol that you will not use.
It is not necessary to delete this folder, but you will not need it.
4. If you are using AppleTalk, open the APPLTALK folder and move files to the following
locations:
To use: Drag these files: To this location:
Any utility or plug-in APPL_TSR.EXE
APPLINIT.EXE
NET_APPL.DLL
CTL3D.DLL
FierySI
WINDOWS\SYSTEM directory,
directory
5. If you are using the utilities with Nov ell IPX, open the IPXSPX f older and mo ve files to
the following:
From this location: Drag these files: To this location:
IPXSPX\SYSTEM CTL3D.DLL WINDOWS\SYSTEM
NET_APPL.DLL
VIPX.386
LSL.COM
VNETWARE.386
Page 27

16 Installing user software on a PC-compatible computer
From this location: Drag these files: To this location:
NWPOPUP.EXE
NETWARE.DRV
NWGDI.DLL
IPXODI.COM
VERIFY THE INFORMATION IN THE
TO
AND
IPX:
• In the Link Driver section of the file , mak e sur e that the Ethernet Fr ame T ype matches
what is set on your Fiery SI.
You can print the Configuration page from the Fiery SI Control Panel to see the
current setting.
MODIFY THE
TO
PPLETALK
A
AUTOEXEC.BAT
:
1. Make a backup copy of your AUTOEXEC.BAT file and give it a unique name.
This file is usually stored in the C directory, at the root level.
It is always a good idea to make a backup copy of your AUTOEXEC.BAT file before
you change it.
2. Use a text editor to open the AUTOEXEC.BAT file.
3. After the network softwar e commands or at the end o f the file , add the f ollo wing lines:
C:\FierySI\APPL_TSR.EXE
C:\FierySI\APPLINIT.EXE
NET.CFG
FILE FOR WINDOWS
FILE FOR WINDOWS
3.1X
AND
3.1
If you are using PhoneNET PC, insert the lines after the
command
If you are using COPSTalk, insert the lines after the last of the following commands:
COPSNODE, COPSLPT, COPSHARE, CSHARE
optional.)
If your system uses a drive letter other than C: or you named the FierySI directory
something other than “FierySI,” type the correct path for your system.
CALL C:\PHONENET\ABOTH
.
. (The last three may not be present; they are
Page 28

17 Installing Windows software
The APPL_TSR line must precede the APPLINIT line.
4. Save the text file as AUTOEXEC.BAT.
5. Exit the text editor.
6. If you are working in Windows, exit Windows.
7. Press Ctrl+Alt+Del to reboot your computer.
Page 29

18 Installing user software on a PC-compatible computer
TO
EDIT THE
ABOTH.BAT
1. Use a text editor to open the ABOTH.BAT file.
FILE FOR WINDOWS
3.1
WITH PHONE
NET:
ABOTH.BAT is stored in the directory in which PhoneNET PC software was installed
(by default, the PHONENET directory).
2. Find the lines that read:
REM Un-REM next two lines for backward compatibility
REM LH C:\PHONENET\COMPAT
REM if errorlevel 1 goto err
If you installed PhoneNET PC in a directory other than C:\PHONENET, the second
line will contain the directory name you chose instead of PHONENET.
3. Delete the word REM from the beginning of the second and third lines, so that they
read:
REM Un-REM next two lines for backward compatibility
LH C:\PHONENET\COMPAT
if errorlevel 1 goto err
4. Save the text file as
5. Exit the text editor.
6. If you are working in Windows, exit Windows.
7. Press Ctrl+Alt+Del to restart your computer.
ABOTH.BAT
.
Page 30

19 Configuring the Chooser list
Completing installation for Windows 95 and Windows NT
To complete installation for Windows 95 or Windows NT, move the plug-ins files to
the appropriate locations. Then make sure that the information in the Chooser
list has been properly configured.
Moving Windows 95 and Windows NT plug-ins to the appropriate locations
To use the Fiery XJ Scan plug-in, move the following files from the Plugins folder in
the FierySI folder to the appropriate locations:.
To use: Drag these files: To this location:
Fiery XJ Scan
Configuring the Chooser list
If you are using Windows 95 or Windows 3.1x with an IPX/SPX network, or using
Windows NT with a TCP/IP network, you must configure the Chooser list for your
server.
OTE
N
:
You should re-configure this file whenever there is a change to your Fiery SI
server or network that impacts the information in the file.
PREPARE TO EDIT THE CHOOSER LIST
TO
• If you are using IPX/SPX, print the Configuration page fr om the Contr ol P anel. U se this
page to determine the IPX address and server name.
In general, you should use the Ethernet IPX address. If you are connected through a
Token Ring network, use the Token Ring IPX address.
• If you are using TCP/IP, set up a Domain Name Server (DNS) for the IP address of the
Fiery SI in the printcap file.
If your network does not support DNS servers, edit the HOSTS file in your WINDOWS
directory and insert an IP address for the Fiery SI. (See your sy stem documentation for
information.) Then go to page 23, “To configure the Chooser list f or T CP/IP network s:”
for TCP/IP instructions.
XJ_SC_32.8BA PLUGINS subdirectory of Photoshop directory
CALRGB.AMS Adobe Photoshop directory
:
Page 31
20 Installing user software on a PC-compatible computer
CONFIGURE THE CHOOSER LIST FOR
TO
1. Start up any of the utilities (Fiery XJ Downloader, Fiery XJ Spooler, or Fiery XJ Print
Calibrator).
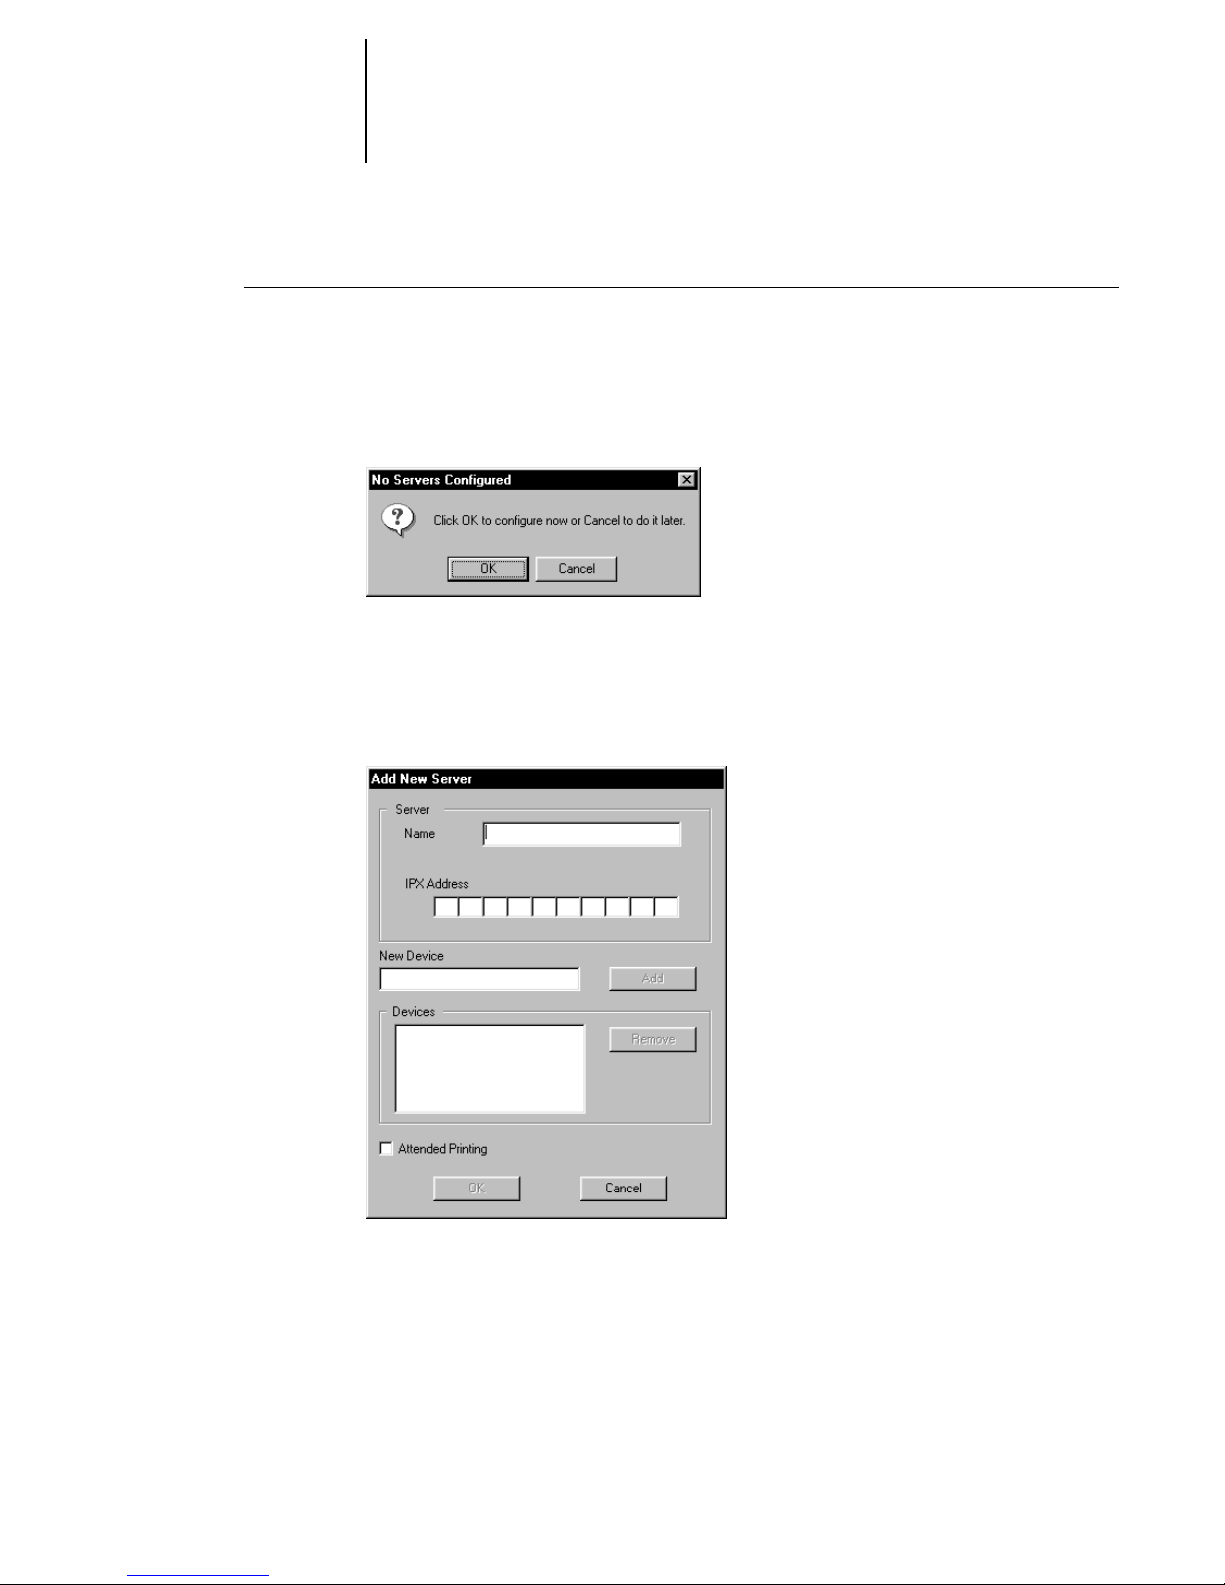
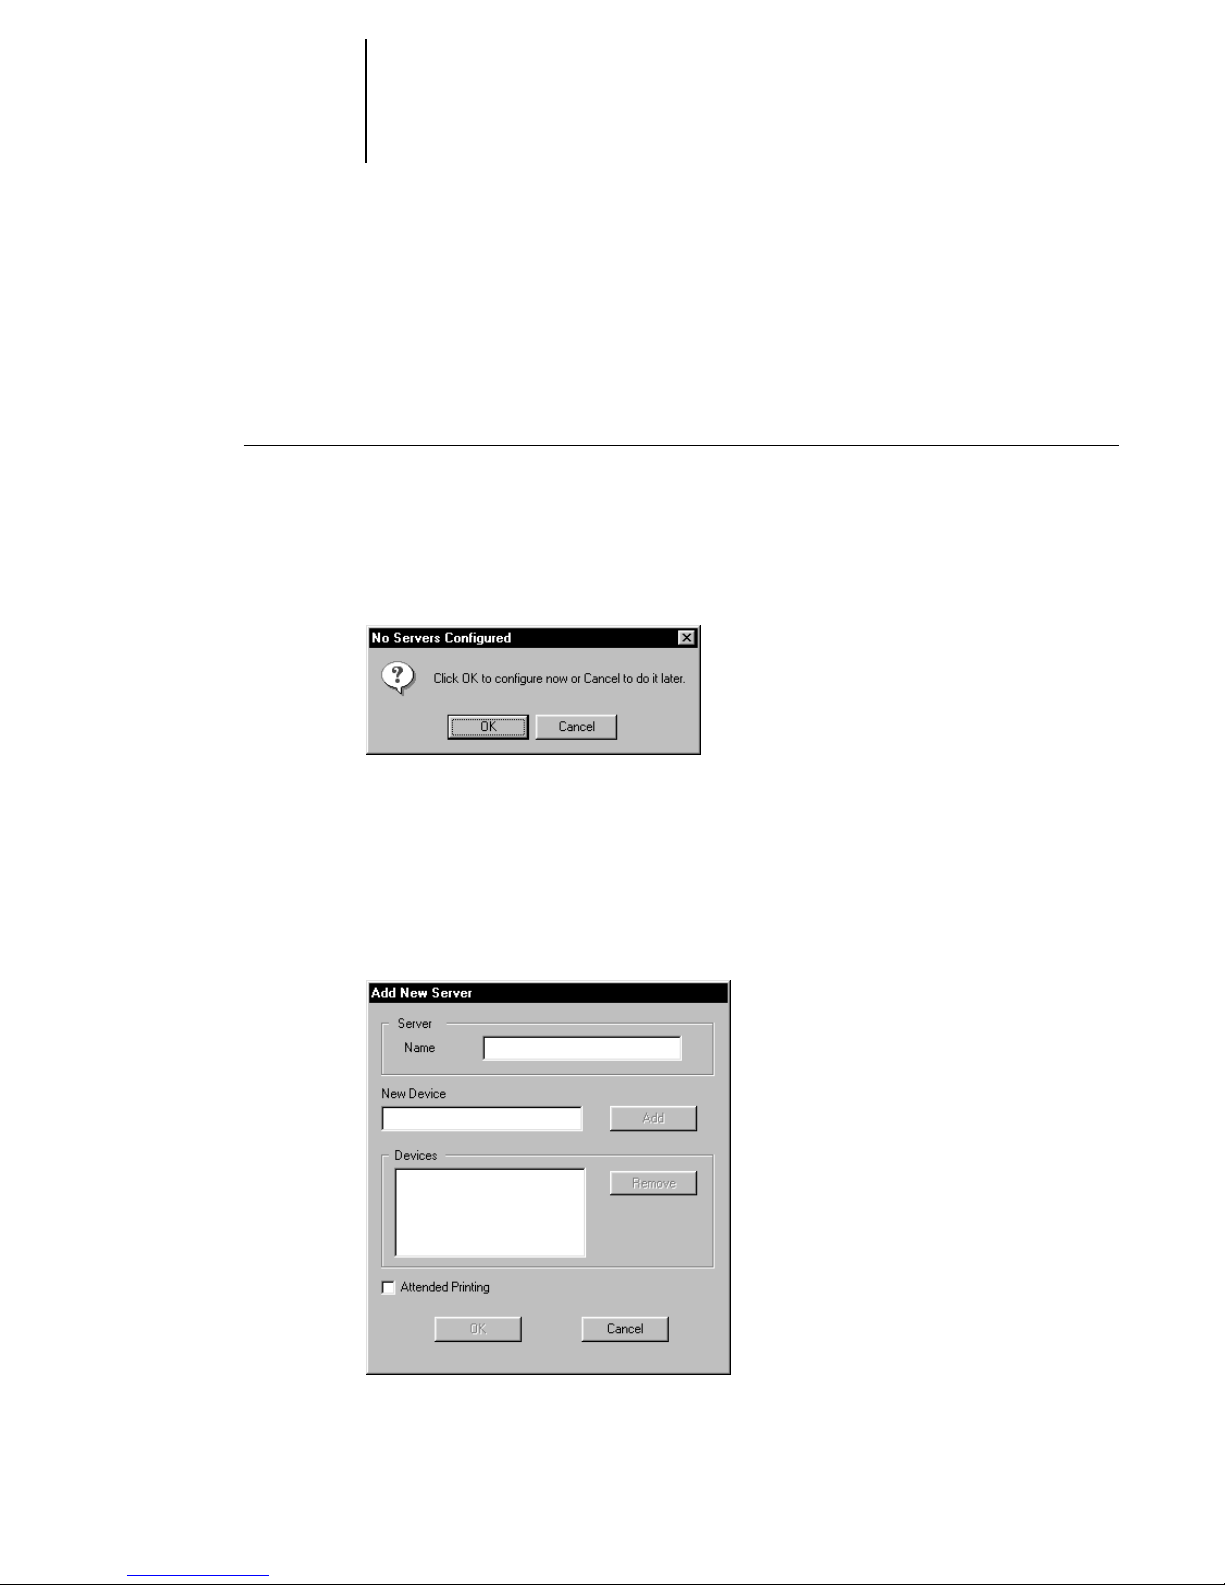
2. When the following dialog box appears, click OK.
3. In the Add New Server dialog box, enter a Server Name.
The Server Name is indicated in the Server Setup section of the Configuration page.
The server name is the name you entered for
Panel if you are using IPX/SPX (Windows 95 or Windows 3.1).
IPX/SPX
NETWORKS
Server Name
:
on the Fiery SI Control
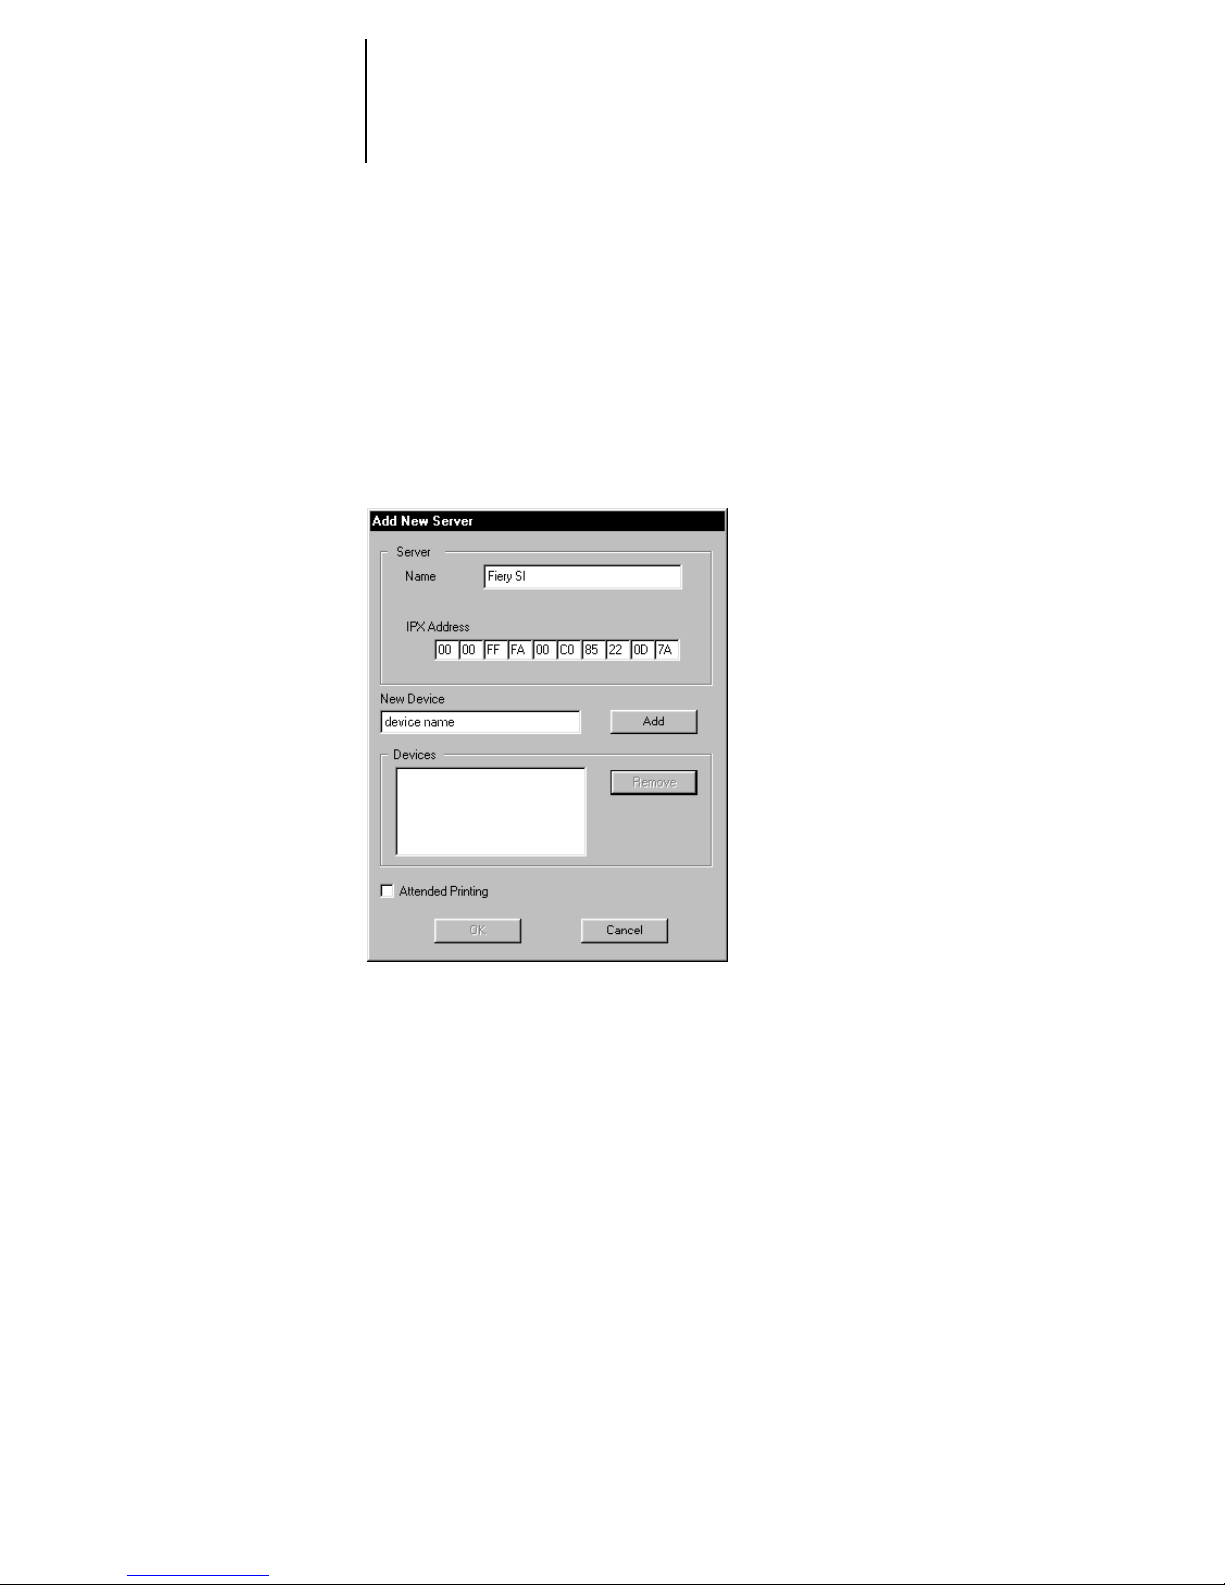
4. Enter the IPX Address.
The IPX address is indicated in the Network Setup section of the Configuration page.
OTE
N
:
Novell server connection and cannot be changed.
The IPX address is a unique value associated with the Fiery SI hardware and
Page 32
21 Configuring the Chooser list
5. Enter the Device code for your copier in the New Device box
For a MajestiK copier, enter: 5760/65
For a Regal copier, enter: 5790
For a 5750 copier, enter: 5750
This device code appears in the Printer Setup section of the Configuration page.
6. When you have entered all the information, click Add.
Page 33
22 Installing user software on a PC-compatible computer
The device appears in the Devices list.
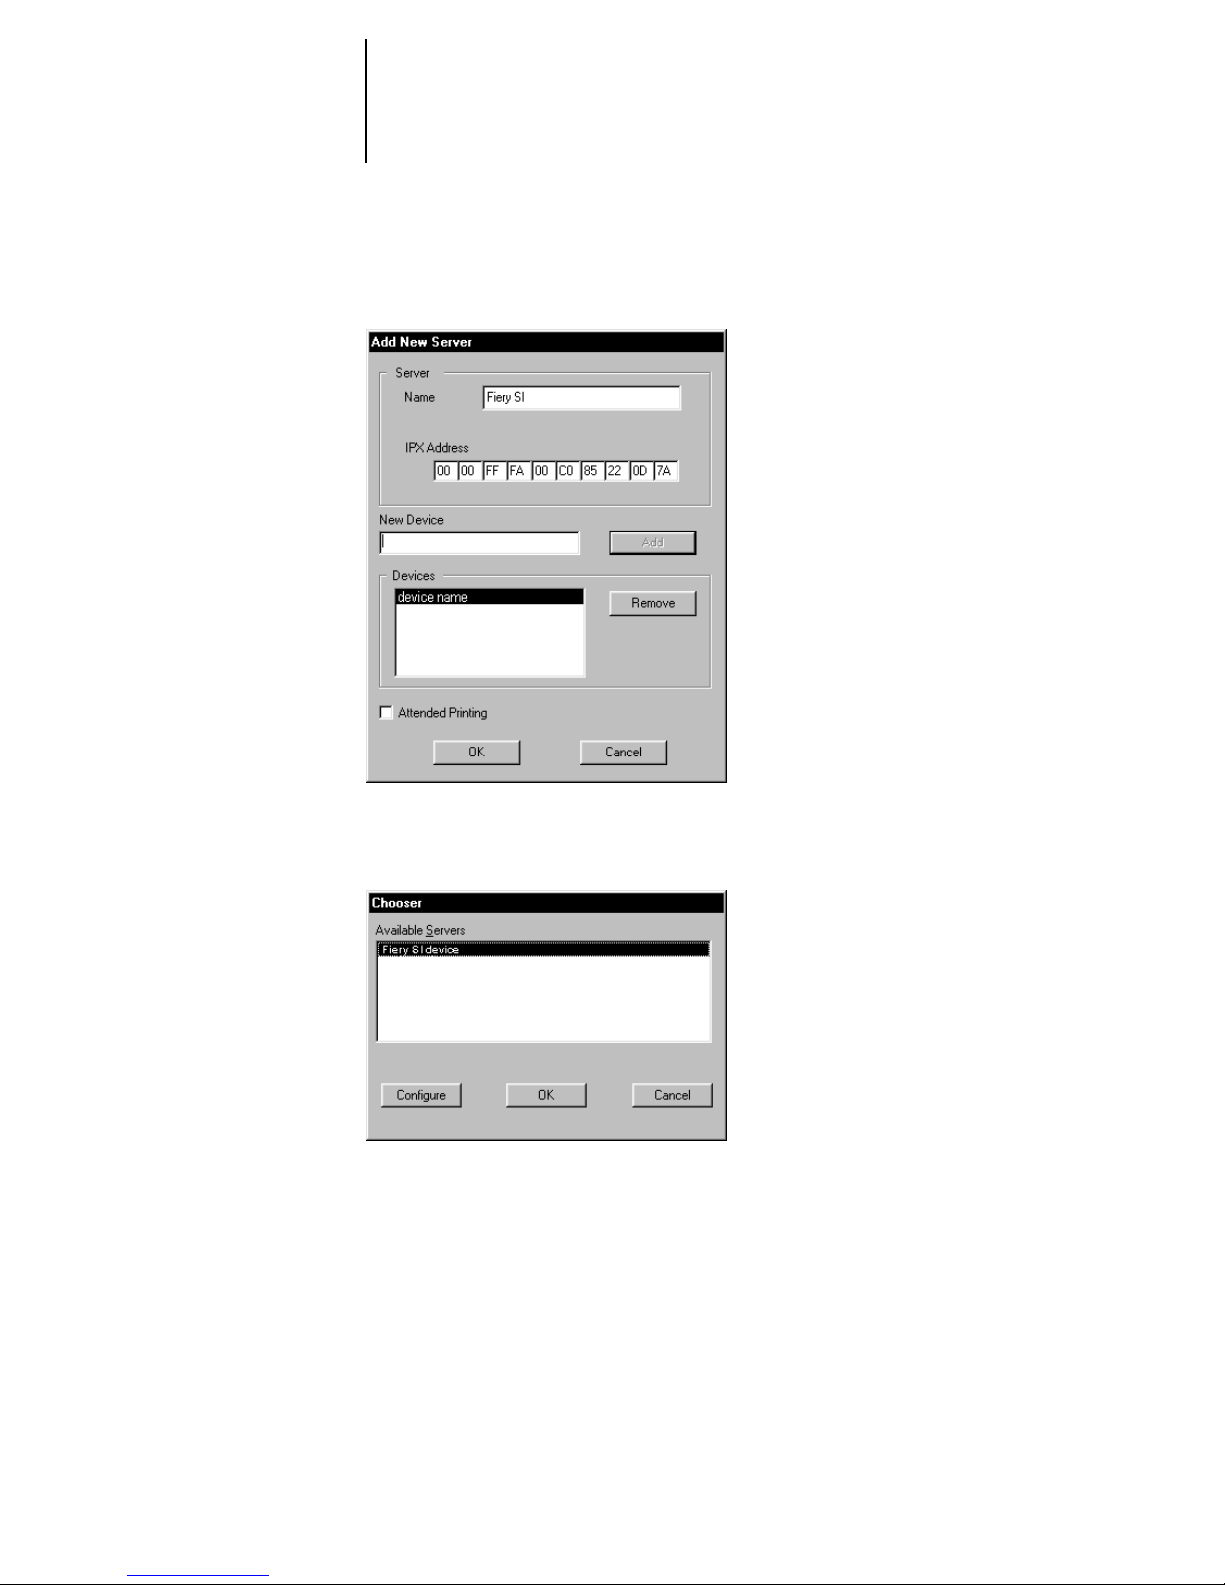
7. Click OK.
The server appears in the Chooser list of available servers.
8. To end the configuration process and begin using the utility, click OK.
NOTE: Configuring the Chooser list also customizes the NET_WSCK.INI
configuration file in your active Windows folder. This file is now ready to be copied to
a floppy disk. You can insert the floppy disk containing the customized
NET_WSCK.INI file when you install the utilities on other workstations that will be
used for printing to the Fiery SI (see step 10, page 13).
Page 34
23 Configuring the Chooser list
If you want to make changes to this configuration, or if you want to add another
configuration, click Configure.
See “Setting up the Fiery SI as a PostScript printer” on page 26 to continue the
installation process.
TO CONFIGURE THE CHOOSER LIST FOR TCP/IP NETWORKS:
1. Start up any of the utilities (Fiery XJ Downloader, Fiery XJ Spooler, or Fiery XJ Print
Calibrator).
2. Click OK when the following message appears.
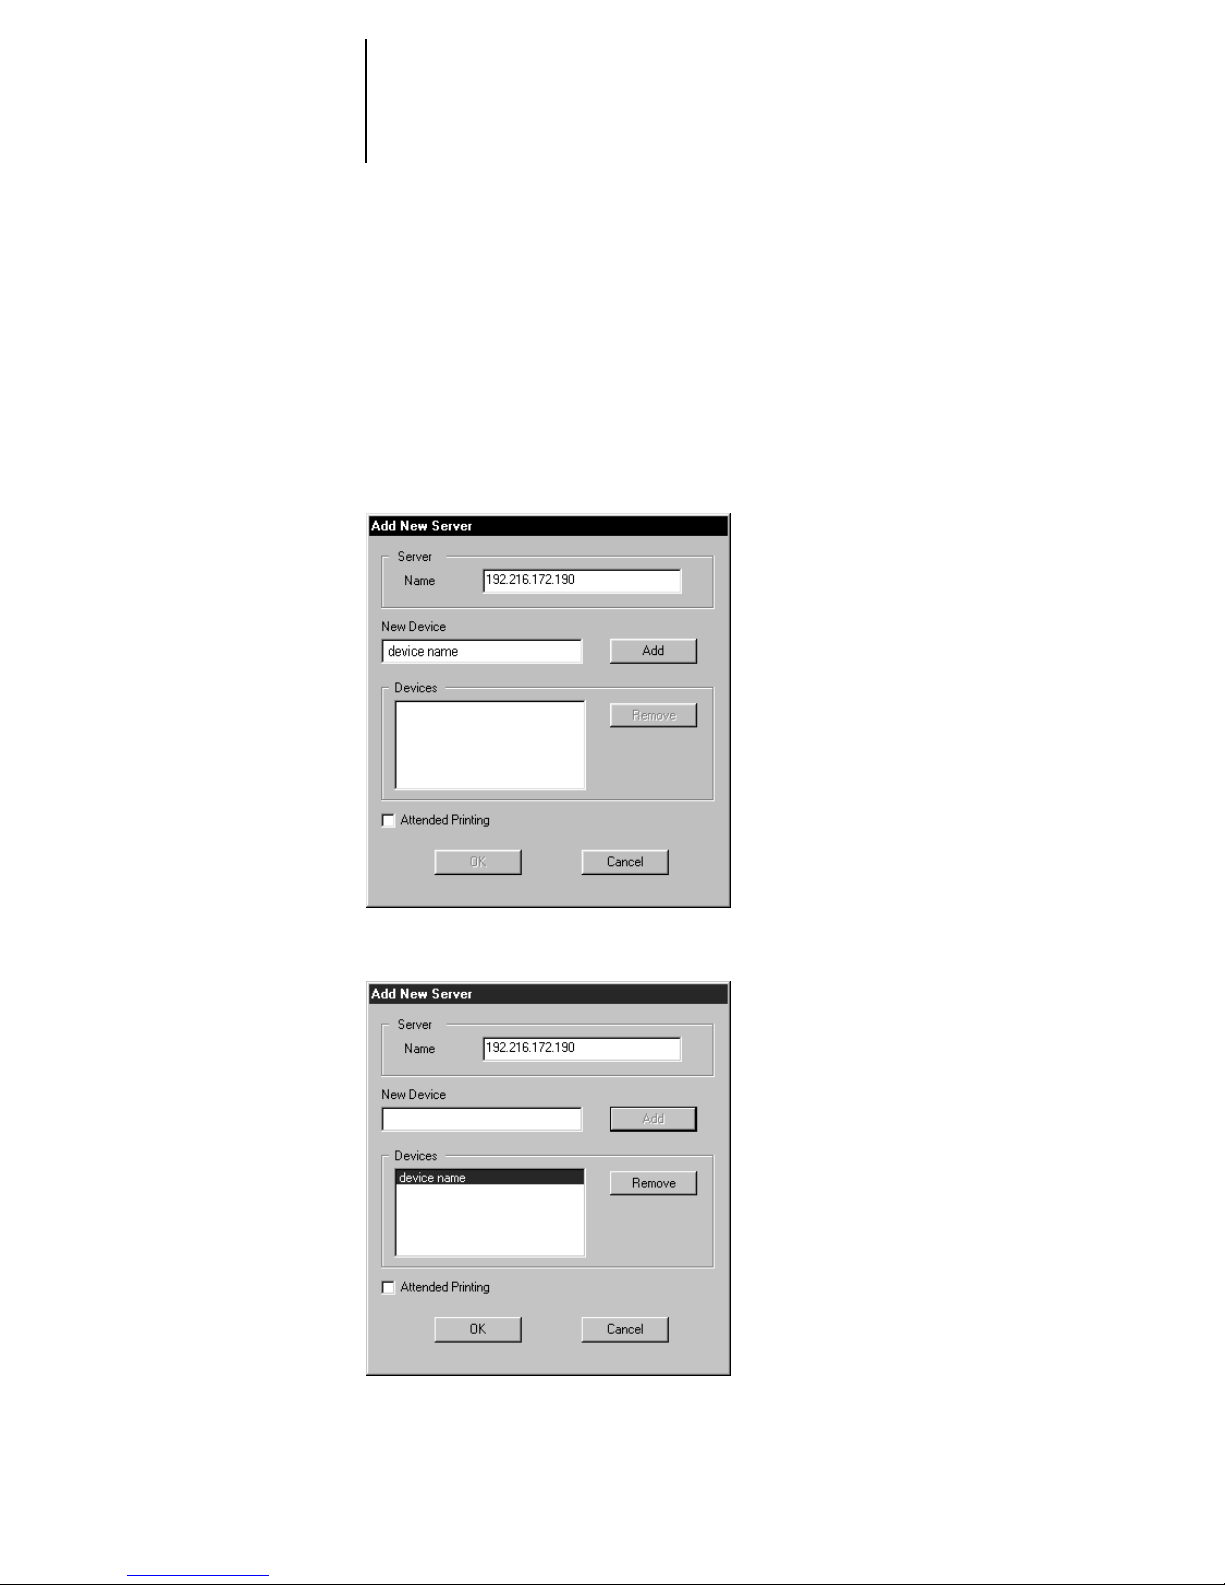
3. In the Add New Server dialog bo x, enter a DNS Name (or IP addr ess) and a Device Code
in the New Device box.
The server name is either the DNS name or the IP address for a Fiery SI server when
you are using TCP/IP with Windows NT. The Server Name is indicated in the Server
Setup section of the Configuration page. The IP address is indicated in the Network
Setup section of the Configuration page.
Page 35
24 Installing user software on a PC-compatible computer
The New Device code should be entered as one of the following:
For a MajestiK copier, enter: 5760/65
For a Regal copier, enter: 5790
For a 5750 copier, enter: 5750
This device code appears in the Printer Setup section of the Configuration page.
4. When you have entered all the information, click Add.
The device appears in the Devices list.
Page 36
25 Configuring the Chooser list
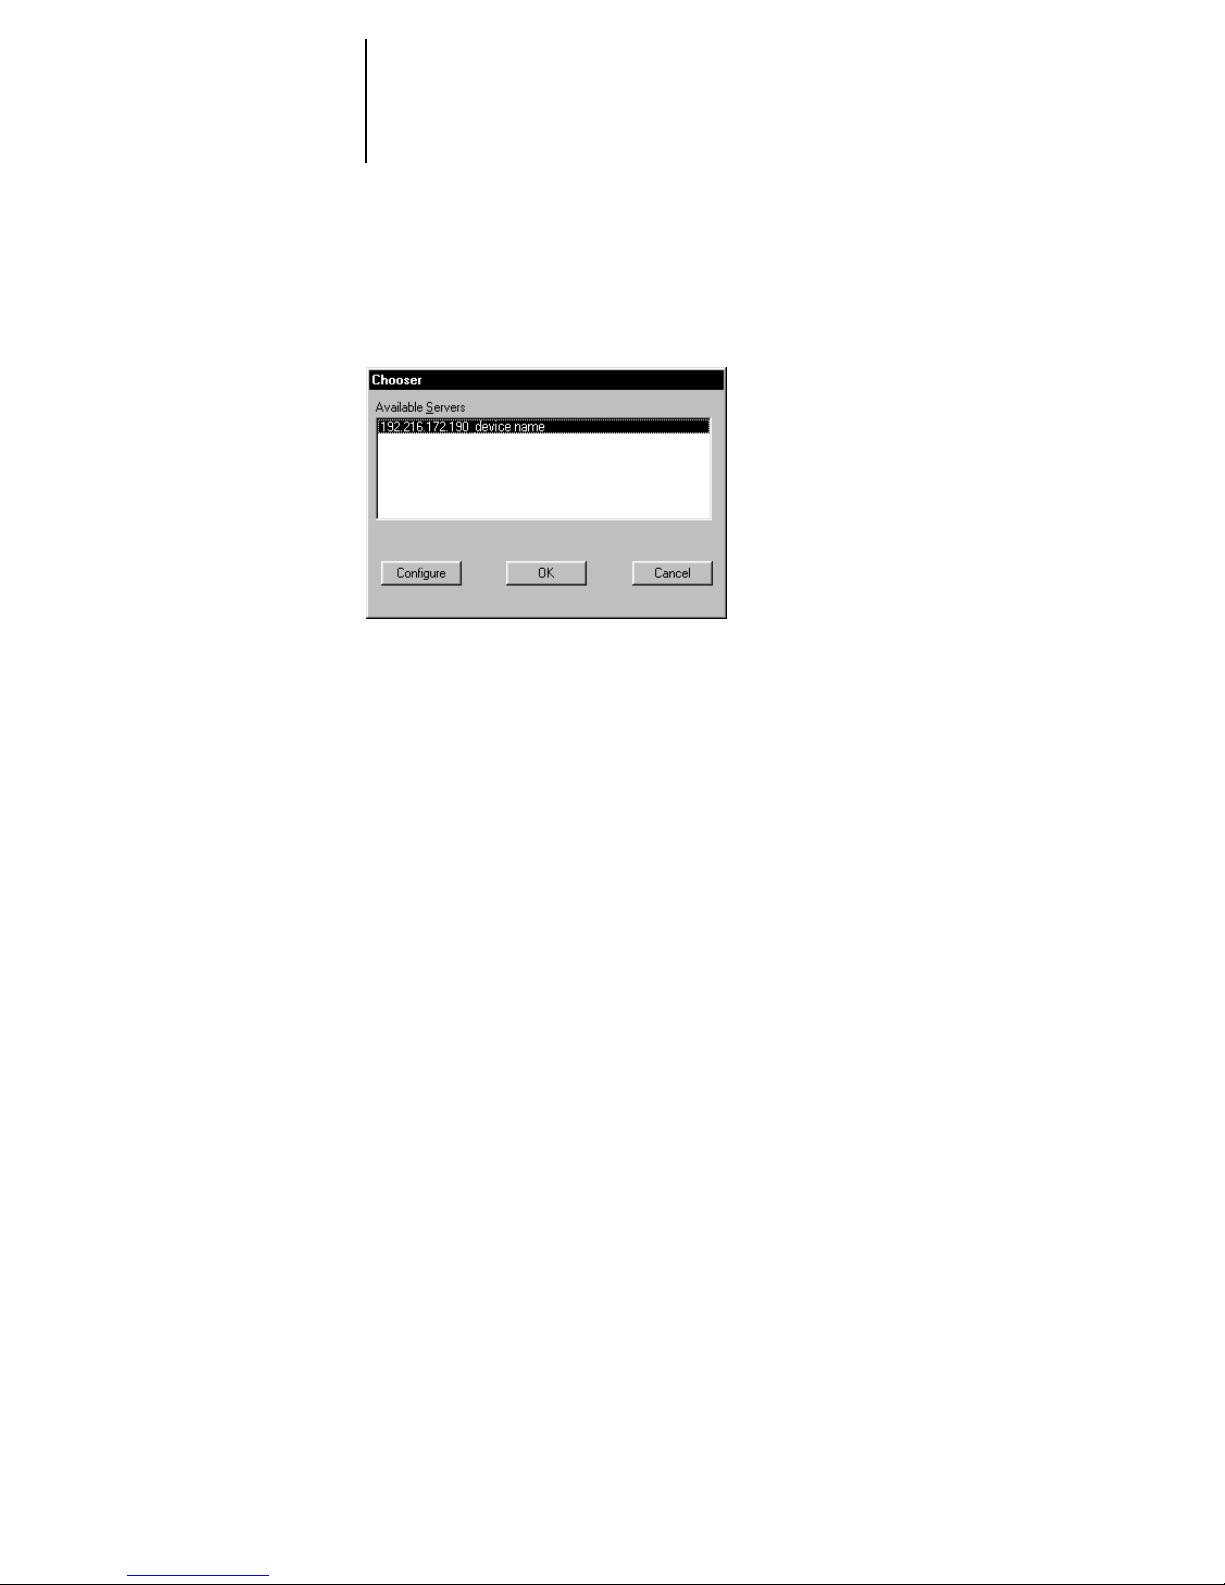
5. Click OK.
The server appears in the Chooser list of available servers.
6. To end the configuration process and begin using the utility, click OK.
NOTE: Configuring the Chooser list also customizes the NET_WSCK.INI
configuration file in your active Windows folder. This file is now ready to be copied to
a floppy disk. You can insert the floppy disk containing the customized
NET_WSCK.INI file when you install the utilities on other workstations that will be
used for printing to the Fiery SI (see step 10, page 13).
If you want to make changes to this configuration, or if you want to add another
configuration, click Configure and go through the appropriate steps.
See “Setting up the Fiery SI as a PostScript printer” on page 26 to continue the
installation process.
Page 37

26 Installing user software on a PC-compatible computer
Setting up the Fiery SI as a PostScript printer
To set up the Fiery SI as a PostScript printer, you need a PostScript printer driver and
the appropriate Fiery SI printer description files. Printer drivers and procedures vary
across Windows versions. These sections also include some information about network
setup.
Consult the section that applies to your version of Windows.
• See “Setting up printing with Windows 3.1x” on page 26.
• See “Setting up printing with Windows 95” on page 34.
• See “Setting up printing with Windows NT” on page 40.
Setting up printing with Windows 3.1x
If you are printing with Windo ws 3.1x, you can print with either the Adobe PostScript
Printer Driver (version 3.0.1 included with User Software CD) or the standard
Windows PostScript printer driver. To take advantage of PostScript Level 2 features in
applications that support them, install the Adobe PostScript Printer Driver. If you use
the Windows PostScript printer driver, you must install the PostScript Printer
Description (PPD) file from the User Software CD.
TO INSTALL THE ADOBE POSTSCRIPT PRINTER DRIVER AND PPD FOR USE WITH
WINDOWS 3.1X:
1. Start Windows and exit any applications that start automatically.
2. Insert the User Software CD in your PC.
3. In the Windows Program manager, choose Run from the File menu.
4. Click Browse.
5. Select the drive containing your User Software CD or Printer Files disk, open the
ENGLISH\PRNTDRV\WIN_31 folders, and select the SETUP.EXE file.
6. Click OK in the Browse and Run dialog boxes.
7. Click Skip to postpone reading the README file.
Page 38
27 Setting up the Fiery SI as a PostScript printer
8. Click Continue to continue the installation procedure and follow the on-screen
instructions.
9. Once the printer driver has been installed, click Restart to restart Windows.
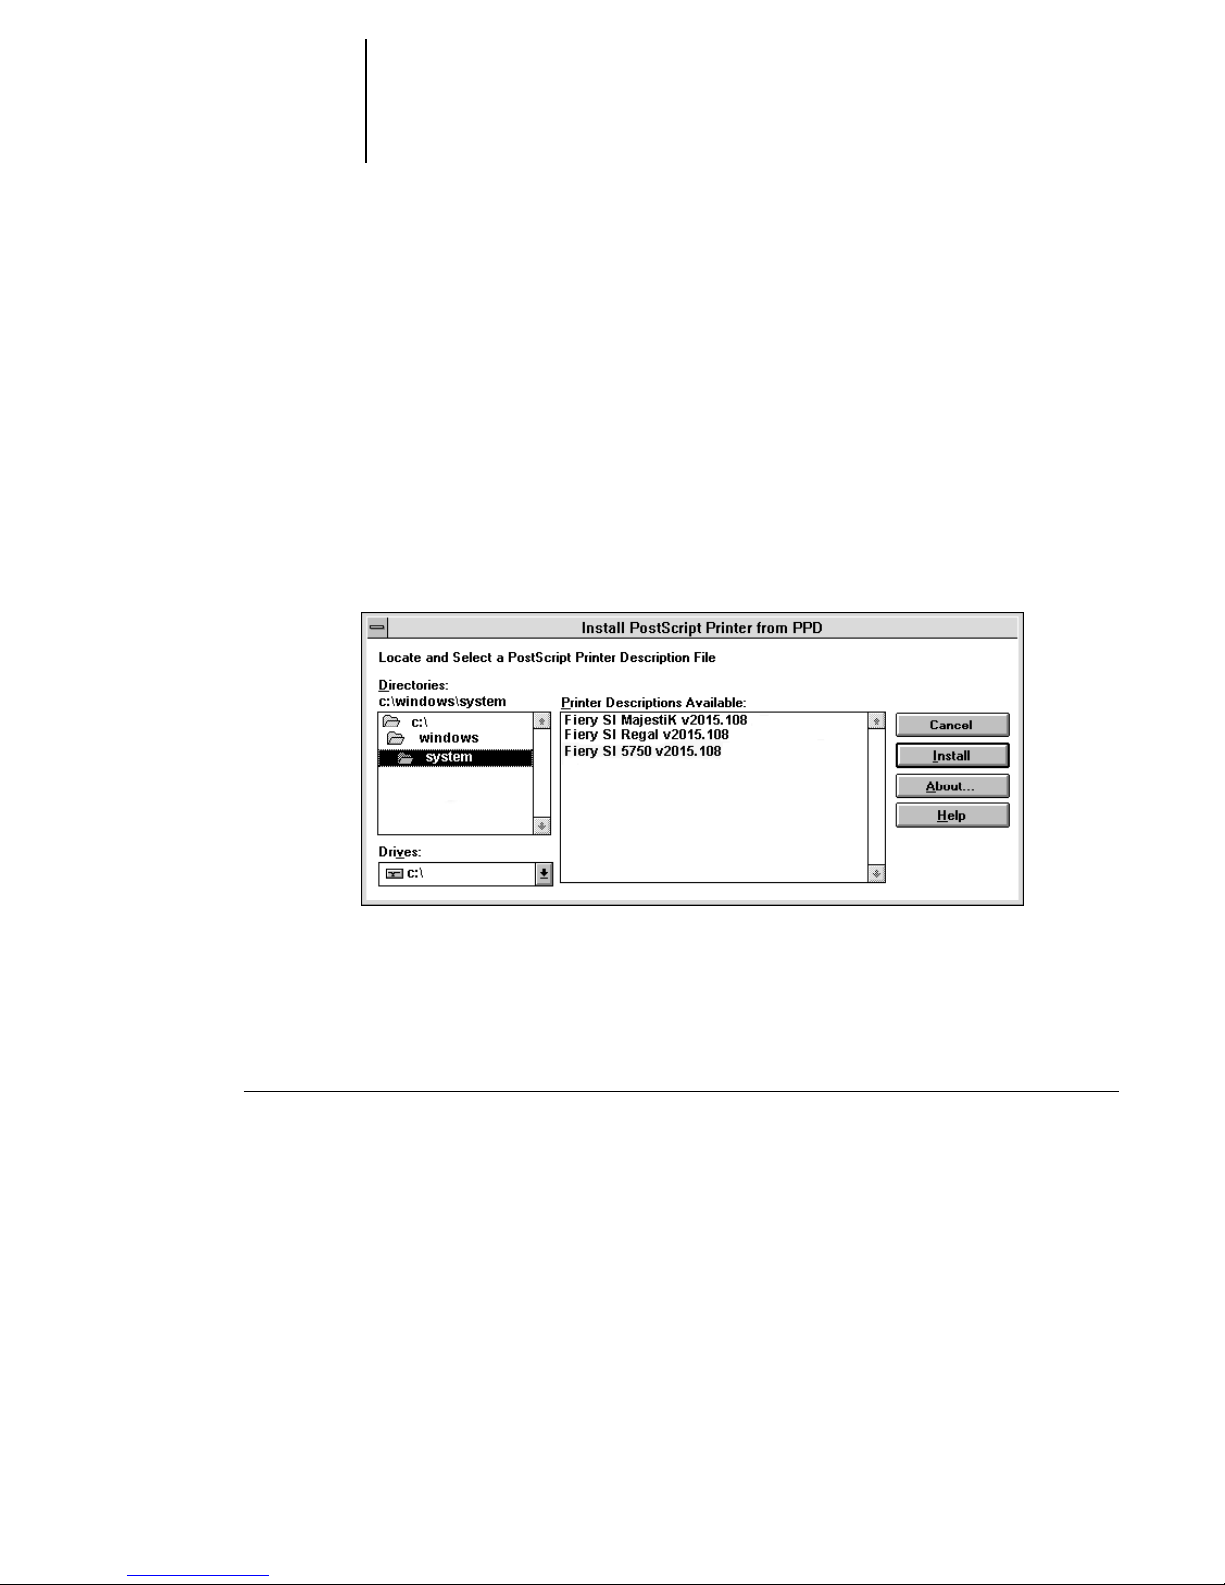
The Adobe PostScript Printers dialog box appears when Windows restarts. If you do
not see it, double-click the Adobe PostScript Printers icon in the Windows Program
Manager Control Panel.
10. Select the Fiery SI printer file that corresponds to your device.
If you need to browse the User Software CD, look in
ENGLISH\PRNTDRV\WIN_31.
11. Click Install.
12. Click OK when you are notified that installation was successful.
13. Click Close when installation is complete.
TO INSTALL THE PPD FILE FOR THE WINDOWS 3.1X
PRINTER DRIVER:
1. In the Main group of the Program Manager, double-click the Control Panel icon.
2. In the Control Panel window, double-click the Printers icon.
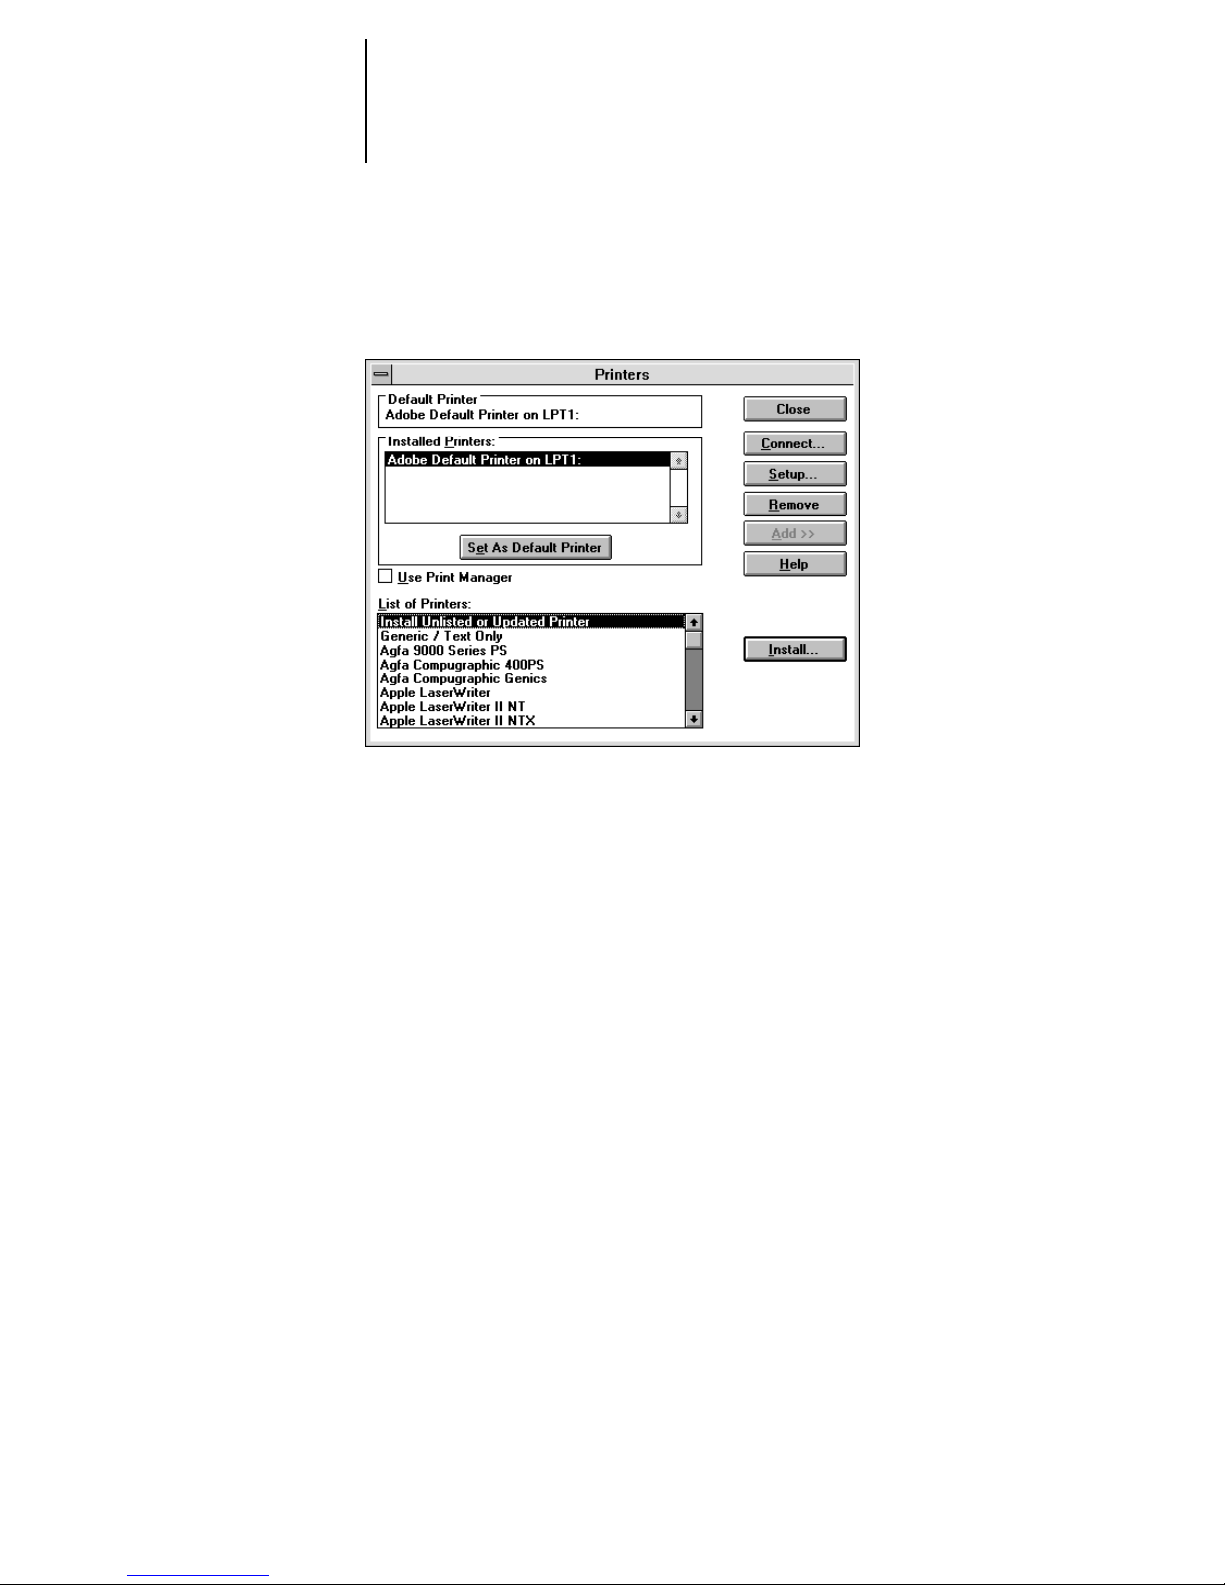
The Printers window appears.
Page 39
28 Installing user software on a PC-compatible computer
3. Click Add.
The Printers window expands to show available printers.
4. Make sure Install Unlisted or Updated Printer is selected and click Install.
The Install Driver window appears.
5. Click Browse.
The Browse window appears.
6. Under Drives, select the drive that r epresents the User So ftwar e CD or Printer Files disk
and then double-click the ENGLISH\PRNTDRV\WIN_31 directories.
7. Click OK in the Browse window, and click OK in the Install Driver window.
The Add Unlisted or Updated Printer window appears.
8. Select your Fiery SI and click OK.
The Fiery SI appears in the Printers window.
9. Click Install to display the Install Driver window again.
10. Click Browse and select the location of the PSCRIPT.DRV file (usually
\WINDOWS\SYSTEM).
This file is included on your Windows software disks.
11. Click OK in the Browse window, and click OK in the Install Driver window.
Page 40
29 Setting up the Fiery SI as a PostScript printer
12. Close the Printers window.
Setting the default printer with Windows 3.1x
You can specify the Fiery SI as the default printer. Many Windows applications use the
default printer when you choose the Print command.
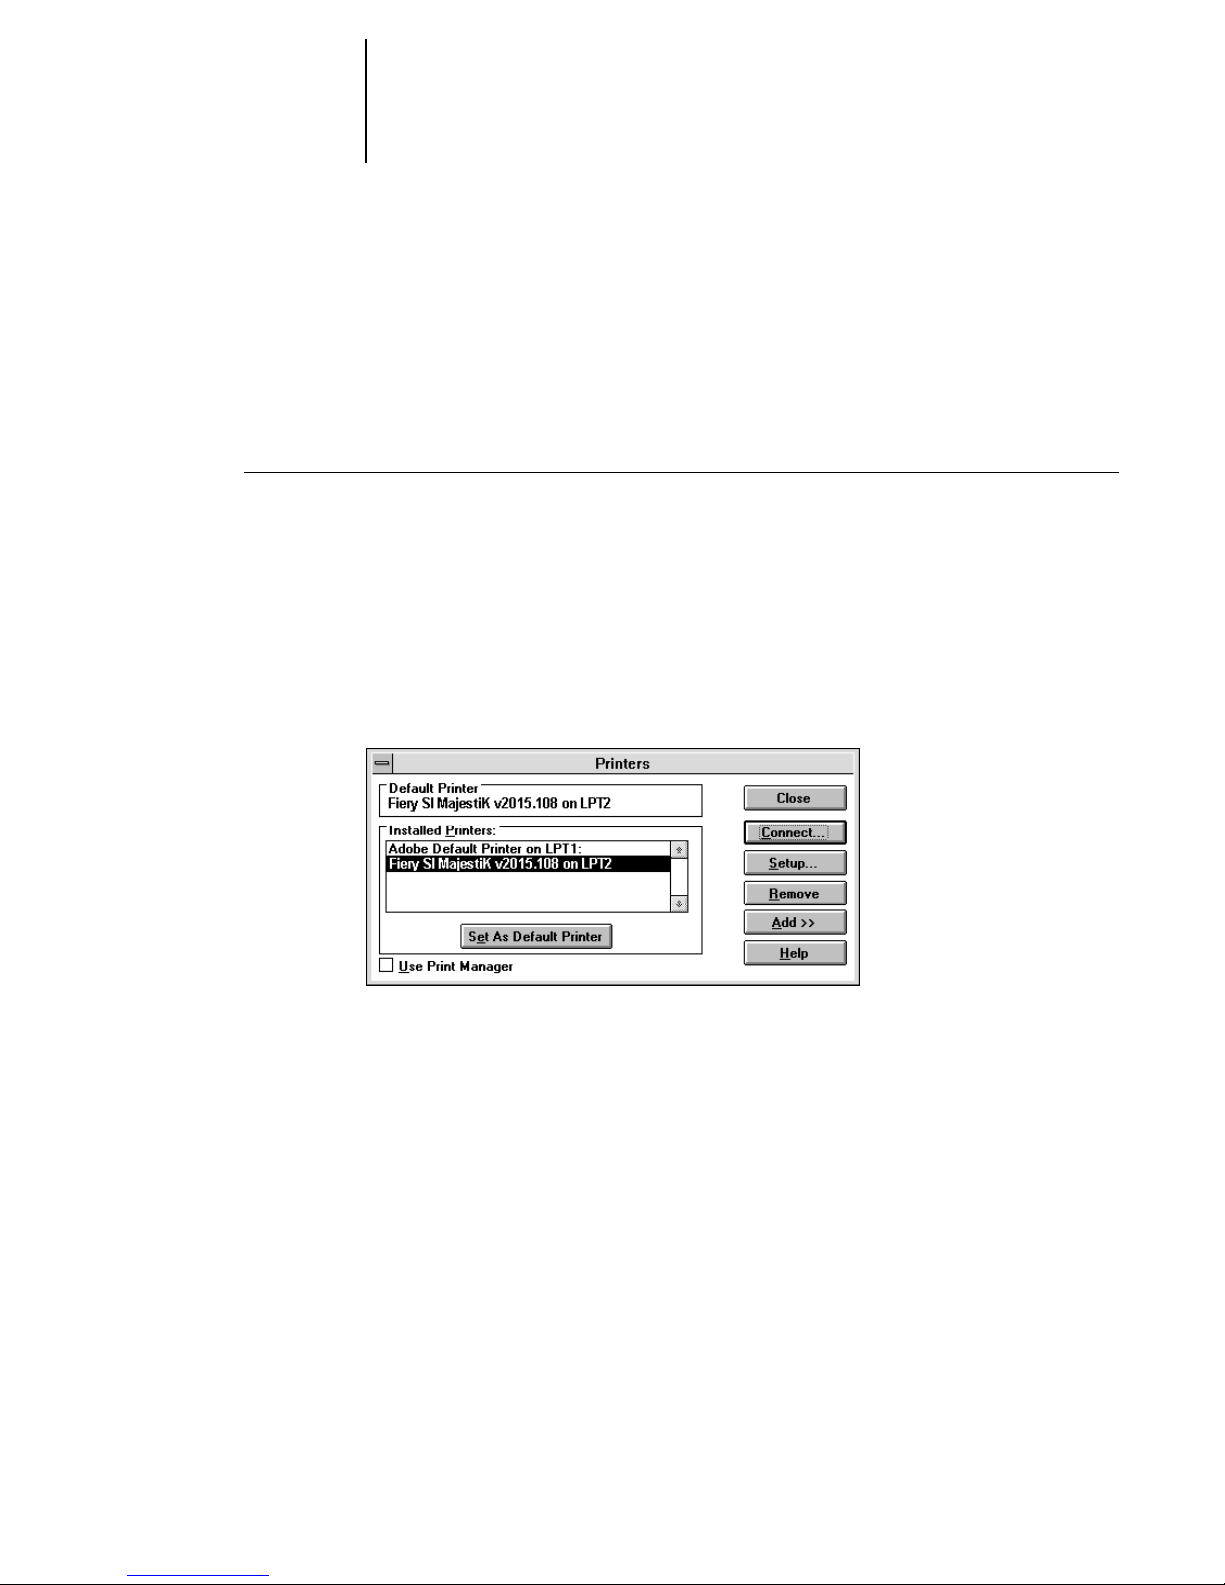
TO SET THE DEFAULT PRINTER:
1. In the Control Panel window, double-click the Printers icon.
The Printers window appears.
2. In the Printers window, select your Fiery SI in the Installed Printers list box.
3. Click Set As Default Printer.
The Fiery SI appears in the Default Printer area of the Printers window.
Selecting a printer port with Windows 3.1x
When you install a printer, Windows assigns it to a default printer port. If the
Fiery SI is connected to your computer through a network or you want to assign it to a
different port, you need to change the port assignment. For information on which port
to use, see your system administrator.
You can use this procedure to enable printing with the parallel port.
Page 41
30 Installing user software on a PC-compatible computer
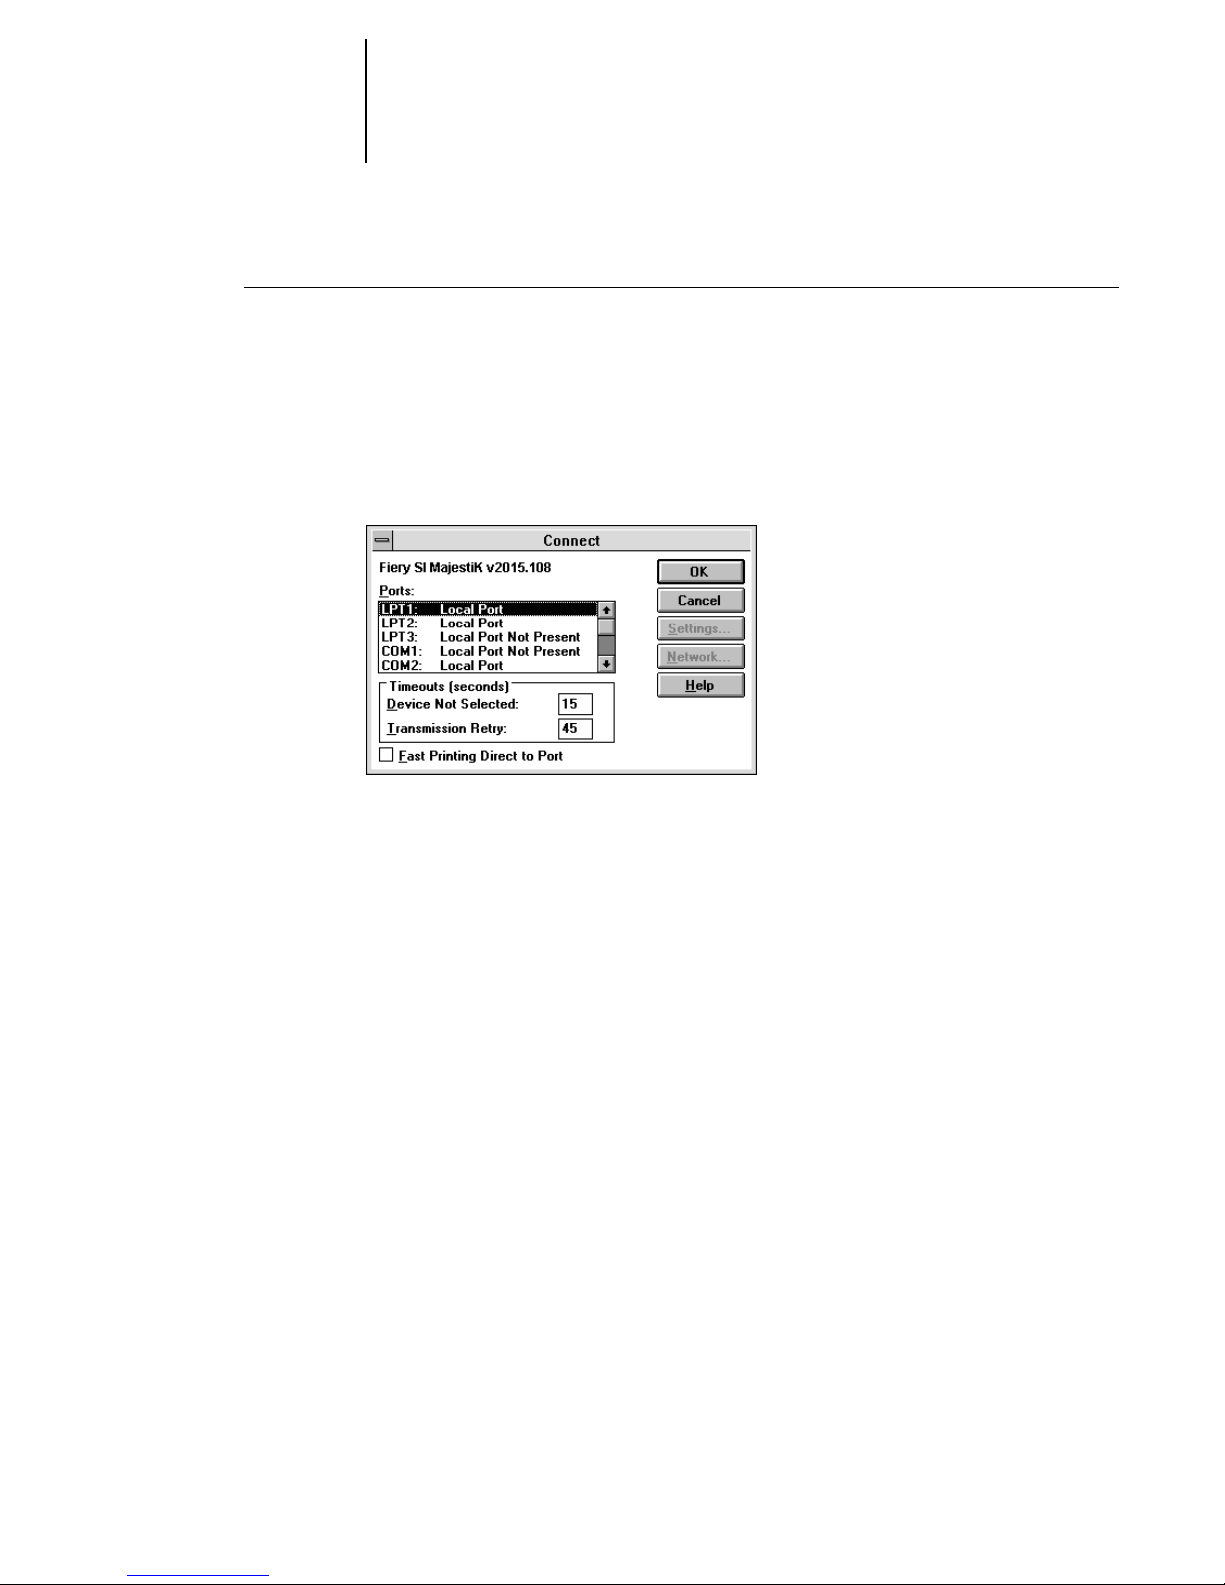
TO SELECT A PRINTER PORT:
1. In the Control Panel window, double-click the Printers icon.
2. In the Printers window, select the Fiery SI in the Installed Printers list box.
3. Click Connect.
The Connect window appears.
4. Connect the Fiery SI to the same port as your network.
For PhoneNET PC, select LPT1, LPT2, or LPT3.
For COPSTalk for Windows, select C:\winque.
For parallel printing, select the port (LPT1, LPT2, or LPT3) connected to your
parallel cable.
To print to a file, select FILE. Printing to a file is useful if the Fiery SI is off-site.
However, if you select the FILE port, you cannot print to a printer until you select a
network or printer port. (In some applications, you can select the FILE port from the
Print dialog box; this is preferable for temporary use since it doesn’t require resetting
the port in the Control Panel.)
5. Click OK.
The Printers window appears again, with the selected port next to the highlighted
printer name in the Installed Printers list box.
6. When you are finished, click OK and then click Close.
Page 42

31 Setting up the Fiery SI as a PostScript printer
Completing AppleTalk network setup for the Fiery SI with Windows 3.1x
The procedure for completing network setup is different for PhoneNet PC and
COPSTalk for Windows.
TO COMPLETE NETWORK SETUP USING PHONENET PC:
1. Double-click the PhoneNET Chooser icon.
2. Select PostScript Printers, select an AppleTalk zone (if applicable), and select the
Fiery SI from the list of printers.
3. Click Connect.
4. Make sure the port you chose when you installed the Fiery SI is selected.
5. Click Print PostScript and click Connect.
If you do not select Print PostScript, your print output will be in the form of
PostScript commands.
6. Close the Chooser.
TO COMPLETE NETWORK SETUP USING COPSTALK:
1. Double-click the WinChoose icon.
2. Select LaserWriter as the AppleTalk Type, select a zone (if applicable), and select the
Fiery SI from the Devices list.
3. Close WinChoose.
4. If you are prompted to restart Windows, click Restart Now.
Some newly installed drivers and driver settings do not take effect until you restart
Windows.
Page 43
Double-click here
32 Installing user software on a PC-compatible computer
Setting up IPX (Novell) printing with Windows 3.1x
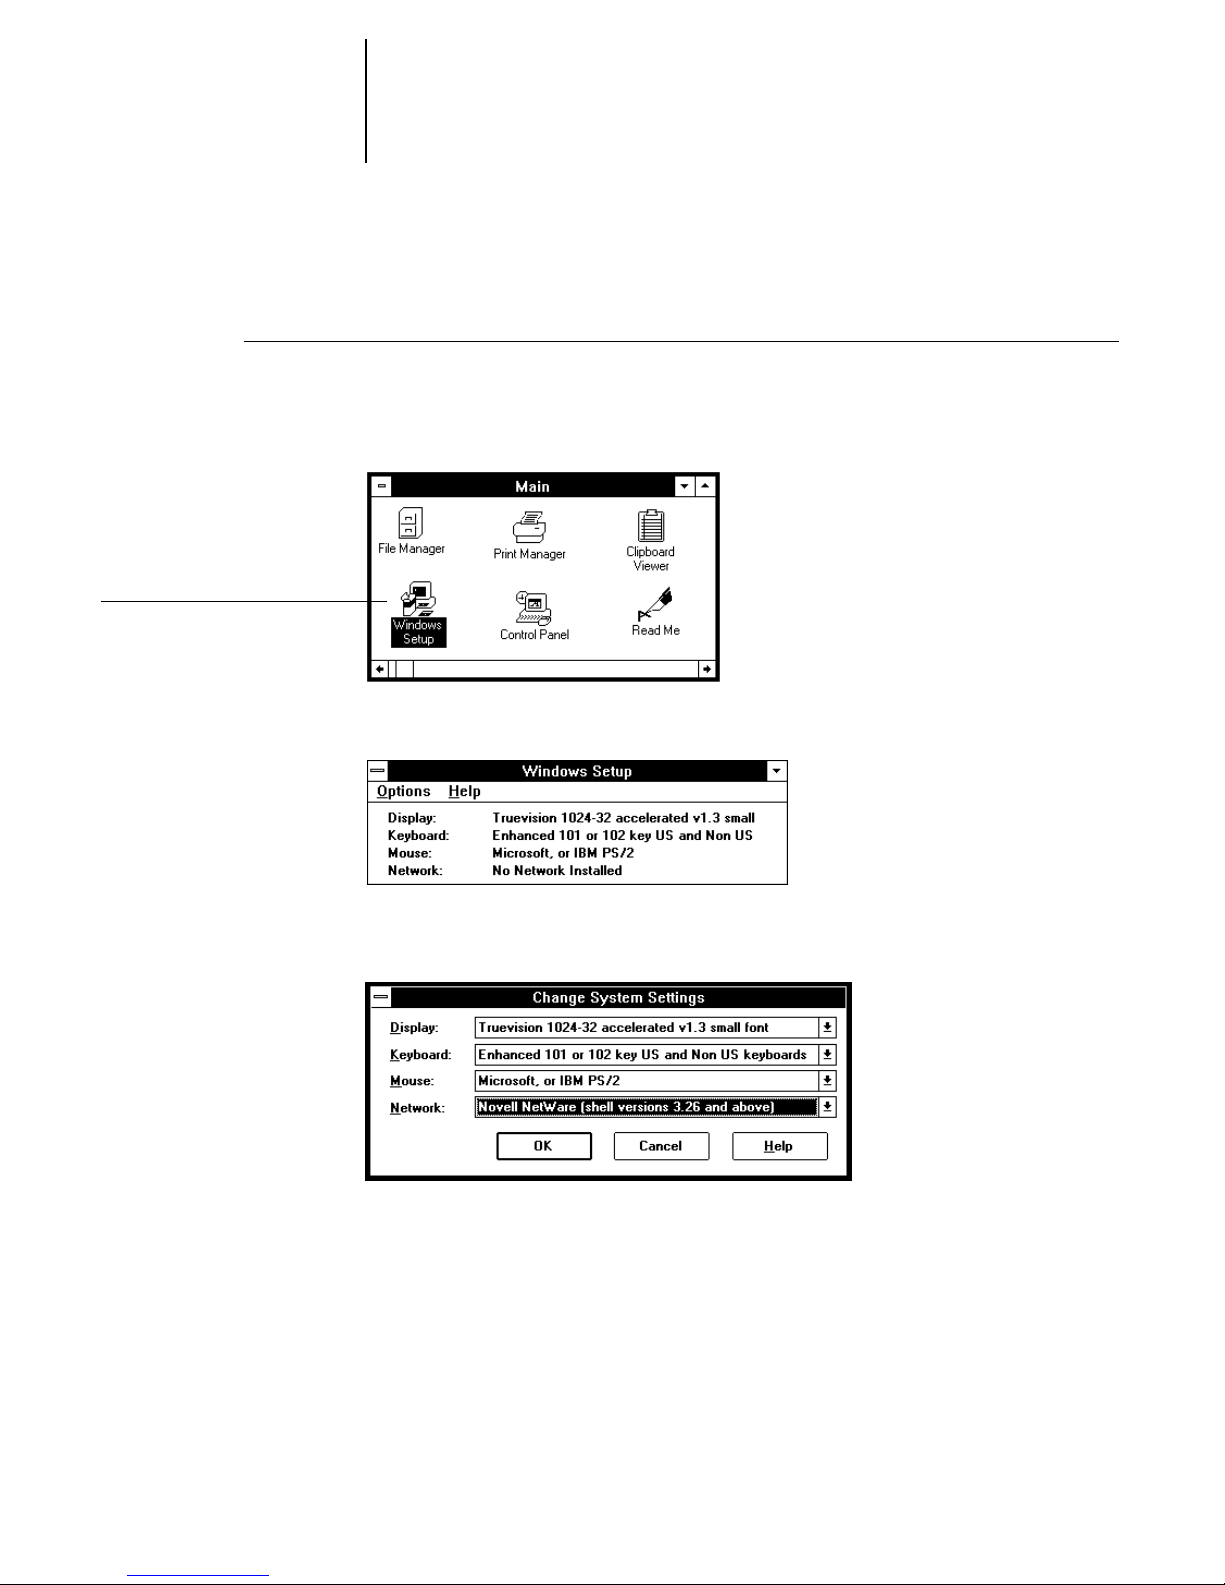
TO SET UP IPX (NOVELL) PRINTING FOR WINDOWS:
1. In the Main group of the Windows Program Manager, double-click the Windows Setup
icon.
2. Choose Change System Settings from the Options menu.
3. From the Network menu, choose Novell NetWare (shell version 3.26 and above) or
(shell version 4.0 and above).
4. Click OK. When prompted, restart Windows.
5. In the Main group, double-click Control Panel, and then double-click Printers.
6. In the Printers Control Panel window, click Connect to connect the printer to the
appropriate port.
Page 44
33 Setting up the Fiery SI as a PostScript printer
7. Select Network.
If you are printing to a file, select FILE. Printing to a file is useful if the printer is
elsewhere. However, if you select the FILE port, you cannot print to a printer until you
select a network or printer port. If you select Network, the next window depends on
the NetWare client driver version.
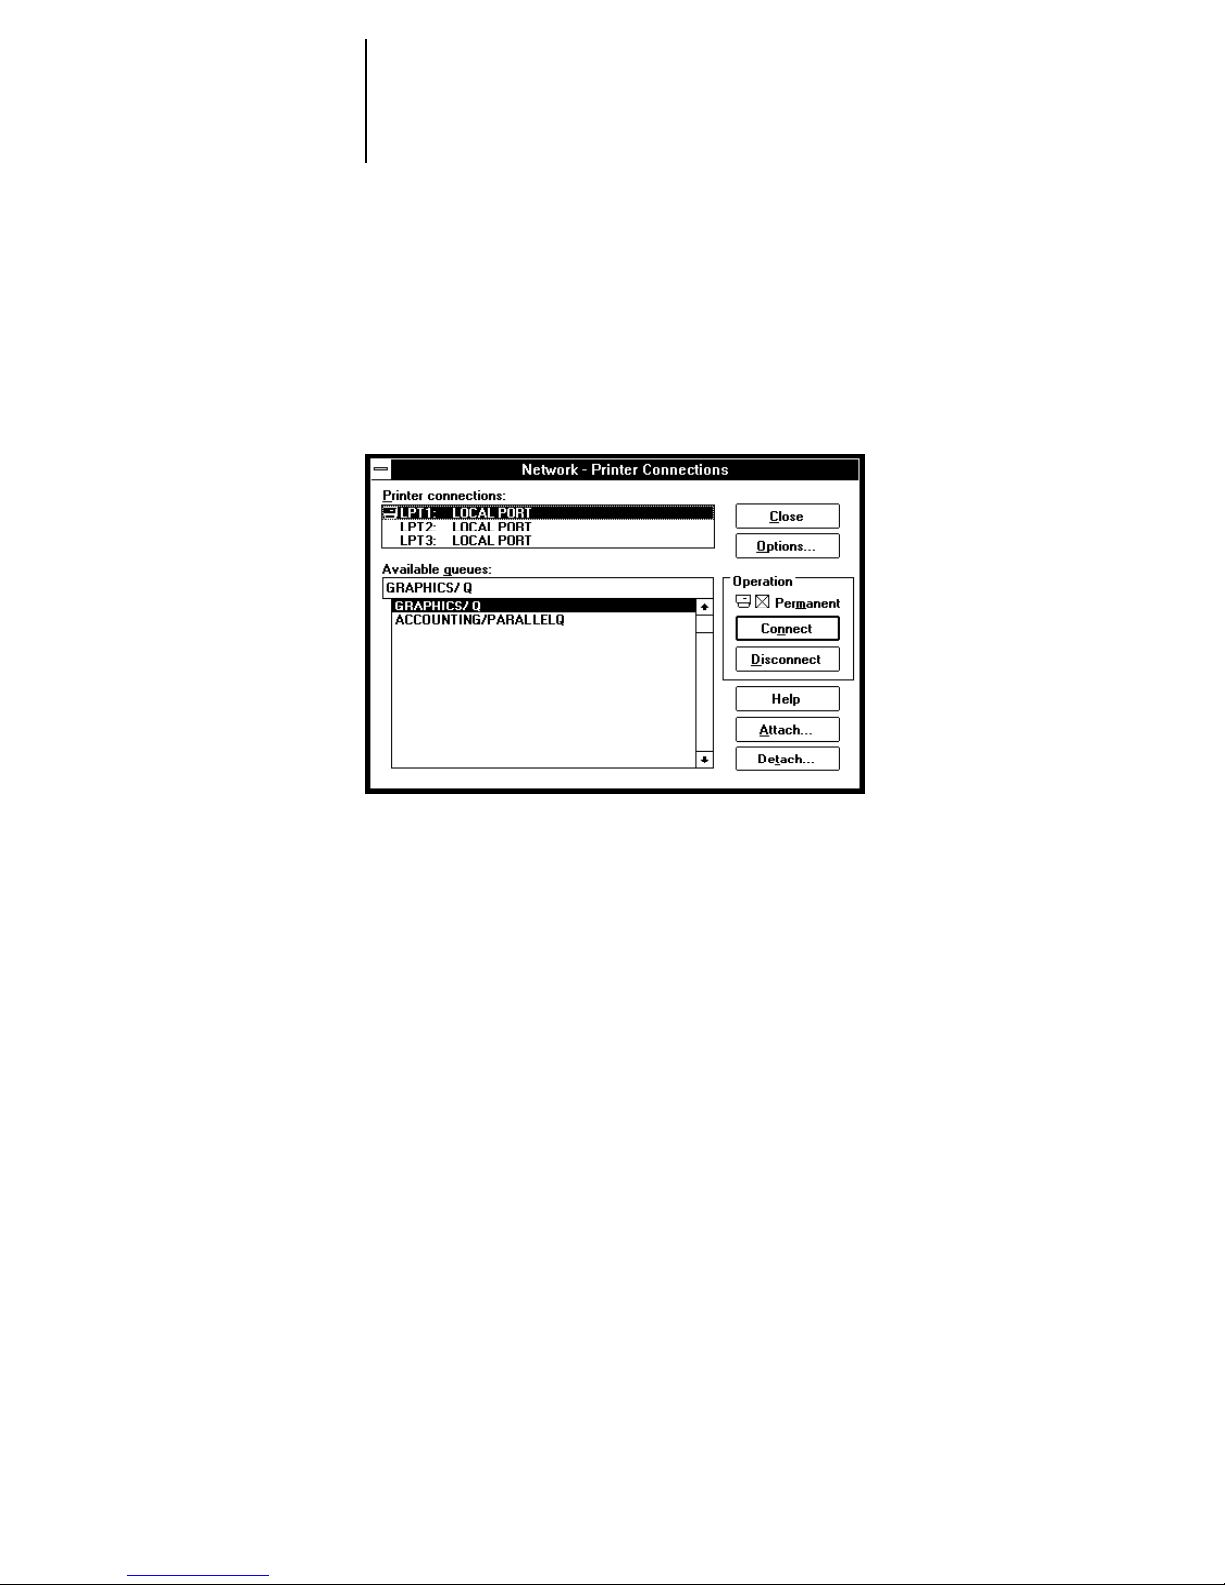
8. If the Network Printer Connections dialog box is displayed, select the port in the
Printer connections box.
9. In the Available queues list box, select the server and queue name that correspond to
the printer.
10. Click the Connect button and then click the Close button.
The Connect dialog box is displayed with the network path to the printer.
11. Click OK in the Connect dialog box.
12. Click Close in the Printers dialog box.
13. Click OK.
The Printers window appears again, with the selected port next to the highlighted
printer name in the Installed Printers list box.
You or your network administrator should verify the network connection by printing a
test document from each networked computer that will use the printer.
Continue to “Installing additional Windows files” on page 45 for information on
copying the remaining files to your computer.
Page 45

34 Installing user software on a PC-compatible computer
Setting up printing with Windows 95
You can print to the printer from your Windows 95 workstation over the parallel port
connection and over an IPX (Novell) network. In both cases you need to install a
PostScript printer driv er and the printer description file (PPD) on your computer, and
set up the printer to accept your print jobs. The Adobe PostScript Printer Driver for
Windows (version 4.1) is included with the user software.
TO INSTALL THE FIERY SI WITH THE ADOBE POSTSCRIPT PRINTER DRIVER
AND WINDOWS 95:
1. Print a copy of the Configuration page f or y our Fiery SI. This will help y ou thr ough the
installation process.
Before you run the Adobe installer, you should know whether you are installing a
network or local printer; if it is a network printer, you need to know the path or queue
name of the printer.
2. In the Windows 95 Explorer, select the User Software CD or Windows Printer Files disk,
select the ENGLISH\PRNTDRV\W95_41 folder, and double-click the SETUP.EXE icon.
SETUP.EXE is the filename for the Adobe Installer.
3. Click Read or click Next to postpone reading the README file.
4. Continue the installation procedure and follow the on-screen instructions.
5. When installation is complete, click Add Another or Exit.
Completing the Windows 95 parallel port connection
TO SET UP PARALLEL PORT PRINTING FOR WINDOWS 95:
1. Click the Start button, point to Settings, and then click Printers.
2. Click the Fiery SI icon and choose Properties from the File menu. (Or right-click the
Printer icon and left-click Properties.)
Page 46
35 Setting up the Fiery SI as a PostScript printer
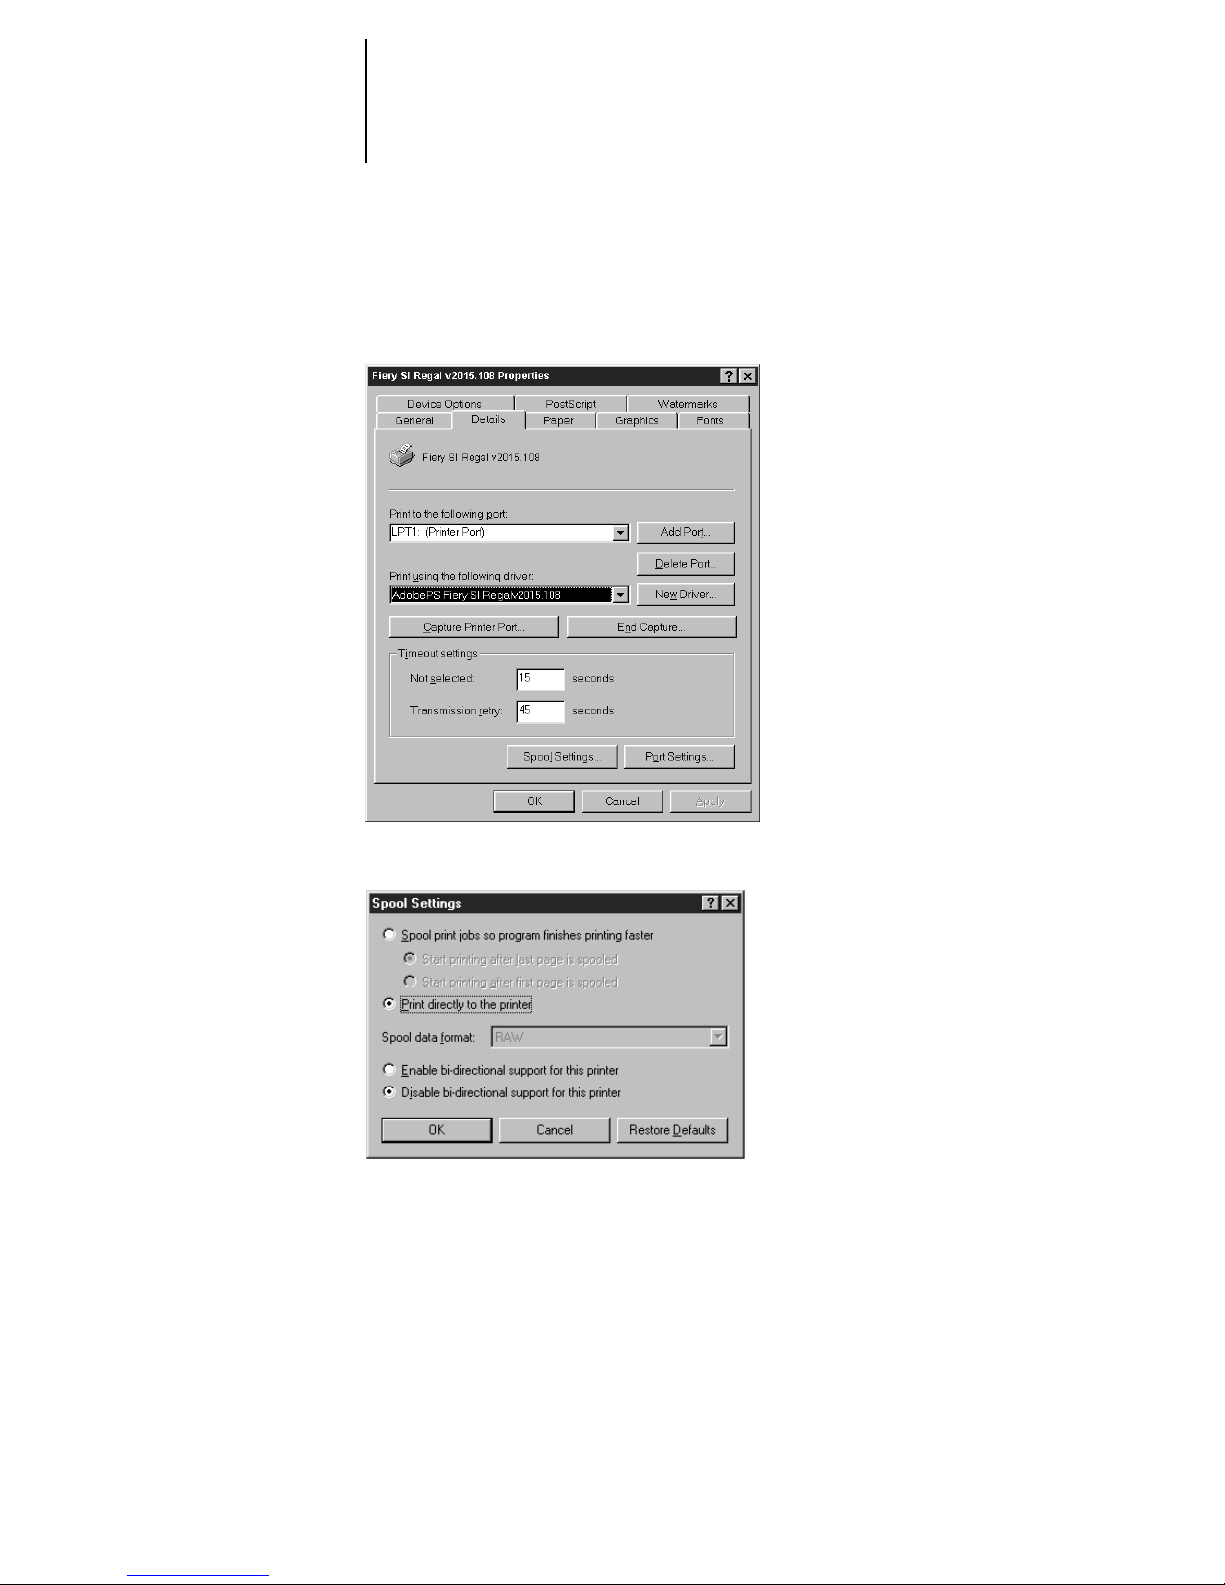
3. Click the Details tab.
The box “Print to the following port:” should say LPT 1: (Printer Port).
4. Click Spool Settings and select Print directly to the printer.
You are now ready to print from your applications to the printer with the parallel port.
Page 47
36 Installing user software on a PC-compatible computer
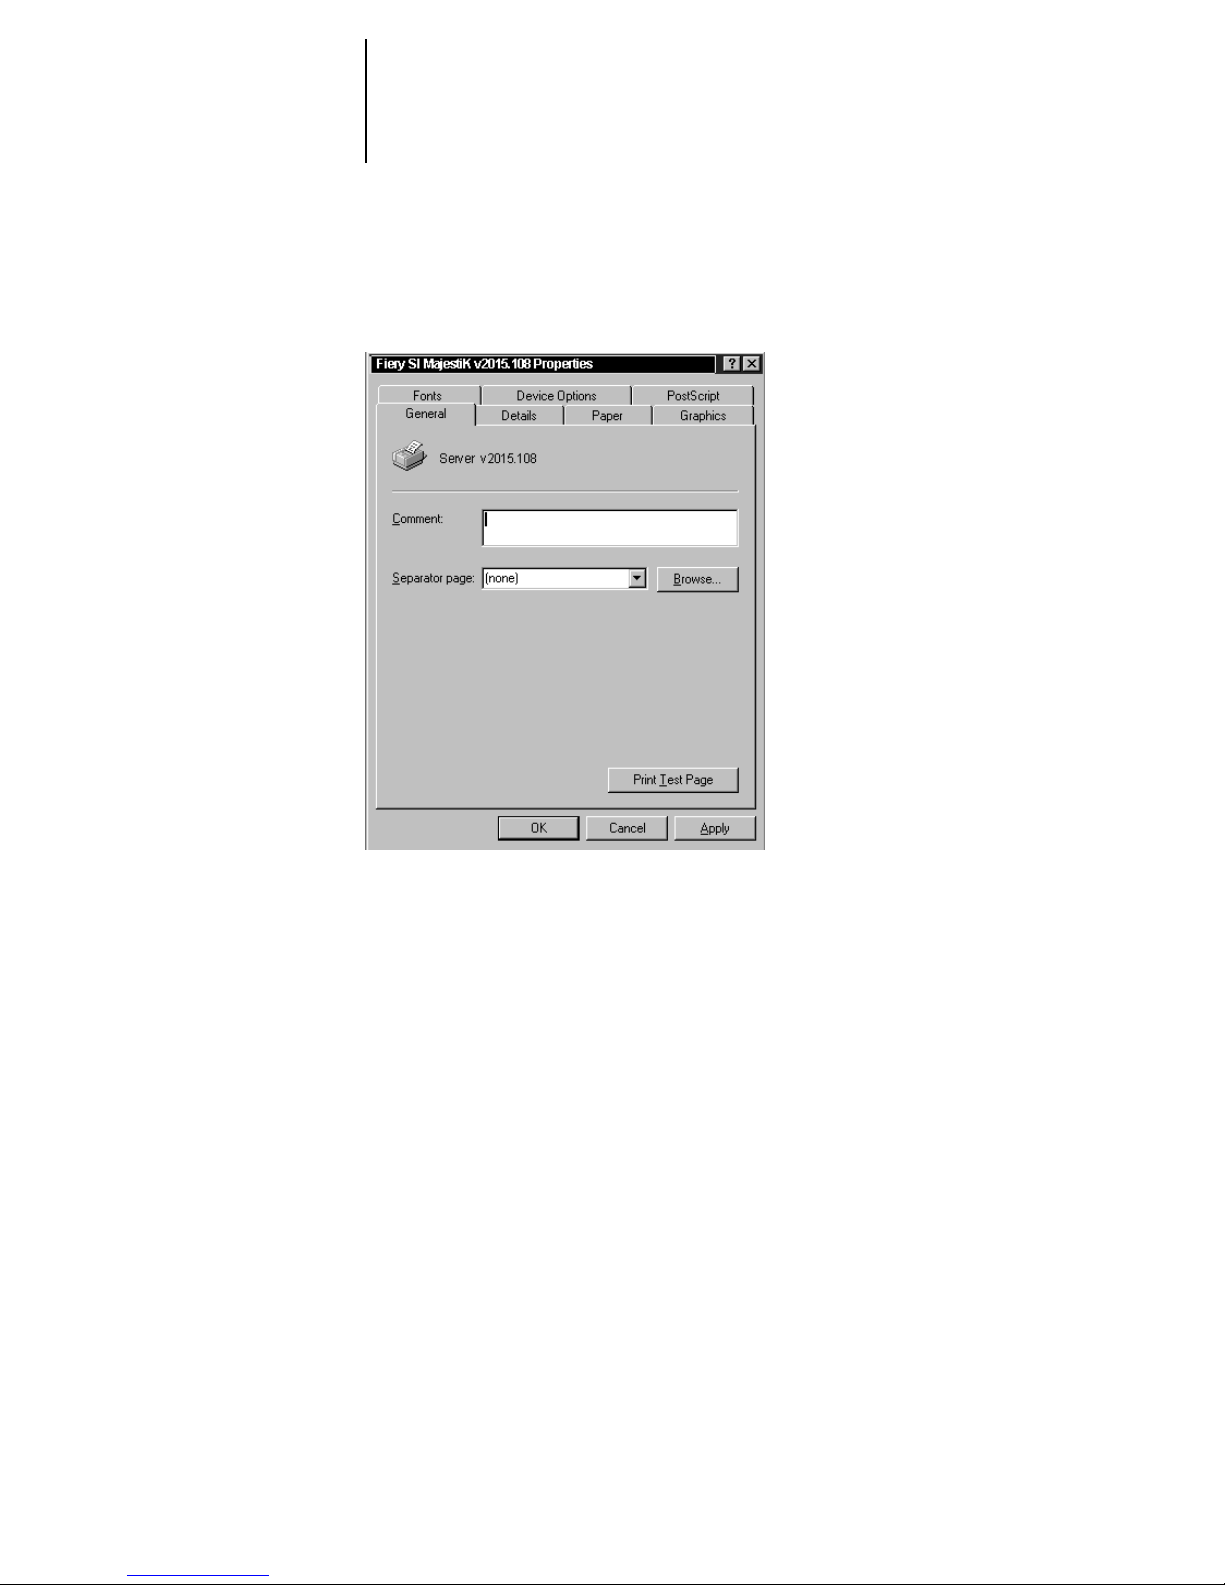
5. To confirm the connection, y ou can print a Window s 95 test page . Click the General tab
in the Properties dialog box.
6. Click Print Test Page and click OK.
When you select Print, your PostScript files will be transmitted over the parallel port
connection to the Print queue, using the printer driver and the Fiery SI printer
description file.
Page 48
37 Setting up the Fiery SI as a PostScript printer
Completing the Windows 95 IPX/SPX or IPX (Novell) connection
If you are printing through a Novell server, before you begin, the Novell network and
file server should be set up. The file server should be configured with a print server and
print queue for the printer. For details see your NetWare documentation and the
Administrator Guide.
You can also print directly to the Fiery SI from Windows 95 with IPX/SPX.
TO SET UP IPX/SPX PRINTING:
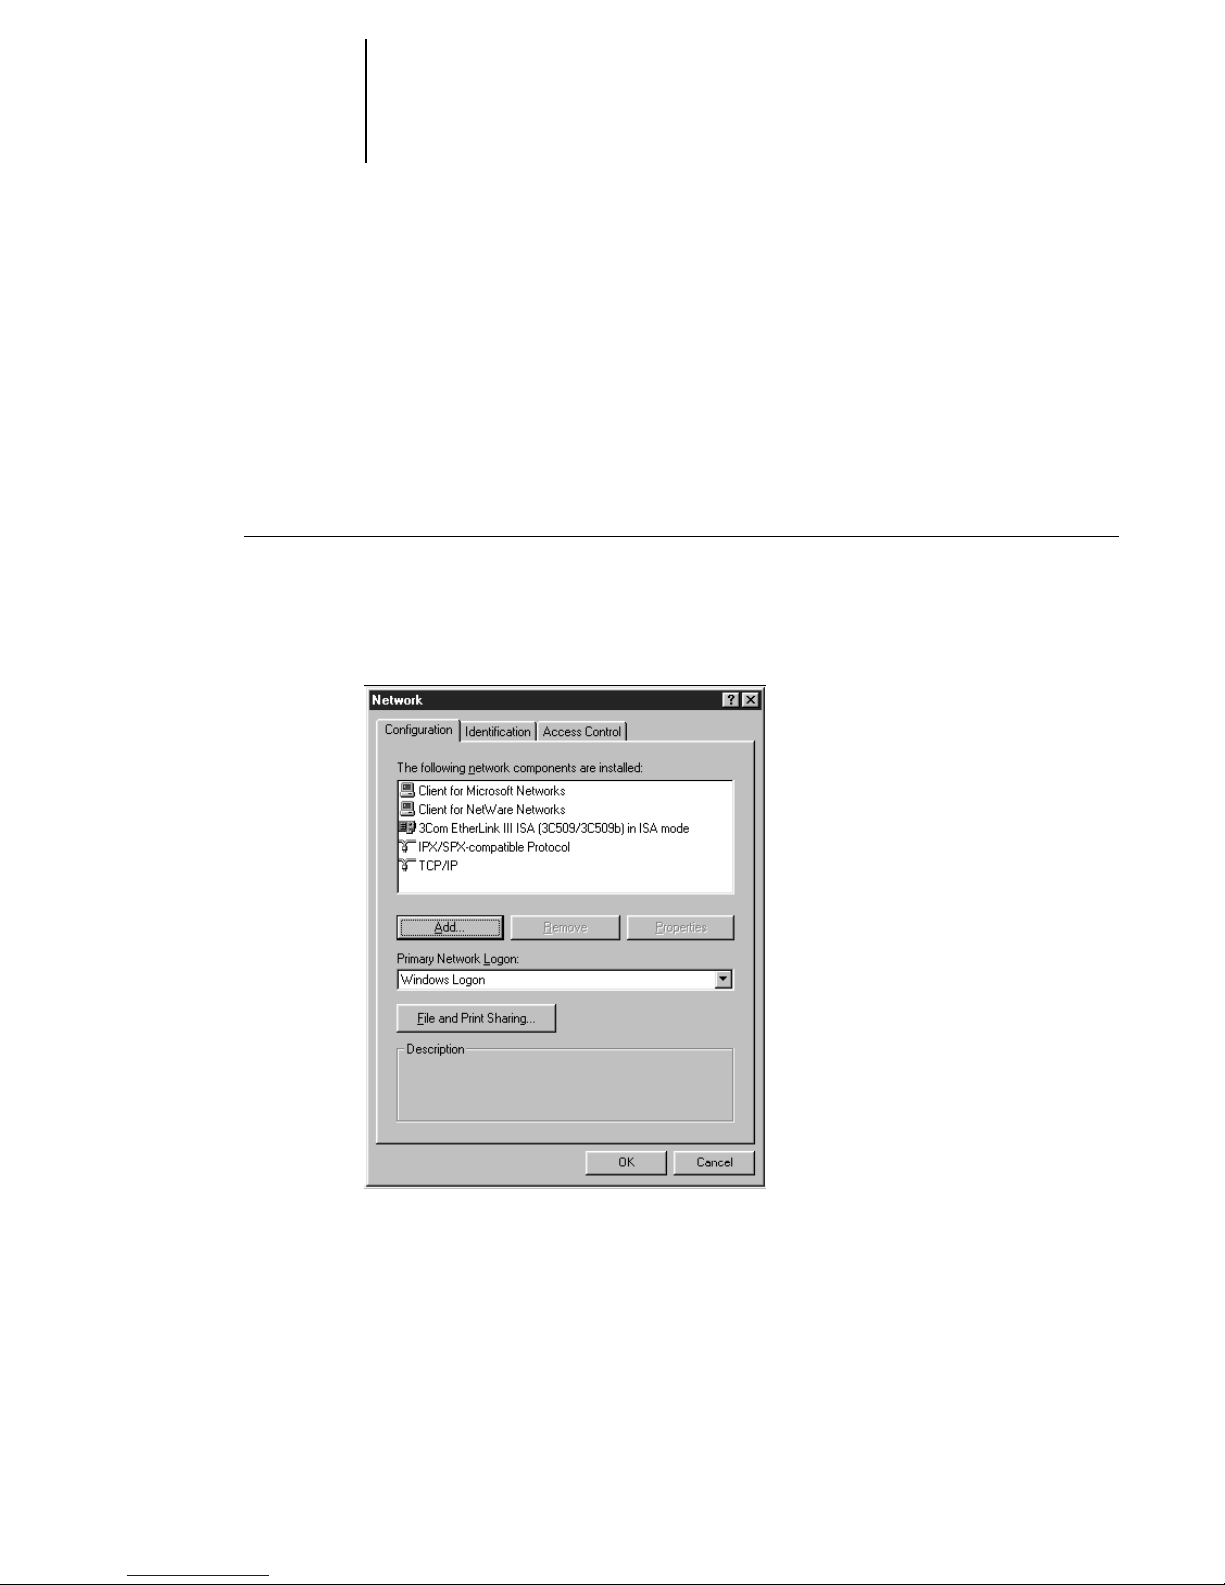
1. Open the Windows 95 Control Panel.
2. Double-click the Network icon.
3. Make sure that IPX/SPX-compatible Protocol and T CP/IP protocol ar e both listed in the
Installed Network Components section.
See your Windows 95 documentation for instructions.
Page 49
38 Installing user software on a PC-compatible computer
NOTE: You must enable TCP/IP printing to ensure that all files required for IPX/SPX
will be installed. You can select it and click Remove after you set up IPX/SPX if you do
not need to use the TCP/IP protocol.
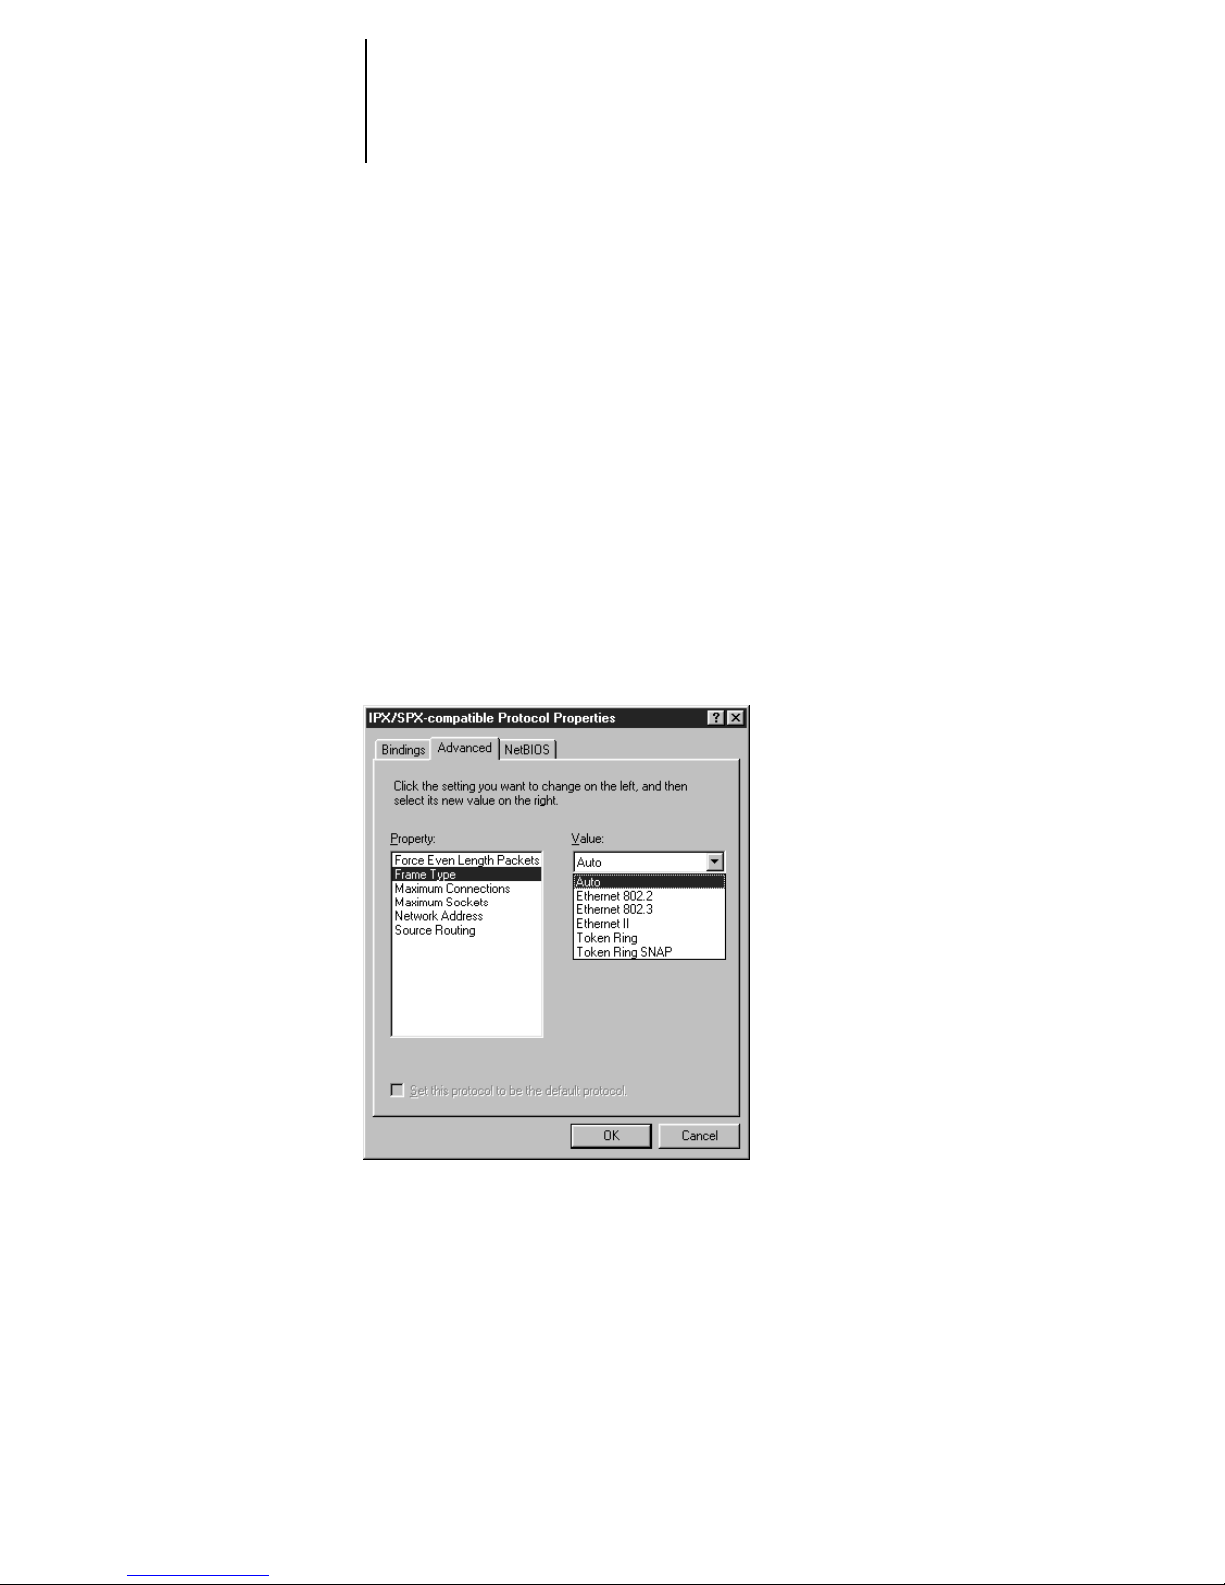
4. Double-click the IPX/SPX-compatible Protocol icon.
5. Click Advanced.
6. In the Property list, click Frame Type and select the Frame Type that corresponds to
the one set during Fiery SI Control Panel Setup.
Print the Configuration page from the Control Panel to see the Frame Type if
necessary.
NOTE: Do not select Auto, this may not select the Frame Type specified on the
Fiery SI.
7. Click OK and close the Network Control Panel.
Page 50

39 Setting up the Fiery SI as a PostScript printer
TO SET UP IPX (NOVELL) PRINTING WITH WINDOWS 95:
1. Click the Start button, point to Settings, and then click Printers.
2. Click the icon for the printer and choose Properties from the File menu. (You can also
hold down the right mouse button and drag down the pop-up menu to choose the
Properties.)
3. Click the Details tab in the Properties window and click Add Port.
A list of connection options is displayed.
4. In the Add Port dialog box, specify the network path, or click Browse for a display of
your network environment.
5. If you are using a NetWare file server, double-click the icon of the NetWare file server
you want to use for printing to the printer and click OK.
6. Click the printer icon labeled with the NetWare print queue you will use and click OK.
7. In the Add Port dialog box, verify that the network path is updated and click OK.
You are ready to print from the workstation.
Your print jobs will be transmitted to the specified print queue on the Novell file
server. The printer will poll the file server, and if jobs are present, they will be
transmitted to the Fiery SI.
8. To confirm the connection, y ou can print a Window s 95 test page . Click the General tab
in the Properties dialog box.
9. Click Print Test Page.
10. Click OK.
Page 51
40 Installing user software on a PC-compatible computer
Setting up printing with Windows NT
To set up Windows NT printing, install the Windows NT PostScript printer driver
and configure printing for your network type. Note that printer files support the Intel
version of Windows NT.
If your administrator has set up the Fiery SI on an NT server and shared it, you may
not have to enter all the information described in this section. Any windows that are
not necessary will not appear, and you can verify information that appears in other
windows instead of typing in new information. For information about setting up and
printing to the Fiery SI with a Windows NT server, see the Administrator Guide.
NOTE: If you have problems installing the Fiery SI with Windows NT, try installing
another PostScript printer (such as the Apple LaserWriter IIg), and then install the
Fiery SI. Installing another printer insures that all files are properly installed and
available. For instructions, see your Windows NT documentation.
TO INSTALL THE PRINTER FILE FOR A PARALLEL, TCP/IP, OR APPLETALK
CONNECTION FROM WINDOWS NT WORKSTATION:
1. In the Windows NT Print Manager window, choose Create Printer from the Printer
menu.
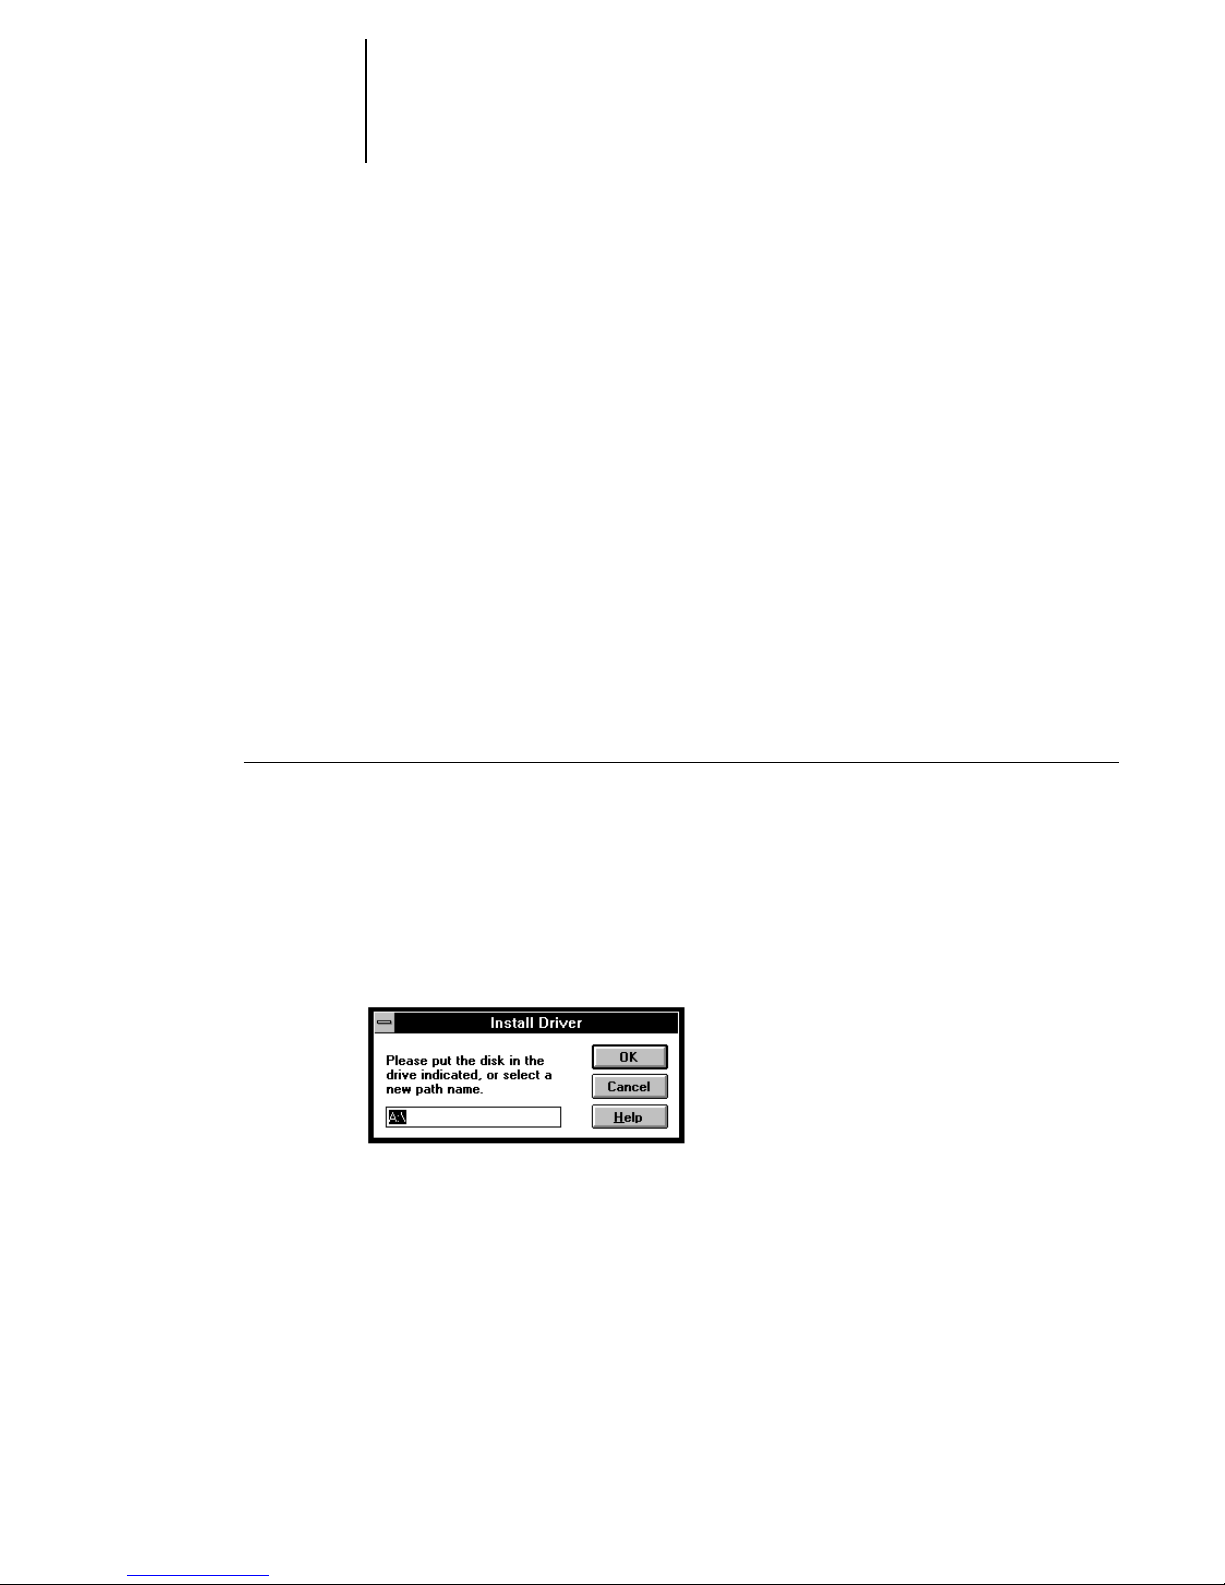
2. In the Create Printer dialog box, scroll down the list of drivers and select Other.
The Install Driver dialog box is displayed, prompting you to insert the disk.
Page 52
41 Setting up the Fiery SI as a PostScript printer
3. Browse the User Software CD to find \ENGLISH\PRNTDRV\WIN_NT.
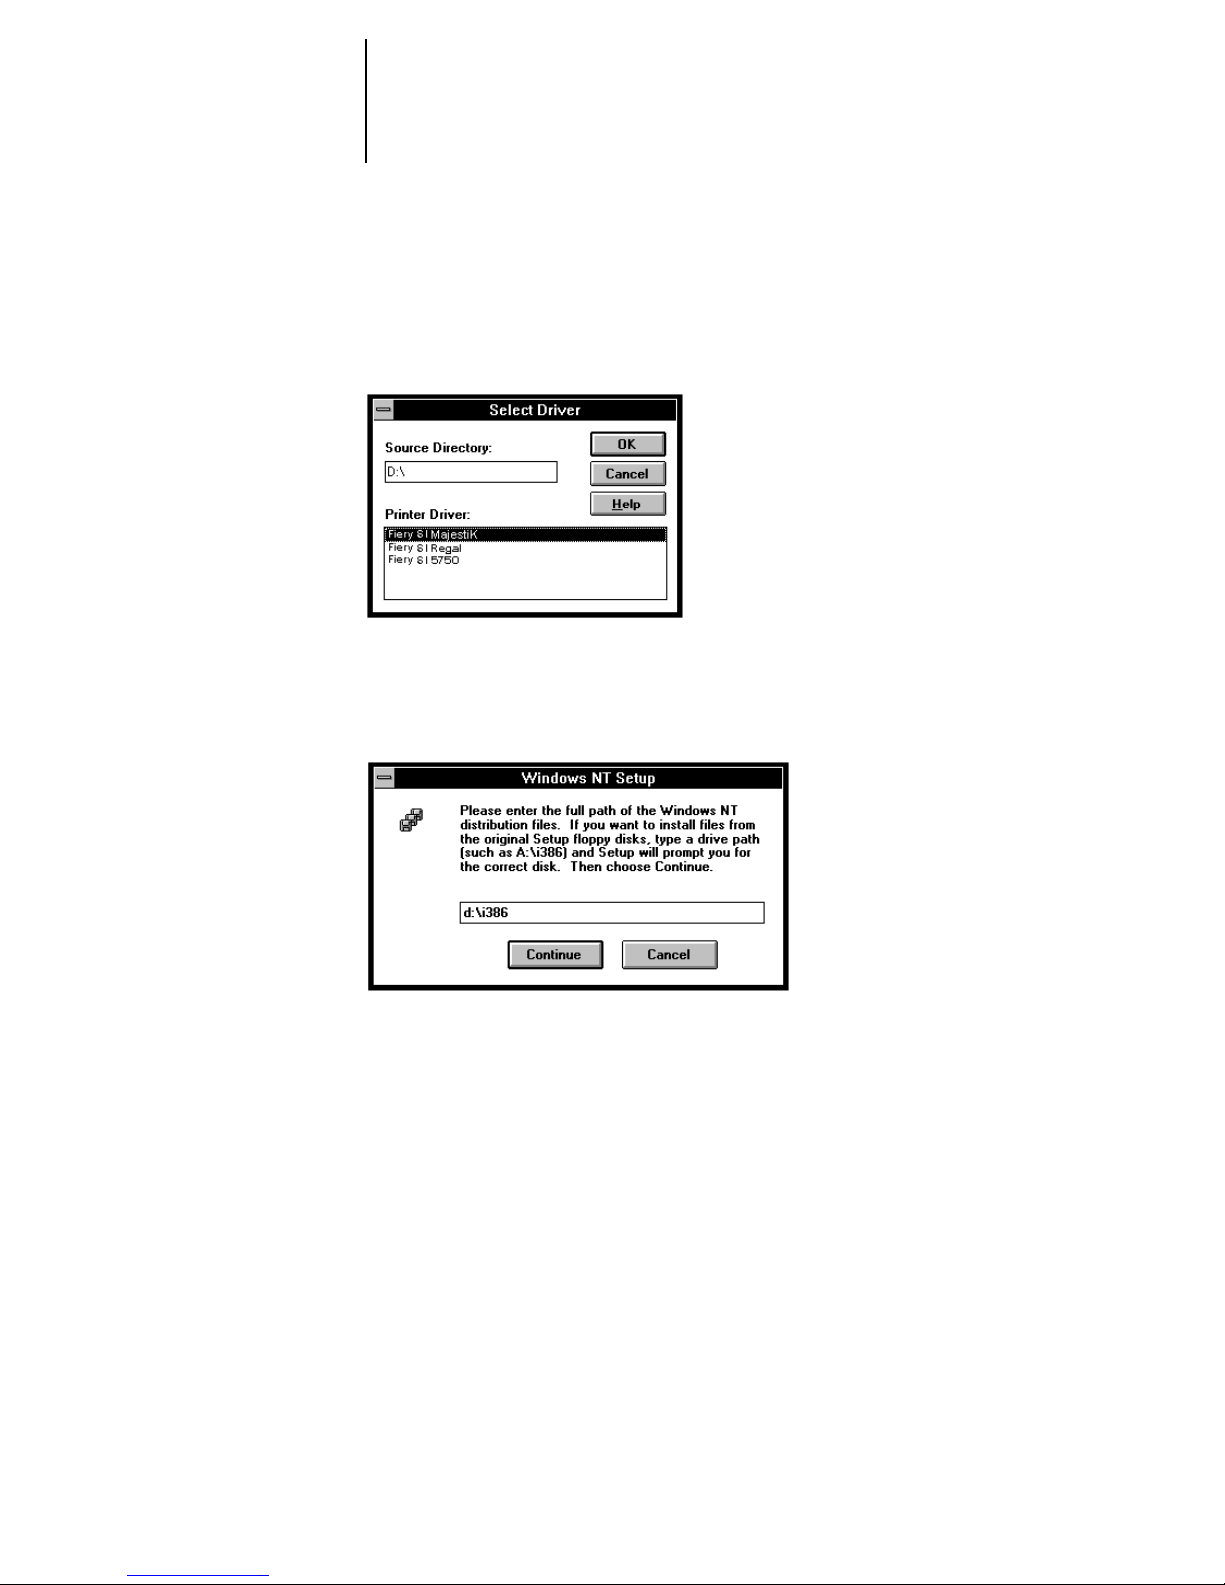
The Select Driver dialog box displays the name of the printer(s) for which there are
printer description files on the disk.
4. Select the printer description file for your device and click OK.
5. In the Windows NT Setup dialog box, enter the path to your PostScript drivers, and
then click Continue.
If you have already installed a PostScript printer, and the Windows NT system is on
your c: drive, type the following path:
c:\winnt35\system32\spool\drivers\w32x86
If you have not already installed a PostScript printer, you will be prompted to insert
your Windows NT system software CD or floppy disks. In that case, if the CD-ROM
drive with your system CD is the d: drive, type the path:
d:\i386
Page 53
42 Installing user software on a PC-compatible computer
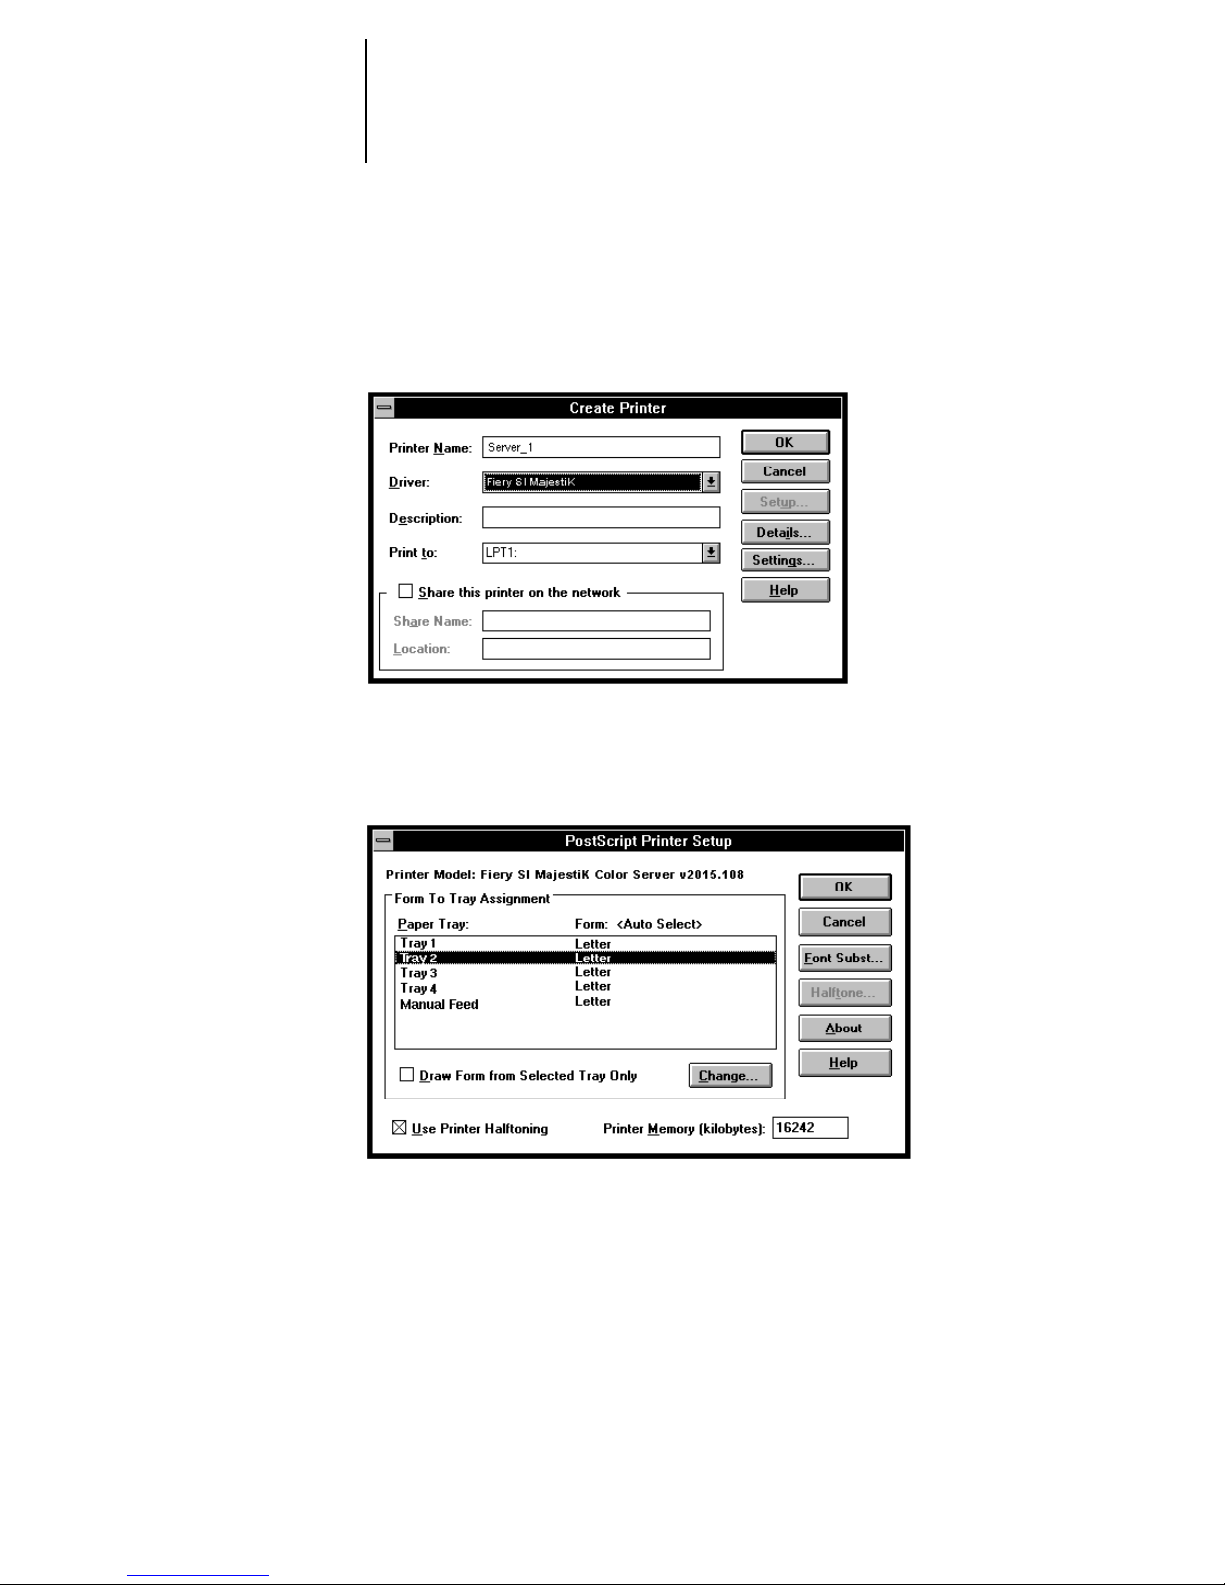
6. Enter a name for the Fiery SI in the Printer Name box in the Create Printer dialog bo x,
and then click OK.
The Fiery SI model name is displayed in the Driver box.
7. When the PostScript Printer Setup dialog box appears, click OK.
Even though the printer does not use halftoning, do not uncheck Use Printer
Halftoning.
The printer now appears in its own Printer window in the Print Manager window.
Page 54
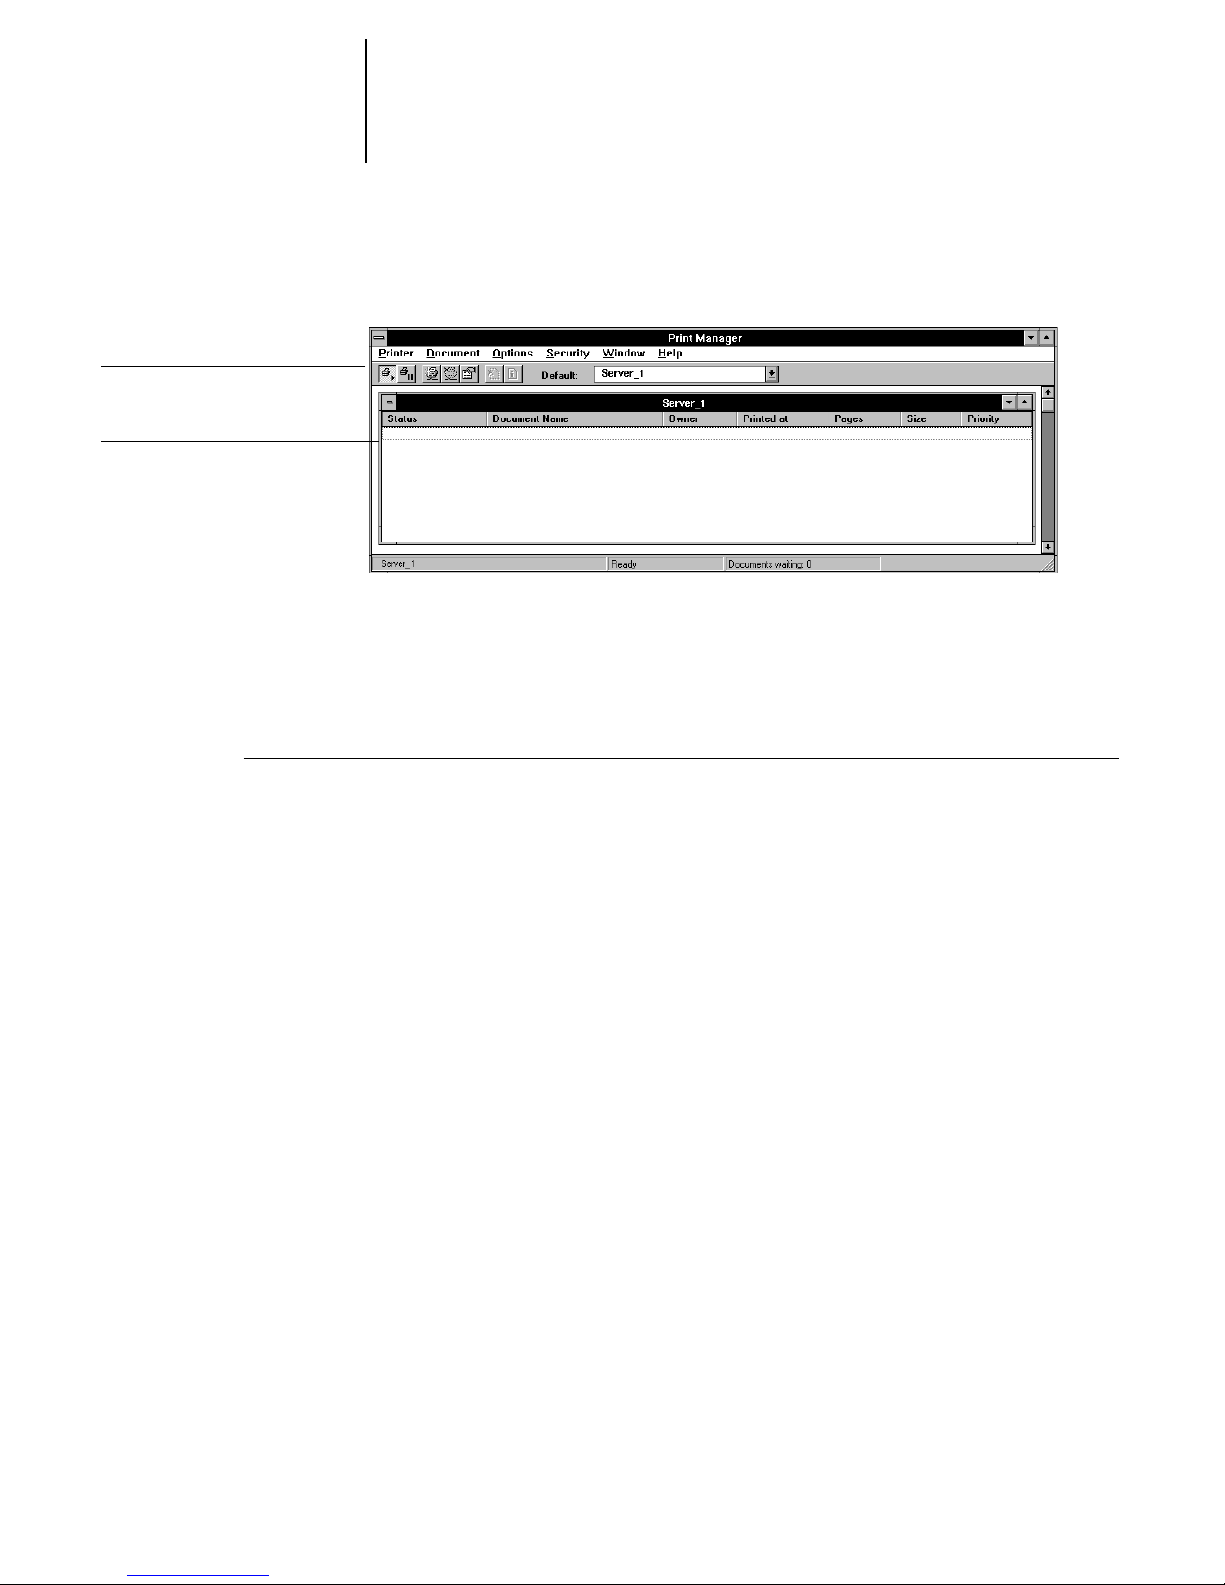
Print Manager window
Server window
43 Setting up the Fiery SI as a PostScript printer
8. In the Print Manager toolbar, select the printer as the Default printer.
9. Copy the printer description file and then connect the printer to a port or a network
connection.
Completing the Windows NT Workstation printer setup
TO SET UP PARALLEL PRINTING FOR WINDOWS NT WORKSTATION:
1. Double-click the printer icon in the Print Manager window and choose Properties from
the Printer menu.
In the Printer Properties dialog box, confirm that LPT1 appears in the “Print to” box.
2. Click Details to check and configure the defaults. Since parallel port jobs are spooled
on the printer, select Print Directly to Ports to bypass Windows NT Print Manager
spooling. Click OK.
3. Click OK to exit the Printer Details dialog box.
The printer is ready to accept parallel print jobs from your computer, using the
Windows NT PostScript printer driver and the copier printer description file. When
you select Print, your PostScript files will be transmitted over the parallel port
connection to the Print queue. The network administrator should verify the parallel
port connection by printing a simple document to LPT1, the designated port.
Page 55
44 Installing user software on a PC-compatible computer
TO SET UP TCP/IP AND LPR PRINTING FOR WINDOWS NT
WORKSTATION:
1. In the Main group, double-click the Print Manager icon.
2. With the Fiery SI window active, choose Properties from the Printer menu.
3. In the Print to list, scroll to Other.
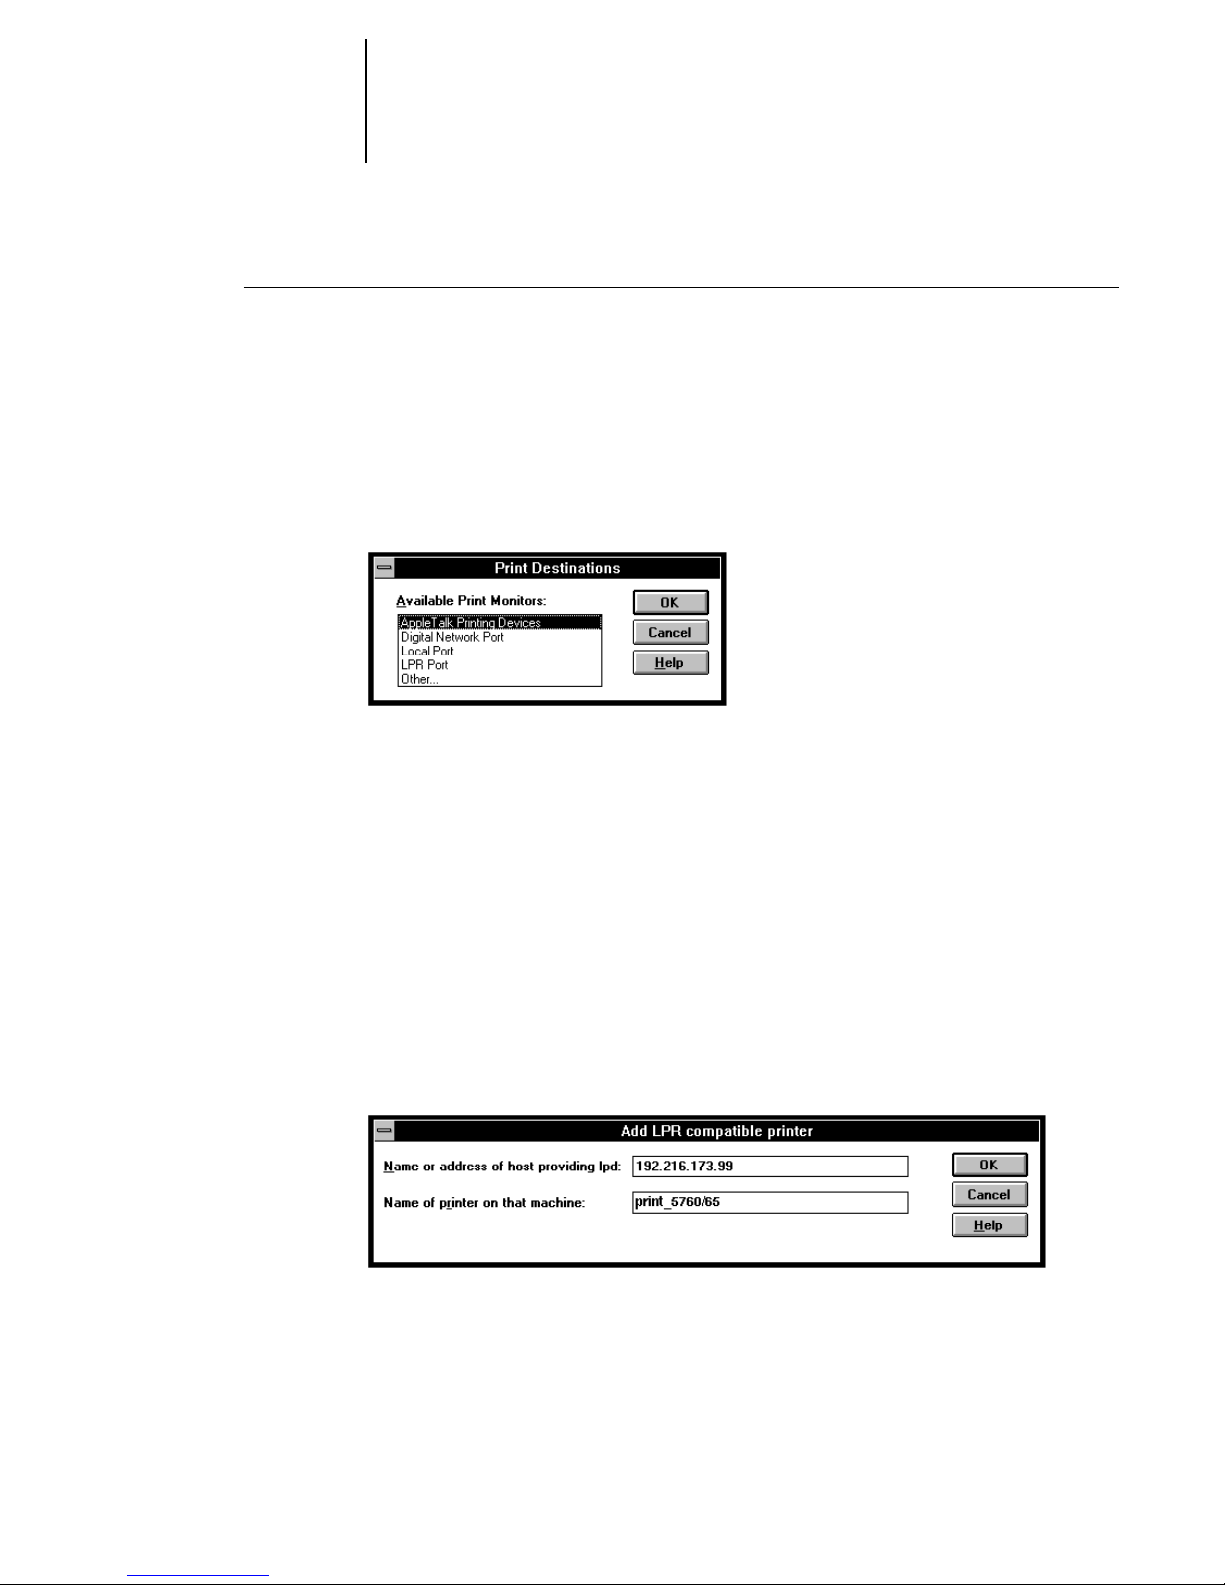
The Print Destinations dialog box is displayed.
4. Select LPR Port and click OK.
This option is available if you installed TCP/IP with the LPR printing protocol when
you installed Windows NT. See your Windows NT documentation for information.
5. In the “Add LPR compatible printer” dialog box, enter the IP address or hostname of
the Fiery SI in the Name or address region.
You can print the Configuration page to see the IP address.
6. In the Name of printer area, type the internal name of the printer in lo w ercase letter s:
queue_devicename .
N
OTE: This name must exactly match one of the following: print_5760/65,
hold_5760/65, print_5790, hold_5790, print_5750, hold_5750
7. Click OK. The Printer Properties dialog box shows the printer printing to
.
IP Address:QueueName
Page 56

45 Installing additional Windows files
8. Enter or verify the name of the printer in the Printer Name box in the Create Printer
dialog, and then click OK.
9. Click OK.
You have configured your workstation to use TCP/IP to communicate with the printer.
When you select Print, your PostScript files will be transmitted over the LPR Port
connection to the queue set up on the server by your administrator. To verify the
connection, print a test document from each networked computer that will use the
printer.
Installing additional Windows files
This section describes installing files that, for the most part, are common for all
versions of Windows.
Installing the EFICOLOR folder files
If you will be using Photoshop, you should install the EFICOLOR Separation Tables
that correspond to your print device. The Separation Tables enable you to get the best
possible CMYK separations.
TO INSTALL THE EFICOLOR FILES FOR PHOTOSHOP:
1. Open the EFICOLOR folder that was created in the FierySI folder when you installed
software.
2. Drag the files corresponding to your copier from the TABLES folder to the Adobe
Photoshop directory.
3. Drag the CALRGB.AMS file into the Adobe Photoshop folder.
You may have already installed this file when you installed Fiery XJ Scan.
4. Start Photoshop.
5. Choose Separation Tables from the Preferences submenu of the File menu.
6. Click Load and browse to the location where you installed the Separation Tables.
Locate the file that corresponds to your copier.
Page 57
46 Installing user software on a PC-compatible computer
7. Select the Separation Tables and click Load.
File names are differentiated by a P or an S that indicates Photographic mode or Solid
Color mode.
Files ending in “P.AST” are for printing in Photographic mode.
Files ending in “S.AST” are for printing in Solid Color mode.
The two separation tables are for Photographic (P) rendering and for Solid (S) color
rendering. Photographic rendering is best for photographs and other images where
tonal relationships are important. Solid color rendering is best when rendering
individual colors accurately is more important than preserving tonal relationships.
8. Click OK to close the Separation Tables dialog box.
Separation Tables r emain loaded the next time you start Photoshop, unless y ou remo ve
them.
Loading the monitor settings file for Fiery XJ Scan
If you will be using Fiery XJ Scan, load the monitor settings file into Photoshop. You
need to load this file only once.
TO LOAD THE MONITOR SETTINGS FILE:
1. Start Photoshop.
2. Choose Monitor Setup from the Preferences submenu of the File menu.
The Monitor Setup dialog box appears. For information about this dialog box, see
your Adobe Photoshop documentation.
Page 58

47 Installing additional Windows files
3. In the Monitor Setup dialog box, click Load.
4. Open the Adobe Photoshop directory, select CALRGB.AMS, and click OK.
The Calibrated RGB file appears as the selection in the Monitor list box of the
Monitor Setup dialog box.
5. Under Room Parameters, set Ambient Light to High.
6. Click OK to close the Monitor Setup dialog box.
Installing the Color Reference pages
There are two folders containing color reference pages for use with the Fiery SI:
• COLORREF folder that you can install from the installer
• CLRFILES folder that you can copy from the User Software CD
Moving files in the COLORREF folder
Put the COLORREF folder that was installed in the FierySI folder anywhere you like.
It contains the following color reference pages:
• CMYK_REF.PS—A PostScript file of the CMYK Color Reference pages that you
can download and print using the Fiery XJ Downloader or any other application
that supports printing PostScript files.
1
• MAJSTK_C.PS
, MAJSTK_U.PS2—PostScript files of the PANTONE coated and
uncoated colors for the MajestiK.
REGAL_C.PS, REGAL_U.PS—PostScript files of the PANTONE coated and
uncoated colors for the Regal.
5750_C.PS, 5750_U.PS—PostScript files of the PANTONE coated and uncoated
colors for the 5750.
Installing files from the CLRFILES folder
There are additional sample color files in the CLRFILES folder on the User Software
CD. You can put the CLRFILES folder anywhere you like. It contains several color
reference pages:
1. Files ending in “C.PS” are for PANTONE coated colors.
2. Files ending in “U.PS” are for PANTONE uncoated colors.
Page 59

48 Installing user software on a PC-compatible computer
• APLPAGES—Contains RGB_REF, a folder of sample application pages for
Microsoft Word or PowerPoint.
• CALIB—Contains a sample measurements file that you can use with Fiery XJ Print
Calibrator. It is for demonstration purposes and should not be used to calibrate your
Fiery SI.
• COLORCHT—A PostScript version (COLORCHT.PS) of the RGB, CMY, and
PANTONE color charts that you can print from the Fiery SI Control Panel.
• SAMPLES—For each device, contains a folder of sample images that you can
download and print using the Fiery XJ Downloader or any other application that
supports printing PostScript files.
Copying the PPD for Adobe PageMaker
If you use Adobe PageMaker, you should copy the PostScript Printer Description file
(PPD) to special locations in your PageMaker directory.
TO COPY THE PRINTER DESCRIPTION FILES FROM THE CD:
1. Insert the User Software CD in your PC.
2. Double-click the ENGLISH\PRNTDRV directories.
3. Double-click the directory that matches your Windows system. Copy the printer
description file for your Fiery SI to the appropriate location.
If you use: Copy this file: To this location:
PageMaker 5.0
or later
*
The 203 version supports the MajestiK; the 303 version supports the Regal; 503 version
supports the 5750.
EFSIX203.PPD*
or
EFSIX303.PPD *
or
EFSIX503.PPD*
For PageMaker 5.0,
\ALDUS\USENGLSH\PPD4
For PageMaker 6.0,
\PM6\RSRC\USENGLSH\PPD4
Page 60

49 On a Macintosh computer
Troubleshooting
This section provides some suggestions in case you encounter problems while installing
and setting up software.
On a Macintosh computer
Installing Macintosh PostScript Printer Driver
• If the Printer Driver cannot autoselect the printer file, when prompted, open the
System Folder:Extensions:Printer Descriptions folder and select the file that
corresponds to your copier.
On a Windows computer
Setting up IPX (Novell) printing for Windows NT Workstation
• Install the Apple LaserWriter IIg before you attempt to “add a printer” for the
Fiery SI.
Installing Adobe PostScript Printer Driver
If you are re-installing the Adobe PostScript Printer Driver, you must delete any
previous versions and related files from DOS before you can successfully install the
driver. See the Adobe README file included with the Printer Driver for instructions.
Problems with Windows and IPX/SPX
• If you are using Windows 95, make sure that SPX/IPX and T CP/IP netw orking pr otocols
are both enabled.
See “Completing the Windows 95 IPX/SPX or IPX (Novell) connection” on page 37
for information.
• Make sure that either the NET_WIPX.DLL(Windows 95) or NET_WSCK.DLL
(Windows NT) file is in the SYSTEM directory.
Make sure that only one file is installed in this directory and that it is the correct file for
your system.
• Make sure that the NET_WSCK.INI file is in the WINDOWS directory.
Page 61

50 Troubleshooting
• Open the NET_WSCK.INI file with a text editor and make sure that it is customized
correctly for your site.
Problems with Windows 3.x and SPX utilities
• Make sure that you installed the files in the UTILS\IPXSPX folder from the User
Software CD or floppy disks.
For instructions, see “Completing installation for Windows 3.1x” on page 14. If you
do not have the correct version of all Novell software installed, you may experience a
blank screen with a blinking cursor.
If you install the files and still encounter the problem, try the following suggestions. If
these suggestions do not help, contact No vell and request additional information about
the “Black screen of death (BSOD)” problem. Information is also available on the
WWW at http://www.novell.com
• If you are running a version of DOS Requestor earlier than version 1.20, or if you are
running a version of VNETWARE.386 dated earlier than 8-17-94, you will need to add
to the [386 Enh] section of SYSTEM.INI a TimerCriticalSection=10000 (or =1000) line .
The VNETWARE.386 driver for the DOS Requestor 1.20 defaults to 1000, which
better supports mobile products.
• Make sure that your system and memory management configurations are set up
properly. Any I/O, memory, or IRQ conflicts may cause this problem.
• If you have a VTDA.386 file, replace it with the latest file (available from Microsoft
Corporation or WWW.MICROSOFT.COM).
This file is not required for all systems. If it is required by your system, make sure that
you have the correct version.
• If you have a WINSTART.BAT file, remove it.
• Virtualize the NIC's IRQ in the [VIPX] section of the System.ini if you use IBM LAN
SUPPORT.
• If you are using Windows for Workgroups, you must also have the following files
installed in your WINDOWS directory: NWCALLS.DLL, NWIPXSPX.DLL, NWLOCALE.DLL,
MWNET.DLL, NWPSRV.DLL.
These files are part of your Novell client software and you can install them from your
installation disks or contact Novell for information.
Page 62

Index
A
ABOTH.BAT file 18
Adobe Photoshop x
Adobe PostScript printer driver
Macintosh 49
Windows 3.x 26
Windows 95 34
ADOBEPS.DRV see Adobe PostScript
printer driver
Aldus PageMaker for Windows 48
AppleTalk
connecting to Macintosh 8
connecting to Windows 3.x 30
APPLINIT.EXE file 15
APPL_TSR.EXE file 15
AUTOEXEC.BAT file 16
C
CALRGB.AMS file 15, 19
Chooser list, configuring 19 to 25
Color Reference pages
Macintosh 4
Windows 47
configuring the Chooser list 19 to 25
connecting
Macintosh by AppleTalk 8
Windows 3.x by AppleTalk 30
Windows 3.x by IPX (Novell) 32
Windows 3.x by parallel port 30
Windows 95 by IPX 37
Windows 95 by parallel port 34
Windows NT by parallel port 43
Windows NT by TCP/IP 44
COPSTalk 31
CTL3D.DLL file 15
D
device code 24
Device Name 21
device name 21
Windows NT with TCP/IP 44
E
EFICOLOR 45
F
Fiery XJ Scan
Macintosh 3
monitor settings file, Windows 46
Windows 3.x 15
Frame Type, IPX for Windows 95 38
I
installing software
Macintosh 1
Windows 10
internal name, for Windows NT with TCP/
IP 44
IPX (Novell)
Windows 3.x printing 32
Windows 95 37, 39
IPX address 20
L
LaserWriter driver x
LPR, Windows NT 44
M
Macintosh
installing software 1
system requirements x
utilities 1
monitor settings file
Windows 46
monitor setup file
Macintosh 6
Page 63

I-2 Index
N
NET_APPL.DLL file 15
NET.CFG file 16
NetWare
network port with Windows 3.x 33
network port with Windows 95 39
NetWare client setup
Windows 3.x 32
Windows 95 37, 39
Novell (IPX) see IPX (Novell)
P
PageNOW! paging software x
parallel port
Windows 3.x 30
Windows 95 34
Windows NT 43
PhoneNet PC 31
printer description files
Windows 48
PSCRIPT.DRV
Windows 3.x 27
S
screen fonts, Macintosh 3
Separation Tables
Macintosh 5
Windows 45
system requirements
Macintosh x
Windows x
T
TCP/IP, Windows NT 44
U
utilities
installing Macintosh 1
installing Windows 10
W
Windows
installing software 10
system requirements x
utilities 10
Windows 3.x
Adobe PostScript printer driver 26
AppleTalk 15
parallel port 30
PostScript Printer Driver 27
SPX 15
Windows 95
Adobe PostScript printer driver 34
IPX/SPX 37
parallel port 34
Windows NT
parallel port 43
PostScript printer driver 40
TCP/IP 44
 Loading...