

Page 1
GAS/OIL
RATIO
50:1
Operator’s Manual
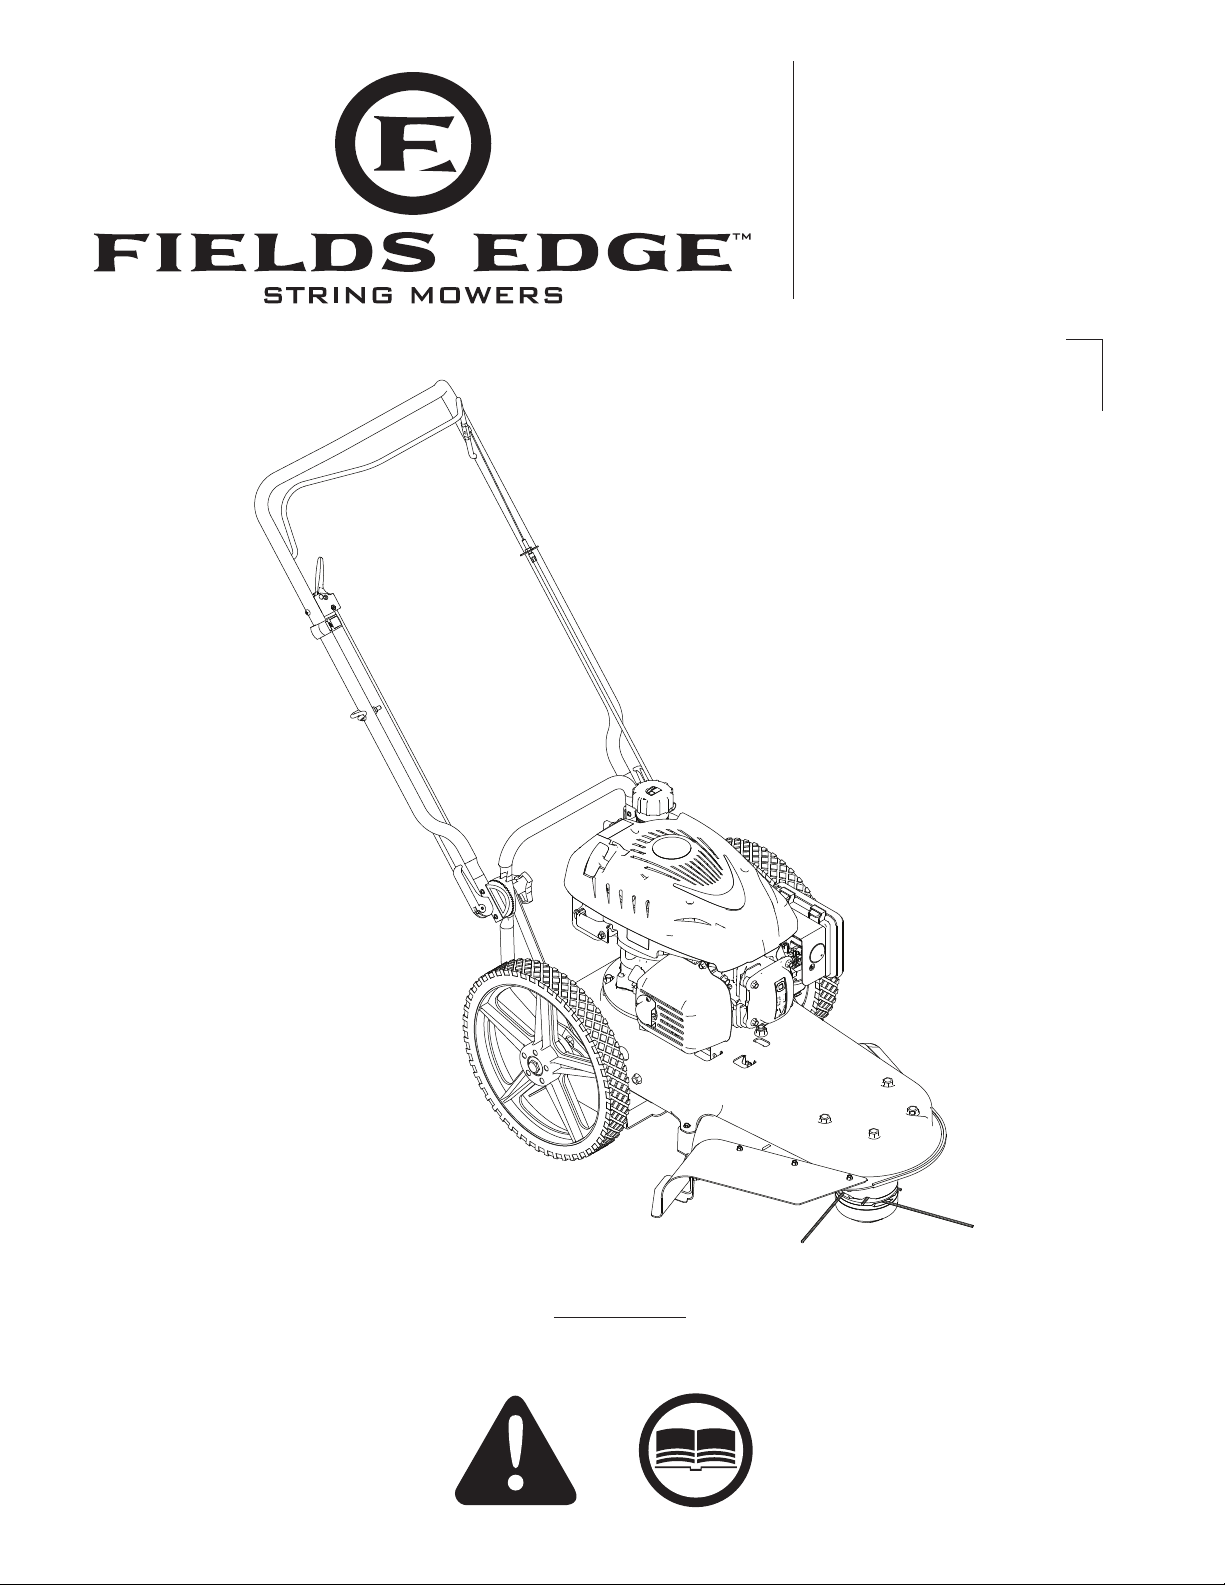
String Mower M220
SN
Get parts online at
www.geteldsedge.com
Includes Model:
M220
P/N: 19444
ECN: 10756
REV2: 02/17/15
© 2015 Ardisam, Inc.
All Rights Reserved
Page 2
Operator's Manual
String Mower M220
INTRODUCTION
Congratulations on your investment in quality. Thank you for purchasing a Fields Edge™ String Mower. We have worked to ensure
that the string mower meets the highest standards for usability and durability. With proper care, your string mower will provide
many years of service.
NOTE: Please read this entire manual before installation and use. Fields Edge™ reserves the right to change, alter or
improve the product and this document at any time without prior notice.
CONTENTS
Registration .................................................................................................................................................................................................................................... 2
Warnings and Safety Precautions ....................................................................................................................................................................................... 3-6
Features ...........................................................................................................................................................................................................................................7
Assembly ..................................................................................................................................................................................................................................... 8-9
Operation ..................................................................................................................................................................................................................................9-10
Maintenance, Service and Storage ............................................................................................................................................................................... 11-15
Maintenance ...........................................................................................................................................................................................................................11
Servicing and Adjustment .......................................................................................................................................................................................... 12-14
Storage ......................................................................................................................................................................................................................................15
Troubleshooting .................................................................................................................................................................................................................. 15-16
Slope Guide ..................................................................................................................................................................................................................................17
Illustrated Parts Breakdown.............................................................................................................................................................................................18-22
Warranty ........................................................................................................................................................................................................................................23
REGISTRATION, SERVICE AND MAINTENANCE LOG
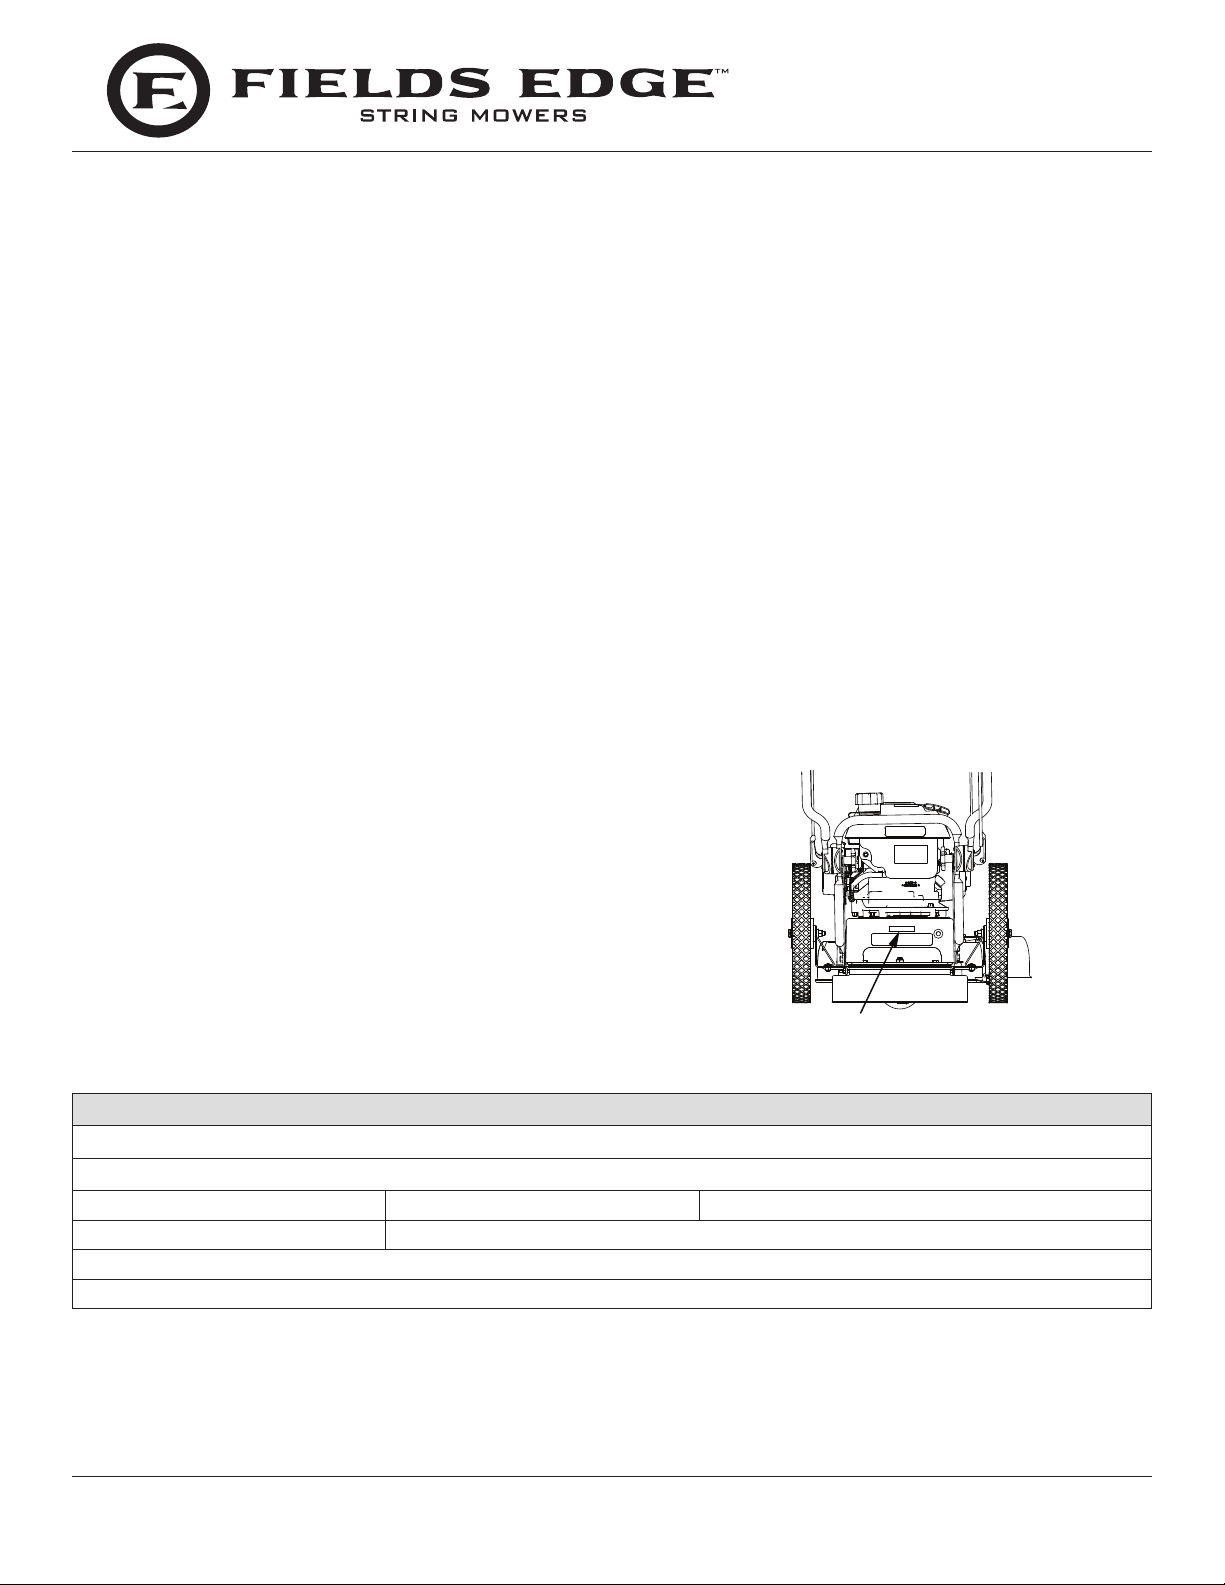
Record the model number and serial number in the space
provided for easy reference. Warranty is valid only if the completed
registration is received by Fields Edge™ within 30 days of purchase.
You can register your warranty online by visiting www.getFields
Edge.com. If you do not have a computer, call our customer service
department at (800) 345-6007 Mondays through Fridays from 8
a.m. to 5 p.m. CST.
MODEL AND SERIAL
NUMBER LOCATION
OWNERSHIP RECORDS
Owner’s Name:
Owner’s Address:
City: State/Province: Zip Code/Postal Code:
Model Number: Serial Number:
Date of Purchase:
Notes:
This instruction book contains information for several models. Read and keep this book for future reference. This book contains important information
on SAFETY, ASSEMBLY, OPERATION, AND MAINTENANCE. The owner must be certain that all the product information is included with the unit. This
information includes the INSTRUCTION BOOKS, the REPLACEMENT PARTS and the WARRANTIES. This information must be included to make sure state
laws and other laws are followed.
2
Check for parts online at www.geteldsedge.com or call 800-345-6007 M-F 8-5
Page 3
WARNINGS AND SAFETY PRECAUTIONS
Operator's Responsibility
Accurate assembly and safe and eective use of the machine is
the operator's responsibility.
• Read and follow all safety instructions.
• Carefully follow all assembly instructions.
• Maintain the machine according to directions and
schedule included in this operator’s manual.
• Ensure that anyone who uses the machine is familiar
with all controls and safety precautions.
Special Safety Messages
Your manual contains special messages to bring attention to
potential safety concerns, machine damage as well as helpful
operating and servicing information. Please read all the
information carefully to avoid injury and machine damage.
NOTE: General information is given throughout the
manual that may help the operator in the
operation or service of the machine.
Operator's Manual
String Mower M220
WARNING
WARNING INDICATES A HAZARD WHICH, IF NOT
AVOIDED, COULD RESULT IN DEATH OR SERIOUS
INJURY TO PERSONNEL AND/OR PROPERTY
DAMAGE.
IMPORTANT
INDICATES HELPFUL INFORMATION FOR PROPER
ASSEMBLY, OPERATION, OR MAINTENANCE OF
YOUR EQUIPMENT.
WARNING
CALIFORNIA PROPOSITION 65 WARNING
ENGINE EXHAUST FROM THIS PRODUCT
CONTAINS CHEMICALS KNOWN TO THE STATE OF
CALIFORNIA TO CAUSE CANCER, BIRTH DEFECTS,
OR OTHER REPRODUCTIVE HARM.
THIS SYMBOL POINTS OUT
IMPORTANT SAFETY INSTRUCTIONS
WHICH IF NOT FOLLOWED COULD
ENDANGER YOUR PERSONAL SAFETY.
Before Operating Engine:
WARNING
READ ENTIRE OPERATING AND MAINTENANCE
INSTRUCTIONS FOR THIS PRODUCT AND THE
INSTRUCTIONS FOR THE ENGINE THAT POWERS
THIS UNIT. FAILURE TO FOLLOW INSTRUCTIONS
COULD RESULT IN SERIOUS INJURY OR DEATH.
OPERATE THE ENGINE ACCORDING TO THE SAFETY
INSTRUCTIONS OUTLINED HERE AND INSERTED
THROUGHOUT THE TEXT. ANYONE WHO USES
THIS PRODUCT MUST READ THE INSTRUCTIONS
AND BE FAMILIAR WITH THE CONTROLS.
CAUTION
CAUTION INDICATES YOUR EQUIPMENT CAN BE
DAMAGED IF THE SAFETY INSTRUCTIONS THAT
FOLLOW THIS SIGNAL WORD ARE NOT OBEYED.
WARNING
YOU MUST READ, UNDERSTAND AND COMPLY
WITH ALL SAFETY AND OPERATING INSTRUCTIONS
IN THIS MANUAL BEFORE ATTEMPTING TO SETUP
AND OPERATE YOUR MACHINE.
FAILURE TO COMPLY WITH ALL SAFETY AND
OPERATING INSTRUCTIONS CAN RESULT IN LOSS
OF MACHINE CONTROL, SERIOUS PERSONAL
INJURY TO YOU AND/OR BYSTANDERS, AND RISK
OF EQUIPMENT AND PROPERTY DAMAGE. THE
TRIANGLE IN THE TEXT SIGNIFIES IMPORTANT
CAUTIONS OR WARNINGS WHICH MUST BE
FOLLOWED.
Check for parts online at www.geteldsedge.com or call 800-345-6007 M-F 8-5
3
Page 4

Operator's Manual
String Mower M220
GENERAL Safety Rules
• Read, understand, and follow all instructions on the
machine and in the manual(s). Be thoroughly familiar
with the controls and the proper use of the mower
before starting.
• Familiarize yourself with all of the safety and
operating decals on this equipment and on any of its
attachments or accessories.
• Do not put hands or feet near or under rotating parts.
• Only allow responsible individuals, who are familiar
with the instructions, to operate the mower.
• Thoroughly inspect the area where the machine
is to be used and remove all foreign objects. Your
equipment can propel small objects at high speed
causing personal injury or property damage. Stay
away from breakable objects, such as house windows,
automobile, greenhouses, etc.
• Keep the area of operation clear of all persons,
particularly small children, and pets.
• Wear appropriate clothing such as a long-sleeved
shirt or jacket. Also wear long trousers or slacks. Do
not wear shorts.
• Do not wear loose clothing or jewelry. They can get
caught in moving parts.
• Always wear safety goggles or safety glasses with side
shields when operating mower to protect your eyes
from foreign objects which can be thrown from the
unit.
• Always wear work gloves and sturdy footwear. Wear
footwear that will improve footing on slippery
surfaces. Leather work shoes or short boots work well
for most people. These will protect the operator’s
ankles and shins from small sticks, splinters, and other
debris.
• It is advisable to wear protective headgear to prevent
the possibility of being struck by small ying particles,
or being struck by low hanging branches, twigs,
or other objects which may be unnoticed by the
operator.
• Do not operate the mower without proper guards or
other safety protective devices in place.
• Use this equipment for its intended purpose only.
• See manufacturer’s instructions for proper operation
and installation of accessories. Only use accessories
approved by the manufacturer.
• Operate only in daylight or good articial light.
• Do not operate product when fatigued or under the
inuence of alcohol, drugs or other medication which
can cause drowsiness or aect your ability to operate
this machine safely.
• Never operate mower in wet grass. Always be sure of
your footing; keep a rm hold on the handle and walk;
never run.
• Before each use, inspect the ON/OFF switch and
cable. Make sure that the cable is free and that the
lever is not damaged. Also check the cable linkage
running to the carburetor for kinks, loose ttings, and
obstructions. Verify that the control bail is working
properly.
• Stop the rotating mower head when crossing gravel
drives, walks, or roads. Wait for the cutting lines to
stop rotating.
• Watch for trac when operating near, or when
crossing roads.
• Stop the engine (motor) whenever you leave the
equipment, before cleaning, repairing or inspecting
the unit, be sure the mower head and all moving
parts have stopped. Let the engine cool, disconnect
the spark plug wire and move it away from the spark
plug.
• If the equipment should start to vibrate abnormally,
stop the engine (motor), disconnect the spark plug
wire and prevent it from touching the spark plug.
Check immediately for cause. Vibration is generally a
warning of trouble.
• After striking a foreign object, stop the engine
(motor). Remove the wire from the spark plug. Inspect
the mower for damage. If damaged, repair before
starting and operating the mower.
• Never leave the mower unattended when the engine
is running. Remove the wire from the spark plug.
• Regularly inspect the mower. Make sure parts are not
bent, damaged or loose.
• Allow muer and engine areas to cool before
touching. Never pick up or carry the mower while the
engine is running.
• Prolonged exposure to noise and vibration from
gasoline engine powered equipment should be
avoided. Take intermittent breaks and/or wear ear
protection from engine noise as well as heavy work
gloves to reduce vibration in the hands.
• Check local regulations for age restrictions on use of
this machine.
• If the noise or vibrations of the machine increase, stop
immediately and perform an inspection.
• The fuel used in this machine is considered extremely
ammable and should be handled with care. When
storing extra fuel be sure that it is in an appropriate
container and away from any re hazards.
4
Check for parts online at www.geteldsedge.com or call 800-345-6007 M-F 8-5
Page 5

Operator's Manual
String Mower M220
Slope Operation
Slopes are a major factor related to slip and fall accidents
which can result in severe injury. All slopes require extra
caution. If you feel uneasy on a slope, do not mow it. Do mow
across the face of slopes; never up and down. Do not mow
excessively steep slopes (maximum 15 degrees) or areas
where the ground is very rough. See the “Slope Guide” in the
back of this manual to check a slope. Exercise extreme caution
when changing direction on slopes.
Remove objects such as rocks, tree limbs, etc.
Watch for holes, ruts, or bumps. Tall grass can hide obstacles.
IMPORTANT NOTES:
Do not mow near drop-os, ditches, or
embankments. The operator could lose footing or
balance.
Do not mow excessively steep slopes.
Do not mow on wet grass. Reduced footing could
cause slipping.
Children
Tragic accidents can occur if the operator is not alert to the
presence of children. Children are often attracted to the
mower and the mowing activity. Never assume that children
will remain where you last saw them.
• Keep children out of the mowing area and under the
watchful care of a responsible adult.
• Be alert and turn mower o if children enter the area.
• Before and while moving backwards, look behind and
down for small children.
• Never allow children to operate the mower.
• Use extra care when approaching blind corners,
shrubs, trees, or other objects that may obscure
vision.
Service
• Use extra care in handling gasoline and other fuels.
They are ammable and vapors are explosive.
• Use only an approved container.
• Never remove gas cap or add fuel with the engine
running. Allow engine to cool before refueling. Do
not smoke while refueling.
• Fill fuel tank outdoors with extreme care. Never ll
fuel tank indoors or near appliances with pilot lights,
heaters, or other ignition sources. Replace fuel cap
securely. If fuel is spilled, do not start the engine but
move product and fuel container from area. Clean up
spilled fuel and allow to evaporate.
• Never store the machine or fuel container inside
where there is an open ame (such as a water heater),
or other ignition source.
• If the fuel has to be drained, this should be done
outdoors. The drained fuel should be stored in a
container specically designed for fuel storage or it
should be disposed of carefully.
• Engines give o carbon monoxide, an odorless,
colorless, poison gas. Breathing carbon monoxide
can cause nausea, fainting or death. Always start and
run engine outdoors. Do not start or run engine in an
enclosed area, even if doors or windows are open.
• Never make adjustments or repairs with the engine
(motor) running. Disconnect the spark plug wire,
and keep the wire away from the plug to prevent
accidental starting (remove the ignition key if
equipped with an electric start). Always wear eye
protection when you make adjustments or repairs.
• Check the mower head and engine mounting bolts at
frequent intervals for proper tightness.
• Keep all nuts and bolts tight and keep equipment in
good condition. Check mounting hardware on mower
head every time you change mower line and prior to
each use.
• Never tamper with safety devices. Check their proper
operation regularly.
• When servicing or repairing the mower, do not tip the
machine over or up unless specically instructed to
do so in this manual. Service and repair procedures
can be done with the mower in an upright position.
Some procedures will be easier if the machine is lifted
on a raised platform or working surface.
• To reduce re hazard, keep mower free of grass,
leaves, or other debris build-up. Clean up oil or fuel
spillage. Allow mower to cool before storing.
• Stop and inspect the equipment if you strike an
object. Repair, if necessary, before restarting.
• Always disconnect spark plug wire before cleaning,
repairing, or adjusting.
• Do not change the engine governor setting or overspeed the engine.
• Clean and replace safety and instruction decals as
necessary.
• To guard against engine over-heating, always have
engine debris lter mounted and clean.
• Inspect mower before storage. When not in use,
disconnect spark plug lead and store indoors in a dry
place locked or otherwise inaccessible to children.
• Use only original equipment or authorized
replacement parts.
• Never replace the cutting lines with metal parts.
Check for parts online at www.geteldsedge.com or call 800-345-6007 M-F 8-5
5
Page 6
SAFETY DECALS AND WARNINGS
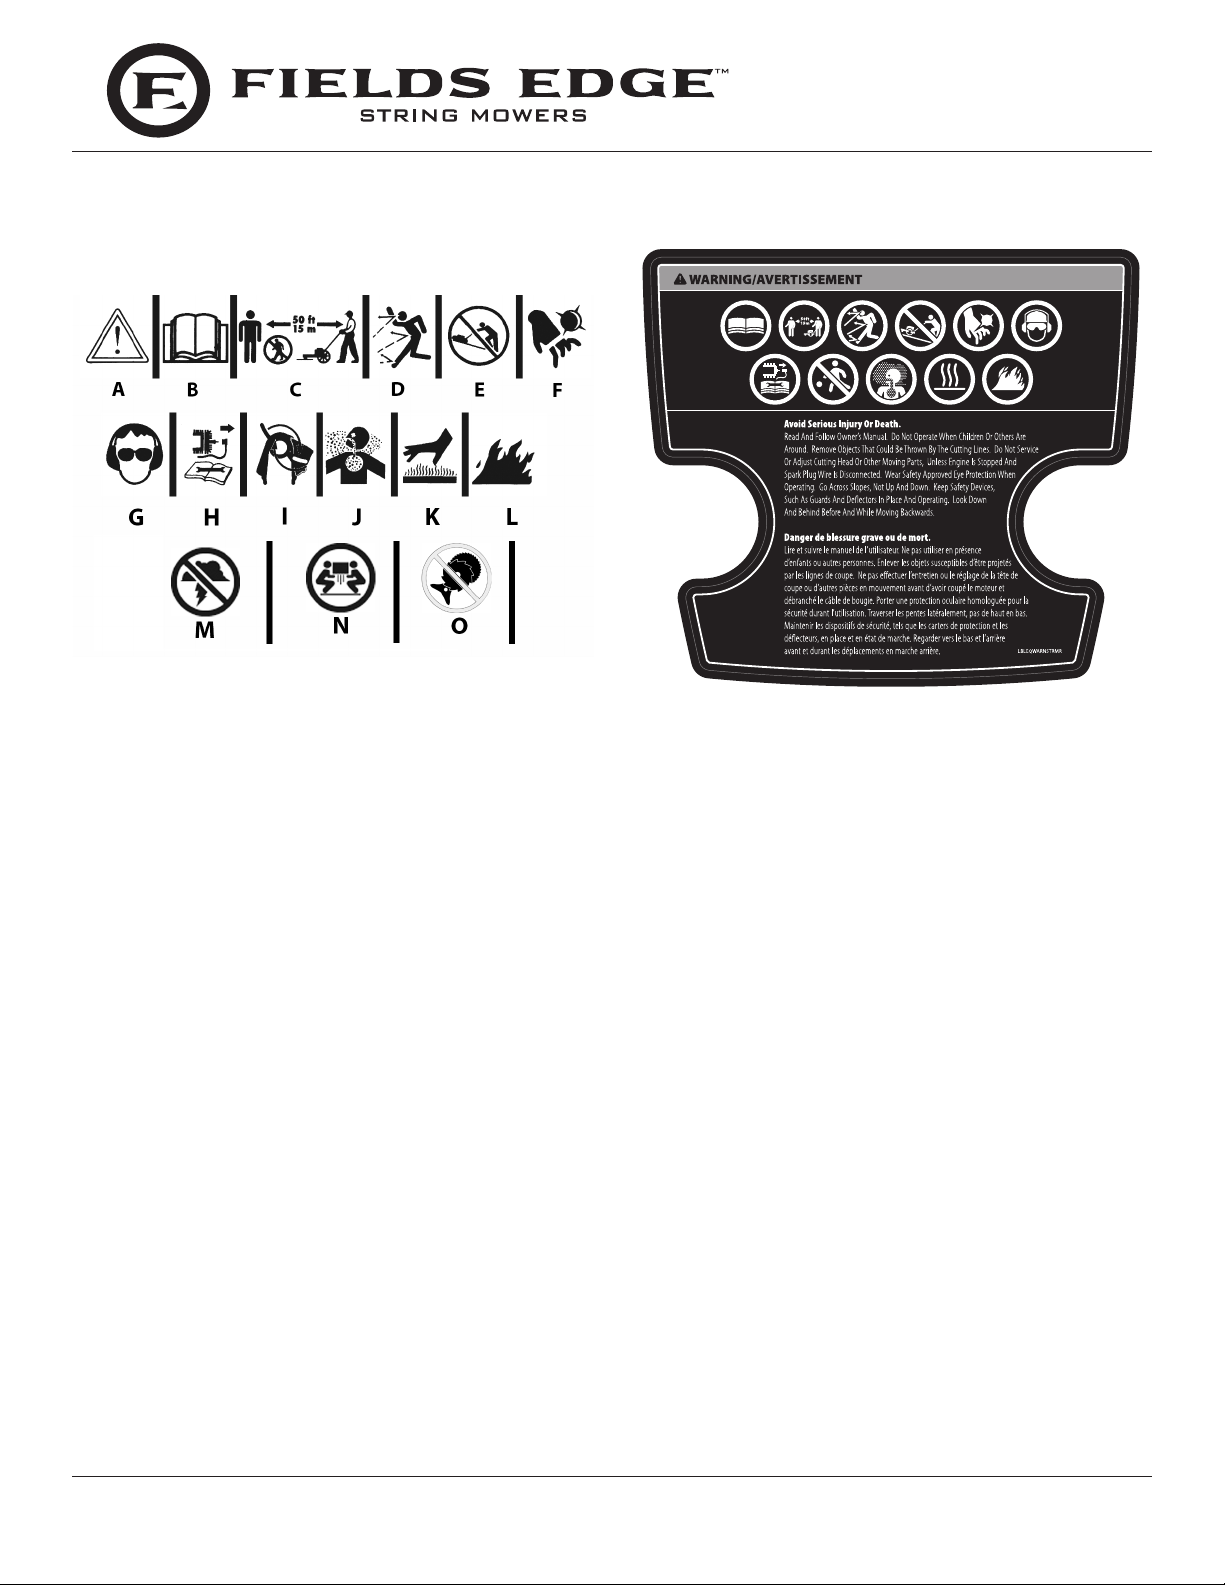
Pictured below are safety and hazard symbols on the unit
or in this manual. Before you operate your unit, learn and
understand the purpose for each symbol.
Operator's Manual
String Mower M220
Hazard Symbols and Meanings
A: Warning!
B: Read Owner's Manual Before Operating Machine
C: Do Not Operate While Others Are Around
D: Remove Objects that Could Be Thrown By This Machine.
E: Never Operate Machine Up and Down Slopes, ALWAYS
Operate Mower Across Slopes
F: Be Aware of Moving and Rotating Parts
G: Wear Ear and Eye Protection At All Times
H: Do Not Service or Adjust Moving Parts Unless Engine is
Stopped and Spark Plug Wire is Disconnected.
I: Direction of Rotating Mower Line
J: Toxic Fumes —Do Not Operate in Unventilated Areas
K: Hot Surfaces
L: Fire Hazards.
M. Do Not Use In Thunderstorms--For severe weather, stop
operation of this machine and seek shelter.
N. Team Lift - For your safety, always have at least two
people when lifting this machine.
O. Never Fit Metal Cutting Parts--Do not attach any metal
parts to the cutting head of this machine.
Should any of the safety labels become unreadable because
of being worn, faded, or otherwise damaged during the use of
your mower, please use the part number information provided
to order a replacement label.
Part No. LBLEQWARNSTRMR
String Mower Warning Decal
6
Check for parts online at www.geteldsedge.com or call 800-345-6007 M-F 8-5
Page 7
Operator's Manual
1
13
String Mower M220
FEATURES
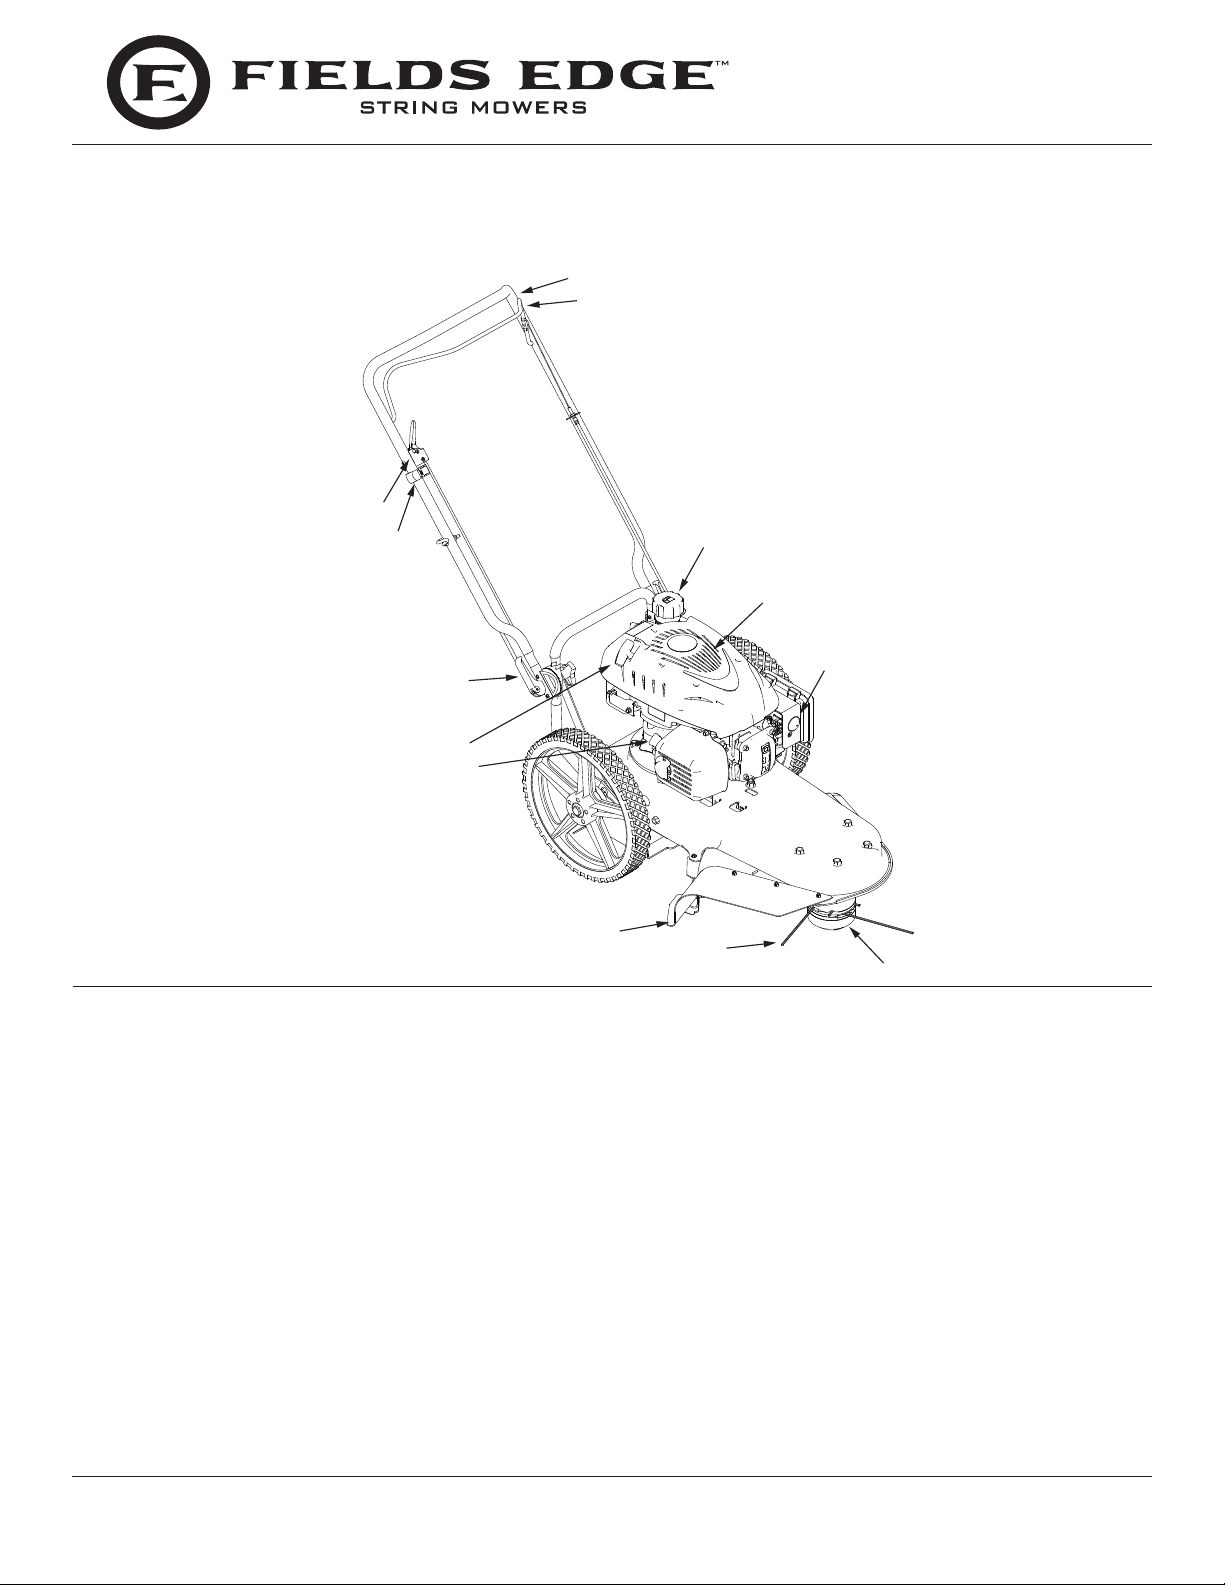
Read this owner’s manual and safety rules before operating your mower. Take time to compare the following illustration with the
mower to familiarize yourself with the product and its controls. SEE FIGURE 1
2
3
4
5
7
8
6
9
FIGURE 1: String Mower Features
1. Upper Handle
2. Mower Head Drive Lever - Engages rotation of
Mower Head.
3. Wheel Oset Locking Lever
4. Engine On/O Switch
5 Fuel Cap and ll port
6. Recoil Starter Pull Handle - Easy Pull Recoil Starter.
7. Debris Screen
8. Handle Adjustment Cam Lever
9. Oil Level Indicator Dip Stick and ll port
10. Primer Bulb - Injects fuel directly into the carburetor
for easy starting.
11. Shield Edge Guard - Protects the shield by
automatically cutting the line to the correct length.
12. Mower Line
13. Mower Head
10
11
12
Specications:
Mower Line Diameter: 0.155 inches
Mower Line Length: 15 inches
Mower Cutting Diameter: 22 inches
Wheel Diameter: 14 inches
Check for parts online at www.geteldsedge.com or call 800-345-6007 M-F 8-5
7
Page 8
Operator's Manual
String Mower M220
ASSEMBLY
Contents of Parts Bag
• Owner’s Manual
• Engine Manual
• Warranty Card
• Replacement Mower Line
• L-Handle Allen Wrench
• Spark Plug Wrench
• Safety Goggles
To Remove the Mower from the Carton
1. Remove any of the loose parts in packaging, including
the parts bags, from the carton.
2. Remove the packing material positioned around the unit.
3 Cut down all four corners of the carton and lay the side panels
at.
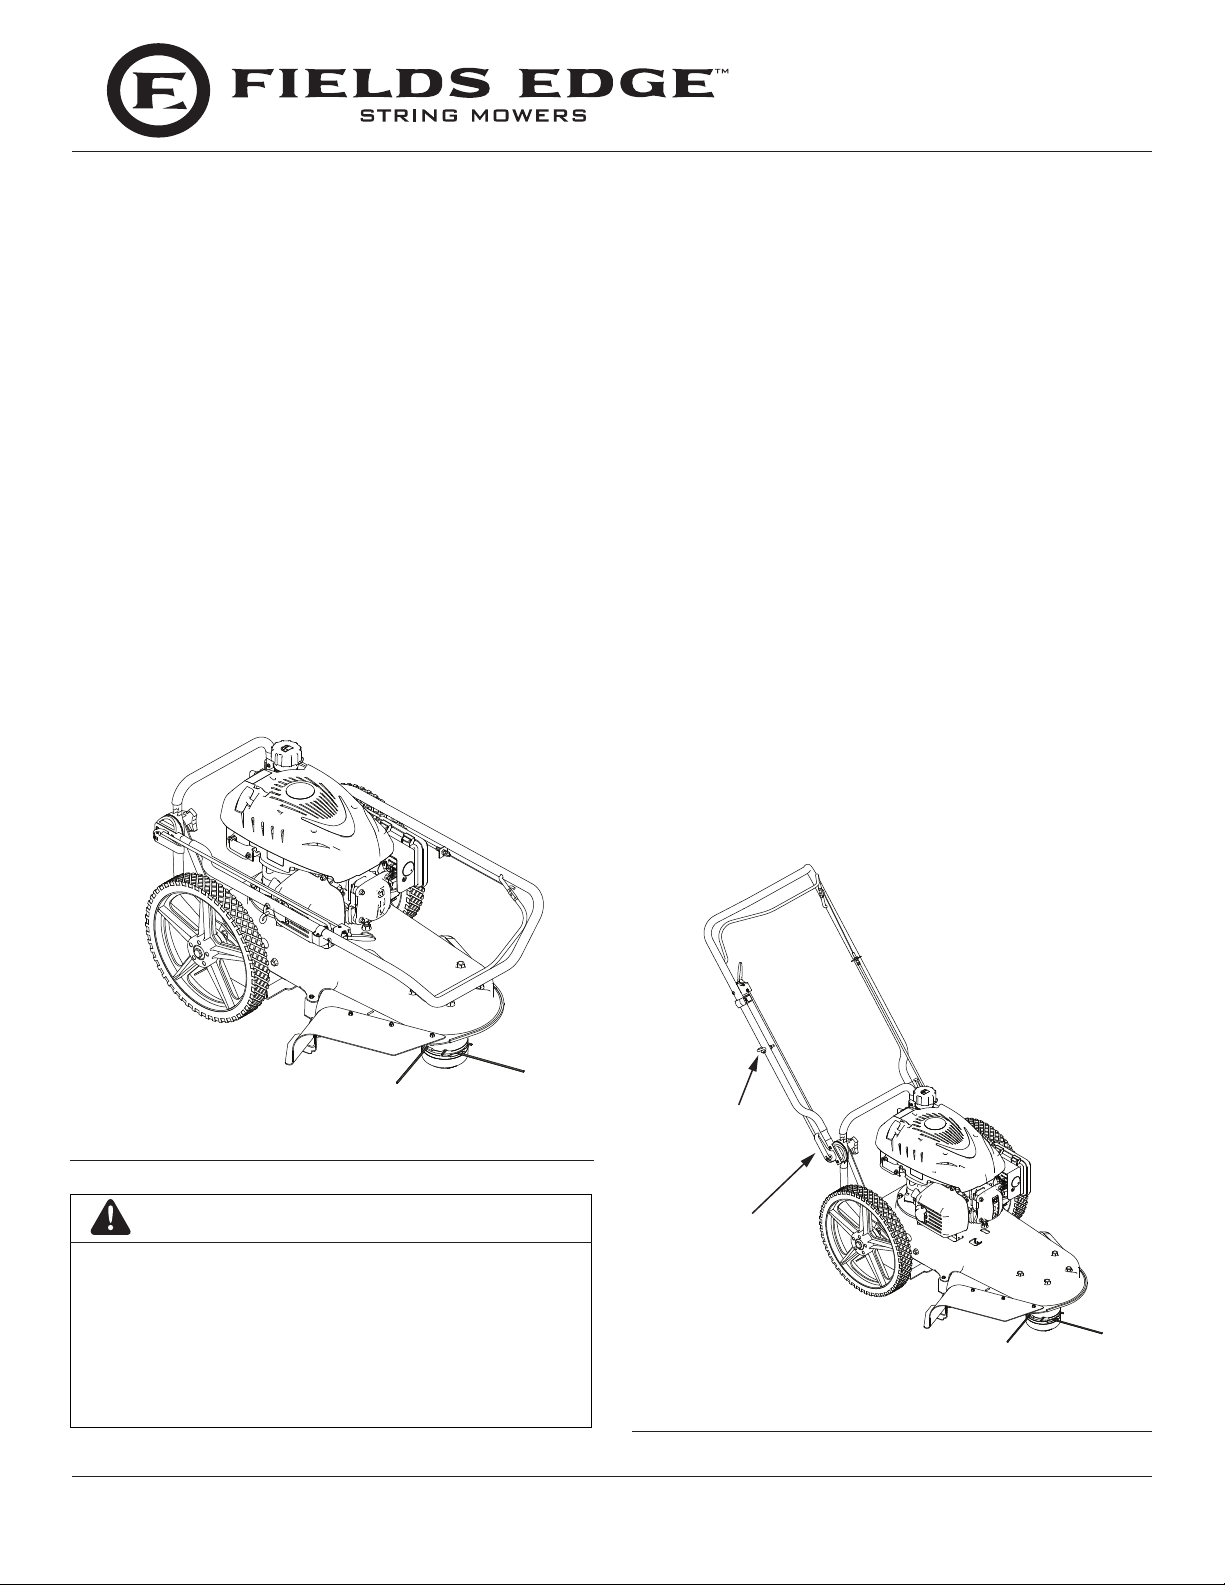
4. Pull the mower out of the carton. SEE FIGURE 2
How to Raise the Handle
1. Hold the handle with one hand and loosen both handle
adjustment cams until the ratchet teeth are disengaged.
Do not remove the handle adjustment levers.
2. Raise the handle to the operating position.
3. Stand in the operator’s position behind the mower. Put
the handle in a comfortable position. Make sure both
sides of the handle are level.
NOTE: Make sure the cables are not caught between the
upper and lower handle.
4. Tighten the handle adjustment levers. Make sure the
handle pivots are locked in place.
NOTE: The handle height is adjustable. See “How To
Adjust The Height Of The Handle” in the Service
and Adjustment section.
5. To attach the recoil start handle to the rope guide, twist
the rope through the rope guide mounted on the right
side of the handle. SEE FIGURE 3.
6. Check mower head. Make sure no more than 1" of line
is exposed out of the outfeed hole. If longer than 1" it
is possible to have line thrown out of head early. SEE
FIGURE 10 (PAGE 12)
FIGURE 2: Your New String Mower as it is shipped to you.
WARNING
USE THE CORRECT PERSONAL PROTECTION.
WEAR SAFETY GLASSES OR EYE SHIELDS WHILE
ASSEMBLING OR OPERATING THE STRING
MOWER.
REMOVE SPARK PLUG WIRE FROM SPARK
PLUG BEFORE DOING ANY ASSEMBLY OR
MAINTENANCE TO THE STRING MOWER.
8
Check for parts online at www.geteldsedge.com or call 800-345-6007 M-F 8-5
ROPE
GUIDE
HANDLE
ADJUSTING
CAM
FIGURE 3: Adjusting the Handle Bars.
Page 9
WARNING
Upper Level
Lower Level
Oil Dipstick
Oil Fill Spout
19444-0012r1
Operator's Manual
String Mower M220
OPERATION
How to Stop the Mower Head
• FOLLOW THE ENGINE MANUFACTURER’S
INSTRUCTIONS FOR THE TYPE OF
GASOLINE AND OIL TO USE.
• ALWAYS USE A SAFETY GASOLINE
CONTAINER. DO NOT SMOKE WHEN
ADDING GASOLINE TO THE ENGINE.
• WHEN INSIDE AN ENCLOSURE, DO NOT
FILL WITH GASOLINE. BEFORE YOU ADD
GASOLINE, STOP THE ENGINE. LET THE
ENGINE COOL FOR SEVERAL MINUTES.
ENGINE PREPARATION
See the engine manufacturer’s instructions for the type of
gasoline and oil to use. Before you use the unit, read the
information on safety, operation, maintenance, and storage.
Note: Engine does not contain OIL or GASOLINE when
shipped from the factory. You must service the
engine before operation.
Fill Crankcase With Oil
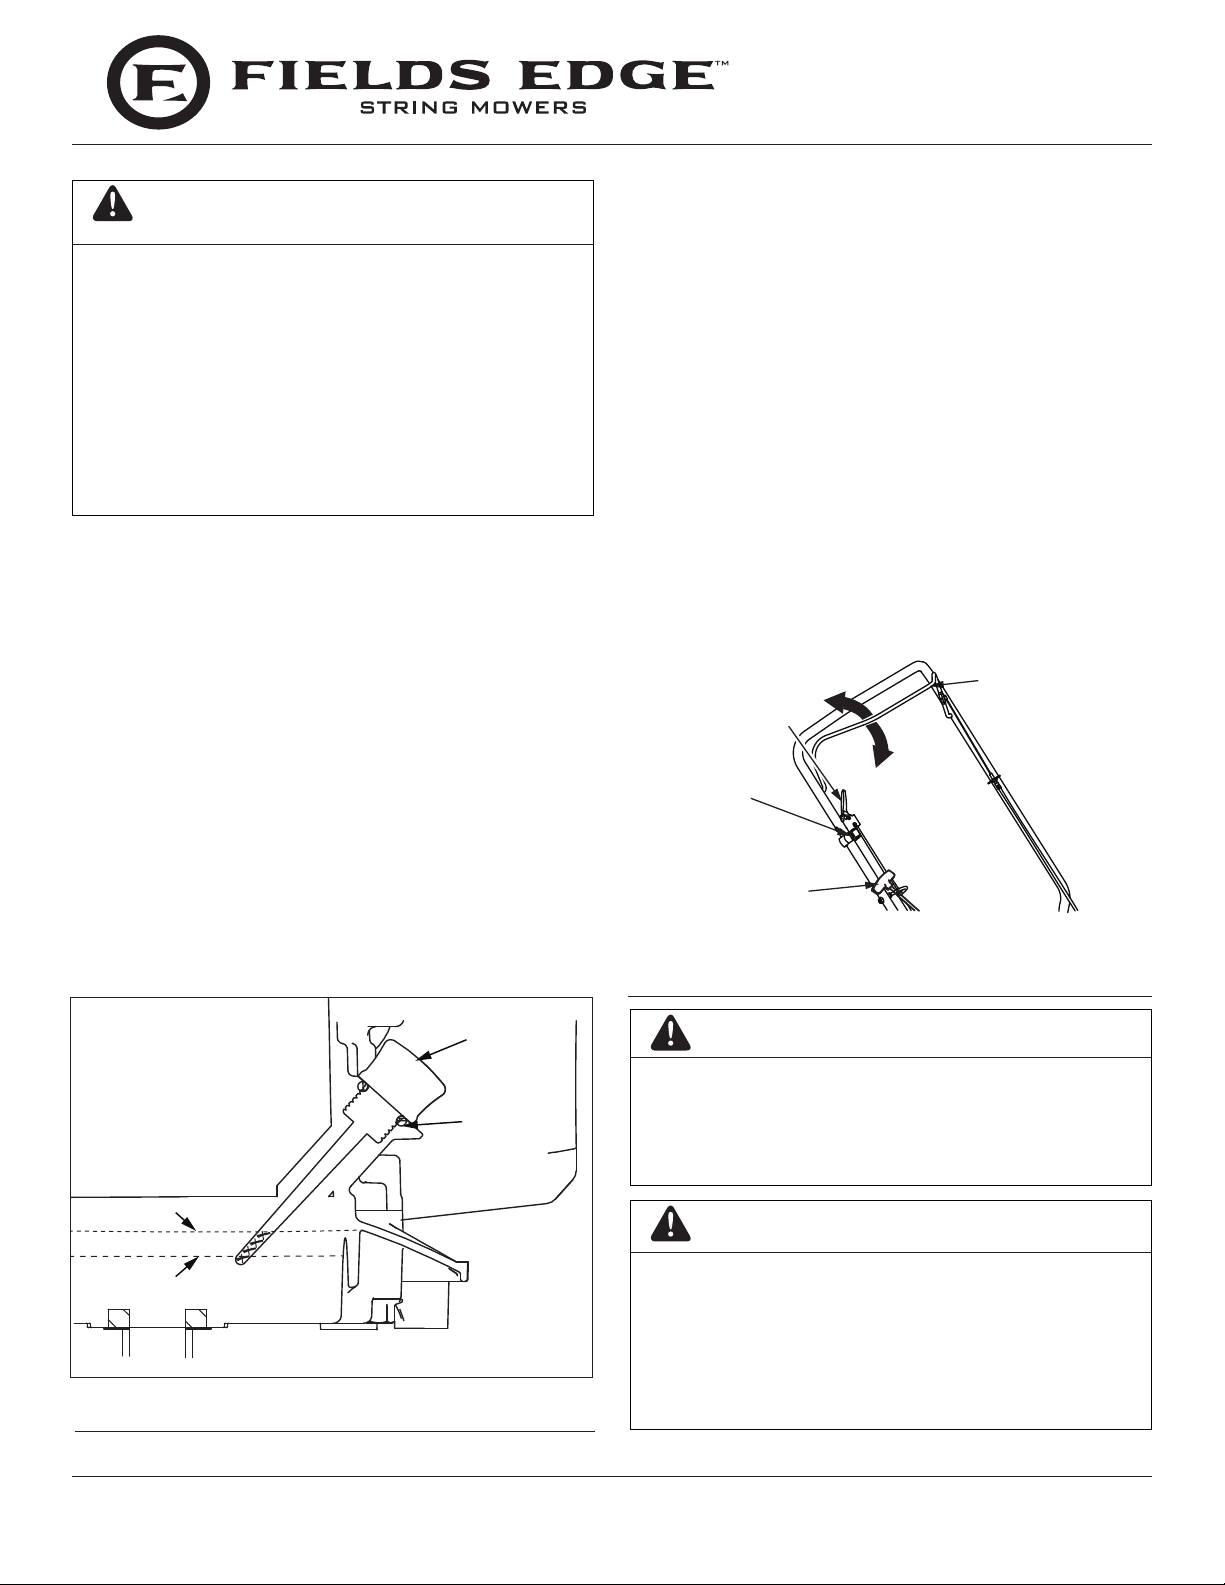
1. Remove the oil dipstick. Fill the crankcase to the FULL
line on dipstick. DO NOT OVERFILL. SEE FIGURE 4
2. Install the oil dipstick and tighten securely.
Fill Fuel Tank With Gasoline
See the engine manufacturer’s instructions for the type of
gasoline to use.
Release the control bail. It will return to its open position and
disengage the mower head.
How to Stop the Engine
Set the ON/OFF switch to the OFF position.
How to Use the Mower Head Drive Lever
1. To engage the mower head, hold the control bail against
the handle. The faster the engine runs, the faster the
mower head will rotate. SEE FIGURE 5
2. Once the mower head is rotating, push the mower forward
to mow.
MOWER HEAD
WHEEL OFFSET
LOCK LEVER
ENGINE
ON/OFF
SWITCH
RECOIL STARTER
PULL HANDLE
CONTROL BAIL
FIGURE 5: Using The Mower Head Drive Lever.
FIGURE 4: Filling Engine with Fuel and Oil.
Check for parts online at www.geteldsedge.com or call 800-345-6007 M-F 8-5
WARNING
BE CAREFUL AROUND MOVING PARTS. THE
MOWER HEAD WILL CONTINUE TO ROTATE FOR
SEVERAL SECONDS AFTER THE ENGINE HAS
STOPPED.
CAUTION
• IMPROPER TREATMENT OF THE STRING
MOWER CAN DAMAGE IT AND SHORTEN ITS
LIFE.
• DO NOT ATTEMPT TO CRANK OR START THE
ENGINE BEFORE IT HAS BEEN PROPERLY
SERVICED WITH THE RECOMMENDED OIL.
THIS MAY RESULT IN AN ENGINE FAILURE.
9
Page 10
Engine Throttle Control
1. The engine throttle speed is a factory setting. It is
designed to ensure proper speed of your string mower
during all operating conditions.
How to Use the Primer Bulb
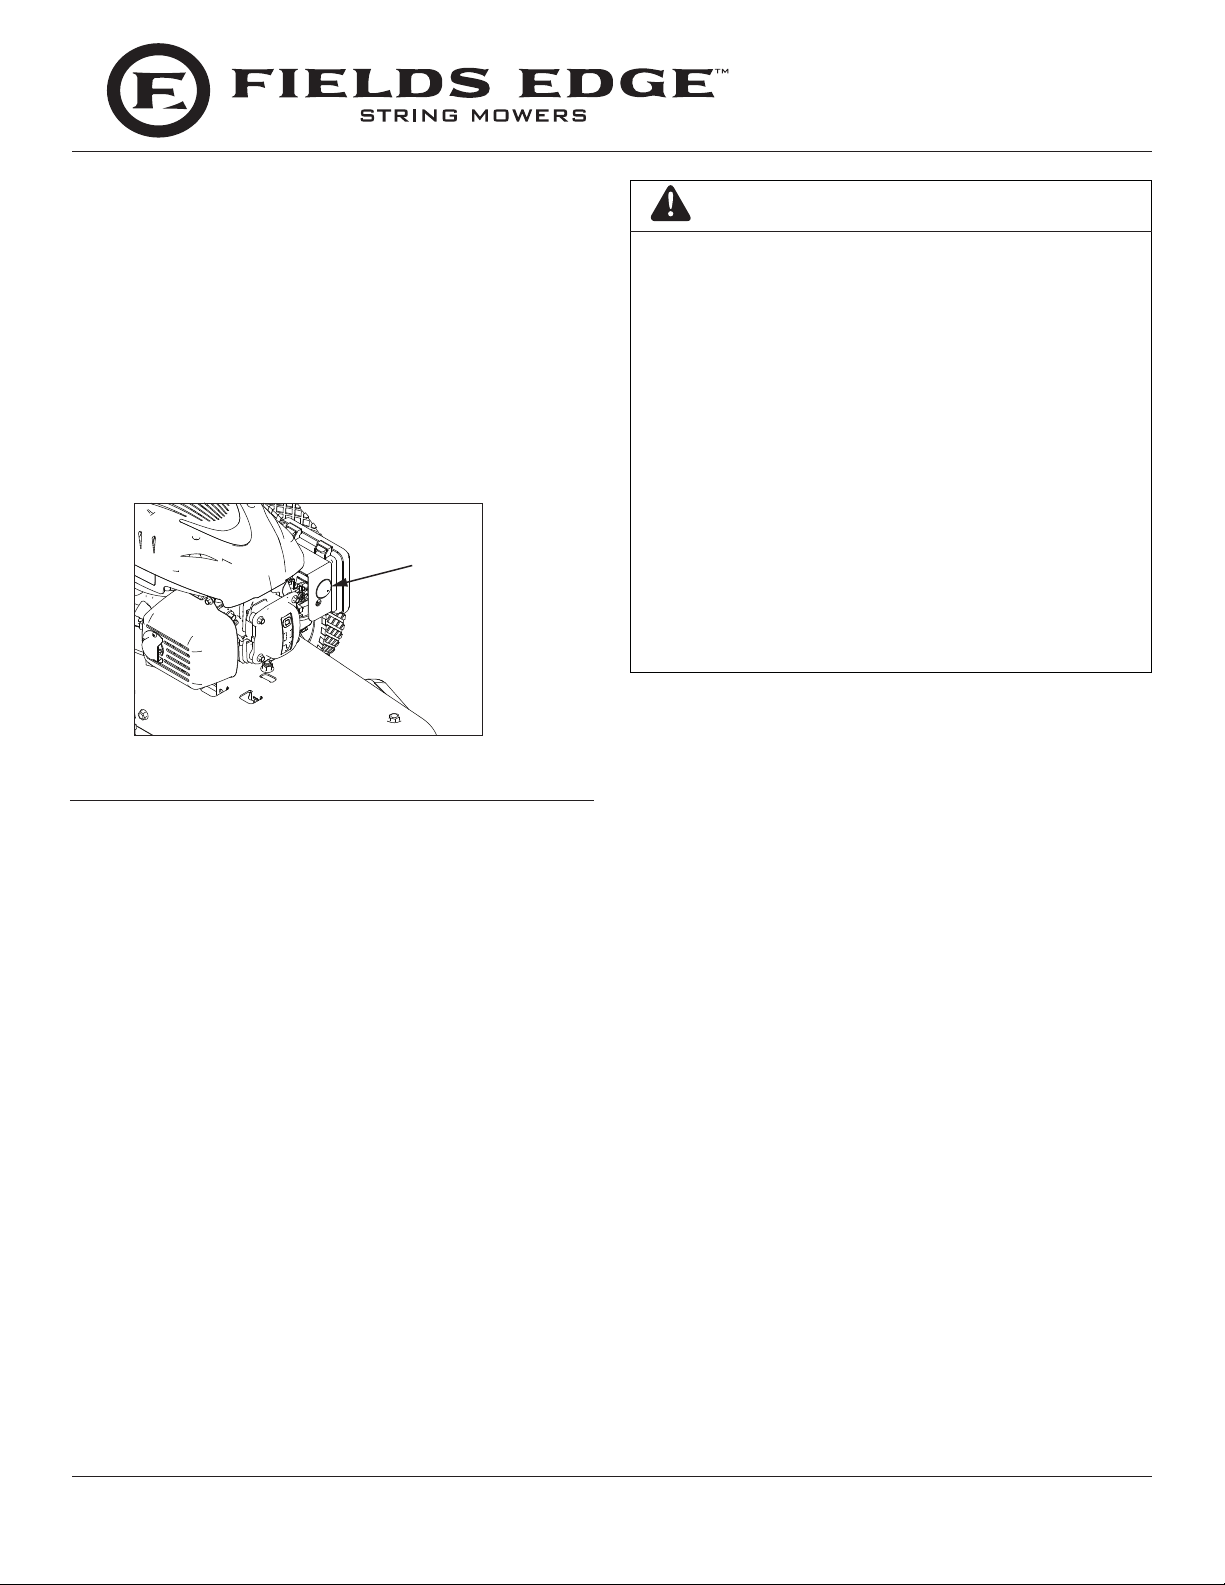
1. Push the primer bulb ve times. Wait approximately two
seconds between each push. SEE FIGURE 6
NOTE: Do not use the primer bulb to restart a warm
engine after a short shutdown. Over priming can
cause the engine to ood.
PRIMER
BULB
Operator's Manual
String Mower M220
WARNING
• DO NOT LEAVE STRING MOWER
UNATTENDED WHILE ENGINE IS RUNNING.
WAIT FOR THE MOWER LINES TO STOP
ROTATING.
• NEVER RUN THE ENGINE INDOORS OR IN
A POORLY VENTILATED AREA. ENGINE
EXHAUST CONTAINS CARBON MONOXIDE,
AN ODORLESS AND DEADLY GAS.
KEEP HANDS, FEET, HAIR AND LOOSE
CLOTHING AWAY FROM THE MOWER AND
ANY MOVING PARTS ON THE ENGINE.
AVOID TOUCHING THE MUFFLER AND
SURROUNDING AREAS. TEMPERATURES
MAY EXCEED 150 DEGREES FAHRENHEIT.
• DEBRIS SUCH AS STICKS, GRAVEL OR
ROCKS CAN BE THROWN WITH SUFFICIENT
FORCE TO CAUSE PERSONAL INJURY OR
PROPERTY DAMAGE.
FIGURE 6: Primer Bulb Location.
How to Start the Engine
NOTE: Your engine will smoke the rst time it is started. It
is burning o the protective coating that is on the
internal engine parts.
1. Before each use, remove debris from the debris screen.
SEE FIGURE 1 IN "FEATURES" SECTION. Debris can
cause the engine to overheat. Wipe the debris screen
with a cloth or paper towel.
2. Set ON/OFF Switch to ON.
3. To start a cold engine, push the primer bulb ve times.
Wait two seconds between each push of the primer bulb.
SEE FIGURE 6
NOTE: Do not use the primer to start a warm engine.
4. Firmly hold the recoil starter handle with your right hand.
5. Pull back sharply on the recoil starter handle.
Mower Tips:
• If the weeds or grass are tall and thick, operate the
mower at a slower walking speed.
• Frequently clean the underside of the mower to
remove any grass build up. See the "Maintenance,
Service and Storage" section for details.
• For best results and longer lasting line, use the ends
of the line to do the cutting. This is easily done by
moving slowly through very thick or heavy weeds.
• If the mower lines become too short, it will take
longer to complete the job. If the mower lines are
worn to less than half their original length, change to
a new mower line. See more on how to replace the
mower line in the "Maintenance, Service and Storage"
section.
• Do not mow on excessively steep slopes. If a slope
is dicult to stand on, do not mow. Do not mow
on slopes when the ground is slippery or wet. Mow
across the face of a slope, not up and down.
• Mower head contact to concrete, asphalt and harder
surfaces may create premature wear to the height
guide.
NOTE: Do not allow the starter rope to snap back. Let the
starter rope slowly rewind as you hold the recoil
starter handle.
TIP: If the engine fails to start after three pulls, push
the primer bulb two times and pull the recoil
starter handle again.
10
Check for parts online at www.geteldsedge.com or call 800-345-6007 M-F 8-5
Page 11
Operator's Manual
String Mower M220
MAINTENANCE, SERVICE, AND STORAGE
NOTE: Maintenance, replacement or repair of the emissions control devices and systems may be performed by any non-
road engine repair establishment or individuals. However, items must be serviced by an authorized dealer to obtain
"no charge" emissions control service. Good maintenance is essential to help reduce air pollution and for safe,
economical and trouble-free operation.
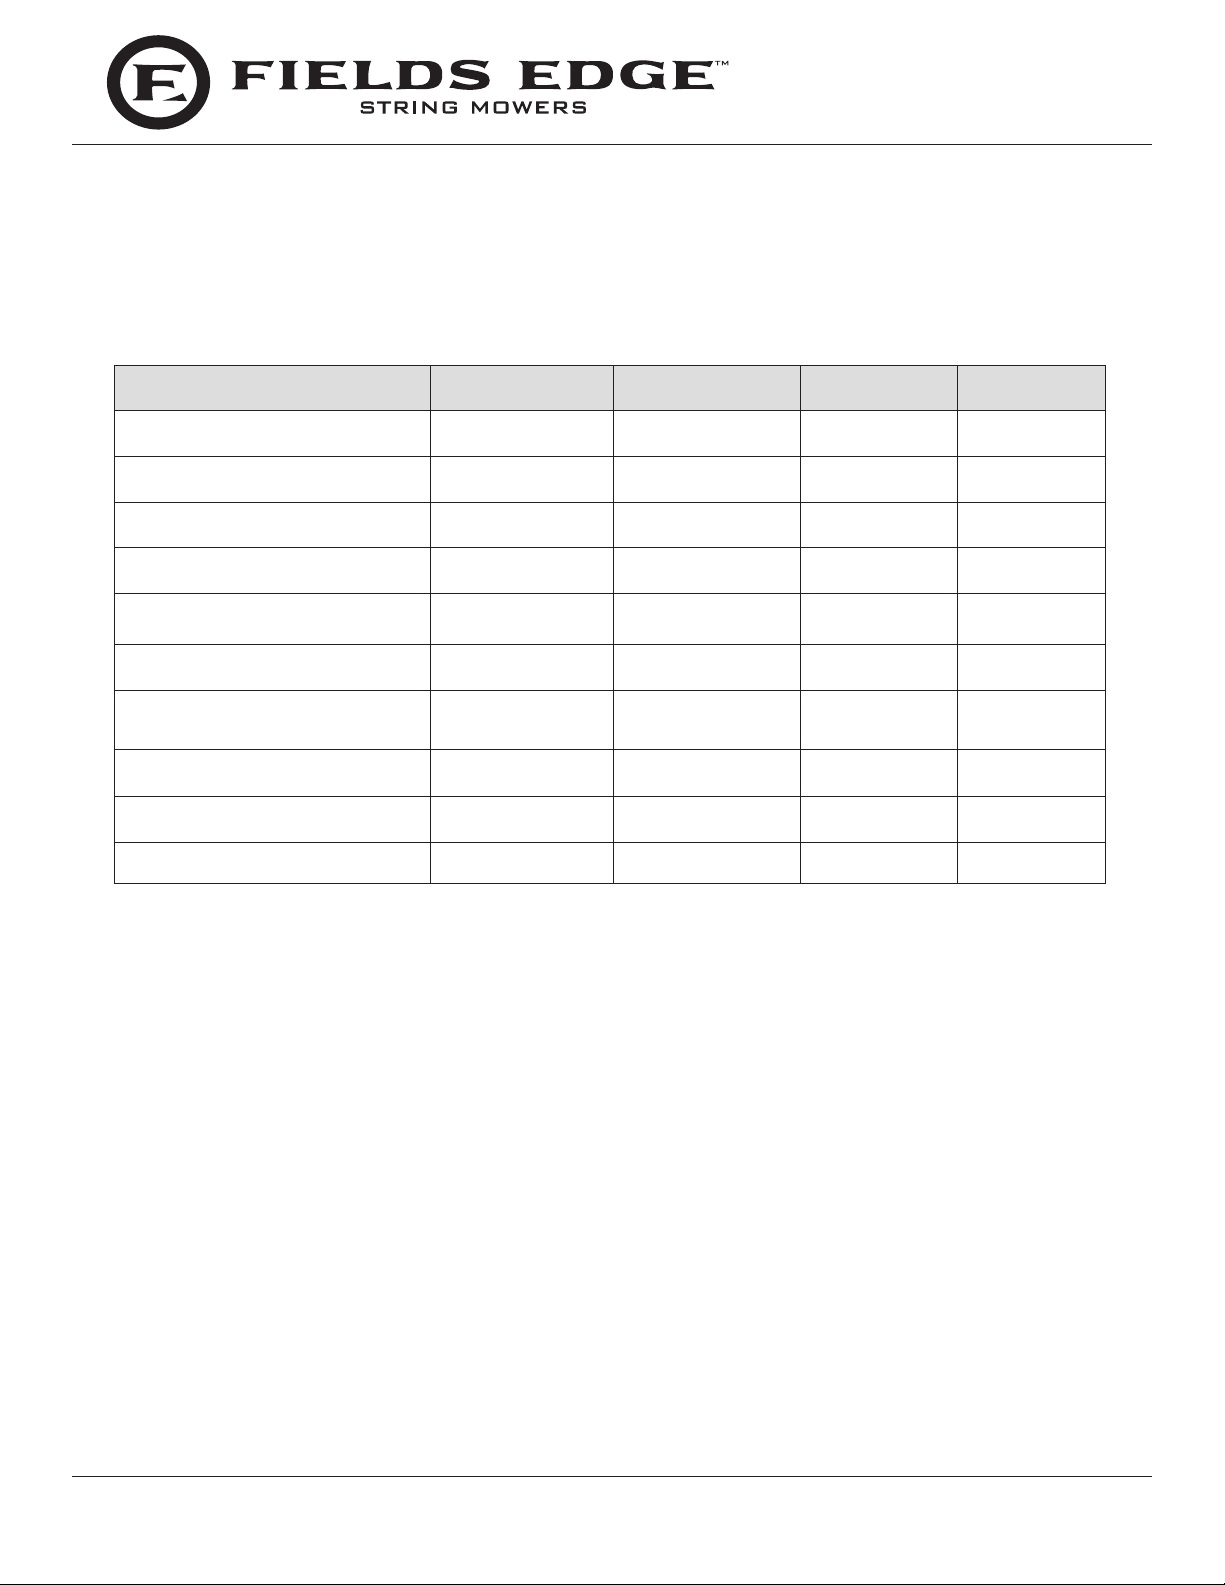
Maintenance Schedule
Service Records Before Each Use Every 25 Hours As Noted Service Date
Check engine oil level x
Check mower lines x 1
Check mower head engagement x
Engine/machine cleaning x 2
Check nuts and bolts x
Check spark plug x
Change engine oil* x
Service air lter* x 3
Lubricate jackshaft assembly x
Lubricate wheel bearings x
Note 1 - When old line is half the original length, replace with new line.
Note 2 - Clean daily if used in extremely dusty or dirty conditions.
Note 3 - Change more often if used in extremely dusty or dirty conditions.
* To service the air lter and change the oil in the M220 model, use the wheel pivot to clear the air cleaner. On models
without wheel pivot, it may be necessary to remove the wheel.
General Recommendations
The warranty on this mower does not cover items that have been subjected to operator abuse or negligence. To receive full value
from the warranty, the operator must maintain the mower as instructed in this manual.
Some adjustments must be made periodically to properly maintain your mower. All adjustments in the "Service and Adjustments"
section of this manual must be checked at least once each season.
Check for parts online at www.geteldsedge.com or call 800-345-6007 M-F 8-5
11
Page 12
SERVICE AND ADJUSTMENT
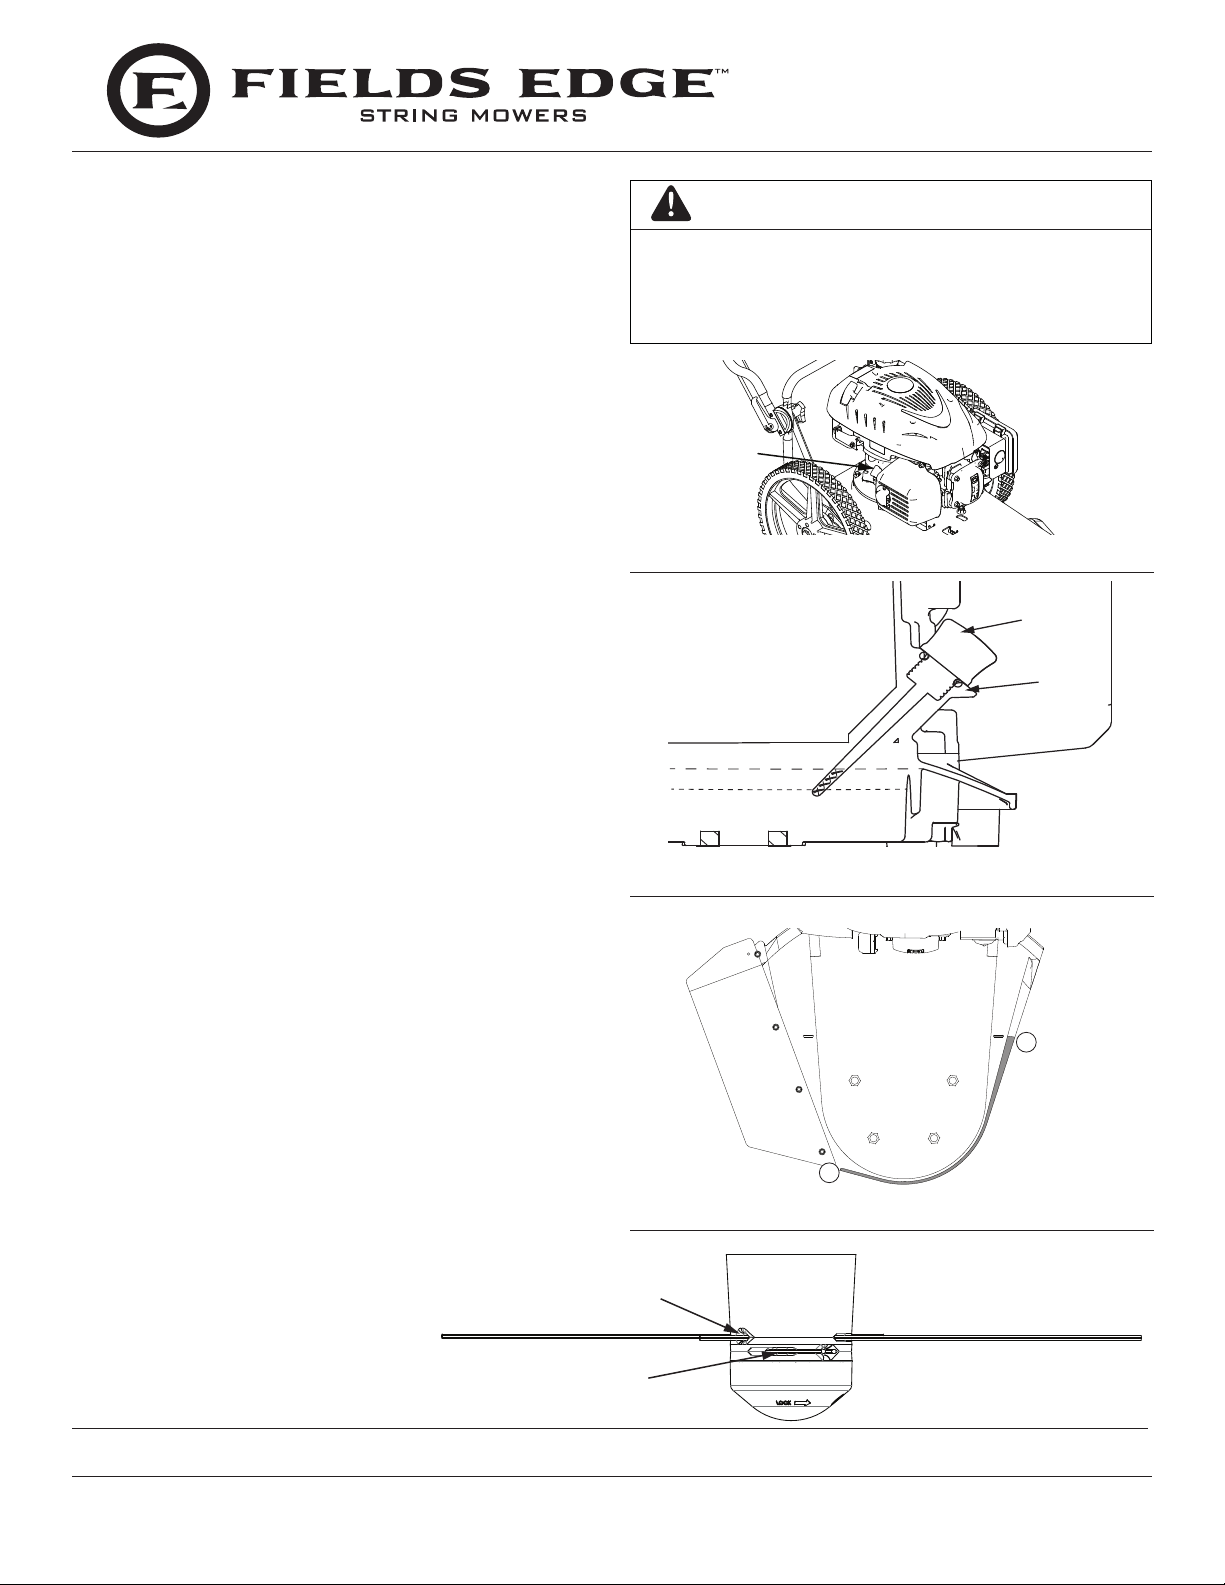
How to Change Engine Oil
Be sure the engine is not operating and is located on a level
surface before checking or relling oil. Engine should be warm
for easy removal of oil.
1. Detach spark plug wire and move away from spark plug.
If the engine uses a battery, disconnect at negative
terminal.
2. Remove dipstick and carefully tip the engine toward the
dipstick side to empty oil from oil ll area. Empty oil into
a suitable oil container and dispose of oil properly. SEE
FIGURE 7
3. Tip engine back onto a level surface and ll with
appropriate oil to the top of the marking on the dipstick
(SEE FIGURE 8). DO NOT OVERFILL. For proper oil
capacity and specication, see the engine manufacturer's
instructions.
4. Reinsert dipstick and tighten.
How to Replace the Mower Line
For the best performance, use a heavy gauge (0.155” (4 mm)
diameter) mower line. Cut the length of the mower line to 15"
(381 mm). Use the length guide, located on the shield, to make
sure the mower line is the correct length. Place one end of the
mower line at location "A" and bend it along the raised portion
of the shield. Cut line at location "B". SEE FIGURE 9
Operator's Manual
String Mower M220
WARNING
BEFORE YOU INSPECT, CLEAN OR SERVICE THE
MOWER, STOP THE ENGINE. MAKE SURE THAT ALL
MOVING PARTS HAVE STOPPED. DISCONNECT
THE WIRE FROM THE SPARK PLUG.
OIL
DIPSTICK
FIGURE 7: Oil Dipstick Location.
OIL
DIPSTICK
OIL
FILL
SPOUT
UPPER OIL LEVEL
LOWER OIL LEVEL
NOTE: Do not allow the length of the lines to vary more
than one inch. This is important to make sure the mower
head is balanced and does not vibrate.
To extend the life of the mower line, keep the
mower line moist. If not kept moist, the nylon
mower line will become dry and brittle. Keep extra
mower line in a can of water. The line will then stay
exible and easy to change. A exible line will also
last much longer.
1. Stop the engine. Wait for all moving parts to stop.
2. Remove the worn mower line from the line retainer
by pulling on exposed 1" line from outfeed hole. SEE
FIGURE 10
3. Push one end of the new mower line through the
insertion hole in the head. SEE FIGURE 10
4. Push the line in until approximately 1 " (25 mm) is exposed
on the outfeed side.
5. Repeat for each of the four locations.
Make sure the line length is the
OUTFEED HOLE
(SMALL OPENING)
same at all four locations.
INSERT MOWER LINE
FIGURE 10: Replace Mower Line
(LARGE OPENING)
FIGURE 8: Dipstick And Oil Levels.
A
B
FIGURE 9: Mower Line Measurement Guide
12
Check for parts online at www.geteldsedge.com or call 800-345-6007 M-F 8-5
Page 13
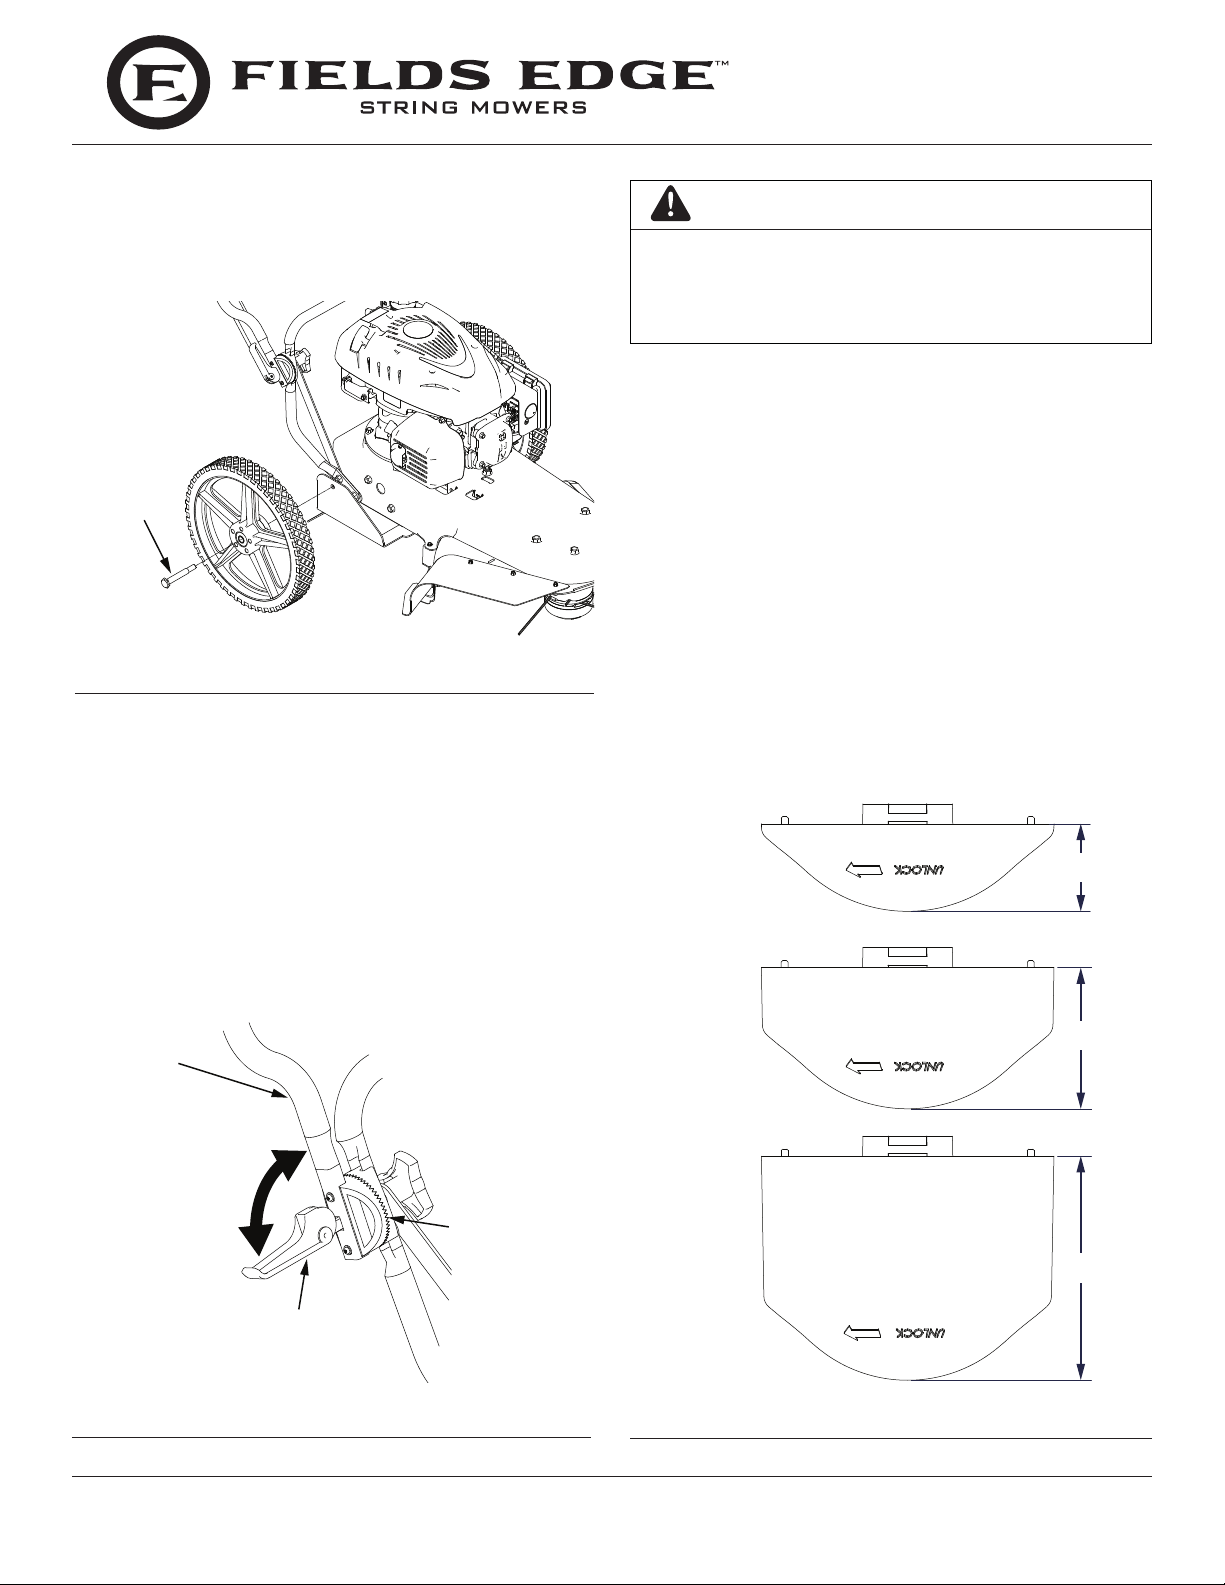
To Remove the Wheels
AXLE BOLT
2 INCH
3 INCH
To detach the wheels, loosen the axle bolts and remove the
wheel. Reverse instructions to reattach tire.
SEE FIGURE 11
FIGURE 11: Removing the Wheels.
How to Adjust the Height/Angle of the Handle
Operator's Manual
String Mower M220
WARNING
BEFORE YOU SET THE HEIGHT OF THE CUT, STOP
THE ENGINE. WAIT FOR ALL MOVING PARTS
TO STOP. ALLOW THE ENGINE TO COOL AND
DISCONNECT THE SPARK PLUG WIRE.
How to Set the Height of the Cut
The height of the cut can be set using three dierent height
bump heads. The recommended cutting height for the
average yard is two (2) inches. SEE FIGURE 13
1. Stop the engine. Wait for all moving parts to stop.
2. Grasp the bump head with your hand and rotate in the
direction of the arrows to the unlock position. Lift o
head.
NOTE: If the bump head is tight, a screw drive or similar
sized metal rod can be inserted in the bump head
holes to assist in removal.
3. Install alternate bump head and tighten in direction of
arrows to the lock position.
Use the cam levers on each side of the handle to adjust the
height of the handle. SEE FIGURE 12
1. Hold the handle with one hand and open both cam levers
until the ratchet teeth are disengaged. Do not remove the
nuts.
2. Move the handle up or down to the desired position, then
align the ratchet teeth. Make sure both sides of the handle
are level.
3. Tighten (lock) the lever.
HANDLE
LOCKED
RATCHET
OPEN
CAM LEVER
TEETH
BUMP
HEAD 1
BUMP
HEAD 2
BUMP
HEAD 3
1 INCH
FIGURE 12: Adjusting The Height Of The Handle. (Lever shown in
OPEN position)
FIGURE 13: Setting The Height Of Your Cut With Bump Heads.
Check for parts online at www.geteldsedge.com or call 800-345-6007 M-F 8-5
13
Page 14
WARNING
BEFORE YOU REMOVE THE DRIVE BELT,
DISCONNECT THE WIRE FROM THE SPARK PLUG.
IMPORTANT
TEST THE DRIVE SYSTEM. START THE ENGINE AND
ENGAGE AND DISENGAGE THE MOWER HEAD
SEVERAL TIMES. WHEN DISENGAGED, MAKE SURE
THE MOWER HEAD COMPLETELY STOPS WHEN
RESTING ON THE GROUND. IF THE MOWER HEAD
CONTINUES TO ROTATE, TAKE THE MOWER TO AN
AUTHORIZED SERVICE CENTER.
Operator's Manual
String Mower M220
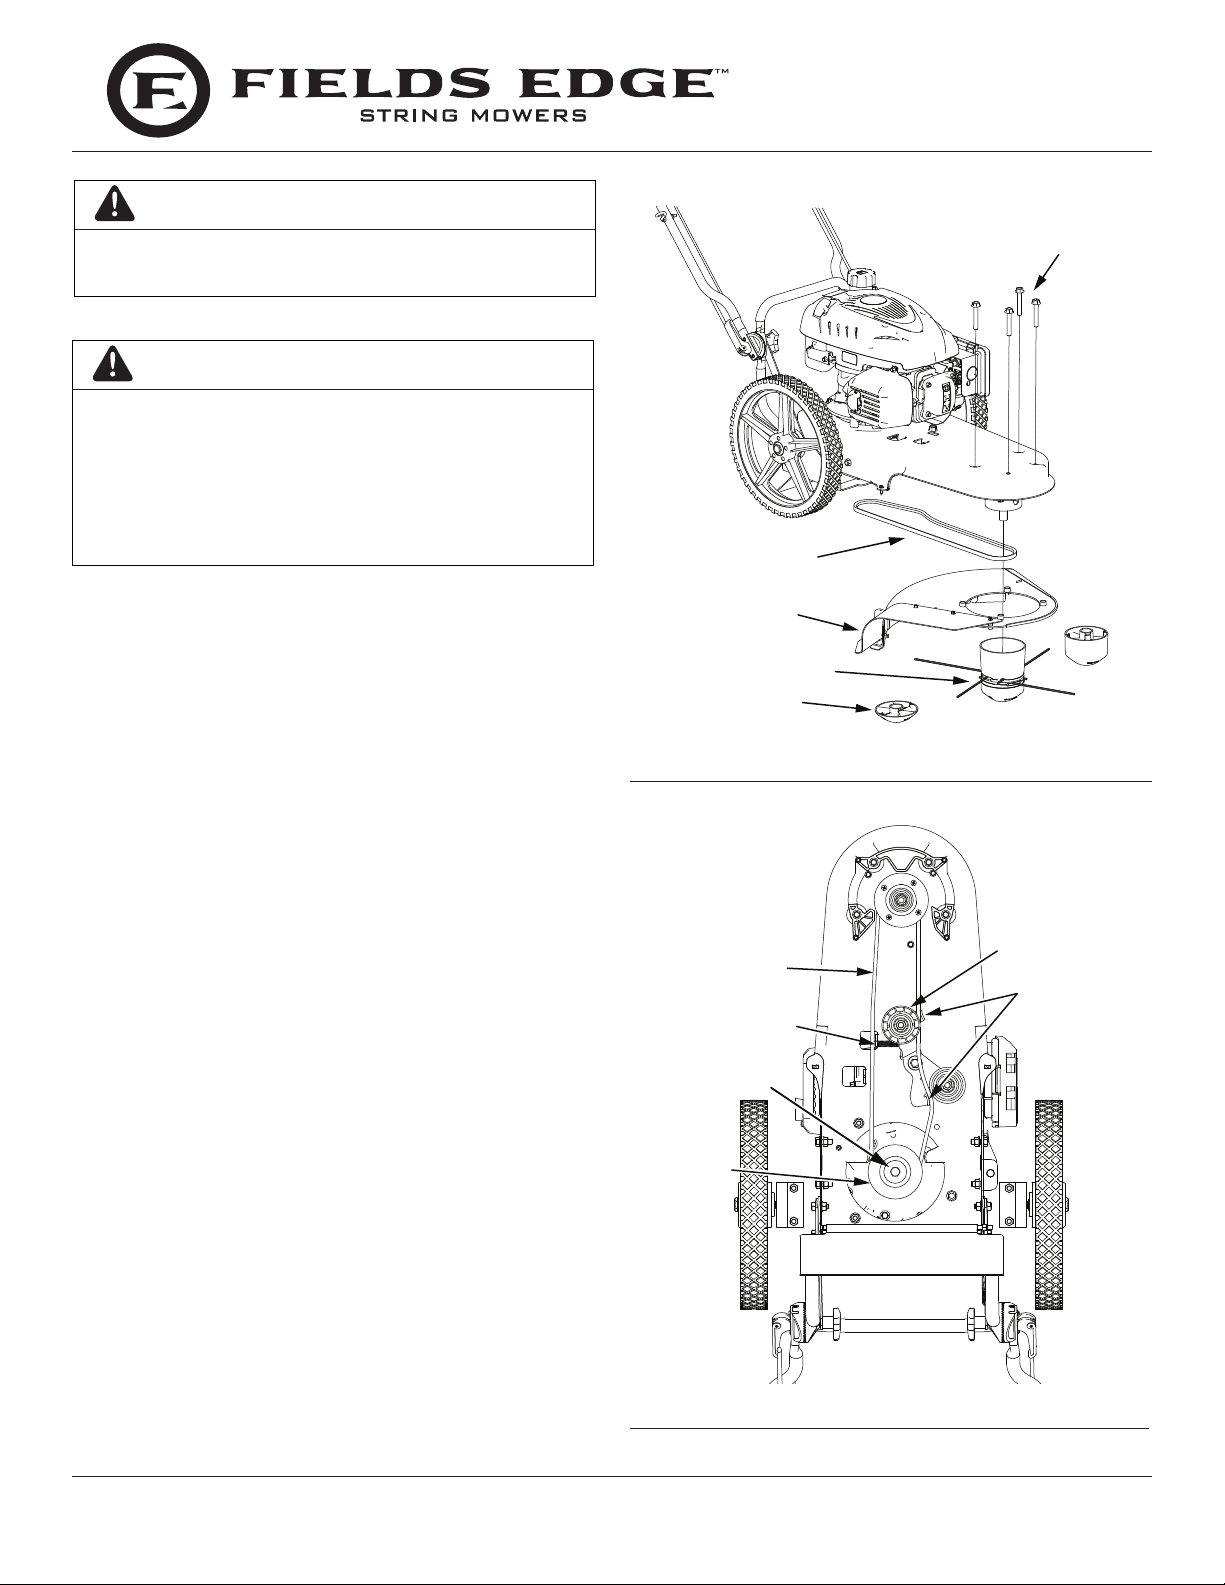
BOLTS
DRIVE BELT
SHIELD
How to Replace the Drive Belt
To replace the drive belt, the mower head and shield must be
removed as follows: SEE FIGURES 14 AND 15
1. Remove the two screws that hold the rear of the shield to
the mower housing.
2. Remove the four bolts that hold the front of the shield
and mower head to the mower housing.
3. Raise the front of the mower housing and remove the
drive belt.
4. Remove the “V” pulley from the idler bracket.
NOTE: On some models, it is necessary to loosen the
mounting bolt for the drive pulley to remove the
drive belt . Do not bend the belt guides. Use only
OEM replacement belts.
5. To assemble the drive belt, reverse the above steps. Make
sure all fasteners are tight. Make sure the mounting bolt
for the drive pulley is tight.
6. Check the routing of the drive belt. Make sure the drive
belt is inside of all belt guides as shown.
MOWER HEAD
BUMP HEADS
FIGURE 14: Mower Head Housing and Shield
DRIVE
BELT
RETURN
SPRING
MOUNTING
BOLT
DRIVE
PULLEY
“V” PULLEY
BELT
GUIDES
14
FIGURE 15: Routing The Drive Belt
Check for parts online at www.geteldsedge.com or call 800-345-6007 M-F 8-5
Page 15

STORAGE
When the mower is put in storage for thirty days or more,
follow the steps below to make sure the mower is in good
condition the following season.
Mower:
Completely Clean The Mower
Remove and discard line or store in a sealed container. Put the
mower in a building that has good ventilation.
NOTE: A yearly check-up or tune-up at an authorized
service dealer will ensure that the mower will
provide maximum performance for the next
season.
Engine:
IMPORTANT NOTE:
It is important to prevent gum deposits from
forming in fuel system parts such as the
carburetor, fuel lter, fuel hose, and tank during
storage. Also, using alcohol blended fuels (called
gasohol, ethanol or methanol) can attract
moisture which leads to separation and formation
of acids during storage. Acidic gas can damage
the fuel system of an engine while in storage.
1. Drain all gasoline from the fuel tank. Let the engine run
until it is out of gasoline. If you do not want to remove
gasoline, add a fuel stabilizer to any gasoline left in the
tank. A fuel stabilizer will minimize the formation of gum
deposits and acids. If the tank is almost empty, mix the
fuel stabilizer with fresh gasoline in a separate container
and add the mixture to the tank. Always follow the
instructions on the stabilizer container. Run the engine
at least ten minutes after stabilizer is added to allow the
mixture to reach the carburetor.
2. Drain the oil from a warm engine. Fill the engine crankcase
with new oil.
3. Remove the spark plug from the cylinder. Pour one ounce
of oil into the cylinder. Slowly pull the recoil starter
handle so that the oil will protect the cylinder. Install a
new spark plug in the cylinder.
4. Completely clean the mower, including dirt and debris
from the cylinder cooling ns and the engine housing.
5. When not in use, disconnect spark plug lead and store in a
well-ventilated area inaccessible to children.
Operator's Manual
String Mower M220
WARNING
DO NOT REMOVE GASOLINE WHILE INSIDE A
BUILDING, NEAR A FIRE, OR WHILE YOU SMOKE.
GASOLINE FUMES CAN CAUSE AN EXPLOSION OR
A FIRE.
TROUBLESHOOTING & REPAIR
At Fields Edge™, we build quality and durability into the
design of our products; but no amount of careful design by
us, and careful maintenance by you, can guarantee a repairfree life for your Fields Edge™ String Mower. Most repairs will
be minor, and easily xed by following the suggestions in the
troubleshooting guide in this section.
The guide will help you pinpoint the causes of common
problems and identify remedies.
For more complicated repairs, you may want to rely on an
authorized service center. A parts breakdown is located toward
the end of this manual.
We will always be glad to answer any questions you have, or
help you nd suitable assistance. To order parts or inquire
about warranty, call or email us using the contact information
found below.
Ordering Replacement Parts
Parts can be obtained from the store where the string mower
was purchased or direct from the factory. To order parts visit
www.getFields Edge.com or call 1-800-345-6007.
For other general questions, you can e-mail us at info@
GetFieldsEdge.com.
Please include the following information with your order:
1) Part numbers
2) Part description
3) Quantity
4) Model number and serial number
Check for parts online at www.geteldsedge.com or call 800-345-6007 M-F 8-5
15
Page 16
Operator's Manual
String Mower M220
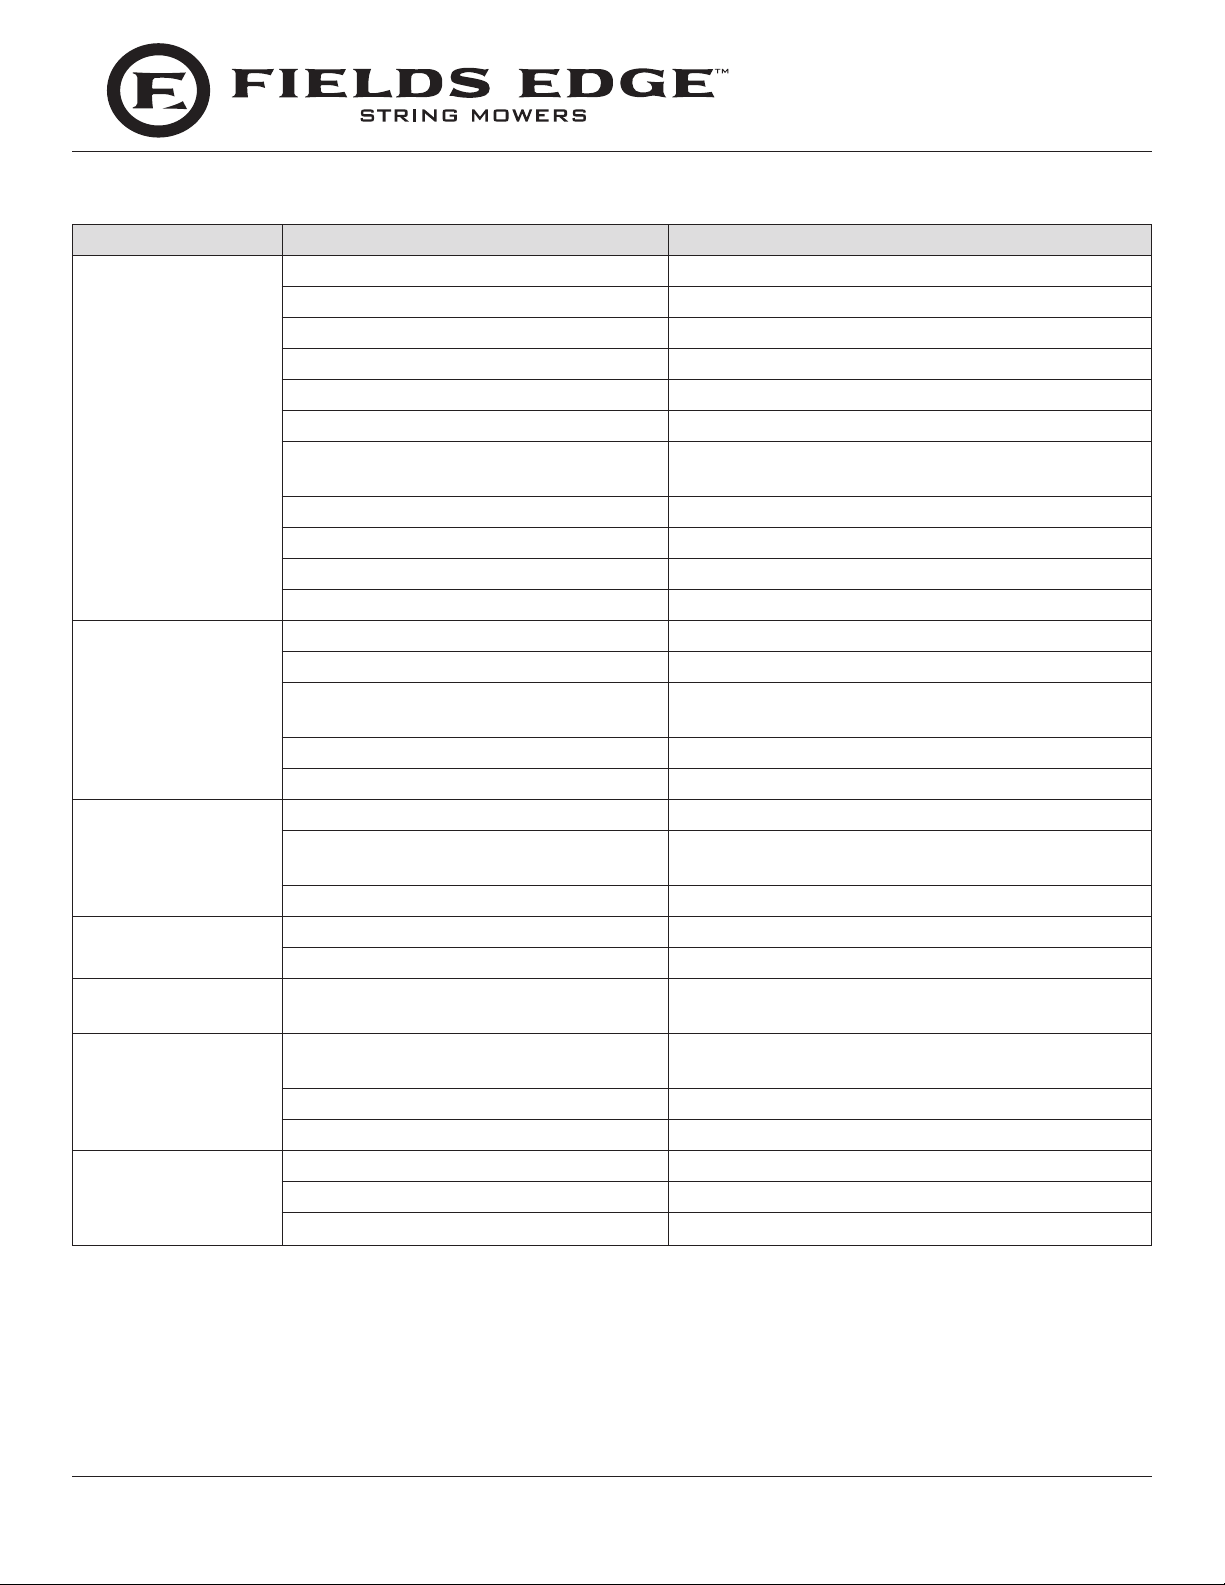
TROUBLESHOOTING GUIDE
Trouble Cause Correction
Engine does not start Spark plug wire disconnected Connect spark plug wire
Engine not primed Prime engine
Defective or incorrectly gapped spark plug Inspect or replace spark plug
Fuel tank empty Add fuel
Dirty carburetor or fuel line Clean carburetor or fuel line
Dirty air lter Replace air lter
Carburetor out of adjustment For carburetor adjustment, take the unit to an
authorized service center
Engine ooded Wait several minutes before starting
ON/OFF Switch in incorrect position Move Switch to ON position
Stale gasoline Drain old gasoline and add fresh gas
Defective ON/OFF Switch or wire Inspect and replace damaged parts
Engine runs poorly Bad spark plug Replace spark plug
Dirty air lter Replace air lter
Carburetor out of adjustment For carburetor adjustment, take the unit to an
authorized service center
Stale gasoline Drain old gasoline and add fresh gas
Engine cooling system clogged Clean debris screen and engine cooling ns
Engine overheats Engine cooling system clogged Clean debris screen and engine cooling ns
Carburetor out of adjustment For carburetor adjustment, take the unit to an
authorized service center
Oil level is low Add oil
Engine will not stop
running
Poor Mower
performance
Mower vibrates Mower line lengths are substantially
Mower head does not
retain line
ON/OFF Switch failed Inspect and replace damaged parts
Wire disconnected from ON/OFF Switch Inspect, repair, or replace damaged parts
Mower line length is too short Correct line length is 15 inches. When the line is less
than 1/2 of this length, replace the line.
Adjust mower line to approximately equal lengths
dierent
Loose nuts or bolts Check all bolts and nuts, including engine bolts
Broken mower head Replace broken part
Mower Head Chassis Dirty Clean mower head
Broken line retainer Replaceline retainer
Mower line not correct size Use a 0.155" (4mm) diameter mower line
NOTE: Please see the engine manual for a full troubleshooting guide for any engine issues.
16
Check for parts online at www.geteldsedge.com or call 800-345-6007 M-F 8-5
Page 17
SLOPE GUIDE
Operator's Manual
String Mower M220
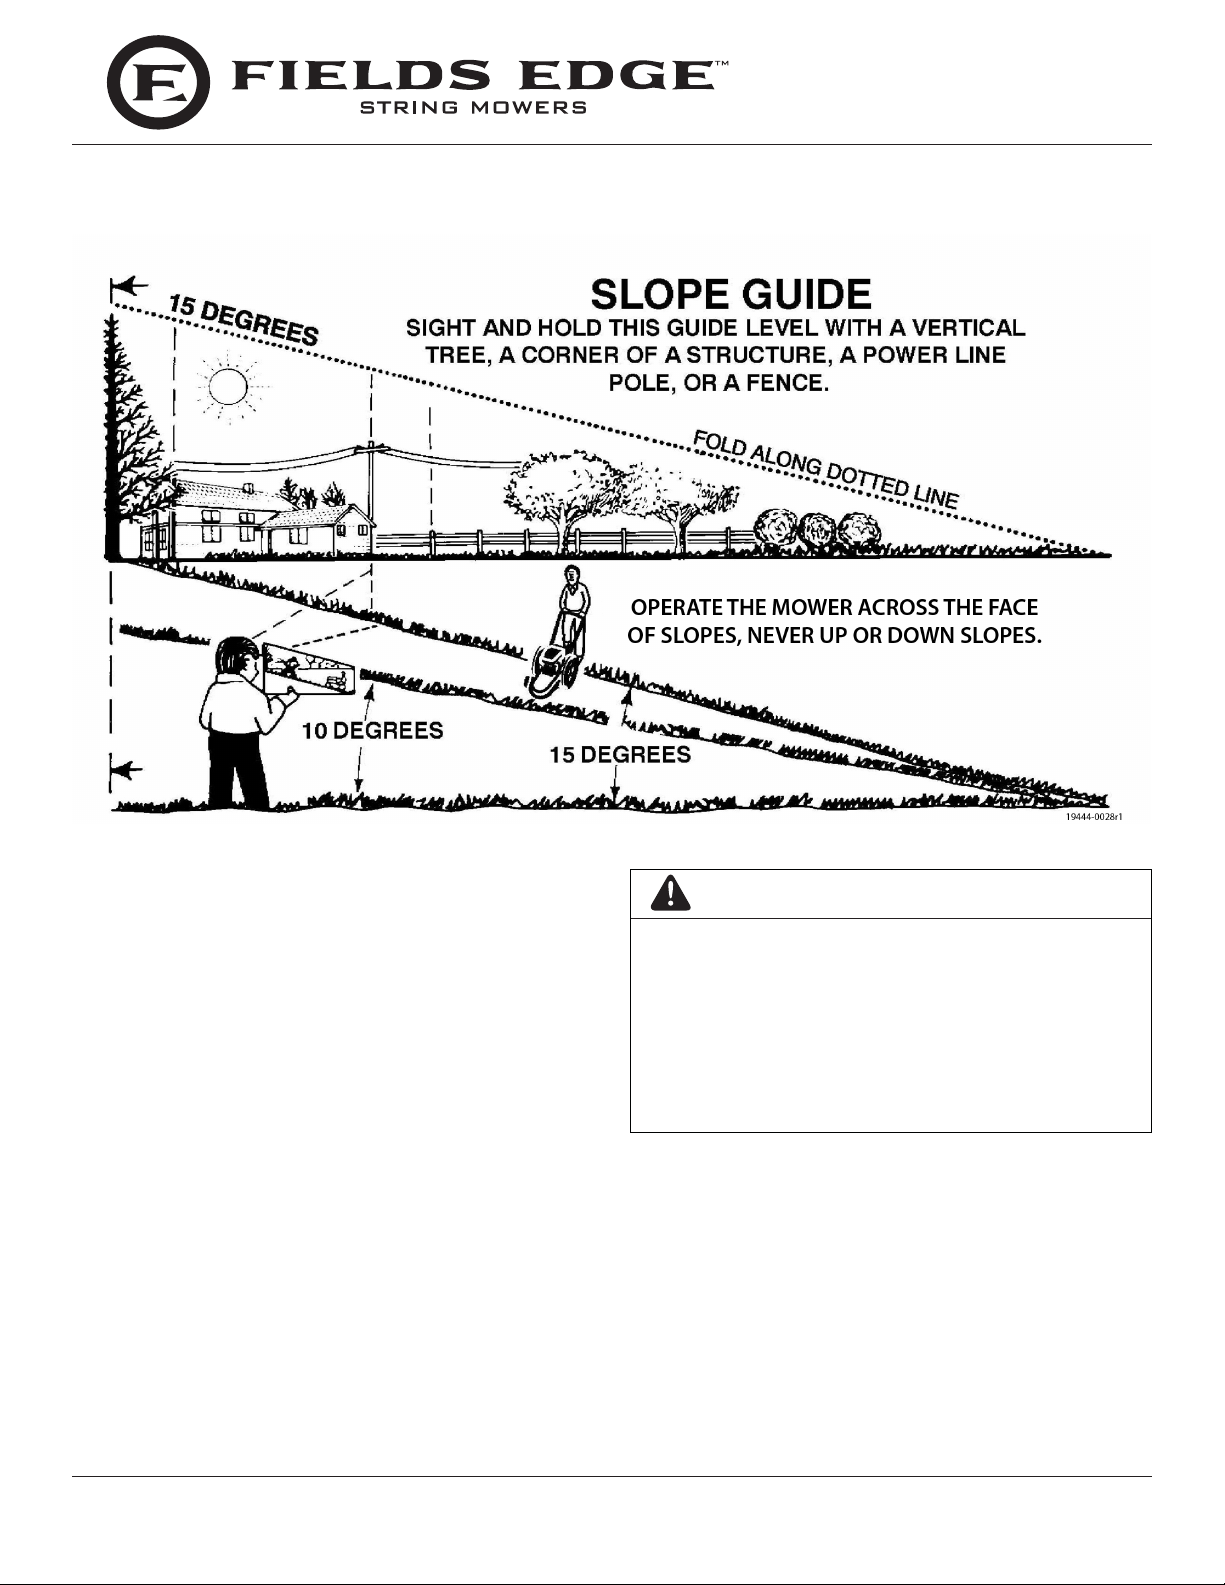
Use this guide to determine slope angle. Do Not mow on a
slope greater than 15 degrees.
• A 10 degree slope is a hill that increases in height at
approximately 1.76 feet (53.6 CM) in 10 feet (304.5
CM).
• A 15 degree slope is a hill that increases in height at
approximately 2.68 feet (81.7 cm) in 10 feet (304.5
cm).
WARNING
USE EXTREME CARE AT ALL TIMES AND AVOID
SUDDEN TURNS OR MANEUVERS. FOLLOW
OTHER INSTRUCTIONS IN THIS MANUAL FOR
SAFETY IN MOWING ON SLOPES. OPERATE A
MOWER ACROSS THE FACE OF SLOPES, NEVER
UP OR DOWN SLOPES. USE EXTRA CARE
WHEN OPERATING ON OR NEAR SLOPES AND
OBSTRUCTIONS.
Check for parts online at www.geteldsedge.com or call 800-345-6007 M-F 8-5
17
Page 18
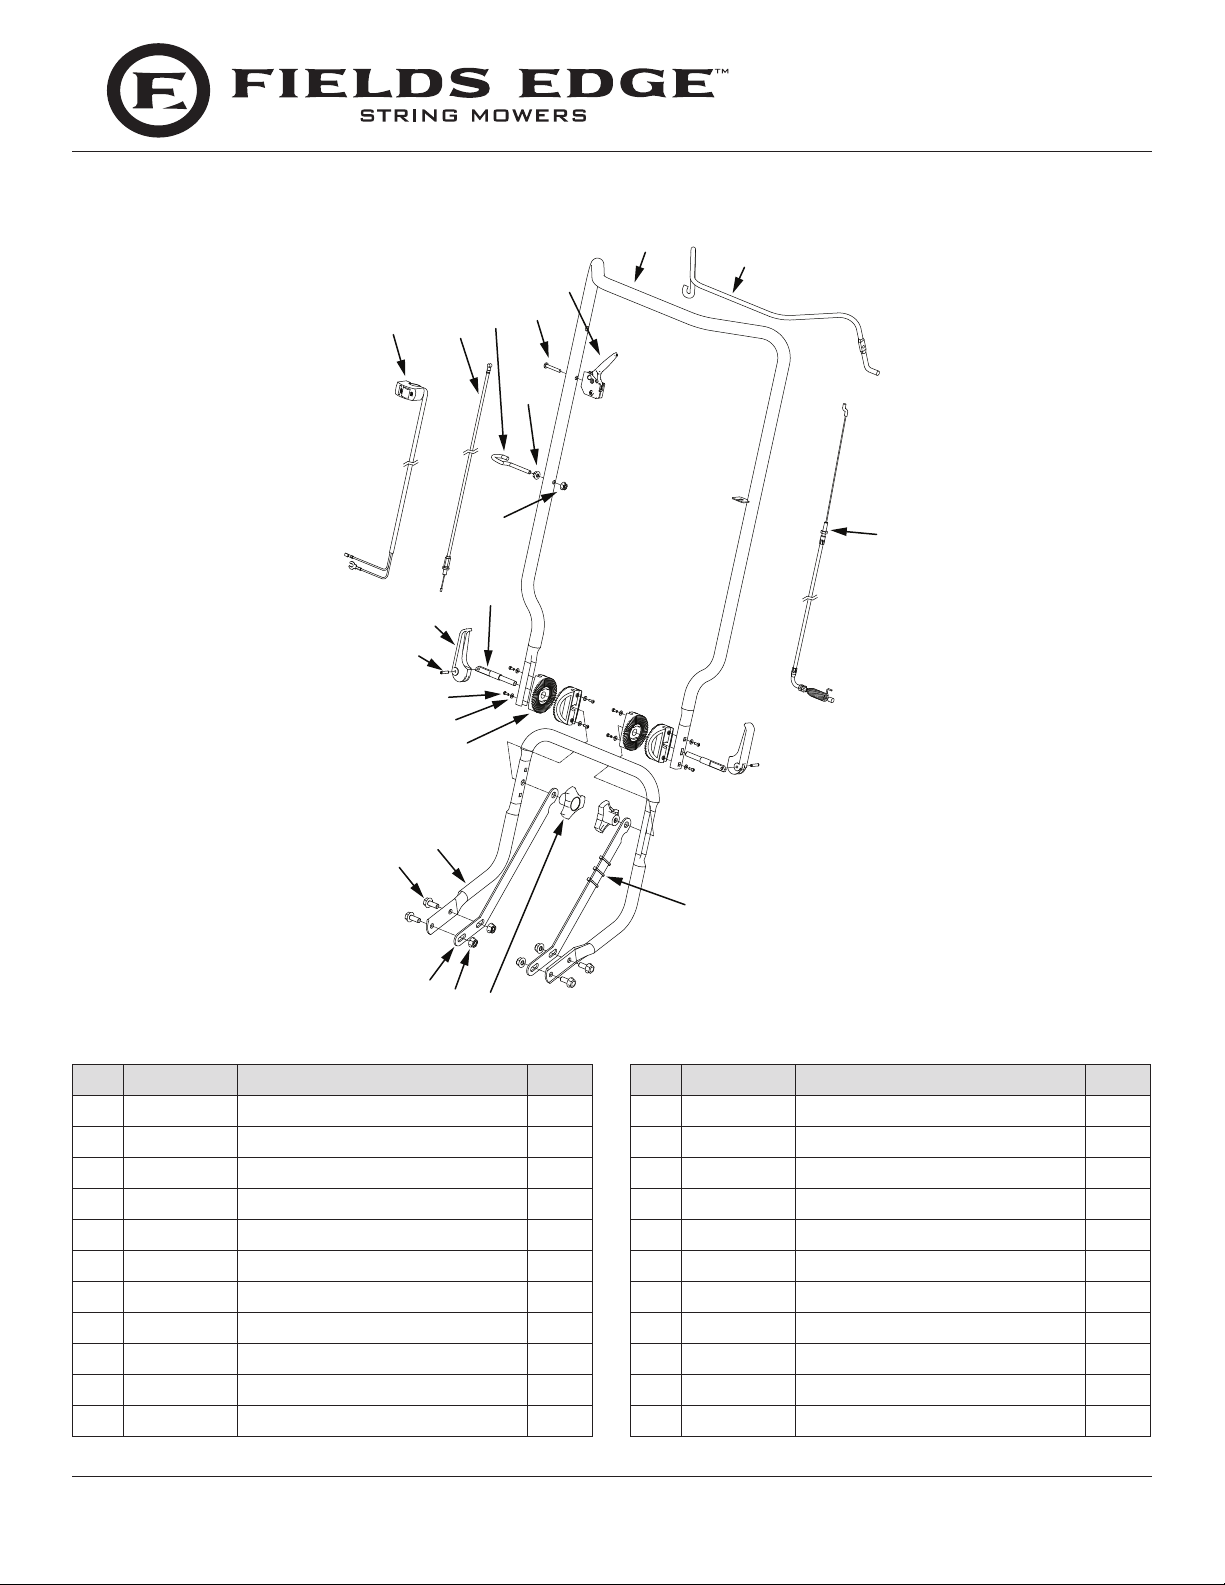
ILLUSTRATED PARTS BREAKDOWN Handlebars
7
5
1
3
2
4
Operator's Manual
String Mower M220
8
6
10
11
12
13
14
15
16
17
18
19
20
21
KEY PART # DESCRIPTION QT Y.
1 17471 ON/OFF SWITCH STRING MOWER 1
2 14178 THROTTLE CABLE 1
3 19902 ROPE GUIDE M6 X 1.0 OPEN EYE 1
4 19939 NUT M6 X 1.0 HEX 1
5 4814 BOLT 10-24 X 1-1/4 PHILIPS 1
6 4819 TRIGGER ASSEMBLY 1
7 17043 HANDLEBAR WITH VINYL 1
8 19160 CONTROL BAIL STRING MOWER 1
9 17527 CLUTCH CABLE STRING MOWER 1
W1265V0913
10
11 16311 HANDLE ADJUST BOLT M8 2
NUT M6 X 1.0 NYLOC 1
9
22
KEY PART # DESCRIPTION QT Y.
12 19972 CAM LEVER BLACK 2
13 19973 RIVET M4 X 20 2
14 16397 SCREW M3 X 10 PHILIPS 8
15 16360 WASHER M3 X 0.8 THICK 8
16 19912 HANDLE PIVOT BLACK 4
17 19941 LOWER HANDLEBAR 1
18 19945 BOLT M8 X 1.25 X 20 HEX 4
19 18893 HANDLEBAR BRACE MOWER 2
20 64132 NUT M8 X 1.25 4
21 13601 KNOB M8 THREE STAR BLACK 2
22 106 ZIP TIE 5.75 INCH BLACK 3
18
Check for parts online at www.geteldsedge.com or call 800-345-6007 M-F 8-5
Page 19
Operator's Manual
3
String Mower M220
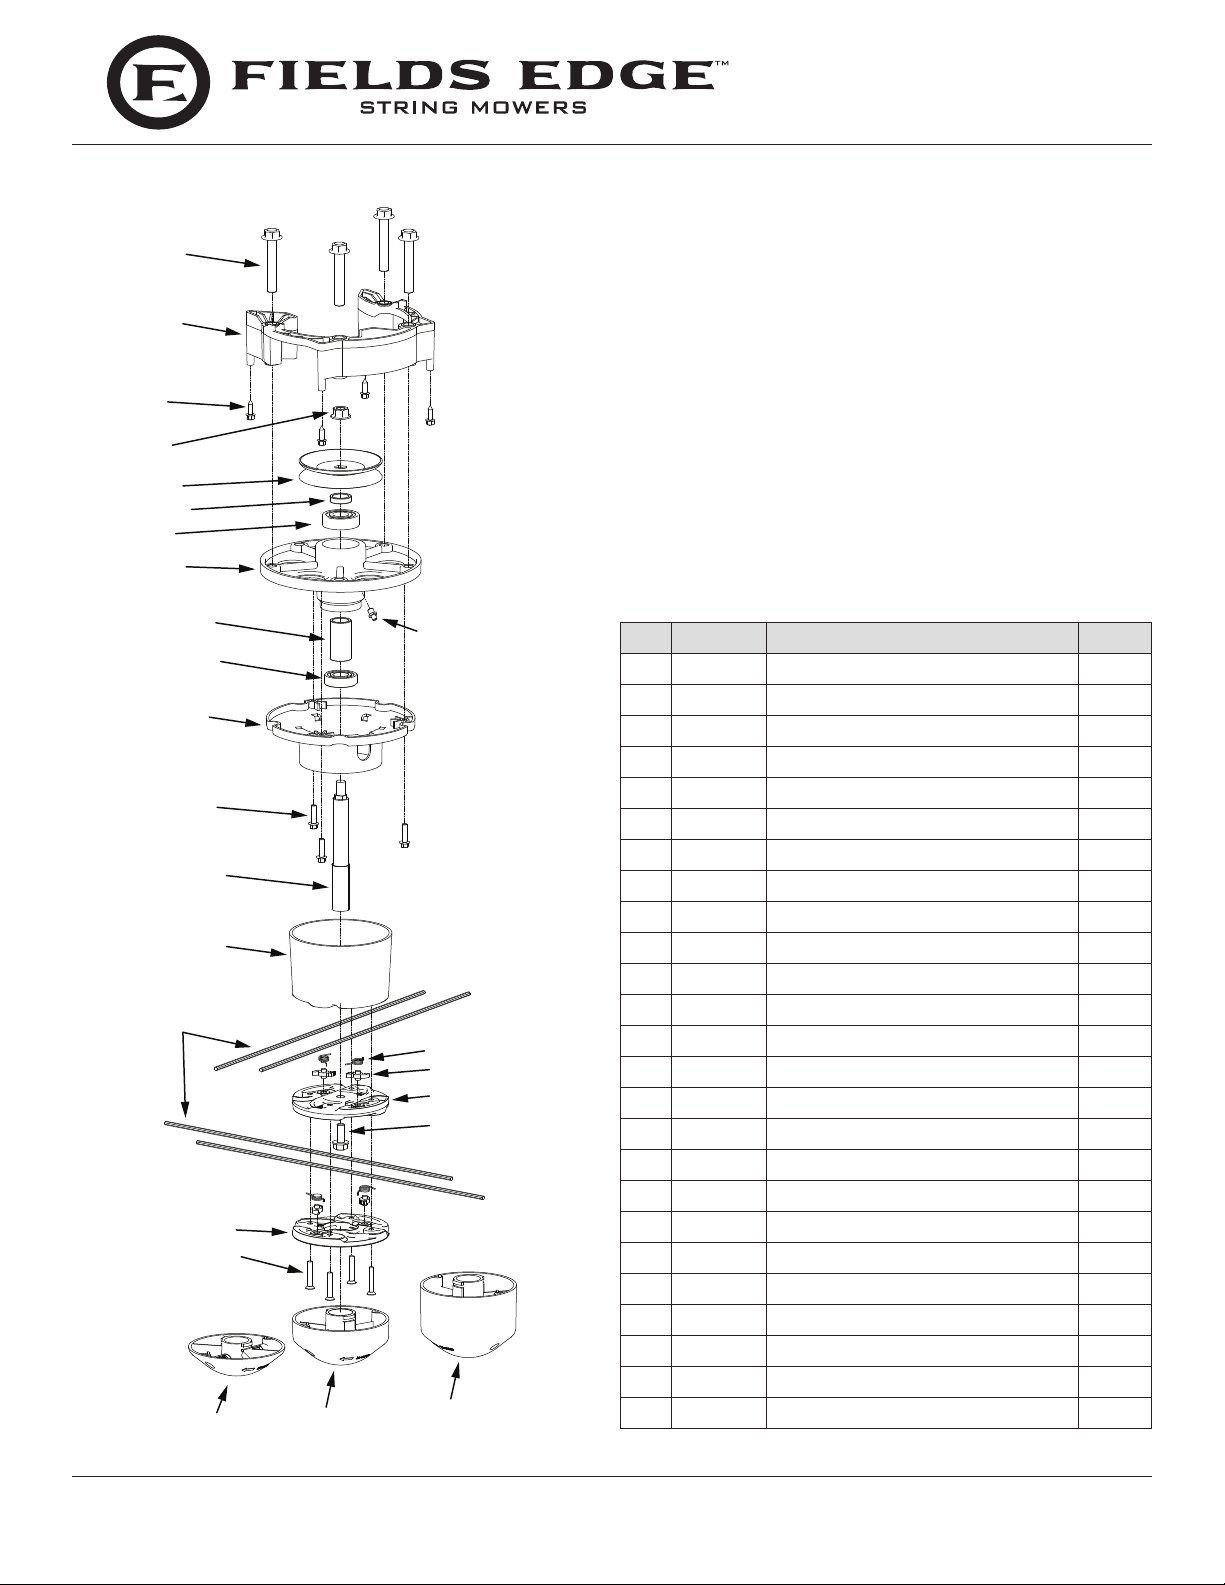
ILLUSTRATED PARTS BREAKDOWN Mower Head
1
2
4
5
6
7
8
16
12
10
13
11
14
15
23
21
22
24
9
KEY PART # DESCRIPTION QT Y.
1 19927 BOLT M10 X 1.5 X 60 HEX 4
2 16318 SPACER JACKSHAFT MOWER 1
3 19931 SCREW M5 X 3 X 15 PHILIPS 4
4 16903 NUT M10 X 1.5 X 13 NYLOC 1
5 16595 PULLEY ASSEMBLY STRING MOWER 1
6 19925 SPACER M17.5 X 23.5 X 6 1
7 19966 BEARING 17 X 40 X 12 MM 1
8 16317 HOUSING JACKSHAFT MOWER 1
9 16598 GREASE FITTING M6 X 1.0 1
10 19960 SPACER JACKSHAFT 1
11 19959 BEARING 17 X 35 X 10 MM 1
12 16337 WEED WRAP STRING MOWER 1
17
18
19
20
13 16779 BOLT M5 X 0.8 X 20 HEX 3
14 16321 JACKSHAFT STRING MOWER 1
15 16662 WEED HEAD TOP STRING MOWER 1
16 17897 KIT LINE 15 IN STRING MOWER 1
17 16670 SPRING WEED HEAD MOWER 4
18 16669 CAM WEED HEAD STRING MOWER 4
19 16663 WEED HEAD MID-LEVEL MOWER 1
20 19945 BOLT M8 X 1.25 X 20 HEX 1
21 16664 WEED HEAD BOTTOM MOWER 1
22 16817 BOLT M5 X 0.08 X 30 PHILIPS 4
23 16665 BUMP HEAD 1 STRING MOWER 1
24 16666 BUMP HEAD 2 STRING MOWER 1
25
25 16668 BUMP HEAD 3 STRING MOWER 1
Check for parts online at www.geteldsedge.com or call 800-345-6007 M-F 8-5
19
Page 20
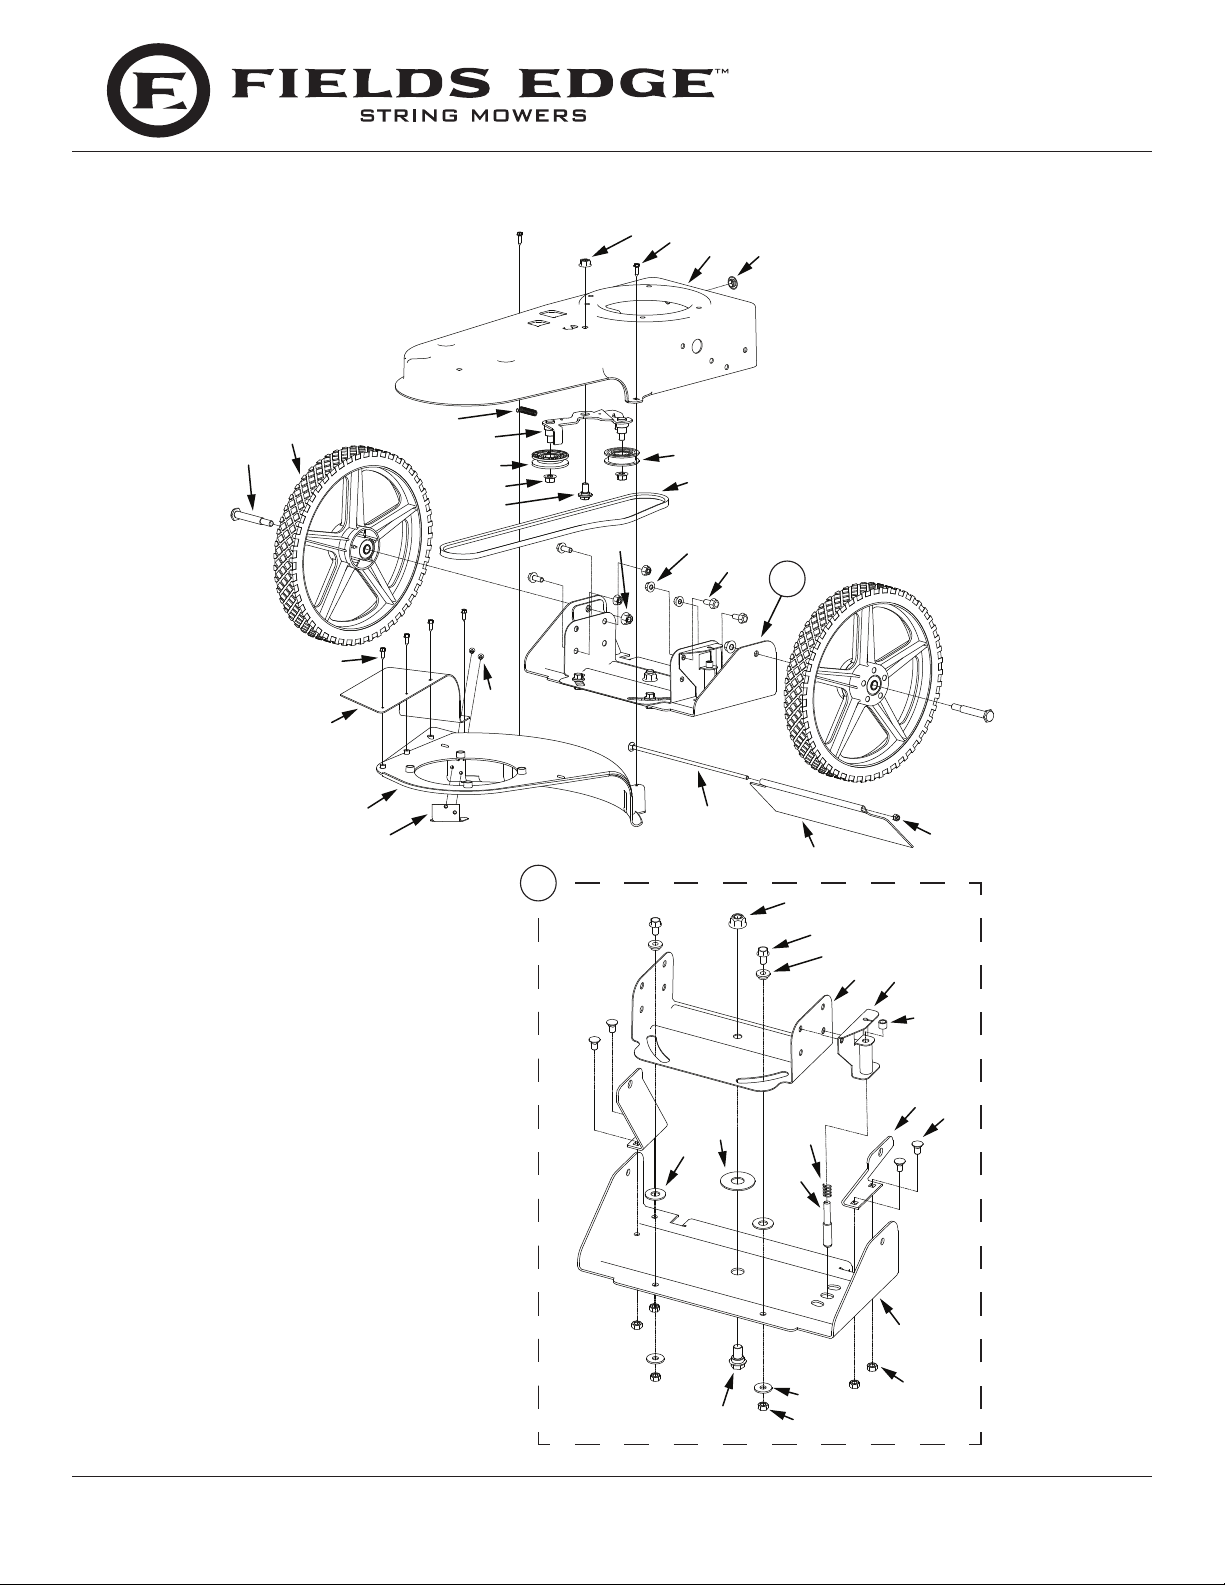
ILLUSTRATED PARTS BREAKDOWN
1
2
Base Unit
Operator's Manual
String Mower M220
3
4
6
5
15
16
17
18
7
8
9
1
10
1
19
23
11
12
13
20
14
23
24
21
25
26
27
22
28
20
29
30
33
32
39
Check for parts online at www.geteldsedge.com or call 800-345-6007 M-F 8-5
35
34
38
37
31
36
37
Page 21
Operator's Manual
String Mower M220
KEY PART # DESCRIPTION QT Y.
1 16903 NUT M10 X 1.5 X 13 NYLOC 5
2 16889 SCREW 4.8 X 1.6 X 20 MM PHILIPS 2
60005058
3
DECK FRAME 1
4 19944 BUSHING M12 X 23 RUBBER 1
5 17227 BOLT M10 X 1.5 X 25 SHLDR 12 X 63 2
6 18773 KIT WHEEL & BEARINGS 2
60005008
7
EXTENSION SPRING 1.5 INCH LONG 1
8 19932 IDLER BRACKET ASSEMBLY 1
9 19968 "V" PULLEY AND BEARING 1
10 19936 BOLT M10 X 1.5 X 20 HEX SHLDR 1
11 19934 PULLEY 3L AND BEARING 1
60005003
12
BELT 3L 45.5 (18.75) 1
13 16400 NUT M8 X 1.0 NYLOC 4
14 19945 BOLT M8 X 1.25 X 20 HEX 4
15 19931 SCREW M5 X 3 X 15 PHILIPS HEX 4
60005010
16
17
60005021
GUARD ASSEMBLY RUBBER BLACK 1
SHIELD MOWER BLACK 1
18 16540 CUTTER LINE STRING MOWER 1
19 19953 RIVET M5 X 10 PHILIPS HEX 2
20 19937 BOLT M6 X 1.0 X 285 CARRIAGE 1
60005018
21
W1265V0913
22 NUT M6 X 1.0 NYLOC 1
TRAILING SHIELD 13.28 V 1
KEY PART # DESCRIPTION QT Y.
23 17221 WHEEL SWIVEL ASSEMBLY MOWER 1
24 14920 • NUT M12 X 1.75 NYLOC 1
25 18106 • BOLT M8 X 1.25 X 20 HEX 2
26 21940 • BUSHING SHLDR 8 ID X 7.4 MM 2
27 17223 • SWIVEL FRAME MOUNT 1
28 19212 • SWIVEL LATCH MOUNT 1
29 19213 • SWIVEL CABLE CLIP MOWER 1
30 19694 • SWIVEL AXLE BRACE MOWER 2
31 21939 • BOLT M8 X 1.25 X 15 CARRIAGE 4
32 17508 • WASHER 13 X 30 X 2 NYLON 2
33 17176 • WASHER 18 X 50 X 2 NYLON 1
34 17224 • SWIVEL PIN MOWER 1
35 17225 • SWIVEL SPRING MOWER 1
36 17222 • SWIVEL WHEEL MOUNT 1
37 3252 • NUT M8 X 1.25 HEX 6
38 3245 • WASHER M8 X 24 X 2.2 MM 2
39 17177 • BOLT M12 X 1.75 X 25 SHDLR 1
Check for parts online at www.geteldsedge.com or call 800-345-6007 M-F 8-5
21
Page 22
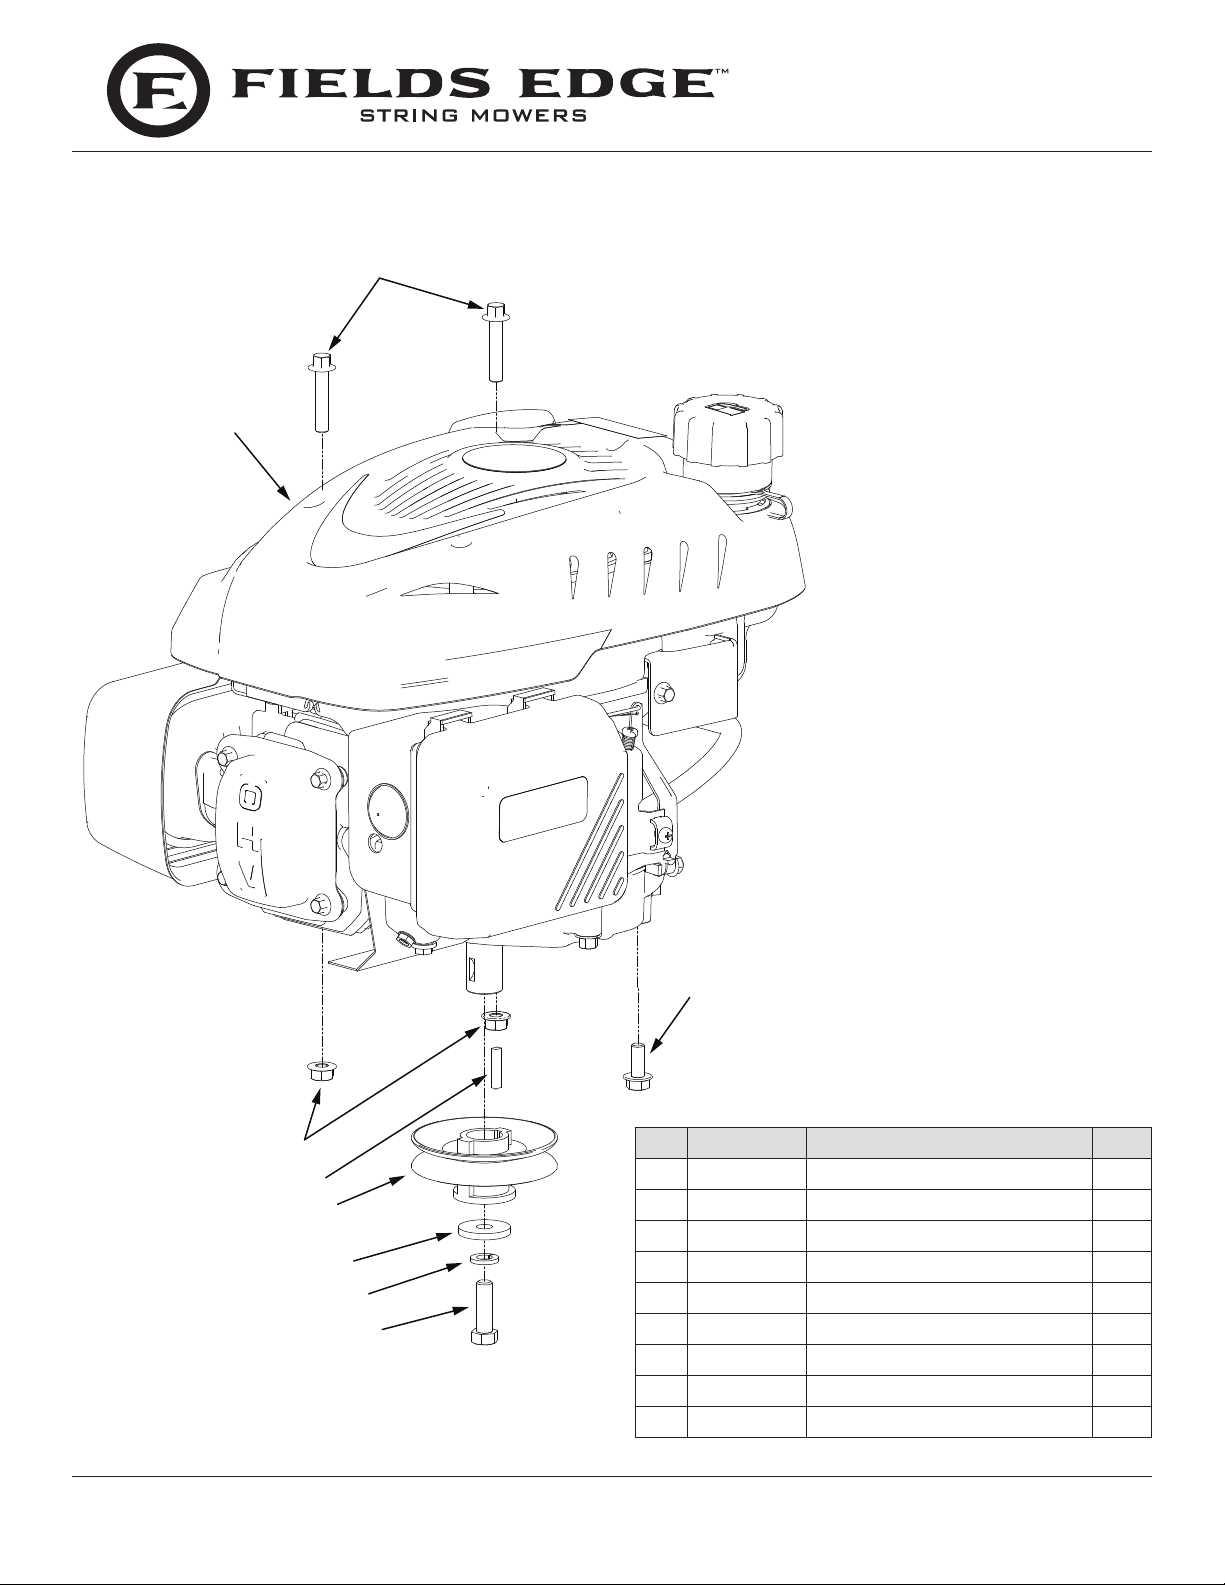
ILLUSTRATED PARTS BREAKDOWN
1
Engine and Pulley Attachment
2
Operator's Manual
String Mower M220
22
9
3
4
5
6
7
8
Check for parts online at www.geteldsedge.com or call 800-345-6007 M-F 8-5
KEY PART # DESCRIPTION Q T Y.
1 19922 BOLT M8 X 1.25 X 40 HEX 2
2 186000 ENGINE 173CC VIPER VERTICAL 1
W1265V0900
3
4 16602 KEY 4 X 5 X 25 MM 1
5 60005013 ENGINE PULLEY 1
6 331040 FLAT WASHER 10 X 32 X 4 MM 1
7 1916965 WASHER 3/8 INCH SPRING LOCK 1
8 1426 BOLT 3/8-16 X 1-1/4 HEX 1
9 19945 BOLT M8 X 1.25 X 20 HEX 1
NUT M8 X 1.25 NYLOC 2
Page 23

Operator's Manual
String Mower M220
WARRANTY TERMS AND CONDITIONS
PRODUCT WARRANTY: 5-YEAR LIMITED WARRANTY – 10/01/2014
Ardisam, Inc. (Ardisam), a manufacturing company, warrants this product to be free from defects in the material or workmanship
for a period of ve years from the date of purchase. If there is insucient evidence of the purchase date, the eective date of
this warranty will begin on the string mower’s date of manufacture. During the ve-year warranty of this product, Ardisam will
furnish, at their discretion, parts and labor to correct any defect caused by faulty material or workmanship. In no event shall
recovery of any kind be greater than the amount of the purchase price of the product sold. Ardisam reserves the right to inspect
any incoming units returned under warranty to determine if the warranty applies before performing any warranty related work
(including parts and components). Any unit used in a commercial application, or producing income is covered for a period of
90 days after purchase. This warranty applies to the original owner with a proof of purchase and is not transferable. For the
warranty to be valid, the product must be registered online, or the warranty card must be lled out and received by Ardisam,
within 30 days of purchase. This warranty excludes parts due to normal wear, wear items such as belts, bearings, cables, wheels,
tires, trimmer line, debris shield, line cutter, routine maintenance items such as lter elements, o-rings, seals, lubricants, and
tune-ups, accessory parts such as nylon parts bag and height adjustment heads. Negligent use such as running dry (without
oil), or below minimum oil levels, using the string mower for a purpose other than for which it was designed and manufactured,
using the string mower in violation of local codes, ordinances and good trade practices voids this warranty. *These warranties
apply only to products which have not been subjected to negligent use, abuse, misuse, overload, improper installation,
alteration, accident, acts of God (or other events beyond Ardisam’s control), vandalism, unauthorized parts, failure to use proper
fuel and oil, or if repairs have been performed at a non-authorized service facility. These warranties shall not cover damage
from normal wear and tear, normal maintenance parts and services, lightning; nor improper installation, operation, storage, or
maintenance; nor operating the equipment above recommended maximums as stated in this manual and the accompanying
engine manual. These warranties supersede all other warranties either expressed or implied and all other obligations or
liabilities on the part of Ardisam. Ardisam, does not assume, and does not authorize any other person to assume for Ardisam,
any liability in connection with the sale of Ardisam products. To be at “No Charge,” warranty work must be sent directly to and
performed by Ardisam or an Ardisam Authorized Warranty Service Facility. To obtain warranty service and/or replacement
instructions, contact the Ardisam Customer Service Department at 800-345-6007. If you choose to ship your product to Ardisam
for warranty repair, you must rst have prior approval from Ardisam by calling the Ardisam Customer Service Department for a
return material authorization number (RMA#). Under these circumstances, all items must be shipped prepaid. Ardisam will at no
charge, repair or replace, at the discretion of Ardisam, any defective part which falls under the conditions stated above. Ardisam
retains the right to change models, specications and price without notice. Ardisam shall not be obligated to ship any repair or
replacement product to any location outside of the United States of America or Canada. Some states and countries do not allow
the limitations on how long an implied warranty lasts, or the exclusion or limitation of incidental or consequential damages,
so the above limitation may not apply to you. This warranty gives you specic legal rights, and you may also have other rights
which vary from state to state and country to country.
SEE ENGINE MANUAL FOR ENGINE WARRANTY
© 2014 Ardisam, Inc.
P/N: 21479
REV1: 111914
All Rights Reserved.
Fields Edge™, Division of Ardisam, Inc.
1160 8th Avenue; P.O. Box 666
Cumberland, Wisconsin 54829
800-345-6007 · Fax (715) 822-4180
E-mail: [email protected]
Check for parts online at www.geteldsedge.com or call 800-345-6007 M-F 8-5
23
Page 24

Fields Edge™, Division of Ardisam, Inc.
1160 8th Avenue, PO Box 666
Cumberland, WI 54829
800-345-6007 | Fax 715-822-2223
E-mail: info@geteldsedge.com
All weights, specications and features are approximate and are subject to change without notice. Due to continuous product improvements, product images may not be exact. Items used for props not included. Some
assembly may be required.
Check for parts online at www.geteldsedge.com or call 800-345-6007 M-F 8-5
 Loading...