

Page 1
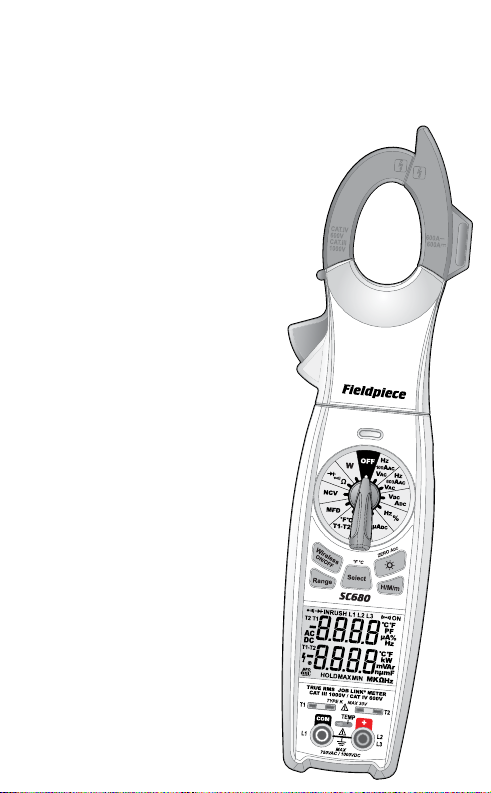
Fieldpiece
+
INRUSH
Job Link® System
Power
Clamp Meter
OPERATOR'S
MANUAL
Model SC680
11
Page 2

Safety Information
Understand and follow operating instructions
carefully.
A Warning identifies conditions and procedures
that are dangerous to the user. A Caution identifies
conditions and procedures that can cause damage to
the Product or the equipment under test.
! WARNING
To avoid possible electric shock, personal injury or
death, follow these guidelines:
• Use the meter only as specified in this manual;
otherwise, the protection provided by the meter
may be impaired.
• Do not use if meter appears damaged. Visually
inspect the meter to ensure case is not cracked
and back case is securely in place.
• Inspect and replace leads if insulation is damaged,
metal is exposed, or probes are cracked. Pay
particular attention to the insulation surrounding
the connectors.
• Do not use meter if it operates abnormally as
protection maybe impaired.
• Use only correct measurement category (CAT),
voltage, and amperage rated probes, test leads,
and adapters for the measurement.
• Do not use this meter to verify the presence of
hazardous voltages on circuits that may have
voltages generated from frequencies above
1000Hz as the low pass filter limits voltage
measurements to below 1000Hz.
• Do not use during electrical storms or in wet
weather.
• Do not use around explosive gas, dust, or vapor.
• Do not apply more than the rated voltage to,
as marked on the meter, between terminals or
between any terminal and earth ground.
• Do not use without the battery and the back case
properly installed.
• Replace battery as soon as battery indicator
appears to avoid false readings.
• Remove the test leads from the circuit prior to
removing battery cover.
• Do not attempt to repair this unit as it has no
user-serviceable parts.
• Temperature switch prevents leaving
thermocouple plugged in while measuring
voltage.
• Do not measure current while the test leads are
in the input jacks.
• When measuring high frequency AC current,
do not exceed the rated 600AAC of the clamp.
Failure to adhere may cause the clamp to heat
up dangerously.
• Do not use the HOLD function to measure
unknown potentials. When HOLD is turned on,
the display does not change when a different
potential is measured.
• Do not use in CAT III or CAT IV environments with
the protective cap of test probe. The protective
cap decreases the exposed probe metal <4mm.
This decreases the possibility of arc flash from
32
Page 3
short circuits.
!
!
!
• Do not place magnet inside Category IV panel.
Place it outside the panel instead.
CAUTION
To protect yourself, think “Safety First”:
• Voltages exceeding 30VAC or 60VDC pose a shock
hazard so use caution.
• Use appropriate personal protective equipment
such as safety glasses, face shields, insulating
gloves, insulating boots, and/or insulating mats.
• Disconnect circuit power and discharge all highvoltage capacitors before testing resistance,
continuity, diodes, or capacitance.
Before each use:
• Perform a continuity test by touching the test
leads together to verify the functionality of the
battery and test leads.
• Use the 3 Point Safety Method. (1) Verify meter
operation by measuring a known voltage. (2)
Apply meter to circuit under test. (3) Return to
the known live voltage again to ensure proper
operation.
• Use the proper terminals, functions and range for
your measurements.
• Never ground yourself when taking electrical
measurements.
• Connect the black common lead to ground
or neutral before applying the red test lead to
potential voltage. Disconnect the red test lead
from the voltage first.
• Always work with a partner.
• Keep fingers behind the finger guards on the
probes.
All voltage tests: All voltage ranges will
withstand up to 1000VDC/750VAC rms. Do not
apply more than 1000VDC or 750VAC rms.
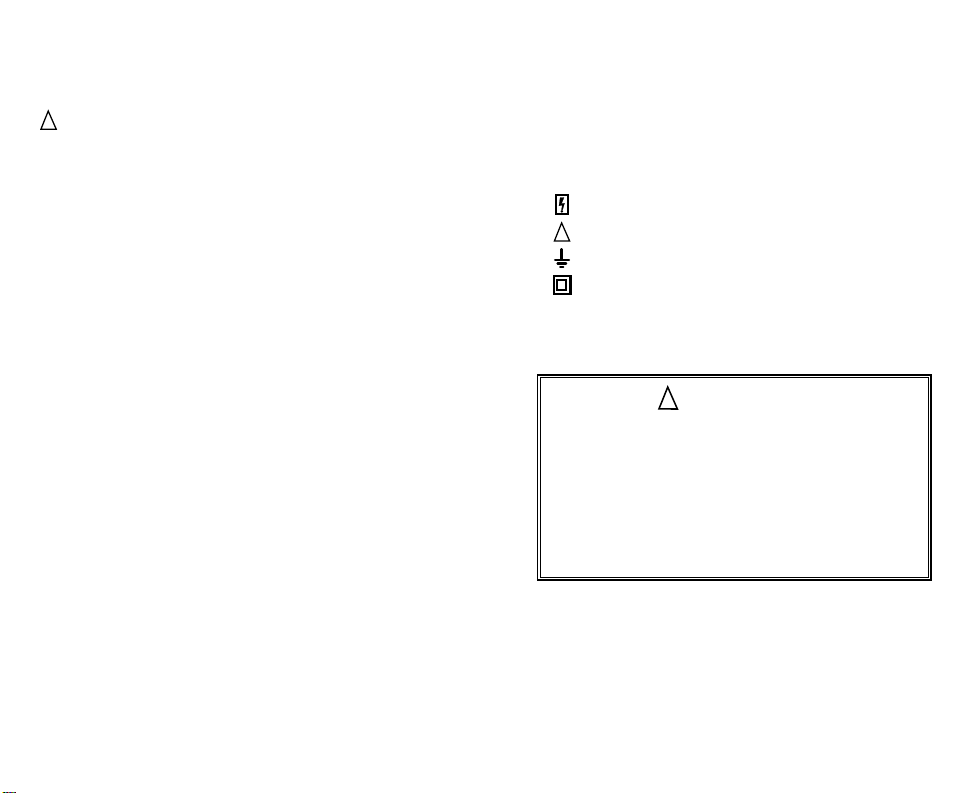
Symbols used:
Caution, risk of electric shock
Caution, refer to manual.
Ground
Double insulation
WARNINGS
DISCONNECT AND UNPLUG TEST LEADS before opening case.
TEST NCV FUNCTION ON KNOWN LIVE WIRE before using.
DO NOT APPLY VOLTAGE greater than 30VAC/VDC to the
thermocouple or the jacks when the rotary dial is on °F°C. (Use
only Type K thermocouples)
DO NOT APPLY VOLTAGE TO THE JACKS when the rotary dial is on
microamps. Even low voltages can cause a current overload and
potentially harm the meter.
54
Page 4

Description
Your SC680 is the top of the line clamp meter with
wireless functionality for the HVACR professional. Send
your electrical measurements directly to the Job Link®
System mobile app. Leave the meter behind a closed
blower door and view the current measurement on your
mobile device.
Help determine system efficiency by directly
measuring power consumption (W) of the system. Use
this value to inform your customer of energy saving
measures you can take to help them save money on
their energy bills.
The SC680 is the only meter you’ll need for
troubleshooting mini-split systems. Dual Type K
temperature ports to measure entering/exiting air
temperatures and measure frequency (Hz) directly with
clamp jaw. Reach those cramped mini-split connectors
with the included RCT2 probe tips for voltage and
resistance measurements.
Hang your SC680 clamp meter to any metallic surface
with the heavy-duty magnet. When the job is done, store
your test leads in the back case for tidy and convenient
storage. See both voltage and amperage readings at the
same time on the large dual display.
Easily see your amperage readings no matter how you
clamp around a wire with the swivel head AAC clamp.
Verify the order of 3-phase voltage lines with just two
leads. Capture L1-L2 and L1-L3 to check that motor lines
are correctly installed with Phase Rotation test.
Take more accurate VAC and AAC readings on variable
frequency drives with True RMS sensing technology.
Measure the starting amp draw of a compressor with
Inrush current mode.
Illuminate the way with a powerful LED built into the
clamp jaw. Easily see your measurements with the bright
blue backlight on the display. Safely change functions
with the backlit illuminated dial.
Take measurements more safely with one hand
using the single test lead holder. Test leads come with
removable gold plated tips to reliably connect Fieldpiece
accessory heads.
What’s Included
• SC680 Job Link® System Power Clamp Meter
• ADLS2 Deluxe Test Leads Kit
• ASA2 Alligator Clips
• RCT2 Molex Probe Tips
• 2 ATB1 Type K Thermocouples
• 2 Velcro Straps
• 9V Alkaline Battery (Not installed)
• ANC7 Protective Padded Case
• Operator’s manual
Quick Start
1. For electrical testing, connect test leads to black "COM"
and red "+" jacks.
2. Rotate the dial to your desired measurement.
3. Connect to test points and read measurement.
4. For temperature testing, remove test leads, slide TEMP
switch to the right and connect Type K thermocouples.
76
Page 5
Measurements Dial
ZERO A
DC
INRUSH
H/M/m
DC
INRUSH
OFF
Select
H/M/m
ZERO A
DC
°F °C
INRUSH
Sync
OFF
Range
Select
H/M/m
ZERO A
DC
°F °C
INRUSH
+
INRUSH
Buttons
Illuminate backlight. Press for 1 second to
zero Amps DC
INRUSH
Activate Inrush AAC capture mode
The SC680 is loaded with the measurement
parameters essential for HVACR professionals.
Select the parameter on the dial you want to
measure with the rotating selector switch.
Activate wireless to connect to Job Link®
System mobile app
Activate and cycle through Hold, Maximum,
minimum, and real-time measurements
(Press for 1 second to clear and exit)
Deactivate autoranging and select the
range manually
Cycle through displayed values on
applicable switch positions (Press for 1
second to toggle °F and °C)
98
Page 6

Display Icons
Battery Life Monitor
Auto Power Off Enabled
High Voltage Warning (>30VAC/VDC)
Manual Ranging
Data Hold
Maximum
Minimum
Inrush AAC
Wireless ON to Job Link® mobile app
Watts (Active Power)
Power Factor
Reactive Power
Apparent Power
Temperature Inputs
Delta T
Fahrenheit / Celsius
Continuity Test
Diode Test
Frequency (Hertz)
Duty Cycle (percentage)
Resistance Test (Ohms)
Capacitance Test (farads)
Microamps DC
Nano Unit (10−9, one billionth)
Micro Unit (10−6, one millionth)
Milli Unit (10−3, one thousandth)
Kilo Unit (103, one thousand)
Mega Unit (106, one million)
Alternating Current
Direct Current
Easy to Read Display
Easily see your measurements on the large dual
display. You’ll never miss a reading no matter the
lighting with the bright blue backlight to illuminate
the way.
1110
Page 7

Measurement Dial
+
Volts AC (VAC) True RMS (50-400Hz)
Test power lines (120 to 480VAC), test 24VAC going to controls and test
for transformer failure.
Ranges: 1000mV, 10V, 100V, 750V Resolution: 0.1mV
Accuracy: ±(1.5% + 10) 50Hz to 60Hz
±(2.0% + 10) 60Hz to 400Hz
Unspecified at 400Hz and greater
Minimum Input Voltage Range: >20 digits
Low Pass Filter: >1 kHz
Crest Factor: ≤ 3
Audio/Visual Hi-V Indicator: >30VAC/VDC
Input Impedance: 5MΩ
Overload Protection: 1000VDC or 750VAC rms
Volts DC (VDC)
Select VDC and measure DC voltages on circuit boards on more
advanced HVACR systems and logic control boards. In VDC/ADC dial
position, VDC is shown on lower display. Press SELECT button to show ADC
on the top display at the same time.
Ranges: 1000mV, 10V, 100V, 1000V Resolution: 0.1mV
Accuracy: ±(0.5% + 5)
Input Impedance: 5MΩ
Overload Protection: 1000VDC or 750VAC rms
Non Contact Voltage (NCV)
Use NCV to check 24VAC from a thermostat or live voltage up to 600VAC.
Always test a known live source before using. A segment graph and RED
LED will display the presence of voltage. An audible beep increases from
intermittent to continuous as intensity of field (EF) increases.
AC Voltage Detection Range: 24VAC to 600VAC (50-60Hz)
1312
Page 8

Amps AC (AAC) True RMS (50-60Hz)
ZERO A
DC
INRUSH
!
Test isolated power lines. Press SELECT on VAC/100AAC/Hz or
VAC/600AAC/Hz position. Read AAC in upper display and VAC on the lower
display. For AC current <100AAC, select VAC/100AAC/Hz switch position
and for AC current >100AAC, select the VAC/600AAC/Hz switch position.
Range: 100A, 600A Resolution: 0.01A Crest factor: ≤ 3
Accuracy: ±(2.5% + 15) 100A, ±(2.0% + 10) 600A
Minimum Input Current Range: >20 digits
Overload Protection: 600AAC Jaw Opening: 1.2in (30 mm)
Frequency (Hz) Through Clamp
Measure Hz on variable frequency drive motors. Turn dial to either
VAC/100AAC/Hz or VAC/600AAC/Hz position and press SELECT twice. Hz
will show in upper display and VAC on the lower display at the same time.
Range: 10Hz to 400Hz Resolution: 0.1Hz
Accuracy: ±(0.1% + 5)
Minimum current range: >7AAC (10 to 100Hz); >20AAC (100 to
400Hz) on 100AAC range; >25AAC (10 to 400Hz) on 600AAC range.
Overload Protection: 600AAC
Amps DC (ADC)
Measure ADC through the clamp jaw. Press
the ADC value in the top display.
Ranges: 100A, 600A Resolution: 0.01A Jaw Opening: 1.2in (30 mm)
Accuracy: ±(2.5% + 15) 100A, ±(2.0% + 10) 600A
Overload Protection: 600ADC
for 1 second to zero
+
+
Amps AC (AAC), Frequency (Hz) through the clamp and Inrush AAC current
is measured in the VAC/100AAC/Hz or VAC/600AAC/Hz switch position
shown above.
Inrush AAC Current
Inrush mode captures the starting amp draw of a motor. Starting amp
draw can assist in diagnosing a motor before it fails.
Activate Inrush mode
1 Rotate selector switch to VAC/100AAC/Hz or VAC/600AAC/Hz
2 Press SELECT once to show AAC on upper display. Press INRUSH on the
right side of meter to activate Inrush Mode.
3 Clamp jaw around the motor’s start wire.
4 Turn motor on. The starting amp draw will hold on the upper display.
5 Press INRUSH to clear captured reading. Press INRUSH for 2 seconds to
exit.
Inrush measurement period: 100-milliseconds
Minimum input: >2A on 100AAC range; >20A on 600A range
Note: AAC or Hz through the clamp and VAC through the test leads
can be measured simultaneously. However, if only AAC, Frequency
(Hz), or Inrush AAC is measured through the clamp, test leads and
thermocouples must be unplugged from the meter.
1514
Page 9

MicroAmps DC (µADC)
Test flame rectifier diodes on a heater control. Connect leads between
flame sensor probe and control module. Turn heating unit on. When the
flame is on, there should be a measurable µADC signal, typically under
10µADC. Compare measurement to manufacturer’s specification to
determine if replacement is necessary.
Ranges: 1000µA Resolution: 0.1µA
Accuracy: ±(1.0% + 5) Volts burden: 5V
Overload Protection: 600VDC or 600VAC rms
Frequency (Hz) Through Leads
Check incoming voltages to ensure they are cycling at 60Hz. For
frequency measurements on VFD equipment, use the amp clamp.
Ranges: 100Hz, 1000Hz, 10kHz, 100kHz, 1000kHz Resolution: 0.01Hz
Accuracy: ±(0.1% + 5) Sensitivity: 10Hz to 1000kHz: >3.5Vrms
Minimum PW: >1µs Duty Cycle Limits: >30% and <70%
Overload Protection: 600VDC or 600VAC rms
Duty Cycle (%)
Duty cycle shows the % On Time of a 5V logic signal square wave.
Ranges: 5%-95% (40Hz to 1kHz), 10%-90% (1kHz to 10kHz), 20%-80%
(10kHz to 20kHz)
Accuracy (5V logic): ±(2% + 10) Resolution: 0.1%
Pulse Width: >10µs
Overload Protection: 600VDC or 600VAC rms
Capacitance (MFD)
Test motor start and run capacitors. Capacitors are one of the most
failure prone components in a HVACR system. Disconnect from power and
any resistors found between terminals. Discharge capacitor before testing. If
dIS.C is displayed, the capacitor needs to be fully discharged to test.
Ranges: 10nF, 100nF, 1000nF, 10µF, 100µF, 1000µF, 10mF
Accuracy: ±(3% + 15) 10nF, ±(3% + 5) 100nF to 1000µF, ±(5% + 5) 10mF
Resolution: 0.01nF Overload Protection: 600VDC or 600VAC rms
Discharge Cap First!
1716
Page 10

Resistance (Ω)
DC
SEL
HOLD
INRUSH
HOLD
INRUSH
Used for “ohming out” a compressor. A 0.01Ω resolution is useful to
test the resistance between the terminal poles because the values are
typically very low. For best practice, use a megger (Fieldpiece SMG5) to
measure motor winding insultion to ground.
Ranges: 100Ω, 1000Ω, 10kΩ, 100kΩ, 1000kΩ, 10MΩ, 50MΩ
Resolution: 0.01Ω
Accuracy: ±(1.0% + 15) 100Ω, ±(1.0% + 5) 1000Ω to 100kΩ, ±(1.5%
+ 5) 1000kΩ, ±(3.0% + 5) 10MΩ to 50MΩ
Open circuit volts: -1.1VDC typical, -3.2VDC (100Ω range)
Overload Protection: 600VDC or 600VAC rms
Continuity (
Perfect for checking isolated fuses, use the continuity function to test
whether a circuit is open (no beep, no green LED) or closed (beep and
green LED). Press SELECT once to enter Continuity mode.
Range: 100Ω Resolution: 0.01Ω Response time: 100ms
Audible beep: <30Ω
Visual Indicator: Green LED
Overload Protection: 600VDC or 600VAC rms
Diode Test (
Test diodes for proper forward and reversed-biased functions. A
voltage will display in forward-bias and “OL” in reversed-bias. Press SELECT
twice to enter Diode mode.
Test current: 0.8mA (Approx.) Accuracy: ±(1.5% + 5)
Open circuit volts: 3.2VDC typical Audible beep: <0.05V
Visual Indicator: Green LED
Overload Protection: 600VDC or 600VAC rms
)
)
1918
Page 11

Dual Temperature (T1, T2, T1-T2)
Plug any Type K thermocouple directly into the meter to measure
temperature. Test for proper airflow across the evaporator coil by
measuring delta T with the dual temperature inputs.
Insulated cold junction is located inside the meter and allows for
accurate measurements even in rapidly changing ambient temperatures
(going from rooftop to freezer). No adapter is required.
By default, T1 will show on top display and T2 on bottom display. Press
SELECT button once to display T1 on top and T1-T2 on the bottom. Press
SELECT button again to display T2 on top and T1-T2 on the bottom.
Range: -58°F to 2372°F, (-50°C to 1300°C) Resolution: 0.1°
Accuracy: ±(1°F)* 32°F to 120°F, ±(1°C) 0°C to 49°C
±(1%+2°F) 32°F to 932°F, ±(1%+1°C) 0°C to 500°C
±(2%+6°F) -58°F to 32°F, ±(2%+3°C) -50°C to 0°C
±(2%+6°F) 932°F to 2372°F, ±(2%+3°C) 500°C to 1300°C
Sensor type: Type K thermocouple *After field calibration
Overload protection: 30 VDC or 30VAC rms
COM
Unplug Leads and Slide
TEMP Switch to the Right
Change Units (°F or °C)
By default, temperature units are set to Fahrenheit (°F). In
Temperature dial position, press SELECT button for 1 second to toggle
between Fahrenheit (°F) and Celsius (°C).
Temperature Calibration
Thermocouples (T/C) are not calibrated directly. Instead, each T/C jack
(T1 and T2) must be calibrated to the particular T/C that is plugged into it.
Though it’s possible for a calibration to hold for years, it’s best practice to
calibrate regularly if only to verify accuracy. Labelling your T/C, T1 or T2,
will help ensure using the same T/C for T1 and T2 ports.
Calibration is quick and easy, requiring just a known temperature to
calibrate to. Ice water is probably the most accurate and readily available
known temperature (32.0°F, 0.0°C) in the field.
1. Rotate dial to the °F °C, T1-T2
position.
2. Plug one thermocouple to be
calibrated into the T1 Type K jack.
3. Unscrew A and B and remove the
battery cover.
4. Stabilize a large cup of ice water.
Stir the ice with the water until
temperature stays at a stable value.
5. Immerse the T1 thermocouple
probe and let it stabilize.
Keep stirring water to prevent
thermocouple from direct contact
with ice.
6. Use a small screwdriver to adjust
calibration T1 Temp Cal pot below
the battery as close to 32°F(0°C) as
you would like.
7. Repeat step 2-6 and replace T2 for
T1 for T2 thermocouple.
Note: J1-J2 switch is for factory
calibration purposes only. Do not
switch from J2.
A
DO NOT SWITCH
FROM J2
TEMP
T1
CAL
T2
B
2120
Page 12

Power (Watts, VAr, VA, WDC, PF)
!
Help determine system efficiency by measuring the power exerted
by the system. The actual power consumed by the system is called Active
Power and is measured in watts (W or kW). Reactive loads, inductors
and capacitors, dissipate zero power, but they drop voltage and draw
current giving the deceptive impression they do dissipate power. This is
called Reactive Power and is measured in Volt-Amps-Reactive (VAr). The
combination of reactive and real power is called Apparent Power and
is the product of a system’s voltage and current, without phase angle
consideration. Apparent Power is measured in Volt-Amps (VA).
Power Factor (PF) is the ratio of the power the system draws from
the main power supply and the power the system actually consumes. An
ideal PF is 1, meaning the system consumes all the power it draws. Due to
inductive and capacitive loads of the system however, this is not possible.
To take the power reading you need to measure both voltage and
amperage simultaneously. Connect test leads to main power supply
terminals and secure amp clamp around the same line that the positive
(red) test lead is connected to.
See Power Factor in top display and Power in bottom display. Press
SELECT to toggle Active Power (W), Reactive Power (VAr), Apparent Power
(VA) and DC Power (W).
CAUTION! DO NOT MEASURE VOLTAGE LINES OR EXPOSE THE METER TO
LIVE POWER LINES EXCEEDING 750VAC/1000VDC NOMINAL VOLTAGE.
+
Power (Watts, VAr, VA, WDC, PF)
Accuracy: Stated accuracy @ 73°F±9°F (23°C±5°C), <75%RH
Effective Current Range: 2AAC/ADC to 600AAC/ADC
Effective Voltage Range: 80VAC to 750VAC, 80VDC to 1000VDC
Effective Frequency Response: 50Hz to 60Hz
Power accuracies unspecified for non-sinusoidal current waveforms
Active Power (W)
Ranges: 1000W, 10kW, 100kW, 450kW
Resolution: 0.1W
Accuracy: ±(5.0% + 5) >10A
±(10.0% + 5) 2A to 10A on 450kW range
Reactive Power (VAr)
Ranges: 1000VAr, 10kVAr, 100kVAr, 450kVAr
Resolution: 0.1VAr
Accuracy: ±(5.0% + 5) >10A on 1000VAr range
±(10.0% + 5) 2A to 10A
Apparent Power (VA)
Ranges: 1000VA, 10kVA, 100kVA, 450kVA
Resolution: 0.1VA
Accuracy: ±(5% + 5) >2A
DC Power (W)
Ranges: 1000W, 10kW, 100kW, 600kW
Resolution: 0.1W
Accuracy: ±(5% + 5) > 10A, ±(10.0% + 5) 2A to 10A
Power Factor (PF)
Ranges: -1.00 to +1.00
Resolution: 0.01 PF
Accuracy: ±(5.0% + 5) >10A, ±(10.0% + 5) 2A to 10A
PF readings will be displayed on upper display
2322
Page 13

Phase Rotation Test (L1L2, L1L3)
Connect 3-phase power lines in the correct order to the terminals of
a motor to ensure the motor turns in the intended direction. Incorrect
wiring can damage some equipment. The terminals on the motor are
usually marked L1, L2, and L3; however, the wires supplying power
usually are not. Perform a simple phase rotation test with two test leads
to quickly identify the order of 3-phase power lines.
Range: 80±5 VAC to 600VAC (50Hz to 80Hz) Resolution: 0.1V
Accuracy: ±(1.5% rdg + 10 dgts)
Overload Protection: 600VDC or AC rms
Step 2: Connect Leads
Connect both black and red
test leads to any two of the three
phase voltage lines in question.
The line voltage will hold on the
bottom display. Blinking L1 and
L2 disappear. L3 will blink on top
display to indicate test is ready for
Step 2.
How to Perform a Phase Rotation Test
Set 1: Select Function
Switch to . Plug black test lead
into the COM (L1) port and red test lead
to the VΩ (L2 L3) port on the SC680.
You will see “L1L2” blinking
to indicate phase rotation test
is ready to begin.
Important: Step 2 must
be performed within
5 seconds of completing Step 1 or “Err” will
show and Step 1 must
be repeated.
Step 3: Move Red Lead
With the black lead still on
“L1”, move the red test lead to the
third 3-phase voltage line. The line
voltage will hold on the bottom
display. The top display will show
L123 indicating forward or L321
indicating reversed.
Simply swap any two lines to
change the direction. You can verify
this by performing the test again.
2524
Page 14

Phase Rotation Testing Tips
1 The measured voltage during phase rotation test
must be >80.0±5VAC. If not, the phase rotation
test can not be performed and “Err” will show on
the top display.
2 After phase rotation test is complete, press SELECT
button to begin a new phase rotation test.
3 Be sure to connect test leads to 3-phase voltage
lines for at least 2 seconds until voltage reading
holds on the bottom display
4 Phase rotation test cannot be performed on Hi-
frequency voltage signals. Be sure voltage lines
are within 50-80Hz to perform the phase rotation
test.
Modular
Expandability
Your SC680 is compatible with Fieldpiece
Accessory Heads. With Fieldpiece Accessory Heads,
you can measure any available parameter, and read
the measurement on your new meter’s display in
real-time, Hold, Max, and min.
Rotate the selector to VDC and stay in mV range.
Remove the probe tips of your test leads, and
connect your accessory head (model AAV3 shown).
+
LCDX
100
ON
READLOBATT
AirVelocity
&Temperature
Average
English
(16sec)
Head
Real
Metric
time
English Metric
Ft/min M/s
KM/hrMPH
ºF ºC
OFF
AUTOOFF
AAV3
Visit www.fieldpiece.com to see all of the
different Accessory Heads that Fieldpiece offers.
2726
Page 15

Works with Job Link® System
Do More with the Job Link® System
Directly document critical electrical
measurements at the job site, and add them to
professional PDF reports. No separate transmitter
required.
Combine your new clamp meter with other Job
Link System tools to create seamless reports. Show
customers what needs to be done (Pre-work) and
prove how that work helped (Post-work).
Other Job Link® System Tools
• SM480V Refrigerant Manifold + Micron Gauge (4 Port)
• SM380V Refrigerant Manifold + Micron Gauge (3 Port)
• JL3KH6 Wireless Charge and Air Test Kit
• JL3KR4 Wireless Charge Test Kit
• SRS3 Wireless Refrigerant Scale
Go to www.fieldpiece.com for all Job Link® System options.
Wireless Mode
Send electrical measurements wirelessly from
SC680 directly to the Job Link® mobile app. No JL2
transmitter required.
Sending Wireless Measurements
1 Select any switch position other than L1L2 and NCV
on SC680.
2 Press WIRELESS ON/OFF button on meter.
3 Favorite your SC680 by going to the measurement
screen in the Job Link app.
4 Tap on Electrical tab in the Job Link measurement
screen.
Note: By default, wireless is OFF when powering on
the SC680. Press WIRELESS ON/OFF buton to turn
wireless ON.
Wireless Specifications
Wireless range: Up to 115 feet (35m) line of sight. Distance decreases
through obstructions.
Wireless frequency: 2.4 GHz
Wireless Compatibility
Minimum Device Requirement:
BLE 4.0 devices running iOS® 7.0 or Android™ 5.0
(Latest compatibility at www.fieldpiece.com)
2928
Page 16

Functions
Sync
OFF
Range
Select
H/M/m
ZERO A
DC
°F °C
INRUSH
Sync
OFF
Range
Select
H/M/m
ZERO A
DC
°F °C
INRUSH
H/M/m
DC
INRUSH
H/M/m
DC
INRUSH
H/M/m
DC
INRUSH
ZERO A
DC
INRUSH
ZERO A
DC
INRUSH
Sync
OFF
Range
Select
H/M/m
ZERO A
DC
°F °C
INRUSH
Auto Power Off
Auto power off or APO will automatically turn off
your meter after 30 minutes of inactivty. By default
it is activated and APO will show on the display. To
disable, turn meter off. Hold
the meter by turning the selector dial to any range.
Release
after the beep. APO will no longer
display over the battery icon.
and power on
Battery Replacement
When your meter’s battery is low, the battery icon
will appear empty and blink for 30 seconds. “bAtt”
will display and meter will power off.
Turn dial to OFF position, disconnect test leads
and remove the battery cover with magnet strap
on the back of your meter. Remove old battery and
replace with a standard 9V battery only. Be sure to
re-insert the magnet strap before re-installing the
battery cover.
Hold/Max/min
Press
minimum, or real-time measurements. When
MAXMIN is displayed, you are seeing the real-time
measurement, but Max and min values are still
being recorded. Press
and exit. Press
in Job Link mobile app. See Wireless Section for Job
Link compatibility details.
High Voltage Warning
The symbol will display when measuring
>30VAC/VDC. An audible beep will be heard and
red LED will be shown.
to cycle through Hold, Maximum,
for 1 second to clear
to log an SC680 measurement
Backlight Illumination
See your measurements in dark environments.
Press
to illuminate the display and the selector
dial. Illumination will stay on for 5 minutes before
turning off automatically. Illumination can be
turned off at any time by pressing
.
Manual Ranging
Press
clamp meter to a specific range. Manual ranging
applies to VAC, VDC, Hz, MFD, W and resistance
(Ω). Press for 1 second to exit manual ranging and
return to auto-ranging.
to disable auto-ranging and set your
3130
Page 17

Certifications and
Module IDs
UL 61010-1, Third Edition
EN61010-1, EN61010-2-032
EN61010-2-033, EMC EN61326-1
FCC ID: 2ALHR005
RCM (N22675)
WEEE
Restriction of Hazardous
Substances Compliant
IC: Industry Canada IFETEL: Federal Telecom Institute
22518-BT005 RCPFI2A19-0287
CATIV 600V, CATIII 1000V or above. Included test leads are gold-plated and
have removable safety caps.
CATIII 1000V, CATIV 600 class II and pollution degree 2 indoor use comply
with CE, RoHS compliant.
CATIII is designated for measurements performed in the building
installation.
CATIV is for measurements performed at the source of the low-voltage
installation.
Specifications
Display: 10000 count dual display
Backlight: 5 minute duration with auto-off, blue color
Overrange: “OL” or “-OL” is displayed
Measurement rate: 3.3 times per second, nominal
Zero: Automatic
Operating environment: 32°F to 122°F (0°C to 50°C) at <70%RH
Storage temperature: -4°F to 140°F (-20°C to 60°C), 0 to 80%RH (with
battery removed)
Accuracy: Stated accuracy @ 73°F±9°F (23°C±5°C), <75%RH
Temperature coefficient: 0.1 x (specified accuracy) per °C [0°C to 19°C
(32°F to 66°F), 28°C to 50° C (82°F to 122°F)]
APO (Auto Power Off): Approx. 30 minutes
Power: Single standard 9-volt battery, NEDA 1604, JIS 006P, IEC 6F22
Battery life: 100 hours typical alkaline (No wireless, no backlight)
Low battery indication: Battery icon blinks and "batt" is displayed
when the battery voltage drops below the operating level
Dimensions: 301.5mm(H) x 79.5mm(W) x 50.0mm(D)
Weight: Approx. 480g including battery
Altitude: Up to 6562 ft (2000m)
Overload protection: 1000VDC or 750VAC rms unless otherwise stated
Test leads: Use UL listed test leads that comply to UL61010-031 rated
CATIV 600V, CATIII 1000V or above. Included test leads are gold-plated
and have removable safety caps.
Please operate the instrument following all instructions of
the operator's manual to avoid impairing the safety of
the product.
3332
Page 18

FCC Statement
This equipment has been tested and found to comply with the limits
for a Class B digital device, pursuant to Part 15 of the FCC Rules. These
limits are designed to provide reasonable protection against harmful
interference in a residential installation. This equipment generates, uses
and can radiate radio frequency energy and, if not installed and used in
accordance with the instructions, may cause harmful interference to radio
communications. However, there is no guarantee that interference will
not occur in a particular installation. If this equipment does cause harmful
interference to radio or television reception, which can be determined by
turning the equipment off and on, the user is encouraged to try to correct
the interference by one or more of the following measures:
1. Reorient the receiving antenna.
2. Increase the separation between the equipment and receiver.
3. Connect the equipment into an outlet on a circuit different from that
to which the receiver is connected.
4. Consult the dealer or an experienced radio/TV technician for help.
FCC Caution:
Any changes or modifications not expressly approved by the party
responsible for compliance could void the user’s authority to operate this
equipment.
This device complies with Part 15 of the FCC Rules. Operation is subject
to the following two conditions: (1) This device may not cause harmful
interference, and (2) this device must accept any interference received,
including interference that may cause undesired operation.
This device and its antenna(s) must not be co-located or operating in
conjunction with any other antenna or transmitter.
IMPORTANT NOTE: FCC Radiation Exposure Statement:
This equipment complies with FCC radiation exposure limits set forth
for an uncontrolled environment. This equipment should be installed and
operated with minimum distance 20cm between the radiator & your body.
IC Statement
This device contains licence-exempt transmitter(s)/receiver(s) that
comply with Innovation, Science and Economic Development Canada’s
licence-exempt RSS(s). Operation is subject to the following two
conditions:
1. This device may not cause interference.
2. This device must accept any interference, including interference
that may cause undesired operation of the device.
L’émetteur/récepteur exempt de licence contenu dans le présent
appareil est conforme aux CNR d’Innovation, Sciences et Développement
économique Canada applicables aux appareils radio exempts de licence.
L’exploitation est autorisée aux deux conditions suivantes :
1. L’appareil ne doit pas produire de brouillage;
2. L’appareil doit accepter tout brouillage radioélectrique subi,
même si le brouillage est susceptible d’en compromettre le
fonctionnement.
IMPORTANT NOTE: IC Radiation Exposure Statement:
This equipment complies with IC RSS-102 radiation exposure limits set
forth for an uncontrolled environment. This equipment should be installed
and operated with minimum distance 20cm between the radiator & your
body.
Cet équipement est conforme aux limites d’exposition aux
rayonnements IC établies pour un environnement non contrôlé. Cet
équipement doit être installé et utilisé avec un minimum de 20cm de
distance entre la source de rayonnement et votre corps
3534
Page 19

IFETEL Statement
La operación de este equipo está sujeta a las siguientes dos
condiciones: (1) es posible que este equipo o dispositivo no cause
interferencia perjudicial y (2) este equipo o dispositivo debe aceptar
cualquier interferencia, incluyendo la que pueda causar su operación no
deseada.
The operation of this equipment is subject to the following two
conditions: (1) this device or device may not cause harmful
interference, and (2) this device or device must accept any interference,
including interference that may cause undesired operation.
Limited Warranty
This product is warranted against defects in material or
workmanship for one year from date of purchase from an authorized
Fieldpiece dealer. Fieldpiece will replace or repair the defective unit, at
its option, subject to verification of the defect.
This warranty does not apply to defects resulting from abuse,
neglect, accident, unauthorized repair, alteration, or unreasonable use
of the machine.
Any implied warranties arising from the sale of a Fieldpiece product,
including but not limited to implied warranties of merchantability and
fitness for a particular purpose, are limited to the above. Fieldpiece
shall not be liable for loss of use of the machine or other incidental or
consequential damages, expenses, or economic loss, or for any claim of
such damage, expenses, or economic loss.
State laws vary. The above limitations or exclusions may not apply
to you.
Obtaining Service
Visit www.fieldpiece.com/rma for the latest information on how
to obtain service. Warranty for products purchased outside of the U.S.
should be handled through local distributors. Visit our website to find
your local distributor.
3736
Page 20

SC680
© Fieldpiece Instruments, Inc 2019; v10
38
 Loading...