

Page 1

Corporate Office:
Plot No. 235 to 240, Sec-3, HSIIDC, Karnal- 132001 (Haryana), India
+91 184 2221571/ 72/ 73 [email protected], www.fieldking.com
BERI UDYOG PVT LTD
?Operator Manual Service Manual Part Catalogue? ?
World Class Farm Equipment
Seeding & Plantation
Post Harvest
Harvest
Crop Protection
Landscaping
Tillage
Haulage
Solutions...
Dabbang
Cultivator / Tiller
Multi Row / Double Coil
Cultivator / Tiller
Rigid Cultivator
1.
2.
3.
Models of beri cultivator
Page No.
2 -14
15-28
29-42
Page 2

Corporate Office:
Plot No. 235 to 240, Sec-3, HSIIDC, Karnal- 132001 (Haryana), India
+91 184 2221571/ 72/ 73 [email protected], www.fieldking.com
BERI UDYOG PVT LTD
?Operator Manual Service Manual Part Catalogue? ?
World Class Farm Equipment
Seeding & Plantation
Post Harvest
Harvest
Crop Protection
Landscaping
Tillage
Haulage
Solutions...
Dabbang
Cultivator / Tiller
Page 3

You have invested in one of the best implements of its type in the market today.
The care you give your “FIELDKING” implement will greatly determine your
satisfaction with its performance and its service life. A careful study of this manual
will give you a thorough understanding of your new implement before operating.
If your manual is lost or destroyed, “FIELDKING” will be glad to provide you a new
copy. Visit to nearest dealership & get a copy. Most of our manuals can also be
downloaded from our website at www.fieldking.com.
As an authorized “FIELDKING” dealer, we stock genuine “FIELDKING” parts which
are manufactured with the same precision and skill as our original equipment. Our
trained service persons are well informed on methods required to service
“FIELDKING” equipments and are ready to help you.
Should you require additional information or assistance, please contact us.
CONGRATULATIONS!
YOUR AUTHORIZED
FIELDKING DEALER
BECAUSE “FIELDKING” MAINTAINS AN ONGOING PROGRAMME
OF PRODUCT IMPROVEMENT, WE RESERVE THE RIGHT TO MAKE
IMPROVEMENTS IN DESIGN OR CHANGE IN SPECIFICATION
WITHOUT INCURRING ANY OBLIGATION TO INSTALL THEM ON
UNITS PREVIOUSLY SOLD. BECAUSE OF THE POSSIBILITY THAT
SOME PHOTOGRAPHS IN THIS MANUAL WERE TAKEN OF
PROTOTYPE MODELS, PRODUCTION MODELS MAY VARY IN
SOME DETAIL. IN ADDITION, SOME PHOTOGRAPHS MAY SHOW
SHIELDS REMOVED FOR THE PURPOSE OF CLARITY. NEVER
OPERATE THIS IMPLEMENT WITHOUT ALL SHIELDS IN PLACE.
Page 4

This manual contains valuable information about your new “FIELDKING” dabbang
cultivator / tiller. It has been carefully prepared to give you helpful suggestions for
operating, adjusting, servicing and ordering spare parts.
Keep this manual in a convenient place for quick and easy reference. Study it
carefully. You have purchased a dependable and sturdy dabbang cultivator / tiller but
only by proper care and operation you can expect to receive the service and long life
designed and built into it.
Sometime in the future your dabbang cultivator / tiller may need new parts to replace
which are worn out or broken. If so, go to your dealer and provide him equipment’s
detail like model and part number.
Name ______________________________________________
Purchased From ______________________________________
Date of Purchase _____________________________________
Model No. ___________________________________________
Serial No. ___________________________________________
TO THE PURCHASER
CUSTOMER INFORMATION
1. Read and understand the information contained in this manual.
2. Operate, lubricate, assemble and maintain the equipment in accordance with all
instructions and safety procedures in this manual.
3. Inspect the equipment and replace or repair any parts that are damaged or worn
out which under continued operation would cause damage, wear to other parts,
or cause a safety hazard.
4. Return the equipment or parts to the authorized “FIELDKING” dealer, from where
it was purchased, for service or replacement of defective parts that are covered
by warranty. (The “FIELDKING” Factory may inspect equipment or parts before
warranty claims are honored.)
5. All costs incurred by the dealer for traveling to or transporting the equipment for
warranty inspection and claims will be borne by the customer.
PURCHASER / OPERATOR’S RESPONSIBILITY
Page 5

1. TECHNICAL DATA
1.1 Introduction
1.2 Warranty
1.3 When the warranty becomes void
1.4 Warning
2. USAGE INSTRUCTIONS
2.1 Before use & adjustments
2.2 Attaching cultivator/tiller to the tractor
2.3 Safety
3. MAINTENANCE
3.1 Operation, care & maintenance of cultivator/tiller
3.2 Storage of machine after work
4. PARTS CATALOGUE
INDEX
Page 6

21
1. TECHNICAL DATA
1.1 INTRODUCTION
FIELDKING ‘dabbang cultivator/tiller’ type rigid tiller is designed for tougher
operations. It is suitable for varying hard soil conditions. Dabbang rigid forged tyne
assemblies derive their strength from heavy duty solid bar, new casted Brackets
which once bolted to the immensely strong main frame, cannot move or strain out
of position. Spacing of the tynes is changed simply by slackening the bolts and
sliding the brackets to the desired position. Height of the tynes can aslo be adjusted.
1.2 WARRANTY POLICY FOR FILEKIDNG TILLER/CULTIVATOR
1. Beri Udyog Pvt. Ltd.(“ the company”) warrants to the retail purchase of the
“FIELDKING” tiller/ cultivator that subject to the limitation specified here in
below, the company’s authorised dealer will repair or replace any part there
of found. In its opinion, to be defective in materials of workmanship. The
warranty shall be for a period 1 year from the date of purchase of new
“FIELDKING” agriculture tiller/cultivator by the original purchaser (“retail
purchaser”).
2. This warranty is limited to the delivery to the retail purchaser, free at the
authorized dealer’s workshop or company’s works of the part or parts
whether repaired or replaced in exchange for those acknowledge by the
company to be defective.
3. The purchaser of “FIELDKING” agriculture tiller/cultivator are advised strictly
to follow the instructions given in the operator manual, provided by the
company along with the “FIELDKING” tiller/cultivator at the time of delivery,
changes if any in the “FIELDKING” tiller/cultivator, resulting in improper
usage will not be covered in the warranty, This warrant will a u t oma ti ca l l y
get terminated on the expiry of warrant period even in the “FIELDKING”
tiller/cultivator, may not in use for any time during the warranty period for any
reason whatsoever including any technical reasons, any time for such
repairs/replacements of parts and in transit, whether under this warranty or
otherwise shall not be excluded from the warranty period.
4. Warranty shall apply to following:
• Manufacturing defects: Breaking of any structure & fabrication covered
under warranty.
5. Warranty shall not apply to the following:
• Accidental cases are not covered under warranty.
NOTE: If any kind of breakage and damage is found due to poor handling of
customer that also is not covered under warranty policy.
6. The retail purchaser shall be required to make a thorough examination of
the products prior to the purchase. The authorized dealer are in no way the
legal agent of the company and have no right or authority to give any
warranty or assume any obligation on behalf of the company or bind the
company in any manner whatsoever.
7. For the purpose of this warranty, the term ‘’product” means and includes
only new “FIELDKING” tiller/cultivator, manufactured by or for the company
design and drawing and sold and installed by the authorized dealer.
8. The company’s responsibility is limited to the terms of this warranty and it
shall not be liable for personal injuries or consequential or resulting liability,
damage or loss arising from any defect.
9. The company’s liability under this warranty is depended upon the strict
observance by the retail purchase, of the following provisions.
• The retail purchaser at the time of delivery shall sign complete and return
the authorized warranty and dealer’s delivery report.
• All the parameters should be thoroughly checked as per the scheduled
maintenance in the operator ’s manual. The customers are also bound to
use the genuine spares for “FIELDKING” tiller/cultivator, purchased from
authorized “FIELDKING’ dealers.
• Repairs and replacements will be performed by the facility of the authorized
dealers/its branch dealers.
• This warranty shall not apply if the product or any part there of repaired or
altered not in accordance with our standard repair procedure or by any
person other than an Authorized Dealers/its branch dealers/its authorized
service centre.
• The decision of the company or the concerned authorized dealers in regard
to the warranty shall be final and conclusive and the retail purchaser hereby
agrees to unconditionally accept their decision on all.
• Claims arising from this warranty will be considered only if they are notified
in writing to the concerned authorized dealers after the defect has been
ascertained.
Page 7

43
12. The court at Karnal shall have exclusive jurisdiction to try, entertain and
dispose of all proceeding relating to any dispute arising between the
company and the retail purchaser on the liability of the company under
this warranty.
1.3 WHEN THE WARRANTY BECOMES VOID
1. Besides the caused specified in the supply agreement, the warranty shall in
any case become void.
2. Should there have been a maneuver error.
3. When following repairs made by the customer without authorization from
the manufacture or owing to the installation of spurious spare parts, the
machine is subject to variations and the damage can be ascribed to these
variations.
4. When the user failed to comply with the instructions in the operator’s
handbook.
5. When the implement has been used beyond the specified power limit like
(tractor horse power).
6. No warranty will be given if the service is not done on time.
1.4 WARNING
Thoroughly read the instruction manual before proceeding with the various
operations.
Maintain the harrow as per the instructions of this handbook to be entitled for
warranty.
2. USAGE INSTRUCTIONS
2.1 BEFORE USE & ADJUSTMENTS
Before mounting of cultivator make sure that all nuts & bolts are properly secured.
Also determine soil and trash conditions of the field and make the preliminary
adjustments. e.g.
Tyne leveling
To eliminate uneven working and side draft, leveling is done by means of top link.
• This warranty does not cover any applicable taxes payable on any parts
which the company may supply or repairs free of cost of during the warranty
period. This warranty also does not cover the cost of packaging to and fro
freight and transportation charges etc. on the defective “FIELDKING”
tiller/cultivator or other part of the “FIELDKING” tiller/cultivator sent to
“FIELDKING” dealers locations.
• The company reserves the right to make changes in design or introduce
any improvement or add any parts on the products any time without
incurring any obligation to install the same on products previously sold.
10. This contract will be ineffective and incorporative if:
• The dully warranty card is not presented during the repairs.
• The “FIELDKING” agriculture tiller/cultivator or any parts thereof is
subjected to neglect, fire, floods or other acts of god or in the company’s
opinion any damage has caused to be “FIELDKING” agriculture
tiller/cultivator during transportation.
• The original numbers are removed, obliterated or altered from the unit.
• Any attempt is made to have the repairs executed by a person, other than
the company’s or its authorized representatives.
• Any defect if not informed immediately to the company or its authorized
representative, any alterations in the warranty card is made.
• The use of replacement parts not manufactured or supplied by the
company will automatically invalidate this warranty.
This warranty shall not be apply to defect/damages caused by the normal
wear and tear, accident, transportation, misuser or neglect usage in non
agric applications, defect in the products which have been altered outside
the company’s work or which have been let out in hire or the identification
marks in which have been altered or removed. Company’s decisions in this
respect will be final and binding on all.
11. The above warranty is in lieu of all other warranties express or implied, and
no person, agent or representative of the company is authorized to give any
other warranties on the company’s behalf or the assume for it any other
liability in connection, with the product.
Page 8

65
SAFETY INSTRUCTIONS:
1. All equipment is potentially hazardous. There is no substitute for a safety
conscious operator who recognizes potential hazards and follows reasonable
safety practices.
2. Personal protection equipment including safety glasses, safety shoes, and
gloves are recommended during assembly, installation, operation, adjustment,
maintaining, repairing, removal or moving the implement.
3. Never place yourself between the tractor and implement while implement is in
operation.
4. Do not work under a raised implement unless it is securely blocked or held in
position. Do not depend on the tractor hydraulic system to hold the implement in
place.
5. A heavy load can cause instability of the tractor. Use extreme care during travel.
Slow down on turns and watch out for bumps. The tractor may need front counterweights to counter-balance the weight of the implement.
6. Do not allow others to ride on the tractor with an operator. Riders are subject to
injury such as being struck by foreign objects or being thrown off. Riders obstruct
the operator’s view resulting in unsafe operation. Never allow anyone to ride on
the implement!
7. Do not allow anyone who is not familiar with the safety rules and operation
instructions to use this implement.
8. Keep alert and watch the front as well as the rear when working with equipment.
9. Always be sure the implement is in the fully raised position when in transport.
10. When removing or adjusting equipment, be sure that your feet are never under the
implement.
11. Avoid excessive speed during operation.
12. Before you operate the field cultivator, check over all pins, bolts and connections
to be sure that all are securely in place. Replace any damaged or worn parts
immediately.
13. Make implement adjustments only when the implement is attached to the tractor.
14. Watch for and avoid hidden obstructions, i.e. buried pipes, rocks, uneven
concrete slabs, stumps etc., when operating equipment.
15. Never operate tractor and implement under trees with low hanging limbs.
Operators can be knocked off the tractor and then run over by the implement.
16. Operating rigid cultivator shanks may suddenly fling rocks and clods. Keep all
bystanders 10 meter away and operator must wear safety glasses.
17. Reduce speed when transporting mounted implements to avoid bouncing and
momentary loss of steering control.
18. It may be necessary to raise implement slightly and then lower to desired working
depth when tractor is moving.
Danger:
In operating position the top link must
be higher on the machine side than on
the tractor side!
Depth control
The depth at which the implement is required to work is controlled hydraulically by
raising or lowering the control lever on the tractor.
2.2 ATTACHING THE CULTIVATOR/TILLER TO THE TRACTOR
1. Place the cultivator duly leveled on the flat piece of land.
2. Reverse the tractor to the cultivator ( Do not drag the cultivator/tiller up the
tractor)
3. Attach the left arm of the tractor to the cultivator/tiller first.
4. Attach the central arm to the cultivator/tiller. To attach, turn the screws on both
sides to an equal length. If the arm is too short or too long, turn the screw to
adjust both at the same time until aligned with the hole on the central arm.
5. Attach the lower right arm, turn the screw until the mounting pin is at the same
level as the hole on the tractor arm. If the gap between the hole and mounting
pin is too close or too distant, turn the control arm in or pull it away to an
appropriate distance. You may have to adjust both height and distance at the
same time. When the hole at tractor arm and mounting pin are even, insert the
pin in the hole and lock it with the lynch pin.
6. After attaching the cultivator/tiller, lift it and adjust the control arm parallel to
the ground. When you look from both rear or sideways, all shovel should be
touching the ground uniformly.
2.3 SAFETY
REMEMBER SAFETY FIRST
Operator must read the instruction manual before operating the cultivator. Do
not allow anyone to operate this equipment who has not fully read and
comprehended this manual and who has not been properly trained in the safe
operation of the equipment.
Page 9

87
Non-observance of the above rules shall be considered negligence.
It will rule out any liability of the manufacturer for all possible
damage and / or consequences.
The user is solely responsible for any risk!
ATTENTION
3. MAINTENANCE
3.1 OPERATION, CARE & MAINTENANCE OF CULTIVATOR/ TILLER
1. All the shovels of the tynes should be set at equal depth. To do this, place the
cultivator on level ground and see that all the shovel touch the ground.
2. Before commencing work with a cultivator, check it for loose bolts and nuts and
fasten them properly. After having taken all these precautions, run the cultivator
for one hour and then inspect it once more for any loose parts.
3. Never turn or reverse your tractor while cultivator is ploughed deep in field. This
will twist the assemblies out of alignment and damage them extensively.
4. Reverse or replace the shovel point when worn out. Delay may result in wearing
out of the tynes which will result into expensive repairing/replacements. Avoid use
of extra wide shovels as they do not improve tillage quality but only put extra load
on the tractor and also result into extra fuel consumption.
3.2.STORAGE OF CULTIVATOR/TILLER AFTER WORK
1. Wash the cultivator after work.
2. Replace the worn out nuts & bolts.
3. If cultivator has to remain unused for long time then clean it & apply a layer of used
oil for rust prevention.
4. These steps will enhance the life of your cultivator.
4. PARTS CATALOGUE
19. Use extra care when working on slopes.
20. Never use alcoholic beverages or drugs which can hinder alertness or
coordination while operating this equipment. Consult your doctor about operating
this machine while taking prescription medications.
Page 10
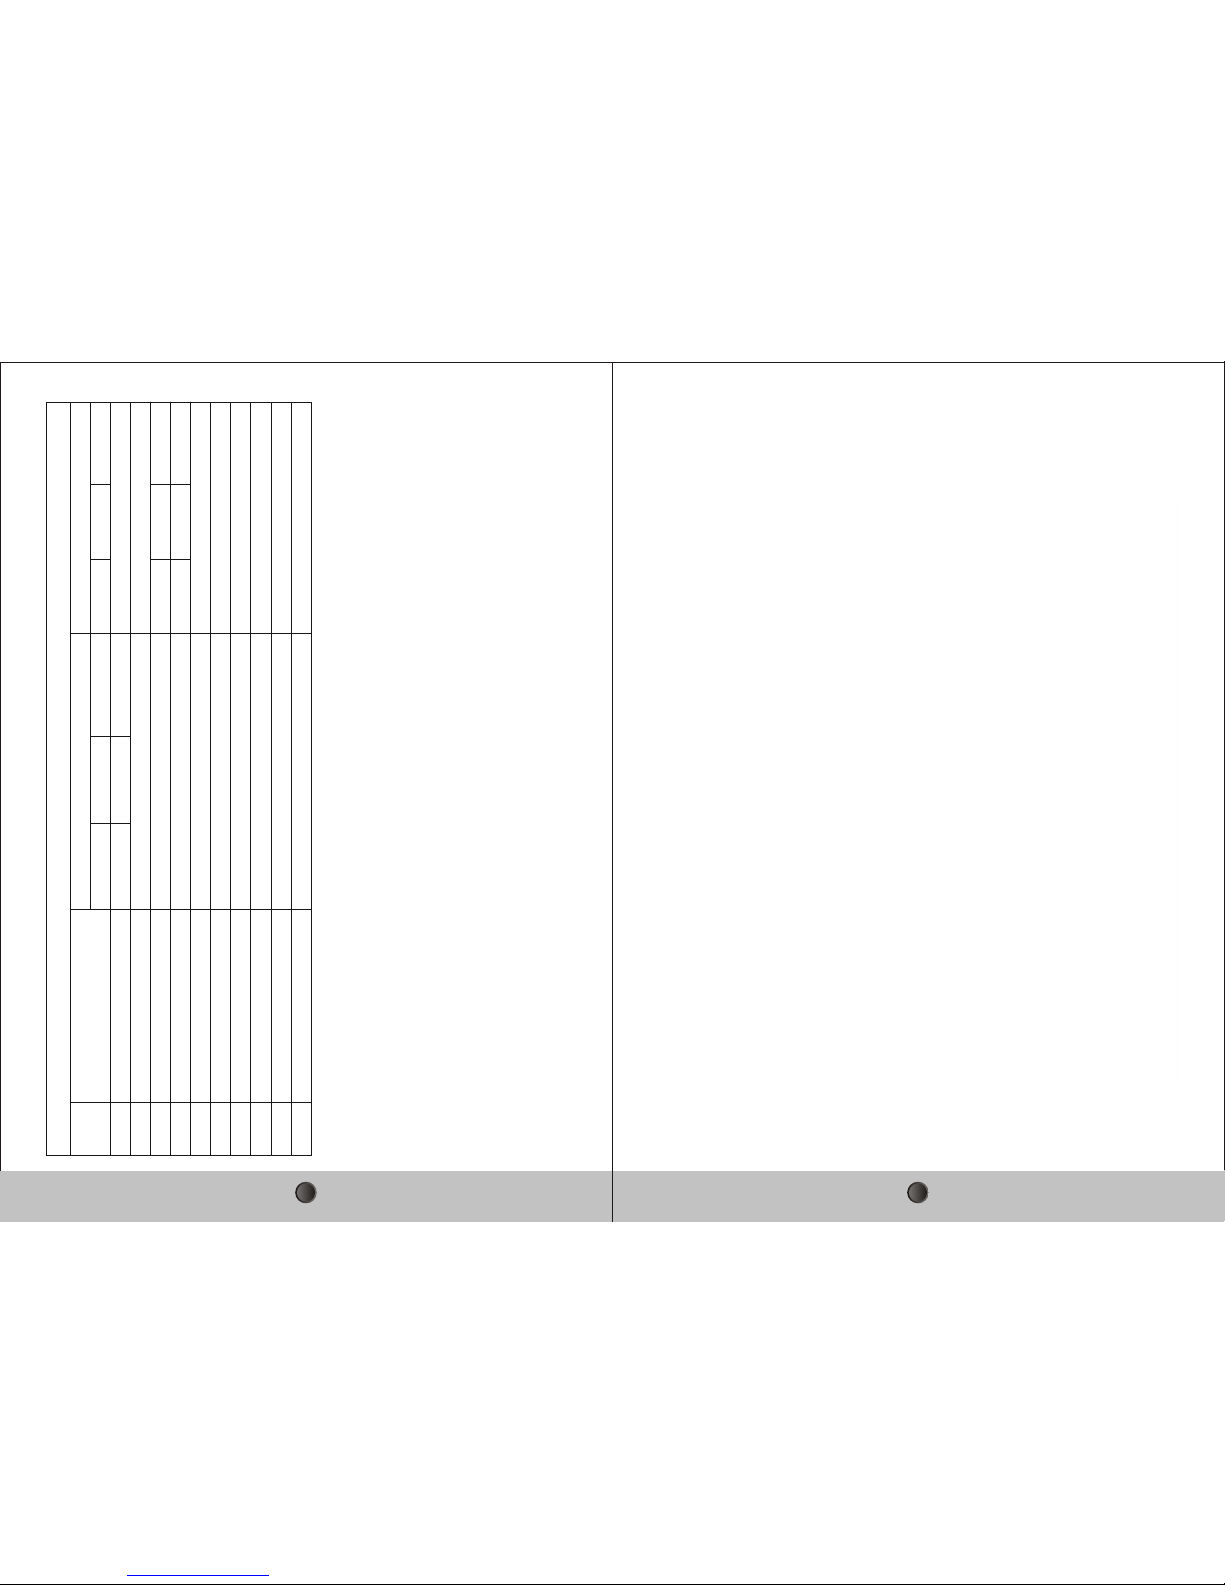
109
FKDRHD-7 FKDRHD-9 FKDRHD-11 FKDRHD-7 FKDRHD-9 FKDRHD-11
1 FRAME ASSEMBLY FKDRHD-507 FKDRHD-501 FKSLOEHD-508
2 3 POINT LINKAGE ASSEMBLY
3 REAR TYNE ASSEMBLY 4 5 6
4 FRONT TYNE ASSEMBLY 3 4 5
5 HEX. BOLT (M18X65X2P)
6 SPRING WASHER (M18)
7 NYLOCK NUT (M18X2.5P)
8 HITCH PIN
9 SPRING WASHER M25
10 NYLOCK NUT 25MM
FKDRHD-502
FKDRHD-503
DABBANG CULTIVATOR
FKDRHD-504
10270007
10280008
222
2
2
2
QTY
1
1
10260114
10270006
10280020
SR.NO. PARTS DESCRIPTION
PART CODE
10020023
Page 11
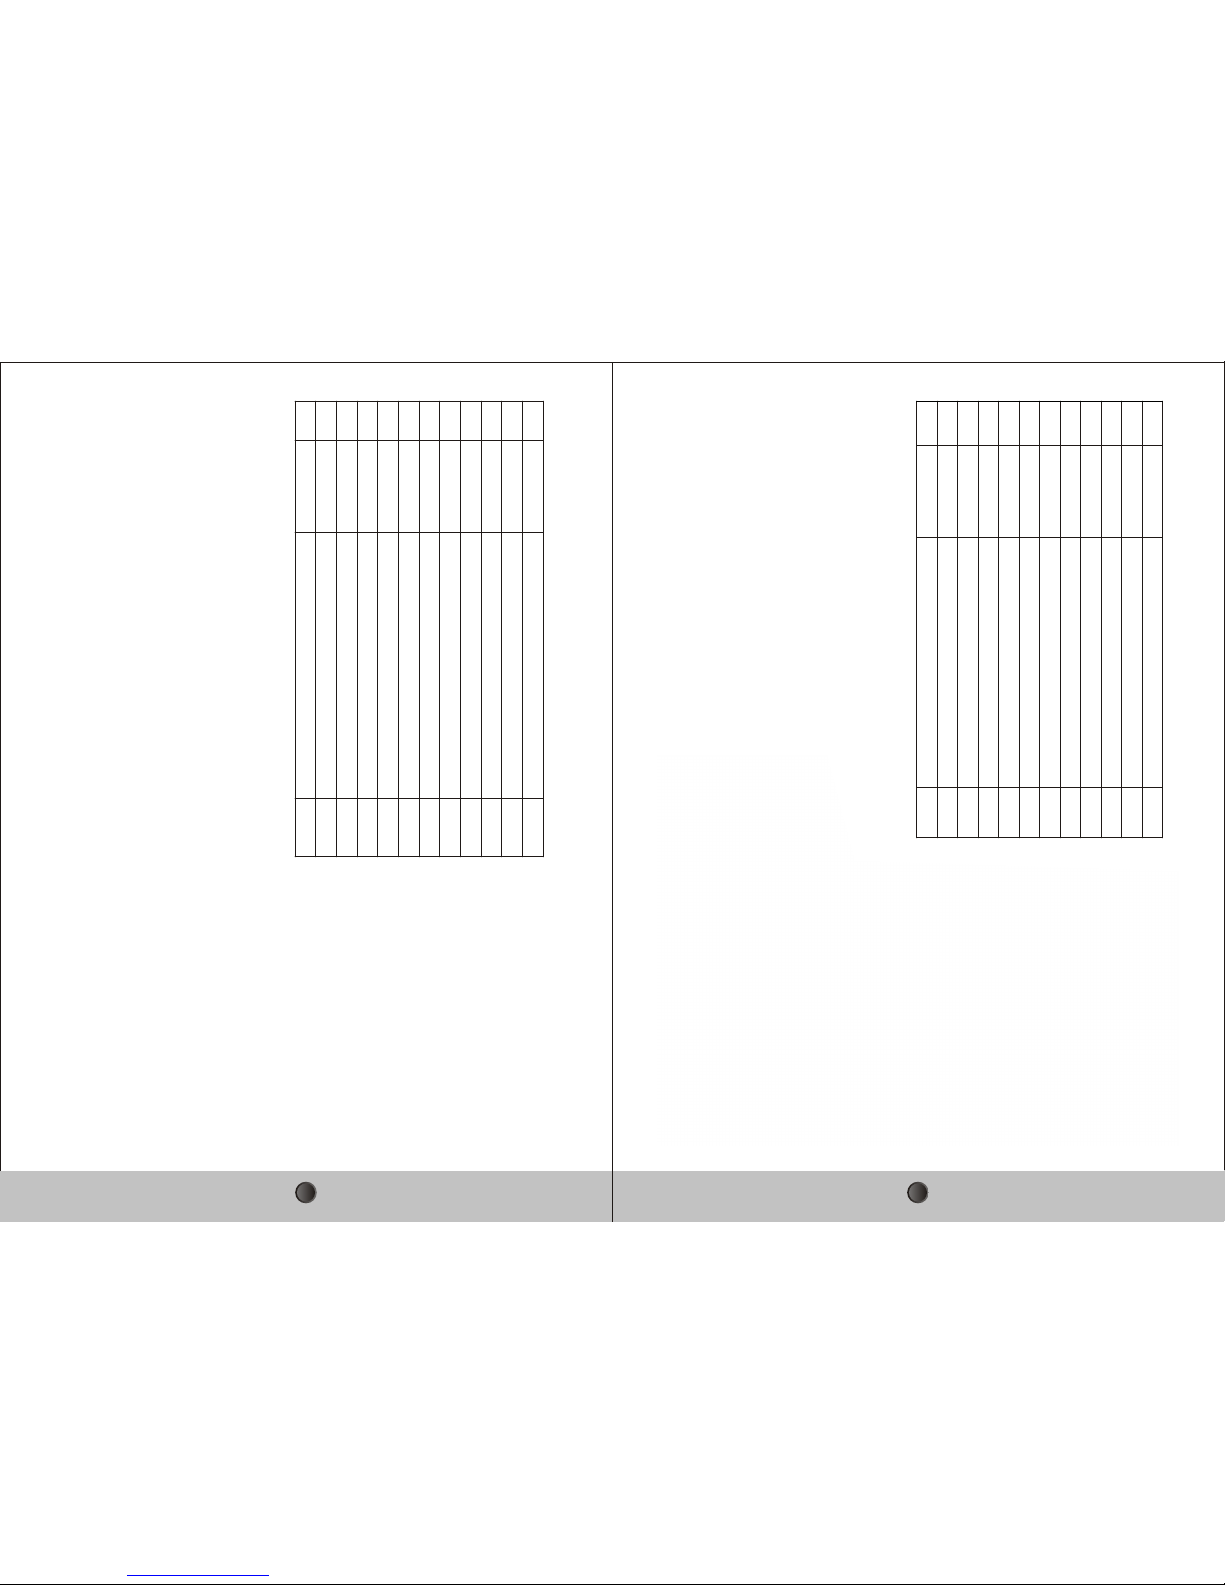
1211
QTY.
111
444
3
111
2
PART NO
FKDRHD-008
FKDRHD-030
FKDRHD-031
10260399
10270004
10280090
10260379
10320007
10260224
10260137
10280033
DESCRIPTION
TYNE 70X25
REAR BRACKET
FRONT BRACKET
HEX HEAD BOLT M14X60
SPRING WASHER 14MM
NYLOCK NUT M14
HEX HEAD BOLT M16X65(FULL THREAD)
DUCKFOOT SHOVEL
SHOVEL BOLT
SHOVEL BOLT
SHOVLE NUT
SL. NO.
1
2
3
4
5
6
7
8
9
10
11
SL.NO. DESCRIPTION PART NUMBER QTY.
1 TYNE 70X25 FKDRHD-008 1
2 REAR BRACKET FKDRHD-030 1
3 FRONT BRACKET FKDRHD-031 1
4 HEX HEAD BOLT M14X60 10260399 4
5 SPRING WASHER M14 10270004 4
6 NYLOCK NUT M14 10280090 4
7 HEX HEAD BOLT M16X65(FULL THREAD) 10260379 3
8 SHOVEL 10320005 1
9 SHOVLE BOLT 10260224 1
10 SHOVLE BOLT 10260137 1
11 SHOVEL NUT 10280033 2
Page 12
13 14
DELIVERY CHECKLIST
Dealer Pre-Delivery (Please Tick)
1. Dealer Pre-Delivery Checklist
1. The customer or person responsible has
been given the operator’s manual.
2. The customer undertakes to read the
co mp le te op erat or ’s m an ua l a nd
understands all aspects of the manual
before operation of the machine.
3. All safety, operational and maintenance
information have been explained and
demonstrated.
4. All greasin g and oil poin ts, stickers,
guarding and ID plate have been identified
and physically pointed out.
5. The c ustomer agre es tha t it is his
responsibility to read and carry out the
safety, maintenance and operation as per
this operator’s manual.
Customer Delivery (Please Tick)
Please Complete all Dealer information Below
Dealer Information
Dealer’s Name..............................................................................
Address........................................................................................
.......................................................................................................
State........................................... Postcode.................................
Phone.......................................... Fax..........................................
Email.............................................................................................
Service Person..............................................................................
I confirm that the pre-delivery service was performed on this machine.
Signature.......................................................................................
Date..............................................................................................
Comments.....................................................................................
.......................................................................................................
.......................................................................................................
Please Complete all Customer Information Below
Customer Information
Customer’s Name.........................................................................
Address........................................................................................
.......................................................................................................
State........................................... Postcode.................................
Phone.......................................... Fax..........................................
Email.............................................................................................
Delivery Person.............................................................................
I confirm that all of the delivery checks were explained and performed.
Signature.......................................................................................
Delivery Date................................................................................
Comments.....................................................................................
.......................................................................................................
.......................................................................................................
2. Customer Delivery Checklist
1. The customer or person responsible has
been given the operator’s manual.
2. The customer undertakes to read the
co mp le te op erat or ’s m an ua l a nd
understands all aspects of the manual
before operation of the machine.
3. All safety, operational and maintenance
information have been explained and
demonstrated.
4. All greasin g and oil poin ts, stickers,
guarding and ID plate have been identified
and physically pointed out.
5. The c ustomer agre es tha t it is his
responsibility to read and carry out the
safety, maintenance and operation as per
this operator’s manual.
WARRANTY CARD
Customer Copy
Customer`s Signature Dealer`s Signature
CUSTOMER NAME Mr./ Mrs :
ADDRESS :
MOBILE NO. :
Email :
NAME OF IMPLEMENT :
MODEL NO. :
YEAR OF Mfg. :
SERIAL NO. :
REGISTRATION NO. :
DATE OF PURCHASING :
NAME OF DEALER :
Corporate Office:
Plot No. 235 to 240, Sec-3, HSIIDC, Karnal- 132001 (Haryana), India
+91 184 2221571/ 72/ 73
info@fieldking.com, www.fieldking.com
BERI UDYOG PVT LTD
Page 13

15 16
WARRANTY CARD
Company Copy
Customer`s Signature Dealer`s Signature
CUSTOMER NAME Mr./ Mrs :
ADDRESS :
MOBILE NO. :
Email :
NAME OF IMPLEMENT :
MODEL NO. :
YEAR OF Mfg. :
SERIAL NO. :
REGISTRATION NO. :
DATE OF PURCHASING :
NAME OF DEALER :
Corporate Office:
Plot No. 235 to 240, Sec-3, HSIIDC, Karnal- 132001 (Haryana), India
+91 184 2221571/ 72/ 73
info@fieldking.com, www.fieldking.com
BERI UDYOG PVT LTD
Page 14

1817
WARRANTY CARD
Dealer Copy
Customer`s Signature Dealer`s Signature
CUSTOMER NAME Mr./ Mrs :
ADDRESS :
MOBILE NO. :
Email :
NAME OF IMPLEMENT :
MODEL NO. :
YEAR OF Mfg. :
SERIAL NO. :
REGISTRATION NO. :
DATE OF PURCHASING :
NAME OF DEALER :
Corporate Office:
Plot No. 235 to 240, Sec-3, HSIIDC, Karnal- 132001 (Haryana), India
+91 184 2221571/ 72/ 73
info@fieldking.com, www.fieldking.com
BERI UDYOG PVT LTD
Page 15
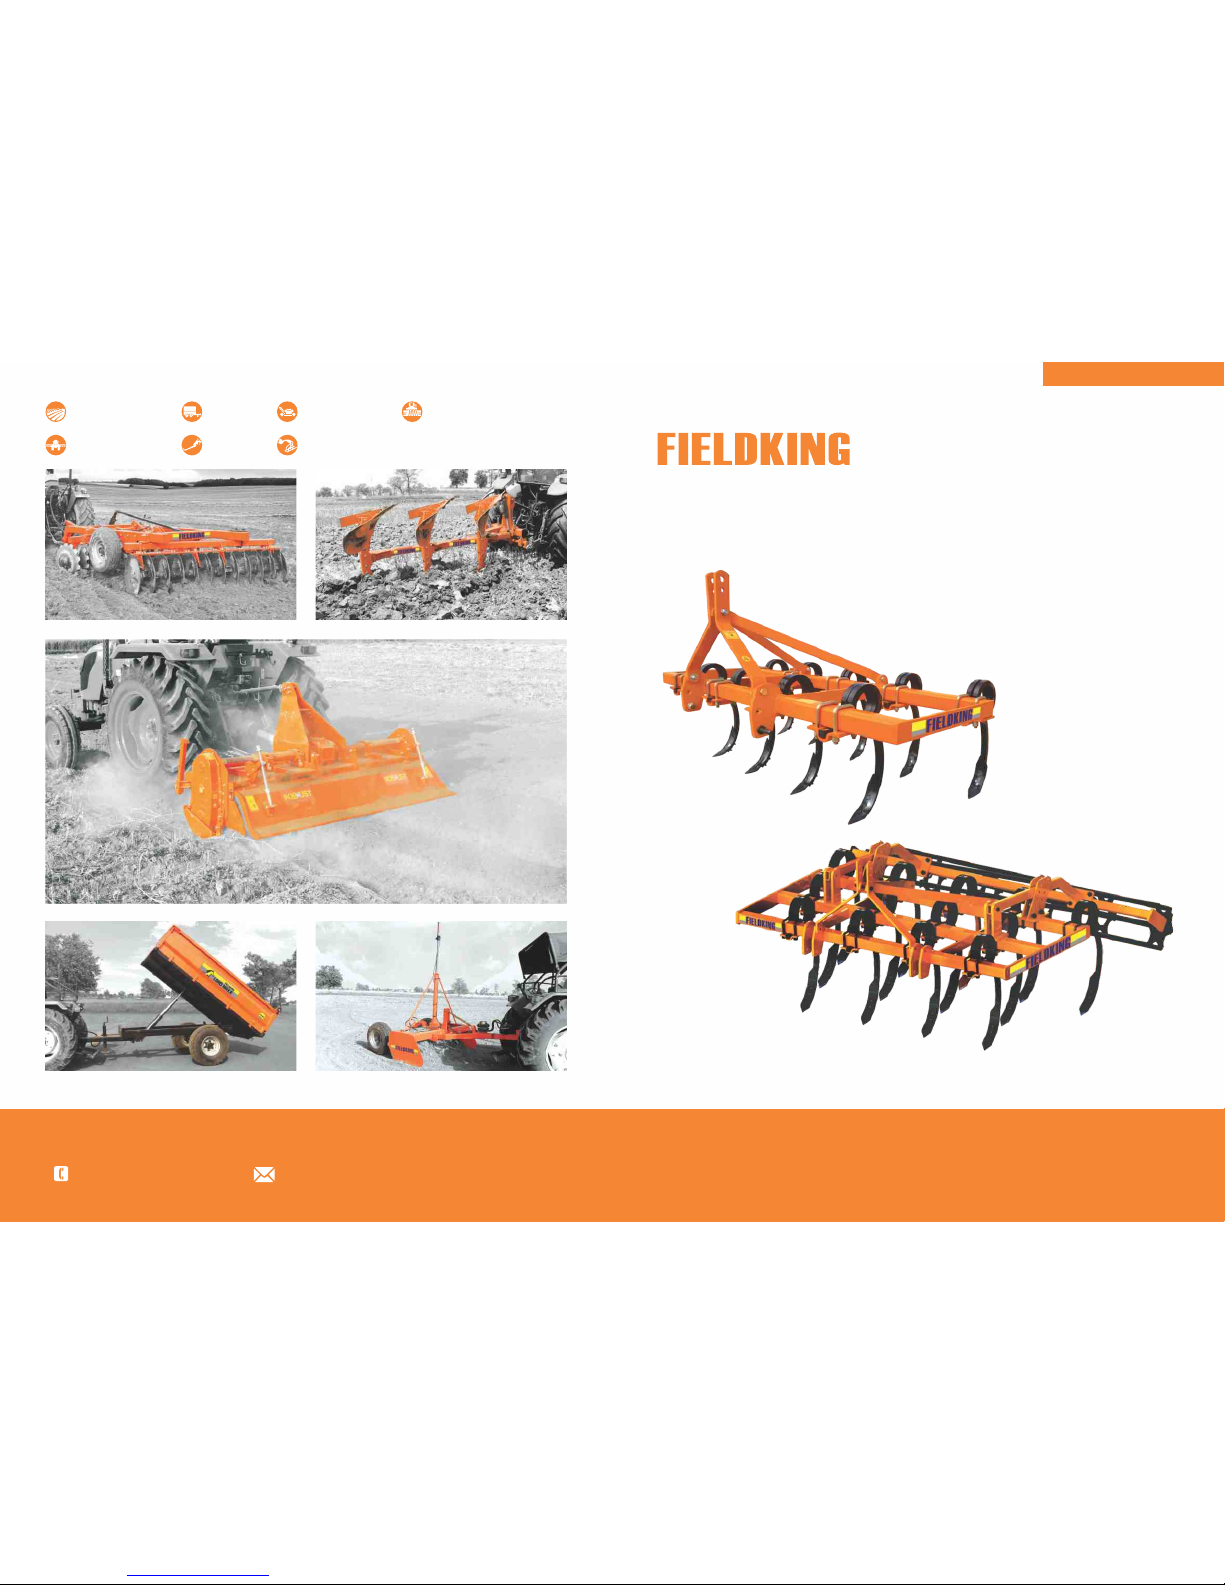
BERI UDYOG PVT LTD
† † †Operator Manual Service Manual Part Catalogue
Corporate Office:
Plot No. 235-236 & 238-240, Sec-3, HSIIDC, Karnal- 132001 (Haryana), India
Seeding & Plantation
Post Harvest
Harvest
Crop Protection
Landscaping
Tillage
Haulage
Solutions...
31-05-2017
Multi Row / Double Coil
Cultivator / Tiller
Page 16

You have invested in one of the best implements of its type in the market today.
The care you give your “FIELDKING” implement will greatly determine your
satisfaction with its performance and its service life. A careful study of this manual
will give you a thorough understanding of your new implement before operating.
If your manual is lost or destroyed, “FIELDKING” will be glad to provide you a new
copy. Visit to nearest dealership & get a copy. Most of our manuals can also be
downloaded from our website at www.fieldking.com.
As an authorized “FIELDKING” dealer, we stock genuine “FIELDKING” parts which
are manufactured with the same precision and skill as our original equipment. Our
trained service persons are well informed on methods required to service
“FIELDKING” equipments and are ready to help you.
Should you require additional information or assistance, please contact us.
CONGRATULATIONS!
YOUR AUTHORIZED
FIELDKING DEALER
BECAUSE “FIELDKING” MAINTAINS AN ONGOING PROGRAMME
OF PRODUCT IMPROVEMENT, WE RESERVE THE RIGHT TO MAKE
IMPROVEMENTS IN DESIGN OR CHANGES IN SPECIFICATION
WITHOUT INCURRING ANY OBLIGATION TO INSTALL THEM ON
UNITS PREVIOUSLY SOLD. BECAUSE OF THE POSSIBILITY THAT
SOME PHOTOGRAPHS IN THIS MANUAL WERE TAKEN OF
PROTOTYPE MODELS, PRODUCTION MODELS MAY VARY IN
SOME DETAIL. IN ADDITION, SOME PHOTOGRAPHS MAY SHOW
SHIELDS REMOVED FOR THE PURPOSE OF CLARITY. NEVER
OPERATE THIS IMPLEMENT WITHOUT ALL SHIELDS IN PLACE.
Page 17

1. Read and understand the information contained in this manual.
2. Operate, lubricate, assemble and maintain the equipment in accordance with all
instructions and safety procedures in this manual.
3. Inspect the equipment and replace or repair any parts that are damaged or worn
out which under continued operation would cause damage, wear to other parts,
or cause a safety hazard.
4. Return the equipment or parts to the authorized “FIELDKING” dealer from where
it was purchased for service or replacement of defective parts that are covered by
warranty. (The “FIELDKING” Factory may inspect equipment or parts before
warranty claims are honored.)
5. All costs incurred by the dealer for traveling to or transporting the equipment for
warranty inspection and claims will be borne by the customer.
PURCHASER / OPERATOR’S RESPONSIBILITY
This manual contains valuable information about your new “FIELDKING” double coil
cultivator/tiller. It has been carefully prepared to give you helpful suggestions for
operating, adjusting, servicing and ordering spare parts.
Keep this manual in a convenient place for quick and easy reference. Study it
carefully. You have purchased a dependable and sturdy double coil cultivator/tiller
but only by proper care and operation can you expect to receive the service and long
life designed and built into it.
Sometime in the future your double coil cultivator/tiller may need new parts to
replace which are worn out or broken. If so, go to your dealer and provide him
equipment’s detail like model and part number.
Name ______________________________________________
Purchased From ______________________________________
Date of Purchase _____________________________________
Model No. ___________________________________________
Serial No. ___________________________________________
TO THE PURCHASER
CUSTOMER INFORMATION
Page 18

1. TECHNICAL DATA
1.1 Introduction
1.2 Warranty
1.3 When the warranty becomes void
1.4 Warning
2. USAGE INSTRUCTIONS
2.1 Before use & adjustments
2.2 Attaching cultivator/tiller to the tractor
2.3 Safety
3. MAINTENANCE
3.1 Operation, care & maintenance of cultivator/tiller
3.2 Storage of machine after work
4. PARTS CATALOGUE
INDEX
Page 19
21
1.2 WARRANTY POLICY FOR FILEKIDNG TILLER/CULTIVATOR
1. Beri Udyog Pvt. Ltd.(“ the company”) warrants to the retail purchase of the
“FIELDKING” tiller/ cultivator that subject to the limitation specified here in
below, the company’s authorised dealer will repair or replace any part there of
found. In its opinion, to be defective in materials of workmanship. The warranty
shall be for a period 1 year from the date of purchase of new “FIELDKING”
agriculture tiller/cultivator by the original purchaser (“retail purchaser”).
2. This warranty is limited to the delivery to the retail purchaser, free at the
authorized dealer’s workshop or company’s works of the part or parts whether
repaired or replaced in exchange for those acknowledge by the company to be
defective.
3. The purchaser of “FIELDKING” agriculture tiller/cultivator are advised strictly to
follow the instructions given in the operator manual, provided by the company
along with the “FIELDKING” tiller/cultivator at the time of delivery, changes if
any in the “FIELDKING” tiller/cultivator, resulting in improper usage will not be
covered in the warranty, This warrant will
automatically get terminated on the expiry of warrant period even in the
“FIELDKING” tiller/cultivator, may not in use for any time during the
warranty period for any reason whatsoever including any technical
reasons, any time for such repairs/replacements of parts and in transit,
whether under this warranty or otherwise shall not be excluded from the
warranty period.
4. Warranty shall apply to following:
• Manufacturing defects: Breaking of any structure & fabrication covered
under warranty.
5. Warranty shall not apply to the following:
• Accidental cases are not covered under warranty.
NOTE: If any kind of breakage and damage is found due to poor handling of
customer that also is not covered under warranty policy.
6. The retail purchaser shall be required to make a thorough examination of
the products prior to the purchase. The authorized dealer are in no way the
legal agent of the company and have no right or authority to give any
warranty or assume any obligation on behalf of the company or bind the
company in any manner whatsoever.
7. For the purpose of this warranty, the term ‘’product” means and includes
only new “FIELDKING” tiller/cultivator, manufactured by or for the company
design sold and installed by the authorized dealer.
8. The company’s responsibility is limited to the terms of this warranty and it
shall not be liable for personal injuries or consequential or resulting liability,
damage or loss arising from any defect.
9. The company’s liability under this warranty is depended upon the strict
observance by the retail purchase, of the following provisions.
• The retail purchaser at the time of delivery shall sign complete and return
the authorized warranty and dealer’s delivery report.
• All the parameters should be thoroughly checked as per the scheduled
maintenance in the operator ’s manual. The customers are also bound to
use the genuine spares for “FIELDKING” tiller/cultivator, purchased from
authorized “FIELDKING” dealers.
1. TECHNICAL DATA
1.1 INTRODUCTION
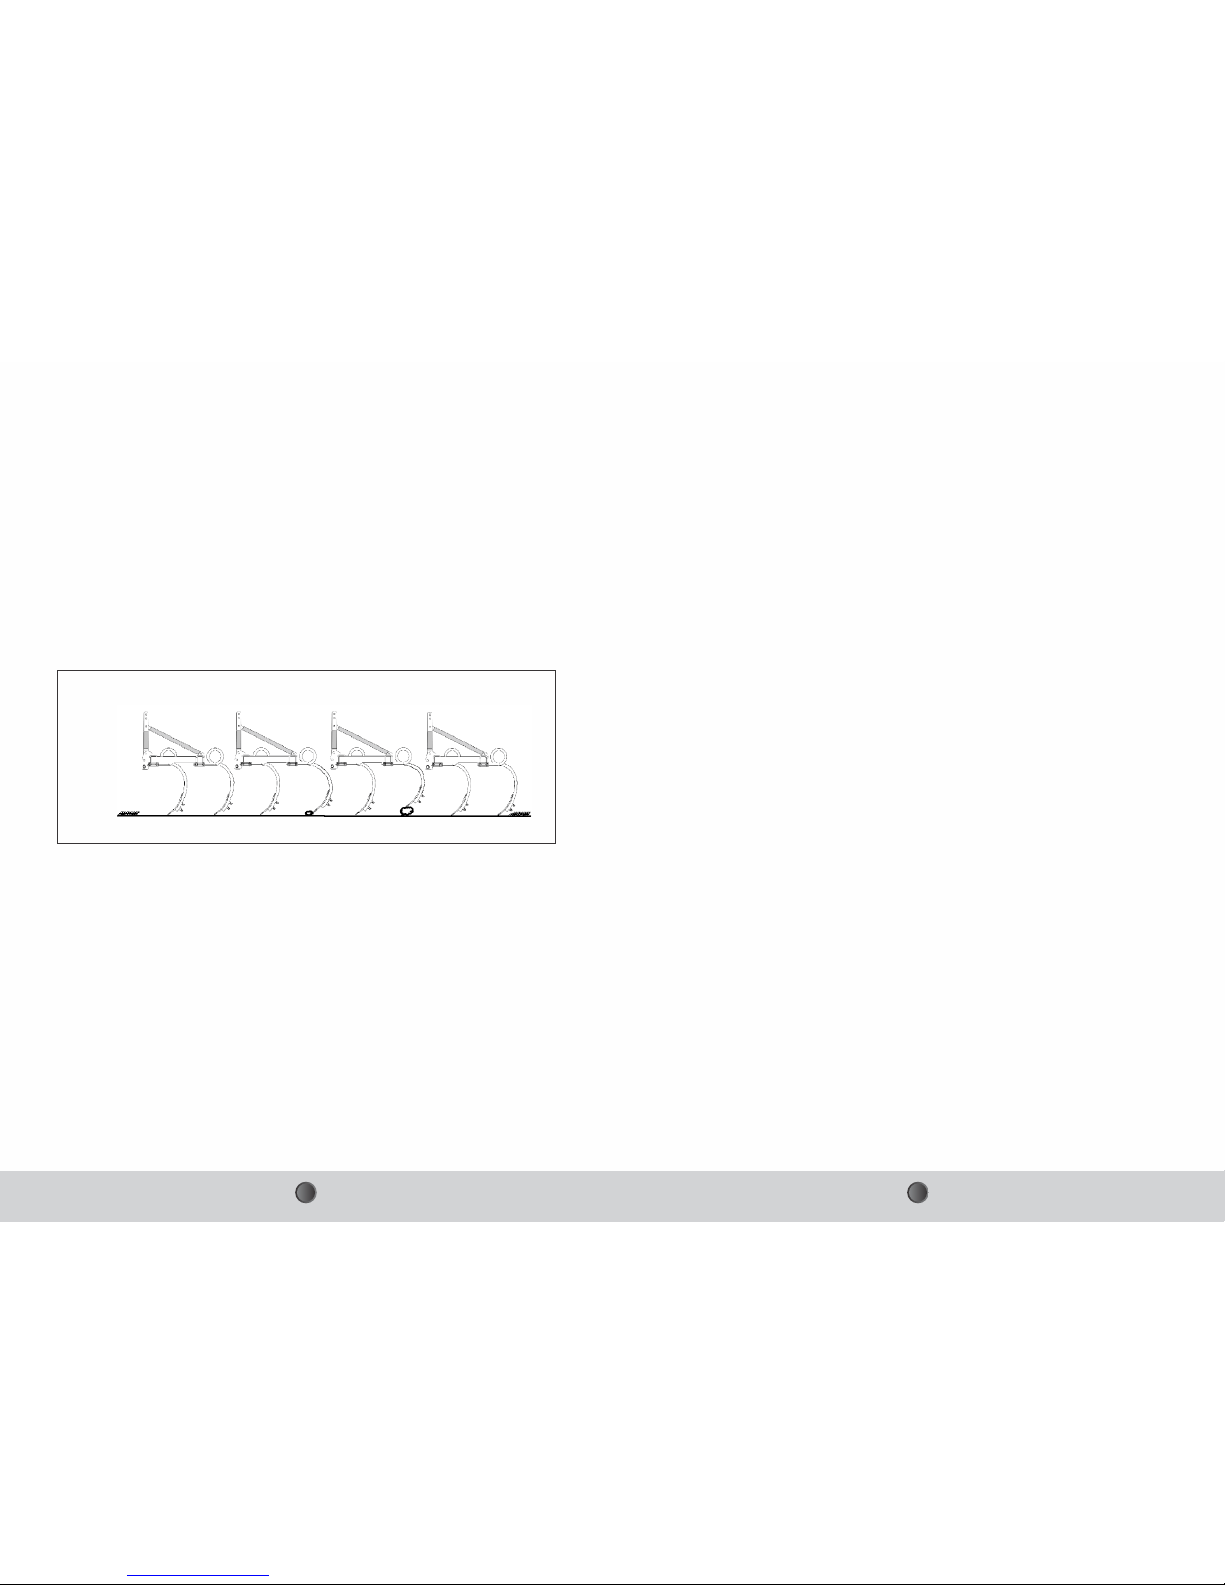
Double coil tyne tiller/cultivator are eminently suitable for use in stone and root
obstructed Soil. When one tyne strikes a hidden object, too firmly fixed to be moved,
the others continue to work at the correct depth. Tillers may be used for loosening
and aerating soil to a depth of nine inches preparing seedbeds quickly and
economically.
“FIELDKING” double coil tyne tiller/cultivator is designed for tougher operations. It
is suitable for varying soil conditions. The spring steel tyne is designed in such a
manner that it doesn’t need any separate spring. The coil shape tynes get its
strength because of efficient design wherein, the stress prone areas are so well
shaped that it withstands any distorting forces.
PRINCIPLE OF OPERATION OF DOUBLE COIL TYNE CULTIVATORS/TILLERS
FIRST STAGE
OBSTACLE ENCOUNTERED
ORIGINAL STAGE
GROUND
Page 20

43
This warranty shall not be apply to defect/damages caused by the normal
wear and tear, accident, transportation, misuse or neglect usage in non agri
applications, defect in the products which have been altered outside the
company’s work or which have been let out in hire or the identification
marks in which have been altered or removed. Company’s decisions in this
respect will be final and binding on all.
11. The above warranty is in lieu of all other warranties express or implied, and
no person, agent or representative of the Company is authorized to give
any other warranties on the company’s behalf or the assume for it any other
liability in connection, with the product.
12. The court at Karnal shall have exclusive jurisdiction to try, entertain and
dispose of all proceeding relating to any dispute arising between the
company and the retail purchaser on the liability of the company under
this warranty.
1.3 WHEN THE WARRANTY BECOMES VOID
1. Besides the caused specified in the supply agreement, the warranty shall in
any case become void.
2. Should there have been a maneuver error.
3. When following repairs made by the customer without authorization from
the manufacture or owing to the installation of spurious spare parts, the
machine is subject to variations and the damage can be ascribed to these
variations.
4. When the user failed to comply with the instructions in the operator’s
handbook.
5. When the implement has been used beyond the specified power limit like
(tractor horse power).
6. No warranty will be given if the service is not done on time.
1.4 WARNING
Thoroughly read the instruction manual before proceeding with the various
operations.
Maintain the cultivator as per the instructions of this handbook to be entitled for
warranty.
• Repairs and replacements will be performed by the facility of the authorized
dealers/its branch dealers.
• This warranty shall not apply if the product or any part there of repaired or
altered not in accordance with our standard repair procedure or by any
person other than an authorized dealers/its branch dealers/its authorized
service centre.
• The decision of the company or the concerned authorized dealers in regard
to the warranty shall be final and conclusive and the retail purchaser hereby
agrees to unconditionally accept their decision on all.
• This warranty does not cover any applicable taxes payable on any parts
which the company may supply or repairs free of cost of during the warranty
period. This warranty also does not cover the cost of packaging to and fro
freight and transportation charges etc. on the defective “FIELDKING”
tiller/cultivator or other part of the “FIELDKING” tiller/cultivator sent to
“FIELDKING” dealers locations.
• Claims arising from this warranty will be considered only if they are notified
in writing to the concerned authorized dealers after the defect has been
ascertained.
• The company reserves the right to make changes in design or introduce
any improvement or add any parts on the products any time without
incurring any obligation to install the same on products previously sold.
10. This contract will be ineffective and incorporative if:
• The duly warranty card is not presented during the repairs.
• The “FIELDKING” agriculture tiller/cultivator or any parts thereof is
subjected to neglect, fire, floods or other acts of god or in the company’s
opinion any damage has caused to be “FIELDKING” agriculture
tiller/cultivator during transportation.
• The original numbers are removed, obliterated or altered from the unit.
• Any attempt is made to have the repairs executed by a person, other than
the company’s or its authorized representatives.
• Any defect if not informed immediately to the company or its authorized
representative, any alterations in the warranty card is made.
• The use of replacement parts not manufactured or supplied by the
company will automatically invalidate this warranty.
Page 21
65
2.3 SAFETY
REMEMBER SAFETY FIRST
Operator must read the instruction manual before operating the cultivator. Do
not allow anyone to operate this equipment who has not fully read and
comprehended this manual and who has not been properly trained in the safe
operation of the equipment.
SAFETY INSTRUCTIONS
1. All equipment is potentially hazardous. There is no substitute for a safety
conscious operator who recognizes potential hazards and follows reasonable
safety practices.
2. Personal protection equipment including safety glasses, safety shoes, and
gloves are recommended during assembly, installation, operation, adjustment,
maintaining, repairing, removal or moving the implement.
3. Never place yourself between the tractor and implement while implement is in
operation.
4. Do not work under a raised implement unless it is securely blocked or held in
position. Do not depend on the tractor hydraulic system to hold the implement in
place.
5. A heavy load can cause instability of the tractor. Use extreme care during travel.
Slow down on turns and watch out for bumps. The tractor may need front counterweights to counter-balance the weight of the implement.
6. Do not allow others to ride on the tractor with an operator. Riders are subject to
injury such as being struck by foreign objects or being thrown off. Riders
obstruct the operator’s view resulting in unsafe operation. Never allow anyone
to ride on the implement!
7. Do not allow anyone who is not familiar with the safety rules and operation
instructions to use this implement.
8. Keep alert and watch the front as well as the rear when working with equipment.
9. Always be sure the implement is in the fully raised position when in transport.
10. When removing or adjusting equipment, be sure that your feet are never under the
implement.
11. Avoid excessive speed during operation.
12. Before you operate the field cultivator, check over all pins, bolts and connections
to be sure that all are securely in place. Replace any damaged or worn parts
immediately.
13. Make implement adjustments only when the implement is attached to the tractor.
14. Watch for and avoid hidden obstructions, i.e. buried pipes, rocks, uneven
concrete slabs, stumps etc., when operating equipment.
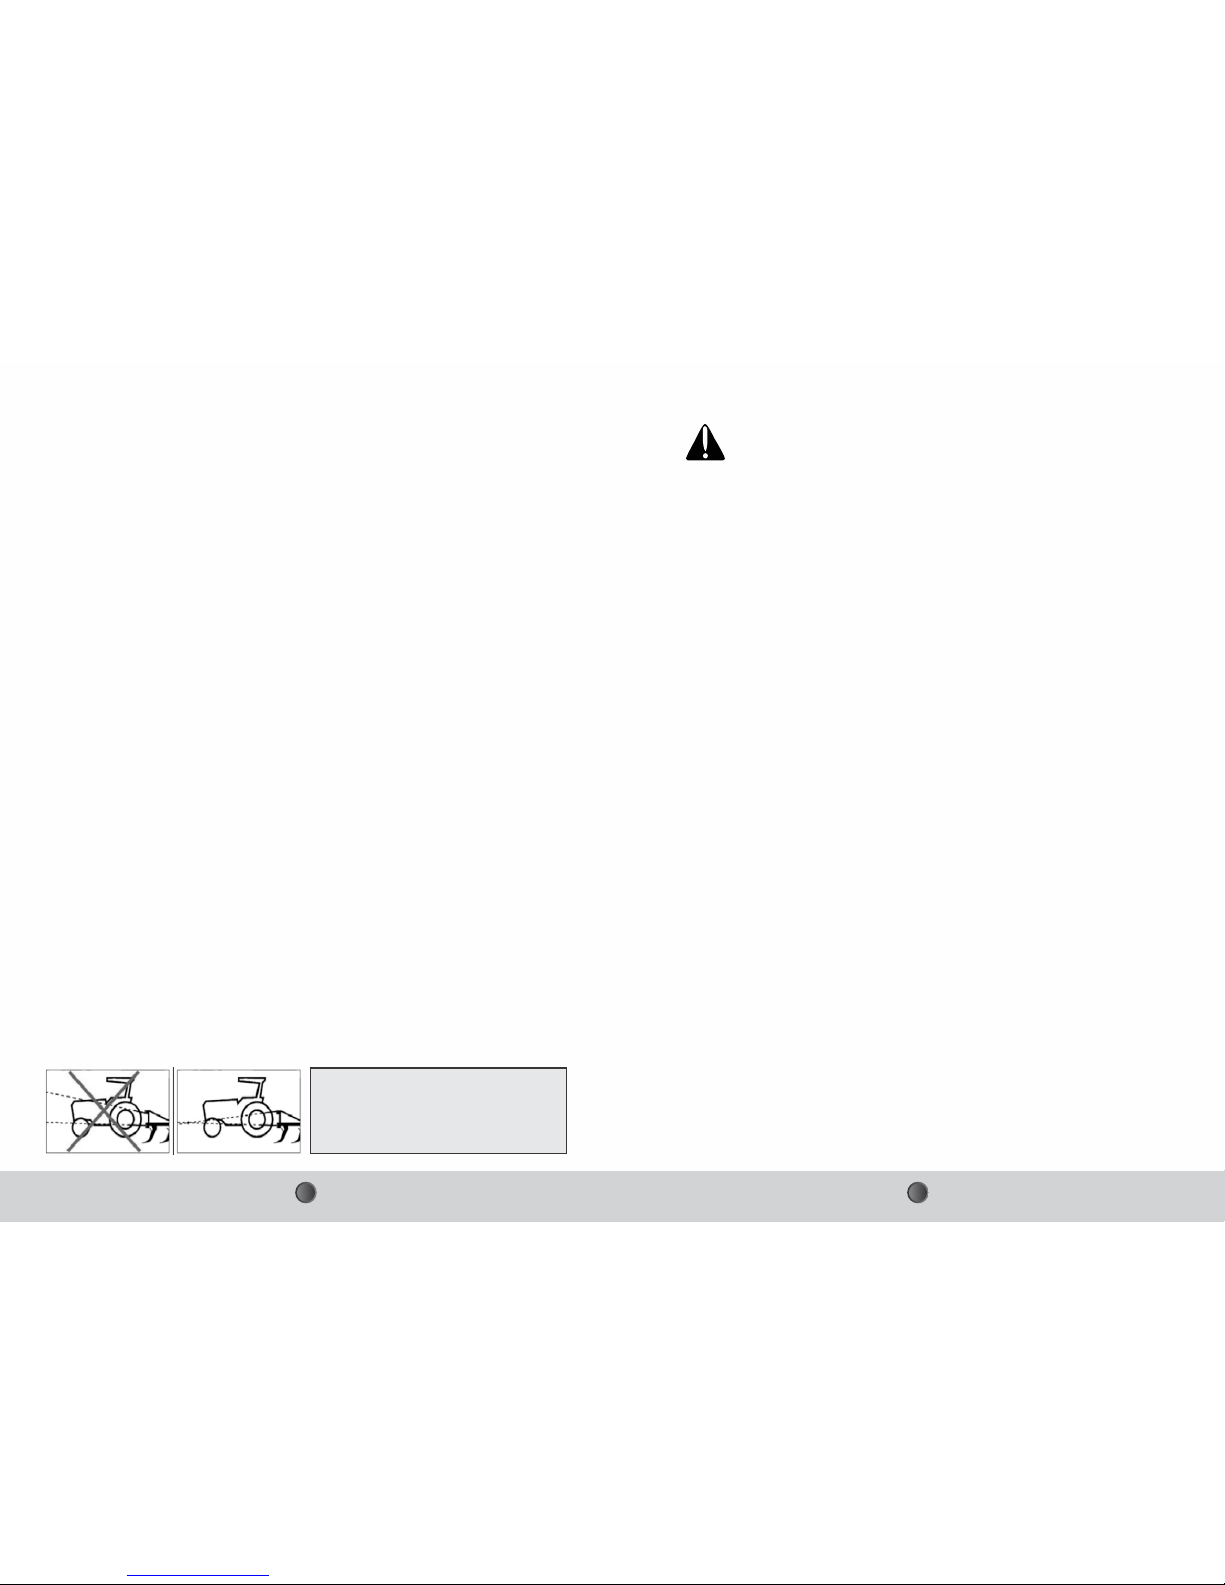
Danger:
In operating position the top link must
be higher on the machine side than on
the tractor side!
2. USAGE INSTRUCTIONS
2.1 BEFORE USE & ADJUSTMENTS
Before mounting of cultivator make sure that all nuts & bolts are properly secured.
Also determine soil and trash conditions of the field and make the preliminary
adjustments. e.g.
Tyne leveling
To eliminate uneven working and side draft, leveling is done by means of top link.
Depth control
The depth at which the implement is required to work is controlled hydraulically by
raising or lowering the control lever on the tractor.
2.2 ATTACHING THE CULTIVATOR/TILLER TO THE TRACTOR
1. Place the cultivator duly leveled on the flat piece of land.
2. Reverse the tractor to the cultivator ( Do not drag the cultivator/tiller up the
tractor)
3. Attach the left arm of the tractor to the cultivator/tiller first.
4. Attach the central arm to the cultivator/tiller. To attach, turn the screws on both
sides to an equal length. If the arm is too short or too long, turn the screw to
adjust both at the same time until aligned with the hole on the central arm.
5. Attach the lower right arm, turn the screw until the mounting pin is at the same
level as the hole on the tractor arm. If the gap between the hole and mounting
pin is too close or too distant, turn the control arm in or pull it away to an
appropriate distance. You may have to adjust both height and distance at the
same time. When the hole at tractor arm and mounting pin are even, insert the
pin in the hole and lock it with the lynch pin.
6. After attaching the cultivator/tiller, lift it and adjust the control arm parallel to
the ground. When you look from both rear or sideways, all shovel should be
touching the ground uniformly.
Page 22
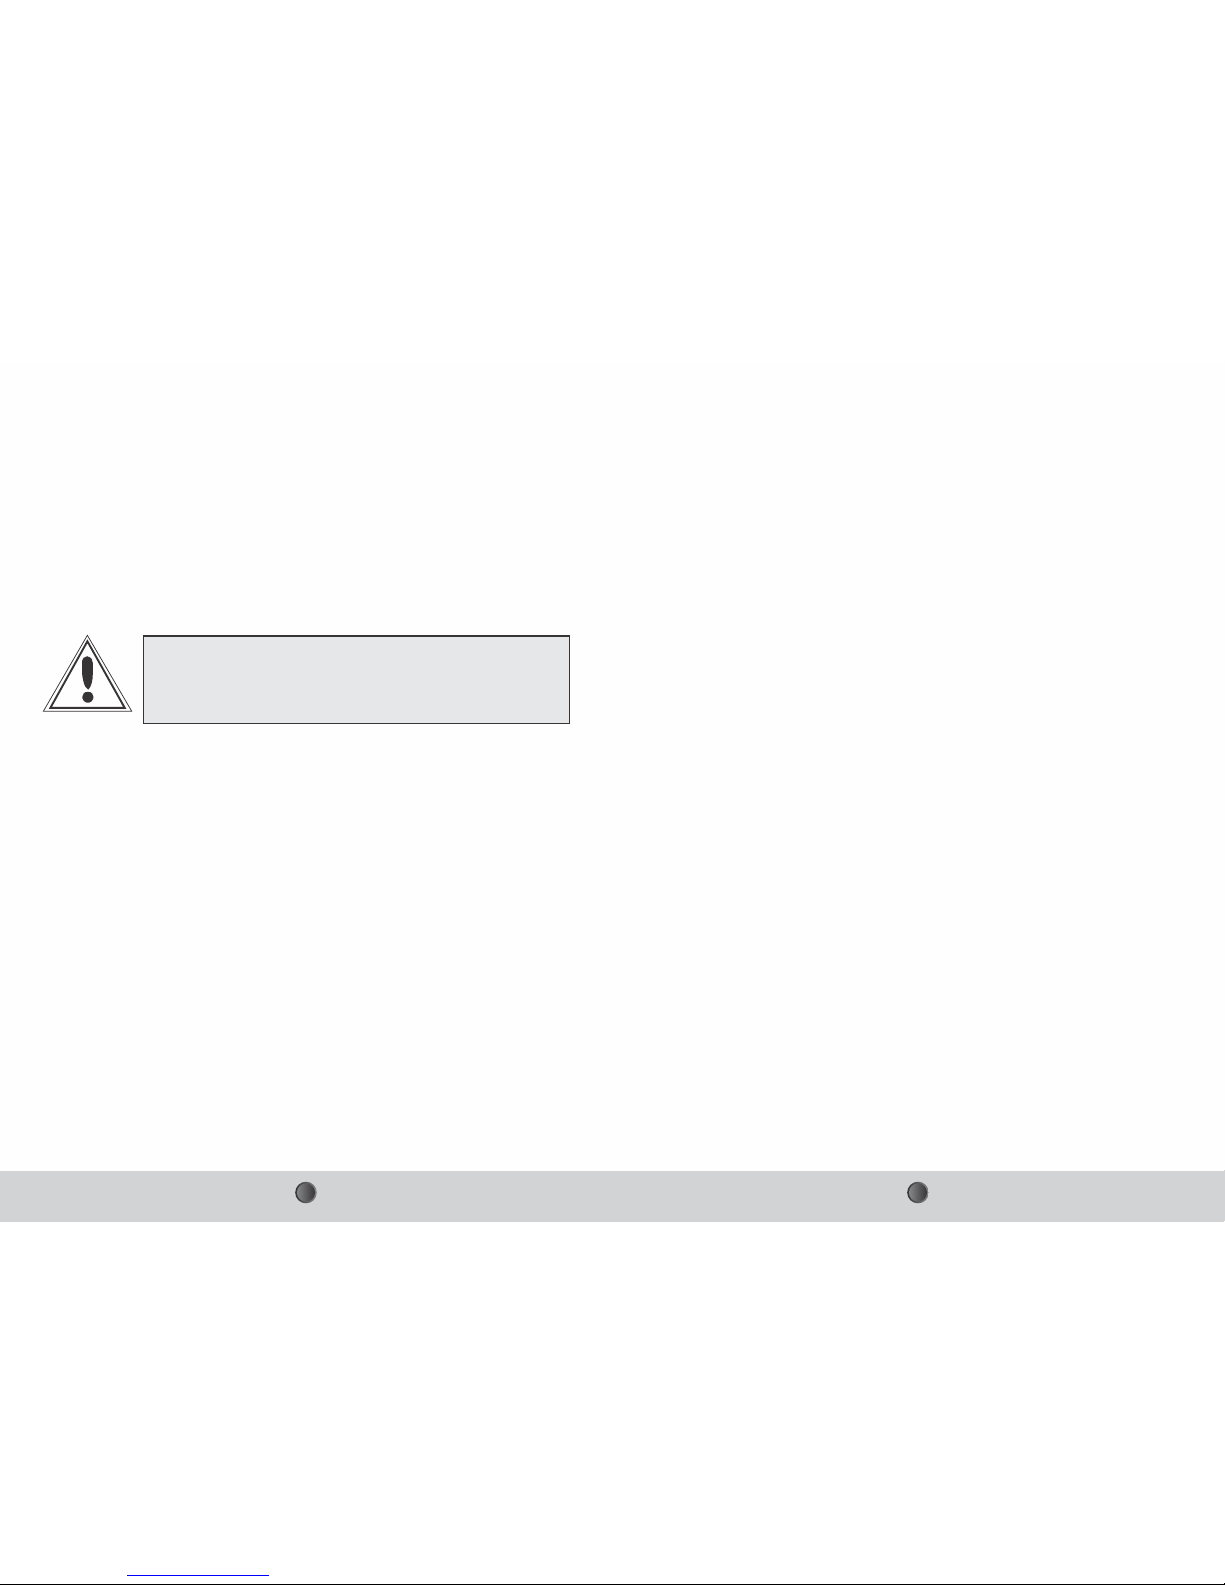
87
Non-observance of the above rules shall be considered negligence.
It will rule out any liability of the manufacturer for all possible
damage and / or consequences.
The user is solely responsible for any risk!
ATTENTION
3. MAINTENANCE
3.1 OPERATION, CARE & MAINTENANCE OF TILLER/CULTIVATOR
1. All the shovels of the tynes should be set at equal depth. To do this, place the
cultivator on level ground and see that all the shovel touch the ground.
2. Before commencing work with a cultivator, check it for loose bolts and nuts and
fasten them properly. After having taken all these precautions, run the cultivator
for one hour and then inspect it once more for any loose parts.
3. Never turn or reverse your tractor while cultivator is ploughed deep in field. This
will twist the assemblies out of alignment and damage them extensively.
4. Reverse or replace the shovel point when worn out. Delay may result in wearing
out of the tynes which will result into expensive repairing/replacements. Avoid use
of extra wide shovels as they do not improve tillage quality but only put extra load
on the tractor and also result into extra fuel consumption.
3.2. STORAGE OF CULTIVATOR/TILLER AFTER WORK
1. Wash the cultivator after work.
2. Replace the worn out nuts & bolts.
3. If cultivator has to remain unused for long time then clean it & apply a layer of
used oil for rust prevention.
4. These steps will enhance the life of your cultivator.
15. Never operate tractor and implement under trees with low hanging limbs.
Operators can be knocked off the tractor and then run over by the implement.
16. Operating spring loaded cultivator shanks may suddenly fling rocks and clods.
Keep all bystanders 10 meter away and operator must wear safety glasses.
17. Reduce speed when transporting mounted implements to avoid bouncing and
momentary loss of steering control.
18. It may be necessary to raise implement slightly and then lower to desired working
depth when tractor is moving.
19. Use extra care when working on slopes.
20. Never use alcoholic beverages or drugs which can hinder alertness or
coordination while operating this equipment. Consult your doctor about operating
this machine while taking prescription medications.
Page 23
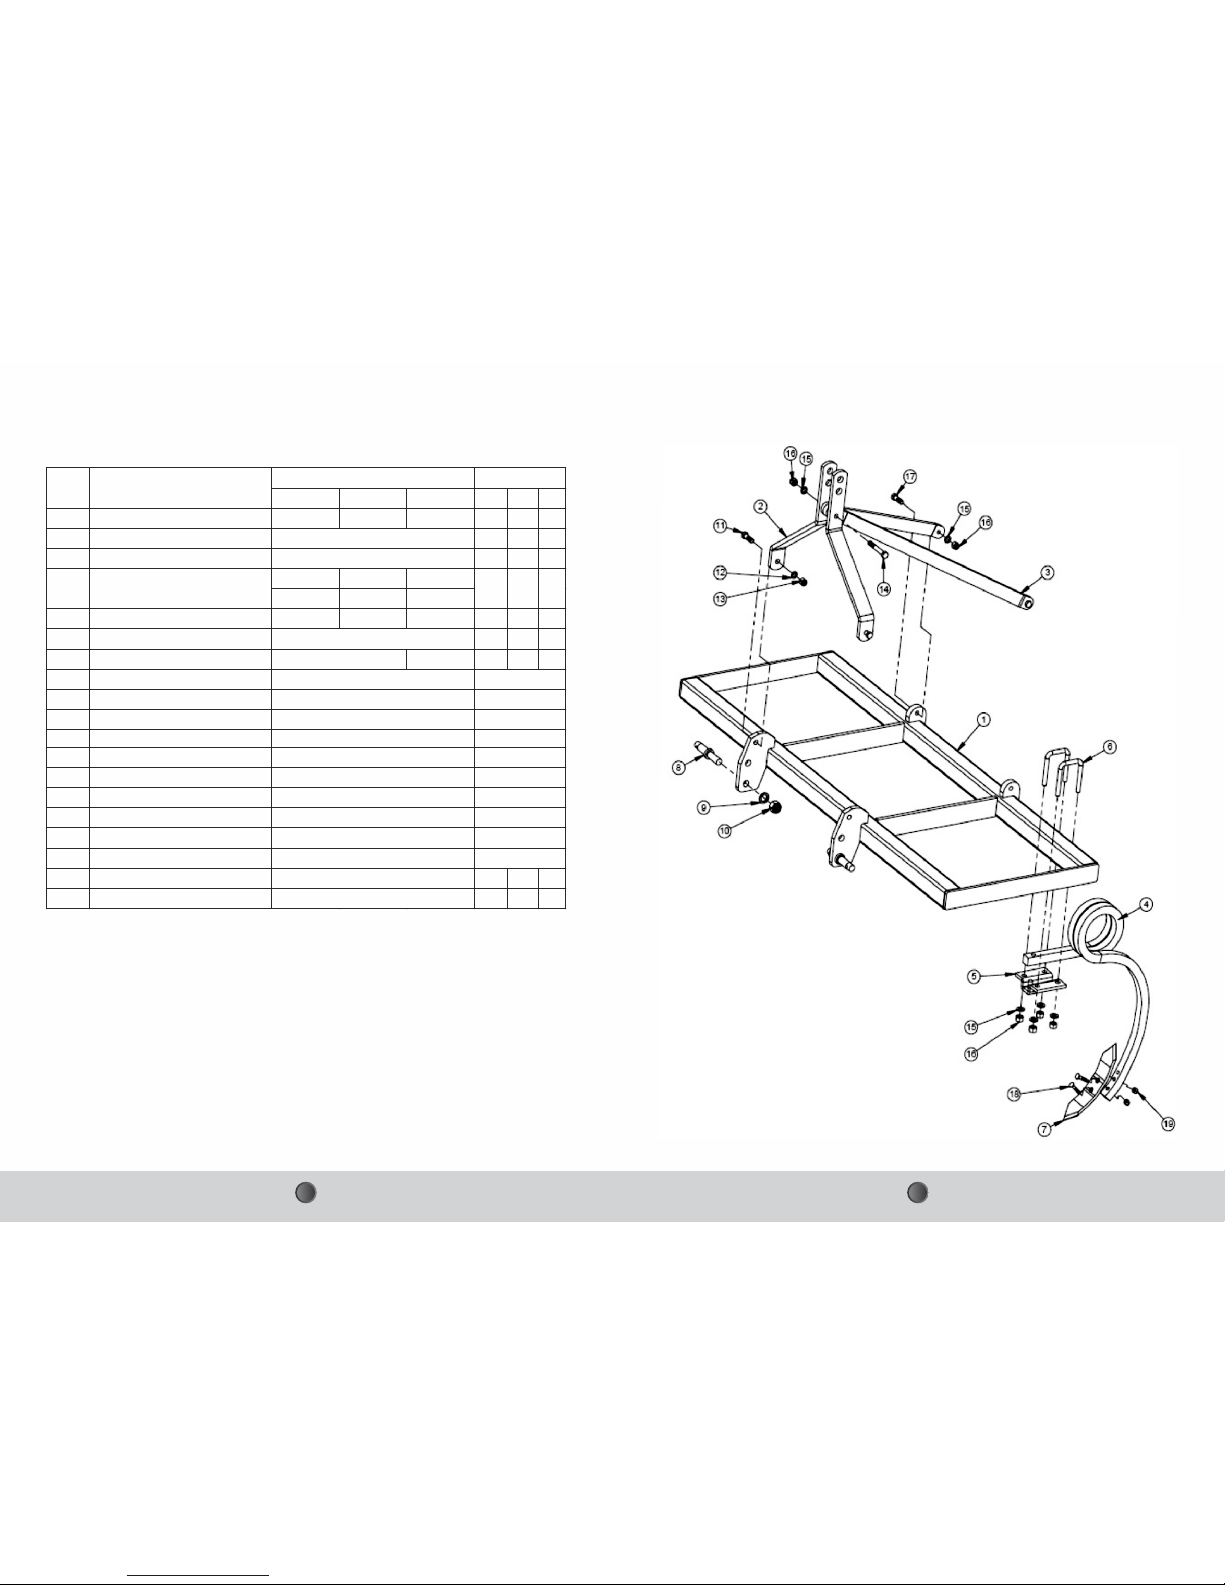
109
9 TYNE 11 TYNE 13 TYNE
9 11 13
1 BOX FRAME ASSEMBLY FKDCT-5001 FKDCT-5005 FKDCT-5008 1 1 1
2 FRONT TOP LINK-65X16X724 1 1 1
3 REAR TOP LINK-50X16X961 1 1 1
25 MM 30 MM 35 MM
10330033 FKDCT-016 FKDCT-014
5 U-CLAMP BRACKET FKDCT-019 FKDCT-013 FKDCT020 9 11 13
6 U-CLAMP 18 22 26
7 SHOVEL 10320010 9 11 13
8 HITCH PIN 25.4X284MM
9 HITCH PIN WASHER
10 HITCH PIN NUT
11 HEX HEAD BOLT 18X75X2.5MM
12 SPRING WASHER 18MM
13 NYLOCK NUT M18X2.5MM
14 HEX HEAD BOLT M16X110X2MM
15 SPRING WASHER 16MM
16 NYLOCK NUT M16X2MM
17 HEX HEAD BOLT M16X75X2MM
18 ROUND HEAD BOLT 7/16X2.5 INCH 18 22 26
19 MS NUT 7/16 BSW 18 22 26
PARTS DESCRIPTIONSR.NO.
10270007
10280008
FKDCT-007
FKDCT-008
PART CODE
10020007
4 TYNE
FKRMD-07
FKDCT-009
10260137
10280033
10260018
10260036
10270006
10280005
10260022
10280020
10270005
1
1
2
2
2
2
2
2
2
QTY
9 11 13
2
PARTS CATALOGUE
Page 24
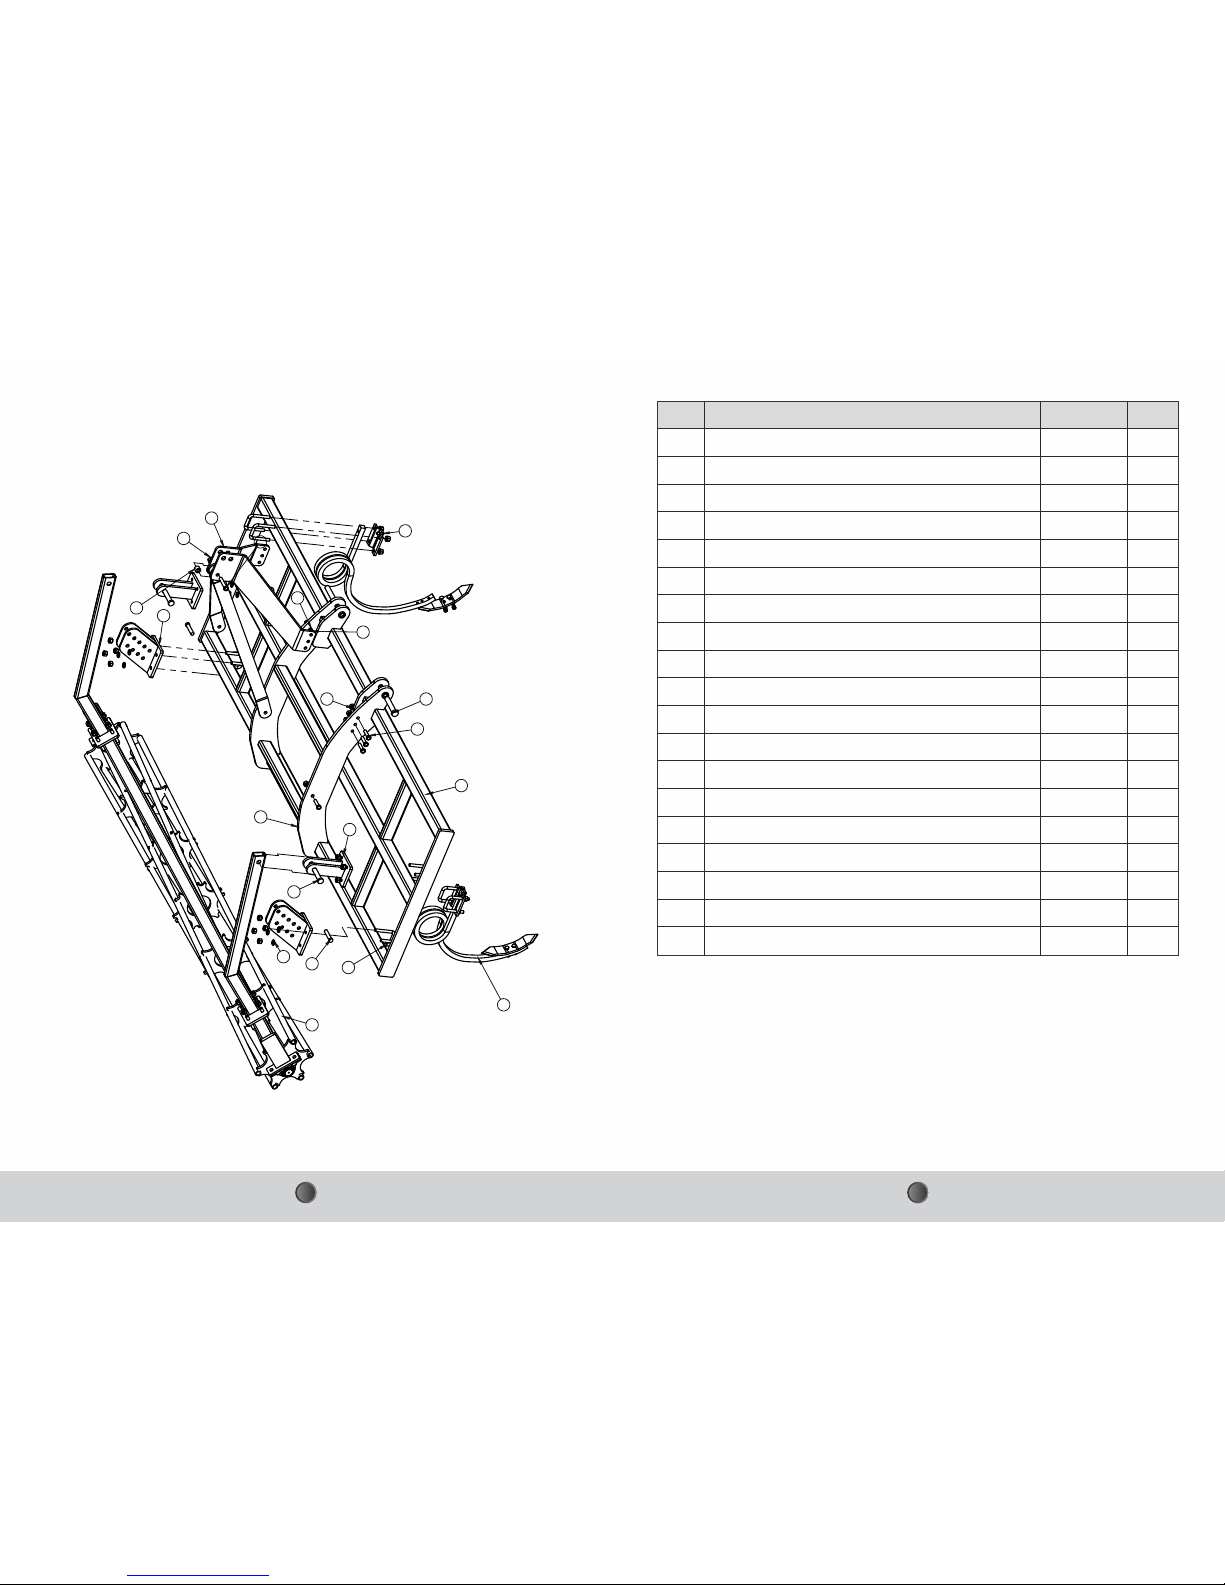
1211
SR.NO. DESCRIPTION PART NO QTY.
1 CLOCKWISE TYNE ASSEMBLY -DOUBLE COIL-30 (MM) FKDCT-5003 18
2 CRUMBLER ASSE MBLY 19 TYNES FKMRCC-504 1
3 FRONT LINK CRUMBLER ASSEMBLY FKMRCC-502 2
4 REAR LINK CRUMBLER ASSEM BLY FKMRCC-503 2
5 FRAME A SSEMBLY MULTI ROW CULTIVATOR -19 TYNE FKDCT-5023 1
6 TOP LINKAGE ASSEMBLY MULTIROW-19 FKDCT-5024 1
7 HEX HEA D BOLT 16X65X2MM (8.8 GRADE) 10260378 8
8 SPRING WAS HER 16MM 10270005 6
9 U CLAMP 76630002 8
10 SPRING WASHER 10270005 16
11 NYLOCK NUT 10280005 16
12 NYLOCK NUT M16X2MM 10280005 8
13 PIN 19X90MM 10020026 2
14 LEVER BUSH 1
15 HEX HEAD BOLT M18X100X2.5MM (8.8 GRADE) 10260391 1
16 NYLOCK NUT M18X2.5MM 10280020 1
17 ANTI CLOCKWIS E TYNE ASSEMB LY -DOUBLE COIL-30 (MM) FKDCT-5009 1
18 PIN 25X125 10020070 2
19 TILLER PIN 28X145 10020019 2
4
6
16
14
15
7
8
12
1
9
5
13
3
10
2
7
5
17
19
18
Page 25
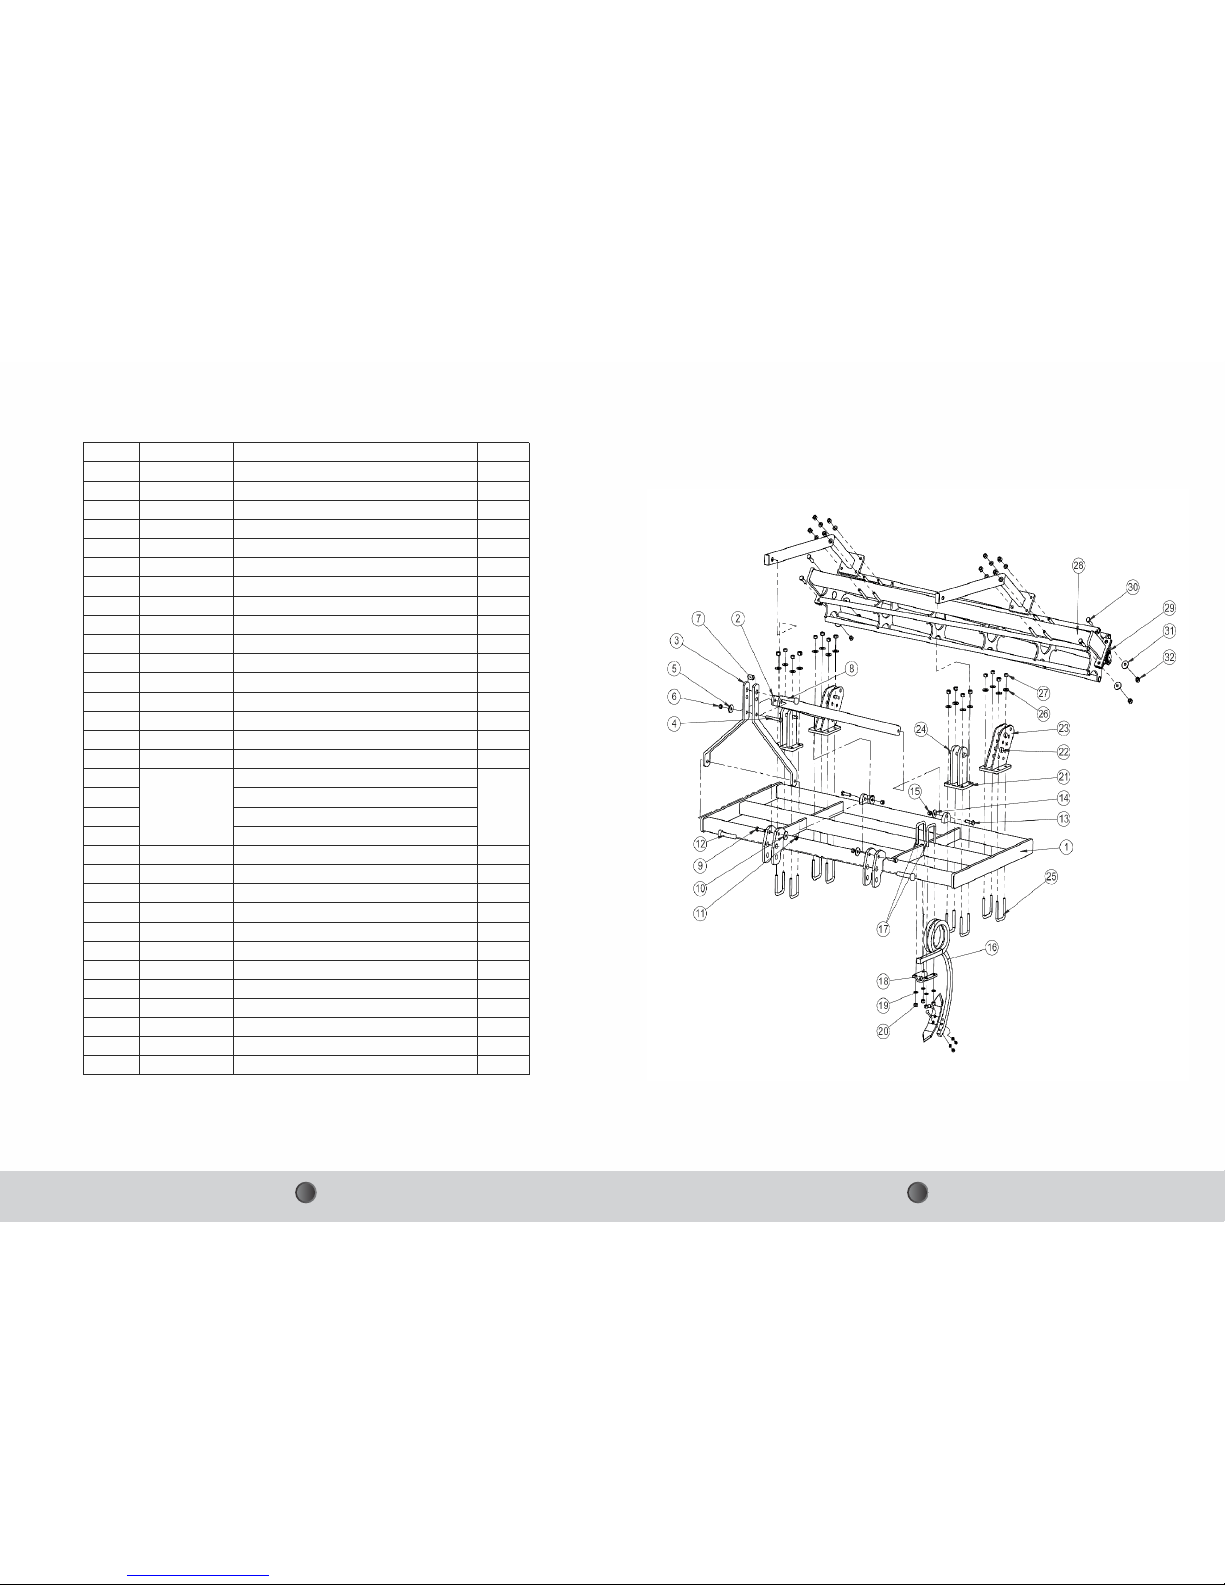
1413
SR.NO. PART NO. PART NAME QTY
1 FKDCT-5021 FRAME ASSEMBLY 1
2 FKDCT-065 REAR LINK MULTIROW 2
3 FKDCT-064 FRONT LINK MULTI ROW 2
4 10260437
HEX HEAD BOLT
1
5 10270006 SPR ING WASHER 1
6 10280020 NYLOCK NUT 1
7 FKDCT-066 BUSH 1
8 10020080 PIN 1
9 10260376 HEX HEAD BOLT 2
10 10270006 SPRING W ASHER 2
11 10280020 NYLOCK NUT 2
12 10020052 PIN 2
13 10280005 HEX HEAD BOLT 2
14 10270005 SPRING W ASHER 3
15 10280005 NYLOCK NUT 3
16 FKDCT-016 TYNE 13
17 U-CLAMP
18 U-CLAMP BRACKET
19 SPRING WASHER
20 NYLOCK NUT
21 FKMRCC-502 FRONT LINK CRUMBLER ASSEMBLY 2
22 10020009 PIN 2
23 FKMRCC-503 REAR LINK CRUMBLER ASSEMBLY 2
24 10020026 PIN 2
25 76630002 U-CLAMP 8
26 10270005 SPRING W ASHER 8
27 10280005 NYLOCK NUT 8
28 FKMRCC-501 CRUMBLE ASSEMBLY 1
29 10050033 BEARING 2
30 10260376 HEX HEAD BOLT 4
31 10270006 WASHER 4
32 10280020 NYLOCK NUT 4
76630005 13
Multi Row Cultivator
Page 26
15
16
DELIVERY CHECKLIST
Dealer Pre-Delivery (Please Tick)
1. Dealer Pre-Delivery Checklist
1. The customer or person responsible has
been given the operator’s manual.
2. The customer undertakes to read the
co mp le te op er at or ’s m an ua l a nd
understands all aspects of the manual
before operation of the machine.
3. All safety, operational and maintenance
information have been explained and
demonstrated.
4. All greasing a nd oil points, stickers,
guarding and ID plate have been identified
and physically pointed out.
5. The custo mer ag rees that it i s his
responsibility to read and carry out the
safety, maintenance and operation as per
this operator’s manual.
Customer Delivery (Please Tick)
Please Complete all Dealer information Below
Dealer Information
Dealer’s Name..............................................................................
Address........................................................................................
.......................................................................................................
State........................................... Postcode.................................
Phone.......................................... Fax..........................................
Email.............................................................................................
Service Person..............................................................................
I confirm that the pre-delivery service was performed on this machine.
Signature.......................................................................................
Date..............................................................................................
Comments.....................................................................................
.......................................................................................................
.......................................................................................................
Please Complete all Customer Information Below
Customer Information
Customer’s Name.........................................................................
Address........................................................................................
.......................................................................................................
State........................................... Postcode.................................
Phone.......................................... Fax..........................................
Email.............................................................................................
Delivery Person.............................................................................
I confirm that all of the delivery checks were explained and performed.
Signature.......................................................................................
Delivery Date................................................................................
Comments.....................................................................................
.......................................................................................................
.......................................................................................................
2. Customer Delivery Checklist
1. The customer or person responsible has
been given the operator’s manual.
2. The customer undertakes to read the
co mp le te op er at or ’s m an ua l a nd
understands all aspects of the manual
before operation of the machine.
3. All safety, operational and maintenance
information have been explained and
demonstrated.
4. All greasing a nd oil points, stickers,
guarding and ID plate have been identified
and physically pointed out.
5. The custo mer ag rees that it i s his
responsibility to read and carry out the
safety, maintenance and operation as per
this operator’s manual.
WARRANTY CARD
Customer Copy
Customer`s Signature Dealer`s Signature
CUSTOMER NAME Mr./ Mrs :
ADDRESS :
MOBILE NO. :
Email :
NAME OF IMPLEMENT :
MODEL NO. :
YEAR OF Mfg. :
SERIAL NO. :
REGISTRATION NO. :
DATE OF PURCHASING :
NAME OF DEALER :
Corporate Office:
Plot No. 235 to 240, Sec-3, HSIIDC, Karnal- 132001 (Haryana), India
+91 184 2221571/ 72/ 73
info@fieldking.com, www.fieldking.com
BERI UDYOG PVT LTD
Page 27
17 18
WARRANTY CARD
Company Copy
Customer`s Signature Dealer`s Signature
CUSTOMER NAME Mr./ Mrs :
ADDRESS :
MOBILE NO. :
Email :
NAME OF IMPLEMENT :
MODEL NO. :
YEAR OF Mfg. :
SERIAL NO. :
REGISTRATION NO. :
DATE OF PURCHASING :
NAME OF DEALER :
Corporate Office:
Plot No. 235 to 240, Sec-3, HSIIDC, Karnal- 132001 (Haryana), India
+91 184 2221571/ 72/ 73
info@fieldking.com, www.fieldking.com
BERI UDYOG PVT LTD
Page 28
2019
WARRANTY CARD
Dealer Copy
Customer`s Signature Dealer`s Signature
CUSTOMER NAME Mr./ Mrs :
ADDRESS :
MOBILE NO. :
Email :
NAME OF IMPLEMENT :
MODEL NO. :
YEAR OF Mfg. :
SERIAL NO. :
REGISTRATION NO. :
DATE OF PURCHASING :
NAME OF DEALER :
Corporate Office:
Plot No. 235 to 240, Sec-3, HSIIDC, Karnal- 132001 (Haryana), India
+91 184 2221571/ 72/ 73
info@fieldking.com, www.fieldking.com
BERI UDYOG PVT LTD
Page 29

Corporate Office:
Plot No. 235 to 240, Sec-3, HSIIDC, Karnal- 132001 (Haryana), India
+91 184 2221571/ 72/ 73 [email protected], www.fieldking.com
BERI UDYOG PVT LTD
?Operator Manual Service Manual Part Catalogue? ?
World Class Farm Equipment
Seeding & Plantation
Post Harvest
Harvest
Crop Protection
Landscaping
Tillage
Haulage
Solutions...
Rigid Cultivator
Page 30

You have invested in one of the best implements of its type in the market today.
The care you give your “FIELDKING” implement will greatly determine your
satisfaction with its performance and its service life. A careful study of this manual
will give you a thorough understanding of your new implement before operating.
If your manual is lost or destroyed, “FIELDKING” will be glad to provide you a new
copy. Visit to nearest dealership & get a copy. Most of our manuals can also be
downloaded from our website at www.fieldking.com.
As an authorized “FIELDKING” dealer, we stock genuine “FIELDKING” parts which
are manufactured with the same precision and skill as our original equipment. Our
trained service persons are well informed on methods required to service
“FIELDKING” equipments and are ready to help you.
Should you require additional information or assistance, please contact us.
CONGRATULATIONS!
YOUR AUTHORIZED
FIELDKING DEALER
BECAUSE “FIELDKING” MAINTAINS AN ONGOING PROGRAMME
OF PRODUCT IMPROVEMENT, WE RESERVE THE RIGHT TO MAKE
IMPROVEMENTS IN DESIGN OR CHANGE IN SPECIFICATION
WITHOUT INCURRING ANY OBLIGATION TO INSTALL THEM ON
UNITS PREVIOUSLY SOLD. BECAUSE OF THE POSSIBILITY THAT
SOME PHOTOGRAPHS IN THIS MANUAL WERE TAKEN OF
PROTOTYPE MODELS, PRODUCTION MODELS MAY VARY IN
SOME DETAIL. IN ADDITION, SOME PHOTOGRAPHS MAY SHOW
SHIELDS REMOVED FOR THE PURPOSE OF CLARITY. NEVER
OPERATE THIS IMPLEMENT WITHOUT ALL SHIELDS IN PLACE.
Page 31

1. Read and understand the information contained in this manual.
2. Operate, lubricate, assemble and maintain the equipment in accordance with all
instructions and safety procedures in this manual.
3. Inspect the equipment and replace or repair any parts that are damaged or worn
out which under continued operation would cause damage, wear to other parts,
or cause a safety hazard.
4. Return the equipment or parts to the authorized “FIELDKING” dealer, from where
it was purchased, for service or replacement of defective parts that are covered
by warranty. (The “FIELDKING” Factory may inspect equipment or parts before
warranty claims are honored.)
5. All costs incurred by the dealer for traveling to or transporting the equipment for
warranty inspection and claims will be borne by the customer.
This manual contains valuable information about your new “FIELDKING” rigid
cultivator / tiller. It has been carefully prepared to give you helpful suggestions for
operating, adjusting, servicing and ordering spare parts.
Keep this manual in a convenient place for quick and easy reference. Study it
carefully. You have purchased a dependable and sturdy rigid cultivator / tiller but only
by proper care and operation you can expect to receive the service and long life
designed and built into it.
Sometime in the future your rigid cultivator / tiller may need new parts to replace
which are worn out or broken. If so, go to your dealer and provide him equipment’s
detail like model and part number.
Name ______________________________________________
Purchased From ______________________________________
Date of Purchase _____________________________________
Model No. ___________________________________________
Serial No. ___________________________________________
TO THE PURCHASER
PURCHASER / OPERATOR’S RESPONSIBILITY
CUSTOMER INFORMATION
Page 32

1. TECHNICAL DATA
1.1 Introduction
1.2 Warranty
1.3 When the warranty becomes void
1.4 Warning
2. USAGE INSTRUCTIONS
2.1 Before use & adjustments
2.2 Attaching cultivator/tiller to the tractor
2.3 Safety
3. MAINTENANCE
3.1 Operation, care & maintenance of cultivator/tiller
3.2 Storage of machine after work
4. PARTS CATALOGUE
INDEX
Page 33

21
1. TECHNICAL DATA
1.1 INTRODUCTION
Rigid cultivators/tillers are eminently suitable for use in hard Soil.. Rigid
cultivators/tillers may be used for loosening and aerating soil to a depth of nine
inches preparing seedbeds quickly and economically. Rigid tynes of cultivators
are those tynes which do not deflect during the work in the field. No springs are
available with these cultivators.
1.2 WARRANTY POLICY FOR FILEKIDNG TILLER/CULTIVATOR
1. Beri Udyog Pvt. Ltd.(“ the company”) warrants to the retail purchase of the
“FIELDKING” tiller/ cultivator that subject to the limitation specified here in
below, the company’s authorised dealer will repair or replace any part there
of found. In its opinion, to be defective in materials of workmanship. The
warranty shall be for a period 1 year from the date of purchase of new
“FIELDKING” agriculture tiller/cultivator by the original purchaser (“retail
purchaser”).
2. This warranty is limited to the delivery to the retail purchaser, free at the
authorized dealer’s workshop or company’s works of the part or parts
whether repaired or replaced in exchange for those acknowledge by the
company to be defective.
3. The purchaser of “FIELDKING” agriculture tiller/cultivator are advised strictly
to follow the instructions given in the operator manual, provided by the
company along with the “FIELDKING” tiller/cultivator at the time of delivery,
changes if any in the “FIELDKING” tiller/cultivator, resulting in improper
usage will not be covered in the warranty, This warrant will au to m a t ica ll y
get terminated on the expiry of warrant period even in the “FIELDKING”
tiller/cultivator, may not in use for any time during the warranty period for any
reason whatsoever including any technical reasons, any time for such
repairs/replacements of parts and in transit, whether under this warranty or
otherwise shall not be excluded from the warranty period.
4. Warranty shall apply to following:
• Manufacturing defects: Breaking of any structure & fabrication covered
under warranty.
5. Warranty shall not apply to the following:
• Accidental cases are not covered under warranty.
NOTE: If any kind of breakage and damage is found due to poor handling of
customer that also is not covered under warranty policy.
6. The retail purchaser shall be required to make a thorough examination of
the products prior to the purchase. The authorized dealer are in no way the
legal agent of the company and have no right or authority to give any
warranty or assume any obligation on behalf of the company or bind the
company in any manner whatsoever.
7. For the purpose of this warranty, the term ‘’product” means and includes
only new “FIELDKING” tiller/cultivator, manufactured by or for the company
design and drawing and sold and installed by the authorized dealer.
8. The company’s responsibility is limited to the terms of this warranty and it
shall not be liable for personal injuries or consequential or resulting liability,
damage or loss arising from any defect.
9. The company’s liability under this warranty is depended upon the strict
observance by the retail purchase, of the following provisions.
• The retail purchaser at the time of delivery shall sign complete and return
the authorized warranty and dealer’s delivery report.
• All the parameters should be thoroughly checked as per the scheduled
maintenance in the operator ’s manual. The customers are also bound to
use the genuine spares for “FIELDKING” tiller/cultivator, purchased from
authorized “FIELDKING’ dealers.
• Repairs and replacements will be performed by the facility of the authorized
dealers/its branch dealers.
• This warranty shall not apply if the product or any part there of repaired or
altered not in accordance with our standard repair procedure or by any
person other than an Authorized Dealers/its branch dealers/its authorized
service centre.
• The decision of the company or the concerned authorized dealers in regard
to the warranty shall be final and conclusive and the retail purchaser hereby
agrees to unconditionally accept their decision on all.
• Claims arising from this warranty will be considered only if they are notified
in writing to the concerned authorized dealers after the defect has been
ascertained.
Page 34

43
12. The court at Karnal shall have exclusive jurisdiction to try, entertain and
dispose of all proceeding relating to any dispute arising between the
company and the retail purchaser on the liability of the company under
this warranty.
1.3 WHEN THE WARRANTY BECOMES VOID
1. Besides the caused specified in the supply agreement, the warranty shall in
any case become void.
2. Should there have been a maneuver error.
3. When following repairs made by the customer without authorization from
the manufacture or owing to the installation of spurious spare parts, the
machine is subject to variations and the damage can be ascribed to these
variations.
4. When the user failed to comply with the instructions in the operator’s
handbook.
5. When the implement has been used beyond the specified power limit like
(tractor horse power).
6. No warranty will be given if the service is not done on time.
1.4 WARNING
Thoroughly read the instruction manual before proceeding with the various
operations.
Maintain the harrow as per the instructions of this handbook to be entitled for
warranty.
2. USAGE INSTRUCTIONS
2.1 BEFORE USE & ADJUSTMENTS
Before mounting of cultivator make sure that all nuts & bolts are properly secured.
Also determine soil and trash conditions of the field and make the preliminary
adjustments. e.g.
Tyne leveling
To eliminate uneven working and side draft, leveling is done by means of top link.
• This warranty does not cover any applicable taxes payable on any parts
which the company may supply or repairs free of cost of during the warranty
period. This warranty also does not cover the cost of packaging to and fro
freight and transportation charges etc. on the defective “FIELDKING”
tiller/cultivator or other part of the “FIELDKING” tiller/cultivator sent to
“FIELDKING” dealers locations.
• The company reserves the right to make changes in design or introduce
any improvement or add any parts on the products any time without
incurring any obligation to install the same on products previously sold.
10. This contract will be ineffective and incorporative if:
• The dully warranty card is not presented during the repairs.
• The “FIELDKING” agriculture tiller/cultivator or any parts thereof is
subjected to neglect, fire, floods or other acts of god or in the company’s
opinion any damage has caused to be “FIELDKING” agriculture
tiller/cultivator during transportation.
• The original numbers are removed, obliterated or altered from the unit.
• Any attempt is made to have the repairs executed by a person, other than
the company’s or its authorized representatives.
• Any defect if not informed immediately to the company or its authorized
representative, any alterations in the warranty card is made.
• The use of replacement parts not manufactured or supplied by the
company will automatically invalidate this warranty.
This warranty shall not be apply to defect/damages caused by the normal
wear and tear, accident, transportation, misuser or neglect usage in non
agric applications, defect in the products which have been altered outside
the company’s work or which have been let out in hire or the identification
marks in which have been altered or removed. Company’s decisions in this
respect will be final and binding on all.
11. The above warranty is in lieu of all other warranties express or implied, and
no person, agent or representative of the company is authorized to give any
other warranties on the company’s behalf or the assume for it any other
liability in connection, with the product.
Page 35

65
SAFETY INSTRUCTIONS:
1. All equipment is potentially hazardous. There is no substitute for a safety
conscious operator who recognizes potential hazards and follows reasonable
safety practices.
2. Personal protection equipment including safety glasses, safety shoes, and
gloves are recommended during assembly, installation, operation, adjustment,
maintaining, repairing, removal or moving the implement.
3. Never place yourself between the tractor and implement while implement is in
operation.
4. Do not work under a raised implement unless it is securely blocked or held in
position. Do not depend on the tractor hydraulic system to hold the implement in
place.
5. A heavy load can cause instability of the tractor. Use extreme care during travel.
Slow down on turns and watch out for bumps. The tractor may need front counterweights to counter-balance the weight of the implement.
6. Do not allow others to ride on the tractor with an operator. Riders are subject to
injury such as being struck by foreign objects or being thrown off. Riders obstruct
the operator’s view resulting in unsafe operation. Never allow anyone to ride on
the implement!
7. Do not allow anyone who is not familiar with the safety rules and operation
instructions to use this implement.
8. Keep alert and watch the front as well as the rear when working with equipment.
9. Always be sure the implement is in the fully raised position when in transport.
10. When removing or adjusting equipment, be sure that your feet are never under the
implement.
11. Avoid excessive speed during operation.
12. Before you operate the field cultivator, check over all pins, bolts and connections
to be sure that all are securely in place. Replace any damaged or worn parts
immediately.
13. Make implement adjustments only when the implement is attached to the tractor.
14. Watch for and avoid hidden obstructions, i.e. buried pipes, rocks, uneven
concrete slabs, stumps etc., when operating equipment.
15. Never operate tractor and implement under trees with low hanging limbs.
Operators can be knocked off the tractor and then run over by the implement.
16. Operating rigid cultivator shanks may suddenly fling rocks and clods. Keep all
bystanders 10 meter away and operator must wear safety glasses.
17. Reduce speed when transporting mounted implements to avoid bouncing and
momentary loss of steering control.
18. It may be necessary to raise implement slightly and then lower to desired working
depth when tractor is moving.
Danger:
In operating position the top link must
be higher on the machine side than on
the tractor side!
Depth control
The depth at which the implement is required to work is controlled hydraulically by
raising or lowering the control lever on the tractor.
2.2 ATTACHING THE CULTIVATOR/TILLER TO THE TRACTOR
1. Place the cultivator duly leveled on the flat piece of land.
2. Reverse the tractor to the cultivator ( Do not drag the cultivator/tiller up the
tractor)
3. Attach the left arm of the tractor to the cultivator/tiller first.
4. Attach the central arm to the cultivator/tiller. To attach, turn the screws on both
sides to an equal length. If the arm is too short or too long, turn the screw to
adjust both at the same time until aligned with the hole on the central arm.
5. Attach the lower right arm, turn the screw until the mounting pin is at the same
level as the hole on the tractor arm. If the gap between the hole and mounting
pin is too close or too distant, turn the control arm in or pull it away to an
appropriate distance. You may have to adjust both height and distance at the
same time. When the hole at tractor arm and mounting pin are even, insert the
pin in the hole and lock it with the lynch pin.
6. After attaching the cultivator/tiller, lift it and adjust the control arm parallel to
the ground. When you look from both rear or sideways, all shovel should be
touching the ground uniformly.
2.3 SAFETY
REMEMBER SAFETY FIRST
Operator must read the instruction manual before operating the cultivator. Do
not allow anyone to operate this equipment who has not fully read and
comprehended this manual and who has not been properly trained in the safe
operation of the equipment.
Page 36

87
Non-observance of the above rules shall be considered negligence.
It will rule out any liability of the manufacturer for all possible
damage and / or consequences.
The user is solely responsible for any risk!
ATTENTION
3. MAINTENANCE
3.1 OPERATION, CARE & MAINTENANCE OF CULTIVATOR/ TILLER
1. All the shovels of the tynes should be set at equal depth. To do this, place the
cultivator on level ground and see that all the shovel touch the ground.
2. Before commencing work with a cultivator, check it for loose bolts and nuts and
fasten them properly. After having taken all these precautions, run the cultivator
for one hour and then inspect it once more for any loose parts.
3. Never turn or reverse your tractor while cultivator is ploughed deep in field. This
will twist the assemblies out of alignment and damage them extensively.
4. Reverse or replace the shovel point when worn out. Delay may result in wearing
out of the tynes which will result into expensive repairing/replacements. Avoid use
of extra wide shovels as they do not improve tillage quality but only put extra load
on the tractor and also result into extra fuel consumption.
3.2.STORAGE OF CULTIVATOR/TILLER AFTER WORK
1. Wash the cultivator after work.
2. Replace the worn out nuts & bolts.
3. If cultivator has to remain unused for long time then clean it & apply a layer of used
oil for rust prevention.
4. These steps will enhance the life of your cultivator.
4. PARTS CATALOGUE
HEAVY DUTY RIGID TILLER - B TYPE -22MM (Box type)
HEAVY DUTY RIGID TILLER - B TYPE -25MM (Box type)
HEAVY DUTY RIGID TILLER - C TYPE -25MM (Box type)
19. Use extra care when working on slopes.
20. Never use alcoholic beverages or drugs which can hinder alertness or
coordination while operating this equipment. Consult your doctor about operating
this machine while taking prescription medications.
Page 37
109
BOX FRAME ASSEMBLY
3 PT.LINKAGE ASSEMBLY
BIG TYNE ASSEMBLY
SMALL TYNE ASSEMBLY
SHOVAL
ROUND HEAD BOLT(7/16X3" BSW
ROUND HEAD BOLT(7/16X2.5" BSW
HEX PLAIN NUT (7/16 BSW)
HEX BOLT (M18X65X2.5P)
PLAIN WASHER M18
SPRING WASHER M18
NYLOCK NUT M18X2.5P
HEX BOLT M(16X65X2.5P)
SPRING WAHER M16
NYLOCK NUT (M16X2P)
HEX BOLT(M12X105X1.75P)
PLAIN WASHER M12
SPRING WASHER M12
NYLOCK NUT (M12X1.75P)
PIN( 28X145MM)
LINCH PIN
PART DESCRIPTION
123456789
1011121314151617181920
21
SR NO
FKRHDBB22-7 FKRHDBB22-9 FKRHDBB22-11 FKRHDBB-13 FKRHDBB22-15 FKRHDBB22-7 FKRHDBB22-9 FKRHDBB22-11 FKRHDBB22-13 FKRHDBB22-15
FKRHDB-507 FKRHDB-509 FKRHDB-511 FKRHDB-513 FKRHDB-519 1
1
4 5 6 7 8
3 4 5 6 7
7 9 11 13 15
7 9 11 13 15
7 9 11 13 15
14 18 22 26 30
28 36 44 52 60
28 36 44 52 60
28 36 44 52 60
28 36 44 52 60
2 2 2 2 2
2 2 2 2 2
22222
2
10020022
FKRHDB-532
FKRHDB-525
1
1
2
10280005
10260159
10270010
10270003
10280025
10020019
10260084
10270021
10270006
10280006
10260079
10270005
FKRHDB-528
FKSLOB-016
B1000125
10260137
10280033
HEAVY DUT Y RIGID TILLER - B TYPE -22MM (Box type)
PART CODE
FKRHDB-531
QTY
FKRHDBB25-7 FKRHDBB25-9 FKRHDBB25-11 FKRHDBB25-13 FKRHDBB25-15 FKRHDBB25-7 FKRHDBB25-9 FKRHDBB25-11 FKRHDBB25-13 FKRHDBB25-15
1 BOX FRAME ASSEMBLY FKRHDB-508 FKRHDB-5010 FKRHDB-512 FKRHDB-514 FKRHDB-520 1
2 3 PT.LINKAGE ASSEMBLY 1
3 BIG TYNE ASSEMBLY 4 5 6 7 8
4 SMALL TYNE ASSEMBLY 3 4 5 6 7
5 SHOVAL 7 9 11 13 15
6 ROUND HEAD BOLT(7/16X3" BSW 7 9 11 13 15
7
ROUND HEAD BOLT(7/16X2.5" BSW
7 9 11 13 15
8 HEX PLAIN NUT (7/16 BSW) 14 18 22 26 30
9 HEX BOLT (M18X65X2.5P)
10 PLAIN WASHER M18
11 SPRING WASHER M18
12 NYLOCK NUT M18X2.5P
13 HEX BOLT M(16X65X2.5P)
14 SPRING WAHER M16
15 NYLOCK NUT (M16X2P)
16 HEX BOLT(M12X105X1.75P) 28 36 44 52 60
17 PLAIN WASHER M12 28 36 44 52 60
18 SPRING WASHER M12 28 36 44 52 60
19 NYLOCK NUT (M12X1.75P) 28 36 44 52 60
20 PIN( 28X145MM) 2 2 2 2 2
21 LINCH PIN 2 2 2 2 2
10270003
10280025
10020019
10020022
10270005 2
10280005 2
10260159
10270010
10270006 2
10280006 2
10260079 2
10270021 2
FKRHDB-531 FKRHDB-532 1
FKRHDB-526
FKRHDB-529
FKSLOB-016
B1000125
10260137
10280033
10260084 2
1
HEAVY DUTY RIGID TILLER - B TYPE -25MM (Box type)
SR NO PART DESCRIPTION
PART CODE QTY
Page 38
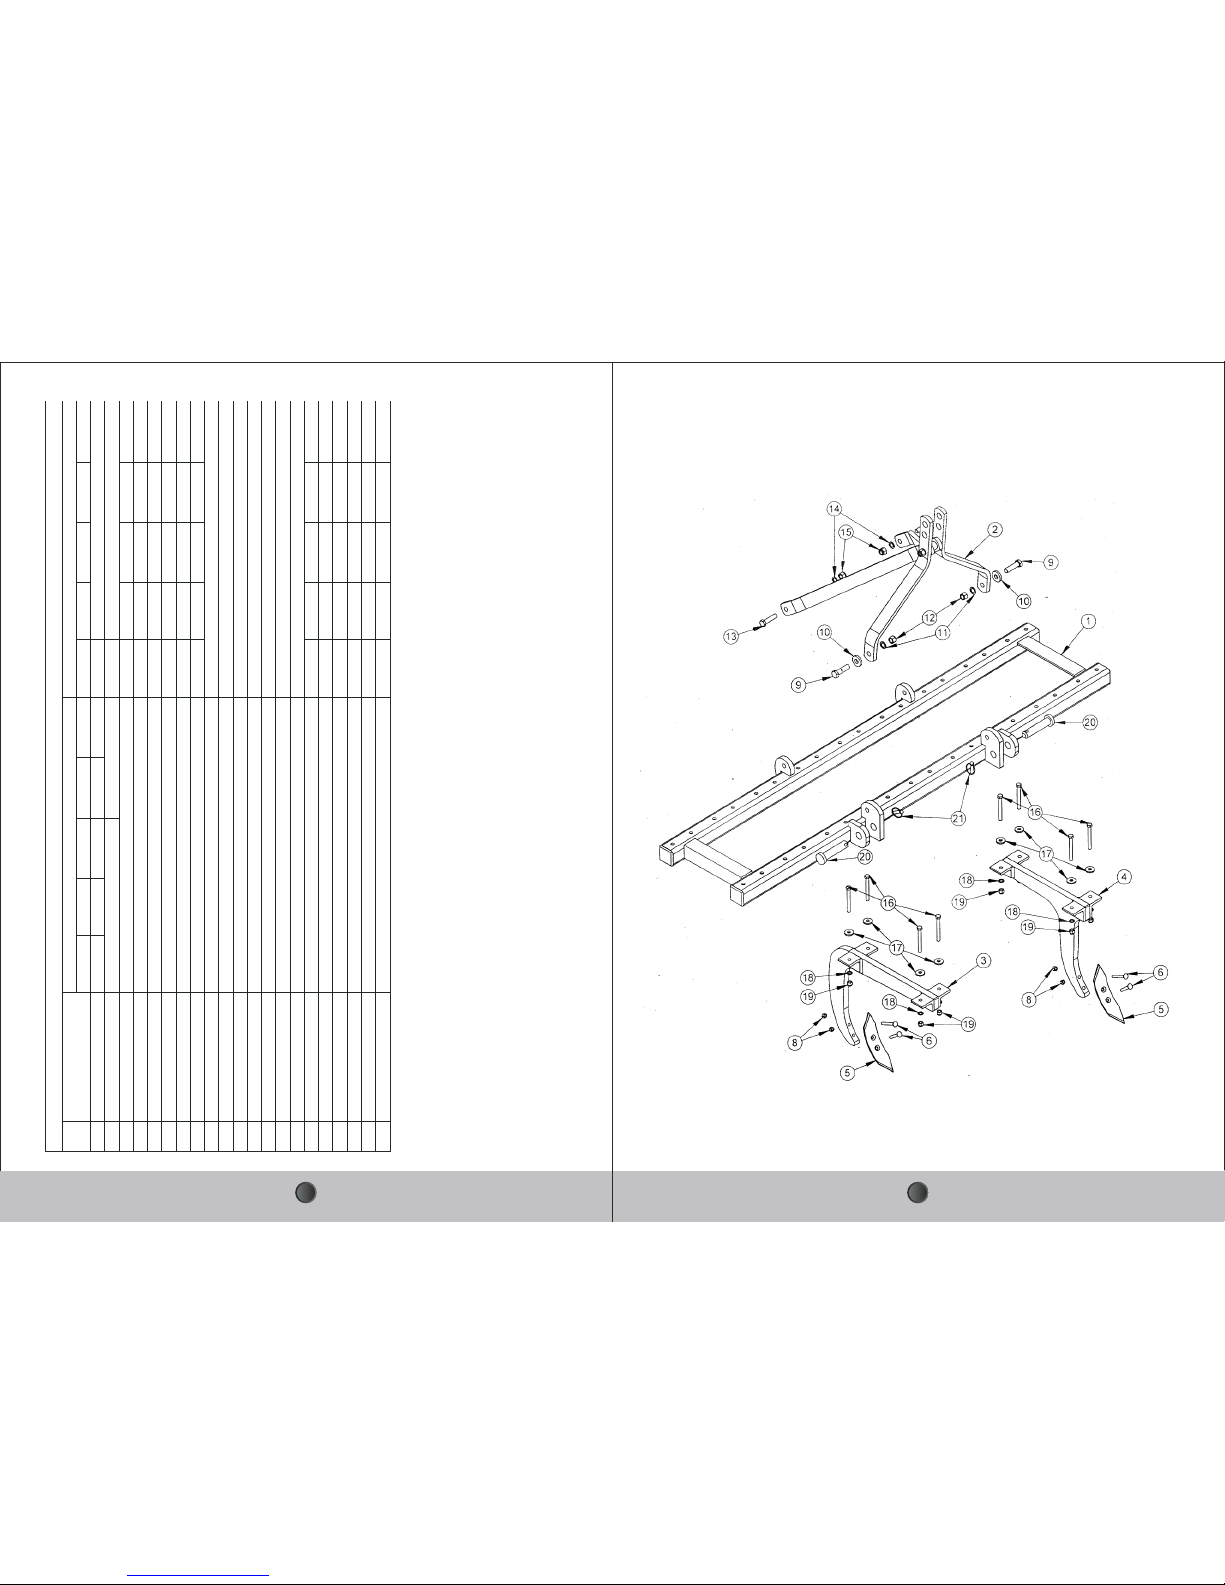
1211
FKRHDC25-7 FKRHDC25-9 FKRHDC25-11 FKRHDC25-13 FKRHDC25-15 FKRHDC25-7 FKRHDC25-9 FKRHDC25-11 FKRHDC25-13 FKRHDC25-15
1 BOX FRAME ASSEMBLY FKRHDC-501 FKRHDC-502 FKRHDC-503 FKRHDC-504 FKRHDC-505 1
2 3 PT.LINKAGE ASSEMBLY 1
3 BIG TYNE ASSEMBLY 4 5 6 7 8
4 SMALL TYNE ASSEMBLY 3 4 5 6 7
5 SHOVAL 7 9 11 13 15
6
ROUND HEAD BOLT(7/16X3" BSW
7 9 11 13 15
7
ROUND HEAD BOLT(7/16X2.5" BSW
7 9 11 13 15
8 HEX PLAIN NUT (7/16 BSW) 14 18 22 26 30
9 HEX BOLT (M18X65X2.5P)
10 PLAIN WASHER M18
11 SPRING WASHER M18
12 NYLOCK NUT M18X2.5P
13 HEX BOLT M(16X65X2P)
14 SPRING WAHER M16
15 NYLOCK NUT (M16X2P)
16 HEX BOLT(M12X105X1.75P) 28 36 44 52 60
17 PLAIN WASHER M12 28 36 44 52 60
18 SPRING WASHER M12 28 36 44 52 60
19 NYLOCK NUT (M12X1.75P) 28 36 44 52 60
20 PIN( 28X145MM) 2 2 2 2 2
21 LINCH PIN 2 2 2 2 2
10270003
10280025
10020019
10020022
10270005 2
10280005 2
10260159
10270010
10270006 2
10280020 2
10260079 2
10270021 2
FKRHDC02 FKRHDC03 1
FKRHDC04
FKRHDC05
FKSLOB-016
10260123
10260137
10280033
10260084 2
1
HEAVY DUTY RIGID TILLER - C TYPE -25MM (Box type)
SR NO PART DESCRIPTION
PART CODE QTY
Page 39

13 14
DELIVERY CHECKLIST
Dealer Pre-Delivery (Please Tick)
1. Dealer Pre-Delivery Checklist
1. The customer or person responsible has
been given the operator’s manual.
2. The customer undertakes to read the
co mp le te op erat or ’s m an ua l a nd
understands all aspects of the manual
before operation of the machine.
3. All safety, operational and maintenance
information have been explained and
demonstrated.
4. All greasin g and oil poin ts, stickers,
guarding and ID plate have been identified
and physically pointed out.
5. The c ustomer agre es tha t it is his
responsibility to read and carry out the
safety, maintenance and operation as per
this operator’s manual.
Customer Delivery (Please Tick)
Please Complete all Dealer information Below
Dealer Information
Dealer’s Name..............................................................................
Address........................................................................................
.......................................................................................................
State........................................... Postcode.................................
Phone.......................................... Fax..........................................
Email.............................................................................................
Service Person..............................................................................
I confirm that the pre-delivery service was performed on this machine.
Signature.......................................................................................
Date..............................................................................................
Comments.....................................................................................
.......................................................................................................
.......................................................................................................
Please Complete all Customer Information Below
Customer Information
Customer’s Name.........................................................................
Address........................................................................................
.......................................................................................................
State........................................... Postcode.................................
Phone.......................................... Fax..........................................
Email.............................................................................................
Delivery Person.............................................................................
I confirm that all of the delivery checks were explained and performed.
Signature.......................................................................................
Delivery Date................................................................................
Comments.....................................................................................
.......................................................................................................
.......................................................................................................
2. Customer Delivery Checklist
1. The customer or person responsible has
been given the operator’s manual.
2. The customer undertakes to read the
co mp le te op erat or ’s m an ua l a nd
understands all aspects of the manual
before operation of the machine.
3. All safety, operational and maintenance
information have been explained and
demonstrated.
4. All greasin g and oil poin ts, stickers,
guarding and ID plate have been identified
and physically pointed out.
5. The c ustomer agre es tha t it is his
responsibility to read and carry out the
safety, maintenance and operation as per
this operator’s manual.
Page 40

15 16
WARRANTY CARD
Customer Copy
Customer`s Signature Dealer`s Signature
CUSTOMER NAME Mr./ Mrs :
ADDRESS :
MOBILE NO. :
Email :
NAME OF IMPLEMENT :
MODEL NO. :
YEAR OF Mfg. :
SERIAL NO. :
REGISTRATION NO. :
DATE OF PURCHASING :
NAME OF DEALER :
Corporate Office:
Plot No. 235 to 240, Sec-3, HSIIDC, Karnal- 132001 (Haryana), India
+91 184 2221571/ 72/ 73
info@fieldking.com, www.fieldking.com
BERI UDYOG PVT LTD
Page 41

1817
WARRANTY CARD
Company Copy
Customer`s Signature Dealer`s Signature
CUSTOMER NAME Mr./ Mrs :
ADDRESS :
MOBILE NO. :
Email :
NAME OF IMPLEMENT :
MODEL NO. :
YEAR OF Mfg. :
SERIAL NO. :
REGISTRATION NO. :
DATE OF PURCHASING :
NAME OF DEALER :
Corporate Office:
Plot No. 235 to 240, Sec-3, HSIIDC, Karnal- 132001 (Haryana), India
+91 184 2221571/ 72/ 73
info@fieldking.com, www.fieldking.com
BERI UDYOG PVT LTD
Page 42

2019
WARRANTY CARD
Dealer Copy
Customer`s Signature Dealer`s Signature
CUSTOMER NAME Mr./ Mrs :
ADDRESS :
MOBILE NO. :
Email :
NAME OF IMPLEMENT :
MODEL NO. :
YEAR OF Mfg. :
SERIAL NO. :
REGISTRATION NO. :
DATE OF PURCHASING :
NAME OF DEALER :
Corporate Office:
Plot No. 235 to 240, Sec-3, HSIIDC, Karnal- 132001 (Haryana), India
+91 184 2221571/ 72/ 73
info@fieldking.com, www.fieldking.com
BERI UDYOG PVT LTD
 Loading...