

Page 1
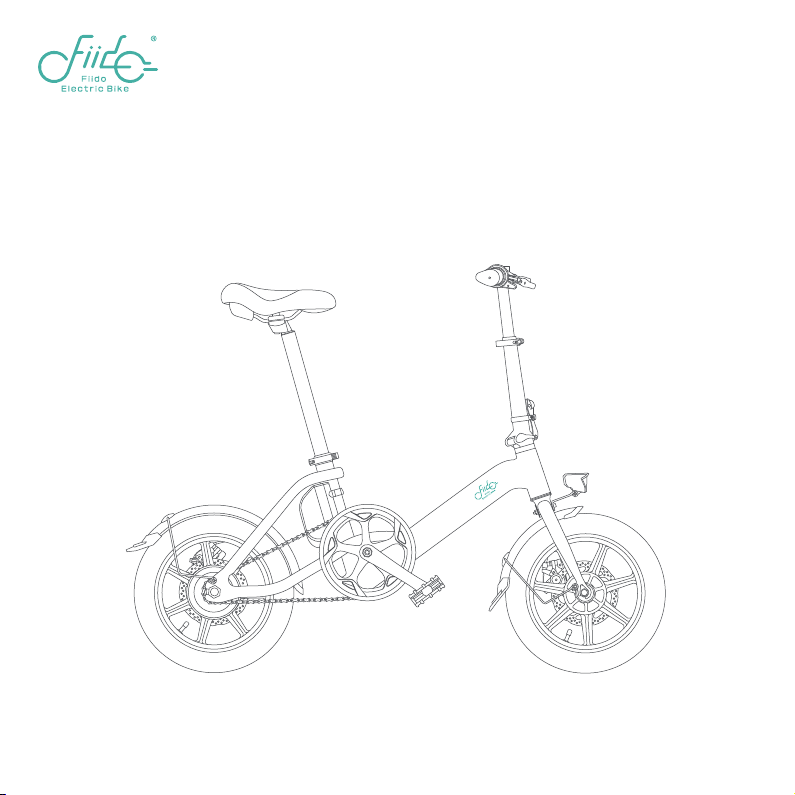
Fiido D3 Pro
Folding Electric Bike
Dear users, please read this manual carefully before operating the bike.
WARNING:DO NOT OPERATE THE BIKE BEFORE UNDERSTANDING HOW TO USE IT.
Page 2

Page 3

Dear user:
In this manual,we will introduce the specification,installation,usage,precautions,and maintenance of
Fiido D3pro.Be sure you know everything you need to know about the bike that introduced in this manual.
Any questions,please contact Fiido After-sales Team or our Local Service Center,and a prompt reply and
feasible solution will be provided.
Safety precautions
1. Please follow the precautions in this instruction to effectively reduce risks. When you enter public areas,
please obey national and local regulations, remain vigilant while riding, and maintain a reasonable safe
distance from other people and vehicles.
2. Please operate by the instruction of the user manual, the loss caused by not following the instructions
shall be borne by oneself.
3. This product is not professional off-road vehicle, do not use this product according to off-road vehicle
standards.
4. For the first time riding, please do not choose the area with many children, pedestrians, pets, vehicles,
or other obstacles and potential hazards. Please be familiar with the bike before riding on public road.
5. Before each ride, please carefully check whether fasteners are loose or parts are damaged. If there’s any
unusual noise, please stop riding immediately, and contact after-sales team for assist.
6. To reduce the injury risk, please read and follow all "Caution", "Danger" and "warning" instructions in this
user manual. No speeding, and do not ride in motorized road under any circumstances.
7. For safety consideration, user must be over 16 years old. Users under the following circumstances are
strongly not recommended to use this product:
- People affected by alcohol or drugs.
- People who are unable to engage in strenuous physical activity due to illness.
- People who are unable to maintain balance or whose balance is impaired by motor skills.
- People whose weight exceeds the max load limit (max load is 120KG/265lb).
- Pregnant woman.
Page 4

8. Please ride carefully in snow, rain, wet road, ice and other bad weather. Do not ride over too
high or too large obstacles, otherwise it’s very likely to lose balance or grip and cause injuries.
9. Do not attempt to charge while the charger or power supply is wet, please follow the local safety
regulations if you need to charge the bike in public area.
10. For effective protection and as convenient as possible for yourself, please be sure to use Fiido
specific parts.
11. If you need to retrofit your bike,Please follow the local laws and regulations, after consulting
with Fiido after-sales team, then proceed with caution. Serious injury and/or damage caused by
unauthorized modification will result in the void of warranty.
Page 5

CONTENTS
1.Product introduction 2. Using guide
1.1 Bike overview
1.2 Packing list
1.3 Bike diagrams
1.4 Function DESC
* All pictures are for reference only.
2.1 Installation guide
2.2 First time using
2.3 Charging instructions
3. Maintenance precautions
3.1 Using precautions
3.2 Bike maintenance & repair
3.3 Motor maintenance & repair
3.4 Battery maintenance & repair
3.5 Reflex reflector cautions
4. Service directory
4.1 Troubleshooting methods
4.2 Specifications
4.3 Warranty coverage
4.4 Repair record
Page 6

1.Product introduction
1.1 Bike overview
1.2 Packing list
1.3 Bike diagrams
1.4 Function DESC
Page 7

1.1 Bike overview
Fiido D3pro, as the smallest folding electric bicycle in the Fiido D series, has been admired by users for its lightness
and convenience since the model enter the market. D3pro inherited the simple aesthetic style of Fiido, which
comes with the sleek and smooth design. The bike only weight 17.3kg and can be carried by one hand. Equipped
with 7.8Ah capacity battery hidden in the frame, it only takes 5 hours to be fully charged. 250W powerful motor and
greater torque can provide a lower power consumption, and yet can easily overcome the slope. It’s the first choice of
entry-level electric bike for urban commuting.
Fiido D3pro has 3 riding modes and 3 power assisted mode, to provide you with a richer riding experience.The front
of the bike can be folded and pushed after folding, to extend more beautiful life scenes.
2
Page 8
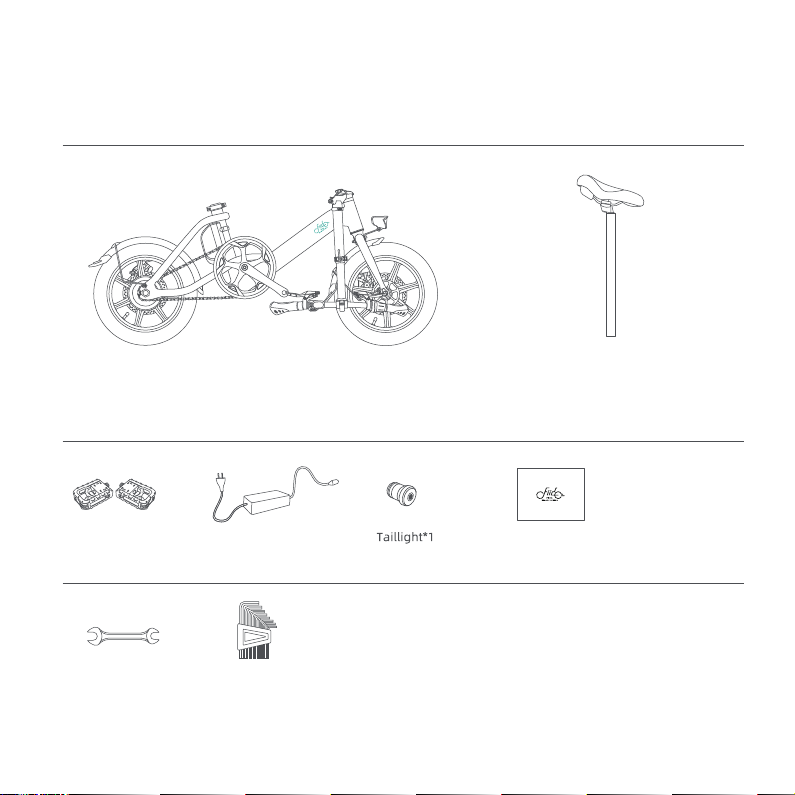
1.2 Packing list
Bike parts
Electric Bike*1
Seatpost *1
Bike accessories
Pendals*1 Charger*1
User manual*1
Tools
Open spanner*1
*Please carefully check whether all items are complete and intact. If there is any problem such as missing or damaged,
please contact the official after-sales team asap.
3
Hex wrench*8
Page 9
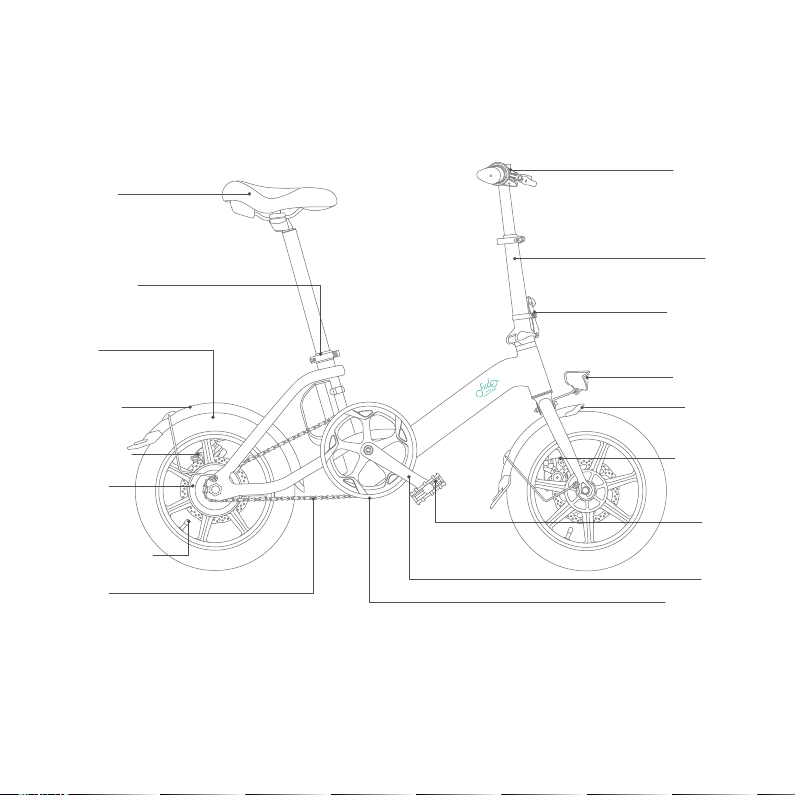
1.3 Bike Diagrams
Saddle
Seat Clamp
Tire
Fenders
Handlebar
Stem
Stem Clamp
Headlight
Fenders
Disc Brake
Motor
Charge Valve
Chain
*Non professionals are forbidden to assemble and disassemble the battery.
Please contact after-sales team for assistance.
Disc Brake
Pedal
Crank
Chainwheel
4
Page 10
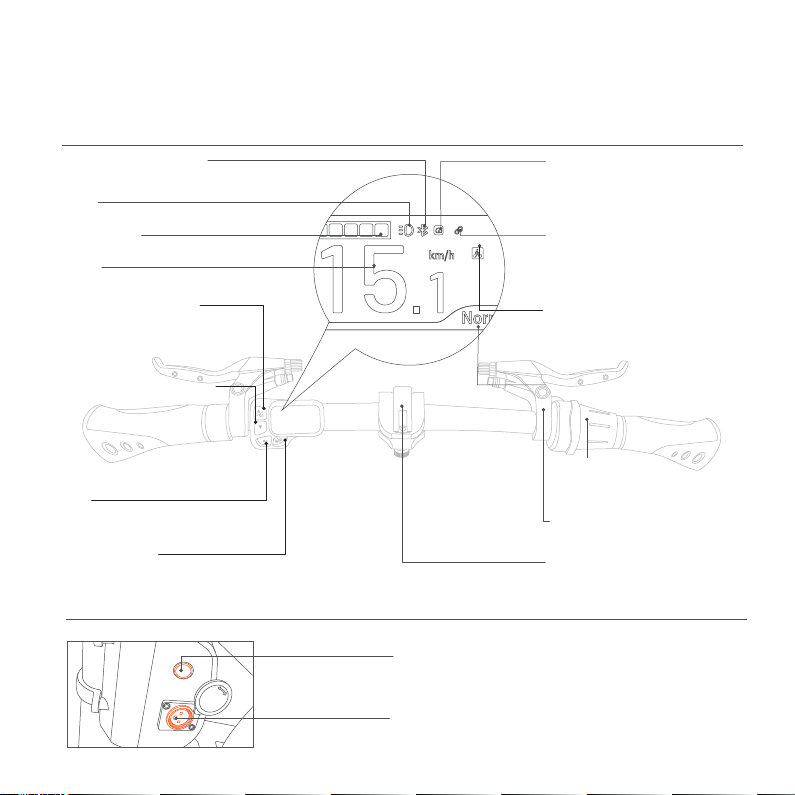
1.4 Function DESC
Handlebar
APP Connection Indicator
(When the bike connects with the phone successfully, the
Bluetooth icon will be shown.)
Lights
(Shows the status of the front light.)
Battery Status
(Display remaining power.)
Speed
(Display the current speed.)
Headlight/Gear Switch
(①Single click to switch up the assist level.
②Double click to turn on/off the headlight.
③Press three times: Activate the boost
function; pressing the brake will exit this
function.)
Power Assisted Level Switch
(① Single click to switch down the
assist level.
② Double-click to switch kmh/mph
display.
③ Long press for 3 seconds,when the
speed displayenters the flashing state,
thecruise contro lfunctioncan be
started/turned off.)
Horn
(In case of overtaking,road section affecting
safety visibility or emergency, slow down
and ring the bell for signal.)
Power-on Button
(①Click to switch the display of the data.
②Long press for more than 3 sec:turn on/off the power.)
Battery
5
Cruise Control Indicator
(Keep the throttle steady for around 8
seconds to turn on cruise control, and
the icon will light up.Brake or change
the throttle to turn off cruise control,
and the icon will go off.)
Fiido Watch Connection Indicator
( To connect the Fiido Mate cycling watch,
please press the button "∧" and"V" at the
same time and hold for 3 seconds. The
Bluetooth connection icon will blink
during the connection process. Once
connected, the icon will remain solid.)
Boost Icon
(When the boost function is activated by
pressing the M button three times, this
icon will be displayed. The icon will turn
off when the brakes are applied.)
Power Assisted Gear Display
(Display the current power assisted gear.)
Electric mode button
(Gently press down the button to switch to
the pure electric mode, the stonger the press,
the faster the speed)
Rear Brake
(The right side is for the rear brake;
in the UK version, it's for the front brake.)
Quick Release
(Open/close to adjust the handlebar)
Battery Switch
(Click to turn on/off the battery power)
If the vehicle is not used for a long time, please remember to turn off the
battery power in time to avoid battery damage caused by depletion.)
ChargingPort
(Insert the Fiido charger ONLY)
Page 11

2.Using Guide
2.1 Installation guide
2.2 First time using
2.3 Charging instructions
Page 12
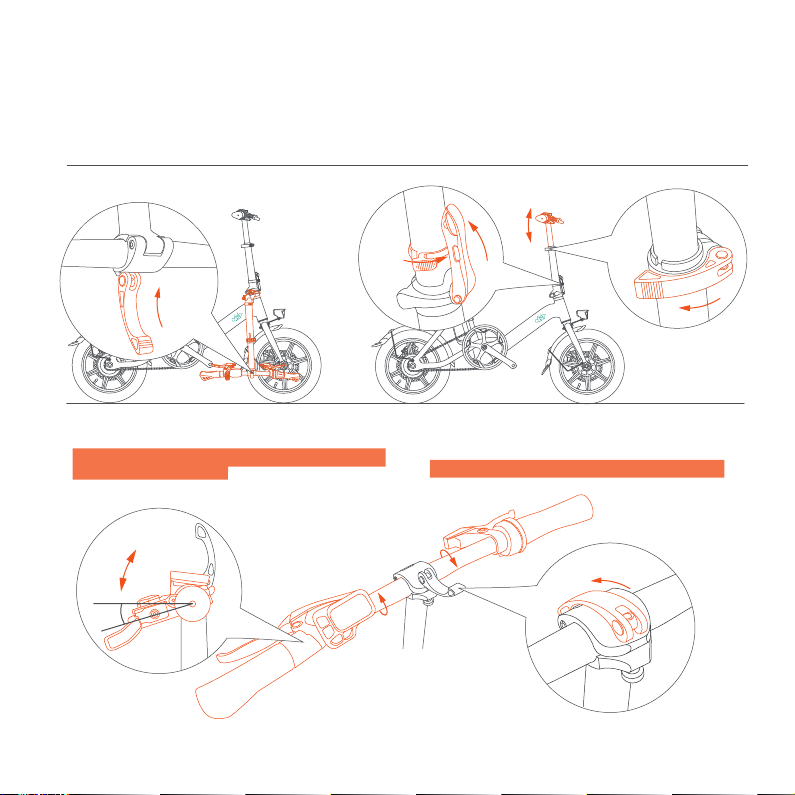
2.1 Installation guide
The basic installation of the bike has been completed before out of the factory. When you receive the bike, you only
need to unfold the bike, install the seat and pedals.
Unfold the stem
① Open the quick release, adjust the handlebar to the right
position. Lift the stem and close the stem clamp to settle it.
Caution: Please operate by the instruction, otherwise
may cause wire breaking.
15°-20°
③ Adjust the handlebar direction, to make it at an angle of 15°-20° with the horizontal line, then close the quick release,
to complete the unfolding stem.
7
② Close the stem clamp and turn the safety hook into the
stem clamp.Adjust the handlebar to suitable height and
close the quick release of the stem.
Caution: The safety line should be within the stem.
Page 13
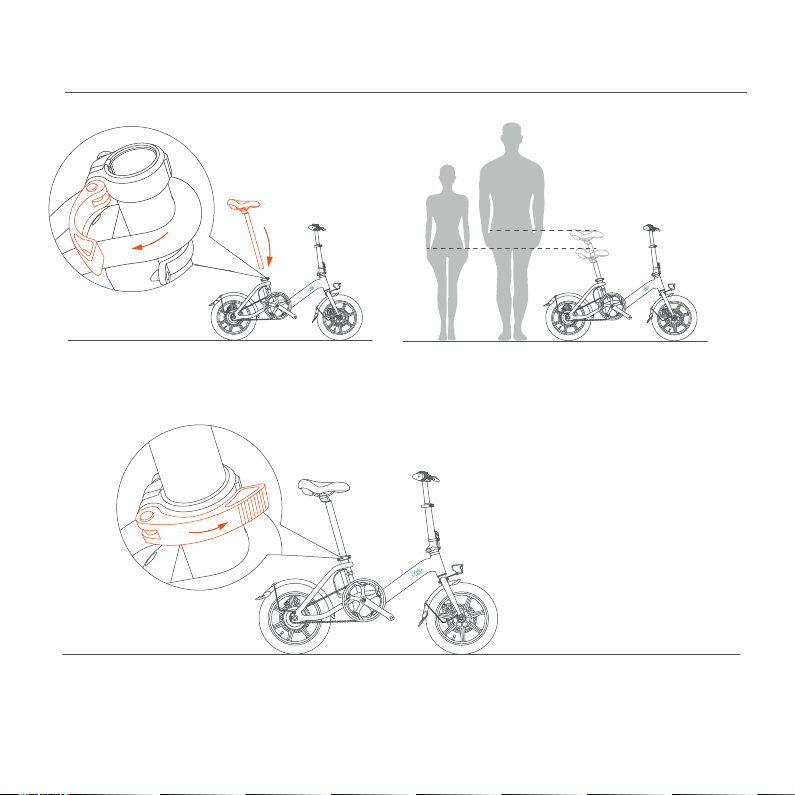
Install the seatpost
① Open the seat clamp, insert the seatpost .
③ Lock the seat clamp.
(the recommended height is when the saddle is level with the user’s pelvis when standing naturally.
The height of the adjustment can NOT exceed the safety line.)
② Adjust the seatpost to suitable height, the recommended
height is when the saddle is level with the user’s pelvis
when standing naturally.The height of the adjustment
can NOT exceed the safety line.
8
Page 14
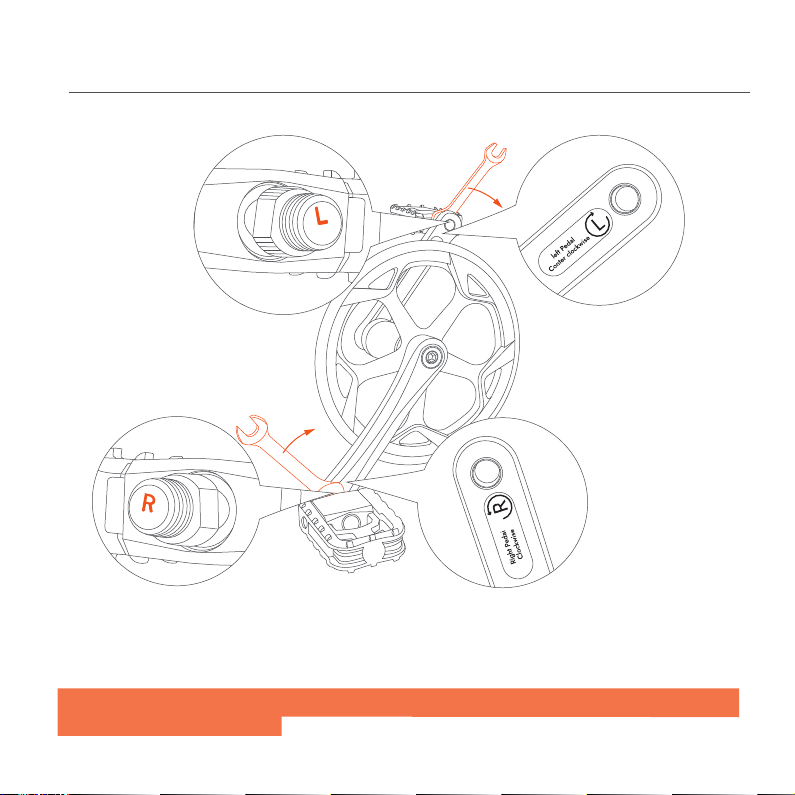
Install pendals
Use the open spanner of the tools bag, screw the pedal shaft into the threaded hole and tighten it in the direction of the arrow.
Caution: While installing the pedal, pay attention to the left / right pendal corresponding to the left / right crank, the
pendal screw and the inside of the crank are respectively marked L(left) / R(right). Please install the pendal correctly to
prevent it from sliding out of the crank.
9
Page 15
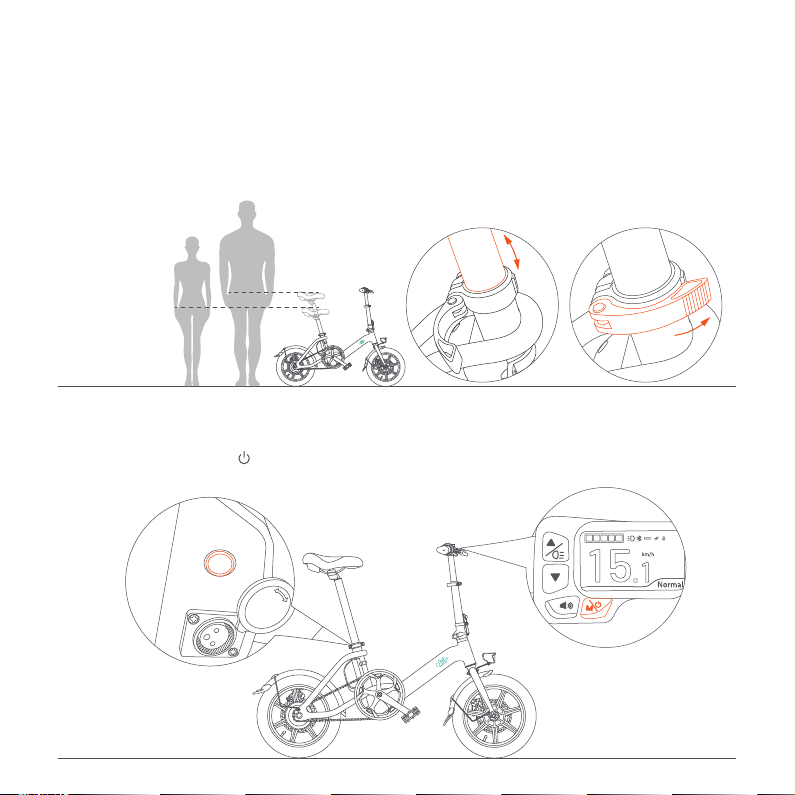
2.2 First time using
Before riding, please follow the installation guide to install components properly, check whether the firmware is loose,
ensure sufficient power, and take appropriate protection for riding.
Step 1:Adjust the seat
Please adjust the seat to the appropriate riding height according to your height.
(the recommended height is when the saddle is level with the user’s pelvis when standing naturally.
The height of the adjustment can NOT exceed the safety line)
Step 2:Turn on the power
① Press the power switch to turn on the battery power.
② Long press the “ ” button on the instrument panel for about 3 seconds, the screen lights up,
and the vehicle power starts.
10
Page 16
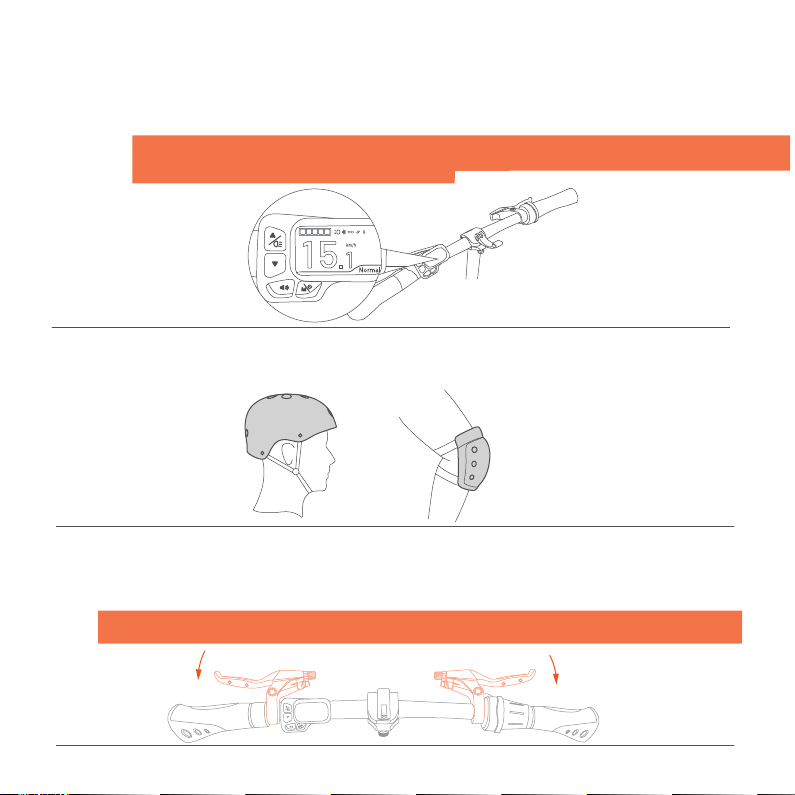
Step 3:Mode switching
Switch and choose the riding mode according to the cycling road conditions and personal needs.
① Electric mode:Equipped with pure electric mode, gently press down the electric mode button to switch
to the pure electric mode, the stonger the press, the faster the speed
② Power assisted mode:Equipped with 3 power assisted gears, click the power assisted gear button to
switch the gear. The 1st gear is suitable for relatively flat road conditions, the more/higher the road slope,
the larger gear can be adjusted accordingly.
Attention: When the bike is on PAS 3 status, click the power assisted gear button again and the bike will be on
PAS 0 status, by then the gear display wont't be lighted and the The motor will be tuen off.But other components
can work as well. The bike will be on pedalling mode.
Step 4:Start riding
Please take corresponding protection before starting riding.
Step 5:Braking introduction
The left side is front brake, the right side is rear brake.(The UK version: Left side for rear brake,
right side for front brake.)
While riding, it’s recommended to use the rear brakefirst, then the front brake to slow down the speed to stop,
in order to avoid falling accident caused by balance problems from urgent front wheel brake.
11
Page 17
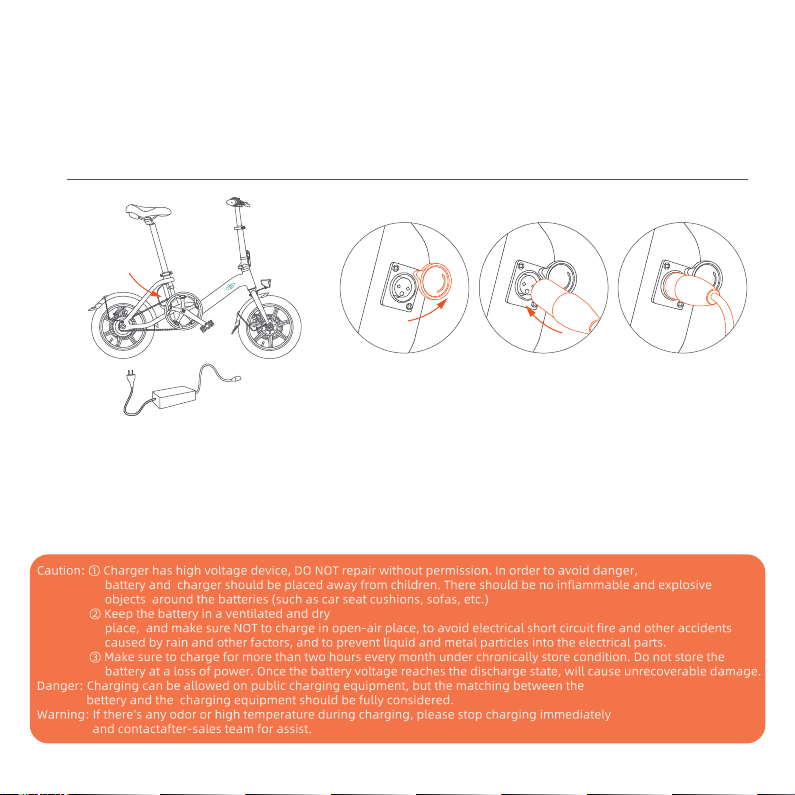
2.3 Charging instructions
The battery comes with a small amount of electricity, before the first time use, please make sure to charge it
to full power before riding.
Charging
1.Charging connection: Connect the charging interface of the charger to the charging port, then connect the power
plug of the charger to the power socket.
2.Fully charged:When the indicator light of the charger is red, means it’s normal charging. When the light is green,
means it’s fully charged.
3.Charging hour: Charging hour is around 5 hours, The duration depends on the situation.
4.Disconnect charging: When the indicator light turns green, means it’s fully charged. Unplug the power plug first,
then remove the charging interface from the battery. Close the battery dust cover.
12
Page 18
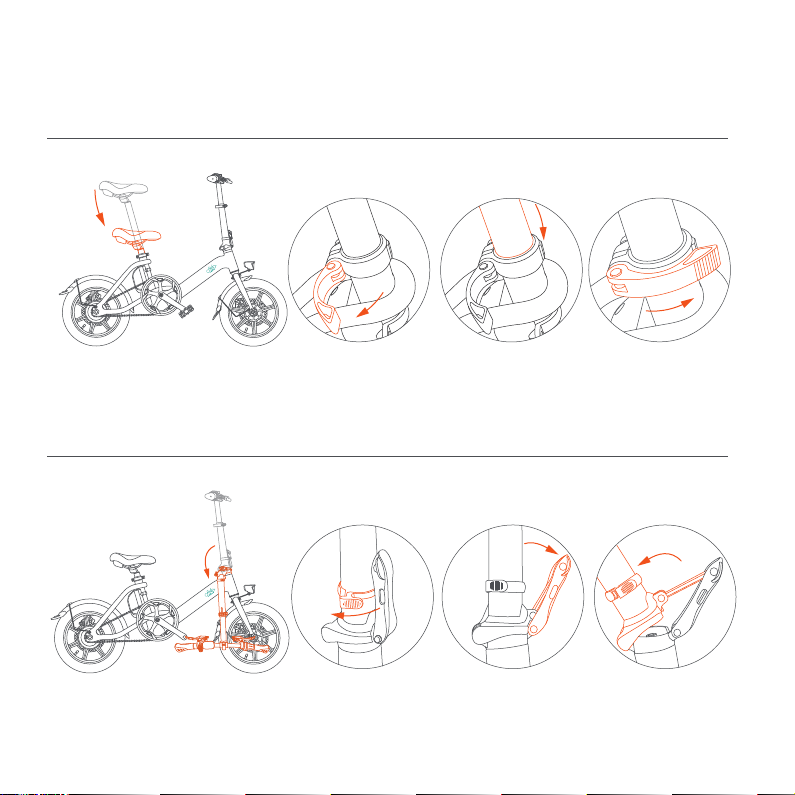
2.4 Folding instructions
Lower the seatpost
Lift the seat clamp upward, to keep it in open status. Gently press down the seatpost to the bottom. Press down the
seat clamp to keep it in closed status.
Fold the stem
Open the stem safety hook, turn the stem clamp downward to keep it in open status. Gently turn the stem downward to
the bottom, to finish the stem folding.
13
Page 19
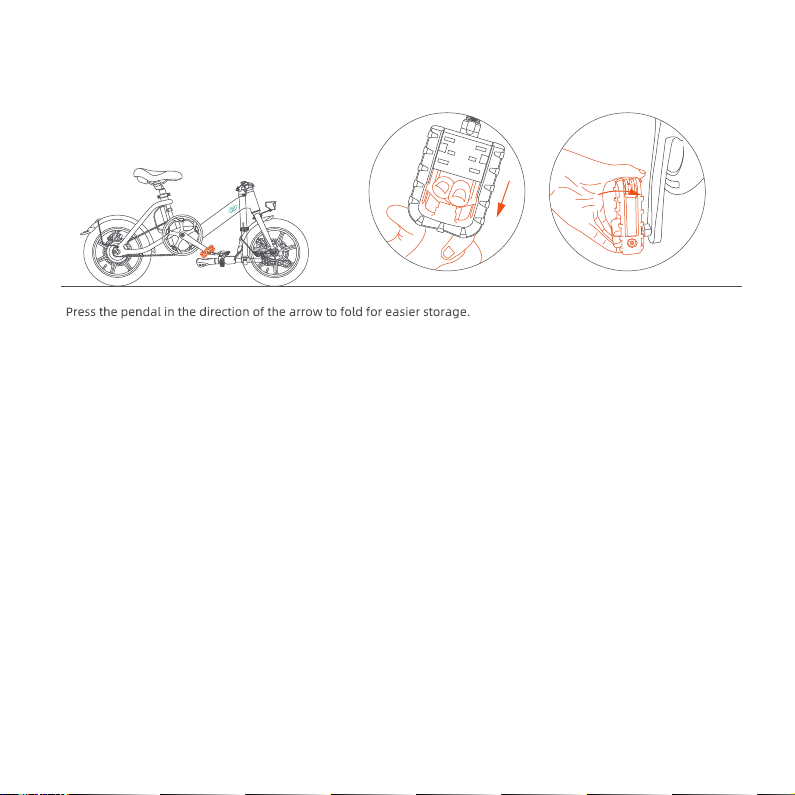
14
Page 20

3.Maintenance precautions
3.1 Using precautions
3.2 Bike maintenance & repair
3.3 Motor maintenance & repair
3.4 Battery maintenance & repair
3.5 Reflex reflector cautions
Page 21

3.1 Using precautions
(Ⅰ)Users should pay attention to the safety of bicycle use
1. No parking in building foyers, evacuation stairs, walkways and safety exits.
2. No charging in residential buildings. Charging should be far away from combustible, and no longer than 9 hours.
3. Prevent water from entering electrical parts. When cleaning the bike, avoid water impact on charging port, wiring
harness connectors, fuse and other electrical parts.
4. When adjusting the height of the saddle, the safety line mark of the seatpost should not be exposed.
5. Users and dealers must not wiring and modifying structure and performance without permission. Such as: change the
battery configuration, the circuit, increase the lamp power, increase the sound and other modification.
6. Please do not change the instrument background parameters settings at will, otherwise normal riding
cannot be guaranteed.
7. Please do not unplug any live wire interface in the powered-on state to avoid damage to accessories
(such as instrument panel, controller, etc.)
8. Do not touch the live part of the bike with wet hands or metal conductors. Such as: charging port, charger plug etc.
9. When replacing circuit breakers or fuses, use circuit breakers or fuses of the specified models and specifications. Do not
short-fuse wires. The circuit breaker or fuse card slot should be in good contact, or may cause the accidents.
10. Please do not disassemble electrical parts without authorization to prevent liquid and metal particles from infiltrating
into electrical parts.
11. Do not ride on bad weathers, or place the bike in a long-term exposure to the sun/rain to avoid parts aging.
12. If scrub the bike is needed, please wipe the body with a neutral lotion mixed with tap water. Do not remove and wash
internal parts to avoid short circuit.
Caution: Non-professionals are strictly prohibited to repair. In case of failure, please contact the after-sales team or
authorized professional maintenance station for maintenance.
16
Page 22

(Ⅱ)Riding safety: please follow the national and local traffic laws and
regulations, pay attention to riding safety.
1. User must be over 16 years old. Do not lend to people who can not operate the bike to avoid the harm.
2. Please ride in Non-Motor Vehicle Lane, with the max speed no more than 25km/h.
3. Please carry persons or goods in accordance with local laws and regulations while riding.
4. Please be sure to wear a suitable safety helmet and fasten the helmet wind strap while riding.
5. The braking distance will be extended in rainy and snowy days, please pay attention to slow down, and try to avoid to
ride on bad weathers. Inner short circuit and electrical parts damage may be caused if the water level reaches the center
of the hub of the rear wheel motor, please noticed.
6. Please follow the local traffic rules carefully. No riding after drinking, and make sure to always ride with both hands.
7. Bright colors, relaxed, and comfortable suit are suggested for riding, and wear low-heeled shoes for riding is necessary.
(Ⅲ)Examination before riding: please repair in time or go to the local
maintenance point for repair, if there’s any abnormality.
1. Please confirm the normal power use when using the kickstand and the rear wheel is off the ground.
2. Turn on the power, check whether the indicator light is normal, and the power supply is sufficient.
3. Check whether the mechanical bell and front/rear light are in good condition.
4. Confirm whether the handlebar and seatpost are adjusted to the appropriate position, that fastening screws and
quick release are fastened. Be attention that the safety line should not be exposed.
5. Check the front/rear brake handle, brake adjustment should make the brake reliable and flexible reset.
6. Check whether the tire pressure is normal, no cracking, abnormal wear, nails, stones, glass and other sharp objects.
7. Check whether the front/rear wheel screws are locked, the side, rear and pedal reflectors are in good condition.
8. Check whether the front /rear lighting is normal and ensure that lights can be good used while riding.
9. Check the fastening state of each axle to ensure the front/rear axles are in a reliable state.
10. Check whether the frame clamp is locked before riding.
Caution: abnormal tire pressure, tire cracking damage and abnormal wear are the main causes of steering failure and
tire burst.
17
Page 23

(Ⅳ)Attentions on the road
1. For your safety and the safety of others, please obey the local traffic rules consciously.
2. Before riding, be sure to wear a safety helmet, take safety precautions and maintain a natural posture.
3. At the beginning of riding, please slowly accelerated, to avoid the energy waste or accidents.
4. For a longer service life of the battery and motor, when start riding or climbing, please try to use power assisted mode.
5. To ensure safety, economic speed should be used as far as possible, and reduce frequent braking, frequent start as far
as possible, to save electricity.
6. avoid the phenomenon of tightening the speed control handle after braking.
7. Riding on muddy areas or uneven roads should use pedal mode as far as possible.
8. Braking distance should be appropriately increased on bad weathers, please be concentrated and careful while riding.
9. Equipped with overcurrent protection. The circuit may be overcurrent under the condition of higher uphill Angle and
higher headwind speed. It’s better to use pendal mode, otherwise, power consumption may be too fast to affect the
range, motor and electrical appliances burn. The body and electrical parts should not be electriferous, the insulation
resistance value shall not be less than 2M ω.
10. Controller has undervoltage protection, the power will be cut off automatically if the voltage is lower than the
undervoltage value, to maintain the service life of the battery.
(Ⅴ)Attentions of pushing and parking
1. The power should be off when pushing the bike, to avoid the accidents.
2. Parking should be on the level ground, and maintain the bike as power off status.
3. For your safety, please maintain and clean your bike regularly to keep it in the best condition.
18
Page 24

3.2 Bike maintenance & repair
1. The bicycle has been checked and adjusted before out of factory, any problems please contact Fiido After Sales
Team for support.
2. Normally the spokes of the wheel should be adjusted once after half a month of riding to ensure the best use.
3. Make sure to check the storage capacity of the tire regularly to keep it in normal use.
4. Make sure to check the main parts like handlebar, stem. saddle, seatpost, front/rear and centre axle, flywheel and chain,
wheels, to keep it in normal use, nut and screw loose should be tightened in time if it loose.
5. In use, it’s recommended to add 3# calcium base lubricating oil (butter) every six months to the parts that need lubrication.
(such as front/middle/rear axle bearing, front fork bowl group, foot pedal bearing, etc.) Add 30# oil to the chain, brake
cable, support and other parts every two months.
6. If the vulnerable parts are damaged, such as: brake line, brake skin, brake pad, bulb, fuse, etc. Please find the local
maintenance center to replace, but be sure to replace with the same model specifications of the parts.
Cautions: Handlebar core screw fastening torque, combined handlebar joint screw fastening torque, saddle clamp screw
fastening torque, front wheel fastening torque recommended torque is not less than 18NM;The recommended
torque for fastening the central shaft lock mother and rear wheel is not less than 30NM. Handlebar and saddle
tube safety line should not be exposed outside the body.
3.3 Motor maintenance & repair
1. Equipped with rare earth permanent magnet DC brushless, external rotor hub motor, without any deceleration
mechanism and carbon brush, which is basically maintenance-free.
2. Do not open the motor base and end cover after sealing.
3. Keep the motor clean, no foreign matter, corrosive liquid, gas into the motor, do not knock and bake the motor shell,
so as not to damage the motor.
Caution: If the issue still exists, please contact Fiido customer care team.
19
Page 25

3.4 Battery maintenance & repair
1. Lithium battery has the characteristics of large capacity, long life, maintenance-free, light weight, pollution-free etc.
Its service life is closely related to using mode. Do not store chronically, please form the habit of frequent charging.
2. It is recommended to charge for 5 - 7 hours each time, and the longest time is not more than 1 day. Lithium battery
has no memory effect, can be used with the charge.
3. Make sure to charge for more than two hours every month under chronically store condition. Do not store the battery
at a loss of power. Once the battery voltage reaches the discharge state, will cause unrecoverable damage.
Danger: Do not dismantle old battery without authorization, it should be collected according to regulations.
Warning: Do not near the fire or high temperature source, or throw it into the fire, or expose it to the sun.
3.5 Reflex reflector cautions
1. Reflex reflector device must not be missing, if it’s missing, please immediately contact after-sales team for replacement,
and the installation position should be consistent with the original bike.
2. Fiido reflex reflector has been fixed on the vehicle, please do not change the position, modify, disassemble, etc.
3. Make sure to check the normal function of reflex reflector before each use, and keep the surface clean.
4. The reflector device must not be covered by luggage, children's chairs, clothing and other objects, otherwise it may
cause safety hazard.
20
Page 26

4.Service directory
4.1Troubleshooting methods
4.2 Specifications
4.3 Warranty coverage
4.4 Repair record
Page 27
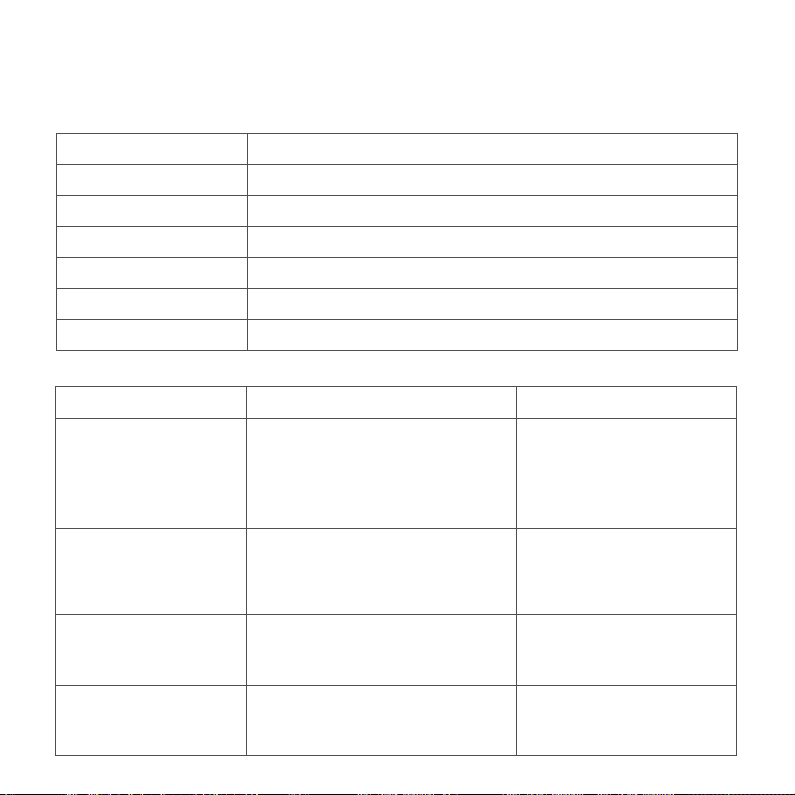
4.1 Troubleshooting methods
Fault code description
Fault code
E1
E2
E3
E4
E5
E6
General fault
Fault phenomenon
Through-supply motor
failure
Lack of range
Difficulty in charging
Speed failure or low speed
than 10KM/h
Fault phenomenon
Communication issues
Throttle issues
Brake lever issues
Motor hall issues
Motor issues
Controller issues
Fault cause Rule out way
Poor contact of regulating handlebar
Poor contact of brake cut-off switch
Motor damage
Controller damage
Loosened connector
Tire pressure deficiency
Undercharged or faulted charger
Aging battery or damaged battery
More uphill, gale, frequent braking,
overload, etc
Loosened plug
Disconnected battery cable
Damaged charger
Poor contact of regulating handlebar
Loosened connector
Battery overvoltage
Change regularing handlebar
Change brake cut-off switch
Change motor
Change controller or get repair
Check the connector
Blow up the tire
Fully charged, check charger
Change battery
Using pendal mode
Tighten socket and connector
Welded connector
Change charger
Change regulating handlebar
Check the connector
Fully charged
22
Page 28

4.2 Specifications
Property index Item D3PRO
Product size
Product weight
Riding requirement
Main spec
Battery
Before folding: Length*Width*Height (mm)
After folding: Length*Width*Height (mm)
Tires (Inch)
Net weight (kg)
Maximum load (kg)
Applicable age
Applicable height
Serial numbe Location
Maximum speed
Center distance between wheels (mm)
Power assisted system
Transmission ratio
Applicable road
Operating temperature
Waterproof rate
Rated voltage (V)
Battery type
Rated capacity (Wh)
Battery management system
Urban asphalt pavement/flat pavement
overcurrent and overcharge protection
1240*575*980
1240*300*610
14*2.125
17.3
120
16+
150cm(4'11") - 185cm(6'1")
Under the frame
15MPH (25km/h)
870
3 gears
52T:12T
-10° ~50°
IP54
36
Lithium battery
280.8
Overheat/short circuit/
23
Page 29

Torque(N·m)
Rated speed(r/min)
Motor
Charger
Others
Caution:
* The above data allow for 5% manufacturing tolerances.
* After receiving the bike, there may be some differences between individual accessories and display drawings, which
are different due to the different batches, and do not affect the use.
Moter type
Undervoltage protection (V)
Overcurrent protection (A)
Input voltage (V)
Output voltage (V)
Output current (A)
Charging hours (h)
Front light
Tail light
Riding mode
Brushless geared motor
Electric mode+Power assisted mode+Pedal mode
35
370
29±1
13±1
100-240
42
2
5
LED
LED
4.3 Warranty coverage
(Ⅰ)Warranty principle
1. Users should operate correctly according to this user manual. In case of performance failure caused by production
quality, according to relevant laws and national provisions of the three guarantees, the company shall uniformly perform
the obligations of the three guarantees.
2. The faults beyond the warranty scope and the main parts after the warranty period shall be repaired by the company but
shall be charged at the discretion.
3. Regards the battery replacement after the warranty period, will be charged with the factory price, but the old battery
must be returned to the manufacturer, to ensure safety and avoid environmental pollution.
24
Page 30

(Ⅱ)Warranty scope and period
Basic
parts
Electrics
parts
Motor
parts
Battery
Parts
Frame
Fork, Handlebar, Stem, Seatpost
Kickstand, Tires, Saddles, Fenders,
Safety hook, Seat clamp,
Stem clamp, Frame clamp, Pedals,
Brakes, Brake discs, Brake levers
Crank chain disc, Front arm set, Hub,
Wheel hub, Spokes, Shift finger dial,
Derailleur, Flywheel, Chian,
Bottom bracket, Shock absorber
Controller
Charger, Main wiring harness
Display instrument,
Speed control knob,
Booster,Controller cover plate
Headlights, Taillights,
Power-off brake levers, Switches
Motor, Hall, Bearing, Clutch
Lithium battery
Guarantee time ServiceItem
36 months
24 months
3 months
6 months
24 months
24 months
6 months
3 months
24 months
24 months
Natural deformation, open welding, desoldering fracture
phenomenon, quality problems caused by poor
manufacturing can be replaced. Self-modification, collision
Man-made damage, self-modification, collision damage
poor manufacturing can be replaced. Water, disconnection,
damage, etc. are not warranted.
Tire puncture by sharp objects, collision damage
of spare parts, etc. are not warranted.
of parts and accessories are not warranted.
Short circuit, burnout, performance failure due to
and man-made damage are not warranted.
Phase loss, Hall element burnout, demagnetization,
abnormal bearing noise can be replaced.
Breakage, water ingress are not warranted.
Replace the battery due to faults such as broken grids,
no power storage, and less than 70% capacity.
No warranty for water ingress or man-made damage.
(Ⅲ)The scope and content exceed warranty
1. Failure caused by user’s failure to use, maintain and adjust according to the User Manual.
2. Failure caused by private modification.
3. Failure caused by improper use or storage by users or accidents.
4. No warranty card, or card and bike do not match.
5. Vulnerable parts and consumables, including plastic parts, spokes, rim, brake line, scratching surface etc.
6. The expenses for self-repair without the consent of the specially contracted maintenance unit.
7. After accessories leaving the factory, shell scratches or shell damage will not enjoy warranty.
8. Lead scratches or breaks.
25
Page 31
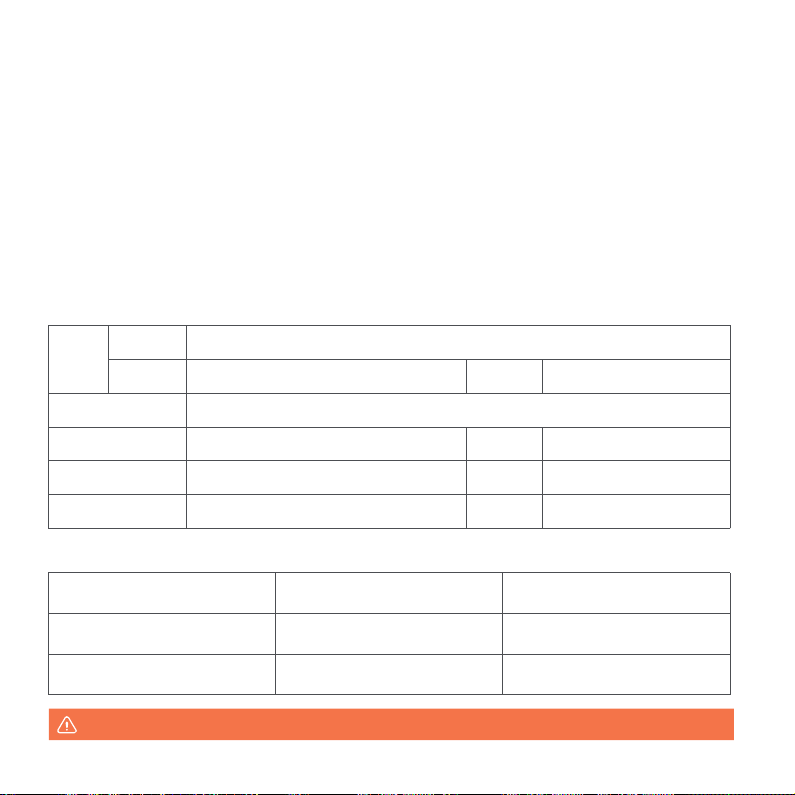
Warranty notification
1. Accessories will be guaranteed in strict accordance with the warranty period.
2. The warranty period shall be calculated from the date of delivery.
3. No warranty will be provided if the charger, battery and motor are disassembled without permission.
4. For other parts of the bike, the quality issues will be provided three months warranty , others will not be warranty.
5. When other parts of the bike has issues, maintenance must be carried out in a professional maintenance centre, not
private disassembly. Controllers, batteries, chargers must be ensured that all labeling integrity.
6. maintenance must comes with the warranty card, invoice, certificate of quality and other relevant documents.
7. The battery warranty method is 1:1. In case of battery problems, the battery should be returned to the manufacturer
to determine whether the battery is covered by warranty according to battery testing standards.
4.4 Repair record
Warranty card
Company
User
Name
Address
Purchase date
Model
Frame No
Repair record
Date RemarksMaintenance
Phone
Color
Order No
Motor No
DON'T THROW AWAY THE PACKAGING JUST YET! Please keep it in case you need to return the bike.
26
Page 32
If you have any questions or suggestions about this user manual,
please contact us via following mailaddress
Contact us:support@fiido.com
Fiido APP
EPAC according to EN 15194
6971957790198
4.003.D3P006
 Loading...