

Page 1

FCC ID : QIRFX-N310
ATTACHMENT E.
- USER’S MANUAL -
HYUNDAI CALIBRATION & CERTIFICATION TECHNOLOG IES CO., LTD.
SAN 136-1, AMI-RI, BUBAL-EUP, ICHEON-SI, KYOUNGKI-DO, 467-701, KOREA
TEL:+82 31 639 8517 FAX:+82 31 639 8525 www.hct.co.kr
Report No. : HCT-F06-1002
Page 2
Page 3
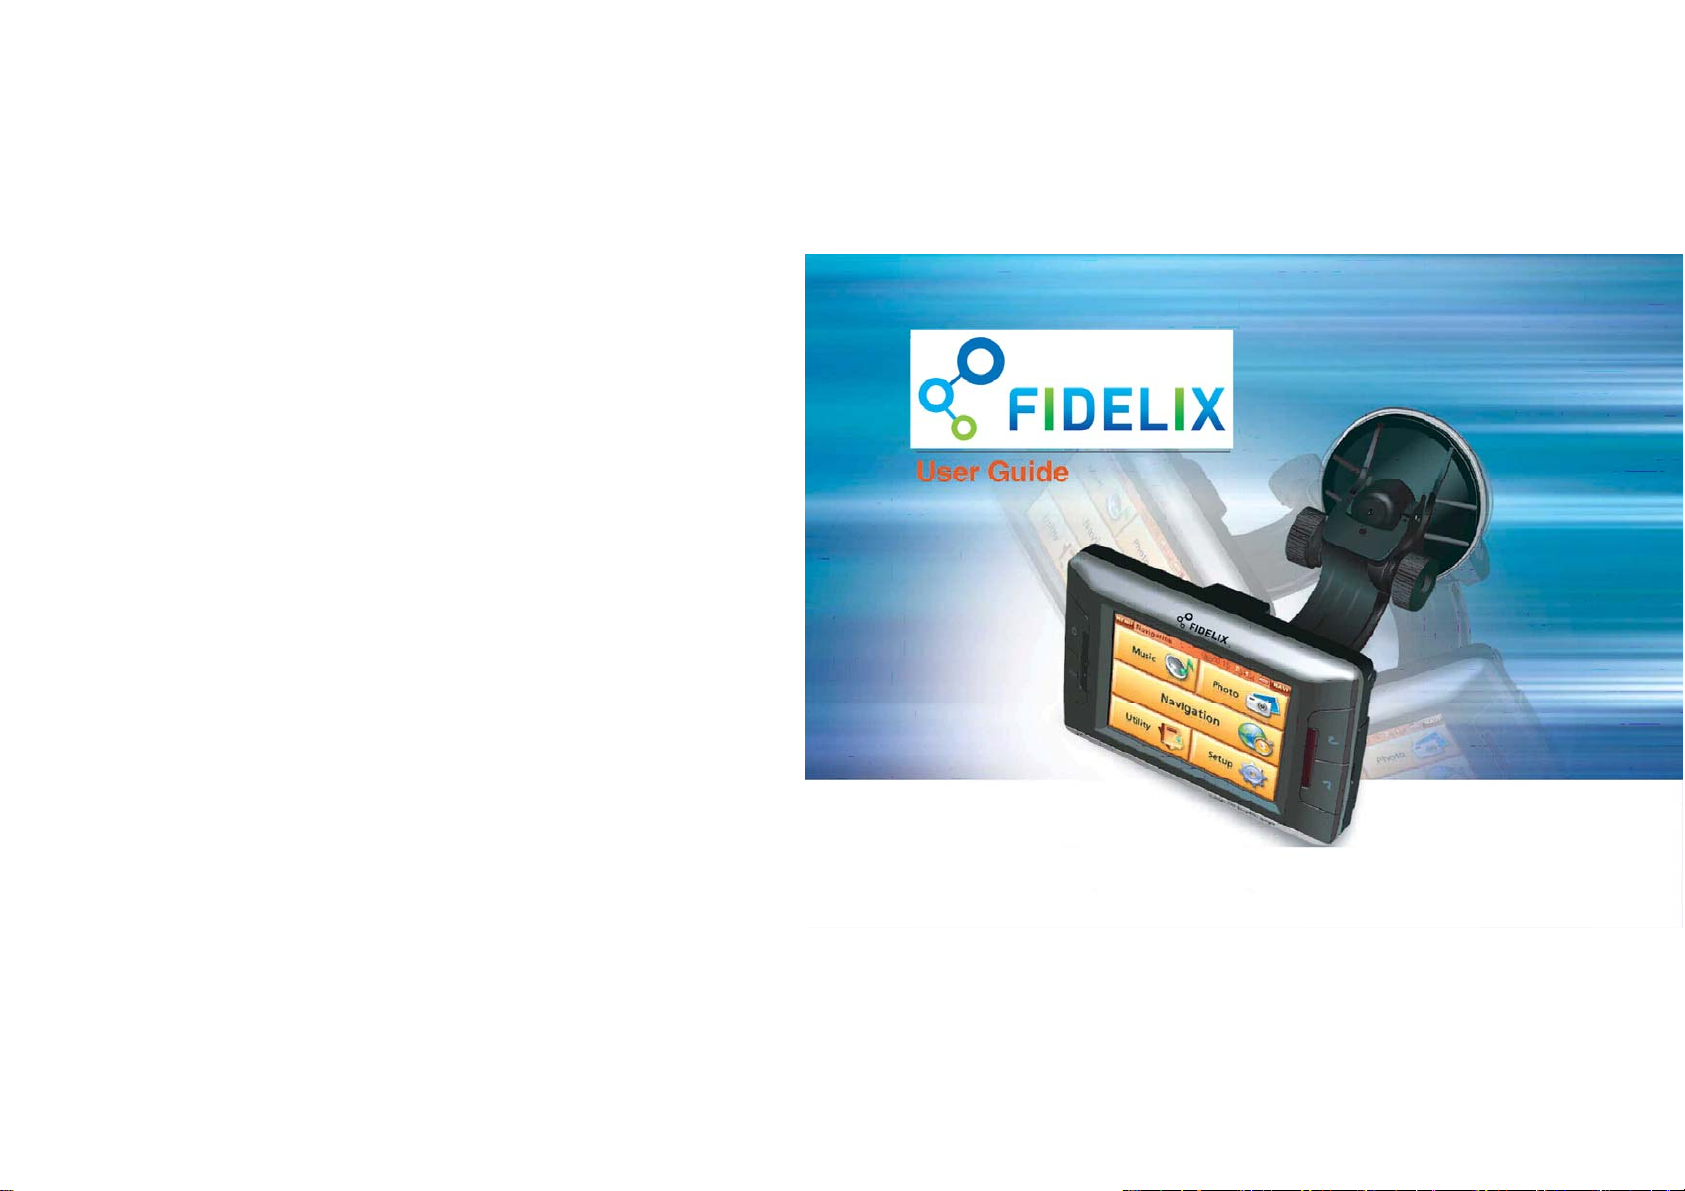
FIDELIX User Guide
Digital Audio Broadcasting HDAB-100
2
Page 4

FIDELIX User Guide
Safety precautions
For product safety and correct operation, the following information must be given to the
operator/user and shall be read before the installation and operation.
y Make sure that it is in stall ed tightl y to prevent th e stan d fr om coming off or mo ving during the
operation. It might cause an accident.
y The GPS receiver might not normally function in some cars that ar e UV coated, t inned and ant i-
electromagnetic wave. In this case, please contact our sales representative to buy external GPS
antenna which is sold as optional item.
y Do not use it where it is hot and humid. Install and keep the product wher e direct r a ys of the sun are
not reached to prevent it fr om bein g da maged due to ov erheating.
y Do not install the product in a location which obstructs driving. It might cause an accident. Do not
install it in a location that obstructs the operation of the air bag.
y Use the navigation only for the purpose of reference and do not place too much reliance on it.
y Note that the map on the navigation might be erroneous for good reasons on the part of the map
provider or failure in upgrading.
y If the cigar jack is tak en of f when t he pr oduct is i n use, it might cause an a ccident.
y GPS signals might not be received under expr ess wa ys, in tunnels, in block ed areas and i n pl aces
where many buildings are concentrated due to f eeble electric wav es.
y Bad weather conditions such as rain or fog might hinder the GPS from receiving signals.
3
Page 5

FIDELIX User Guide
y The GPS receiver operates optimally at 0℃ to 40℃. If the temperature i nside of the car is too low or
too high, the product might not function normally . Make sure that the o ptimal temperature is
maintained.
y If the driver manipulates the product or watch TV while driving, it might cause an accident. Make
sure to stop the car in a safe place to manipulate the product.
y Adjust volume so that the driver can hear sound fr om the outside of t he vehicle. It might cause an
accident.
y Do not touch the product with wet hands. It might cause an electric shock or damage.
y If the windshield mount is attached to the glass of the vehicle for a long time, it might come off due
to reduced adhesiveness.
y Make sure that water and beverages do not get into the inside of the pr oduct. It mi ght ca use a fire or
an electric shock.
y Do not disassemble or dro p the pro duct. It might caus e damage or a mech anical br eakdo wn.
y T ouch the L CD by using fingers or obtuse devices. If a sharp drill or a nail is used, it might cause
damage.
y Do not press the button f orci bly dur ing manipul atio n.
y Make sure to use the adaptor that comes in with the product.
y Do not apply too much fo rce or gi v e an i mpact. It might ca use d amage.
y Do not disassemble the product. It might cause a mechanical breakdown.
y If the product does not function normally, stop using it and contact the sales representative.
4
Page 6

FIDELIX User Guide
Contents
Safety precautions 3
Contents 5
SURE-PATH Features 9
Package 10
Mechanical Features 11
Front 11
Right/Back/Bottom 13
Install 15
Navigation 18
Overview 18
Map view options.................................................................................19
Guidance Screen options........................................................................20
Guidance Mode ...................................................................................21
Cruise Mode.......................................................................................23
5
Page 7

FIDELIX User Guide
Explore Mode .....................................................................................24
POI Details.........................................................................................25
Navigate to an Address 26
Navigate to a Street Intersection 28
Navigate to a Point of Interest (POI) 30
Find a Location on the Map 32
Plan a Simple Route 33
Save a Location as a Favorite 35
Find a Favorite Location 36
Configure Map Options 37
Configure Route Options 38
Configure Guidance Options 39
Select a Language 40
Select a Voice 41
Select POIs to Display on Map 42
Set Your Home Location 43
Set the Time Zone 44
Select Measurement Units 45
Set Application Volume 46
Configure Display Setup 47
View Installed Map Regions 48
6
Page 8
FIDELIX User Guide
Set Max Speed Alert 49
Set Auto Speed Alert 50
POKETMAP INSTALL 51
Install PocketMap Naviagator Data Loader Program. 51
Install PocketMap Naviagator Map Data 53
UnInstall PocketMap Naviagator Map Data 54
Using SURE-PATH 57
MAIN SCREEN 57
Main screen .......................................................................................58
MUSIC PLAYER 59
File open...........................................................................................61
PHOTO VIEWER 62
Menu ...............................................................................................63
Full Screen ........................................................................................64
UTILITY 65
Text Viewer .......................................................................................66
Quick Memo.......................................................................................67
7
Page 9
FIDELIX User Guide
Calculator .........................................................................................69
Calendar...........................................................................................69
Setup 70
Setup...............................................................................................71
Power Management..............................................................................73
Touch Pad..........................................................................................75
DATA Download 76
Download Sequence 76
Mode Cahnge......................................................................................76
Connect USB Cable...............................................................................78
Copy and Delete Files ...........................................................................79
Safety Remove 80
Safety Remove From PC.........................................................................80
Disconnect USB Cable ...........................................................................80
Return to Normal Mode..........................................................................81
Appendix 82
Specification 82
8
Page 10
SURE-PATH Features
1. 3.5 inch Color LCD with
Touch Screen
It is possible to view the operation status of
the product conveniently through the use of
a 3.5” 65,000-color 320 x 240-pixel TFT-LCD.
Since it is compact, it can be installed in a
small vehicle without obstructing driving.
2. Various Music Format
The music player supports a variety of
formats including MP3, MP2, WMA, WAVE,
and OGG.
Users can save their favorite songs in SD
memory to enjoy them later on.
3. Li-Polymer Battery Built-in
Since LI-Ion Rechargeable Battery is built in
the product, external battery is not needed
for some duration.
FIDELIX User Guide
Users do not have to exchange batteries, and
recharged battery can be used.
4. Image Viewer
Users can view image files (JPG).
Users can view the image in a slide show or
in an enlarged format
5. Text Viewer
Users can view text files (TXT).
Users can view the text in an auto scroll or
in an enlarged format
6. Stereo Dual Speaker Built-in
Since Stereo Dual Speaker is built in, users
can enjoy rich sound.
9
Page 11
FIDELIX User Guide
Package
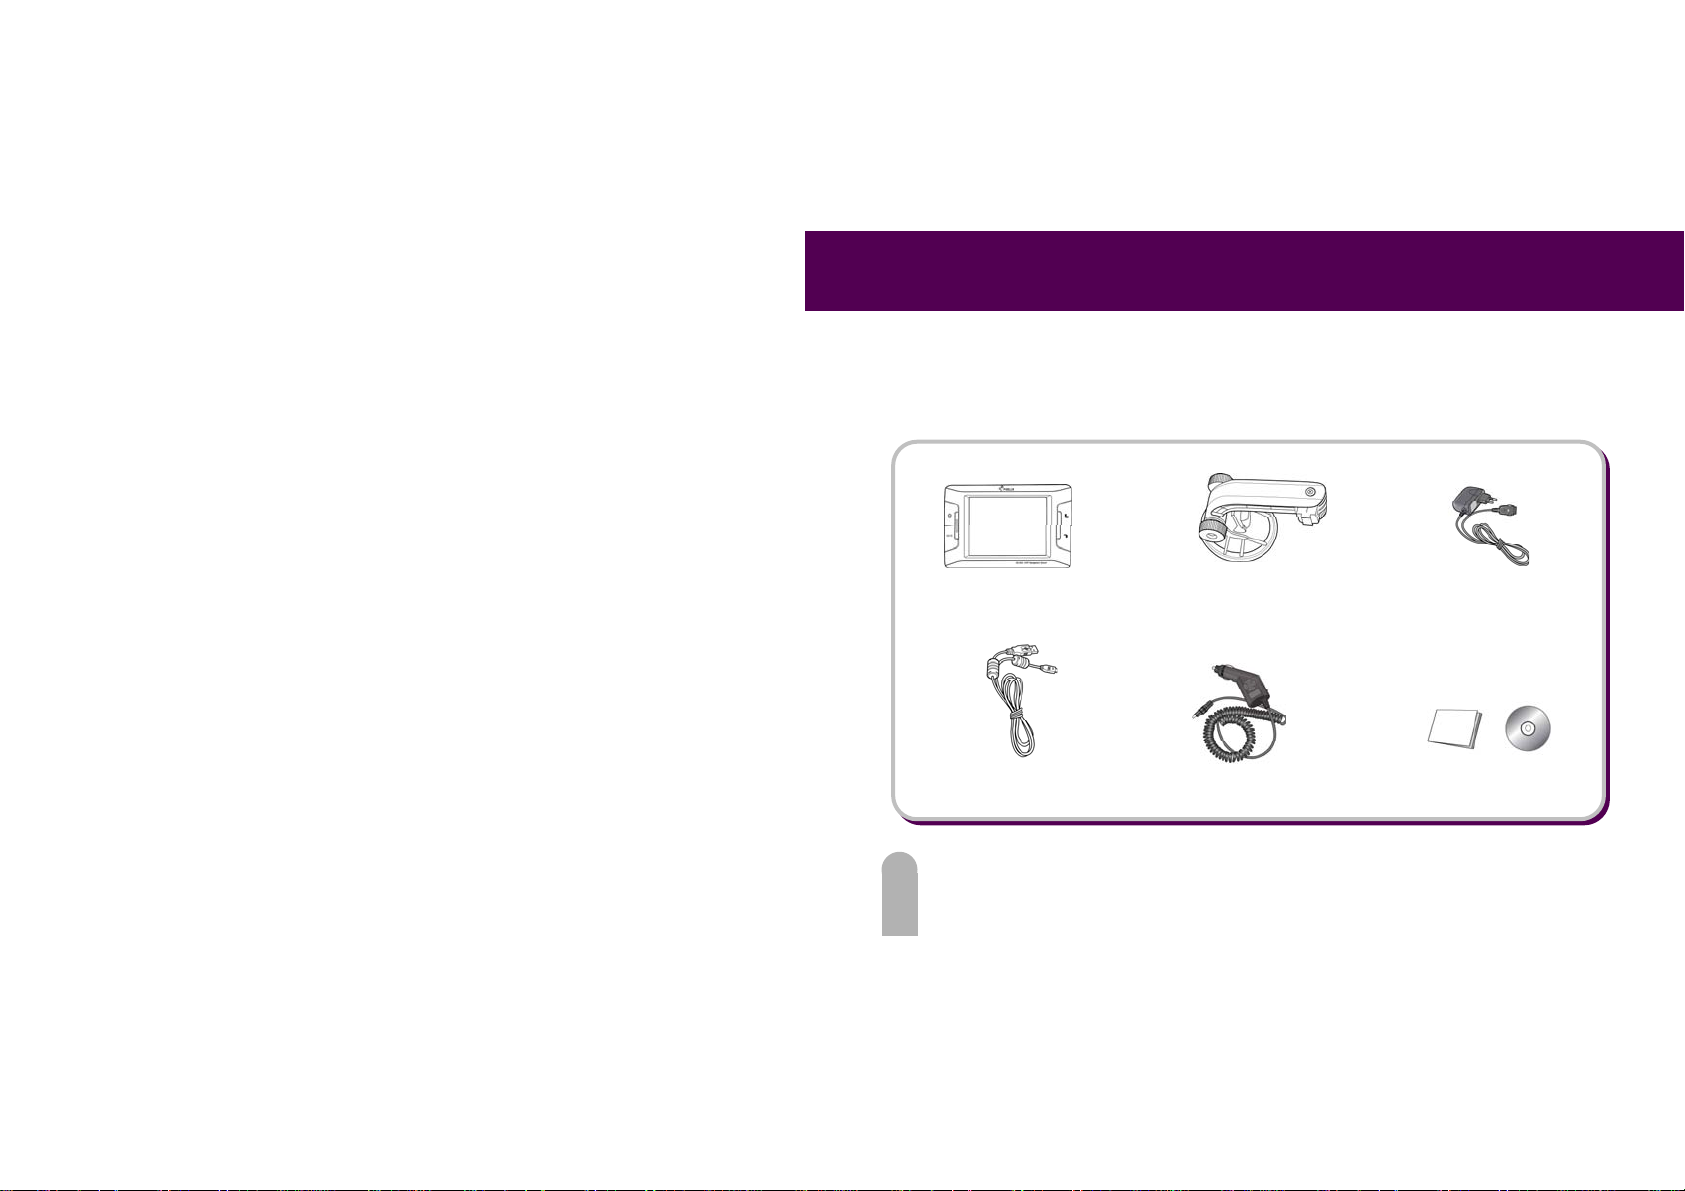
After purchase of the product, check if there are all of the followings. If there are any missing
components, contact your sales agency.
FIDELIX unit
Windshield mount
Car charger User Guide & CD
10
Page 12
Mechanical Features
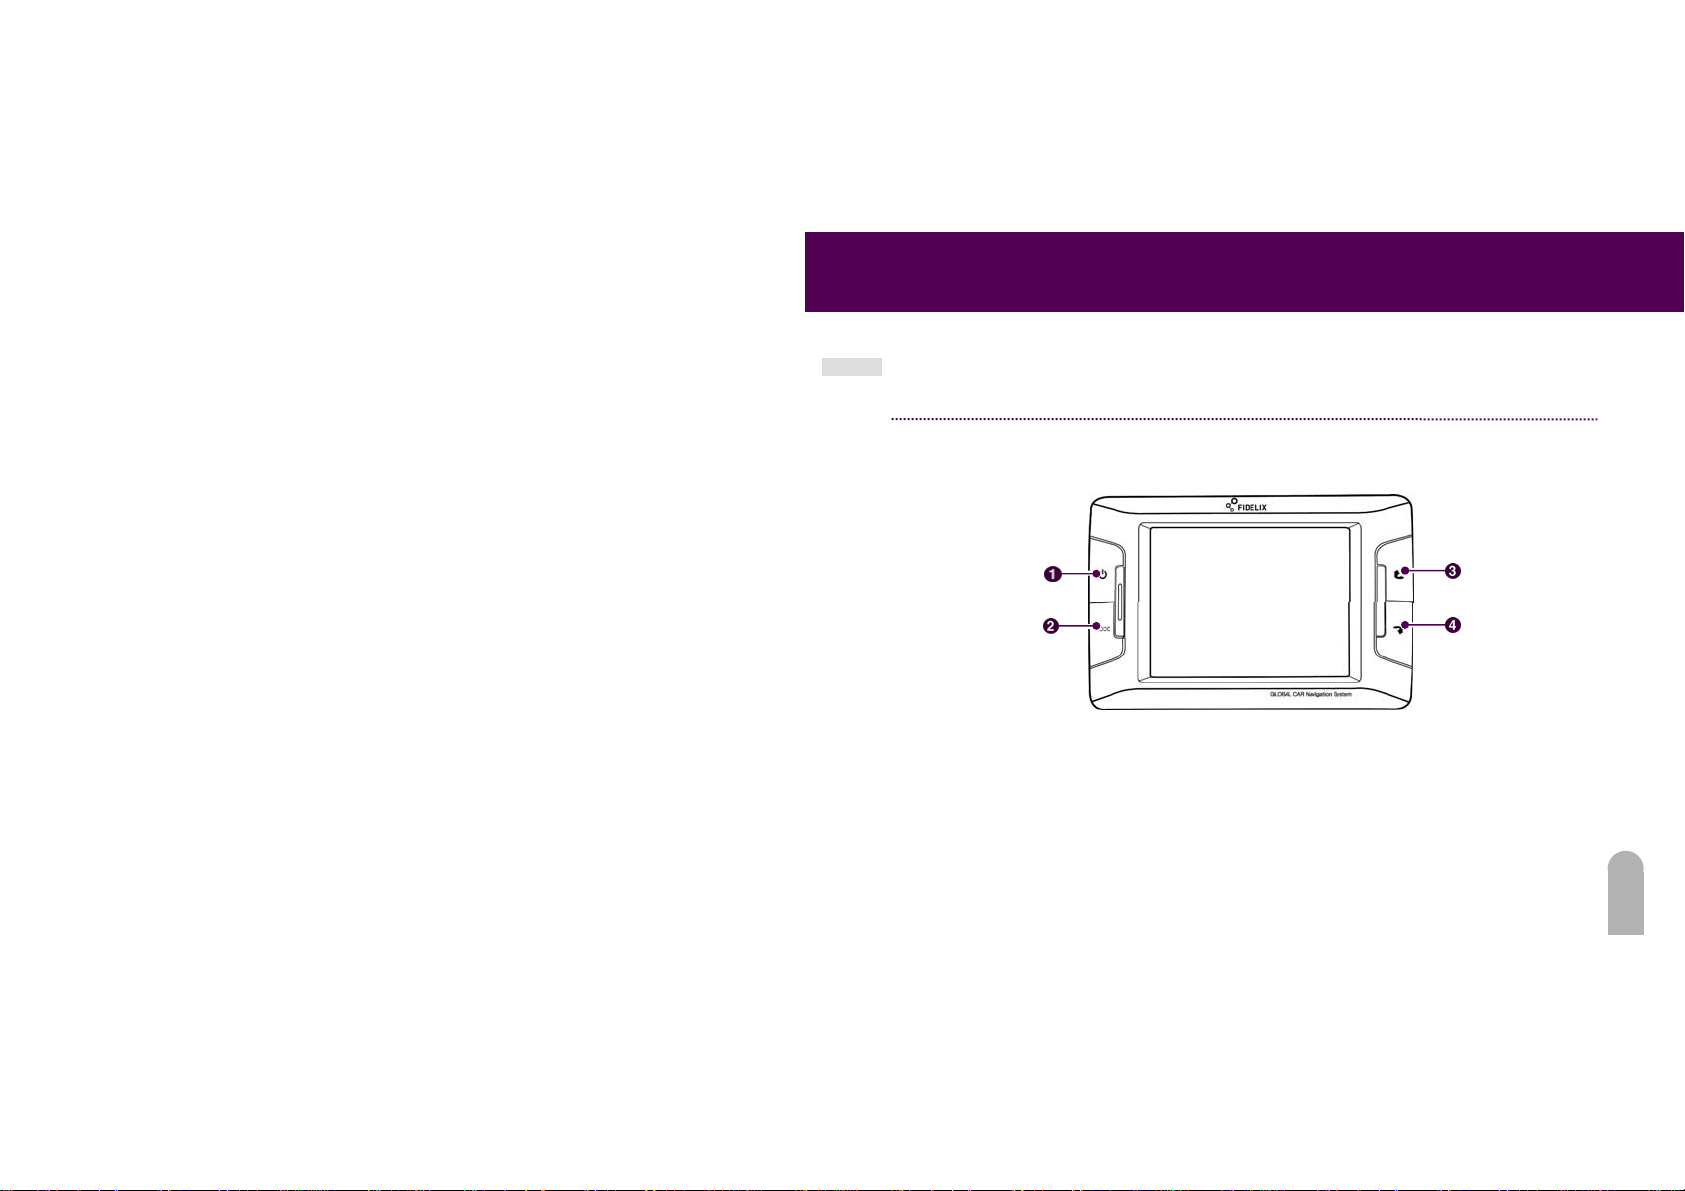
Front
Power
Mode
FIDELIX User Guide
Up
Down
11
Page 13
FIDELIX User Guide
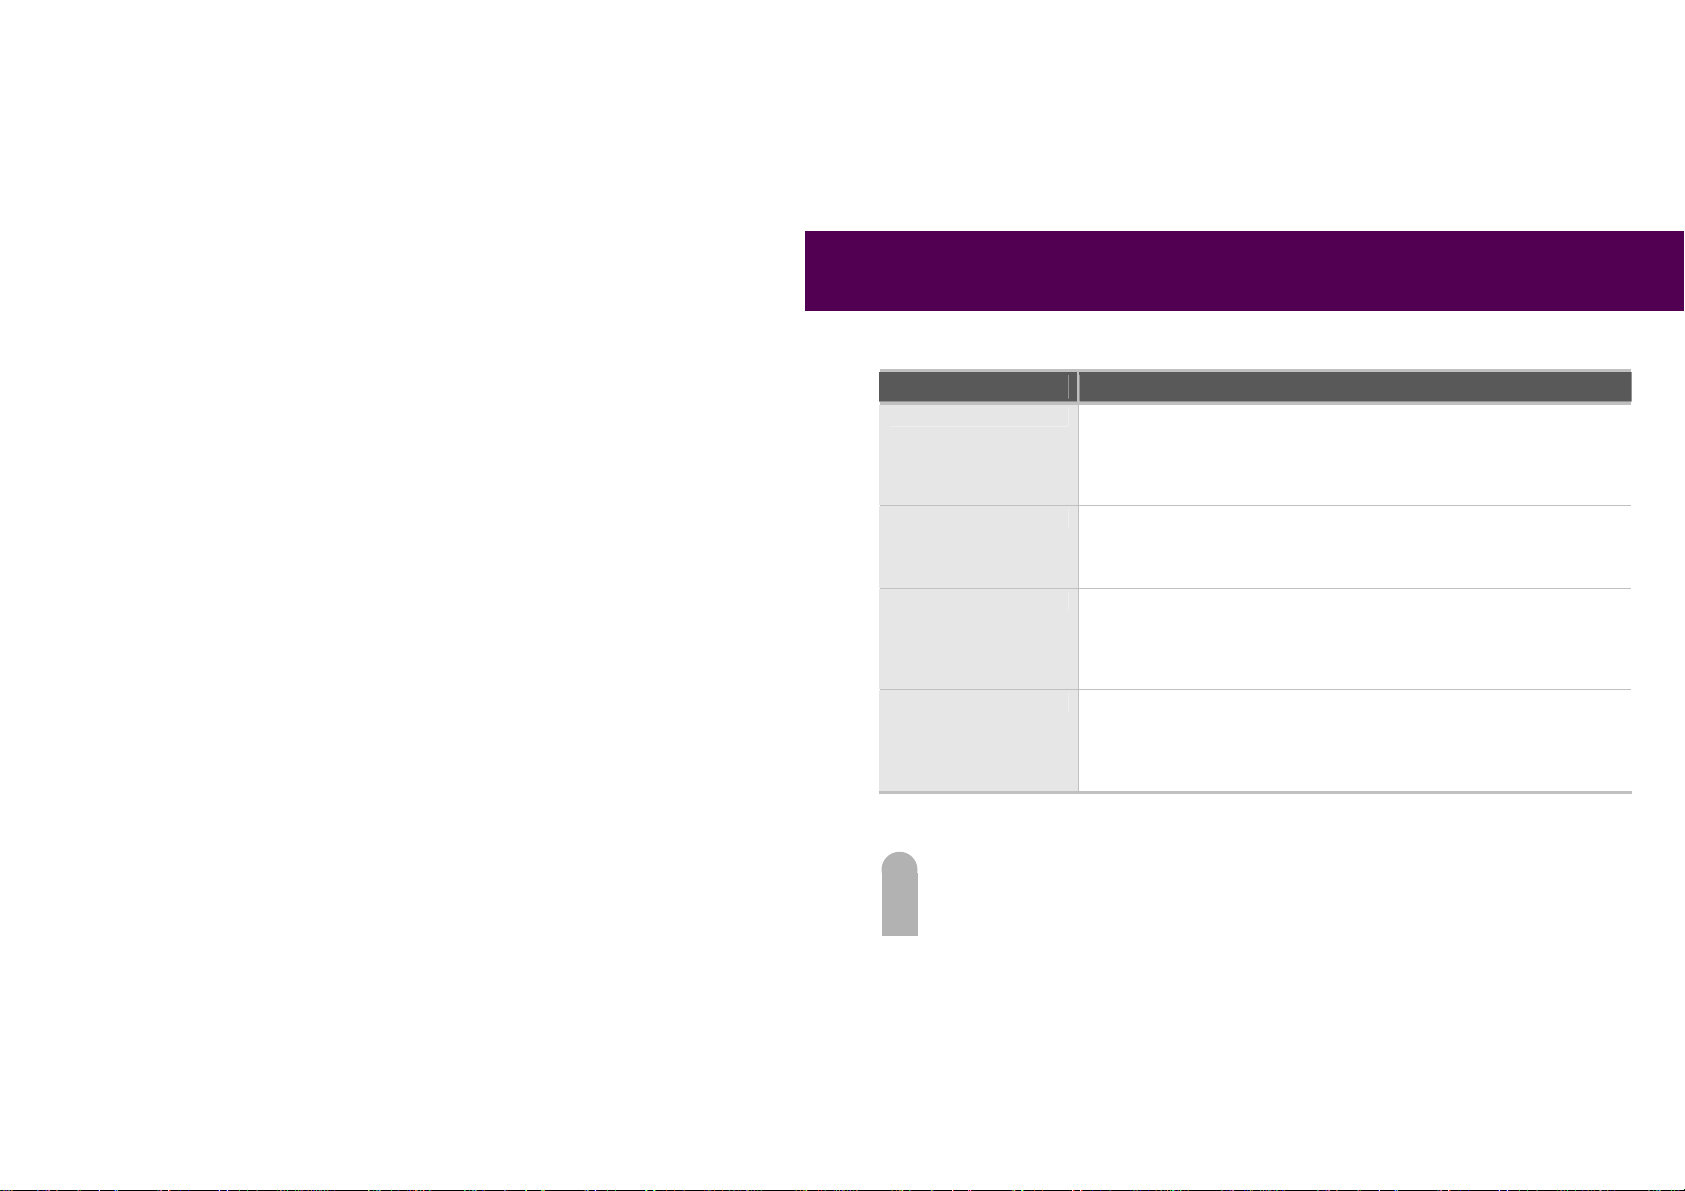
Part Description
1. Power Button - Power-On (Short Press) It is used when the terminal is connected to AC or DC.
2. Mode Button - Menu (Short Press) It displa ys ma in scr een in any modes.
3. Up Button - Volume-Up(Short Press)
4. Down Button - Volume-Down (Short Press)
- Power-On (Long Press) It is used when the ter minal is not connect ed to AC or DC.
- Power-Off (Long Press)
- Sleep/Wake-up m ode (Shor t Press) If the terminal is conne cted to AC or DC it
changes into Sleep/Wake-up mode.
- Screen adjust mode (Long Press) It display s the mode wh ere bright ness can be
adjusted through the use of the UP/DOWN button. If there is no action for 3
seconds, it is automatically tuned into sound ajdust mode.
- Maximum Volume (Long Press): It maximizes volume at once.
- Brightness-Up (Short Press): It gradually lightens brightness in brightness mode by
Mode button.
- Maximum Brightness (Long Press): It maximizes brightness at once.
- Mute (Long Press ): It mutes soun d.
- Brightness-Down (Short Press): It darke ns brightne ss one step at a t ime in
brightness mode by Mode button.
- Minimal brightness (Long Pr ess) : It mi nimiz es brig htness at on ce.
12
Page 14
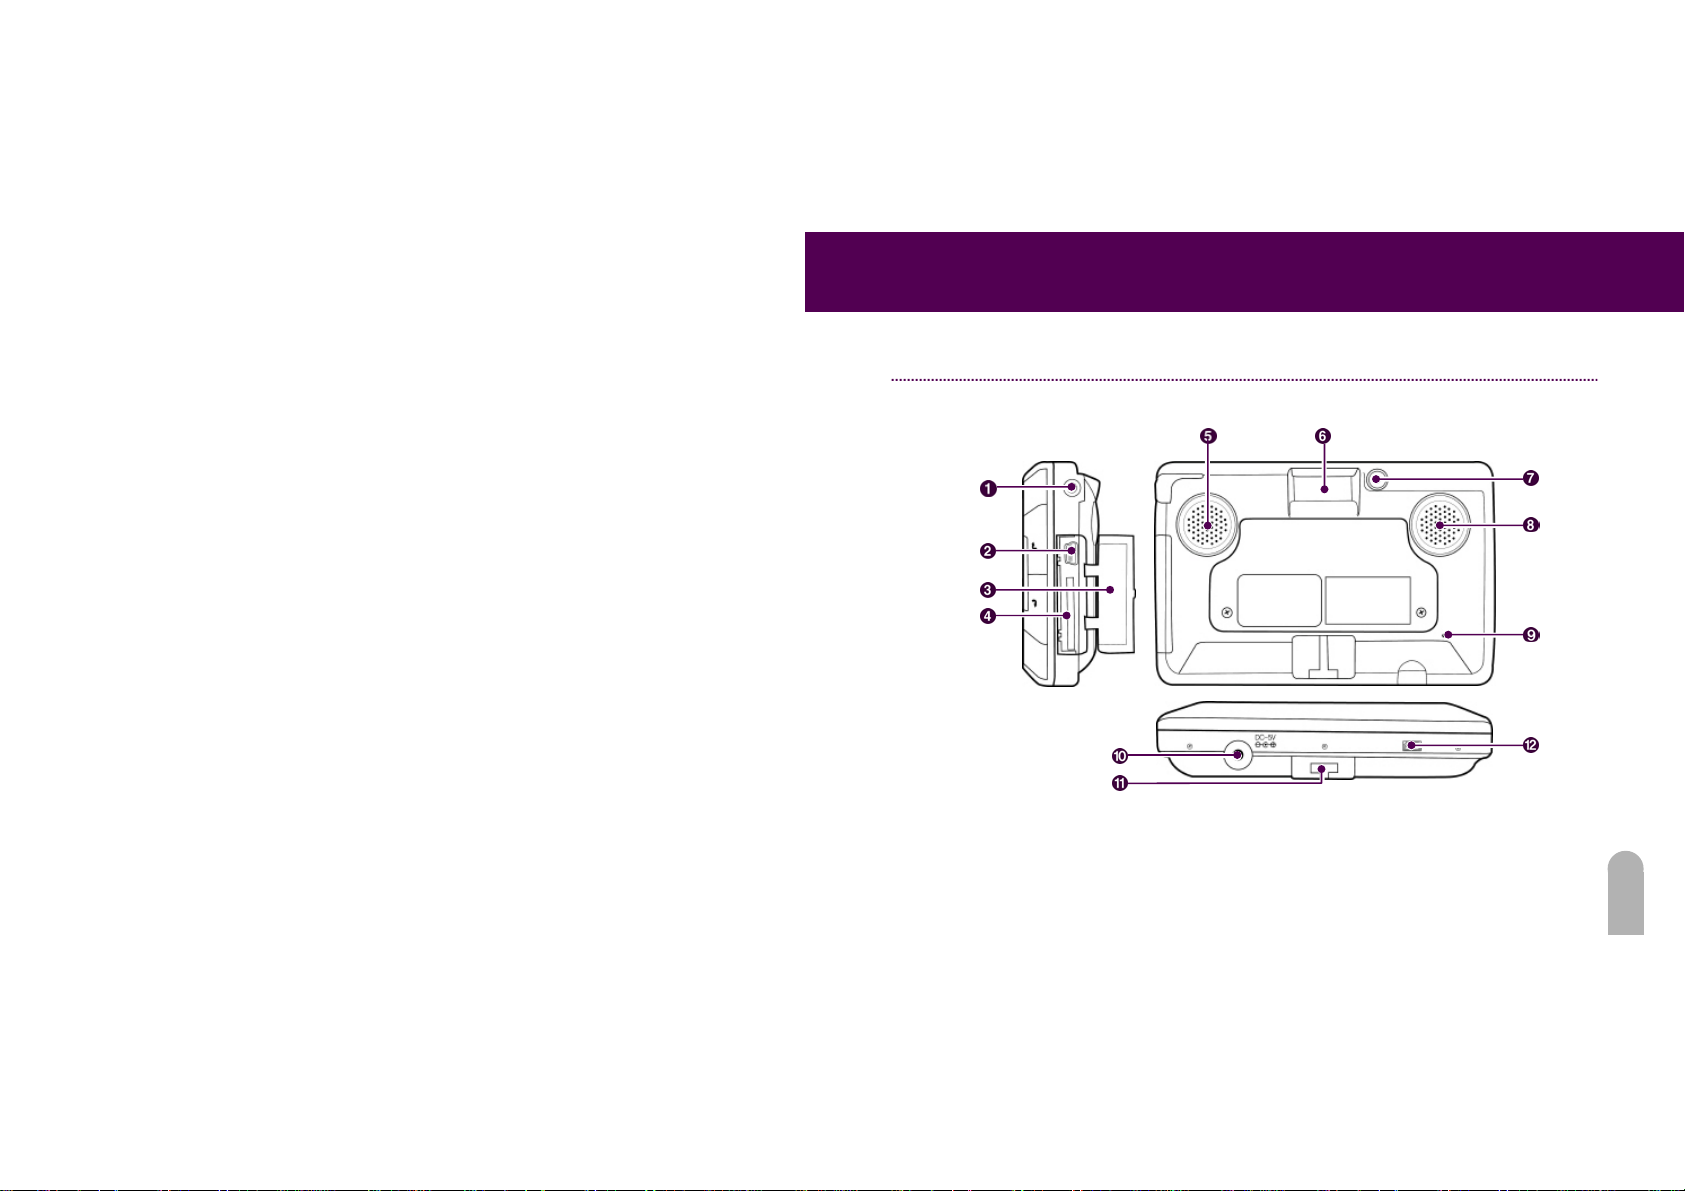
t
Right/Back/Bottom Views
Stereo headphone
USB connection
Compartment door
Memory card slo
Car Charger connection
Windshield mount connection
FIDELIX User Guide
L-Speaker GPS receiver
External
GPS connection
R-Speaker
Reset
Diagnostic
Port
13
Page 15
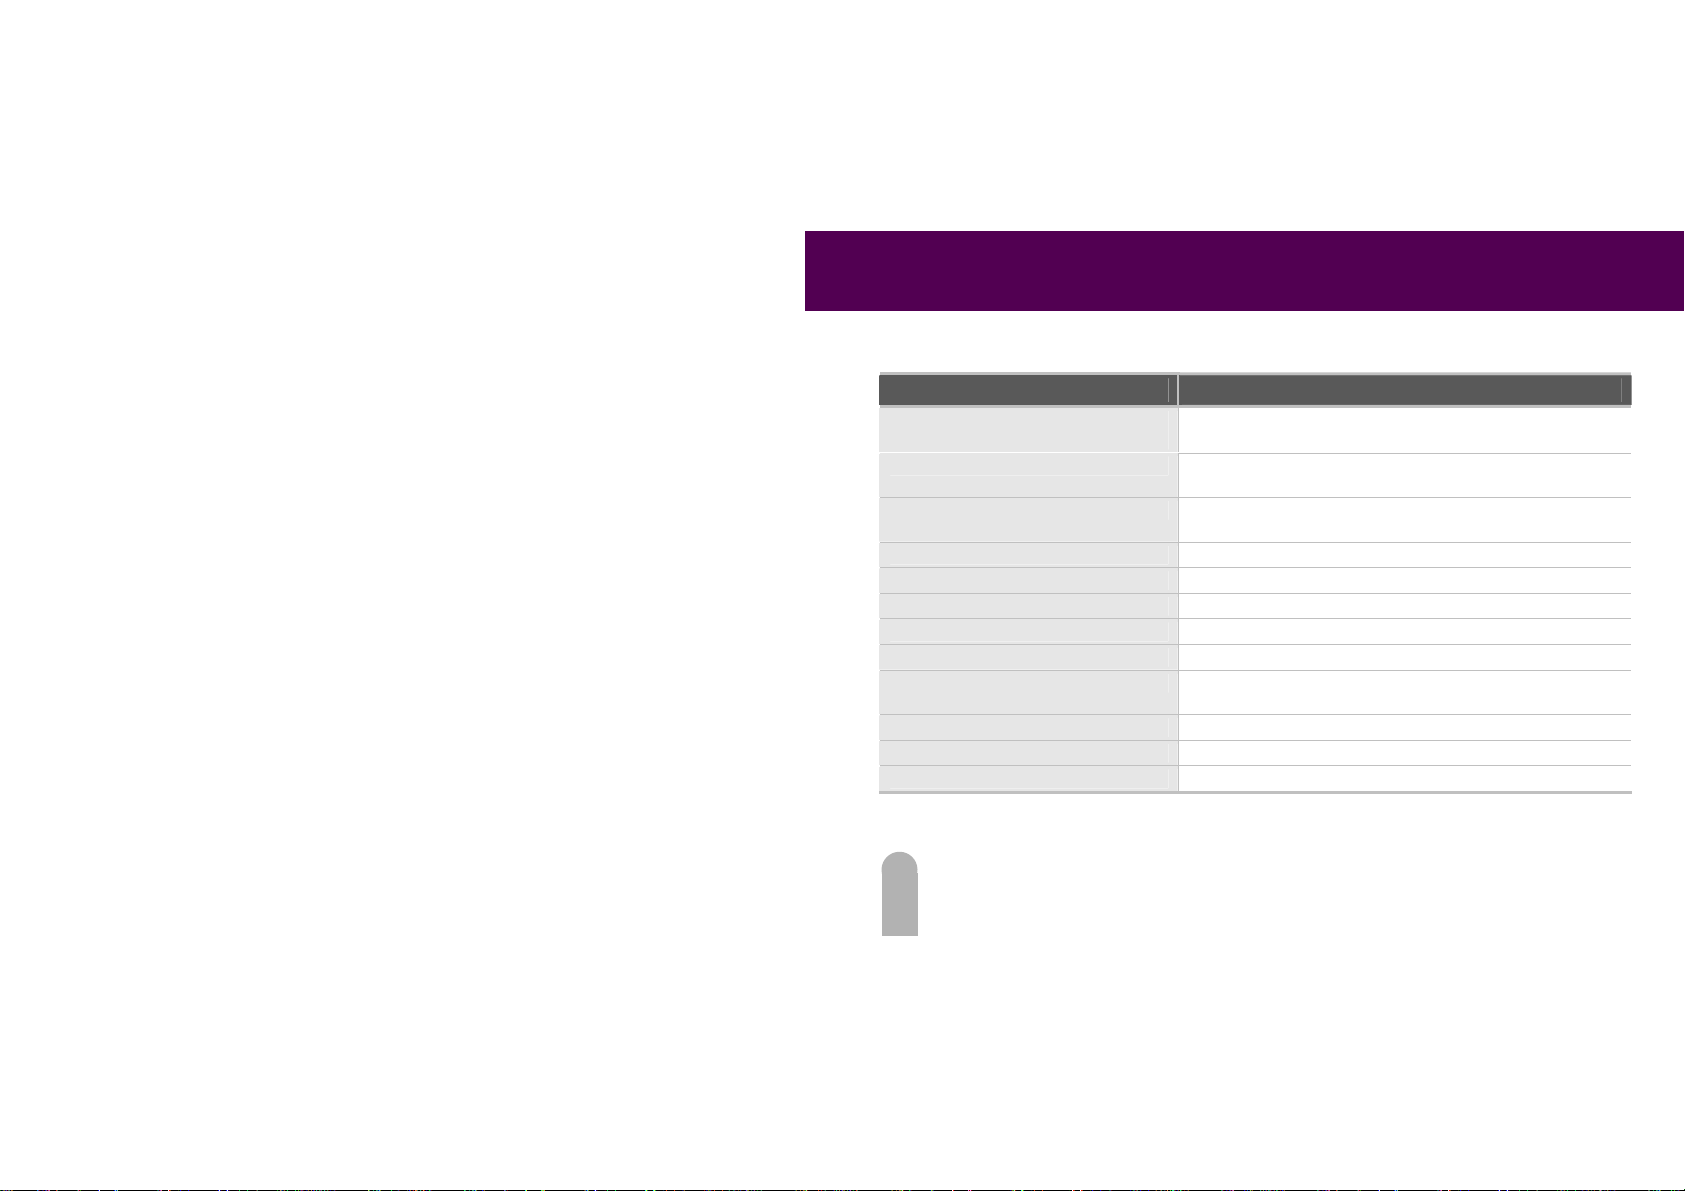
FIDELIX User Guide
Part Description
1. Stereo headphone connection
2. USB connection Used to connect the SURE-PATH unit into your PC over a USB cable
3. Compartment door Covers to protect memory card slot and USB connector inside the
4. Memory Card slot T o lisen to music or view files stored on a SD card.
5. L-Speaker It is the lefthand speaker.
6. GPS receiver It is the GPS (global positioning sys tem) rece iving par t.
7. External GPS connection It is the external GPS antenna receiving port.
8. R-Speaker It is the righthand speaker.
9. Reset In the even of the SURE-PATH unit should fail to respond, pres s the
10. Car charger connection Insert the car charger to charge the SURE-P ATH unit
11. Windshield mount connectio n Insert the notches of the winshe ild mount her e.
12. External Port It is External port.
Used to connect stereo headhones.
to download or upload files.
compartment.
reset button to reboot.
14
Page 16

Install
1. Remove the backing from the suction cup.
2. Insert the SURE-PATH unit into the windshield mount.
3. Determine where to install the stand.
- Install the windshield mount in a location that does not block
the driver’s view of the road.
FIDELIX User Guide
15
Page 17
FIDELIX User Guide
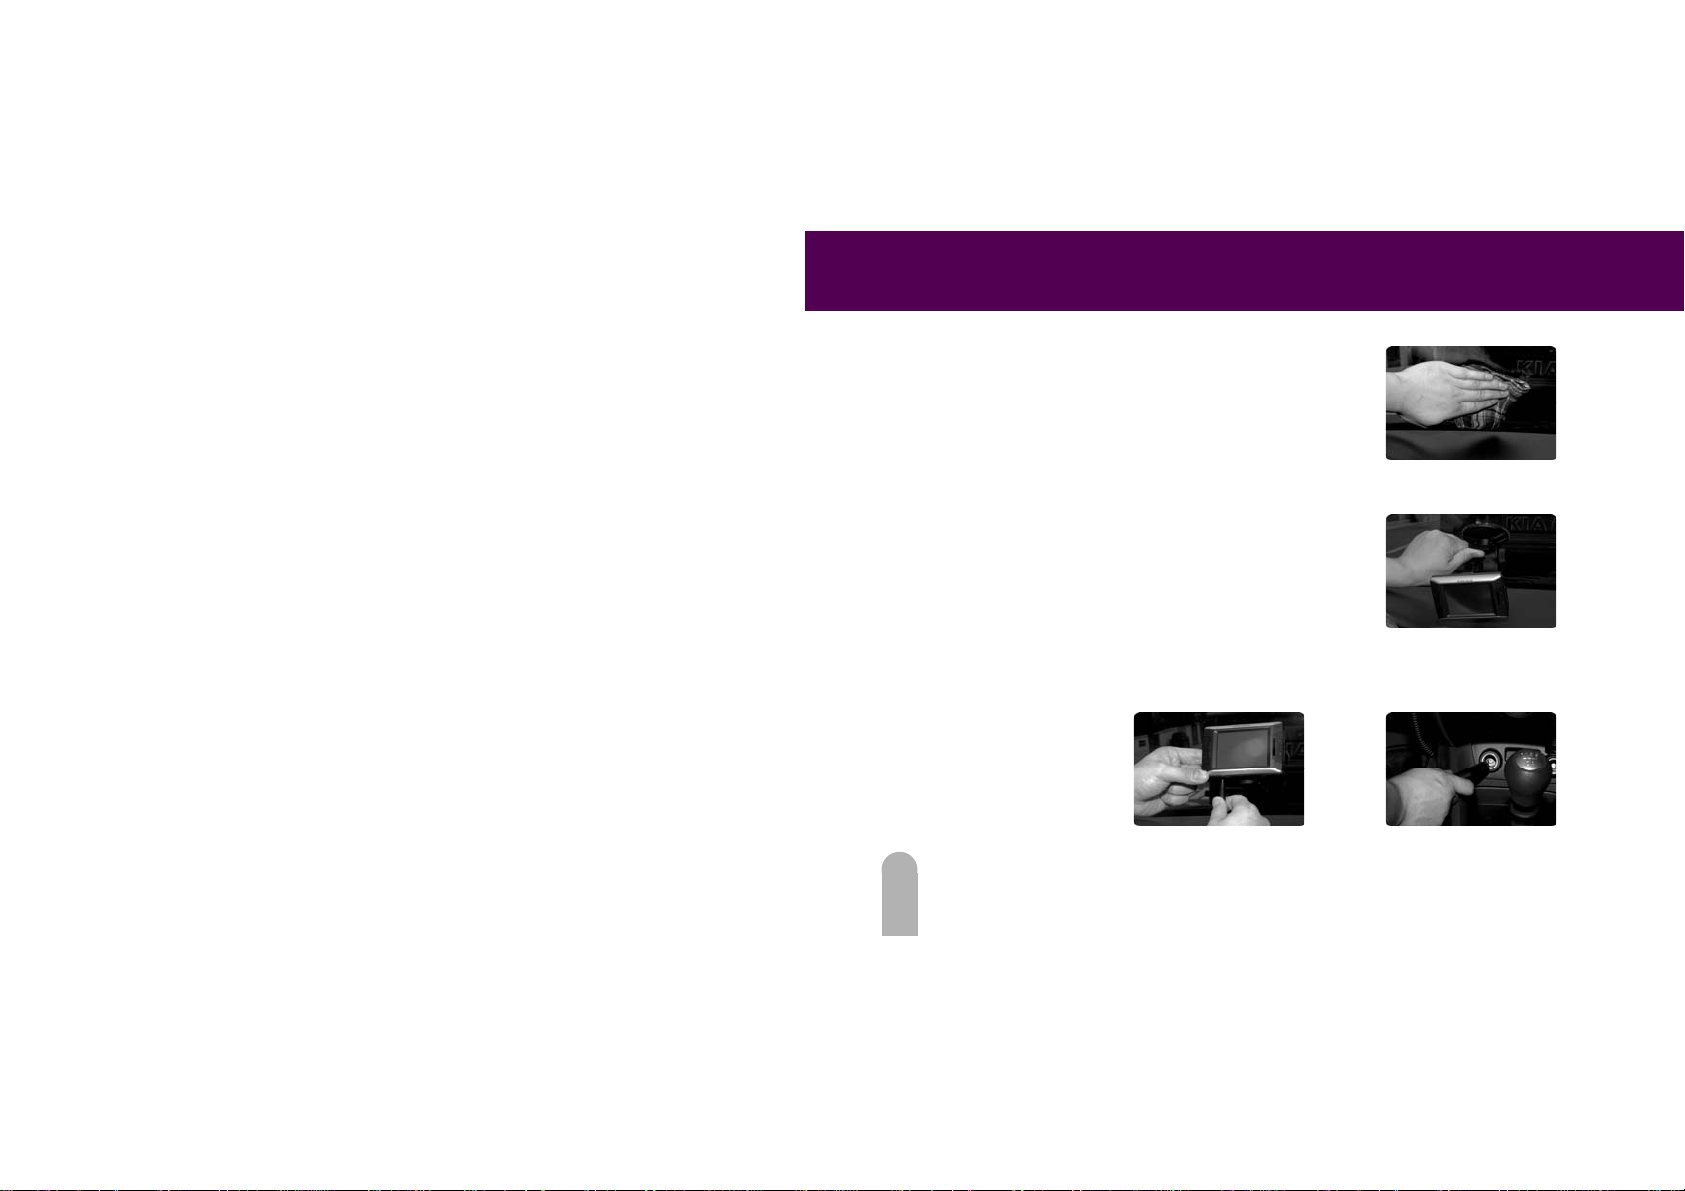
4. Wipe clean the glass where the windshield mount
will be attached.
5. Attach the suction cup of the windshield mo unt to the glass
and slide the suction lever toward the glass.
- If the inside of the suction cup becomes vacuum,
it adheres to the glass.
6. Plug your car charger into vehicles cigarette lighter and the small end of the cable into the SURE-
PATH unit.
16
Page 18
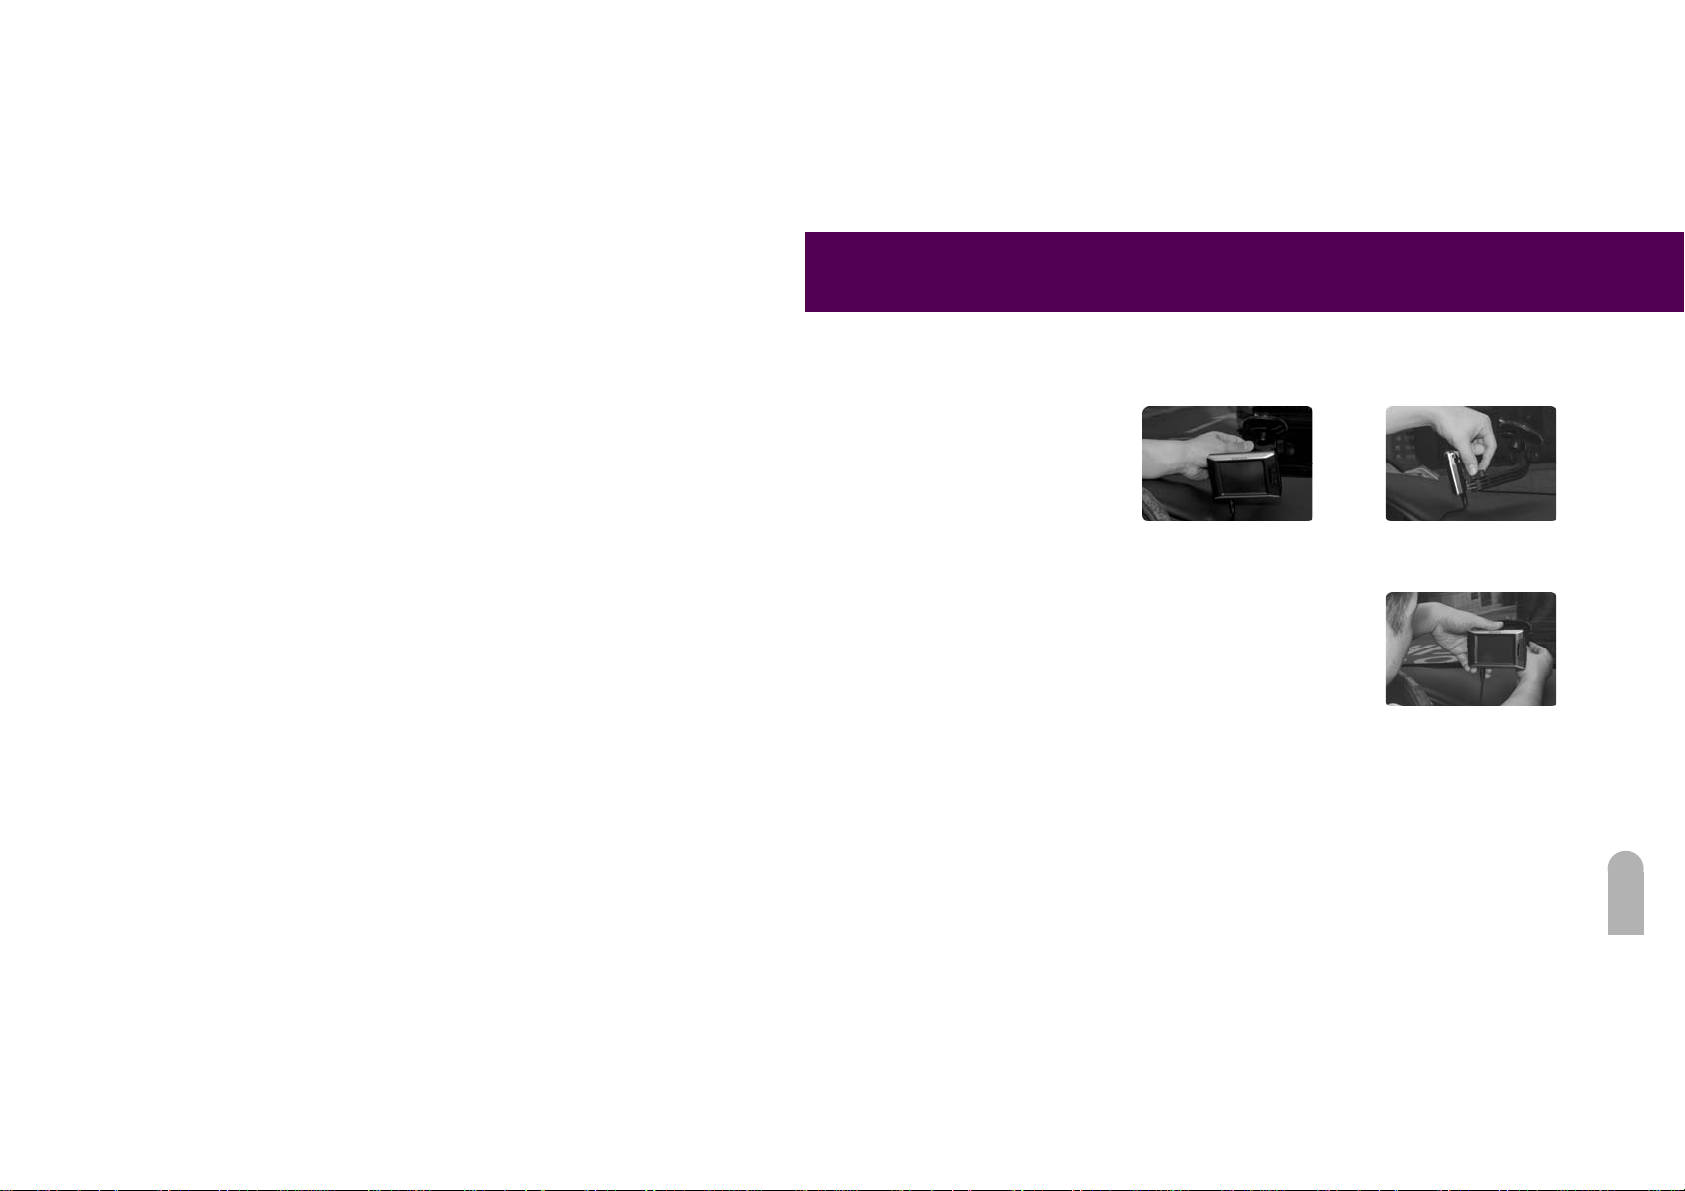
7. Release the screws of the windshield mount and then adjust the angle
so that the driver can see the main screen well.
8. Turn the screws of the windshield mount to tightly fix SURE -PATH unit.
FIDELIX User Guide
17
Page 19
FIDELIX User Guide
Navigation
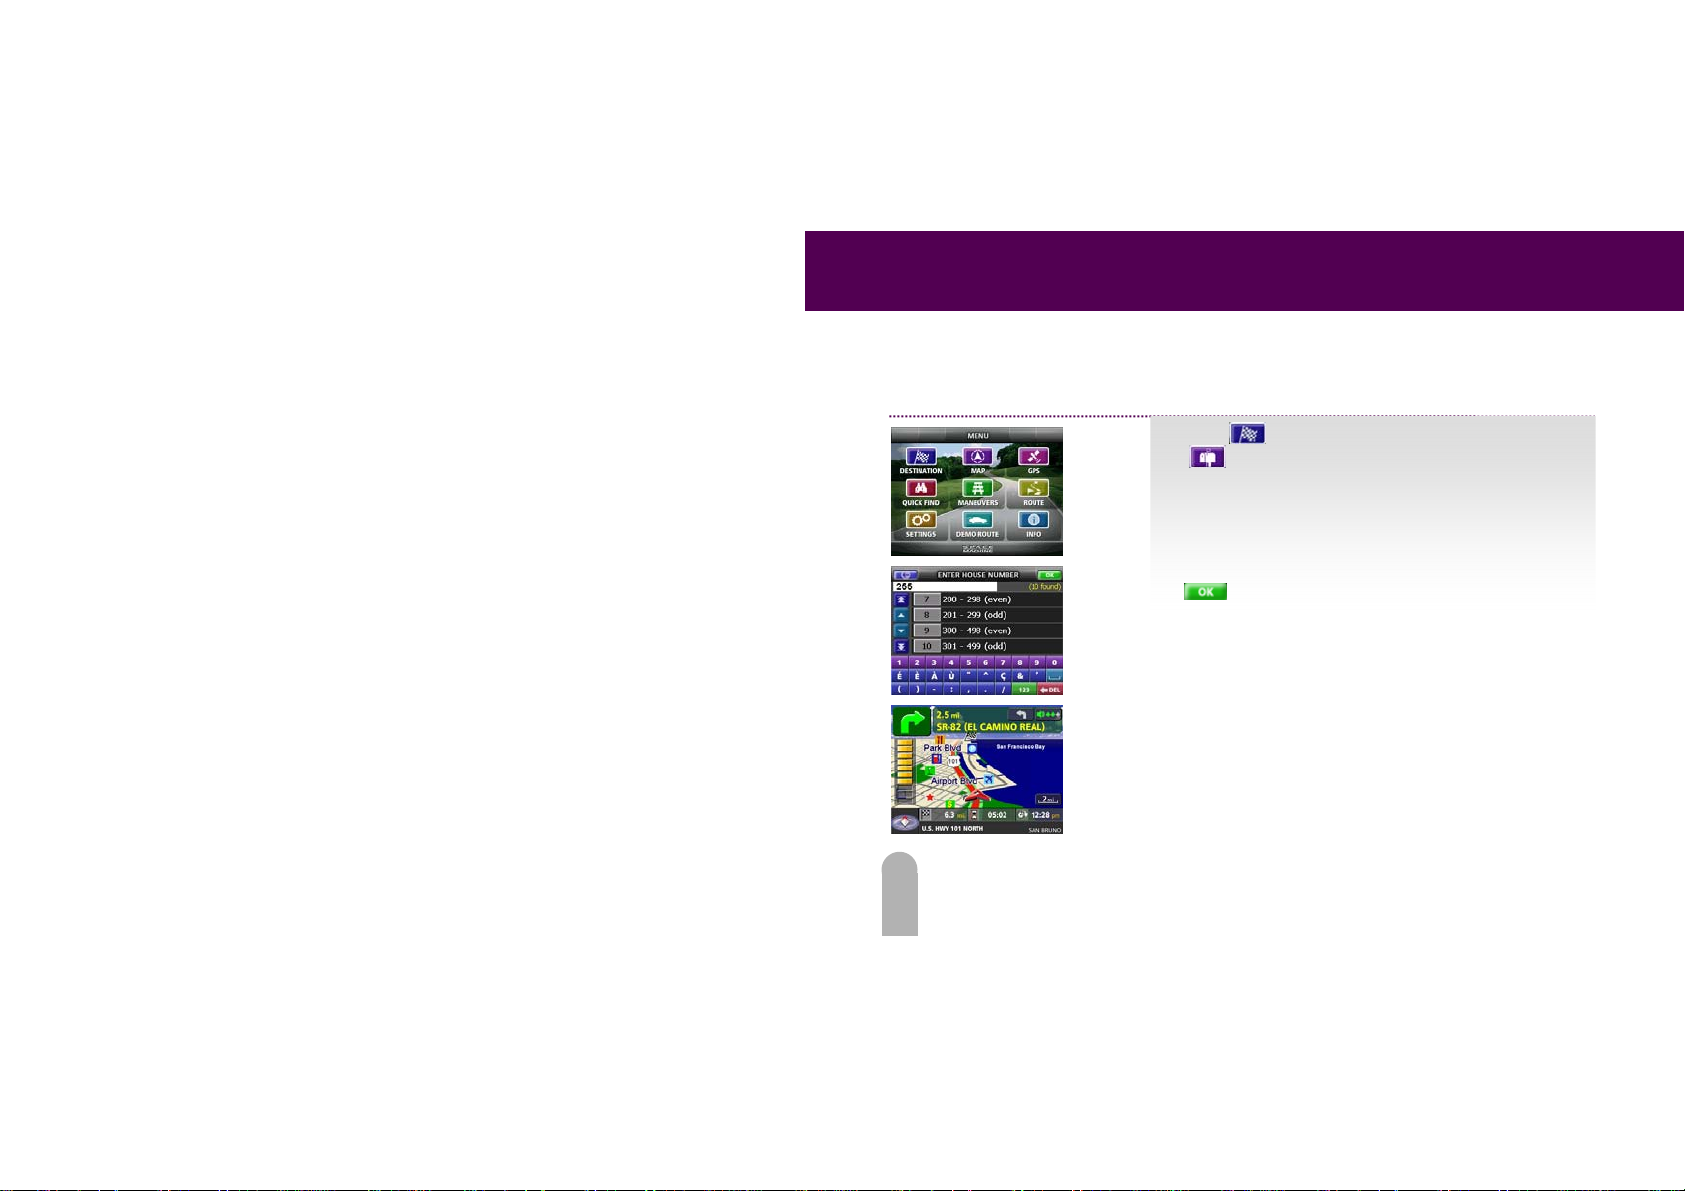
Overview
1. Touch to activate the destinati on m e nu, then touch
to specify the destina ti on ad dress.
2. Type and select the city, street, and house number. Touch
to create a route.
3. Start driving!
18
Page 20
FIDELIX User Guide
p
Map view options
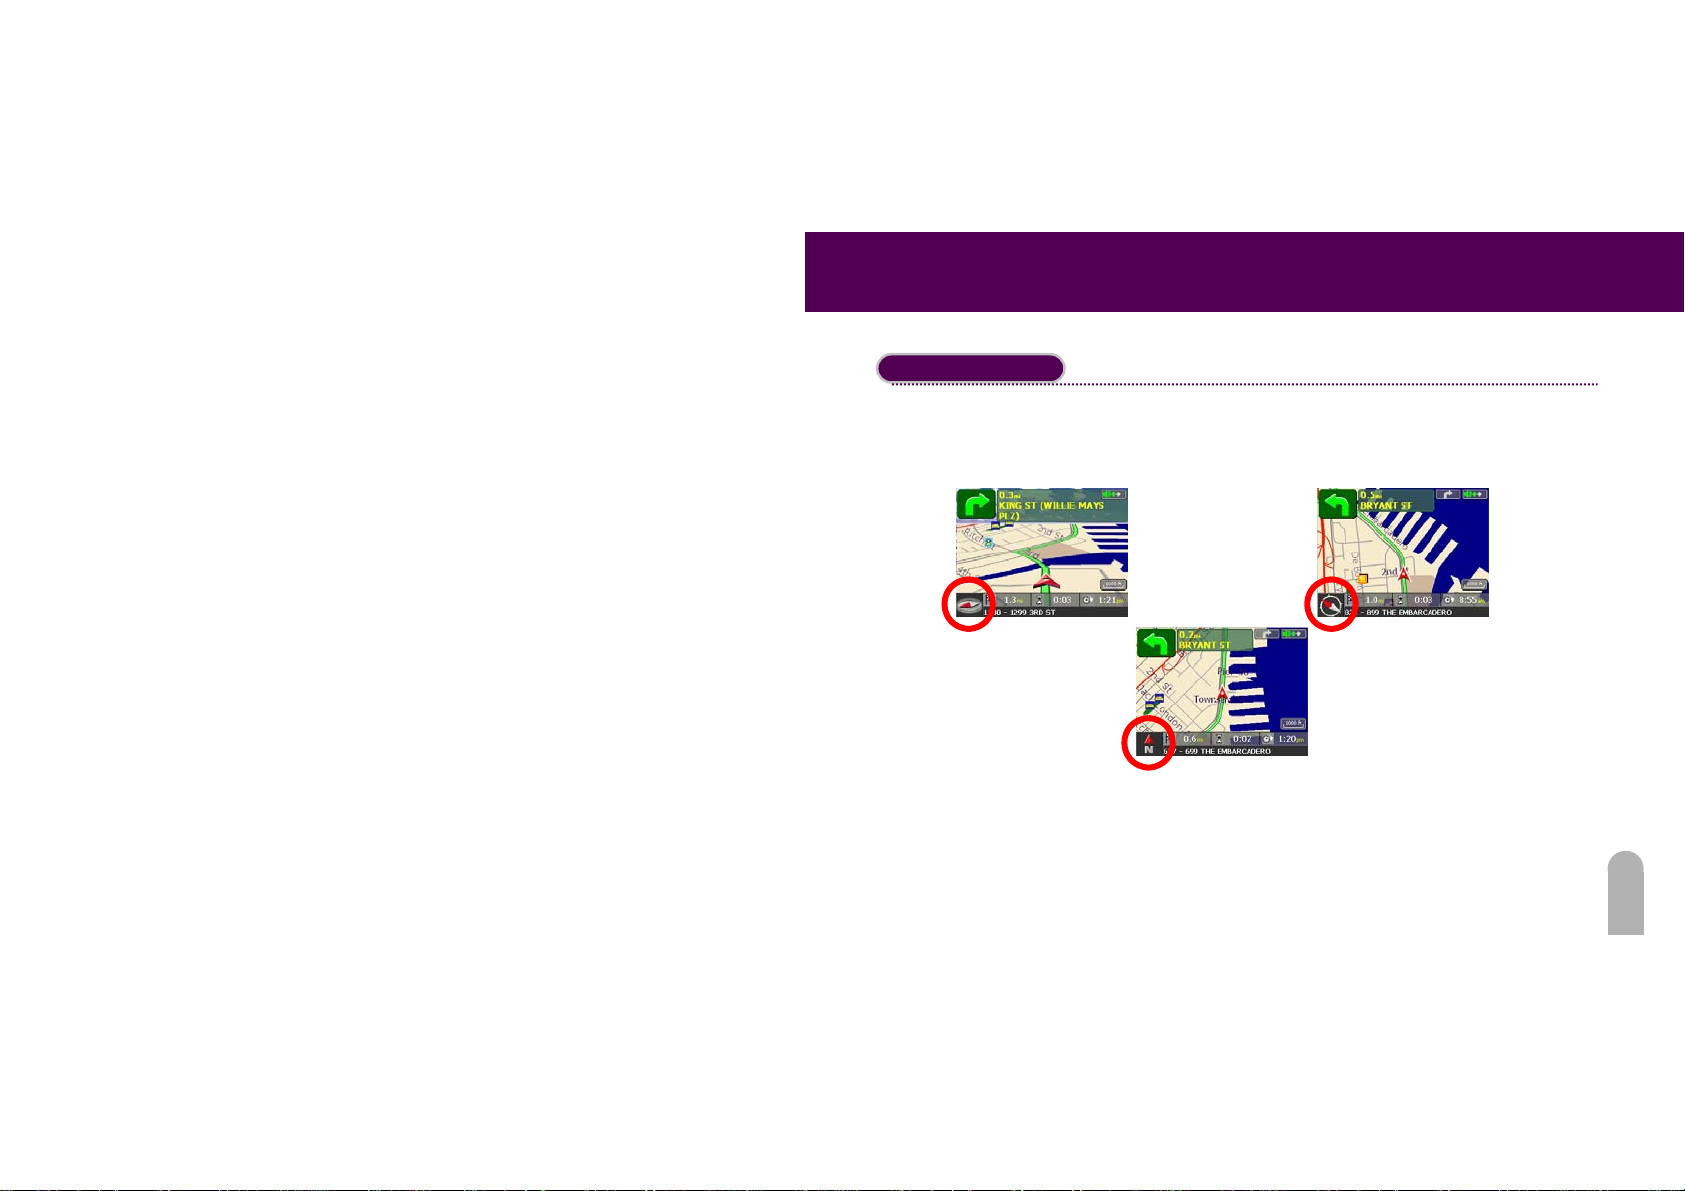
There 3 map views you can choose from: 3D, Heading Up, and North Up. To toggle between the
screens, simply touch the compass on the bottom left hand corner of the screen (As shown in the
red circles below).
3D viewer
North U
Heading Up viewer
viewer
19
Page 21
FIDELIX User Guide
Guidance Screen options
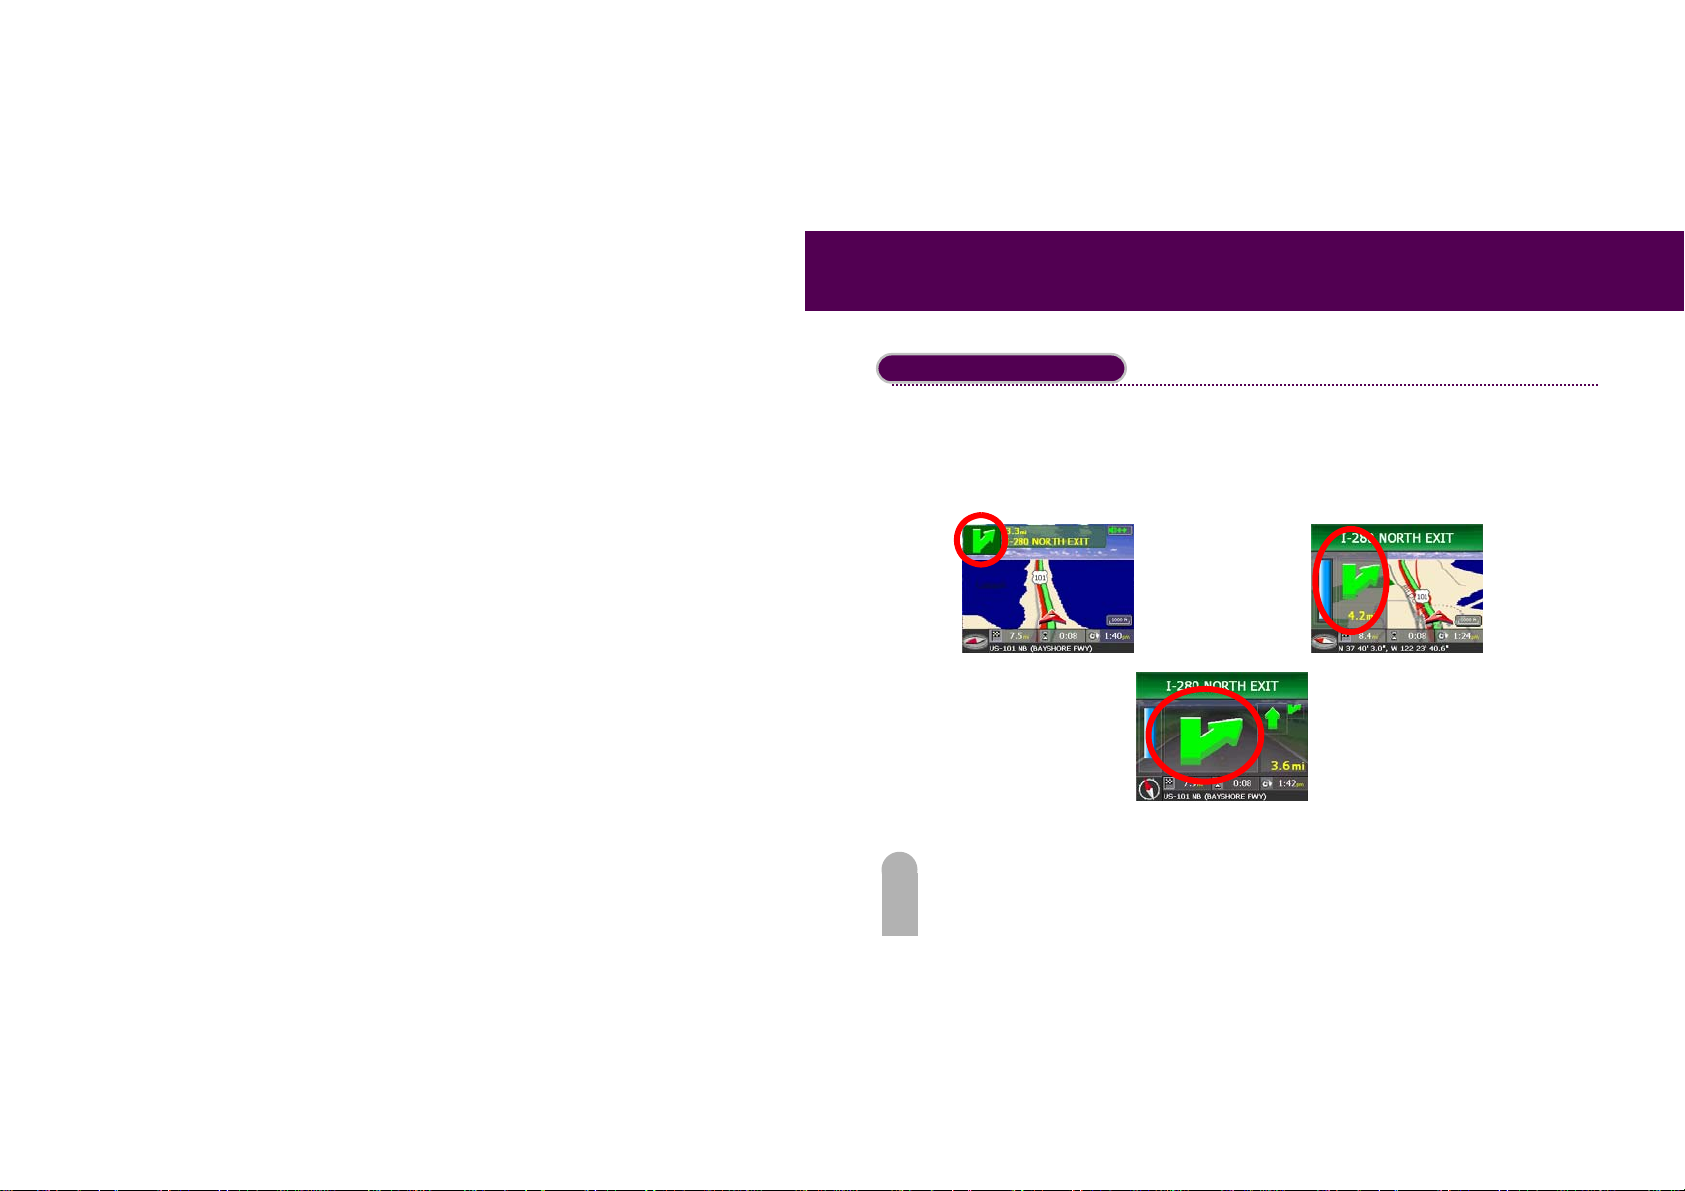
There are 3 screen options in guidance mode. The Mini Arrow view displays a full screen map with
small turn arrows on the top of the screen. The Split Screen view enlarges the turn arrows to fit
half the screen while the map is shown on the other half of the screen. The Full Screen view
shows only the turn arrows on the screen without a map. Touch the turn arrows, as shown below in
the red circles, to toggle between views.
Mini Arrow
Full Guide
Split screen
20
Page 22
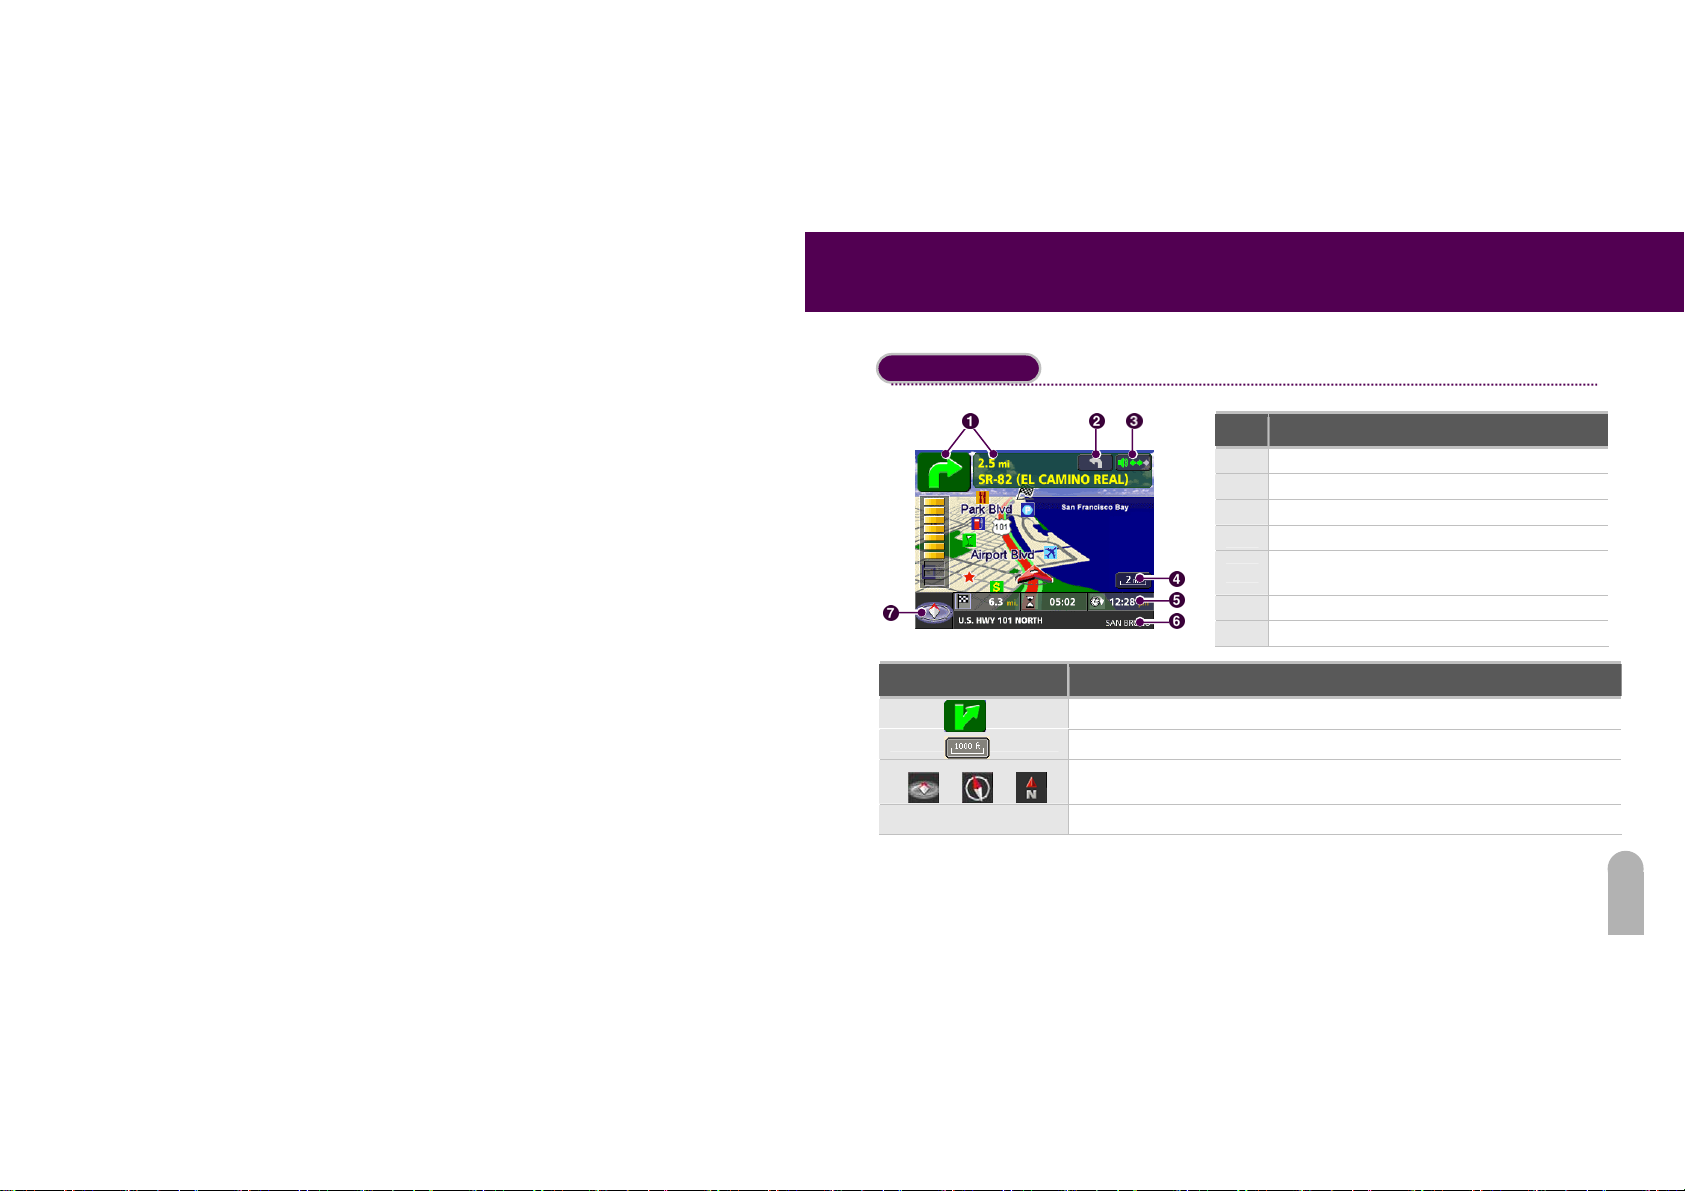
Guidance Mode
Icon Description
Tap Anywhere on Map
FIDELIX User Guide
No. Description
① Next Maneuver
② Maneuver after next
③ Number of voice prompts remaining
④ Zoom Level
Distance Remaining, Time Remaining, and
⑤
Estimated Time of Arrival (ETA)
⑥ Current road
⑦ Compass
Touch to change to Cruise Mode
Touch to change the Zoom Level
Touch to switch between 3D/Heading Up/North Up Views
Change to the Explore Mode
21
Page 23

FIDELIX User Guide
After creating a route, you will automatically be put into Guidance Mode. The Guidance Mode will
provide you with voice and text guidance as you drive to your destination along the created route.
The map will automatically follow your location, and will re-route you if you go off the planned
route.
22
Page 24
FIDELIX User Guide
Cruise Mode
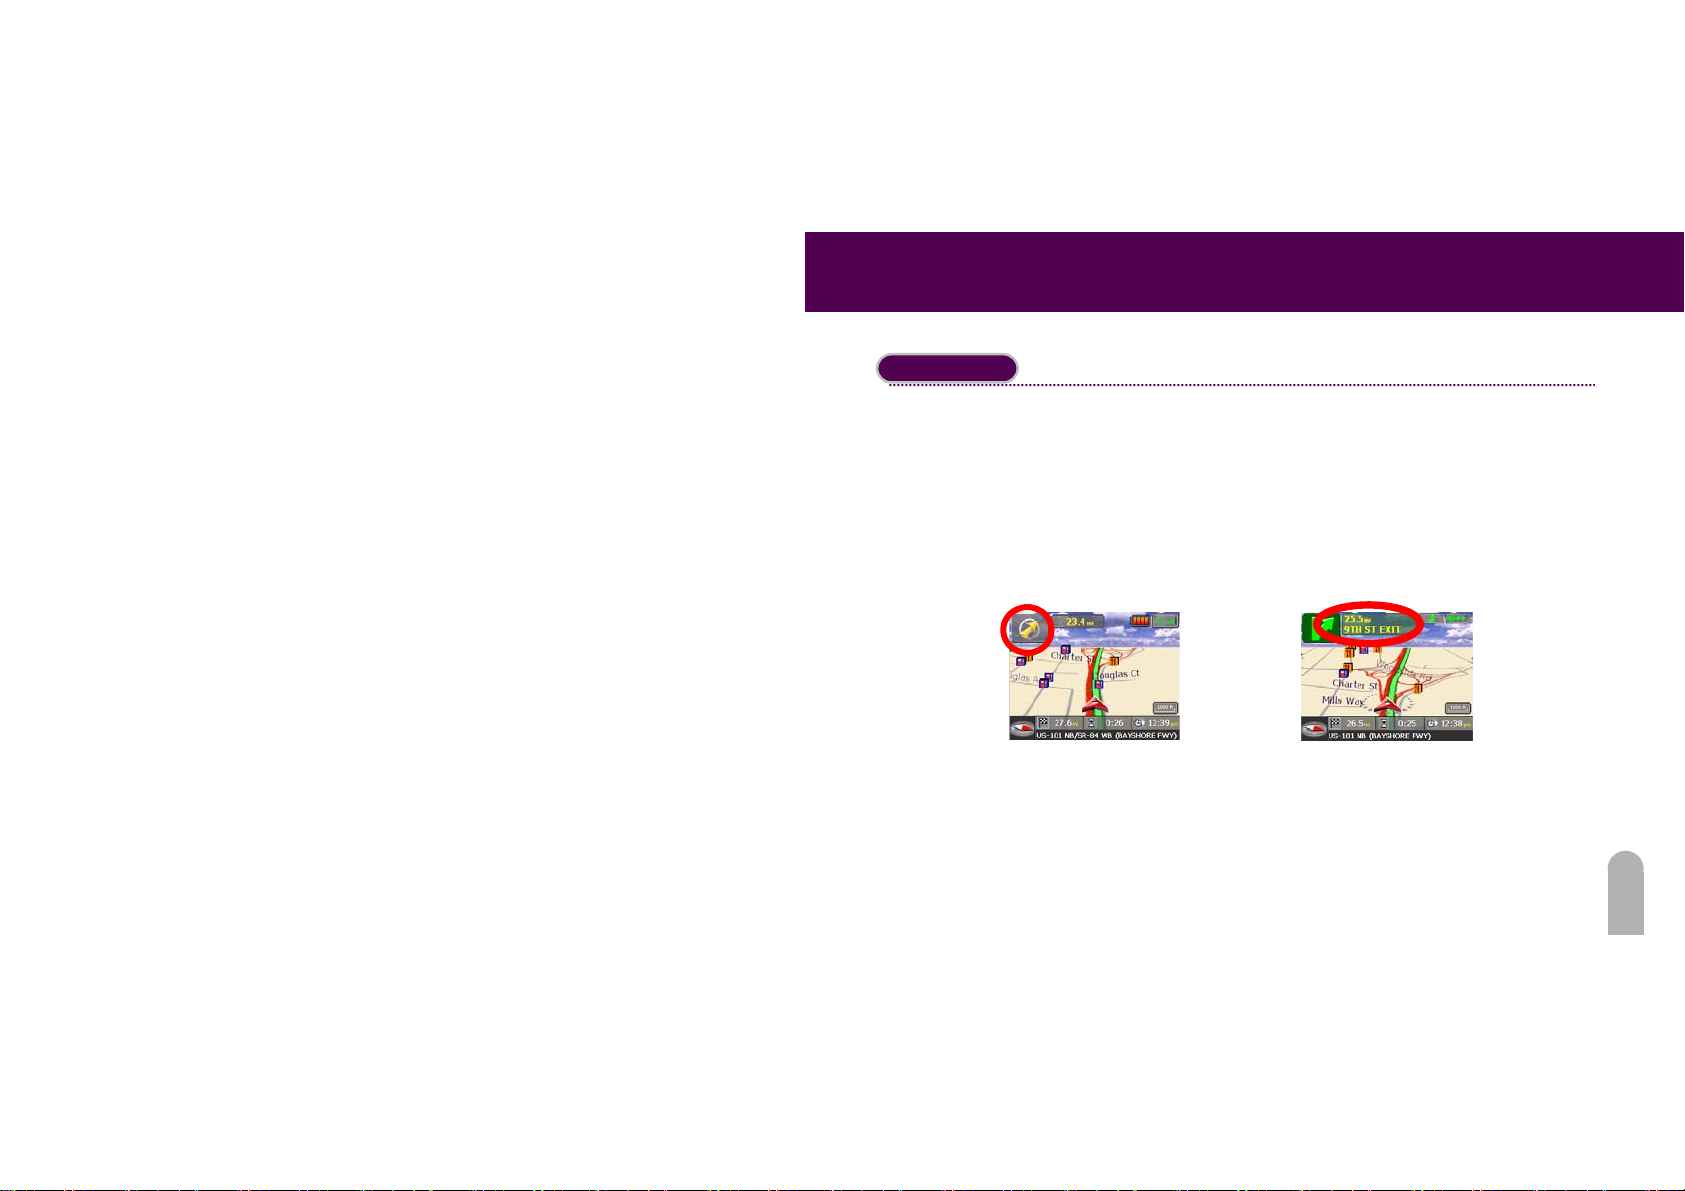
If you are following a route but would like to make a quick detour that doesn’t require guidance,
you can easily switch to Cruise Mode. When you are in Cruise Mode, you will be able to go off the
planned route without recalculating the route. PocketMap Navigator will simply track your location
as you drive and will not recalculate the route from your GPS position. An arrow on the top left
hand corner of the screen will show you which direction you need to go to head back to the
calculated route, but will not guide you there.
You can switch between Cruise Mode and Guidance Mode by touching the circled items on the
screen.
Cruise Mode Guidance Mode
23
Page 25
FIDELIX User Guide
Explore Mode
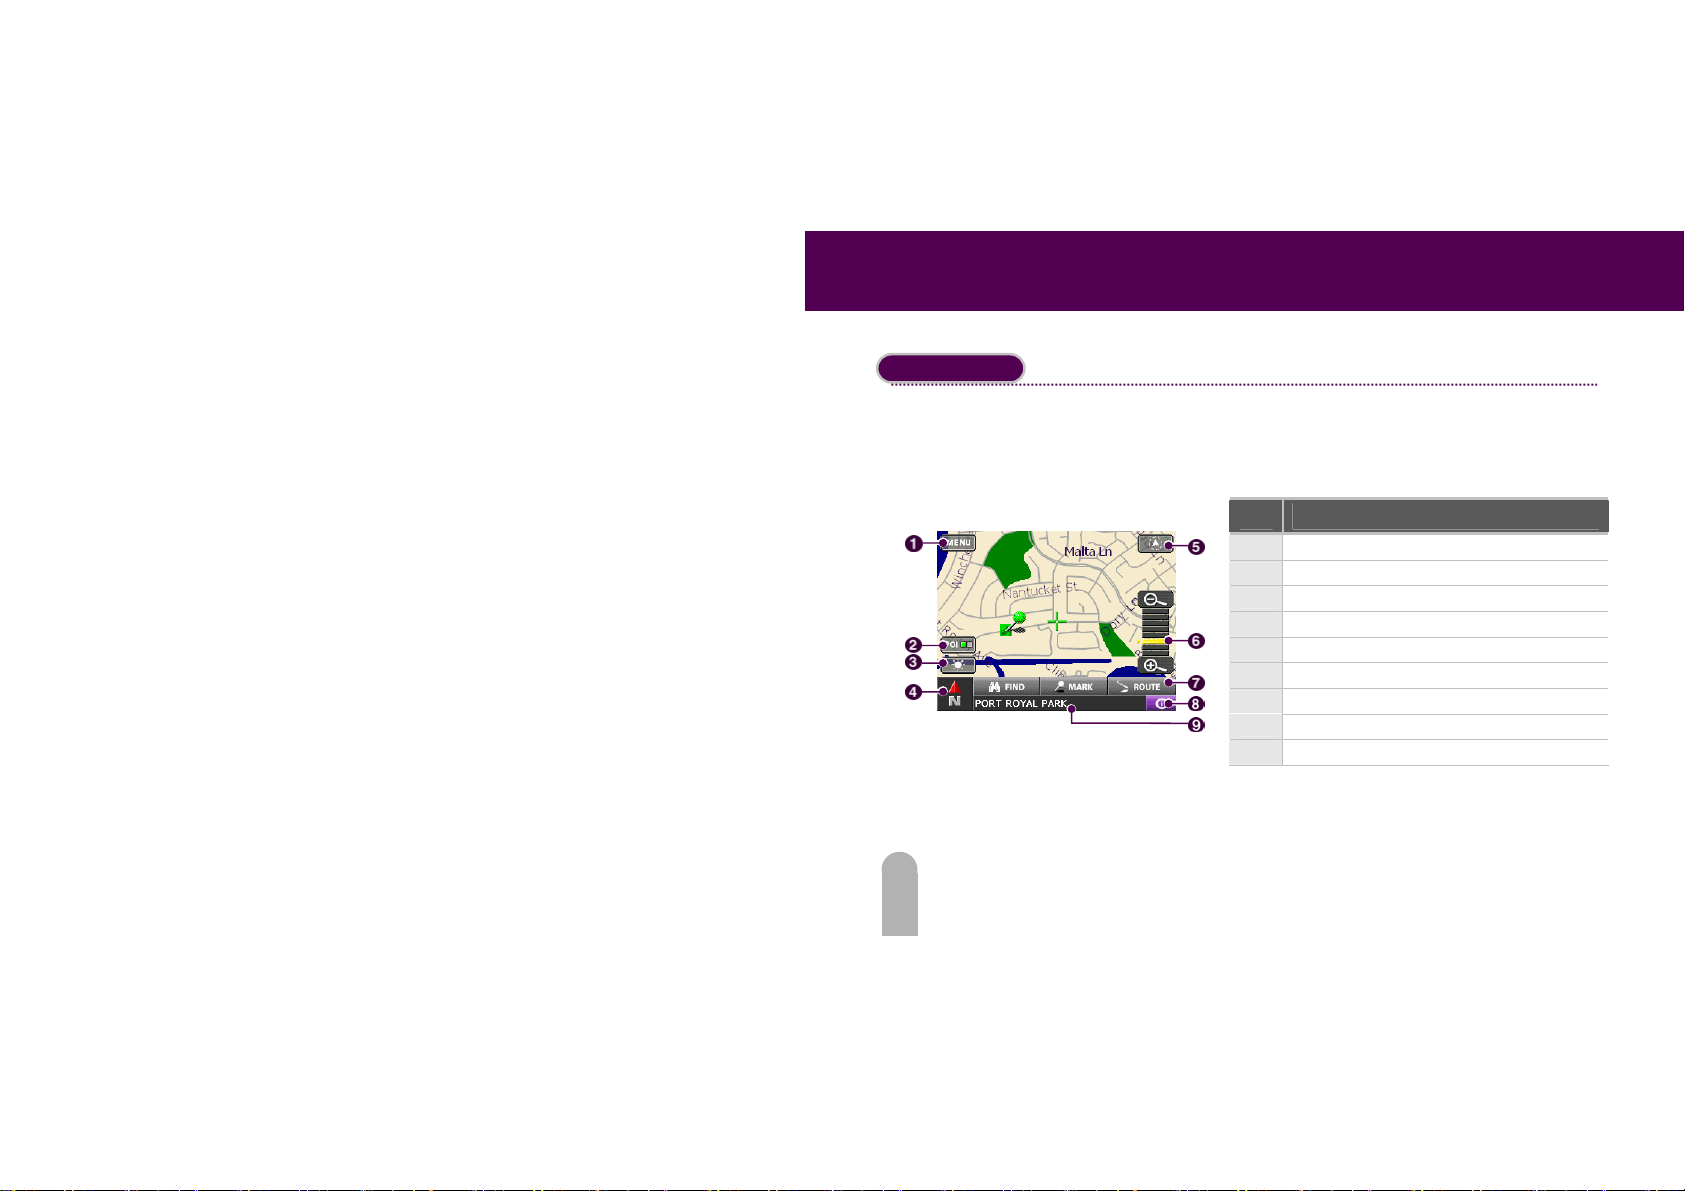
Touching the map, whether you are on a route or not, will send you to Explorer Mode. The
Explore Mode allows you to interact with the map by finding an address, panning the map, planning
your route, and edit your route. Explore Mode features include:
No. Description
① Main Menu
② Show/Hide Points of Interest (POI)
③ Day/Night Mode
④ Compass
⑤ Current road
⑥ POI Details
⑦ Find, Mark, and Route buttons
⑧ Zoom Level
⑨ Guidance/Cruise Mode
24
Page 26
FIDELIX User Guide
POI Details
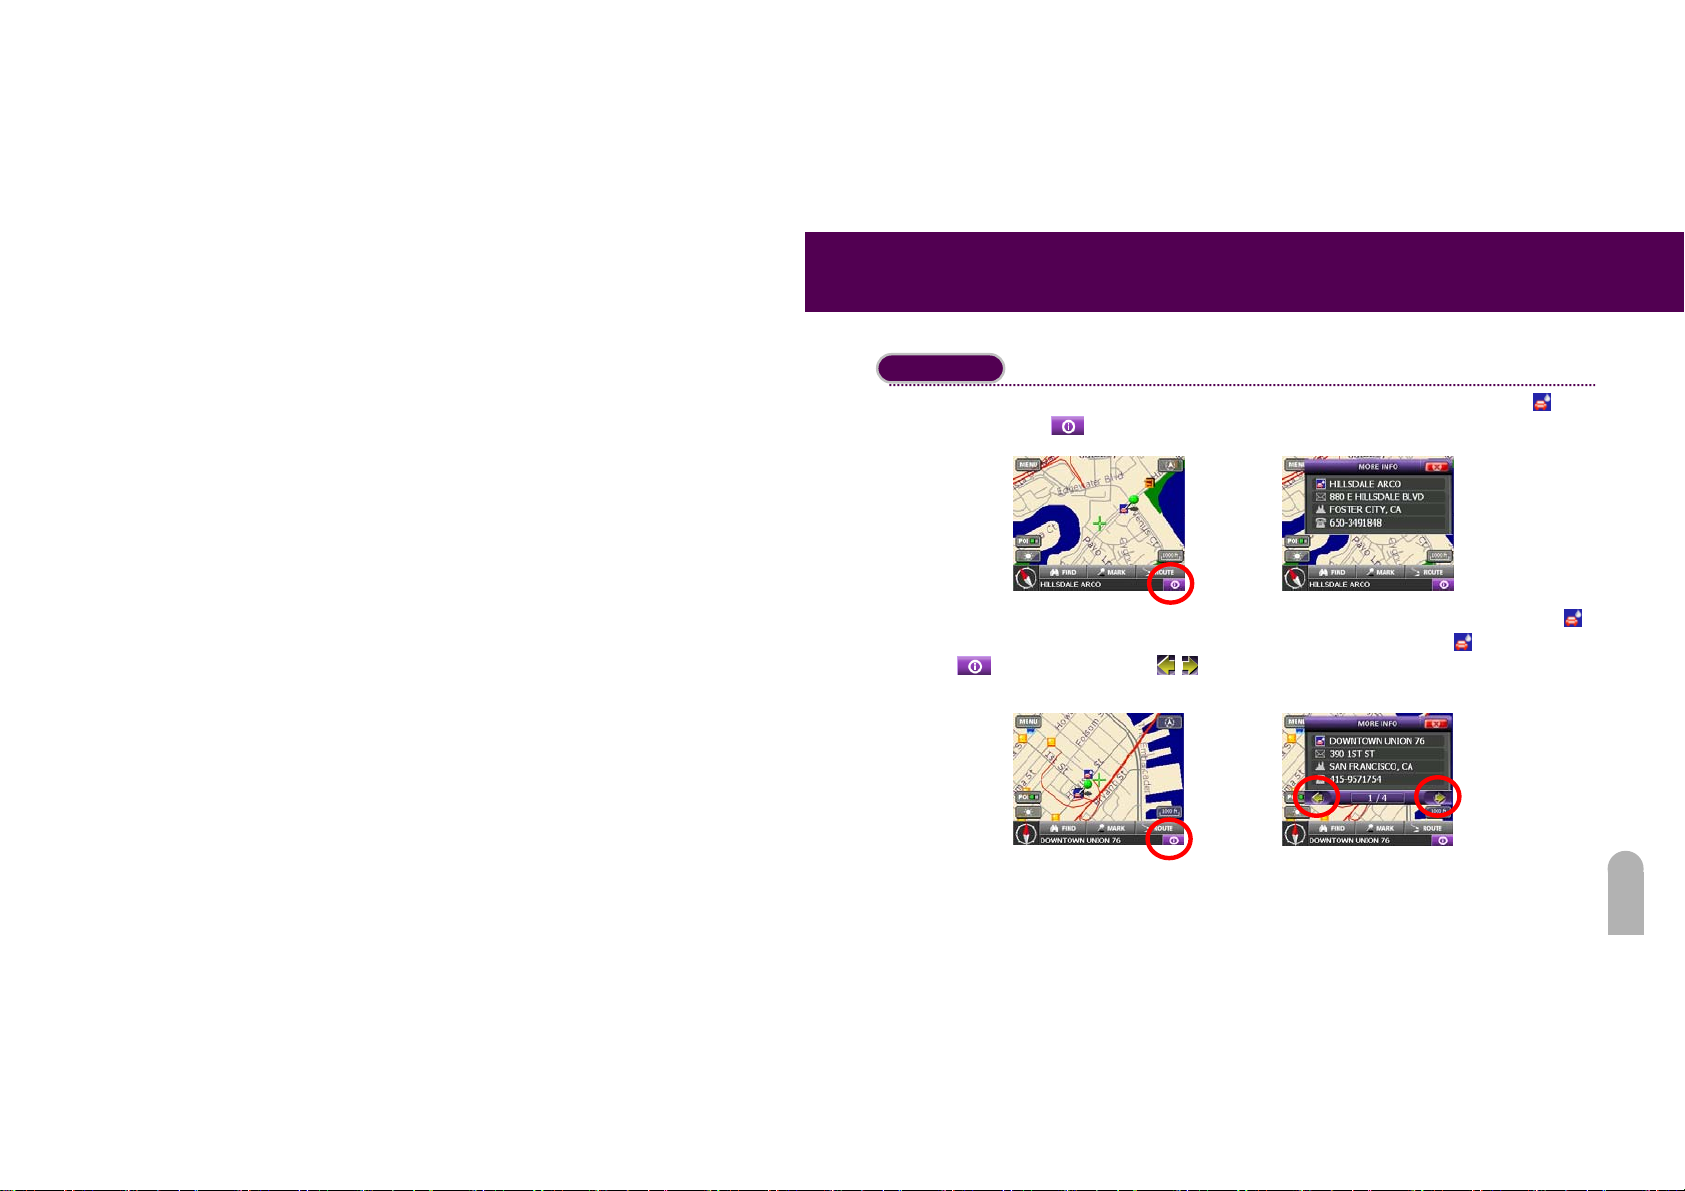
When you are in the Explore Mode, you can view the POI details by touching the POI icon then
touching the info icon
Sometimes there are multiple POIs in one lo cation. This is represented by a multiple POIs icon
To view details of all the POI’s in that one locat ion, touch the multiple POI icon
info icon
, then use the arrows (as shown below) to go through each POI.
in the bottom righ t hand corner.
.
, then touch the
25
Page 27
FIDELIX User Guide
Navigate to an Address
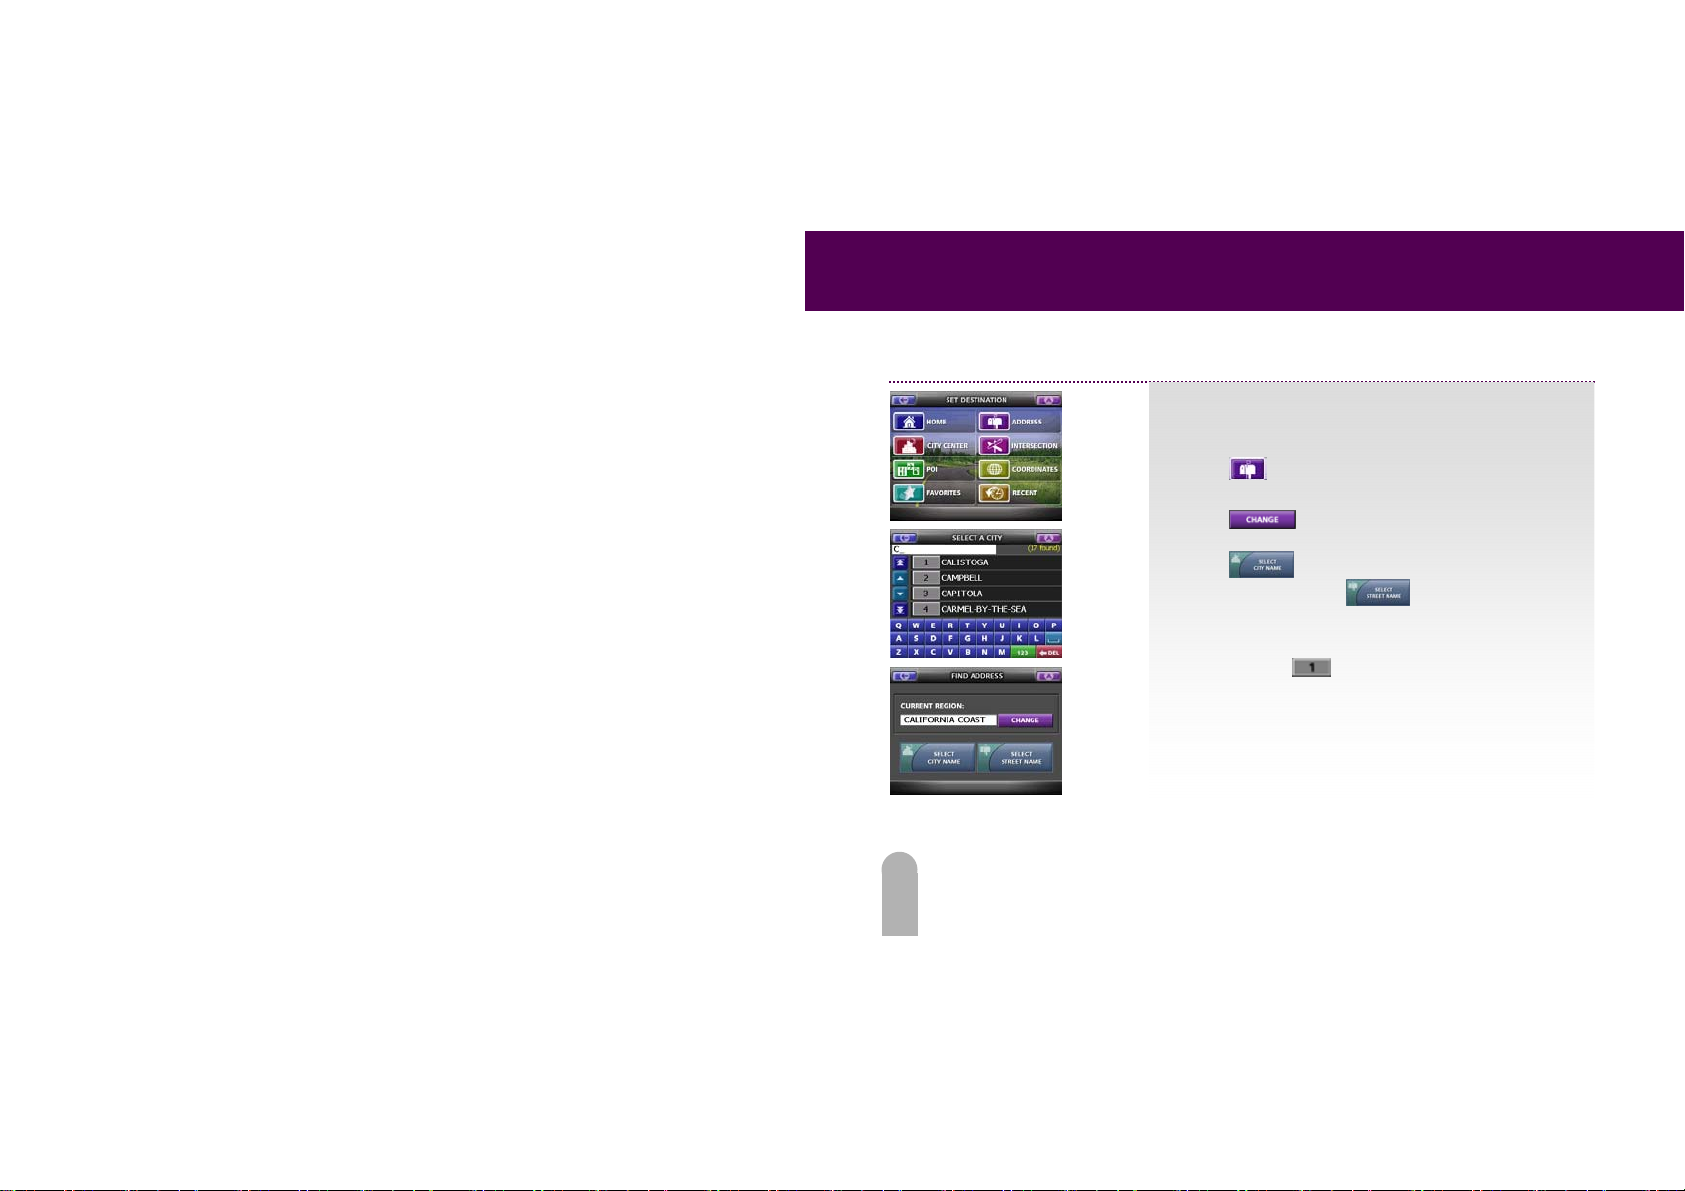
To create a route from your current GPS location to an
address, do the following:
1. Touch
destination address.
2. Touch
displayed.
3. Touch
(recommended) or touch
4. Enter the first few letters of the destination city, then
select it from the list by touching the numbered button
(for example,
from the Destination Menu to input the
to search a different region than the one
to search by city name
to search by street name.
) beside the city name.
26
Page 28
FIDELIX User Guide
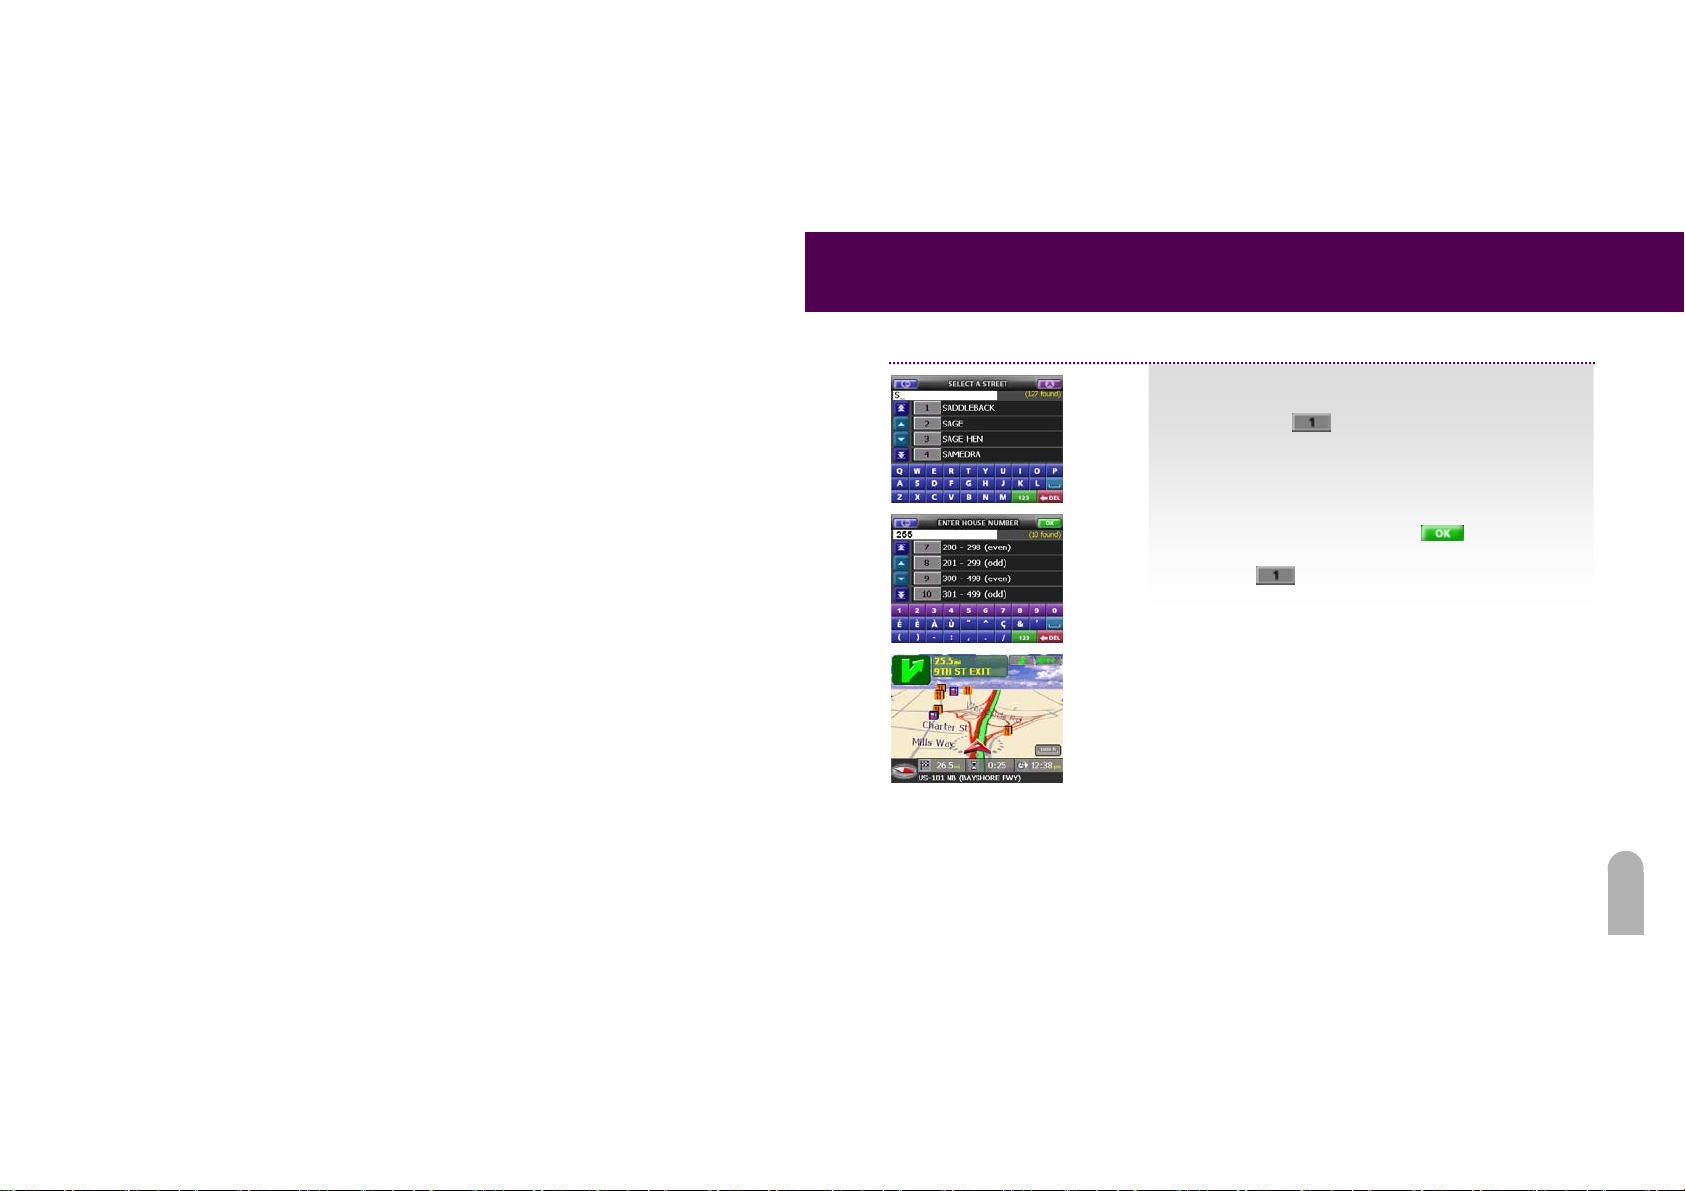
5. Enter the fir st few letters of the destination street, then
select it from the list by tapping the numbered button
(for example,
6. Enter the house number, and tap
address range from the list by touching the button (for
example,
7. Start driving!
) beside the street name.
or select an
) next to the range.
27
Page 29
FIDELIX User Guide
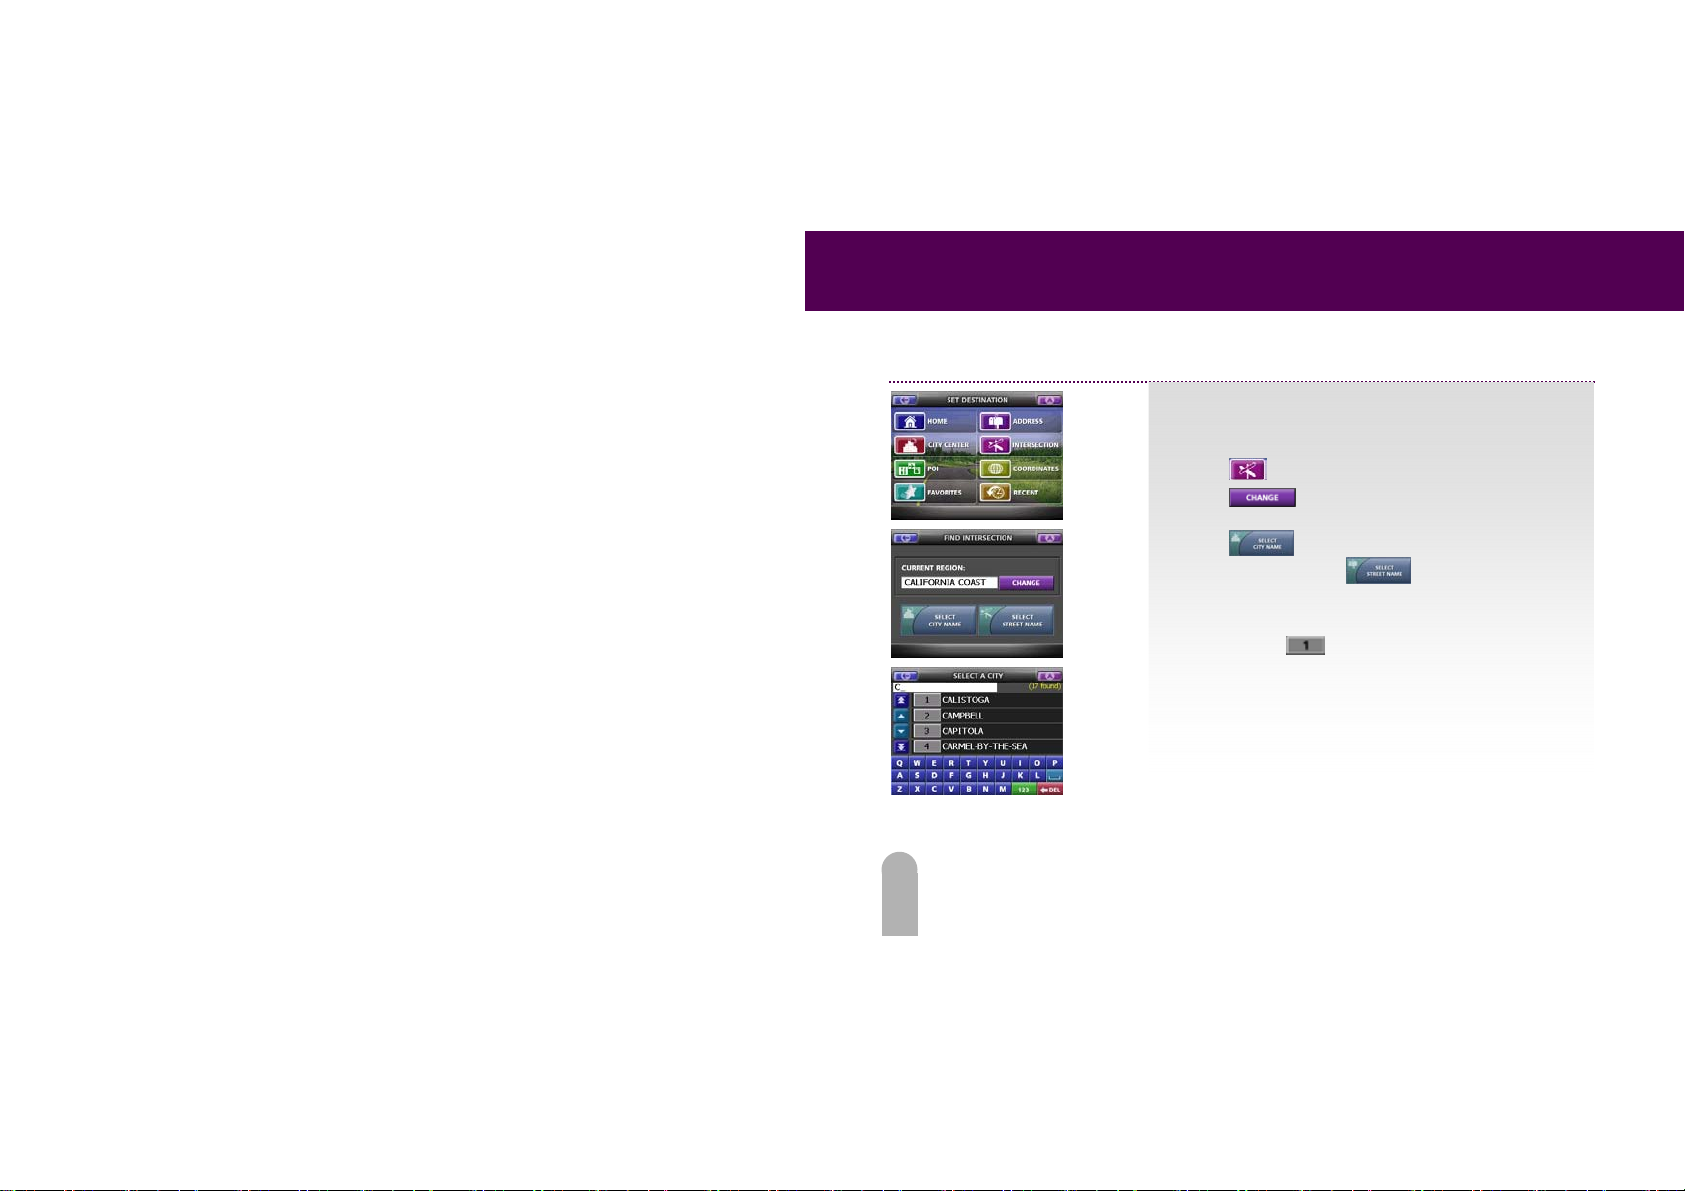
Navigate to a Street Intersection
To navigate from your current GPS location to an intersection,
do the following:
1. Touch
2. Touch
displayed.
3. Touch
(recommended) or touch
4. Enter the first few letters of the destination city, then
select it from the list by touching the numbered button
(for example,
from the Destination Menu.
to search a different region than the one
to search by city name
to search by street name.
) beside the city name.
28
Page 30
FIDELIX User Guide
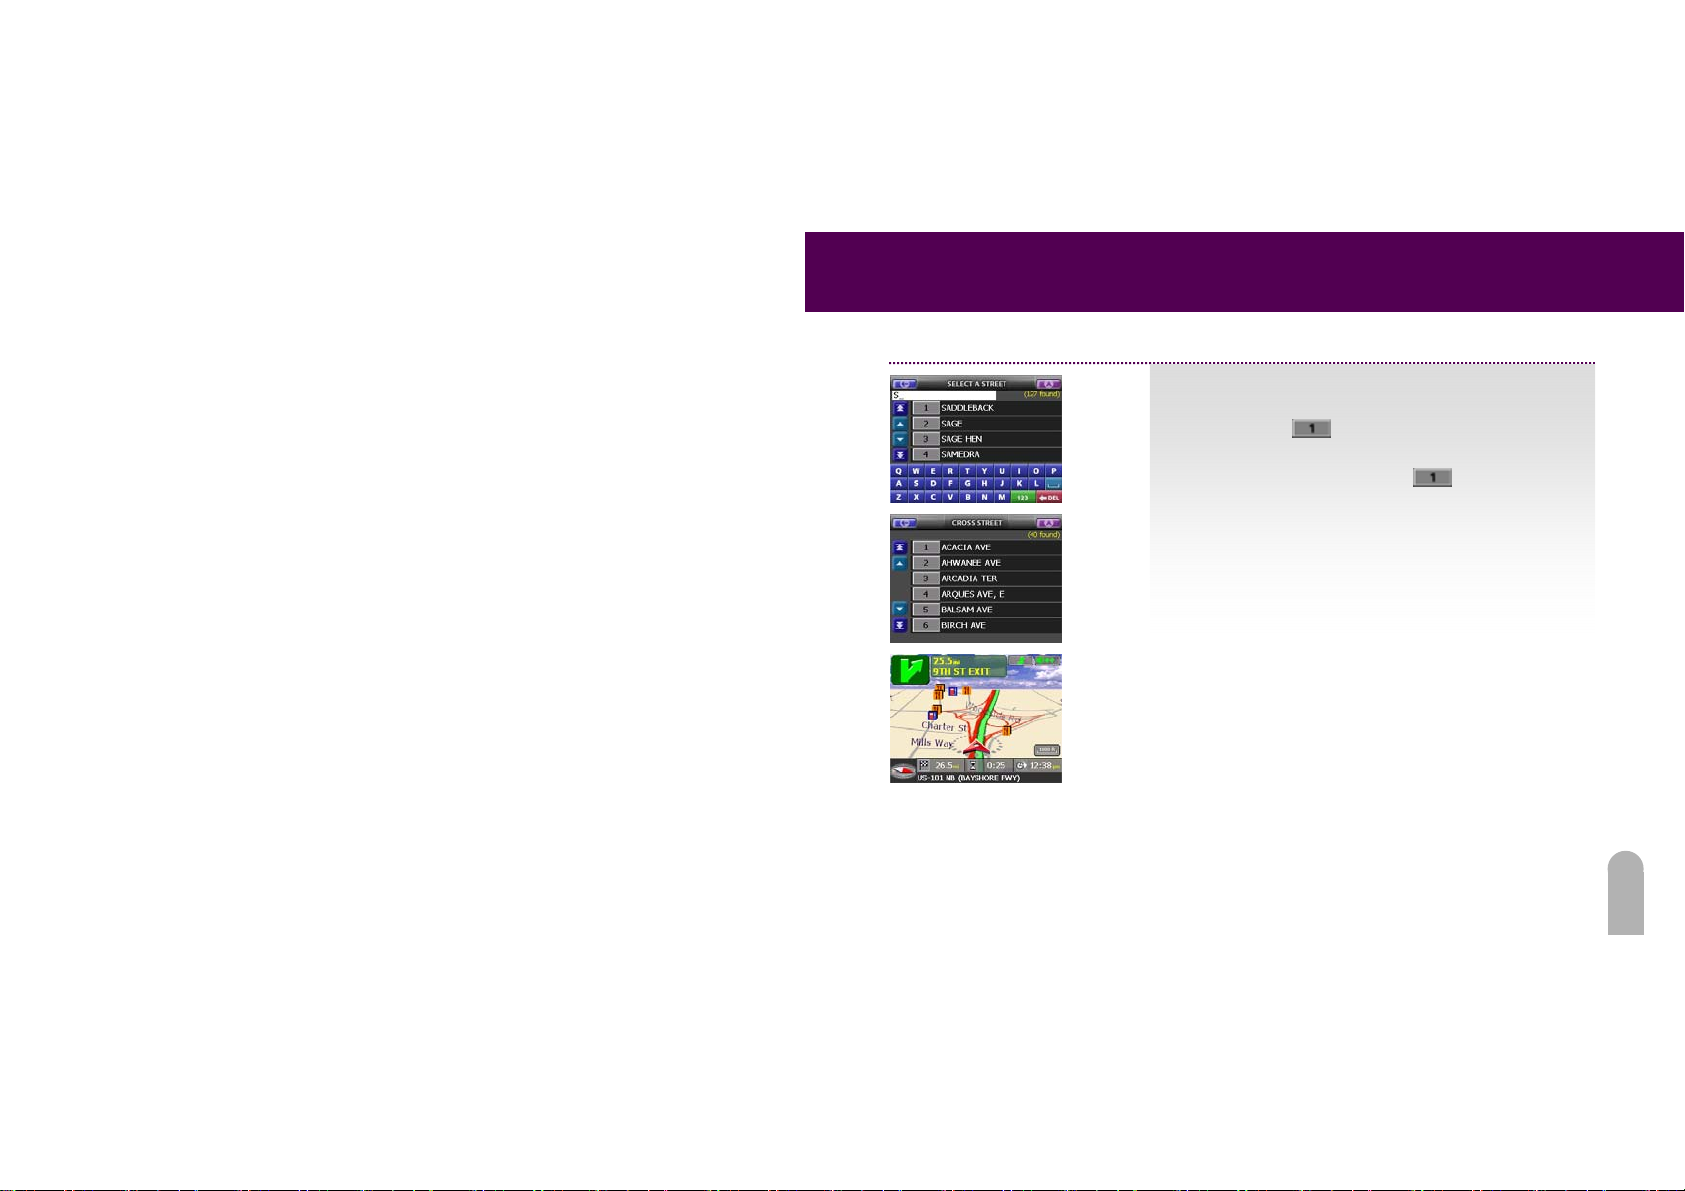
5. Enter the fir st few letters of the destination street, then
select it from the list by touching the numbered button
(for example,
6. Select the cross street from the list by touching the
numbered button (for example,
name.
7. Start driving!
) beside the street name.
) next to the street
29
Page 31
FIDELIX User Guide
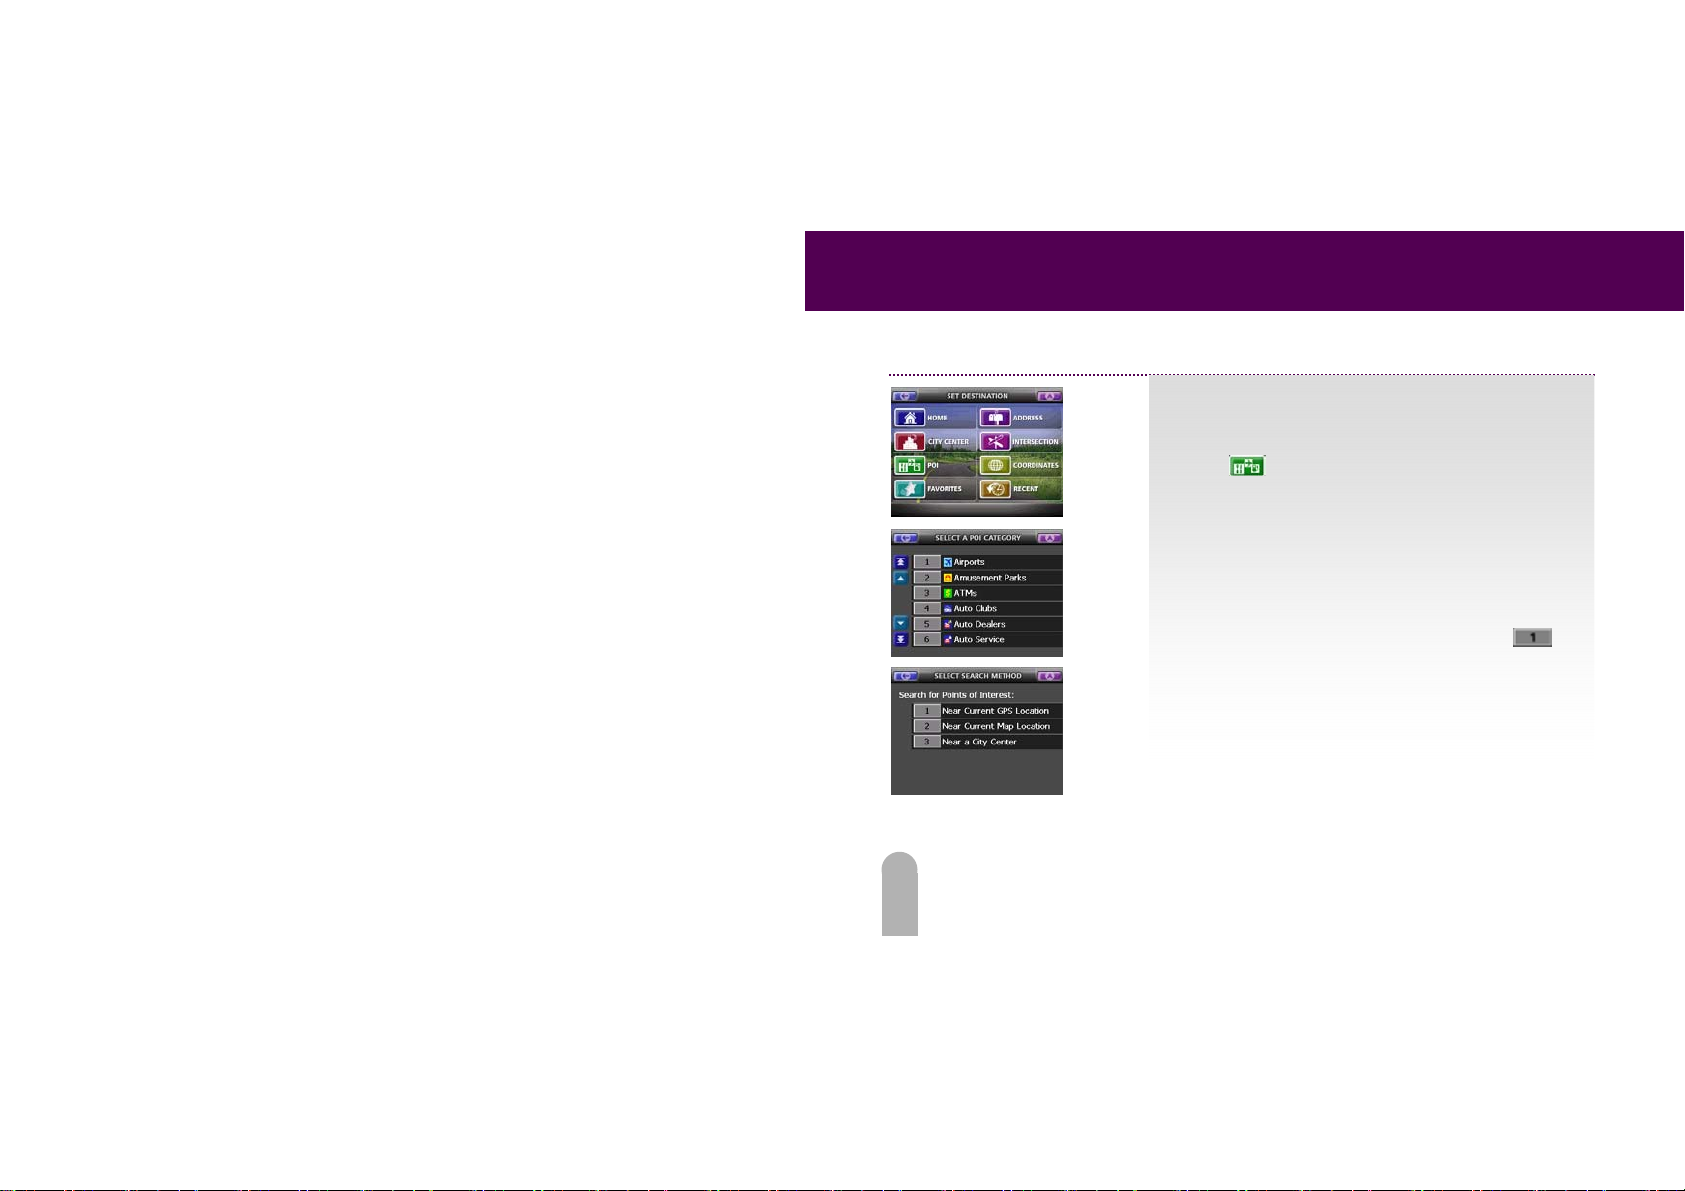
Navigate to a Point of Interest (POI)
To navigate from your current GPS location t o a POI, do the
following:
1. Touch
2. Select a POI category.
3. Select whether you would like to to search around the
Current GPS Location, the Current Map Location, or a City
Center.
4. (Optional) If you chose City Center in step 3, enter the
first few letters of the city, then select it from the list by
touching the numbered button (for example,
beside the city name.
from the Destination Menu.
)
30
Page 32
FIDELIX User Guide
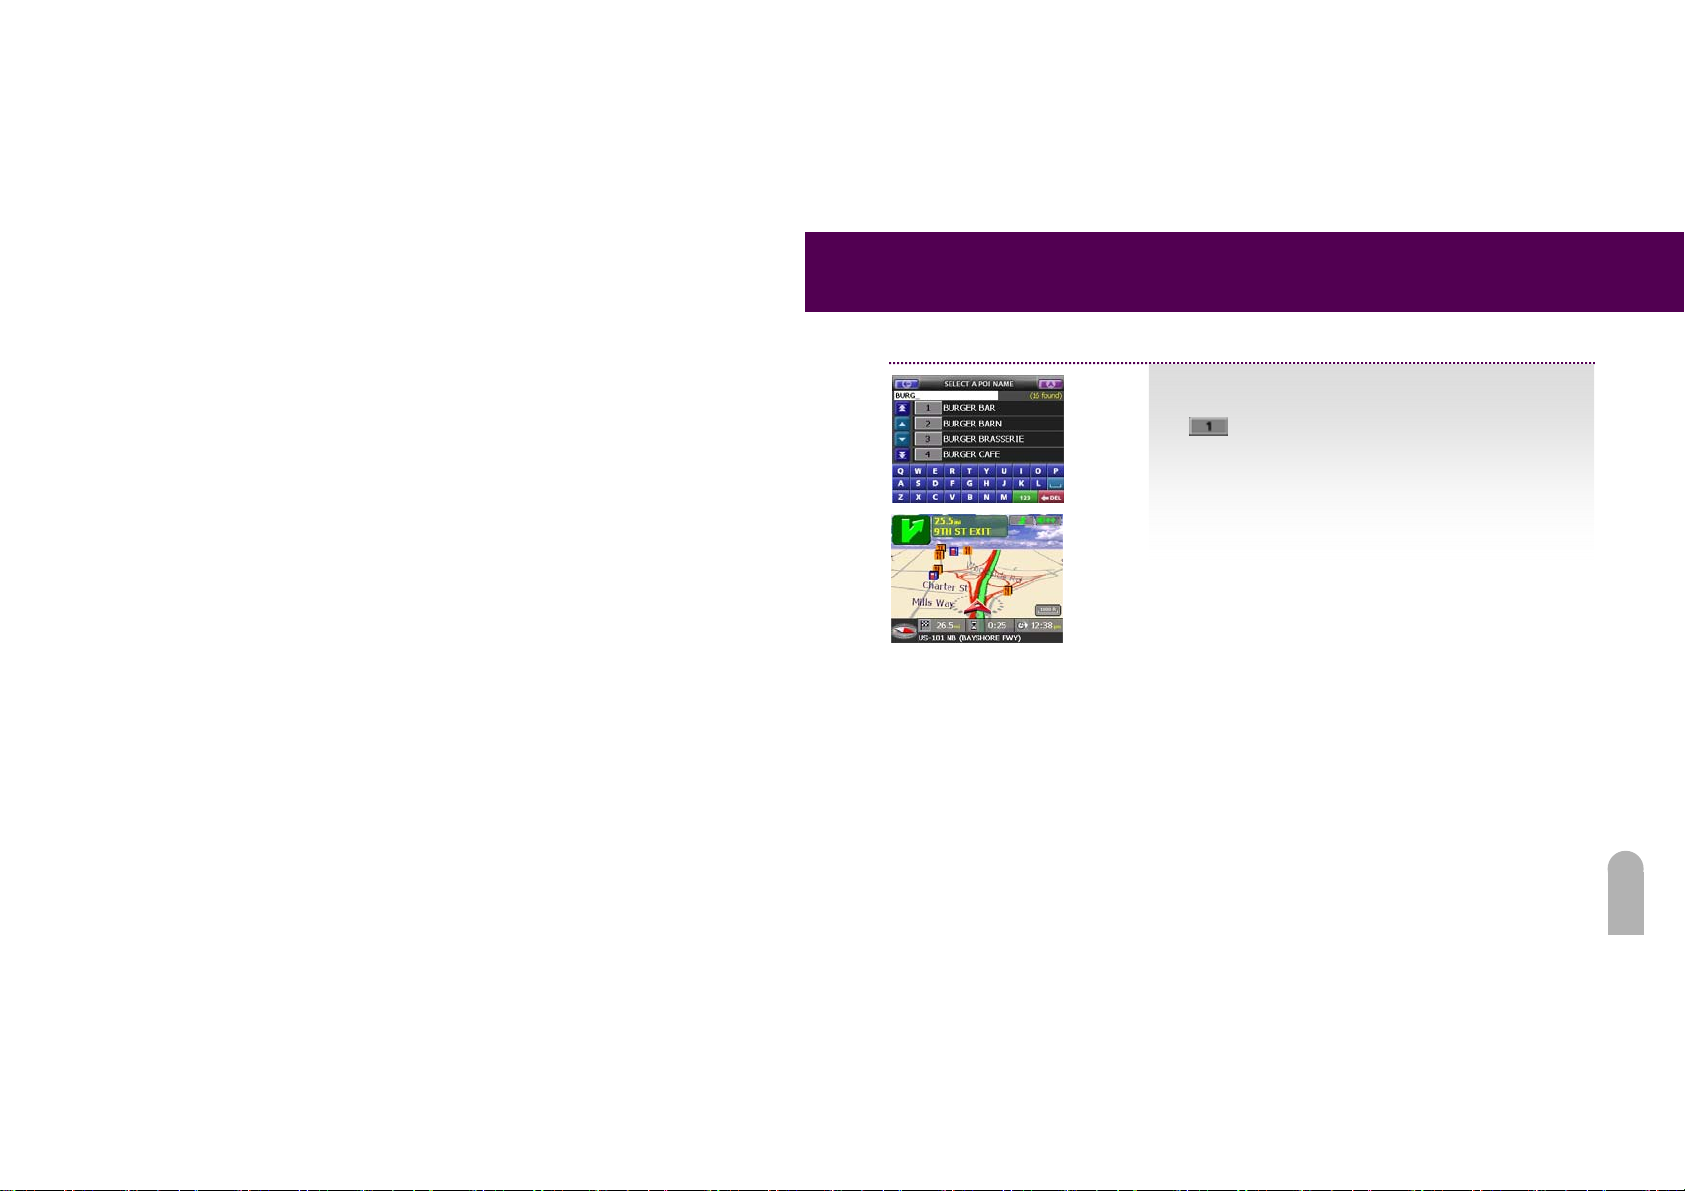
5. Enter the first few letters of the POI, then select it from
the list by touching the numbered button (for example,
) beside the POI name.
* Please be sure to enter the first few letters as the initial
list will not show all pos sible choices.
6. Start driving!
31
Page 33
FIDELIX User Guide
Find a Location on the Map
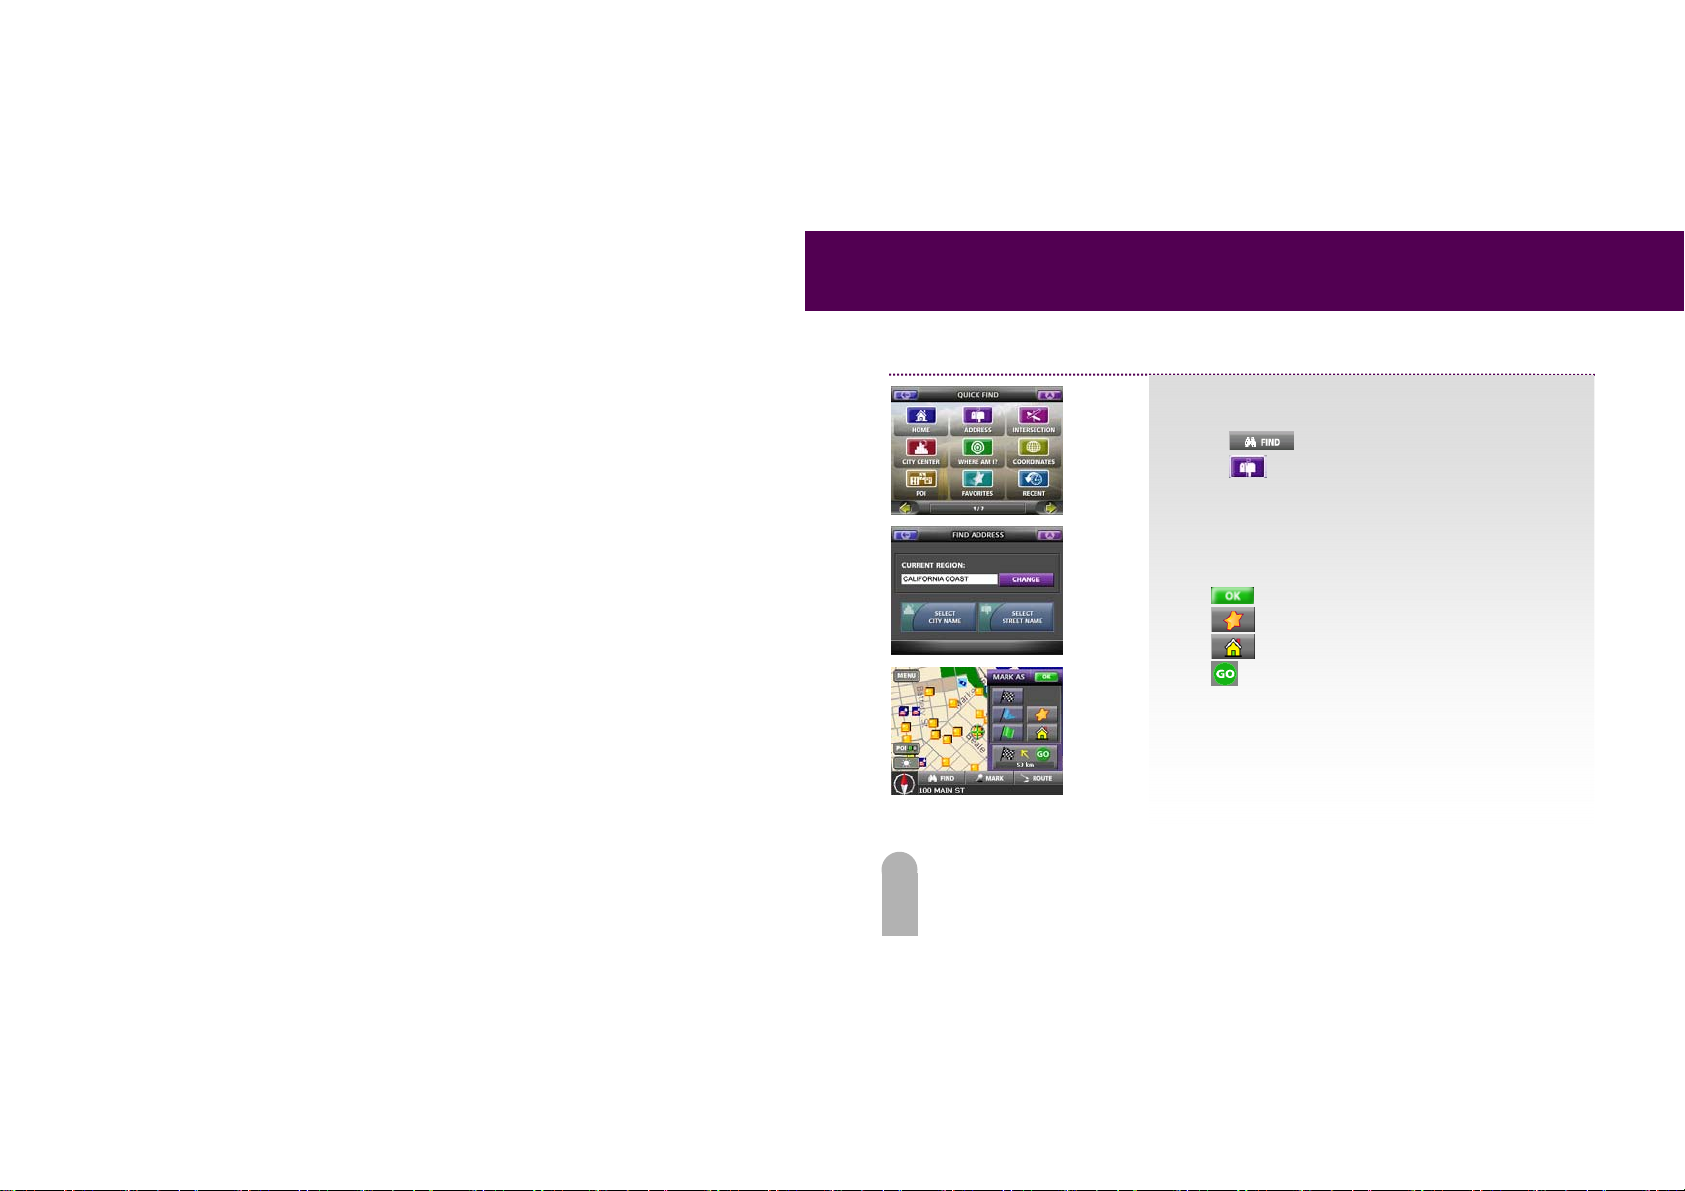
To locate a place in Explore Mode, do the following:
1. Touch
2. Touch
address.
3. The map of the location and the Mark As Menu are the n
displayed.
From here you can:
Touch
Touch
Touch
Touch
current GPS location.
To set the location as the origin, waypoint, or destination of a
route, see section 6 “Plan a Simple Route”.
to activate the Quick Find Menu.
from the Quick Find Menu and enter the
to view the map.
to save the location as a favorite point.
to set the location as your Home.
to create a route to the location from your
32
Page 34
Plan a Simple Route
FIDELIX User Guide
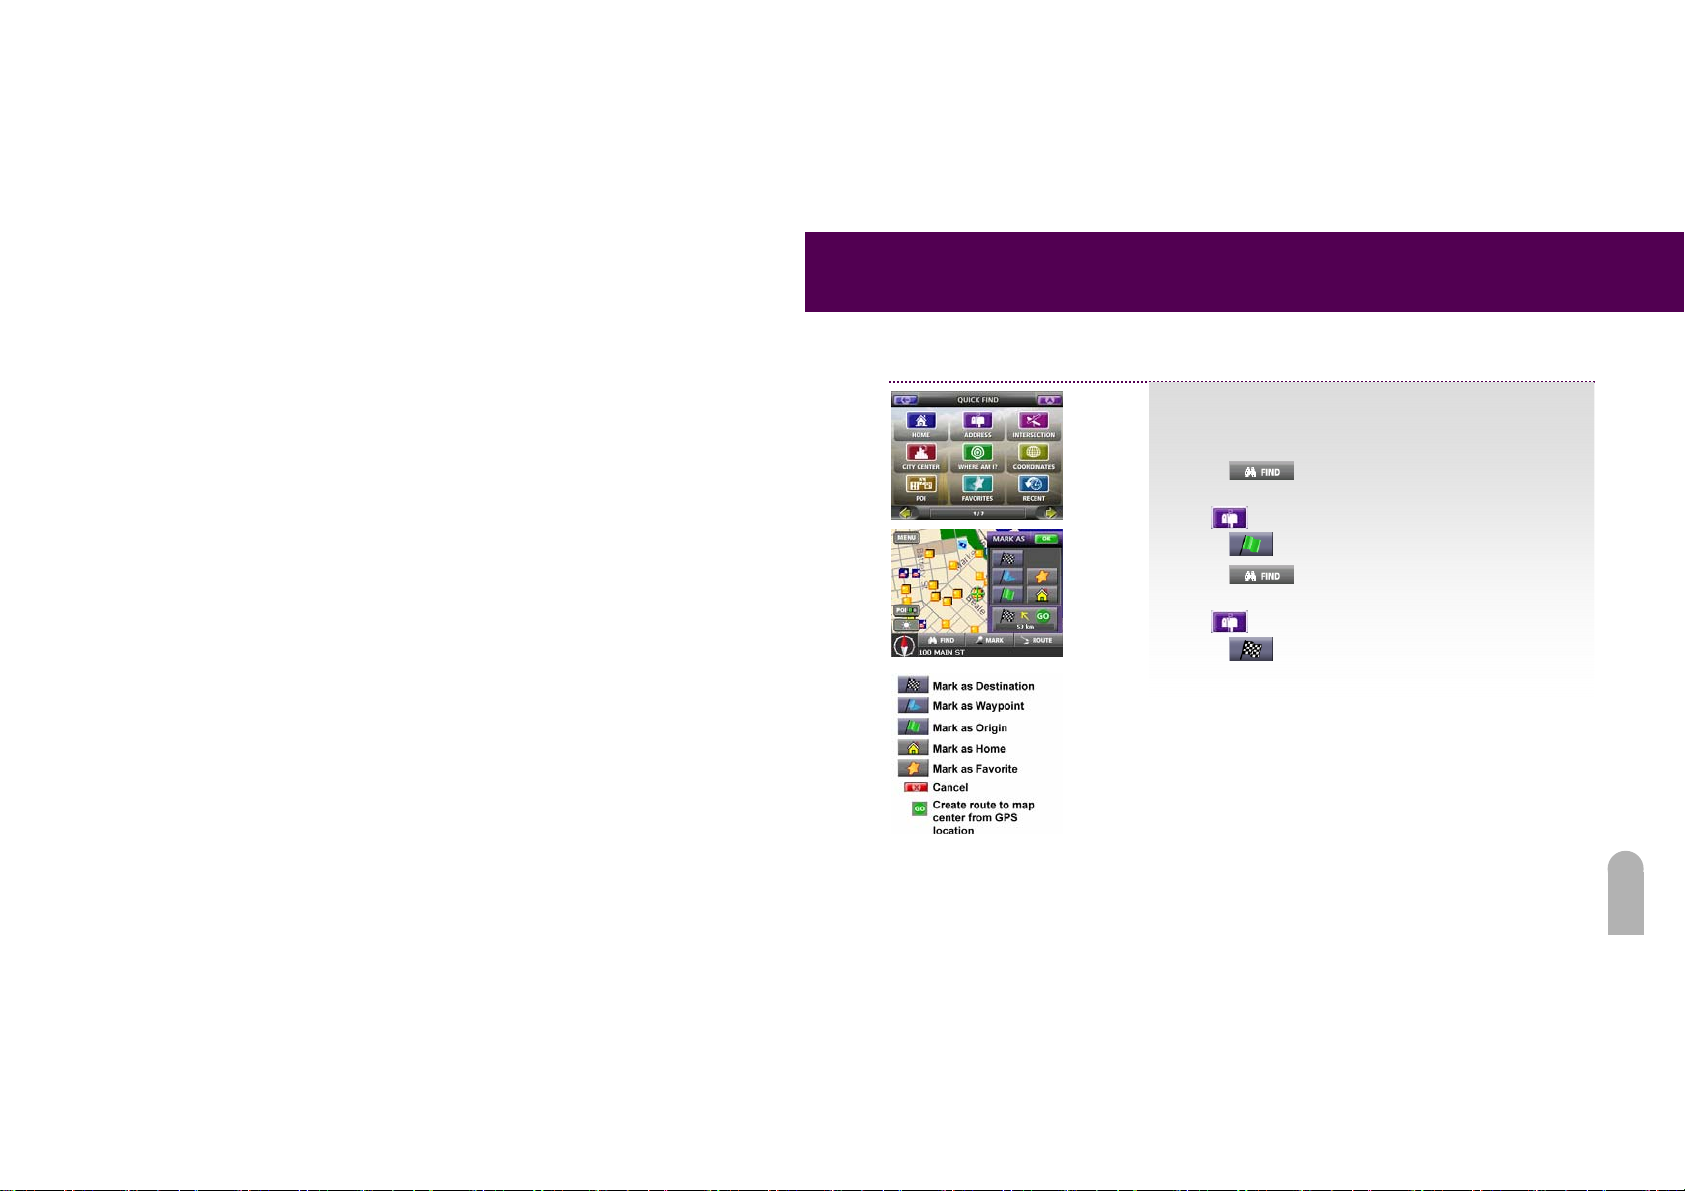
To plan a route by entering the origin and destination (and/or
waypoint), do the following:
1. Touch
Find Menu.
Touch
2. Touch
3. Touch
Find Menu.
Touch
4. Touch
destination.
from the Explore Mode to open the Quick
to enter the origin address.
in the Mark As Menu to mark it as the origin.
from the Explore Mode to open the Quick
to enter the destinat ion address.
in the Mark As Menu to mark it as the
33
Page 35
FIDELIX User Guide
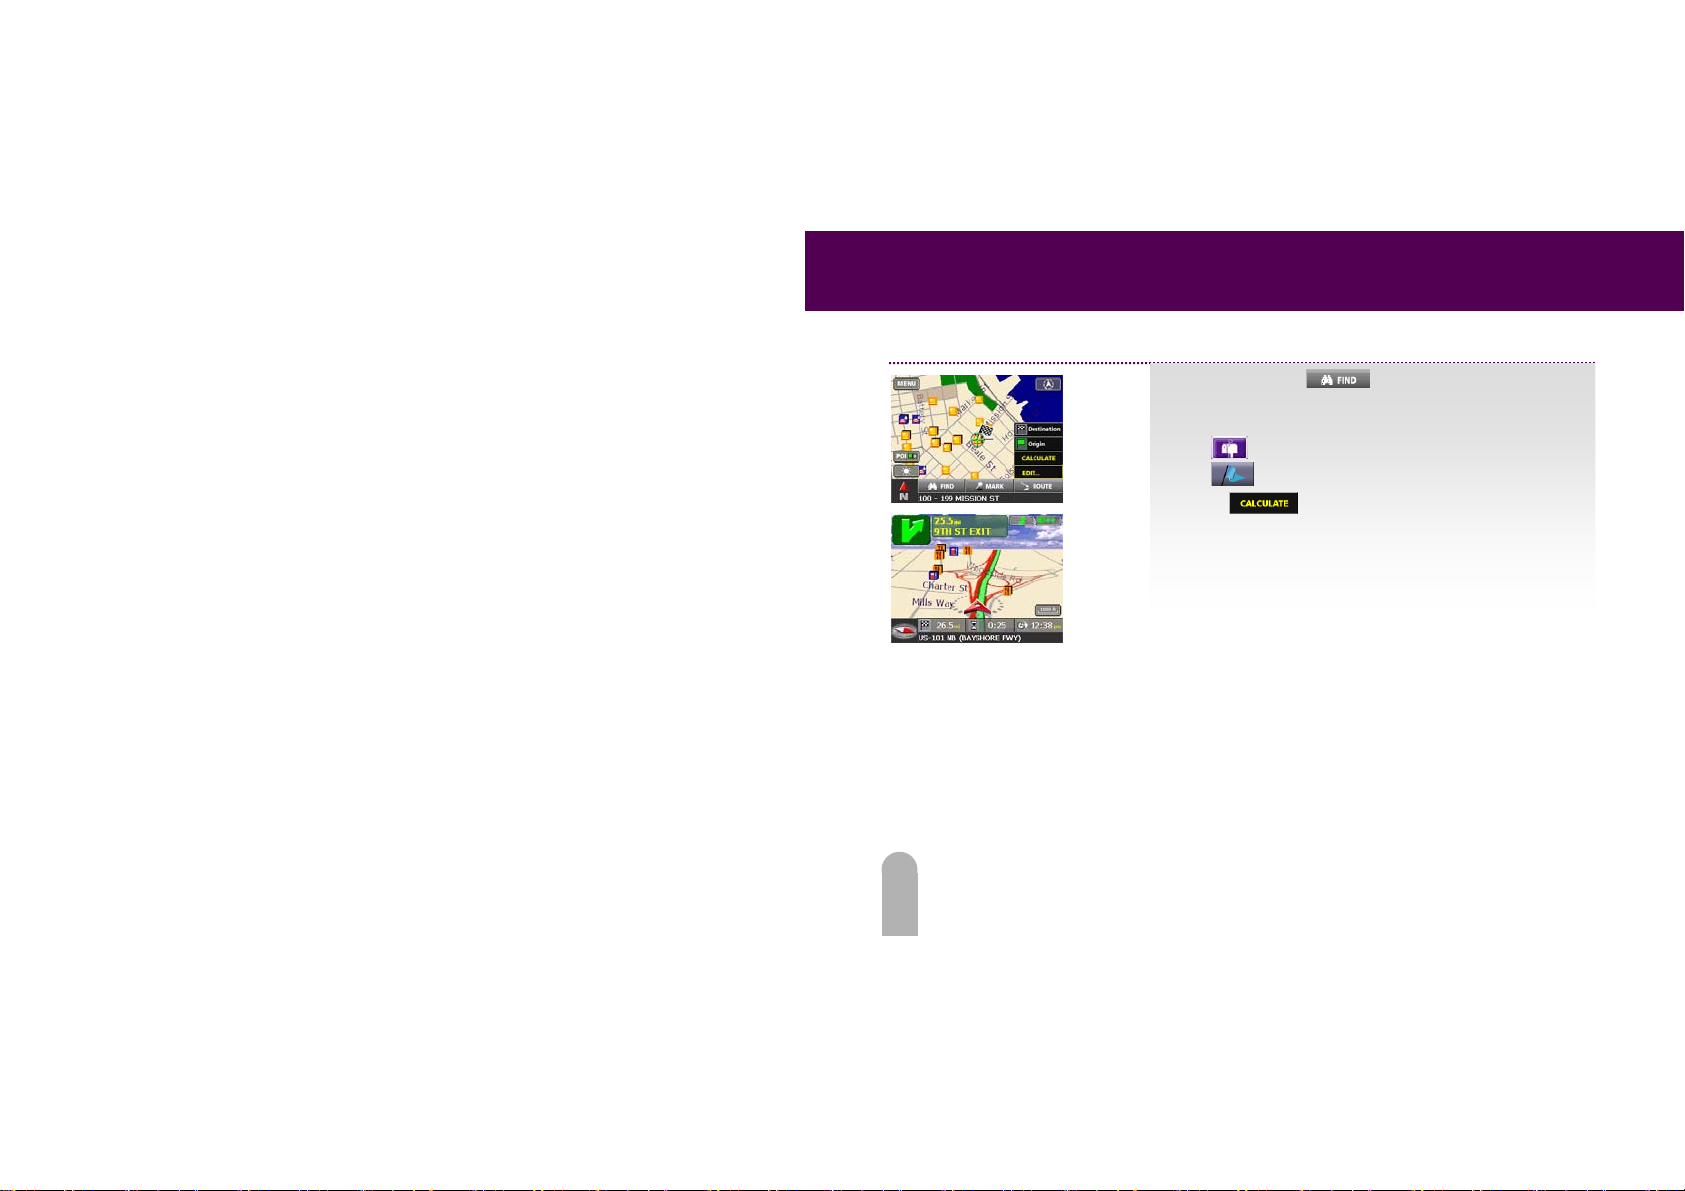
5. (Optional) Touch
enter a waypoint. A waypoint is a point between the
origin and destination.
Touch
Touch
6. Touch
7. Start driving!
and enter the waypoint address.
in the Mark As Menu to mark it as a waypoint..
to create the route.
from the Explore Mode to
34
Page 36
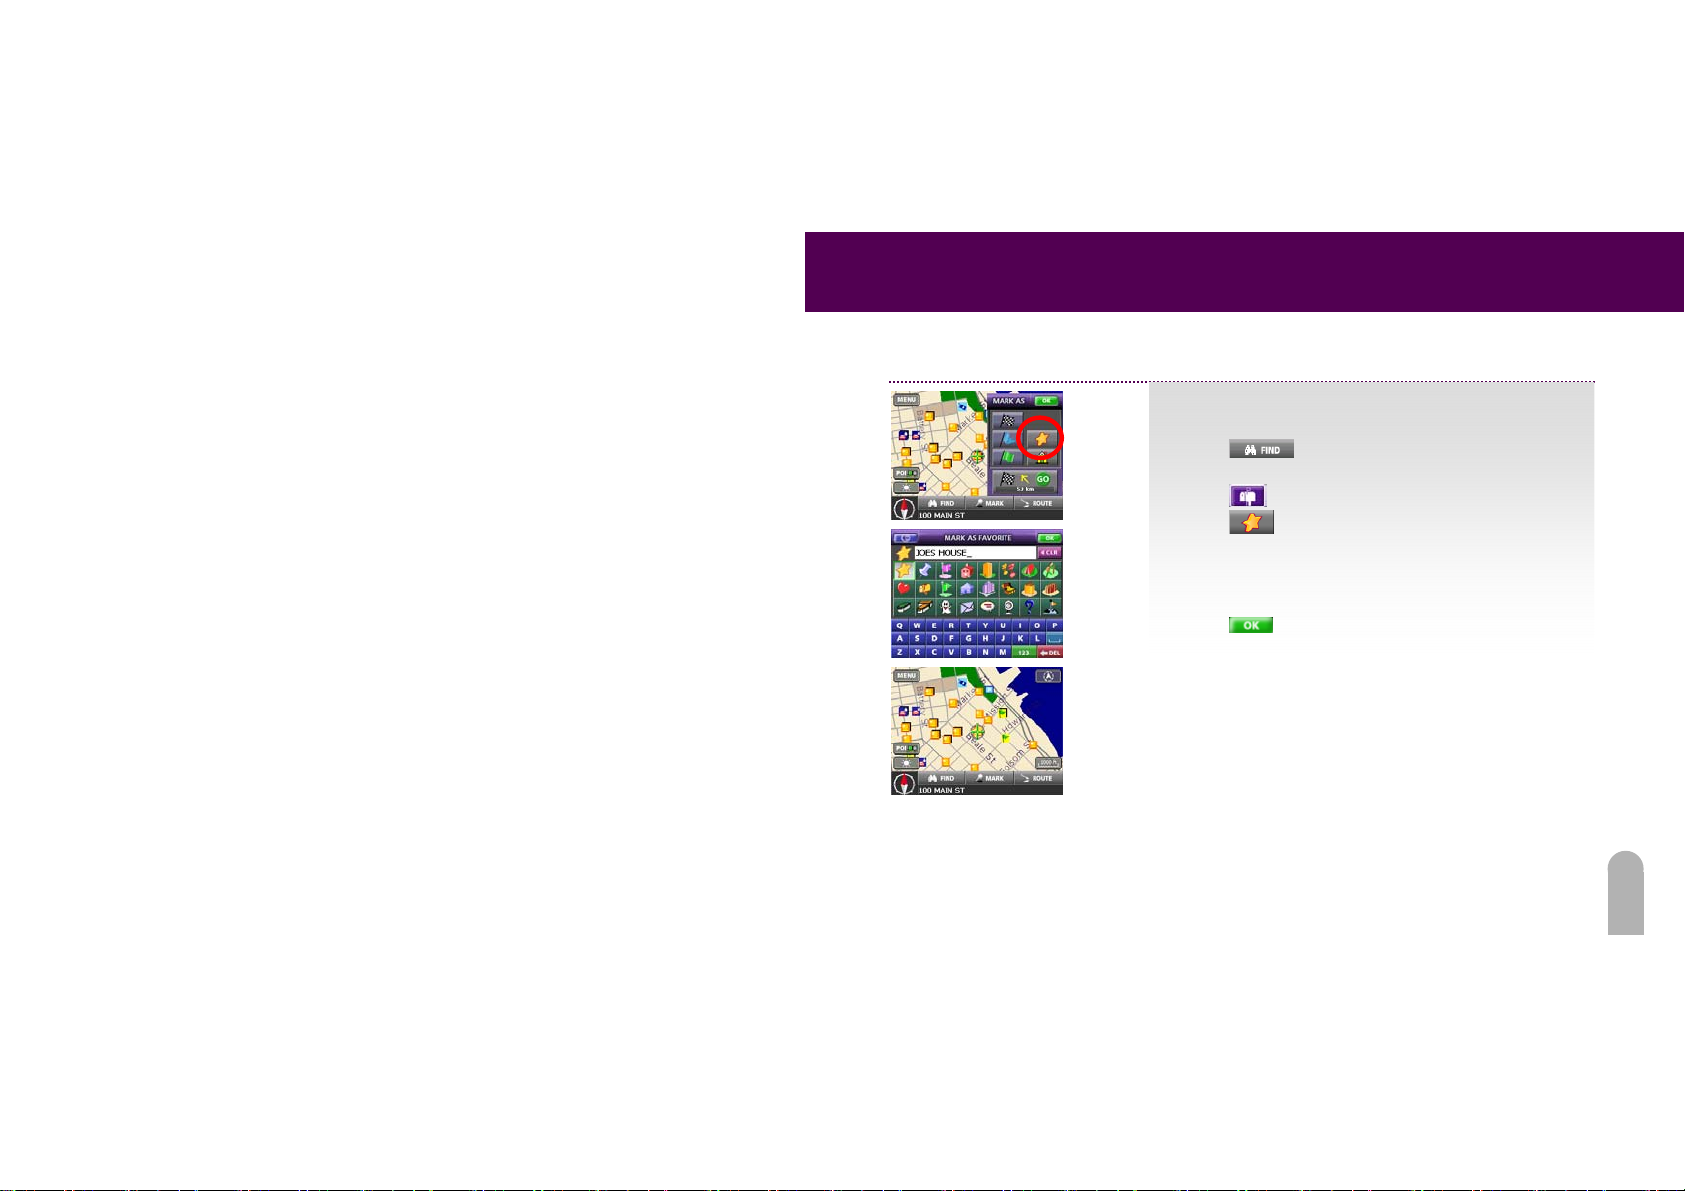
Save a Location as a Favorite
To save a location as a Favorite point:
1. Touch
location.
2. Touch
3. Touch
point.
4. Select the icon you would like and enter a name for the
point.
5. Touch
FIDELIX User Guide
from the Explore Mode to enter the
and enter the address.
in the Mark As Menu to mark it as a favorite
to save the point.
35
Page 37
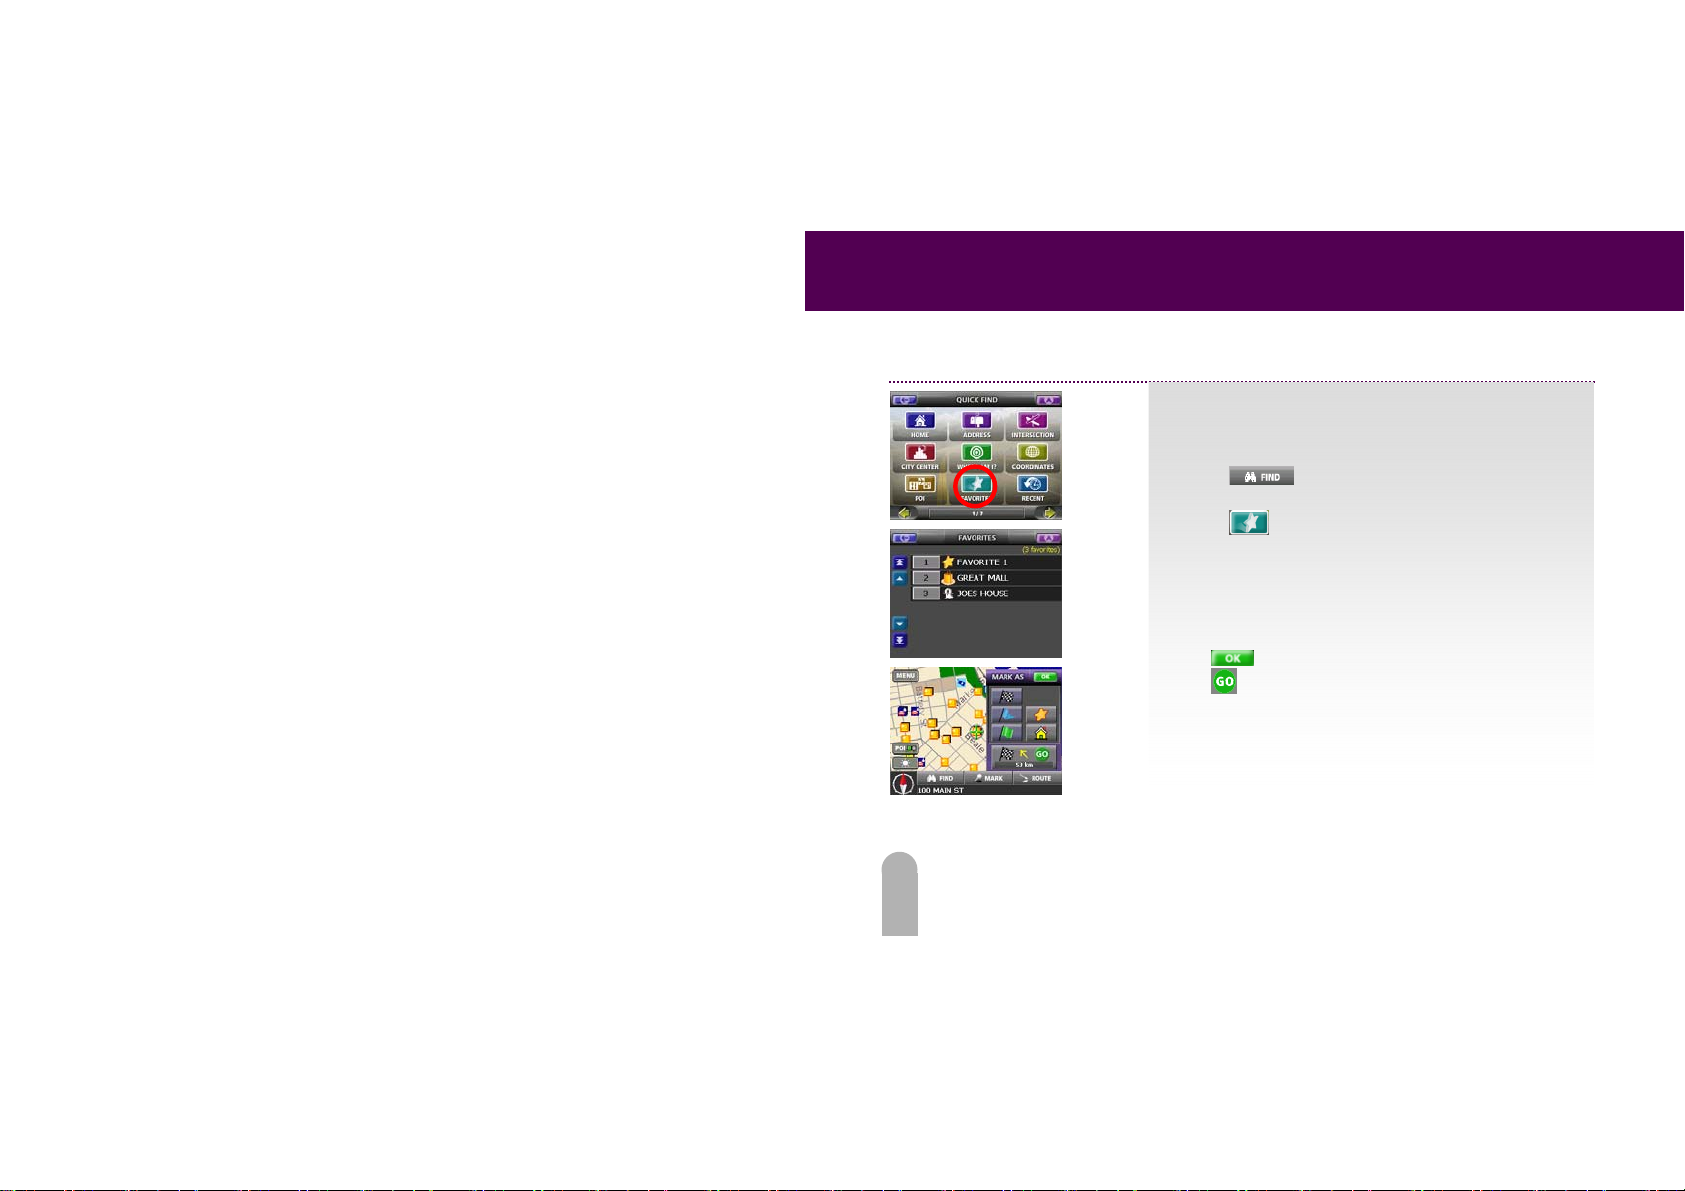
FIDELIX User Guide
Find a Favorite Location
To find a Favorite point you have previously saved:
1. Touch
Find Menu.
2. Touch
3. Select a Favorite point. The location will be displayed on
the map.
From here you can also:
Touch
Touch
current GPS location.
from the Explore Mod e to g o to the Quick
to show the list of Favorites.
to view more of the map.
to create a route to the location from your
36
Page 38
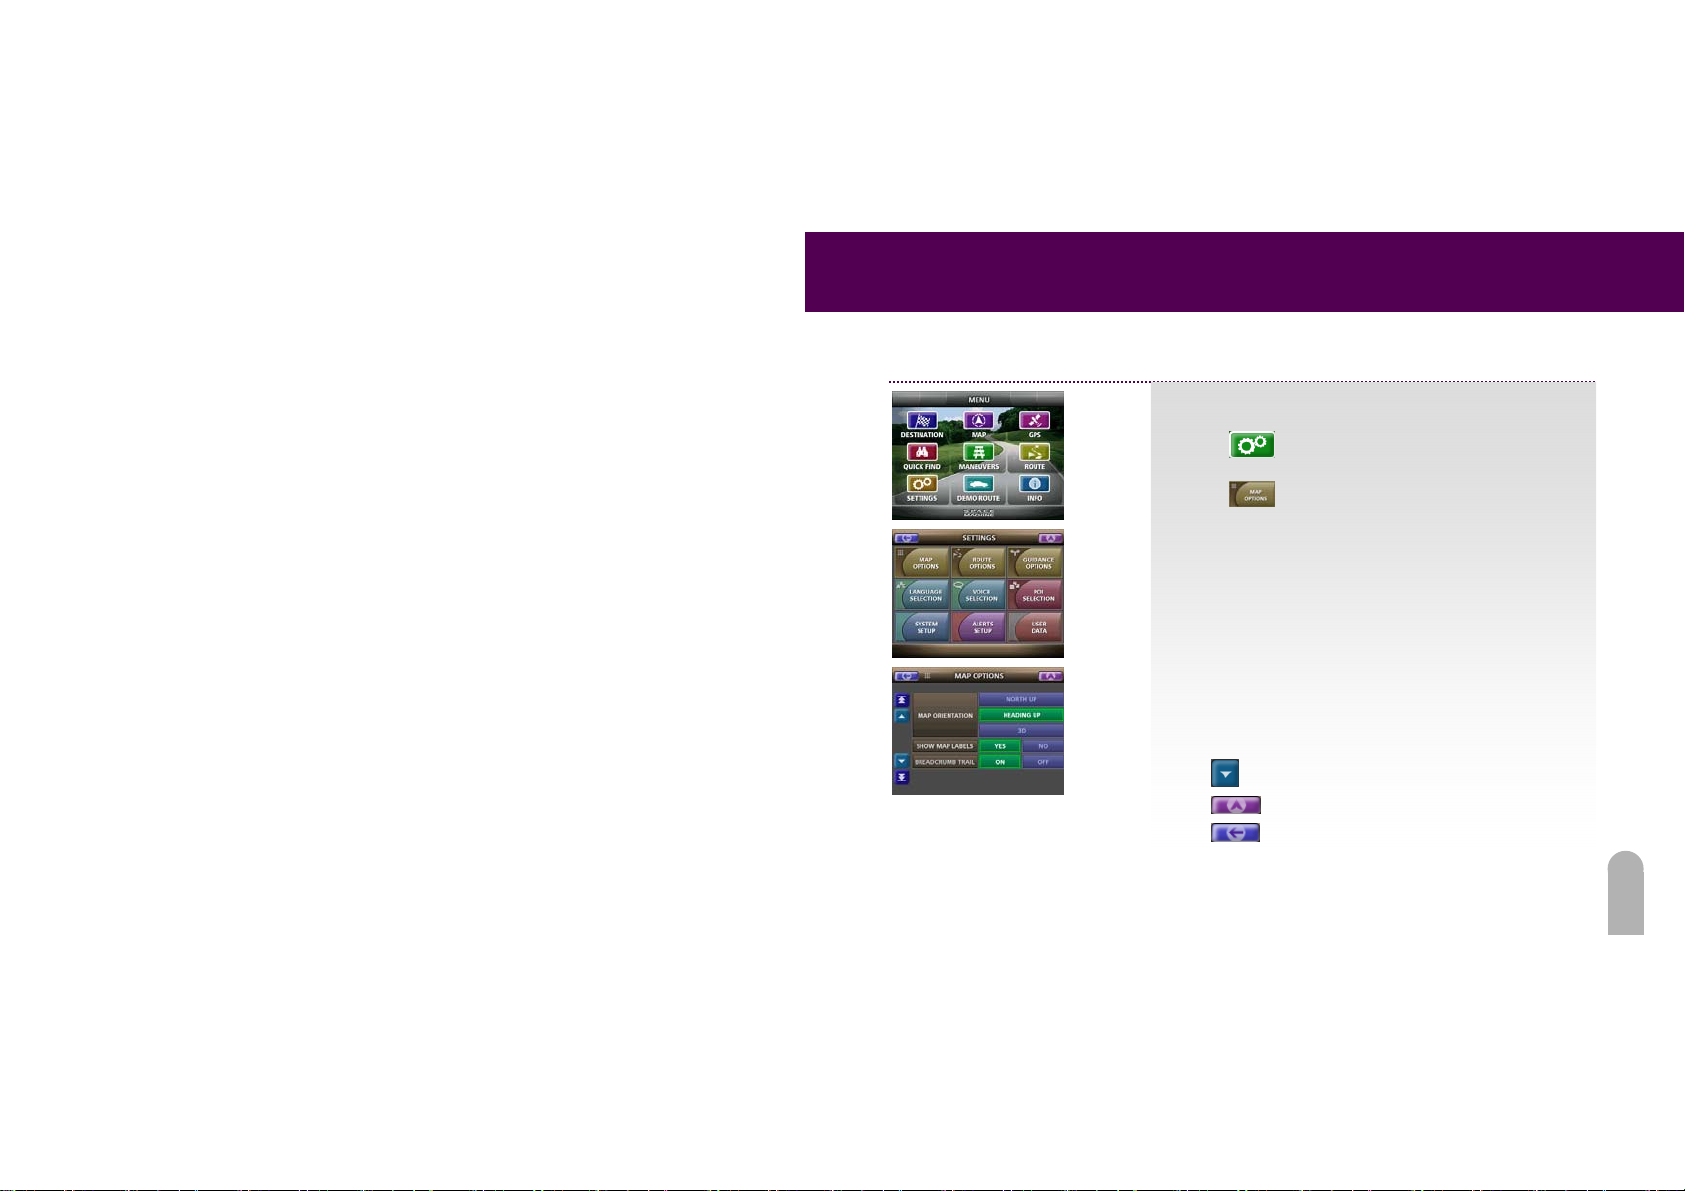
Configure Map Options
FIDELIX User Guide
To configure your map display options:
1. Touch
Menu.
2. Touch
3. Touch the buttons to configure the following settings:
- Map Orientation
map display.
- Show Map Labels
on map display.
- Breadcrumb Trail
you have driven so you can retrace your steps.
- Map Display Color
display.
Touch
Touch
Touch
from the Main Menu to see the Settings
from the Settings Menu.
: Determines the default orientation of the
: Determines if street names are labeled
: Determines if PocketMap traces where
: Determines default colors on the map
to scroll down for more options.
to return to the ma p.
to go back to the Setti ng s Menu.
37
Page 39
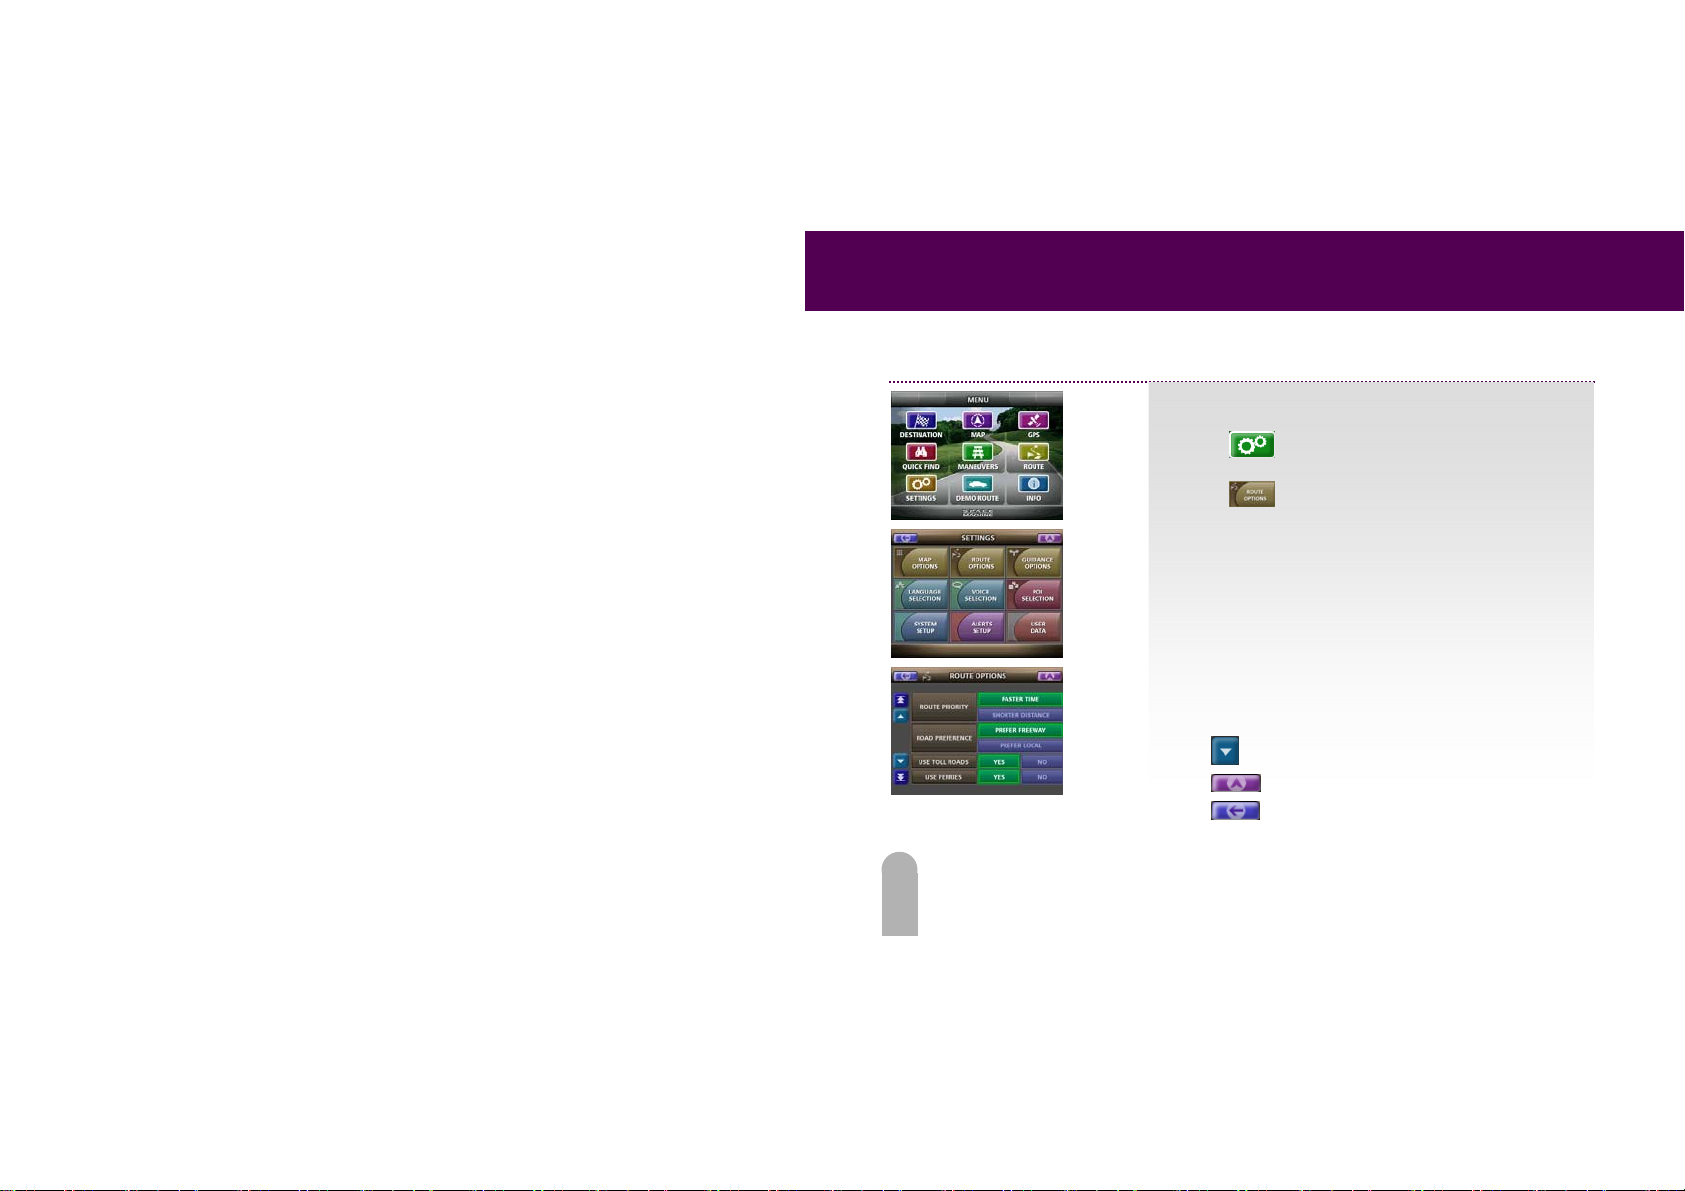
FIDELIX User Guide
Configure Route Options
To configure your routing options:
1. Touch
2. Touch
3. Touch the buttons to configure the following settings:
- Route Priority
- Road Preference
- Use Toll Roads, Use Ferries, Use Car Pool Lanes
- Reduce Turns, Avoid Sharp Turns
Touch
Touch
Touch
from the Main Menu to see the Settings
Menu.
from the Settings Menu.
: Determines whether you prefer routes with
the shortest driving time or with the shortest dri ving
distance.
: Determines whether you prefer routes to
use freeways or local roads.
to scroll down for more options.
to return to the ma p.
to go back to the Setti ng s Menu.
38
Page 40
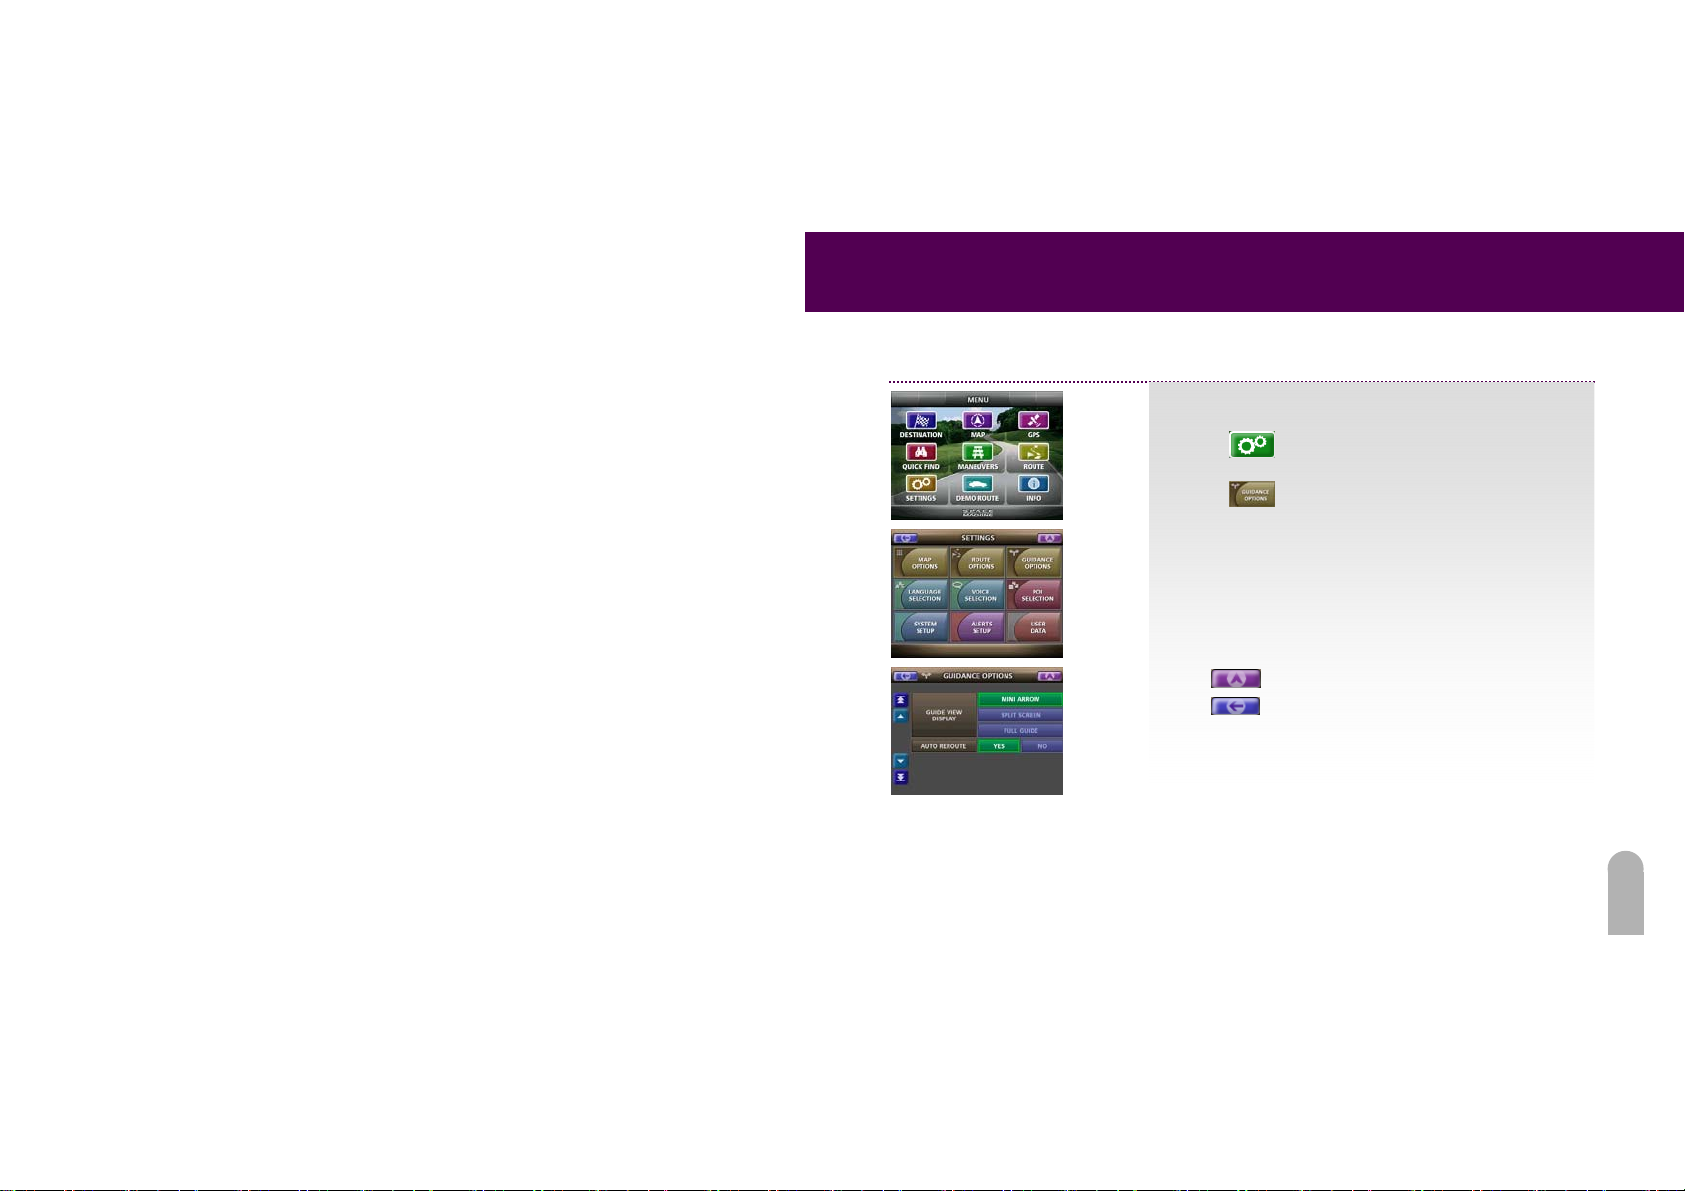
Configure Guidance Options
To configure your Guidance options:
1. Touch
Menu.
2. Touch
3. Touch the buttons to configure the following settings.
- Guidance View Display
are displayed in Guidance Mode.
- Auto Reroute
reroutes if you have gone off route.
Touch
Touch
FIDELIX User Guide
from the Main Menu to see the Settings
from the Settings Menu.
: Determines how guidance arrows
: Determines if PocketMap automatically
to return to the ma p.
to go back to the Setti ng s Menu.
39
Page 41
FIDELIX User Guide
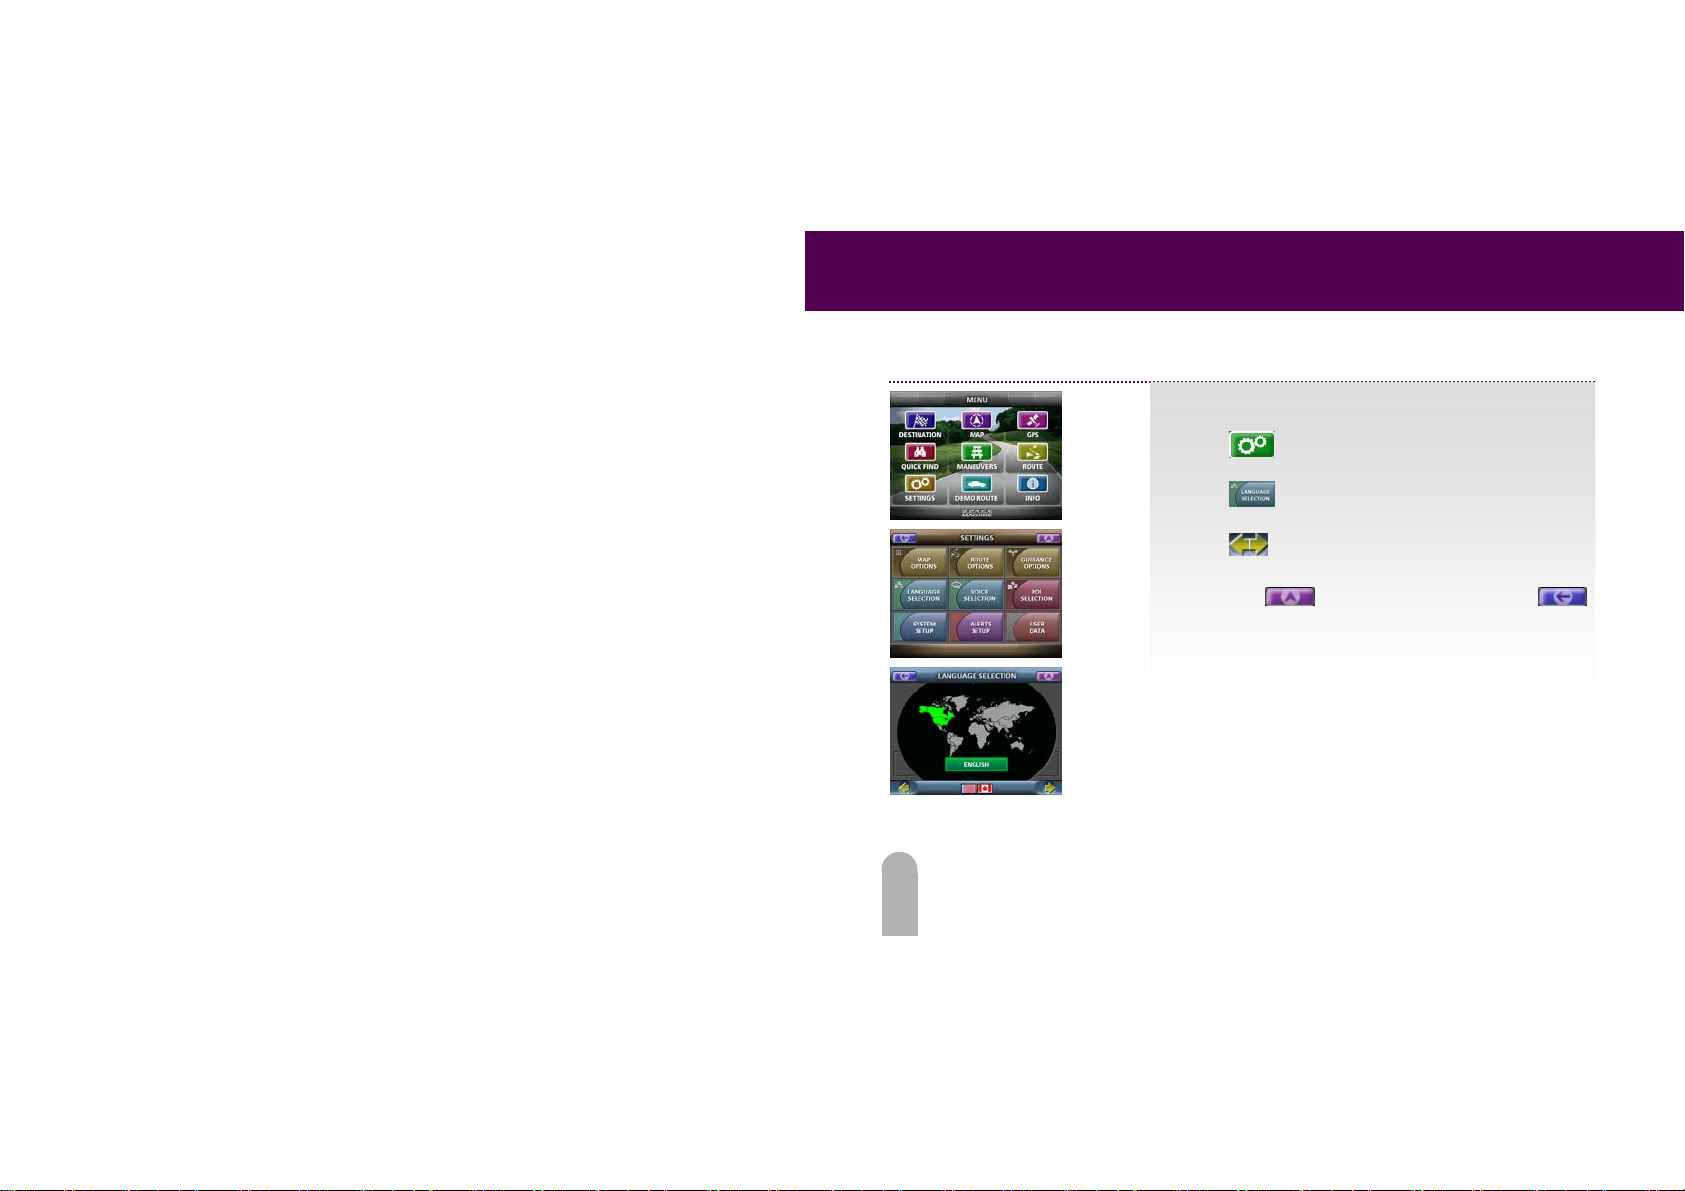
Select a Language
To select your language for the voice prompts:
1. Touch
Menu.
2. Touch
Language Menu.
3. Touch
4. When you have selected the language you would like to
use, touch
to go back to the Settings Menu.
from the Main Menu to activate the Settings
from the Settings Menu to activate the
to select the language
to return to the m a p or touch
40
Page 42
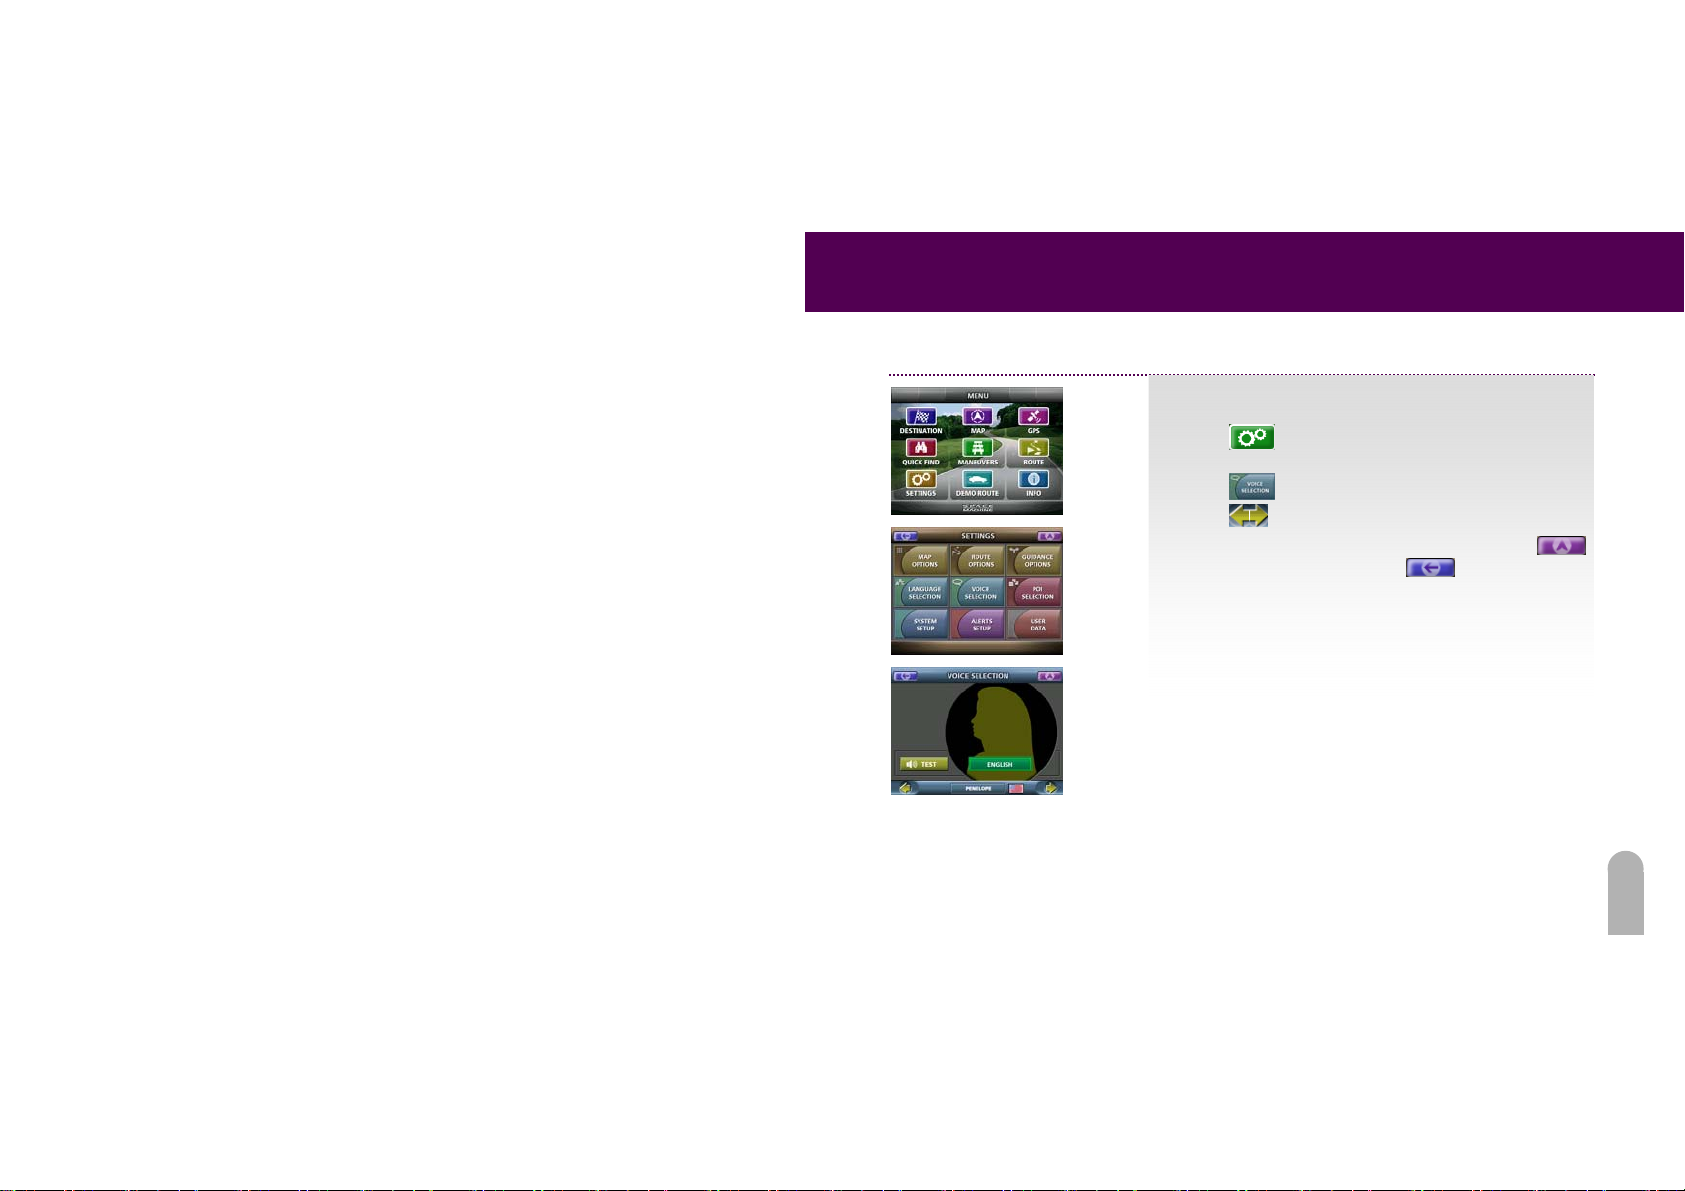
Select a Voice
FIDELIX User Guide
To select a voice for the voice prompts:
1. Touch
Menu.
2. Touch
3. Touch
4. When you have selected the voice you like, touch
to return to the map or touch
Settings Menu.
from the Main Menu to activate the Settings
from the Settings Menu.
to select the voice.
to go back to the
41
Page 43
FIDELIX User Guide
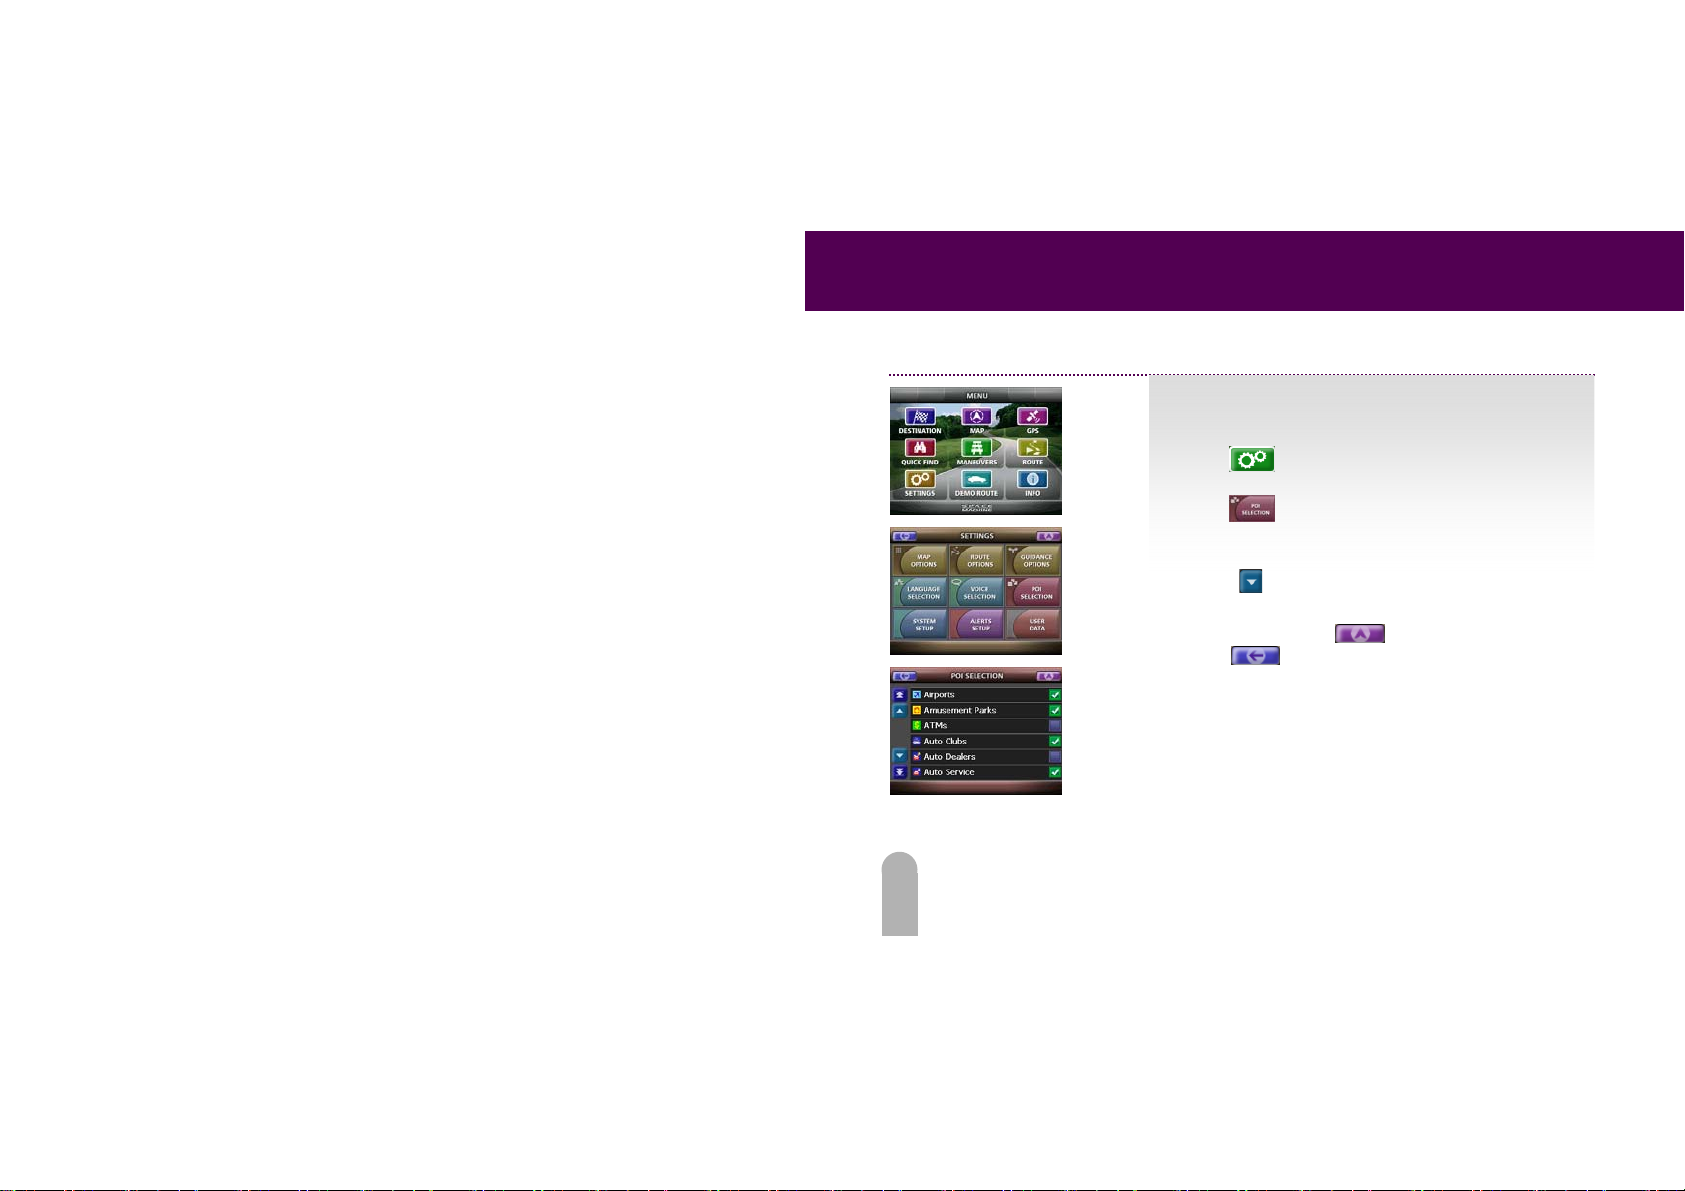
Select POIs to Display on Map
To show or hide specific categories of POI icons on map
display:
1. Touch
Menu.
2. Touch
3. Check the POI categories you want displayed. Uncheck the
POI categories you do not want displayed.
Touch
4. When you have selected all the POI categories you would
like displayed, touch
touch
from the Main Menu to activate the Settings
from the Settings Menu.
to scroll down for more categories.
to return to the map or
to go back to the Settings Menu.
42
Page 44
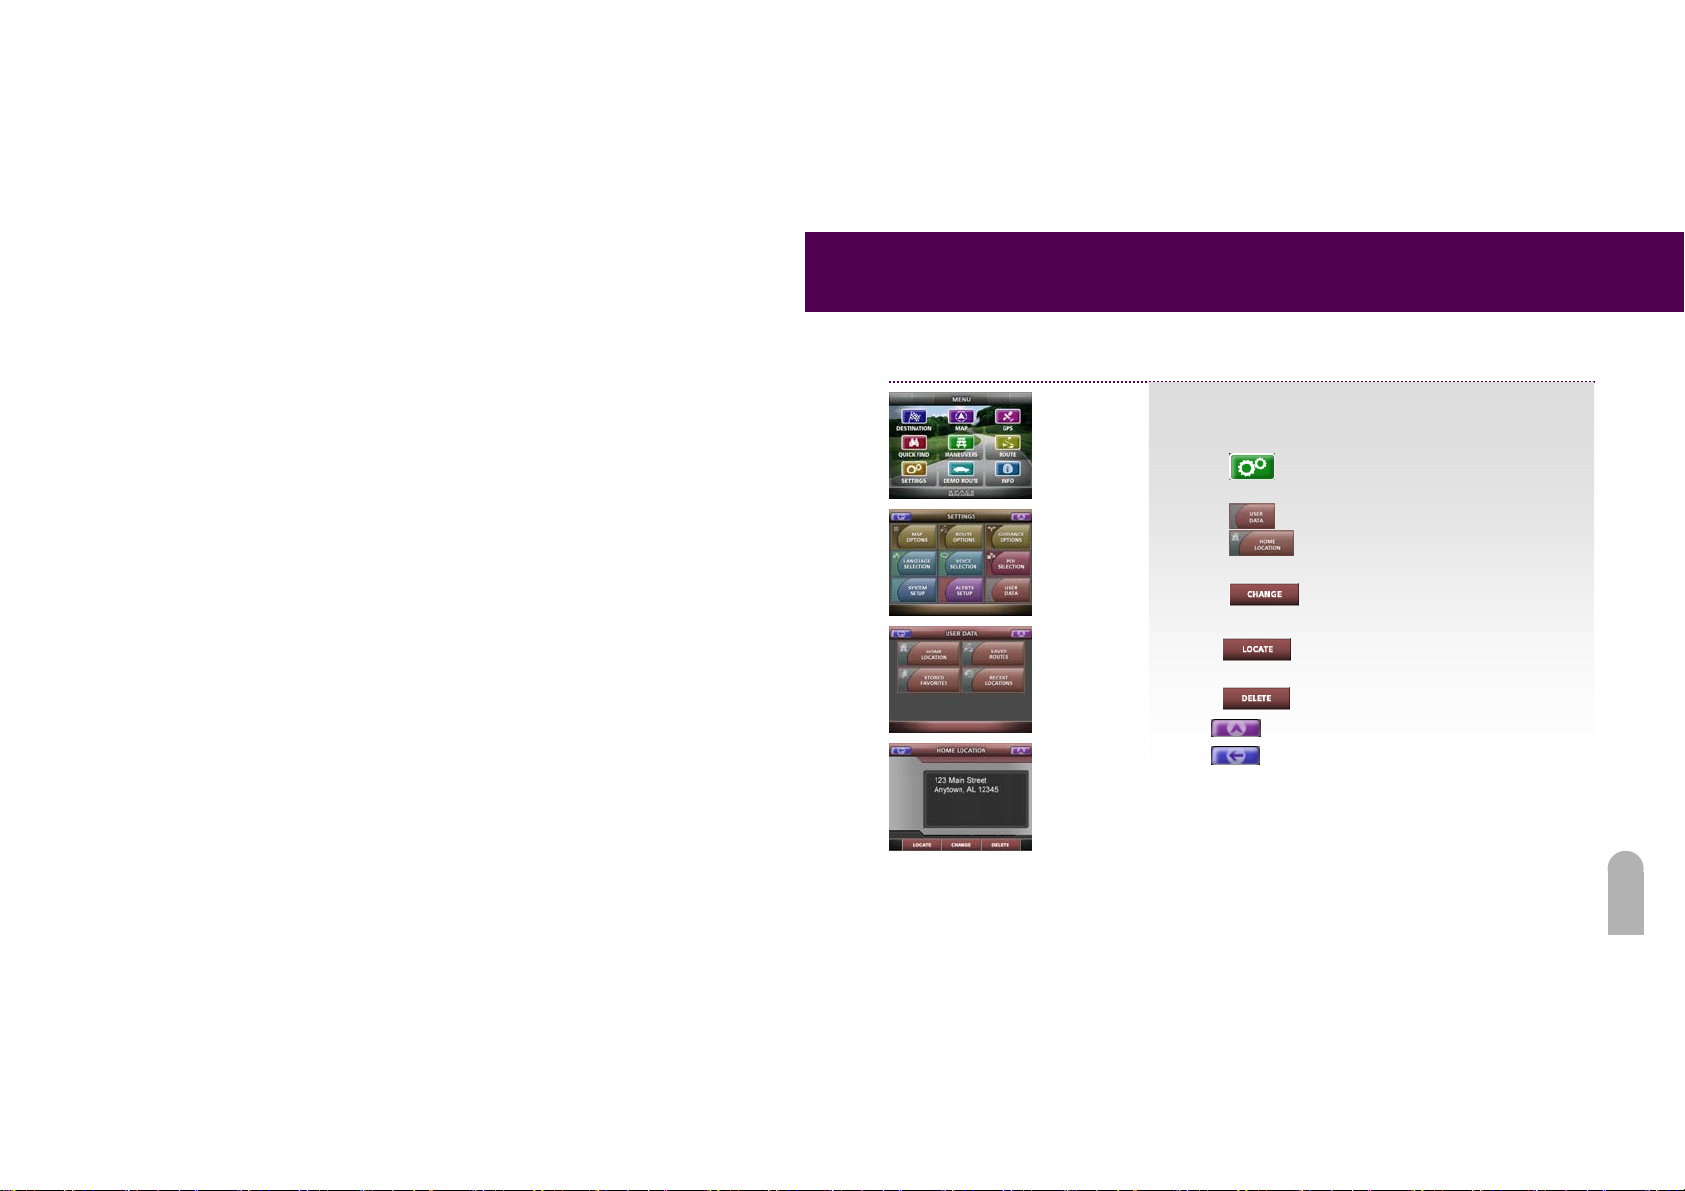
Set Your Home Location
To set your Home location so you can use the Home feature
1. Touch
2. Touch
3. Touch
4. Touch
From here you can also:
- Touch
- Touch
Touch
Touch
FIDELIX User Guide
in the Destination and Quick Find Menus:
from the Main Menu to activate the Settings
Menu.
from the Settings Menu.
from the User Data Menu.
The current Home Location is displayed.
to set a new Home Loca tion.
to view the current home location on
a map.
to delete the location.
to return to the ma p.
to go back to the Setti ng s Menu.
43
Page 45
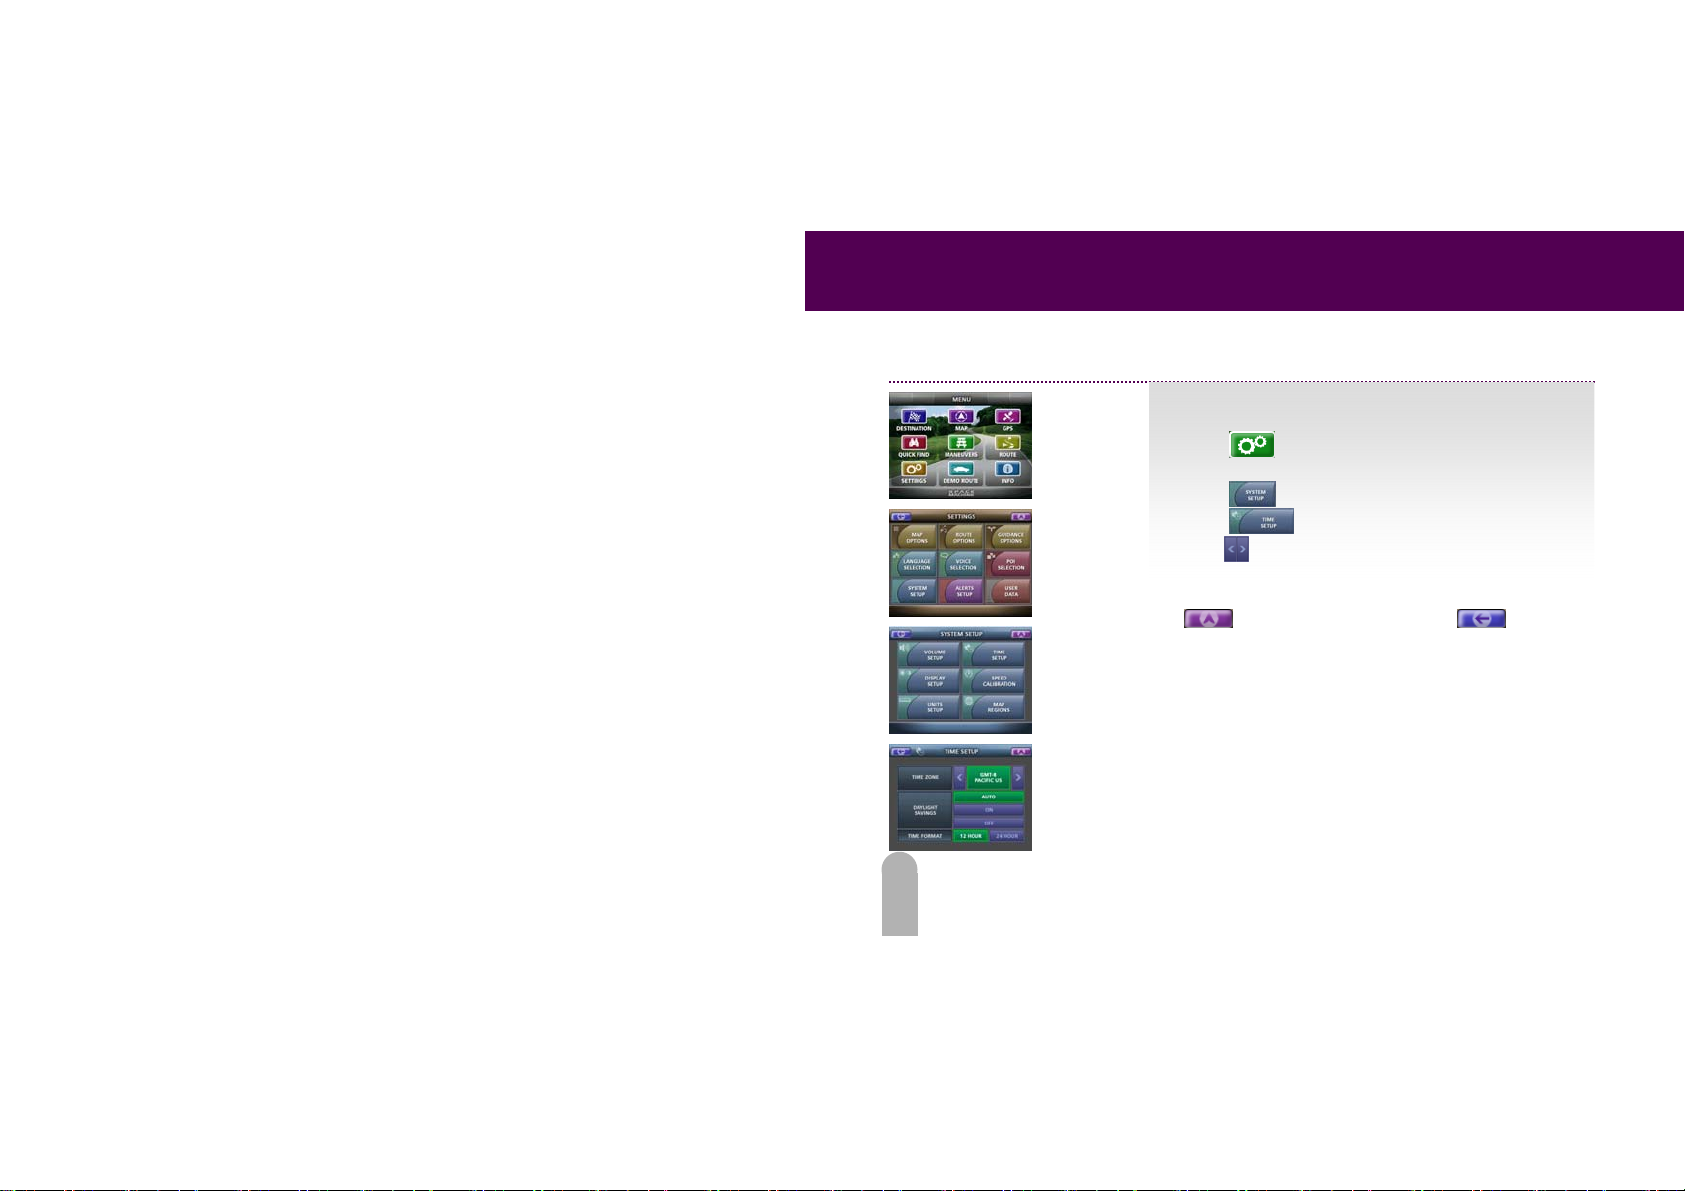
FIDELIX User Guide
Set the Time Zone
To change the current time zone:
1. Touch
Menu.
2. Touch
3. Touch
4.Touch
“Daylight Savings” and “Time Format” options. Once you
have selected the right time zone, you can either touch
to the Settings Menu.
from the Main Menu to activate the Settings
from the Settings Menu.
from the System Setup Menu.
to select the correct time zone. Configure the
to return to the map or touch to go back
44
Page 46
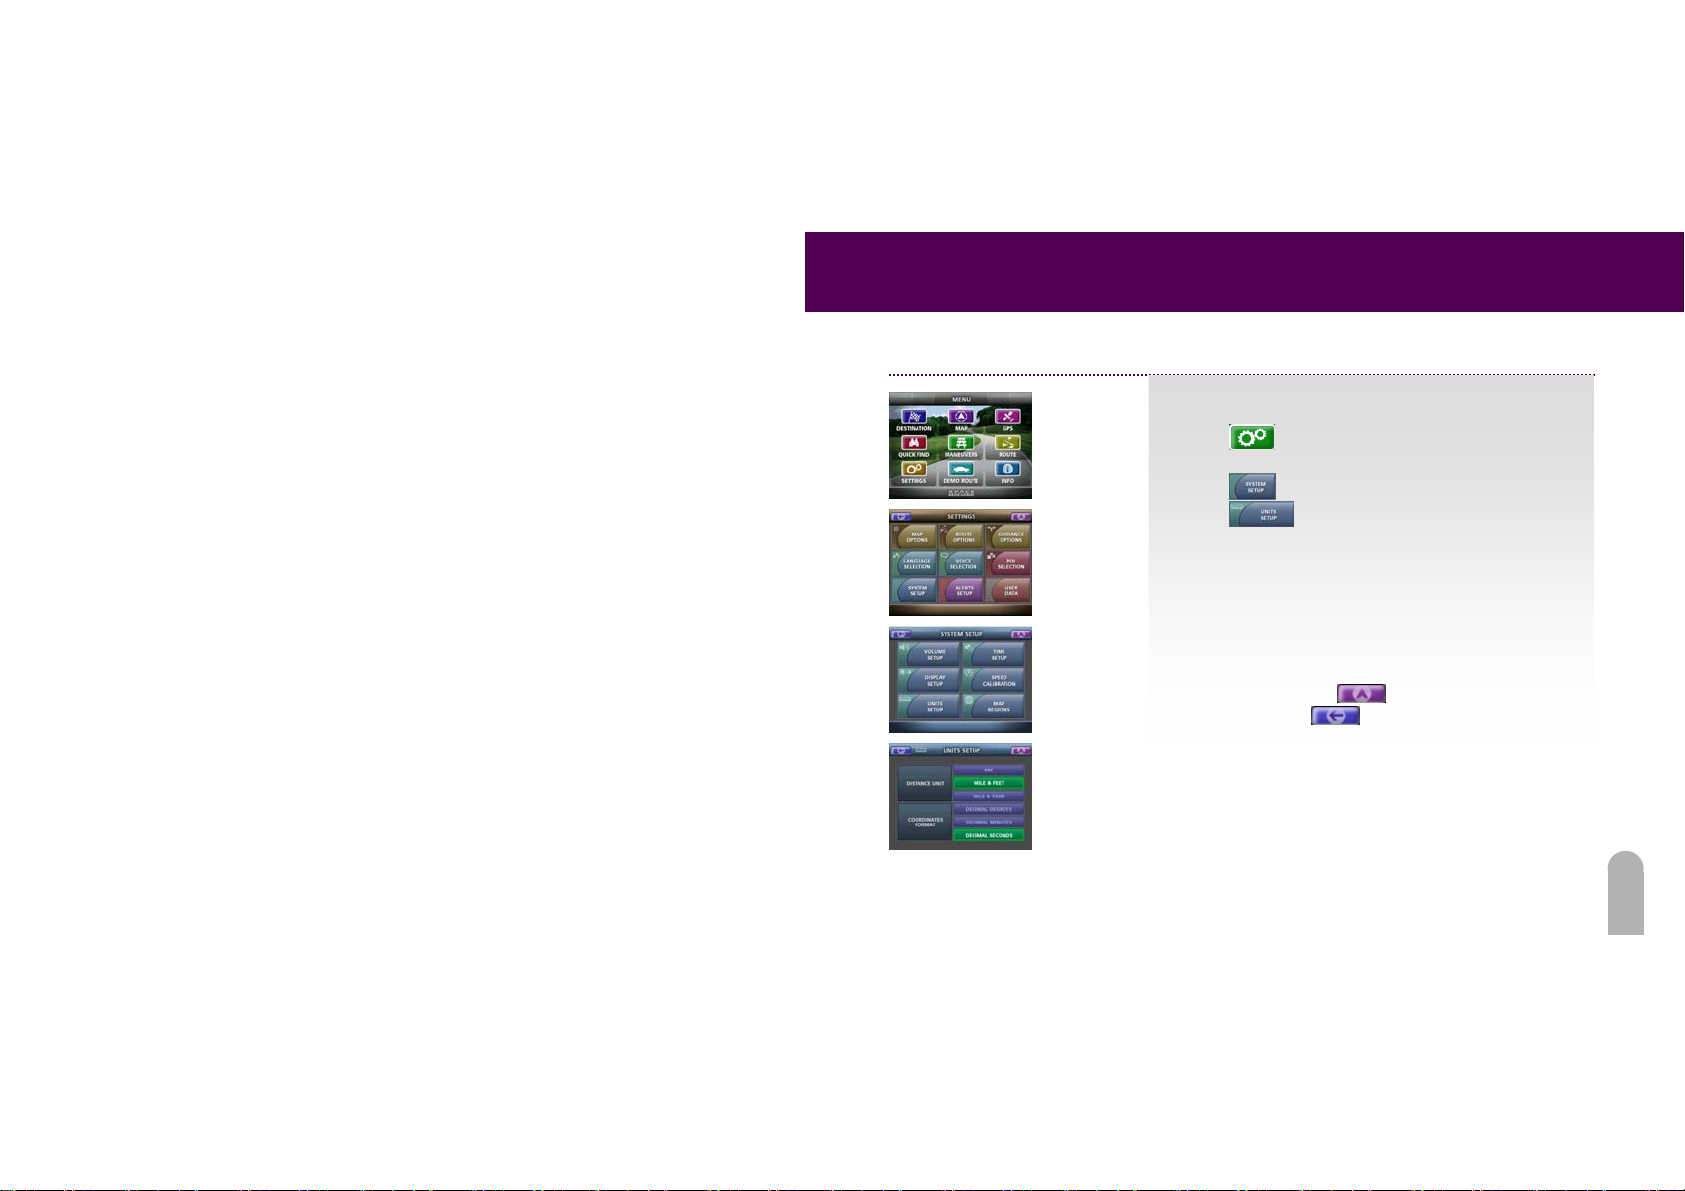
Select Measurement Units
To change the measurement units:
1. Touch
Menu.
2. Touch
3. Touch
4. Touch the buttons to configure the following settings.
- Distance Unit
to determine distance in Guidance Mode.
- Coordinates Format
coordinates are displayed or inputed.
5. When you have finished configuring the measuring units,
you can either touch
or you can touch
FIDELIX User Guide
from the Main Menu to see the Settings
from the Settings Menu.
from the System Setup Menu.
: Determines which measuring system is used
: Determines which format is used when
to return to the map display
ti gi back to th e Settings Menu.
45
Page 47
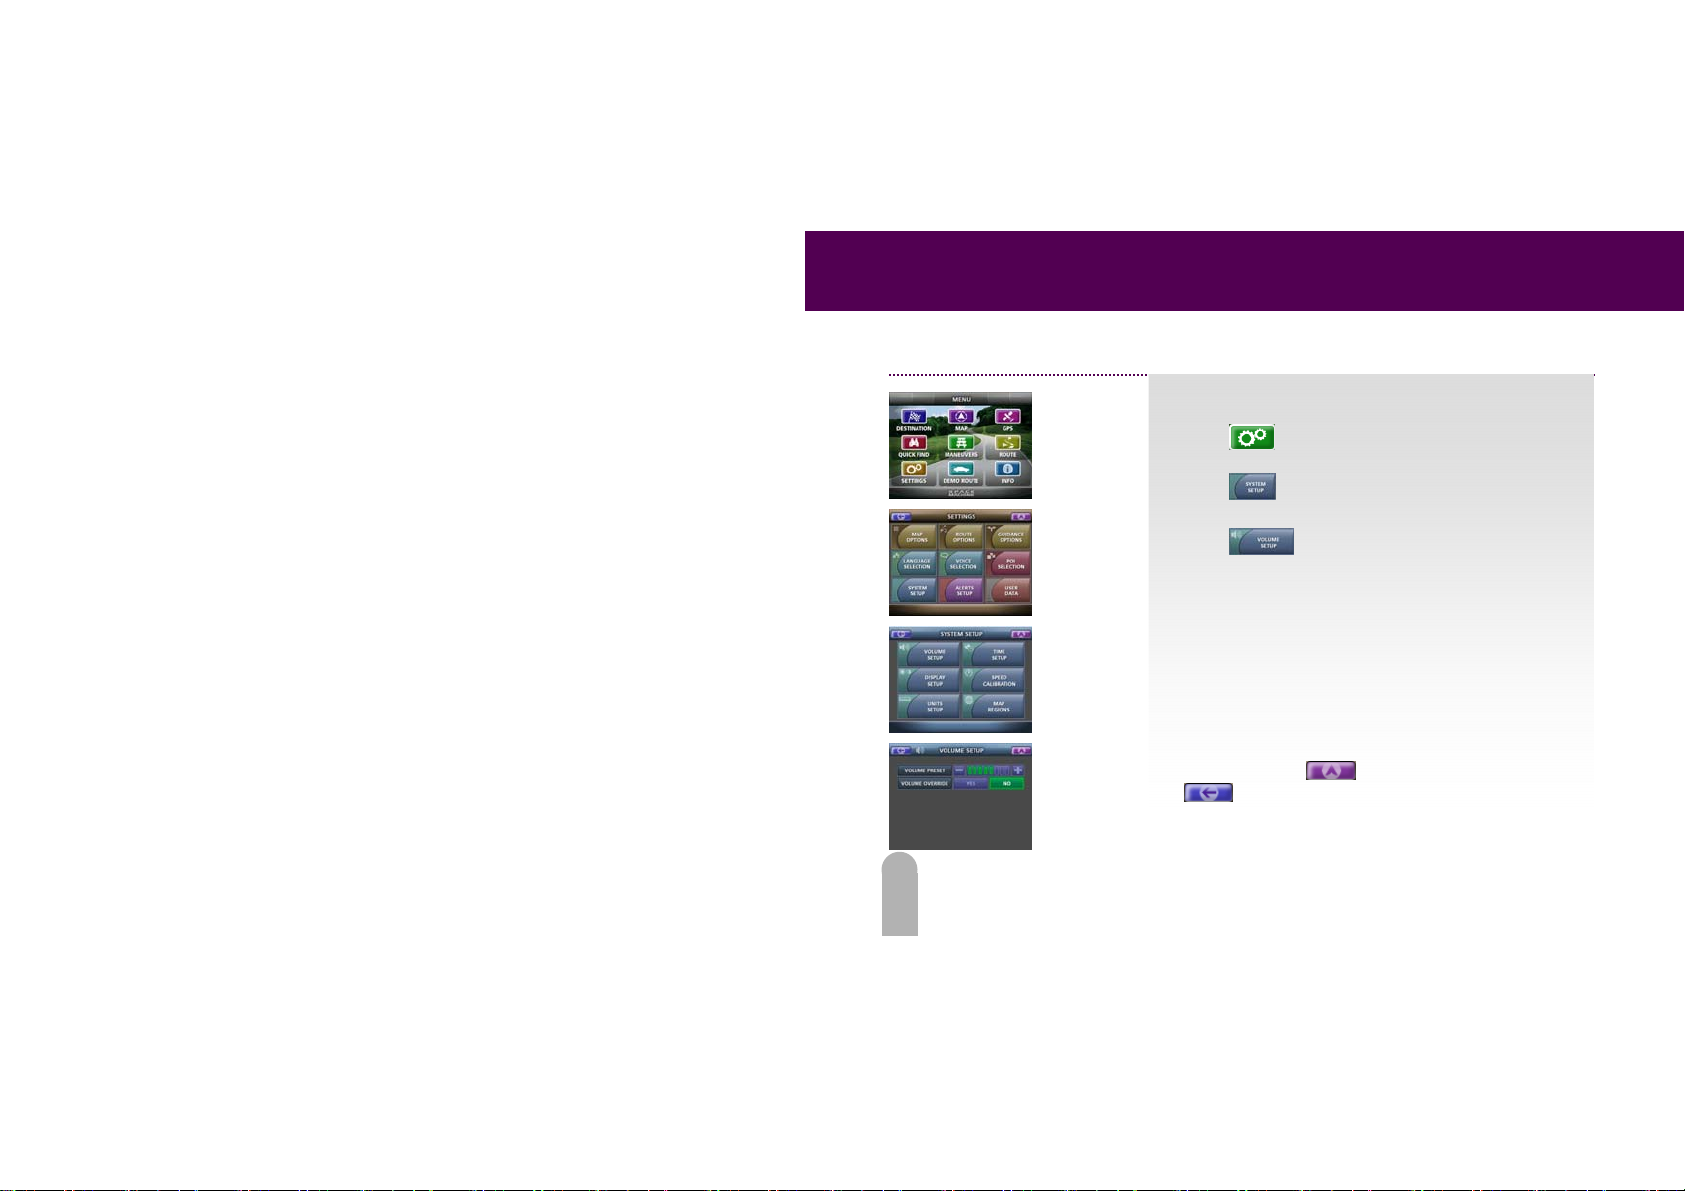
FIDELIX User Guide
Set Application Volume
To set application volume:
1. Touch
Menu.
2. Touch
3. Touch
4. Touch the buttons to configure the following settings.
- Volume Preset: Allows you to set the volume.
- Volume Override: This button allows you to choose
whether PocketMap Navigator overrides the volume of any
other program on the GPS device (such as an mp3 player)
or not.
5. When you are done configuring the volume s ettings, you
can either touch
from the Main Menu to see the Settings
from the Settings Menu.
from the System Setup Menu.
to return to the map or touch
to go back to the Settings Menu.
46
Page 48
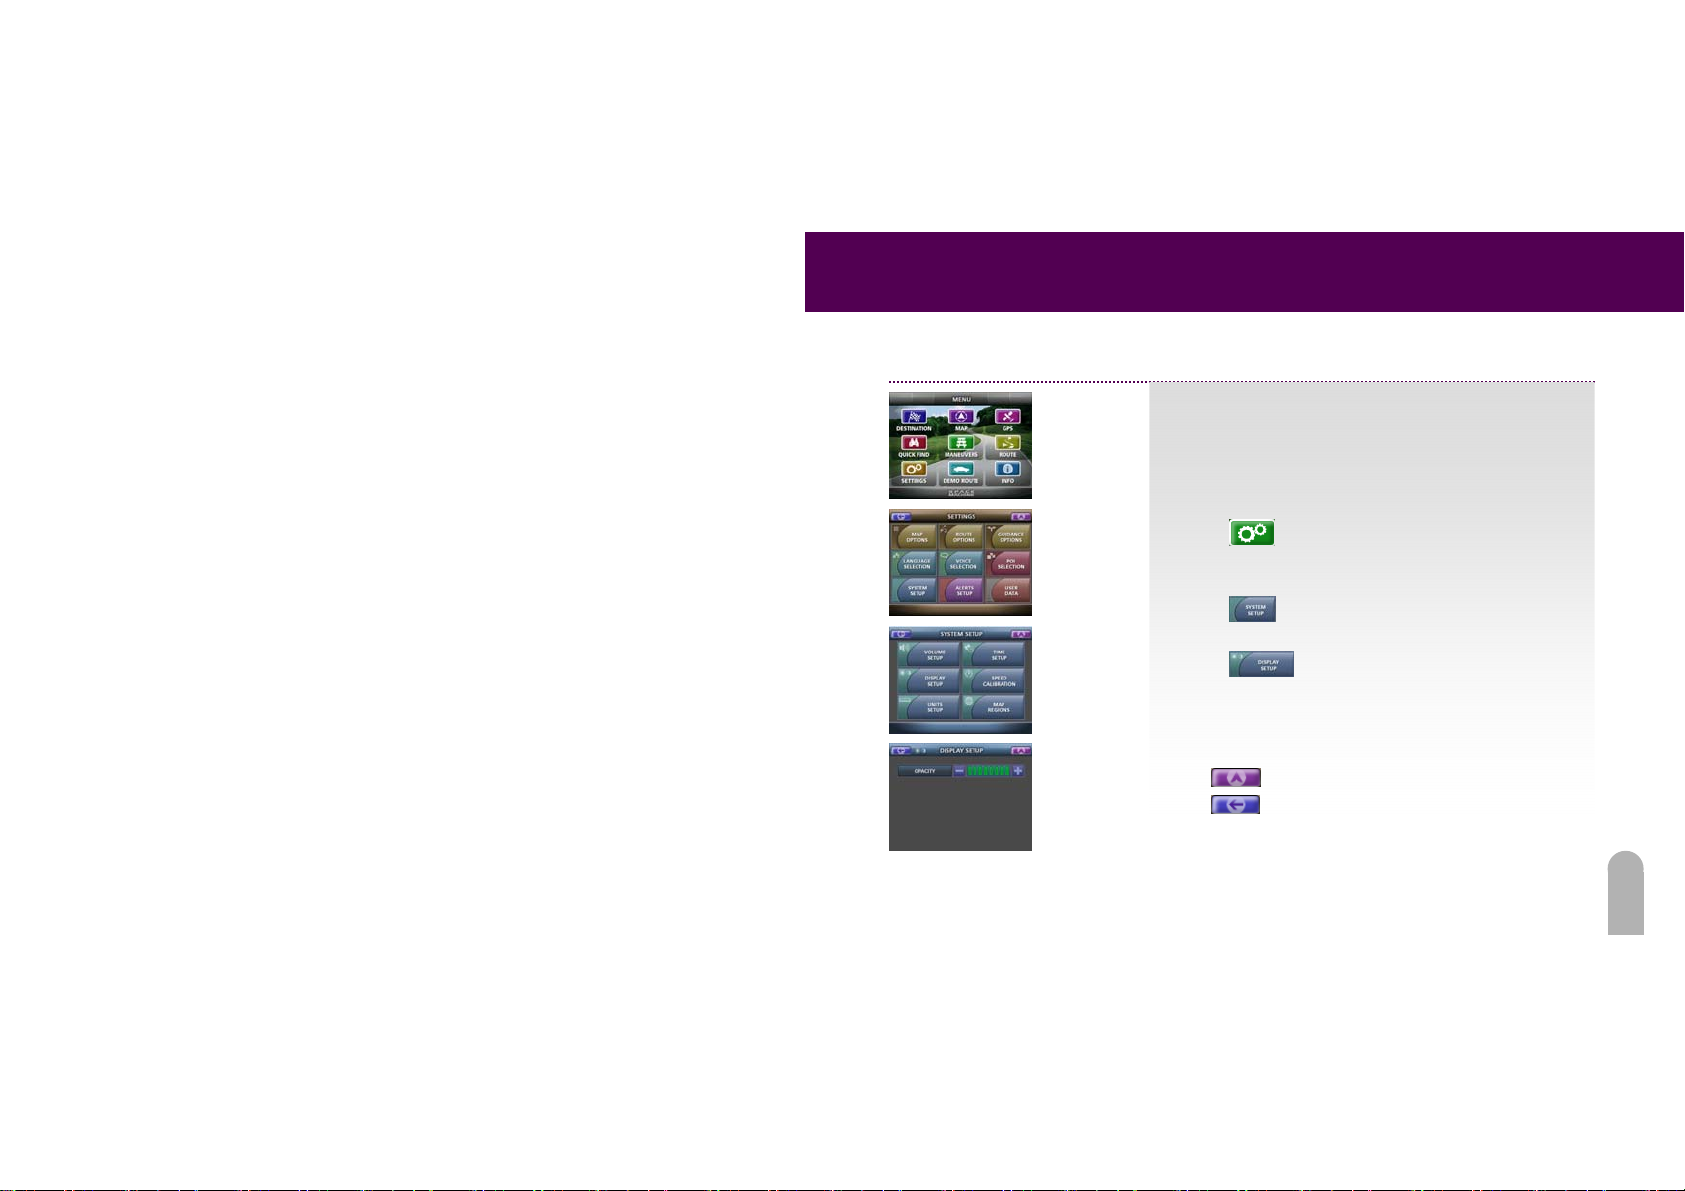
Configure Display Setup
FIDELIX User Guide
The Display Setup allows you to configure the opacity of the
panels in the Map. For example, if you increase the
opacity to the maximum level, the Next Maneuver pane
will become completely opaque (cannot see through). To
configure the display:
1. Touch
Menu.
2. Touch
3. Touch
4. Touch the buttons to configure the setup.
Touch
Touch
from the Main Menu to see the Settings
from the Settings Menu.
from the System Setup Menu.
to return to the ma p.
to go back to the Setti ng s Menu.
47
Page 49
FIDELIX User Guide
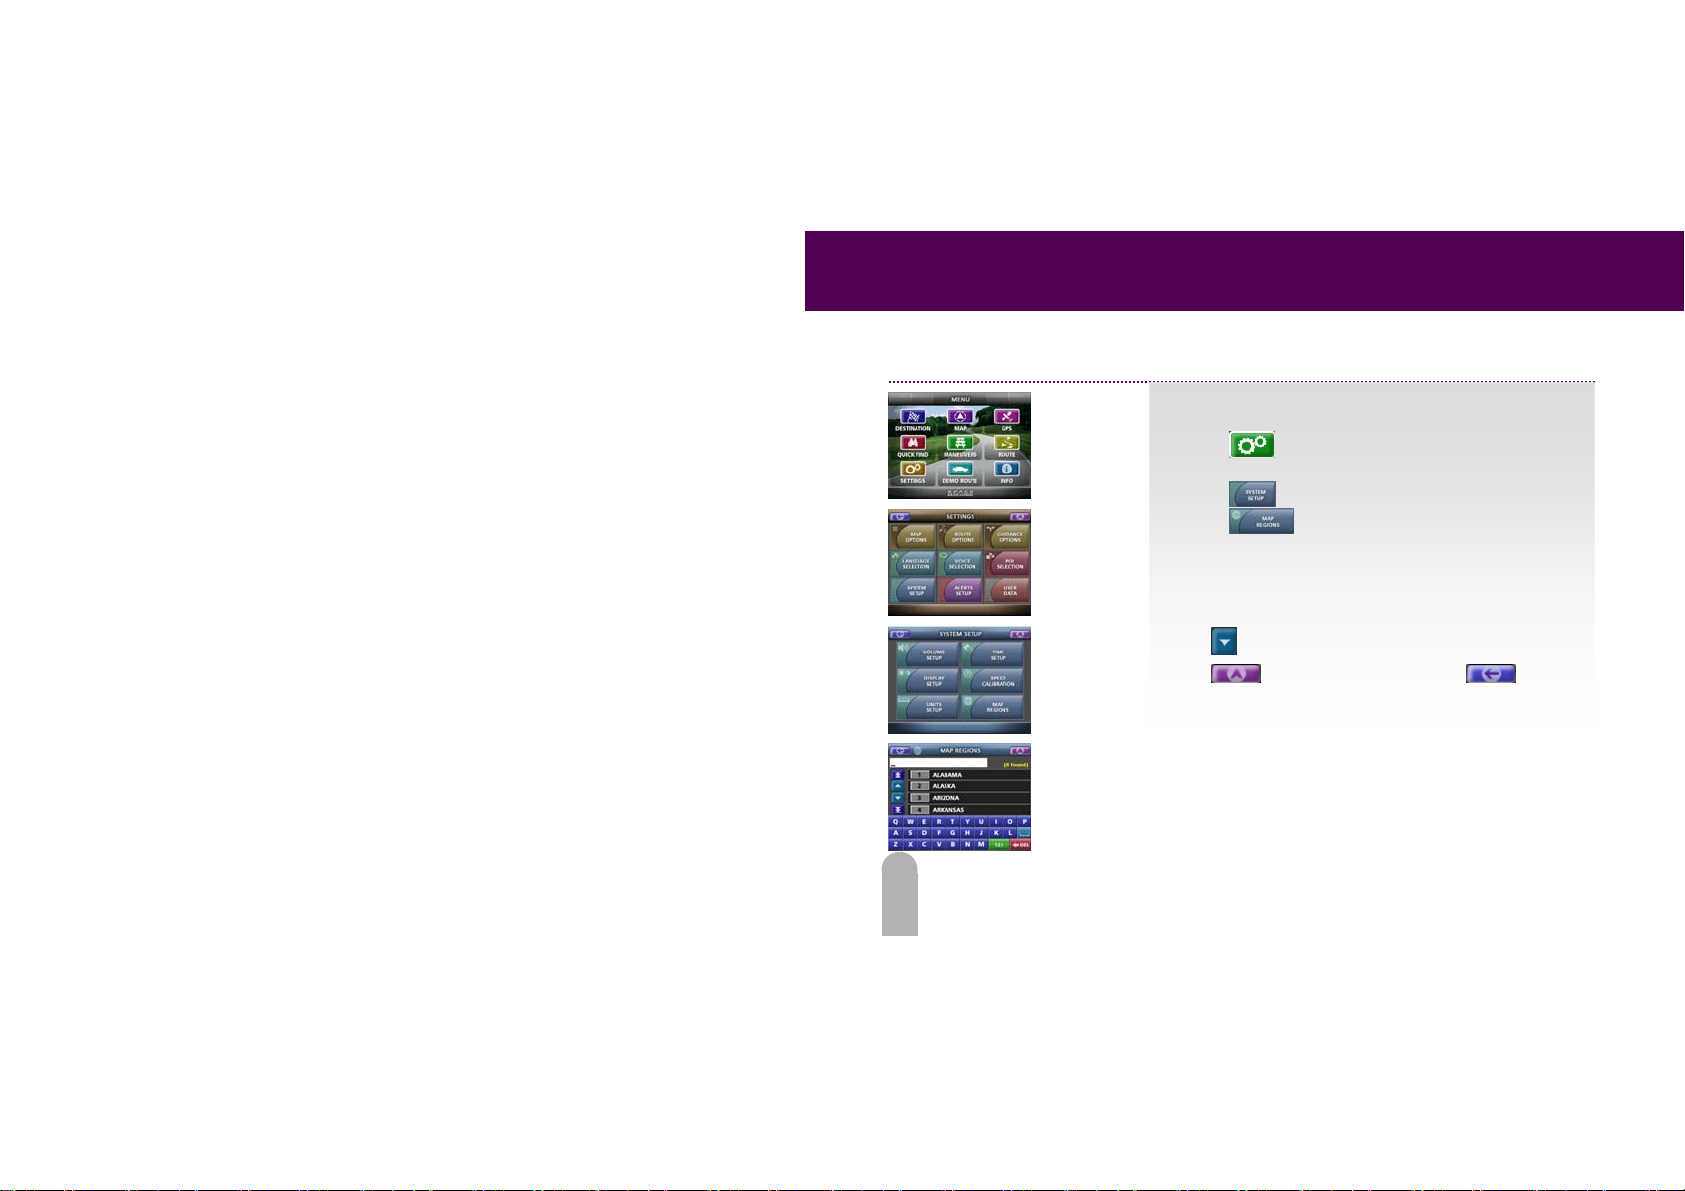
View Installed Map Regions
To view the installed map regions or select a default region:
1. Touch
Menu.
2. Touch
3. Touch
4. The list of installed regions is displayed. You can select a
region as the default region by highlighting it from the list
shown. Type in the name of your region to show it in the
list.
Touch
Touch
to the Settings Menu
from the Main Menu to see the Settings
from the Settings Menu.
from the System Setup Menu.
to scroll down for more options.
to return to the map.Touch to go back
48
Page 50
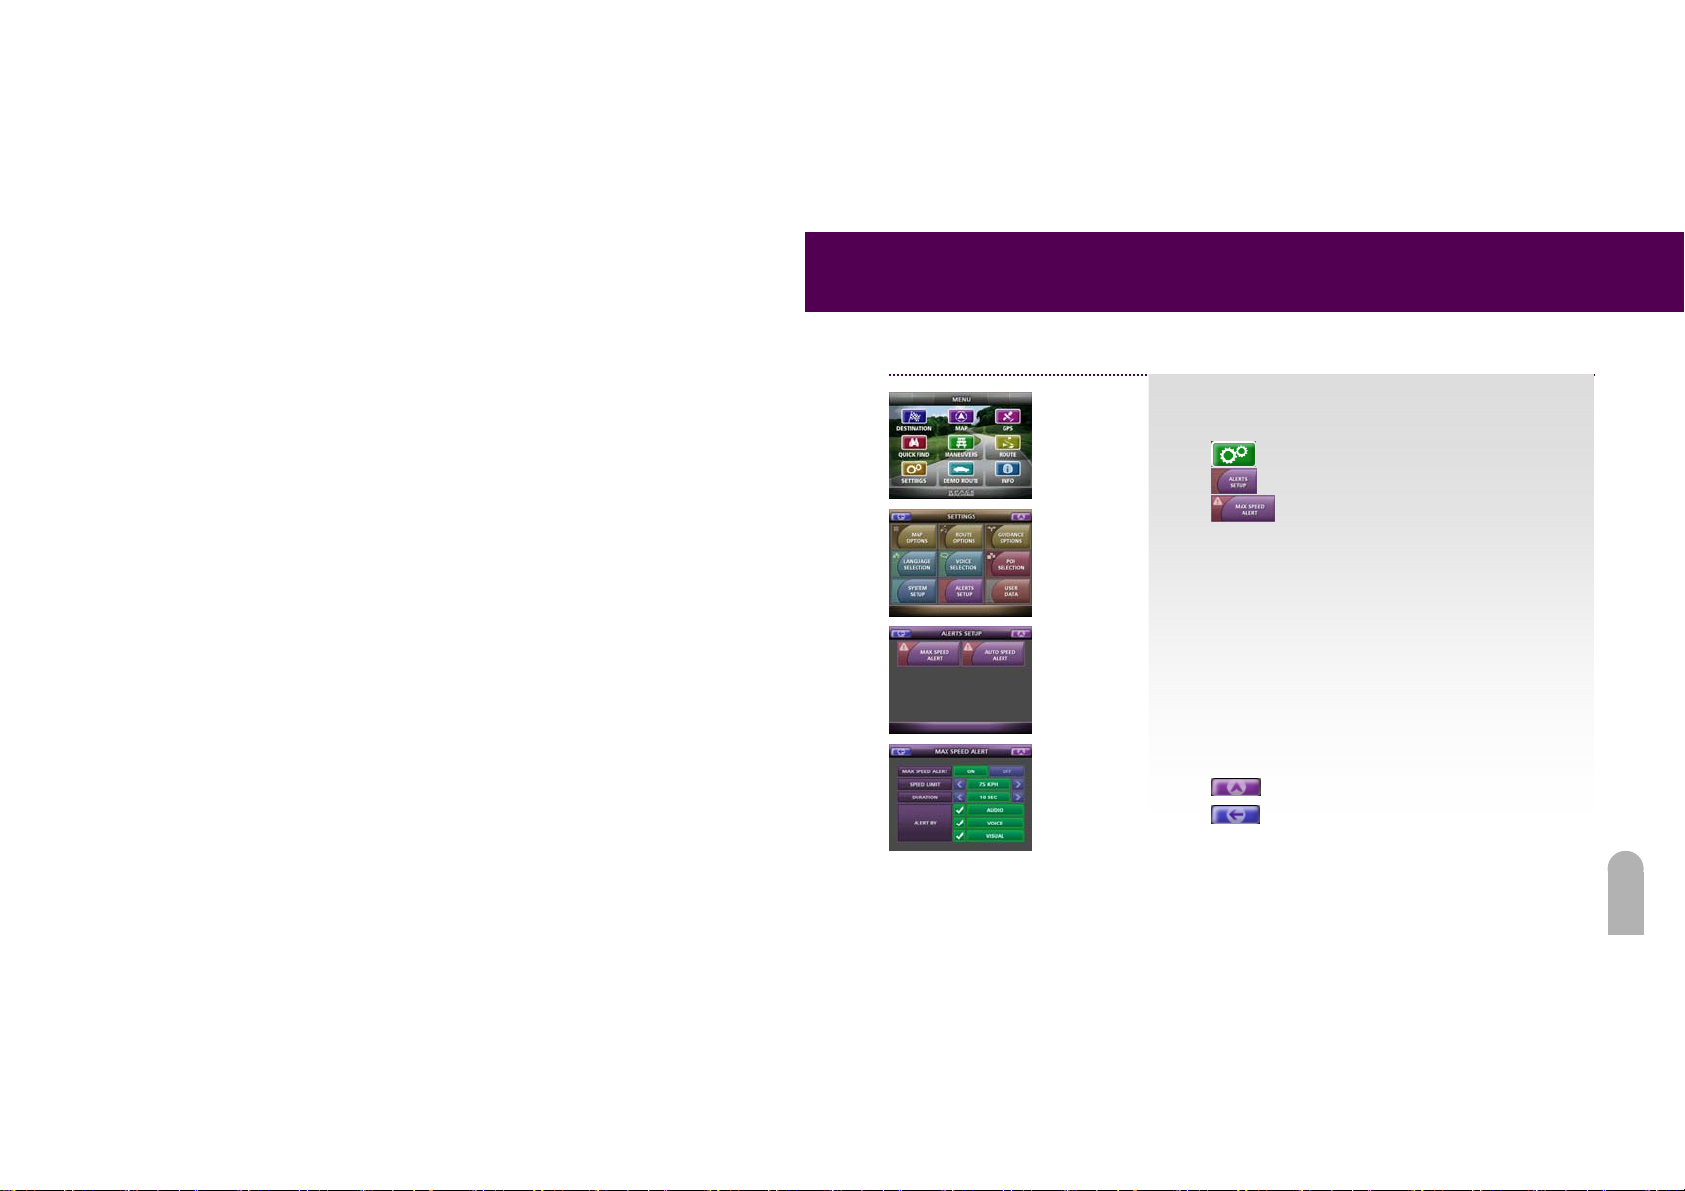
Set Max Speed Alert
FIDELIX User Guide
The Max Speed Alert will alert you when you are driving at a
certain speed for a certain length of time. To configure
the alert settings:
Touch
Touch
Touch
Touch the buttons to configure the following settings:
- Max Speed Alert
- Speed Limit
alerted. For example, if you select 90 mph, you will be
alerted if you drive at or above 90 mph for a set period of
time.
- Duration
limit before you are alerted.
- Alert by
choose more than one option.
Touch
Touch
from the Menu to acti vate the Settings Menu.
from the Settings Menu.
from the Alerts Setup Menu.
: Turns Max Speed Alert on or off
: Set at which speed you would like to be
: Set how long you would like to drive at set speed
: Select how you would like to be alerted. You may
to return to the ma p.
to go back to the Setti ng s Menu.
49
Page 51
FIDELIX User Guide
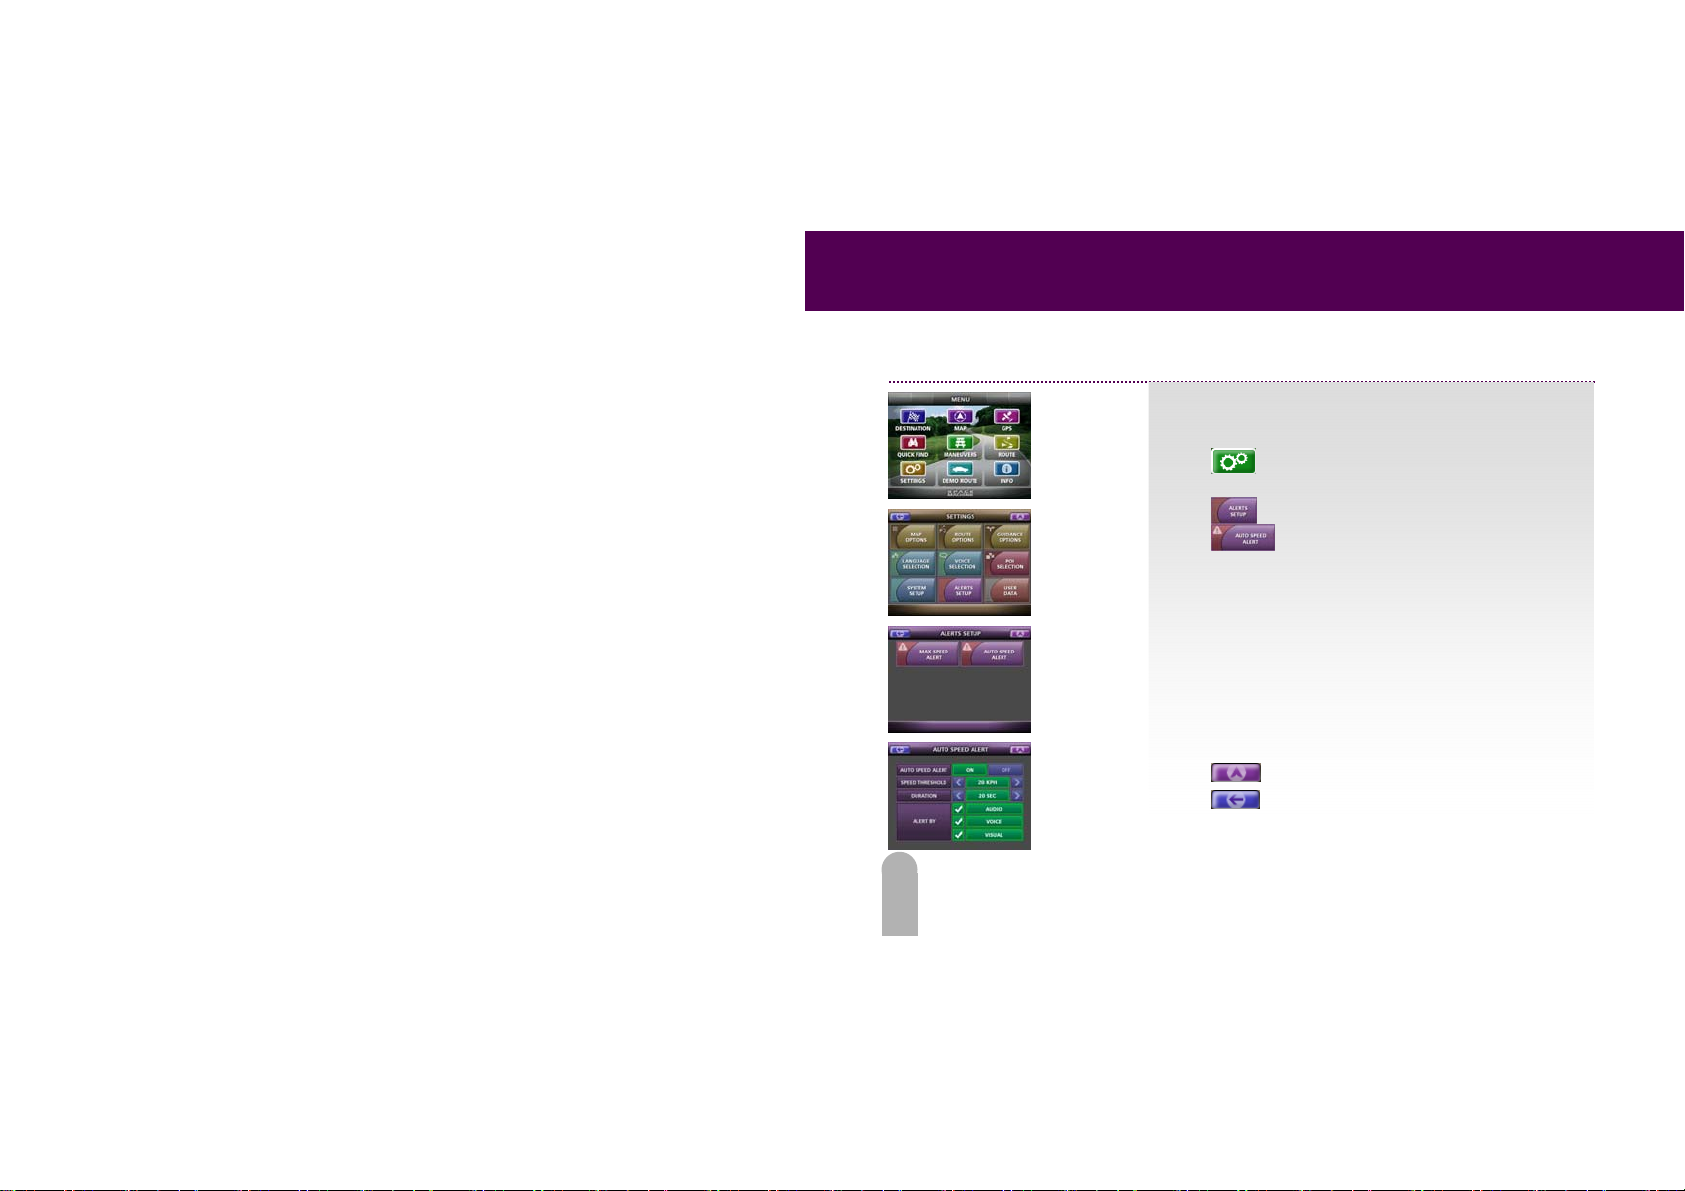
Set Auto Speed Alert
The Auto Speed Alert will alert you when you are driving a
certain speed above the legal speed limit. To change the
speed threshold, do the following:
Touch
Menu.
Touch
Touch
Touch the buttons to configure the following settings.
- Auto Speed Alert
- Speed Threshold
speed limit you would like to drive before being alerted.
- Duration
threshold before being alerted.
- Alert By
choose more than one option.
Touch
Touch
from the Main Menu to ac tivate the Settings
from the Settings Menu.
from the Alerts Setup Menu.
: Turns Auto Speed Alert on or off
: Set how many miles above the legal
: Set how long you would like to drive at the speed
: Select how you would like to be alerted. You may
to return to the ma p.
to go back to the Setti ng s Menu.
50
Page 52

FIDELIX User Guide
POKETMAP INSTALL
This Document describes how to install p ocketmap software
And it explains how to install map area and how to uninstall map area.
This Document is under review and subject to changes. Please check up latest version Documents.
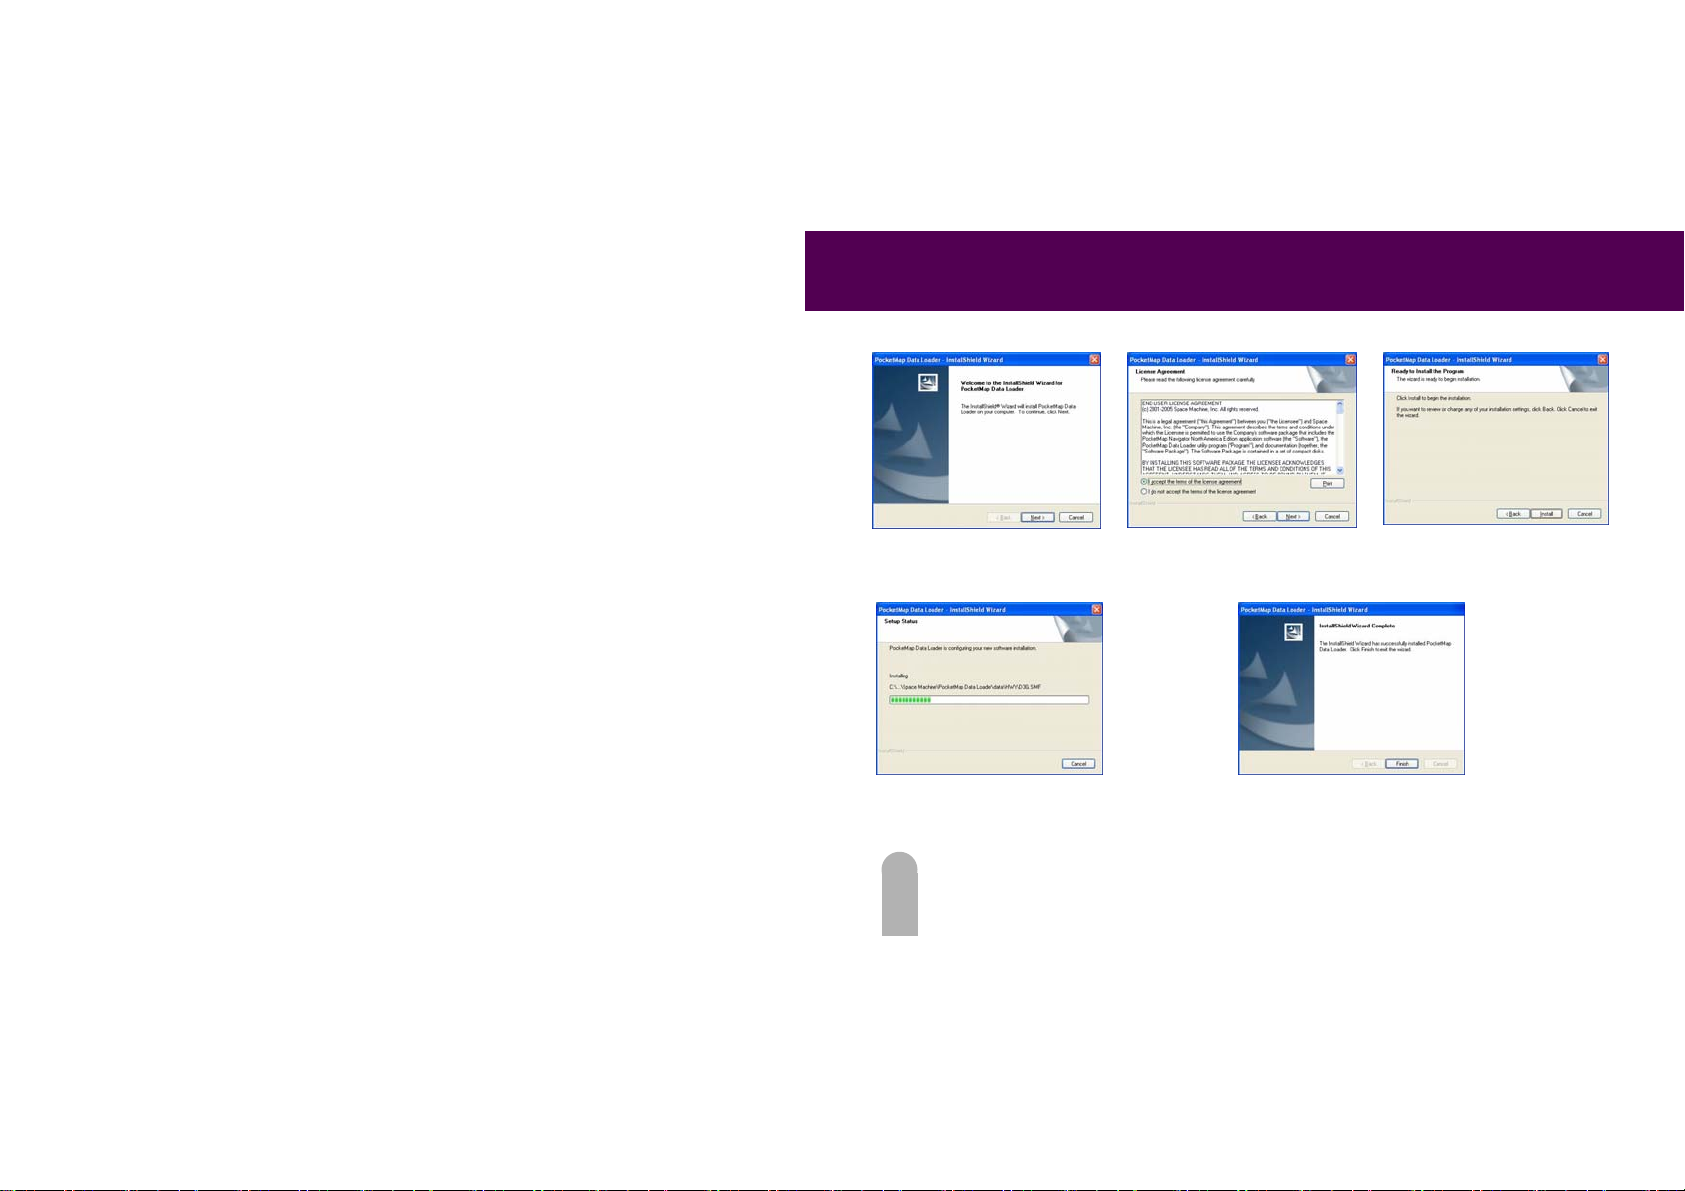
Install PocketMap Naviagator Data Loader Program.
- Pocketmap Navigator is consist of 3 CD’s.
- When you insert f irst CD,
then pocketmap installer launched b y itself.
- Click the [INSTALL] button.
51
Page 53
FIDELIX User Guide
- Click the [Next] Button.
-Agree the terms of the license
agreement
-Click the [NEXT] button.
-Push the [Install] button
-It displays process of installation.
- PocketMap Installation is finished.
- You can find the shortcut in the Desktop.
52
- Complete !
Page 54
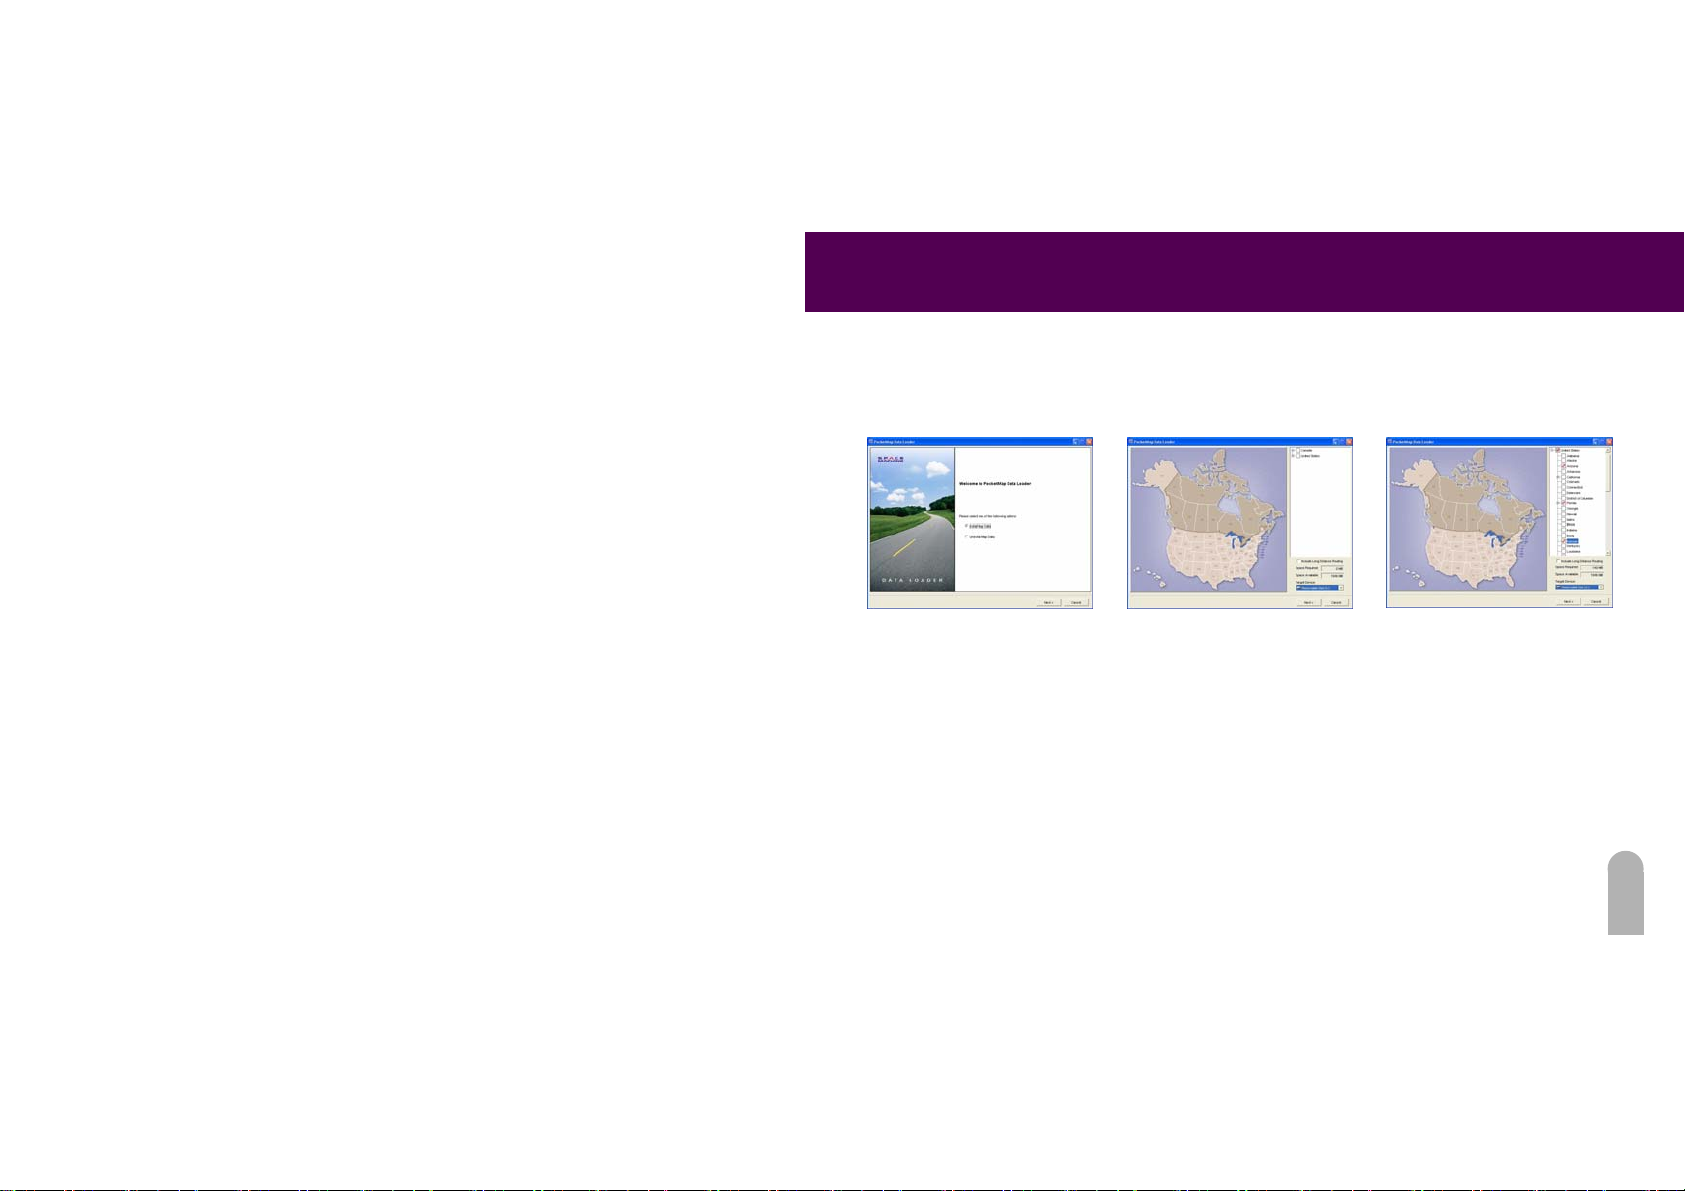
Install PocketMap Naviagator Map Data
FIDELIX User Guide
Before install the map data, please
connect the target device.
Please click the Pocketmap shortcut
in the desktop.
Choose the [Installing Map]
Click the [Next] button.
Select Removable Disk in the
Target Device
Click the [Next] button.
Select the state what you want to
install.
Click the [Next] button.
53
Page 55
FIDELIX User Guide
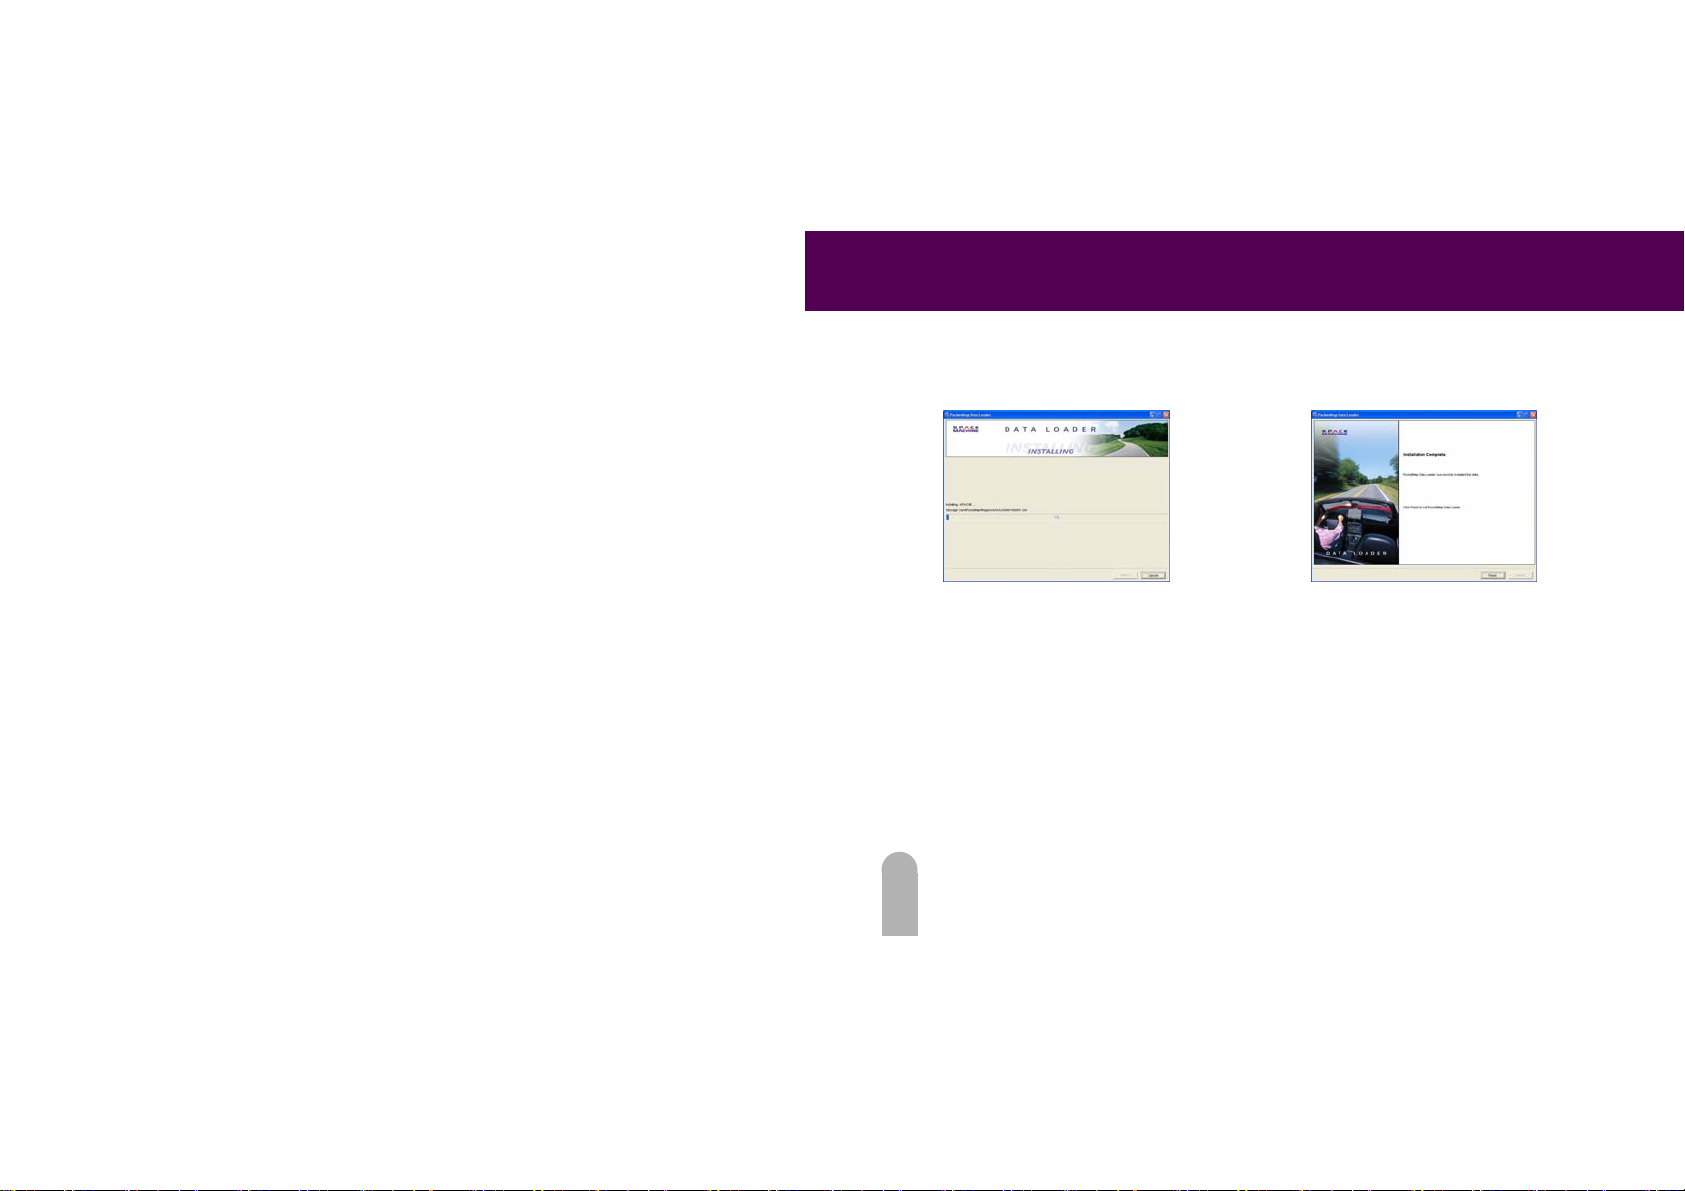
54
It displays the progress of installation.
The map data installation is finished.
Click the [Finish] button.
Page 56
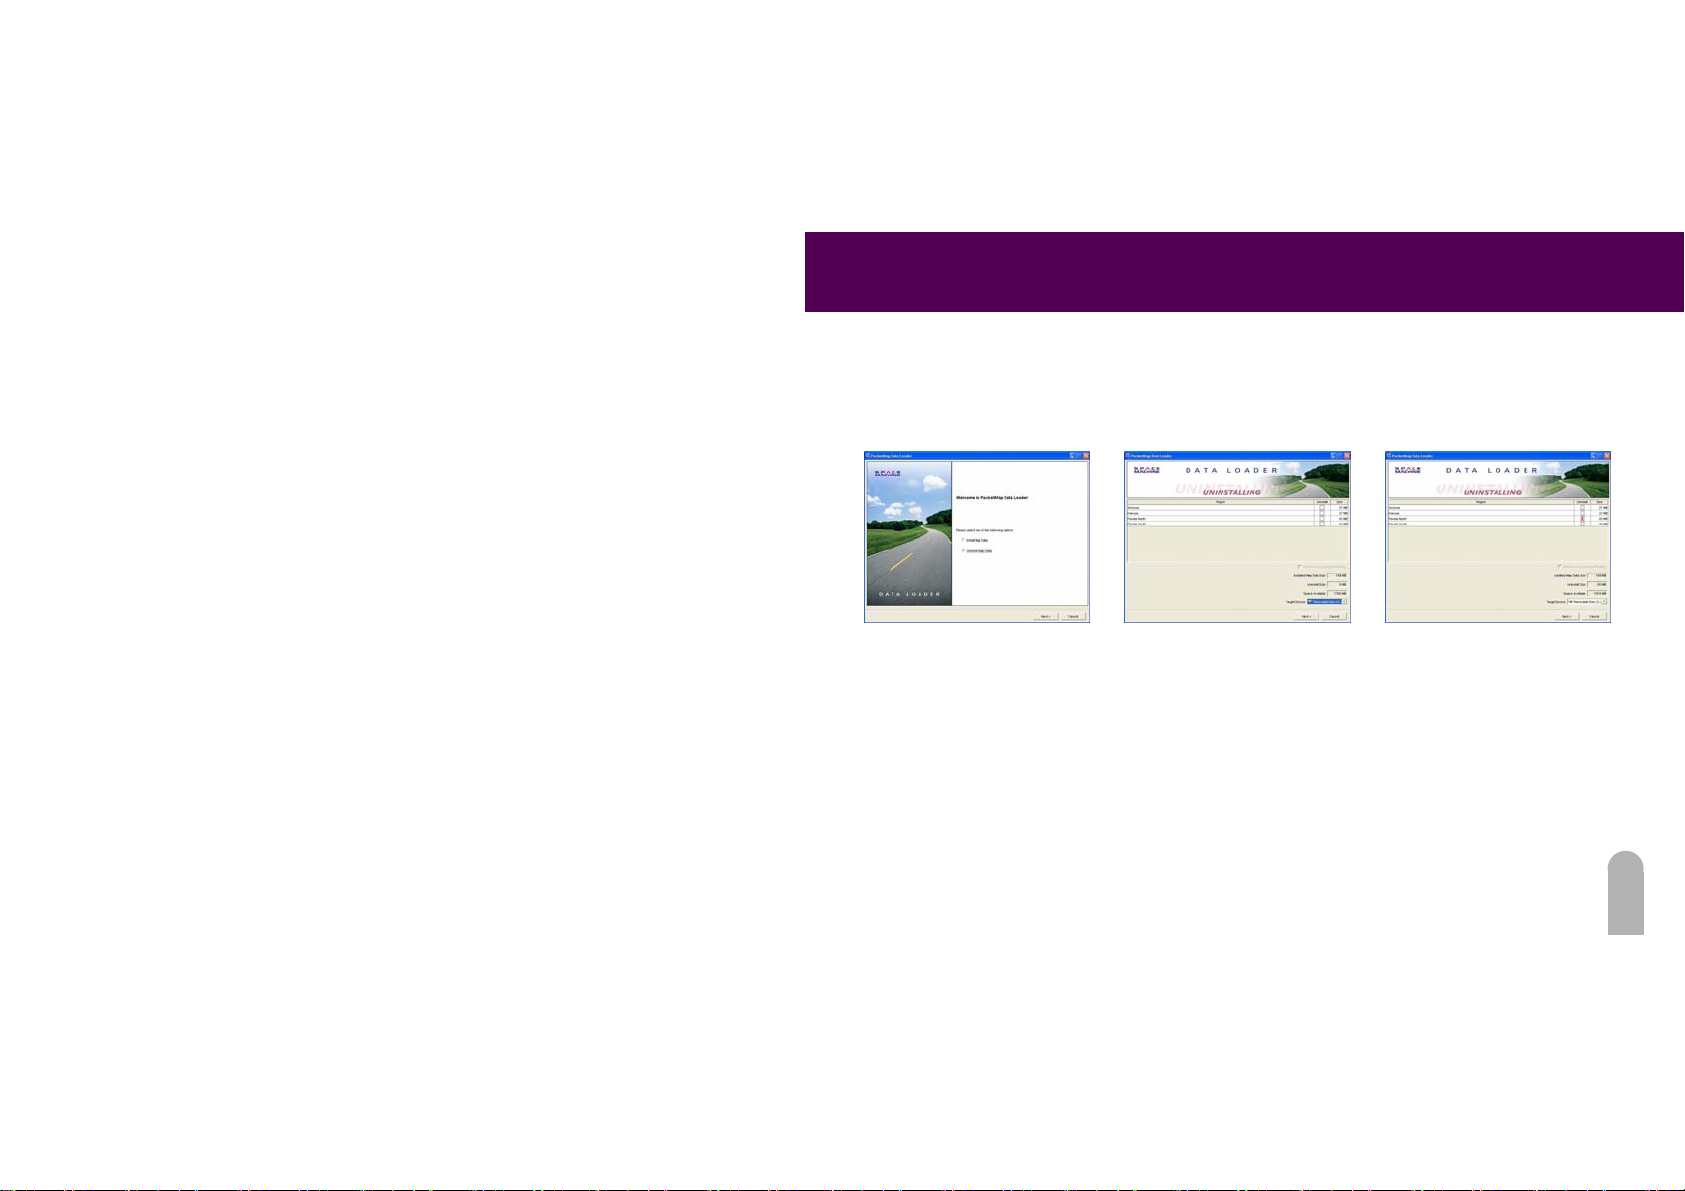
UnInstall PocketMap Naviagator Map Data
FIDELIX User Guide
Before uninstall map data, you must
connect the target device.
Select the [uninstall map data]
Click the [Next] button.
55
Select the Removable Disk in
the Target Device.
This program read the map data
in the device and displays
the map data.
Check the map data what you uninstall.
Click the [Next] button.
Page 57
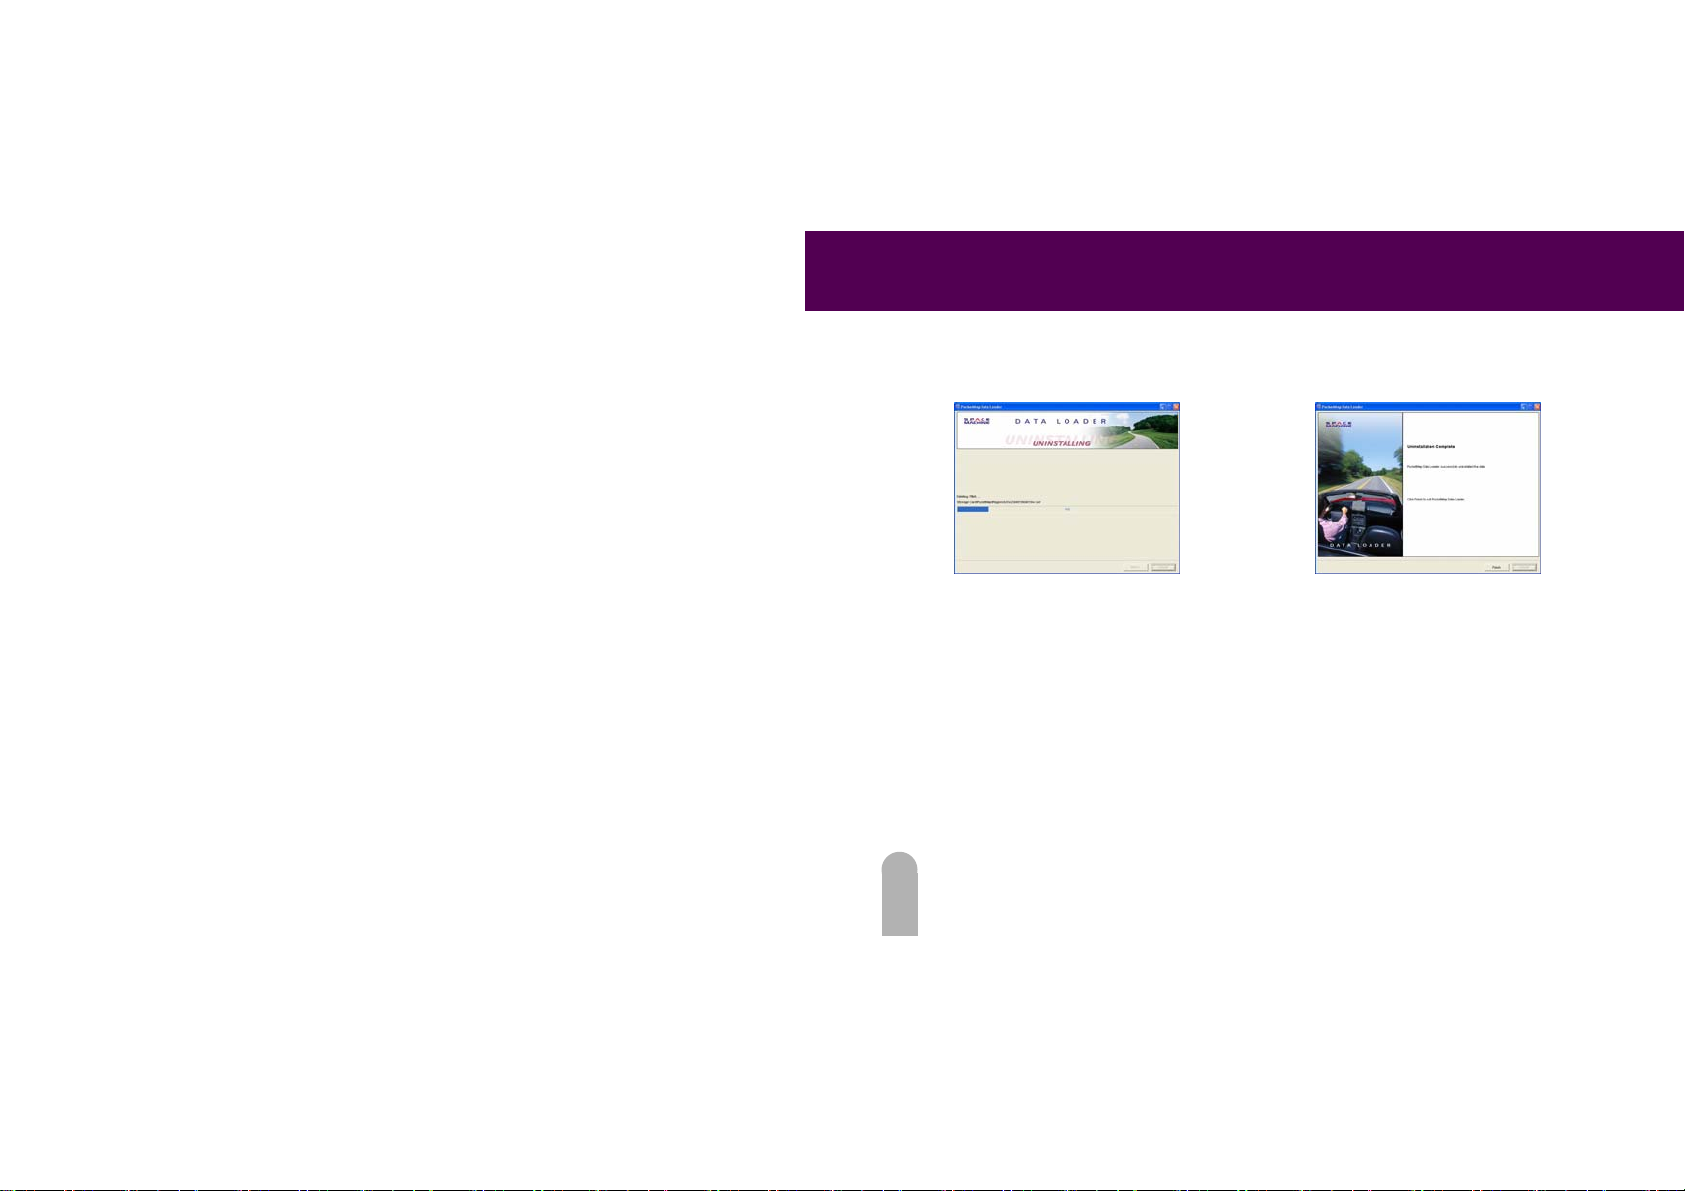
FIDELIX User Guide
It displays uninstalling procedure.
Click the [Finish] button.
Remove your device.
56
Page 58
Using SURE-PATH
MAIN SCREEN
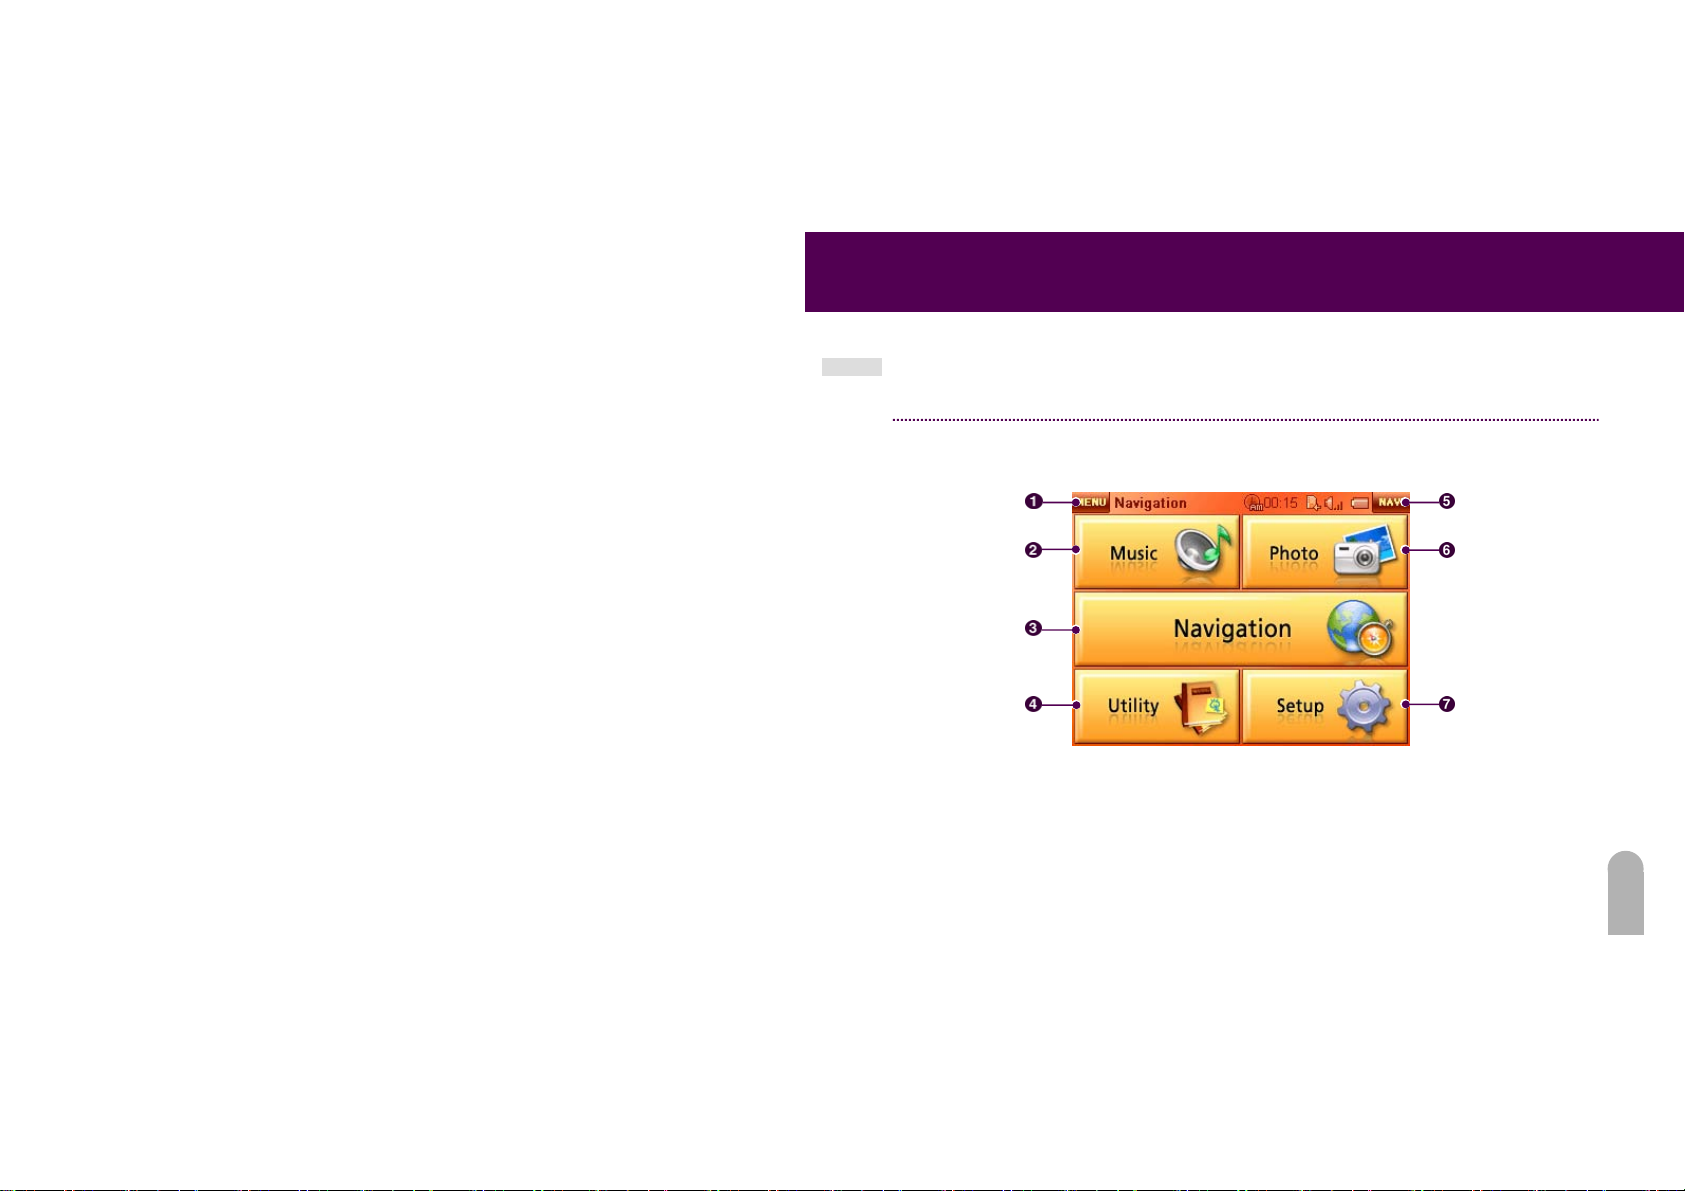
Users can select various functions supported by the device here.
Menu
Music
Navigation
Utility
FIDELIX User Guide
Navigation
Photo
Setup
57
Page 59
FIDELIX User Guide
Name Description
1. Menu Closes the current program and d isplays th e main menu.
2. Music Operates the music player.
3. Navigation Operates the nav igation .
4. Utility Displays sub menus including Test View, Calendar, Quick Memo and Calculat or.
5. Navigation Operates the nav igation .
6. Photo Executes Image View (JPEG).
7. Setup Displays sub menus including Set-up, Touch Pad, Power and System Information.
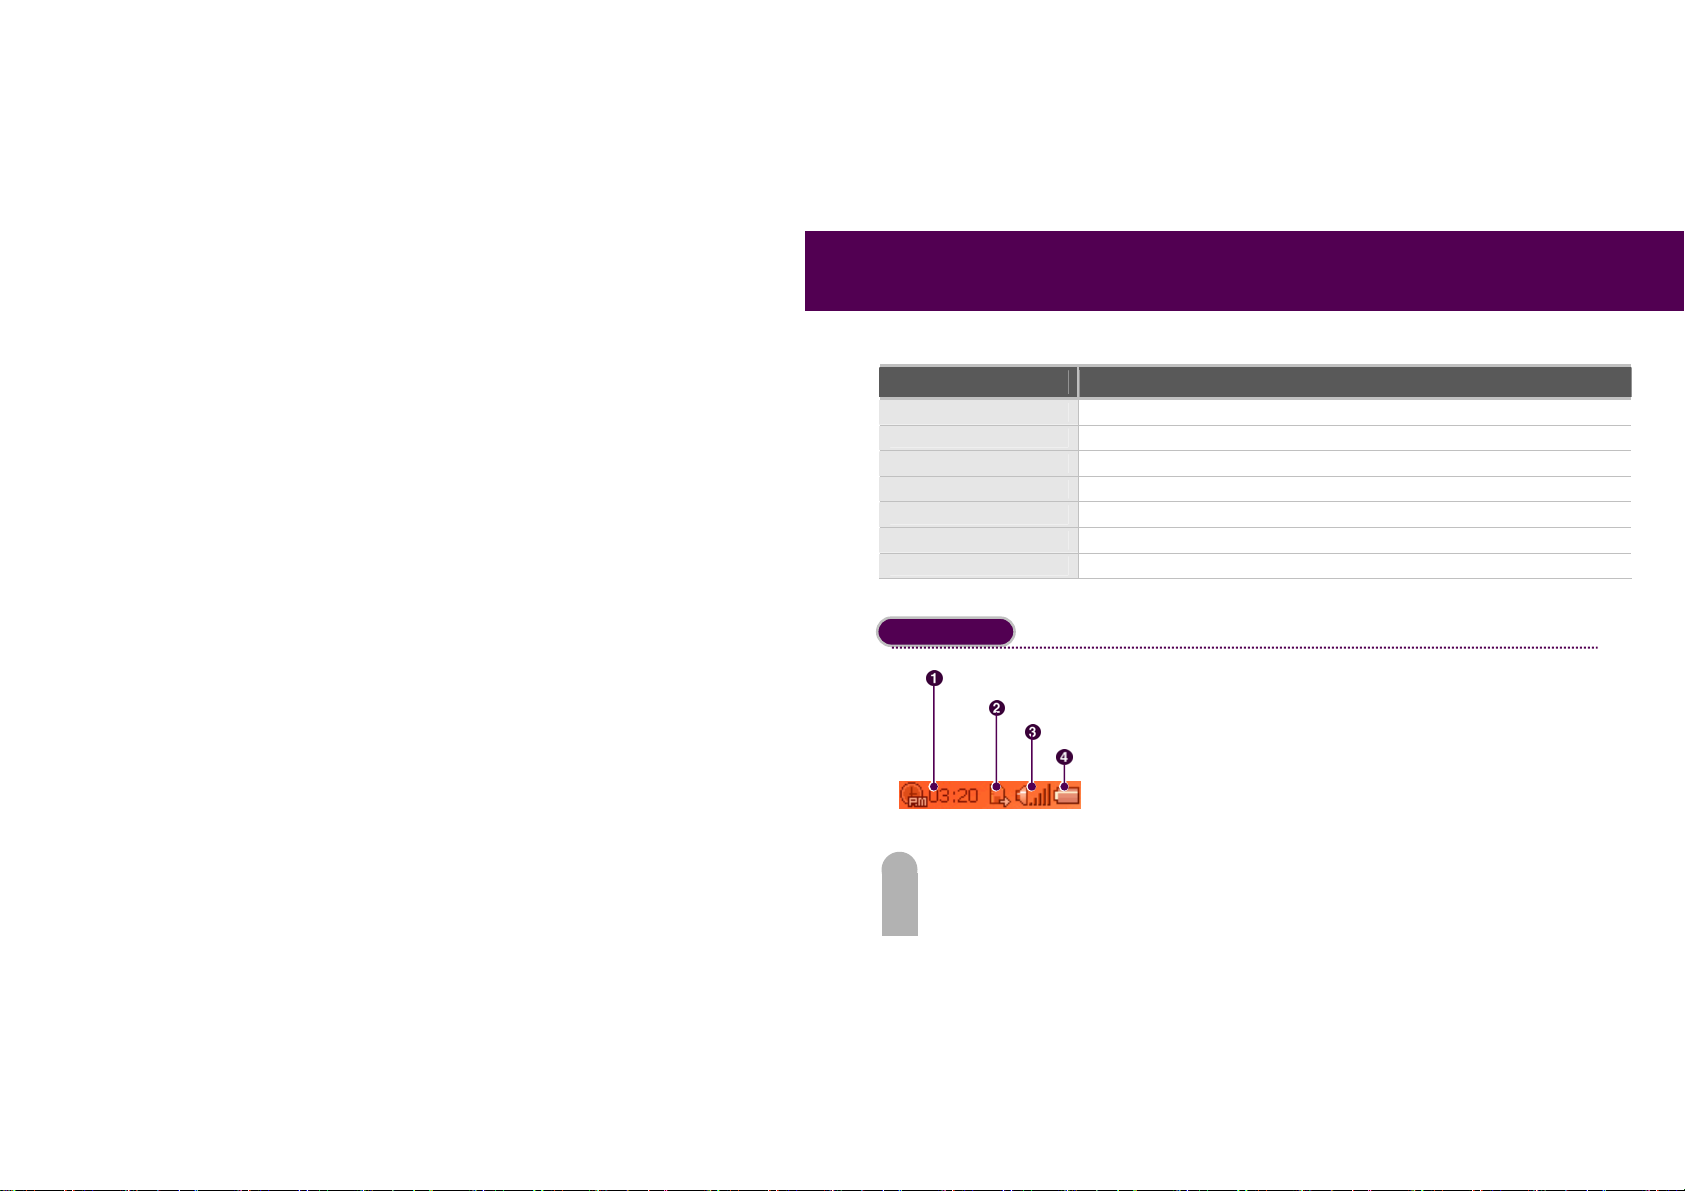
Main screen
Time
58
It displays such information as product sound, memory, battery and time.
1. Shows the current time. I t is automatically set up at a
Memory status
Volume
Battery
time of the first recepit of GPS signal.
2. Displays the insertion status of the SD memory card.
3. Displays the level of volume
4. Displays the remainder of the previous battery.
Page 60
FIDELIX User Guide
MUSIC PLAYER
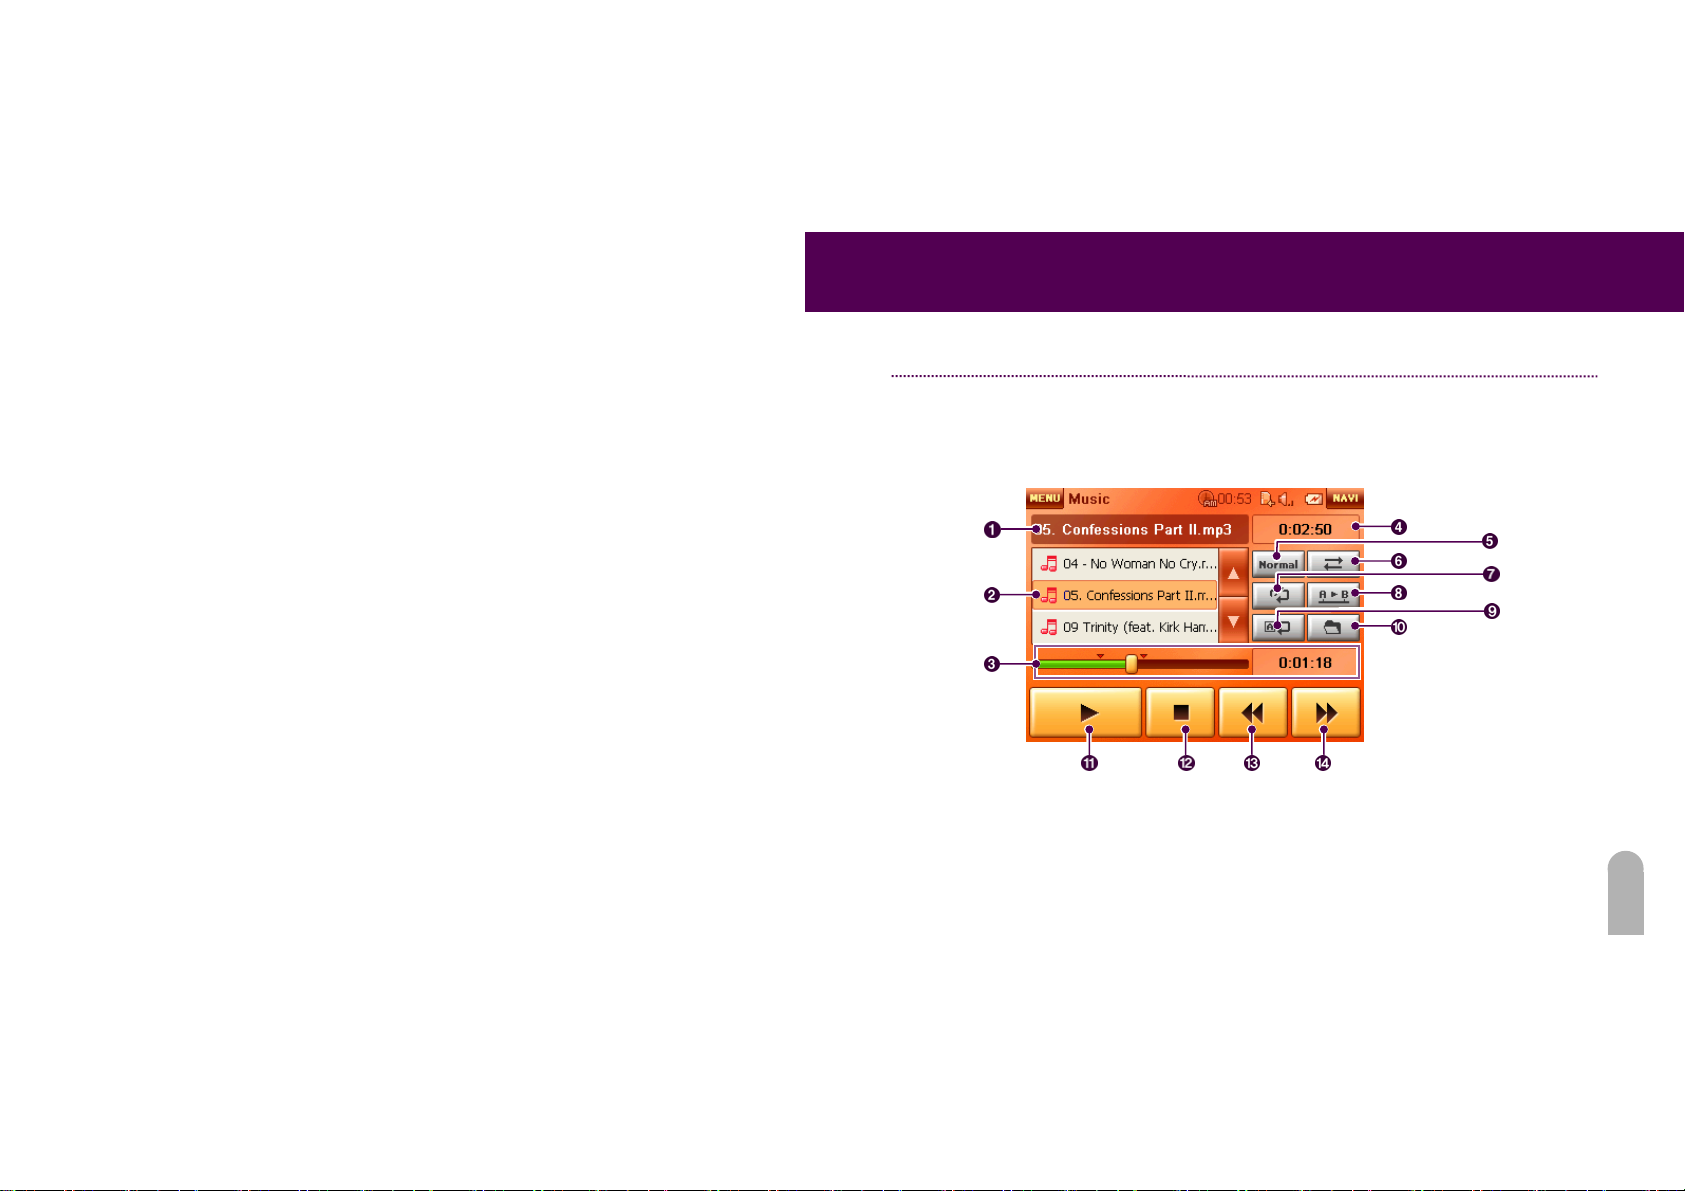
Users can play the songs saved in the SD memory here. An SD memory card needs to be inserted
for it to be activated. It supports MP3, WMA, WAV, OGG and MP2 and automatically searches and
displays play files in the SD memory.
File name
File list
Progress Bar
Play/Pause Stop Previous Next
Play time
Random
Repeat section
File open
Equalizer
Repeat a song
Repeat all
59
Page 61
FIDELIX User Guide
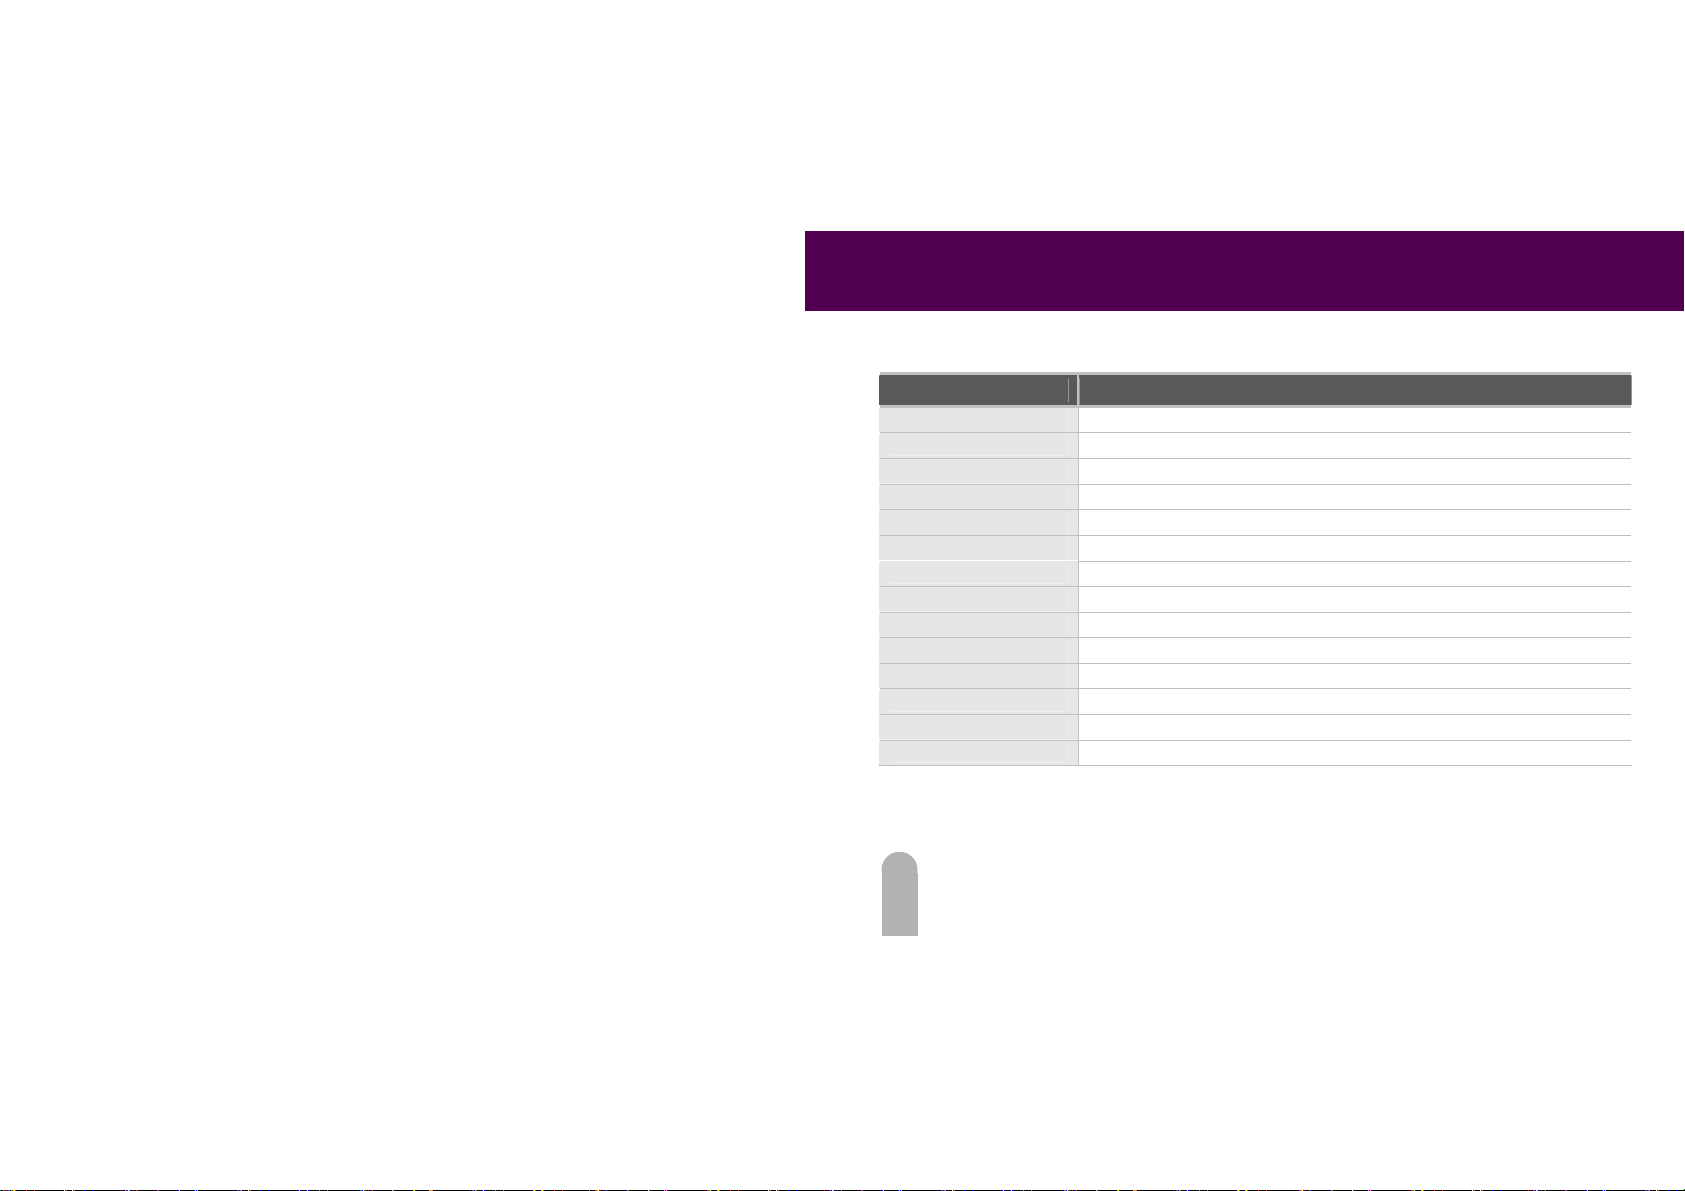
Name Description
1. File name Displays the name of the currently play ed file.
2. File list Displays selected files.
3. Progress bar Displays play time against the total play time.
4. Play time Displays the total play time.
5. Equalizer 4 types of play modes that inlcude normal, jazz, rock and classic can be set up.
6. Random Selected files are randomly play ed .
7. Repeat a song Repeats only one selected song.
8. Repeat section Files are repeatedly played in designated A and B areas.
9. Repeat all Selected files are repeatedly played.
10. File open Explor er is activi ed to search play files.
11. Play/Pause Plays/pauses a selected file.
12. Stop Stops plaing a file.
13. Previous file Displays the previous file.
14. Next file Displays the next file.
60
Page 62
FIDELIX User Guide
K
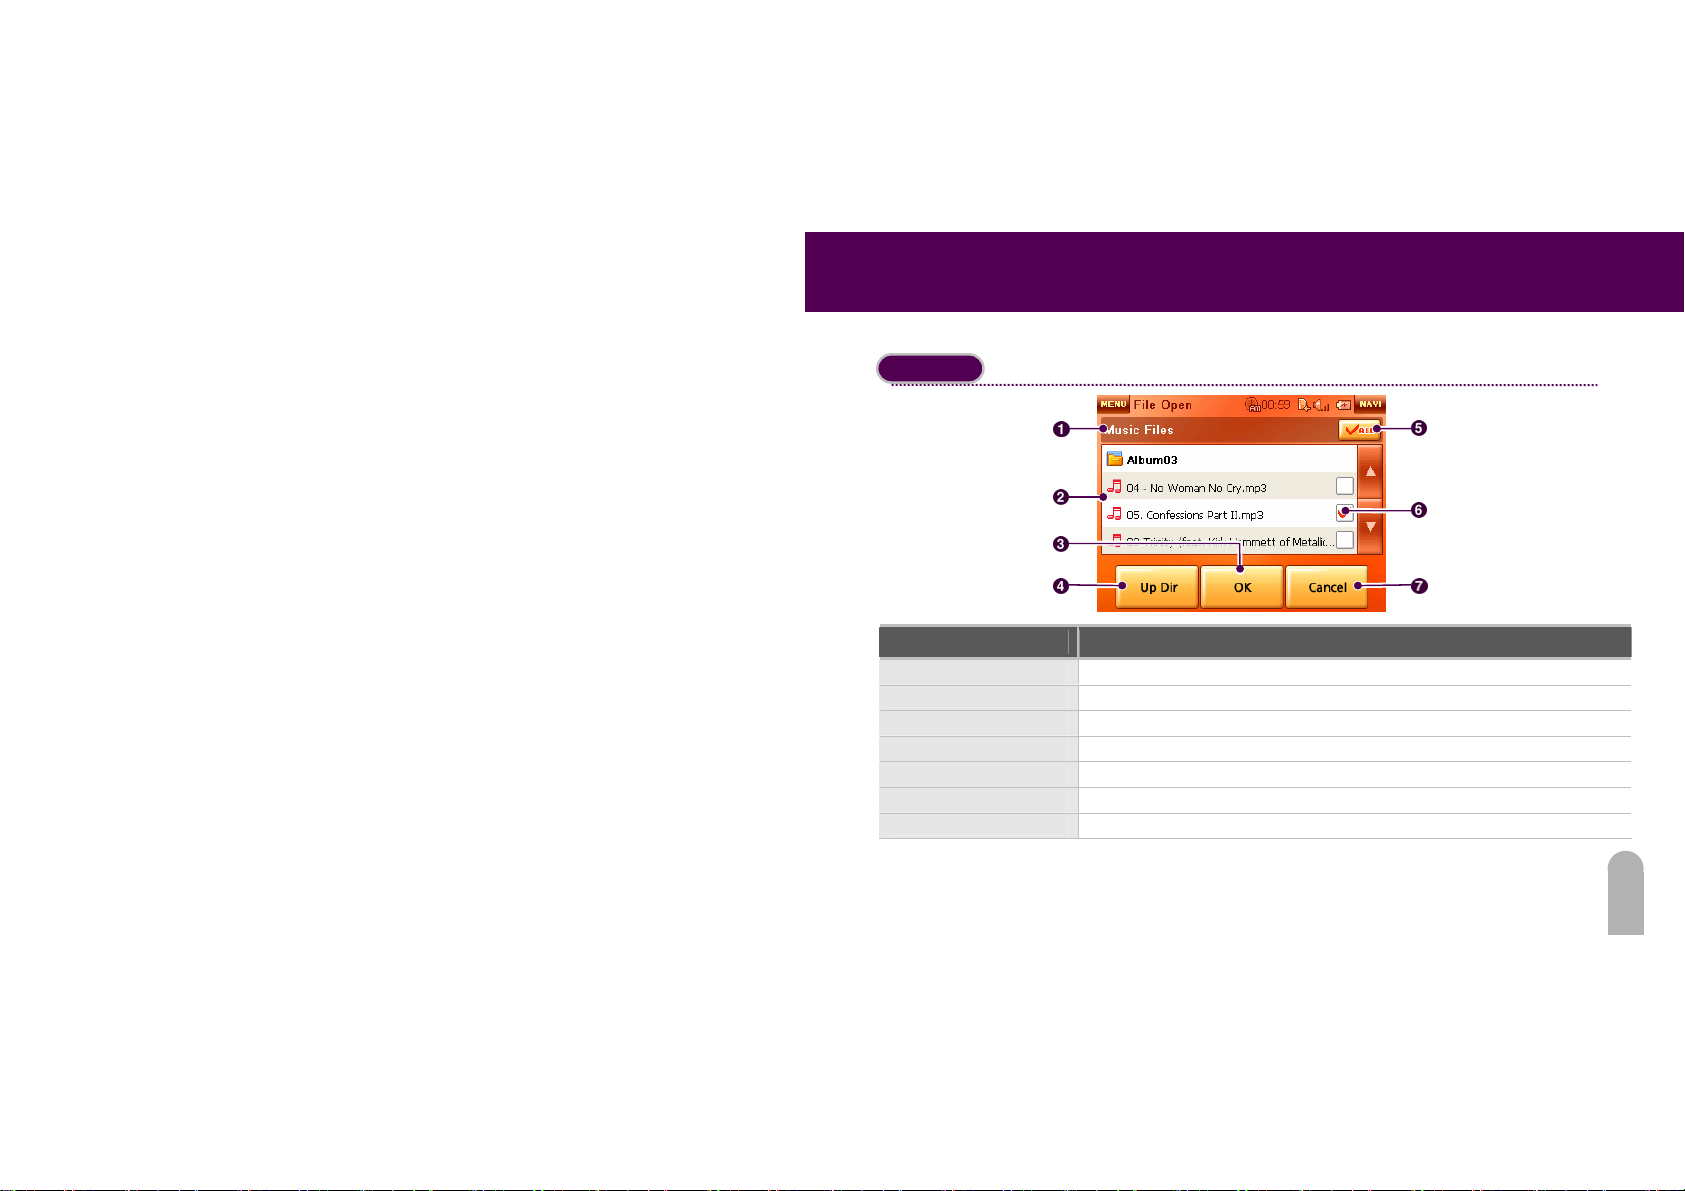
File open
File open is commonly used in Music Player, Image View and Text View.
Folder/File name
All select
File list
O
Up Dir
Check box
Cancel
Name Description
1. Folder name Displays the currently folder name.
2. File list Displays a text file list within the selected folder.
3. OK Selected file is applied, and the File Open window is clos ed.
4. Up Dir Di splay s a parent f older.
5. All select Selects all files within the selected folder.
6. Check box Checks a selected file.
7. Cancel Closes File Open without application of the selected file.
61
Page 63
FIDELIX User Guide
PHOTO VIEWER
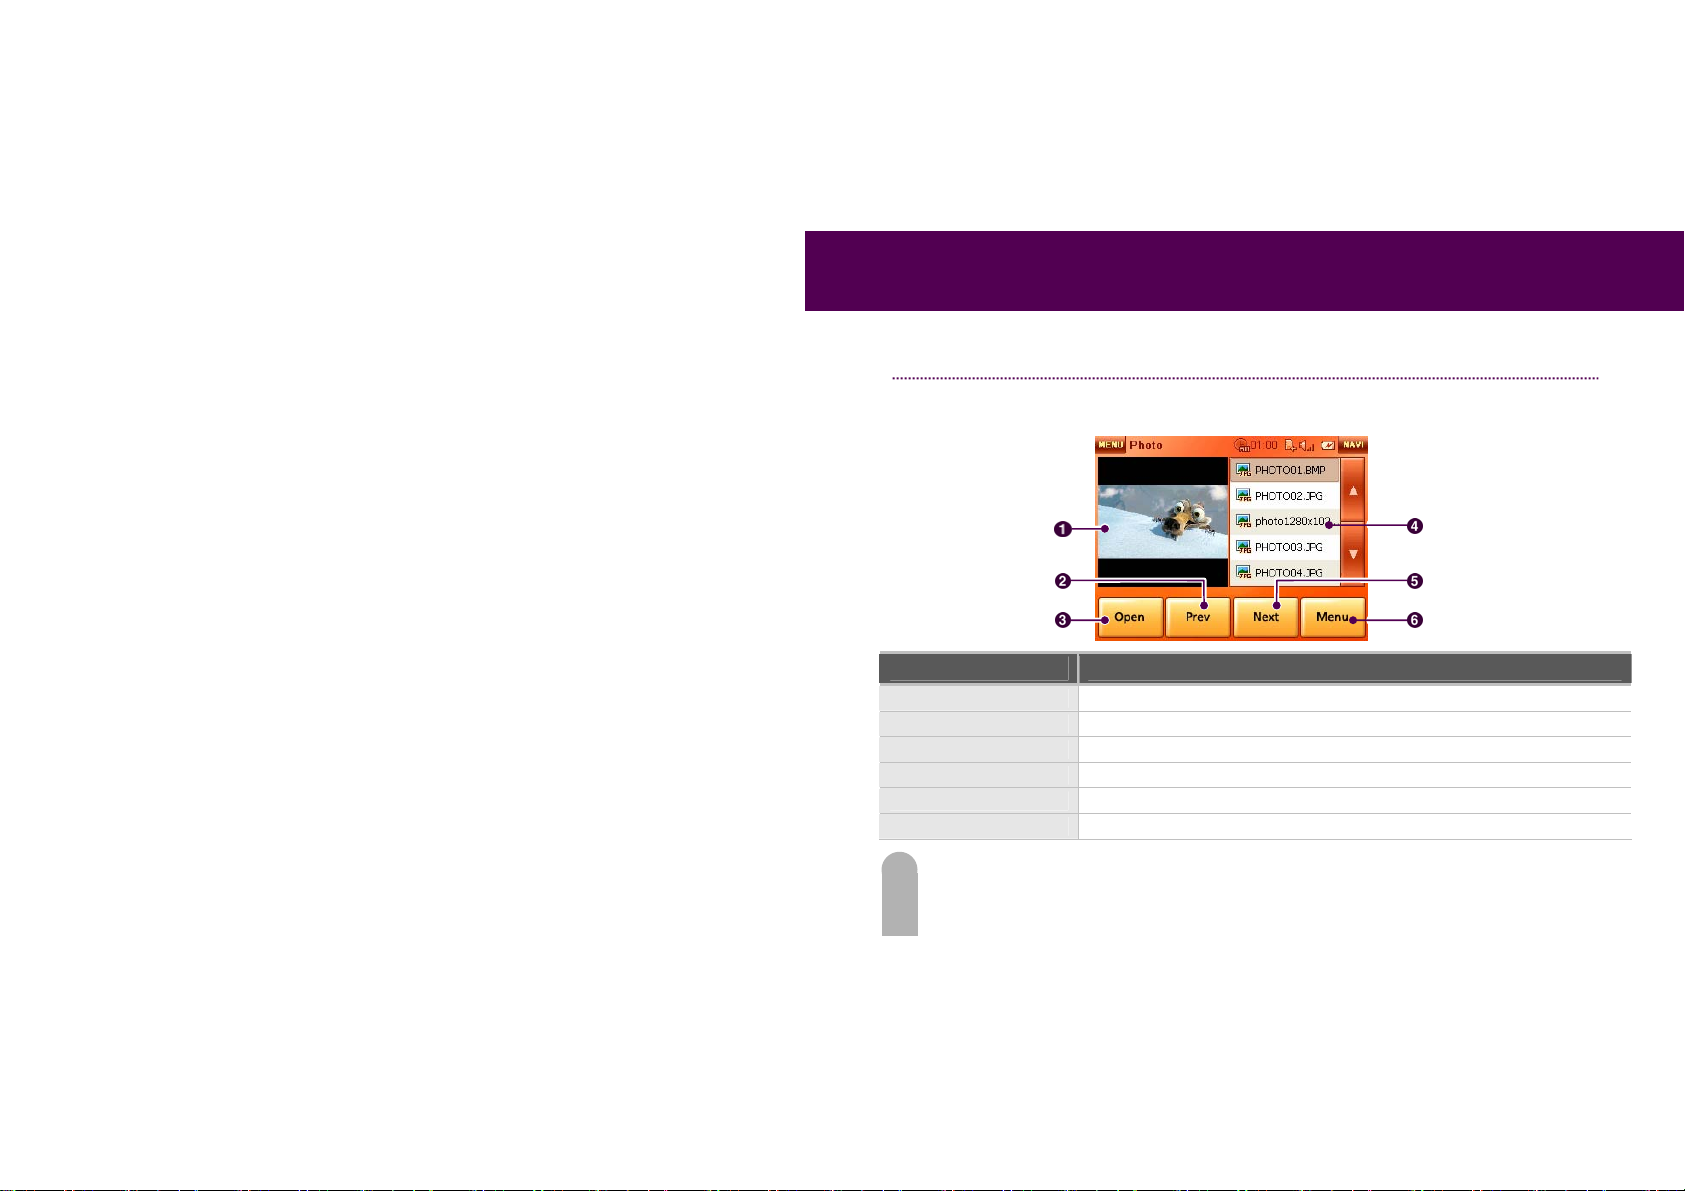
Displays the image saved in the SD memory. It supports only JPEG file format. The SD m em ory
card needs to be inserted for it to be activated.
Picture
Prev
Open
Part Description
1. Picture Displays a selected picture. If the picture is touched, a full screen appears.
2. Prev Displays the previous pictur e.
3. Open Explor er is activ iate d to se arc h files.
4. File list Displayes a select ed p ictur e file.
5. Next Displays the next picture .
6. Menu Displays sub menus including Slide an d Rotate .
File list
Next
Menu
62
Page 64
FIDELIX User Guide
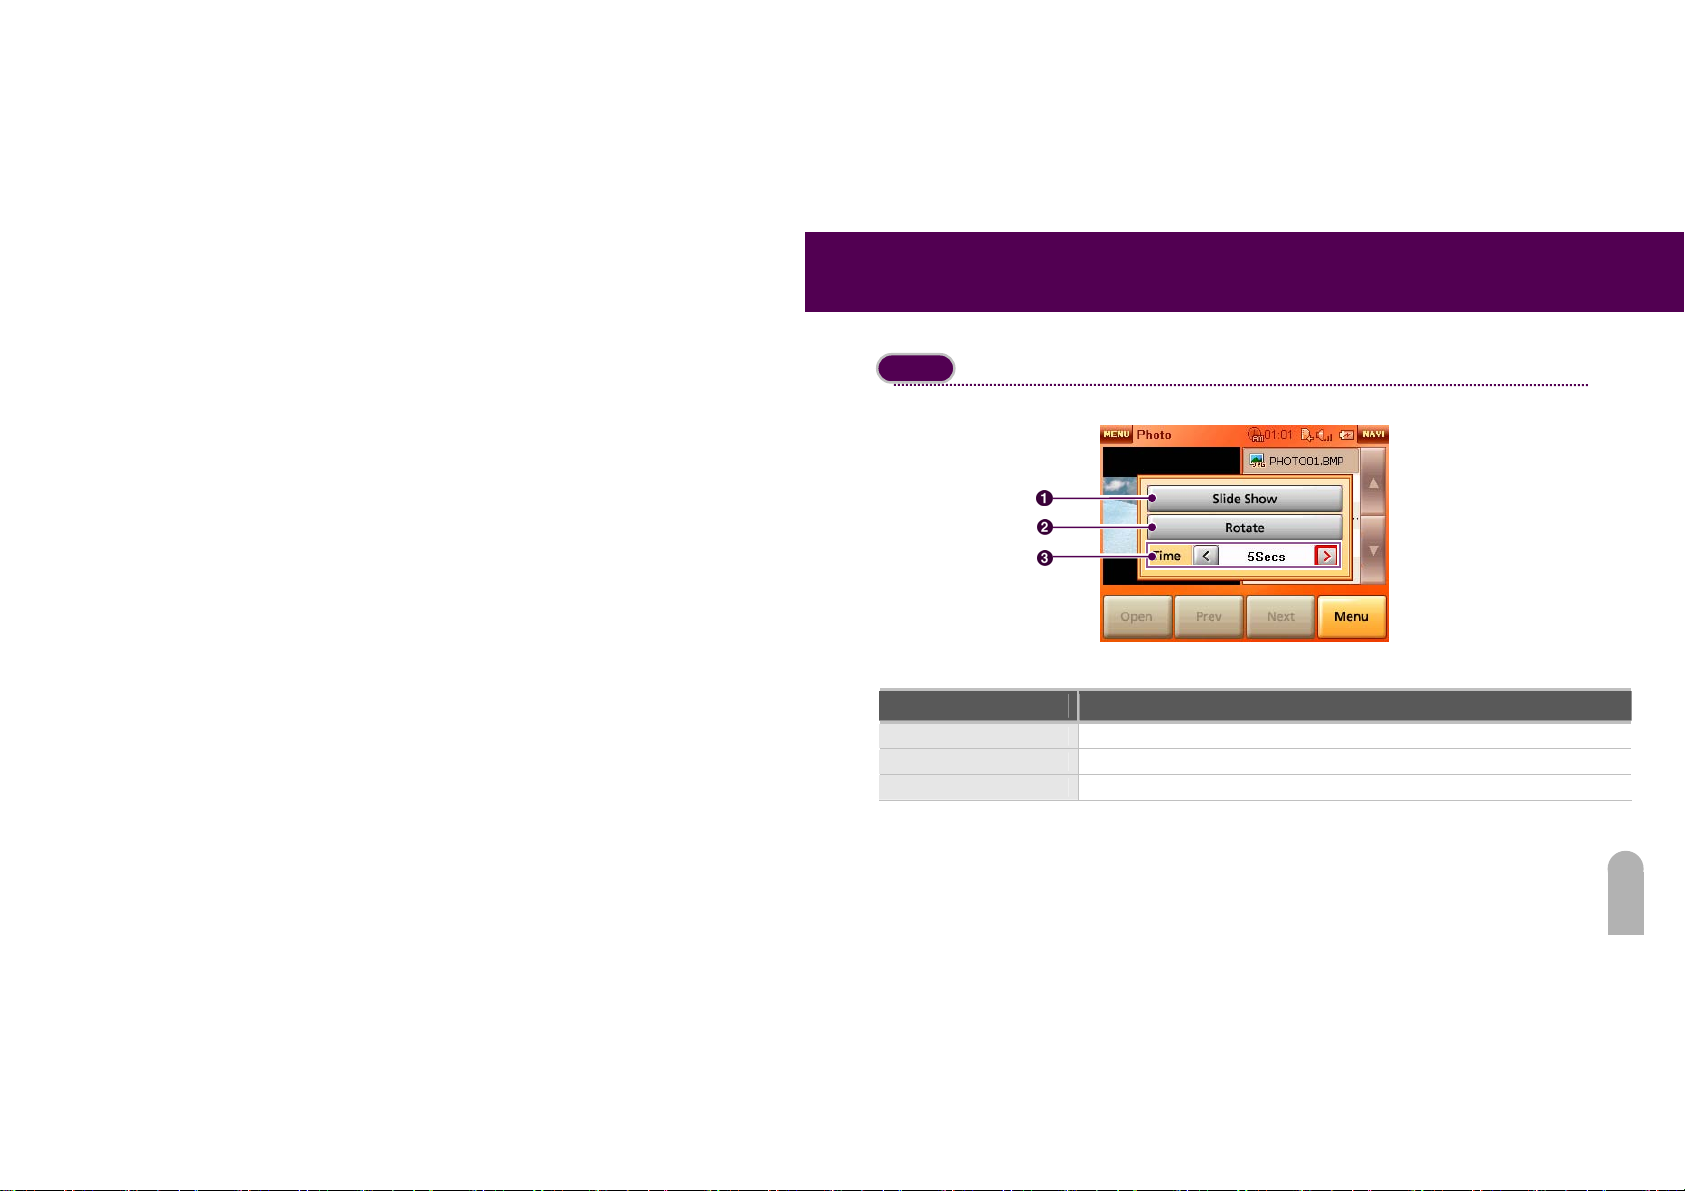
Menu
1. Slide Show Consecut ively displays s elected pict ures at desi gnated inte rval s.
2. Rotate Rotates a selected file clockwise by 90 degrees.
3. Interval Sets the time interval of Slid e Show .
63
If the menu button is pressed, the following sub-menu appears.
Slide Show
Rotate
Interval
Part Description
Page 65
FIDELIX User Guide
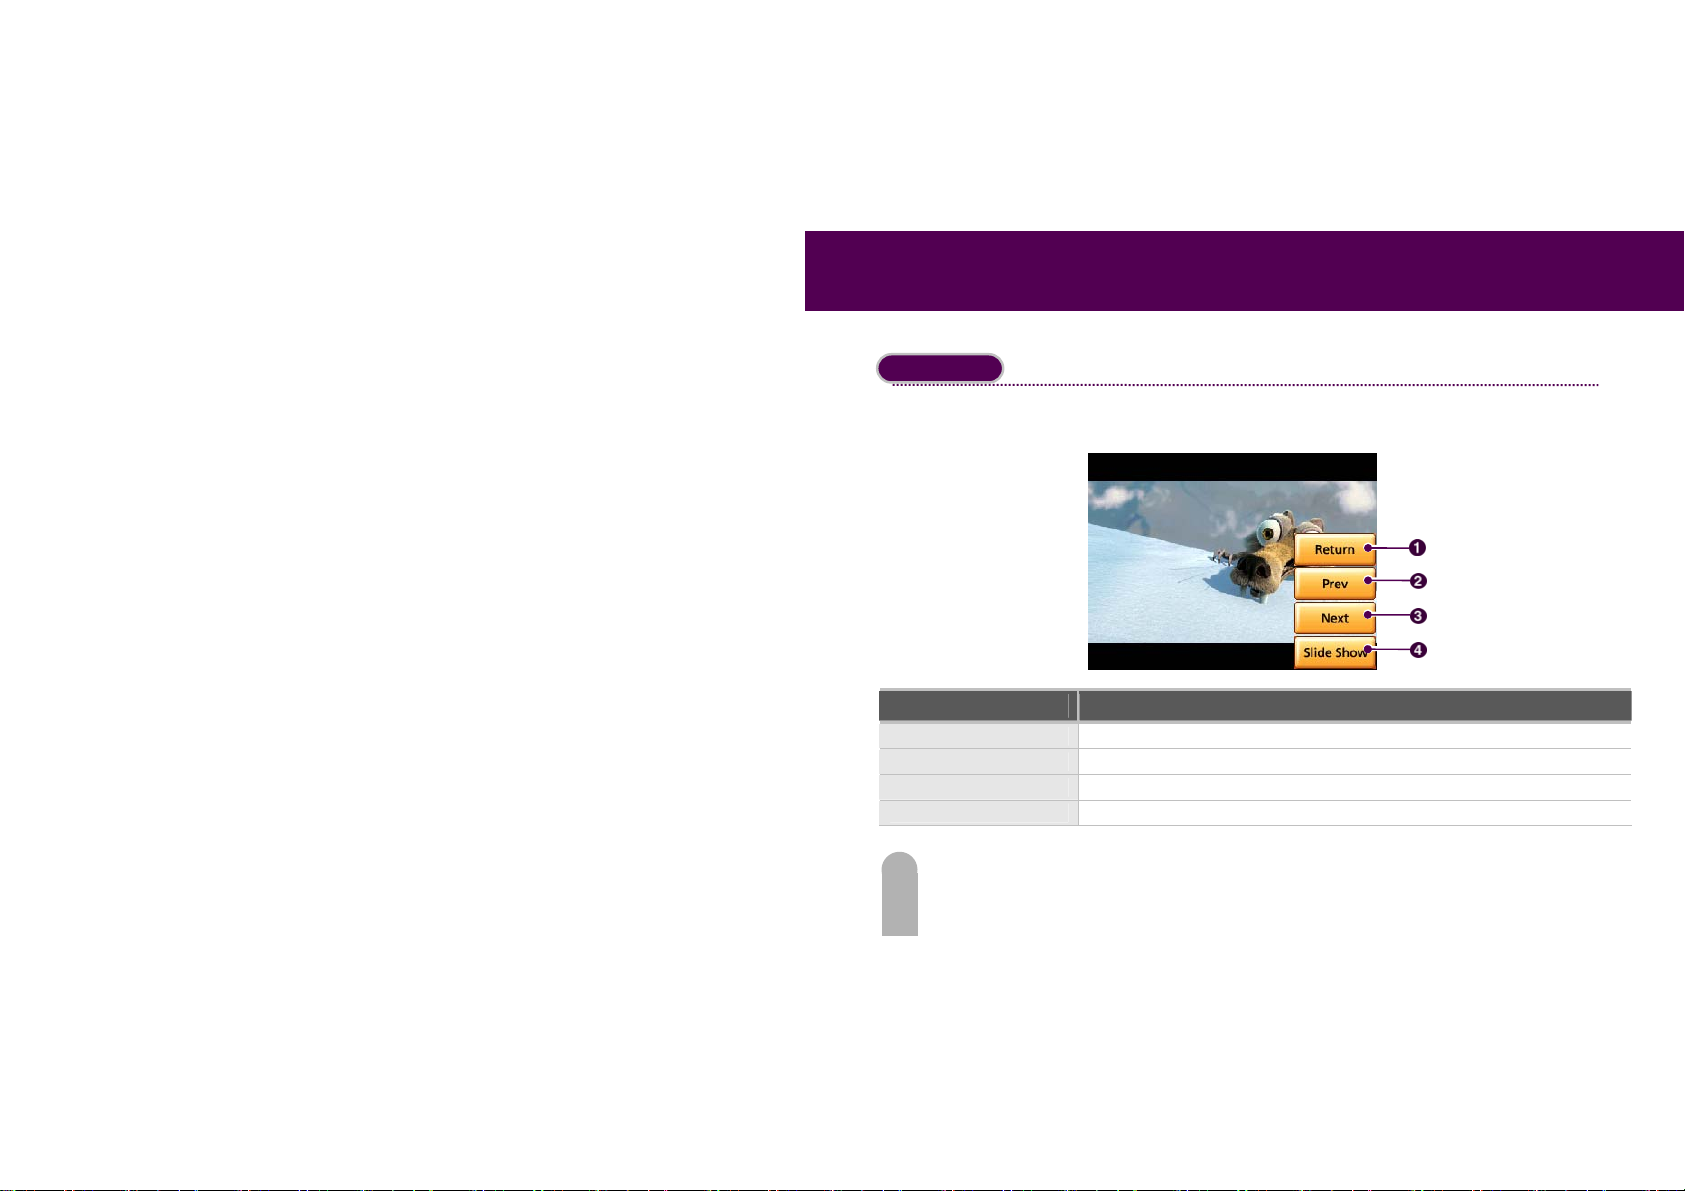
Full Screen
If the image is pressed, the full screen appears as shown in the figure. If the image screen is
pressed again in the full screen, menus appear on the right.
Part Description
1. Return Displays PHOTO VIEWER screen.
2. Prev Displays the previous pictur e.
3. Next Displays the next picture .
4. Slide Show Consecutively shows selected pictures at designated intervals.
Return
Prev
Next
Slide Show
64
Page 66
FIDELIX User Guide
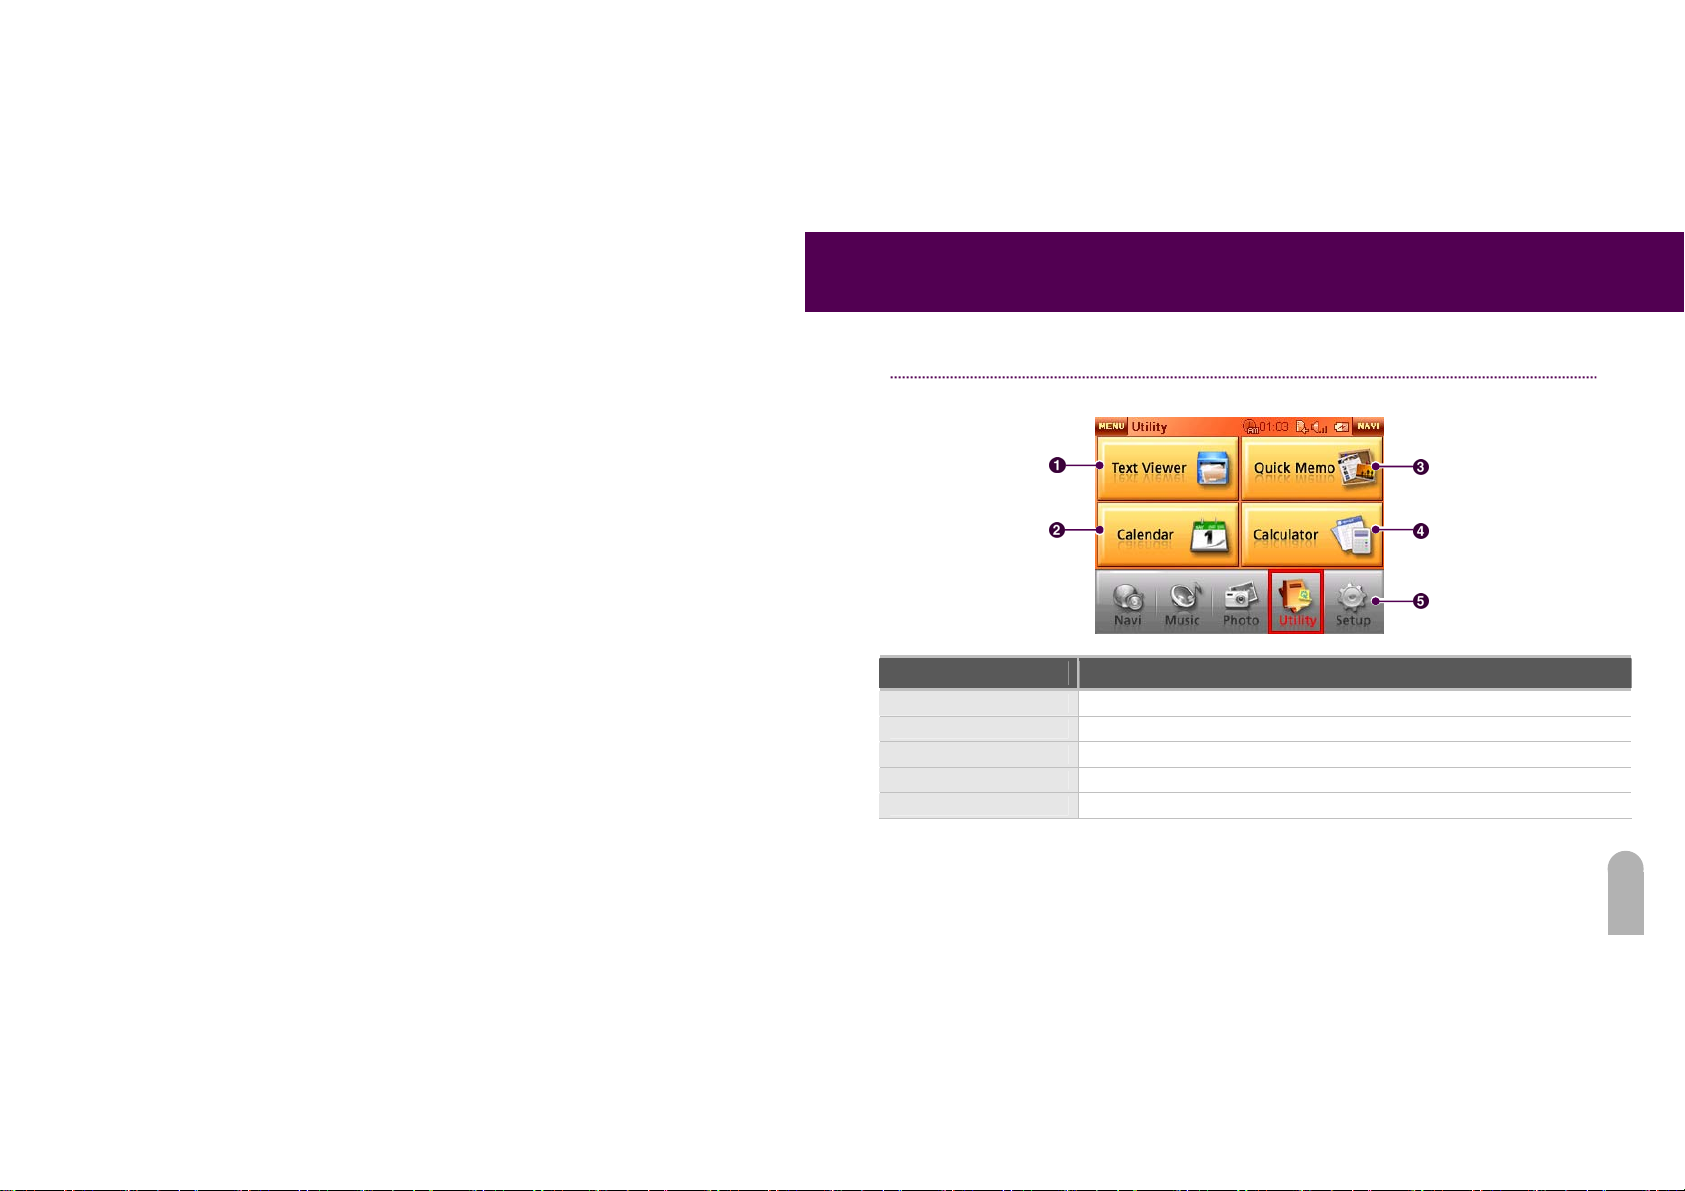
UTILITY
Utility can execute Text Viewer, Calendar, Calculator and Quick Memo.
1. Text Viewer Displays the content of sav ed text files.
2. Calendar Displays Calendar.
3. Quick Memo Executes Quick Memo thr ough t he us e of Touch P ad.
4. Calculator Simple calculations can be im plement ed.
5. Main Menu It is a menu on the Main Screen. It activates menu at once.
Text Viewer
Calendar
Part Description
Quick Memo
Calculator
Main Menu
65
Page 67
FIDELIX User Guide
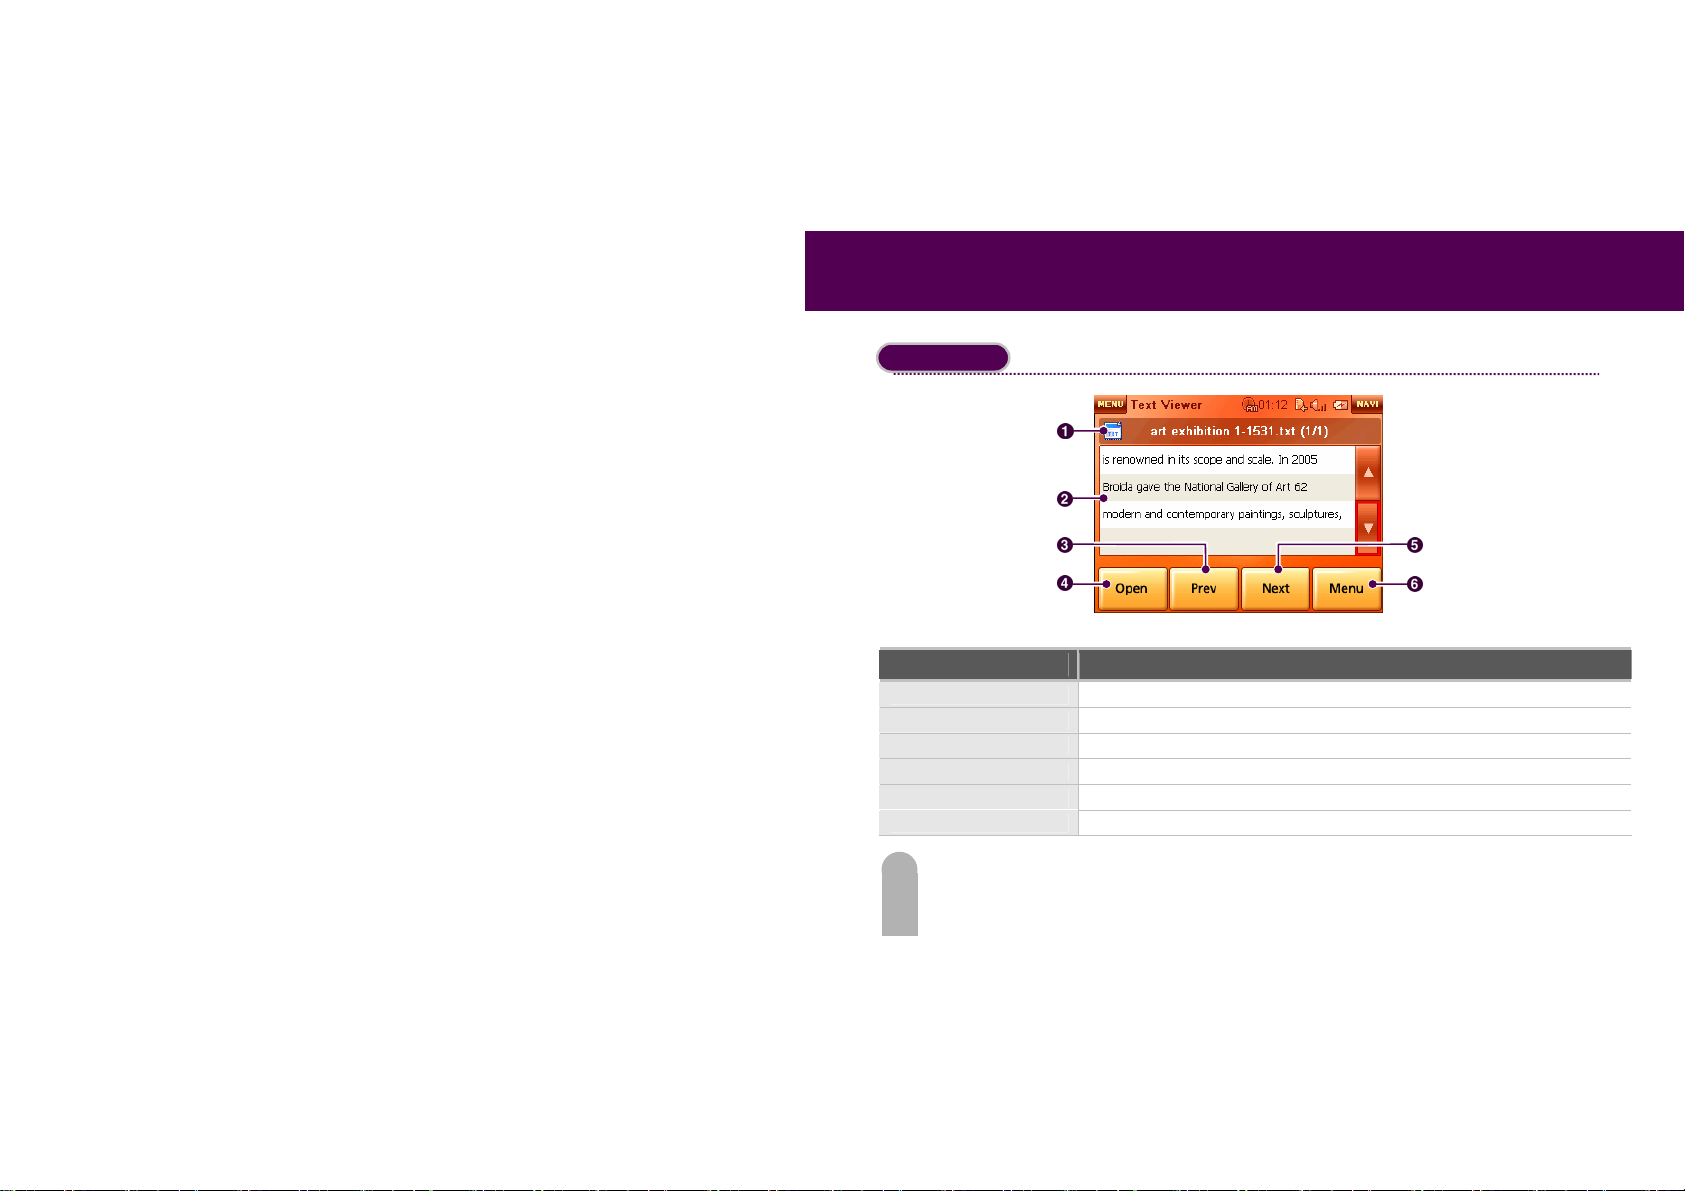
Text Viewer
Text files saved in the SD memory is displayed here.
File name
Text
Prev
Next
Open
Menu
Part Description
1. File name Displays the names of slected files.
2. Text Displays the content of the selected files.
3. Open Acti v ates Exp lorer to se arch r eadab le files.
4. Prev Displays the previous file.
5. Next Displays the next file.
6. Menu Sets up sub menus including Bookm ark, A uto Scr oll a nd Ful l Scr een.
66
Page 68
FIDELIX User Guide
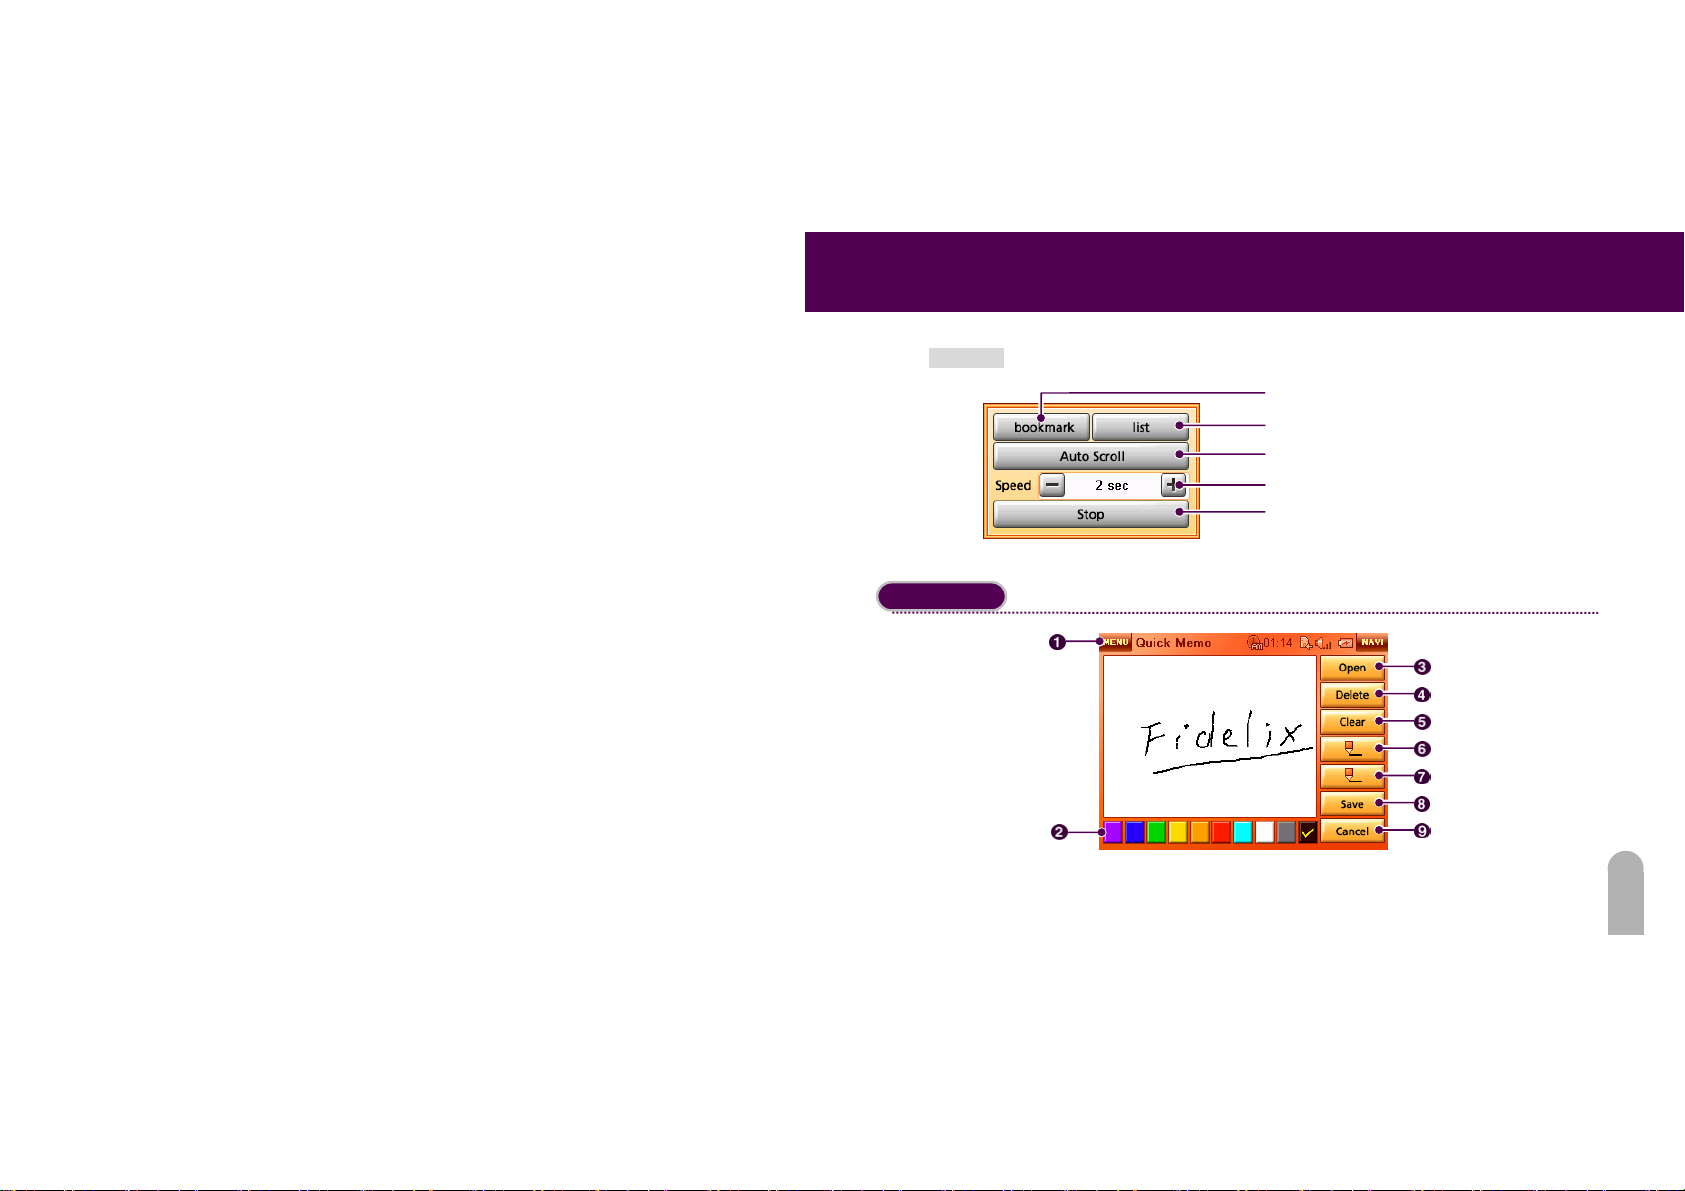
<Menu>
Saves the current location of text.
Displays Bookmark List.
Text View is set up as Auto Scroll.
Sets up time interval of Auto Scroll.
Stops Auto Scroll.
Quick Memo
Quick Memo or Save is executed through the use of a touch pen.
Memo
Palette
Open
Delete
Clear
Bold
Thin
Save
Cancel
67
Page 69
FIDELIX User Guide
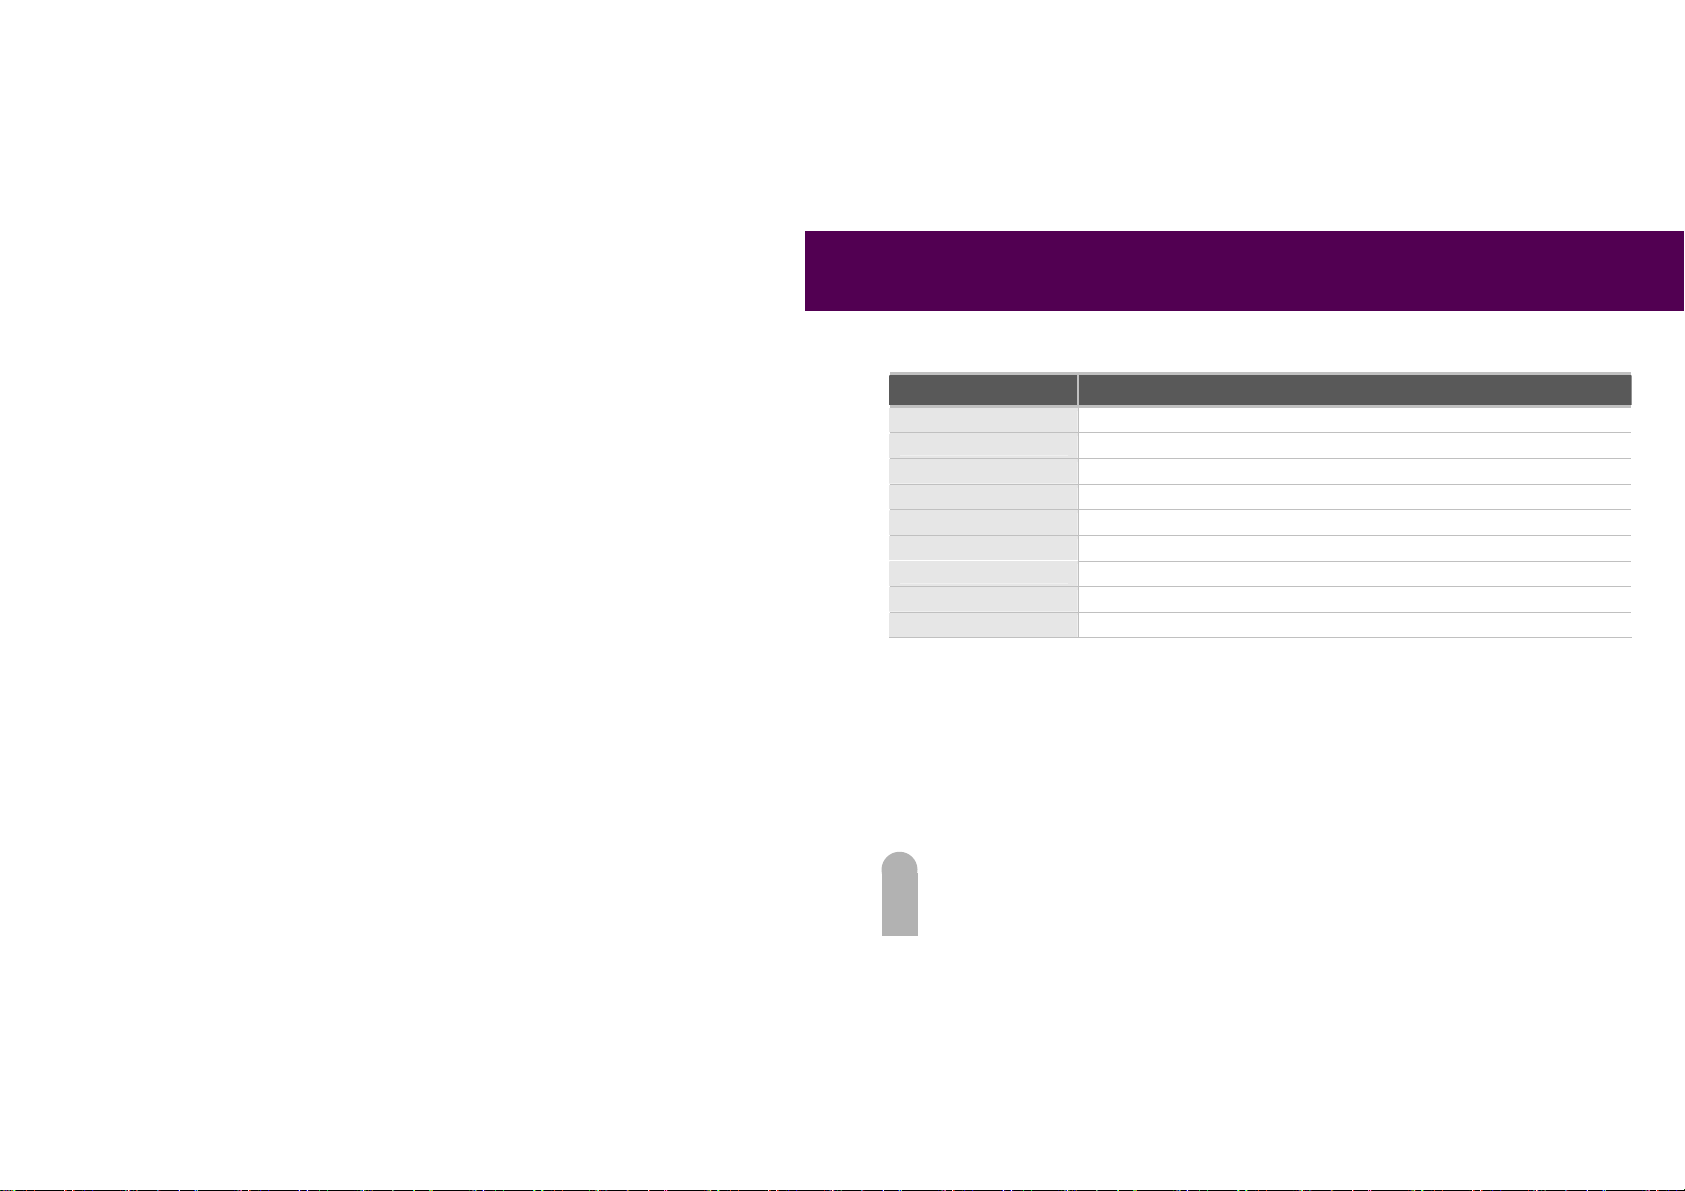
Part Description
1. Memo A quick memo can be written through the us e of the touch pad
2. Palette Selects the co lor of the lines used in the m emo.
3. Open Searches a memo file to be selected.
4. Delete Deletes a selected memo file.
5. Clear Deletes the memo.
6. Bold Thickens lines.
7. Thin Thins lines.
8. Save Saves a completed memo.
9. Cancel Closes a memo withous saving it.
68
Page 70
FIDELIX User Guide
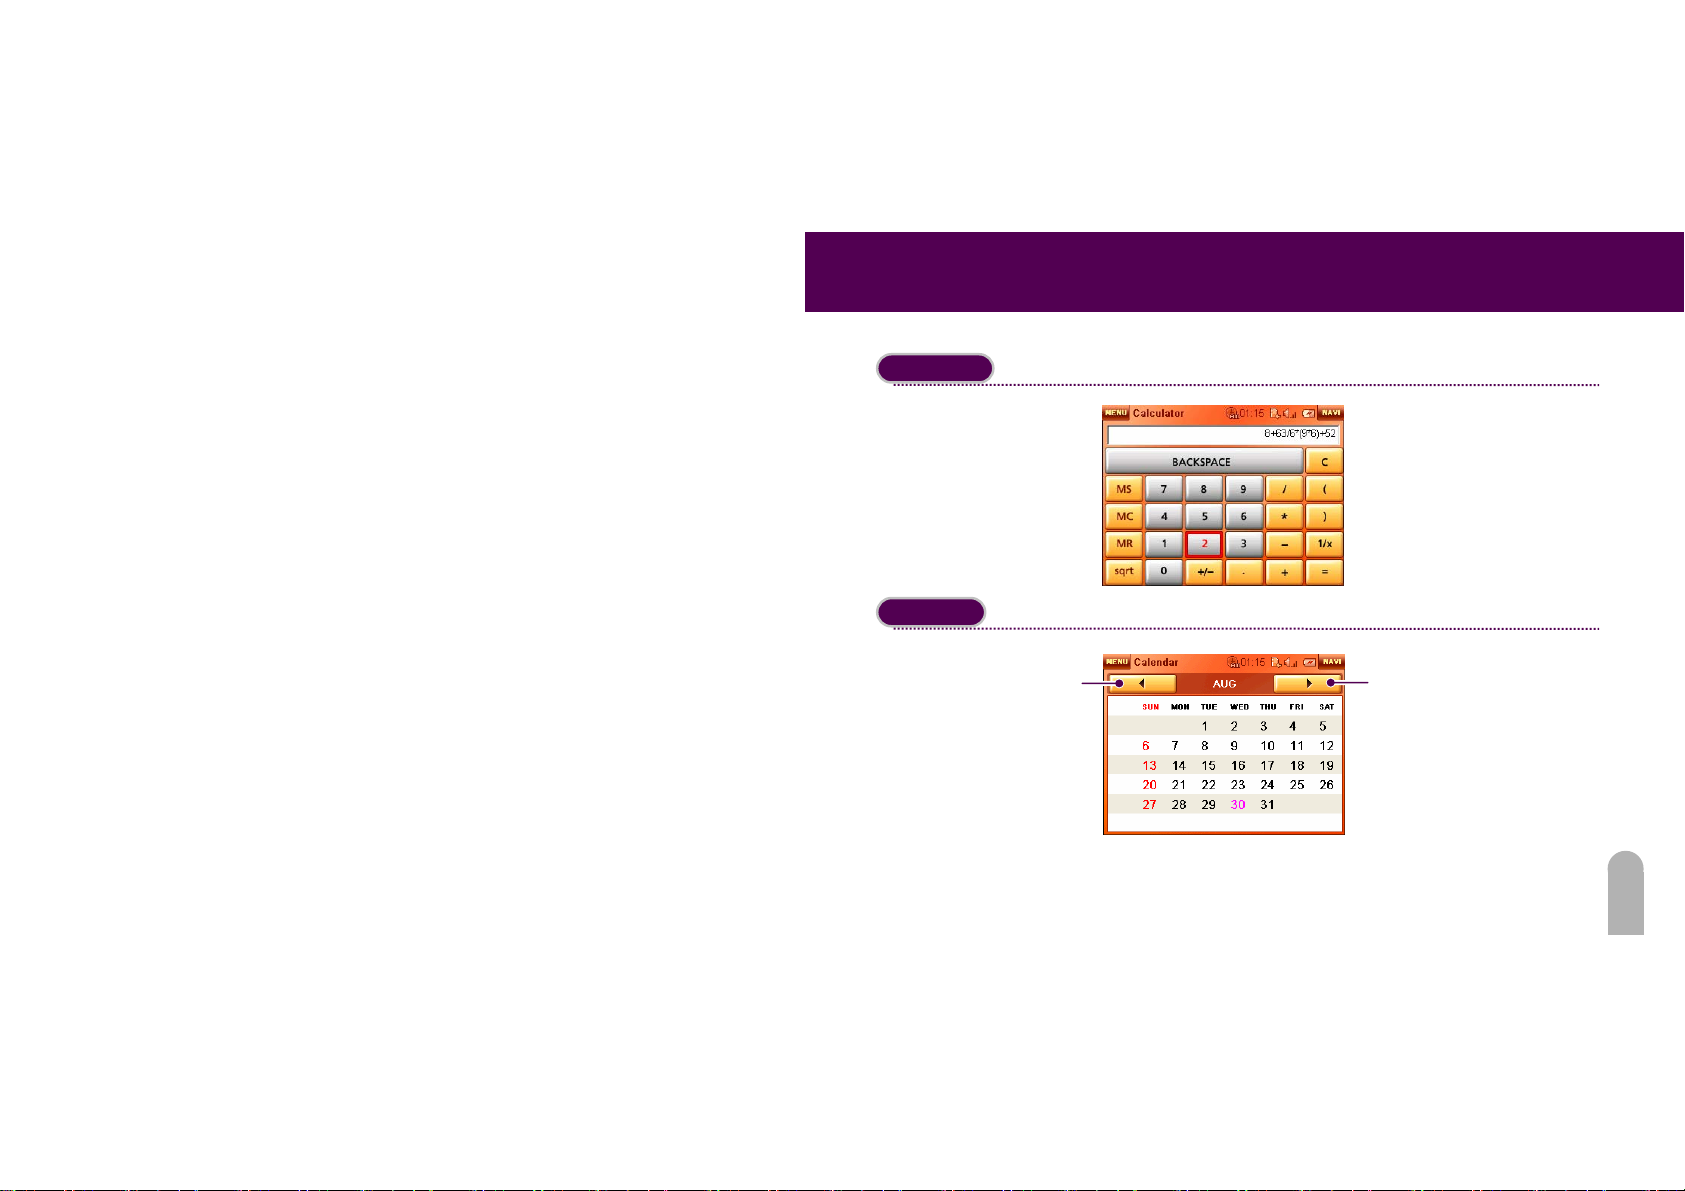
Calculator
Calendar
69
It displays simple calculations.
If the Calendar is pressed, the current month is displayed
Previous month
Next month
* Holidays are not indicated.
Page 71
FIDELIX User Guide
Setup
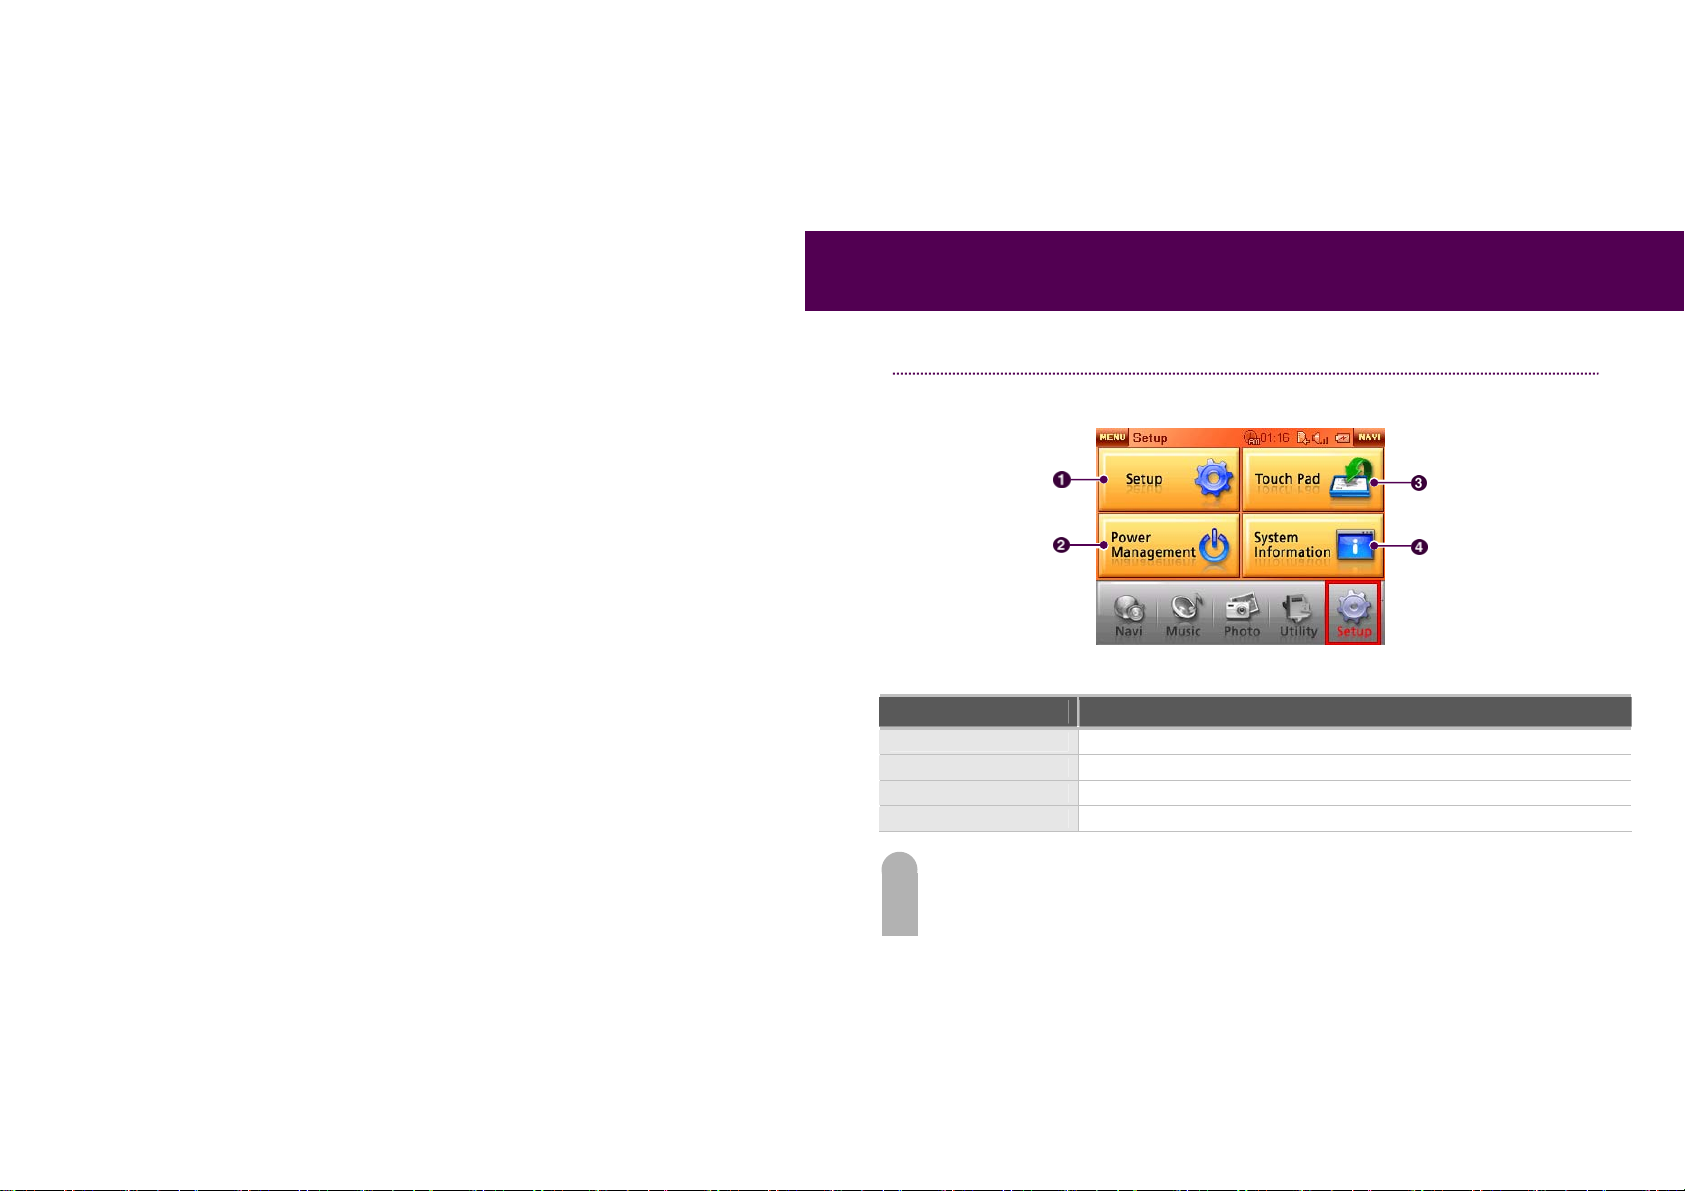
Displays System Setup, Touch Pad, Power Management and System Information.
1. System setup Use to set up screen and sound.
2. Power management Use to test the touch pad.
3. Touch Pad Use to manage Power-On/Off effectively.
4. System information Dislays information abou t S/W and H/W of the ter minal.
Setup
Power
Management
Part Description
Touch Pad
System
information
70
Page 72
FIDELIX User Guide
Setup
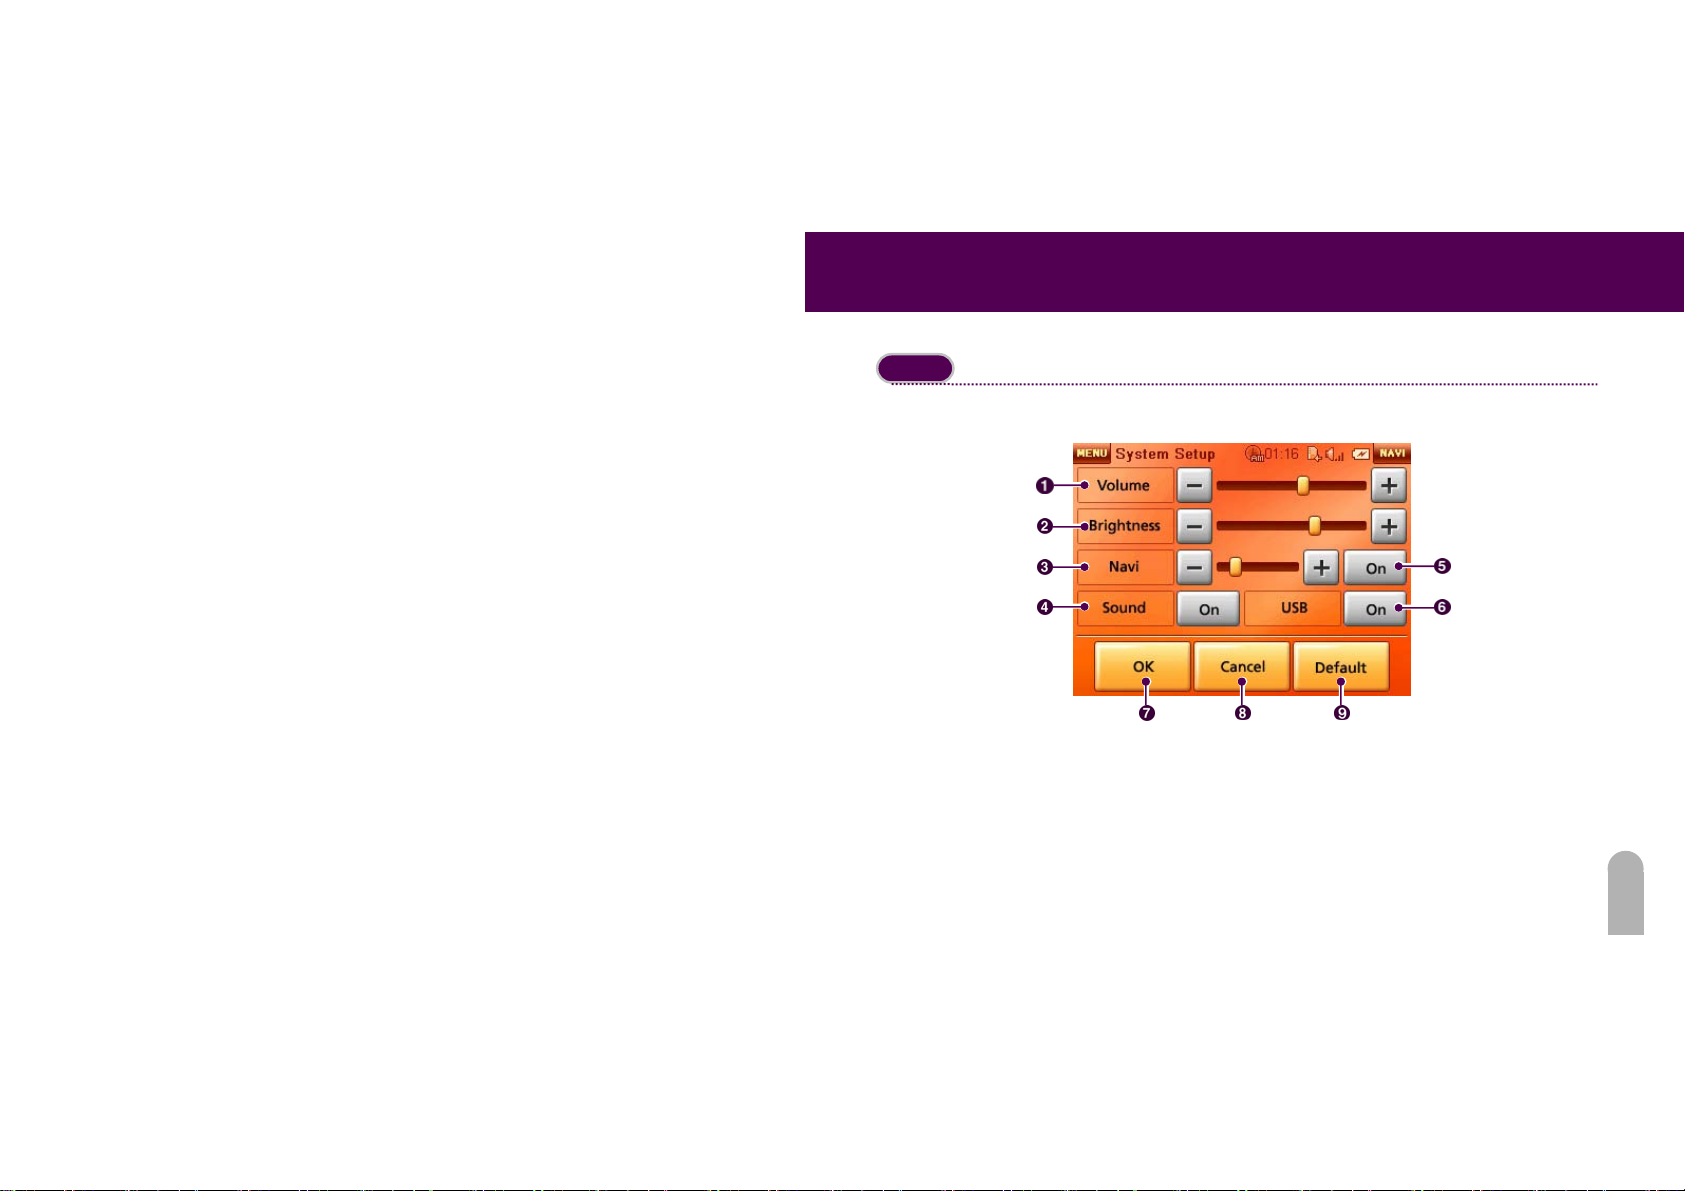
Default setting is shown.
Volume
Brightness
Navi
Sound
Navi On
USB
OK
Cancel Default
71
Page 73
FIDELIX User Guide
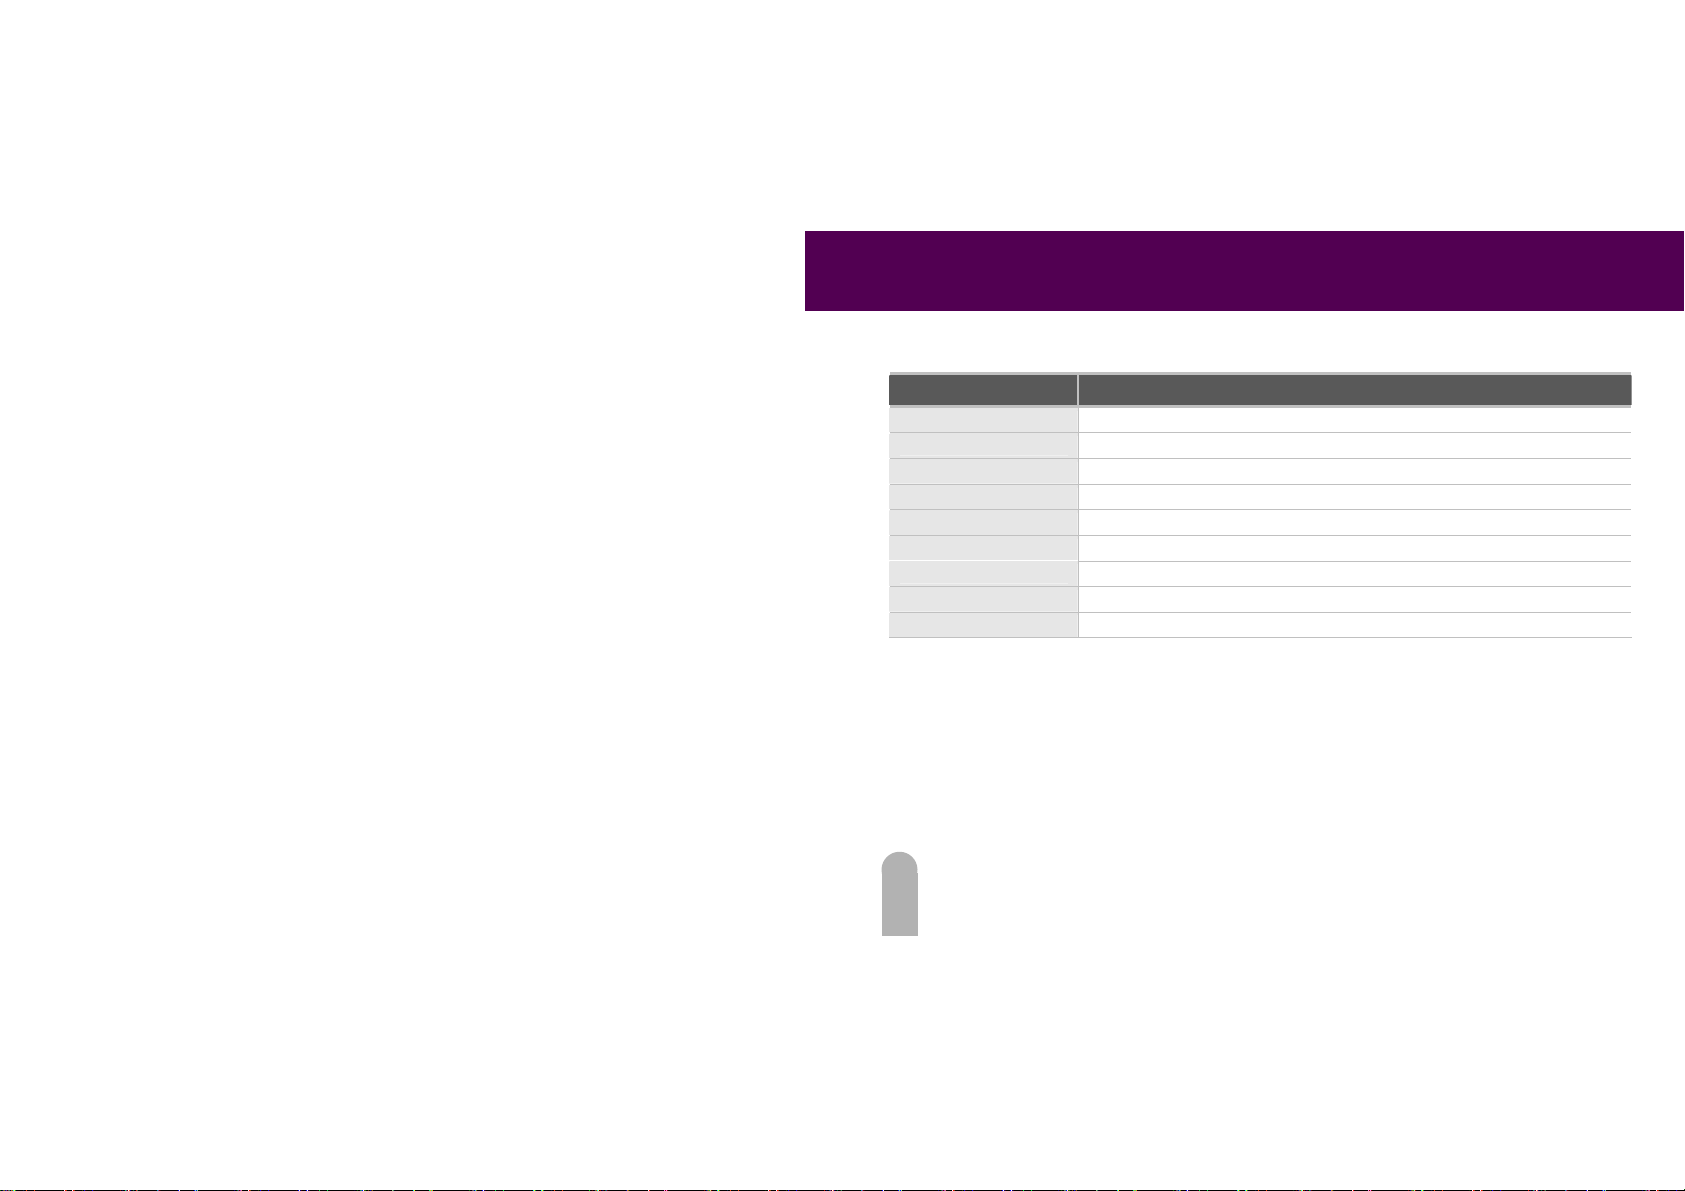
Part Description
1. Volume Sets up volume.
2. Brightness Sets up brig htness.
3. Nav Sets up the time when it returns to navigation.
4. Sound Sets up so und on/off.
5. Navi On Sets up shift to automatic navigation.
6. USB Sets up the time when data are sav ed throu gh the use of USB .
7. OK A selected file is applied , and F ile Op en is closed.
8. Cancel A selected file is not applied, and File Open is closed.
9. Default The basic values at a time o f produ ct r eleas e are set up as def ault .
72
Page 74
FIDELIX User Guide
A
f
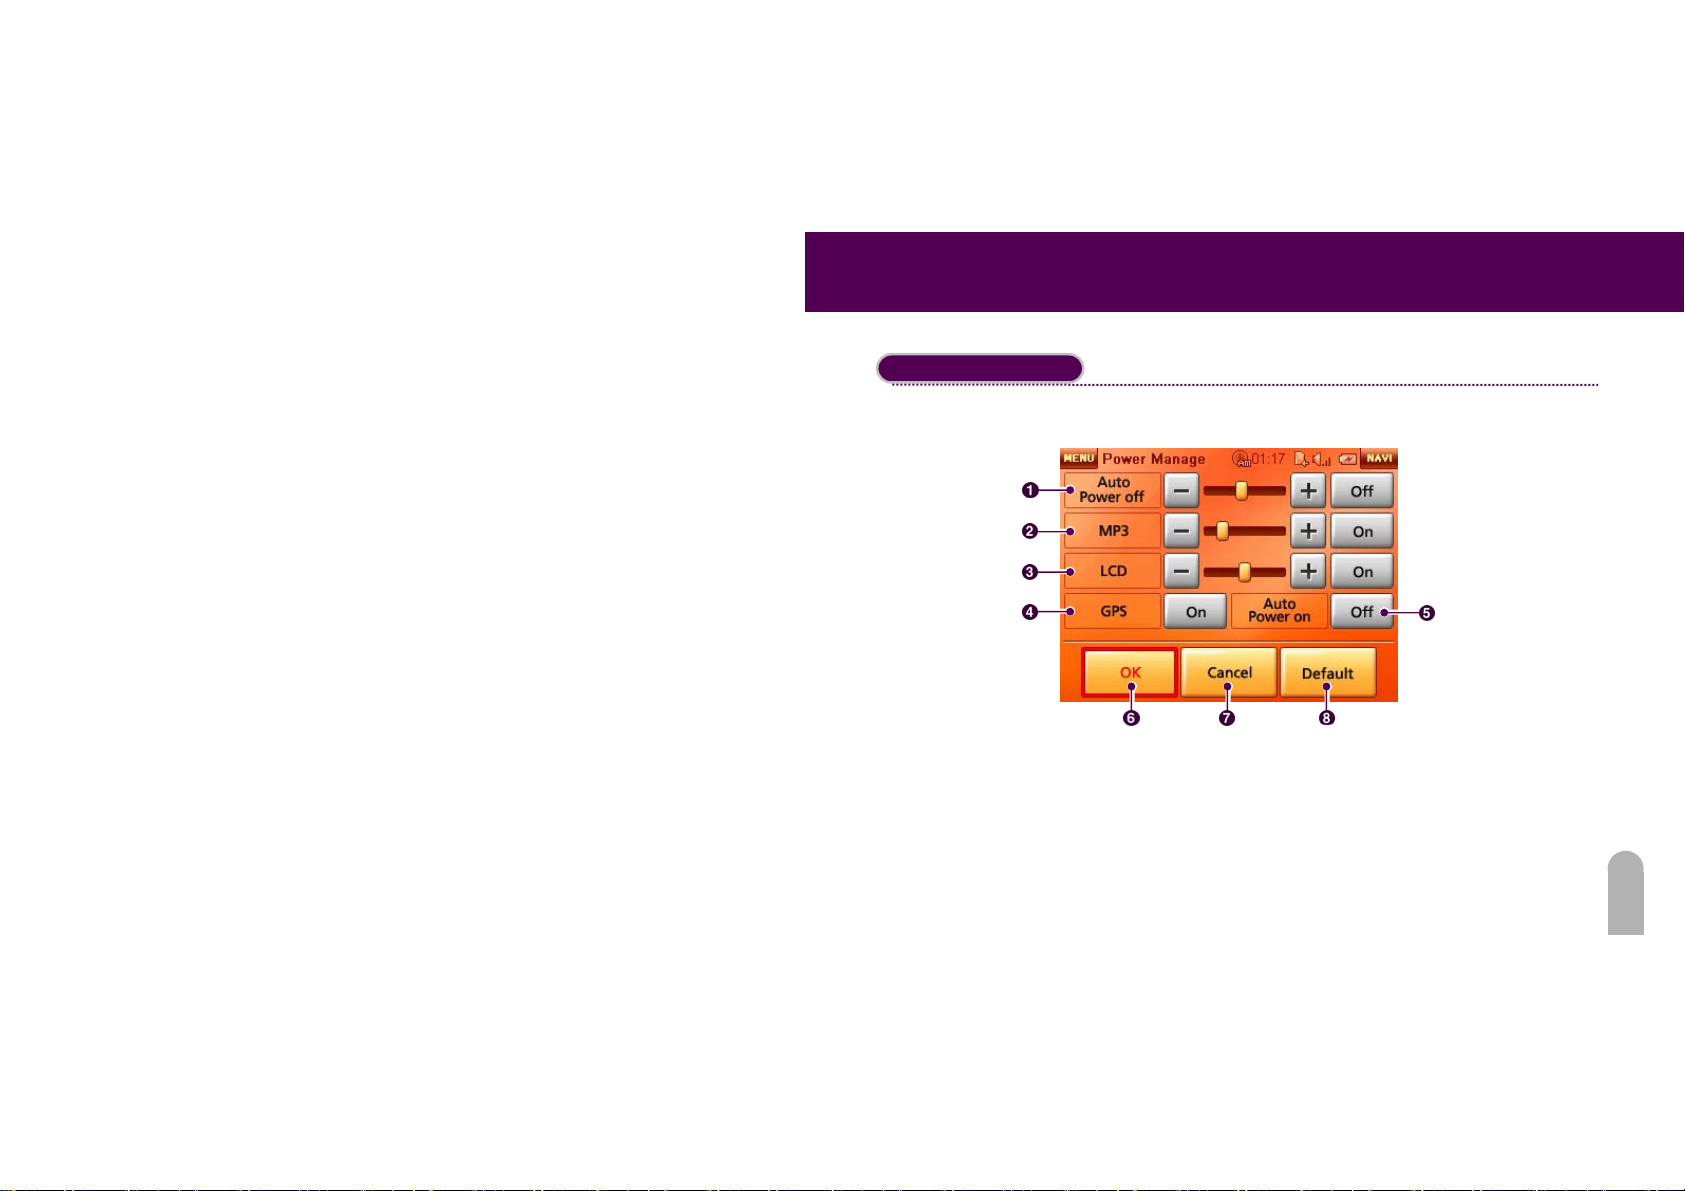
Power Management
Default setting is shown.
uto Power of
MP3
LCD
GPS
Auto Power On
OK
Cancel Default
73
Page 75
FIDELIX User Guide
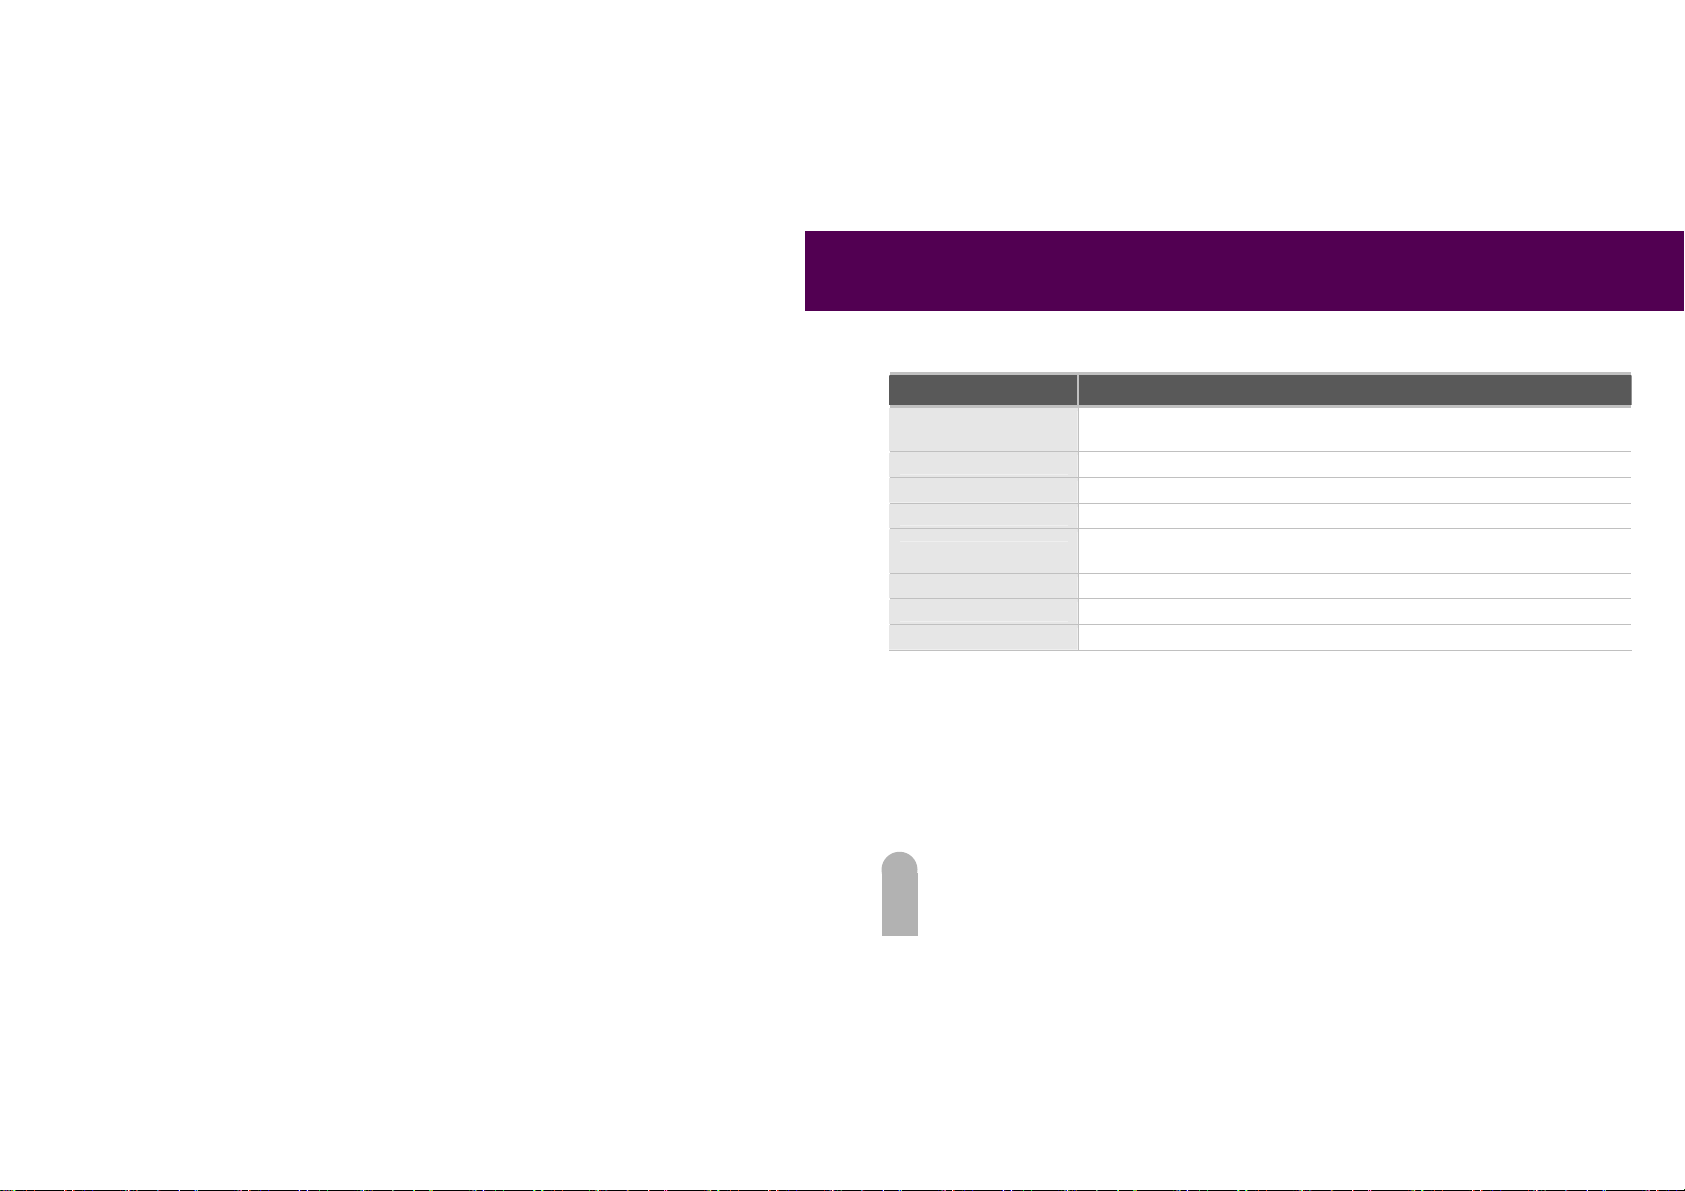
Part Description
1. Auto Power off At a time of external power cut-off, it sets up the time when it i s automatically
2. MP3 Sets ups the time when power is saved at a time of playing music.
3. LCD Sets up the time when power is saved in the SCD screen.
4. GPS standby mode Displays the setup status of standby mode of GPS modu le.
5. Auto Power On
6. OK Is closed wthout saving setup values.
7. Cancel Basic values at a time of prod uct rele ase are set up as defau lt.
8. Default File Open is closed without appl ication of se lectio n.
turned off .
If external power is conn ected at a time of Power-Off, it sets up automatic PowerOn.
74
Page 76
FIDELIX User Guide
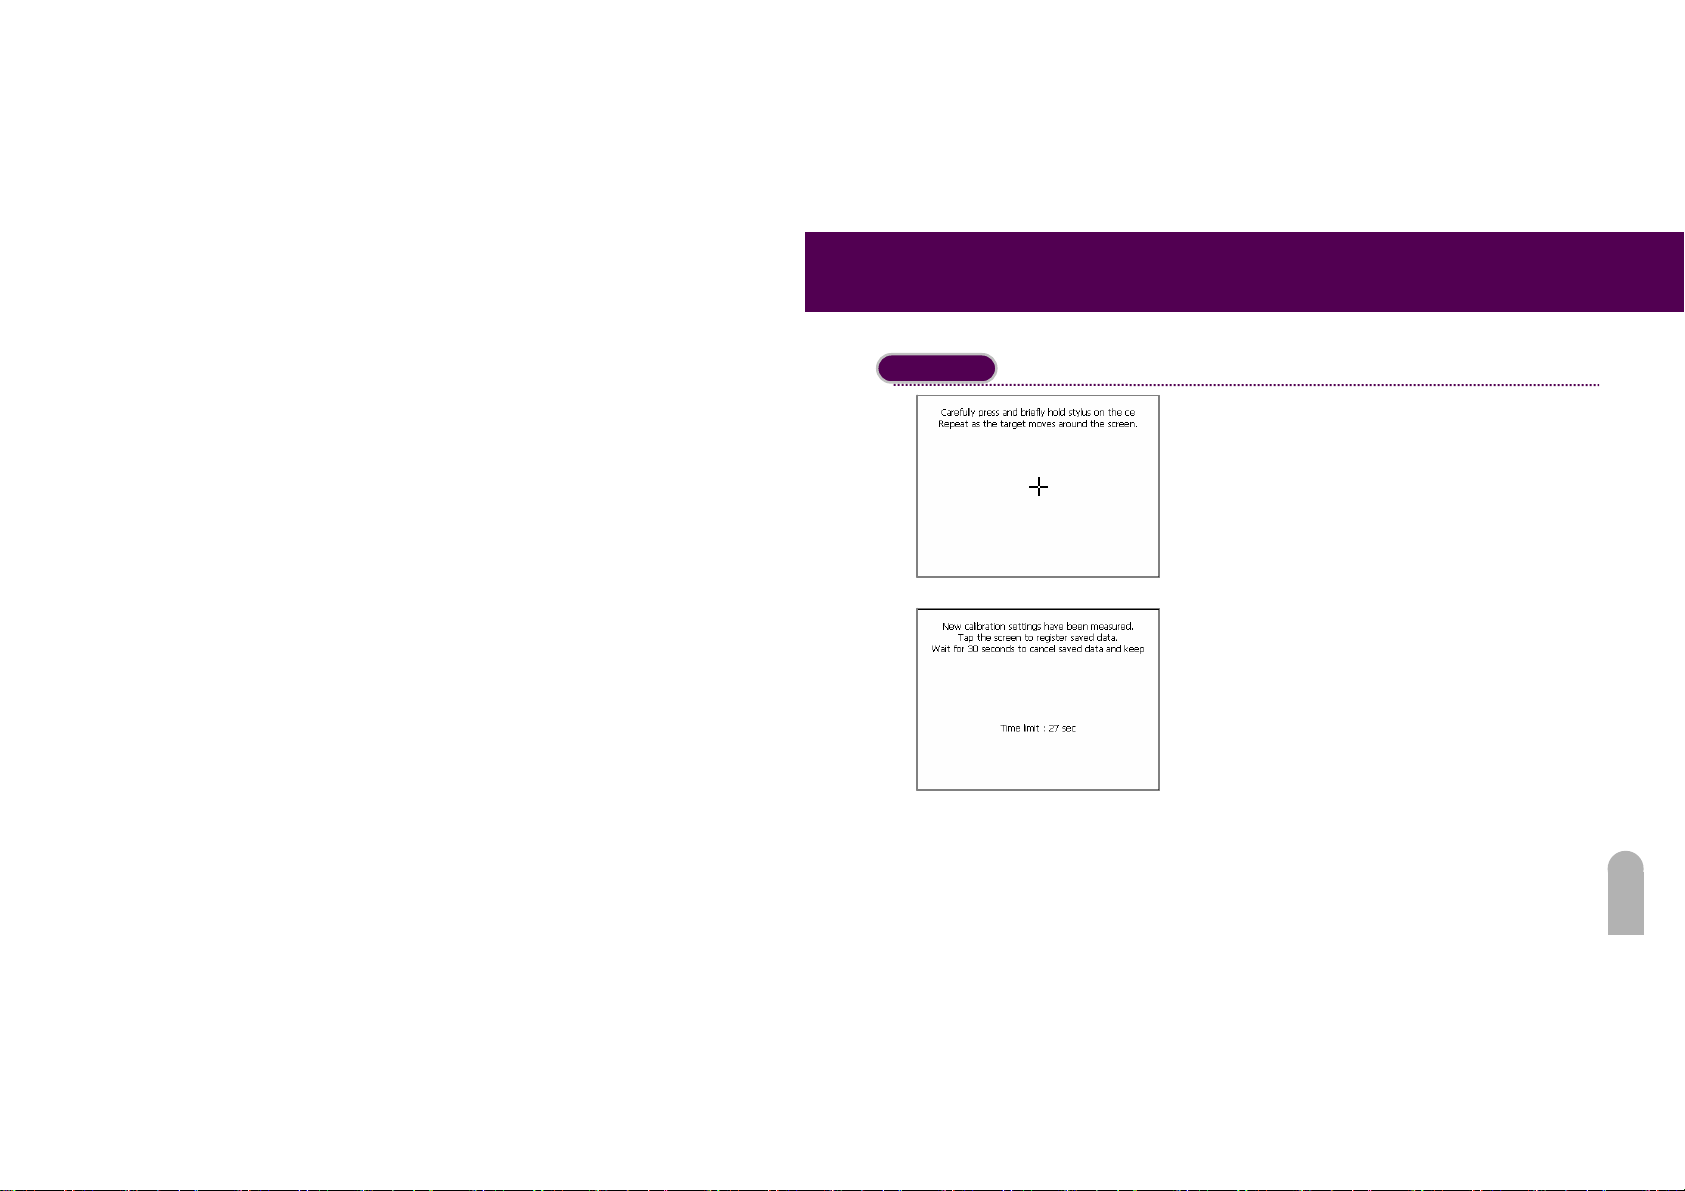
Touch Pad
75
Touch pad is set up here.
After executing the touch pad, press the cross
part. The cross starts moving in the middle and
then it moves on the upper left, on the lower left,
on the lower right and on the upper right in the
order.
If you press exactly the cross, touch pad setup is
executed. If the test is successfully completed,
the following message appears.
If you want to apply the adjusted value, touch the
screen. If you want to cancel the content saved,
wait for 30 seconds.
Page 77
FIDELIX User Guide
g
DATA Download
Download Sequence
Mode Cahnge
- Change device to USB Mass Storage mode.
- To avoid data crack and wron
please change device to USB Mass Storage mode.
operation in program from da ta sharing,
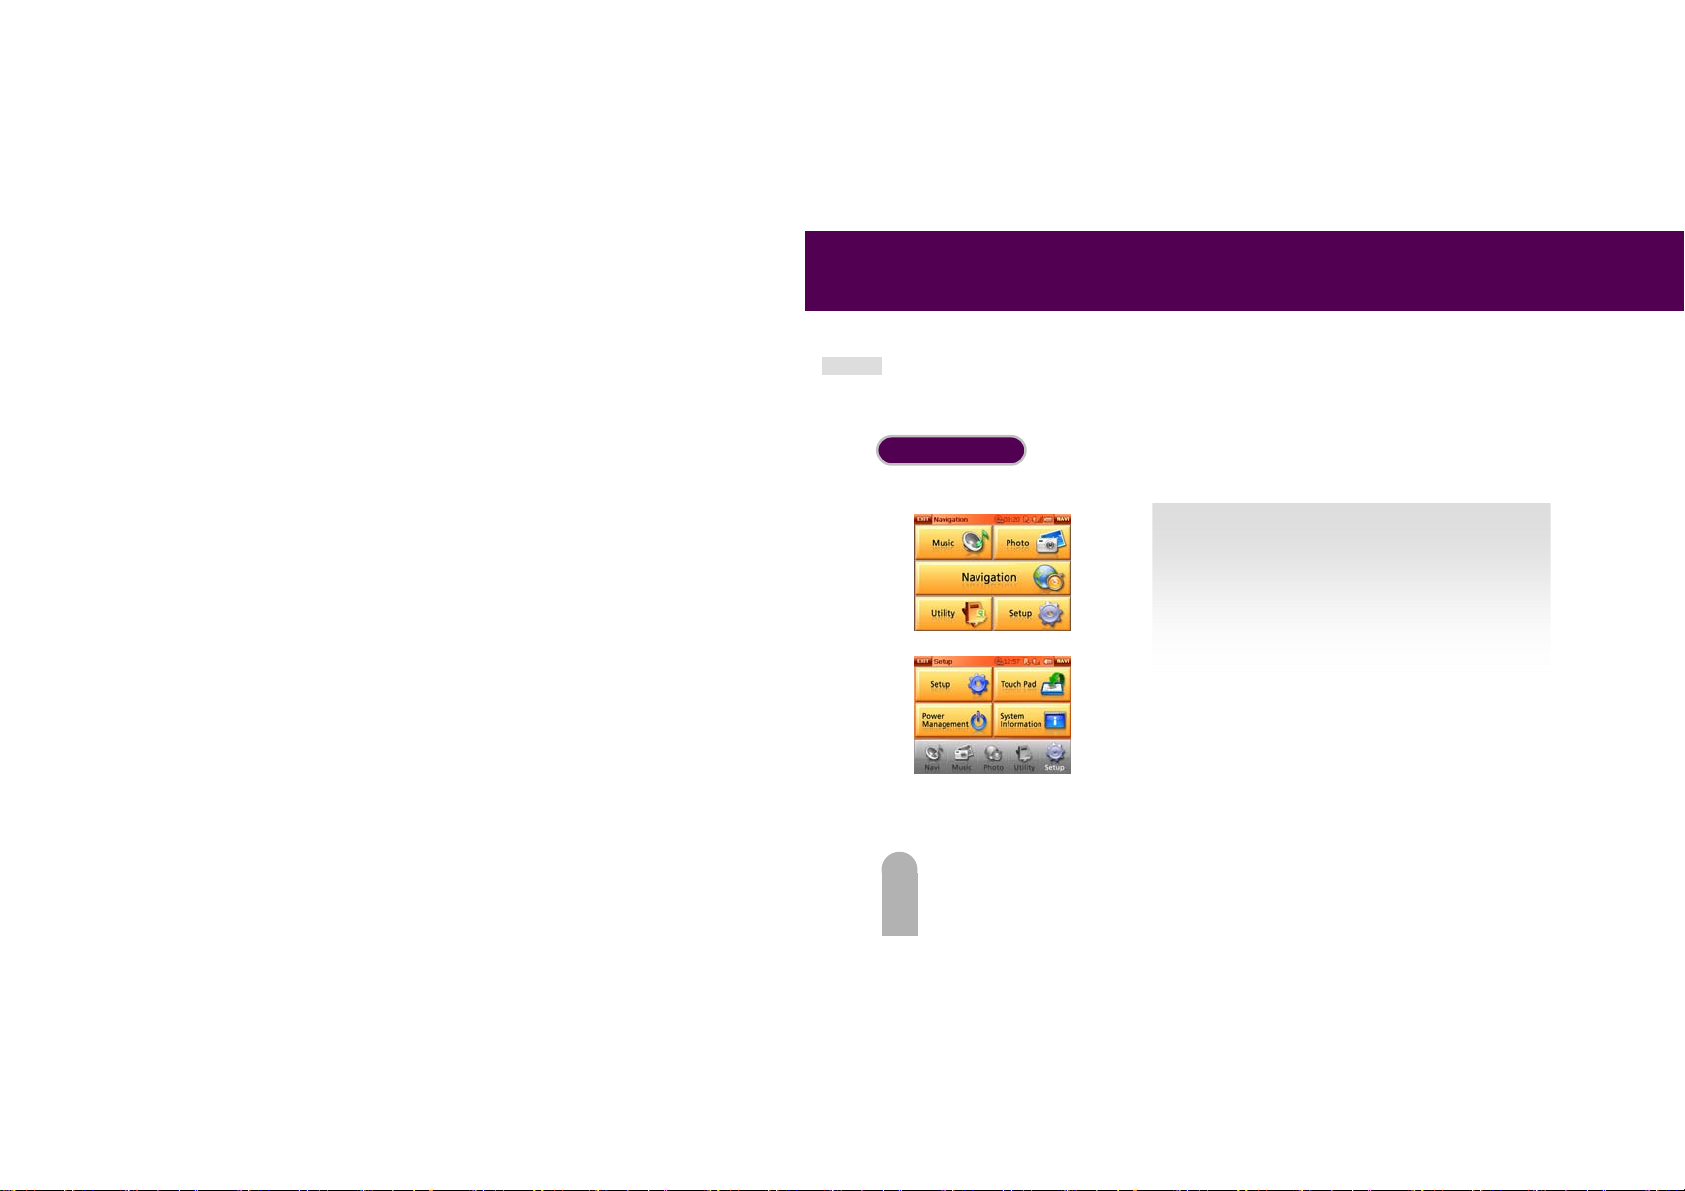
1. Move to [Main Menu]. Select the [Setup Menu].
2. Select the [Setup Menu].
76
Page 78
FIDELIX User Guide
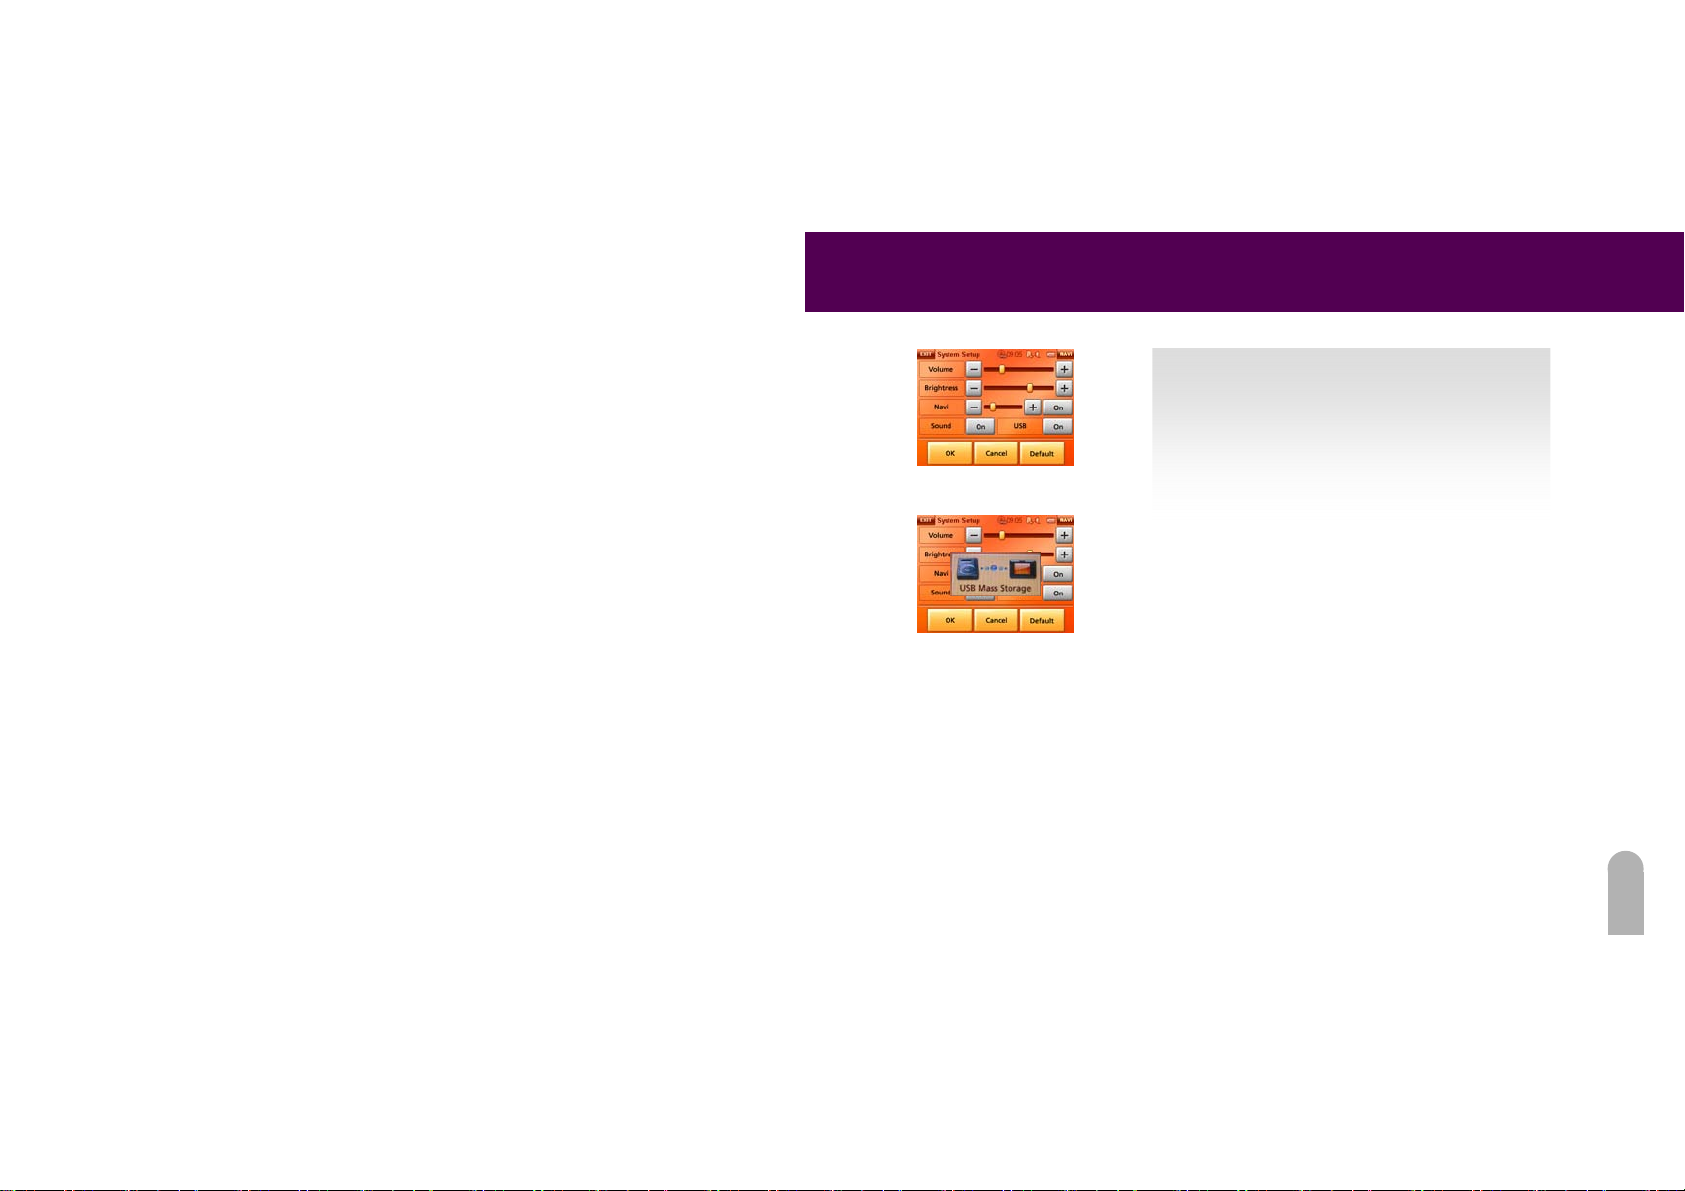
3. Push the [USB] On Button.
4. Once the USB Mass storage pictu re is displayed, you may
begin downloading.
77
Page 79
FIDELIX User Guide
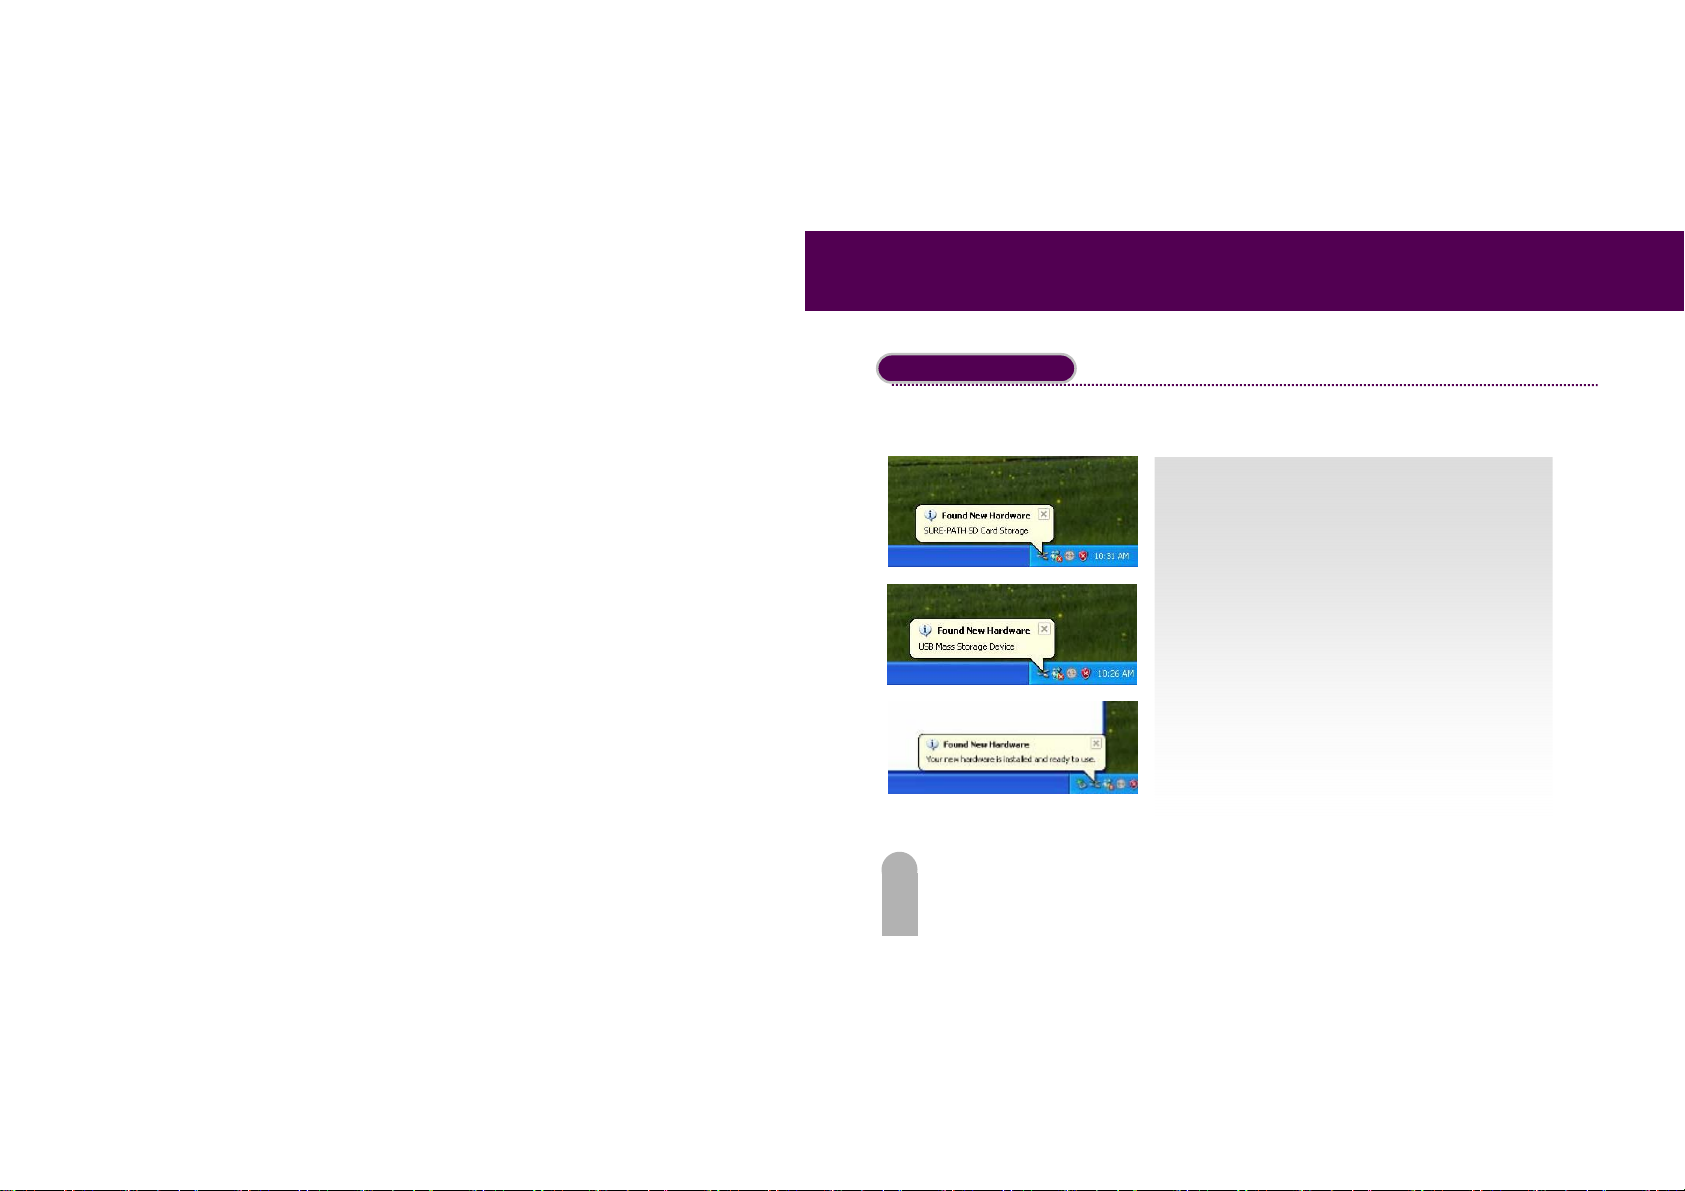
Connect USB Cable
- Connect USB Cable between PC and Device
- Change Device to USB Storage Mode, see previous page.
After the USB cable is connected and the device
is set to USB storage mode, your PC will display
one of the following 3 messages.
78
Page 80
FIDELIX User Guide
Copy and Delete Files
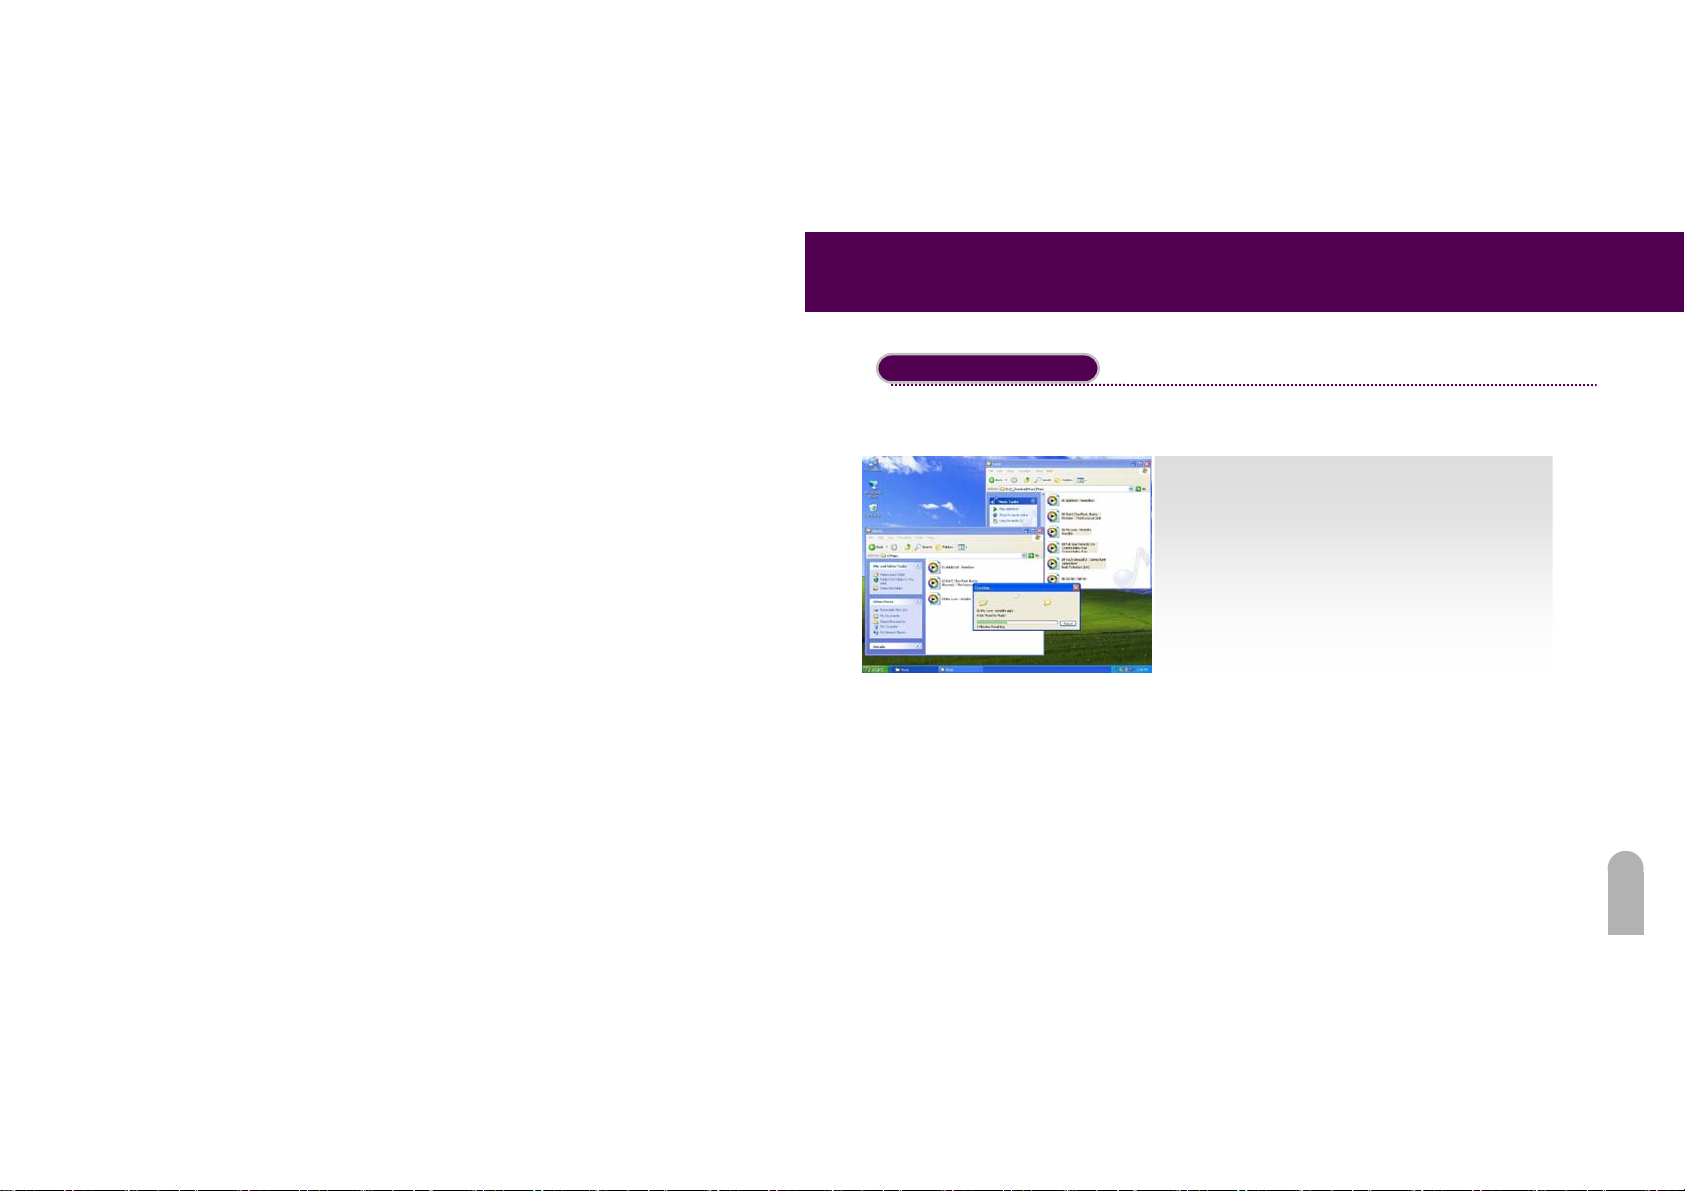
- Open <My Documents> folder or the folders holding your music, picture, or text files.
- Drag and Drop files what you want to download into the designated folder of the Device.
1. Copy MP3 Files
2. Copy Picture Files.
79
Page 81
FIDELIX User Guide
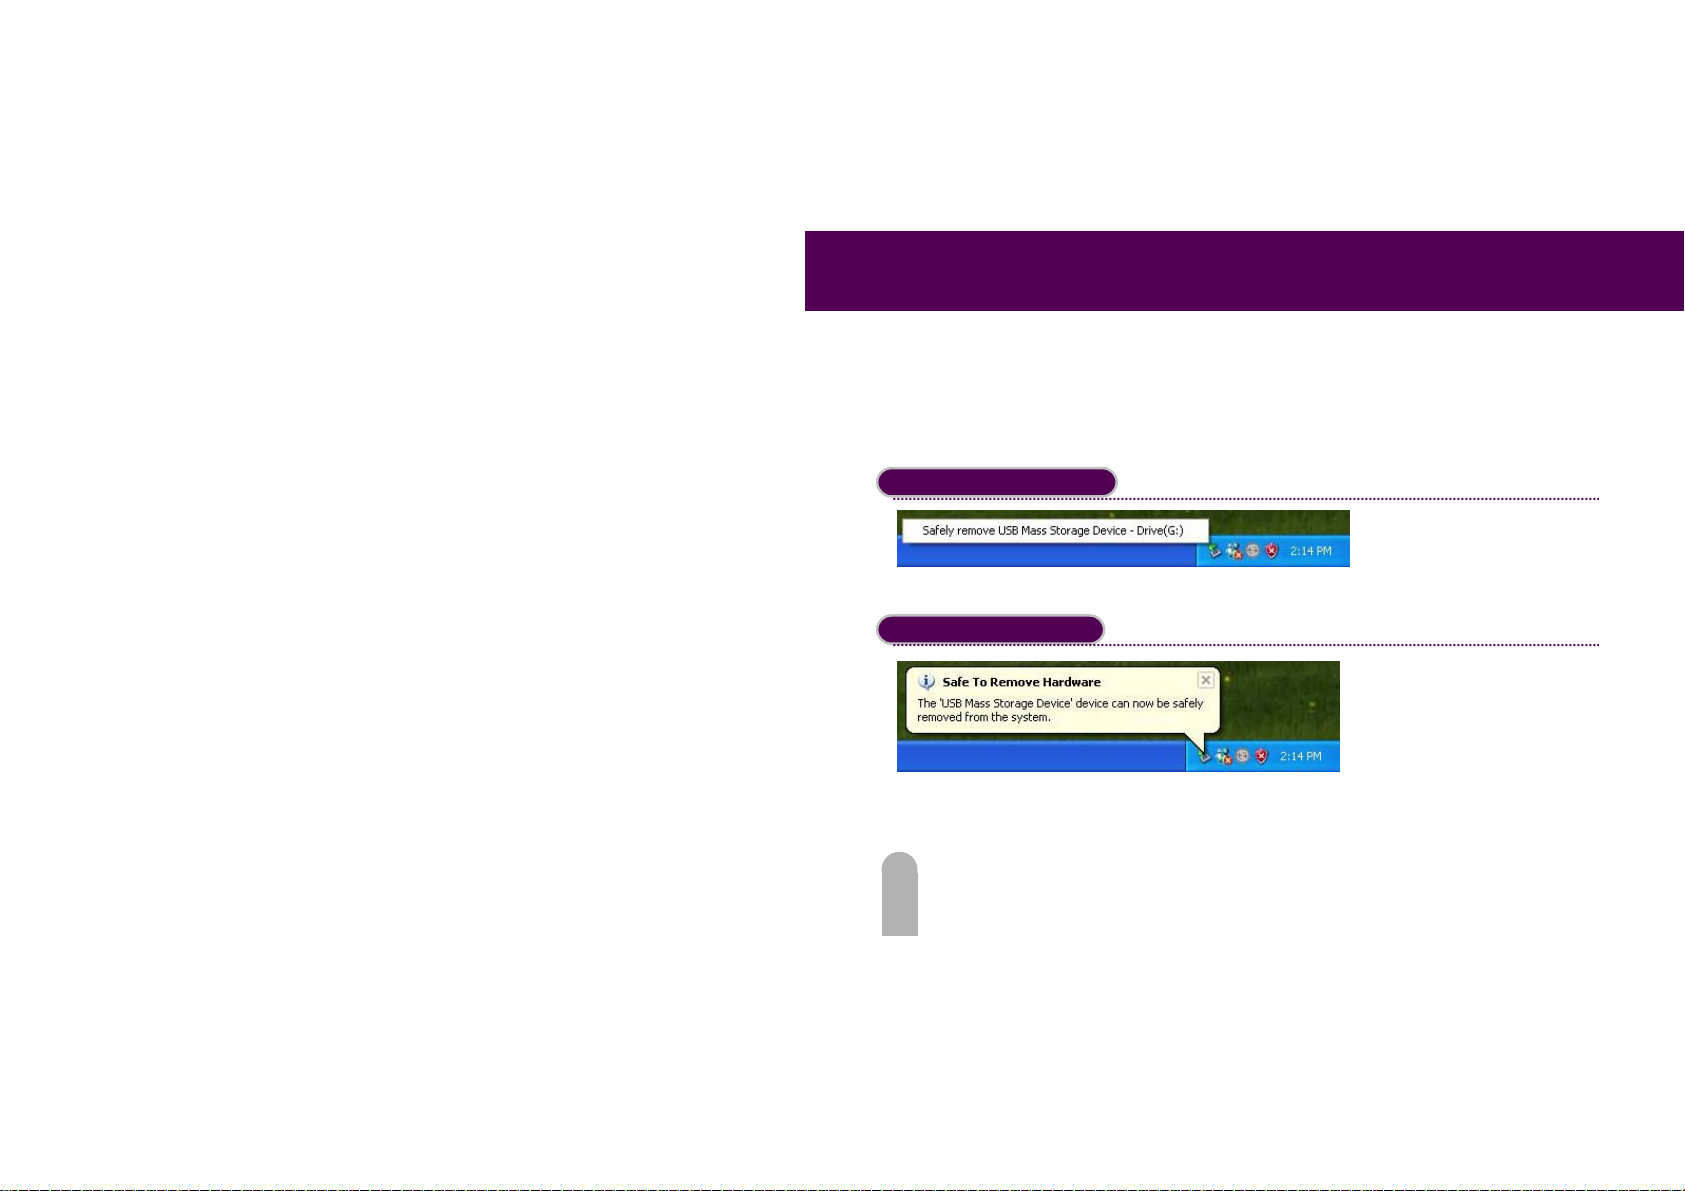
Safety Remove
- Safely remove USB Mass Storage Device.
- To avoid data crack, you must safely remove the SURE-PATH device.
Safety Remove From PC
Click safely remove USB Mass Storage Device.
Disconnect USB Cable
80
If below message show, please disconnect the USB Cable.
Page 82
FIDELIX User Guide
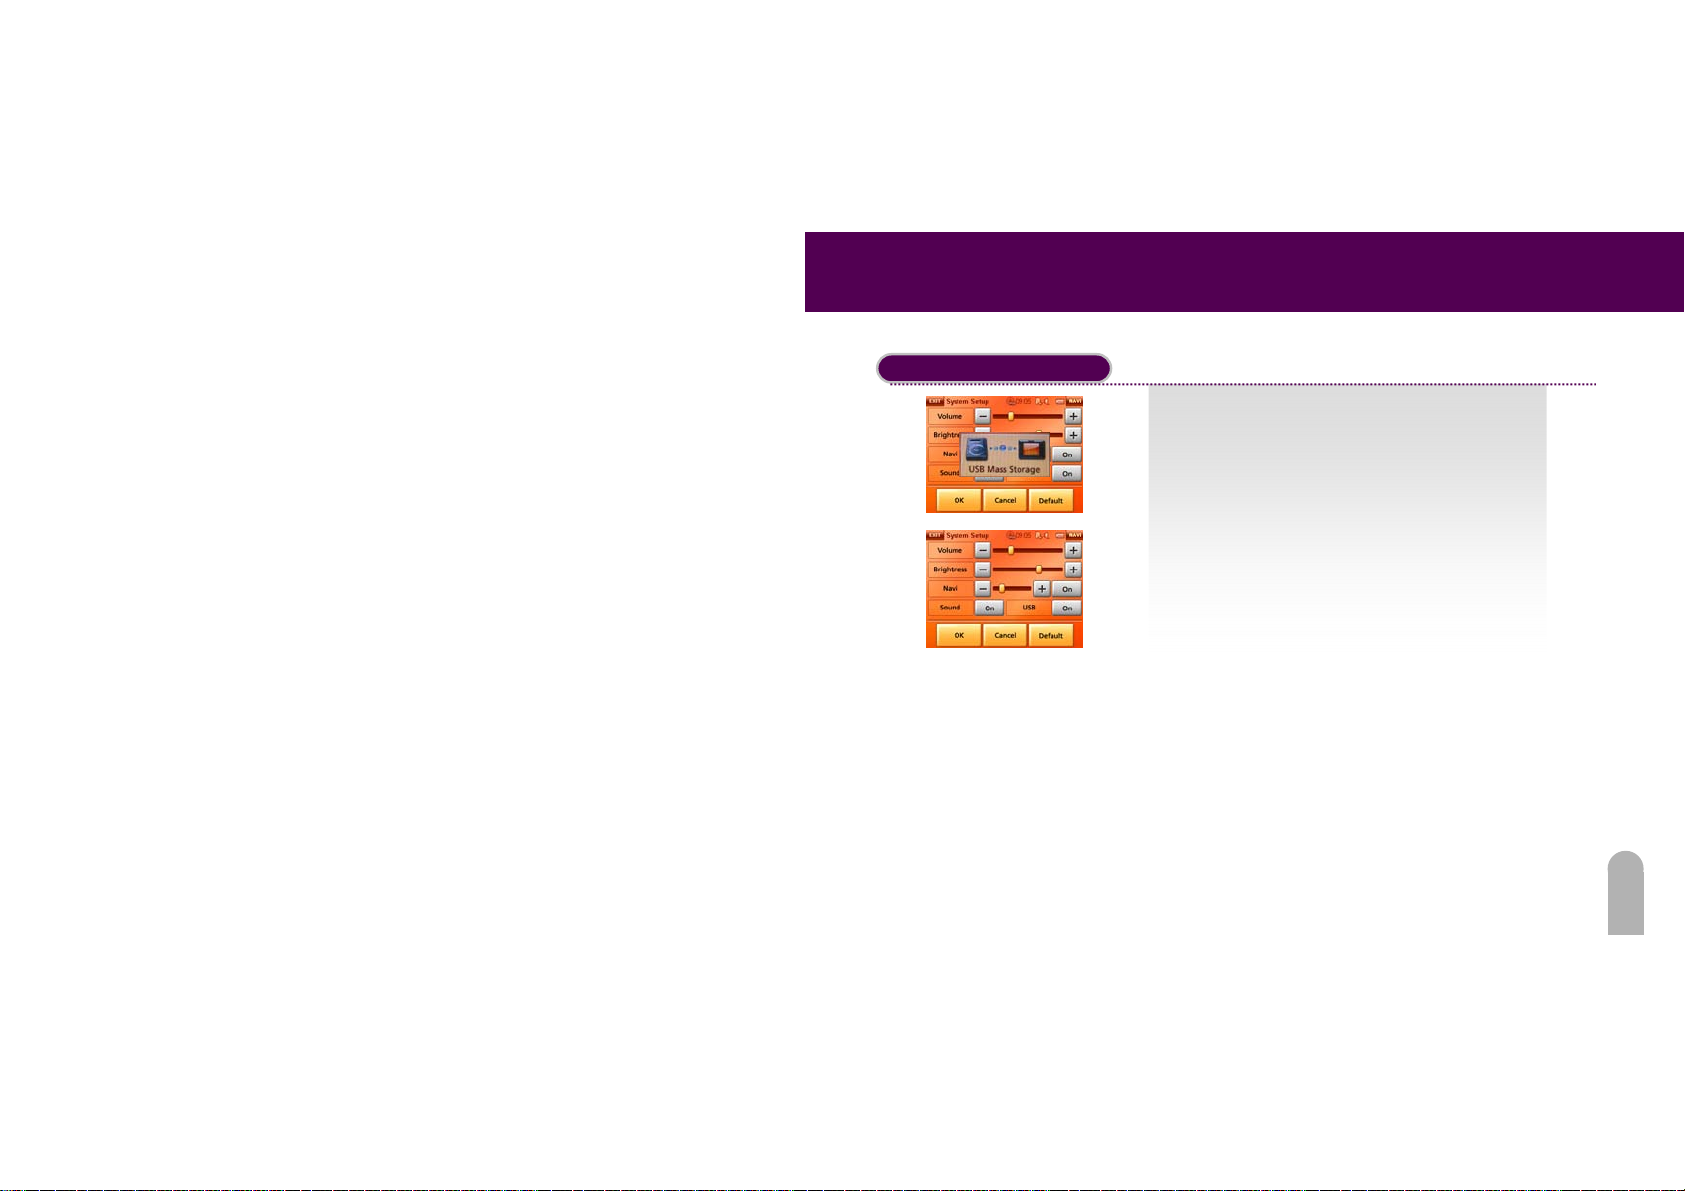
Return to Normal Mode
After disconnect USB Cable, return to normal mode.
1. Push the [USB Off] Button .
2. SURE-PATH return to Normal Mode.
81
Page 83
FIDELIX User Guide
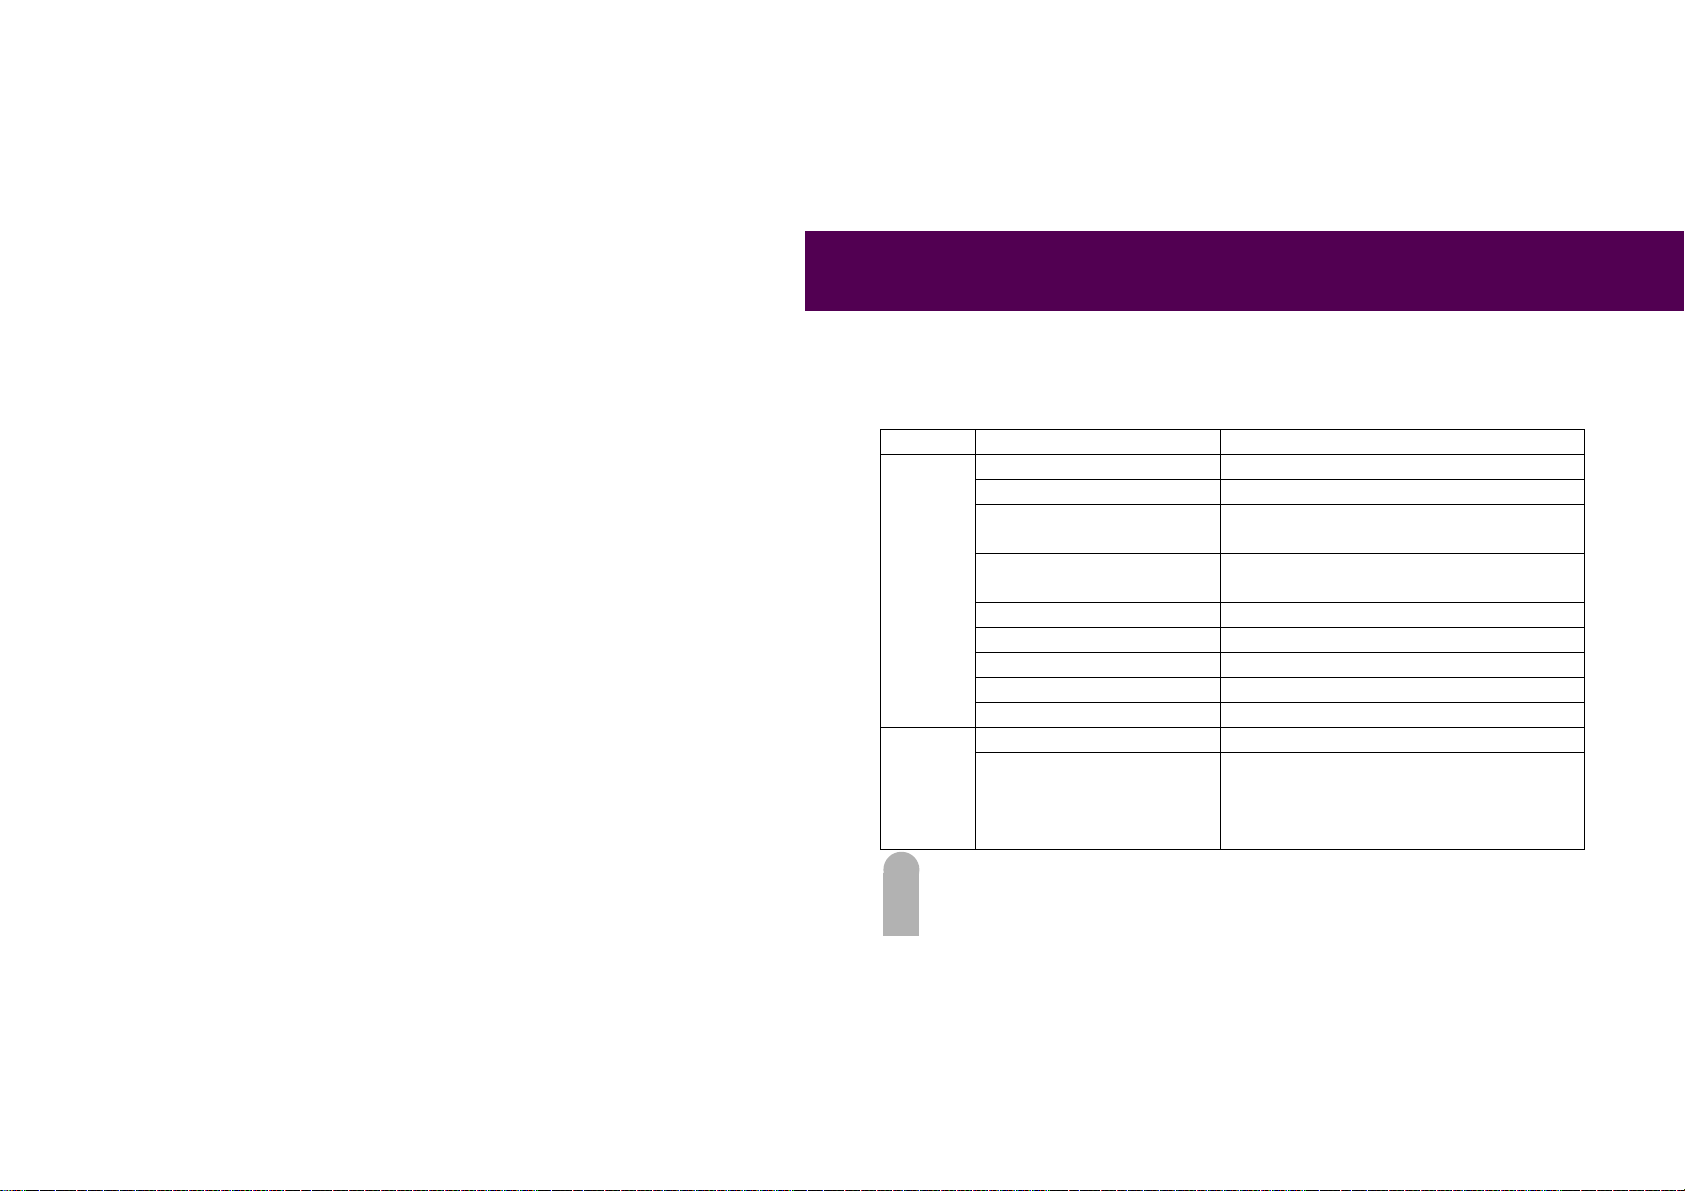
Appendix
Specification
S/W OS -Window CE 5.0 Core
Display -3.5 Inch TFT Color, 320 x 240 pixels, 64K Colors
Memory -RAM : 64MB SDRAM
-USB 1.1 Slave, SD Card Slot, External GPS Antenna
Hook Up
-Speaker Output : Max. 1.2W x 2
-Earphone Output : 20mW
-Original Source : NAVTEQ
-Application Supplier : Space Machine
-Map Coverage : USA 50 States and DC + Canada 13
Provinces
H/W
GPS
I/O Port
Audio In/Out
Battery -Lithium Ion 1,130mAh
Power Supply -5V Cigar Jack Vehicle Adaptor Power
Operating/Storage Temperature - 0 ℃ ~ 40 ℃ / -20 ℃ ~ +70 ℃
External Size (Device) -117mm x 77mm x 25mm (30mm on GPS)
Weight (Device) -180g (Can be changed)
GPS -16CH / Sirf III
MAP
82
Page 84
MEMO
FIDELIX User Guide
83
Page 85

FIDELIX User Guide
84
 Loading...