

Page 1

FR33E
MAINBOARD
MANUAL
DOC No.: M01503
Rev. : A0
Date : 9, 2001
Part No. : 25-11620-00
Page 2

Notice
Handling Precautions
Warning:
1. Static electricity may cause damage to the integrated circuits on
the motherboard. Before handling any motherboard outside of its
protective packaging, ensure that there is no static electric charge
in your body.
2. There is a danger of explosion if the battery is incorrectly
replaced. Replace only with the same or an equivalent type
recommended by the manufacturer.
3. Discard used batteries according to the manufacturer’s
instructions.
4. Never run the processor without the heatsink properly and firmly
attached. PERMANENT DAMAGE WILL RESULT!
Observe the following basic precautions when handling the motherboard
or other computer components:
n Wear a static wrist strap which fits around your wrist and is
connected to a natural earth ground.
n Touch a grounded or anti-static surface or a metal fixture such as a
water pipe.
n Avoid contacting the components on add-on cards, motherboards,
and modules with the golden fingers connectors plugged into the
expansion slot. It is best to handle system components by their
monting brackets.
The above methods prevent static build-up and cause it to be discharged
properly.
Trademark
All trademarks mentioned in this manual are registered properly of
the respective owners.
Handling Precautions
This manual may not, in whole or in part, be photocopied, reproduced,
transcribed, translated, or transmitted in whatever form without the
written consent of the manufacturer, except for copies retained by the
purchaser for personal archival purposes.
Page 3

T able of Contents
Table of Contents
Quick Reference (German) G- 1
Quick Reference (French) F- 1
Quick Reference (Spanish) S-1
Quick Reference (Japanese) J-1
Quick Reference (Chinese) C-1
Quick Reference (Simplified Chinese) |||||||||||||SC-1
Chapter 1 Overview
Package Checklist ...................................................................... 1-2
The FR33E Mainboard .............................................................. 1-3
Main Features ................................................................................ 1-4
ACPI Ready ................................................................................... 1-6
FIC Unique Innovation for Users (NOVUS) -
Enhanced Mainboard Features and System Support .................... 1-6
Chapter 2 Installation Procedures
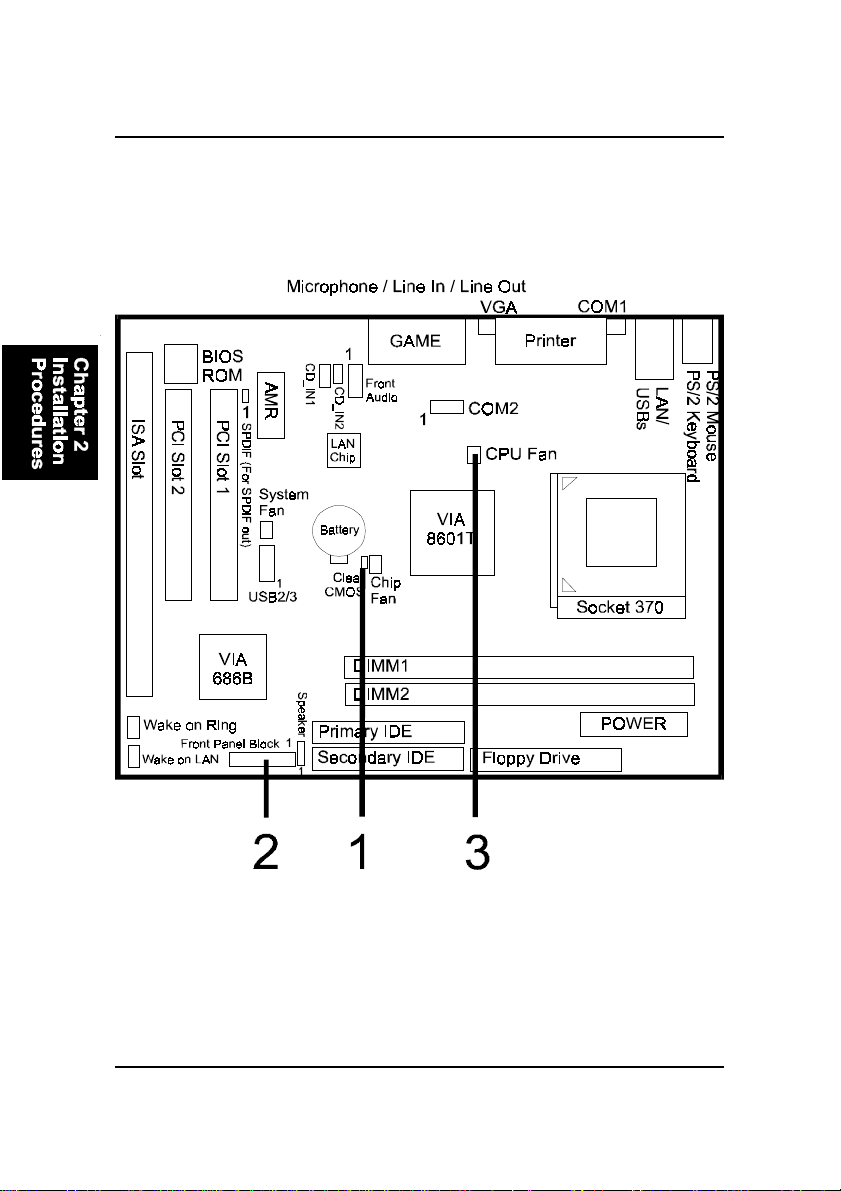
Quick Reference (from Page 2-2 to 2-4) .......................................... 2-2
Mainboard Layout .................................................................... 2-2
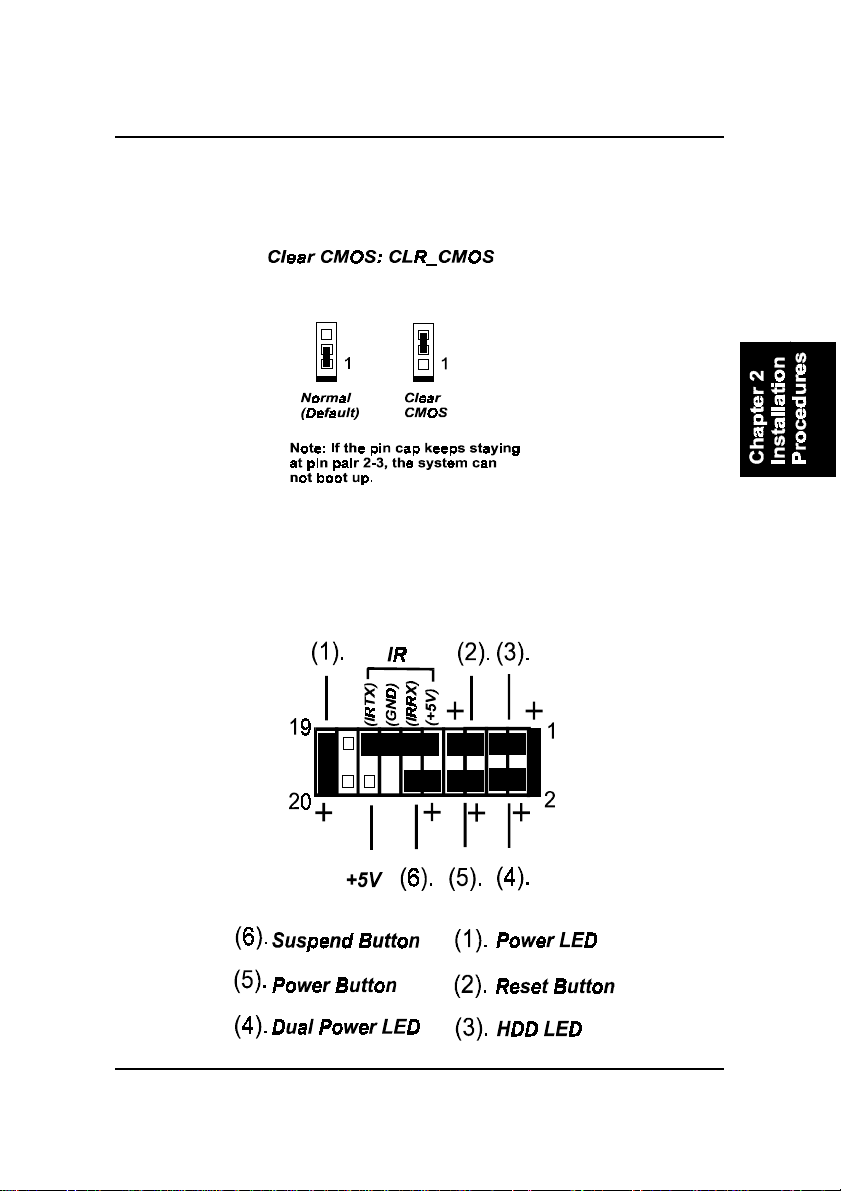
1). Clear CMOS Enable ...................................................... 2-3
2). Front Panel Block Cable Connection ............................ 2-3
3). CPU Fan Installation .................................................... 2-4
1). Set System Jumpers .................................................................. 2-4
Clear CMOS: CLR_CMOS ................................................. 2-5
2). Install Memory Modules .......................................................... 2-5
3). Install the CPU .......................................................................... 2-6
4). Install Expansion Cards ............................................................. 2-7
5). Connect Devices ....................................................................... 2-9
Floppy Diskette Drive Connector: ..................................... 2-9
IDE Device Connectors ..................................................... 2-10
ATX Power Connector ...................................................... 2-10
Fan Connectors ................................................................. 2-11
Wake-On-LAN Connector ................................................. 2-11
Wake-On-Ring Connector ................................................. 2-12
CD Audio-In Connector .................................................... 2-12
Front Panel Block and Speaker Connector ........................ 2-13
PS/2 Keyboard and Mouse Connector ............................. 2-14
LAN Jack ........................................................................... 2-14
i
Page 4

FR33E Mainboard Manual
Universal Serial Bus Connectors ....................................... 2-15
Serial Port Connectors ....................................................... 2-15
Video Graphics Accelerator Connector.............................. 2-16
Printer Connector .............................................................. 2-16
Audio I/O Jacks ................................................................ 2-17
GAME/MIDI Connector .................................................... 2-17
SPDIF Connector .............................................................. 2-18
Chapter 3 BIOS Setup
CMOS Setup Utility ....................................................................... 3-1
Standard CMOS Setup ................................................................... 3-2
Advanced BIOS Features .............................................................. 3-4
Advanced Chipset Features .......................................................... 3-7
Integrated Peripherals .................................................................... 3-10
Power Management Setup ............................................................. 3-15
PnP/PCI Configurations ................................................................. 3-19
PC Health Status ............................................................................ 3-21
Frequency/Voltage Control ............................................................ 3-22
Load Fail-Safe Defaults .................................................................. 3-23
Load Optimized Defaults ................................................................ 3-23
Supervisor/User Password ............................................................ 3-23
Save and Exit Setup ........................................................................ 3-24
Exit without Saving ........................................................................ 3-24
ii
Page 5

Overview
Chapter 1
Overview
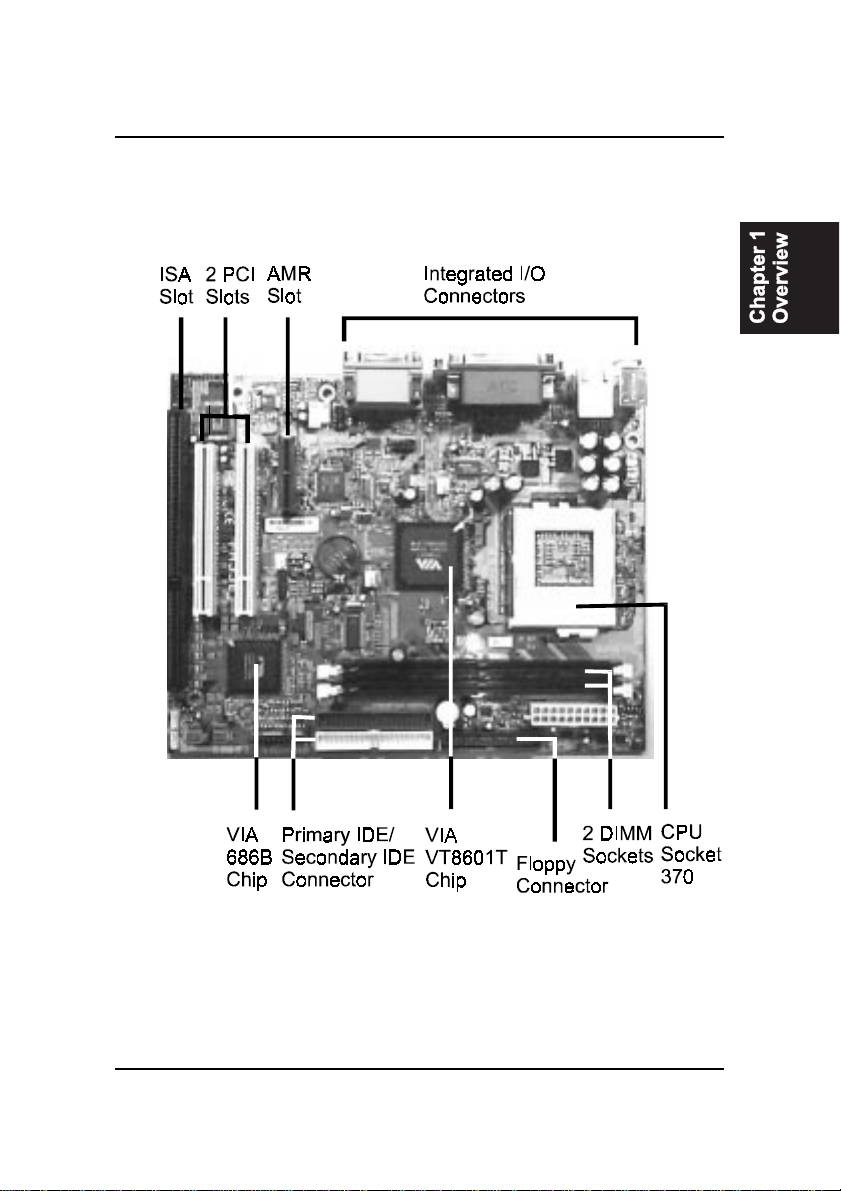
The new Micro ATX, Socket 370 mainboard is a low cost all-in-on Intel® solu-
tion that supports a full range of the latest generation Intel® and Cyrix® pro-
cessors. New lightening fast processors from Intel of up to 1.26GHz and up*
are supported with Front Side Bus speeds of 66/100/133 MHz.
(*: not tested yet)
The VIA VT8601T Apollo PLE133T® on this mainboard coworks with Intel
Celeron® , Cumine® , Tualatin® and Cyrix processors. With integrated AGP 2D/
3D graphics accelerator, features AC97 codec, and other onboard audio fea-
ture that embedded in VIA 686B® Super South, the mainboard offers an excel-
lent media environment.
Support for the Ultra DMA/100 protocol and its high-speed interface further
ensures that data transfer speeds are improved, especially for long sequential
transfers required by audio/visual applications. With 2 DIMM sockets, the
mainbard allows up to total 1GB PC-133 SDRAM.
The board comes with a versatile range of I/O features such as 2 serial ports, 1
parallel port, 1 front audio, 1 PS/2 mouse and keyboard connector, 2 USB rear
connectors, 2 USB ports for either front or rear panel connection, 1 VGA con-
nector, 1 media connector (MIDI /game port, Line-in, Line-out and Mic-in) and
moreover, with 1 RJ45 LAN jack. Addon card expansion is available through 2
PCI , 1 AMR and 1 ISA.
Other key features are Remote On/Off, Auto Power Failure Recovery, inte-
grated temperature monitoring and system fan control. Included also is CD Pro
with enhanced drivers.
1 - 1
Page 6
FR33E Mainboard Manual
Package Checklist
If you discover any item below was damaged or lost, please contact your
vendor.
þ The mainboard þ This user manual
þ One FDD cable þ Software drivers
þ One A T A/100 cable
NOTE: CD Pro that contains patch files, onboard video/audio chip
drivers, related online help and other useful information can be
found in your mainboard package.
Please install it right after your Windows operating system installation is done.
appears in your monitor. Please select
matically detect which software tools (patch files, drivers) that the
mainboard needs. Press OK button to go through the whole installation procedure in a very straight forward and easy way. It also
provides you with a custom way to select wanted patch files and
software drivers that for onboard chips use.
Place your CD Pro in the drive, an operating menu will
Auto Installation
. It will auto-
1 - 2
Page 7
The FR33E Mainboard
Overview
1 - 3
Page 8

FR33E Mainboard Manual
Main Features
n Easy Installation
||BIOS with support for Plug and Play, auto detection of IDE hard drives,
||LS-120|drives, IDE ZIP drives, Windows 98SE, Windows ME, Windows
||NT, Windows 2000, Windows XP, and OS/2.
n Leading Edge Chipset
VIA Apollo PLE133T (VT 8601T) is a North Bridge with integrated 2D/3D
graphics accelerator. The chip is designed for offering a reliable,
effective,and excellent performance. It contains internal AGP controller,
concurrent PCI bus controller, advanced DRAM controller, and power
management support.
n Versatile Main Memory Support
Accepts up to total 1GB PC-133 SDRAM using two DIMMs of 64, 128,
256, 512MB with support for lightning-fast SDRAM (100/133MHz).
n Flexible Processor Support
Onboard CPU socket supports:
Intel Celeron 667 MHz -1.1 GHz and up*
Intel Pentium 533 MHz - 1 GHz
Intel Tualatin 1.13 - 1.26*GHz
Cyrix III 733A - 933* MHz
(*: not tested yet)
n Enhanced PCI Bus Master IDE Controller with Ultra DMA 33/66/100
Support
Integrated Enhanced PCI Bus Master IDE controller features two dual-
channel connectors that up to four Enhanced IDE devices, including CD-
ROM and Tape Backup Drives, as well as Hard Disk Drives supporting
the new Ultra DMA 100 protocol. Standard PIO Mode 3, PIO Mode 4,
DMA Mode 2, DMA Mode 4, UltraDMA-100 Mode 5 devices are also
supported.
1 - 4
Page 9

Overview
n LAN Support
One RJ45 LAN jack on the rear panel and onboard LAN controller allows
you to connect with network system in a very easy way.
n AMR, ISA, and PCI Expansion Slots
One AMR, one ISA Bus expansion slot, and two PCI Bus expansion slots
provided the room to install a full range of add-on cards.
n Integrated Audio Subsystem
Embedded audio features in the VIA 686B provide hardware Sound
BlasterProfor Windows DOS box and real mode DOS legacy compatibil-
ity, dual full-duplex Direct Sound channels between system memory and
AC97 link.
n Super Multi Input/Output (I/O) Support
Integrated super I/O controller in the VIA 686B features two high-speed
UART serial ports, one multi-mode (standard/ECP/EPP) parallel port, one
IR port, and one FDD connector.
n Convenient Rear Panel USB Connection Support
Two USB ports integrated in the rear I/O panel with two extra USB pin-
heads for either front or rear panel connections to the growing number of
USB compliant peripheral devices on the market.
1 - 5
Page 10

ACPI Ready
This mainboard fully implements the new ACPI (Advanced Configuration and
Power Interface) 1.0B Hardware and BIOS requirement. If you install ACPI
aware of operating system, such as Windows 98, you fully utilized the power
saving under ACPI. (Windows ME/2000 Professional/XP supports ACPI func-
tions.)
FIC Unique Innovation for Users (NOVUS) -
Enhanced Mainboard Features and System Support
n Easy Key
Instead of completing the multi-layered BIOS setup process these Easy
Key functions provide direct access to Sub-Menu when completing BIOS
settings adjustments.
Easy-Keys are as follows:
Ctrl + c: To enter clock settings menu.
Ctrl + p: To load Performance Default settings and restart.
Ctrl + f: To load Fail-Safe Default settings and restart.
Page 11

Installation Procedures
Chapter 2
Installation Procedures
The mainboard has several user-adjustable jumpers on the board that allow you to
configure your system to suit your requirements. This chapter contains information
on the various jumper settings on your mainboard.
To set up your computer, you must complete the following steps:
n
Step 1 - Set system jumpers/switches
n
Step 2 - Install memory modules
n
Step 3 - Install the Central Processing Unit (CPU)
n
Step 4 - Install expansion cards
Step 5 - Connect ribbon cables, cabinet wires, and power supply
n
n
Step 6 - Set up BIOS software
n
Step 7 - Install supporting software tools
WARNING: Excessive torque may damage the mainboard. When
using an electric screwdriver on the mainboard, make sure that
the torque is set to the allowable range of 5.0 ~ 8.0kg/cm.
Mainboard components contain very delicate Integrated Circuit
(IC) chips. To prevent static electricity from harming any of the
mainboard’s sensitive components, you should follow the
following precautions whenever working on the computer:
1. Unplug the computer when working on the inside.
2. Hold components by the edges and try not to touch the IC
||||chips, leads, or circuitry.
3. Wear an anti-static wrist strap which fits around the wrist.
4. Place components on a grounded anti-static pad or on the bag
that came with the component whenever the components are
separated from the system.
2 - 1
Page 12
FR33E Mainboard Manual
Quick Reference (from Page 2-2 to 2-4)
Mainboard Layout
2 - 2
Page 13
Installation Procedures
1). Clear CMOS Enable
2). Front Panel Block Cable Connection
2 - 3
Page 14
FR33E Mainboard Manual
3). CPU Fan Installation
This connector is linked to the CPU fan. When the system is in power saving mode, the
CPU fan will turn off; when it reverts back to full on mode, the fan will turn back on.
Without sufficient air circulation, the CPU may overheat resulting in damage
to both the CPU and the mainboard.
Damage may occur to the mainboard and/or the CPU fan if these pins are
used incorrectly. These are not jumpers, do not place jumper caps over these
pins.
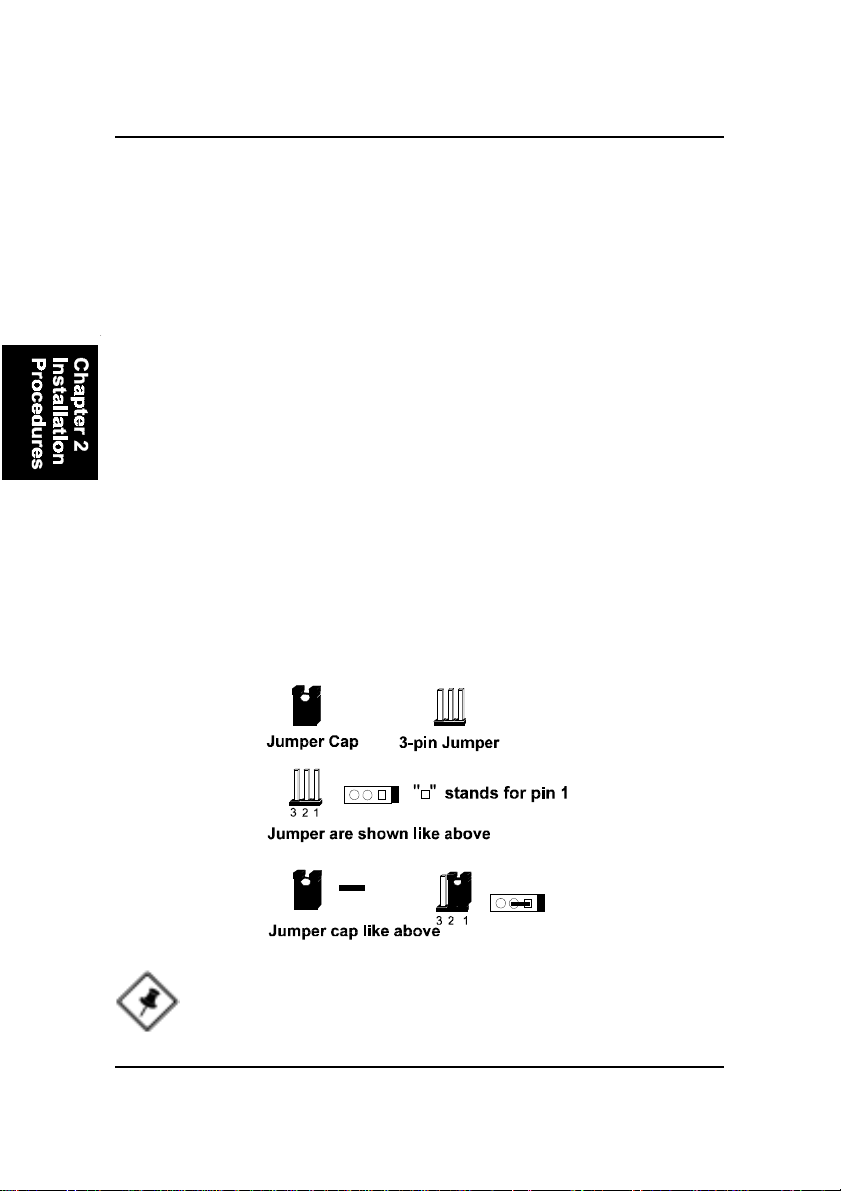
1). Set System Jumpers
Jumpers are used to select the operation modes for your system. Some jump-
ers on the board have three metal pins with each pin representing a different
function. A 1 is written besides pin 1 on jumpers with three pins. To set a
jumper, a black cap containing metal contacts is placed over the jumper pin/s
according to the required configuration. A jumper is said to be shorted when
the black cap has been placed on one or two of its pins. The types of jumpers
used in this manual are shown below:
2 - 4
NOTE: Users are not encouraged to change the jumper settings
not listed in this manual. Changing the jumper settings improperly
may adversely affect system performance.
Page 15
Installation Procedures
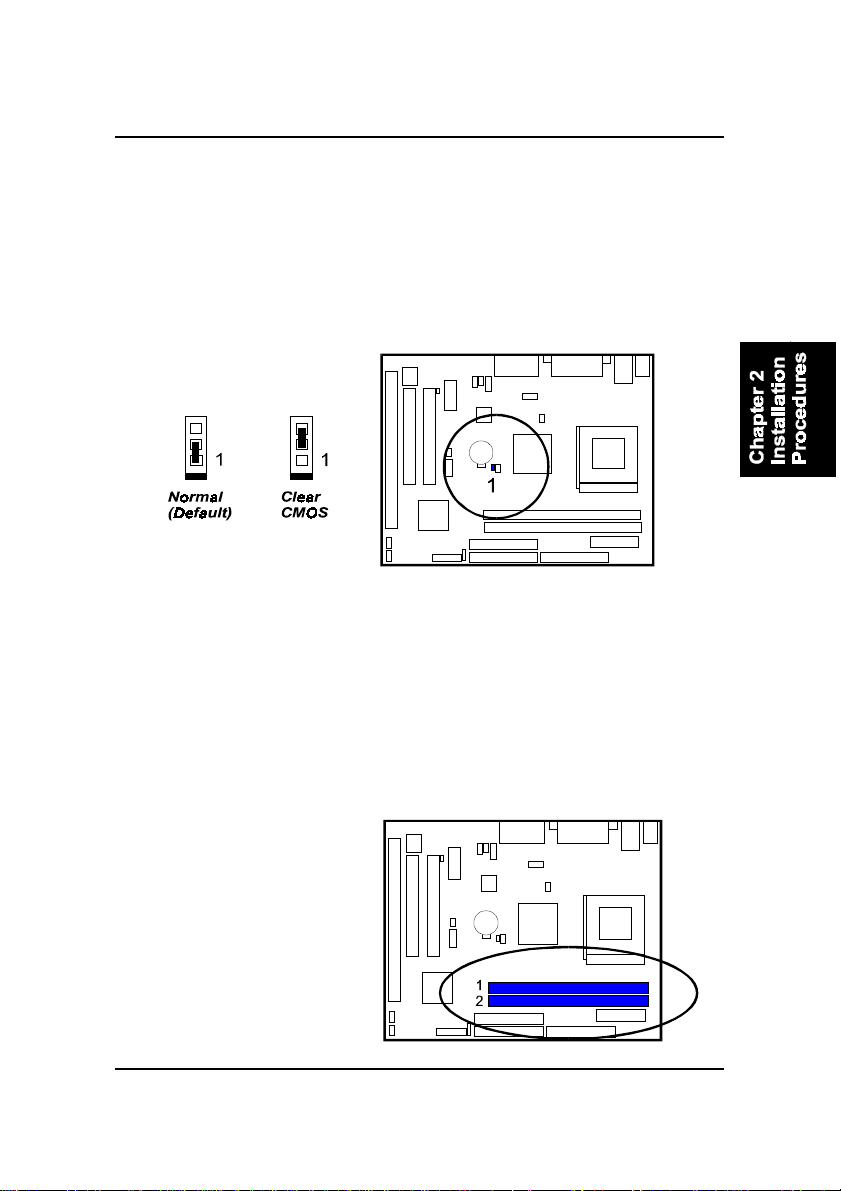
Clear CMOS: CLR_CMOS
The CMOS RAM is powered by the onboard button cell battery. To clear the
RTC data: (1) Turn off your computer. (2) Place the jumper cap onto the pinpair
2-3 to clear CMOS (3) Turn on your computer until CMOS checksum error
appears (4) Turn off your computer. (5) Place the jumper cap onto the pinpair
1-2 to Normal (6) Turn on your computer. (7) Hold down the Delete key when
boots. (8) Enter the BIOS Setup to re-enter user preferences.
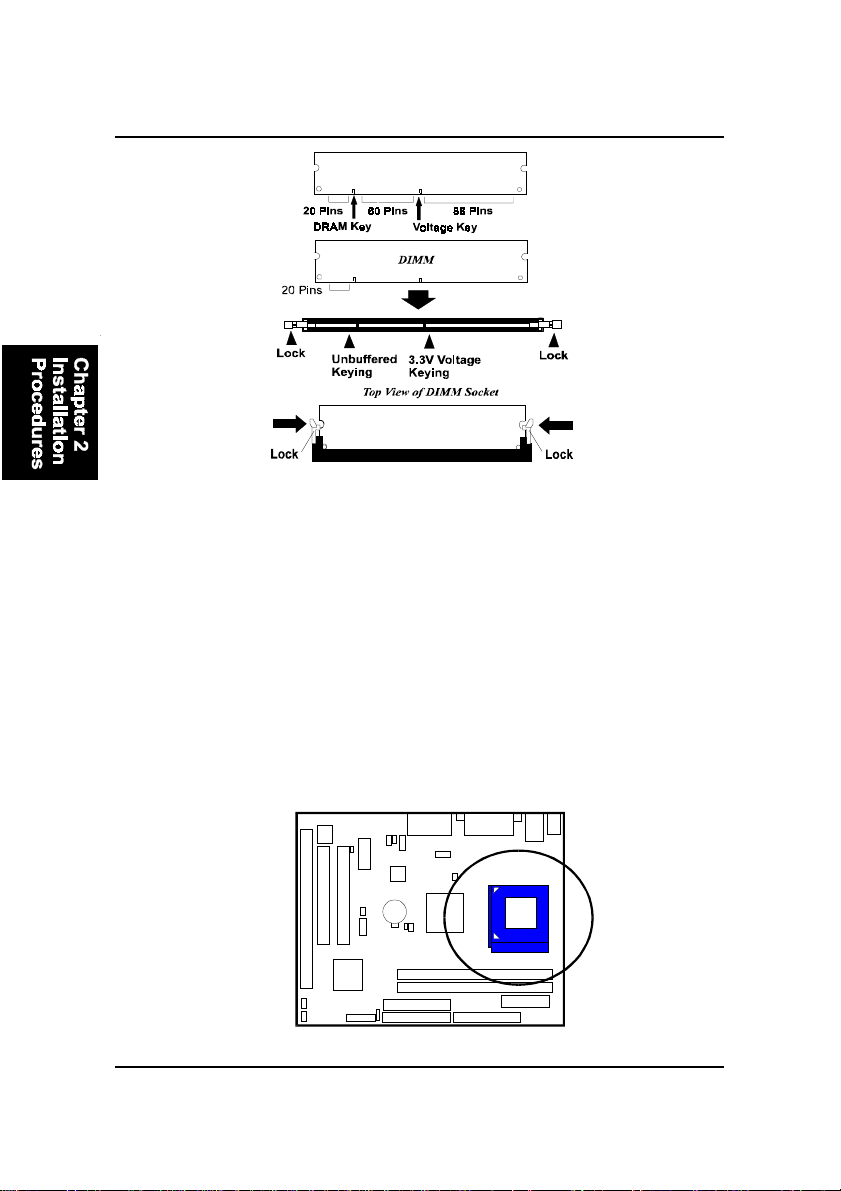
2). Install Memory Modules
1. Locate the DIMM slots on the mainboard.
2. Install the DIMM straight down into the DIMM slot using both hands.
3. The clip on both ends of the DIMM slot will close up to hold the DIMM
in place when the DIMM reaches the slots bottom.
2 - 5
Page 16
FR33E Mainboard Manual
Press the clips with both hands to remove the DIMM.
3). Install the CPU
The mainboard has built-in Switching Voltage Regulator to support CPU Vcore
autodetection. That is, It has the ability to detect and recognize the CPU
voltage, clock, ratio and enables users to set up the CPU frequency from the
BIOS Setup Screen. Users can adjust the frequency through Frequency /
Voltage Control of the BIOS Setup Screen.
2 - 6
Page 17

Installation Procedures
CAUTION:
1. The heatsink and fan you installed must be approved by CPU
|||||manufactories.
2. The mainboard must be placed on a solid place to avoid shaking
|||||while install the heatsink and fan on the board.
3. The heatsink must be contact with the CPU top tightly.
4. Never run the processor without the heatsink properly and firmly
attached. PERMANENT DAMAGE WILL RESULT!
To install the CPU, do the following:
1. Lift the lever on the side of the CPU socket.
2. Handle the chip by its edges and try not to touch any of the pins.
3. Place the CPU in the socket. The chip has two notches to correctly locate
the chip. Align two notches of the processor with the two triangular
marks on the socket. Do not force the chip. The CPU should slide easily
into the socket.
4. Swing the lever to the down position to lock the CPU in place.
5. Install the cooling fan with heatsink on top of the installed CPU.
6. Place the mainboard (with the CPU, its cooling fan, and heatsink) into the
system chassis and affix it with screws.
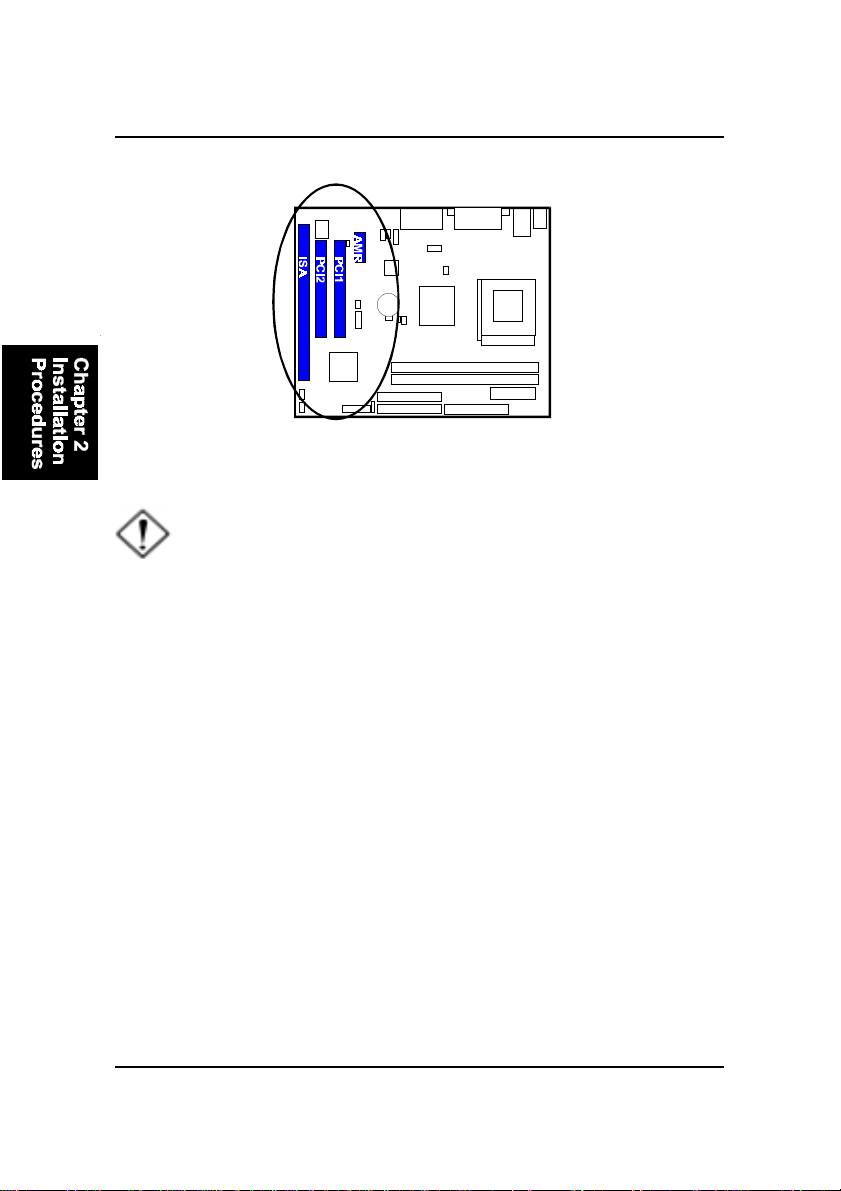
4). Install Expansion Cards
This section describes how to connect an expansion card to one of your
system expansion slots. Expansion cards are printed circuit boards that, when
connected to the mainboard, increase the capabilities of your system. For
example, expansion cards can provide video and sound capabilities. The
mainboard features one AMR, one ISA, and two PCI bus expansion slots.
2 - 7
Page 18
FR33E Mainboard Manual
CAUTION: Make sure to unplug the power supply when adding or
removing expansion cards or other system components. Failure to
do so may cause severe damage to both the mainboard and
expansioncards.
Always observe static electricity precautions.
Please read Handling Precautions at the start of this manual.
To install an expansion card, follow the steps below:
1. Remove the computer chassis cover and select an empty expansion
slot.
2. Remove the corresponding slot cover from the computer chassis.
Unscrew the mounting screw that secures the slot cover and pull
the slot cover out from the computer chassis. Keep the slot cover
mounting screw nearby.
3. Holding the edge of the peripheral card, carefully align the edge
connector with the expansion slot.
4. Push the card firmly into the slot. Push down on one end of the
expansion card, then the other. Use this rocking motion until the add
on card is firmly seated inside the expansion slot.
2 - 8
Page 19
Installation Procedures
5. Secure the board with the mounting screw removed in Step 2. Make
sure that the card has been placed evenly and completely into the
expansion slot.
6. Replace the computer system cover.
7. Setup the BIOS if necessary.
8. Install the necessary software drivers for the expansion card.
5). Connect Devices
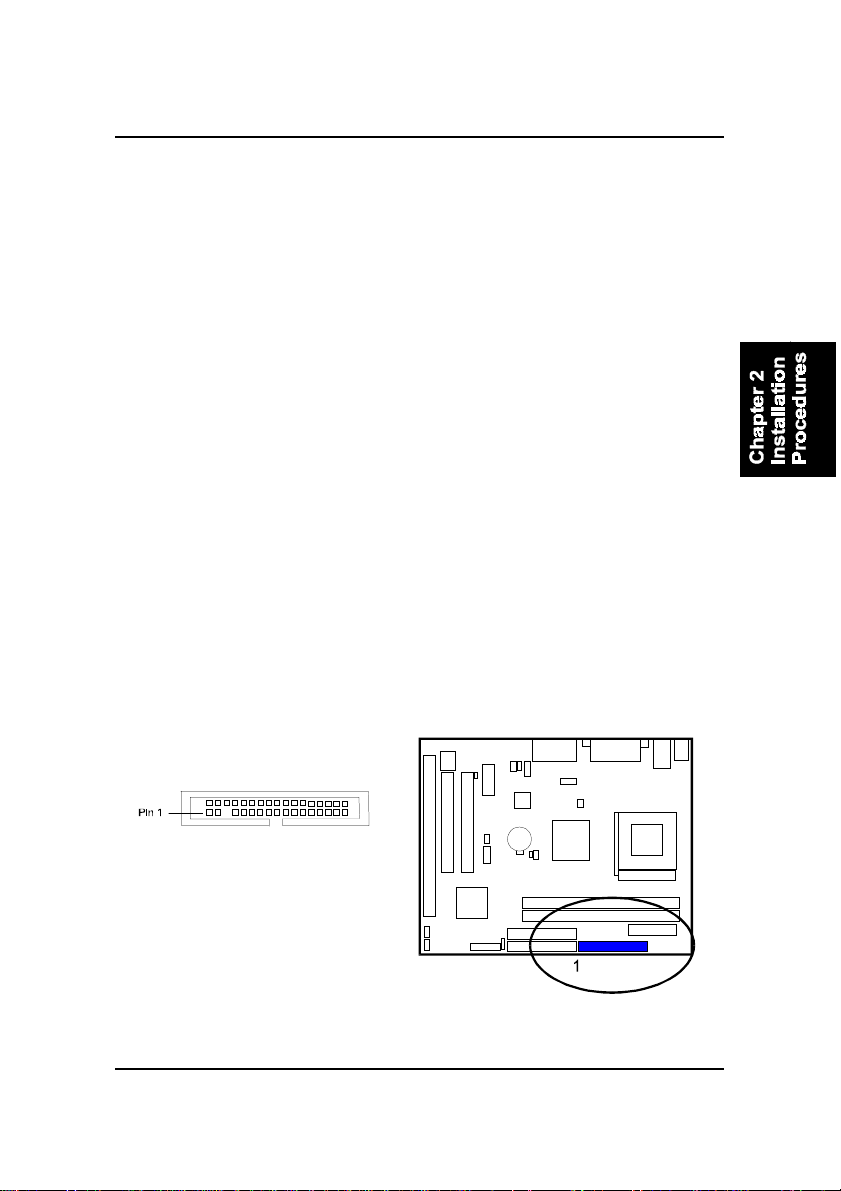
Floppy Diskette Drive Connector
This connector provides the connection with your floppy disk drive.
The red stripe of the ribbon cable must be the same side with the Pin 1.
2 - 9
Page 20
FR33E Mainboard Manual
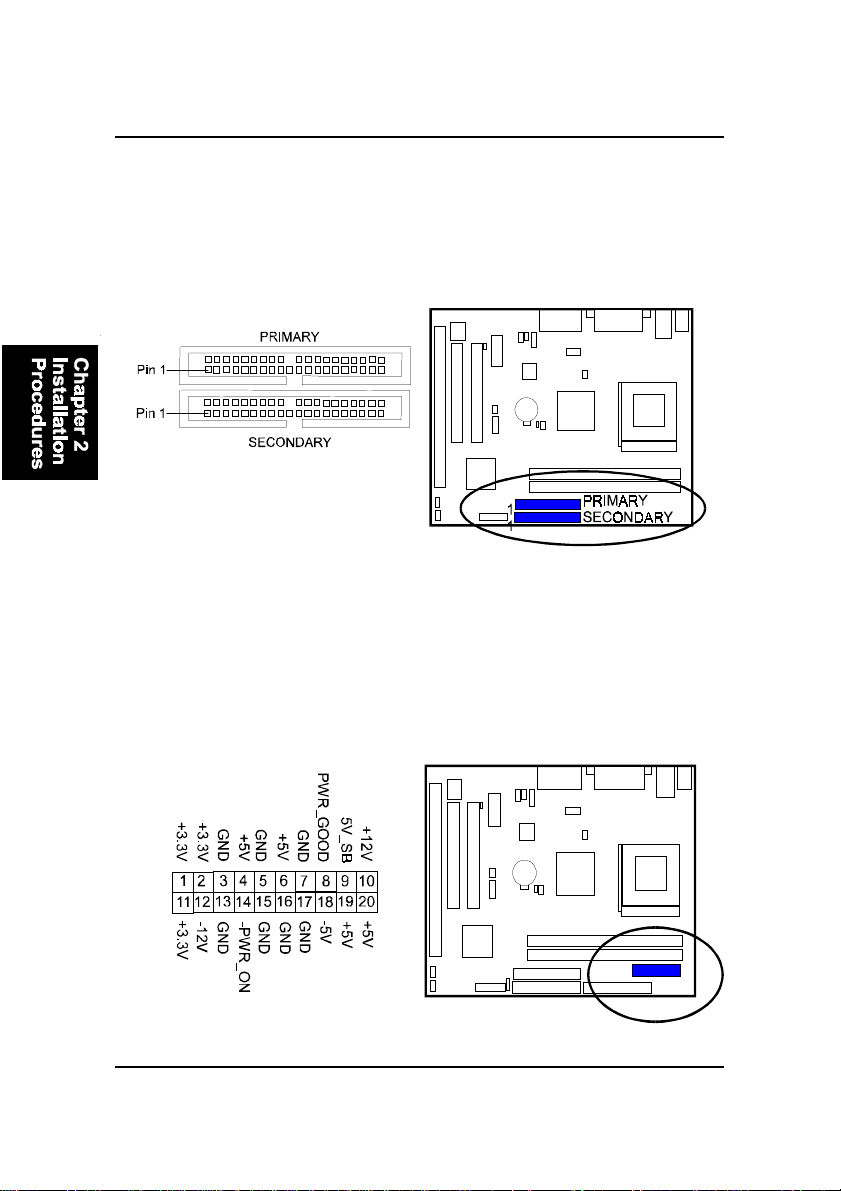
IDE Device Connectors
These two connectors are used for your IDE hard disk drives, CD drives, LS-
120|drives, or IDE ZIP drives. The red stripe of the ribbon cable must be the
same side with the Pin 1.
ATX Power Connector
This 20-pin male block connector is connected to the ATX power supply. The
plug from the power supply will only insert in one orientation because of the
different hole sizes. Find the proper orientation and push down firmly making
sure that the pins are aligned.
2 - 10
Page 21
Installation Procedures
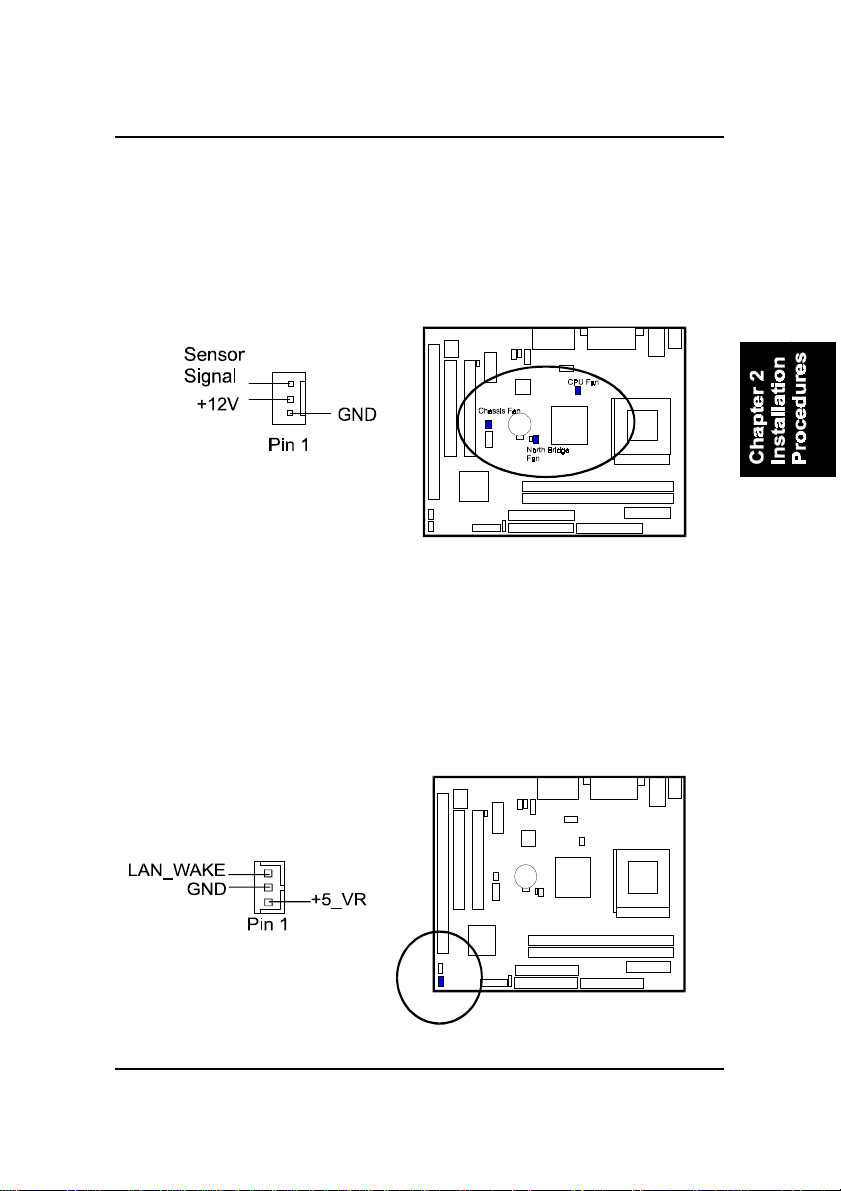
Fan Connectors
The two connectors, CPU_FAN, SYS_FAN are linked to the CPU fan, case fan,
respectively. CHIP_FAN can be used either with the case fan or North Bridge
chip fan. For preventing the system and chip from overheat damage, the fans
on this board will keep running when the system in suspend mode.
Wake-On-Lan Connector
This 3-pin connector allows the remote servers to manage the system that
installed this mainboard via your network adapter which also supports WOL.
2 - 11
Page 22
FR33E Mainboard Manual
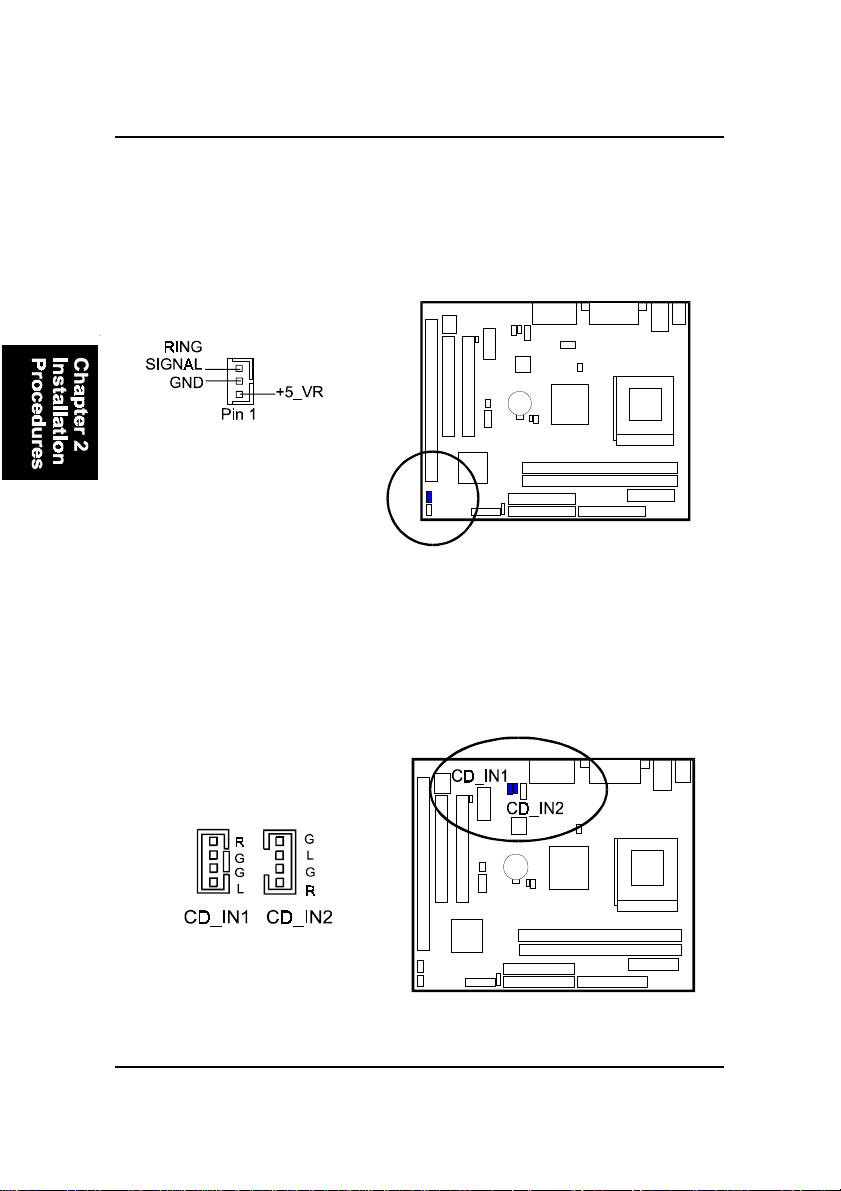
Wake-On-Ring Connector
This 3-pin connector allows the modem ring call to wake up your computer
system by connecting a wire between this connector and your modem card
that installed on the AMR slot.
CD Audio-In Connectors
The two connectors are used for different types for CD drive audio in port.
2 - 12
Page 23
Installation Procedures
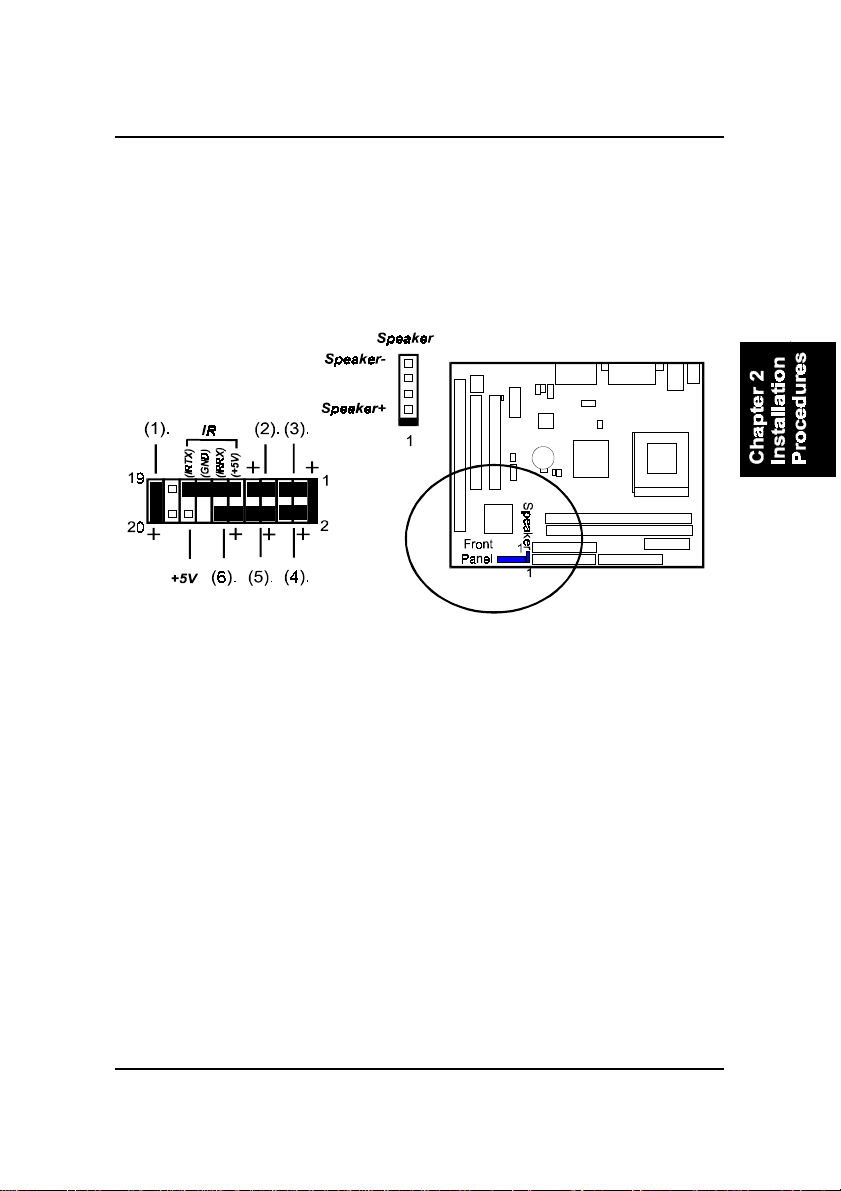
Front Panel Block and Speaker Connector
This block connector includes the connectors for linking with HDD LED,
power LED, dual power LED, power button, suspend button, reset button, and
IR on the front panel of the system case. Please identify polarities of plug
wires for the case speaker and LEDs. Please ask vendor about this information
when you buy them and install the system by yourself. The plug wires polari-
ties of these buttons will not affect the function.
1. Power LED is connected with the system power indicator to indicate whether
the system is on/off. It will blink when the system enters suspend mode.
2. Reset Button is connected to the reset button. Push this switch to reboot
the system instead of turning the power button off and on.
3. HDD LED is connected to the IDE device indicator. This LED will blink
when the hard disk drives are activated.
4. Dual Power LED it is in green light when the system in power on status.
It is in yellow light when the system in suspend mode.
5. Power Button is connected with power button. Push this switch allows the
system to be turned on and off rather than using the power supply button.
6. Suspend Button is connected with suspend button. To enter the system
into power saving mode, simply press this button when the system is in full-
on mode.
Speaker is connected with the case speaker.
2 - 13
Page 24
FR33E Mainboard Manual
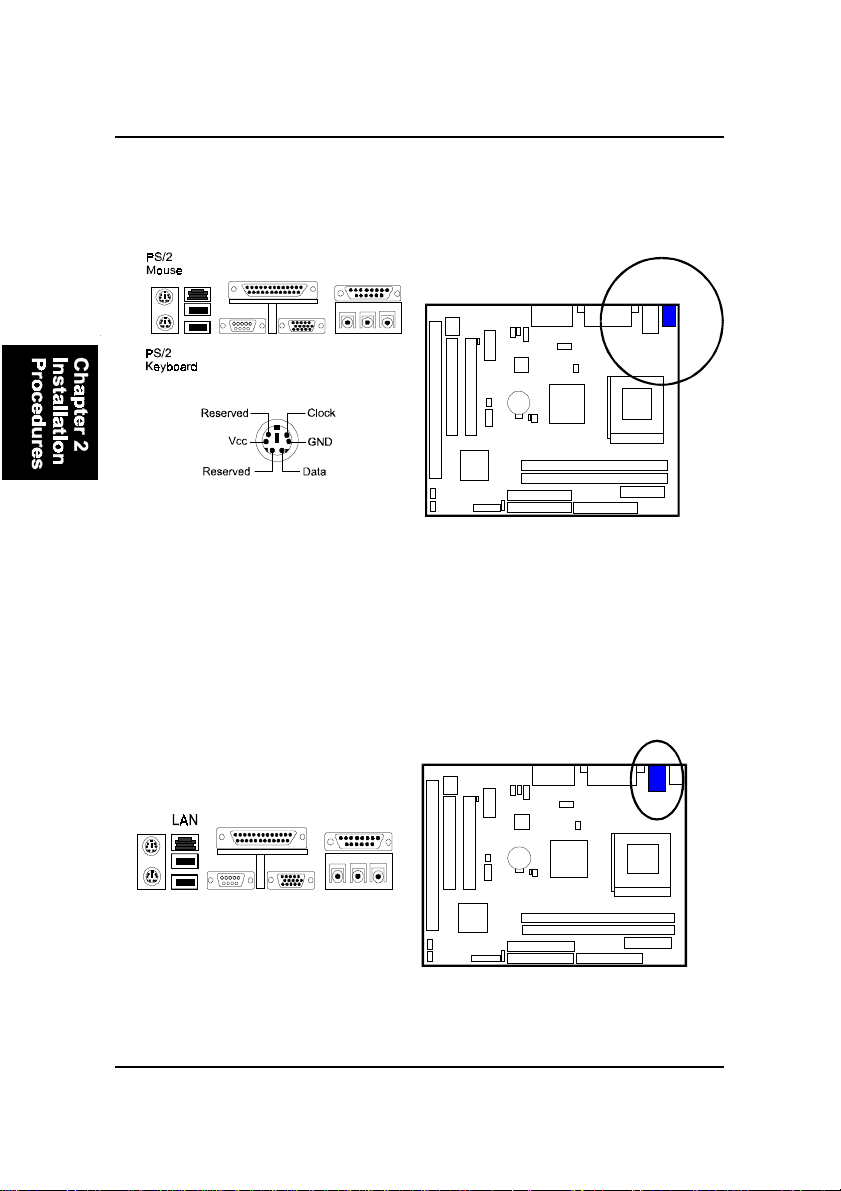
PS/2 Keyboard and Mouse Connector
These two 6-pin female (PS/2 keyboard is purple color and PS/2 mouse is
green color) connectors are used for your PS/2 keyboard and PS/2 mouse.
LAN Jack
Please plug your LAN cable into this jack to connect with network system.
2 - 14
Page 25
Installation Procedures
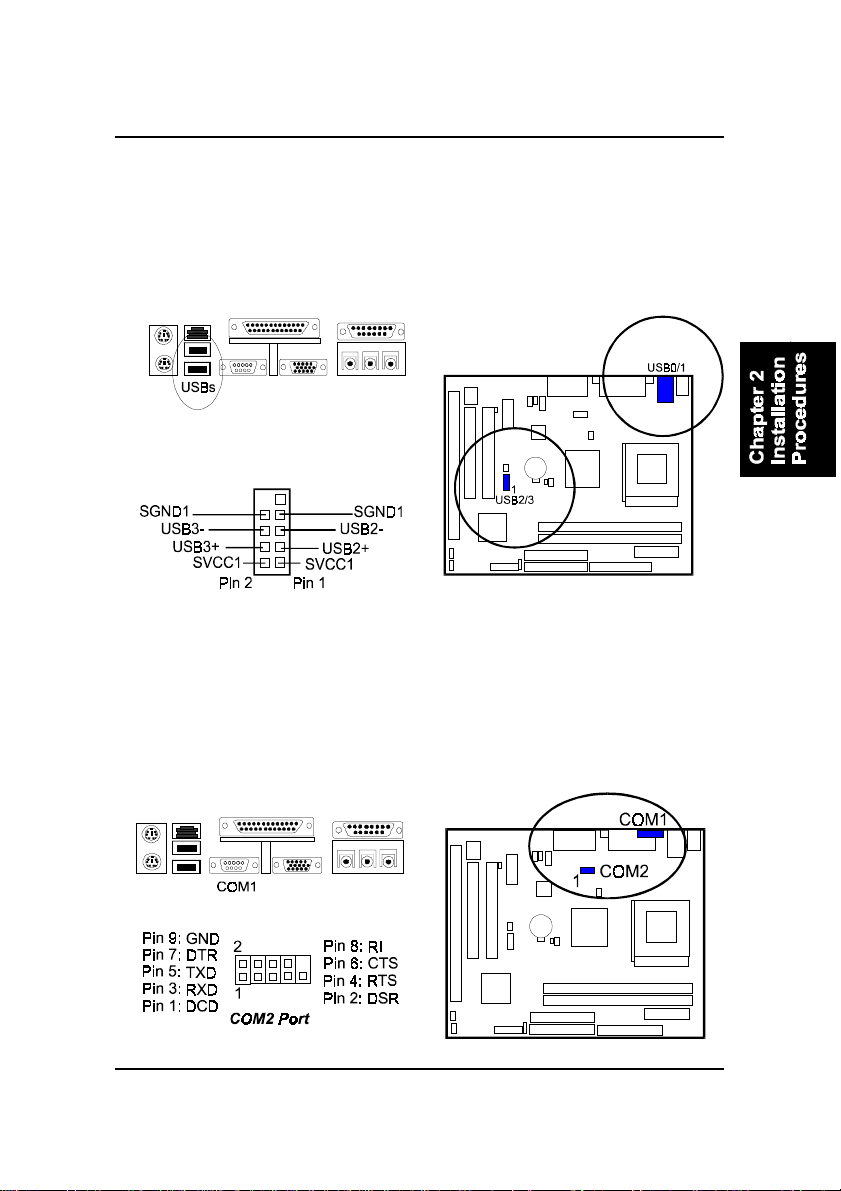
Universal Serial Bus Connectors
These two black connectors integrated on the edge of the board are used for
linking with USB peripheral devices. This board also provides two extra USB
connectors, USB2/3, either for the front panel USB sockets or for rear panel.
Please note your operating system must support USB features, such as MS
Windows 98, MS Windows 95 OSR2.5 with USB Supplement.
The figure below is the pin assignment
of USB2/3 connectors.
(Only rear USBs support keyboard/mouse power-on from S3, front USBs
do not.)
Serial Port Connectors
COM1 (9-pin D-sub male connector with teal color) and COM2 (9-pin male
connector) allow you to connect with your devices that use serial ports, such
as a serial mouse or an external modem.
2 - 15
Page 26
FR33E Mainboard Manual
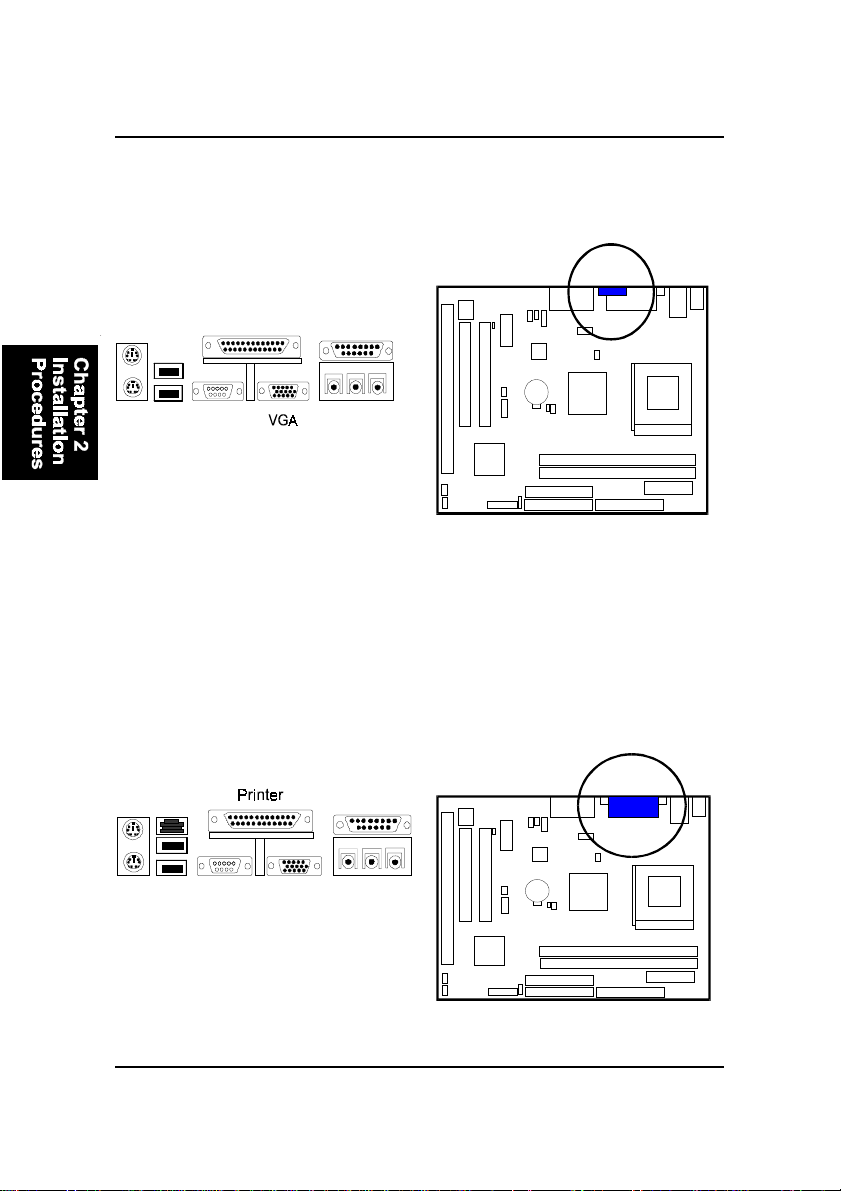
Video Graphics Accelerator Connector
This 15-pin female D-sub blue connector is connected to your display moni-
tor.
Printer Connector
This 25-pin D-Sub female burgundy-colored connector is attached to your
printer.
2 - 16
Page 27
Installation Procedures
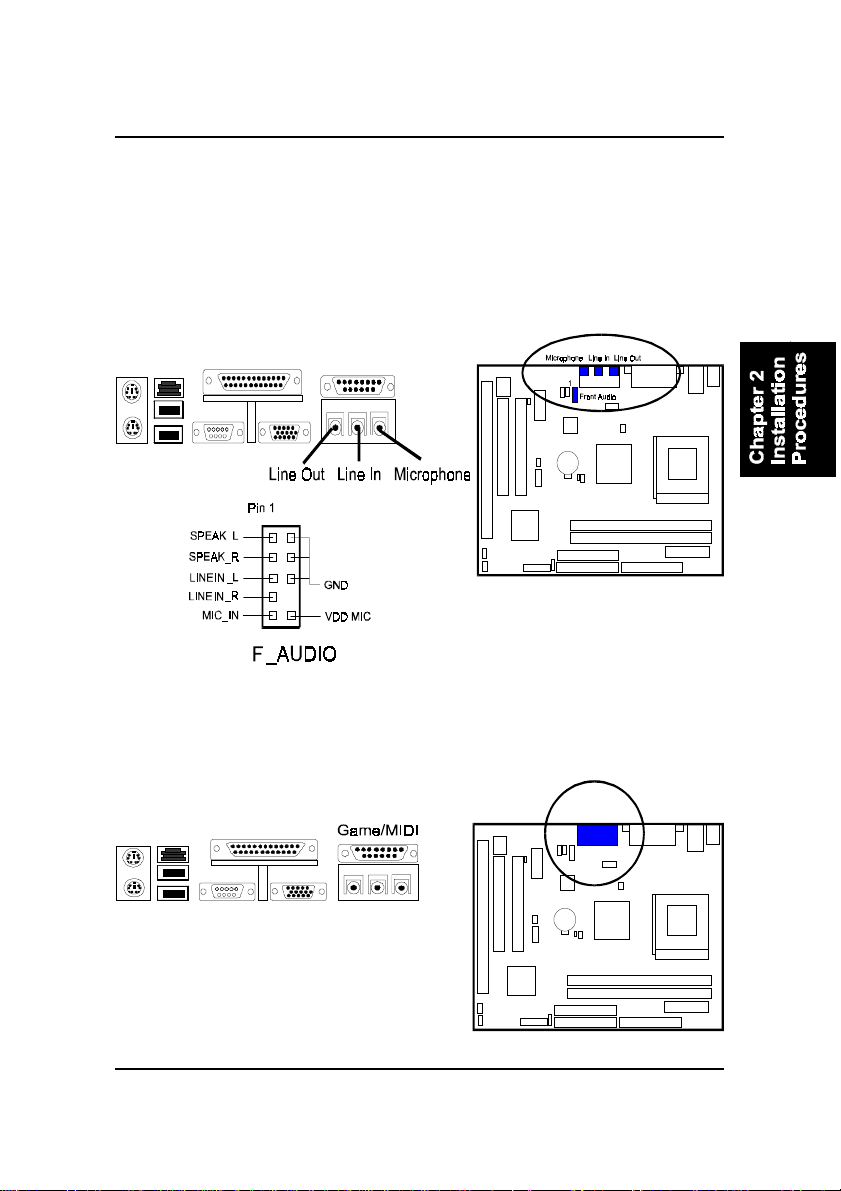
Audio I/O Jacks
LINE_OUT (lime) can be connected to headphones or preferably powered
speakers. LINE_IN (light blue) allows tape players or other audio sources to
be recorded by your computer or played through the LINE_OUT. MIC_IN
(pink) allows microphones to be connected for voice input. The mainboard
also provides you with a front panel audio port connector, F_AUDIO, when
needed. Its pin definitions were presented below.
Game/MIDI Connector
This 15-pin female gold-colored connector allows you to connect game joy-
sticks or game pads. Connect MIDI devices for playing or editing audio.
2 - 17
Page 28
FR33E Mainboard Manual
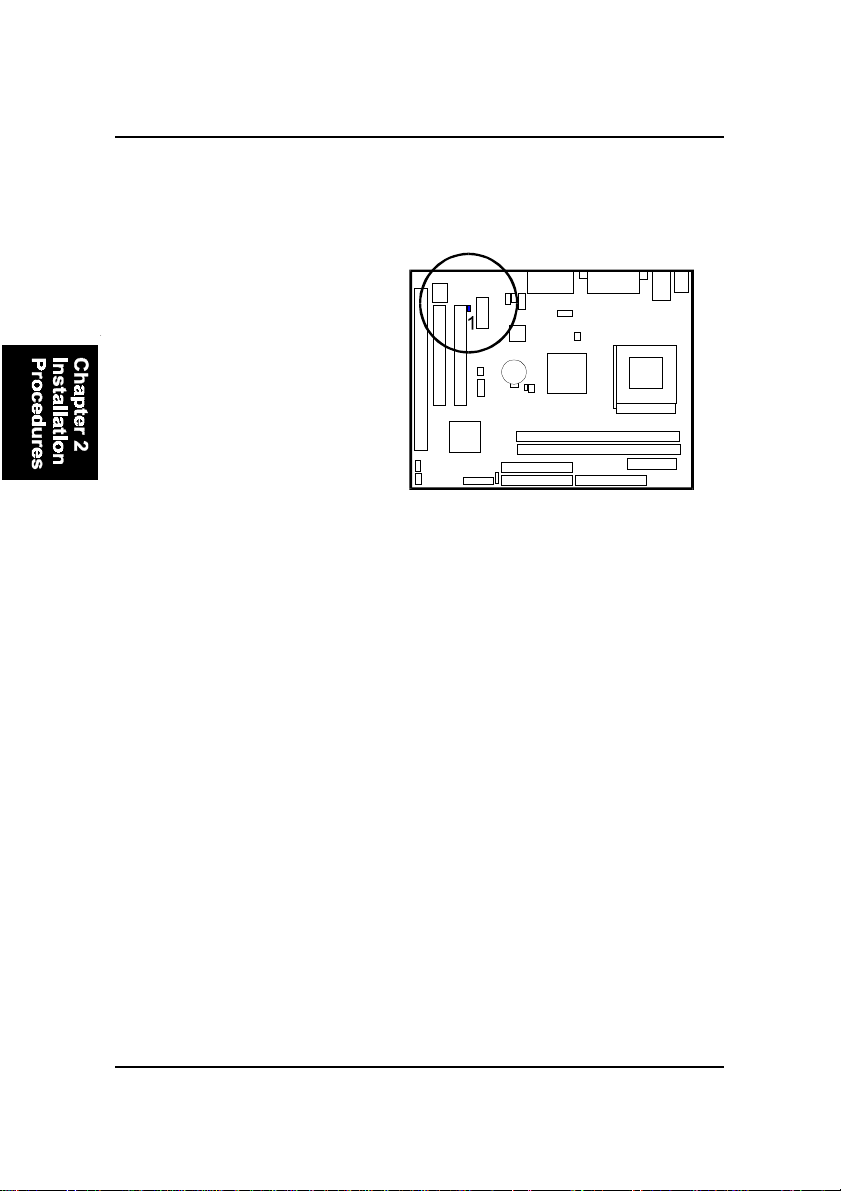
SPDIF Connector
This 3-pin connector offers the audio output in a SPDIF specification to achieve
a better sound performance.
2 - 18
Page 29
BIOS Setup
Chapter 3
BIOS Setup
The mainboard comes with the chip that Award BIOS that contains the ROM
Setup information of your system. (This chip serves as an interface between
the processor and the rest of the mainboard components.) This section ex-
plains the information contained in the Setup program and tells you how to
modify the settings according to your system configuration.
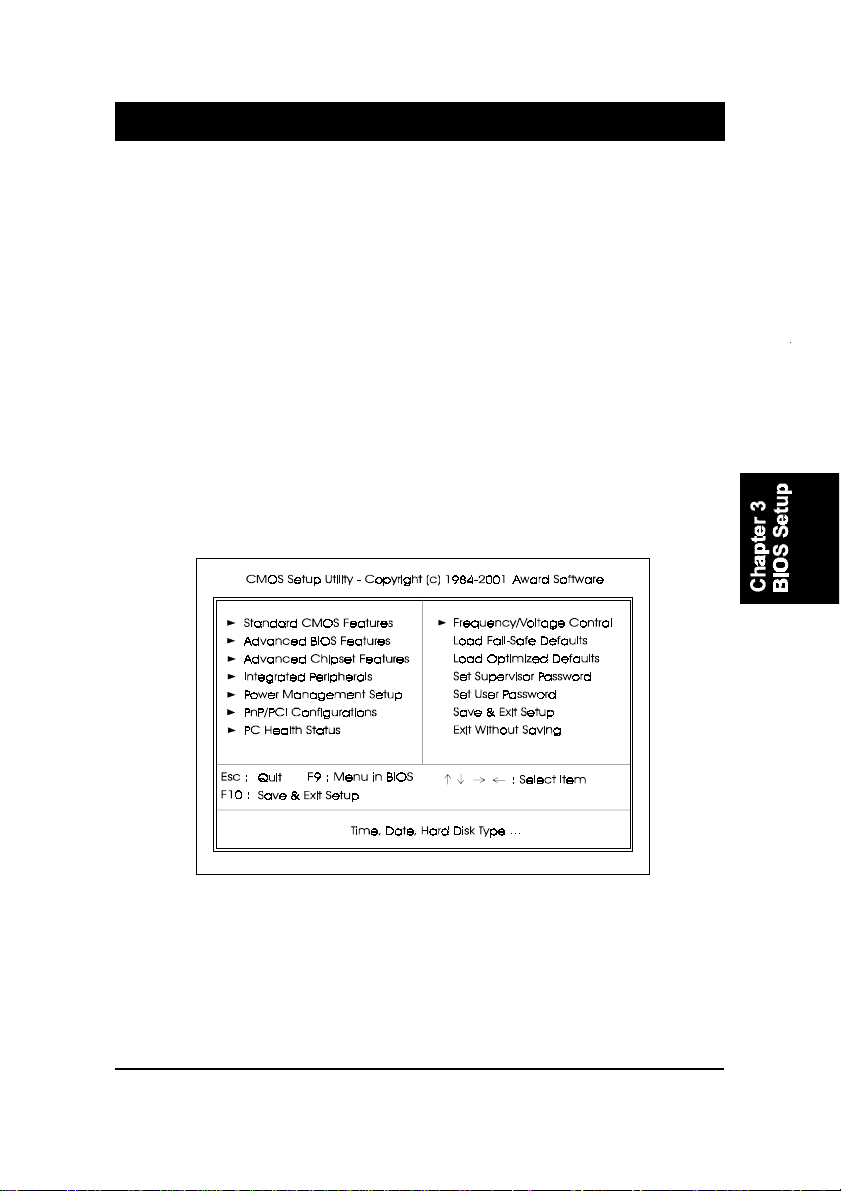
CMOS Setup Utility
A Setup program, built into the system BIOS, the settings are stored in the
CMOS. This Setup utility program allows updates to the mainboard configura-
tion settings. It is executed when the user changes system configuration; user
changes system backup battery; or the system detects a configuration error
and asks the user to run the Setup program. Use the arrow keys to select and
press Enter to run the selected program.
3 - 1
Page 30
FR33E Mainboard Manual
Standard CMOS Setup
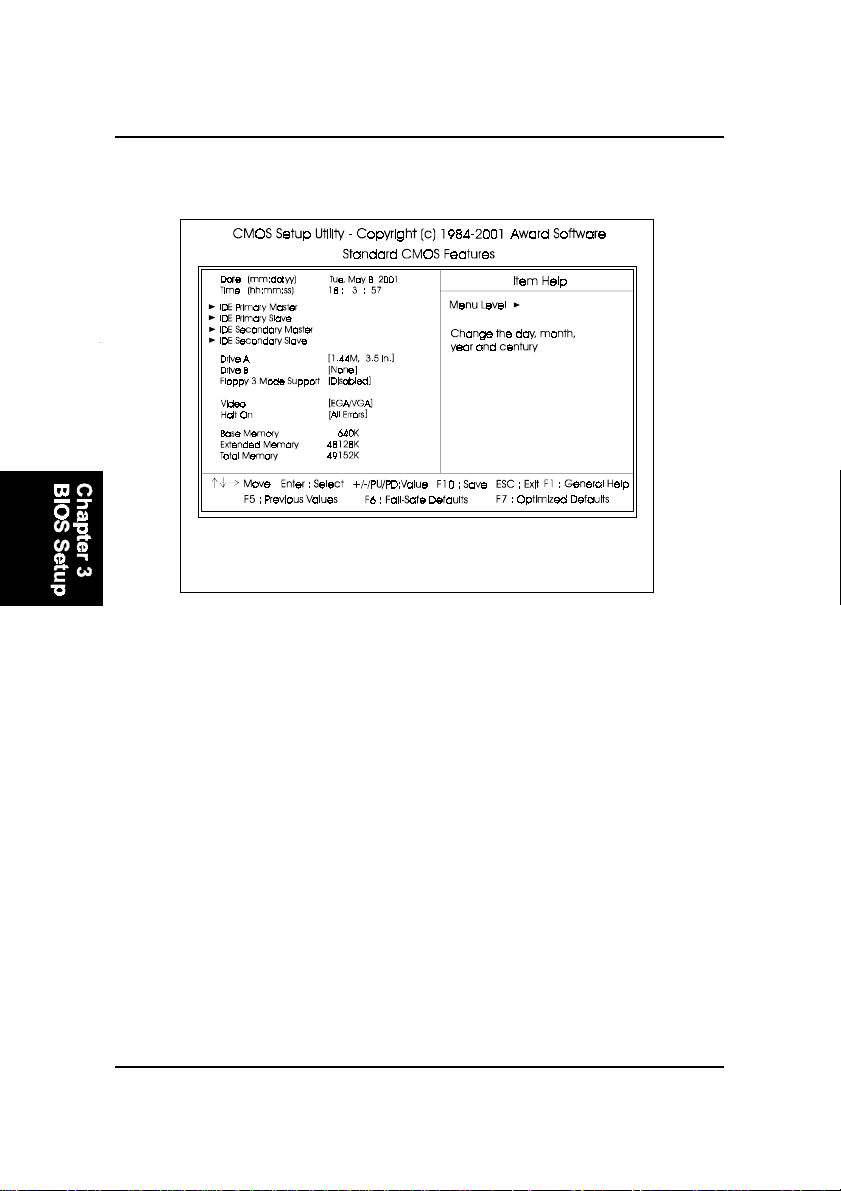
The Standard CMOS Setup screen is displayed above. Each item may have
one or more option settings. The system BIOS automatically detects memory
size, thus no changes are necessary. Use the arrow keys to highlight the item
and then use PgUp or PgDn keys to select the value you want in each item.
Date
To set the date, highlight the Date field and then press Page Up/Page
Down or +/- keys to set the current date. Follow the month, day and year
format.
Time
To set the time, highlight the Time field and then press Page Up/Page Down
or +/- keys to set the current time. Follow the hour, minute, and second
format.
3 - 2
Page 31

BIOS Setup
Hard Disks
This field records the specifications for all non-SCSI hard drives installed
in the system. The onboard PCI IDE connectors provide Primary and Sec-
ondary channels for connecting up to four IDE hard disks or other IDE
devices. Each channel can support up to two hard disks, the first of which
is the Master and the second is the Slave.
Hard Disk Configurations
Capacity: The hard disk size. The unit is Bytes.
Cylinder: The cylinder number of the hard disk.
Head: The read/write head number of hard disk.
Precomp: The cylinder number at which the disk drive
changes the write current.
Landing Zone: The cylinder number that the disk drive heads
(read/write) are seated when the disk drive is
parked.
Sector: The sector number of each track defined on the
hard disk.
Drive A / Drive B
This field records the types of floppy drives installed in the system. To
enter the configuration value for a particular drive, highlight its corre-
sponding field and then select the drive type using the Page Up or Page
Down key.
Floppy 3 Mode Support
This is a Japanese standard floppy type drive. The standard stores 1.2MB
in a 3.5 inch diskette.
Video
Set this field to the type of video display card installed in the system.
Halt On
This field determines which types of errors will cause the system to halt.
3 - 3
Page 32
FR33E Mainboard Manual
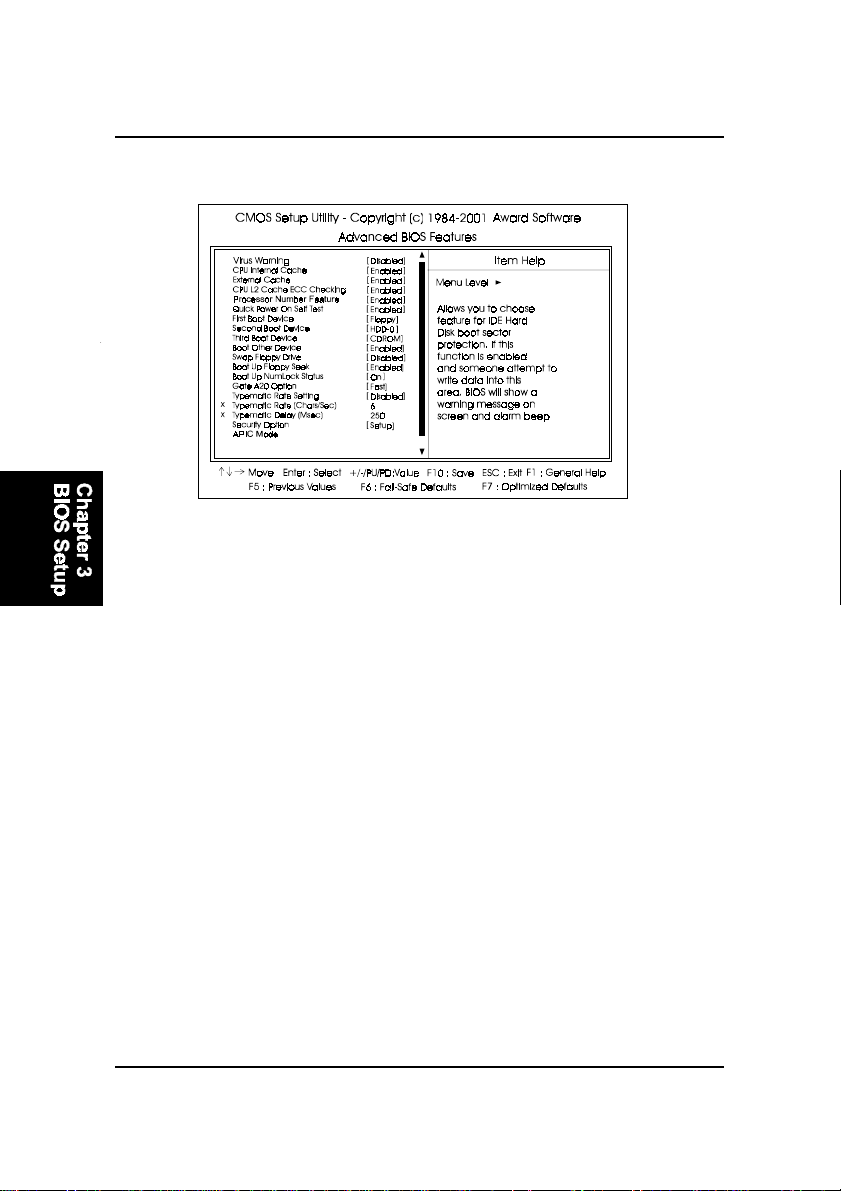
Advanced BIOS Features
Virus Warning
This feature will prompt uses a warning message, when any write boot
sector commend executed.
The options are: Enabled, Disabled.
CPU Internal Cache
When enabled, improves the system performance. Disable this item when
testing or trouble-shooting. The options are: Enabled, Disabled.
External Cache
When enabled, supports CPU L2 cache. This feature allows you to disable
the cache function when the system performance is unstable to run some
software. The options are: Enabled, Disabled.
CPU L2 Cache ECC Checking
When enabled, it activates the CPU L2 cache check and error correction.
The options are: Enabled, Disabled.
Processor Number Feature
If a Pentium III processor is installed on this mainboard, the system BIOS
will allow other utilities to access the Intel Pentium III serial number while
this feature set at Enabled. The options are: Enabled, Disabled.
3 - 4
Page 33

BIOS Setup
Quick Power On Self T est
When enabled, allows the BIOS to bypass the extensive memory test.
The options are: Enabled, Disabled.
First/Second/Third Boot Device
This feature allows user to select the boot device priority. The options are:
Floppy, LS120, HDD-0, SCSI, CDROM, HDD-1, HDD-2, HDD-3, ZIP100,
USB-FDD, USB-ZIP, USB-CDROM, USB-HDD, LAN, Disabled.
Boot Other Device
This feature allows user to select the boot device priority.
The options are: Enabled, Disabled.
Swap Floppy Drive
Allows you to switch the order in which the operating system accesses
the floppy drives.
The options are: Enabled, Disabled.
Boot Up Floppy Seek
When enabled, assigns the BIOS to perform floppy diskette drive tests by
issuing the time-consuming seek commands.
The options are: Enabled, Disabled.
Boot Up Numlock Status
When set to On, allows the BIOS to automatically enable the Num Lock
Function when the system boots up. The options are: On, Off.
Gate A20 Option
When set at Fast, allows a faster access response of address Line No. 20.
The options are: Fast, Normal.
Typematic Rate Setting
The term typematic means that when a keyboard key is held down, the
character is repeatedly entered until the key is released.
The options are: Disabled, Enabled.
Typematic Rate (Chars/Sec)
This feature is available only if the above item, Typematic Rate Setting, is
set at Enabled. Sets the rate of a character repeat when the key is held
down. The options are: 6, 8, 10, 12, 15, 20, 24, 30.
3 - 5
Page 34
FR33E Mainboard Manual
Typematic Delay (Msec)
This feature is available only if the item, Typematic Rate Setting, is set at
Enabled. Sets the delay time before a character is repeated.
The options are: 250, 500, 750, 1000 millisecond.
Security Option
Allows you to set the security level of the system.
The options are: Setup, System.
APIC Mode
Allows you to decide if the system enters the APIC (Advanced Program-
mable Interrupt Controller) mode or not for more IRQs can be released.
MPS Version Control For OS
When two CPUs onboard (not this board) this feature allows you to select
MPS (Multi-Processor Spec.) version control for OS when logo test ex-
ecutes. The options are: 1.1, 1.4.
OS Select For DRAM > 64MB
If your operating system (OS) is OS/2, select the option OS2. Otherwise,
stay with the default setting Non-OS2.
The options are: Non-OS2, OS2.
HDD S.M.A.R.T . Capability
S.M.A.R.T. stands for Self-Monitoring and Analysis Reporting Technol-
ogy which allows your hard disk drive to report any read/write errors and
issues a warning with LDCM installed.
The options are: Disabled, Enabled.
Report No FDD For WIN 95
When the field under the Standard CMOS Setup Menu for Drive A and/or
Drive B is set at None, users must set this field is set at Yes for it to function
properly. Otherwise, set at No, even if field for Drive A and/or Drive B is set
at None, system will still detect and recognize of a floppy drive(s).
The options are: Yes, No.
3 - 6
Page 35
BIOS Setup
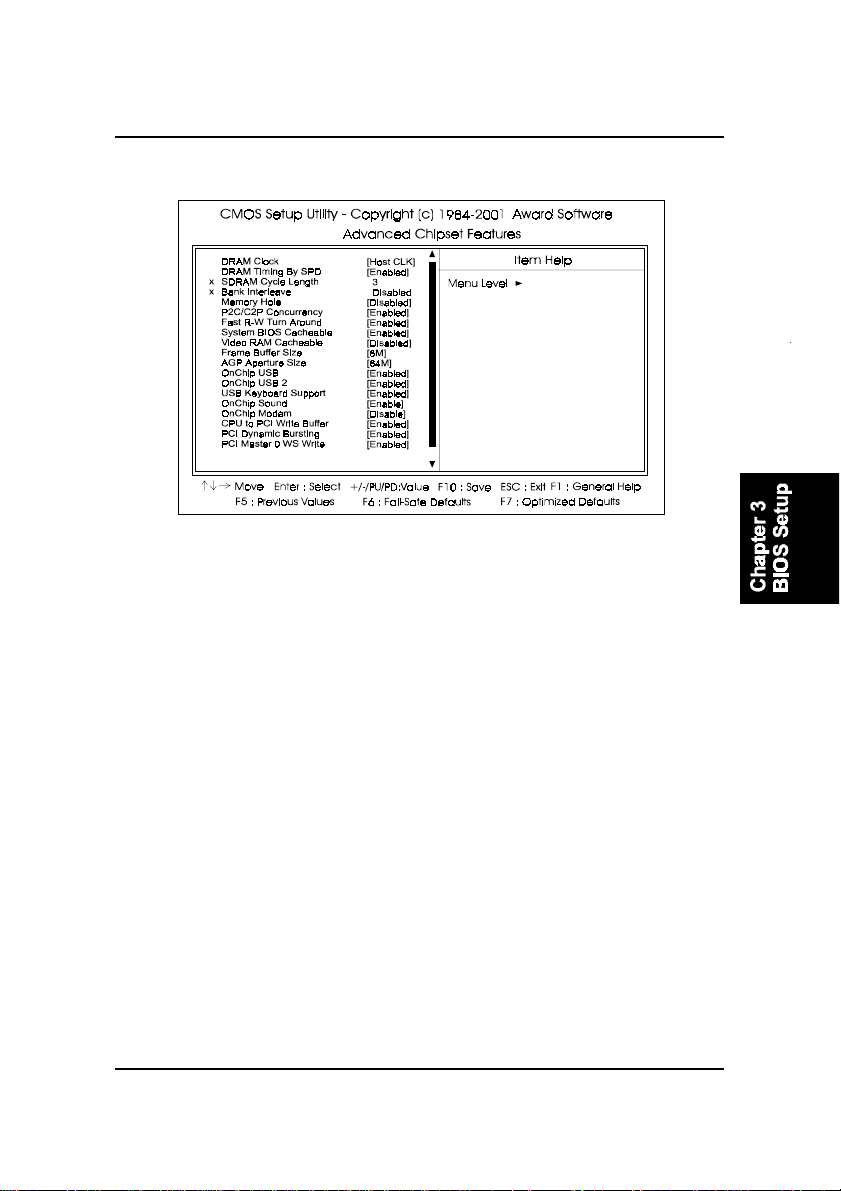
Advanced Chipset Features
DRAM Clock
The feature allows users to select the DRAM clock.
The options are: Host CLK, HCLK-33M, HCLK+33M, By Auto.
DRAM Timing By SPD
This item allows you to use supports of Serial Presence Detect (SPD), the
system BIOS can recongnize its specificity, then do automatic timer setting
SPD data. If you set any timing manually, please set this feature at Dis-
abled. The options are: Enabled, Disabled.
SDRAM Cycle Length
This item will function only when SDRAM DIMM/s are installed on the
mainboard (BIOS auto detection). If the CAS latency of your SDRAM
DIMM is 2, set it at 2 to enhance your system performance. If the CAS
latency of your SDRAM DIMM is 3, stay with the default setting, 3.
The options are: 3, 2.
Bank Interleave
This item allows users to select the bank interleave function of DRAM,
when the feature DRAM Timing By SPD set at Disabled.
The options are: Disabled, 2 Bank, 4 Bank.
3 - 7
Page 36
FR33E Mainboard Manual
Memory Hole
When you install a Legacy ISA card, this feature allows you to select the
memory holes address range of the ISA cycle when the processor ac-
cesses the selected address area. Please read your card manual for detail
information. When disabled, the memory hole at the (15-16MB) address
will be treated as a DRAM cycle when the processor accesses the 15~16MB
address area. The options are: 15M - 16M, Disabled.
P2C/C2P Concurrency
This feature allows users to set PCI/AGP Master-to-CPU/ CPU-to-PCI/
AGP Slave concurrent.
The options are: Enabled, Disabled.
Fast R-W Turn Around
It allows users to set DRAM fast read-to-write turn around.
The options are: Enabled, Disabled.
System BIOS Cacheable
When enabled, allows the ROM area F000H-FFFFH to be cacheable when
cache controller is activated. The options are: Enabled, Disabled.
Video BIOS Cacheable
As with caching the system BIOS above, enabling the video BIOS cache
will cause access to the video BIOS addressed at C0000H-C7FFFH to be
cached, if the cache controller is also enabled.
The options are Enabled, Disabled.
Video RAM Cacheable
When enabled, allows the video RAM area to be cacheable.
The options are: Enabled, Disabled.
Frame Buffer Size
It allows user to select the frame buffer size of VGA share memory.
The options are 2M, 4M, 8M.
AGP Aperture Size
It allows you to select the main memory frame size for AGP use.
The options are 4M, 8M, 16M, 32M, 64M, 128M.
3 - 8
Page 37

BIOS Setup
OnChip USB/OnChip USB 2
When enabled, this feature allows you to use the onboard USB feature.
The options are: Enabled, Disabled.
USB Keyboard Support
This feature will appear only if the above item Onchip USB is set at En-
abled. Set this feature to Enabled to use a USB keyboard with your system.
The options are: Disabled, Enabled.
OnChip Sound
This feature allows you to disable the onboard audio function if needed.
The options are: Enable, Disable.
OnChip Modem
This feature allows you to disable the CNR modem function if needed.
The options are: Enable, Disable.
CPU to PCI Write Buffer
When enabled, allows data and address access to the internal buffer of
the system controller; so the processor can be released from the waiting
state. The options are: Enabled, Disabled.
PCI Dynamic Bursting
When enabled, the PCI controller allows Bursting PCI transfer if the con-
secutive PCI cycles come with the address falling in same 1KB space. This
improves the PCI bus throughput.
The options are: Enabled, Disabled.
PCI Master 0 WS Write
When enabled, allows a zero-wait-state-cycle delay when the PCI master
drive writes data to DRAM. The options are: Enabled, Disabled.
PCI Delay Transaction
Enable this feature to abort the current CPI master cycle and to accept the
new PCI master request, it reaccepts the original PCI master and returns
the PCI data phase to the original PCI master.
The options are: Disabled, Enabled.
3 - 9
Page 38
FR33E Mainboard Manual
PCI#2 Access #1 Retry
When enabled, the AGP (PCI#2) access to PCI (PCI#1) will be retried until
the maximum count. The options are: Disabled, Enabled.
AGP Master 1 WS Write
When enabled, the AGP bus master write access to DRAMs will add one
wait-state cycle. The options are: Enabled, Disabled.
AGP Master 1 WS Read
When enabled, the AGP bus master read access to the DRAMs will add
one wait-state cycle. The options are: Disabled, Enabled.
Memory Parity Check/ECC Check
This feature enables BIOS to perform automatic memory checking upon
detection of ECC or parity DRAM.
The options are: Enabled, Disabled.
Integrated Peripherals
OnChip IDE Channel0
When enabled, allows you to use the onboard primary PCI IDE. If a hard
disk controller card is used, set at Disabled.
The options are: Enabled, Disabled.
3 - 10
Page 39

BIOS Setup
OnChip IDE Channel1
When enabled, allows you to use the onboard secondary PCI IDE. If a
hard disk controller card is used, set at Disabled.
The options are: Enabled, Disabled.
IDE Prefetch Mode
When set at Enabled, it allows data to be posted to and prefetched from
the primary IDE data ports. Data prefetching is initiated when a data port
read occurs. The read prefetch eliments latency to the IDE data ports and
allows them to be performed back to back for the highest possible PIO data
transfer rates. The first data port read of a sector is called the demand read.
Subsequent data port reads from the sector are called prefetch reads. The
demand read and all prefetch reads must be of the same size (16 or 32 bits).
The options are: Enabled, Disabled.
Primary Master PIO
Allows an automatic or a manual configuration of the PCI primary IDE hard
disk (master) mode. The options are: Auto, Mode 0, Mode 1, Mode 2,
Mode 3, Mode 4.
Primary Slave PIO
Allows an automatic or a manual configuration of the PCI primary IDE hard
disk (slave) mode. The options are: Auto, Mode 0, Mode 1, Mode 2, Mode
3, Mode 4.
Secondary Master PIO
Allows an automatic or a manual configuration of the PCI secondary IDE
hard disk (master) mode. The options are: Auto, Mode 0, Mode 1, Mode 2,
Mode 3, Mode 4.
Secondary Slave PIO
Allows an automatic or a manual configuration of the PCI secondary IDE
hard disk (slave) mode. The options are: Auto, Mode 0, Mode 1, Mode 2,
Mode 3, Mode 4.
Primary Master UDMA
Allows you to select the first PCI IDE channel of the first master hard disk
mode or to detect it by the BIOS if the hard disk supports UDMA (Ultra
DMA, faster than DMA). The options are: Auto, Disable.
3 - 11
Page 40
FR33E Mainboard Manual
Primary Slave UDMA
Allows you to select the first PCI IDE channel of the first slave hard disk
mode or to detect it by the BIOS if the hard disk supports UDMA (Ultra
DMA, faster than DMA). The options are: Auto, Disable.
Secondary Master UDMA
Allows you to select the second PCI IDE channel of the secondary master
hard disk mode or to detect it by the BIOS if the hard disk supports UDMA
(Ultra DMA, faster than DMA). The options are: Auto, Disable.
Secondary Slave UDMA
Allows you to select the second PCI IDE channel of the secondary slave
hard disk mode or to detect it by the BIOS if the hard disk supports UDMA
(Ultra DMA, faster than DMA). The options are: Auto, Disable.
Init Display First
When you install a PCI VGA card on the board, this feature allows you to
select the first initiation of the monitor display from PCI or onboard AGP.
The options are: PCI Slot, AGP.
IDE HDD Block Mode
When enabled, the system executes read/write requests to hard disk in
block mode. The options are: Enabled, Disabled.
Onboard FDD Controller
When enabled, the floppy diskette drive (FDD) controller is activated.
The options are: Enabled, Disabled.
Onboard Serial Port 1
If the serial port 1 uses the onboard I/O controller, you can modify your
serial port parameters. If an I/O card needs to be installed, COM3 and
COM4 may be needed. The options are: 3F8/IRQ4, 3E8/IRQ4, 2F8/IRQ3,
2E8/IRQ3, Disabled.
Onboard Serial Port 2
If the serial port 2 uses the onboard I/O controller, you can modify your
serial port parameters. If an I/O card needs to be installed, COM3 and
COM4 may be needed. The options are: 2F8/IRQ3, 3E8/IRQ4, 2E8/IRQ3,
3F8/IRQ4, Disabled.
3 - 12
Page 41

BIOS Setup
UART 2 Mode
Select an operating mode for the second serial port. Set at
Standard, if you use COM2 as the serial port as the serial port,
instead as an IR port. The options are: Standard, ASKIR, HPSIR.
IR Function Duplex
This feature is available only it the above item , UART2 Mode, is set at
ASKIR or HPSIR. It allows you to select the infrared data transaction way.
The options are: Half , Full.
TX, RX Inverting Enable
This feature is available only it the above item , UART2 Mode, is set at
ASKIR or HPSIR. It allows you to select the active signals of the recep-
tion end and the transmission end.
The options are: No, Yes; Yes, Yes; No, No; Yes, No.
Onboard Parallel Port
Allows you to select from a given set of parameters if the parallel port uses
the onboard I/O controller.
The options are: 378/IRQ7, 278/IRQ5, 3BC/IRQ7, Disabled.
Onboard Parallel Port Mode
Allows you to connect with an advanced printer.
The options are: Normal, EPP, ECP, ECP/ ECP.
ECP Mode Use DMA
This feature allows you to select Direct Memory Access (DMA) channel if
the ECP mode selected. The options are: 3, 1.
Parallel Port EPP Type
This feature allows you to select the EPP type for the parallel port.
The options are: EPP1.9, EPP1.7.
Onboard Legacy Audio
Set Audio to be compatible with legacy mode.
The options are: Enabled, Disabled.
3 - 13
Page 42
FR33E Mainboard Manual
Sound Blaster
This feature allows you to set audio to Sound Blaster mode, if the onboard
Legacy audio chosen. The options are: Enabled, Disabled.
SB I/O Base Address
This feature allows you to select the SB I/O base address, if the onboard
Legacy audio chosen. The options are: 220H, 240H, 260H, 280H.
SB IRQ Select
This feature allows you to select the SB IRQ, if the onboard Legacy audio
chosen. The options are: IRQ 5, IRQ 7, IRQ 9, IRQ 10.
SB DMA Select
This feature allows you to select the SB DMA channel, if the onboard
Legacy audio chosen.
The options are: DMA 1, DMA 2, DMA 3, DMA0.
MPU-401
This feature allows you to enable MPU-401, if the onboard Legacy audio
chosen. The options are: Disabled, Enabled.
MPU-401 I/O Address
This feature allows you to select the MPU-401 I/O address, if the onboard
Legacy audio chosen.
The options are: 310-313H, 320-323H, 330-333H, 300-303H.
Game Port (200-207H)
This feature allows you to select the game port (200-207H), if the onboard
Legacy audio chosen.
The options are: Enabled, Disabled.
3 - 14
Page 43
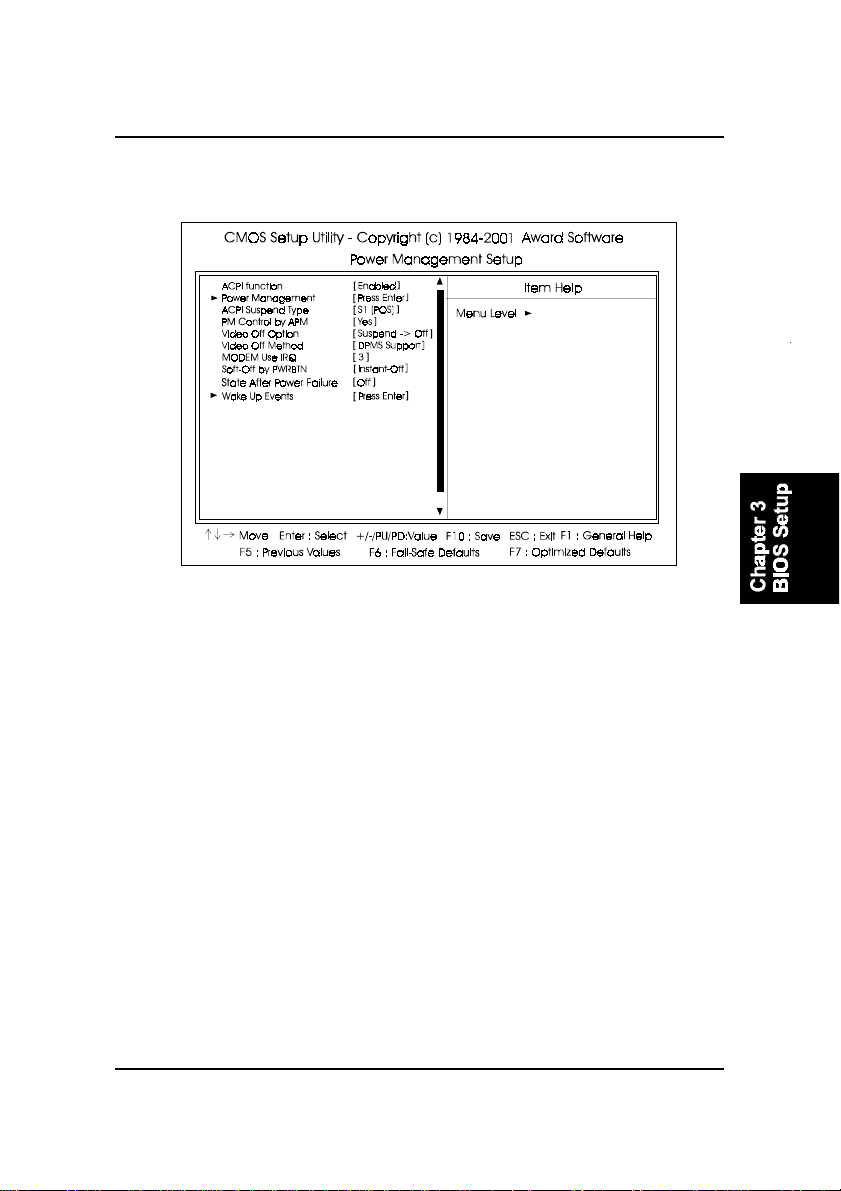
Power Management Setup
ACPI function
This item allows you to disable the ACPI function.
The options are: Enabled, Disabled.
BIOS Setup
Power Management
This item allows you to adjust the power management features.
Select User Define for configuring your own power management features.
Min Saving initiates all predefined timers in their minimum values. Max
Saving, on the other hand, initiates maximum values. The options are: User
Define, Min Saving, Max Saving.
HDD Power Down
The option lets the BIOS turn the HDD motor off when system is in Sus-
pend mode. Selecting 1 Min..15 Min allows you define the HDD idle time
before the HDD enters the Power Saving Mode.
The options 1 Min..15 Min will not work concurrently. When HDD is in the
Power Saving Mode, any access to the HDD will wake the HDD up.
The options are: Disable, 1 Min..15 Min.
3 - 15
Page 44
FR33E Mainboard Manual
Doze Mode
When disabled, the system will not enter Doze mode. The specified time
option defines the idle time the system takes before it enters Doze mode.
The options are: Disable, 1, 2, 4, 6, 8, 10, 20, 30, 40 Min, 1 Hour.
Suspend Mode
When disabled, the system will not enter Suspend mode. The specified
time option defines the idle time the system takes before it enters Suspend
mode. The options are: Disable, 1, 2, 4, 6, 8, 10, 20, 30, 40 Min, 1 Hour.
ACPI Suspend Type
This item allows you to select ACPI suspend types.
The options are: S1(POS), S3 (STR).
PM Control by APM
The option No allows the APM (Advanced Power Management) specifi-
cation be ignored. Selecting Yes will allow the BIOS wait for APMs prompt
before it enters Doze mode, Standby mode, or Suspend mode. If the APM
is installed, it will prompt the BIOS to set the system into power saving
mode when all tasks are done. The options are: No, Yes.
Video Off Option
This feature provides the selections of the video display power saving
mode. The option Suspend - Off allows the video display to go blank if the
system enters Suspend mode. The option All Modes - Off allows the video
display to go blank if the system enters Doze mode or Suspend mode. The
option Always On allows the video display to stay in Standby mode even
when the system enters Doze or Suspend mode.
The options are: Suspend - Off, All Modes -> Off, Always On.
3 - 16
Page 45

BIOS Setup
Video Off Method
The option V/H SYNC+Blank allows the BIOS to blank off screen display
by turning off the V-Sync and H-Sync signals sent from add-on VGA card.
DPMS Support allows the BIOS to blank off screen display by your add-
on VGA card which supports DPMS (Display Power Management Signal-
ing function). Blank Screen allows the BIOS to blank off screen display by
turning off the red-green-blue signals.
The options are: V/H SYNC+Blank, DPMS Support, Blank Screen.
MODEM Use IRQ
This feature allows you to select the IRQ# to meet your modems IRQ#.
The options are: NA, 3, 4, 5, 7, 9, 10, 11.
Soft-Off by PWR-BTTN
The selection Delay 4 Sec. will allow the system shut down after 4 seconds
after the power button is pressed. The selection Instant-Off will allow the
system shut down immediately once the power button is pressed.
The settings are: Delay 4 Sec, Instant-Off.
State After Power Failure
The item allows you to select the state that your personal computer re-
turns to after a power failure. If set at Off, the system will not boot after a
power failure. If set On, the system will restart after power failure.
The settings are: Auto, On, Off.
VGA
When set at On, any VGA activity will awake the system.
The options are: OFF, ON.
LPT & COM
When LPT/COM is selected, any access of LPT and COM ports will awake
the system. Likewise, either LPT or COM is chosen, the system will be
awaken by any activity of LPT or COM port.
The options are: LPT/COM, LPT, COM, NONE.
3 - 17
Page 46
FR33E Mainboard Manual
HDD & FDD
When it is set at ON, any access happened at hard drives and floppy
drives will awake the system.
The options are: OFF, ON.
PCI Master
To set this feature at ON activates that Power Management feautre (PM)
wake-up event for the PCI bus master card.
The options are: OFF, ON.
PowerOn by PCI Card
When set at Enabled, any PCI-PM event awakes the system from a PCI-
PM controlled state.
The options are Disabled, Enabled.
Wake Up On LAN/Ring
When set at Enabled, an input signal that comes from the other client/
server of the network or from a modem ring can awake the system from a
soft off state. The options are Disabled or Enabled.
Modem Ring Resume
An input signal on the serial Ring Indicator (RI) line (in other words, an
incoming call on the modem) awakens the system from a soft off state.
The options are: Enabled, Disabled.
RTC Alarm Resume
Enabled allows you to set the time the system will be turned on from the
system power-off status. The options are: Enabled, Disabled.
Date (of Month)
This feature allows you to set the day of the alarm starts when the RTC
Alarm Resume From Soft Off is set to be Enabled. The options are: 0, 1..31.
3 - 18
Page 47
BIOS Setup
Resume Time (hh:mm:ss)
If an ATX power supply is installed and when RTC Alarm Resume is En-
abled, this feature allows you to set the time of the alarm starts when the
RTC Alarm Resume From Soft Off is set to be Enabled.
The options are: 7: 0: 0. hh (hour) - 0, 1, 2,.., 23; mm (minute) - 0, 1, 2,..,59;
ss (second) - 0, 1, 2,..,59.
IRQs Activity Monitoring
After the time period which you set, the system advances from doze mode
to suspend mode in which the CPU clock stops and the screen display is
off. At this moment, if the IRQ activity occurs, the system goes back to
full-on mode directly.
If the IRQ activity which is defined as Non Primary takes place, the system
remains off until the corresponding IRQ handler finishes.
The options of IRQ 3, 4, 5, 6, 7, 8, 9, 10, 11, 12, 13, 14, 15 are: Enabled,
Disabled.
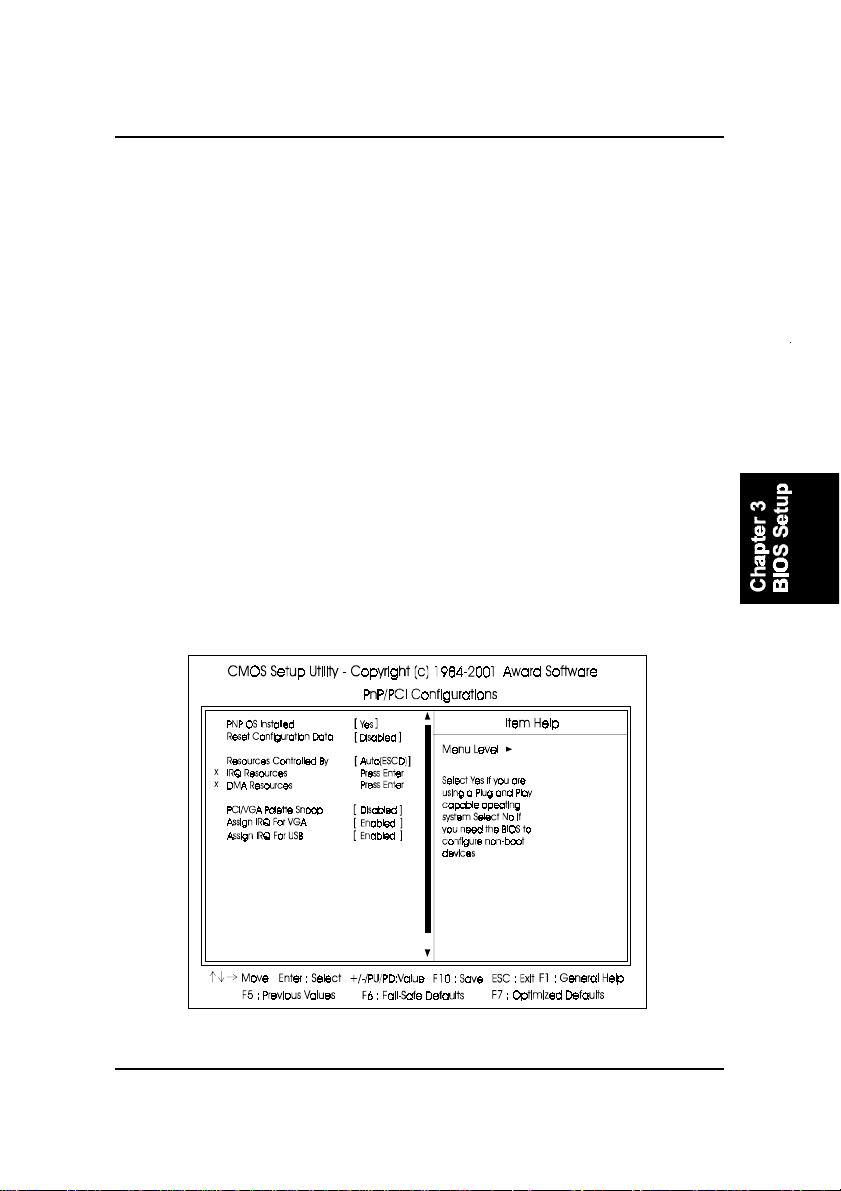
PnP/PCI Configurations
3 - 19
Page 48
FR33E Mainboard Manual
PNP OS Installed
If your operating system is a Plug-and-Play one, such as Windows NT,
Windows 95, select Yes. The options are: No, Yes.
Reset Configuration Data
Enabling it to reset the system Extended System Configuration Data (ESCD)
when you exit Setup if you have installed a new add-on card and the
system reconfiguration has caused such a serious conflict that the operat-
ing system can not boot. The options are: Disabled, Enabled.
Resources Controlled By
If set at Auto, the BIOS arranges all system resources. If there exists con-
flict, select Manual. The options are: Auto (ESCD), Manual.
The manual options of IRQ- / DMA- assigned to are: PCI/ISA PnP, Legacy
ISA.
PCI/VGA Palette Snoop
Set this feature to be enabled if any ISA adapter card installed in the
system requires the VGA palette snoop function.
The options are: Disabled, Enabled.
Assign IRQ For VGA
If your PCI VGA card devices do not need an IRQ, select Disabled; there-
fore, an IRQ can be released for the system use.
The options are: Enabled, Disabled.
Assign IRQ For USB
If your USB devices do not need an IRQ, select Disabled; therefore, an
IRQ can be released for the system use.
The options are: Enabled, Disabled.
3 - 20
Page 49
BIOS Setup
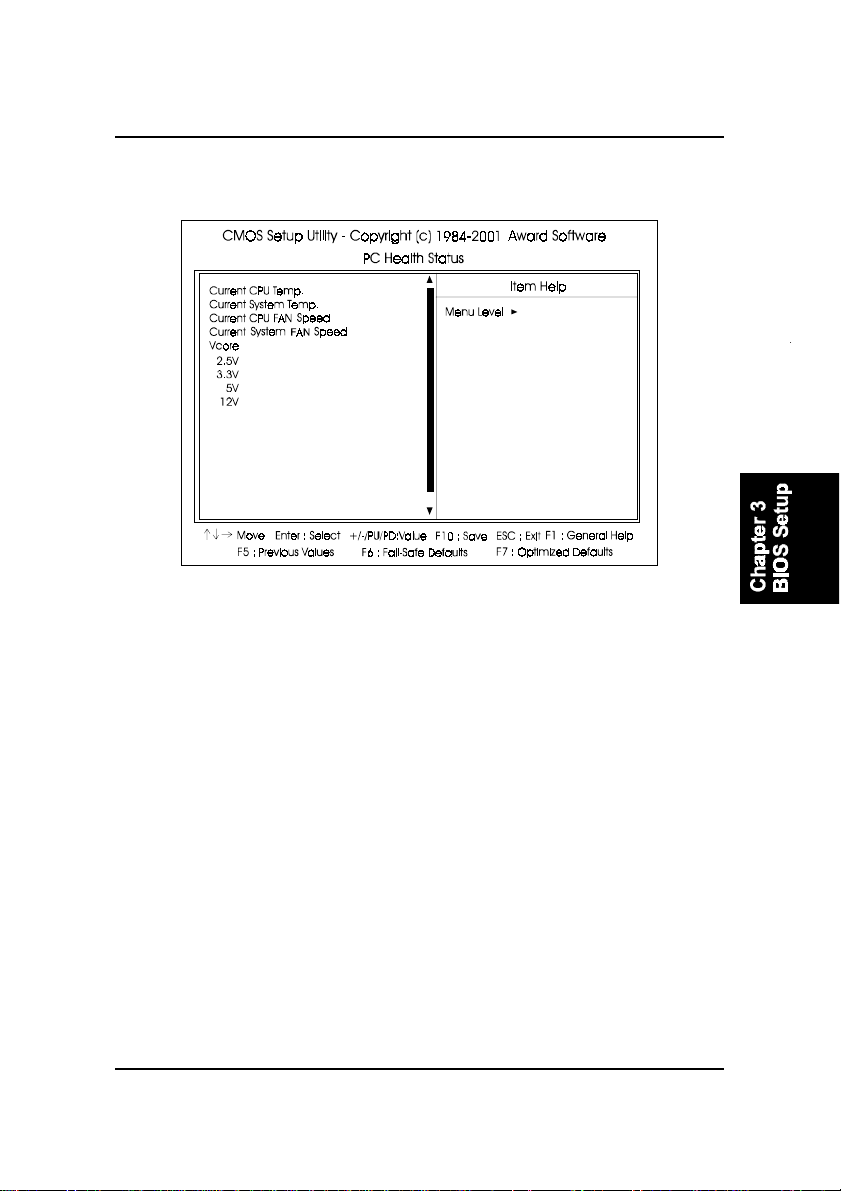
PC Health Status
It allows you and technicians to monitor data provided by the BIOS on this
mainboard. Some of them are not user-configurable.
Current CPU T emp. / Current System Temp. / Current CPU F AN Speed
/ Current System FAN Speed
These items allow end users and technicians to monitor data such as the
current CPU temperature, CPU and case cooling fans rotating speed.
3 - 21
Page 50
FR33E Mainboard Manual
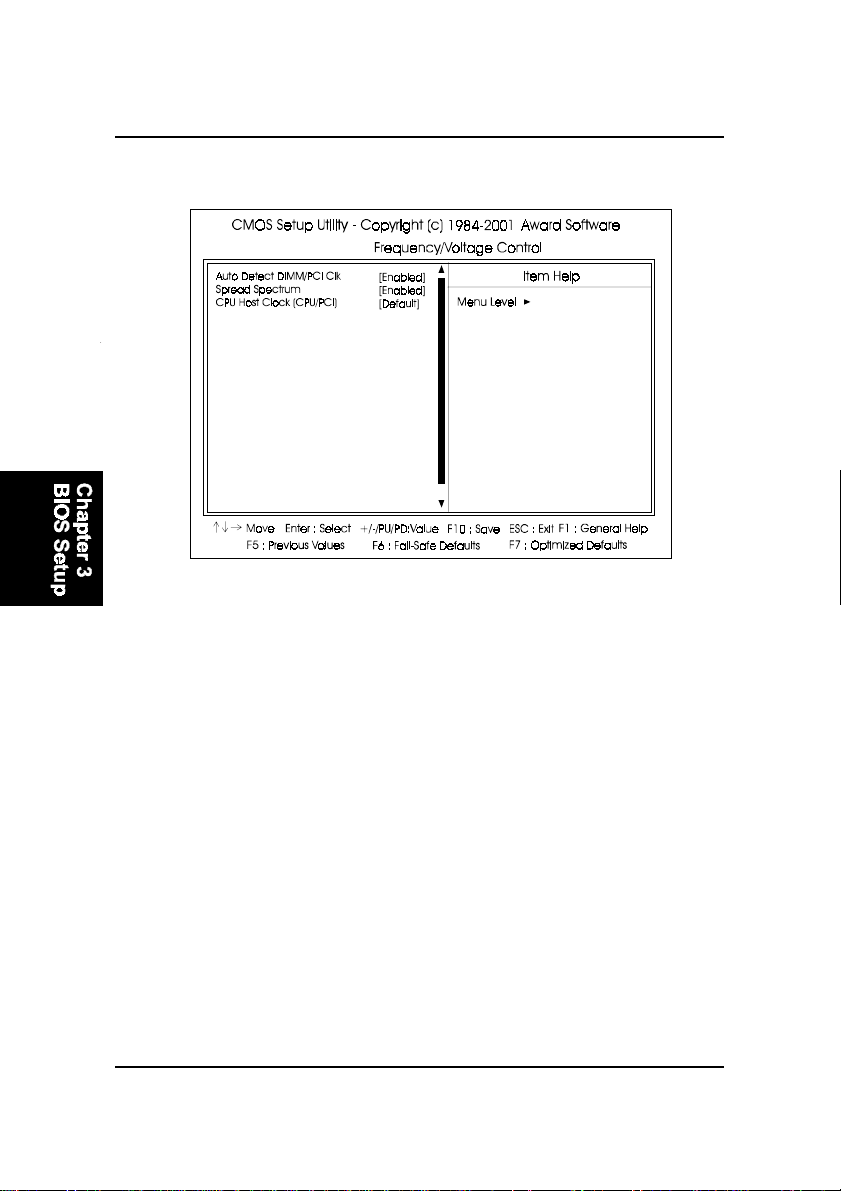
Frequency/Voltage Control
Auto Detect DIMM/PCI Clk
When enabled, BIOS will detect the PCI slot and DIMM slot. If no any
device in, BIOS will auto disable its clock.
The options are: Enabled, Disabled.
Spread Spectrum
This feature is used to activate spread spectrum feature.
The options are: Disabled, Enabled.
CPU Host Clock (CPU/PCI)
This feature allows you to set the CPU/PCI clock frequency. The default
setting, Default, will detect your CPU/PCI clock frequency automatically. If
you set a unappropriate option which leads to a booting problem, keep
pressing the Insert key until the display appears will solve it.
The option list offered all combinations that supported by this mainboard.
3 - 22
Page 51
BIOS Setup
Load Fail-Safe Defaults
This submenu is selected to diagnose the problem after the computer boots, if
the computer will not boot. These settings do not give optimal performance.
Load Optimized Defaults
This submenu is selected for default settings which provide the best system
performance.
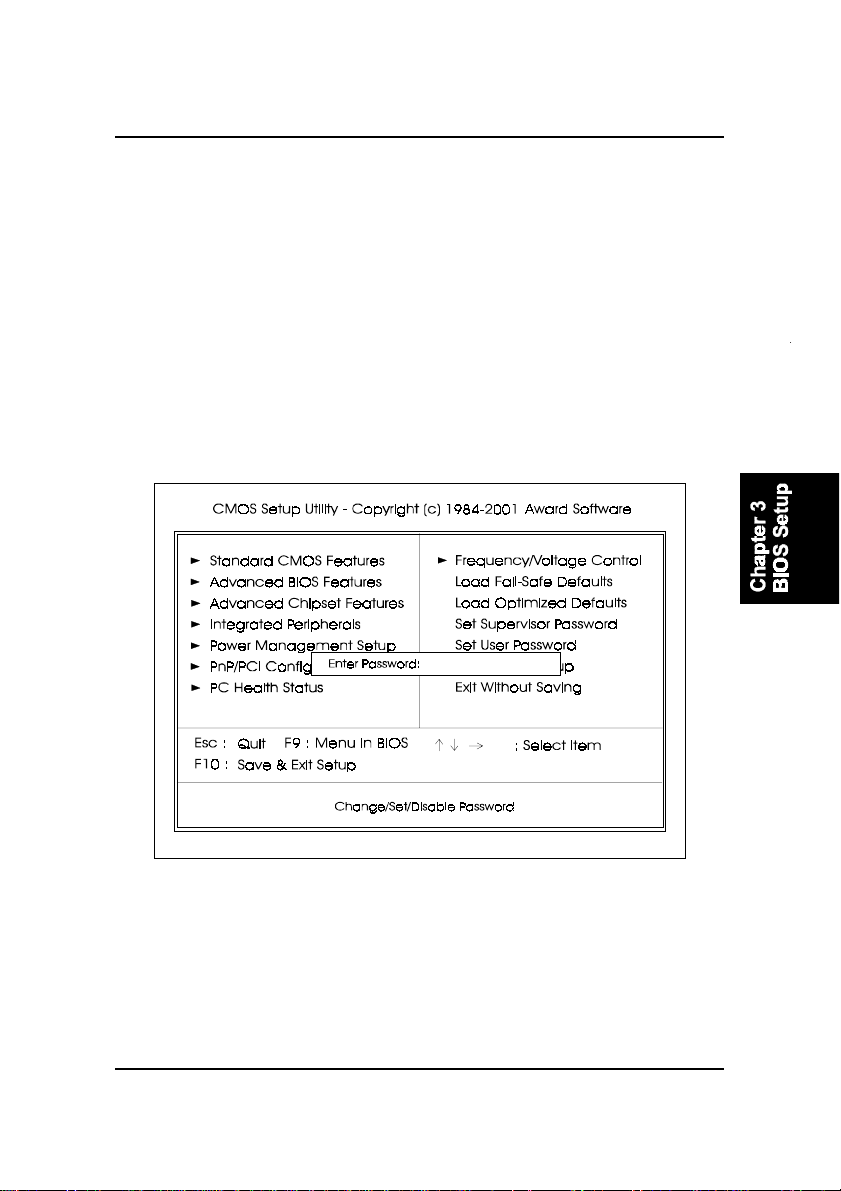
Supervisor/User Password
To enable the Supervisor/User passwords, select the item from the Standard
CMOS Setup. You will be prompted to create your own password. Type your
password up to eight characters and press Enter. You will be asked to confirm
the password. Type the password again and press Enter. To disable password,
press Enter twice when you are prompted to enter a password. A message
appears, confirming the password is disabled.
3 - 23
Page 52
FR33E Mainboard Manual
Under the BIOS Feature Setup, if Setup is selected under the Security Option
field and the Supervisor/User Password is enabled, you will be prompted
password every time you try to enter the CMOS Setup Utility. If System is
selected and the Supervisor/User Password is enabled, you will be requested
to enter the Password every time when you reboot the system or enter the
CMOS Setup utility.
Save and Exit Setup
After you have made changes under Setup, press Esc to return to the main
menu. Move cursor to Save and Exit Setup or press F10 and then press Y to
change the CMOS Setup. If you did not change anything, press Esc again or
move cursor to Exit Without Saving and press Y to retain the Setup settings.
The following message will appear at the center of the screen to allow you to
save data to CMOS and exit the setup utility: SAVE to CMOS and EXIT (Y/N)?
Exit without Saving
If you select this feature, the following message will appear at the center of the
screen to allow you to exit the setup utility without saving CMOS modifica-
tions: Quit Without Saving (Y/N)?
3 - 24
 Loading...