

Page 1

AU13
MAINBOARD
MANUAL
DOC No.: M02901
Rev. |: A0
Date |:12, 2002
Part No. |: 25-10652-00
Page 2

Notice
Handling Precautions
Warning:
1. Static electricity may cause damage to the integrated circuits on
the motherboard. Before handling any motherboard outside of its
protective packaging, ensure that there is no static electric charge
in your body.
2. There is a danger of explosion if the battery is incorrectly
replaced. Replace only with the same or an equivalent type
recommended by the manufacturer.
3. Discard used batteries according to the manufacturer’s
instructions.
4. Never run the processor without the heatsink properly and firmly
attached. PERMANENT DAMAGE WILL RESULT!
Observe the following basic precautions when handling the motherboard
or other computer components:
n Wear a static wrist strap which fits around your wrist and is
connected to a natural earth ground.
n Touch a grounded or anti-static surface or a metal fixture such as a
water pipe.
n Avoid contacting the components on add-on cards, motherboards,
and modules with the golden fingers connectors plugged into the
expansion slot. It is best to handle system components by their
mounting brackets.
The above methods prevent static build-up and cause it to be discharged
properly.
Trademark
All trademarks mentioned in this manual are registered properly of
the respective owners.
Handling Precautions
This manual may not, in whole or in part, be photocopied, reproduced,
transcribed, translated, or transmitted in whatever form without the
written consent of the manufacturer, except for copies retained by the
purchaser for personal archival purposes.
Page 3

T able of Contents
Table of Contents
Quick Reference (German) G- 1
Quick Reference (French) F- 1
Quick Reference (Spanish) S-1
Quick Reference (Japanese) J-1
Quick Reference (Chinese) C-1
Quick Reference (Simplified Chinese) |||||||||||||SC-1
Chapter 1 Overview
Package Checklist .......................................................................... 1-2
The AU13 Mainboard ................................................................ 1-3
Main Features ................................................................................ 1-4
Chapter 2 Installation Procedures
Quick Reference (from Page 2-2 to 2-3) .......................................... 2-2
Mainboard Layout .................................................................... 2-2
(1). Clear CMOS ......................................................................... 2-3
(2). Front Panel Block Cable Connection ................................... 2-3
(3). CPU Fan Installation ............................................................ 2-3
1). Set System Jumpers .................................................................. 2-4
Clear CMOS: CLR_CMOS ......................................................... 2-4
2). Install Memory Modules .......................................................... 2-4
3). Install the CPU .......................................................................... 2-5
CPU Overheating Protection ..................................................... 2-7
4). Install Expansion Cards ............................................................. 2-7
5). Connect Devices ....................................................................... 2-9
Floppy Diskette Drive Connector ...................................... 2-9
IDE Device Connectors ..................................................... 2-9
Fan Connectors ................................................................. 2-10
Wake-On-Lan Connector ................................................... 2-10
Power Connector ............................................................... 2-11
CD Audio-In Connectors ................................................... 2-11
Wake-On-Ring Connector ................................................. 2-12
SIRQ Connector ................................................................ 2-12
Serial ATA Connectors ...................................................... 2-12
Front Panel Block and IR Connector .................................. 2-13
IEEE 1394 Connectors ....................................................... 2-14
i
Page 4

AU13 Mainboard Manual
PS/2 Keyboard and Mouse Connector .............................. 2-15
Universal Serial Bus Connectors ....................................... 2-15
Printer Connector .............................................................. 2-16
Audio I/O Jacks ................................................................ 2-16
Serial Port Connectors ....................................................... 2-18
LAN Connector (optional) ................................................ 2-18
Chapter 3 BIOS Setup
CMOS Setup Utility ....................................................................... 3-1
Standard CMOS Setup ................................................................... 3-2
Advanced BIOS Features .............................................................. 3-4
Advanced Chipset Features .......................................................... 3-8
Integrated Peripherals .................................................................... 3-10
Power Management Setup ............................................................. 3-14
PnP/PCI Configurations ................................................................. 3-16
PC Health Status ............................................................................ 3-17
Frequency/Voltage Control ............................................................ 3-18
Load Fail-Safe Defaults .................................................................. 3-20
Load Optimized Defaults ................................................................ 3-20
Supervisor/User Password ............................................................ 3-20
Save and Exit Setup ........................................................................ 3-21
Exit without Saving ........................................................................ 3-21
ii
Page 5

Overview
Chapter 1
Overview
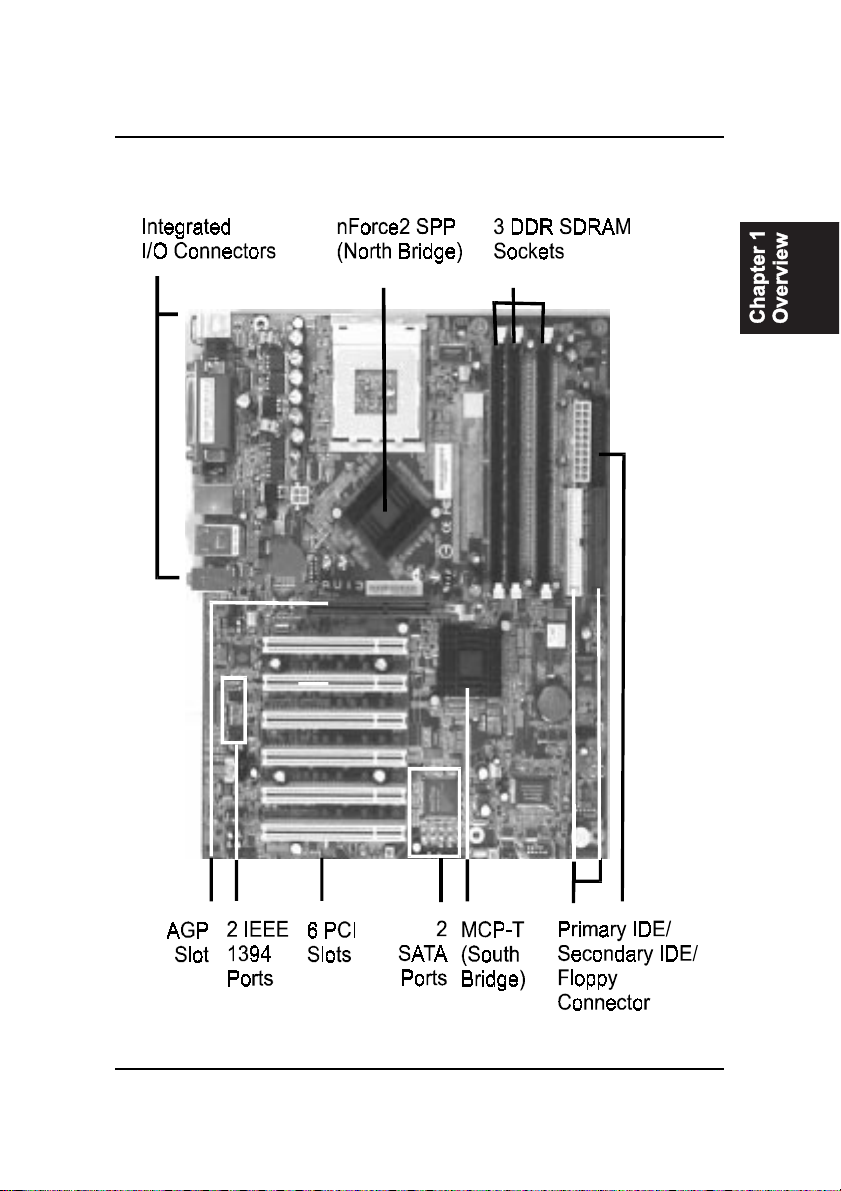
The new 1stMainboard® AU13Ô is an ATX sized motherboard supporting
the latest generation of AMD® AthlonÔ and DuronÔ processors at industry
leading speeds.
By utilizing DDR ( Double Data Rate ) transfer rate the 100/133 MHz system bus
effectively reaches Front Side Bus speeds of 200/266/333 MHz. The board
provides users with an ATA133 data transaction for hard drives and has 3
PC1600/2100/2700/3200 64-bit DDR DIMMs for up to 3 GB.
The optional IEEE 1394 feature allows users to connect up to 63 devices to the
serial bus on a computer system. The board is equipped with 2 dual channeled
enhanced PCI bus master IDE connectors.
The board is based around the high performance nVIDIA nForce2 SPP (Crush
18D)Ô as North Bridge and the MCP-T AGPsetÔ as South Bridge. Its AGP
functions supported AGP v3.0 compliant and the most robust 3D games with
software environments. The AGP slot allows 1.5/0.8 volt AGP 4X/8X card only
and Maximum AGP interface bandwith 2.1 GB/s.
The board features onboard 5.1-channel audio port that linked with an op-
tional A73 daughter board and bracket and optional onboard LAN functionaudio
port.
The serial ATA feature of AU13 replaces the standard parallel ATA physical
storage interface and allows future enhancements to the computing platform.
It completely software compatible with parallel ATA, requiring no mofication
to your operating system. The onboard serial ATA feature includes RAID
function (level 0, 1) to provide you with a more efficient storage backup. For
more detail, please read the help file in the accompanied driver CD.
1 - 1
Page 6
AU13 Mainboard Manual
Package Checklist
If you discover any item below was damaged or lost, please contact your
vendor.
þ The mainboard þ This user manual
þ FDD cable þ Drivers CD þ A T A-66/100 cable
þ IEEE 1394 cable þ I/O shielding
o One A73 bracket with cable (optional)
o One serial ATA cable and one power cable (optional)
IMPORT ANT : AMD CPU HEAT SINK INST ALLA TION
Be ware finish heat sink install. Before you boot system, please
check the heat sink is complete contact with die of CPU.
The poor contact will bring about over heat, it may damage your
processor.
1 - 2
It is strongly recommended that at least a 250-watt A TX power pupply
be used for this motherboard. Make sure that your ATX power supply can supply at least 20 amperes on the +5-Volt lead and 1A on
the +5-Volt standby lead (+5VSB). Your system may become unstable / unreliable and may experience difficulty in powering up if
your power supply is inadequate.
Page 7
The AU13 Mainboard
Overview
1 - 3
Page 8

AU13 Mainboard Manual
Main Features
n Processor Supported
Supports 462-pin SocketA for AMD Athlon XP and Duron processors with
200/266/333MHz Front Side Bus
- Athlon XP (1500+ to 2800+) @ 266/333MHz Front Side Bus,
- Duron (800 to 1.3GHz) @ 200MHz Front Side Bus
n Chipset
nVIDIA nForce2 SPP (Crush 18D) +MCP-T AGPset
n Main Memory
Three 184-pin DDR DIMM sockets for 64-bit, Unbuffered, Single/
Double-side and Non-ECC DDR-200/266/333/400 DIMMs
Supports 128-bit dual channel memory architecture
w
Supports up to 3GB memory size
w
Supports complete FSB/Memory and FSB/AGP Asynchronous
w
scheme for over-clocking
n BIOS
4Mb Flash EEPROM with Award BIOS
- ACPI v2.0 compliant
- S3 (Suspend to DRAM) sleep-state support
- SMBIOS (System Management BIOS) v2.2 compliant
- Supports Power failure recovery
- Capable to waked the computer up from specific states by LAN,
Power switch, PME#, RTC alarm, USB, Modem ring on
COM#1...
1 - 4
Page 9

n Onboard PCI Devices
w 1394 --> Embedded 1394 controller with Agere FW803 for 3
ports solution
- IEEE-1394a compliant with up to 400Mbps bandwidth
w LAN --> Embedded 3COM 3C920B-EMB 10/100Mbps Fast
|||||||||||||||||||||||||||||||Ethernet controller
w IDE --> Embedded IDE controller supports 2 IDE ports for up
to 4 IDE devices
- Supports ATA-133 with up to 133MB bandwidth
n Legacy IO Controller
w Winbond W83627HF LPC IO controller with floppy, printer, serial
and CIR/SIR interface
n Audio
w 5.1 channel audio with analog and digital output using ALC650E
AC97 CODEC
- AC97 v2.2 compliant
- In 5.1-CH mode, supports Center/Subwoofer (Pink), Rear out
(Blue), Front out (Green) at rear panel
- Supports CD-In, Aux-In interface
- Supports Line-out and Mic-In for front panel
Overview
n Peripheral Interfaces
w PS/2 keyboard and mouse ports (at rear panel)
w One Parallel (printer) port (at rear panel)
1 - 5
Page 10

AU13 Mainboard Manual
w One RJ45 LAN connector (at rear panel) (Optional)
w Tw o Serial ports (at rear panel)
w One floppy drive interface
n Front Panel Controller
w Supports Reset & Soft-Off switches
w Supports HDD & Power LEDs
w Supports PC speaker
n Expansion Slots
w One AGP slots supporting 1.5V/0.8V 4X/8X-AGP cards
- AGP v3.0 compliant
w Six PCI bus sockets with Bus Master support
- PCI v2.3 compliant
1 - 6
Page 11
Installation Procedures
Chapter 2
Installation Procedures
The mainboard has several user-adjustable jumpers on the board that allow you to
configure your system to suit your requirements. This chapter contains information
on the various jumper settings on your mainboard.
To set up your computer, you must complete the following steps:
Step 1 - Set system jumpers
Step 2 - Install memory modules
Step 3 - Install the Central Processing Unit (CPU)
Step 4 - Install expansion cards
Step 5 - Connect ribbon cables, cabinet wires, and power supply
Step 6 - Set up BIOS software
Step 7 - Install supporting software tools
WARNING: Excessive torque may damage the mainboard. When
using an electric screwdriver on the mainboard, make sure that
the torque is set to the allowable range of 5.0 ~ 8.0kg/cm.
Mainboard components contain very delicate Integrated Circuit
(IC) chips. To prevent static electricity from harming any of the
sensitive components, you should follow the following precautions whenever working on the computer:
1. Unplug the computer power cord when working on the inside.
2. Hold components by the edges and try not to touch the IC
||||chips, leads, or circuitry.
3. Wear an anti-static wrist strap which fits around the wrist.
4. Place components on a grounded anti-static pad or on the bag
that came with the component whenever the components are
separated from the system.
2 - 1
Page 12
AU13 Mainboard Manual
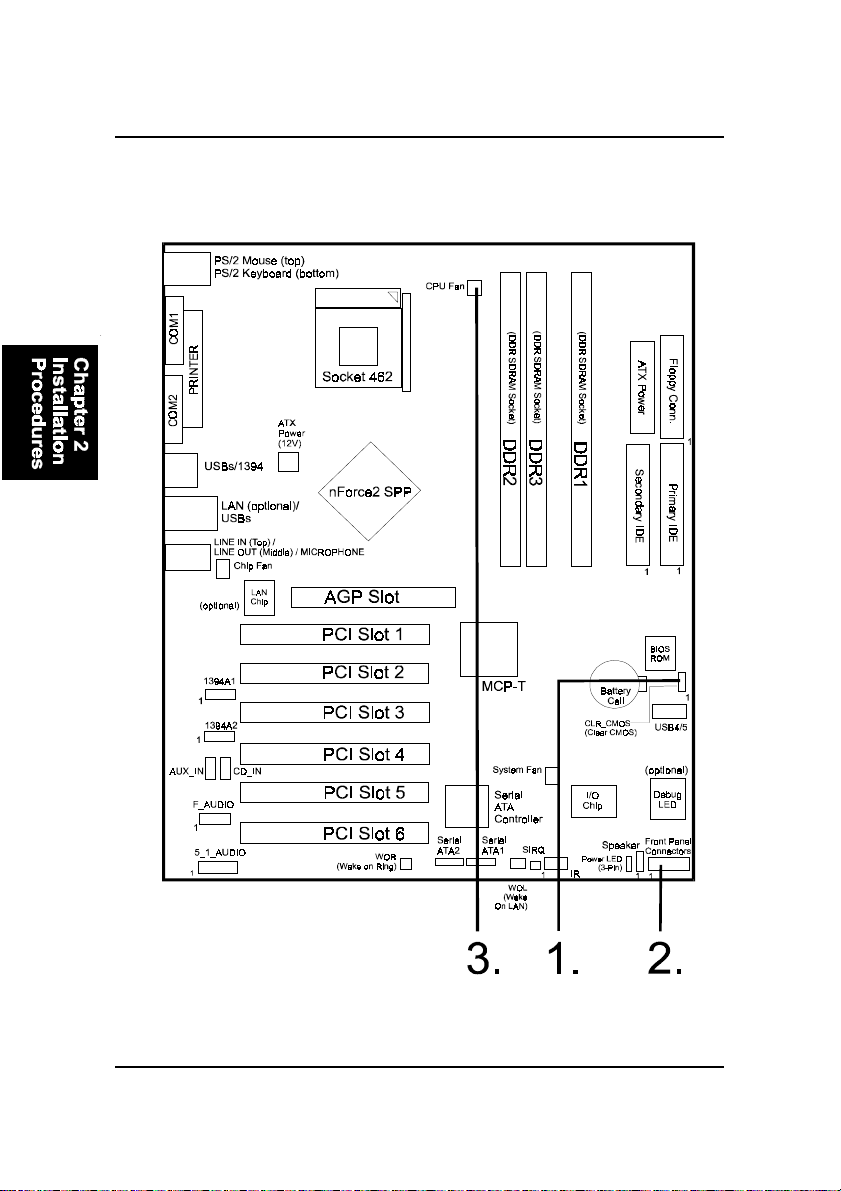
Quick Reference (from Page 2-2 to 2-3)
Mainboard Layout
* When link to Line_Out jack, please use a speaker that with amplifier.
2 - 2
Page 13
Installation Procedures
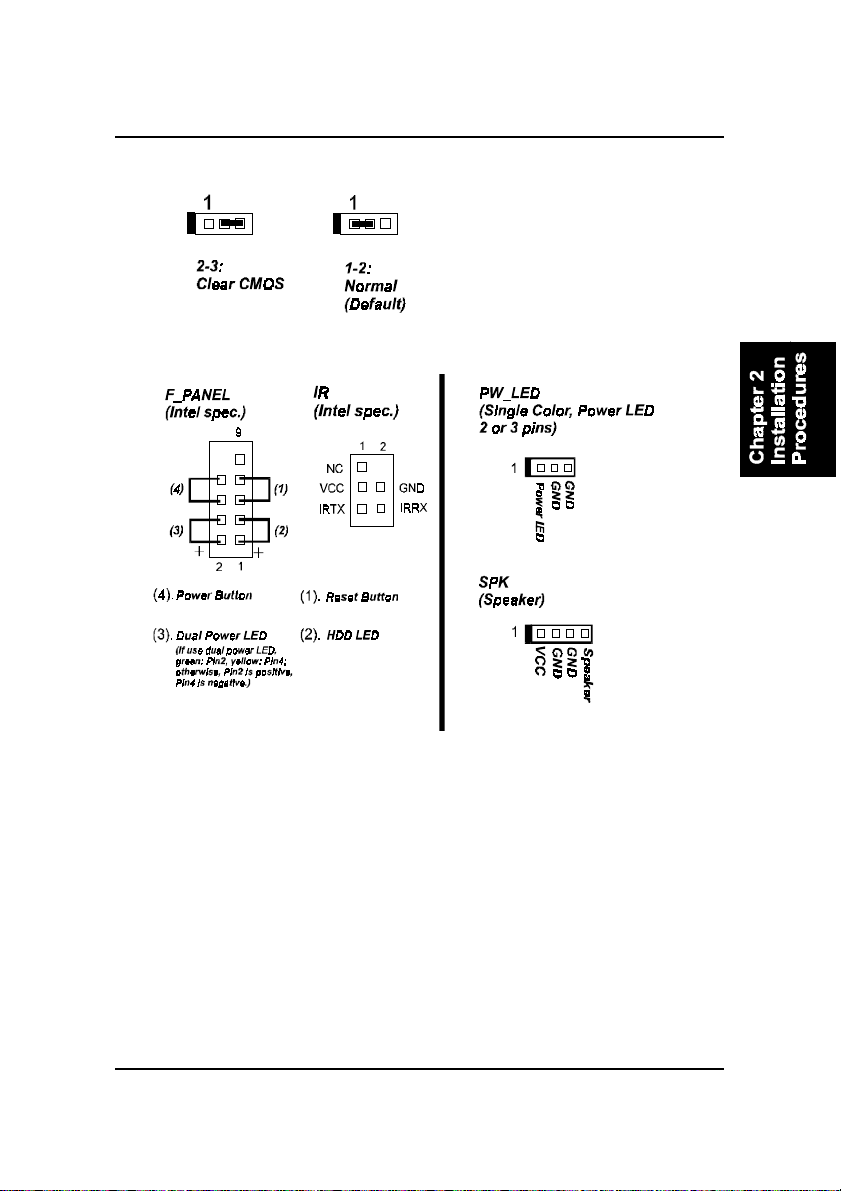
1). Clear CMOS
2). Front Panel Block Cable Connection
3). CPU Fan Installation
This connector is linked to the CPU fan. Without sufficient air circulation, the
CPU may overheat resulting in damage to both the CPU and the mainboard.
Damage may occur to the mainboard and/or the CPU fan if these pins are
used incorrectly. These are not jumpers, do not place jumper caps over these
pins.
2 - 3
Page 14
AU13 Mainboard Manual
1). Set System Jumpers
NOTE: Users are not encouraged to change the jumper settings
not listed in this manual. Changing the jumper settings improperly
may adversely affect system performance.
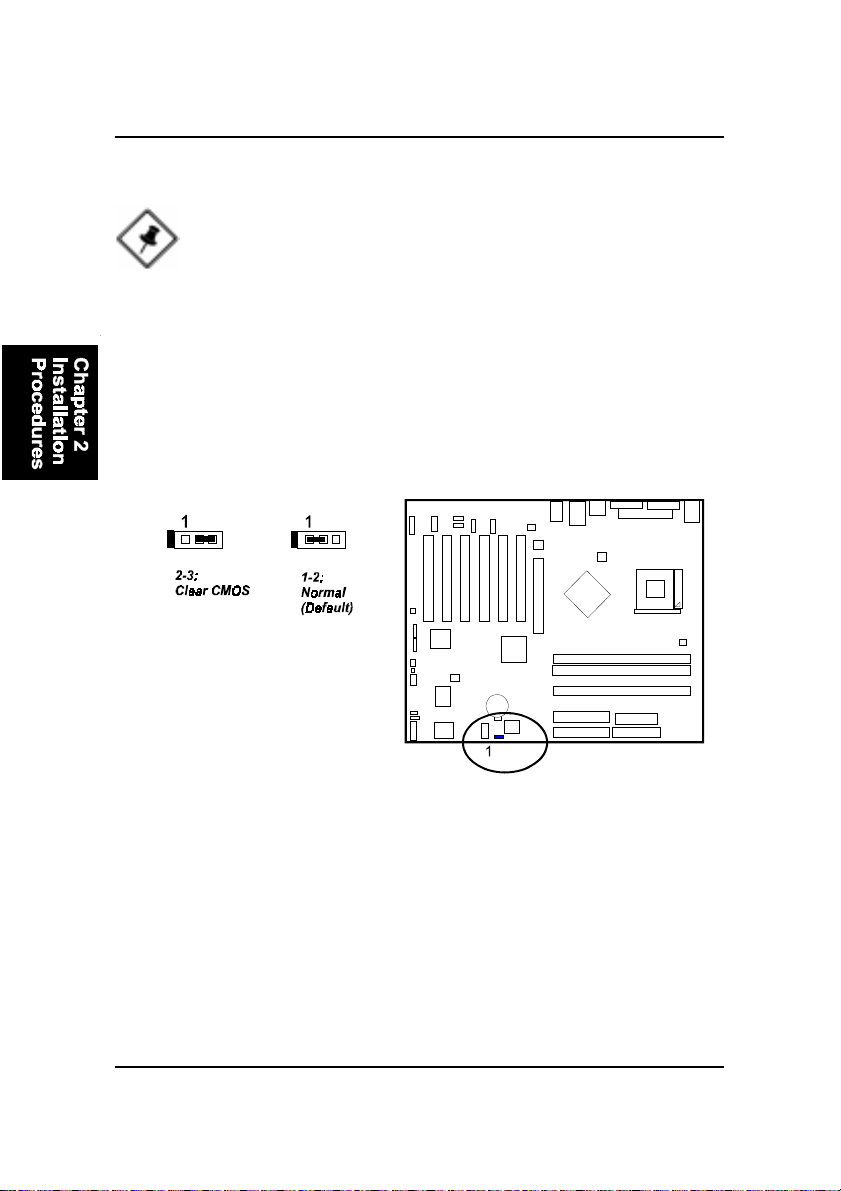
Clear CMOS: CLR_CMOS
(1) Turn off your computer
(2) Place the jumper cap onto the pinpair 2-3 at least 6 seconds to clear CMOS
(3) Place the jumper cap onto the pinpair 1-2 to Normal
(4) Turn on your computer until CMOS checksum error appears
(5) Hold down the Delete key when boots
(6) Enter the BIOS Setup to re-enter user preferences, save it and exit.
2). Install Memory Modules
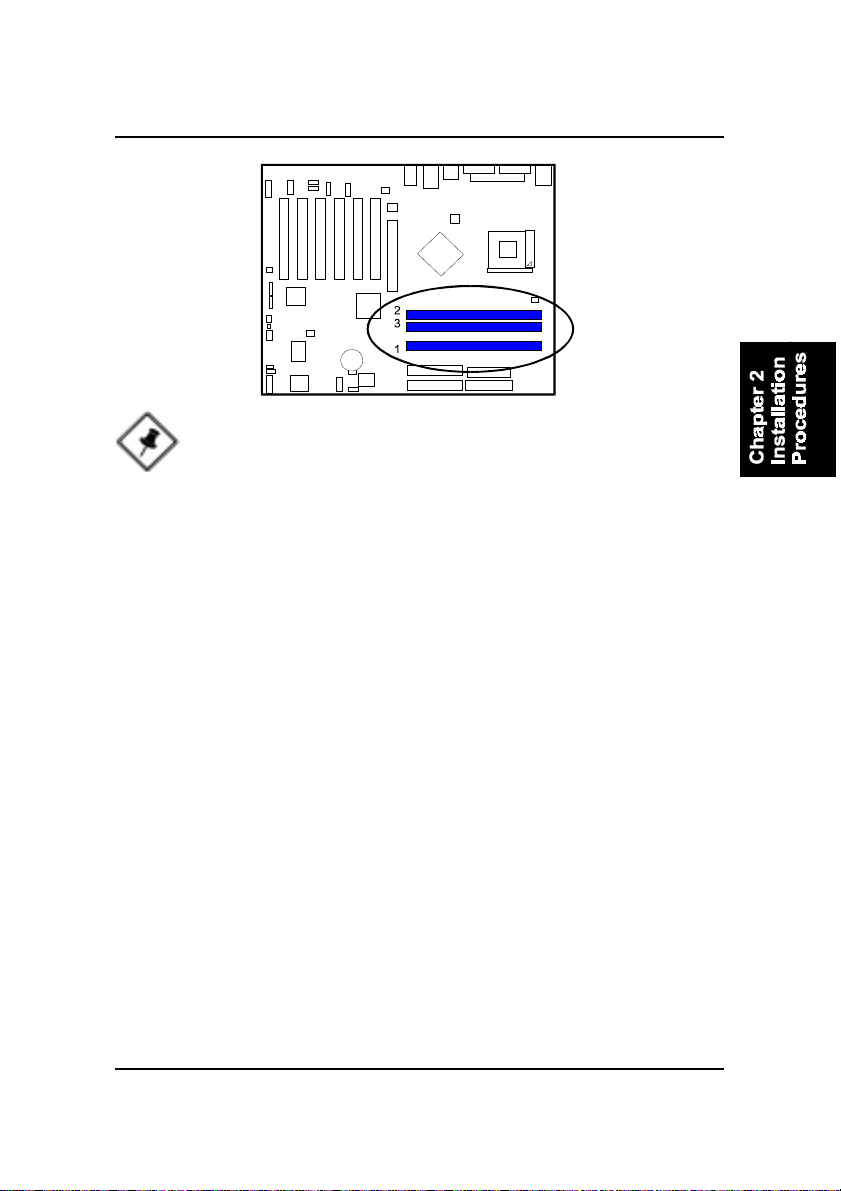
1. Locate DDR DIMM sockets on the mainboard.
2. Install DDR DIMM straight down into the socket 1 using both hands,
then socket 2, and so forth.
3. The clip on both ends of the socket will close up to hold the DDR DIMM
in place when the DDR DIMM reaches the socket bottom.
2 - 4
Page 15
Installation Procedures
NOTE: For better system performance, it is suggested that DIMM
installing starts from DIMM Socket 1.
Press the clips with both hands to remove the DIMM.
3). Install the CPU
The mainboard has built-in Switching Voltage Regulator to support CPU Vcore
autodetection. That is, It has the ability to detect and recognize the CPU
voltage, clock, ratio and enables users to set up the CPU frequency from the
BIOS Setup Screen. Users can adjust the frequency through Frequency /
Voltage Control of the BIOS Setup Screen.
2 - 5
Page 16
AU13 Mainboard Manual
When you install the CPU on this mainboard, please use a power supply that
designed and manufactured only for your CPUs use. Your CPU fansink com-
bined with its retention module must be completely closed and firmly attached
on the top of the processor.
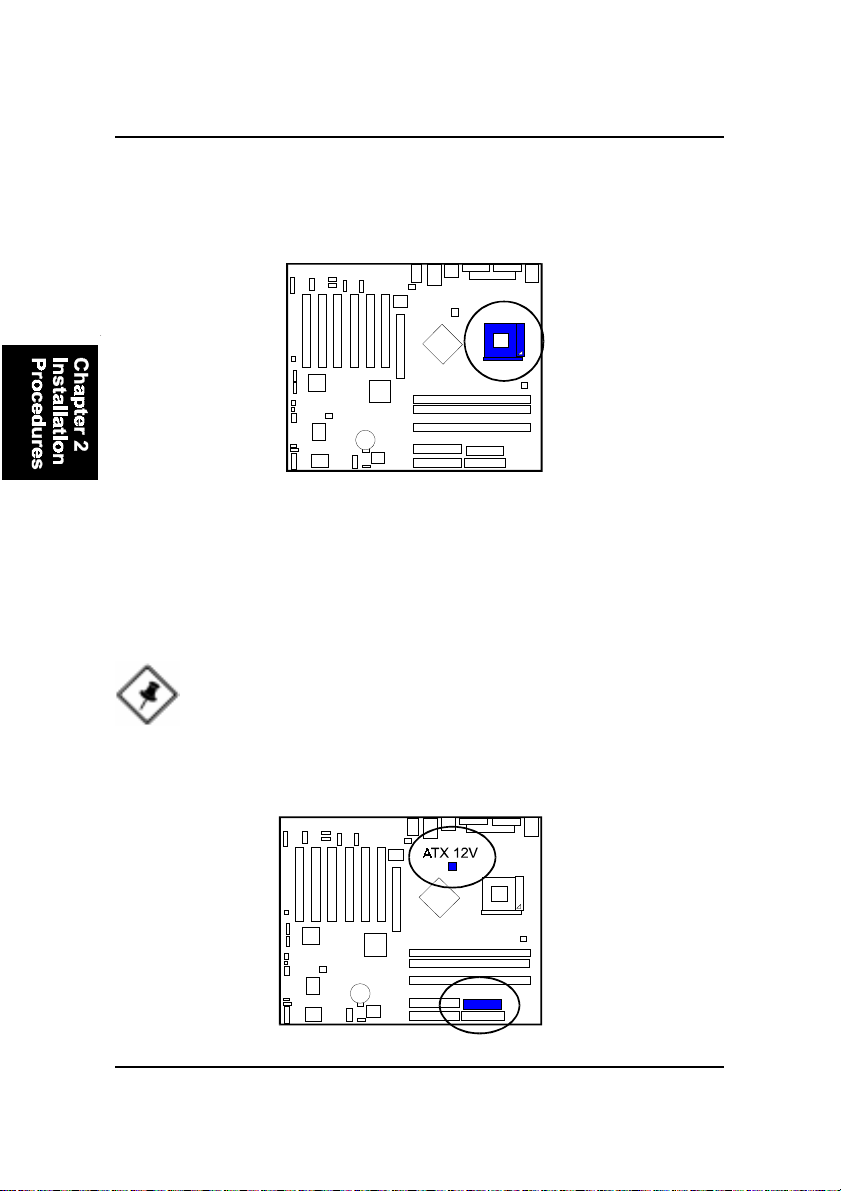
To install the CPU, do the following:
1. Lift the lever on the side of the CPU socket.
2. Handle the chip by its edges and try not to touch any of the pins.
3. Place the CPU in the socket. Do not force the chip. The CPU should slide
easily into the socket.
4. Swing the lever to the down position to lock the CPU in place.
5. Place the cooling fan with heatsink on top of the installed CPU.
NOTE: Users The CPU installing procedures should be:
1. Insert the CPU (with its fansink and retention module) on the
socket.
2. Connect the 4-pin plug of the ATX_12V power supply.
3. Connect the 20-pin plug of ATX_PWR power supply.
To remove the processor, please do it in reverse order.
2 - 6
Page 17
Installation Procedures
CPU Overheating Protection
This board has CPU Overheating Protection when the temperature of CPU is
overheating. This board supports automatically shutdown (to remove power)
circuit when the CPU has reached the temperature of approximately 110oC.
Meanwhile the speaker will sustained beep and the system will not be to power
on. This protection is designed by hardware, you do not need to do the BIOS
setup.
To power on your system normally, we recommend you to confirm the follow-
ing steps:
Step1: Unplug in the ATX power core (or turn off ATX power
supply switch).
Step2: Please wait the beep to stop then plug in the ATX power
cord again (or turn on ATX power switch) to turn on your
system.
NOTE: The CPU Overheating Protection will function only when
CPU has thermal diode design.
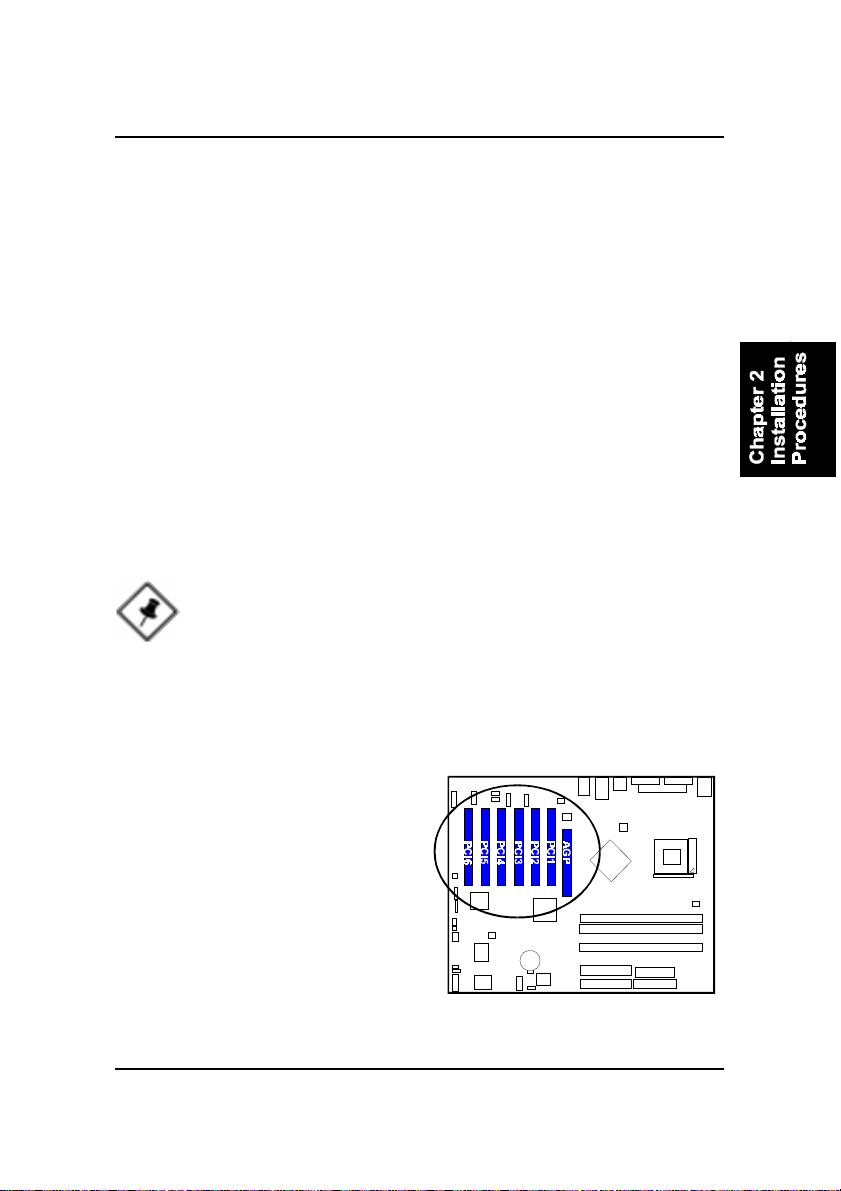
4). Install Expansion Cards
This section describes how to connect
an expansion card to one of your sys-
tem expansion slots. Expansion cards are
printed circuit boards that, when con-
nected to the mainboard, increase the
capabilities of your system. For example,
expansion cards can provide video and
sound capabilities. The mainboard fea-
tures one AGP and six PCI bus expan-
sion slots.
2 - 7
Page 18
AU13 Mainboard Manual
CAUTION: Make sure to unplug the power supply when adding or
removing expansion cards or other system components. Failure to
do so may cause severe damage to both the mainboard and expansion cards.
Always observe static electricity precautions.
Please read Handling Precautions at the start of this manual.
To install an expansion card, follow the steps below:
1. Remove the computer chassis cover and select an empty expansion
slot.
2. Remove the corresponding slot cover from the computer chassis.
Unscrew the mounting screw that secures the slot cover and pull
the slot cover out from the computer chassis. Keep the slot cover
mounting screw nearby.
3. Holding the edge of the peripheral card, carefully align the edge
connector with the expansion slot.
4. Push the card firmly into the slot. Push down on one end of the
expansion card, then the other. Use this rocking motion until the
addon card is firmly seated inside the expansion slot.
5. Secure the board with the mounting screw removed in Step 2. Make
sure that the card has been placed evenly and completely into the
expansion slot.
6. Replace the computer system cover.
7. Setup the BIOS if necessary.
8. Install the necessary software drivers for the expansion card.
2 - 8
Page 19
Installation Procedures
5). Connect Devices
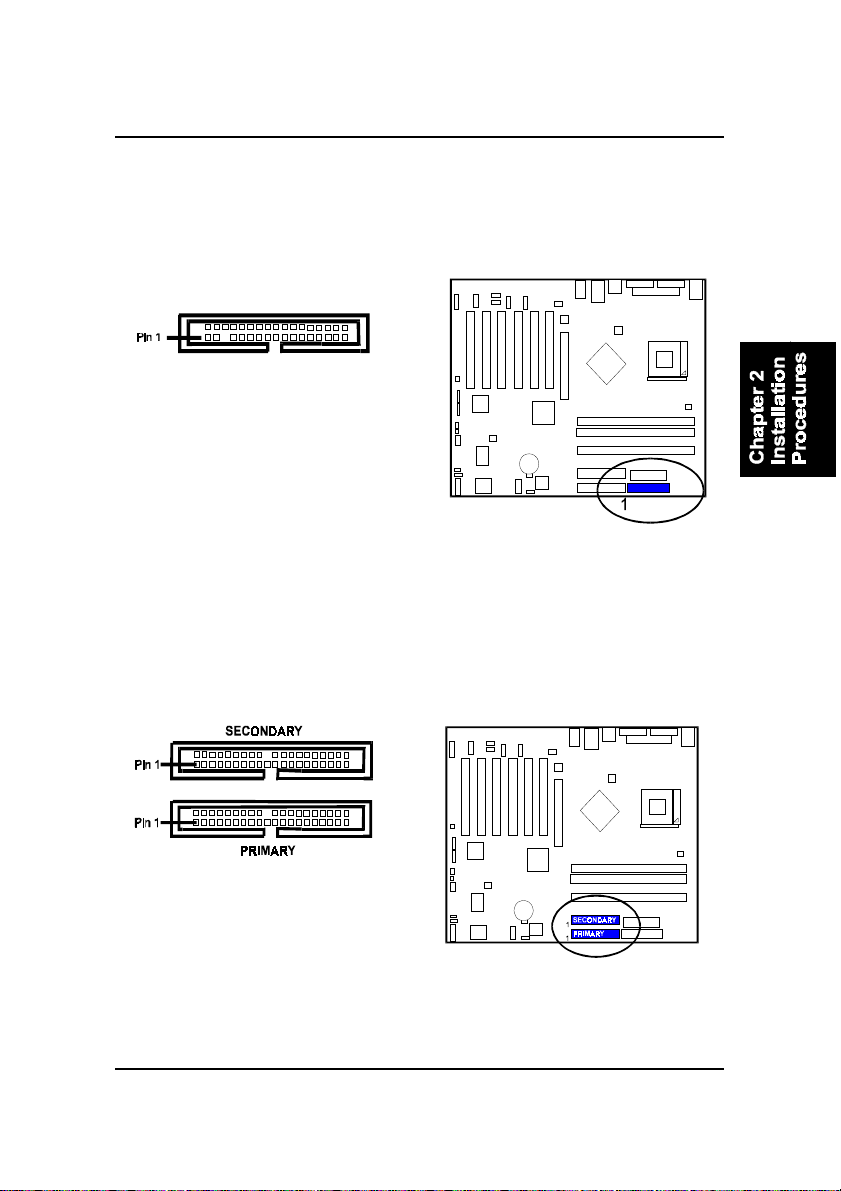
Floppy Diskette Drive Connector
This connector provides the connection with your floppy disk drive.
The red stripe of the ribbon cable must be the same side with the Pin 1.
IDE Device Connectors
The two connectors, PRIMARY and SECONDARY, are used for your IDE hard
disk drives, CD drives, LS-120|drives, or IDE ZIP drives. The red stripe of the
ribbon cable must be the same side with the Pin 1.
2 - 9
Page 20
AU13 Mainboard Manual
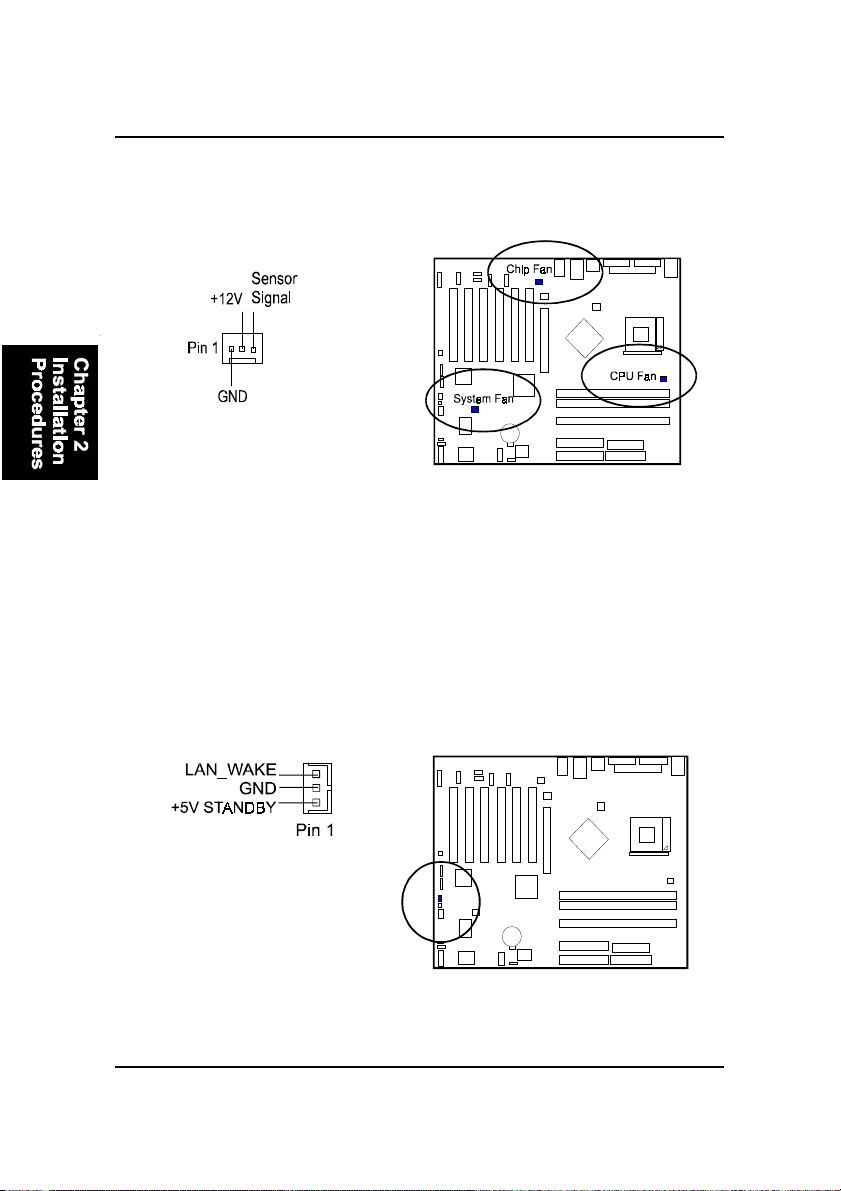
Fan Connectors
The two connectors, CPU Fan and System Fan are linked to the CPU fan, case
fan, respectively. Chip Fan is connnected with the cooling fan of North Bridge.
Wake-On-Lan Connector
This 3-pin connector is reserved for an NIC (Network Interface Card) to wake
the system from power saving mode.
2 - 10
Page 21
Installation Procedures
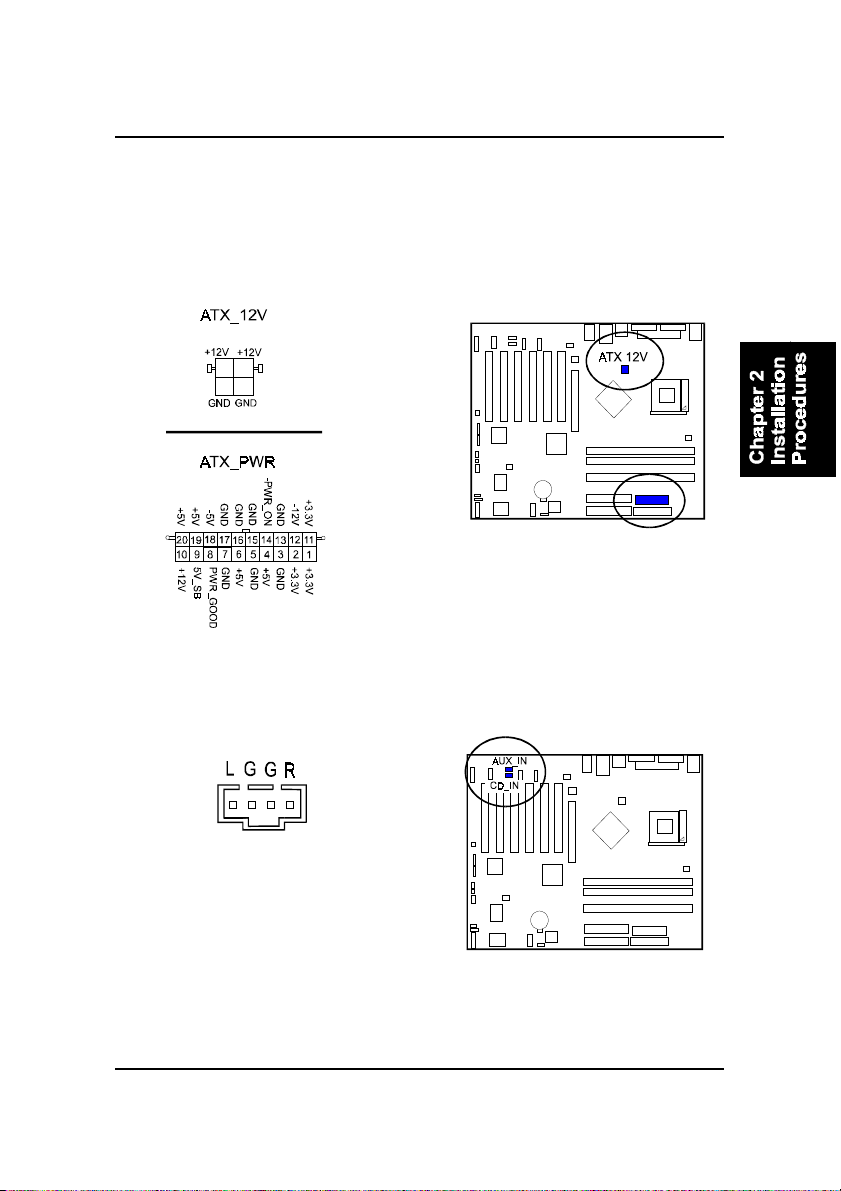
Power Connectors
The 20-pin male block connector is connected to the ATX power supply. The
4-pin male block connector is for the ATX_12V power use. All two connectors
are linked with your ATX power supply. The plug from the power supply will
only insert in one orientation because of the different hole sizes. Find the
proper orientation and push down firmly making sure that the pins are aligned.
CD Audio-In Connectors
The connectors, CD_IN and AUX_IN, are for CD-ROM drive audio analog
input use.
2 - 11
Page 22
AU13 Mainboard Manual
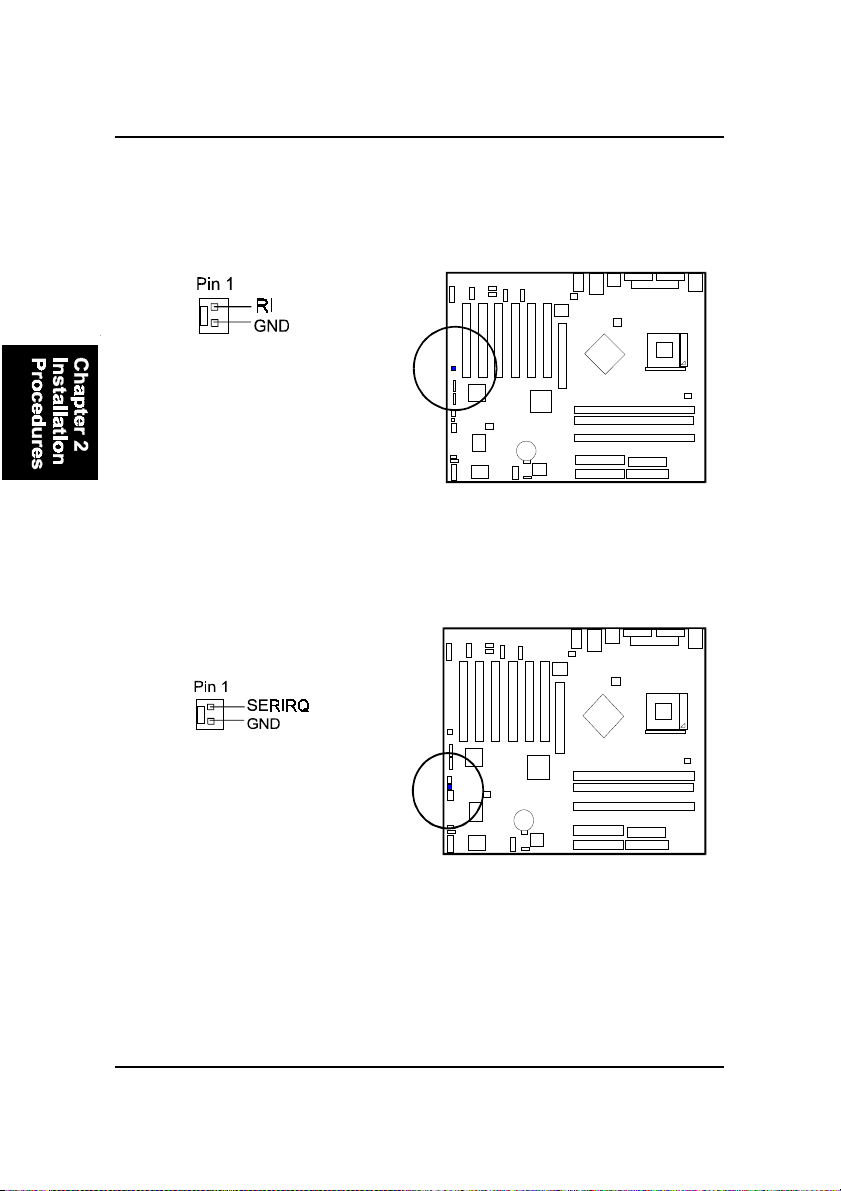
Wake-On-Ring Connector
The 2-pin connector allows you to link with your modem card which outputs
a WOR singal; the system can be turned on from the power-off status by a
remote phone call via the modem card.
SIRQ Connector
The 2-pin connector provides with a connection for some add-on cards that
require a serial IRQ linkage to the mainboard for the system operation use.
Serial ATA Connectors
The 2 optional connectors provide you with the connection two serial
ATA devices that confirm to the Serial ATA specification. Serial ATA sup-
ports all ATA and ATAPI devices, including high capacity removable devices,
optical devices, tape storage devices, and zip devices. The connectors also
allows two RAID hard disks for level 0 and 1 RAID functions.
2 - 12
Page 23
Installation Procedures
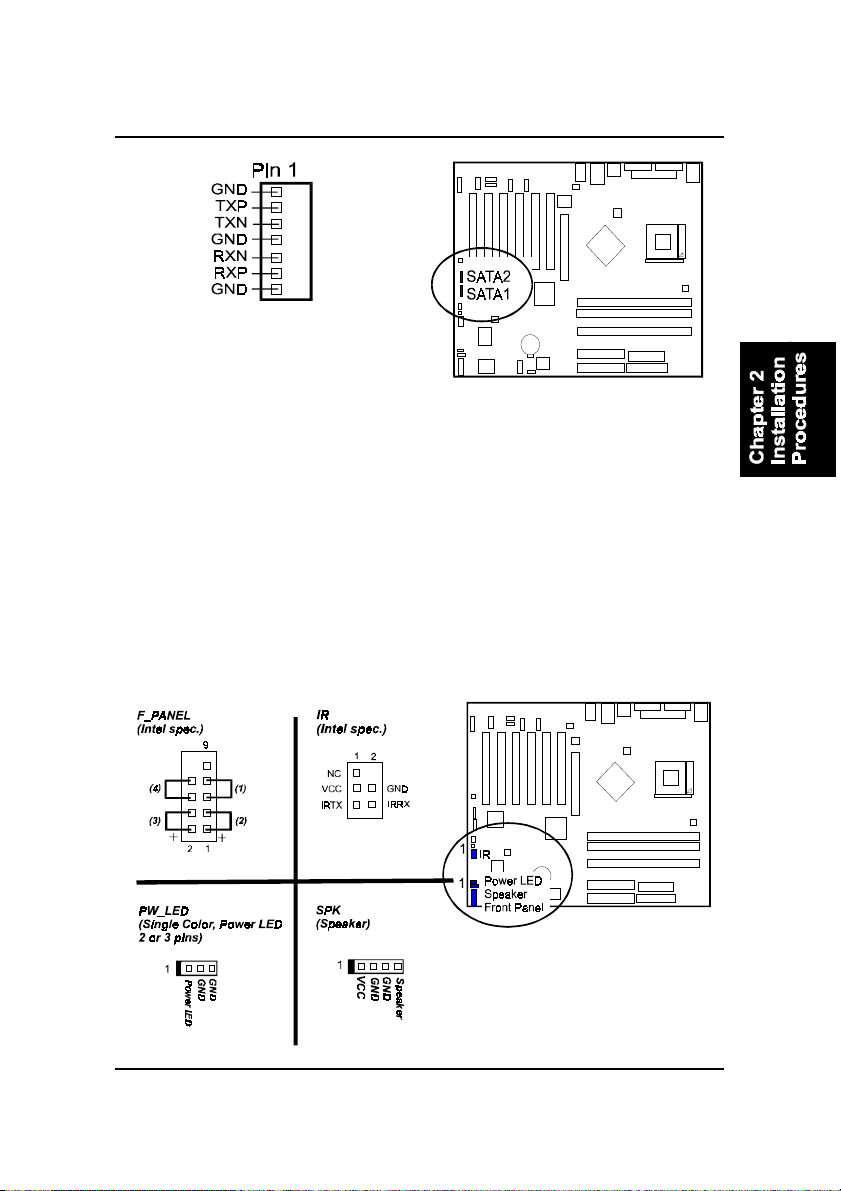
Front Panel Block and IR Connector
This block connector includes the connectors for linking with Power LED (2
pins or 3 pins), HDD LED, power/sleep button, power/sleep LED, reset button
on the front panel of the system case. Please identify polarities of plug wires
for the case speaker and LEDs. Please ask vendor about this information when
you buy them and install the system by yourself. The plug wires polarities of
these buttons will not affect the function.
2 - 13
Page 24
AU13 Mainboard Manual
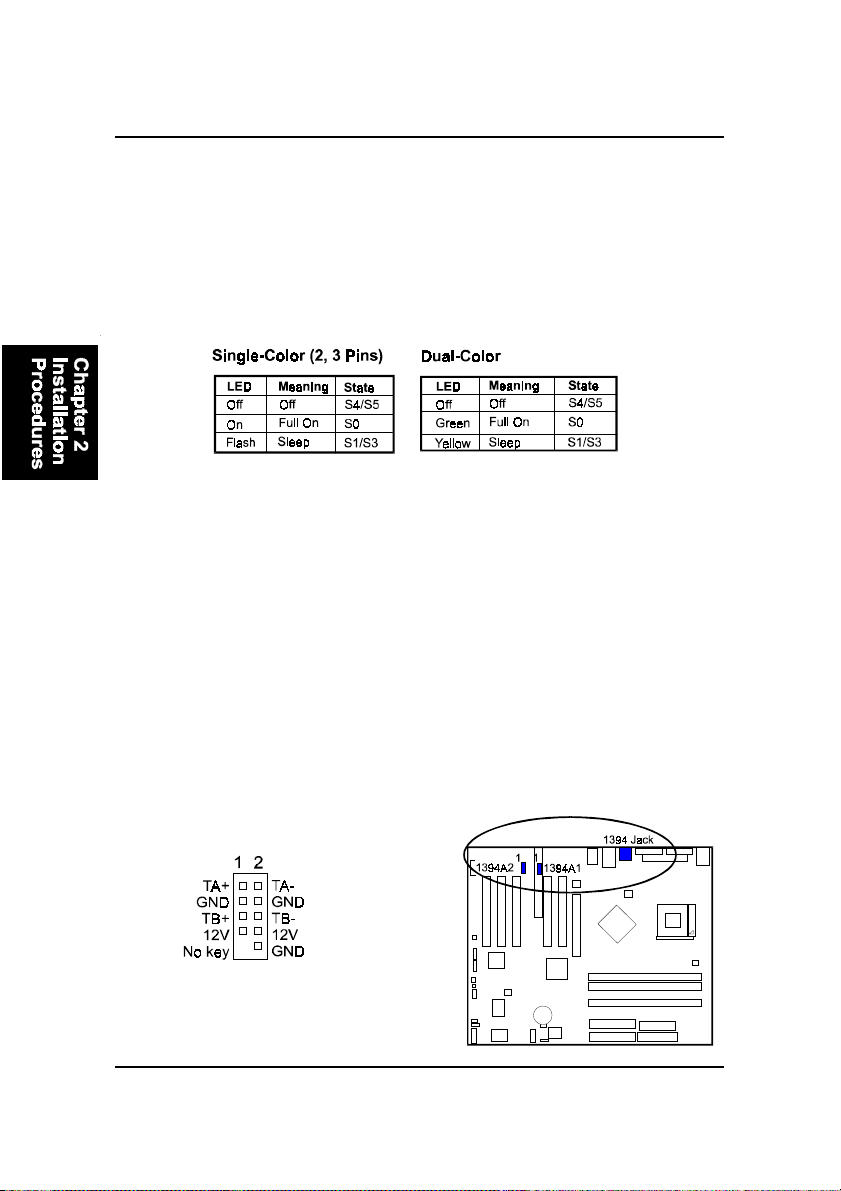
(1) Reset Switch is connected to the reset button. Push this switch to reboot
the system instead of turning the power button off and on.
(2) HDD LED is connected to the IDE device indicator. This LED will blink
when the hard disk drives are activated.
(3) Power /Sleep LED (2-Pin/3-Pin)
Please refer to the tables below for the representations of LED states.
(4) Power Button is connected with power button. Push this switch allows the
system to be turned on and off rather than using the power supply button.
IR is a pinheader that is used for linking with your ID device to allow transmis-
sion of data to another system that also supports the IR feature.
Speaker is a pinheader for connecting to speaker.
IEEE 1394 Connectors
400Mbps 1394a (FireWire) Connectors1394A1 with 1394A2 (via 1394 power
cable and data cable) plus one 1394 jack enable you to connect with external
IEEE 1394 devices that conform to the IEEE 1394 specification.
2 - 14
Page 25
Installation Procedures
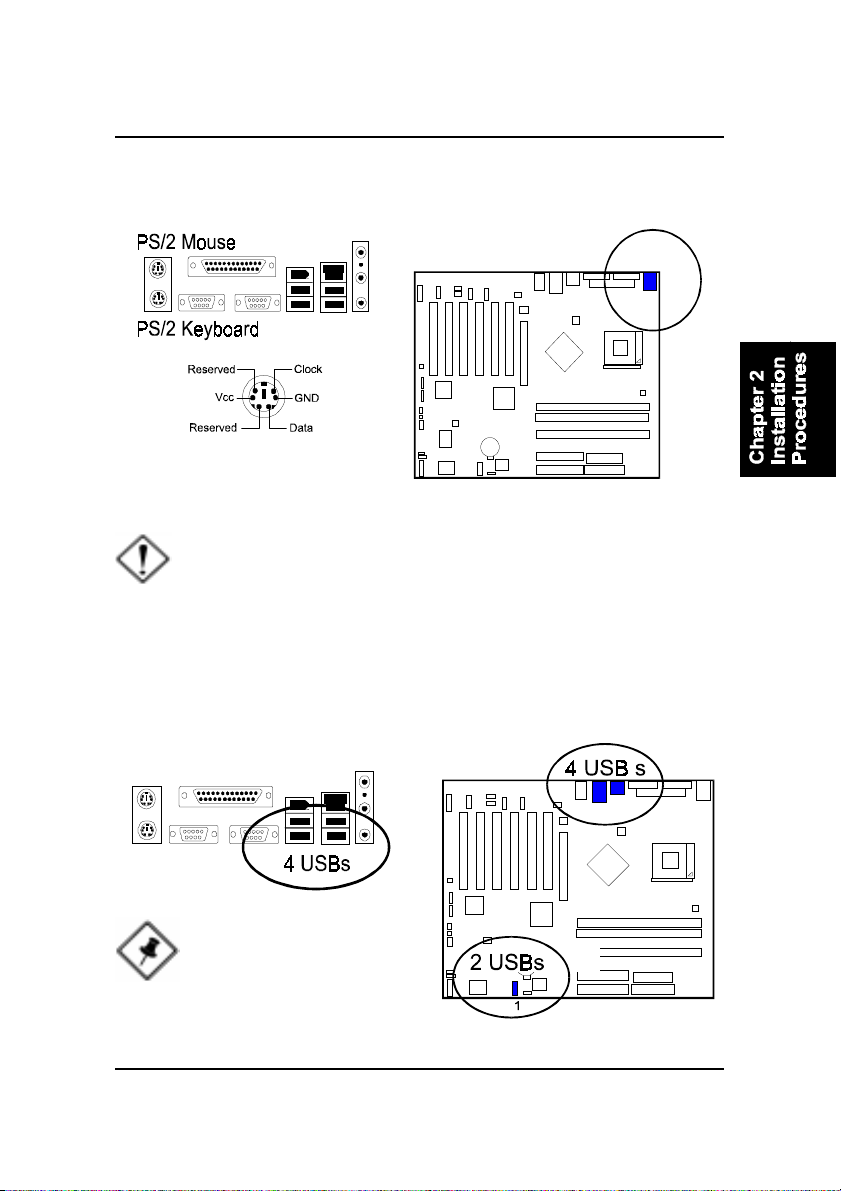
PS/2 Keyboard and Mouse Connector
These two 6-pin female (PS/2 keyboard is purple color and PS/2 mouse is green
color) connectors are used for your PS/2 keyboard and PS/2 mouse.
CAUTION:
Please make sure the USB cable has the same pin assignment.
The different pin assignment may be caused damage of system.
If you need the USB cable, please contact our retailer.
Universal Serial Bus Connectors
These four black connectors integrated on the edge of the board are used for
linking with USB2.0 peripheral devices. This board also provides a connector
USB4/5 for linking with the two extra USB2.0 ports (pinheader). They can link
with front panels of some system cases.
NOTE: Please make sure the
USB cable has the same pin
assignment. The different pin
assignment may be caused
damage of system.If you need
the USB cable, please contact our retailer.
2 - 15
Page 26
AU13 Mainboard Manual
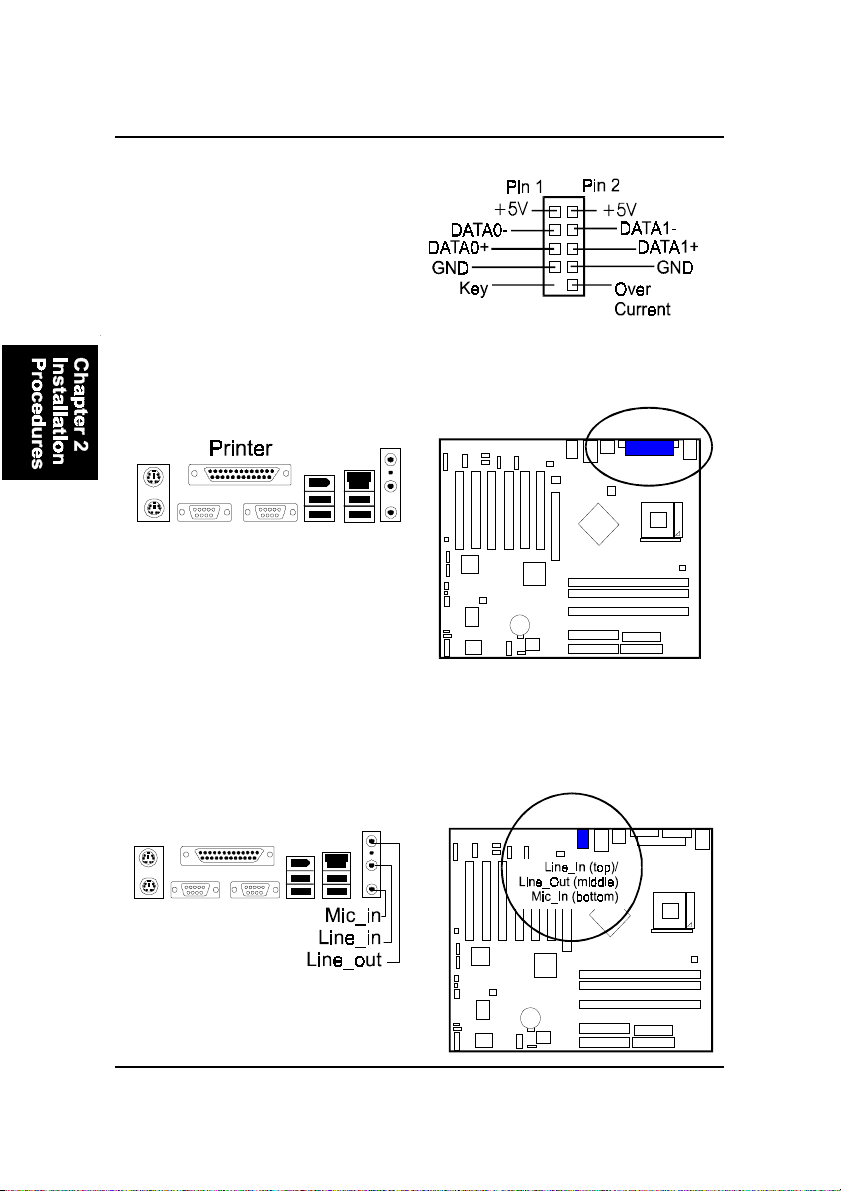
The figure below is the pin assignment
of the USB4/5.
Printer Connector
This 25-pin D-Sub female burgundy-colored connector is attached to your
printer.
Audio I/O Jacks
LINE_OUT (lime) can be connected to headphones or preferably powered
speakers. LINE_IN (light blue) allows tape players or other audio sources to
be recorded by your computer or played through the LINE_OUT. MIC_IN
(pink) allows microphones to be connected for voice input. The mainboard
also has a front panel audio connector (Intel spec.), F_AUDIO, with an op-
tional cable.
2 - 16
Page 27
Installation Procedures
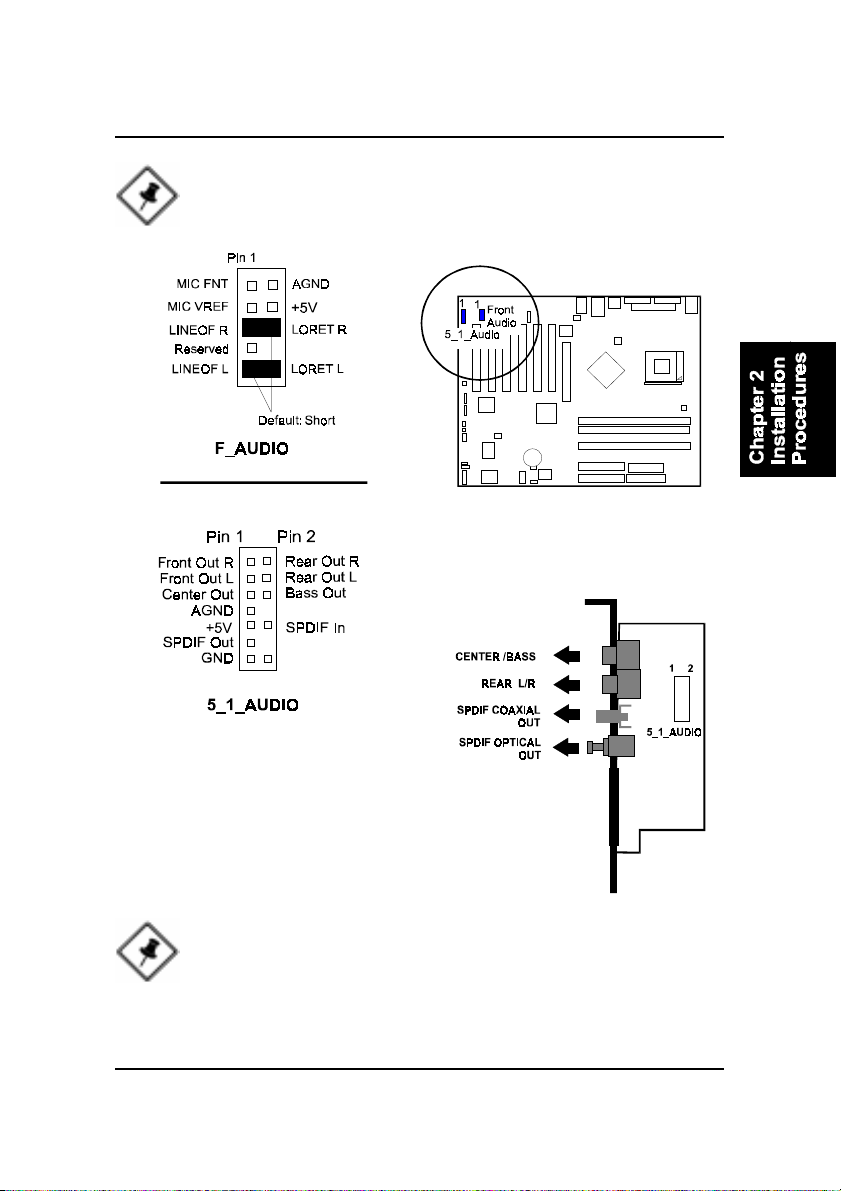
NOTE: If you do not use F_AUDIO, please keep the pinpair 5-6, 9-10
short as default; also, when the front headphone is plugged in, the
rear audio output will be disabled.
The mainboard 5.1 audio feature is used
with an optional A73 audio bracket.
When use this bracket, plug in the
LINE_OUT jack for the front speaker
audio output. If do not have A73,
LINE_IN, LINE_OUT, MICROPHONE
jack can be used as the 5.1-channel audio output.
NOTE: In 5.1-Channel audio mode, the Mic-In is dedicated for front
panel used, and rear panel Mic-In function will switch to Center and
subwoofer support.
2 - 17
Page 28
AU13 Mainboard Manual
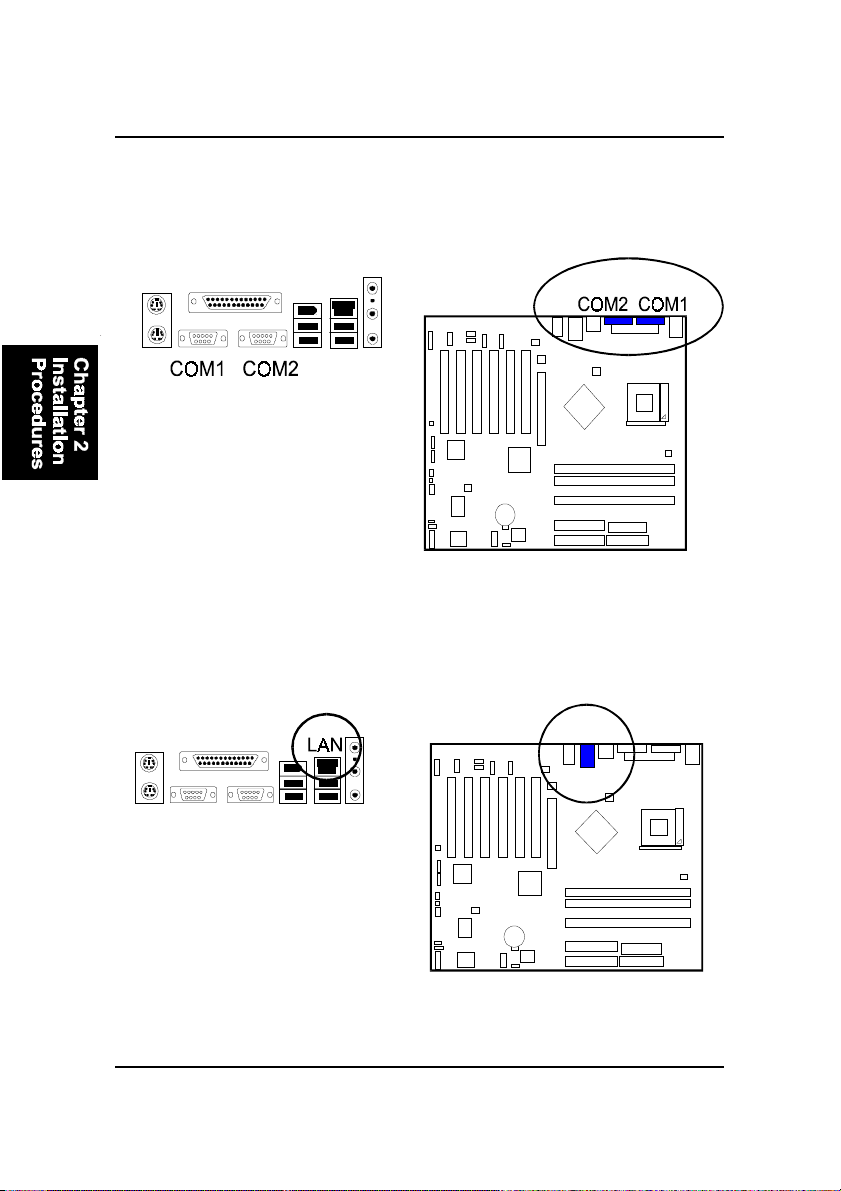
Serial Port Connectors
COM1 (9-pin D-sub male connector with teal color) and COM2 (9-pin D-sub
teal male connector with teal color) allow you to connect with your devices
that use serial ports, such as a serial mouse or an external modem.
LAN Connector (optional)
The RJ45 LAN jack is used for the LAN cable plug.
2 - 18
Page 29
BIOS Setup
Chapter 3
BIOS Setup
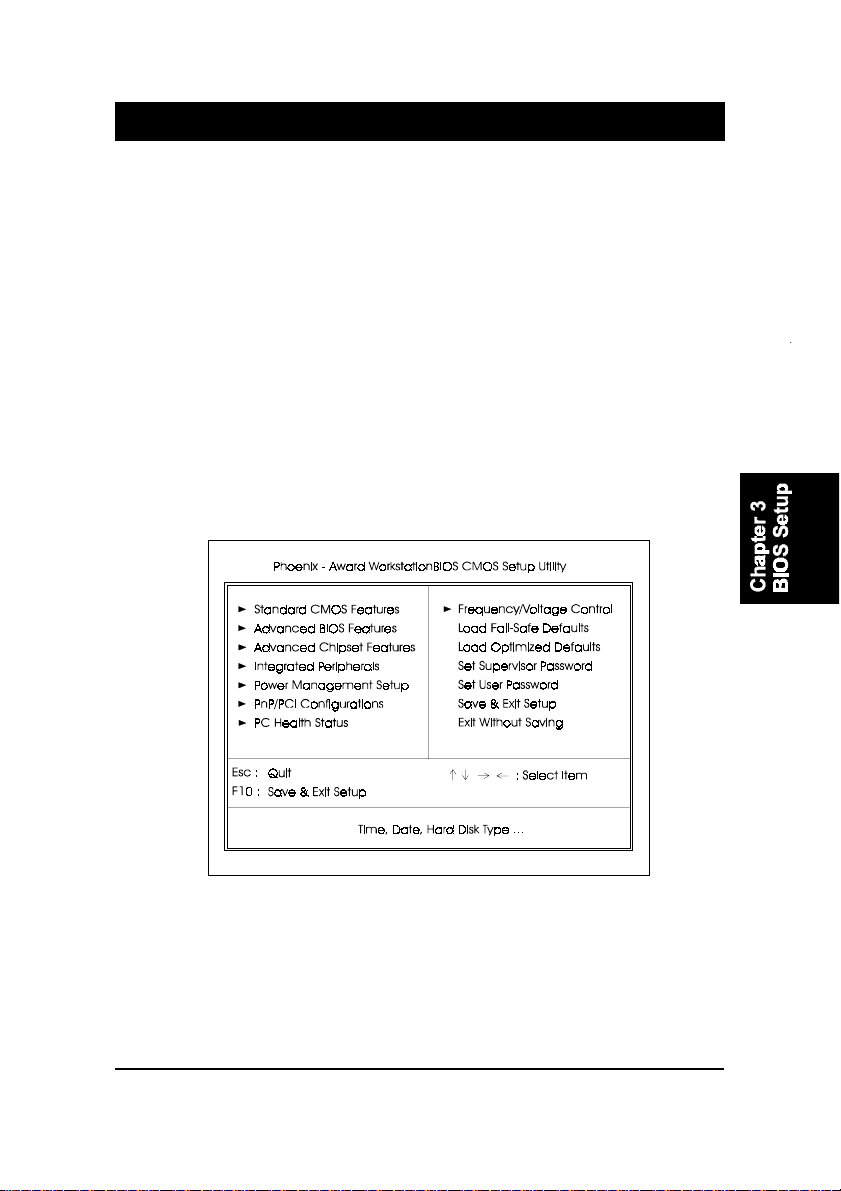
The mainboard comes with the chip that Award BIOS that contains the ROM
Setup information of your system. (This chip serves as an interface between
the processor and the rest of the mainboard components.) This section ex-
plains the information contained in the Setup program and tells you how to
modify the settings according to your system configuration.
CMOS Setup Utility
The Setup utility program allows updates to the mainboard configuration set-
tings. The BIOS setup values will be saved in the CMOS. It is executed when
the user changes system configuration; user changes system backup battery;
or the system detects a configuration error and asks the user to run the Setup
program. Use the arrow keys to select and press Enter to run the selected
program.
3 - 1
Page 30
AU13 Mainboard Manual
Standard CMOS Setup
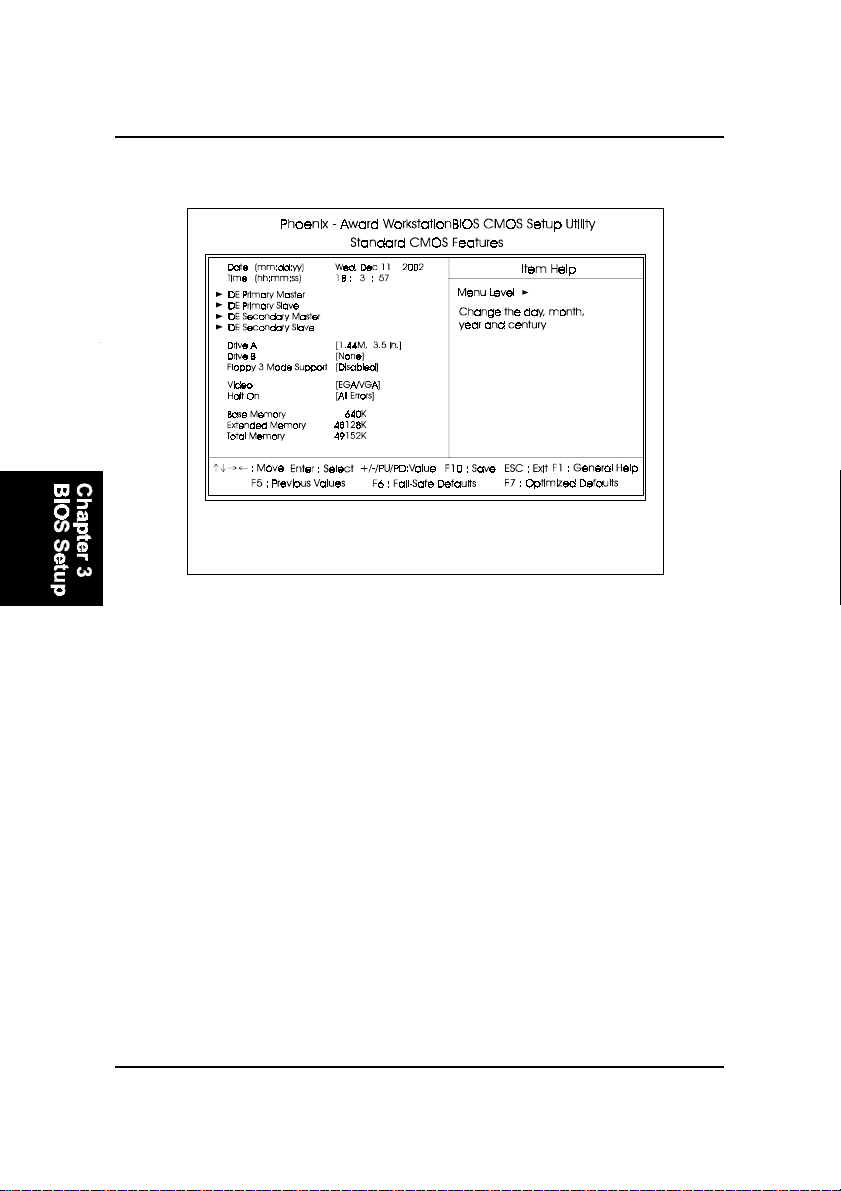
The Standard CMOS Setup screen is displayed above. Each item may have
one or more option settings. The system BIOS automatically detects memory
size, thus no changes are necessary. Use the arrow keys to highlight the item
and then use PgUp or PgDn keys to select the value you want in each item.
Date
To set the date, highlight the Date field and then press Page Up/Page
Down or +/- keys to set the current date. Follow the month, day and year
format.
Time
To set the time, highlight the Time field and then press Page Up/Page Down
or +/- keys to set the current time. Follow the hour, minute, and second
format.
3 - 2
Page 31

BIOS Setup
Hard Disks
This field records the specifications for all non-SCSI hard drives installed
in the system. The onboard PCI IDE connectors provide Primary and Sec-
ondary channels for connecting up to four IDE hard disks or other IDE
devices. Each channel can support up to two hard disks, the first of which
is the Master and the second is the Slave.
Hard Disk Configurations
Capacity: The hard disk size. The unit is Bytes.
Cylinder: The cylinder number of the hard disk.
Head: The read/write head number of hard disk.
Precomp: The cylinder number at which the disk drive
changes the write current.
Landing Zone: The cylinder number that the disk drive heads
(read/write) are seated when the disk drive is
parked.
Sector: The sector number of each track defined on the
hard disk.
Drive A / Drive B
This field records the types of floppy drives installed in the system. To
enter the configuration value for a particular drive, highlight its corre-
sponding field and then select the drive type using the left- or right-arrow
key.
Floppy 3 Mode Support
This is a Japanese standard floppy type drive. The standard stores 1.2MB
in a 3.5 inch diskette.
Video
Set this field to the type of video display card installed in the system.
Halt On
This field determines which types of errors will cause the system to halt.
3 - 3
Page 32
AU13 Mainboard Manual
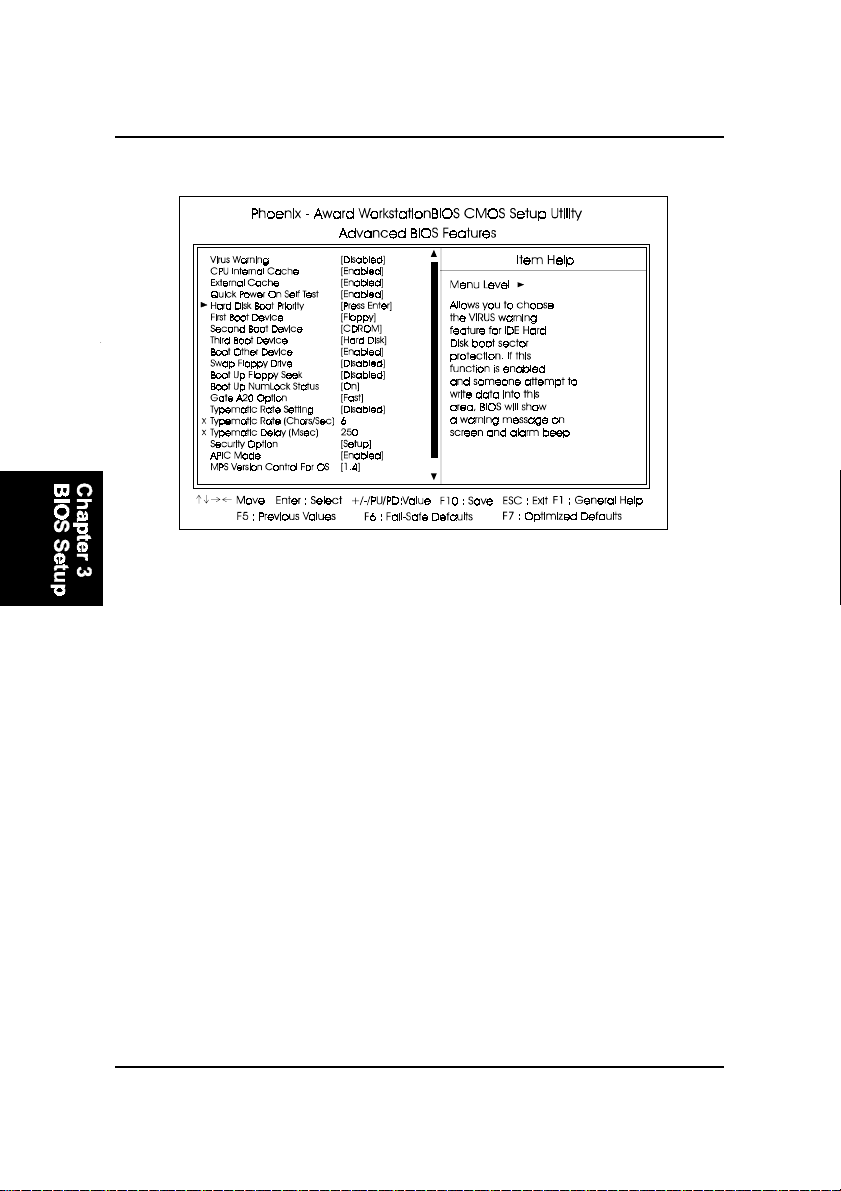
Advanced BIOS Features
Virus Warning
This feature starts the virus scan tool to detect if boot virus in boot sector
of the first hard disk drive when booting up.
The options are: Enabled, Disabled.
CPU Internal Cache
This controls the status of the processors internal cache area. The de-
fault is Enabled. The options are: Enabled, Disabled.
External Cache
This controls the status of the external (L2) cache area. The default is
Enabled. The options are: Enabled, Disabled.
Quick Power On Self T est
When enabled, allows the BIOS to bypass the extensive memory test.
The options are: Enabled, Disabled.
Hard Disk Boot Priority
This feature will auto detect all hard disks of bootable device on the sys-
tem. It also allows users to select hard disk device booting priority.
3 - 4
Page 33

BIOS Setup
First/Second/Third Boot Device
This feature allows user to select the boot device priority. The options are:
Floppy, LS120, Hard Disk, CDROM, ZIP100, USB-FDD, USB-ZIP, USB-
CDROM, USB-HDD, LAN, Disabled.
Boot Other Device
This feature allows user to select the boot device priority.
The options are: Enabled, Disabled.
Swap Floppy Drive
Allows you to switch the order in which the operating system accesses
the floppy drives during boot up.
The options are: Enabled, Disabled.
Boot Up Floppy Seek
When enabled, assigns the BIOS to perform floppy diskette drive tests by
issuing the time-consuming seek commands.
The options are: Enabled, Disabled.
Boot Up Numlock Status
When set to On, allows the BIOS to automatically enable the Num Lock
Function when the system boots up. The options are: On, Off.
Gate A20 Option
When set at Fast, allows a faster access response under Protected mode.
The options are: Fast, Normal.
Typematic Rate Setting
The term typematic means that when a keyboard key is held down, the
character is repeatedly entered until the key is released.
The options are: Disabled, Enabled.
Typematic Rate (Chars/Sec)
This feature is available only if the above item, Typematic Rate Setting, is
set at Enabled. Sets the rate of a character repeat when the key is held
down. The options are: 6, 8, 10, 12, 15, 20, 24, 30.
3 - 5
Page 34
AU13 Mainboard Manual
Typematic Delay (Msec)
This feature is available only if the item, Typematic Rate Setting, is set at
Enabled. Sets the delay time before a character is repeated.
The options are: 250, 500, 750, 1000 millisecond.
Security Option
Allows to set the security level of the system.The options: Setup, System.
APIC Mode
Allows you to decide if the system enters the APIC (Advanced Program-
mable Interrupt Controller) mode or not for more IRQs can be released.
The options are: Enabled, Disabled.
MPS Version Control For OS
When two CPUs onboard (not this board) this feature allows you to select
MPS (Multi-Processor Spec.) version control for OS when logo test ex-
ecutes. The options are: 1.1, 1.4.
OS Select For DRAM > 64MB
If your operating system (OS) is OS/2, select the option OS2. Otherwise,
stay with the default setting Non-OS2.The options are: Non-OS2, OS2.
HDD S.M.A.R.T . Capability
S.M.A.R.T. stands for Self-Monitoring and Analysis Reporting Technol-
ogy which allows your hard disk drive to report any read/write errors and
issues a warning with LDCM installed. The options: Disabled, Enabled.
BIOS Guardian
It allows the system to prevent computer viruses. Users will need to dis-
able it to update BIOS. The options are: Enabled, Disabled.
NOTE:
Please disable this BIOS feature before you start to reflash BIOS.
BIOS Guardian and Reflash BIOS
BIOS Guardian by default is enabled, thus effectively acts as a fire-
wall against viruses that can attack the BIOS while the system is
running. It must be disabled before reflash BIOS.
3 - 6
Page 35
BIOS Setup
The steps below show you how to off and on BIOS Guardian when
reflash BIOS:
1. Press Del key while booting. Go to CMOS Setup Utility menu.
2. Go to Advanced BIOS Features submenu.
3. Set the feature BIOS Guardian at Disabled.
4. Save the setting and exit. The system restarts.
5. POST screen holds. A message about BIOS Guardian shows.
6. Press Space bar.
7. Reflash BIOS. Restart the system after complete it.
8. POST screen holds. A message about BIOS Guardian shows.
9. Press G key. The feature BIOS Guardian will be enabled again.
Full Screen LOGO Show
It decides whether or not the full screen logo is shown during system
booting up. The options are: Enabled, Disabled.
NOTE:
1. LogoGenie supports Award BIOS only.
2. If you create a Logo file (.bmp) by LogoGenie, the file size must
||||be 640 x 464 x 256 colors.
To enable this utility, please proceed as follows:
1. Insert software CD. Select LogoGenie from the Menu
and follow the installation instructions.
2. After LogoGenie has been installed, go to Windows Start Box.
In Programs Menu, select LogoGenie, then select LogoGenie.
3. Press F1 to read Help file to understand how to use this software if
it is new to you.
3 - 7
Page 36
AU13 Mainboard Manual
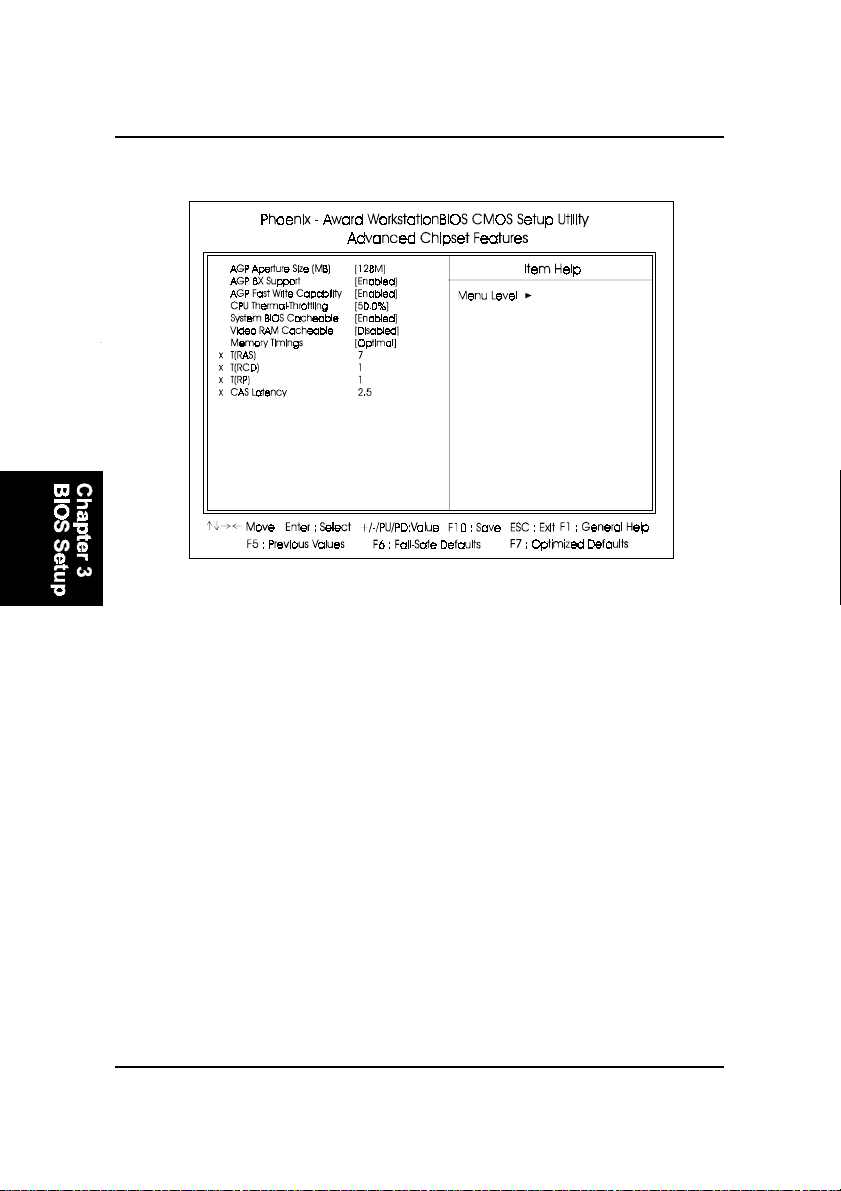
Advanced Chipset Features
AGP Aperture Size (MB)
This item defines the size of the aperture if you use an AGP graphics
adapter. It refers to a section of the PCI memory address range used for
graphics memory. The default is 64 MB.
Options: 32, 64, 128, 256, 512 MB.
AGP 8X Support
Enables AGP 8X supports. Options: Disabled, Enabled.
AGP Fast Write Capability
Enables Fast Write protocol for AGP cards. Options: Disabled, Enabled.
Memory Timings
For setting DRAM Timing. Options: Optimal, Aggressive, Expert.
CPU THRM-Throttling
This item sets the percentage of time that the CPU is idled if CPU throttling
is initiated by excess heat. The default setting is 50%.
Options: 12.5%, 25.0%, 37.5%, 50.0%, 62.5%, 75.0%, 87.5%.
3 - 8
Page 37

BIOS Setup
System BIOS Cacheable
This item allows the system to be cached in memory for faster execution.
The default is Enabled. The options are: Disabled, Enabled.
Video RAM Cacheable
This option allows the CPU to cache read/writes of the video RAM. The
default is Enabled. The options are: Disabled, Enabled.
Memory Timings
For setting DRAM Timing.
Options: Optimal, Aggressive, Expert.
T (RAS)
This item specifies the number of clock cycles needed after a bank active
command before a precharge can occur (sets the minimum RAS pulse
width.).
Options: 1 ~ 15.
T (RCD)
This item sets the timing parameters for the system memory such as the
CAS (Column Address Strobe) and RAS (Row Address Strobe).
Options: 1 ~ 7.
T (RP)
This item refers to the number of cycles required to return data to its
original location to close the bank or the number of cycles required to page
memory before the next bank activate command can be issued.
Options: 1 ~ 7.
CAS Latency
Enables you to select the CAS latency time. The value is set at the factory
depending on the DRAM installed. Do not change the values in this field
unless you change specifications of the installed DRAM.
Options: 2.0, 2.5, 3.0.
3 - 9
Page 38
AU13 Mainboard Manual
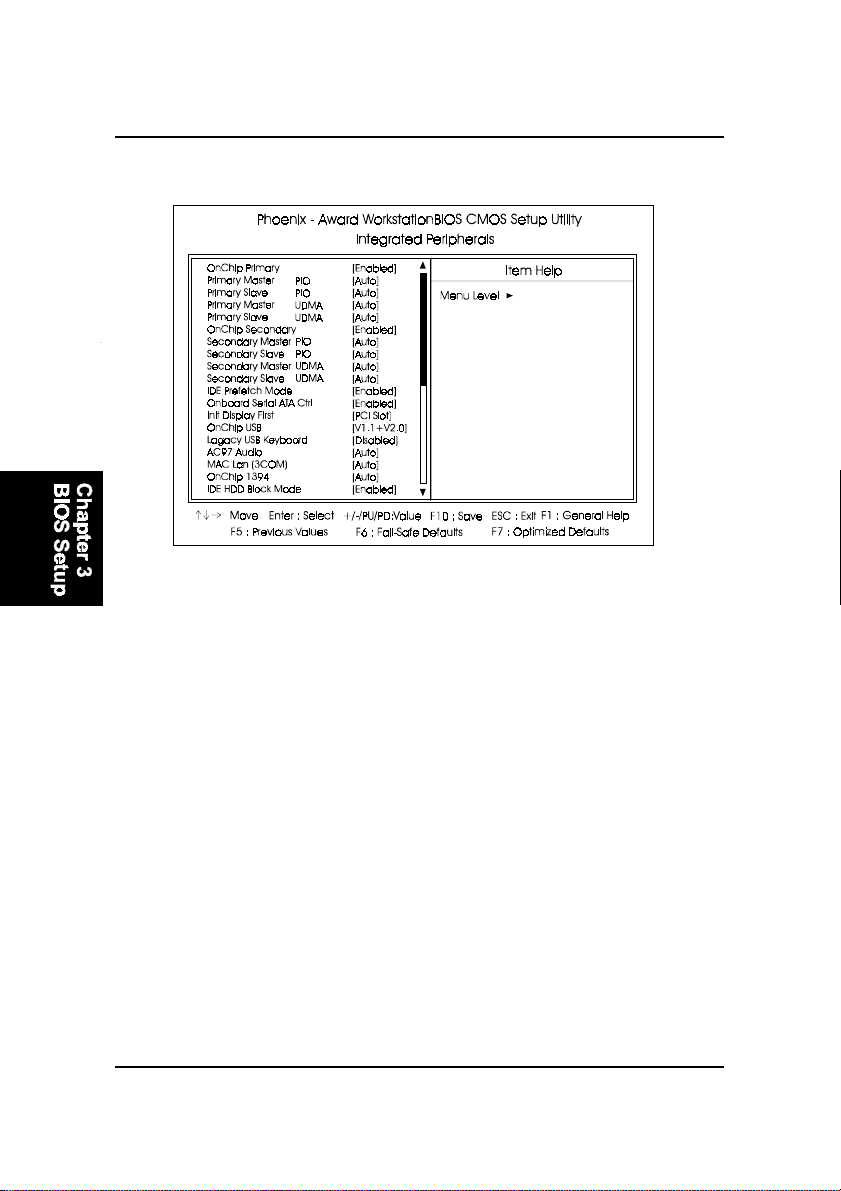
Integrated Peripherals
OnChip Primary PCI IDE
When enabled, it allows you to use the onboard primary PCI IDE.
The options are: Enabled, Disabled.
Primary Master/Slave PIO
Allows an automatic or a manual configuration of the PCI primary IDE
hard drive (master/slave) mode. The options are: Auto, Mode 0, Mode 1,
Mode 2, Mode 3, Mode 4.
Primary Master UDMA
Allows an automatic configuration of the PCI primary IDE hard drive
(master/slave) mode if Ultra DMA is supported both on the motherboard
and the hard disk. The options are: Auto, Disabled.
OnChip Secondary PCI IDE
When enabled, it allows you to use the onboard secondary PCI IDE.
The options are: Enabled, Disabled.
3 - 10
Page 39

BIOS Setup
Secondary Master/Slave PIO
Allows an automatic or a manual configuration of the PCI secondary IDE
hard drive (master/slave) mode. The options are: Auto, Mode 0, Mode 1,
Mode 2, Mode 3, Mode 4.
Secondary Master/Slave UDMA
Allows an automatic configuration of the PCI secondary IDE hard drive
(master/slave) mode if Ultra DMA is supported both on the motherboard
and the hard disk. The options are: Auto, Disabled.
IDE Prefetch Mode
Selecting Enabled reduces latency between each drive read/write cycle,
but may cause instability in IDE subsystems that cannot support such fast
performance. If you are getting disk drive errors, try setting this value to
Disabled. This field does not appear when the Internal PCI/IDE field,
above, is Disabled. The options are: Enabled, Disabled.
Init Display First
When you install an AGP VGA card and a PCI VGA card on the board, this
feature allows you to select the first initiation of the monitor display from
which card. The options are: PCI Slot, AGP.
Onchip USB
Enables the USB controllers.
Options: Disabled, V1.1+V2.0, V1.1.
Legacy USB Keyboard
When a USB keyboard is installed, please set at Enabled.
The options are: Disabled, Enabled.
AC97 Audio
This feature auto detects if you use a card that with a CODEC to enable or
disable the AC97 audio function.
The options are: Auto, Disabled.
MAC Lan (3COM)
Enables the onboard LAN feature.
Options: Auto, Disabled.
3 - 11
Page 40
AU13 Mainboard Manual
OnChip 1394
Enables the onboard IEEE 1394 feature.
Options: Auto, Disabled.
Onboard Serial A T A Ctrl
Allows users to diable the onboard SATA feature.
The options are: Enabled, Disabled.
IDE HDD Block Mode
When enabled, the system executes read/write requests to hard disk in
block mode. The options are: Enabled, Disabled.
Onboard Lan Boot ROM
Enables and disables the onboard LAN Boot ROM. The default is Dis-
abled. Options: Enabled, Disabled.
Onboard FDC Controller
Select Enabled if your system has a floppy disk controller (FDC) installed
on the system board and you wish to use it. If you install and-in FDC or the
system has no floppy drive, select Disabled in this field.
Options: Enabled, Disabled.
Onboard Serial Port 1/2
If the serial port 1/2 uses the onboard I/O controller, you can modify your
serial port parameters. If an I/O card needs to be installed, COM3 and
COM4 may be needed. The options are: Disabled, 3F8/IRQ4, 2F8/IRQ3,
3E8/IRQ4, 2E8/IRQ3.
UART Mode Select
Allows you to select the IR modes if the serial port 2 is used as an IR port.
Set at Standard, if you use COM2 as the serial port as the serial port,
instead as an IR port. The options are: Normal, IrDA, ASKIR.
RxD , TxD Active
This feature is available only if the item, UART 2 Mode, is set at ASKIR or
HPSIR. The feature allows you to select the active signals of the reception
end and the transmission end. This is for technician use only.
The options are: Hi, Lo; Hi, Hi; Lo, Hi; Lo, Lo.
3 - 12
Page 41

BIOS Setup
IR Transmission Delay
When Enabled, the transmission delays 4 characters-time (40 bit-time) if
SIR is changed from RX mode to TX mode. When Disabled, no transmis-
sion delay if SIR is changed from RX mode to TX mode.
The options are: Enabled, Disabled.
UR2 Duplex Mode
Allows you to select the IR modes.
The options are: Full, Half.
Use IR Pins
Allows you to select IR pin mode.
The options are: RxD2, TxD2; IR-Rx2Tx2.
Onboard Parallel Port
Allows you to select from a given set of parameters if the parallel port uses
the onboard I/O controller.
The options are: Disabled, 378/IRQ7, 278/IRQ5, 3BC/IRQ7.
Parallel Port Mode
Allows you to connect with an advanced printer via the port mode it sup-
ports. The options are: SPP, EPP1.9+SPP, ECP, EPP1.9+ECP, EPP1.7+SPP,
EPP1.7+ECP.
EPP Mode Select
This feature allows you to select the EPP type version.
The options are: EPP1.7, EPP1.9.
ECP Mode Use DMA
This feature allows you to select Direct Memory Access (DMA) channel.
The options are: 1, 3.
State After Power Failure
The system will stay of or power on after a power interrupt. The default is
Off.
Off: System always stay off after a power interrupt.
On: System always power on after a power interrupt.
Auto: Stay off or power on depend on system safe shutdown or power fail.
3 - 13
Page 42
AU13 Mainboard Manual
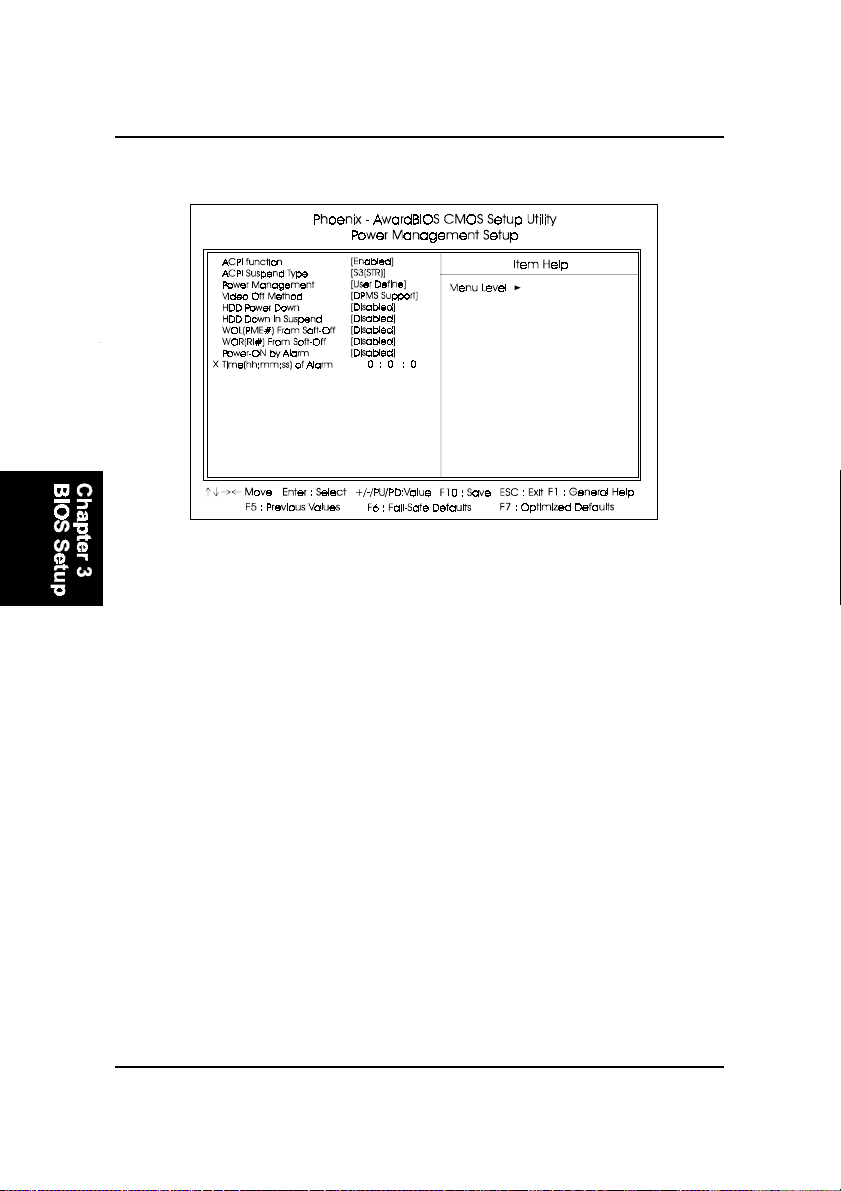
Power Management Setup
ACPI Function
This item allows you to disable the ACPI function.
The options are: Enabled, Disabled.
ACPI Suspend Type
This item allows you to select S1(POS) or S3(STR) function. When set to
S3(STR) or S1&S3 the following two fields become available.
Options: S1(POS), S3(STR), S1&S3.
Power Management
Use this to select your Power Management selection. Max. saving: Maxi-
mum power savings. Inactivity period is 1 minute in each mode. Min. sav-
ing: Minimum power savings. Inactivity period is 1 hour in each mode.
User define: Allows user to define PM Timers parameters to control power
saving mode.
Video Off Method
This option allows you to select how the video will be disabled by the
power management. V/H Sync + Blank: System turns off vertical and hori-
zontal synchronization ports and writes blanks to the video buffer.
3 - 14
Page 43

BIOS Setup
DPMS Support: Select this option if your monitor supports the Display
Power Management Signaling (DPMS) standard of the Video Electronics
Standards Association (VESA). Use the software supplied for your video
subsystem to select video power management values. Blank Screen: Sys-
tem only writes blanks to the video buffer.
HDD Power Down
When enabled and after the set time of system inactivity, the hard disk
drive will be powered down while all other devices remain active.
Options: Disabled, 1 ~ 15 Min.
HDD Down In Suspend
Lets you enable the HDD to power off in suspend mode.
Options: Enabled, Disabled.
WOL (PME#) From Soft-Off
An input signal form PME on the PCI card awakens the system from a soft
off state. Options: Enabled, Disabled.
WOR (RI#) From Soft-Off
An input signal form RI on the PCI card awakens the system from a soft off
state. Options: Enabled, Disabled.
Power-On by Alarm
When enabled, you can set the date and time in the following two fields.
Any event occurring at the specified date or time awakens the system from
power savings mode.
Time (hh:mm:ss) Alarm
If an ATX power supply is installed and when RTC Alarm Resume is En-
abled, this feature allows you to set the time of the alarm starts when the
RTC Alarm Resume From Soft Off is set to be Enabled. The options are: hh
(hour) - 0, 1, 2,.., 23; mm (minute) - 0, 1, 2,..,59; ss (second) - 0, 1, 2,..,59.
3 - 15
Page 44
AU13 Mainboard Manual
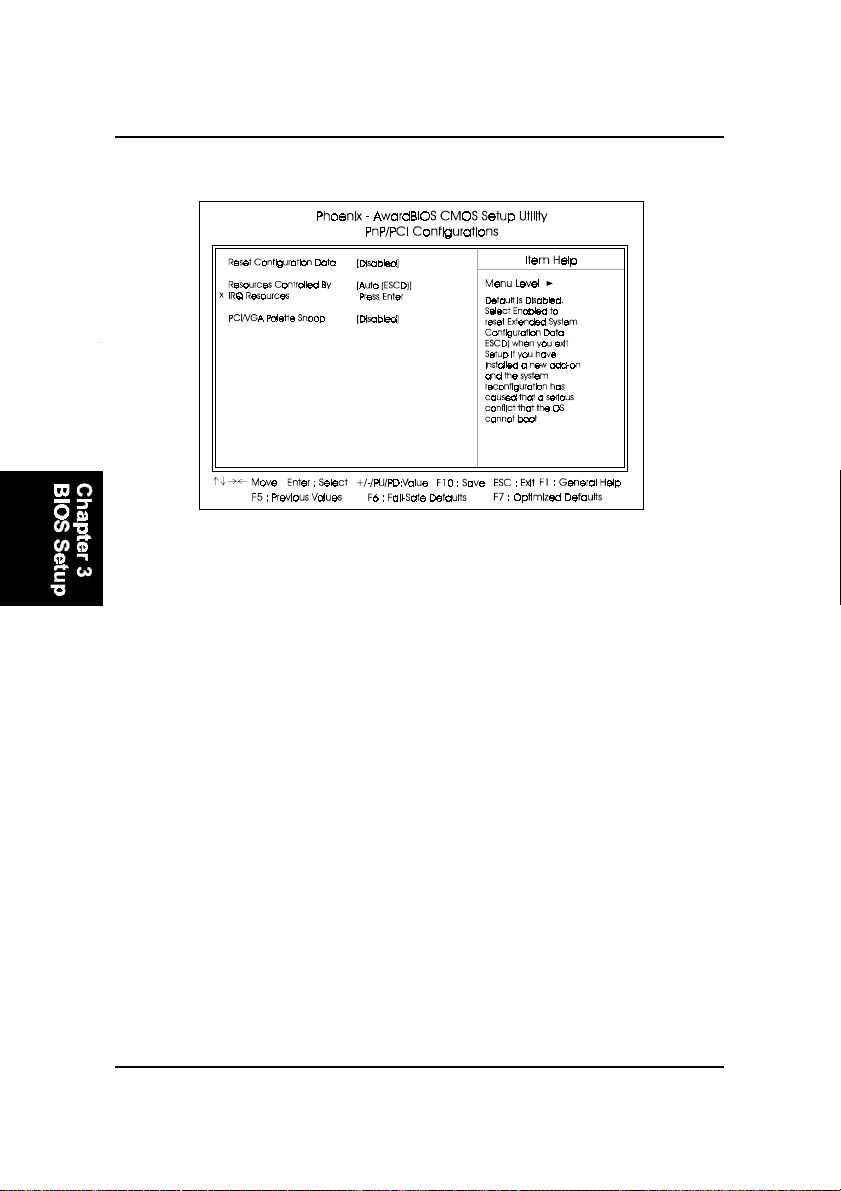
PnP/PCI Configurations
Reset Configuration Data
Enabling it to reset the system Extended System Configuration Data (ESCD)
when you exit Setup if you have installed a new add-on card and the
system reconfiguration has caused such a serious conflict that the operat-
ing system can not boot. The options are: Disabled, Enabled.
Resources Controlled By
If set at Auto, the BIOS arranges all system resources. If there exists con-
flict, select Manual. The options are: Auto (ESCD), Manual.
If the manual options, after the featrue IRQ Resources being pressed, of
IRQ- Assigned To are: PCI Device, Reserved. When resources were con-
trolled manually, assign each system interrupt a type, depending on each
device type to use the interrupt.
PCI/VGA Palette Snoop
Set this feature to be enabled if any ISA adapter card installed in the
system requires the VGA palette snoop function.
The options are: Disabled, Enabled.
3 - 16
Page 45
BIOS Setup
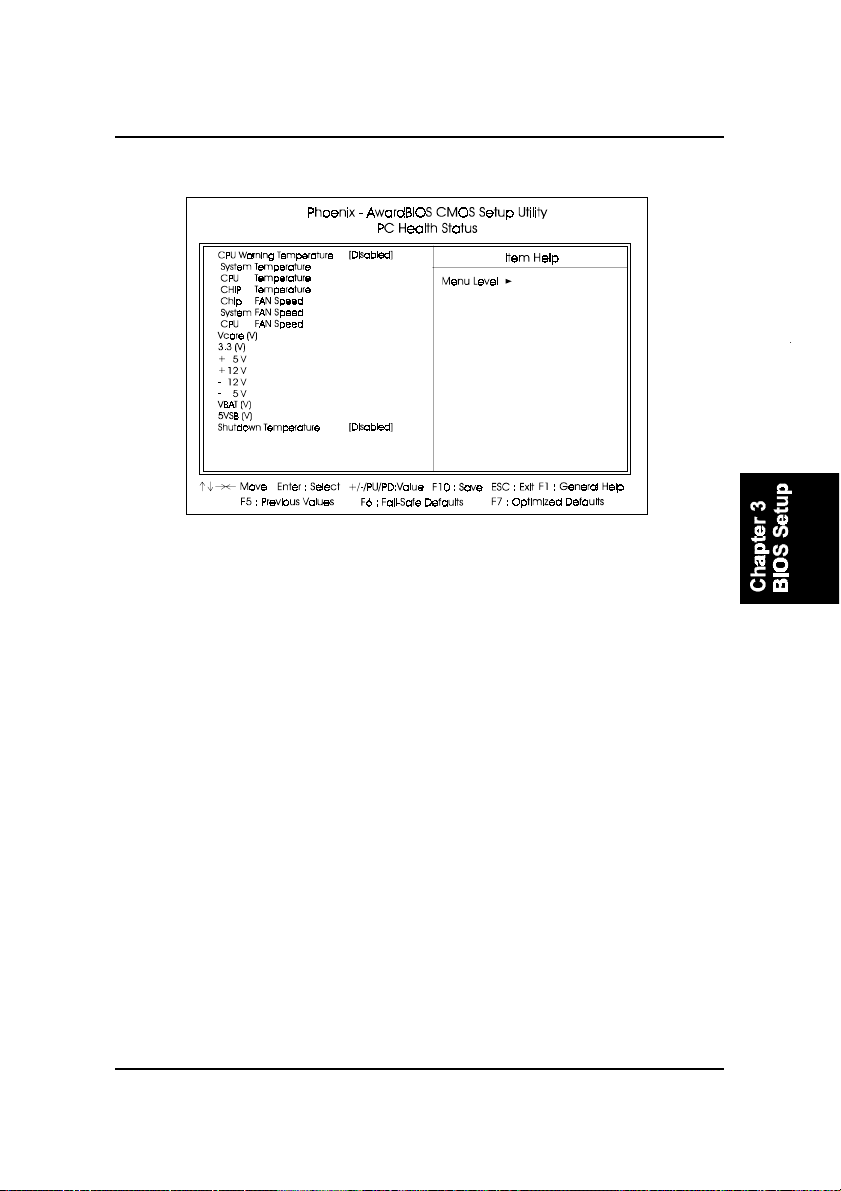
PC Health Status
CPU Warning T emperature
This feature allows you to set the temperature to slow down the CPU clock
frequency. The option list presents all the temperatures that supported by
the board and Disabled.
System Temperature / CPU Temperature / CHIP Temperature / Chip
FAN Speed / System F AN Speed / CPU F AN Speed / Vcore (V) / 3.3V /
+5V / +12V / -12V / -5V / VBAT(V) / 5VSB(V)
These items allow end users and technicians to monitor data provided by
the BIOS on this mainboard. It is not user-configurable.
Shutdown T emperature
This feature helps to shutdown the system when the system temperature
is as high as the selected temperature to prevent from the overheat prob-
lem. The option list presents all the temperatures that supported by the
board and Disabled.
3 - 17
Page 46
AU13 Mainboard Manual
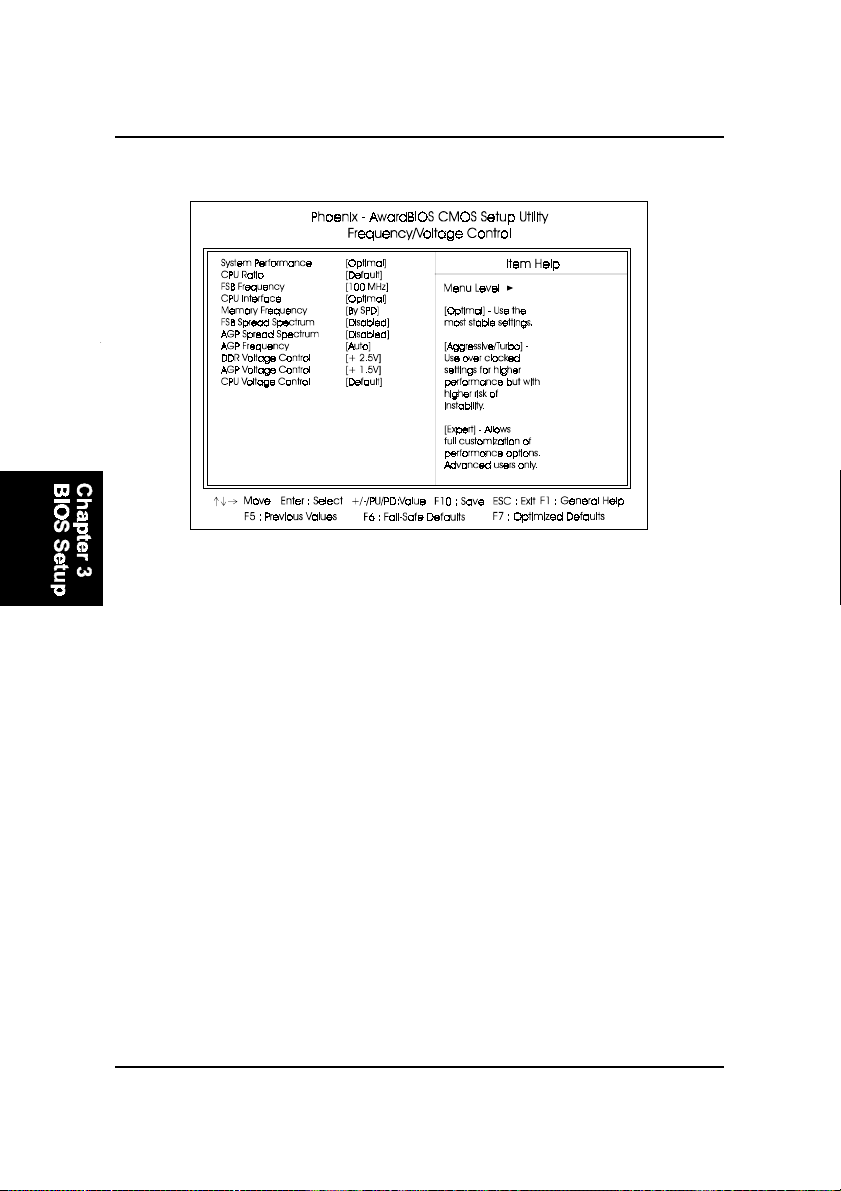
Frequency/Voltage Control
System Performance
This item will help you to configure your system performance.
Options: Optimal, Aggressive, Expert.
FSB Frequency
Enables you to set the CPU frontside bus speed. Enables you to subtle
tuning FSB.
CPU Interface
Allows you to set CPU/FSB parameters for CPU most stable or overclocked.
Options: Optimal, Aggressive.
Memory Frequency
Enables you to select the memory frequency.
Options: By SPD, 50%, 60%, 66%, 75%, 80%, 85%, Sync, 120%, 125%,
133%, 150%, 166%, 200%.
FSB Spread Spectrum
This item can significantly reduce the EMI (ElectroMagnetic Interference)
generated by the CPU.
Options: Disabled, 0.50%, 1.00%.
3 - 18
Page 47

BIOS Setup
AGP Spread Spectrum
This item can significantly reduce the EMI (ElectroMagnetic Interference)
generated by the AGP.
Options: Disabled, 0.50%, 1.00%.
AGP Frequency
This item allows you to select the AGP frequency.
Options: Auto, 90MHz, 93MHz, 95MHz, 97MHz, 100MHz, 50MHz ~87MHz
in 1MHz increments.
DDR Voltage Control
This item allows you to set the DIMM slot voltage.
Options: +2.5V to +2.8V in +0.1V increments. We recommend that you
leave this at the default value.
AGP Voltage Control
This item allows you to set the AGP slot voltage.
Options: +1.5V to +1.8V in +0.1V increments. We recommend that you
leave this at the default value.
CPU Voltage Control
This item allows you to set the CPU Vcore voltage.
Options: 1.100V to 1.925V in 0.025V increments. We recommend that you
leave this at the default value.
3 - 19
Page 48
AU13 Mainboard Manual
Load Fail-Safe Defaults
When you press <Enter> on this item you get a confirmation dialog box:
Load Fail-Safe Defaults (Y/N) ? N
Pressing Y loads the BIOS default values for the most stable, minimal-
performance system operations.
Load Optimized Defaults
When you press <Enter> on this item you get a confirmation dialog box:
Load Optimized Defaults (Y/N) ? N
Pressing Y loads the default values that are factory settings for optimal
performance system operations.
Supervisor/User Password
These items are used to install a password. A Supervisor password takes
precedence over a User password, and the Supervisor limits the activities
of a User. You can set either a supervisor or user password, or both of
them:
Supervisor password: authorized to enter and change the options of the
setup menus.
User password: authorized to enter, but not authorized to change the op-
tions of the setup menus.
When you select Set User/Supervisor Password, the following message
appears prompting you to type a password:
ENTER P ASSWORD:
Type the password, up to eight characters in length, and press <Enter>.
The password typed now clears any previously entered password from
CMOS memory. You will be prompted to confirm the password. Type the
password and press <Enter>. You may also press <Esc> to abort the selec-
tion and not enter a password.
3 - 20
Page 49

BIOS Setup
To disable a password, press <Enter> when you are prompted to enter the
password. A message will confirm the password is disabled:
P ASSWORD DISABLED.
Once the password is disabled, the system will boot and you can enter
Setup freely. When a password has been enabled, you will be prompted to
enter it every time you try to enter Setup. This prevents an unauthorized
person from changing any part of your system configuration. Additionally,
when a password is enabled, you can also require the BIOS to request a
password every time your system is rebooted. This prevents unautho-
rized use of your computer.
You determine when the password is required within the BIOS Features
Setup menu Security option. If the Security option is set to System, the
password will be required both at boot and at entry to Setup. If set to
Setup, prompting only occurs when trying to enter Setup.
Save and Exit Setup
Pressing <Enter> on this item asks for confirmation:
Save to CMOS and EXIT (Y/N)? Y
Pressing Y stores the selections made in the menus in CMOS - a special
section of memory that stays on after you turn your system off. The next
time you boot your computer, the BIOS configures your system according
to the Setup selections stored in CMOS. After saving the values the system
is restarted again.
Exit Without Saving
Pressing <Enter> on this item asks for confirmation:
Quit without saving (Y/N)? Y
This allows you to exit Setup without storing in CMOS any change. The
previous selections remain in effect. This exits the Setup utility and restarts
your computer.
3 - 21
Page 50
AU13 Mainboard Manual
This Page Left Blank for Note
3 - 22
 Loading...