

Page 1
Fibrain FSR-R2 User’s Manual
1
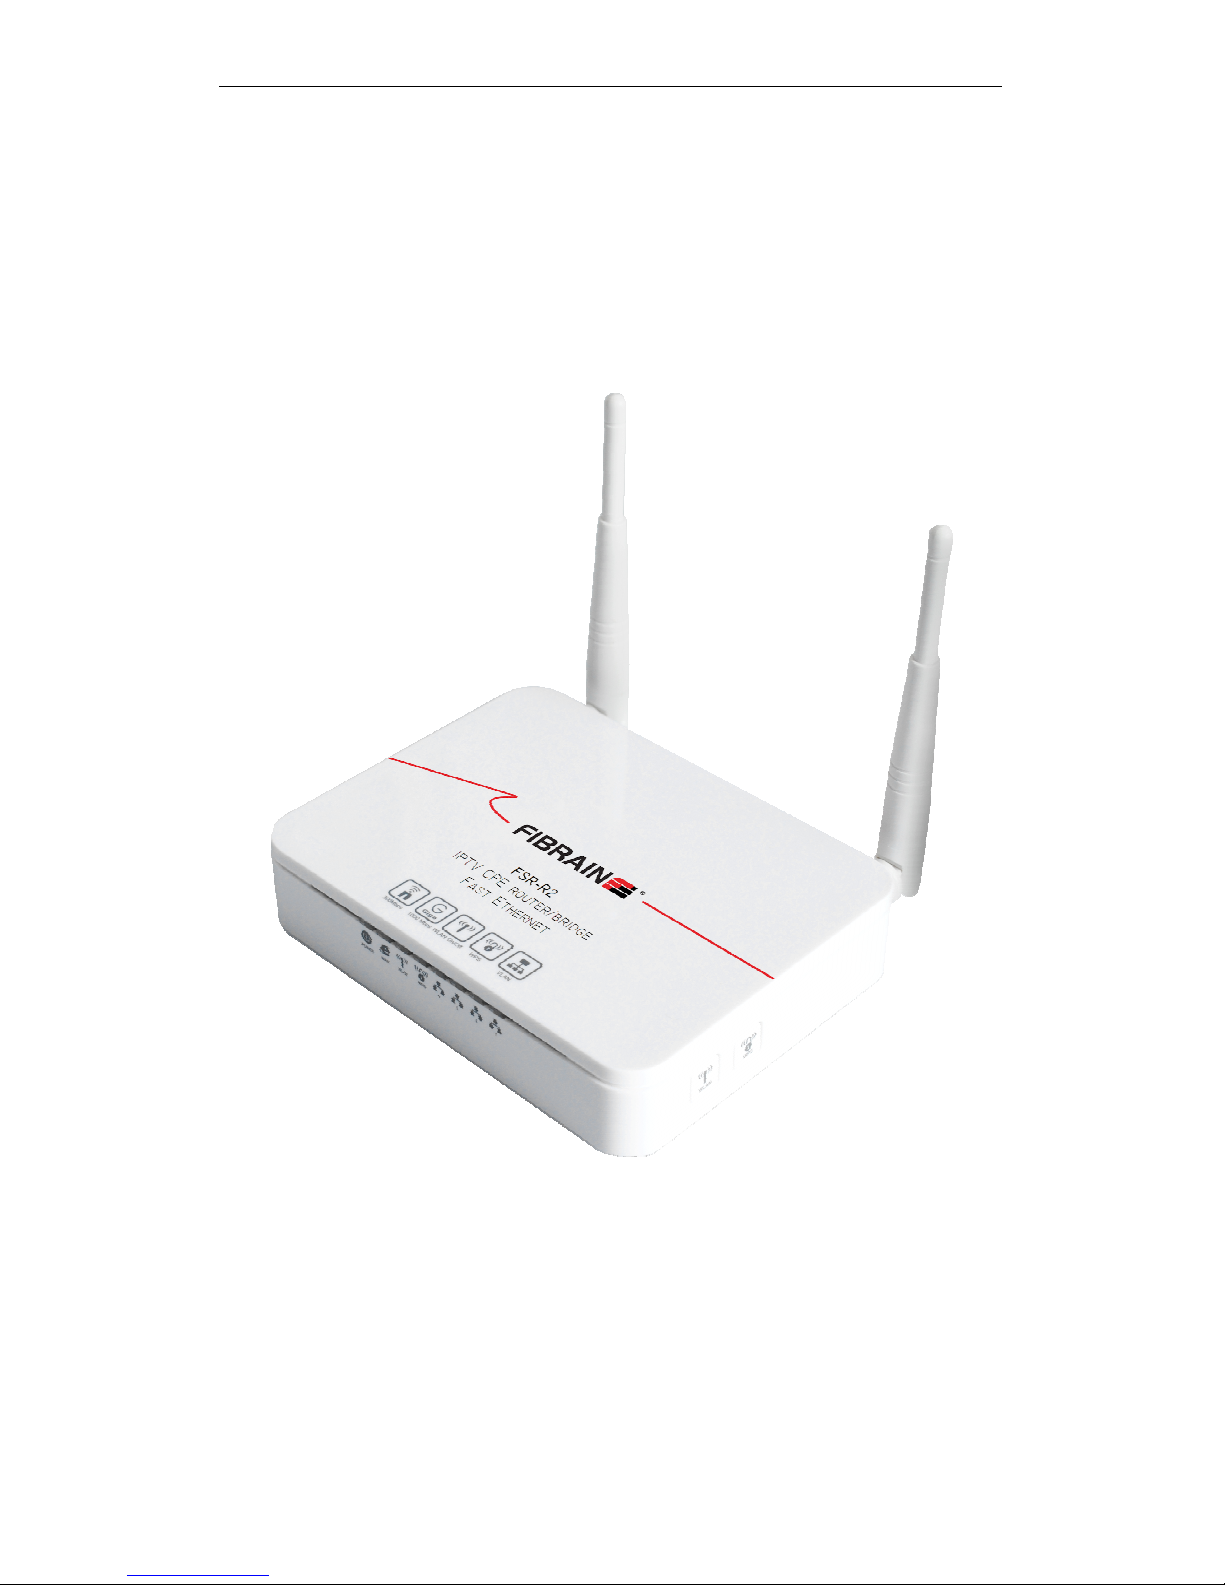
FIBRAIN FSR-R2
WLAN AP ROUTER
User’s Manual
Page 2

Fibrain FSR-R2 User’s Manual
2
Table of Contents
FIBRAIN FSR-R2 .................................................................. 1
WLAN AP ROUTER .............................................................. 1
User’s Manual ........................................................................ 1
1
Introduction ........................................................... 6
Features ................................................................................. 6
Device Requirements ............................................................ 6
Using this Document ............................................................. 7
Getting Support ...................................................................... 7
2
Getting to know the device .................................. 8
Computer / System requirements ......................................... 8
Package Contents ................................................................. 8
LED meanings & activations ................................................. 9
3
Computer configurations under
different OS, to obtain IP address
automatically.................................................... 13
For Windows 98SE / ME / 2000 / XP ................................. 13
For Windows Vista-32/64 .................................................... 17
For Windows 7-32/64 .......................................................... 22
4
Connecting your device ..................................... 26
Connecting the Hardware ................................................... 26
802.11n WLAN Router Configuration ................................ 28
Wireless Connection............................................................ 33
5
What the Internet/WAN access of your
own Network now is ........................................ 35
Internet/WAN access is the DHCP client ........................... 37
Internet/WAN access is the Static IP .................................. 38
Internet/WAN access is the PPPoE client ......................... 40
6
Getting Started with the Web pages ................. 41
Accessing the Web pages .................................................. 41
Testing your Setup............................................................... 43
Default device settings ........................................................ 43
7
Wide Area Network (WAN) Settings ................. 45
Static IP (Fixed IP address assignment) ............................ 46
DHCP.................................................................................... 47
PPPoE .................................................................................. 48
8
Local Area Network (LAN) Settings................... 49
Page 3

Fibrain FSR-R2 User’s Manual
3
9
Routing Settings ................................................. 50
Add Routing Rule ................................................................. 50
Example of Routing Rule .................................................... 51
10
DHCP Server Settings ....................................... 52
11
DDNS Settings ................................................... 53
12
MAC Address Clone Settings ............................ 54
13
VLAN Settings .................................................... 55
14
Wireless - Basic Setting ..................................... 57
WLAN 1 Settings ................................................................. 59
SSID Settings ....................................................................... 60
WEP Settings ....................................................................... 61
WPA Pre-shared Key / WPA2 Pre-shared Key
Settings ............................................................................. 62
WPA / WPA2 Radius Settings ............................................ 63
15
Wireless - Advanced Setting ............................. 64
16
Wireless - WDS Setting ..................................... 66
17
Wireless - Universal Repeater Setting .............. 67
18
Wireless - WPS Setting ..................................... 68
19
Security - Firewall Setting .................................. 69
20
Security - ACCESS CONTROL LIST
(ACL) SETUP Setting ..................................... 71
Add Access Control List (ACL) Rule .................................. 72
Example: Filter and block MSN usage. .............................. 73
21
Security - MAC Access Control Setting............. 74
Add MAC Access Control Rule........................................... 75
Example: Bind IP to a MAC ................................................ 76
22
Security - Web Filtering Setting ......................... 77
Add Web Filtering Rule ....................................................... 78
Example: Block a URL with Keyword ................................. 79
23
Bandwidth - INTELLIGENT DYNAMIC
BANDWIDTH MANAGEMENT ...................... 80
DBM - WAN 1 Settings ........................................................ 81
Modify Bandwidth Management Group Rule .................... 82
Add Static Bandwidth Management (SBM)
Rule ................................................................................... 83
24
Bandwidth - Throughput Optimizer ................... 84
25
Bandwidth - TurboNAT ...................................... 85
26
Applications - Port Range Forward ................... 86
Page 4

Fibrain FSR-R2 User’s Manual
4
DMZ - WAN 1 Settings ........................................................ 88
Port Range Forwarding Settings ........................................ 88
Add Port Range Forwarding Rule ...................................... 89
27
Applications - Virtual Hosts ................................ 90
Add Virtual Host Rule .......................................................... 91
28
Applications - Streaming / VPN ......................... 92
Streaming Settings .............................................................. 92
Streaming Settings .............................................................. 93
VPN Pass-through Settings ................................................ 93
29
Applications - UPnP / NAT-PMP ....................... 94
30
Admin - Management ........................................ 95
Administration Interface Settings ........................................ 96
Reboot Settings ................................................................... 96
Configuration Settings ......................................................... 97
Firmware Upgrade Settings ................................................ 97
APS Settings ....................................................................... 98
31
Admin - System Utilities ..................................... 99
Ping Settings ...................................................................... 100
ARPing (Within the same broadcasting
domain) Settings ............................................................ 100
Trace Route Settings ......................................................... 101
32
Admin - TIME SETUP ...................................... 102
33
Status - Router ................................................. 103
Router Information Settings .............................................. 104
WAN Settings .................................................................... 104
LAN Settings ..................................................................... 105
Wireless Network 1 Settings ............................................. 106
34
Status - User / DHCP ....................................... 107
35
Status – User / Current .................................... 108
36
Status – Log ..................................................... 109
A
Configuring your Computers ............................ 110
Configuring Ethernet PCs ................................................. 110
B
IP Addresses, Network Masks, and
Subnets ......................................................... 115
IP Addresses ...................................................................... 115
Subnet masks .................................................................... 116
C
UPnP Control Point Software on
Windows ME/XP ........................................... 118
UPnP Control Point Software on Windows ME ............... 118
Page 5

Fibrain FSR-R2 User’s Manual
5
UPnP Control Point Software on Windows XP
with Firewall .................................................................... 119
D
Troubleshooting ............................................... 122
Troubleshooting Suggestions ........................................... 122
Diagnosing Problem using IP Utilities .............................. 124
E
Glossary ........................................................... 126
Page 6

Fibrain FSR-R2 User’s Manual
6
1
Introduction
Congratulations on becoming the owner of the Wireless
Gateway. You will now be able to access the Internet using your
high-speed xDSL/Cable modem connection.
This User Guide will show you how to connect your Wireless
Gateway, and how to customize its configuration to get the most
out of your new product.
Features
The list below contains the main features of the device and may
be useful to users with knowledge of networking protocols. If
you are not an experienced user, the chapters throughout this
guide will provide you with enough information to get the most
out of your device.
Features include:
• 10/100Base-T Ethernet router to provide Internet
connectivity to all computers on your LAN
• Network address translation (NAT) functions to provide
security for your LAN
• Network configuration through DHCP Server and DHCP
Client
• Services including IP route and DNS configuration, RIP,
and IP
• IOP (Inter-Operability) with major soft-switch vendors
• SIP signaling supporting
• Supports remote software upgrades
• Plug & Play, Auto Configuration / Auto Provisioning
• User-friendly configuration program accessed via a web
browser
The Wireless Gateway has the internal Ethernet switch
allows for a direct connection to a 10/100BASE-T Ethernet
network via an RJ-45 interface, with LAN connectivity for
both the Wireless Gateway and a co-located PC or other
Ethernet-based device.
Device Requirements
In order to use the Wireless Gateway, you must have the
following:
• One RJ-45 Broadband Internet connection via cable
modem or xDSL modem
• Instructions from your ISP on what type of Internet access
you will be using, and the addresses needed to set up access
• One or more computers each containing an Ethernet card
(10Base-T/100Base-T network interface card (NIC))
Page 7
Fibrain FSR-R2 User’s Manual
7
• TCP/IP protocol for each PC
• For system configuration using the supplied
a. web-based program: a web browser such as Internet
Explorer v7 or later. Note that version 7 of each browser is
the minimum version requirement – for optimum display
quality, use Internet Explorer v8
Note
You do not need to use a hub or switch in order to connect more
than one Ethernet PC to your device. Instead, you can connect
up to four Ethernet PCs directly to your device using the ports
labeled Ethernet on the rear panel.
Using this Document
Notational conventions
• Acronyms are defined the first time they appear in the text
and also in the glossary.
• For brevity, the Wireless Gateway is referred to as “the device”.
• The term LAN refers to a group of Ethernet-connected
computers at one site.
Typographical conventions
• Italic text is used for items you select from menus and drop-
down lists and the names of displayed web pages.
• Bold text is used for text strings that you type when prompted
by the program, and to emphasize important points.
Special messages
This document uses the following icons to draw your attention to
specific instructions or explanations.
Note
Provides clarifying or non-essential information on the current
topic.
Definition
Explains terms or acronyms that may be unfamiliar to many
readers. These terms are also included in the Glossary.
WARNING
Provides messages of high importance, including messages
relating to personal safety or system integrity.
Getting Support
Supplied by:
Helpdesk Number:
Website:
Page 8

Fibrain FSR-R2 User’s Manual
8
2
Getting to know the device
Computer / System requirements
• 1. Pentium 200MHZ processor or above
• 2. Windows 98SE, Windows Me, Windows 2000, Windows
XP, Windows Vista and Windows 7
• 3. 64MB of RAM or above
• 4. 25MB free disk space
Package Contents
1. 802.11n WLAN Router
2. CD-ROM (Software & Manual)
3. Quick Installation Guide
4. Ethernet Cable (RJ-45)
5. Power Adapter
Page 9
Fibrain FSR-R2 User’s Manual
9
LED meanings & activations
Front Panel
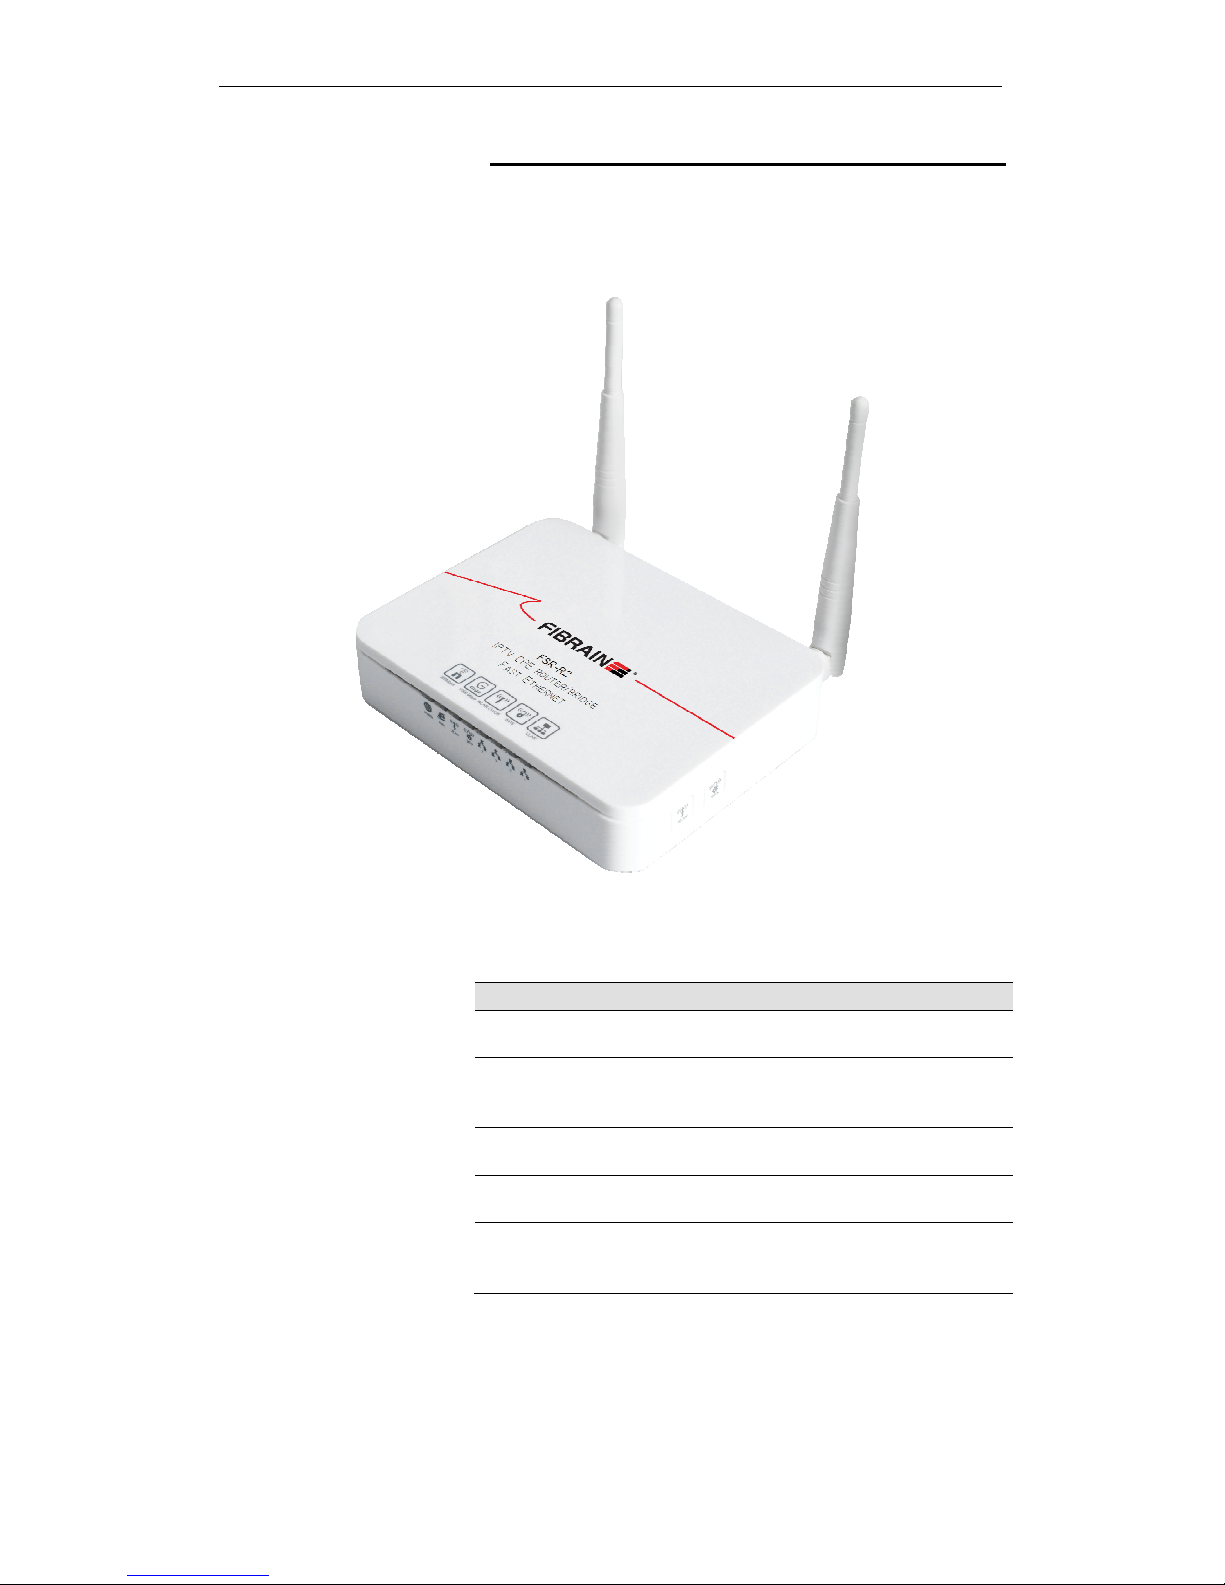
The front panel contains lights called Light Emitting Diodes
(LEDs) that indicate the status of the unit.
Figure 1: Front Panel and LEDs
Label Color Function
POWER green On: device is powered on
Off: device is powered off
WAN green On: WAN link established and active
Off: No LAN link
Blink: Valid Ethernet packet being transferred
WLAN green On: WLAN link established and active
Blink: Valid Wireless packet being transferred
WPS green Off: WPS link isn’t established and active
Blink: Valid WPS packet being transferred
LAN
1/2/3/4
green On: LAN link established and active
Off: No LAN link
Blink: Valid Ethernet packet being transferred
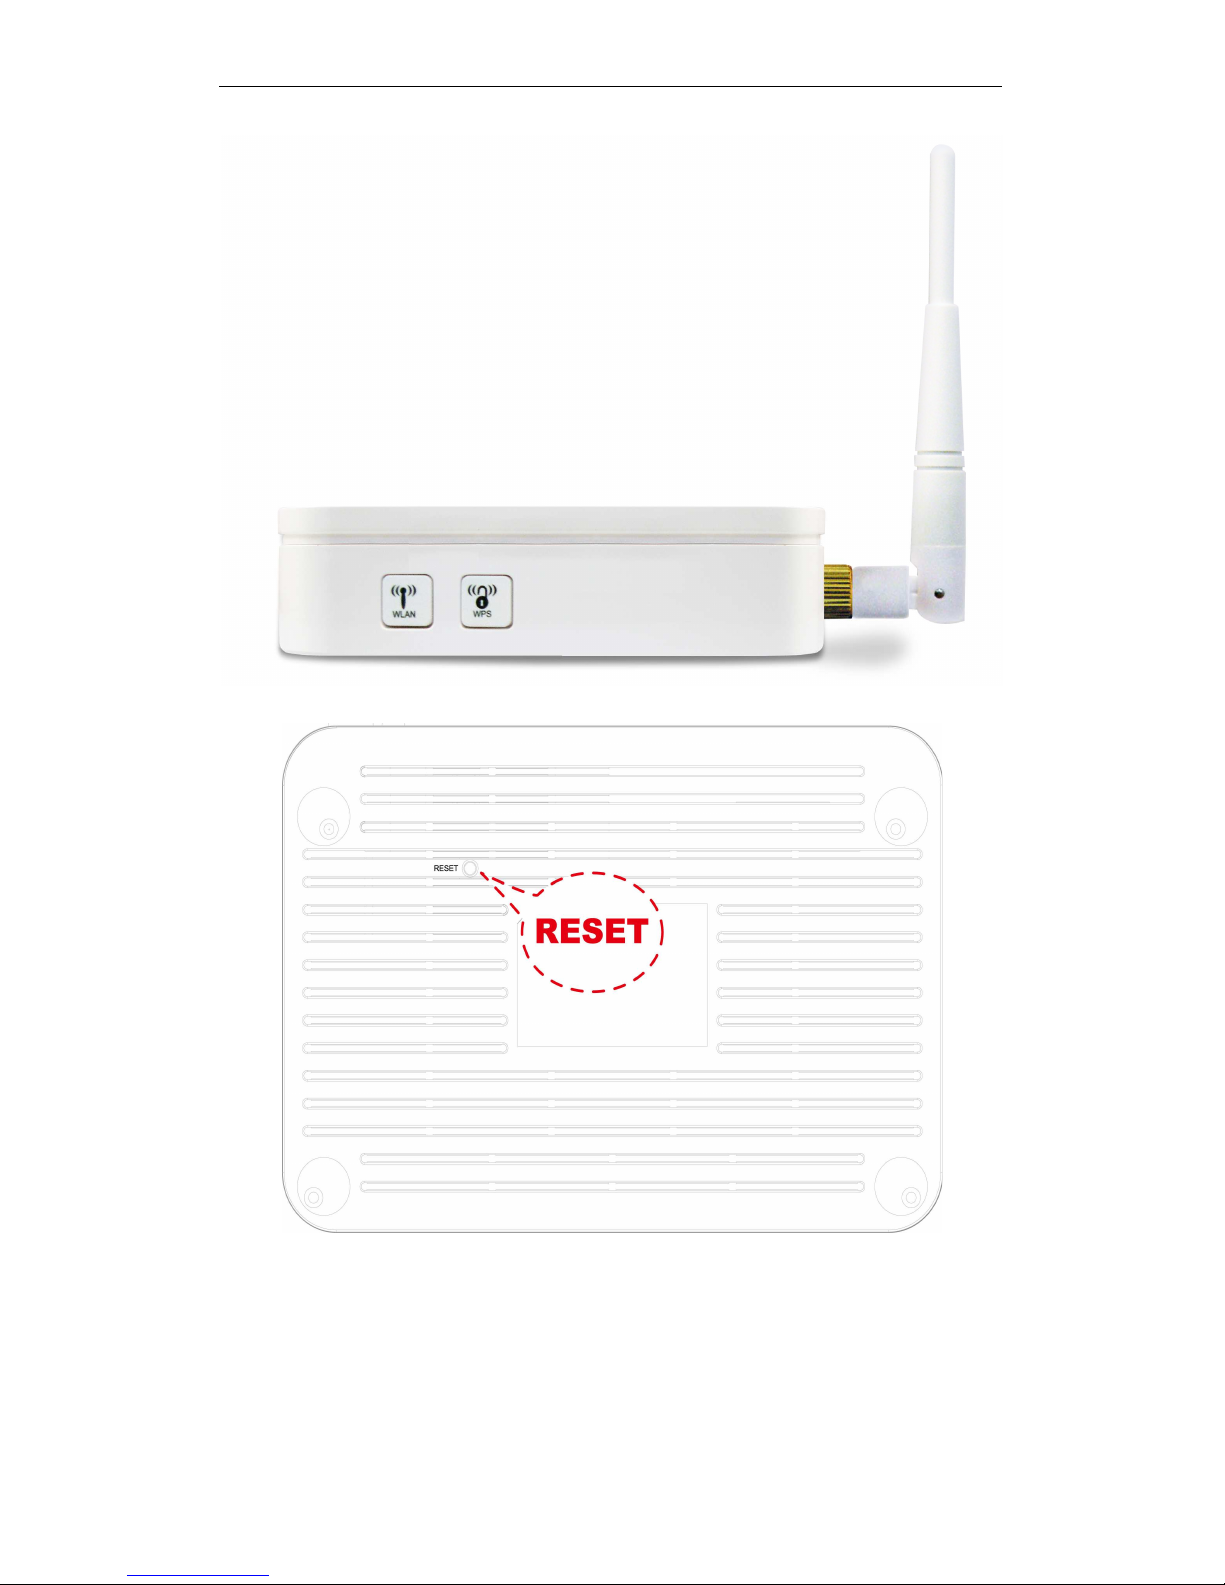
Rear and Right Panel and bottom Side
The rear and right panel and bottom side contains a Restore
Defaults button, the ports for the unit's data and power
connections.
Page 10
Fibrain FSR-R2 User’s Manual
10
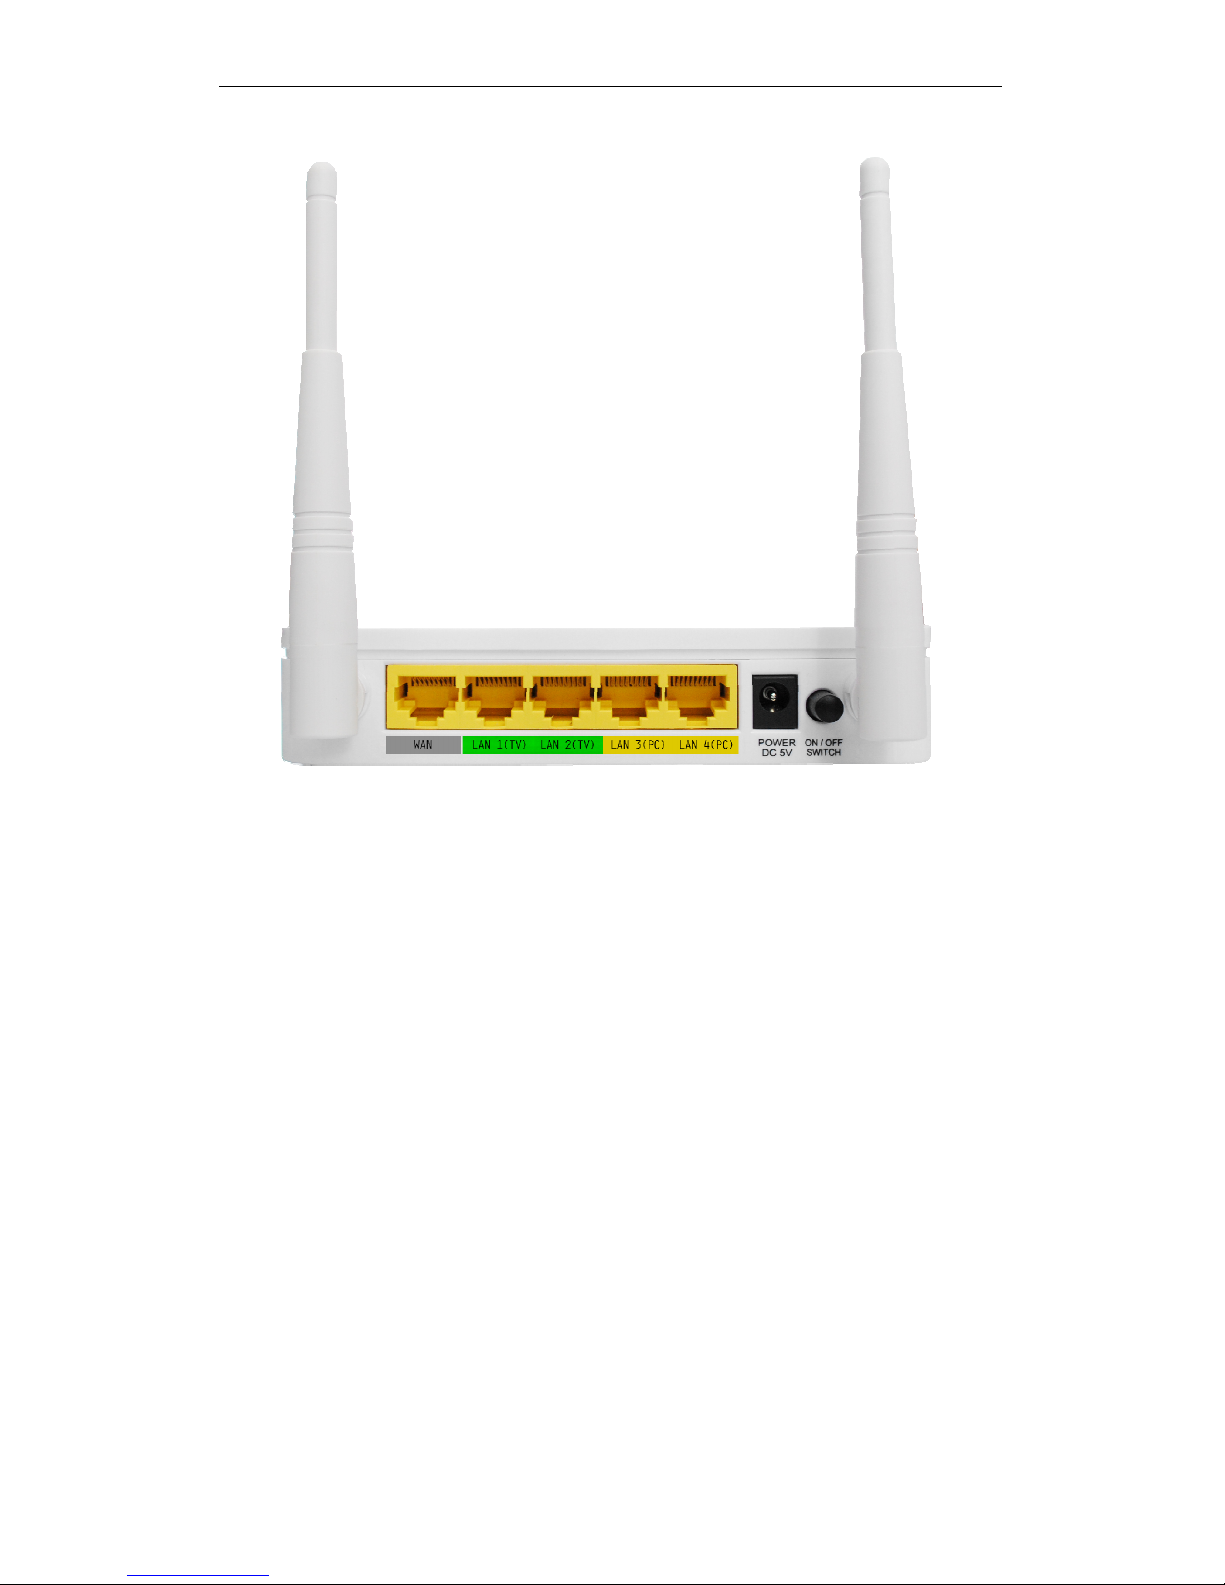
Figure 2: Rear Panel Connections
Page 11
Fibrain FSR-R2 User’s Manual
11
Figure 3: Right Panel Connections
Figure 4: Bottom Side for Reset button
Page 12

Fibrain FSR-R2 User’s Manual
12
Label Function
ANETENNA ANETENNA
ON/OFF
SWITCH
Power on/off the device
POWER Connects to the supplied power cable
LAN 4/3/2/1 Connects the device via Ethernet to up to four PCs on your LAN
WAN Connects the device via Ethernet to xDSL / Cable Modem
WLAN Press this button for at least two full second to turn off/on wireless signals
WPS
Press this button for at least three full seconds and the WPS LED will flash
to start WPS.
Now go to the wireless adapter or device and press its WPS button. Make
sure to press the button within 120 seconds (2 minutes) after pressing the
router's WPS button.
If you are using a Wireless adapter connected to a computer, a "WPS
Authentication" screen will appear. Wait until the screen says "Authentication
succeeded." This may take a few minutes.
RESET Reset button. RESET the 802.11n WLAN router to its default settings.
Press this button for at least 6 full seconds to start to reset it to its default settings.
Page 13
Fibrain FSR-R2 User’s Manual
13
3
Computer configurations under different OS,
to obtain IP address automatically
Before starting the 802.11n WLAN Router configuration, please
kindly configure the PC computer as below, to have automatic
IP address / DNS Server.
For Windows 98SE / ME / 2000 / XP
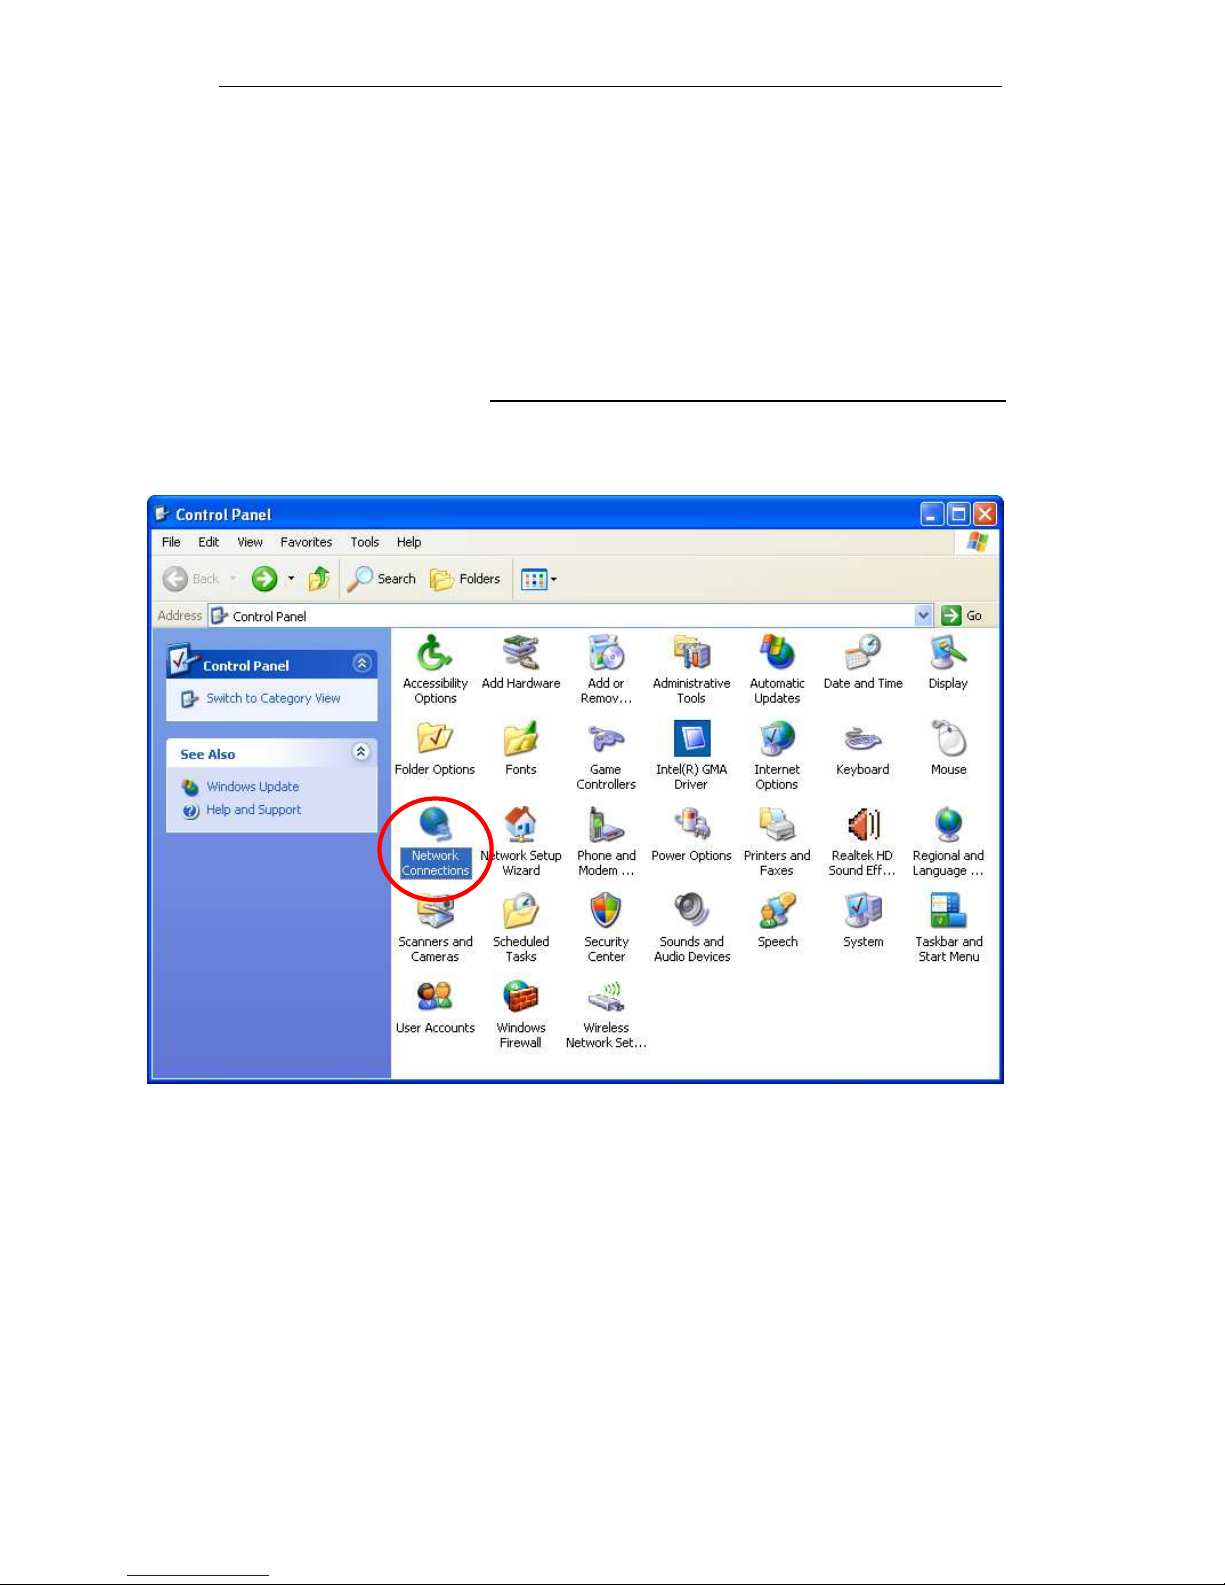
1. Click on "Start" -> "Control Panel" (in Classic View). In
the Control Panel, double click on "Network Connections"
to continue.
Page 14
Fibrain FSR-R2 User’s Manual
14
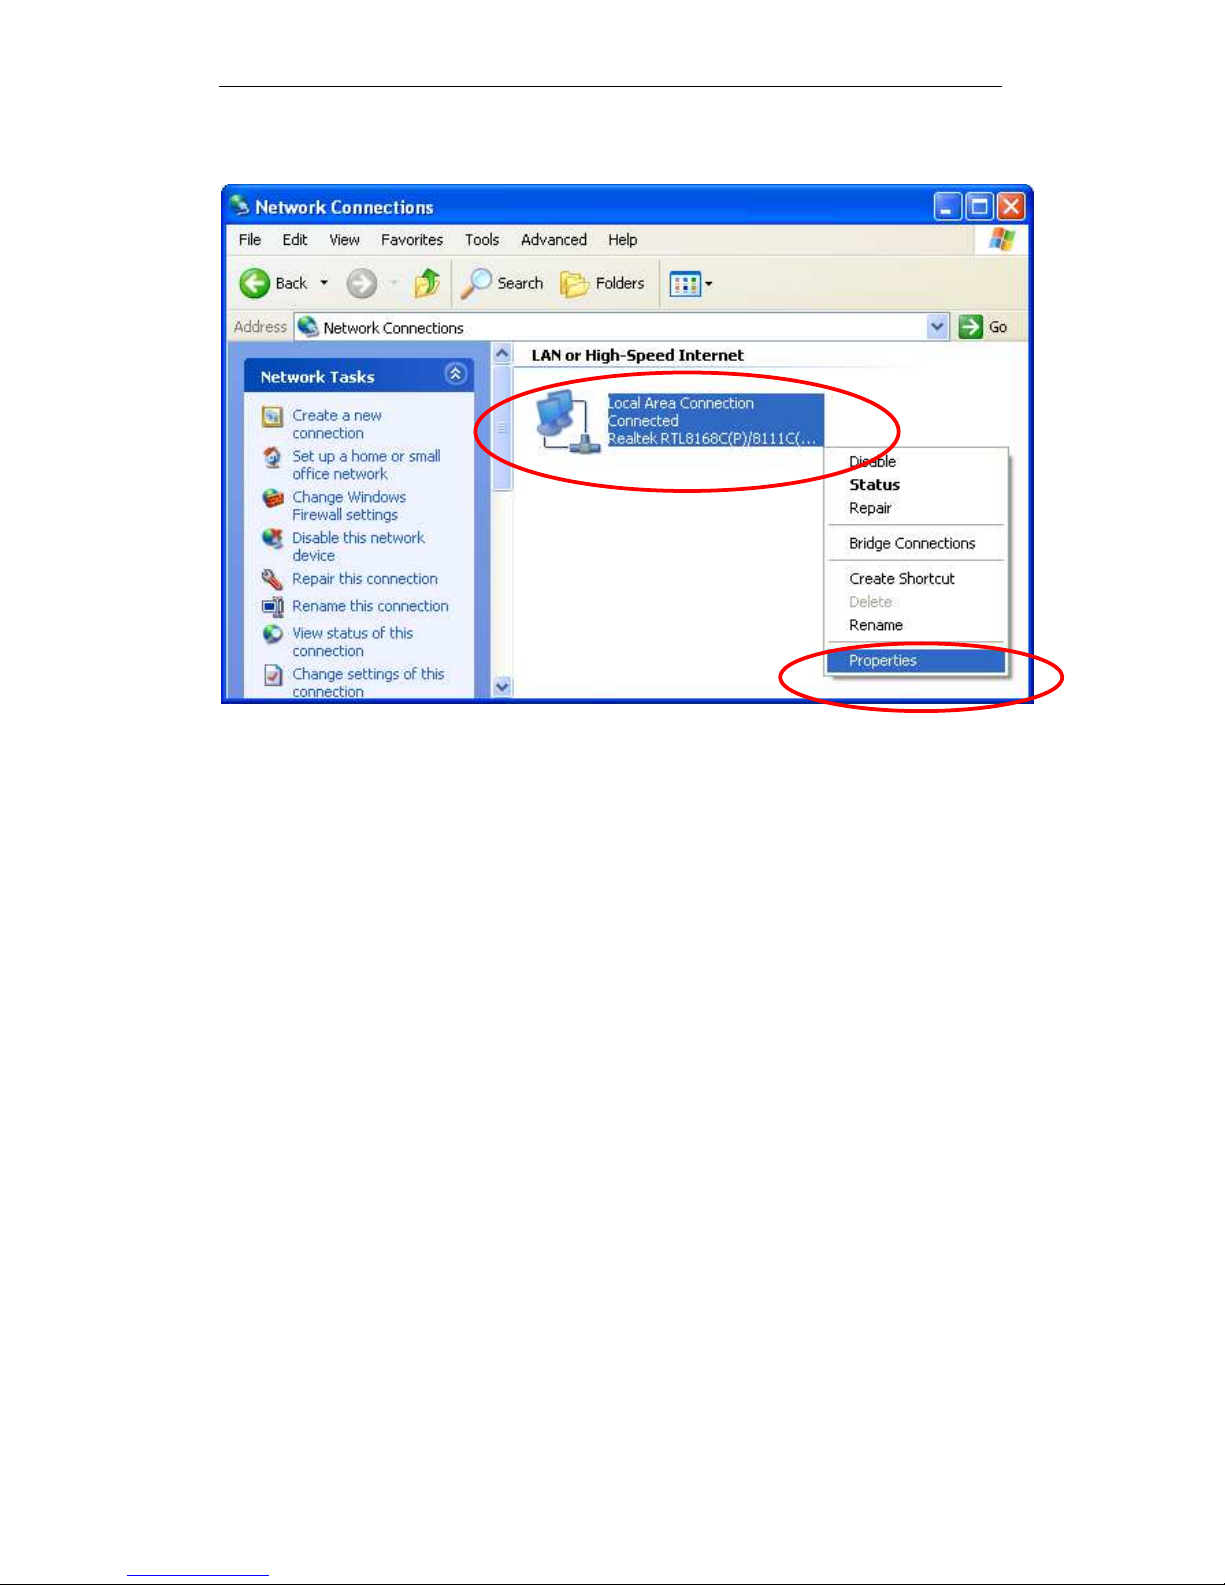
2. Single RIGHT click on "Local Area connection", then click
"Properties".
Page 15
Fibrain FSR-R2 User’s Manual
15
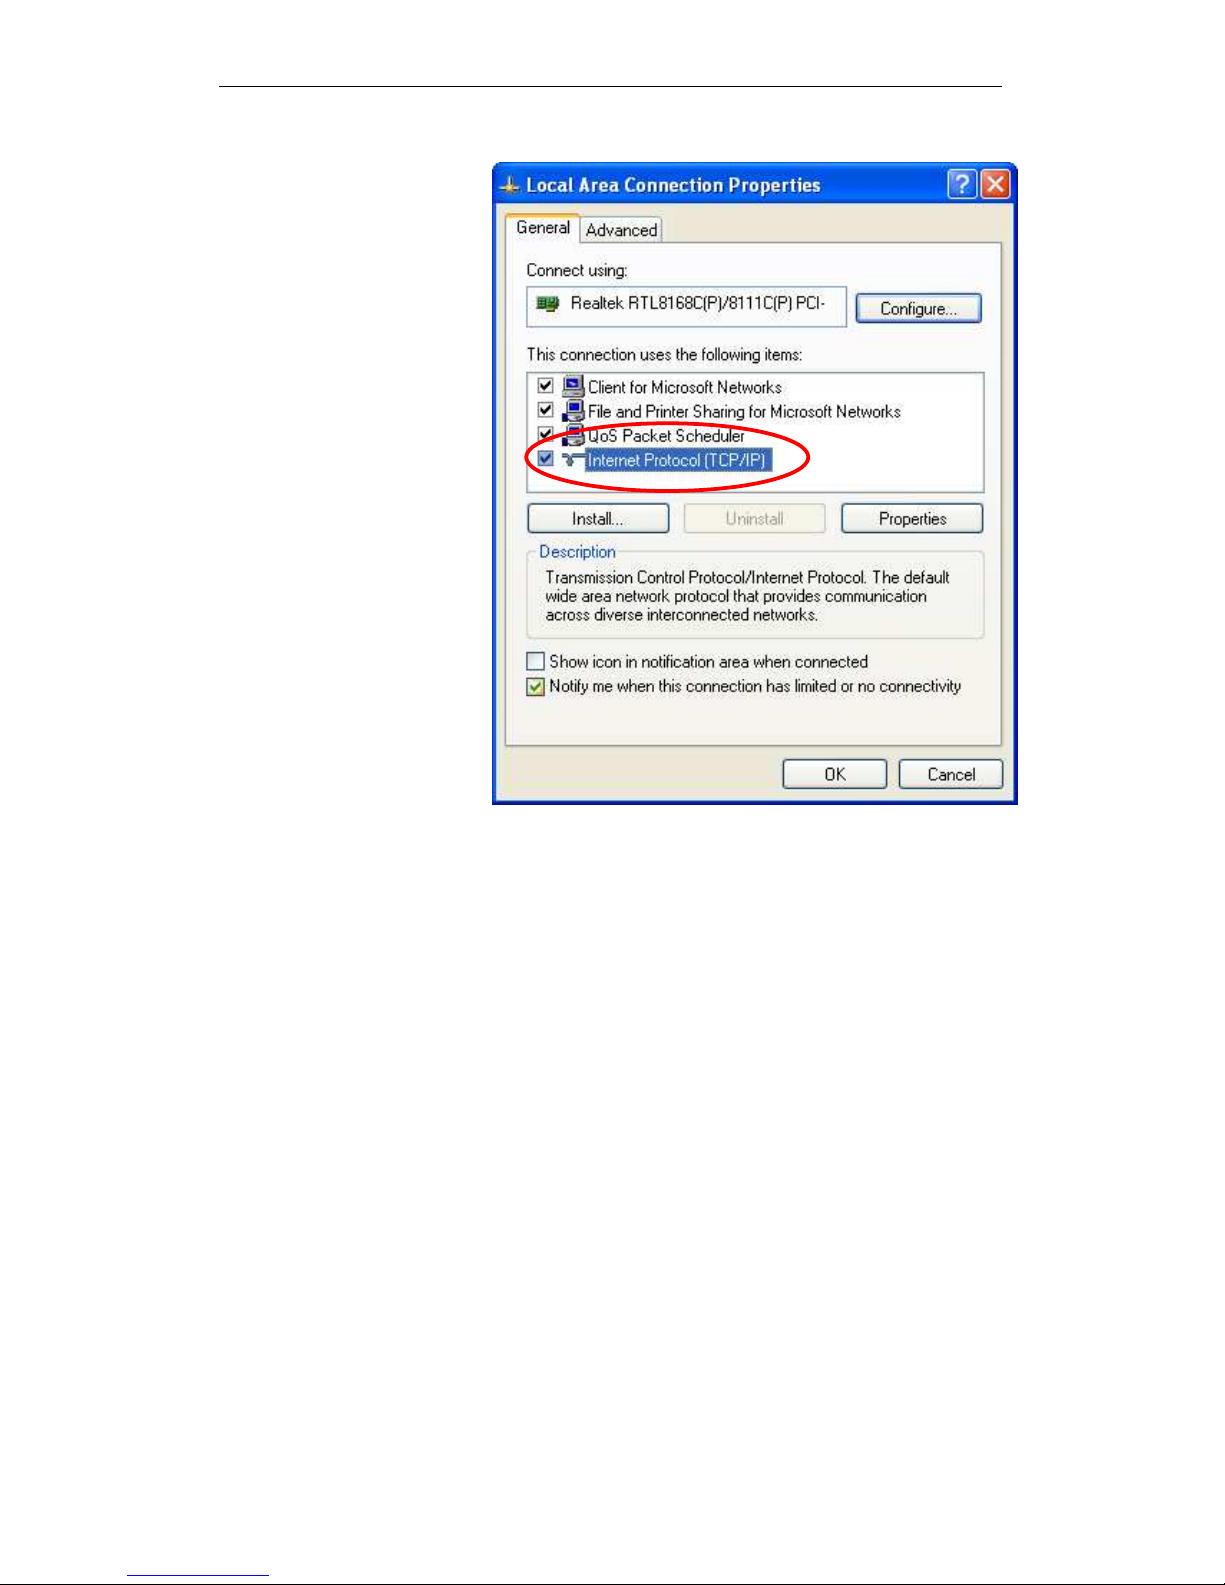
3. Double click on "Internet Protocol (TCP/IP)".
Page 16
Fibrain FSR-R2 User’s Manual
16
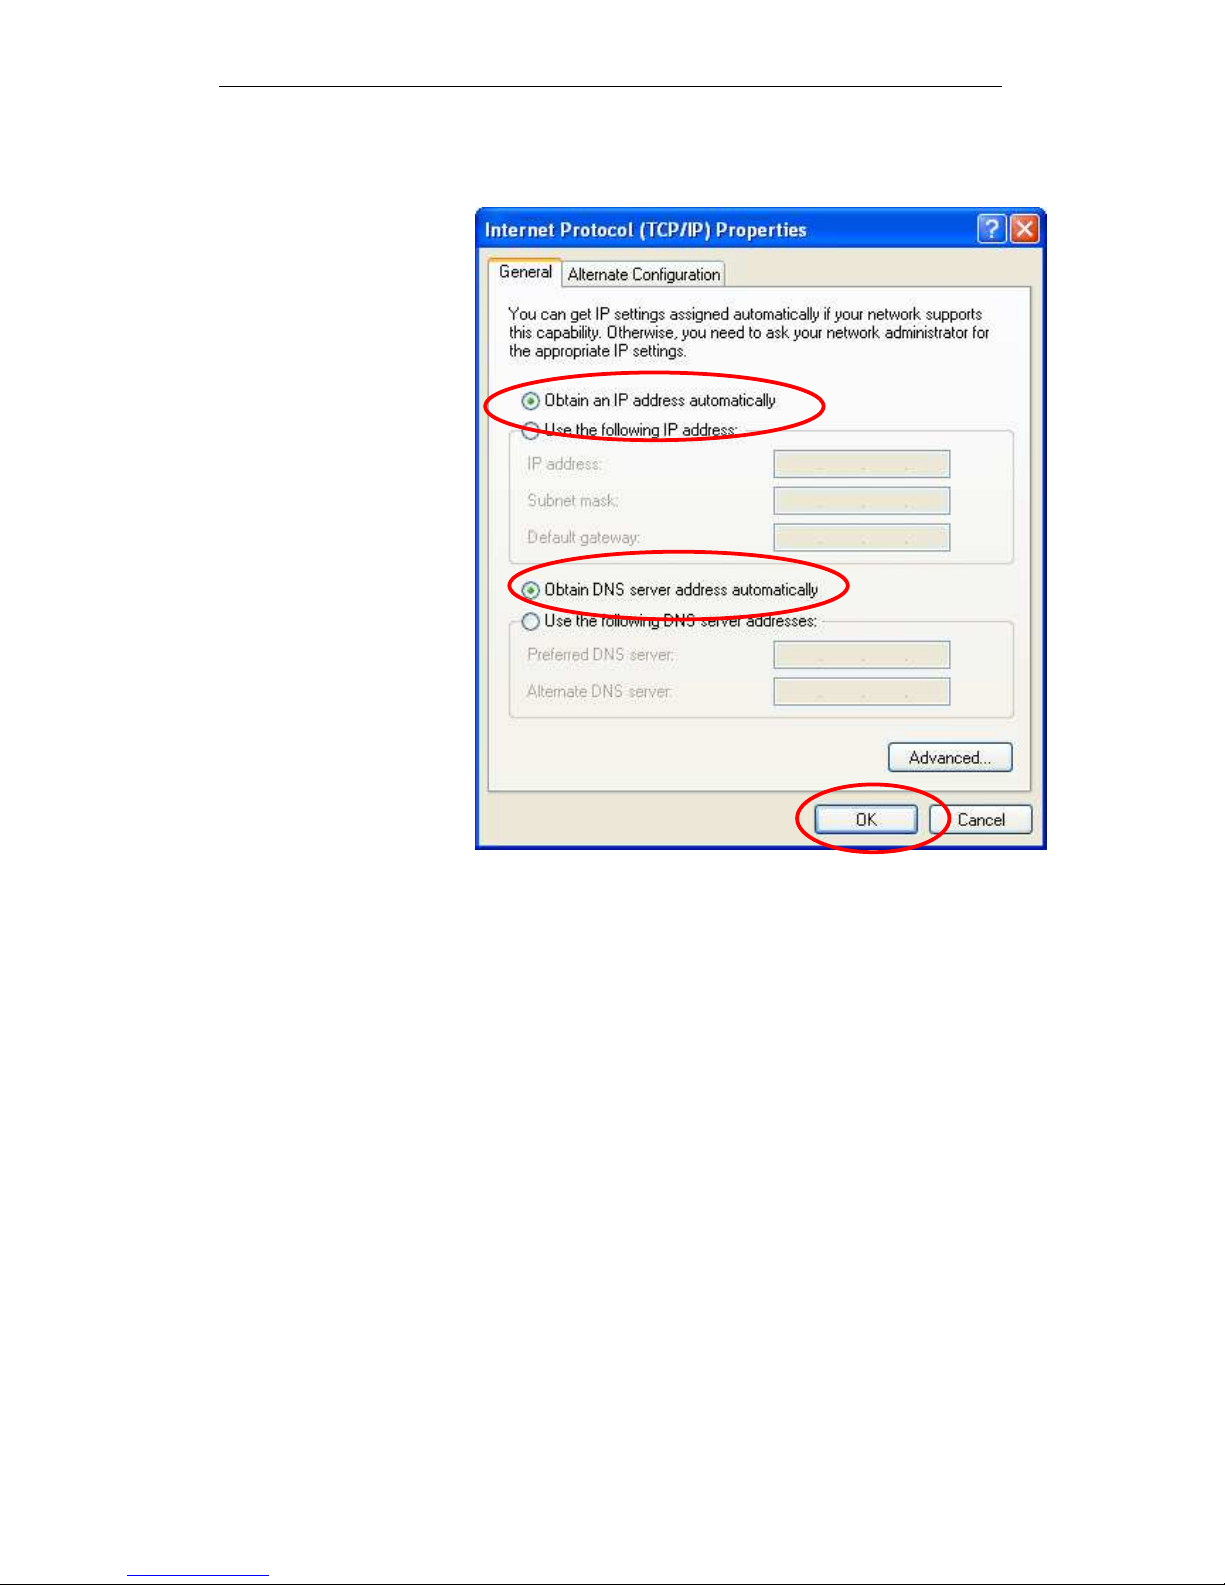
4. Check "Obtain an IP address automatically" and "Obtain
DNS server address automatically" then click on "OK" to
continue.
5. Click "Show icon in notification area when connected"
(see screen image in 3. above) then Click on "OK" to
complete the setup procedures.
Page 17
Fibrain FSR-R2 User’s Manual
17
For Windows Vista-32/64
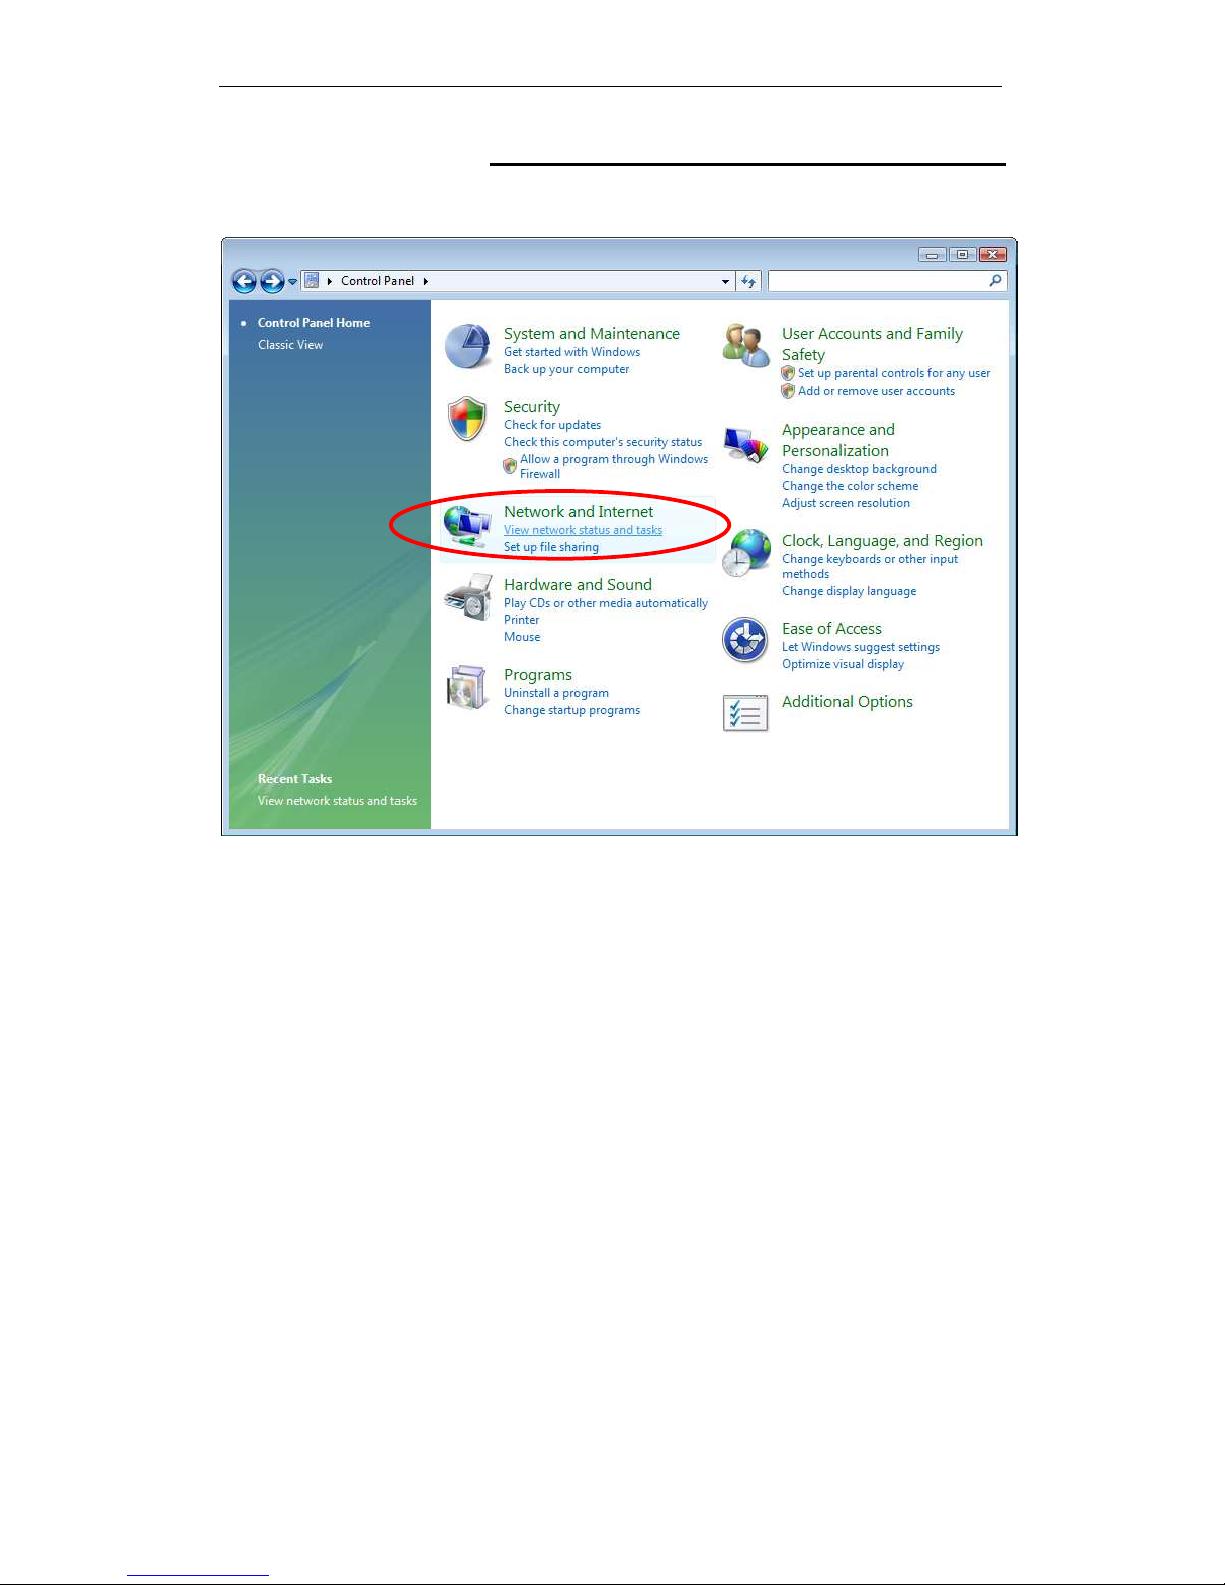
1. Click on “Start” -> “Control Panel” -> “View network
status and tasks”.
Page 18
Fibrain FSR-R2 User’s Manual
18
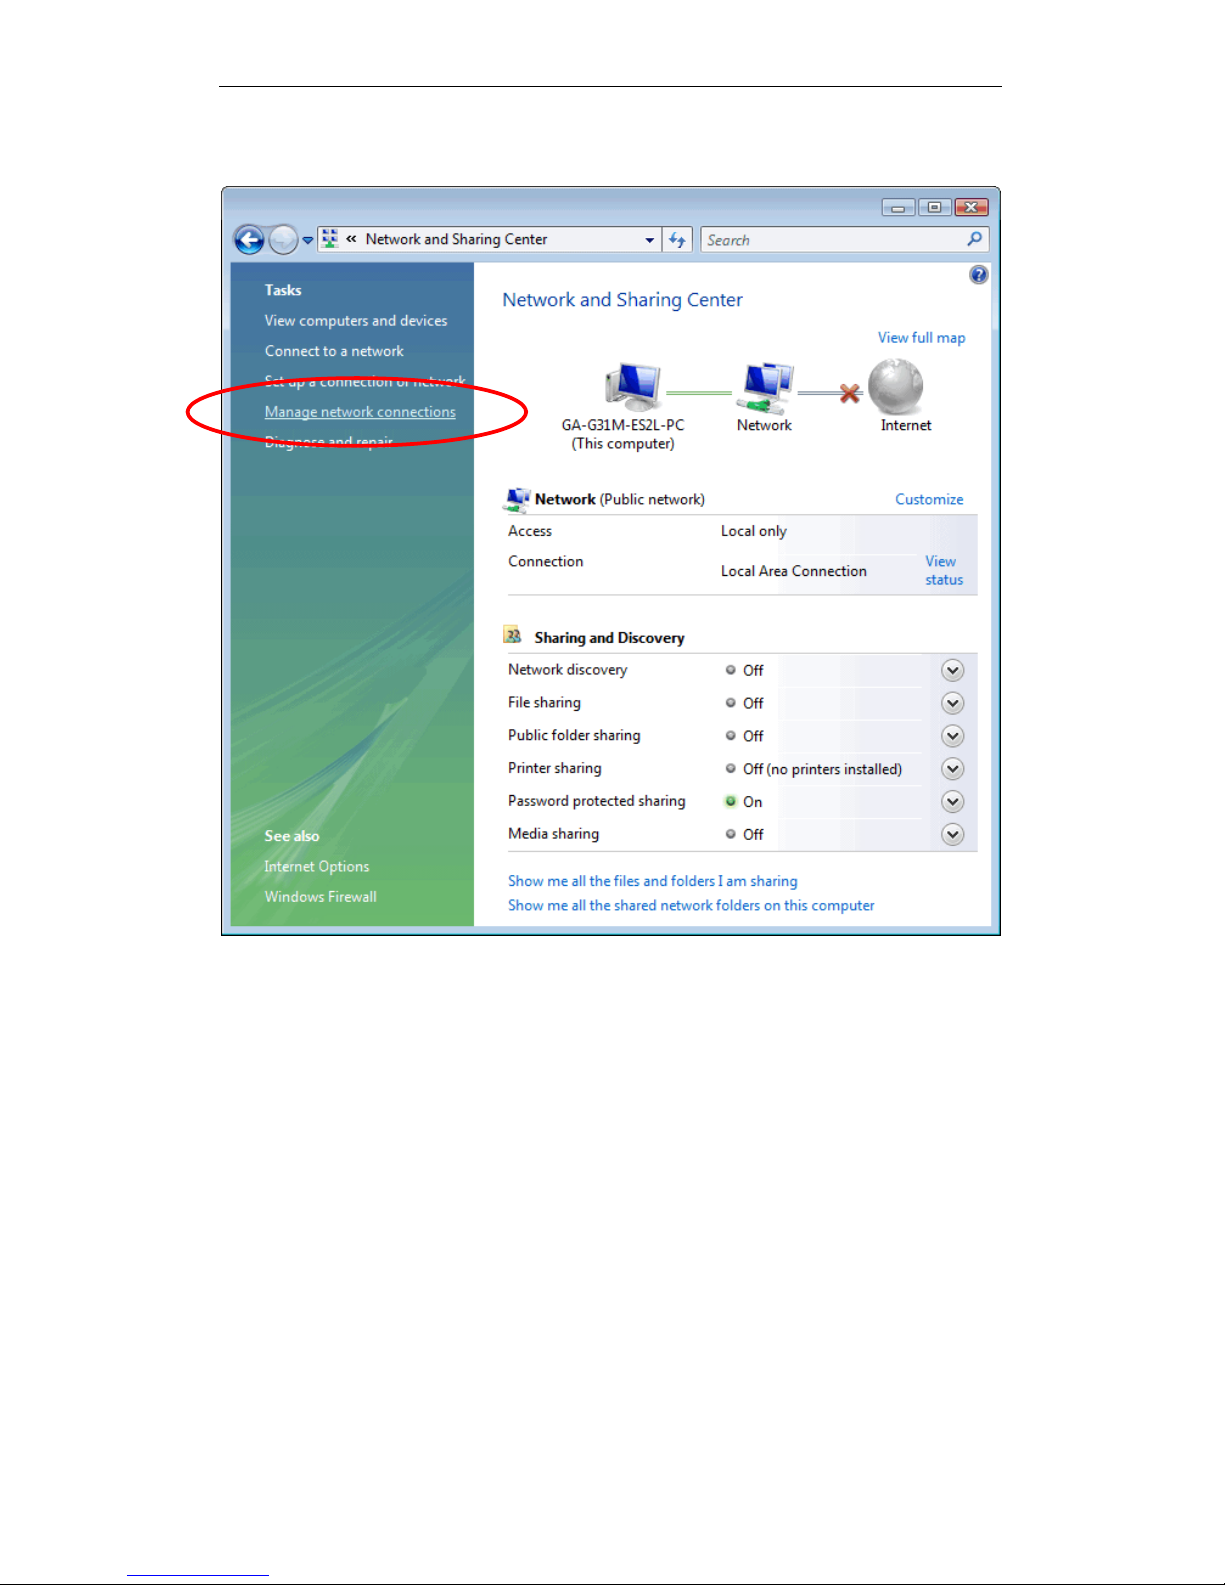
2. In the Manage network connections, click on “Manage
network connections” to continue.
Page 19
Fibrain FSR-R2 User’s Manual
19
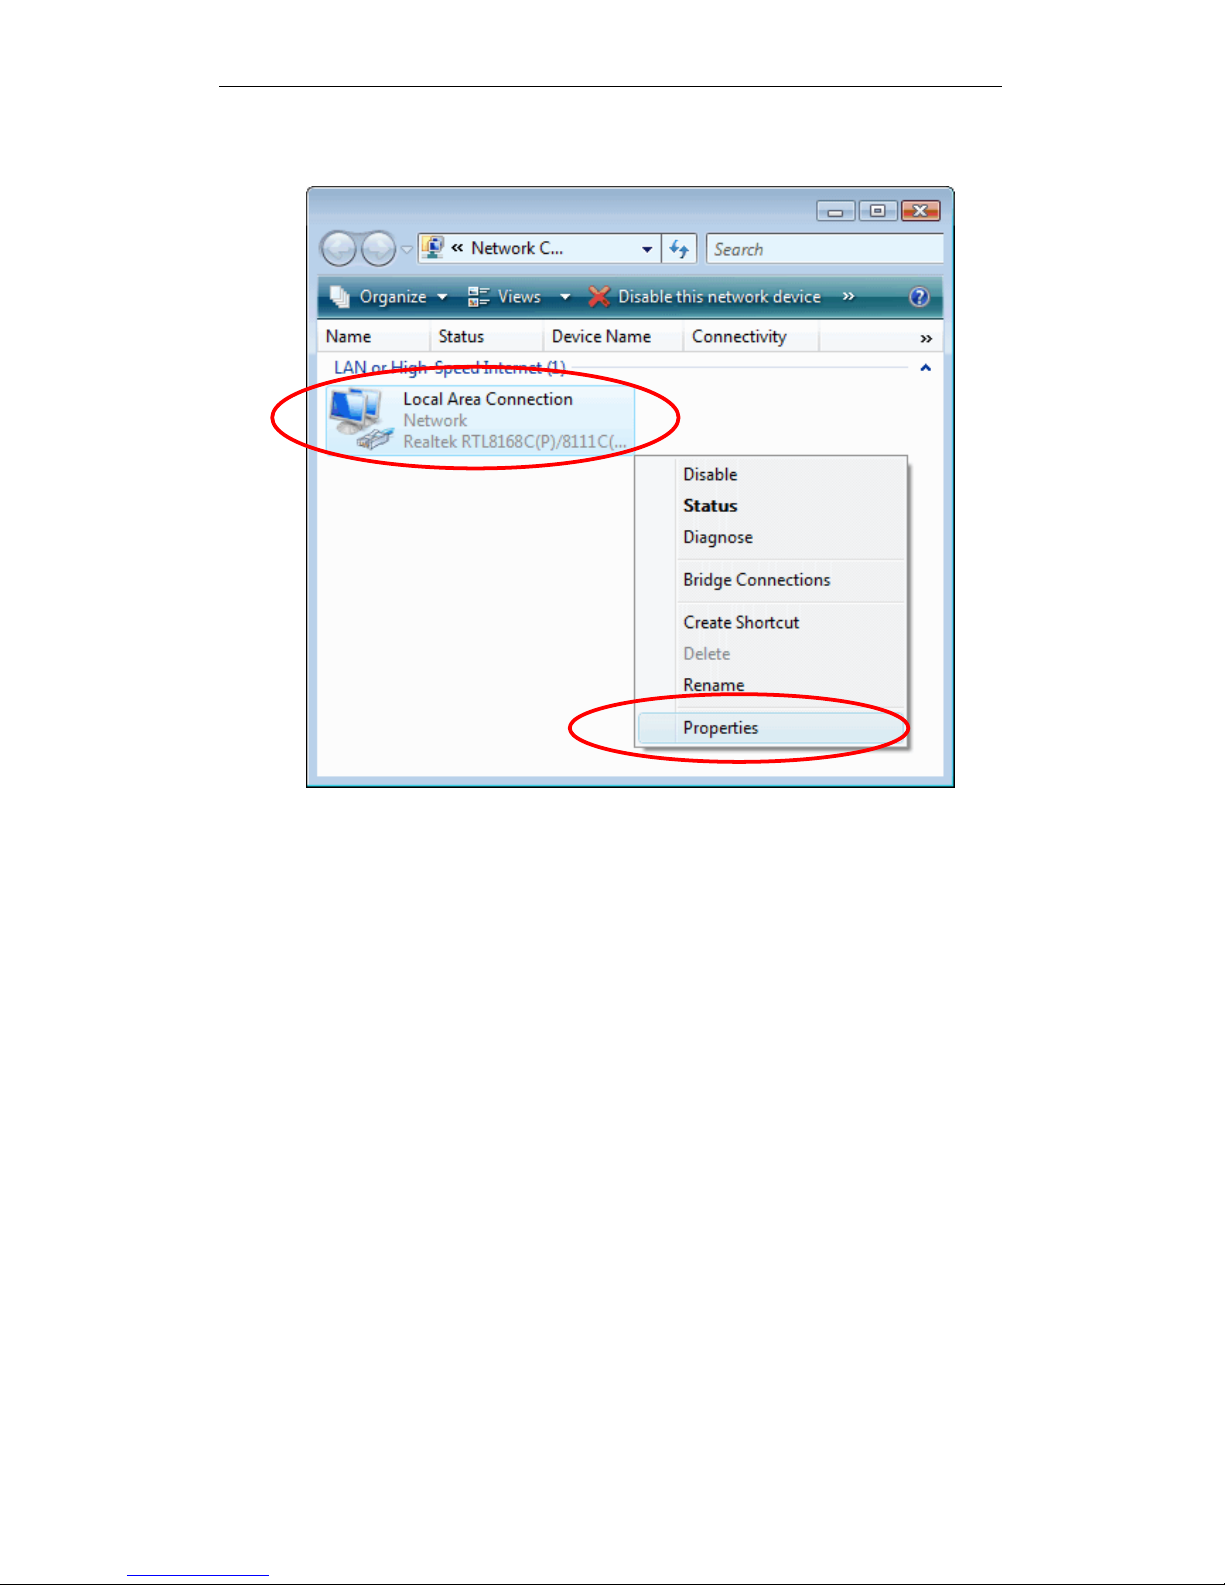
3. Single RIGHT click on "Local Area connection", then click
"Properties".
Page 20
Fibrain FSR-R2 User’s Manual
20
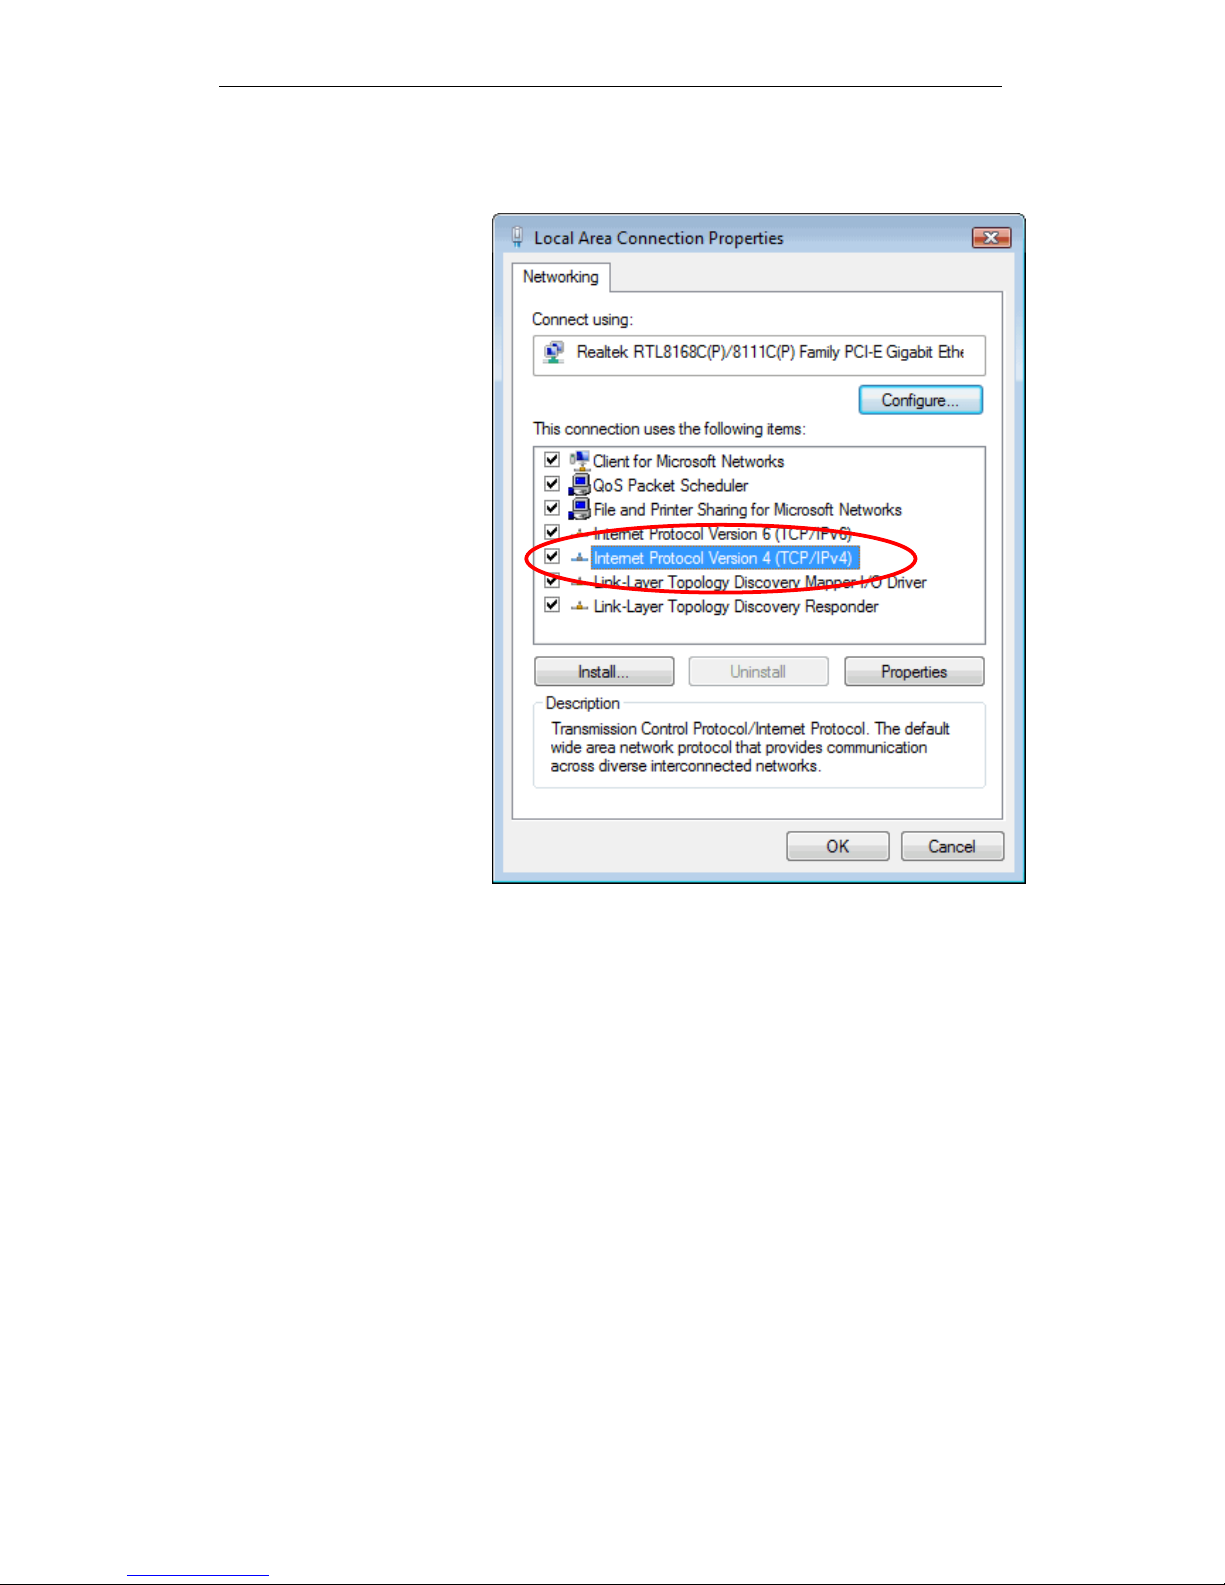
4. The screen will display the information "User Account
Control" and click "Continue" to continue.
5. Double click on "Internet Protocol Version 4 (TCP/IPv4)".
Page 21
Fibrain FSR-R2 User’s Manual
21
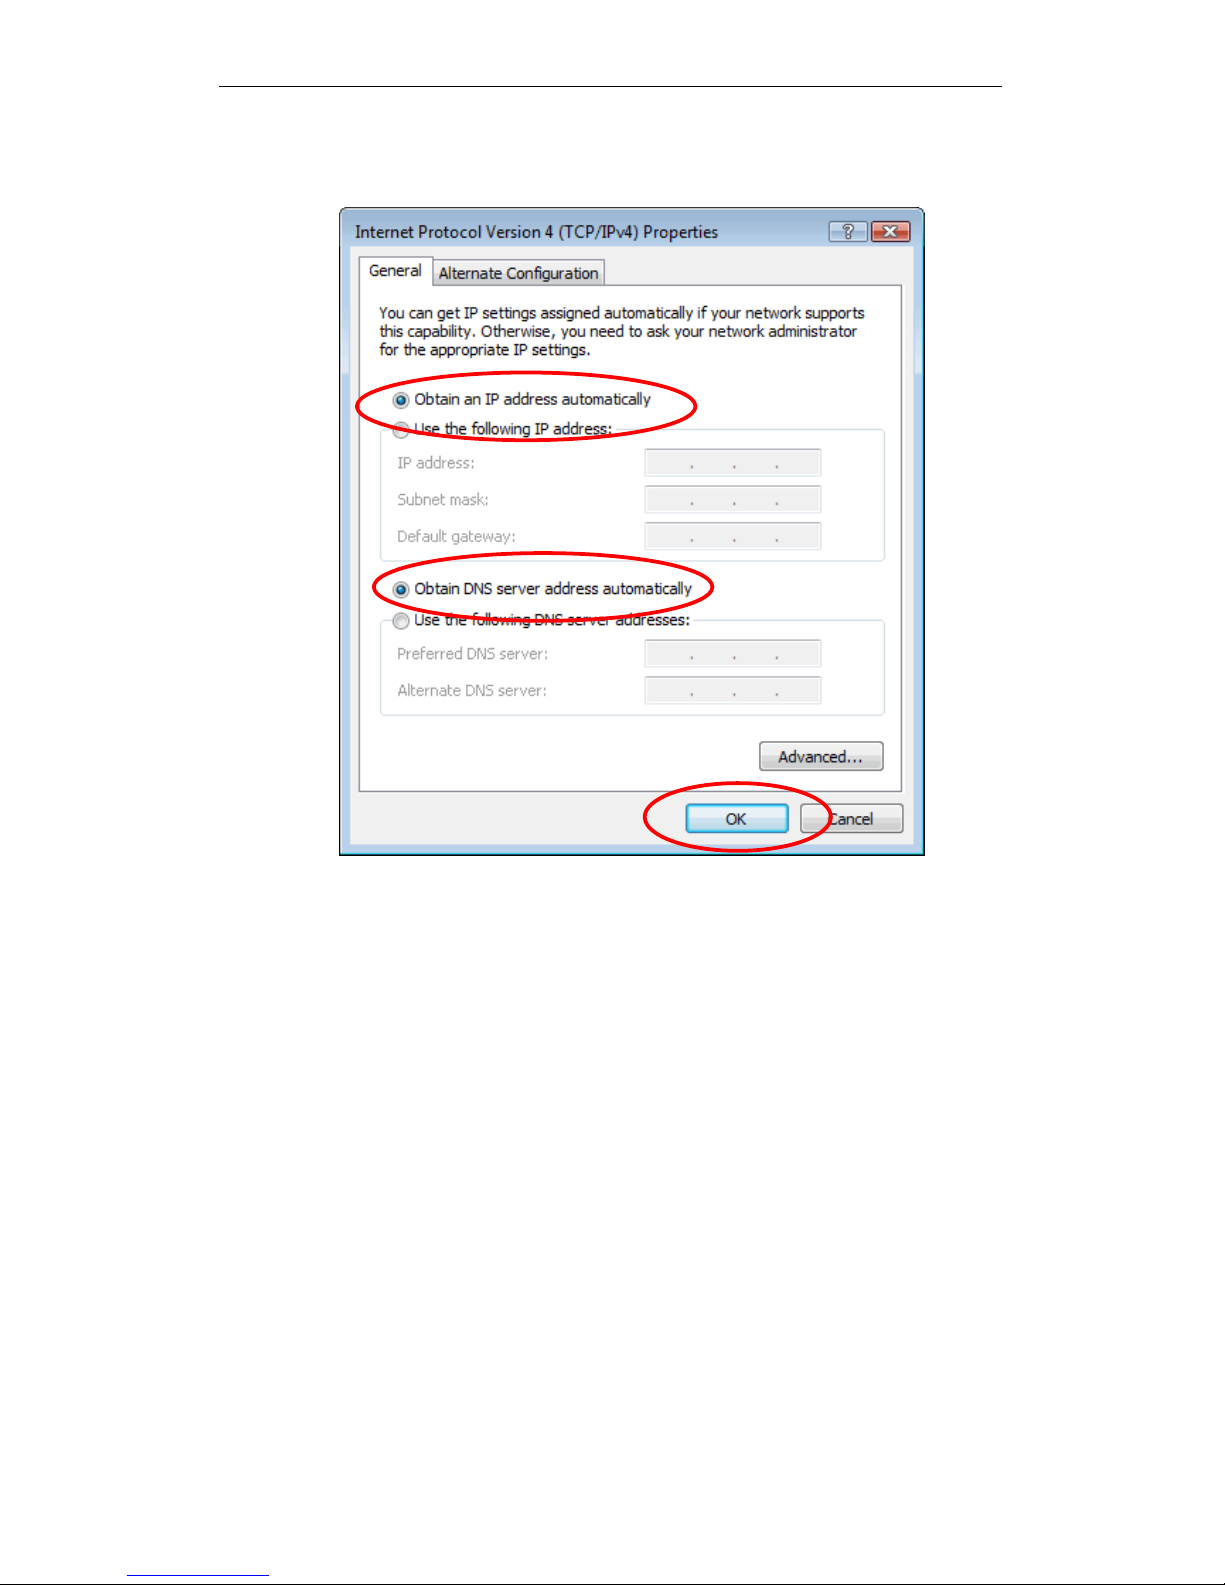
6. Check "Obtain an IP address automatically" and "Obtain
DNS server address automatically" then click on "OK" to
continue.
Page 22
Fibrain FSR-R2 User’s Manual
22
For Windows 7-32/64
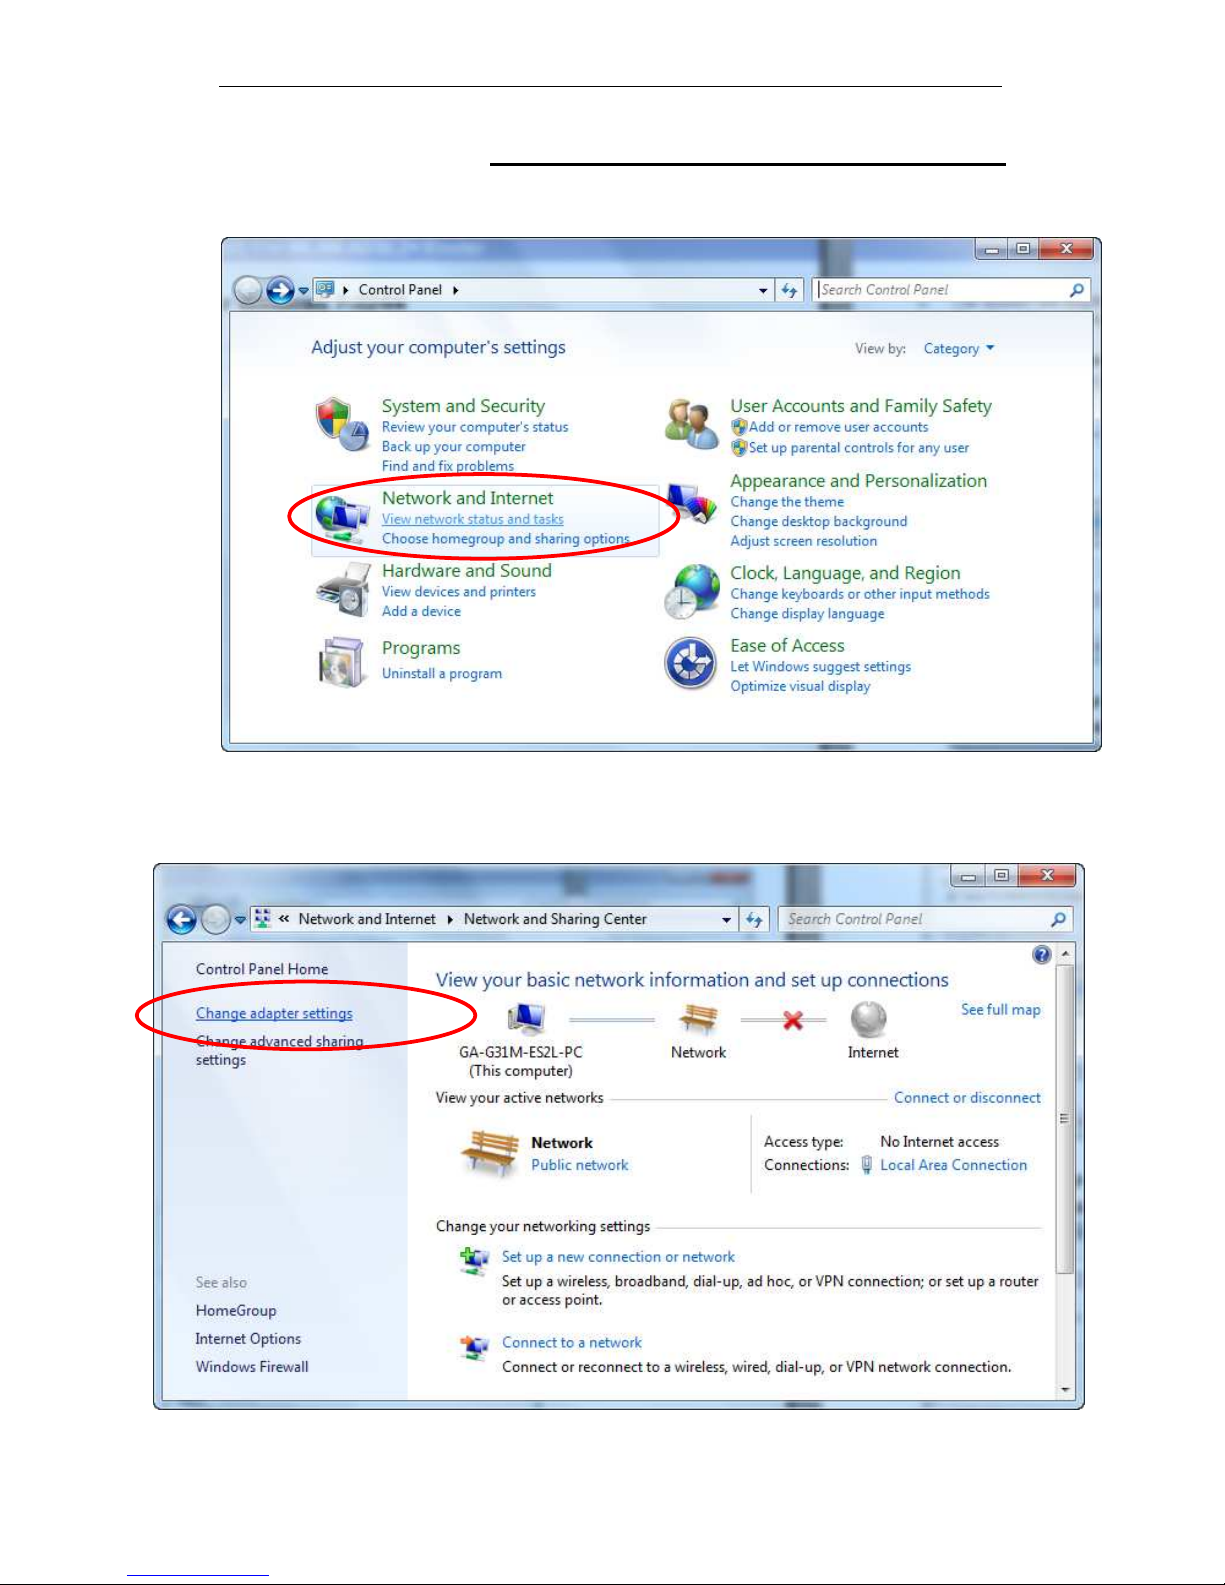
1. Click on “Start” -> “Control Panel” (in Category View) ->
“View network status and tasks”.
2. In the Control Panel Home, click on “Change adapter
settings” to continue.
Page 23
Fibrain FSR-R2 User’s Manual
23
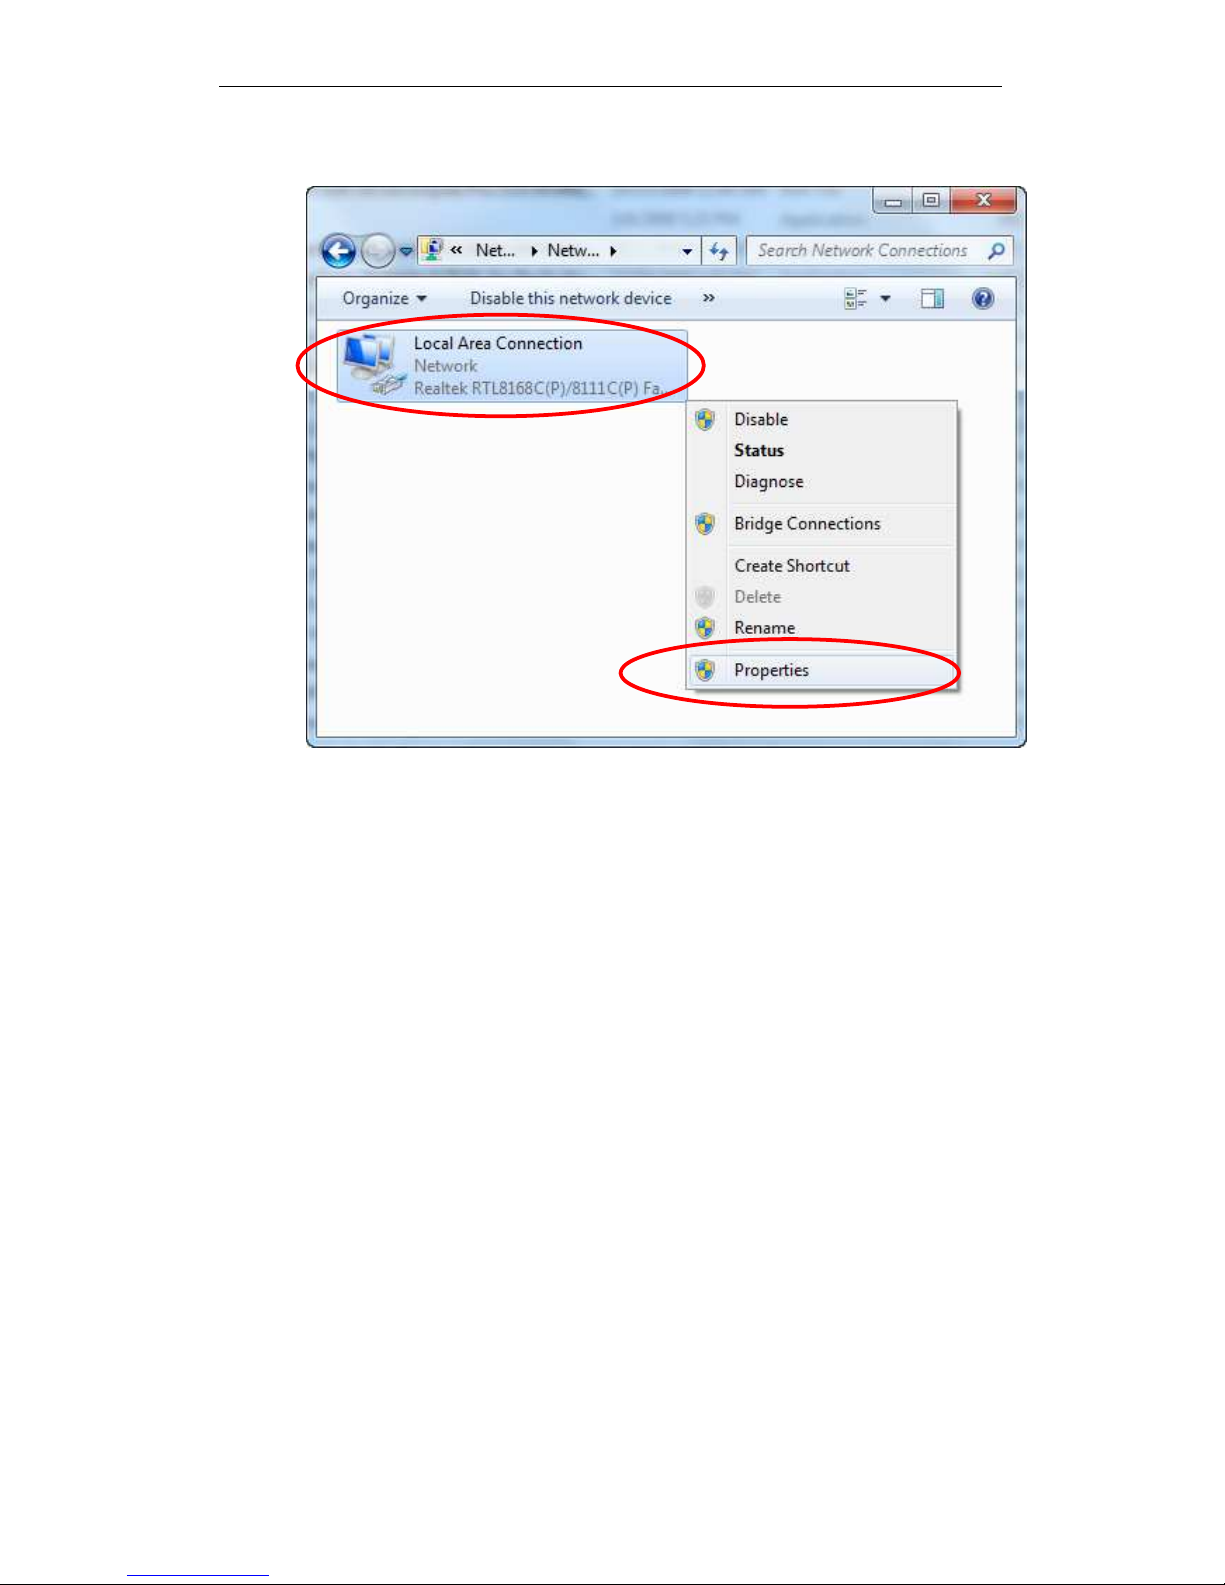
3. Single RIGHT click on “Local Area Connection”, then click
“Properties”.
Page 24
Fibrain FSR-R2 User’s Manual
24
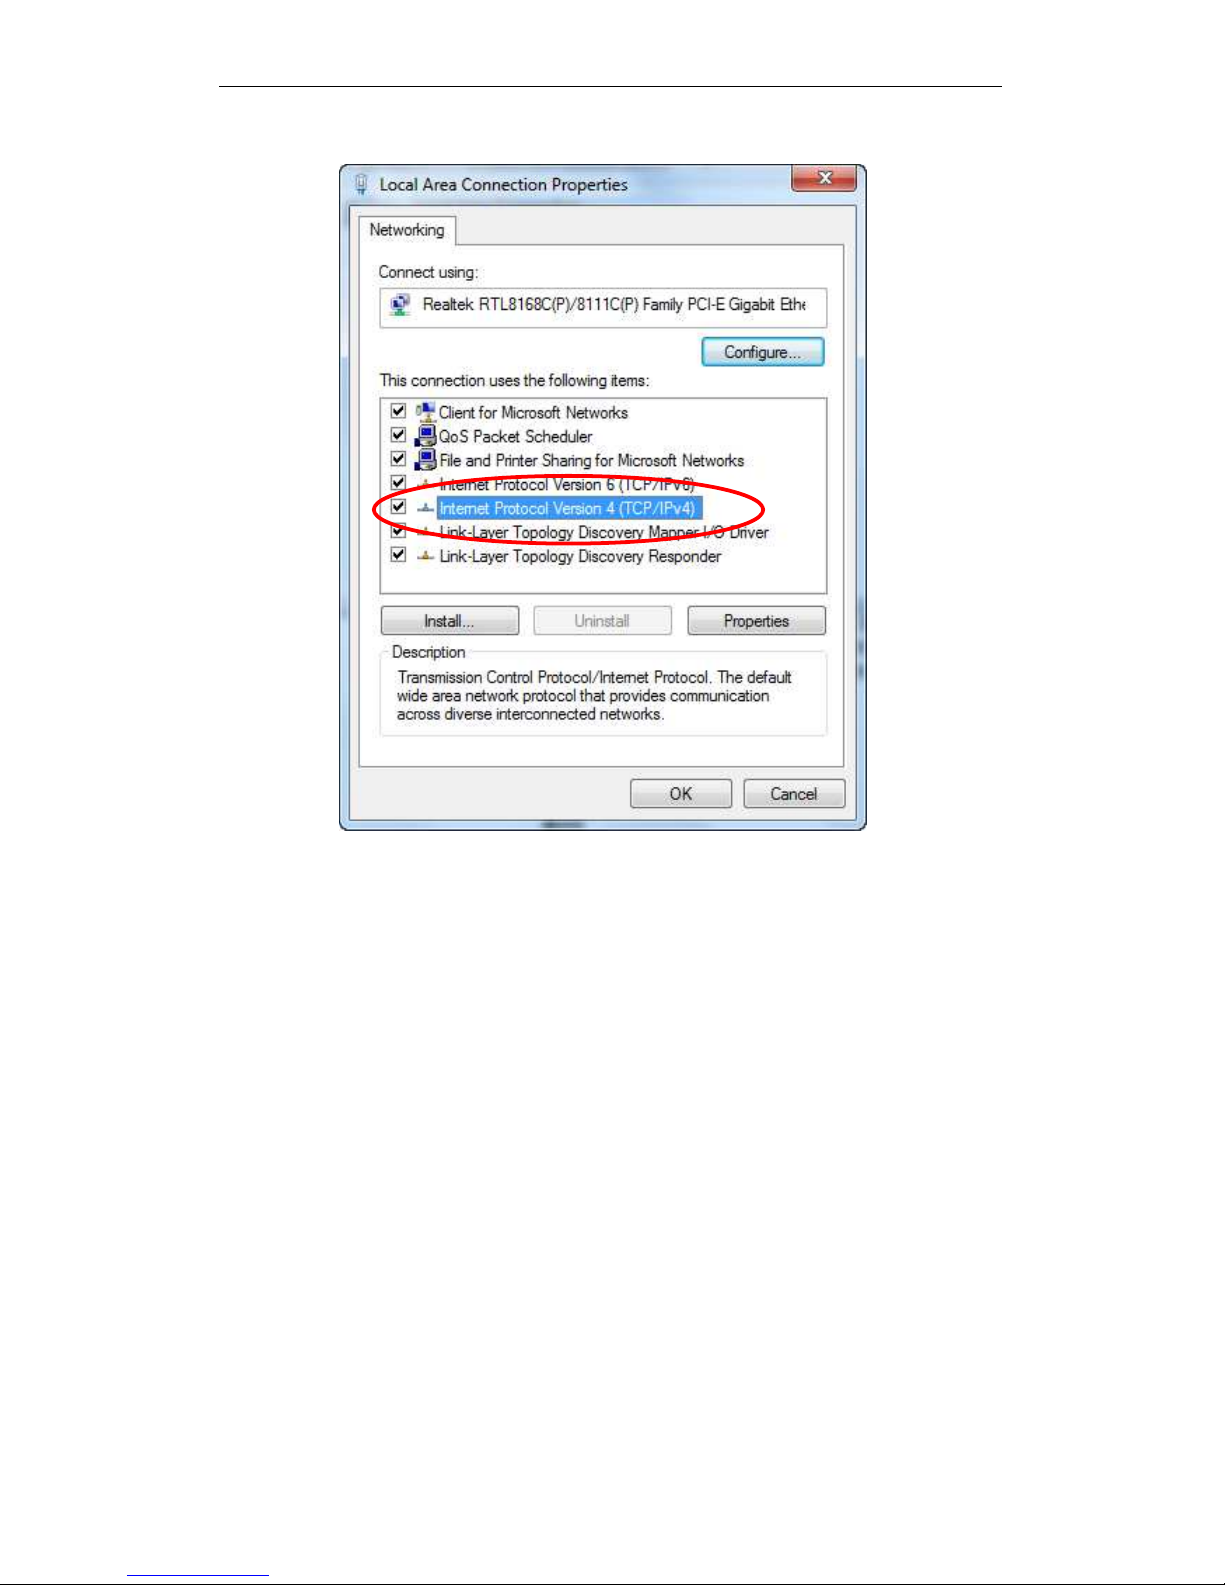
4. Double click on "Internet Protocol Version 4 (TCP/IPv4)".
Page 25
Fibrain FSR-R2 User’s Manual
25
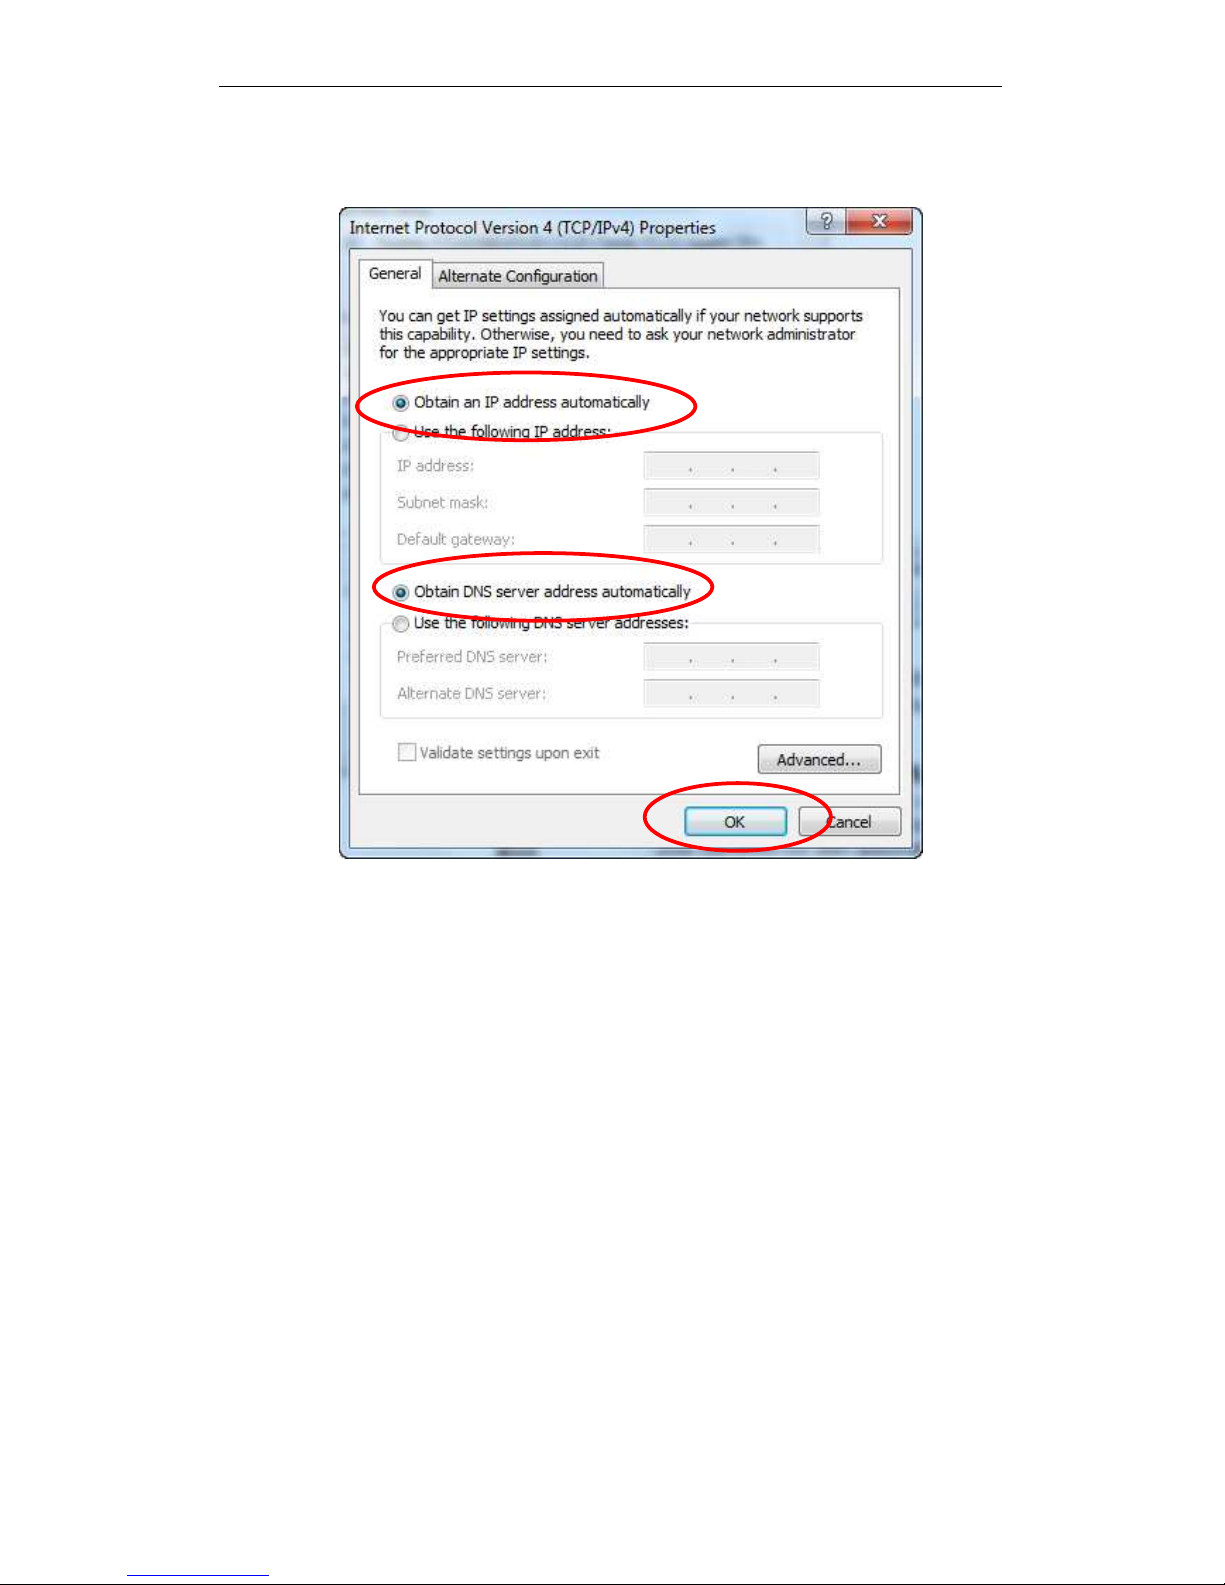
5. Check "Obtain an IP address automatically" and "Obtain
DNS server address automatically" then click on "OK" to
continue.
Page 26

Fibrain FSR-R2 User’s Manual
26
4
Connecting your device
This chapter provides basic instructions for connecting the
Wireless Gateway to a computer or LAN and to the Internet.
In addition to configuring the device, you need to configure the
Internet properties of your computer(s). For more details, see
the following sections:
• Configuring Ethernet PCs
This chapter assumes that you have already established a
DSL/Cable service with your Internet service provider (ISP).
These instructions provide a basic configuration that should be
compatible with your home or small office network setup. Refer
to the subsequent chapters for additional configuration
instructions.
Connecting the Hardware
This section describes how to connect the device to the wall
phone port, the power outlet and your computer(s) or network.
WARNING
Before you begin, turn the power off for all devices. These
include your computer(s), your LAN hub/switch (if applicable),
and the device.
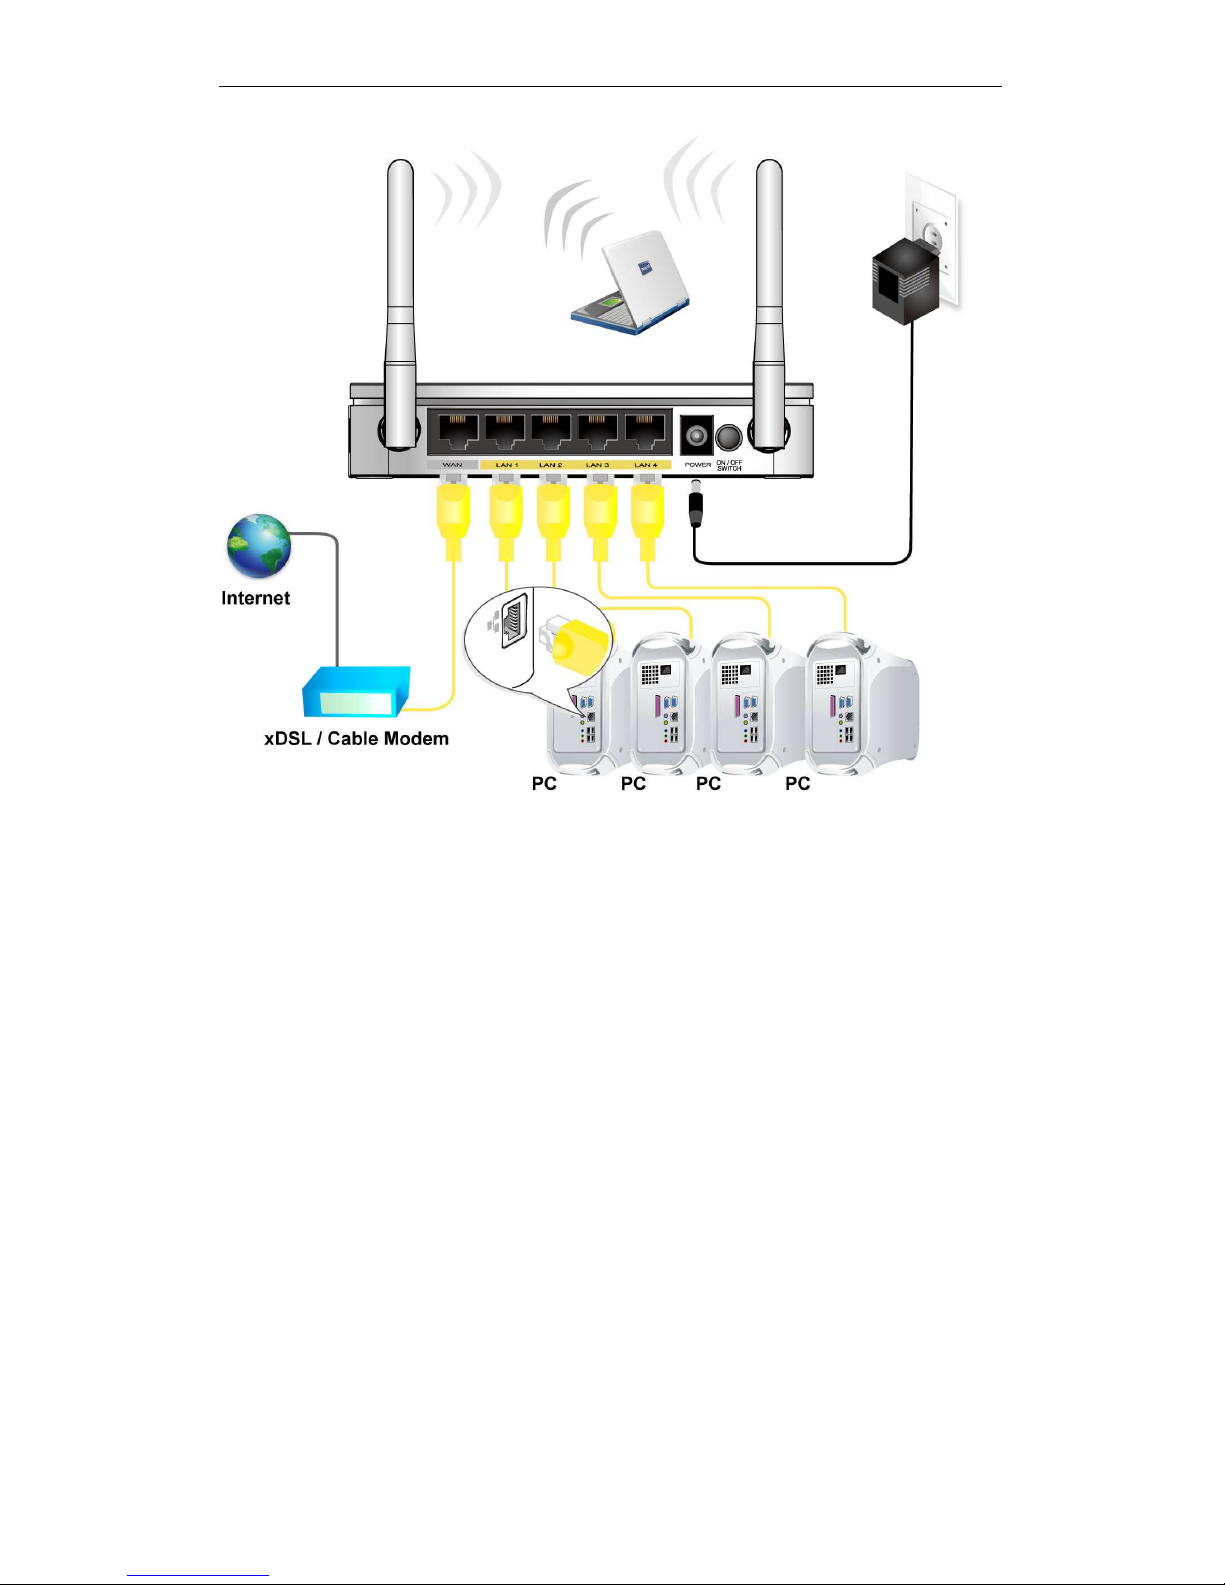
The diagram below illustrates the hardware connections. The
layout of the ports on your device may vary from the layout
shown. Refer to the steps that follow for specific instructions.
Page 27
Fibrain FSR-R2 User’s Manual
27
Figure 5: Overview of Hardware Connections
Step 1. Connect the Ethernet cable to WAN Port
Connect the RJ45 Ethernet cable from your xDSL/Cable
Modem's Ethernet port to 802.11n WLAN Router's WAN Port.
Step 2. Connect the Ethernet cable to LAN Port
Connect the supplied RJ45 Ethernet cable from your PC's
Ethernet port to any of the 4 802.11n WLAN Router's LAN
Ports.
Step 3. Attach the power connector
Connect the power adapter to the power inlet “POWER” of the
802.11n WLAN Router and turn the power switch “ON/OFF
SWITCH” of your 802.11n WLAN Router on.
Page 28
Fibrain FSR-R2 User’s Manual
28
802.11n WLAN Router Configuration
1. Please insert the supplied CD into your CD-ROM drive.
2. The CD should auto-start, displaying the window shown in
3. below. If your CD does not start automatically, go to
Windows Explorer, Select your CD drive and double click
autorun.exe.
3. To configure the device, please click on Advanced
Configuration button.
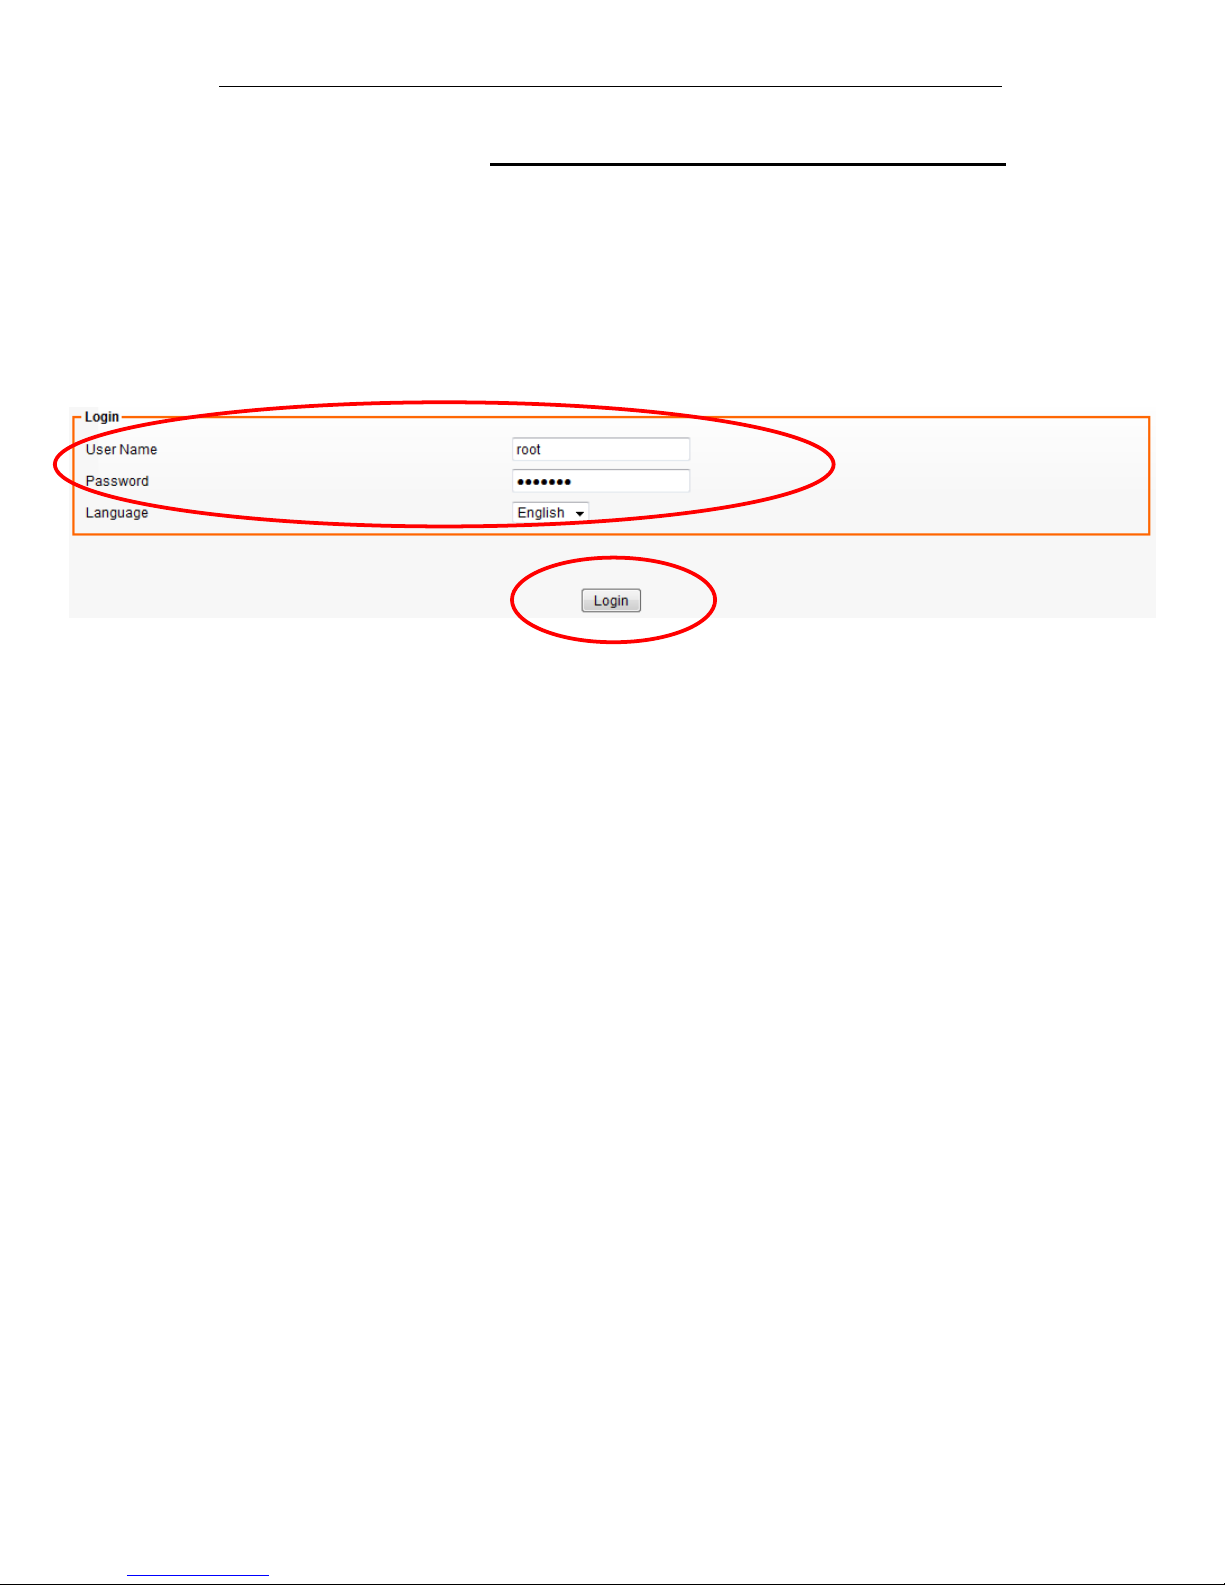
4. Please enter the Login User Name: root and Login
Password: fibrain and then click on Login button.
Page 29
Fibrain FSR-R2 User’s Manual
29
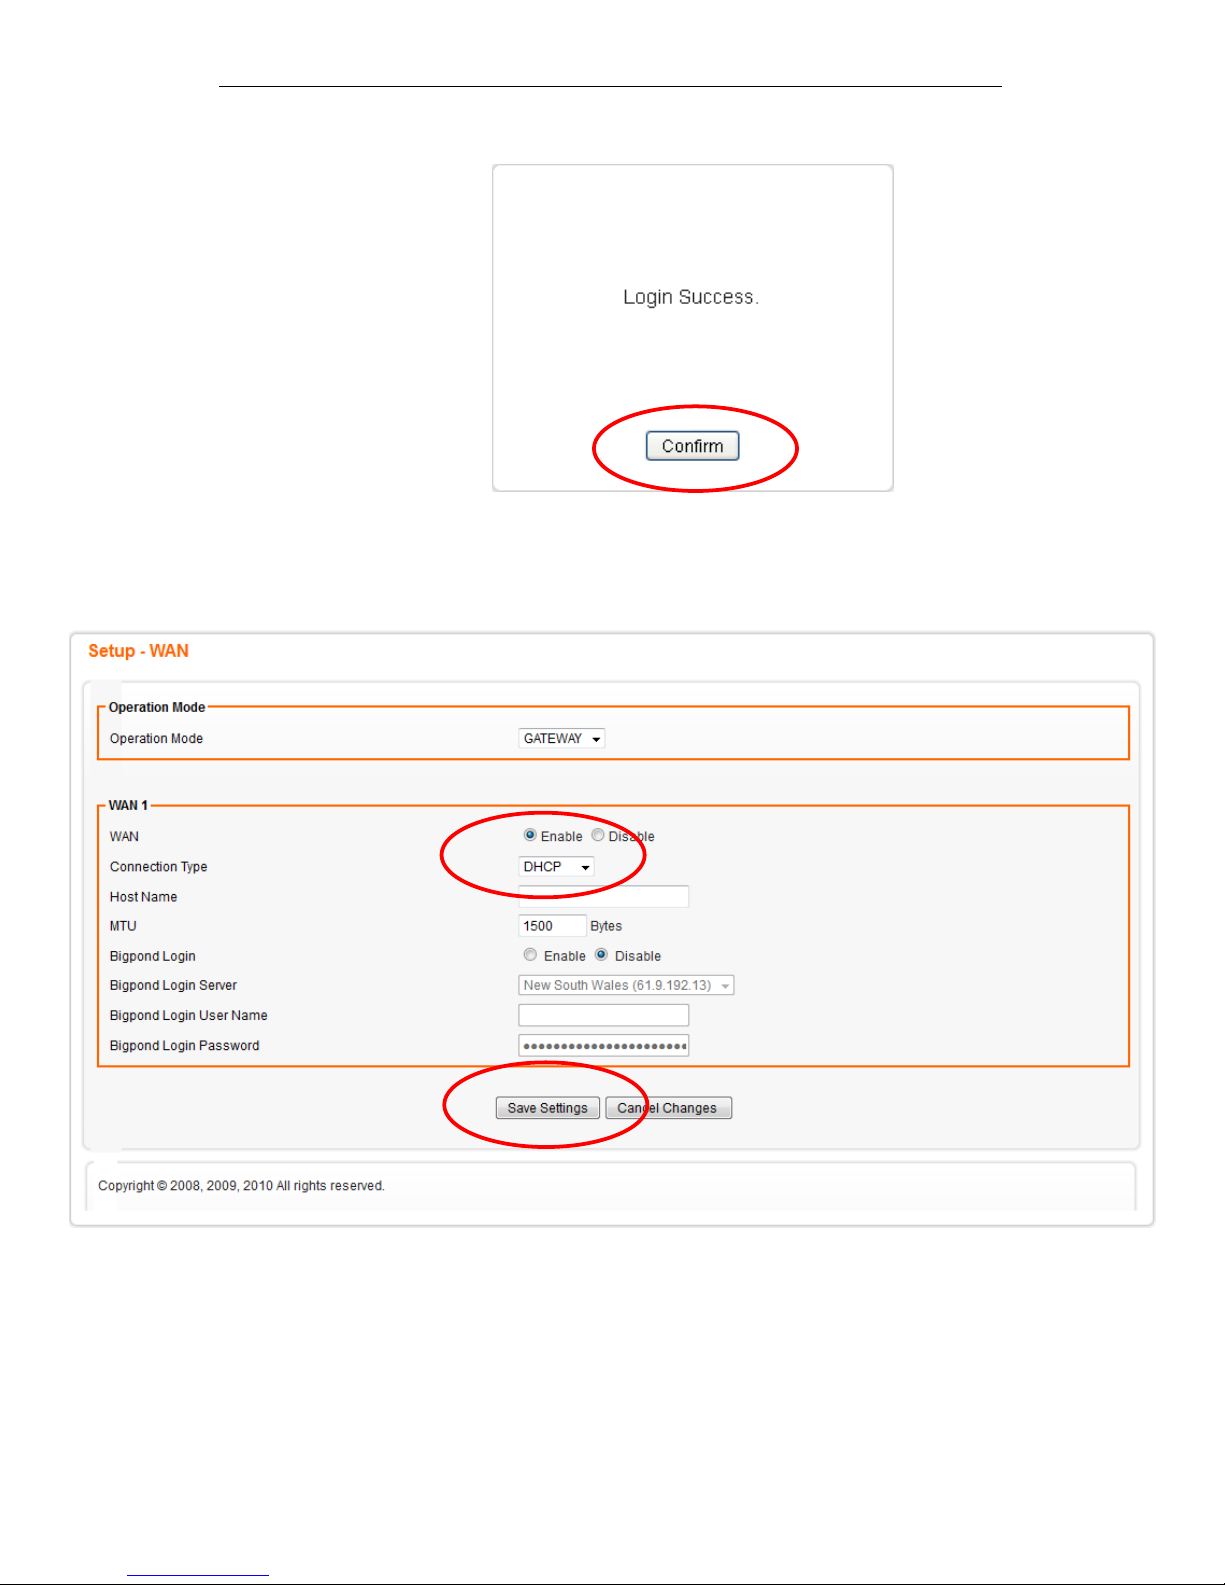
5. Click on Confirm button.
6. Select the Connection Type DHCP, Static IP or PPPoE
and enter related parameters that your ISP (Internet
Services Provider) or Network Administrator provided and
then click on Save Settings button.
Page 30
Fibrain FSR-R2 User’s Manual
30
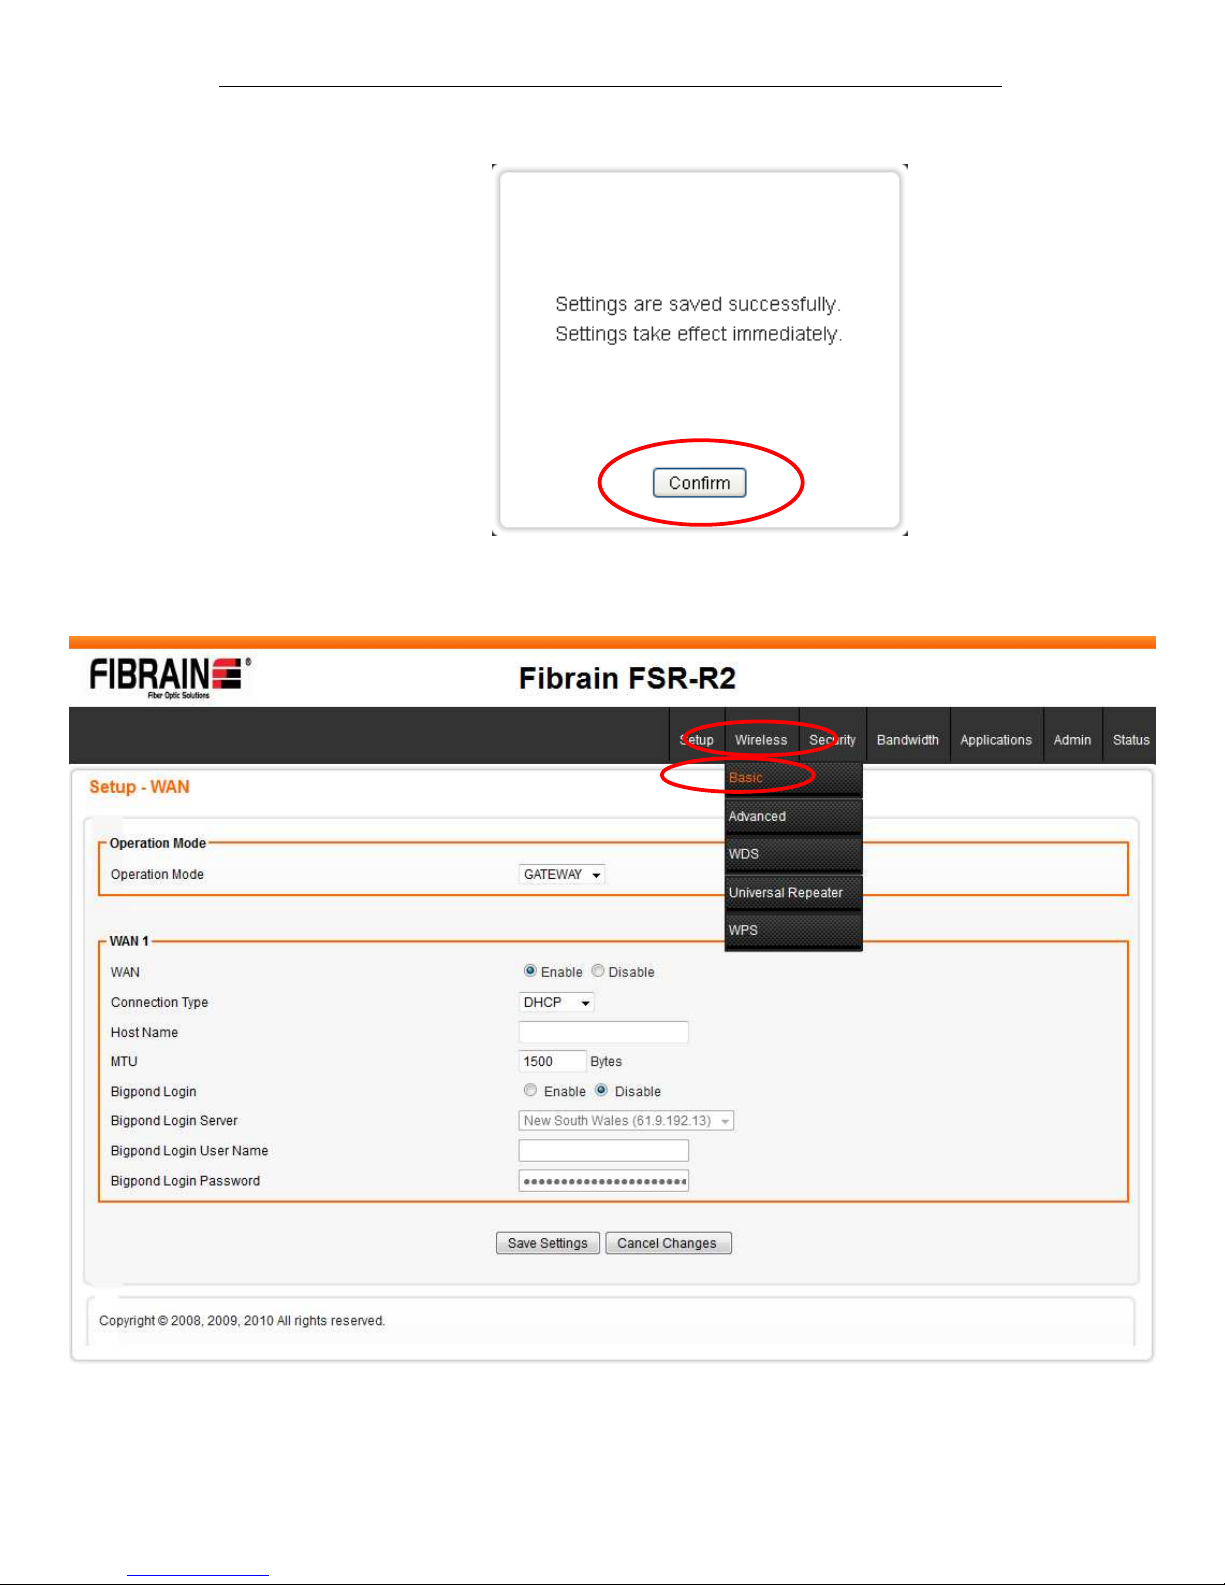
7. Click on Confirm button.
8. From the Wireless menu, click on Basic.
Page 31
Fibrain FSR-R2 User’s Manual
31
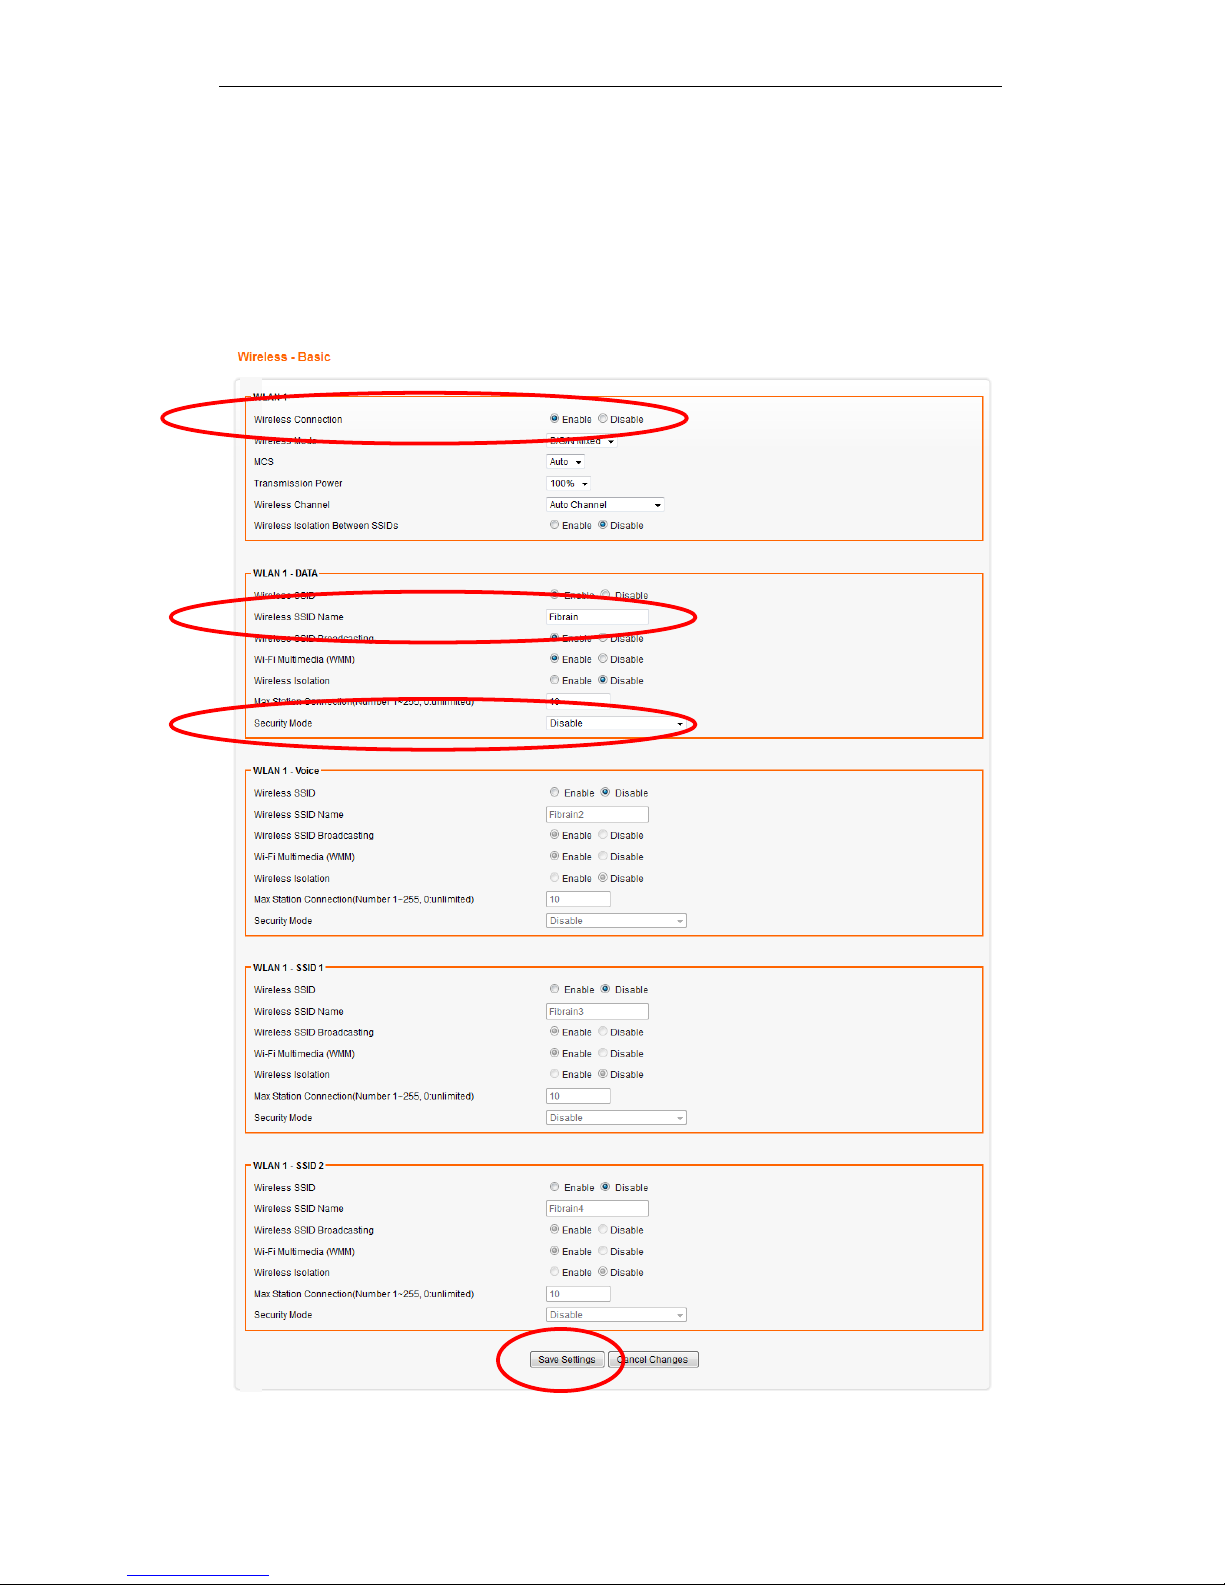
9. Please enter the SSID and if you want to change (the
default settings Wireless Connection= Enable, SSID =
Fibrain).
10. Choose the Security Mode if necessary, as Disable
(Default) / WEP / WPA PSK (Pre-Shared Key) / WPA
Radius / WPA2 PSK (Pre-Shared Key) and WPA2 Radius.
For example, you choose the WPA2 PSK Security Mode
and configure the Key (Passphrase).
11. Please click Save Settings button to continue.
Page 32
Fibrain FSR-R2 User’s Manual
32
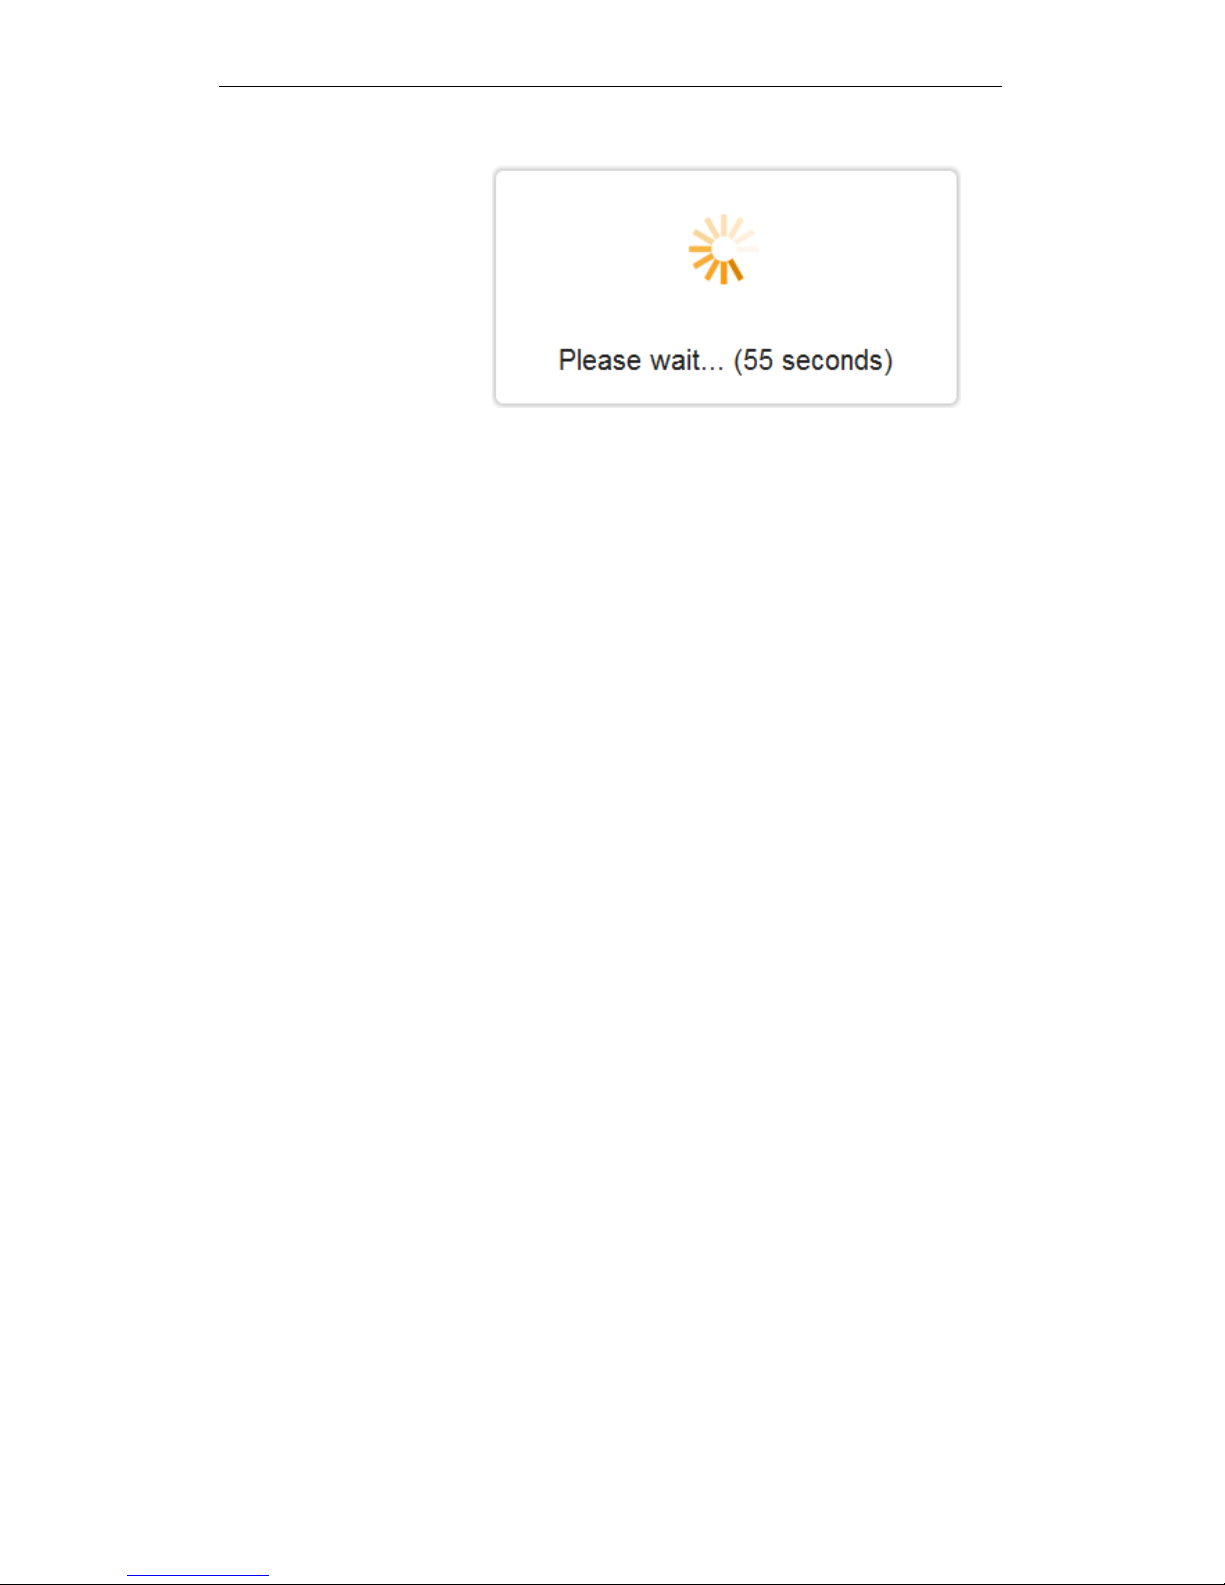
12. Please wait... (55 seconds).
13. WLAN Router has been configured completely, and
suitable for Wireless and Internet Connections.
Page 33
Fibrain FSR-R2 User’s Manual
33
Wireless Connection
For easy installation it is saved to keep the settings. You can
later change the wireless settings via the wireless configuration
menu. (see user manual on the CD – Chapter 14 and other).
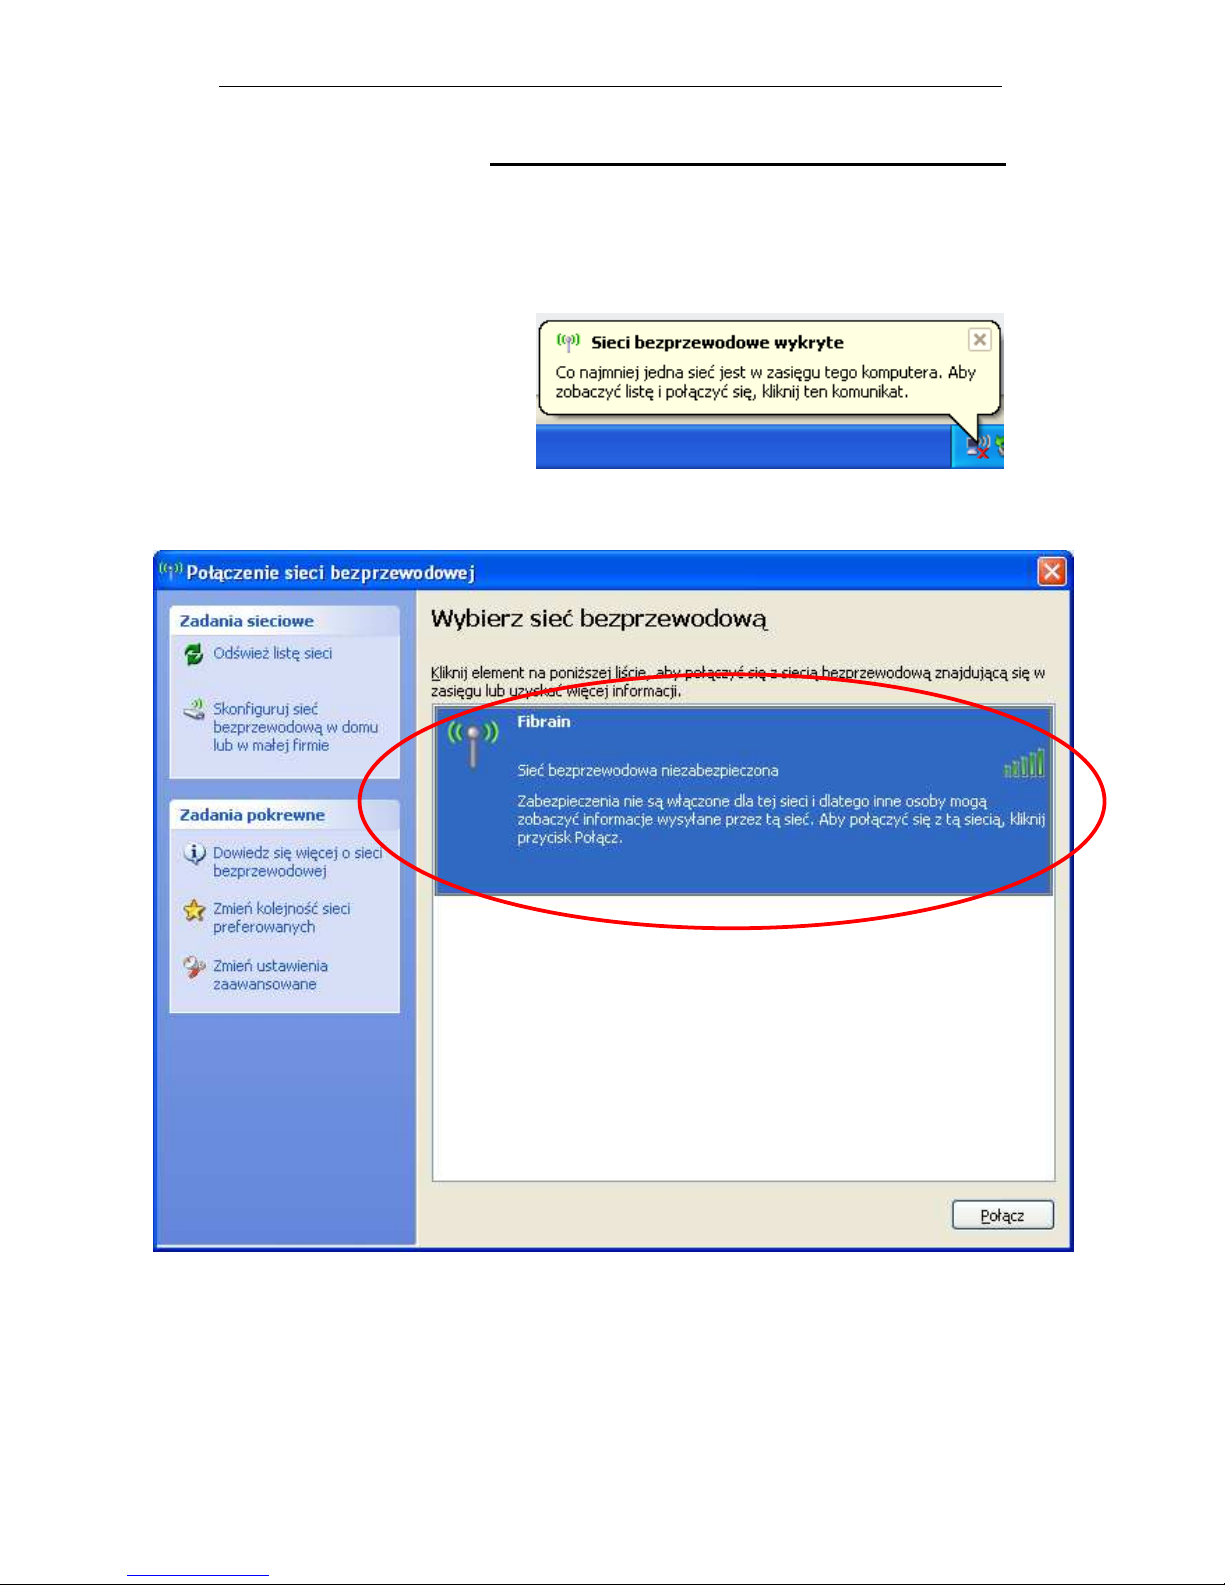
1. Double click on the wireless icon on your computer and
search for the wireless network that you enter SSID name.
2. Click on the wireless network that you enter SSID name to
connect.
Page 34
Fibrain FSR-R2 User’s Manual
34
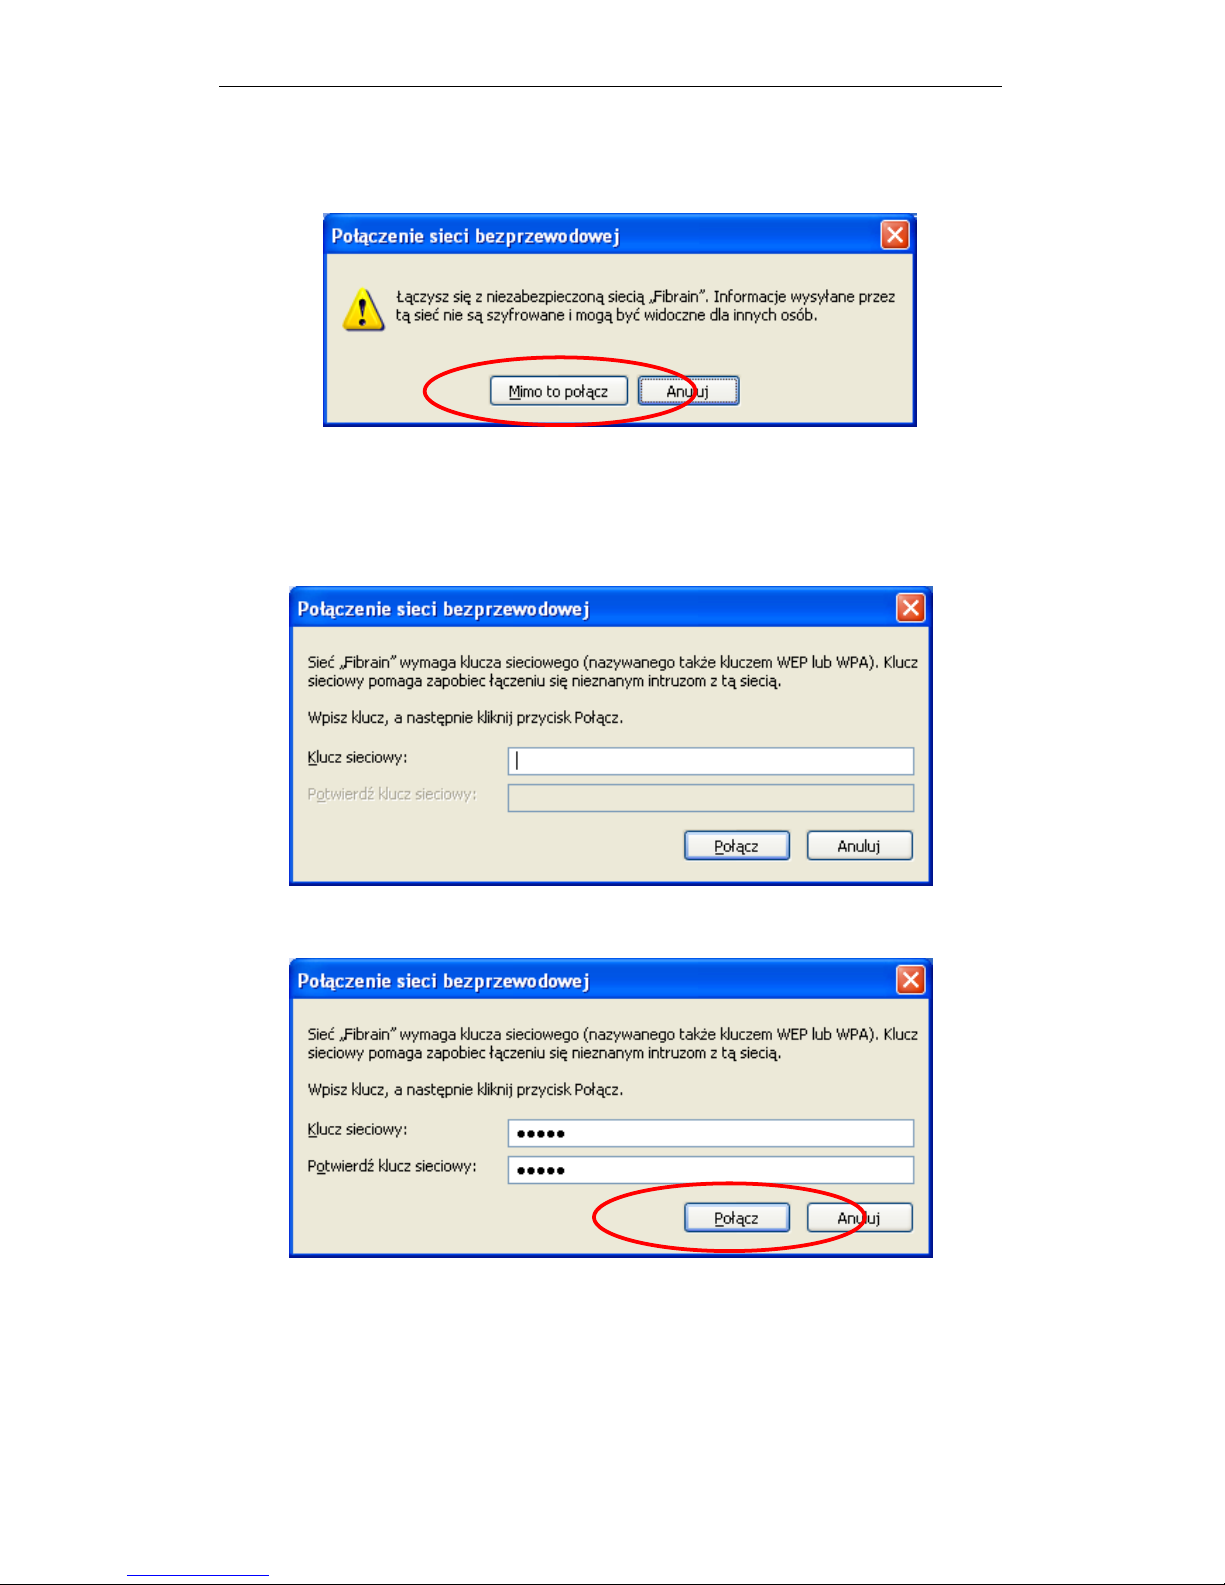
3. If the wireless network isn’t encrypted, click on "Connect
Anyway" to connect.
4. If the wireless network is encrypted, enter the network key
that belongs to your authentication type and key. You can
later change this network key via the wireless configuration
menu. (see user manual on the CD – Chapter 14 and
other).
5. Click on "Connect" or "Apply".
6. Now you are ready to use the Wireless Network to Internet
or intranet.
Page 35
Fibrain FSR-R2 User’s Manual
35
5
What the Internet/WAN access of your own
Network now is
Now you could check what the Internet/WAN access of your
network is to know how to configure the WAN port of Wireless
Gateway.
Please follow steps below to check what the Internet/WAN
access if your own Network is DHCP Client, Static IP or PPPoE
Client.
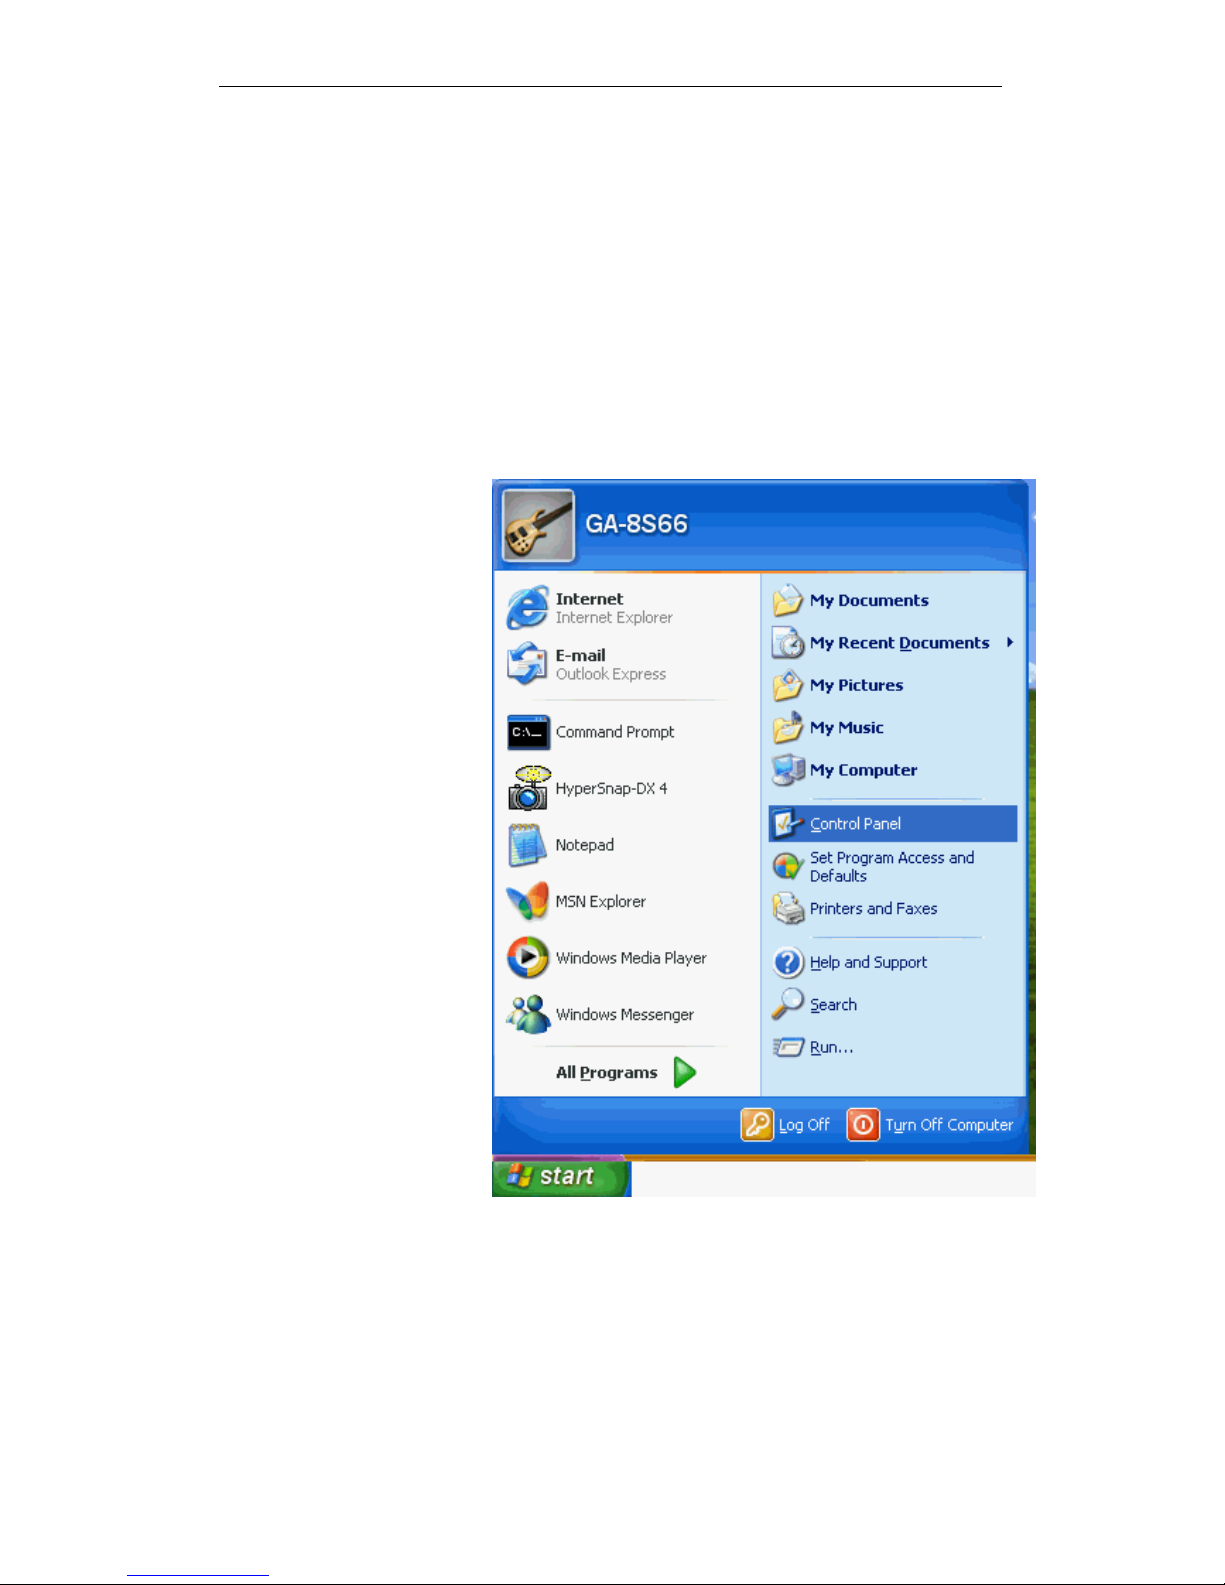
1. Click Start -> Control Panel
Page 36
Fibrain FSR-R2 User’s Manual
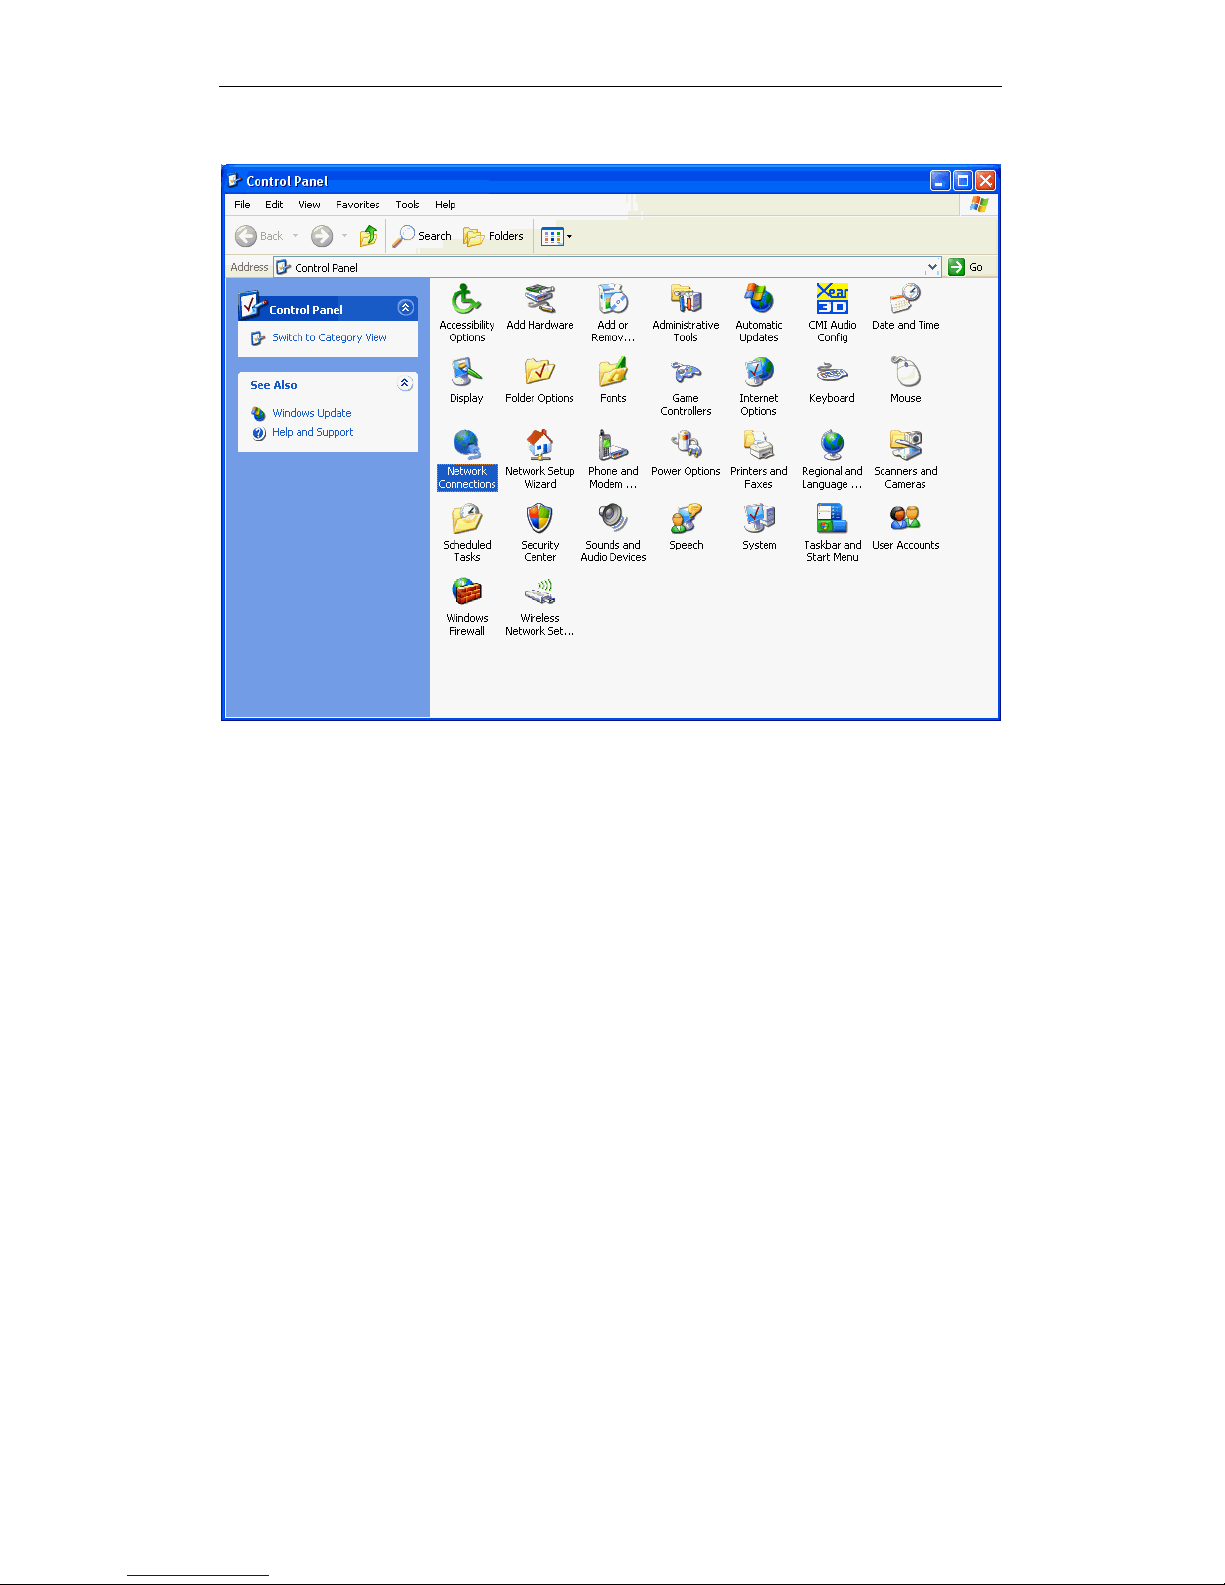
36
2. Double click Network Connections
Page 37
Fibrain FSR-R2 User’s Manual
37
Internet/WAN access is the DHCP client
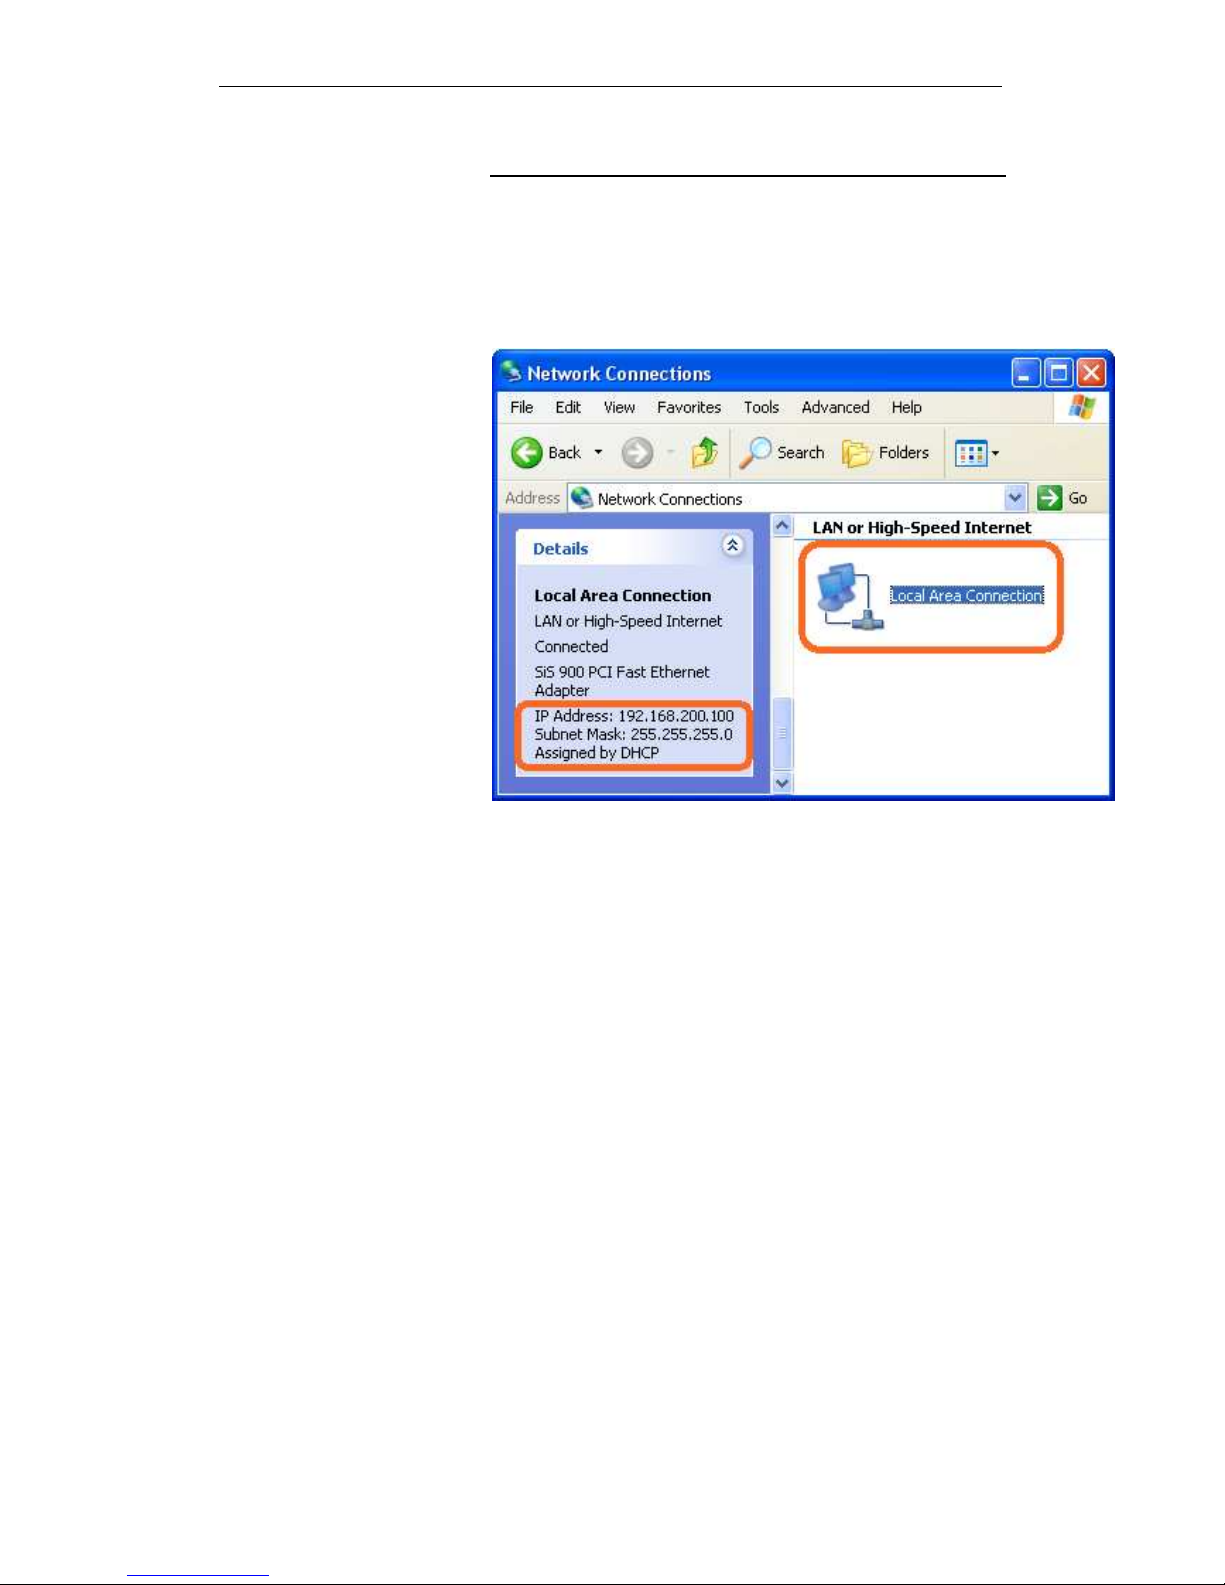
If you cannot see any Broadband Adapter in the Network
Connections, your Internet/WAN access is DHCP Client or
Static IP.
1. Click Local Area Connection in LAN or High-Speed
Internet and you could see string Assigned by DHCP in
Details.
Page 38
Fibrain FSR-R2 User’s Manual
38
Internet/WAN access is the Static IP
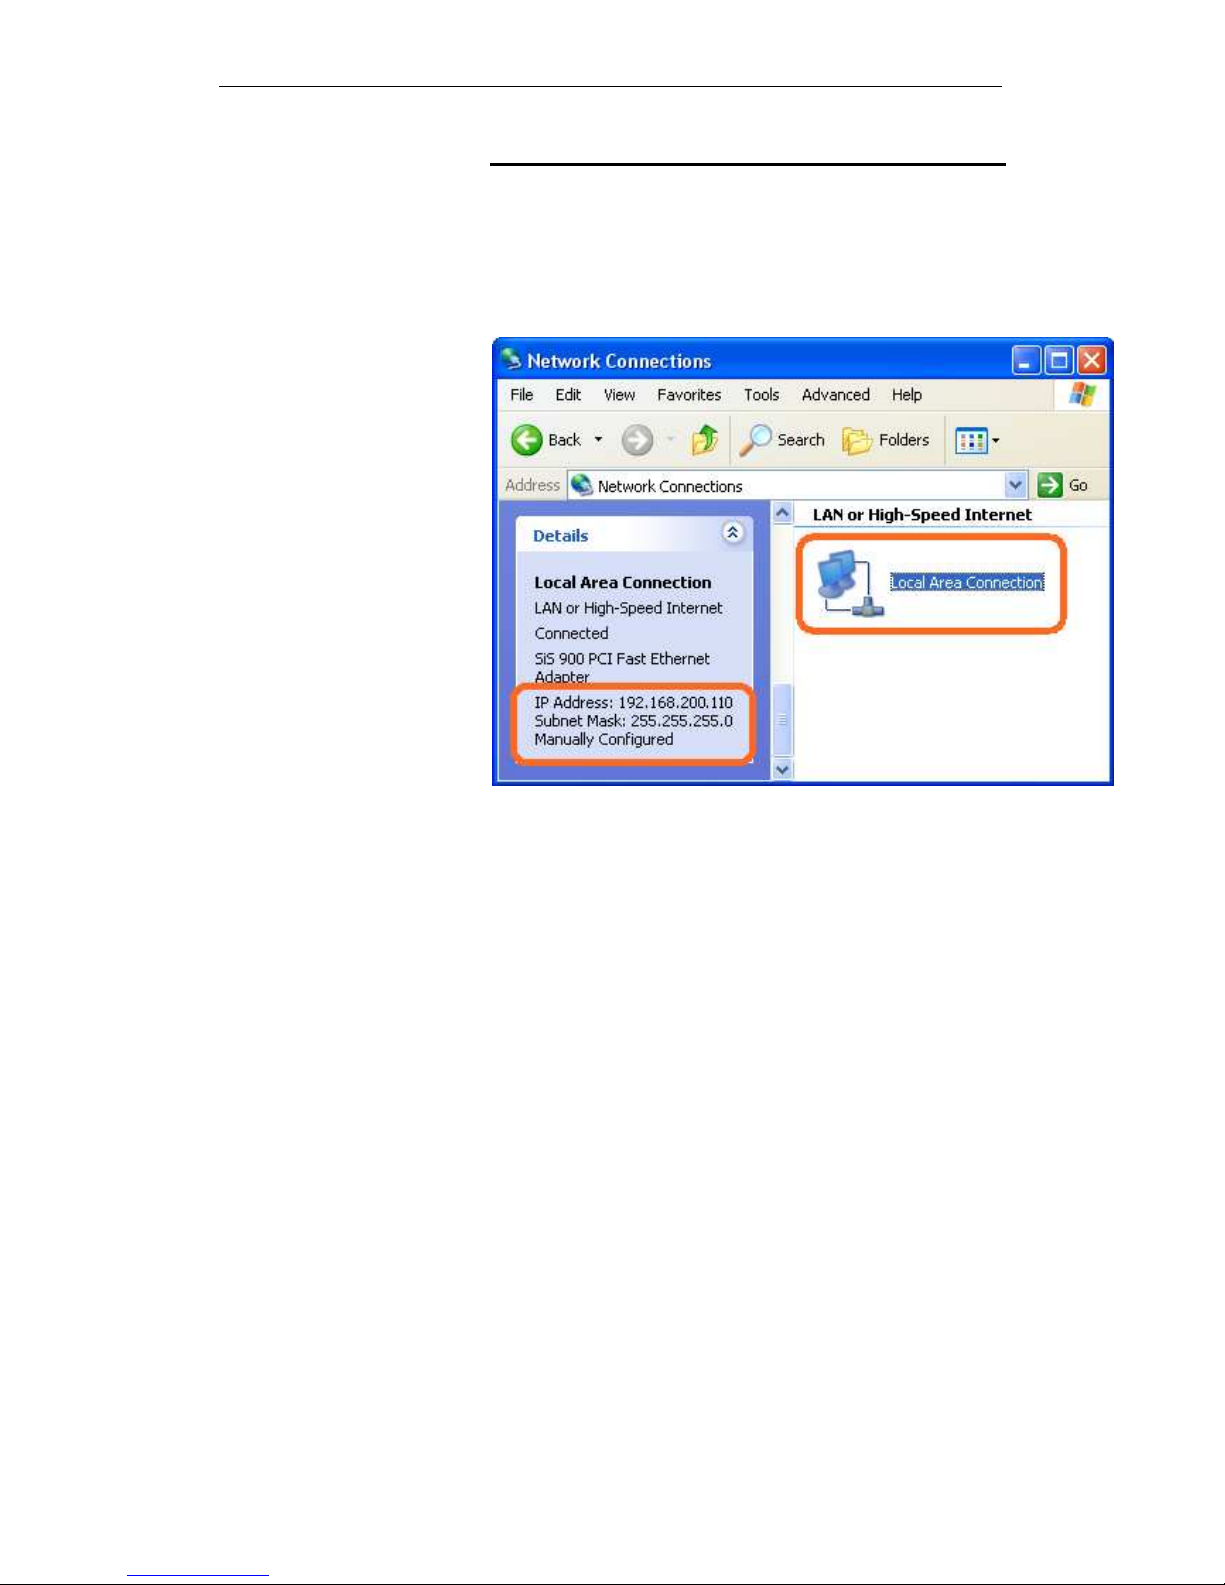
If you cannot see any Broadband Adapter in the Network
Connections, your Internet/WAN access is DHCP Client or
Static IP.
2. Click Local Area Connection in LAN or High-Speed
Internet and you could see string Manually Configured in
Details.
Page 39
Fibrain FSR-R2 User’s Manual
39
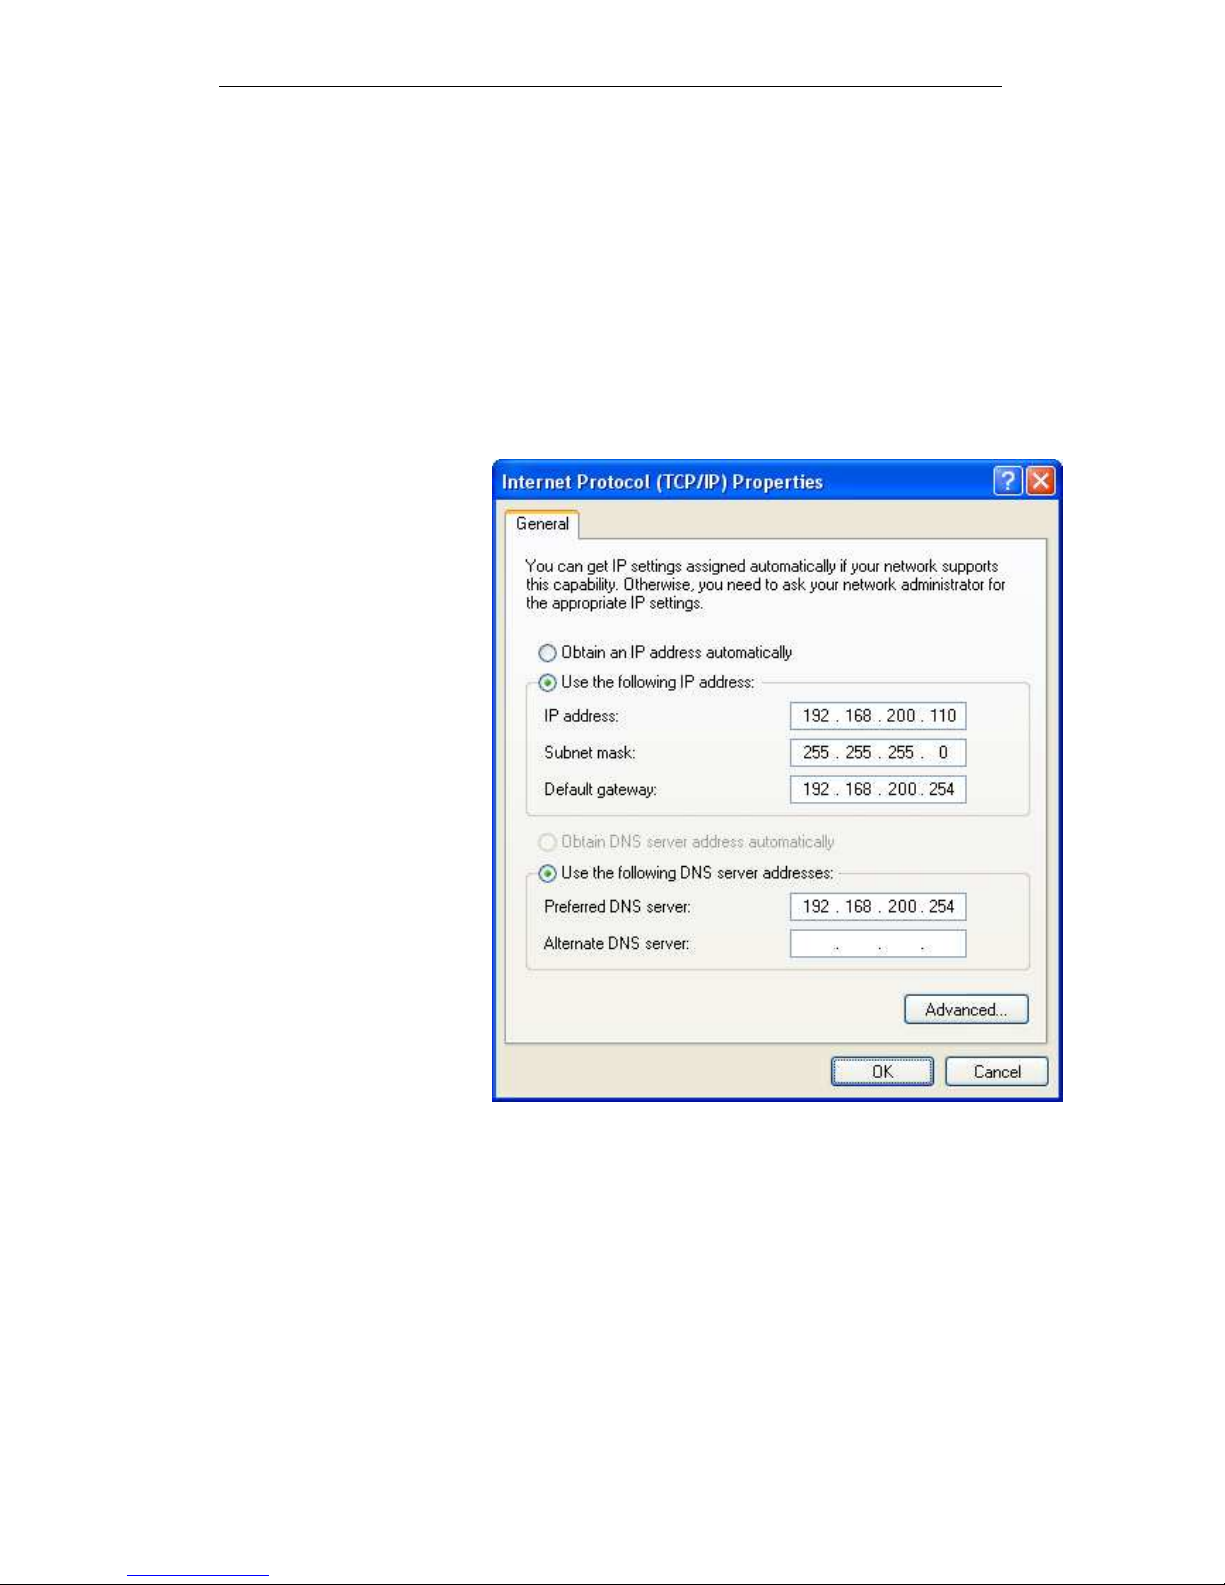
3. Right click Local Area Connection and click Properties
and then you could get the IP settings in detail and write
down the IP settings as follow:
IP Address: 192.168.200.110
Subnet mask: 255.255.255.0
Default gateway: 192.168.200.254
Preferred DNS server: 192.168.200.254
Alternate DNS Server: If you have it, please also write it
down.
Page 40
Fibrain FSR-R2 User’s Manual
40
Internet/WAN access is the PPPoE client
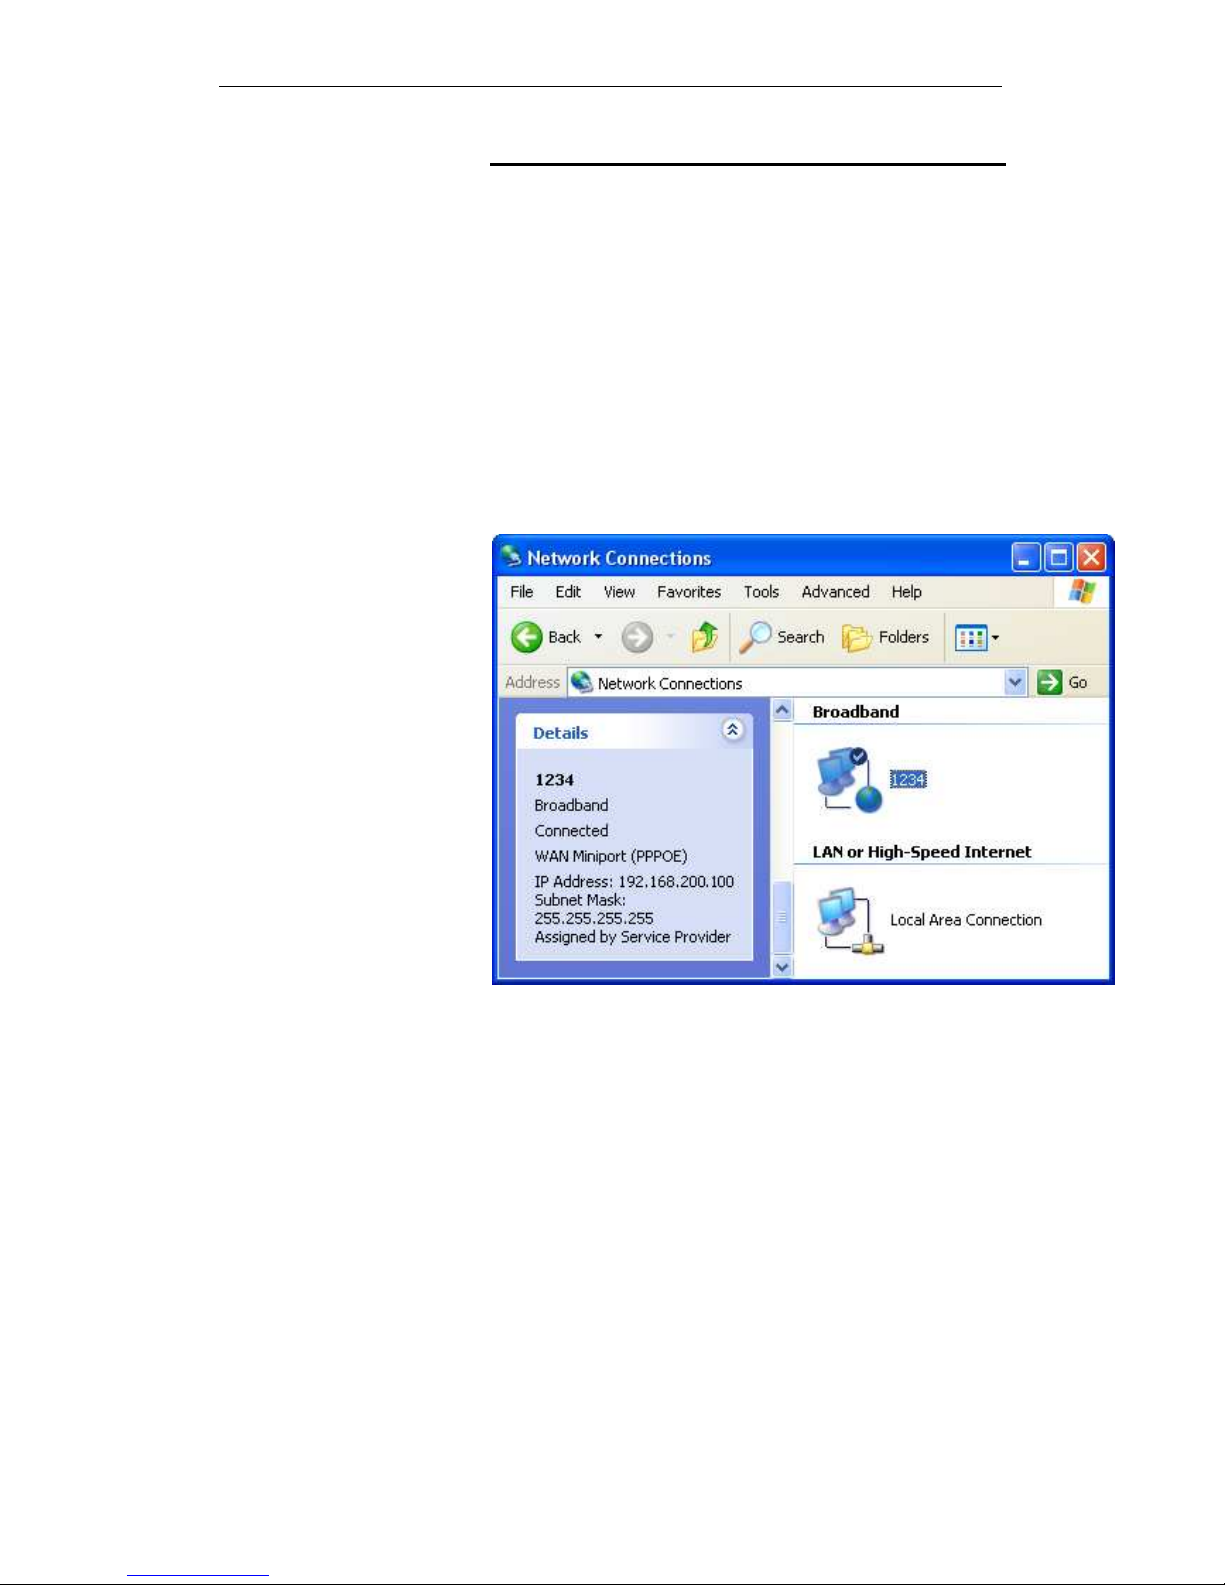
If you can see any Broadband Adapter in the Network
Connections, your Internet/WAN access is PPPoE Client.
1. Click Broadband Adapter in Broadband and you could
see string Assigned by Service Provider in Details.
For PPPoE configuration on Wireless Gateway, you’ll need
following information that you could get from your Telecom, or
by your Internet Service Provider.
Username of PPPoE: 1234 for example
Password of PPPoE: 1234 for example
Page 41
Fibrain FSR-R2 User’s Manual
41
6
Getting Started with the Web pages
The Wireless Gateway includes a series of Web pages that
provide an interface to the software installed on the device. It
enables you to configure the device settings to meet the needs
of your network. You can access it through your web browser
from any PC connected to the device via the LAN ports.
Accessing the Web pages
To access the Web pages, you need the following:
• A PC or laptop connected to the LAN port on the device.
• A web browser installed on the PC. The minimum browser
version requirement is Internet Explorer v4 or Netscape v4.
For the best display quality, use latest version of Internet
Explorer, Netscape or Mozilla Firefox.From any of the LAN
computers, launch your web browser, type the following
URL in the web address (or location) box, and press [Enter]
on your keyboard:
http://192.168.200.254
The first time that you click on an entry from the left-
hand menu, a login box is displayed. You must enter
your username and password to access the pages.
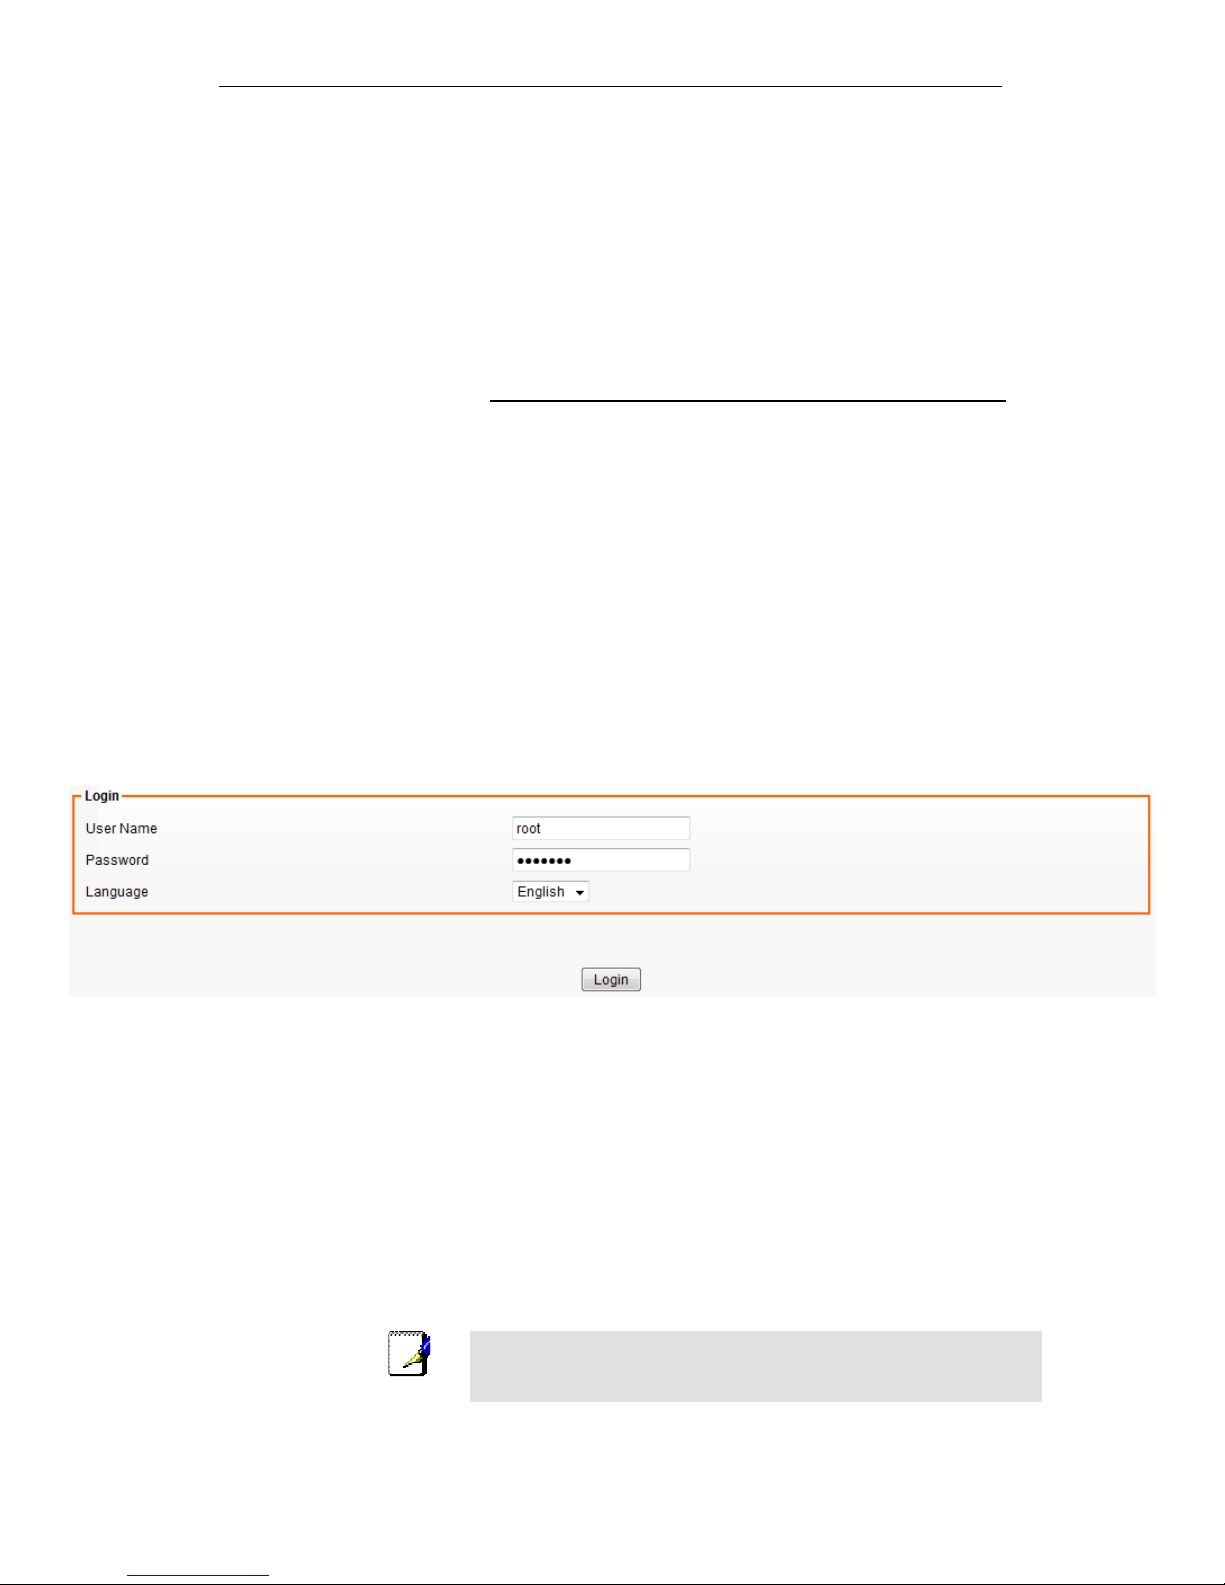
A login screen is displayed:
Figure 6: Login screen
1. Enter your user name and password. The first time you log
into the program, use these defaults:
Administrator Level
User Name:
root
Password:
fibrain
User Level
User Name:
admin
Password:
admin
Note
You can change the password at any time or you can configure your
device so that you do not need to enter a password. See Password.
Page 42
Fibrain FSR-R2 User’s Manual
42
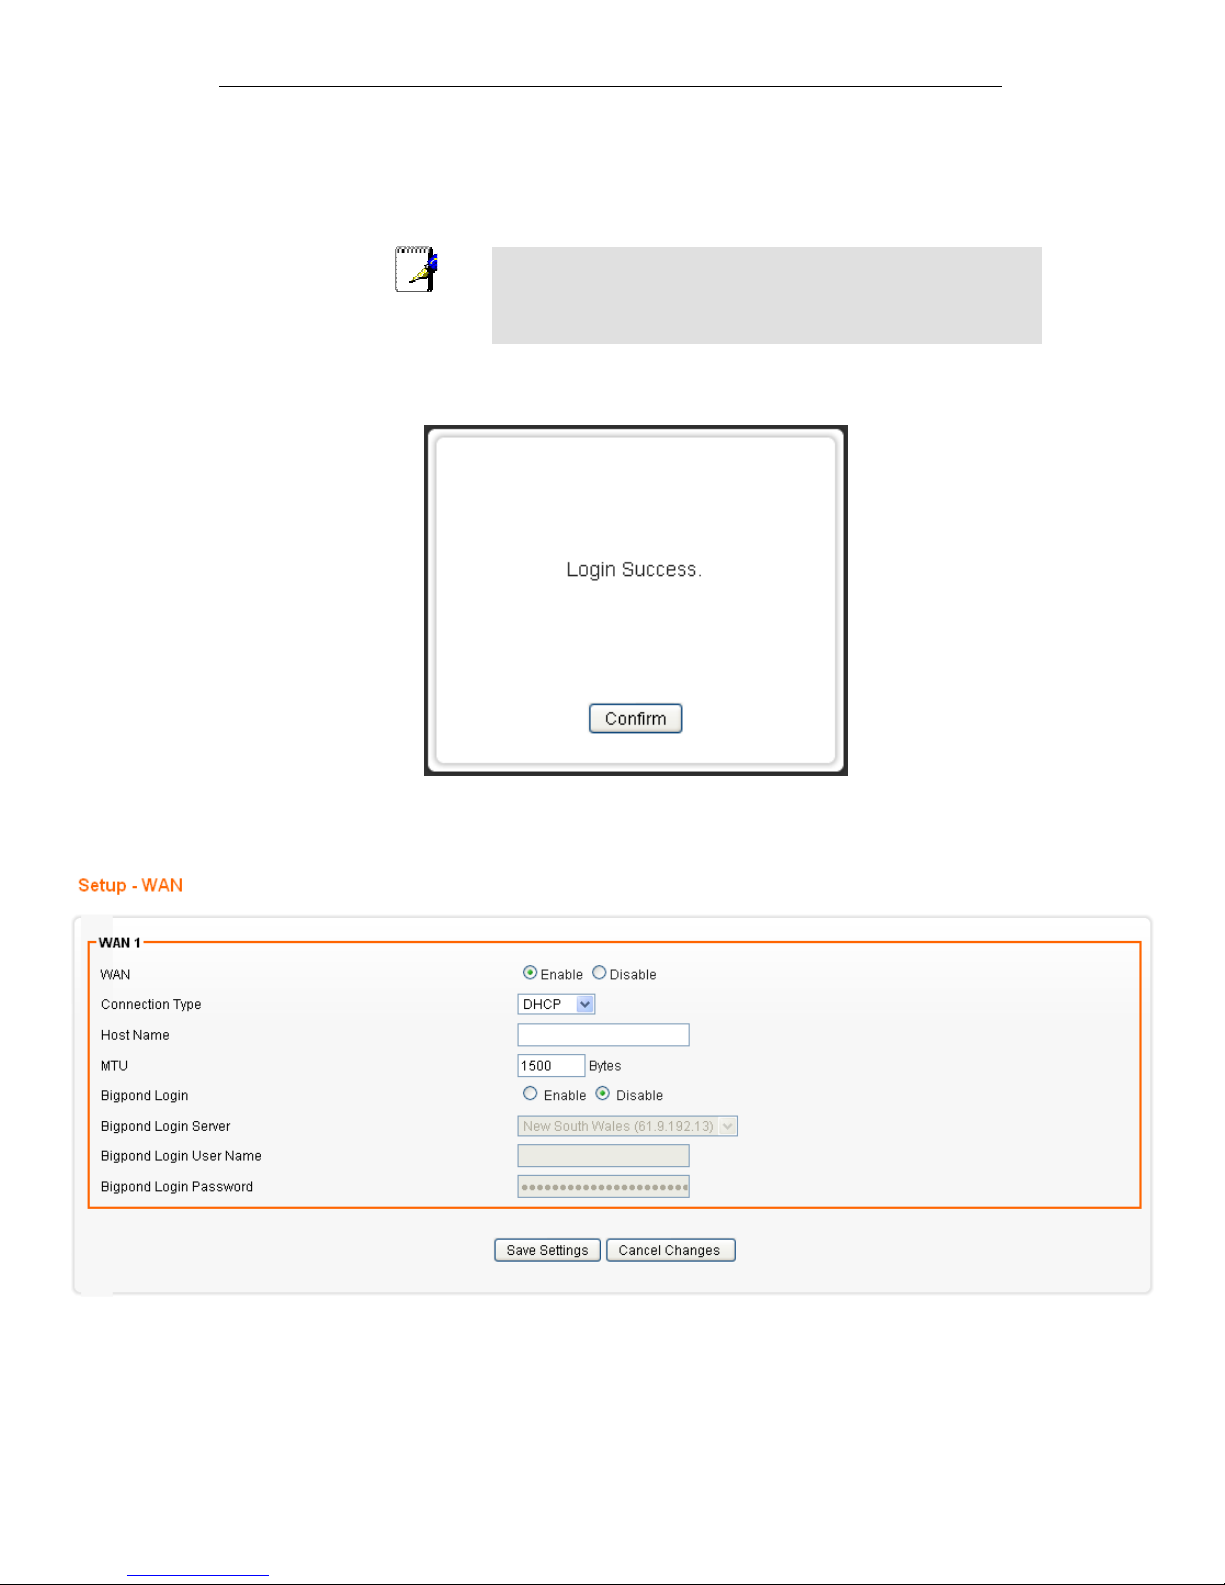
2. Click on Login.
This is the first page displayed each time you log in to the Web
pages.
Note
If you receive an error message or the Welcome page is not
displayed, see Troubleshooting Suggestions.
3. Click on Confirm. You are now ready to configure your
device.
The Setup - WAN homepage for the web pages is
displayed:
Figure 7: Homepage
Page 43

Fibrain FSR-R2 User’s Manual
43
Testing your Setup
Once you have connected your hardware and configured your
PCs, any computer on your LAN should be able to use the DSL
/Cable connection to access the Internet.
To test the connection, turn on the device, wait for 30 seconds
and then verify that the LEDs are illuminated as follows:
Table 1. LED Indicators
Label Color Function
POWER green On: device is powered on
Off: device is powered off
WLAN green On: WLAN link established and active
Blink: Valid Wireless packet being transferred
WPS green Off: WPS link isn’t established and active
Blink: Valid WPS packet being transferred
WAN green On: WAN link established and active
Off: No LAN link
Blink: Valid Ethernet packet being transferred
LAN
1/2/3/4
green On: LAN link established and active
Off: No LAN link
Blink: Valid Ethernet packet being transferred
If the LEDs illuminate as expected, test your Internet connection
from a LAN computer. To do this, open your web browser, and
type the URL of any external website (such as
http://www.yahoo.com). The LED labeled WAN should blink
rapidly and then appear solid as the device connects to the site.
If the LEDs do not illuminate as expected, you may need to
configure your Internet access settings using the information
provided by your ISP. For details, see Internet Access. If the
LEDs still do not illuminate as expected or the web page is not
displayed, see Troubleshooting Suggestions or contact your
ISP for assistance.
Default device settings
In addition to handling the xDSL / Cable modem connection to
your ISP, the Wireless Gateway can provide a variety of
services to your network. The device is preconfigured with
default settings for use with a typical home or small office
network.
The table below lists some of the most important default
settings; these and other features are described fully in the
subsequent chapters. If you are familiar with network
configuration, review these settings to verify that they meet the
needs of your network. Follow the instructions to change them if
necessary. If you are unfamiliar with these settings, try using the
device without modification, or contact your ISP for assistance.
WARNING
We strongly recommend that you contact your ISP prior to
changing the default configuration.
Page 44

Fibrain FSR-R2 User’s Manual
44
Option Default Setting Explanation/Instructions
WAN Port IP
Address
DHCP Client This is the temporary public IP address of the WAN
port on the device. It is an unnumbered interface that
is replaced as soon as your ISP assigns a ‘real’ IP
address. See Network Settings -> WAN Interface.
LAN Port
IP Address
Assigned static IP address:
192.168.200.254
Subnet mask:
255.255.255.0
This is the IP address of the LAN port on the device.
The LAN port connects the device to your Ethernet
network. Typically, you will not need to change this
address. See Network Settings -> LAN Interface.
DHCP (Dynamic
Host Configuration
Protocol)
DHCP server enabled with the
following pool of addresses:
192.168.200.100
through
192.168.200.200
The Wireless Gateway maintains a pool of private IP
addresses for dynamic assignment to your LAN
computers. To use this service, you must have set up
your computers to accept IP information dynamically,
as described in Configuring Ethernet PCs.
Page 45
Fibrain FSR-R2 User’s Manual
45
7
Wide Area Network (WAN) Settings
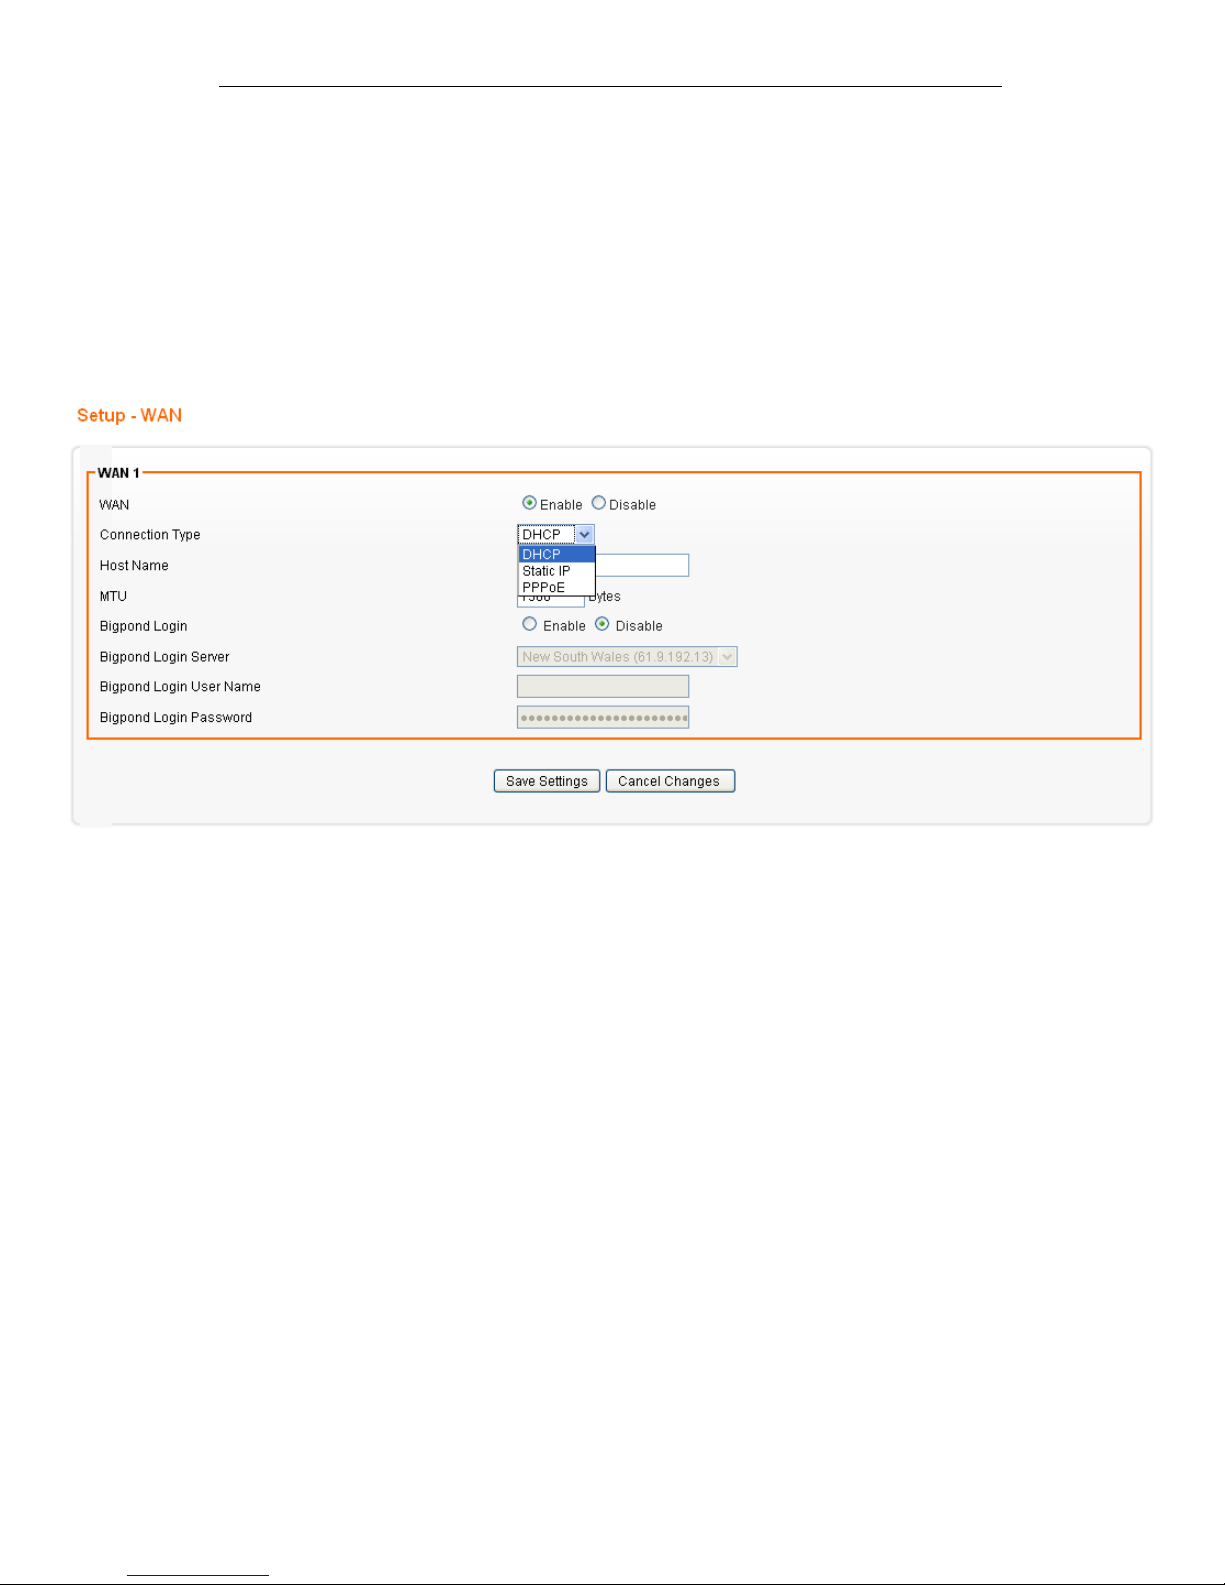
The device supports 3 connection types: DHCP, Static IP and
PPPoE. Please ensure which connection type should be used,
and select your internet connection type from the drop-down list.
From the Configuration menu, click on WAN. The following
page is displayed:
Page 46
Fibrain FSR-R2 User’s Manual
46
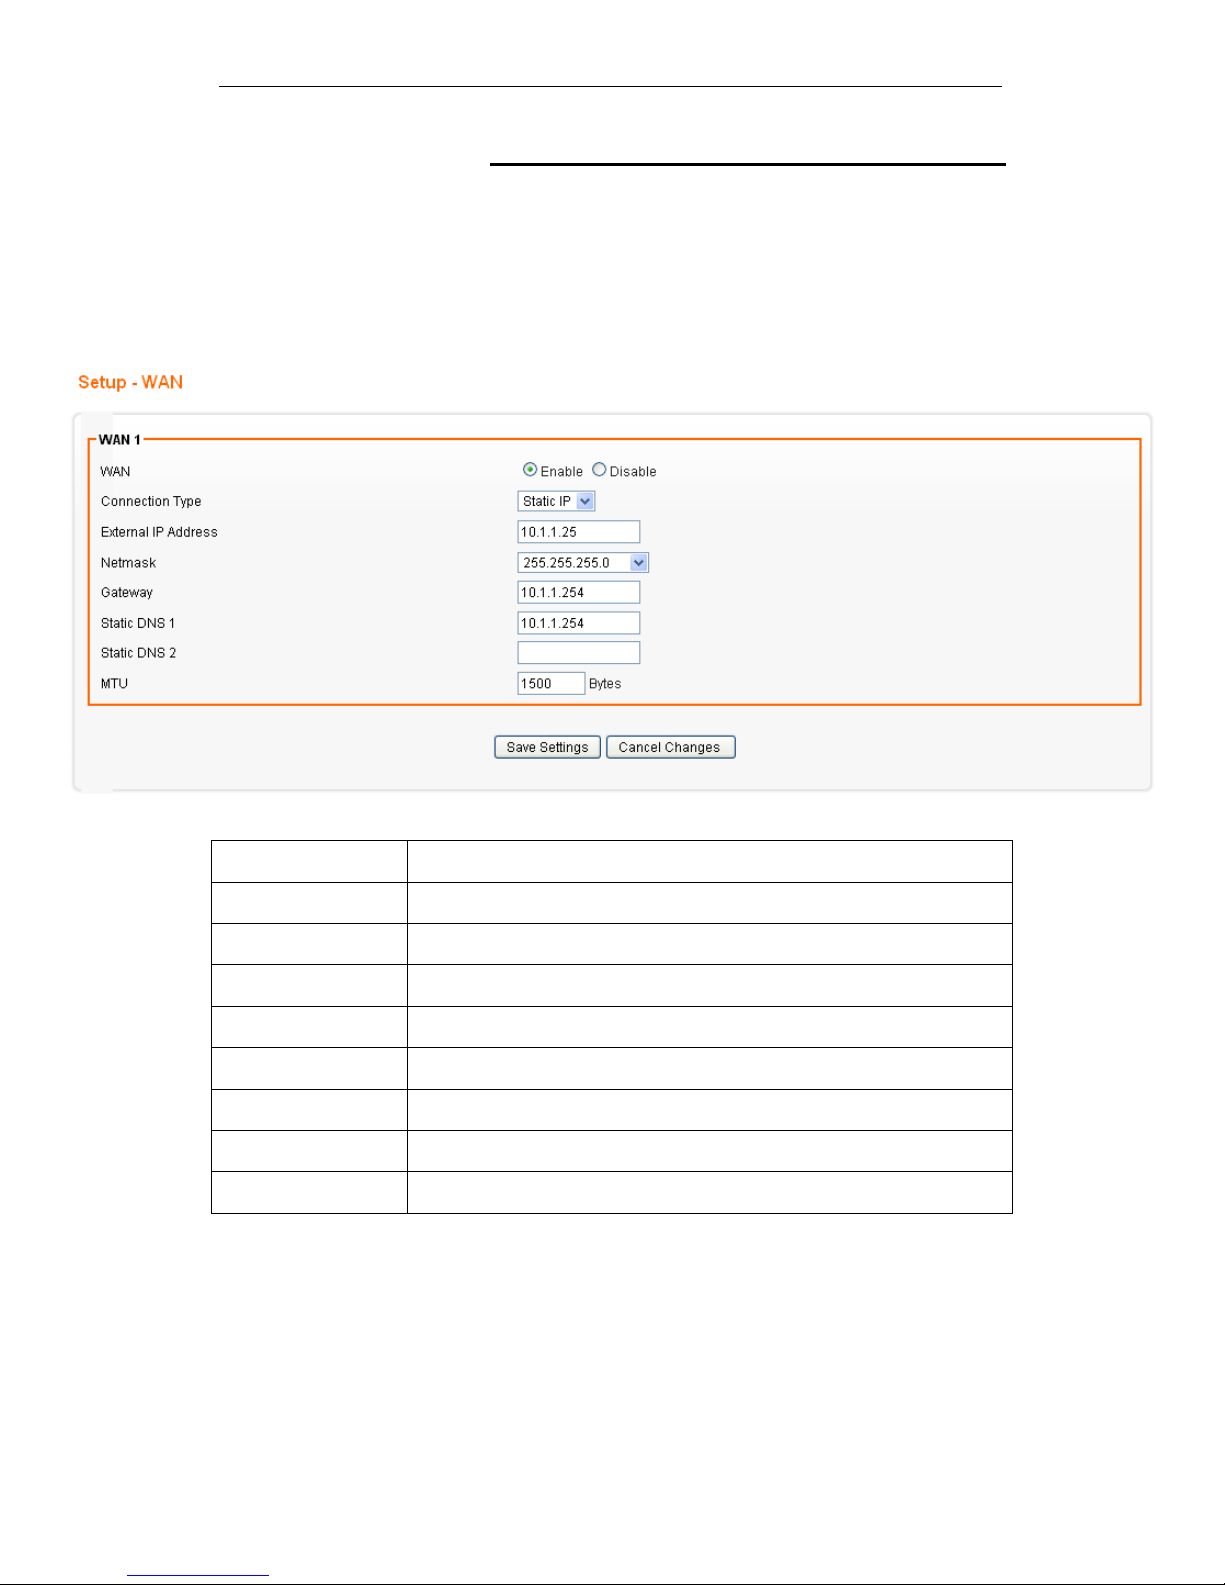
Static IP (Fixed IP address assignment)
If you need to assign static IP addresses to the devices in your
network, please remember that the IP address for each
computer or device must be in the same IP address range as all
the devices in the network. Each device must also have the
same subnet mask. For example: Assign the first computer an
IP address of 192.168.0.2 and a subnet mask of 255.255.255.0,
the second device an IP address of 192.168.0.3 and a subnet
mask of 255.255.255.0, and so on.
Field Description
WAN Select Enable / Disable to enable/disable WAN.
Connection Type Static IP
External IP Address The external IP addresses offered by the ISP.
Netmask The netmask offered by the ISP.
Gateway The gateway offered by the ISP.
Static DNS 1 The static DNS 1 offered by the ISP.
Static DNS 2 The static DNS 2 offered by the ISP.
MTU Maximum Transmission Unit
Page 47
Fibrain FSR-R2 User’s Manual
47
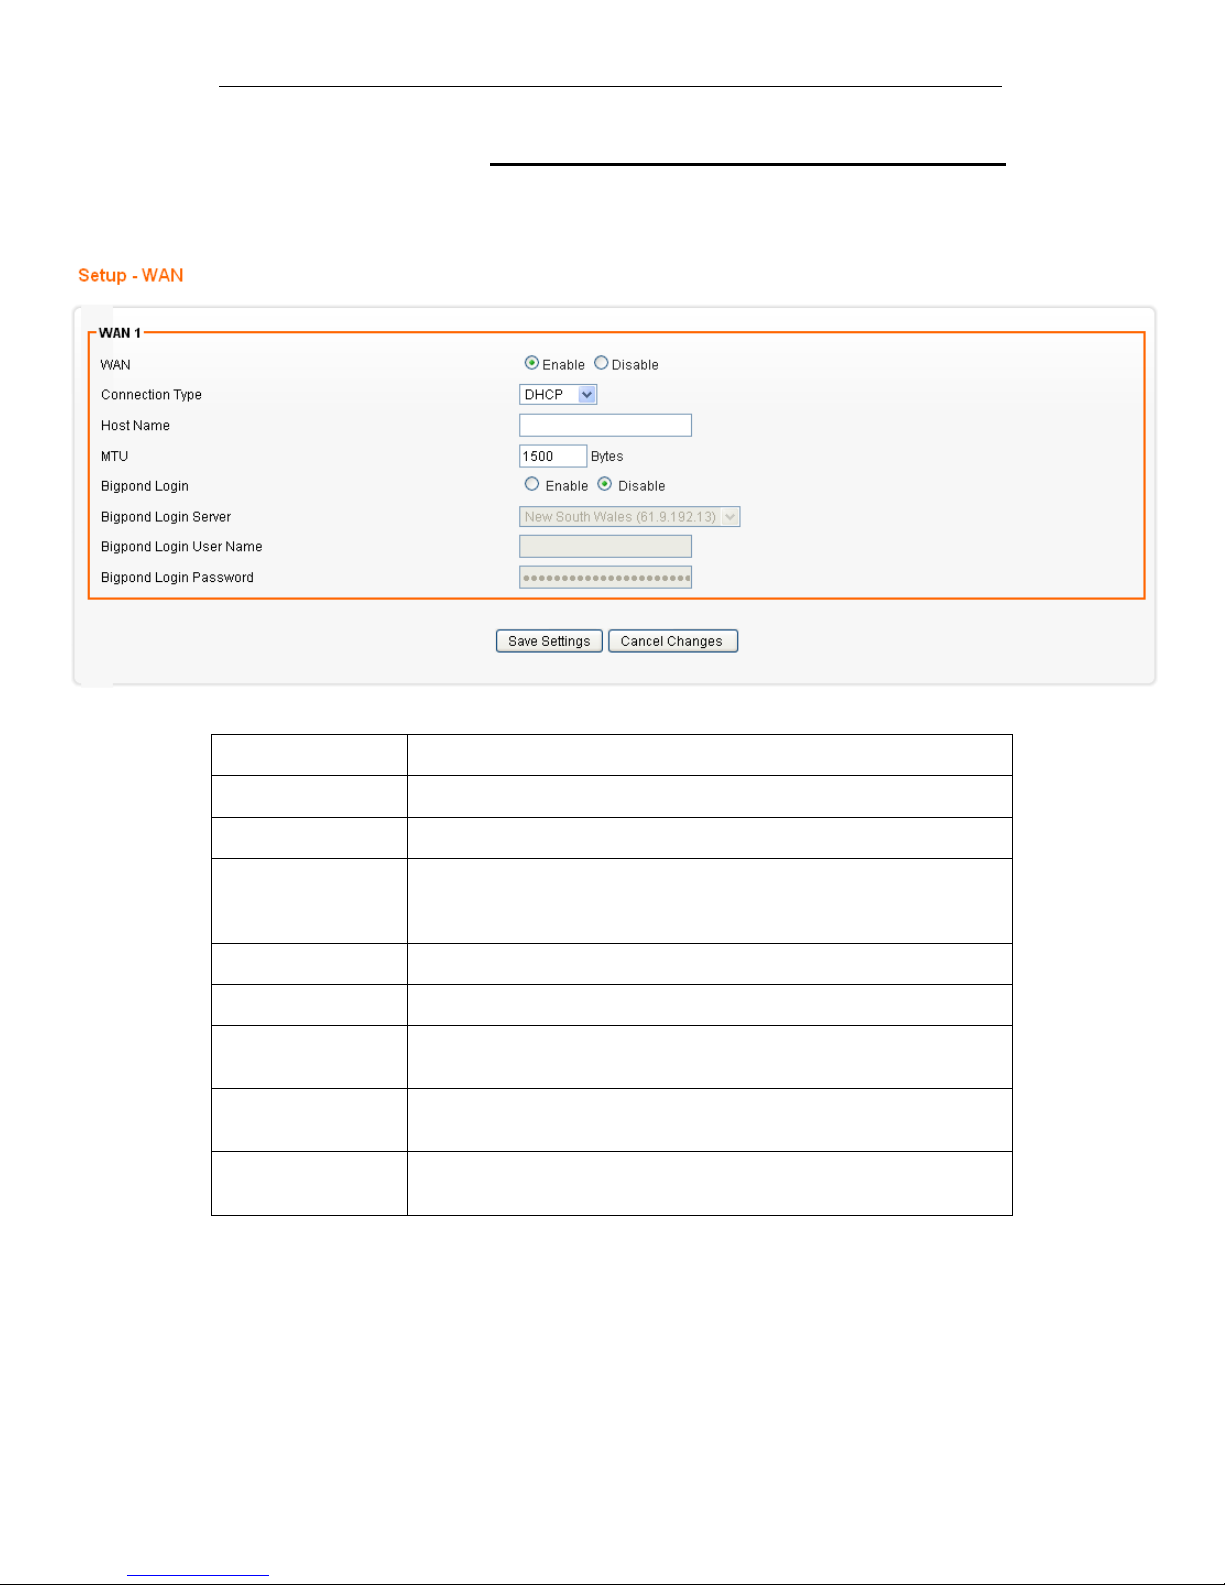
DHCP
It will auto get the IP address from the DHCP Server. Assign the
length of time for the IP lease, default setting is 86400 seconds.
The Hostname is the name of the device.
Field Description
WAN Select Enable / Disable to enable/disable WAN.
Connection Type DHCP
Host Name Some ISP and DHCP servers ask for the Host Name of the DHCP
client before assigning an IP address. In this case, please key in
your Host Name.
MTU Maximum Transmission Unit
Bigpond Login If you are using “Bigpond” system, please enable this item
Bigpond Login
Server
Please choose the Bigpond server.
Bigpond Login User
Name
Please enter your User Name provided by Bigpond
Bigpond Login
Password
Please enter your Password provided by Bigpond
Page 48
Fibrain FSR-R2 User’s Manual
48
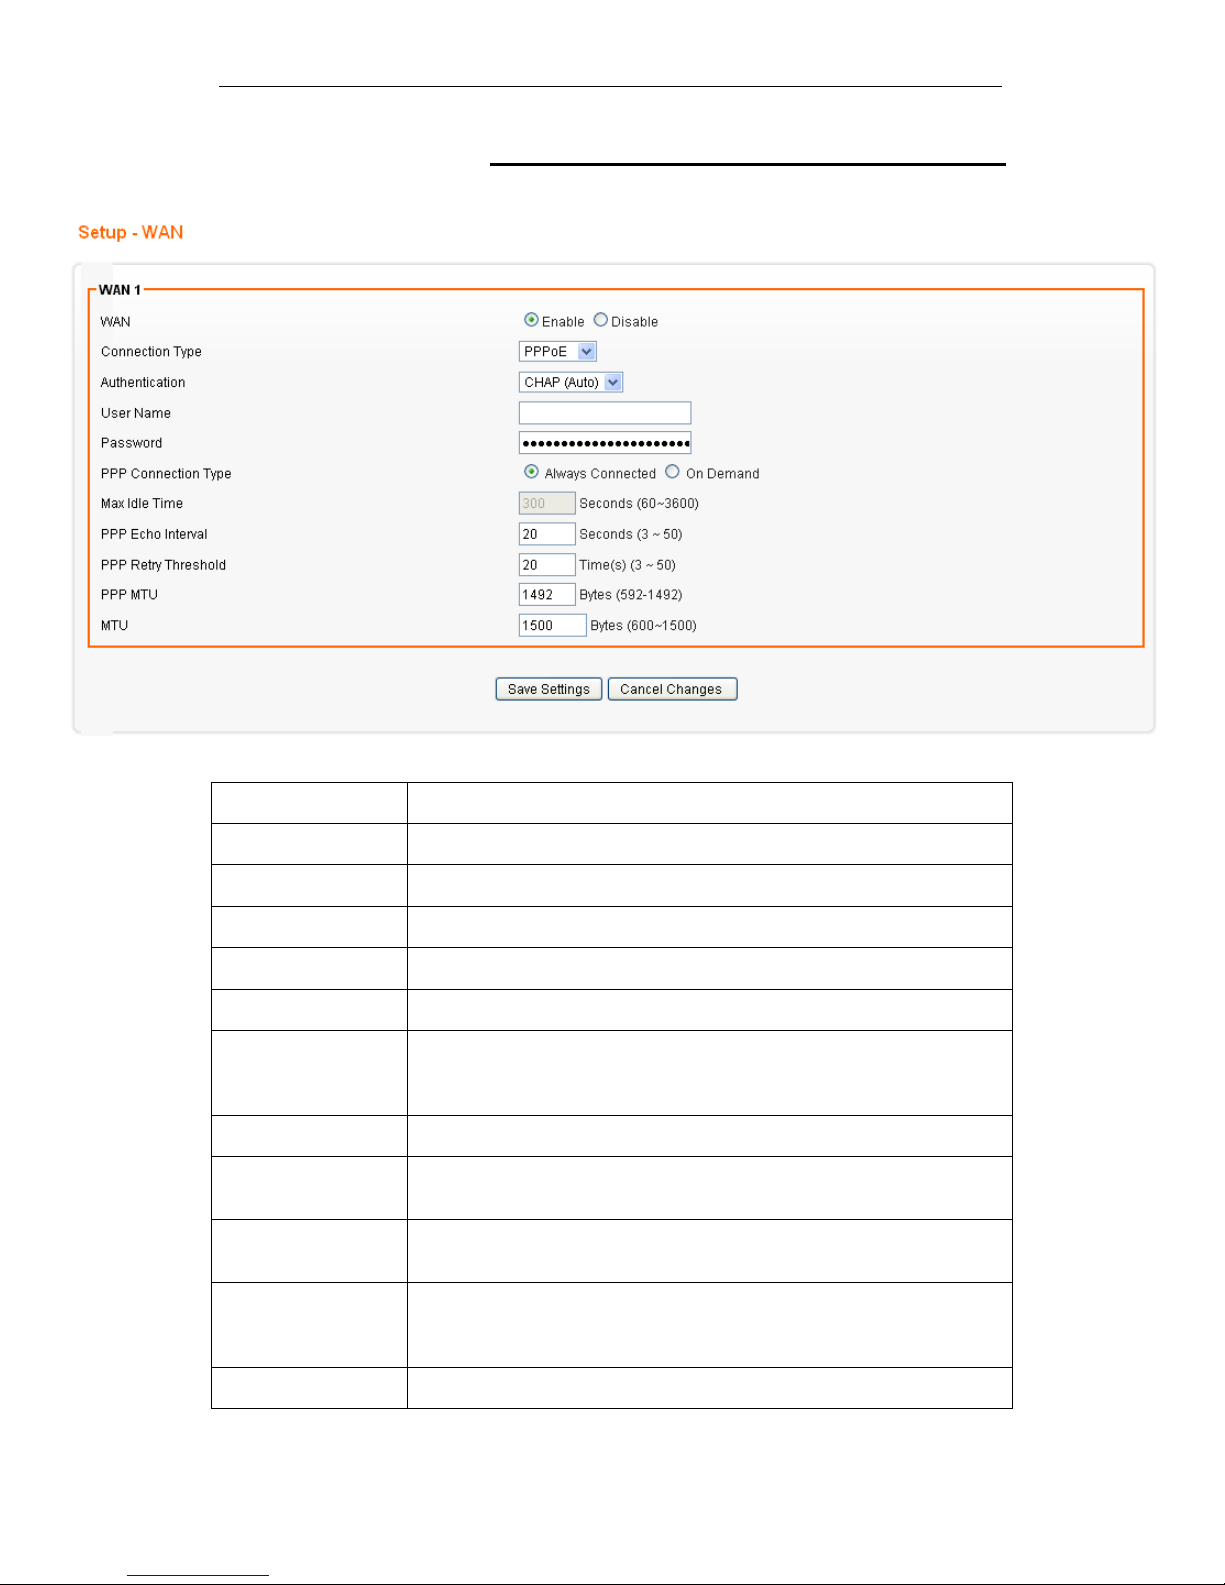
PPPoE
Please enter the information accordingly provided by ISP.
Field Description
WAN Select Enable / Disable to enable/disable WAN.
Connection Type PPPoE
Authentication Select authentication type for PPPoE
User Name The user name offered by the ISP.
Password The password offered by the ISP.
On Demand: Max
Idle Time
PPPoE On Demand will only be activated when there is traffic.
When there is no traffic within max. idle time (default: 300 seconds),
PPPoE will be disconnected.
Keep Alive PPPoE Keep Alive will maintain the PPPoE dial up connection.
PPPoE Echo
Interval
PPPoE echo will ensure whether the link is still up or not (default
interval 20 seconds)
PPPoE Retry
Threshold
When PPPoE echo retry exceeds PPPoE Retry Threshold (default
20 times), the dial up connection would be recognized as down.
PPPoE MTU PPPoE maximum transmission unit: up to 1492 bytes (PPPoE’s
header is 8 bytes)(This value should be less than MTU value at least
8 bytes ).
MTU Physical Device Maximum Transmission Unit
Page 49
Fibrain FSR-R2 User’s Manual
49
8
Local Area Network (LAN) Settings
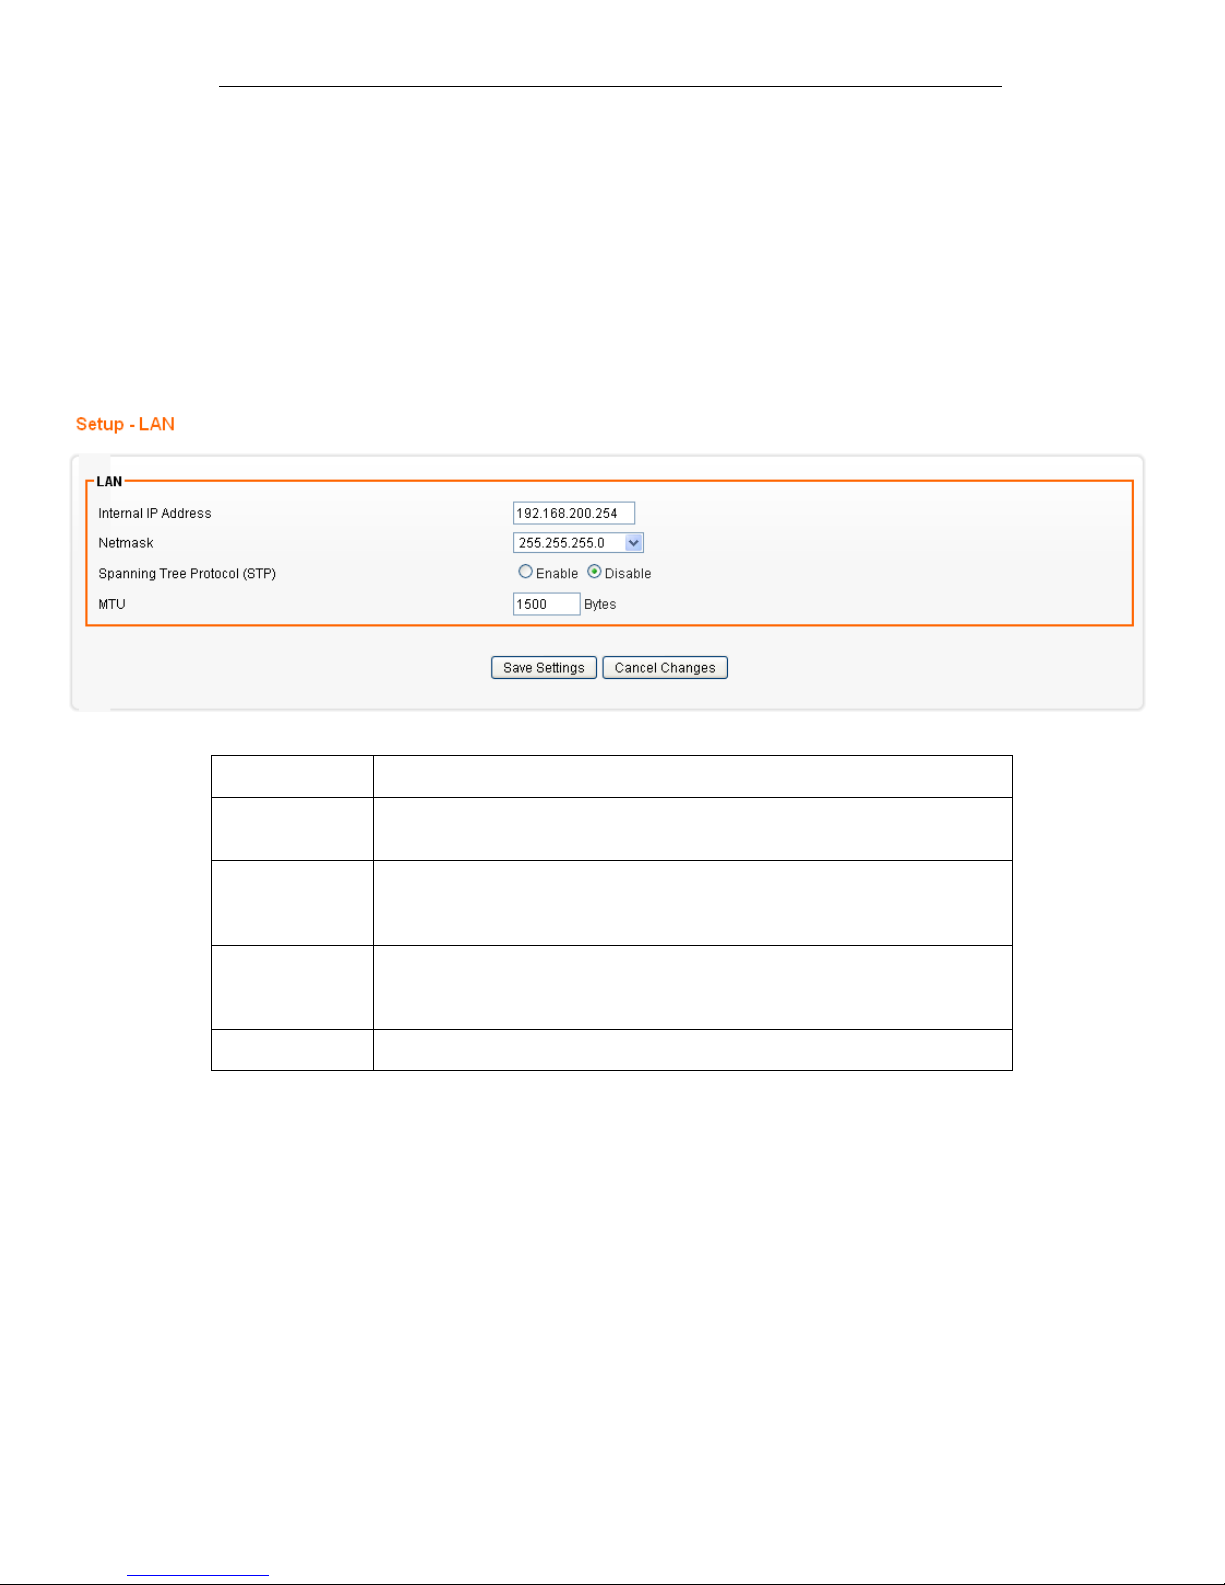
To set up the configuration of LAN interface, private IP of your
router LAN port and subnet mask for your LAN segment.
Default IP is 192.168.200.254.
From the Configuration menu, click on LAN. The following page
is displayed:
Field Description
Internal IP
Address
The IP of your Router LAN port (default 192.168.200.254).
Netmask Select Netmask from the drop-down list. Subnet Mask of you LAN
(default 255.255.255.0). All devices on the network must have the same
subnet mask to communicate on the network.
Spanning Tree
Protocol (STP)
Click Enable to avoid cyclic topology caused by incorrect connection of
your internal network. (A cyclic topology will cause network
breakdown.)
MTU Maximum transmission unit: up to 1500 bytes.
Page 50
Fibrain FSR-R2 User’s Manual
50
9
Routing Settings
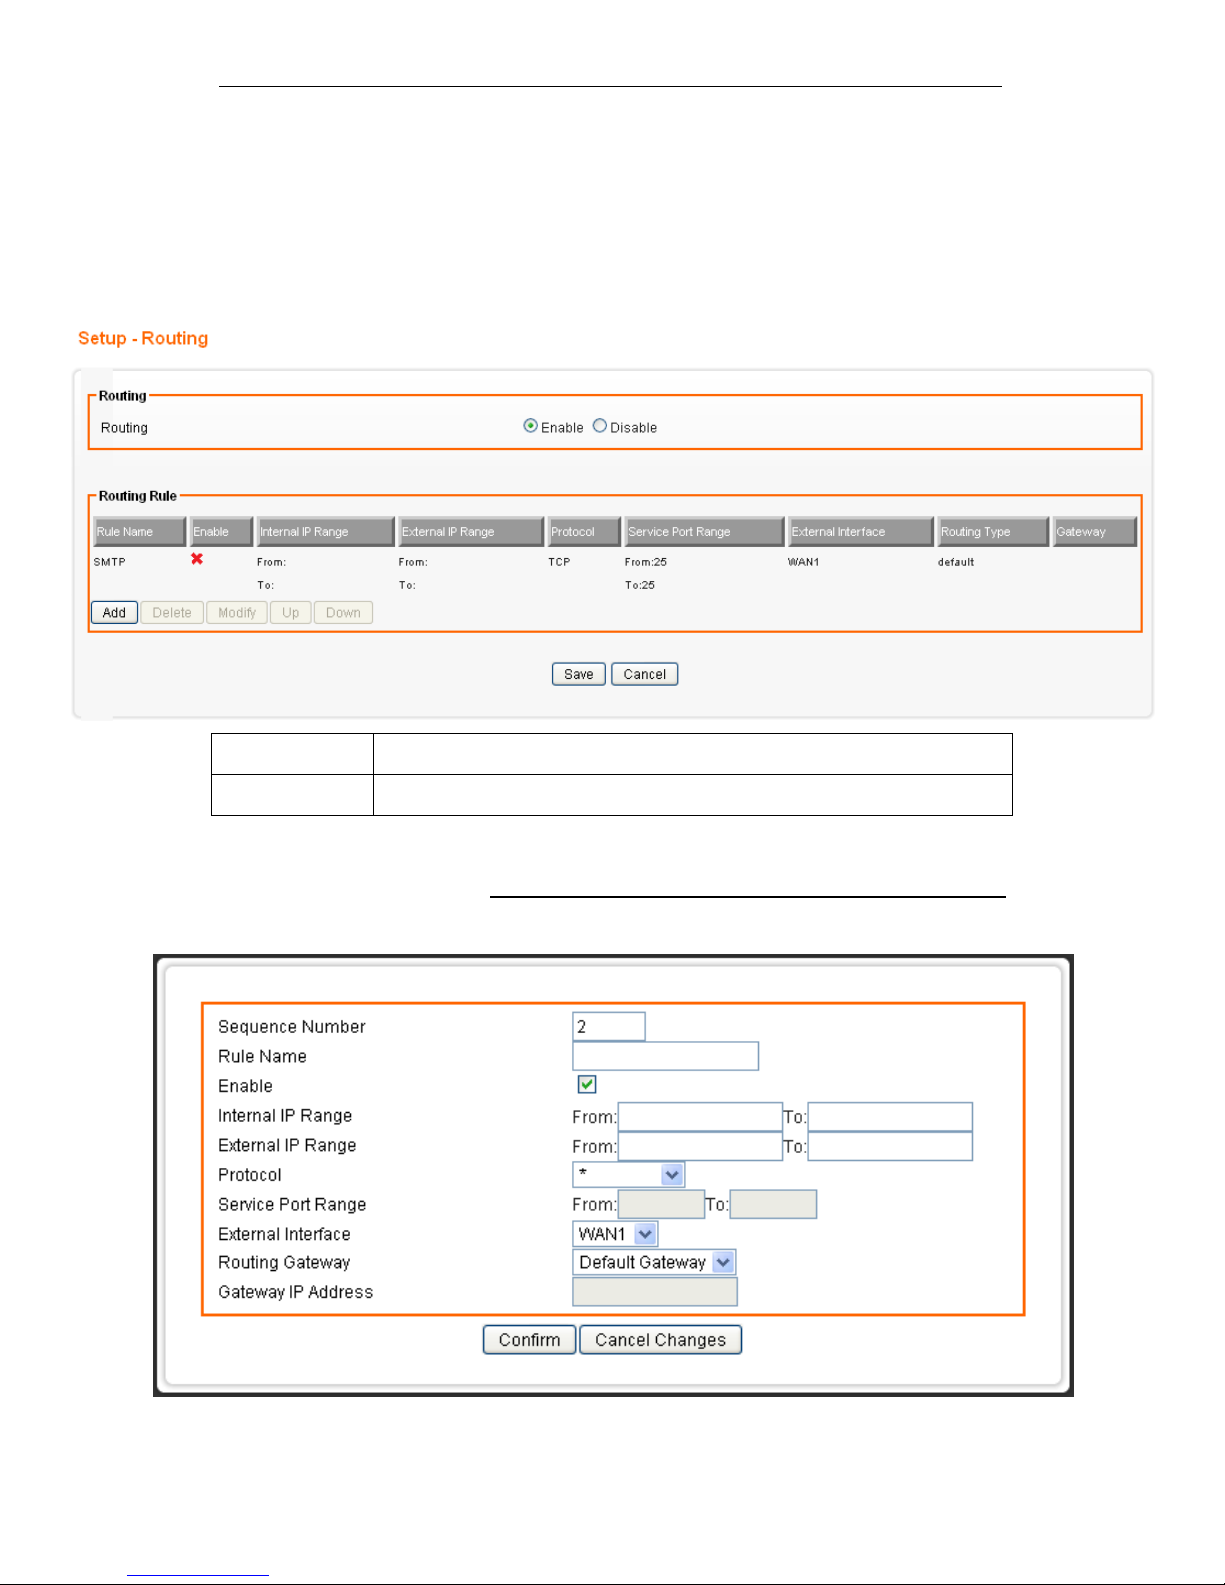
User can set a route rule (table) in here.
From the Configuration menu, click on Routing. The following
page is displayed:
Field Description
Routing Choose Enable/Disable to enable/disable routing policy.
Add Routing Rule
Click on Add. The following page is displayed:
Page 51

Fibrain FSR-R2 User’s Manual
51
Field Description
Sequence Number This defines the sequence of the Routing rules. If a packet fits the
conditions set by the Routing rules, the packet will then be sorted
according to the first Routing rule from the top of the list.
Rule Name Name of the Routing rule.
Rule Enable Enable/Disable this Routing rule
External Interface Please select which External Interface (WAN1 or WAN2) you want
for a packet to go through, IF the packet fits the condition of this
ACL rule.
Internal IP Range Set up the internal IP range for this ACL rule.
External IP Range Set up the external IP range for this ACL rule.
Protocol Set up the protocol (TCP or UDP) for the ACL to be enabled.
Service Port Range Set up the Service Port Range (e.g., HTTP is TCP/80) for the ACL to
be enabled.
External Interface Please select which External Interface (WAN1 or WAN2) you want
for a packet to be routed, IF the packet fits the condition of this
Routing rule.
Example of Routing Rule
Rule Name SMTP outgoing routing
Enable Enable
Internal IP Range Blank (applied to all)
External IP Range Blank (applied to all)
Protocol TCP
Service Port Range 25:25 (SMTP Port:25)
External Interface WAN1
Page 52
Fibrain FSR-R2 User’s Manual
52
10
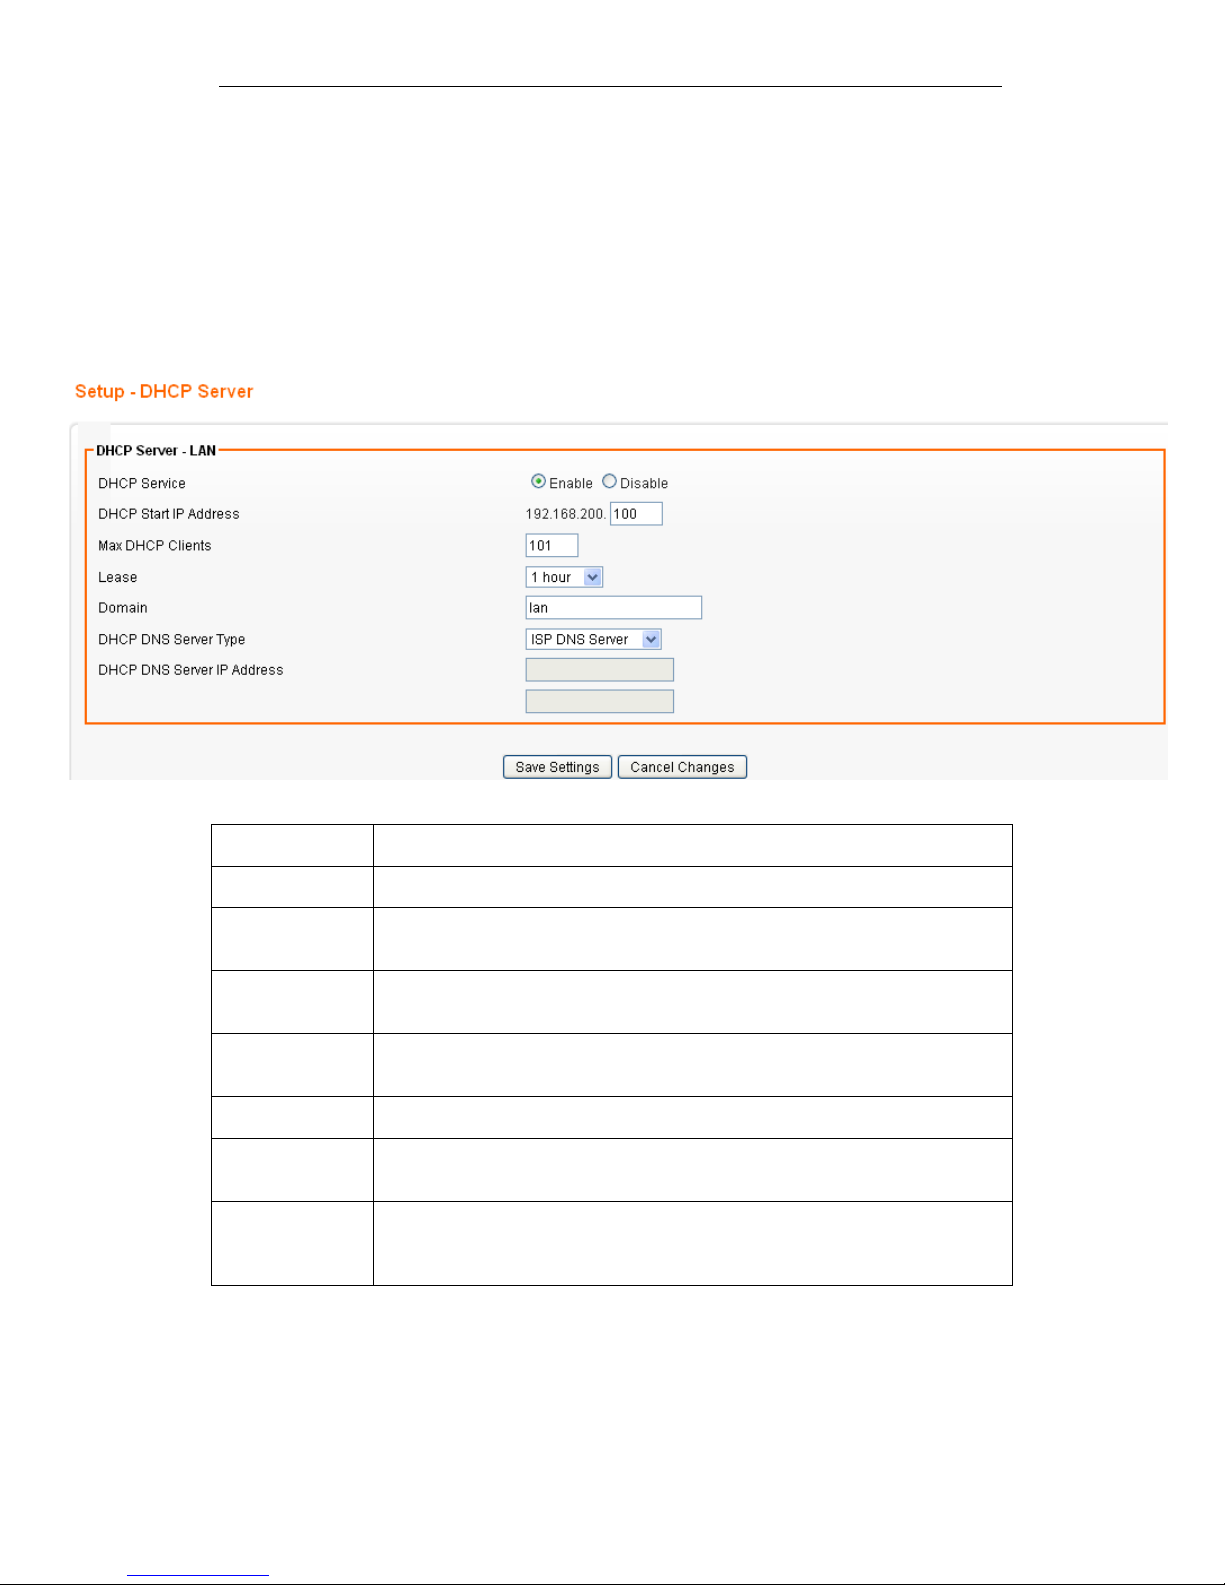
DHCP Server Settings
The device provides DHCP server service in order to offer IP
addresses to the computers within a LAN.
From the Configuration menu, click on DHCP Server. The
following page is displayed:
Field Description
DHCP Server Select Enable/Disable to enable/disable DHCP Server.
DHCP Starting
IP Address
The DHCP starting IP addresses offered by the DHCP Server.
Max DHCP
Clients
The maximum number of the IP addresses supported by the DHCP
server
Lease Please choose lease time from the drop-down list. You can choose 1
Hour, 3 Hours, 6 Hours, 1 Day, 3 Days, or 7 Days.
Domain Please enter the domain name.
DHCP DNS
Server Type
Select DHCP DNS server type
DHCP DNS
Server IP
Address
Please set up the DHCP DNS server IP address
Page 53
Fibrain FSR-R2 User’s Manual
53
11
DDNS Settings
DDNS (Dynamic Domain Name Service) allows an “internet
domain name” to be assigned to a computer/router which has a
dynamic IP address. This makes it possible for other internet
devices to connect to the computer/router without needing to
trace the changing IP addresses themselves. To enable DDNS,
you will first need to sign up for DDNS services from
DynDNS.org, TZO.com or ZoneEdit.com.
DDNS is useful when combined with the virtual server feature. It
allows other internet users to connect to your virtual server by
using a domain name, rather than an IP address. The DDNS
service helps users to locate the right IP address by the domain
name.
For example, you wish to set up a personal web server.
However, you obtain a different IP address from your ISP every
time you connect to the internet. The dynamic IP address you
have will cause difficulty for other internet users to find your web
server. In this case, you will need to enable DDNS, so other
users can connect to you through a fixed domain name to
disregard the potential varying IP addresses behind the server.
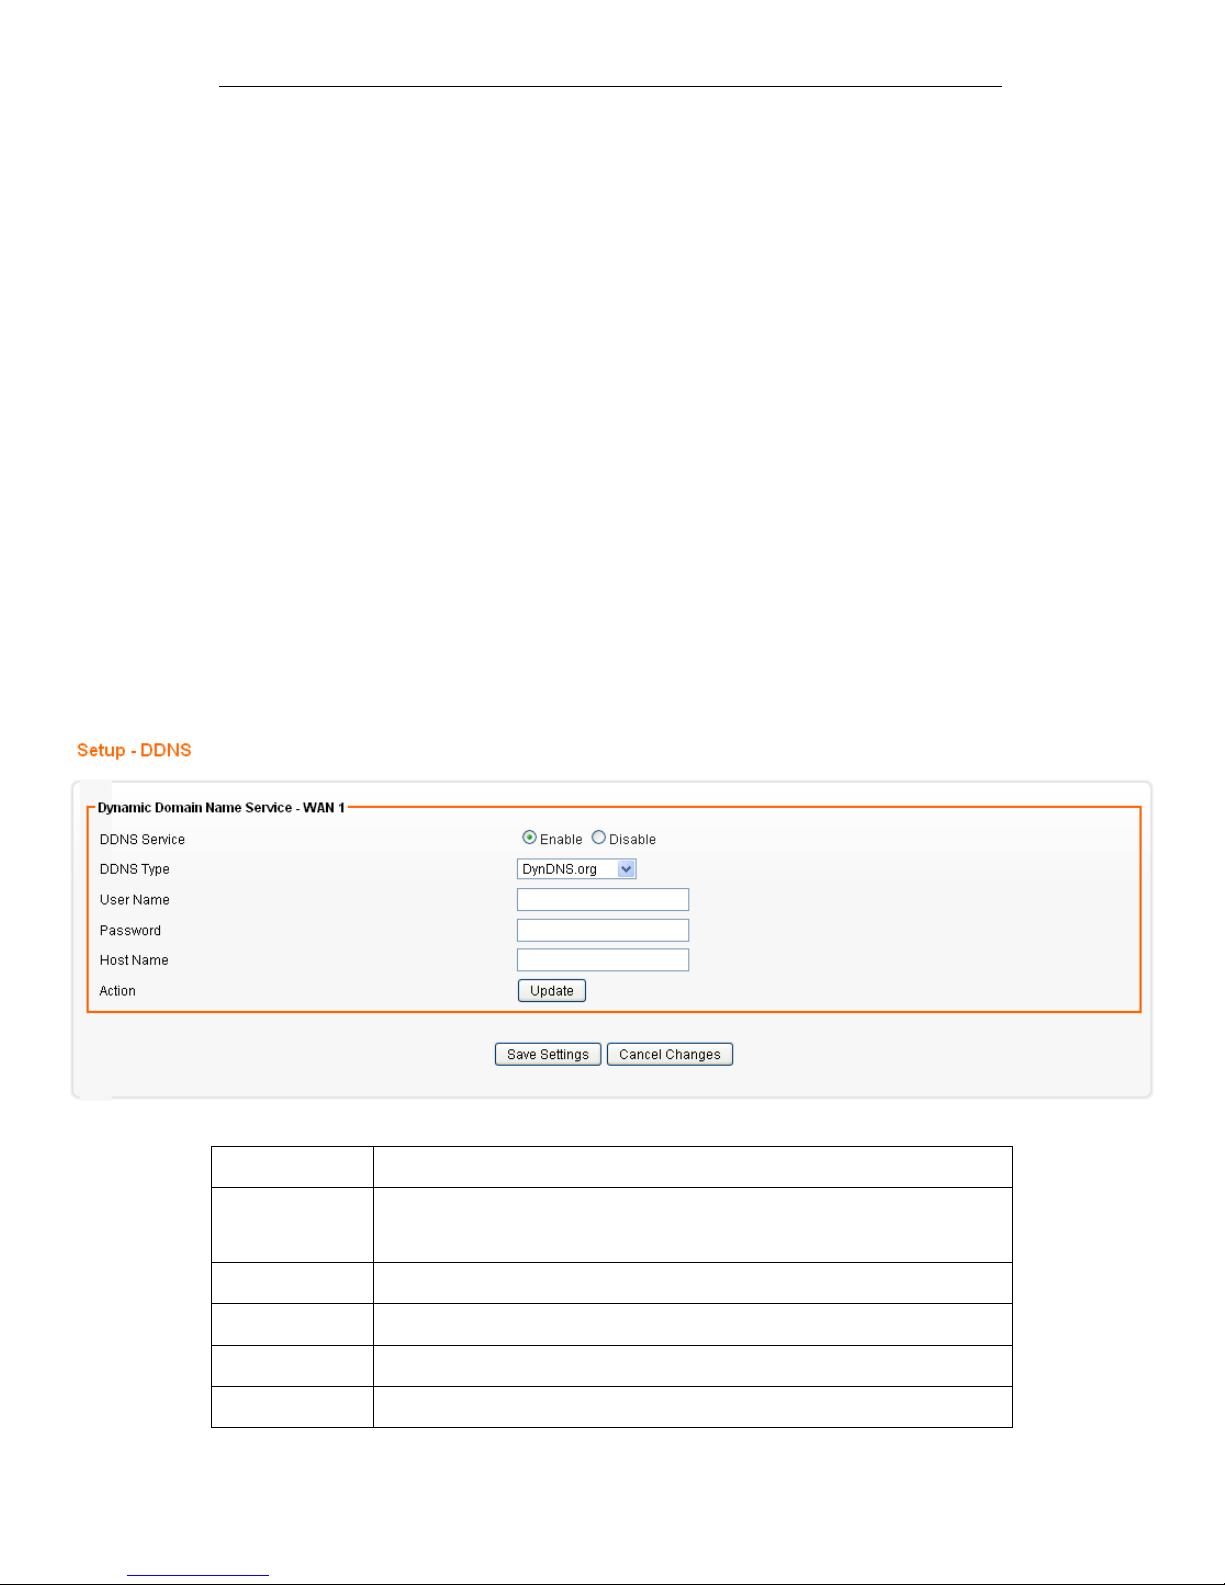
From the Configuration menu, click on DDNS. The following
page is displayed:
Field Description
DDNS Service Select Enable to enable DDNS service.
Select Disable to disable DDNS service.
DDNS Type Select the desired DDNS service provider from the list.
User Name Enter your username provided by DDNS Service
Password Enter your password provided by DDNS Service
Host Name Apply for a domain name, and make sure it is allocated to you
Page 54
Fibrain FSR-R2 User’s Manual
54
12
MAC Address Clone Settings
Some ISPs only allow a registered MAC address to access to
the internet. To bypass the rule, you need to set up a cloned
MAC address for the device using the pre-registered MAC
address.
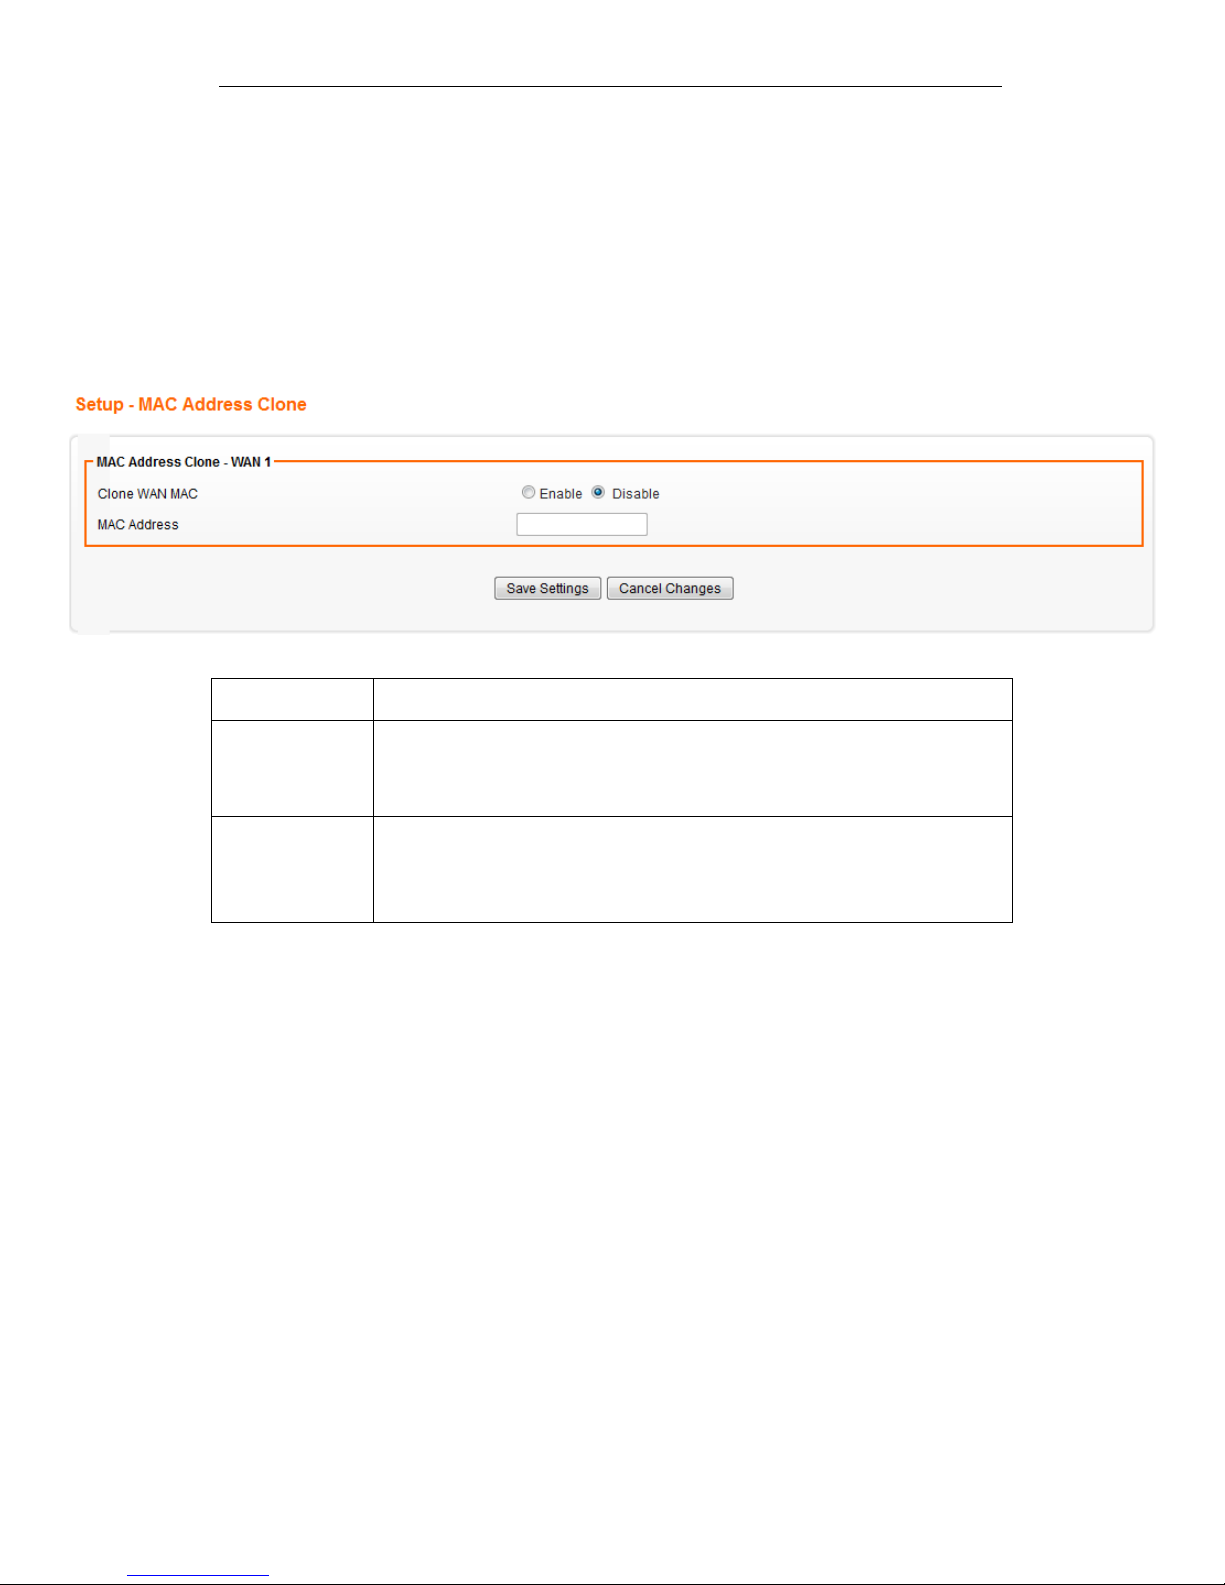
From the Configuration menu, click on MAC Address Clone.
The following page is displayed:
Field Description
Clone WAN
MAC
If your ISP only grants access to a fixed MAC address, please select
Enable.
If your ISP does not enforce access control, please select Disable.
MAC Address If the PC you use to configure AXIMCom Mobile Router is the device
which has the right MAC address to access the internet, press Get
Current PC MAC Address button. Or you can type in the MAC Address
which has been granted access by your ISP.
Page 55
Fibrain FSR-R2 User’s Manual
55
13
VLAN Settings
Port-based VLAN is the simplest approach to VLAN
implementation. The idea is to assign the ports on a switch to
different VLANs, confining the propagation of the packets
received on a port within the particular VLAN. Thus, separation
of broadcast domains and division of virtual groups are
achieved.
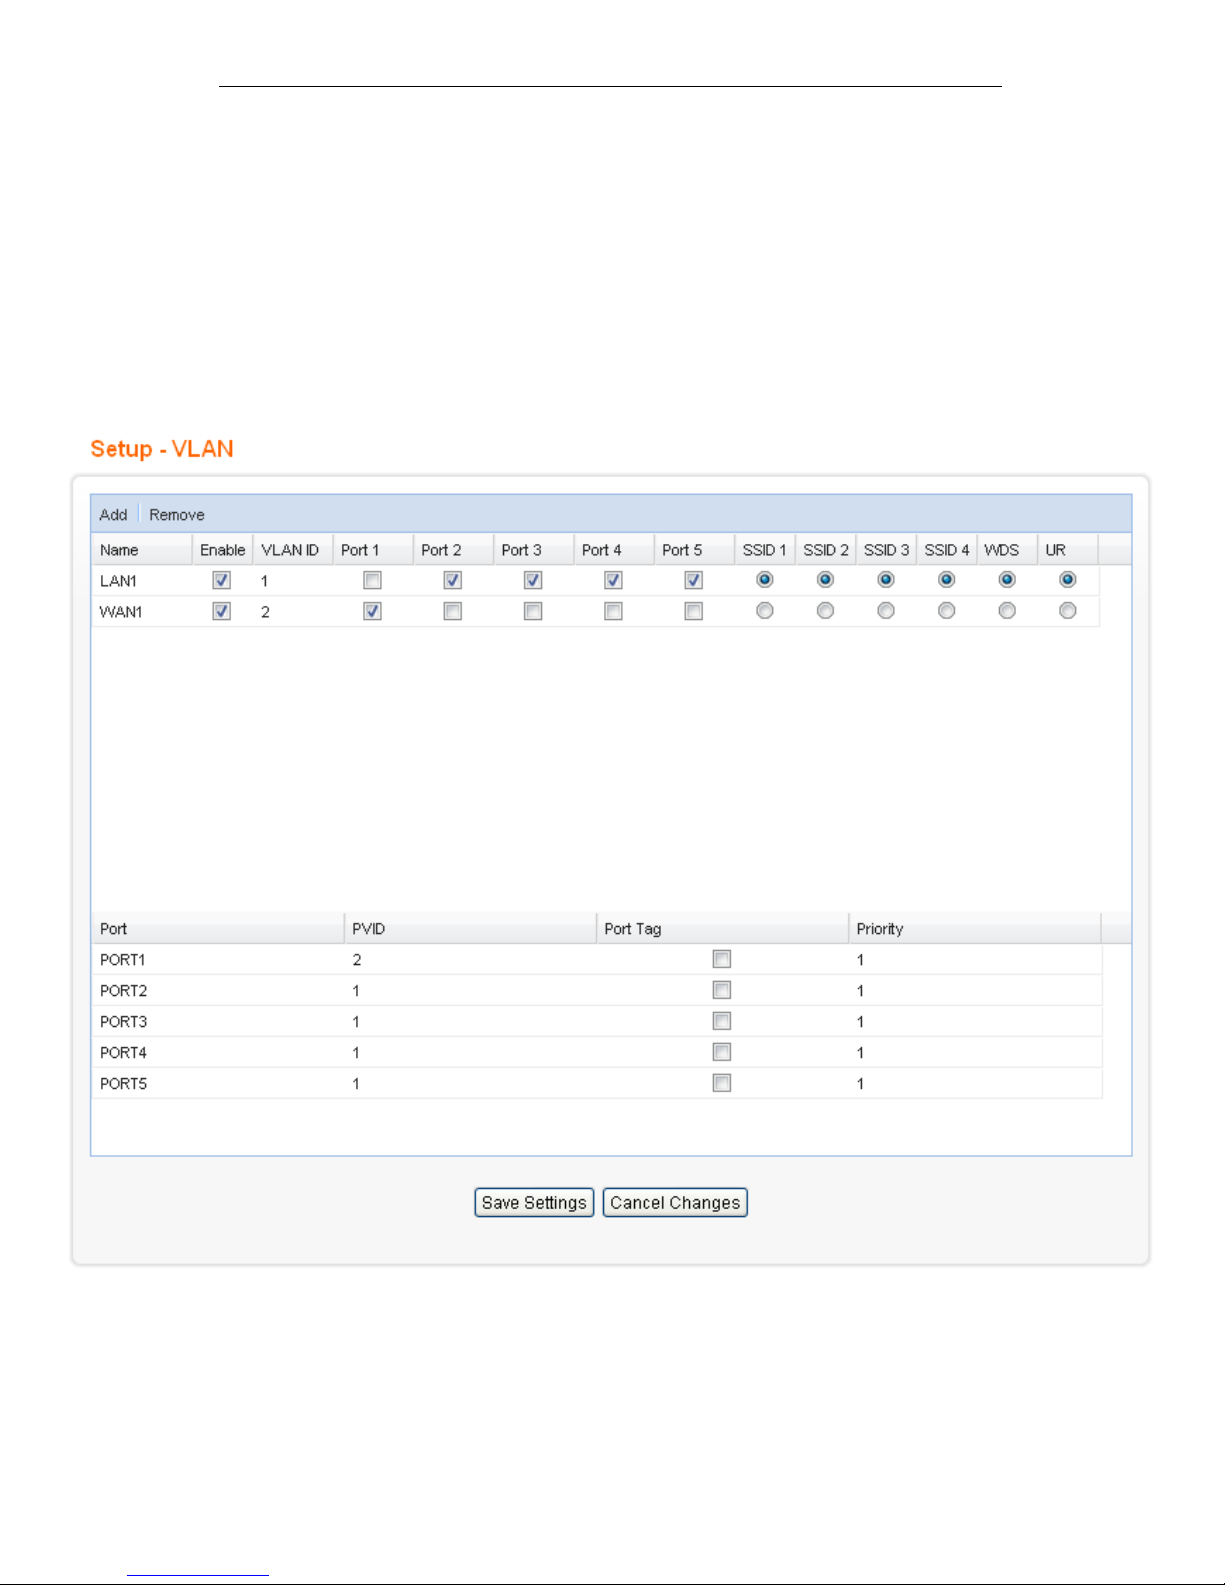
From the Setup menu, click on VLAN. The following page is
displayed:
Page 56

Fibrain FSR-R2 User’s Manual
56
Field Description
Add Add a new VLAN rule
Remove Remove a new VLAN rule
Name Enter the name of VLAN rule
PVID Enter the Port VLAN ID
Port tag Enable or disable Port VLAN tag
Priority Set up the port priority
Page 57

Fibrain FSR-R2 User’s Manual
57
14
Wireless - Basic Setting
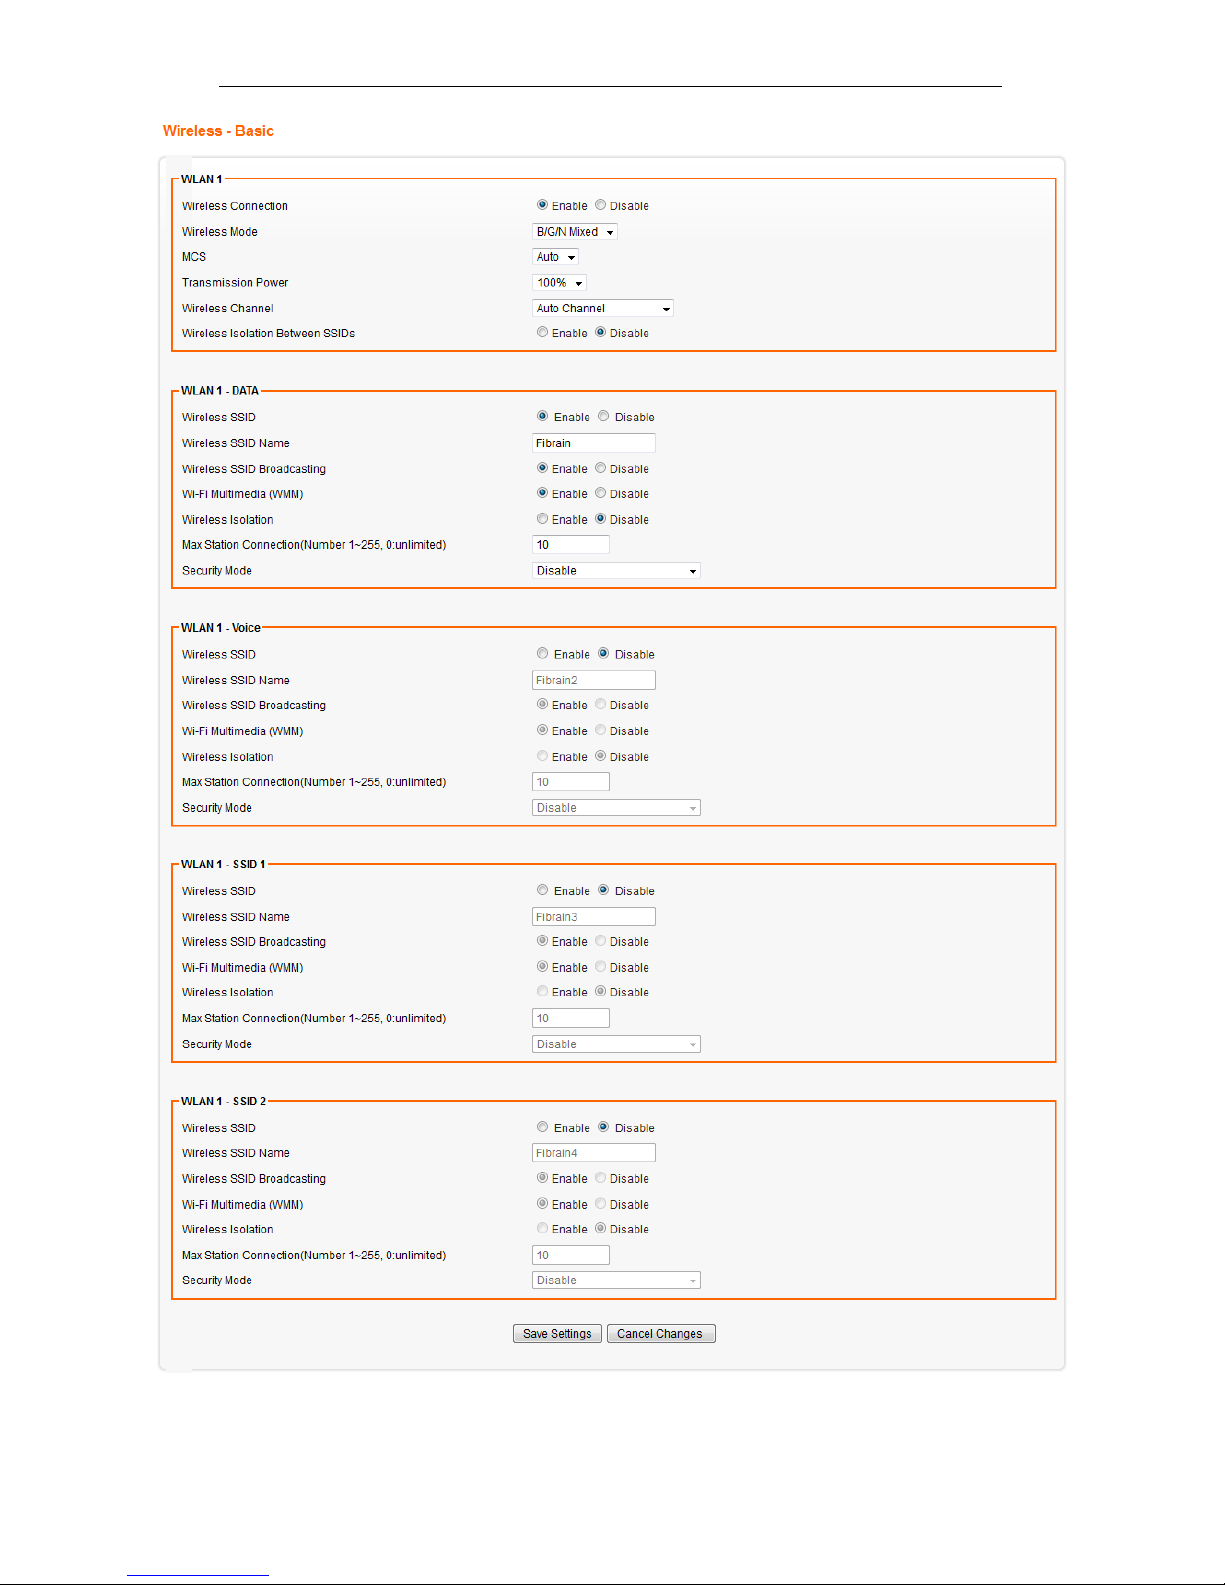
Multiple SSIDs allow the ability for separate security mode and
key settings to be set by users for both convenience and
increased protection. Users are able to configure their network
devices to access the first SSID with the WPA2 PSK (PreShared Key) and secret key, whilst share the second SSID with
WEP and the periodically changed key for visitors. In addition,
users are able to isolate these SSIDs to avoid malicious attacks
and prevent certain access for visitors using the second SSID.
This then provides users an extremely convenient approach to
share the wireless access, provide access internet access for
visitors, while possessing a strong security protection system at
all times.
From the Wireless menu, click on Basic. The following page is
displayed:
Page 58
Fibrain FSR-R2 User’s Manual
58
Page 59
Fibrain FSR-R2 User’s Manual
59
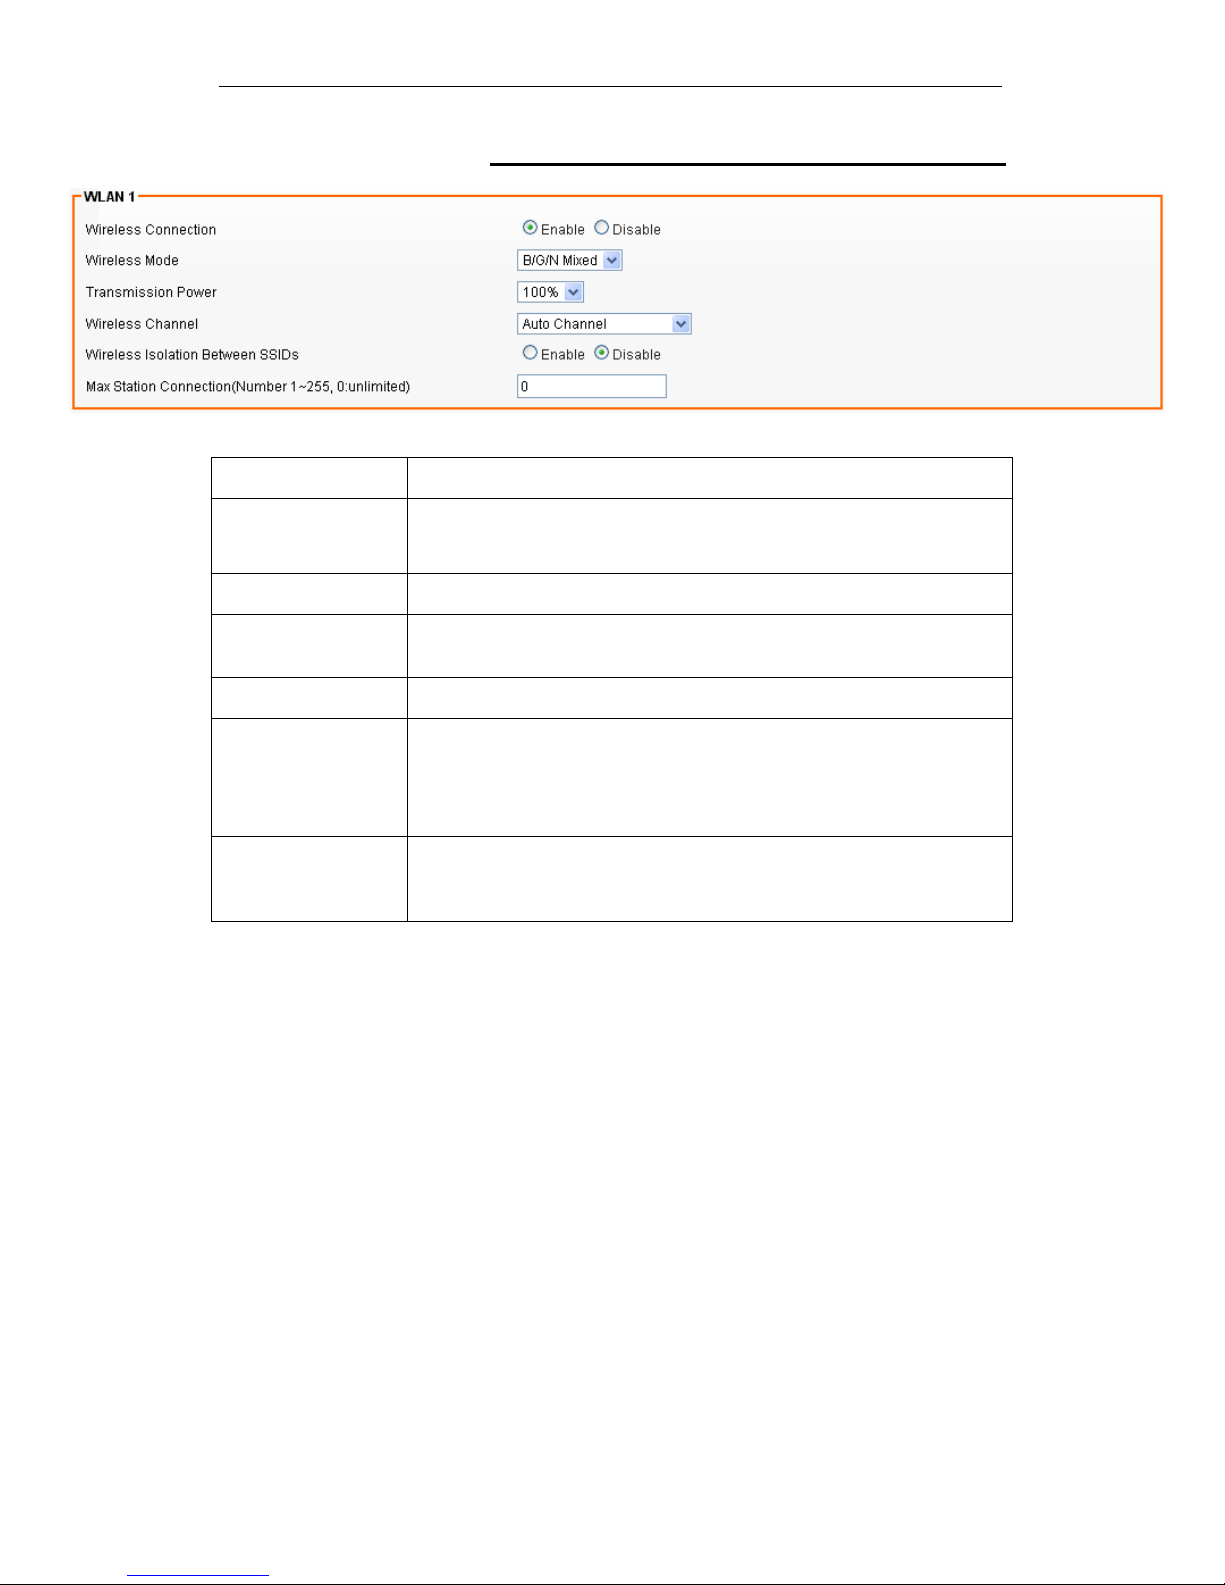
WLAN 1 Settings
Field Description
Wireless
Connection
Select Enable if you would like to turn on the wireless signal.
Select Disable if you would like to turn off the wireless signal.
Wireless Mode Select the wireless mode for 802.11b/g/n or mixed use.
Transmission
Power
Select the transmission power class from 10%, 25%, 50%, 75%, and
100%.
Wireless Channel Select which channel to be located to.
Wireless Isolation
Between SSIDs
Select Enable if you would like to omit the access from one SSID to
another.
Select Disable if you would like to allow the access from one SSID
to another.
Max Station
Connection(Number
1~255, 0:unlimited)
Max Station Connection Number of client
Page 60
Fibrain FSR-R2 User’s Manual
60
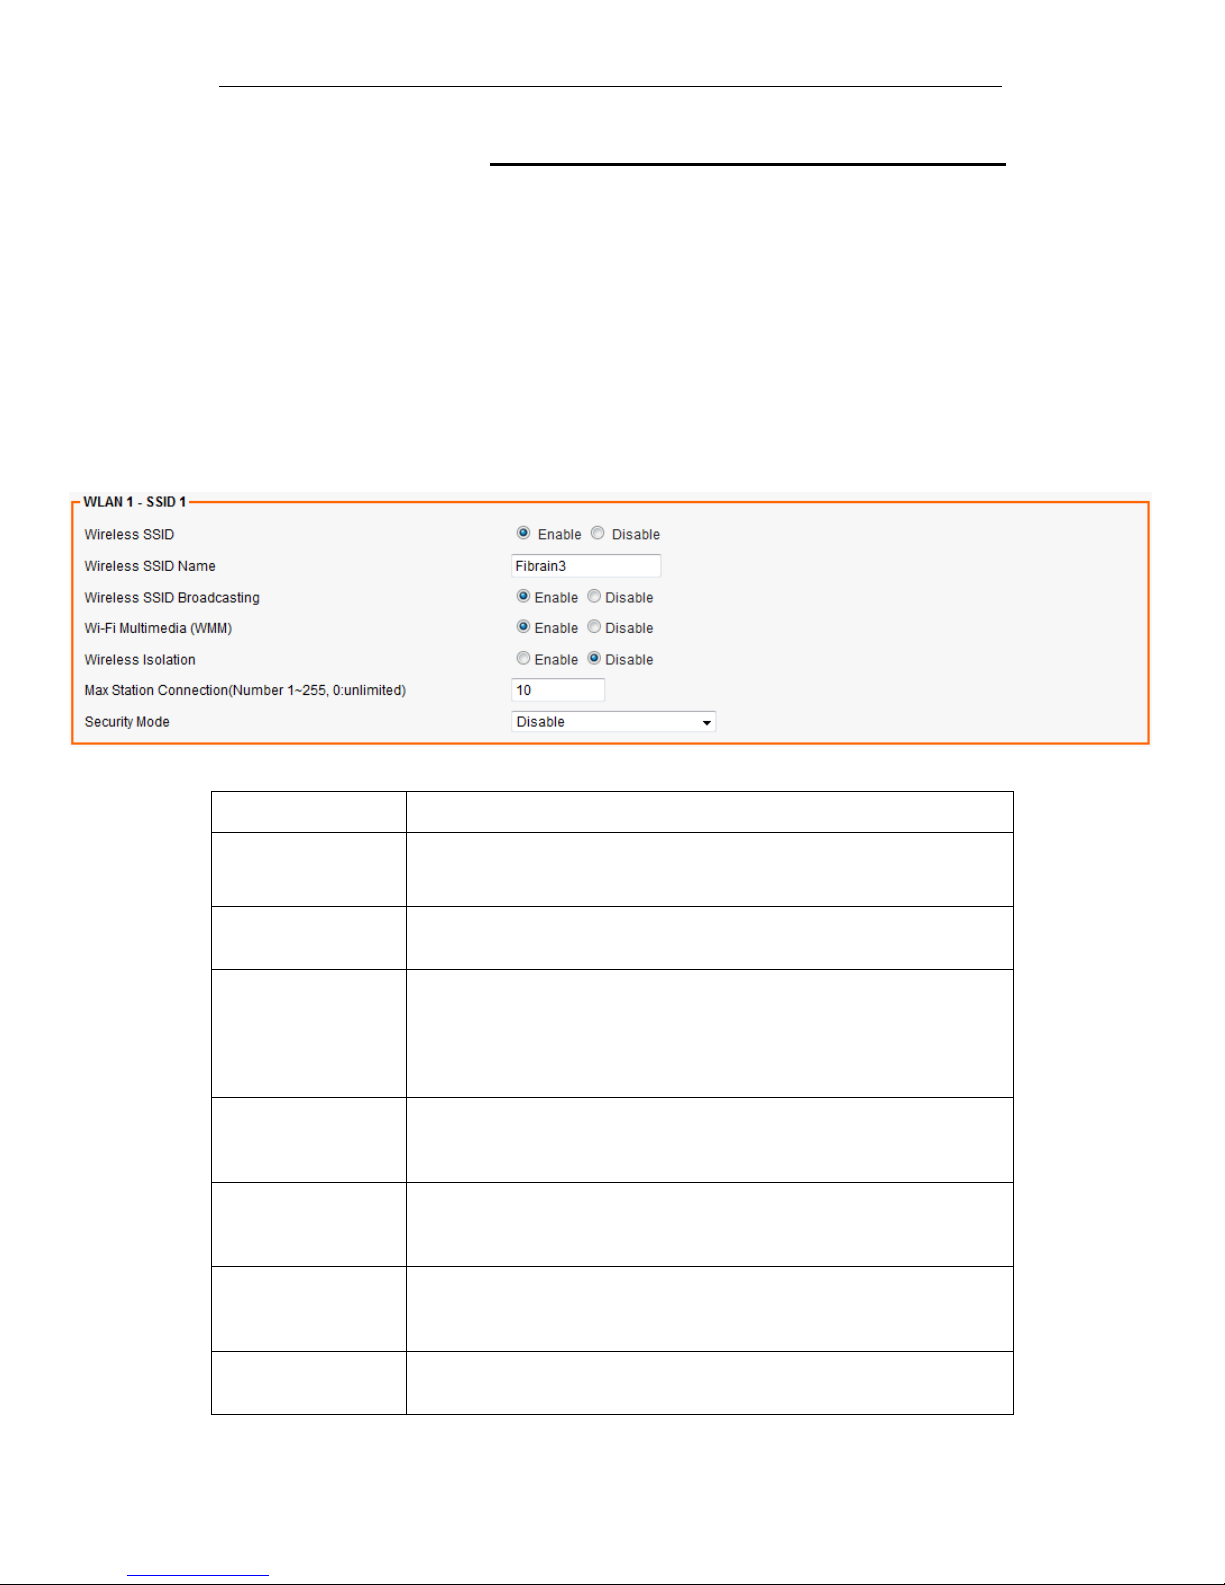
SSID Settings
Users are able to configure each SSID with its own attributes.
Further, various security modes are available based on the
user’s needs and preference: Disable, WEP, WPA Pre-Shared
Key, WPA, WPA2 Pre-Shared Key, and WPA2. However, it is
important to note that all devices under the wireless network
must use the same security mode.
You can configure the security settings of your wireless network
to suit your desired preference. Different methods will grant
different levels of security. Using encryption - data packet is
encrypted before transmission - can prevent data packets from
being intruded on by un-trusted parties. However, please note
that the higher the security level is, the lower the data
throughput becomes.
Field Description
Wireless SSID Select Enable if you would like to turn on this SSID.
Select Disable if you would like to turn off this SSID.
Wireless SSID
Name
Enter the wireless station name you would like to have.
Wireless SSID
Broadcasting
The device broadcasts SSID periodically. Select Enable to turn it on
or Disable to turn it off. Enabling SSID Broadcasting brings
convenience for users to find and connect the device. Disabling
SSID broadcasting enhances the security by hiding SSID
information.
Wi-Fi Multimedia
(WMM)
Select Enable to prioritize different traffic types based on their
characteristics. For example, VoIP or video traffic will have higher
priorities over ordinary traffic.
Wireless Isolation Select Enable if you would like to omit the access to other network
devices connecting to this SSID. Select Disable if you would like to
allow the access to other network devices connecting to this SSID.
Max Station
Connection(Number
1~255, 0:unlimited)
Max Station Connection Number of client
Security Mode Configure the security to Disable, WEP, WPA Pre-Shared Key, WPA,
WPA2 Pre-Shared Key, and WPA2
Page 61
Fibrain FSR-R2 User’s Manual
61
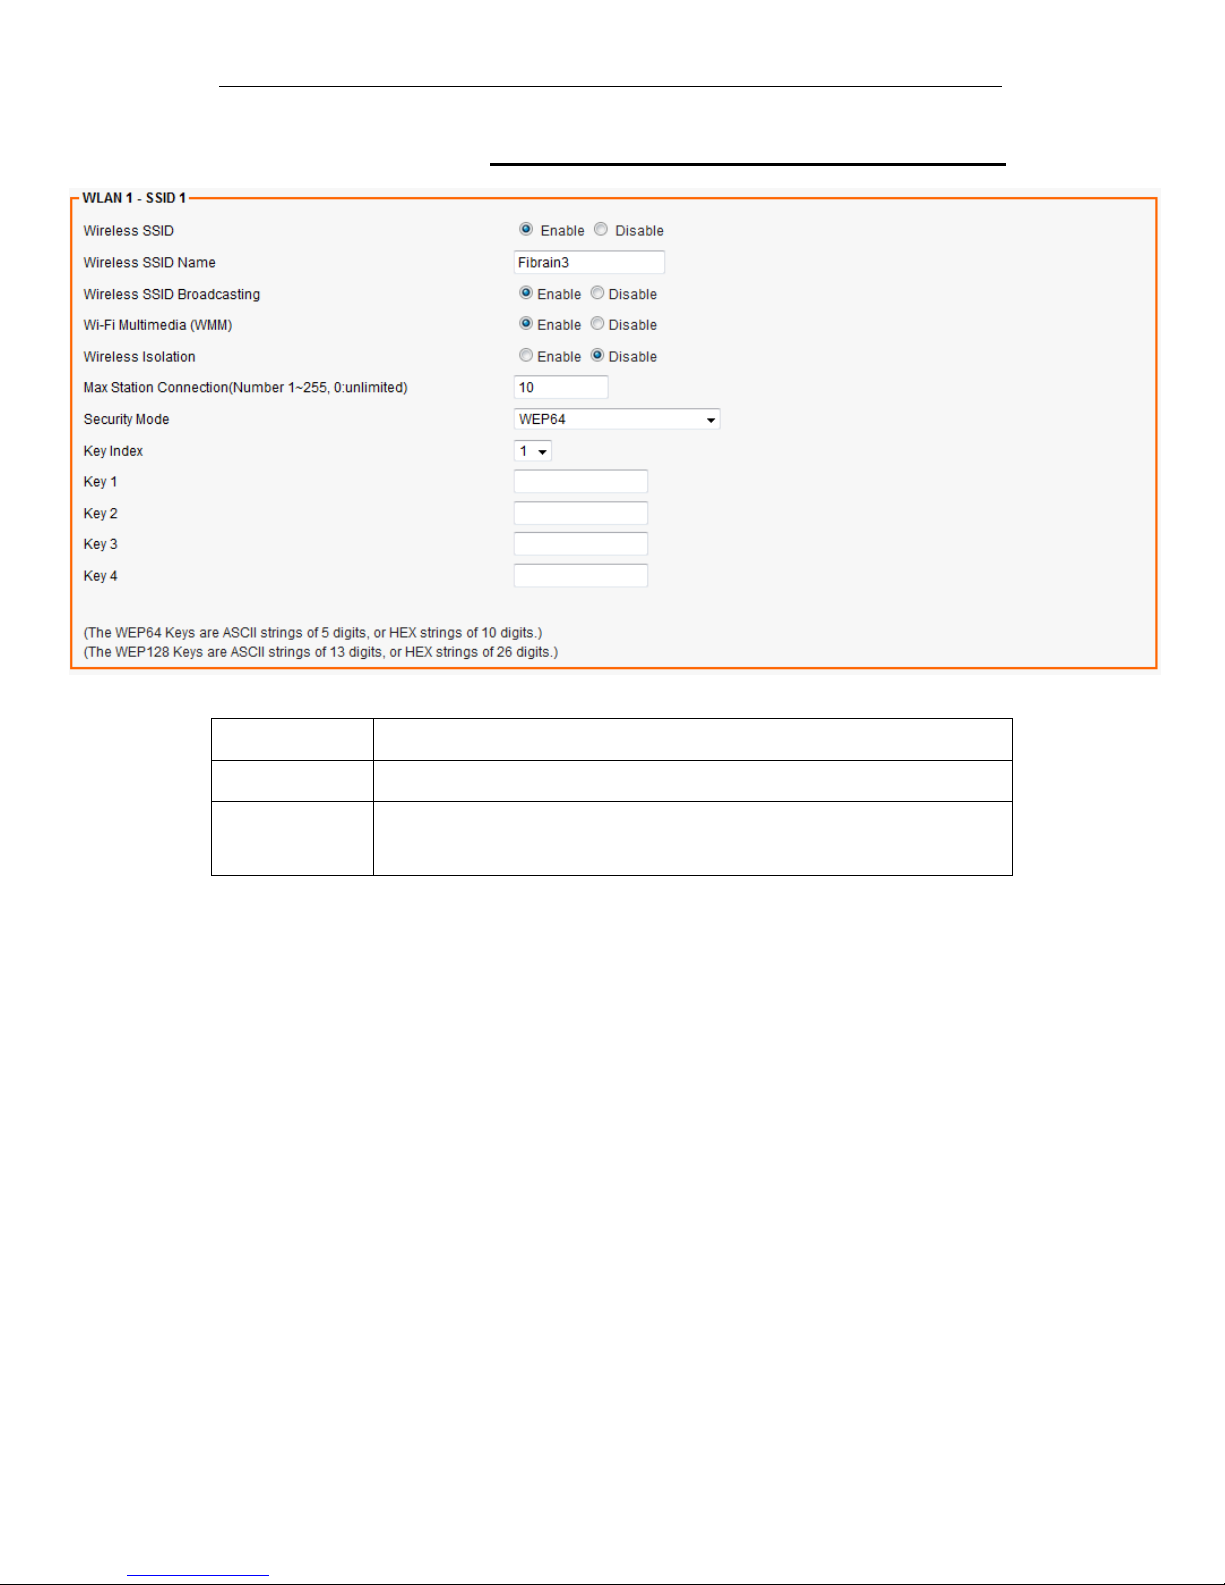
WEP Settings
Field Description
WEP Key Index WEP Key Index indicates which WEP key is used for data encryption.
WEP Key (1~4) 64-bit WEP: type 10 hexadecimal digits or 5 ASCII characters.
128-bit WEP: type 26 hexadecimal digits or 13 ASCII characters.
Page 62
Fibrain FSR-R2 User’s Manual
62
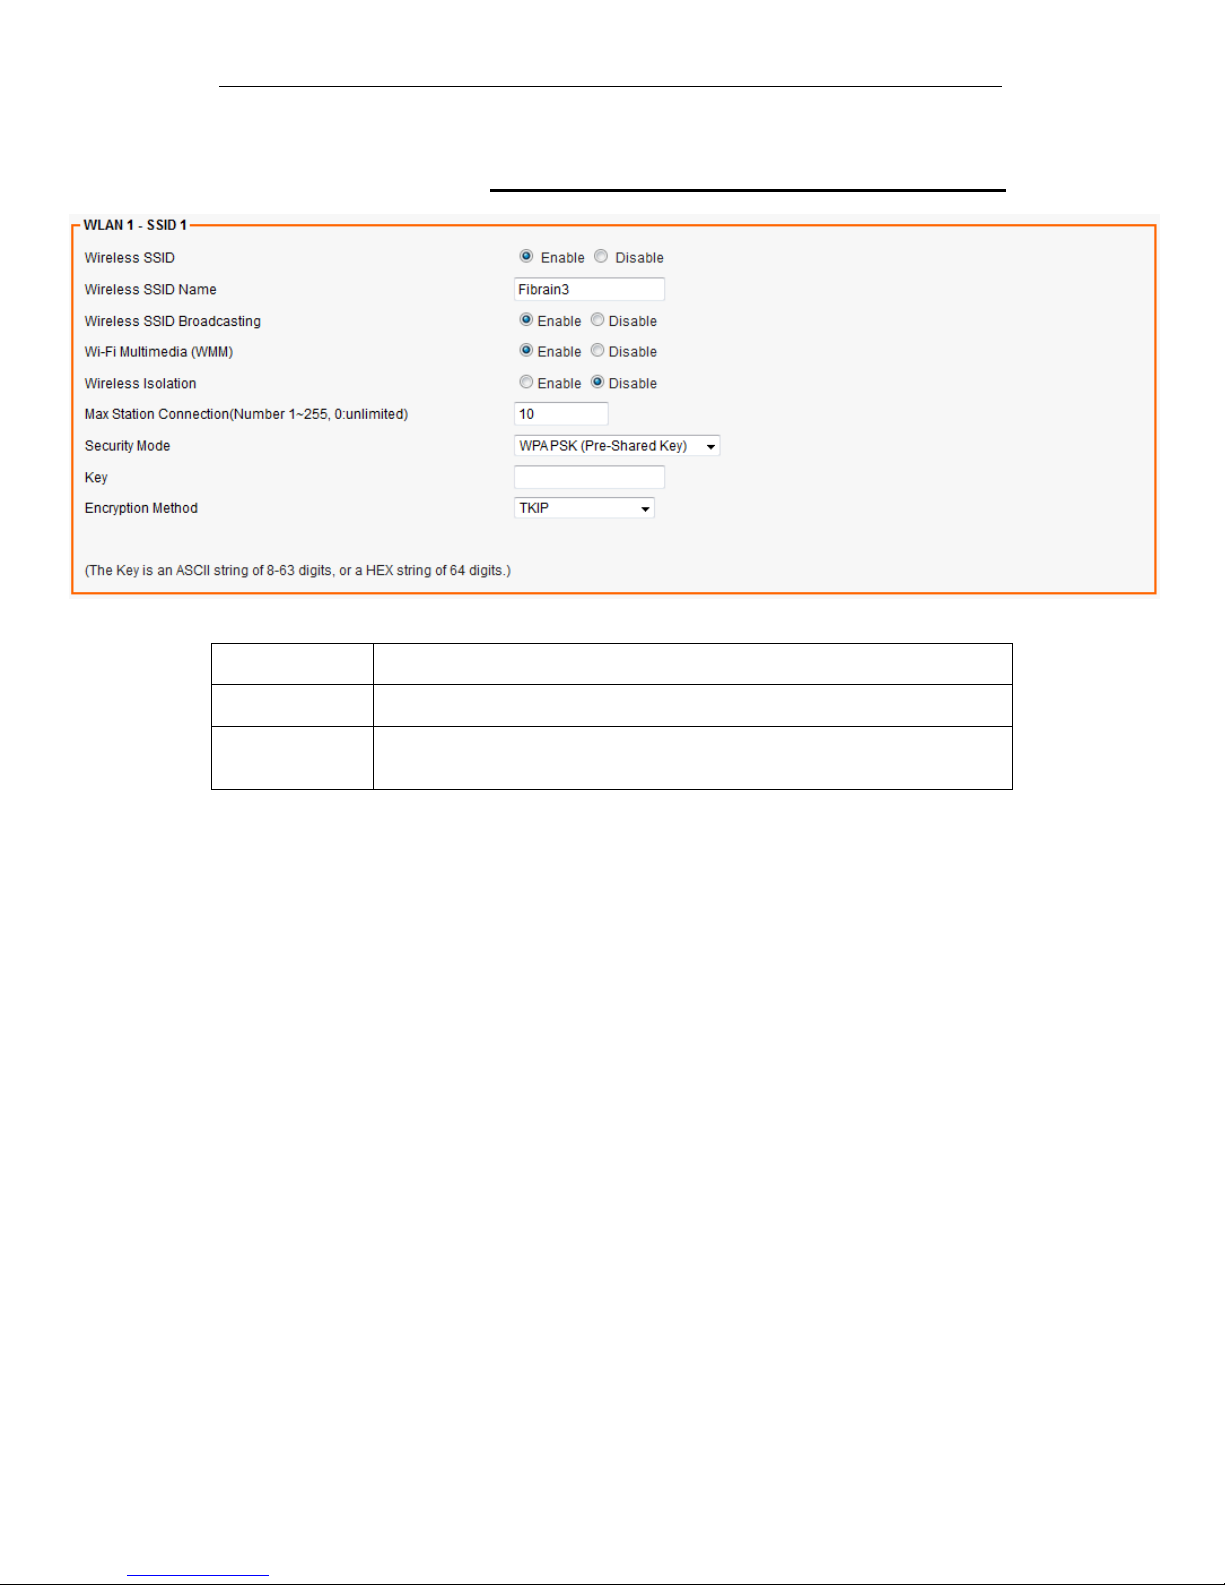
WPA Pre-shared Key / WPA2 Pre-shared Key
Settings
Field Description
Pre-shared Key Pre-shared Key serves as the credential for the packet encryption.
Encryption
Mode
TKIP/AES are supported.
Page 63
Fibrain FSR-R2 User’s Manual
63
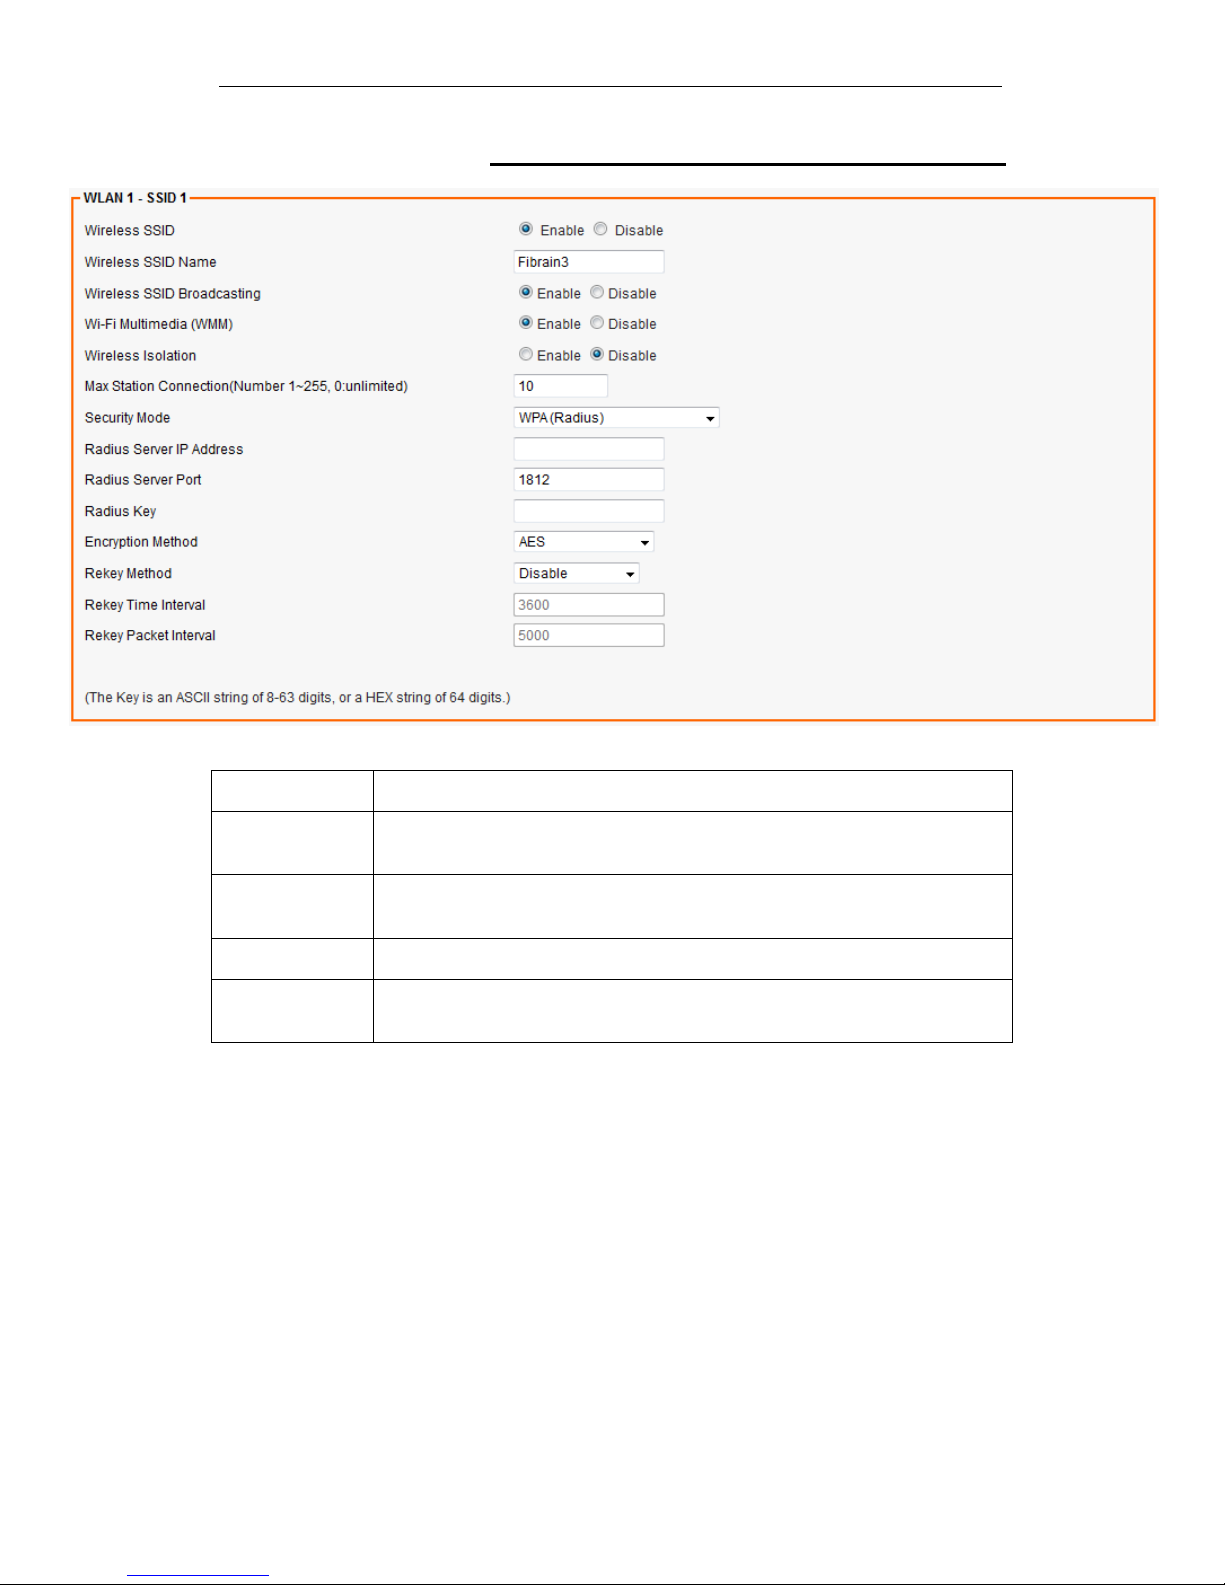
WPA / WPA2 Radius Settings
Field Description
Radius Server
IP Address
Enter the RADIUS server’s IP address.
Radius Server
Port
Enter the RADIUS server’s port number. The default port is 1812.
Radius Key Enter the RADIUS server’s IP Address.
Encryption
Mode
Select TKIP or AES for the packet encryption.
Page 64
Fibrain FSR-R2 User’s Manual
64
15
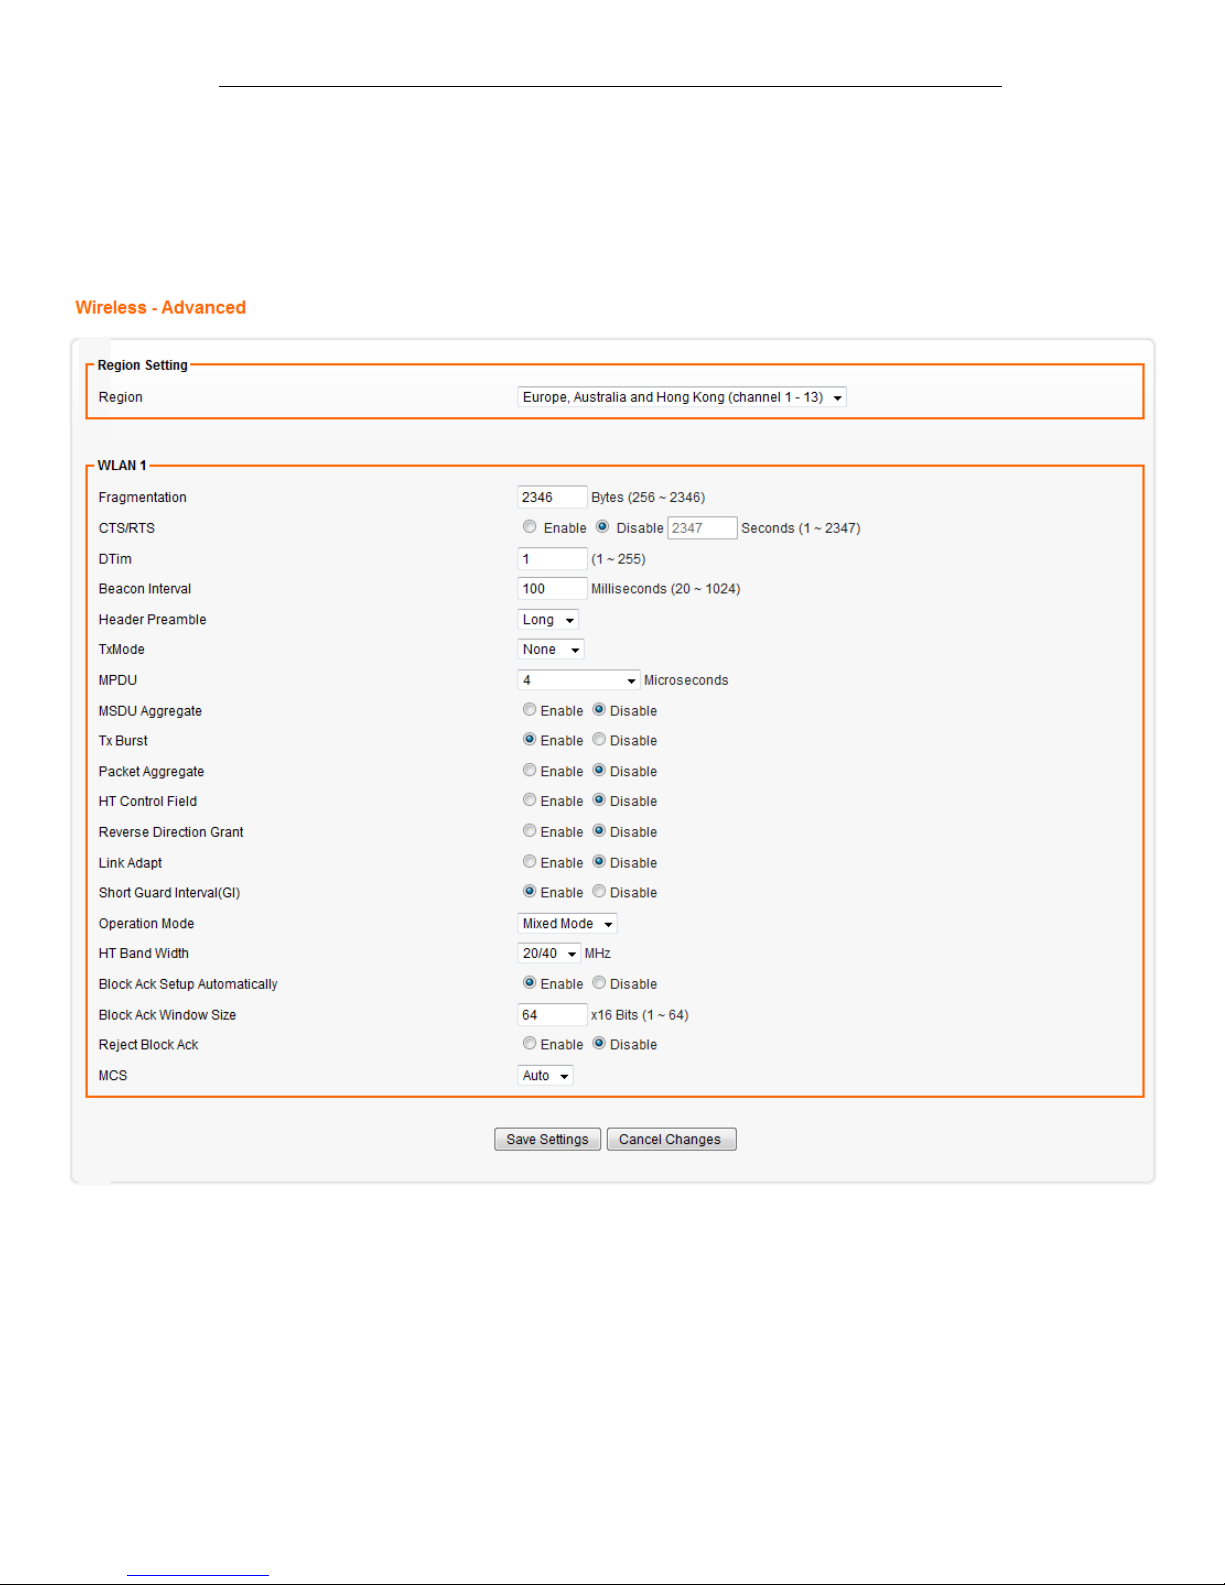
Wireless - Advanced Setting
From the Wireless menu, click on Advanced. The following
page is displayed:
Page 65

Fibrain FSR-R2 User’s Manual
65
Field Description
Region Choose the region you are currently located.
Fragmentation Enter the fragmentation bytes. The default value is 2346 bytes.
CTS/RTS Enter the CTS/RTS seconds. The default value is 2347 seconds.
DTim Enter the DTim seconds. The default value is 1.
Beacon Interval Enter the interval to send a beacon. The default value is 100
milliseconds.
Header
Preamble
Choose Long or Short header preamble.
TxMode Choose different transmission mode.
MPDU MPDU data length. The transmission rate is increase when you choose
a larger number, but usually the max value will be 4 in the wireless card
MSDU
Aggregate
A kind of packet aggregation method, it can improve the transmission
efficiency. Please make sure you Wireless card has this function
supported.
Tx Burst Some 802.11g wireless card can supported this mode, and the
transmission rate can be increased when enable this function.
Packet
Aggregate
An aggregation method like A-MSDU, it can improve the transmission
efficiency. Please make sure you Wireless card has this function
supported.
HT Control Field Choose Enable/Disable. It is useful when you need to debug the
wireless network
Reverse
Direction Grant
Choose Enable/Disable. The response time can be shorter when enable
this function.
Link Adapt Choose Enable/Disable. The function is use to dynamically change the
modulation and encode mechanism between wireless devices.
Short Guard
Interval (SGI)
Choose Enable/Disable. Short GI can improve some transmission rate,
but with less immunity when interference exist.
Operation Mode Choose Mixed mode or Greenfield. You may choose Greenfield mode to
increase the transmission rate when you using 802.11n wireless
network only.
HT Band Width Using HT20MHz or HT20/40MHz
Block Ack
Setup
Automatically
Choose Enable/Disable. If your Wifi Card supported Block Ack
mechanism, it can improve the data transmission efficiency when
enable this function.
Block Ack
Window Size
Specify a Block Ack window size
Reject Block
Ack
Choose Enable to reject the request of BA from other Wireless device
MCS Select transmission (connection) speed.
Page 66
Fibrain FSR-R2 User’s Manual
66
16
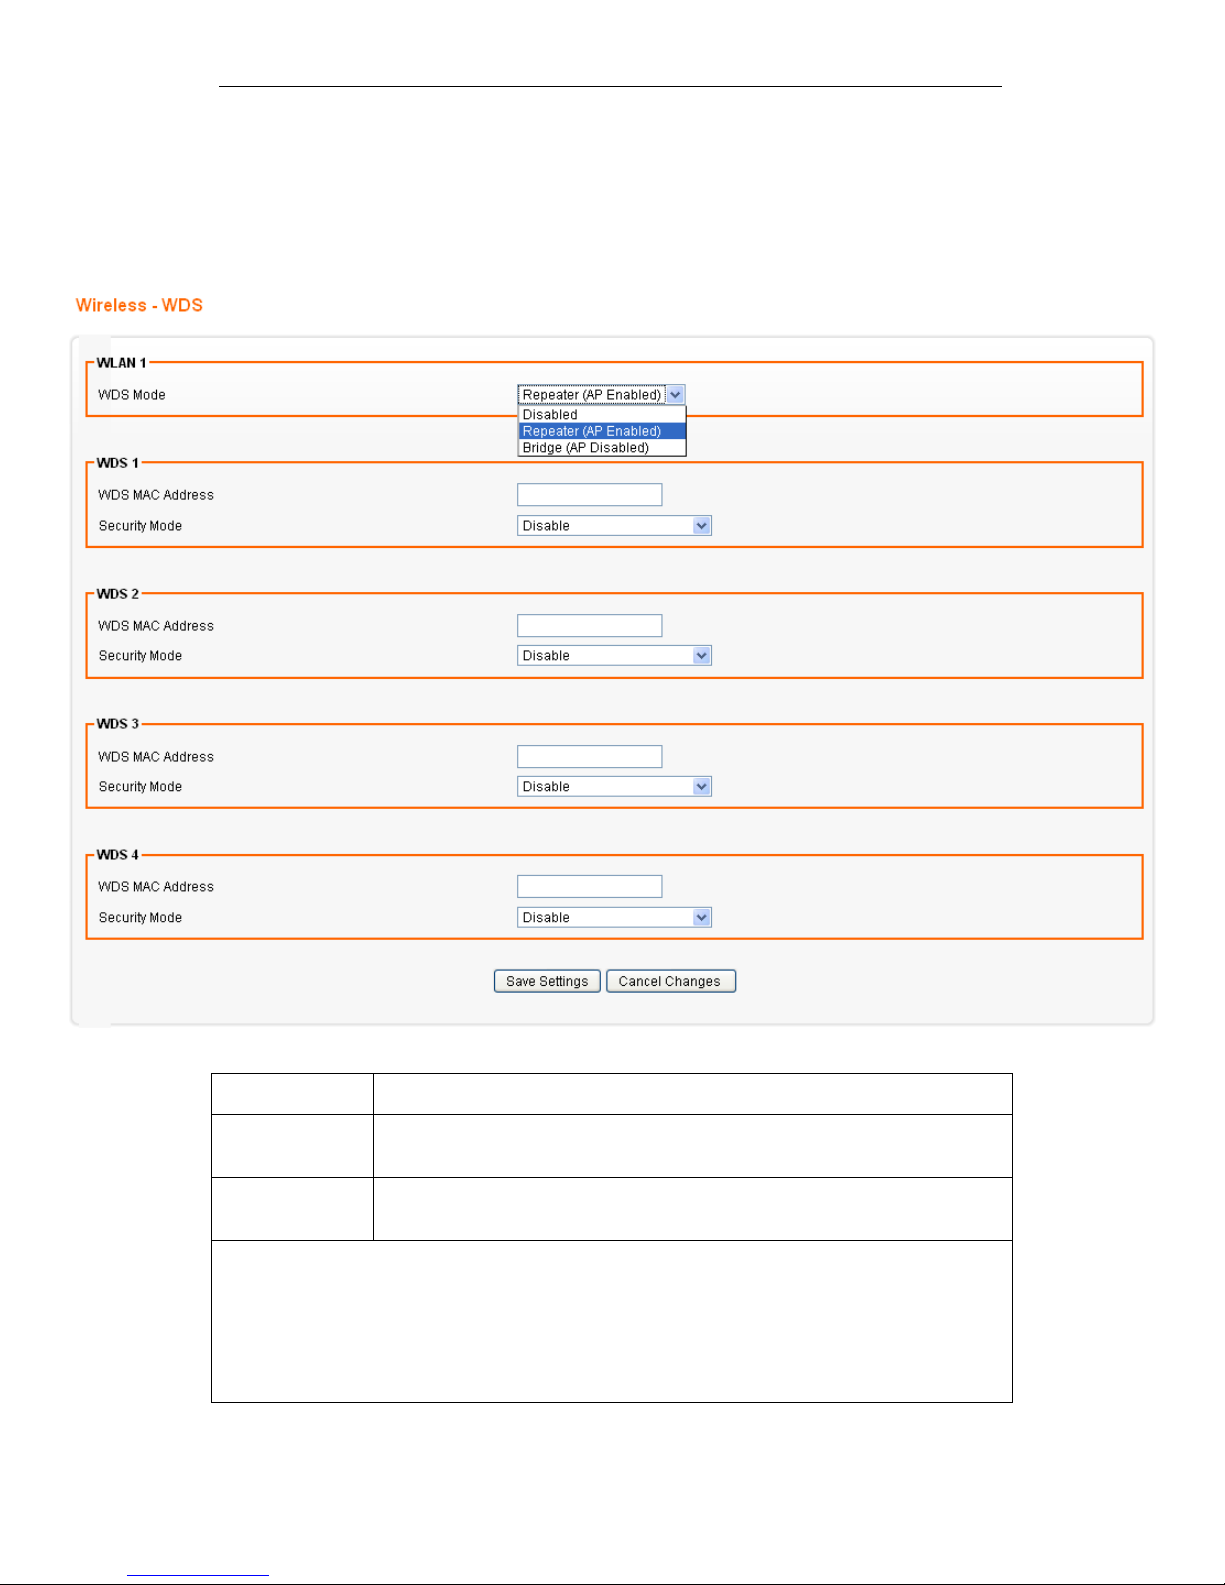
Wireless - WDS Setting
From the Wireless menu, click on WDS. The following page is
displayed:
Field Description
WDS Select Enable to enable WDS function. Select Disable to disable WDS
function.
MAC Address
[1~4]
Enter the MAC addresses of the other bridged wireless devices.
Maximum of 4 devices are allowed to be bridged together.
*Please make sure of the following settings in order to allow WDS to work effectively:
(1) WDS bridged devices must use the same radio channel.
(2) WDS bridged devices must use the same encryption mode and encryption keys.
Please Note: If one of the above fails, WDS devices cannot communication with each
other.
Page 67
Fibrain FSR-R2 User’s Manual
67
17
Wireless - Universal Repeater Setting
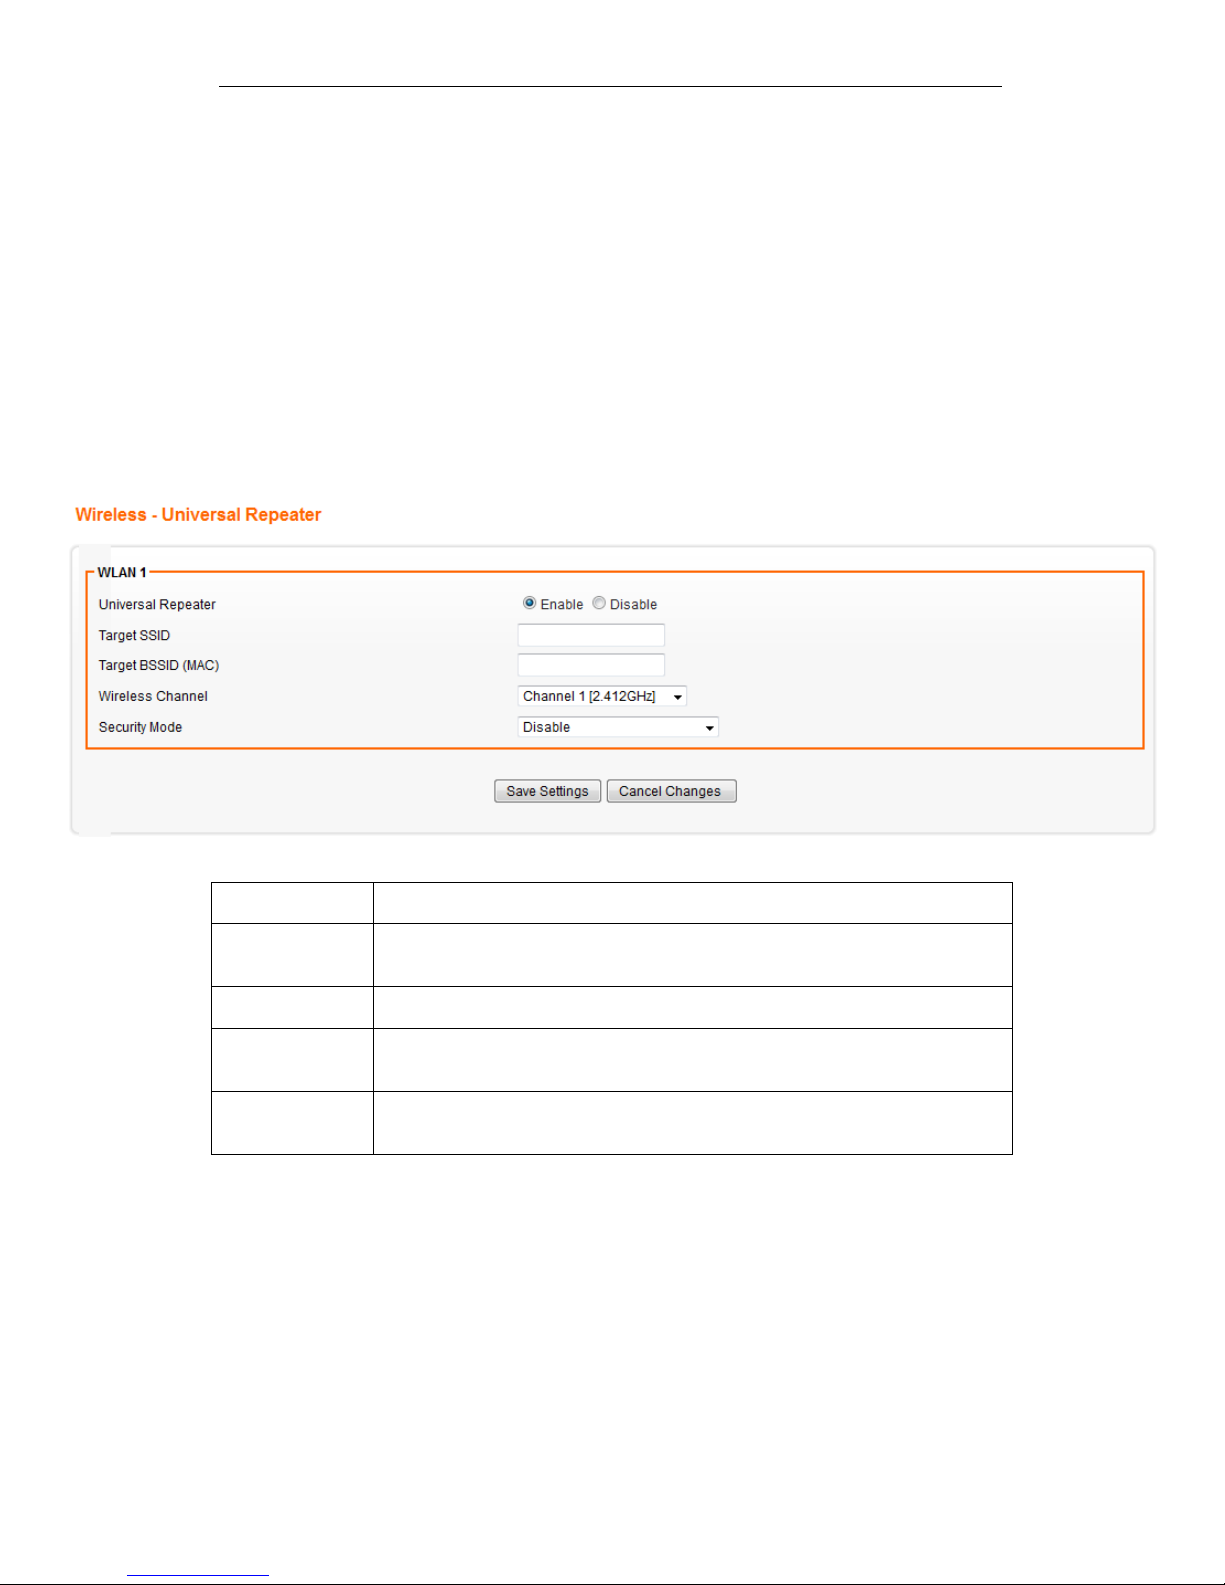
The Universal Repeater function is similar with WDS in that it is
used to essentially enlarge the area of wireless network
coverage. However, unlike WDS, Universal Repeater offers
simplicity in configuration requirements, as users only need to
configure the current AP as a client, and to connect it to the
second AP’s SSID (or BSSID). However, you need to ensure
that the two APs are using the same wireless channel and
security mode (and key) for Universal Repeater to work
effectively.
From the Wireless menu, click on Universal Repeater. The
following page is displayed:
Field Description
Universal
Repeater
Select Enable to enable Universal Repeater function. Select Disable to
disable Universal Repeater function.
Target SSID Enter the target SSID to connect to.
Target BSSID
(MAC)
Enter the target BSSID to connect to. The BSSID is optional if you setup
the target SSID.
Security Mode Choose the security mode the target AP uses, and enter the key if
needed.
Page 68
Fibrain FSR-R2 User’s Manual
68
18
Wireless - WPS Setting
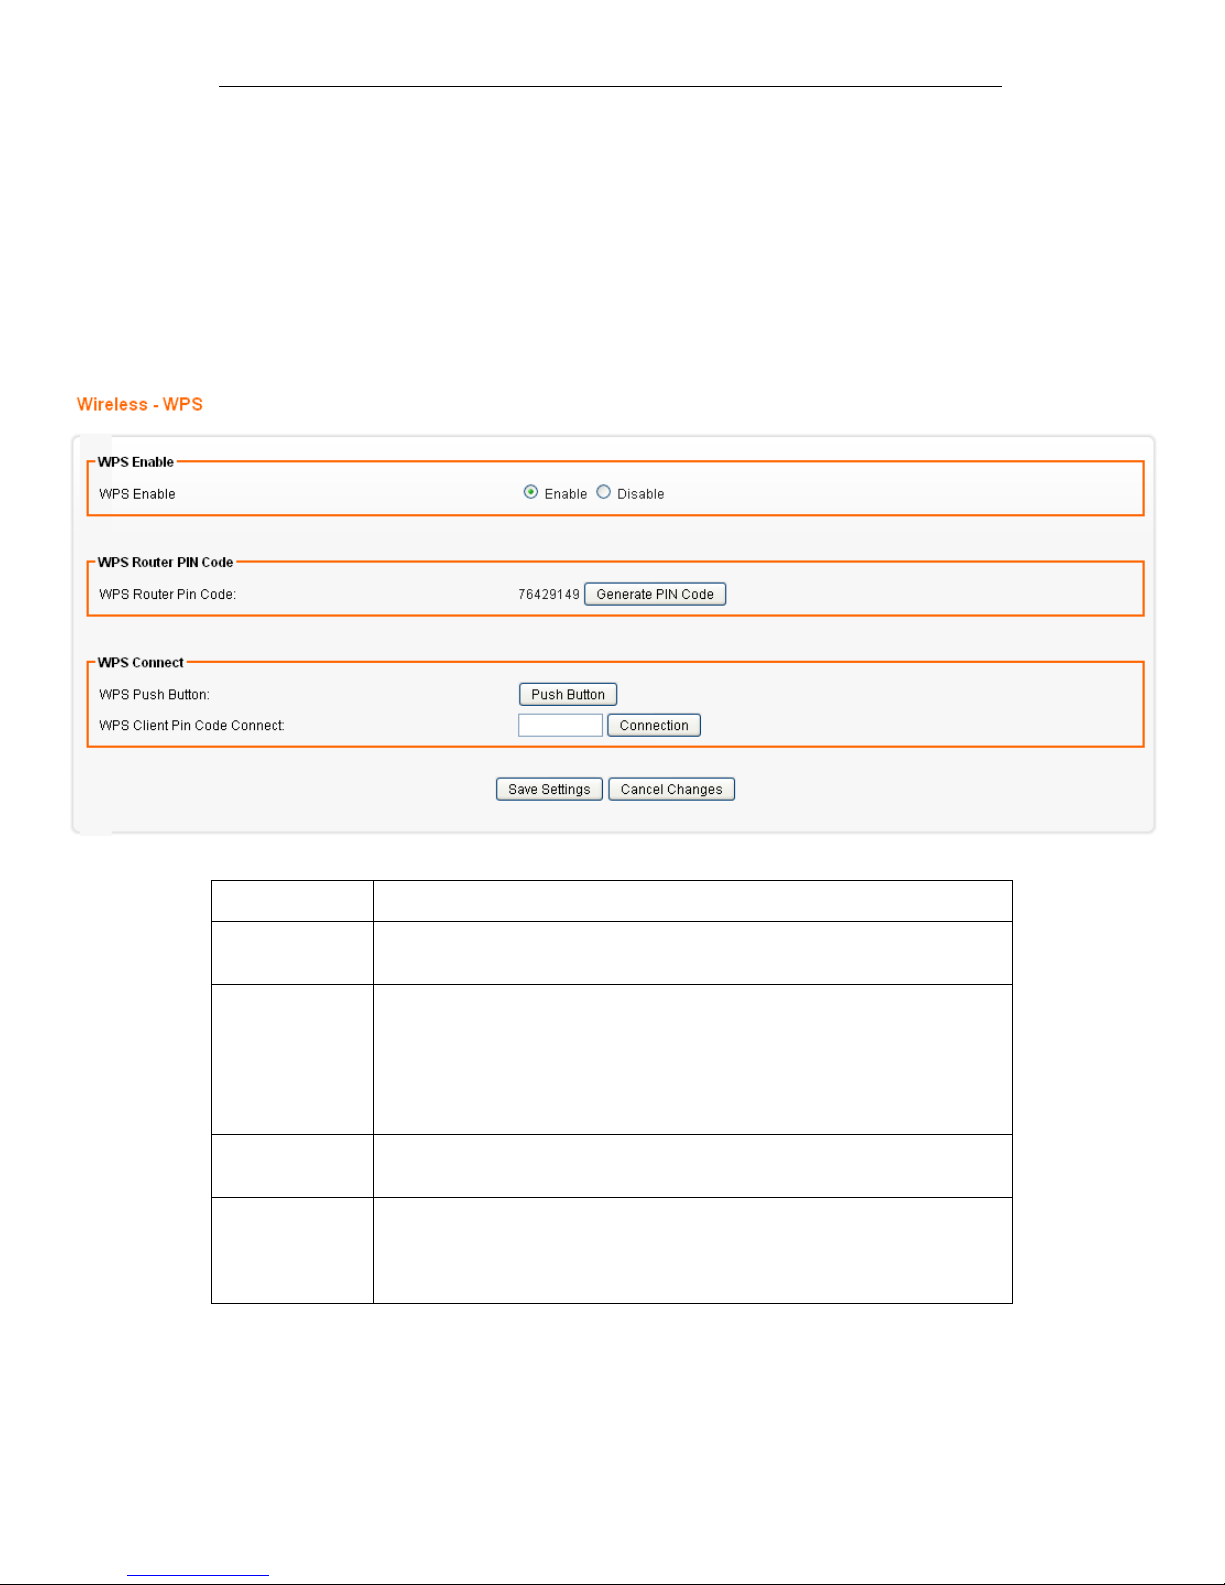
This page allows you to change the setting for WPS (Wi-Fi
Protected Setup). Using this feature could let your wireless
client automatically syncronize its setting and connect to the
Access Point in a minute without any hassle.
From the Wireless menu, click on WPS. The following page is
displayed:
Field Description
WPS Enable Select Enable to enable WPS function. Select Disable to disable WPS
function.
WPS Router PIN
Code
“WPS Router PIN Code” is AP’s PIN. Whenever users want to change
AP’s PIN, they could click “Regenerate PIN” and then click “ Apply
Changes”. Moreover, if users want to make their own PIN, they could
enter four digit PIN without checksum and then click “ Apply Changes”.
However, this would not be recommended since the registrar side
needs to be supported with four digit PIN.
WPS Push
Button
Clicking this button will invoke the PBC method of WPS. It is only used
when AP acts as a registrar.
WPS Client Pin
Code Connect:
It is only used when users want their station to join AP’s network. The
length of PIN is limited to four or eight numeric digits. If users enter
eight digit PIN with checksum error, there will be a warning message
popping up. If users insist on this PIN, AP will take it.
Page 69
Fibrain FSR-R2 User’s Manual
69
19
Security - Firewall Setting
This page allows you to change the setting for WPS (Wi-Fi
Protected Setup). Using this feature could let your wireless
client automatically syncronize its setting and connect to the
Access Point in a minute without any hassle.
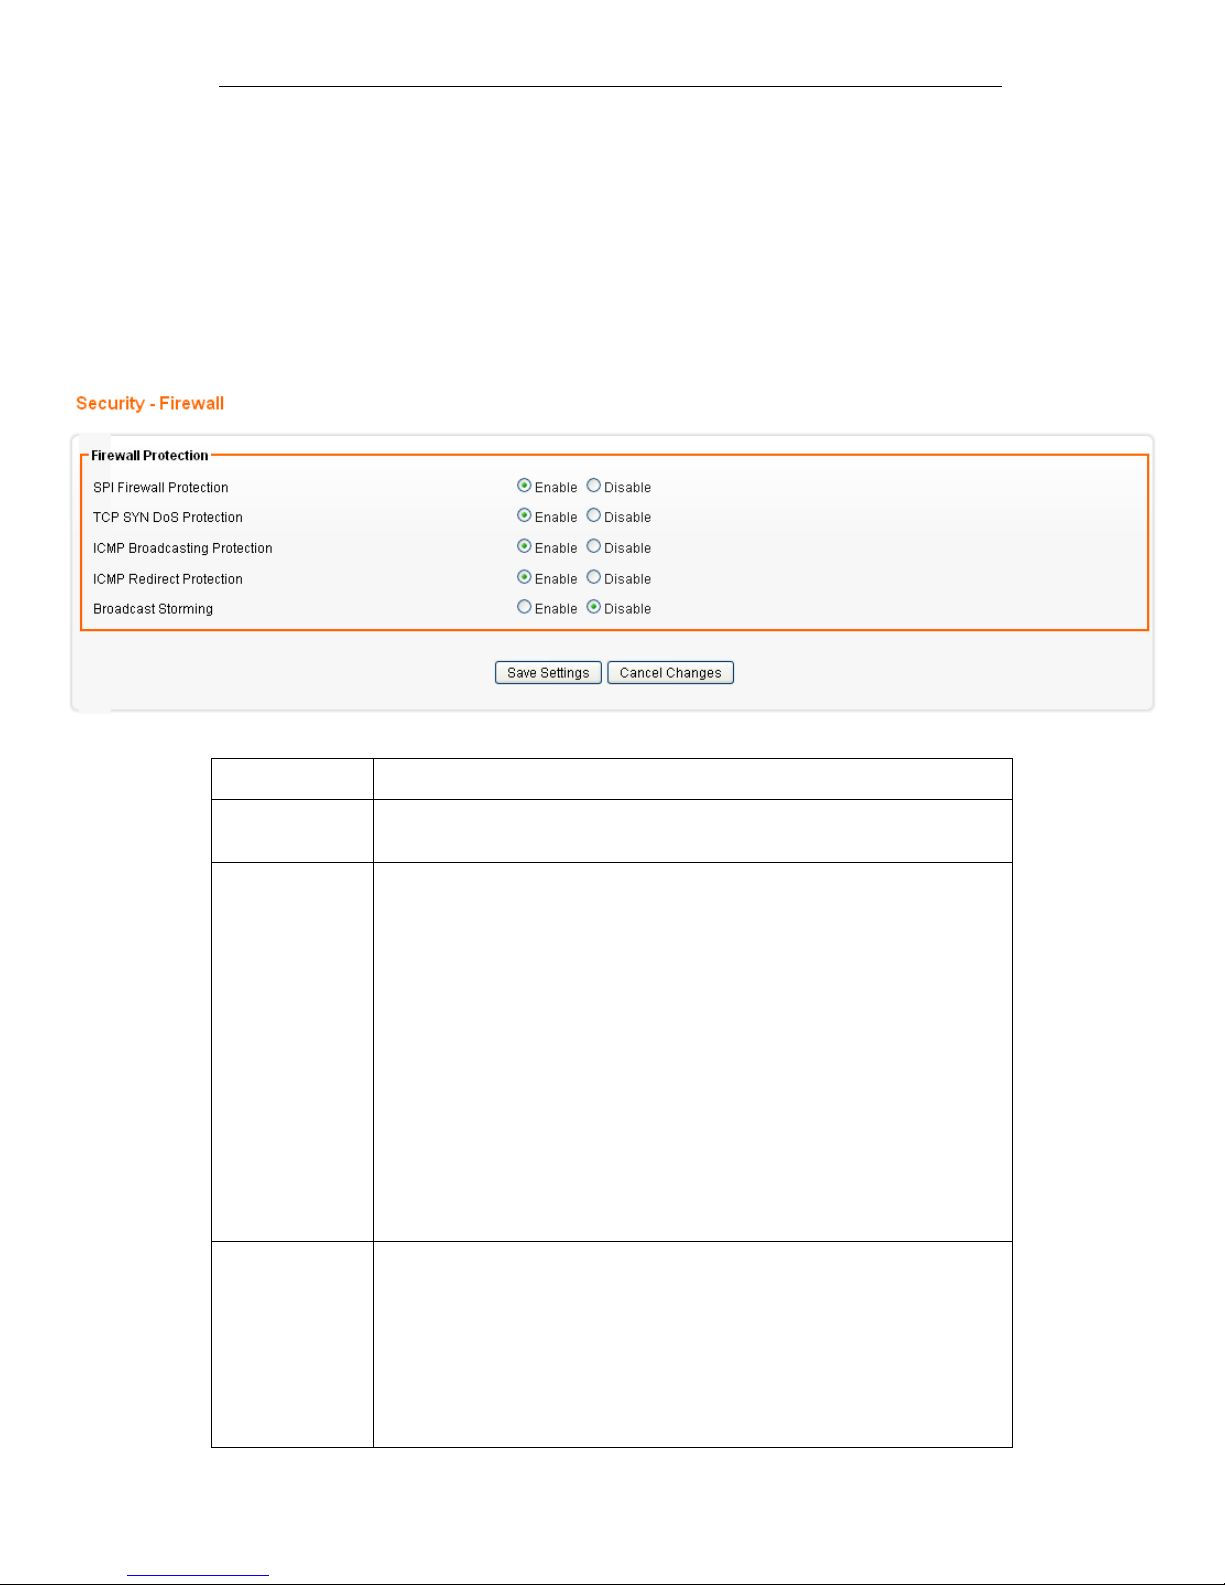
From the Security menu, click on Firewall. The following page is
displayed:
Field Description
SPI Firewall
Protection
Select Enable to enable SPI Firewall Protection. Select Disable to
disable SPI Firewall Protection.
TCP SYN DoS
Protection
Check to enable TCP SYN DoS Protection.
Uncheck to disable TCP SYN DoS Protection.
TCP SYN DoS attack sends a flood of TCP/SYN packets. Each of these
packets are like a connection request, causing the server to consume
computing resources (e.g. memory, CPU) to reply and to continuously
wait for the incoming packets. Without TCP SYN Dos Protection, the
resources in the server will be easily consumed completely. This will
then consequently result in the dysfunction of the server.
The device is able to detect TCP SYN DoS attacks and limits the
resource consumption by lowering the incoming request rate by fast
recycling the resource. Therefore, The device is still able to serve
normal traffic while it is under such an attack.
ICMP
Broadcasting
Protection
Check to enable ICMP Broadcasting Protection.
Uncheck to disable ICMP Broadcasting Protection.
ICMP broadcasting attack is a type of DoS attacks. A flood of ICMP
broadcasting packets is generated and sent to a server (like AXIMCom
Mobile Router). Consequently, this server will suffer from a huge
amount of interruptions and consumption of computing resources.
Page 70

Fibrain FSR-R2 User’s Manual
70
The device is able to stop respon
ding to ICMP broadcasting echo
packets in order to avoid a potential ICMP broadcasting DoS attack.
ICMP Redirect
Protection
Check to enable ICMP Redirect Protection.
Uncheck to disable ICMP Redirect Protection.
An ICMP redirect message is a way to change the existing routing path.
Generally, ICMP redirect packets should not be sent, and so when there
is the occurrence that ICMP redirect packets are sent, it is important to
note that it is very likely to be used as a means for a network attack.
Broadcast
Storming
Enable/disable Broadcast Storming protection.
Page 71
Fibrain FSR-R2 User’s Manual
71
20
Security - ACCESS CONTROL LIST (ACL)
SETUP Setting
This page allows you to change the setting for WPS (Wi-Fi
Protected Setup). Using this feature could let your wireless
client automatically syncronize its setting and connect to the
Access Point in a minute without any hassle.
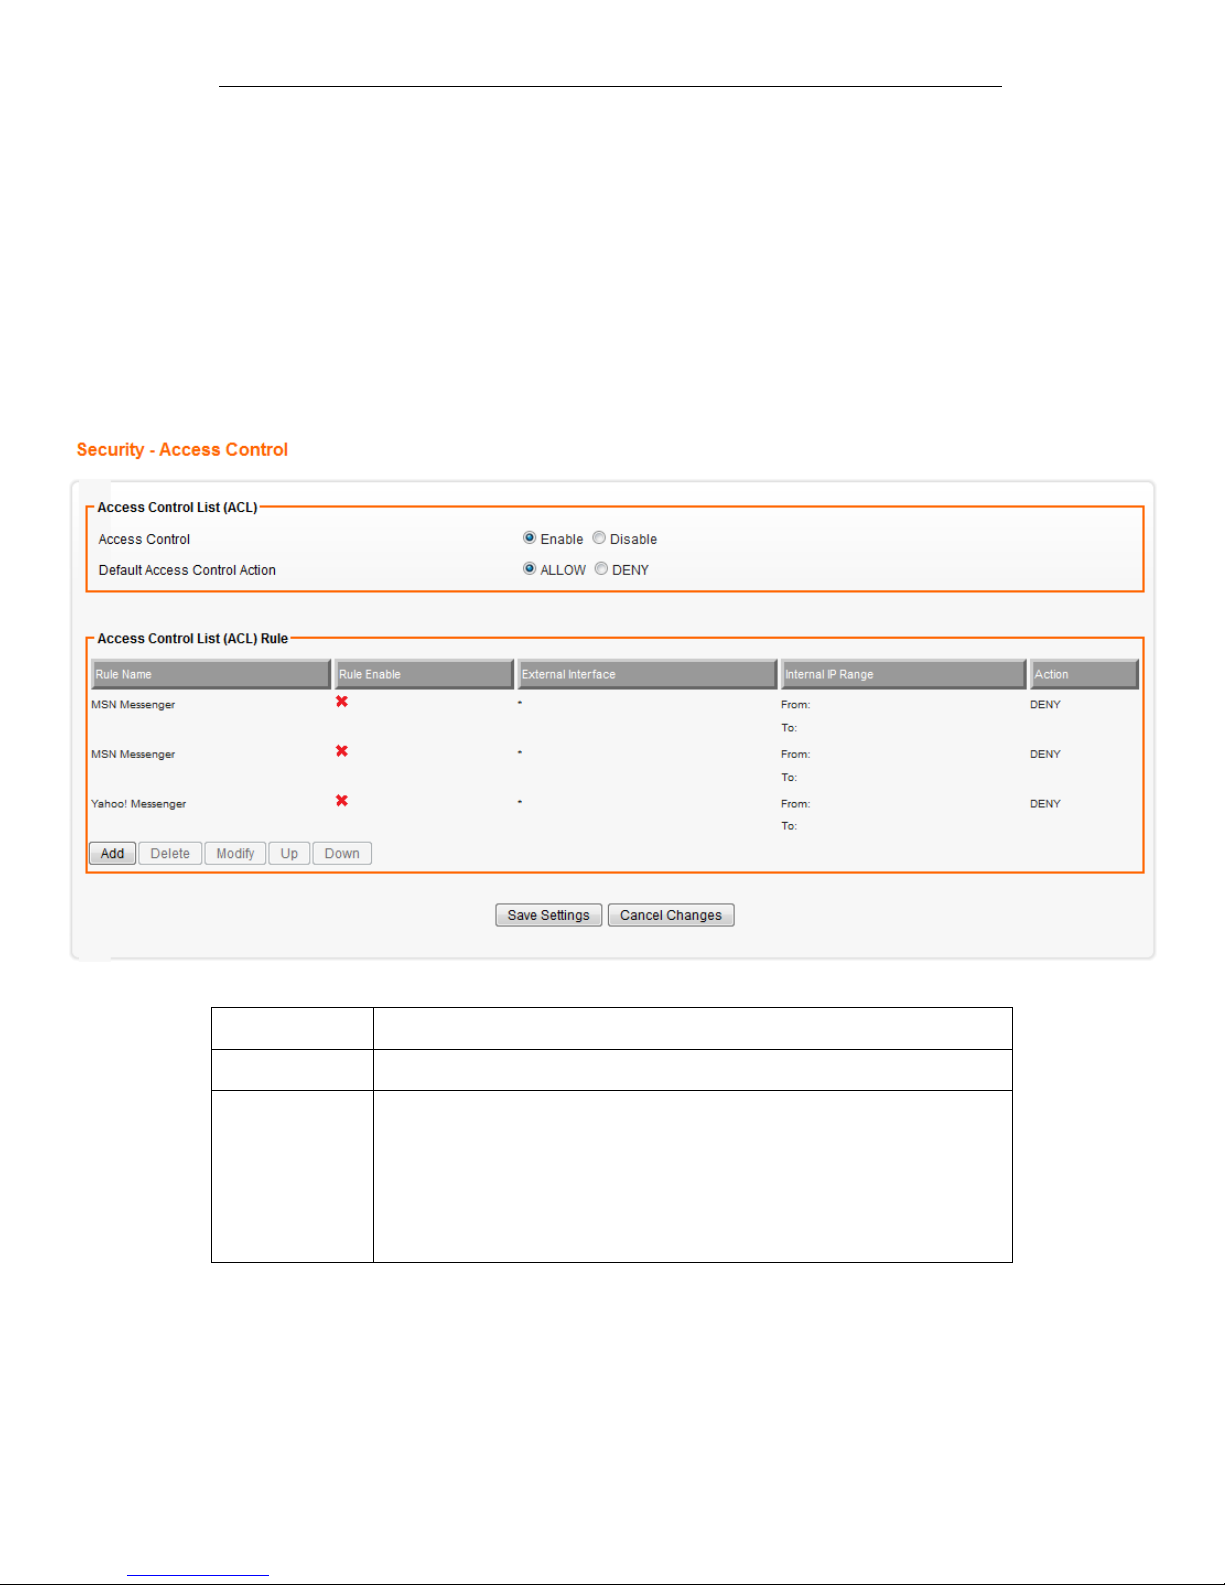
From the Security menu, click on ACL. The following page is
displayed:
Field Description
ACL Select Enable to enable ACL. Select Disable to disable ACL.
Default ACL
Action
Check Enable to enable a specific MAC Filter rule.
Uncheck Enable to disable a specific MAC Filter rule. Type the MAC
address to permit a device to access to the network.
* Enabling MAC filtering blocks all MAC addresses which are not listed
in the MAC Filter Rule. Be aware that adding the MAC address of your
managing computer is required in order to access to the device.
Page 72
Fibrain FSR-R2 User’s Manual
72
Add Access Control List (ACL) Rule
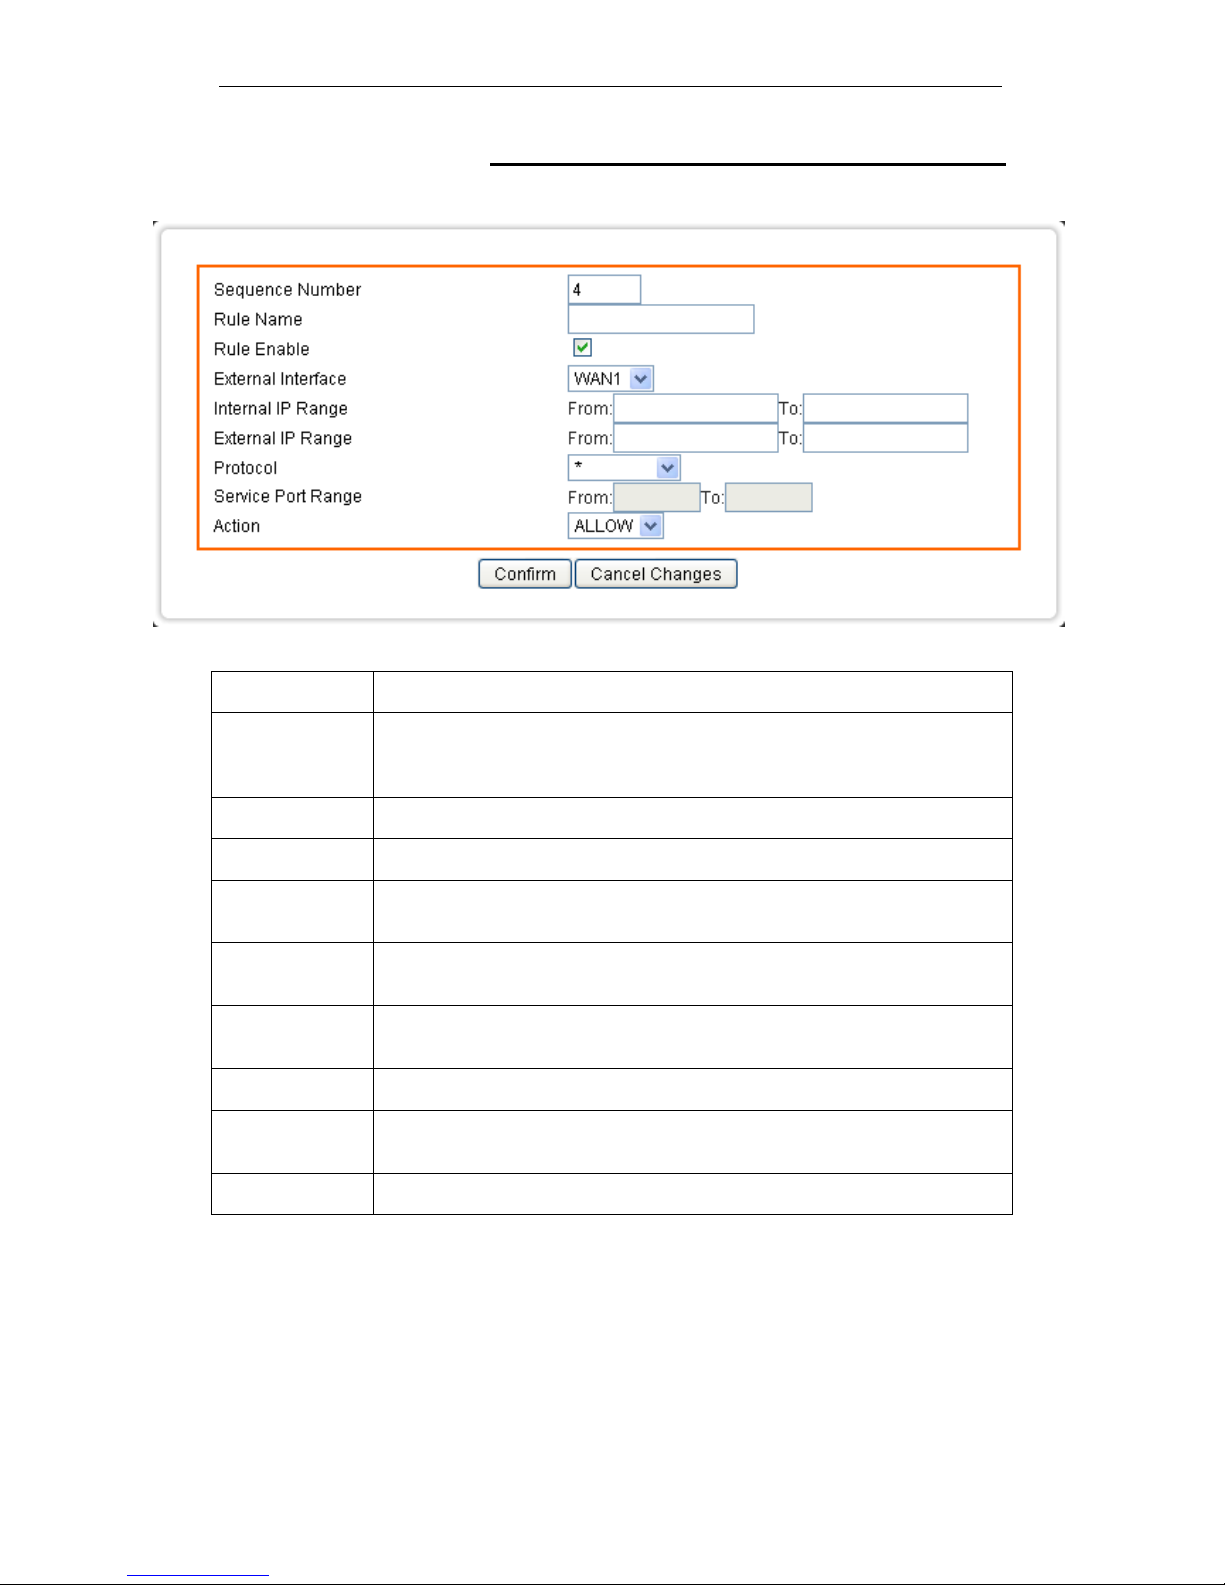
Click on Add. The following page is displayed:
Field Description
Sequence
Number
This defines the sequence of the ACL rules. If a packet fits the
conditions set by the ACL rules, the packet will then be sorted
according to the first ACL rule from the top of the list.
Rule Name Name of the ACL rule.
Rule Enable Enable/Disable this ACL rule
External
Interface
Please select which External Interface (WAN1 or WAN2) you want a
packet to go through, IF the packet fits the condition of this ACL rule.
Internal IP
Range
Set up the internal IP range for this ACL rule.
External IP
Range
Set up the external IP range for this ACL rule.
Protocol Set up the protocol (TCP or UDP) for the ACL to be enabled.
Service Port
Range
Set up the Service Port Range (e.g., HTTP is TCP/80) for the ACL to be
enabled.
Action Select ALLOW / DENY
Page 73

Fibrain FSR-R2 User’s Manual
73
Example: Filter and block MSN usage.
For example, a company does not wish to allow employees to
use MSN. The system administrator can set up an ACL action:
rejecting the traffic going out to External IP Range at
207.46.110.*/24.
Field Description
Rule Name MSN Blocking
Rule Enable Enable
External
Interface
* (All complies)
Internal IP
Range
Keep it blank (All complies)
External IP
Range
207.46.110.1:207.46.110.1.254 (IP address range for MSN server)
Protocol TCP
Service Port
Range
Keep it blank (All complies)
Action DENY
Page 74
Fibrain FSR-R2 User’s Manual
74
21
Security - MAC Access Control Setting
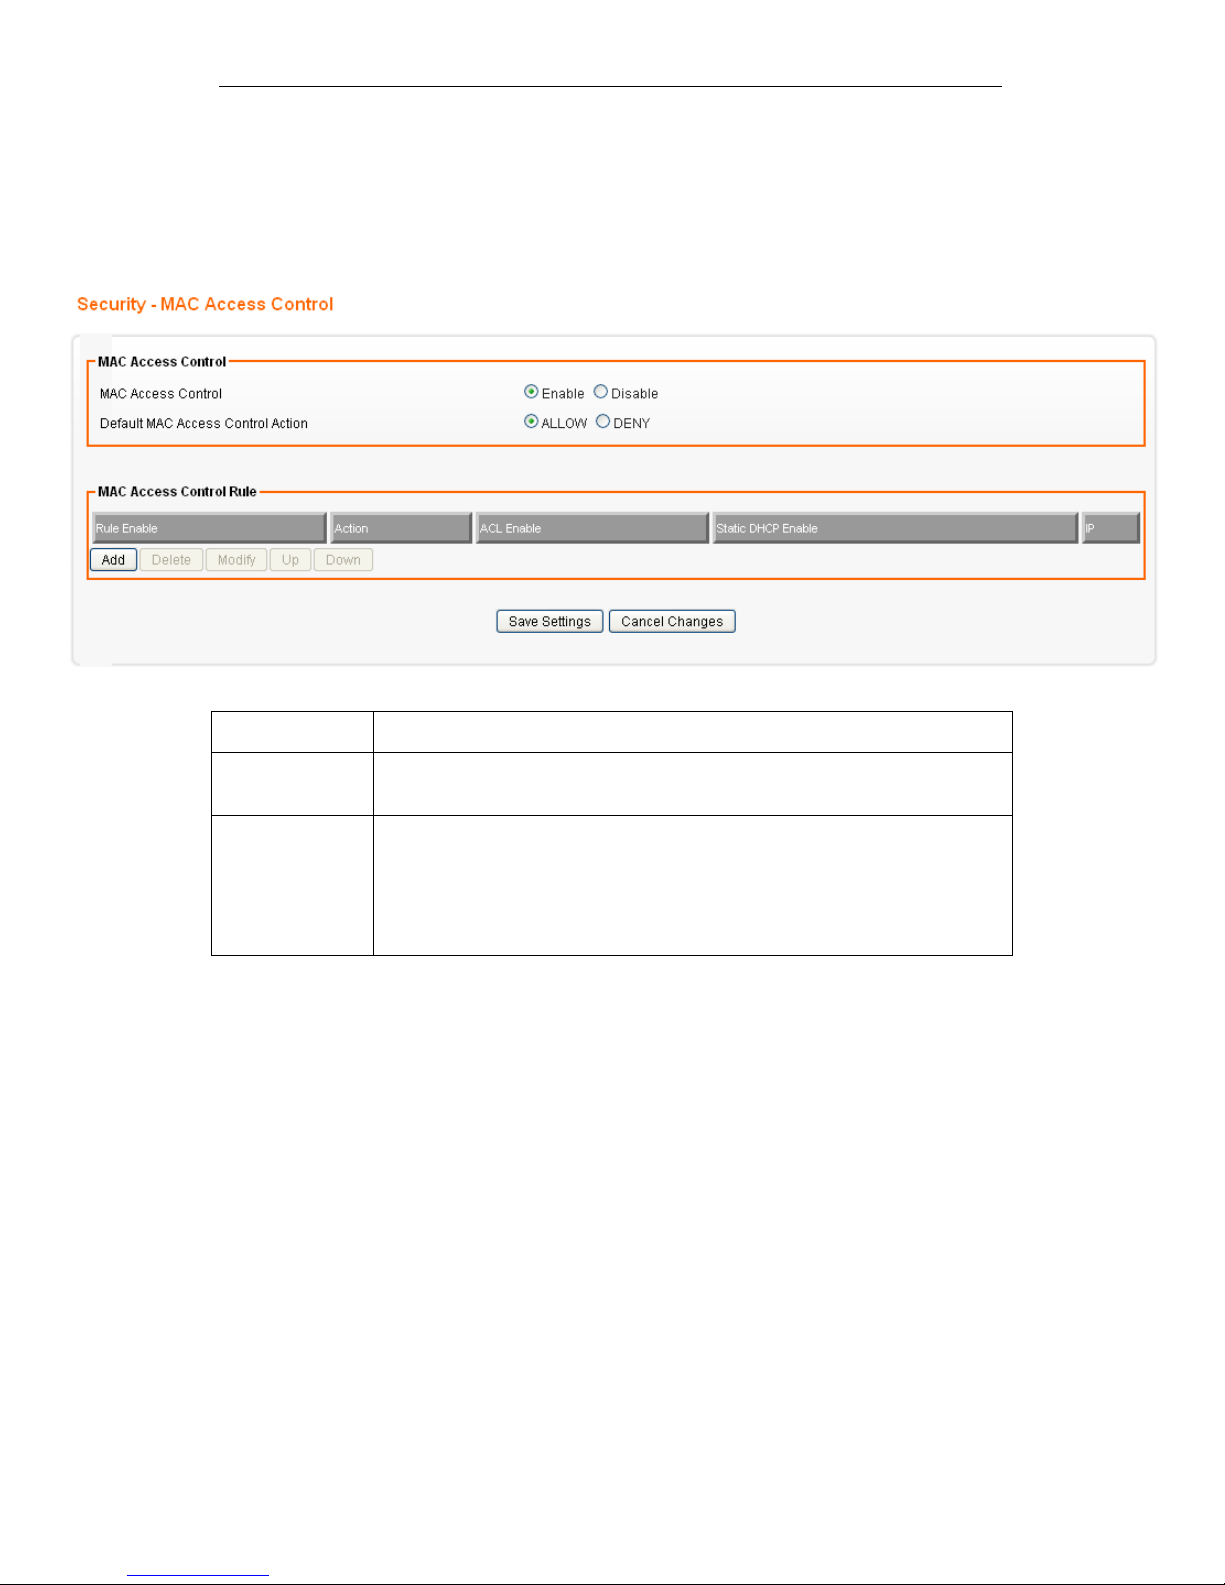
From the Security menu, click on MAC Access Control. The
following page is displayed:
Field Description
MAC Access
Control
Choose Enable/Disable to enable/disable MAC access Control
Default MAC
Access Control
Action
The default ACL action of the ACL rules. When you add the individual
rules, it can be viewed as exceptions and take effects relating to the
default action.
If the action of the adding rule is the same as the default action, then
this rule will not work.
Page 75
Fibrain FSR-R2 User’s Manual
75
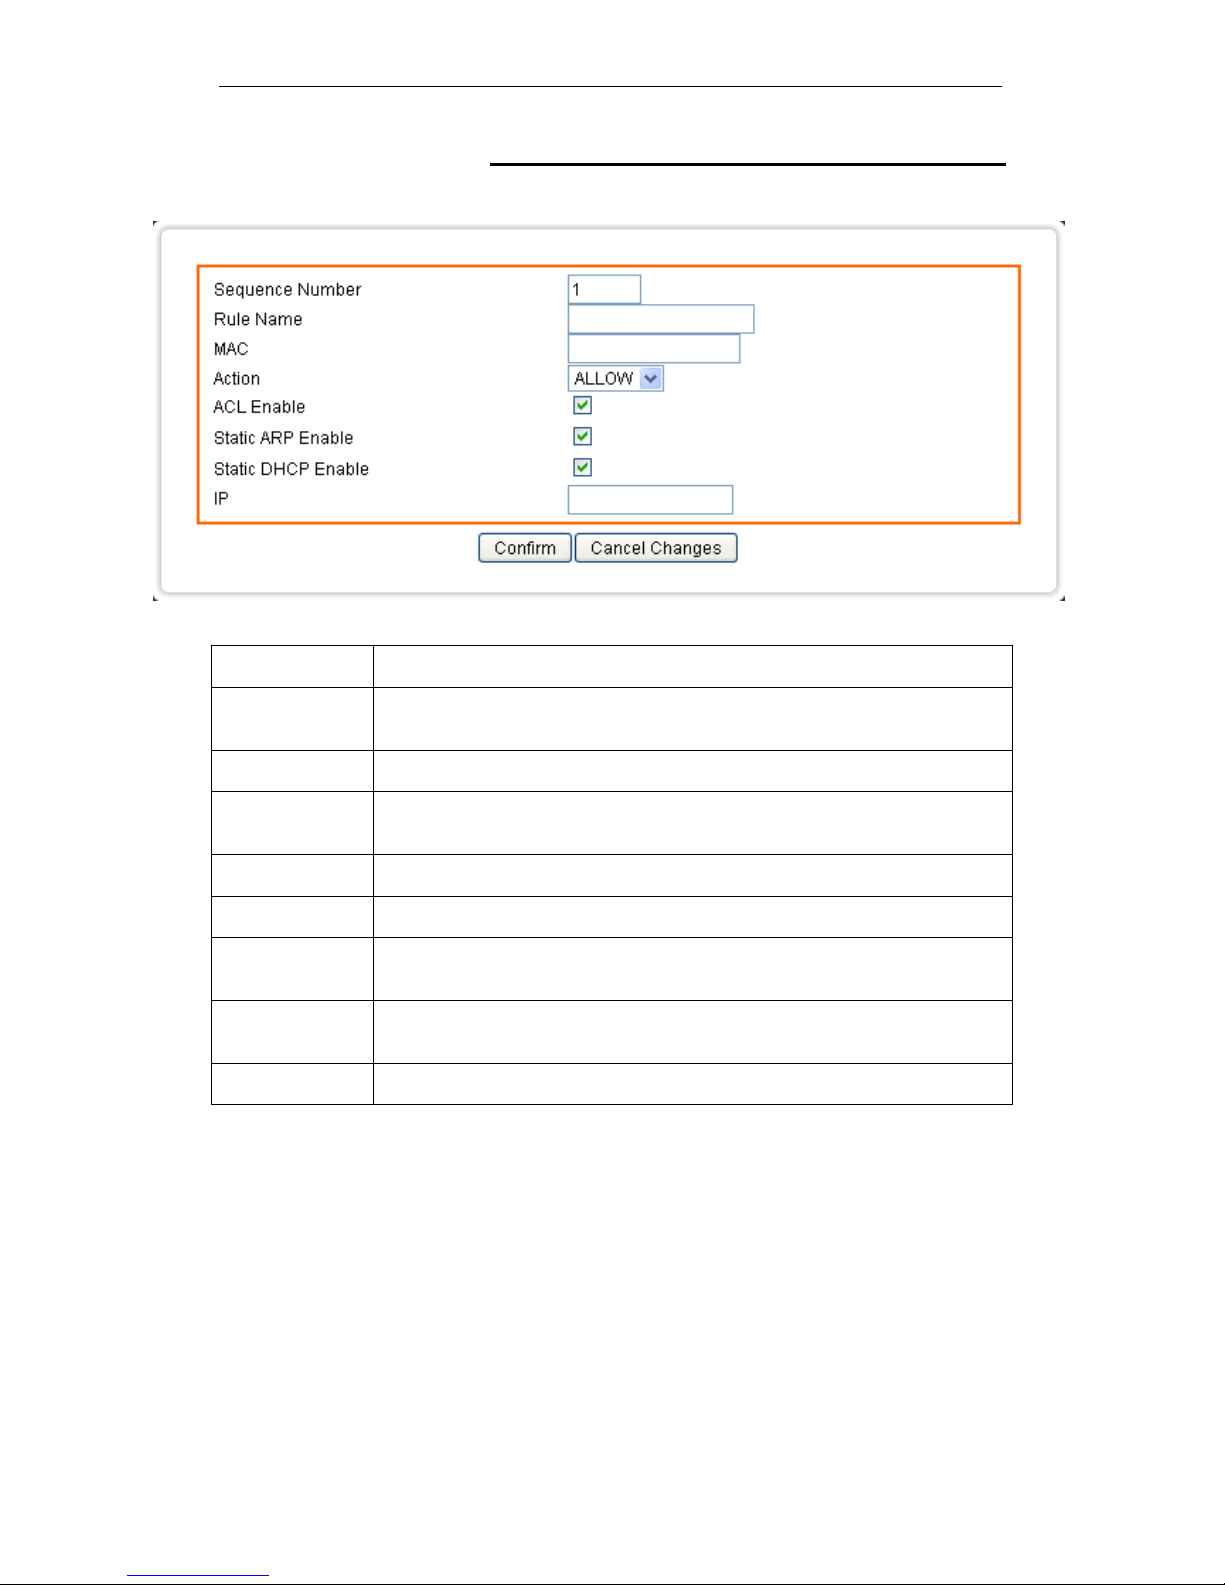
Add MAC Access Control Rule
Click on Add. The following page is displayed:
Field Description
Sequence
Number
This defines the sequence (priority) of all the MAC ACL actions.
Rule Name Name of the MAC access rule.
MAC Set up the MAC Address to which you would like to enable the MAC
ACL action.
Action Choose ALLOW/DENY to ALLOW/DENY
ACL Enable Enable/Disable this MAC access rule
Static ARP
Enable
Enable/Disable this Static ARP rule
Static DHCP
Enable
Enable/Disable this Static DHCP rule
IP The IP address corresponds to static ARP or static DHCP.
Page 76

Fibrain FSR-R2 User’s Manual
76
Example: Bind IP to a MAC
If users need to bind a IP to a specified MAC (network device),
one can follow the settings as below.
Field Description
Sequence
Number
User1
Rule Name Enable
MAC 00:33:44:55:66:77
Action Allow Access
ACL Enable Enable
Static ARP
Enable
Enable
Static DHCP
Enable
Enable
IP 192.168.1.100
Page 77
Fibrain FSR-R2 User’s Manual
77
22
Security - Web Filtering Setting
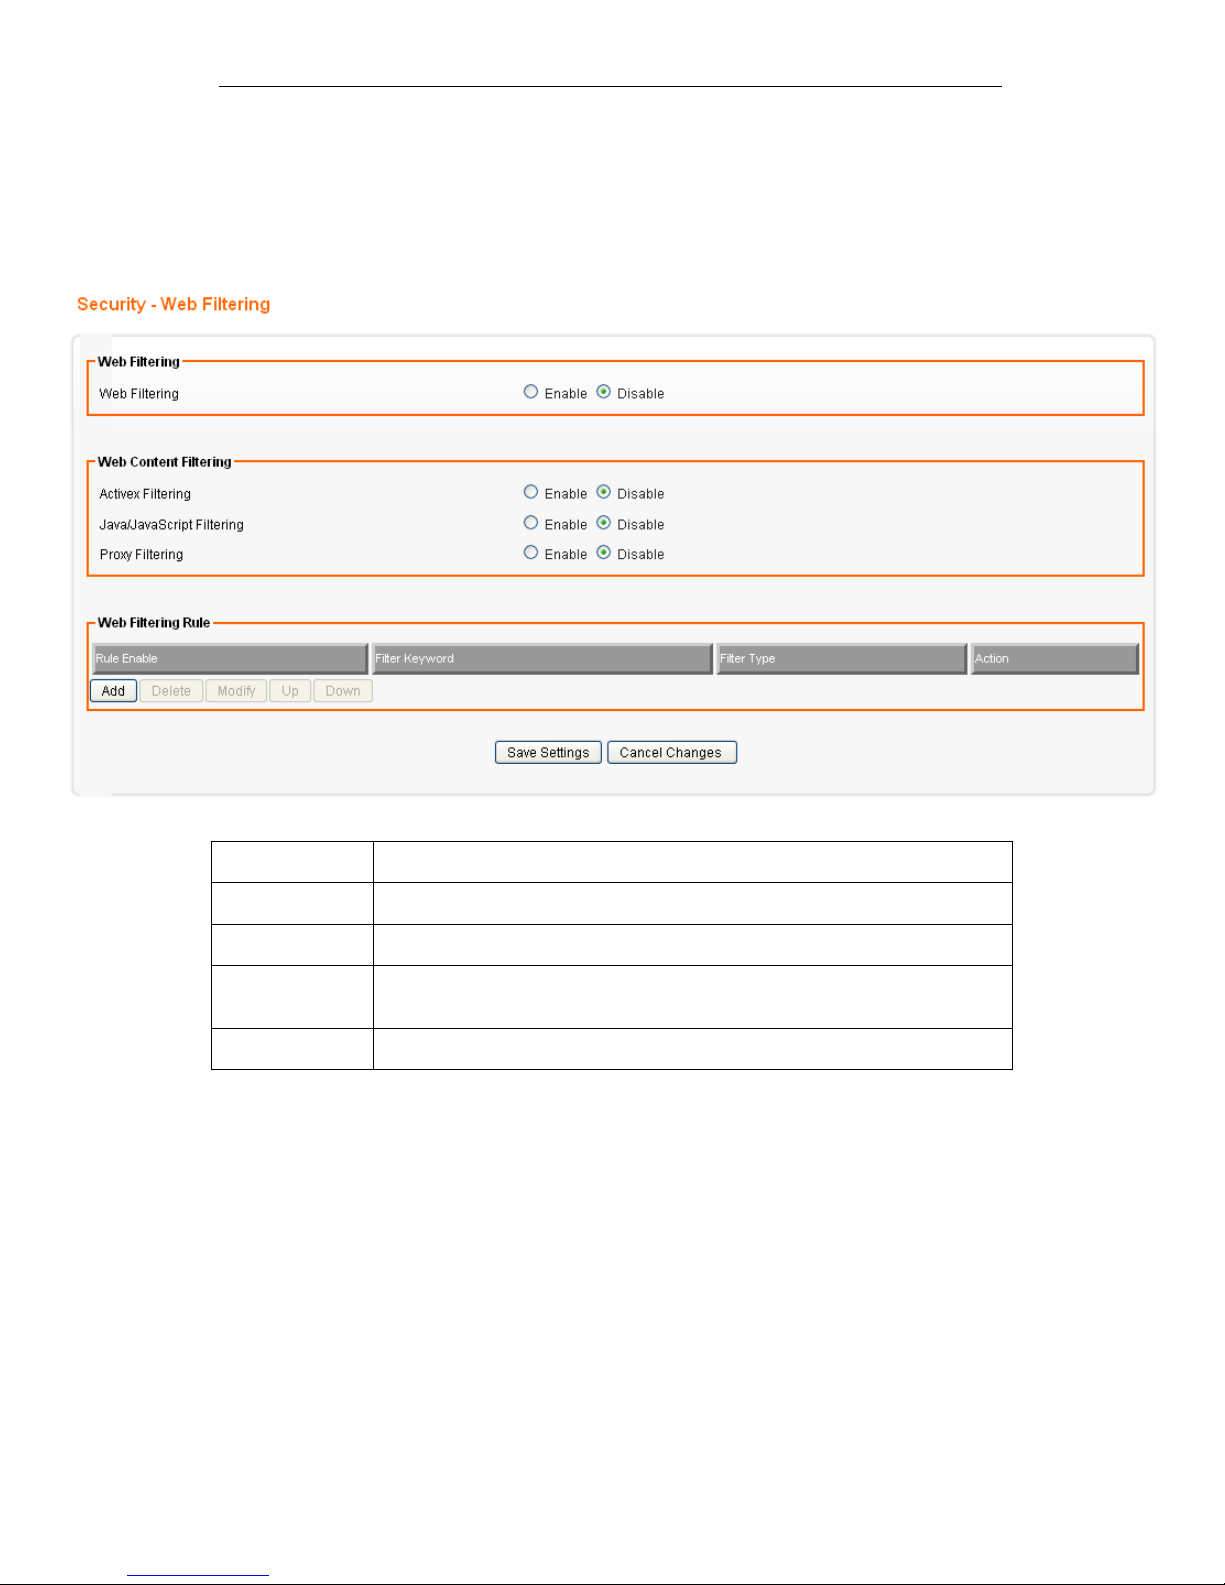
From the Security menu, click on Web Filtering. The following
page is displayed:
Field Description
Web Filtering Choose Enable/Disable to enable/disable Web Filtering
Activex Filtering Choose Enable/Disable to enable/disable Activex Filtering
Java/JavaScript
Filtering
Choose Enable/Disable to enable/disable Java/JavaScript Filtering
Proxy Filtering Choose Enable/Disable to enable/disable Proxy Filtering
Page 78
Fibrain FSR-R2 User’s Manual
78
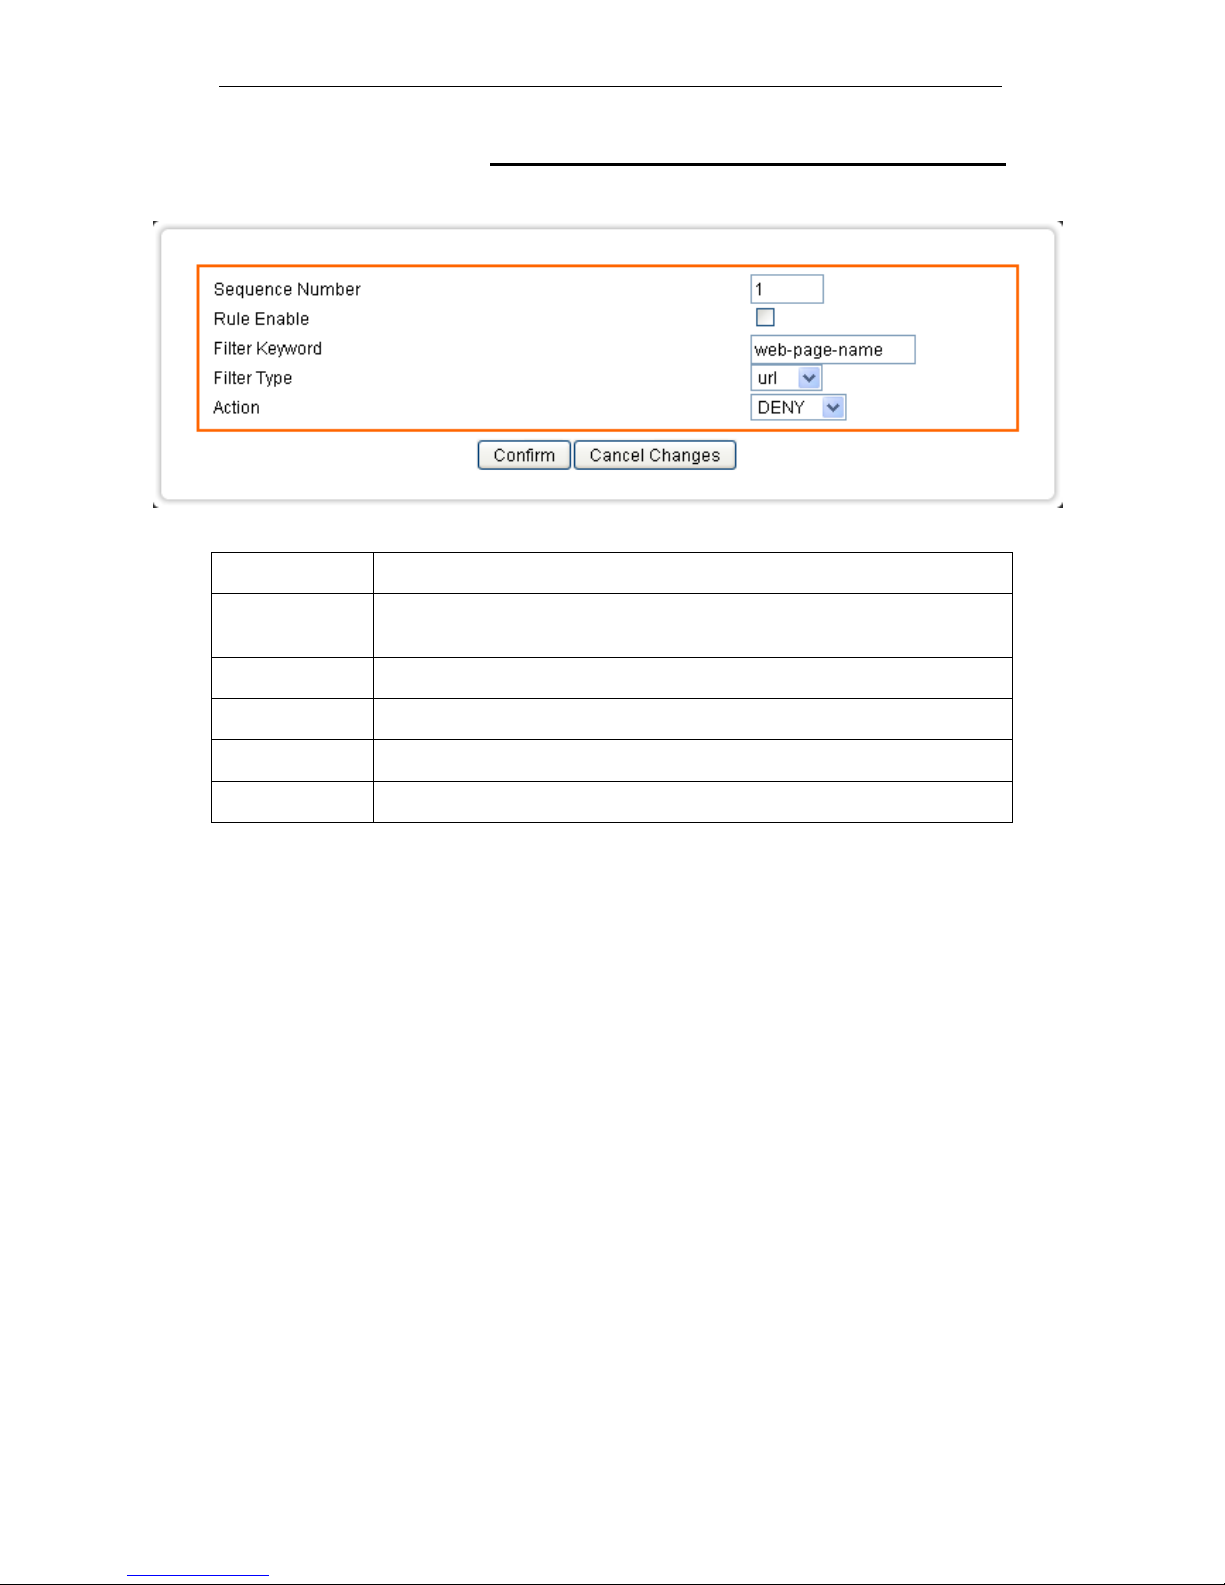
Add Web Filtering Rule
Click on Add. The following page is displayed:
Field Description
Sequence
Number
This defines the sequence (priority) of all the Web Filtering rules.
Rule Enable Choose Enable/Disable to enable/disable Web Filtering rule
Filter Keyword Enter the Keyword
Filter Type Choose URL or Sever
Action Select ALLOW / DENY
Page 79
Fibrain FSR-R2 User’s Manual
79
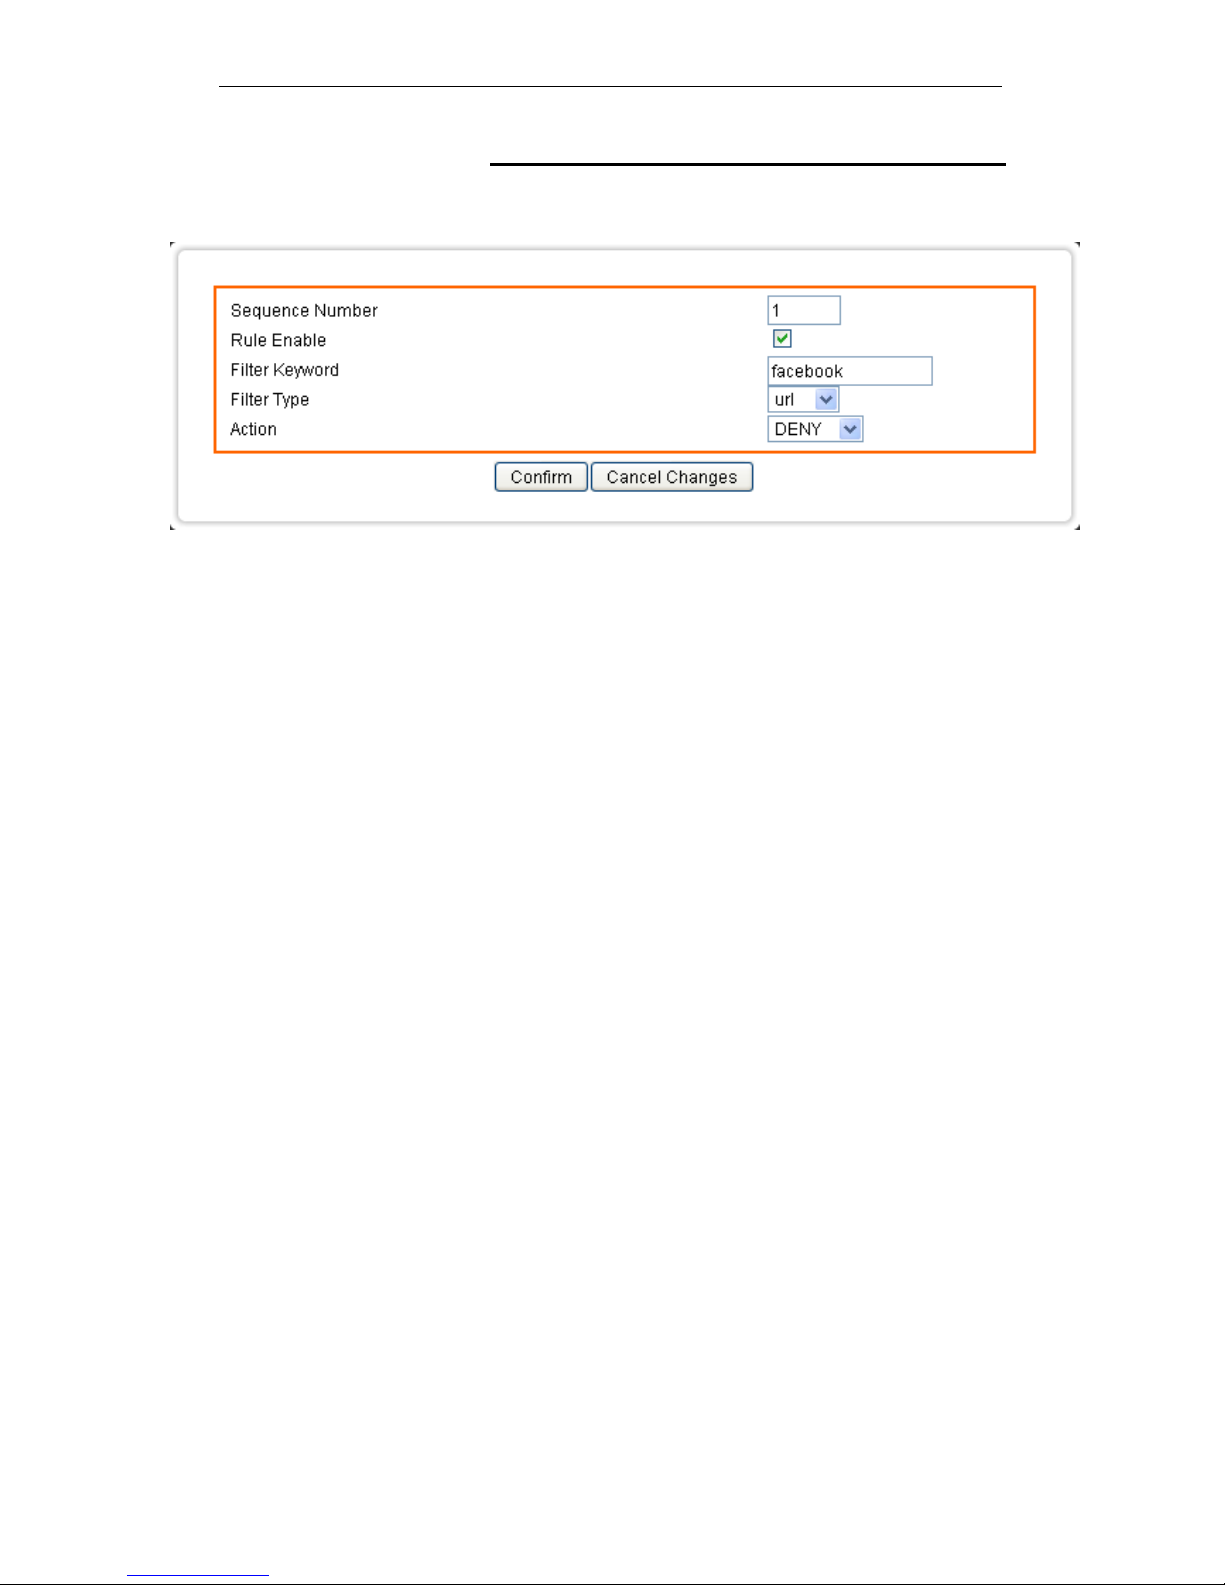
Example: Block a URL with Keyword
If one need to block Facebook related web page, can follow the
settings as below.
Page 80
Fibrain FSR-R2 User’s Manual
80
23
Bandwidth - INTELLIGENT DYNAMIC
BANDWIDTH MANAGEMENT
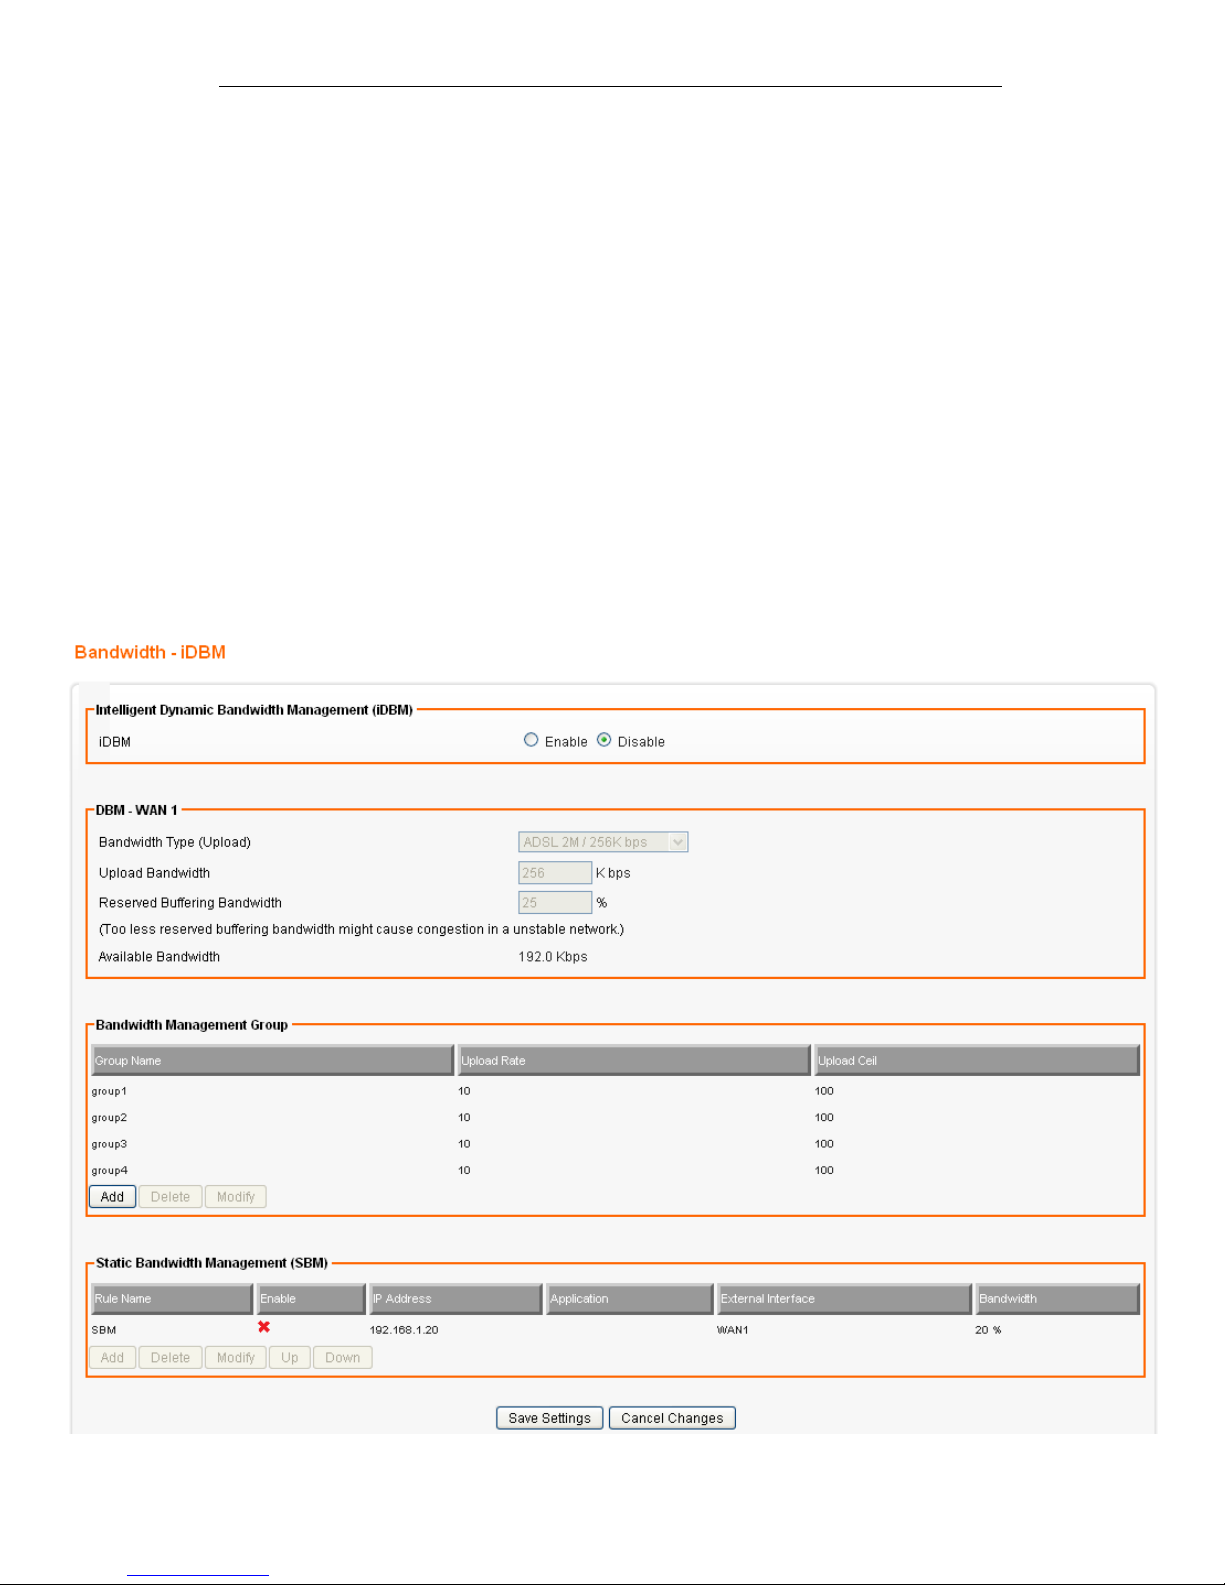
Intelligent Bandwidth Management (iDBM) provides two
powerful and unique mechanisms to manage bandwidth: Static
Bandwidth Management (SBM) and Dynamic Bandwidth
Management (DBM). SBM provides users with the option to
allocate a fixed amount of bandwidth for a specific computer or
a particular application, while DBM intellectually manages the
rest of the bandwidth while all the time satisfying the
complicated bandwidth requirements/settings of SBM.
The essential configuration needed by iDBM is to specify
accurately the bandwidth you have. iDBM would then dispatch
bandwidth according to this information. Please Note: Improper
bandwidth assignment may cause iDBM to work ineffectively.
From the Bandwidth menu, click on iDBM. The following page is
displayed:
Page 81
Fibrain FSR-R2 User’s Manual
81
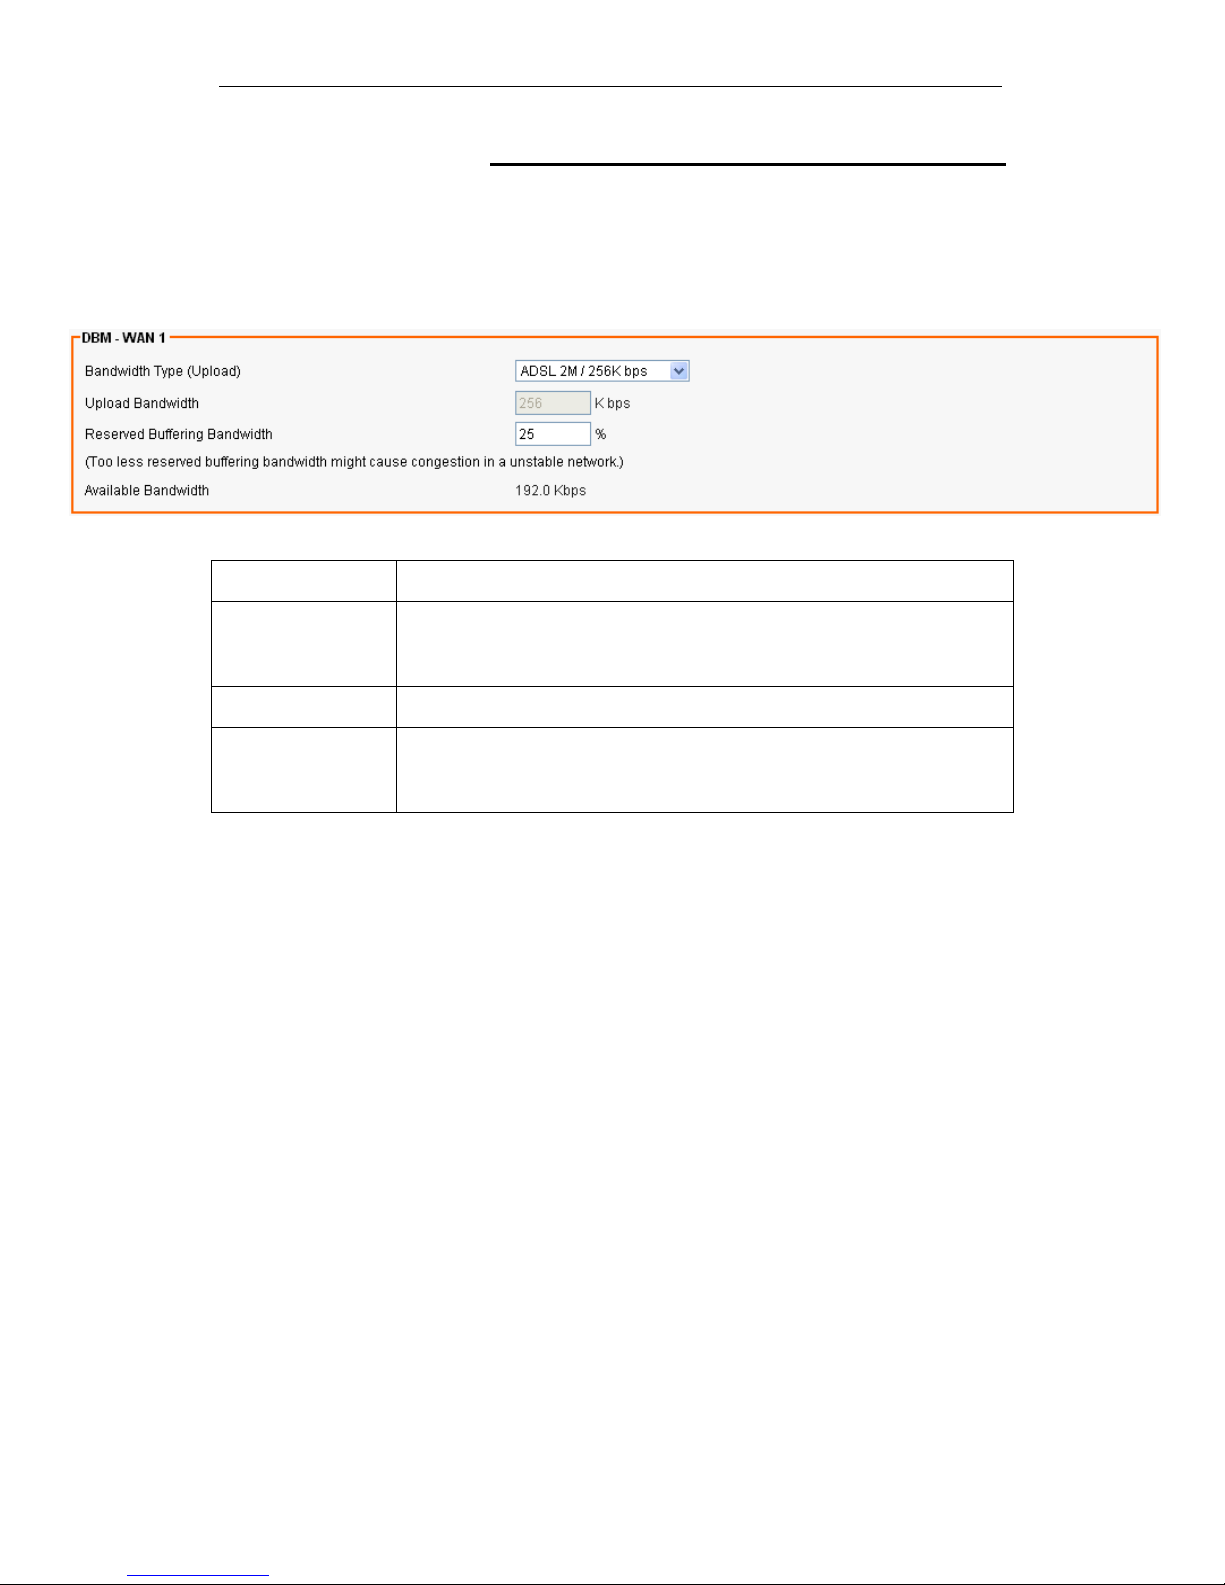
DBM - WAN 1 Settings
Please adjust your bandwidth type according to your bandwidth
(download/upload) subscribed from your ISP. Due to the
unstable nature of network bandwidth supported by ISP, users
are recommended to reserve a portion of bandwidth for
buffering usage, and iDBM would then arrange the reserved
bandwidth under heavy traffic.
Field Description
Bandwidth Type
(Download/Upload)
Select the correct bandwidth type according to your Internet service
subscription. If the bandwidth type is not available on the list, select
Custom.
Upload Bandwidth Enter the value to customize upload bandwidth.
Reserved
Buffering
Bandwidth
Enter the value to provide bandwidth buffer.
Page 82
Fibrain FSR-R2 User’s Manual
82
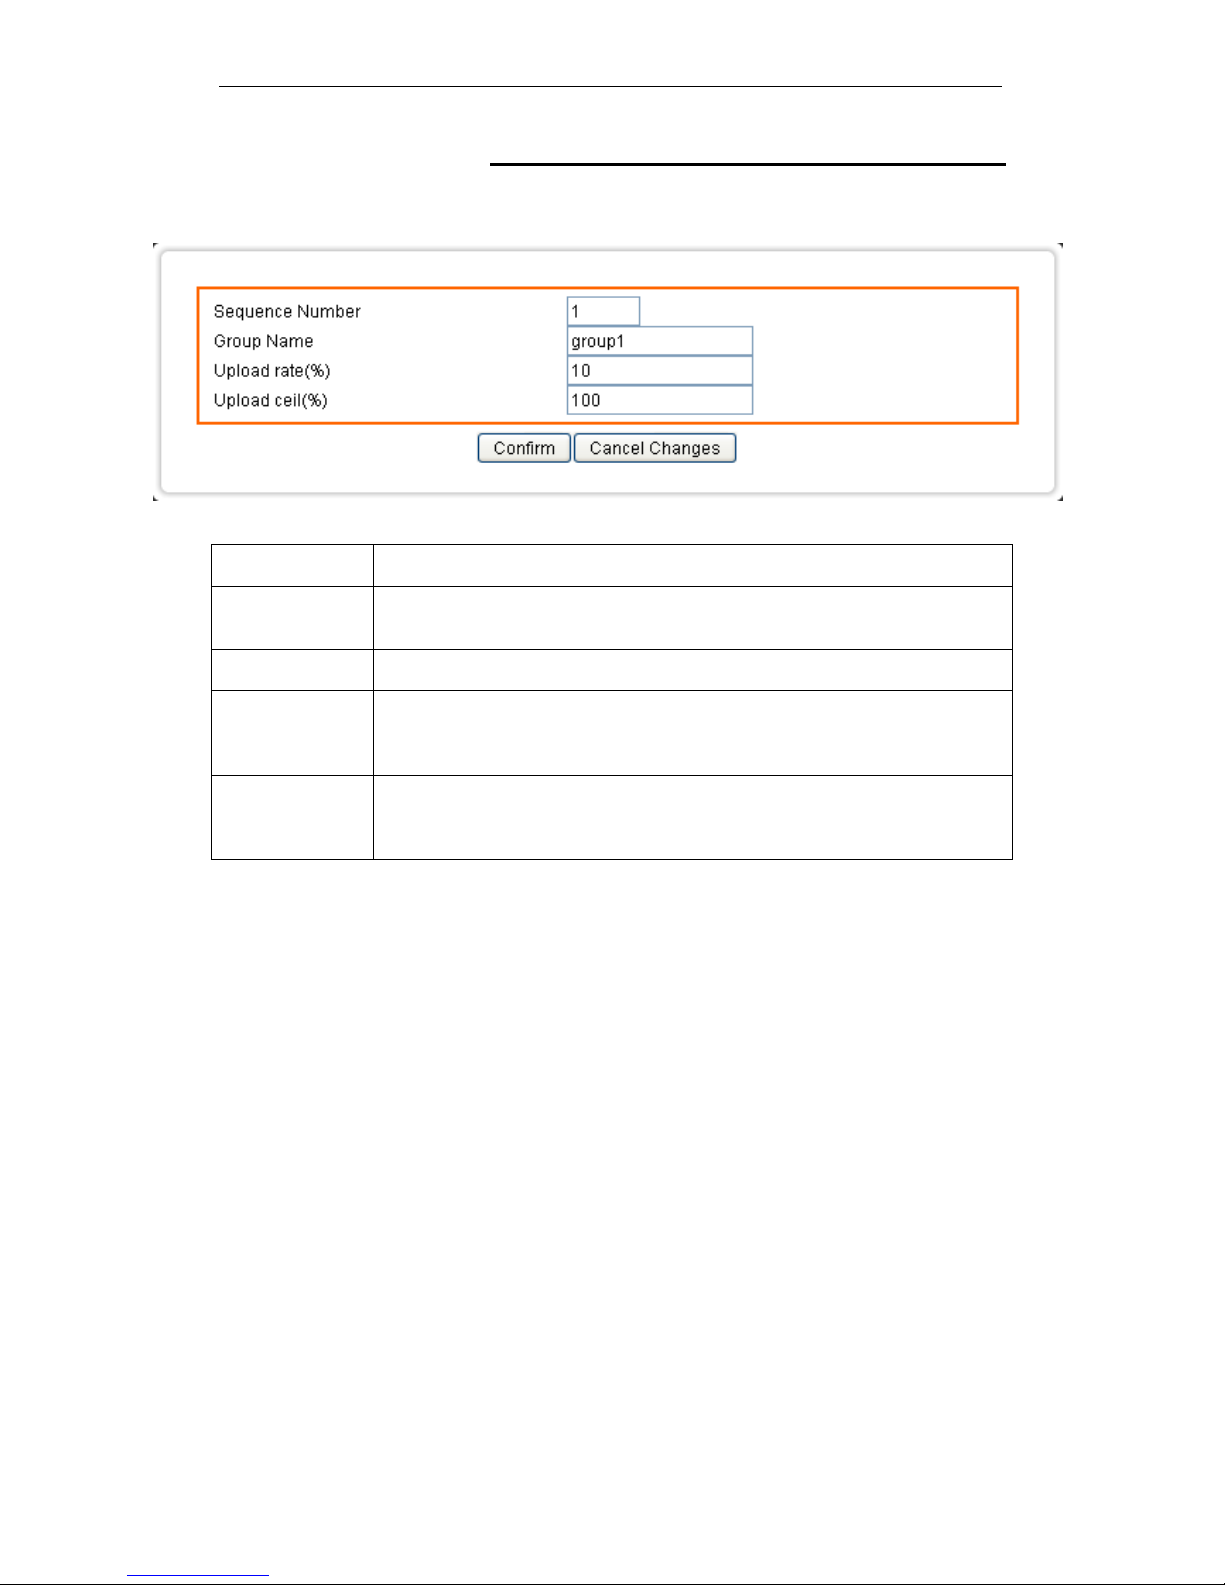
Modify Bandwidth Management Group Rule
Click on one of Bandwidth Management Group and then click
on Modify. The following page is displayed:
Field Description
Sequence
Number
Enter the Sequence Number
Group Name Enter the Group Name
Upload
(Minimum)
rate(%)
Enter the Minimum rate of bandwidth
Upload
(Maximum)
ceil(%)
Enter the Maximum rate of bandwidth
Page 83
Fibrain FSR-R2 User’s Manual
83
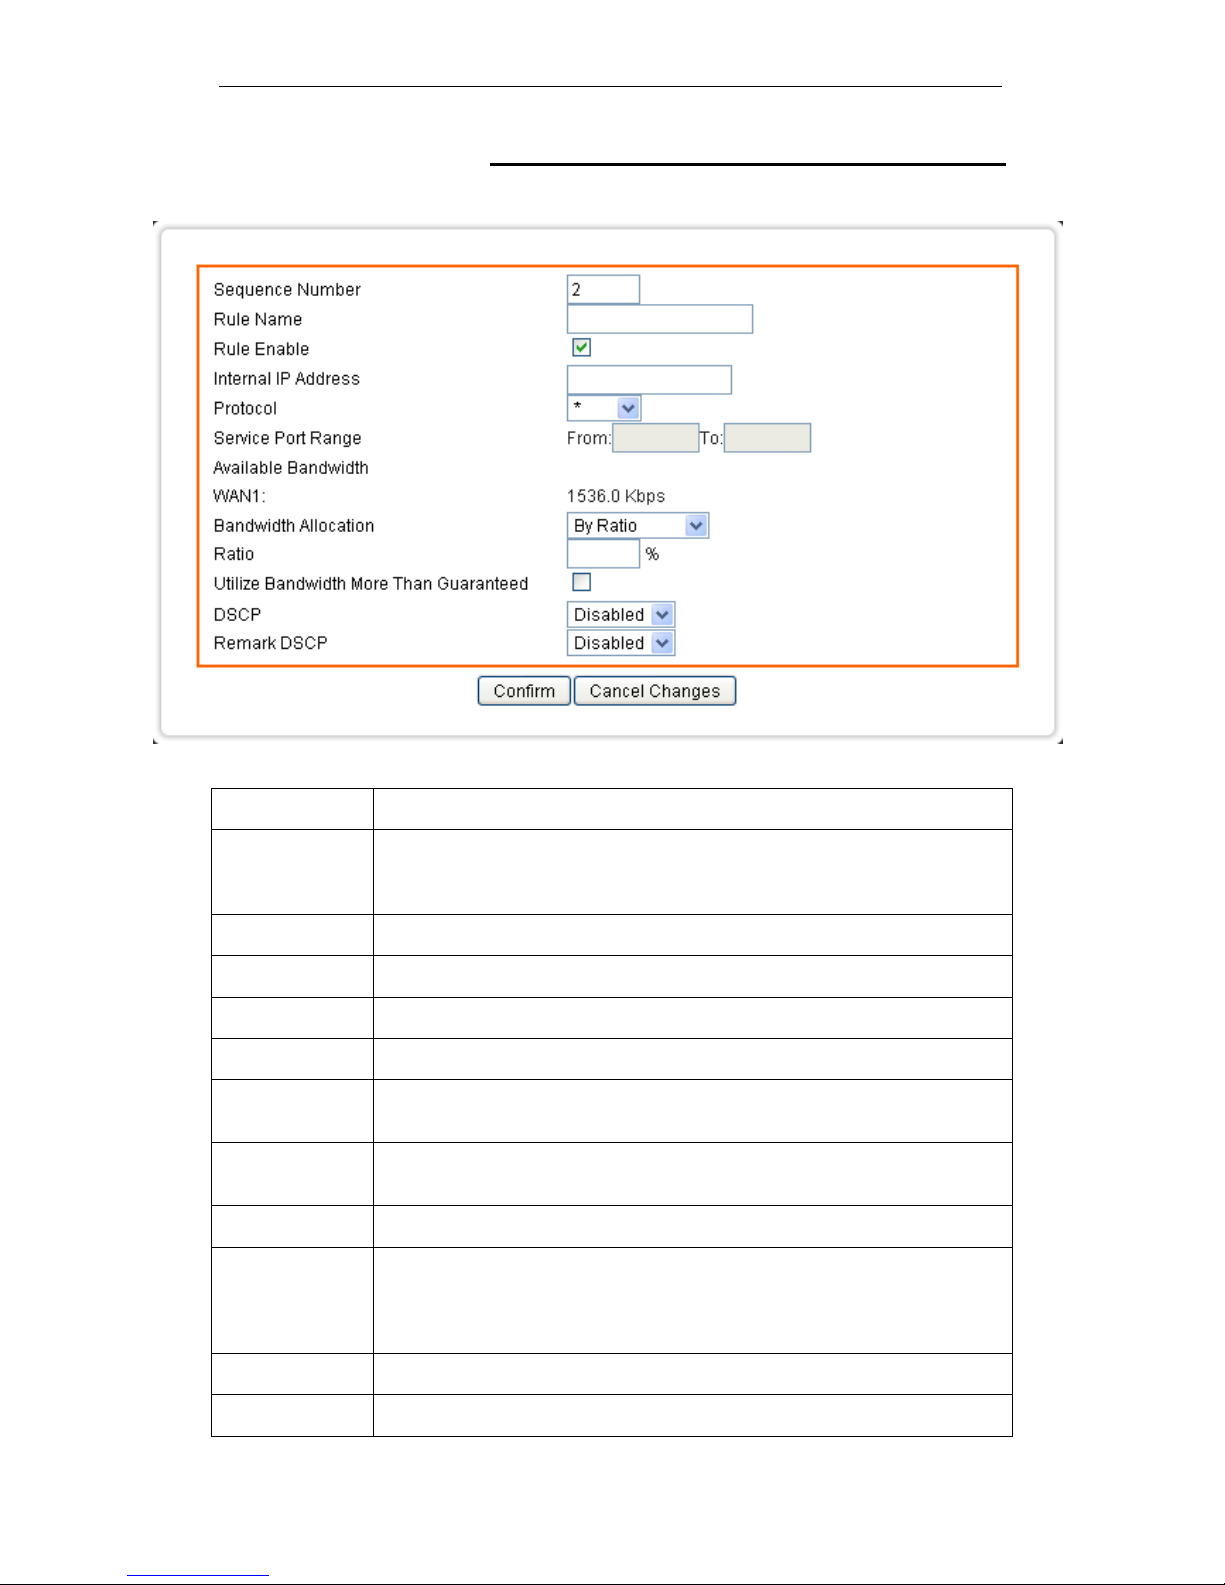
Add Static Bandwidth Management (SBM) Rule
Click on Add. The following page is displayed:
Field Description
Sequence
Number
This defines the sequence of the SBM rules. If a packet fits the
conditions set by the SBM rules, the packet will then be sorted
according to the first SBM rule from the top of the list.
Rule Name Name of the SBM rule.
Rule Enable Enable/Disable this SBM rule
Internal IP Set up the internal IP for this SBM rule.
Protocol Set up the protocol (TCP or UDP) for the ACL to be enabled.
Service Port
Range
Set up the Service Port Range (e.g., HTTP is TCP/80) for the SBM to be
enabled.
Bandwidth
Allocation
By Ratio, Group or By Bandwidth
Ratio The ratio of the whole bandwidth according to the External Interface.
Utilize
Bandwidth More
than
Guaranteed
Check this box if you wish to allow the traffic confirming this SBM rule
to be able to utilize the whole bandwidth when the bandwidth is idle.
DSCP Select the DSCP from the drop-down list
Remark DSCP Select the remark DSCP from the drop-down list
Page 84
Fibrain FSR-R2 User’s Manual
84
24
Bandwidth - Throughput Optimizer
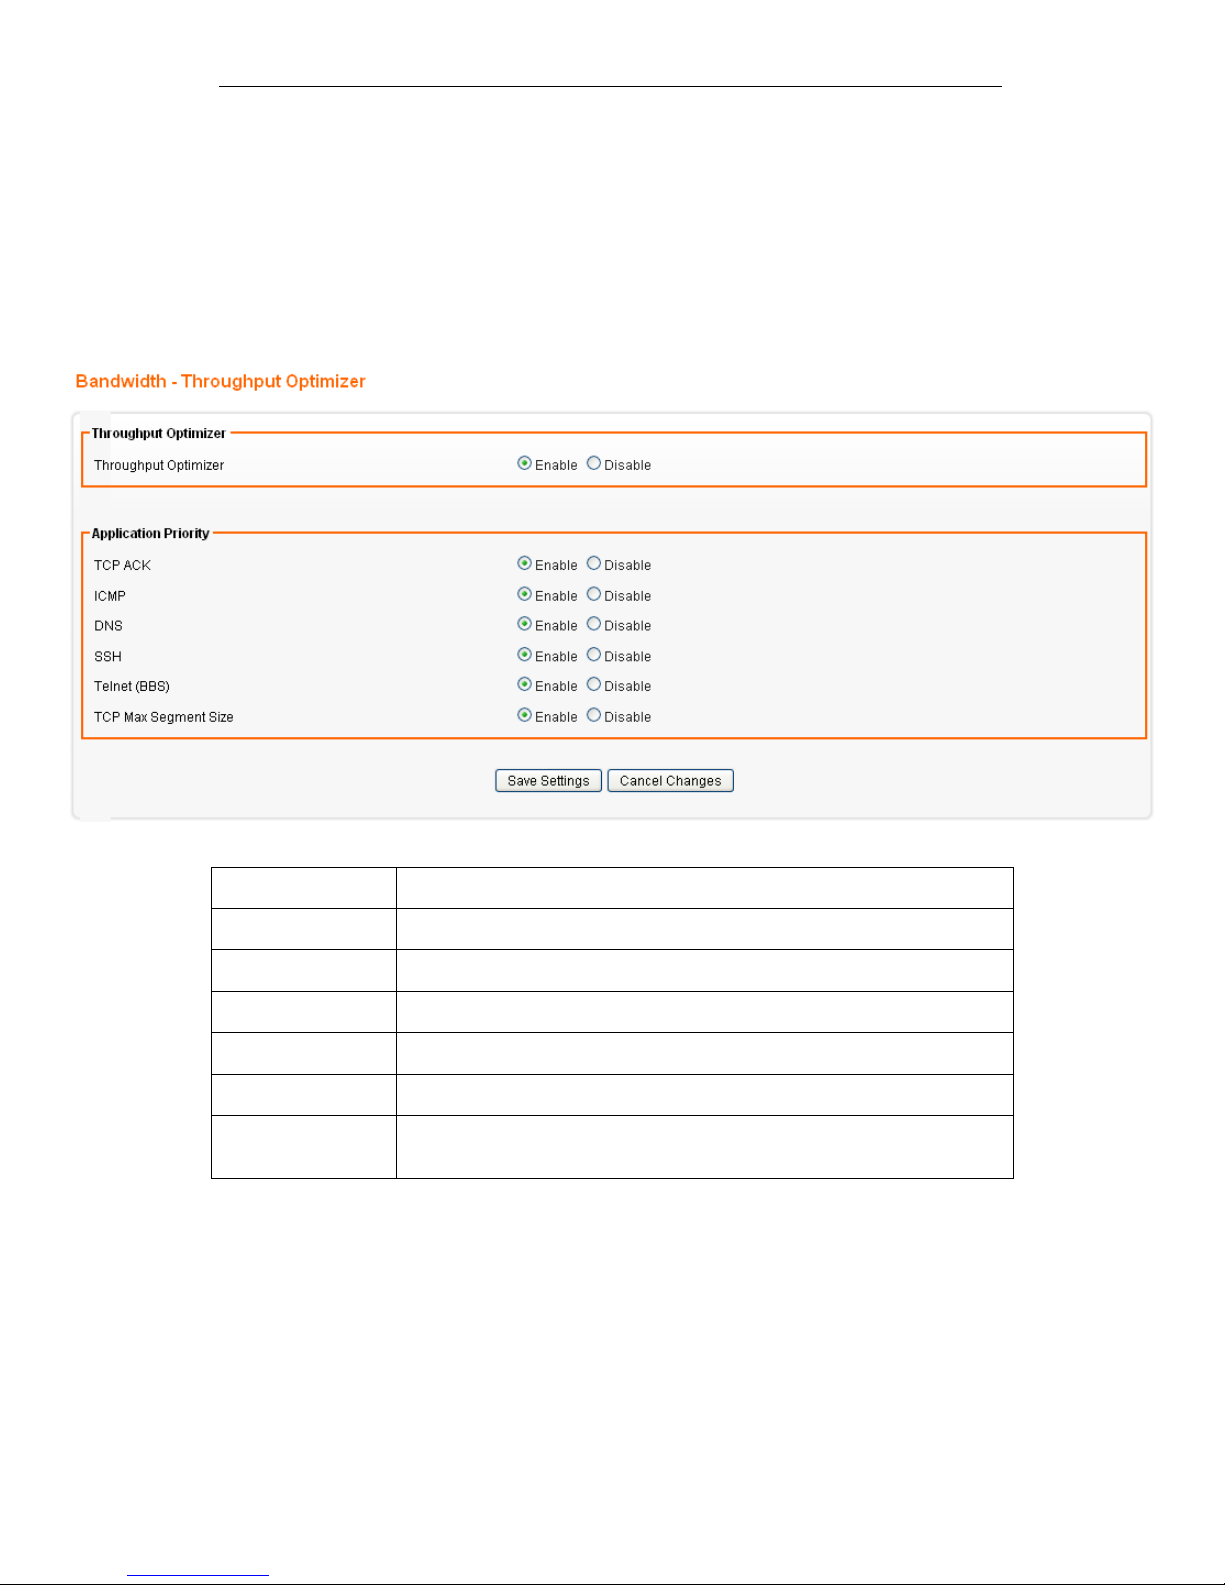
The device built in iDBM transmits the important packets in high
priority to optimize the network utilization. You can specify the
types of packets for high priority.
From the Bandwidth menu, click on Throughput Optimizer. The
following page is displayed:
Field Description
TCP ACK Select Enable/Disable to enable/disable TCP ACK priority
ICMP Select Enable/Disable to enable/disable ICMP priority
DNS Select Enable/Disable to enable/disable DNS priority
SSH Select Enable/Disable to enable/disable SSH priority
Telnet (BBS) Select Enable/Disable to enable/disable Telnet (BBS) priority
TCP Max Segment
Size
Select Enable/Disable to enable/disable TCP Max Segment Size
Page 85
Fibrain FSR-R2 User’s Manual
85
25
Bandwidth - TurboNAT
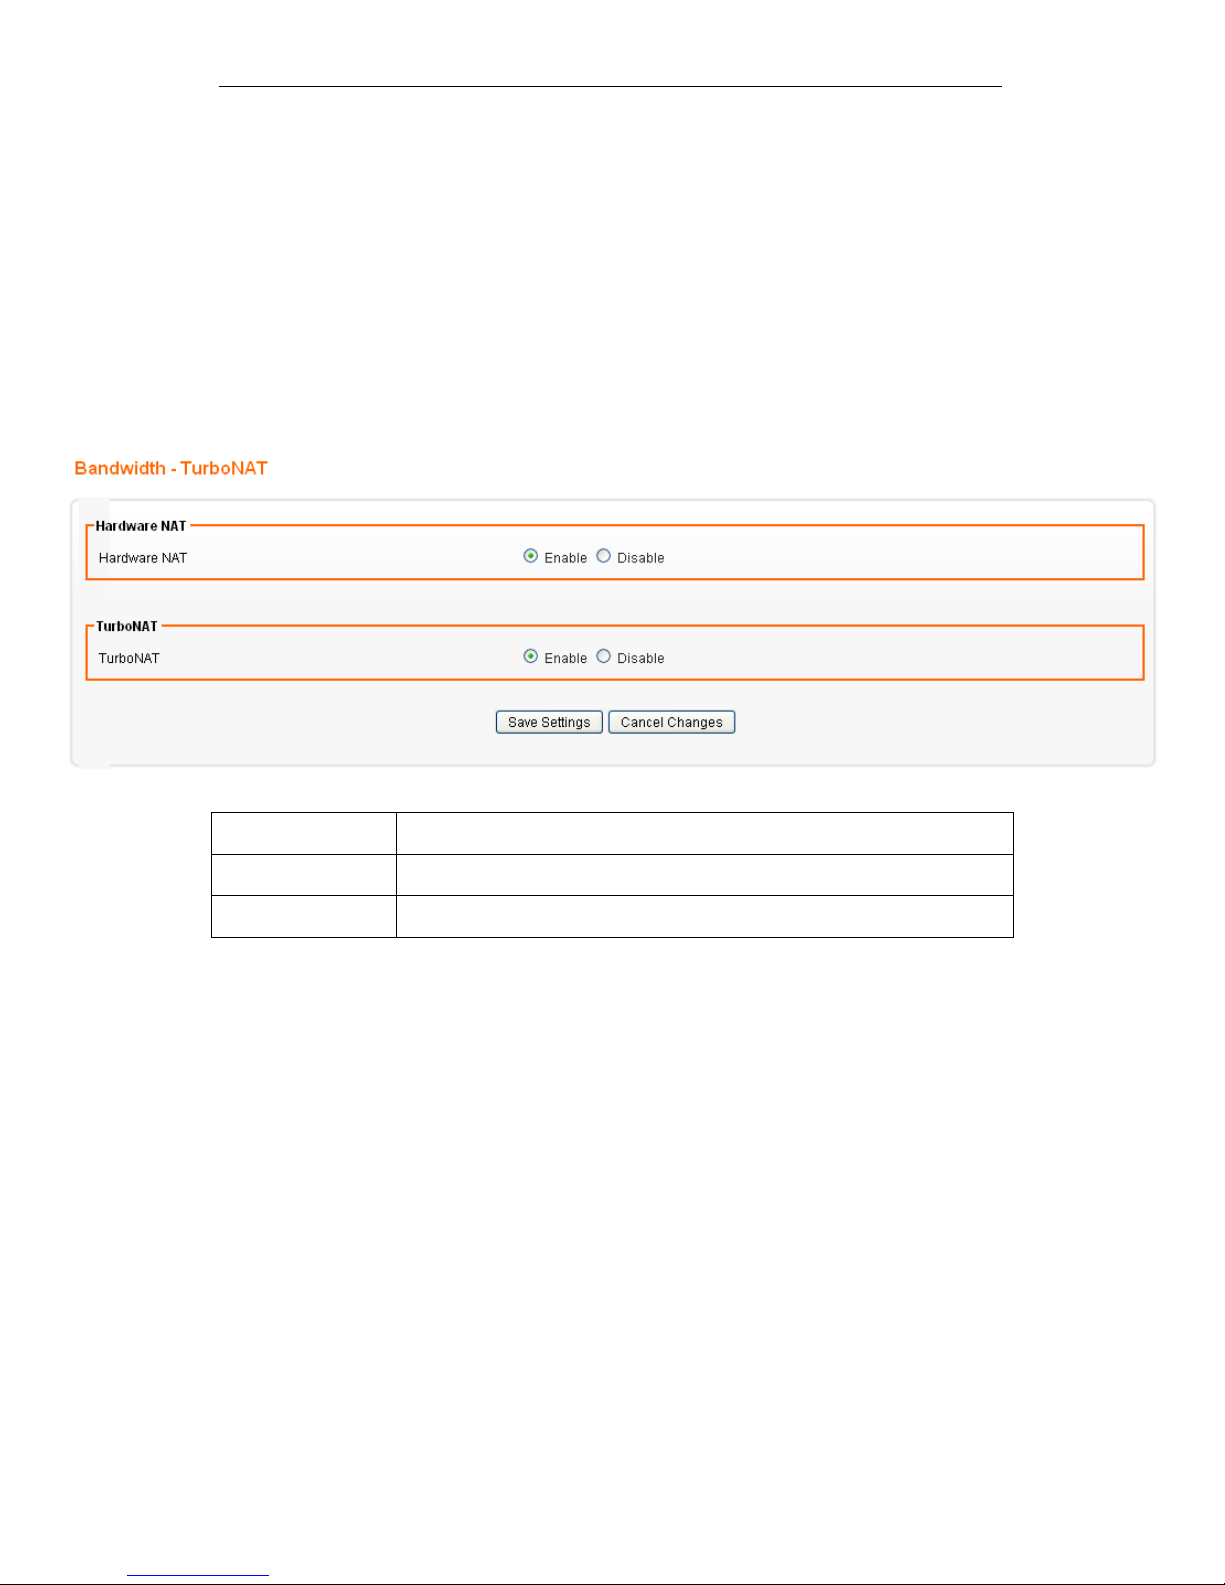
NAT is often the performance bottleneck in an IP sharing
device. Generic routers are generally insufficient when dealing
with a high-speed broadband network. Therefore, TurboNAT is
designed to solve this problem. By accelerating the NAT
performance, TurboNAT allows the device to fulfill the higher
speed network and to reserve the system performance for other
features such as ACL and VPN servers.
From the Bandwidth menu, click on TurboNAT. The following
page is displayed:
Field Description
Hardware NAT Select Enable/Disable to enable/disable Hardware NAT.
TurboNAT Select Enable/Disable to enable/disable TurboNAT.
Page 86

Fibrain FSR-R2 User’s Manual
86
26
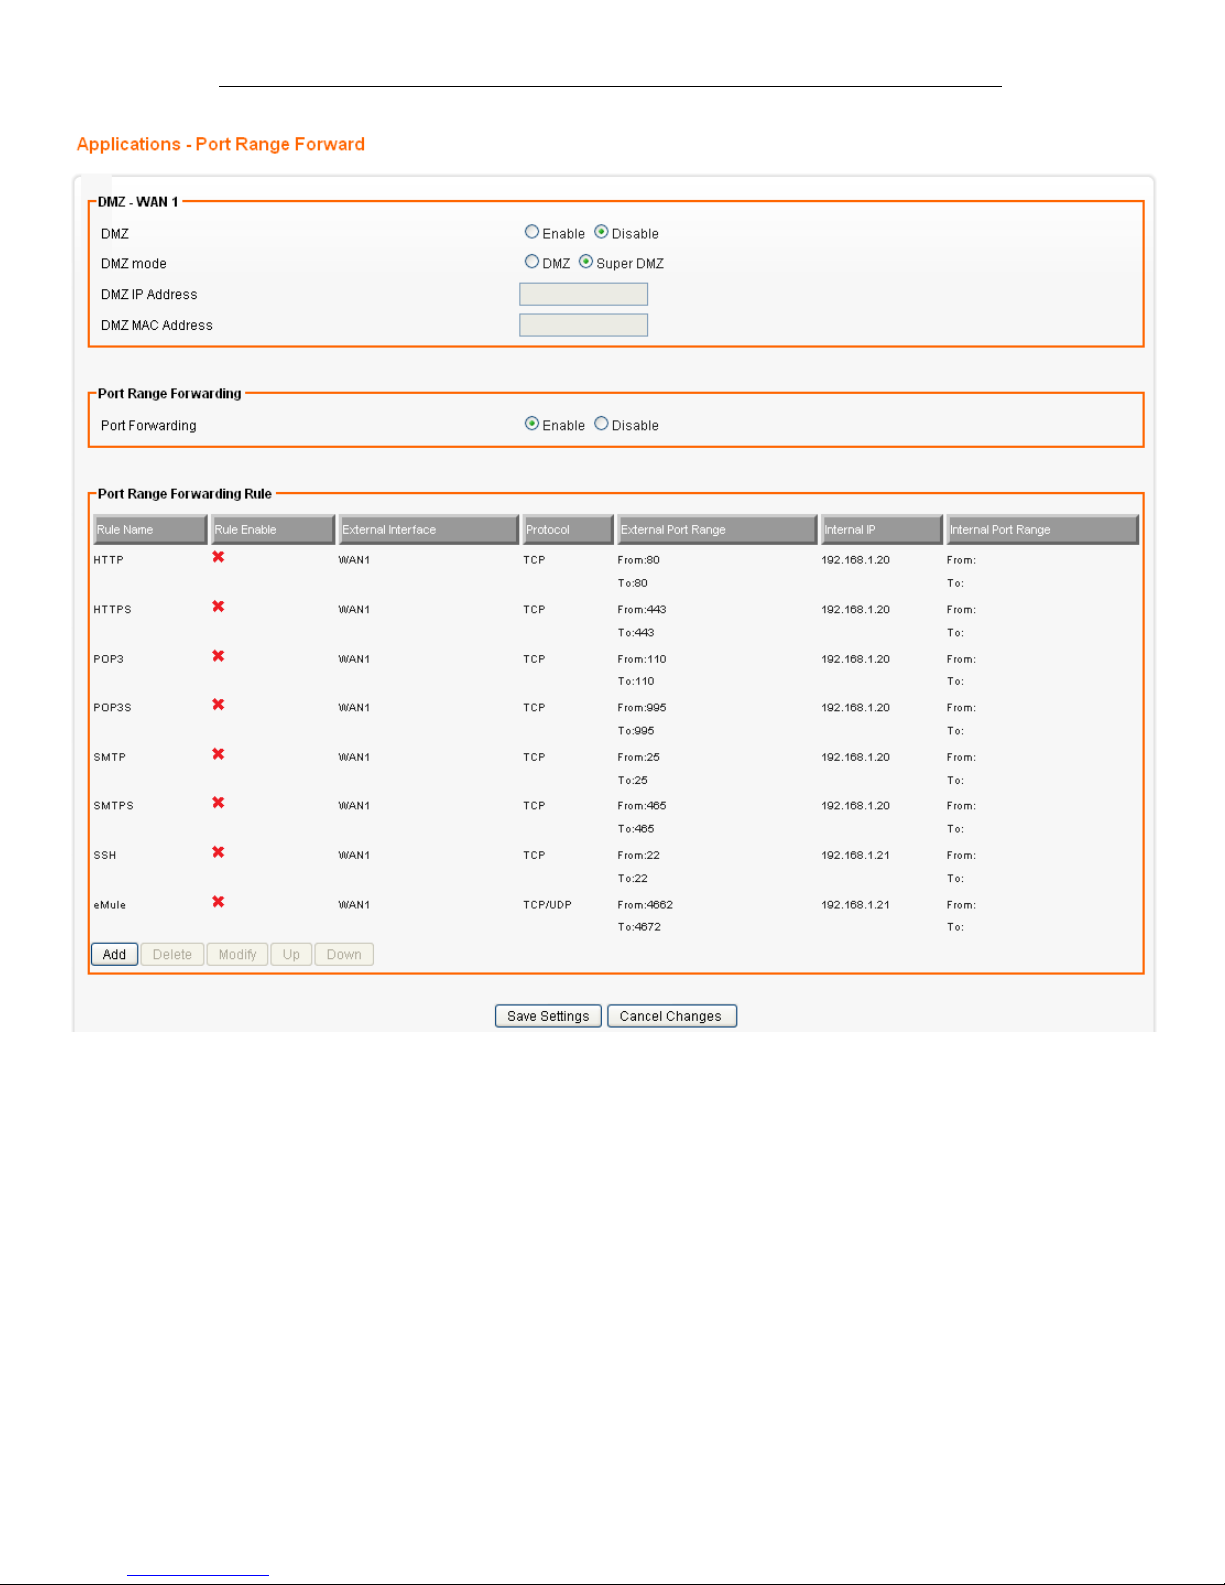
Applications - Port Range Forward
By activating the port range forwarding function, remote users
can access the local network via the public IP address. Users
can assign a specific external port range to a local server.
Furthermore, users can specify an internal port range
associated in a port range forwarding rule. When the device
receives an external request to access any one of the
configured external ports, it will redirect the request to the
corresponding internal server and change its destination port to
one of the internal ports specified. Therefore, if users do not
wish for destination port to be changed for a request, the
internal port range should be left empty.
Certain applications in a LAN are available only after activating
the port range forwarding, including servers and online gaming.
When an Internet request wants to access a port, the device will
dispatch it to the IP specified. Due to security reasons, users
are suggested to limit the use of port range forwarding, and
cancel it when the application is not used.
By enabling DMZ Host Function, you can set up a DMZ host at
a particular computer exposed to the Internet. In this way, some
applications, especially online games (if the traffic port numbers
of the applications are always changing), can be easily
accessed.
From the Applications menu, click on Port Range Forward. The
following page is displayed:
Page 87
Fibrain FSR-R2 User’s Manual
87
Page 88
Fibrain FSR-R2 User’s Manual
88
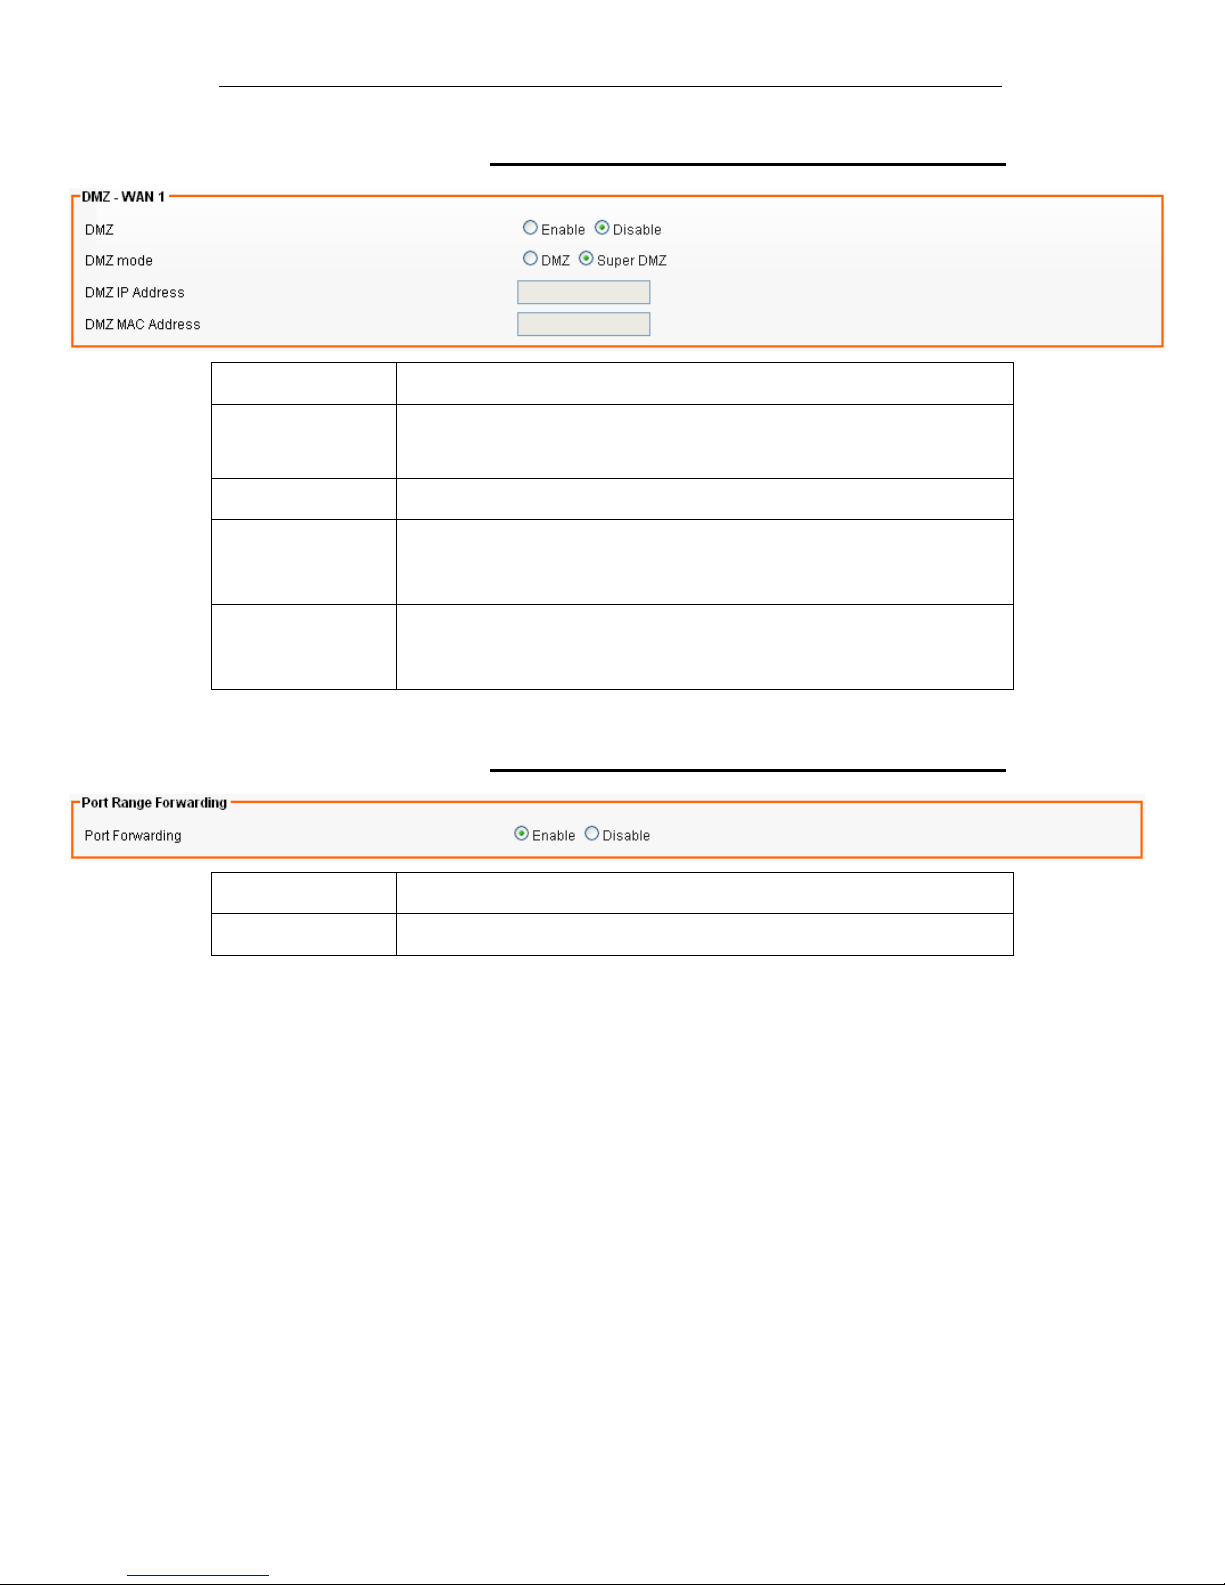
DMZ - WAN 1 Settings
Field Description
DMZ Select Enable to enable DMZ function.
Select Disable to disable DMZ function.
DMZ mode Select DMZ or Super DMZ mode
DMZ IP Address Enter the IP address of a particular host in your LAN which will
receive all the packets originally going to the WAN port / Public IP
address above.
DMZ MAC Address Enter the MAC address of a particular host in your LAN which will get
the same Public IP address of WAN port and receive all the packets
going to this Public IP address.
Port Range Forwarding Settings
Field Description
Port Forwarding Select Enable / Disable to enable/disable Port Forwarding
Page 89
Fibrain FSR-R2 User’s Manual
89
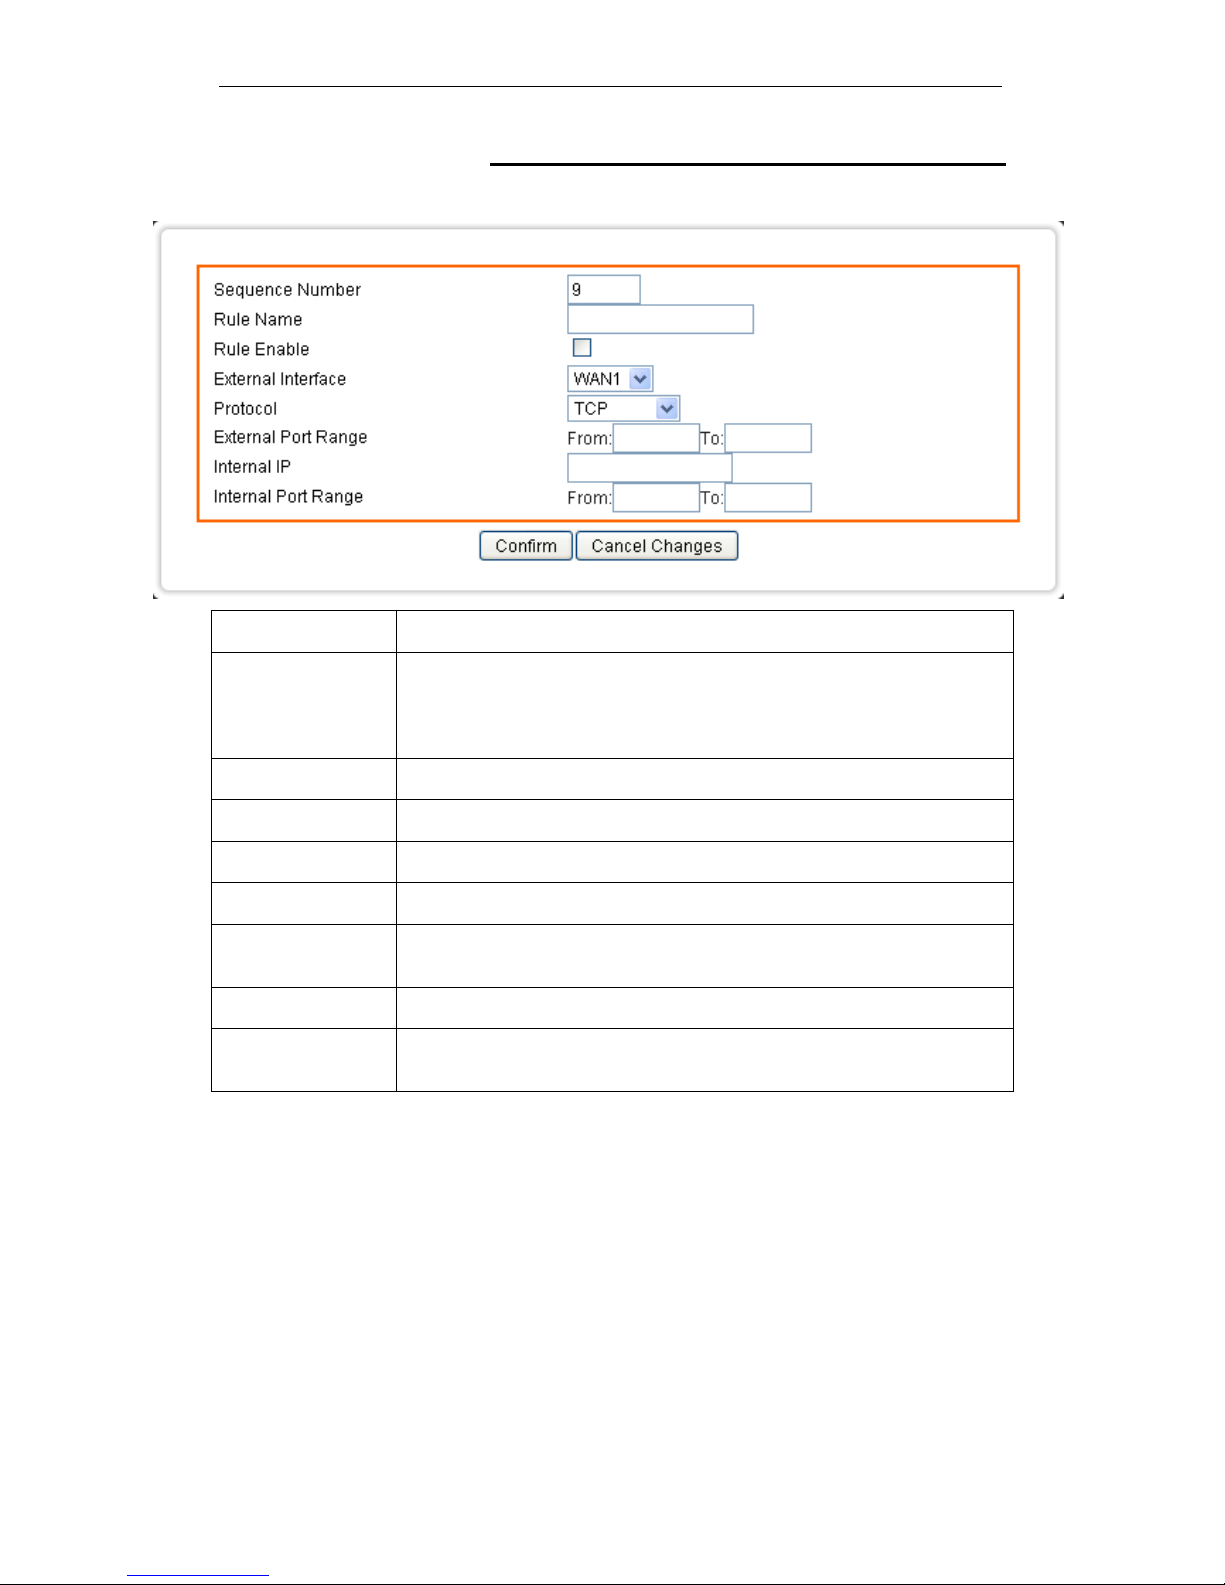
Add Port Range Forwarding Rule
Click on Add. The following page is displayed:
Field Description
Sequence Number This defines the sequences (priorities) of the port forwarding rules. If
a packet fits the conditions setup by the port forwarding rules, the
packet will then be forwarded according to the 1st rule from the top
of the list.
Rule Name Enter the name of the port forwarding rule.
Rule Enable Check/Uncheck to enable/disable this port forwarding rule.
External Interface Choose WAN1 as the External port forwarding interface.
Protocol Choose TCP, UDP or TCP/UDP for the rule to be applied.
External Port
Range
Set up the External Port Range for the rule to be applied.
Internal IP Set up the Internal IP for the rule to be applied.
Internal Port
Range
Set up the Internal Port Range for the rule to be applied.
Page 90
Fibrain FSR-R2 User’s Manual
90
27
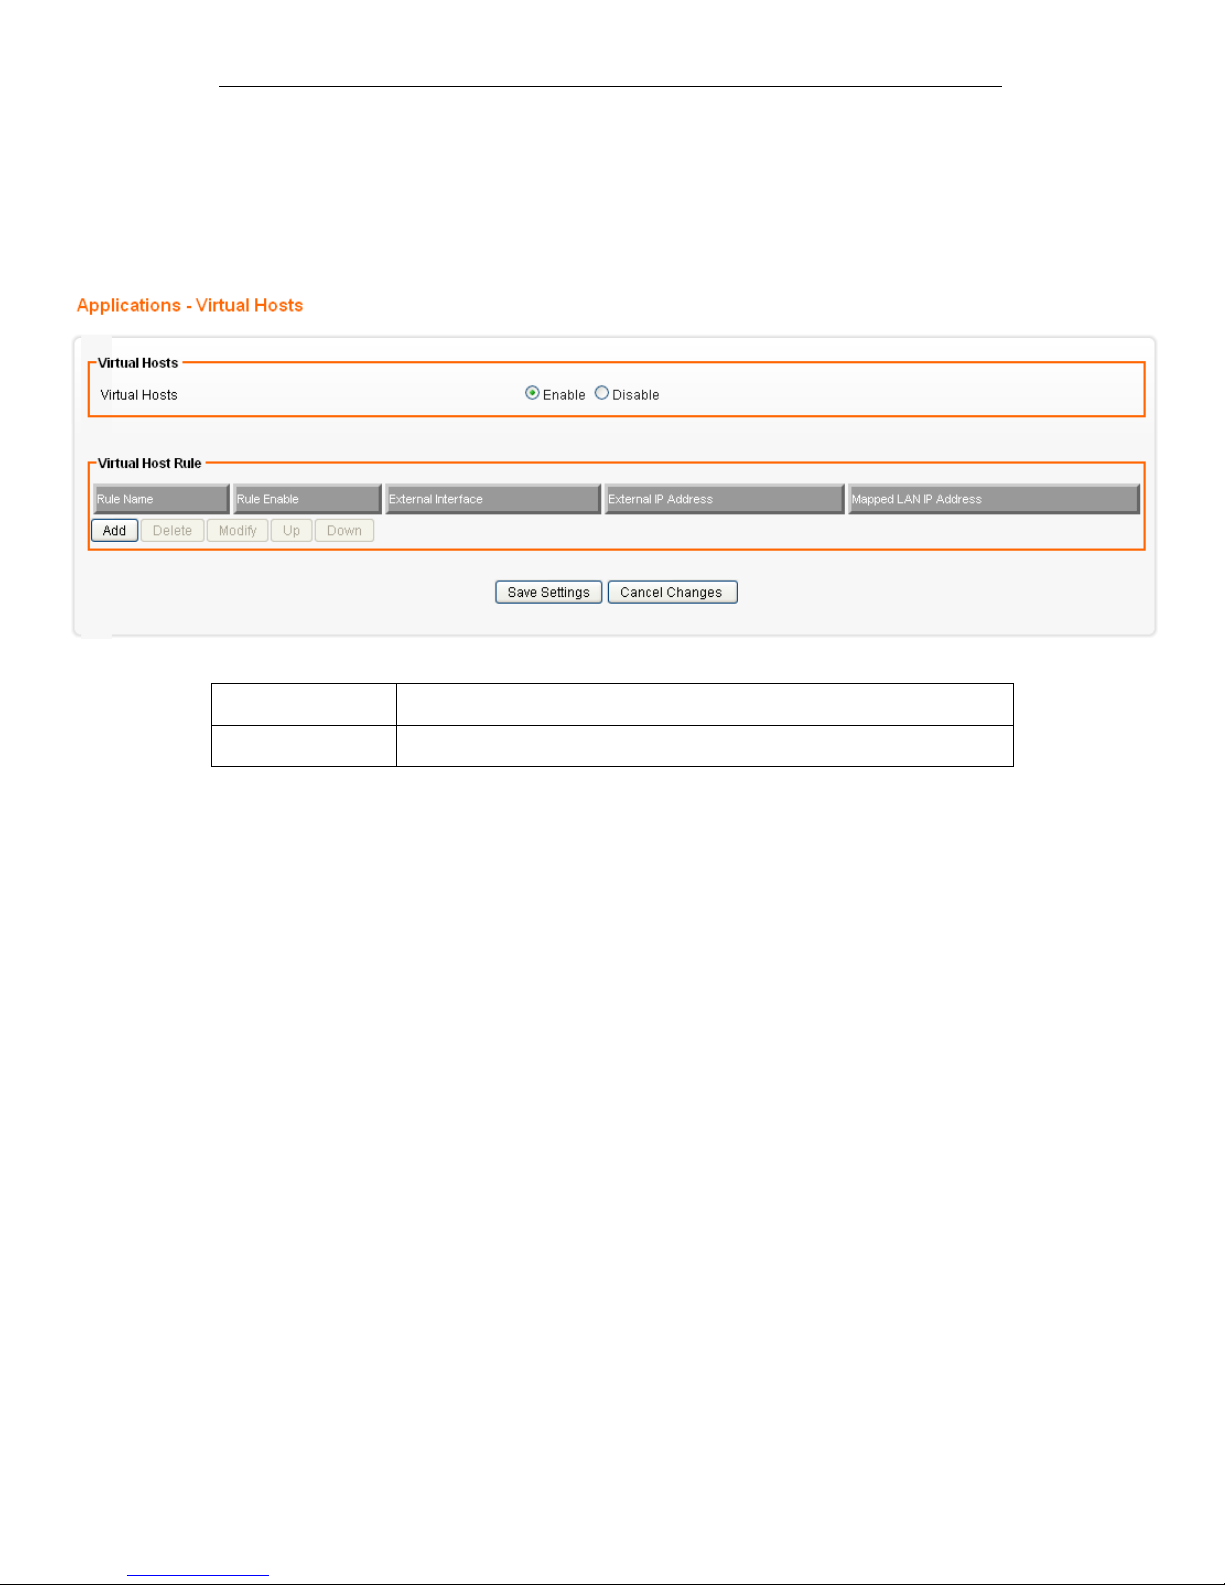
Applications - Virtual Hosts
From the Applications menu, click on Virtual Hosts. The
following page is displayed:
Field Description
Virtual Hosts Select Enable/Disable to enable/disable Virtual Hosts.
Page 91
Fibrain FSR-R2 User’s Manual
91
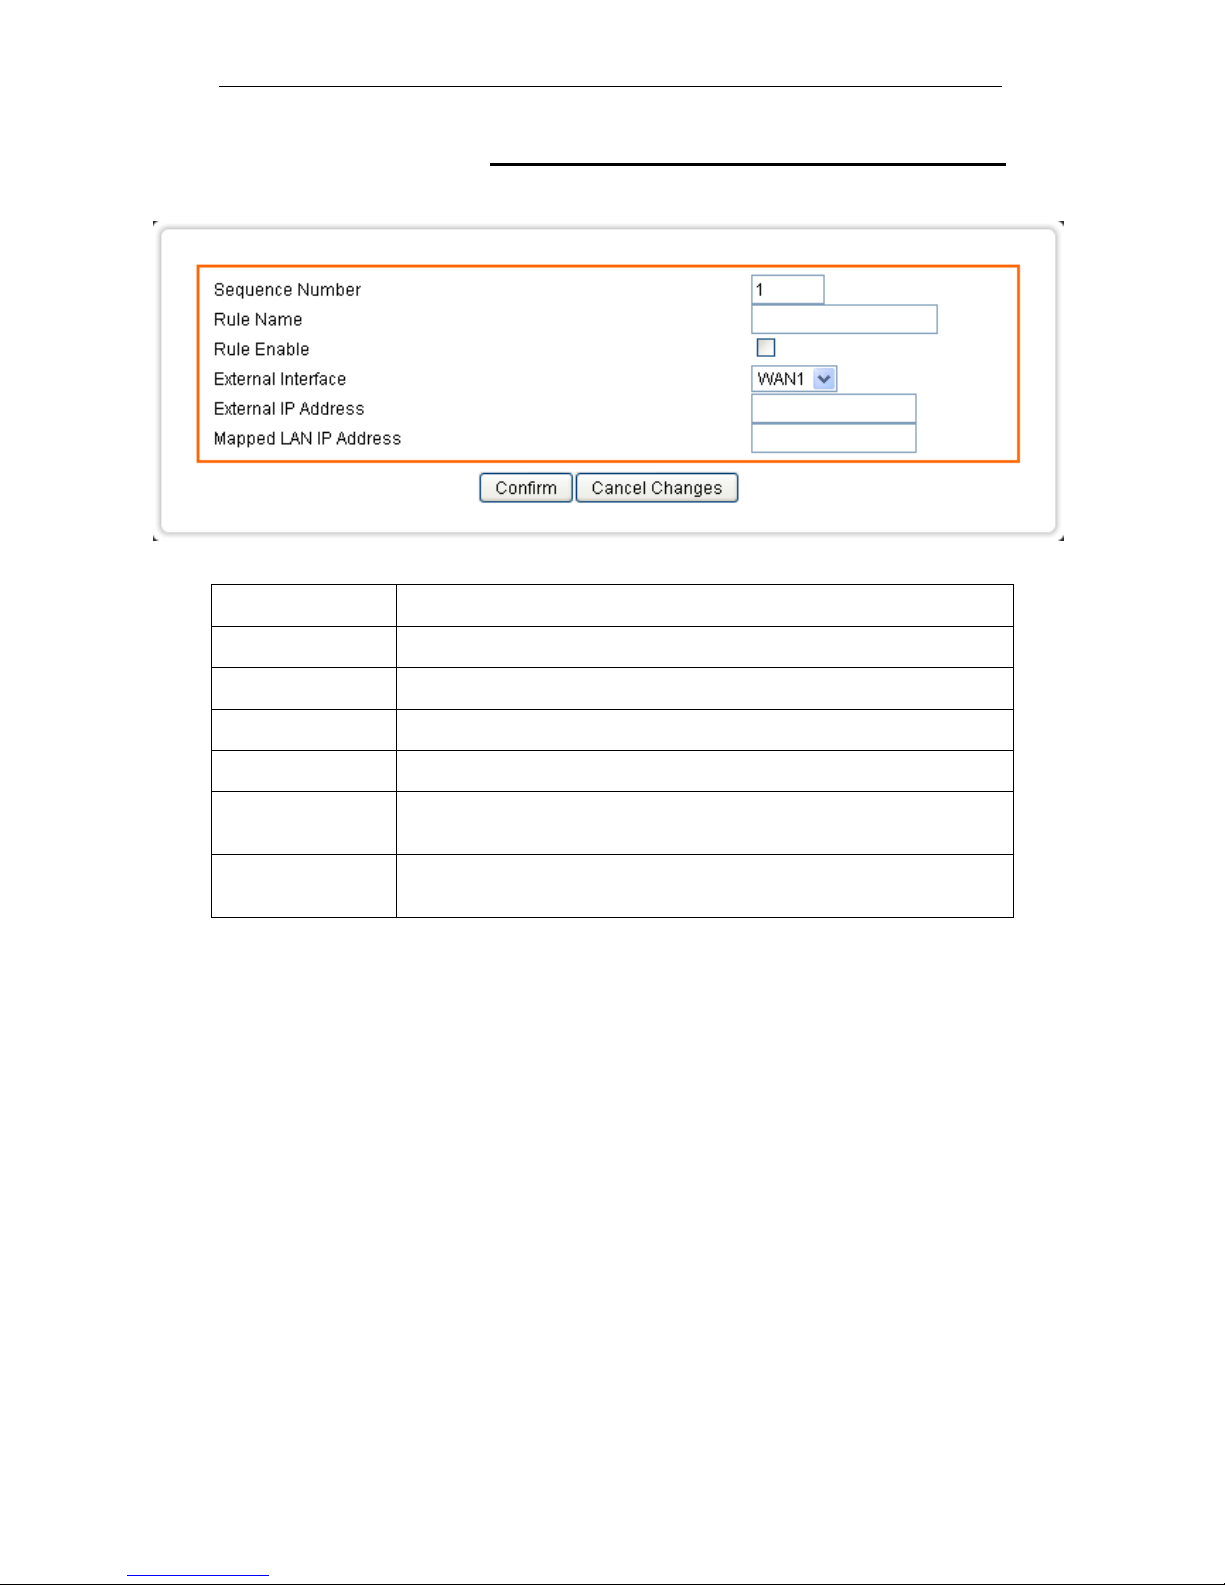
Add Virtual Host Rule
Click on Add. The following page is displayed:
Field Description
Sequence Number This defines the sequences (priorities) of the Virtual Host rules.
Rule Name Enter the name of the Virtual Host rule.
Rule Enable Check/Uncheck to enable/disable this Virtual Host rule.
External Interface Choose WAN1 as the External Virtual Host interface.
External IP
Address
Set up the External IP Address for the rule to be applied.
Mapped LAN IP
Address
Set up the mapped Mapped LAN IP Address for the rule to be
applied.
Page 92
Fibrain FSR-R2 User’s Manual
92
28
Applications - Streaming / VPN
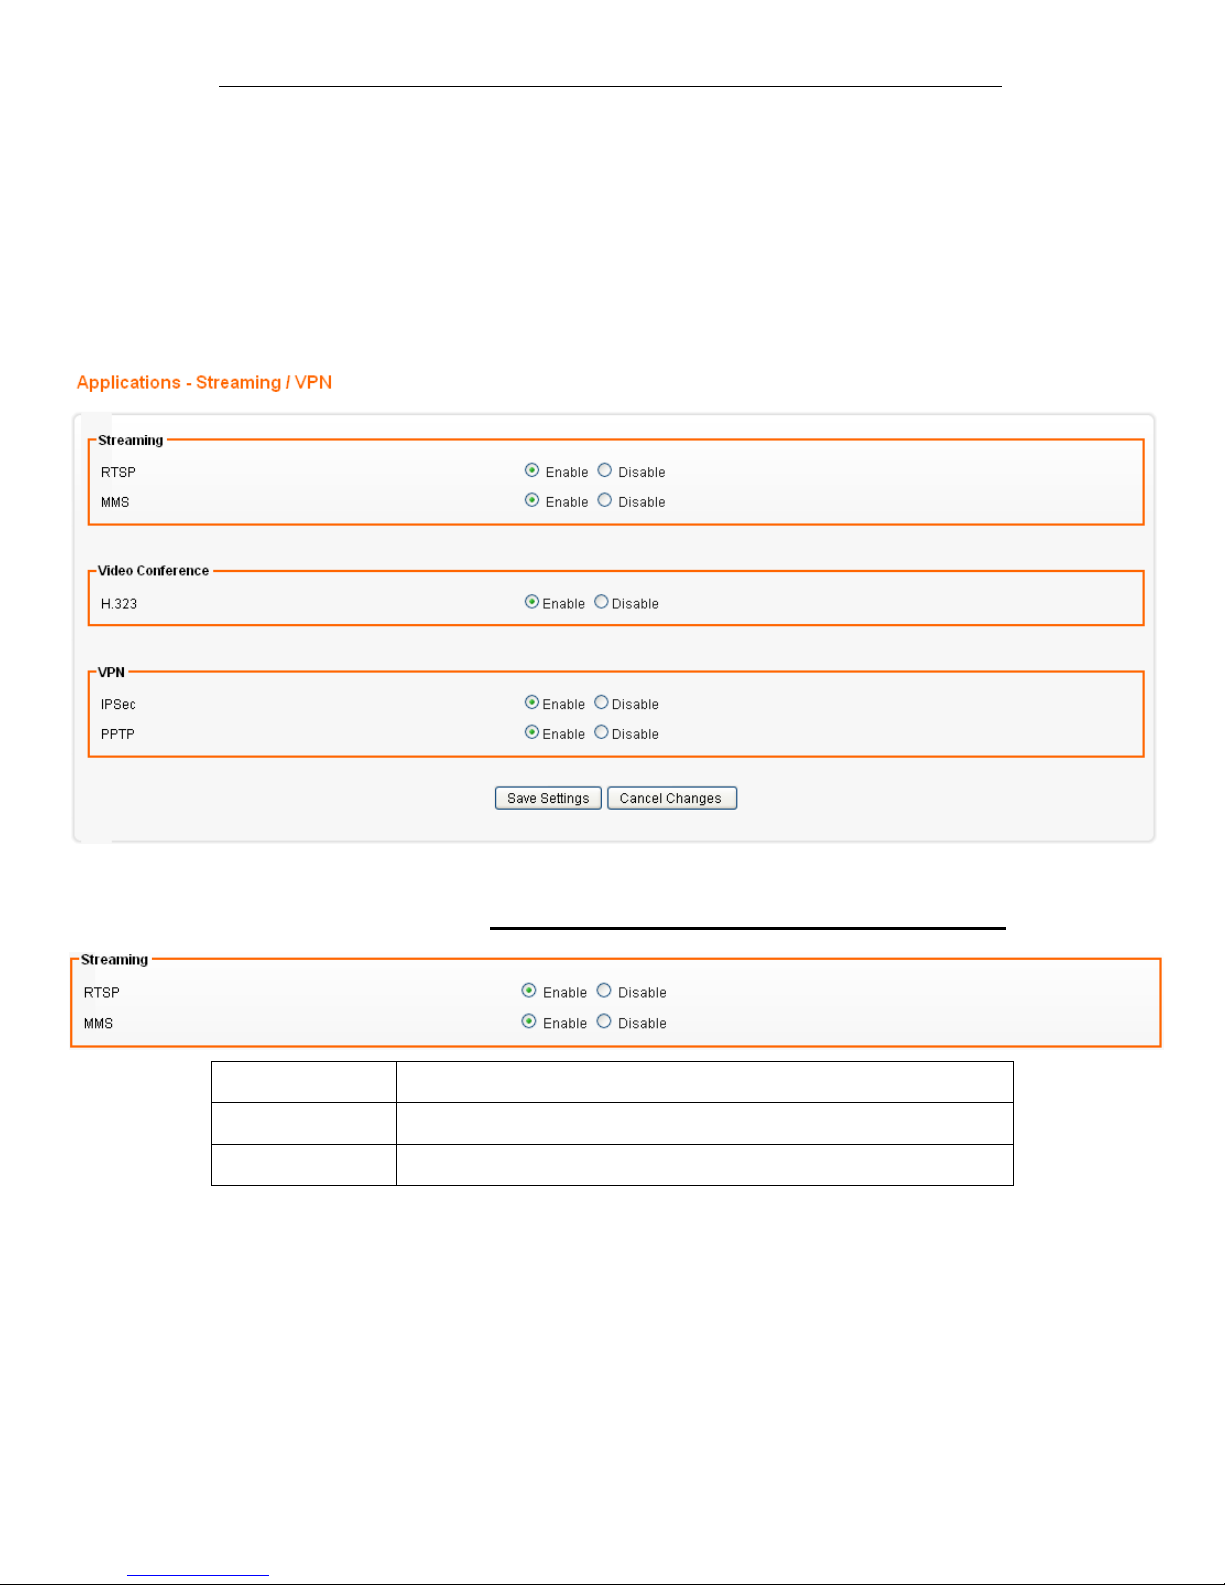
You can enhance your media streaming quality by enabling
RTSP, MSS, and H.323 protocols. Moreover, VPN Passthrough functionality can also be enabled.
From the Applications menu, click on Streaming / VPN. The
following page is displayed:
Streaming Settings
Field Description
RTSP Select Enable/Disable to enable/disable RTSP
MMS Select Enable/Disable to enable/disable MMS
Page 93
Fibrain FSR-R2 User’s Manual
93
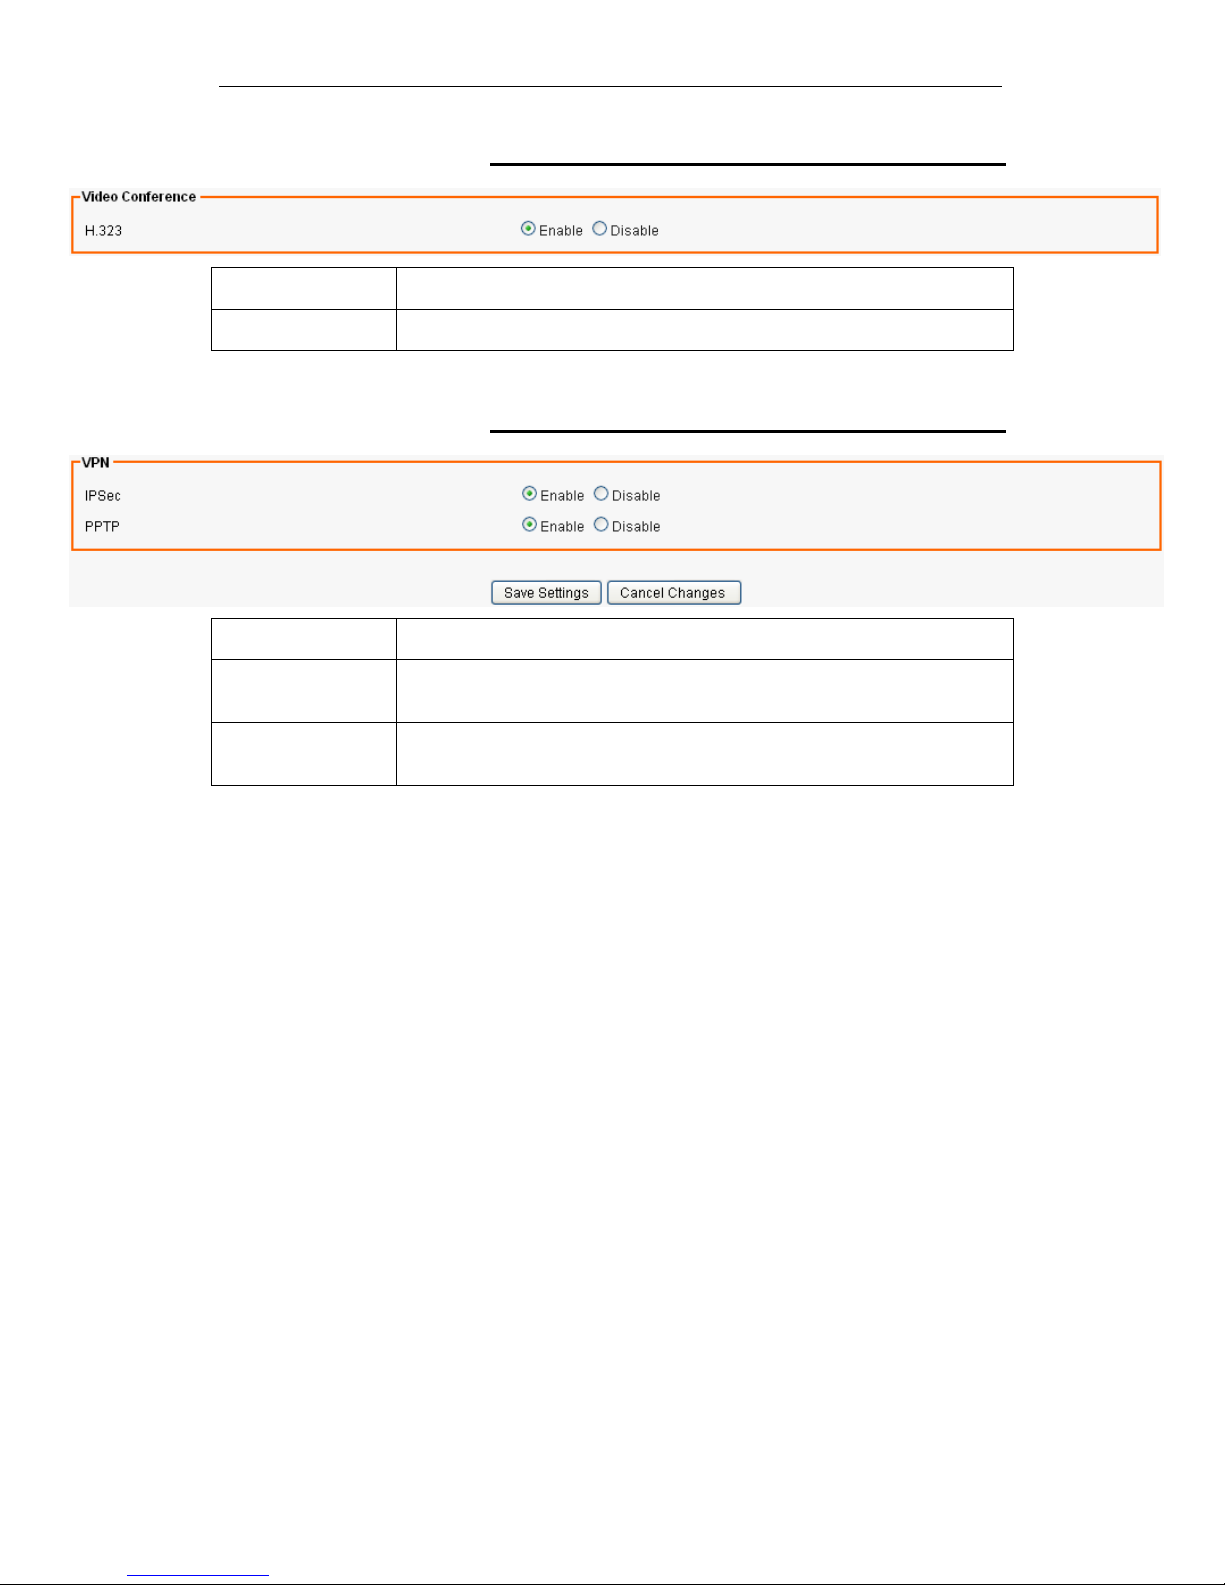
Streaming Settings
Field Description
H.323 Select Enable/Disable to enable/disable H.323
VPN Pass-through Settings
Field Description
IPSec Passthrough
Select Enable/Disable to enable/disable IPSec Pass-through
PPTP Passthrough
Select Enable/Disable to enable/disable PPTP Pass-through
Page 94
Fibrain FSR-R2 User’s Manual
94
29
Applications - UPnP / NAT-PMP
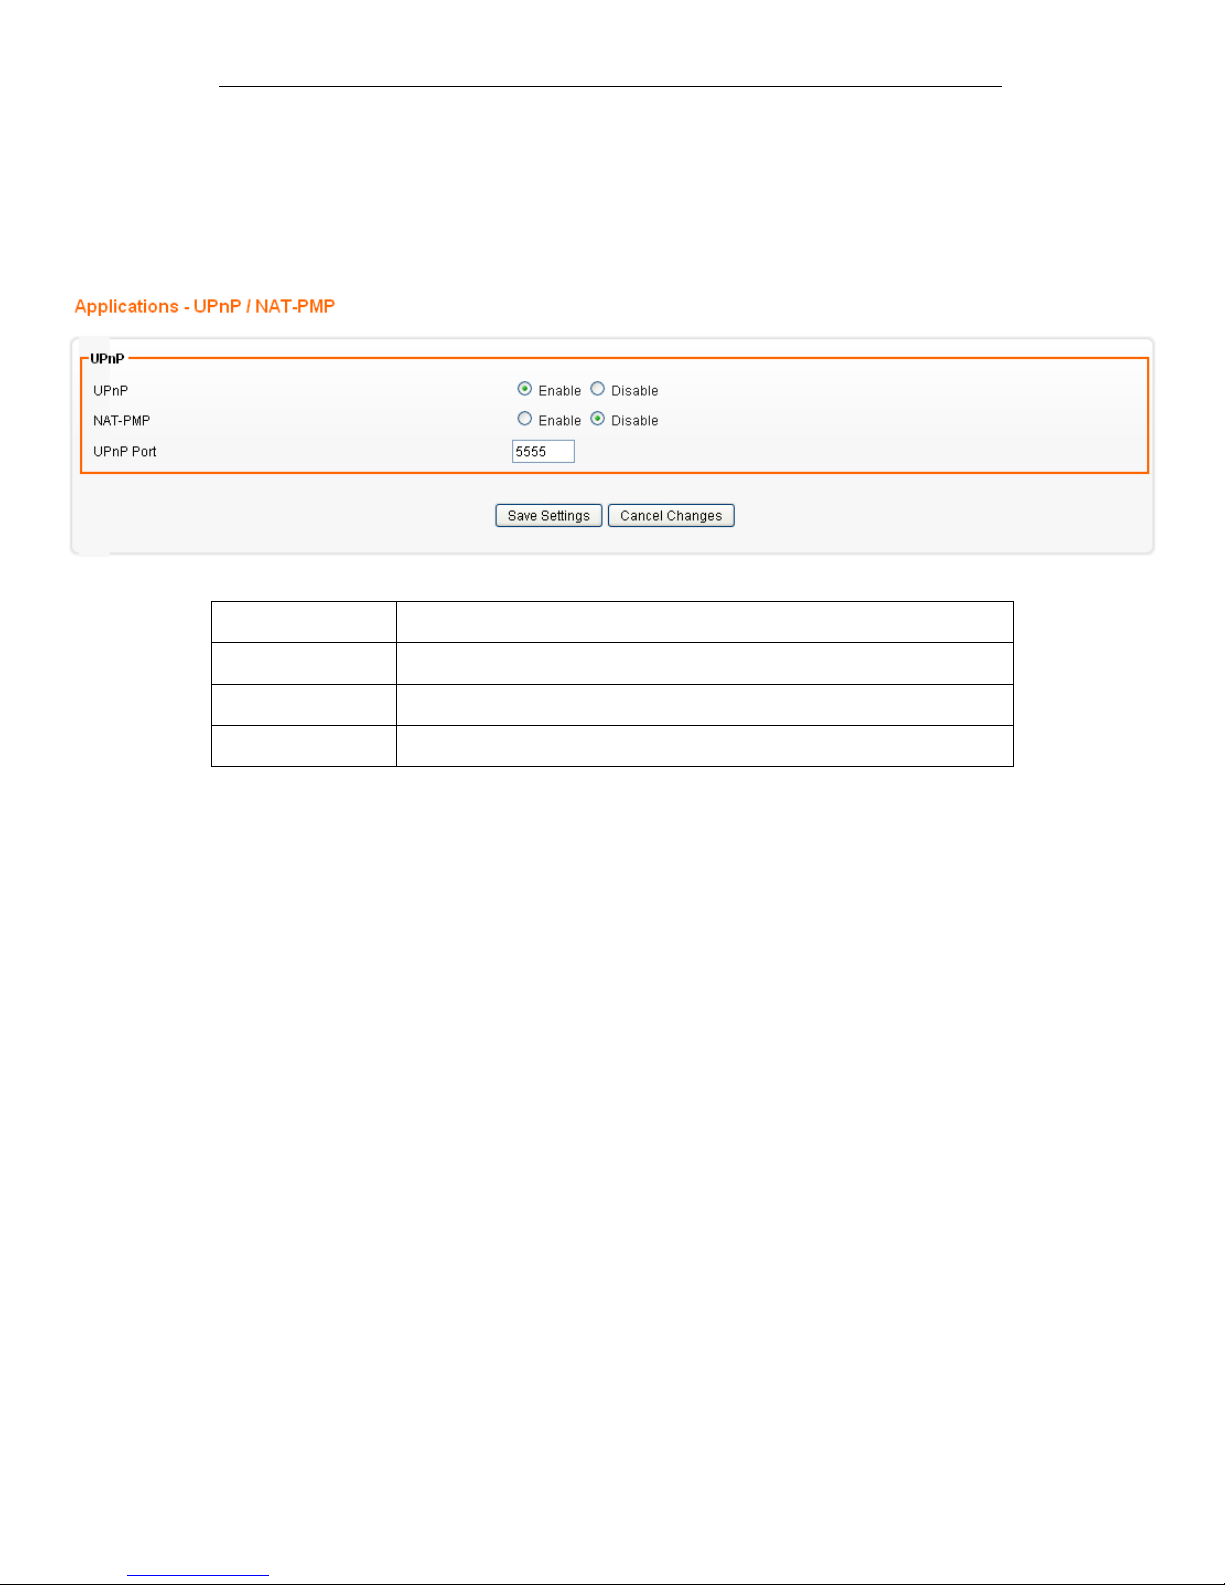
From the Applications menu, click on UPnP / NAT-PMP. The
following page is displayed:
Field Description
UPnP Select Enable/Disable to enable/disable UPnP
NAT-PMP Select Enable/Disable to enable/disable NAT-PMP
UPnP Port Enter the number for UPnP port.
Page 95
Fibrain FSR-R2 User’s Manual
95
30
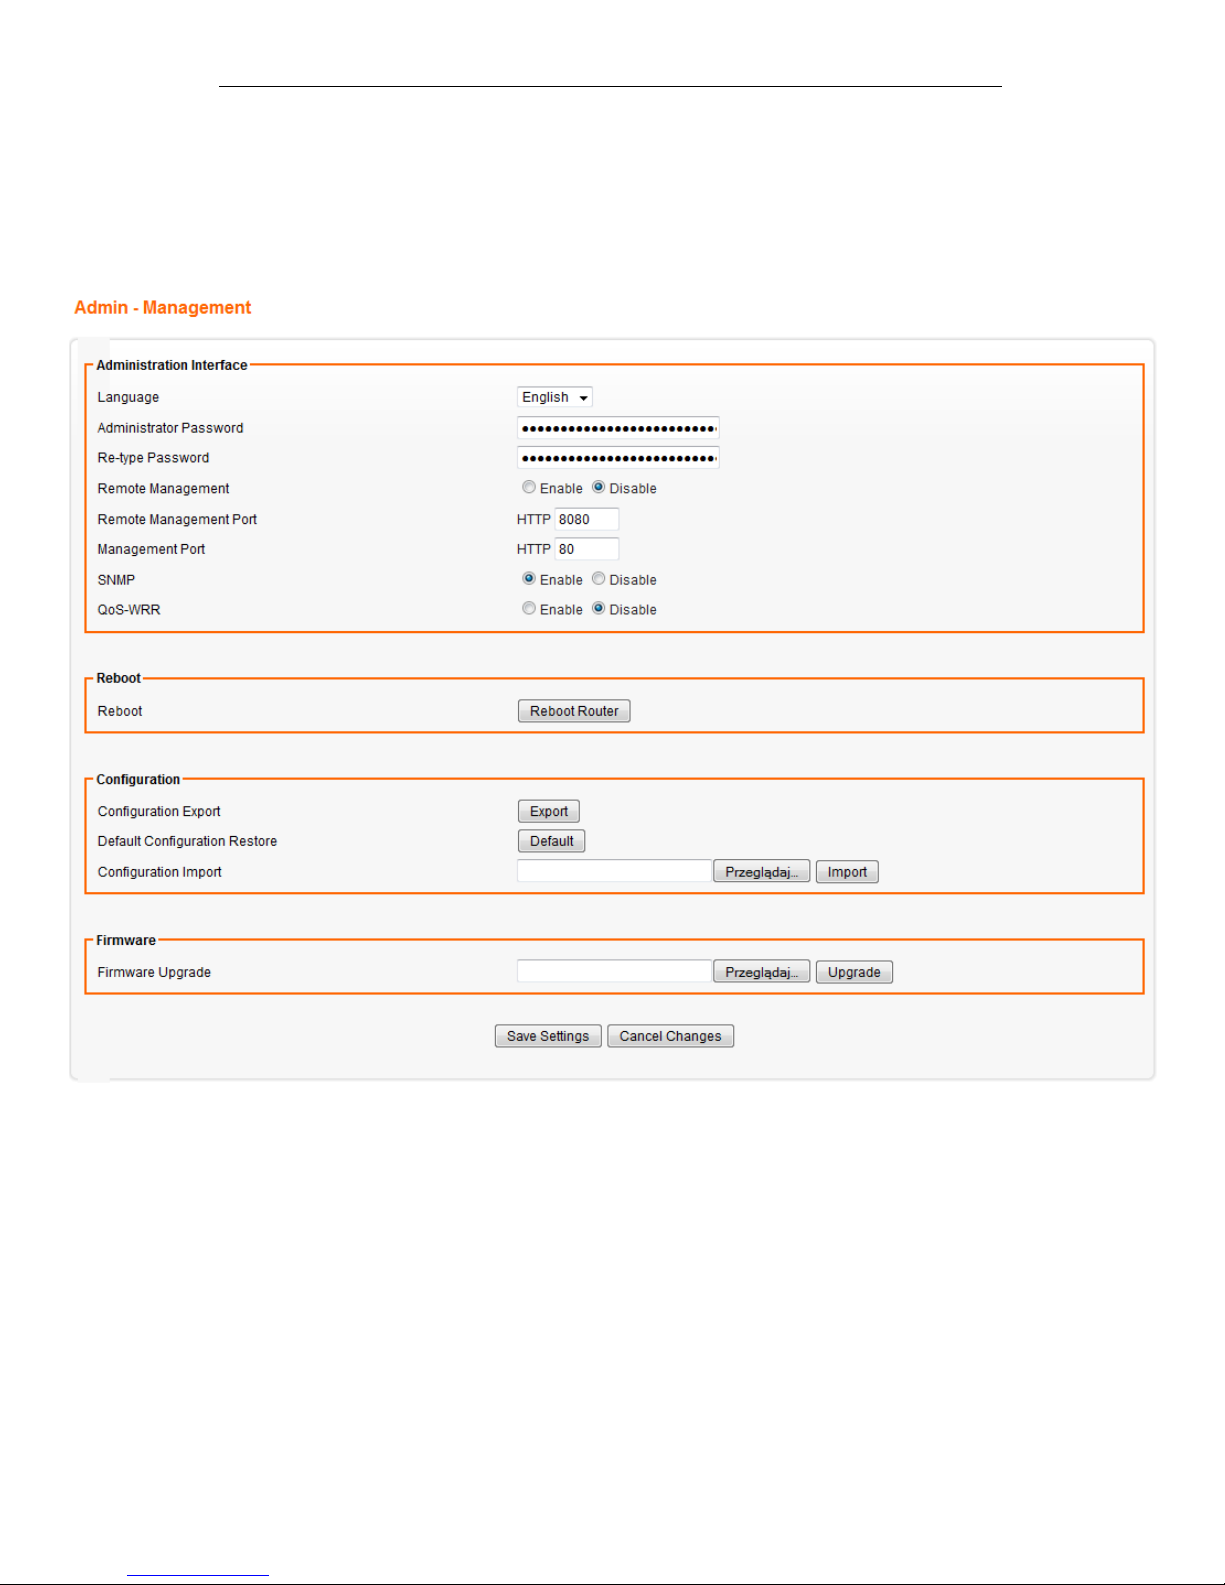
Admin - Management
From the Admin menu, click on Management. The following
page is displayed:
Page 96
Fibrain FSR-R2 User’s Manual
96
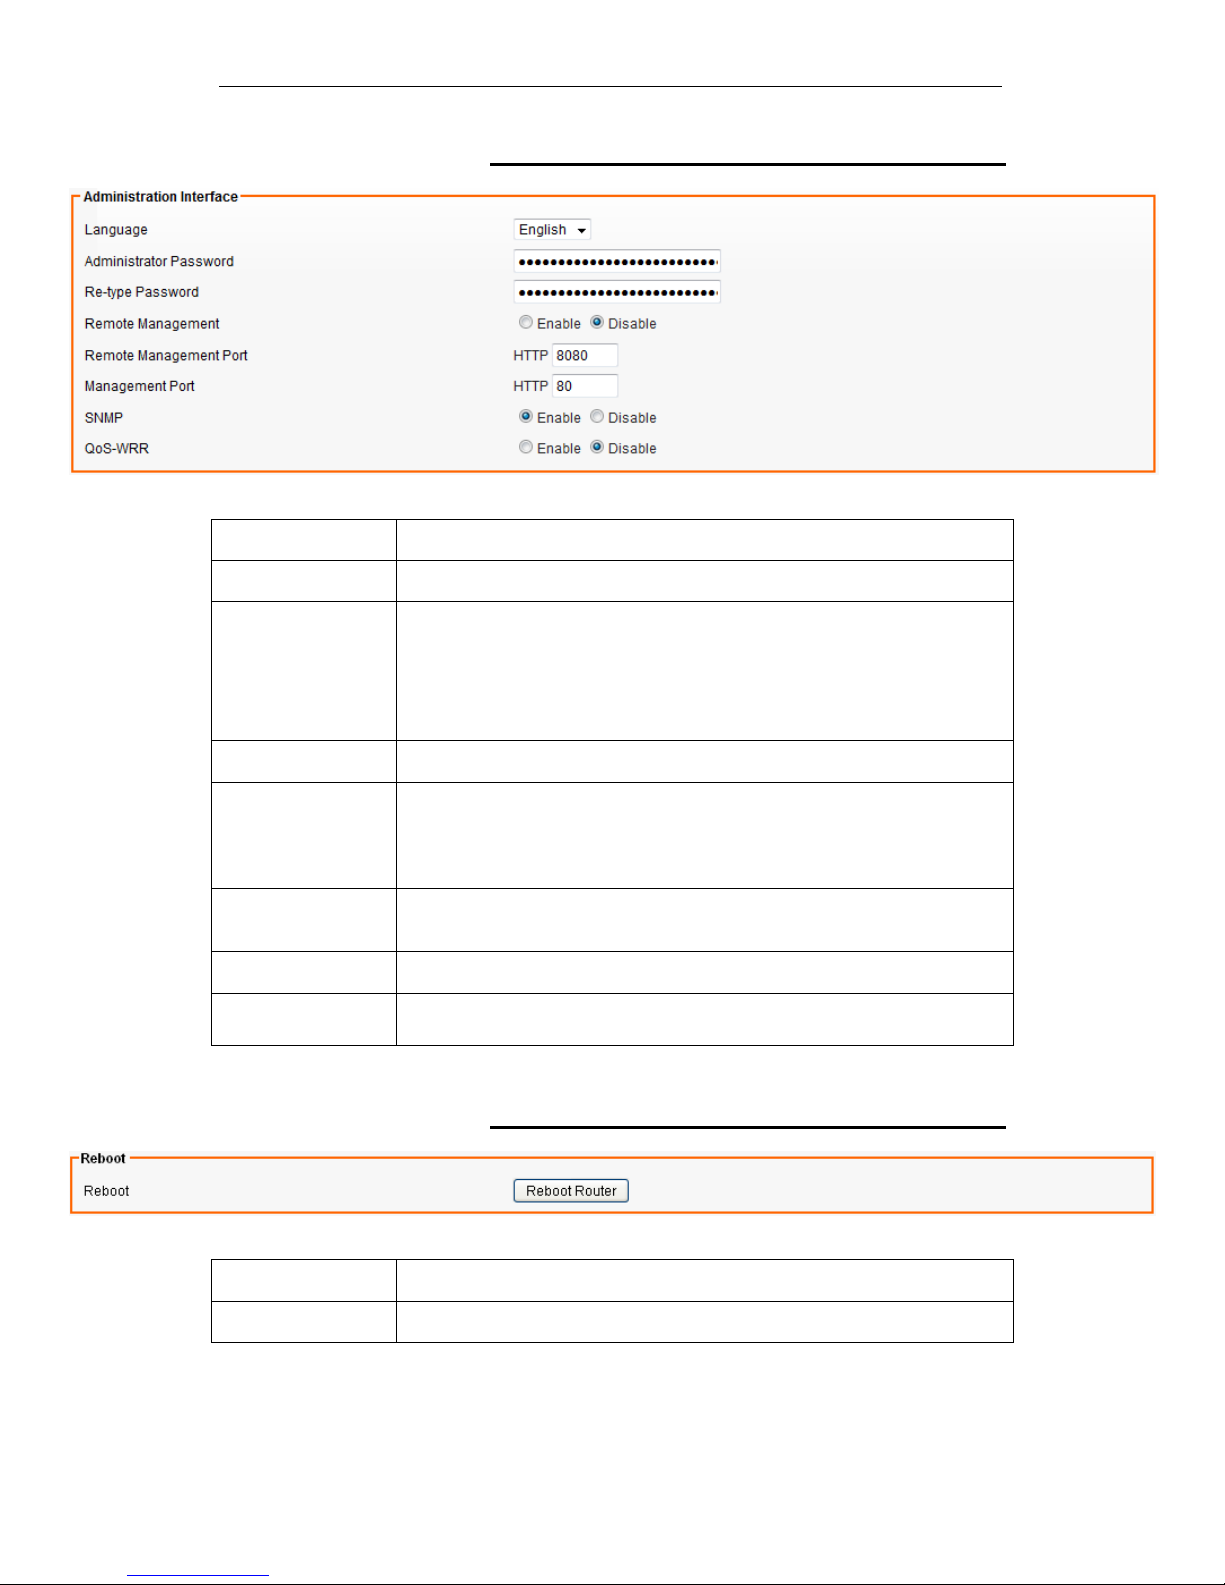
Administration Interface Settings
Field Description
Language Select the language of administration Interface you wish to use.
Administrator
Password
Maximum input is 36 alphanumeric characters (case sensitive)
* Please change the administrator’s password if the remote
management is enabled. Otherwise, a malicious user can access the
management interface. This user can then have the ability to change
the settings and damage your network access.
Re-type Password Enter the password again to confirm.
Remote
Management
Select Enable to enable Remote Management.
Select Disable to disable Remote Management
If the remote management is enabled, users who are not in the LAN
can connect to the device and configure it from the Internet.
Remote
Management Port
HTTP port which users can
remote
connect to. (default port is 80
80)
Management Port
HTTP port which users can connect to. (default port is 80)
SNMP
Select Enable to enable
SNMP
.
Select Disable to disable
SNMP
.
Reboot Settings
Field Description
Reboot Click this button to reboot the device.
Page 97
Fibrain FSR-R2 User’s Manual
97
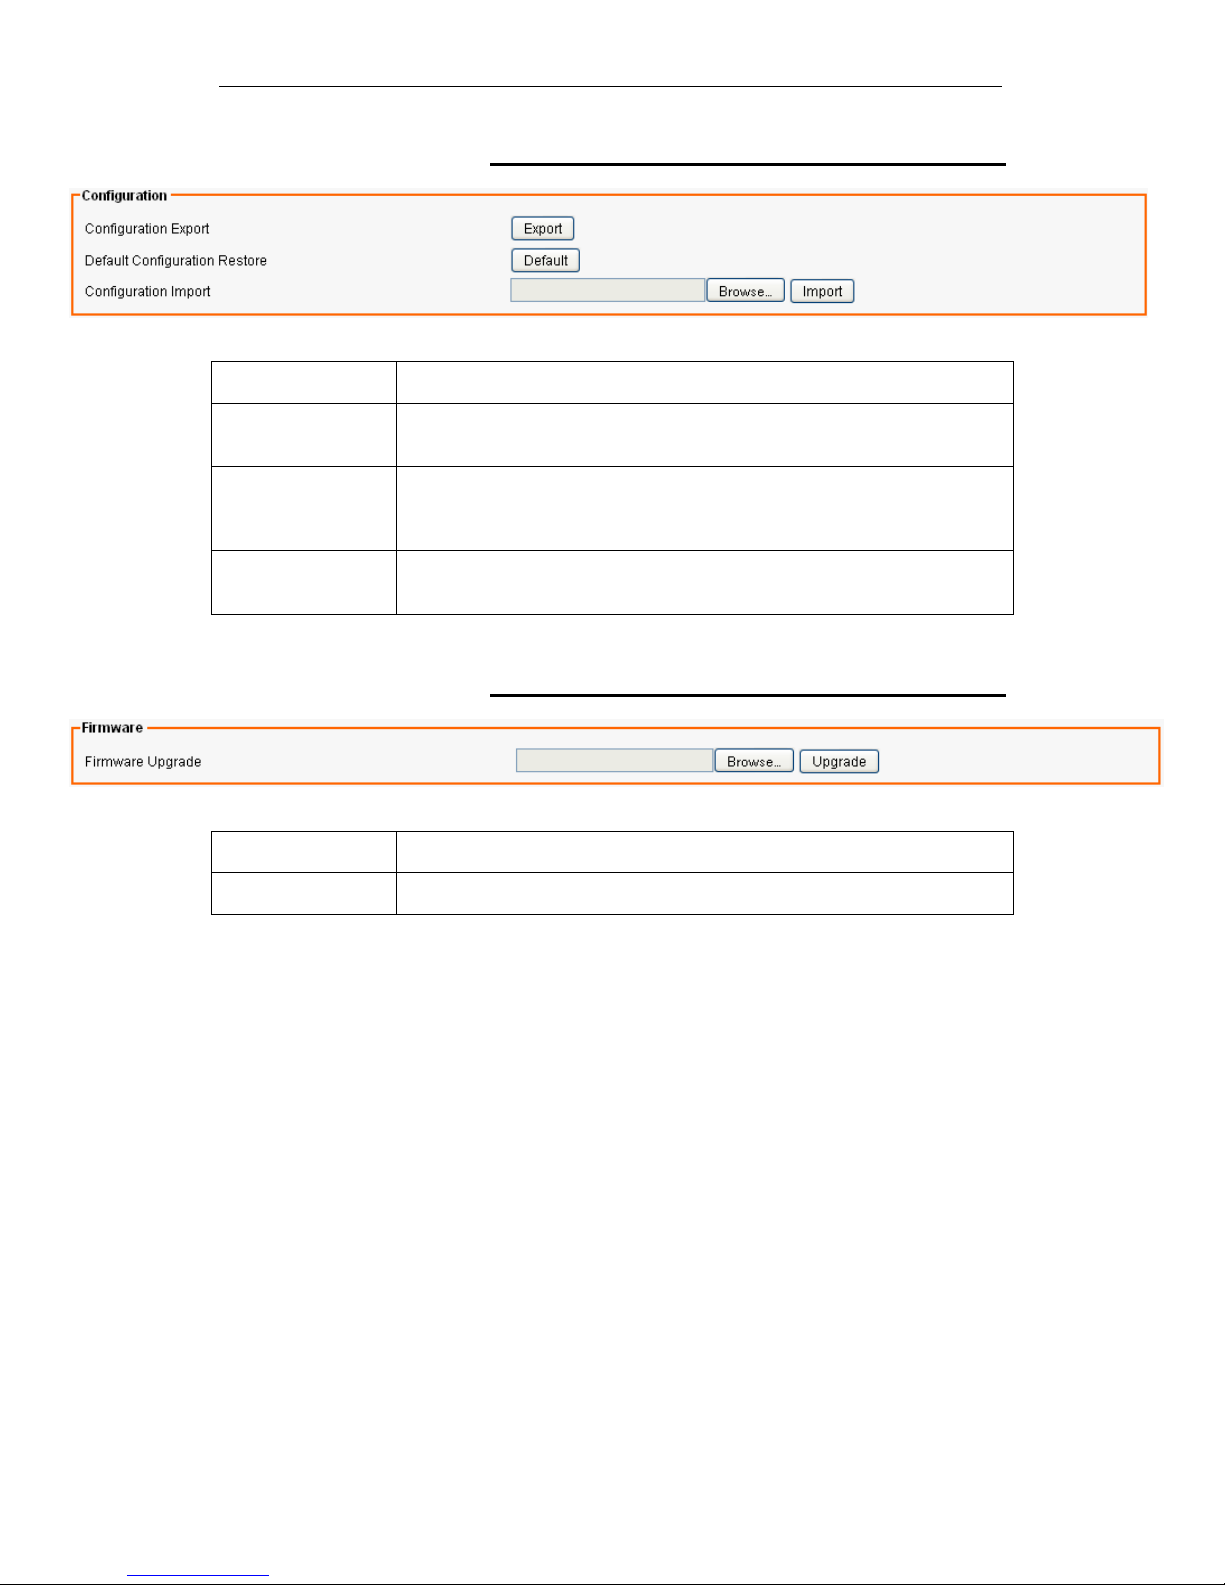
Configuration Settings
Field Description
Configuration
Export
Click this button to save your current configuration settings in a file.
Default
Configuration
Restore
Click this button to recover the default system settings.
Configuration
Import
Click Browse and Import to load previous configuration settings.
Firmware Upgrade Settings
Field Description
Firmware Upgrade Click Browse and Upgrade button to upgrade the firmware.
Page 98
Fibrain FSR-R2 User’s Manual
98
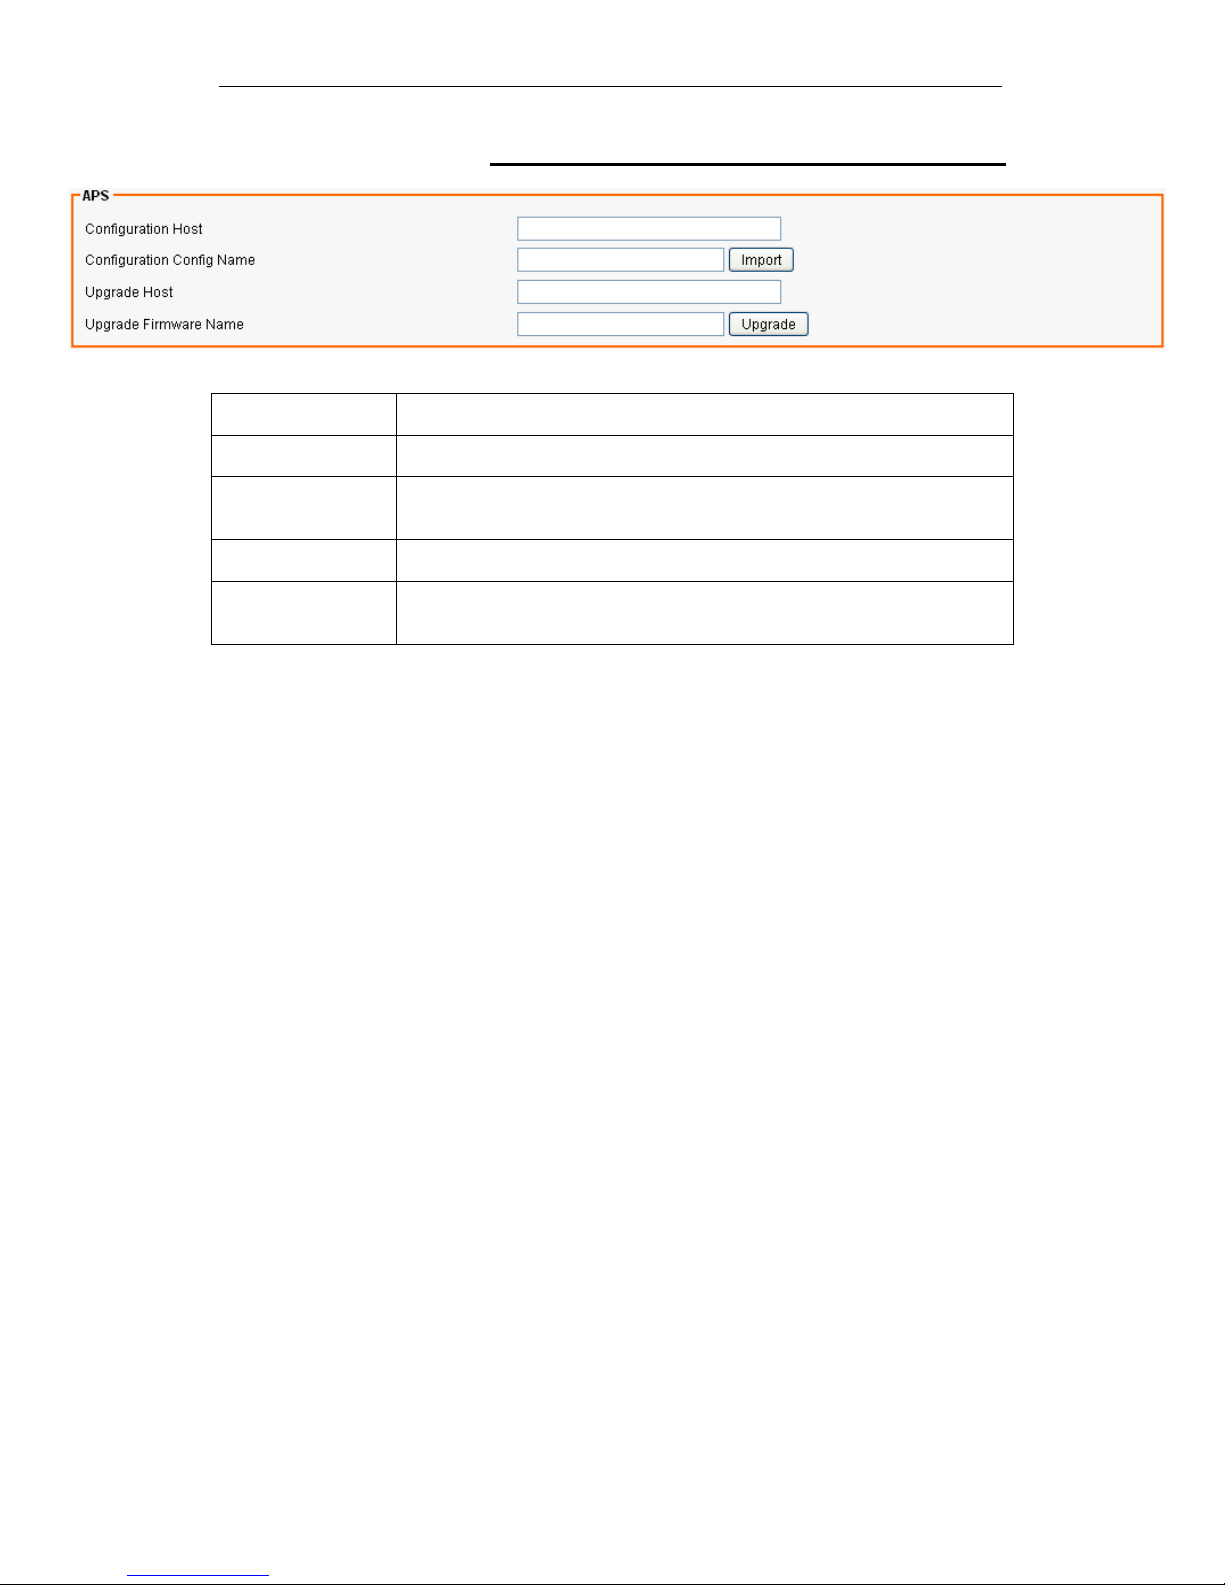
APS Settings
Field Description
Configuration Host Enter the IP Address of the TFTP Server
Configuration
Config Name
Enter the configuration config file name and then click Import button
to update configuration config from TFTP Server
Upgrade Host Enter the IP Address of the TFTP Server
Upgrade Firmware
Name
Enter the firmware file name and then click Upgrade button to update
firmware from TFTP Server
Page 99
Fibrain FSR-R2 User’s Manual
99
31
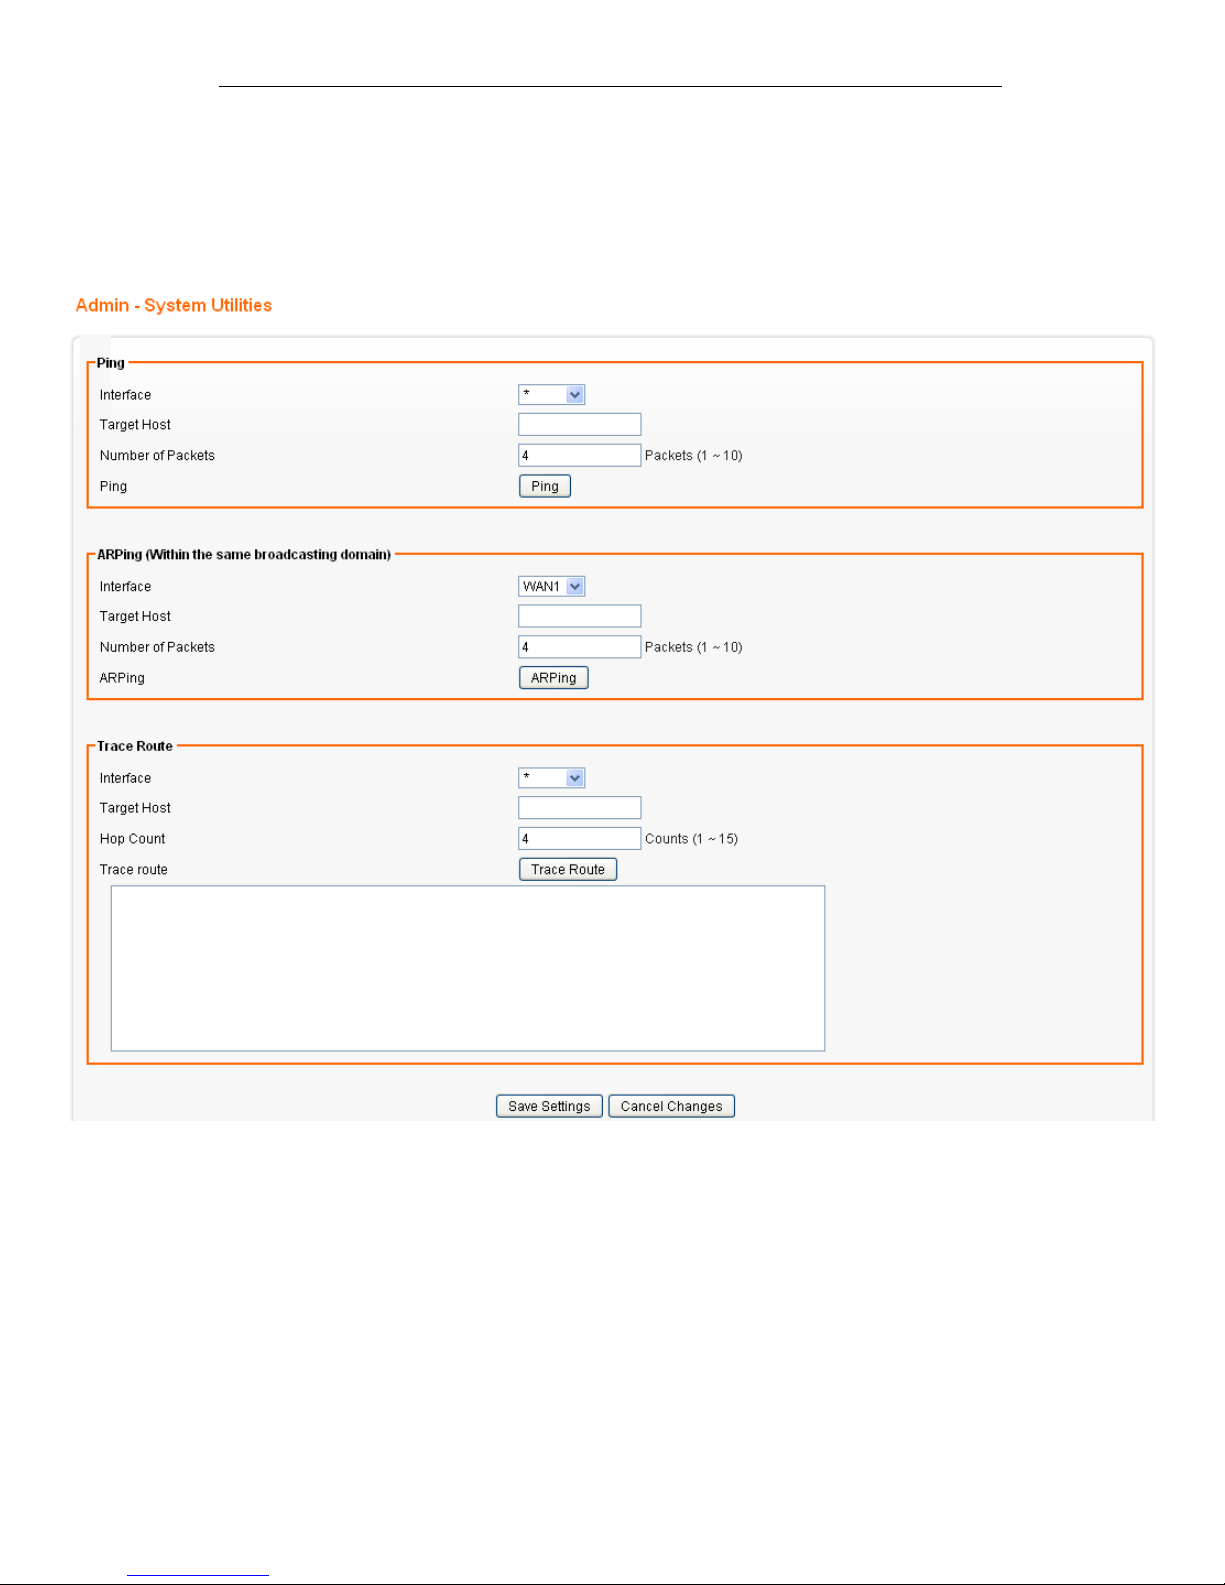
Admin - System Utilities
From the Admin menu, click on System Utilities. The following
page is displayed:
Page 100
Fibrain FSR-R2 User’s Manual
100
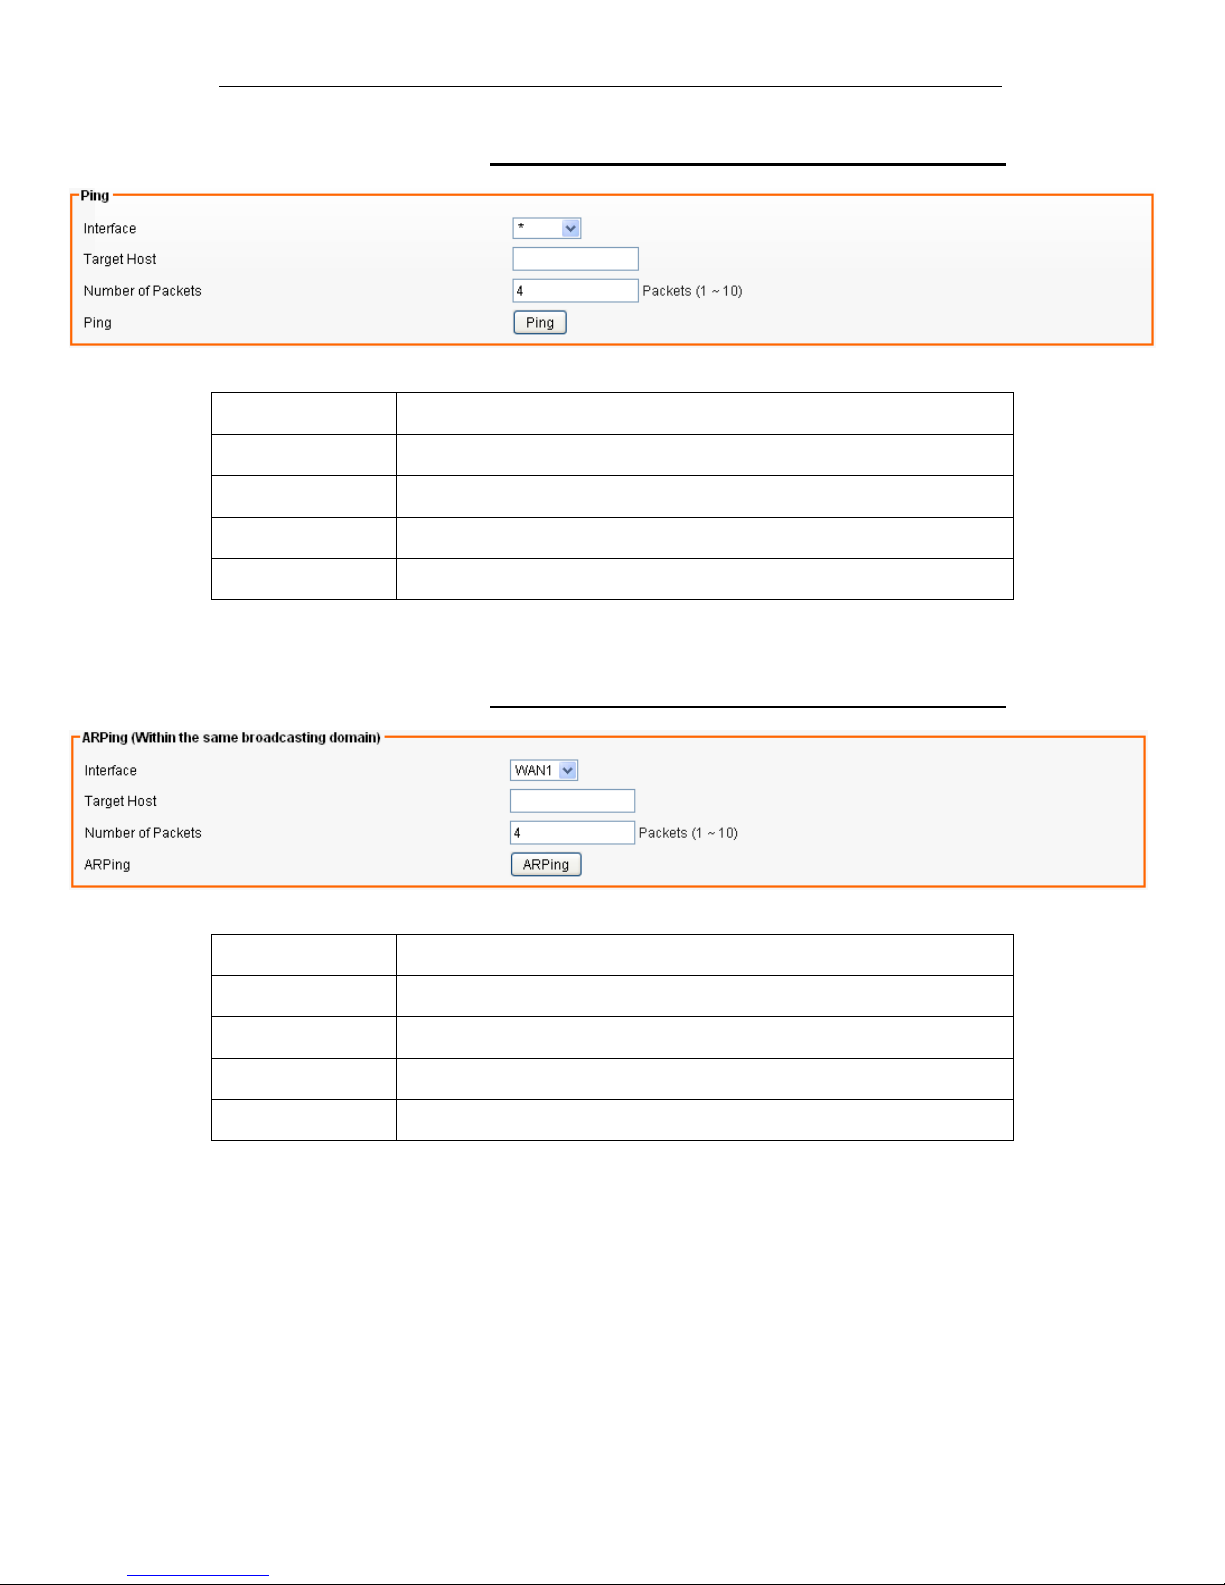
Ping Settings
Field Description
Interface Select the interface that use to ping to, ie. LAN, WAN.
Target Host Enter the IP address to ping to
Number of Packets Specify the number of the ICMP packets to send out
Ping Press the tab to start the “ping” actions
ARPing (Within the same broadcasting domain)
Settings
Field Description
Interface Select the interface that use to ARPing to, ie. LAN, WAN.
Target Host Enter the MAC address to ARPing to
Number of Packets Specify the number of the ARP request packets to send out
ARPing Press the tab to start the “ARPing” actions
 Loading...