

Page 1
OPERATING
MANUAL
4 x BEEP
)
)
RED LED
)
BLINKING
MOVE TO
FRESH AIR!
EN
&
FIBARO CO SENSOR
FGBHCD-001
CONTENTS
#1: Description and features 3
#2: Powering the accessory 4
#3: Pairing the accessory 5
#4: Physical installation 6
#5: Operating the device 7
v1.0
#6: Functionality 8
#7: Visual indications & acoustic signals 9
#8: Battery 10
#9: Specications 11
#10: Regulations 12
Page 2

2
Important safety information
Read this manual before attempting to install the device!
Failure to observe recommendations included in this manual may be
dangerous or cause a violation of the law. The manufacturer, Fibar Group
S.A. will not be held responsible for any loss or damage resulting from
not following the instructions of operating manual.
General carbon monoxide information
Carbon monoxide (CO) is a colourless, odourless, and tasteless poison
gas that can be fatal when inhaled. It is produced when liquid, solid, or
gas fuel is burned.
Symptoms of carbon monoxide poisoning
The early symptoms of carbon monoxide poisoning can be confused
with u-like symptoms: headache, dizziness and nausea. Breathing carbon monoxide causes these symptoms even in healthy people. It can
also cause sleepiness, vision problems (including blurred vision), ringing in the ears, aching arms and legs, irregular breathing, fatigue and
confusion. At very high levels, it causes loss of consciousness and death.
Some external factors, eg. exposure to high concentration of basic
(non-acidic) gases, silicone vapors, hydrogen sulde or sulfuric acid gas,
organic vapors, contact with water, dust and oil mist, or dew condensation may aect the reliability of the device operation.
This device may not protect from long-term exposure to low levels of
carbon monoxide which can also lead to neurological symptoms.
The device is not a substitute for appropriate ventilation and exhaust
systems.
HomeKit technology
Apple HomeKit technology provides an easy, secure way to control
HomeKit-enabled accessories using Siri on your iPhone, iPad, or iPod
touch.
After installing your FIBARO CO Sensor, congure it from a compatible
app with just a few simple steps.
You can even create your own custom scenes to control your home
settings. For example, you can create a scene to automatically turn
o the lights, lock your doors, close the garage door, and set the
thermostat to the desired temperature in just one step.
Controlling this HomeKit-enabled accessory requires an iPhone,
i
iPad, or iPod touch with iOS 9.3 or later.
Controlling this HomeKit-enabled accessory away from home
requires a third-generation Apple TV with Apple TV software
7.2.1 or later or a fourth generation AppleTV with tvOS 9.2 or
later and an iPhone, iPad, or iPod touch with iOS 9.3 or later
Page 3

#1: Description and features
FIBARO CO Sensor is a HomeKit-enabled carbon monoxide detector
using Bluetooth® low energy technology.
Its high sensitivity allows to detect the presence of the carbon
monoxide (CO) gas at the early stage in order to prevent carbon
monoxide poisoning.
Alarm is signalled with a built-in siren, blinking LED indicator and by
sending information to your iOS device.
Additionally, the accessory is equipped with a temperature sensor.
Main features of FIBARO CO Sensor:
3
• compatible with Apple HomeKit technology
• Bluetooth® low energy technology for wireless communication
• detects tampering when the casing is opened
• wall-mounted
• battery-powered
• alarm signalled with a built-in siren and LED diode
• built-in temperature sensor measuring ambient temperature
DESCRIPTION AND FEATURES
Page 4
4
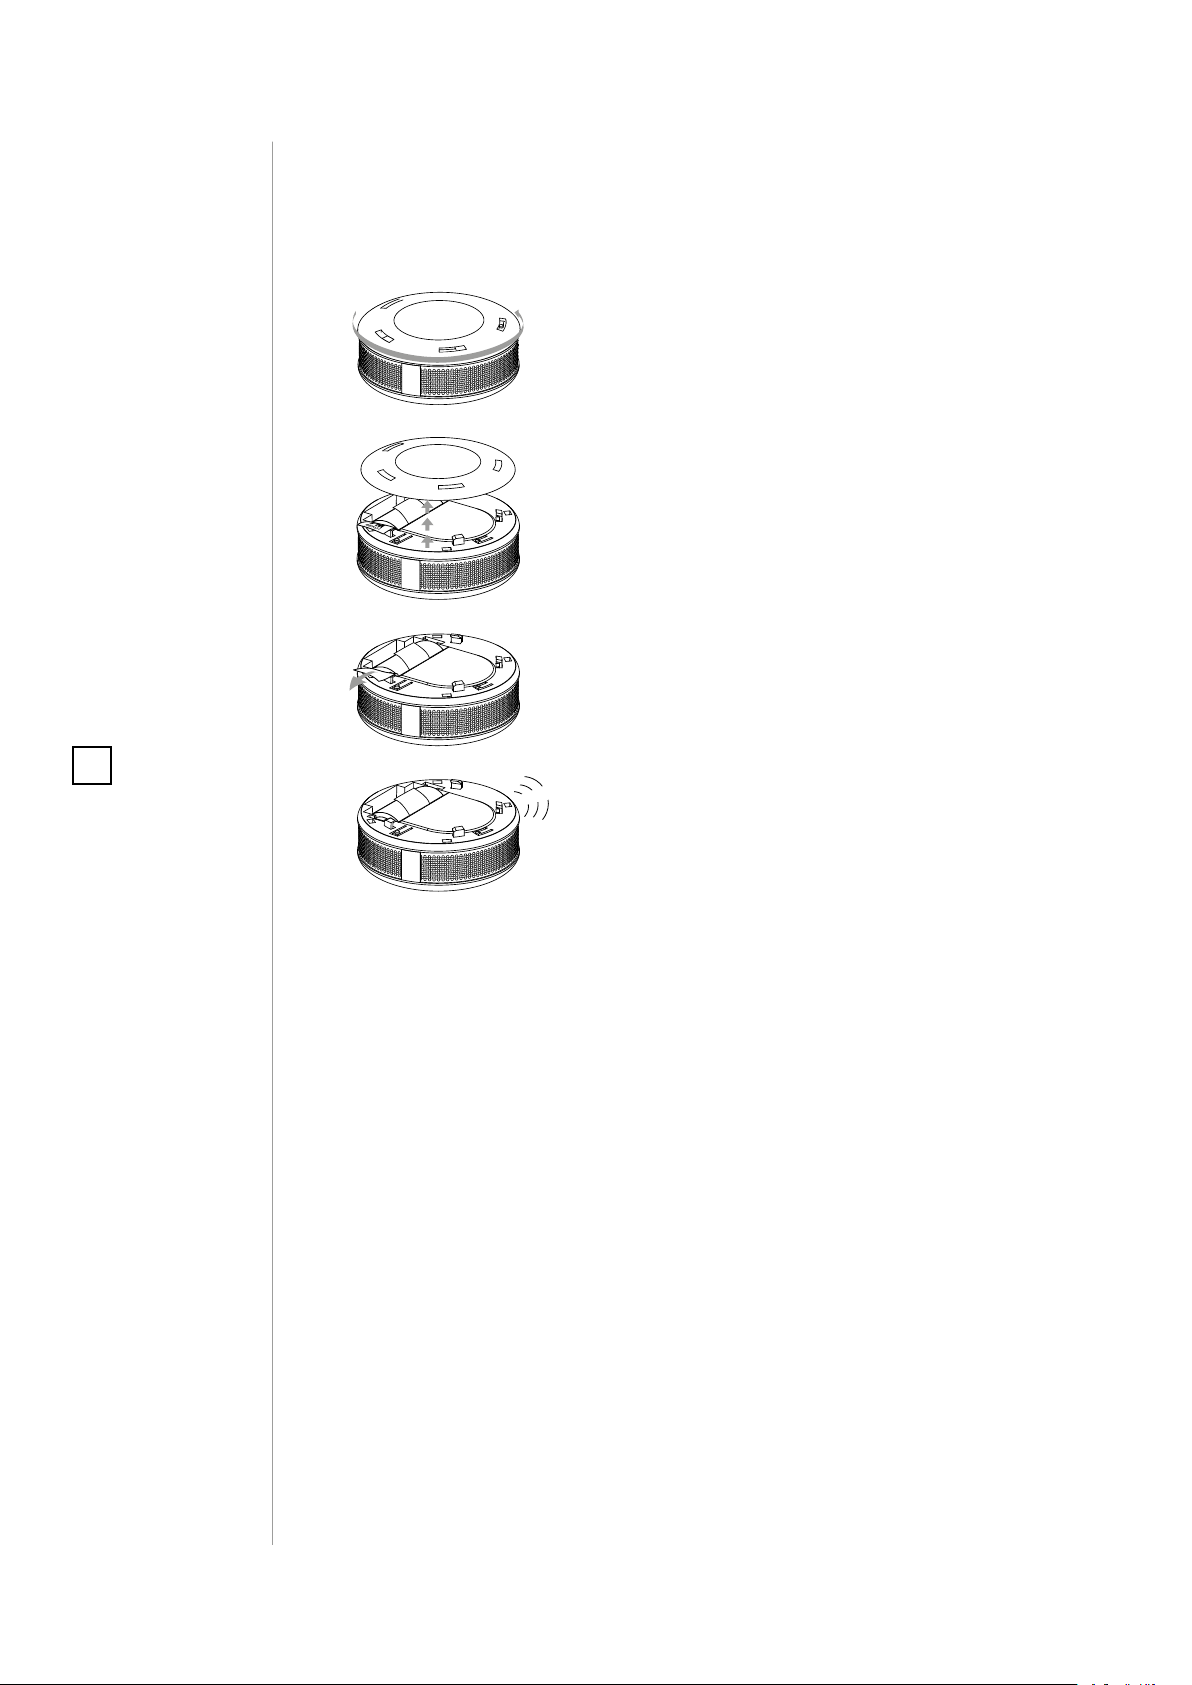
#2: Powering the accessory
1. Turn the cover counter-clockwise.
PULL
1xCR123A(3V)
PULL
1xCR123A(3V)
2. Take o the cover.
3. Remove the paper strip protecting
the battery.
NOTE
i
FIBARO CO Sensor may
operate as a standalone carbon monoxide detector or may be
used in cooperation
with HomeKit technology as a part of smart
home system.
!
p
e
e
PULL
1xCR123A(3V)
B
4. Proper powering up will be conrmed with a short beep.
5. Pair the accessory if you want to use
it with HomeKit.
POWERING THE ACCESSORY
Page 5
#3: Pairing the accessory
1. Open the Settings app on your iOS device.
2. Go to the Bluetooth® section, and turn the Bluetooth® on.
3. Place the accessory next to your iOS device.
4. Open a HomeKit compatible app of your choosing on your iOS
device.
5. Open pairing window in your HomeKit app to detect available
accessories.
6. Choose CO Sensor you wish to pair.
7. You can identify it - CO Sensor will blink green.
8. Find HomeKit Setup Code on the last page of Quick Start Guide
included in the box that looks like this:
5
NOTE
i
XXX-XX-XXX
9. Start pairing with your HomeKit app.
10. Point your iOS device’s camera at the Setup Code to scan it or enter the Setup Code manually.
11. If entered Setup Code is valid, the device will complete the setup
process.
12. Follow instructions displayed in the application.
Remember to keep
your HomeKit Setup
Code in safe place. You
may need it in case of
re-pairing.
PAIRING THE ACCESSORY
Page 6

6
#4: Physical installation
READ BEFORE INSTALLATION
!
AND HEED ALL THE WARNINGS!
• The accessory should be installed below the ceiling level.
• The accessory should be installed on the wall, at least 30 cm (1 ft)
away from the corners.
• The accessory should not be installed: in a bathroom, next to heat
sources, within range of kids, obstructed from possible carbon
monoxide sources, in direct sunlight.
• The accessory should be installed by a qualied installator.
• Do not paint the accessory.
• The accessory should be cleaned with a slightly damp cloth or
moistened tissue.
NOTE
i
Recommended height
of installation is dependant on the purpose of the room and
height at which head
typically is.
Place of installation:
NOT HERE
HERE
Installation on the wall:
CEILING
30cm/1ft
WALL
1.5m/5ft
FLOOR
PHYSICAL INSTALLATION
1.
1. Mount the cover on a wall.
2. Attach the accessory to its cover.
3. Turn the accessory clockwise to close it.
2.
3.
Page 7
#5: Operating the device
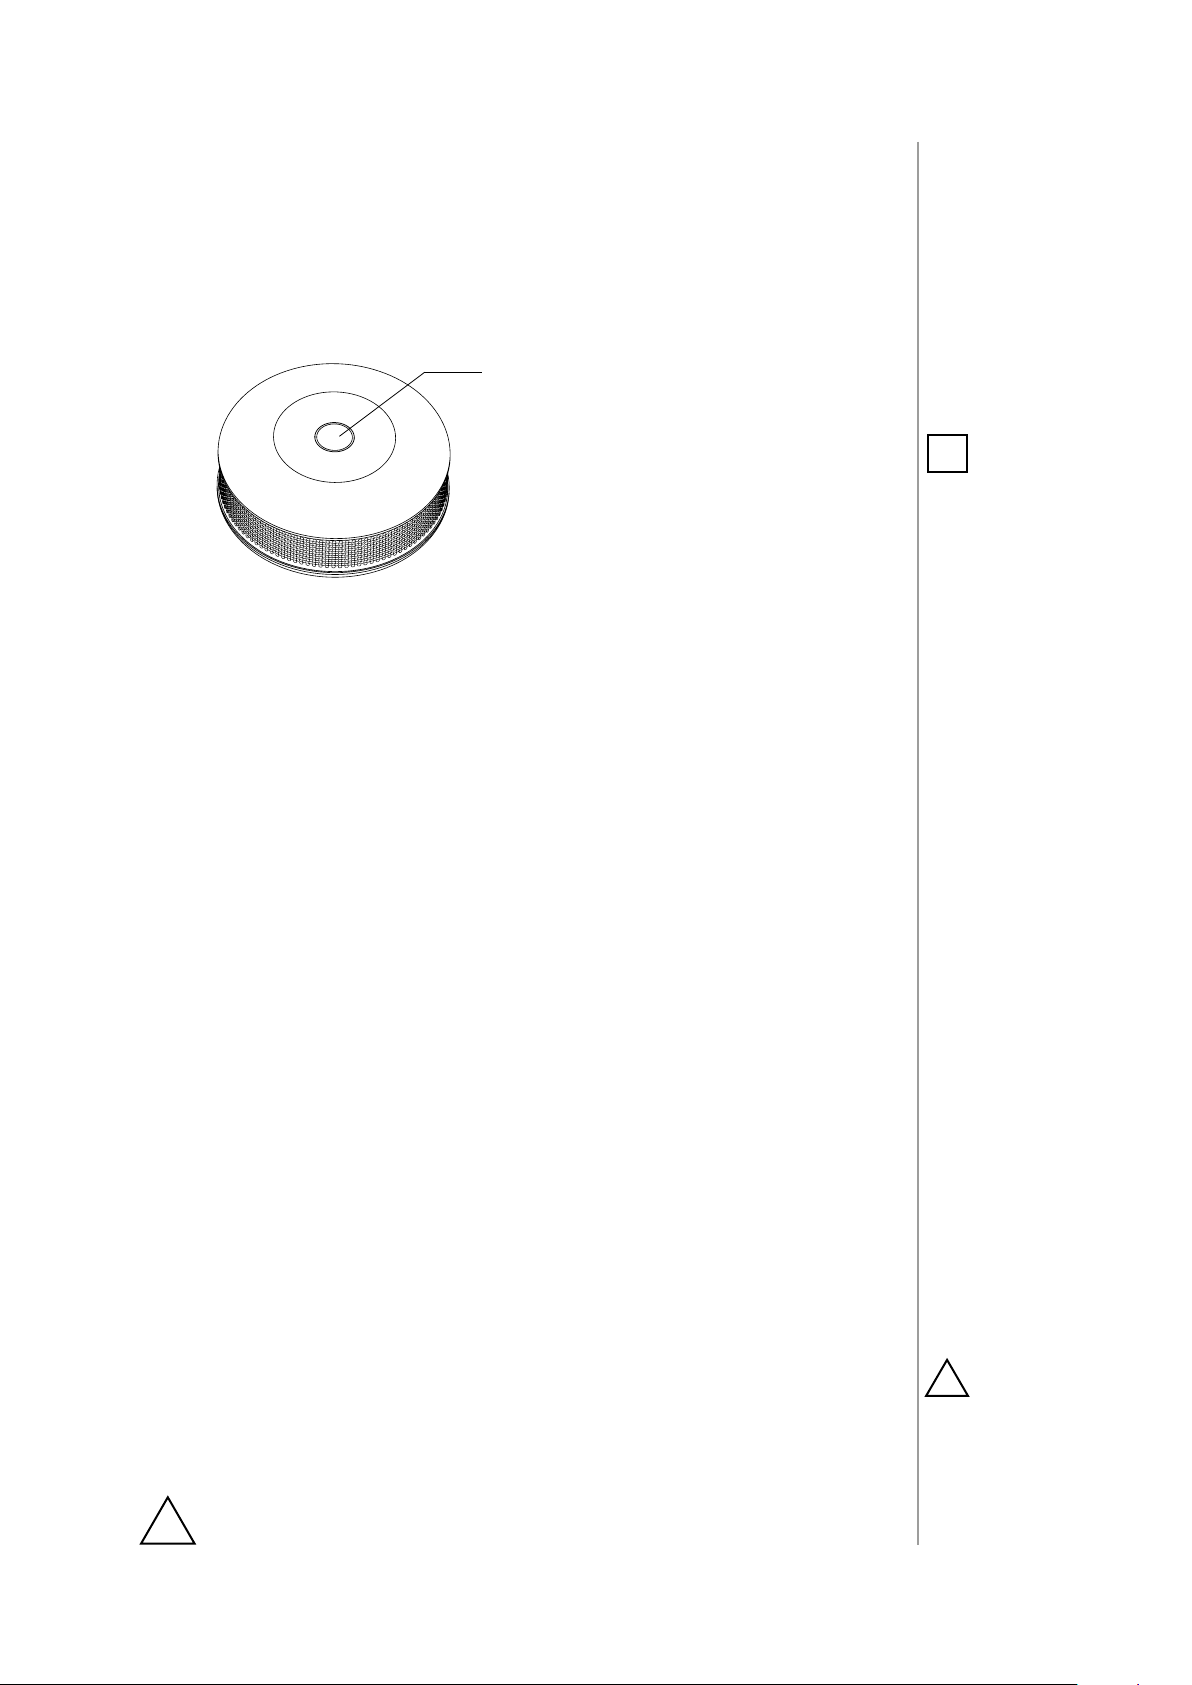
Menu allows to perform dierent actions. In order to use the menu:
1. Press and hold the button for 3 seconds.
Button
2. You should hear a short signal while the LED diode blinks white.
3. Release the button.
7
NOTE
i
CO Sensor must be detached from the wall
and battery level must
be greater than 30%
of its full capacity to
perform the rmware
update process.
4. Wait for the device to indicate desired menu position with a colour:
• White - conrm the start of the rmware update process
• Green - send the current state of CO Alarm
• Magenta - reset the CO peak value
• Yellow - the device reset
5. Press the button to conrm selection.
Resetting the accessory to factory defaults:
Reset procedure allows to restore the accessory back to its factory
settings including HomeKit pairing. Stored carbon monoxide and
temperature measurement are not deleted.
1. Press and hold the button.
2. Release the button when LED indicator glows white and short
beep sounds.
3. Click the button when LED indicator glows yellow.
4. After few seconds the device will be reset (conrmed by red LED
indicator and long beep).
Self-test allows to check operation of the accessory.
To start the self-test:
1. Press and hold the button.
2. The LED indicator will glow white and you will hear a short beep.
3. Release the button when you hear the rst alarm sequence.
4. Move away from the accessory to protect your hearing.
If the self-test procedure does not result in emitting sound
!
and red light signal, replace the accessory.
CAUTION
!
The alarm is very loud!
Only the rst alarm sequence is quieter.
OPERATING THE DEVICE
Page 8

8
#6: Functionality
Carbon monoxide alarm:
The CO Sensor alarms about abnormal levels of carbon monoxide
concentration with 4 red blinks and 4 loud beeps (every 5 seconds).
Alarm is also reported to your iOS device.
Carbon monoxide measuring and storing:
The CO Sensor measures carbon monoxide concentration and reports. If measured value diers from previously reported by at least
5ppm, accessory reports it to your iOS device.
Last 2500 measurements are stored in non-volatile memory of the accessory and can be accessed via FIBARO for HomeKit app.
NOTE
i
The accessory measures temperature in
the place of installation. Remember that
temperature near the
ceiling may dier from
that on eye-level or
the oor..
Temperature measuring:
The CO Sensor measures ambient temperature every 30 seconds.
If the measured temperature diers from previously reported
by at least 0.5°C (0.9°F), accessory reports it to your iOS device.
Last 2500 measurements are stored in non-volatile memory of the accessory and can be accessed via FIBARO for HomeKit app.
Tamper detection:
The CO Sensor detects tampering when accessory is removed from
its base and reports it to your iOS device. Tampering is indicated with
one white blink and beep.
Battery level measuring:
The CO Sensor measures battery level every 6 hours and reports it to
your iOS device. Additionally, if battery level is below 15%, the accessory will report low level battery status to your iOS device and indicate it with one yellow blink and beep.
FUNCTIONALITY
Page 9

#7: Visual indications & acoustic
signals
Indications and signals:
The CO Sensor is equipped with a LED diode and a buzzer, signalling
menu position and status of the accessory.
Accessory status indications:
9
What
you hear
4 x BEEP
every 5s
1 x BEEP
1 x BEEP
every 30s
2 x BEEP
1 x BEEP 1 x WHITE BLINK Tamper alarm Check the housing
–
1 x BEEP
What you see What it means What to do
1. Open the windows
2. Move to fresh air!
3. Contact emergency
services
Reset the accessory,
replace if no eect
Reset the accessory,
replace if no eect
–
–
4 x RED BLINK
every 5s
1 x YELLOW BLINK
every 30s
– Sensor error
1 x CYAN BLINK
every 30s
1 x GREEN BLINK
after button press
1 x GREEN BLINK
after powering
Detected presence of carbon
monoxide which
can kill you!
Low battery level Replace the battery
End of lifespan
Accessory
powered
Paired with
HomeKit
NOTE
i
Replace the accessory before date on the
front or if sensor error
is detected.
1 x BEEP
– CYAN BLINKING Firmware update Wait for completion
1 x RED BLINK
after powering
Not paired with
HomeKit
–
VISUAL INDICATIONS & ACOUSTIC SIGNALS
Page 10

10
#8: Battery
CAUTION
!
Using batteries other
than specied may
result in explosion.
Dispose of properly,
observing environmental protection
rules.
CAUTION
!
Use only type of battery specied in this
manual and keep
proper polarity!
FIBARO CO Sensor can be powered with CR123A (included) battery.
Estimated battery life with accessory on default settings is 3 years
(tested with Panasonic Industrial Lithium).
Checking battery level:
The CO Sensor measures battery level every 6 hours and reports it to
your iOS device. Additionally, if battery level is below 15%, the accessory will report low level battery status to your iOS device and indicate it with one yellow blink and a short beep.
Replacing the battery:
1. Remove the accessory from the cover by turning it counterclockwise.
2. Pull the paper strip to take out the battery.
3. Press and hold the button for at least one second.
4. Insert a new CR123A battery observing the polarities shown
inside.
5. Attach the accessory to its cover by turning it clockwise and
perform the test (as decribed in #5: Operating the device).
BATTERY
Page 11

#9: Specications
11
Power supply:
Battery life:
Lifespan under typical
conditions:
CO concentration
measurement range:
Measuring accuracy:
Alarm response times:
Alarm siren sound level:
Operating temperature:
Operating humidity:
Conformity with EU
requirements:
Radio protocol:
Radio frequency:
Range:
Dimensions (d x h):
CR123A 3.0V battery (included)
3 years on default settings
(tested with Panasonic Industrial Lithium)
8 years
0 - 450 ppm
±10ppm / ±5%
50ppm 60-90min
100ppm 10-40min
300ppm <1.5min
85 dBA at 3 meters (10 feet)
0 - 50°C (32-122°F)
10-95%RH without condensation
RED 2014/53/EU
RoHS 2011/65/EU
EN 50291-1:2010
Bluetooth® low energy
2.4 GHz
up to 50m (free range)
(164 feet)
65 x 28 mm (2.56 x 1.1 inches)
CAUTION
!
Using batteries other
than specied may
result in explosion.
Dispose of properly,
observing environmental protection
rules.
NOTE
i
Replace the accessory before date on the
front or if sensor error
is detected.
SPECIFICATIONS
Page 12

12
#10: Regulations
Legal Notices
All information, including, but not limited to, information regarding the
features, functionality, and/or other product specication are subject
to change without notice. Fibaro reserves all rights to revise or update
its products, software, or documentation without any obligation to notify any individual or entity.
FIBARO and Fibar Group logo are trademarks of Fibar Group S.A.
Apple, iPhone, iPad, iPad Air, and iPod touch are trademarks of Apple
Inc., registered in the U.S. and other countries. HomeKit is a trademark
of Apple Inc.
Wi-Fi is a registered trademark of Wi-Fi Alliance.
The Bluetooth word mark is registered trademark of Bluetooth SIG, Inc.
All other brands and product names referred to herein are trademarks
of their respective holders.
Use of the Works with Apple HomeKit logo means that an electronic
accessory has been designed to connect specically to iPod touch,
iPhone, or iPad, respectively, and has been certied by the developer
to meet Apple performance standards. Apple is not responsible for the
operation of this device or its compliance with safety and regulatory
standards.
Information according REACH
The included Panasonic CR123A battery contains 1,2-Dimethoxyethane substance. Normal use of the device does not expose the user to
a given substance.
Declaration of conformity
Hereby, Fibar Group S.A. declares that FIBARO CO Sensor is in compliance with the essential requirements and other relevant provisions of
Directive 2014/53/EU.
WEEE Directive Compliance
Device labelled with this symbol should not be disposed with other
household wastes. It shall be handed over to the applicable collection
point for the recycling of waste electrical and electronic equipment.
REGULATIONS
 Loading...