

Fiamma Vent F Pro Installation And Usage Instructions
fi amma.com
fi amma.com
DACHHAUBE
ROOFLIGHT
LANTERNEAU
CLARABOYA
OBLÓ
Vent F Pro
Montage- und
DE
Gebrauchsanleitung
Installation and
EN
usage instructions
Instructions de montage et
FR
mode d’emploi
Instruciones de montaje y uso
ES
Istruzioni di montaggio e d’uso
IT
Quality Motorhome ProductsCOMFORT
fiamma.com
Quality Motorhome Products
COMFORT
Vent F Pro
fiamma.com
DACHHAUBE
DE
Montage- und
Gebrauchsanleitung
ROOFLIGHT
EN
Installation and
usage instructions
LANTERNEAU
FR
Instructions de montage et
mode d’emploi
CLARABOYA
ES
Instruciones de montaje y uso
OBLÓ
IT
Istruzioni di montaggio e d’uso
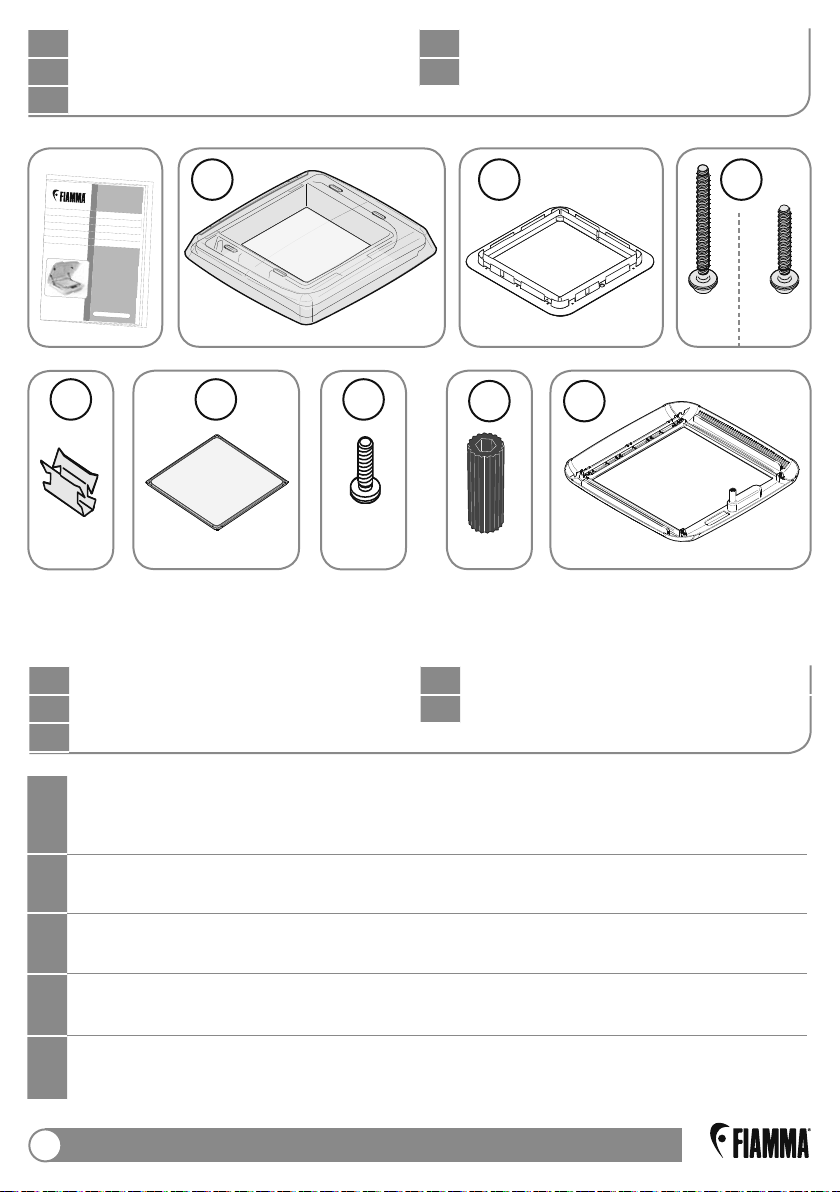
Verpackungsinhalt
DE
FR
Contenu de l’emballage
IT
Contenuto dell’imballo
Package contents
EN
ES
Contenido del embalaje
A B C
1x
6x
Kontrolle bei der Übernahme
DE
FR
Contrôle à la réception
IT
Controllo al ricevimento
Bitte kontrollieren Sie, dass alle Einzelteile einwandfrei sind und nicht während dem
DE
Transport beschädigt wurden. Wenden Sie sich in diesem Falle an Ihren Händler.
Check that nothing has been damaged or deformed during transport.
EN
In case of damage please contact the dealer.
1x 1x 11x
FED
HG
1x4x1x 1x
Goods receipt inspection
EN
ES
Control al recibimiento
35X45
35
X30
11x
Contrôler qu’aucune pièce ne soit cassée ou déformée suite au transport.
FR
En cas contraire, contacter le revendeur.
Controlar que ningún detalle se haya roto o deformado durante el transporte.
ES
En este caso contactar al revendedor.
Controllare che nessun particolare sia rotto o deformato a causa di errori di
IT
trasporto. In questo caso contattare il rivenditore.
2
COMFORT
Montageanleitung
DE
FR
Instructions de montage
IT
Istruzioni di montaggio
Installation instructions
EN
ES
Instrucciones de montaje
COMFORT
35X30
35X45
A
B
D
C
E
F
G
H
3
Gebrauchsanweisungen und Ratschläge
DE
FR
Instructions et conseils
IT
Avvertenze e suggerimenti
Um das Produkt optimal nutzen zu können, lesen Sie bitte die Bedienungsanleitung
DE
aufmerksam durch und bewahren Sie sie zur späteren Verwendung auf.
To use the product in the best way, read the user’s instructions carefully and
EN
keep them to hand for future consultation.
Pour tirer le meilleur parti de votre produit, nous vous invitons à lire attentivement les
FR
notices d’emploi et à les conserver pour toute consultation
Para usar el producto en lo mejor de los modos, os invitamos a leer
ES
atentamente las instrucciones de uso, guardándolas en caso de necesidad.
Per utilizzare al meglio il prodotto, vi invitiamo a leggere attentamente
IT
le istruzioni d’uso e a conservarle in caso di necessità.
Maintenance instructions
EN
ES
Recomendaciones
ultérieure.
Technische Daten
DE
FR
Données techniques
IT
Dati Tecnici
Technical specifi cations
EN
ES
Datos tecnicos
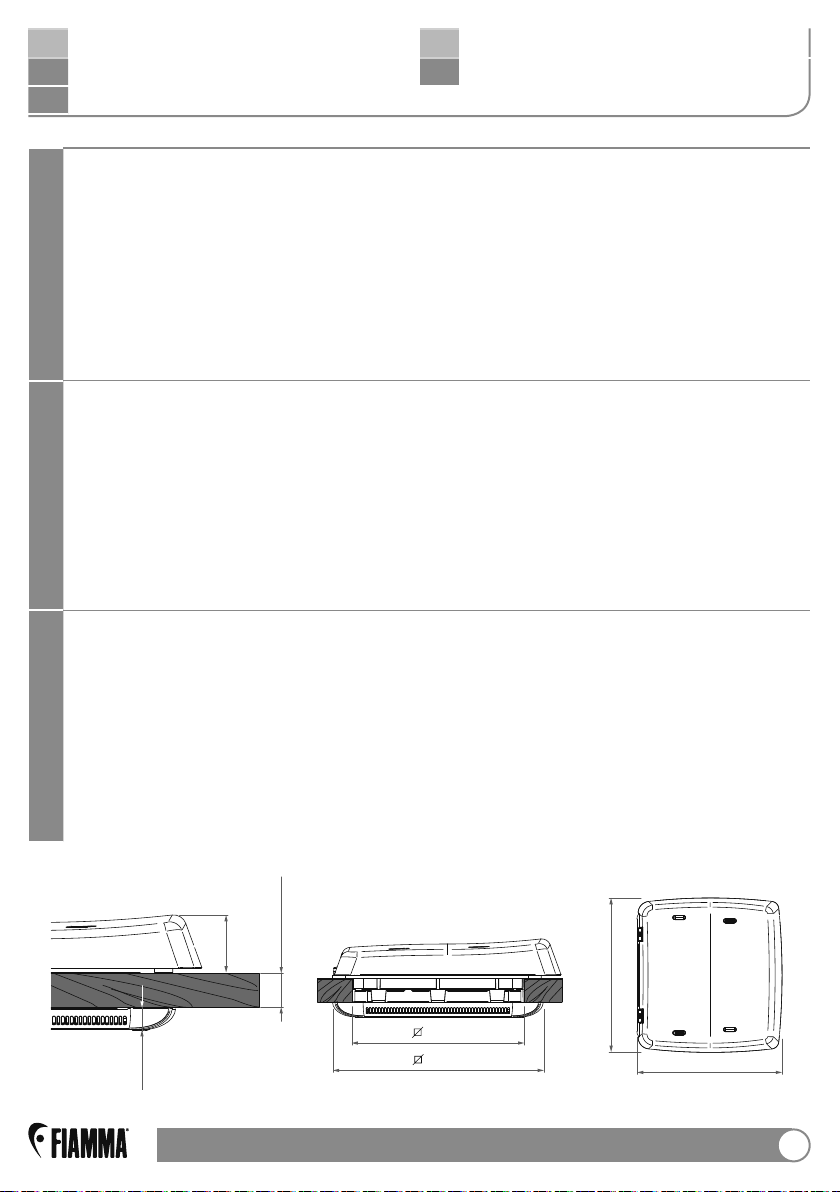
Montagebohrung mm 400x400 mm
Aussenmaße mm 566 x 531 x h92 mm
Innenmaße mm 490 x 486 x h35 mm
Innenlicht 344 x 344 mm
DE
Dachstärke (min. – max.) mm 28 – 55 mm
Dauerbelüftung 100 cm²
Nettogewicht kg 4,7
Zulassung ECE R43
Farbe der Komponenten Innen RAL 9001 – Abdeckung Crystal
Roof hole dimensions 400x400 mm
Outside dimensions 566 x 531 x h92 mm
Internal dimensions 490 x 486 x h35 mm
Inside light 344 x 344 mm
Roof thickness (min. – max.) mm. 28 – 55 mm
EN
Permanent air fl ow 100 cm²
Net weight kg. 4,7 kg
Certifi cate ECE R43
Components’ colour Inner frame: RAL 9001 – Cover: Crystal
4
COMFORT
Technische Daten
DE
FR
Données techniques
IT
Dati Tecnici
Technical specifi cations
EN
ES
Datos tecnicos
Dimensions de perçage en mm. 400 x 400 mm.
Encombrement externe en mm. 566 x 531 x h92 mm.
Encombrement interne en mm. 490 x 486 x h35 mm.
Lumière interne 344 x 344 mm.
Épaisseur de toit (min. – max.) en mm. 28 – 55 mm.
FR
Ventilation permanente 100 cm²
Poids net en kg. 4,7
Homologation ECE R43
Couleur des éléments RAL 9001 pour l’intérieur – Crystal pour le capot
Medidas 400x400 mm.
Medidas externas 566 x 531 x h92 mm.
Medidas internas 490 x 486 x h35 mm.
Luz interna 344 x 344 mm.
ES
Grosor techo (min. – max.) 28 – 55 mm.
Ventilación permanente 100 cm²
Peso neto kg. 4,7
Homologación ECE R43
Colores componentes RAL 9001 interno – Cobertura cristal
Foratura d’installazione mm. 400x400 mm.
Dimensioni di ingombro esterne mm. 566 x 531 x h92 mm.
Dimensioni di ingombro interne mm. 490 x 486 x h35 mm.
Luce interna 344 x 344 mm.
IT
Spessore tetto (min. – max.) mm. 28 – 55 mm.
Aereazione permanente 100 cm²
Peso netto kg. 4,7
Omologazione ECE R43
Colore componenti RAL 9001 interno - Cristallo copertura
min 2,8 cm
9 cm
max 5,5 cm
57 cm
40 cm
49 cm
3,5 cm
COMFORT
53 cm
5
Montageanleitung
DE
FR
Instructions de montage
IT
Istruzioni di montaggio
Installation instructions
EN
ES
Instrucciones de montaje
Sicherheits- und Montagehinweise:
• Es ist verboten auf der Aussenhaube zu gehen.
• Vor dem Starten des Fahrzeuges die korrekte Schliessung der Dachhaube
kontrollieren.
• Regelmässig kontrollieren, dass die Abdeckung keine Risse aufweist.
• Nicht die Dachhaube während der Fahrt öffnen.
• Die Dachhaube nicht bei starkem Wind oder Regen öffnen.
• Ansammlung von Schnee oder Eis auf der Aussenhaube vermeiden.
• Die zugelassene, maximale Geschindigkeit bei angebrachter Dachhaube ist 130 km/h.
• Vor der Montage überprüfen, dass die Dachstärke mit dem Produkt kompatibel ist.
• Beachten Sie bei der Wahl des Montagepunktes der Dachhaube, dass:
- das Produkt sich nicht mit anliegendem Zubehör überschneidet (Dachreling, Kabel,
Dachverstärkungen, Innenschränke).
- die Innen- und Aussenfl äche des Daches eben sind.
• Vorrüsten der elektrischen 12 V Verbindung falls die Montage eines Ventilatorkits
vorgesehen ist.
6
COMFORT
Montageanleitung
DE
FR
Instructions de montage
IT
Istruzioni di montaggio
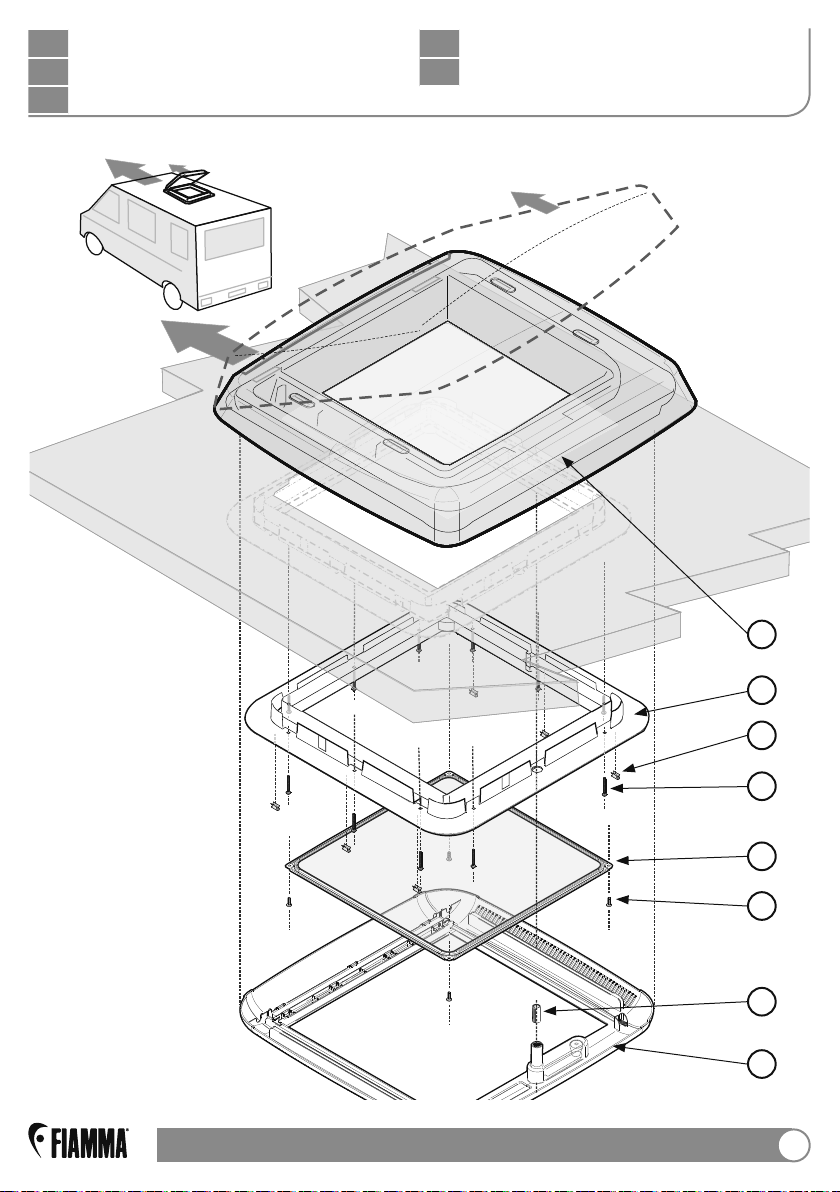
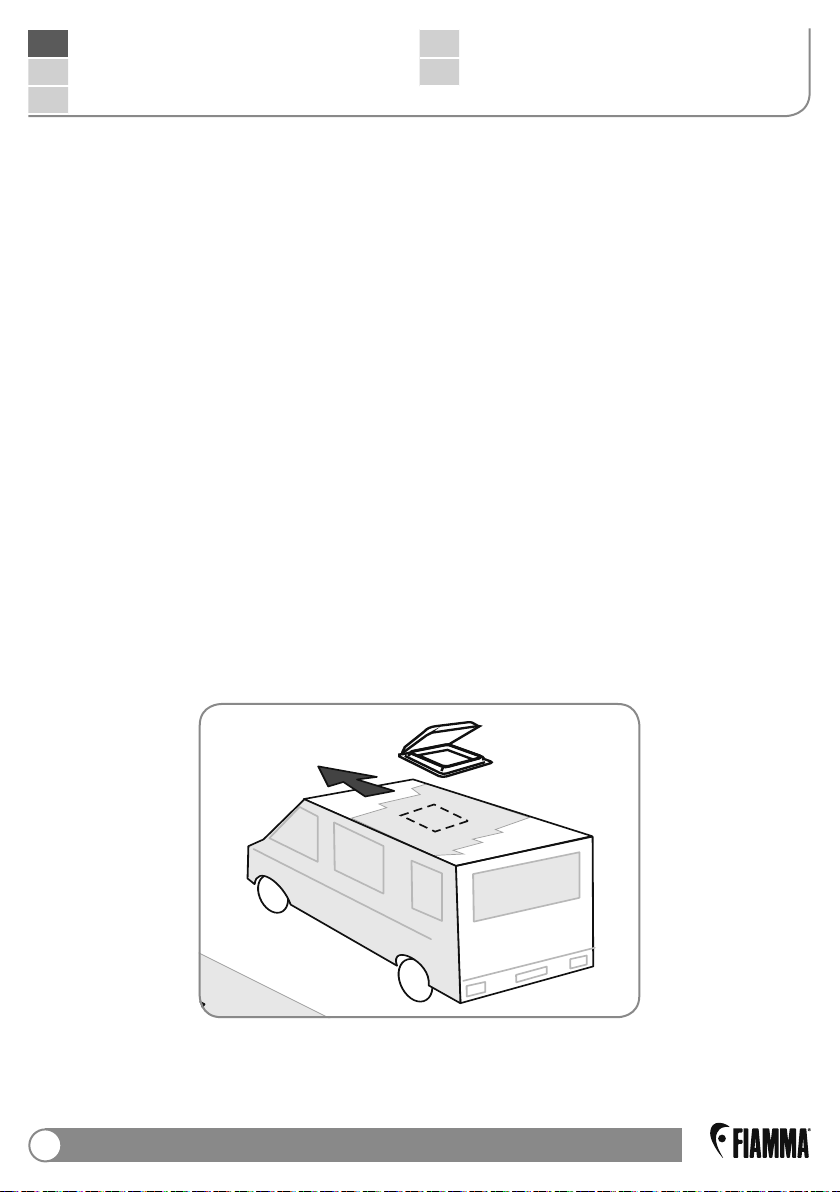
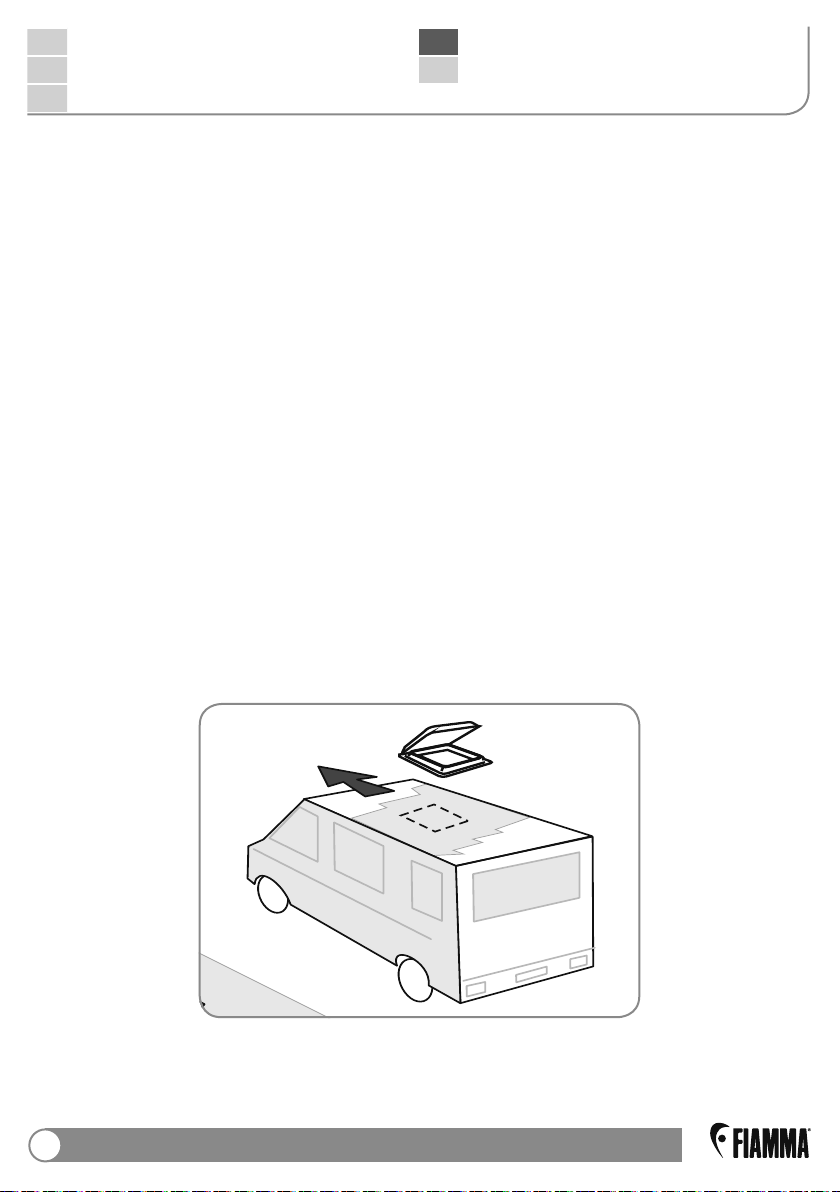
Nachdem festgelegt wurde wo die Dachhaube angebracht werden soll, einen
1
Ausschnitt am Dach vornehmen.
Die Dachoberfl äche reinigen um die vom Hersteller empfohlene Dichtungsmasse
anbringen zu können.
Die Dichtungsmasse (SikaLastomer710) am Aussenrahmen auf der dafür
2
vorgesehenen Schiene anbringen.
Das Aussenteil der Dachhaube in den Ausschnitt einsetzen und darauf achten,
3
dass die Scharnieren in die Fahrtrichtung positioniert sind. Falls erforderlich den
Aussenrahmen leicht auf das Dach aufdrücken damit die Dichtungsmasse
gleichmässig verteilt wird.
Den Innenrahmen montieren und mit die Dachhaube mit den 11 im Montagesatz
4
enthaltenen Schrauben befestigen:
- Schraube Ø3,5x30 bei Dachstärken von 28 mm bis 44 mm.
- Schraube Ø3,5x45 bei Dachstärken von 44 mm bis 55 mm.
Beachten Sie den empfohlenen Anzugsmoment max 1,5 Nm.
Installation instructions
EN
ES
Instrucciones de montaje
Das Moskitonetz in den dafür vorgesehenen Sitz mit den 4 im Montagesatz
5
enthaltenen Schrauben M4x12 anbringen.
Fügen Sie die 6 Einhängefedern in den im Innenrahmen entsprechend vorgesehenen
6
Sitz ein.
Fügen Sie den Stift in die Antriebswelle der Öffnungsvorrichtung.
7
Montieren Sie den Rahmen des Rollo und führen dabei Druck auf den Innenrahmen
8
und den dafür vorgesehenen Einhakfedern aus. Vergewissern Sie sich, dass bei
diesem Vorgang die Dachhaubenabdeckung einwandfrei verschlossen und in der
Sicherheitsposition sowie die Kurbel in dem dafür vorgesehen Sitz ist.
Den Plastikschutz von der Abdeckung entfernen. Hierzu möglichst das Produkt
den Sonnenstrahlen nicht allzu lange aussetzen, da sich dieser Vorgang sonst als
schwierig erweisen könnte.
Überprüfen Sie die korrekte Funktion des Produktes.
COMFORT
7
Montageanleitung
DE
FR
Instructions de montage
IT
Istruzioni di montaggio
Installation instructions
EN
ES
Instrucciones de montaje
Safety and installation instructions:
• It is forbidden to walk on the cover of the product.
• Before starting your journey, check that the roofl ight is locked properly.
• Check periodically the roofl ight for damage (such as tension cracks).
• Do not open the roofl ight while driving.
• Do not open the roofl ight in strong wind or rain.
• Keep the roofl ight free of snow and ice.
• The maximum permissible speed with roofl ight mounted is 130km/h.
• Before installation, check that the roof thickness of your vehicle is compatible with
the product.
• When choosing the installation location, observe the following:
- The product should not interfere with adjoining components (roof rack, cables,
reinforcing roof parts, cabinets in the vehicle interior).
- Only fi t the roofl ight on fl at interior and exterior roof areas.
• Carry out the electrical connection 12 Vcc where it is planned the installation of a force
ventilation kit.
8
COMFORT
Montageanleitung
DE
FR
Instructions de montage
IT
Istruzioni di montaggio
Once the roofl ight installation location has been chosen, make a hole on the roof.
1
Clean the roof mounting area, which will be in contact with the seal according to the
manufacturer.
Seal the outer frame with a sealing compound (SikaLastomer710) following the proper
2
rail.
Place the upper frame in the opening hole making sure that the hinges are facing
3
towards the front of the vehicle. If necessary, press the outer frame on the roof slightly
so that the packing compound spreads out uniformly.
Place the inner frame and proceed with the installation of the roofl ight using the 11
4
supplied screws:
- Screw Ø3,5x30 mm to use for roof thickness between 28 - 44 mm.
- Screw Ø3,5x45 mm to use for roof thickness between 44 - 55mm.
Observe the recommended tightening torque Max 1.5Nm.
Install the mosquito screen in the dedicated seat with the 4 supplied screws M4x12.
Installation instructions
EN
ES
Instrucciones de montaje
5
Insert the 6 supplied pick springs in the inner frame, paying attention to place them in
6
the proper seat.
Insert the hand wheel joint on the drive shaft of the opening mechanism.
7
Mount the roller blind frame pressing on the inner frame and fi x the proper pick
8
springs, during this operation make sure that the cover of the roofl ight is perfectly
closed and in the safety position and that the hand wheel is in its seat.
Remove the protective fi lm from the cover. Do not expose the product to UV rays for
too long because it can make this operation diffi cult.
Check the product works properly.
COMFORT
9

Montageanleitung
DE
FR
Instructions de montage
IT
Istruzioni di montaggio
Installation instructions
EN
ES
Instrucciones de montaje
Consignes de sécurité et installation :
• Ne pas marcher sur le capot.
• Avant tout démarrage du véhicule, vérifi er que le lanterneau est bien fermé.
• Contrôler périodiquement que le capot ne présente aucune fi ssure.
• Ne pas rouler avec le lanterneau ouvert.
• Ne pas ouvrir le lanterneau en cas de vent fort ou de pluie.
• Déblayer la neige et retirer les blocs de glace du lanterneau.
• Après la pause d’un lanterneau la vitesse maximale autorisée est de 130 km/h.
• Avant d’installer le lanterneau vérifi er que l’épaisseur de toit est suffi sante.
• Concernant le choix du lieu de pose du lanterneau, vérifi er que :
- le lanterneau ne sera pas gêné par la présence d’autres accessoires à proximité
(galeries de toit, câbles, renforts de toit, armoires à l’intérieur de la cellule).
- la surface interne et externe du toit est effectivement plate.
• Prédisposer le branchement électrique à 12 Vcc si l’installation d’un kit d’aération
devait être envisagée.
10
COMFORT
 Loading...