

Fiamma VENT 28, TURBO 28 Installation And Usage Instructions
fiamma.com
DACHHAUBE
ROOFLIGHT
LANTERNEAU
CLARABOYA
VENT 28
OBLÒ
Montage- und
DE
Gebrauchsanleitung
Installation and
EN
usage instructions
Instructions de montage et
FR
mode d’emploi
Instruciones de montaje y uso
ES
Istruzioni di montaggio e d’uso
IT
TURBO 28
10R-050518
E
24
COMFORT
Montageanleitung für
fi amma.com
VENT 28
TURBO 28
COMFORT
DACHHAUBE
DE
Montage- und
Gebrauchsanleitung
ROOFLIGHT
EN
Installation and
usage instructions
LANTERNEAU
FR
Instructions de montage et
mode d’emploi
CLARABOYA
ES
Instruciones de montaje y uso
OBLÒ
IT
Istruzioni di montaggio e d’uso
DE
FR
Instructions de produit pour
IT
Istruzioni prodotto per
Code Description
04918-01- Vent 28 White
04918-01B Vent 28 Crystal
04919-01- Turbo 28 White
Product instructions for
EN
ES
Instructiones producto para
04919-01B
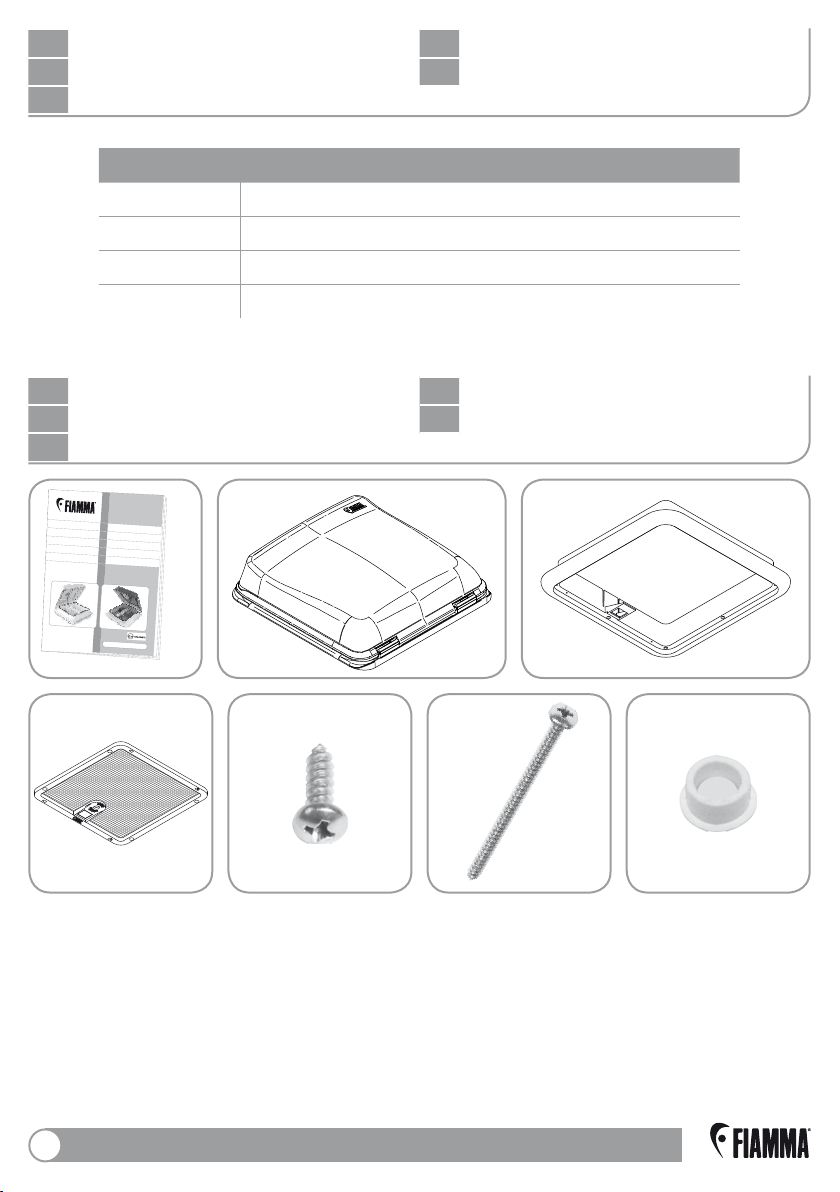
Verpackungsinhalt
DE
FR
Contenu de l’emballage
IT
Contenuto dell’imballo
1x
1x 4x 8x 5x
Turbo 28 Crystal
Package contents
EN
ES
Contenido del embalaje
1x 1x
2
COMFORT
Kontrolle bei der Übernahme
DE
FR
Contrôle à la réception
IT
Controllo al ricevimento
Bitte kontrollieren Sie, dass alle Einzelteile einwandfrei sind und nicht während dem
DE
Transport beschädigt wurden. Wenden Sie sich in diesem Falle an Ihren Händler.
Check that nothing has been damaged or deformed during transport.
EN
In case of damage please contact the dealer.
Contrôler qu’aucune pièce ne soit cassée ou déformée suite au transport.
FR
En cas contraire, contacter le revendeur.
Controlar que ningún detalle se haya roto o deformado durante el transporte.
ES
En este caso contactar al revendedor.
Controllare che nessun particolare sia rotto o deformato a causa di errori di
IT
trasporto. In questo caso contattare il rivenditore.
Gebrauchsanweisungen und Ratschläge
DE
FR
Instructions et conseils
IT
Avvertenze e suggerimenti
Um das Produkt optimal nutzen zu können, lesen Sie bitte die Bedienungsanleitung
DE
aufmerksam durch und bewahren Sie sie zur späteren Verwendung auf.
To use the product in the best way, read the user’s instructions carefully and
EN
keep them to hand for future consultation.
Goods receipt inspection
EN
ES
Control al recibimiento
Maintenance instructions
EN
ES
Recomendaciones
Pour tirer le meilleur parti de votre produit, nous vous invitons à lire attentivement les
FR
notices d’emploi et à les conserver pour toute consultation
Para usar el producto en lo mejor de los modos, os invitamos a leer
ES
atentamente las instrucciones de uso, guardándolas en caso de necesidad.
Per utilizzare al meglio il prodotto, vi invitiamo a leggere attentamente
IT
le istruzioni d’uso e a conservarle in caso di necessità.
ultérieure.
COMFORT
3
Technische Daten
DE
FR
Données techniques
IT
Dati Tecnici
Technical specifications
EN
ES
Datos tecnicos
- Eingangsspannung 12 Vcc
DE
- Aufgenommene Leistung 25 W
- Empfohlener Kabel Ø1,5 mm
- Input voltage 12 Vdc
EN
- Absorbed power 25 W
- Suggested cable Ø1,5 mm
- Tension d’alimentation 12 Vdc
FR
- Puissance absorbée 25 W
- Câble conseillé Ø1,5 mm
- Tensión de entrada 12 Vcc
ES
- Potencia absorbida 25 W
- Cavo aconsejado Ø1,5 mm
- Tensione d’ingresso 12Vcc
IT
- Potenza assorbita 25 W
- Cavo consigliato Ø1,5 mm
- Max. Stromaufnahme 1,9 A
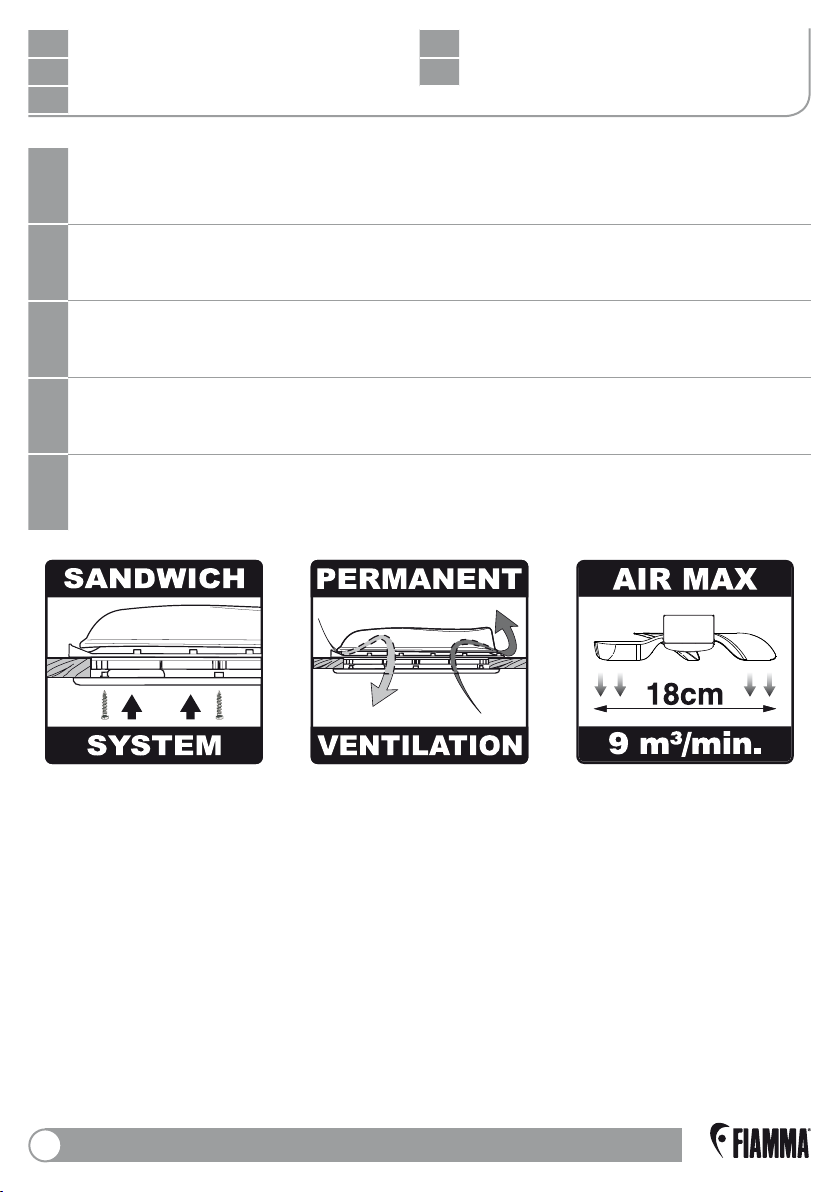
- Luftförderung max 9 m³/min .
- Dauerlüftungsquerschnitt 53 cm² vc
- Max. input current 1,9 A
- Max flow rate 9 m³/min
- Permanent ventilation 53 cm²
- Absorption max. 1,9 A
- Volume d’air ventilé max 9 m³/min.
- Aération permanente 53 cm²
- Absorbencia máx. 1,9 A
- Alcance máx. 9 m³/min.
- Ventilacíon permanente 53 cm²
- Assorbimento max. 1,9 A
- Portata max 9 m³/min.
- Aerazione permanente 53 cm²
4
COMFORT

Montageanleitung
DE
FR
Instructions de montage
IT
Istruzioni di montaggio
Installation instructions
EN
ES
Instrucciones de montaje
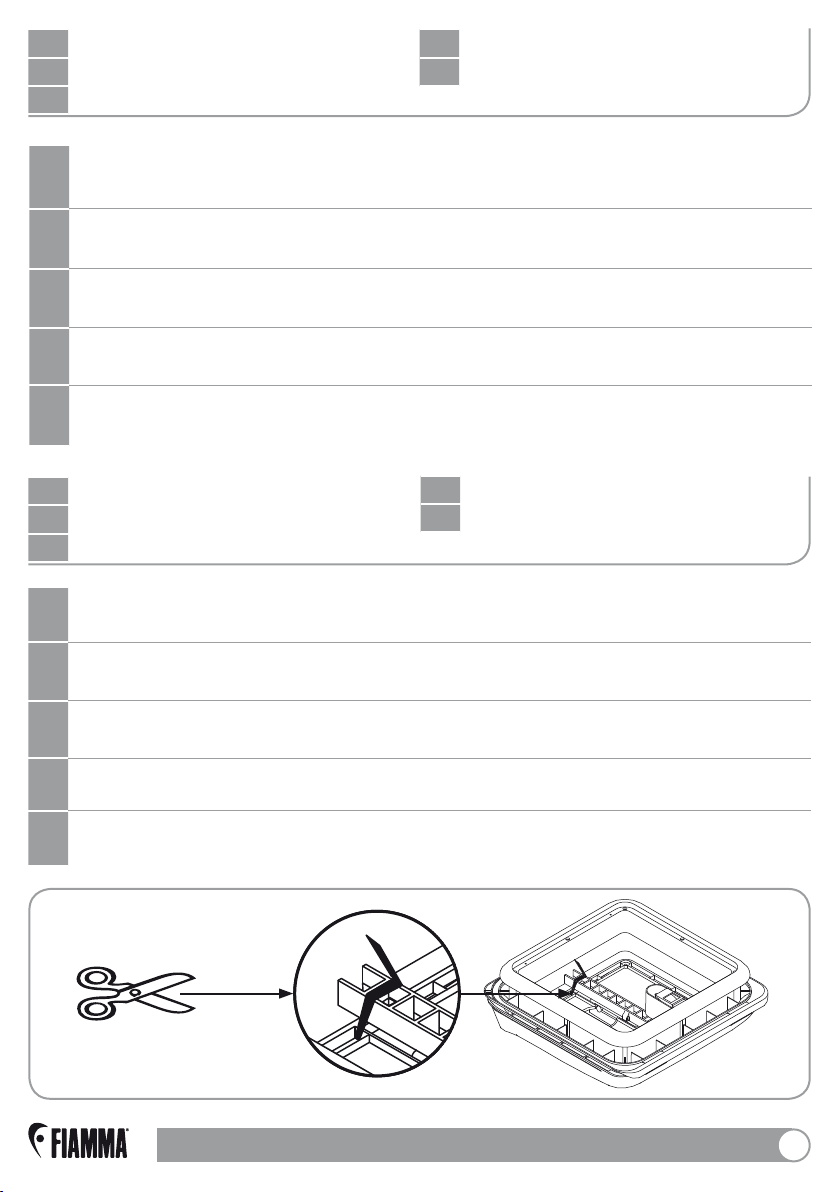
DE
1) Eine quadratische Öffnung mit einer Seitenlänge von 28 cm an die für die Dachhaube
vorgesehene Stelle schneiden. Die Dachhaube kann an Dächern mit einer Stärke von
25mm bis 50mm angebracht werden.
2) *Turbo 28: Bitte achten Sie darauf, die elektrische Verbindung vorzubereiten
(nur 12 Vcc - NICHT 22V). Abbildung 9.
3) Die vorhandene Fuge, die sich auf der Unterseite des oberen Rahmens befindet, mit
der Dichtmaße, min.10mm lang (halten Sie sich hierzu an die vorhergesehene Schiene),
füllen. Empfohlene Dichtmasse: SIKALASTOMER-710/THEROSTAT II. Abbildung 3.
4) Den äußeren Rahmen mit der Öffnung verbinden und sich vergewissern, dass
die Scharniere in Fahrtrichtung zeigen. Abbildung 4.
5) *Turbo 28: Vor der Verbindung der Stromkabel den Wechselschalter auf “0”
setzen (Abbildung 9).
6) *Turbo 28: Zuerst die Motorkabel mit dem Wechselschalter und dann die 12Vcc
Stromversorgungskabel wie in Abbildung 9 beschrieben, verbinden.
7) Den inneren Rahmen mit den 8 mitgelieferten Schrauben (ø3,5X60mm)
anbringen, die Schrauben entsprechend so anziehen, dass der Rahmen am Dach
anliegt und gleichzeitig darauf achten, dass er durch das Anziehen der Schrauben
jedoch nicht verzogen wird. (Abbildung 6/10).
8) Wie in Abbildung 7/11, den Moskitonetzrahmen mit 4 Schrauben und
4 Schraubdeckeln befestigen.
EN
1) Decide where the vent should be installed and make a square hole of 28cm.
The vent can be installed on roofs with depths between 25 to 50mm.
2) *Turbo 28: remember to prepare the electric connection
(only 12 Vdc - NOT 220 V) Fig. 9.
3) Seal the lower part of the external frame with a minimum width of 10mm by
following the appropriate track.
Recommended sealant: SIKALASTOMER-710/THEROSTAT II. Fig. 3.
4) Place the upper rooflight frame in the opening hole making sure that the hinges
are facing towards the front of the vehicle. Fig. 4.
5) *Turbo 28: position the switch to “0” before connecting the power supply wires. Fig. 9
6) *Turbo 28: connect the motor wires to the reversing switch, then connect the 12 Vdc
power supply wires as illustrated in the diagram. Fig. 9
7) Fasten the internal frame with the 8 supplied screws (ø3,5x60mm) tighten
screws to get the frame sticking to the roof paying attention that it does not show
any deformation. Fig. 6/10.
8) Install the mosquito screen frame with the 4 screws and the caps ( all included) Fig. 7/11.
COMFORT
5
 Loading...