

FGM TC 155 GTI, TC 160 V-2, TC 180 V-2 Operator's Manual


TABLE OF CONTENTS
INTERNATIONAL SYMBOLS 1
SAFETY RULES 2
ASSEMBLY 4
OPERATION 9
MAINTENANCE 16
ADJUSTMENTS 21
WIRING ` 27
TROUBLESHOOTING GUIDE 29
STORAGE 31
TECHNICAL SPECIFICATIONS 32
Read this manual carefully so that you will know how to assemble, use and maintain this unit, Fill in and mail
the registration card provided with the unit. For service other than described in this manual, contact an
authorized service dealer. He will provide you with parts and service.
NOTE: This lawn tractor is equipped with a combustion engine, which should not be used near any land covered
with grass or brush, unless the engine's exhaust system is equipped with a spark arrester meeting local laws.
The operator should maintain the spark arrester in effective working order.
INTERNATIONAL SYMBOLS
These symbols appear on your unit and in the supplied documentation.
You should learn and understand their meaning.
1

SAFETY RULES
BE POINTED OUT
YOUR SAFETY IS INVOLVED
THESE INSTRUCTIONS ARE FOR YOUR PROTECTION. YOU SHOULD READ THEM CAREFULLY
WARNING: THIS LAWN TRACTOR IS ABLE TO CUT HANDS, FEET AND THROW OBJECTS. IF YOU DO
NOT FOLLOW THE SAFETY INSTRUCTIONS, YOU COULD EXPERIENCE SERIOUS INJURIES.
1. GENERAL OPERATION: 2. SLOPE OPERATION:
*
KNOW CONTROLS AND HOW TO STOP QUICKLY. SLOPES ARE A MAJOR FACTOR RELATED TO LOSS OF CONTROL
* READ, UNDERSTAND AND FOLLOW ALL INSTRUCTIONS AND TIP OVER ACCIDENTS, WHICH CAN RESULT IN SEVERE
IN THE AND ON THE MACHINE BEFORE STARTING. INJURY OR DEATH. ALL SLOPES REQUIRE EXTRA CAUTION.
* ONLY ALLOW RESPONSIBLE ADULTS, WHO ARE FAMILIAR IF YOU CAN NOT BACK UP THE SLOPE OR IF YOU FEEL UNEASY
WITH INSTRUCTIONS TO OPERATE THE MACHINE. ON IT, DO NOT MOW IT.
* WEAR SAFETY GLASSES OR EYE SHIELDS WHEN DO !
ASSEMBLING OR OPERATING THE MACHINE * MOW UP AND DOWN, NOT ACROSS
* DO NOT OPERATE MACHINE WHEN BAREFOOT. ALWAYS * REMOVE OBSTACLES SUCH AS ROCKS, TREE LIMBS, ETC.
WEAR SUBSTANTIAL FOOTWEAR, PREFERABLY STEEL TOED SHOES.
* DO NOT WEAR LOOSE FITTING CLOTHING THAT COULD OVERTURN THE MACHINE. TALL GRASS CAN HIDE OBSTACLES.
GET CAUGHT IN MOVING PARTS.
* CLEAR THE AREA SUCH AS ROCKS, TOYS, WIRES, ETC., TO STOP OR SHIFT WHILE ON SLOPE.
WHICH COULD BE PICKED UP AND THROWN BY BLADES.
* BE SURE THE AREA IS CLEAR OF PEOPLE WHEN MOWING. WEIGHTS OR COUNTERWEIGHTS TO IMPROVE STABILITY.
* STOP MACHINE IF ANYONE ENTERS THE AREA. * USE EXTRA CARE WITH GRASS COLLECTOR OR OTHER ATTACHMENTS.
* NEVER CARRY PASSENGERS. THIS CAN CHANGE THE STABILITY OF THE MACHINE.
* DO NOT MOW IN REVERSE UNLESS NECESSARY. * KEEP ALL MOVEMENTS ON THE SLOPE SLOW AND GRADUAL.
* ALWAYS LOOK DOWN AND BEHIND BEFORE AND * DO NOT MAKE SUDDEN CHANGES IN DIRECTION OR SPEED.
DURING BACKING UP.
* BE AWARE OF MOWER DISCHARGE AND DO NOT POINT TURN OFF THE BLADES AND PROCEED SLOWLY DOWN THE SLOPE.
IT AT ANYONE.
* DO NOT OPERATE MOWER WITHOUT THE ENTIRE GRASS DO NOT !
COLLECTOR. * DO NOT TURN ON SLOPES UNLESS NECESSARY, AND THEN
* SLOW DOWN BEFORE TURNING. SLOWLY AND GRADUALLY DOWNHILL, IF POSSIBLE.
* NEVER LEAVE A RUNNING MACHINE UNATTENDED * DO NOT MOW NEAR DROP-OFF DITCHES OR EMBANKMENTS
ALWAYS TURN OFF BLADES, SET PARKING, STOP ENGINE
* AND REMOVE KEYS BEFORE DISMOUNTING. OVER THE EDGE OF A CLIFF OR DITCH, OR IF AN EDGE
* TURN OFF BLADES WHEN NOT MOWING. CAVES IN.
* STOP ENGINE BEFORE REMOVING GRASS COLLECTOR. * DO NOT MOW ON WET GRASS. REDUCED TRACTION COULD
* MOW ONLY IN DAYLIGHT OR GOOD ARTIFICIAL LIGHT. CAUSE SLIDING.
* DO NOT OPERATE THE MACHINE WHILE UNDER THE * DO NOT TRY TO STABILIZE THE MACHINE BY PUTTING YOUR
INFLUENCE OF ALCOHOL OR DRUGS. FOOT ON THE GROUND.
* WATCH FOR TRAFFIC WHEN OPERATING NEAR OR
WHILE CROSSING ROADWAYS.
* USE CARE WHEN MOVING AROUND A FIXED OBJECT
TO PREVENT THE BLADES FROM STRIKING IT. NEVER
DELIBERATELY RUN OVER ANY FOREIGN OBJECT.
* USE EXTRA CARE WHEN LOADING OR UNLOADING
THE MACHINE INTO A TRAILER OR TRUCK.
* USE CARE WHEN PULLING LOADS OR USING HEAVY
EQUIPMENT.
a USE ONLY APPROVED DRAWBAR HITCH POINTS.
b LIMIT LOADS TO THOSE THAT YOU CAN SAFELY CONTROL
c DO NOT RUN SHARPLY. USE CARE WHEN BACKING.
d USE COUNTERWEIGHTS, WHEEL WIEIGHT WHEN SUGGESTED
IN ATTACHMNENTS INSTRUCTIONS.
* WATCH FOR HOLES, RUTS OR BUMPS. UNEVEN TERRIAN COULD
* USE SLOW SPEED. CHOOSE A LOW GEAR SO THAT YOU WILL NOT HAVE
* FOLLOW THE MANUFACTURER'S RECOMMENDATIONS FOR WHEEL
* AVOIC STARTING OR STOPPING ON A SLOPE. IF TIRES LOSE TRACTION
THE MOWER COULD SUDDENLY TURN OVER IF A WHEEL IS
THIS SYMBOL MEANS THAT IMPORTANT SAFETY PRECAUTIONS HAVE TO
.
.
2

SAFETY RULES
3. CHILDREN: 4. SERVICE:
TRAGIC ACCIDENTS CAN OCCUR IF THE OPERATOR IS NOT * USE EXTRA CARE IN HANDLING GASOLINE AND OTHER FUELS.
ALERT TO THE PRESENCE OF CHILDREN. CHILDREN ARE
OFTEN ATTRACTED TO THE MACHINE AND THE MOWING
ACTIVITY. NEVER ASSUME THAT CHILDREN WILL REMAIN
WHERE YOU LAST SAW THEM.
* KEEP CHILDREN OUT OF THE MOWING REA AND UNDER IS OPEN FLAME, SUCH AS IN A WATER HEATER.
WATCHFUL CARE OF ANOTHER RESPONSIBLE ADULT.
* BE ALERT AND TURN MACHINE OFF IF CHILDREN ENTER AREA. AS THE HEAT OF THE ENGINE AND SUN CAN CAUSE GASOLINE TO EXPAND
* BEFORE AND WHEN BACKING, LOOK DOWN AND BEHIND FOR CHILDREN. AND OVERFLOW THE TANK.
* NEVER CARRY CHILDREN. THEY MAY FALL OFF AND BE SERIOUSLY * USE EXTRA CARE WHEN HANDLING BATTERY ACID. ACID CONTACT WITH
INJURED OR INTERFERE WITH SAFE MACHINE OPERATION. SKIN MAY CAUSE SEVERE BURNS. EYE CONTACT MAY CAUSE BLINDNESS.
* NEVER ALLOW CHILDREN TO OPERATE THE MACHINE. * USE EXTRA CARE WHEN SERVICING THE BATTERY. EXPLOSIVE GAS IS
* USE EXTRA CARE WHEN APPROACHING BLIND CORNERS, SHRUBS, PRODUCED IN THE BATTERY. DO NOT SERVICE THE BATTERY WHILE
TREES OR OTHER OBJECTS THAT MAY OBSCURE VISION. SMOKING OR NEAR AN OPEN FLAME. THIS MAY CAUSE THE BATTERY
a USE ONLY AN APPROVED CONTAINER.
b NEVER REMOVE GAS CAP OR ADD FUEL WITH THE ENGINE RUNNING.
c NEVER REFUEL THE MACHINE INDOORS.
d NEVER STORE THE MACHINE OR FUEL CONTAINER INSIDE WHERE THERE
* CHECK FUEL SUPPLY BEFORE EACH USE ALLOWING SPACE FOR EXPANSION
TO EXPLODE CAUSING SERIOUS INJURY.
* NEVER RUN A MACHINE INSIDE A CLOSED AREA. EXHAUST FUMES CONTAIN
CARBON MONOXIDE, AND ODOURLESS AND DEADLY GAS.
* KEEP NUTS AND BOLTS, ESPECIALLY BLADE ATTACHMENT BOLTS, TIGHT
AND KEEP EQUIPMENT IN GOOD CONDITION.
* NEVER TAMPER WITH SAFETY DEVICES. CHECK OPERATION REGULARLY.
* DO NOT CHANGE THE ENGINE GOVERNOR SETTINGS OR OVERSPREAD
ENGINE.
* REDUCE FIRE HAZARDS. KEEP MACHINE FREE OF GRASS , LEAVES OR
OTHER DEBRIS BUILD-UP. CLEAN UP OIL OR FUEL SPILLAGE. ALLOW
MACHINE TO COOL BEFORE STORING.
* STOP AND INSPECT THE EQUIPMENT IF YOU STRIKE AN OBJECT. REPAIR IT,
IF NECESSARY, BEFORE RESTARTING.
* NEVER MAKE ADJUSTMENTS OR REPAIRS WITH THE ENGINE RUNNING.
* GRASS COLLECTOR COMPONENTS ARE SUBJECTS TO WEAR, DAMAGE AND
DETERIORATION, WHICH COULD EXPOSE MOVING PARTS OR ALLOW OBJECTS
TO BE THROWN. FREQUENTLY CHECK COMPONENTS AND REPLACE WITH
MANUFACTURER'S RECOMMENDED SPARE PARTS. WHEN NECESSARY.
* MOWER BLADES ARE SHARP AND CAN CUT. WRAP THE BLADES OR WEAR
GLOVES, AND USE EXTRA CAUTION WHEN SERVICING THEM.
* CHECK BRAKE OPERATING FREQUENTLY. ADJUST AND SERVICE AS NEEDED.
3
ASSEMBLY
G
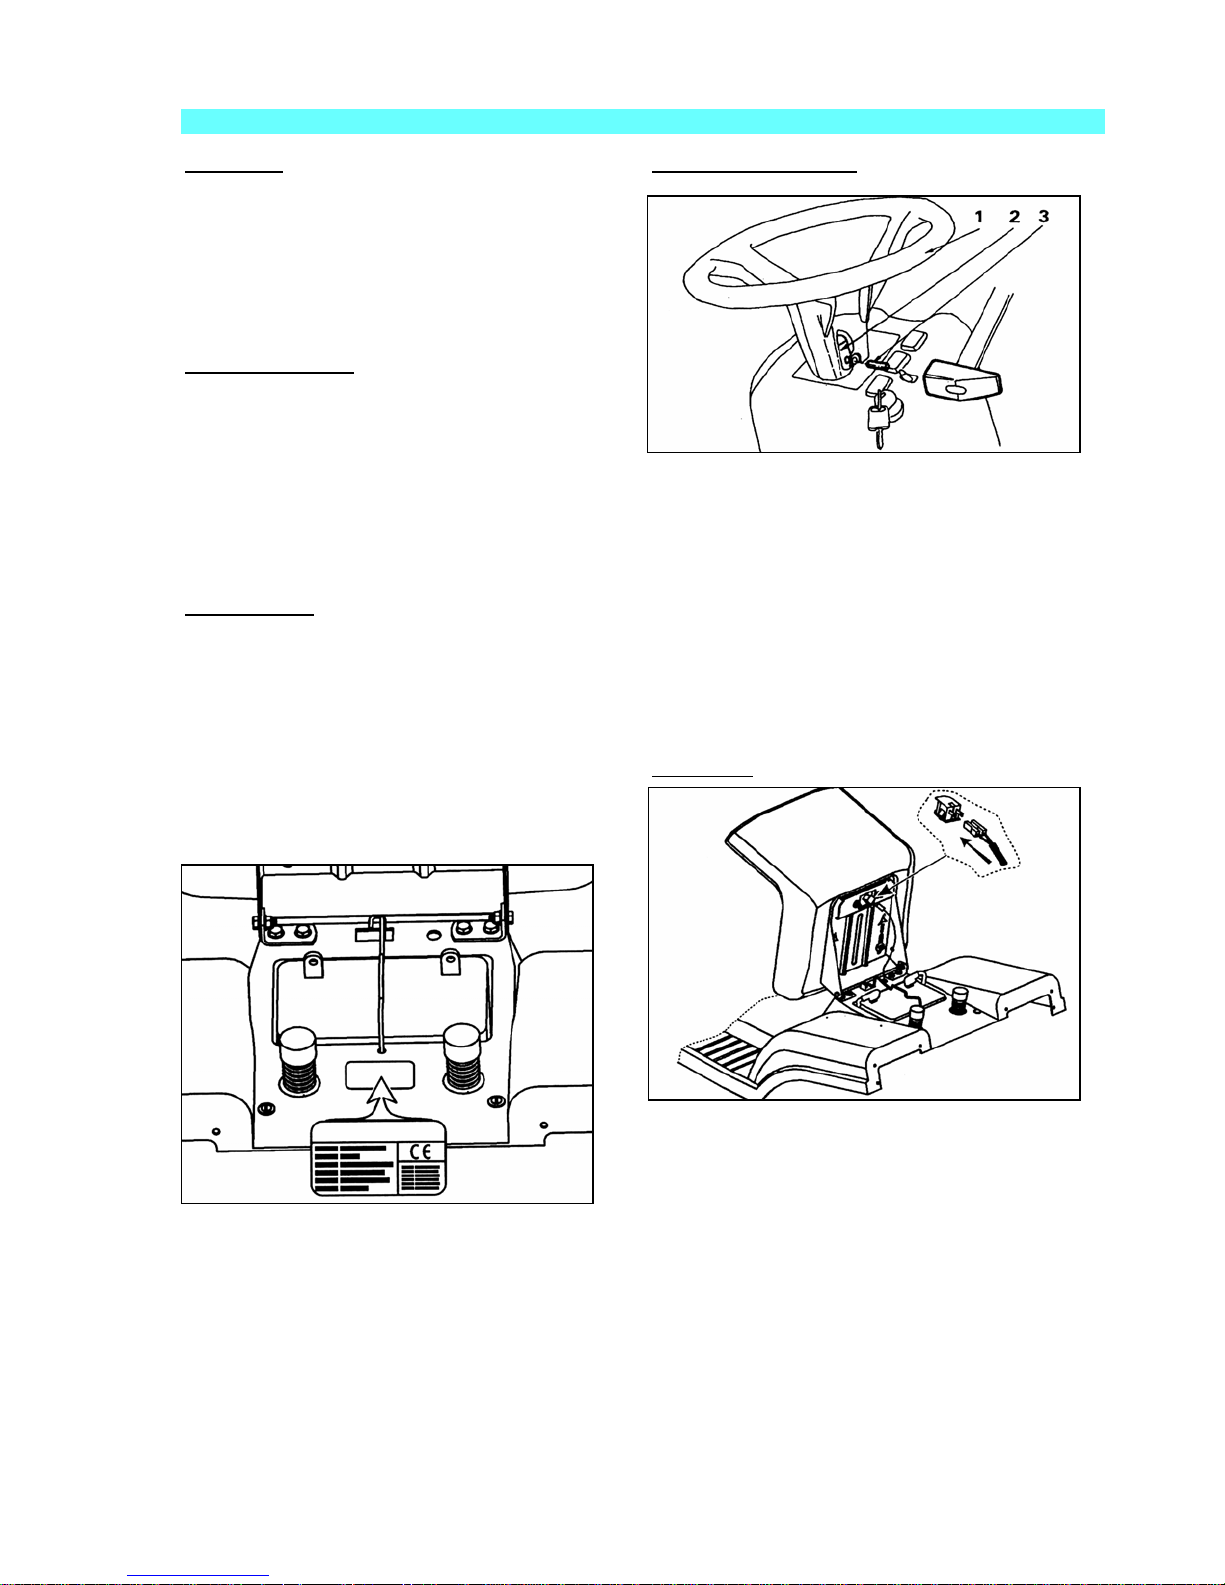
UNPACKING STEERING WHEEL (Fig. 2)
The tractor is not completely assembled at
the factory, for transportation reasons.
After removing the packaging, check the
machine for any damage during the shipment,
locate the hardware bag and loose parts. Take
care while removing the machine from the pallet,
to avoid any damage on the mower deck.
STANDARD PACKIN
* tractor
* steering wheel
* seat with fasteners
* battery Fig. 2
* grass catcher
trailer hitch - optional
*
* bag with owner's manual ,engine manual, 2 keys 1. Straighten the front wheels.
for ignition, 1 decal with an arrow. 2. Align the holes of the steering wheel (pos. 1) with the
* hardware bag for grass catcher the hole in the steering shaft (pos. 2).The steering
IDENTIFICATION
The tractor identification plate is located control elements located on the dash panel
under the driver's seat and behind the easily visible.
battery. Make a note of the serial number 3. Insert the lock pin (pos. 3) through the holes,
on this page. This serial number will have and drive it throught the holes with a
to be quoted when contacting your hammer.
distributor for service and ordering spare
parts for the tractor. See Fig. 1. SEAT (Fig. 3)
Proceed to the following steps:
wheel bar closest to the operator's seat has to be
aligned with the lengthwise axis of the tractor.This
orientation of the steering wheel makes all the
Serial No ...............................................
Fig. 1: Identification plate 3. Place the seat and tighten securely with
Fig. 3
Proceed to the following steps:
1. Discard the plastic cover from the seat
2. Take off both the adjustment knobs
and both hex flange bolts.
two bolts, flat and spring washers.
4. Connect the safety switch (Fig. 3).
4
ASSEMBLY
)
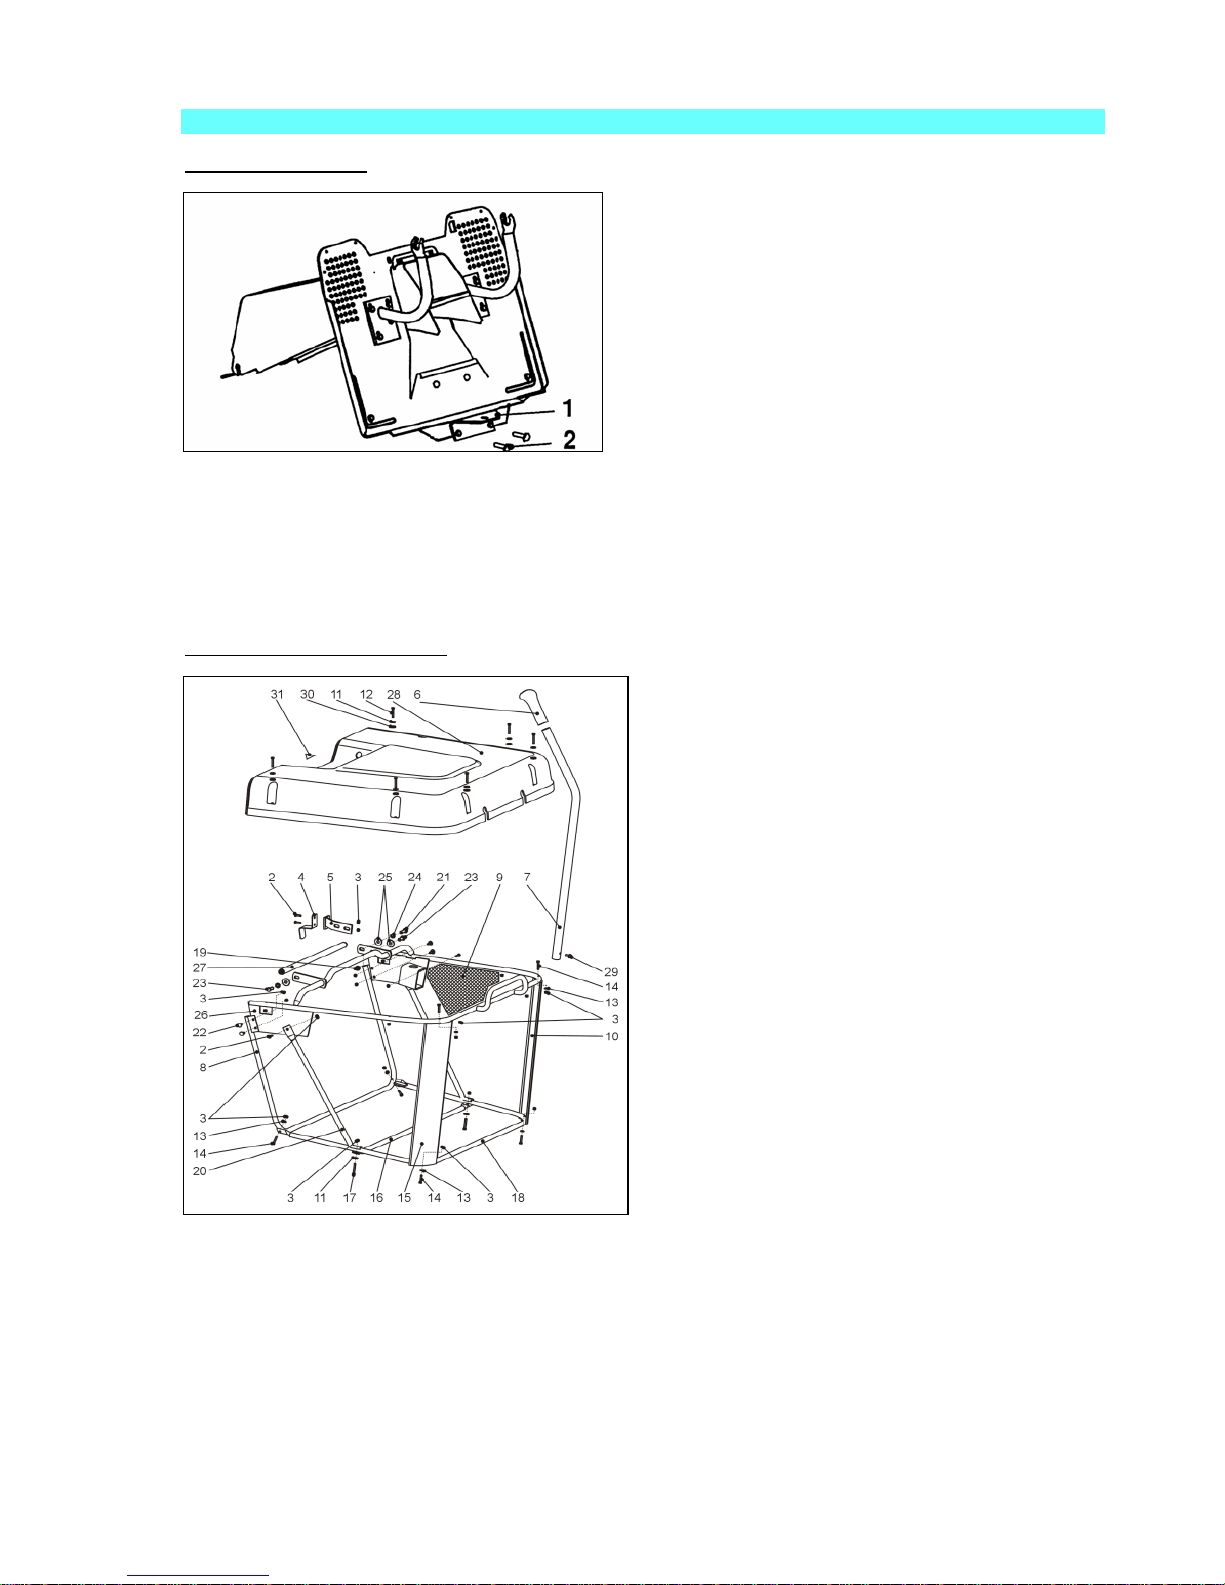
TRAILER HITCH (Fig. 4) The grass collector has been partially assembled.
To final assemble it correctly (to fit the
collector cover with tractor fenders), it is
recommended to follow the instructions below:
1. Take all parts of grass collector out from paper box
including the partially assembled collector.
2. Lay the assembly down on level surface facing down
the plastic collector cover (pos. 28). Make sure
not scratching plastic collector cover from outside.
3. Open the front frame assembly (pos. 8) to align holes
on the top frame assembly (pos. 26). Insert bolts
(pos. 22) and tight the nuts (pos. 3).
Fig. 4
4. Using bolt (pos. 14) and nut (pos. 3) tighten the front
Note: If your tractor is equipped with the optional frame assembly on the bottom frame assembly.
trailer hitch then proceed to the following steps:
5. Insert corner support (pos. 10) and (pos. 15) between
1. Place trailer hitch in place. top frame assembly (pos. 18) to fit on outside part
2. Install supplied bolts, washers and nuts. Tighten of tubes. Tighten them by bolts (pos. 14) and nuts
securely. (pos. 3). Be careful about the right placement
of corner supports.
GRASS COLLECTOR BAG (Fig. 5
6. Tilt down the braces (pos. 20).
Fig. 5
7. Place the connecting brace (pos. 16) on the outside
of the bag (pos. 9) and tighten it together with braces
(pos. 20) using bolts (pos. 17) and nuts (pos. 3).
8. Insert the dumping lever (pos. 7) through the hole
of the collector cover (pos. 28) and secure it with
the screw (pos. 29). Recommendation: to make
the assembling easier you can make the thread
into the dumping lever by using the screw (pos. 29)
before inserting dumping lever (pos.7) through
collector cover (pos. 28).
9. Check out the tightness of grass collector bag (pos. 9)
and placing of washer (pos. 11) and (pos. 13) on right
places and tighten well nuts (pos. 3).
10. Use the plastic extrusions of collector bag (pos. 9)
on the side and bottom part of front frame assembly
(pos. 8).
5
ASSEMBLY
R
.
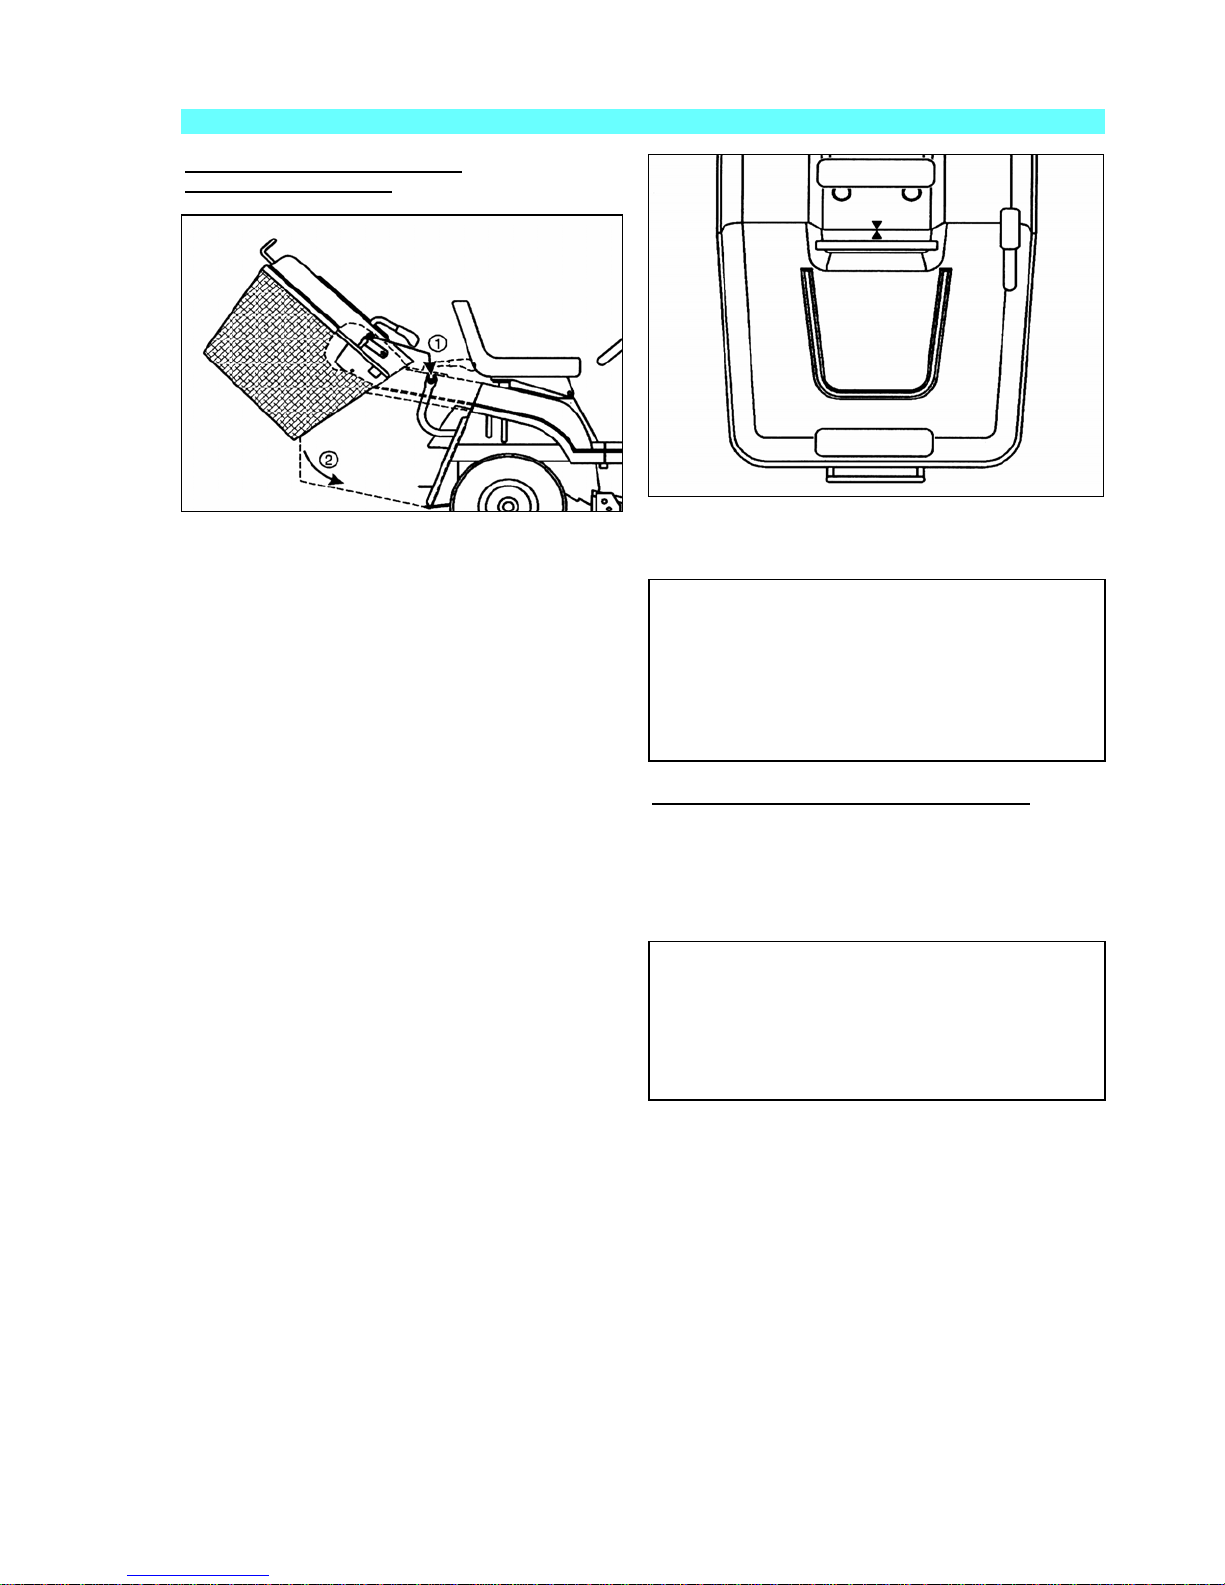
PLACING THE GRASS COLLECTO
ON THE TRACTOR (Fig. 6)
Fig. 7
Fig. 6
Proceed to the following steps: WARNING
1. Lift the grass collector assembly with This tractor is equipped with a safety
both hands. Slant it to an angle of micro-switch and the cutting system will
approximately 40 degrees (Fig. 6). not function when the grass collector
assembly is not in place. Do not tamper
2. Slide the grass catcher on the two with this microswitch.
support brackets located on the rear collector
plate of the tractor. Check out the alignment
of grass collector cover to the fender. In case
it is not fitting precisely adjust the position
of grass collector using the movement The tractor is shipped without gas
of the braces on the slots or by light bending for safety reasons.Check oil level.
of the braces. Fill fuel tank with reccommended gas.
PREPARATION BEFORE THE FIRST OPERATION
3. When the grass catcher is properly
positioned, place the decal with the DANGER
triangle symbol directly opposite to the
symbol on the rear of the tractor. This Lead acid batteries generate explosive
will assist alignment in the future (Fig. 7). gases. Keep sparks, flame and smoking
materials away from batteries. Always wear
eye protection when around batteries.
6

ASSEMBLY
N
Y
R
A
E
BATTERY PREPARATIO
Maintenance-free battery is delivered dry (without electrolyte).
The electrolyte is delivered in two bottles together with
machine. The battery is placed under the seat. Thanks to
its cover it is waterproof and up angle 45° it is sealed
against leakage, so the electrolyte do not leak under
standard usage.
CHARGE BATTER
1. Loose wire battery holder.
2. Disconnect black electric wire (“-“pole).
3. Disconnect red electric wire (“+“pole). Fig. 8
4. Take the battery out of the tractor.
DANGE
5. Take off covers from top of the battery.
Electrolyte is a dangerous acid and
6. Slowly fill the electrolyte into each battery cell until poisonous. Always wear eye protection
it is full up to lower end of tube. Protect your skin when handling acid or battery
7. Connect 12 volt battery charger to the battery. POISON/DANGER-CAUSES SEVERE
Charge the battery with 2 amps for 4 hours. Do not BURNS
overcharge the battery. Disconnect battery charger
when the battery is fully charged and close battery Contains sulfuric acid.
cells with covers. Avoid contact with skin, eyes or clothing
To prevent accidents, neutralize excess acid
8. Put the battery back to the tractor and connect it to with baking soda and rinse empty container with water
electric wires – first to the red one and then to
the black one.
NTIDOT
9. Cover the poles with rubber cover. EXTERNAL: Flush with water
INTERNAL: drink large quantities of water or milk.
10. Fasten the battery with wire battery holder. Follow with milk of magnesia, beaten
eggs or vegetable oil.
CALL A PHYSICIAN IMMEDIATELY
EYES: Flush with water for 15 minutes and
get prompt medical attention.
KEEP OUT OF THE REACH OF CHILDREN
TO SERVICE THE ENGINE
NOTE: The engine is shipped with oil!
If oil needs to be added or changed then fill crankcase with
SAE 10w-30 oil. (See engine Operation Manual).
Do not overfill or it will cause serious damage
to the engine.
Before starting the engine, read carefully
the engine manual.
7
ASSEMBLY
R
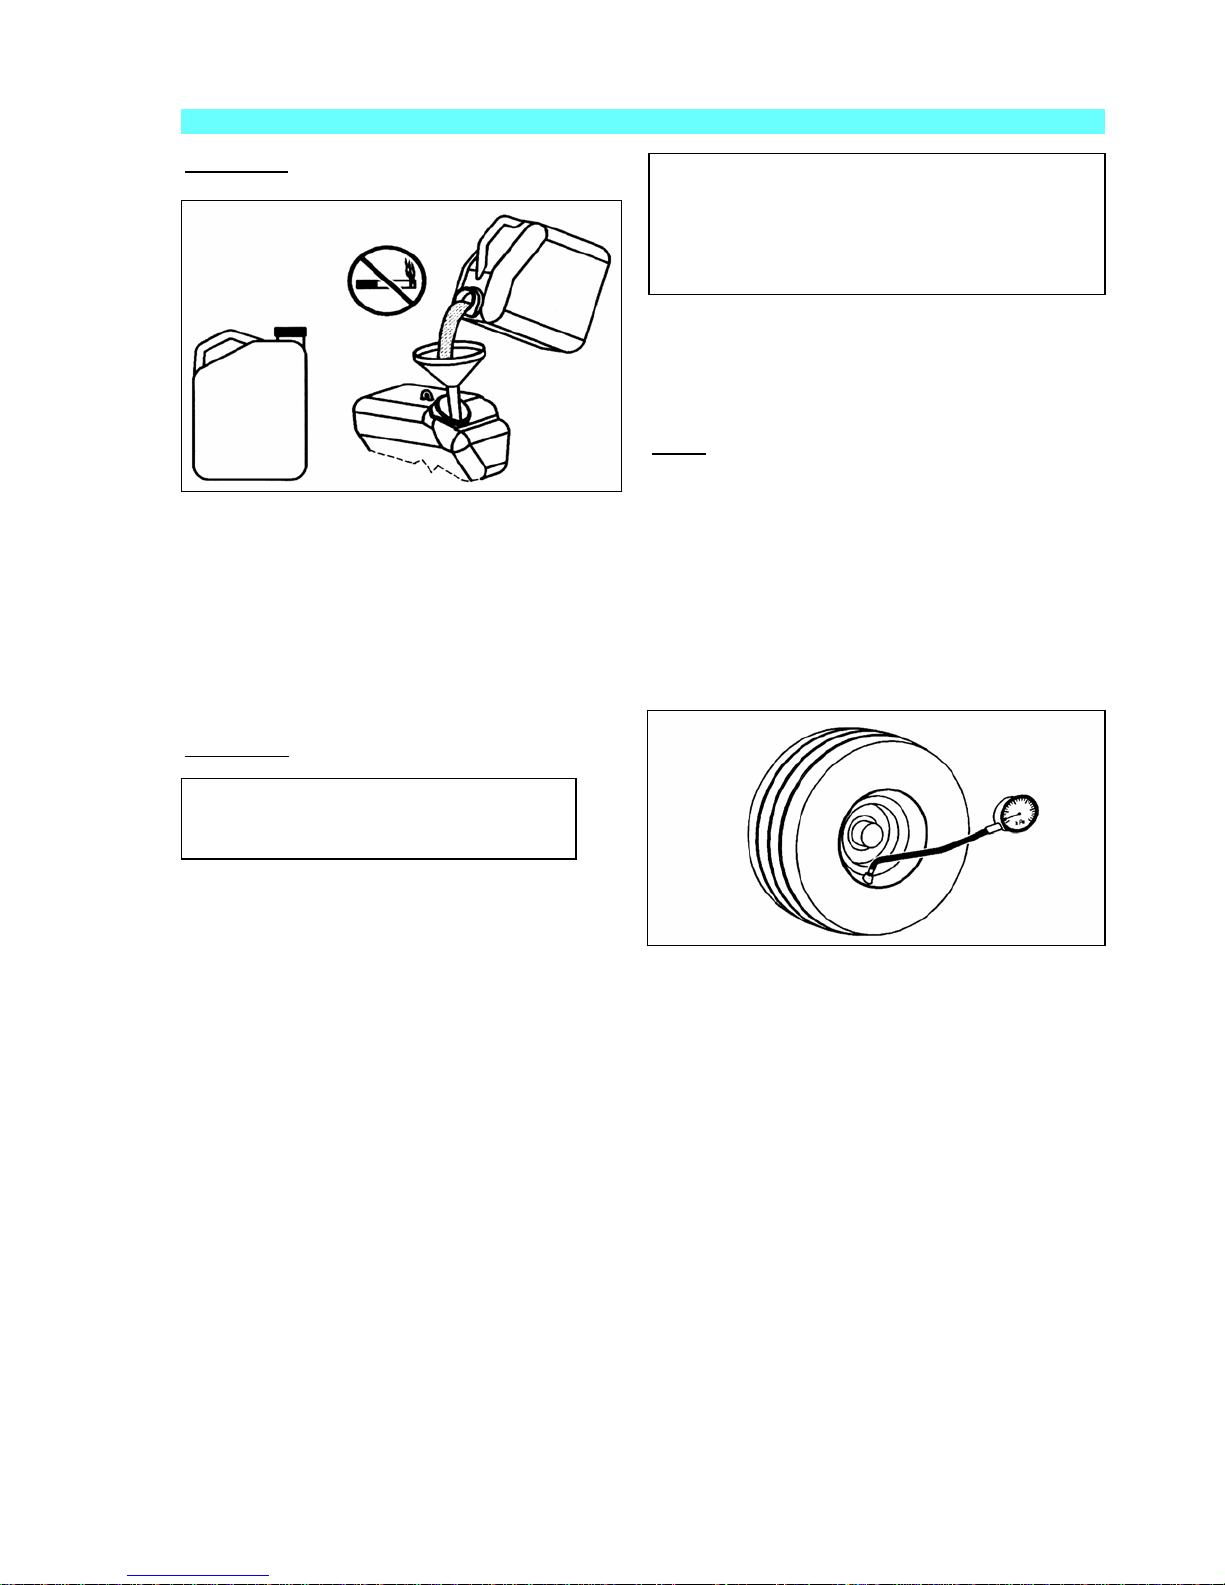
GAS FILLING DANGE
Use extra care in handling fuels. They are
flammable, vapors are explosive. Allow the
engine to cool down before refuelling. Do
not smoke. Use safety approved container
only to store your gasoline!
In the engine owner's manual, you will find fuel and
oil recommendations.
TYRES
Proceed to the following steps:
Fig. 9
1. Check the tyre pressure :
(1.0 BAR) for the front wheels: 100 kPa
Use only regular unleaded gasoline. (0.8 BAR) for the rear wheels. 80 kPa
The recommended lowest octane level is 95.
If the engine runs on gasoline with a lower 2. Adjust pressure up or down if necessary (Fig.10).
octane level than 95, an effect known as
knocking can arise. This engine temperature NOTE: The tyre pressure is important for
occurs when reached operating level and can an even cut.
cause engine failure.
REFUELLING
WARNING
Make sure there is good air ventilation
when refuelling.
1. Stop the engine and let it cool down.
2. Open the gasoline cap slowly in order to
release any possible high pressure.
3. Tighten the gasoline cap carefully after refuelling. Fig. 10
4. Dry fuel tank around the area of the gasoline cap.
Clean the tank regularly. Impurities in the tank
can cause operating problems.
For refuelling, use an approved container with
funnel. Do not overfill the tank, which contains
approximately 8 litres.
8
OPERATION
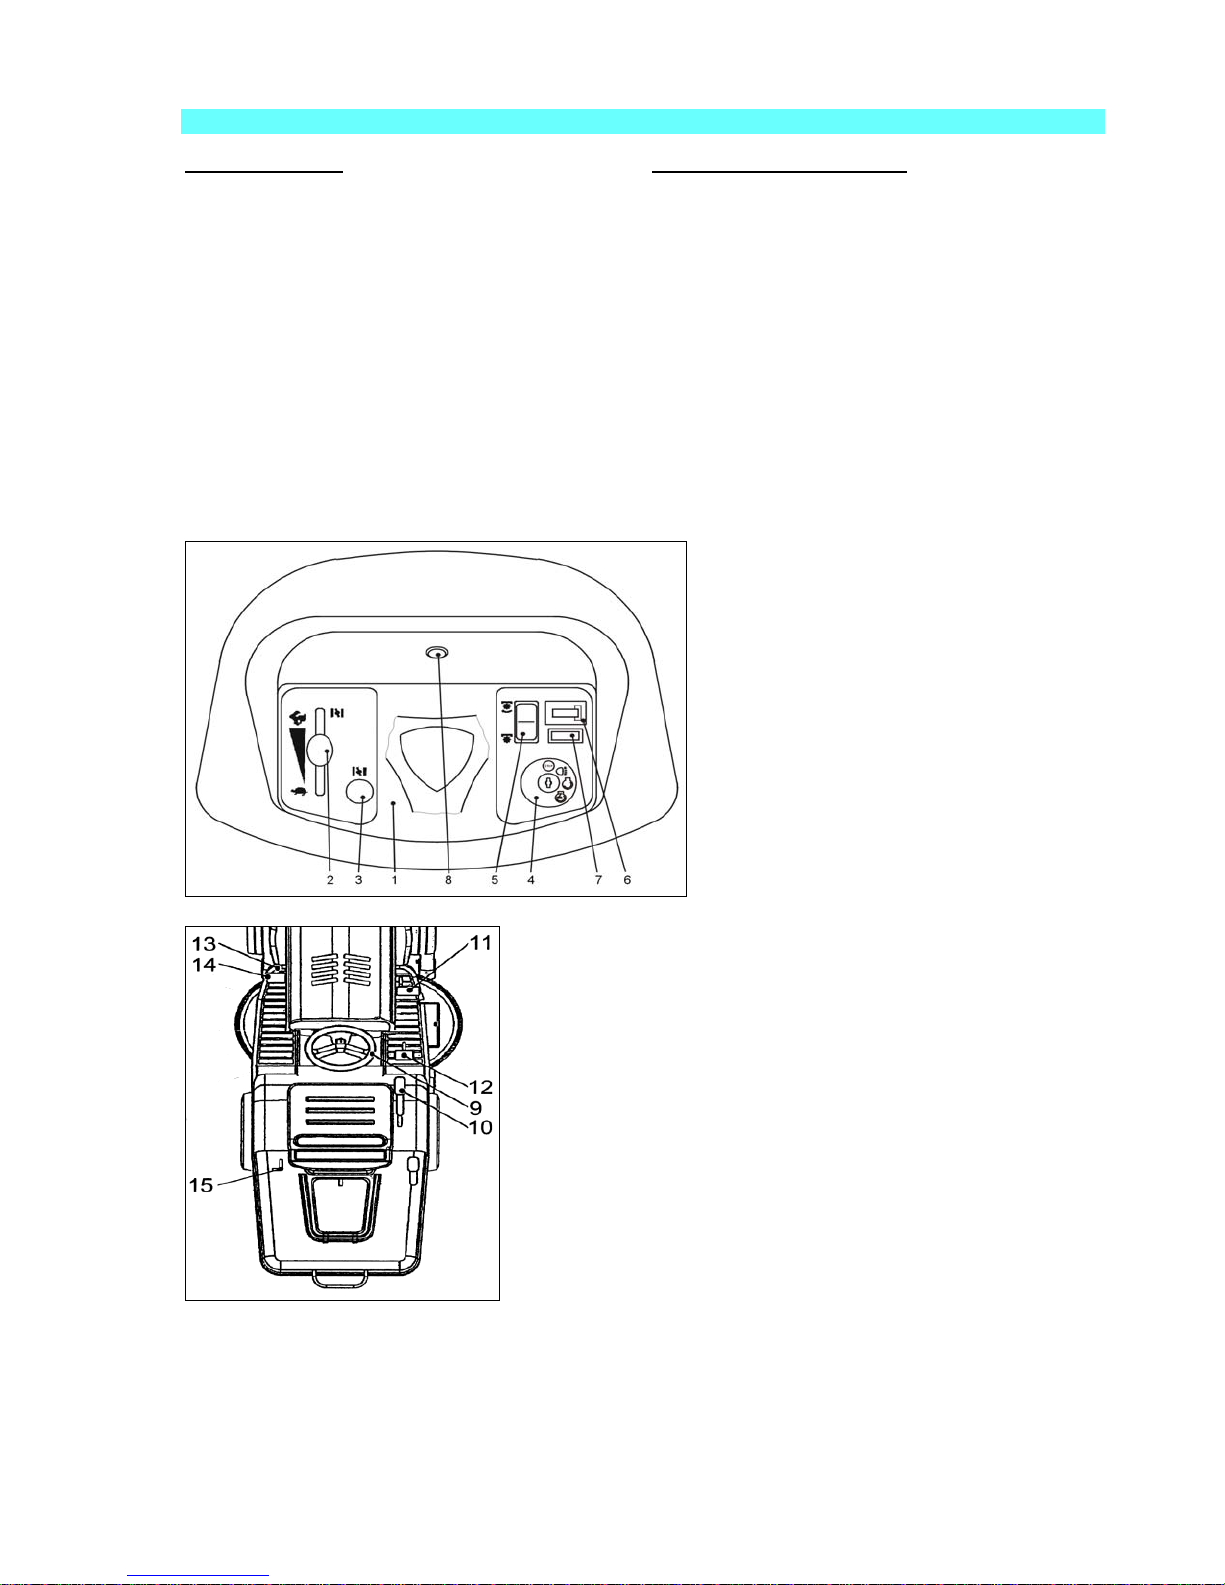
CONTROLS (Fig. 11) OPERATION AND DESCRIPTION
1. Dash panel Toggle switch cutting system (Fig.11, pos.5).
2. Throttle control lever (15.5HP & 16HP) To engage, push the mower system down on the rocker
or throttle control knob (18HP) switch and place it in the ON position: this actuates
3. Choke control (only 18HP) the cutting system clutch which drives the blades.
4. Ignition switch
5. ON/OFF switch cutting system When the collector is full with grass the overload
6. Service hour meter (only 16HP & 18HP) protection switch located inside the grass collector
7. DC AMMETER (only 16HP & 18HP) will be mechanically activated and the warning buzzer
8. Engine oil pressure light (only 20HP Honda) will come on. The buzzer is located in the
9. Steering wheel center of the dash panel.
10. Cutting height adjustment lever
11. Forward speed pedal Note:
12. Reverse speed pedal It is highly recommended that when the warning
13. Parking brake lever buzzer is activated to disengage the mower system
14. Brake pedal to prevent the tunnel from being severely clogged.
15. Transmission disengagement lever
Fig. 11a
Fig. 11b
9
 Loading...