

Page 1
F&F Filipowski sp. j.
Konstantynowska 79/81
tel/fax +48 42 2152383; 2270971
e-mail: [email protected]
95-200 Pabianice
POLAND
http:/www.fif.com.pl
PROGRAMMABLE CONTROL TIMER
dual-channel
PCZ-522.3
PURPOSE
OPERATION
Programmable control timer is used to time control the devices in home or
industrial automation systems according to an individual time program set by
the user.
Timer activates and deactivates the device or electrical circuit on the
programmed hours in cycles: daily, weekly, working days (Mon-Fri)
or weekend (Sat, Sun). The timer has two independently programmable
channels.
CHANNEL – program line with individual entries for ON-OFF COMMANDS,
which controls its own contact for enabling the receiver.
ON-OFF COMMAND – program entry for enabling or disabling the receiver.
500 MEMORY CELLS – memory for individual program entries that allows to
program 250 pairs of ON-OFF COMMANDS.
AUTOMATIC MODE - operation by ON-OFF COMMANDS programmed by the
user in the timer memory [highlighted icon on display]
MANUAL MODE - [ON] permanently closed contact (position 1-5) or [OFF]
permanently open contact (position 1-6) when the AUTOMATIC MODE is off
[no icon on display]
CYCLE - adjustable, weekly cycle (7 days from Monday to Sunday) of the
receiver switching in accordance with the programmed ON-OFF COMMANDS:
* single day of the week: Mo; Tu; We; Th; Fr; Sa or Su.
* working days: Mo Tu We Th Fr (Monday to Friday).
* weekend: Sa Su (Saturday and Sunday)
* daily: Mo Tu We Th Fr Sa Su (Monday to Sunday).
AUTOMATIC TIME CHANGE - change from winter time to summer time with
options to change automatically or not. User can set the time zone so that the
switching time is consistent with the local time
DATE PREVIEW - the ability to preview the set date (OK.)
CURRENT PROGRAM PREVIEW – pressing the +/- keys in the date preview
mode displays information about the number and details of the current
program.
NFC WIRELESS COMMUNICATION - wirelessly read and write timer
configuration from an Android phone equipped with the NFC module.
PCZ Konfigurator APP - free application for Android mobile phones and
tablets equipped with the NFC module for wireless communication.
Features: · timer configuration in Offline mode (without the connection with
the PCZ-521 timer);
· read and write the configuration of the controller;
· quick programming of multiple controllers using a single configuration;
· read and write the configuration from and to a file;
· sharing the configuration via e-mail, Bluetooth, network drives…
· identification of the connected timer and the ability to name individual
devices;
· automatic backups of the configuration. Along with a unique identifier for
each timer, user can easily restore previous configuration;
· set the time and date according to the clock in mobile phone;
The app is available on Google Play!
CLOCK TIME CORRECTION – set monthly adjustment of the seconds of the
system clock.
BATTERY INDICATOR - the controller comes with built-in control system of the
backup timer battery used in case of main power supply failure. If the battery
is low, user will receive information that the battery needs to be replaced.
Battery life depends on the ambient temperature and the degree of the
battery wear.
OPERATING MODES AND FUNCTIONS
3. TIME
Press MENU. The timer will enter the program menu. Using the +/- buttons
select the mode for time setting [hour]
Timer will show settings for the next parameters: year, month, and day. Use
the +/- keys to set the parameters; move to the next parameter with the OK
button. Go back to the previous item by pressing MENU.
Timer will show settings for the next parameters: hour and minutes. Set the
parameters with the +/- buttons. Move to the next parameter with the OK
button. Go back to the previous item by pressing MENU.
Press OK to accept date setting. The timer will automatically exit from the
date setting mode and go to the program menu.
Press OK to accept time entry. The timer will automatically exit from the date
setting mode and go to the program menu.
4.1 ON-OFF COMMAND - setting the parameters
Press OK to accept (or select another number using the +/- keys). Clock will
enter the single ON-OFF COMMAND parameters setting mode.
A. Operation cycle
Set OPERATION CYCLE using the +/- keys:
* single day of the week: Mo; Tu; We; Th; Fr; Sa or Su.
* working days: Mo Tu We Th Fr (Monday to Friday).
* weekend: Sa Su (Saturday and Sunday)
* daily: Mo Tu We Th Fr Sa Su (Monday to Sunday)
Press OK to accept.
B. Hour and minutes
Timer will show setting for the next parameters: hour and minutes. Set the
values using +/- keys; move to the next parameter with the OK button. Go
back to the previous item by pressing MENU.
The date setting is tantamount to time determination: winter or summer.
In Poland, the time change from winter to summer is done automatically at
night, on the last Sunday of March at 2.00 AM (by adding one hour to the
current time). Time change from summer to winter is done automatically at
night, on the last Sunday of October at 3.00 AM (by subtracting one hour
from the current time).
PLEASE NOTE!
The automatic time change can be turned off (see section 5.1).
Using the +/- buttons select the mode for the date setting [prog].
Press OK to accept. The clock will enter the memory cell number selecting
mode. The display will automatically show the number of the first empty
memory cell.
Mo
TU
WE
TH
FR
SASU
ş
1
ON
OFF
5 9 0 8 3 1 2 5 9 3 2 5 6
4. CHANNEL – Selecting a channel number and setting its parameters
Press MENU. The clock will enter the program menu. Using +/- buttons select
the mode for the date setting: "Chn 1" or "Chn 2".
Select channel 1 or 2, and accept with OK button.
Timer will show the submenu of the selected channel parameter settings:
on-off commands, edit, delete and mode select.
Select the desired entry with the +/- buttons. Open the desired item with OK
button.OK. Press MENU button to return to the main MENU.
1
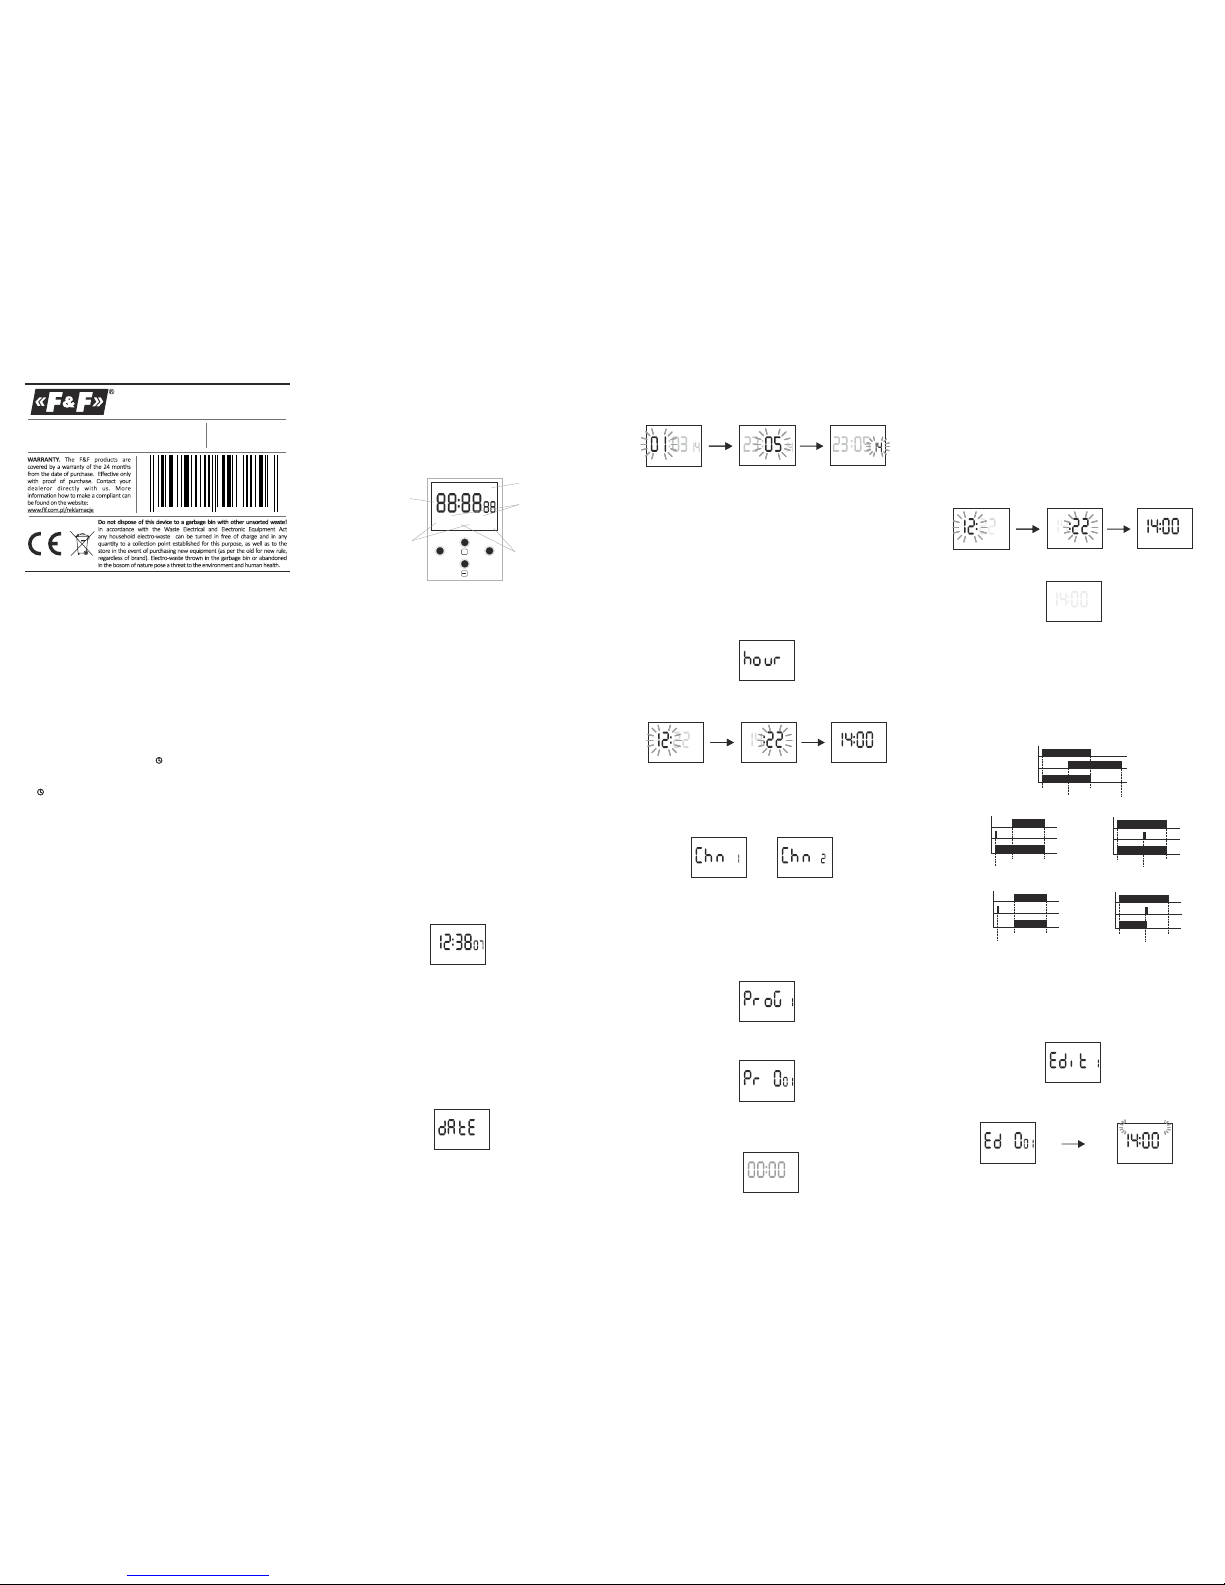
DISPLAY AND CONTROL PANEL DESCRIPTION
Mo – Monday; Tu – Tuesday; We – Wednesday; Th – Thursday; Fr – Friday;
Sa – Saturday; Su – Sunday.
Mo
TU
WE
TH
FR
SASU
ş
1
ON
OFF
DATE AND TIME /
/ PROGRAM ENTRIES
MODE INDICATOR /
/ AUTOMATIC MODE
DAYS OF THE WEEK /
/ CYCLE
INDICATION OF CONTACT
POSITION
MENU
OK
+
FUNCTION KEYS DESCRIPTION
MENU:
- enter the program menu
- return to the previous position (back).
OK:
- move to the next setting
- accept setting
- preview of the date
+ [Plus]:
- change the setting by one position up for the selected programming option
(holding down the button continuously changes the setting by one position
up in a loop)
- in MANUAL MODE: permanent ON and OFF contact switching
- [Minus]:
- change in the setting by one position down for the selected programming
option (holding down the button continuously changes the setting by one
position down in a loop)
- in MANUAL MODE: permanent ON and OFF contact switching
1. START
1.1 Connect the power supply.
1.2 The timer will start at the root level and the display will show selected
hour.
In the absence of any program entries, timer will automatically run in manual
mode. If the previous entries are present, timer will execute the program.
To erase all previous settings, see section 5.6.
1.3 Set individual timer program with internal configuration menu or by using
the "PCZ Konfigurator" app for mobile devices.
PROGRAMMING
2. DATE
Press MENU. The timer will enter program menu. Using the +/- buttons
select the date setting mode [date]
Mo
TU
WE
TH
FR
SASU
1
OFF
Confirm with OK.
ş
2
ON
OFF
CHANNEL NUMBER
LCD BRIGHTNESS ADJUSTMENT - change the contrast of the display to get
aclear LCD read-out from different viewing angles.
RELAY STATE MEMORY - the relay state in manual mode will be remembered
even after power supply failure.
ON
1
OFF
1
OFF
2
ON
1
OFF
2
OFF
1
* Time of contact closing established by a pair of ON-OFF commands can be
longer than 24 hours, which means that [ON] command can be set to any
time and any day of the week (e.g. Tuesday, 1:45 PM) and [OFF] command to
any hour of any other day of the week (e.g. Thursday, 5.05 PM).
C. ON / OFF
Timer will allow to choose [ON] or [OFF] option.
Set ON or OFF using +/- keys; confirm with OK. Timer will automatically enter
the next ON-OFF COMMAND parameter input mode. Go back to the previous
item by pressing MENU.
PLEASE NOTE!
* The registered ON-OFF commands do not constitute solid pairs of
commands for a contact opening and closing. They are treated as individual
commands and executed in accordance with the specified time chronology.
Cases of overlapping contact closing times from two pairs of ON-OFF
commands are illustrated in the following diagrams:
ON
1
contacts 1-5
entry 1
OFF
1
ON
2
OFF
2
entry 2
ON
1
OFF
1
ON
1
OFF
1
ON
2
ON
2
Mo
TU
WE
TH
FR
SASU
ş
1
ON
OFF
Mo
TU
WE
TH
FR
SASU
ş
1
ON
OFF
Mo
TU
WE
TH
FR
SASU
ş
1
ON
OFF
Mo
TU
WE
TH
FR
SASU
ş
1
ON
OFF
4.2 EDITION OF ON / OFF COMMANDS PARAMETERS
Using the +/- keys select the parameter edit mode “edit”
Press OK to accept. The timer will enter the memory cell number selecting
mode. Select the cell to edit and accept by pressing OK.
Mo
TU
WE
TH
FR
SASU
ş
1
ON
OFF
contacts 1-5
entry 1
entry 2
contacts 1-5
entry 1
entry 2
contacts 1-5
entry 1
entry 2
contacts 1-5
entry 1
entry 2
Proceed as with ON-OFF COMMAND parameters setting (see section 5.1).
1
Continued on page 5
-3-
-4-
-2-
-1-
Page 2
Continued from page 4
-8-
-6--5- -7-
4.3 DELETION – removing entries
Confirm by pressing OK. The cell will be deleted. The timer will display the
next programmed cell number. Pressing MENU will take you to the root level.
PLEASE NOTE!
To erase all previous ON-OFF COMMANDS settings see section 5.6.
Accept by pressing OK. The timer will enter work mode menu (auto – hand).
With +/- keys select desired operation mode:
4.4 OPERATION MODE
Using the +/- keys select “mode”.
*MANUAL – “hand”
*AUTOMATIC – “auto”
Accept by pressing OK. The timer will automatically exit the operation mode
selection and go to the program menu. Pressing Menu one more time will
take the timer back to the root menu.
PLEASE NOTE!
To change the contact position in the MANUAL OPERATION mode use the +/-
keys at the root level. In the absence of any program entries timer will
automatically run in MANUAL MODE (there is no option to set AUTOMATIC
OPERATION MODE).
5.1 Automatic time change – dst
Confirm by pressing OK. The timer will enter the System Settings submenu
(dst - utc - batt - cal - lcd - clear - info). Select the parameter with the +/- keys
and confirm with OK. Pressing MENU will take you to the upper level.
5. SYSTEM SETTINGS
Press MENU. The timer will enter the program menu. Using the +/- keys
select system settings “syst”.
DST – Daylight Saving Time – international name of summer time. Confirm by
pressing OK. The timer will enter the menu with the option to disable
automatic time change (auto-off). With +/- keys select desired mode:
* with AUTOMATIC TIME CHANGE – “auto”
* without AUTOMATIC TIME CHANGE – “off”
5.2 Time zone – utc
Using the +/- keys select ON-OFF COMMANDS reset mode "del".
Press OK to accept. The timer will enter the memory cell number selecting
mode. Select the cell to be deleted and accept by pressing OK. The timer will
be waiting for confirmation. This is indicated by alternating flashing of the
number of the selected cell and its set parameters.
Mo
TU
WE
TH
FR
SASU
ş
1
ON
OFF
1
1 1
Confirm by pressing OK. The timer will enter the submenu (prog - sys - error).
Use the +/- keys to select reset option:
* "prog" – deletion of ON/OFF entries
* "sys" – deletion of system settings
Confirm by pressing OK.
A. prog
Confirm selected option by pressing OK. The timer will enter standby mode
awaiting for deletion confirmation. This is indicated by alternating flashing
of "prog" and "clear" on display.
Confirm by pressing OK.
The timer will start deleting entries. The display will count off consecutive
numbers of deleted entries (from 1 to 500). Upon completion the display will
show "prog".
B. sys
Confirm selected option by pressing OK. The timer will enter standby mode
awaiting for deletion confirmation. This is indicated by alternating flashing
of "syr" and "clear" on display.
Confirm by pressing OK.
The timer will start deleting entries. Upon completion the display will show
"sys".
C. error
If the timer system detects an error, the display will show "error" message
at the root level. At the same time in the "clear" section the extra "error"
item will appear. Error reset is possible only through the menu (menu ->
syst -> clear -> error).
Confirm the “error” option by pressing OK. The timer will enter standby
mode awaiting for deletion confirmation. This is indicated by alternating
flashing of "error" and "clear" on display.
Confirm by pressing OK. The timer will reset the error. The display will show
“error”. The clock will return to standard operation mode.
5.7 System information – info
Confirm by pressing OK. The timer will enter the information menu. Browse
the information by pressing +/- keys:
*clock type
*software version
Confirm by pressing OK. The timer will display current parameter for time
zone (12/-12). Pressing +/- keys set time zone for the clock. Confirm by
pressing OK. Time zone for Poland is +1.
5.3 Battery charge indicator – batt
Confirm by pressing OK. The clock will display information about battery
charge level.
HIGH - fully charged, new battery.
GOOD - in good condition, provides long-term operation.
LOW - low battery level, recommended replacement.
EMPTY - discharged, it must be replaced immediately.
5.4 System clock time adjustment - cal
Time adjustment is the number of seconds by which the system clock is
adjusted per month. Setting range: +/- 300 seconds.
For example:
If the clock is fast 4 seconds per month, set the parameter value -4.
Confirm by pressing OK. The timer will display current parameter of time
adjustment. Press +/- keys to set desired number of seconds. Confirm by
pressing OK.
5.5 Display contrast - lcd
Setting the display contrast. Range: -3 (lowest) ... + 3 (highest).
Confirm by pressing OK. The clock will display the current contrast
parameter. Use the +/- keys to set the contrast parameter. Confirm by
pressing OK.
5.6 Resetting the commands, parameter settings and errors - clear
Confirm by pressing OK. The timer will enter the submenu (prog - sys - error).
Use the +/- keys to select reset option.
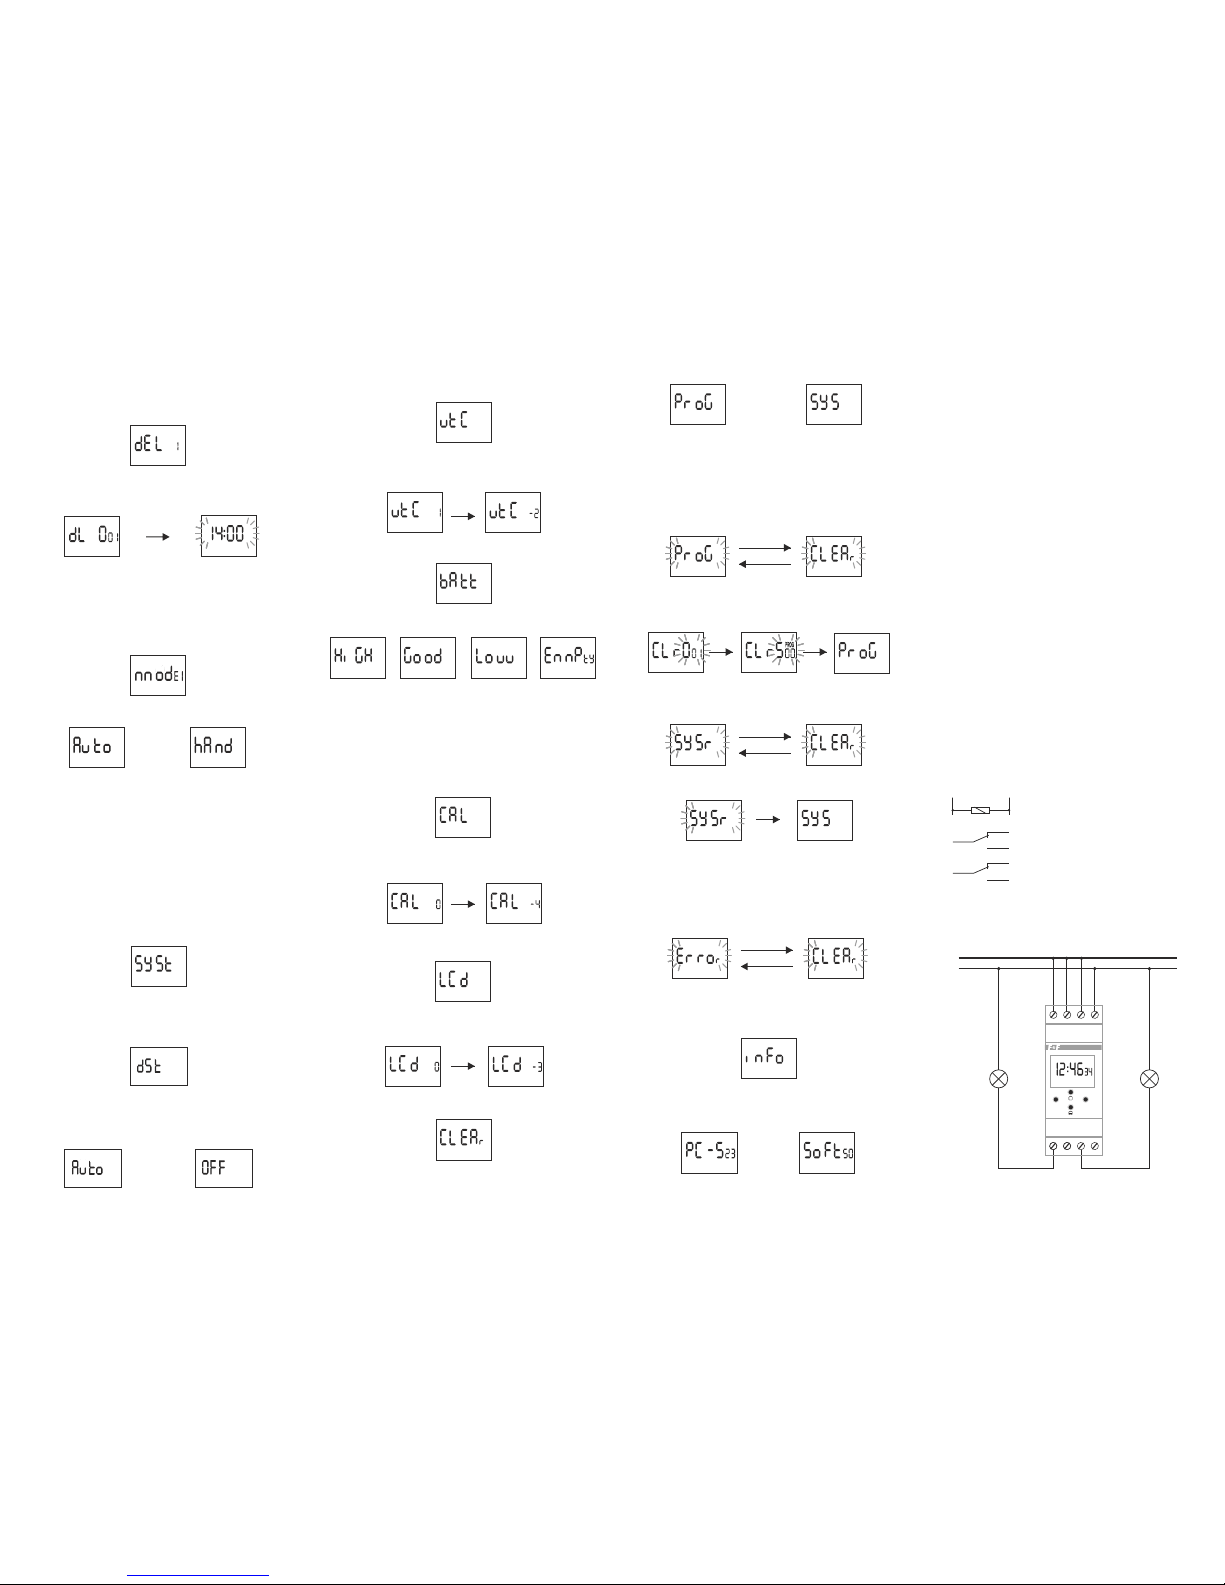
IN/OUT DESCRIPTION
3-4 timer power supply
CHANNEL 1
1 COM contact input
5 NO contact output
- “standard open” position
6 NC contact output
- “standard closed” position
CHANNEL 2
2 COM contact input
7 NO contact output
- “standard open” position
8 NC contact output
- “standard closed” position
3
4
1
5
6
AC/DC
CONNECTION SCHEME
INSTALLATION
1. Turn off the power.
2. Mount the timer on the TH rail in the distribution box.
3. Connect wires according to the diagram.
4. Connect receivers according to the diagram.
5. Set the correct date (see section 2) and time (see section 3).
6. Set individual switch-on time programs for receivers.
SPECIFICATIONS
power input 24÷264V AC/DC
current load 2×[<16A]
contact 2× separated 1NO/NC
up time of the clock 6 years
battery type 2032 (lithium)
up time of the display operation no information
the accuracy of the clock 1s
time error ±1s/24h
precision of program time setting 1min.
program memory cell 500
(2× 125 pairs of ON-OFF COMMANDS/CHANNEL)
power consumption 1.5W
operating temperature -20÷50°C
terminal 2.5 mm² screw terminals
tightening torque 0.4Nm
dimensions 2 modules (35mm)
mounting on TH-35 rail
ingress protection IP20
(for T=20°C)
L
N
2
7
8
CHANNEL 1
PROG
Mo
ş
1
ON
MENU
OK
+
1 2 3 4
5 6 7 8
ş
2
OFF
CHANNEL 2
BATTERY REPLACEMENT
User can single-handedly replace the battery. Detailed instructions with
pictures and videos can be found on the website www.fif.com.pl on the
subpage of the timer. Battery type: 2032 (lithium).
D151109
Page 3
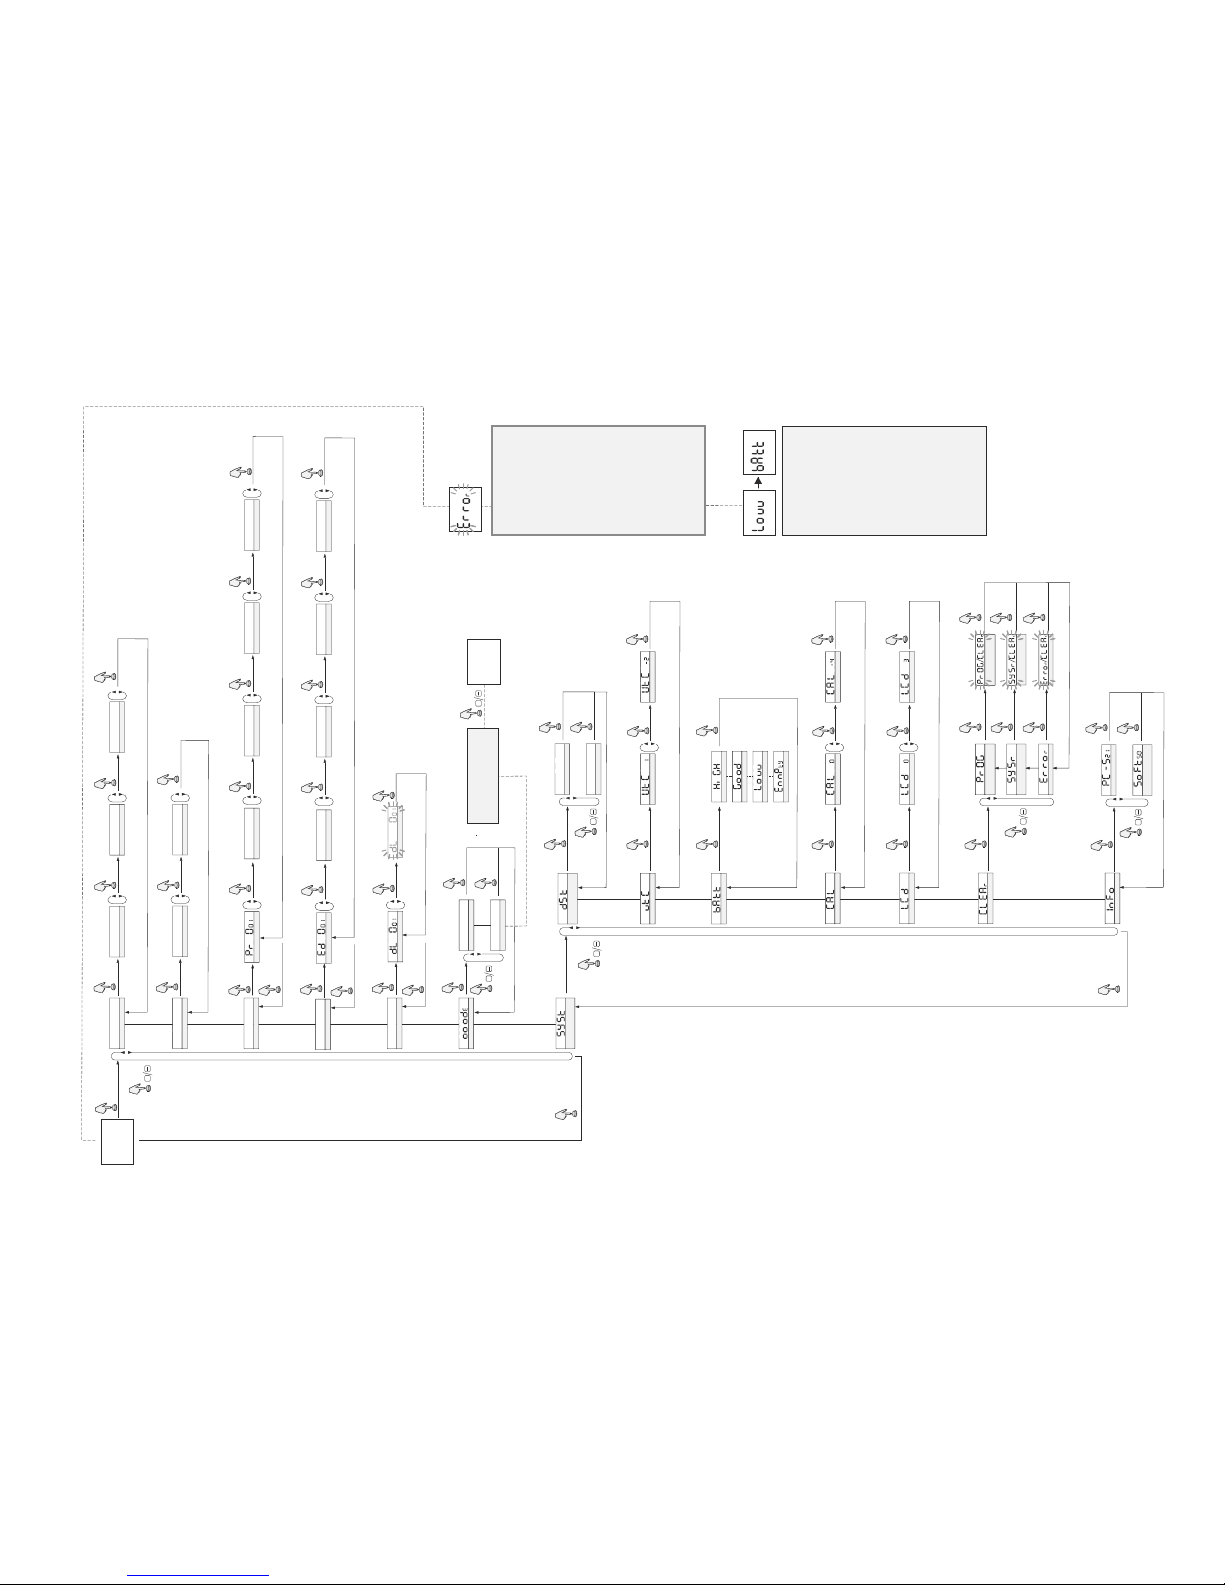
Programming scheme
MENU
8a8E
DATE
OPERATION MODE
+
OK
00 00 i4
YEAR
:
00 i400
MONTH
:
OK
00 07 i4
DAY
:
OK
+1
-1
+1
-1
+1
-1
OK
MENU
AUTOMATIC
MANUAL
a088
hah8
+
+
OK
OK
SYSTEM
SETTINGS
In MANUAL operation mode
the contact is switched on the
main level.
i3
:
48
08
PROG
Mo
TU
WE
TH
FR
ş
1
ON
i3
:
48
08
PROG
Mo
TU
WE
TH
FR
ş
1
ON
OFF
PROGRAM
pf66
OK
00 00
MINUTES
:
00 i5
HOUR
:
OK OK
+1
-1
+1
-1
+1
-1
OPERATION MODE
MO TU WE TH FR SA SU
ON/OFF
OK
+1
-1
NEXT ENTRY NUMBER
OK
ON
OFF
+1
-1
OK
MENU
OK
i2 i5
MINUTES EDIT
:
i2 30
HOURS EDIT
:
OK OK
+1
-1
+1
-1
+1
-1
EDIT
E8i8
OPERATION MODE EDIT
MO TU WE TH FR SA SU
ON/OFF EDIT
OK
+1
-1
NEXT ENTRY NUMBER
OK
ON
OFF
+1
-1
OK
MENU
BATTERY INDICATOR
+
MENU
TIME CORRECTION
ON
a088
OK
OK
ofF
OFF
+
OK
TIME CHANGE
SUMMER/WINTER
OK
OK
+1
-1
OK
TIME ZONE TIME ZONE TIME ZONE
OK
OK
OK
+1
-1
OK
TIME CORRECTION TIME CORRECTION
CONTRAST
OK
OK
+1
-1
OK
CONTRAST CONTRAST
HIGH
GOOD
LOW
DISCHARGED
DELETION
OK
i2 i5
CHOSEN ENTRY
:
NEXT ENTRY NUMBER
OK
8El
+1
-1
OK
MENU
OK
RESET
OK
RESET ON/OFF
COMMANDS
OK+OK
RESET ON/OFF
COMMANDS
OK
RESET SYSTEM
SETTINGS
RESET SYSTEM
SETTINGS
OK
RESET ERRORSRESET ERRORS
OK
OK
RESET
OK
DEVICE TYPE
OK+OK
RESET SYSTEM
SETTINGS
HOUR
86uf
00 00
MINUTY
:
00 00
HOUR
:
OK
+1
-1
+1
-1
OK
OK
MINUTES
OK
Low batt - too low level of the
battery that supports the opera-
tion of the timer after a power
failure. In this case it is recom-
mended to replace the battery.
PLEASE NOTE! Low battery does
not preclude normal operation of
the timer. However, in case of a
timer power failure it may lead to
loss of date and time settings.
PLEASE NOTE: All settings except
time and date are stored in non-
volatile memory and are not lost
when the power is off or the
battery level is too battery. User
can single-handedly replace the
batteries. Deta iled instructi ons
with pictures and videos can be
found on the website:
www.fif.com.pl on the subpage of
the timer.
Battery type: 2032 (lithium).
System error indicated by the
word "error" on the root level of
the display.
Reset of the error is possible only
through the menu.
Error codes and their descrip-
tions:
Error 01 - error in reading external
mem ory. U sual ly ca use d by
elec trom agne tic i nter feren ce
affecting the NFC module. It is
recommended to separate the
timer from the source of inter-
ference, for example shielding or
moving the devices away from
each other.
Error 02 - internal temperature
sensor error. Please contact our
technical department.
Error 03 - simultaneous error 01
and 02.
Page 4
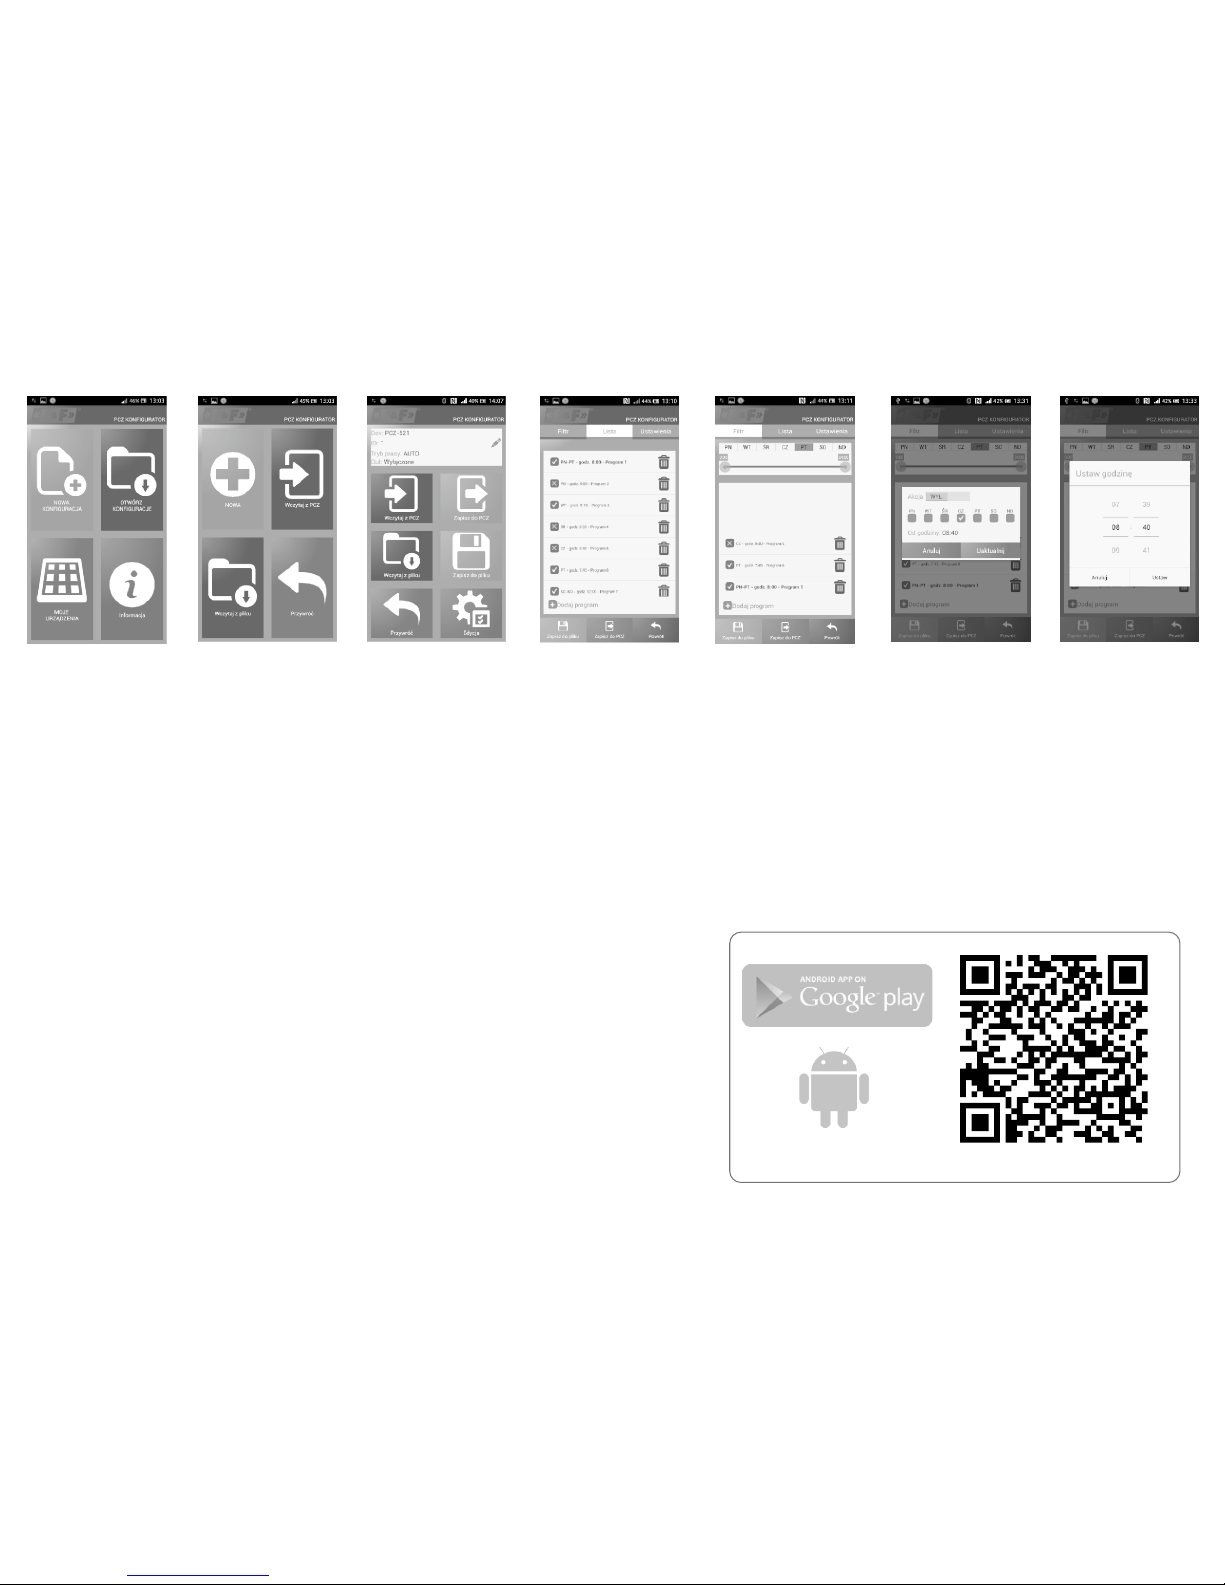
Adding and editing programs
žAdd or edit program displays a window
with following options:
ž Operation – selects whether the
program will turn the relay on or off .
ž Day – selects the days of program
execution. You can select a single day,
Monday - Friday, Saturday - Sunday, all
week.
ž Time – selects the time of program
execution.
Main window
1) New configuration – opens window
for creat ion o f a new cont roller
configuration.
2) Open configuration- opens window
for loading the program configuration
stored as a file in the phone memory.
3) My device - gives access and support
for all backup copies of configurations
assigned to specific devices.
4) Information – application user guide
New configuration
1) N ew – c re at es n ew, e mp t y
co nfi gu rat ion fi le (w ith ou t a ny
programs).
2) Load from PC – new configuration is
created based on a program saved in the
PCZ controller.
Select this option and bring the phone
closer to the timer to load the program
from the phone to the application.
3) Load from file - new configuration is
created based on a files saved by the
user. Opens a window with a list of files
previously saved by the user.
4) Restore - a new configuration is
created based on a backup copy of one
of the previous configuration. Tapping
this icon opens window with a list of
backups split into controllers in which
they were writt en. Se lect a ne w
configuration option opens another
window.
The function window allows to edit
program as well as to load and save
configuration to a PCZ controller. It
appears automatically when we bring
the phone closer to the controller, or
when we create a new configuration. In
the upper part of the scree n the
appli cation disp lays a frame with
following information:
Dev – sup porte d co ntrol ler t ype
ID – unique identifier of connected
controller (appea rs only w hen the
applic ation i s conne cted wi th the
controller. In the Offline mode that field
remains empty). Icon of a pencil on the
right-hand side allows you to enter your
ow n na me f or th e co nt ro ll er .
Operating mode – displays the current
operating mode fo r the c ontroller
(manual or automatic). Applies only to
operating in Online Out mode – Output
relay stat us (enabled or disa bled).
Ap pl ie s on ly i n O nl in e m od e.
Keys:
1) Read the timer configuration.
2) Save the current configuration to the
timer.
3) Load configuration from file.
4) Save the current configuration to file.
5) Restore configuration from backup
copies.
6) Edit the current configuration.
Edit
Editing window allows you to edit
current configuration (new, loaded from
file or from PCZ)
Editing window consists of three tabs:
1) List - a list of all programs (in the order
in which they are stored in the memory).
2) Filter - a list of programs that will be
executed on th e select ed day (in
chr ono log ica l o rder by pr ogra m
execution).
3) S et ti ng s – s ys te m s et ti n gs
configuration.
List
Main part of the screen is taken by the
list of PCZ programs. Programs are
displayed sorted by the time they are
written in the controller memory.
Each program is symbolized by:
ž action icon - the green "v" means that
the specific program will activate relay.
Red “x” means deactivation of relay.
ž Date and time – show days of programs
activation and their start time.
ž Program number - program position in
the contro ller m emory. Bold font
marking represents a program that is (or
should be) executed. Pressing the trash
bin icon next to the program entry
deletes program. To add a new program
select "Add Program". To edit an existing
program tap into the edited program.
The three icons at the bottom of the
screen allow you to:
ž Save to file - saves the current
configuration to a file.
ž Save to PCZ - saves the configuration to
a timer.
ž Back - returns to the function window.
Upon returning to the function window,
curre nt conf igurati on is store d in
application memory.
Filter
Filter tab performs a similar function to
List. In this case, at the top of the screen
appears addition frame for choosing the
day and time interval for which the
application displays a list of programs
active during that time. Programs are
displayed in chronological order, sorted
by the time of their actual execution.
Configurator AppPCZ
https://play.google.com/store/apps/details?id=pl.com.fif.clockprogramer
Application available on:
 Loading...