

Page 1

© IP VISION 2010
SmartBox User Guide
For use with:
Technika SmartBox 8320HD
FetchTV SmartBox 8000
FetchTV SmartBox 7000
Page 2

2
CON TENTS
1. WELCOME 5
2. IMPORTANT TV CARE INFORMATION 6
3. FOR YOUR SAFETY 7
4. GETTING STARTED 8
4.1 SET UP YOUR FETCHTV ACCOUNT ONLINE 8
4.2 YOUR SMARTBOX PACKAGE SHOULD INCLUDE 9
4.2.1 SMARTBOX 8320HD 9
4.2.2 SMARTBOX 8000 9
4.2.3 SMARTBOX 7000 9
5. INSTALLATION 10
5.1
STEP ONE: GETTING A FREEVIEW TV SIGNAL
11
5.2
STEP TWO: CONNECTING TO YOUR
TV 11
5.3
STEP THREE: CONNECTING TO YOUR BROADBAND ROUTE
R 11
5.3.1
CONNECTING VIA ETHERNET
12
5.3.2
CONNECTING VIA BUILT IN WIFI
12
5.4
STEP FOUR: CONNECTING TO EXTERNAL AUDIO DEVICES
12
5.5
STEP FIVE: SWITCHING ON
12
5.6
STEP SIX: ON SCREEN SET UP
12
5.6.1 C
HOOSE THE MOST SUITABLE SCREEN
12
5.6.2
CHOOSE APPROPRIATE ASPECT RATIO
13
5.6.3
SET YOUR
PARENTAL C
ONTROL PIN
. 13
5.6.4
FREEVIEW TUNING INTRODUCTION
13
5.6.5
START THE AUTO TUINING IN PROCEDURE
14
5.6.6
NETWORK CONNECTION INTRODUCTION
14
5.6.7
CHOOSE WI-FI OR ETHERNET CONNECTION
15
5.6.8
ETHERNET CONNECTION
15
5.6.9
WIFI CONNECTION
15
6. USING YOUR SMARTBOX 16
6.1
THE REMOTE CONTROL
16
6.1.1 UNIVERSAL REMOTE – SMARTBOX 8320HD 16
6.2.1
TWIST 2 REMOTE - SMARTBOX 7000 & 8000 16
6.2
SETTING UP THE FETCHTV SERVICE
17
Page 3

3
6.2.1
CREATING YOUR FETCHTV ACCOUNT
17
6.2.2
REGISTERING YOUR ACCOUNT ON YOUR SMARTBOX
17
7. USING FETCHTV 18
7.1 F
INDING A PROGRAMME OR MOVIE ON FETCH
TV 18
7.2
DOWNLOADING A PROGRAMME OR MOVIE ON FETCH
TV 18
7.3
CATCHUP TV SERVICES
19
7.4
SKY PLAYER
20
7.4.1 N
ON SKY TV CUSTOMERS
20
7.4.2 S
KY TV CUSTOMERS
20
7.4.3 S
IGN IN PROCESS
20
8. DIGITAL TELEVISION 22
8.1
PARENTAL CONTROLS
22
8.1.1
SETTING UP PARENTAL CONTROLS
22
8.1.2
CHANGING THE PARENTAL CONTROLS
22
8.2
CHANGING CHANNELS
23
8.3 F
AVOURITE CHANNELS
23
8.4
THE ELECTRONIC PROGRAMME GUIDE (EPG
) 24
8.4.1 ACCESSING THE EPG 24
8.4.2 NAVIGATING AROUND THE EPG 24
8.4.3 PROGRAMME INFORMATION 25
8.5 THE INFO BAR 25
8.6 SUBTITLES 26
8.7 PAUSE & REWIND LIVE TV 26
8.7.1 PAUSING LIVE TV 26
8.7.2 RESUMING LIVE TV 27
8.7.3 REWINDING LIVE TV 27
8.7.4 O
THER PLAYBACK CONTROLS
27
9. RECORDING CAPABILITIES 28
9.1 R
ECORDING A LIVE PROGRAMME
28
9.2
SETTING A RECORDING
29
9.3
REMOTE RECORDING
30
9.4
SERIES LINKING
31
9.5 M
ODIFYING SCHEDULED RECORDINGS
31
9.5.1
MODIFYING A SCHEDULED RECORDING FROM THE EPG
31
9.5.2
MODIFYING A SCHEDULED RECORDING FROM THE MENU
32
9.6
DELETING A SCHEDULED RECORDING TIMER
32
9.6.1
DELETING A SCHEDULED RECORDING TIMER FROM THE EPG
32
Page 4

4
9.6.2
DELETING A SCHEDULED RECORDING TIMER FROM THE MENU
33
9.7
RECORDING ONE CHANNEL AND WATCHING ANOTHER
33
9.8
RECORDING TWO CHANNELS AT THE SAME TIME
33
9.9
RECORDING CONFLICT AND CONFLICT RESOLUTION
33
9.10
PLAYBACK OF RECORDED TV PROGRAMMES
35
9.11
DELETE STORED RECORDINGS
35
9.12
EXPORT STORED RECORDINGS
35
9.13
DIGITAL RECORDER MANAGEMENT
36
10. MEDIA CENTRE 37
10.1
NETWORK YOUR PC
37
10.2
AUTO DISCOVERY
38
10.2.1 S
UPPORTED FILE TYPES WHILE USING WINDOWS MEDIA PLAYER THROUGH THE NETWORK
: 38
10.2.2 S
UPPORTED FILE TYPES WHILE USING A
USB
STORAGE DEVICE
WITH YOUR SMARTBOX 39
10.3
USB PORT
39
11. USING ADVANCED SETTINGS 40
11.1
DISPLAY MANAGEMENT
40
11.1.1
MANAGE THE INFO BAR
40
11.1.2
FETCHTV SCREENSAVER
40
11.1.3 TV
GUIDE LAYOUT
40
12. SOLVING PROBLEMS 41
12.1
ON SCREEN MESSAGES
41
12.2
TROUBLESHOOTING
42
Page 5

5
1. WELCOM E
Thank you for choosing FetchTV. This User Guide provides you with easy to understand instructions
on how to use FetchTV, your SmartBox and your SmartBox remote control. FetchTV puts you in
control of what you watch and when you watch it. Your SmartBox is simple to install, easy to use and
packed with great features to help you get the most out of your TV entertainment.
FetchTV uses the latest technology, but you do not need to be technical to use it. It combines the
best of free digital TV and personal video recording, with on demand content delivered over
broadband, and it is also capable of playing high definition content.
Follow the instructions below and in minutes you will be able to access all of the great services from
FetchTV. Should you have any difficulty with the installation, just call 08450 347 348 for our customer
support service, or use our helpdesk ticketing system at www.fetchTV.net/helpdesk, email
support@fetchtv.co.uk, or take a look at our comprehensive FAQ site, which is constantly updated
and includes a search facility as well as a way to post new questions. You can find it at
www.fetchTV.net/FAQs
Page 6

6
2. IM PORTANT TV CARE INFORMATI ON
Do not allow a still image to be displayed on your TV screen for an extended period of time. This can
cause a permanent residual image (‘burn-in’) remaining on your screen.
The SmartBox has a screen saver that automatically cuts in after 10 mins on the EPG and FetchTV
service to help protect your screen. You can disable this feature in the audio video menu, or change
the default time.
Plasma and Rear Projection televisions are at a higher risk of burn-in. These televisions are more
prone to burn-in during the first 200 hours of use. LCD screens can also suffer from image
persistence.
Always consult your television manufacturer’s manual for proper operating instructions.
Examples of still images include:
Channel logos and certain channel formats;
Images displayed in a 4:3, 14:9 and 16:9 mode that are different to your TV set up;
On-screen information (e.g. Tickers and Active features) that are part of programmes;
Electronic Programme Guides;
Games and voting features;
Audio channels.
Page 7

3. FO R Y O UR SAFETY
Your safety is important to us, please read carefully:
The SmartBox
has been manufactured to meet international safety standards. To obtain the best
results and operate the
SmartBox
Do’s and Don’ts
DO
Always install the SmartBox
on a firm and flat surface.
Allow a minimum of 5 cm around each side of the
Keep the SmartBox
away from domestic heating equipment, direct sunlight or humidity.
Always disconnect the SmartBox
You can use an external surge protection device to protect the
DO NOT
Do not try to open the
SmartBox
Do not expose the SmartBox
to dripping or splashing & no objects filled with liquids, such as vases,
should be placed close to it.
Do not place naked flame sources, such as lit candles near the
Do not insert foreign objects in openings and connectors of the
Always use the power supply that was provided with your
unserviceable, a replacement can be purchased from our website:
This product is for use only in the United Kingdom.
You should never try to repair the
the instructions in the troubleshooting section of the Fetch
WARANTY
The SmartBox
7000, 8000 and 8320HD have a standard 12 month manufacturer’s warranty. We will
extend this to 24 months for the
at www.fetchTV.co.uk
Please note, this is subject to terms and conditions.
safely it is important that you read the safety instructions below.
SmartBox for cooling.
from the power supply before cleaning it.
SmartBox
from thunderstorms.
, as this will invalidate your warranty.
SmartBox.
SmartBox.
SmartBox
. If this becomes damaged or
www.fetchTV
.co.uk
SmartBox
yourself. If you encounter any problems please follow
TV
website or call 08450 347 348.
SmartBox 7000 and SmartBox
8000 when you register your account
7
.
Page 8
8
4. GETTING STARTED
This guide is intended to help you get started and provide you with a basic overview of the key
functions.
You have probably already checked, but before you install your SmartBox you need to be sure you
are in a FREEVIEW coverage area. If you are not sure it is easy to check coverage in your area,
simply text your postcode, followed by your house name or number to 80560 e.g. NW9 6NY 1 (Costs
no more than a normal text). Or visit www.freeview.co.uk. If you have purchased a SmartBox
8320HD, please ensure that you are in a FREEVIEW HD reception area by texting your postcode and
your house number to 80560 (e.g. NW9 6NY 1) to 80560.
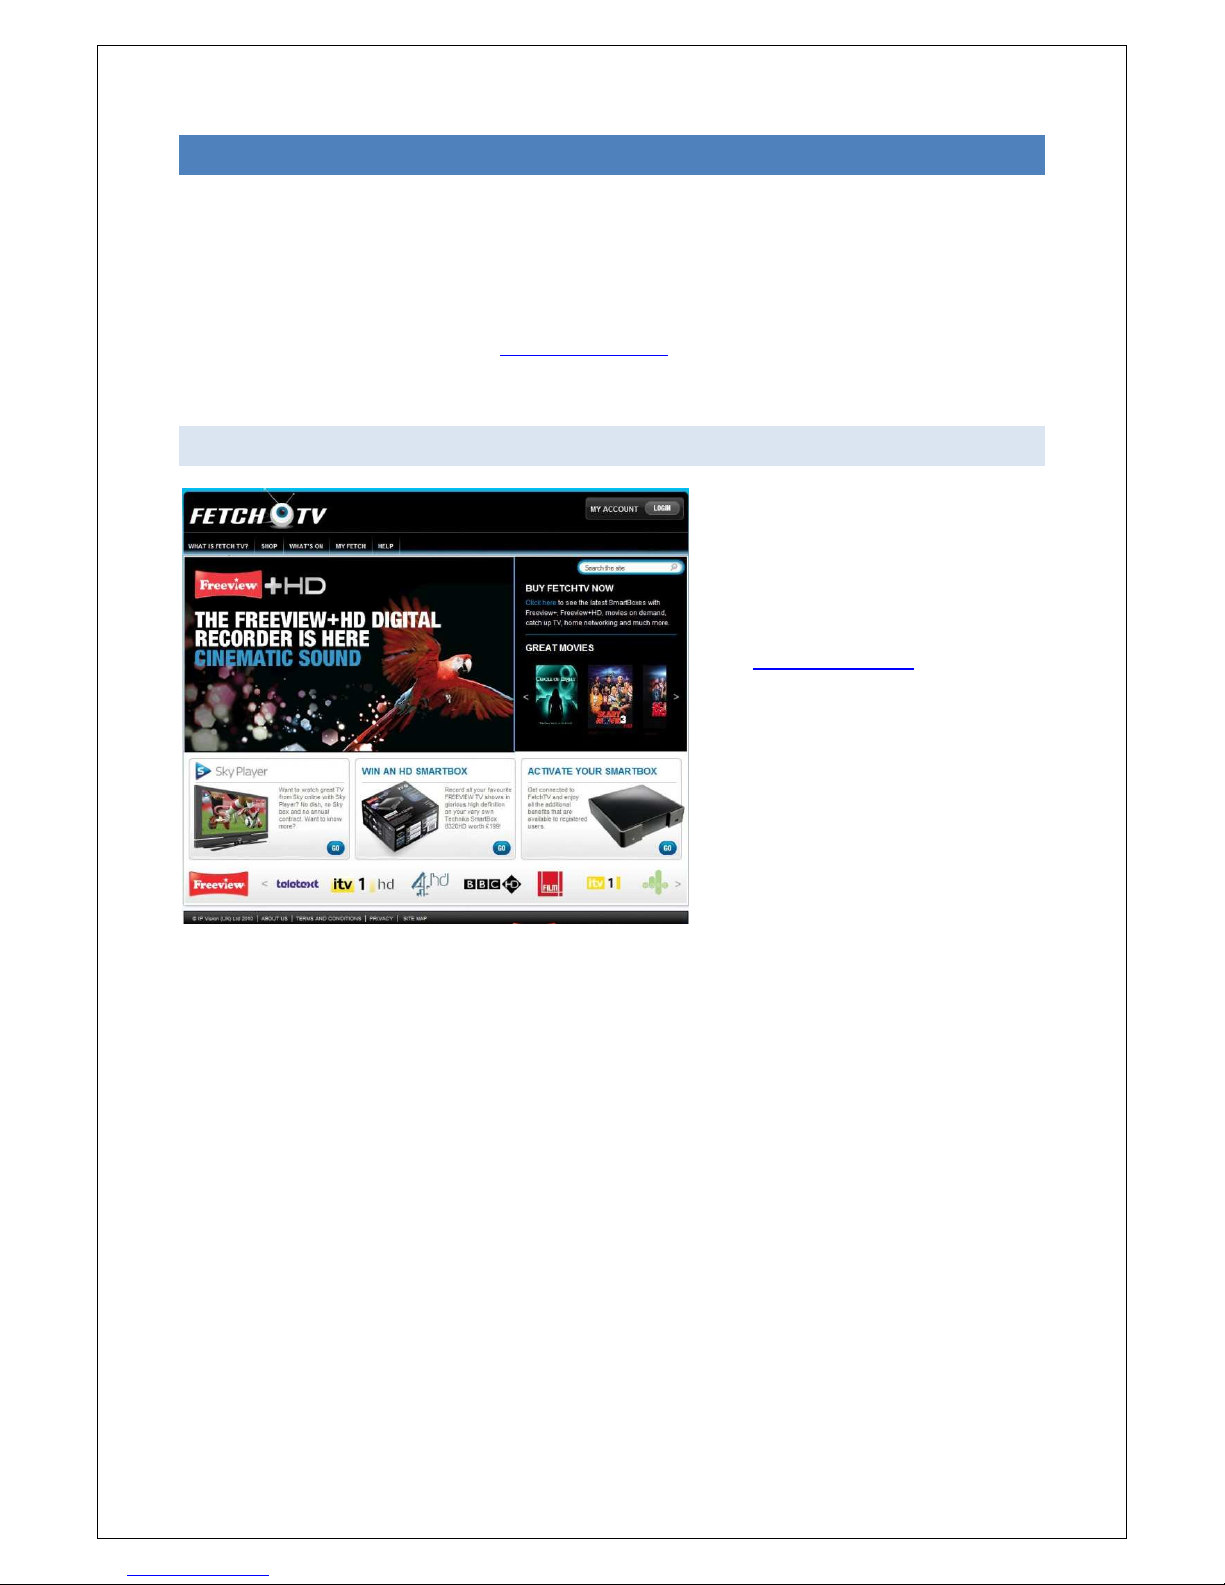
4. 1 SET UP YOUR FETCHTV ACC O U NT ONLINE
To unleash the potential of your
SmartBox and to take advantage of all
of the fantastic features including the
ability to watch BBC iPlayer on your TV,
you will need to set up your free
FetchTV account online.
Visit www.fetchTV.co.uk and click on
Activate Your SmartBox.
Follow the onscreen instructions to set
up your FetchTV account.
This account gives you access to all of
the catch up and on demand services
on FetchTV.
You will be asked for your credit or debit card information during the registration process, this is
because we need to verify that there is someone in your household who is over 18 (as the service has
access to 18 rated content) and will allow you to buy movies and other content simply using your
remote control.
You will only ever be charged if you choose to purchase content. There is no subscription charge for
FetchTV.
Once you have your account and know you are in a Freeview coverage area, please take a moment
to check that you have all of the required components. We also recommend that you review the
safety information found at the end of this guide.
Page 9
9
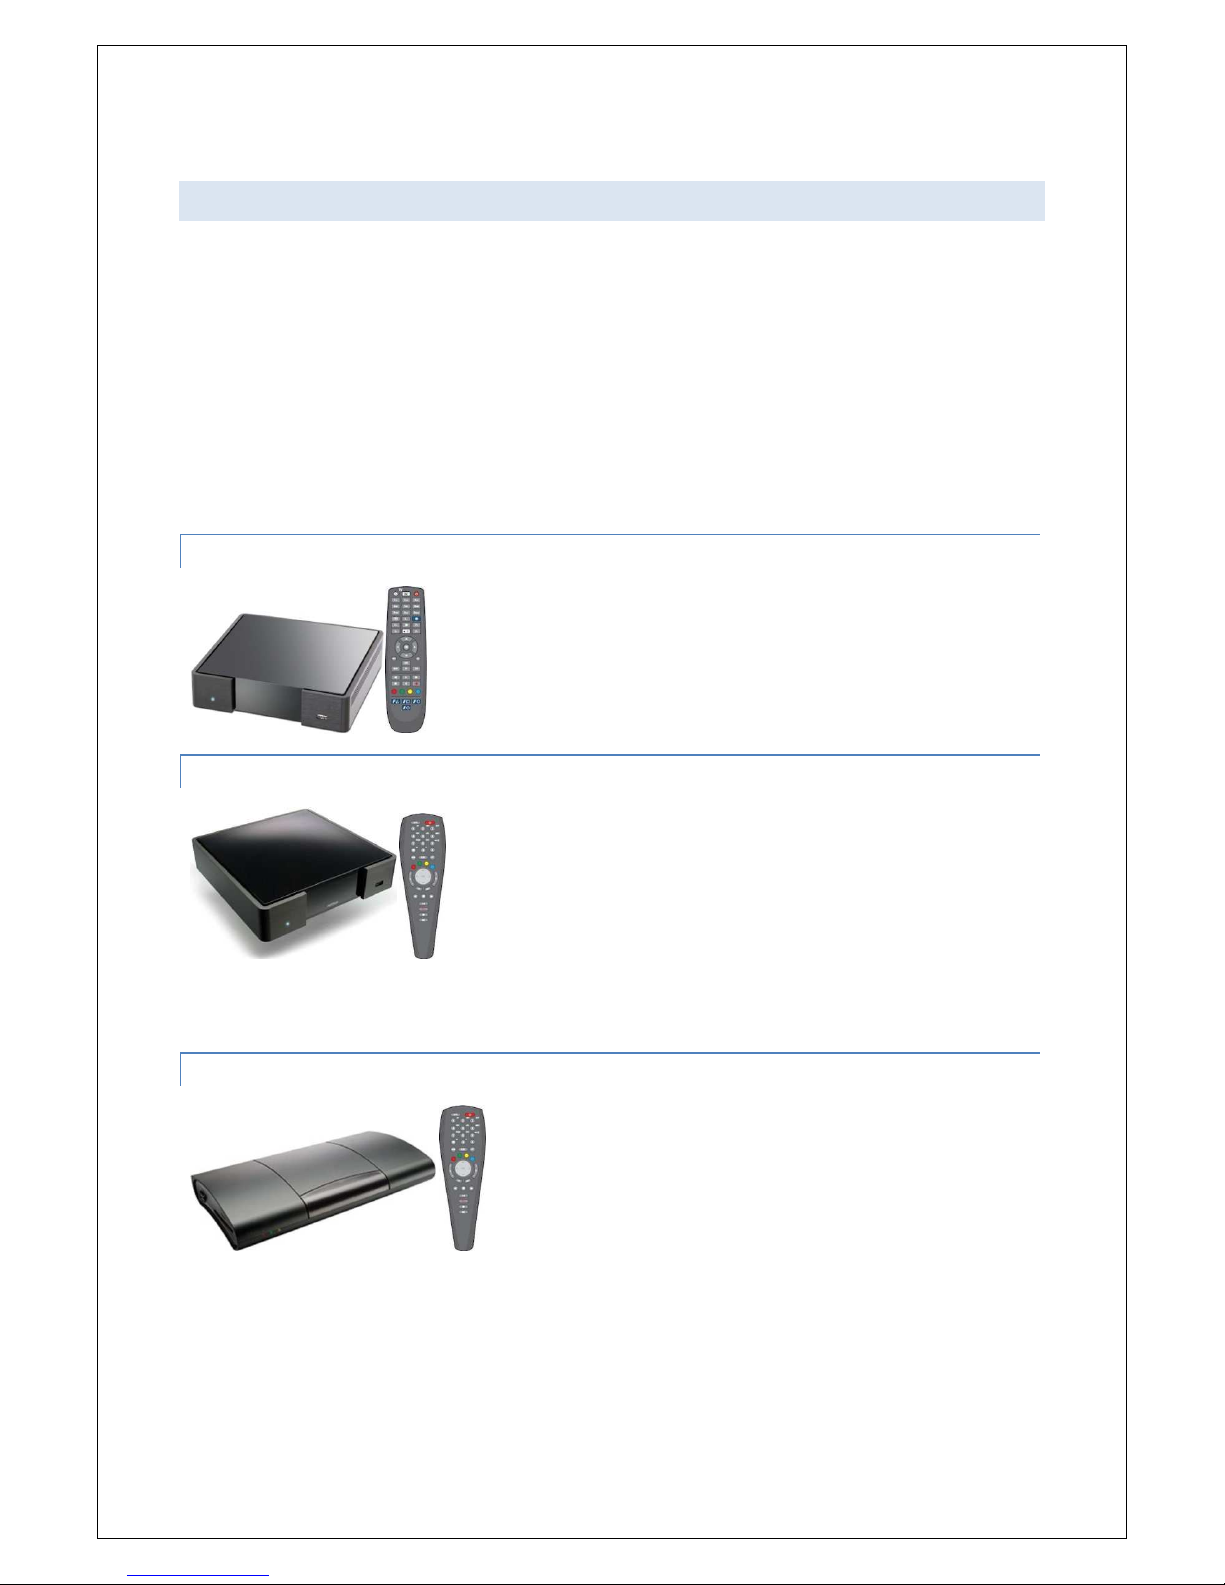
4. 2 YOUR SMARTBOX PACKAGE S HO ULD INCLUDE
SmartBox
RF/Aerial Cable
HDMI Cable
Remote control
2 x AAA Batteries
Ethernet Cable
Power Supply
SCART Cable (SmartBox 7000)
10 pin DIN to SCART Cable (SmartBox 8000 and SmartBox 8320HD)
See below for which SmartBox and remote is included in your FetchTV package.
4. 2 . 1 SMARTBOX 8320HD
4. 2 . 2 SMARTBOX 8000
4. 2 . 3 SMARTBOX 7000
Page 10
10
5. IN STALLATION
It’s important to choose a location that is well ventilated and easily accessible. Please see our safety
instructions above.
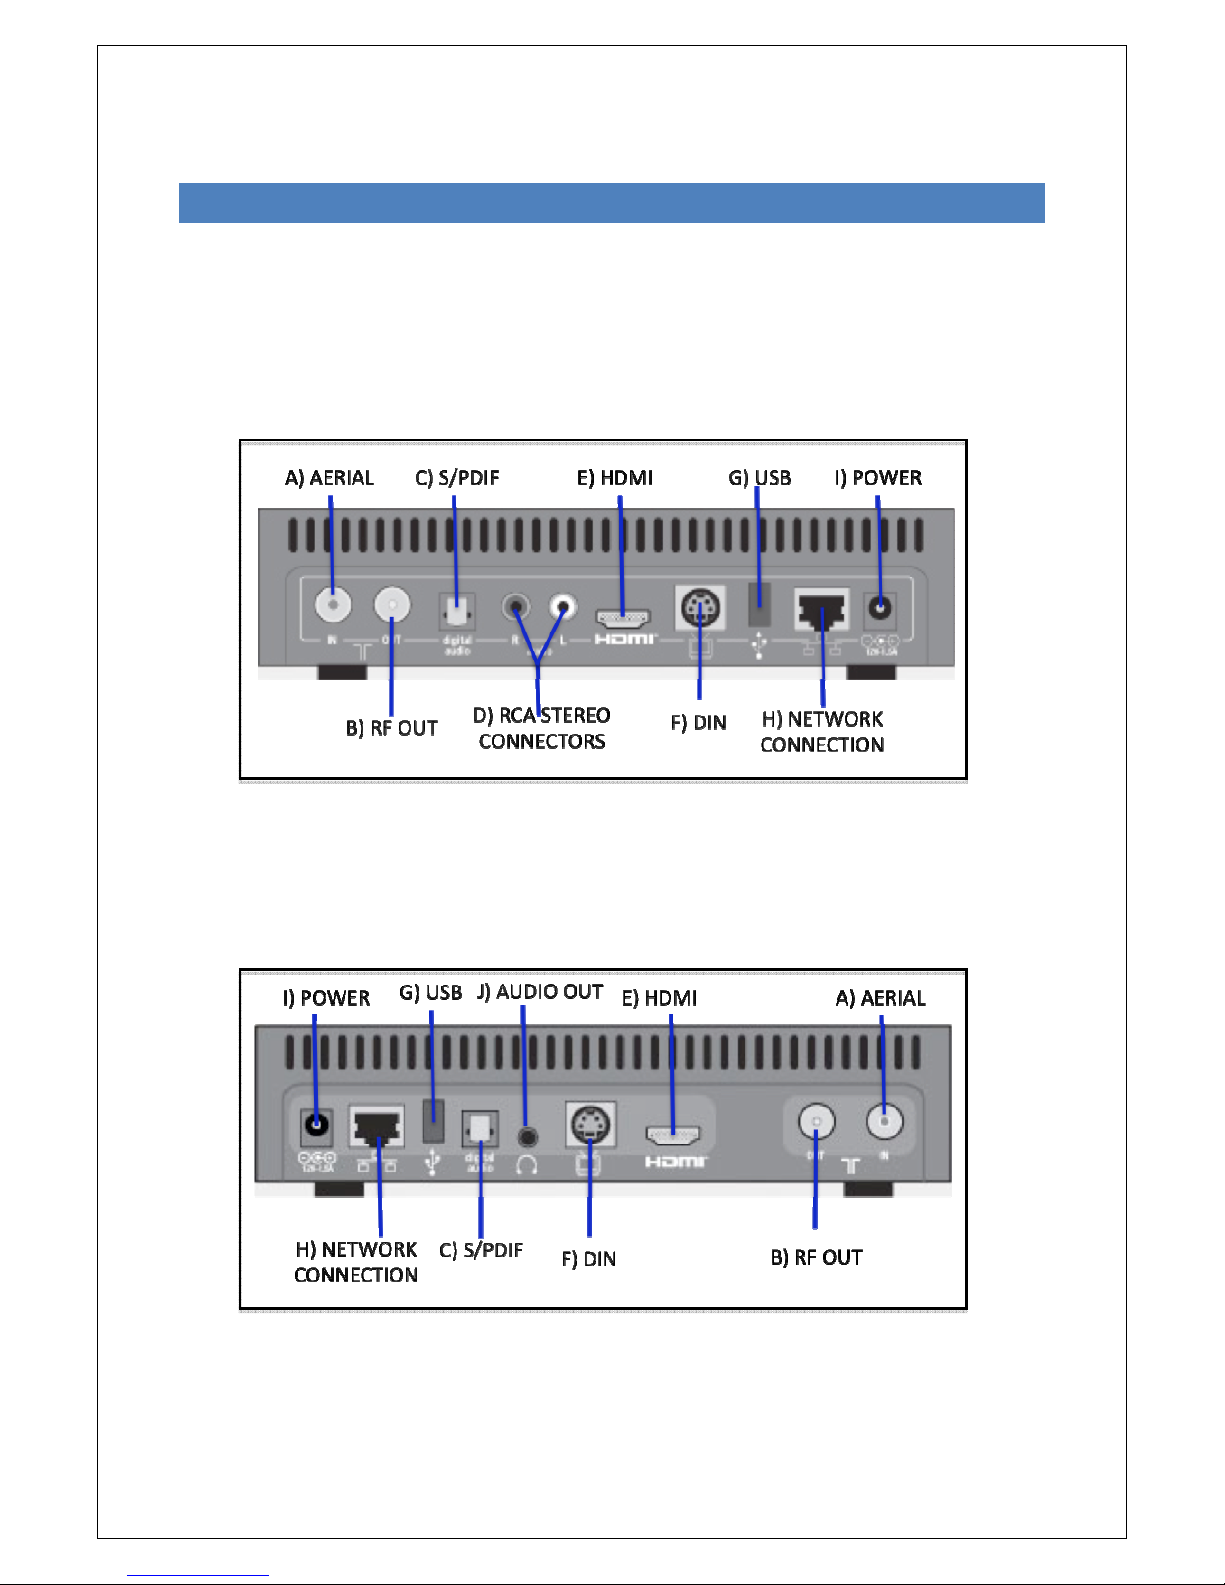
8320HD – B A C K O F B O X C O N N E CTIONS
8000 – B A C K O F B O X C ON N ECT I ONS
Page 11
11
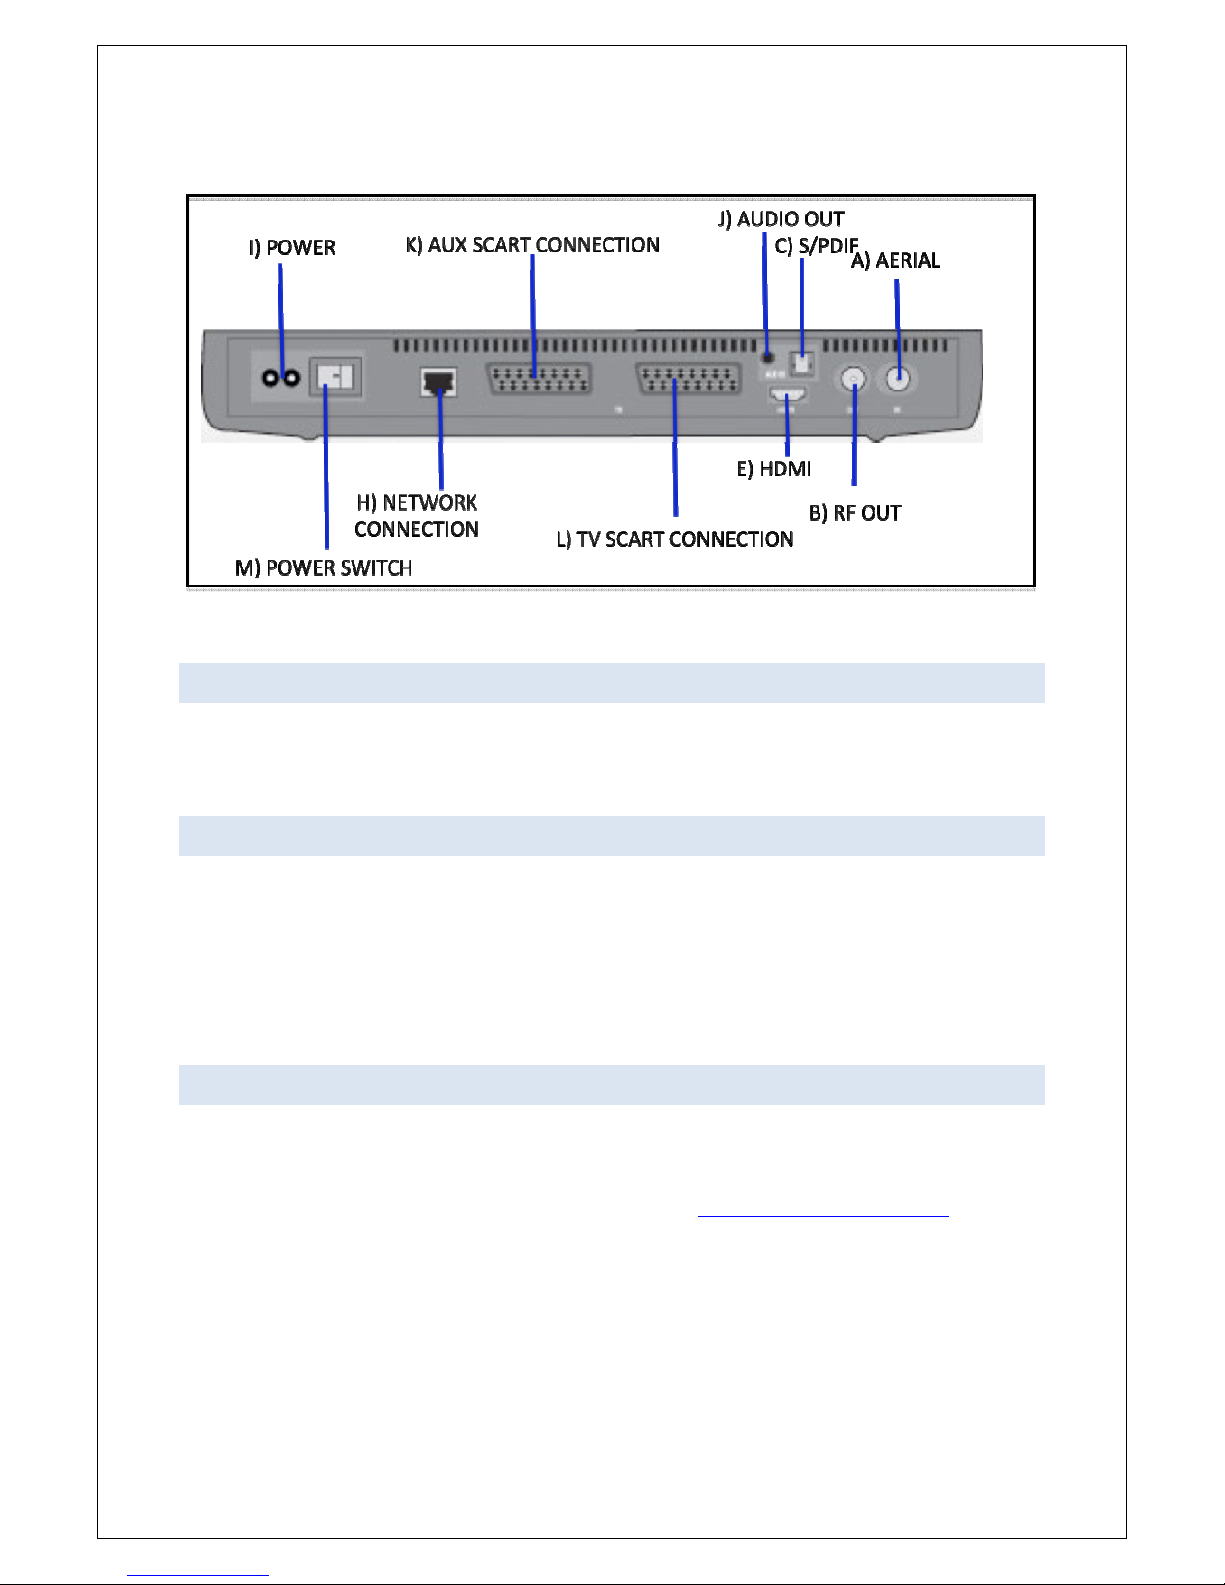
7000 – B A C K O F B O X C ON N ECT I ONS
5. 1 STEP ONE: GETTING A FRE EVIE W T V SIGNAL
Start by connecting your incoming aerial cable to the aerial socket (A), then connect the RF/aerial
cable (as supplied) from the SmartBox socket (B) to the aerial socket on your TV, so that the tuner in
your TV works too.
5. 2 STEP TWO: CONNECTING TO Y O UR TV
To get the best picture quality from FetchTV, connect the supplied HDMI cable to the HDMI socket
(E) on both your TV and your SmartBox. Should your TV not support an HDMI connection then you
can connect to your TV by using the supplied SCART/DIN cable using socket (F) for the 8000 and the
8320. On the 7000 you can use a normal SCART lead to connect your TV to the TV SCART connection
on the SmartBox (L). The second SCART connection (K) can be used to connect a secondary device
(e.g. DVD player) for pass through to your TV.
5. 3 STEP THREE: CONNECTING T O YOUR BROADBAND ROUTER
Your SmartBox must be connected to a broadband network to work properly. For the best possible
download speeds we recommend connecting directly using an Ethernet cable. Alternatively, you may
use powerline connectors which will extend your high-speed home network using existing household
power sockets. These are available from our shop website at www.fetchTV.co.uk/shop.html or from
most electrical retailers.
The SmartBox 8000 and the SmartBox 8320HD can connect to your broadband router via the
Ethernet socket (H) or via the built in Wi-Fi. Should your SmartBox location be near your broadband
router, use the supplied Ethernet cable. See below for details on connecting to a wireless network.
At this stage, you should ensure that your router is set to work with the FetchTV SmartBox. Most
routers are set by default to dynamically assign IP addresses using DHCP. If that is how your router is
set, then the SmartBox should connect automatically. Advice on how to set your router will be in the
router’s user manual, or on the manufacturer’s website.
Page 12
12
Note: If you use static IP addresses on your network, you can set a static IP address on the FetchTV
SmartBox, by pressing MENU > PREFERENCES > NETWORK then select MANUAL and input your
settings. Please note that you can’t access the menu during the initial setup.
5. 3 . 1 CONNECTING VIA ETHERNET
Connect one end of the Ethernet cable to the network connection socket on the rear of your
SmartBox using socket (H), and the other end to your router or, if you are using powerline
connectors, plug it into the connector in the electrical socket nearest your TV.
5. 3 . 2 CONNECTING VIA BUILT IN WIFI
This is covered during the on-screen set-up procedure. Make sure you have your encryption key
available. You may wish to plug a USB keyboard into the USB socket of your SmartBox to make this
easier.
5. 4 STEP FOUR: CONNECTING TO E X T E RNAL AUDIO DEVICES
If your digital amplifier is equipped with HDMI input, you can connect the SmartBox via the HDMI
cable, then connect the HDMI output from the digital amplifier to your TV (for video and audio passthrough). If your digital amplifier has an optical SPDIF connector, you can connect the SmartBox
optical audio (C) via a TOSLINK optical cable (not supplied). To connect the SmartBox to an analogue
amplifier, use an RCA stereo cable for the SmartBox 8320 HD, or plug a 3.5mm audio cable into the
SmartBox 8000 or 7000 audio jack (J)
5. 5 STEP FIVE: SWITCHING ON
Finally, insert the batteries into the remote control, connect the power supply to your SmartBox (I)
and plug it into the wall power socket. Please note, the 7000 has an internal power supply, and has a
switch on the back of the box (M), the 8000 and 8320HD have external power supplies.
5. 6 STEP SIX: ON SCREEN SET UP
When you switch on your SmartBox, make sure your TV is set to the appropriate AV (HDMI/SCART)
input, so that you’re able to view the output from your SmartBox.
The automated set-up process will start, follow the on-screen instructions:
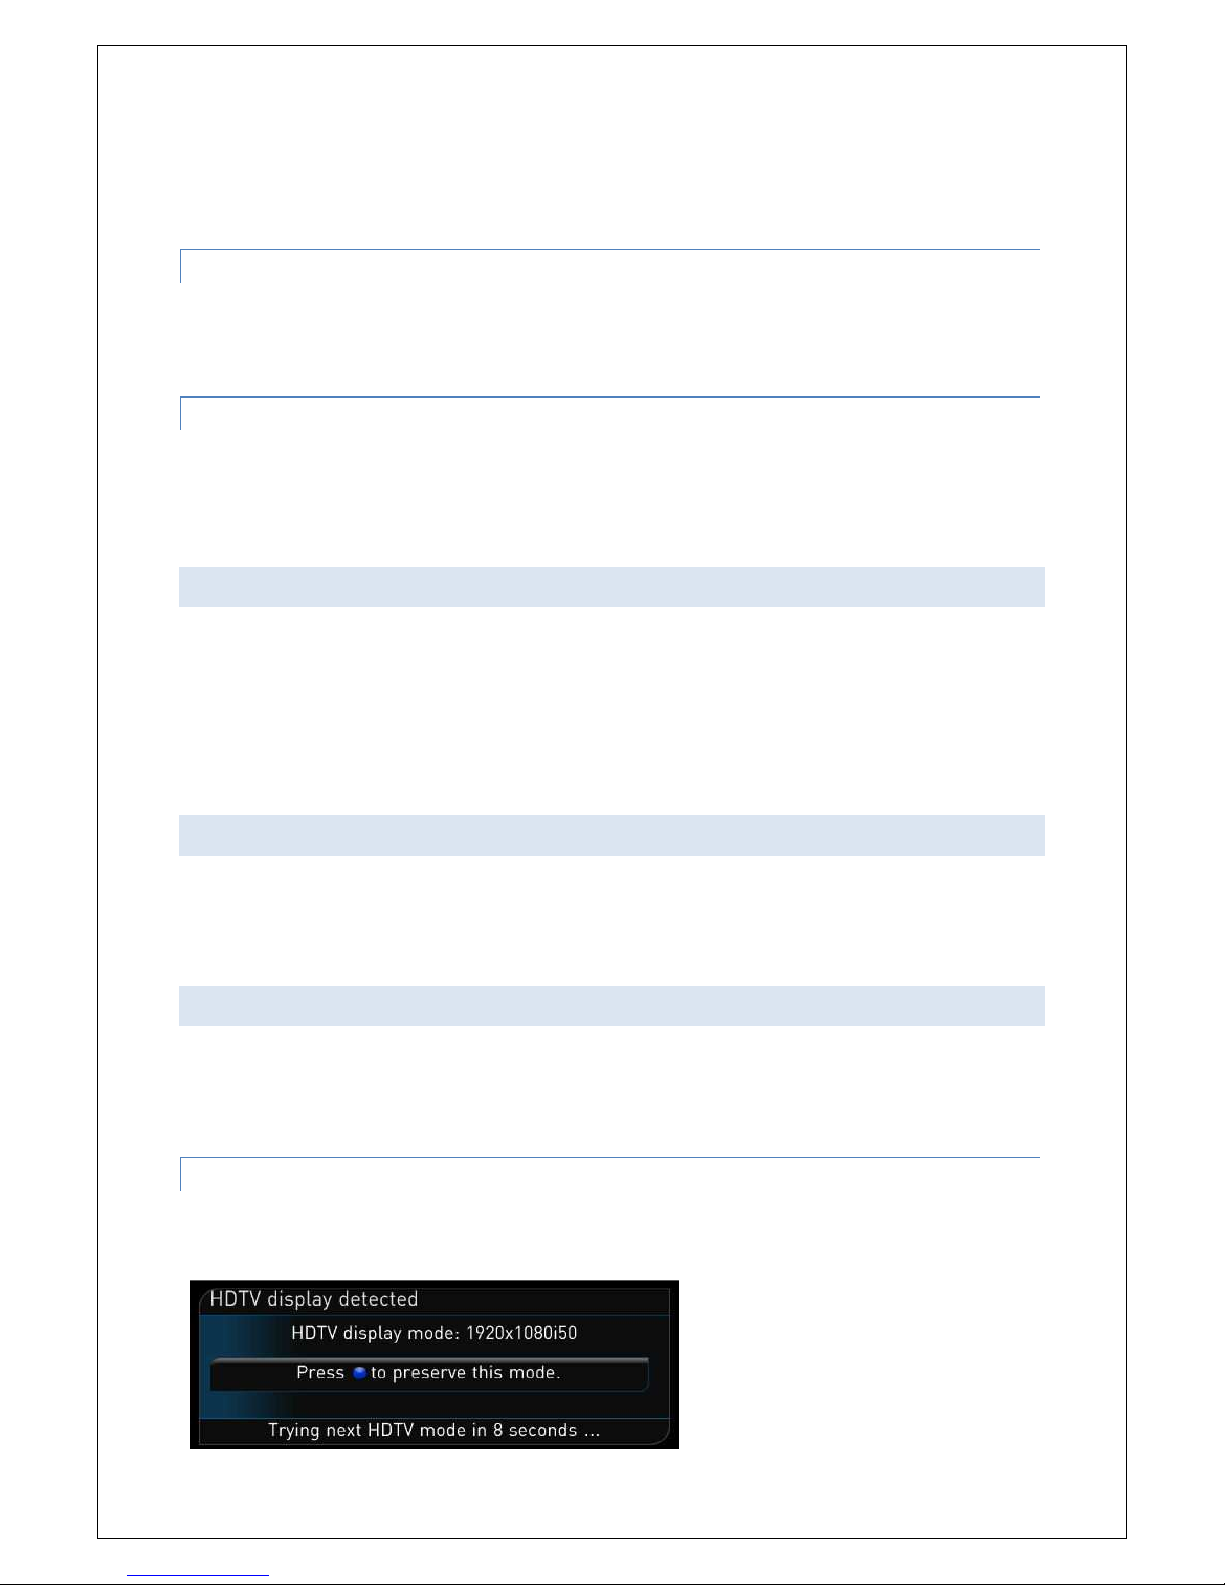
5. 6 . 1 CHOOSE THE MOST SUIT A BLE SC REE N
The SmartBox will show you a number of HDTV modes, when you are able to clearly see the option
to accept a particular mode, press OK and then BLUE.
Page 13
13
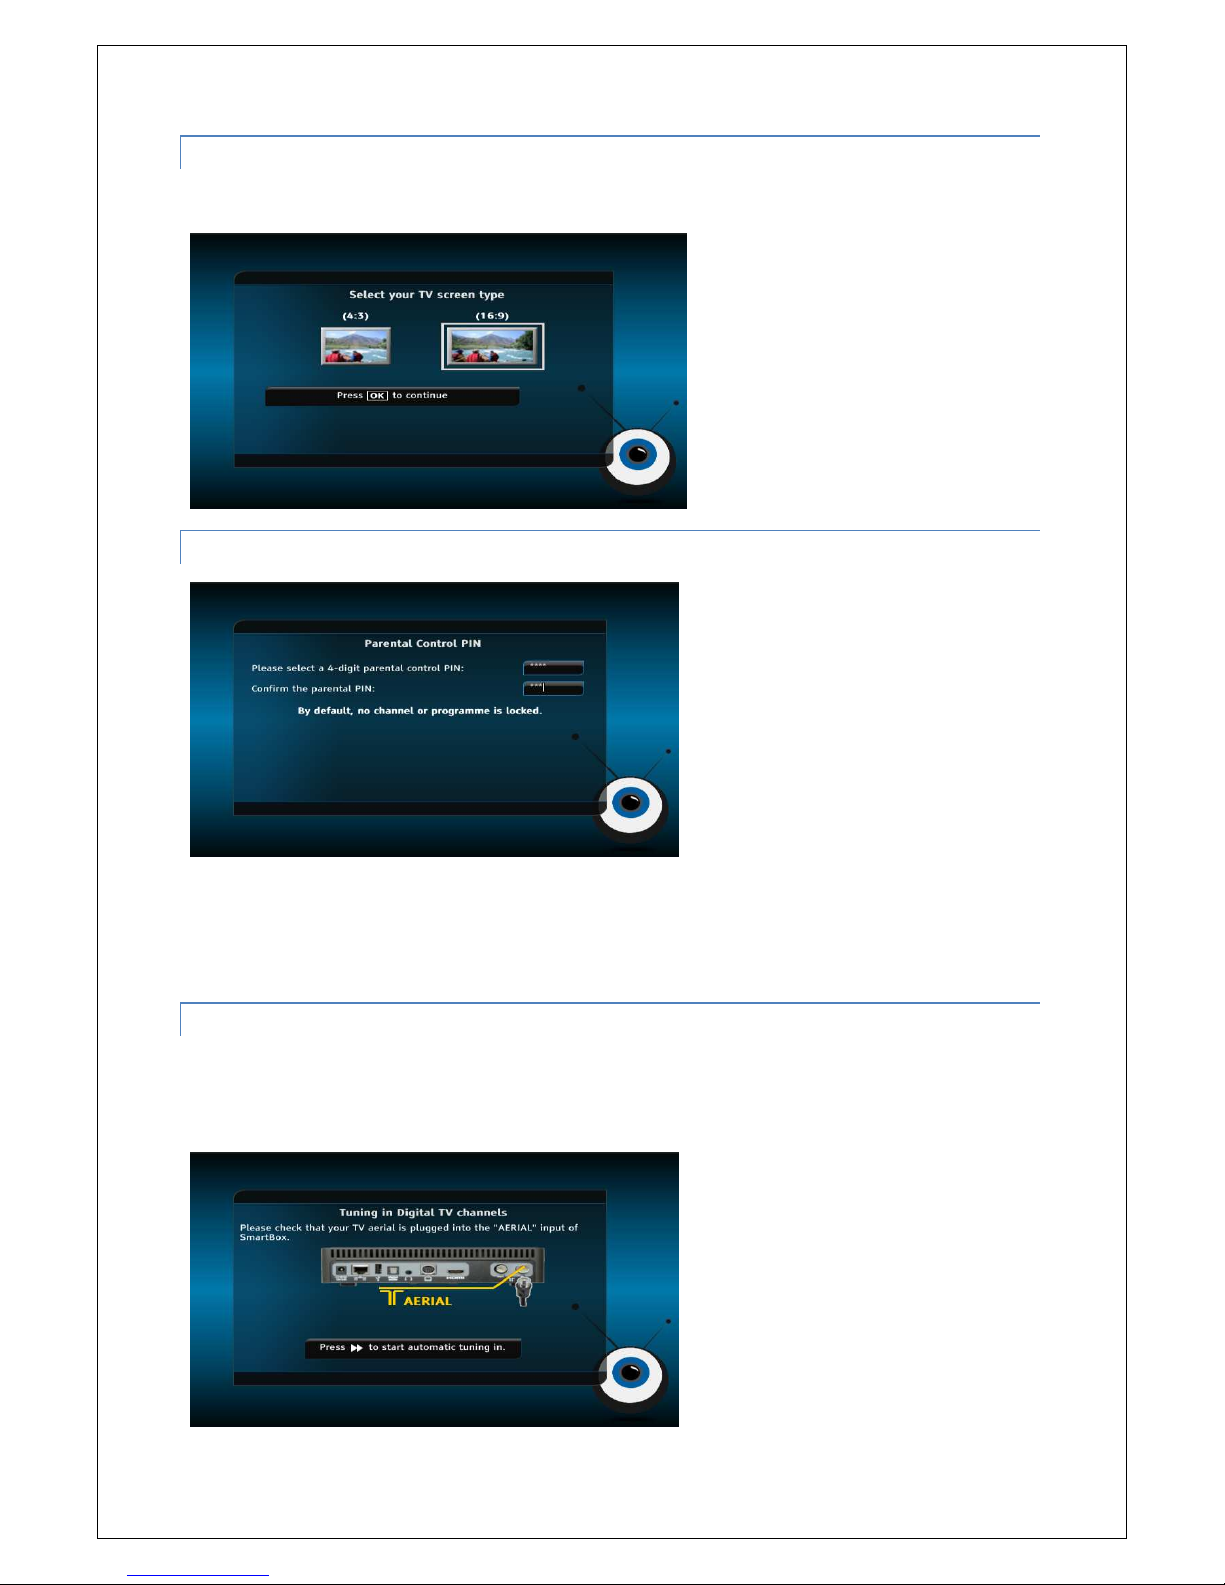
5. 6 . 2 CHOOSE APPROPRIATE ASP E C T RATIO
Using your remote control, select the appropriate screen ratio and select OK to continue.
5. 6 . 3 SET YOUR PARENTAL CONT R OL PI N.
This is not the FetchTV Purchase Pin which you selected when setting your account up on line and
will need to input every time you make a purchase. This is the Parental Control Pin which is used for
locking/unlocking channels and services, restricting selected TV programme and locking/unlocking
timeshift programmes.
5. 6 . 4 FREEVIEW TUNING INTRO D U CTION
Once you’ve connected your aerial to the SmartBox as indicated, press the double arrow key to start
the tuning in process where your SmartBox will search for available Freeview channels. If you have a
SmartBox 8320HD, this will also include available Freeview HD channels.
Page 14

5. 6 . 5
ST A R T THE AUTO TUINI
This will
automatically find all the channels currently available in your region
in
process progresses, channels will appear in the list on the right.
5. 6 . 6
NE T W O RK CONNECTION I
To get the most out of your
SmartBox
Ethernet connection.
NG I N PROCEDURE
. As the automatic tuning
NT R OD UCT ION
, we reccommend, where possible,
to connect using
14
the
Page 15

15
5. 6 . 7 CHOOSE WI-FI OR ETHERNET CON NECTION
5. 6 . 8 ETHERNET CONNECTION
Once your SmartBox is connected to your home network useing an ethernet cable, use the arrow
keys to navigate to “I want to use my Ethernet connection” and press OK.
5. 6 . 9 WIFI CONNECTION
To connect your SmartBox wirelessly, use the left/right arrows to scroll through the available
networks and press OK when you have found your home network. Navigate the the “Key” field and
input your wireless key using your remote control. You might find it easier to plug in a USB keyboard,
otherwise you can input letters by tapping your remote control (eg “a” would be one tap on the
number 2 key and “A” would be 5 taps on the number 2 key).
You will then be taken through to the on-screen registration for FetchTV and to activate your
SmartBox for on line and on demand services.
Please refer to section 6.2.2 of this guide, entitled “Registering Your Account On Your SmartBox”.
Page 16

16
6. USING YOUR SMARTBOX
6. 1 T HE REMOTE CONTROL
To access the great features and services in FetchTV, you will need to familiarize yourself with the
remote control, which is designed to be easy to hold.
6. 1 . 1 UNIVERSAL REMOTE – SMARTBO X 8320HD
RECORD FORWARD/ CANCEL/ VOLUME LIVE TV MUTE STAND BY
REWIND BACK
TEXT TV GUIDE LIST OK/NAVIGATION
6. 2 . 1 TWIST 2 REMOTE - SMARTBO X 7 000 & 8000
RECORD PLAY/PAUSE OK BUTTON VOLUME CANCEL/BACK FAST TEXT KEYS
TEXT
MUTE FORWARD/ CHANNEL CHANNEL EPG FETCHTV
REWIND INFO CHANGE
Page 17

17
6. 2 SETTING UP THE FETCHTV SERVIC E
Now that you have set up your SmartBox, you can enter the exciting world of on-demand content.
Watch what you want, when you want, from your favourite armchair.
6. 2 . 1 CREATING YOUR FETCHTV ACCO UNT
If you haven’t already created an account with FetchTV, you will need to do that now.
Please see section 4.1 entitled “Set Up Your FetchTV Account Online” for instructions on how to set
up your free FetchTV account.
6. 2 . 2 REGISTERING YOUR ACCO UNT O N YO UR SMARTBOX
When you have registered on the PC, go back to your SmartBox and press the * button on your 7000
or 8000 series remote control, or the blue FetchTV button on the 8320HD universal remote control.
Registering your account on your SmartBox will give you access to thousands of hours of movies,
music videos and TV, as well as catch-up TV services like BBC iPlayer, Sky Player and remote
recording. It will also give you access to the free archive facility that allows you to save recorded TV
programmes onto external drives, and with 7000 and 8000 series boxes it will also mean that your
warranty is extended to 24 months, free of charge.
When you connect to the FetchTV service for the first time you will be asked for your mobile number.
This is the unique number you used when you created your FetchTV account online. If you do not
have a mobile, a land line number will work as well.
If you need to check the number that you used you should log in to your FetchTV account at
www.fetchtv.co.uk and go to My Fetch to review your account information.
If this page does not appear then check your connection to the router in the diagnostics menu.
Input your mobile phone number, using the remote control number keys, and press OK. You will now
be asked to input your FetchTV PIN which you selected when you created your FetchTV account,
again using the number keys on your remote control, then press OK. Note that the FetchTV PIN is not
the same as the SmartBox parental control PIN (used to block restricted programmes).
You should now be able to access the FetchTV service in full.
You will not normally have to enter your details again but it is a good idea to keep them safe for
future reference.
You will only be asked for your FetchTV PIN for payment verification. You should keep it private and
secure, and you can change it any time by logging in to your account at www.fetchtv.co.uk.
Page 18

18
7. USING FETCHTV
To access FetchTV and other online services your SmartBox must be connected to the internet.
7. 1 FINDING A PROGRAMME OR MOVIE O N FETCHTV
FetchTV gives you access to thousands of hours of movies and TV programmes ready for you to
download and watch whenever you want. Use the UP and DOWN arrow keys on the remote to
browse through the menus and lists and press OK to select.
7. 2 DOWNLOADING A PROGRAM M E O R MOVIE ON FETCHTV
As you scroll through the movies and TV available on FetchTV, when you’ve found something which
you might like to watch you have the option to press the OK button to be taken through to the
synopsis page where you can watch a trailer. If you press the PiP button, you can play the trailer in
the centre of the screen.
Once you’ve read the synopsis and made your decision, press OK again when you will be asked for
your FetchTV Purchase PIN which you registered during the set up of your on line account. Your
credit card or pre-pay will be debited. Your SmartBox will then acquire the digital rights to watch the
programme. Once you have purchased a movie or a programme from FetchTV the screen
automatically switches to the MY RECORDINGS menu. The progress of the download will be shown
on screen, and in the information area at the bottom of the recordings list, it will tell you when the
programme can be viewed. If it says ‘Ready to Play’ you can select it and start watching it
immediately by pressing OK.
Please note: FetchTV is not responsible for the quality of your broadband service, this is the
responsibility of your broadband provider. Downloading programmes may count towards the
Page 19

19
download limit on your account so you should check the terms and conditions of your broadband
provider.
7. 3 CATCHUP TV SERVICES
To watch catch up TV programmes on your FetchTV SmartBox, like BBC iPlayer, you must be
connected to the Internet. You can access these services by selecting FETCHTV from the MENU, then
selecting FETCH TELEVISION, then CATCH-UP TV.
Services like BBC iPlayer and other free web services in the catch up TV section are provided by third
parties and are outside of the control of FetchTV. If content is not available, or is provided in a quality
that you do not find acceptable, then you should contact the broadcaster or content provider directly.
BBC iPlayer can be found in the catch-up TV service, or by pressing 222 (B-B-C) on your remote
control, and displays the BBC iPlayer interface on your TV, allowing you to navigate through its
services using your remote control.
Page 20

20
Please note that the BBC iPlayer is a service supplied by the BBC and is not the responsibility of
FetchTV. In particular, some programmes may not be available to watch on TV or other devices, even
though they can be watched on a PC or Laptop. Please also note that you cannot record BBC iPlayer
content on your SmartBox.
7. 4 SKY PLAYER
In order to watch TV from Sky delivered over your internet connection on your SmartBox with
FetchTV, you will need a free Sky iD and a relevant Sky or Sky Player subscription.
7. 4 . 1 NON SKY TV CUSTOMERS
Visit http://www.fetchTV.co.uk/skyplayer and select the “Register Now” option which will take you
through to the Sky website where you can sign up for a free Sky iD. Follow the online prompts to
select a subscription package which suits you. Minimum contract is one month.
7. 4 . 2 SKY TV CUSTOMERS
If you are already a Sky customer, you can use your existing Sky iD to log into Sky Player on your
SmartBox where you can watch live channels and on demand programmes from channels in line with
your current Sky TV package. If you do not already have a Sky iD you can visit Visit
http://www.fetchTV.co.uk/skyplayer and register for one for free.
7. 4 . 3 SIGN IN PROCESS
Press the MENU button on your remote control and navigate to the SKY PLAYER option. You can also
launch Sky Player by pressing 759 (S-K-Y) on your remote control. Using the number keys on your
remote control, enter your user name and password and navigate to the Sign In button and press
OK.
Using the navigation buttons on the remote control, navigate to either LIVE TV or TV ON DEMAND.
Page 21

21
If you select to watch LIVE TV, you can view the programme guide where you can scroll through by
time or by channel to see what’s on.
Please note: You CANNOT record content from Sky Player on your SmartBox, but you can access
many programmes in the on-demand section of Sky Player.
Availability of Sky Player content depends on your device type and subscription. Sky Player terms
and conditions apply. See Skyplayer.com for details.
Page 22

22
8. DIG I TAL TELEVISION
Your FetchTV SmartBox lets you watch TV in a number of different ways:
Watch Digital Freeview Channels on Broadcast TV
Watch programmes you have recorded on your SmartBox Personal Video Recorder
Catch-up with programmes you have missed on BBC iPlayer
Watch a large selection of movies and programmes on FetchTV
Watch videos you have on your PC or USB hard drive.
Access Sky Player, the online TV service from Sky (subscription required)
For the safety of you and your family the SmartBox offers parental control features that can be set up
for broadcast TV and FetchTV.
8. 1 P ARENTAL CONTROLS
8. 1 . 1 SETTING UP PARENTAL CONT R OLS
The FetchTV SmartBox allows you to restrict viewing by use of the parental control PIN. To do so
Press the MENU button
Use the remote control to navigate to select PARENTAL LOCK and press OK
Enter the parental PIN code you have selected at installation and press OK, you will then be asked
what channels require protection, the level to which you require programme restrictions and whether
you require a lock on time-shifted content (the content that is automatically recorded on your hard
drive from the broadcast channel you have been watching to allow you to rewind at any time).
Press the BLUE Button to save your settings.
8. 1 . 2 CHANGING THE PARENTAL CO NTROLS
To change to a new PIN press blue and then enter your old PIN number first, then new PIN number
into both boxes using the Number Input buttons
Press the BLUE Button to save the new PIN
Exit by pressing the RED Button
Please note that once you have unlocked a television channel by navigating to it and inputting your
Parental Control Number, the channel will stay unlocked until you set the SmartBox to standby mode
Page 23

23
(press the POWER key). This is not the case for 18+ movies and adult content on FetchTV, which will
always require you to input your Parental Control PIN.
8. 2 CHANGING CHANNELS
There are five additional ways to change the channel without the need to enter the Electronic
Programme Guide (EPG)
(1) Use the P+ and P- buttons
(2) Enter the channel number using the number keys.
(3) Press the LIST button on your remote control, scroll to the required channel using the remote
and press OK to select.
(4) Press the INFO button, then use the UP / DOWN arrows to browse what’s currently playing
on other channels. When you see something you wish to watch, simply press OK.
(5) Press the PiP key then OK to return to the last channel
Open the guide, navigate to the channel you wish to watch and press OK
8. 3 FAVOURITE CHANNELS
Your SmartBox gives you the option to select your favourite channels for quick and easy navigation.
Press MENU, followed by PREFERENCES, followed by FAVOURITE CHANNELS, then press OK.
This screen provides you with a list of all the channels available on your service and from here you
can edit the list to either skip a channel when changing channels. In order to navigate to your
favourite channels while watching live TV press the LIST button and then the fast forward (>>)
button twice. This will take you to your favourite channels list, once you have selected a channel from
this list the P± buttons will only take you to your favourite channels.
Page 24

24
8. 4 T HE ELECTRONIC PROGRAMME GUI DE (EPG)
The Guide allows you to see what’s on today and the next 8 days and set programme recordings.
8. 4 . 1 ACCESSING THE EPG
Press the GUIDE button on the remote control or Press the MENU button, use the remote to scroll to
the TV Guide option and press OK.
8. 4 . 2 NAVIGATING AROUND THE E P G
Press OK to exit the EPG to view the selected channel
Use the << and >> buttons to jump +/- 24 hours
Press the blue button to go to the programme currently tuned in
Press the yellow button to view as channel listing
Press the P+/P- keys to scroll one full screen at once
Press the 0 or the Guide button to exit the EPG
Press Text button to switch from the current 2-hour programme window to a 30min programme
window, a 1-hour programme window or a 4-hour programme window.
Page 25

25
8. 4 . 3 PROGRAMME INFORMATION
The EPG gives you basic information about each programme.
Pressing INFO gives you the programme title and full description, as well as showing which
programmes have subtitles marked [S]. Pressing INFO again, or OK takes you back to the EPG.
8. 5 T HE INFO BAR
The info bar provides basic information about the programme you are watching. Pressing INFO while
you are watching TV launches the Info bar and displays programme title, channel information and
how much of the programme has been broadcast.
To scroll through programme information for different channels use the up and down arrows on the
remote.
To scroll through programme information for different times on the same channel use the left and
right arrows on the remote.
The INFO bar also provides quick easy access to FetchTV via the Green button, and allows you to
turn subtitles on and off using the yellow button while you are watching Live TV.
Page 26

26
8. 6 SUBTITLES
The Info bar also tells you when the current programme has subtitles. Simply display the bar by
pressing INFO. If subtitles are available the option will appear in the yellow lozenge at the bottom of
the screen.
Simply press the Yellow button on your remote control with the info bar open to turn subtitles on/off.
8. 7 P AUSE & REWIND LIVE TV
8. 7 . 1 PAUSING LIVE TV
Press the Pause/Play Key on your remote control.
An Information bar will temporarily appear and it will tell you how far behind live TV you now are.
Page 27

27
8. 7 . 2 RESUMING LIVE TV
Press the Pause / Play key on your remote control.
An Information bar will temporarily appear showing how far behind live TV you now are.
8. 7 . 3 REWINDING LIVE TV
Press the rewind button <<. (Note: The FetchTV SmartBox has multiple rewind speeds. To change
the speed of rewind, simply press the rewind button again to cycle through the speeds.)
Once you have reached the required place in your programme, press Play to resume viewing or press
the fast forward button >> to fast forward at various speeds.
8. 7 . 4 OTHER PLAYBACK CONT ROL S
When watching a downloaded movie or programme, you can use your remote control to perform the
following functions:
• skip forward 1 minute: tap the right arrow
• Keep the right arrow pressed until you reached the position you wish to start playing at
• Rewind 1 min: tap the left arrow
• Keep the left arrow pressed until you reached the position you wish to start playing at
• Rewind 30secs: tap the down facing arrow
• Skip forward 30s: tap the up arrow
When you are watching live TV or a TV recording, you can use your remote control to perform the
following functions:
• Fast forward an hour: press and hold the right facing arrow
• Rewind an hour: press and hold the left facing arrow
• Rewind 30secs: tap the down facing arrow
• Fast forward 30secs: tap the upwards facing arrow
• Forward skip 1 hour: keep the right arrow pressed
• Rewind 1 hour: keep the left arrow pressed
If you have paused live TV or a recording, you can press the up arrow to playback at half speed (slow
motion).
Page 28

28
9. RECO R D ING CAPABILITIES
9. 1 RECORDING A LIVE PROGRAMME
If you want to record the programme you are currently watching, press the REC button on the
remote. A window will appear on the screen.
If you press the red button, recording will continue until you stop it (by pressing REC again), or until
3 hours have passed.
If you press the green button the current programme will be recorded from the current point (the
part of the programme until the current point will not be recorded; if you wish to record from the
beginning, you can rewind and then press the REC button). The programme will be recorded until it
ends.
Pressing the RED Button Pressing the GREEN Button
Page 29

9. 2
SE T T I NG A RECORDING
9.3.1 From the EPG
Access the EPG by pressing GUIDE on the remote control
Using the remote control, select the
Press the Red Button to record the
A red dot will appear next to the
9.3.2 Manually
You can manually set recordings from the Recording Timers screen, Press M
RECORDING TIMERS, next y
ou should press the BLUE button.
Then m
anually adjust the recording
recording.
programme you wish to record
programme
programme
name to confirm the record function
ENU
, then select
timer info, and press the BLUE button again to save your
29
Page 30

30
9. 3 REMOTE RECORDING
You can now find out what’s on Freeview over the next 7 days and set your SmartBox to record, from
anywhere in the world.
Visit www.fetchTV.co.uk and sign in to your FetchTV account. Go to http://www.fetchTV.co.uk/my-
fetch/TV-listings.html and look for the programme which you’d like your SmartBox to record.
Click on the programme for the synopsis, and the option to set email reminders when the show is on,
or to “Record this on my SmartBox”.
Select “Record this on my SmartBox” and your SmartBox will be set to record the selected
programme. When the SmartBox is in standby, it will check for new recordings every 5 minutes.
When the SmartBox is in Low Power mode, it will check for new recordings daily. By default, if the
SmartBox is left in standby for over 10 minutes it will power down to low power mode. Disabling the
“Energy savings delay” in the Display preferences menu will prevent this.
Page 31

31
9. 4 SERIES LINKING
Once you have set a programme to record that is part of a series, the red button at the bottom of the
screen will change to ‘Link Series’ and you can press red again to record the whole series. The red
dot next to your selected programme will then change to a double dot.
9. 5 M ODIFYING SCHEDULED RE CO R D IN GS
Once you have set a programme to record you can manually change it in one of two ways:
9. 5 . 1 MODIFYING A SCHEDUL E D RECORDING FROM THE EPG
Use the remote control to select the programme you have set to record and press the RED button,
You may need to press it twice if it offers a Series Link option. This will bring up the Modify Recorder
Timing Screen and you can use the remote control to alter your settings.
Page 32

32
9. 5 . 2 MODIFYING A SCHEDUL E D RECORDING FROM THE MENU
Alternatively you can Press the MENU button and select RECORDING TIMERS, this will show you all
the recordings you have set up on your SmartBox.
Simply select the timer you wish to edit and press OK. This will bring up the Modify Recorder Timing
Screen and you can use the navigation keys and OK button to alter your settings.
Press the Blue button to save your new settings.
When you have finished, press the RED button to EXIT.
9. 6 DELETING A SCHEDULED RECO R D ING TIMER
Once you have set a programme to record you can manually delete it one of two ways:
9. 6 . 1 DELETING A SCHEDULED R E C ORDING TIMER FROM THE EP G
Use the navigation keys to select the programme you have set to record and press the RED button,
You may need to press it twice if it offers a Series Link option. This will bring up the Modify Recorder
Timing Screen and you should press the GREEN button to delete your scheduled recording.
Alternatively, you can delete a scheduled recording by finding it on the EPG and pressing the STOP
button. The red record symbol will then disappear and the corresponding recording timer will be
deleted.
Page 33

33
9. 6 . 2 DELETING A SCHEDULED R E C ORDING TIMER FROM THE MENU
Alternatively you can Press the MENU button and select RECORDING TIMERS, this will show you all
the recordings you have set up on your SmartBox. Simply select the timer you wish to delete and
press the GREEN button.
When you have finished, press the RED button to EXIT
9. 7 RECORDING ONE CHANNEL AND WATCHING ANOTHER
The SmartBox 8000 and 8320HD come with twin tuners, which means you can record one channel
and watch another. You may set the recording in any manner shown above. Then, to watch a
different channel, simply choose the channel you want as usual.
9. 8 RECORDING TWO CHANNE L S AT THE SAME TIME
The SmartBox 8000 and SmartBox 8320HD’s twin tuners mean that you can record two channels at
the same time. Simply follow the recording procedures shown above for each programme.
Hint! : If you want to watch a different programme to the two you are recording, then you should use
the tuner in your TV to watch the live programme, while your SmartBox records the other channels.
In addition to recording the two shows, you are able to download on demand content from FetchTV,
or playback previously recorded or downloaded content.
Note: the SmartBox 7000 can record up to 40 hours of standard definition programmes, the
SmartBox 8000 can record approximately 80 hours of standard definition programmes and the
SmartBox 8320HD can record up to 40 hours of high definition programmes or 160 hours of high
definition programmes. Once full, the FetchTV SmartBox will be unable to record further programmes
until space has been made available by deleting old recordings or exporting them to a USB drive or to
your PC.
As the SmartBox 8000 and 8320HD have two USB ports and the SmartBox 7000 has one USB port,
one on the front and one on the back, you might like to connect a large permanent drive to the rear
port, and use the front USB port for temporary USB drives. (see below for details of exporting archive
recordings).
9. 9 RECORDING CONFLICT AND C ONFLICT RESOLUTION
You cannot record 3 channels at the same time on twin tuner SmartBoxes. However, if you have two
recordings set and try to set a third recording for the same time your SmartBox will flag this and
Page 34

34
search through the database over the next 7 days to offer you an alternative opportunity to record
one of the programmes.
You can select this alternate instance by pressing blue on your remote control, this will leave the two
recordings you have already set, unchanged, and automatically set the alternate instance to record.
Please note, the SmartBox will only do this for programmes that are rebroadcast in the next 7 days. If
the third programme you have selected is not rebroadcast in the next 7 days, you will be asked if you
want to stop one of the currently recording programme in order to record the new one.
This will happen if you try to set two recordings at the same time on a 7000 series SmartBox.
Page 35

35
9. 1 0 PLAYBACK OF RECORDED TV PRO GRAMMES
Press the MENU button on the remote control
Using the remote control, scroll to MY RECORDINGS and press OK
You will now see a list of recorded programmes
Navigate to the required programme and press “OK” to view
Hint: You can view a recorded programme while recording another programme or even two other
programmes.
The red dot means the programme is still recording
The stars mean that the recording has not yet been watched.
9. 1 1 DELETE STORED RECORDI NGS
Press the MENU button on the remote control
Using the navigation keys, scroll to MY RECORDINGS
Press OK – you will now see a list of recorded programmes
Navigate to the required programme and press the Yellow Button to delete
Press the Blue button to confirm
Press Red to exit to live TV
9. 1 2 EXPORT STORED RECORDING S
Unlike most other Digital TV Recorders, with FetchTV, you can export Freeview recordings from the
hard drive of your FetchTV SmartBox to external storage/hard drive/USB key. This means that you
need never run out of recording space, or have to delete something you want to keep.
The 8000 and 8320HD SmartBoxes have one USB port at the front of the box and one at the rear.
We recommend using the rear port for more permanent storage. The 7000 series boxes have one
USB port on the left hand side of the box.
Press the MENU button on the remote control
Using the navigation keys, scroll to MY RECORDINGS
Press OK – you will now see a list of recorded programmes
Navigate to the required programme and press the BLUE button to export your content.*
Note: you can only export recorded programmes, not downloaded movies or programmes from
FetchTV. Please also note that HD recordings are protected by the broadcasters, and while they can
be exported in order to archive them on another device, they can only be played back on the same
SmartBox.
Page 36

36
NOTE: The FetchTV SmartBox is a personal recording device and programmes recorded on it are only
for your personal use. Retransmission, duplicating or sharing of content is a breach of copyright and
is illegal.
Current licensing for HD content means that HD broadcast TV can be exported and stored on an
external hard drive or device, but can only be played back on the SmartBox on which it was
recordered.
Hint: Make sure that there is enough space on your target device before exporting a programme.
9. 1 3 DIGITAL RECORDER MANAGE M E NT
To manage the hard disk of your FetchTV SmartBox, press MENU > DIAGNOSTICS > DIGITAL
RECORDER. You will see an information screen showing the usage of your hard disk. You can delete
time-shifted files by pressing the green button (these are the files stored for rewinding live TV) or
erase everything on the disk, including your recordings, by pressing the yellow button.
Please note: you do not need to delete the timeshift files as the SmartBox automatically discards the
oldest timeshift programmes to make space for live programmes. Your recordings are NOT affected
by this and will always be preserved until you delete them yourself.
If you wish to use the DELETE TIMESHIFT option, please note that it is not instantaneous. The
timeshift (green) buffer will be gradually deleted over the next hour or so, depending on the disk size.
Press MENU to exit this dialogue box.
Page 37

37
10. ME DIA CENTRE
10 . 1 NETWORK YOUR PC
The FetchTV SmartBox will recognise and play compatible media stored on your home
network
Please note that some files that you have downloaded to your computer, may have digital rights
controls that do not allow you to play them back on another device.
The box will detect the shared Windows Media Player content. So, to read your files with the bow you
will need Windows Media Player version 11 or higher. You can download it on
http://www.microsoft.com/windows/windowsmedia/download.
Open Windows Media Player, Click on “Library” on the top of the window. Then right click on “Library”
on the left side of the window and on "Media Sharing". The following pop up will appear :
Check the same options as on the picture and click OK. The box will probably be identified as
“Unknown Device”. Select it and then click on “Allow” and press OK.
Finally you just have to add the files you want to share by dragging them to the specified area of the
window (on the right side) and saving the new playlist you have just created.
Your computer is now configured.
Note: you may also use other third-party “UPnP Media Server” software that is available for PCs
(Windows or Linux) and Macs, such as TVersity or EyeConnect.
After you have configured the computer(s) on your network, you can access the shared media with
your SmartBox, by following these steps:
Press the MENU button on your remote control
Using the navigation keys, select MEDIA CENTRE from the menu and press OK
Navigate and select the required media folder from the list
Page 38

38
Please note that the presentation of content (folder structure) is provided by your media server (e.g.,
Windows Media Player). In addition, your media server may not display all your media files (the
media files that it doesn’t understand). In particular Windows Media Player will not display exported
recordings from the SmartBox because they are not in a format that Windows recognises.
Hint: Media stored on compatible storage devices which are connected to FetchTV SmartBox USB
socket can be accessed in the same manner
10 . 2 AUTO DISCOVERY
Your FetchTV SmartBox is smart enough to find other compatible devices on the network, using auto
discovery. Any compatible devices found on your home network will appear in the Media Centre .
10 . 2.1 SUPPORTED FILE TYPES WHILE US ING WINDOWS MEDIA PLAYER
THRO UGH THE NETWORK:
You will be able to play the following unprotected (DRM-free) files on your SmartBox
Music: MP3, FLAC, Wav and WMA
Video: WMV, MPEG, MOV and AVI files
Pictures: JPEG, GIF, PNG and TIFF
Page 39

39
10 . 2.2 SUPPORTED FILE TYPES WHILE US ING A USB STORAGE DE V ICE WITH
YOU R SMARTBOX
Provided you have the digital rights, you will be able to play:
• Music: MP3, Flac, Wav and WMA
• Video: MPEG (including MPEG-TS), MOV, WMV and AVIfiles
• Pictures: JPEG, GIF, PNG and TIFF
Note: These are just some of the most commonly used formats, many others may also work with
your SmartBox
10 . 3 USB PORT
You can connect supported external storage devices to the USB port of your FetchTV SmartBox. To
be compatible they will need to be in FAT 32 format. This includes certain USB storage device/USB
storage devices, portable hard drives and some MP3 players and digital cameras.
Page 40

40
11. USING ADVANCED SETTINGS
11 . 1 DISPLAY MANAGEMENT
To access the display management interface, select MENU > PREFERENCES > DISPLAY.
You can now set the following variables:
11 . 1.1 MANAGE THE INFO BAR
Infobar timeout: normal, short, long or no display
This is how long before the info bar disappears from the screen.
11 . 1.2 FETCHTV SCREENSAVER
Screensaver timeout: disabled, 5, 10 , 15 or 30 mins
This is to protect your screen from Burn-in
11 . 1.3 TV GUIDE LAYOUT
TV Guide layout: large grid, small grid, now & next
This allows you to change the appearance of the EPG from when you go to the TV GUIDE
Once you have finished editing your display preferences you should press the BLUE button to save
the changes you have made.
Page 41

41
12. SO L V ING PROBLEMS
12 . 1 ON SCREEN MESSAGES
If one of the following messages appears on your TV screen, make a note of the number that
appears with the message (for example, F01). If you need to call Customer Support for assistance,
please have the error number handy so they can help you as quickly as possible.
Problem Suggested Solution
The server is
temporarily
unavailable, please try
later.
There is a problem with the service, which will be resolved shortly.
Rights licence cannot
be acquired.
There is a problem with the service, which will be resolved shortly.
Your account PIN
number is not
recognised.
Please check your PIN and try again. If the problem persists, log in to
your FetchTV account on the internet and change your PIN.
You have insufficient
funds in your account.
Please check the account you have linked to your FetchTV account at
www.fetchTV.co.uk and ensure that it has sufficient funds
Page 42

42
12 . 2 TROUBLESHOOTING
For support please call: 08450 347 348 or post a helpdesk ticket at
www.fetchTV.net/helpdesk, or visit www.fetchTV.co.uk and click on support
Problem Possible Cause Suggested Solution
The SmartBox doesn’t
seem to be working, and
there are no lights on the
front panel
The digital set-top unit is not
receiving any power.
Make sure that the power adapter is properly
plugged in.
Check that the power point has power (try
plugging in a lamp).
The SmartBox doesn't
seem to be working, and
the front-panel standby
light is on?
The SmartBox is not correctly
connected to your TV, or your
TV is not correctly set up.
Check that all the connections are properly
made.*
Check that your TV is plugged into the power
supply and that it is switched on.
Your TV is not set to the
correct AV input.
Try selecting the appropriate AV input on your
TV.
The SmartBox remote
isn’t working.
Something is between the
remote and the SmartBox
Make sure you point the SmartBox remote
directly at the SmartBox and that nothing is
between it and the SmartBox. The LED on the
SmartBox unit’s front panel should flash each
time you press a FetchTV remote button.
The batteries are flat or
inserted the wrong way round.
Check the batteries and replace them if
necessary.
You have forgotten your
PIN code
There are two PIN codes for
your FetchTV service. One is
for your FetchTV account and
purchasing content from the
FetchTV service.
One is your SmartBox parental
control PIN, required to
change Parental Control
settings and view restricted
programmes.
Make sure you are using the correct PIN.
If it is still not working, contact Customer
Support on 08450 347 348 for advice,
specifying which PIN is not working.
Page 43

43
I can see my PC from my
SmartBox but I cannot
access any files
It is likely that you have not
enabled file sharing on your PC
(in Windows Media Player) to
allow the FetchTV SmartBox to
access them
Open Windows Media Player and select
"Library", then right click on “library” on the
left side of the window and on "Media Sharing"
and set the preferences to allow media
sharing.
I cannot access FetchTV
from the menu
It is possible that you
SmartBox is not correctly
connected to your broadband
router
Please make sure that you have a network
connection. Press MENU>DIAGNOSTICS>
SMARTBOX INFO.
Next to 'Local Network' you should have the IP
address (like 192.168.1.2 for example) of the
SmartBox on your local network
Next to 'Internet' it should say: OK
(connected)
If it does not, please check your connections
from your FetchTV SmartBox to your router,
including any connection devices such as
powerline adaptors or Wi-Fi bridge.
Please make sure that your router is
configured for DHCP (see your router user
manual)
If you are still experiencing problems
connecting:
Turn off your router/modem and leave for 1
minute
Switch on your router/modem, waiting until all
lights are lit
Power the SmartBox off, wait 20 seconds and
power back on
Re-attempt access to FetchTV
I can get to FetchTV, but
when I select a
programme to download
nothing happens.
It is possible that you are not
connected to the Internet.
Please make sure that you have a network
connection. See above
There may be a temporary
network problem.
Please restart your FetchTV SmartBox and
your router and try again later. If the problem
persists we will need to analyse it for you.
 Loading...