

Page 1
Festool GmbH
Wertstraße 20
73240 Wendlingen
Germany
www.festoolusa.com
Instruction manual
Page 6
IMPORTANT: Read all instructions before using.
Guide d’utilisation
Page 17
IMPORTANT: Lire toutes les instructions avant de démarrer les travaux.
Manual de instrucciones
Página 28
IMPORTANTE: Lea todas las instrucciones antes de usar.
-
Eccentric sander
-
Ponceuse excentrique
-
Lijadora excéntrica
708341_001
Instruction manual
Guide d’utilisation
Manual de instrucciones
ETS 125 REQ
Page 2

Page 3

Page 4
1
1-1
1-3
1-4
1-5
1-6
1-9
1-2
1-7
1-8
Page 5

Page 6

Original operating manual
Settings................................................. 11
About this manual................................ 6
Symbols................................................ 7
Safety instructions............................... 8
General safety instructions ................. 8
Machine-related safety instructions ... 9
Health hazard by dust.......................... 9
Intended use ........................................ 10
Technical data...................................... 10
Functional description......................... 10
Commissioning .................................... 11
Electronics............................................ 11
Replacing the sanding pad [3].............. 11
Attaching sanding accessories using
StickFix [4]............................................ 12
Dust extraction..................................... 12
Edge protector [6]................................. 13
Working with the machine.................... 14
Service and maintenance..................... 14
Accessories .......................................... 15
Environment ......................................... 16
About this manual
Save these instructions
It is important for you to read and understand this manual. The information it contains relates to protecting
your safety
and
preventing problems
. The symbols below are used to help you recognize this information.
DANGER Description of imminent haz-
ard and failure to avoid hazard
will result in death.
WARNING Description of hazard and
possible resulting injures or
death.
CAUTION Description of hazard and
possible resulting injuries.
NOTICE Statement including nature of
hazard and possible result.
HINT Indicates information, notes,
or tips for improving your success using the tool.
6
Page 7
Symbols
Symbol Significance
Warning of general danger
Risk of electric shock
Read operating instructions and safety
notices!
Wear ear protection.
Wear a dust mask.
Wear protective goggles.
Do not dispose of as domestic waste.
Tip or advice
Handling instruction
Symbol Significance
Safety class II
Vvolts
A amperes
Hz hertz
~ a.c. alternating current
d.c. direct current
n
0
no load speed
rpm
revolutions per minute
-1
min
’’ inch
lbs pound
diameter
°C degree centigrade
°F degree Fahrenheit
Nm Newton metre
mm millimetre
Ah amps hour
7
Page 8

Safety instructions
General safety instructions
WARNING
structions, illustrations and specifications
provided with this power tool.
instructions listed below may result in electric
shock, fire and/or serious injury.
Save all warnings and instructions for future reference.
The term "power tool" in the warnings refers to
your mains-operated (corded) power tool or battery-operated (cordless) power tool.
1 WORK AREA SAFETY
a.
Keep work area clean and well lit.
dark areas invite accidents.
b.
Do not operate power tools in explosive atmospheres, such as in the presence of flammable
liquids, gases or dust.
which may ignite the dust or fumes.
c.
Keep children and bystanders away while operating a power tool.
lose control.
d.
Never leave the power tool unattended.
leave the power tool when the tool in use has
come to a complete standstill.
2 ELECTRICAL SAFETY
a.
Power tool plugs must match the outlet. Never
modify the plug in any way. Do not use any
adapter plugs with earthed (grounded) power
tools.
will reduce risk of electric shock.
b.
Avoid body contact with earthed or grounded
surfaces, such as pipes, radiators, ranges and
refrigerators.
tric shock if your body is earthed or grounded.
c.
Do not expose power tools to rain or wet conditions.
the risk of electric shock.
d.
Do not abuse the cord. Never use the cord for
carrying, pulling or unplugging the power tool.
Keep cord away from heat, oil, sharp edges or
moving parts.
crease the risk of electric shock.
e.
When operating a power tool outdoors, use an
extension cord suitable for outdoor use.
a cord suitable for outdoor use reduces the risk of
electric shock.
f.
If operating a power tool in a damp location is
Unmodified plugs and matching outlets
Water entering a power tool will increase
Read all safety warnings, in-
Failure to follow all
Cluttered or
Power tools create sparks
Distractions can cause you to
Only
There is an increased risk of elec-
Damaged or entangled cords in-
Use of
unavoidable, use a residual current device
(RCD) protected supply.
the risk of electric shock.
3 PERSONAL SAFETY
a.
Stay alert, watch what you are doing and use
common sense when operating a power tool. Do
not use a power tool while you are tired or under
the influence of drugs, alcohol or medication.
moment of inattention while operating power
tools may result in serious personal injury.
b.
Use personal protective equipment. Always
wear eye protection.
as a dust mask, non-skid safety shoes, hard hat
or hearing protection used for appropriate conditions will reduce personal injuries.
c.
Prevent unintentional starting. Ensure the
switch is in the off-position before connecting to
power source and/or battery pack, picking up or
carrying the tool.
finger on the switch or energising power tools
that have the switch on invites accidents.
d.
Remove any adjusting key or wrench before
turning the power tool on.
attached to a rotating part of the power tool may
result in personal injury.
e.
Do not overreach. Keep proper footing and balance at all times.
the power tool in unexpected situations.
f.
Dress properly. Do not wear loose clothing or
jewellery. Keep your hair and clothing away
from moving parts.
long hair can be caught in moving parts.
g.
If devices are provided for the connection of
dust extraction and collection facilities, ensure
these are connected and properly used.
dust collection can reduce dust-related hazards.
h.
Do not let familiarity gained from frequent use
of tools allow you to become complacent and ignore tool safety principles.
cause severe injury within a fraction of a second.
4 POWER TOOL USE AND CARE
a.
Do not force the power tool. Use the correct
power tool for your application.
power tool will do the job better and safer at the
rate for which it was designed.
b.
Do not use the power tool if the switch does not
turn it on and off.
controlled with the switch is dangerous and must
be repaired.
Carrying power tools with your
This enables better control of
Any power tool that cannot be
Use of an RCD reduces
Protective equipment such
A wrench or a key left
Loose clothes, jewellery or
Use of
A careless action can
The correct
A
8
Page 9
c.
Disconnect the plug from the power source and/
or remove the battery pack, if detachable, from
the power tool before making any adjustments,
changing accessories, or storing power tools.
Such preventive safety measures reduce the risk
of starting the power tool accidentally.
d.
Store idle power tools out of the reach of children and do not allow persons unfamiliar with
the power tool or these instructions to operate
the power tool.
hands of untrained users.
e.
Maintain power tools and accessories. Check
for misalignment or binding of moving parts,
breakage of parts and any other condition that
may affect the power tool’s operation. If damaged, have the power tool repaired before use.
Many accidents are caused by poorly maintained
power tools.
f.
Keep cutting tools sharp and clean.
maintained cutting tools with sharp cutting edges
are less likely to bind and are easier to control.
g.
Use the power tool, accessories and tool bits
etc. in accordance with these instructions, taking into account the working conditions and the
work to be performed.
operations different from those intended could
result in a hazardous situation.
h.
Keep handles and grasping surfaces dry, clean
and free from oil and grease.
grasping surfaces do not allow for safe handling
and control of the tool in unexpected situations.
5 SERVICE
a.
Have your power tool serviced by a qualified repair person using only identical replacement
parts.
er tool is maintained.
b.
Only use original Festool parts for repair and
maintenance.
ries or spare parts can result in electric shocks or
other injuries.
This will ensure that the safety of the pow-
Power tools are dangerous in the
Properly
Use of the power tool for
Slippery handles and
The use of incompatible accesso-
Machine-related safety instructions
–
Dust that is harmful to your health may be produced as you work (e.g. paint products containing lead and some types of wood).
or inhalation of this dust may pose a risk for the
operating personnel or persons in the vicinity.
Observe the safety regulations that apply in your
country.
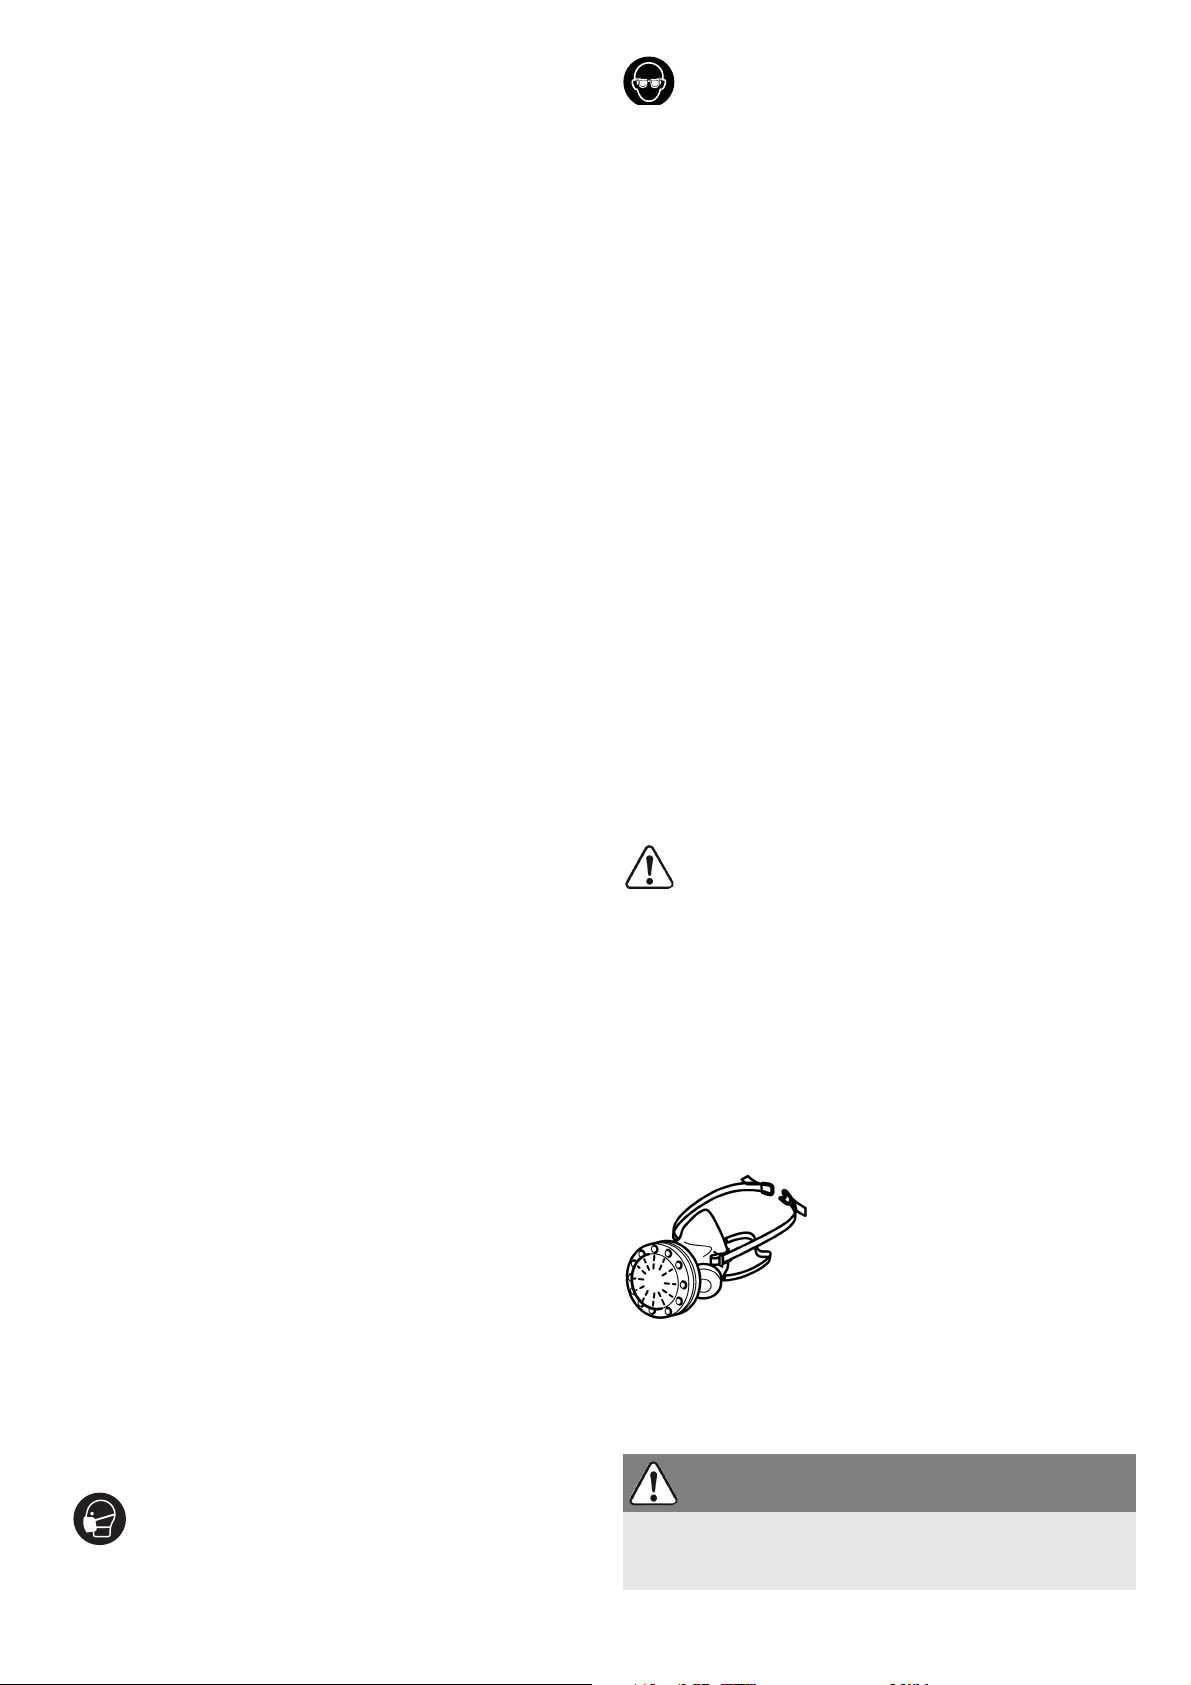
Wear a P2 respiratory mask to protect your
health. In enclosed spaces, ensure that
there is sufficient ventilation and connect an
extraction system.
Contact with
Always wear protective goggles to protect
against sanding hazards.
–
Clean work equipment soaked in oils, for example sanding pad or polishing felt, with water and
allow to dry.
combust spontaneously.
–
Attention: Risk of fire! Avoid overheating the
grinding material and the sander. Always empty
the dust container before taking a break.
in the filter bag or filter of the mobile dust extractor may self-ignite in unfavourable conditions such as flying sparks when grinding metals.
Particular danger exists if the swarf is mixed with
paint, polyurethane residue or other chemical
materials and the grinding material is hot after
long periods of work.
–
If the power tool is dropped or falls, check for
damage to the machine and sanding pad. Remove the sanding pad for closer inspection. Repair damaged parts before using again.
sanding pads and damaged machines can cause
injuries and machine instability.
–
Always use original Festool sanding pads.
eign pads are not suitable for the speed of the
sander and may break.
Work equipment soaked in oil may
Swarf
Broken
For-
Health hazard by dust
WARNING!
sanding, sawing, grinding, drilling and other
construction activities contains chemicals
known (to the State of California) to cause cancer,
birth defects or other reproductive harm. Some examples of these chemicals are:
• lead from lead-based paints,
• crystalline silica from bricks and cement and
other masonry products, and
• arsenic and chromium from chemically treated
lumber.
proved safety equipment, such as dust masks that
are specially designed to filter out microscopic particles. Wash hands after handling.
Various dust created by power
The risk from these exposures
varies, depending on how often
you do this type of work. To reduce your exposure to these
chemicals: work in a well ventilated area, and work with ap-
WARNING
TO REDUCE THE RISK OF INJURY, USER MUST
READ INSTRUCTION MANUAL.
9
Page 10

Intended use
The sanders are designed for sanding wood, plastic, stone, composites, paint/varnish, filler and similar materials as directed. Metals and materials
that contain asbestos must not be processed.
To guarantee electrical safety, the machine must
not be damp or operated in a damp environment.
The machine must only be used for dry sanding.
The user is liable for improper or non-intended use.
Technical data
Eccentric sander ETS 125 REQ
Power 250 W
No-load speed 6000 - 12000 min
Max. speed
1
16000 min
Sanding stroke 5/64" (2.0 mm)
Sanding pad Dia 5" (125 mm)
Weight (without mains cable, with sanding pad) 2.6 lbs (1.2 kg)
Safety class /II
1.
Max. speed in the event of faulty electronics.
-1
-1
Functional description
The pictures for the functional description are on a
fold-out page at the beginning of the instruction
manual. While reading the manual you can fold out
the page for comparison and quick reference.
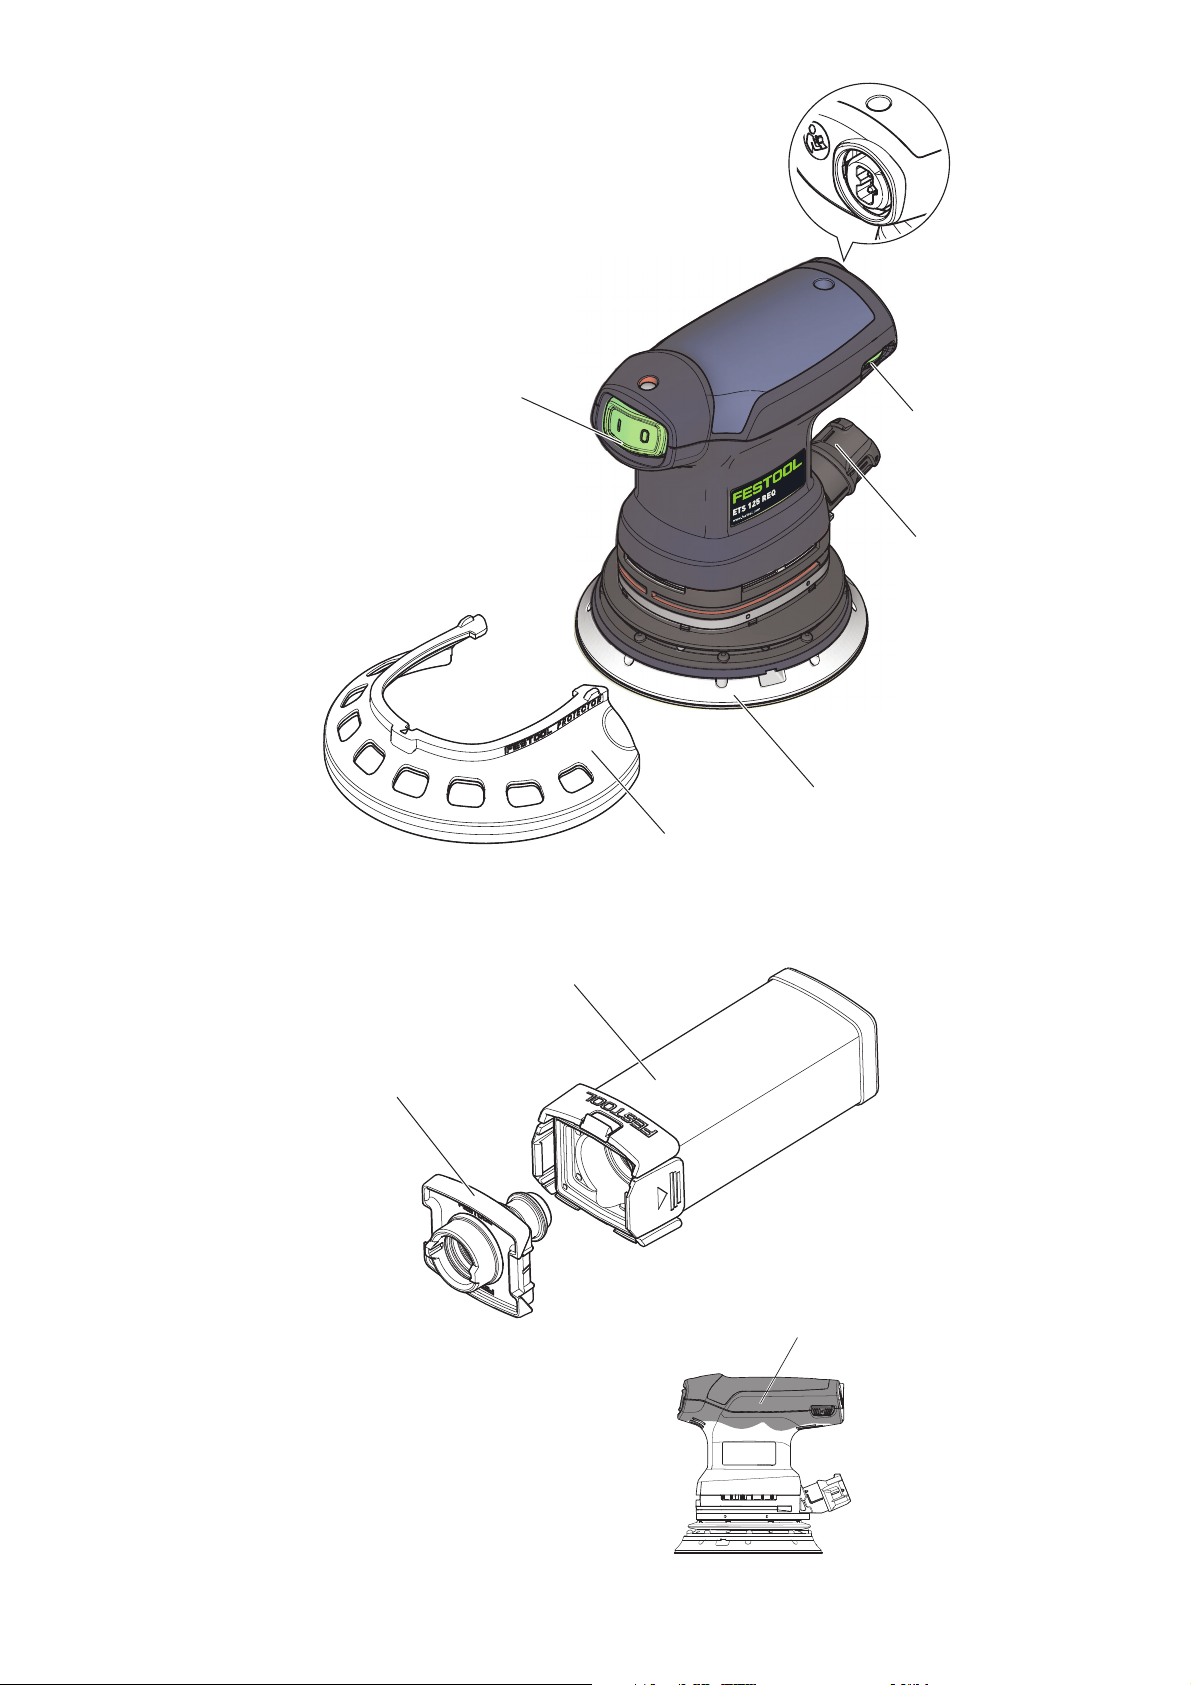
[1-1]
[1-2]
[1-3]
[1-4]
On/Off switch
Plug it-connection
Speed control
Extractor connector
[1-5]
[1-6]
[1-7]
[1-8]
[1-9]
Sanding pad
Protector
Long-life dust bag
Dust bag adapter
Handle (insulated gripping surface)
Accessories shown or described are sometimes not
included in the scope of delivery.
10
Page 11
Commissioning
2
WARNING
Unauthorised voltage or frequency!
Risk of accident
The mains voltage and the frequency of the power source must correspond with the specifications on the machine's name plate.
In North America, only Festool machines with
the voltage specifications 120 V/60 Hz may be
used.
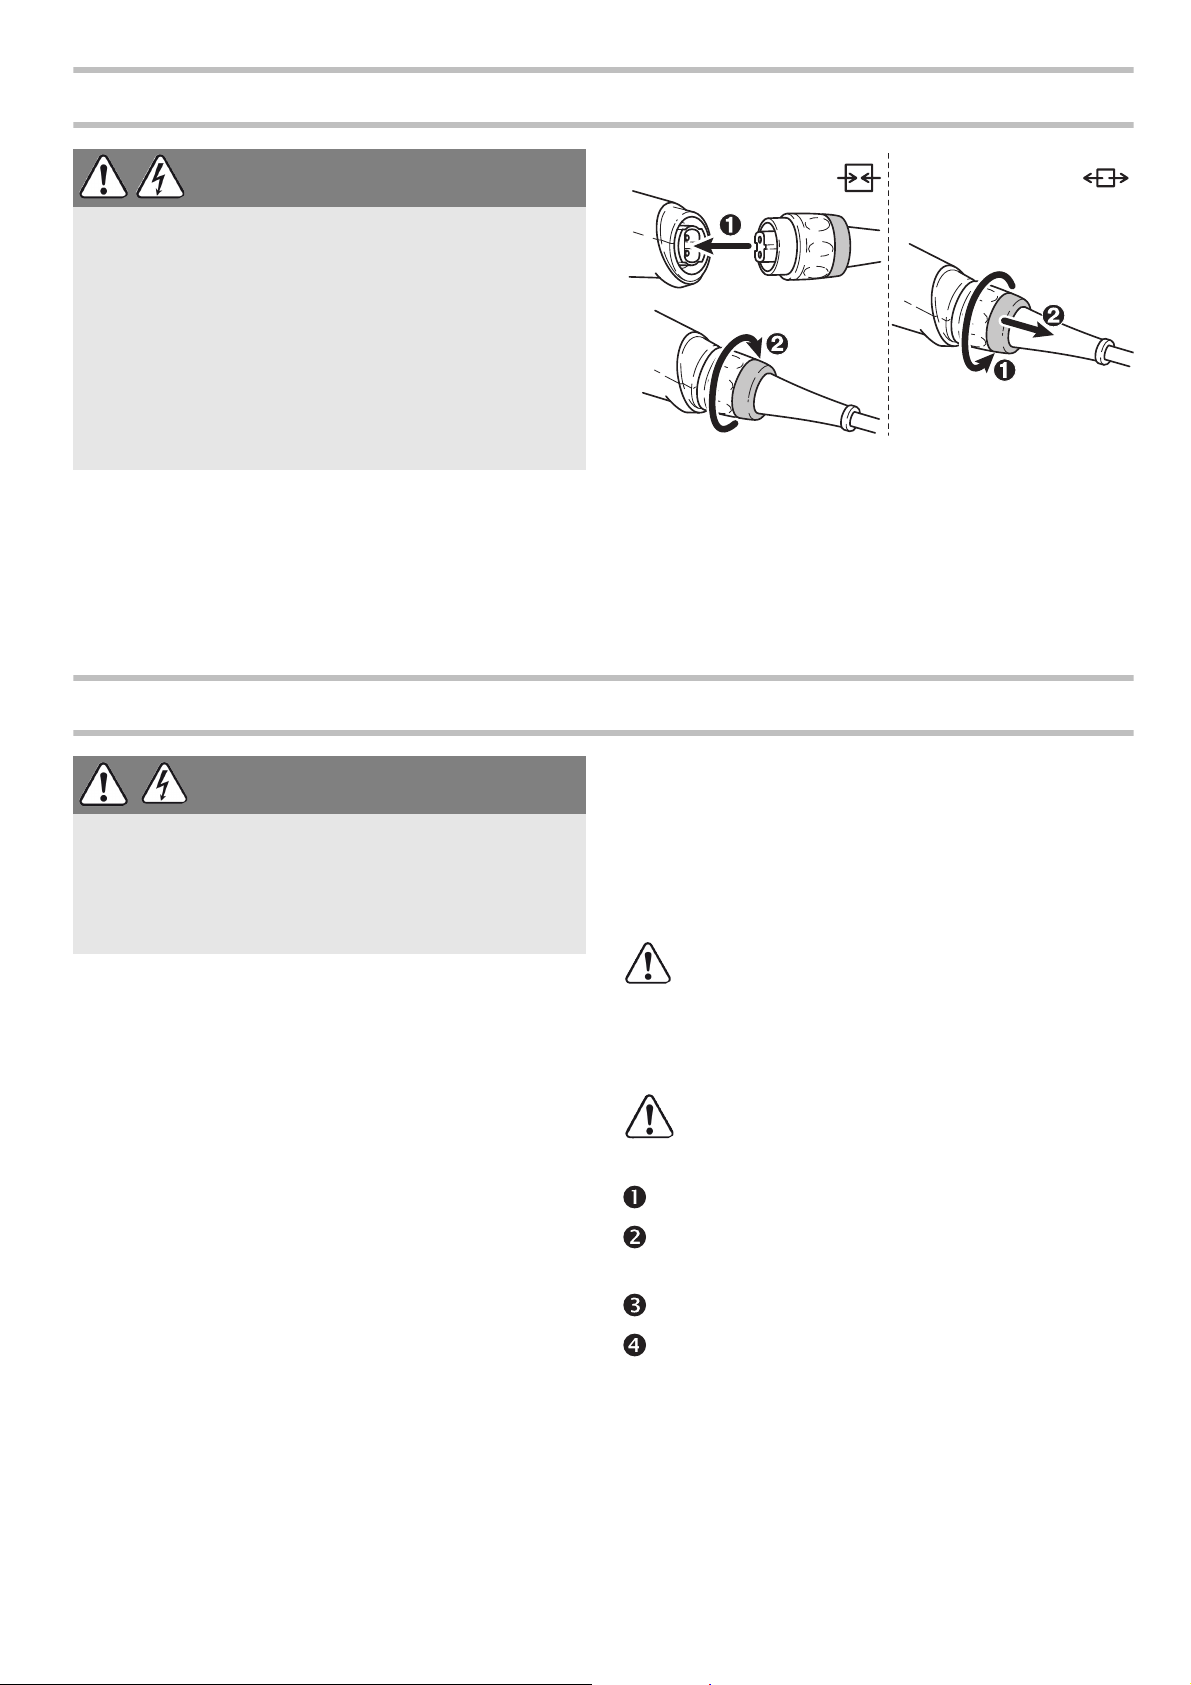
Connecting and detaching the mains power cable
see Fig.
[2]
.
The switch
OFF).
-
[1-1]
is an on/off switch (I = ON, 0 =
In case of a power failure or if the mains connector is removed, move the on/off switch immediately to the Off position. This prevents uncontrolled restarting.
Settings
WARNING
Risk of injury, electric shock
Always pull the mains plug out of the socket before performing any type of work on the machine!
Electronics
Smooth start-up
The electronically controlled smooth start-up ensures that the machine starts up jolt-free.
Constant speed
The preselected motor speed is kept constant
through electronic control. This means that, if the
machine is used as intended (reasonable contact
pressure), a constant sanding speed is achieved.
Setting and adjusting the speed
The speed can be set
[1-3]
between 6000 and
12000 min
This enables you to optimise the sanding speed to
suit the material (see chapter Working with the machine).
-1
using the adjusting wheel.
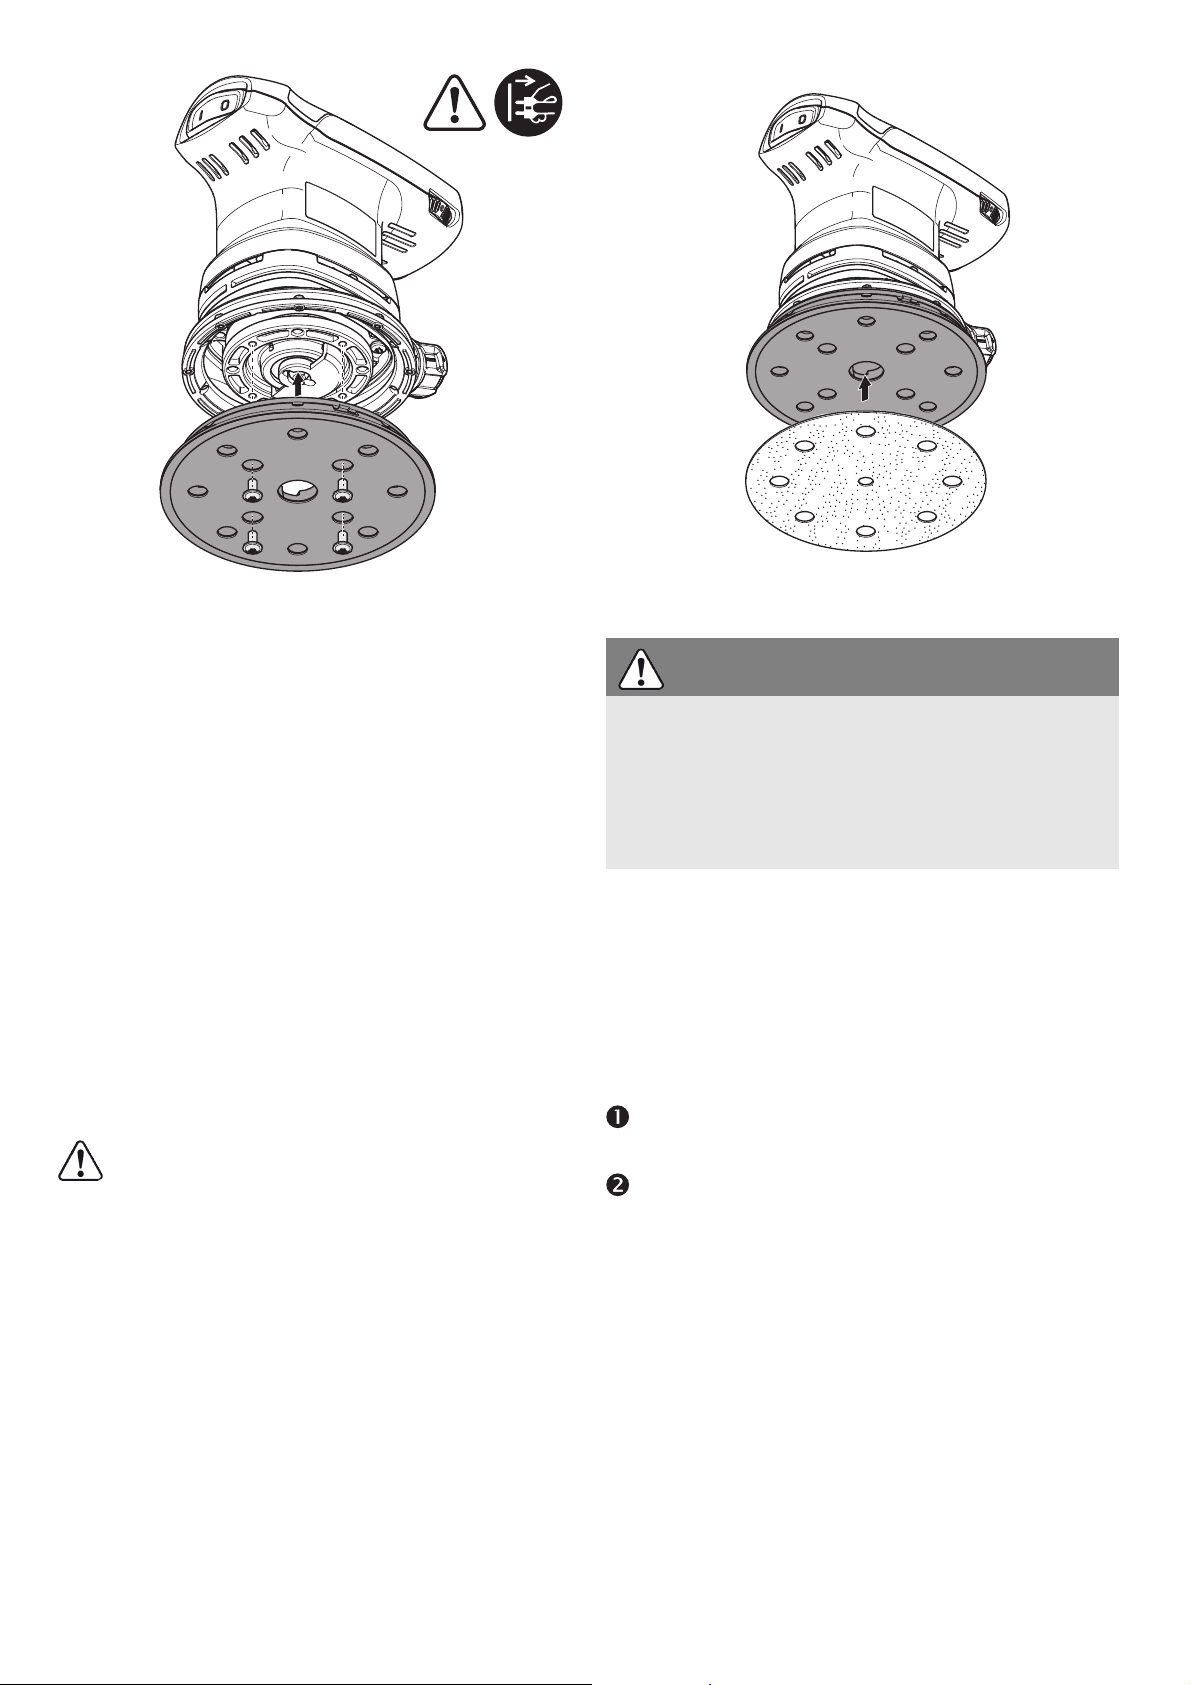
Replacing the sanding pad [3]
An optimal work result can only be achieved
using original accessories and consumables.
The use of non-original accessories or consumables invalidates the right to claim under warranty.
Warning!
changes in the open interior space of the ma-
chine when the sanding pad is dismantled.
Undo the four screws.
Remove the sanding pad by pulling it down-
wards.
Attach the new sanding pad.
Use four screws to tighten it by hand (2.5 Nm).
Do not perform any structural
11
Page 12
Hardness of the sanding pad
3
4
Dust extraction
Adapted to the surface being processed, the machine can be equipped with sanding pads of different hardnesses.
Soft:
Universal for coarse and fine sanding, for flat
and convex surfaces.
Extra-soft:
radii. Do not use on edges.
Fine sanding of moulded parts, arches,
Attaching sanding accessories using Stick-
Fix [4]
The suitable StickFix sandpaper and StickFix sanding cloth can be attached quickly and simply to the
StickFix sanding pad.
Press the self-adhesive sanding accessory onto
the sanding pad
In the case of a weakening adhesive effect of
sories, in particular those which are not yet touching
the workpiece,
pad and cause injuries
the StickFix surface, the sanding pad acces-
[1-5]
.
may come loose from the sanding
. Replace the sanding pad!
WARNING
Dust hazard
Dust can be hazardous to health. Always work
with a dust extractor.
Always read applicable national regulations before extracting hazardous dust.
Integral dust extractor with long-life dust bag
As standard, the sanders are equipped with an integral dust extractor. The sanding dust is extracted
through extraction openings in the sanding pad and
is collected in the dust bag.
Installing the dust bag [5]
Slide the dust bag adapter onto the extractor
connection piece.
Slide the dust bag onto the adapter until it clicks
into place.
12
Page 13

Dust extraction with Festool's mobile dust ex-
5
1
2
1
2
4
3
1
2
6
1
2
2
1
tractor
To prevent having to frequently empty the dust bag
when carrying out sanding work for a long period of
time, you can connect Festool's mobile dust extractor (with an extraction hose diameter of 27 mm)
to the extractor connection piece
[1-4]
.
If the suction power is decreasing, empty the
dust bag.
Press the dust bag onto the actuating elements.
Remove the dust bag by moving it towards the
rear.
Open the flap on the dust bag.
Recommendation:
This helps reduce the electric charge.
Use anti-static extractor hose!
Edge protector [6]
The edge protector
circumference from coming into contact with a surface (e.g. when sanding along a wall or a window),
thus preventing back-kick of the machine, or machine damage.
[1-6]
prevents the sanding pad
Empty the dust bag and dispose of the waste.
13
Page 14

Working with the machine
WARNING
Risk of injury
Always secure the workpiece in such a manner
that it cannot move while being machined.
Observe the following instructions:
– Do not overload the machine by pressing with ex-
cessive force! The best sanding results are
achieved with moderate application pressure.
The sanding capacity and quality are mainly dependent on the selection of the correct abrasive.
– Hold the machine with one hand on the handle
[1-9].
For sanding, we recommend the following settings
for the adjusting wheel
Sanding work Adjusting
– Sanding with max. abrasion
– Sanding off old paint
– Sanding of wood and veneered surface
prior to paintwork
– Intermediate sanding of paintwork on sur-
faces
[1-3]
:
wheel set-
ting
5 - 6
Sanding work Adjusting
wheel set-
ting
– Sanding thinly applied undercoat
– Sanding wood with sanding cloth
– Edge breaking on wooden parts
– Smoothing primed wooden surfaces
– Sanding solid wood and veneered edges
– Sanding rebate of windows and doors
– Intermediate sanding of paintwork at edges
– Light sanding of natural wood windows
using sanding cloth
– Smoothing wooden surfaces using sand-
ing cloth before staining
– Rubbing or removing excess limestone
residue using sanding cloth
– Intermediate sanding of paintwork on
stained surfaces
– Cleaning natural wood window rebate us-
ing sanding cloth
– Sanding stained edges
– Sanding of thermoplastics
4 - 5
3 - 4
2 - 3
1 - 2
Service and maintenance
WARNING
Any maintenance or repair work that requires
opening of the motor or gear housing should only
be carried out by an authorised Customer Service
Centre (name supplied by your dealer)!
Maintenance or repair work carried out by an
unauthorised person can lead to the wrong connection of the power cord or other components,
which in turn can lead to accidents with serious
consequences.
14
CAUTION
Certain cleaning agents and solvents are harmful
to plastic parts.
Some of these include, but are not limited to:
Gasoline, Acetone, Methyl Ethyl Ketone (MEK),
Carbonyl Chloride, cleaning solutions containing
Chlorine, Ammonia, and household cleaners
containing Ammonia.
Page 15

WARNING
EKAT
1
2
3
5
4
Risk of injury, electric shock
Always disconnect the battery pack from the
machine before any cleaning or maintenance!
All maintenance and repair work which requires
the motor housing to be opened, must only be
carried out by an authorised service workshop.
Customer service and repair
through manufacturer or service
workshops: Please find the nearest
address at: www.festoolusa.com/service
The machine is equipped with special carbon
brushes. If they are worn out, the power is interrupted automatically and the machine comes to a
standstill.
To ensure constant air circulation, always keep the
only
cooling air openings in the motor housing clean and
free of any obstruction.
In the event of a slowdown in performance or increased vibrations, blow and clean cooling air
openings.
Accessories
Use only original Festool spare parts!
Order No. at: www.festoolusa.com/
service
Use only original Festool accessories and Festool
consumable material intended for this machine.
These components are designed specifically for
this machine. Using accessories and consumable
material from other suppliers will most likely affect
the quality of your results and limit warranty
claims. Machine wear or your own personal workload may increase depending on the application.
Protect yourself and your machine, and preserve
your warranty claims by always using original Festool accessories and Festool consumable material!
The order numbers of the accessories and tools can
be found in the Festool catalogue or on the Internet
under "www.festoolusa.com".
Systainer
Many Festool products are shipped in a unique system container, called "Systainer". This provides
protection and storage for the tool and accessories.
The Systainers are stackable and can be inter-
locked together. They also can be interlocked atop
Festool CT dust extractors.
To open the Systainer
Turn the T-loc
[7-1]
to this position.
To lock the Systainer
Turn the T-loc
[7-1]
to this position.
To connect two Systainers
Place one Systainer on the top of the other (Fig.
A]
).
[7-1]
Turn the T-loc
tions (Fig.
[7 B]
to one of this posi-
).
[7
The Systainers are connected and locked.
A new generation Systainer is connectable on
top of a previous generation Systainer by the
four latches of the previous Systainer.
15
Page 16

open
lock
connect
connect
T-loc
7.1
A
B
7
Environment
Do not dispose of the device as domestic waste!
Dispose of machines, accessories and packaging at
16
an environmentally responsible recycling centre.
Observe the respective national regulations.
Page 17

Notice d'utilisation d'origine
Réglages............................................... 23
À propos de ce manuel........................ 17
Symboles ............................................. 18
Consignes de sécurité ......................... 19
Consignes générales de sécurité pour
outils électroportatifs.......................... 19
Consignes de sécurité spécifiques à la
machine ............................................... 20
La poussière, un risque pour la santé. 21
Utilisation en conformité avec les ins-
tructions............................................... 21
Caractéristiques techniques ............... 22
Description fonctionnelle .................... 22
Mise en service.................................... 22
À propos de ce manuel
Électronique ......................................... 23
Remplacement du plateau de ponçage
[3].......................................................... 23
Fixation des accessoires de ponçage
avec StickFix [4] ................................... 24
Aspiration ............................................. 24
Protection pour chants (Protector) [6]. 25
Travail avec la machine........................ 25
Entretien et maintenance .................... 26
Accessoires .......................................... 27
Environnement..................................... 27
Conservez ces instructions
Il est important pour vous de lire et de comprendre ce manuel. Les informations qu'il contient, se rapporte
à la protection
vous aider à reconnaître cette information.
DANGER Description du risque immi-
AVERTISSEMENT
ATTENTION
de votre sécurité
nent et l'incapacité à éviter
tout risque qui peut entraîner
la mort.
Description des dangers possibles et des blessures qui en
résultent ou la mort.
Description des dangers et
des éventuelles blessures qui
en résultent.
et
de prévention des problèmes
. Les symboles suivants sont utilisés pour
AVIS Déclaration incluant le type de
danger et conséquences possibles.
CONSEIL Indique des informations, des
notes ou des conseils pour
améliorer votre succès en utilisant l'outil.
17
Page 18

Symboles
Symbole
Signification
Avertissement de danger
Avertissement contre le risque d'électrocution
Notice d'utilisation, lire les consignes de
sécurité !
Porter une protection auditive !
Porter une protection respiratoire !
Porter des lunettes de protection !
Ne pas jeter l'appareil avec les ordures
ménagères.
Astuce, information
Consignes opératoires
Classe de protection II
Sym-
Signification
bole
VVolt
AAmpère
Hz Hertz
~ a.c. Tension alternative
d.c. courant continu
n
0
vitesse de rotation à vide
rpm
tours ou course par minute
-1
min
’’
pouce
lbs livre
Diamètre
°C centigrade
°F degrés Fahrenheit
Nm Newton mètre
mm millimètre
Ah Volt
Wh Ampère
18
Page 19

Consignes de sécurité
Consignes générales de sécurité pour ou-
tils électroportatifs
AVERTISSEMENT !
les consignes de sécurité, instructions,
images et caractéristiques techniques avec lesquels cet outil électrique est fourni.
gences relatives aux instructions ci-dessous
peuvent occasionner un choc électrique, un incendie et/ou des blessures graves.
Conserver toutes les consignes de sécurité et instructions pour une référence future.
Le terme "outil électrique" utilisé dans les
consignes de sécurité se rapporte aux outils électroportatifs fonctionnant sur secteur (avec câble) et
aux outils électroportatifs fonctionnant sur accumulateurs (sans câble).
1 SÉCURITÉ DU POSTE DE TRAVAIL
a.
Veillez à ce que la zone de travail soit propre et
bien éclairée.
mal éclairé peut entraîner des accidents.
b.
Ne vous servez pas de l'outil électroportatif
dans un environnement où il y a un risque d'explosion dû à la présence de liquides inflammables, de gaz ou de poussières.
électroportatifs peuvent générer des étincelles
susceptibles d'enflammer la poussière ou les vapeurs.
c.
Éloignez les enfants et d'autres personnes pendant l'utilisation de l'outil électroportatif.
vous êtes distrait, vous pouvez perdre le contrôle
de l'outil.
d.
Ne laissez pas l'outil électroportatif fonctionner
sans surveillance.
électroportatif que lorsque l'accessoire est complètement immobilisé.
2 SÉCURITÉ ÉLECTRIQUE
a.
Le connecteur de l'outil électroportatif doit correspondre à la prise électrique. Le connecteur
ne doit être modifié d'aucune façon. N'utilisez
pas d'adaptateur avec des outils électroportatifs mis à la terre.
prises correspondantes diminuent le risque d'un
choc électrique.
b.
Évitez tout contact avec des surfaces mises à la
terre telles que des tuyaux, chauffages, cuisinières et réfrigérateurs.
électrique existe si votre corps est relié à la terre.
Un poste de travail en désordre et
Ne vous éloignez de l'outil
Des connecteurs intacts et des
Veuillez lire toutes
Des négli-
Les outils
Si
Un risque élevé de choc
c.
Protégez les outils électroportatifs de la pluie
et de l'humidité.
électroportatif augmente le risque de choc électrique.
d.
Ne détournez pas l'utilisation du câble de raccordement pour porter l'outil électroportatif,
l'accrocher ou pour tirer le connecteur de la
prise. Éloignez le câble de la chaleur, de l'huile,
de bords tranchants ou de pièces de l'appareil
en mouvement.
vêtré augmente le risque de choc électrique.
e.
Si vous travaillez avec un outil électroportatif à
l'extérieur, utilisez uniquement des rallonges
prévues pour l'extérieur.
prévu pour l'extérieur diminue le risque d'un choc
électrique.
f.
Utilisez un disjoncteur à courant de défaut
quand le fonctionnement de l'outil électroportatif en environnement humide ne peut pas être
évité.
défaut diminue le risque d'un choc électrique.
3 SÉCURITÉ DES PERSONNES
a.
Soyez attentif à ce que vous faites, faites preuve
de bon sens lorsque vous travaillez avec l'outil
électroportatif. N'utilisez pas l'outil électroportatif si vous êtes fatigué ou si vous êtes sous
l'influence de drogues, de l'alcool ou de médicaments.
sation de l'outil électroportatif peut entraîner des
blessures graves.
b.
Portez un équipement de protection individuelle et des lunettes de protection en permanence.
individuelle tel que masque contre la poussière,
chaussures de sécurité antidérapantes, casque
ou protection auditive, en fonction du type et de
l'utilisation de l'outil électroportatif, diminue le
risque de blessures.
c.
Évitez toute mise en service involontaire. Assurez-vous que l'outil électroportatif est déconnecté avant de le raccorder à l'alimentation
électrique et/ou à la batterie, avant de le soulever ou de le porter.
portatif, vous avez le doigt sur l'interrupteur ou si
vous raccordez l'appareil connecté à l'alimentation électrique, cela peut entraîner des accidents.
d.
Retirez les outils de réglage ou les clés anglaises avant de connecter l'outil électroportatif.
L'utilisation d'un disjoncteur à courant de
Un moment d'inattention lors de l'utili-
Le port d'un équipement de protection
Un outil ou une clé qui se trouve dans une
L'infiltration d'eau dans un outil
Un câble endommagé ou enche-
L'utilisation d'un câble
Si, en portant l'outil électro-
19
Page 20

partie de l'outil en rotation peut entraîner des
blessures.
e.
Évitez toute position de travail anormale. Veillez à maintenir une position stable et un bon
équilibre à tout moment.
tout moment contrôler l'outil électroportatif dans
des situations inattendues.
f.
Portez des vêtements adaptés. Ne portez pas de
vêtements amples ou de bijoux. Éloignez vos
cheveux et vos vêtements des pièces en mouvement.
cheveux longs pourraient se prendre dans les
pièces en mouvement.
g.
Si des dispositifs d'aspiration et de récupération des poussières peuvent être montés, raccordez-les et utilisez-les correctement.
L'utilisation d'une aspiration des poussières peut
diminuer les dangers dus aux poussières.
h.
Ne vous croyez pas faussement en sécurité et
n'enfreignez pas les règles de sécurité destinées aux outils électroportatifs, même si vous
maîtrisez l'outil électroportatif après de multiples utilisations.
un quart de seconde entraîner de graves blessures.
4 UTILISATION ET TRAITEMENT DE L'OUTIL ÉLECTROPORTATIF
a.
Ne surchargez pas l'appareil. Utilisez l'outil
électroportatif destiné à votre travail.
électroportatif adapté vous permet de travailler
mieux et avec plus de sécurité dans la plage de
puissance indiquée.
b.
N'utilisez aucun outil électroportatif dont l'interrupteur serait défectueux.
portatif qui ne peut plus être mis en marche ou
arrêté est dangereux et doit être réparé.
c.
Débranchez le connecteur de la prise de courant et/ou retirez une batterie amovible avant
d'effectuer des réglages sur l'appareil, de remplacer des accessoires ou de déposer l'outil.
Cette mesure de précaution empêche un démarrage involontaire de l'outil électroportatif.
d.
Rangez toujours les outils électroportatifs inutilisés hors de portée des enfants. Ne laissez
pas les personnes auxquelles vous ne faites pas
confiance ou qui n'ont pas lu ces consignes se
servir de l'appareil.
sont dangereux lorsqu'ils sont utilisés par des
personnes inexpérimentées.
e.
Prenez soin de vos outils électroportatifs et accessoires. Vérifiez que les parties mobiles fonctionnent sans problème, qu'elles ne coincent
pas et qu'il n'y a pas de parties cassées ou en-
Des vêtements amples, des bijoux ou des
Un manque d'attention peut en
Vous pourrez ainsi à
L'outil
Un outil électro-
Les outils électroportatifs
dommagées qui pourraient entraver le bon
fonctionnement de l'outil électroportatif. Faites
réparer les parties endommagées avant d'utiliser l'appareil.
un mauvais entretien des outils électroportatifs.
f.
Maintenez les outils de coupe affûtés et
propres.
soin dotés de bords de coupe affûtés se coincent
moins et sont plus faciles à utiliser.
g.
Utilisez l'outil électroportatif, les accessoires,
outils, etc. en respectant ces instructions. Tenez compte des conditions de travail et de la
tâche à effectuer.
portatifs pour d'autres applications que celles
prévues peut entraîner des situations dangereuses.
h.
Veillez à ce que les poignées et surfaces des
poignées soient sèches, propres et exemptes
d'huile ou de graisse.
de poignées glissantes ne permettent pas une
utilisation en toute sécurité ni un contrôle de l'outil électroportatif dans des situations imprévues.
5 SERVICE
a.
Faites réparer votre outil électroportatif uniquement par un personnel qualifié ; les réparations doivent être effectuées avec des pièces
d'origine uniquement,
de l'outil électroportatif.
De nombreux accidents sont dus à
Des outils de coupe entretenus avec
L'utilisation des outils électro-
Des poignées et surfaces
afin de garantir la fiabilité
Consignes de sécurité spécifiques à la ma-
chine
–
Au cours du travail, des poussières dangereuses pour la santé peuvent être générées
(comme les poussières de peintures au plomb,
certaines poussières de bois).
halation de ces poussières peut présenter un
danger pour l'utilisateur ou les personnes se
trouvant à proximité. Veuillez respecter les prescriptions de sécurité en vigueur dans votre pays.
Pour votre santé, porter un masque de protection respiratoire de classe P2. Dans les
espaces clos, assurer une ventilation suffisante et brancher un dispositif d'aspiration.
Porter systématiquement des lunettes de
protection pour se protéger des risques inhérents au ponçage.
–
Nettoyez à l'eau les accessoires imprégnés
d'huile, comme par ex. le patin de ponçage ou le
feutre de polissage, et laissez-les sécher en les
étalant convenablement.
bés d'huile sont susceptibles de s'enflammer
spontanément.
Le contact ou l'in-
Les accessoires imbi-
20
Page 21

–
Attention au risque d'incendie ! Évitez la surchauffe des matériaux travaillés et de la ponceuse. Videz systématiquement le bac de
récupération des poussières avant de faire une
pause dans votre travail.
sières se trouvant dans le sac filtre ou le filtre de
l'aspirateur peuvent s'enflammer d'ellesmêmes dans des conditions défavorables,
comme par ex. la projection d'étincelles lors du
ponçage de pièces en métal. Le risque est particulièrement important lorsque les particules de
poussières sont mélangées à des résidus de vernis, de polyuréthane ou d'autres substances
chimiques et que les matériaux travaillés sont
très chauds après avoir été longtemps travaillés.
–
En cas de chute, vérifiez que l'outil électrique et
le patin de ponçage ne sont pas endommagés.
Démontez le patin de ponçage pour un examen
minutieux. Faites réparer les pièces endommagées avant toute utilisation.
çage cassés et des machines endommagées
peuvent causer des blessures et compromettre
la sûreté de la machine.
–
N'utilisez que des plateaux de ponçage d'origine Festool.
sont pas adaptés au régime de la ponceuse et
peuvent se casser.
Les plateaux d'autres marques ne
Les particules de pous-
Des patins de pon-
La poussière, un risque
pour la santé
AVERTISSEMENT!
créées par le ponçage mécanique, le sciage,
le meulage, le perçage et autres activités reliées à la construction contiennent des substances
chimiques connues (dans l’État de la Californie)
comme pouvant causer le cancer, des anomalies
congénitales ou représenter d’autres dangers pour
la reproduction. Voici quelques exemples de telles
substances:
• plomb provenant de peintures à base de plomb,
• silice cristallisée utilisée dans les briques, le ci-
ment et autres matériaux de maçonnerie, et
• arsenic et chrome du bois d’oeuvre traité avec un
produit chimique.
Le risque d’exposition à de tels
produits varie selon la fréquence à laquelle vous faites
ce genre de travail. Pour réduire les risques d’exposition à
ces substances chimiques :
travaillez dans un endroit adéquatement ventilé et
utilisez un équipement de sécurité approuvé, tel
que masques antipoussières spécialement conçus
pour filtrer les particules microscopiques.
Certaines poussières
Utilisation en conformité avec les instructions
Les ponceuses sont conçues pour le ponçage des
matériaux suivants : bois, matières plastiques,
pierre, matériaux composites, peintures / vernis,
enduits et matériaux similaires. L'usinage du métal
et de l'amiante est formellement interdit.
AVERTISSEMENT
POUR RÉDUIRE LE RISQUE DE DOMMAGES,
L'UTILISATEUR DOIT LIRE LE MANUEL D'INSTRUCTION.
Afin de garantir la sécurité électrique, l'outil ne doit
pas être mouillé ou utilisé en environnement humide. Cet outil doit être exclusivement utilisé pour
le ponçage à sec.
L'utilisateur est responsable des dommages
provoqués par une utilisation non conforme.
21
Page 22

Caractéristiques techniques
2
Ponceuse excentrique ETS 125 REQ
Puissance 250 W
Vitesse de rotation à vide 6000 - 12000 min
Vitesse de rotation max.
1
16000 min
-1
Course de poncage 5/64" (2.0 mm)
Plateau de poncage Dia 5" (125 mm)
Poids (sans cable secteur, avec plateau de poncage) 2,6 lbs (1,2 kg)
Classe de protection /II
1.
Vitesse de rotation max. en cas d'electronique defectueuse.
Description fonctionnelle
-1
Des eléments fournis sont disponibles sur le volet
qui se trouve au début de cette notice d'utilisation.
Vous pouvez ainsi déplier cette page et visualiser
en permanence les différentes parties de l'outil
lorsque vous lisez la notice.
[1-1]
[1-2]
[1-3]
[1-4]
Interrupteur de marche/arrêt
Raccordement plug-it
Régulation de la vitesse
Raccord d'aspiration
Mise en service
AVERTISSEMENT
Tension ou fréquence non admissible !
Risque d'accident
La tension et la fréquence d'alimentation électrique doivent être conformes aux indications de
la plaque signalétique.
En Amérique du nord, utilisez uniquement les
outils Festool fonctionnant sous une tension de
120 V/60 Hz.
[1-5]
[1-6]
[1-7]
[1-8]
[1-9]
Plateau de ponçage
Capot de protection
Sac poussière Longlife
Adaptateur pour sac poussière
Poignées isolées
Les accessoires illustrés ou décrits ne sont partiellement pas contenus dans le volume de livraison.
Voir en figure
câble de raccordement
[2]
a connexion et la déconnexion du
-
au secteur.
[1-1]
L'interrupteur
fait office d'interrupteur
marche/arrêt (I = MARCHE, 0 = ARRÊT).
Si une panne de courant se produit ou que la
prise secteur est débranchée, mettre immédiatement l'interrupteur marche/arrêt en position
d'arrêt. Ceci permet d'éviter tout redémarrage
intempestif.
22
Page 23

AVERTISSEMENT
3
Réglages
Desserrer quatre vis.
Tirer le plateau de ponçage vers le bas.
Risques de blessures, choc électrique
Débranchez prise de courant avant toute intervention sur la machine !
Électronique
Démarrage progressif
Le démarrage progressif assure un fonctionnement sans à-coups de la machine.
Vitesse de rotation constante
La vitesse sélectionnée est maintenue constante de
manière électronique. La vitesse de ponçage reste
homogène lorsque l'outil est utilisé de façon
conforme (pression appropriée).
Réglage de la vitesse
La molette
tation entre 6000 et 12000 min-1.
Vous pouvez ainsi adapter de façon optimale la vitesse de ponçage à chaque matériau (voir le chapitre Travail avec la machine).
[1-3]
permet de régler la vitesse de ro-
Remplacement du plateau de ponçage [3]
Pour obtenir un résultat exceptionnel, utiliser uniquement les accessoires et consom-
mables d'origine. En cas de non-utilisation
des accessoires et consommables d'origine, les
dommages qui pourraient s'ensuivre ne sont pas
couverts par la garantie.
Avertissement !
dification de l'outil lorsque le plateau de ponçage est démonté.
Ne procédez à aucune mo-
Monter un nouveau plateau de ponçage.
Serrer avec quatre vis à la main (2,5 Nm).
Degré de dureté du plateau de ponçage
En fonction de la surface à traiter, cet outil peut être
équipé de plateaux de ponçage de duretés différentes.
Surfaces tendres :
çage dégrossissant et ponçage fin, pour surfaces
planes et incurvées.
Surfaces super tendres :
pièces de forme, bombages, rayons. Ne pas employer sur chant !
accessoire universel pour pon-
pour ponçage fin sur
23
Page 24

Fixation des accessoires de ponçage avec
4
5
1
2
1
2
4
3
1
2
raccord d’aspiration.
StickFix [4]
Le plateau de ponçage StickFix permet de fixer des
abrasifs et des feutres StickFix adaptés de manière
simple et rapide.
Placez l'accessoire de ponçage auto-agrippant
sur le plateau de ponçage
Si l'adhérence du revêtement StickFix dimi-
nue, il est possible que des accessoires du
patin de ponçage se détachent du patin de ponçage,
en particulier quand il n'est pas monté,
des blessures
. Remplacez le plateau de ponçage !
[1-5]
et appuyez bien.
et causent
Enfoncer le sac poussière sur l'adaptateur
jusqu'à enclenchement.
Aspiration
AVERTISSEMENT
Risques pour la santé dus aux poussières
Les poussières peuvent être dangereuses pour
la santé. Pour cette raison, ne travaillez jamais
sans aspiration.
Respectez toujours les prescriptions nationales
en vigueur lors de l'aspiration de poussières
dangereuses pour la santé.
Aspiration intégrée avec sac poussière Longlife
Quand la puissance d’aspiration diminue, vider le sac poussière.
Appuyer sur les dispositifs d'actionnement du
sac poussière.
Tirer le sac poussière vers l'arrière.
Ouvrir le clapet du sac poussière.
Vider le sac poussière et éliminer les déchets.
Les ponceuses sont équipées de série d'une aspiration intégrée. La poussière de ponçage est aspirée à travers les orifices d'aspiration du patin de
ponçage et recueillie dans le sac poussière.
Montage du sac poussière [5]
Enfoncer l'adaptateur de sac poussière sur le
24
Page 25

Aspiration avec l'aspirateur Festool
6
1
2
2
1
Pour éviter de vider fréquemment le sac poussière
lors de travaux de ponçage prolongés, raccorder un
aspirateur Festool avec tuyau d'aspiration de
27 mm de diamètre au raccord d'aspiration
[1-4]
.
Notre recommandation :
ration antistatique ! La fonction antistatique empêche la charge d'électricité statique.
utilisez un tuyau d'aspi-
Protection pour chants (Protector) [6]
La protection pour chants
circonférence du patin de ponçage ne touche une
surface (par ex. lors du ponçage le long d'un mur ou
d'une fenêtre) et ne provoque un rebond de l'outil,
voire des dommages.
[1-6]
empêche que la
AVERTISSEMENT
Risques de blessures
Fixer la pièce à usiner de manière à ce qu‘elle ne
puisse pas bouger pendant le traitement.
Observez les consignes suivantes :
– Ne surchargez pas l'outil : n'exercez pas de pres-
sion trop importante ! Pour obtenir des résultats
optimaux, il convient d'exercer une pression modérée. Les performances de ponçage et la qualité du ponçage dépendent essentiellement du
choix de l'abrasif.
– Maintenir la machine avec une main à la poignée
[1-9]
afin de garantir un guidage sûr.
Travail avec la machine
Pour les travaux de ponçage, nous recommandons
de régler la molette comme suit
Travaux de ponçage Position de
– Ponçage avec abrasion élevée
– Ponçage d'anciennes peintures
– Ponçage de bois et de contreplaqué avant
peinture
– Ponçage intermédiaire de peintures (sur-
faces planes)
– Ponçage de sous-couches fines
– Ponçage de bois à l'aide du non-tissé de
ponçage
– Réalisation de chants sur des pièces en bois
– Lissage de surfaces en bois à enduit
[1-3]
:
la molette
5 - 6
4 - 5
25
Page 26

Travaux de ponçage Position de
la molette
– Ponçage de chants en bois massif et en
contreplaqué
– Ponçage dans la rainure de fenêtres et de
portes
– Ponçage intermédiaire du vernis de
chants
– Ponçage de fenêtres en bois naturel à
l'aide du non-tissé de ponçage
– Lissage de la surface en bois avant le dé-
capage à l'aide du non-tissé de ponçage
– Ponçage ou enlèvement de la pâte de
chaux superflue à l’aide du non-tissé de
ponçage
– Ponçage intermédiaire de vernis de sur-
faces décapées
– Nettoyage de rainures de fenêtres en bois
à l'aide du non-tissé de ponçage
– Ponçage de chants décapés
– Ponçage de matières synthétiques ther-
moplastiques
3 - 4
2 - 3
1 - 2
Entretien et maintenance
AVERTISSEMENT
Tout travail de maintenance ou de réparation, qui
nécessite l'ouverture du moteur ou du carter
d'engrenages doit uniquement être effectué par
un centre service-client autorisé (nom fourni par
votre revendeur) !
Les travaux de maintenance ou de réparation effectués par un personnel non autorisé peuvent
conduire à la mauvaise connexion de câbles
d'alimentation ou d'autres composants, ce qui
peut entraîner à son tour des accidents avec des
conséquences graves.
ATTENTION
Certains produits nettoyants et solvants sont nocifs pour les pièces en plastique
Quelques exemples de produit nocif: essence,
acétone, méthyléthylcétone (MEK), chlorure de
carbonyle, solutions nettoyantes contenant du
chlore, de l'ammoniac et les produits ménagers
contenant de l'ammoniac.
AVERTISSEMENT
Risques de blessures, choc électrique
Retirez systématiquement la batterie de la machine avant tous les travaux de maintenance et
d'entretien !
Tous les travaux de maintenance et de réparation nécessitant une ouverture du carter moteur
doivent uniquement être effectués par un atelier
de service après-vente agréé.
Seuls le fabricant et un atelier homologué sont habilités à effectuer
réparation ou service
. Les adresses à
proximité sont disponibles sur:
www.festoolusa.com/service
EKAT
4
Utilisez uniquement des pièces de rechange Festool d‘origine. Référence
5
3
2
1
sur: www.festoolusa.com/service
L'appareil est équipé de charbons spéciaux à coupure automatique. Lorsque ceux-ci sont usés, l'ali-
toute
26
Page 27

mentation est coupée et l'appareil s'arrête.
Pour assurer la circulation de l'air, il est impératif
que les ouïes de ventilation du carter moteur soient
maintenues dégagées et propres.
Accessoires
En cas de pertes de puissance ou de vibrations accrues, purgez et nettoyez les ouvertures de circulation d'air de refroidissement.
Utilisez uniquement les accessoires Festool et
consommables Festool d'origine prévus pour cette
machine, car ces composants systèmes sont parfaitement adaptés les uns par rapport aux autres.
Si vous utilisez des accessoires et consommables
d'autres marques, la qualité du résultat peut être
dégradée et les recours en garantie peuvent être
soumis à des restrictions. L'usure de la machine ou
votre charge personnelle peuvent augmenter selon
chaque application. Pour cette raison, protégezvous, votre machine et vos droits à la garantie en
utilisant exclusivement des accessoires Festool et
des consommables Festool d'origine !
Les références des accessoires et des outils figurent dans le catalogue Festool ou sur Internet
sous "www.festoolusa.com".
Systainer
De nombreux produits Festool sont fournis dans
une caisse exclusive, appelée "Systainer". Celle-ci
permet de protéger et de ranger des outils et des
appareils complémentaires. Les Systainer sont
empilables et peuvent être solidarisés. En outre, il
se fixent sur les aspirateurs CT Festool.
Les Systainers sont combinés.
Un Systainer de la nouvelle génération peux
être attaché au dessus d' un Systainer de l'ancienne génération par les quatre loquets de
l'ancien Systainer.
A
ouvrir
connecter
T-loc
connecter
7
Pour ouvrir le Systainer
[7-1]
Tournez le T-loc
à cette position.
Pour fermer le Systainer
Tournez le T-loc
[7-1]
à cette position.
Pour connecter deux Systainers
Placez un Systainer au dessus de l'autre (Fig.
A]
).
Tournez le T-loc
tions (Fig.
[7 B]
[7-1]
).
à une de cette posi-
[7
Environnement
Ne jetez pas l'appareil avec les ordures ménagères !
emballages de façon compatible avec l'environne-
Eliminez l'appareil, les accessoires et les
fermer
7.1
B
ment. Respectez les prescriptions nationales en vigueur.
27
Page 28

Manual de instrucciones original
Ajustes .................................................. 33
Sobre este manual............................... 28
Símbolos............................................... 29
Indicaciones de seguridad ................... 30
Indicaciones de seguridad generales
para herramientas eléctricas.............. 30
Indicaciones de seguridad específicas 31
Riesgos para la salud producidos por el
polvo..................................................... 32
Uso conforme a lo previsto .................. 32
Datos técnicos...................................... 32
Descripción de las funciónes............... 33
Puesta en servicio................................ 33
Guarde estas instrucciones
Sistema electrónico.............................. 33
Cambiar el plato lijador [3] .................. 34
Fijar los accesorios de lijado con StickFix
[4].......................................................... 34
Aspiración............................................. 34
Protección de cantos (Protector) [6] .... 35
Trabajo con la máquina ........................ 36
Mantenimiento y cuidado ..................... 37
Accesorios ............................................ 37
Medio ambiente.................................... 38
Sobre este manual
Es importante que usted lea y entienda este manual. La información que contiene se relaciona con la protección de
a reconocer esta información.
su seguridad
PELIGRO Descripción de peligro inmi-
ADVERTENCIA
PRECAUCIÓN
y
la prevención de problemas
nente y fracaso para evitar
riesgos que podran causar la
muerte.
Descripción de peligro y posibles lesiones resultantes o la
muerte.
Descripción de peligro y posibles lesiones resultantes.
. Los símbolos que siguen se utilizan para ayudarlo
AVISO Declaración incluyendo el tipo
de riesgo y posible resultados.
CONSEJO Indica informaciónes, notas, o
consejos para mejorar su
éxito con la herramienta.
28
Page 29

Símbolos
Símbolo
Significado
Aviso de peligro general
Peligro de electrocución
¡Leer el manual de instrucciones y las
indicaciones de seguridad!
¡Usar protección para los oídos!
¡Utilizar protección respiratoria!
¡Utilizar gafas de protección!
No depositar en la basura doméstica.
Consejo, indicación
Guía de procedimiento
Clase de protección II
Sím-
Significado
bolo
VVoltios
A
Hz
~ a.c.
n
0
Amperios
Hertzios
Tensión alterna
d.c.
Tensión continua
revoluciones por minuto en vacío
rpm
revoluciones por minuto
-1
min
’’
lbs
pulgada
libras
diámetro
°C
°F
Nm
mm
centigrados
grados Fahrenheit
Newton metro
milímetros
Ah Voltios
Wh
Amperios
29
Page 30

Indicaciones de seguridad
Indicaciones de seguridad generales para
herramientas eléctricas
ADVERTENCIA !
las indicaciones de seguridad, instrucciones, imágenes y datos técnicos con los que se presenta esta herramienta eléctrica.
plen debidamente las instrucciones de abajo, puede producirse una descarga eléctrica, quemaduras
o lesiones graves.
Guardar todas las indicaciones de seguridad e instrucciones para que sirvan de futura referencia.
El término «herramienta eléctrica» empleado en
las indicaciones de seguridad hace referencia a herramientas eléctricas conectadas a la red eléctrica
(con un cable de red) y a herramientas eléctricas
alimentadas con batería (sin cable de red).
1 SEGURIDAD EN EL LUGAR DE TRABAJO
a.
Mantenga su zona de trabajo limpia y bien iluminada.
las zonas de trabajo pueden dar lugar a accidentes.
b.
No trabaje con la herramienta eléctrica en entornos potencialmente explosivos donde se encuentren líquidos, gases o polvos
inflamables.
cen chispas que pueden inflamar el polvo o los
vapores.
c.
Mantenga a los niños y otras personales alejados de la herramienta eléctrica durante el uso.
Si se distrae, puede perder el control de la herramienta.
d.
No desatienda la herramienta eléctrica en ningún momento mientras esté en funcionamiento.
Mantenga vigilada la herramienta eléctrica
hasta que esta pare por completo.
2 SEGURIDAD ELÉCTRICA
a.
El conector de la herramienta eléctrica debe
encajar en el enchufe. El conector no debe modificarse en modo alguno. No utilice conectores
adaptadores con herramientas eléctricas con
puesta a tierra.
enchufes adecuados reducen el riesgo de descarga eléctrica.
b.
Evite el contacto físico con superficies con puesta a tierra como las de tuberías, calefacciones,
cocinas y frigoríficos.
El desorden y la falta de iluminación en
Las herramientas eléctricas produ-
Unos conectores intactos y unos
Lea y observe todas
Si no se cum-
Existe un riesgo elevado de
descarga eléctrica si su cuerpo está en contacto
con la tierra.
c.
Mantenga las herramientas eléctricas lejos de
la lluvia y la humedad.
en una herramienta eléctrica aumenta el riesgo
de descarga eléctrica.
d.
No utilice el cable de conexión para transportar
o colgar la herramienta eléctrica ni para extraer el conector del enchufe. Mantenga el cable de conexión alejado del calor, aceite, cantos
afilados o piezas de la herramienta en movimiento.
tan el riesgo de descarga eléctrica.
e.
Si trabaja con una herramienta eléctrica al aire
libre, utilice únicamente alargadores aptos
para el uso en exteriores.
dores aptos para el uso en exteriores reduce el
riesgo de descarga eléctrica.
f.
Cuando sea inevitable el uso de la herramienta
eléctrica en un entorno húmedo, utilice un interruptor diferencial.
rencial reduce el riesgo de que se produzca una
descarga eléctrica.
3 SEGURIDAD DE LAS PERSONAS
a.
Sea cuidadoso, preste atención a lo que está haciendo y actúe con prudencia al trabajar con herramientas eléctricas. No utilice ninguna
herramienta eléctrica si está cansado o bajo los
efectos de drogas, alcohol o medicamentos.
mínima distracción mientras está utilizando la
herramienta eléctrica puede ocasionarle graves
lesiones.
b.
Lleve puesto el equipamiento de protección
personal y utilice gafas de protección en todo
momento.
tección personal como p. ej. mascarilla, guantes
de seguridad antideslizantes, casco o protección
de oídos, según el tipo y la aplicación de la herramienta eléctrica, reduce el riesgo de lesiones.
c.
Evite un arranque accidental de la herramienta.
Asegúrese de que está desconectada antes de
conectarla al suministro de corriente o la batería, recogerla o transportarla.
accidente si transporta la herramienta eléctrica
con el dedo sobre el interruptor o si conecta la
herramienta encendida a la red.
d.
Retire las herramientas de ajuste y las llaves de
tornillos antes de conectar la herramienta eléc-
Los cables dañados o enredados aumen-
El empleo del equipamiento de pro-
La penetración de agua
El empleo de alarga-
El uso de un interruptor dife-
Existe peligro de
Una
30
Page 31

trica.
Si una herramienta o llave se encuentra en
una pieza en movimiento de la herramienta, pueden producirse lesiones.
e.
Evite una postura anormal del cuerpo. Procure
un apoyo seguro y mantenga el equilibrio en
todo momento.
De esta manera podrá controlar
mejor la herramienta eléctrica en situaciones
inesperadas.
f.
Utilice ropa adecuada. No utilice ropa ancha ni
objetos de joyería o bisutería. Mantenga el pelo
y la ropa alejados de las piezas en movimiento.
La ropa holgada o el pelo largo pueden quedar
atrapados por piezas en movimiento.
g.
Si se montan dispositivos de aspiración o recogida de polvo, estos deberán conectarse y utilizarse correctamente.
El empleo de un sistema
de aspiración del polvo puede disminuir los peligros a causa del polvo.
h.
No se cree un falso sentido de la seguridad ni ignore las normas de seguridad de las herramientas eléctricas, ni siquiera si está muy
familiarizado con el uso de la herramienta.
Una
distracción durante el manejo puede derivar en
graves lesiones en cuestión de pocas fracciones
de segundo.
4 USO Y MANEJO DE LA HERRAMIENTA ELÉCTRICA
a.
No sobrecargue la herramienta. Utilice la herramienta eléctrica adecuada para el trabajo
que va a realizar.
Con la herramienta apropiada
trabajará mejor y más seguro en el rango de potencia especificado.
b.
No utilice ninguna herramienta eléctrica cuyo
interruptor esté defectuoso.
Una herramienta
eléctrica que no se pueda conectar o desconectar
resulta peligrosa y es necesario repararla.
c.
Extraiga el conector del enchufe o retire la batería extraíble antes de efectuar los ajustes de
la herramienta, cambiar los accesorios o guardar la herramienta.
Esta medida de seguridad
impide el arranque accidental de la herramienta
eléctrica.
d.
Mantenga las herramientas eléctricas que no
esté utilizando fuera del alcance de los niños.
No permita que la herramienta sea utilizada por
personas que no estén familiarizadas con ella o
no hayan leído las presentes indicaciones.
Las
herramientas eléctricas en manos inexpertas
pueden ser peligrosas.
e.
Trate las herramientas eléctricas y accesorios
con cuidado. Compruebe si las partes móviles
funcionan correctamente y no se atascan, y si
hay piezas rotas o tan deterioradas que podrían
mermar el funcionamiento de la herramienta
eléctrica. Haga reparar las piezas deterioradas
antes de usar la herramienta.
Muchos accidentes tienen su origen en un mantenimiento deficiente de las herramientas eléctricas.
f.
Mantenga las herramientas cortantes limpias y
afiladas.
Las herramientas cortantes bien cuidadas con aristas de corte afiladas se atascan menos y se guían más fácilmente.
g.
Utilice la herramienta eléctrica, los accesorios,
los elementos intercambiables, etc. de acuerdo
con estas instrucciones. Para ello, tenga en
cuenta las condiciones de trabajo y la actividad
que debe realizar.
El uso de herramientas eléctricas en aplicaciones diferentes a las previstas
puede dar lugar a situaciones peligrosas.
h.
Mantenga las superficies de agarre y los mangos secos, limpios y libres de aceite y grasa.
mango o unas superficies de agarre resbaladizos
no permiten un manejo y control seguros de la
herramienta eléctrica en situaciones imprevistas.
5 SERVICIO
a.
Encargue la reparación de su herramienta eléctrica únicamente a personal técnico cualificado
y solo con piezas de recambio originales.
esta forma queda garantizada la seguridad de la
herramienta eléctrica.
Indicaciones de seguridad específicas
–
Durante el trabajo puede generarse polvo perjudicial para la salud (p. ej., de pintura de plomo
o de algunos tipos de madera).
inhalación de este polvo puede suponer una
amenaza para la persona que realiza el trabajo o
para aquellas que se encuentren cerca. Debe
cumplir la normativa de seguridad vigente en su
país.
Por el bien de su salud, utilice una mascarilla de protección respiratoria con filtro P2.
En espacios cerrados procure una ventilación suficiente y conecte un dispositivo de
aspiración.
Ante el peligro que supone el lijado, lleve
siempre gafas de protección.
–
Limpie los medios de trabajo impregnados en
aceite, como p. ej. almohadillas para lijar o fieltros de pulido, con agua y déjelos secar.
dios de trabajo empapados en aceite pueden
inflamarse.
–
¡Atención: peligro de incendio! Evitar un sobrecalentamiento del material de lijado y de la lijadora. Vaciar siempre el contenedor para polvo
antes de las pausas en el trabajo.
El contacto o la
Los me-
En condicio-
Un
De
31
Page 32

nes desfavorables, el polvo resultante del lijado
acumulado en la bolsa filtrante o en el filtro del
sistema móvil de aspiración puede inflamarse, p.
ej. si se proyectan chispas al lijar metales. Se
puede producir una situación especialmente peligrosa si el polvo resultante del lijado se mezcla
con restos de pintura o poliuretano, o bien con
otras sustancias químicas, y el material de lijado
está caliente después de un trabajo prolongado.
–
Tras la caída, compruebe si se han dañado la
herramienta eléctrica y el plato lijador. Desmonte el plato lijador para realizar una comprobación exacta. Haga reparar las piezas
deterioradas antes de usar la herramienta.
plato lijador roto y las herramientas dañadas
pueden provocar lesiones e incertidumbre al utilizar la máquina.
–
Utilice solo platos lijadores originales de Festool.
Los platos de otros fabricantes no son aptos
para el número de revoluciones de la lijadora y
pueden romperse.
Riesgos para la salud producidos por el
dores, perforadoras y otras actividades de construcción contienen sustancias químicas que se
sabe (en el Estado de California) causan cáncer, defectos de nacimiento u otros daños al sistema reproductivo. Algunos ejemplos de estas sustancias
químicas son:
• Plomo de las pinturas con base de plomo
• Sílice cristalino de los ladrillos y cemento y otros
productos de mampostería, y
• Arsénico y cromo de madera tratada con sustancias químicas
El riesgo de exposición a estas
El
sustancias varía, dependiendo
de cuantas veces se hace este
tipo de trabajo. Para reducir el
contacto con estas sustancias
químicas: trabaje en un área
con buena ventilación y trabaje con equipo de seguridad aprobado, como mascarillas para el polvo diseñadas específicamente para filtrar partículas
microscópicas.
polvo
ADVERTENCIA!
lijadoras motorizadas, aserraderos, tritura-
Algunos polvos creados por
PARA REDUCIR EL RIESGO DE LESIÓN, EL USUA-
ADVERTENCIA
RIO DEBE LEER EL MANUAL DE INSTRUCCIÓN.
Uso conforme a lo previsto
Conforme a las especificaciones, las lijadoras están diseñadas para lijar madera, plástico, piedra,
materiales compuestos, pintura/barniz, emplaste y
materiales similares. No deben emplearse para el
tratamiento de metales o materiales que contengan amianto.
Por motivos de seguridad eléctrica, la máquina no
debe mojarse ni utilizarse en entornos húmedos.
La máquina solo puede utilizarse para el lijado en
seco.
El usuario será responsable de cualquier utilización indebida.
Datos técnicos
Lijadora excéntrica ETS 125 REQ
Potencia 250 W
Numero de revoluciones (marcha en vacio) 6000 - 12000 min
Numero de revoluciones max.
1
16000 min
-1
Órbita 5/64" (2.0 mm)
Plato lijador Dia 5" (125 mm)
Peso (sin cable de red, con plato lijador) 2,6 lbs (1,2 kg)
Clase de proteccion /II
1.
Número de revoluciones máx. posible con el sistema electrónico defectuoso.
32
-1
Page 33

Descripción de las funciónes
2
Las imágenes con la dotación de suministro se encuentran en una hoja desplegable al comienzo de
este manual de instrucciones. Cuando lea este manual, le recomendamos que despliegue esta página
para disponer fácilmente de una vista general de la
máquina.
[1-1]
[1-2]
[1-3]
[1-4]
Interruptor de conexión y desconexión
Conexión plug it
Regulación del número de revoluciones
Racor de aspiración
Puesta en servicio
ADVERTENCIA
Tensión o frecuencia no permitida
Peligro de caída
La tensión de red y la frecuencia de la red eléctrica deben coincidir con los datos que figuran
en la placa de tipo.
En Norteamérica sólo las máquinas Festool pueden utilizarse con una tensión de 120 V/60 Hz.
Ver la figura
ble de conexión - a la red.
[2]
para enchufar y desenchufar el ca-
[1-5]
[1-6]
[1-7]
[1-8]
[1-9]
Los accesorios representados o descritos no forman parte íntegra de la dotación de suministro.
El interruptor
xión y desconexión (I = CONECTADO, 0 = DESCONECTADO).
Plato lijador
Protector
Saco para polvo Longlife
Adaptador para saco para polvo
Empuñadura (superficies de agarre con
aislamiento)
[1-1]
sirve como interruptor de cone-
En caso de corte de corriente o al retirar el enchufe, colocar el interruptor de conexión y desconexión inmediatamente en la posición de desconexión. Esto impide que la máquina se vuelva
a conectar de forma incontrolada.
Ajustes
cudidas.
ADVERTENCIA
Peligro de lesiones y electrocución
Desconectar el enchufe de la toma de corriente antes de realizar cualquier trabajo en la máquina.
Arranque suave
El arranque suave mediante control electrónico garantiza una puesta en marcha de la máquina sin sa-
Sistema electrónico
Número de revoluciones constante
El número preseleccionado de revoluciones del
motor se mantiene constante gracias a un sistema
electrónico. De esta manera se alcanza una velocidad de lijado constante si la herramienta se utiliza
conforme a las especificaciones (fuerza de aplicación adecuada).
Regular el número de revoluciones
Con la rueda de ajuste
mero de revoluciones entre 6000 y 12000 rpm.
[1-3]
se puede variar el nú-
33
Page 34

De esta forma, la velocidad de lijado se puede adap-
3
4
tar perfectamente a cada material (véase el capítulo Trabajo con la máquina).
Cambiar el plato lijador [3]
Solo se conseguirá un resultado óptimo si se
utilizan los accesorios y material de consu-
mo originales. Si no se instalan accesorios o
material de consumo originales, se extinguirá el
derecho a la garantía.
¡Advertencia!
ción en el interior de la máquina abierta si el
plato lijador está desmontado.
Aflojar los cuatro tornillos.
Extraer el plato lijador hacia abajo.
Colocar el plato lijador nuevo.
Fijar el plato apretando manualmente los cua-
tro tornillos (2,5 Nm).
No realizar ninguna modifica-
Fijar los accesorios de lijado con StickFix
[4]
El abrasivo StickFix y el vellón de lijar StickFix correspondientes se pueden fijar de forma rápida y
sencilla en el plato lijador StickFix.
Presione el accesorio de lijado autoadhesivo sobre el plato
En la medida que disminuye la adherencia
de la capa StickFix, los accesorios de plato
lijador (en especial en funcionamiento no acoplado)
pueden soltarse del plato lijador y provocar lesiones
. Cambiar el plato lijador.
[1-5]
lijador.
Grado de dureza del plato lijador
La máquina puede equiparse con platos lijadores
de distinta dureza en función de la superficie que se
desee tratar.
Blando:
no, para superficies planas y abombadas.
Superblando:
curvaturas y radios. ¡No aplicar en cantos!
universal para el lijado basto y el lijado fi-
lijado fino de piezas preformadas,
Aspiración
ADVERTENCIA
Consecuencias perjudiciales para la salud a causa del polvo
El polvo puede ser perjudicial para la salud. Por
este motivo, no trabaje nunca sin aspiración.
Durante la aspiración de polvo perjudicial para
la salud, respete siempre las normativas nacionales.
Autoaspiración con el saco para polvo Longlife
Las lijadoras vienen equipadas de serie con un sistema de autoaspiración. El polvo de lijado se aspira
a través de las aberturas de aspiración de la zapata
y se recogen en el saco para polvo.
34
Page 35

Montaje del saco para polvo [5]
5
1
2
1
2
4
3
1
2
6
1
2
2
1
Aspiración con el aspirador Festool
Introducir el adaptador para el saco para polvo
en el racor de aspiración.
Introducir el saco para polvo en el adaptador
hasta que encaje.
Para evitar tener que vaciar con frecuencia el saco
para polvo en trabajos de lijado prolongados, puede
conectarse un aspirador Festool con un diámetro
de tubo flexible de aspiración de 27 mm en el racor
de aspiración
Recomendación:
ción antiestáticos, pues reducen la carga electrostática.
[1-4]
.
utilizar tubos flexibles de aspira-
Protección de cantos (Protector) [6]
La protección de cantos
tro de la zapata toque la superficie (p. ej. al lijar una
pared o una ventana) y de que se produzca un contragolpe de la máquina o se produzcan daños.
[1-6]
evita que el períme-
Vaciar el saco para polvo cuando disminuya
el rendimiento de aspiración.
Comprimir los elementos de accionamiento del
saco para polvo.
Extraer el saco para polvo hacia atrás.
Abrir la tapa del saco para polvo.
Vaciar el saco para polvo y eliminar los residuos.
35
Page 36

Trabajo con la máquina
ADVERTENCIA
Peligro de lesiones
Fije la pieza de trabajo siempre de forma que no
se pueda mover cuando se trabaje con ella.
Tenga en cuenta las siguientes advertencias:
– ¡No sobrecargue la máquina aplicando demasia-
da presión! Los mejores resultados de lijado se
consiguen aplicando una presión moderada. La
calidad y el rendimiento de lijado dependen fundamentalmente de la elección del abrasivo adecuado.
– Para guiar la máquina con seguridad, sujétela
con una mano en la empuñadura
Para los trabajos de lijado recomendamos los siguientes ajustes de la rueda de ajuste
Trabajos de lijado Nivel de la
– Lijado con la máxima abrasión
– Lijado de pinturas antiguas
– Lijado de madera y enchapado antes del
barnizado
– Lijado intermedio de barniz en superficies
[1-9]
[1-3]
.
:
rueda de
ajuste
5-6
Trabajos de lijado Nivel de la
rueda de
ajuste
– Lijado de masilla tapaporos fina aplicada
4-5
– Lijado de madera con vellón de lijar
– Achaflanado en piezas de madera
– Alisado de superficies de madera impri-
madas
– Lijado de cantos de madera maciza y en-
3-4
chapada
– Lijado en el renvalso de ventanas y puer-
tas
– Lijado intermedio de barniz en cantos
– Rectificado de ventanas de madera natu-
ral con vellón de lijar
– Alisado de superficies de madera con ve-
llón de lijar antes del barnizado
– Eliminación o despegado de cal en pasta
sobrante con vellón de lijar
– Lijado intermedio de barniz en superficies
2-3
barnizadas
– Limpieza de renvalsos de ventanas de
madera natural con vellón de lijar
– Lijado de cantos barnizados
1-2
– Lijado de plásticos termoplásticos
36
Page 37

Mantenimiento y cuidado
EKAT
1
2
3
5
4
ADVERTENCIA
Cualquier trabajo de mantenimiento o reparación
que requiera abrir el motor o la carcasa del engranaje deberá ser realizado únicamente por un
Centro de Atención al Cliente (nombre proporcionado por su concesionario).
Los trabajos de mantenimiento o reparación
realizados por una persona no autorizada podrían provocar la conexión incorrecta de los conductores de alimentación u otros componentes,
lo que a su vez podría provocar accidentes con
consecuencias graves.
ATENCIÓN
Algunos productos de limpieza y disolventes resultan perjudiciales para las piezas de plástico.
Algunos de ellos incluyen, entre otros, gasolina,
acetona, metiletilacetona (MEK) y oxicloruro de
carbono. Los productos de limpieza normalmente contienen cloro y amoníaco y los productos de limpieza del hogar contienen amoníaco.
ADVERTENCIA
Peligro de lesiones, electrocución
Extraiga siempre la batería de la máquina antes
de realizar cualquier trabajo de mantenimiento y
conservación.
Todos los trabajos de mantenimiento y reparación que exijan abrir la carcasa del motor tan
sólo pueden ser llevados a cabo por un taller autorizado.
El
Servicio de atención al cliente y re-
paraciones
parte del fabricante o de los talleres de
reparación:encuentre la dirección más
próxima a usted en: www.festoolusa.com/service
Utilice únicamente piezas de recambio
Festool originales. Referencia en:
www.festoolusa.com/service
solo está disponible por
Accesorios
Utilice únicamente los accesorios Festool originales y el material de consumo Festool diseñados
para esta máquina, puesto que los componentes de
este sistema están óptimamente adaptados entre
sí. La utilización de accesorios y material de consumo de otros fabricantes puede afectar a la calidad
de los resultados de trabajo y conllevar una limitación de los derechos de la garantía. El desgaste de
La máquina está equipada con escobillas especiales autodesconectables. Si las escobillas están
desgastadas, se interrumpe automáticamente la
corriente y la máquina se detiene.
A fin de garantizar una correcta circulación del aire,
las aberturas para el aire de refrigeración dispuestas en la carcasa del motor deben mantenerse libres y limpias.
Si se observa una disminución del rendimiento o un
aumento de las vibraciones, soplar y limpiar las
aberturas para el aire de refrigeración.
la máquina o de su carga personal puede variar en
función de la aplicación. Utilice únicamente accesorios originales y material de consumo de Festool
para su propia protección y la de la máquina, así
como de los derechos de la garantía.
Los números de pedido para los respectivos accesorios y herramientas se encuentran en su catálo-
37
Page 38

go Festool o en la dirección de Internet "www.fes-
abrir
cerrar
encajar
encajar
T-loc
7.1
7
A
B
toolusa.com".
Systainer
Muchos de los productos Festool se entregan en un
embalaje exclusivo denominado "Systainer" que
sirve de protección a la herramienta y sus complementos, además de facilitar su almacenamiento.
Los Systainer pueden apilarse y encajan unos con
otros. Además se adaptan sin problema a cualquier
aparato de aspiración CT de Festool.
Para abrir el Systainer
Gire el T-loc
[7-1]
a esta posición.
Para cerrar el Systainer
Gire el T-loc
[7-1]
a esta posición.
Para encajar dos Systainer
Ponga el Systainer sobre un otro (Fig.
Gire el T-loc
nes (Fig.
[7 B]
[7-1]
a una de estas posició-
).
[7 A]
Los Systainers estan encajados y cerrados.
Un Systainer de la nueva generación es encajable encima de un Systainer de la generación anterior con los cuatro enganches del Systainer
anterior.
).
No deseche la herramienta junto con los residuos
domésticos.
Recicle las herramientas, accesorios y
Medio ambiente
embalajes de forma respetuosa con el medio ambiente. Respete la normativa vigente del país.
38
 Loading...