

Page 1
ES 125 Q
ES 125 EQ
Instruction manual
Page 2 - 6
IMPORTANT: Read and understand all instructions
before using.
Guide dutilisation
Page 7 - 11
IMPORTANT: Lire et comprendre toutes les
instructions avant de démarrer les travaux.
Ponceuse excentrique
Manual de instrucciones
Página 12 - 16
IMPORTANTE: Lea y comprende todas las
457 984_002
instrucciones antes de usar.
1
Eccentric sander
Lijador excéntrica
Page 2

GENERAL SAFETY RULES
WARNING! Read and understand all
instructions. Failure to follow all instructions
listed below, may result in electric shock, fire
and/or serious personal injury.
SAVE THESE INSTRUCTIONS
Work area
1 Keep your work area clean and well lit.
Cluttered benches and dark areas invite
accidents.
2 Do not operate power tools in explosive
atmospheres, such as in the presence of
flammable liquids, gases, or dust. Power
tools create sparks which may ignite the dust or
fumes.
3 Keep bystanders, children, and visitors
away while operating a power tool.
Distractions can cause you to lose control.
Electrical safety
4a Grounded tools must be plugged into an
outlet properly installed and grounded in
accordance with all codes and ordinances.
Never remove the grounding prong or
modify the plug in any way. Do not use any
adapter plugs. Check with a qualified
electrician if you are in doubt as to whether
the outlet is properly grounded. If the tools
should electrically malfunction or break down,
grounding provides a low resistance path to carry
electricity away from the user.
4b Double insulated tools are equipped
with a polarized plug (one blade is wider
than the other.) This plug will fit in a
polarized outlet only one way. If the plug
does not fit fully in the outlet, reverse the plug.
If it still does not fit, contact a qualified electrician
to install a polarized outlet. Do not change the
plug in any way. Double insulation eliminates
the need for the three wire grounded power cord
and grounded power supply system.
5 Avoid body contact with grounded
surfaces such as pipes, radiators, ranges
and refrigerators. There is an increased risk
of electric shock if your body is grounded.
6 Dont expose power tools to rain or wet
conditions. Water entering a power tool will
increase the risk of electric shock.
7 Do not abuse the cord. Never use the
cord to carry the tools or pull the plug from
an outlet. Keep cord away from heat, oil,
sharp edges or moving parts. Replace
damaged cords immediately. Damaged cords
increase the risk of electric shock.
8 When operating a power tool outside,
use an outdoor extension cord marked W-
A or W. These cords are rated for outdoor
use and reduce the risk of electric shock.
Personal safety
9 Stay alert, watch what you are doing
and use common sense when operating a
power tool. Do not use while tired or under
the influence of drugs, alcohol, or
medication. A moment of inattention while
operating power tools may result in serious
personal injury.
10 Dress properly. Do not wear loose
clothing or jewellery. Contain long hair.
Keep your hair, clothing, and gloves away
from moving parts. Loose clothes, jewellery,
or long hair can be caught in moving parts.
11 Avoid accidental starting. Be sure
switch is off before plugging in. Carrying
tools with your finger on the switch or plugging
in tools that have the switch on invites accidents.
12 Remove adjusting keys or switches
before turning the tool on. A wrench or key
that is left attached to a rotating part of the tool
may result in personal injury.
13 Do not overreach. Stand on both feet an
keep proper footing and balance at all
times. Proper footing and balance enables better
control of the tool in unexpected situations.
14 Use safety equipment. Always wear eye
protection. Dust mask, non-skid safety shoes,
hard hat, or hearing protection must be used for
appropriate conditions.
Tool use and care
15 Use clamps or other practical way to
secure and support the workpiece to a
stable platform. Holding the work by hand or
against your body is unstable and may lead to
loss of control.
16 Do not force tool. Use the correct tool for
your application. The correct tool will do the job
better and safer at the rate for which it is designed.
17 Do not use tool if switch does not turn it
on or off. Any tool that cannot be controlled
with the switch is dangerous and must be
repaired.
18 Disconnect the plug from the power
source before making any adjustments,
changing accessories, or storing the tool.
Such preventive safety measures reduce the risk
of starting the tool accidentally.
19 Store idle tools out of reach of children
and other untrained persons. Tools are
dangerous in the hands of untrained users.
20 Maintain tools with care. Keep cutting
tools sharp and clean. Properly maintained
tools, with sharp cutting edges are less likely to
bind and are easier to control.
2
Page 3
21 Check for misalignment or binding of
Various dust created by power
sanding, sawing, grinding, drilling and other
construction activities contains chemicals
known (to the State of California) to cause
cancer, birth defects or other reproductive
harm. Some examples of these chemicals are:
lead from lead-based paints,
crystalline silica from bricks and cement and
other masonry products, and
arsenic and chromium from chemically-
treated lumber.
The risk from these exposures varies,
depending on how often you do this type of
work.
To reduce your exposure to these
chemicals: work in a well
ventilated area, and work with
approved safety equipment, such
as dust masks that are specially
designed to filter out microscopic
particles.
moving parts, breakage of parts, and any
other condition that may affect the tools
operation. If damaged, have the tool
serviced before using. Many accidents are
caused by poorly maintained tools.
22 Use only accessories that are
recommended by the manufacturer for
your model. Accessories that may be suitable
for one tool, may become hazardous when used
on another tool.
Service
23 Tool service must be performed only by
qualified repair personnel. Service or
maintenance performed by unqualified personnel
could result in a risk of injury.
24 When servicing a tool, use only identical
replacement parts. Follow instructions in
the Maintenance section of this manual. Use
of unauthorised parts or failure to follow
Maintenance instructions may create a risk of
electric shock or injury.
Technical data ES 125 Q ES 125 EQ
Wattage W 200 200
No load speed rpm 13 000 6 000 - 13 000
No. of strokes spm 26 000 12 000 - 26 000
Sanding stroke mm (in.) 2.0 (0.08) 2.0 (0.08)
Sanding base mm (in.) Ø 125 (4.9) Ø 125 (4.9)
Weight kg (lbs) 1.1 (2.4) 1.1 (2.4)
Safety llevel UL 745, CSA C22.2 No. 745
Symbols
V volts
A amperes
Hz hertz
W watt
alternating current
n
0
rpm revolutions per minute
spm strokes per minute
Intended use
The sanders are designed for sanding wood,
plastic, composite materials, paint / varnish,
filling material and similar materials. Metal and
materials with an asbestos content must not
be processed with these tools.
The machine is particularly suitable for
processing smaller surfaces and overhead work
because of its size, its weight and its output.
The machines must not be damp nor operated
in a damp environment for electrical safety
reasons. The machines may only be used for
dry sanding.
no load speed
Class II Construction
The user bears sole responsibility
for any damage or accidents resulting from
incorrect use.
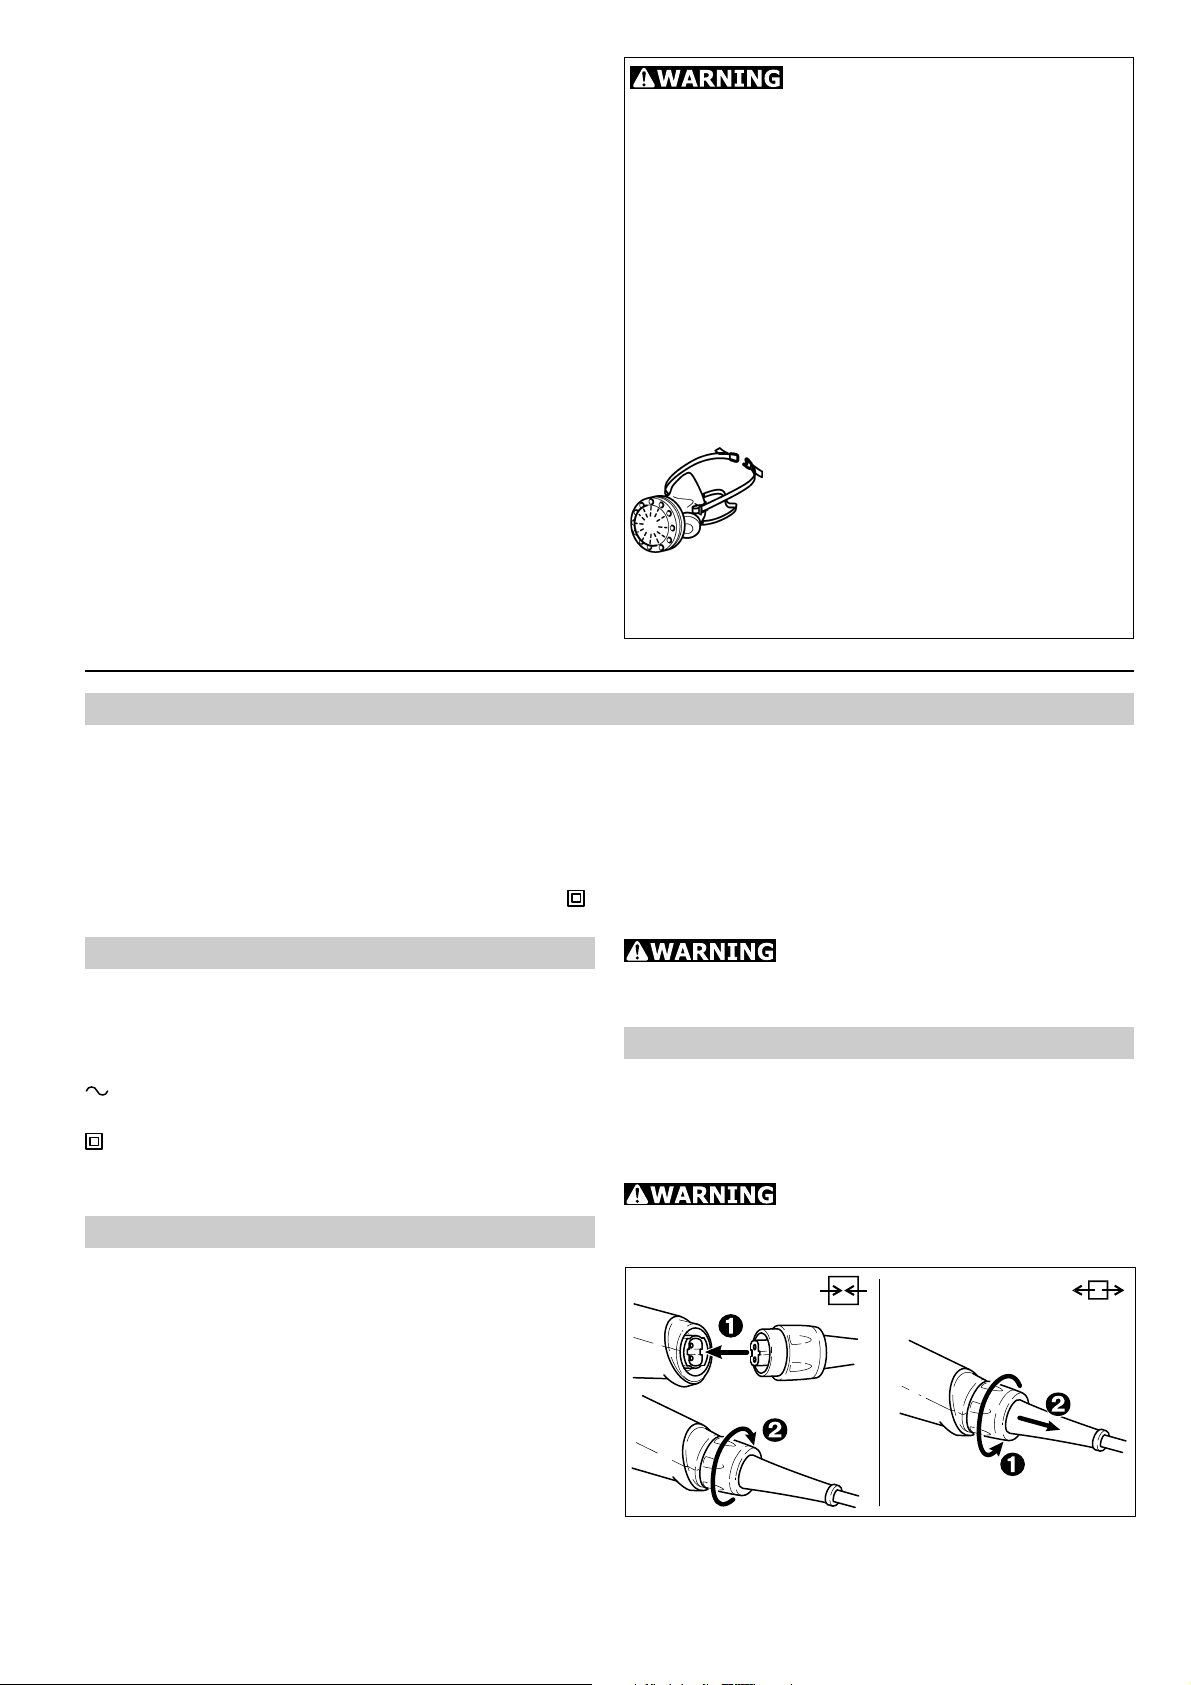
Electrical connection and operation
The mains voltage must correspond with the
voltage on the rating plate!
See the following Fig. for connecting or
disconnecting the power cord of the tool.
Always switch the machine off
before connecting or disconnecting the power
cable!
3
Page 4
The switch (1.1) acts as an ON / OFF switch (I
ELECTRONIC
= ON / 0 = OFF).
Electronic control
The ES 125 EQ has an electronic control
with which the rotational speed can be
varied step-free.
This allows the sanding speed to be adapted to
the optimum level according to the material
concerned.
The speed is set using the rotary control button
(2.1).
Inserting a turbo-filter
- Push the filter holder with its opening (3.2)
as far as it will go onto the extraction nozzle
(3.1) of the machine and clamp tight by
turning rotary knob (3.3).
- Push the front cardboard section of the turbo-filter with the sealing lip (3.7) onto the
extraction nozzle (3.6) of the filter holder
- Insert rear cardboard section with slot (3.9)
onto the retaining strip (3.8) of the filter holder
The numbers on the rotary control button
represent approximately the following strokes
per minute:
Dust extraction
Dust extractors prevent large accumulations of
dust in the air in the working environment and
dirt collecting in the workplace.
Inboard extraction
The machines are fitted with inbuilt extraction
as standard. The sanding dust is extracted
through suction openings in the sanding base
(3.5) and trapped in the turbo-filter (3.4).
The turbo-filter has to be changed when it is so
full of dust that the extraction power diminishes.
External extraction by an extraction
unit
In order to avoid frequent changing of the turbo-filter when carrying longer sanding jobs, it
is possible to connect a Festool extractor to the
unit instead of using inbuilt extraction.
In this case, the extraction pipe (Æ 27 mm (4.1))
of the extraction unit is connected to the suction
nozzle.
Attaching sanding material
The appropriate Stickfix sanding paper and
Stickfix sanding felt can be fastened quickly and
easily onto the Stickfix sanding base.
4
Page 5
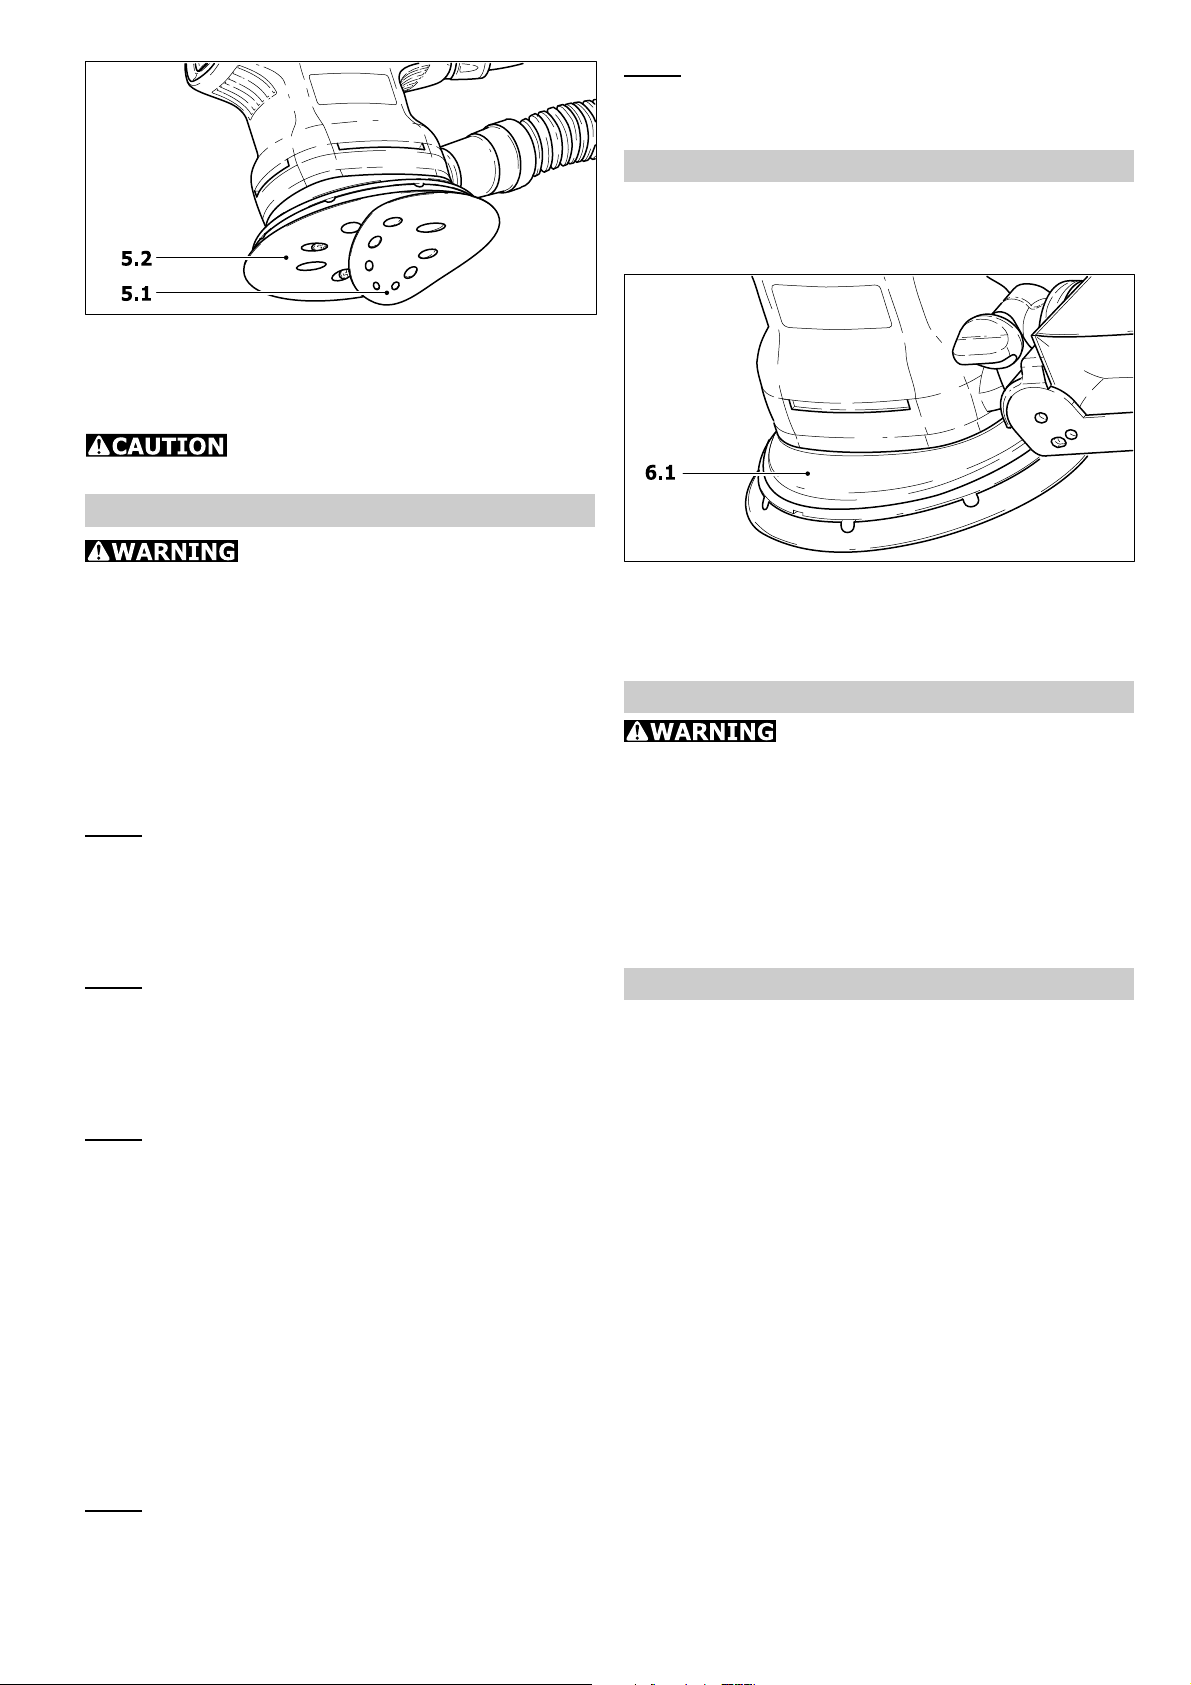
The self-adhesive sanding material (5.1) is
simply pressed onto the sanding base (5.2) and
held safely in place by the Stickfix sanding base
velcro surface.
Always use original Festool
sanding materials!
Operating instructions
Never overload the tool by using
too much pressure! The best sanding results
are achieved when applying moderate pressure.
The sanding performance and quality depend
mainly on the choice of the right sanding
material. Festool offers the appropriate sanding
material for all applications (see Festool
catalogue).
We recommend the following settings on the
rotary control (2.1) for electronic machines:
5 - 6
- sanding with max. drive
- sanding old paint
- sanding wood and veneer prior to painting
- interim sanding of paint on surfaces
1 - 2
- sanding stained edges
- sanding thermoplastic synthetics
Sanding base brakes
The sanding base is braked by a collar (6.1) in
order to prevent any uncontrolled excessive
speed of the sanding base.
Because the collar wears down in the course of
time, it has to be replaced by a new one (order
no. 489 190) as soon as there is any reduction
in the braking effect.
Maintenance and care
Always remove the plug from the
mains supply socket before carrying out any
work on the machine!
The cooling air vents on the motor housing must
always be free of blockages and clean to ensure
air circulation. Any maintenance or repair work
requiring the motor housing to be opened may
only be carried out by an authorised service
workshop.
4 - 5
- sanding of thinly applied primer
- sanding of wood with sanding vlies
- sanding edges on wooden parts
- smoothing primed wooden surfaces.
3 - 4
- sanding full wooden and veneer edges
- sanding in the grooves/rebates of windows
and doors
- interim paint sanding on edges
- pre-sanding natural wood windows with
sanding vlies
- smoothing wood surfaces with sanding felt
prior to staining
- rubbing down stained surfaces with sanding
vlies
- rubbing down or removing excess lime paste
with sanding vlies
2 - 3
- interim paint sanding on stained surfaces
- cleaning natural wood window grooves with
sanding felt
Warranty
Conditions of 1+2 Warranty
You are entitled to a free extended warranty (1
year + 2 years = 3 years) for your Festool power
tool. Festool shall be responsible for all shipping
costs during the first year of the warranty.
During the second and third year of the
warranty the customer is responsible for
shipping the tool to Festool. Festool will pay for
return shipping to the customer using UPS
Ground Service. All warranty service is valid 3
years from the date of purchase on your receipt
or invoice.
Festool Limited Warranty
This warranty is valid on the pre-condition that
the tool is used and operated in compliance
with the Festool operating instructions. Festool
warrants, only to the original consumer
purchaser, that the specified tool will be free
from defects in materials and workmanship for
a term of one year from the date of
procurement. Festool makes no other warranty,
5
Page 6

express or implied, for Festool portable power
tools. No agent, representative, distributor,
dealer or employee of Festool has the authority
to increase or otherwise change the obligations
or limitations of this warranty. The obligations
of Festool in its sole discretion under this
warranty shall be limited to the repair or
replacement of any Festool portable power tool
that is found to be defective as packaged with
the User Manual.
Excluded from coverage under this warranty
are: normal wear and tear; damages caused
by misuse, abuse or neglect; damage caused
by anything other than defects in material and
workmanship. This warranty does not apply to
accessory items such as circular saw blades,
drill bits, router bits, jigsaw blades, sanding
belts, and grinding wheels. Also excluded are
wearing parts, such as carbon brushes,
lamellas of air tools, rubber collars and seals,
sanding discs and pads, and batteries.
Festool portable power tools requiring
replacement or repair are to be returned with
the receipt of purchase to Festool (call 800554-8741 for address details).
IN NO EVENT SHALL FESTOOL BE LIABLE
FOR ANY CONSEQUENTIAL OR
INCIDENTAL DAMAGES FOR BREACH OF
THIS OR ANY OTHER WARRANTY,
EXPRESSED OR IMPLIED WHATSOEVER.
ALL WARRANTIES IMPLIED BY STATE
LAW, INCLUDING THE IMPLIED
WARRANTIES OF MERCHANTABILITY AND
FITNESS FOR A PARTICULAR PURPOSE,
ARE HEREBY LIMITED TO THE DURATION
OF THREE YEARS.
Some states in the U.S. and some Canadian
provinces do not allow the limitations on how
long an implied warranty lasts, so the above
limitation may not apply to you. With the
exception of any warranties implied by state or
province law as hereby limited, the foregoing
express limited warranty is exclusive and in lieu
of all other warranties, guarantees, agreements
and similar obligations of Festool.
This warranty gives you specific legal rights and
you may also have other rights which vary from
state to state in the U.S. and province to
province in Canada.
6
Page 7

RÉGLES DE SÉCURITÉ GÉNÉRALES
AVERTISSEMENT! Vour devez lire et
comprendre toutes les instructions. Le non-
respect, même partiel, des instructions ci-après
entraîne un risque de choc électrique, dincendie
et/ou de blessures graves.
CONSERVEZ CES INSTRUCTIONS
Aire de travail
1 Veillez à ce que laire de travail soit propre et bien éclairée. Le désordre et le manque
de lumière favorisent les accidents.
2 Nutilisez pas doutils électriques dans
une atmosphère explosive, par exemple en
présence de liquides, de gaz ou de
poussières inflammables. Les outils
électriques créent des étincelles qui pourraient
enflammer les poussières ou les vapeurs.
3 Tenez à distance les curieux, les enfants
et les visiteurs pendant que vous travaillez
avec un outil électrique. Ils pourraient vous
distraire et vous faire une fausse manoeuvre.
Sécurité électrique
4a Les outils mis à la terre doivent être
branchés dans une prise de courant
correctement installée et mise à terre
conformément à tous les codes et
règlements pertinents. Ne modifiez jamais
la fiche de quelque façon que ce soit, par
exemple en enlevant la broche de mise à la
terre. Nutilisez pas dadaptateur de fiche.
Si vous nêtes pas certain que la prise de
courant est correctement mise à la terre,
adressez-vous à un électricien qualifié. En
cas de défaillance ou de défectuosité électrique
de loutil, une mise à la terre offre un trajet de
faible résistance à lélectricité qui autrement
risquerait de traverser lutilisateur.
4b Les outils à double isolation sont
équipés dune fiche polarisée (une des
lames est plus large que lautre), qui ne
peut se brancher que dune seule façon
dans une prise polarisée. Si la fiche nentre
pas parfaitement dans la prise, inversez sa
position; si elle nentre toujours pas bien,
demandez à un èlectricien qualifié dinstaller une
prise de courant polarisée. Ne modifiez pas la
fiche de loutil. La double isolation élimine le
besoin dun cordon dalimentation à trois fils avec
mise à la terre ainsi que dune prise de courant
mise à la terre.
5 Évitez tout contact corporel avec des
surfaces mises à la terre (tuyauterie,
radiateurs, cuisinières, réfrigérateurs,
etc.). Le risque de choc électrique est plus grand
si votre corps est en contact avec la terre.
6 Nexposez pas les outils électriques à la
pluie ou à leau. La présence deau dans un
outil électrique augmente le risque de choc
électrique.
7 Ne maltraitez pas le cordon. Ne
transportez pas loutil par son cordon et ne
débranchez pas la fiche en tirant sur le
cordon. Nexposez pas le cordon à la
chaleur, à des huiles, à des arêtes vives ou
à des pièces en mouvement. Remplacez
immédiatement un cordon endommagé. Un
cordon endommagé augmente le risque de choc
électrique.
8 Lorsque vous utilisez un outil électrique
à lextérieur, employez un prolongateur
pour lextérieur marqué W.A. ou W. Ces
cordons sont faits pour être utilisés à lextérieur
et réduisent le risque de choc électrique.
Sécurité des personnes
9 Restez alerte, concentrez-vous sur
votre travail et faites preuve de jugement.
Nutilisez pas un outil électrique si vous
êtes fatigué ou sous linfluence de drogues,
dalcool ou de médicaments. Un instant
dinattention suffit pour entraîner des blessures
graves.
10 Habitiez-vous convenablement. Ne
portez ni vêtements flottants ni bijoux.
Confinez les cheveux longs. Napprochez
jamais les cheveux, les vêtements ou les
gants des pièces en mouvement. Des
vêtement flottants, des bijoux ou des cheveux
longs risquent dêtre happés par des pièces en
mouvement.
11 Méfiez-vous dun démarrage accidentel.
Avant de brancher loutil, assurez-vous que
son interrupteur est sur ARRÊT. Le fait de
transporter un outil avec le doigt sur la détente
ou de brancher un outil dont linterrupteur est
en position MARCHE peut mener tout droit à un
accident.
12 Enlevez les clés de réglage ou de
serrage avant de démarrer loutil. Une clé
laissée dans une pièce tournante de loutil peut
provoquer des blessures.
13 Ne vous penchez pas trop en avant.
Maintenez un bon appui et restez en équilibre
en tout temps. Un bonne stabilité vous permet
de mieux réagir à une situation inattendue.
14 Utilisez des accessoires de sécurité.
Portez toujours des lunettes ou une visière.
Selon les conditions, portez aussi un masque
antipoussière, des bottes de sécurité
antidérapantes, un casque protecteur et/ou un
appareil antibruit.
Utilisation et entretien des outils
15 Immobilisez le matériau sur une surface
stable au moyen de brides ou de toute autre
façon adéquate. Le fait de tenir la pièce avec
7
Page 8

la main ou contre votre corps offre une stabilité
Certaines poussières
créées par le ponçage mécanique, le sciage, le
meulage, le perçage et autres activités reliées
à la construction contiennent des substances
chimiques connues (dans lÉtat de la Californie)
comme pouvant causer le cancer, des anomalies congénitales ou représenter dautres
dangers pour la reproduction. Voici quelques
exemples de telles substances:
Plomb provenant de peintures à base de
plomb,
Silice cristallisée utilisée dans les briques, le
ciment et autres matériaux de maçonnerie,
et
Arsenic et chrome du bois duvre traité avec
un produit chimique.
Le risque dexposition à de tels produits varie
selon la fréquence à laquelle vous faites ce
genre de travail.
Pour réduire les risques
dexposition à ces substances
chimiques : travaillez dans un
endroit adéquatement ventilé et
utilisez un équipement de sécurité
approuvé, tel que masques
antipoussières spécialement
conçus pour filtrer les particules
microscopiques.
insuffisante et peut amener un dérapage de loutil.
16 Ne forcez pas loutil. Utilisez loutil
appropríé à la tâche. Loutil correct fonctionne
mieux et de façon plus sécuritaire. Respectez
aussi la vitesse de travail qui lui est propre.
17 Nutlisez pas un outil si son interrupteur
est bloqué. Un outil que vous ne pouvez pas
commander par son interrupteur est dangereux
et doit être réparé.
Lentretien ou la réparation dun outil électrique
par un amateur peut avoir des conséquences
graves.
24 Pour la réparation dun outil,
nemployez que des pièces de rechange
dorigine. Suivez les directives données à
la section Réparation de ce manuel.
Lemploi de pièces non autorisées ou le nonrespect des instructions dentretien peut créer
un risque de choc électrique ou de blessures.
18 Débranchez la fiche de loutil avant
deffectuer un réglage, de changer
daccessoire ou de ranger loutil. De telles
mesures préventives de sécurité réduisent le
risque de démarrage accidental de loutil.
19 Rangez les outils hors de la portée des
enfants et dautres personnes inexpérimentées. Les outils sont dangereux dans
les mains dutilisateurs novices.
20 Prenez soin de bien entretenir les outils.
Les outils de coupe doivent être toujours
bien affûtés et propres. Des outils bien
entretenus, dont les arêtes sont bien
tranchantes, sont moins susceptibles de coincer
et plus faciles à diriger.
21 Soyez attentif à tout désalignement ou
coincement des pièces en mouvement, à
tout bris ou à toute autre condition
préjudiciable au bon fonctionnement de
loutil. Si vous constatez quun outil est
endommagé, faites-le réparer avant de
vous en servir. De nombreux accidents sont
causés par des outils en mauvais état.
22 Nutilisez que des accessoires que le
fabricant recommande pour votre modèle
doutil. Certains accessoires peuvent convenir
à un outil, mais être dangereux avec un autre.
Réparation
23 La réparation des outils électriques doit
être confiée à un réparateur qualifié.
Caracteristiques techniques ES 125 Q ES 125 EQ
Puissance absorbée W 200 200
Vitesse à vite tr/min 13 000 6 000 13 000
Nombre d'oscillations tr/min 26 000 12 000 26 000
Amplitude mm (in.) 2.0 (0.08) 2.0 (0.08)
Patin de ponçage mm (in.) Ø 125 (4.9) Ø 125 (4.9)
Poids kg (lbs) 1.1 (2.4) 1.1 (2.4)
Sécurité UL 745, CSA C22.2 No. 745
Symbole
V Volt
A Ampère
Hz Hertz
W Watt
n
0
Tension alternative
Vitesse de rotation à vide
tr/min tours par minute
Utilisation conforme
Les ponceuses sont destinées au ponçage du
bois, des matières synthétiques, des matériaux
composites, de la peinture / du vernis, du mastic
et des matériaux similaires.
Classe II conception
8
Page 9

Les métaux et du matériau comportant de
ELECTRONIC
lamiante ne doivent pas être usinés.
En raison de sa taille, de son poids et de sa
puissance, la machine est adaptée notamment
au traitement de petites surfaces ainsi quaux
travaux au-dessus de la tête.
Pour des raisons de sécurité électrique, les
machines ne doivent pas être humides ni
fonctionner dans un environnement humide. Il
ne faut utiliser les machines que pour un
ponçage sec.
En cas dune utilisation
non conforme, la responsabilité des dommages
et accidents incombe à lutilisateur.
Raccordement électrique et mise en
service
La tension du réseau doit correspondre à la
tension indiquée sur la plaque signalétique!
Voir en figure suivante la connexion et la
déconnexion du câble de raccordement au
secteur.
La vitesse de rotation est réglée par la molette
(2.1).
Les chiffres de la molette correspondent
approximativement aux nombres de oscillations
ci-après :
Avant de brancher ou de
débrancher le câble de raccordement secteur,
il est absolument indispensable de toujours
mettre la machine hors marche!
Linterrupteur (1.1) sert dinterrupteur Marche
/ Arrêt (I = Marche / 0 = Arrêt).
Aspiration de la poussière
Laspiration de la poussière empêche des
lourdes charges de lair environnant par des
poussières et des fortes salissures du lieu de
travail.
Dispositif dauto-aspiration
Réglage électronique
La ponceuse ES 125 EQ possède un
réglage électronique permettant une
variation progressive de la vitesse de
rotation.
Ceci permet une adaptation optimale de la
vitesse du ponçage aux différents matériaux.
Les machines sont équipées en série dun
dispositif dauto-aspiration. La poussière de
ponçage est aspirée à travers les orifices
daspiration du patin de ponçage (3.5) puis
collectée dans le filtre turbo (3.3). Lorsque le
filtre turbo est rempli de poussières, la
performance daspiration baisse et il faut le
remplacer.
9
Page 10

Montage dun filtre turbo
- Placer le porte-filtre avec lorifice (3.2) jusquà
larrêt sur le manchon daspiration (3.1) de la
machine et serrer à laide du bouton tournant (3.3).
- faire glisser la partie avant du filtre avec la
lèvre détanchéité (3.7) sur le manchon
daspiration (3.6) du porte-filtre,
- placer la partie arrière du carton avec la fente
(3.9) sur la nervure de maintien (3.8) du
porte-filtre,
Aspiration extérieure à laide dun
aspirateur
Afin déviter davoir à remplacer souvent le filtre
turbo, on peut raccorder un aspirateur Festool
à la place du dispositif dauto-aspiration. Pour
ce faire, le flexible daspiration (Ø 27 mm (4.1))
de laspirateur est monté sur le manchon
daspiration.
Fixer labrasif
Le patin de ponçage Stickfix permet une fixation
rapide et aisée des papiers abrasifs Stickfix et
des non-tissés abrasifs Stickfix adaptés.
Le rendement et la qualité du ponçage
dépendent essentiellement de la sélection de
labrasif adéquat. Festool propose labrasif
approprié à chaque cas dutilisation (cf. le
catalogue Festool).
Pour des machines électroniques nous préconisons les réglages ci-après de la molette (2.1):
5 6
- Ponçage à entraînement max.
- Ponçage danciennes peintures
- Ponçage de bois et de contreplacage avant
application du vernis
- Ponçage intermédiaire du vernis de surfaces
4 5
- Ponçage dun enduit appliqué en fine couche
- Ponçage de bois à laide du non-tissé de
ponçage
- Réalisation de chants sur des pièces en bois
- Lissage de surfaces en bois à enduit
3 4
- Ponçage de bordures en bois massif et
contreplaquées
- Ponçage dans la rainure de fenêtres et de portes
- Ponçage intermédiaire du vernis de chants
- Ponçage de fenêtres en bois nature à laide
du non-tissé de ponçage
- Lissage de la surface en bois avant le
décapage à laide du non-tissé de ponçage
- Ponçage de surfaces décapées à laide du nontissé de ponçage
- Ponçage ou enlèvement de la pâte de chaux
superflue à laide du non-tissé de ponçage
2 3
- Ponçage intermédiaire de vernis de surfaces
décapées
- Nettoyage de rainures de fenêtres en bois à
laide du non-tissé de ponçage
Les abrasifs autoagrippant (5.1) sont facilement
placés sur le patin de ponçage (5.2) puis
maintenus en toute sécurité par le revêtement
autoagrippant du patin de ponçage Stickfix.
Nutilisez que des produits
abrasifs originaux Festool!
Conseils pour le travail
Ne surchargez pas la
machine en appuyant trop fort! Vous obtiendrez
le meilleur résultat de ponçage avec une
pression dapplication moyenne.
1 2
- Ponçage de chants décapés
- Ponçage de matières synthétiques thermoplastiques
Blocage du patin de ponçage
10
Page 11

Le patin de ponçage est bloqué par une
collerette (6.1) afin déviter quil ne monte de
façon incontrôlée.
La collerette étant soumise à lusure dans le
temps, leffet de blocage saffaiblit, et elle doit
être remplacée par une neuve (référence
489190).
Entretien et maintenance
Avant toute intervention
sur la machine il faut retirer la fiche de la prise
de courant!
Les orifices dair de refroidissement du carter
moteur doivent toujours être propres et libres
afin dassurer la circulation libre de lair.
Les travaux dentretien et de réparation
nécessitant une ouverture du carter moteur ne
doivent être effectués que par le personnel dun
atelier autorisé du service après-vente.
Garantie
Conditions de la garantie (1+2 ans)
Vous avez droit à une prolongation de garantie
gratuite (1 an + 2 ans = 3 ans) sur votre outil
électrique Festool. Festool assumera tous les
coûts dexpédition pendant la première année
de la garantie alors que les deuxième et
troisième années, les coûts devront être
assumés par le client. Festool paiera les frais
de retour de loutil au client par service de
livraison terrestre UPS. La garantie est valable
pour une période de 3 ans à compter de la date
dachat indiquée sur votre reçu ou votre facture.
Garantie limitée de Festool
Cette garantie est valable à condition que loutil
soit utilisé conformément aux instructions de
Festool. Festool garantit, à lacheteur initial
seulement, que loutil indiqué sera exempt de
tout défaut de matériau et de fabrication
pendant un an à compter de la date dachat.
Festool ne donne aucune garantie
supplémentaire, implicite ou explicite, sur les
instruments portables électriques Festool.
Aucun agent, représentant commercial,
distributeur, vendeur ou employé de Festool
nest autorisé à prolonger ou à modifier les
obligations ou restrictions de la présente
garantie. Les obligations de Festool sont, à son
entière discrétion, limitées à la réparation ou à
léchange des outils portables électriques
Festool trouvés défectueux dans le présent
emballage, tels que fournis avec le présent
Guide dutilisation.
Cette garantie exclut lusure normale, les
dommages causés par un usage impropre, les
abus ou la négligence, ou tout dommage autre
que ceux attribuables à des défauts de matériau
et de fabrication. Cette garantie ne sapplique
pas aux accessoires tels que lames de scie
circulaire, mèches de perceuse et vilebrequin,
lames de scie sauteuse, bandes abrasives et
meules. Sont également exclues les pièces
dusure, telles que balais de charbon, lamelles
pour outils à air comprimé, joints et manchons
de caoutchouc, disques et patins ponceurs, ainsi
que les piles.
Les outils électriques portables Festool à
remplacer ou à réparer doivent être retournés
avec le reçu dachat à Festool (appelez au 800554-8741 pour connaître ladresse
dexpédition).
FESTOOL NEST EN AUCUN CAS
RESPONSABLE DES DOMMAGES DIRECTS
OU INDIRECTS, IMPLICITES OU
EXPLICITES, DÉCOULANT DE LA RUPTURE
DE CETTE GARANTIE OU DE TOUTE AUTRE
GARANTIE. TOUTES LES GARANTIES
IMPLICITES, Y COMPRIS LES GARANTIES
IMPLICITES DE QUALITÉ MARCHANDE ET
DADÉQUATION À UN USAGE
PARTICULIER, SONT LIMITÉES À UNE
PÉRIODE DE TROIS ANS.
Certains états américains et certaines provinces
canadiennes ne permettent pas la limitation des
garanties implicites; il se pourrait donc que les
limites indiquées ci-dessus ne sappliquent pas
dans votre cas. À lexception de certaines
garanties implicites des provinces ou des états
indiquées ici, la présente garantie est exclusive
et remplace toute autre garantie, convention
et obligation similaire de Festool.
Cette garantie vous confère des droits légaux
spécifiques, et vous pouvez aussi avoir dautres
droits pouvant varier dun état à lautre, ou
dune province à lautre au Canada.
11
Page 12

NORMAS GENERALES DE SEGURIDAD
¡AVISO! Lea y entienda todas las
instrucciones. El incumplimiento de una sola
de las instrucciones aquí listadas, puede tener
como resultado una descarga eléctrica, fuego
y/o lesiones personales serias.
CONSERVE ESTAS INSTRUCCIONES
Espacio de trabajo
1 Mantenga su espacio de trabajo limpio y
bien iluminado. Bancos de trabajo desordenados
y areas oscuras facilitan accidentes.
2 No maneje herramientas mecánicas en
ambientes explosivos, como por ejemplo
en presencia de líquidos inflamables, gases,
o polvo. Las herramientas mecánicas generan
chispas que pueden encender el polvo o gases.
3 Mantenga espectadores, niños, y
visitantes fuera del alcance mientras maneje
herramientas mecánicas. Distracciones
pueden causarle la pérdida del control.
Seguridad eléctrica
4a Herramientas conectadas a tierra deben
estar enchufadas en una toma de corriente
apropiada que esté correctamente
instalada y conectada a tierra, de acuerdo
con la normativa vigente. Nunca quite el
diente de conexión a tierra o modifique el
enchufe de alguna manera. No utilice
ningún adaptador de enchufe. Compruebe
con un electricista cualificado si duda de la
conexión correcta a tierra de la toma de
corriente. Si las herramientas funcionaran
electricamente mal o se estropearan, la conexión
a tierra ofrece una vía de mínima resistencia para
desviar la corriente eléctrica del usuario.
4b Herramientas con doble aislamiento
están equipadas con un enchufe polarizado
(un filo es más ancho que el otro). Este
enchufe solo encaja de una manera en la
toma de corriente polarizada. Si el enchufe
no encaja, déle la vuelta. Si aún no encaja,
contacte un electricista cualificado para instalar
una toma de corriente polarizada. No modifique
el enchufe de ninguna manera. El doble
aislamiento
de corriente con conexión a tierra de tres hilos y
un sistema de suministro de corriente conectado
a tierra.
5 Evite el contacto con superficies
conectadas a tierra, como tubos,
radiadores, cableado y refrigeradores.
Existe un elevado riesgo de descarga eléctrica si
su cuerpo está conectado a tierra.
6 No exponga las herramientas
mecánicas a la lluvia o condiciones
húmedas. Agua que entra en una herramienta
elimina la necesidad de un cable
mecánica aumenta el riesgo de descarga
eléctrica.
7 No abuse del cable. Nunca use el cable
para transportar la herramienta o
desenchufarla de la toma de corriente.
Mantenga el cable fuera de calor, aceite,
filos agudos o partes movibles. Reemplace
cables dañados inmediatamente. Cables
dañados aumentan el riesgo de descarga
eléctrica.
8 Cuando utilice herramientas mecánicas
en el exterior, utilice un cable de exterior
señalizado con «W-A» o «W». Estos cables
están clasificados para uso exterior y reducen el
riesgo de descarga eléctrica.
Seguridad personal
9 Manténgase atento, observe lo que está
haciendo y use el sentido común cuando
use una herramienta mecánica. No trabaje
estando cansado o bajo influencia de
drogas, alcohol, o medicamentos. Un
momento sin prestar atención mientras maneja
una herramienta mecánica puede tener como
resultado serias lesiones personales.
10 Vístase apropiadamente. No lleve ropa
suelta o joyas. Sujete pelo largo. Mantenga
su pelo, ropa y guantes fuera del alcance
de partes movibles. Ropa, joyas y pelo suelto
pueden pillarse en partes movibles.
11 Evite accidentes al iniciar. Asegúrese
que el interruptor está apagado antes de
enchufar. Transportar herramientas con el dedo
en el interruptor o enchufar las herramientas con
el interruptor encendido puede provocar
accidentes.
12 Quite llaves de ajuste o conmutadores
antes de encender la herramienta. Una llave
inglesa u otra llave que se deja puesta en partes
rotatorias de la herramienta pueden causar
lesiones personales.
13 No exceda límites. Mantenga
estabilidad y balance apropiado en todo
momento. Estabilidad y balance apropiado
posibilitan el mejor control de la herramienta en
situaciones inesperadas.
14 Use equipamiento de seguridad. Lleve
siempre gafas protectoras. Mascarilla de
polvo, zapatos de seguridad antirresbaladizos,
casco, o protección de los oídos deben ser
utilizados para condiciones adecuadas.
Uso y cuidado de la herramienta
15 Use abrazaderas u otras formas
prácticas de sujetar y asegurar la pieza de
trabajo en una plataforma estable. Sujetar
la pieza de trabajo con la mano o contra el cuerpo
es inestable y puede causar la pérdida de control.
12
Page 13

16 No fuerce la herramienta. Use la
Algunos polvos creados por
lijadoras mecánicas, aserraderos, trituradores,
perforadoras y otras actividades de
construcción contienen sustancias químicas que
se sabe (en el Estado de California) causan
cáncer, defectos de nacimiento u otros daños
al sistema reproductivo. Algunos ejemplos de
estas sustancias químicas son:
Plomo de las pinturas con base de plomo
Sílice cristalino de los ladrillos y cemento y
otros productos de mampostería, y
Arsénico y cromo de madera tratada con
sustancias químicas
El riesgo de exposición a estas sustancias varía,
dependiendo de cuantas veces se hace este tipo
de trabajo.
Para reducir el contacto con estas
sustancias químicas: trabaje en
un área con buena ventilación y
trabaje con equipo de seguridad
aprobado, como mascarillas para
el polvo diseñadas específicamente para filtrar partículas
microscópicas.
herramienta correcta para su aplicación. La
herramienta correcta hará su trabajo de manera
mejor y más segura al nivel para el cual está
diseñada.
17 No use la herramienta si el interruptor
no la enciende y apaga. Cualquier
herramienta que no se pueda controlar por el
interruptor es peligrosa y debe ser arreglada.
18 Desconecte el enchufe de la toma de
corriente antes de realizar cualquier ajuste,
cambiar accesorios, o guardar la
herramienta. Estas medidas preventivas de
seguridad reducen el riesgo de poner en
funcionamiento la herramienta accidentalmente.
19 Guarde herramientas desocupadas
fuera del alcance de niños u otras personas
sin experiencias. Las herramientas son
peligrosas en manos de personas inexpertas.
20 Mantenga las herramientas con
cuidado. Mantenga herramientas para
cortar afiladas y limpias. Herramientas
mantenidas correctamente, con filos afilados,
difícilmente se traban y se controlan con mayor
facilidad.
21 Compruebe si hay alineación incorrecta
o trabadura de partes movibles, rotura de
partes, o cualquier otra condición que
puedan afectar el funcionamiento de la
herramienta. En caso de daños, arregle la
herramienta antes de usarla. Muchos accidentes
son causados por herramientas con mal
mantenimiento.
22 Use solo accesorios que recomiende el
fabricante para su modelo. Accesorios que
funcionen en una herramienta pueden ser
peligrosos al usarlos en otra.
Datos técnicos ES 125 Q ES 125 EQ
Potencia absorbida W 200 200
Velocidad sin carga rpm 13 000 6 000 - 13 000
Orbitas por minuto opm 26 000 12 000 - 26 000
Orbita de lijado mm (in.) 2.0 (0.08) 2.0 (0.08)
Plato de lijado mm (in.) Ø 125 (4.9) Ø 125 (4.9)
Peso kg (lbs) 1.1 (2.4) 1.1 (2.4)
Seguridad UL 745, CSA C22.2 No. 745
Símbolos
V voltios
A amperios
Hz hertzios
W vatios
n
rensión alterna
0
revoluciones por minuto en vacío
Clase II Construcción
Mantenimiento
23 El mantenimiento de la herramienta
solo se podrá realizar por personal de
mantenimiento cualificado. Revisión o
mantenimiento realizado por personal no
cualificado puede resultar en el riesgo de lesión.
24 Cuando se revise una herramienta, use
solo repuestos idénticos. Siga las
instrucciones en la sección de mantenimiento de
este manual. El uso de repuestos no autorizados
o el incumplimiento de las instrucciones de
mantenimiento pueden conllevar el riesgo de
descarga eléctrica o lesión.
rpm revoluciones por minuto
opm orbitas por minuto
Uso conforme a lo determinado
En cuanto a su determinación de uso, las
lijadoras están previstas para el lijado de
madera, plástico, materiales compuestos,
pintura / barniz / nogalina, masilla de emplaste
y materiales similares. Con este útil no se deben
13
Page 14

trabajar metales ni materiales que contengan
ELECTRONIC
amianto.
Debido a su tamaño, su peso y su potencia, la
máquina es especialmente apropiada para el
trabajado de superficies pequeñas, así como
para realizar trabajos por encima de la cabeza.
A causa de la seguridad eléctrica, las máquinas
no deben ser operadas estando húmedas y
tampoco en un ambiente húmedo. Las
máquinas solamente se deben emplear para un
lijado en seco.
El usuario se responsabilizará en el caso de daños y accidentes durante un uso no conforme a lo predeterminado.
Conexión eléctrica y puesta en
servicio
¡La tensión de red tiene que coincidir con la
tensión indicada en la placa de características!
Ver la figura siguiente para enchufar y
desenchufar el cable de conexión a la red.
Apague siempre la máquina
antes de conectar o sacar el cable de conexión
a la red.
El número de revoluciones se ajusta en la rueda
de ajuste (2.1).
Al respecto, las cifras inscritas en la rueda de
ajuste corresponden aproximadamente a los
siguientes números de orbitas:
Dispositivo de aspiración de polvo
El interruptor (1.1) se utiliza como interruptor
de conexión / desconexión (I = conectado / 0
= desconectado).
El dispositivo de aspiración de polvo evita altas
cargas de polvo en el aire de trabajo y
ensuciamientos considerables en el puesto de
trabajo.
Dispositivo autoaspirador
Regulación electrónica
La lijadora ES 125 EQ dispone de una
posibilidad de regulación electrónica,
con la que se puede variar el número
de revoluciones en progresión continua.
De este modo es posible adaptar óptimamente
la velocidad de lijado al respectivo material.
Las máquinas están equipadas como equipo de
serie con un dispositivo autoaspirador. El polvo
de lijado es aspirado por las aberturas de
aspiración que se encuentran en el plato de
lijado (3.5) y es recogido en el turbofiltro (3.4).
Cuando el turbofiltro se ha llenado hasta el
punto de que se nota una merma de la
14
Page 15

capacidad de aspiración, se deberá proceder a
su cambio.
Montaje de un turbofiltro
- Meter el soporte del filtro con la abertura (3.2)
hasta el tope sobre la tubuladura de aspiración
(3.1) de la máquina y fijarlo con el botón
giratorio (3.3).
- desplazar la parte delantera de cartón del
turbofiltro con labio de hermetización (3.7)
sobre la tubuladura de aspiración (3.6) del
soporte del filtro,
- meter la parte trasera de cartón con ranura
(3.9) sobre la aleta de retención (3.8) del
soporte del filtro,
Dispositivo de aspiración externa, con
aspirador
A fin de evitar un frecuente cambio del
turbofiltro durante trabajos de lijado
relativamente largos, en lugar del dispositivo
autoaspirador se puede conectar un aspirador
Festool. Para ello se cala el tubo flexible de
aspiración (Ø 27 mm (4.1)) del aspirador sobre
la tubuladura de aspiración.
¡Emplee únicamente material
abrasivo original de Festool!
Indicaciones para el trabajo
No sobrecargue la máquina
presionándola demasiado sobre el objeto a lijar.
Un resultado óptimo de lijado lo conseguirá
trabajando con una presión de apriete
moderada.
La capacidad y calidad de lijado dependen
esencialmente de la elección del material
abraviso correcto. Festool ofrece material
adhesivo apropiado para todo caso de aplicación
(ver el catálogo Festool).
Para máquinas con sistema electrónico
recomendamos realizar los siguientes ajustes
de la rueda de ajuste (2.1):
5 - 6
- Lijado con accionamiento máximo
- Lijado de pinturas viejas
- Lijado de madera y de enchapados antes del
barnizado
- Lijado intermedio de barniz sobre superficies
4 - 5
- Lijado de barnizado previo de aplicación fina
- Lijado de madera con velo de lijar
- Redondeado de cantos en piezas de madera
- Alisado de superficies de madera con pintura
de imprimación
Fijación del material abrasivo
Sobre el plato de lijado Stickfix se pueden fijar
con rapidez y facilidad los papeles de lija Stickfix
y velos de lijado Stickfix apropiados para ello.
Los materiales abrasivos autoadheribles (5.1)
se presionan simplemente sobre el plato de
lijado (5.2) y son retenidos con seguridad por
el recubrimiento adherente del plato de lijado
Stickfix.
3 - 4
- Lijado de cantos de madera maciza y de
madera enchapada
- Lijado de encajes de ventanas y puertas
- Lijado intermedio de barniz en cantos
- Lijado inicial de ventanas de madera natural
con velo de lijado
- Alisado de la superficie de madera antes del
barnizado, empleando velo de lijado
- Frotado de superficies barnizadas empleando
velo de lijado
- Abrasión o desprendimiento de pasta de cal
sobrante empleando el velo de lijado
2 - 3
- Lijado intermedio de pinturas sobre superficies
barnizadas (coloreadas con nogalina)
- Limpieza de encajes de ventanas de madera
natural con velo de lijado
1 - 2
- Lijado de cantos pintados/coloreados con
nogalina
- Esmerilado de termoplásticos.
15
Page 16

Freno del plato de lijado
A fin de evitar una aceleración incontrolada del
plato de lijado, ésta es frenada por medio de
una guarnición (6.1).
Debido a que esta guarnición se desgasta con
el tiempo, ésta tiene que ser renovada cuando
se registre una merma en el efecto de frenado
(núm. de pedido 489 190).
Mantenimiento y conservación
Desenchufar el enchufe de
la toma de corriente antes de realizar trabajos
en la máquina!
Para asegurar la circulación de aire, las
aberturas para el aire de refrigeración en la
carcasa del motor tienen que mantenerse
siempre libres y limpias.
Todos los trabajos de mantenimiento y de
reparación, para los que se tiene que abrir la
carcasa del motor, sólo deben ser llevados a
cabo por un taller de servicio de asistencia
técnica autorizado.
Garantiá
Condiciones de la Garantía 1 + 2
Usted tiene derecho a una garantía extendida
gratuita (1 año + 2 años = 3 años) para su
herramienta mecánica Festool. Festool se hará
responsable por los gastos de envío durante el
primer año de garantía. Durante el segundo y
tercer año de garantía el cliente es responsable
por el costo del envío de la herramienta a
Festool. Festool pagará el embarque de regreso
al cliente usando UPS Ground Service. Todo el
servicio de garantía es válido por 3 años desde
la fecha de la compra de acuerdo a la fecha de
su recibo o factura de compra.
Garantía limitada de Festool
Esta garantía es válida con la condición previa
de que la herramienta se usa y opera de
conformidad con las instrucciones de operación
de Festool. Festool garantiza, sólo al comprador
original, que la herramienta especificada estará
libre de defectos de fabricación y materiales
durante un periodo de un año a partir de la
fecha de compra. Festool no otorga otras
garantías, ni explícitas ni implícitas para
ninguna de las herramientas mecánicas
portátiles Festool. Ningún agente, representante,
distribuidor, comerciante o empleado de Festool
está autorizado para extender o modificar de
cualquier manera las obligaciones o limitaciones
de esta garantía. Las obligaciones de Festool,
a su propia entera discreción, están limitadas
a la reparación o sustitución de cualquier
herramienta portátil Festool que se encuentre
estar defectuosa en el momento de ser
embalada junto con el manual de usuario.
Quedan excluidos de la cobertura en esta
garantía: el desgaste normal; los daños
causados por uso indebido, el abuso o
negligencia; los daños causados por cualquier
otra causa que no sean defectos del material o
de la fabricación. Esta garantía no aplica a
accesorios como cuchillas de sierras circulares,
brocas de taladro, barrenas de buriladora,
cuchillas de sierra, cuchillas para sierras de
calado, correas de lijadoras y ruedas de esmeril.
También se excluyen las partes que se
desgastan como cepillos de carbón, laminillas
de herramientas de aire, collarines de hule y
sellos, discos y cojines de lijado, y baterías.
Las herramientas mecánicas portátiles Festool
que requieran de reemplazo o reparación deben
devolverse con el recibo de compra a Festool
(llame al 800-554-8741 para los detalles de la
dirección).
EN NINGÚN CASO FESTOOL SE HARÁ
RESPONSABLE POR LOS DAÑOS
SECUNDARIOS O CONSECUENTES
OCASIONADOS POR LA VIOLACIÓN DE
ESTA O CUALUQUIER OTRA GARANTÍA,
SEA EXPLÍCITA O IMPLÍCITA. TODAS LAS
GARANTÍAS IMPLICADAS POR LEYES
ESTATALES, INCLUYENDO LAS
GARANTÍAS IMPLICADAS DE
COMERCIALIZACIÓN Y ADECUACIÓN A UN
PROPÓSITO PARTICULAR, QUEDAN
LIMITADAS A TRES AÑOS DE DURACIÓN.
Algunos estados de EE.UU. y algunas provincias
de Canadá no permiten las limitaciones en
cuanto a la duración de las garantías implícitas,
de modo que la limitación arriba indicada puede
que no le afecte. A excepción de algunas garantías
implicadas por leyes estatales o provinciales,
limitadas por la presente, la anteriormente
citada garantía, expresamente limitada, es
exclusiva y sustituye a cualquier otra garantía,
acuerdo u obligación similar de Festool.
Esta garantía le concede derechos legales
específicos y usted podría tener otros derechos
legales que varían de estado a estado en EE.UU.
y de provincia a provincia en Canadá.
16
 Loading...