

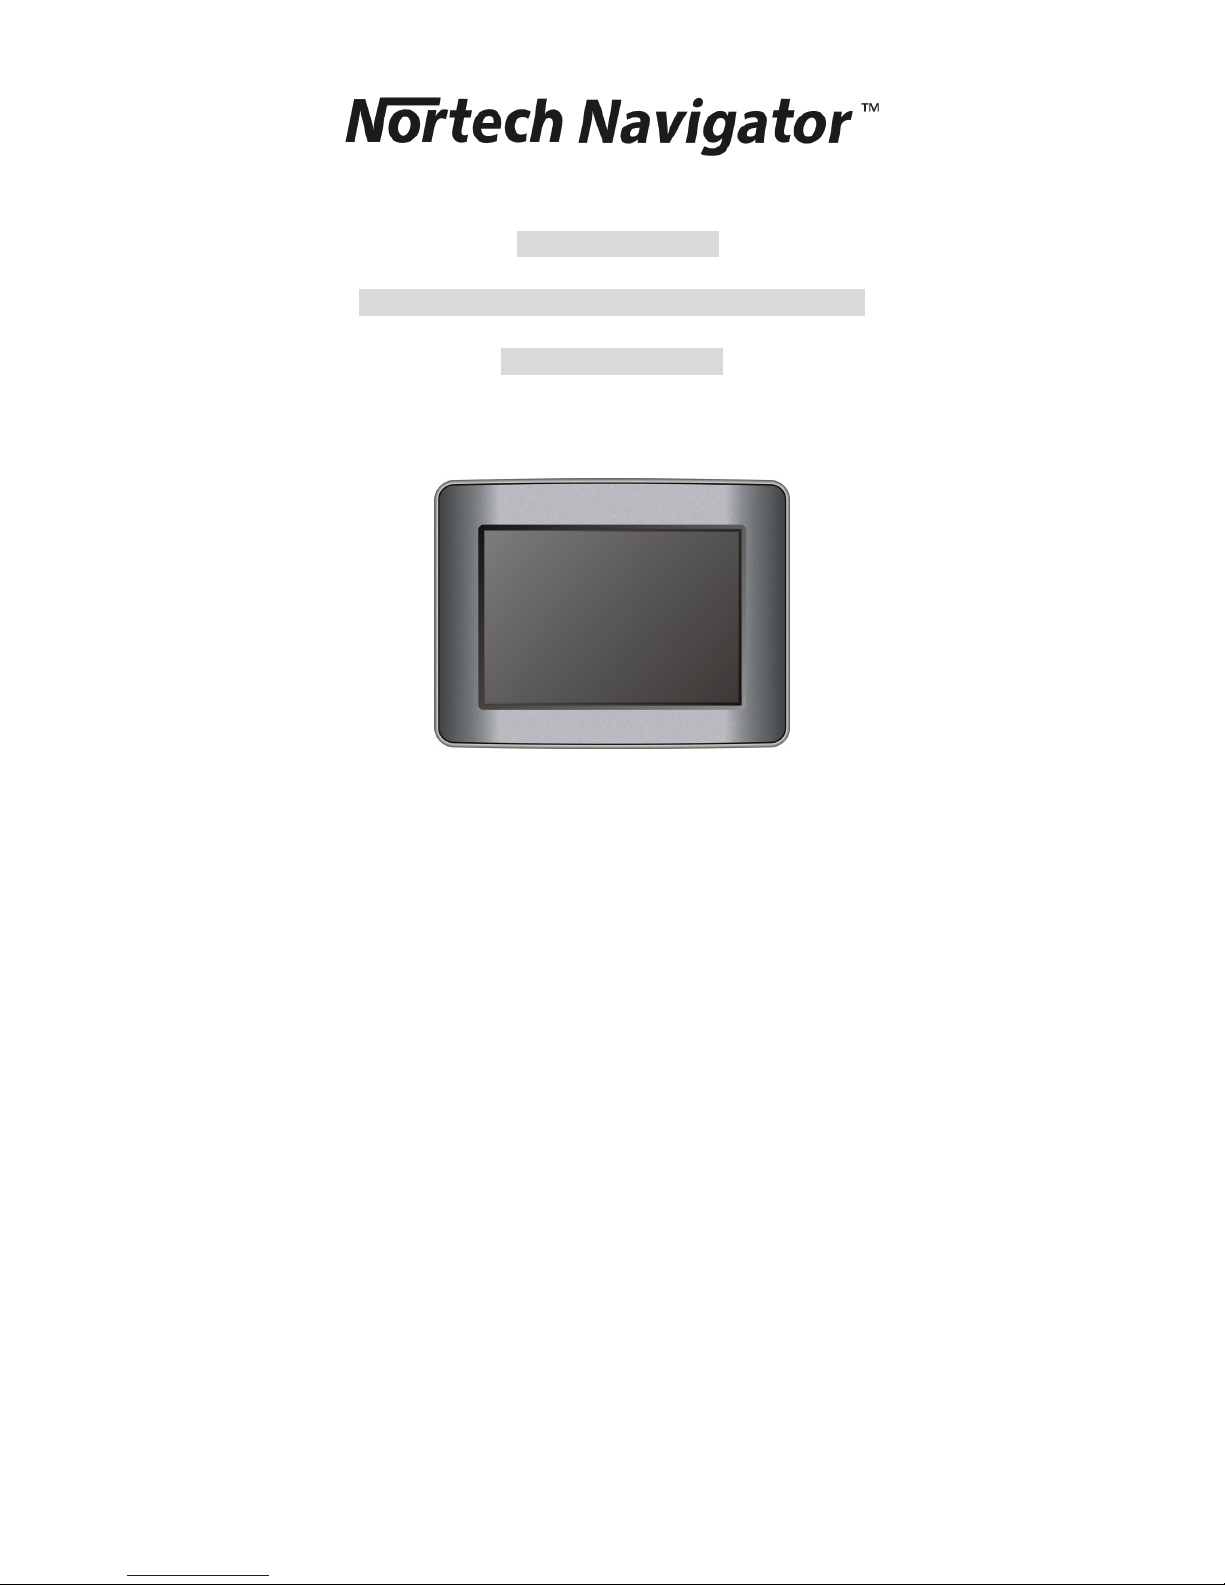
Operation Manual
Mobile GPS Car Navigation with 3.5inch screen
Model No. E-GPS010
1
POWER SUPPLY:
Connect the supplied adapter to the side of the unit in the slot marked “DC 5V IN”. Plug
the two-prong end of the power cord to an AC100-240V outlet. If you have difficulty
inserting the plug, turn it over and reinsert it. If the unit will not be used for a long time,
disconnect the plug from the outlet.
NOTE:
Before plugging the power cord into an AC outlet, make sure that all the connections
have been made.
CAUTION: These servicing instructions are for use by qualified service personnel only.
To reduce the risk of electric shock, do not perform any servicing other than that
contained in the operating instructions unless you are qualified to do so.
Refer to service manual for servicing instructions.
CAUTION: TO REDUCE THE RISK OF ELECTRIC SHOCK, DO NOT
REMOVE COVER (OR BACK). NO USE-SERVICEABLE PARTS INSIDE.
REFER SERVICING TO QUALIFIED SERVICE PERSONNEL.
The lightning flash with arrowhead symbol, within an equilateral triangle, is
intended to alert the user to the presence of uninsulated “dangerous voltage”
within the product’s enclosure that may be of sufficient magnitude to constitute
a risk of electric to persons.
The exclamation point within an equilateral triangle is intended to alert the use
r
to the presence of important operating and maintenance (servicing)
instructions in the literature accompanying the appliance.
WARNING: TO REDUCE THE RISK OF FIRE OR ELECTRIC SHOCK,
DO NOT EXPOSE THIS APPLIANCE TO RAIN OF MOISTURE.
Important Safety
Instructions

2
NOTES
1) Read these instructions.
2) Keep these instructions.
3) Heed all warnings.
4) Follow all instructions.
5) Do not use this apparatus near water.
6) Clean only with a dry cloth.
7) Do not block any of the ventilation openings. Install in accordance with the
manufacturer's instructions.
8) Do not install near any heat sources such as radiators, heat registers, stoves, or
other apparatus (including amplifiers) that produce heat.
9) Do not defeat the safety purpose of the polarized or grounding-type plug. A
polarized plug has two blades with one wider than the other. A grounding type plug
has two blades and a third grounding prong. The wide blade or the third prong is
provided for your safety. When the provided plug does not fit into your outlet,
consult an electrician for replacement of the obsolete outlet.
10) Protect the power cord from being walked on or pinched particularly at plugs,
convenience receptacles, and the point where they exit from the apparatus.
11) Only use attachments/accessories specified by the manufacturer.
12) Use only with a cart, stand, tripod, bracket, or table specified by the
manufacturer, or sold with the apparatus. When a cart is used, use
caution when moving the cart/apparatus combination to avoid injury from tip-over.
13) Unplug this apparatus during lightning storms or when unused for long periods of
time.
14) Refer all servicing to qualified service personnel. Servicing is required when the
apparatus has been damaged in any way, such as power-supply cord or plug is
damaged, liquid has been spilled or objects have fallen into the apparatus, the
apparatus has been exposed to rain or moisture, does not operate normally, or has
been dropped.
15) Apparatus shall not be exposed to dripping or splashing and no objects filled with
liquids, such as vases, shall be placed on the apparatus.
Important Safety
Instructions

3
Warning
Failure to avoid the following potentially hazardous situations may result in injury or
property damage.
The unit is designed to provide you with route suggestions. It does not reflect road
closures or road conditions, traffic congestion, weather conditions, or other factors that
may affect safety or timing while driving.
Use the unit only as a navigational aid. Do not attempt to use the unit for any purpose
requiring precise measurement of direction, distance, location, or topography. This
product should not be used to determine ground proximity for aircraft navigation.
This device complies with part 15 of the FCC Rules. Operation is subject to the following
two conditions:
(1) This device may not cause harmful interference, and
(2) This device must accept any interference received, including interference that may
cause undesired operation.
The images in this manual are only for reference and they may be different from
the actual ones.
Important Safety
Instructions
4
Navigation Function
Other Special Functions
Navigation Function: Supports address destination, POI suggestions, route
planning, favorites route setup, etc. Audio prompts to help you keep your eyes on
the road while providing helpful navigation cues.
OSD (On-screen Display) language: There are several languages for you to
choose for the OSD language.
SD Card and USB Input: The unit is designed with SD card slot and USB port.
Insert SD card or connect to other USB device for file loading.
Power Adapter Switch: Automatically adapts to voltage requirements in U.S and
other countries.
Flash Storage: Built in Flash Storage can store map data.
Features
5
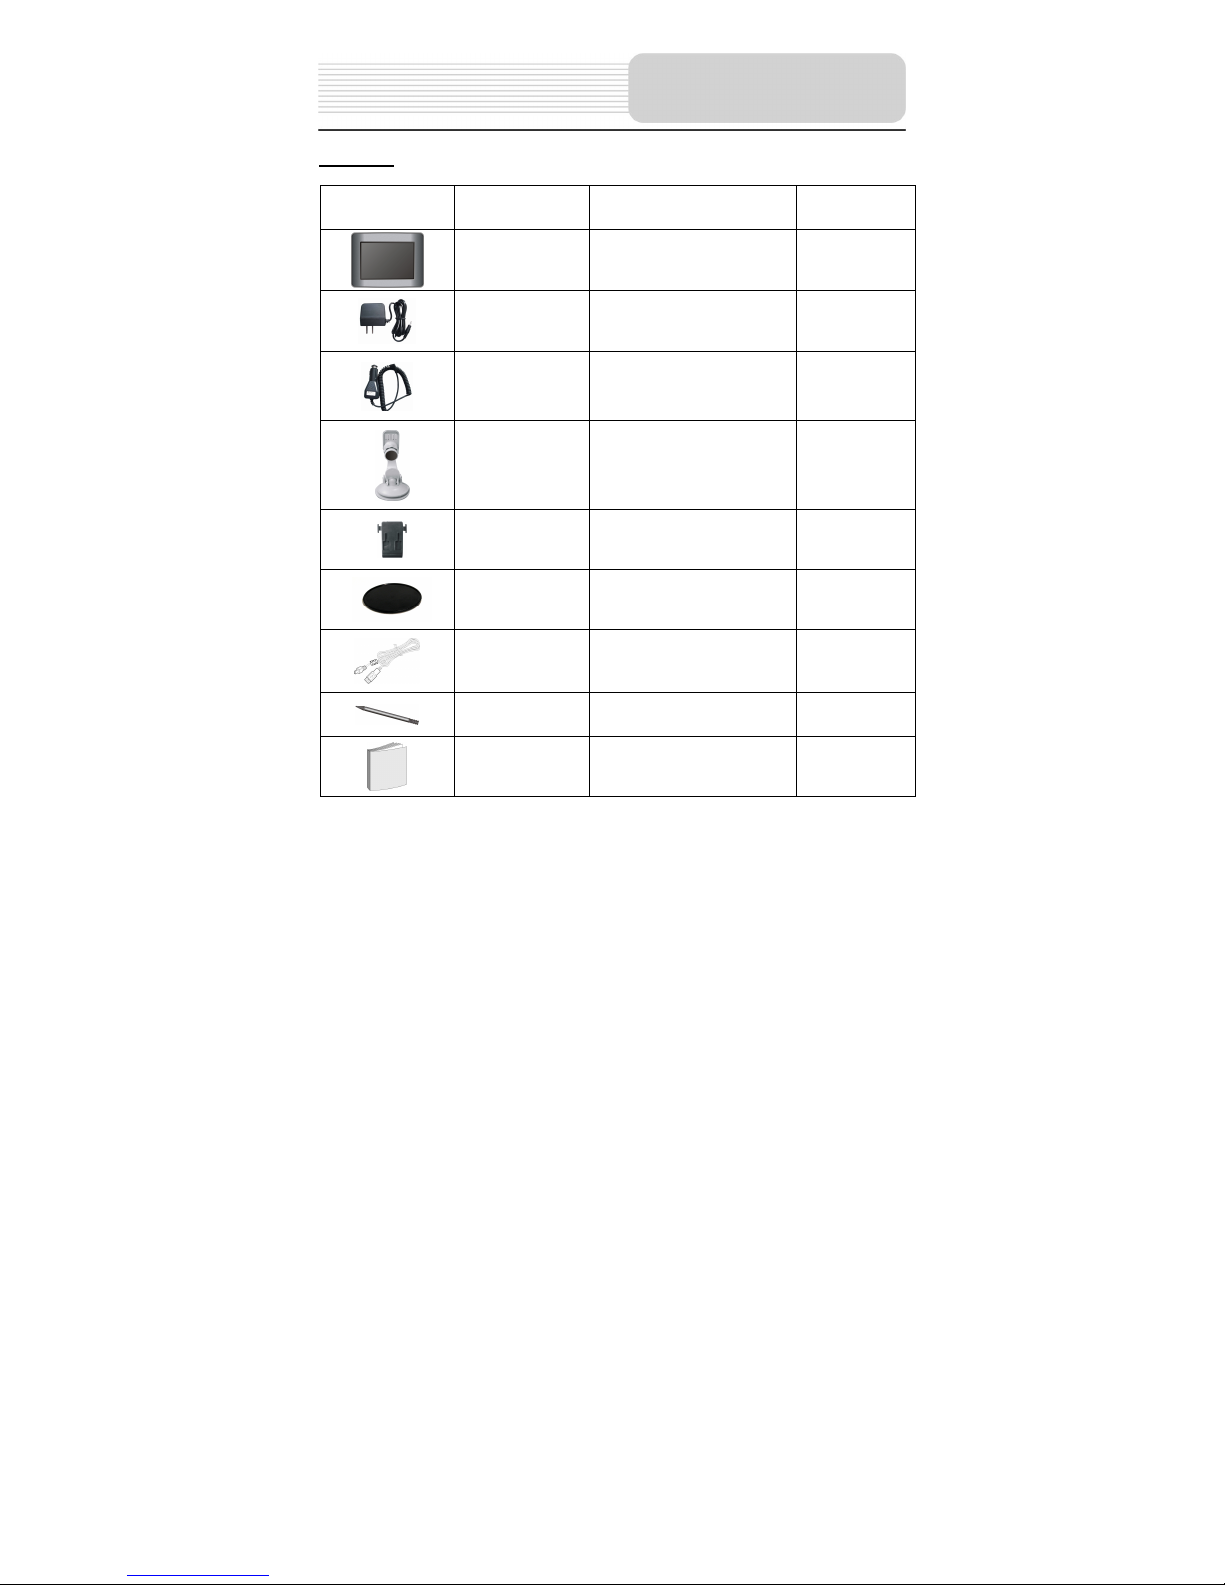
Part List
Picture Part No. Description Q’ty
a
GPS Unit 1
b
Home Power Adaptor 1
c
Car Power Adaptor 1
d
Mounting Bracket 1
e
Mounting Cradle 1
f
Dashboard Mount Disk 1
g
USB Cable 1
h
Touch Pen 1
i
Operation Manual 1
NOTE
Parts and their quantities are subject to modification without prior notice due to
improvements.
Parts

6
Important Safety Instructions------------------------------------------------------------------------
Features-----------------------------------------------------------------------------------------------------
Parts----------------------------------------------------------------------------------------------------------
View of Main Unit-----------------------------------------------------------------------------------------
System Connections------------------------------------------------------------------------------------
Power Supply Preparation-----------------------------------------------------------------------------
Mount Parts-------------------------------------------------------------------------------------------------
Navigation---------------------------------------------------------------------------------------------------
Destinations Menu-------------------------------------------------------------------------------------What's on the Map? -----------------------------------------------------------------------------------GPS Not Found-----------------------------------------------------------------------------------------Map Views------------------------------------------------------------------------------------------------Point on the Map---------------------------------------------------------------------------------------Navigation Screen Buttons---------------------------------------------------------------------------Cycling Through Screens-----------------------------------------------------------------------------Search for a Location----------------------------------------------------------------------------------Recent Locations---------------------------------------------------------------------------------------My Favorites---------------------------------------------------------------------------------------------Gas, Food, and Lodging, Etc.-----------------------------------------------------------------------Turn-by-Turn List---------------------------------------------------------------------------------------Show Route or Cancel Route-----------------------------------------------------------------------Avoid Roads---------------------------------------------------------------------------------------------Setup------------------------------------------------------------------------------------------------------Map and Route Planning-----------------------------------------------------------------------------QuickNav-------------------------------------------------------------------------------------------------GPS Signal----------------------------------------------------------------------------------------------Prompts--------------------------------------------------------------------------------------------------Select Map-----------------------------------------------------------------------------------------------Pedestrian Mode---------------------------------------------------------------------------------------Multistop Planner---------------------------------------------------------------------------------------About-------------------------------------------------------------------------------------------------------
Definitions--------------------------------------------------------------------------------------------------
Troubleshooting------------------------------------------------------------------------------------------
Specifications----------------------------------------------------------------------------------------------
1
4
5
7
9
11
13
14
14
17
18
19
20
21
21
22
26
27
31
34
35
35
38
39
40
40
41
42
43
44
46
47
48
50
Contents
7
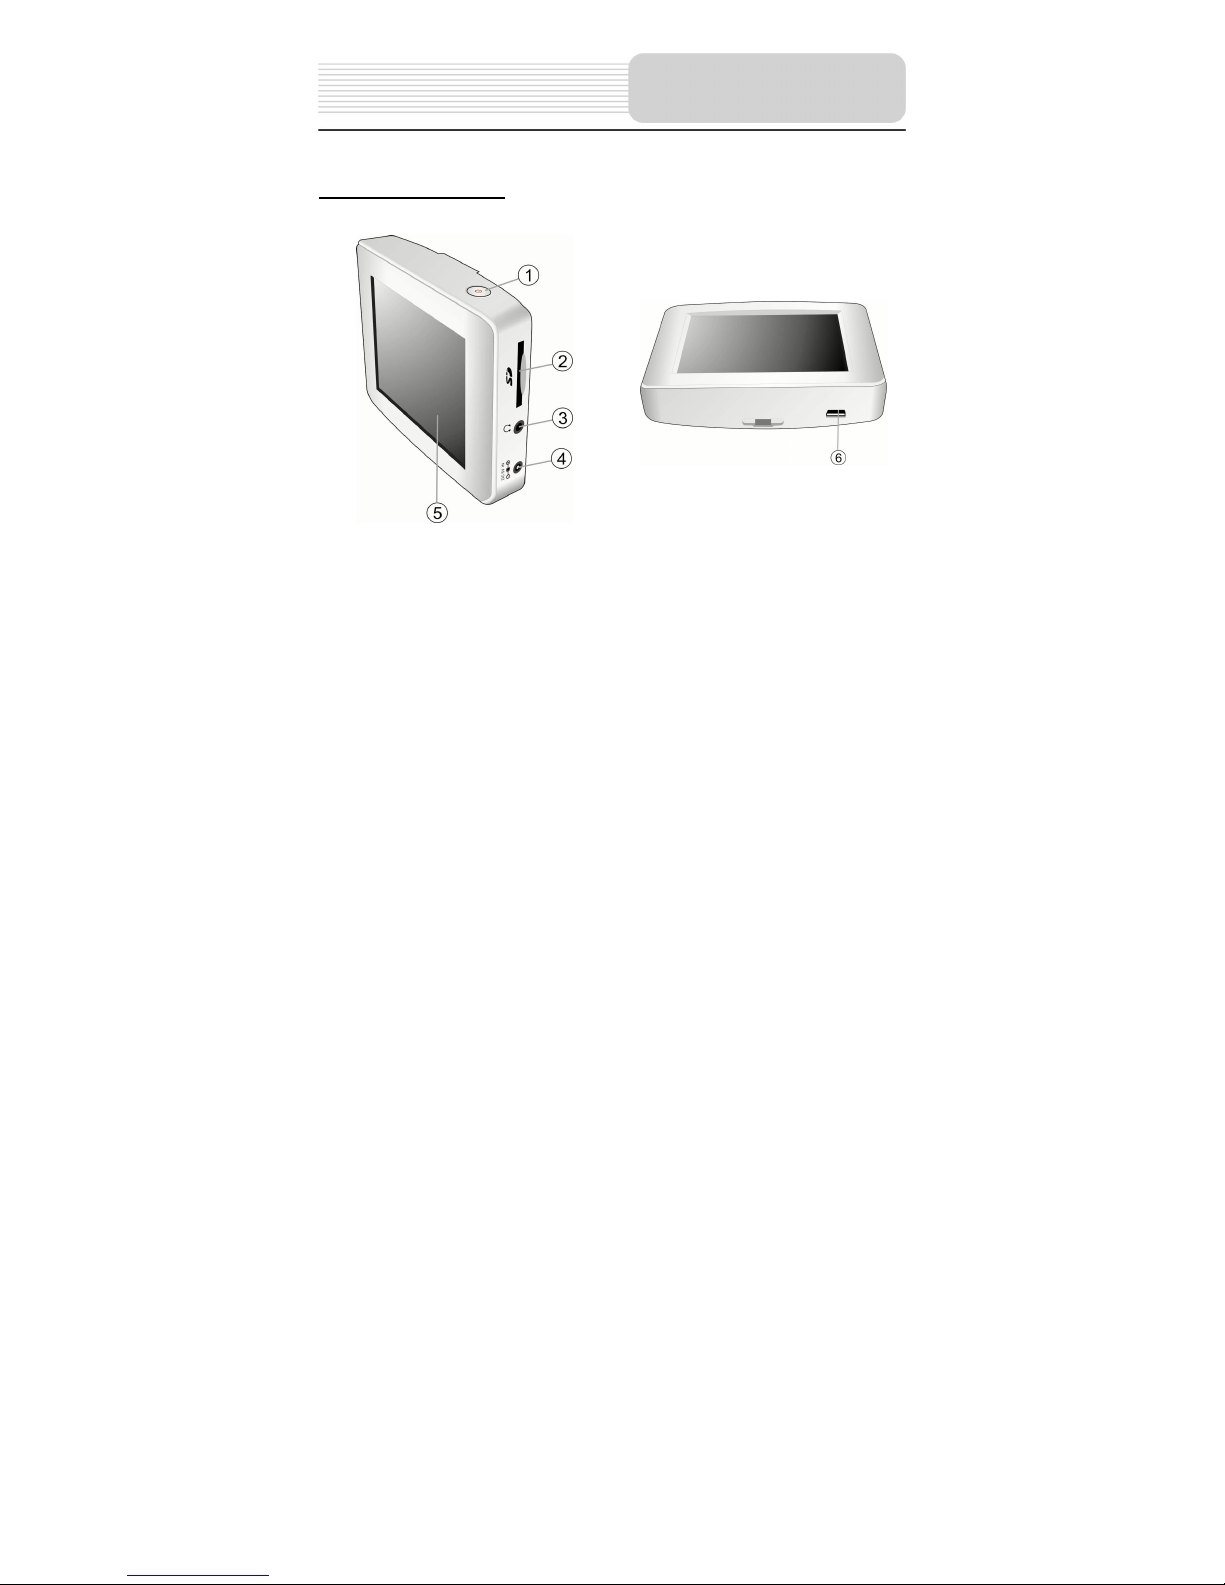
Front and Side panel
1. POWER button
Press the button to turn ON/OFF the unit. Press for several seconds to enter or exit
the standby mode.
During operation, press to return to the main menu.
2. Card Port
Insert the SD/MMC card into the slot.
3. Earphone Jack
Connect earphone for private listening. When the earphone is connected to this
jack, the speaker will be turned off automatically.
4. DC 5V Input Jack
Connect to the power adapter or car adapter.
5. LCD Screen
Finger touches the screen directly or use the touch pen included for optional.
6. USB port
Connect to the USB device.
View of Main Unit
8
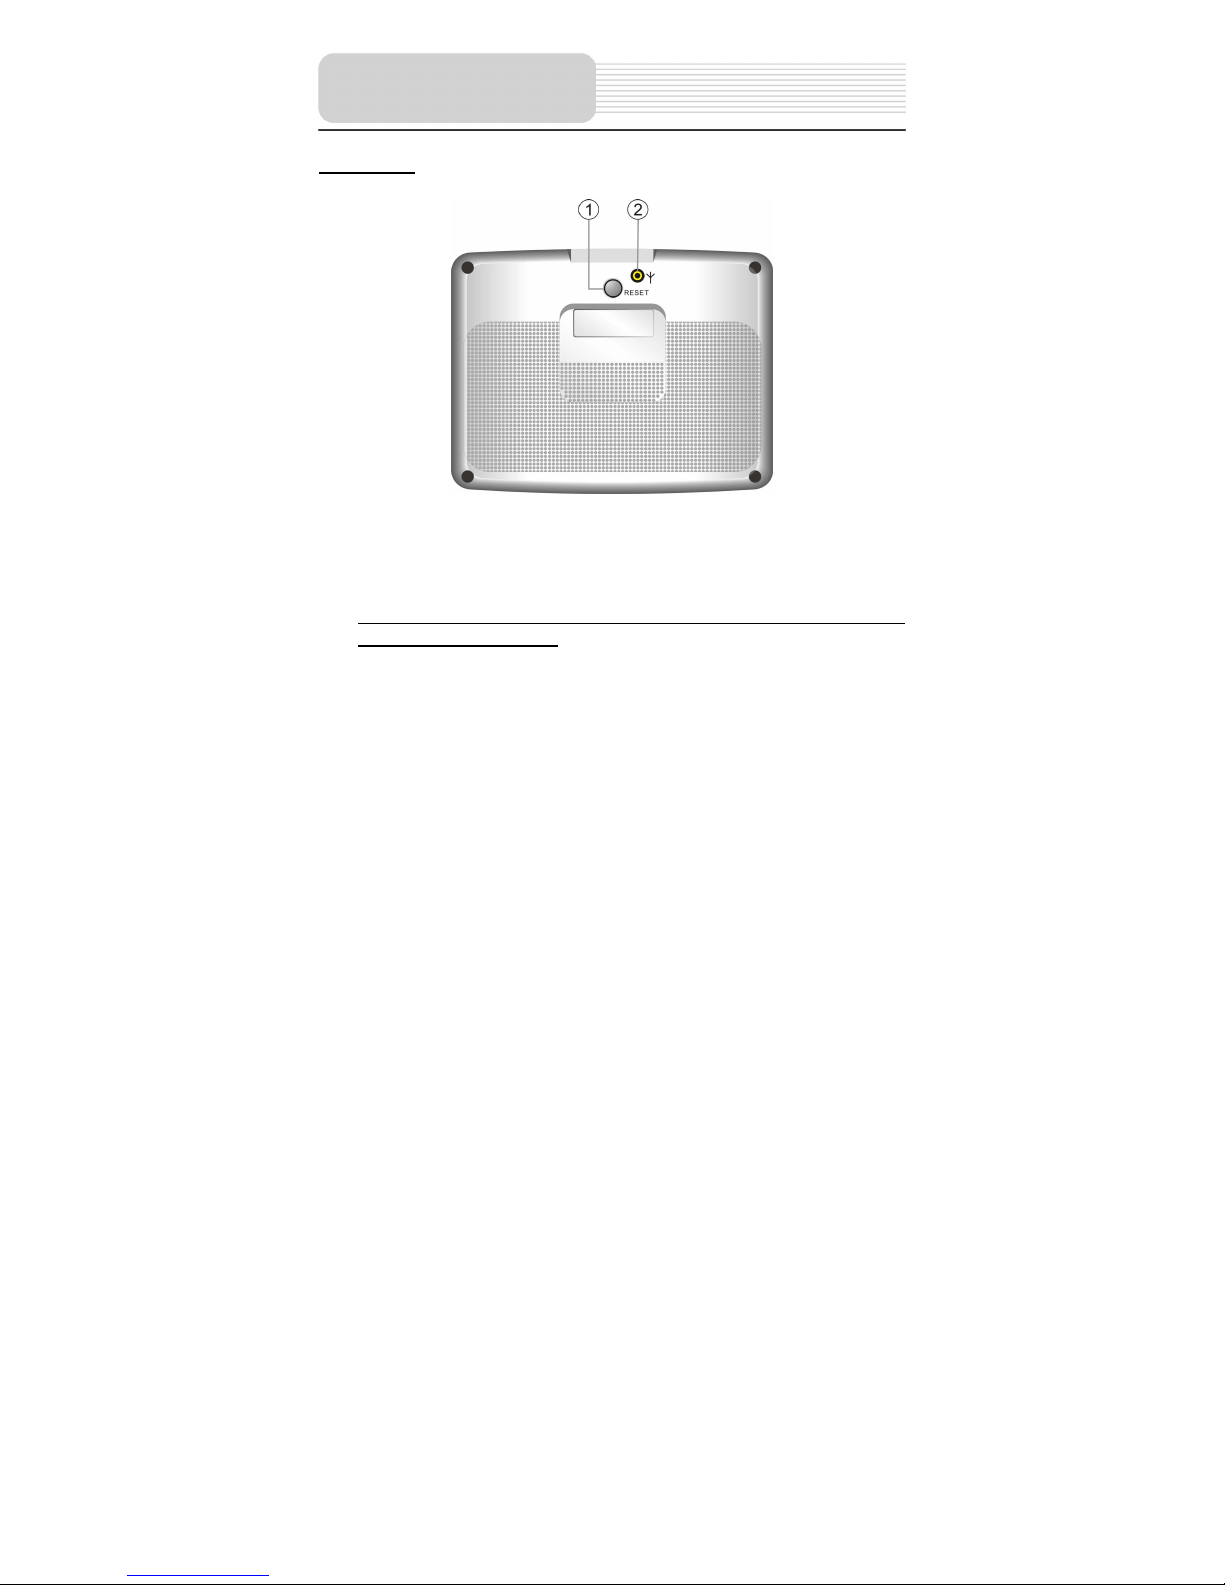
Rear panel
1. RESET button
Press to reset the system.
2. GPS Antenna Jack
Connect the external GPS antenna.
Note: This unit comes without extra external GPS antenna. Please purchase
external antenna separately.
View of Main Unit
9
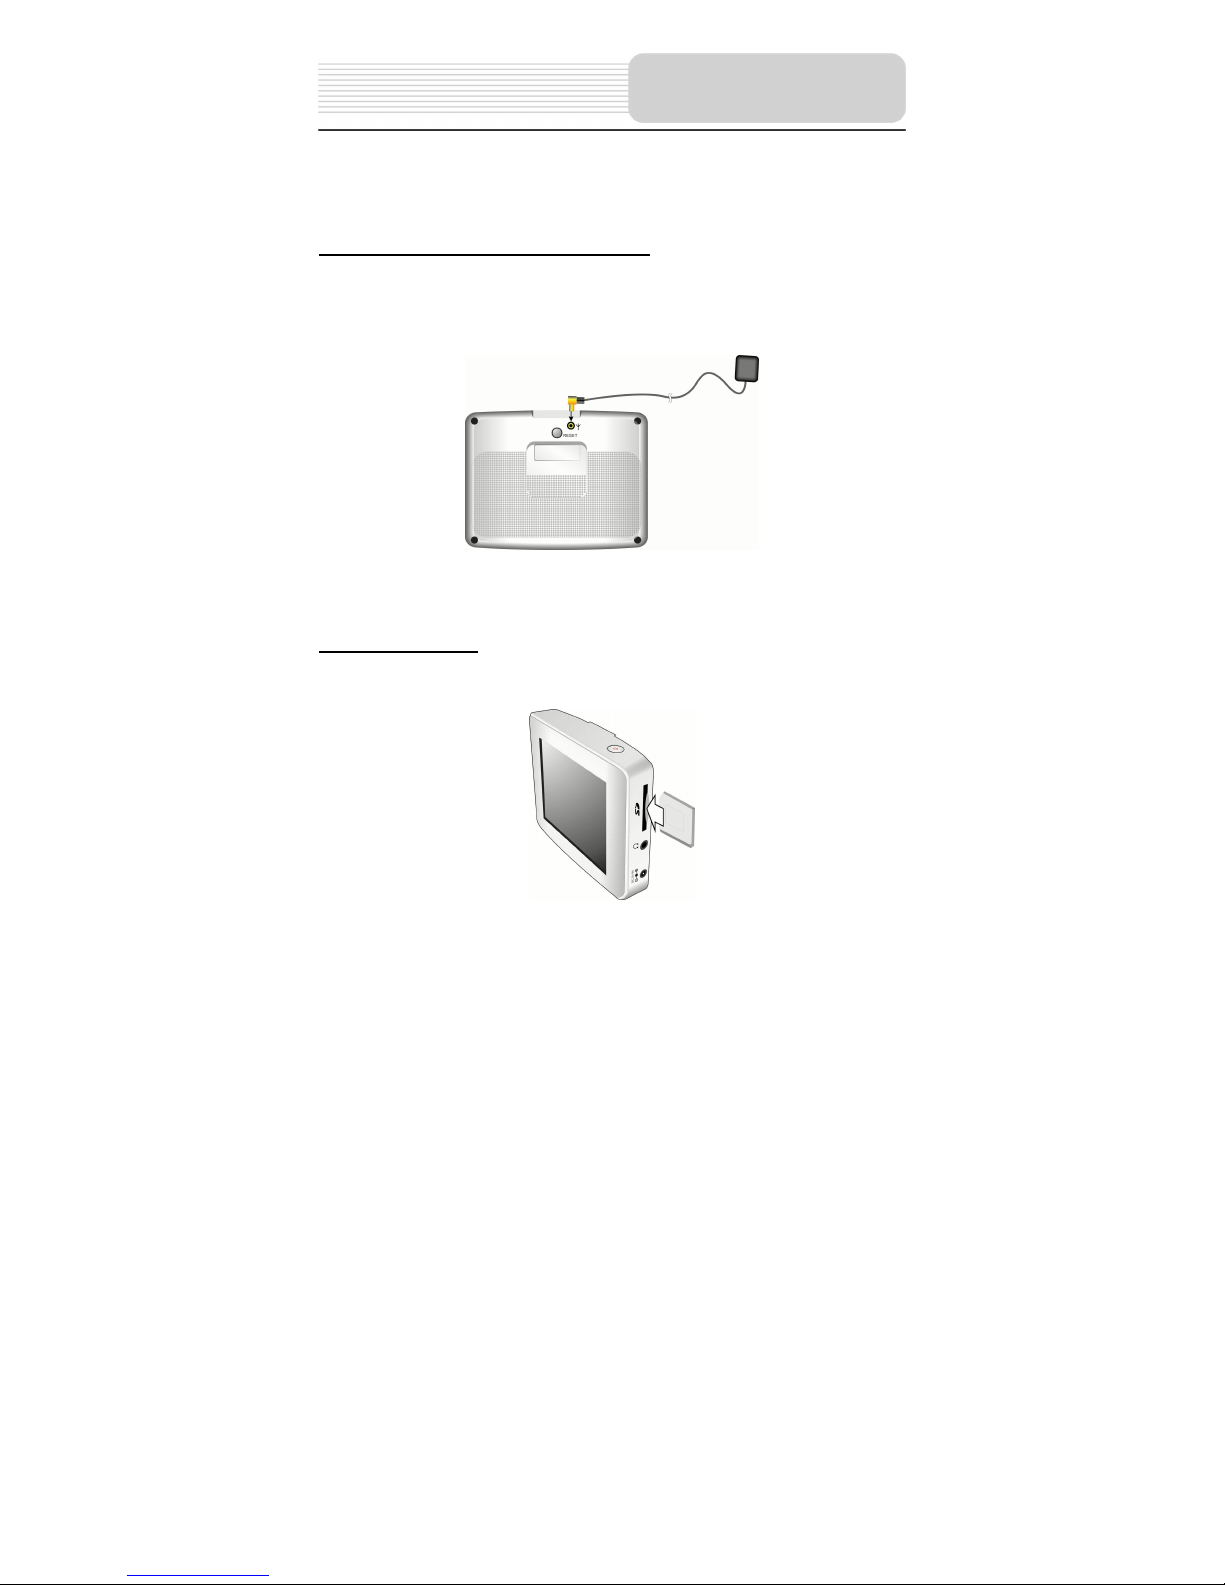
Always ensure that the unit and any other external device connected to the unit are
switched off and unplugged from the power supply before you attempt to connect
the unit to any external device.
Connecting to External GPS Antenna
Note: This unit comes without extra external GPS antenna. Please purchase
external antenna separately.
The unit is designed with GPS antenna jack which allows you to connect external GPS
antenna to receive GPS signals in the car when the signal is bad.
One end is connected to the jack of the unit and the other one to be placed on the roof of
the car and make it to be sucked by the car.
Inserting SD Card
The unit is designed with SD/MMC Card slot which allows you to insert the SD/MMC
card into the unit as shown below:
System Connections

10
Connecting to External USB Device
The unit is designed with a USB port which allows you to connect the unit to PC for
software and map updating. See the below figure for details:
1. You should install the driver into your PC first. You can download the driver
(MSASYNC) via the Internet from web site:
http://www.microsoft.com/windowsmobile/downloads/activesync42.mspx
2. Turn on the unit.
3. Connect the unit to the PC with the USB cable (supplied). “Mobile Device” will
appear in “My Computer”.
Note: You can obtain the software and map updating information via the internet from
website: www.Destinatortechnologies.com
System Connections
11
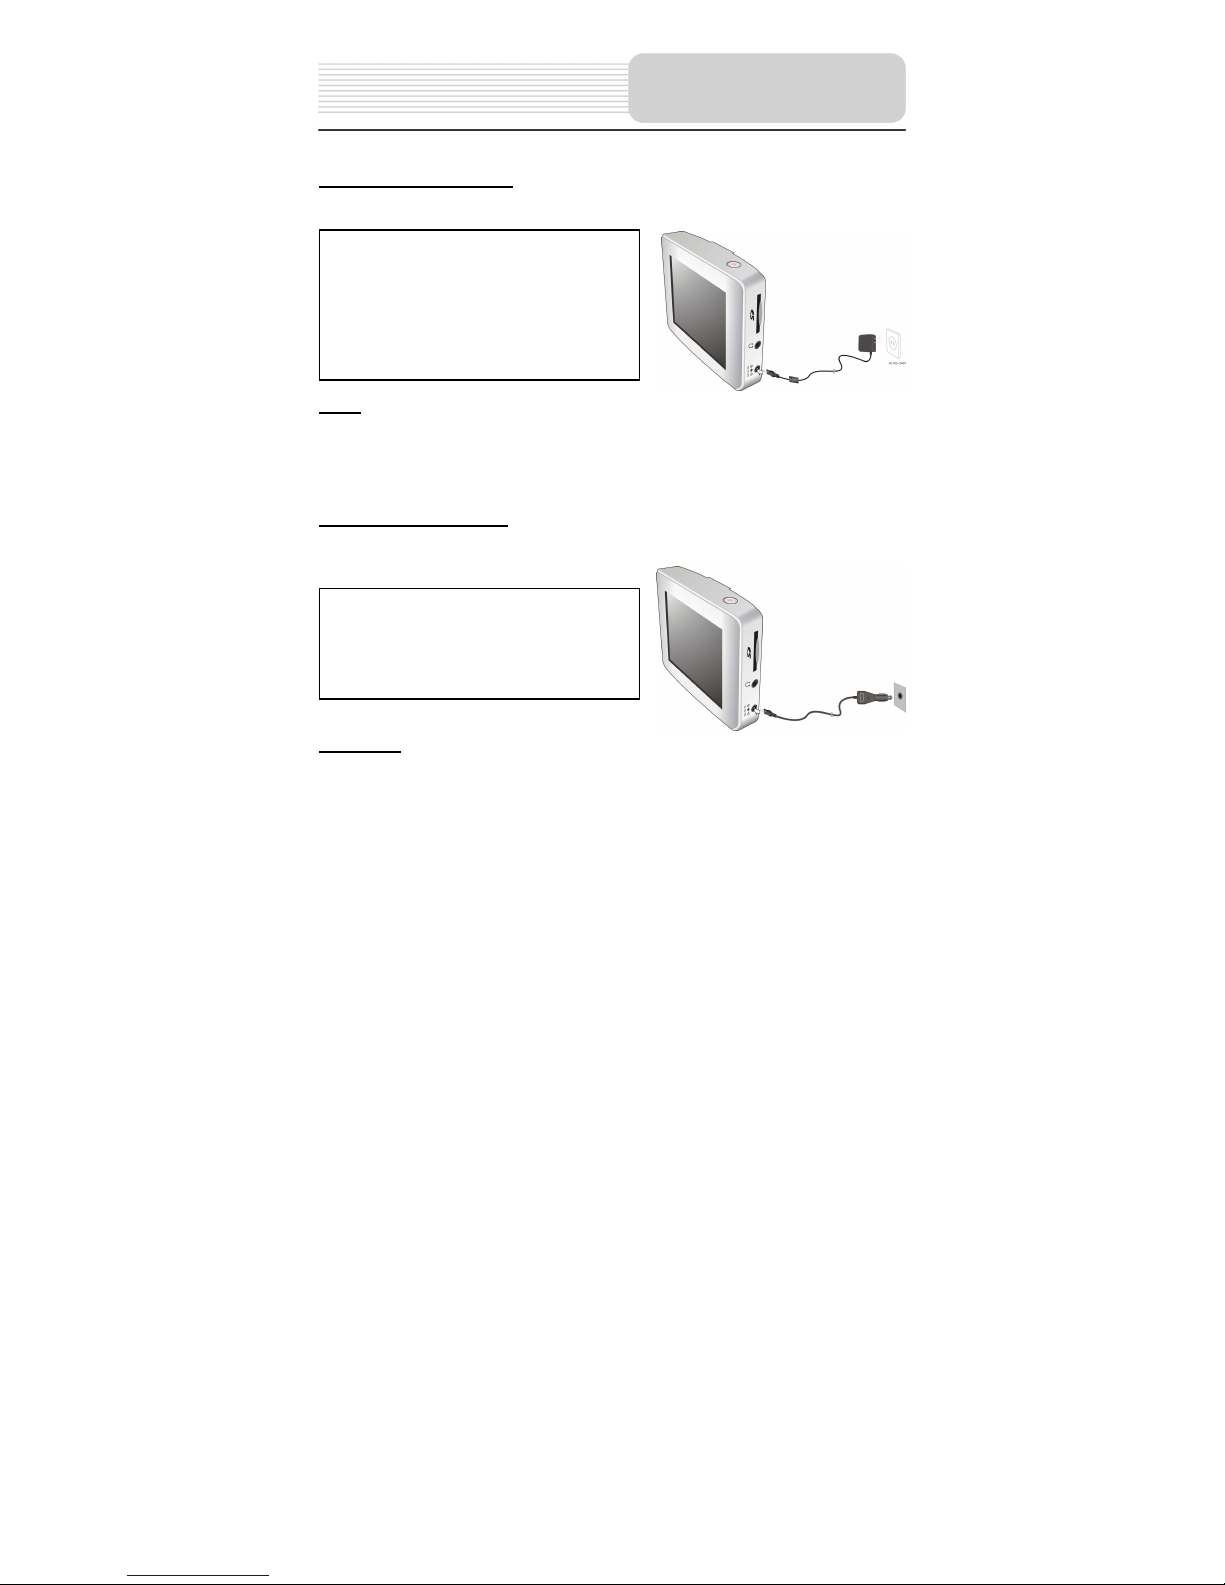
Using the AC Adaptor
The player is supplied with an AC adaptor for powering the unit and charging the battery.
Note
Turn player's power off before unplugging.
In the case of using the adaptor, the LCD screen will be brighter than with the
rechargeable battery.
Using of Car Adaptor
The player is supplied with a Car Adaptor for powering the unit while in a vehicle.
Attention
Do not operate the unit while driving a vehicle.
Place the unit in a proper position for viewing.
Disconnect the player from the Car Adaptor when starting the vehicle.
Your portable GPS player comes with a built-in rechargeable battery. Please see details
in the following segment.
Connect the Car Adaptor Power Plug to the
unit’s power jack and plug the other end to
the vehicle’s 5V accessory/ cigarette
socket, as shown on the right figure.
1. Connect AC adaptor to the right side o
f
the player in the jack marked DC 5V
IN, as shown on the right.
2. Plug the two-prong end of the powe
r
cord into a grounded electrical outlet.
The power indicator lights red.
Power Supply
Preparation

12
About Rechargeable Battery
Your portable GPS player comes with a built-in rechargeable battery. Charge the battery
fully before initial use. Charging time is normally about 3.5 hours. A fully charged battery
delivers about 3 hours of use.
Working conditions and precautions for the rechargeable battery
New batteries should be fully charged before initial use.
Battery should only be used and charged when temperatures are between
32°-100°F.
Maintain well-ventilated conditions around the product to avoid overheating. Don’t
put the product on a bed, sofa or anything that may block ventilation to the product.
When the battery is weak, an indication menu will appear on the LCD screen and
about five minutes later, the player will power OFF automatically.
When charging the battery, the charge indicator is red; when finishing charging, it
turns green.
Charging the rechargeable battery
The battery must be charged by using the supplied Car Power Adaptor or home Power
adaptor
Power Supply
Pre
p
aration
13
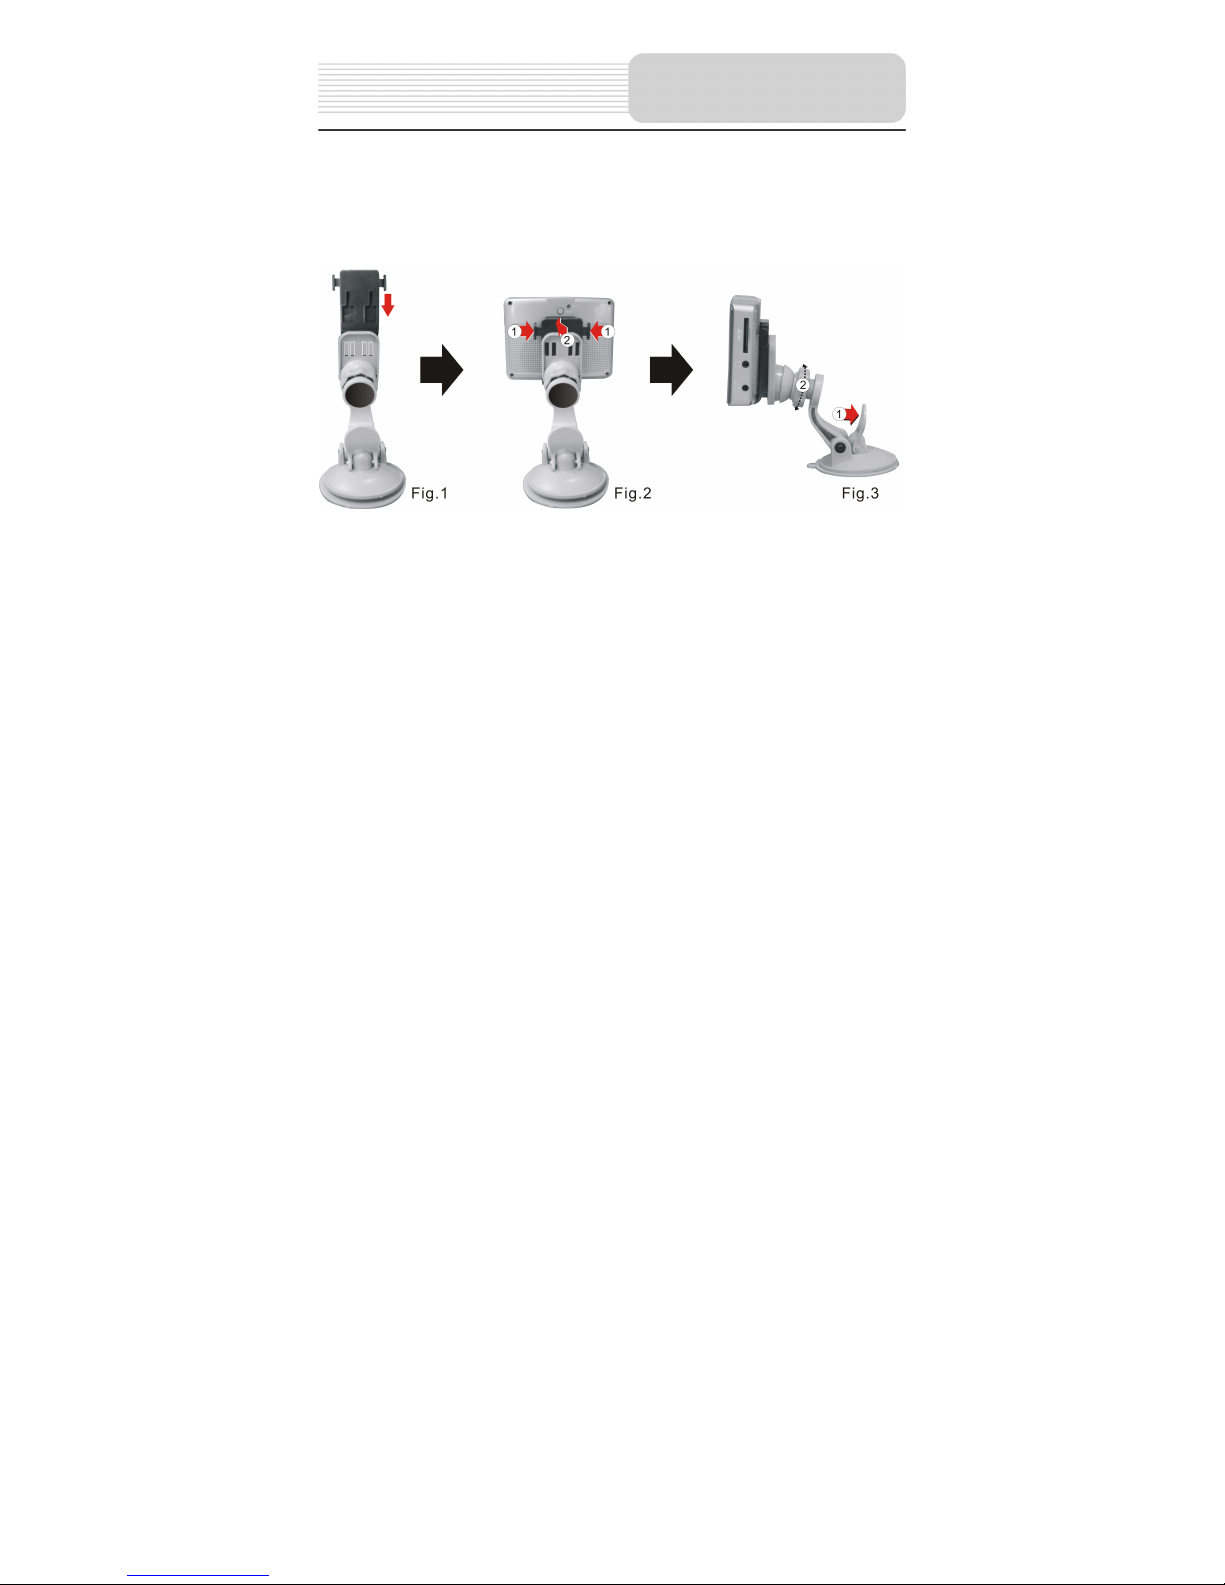
When using the unit in vehicle, you can use the supplied mount parts (mount bracket,
mount cradle and dashboard mount disk) to mount the unit in the vehicle. Take the
following steps to operate:
1. See Fig. 1. Push the mount cradle to mount bracket.
2. See Fig. 2. Fix the unit on mount cradle and bracket.
3. See Fig. 3. Lift the suction fastener, and place the unit on the desired location, then
press down fastener for immobility. Rotate the knob to adjust the unit to proper
position.
If you want to mount the unit to the dashboard, you can use the adhesive disk:
1) Choose a clean, dry spot on your dashboard
2) Peel off protection liner from the back of the disk.
3) Attach the disk to your dashboard.
4) Mount the bracket to the adhesive disk.
Mount Parts
14
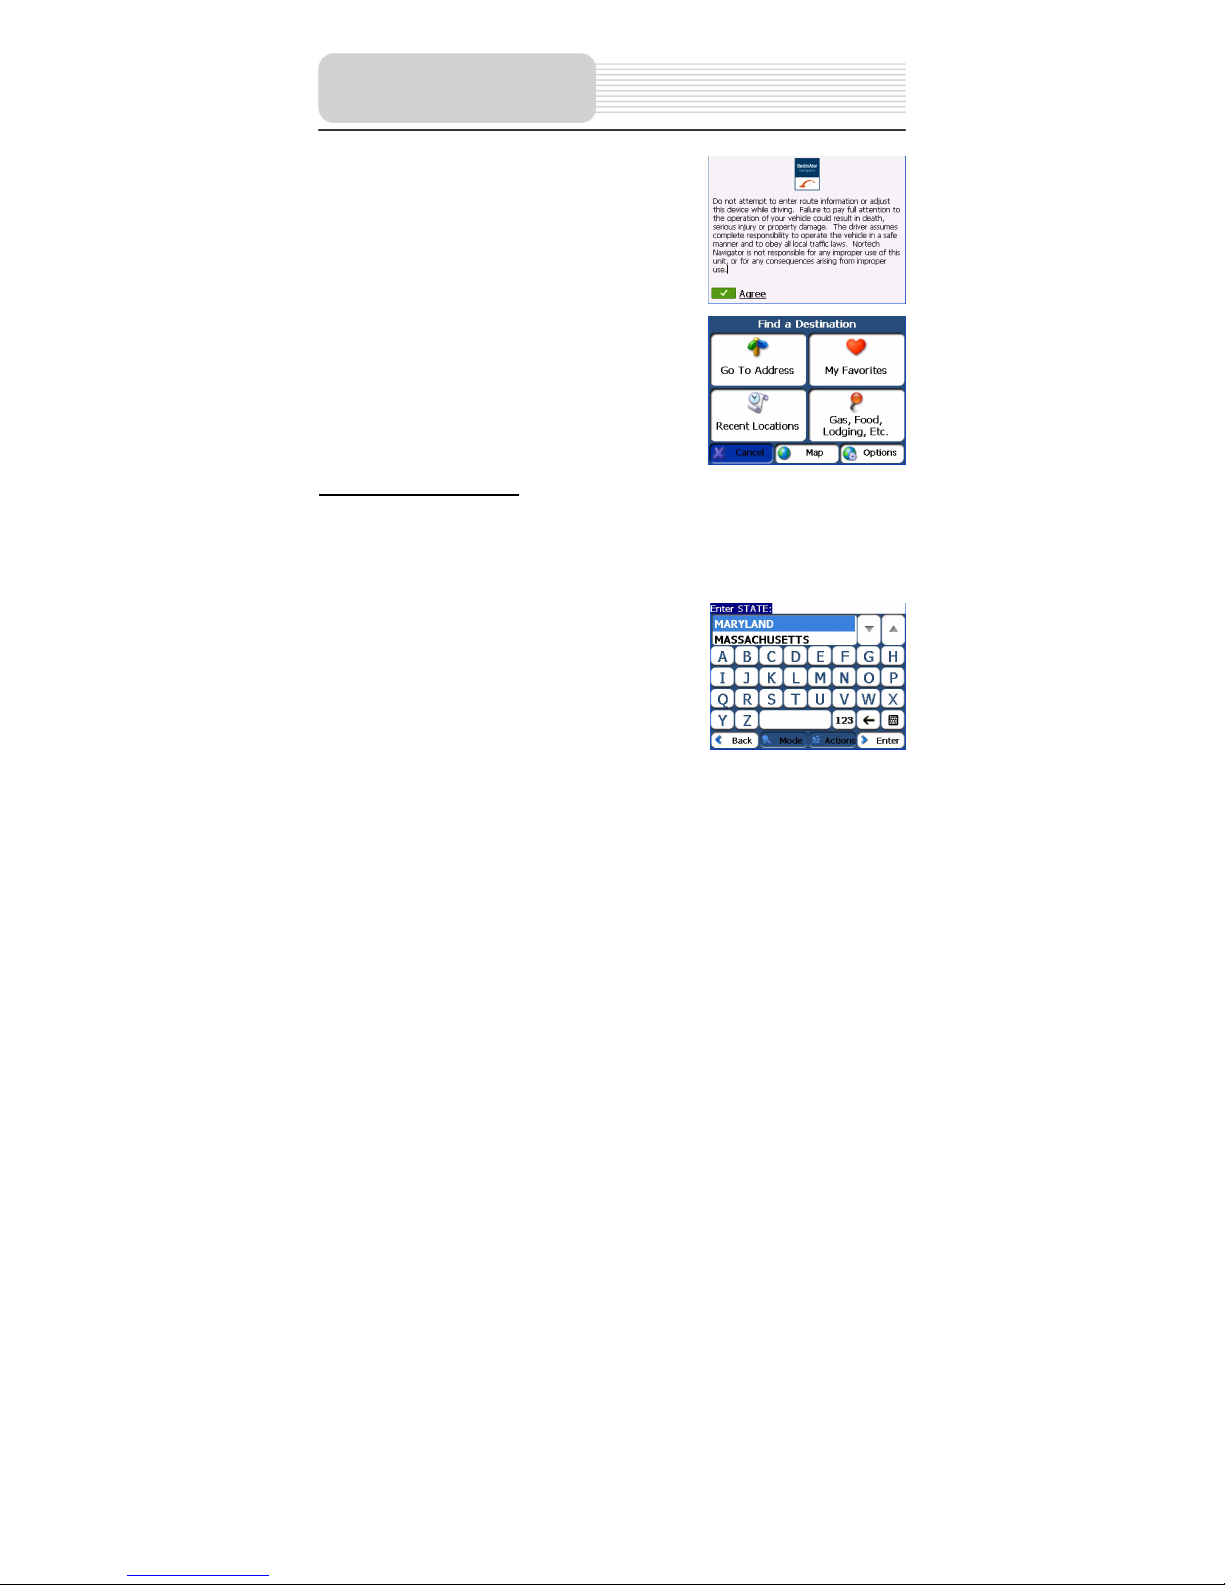
When turn on the unit, later the screen will display the
warning menu, as shown right:
Tap “Agree” to enter the navigation mode and the
screen display the destinations menu, as shown right:
Destinations Menu
Note: When you have the Main Map screen displayed, you can tap the Menu button to
display the Destinations menu.
Go to Address Screen
The Go To Address button lets you navigate to an
address. Tap the Go To Address button to enter the
menu as shown right:
For a complete description of how to navigate to an address, see "Address" on page 22.
Navigation
15
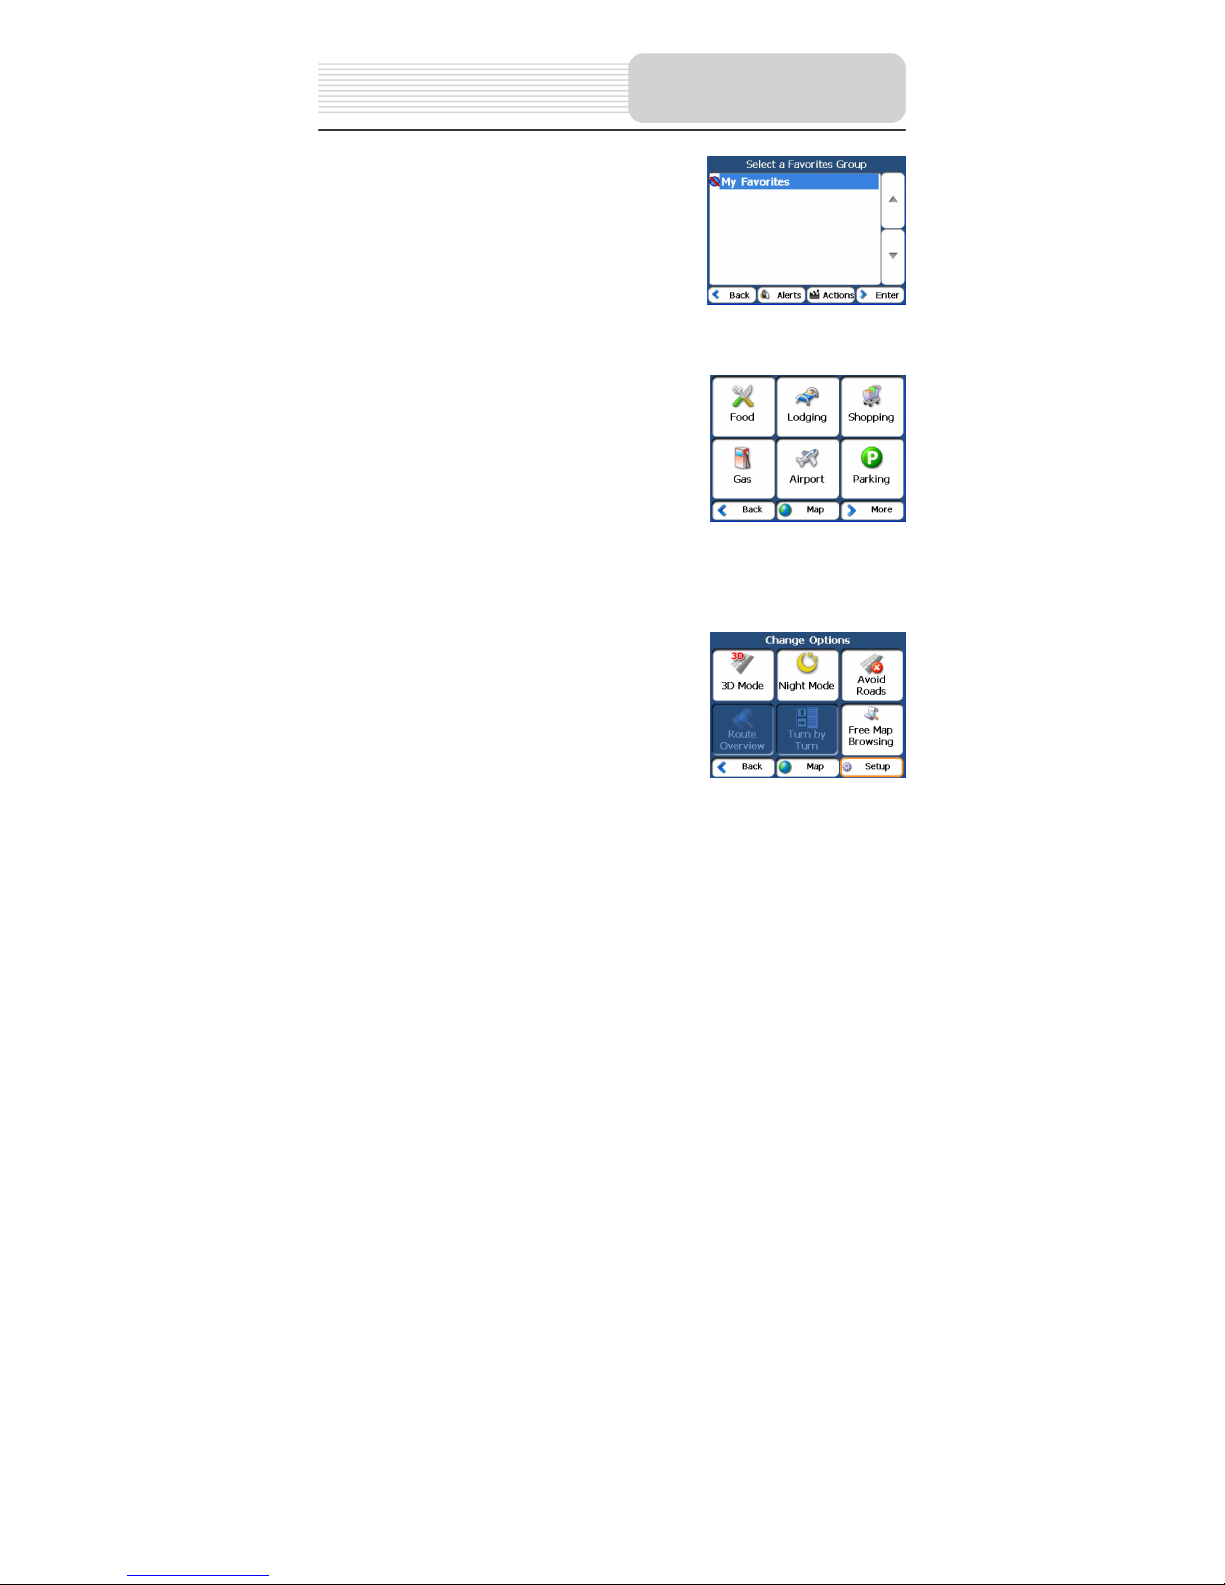
My Favorites Screen
A Favorite is a destination that you have stored for easy
retrieval.
Tap the My Favorites button to enter the
menu as shown right:
For a complete description of how to navigate to an address, see "My Favorites" on
page 27.
Gas, Food, Lodging, Etc. Screen
When you tap the Gas, Food, Lodging, Etc. button, the
first screen of popular place categories appears, as
shown right:
The Gas, Food, Lodging, Etc. button lets you navigate to thousands of interesting
places, such as beaches, parks, hotels, museums, and restaurants. For more
information, see "Gas, Food, Lodging" on page 31.
Options Menu
You can tap the Options button to determine the map
display and to show the generated route after you have
selected a location. The Options menu is shown right:
Note: Route overview and Turn by turn are active only after a destination has been set.
Navigation

16
Setup Menu
Tap the Setup button on the options menu to enter the
menu as shown right. The Setup button lets you:
• Specify the route type, Faster or Shorter, and
whether to allow for U-turns by tapping the
Map and Route Settings button. For more
information, see “ Map and Route Planning” on
page 39.
• Specify map orientation, font, and zoom features by tapping the Map and
Route Settings button. For more information, see " Map and Route Planning "
on page 39.
• Specify the system measurement units by tapping the Map and Route
Settings button. For more information, see " Map and Route Planning " on
page 39.
• Select an address or place to which you can navigate with a single tap on the
QuickNav
button, located on the Main Map screen. For more
information, see " QuickNav " on page 40.
• Display the GPS configurations by tapping the GPS Signal button. For more
information, see "GPS Signal" on page 40.
• Specify voice or visual prompts that you want to use by tapping the Prompts
button. For more information, see "Prompts" on page 41.
• Choose among different maps on your memory card by tapping the Select
Map button. For more information, see "Select Map" on page 42.
• The Pedestrian Mode/Driving Mode button lets you toggle between traveling
as a pedestrian or in a vehicle. When in Pedestrian Mode, you are not limited
by vehicle constraints, such as one way streets. Note that you can only
generate a route up to ten kilometers and Voice prompts are not available.
• The Multistop Planner button lets you designate several stops on a route, as
described in "Multistop Planner" on page 44.
• Display copyright and unit version information by tapping the About button.
Navigation

17
Menu Buttons
The Map button displays the Main Map screen.
The Cancel button stops the current navigation and clears the
route.
The More button lets you move to the second menu screen.
The Back button lets you move to the previous menu screen.
The Setup button, at the bottom of the Options menus, lets you
configure your settings options.
The Help button displays technical support information.
What's on the Map?
When you tap the Map button on the Destinations menu screens, the Main Map screen
appears. You can use the icons displayed on this screen to view your route.
Menu Button
Directions Bar
Navigation
V
olume
Current Location
Zoom Out
Directions Bar
Menu Button
Compass
GPS-Generated Information

18
Your current location.
Your last known location when the GPS signal is unreliable.
The generated route.
Your selected destination.
The Compass displays the travel direction.
The GPS bar is a toggle button that displays the remaining travel distance and travel
time, estimated time of arrival, and speed and altitude, and street name and address
number.
When you have calculated a route, the Directions bar displays information about your
next turn. Click this bar for a complete list of turn-by-turn directions.
GPS Not Found
When you first start your navigation device, you will hear the message “Signal too low”.
This message means that your navigation device hasn’t yet located a reliable GPS
signal. Check that your device is connected and has a clear view of the sky.
Please check that:
• The device has a clear view of the sky for uninterrupted GPS reception. The
unit cannot calculate the route if there is no GPS reception (for example, in a
tunnel).
• The navigation device is charged or connected to the cigarette lighter.
Navigation

19
Map Views
You can determine whether you want to see a two-dimensional or three-dimensional
map in daylight or nighttime conditions.
The 2D Day Mode View is optimized for a daytime viewing. 2D views let you manually
pan or zoom. For an example, refer to Figure 1 - 2D Day Mode Map View.
The 2D Night Mode View is optimized for night driving or adverse weather conditions.
For an example, refer to Figure 2 - 2D Night Mode Map View.
The 3D Mode Day View or Night View provides you with a three-dimensional map for
day or night driving. For an example, refer to Figure 3 - 3D Day Mode Map View and
Figure 4 - 3D Night Mode Map View.
From the Options menu, you can click from the following buttons:
3D Mode button to view a three-dimensional map. If the map already
appears in three-dimensions, 2D Mode is displayed on the toggle button.
2D Mode button to view a two-dimensional map. If the map already appears
in two-dimensions, 3D Mode is displayed on the toggle button.
You can click the Night Mode button to display the map in night conditions.
If the map already appears in night mode, Day Mode is displayed on the
toggle button.
You can click the Day Mode button to display the map in day conditions. If
the map already appears in day mode, Night Mode is displayed on the
toggle button.
Navigation

20
Figure1-2D Day Mode Map View
Figure2-2D Night Mode Map View
Figure3-3D Day Mode Map View
Figure4-3D Night Mode Map View
Point on the Map
You can navigate to any point by tapping its location directly on the Main Map screen.
This feature is especially handy when you want to navigate to a specific point on the map,
but you don’t have the street address. When you tap on the map, the context menu
appears.
Go There – This button lets you calculate a route from
the map point.
Add to My Favorites – This button lets you save a point
on the map as a favorite destination. This feature lets you
quickly save a location that you would want to return to
later.
Set as Origin –This button lets you designate the
selected point as the starting point and not the
designation.
Navigation

21
Navigation Screen Buttons
The following buttons appear on many of the navigation screens.
When you tap the Enter button for a selected address, group, or
place, the unit automatically opens the next screen in the sequence.
After you have specified your destination, tap the Enter button to
display a map screen showing your selected location. This map lets
you determine a route type and provides a GO button, which
instructs the unit to calculate the route from your current location to
your selected destination.
When you tap the Back button, the unit returns you to the previous
screen.
When you tap the GO button, the unit calculates the route to your
selected destination.
The Actions button provides a list of command options available for
the selected address or place.
The Hide/Display Keyboard toggle button lets you show or remove
the keyboard.
The Save, OK, or Done buttons confirm your value preferences and
returns you to the menu or map.
Cycling Through Screens
Every navigation function in the system, such as Go To Address, Gas, Food, Lodging,
Etc., or My Favorites consists of a sequence of screens. You can cycle through the
screen sequences by either:
• Selecting an item from the list and tapping it.
Navigation

22
• Selecting an item form the list and tapping the Next button.
The sequence ends with the Show on Map screen, where the destination is displayed
and the GO button is available for you to calculate a route.
You must first select an item from the list to cycle through the screen sequence, and for
the Actions, Enter and Back buttons to be enabled.
Search for a Location
Address
When you tap the Go To Address button, the Go To Address screen appears, as
shown below.
1. Enter City
2. Enter Street
3. Enter Address Number
4. Show on Map
Navigation

23
You can use the keyboard to enter the first characters of the address name. The
characters appear in the Address field. It automatically searches the Address list for the
first occurrence of the entered characters. After you have selected a city, it displays the
next address field, such as street and address number.
You can also tap the Enter button to move through the sequence of address screens.
The following command keys are available to enhance your search process:
The Scroll buttons let you move up or down the list of address items, such
as city or street names.
The Hide/Display Keyboard toggle button lets you extend or shorten the
address list by hiding or displaying the keyboard.
The Select key lets you display numeric characters. You can tap the
Umlauts
button to display a keyboard of umlauts characters.
The Erase key lets you delete the last character in an address field.
You can change your address search method by tapping the Mode button to select from
a variety of address formats, as described in "Address Modes".
Note: If the entered characters are not found at the beginning of the name in the
Address list, the Smart Search System automatically searches for the entered
characters throughout the entire list, for example, in the middle or the end of the name.
The unit lets you search for city and street names without having to enter accent marks
(umlauts), which are used in many European languages.
Navigation

24
Address Modes
You can define the information used to locate an
address by tapping the Mode button. The unit provides a
variety of address formats, as described below.
City-Street
This sequence displays the following address screens: City, Street, Address
Number
You can also navigate to city or street only. When you have selected a city, the
first entry of the Street Name list is City Center. When you have selected a
street, the first entry in the Address Number list is Street Midpoint.
City-Street is the default format.
Street-City
This sequence displays the following address screens: Street, City, Address
Number
Lets you enter a street name without having to first designate a city. Useful
when you're looking for an address in a metropolitan area where there are
many cities and towns.
Cross-Street
This sequence displays the following address screens: City, Street 1, Street 2
Lets you locate an intersection by entering the names of two intersecting
streets.
Zip Code
This sequence displays the following address screens: Zip Code, Street,
Address Number
This mode lets you locate a street address by entering the zip code, without
entering a city name. Useful when you have no city information or if the city has
multiple zip codes.
Navigation

25
Address Actions
When you have specified an address, tap the Actions
button to select from the following commands:
Set as Origin
Lets you designate the selected address as the route origin. Use
this command when calculating a route from a point other than your
current location. The navigation device displays the selected
location as a starting point only for a few seconds before returning
you to your current location.
Note: You are still receiving the GPS signal.
Show on Map
Lets you see the selected address on the map.
Add to My
Favorites
Lets you add an address to your list
of favorite locations, as shown in
the figure below. For more
information, see "My Favorites" on
page 27.
Go to your Destination
After you have specified the address, tap the Enter button. The unit shows your
destination on the Map screen before calculating a route. Check that the destination
address is correct at the top of the screen. If you want to change the destination, tap the
Back button and change your address entries. When
you are ready, tap the GO button to create a route to
your selected destination.
You can review the route you would go on before
instructing the unit to calculate your route and specify
roads to avoid by tapping the Avoid Roa ds button on the
Options menu. For more information, see “Avoid Roads”
on page 35.
Navigation

26
Recent Locations
The Recent Location screen lets you select an existing destination from a list of
destinations that you have previously traveled to. The unit automatically stores the last
64 destinations in memory. As each new route is added to the top of the list, the older
destinations at the bottom are erased.
To navigate to a recently-traveled destination, tap the Recent Locations button on the
Destinations menu. On the Recent Locations screen, select a location and tap the
Enter button. A map appears showing the specified location. Tap the GO button to
calculate the route.
1. Recent Locations
2. Show on Map
On the Recent Locations screen, you can tap the Actions button to select from the
following commands.
Set as Origin
Lets you designate the selected address as the route origin. You
would use this command when calculating a route from a point other
than your current location
Note: You are still receiving the GPS signal.
Add to My
Favorites
Lets you add an address to your list of favorite locations. For more
information, see "My Favorites" on page 27.
Delete Item
Lets you delete a recent location.
Clear List Lets you clear all locations in the Recent Locations screen.
Navigation

27
My Favorites
A Favorite is a destination that you have stored for easy retrieval.
To access a favorite destination, open the Destinations menu and tap the My Favorites
button. The My Favorites screen displays your favorites groups. When you tap on a
selected group, the unit automatically displays its stored locations. Tap the selected
location to show your destination on a map. Tap GO to calculate your route.
1. Favorites Groups
2. Favorites Locations
3. Move to Enter Screen
4. Show on Map
Note: The MY FAVORITES folder is the default folder where all favorites are stored if not
assigned to a group.
Navigation

28
Favorite Groups
You can tap the Actions button from the My Favorites screen to add, edit, or delete
groups, as described below.
Add Group
When you tap this button, the
Favorites Group screen appears.
Enter the group name and select an
icon to identify the group, as shown
below.
The icon identifies all destinations
located in that group, as displayed
on the map.
Edit Group
When you tap this button, the Favorites Group screen appears with
the name and selected image of the highlighted group. You can
change the name and icon.
Delete Group
When you tap this button, the selected group and its associated
entries are removed. The My Favorites group cannot be deleted.
Navigation

29
Favorite Alerts
Alerts let you know that you are within a certain distance
of a favorite location.
You can tap the Alerts button to set the distances for the
1st and 2nd Alerts. When you travel closer than the
designated distance, the alert will sound, as shown
below.
Examples:
You have a group called “Shopping” that includes all of your favorite stores. An alert
appears on the screen when you are closer than the designated distance to the stores in
your group, providing an opportunity to consider whether you would like to stop and
shop.
You have a group called “Projects” that include addresses of your bank, grocery store,
garage, hardware store, doctor’s office, post office, and so on. When the alert is set, the
unit reminds you about these places when you come within close proximity to them.
You are going on a trip and friends have recommended certain restaurants that are on
your route. You can create a group called “Restaurants” and enter the restaurant
addresses. As you take your trip, an alert will go off when you come within range of these
restaurants.
Notes:
Favorite Alert settings affect all Favorites Groups.
The 2
nd
Alert must be set to go off at closer distance than the 1st Alert.
Alerts can be set for a group but not for individual locations. Of course, you can always
create a group that has just one location.
Navigation

30
You can disable the alerts for all groups by selecting the 1
st
Alert setting to Off.
You can disable the alerts for a particular group by selecting the group and tapping the
Show/Hide Symbol on Map toggle button. Disabled alerts are identified by a red
diagonal line through the symbol.
Activate that disabled alert by selecting the group and tapping the Show Symbol on
Map button.
Add Favorite Locations
Tap My Favorites or any selected group that you have created to display its locations.
You can save a location to your favorites groups from the Address, Recent Locations,
or POI screens. For more information, see "Add to My Favorites" on page 25.
From this screen, you can tap the Actions button to display the following commands.
Set as Origin
Lets you designate the selected location as the route origin. You
would use this command when calculating a route from a point
other than your current location.
Note: You are still receiving the GPS signal.
Show Map
Lets you see the map with the selected favorite destination for
you to review before creating a route.
Edit Favorite
Location
Lets you change the name, comment, or group location for the
selected location.
Delete Favorite
Location
Tap the button to remove the selected location.
Navigation

31
Gas, Food, and Lodging, Etc.
The Gas, Food, Lodging, Etc. list is a collection of hundreds of interesting or useful
places organized by easy-to-find categories. For example, you can use the unit to guide
you to a mall, hotel, restaurant, or gas station.
On the Destinations menu, tap the Gas, Food, Lodging,
Etc. button and the first Gas, Food, Lodging, Etc.
Popular Category screen appears, as shown right:
The More button located on the second Gas, Food,
Lodging, Etc. screen displays the list of all categories,
as shown right:
You can find a category by tapping the Hide/Display Keyboard
button and
entering text in the POI Category field. The Smart Search System automatically displays
the POI categories that match the characters entered.
When selecting a category, the unit automatically displays the category entries and the
distance each entry is from your current position. Select your entry and tap or click the
Enter button to display your selected destination on the map and then tap GO to
calculate your route.
Navigation

32
1. POI Locations
2. Show on Map
Note: On the Item Entries Actions screen, tap the Sort by ABC button to display the
category entries in alphabetical order.
Subcategories
Many categories have subcategories to provide for an
even greater list of choices. For example, “Gasoline
Station” may have many subcategories each
representing a particular brand name. The same is
also true for “Hotels”. “Restaurants” have
subcategories that represent different types of food,
such as American, Italian, and French, as shown
right:
Navigation

33
Search Near a Location
You can tap the Near button to determine the location
area, where you want to search for a specific place,
such as a gas station, hotel, or restaurant, as shown
right.
The available options are listed below.
Current
Location
Lets you search near your current location. This is the default value.
Destination
Lets you search near a specified destination. For example, you know
your general destination, but not very much about interesting locations in
the area. You can use the unit to locate the tourist attractions most
appealing to yourself, family, or friends. Note that this button is enabled
only when a destination is entered.
Other
Address
Lets you search near another address. For example, you have set a
destination, but on the way you want to stop at another location. You can
use this feature to search near that location for restaurants, lodging,
historical sites, or anything you want.
Search
Radius
Enter the location distance to search for a designated place. For
example, if you enter 5 km, the unit only searches within a five kilometer
radius.
When you select a large search radius, you risk the chance of finding too
many locations, which makes it harder to find the place that you are
searching for. It is best to start with a small search radius size, and then
make it larger if necessary.
Note: if you don’t specify a search radius, the unit searches the whole
map.
Show or Hide
Symbol on
Map
Lets you customize your POI list by showing or hiding the POI category
symbols that you don’t want. When you hide a category a red mark
appears. This mark only means that the category symbol does not
appear on your map. The category locations are still available to you. You
can always show a hidden category symbol by selecting the category
and tapping the Show Symbol on Map button.
Navigation

34
Actions
When you have selected a POI location, tap the Actions
button to display the commands listed below.
Set as Origin
Lets you designate the selected location as the route origin. You would
use this command when calculating a route from a point other than your
current location.
Note: You are still receiving the GPS signal.
Show on Map
Lets you show the map with the displayed destination for you to review
before creating a route.
Add to My
Favorites
Lets you add a POI entry to your list of favorite locations. For more
information, see “My Favorites” on page 27.
Sort By ABC
or Distance
Lets you sort the entries of the selected category alphabetically or by
distance from your current location.
Note the unit initially displays the entries by distance.
Turn-by-Turn List
After you have entered a destination and calculated a route, the Directions bar appears
at the top of the Map screen, displaying the following information:
• The next turn direction
• The distance to the next turn
• The street name of the next turn
When you tap the Directions bar or the Tur n- by- Tur n
button on the Options menu, it displays a complete set of
turn-by-turn directions from your current point to your
selected destination.
Use the Scroll buttons to move up or down the directions
list.
Navigation

35
The following options are available:
The Route Summary button displays your entire route on the Map
screen, plus the travel distance and the Estimated Travel Time
Remaining (ETR).
The Show Turn button displays the next turn on the Map screen,
including the street name, the distance to it, and the turn direction.
The Avoid button lets you avoid the selected turn in the directions
list. The unit recalculates the route automatically. Note that when
you exclude a turn, the recalculated route may take longer.
Show Route or Cancel Route
On the Options menu, you can tap the Route Overview
button to display an overview of your complete route on
the Map screen, the total driving distance to your
destination, the estimated travel time, and the complete
destination address.
On the Destinations menu, the Cancel button stops the current navigation and clears
the route. This button is active only after a destination has been set.
Avoid Roads
You can specify that certain roads be permanently excluded from your route calculations.
Use this feature when you want to avoid congested boulevards, toll roads, or unsafe
streets.
On the Options menu, tap the
Avoid Roads button. The Avoid Ro ads screen appears,
displaying the Toll Roads and Avoid Road groups.
Navigation

36
1. Displays Groups
2. Add Group
3. Enter Group Name
Avoid Road Groups
On the Avoid Roa ds menu, tap the Actions button to
enter the menu right. The Actions menu lets you select
from the following commands:
Add Group
Create a new a group of roads to avoid. For example, you can create a
group called “San Francisco Roads”, where you designate the roads in that
area to be avoided.
When you tap the Add Group button, the Avoid Roads Group screen
appears. Enter the group name and tap Save.
Edit Group
Select a group and tap this button to change the group name. When you tap
the Edit Group button, the Avoid Roads Group screen appears displaying
the group name. Change the group name and tap Save. The new name is
displayed on the Avoid Roads screen.
Delete Group
Select a group and tap this button to remove the group from the Avoid
Roads screen. The road entries in this group are also removed.
When selecting a group route, you can tap the Allow
or Avoid button
to include or exclude all roads located in the group.
Navigation

37
Avoid Road Locations
When you tap Default or an Avoid Roads group, the unit displays the group screen,
which lets you select roads to avoid. On this screen, you can use the Allow or Avoid
buttons to include or exclude a selected road when calculating a route.
1. Displays Roads
2. Add Road
3. Enter Road Name
4. Show on Map
Note: You cannot specify a particular toll road.
Navigation

38
You can tap the Actions button on this menu to select from the following commands:
Add Road
Lets you select a road. An address screen appears for you to specify a
city and street. When you have completed updating your road
information, tap Save.
Edit Road
Lets you rename the road and select a different group. When you have
made your changes, tap Save.
Delete Road
Select a road and tap this button to remove the road from your group. The
unit no longer recognizes the removed entry as a road to avoid.
Show on Map
Lets you show the map with the displayed destination for you to review
before creating a route.
Setup
On the Options menu, you can tap the Setup button to display the Setup menus, as
shown below.
Navigation

39
Map and Route Planning
You can tap the Map and Route Settings button on the
Setup menu to specify map and route planning options,
as shown right:
The following map and route settings are:
Route Planning
The Faster route option selects the route that takes less time.
Quickest route is the default value.
The Shorter route option selects the route that is the shorter distance.
Remember, the shorter route may not always be the quickest, as you
are able to travel faster on some roads than on others.
Note: Route generation does not take into account any detours, stops,
or delays along the route.
U-Turn Enabled
When this checkbox is selected, the unit is permitted to use U-turns
when calculating a route.
System Units You can select: Miles/Hour or Kilometers/Hour
Map Orientation
Forward is up – This option orients the map so that your forward
direction is always at the top.
North is up – This option orients the map so that North is always at the
top.
Use Automatic
Zoom
When this option is selected, the zoom is speed dependent. The map
zooms out at higher speeds, displaying a larger map area, and zooms
in at slower speeds, displaying a smaller map area. If you manually
change the zoom, the Automatic Zoom returns to its system level after
several seconds of inactivity.
Use Larger
Labels
This option increases the size of street names to make the map easier
to read.
Navigation

40
QuickNav
You can define the QuickNav location by selecting either
the To Predefined Address or To Nearest POI
Category on the QuickNav menu. When the location is
selected, you can navigate to your address by tapping
the QuickNav
button displayed on the map screen.
For example, if you have selected "Hospitals" as the QuickNav destination, when you
click the QuickNav
button, it automatically creates a route to the closest hospital or
clinic.
GPS Signal
The unit uses the GPS receiver to pinpoint your location. GPS signals are automatically
acquired and your vehicle's location and position are constantly updated unless you are
working in the Free Browse Map mode or you tap the GPS Off button. The GPS
receiver may take a few minutes to find its initial location. For best results, ensure that
the GPS receiver has a clear view of the sky.
Tap the GPS Signal button on the Setup menu to enter
the menu displayed as right:
The menu displays the following information:
• Longitude - The angular distance east or west on the earth's surface.
• Latitude - The location of a place north or south of the equator.
• Speed - The rate of movement, as expressed by kilometers or miles per hour.
• Altitude - The height above sea level.
Navigation

41
The GPS On and GPS Off buttons let you connect or disconnect from the GPS receiver.
If you are working in Free Map Browsing mode, the unit automatically disconnects from
the GPS receiver.
Tap the Set button on GPS Signal menu to enter the
menu right and the screen display the following
Connection fields:
COM Port
This field lets you specify the Communications port.
Note: Most BlueTooth receivers use COM 6 or COM 8. Most serial
receivers use COM 1.
Baud Rate
This field lets you specify the transmission rate of data.
Protocol
This field displays the GPS protocol. The default value is NMEA.
Note: Most receivers use NMEA 4800.
Connect to GPS
This button lets you locate the GPS receiver by the values you have
entered in the COM, Baud, and Protocol fields.
Prompts
You can select the types of voice and visual notifications
that you would like to use while navigating. On the Setup
menu, tap the Prompts button to enter the Prompts
menu, as shown right:
Navigation

42
Voice Prompts
Speed Warning
This prompt warns you when your car exceeds the speed limit. This
prompt is not active unless selected.
Route
Recalculation
This prompt is activated when the unit recalculates a new route.
This prompt is not active unless selected.
Unreliable GPS
Signal
This prompt warns that the GPS signal is too low and unreliable for
navigation. This prompt is automatically active.
GPS Not Found
This prompt is activated when the unit cannot find the GPS signal.
This prompt is automatically active.
Drive Carefully
This is a friendly reminder at the start of each journey. This prompt
is automatically active.
Visual Prompts
Text Directional prompts are displayed in written form.
Symbols Directional prompts are displayed in diagram form, such as an
arrow.
None Directional prompts are not displayed.
Select Map
This feature lets you change the currently selected map to another map saved on your
SD memory card.
You can tap the Select Map button on the Options menu
to display the maps saved on the unit. The Select Map
menu displays map details and version numbers. The
map currently used appears at the top of the list.
Navigation

43
The following Select Map commands are:
Select
Lets you designate a selected map as the current map.
Delete
Lets you permanently remove a selected map.
Note: You cannot delete the current map.
Refresh
Lets you refresh the screen when a new memory card is inserted into the
device.
Pedestrian Mode
The Pedestrian Mode button lets you toggle between traveling as a
pedestrian or in a vehicle. When in Pedestrian Mode, you can generate
a route up to ten kilometers and you are not limited by vehicle
constraints, such as one way streets. When creating a pedestrian route,
the unit avoids highways or other roads where pedestrians would not travel. Voice
prompts are not available in this mode.
Pedestrian Mode displays a shadow that shows the position of the sun. This is helpful
when you are trying to orient yourself to the Map screen during the day. For example,
you have calculated a route, but you don’t know whether the route is to the right or left of
your current position. If you’re shadow is behind you, then the sun is in front of you.
Move your navigation device to the direction of the sun and follow the route. At night, no
shadow is displayed.
Note: The sun is always in the opposite direction from where your shadow appears.
Navigation

44
Multistop Planner
The Multistop Planner lets you plan a route with up to twelve stops.
When you press the GO button, the route is calculated in stages from the departure point
to the first stop. When you reach the first stop, the route recalculates to the second stop,
and so on.
Defining Route Groups
A Route Group represents a group of stops.
On the Multistop Planner menu, select the Actions button and then tap Add Group.
On the Add Group menu, enter the Group name and save. The Actions screen also
lets you edit or delete a selected group.
Navigation

45
Setting Stops along the Route
You can set up stops by selecting the Route Group and tapping the Enter button. On
the Stops menu, tap the Actions button to add, rename, or delete a destination.
Add a stop by Address, POI, My Favorites, or Recent Locations. Select one of these
options, specify a location, and click the OK button. The Add Stop screen appears. You
can change the location name, enter a comment, or designate a different group. When
you’re done, tap Save.
When in the Stops screen, you can use the following commands:
You can use the Move Up or Move Down buttons to change the
order of your itinerary.
Shows the stop destination on the map and lets you tap GO to
calculate the stop destination.
Select the Show button to view the selected stop destination on the
map.
Navigation

46
Stops Actions
You can tap the Actions button for the following
command options:
Set as Origin
Lets you designate the selected address as the route origin. You
would use this command when calculating a route from a point
other than your current location.
Note: You are still connected to the GPS signal.
Add Stop
Lets you add a location by specifying an address from recent
locations, favorite locations, or pre-defined POIs, such as fuel,
food, or lodging.
Rename Stop
Lets you change the stop information, such as name, comments,
or route group.
Delete Stop
Lets you remove a selected stop.
Optimize Route
Your trip itinerary is created by the sequence of stops entered.
This may not be the most efficient route. When you click
Optimize Stops, the unit changes the order of stops to create
the most efficient route.
Information
This button displays the location’s address information.
About
Tap the About button on the Setup-More menu to
display the unit’s version and copyright information as
shown right:
Navigation

47
COM PORT
Communications Port. In Computer systems, the name of a serial communications port - E.g.:
COM1, COM2, COM3, and COM4.
EULA
End-User License Agreement. Is a legal contract between a software application author or
publisher and the user of that application. The EULA, often referred to as the "software
license," is similar to a rental agreement; the user agrees to pay for the privilege of using the
software, and promises the software author or publisher to comply with all restrictions stated in
the EULA.
ETA
Estimated Time of Arrival. The estimate time to complete the journey, if we where to leave now.
Excluding any detours, stops or delays along the route.
ETR
Estimated Time Remaining. Estimated Time remaining to complete route. Does not allow for
any delays.
FAQ
Frequently Asked Questions. List of Frequently Asked Questions with Answers.
GPS
Global Positioning System. The GPS (Global Positioning System) is a "constellation" of 24
well-spaced satellites that orbit the Earth and make it possible for Vehicles/ people/ assets
enabled with GPS receivers to pinpoint their location.
Lat
Latitude. An imaginary parallel circular line (East / West) around the earth, the same distance,
north or south from the equator – expressed in degrees.
Long
Longitude. An imaginary circular line on the surface of the earth passing through the North and
South poles at right angles to the equator - expressed in degrees.
Orbit
Orbital path of a Satellite. Path or trajectory of a body through space. A GPS satellite traces
out an orbit about the earth.
POI
Point Of Interest. A place or item of interest along the selected route.
Sat
Satellite, See also GPS. A man-made object, or device that orbits the earth. E.g.: a GPS
Satellite which orbits the earth in a fix pattern, height and speed
SD
Secure Digital memory card. A Secure Digital (SD) card is a tiny flash memory card used to
make data storage portable among various devices.
TTD
Total Time Duration. The projected total time the trip is calculated to take - does not allow for
any detours or other delays.
Definitions

48
Take steps described in the tables below to solve simple problems before contacting
customer service.
If you suspect something wrong with this unit, immediately turn the power off and
disconnect the power connector from the unit. Never try to repair the unit yourself
because it is dangerous to do so.
PROBLEM
POSSIBLE CAUSE
POSSIBLE SOLUTION
There is no
sound.
The volume may be turned
down or mute.
Turn up the volume or turn
on the sound output.
The unit can’t
receive satellite
signals or can’t
orient.
The unit may be obstructed
by buildings or metal block.
Make sure to use the unit
out of room; if in the
vehicle, you can use the
external GPS antenna to
solve this problem.
The built-in GPS antenna is
not open or it’s angle is not
correct..
Rotate the built-in GPS
antenna out until it’s
horizontal (parallel with the
ground) and make sure it
maintains the status.
Users can’t turn
on the unit.
The adaptor doesn’t
connect well.
Connect the adaptor
correctly.
The built-in rechargeable
battery is weak.
Use the adaptor to supply
power or charge the
battery.
There is no
picture.
There is no power supply.
Connect the adaptor
correctly or charge the
battery.
Troubleshooting

49
Other possibilities:
Static or other external interference may cause the unit function abnormally. In order to
recover normal status, please unplug the power supply cord and then plug it into the
outlet again to reset the unit. If the problems still exist, please cut off the power supply
and consult your service center or the qualified technician.
The unit can
receive signals
now but can’t
then or signals
received are not
stable.
The built-in rechargeable
battery is weak.
Use the adaptor to supply
power or charge the
battery.
The unit may be obstructed
by veil, such as heat
insulation paper.
Remove the veil.
Swing of the unit is too
great.
A
void great swing of the
unit.
System software of the uni
t
fails to function by change.
Turn on the unit again.
PROBLEM
POSSIBLE CAUSE
POSSIBLE SOLUTION
Troubleshooting

50
Design and specifications are subject to change without notice.
TFT screen size 3.5 inches
Frequency Response
20Hz~20kHz
Audio Signal-to-noise Rate
≥65dB
Audio distortion+noise
≤-20dB (1kHz)
Channel Separation
≥70dB (1kHz)
Dynamic Range
≥80dB (1kHz)
Power
AC 100-240V ~ 50/60Hz
Power
Consumption
< 8W
Dimensions 100mmX76mmX22mm (L*W*D)
Weight About 0.25kg
Specifications
 Loading...