

Page 1
,
cod. 3540I885 — 08/2012 (Rev. 00)
OPTIMAX HE PLUS C
INSTRUCTIONS FOR USE INSTALLATION AND MAINTENANCE
Page 2
OPTIMAX HE PLUS C
2 EN
cod. 3540I885 - 08/2012 (Rev. 00)
B
• Carefully read the warnings in this instruction booklet since they provide important information on safe
installation, use and maintenance.
• This instruction booklet is an integral part of the
product and must be carefully kept by the user for future reference.
• If the unit is sold or transferred to another owner or if
it is to be moved, always make sure that the booklet
accompanies the boiler so that it can be consulted
by the new owner and/or installer.
• Installation and maintenance must be carried out by
professionally qualified personnel, according to current regulations and the manufacturer's instructions.
• Incorrect installation or poor maintenance can cause
damage or physical injury. The manufacturer declines any responsibility for damage caused by errors in installation and use or by failure to follow the
manufacturer's instructions.
• Before carrying out any cleaning or maintenance operation, DISCONNECT AND ISOLATE the boiler from the
electrical power supply.
• In case the unit breaks down and/or functions poorly,
deactivate it, do not make any attempt to repair it or
directly intervene. Contact professionally qualified
personnel. Any repair/replacement of products must
only be carried out by qualified professional personnel using exclusively genuine parts. Failure to comply with the above could affect the safety of the unit.
• Periodical maintenance carried out by qualified personnel is essential for guaranteeing good operation
of the unit.
• This unit must only be used for the purpose for which
it was designed. Any other use is considered improper and therefore hazardous.
• After removing the packing, check the integrity of the
contents. Packing materials must not be left within the
reach of children as they are potentially hazardous.
• In case of doubt do not use the unit, and contact the
supplier.
• The images shown in this manual are a simplified
representation of the product. In this representation
there may be slight, unimportant differences with the
supplied product.
• Whilst every effort is taken to ensure the accuracy of
the information contained within these instructions,
the details are offered in good faith and the Manufacturer accepts no liability for matters arising as a result of errors and/or omissions.
• Due to the Manufacturers continuous product research and development, the details contained in
this manual may not truly reflect the actual product.
IMPORTANT
•
Your "benchmark" Installation, Commissioning and Service Record Log Book is enclosed in the
last pages of this manual. “This record must be completed and left with the end user”.
Ferroli is a member of the Benchmark initiative and fully supports the aims of the programme.
Benchmark has been introduced to improve the standards of installation and commissioning of
central heating systems in the UK and to encourage the regular servicing of all central heating
systems to ensure safety and efficiency. Please see installation and servicing guidelines.
•
"Ferroli declare that no substances harmful to health are contained in the appliance or used
during the appliance manufacture”.
B
This symbol indicates "Caution" and is placed next to all safety warnings. Strictly follow
these instructions in order to avoid danger and damage to persons, animals and things.
A
This symbols calls attention to a note or important notice.
Page 3

OPTIMAX HE PLUS C
3
,
cod. 3540I885 - 08/2012 (Rev. 00)
1 Instructions .............................................................................................................................. 2
1.1 Introduction............................................................................................................................................. 2
1.2 Control panel .......................................................................................................................................... 2
1.3 Turning ON and OFF.............................................................................................................................. 3
1.4 Adjustments............................................................................................................................................ 5
2 Installation ................................................................................................................................ 7
2.1 General Instructions ............................................................................................................................... 7
2.2 Place of installation ............................................................................................................................... 8
2.3 Plumbing connections ............................................................................................................................ 8
2.4 Connection to the gas system .............................................................................................................. 10
2.5 Electrical connections........................................................................................................................... 10
2.6 Flue system .......................................................................................................................................... 11
2.7 Condensate drain connection............................................................................................................... 16
3 Service and maintenance......................................................................................................18
3.1 Adjustments.......................................................................................................................................... 18
3.2 Start-up................................................................................................................................................. 19
3.3 Commisioning instructions ................................................................................................................... 20
3.4 Routine servicing, maintenance & repair.............................................................................................. 21
3.5 Troubleshooting.................................................................................................................................... 23
4 Technical data and characteristics ...................................................................................... 25
4.1 Dimensions and connections ............................................................................................................... 25
4.2 General view and main components ....................................................................................................26
4.3 Water circuit ......................................................................................................................................... 27
4.4 Technical data table .............................................................................................................................28
4.5 Diagrams .............................................................................................................................................. 29
4.6 Wiring diagram ..................................................................................................................................... 30
Page 4
OPTIMAX HE PLUS C
4 EN
cod. 3540I885 - 08/2012 (Rev. 00)
1. Instructions
1.1 Introduction
Dear Customer,
thank you for choosing the OPTIMAX HE PLUS C, a FERROLI wall-mounted boiler of the latest generation, featuring
advanced design and cutting-edge technology.
OPTIMAX HE PLUS C is a high-efficiency condensing pre-mix appliance for heating and hot water production with
extremely low emissions, running on natural gas or LPG.
The boiler consists of an aluminium laminar heat exchanger providing effective condensation of the water vapour contained in the flue gases, permitting extremely high efficiency.
Above the heat exchanger, in the boiler, there is a pre-mix burner, with a large ceramic surface, equipped with elec-
tronic ignition and ionization flame control, which achieves extremely low emissions while ensuring high reliability and
long life operation.
The boiler is totally room sealed from the installation room: the air needed for combustion is drawn from outside. The
boiler also includes a modulating speed fan, modulating gas valve, pump, expansion vessel, safety valve, flow sensor,
temperature sensors, a safety thermostat and a low water pressure switch.
Thanks to the microprocessor control and adjustment system with advanced self-diagnosis, unit operation is for the
most part automatic. The power for heating is automatically governed by the control system.
The display continuously provides information on the unit’s operating status and it is easily possible to obtain additional
information on the sensor temperatures, set-points, etc. or configure them. Any operating problems associated with the
boiler or system is immediately signalled by the display and, if possible, corrected automatically.
1.2 Control panel
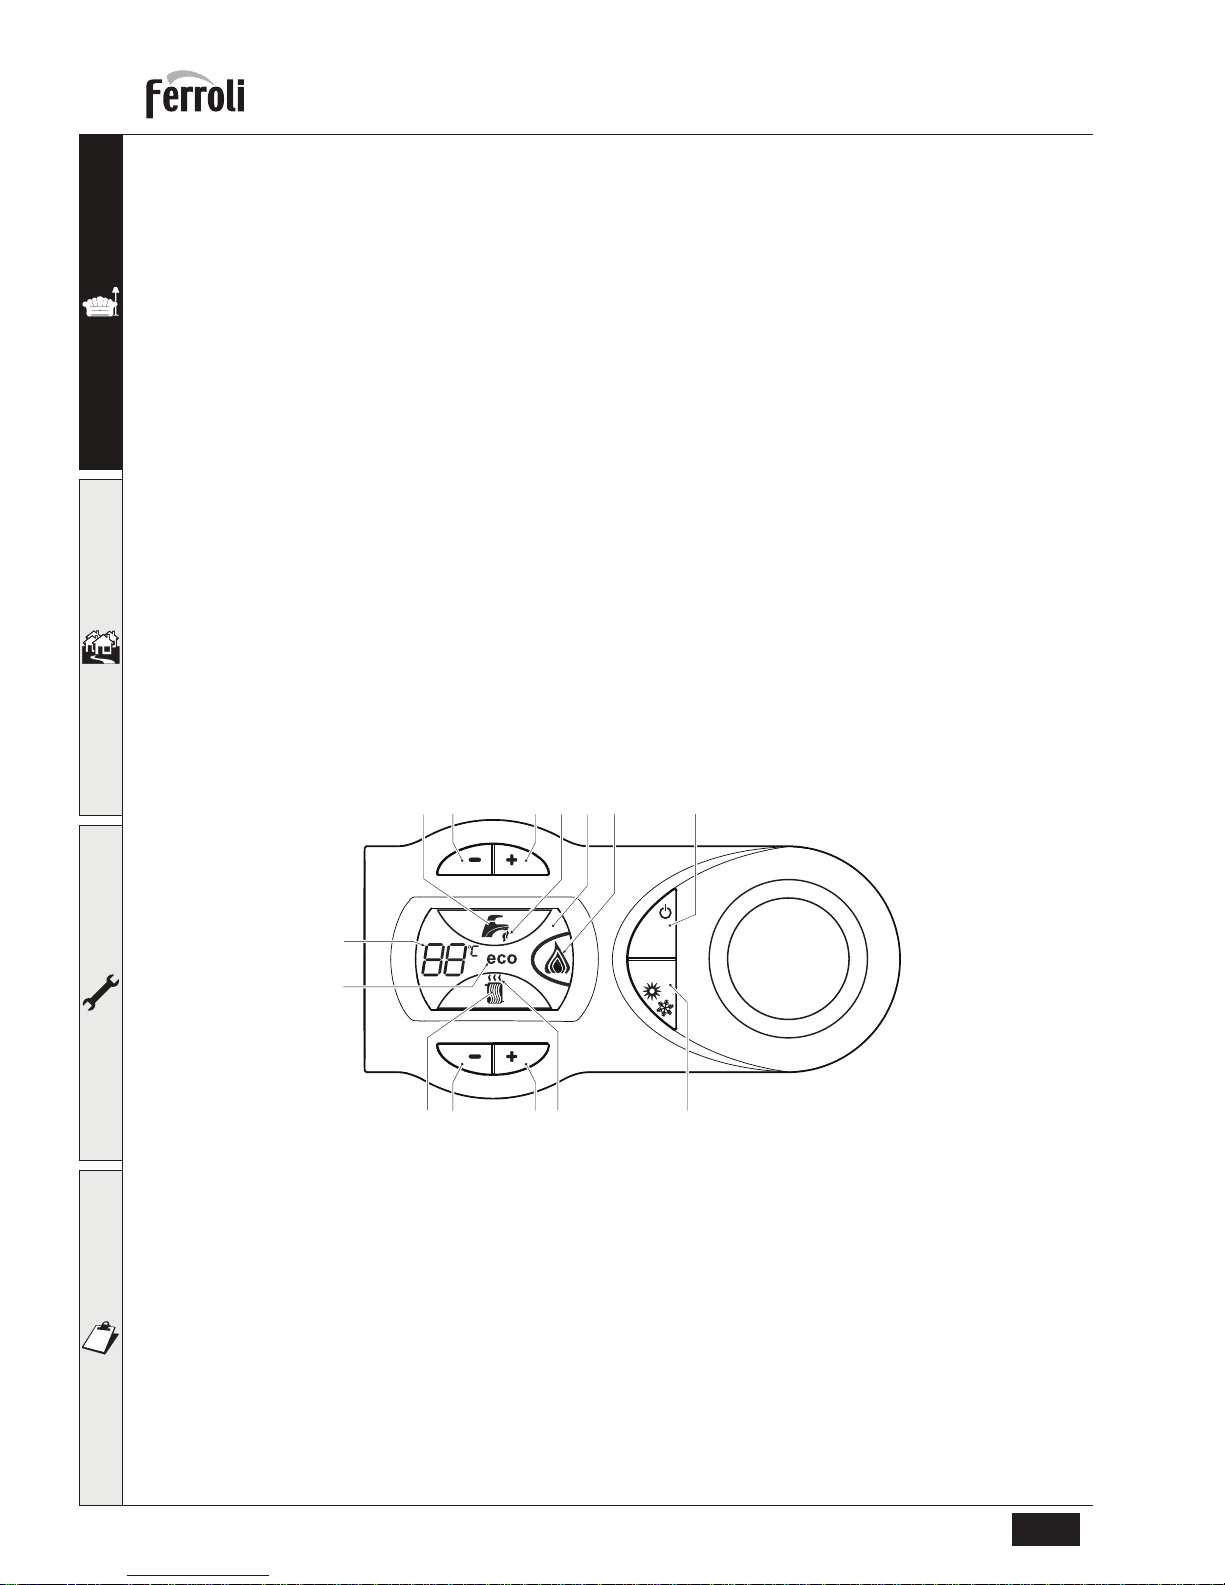
fig. 1 - Control panel
Key
1 = Domestic Hot Water temperature setpoint de-
creasing push button
2 = Domestic Hot Water temperature setpoint in-
creasing push button
3 = Central Heating water temperature setpoint de-
creasing push button
4 = Central Heating water temperature setpoint in-
creasing push button
5 = Display LCD
6 = Reset / OTC push button
7 = Economy-Comfort / On-Off push button
8 = Domestic Hot Water symbol
9 = Domestic Hot Water mode operation
11 = Multi-function indication (Flashing during heat
exchanger protection)
12 = Economy symbol
13 = Central Heating mode operation
14 = Central Heating symbol
15 = Burner on and actual load indication (Flashing
during flame current supervision)
eco
comfort
reset
89
15
1314
12
11
21
436
75
Page 5
OPTIMAX HE PLUS C
5EN
cod. 3540I885 - 08/2012 (Rev. 00)
Indication during boiler operation
Central Heating mode
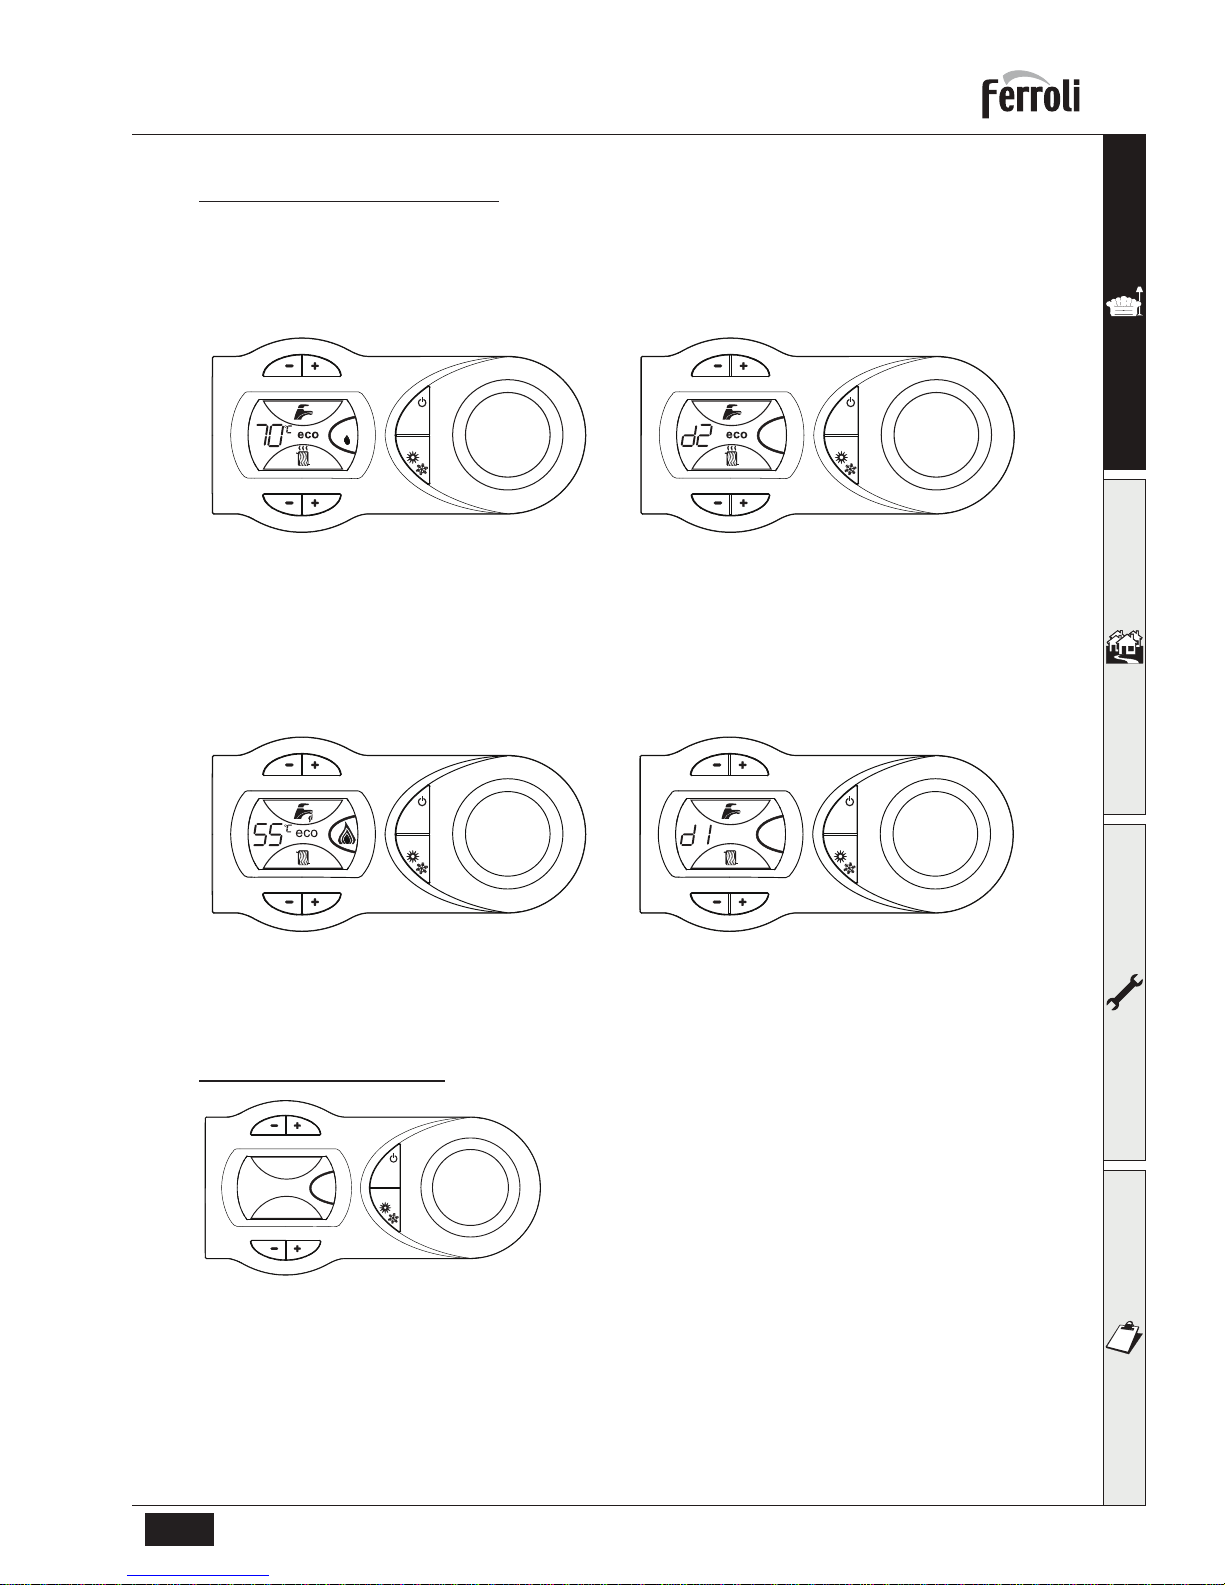
The Central Heating heat demand (generated by the OpenTherm Remote Control, the Room Thermostat or the Clock)
is indicated by the flashing of the Hot Air symbol over the radiator (part. 13 and 14 - fig. 1). The display indicates the
actual Central Heating water temperature (part. 11 - fig. 1) and during central heating off time the text “d2”.
fig. 2
Domestic hot water mode
The Domestic Hot Water heat demand (generated by the DHW flow sensor or due to a Comfort request) is indicated by
the flashing of the Hot Water symbol under the tap (part. 8 and 9 - fig. 1). The display indicates the actual Domestic Hot
Water temperature (part. 11 - fig. 1) and during domestic hot water off time the text “d1”.
fig. 3
1.3 Turning ON and OFF
Without main power supply
fig. 4 - Boiler without main power supply
B
To avoid damage caused by freezing during
long shutdowns in winter, it is advisable to
drain all water from the system.
eco
comfort
reset
eco
comfort
reset
eco
comfort
reset
eco
comfort
reset
eco
comfort
reset
Page 6
OPTIMAX HE PLUS C
6 EN
cod. 3540I885 - 08/2012 (Rev. 00)
Ignition
Ensure the power is on to the appliance.
fig. 5 - Ignition
fig. 6 - Air purge
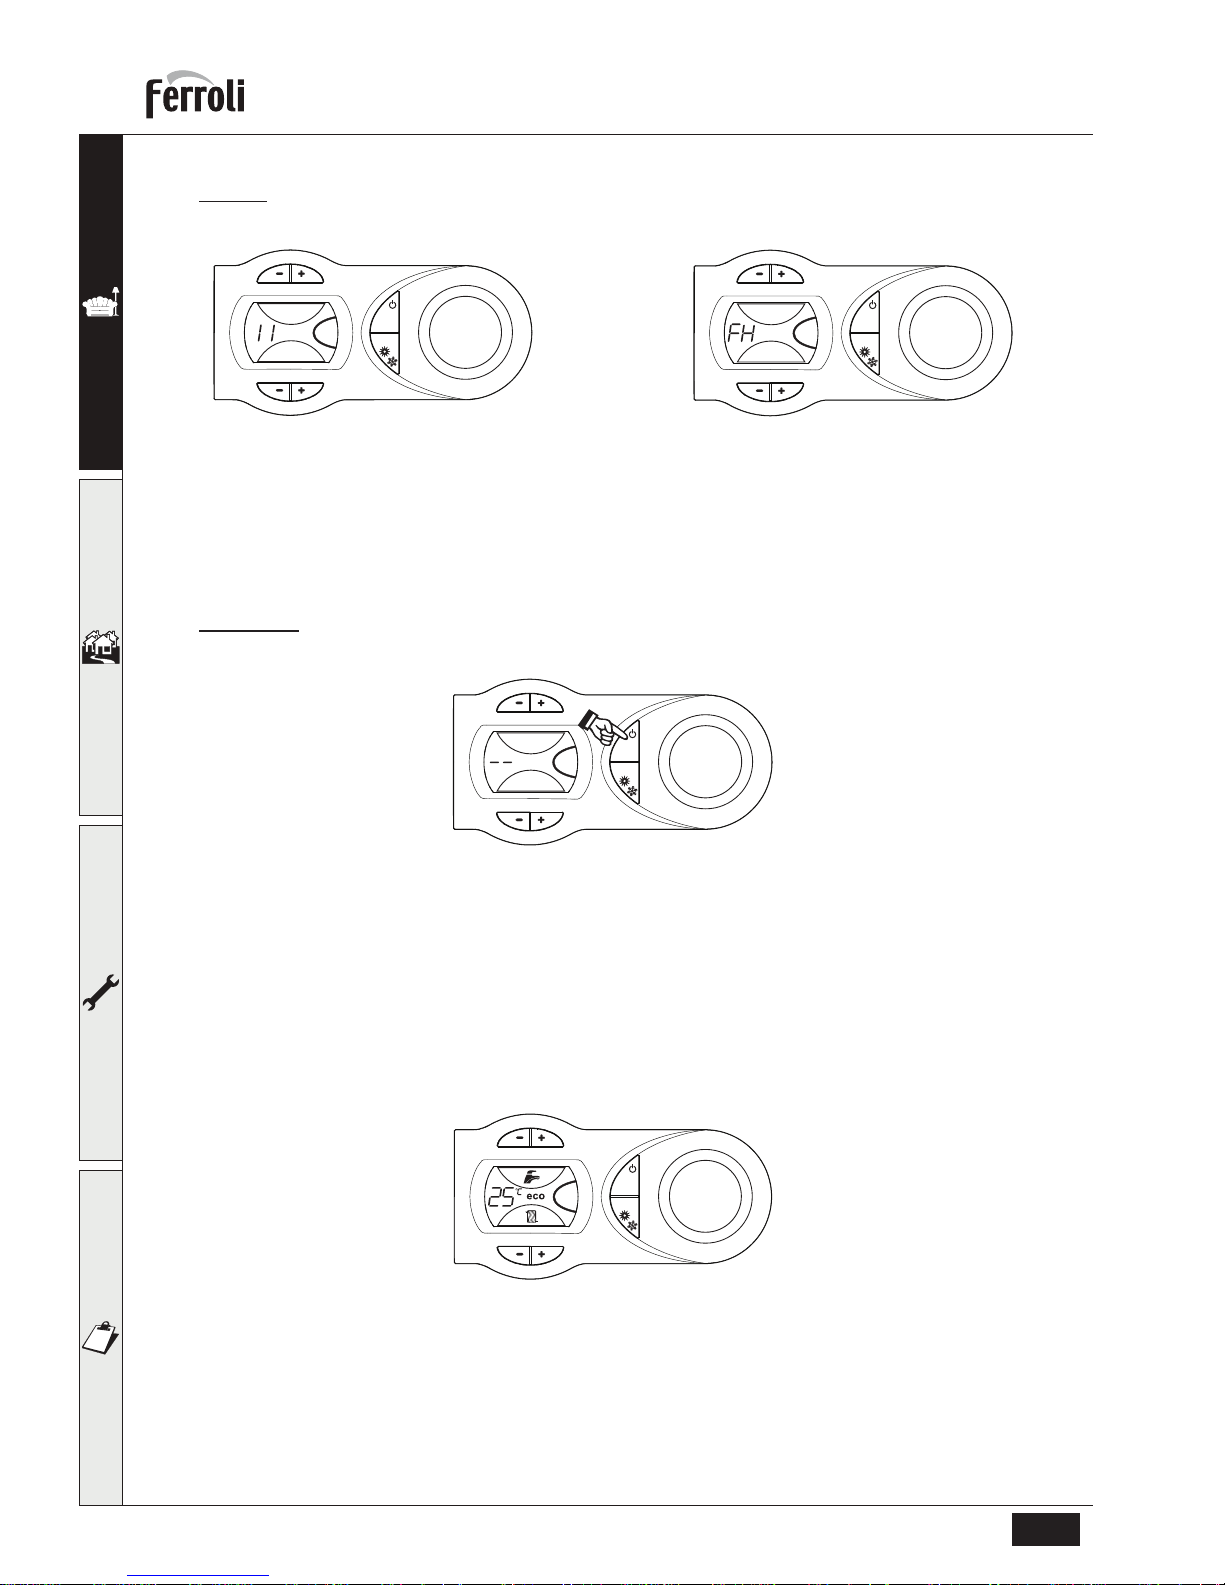
• For the firsts 120 seconds, the display shows FH that identifies the Air purge function.
• During the first 5 seconds, the display shows the software version of the pcb.
• Open the gas cock on the boiler and purge the air from the pipework upstream of the gas valve.
• When the FH disappears, the boiler is ready to function automatically whenever the external controls are calling for
heat.
Turning off
Press the on/off button (part. 7 - fig. 1) for 5 seconds.
fig. 7 - Turning off
When the boiler is turned off with this key, the p.c.b is still powered, heating operation is disabled and the display is off
however the frost protection will still be active.
To totally isolate close the gas cock ahead of the boiler and disconnect electrical power.
B
To avoid damage caused by freezing during long shutdowns in winter, it is advisable to drain all water from
the system.
To turn boiler on again, press the on/off button (part. 7 - fig. 1) for 5 seconds
fig. 8
The boiler is ready to function automatically whenever the external controls are calling for heat.
eco
comfort
reset
eco
comfort
reset
eco
comfort
reset
eco
comfort
reset
Page 7
OPTIMAX HE PLUS C
7EN
cod. 3540I885 - 08/2012 (Rev. 00)
1.4 Adjustments
Heating temperature setting
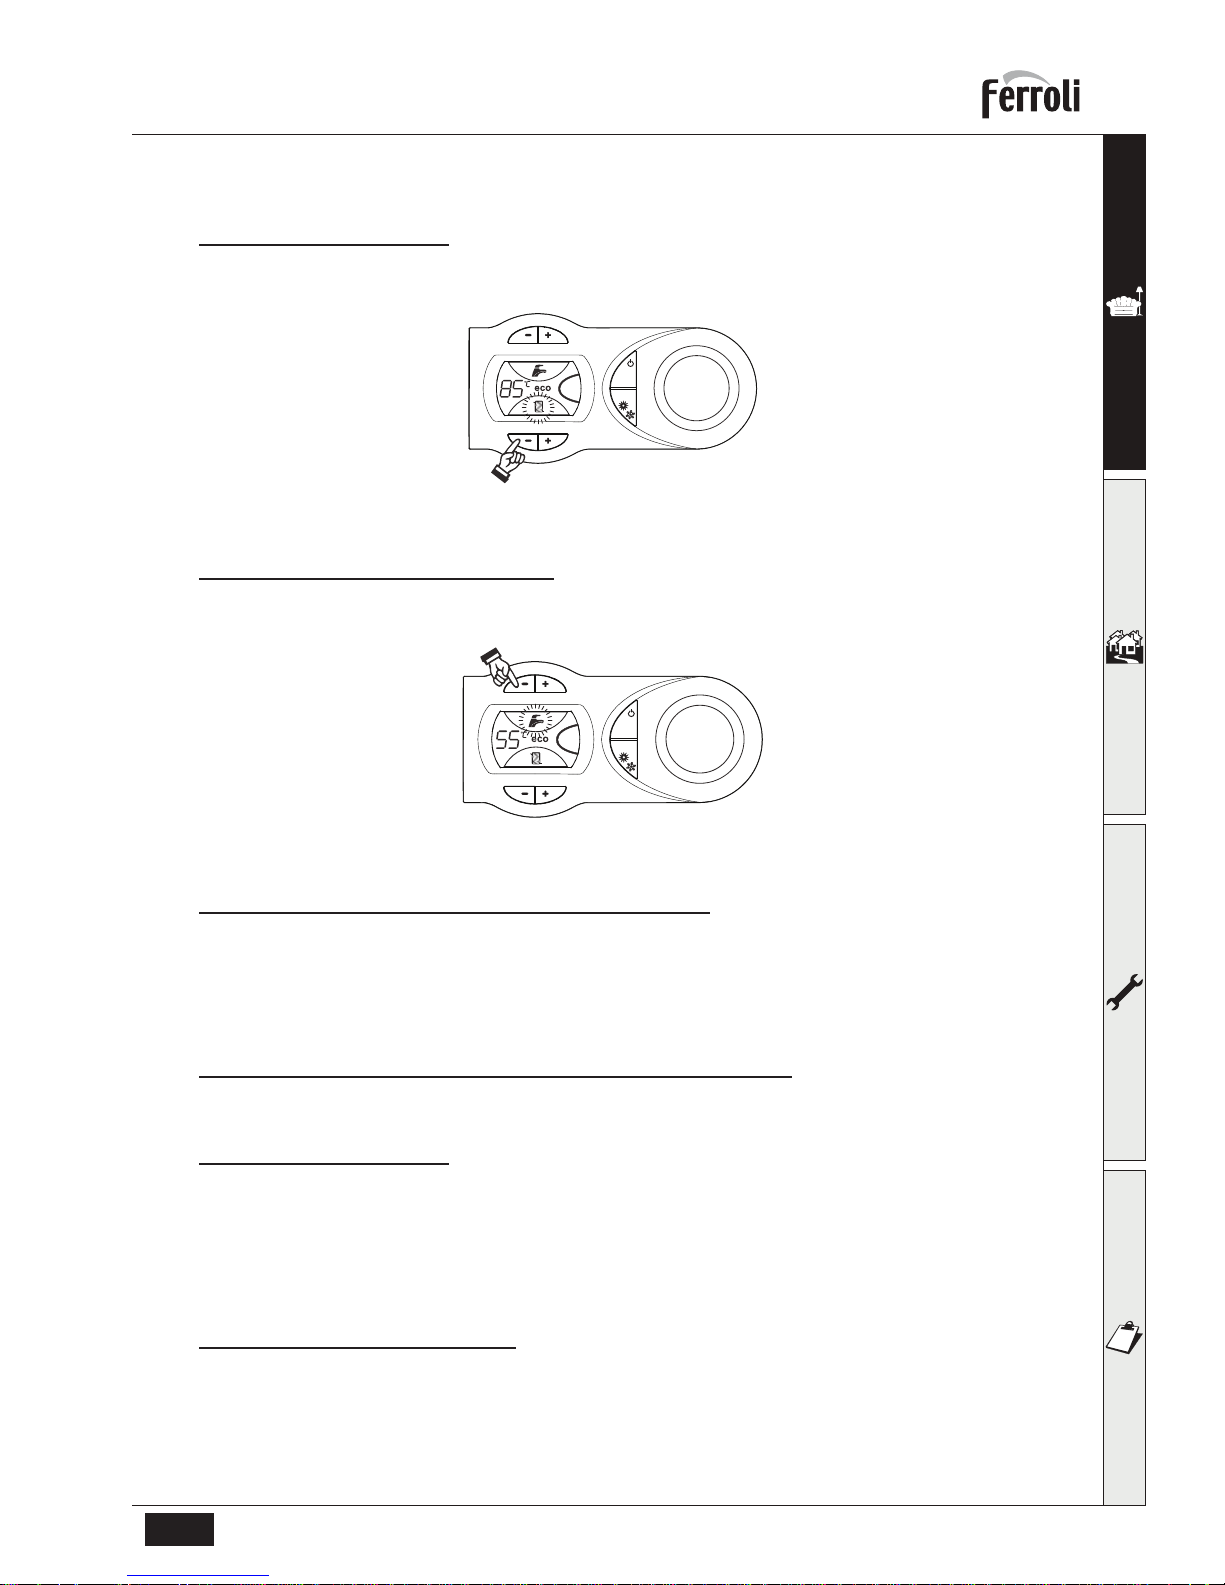
To set the system flow temperature, use the CH push buttons (part. 3 and 4 - fig. 1). It can be varied from a minimum
of 20°C to a maximum of 90°C.
fig. 9
Domestic hot water temperature setting
To set the hot water temperature, use the DHW push buttons (part. 1 and 2 - fig. 1). It can be varied from a minimum of
40°C to a maximum of 55°C.
fig. 10
Room temperature adjustment (using a room thermostat)
Using the room thermostat, set the temperature desired. Controlled by the room thermostat, the boiler lights and heats
the system water to the system delivery setpoint temperature. The burner shuts down when the desired temperature in
the room is reached.
A
A room thermostat and programmer are a mandatory requirement (Building regulations Doc ‘L’ 2002).
Room temperature adjustment (using an optional Remote Control)
Using the remote control, set the temperature desired. The flow temperature will be controlled by the remote control.
For settings and other informations, see the relative manual.
Economy/Comfort selection
The unit is equipped with a special internal device that ensures a high hot-water delivery speed and excellent user comfort. When comfort mode is active the water in the boiler is maintained at a pre-determined temperature, which means
that hot water is available at the boiler outlet as soon as a tap is opened, ie with no waiting.
The user can turn the device off (ECO mode) by pressing economy/comfort button (part.7 - fig. 1).
In ECO mode the display shows the relevant symbol (part. 12 - fig. 1). To turn on COMFORT mode, press economy/
comfort button (part. 7 - fig. 1) again, the ECO symbol will vanish from the display.
Outside temperature compensation
When the (optional) external sensor kit is fitted to the appliance, the system can work in Outside temperature compensation mode. In O.T.C. mode the temperature of the heating system is controlled according to the external climate conditions, this will guarantee a high degree of comfort and energy saving all year round.
By the CH push buttons (part. 3 and 4 - fig. 1) is possible to set the maximum flow temperature for the installation.
eco
comfort
reset
eco
comfort
reset
Page 8
OPTIMAX HE PLUS C
8 EN
cod. 3540I885 - 08/2012 (Rev. 00)
O.T.C. setting
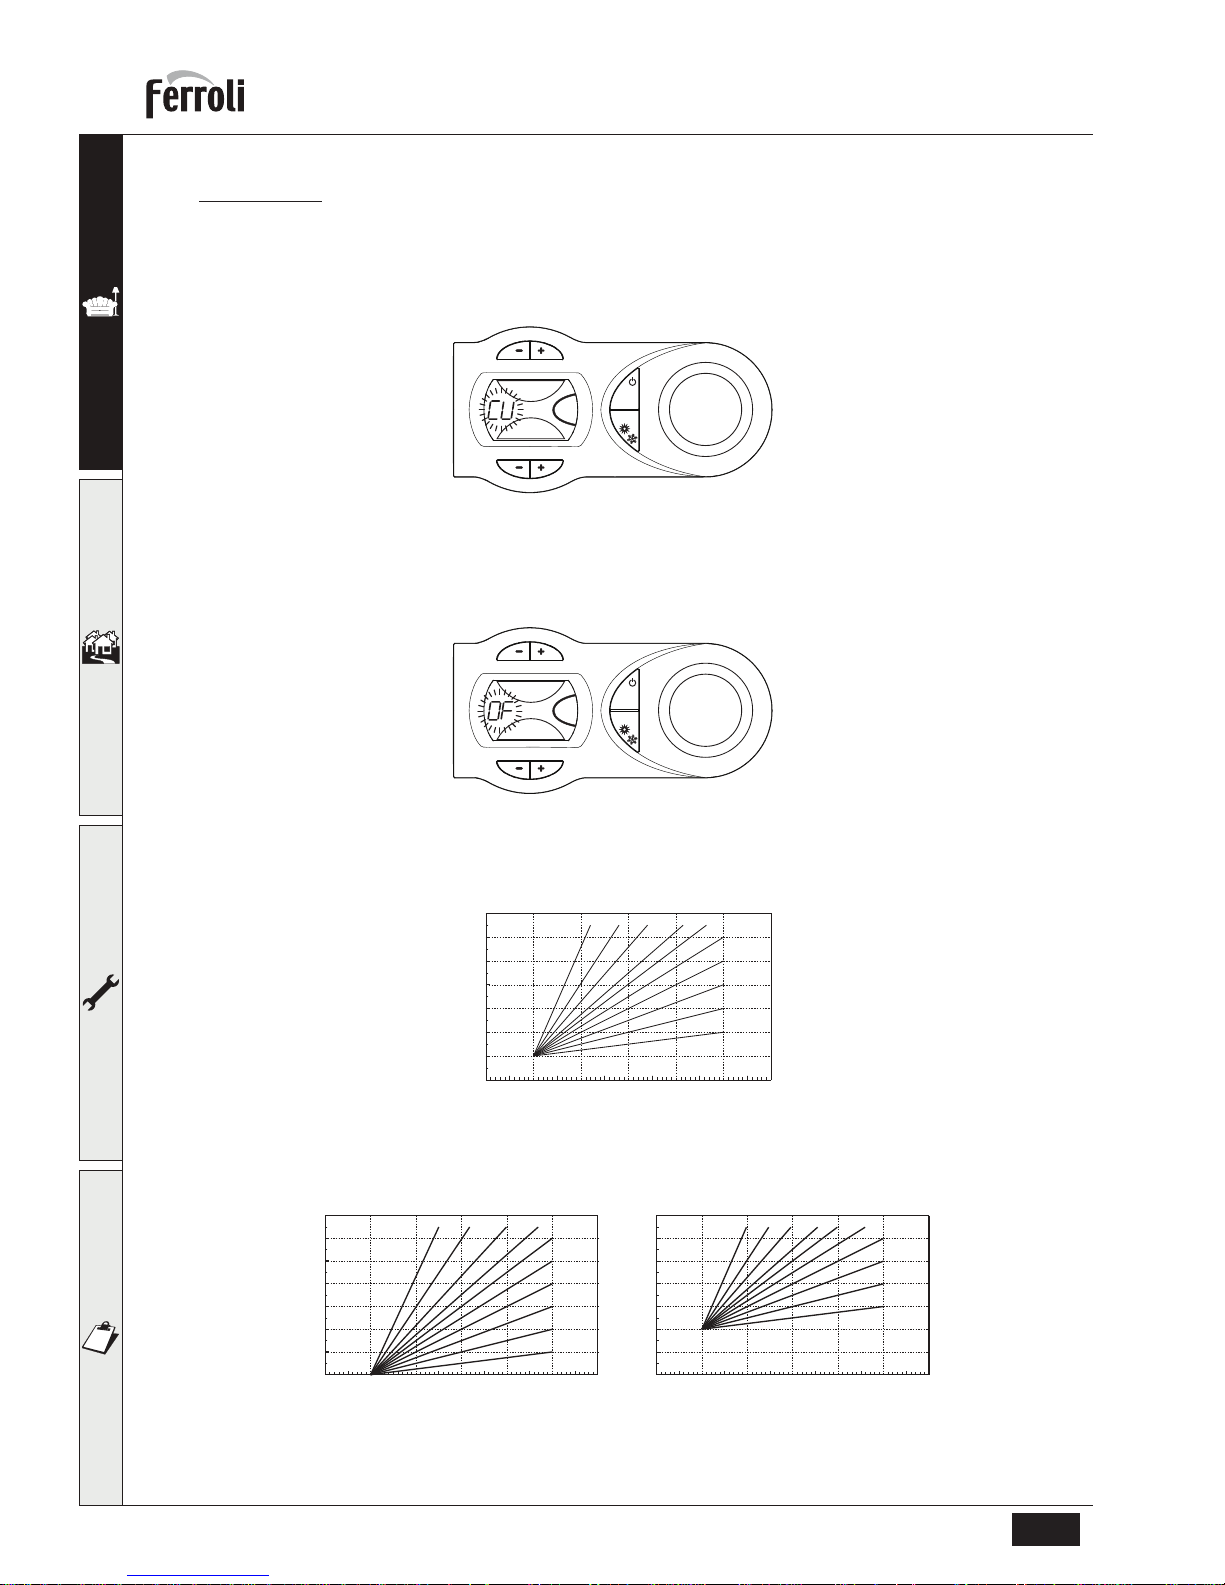
To enter the OTC mode, press OTC button (part. 6 - fig. 1) for 5 seconds.
The display shows CU flashing (fig. 11); to set Curve, use the DHW push buttons (part. 1 and 2 - fig. 1). It can be varied
from 1 to 10, in accordance with the chart (fig. 13). O means no O.T.C. mode.
It is recommended a start point of 20 - 30°C and a flow temperature of 85°C is required for the UK (Curve 9 or 10).
fig. 11
By pressing the CH push buttons (part. 3 e 4 - fig. 1), the display shows OF flashing (fig. 12); to set Offset, use the DHW
push buttons (part. 1 and 2 - fig. 1). It can be varied from 20 to 40, in accordance with the chart (fig. 14).
fig. 12
To exit the OTC mode, press OTC button (part. 6 - fig. 1) for 5 seconds.
fig. 13 - Compensation curves
fig. 14 - Example of compensation parallel curve offset
eco
comfort
reset
eco
comfort
reset
20
30
40
50
60
70
80
90
85
20 10 0 -10 -20
1
2
3
4
5
68910 7
Maximum boiler flow temperature
Outside Air Temperature
20
30
40
50
60
70
80
90
85
20 10 0 -10 -20
1
2
3
4
5
6
8910
7
20 10 0 -10 -20
20
30
40
50
60
70
80
90
85
1
2
3
4
568910 7
OFFSET = 20 OFFSET = 40
Maximum boiler flow temperature
Outside Air Temperature
Maximum boiler flow temperature
Outside Air Temperature
Page 9
OPTIMAX HE PLUS C
9EN
cod. 3540I885 - 08/2012 (Rev. 00)
2. Installation
2.1 General Instructions
B
This unit must only be used for its intended purpose. This unit is designed to heat water to a temperature below
boiling point and must be connected to a heating system and/or a water supply system for domestic use, compatible with its performance, characteristics and heating capacity. Any other use is deemed improper.
THE BOILER MUST ONLY BE INSTALLED BY QUALIFIED PERSONNEL, IN COMPLIANCE WITH ALL THE INSTRUCTIONS GIVEN IN THIS TECHNICAL MANUAL, THE PROVISIONS OF CURRENT LAW, THE REQUIREMENTS OF THE TECHNICAL STANDARDS (BS) AND ANY LOCAL REGULATIONS AND THE RULES OF PROPER
WORKMANSHIP.
Incorrect installation can cause damage or injury for which the manufacturer cannot be deemed responsible.
The unit must be installed in compliance with these instructions and the following standards applicable in
Great Britain.
Gas Safety Regulations (Installations & Use).
Local Building Regulations.
The Building Regulations (Part L).
The Buildings Standards (Scotland - Consolidated) Regulations).British Standards Codes of Practice (BSI):
Model Water By-Laws (Great Britain)
For Northern Ireland the relevant laws in force must be observed.
Safe handling of materials
Pay attention when handling the boiler insulation panels because the material they are made of could irritate the skin.
No part of the boiler contains asbestos, mercury or CFC's.
Advice for transport and handling
For lifting and transport always take suitable safety precautions: keep your back straight, bend knees, do not turn your
body, move feet, avoid bending forward or sideways and keep the load as close as possible to your body.
If possible, use a trolley or other suitable means to carry the boiler.
Grip the boiler firmly and, before lifting it, try and find the point where the load is concentrated in order to establish the
centre of gravity and suitably reposition yourself. Ideally seek assistance in lifting the boiler.
B.S. 5440 Part 1 Flues
B.S. 5440 Part 2 Air flow and ventilation
B.S. 5449 ......... Forced circulation hot water production systems
B.S. 6798 ......... Installation of gas-fired boilers for hot water
B.S. 6891 ......... Gas systems
B.S. 7671 ......... IEE wiring system standards
B.S. 4814 ......... Specifications for expansion tanks
B.S. 5482 ......... LPG systems
B.S. 7593 ......... Water treatment in central heating systems for DHW production
B.S. 5546 ......... Installation of systems for DHW production
B.S. 5955-8 ......... Installation of plastic pipes
Page 10
OPTIMAX HE PLUS C
10 EN
cod. 3540I885 - 08/2012 (Rev. 00)
2.2 Place of installation
The combustion circuit is sealed with respect to the
place of installation and therefore the unit can be installed in any room. However, the place of installation
must be sufficiently ventilated to prevent the creation
of dangerous conditions in case of even slight gas
leaks. This safety regulation is provided for by EEC Directive no. 90/396 for all gas units, including those with
a sealed chamber.
In any case, the place of installation must be free of
dust, flammable materials or objects or corrosive gases.
The boiler is arranged for wall mounting and comes
standard with a hanging bracket. A paper template for
marking the drilling points on the wall is provided in the
box. The wall fixing must ensure stable and effective
support for the generator.
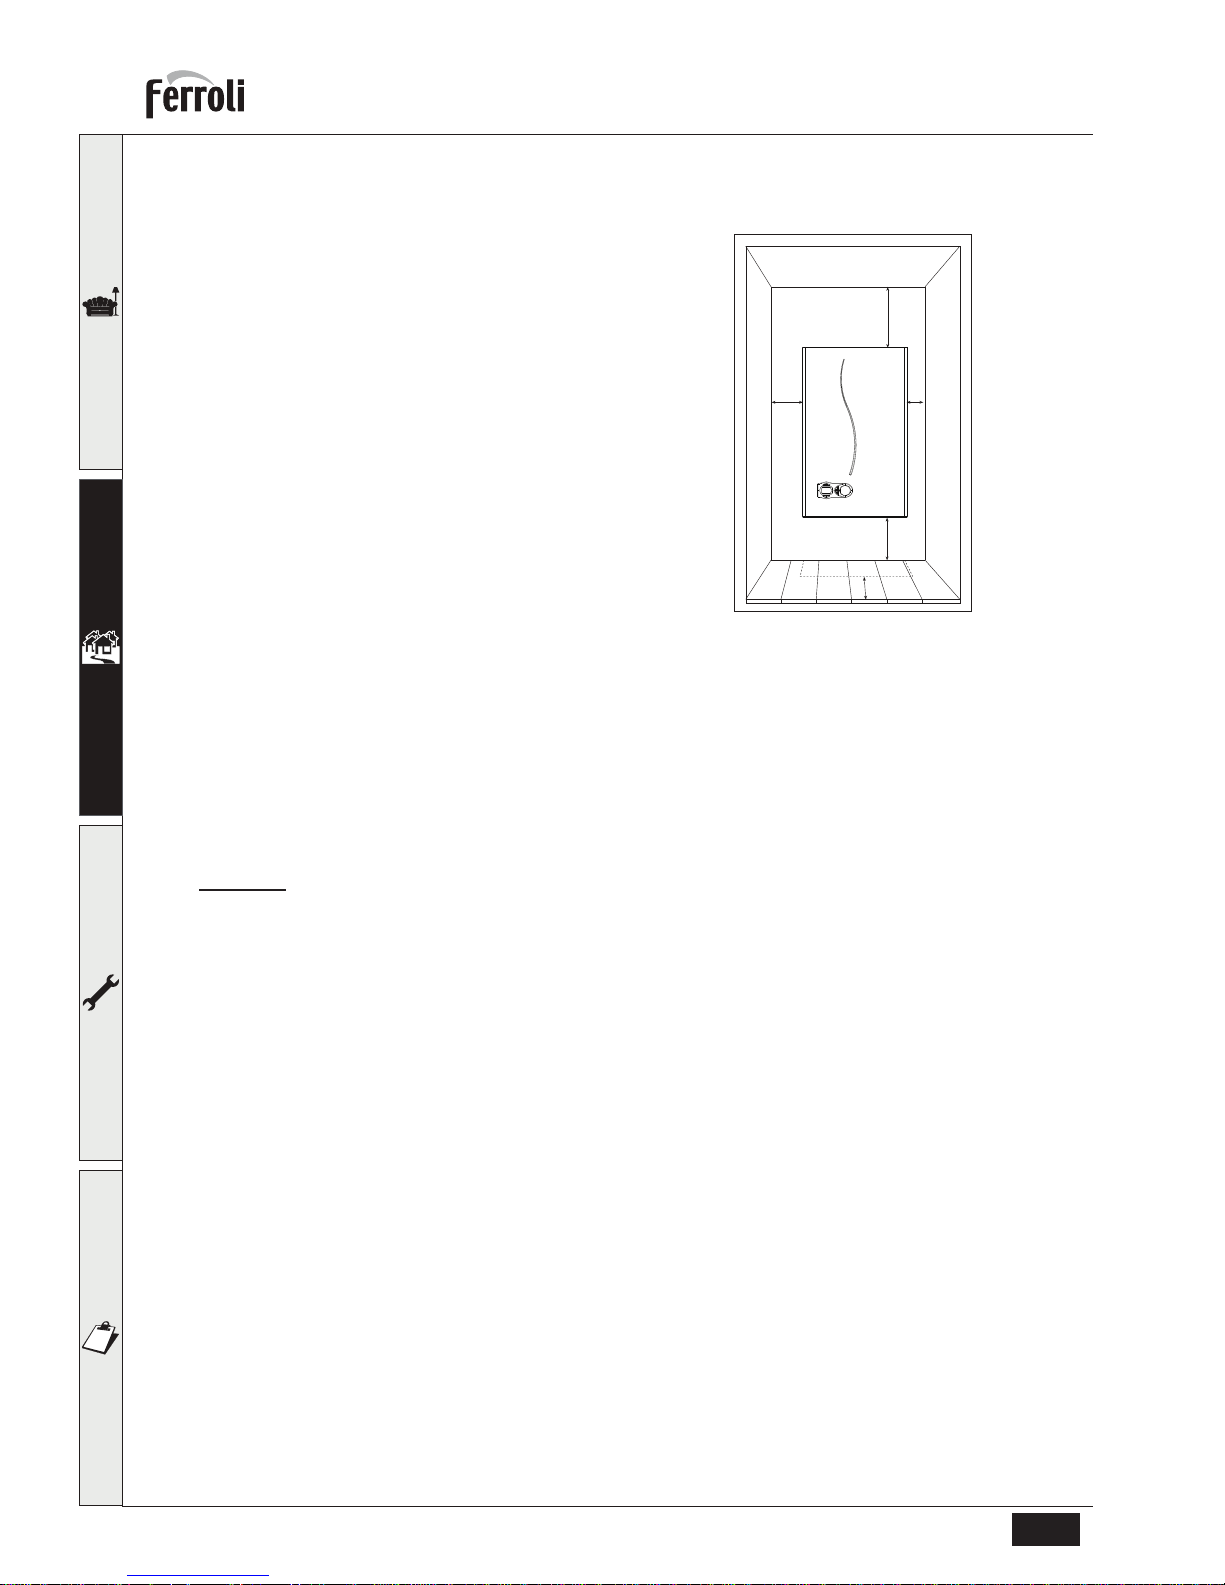
A
If the unit is enclosed in a cabinet or mounted
alongside, a space must be provided for removing the casing and for normal maintenance operations. The minimum
measurements to be respected are given in
fig. 15.
fig. 15 - Minimum distances around the boiler
A Min. 2,5 cm
B Min. 20 cm
C Min. 30 cm
D Min. 35 cm (via an openable panel)
2.3 Plumbing connections
Important
The heating capacity of the boiler must be previously established by calculating the building's heat requirement according to the current regulations. To ensure proper operation and long boiler life, the plumbing system must be adequately
sized and complete with all the necessary accessories, including a room thermostat, a thermostatic radiator valve
(TRV), etc. The system flow and return pipes must have a diameter of at least 22 mm for the first 3 m of length from the
unit.
If the system delivery and return pipes follow a path where air pockets could form in certain places, it is advisable to
install vent valves at these points. Also, install type "A" drain cocks at the lowest points in the system to allow complete
emptying.
The temperature drop between the delivery manifold and the return to the boiler should not exceed 20 °C.
A flow rate of at least 6 litres/min through the heat exchanger is required. An automatic bypass installed in the boiler
guarantees maintaining of the required flow rate.
B
Do not use the water system pipes to earth electrical appliances.
Before installation, carefully
flush all the heating system pipes to remove any residuals or impurities that could affect
proper operation of the unit (as required by BS 7593 Building regs Doc L).
Carry out the connections to the unit as indicated in fig. 33.
B
The safety valve discharge must be connected to a 15 mm diameter copper pipe descending from the boiler
to run off system water in case of overpressure in the heating circuit.
Otherwise, the boiler manufacturer
cannot be held liable if the discharge valve operates and floods the room
. The discharge must be run
to the outside of the building to prevent the risk of damage or injury caused by discharged hot water in case
of overpressure in the system.
Connections to the boiler are to be made in such a way as to ensure that its internal pipes and fittings are free of stress.
If a non-return valve is installed also on the DHW circuit (if provided for), it is necessary to install a safety valve between
the boiler and circuit (with non-return valve at least 3 metres from the boiler) or an expansion tank for domestic use.
A A
B
D
C
Page 11
OPTIMAX HE PLUS C
11EN
cod. 3540I885 - 08/2012 (Rev. 00)
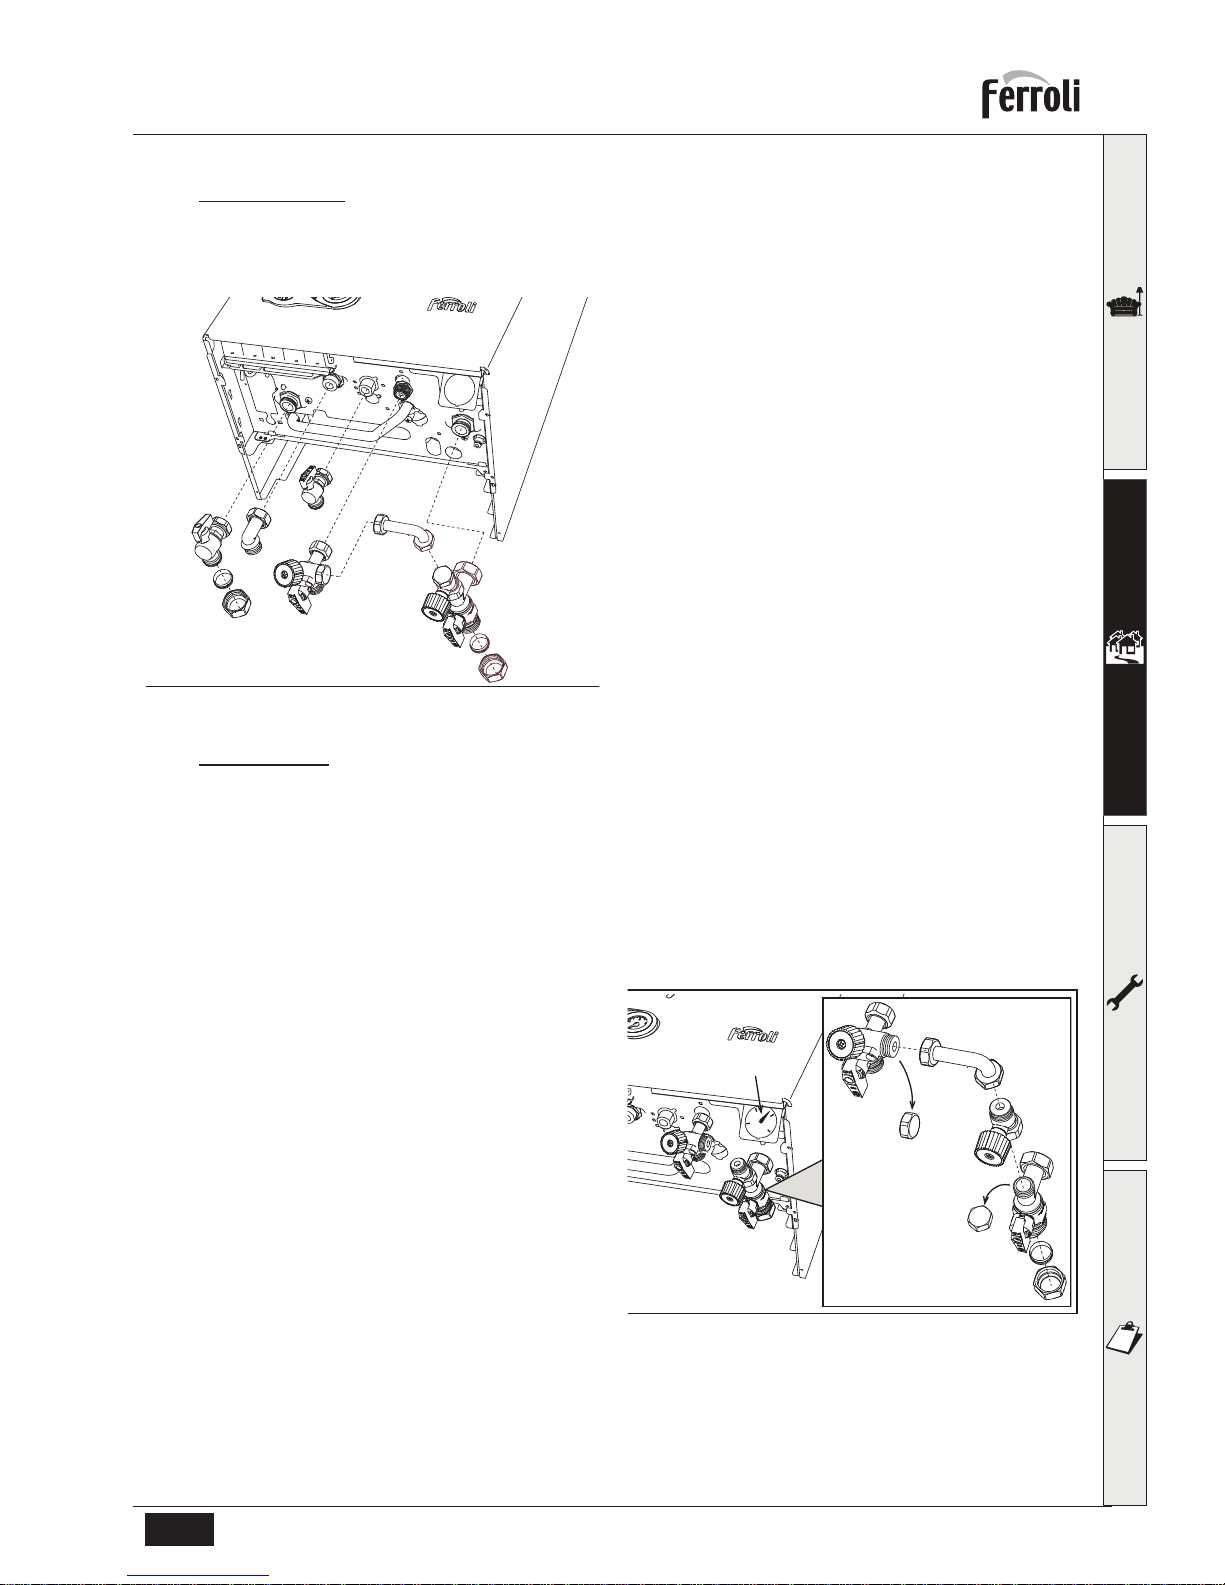
Shutoff valve kit
The shutoff valves supplied (see fig. 16) must be installed between the boiler and heating system to allow the boiler to
be isolated from the system if necessary.
For installation, follow the instructions contained in the kit.
fig. 16 - Shutoff valve kit
A Delivery cock 3/4” (Red)
B Domestic hot water outlet connection
C Gas cock 1/2” (yellow)
D Cold water inlet connection - System filling
E Removable connection for system filling
F System return cock 3/4” - System filling
Make up water
It is necessary to provide for replenishing of the water lost by the sealed system. Refer to standard BS6798 for the
methods of filling and replenishing water in sealed systems. There must not be a direct connection between the central
heating system of the boiler and the water mains. For the use of water coming from the water mains and direct pressurisation of the system, refer to the local water management by-laws. This connection, if provided for, must be interrupted after use.
The valve installed in the boiler shell is provided with a filling connector.
Attention - is drawn to the Model Water Byelaws.
Filling system
The boiler is provided with a special filling system. To
fill the system remove caps “G” and install the removable connection tube “E”. Fill the system by turning
both knobs “L“until the pressure gauge “M“ reads a
pressure of 1 ÷ 1.5 bar. Close the knobs “L” and remove the connection tube “E”.
fig. 17 - Filling system
B
C
D
E
F
A
L
L
E
M
G
G
Page 12
OPTIMAX HE PLUS C
12 EN
cod. 3540I885 - 08/2012 (Rev. 00)
Water treatment
If treatment of the water is necessary, Ferroli recommends the exclusive use of specific products such as Fernox or
Sentinel to be applied in compliance with the producer's instructions. For more information, please contact:
A
If the boiler is installed in an existing system, it is necessary to remove any unsuitable additives by thoroughly
cleaning the system. Cleaning of all the systems must be carried out in compliance with the provisions of
Standard B.S. 7593.
A
In areas characterised by the presence of hard water, treatment may be necessary to prevent the formation
of encrustations in the boiler.
A
Make sure to use the water treatment product in the correct concentration, in compliance with the producer's
instructions.
2.4 Connection to the gas system
If necessary the local Gas supplier should be consulted, at the installation planning stage, in order to establish the availability of an adequate supply of gas.
An existing service pipe must not be used without prior consultation with the local Gas supplier.
A gas meter can only be connected by the Local Gas supplier, or by a Local Gas suppliers Contractor.
Installation pipes should be fitted in accordance with BS6891.
Appliance inlet working pressure must be 20mbar MINIMUM, for NG and 37 mbar minimum for LPG.
Do not use pipes of a smaller size than the combination boiler inlet gas connection (22 mm).
B
The complete installation must be tested for gas soundness and purged as described in BS689. All pipework
must be adquately supported. An isolating gas valve is provided and should be fitted on the boiler gas inlet.
Please wait 10 minutes when lighting from cold before checking. Gas pressures should be checked after the
boiler has operated for 10 minutes to reach thermal equilibrium. This appliance has no facility to check the
burner pressure, however if the inlet pressure and the gas rate are correct the boiler should be set correctly,
the gas valve is set and sealed at the factory and should not be adjusted without authorisation from Ferroli
Personnel. A combustion test can be carried out to ensure correct air/gas mix (see page 28 combustion analyser testing).
The isolation kit shown in fig. 16 is supplied as standard.
2.5 Electrical connections
The unit must be installed in conformity with current national and local regulations.
Connection to the electrical grid
B
The unit's electrical safety is only guaranteed when correctly connected to an efficient earthing system executed according to current safety standards. Have the efficiency and suitability of the earthing system checked
by professionally qualified personnel. The manufacturer is not responsible for any damage caused by failure
to earth the system. Also make sure that the electrical system is adequate for the maximum power absorbed
by the unit, as specified on the boiler dataplate.
The boiler is prewired and provided with a cable and plug for connection to the electricity supply. The connections to
the grid must be made with a permanent connection and equipped with a bipolar switch whose contacts have a minimum
opening of at least 3 mm, interposing fuses of max. 3A between the boiler and the line. It is important to respect the
polarities (LINE: brown wire / NEUTRAL: blue wire / EARTH: yellow-green wire) in making connections to the electrical
supply. During installation or when changing the power cable, the earth wire must be left 2 cm longer than the others.
B
The user must never change the unit's power cable. If the cable gets damaged, switch off the unit and have it
changed solely by professionally qualified personnel. If changing the electric power cable, use solely “HAR
H05 VV-F” 3x0.75 mm2 cable with a maximum outside diameter of 8 mm.
Fernox Manufacturing Co. LTD.
Cookson Electronics, Forsyth Road
Sheerwater, Woking, Surrey, GU21 5RZ
Tel.: 0870 8700362
Sentinel Performance Solutions Ltd
The Heath Business & Technical Park
Runcorn, Cheshire WA7 4QX
Tel.: 0151 424 5351
Page 13
OPTIMAX HE PLUS C
13EN
cod. 3540I885 - 08/2012 (Rev. 00)
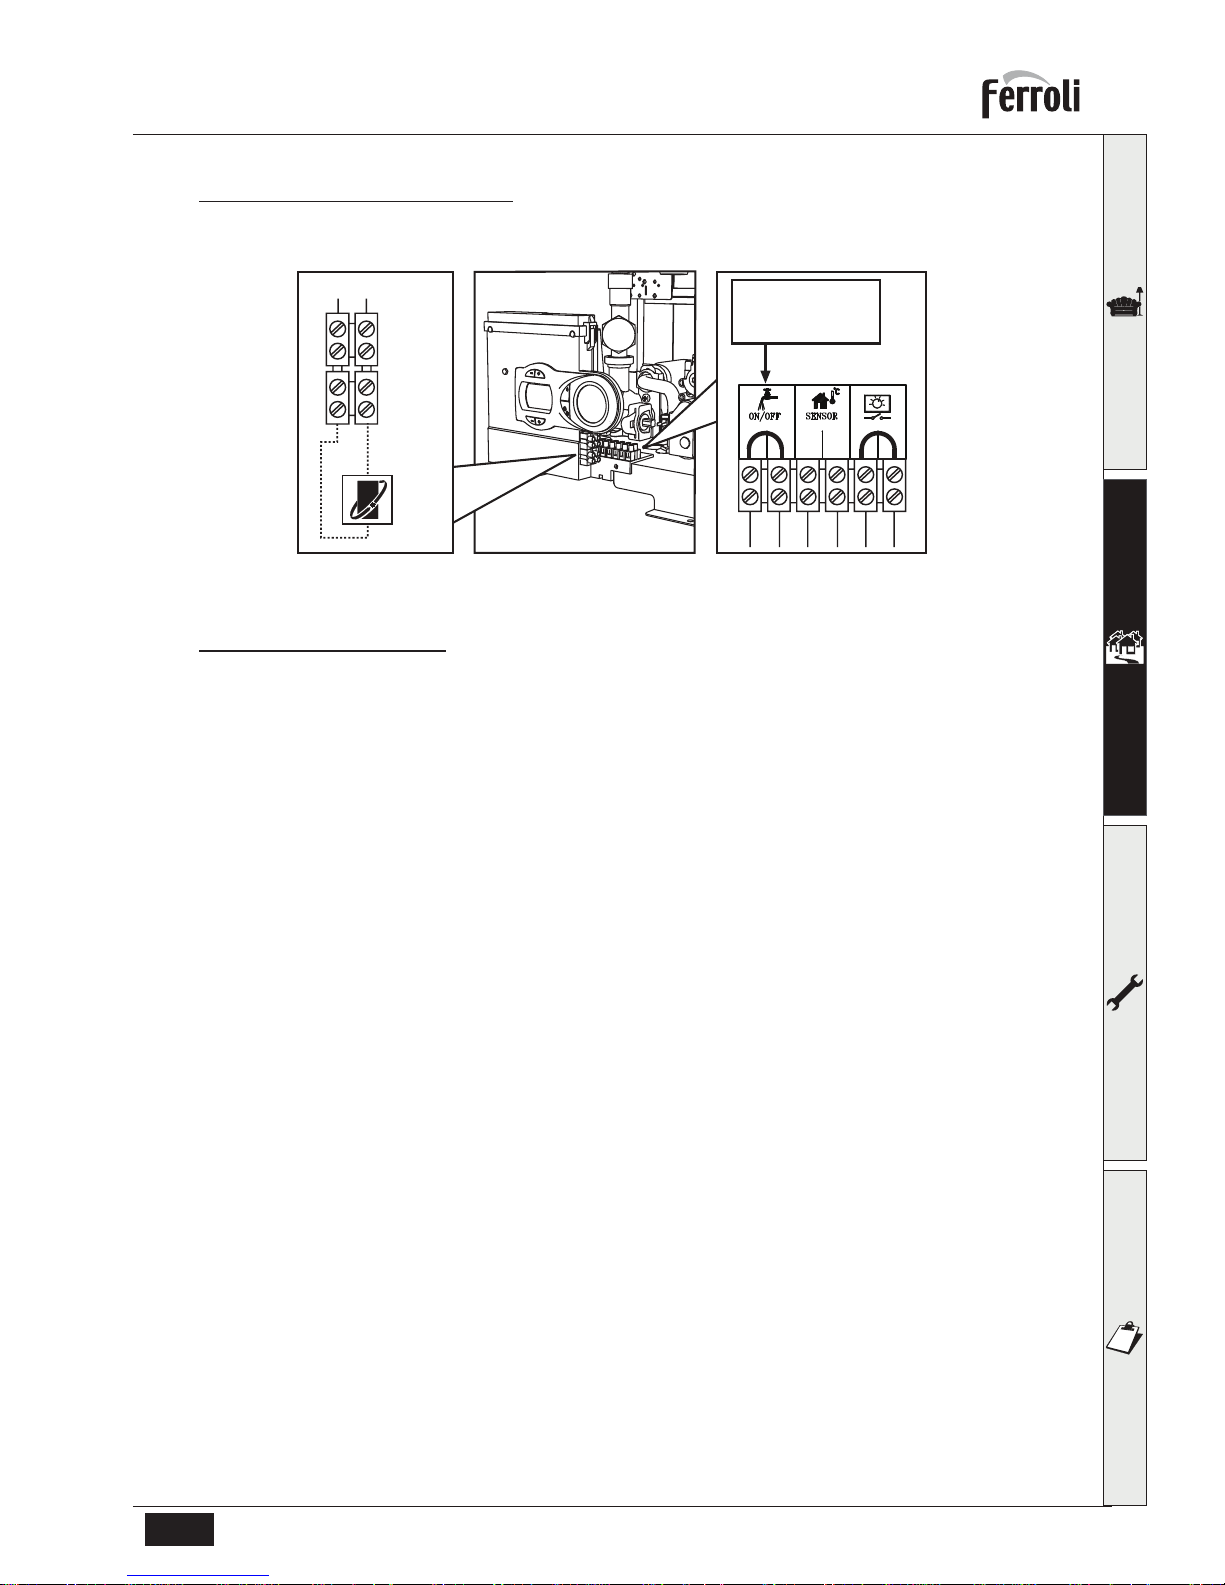
Accessing electrical terminal block
The electrical connections terminal block can be accessed after removing the casing The layout of the terminals for the
various connections is given in the wiring diagram in fig. 38.
fig. 18 - Electrical terminal block
Room thermostat (optional)
B
CAUTION: THE ROOM THERMOSTAT MUST HAVE VOLTAGE FREE SWITCH CONTACTS.
CONNECTING 240V TO THE SWITCH TERMINALS OF THE BOILER (5-6) WILL IRREPARABLY DAMAGE
THE BOILER PCB.
When connecting either a room thermostat or remote timer control, remove the jumper on the terminal block
(5-6) and connect the volt free switch connections across these terminals. If a remote timer control and room
thermostat are required then these must be connected in series.
2.6 Flue system
This unit is a "C type" with sealed chamber and forced draught, with air inlet and flue exhaust to be connected to one
of the following flue systems. Before installation, with the aid of the tables and calculation methods given, check that the
pipes of the fume system do not exceed the maximum permissible lengths. The current standards and local regulations
must be observed.
B
Only a Ferroli flue system (with respective accessories) must be used with this unit, as required by BS 5440
and CE standards.
138 72
FLOWMETER
ON/OFF
SWITCH
139
123456
Page 14
OPTIMAX HE PLUS C
14 EN
cod. 3540I885 - 08/2012 (Rev. 00)
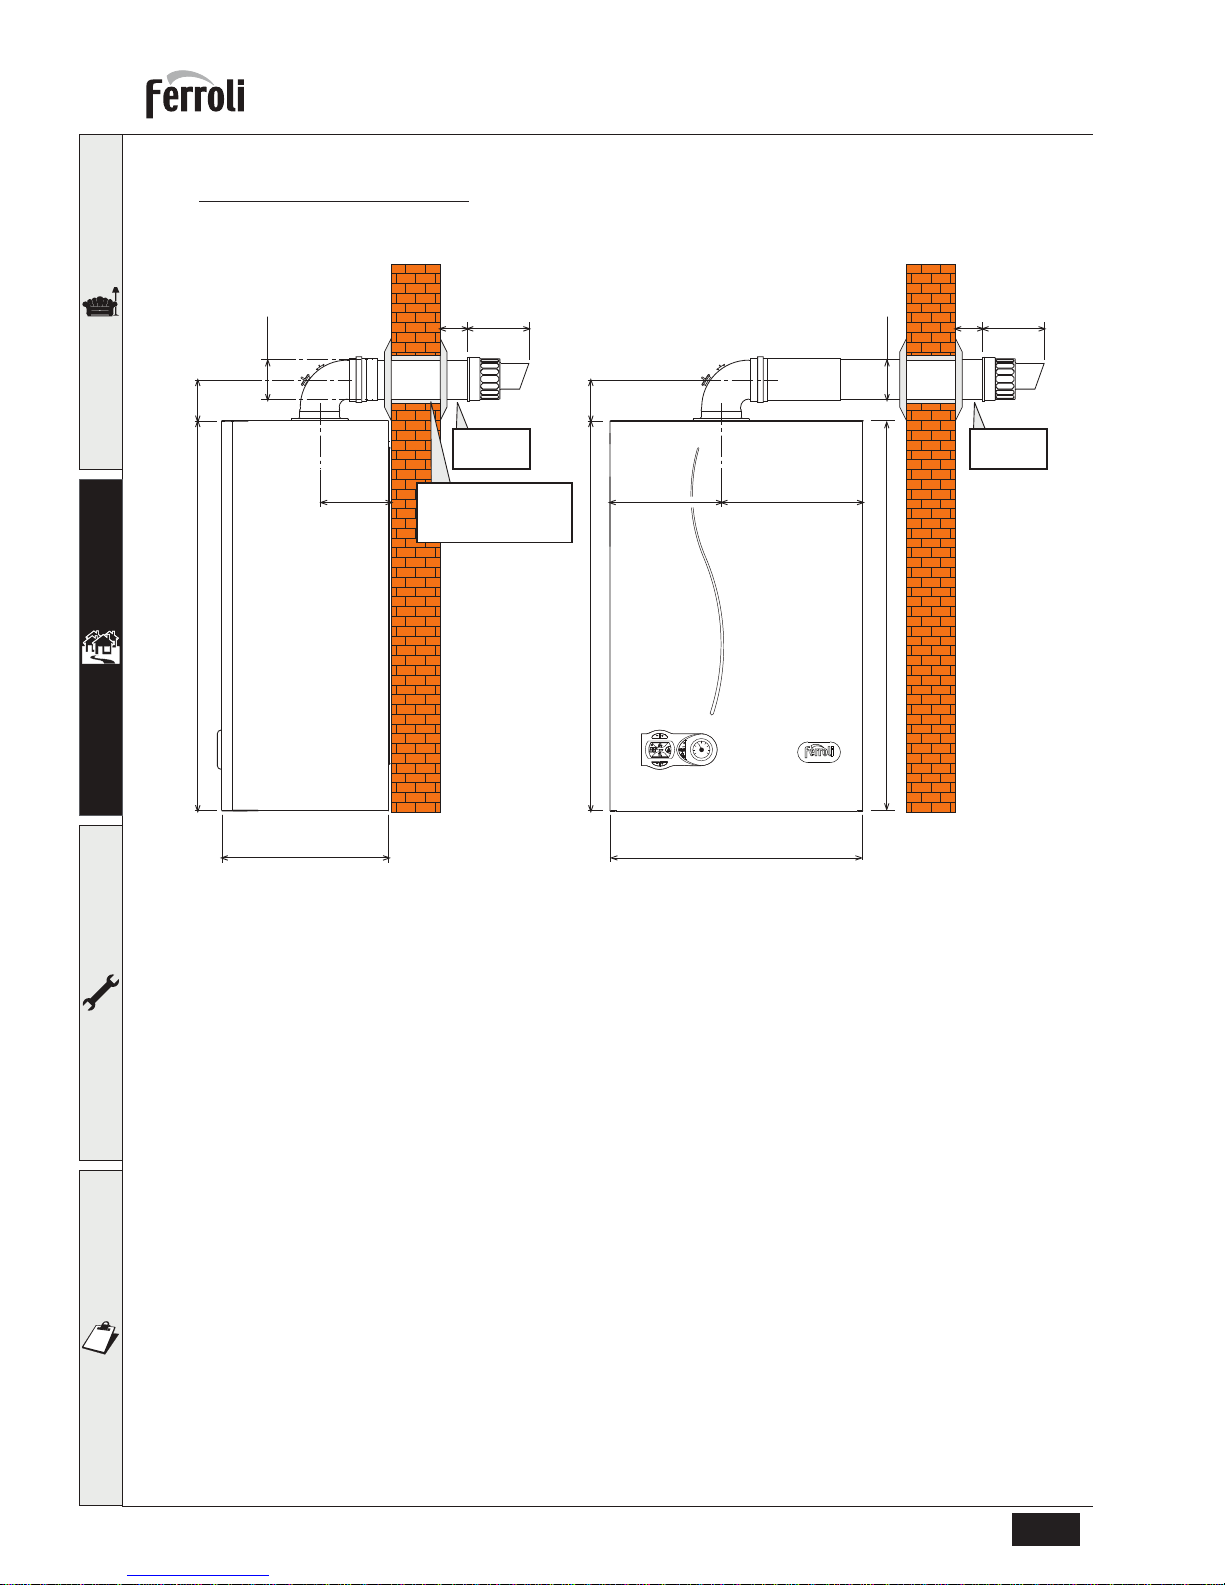
Connection with coaxial pipes
Standard connection with coaxial pipes (code 041025G0)
fig. 19 - Standard connection
Horizontal flue installation
1. Define the position for installing the unit.
2. If using standard flue (041025G0) this must be installed level. For extended horizontal flue lengths over 1m a fall of
3 mm per metre of the flue exhaust should be incorporated back to the boiler.
3. Make a hole of diameter 10 - 20 mm greater than the nominal diameter of the concentric pipe used.
4. If necessary, cut the terminal length to size, ensuring that the external pipe protrudes from the wall by between 10
and 60 mm. Remove the cutting burrs.
5. Connect flue to the boiler, positioning the seals correctly. Seal the flue into the wall with silicone or sand + cement
and cover with wall seals provided.
A
Flue seals should be lubricated with a silicone type grease to prevent damage (grease not supplied).
Between
10 e 60 mm
Between
10 e 60 mm
1
2
3
4
0
BAR
400 mm (model 31 C)
450 mm (model 38 C)
700
330
125
200
196
80700
Ø100
125
195
80700
Ø100
Drill the wall 10÷20 mm
more than the
pipe diameter
Rear outlet
Side view
Side outlet
Front view
200 (model 31 C)
254 (model 38 C)
Page 15
OPTIMAX HE PLUS C
15EN
cod. 3540I885 - 08/2012 (Rev. 00)
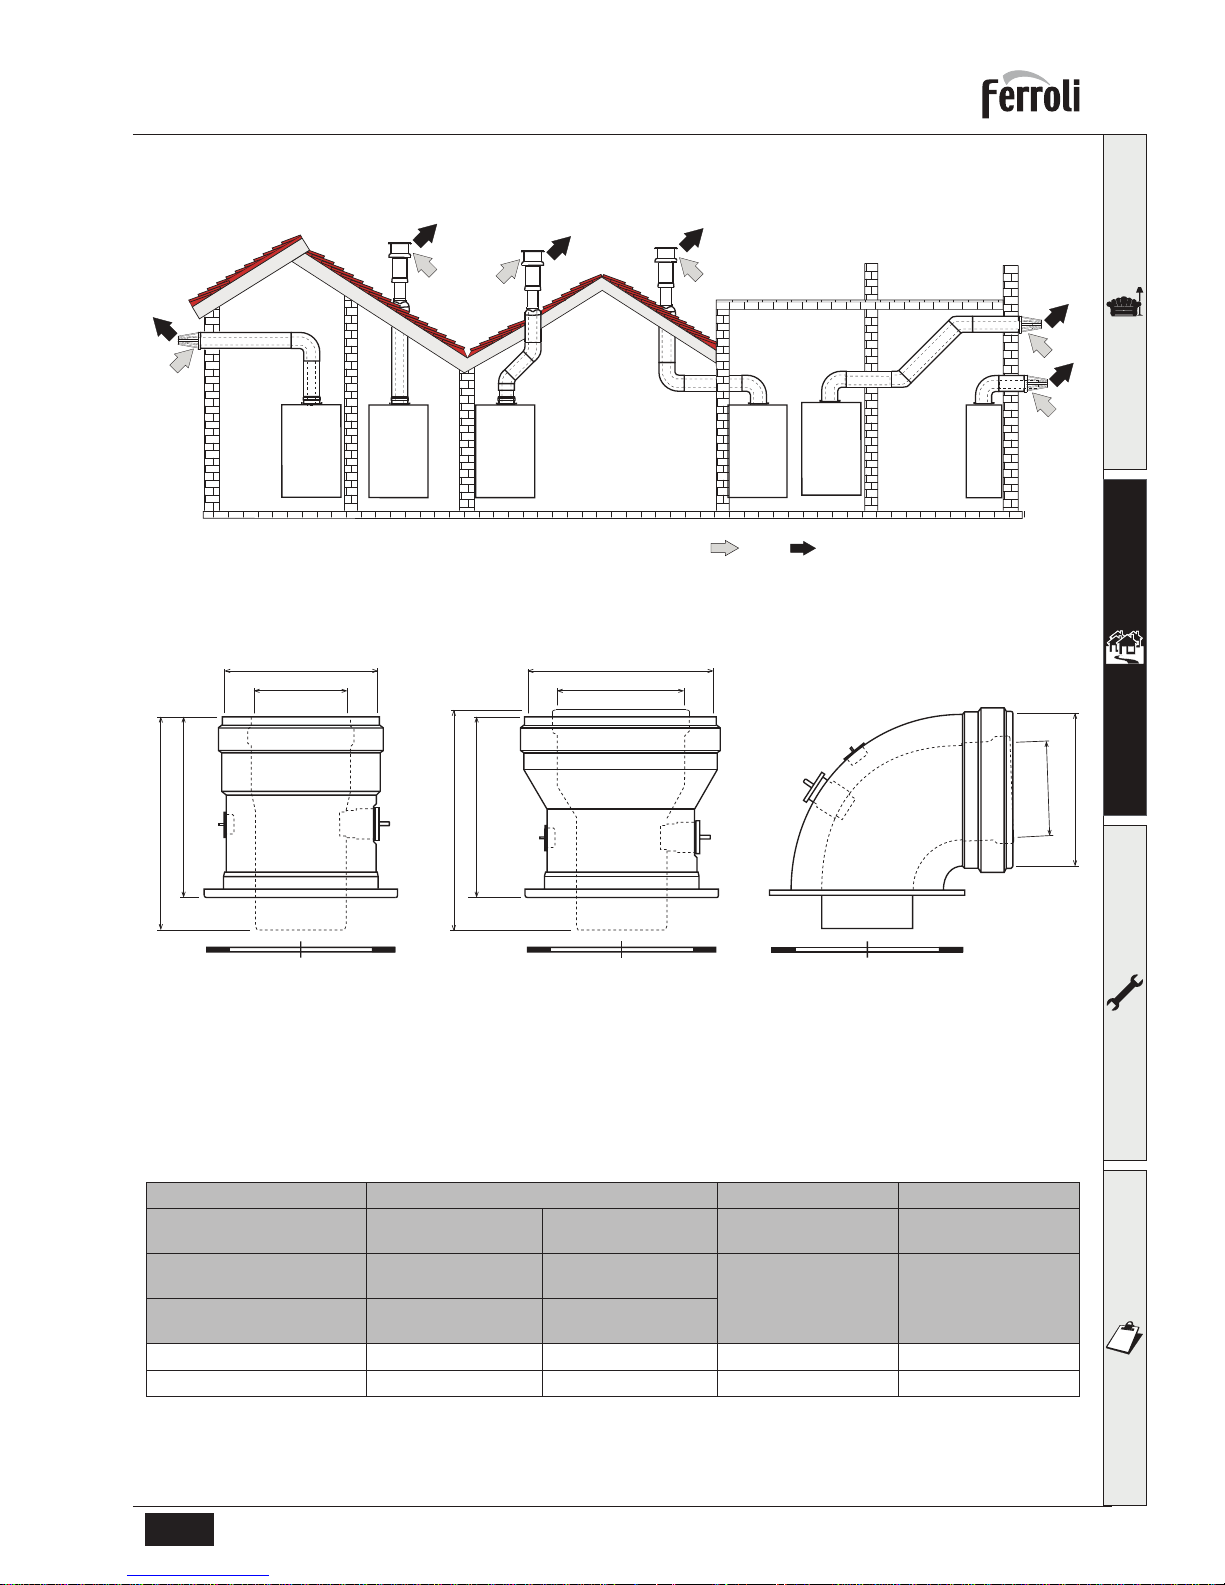
Other coaxial connections
fig. 20 - Examples of connection with coaxial pipes ( = Air / = Fumes)
For coaxial connection, fit the unit with one of the following starting accessories. For the wall hole dimensions, refer to
section 4.1 Dimensions and connections.
fig. 21 - Starting accessory for coaxial ducts
Before proceeding with installation, check with table 1 that the maximum permissible length is not exceeded, bearing in
mind that every coaxial bend gives rise to the reduction indicated in the table. For example, a Ø 60/100 duct comprising
a 90° bend + 1 horizontal metre has a total equivalent length of 2 metres.
Table. 1 - Max. length coaxial ducts
Coaxial 60/100 Coaxial 80/125 Coaxial 80/125
OPTIMAX
HE PLUS 31 C
OPTIMAX
HE PLUS 38 C
OPTIMAX
HE PLUS 31 C
OPTIMAX
HE PLUS 38 C
Max permissible (horizontal)
equivalent flue length
7 m 6 m
28 m 25 m
Max permissible (vertical)
equivalent flue length
8 m 7 m
Reduction factor 90° bend 1 m 1 m 0.5 m 0.5 m
Reduction factor 45° bend 0.5 m 0.5 m 0.25 m 0.25 m
C
13
C
13
C
33
C
33
C
33
C
13
Ø 100
Ø 60
120
142
Ø 80
Ø 127
120
147
Ø 100
Ø 60
041002X0 041006X0 041001X0
Page 16
OPTIMAX HE PLUS C
16 EN
cod. 3540I885 - 08/2012 (Rev. 00)
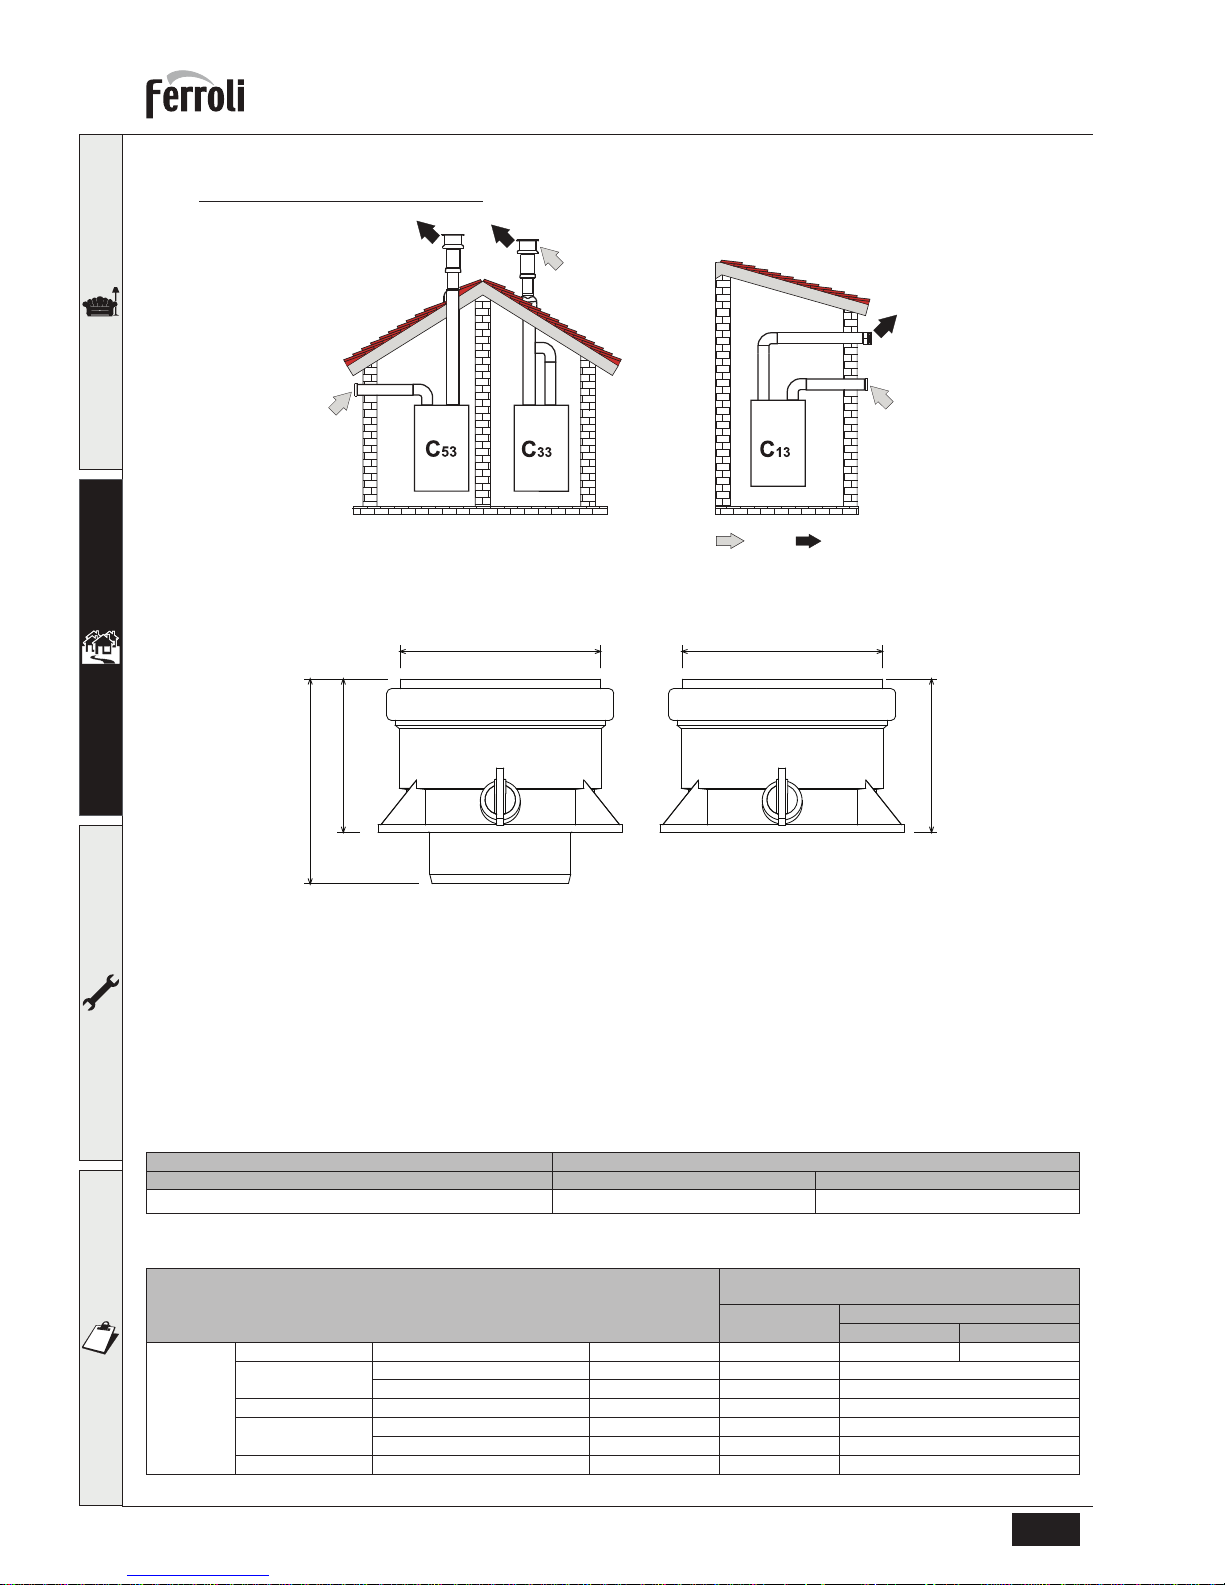
Connection with separate pipes
fig. 22 - Examples of connection with separate pipes ( = Air / = Fumes)
For the connection of separate ducts, fit the unit with the following starting accessory:
fig. 23 - Starting accessory for separate ducts
Before proceeding with installation make sure the maximum permissible length has not been exceeded, by means of a
simple calculation:
1. Completely establish the layout of the system of split flues, including accessories and outlet terminals.
2. Consult the table 3 and identify the losses in m
eq
(equivalent metres) of every component, according to the instal-
lation position.
3. Check that the sum total of losses is less than or equal to the maximum permissible length in table 2.
Table. 2 - Max. length separate ducts
Table. 3 - Accessories
Separate ducts
OPTIMAX HE PLUS 31 C OPTIMAX HE PLUS 38 C
Max. permissible length 75 m
eq
55 m
eq
Losses in m
eq
Air
inlet
Fume exhaust
Vertical Horizontal
Ø 80 PIPE 1 m M/F 1.0 1.6 2.0
BEND 45° M/F 1.2 1.8
90° M/F 1.5 2.0
PIPE SECTION with test point 0.3 0.3
TERMINAL air, wall 2.0 -
fumes, wall with antiwind - 5.0
FLUE Split air/fumes 80/80 - 12.0
Ø 81Ø 81
Ø 65
Ø 87
Ø 65
041039X0
Page 17
OPTIMAX HE PLUS C
17EN
cod. 3540I885 - 08/2012 (Rev. 00)
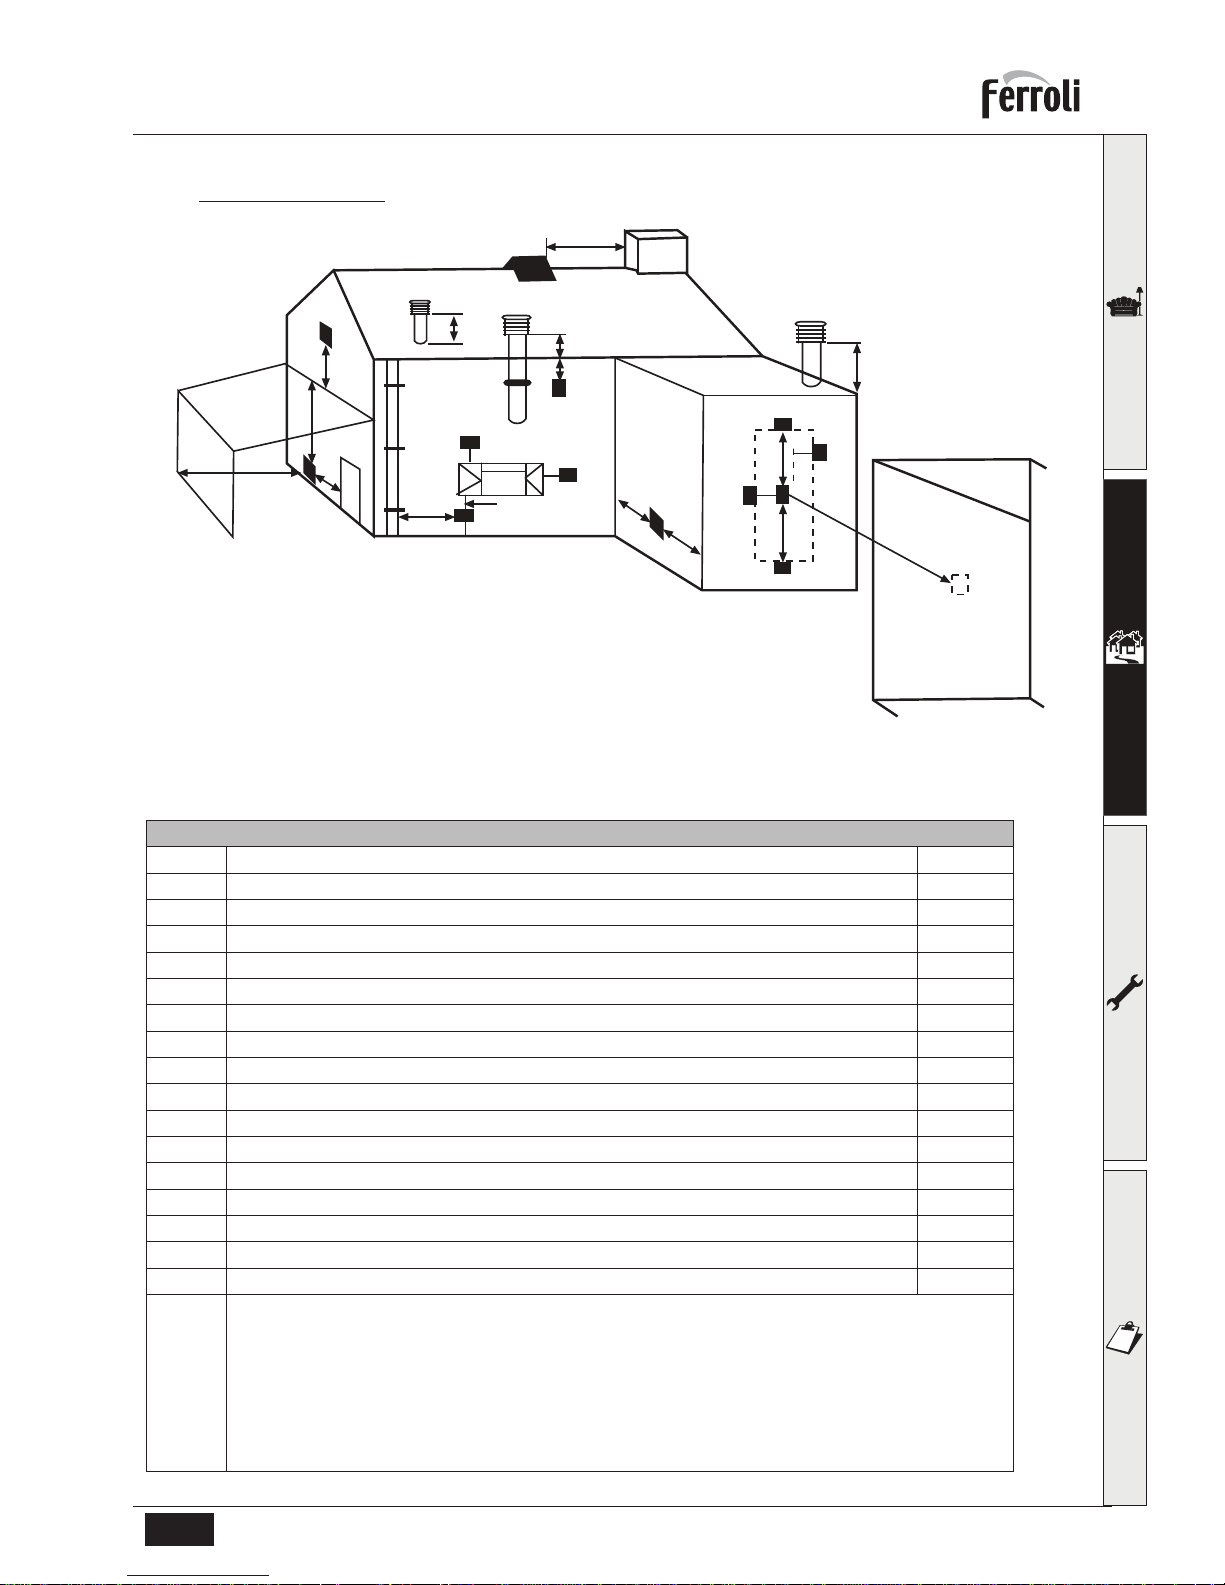
Position of terminals
fig. 24
Minimum dimensions of fume exhaust terminals
A Directly under an opening, air inlet, openable window, etc. 300 mm
B Above an opening, air inlet, openable window, etc. 300 mm
C Horizontally to an opening, air inlet, openable window, etc. 300 mm
D Under gutters, drain pipes 75 mm
E Under cornices or under eaves 200 mm
F Under balconies or garages 200 mm
G From a drain pipe or a vertical drain pipe 150 mm
H From an internal or external corner 100 mm
I Above ground level, a roof or balcony 300 mm
J From a surface facing the terminal 600 mm
K From a terminal facing the terminal 1200 mm
L From a garage opening (e.g. door, window) with access to the home 1200 mm
M Vertically from a terminal on the same wall 1500 mm
N Horizontally from a terminal on the same wall 300 mm
O From the wall on which the terminal is fitted N/A
P From a vertical structure on the roof 150 mm
Q Above the intersection with the roof 300 mm
NOTES
• N/A = Not applicable
• Also, the terminal must be at least 150 mm (in case of forced intake) from an opening made in the structure of
the building to house a fitted element such as a window frame.
• Positions of condensate drain terminals: if the fume exhaust is provided for at a low level, the potential effect of
the flue gas cloud must be considered. Special flue gas management kits are available by request.
• The flue gas cloud must not be directed towards:
- A frequented approach
- A window or door
- An adjacent property
P
D, E
Q
Q
l
B
C
A
G
F
L
J
H
H
K
N
N
MM
Q
Page 18
OPTIMAX HE PLUS C
18 EN
cod. 3540I885 - 08/2012 (Rev. 00)
Connection to multiple flues or single flues with natural draught
To connect the OPTIMAX HE PLUS C boiler to a multiple flue or a single flue with natural draught, the flue or chimney
must be expressly designed by professionally qualified technical personnel in conformity with the current standards and
regulations.
In particular, flues and chimneys must:
• Be sized according to the method of calculation given in the standard.
• Be tight with respect to the products of combustion, resistant to the fumes and heat and impermeable to condensate.
• Have a circular or square cross-section (some hydraulically equivalent sections are permissible), with a vertical progression and with no constrictions.
• Have the ducts conveying the hot fumes at a suitable distance or separately from combustible materials.
• Be connected to just one unit per floor, for not more than 6 units (8 if there is a compensation duct or opening).
• Have no mechanical suction devices in the main ducts.
• Be at low pressure, all along their length, in conditions of stationary operation.
• Have at their base a collection chamber for solid materials or condensate, of at least 0.5 m, equipped with an airtight
metal door.
2.7 Condensate drain connection
Installation
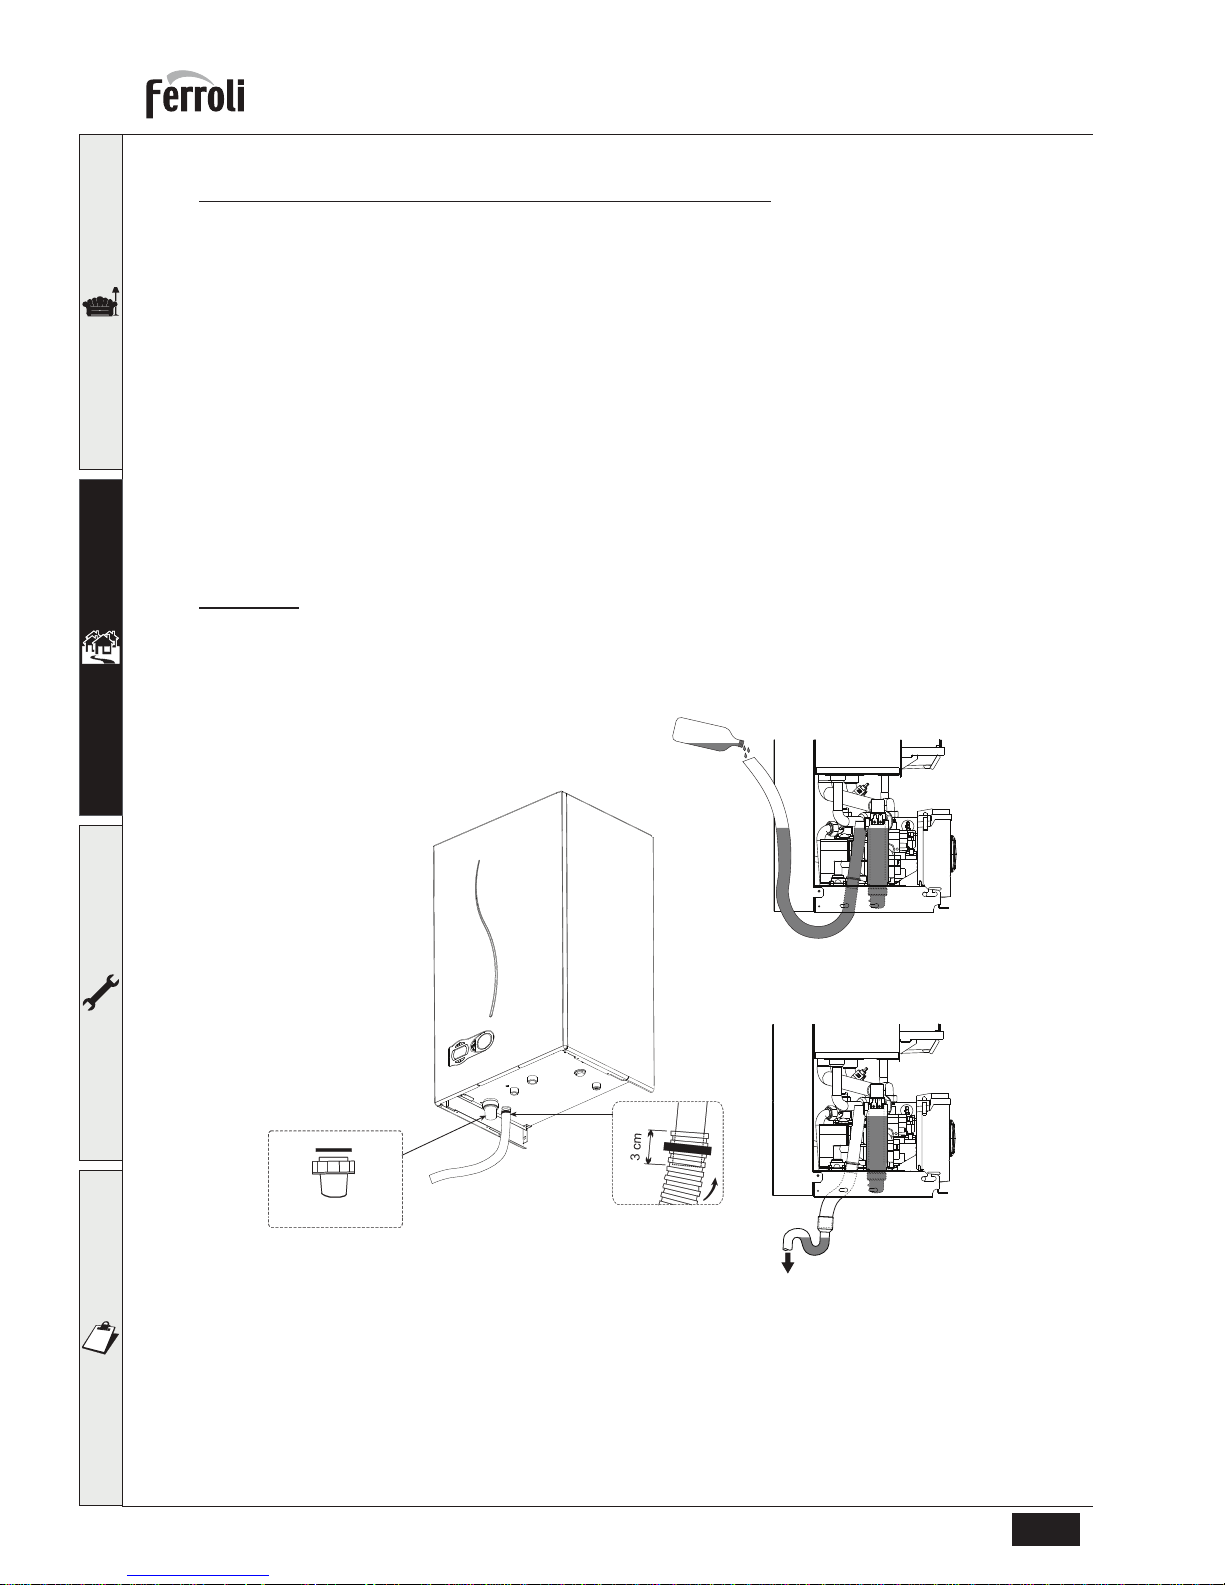
The boiler is equipped with an internal air-trap to drain off the condensate.
Fit the inspection coupling A and the hose B, pushing it on for approximately 3 cm and securing it with a clamp.
Fill the air-trap with approximately 0.5 ltrs of water and connect the hose to the waste system, or soakaway.
fig. 25
B
0,5 lt.
A
Page 19
OPTIMAX HE PLUS C
19EN
cod. 3540I885 - 08/2012 (Rev. 00)
Condensate drain
If possible, the condensate should be conveyed inside the internal drainage system or pipe. For that purpose, use a
pipe of at least 22 mm diameter and a trap with flexible connection
supplied with the unit to facilitate connection of the
condensate drain pipe.
The pipe must be in glue-joined plastic and not in copper, since the condensate has a pH of 4 (slightly acid).
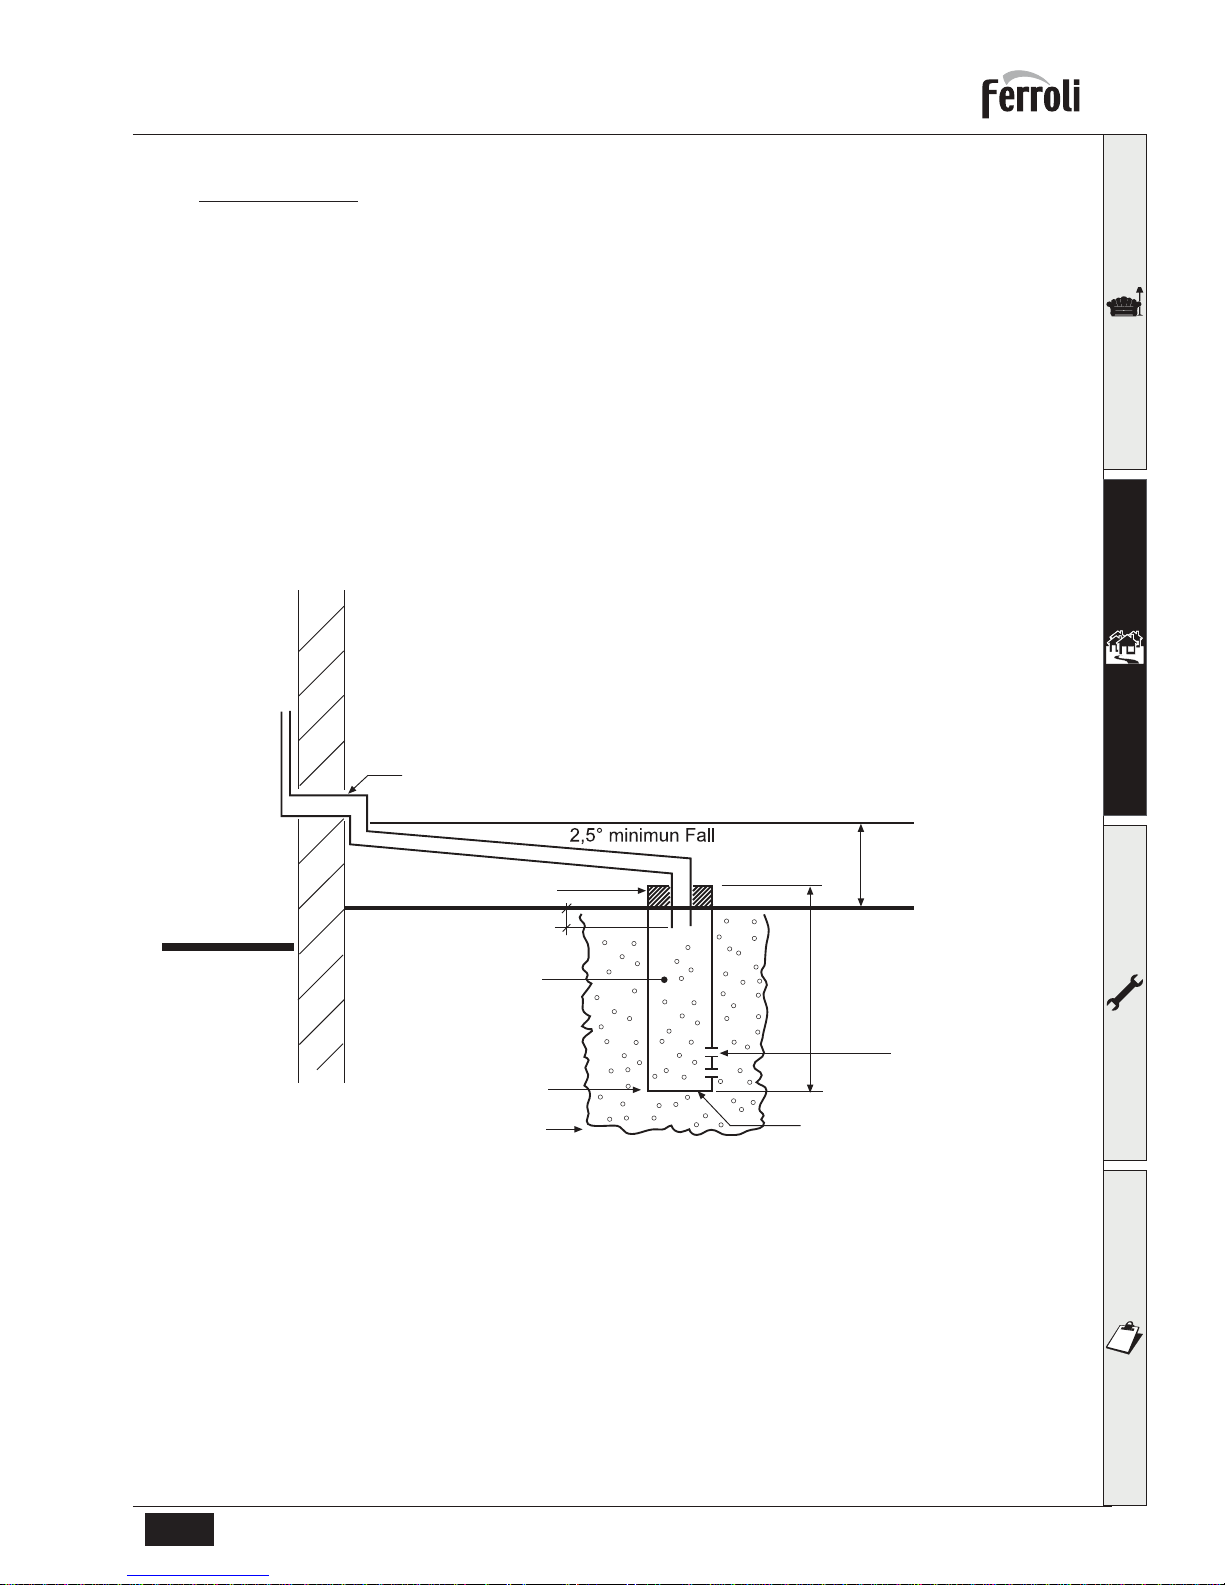
If the condensate drain pipe cannot be ended on the inside, it is advisable to run it outside as shown in the following
figure.
The pipe sections going to the outside are exposed to the risk of freezing in particularly extreme weather conditions. To
prevent this from occurring, it is advisable to reduce the length of the condensate drain pipes and run them on the inside,
as much as possible, before going to the outside. It may also be necessary to insulate the condensate pipe or apply a
trace heating device to prevent freezing of the condensate.
The pipes outside the building must be in glue-joined plastic with increased diameter of up to 32 or 40 mm with a maximum run of 3m for connection to a condensate collection
soakaway or external drain.
If using a condensate collection
soakaway, it must be as indicated in the figure below, or use a specific system (such
as Mc Alpine SOAK1GR) available from the majority of suppliers of products and accessories for plumbing or heating
systems.
fig. 26 - Condensate drain
External
32/40mm Solvent weld pipework 2.5 * Minimum Fall see below
Cement seal
100mm Dia tube
Bottom sealed
Lime stone chippings
Ground level (either/Or)
Hole depth 400mm
25mm
2 Rows of
3x12 mm Holes
Internal
-300mm
Page 20
OPTIMAX HE PLUS C
20 EN
cod. 3540I885 - 08/2012 (Rev. 00)
3. Service and maintenance
All adjustment, conversion, startup and maintenance operations described below must only be carried out by Qualified Personnel (meeting the professional technical requirements prescribed by current regulations).
FERROLI declines any liability for damage and/or injury caused by unqualified and unauthorised persons tampering with
the unit.
3.1 Adjustments
Gas supply conversion
The unit can operate on natural gas or LPG and is factory-set for use with one of these two gases, as clearly shown
onthe packing and on the dataplate. If a gas different from that for which the unit is arranged has to be used, a conversion kit will be required, proceeding as follows:
1. Remove the casing.
2. Open the airtight chamber.
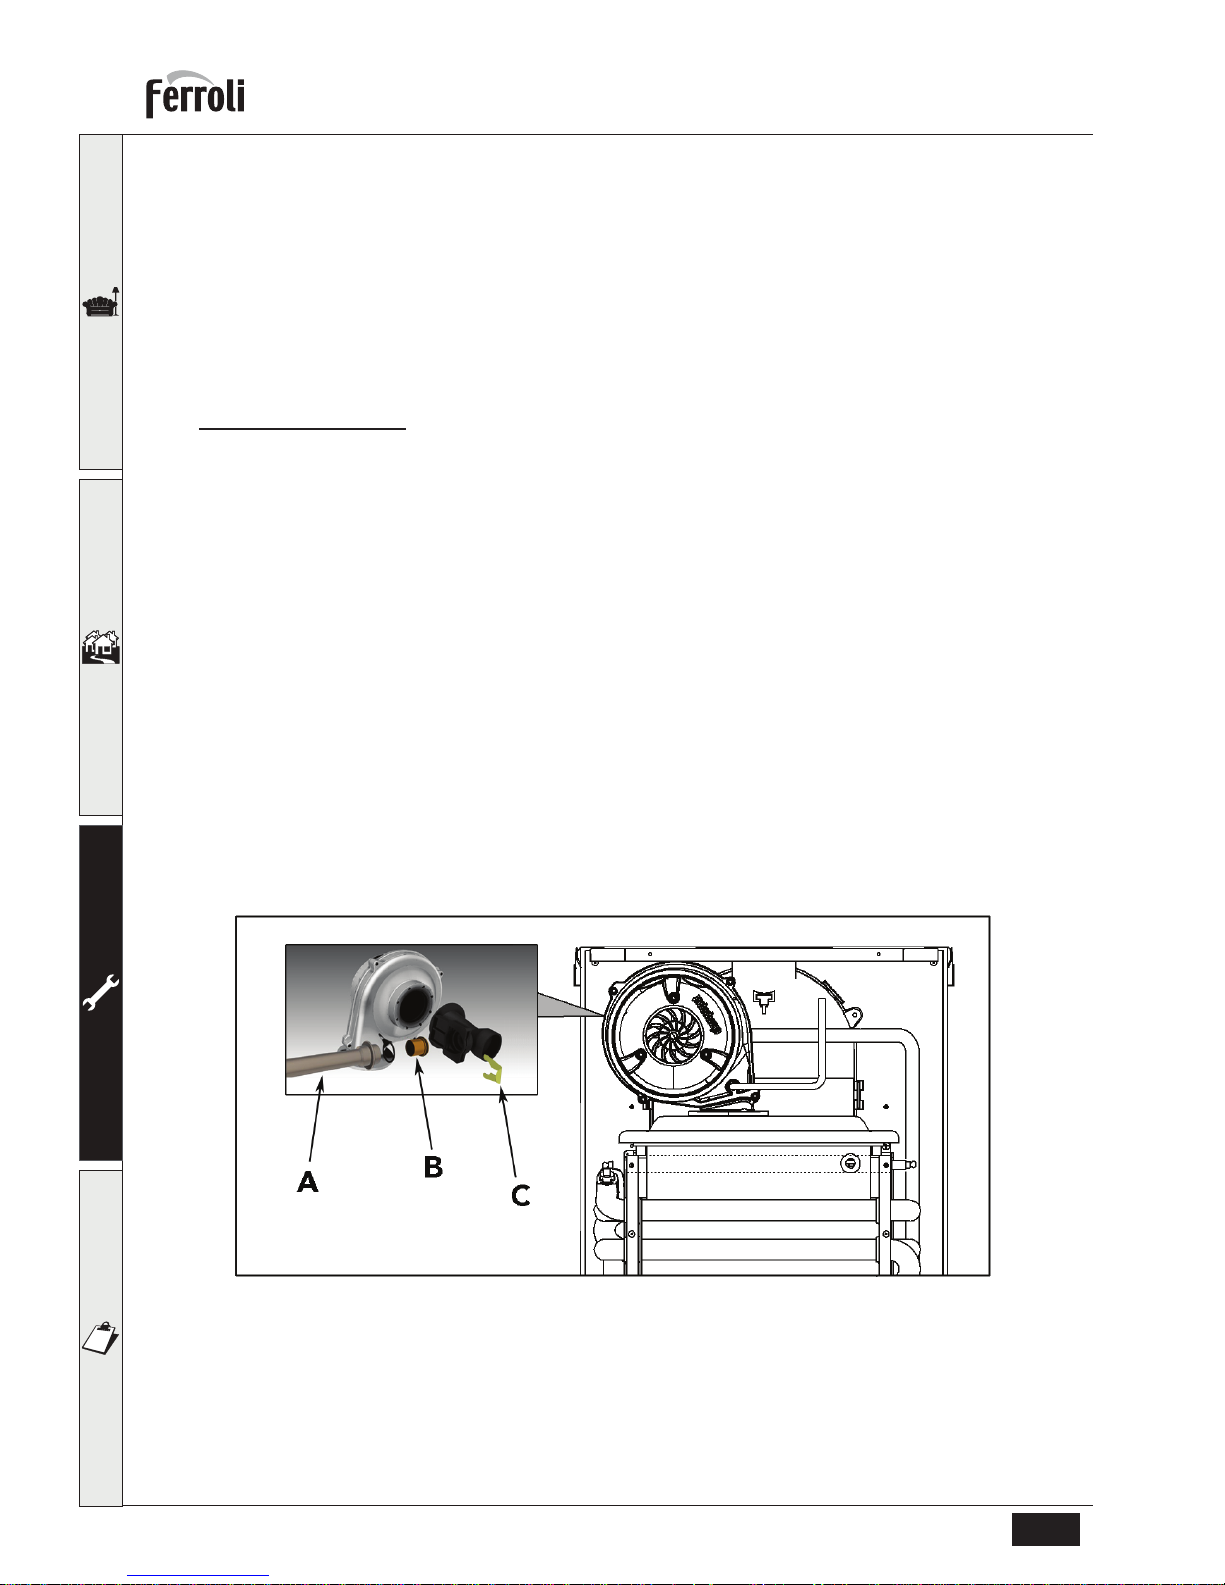
3. Release the fixing clip C and remove gas pipe A from the fan - venturi assembly.
4. Replace
injector B, inserted in the gas pipe, with that contained in the conversion kit.
5. Reassemble gas pipe A with the clip and check the seal of the connection.
6. Apply the label, contained in the conversion kit, near the dataplate.
7. Refit the sealed chamber and casing.
8. Modify the parameter for the type of gas:
• put the boiler in standby mode
• press the DHW buttons details 1 and 2 - fig.1 for 10 seconds: the display shows “P01“ flashing.
• press the DHW buttons fig.1 details 1 and 2 - to set parameter 00 (for use with natural gas) or 01 (for use with-
LPG ).
• press the DHW buttons details 1 and 2 - fig.1 for 10 seconds.
• the boiler will return to standby mode
9. Check the working pressure
10. Using a combustion analyser connected to the boiler fume outlet, check that the CO 2 content in the fumes, withthe
boiler operating at max. and min. power, matches that given in the technical data table for the corresponding type
of gas.
fig. 27 - Changing the gas nozzle
Page 21
OPTIMAX HE PLUS C
21EN
cod. 3540I885 - 08/2012 (Rev. 00)
3.2 Start-up
B
Checks to be made at first lighting, and after all maintenance operations that involved disconnection from the
systems or an operation on safety devices or parts of the boiler:
Before lighting the boiler
• Open any on-off valves between the boiler and the systems.
• Check the tightness of the gas system, proceeding with caution and using a soap and water solution to detect any
leaks in connections.
• Check correct prefilling of the expansion tank (ref. section 4.4 Technical data table).
• Fill the water system and make sure all air contained in the boiler and the system has been vented, by opening the
air vent valve on the boiler and any vent valves on the system.
• Fill the condensate trap and check correct connection of the condensate
discharge system.
• Make sure there are no water leaks in the system, DHW circuits, connections or boiler.
• Check correct connection of the electrical system and efficiency of the earthing system
• Make sure there are no flammable liquids or materials in the immediate vicinity of the boiler.
Checks during operation
• Turn the unit on as described in section 1.3 Turning ON and OFF.
• Make sure the fuel circuit and water systems are tight.
• Check the efficiency of the flue exhaust and air ducts while the boiler is working.
• Check the correct tightness and functionality of the condensate
discharge system and trap.
• Make sure the water is circulating properly between the boiler and the systems.
• Make sure the gas valve modulates correctly in the heating and domestic hot water production phases.
• Check proper boiler lighting by doing several tests, turning it on and off with the room thermostat or remote control.
• Using a combustion analyser connected to the boiler fume outlet, check that the CO
2
content in the fumes, with the
boiler operating at max. and min. output, corresponds to that given in the technical data table for the corresponding
type of gas.
(Because the combustion for this appliance has been checked, adjusted and preset at the factory, it is only necessary to undertake a further combustion check if there are operating performance difficulties or the boiler has been
converted or if essential components have been replaced).
• Make sure the gas rate indicated on the meter matches that given in the technical data table on section 4.4 Technical
data table.
• Check the correct programming of the parameters and carry out any necessary customization (compensation curve,
power, temperatures, etc.).
(As the parameters for each boiler are factory set, there is no requirement to recheck
parameters at the time of
commissioning unless a gas conversion has been undertaken.)
Page 22
OPTIMAX HE PLUS C
22 EN
cod. 3540I885 - 08/2012 (Rev. 00)
3.3 Commisioning instructions
General
PLEASE NOTE: The combustion for this appliance has been checked, adjusted and preset at the factory for operation
on the gas type defined on the appliance data plate.
Having checked:
• That the boiler has been installed in accordance with these instructions,
• The integrity of the flue system and the flue seals.
• The integrity of the boiler combustion circuit and the relevant seals.
Test mode
Proceed to put the boiler into operation as follows:
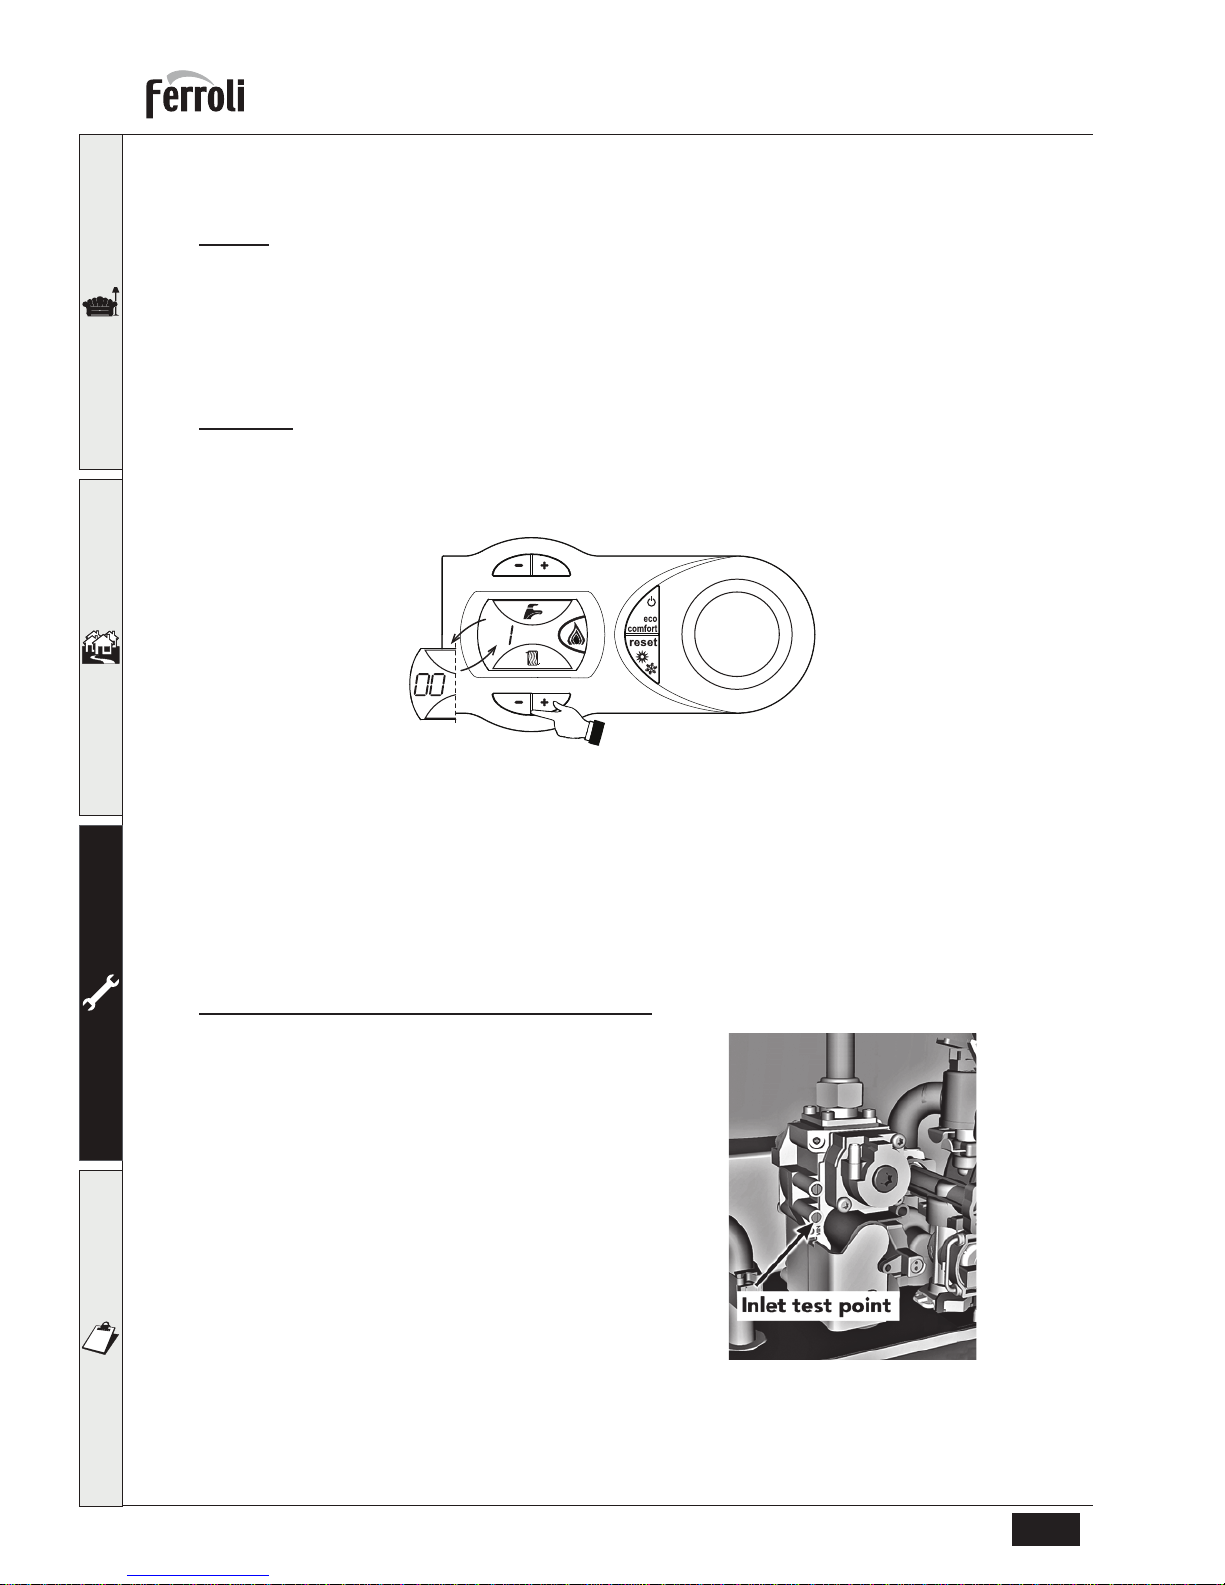
1. To operate the boiler in test mode, press the CH keys together for 5 seconds (see fig. 28)
2. The boiler lights at
the ignition percentage rate (60% dependant on model)
fig. 28 - Test Mode
3. The heating power will be displayed 100% - denoted by flashing ‘1’ then ‘00’ continuously on the LCD
display.
4. The flame symbol will be displayed once the boiler
has lit.
5. N.B. The ECO symbol will only be displayed if boiler is in the ECO mode.
6. Use the CH keys (part. 3 and 4 fig. 1) to give the
required output.
7. To exit the test mode, press the CH keys (part. 3
and 4 fig. 1) together for 5 seconds, or leave the
boiler to automatically switch off after 15 minutes
or stopping DHW drawing.
Check the operational (working) gas inlet pressure
Set up the boiler to operate at maximum rate as described in section Test mode of section 3.3.
With the boiler operating in the maximum rate condition check that the operational (working) gas pressure
at the inlet gas pressure test point (see fig. 29) complies with the requirements of section 4.4.
Ensure that this inlet pressure can be obtained with all
other gas appliances in the property working.
fig. 29
I
I
I
I
I
I
I
I
I
I
I
I
I
I
I
I
I
I
I
I
I
I
I
I
I
I
I
I
I
I
I
I
I
I
I
I
I
I
I
I
I
I
I
I
I
I
I
Page 23
OPTIMAX HE PLUS C
23EN
cod. 3540I885 - 08/2012 (Rev. 00)
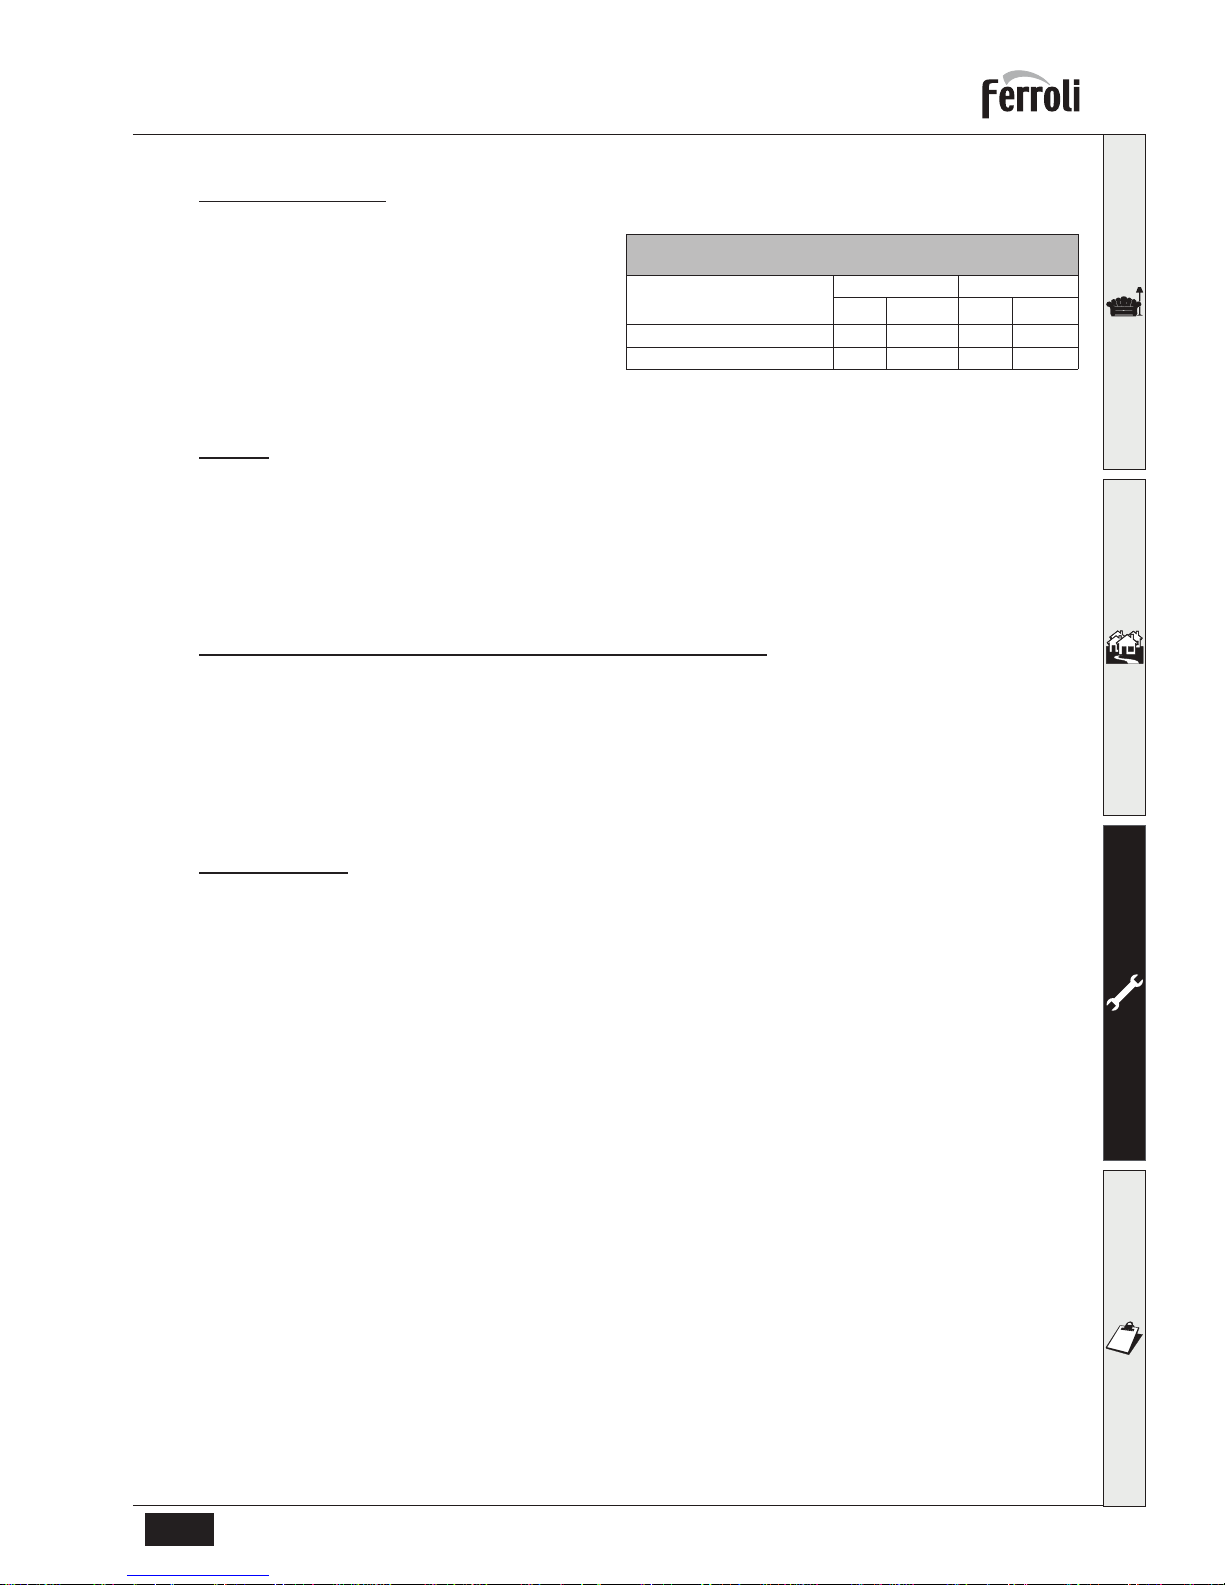
Measure the gas rate
Measure the gas rate and check against following table:
3.4 Routine servicing, maintenance & repair
General
PLEASE NOTE: During routine servicing, and after any maintenance or change of part of the combustion circuit, we
recommend that the following is checked:
• The integrity of the flue system and the flue seals;
• The integrity of the boiler combustion circuit and the relevant seals;
• The operational (working) gas inlet pressure at maximum rate, as described in section 4.4;
• The gas rate, as described in section 4.4;
• The combustion performance, as described in section 3.4 Combustion check.
Competence to carry out the check of combustion performance
PLEASE NOTE: BS 6798: 2009 Specification for installation and maintenance of gas-fired boilers of rated input
not exceeding 70 kW net advises that:
• The person carrying out a combustion measurement should have been assessed as competent in the use of a flue
gas analyser and the interpretation of the results;
• The flue gas analyser used should be one meeting the requirements of BS7927 or BS-EN50379-3 and be calibrated
in accordance with the analyser manufacturers’ requirements, and
• Competence can be demonstrated by satisfactory completion of the CPA1 ACS assessment, which covers the use
of electronic portable combustion gas analysers in accordance with BS 7967, Parts 1 to 4.
Periodical check
To keep the unit working properly over time, it is necessary to have qualified personnel make an annual check that includes the following tests:
• The control and safety devices (gas valve, flow meter, thermostats, etc.) must function correctly.
• The fume extraction circuit must be fully efficient.
• The airtight chamber must be sealed
•The
air-flue terminal and ducts must be free of obstructions and leaks
• The condensate evacuation system must be efficient with no leakage or obstructions.
• The burner and exchanger must be clean and free of scale. When cleaning, do not use chemical products or wire
brushes.
• The electrode must be free of scale and properly positioned.
• The gas and water systems must be airtight.
• The water pressure in the cold water system must be about 1 bar; otherwise, bring it to that value.
• The circulation pump must not be blocked.
• The expansion tank must be filled.
• The gas flow and pressure must correspond to that given in the respective tables.
A
The boiler casing, panel and aesthetic parts can be cleaned with a soft damp cloth, possibly soaked in soapy
water. Do not use any abrasive detergents and solvents.
GAS RATES (NATURAL GAS)
AFTER 10 MINUTES FROM COLD
BOILER MODEL
Maximum rate Minimum rate
m
3
/h ft3/h m3/h ft3/h
OPTIMAX HE PLUS 31 C 3.33 117.78 0.56 19.81
OPTIMAX HE PLUS 38 C 4.07 143.96 0.69 24.41
Page 24
OPTIMAX HE PLUS C
24 EN
cod. 3540I885 - 08/2012 (Rev. 00)
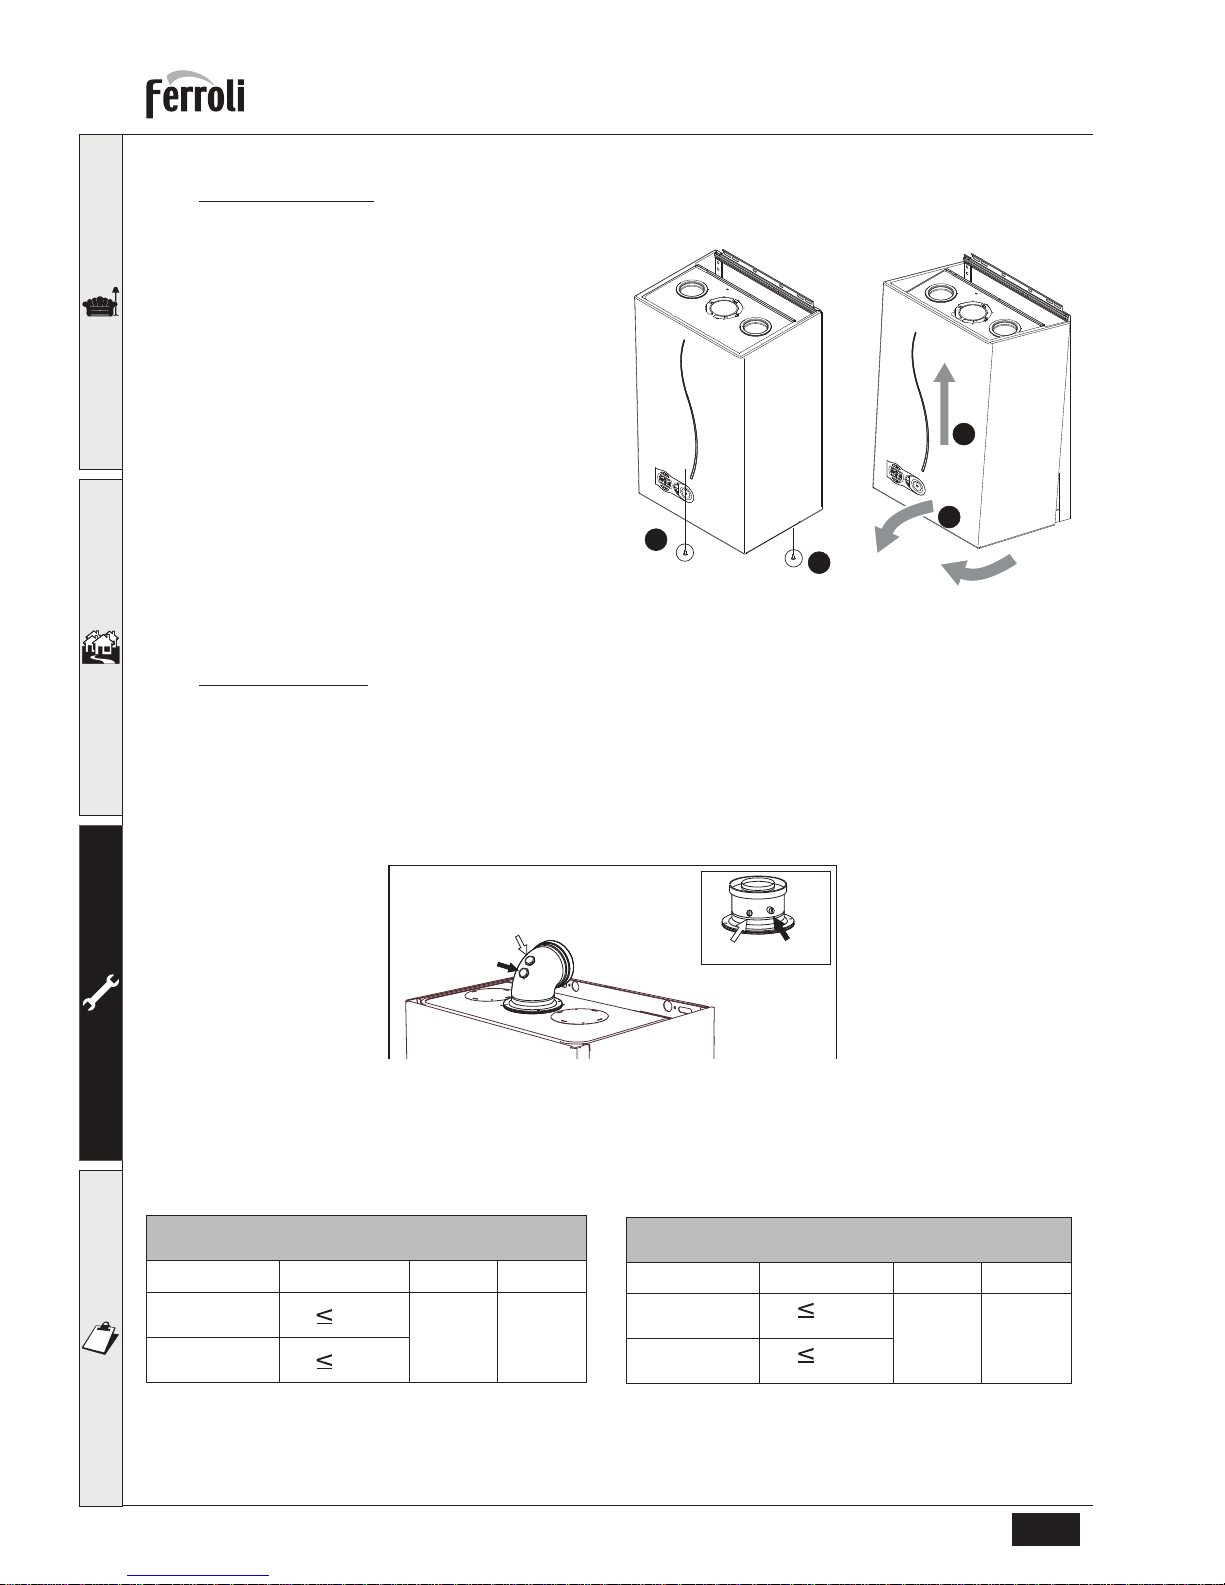
Opening the casing
To open the boiler casing, you need to follow the sequence given below and the instructions of fig. 30.
1. Using a screwdriver, fully unscrew and remove the
2 screws “A”
2. Open by lowering the panel “B”
3. Lift and take off the casing “C”
B
Before carrying out any operation inside the
boiler, disconnect the electrical power supply
and close the gas cock upstream
fig. 30 - Opening the casing
Combustion check
Connect the flue gas analyzer to the flue gas sampling point as shown in the fig. 31 and check combustion as described
in table 4 and table 5.
1. Press the CH button for 5 seconds to place boiler into test mode
2. Wait for 10 minutes for the boiler to stabilize fully
3. Take the measurement and record
4. Take the boiler to minimum output by pressing the CH – button, allow the boiler to stabilize for a further 10 minutes.
5. Take the measurement and record.
fig. 31 - Flue gas sampling Point
1 = Air - 2 = Fumes
Tabella. 4 - Maximum rate
Tabella. 5 - Minimum rate
If the combustion reading is greater than the acceptable value AND the integrity of the complete flue system
and combustion circuit seals have been verified and the inlet gas pressure (and gas rate) have been verified,
proceed as in section Setting the Air/Gas Ratio valve.
B
A
C
A
e
c
o
com
f
ort
r
ese
t
1
2
3
4
0
B
AR
e
c
o
c
om
f
ort
r
eset
1
2
3
4
0
B
A
R
1
2
1
2
NATURAL GAS ACCEPTABLE COMBUSTION RANGE
MAXIMUM RATE AFTER 10 MINUTES FROM COLD
Boiler Model
CO/CO
2
RATIO CO2 NG CO2 LPG
OPTIMAX HE
PLUS 31 C
0.004
8,7 ÷ 9,2 10 ÷ 10,5
OPTIMAX HE
PLUS 38 C
0.004
NATURAL GAS ACCEPTABLE COMBUSTION RANGE
MINIMUM RATE AFTER 10 MINUTES FROM COLD
Boiler Model CO/CO
2
RATIO CO2 NG CO2 LPG
OPTIMAX HE
PLUS 31 C
0.004
8,2 ÷ 8,7 9,5 ÷ 10,0
OPTIMAX HE
PLUS 38 C
0.004
Page 25
OPTIMAX HE PLUS C
25EN
cod. 3540I885 - 08/2012 (Rev. 00)
Setting the Air/Gas Ratio valve
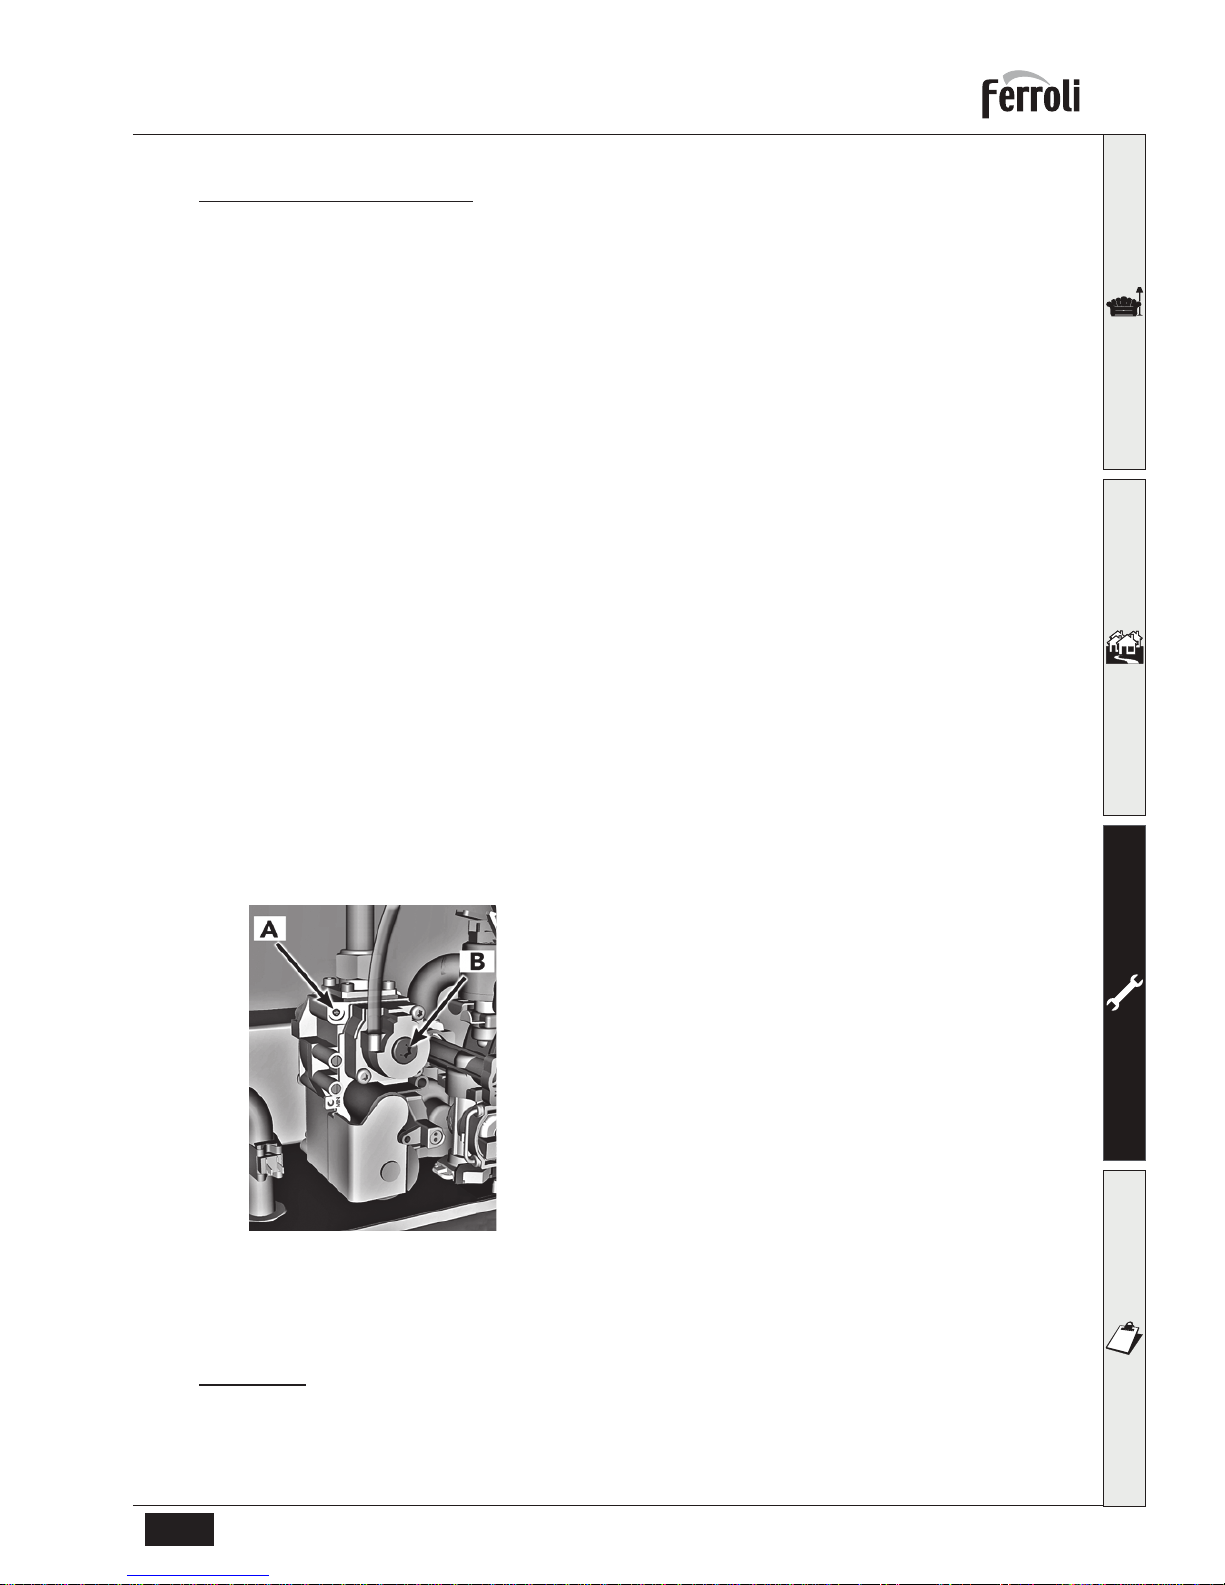
There are two adjustments possible on the air/gas ratio valve, the throttle setting at maximum rate and the offset setting
at minimum rate. If either setting is adjusted the combustion values must be rechecked at both rates.
At Maximum Rate:
1. Adjust the boiler to maximum rate in section 3.3 Test Mode.
2. Wait 10 minutes to allow the boiler to stabilize.
3. Now adjust the Throttle setting (fig. 32 - screw A) until the CO
2
is at the correct SETTING LEVEL (see table 4),
confirm that the CO/CO
2
ratio is within limits.
NOTE: ADJUST IN STEPS OF NO MORE THAN 1/8 OF A TURN AND WAIT 1 MINUTE AFTER EACH ADJUSTMENT
TO ALLOW THE SETTING TO STABILISE.
In the event that the CO
2
setting level with an acceptable CO/CO2 ratio cannot be obtained please contact the
helpline number.
Should you require any assistance during the set up procedure call our Technical service helpline or should you
require a service engineer to visit call our service centre at numbers listed on last page of this manual.
At Minimum Rate:
1. Adjust the boiler to minimum output and allow the boiler to stabilize.
2. Now adjust the offset pressure setting (fig. 32 - cup B) until the CO2 is at the correct SETTING LEVEL (see
table 5), confirm that the CO/CO2 ratio is within limits.
NOTE: ADJUST IN STEPS OF NO MORE THAN 1/8 OF A TURN AND WAIT 1 MINUTE AFTER EACH ADJUSTMENT
TO ALLOW THE SETTING TO STABILISE.
Re-check the Minimum Rate
Turn off the boiler and then turn it back on and put in Test Mode at maximum for 1minute. Reduce to minimum and re-check
the minimum rate output ensuring the CO2 setting level has remained unchanged and confirm that
the CO/CO
2
ratio is within limits.
In the event that the CO
2
setting level with an acceptable CO/CO2 ratio cannot be obtained please contact the
helpline number.
Should you require any assistance during the set up procedure call our Technical service helpline or should you
require a service engineer to visit call our service centre at numbers listed on last page of this manual.
fig. 32 - Gas valve
A Throttle
B Offset adjustment
NOTE: In the event that an acceptable setting level
cannot be obtained it will be necessary to change the
Air/Gas Ratio Valve.
3.5 Troubleshooting
Diagnostics
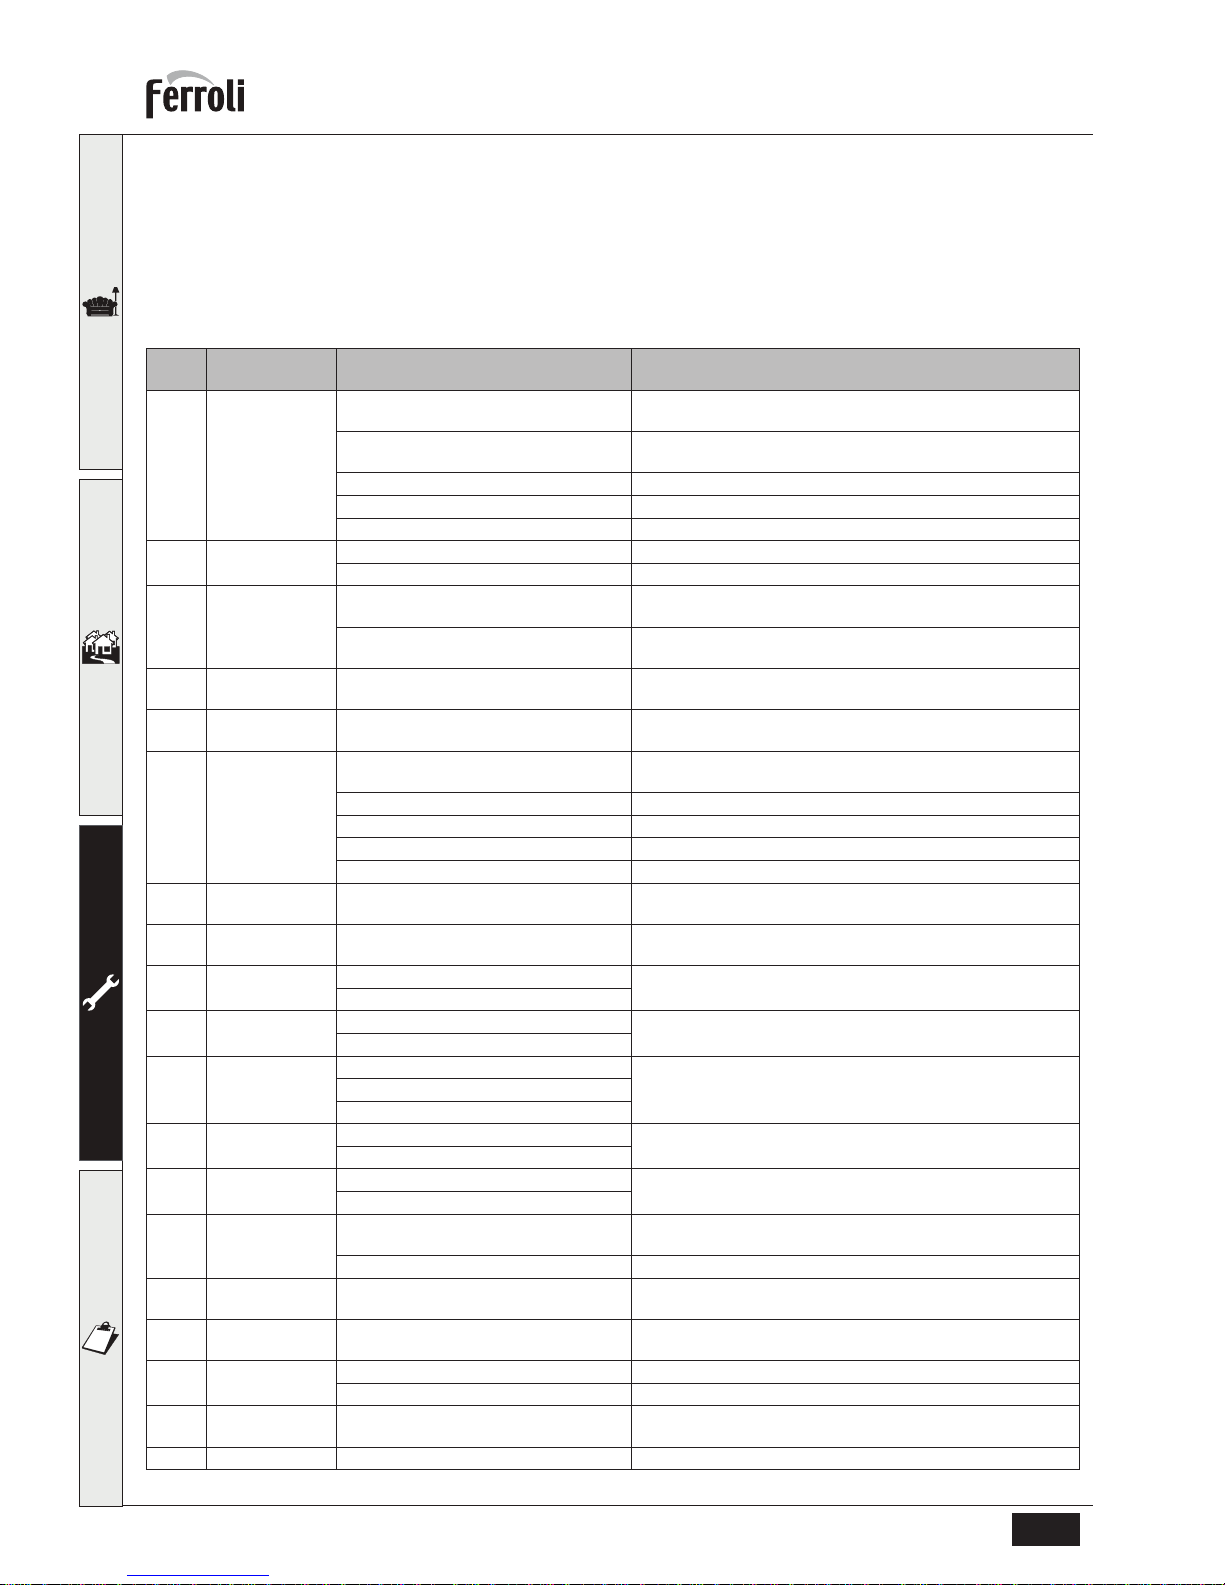
The boiler is equipped with an advanced self-diagnosis system. In case of a boiler fault, the display will flash together
with the fault symbol (detail 11 - fig. 1) indicating the fault code.
Page 26
OPTIMAX HE PLUS C
26 EN
cod. 3540I885 - 08/2012 (Rev. 00)
Certain faults cause permanent boiler shutdowns (marked with the letter “A”): to restore operation, press the RESET
button (detail 6 - fig. 1) for 1 second or RESET on the optional remote timer control if installed; if the boiler fails to start,
it is necessary to firstly eliminate the fault.
other faults (indicated with the letter “F”) cause temporary shutdowns that are automatically reset as soon as the value
returns within the boiler's normal working range.
Table. 6 - List of faults
Fault
code
Fault Possible cause Cure
A01 No burner ignition
No gas
Check the regular gas flow to the boiler and that the air has been
purged from the pipes
Detection or Ignition electrode fault
Check that the electrodes are correctly positioned and free of any
deposits
Defective gas valve Check and change the gas valve
Incorrect inlet gas pressure Check inlet gas pressure
Siphon obstructed Check and if necessary change the siphon
A02
Flame detected
with the burner off
Ionisation electrode defective Check the ionising electrode wiring
Main board defective Check the PCB
A03
High limit protection
Flow temperature sensor not active or correctly located
Check the correct positioning and operation of the flow sensor
No system circulation
Check pump and radiator valves present in the system
Check operation of the internal by-pass
A04 Flue gas fault
Fault F07 happened 3 times in the last 24
hours
Check the flue
A05 Fan problem
Tachometer signal interrupted for 1 hour or
longer
Check the wiring and the fan
A06
No flame after the
ignition phase (6
times in 4 minutes)
Detection electrode fault Check that the electrodes are correctly positioned and if neces-
sary change it
Flame unstable Check the burner
Incorrect valve gas Offset Check the Offset at the minimum power
Flue gas circuit obstructed Check if flue gas circuit is free
Siphon obstructed Check and if necessary change the siphon
A41
Flow sensor disconnected
Sensor disconnected Check the correct positioning and operation of the flow sensor
F07
High fume temperature
The exchanger probe detects and excessive temperature for over 2 minutes
Check the exchanger
F10 Flow sensor fault
Sensor damaged or short circuited
Check the wiring or change the sensor
Sensor damaged or wiring broken
F11
Return sensor
fault
Sensor damaged or wiring shorted
Check the wiring or change the sensor
Sensor damaged or wiring broken
F12 DHW sensor fault
Sensor damaged
Check the wiring or replace the sensorWiring shorted
Wiring disconnected
F13
Exchanger probe
fault
Sensor damaged or wiring shorted
Check the wiring or replace the probe
Sensor damaged or wiring broken
F14 Flow sensor fault
Sensor damaged or short circuited
Check the wiring or change the sensor
Sensor damaged or wiring broken
F15 Fan problem
Tachometer signal interrupted, fan connection
Check the wiring and the fan
Fan damaged, debris in fan Check the fan, clean debris
F34
Supply voltage
under 170V
Electric supply problem Check the electrical system
F35
Irregular mains
frequency
Electric supply problem Check the electrical system
F37
Incorrect system
water pressure
Pressure too low Fill the system
Sensor damaged Check the sensor
F39
External probe
fault
Sensor damaged or short-circuited Check the wiring or change the sensor
F42 Flow sensor fault Sensor damaged Change the sensor
Page 27
OPTIMAX HE PLUS C
27EN
cod. 3540I885 - 08/2012 (Rev. 00)
4. Technical data and characteristics
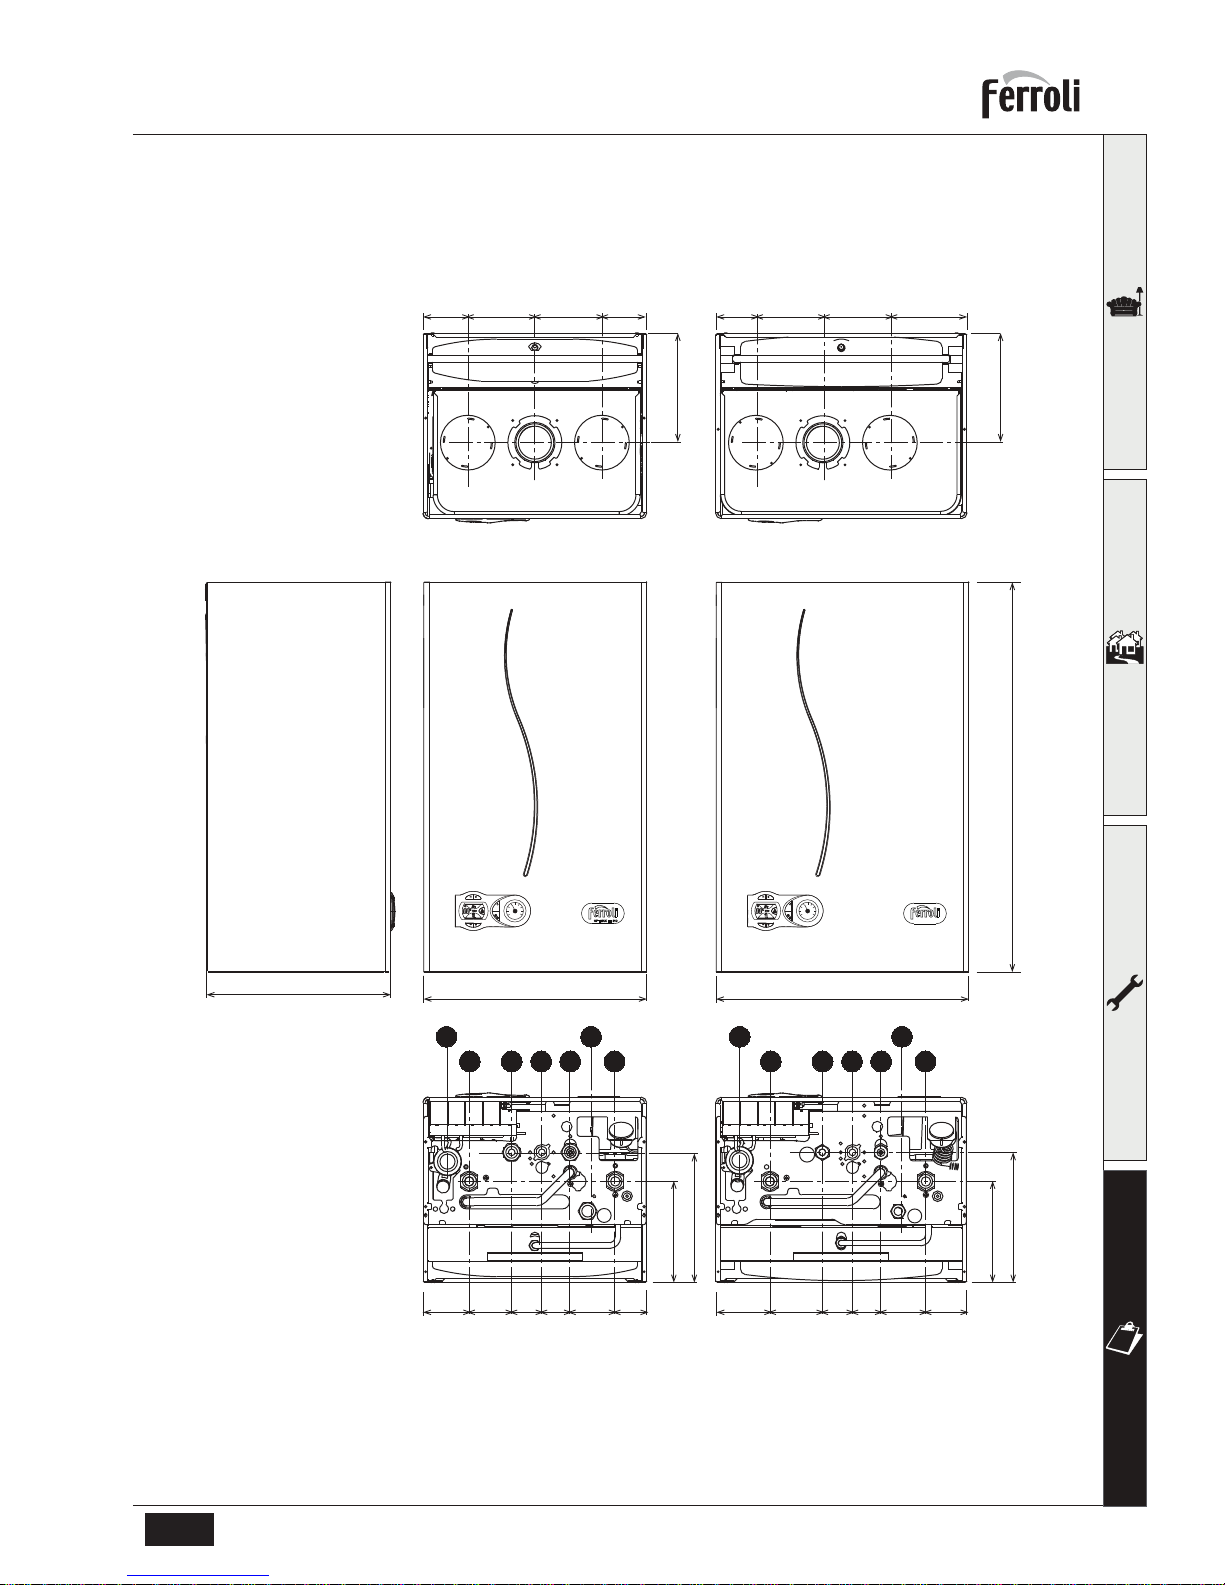
4.1 Dimensions and connections
fig. 33 - Dimensions and connections
1 = Heating system delivery
2 = Domestic hot water outlet
3 = Gas inlet
4 = Cold water inlet
5 = Heating system return
6 = Safety valve drain
7 = Condensate drain
1 2 3 465
7
1 2 3 465
7
330
400
72
120
120
138
194
450
700
97
93
55
51
80.5
73.5
179
231
82.5
76
54
51
80.5
56
179
231
80
120
120
80
194
eco
comfort
reset
1
2
3
4
0
BAR
eco
comfort
reset
1
2
3
4
0
BAR
31C 38C31C - 38C
Page 28
OPTIMAX HE PLUS C
28 EN
cod. 3540I885 - 08/2012 (Rev. 00)
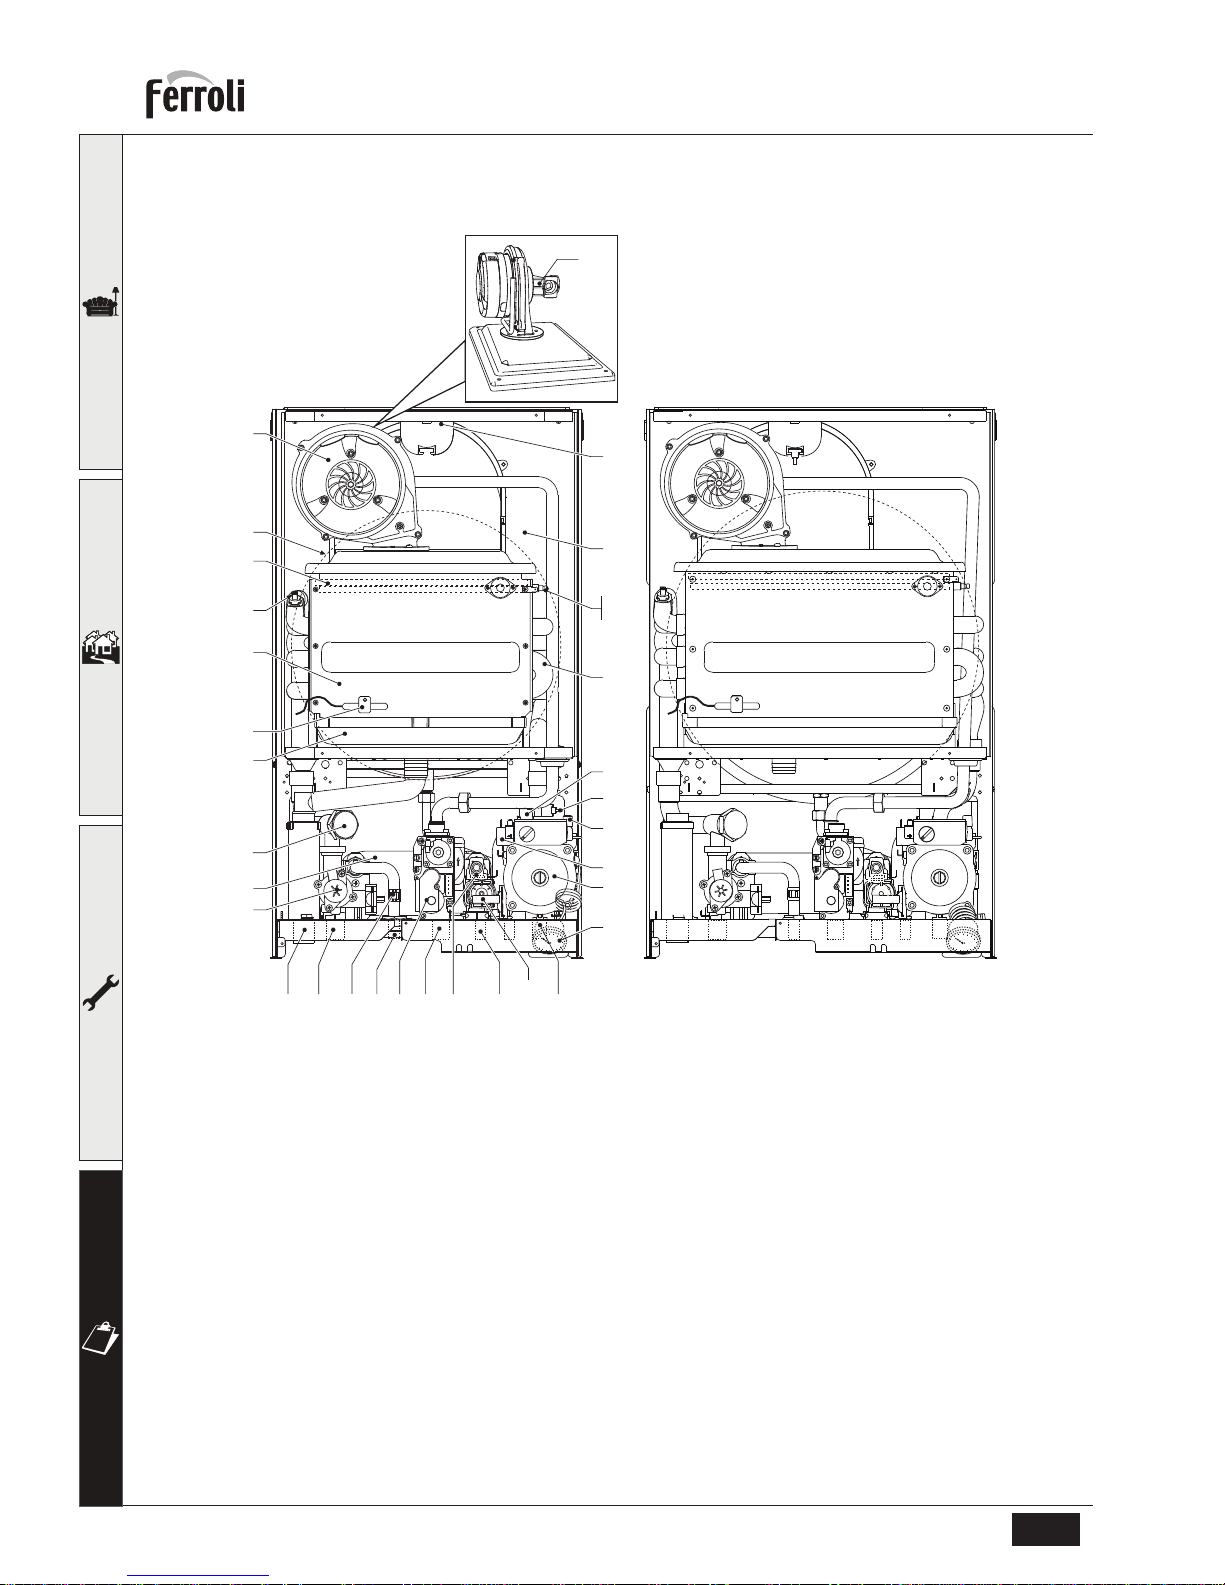
4.2 General view and main components
fig. 34 - General view
Key
5 Sealed chamber
7 Gas inlet
8 Domestic hot water outlet
9 Cold water inlet
10 System delivery
11 System return
14 Safety valve
16 Fan
19 Combustion chamber
22 Main burner
29 Fume outlet manifold
32 Heating circulating pump
36 Automatic air vent
37 Cold water inlet filter
39 Flow regulator
42 DHW temperature probe
44 Gas valve
56 Expansion tank
82 Detection electrode
95 Diverter valve
114 Water pressure switch
136 Flow meter
145 C.H. pressure gauge
154 Condense drain pipe
161 Condensing heat exchanger
186 Return sensor
188 Ignition electrode
194 DHW exchanger
196 Condensate tray
201 Mixing chamber
250 System delivery filter
278 Double sensor (Safety + Heating)
341 Exchanger probe
10 8 44 7 39 9
136
37 11
145
32
36
14
161
5
29
16
82
188
19
196
194
95
278
114
154
186
56
22
42
250
201
31C 38C
341
Page 29
OPTIMAX HE PLUS C
29EN
cod. 3540I885 - 08/2012 (Rev. 00)
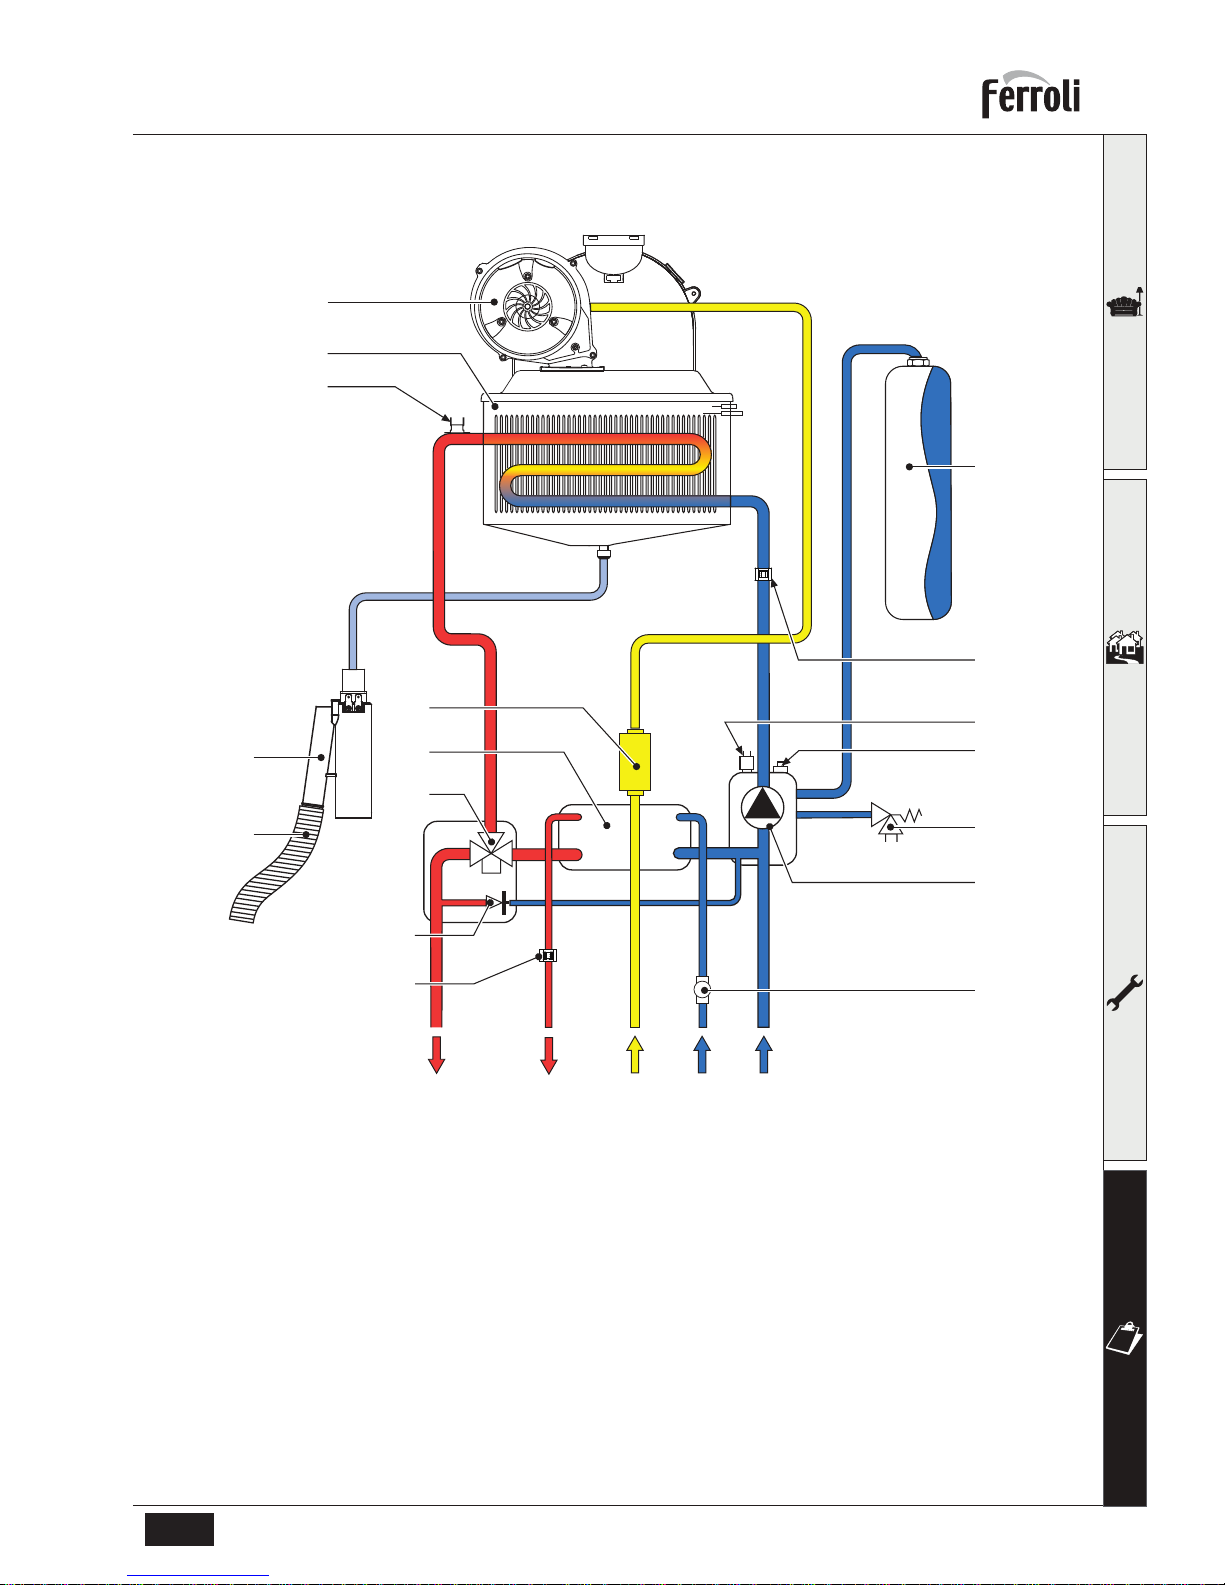
4.3 Water circuit
fig. 35 - Water circuit
Key
7 Gas inlet
8 Domestic hot water outlet
9 Cold water inlet
10 System delivery
11 System return
14 Safety valve
16 Fan
32 Heating circulating pump
36 Automatic air vent
37 Cold water inlet filter
42 DHW temperature probe
44 Gas valve
56 Expansion tank
95 Diverter valve
114 Water pressure switch
136 Flow meter
154 Condensate outlet pipe
161 Condensing heat exchanger
186 Return sensor
193
Condensate Trap
194 DHW exchanger
241 Automatic bypass
278 Double sensor (Safety + Heating)
56
44
14
32
136
37
1110 78
9
95
241
114
36
186
161
278
193
154
16
194
42
Page 30
OPTIMAX HE PLUS C
30 EN
cod. 3540I885 - 08/2012 (Rev. 00)
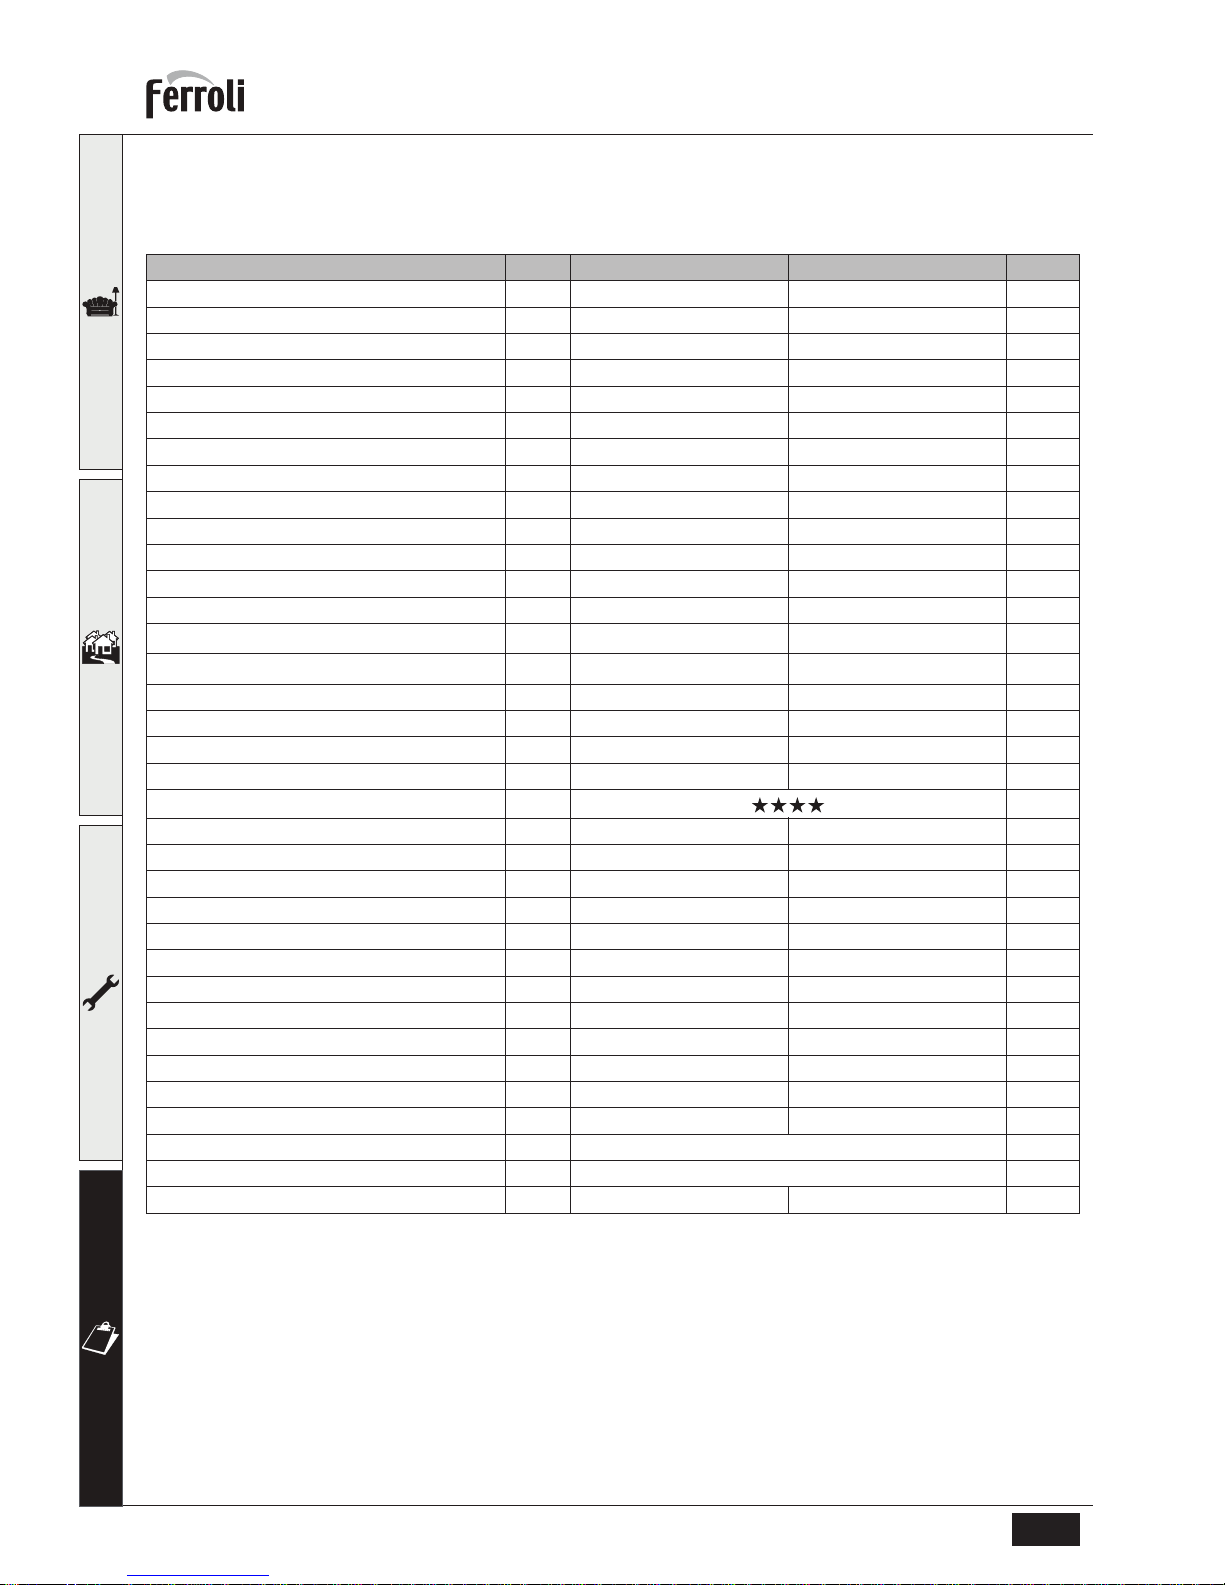
4.4 Technical data table
Data Unit OPTIMAX HE PLUS 31 C OPTIMAX HE PLUS 38 C
Max. heating capacity kW 25.2 30.8 (Q)
Min. heating capacity kW 5.3 6.5 (Q)
Max. Heat Output in heating (80/60°C) kW 24.6 30.2 (P)
Min. Heat Output in heating (80/60°C) kW 5.2 6.3 (P)
Max. Heat Output in heating (50/30°C) kW 26.6 32.5
Min. Heat Output in heating (50/30°C) kW 5.7 6.9
Max. heating capacity in hot water production kW 31.5 38.5
Min. heating capacity in hot water production kW 5.3 6.5
Max. Heat Output in hot water production kW 30.8 37.7
Min. Heat Output in hot water production kW 5.2 6.3
Maximum DHW production Dt 35ºC l/min 12.6 15.4
Gas supply pressure G20 mbar 20 20
Gas injector G20 Ø 6.2 8.2
Max. gas delivery G20
m
3
/h
3.3 4.1
Min. gas delivery G20
m
3
/h
0.56 0.69
Gas supply pressure G31 mbar 37 37
Gas injector G31 Ø 4.7 5.6
Max. gas delivery G31 kg/h 2.47 3.01
Min. gas delivery G31 kg/h 0.41 0.51
Efficiency class Directive 92/42 EEC -
NOx emission class - 5 5 (NOx)
Max. working pressure in heating bar 3 3 (PMS)
Min. working pressure in heating bar 0.8 0.8
Max. heating temperature °C 95 95 (tmax)
Heating water content litres 1.5 2.0
Heating expansion tank capacity litres 8 10
Heating expansion tank prefilling pressure bar 1 1
Protection rating IP X5D X5D
Power supply voltage V/Hz 230V/50Hz 230V/50Hz
Electrical power input W 130 150
Electrical power input in hot water production W 130 150
Empty weight kg 37 42
Type of unit C13-C23-C33-C43-C53-C63-C83-B23-B33
PIN CE 0461BU0941
G.C. n° 47-267-44 47-267-45
Page 31
OPTIMAX HE PLUS C
31EN
cod. 3540I885 - 08/2012 (Rev. 00)
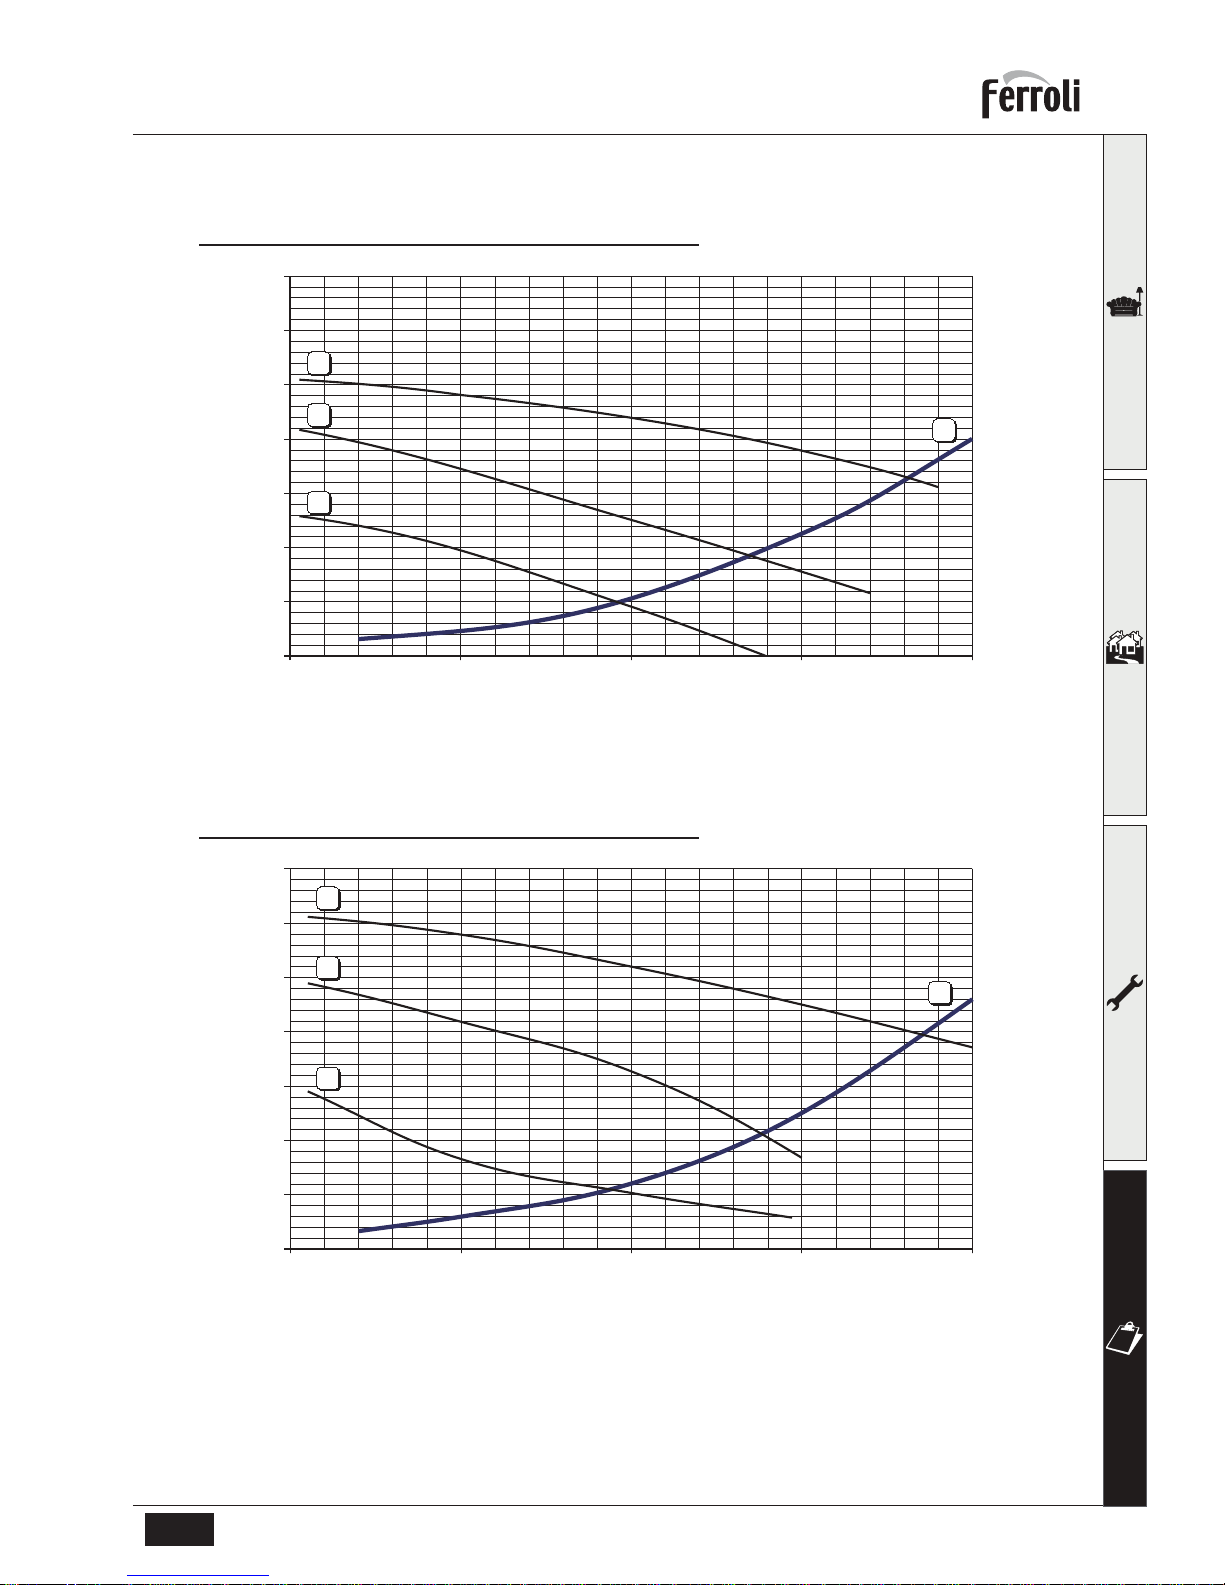
4.5 Diagrams
Head available for the system (OPTIMAX HE PLUS 31 C)
fig. 36 - Pressure loss
1 - 2 - 3 Pump selector positions (In order to obtain maximum hot water output the pump must be left in position 3)
A Boiler pressure losses
Head available for the system (OPTIMAX HE PLUS 38 C)
fig. 37
1 - 2 - 3 Pump selector positions (In order to obtain maximum hot water output the pump must be left in position 3)
A Boiler pressure losses
0
1
2
3
4
5
6
7
0 500 1.000 1.500 2.000
Q [l/h]
H [m H
2
O]
A
3
2
1
0
1
2
3
4
5
6
7
0 500 1.000 1.500 2.000
Q [l/h]
H [m H
2
O]
A
3
1
2
Page 32
OPTIMAX HE PLUS C
32 EN
cod. 3540I885 - 08/2012 (Rev. 00)
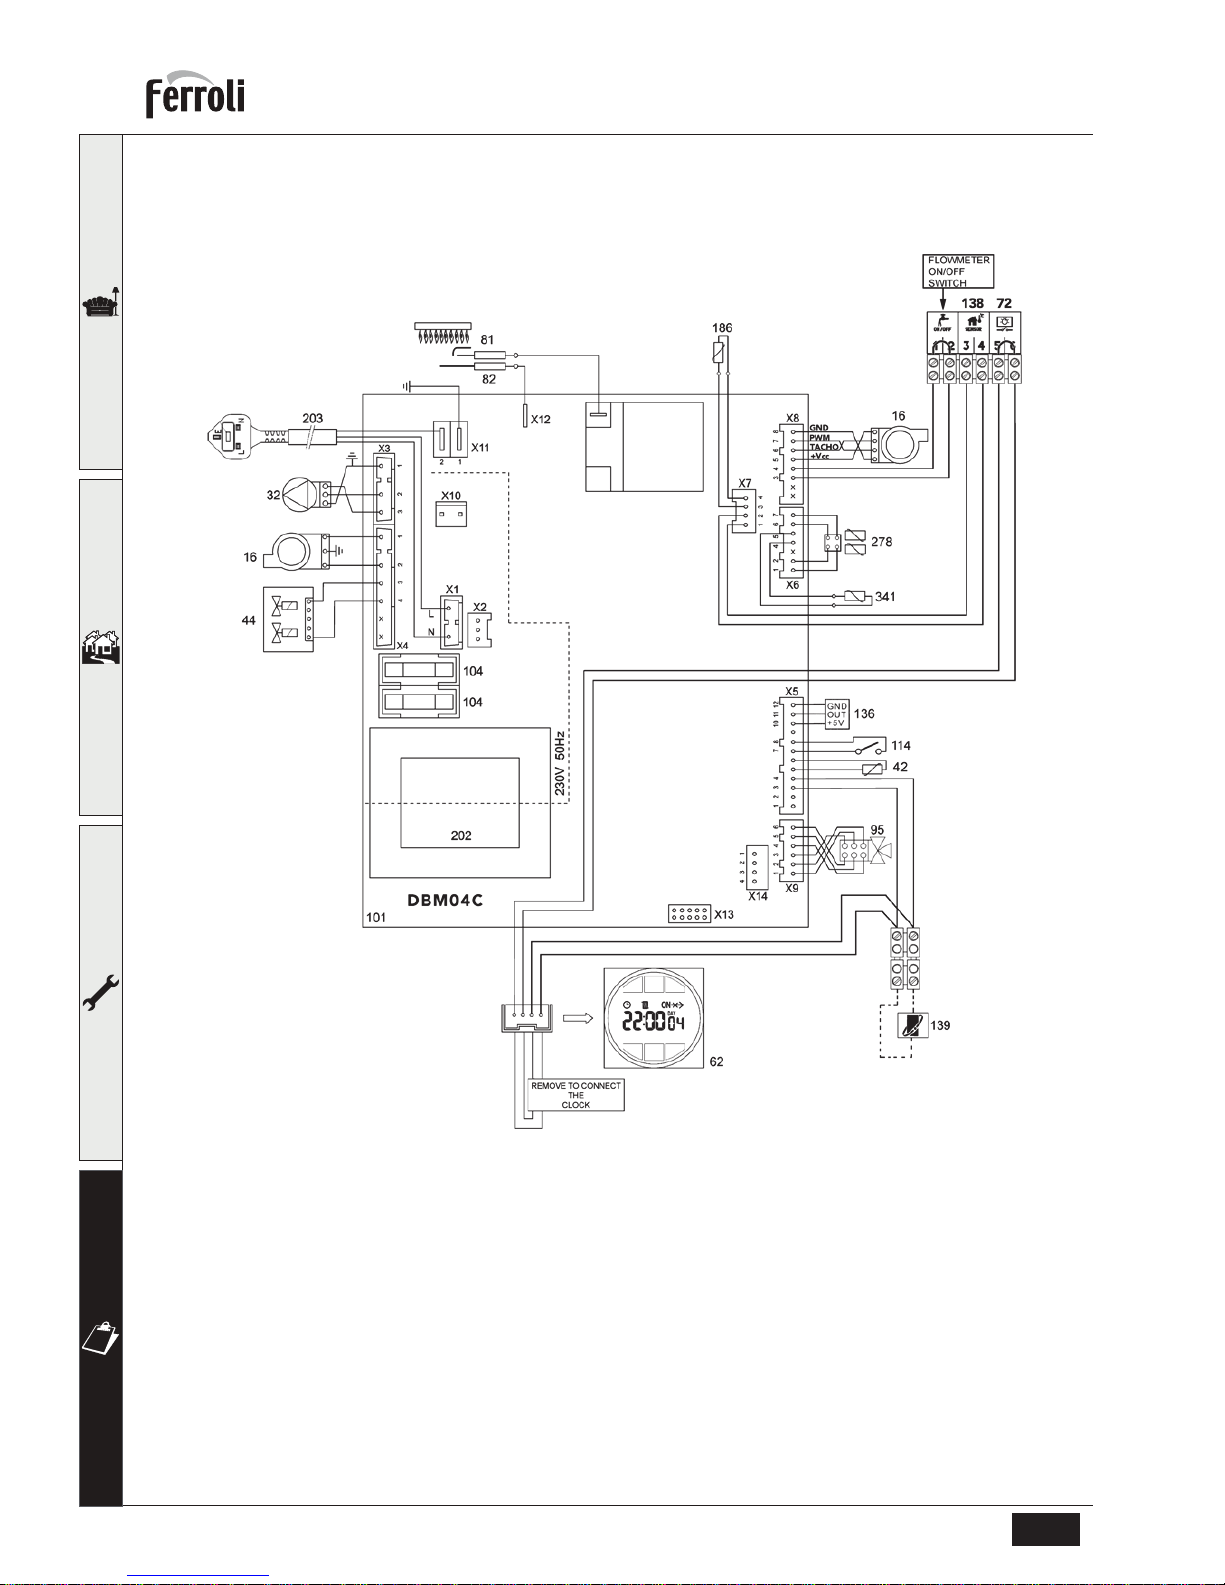
4.6 Wiring diagram
fig. 38 - Wiring diagram
A
Important: Before connecting the room thermostat or the remote timer control, remove the jumper on the
terminal block.
16 Fan
32 Heating circulating pump
42 DHW temperature sensor
44 Gas valve
62 Time clock (optional)
72 Room thermostat (not supplied)
81 Ignition electrode
82 Detection electrode
95 Diverter valve
114 Water pressure switch
136 Flow meter
138 External probe
139 Remote timer control
186 Return sensor
203 230v A/C switched supply
278 Double sensor (heating + safety)
341 Exchanger probe
A Flow meter ON/OFF contact
Page 33

Page 34

Page 35
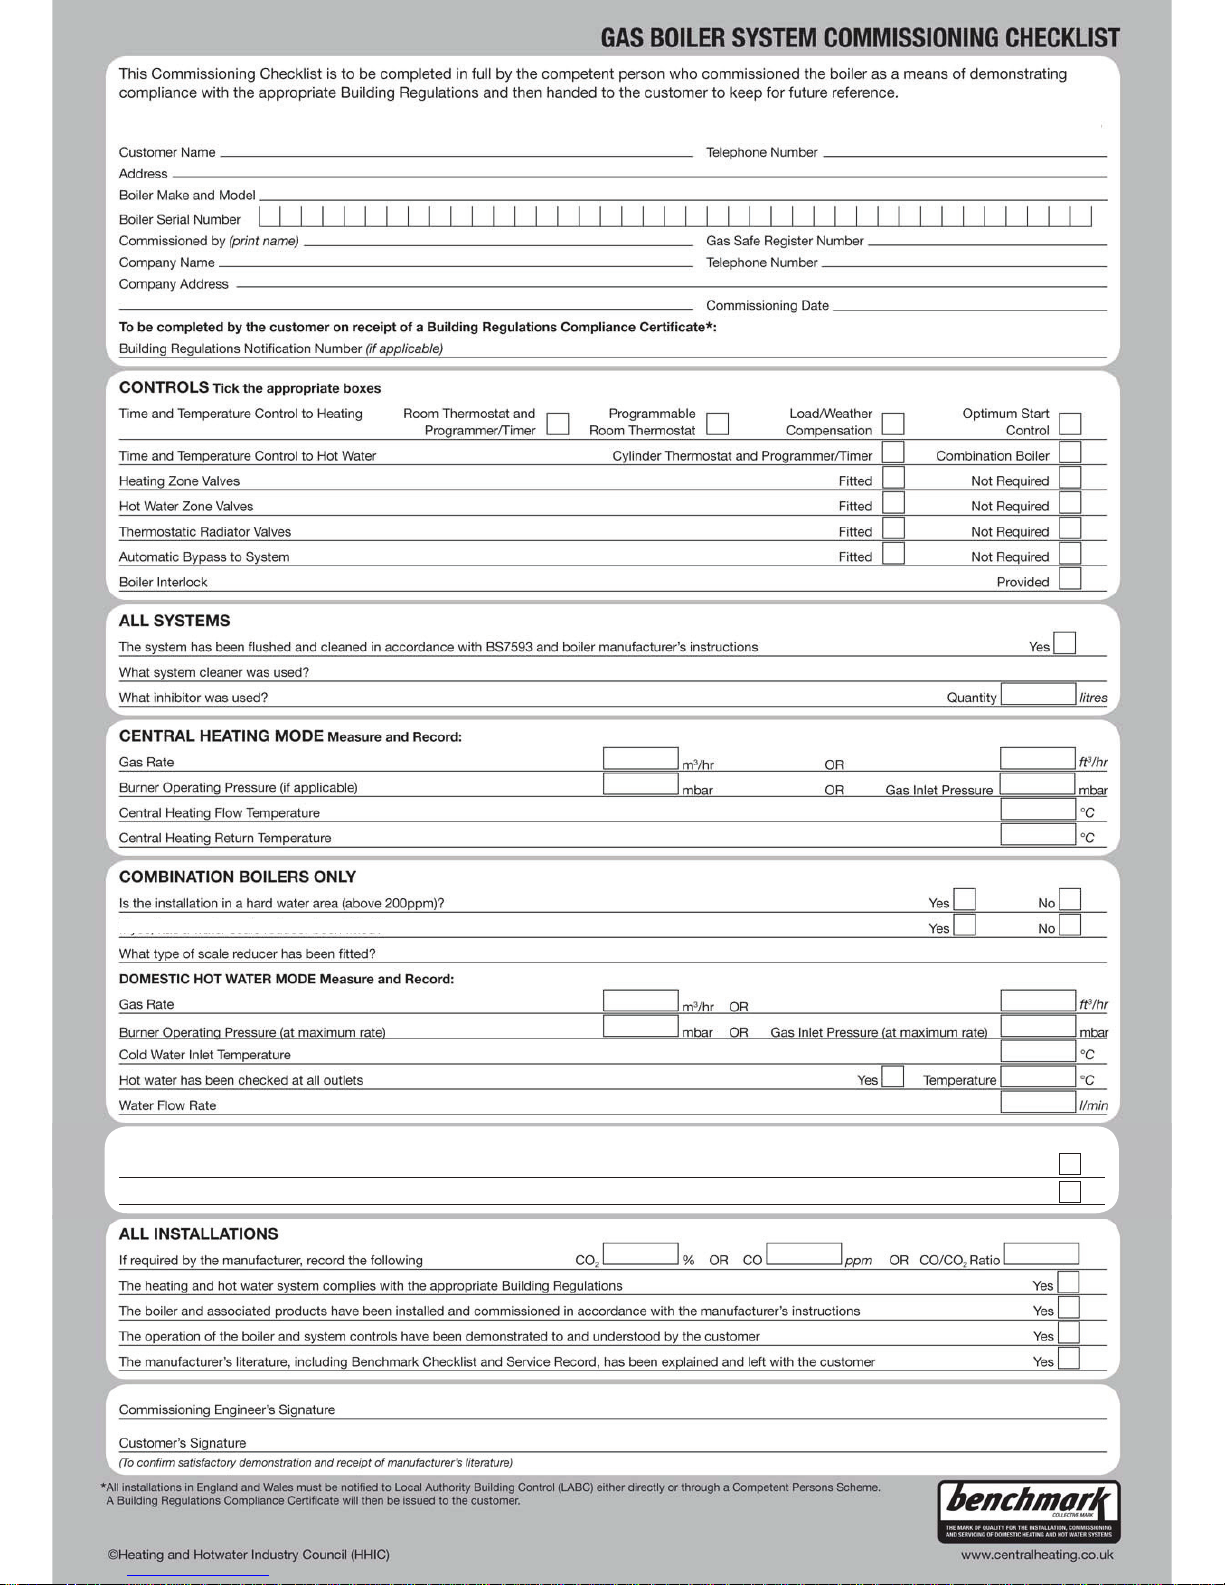
Failure to install and commission according to the manufacturer’s instructions and complete this Benchmark Commissioning Checklist will invalidate the warranty. This
does not affect the customer’s statutory rights.
If yes, and if required by the manufacturer, has a water scale reducer been fitted?
CONDENSING BOILERS ONLY
The condensate drain has been installed in accordance with the manufacturer’s instructions and/or BS5546/BS6798 Yes
If the condensate pipe terminates externally has the pipe diameter been increased and weatherproof insulation fitted? Yes
Page 36
Service Record
It is recommended that your heating system is serviced regularly and that the appropriate Service Interval Record is completed.
Service Provider
Before completing the appropriate Service Record below, please ensure you have carried out the service as described in the
manufacturer’s instructions.
Always use the manufacturer’s specified spare part when replacing controls.
Date:
Engineer Name:
Company Name:
Telephone No.
Gas Safe Register No.
Comments:
Signature:
Date:
Engineer Name:
Company Name:
Telephone No.
Gas Safe Register No.
Comments:
Signature:
Date:
Engineer Name:
Company Name:
Telephone No.
Gas Safe Register No.
Comments:
Signature:
Date:
Engineer Name:
Company Name:
Telephone No.
Gas Safe Register No.
Comments:
Signature:
Date:
Engineer Name:
Company Name:
Telephone No.
Gas Safe Register No.
Comments:
Signature:
Date:
Engineer Name:
Company Name:
Telephone No.
Operative ID No.
Comments:
Signature:
Date:
Engineer Name:
Company Name:
Telephone No.
Gas Safe Register No.
Comments:
Signature:
Date:
Engineer Name:
Company Name:
Telephone No.
Gas Safe Register No.
Comments:
Signature:
Date:
Engineer Name:
Company Name:
Telephone No.
Gas Safe Register No.
Comments:
Signature:
Date:
Engineer Name:
Company Name:
Telephone No.
Gas Safe Register No.
Comments:
Signature:
Service 1 Service 2
Service 3 Service 4
Service 5 Service 6
Service 7 Service 8
Service 9 Service 10
Page 37

Before contacting Ferroli please have available the
completed BENCHMARK document (located in the back of this manual),
boiler serial number and model detail.
For Technical assistance during the installation, call our
Technical Helpline on 0843 479 0479.
You will be required to provide your Gas Safe Register Number.
Should you require a Service Engineer to visit, call our
Service Centre on 0843 479 0479.
Calls to these numbers are charged at National Rate from BT landlines.
Calls made from mobile networks may be considerable more.
Phone numbers:
Installer
Service Engineer
BECAUSE OF OUR CONSTANT ENDEAVOUR FOR IMPROVEMENT DETAILS
MAY VARY SLIGHTLY FROM THOSE QUOTED IN THESE INSTRUCTIONS.
ALL SPECIFICATIONS SUBJECT TO CHANGE
Please note - to avoid incurring unnecessary expense, in the event of a boiler shut down, check
this is not caused by lack of electricity supply, gas supply or low water pressure before calling our
Customer Service Helpline.
 Loading...