


Ferrari F430 2008 User Manual
Owner’s Manual
2
Introduction
The aim of this Owner’s Manual is to help
you get the best value from your vehicle
and to provide information on routine
maintenance.
We advise you to read it carefully before
setting out. The Owner's Manual is an
integral part of the vehicle and it must
therefore always be kept on board.
This manual refers to vehicles with two
types of transmission:
• F1 electronically-controlled gearbox
• mechanical gearbox
Therefore some information may vary
depending on the gearbox installed.
Consulting the manual
To facilitate reading and fast consultation,
the topics have been divided into sections
and chapters. The important parts requiring
particular attention are easily identifiable in
the sections and chapters.
Extreme caution required: failure
to comply with the instructions
could cause hazardous situations involving
personal and vehicle safety!
Important note: warning aimed at
preventing any damage to the vehicle and
thus hazards involving the safety of persons.
Service
The information contained in this manual is
limited to those instructions and indications
that are strictly required for the use and
good preservation of the vehicle.
Carefully following the instructions
contained herein will help you get the best
results and satisfaction from your vehicle.
We also recommend you have all the checks
and service carried out at our Dealers or
Authorised Workshops as they have the
skilled staff and appropriate equipment
available.
See the “Sales and Service Organisation”
manual for the locations of the
Ferrari
Dealers and Authorised Service Centres
.
The
Ferrari Technical Service Department
is at your complete disposal for any
information and suggestions.
Updating
The high quality of your vehicle is
guaranteed by constant improvements and
there may hence be differences between
this manual and your vehicle.
All specifications and illustrations
contained in this manual refer to those
resulting as of the printing date.
Abbreviations
Some descriptions and terms with
particular meanings are found in this
manual in an abbreviated form:
A.C. Air Conditioning System
ABS Anti-lock Braking System
ASR Anti-skid Regulation during
acceleration
EBD Electronic Brake-force
Distribution
CST Traction Stability Control
MSR Engine braking torque adjustment
ECU Electronic Control Unit
F1 Formula 1 - Electronically-
controlled gearbox, designed with
the same technology as used in the
racing sector
L.C. Launch Control - strategy for
performance standing start.
Introduction
3
Spare parts
When replacing parts or topping up with
lubricants and fluids, we recommend you
use original spare parts and the lubricants
and fluids recommended by Ferrari.
The
Ferrari warranty is voided if Original
Ferrari Spare Parts are not used for
repairs.
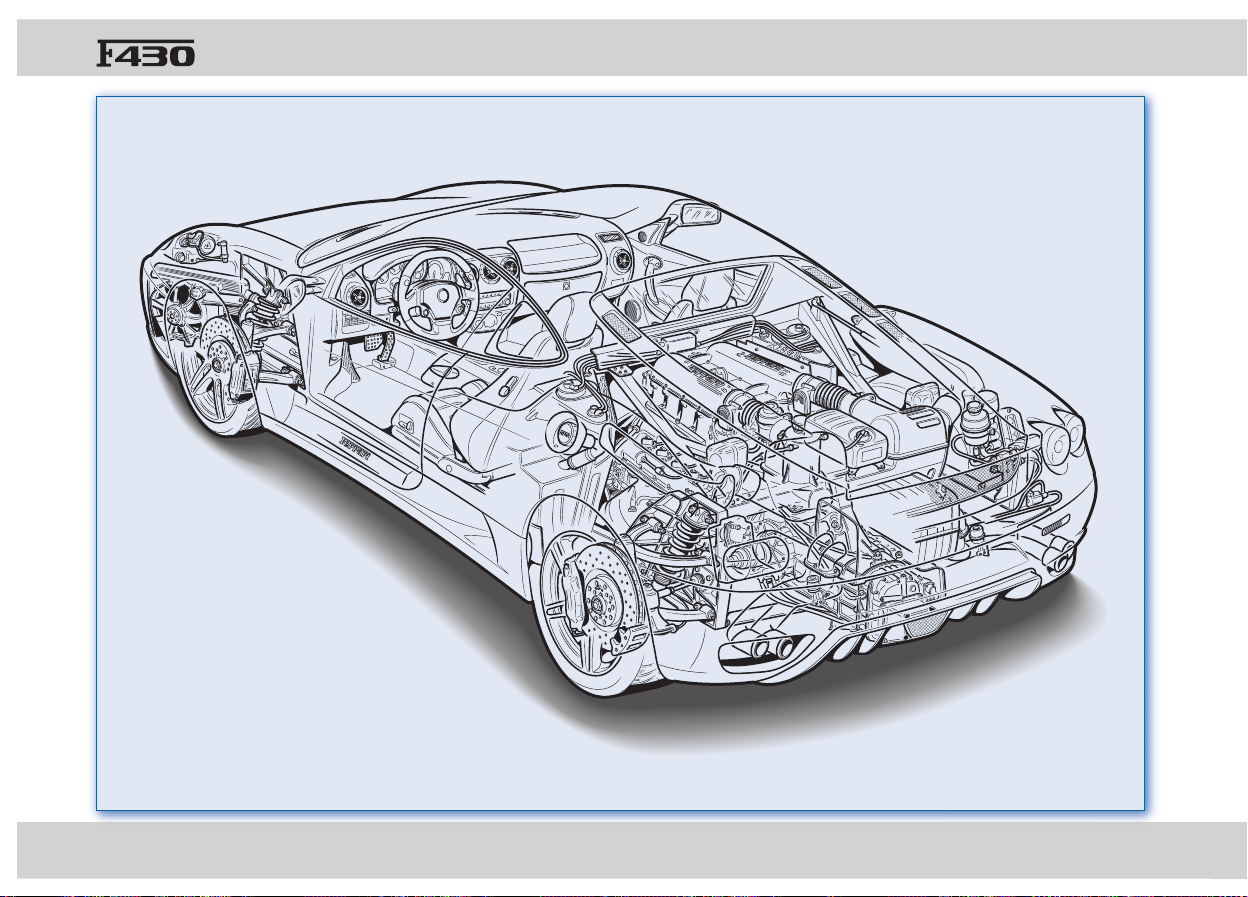
Chassis
The chassis of this vehicle is entirely
constructed of aluminium.
If the chassis is damaged in an accident, have
it repaired at the F
ERRARI SERVICE NETWORK
only.
Using non-original spare parts and having
inexpert persons carry out repairs may have
serious consequences for the vehicle.
In normal conditions of use the chassis
does not require any maintenance; it is
however advisable to contact the
Ferrari
Service Network at the intervals indicated
in the Service Time Schedule in order to
have it checked.
Should emergency repairs be
required, it is advisable to have the
vehicle checked by the Ferrari Service
Network as soon as possible.
F1 gearbox
Warning: The vehicle may be fitted
with an electro-hydraulicallycontrolled gearbox system, driven by means
of levers on the steering wheel.
Even though the system can be used
in "Automatic" mode, it should not
be considered an automatic gearbox.
Hence, for proper use always follow the
instructions given in this manual on
page
70
.
4

Introduction
5
1 - General information
2 - About your vehicle
3 - Driving your vehicle
4 - In an emergency
5 - Maintenance
6 - Technical information
7 - Table of contents

6

1 - General information
7
Identification and homologation data _____ 8
Instruction plates ______________________ 9
Main engine specifications _____________
10
Transmission ratios ____________________ 10
Performance _________________________ 10
Consumption and CO
2 emissions ________ 11
Dimensions and weights _______________ 11
Rims and tyres _______________________
12
Electric system _______________________
13
Recommended lubricants and fluids _____ 14

8
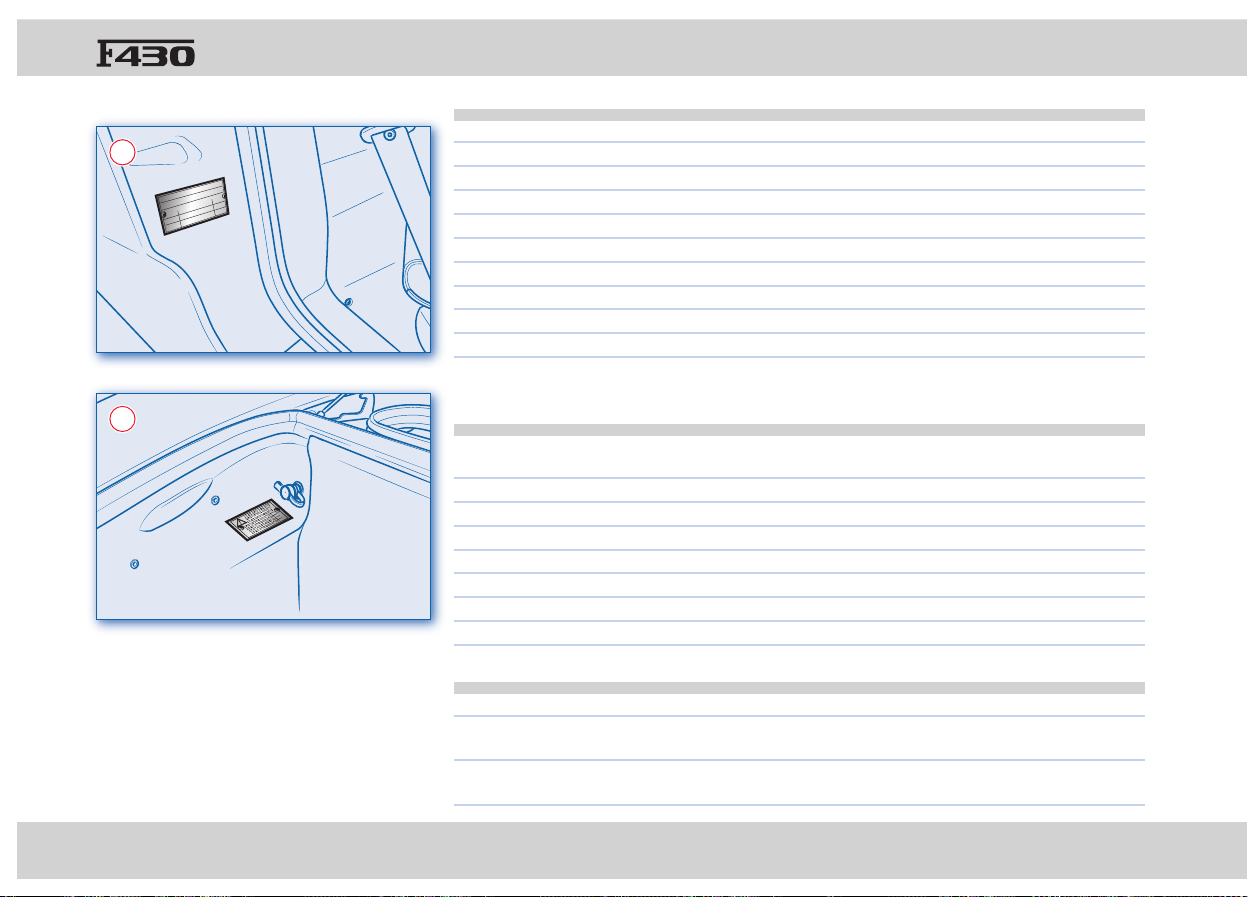
Identifi cation and
homologation data
Identifi cation data:
Punched chassis number.
1
Summary plate with chassis type and
number.
2
Punched engine type and number.
3
Assembly number plate.
4
Punched gearbox type and number.
5
Vehicle identifi cation.
6
1 - General information
9
Homologation plates:
ECE homologation.
7
High beam homologation.
8
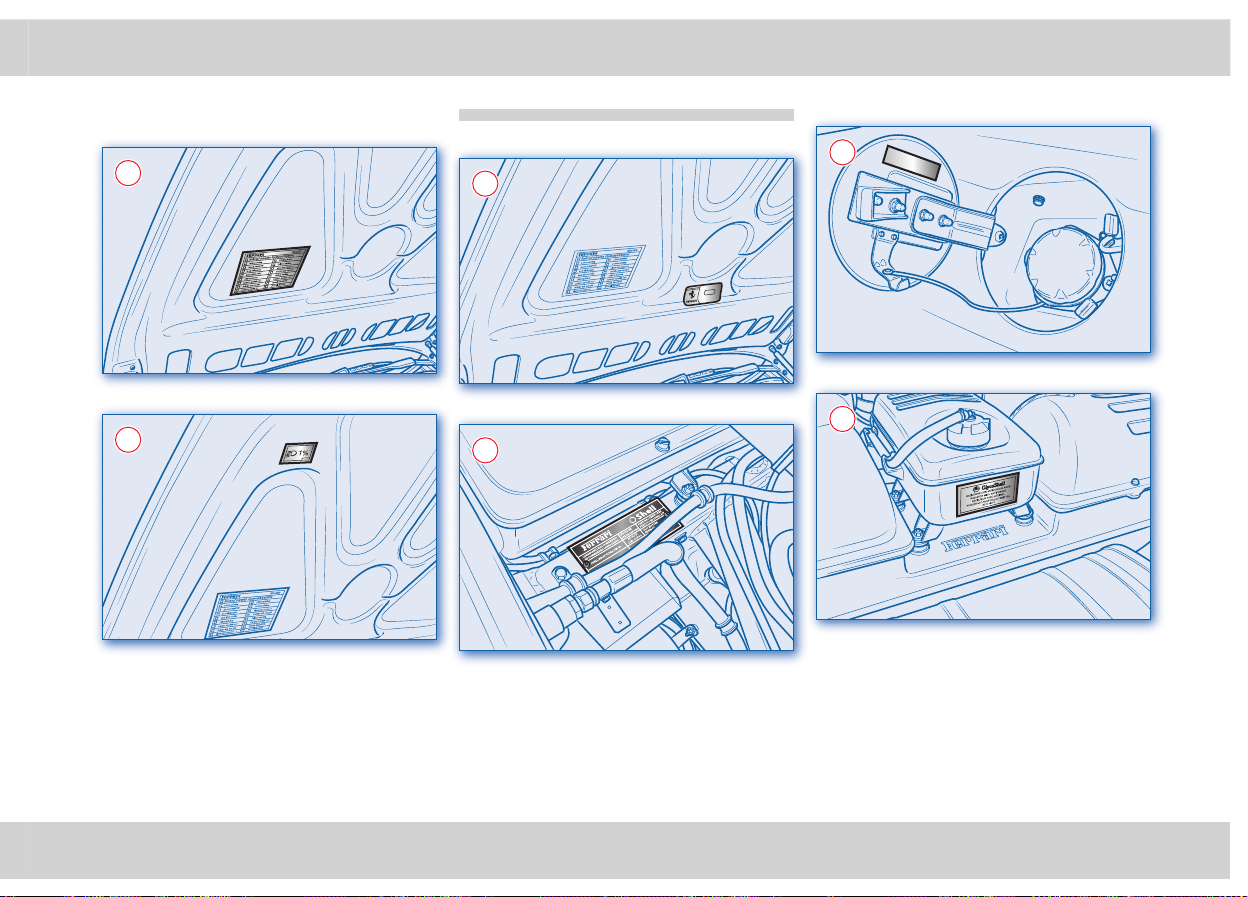
Instruction plates
Paint code plate.
1
Lubricants plate.
2
Fuel plate.
3
Antifreeze plate.
4
10
Tyre pressure plate.
5
Battery master switch plate.
6
Main engine specifi cations
Type F 136 E
Number of cylinders 8 - V 90°
Cylinder bore mm 92 (3.622 in.)
Piston stroke mm 81 (3.189 in.)
Total displacement cm3 4308 (262.788 cu.in.)
Compression ratio
11,3 : 1
(*) Max power: (2002/80B/CE) kW 360,3 (490 HP)
Corresponding r.p.m. rpm 8500
Maximum torque (2002/80B/CE) Nm 465
Corresponding r.p.m. rpm 5250
(*) A slight boosting is attainable at top speed.
Transmission ratios
Differential bevel Total transmission ratio
Gear ratios gear pair ratio (engine/wheel rev)
1 46 / 14 = 3,29 4,30 (10/43) 1 14,13
2 41 / 19 = 2,16 2 9,28
3 37 / 23 = 1,61 3 6,92
4 33 / 26 = 1,27 4 5,46
5 30 / 29 = 1,03 5 4,45
6 31 / 38 = 0,82 6 3,51
R 41 / 15 = 2,73 R 11,75
Performance
0-100 km/h 0-400 m 0-1000 m Max. speed.
F1 gearbox 4,0 sec. 11,95 sec 21,60 sec over 315 km/h
(195.74 mph)
Mechanical gearbox 4,0 sec. 12,00 sec 21,65 sec over 315 km/h
(195.74 mph)
1 - General information
11
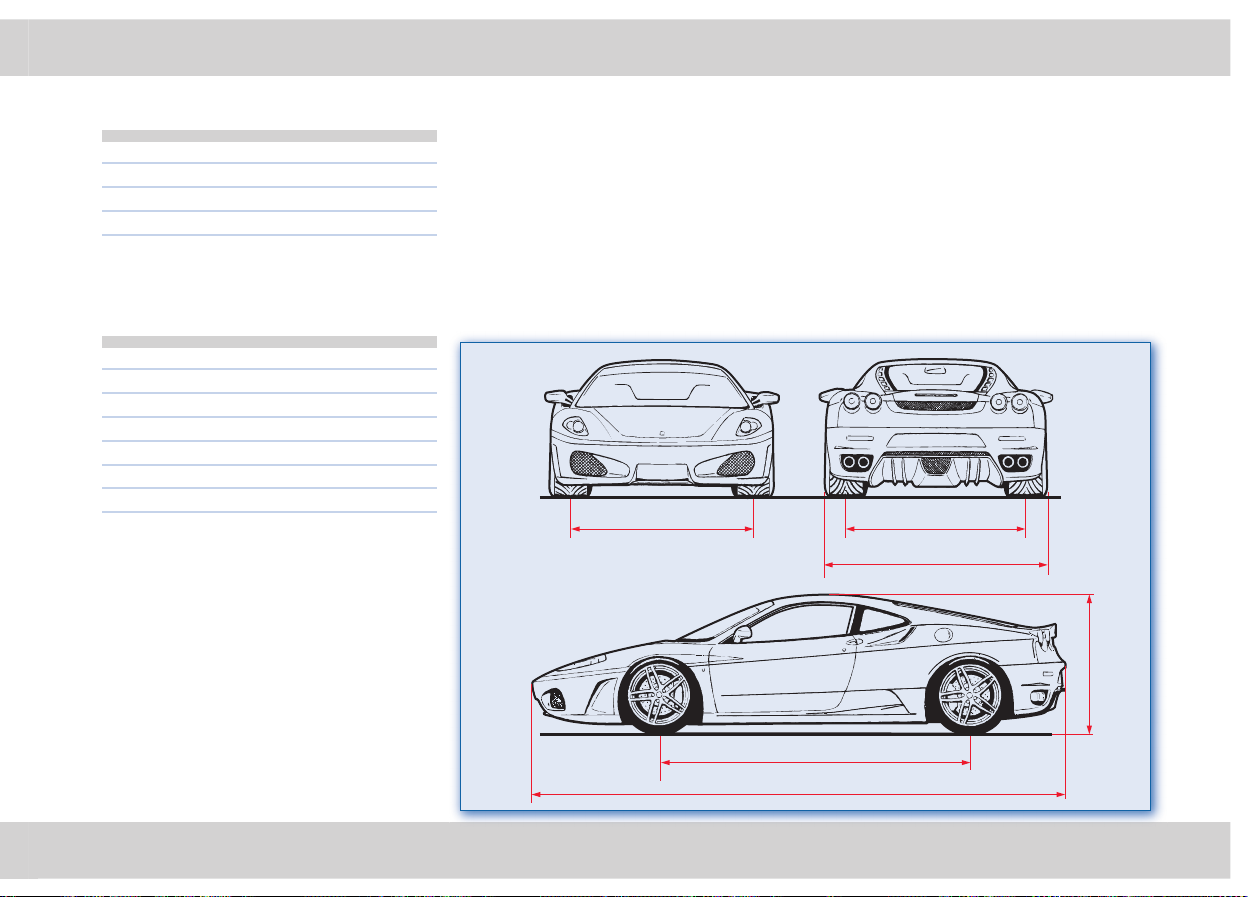
Dimensions and weights
Wheel base 2600 mm (102.36 in.)
Max. length 4512 mm (177.63 in.)
Max. width 1923 mm (75.70 in.)
Max. height 1214 mm (47.79 in.)
Front track 1669 mm (65.70 in.)
Rear track 1616 mm (63.62 in.)
Kerb weight 1450 Kg (3196.67 lb.)
Consumption and CO2
emissions
Dir. 1999/100 EEC g/km l/100 km
• Urban cycle 615 26,9
• Extra-urban cycle 305 13,3
• Combined cycle 420 18,3
1616
2600
4512
1214
1669
1923
12
Rims and tyres
Wheel rims
Front Rear Spare wheel
7,5” J x 19” 10” J x 19”
3,5” J x 19”
Tyres tested by FERRARI (all tyres without air chamber) Inflation pressure (cold)
Front Rear Front Rear
Pirelli P Zero Rosso
225/35 ZR19” 285/35 ZR19” 2,2 bar (32,3 psi) 2,2 bar (32,3 psi)
Bridgestone Potenza RE050A
225/35 ZR19” 285/35 ZR19” 2,3 bar (33,8 psi) 2,5 bar (36,7 psi)
Michelin Pilot Sport 2
225/35 ZR19” 285/35 ZR19” 2,2 bar (32,3 psi) 2,4 bar (35,3 psi)
Optional tyres (Run Flat)
Goodyear Regol F1 GS-D3 EMT 225/35 ZR19” 285/35 ZR19” 2,5 bar (36,7 psi) 2,5 bar (36,7 psi)
Snow tyres (max. speed 210 km/h)
Pirelli Winter Sottozero 225/35 ZR19” 285/35 ZR19”
Replacing a wheel
For the correct procedure, see the notes on page 82.
Stud bolt pre-tightening Stud bolt final tightening
35÷40 Nm 100 Nm
Spare wheel
Tyre (max. speed 80 km/h) Inflation pressure (cold)
Pirelli T 115/70 R19” 4,2 bar (62 psi)
1 - General information
13
“Run fl at” tyres (optional)
The vehicle can be fi tted with “Run Flat”
tyres. This type of tyre has reinforced
sidewalls which permit the vehicle to
continue travelling at a moderate speed
(80 km/h - 50 mph) for a set distance, even
in the event of a puncture.
Always comply with the specifi ed wheel
alignment values, as this is fundamental to
obtain the best performance from and the
longest life of your tyres.
Further information on these tyres and the
relevant pressure monitoring system can be
found in the “Scaglietti Bodywork” Owner’s
manual.
Run flatStandard
0 bar - 0 psi
0 bar - 0 psi
Power supply voltage
12 V
Battery
Fiamm ECO FORCE VR760 - 12V - 65 Ah
- 760 A
Alternator
Nippondenso 150 A
Starter motor
Nippondenso
Key-operated circuits
• Starting
• Windscreen wipers and washer
• Stop lights
• Direction indicators
• Hazard lights
• Rear fog lights
• Reverse lights
• Glove compartment light
• Cigarette lighter
• Ignition
• Injection
• Electric fuel pumps
• Air conditioning and heating system
• Instruments
• Water radiator cooling fan motors
• Heated rear window and rear view mirror
defroster
• Exterior rear view mirror adjustment
• Shock absorber calibration control
system
• CST system
• Exhaust temperature control circuit
• Tyre pressure monitoring system
(optional)
Electric system
14
Recommended lubricants and fluids
Parts to be refilled Quantity Fill with: Ref. Page
Engine
Total system capacity 10 l (2.2 Imp.Gall.)
HELIX ULTRA SAE 5W-40 99-110
Oil quantity between MIN
and MAX 2,0 l (0.44 Imp.Gall.)
Oil consumption (depending on driving conditions) 1,0 ÷ 2,0 l / 1.000 km
Gearbox and differential (including lines) 3,5 l (0.77 Imp.Gall.)
TRANSAXLE OIL SAE 75W-90 117
F1 gearbox system - Electronic differential 1,0 l (0.22 Imp.Gall.)
DONAX TX 99
Brake and clutch system 1,3 l (0.286 Imp.Gall.)
DONAX UB BRAKE FLUID
DOT4 Ultra 100
Cooling circuit 17,5 l (3.85 Imp.Gall.) GLYCOSHELL 100-111
• 50:50 mixture of water and coolant
Hydraulic steering system 1,8 l (0.396 Imp.Gall.)
DONAX TA 99
Steering box 100 g (0.22 Imp.Gall.)
RETINAX CS00
Fuel tank 95,0 l (20.89 Imp.Gall.) Unleaded fuel 95 N.O. 112
Reserve 20,0 l (4.4 Imp.Gall.)
Air conditioning and heating system 119
Compressor 165 cc (10.065 cu.in.) DELPHI 7CVC
Compressor oil 150 cc (9.15 cu.in.) DELPHI RL897
Coolant 800 ± 30 g “R 134 A”
(1.863±0.066 lb.)
Windscreen and headlight washer tank 6,5 l (1.43 Imp.Gall.) Mixture of water and glass cleaner 103
Note: To clean the windscreen, use one phial of glass-cleaner in summer and two in winter.

2 - About your vehicle
15
Keys _______________________________ 16
Alarm system ________________________ 16
Steering wheel controls _______________
21
Instrument panel _____________________ 29
Warning lights _______________________ 32
Multi-function display _________________
34
Dashboard controls ___________________ 36
Controls on the tunnel ________________
43
Doors _______________________________
46
Seat controls _________________________ 47
Interior rearview mirror ________________
49
Safety ______________________________
50
Seat belts ___________________________ 51
Airbag ______________________________
55
Passenger compartment accessories _____
57
Internal lights ________________________ 59
Hands-free microphone (optional) _______
59
Engine compartment lid _______________ 60
Air conditioning and heating system _____ 61
16
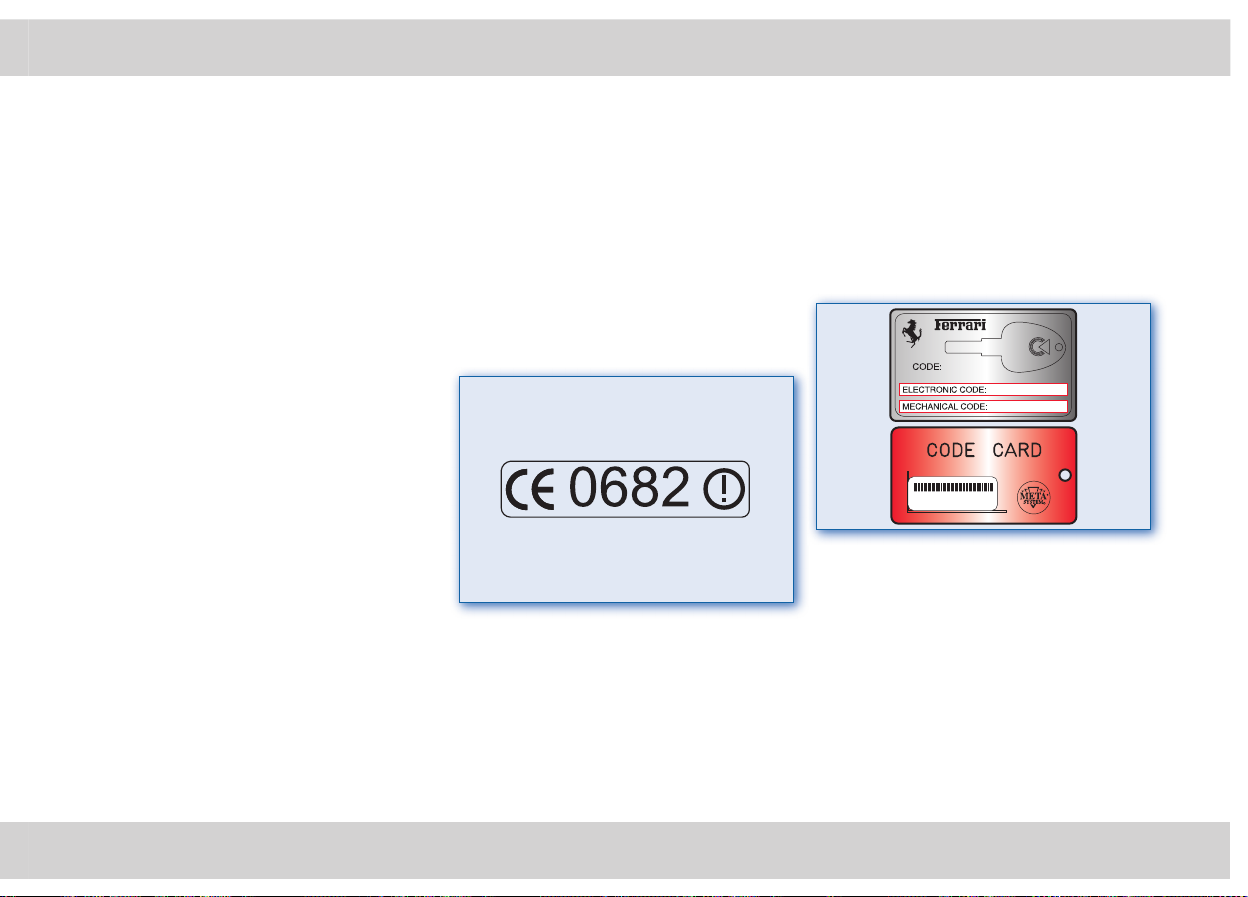
Key codes
A CODE CARD is supplied with the keys.
This card indicates the following:
- the electronic code to be used for
“emergency starting”;
- the mechanical code for the keys, to be
given to the Ferrari Service Network
in the case that you request duplicates of
the keys.
The code numbers shown on the
CODE CARD should be kept in a
safe place.
You are advised to always keep the
CODE CARD number with you, as
this is absolutely necessary in the event of
an “emergency start”.
In the event of a vehicle ownership
transfer, it is essential that the new owner
is provided with all the keys and with the
CODE CARD.
You are advised to record and keep the
codes listed on the tags delivered with the
keys and the remote control in a safe place
(not in the vehicle) in order to request
duplicates if needed.
Alarm system
FERRARI CODE system
For greater protection against theft, the
vehicle is equipped with an electronic
engine immobilizer system (
Ferrari
CODE), which is automatically activated
when the ignition key is removed.
Each ignition key contains an electronic
device which transmits a code signal to the
Ferrari CODE control unit, and engine
ignition is enabled only if the key code is
acknowledged by the system.
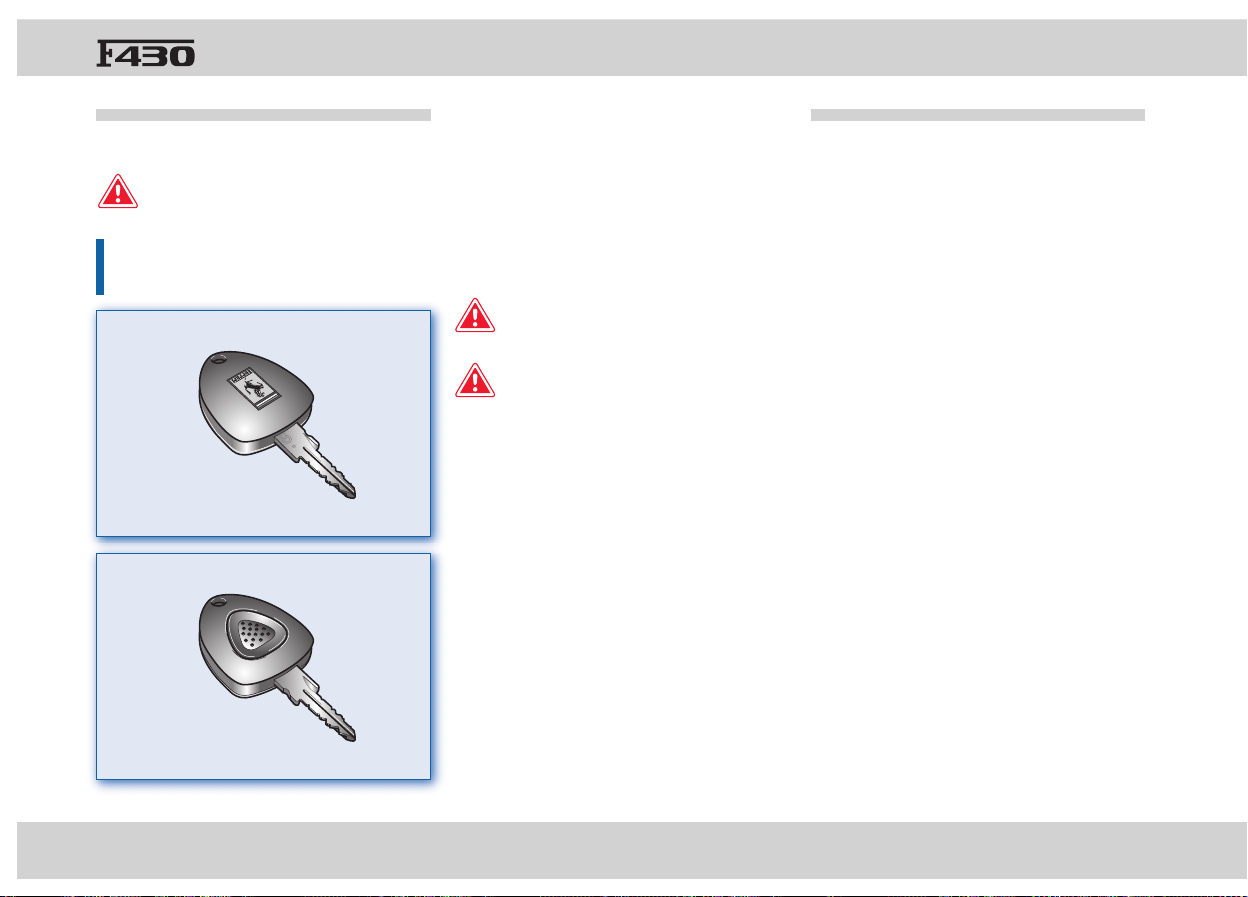
Two keys are supplied with the vehicle.
The key serves to:
- lock/unlock the doors (central door
locking)
- activate/deactivate the passenger airbag
(not present in Australian and Japanese
versions)
- activate/deactivate the alarm.
Operation
Each time the ignition key is removed from
position 0, the protection system activates
the engine immobilizer.
• When starting the engine, press the
ENGINE START button on the steering
wheel:
Keys
The vehicle is delivered with two identical
keys.
Write the code number of the key in
the space provided in the warranty
booklet.
A duplicate of the keys can be requested
communicating the identifi cation number to
the Ferr ari Service Network.

2 - About your vehicle
17
1) If the code is recognized, the CODE
warning light on the instrument panel
goes off within a second, while the
EOBD warning light goes off after
about four seconds once the ECU
diagnostic cycle has been completed.
In these conditions, the protection
system recognizes the key code and
deactivates the engine immobilizer.
CODE
EOBD
2) If the CODE warning light stays on
and the EOBD warning light does not
go off after the four seconds required
by the ECU to run a diagnostic cycle,
the code has not been recognised. In
this case, it is advisable to turn the key
back into position 0 then back to II. If
the immobilizer stays on, try with the
other keys. If you are still unable to
start the engine, do an emergency start
(see the chapter “Emergency starting”)
and contact the Ferrari Service
Network
.
• When driving with the ignition key in
position II:
1) If the CODE warning light comes on,
it means that the system is running a
self-diagnostic cycle. At the fi rst stop
you can test the system: switch off
the engine by turning the ignition
key to position
0, then turn it back to
position II: the CODE warning light
will come on and should go off within
one second. If the warning light stays
on, repeat the procedure described
previously leaving the key at 0 for
more that 30 seconds.
If the problem persists, contact the
Ferrari
Service Network
.
2) If the CODE warning light fl ashes, it
means that the vehicle is not protected
by the immobilizer device.
Immediately contact the Ferrari Service
Network to have all the keys stored in the
memory.
Strong impact can damage the electronic
components in the key.
Each key supplied has its own specifi c code,
which must be stored in the memory of the
system control unit.
Duplicating the keys
When ordering additional keys, remember
that the storage procedure (maximum 7
keys) must be carried out for all the keys,
including those already in your possession.
Directly contact the Ferrari Service
Network, bringing with you all the keys
in your possession, the CODE CARD for
the Ferrari CODE system, a personal ID
document and the registration documents
proving ownership of the car.
The codes of any keys that are not available
when the new storage procedure is carried
out will be deleted from the memory to
prevent any lost or stolen keys being used
to start the vehicle.
Emergency starting
If the Ferrari CODE fails to disable the
engine immobilizer, the
CODE warning
light comes on fi xed and the
EOBD
warning light goes off after four seconds
and then comes on again immediately, and
the engine will not start. In this condition,
the engine can only be started with the
emergency starting procedure.
It is recommended to carefully read
through the whole procedure before
carrying it out.
18
If you make a mistake, turn the key to
position 0 and repeat the operation from
step 1.
1) Read the 5-digit electronic code found
on the CODE CARD.
2) Turn the ignition key to position II:
at this point, the CODE and EOBD
warning lights stay on.
3) Push and hold down the accelerator
pedal. After approximately 8 seconds,
the EOBD warning light will go off.
Release the accelerator pedal and get
ready to count the number of times the
EOBD warning light fl ashes.
4) Wait until the number of fl ashes is
equal to the fi rst digit of your CODE
CARD, then push and hold down
the accelerator pedal until the EOBD
warning light goes off after about 4
seconds, then release the accelerator
pedal.
5) The EOBD warning light starts fl ashing
again. When the number of fl ashes
is equal to the second digit of your
CODE CARD, push and hold down the
accelerator pedal.
6) Proceed in the same manner for the
remaining digits in the code on the
CODE CARD.
7) When the last digit has been entered,
hold the accelerator pedal pushed
down. The
EOBD warning light comes
on for 4 seconds and then goes off;
release the accelerator pedal.
8) When the EOBD warning light fl ashes
fast (for about 4 seconds) it confi rms
that the procedure has been carried
out correctly.
9) Proceed with starting the engine by
pressing the ENGINE START button
on the steering wheel.
If the
EOBD warning light remains on,
turn the key to position
0 and repeat the
procedure from step
1.
This procedure can be repeated an
unlimited number of times.
After an emergency start, it is advisable to
contact the Ferrari Service Network
as
the emergency starting procedure has to be
carried out for each starting.
Electronic alarm system
The electronic alarm system carries out the
following functions:
- remote control for central door locking;
- perimeter surveillance, detecting when
the doors or lids are opened;
- car movement surveillance.
The engine immobilizer function is
guaranteed by the
Ferrari CODE system,
which is automatically activated when the
ignition key is removed from the switch.
System activation
Press button
A on the key to activate the
alarm system:
A
- the direction indicators fl ash once
- the red LED
B on the dashboard fl ashes
B
- the central door locking system is
activated and the doors are locked.
After about 25 seconds, the system is active
and the alarm will be triggered if:
- a door is opened
- the luggage compartment lid is opened
- the engine compartment lid is opened
- the power is cut
2 - About your vehicle
19
- the siren is disconnected
- the car is moved.
Should the siren beep twice when you
activate the alarm system, this means that
one of the doors or the luggage/engine
compartment lid is not perfectly closed and
therefore is not protected by the perimeter
surveillance.
Check that the doors and lids are properly
closed and close the open door or lid, then
reactivate the alarm system.
Deactivation
Press button
A on the key to deactivate the
alarm system:
- the direction indicators fl ash once;
- the red LED
B on the dashboard goes
off;
- the central door locking system is
activated and the doors are unlocked.
The alarm system is off and you can get into
the vehicle and start the engine.
If the remote control battery is fl at, to access
the vehicle, you must use the spare key or
replace the battery as described below.
Alarm memory
If the red LED B fl ashes when you have
deactivated the system by means of the
radio control, it means that the alarm was
triggered while you were away. In this case,
the system will indicate the reason for the
alarm according to the following priority:
- LED off twice: lifting sensor alarm;
- 3 LED off three times: door alarm;
- LED off four times: engine compartment
lid alarm;
- LED off fi ve times: ignition key alarm.
The alarm system memory is reset when
you turn the ignition key.
Ministerial homologation
The electronic alarm system has been
homologated in all the countries where
radio frequency legislation is in force.
The homologation number is shown in the
fi gure.
For those markets that require the
transmitter and/or receiver marking, the
homologation number is found on the
component.
Requesting new keys
To purchase new keys with radio control,
exclusively contact the Ferrari Service
Network, bringing with you:
- all the keys with radio control in your
possession;
- the CODE CARD for the
Ferrari CODE
system and the red CODE CARD for the
alarm system;
- a personal ID document;
- the registration documents proving
ownership of the vehicle.
Keys with remote control that are not
provided to the Ferrari Network centre,
for the new code storage procedure, will
automatically be deactivated. This is to
prevent any lost or stolen keys with remote
control from being used to deactivate the
electronic alarm system.
20
If you accidentally activate the alarm during
engine starting, the engine starts normally
and the alarm siren will be activated after
30 seconds. To deactivate it, press the remote
control button on the key.
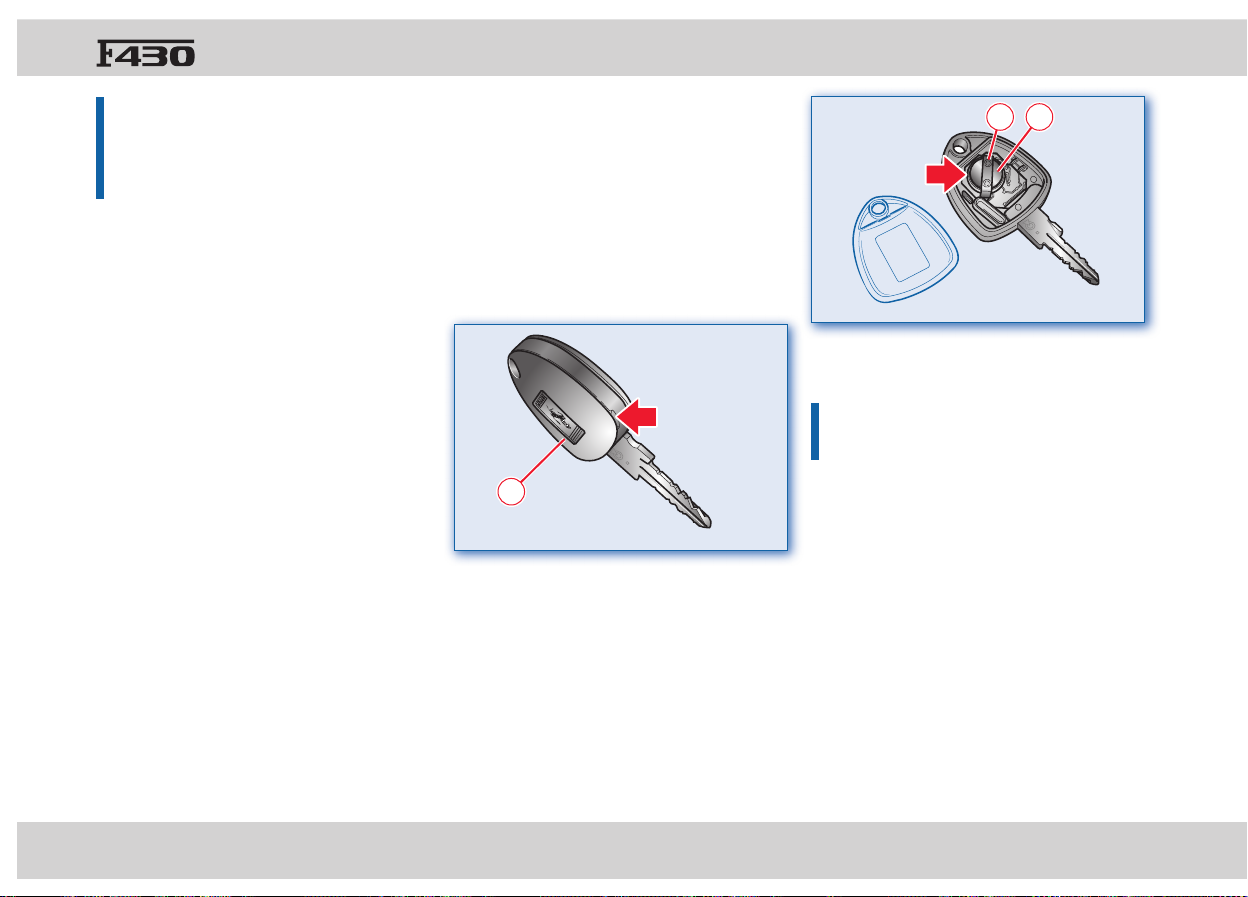
Replacing the radio control batteries
If the corresponding function is not
activated when the key button is pressed,
replace the radio control battery after
checking with the other radio control that
the alarm system functions work.
To replace the radio control battery:
- detach the key cover
A prising with a
small screwdriver at the point indicated
by the arrow
A
- remove the battery B by pushing it out
from under the retaining spring clip C in
the direction indicated by the arrow
BC
- fi t a new battery of the same type,
respecting the polarity indicated
- close the key cover
A.
Do not use sharp tools to separate the key
cover and be extremely careful not to damage
the radio control.
2 - About your vehicle
21
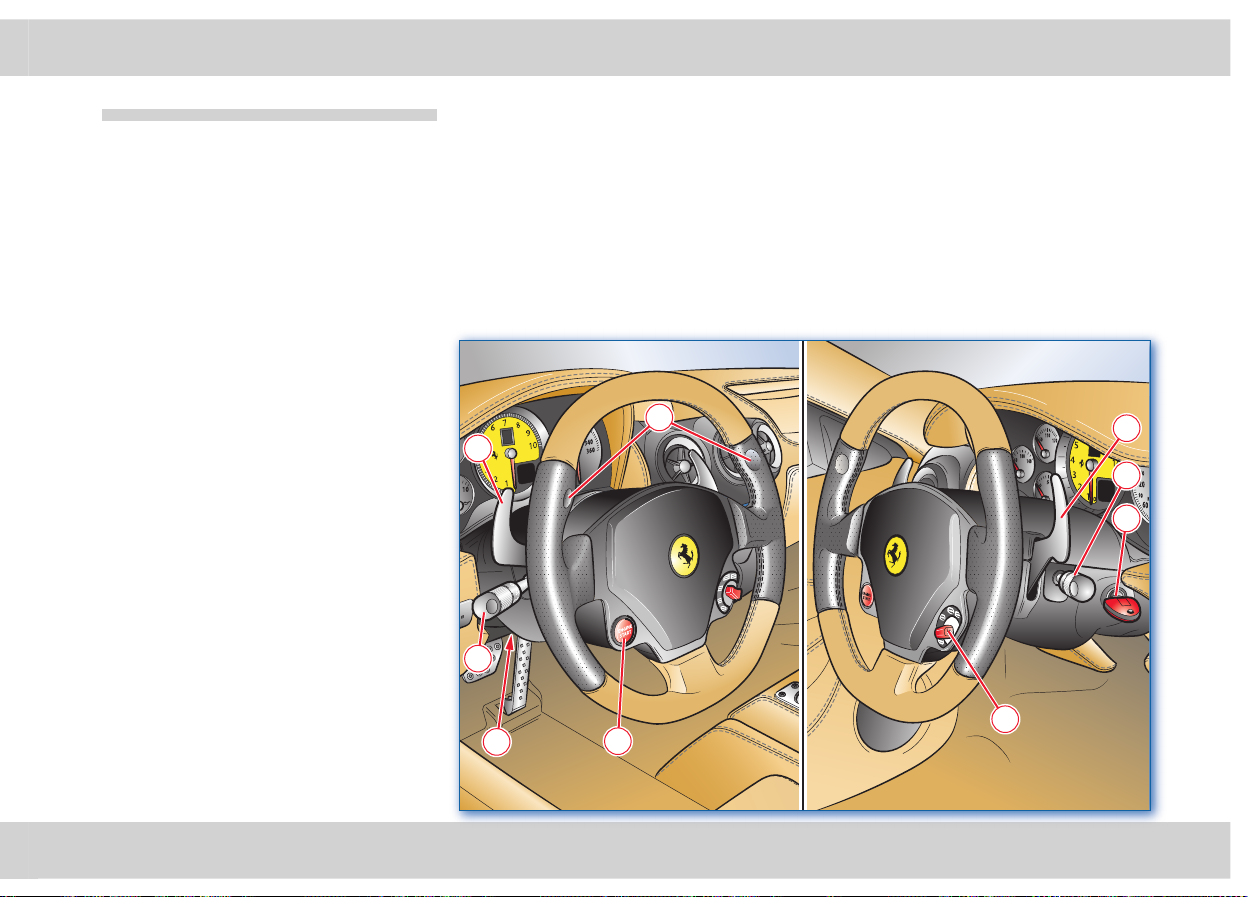
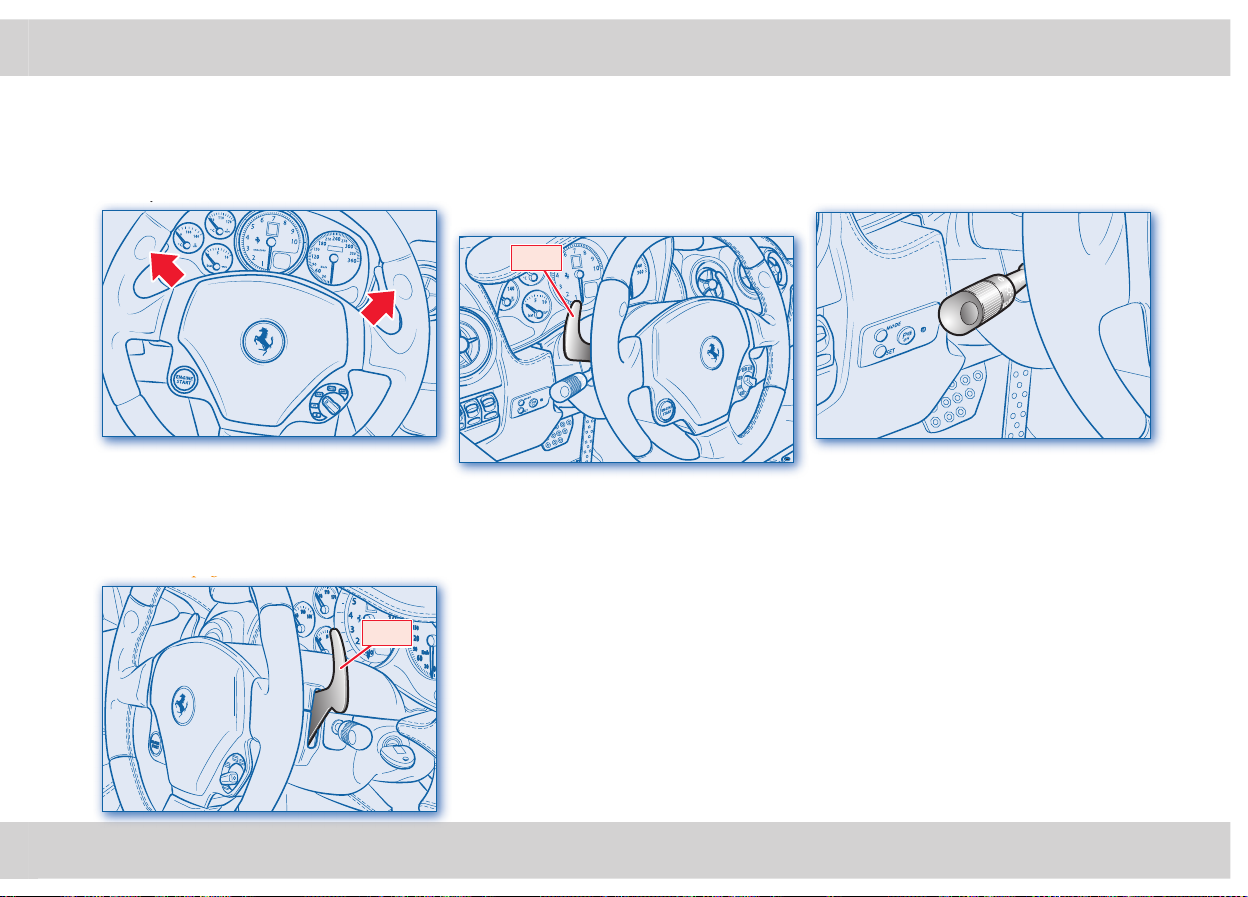
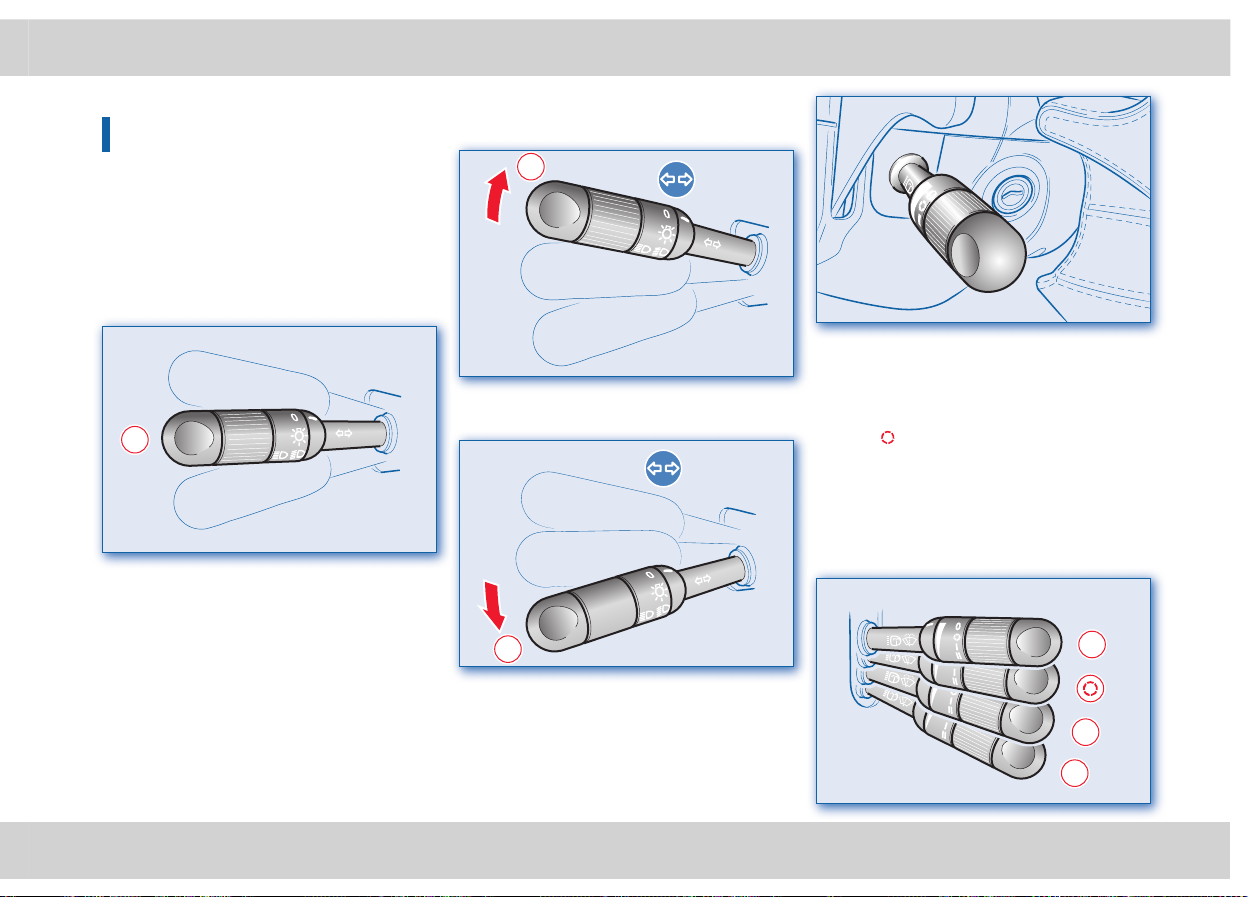
Steering wheel controls
Key switch
Start button
Driving mode switch
Horn control
UP gearshift lever (*)
DOWN gearshift lever (*)
Exterior lights and direction indicator
control lever
Windscreen and headlight wiper/
washer control lever
Steering wheel adjustment lever
(*) for versions with F1 gearbox only
8
5
1
2
3
4
6
7
9
22
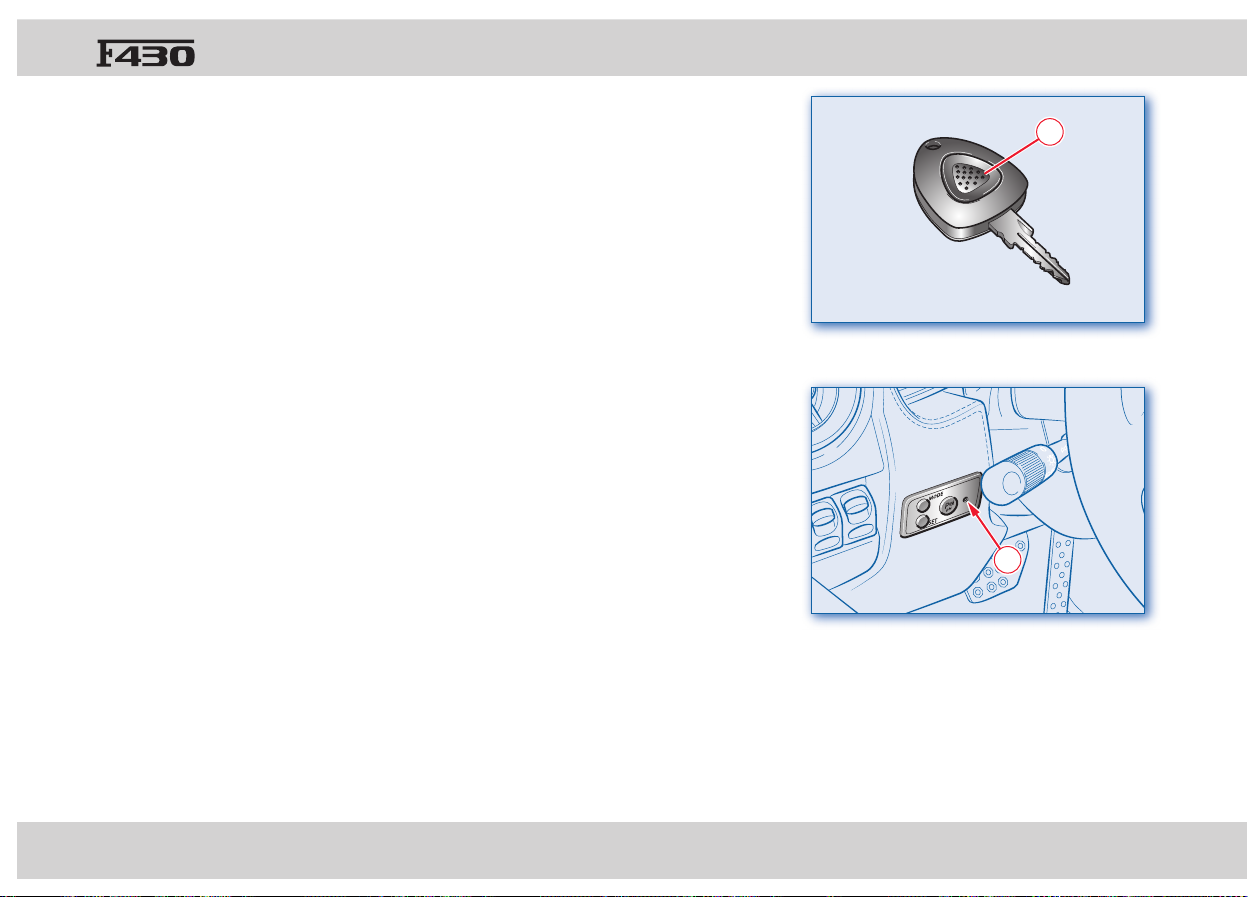
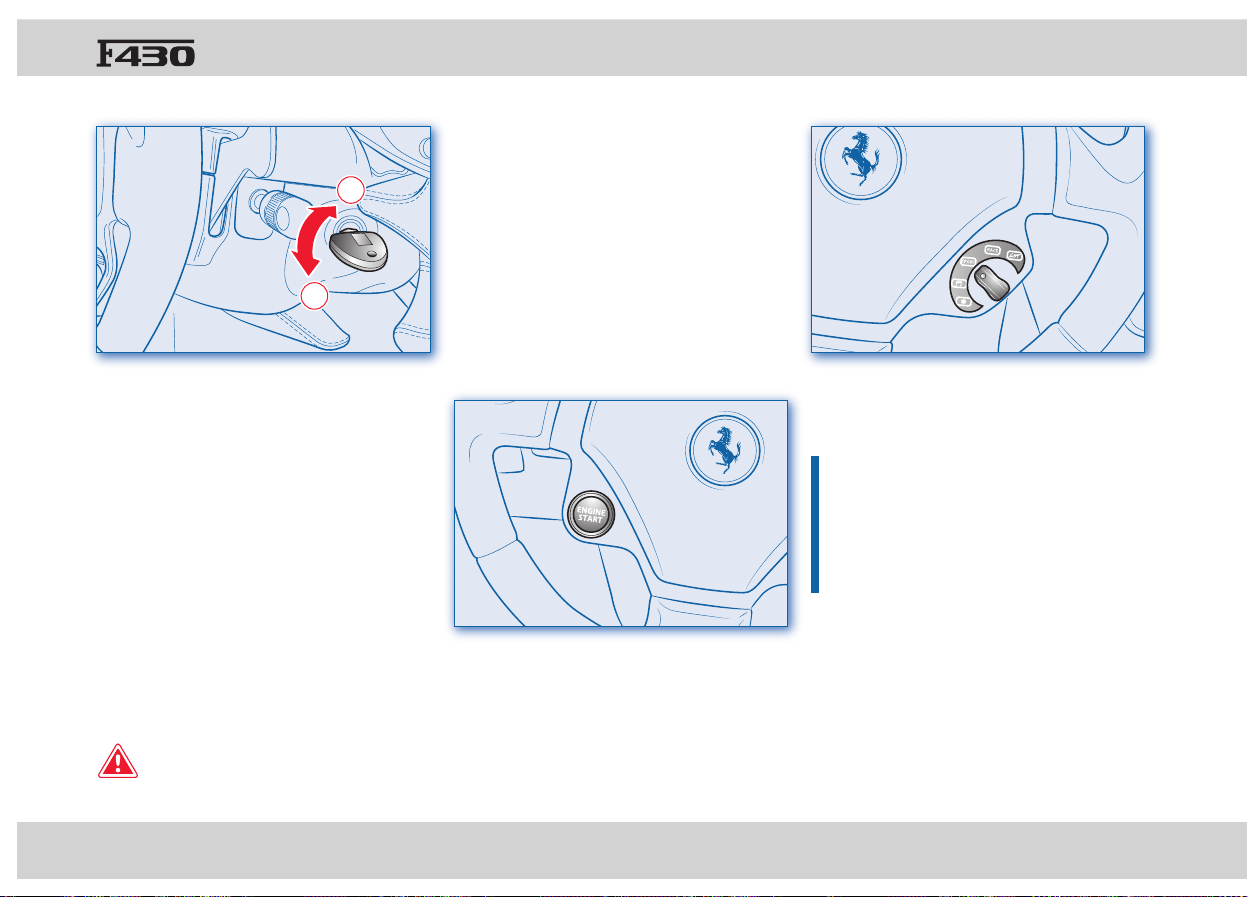
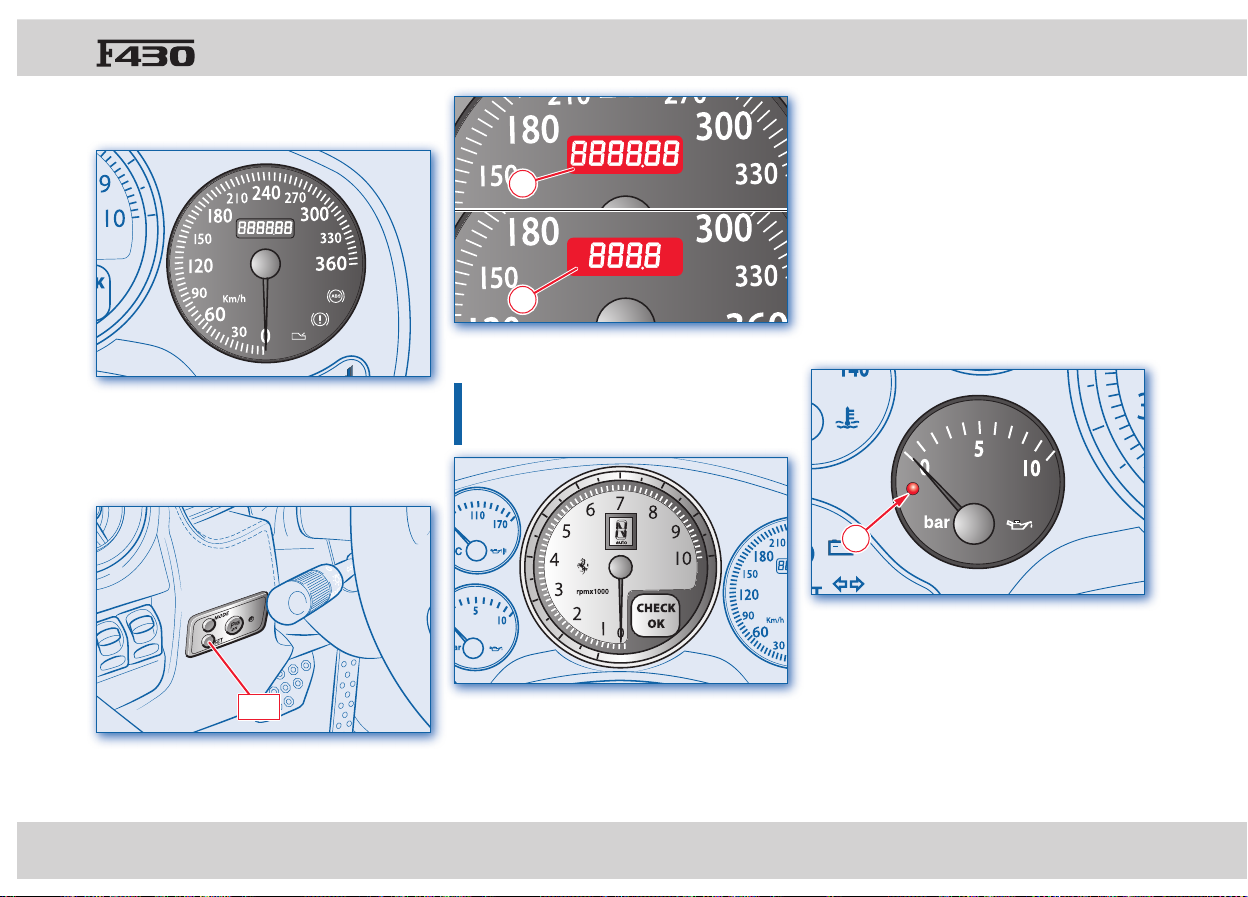
1 - Key switch
0
II
The ignition key can be turned to 2
positions:
Position
0 - Stop
Engine off, key removable.
When the key is even only partially
extracted, the steering column is locked.
The hazard warning lights and the parking
lights can be turned on.
To facilitate steering wheel release, turn the
steering wheel slightly in both directions
while turning the ignition key.
Position
II - Start
When turning the key to this position, the
system checks the signals coming from the
systems installed on the vehicle. If no faults
are found, the words
CHECK OK light up
and the engine can be started.
Never remove the key when the
vehicle is moving!
The steering wheel will lock on the fi rst
steer.
Always remove the key from the ignition
block when you get out of the vehicle!
Never leave children unattended in the
vehicle.
2 - Start button
Press the ENGINE START button to start
the engine. When the engine has started,
release the
ENGINE START button.
Do not hold the
ENGINE START button
down for a long time.
For the starting procedure, see “Starting
and driving the vehicle” on page 67 or 71.
3 - Driving mode selection switch
Whichever driving mode you select, always
follow the rules for safe driving.
You can select the driving mode to suit the
driving style you desire.
In the event of a failure of one of the onboard
systems, signalled by the dedicated warning
light on the instrument panel display (see
page 35), the switch moves to a “recovery”
position, allowing the vehicle to be driven
nevertheless. In these cases, contact the
Ferrari Service Network
.
2 - About your vehicle
23
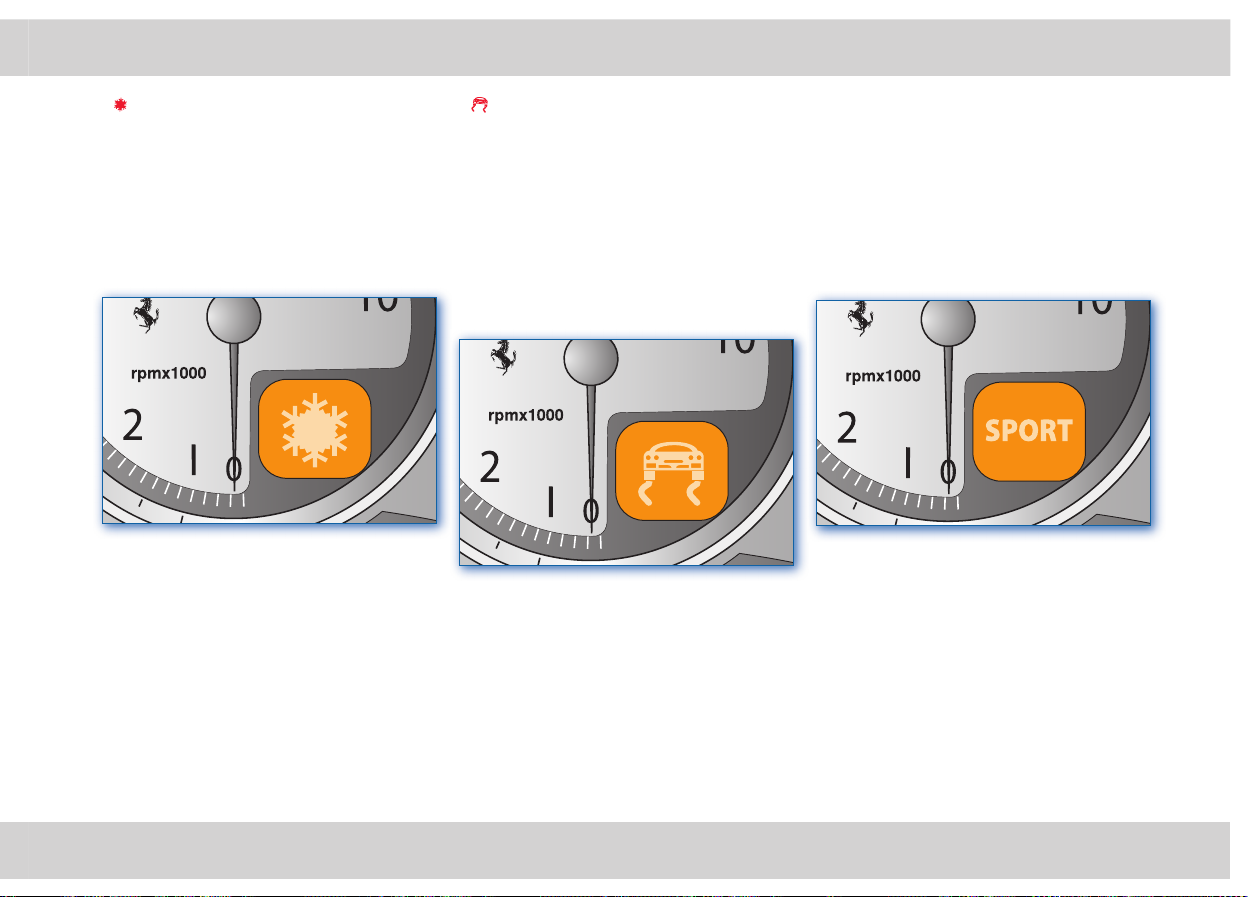
( )“ICE” mode
This mode can be used when the road
conditions are particularly slippery (snow,
ice).
When this mode is activated, the
ICE
symbol will appear on the multi-function
display for a few seconds and an acoustic
signal will warn the driver that the driving
mode has been changed.
For use, see on page 76.
( )“Low-grip” mode
It can also be activated to enhance driving
comfort even when driving in racing style,
assuring stability in low- to medium- grip
conditions. It is also recommended for city
driving.
When this mode is activated, the
Low Grip
symbol appears on the multi-function
display for a few seconds and an acoustic
signal will warn the driver that the driving
mode has been changed.
For use, see on page 76.
SPORT mode
This is the ideal vehicle use condition.
Select
SPORT mode if you wish to drive in
racing style in high-grip conditions.
When this mode is activated, the
SPORT
symbol will appear on the multi-function
display for a few seconds and an acoustic
signal will warn the driver that the driving
mode has been changed.
For use, see on page 76.
24
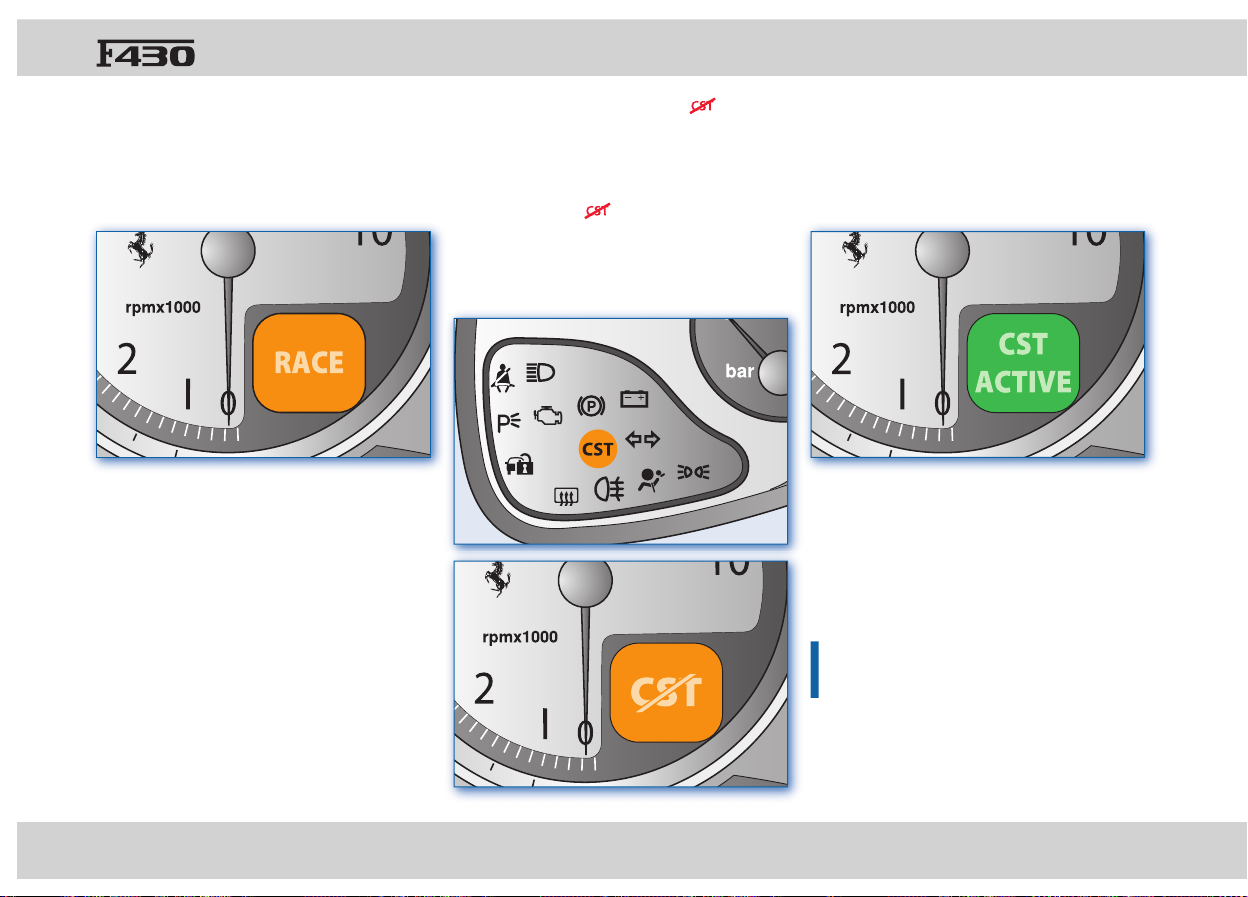
RACE mode
The
RACE mode further enhances the
already racing style performance of the
vehicle. When this mode is activated, the
RACE symbol will appear fi xed on the
multi-function display.
This selection is ideal for the race track.
For use, see on
page 76.
Deactivating the CST system (
)
Selecting this mode you can deactivate the
CST system (always on upon engine start).
When this mode is deactivated, the relevant
warning light on the instrument panel will
come on and the
symbol will appear on
the multi-function display.
An acoustic signal will sound at length to
warn the driver that the driving mode has
beep changed.
When the CST system is active, its
operation is signalled by the relative
warning light on the instrument panel and
by the (green) message CST ACTIVE on
the multi-function display, which fl ashes for
at least 4 seconds.
In low- to medium-grip conditions (wet,
icy, sandy roads), do not deactivate the CST
system.
When the CST system is active and the
amber warning light comes on, it means
that there is a fault in one of the system
parts. Contact the Ferrari Service
Network
.
Every time the ignition is switched on
further to this operation, the CST system will
reactivate.
For use, see on page 76.
2 - About your vehicle
25
4 - Horn control
The horn is activated by pressing by the
sides of the upper spokes on either side
of the steering wheel, in position with the
horn symbol.
horn symbol.
5 - UP gearshift lever (vehicles with F1
gearbox)
Pull the right-hand UP lever towards the
steering wheel to shift up.
For use, see “Starting and driving the
vehicle” on page 67.
page 67
UP
6 - DOWN gearshift lever (vehicles
with F
1 gearbox)
Pull the left-hand DOWN lever towards the
steering wheel to shift down.
For use, see “Starting and driving the
vehicle” on
page 67.
DOWN
7 - Exterior lights and direction
indicator control lever
The exterior lights and the direction
indicators only work when the ignition key
is in position II
.
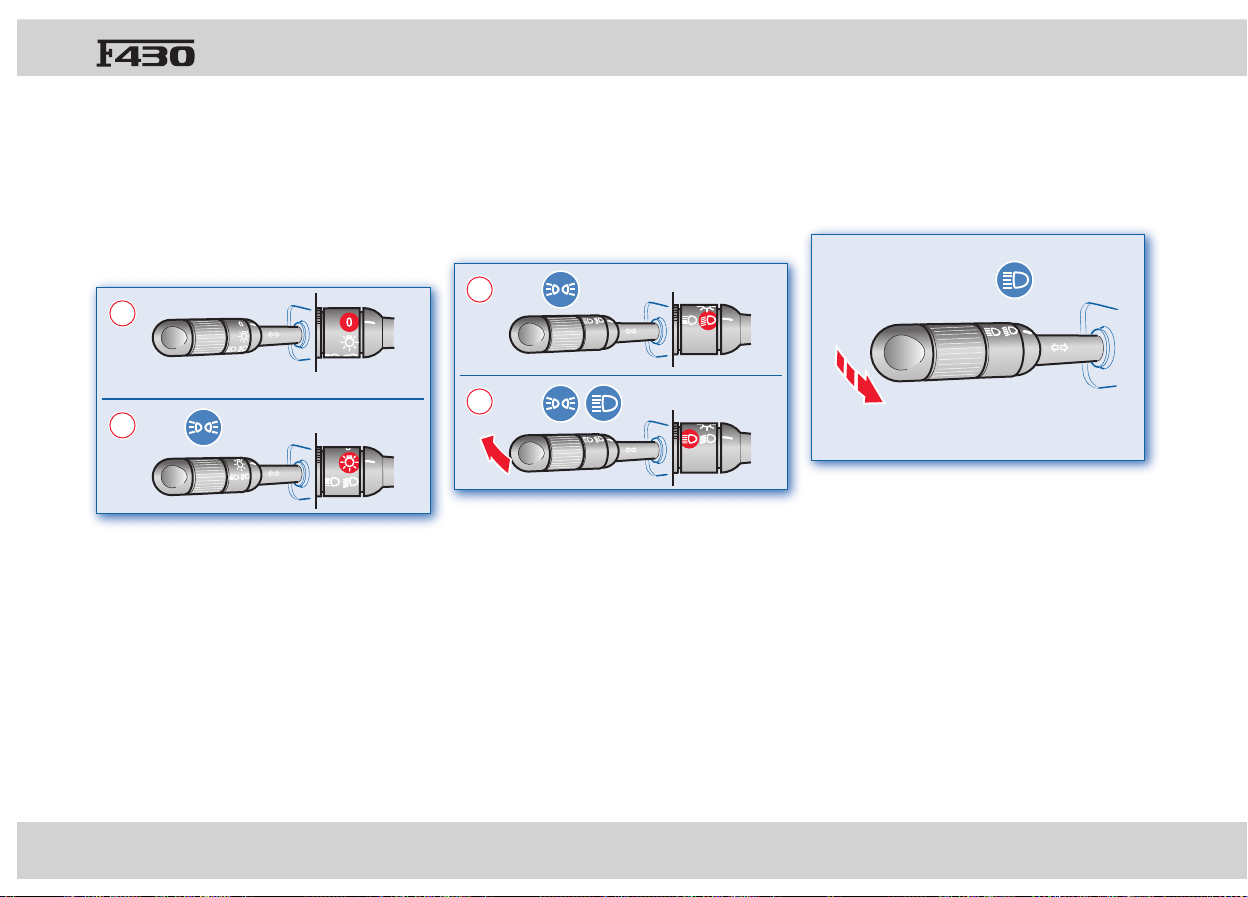
26
Operate the lever to activate:
- the exterior lights:
Position
0:
Lights off.
Position
1 (lever turned by one click):
Position lights and number plate lights on
(the relevant warning light also comes on)
and the instrument panel is backlit.
0
1
Position 2 (lever turned by two clicks):
Low beams on.
Position
3 (lever pushed forward):
High beams on (the relevant warning light
also comes on).
The high beams can only be switched on
with the lever in position
2.
2
3
- headlight fl ashing:
with the high beams, it is activated by
pulling the lever towards the steering
wheel.
The function can be activated with the lever
in any position.
2 - About your vehicle
27
- direction indicators
The direction indicators work only when the
ignition key is in position II
.
The instant the lever is moved, the relevant
warning light on the instrument panel also
comes on.
The lever returns to its central position
when the steering wheel is straightened.
Position
A (lever in rest position):
Direction indicators off.
A
Position B (lever up):
Right-hand side indicators.
B
Position C (lever down):
Left-hand side indicators.
C
8 - Windscreen wiper and washer
control lever
The windscreen wiper and washer operate
only with the ignition key in position II
.
Operate the lever to activate:
- the windscreen wiper:
Position
0:
Windscreen wiper off.
Position (lever lowered by one click):
Adjustable intermittent operation.
Position
I (lever lowered by two clicks):
Continuous slow operation.
Position
II (lever lowered by three clicks):
Continuous fast operation.
0
I
II

28
- to adjust the intermittent speed:
In position
, turn the lever to change the
intermittent speed:
- clockwise = slower intermittent speed;
- anticlockwise = faster intermittent speed.
- windscreen washer:
Pull the lever towards the steering wheel
A
to simultaneously activate the windscreen
washer and the windscreen wiper.
When the lever is released, the windscreen
washer stops while the windscreen wiper
runs a few more strokes.
- headlight washers:
Push the lever in the opposite direction
to the steering wheel B to activate the
headlight washers. When the lever is
released, the spray nozzles go back into
their seats.
For better cleaning, use the headlight
washers when the vehicle speed is below
130 km/h (80 mph).
A
B
9 - Steering wheel adjustment lever
The steering wheel can be adjusted in
height and depth.
• Release the lever by pulling it towards
the steering wheel.
• Adjust the steering wheel position.
• Lock the steering wheel by pushing the
lever back to its original position.
Do not adjust the steering wheel when the
vehicle is moving.
2 - About your vehicle
29
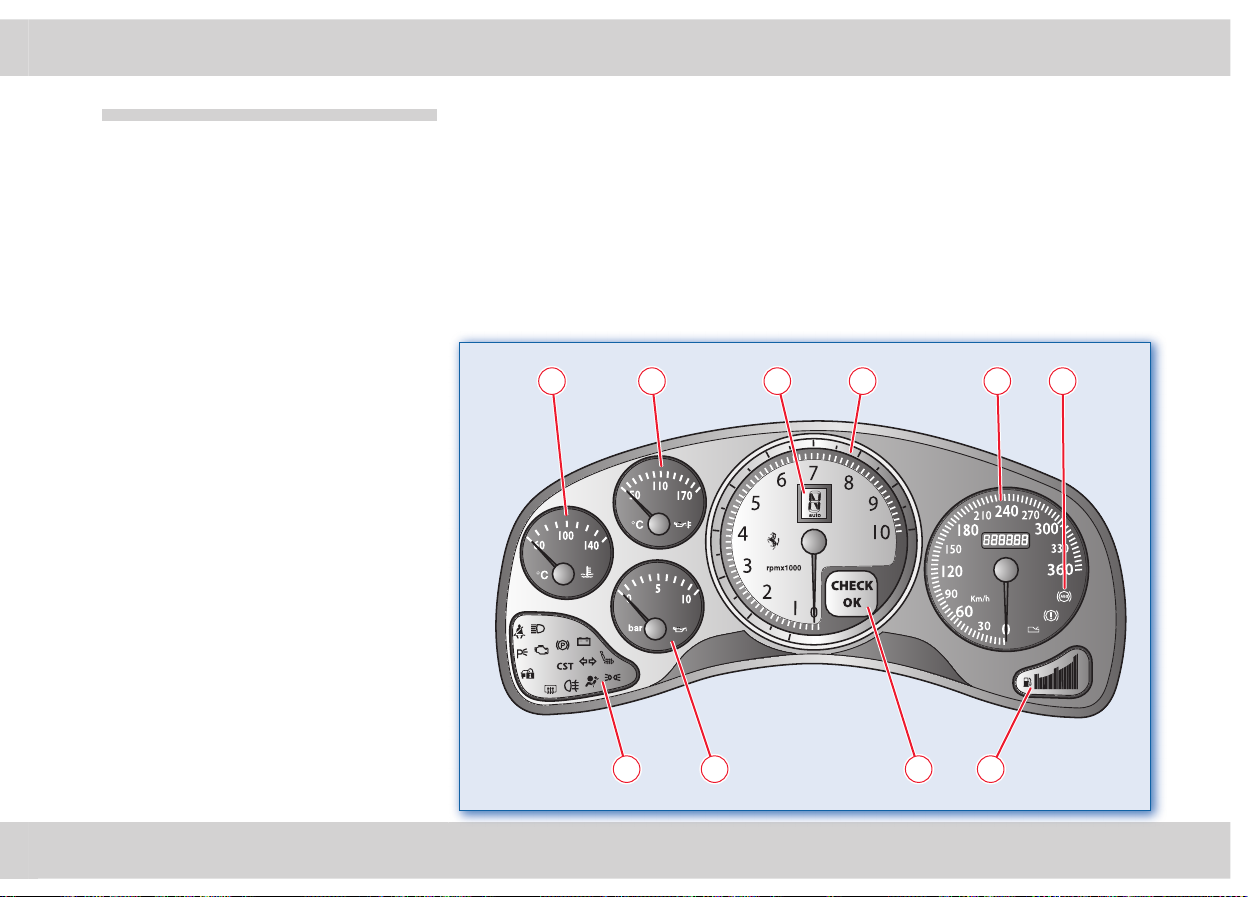
Instrument panel
Electronic speedometer
Rev. Counter
Oil pressure gauge
Oil temperature gauge
Water temperature gauge
Fuel level gauge
Gear display (*)
Warning lights display
Multi-function display
(*) for versions with F1 gearbox only.
30
1 - Electronic speedometer
Indicates the vehicle speed.
Odometer:
Briefl y press button
SET to display the total
B or trip C mileage on the instrument panel.
To reset the trip kilometres, hold button
SET pressed down for at least 2 seconds.
SET
2 - Rev. Counter
Indicates the engine rpm.
Avoid engine speeds in the red sector.
If you exceed the rpm, the ignition/injection
ECU will temporarily cut off the fuel supply.
3 - Engine oil pressure gauge
The red warning light D indicates
insuffi cient pressure.
In normal conditions, it comes on before
starting in order to run a self-test.
If a failure occurs, it lights up when
the engine is running and pressure is
insuffi cient. In this case, turn the engine off
immediately and carry out the necessary
checks.
If the problem persists, contact the
Ferrari
Service Network
.
D