

Ferrari 2003 Challenge Stradale Owner's Manual
Uso e Manutenzione
Owner's Manual
Notice d'entretien
Betriebsanleitung

Uso e Manutenzione
Owner’s Manual
Notice D’entretien
Betriebsanleitung
Il Progetto di Design Ferrari
The Ferrari Design Project
Le Projet de Design Ferrari
Das DesignProjekt Ferrari
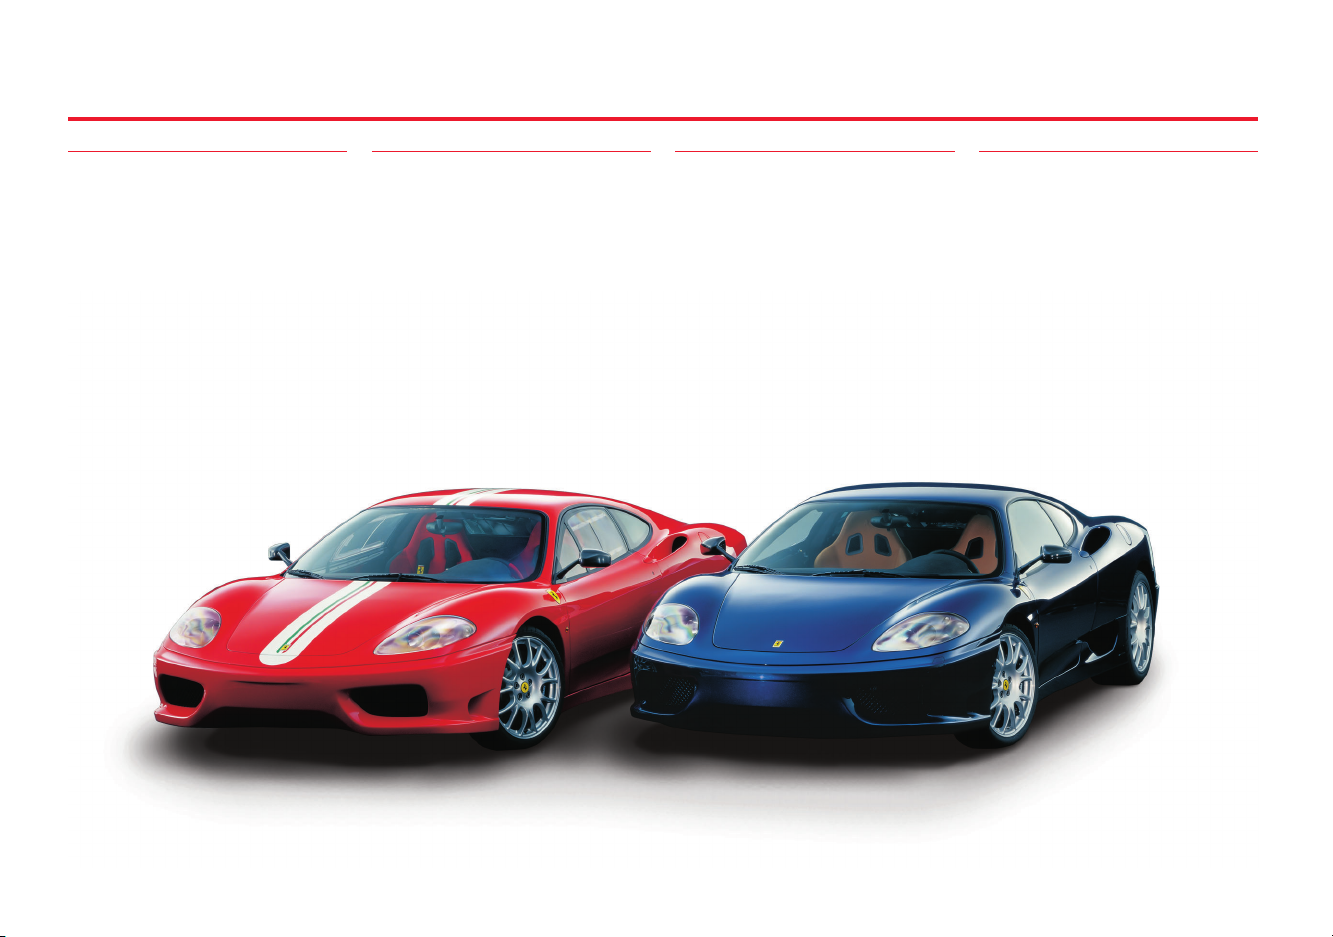
Uno Stile Inedito
Questa vettura, oltre ai contenuti tecnologici sempre più all’avanguardia,
segna il passo nell’evoluzione stilistica
legata alla produzione 8 cilindri
F
ERRARI.
A Brand-new Style
Besides being on the cutting edge of
new technologies, this car makes a
mark in the evolution of the design
which characterises the production
of F
ERRARI 8-cylinder cars.
Un Style Inédit
Cette voiture est non seulement un
modèle de technologies des plus avancées, mais aussi une étape dans l’évolution d’un style lié à la production
des 8 cylindres F
ERRARI.
Ein Ganz Neuer Stil
Dieses Fahrzeug stellt, abgesehen von
seinem avantgardistischen Technologie-Gehalt, einen weiteren Schritt in
der stilistischen Fortentwicklung der
8-Zylinder-F
ERRARI dar.
Introduzione
Introduction
Introduction
Einleitung
Lo scopo di questo libretto di uso e
manutenzione è quello di facilitare
la comprensione del funzionamento
e la manutenzione della vettura.
Si raccomanda di leggerlo attentamente prima di mettersi alla guida; è
parte integrante della vettura e pertanto deve essere sempre conservato
a bordo della stessa.
Consultazione del Libretto
Per facilitarne la lettura, in funzione
di un rapido orientamento, gli argomenti sono stati suddivisi in
SEZIONI
e CAPITOLI. Al loro interno possono
essere individuate facilmente parti
importanti, alle quali è necessario
prestare particolare attenzione:
N
OTA DI ESTREMA ATTENZIONE: la
non osservanza delle istruzio-
ni, può generare una situazione di
RICOLO GRAVE per l’incolumità delle
PE-
persone e l’integrità della vettura!
N
OTA IMPORTANTE: indicazione che
permette di mantenere la perfetta
integrità della vettura e conseguentemente può evitare pericoli alle persone.
This use and maintenance manual has
been designed to help the user understand the car’s operation and
maintenance procedures.
We recommend to read it carefully
before driving the vehicle. Since the
owner’s manual is an integral part of
the vehicle, it must always be kept
onboard.
Consulting the Manual
To render this manual user-friendly
and thus permit a quick understanding of it, the subjects dealt with have
been divided into
TERS. The most important parts con-
SECTIONS and CHAP-
tained herein, which have to be carefully read, are clearly highlighted:
E
XTREMELY IMPORTANT NOTE: the
non-observance of the instruc-
tions contained could
DANGER the passengers’ life and the
SERIOUSLY EN-
car parts!
I
MPORTANT NOTE: it permits to keep
the car in perfect working order and
can therefore avoid any risk for passengers.
Ce manuel d’utilisation et d’entretion
a pour but de faciliter la compréhension du fonctionnement et de l’entretien de la voiture.
Il est conseillé de le lire attentivement
avant de conduire le véhicule; il fait
partie intégrante de la voiture et doit
donc toujours être conservé à son bord.
Consultation du Carnet
Pour faciliter sa lecture, suivant une
orientation rapide, les arguments ont
été sous-divisés en
TRES. A l’intérieur de ces divisions,
SECTIONS et CHAPI-
on peut repérer les parties importantes, auxquelles il faut prêter particulièrement attention:
N
OTE D’EXTRÊME IMPORTANCE: le
non respect de ces instructions
peut mettre en
GRAVE DANGER les per-
sonnes et l’état de la voiture !
OTE IMPORTANTE: indication permet-
N
tant de maintenir le bon fonctionnement de la voiture et par conséquent
d’éviter de mettre en danger les personnes.
Ziel dieser Betriebsanleitung ist es, das
Verständnis für die Funktionsweise und
die Wartung des Fahrzeugs zu erleichtern.
Es empfiehlt sich, die Betriebsanleitung
vor Antritt Ihrer ersten Fahrt aufmerksam zu lesen. Sie ist ein wesentlicher
Bestandteil der Fahrzeugaustattung und
sollte daher stets mitgeführt werden.
Benutzung der Anleitung
Um die Benutzung zu erleichtern, sind
die Inhalte in A
TEL gegliedert. Die wichtigsten Aus-
BSCHNITTE und KAPI-
sagen sind deutlich hervorgehoben.
BESONDERS WICHTIGER HINWEIS:
Bei Nichtbeachten der Anwei-
sungen droht eine
FÄHRDUNg Ihrer persönlichen Sicherheit
SCHWERWIEGENDE G E-
und die Beschädigung Ihres Fahrzeugs.
W
ICHTIGER HINWEIS: Hilfreiche An-
gaben, um den perfekten technischen
Zustand Ihres Fahrzeugs zu erhalten, und damit Gefahrensituationen
für seine Insassen zu vermeiden.
4

Abbreviazioni
Alcune descrizioni e termini con significati particolari, sul presente libretto sono riportati abbreviati:
A.C. -ARIA CONDIZIONATA
ABS -ANTI BLOKIER SYSTEM - sistema
antibloccaggio delle ruote in
frenata
ASR -ANTRIEBS SCHLUPF REGELUNG -
regolazione dello slittamento in
accelerazione
EBD -ELECTRONIC BRAKE-FORCE
DISTRIBUTION - ripartitore di
frenata a controllo elettronico
ECU -ELECTRONIC CONTROL UNIT -
centralina elettronica di controllo
ORMULA 1 - cambio elet-
“F1” -F
troattuato derivato da tecnologie
impiegate nel settore corse.
L.C. - LAUNCH CONTROL - strategia
per partenze da fermo prestazionali.
Abbreviations
Some words and descriptions relating to specific components or systems have been shortened as follows:
A.C. -AIR CONDITIONING
ABS -ANTI BLOKIER SYSTEM -
antilock system for the wheels
during braking
ASR -ANTRIEBS SCHLUPF REGELUNG -
slip regulation during acceleration
EBD -ELECTRONIC BRAKE-FORCE
DISTRIBUTION - brake force distribution with electronic control
ECU -ELECTRONIC CONTROL UNIT -
ORMULA 1 - electrically-
“F1” -F
controlled gearbox, designed on the
basis of technologies used for
racing cars.
L.C. - LAUNCH CONTROL – control
strategy for performance starts
with the vehicle stopped.
Abbréviations
Certaines descriptions ayant un sens
particulier sont reportées en abrégé
dans ce carnet comme suit:
A.C. -AIR CONDITIONNÉ
ABS -ANTI BLOKIER SYSTEM - système
d’antiblocage des roues lors des
freinages
ASR -ANTRIEBS SCHLUPF REGELUNG -
réglage du dérapage en accélération
EBD -ELECTRONIC BRAKE-FORCE
Distribution - réglage électronique
de distribution de freinage entre axe
avant et axe arrière
ECU -ELECTRONIC CONTROL UNIT -
boîtier électronique de commande
“F1” -F
commandée électroniquement et créée
suivant les technologies utilisées pour
les voitures de courses.
L.C. - LAUNCH CONTROL - stratégie
pour départs performants à l’arrêt.
ORMULA 1 - boîte de vitesses
Abkürzungen
Einige Beschreibungen und Fachausdrücke mit besonderer Bedeutung
werden in der vorliegenden Anleitung
in abgekürzter Form verwendet:
K.A. -KLIMAANLAGE
ABS -ANTI BLOKIER SYSTEM -
Antiblockiersystem der Räder beim
Bremsvorgang
ASR -ANTRIEBS SCHLUPF REGELUNG -
Antriebsschlupfregelung
EBD -ELECTRONIC BRAKE-FORCE
DISTRIBUTION - elektronischer
Bremskraftverteiler
ECU -ELECTRONIC CONTROL UNIT -
elektronisches Steuergerät
“F1” -F
gesteuertes Getriebe, dessen
Technik aus dem Rennsport
abgeleitet ist.
L.C. - LAUNCH CONTROL – Strategie
für Leistungsstarts aus dem Stand.
ORMULA 1 - elektronisch
1
2
3
4
5
6
Aggiornamento
L’alto livello qualitativo della vettura è garantito da un continuo perfezionamento, quindi possono risultare eventuali differenze fra il presente
libretto e la Sua vettura.
Tutte le caratteristiche e illustrazioni
contenute in questo libretto sono relative al momento della stampa.
Updating
The high quality of our vehicles is
guaranteed by continuous technical
perfecting, therefore it is possible that
your car somehow differs from the
descriptions contained in this manual.
All the features and illustrations contained herein are valid as of the date
of publication.
Mise à Jour
Un perfectionnement permanent des
techniques garantit les prestations de
haut niveau de cette voiture, c’est
pourquoi il se peut que vous trouviez des différences entre les informations publiées dans ce carnet et le
fonctionnement de votre voiture.
Toutes les descriptions et illustrations
dans ce carnet dépendent du moment
où elles ont été publiées.
Aktualisierung
Das hohe Qualitätsniveau des Fahrzeugs wird durch ständige Verbesserungen noch weiter gesteigert. Daher
kann die vorliegende Betriebsanleitung
in einzelnen Punkten vom technischen
Stand Ihres Fahrzeugs abweichen.
Alle in dieser Anleitung enthaltenen
technischen Beschreibungen und Abbildungen entsprechen dem Stand bei
Drucklegung.
5
7
8

Servizio Assistenza
Le informazioni contenute nel presente libretto sono limitate a quelle
strettamente necessarie all’uso ed alla
buona conservazione della vettura.
Attenendosi scrupolosamente alla
osservanza di esse, il Proprietario
potrà sicuramente trarre dalla sua
vettura le maggiori soddisfazioni ed
i migliori risultati.
Consigliamo inoltre di fare eseguire
tutte le operazioni di manutenzione e
di controllo presso le nostre Agenzie o
presso le Officine da noi autorizzate,
poiché dispongono di personale specializzato e di attrezzature adeguate.
Vedi libretto “O
VENDITA E ASSISTENZA” per la disloca-
zione dei C
RGANIZZAZIONE DI
ONCESSIONARI e SERVIZI
AUTORIZZATI FERRARI.
Il S
ERVIZIO ASSISTENZA TECNICA della
ERRARI è a completa disposizione dei
F
Signori Clienti per tutte le informazioni ed i consigli richiesti.
Service and Assistance
This Owner’s Manual contains only
the information which is deemed
necessary for the use and good maintenance of your car.
Provided service schedules are respected, you can be sure of obtaining
maximum satisfaction and optimum
results from your car.
We strongly recommend that you have
all maintenance and service operations carried out by F
ERRARI SERVICE
CENTERS or Authorized Workshops
only, where skilled personnel and
special tools are available.
Refer to the “S
GANIZATION” booklet for details on
your nearest A
ALES AND SERVICE OR-
UTHORIZED FERRARI
DEALERS and SERVICE CENTERS.
Customers are invited to contact the
ERRARI TECHNICAL SERVICE for any
F
further information or advice concerning their cars.
Service d’Assistance
Ce carnet contient les informations
strtictement nécessaires au bon usage et à l’entretien de la voiture.
En respectant scrupuleusement ces
instructions, le Propriétaire pourra
obtenir les meilleures satisfactions et
performances de son véhicule.
Nous conseillons en outre de faire
effectuer toutes les opérations d’entretien et de contrôle auprès de nos
Concessions ou des A
TELIERS AGRÉÉS
FERRARI qui disposent de personnel
spécialisé et d’outillages adaptés.
Voir carnet “O
ET D’ASSISTANCE” pour la liste des
C
ONCESSIONNAIRES ET CENTRES AGREES
RGANISATION DE VENTE
FERRARI.
Le S
ERVICE D’ASSISTANCE TECHNIQUE
FERRARI se tient à la disposition des
clients pour fournir tous renseignements ou conseils éventuels.
Kundendienst
Die in der vorliegenden Anleitung
gegebenen Informationen vermitteln
Kenntnisse, die zum ordnungsgemäßen Gebrauch und dem Erhalt eines
einwandfreien technischen Zustands
des Autos nötig sind.
Werden die hier enthaltenen Hinweise
gewissenhaft befolgt, wird dieses
Fahrzeug seinem Eigentümer mit Sicherheit größtes Fahrvergnügen und
hervorragende Leistungen bieten.
Wir empfehlen zudem, alle Kontrollund Wartungsmaßnahmen bei unseren Kundendienststellen oder in von
uns autorisierten Werkstätten durchführen zu lassen, da diese über Fachpersonal und geeignete Werkstatteinrichtungen verfügen.
Die Anschriften der F
TRAGSHÄNDLER und AUTORISIERTEN
ERRARI-VER-
WERKSTÄTTEN befinden sich in der
Broschüre “V
UND KUNDENDIENST”.
Der
TECHNISCHE KUNDENDIENST FERRARI
ERKAUFSORGANISATION
steht unseren Kunden jederzeit für
weitere Informationen und Ratschläge
zur Verfügung.
Parti di Ricambio
Nel caso di sostituzioni di particolari o
di rifornimenti si raccomanda l'uso di
parti di ricambio originali e dei lubrificanti consigliati dalla F
La garanzia F
ERRARI decade se per la
ERRARI.
riparazione vengono impiegati ricambi che non siano R
ICAMBI ORIGINALI
FERRARI.
6
Spare Parts
If you have to replace any parts or
fluids, you are advised to use original parts and lubricants recommended by F
ERRARI.
The F
ERRARI warranty is forfeited if
repair work is carried out using spare
parts which are not O
RI PARTS.
RIGINAL FERRA-
Pièces de Rechange
En cas de remplacement de pièces ou de
ravitaillement, il est conseillé d’utiliser
les pièces de rechange d’origine et les
lubrifiants préconisés par F
La garantie F
ERRARI n’est plus vala-
ble si d’autres pièces que les P
D’ORIGINE FERRARI sont utilisées pour
ERRARI.
IECES
une réparation.
Ersatzteile
Für den Austausch von Teilen oder Betriebsflüssigkeiten sollten Original-Ersatzteile und die von F
ERRARI empfohle-
nen Schmiermittel verwendet werden.
Die F
ERRARI Garantie verfällt, wenn
für Reparaturmaßnahmen keine O
GINAL-FERRARI-ERSATZTEILE verwendet
RI-
werden.
TELAIO
Questa vettura utilizza un telaio interamente costruito in alluminio.
Nel caso il telaio venga dan-
neggiato in seguito ad incidente rivolgersi esclusivamente alla
R
ETE ASSISTENZA FERRARI.
L’utilizzo di parti di ricambio non originali e interventi eseguiti da personale
non specializzato, possono avere gravi
conseguenze per la vettura.
Il telaio, in condizioni di normale
utilizzo, non necessita di alcuna manutenzione; è comunque buona norma rivolgersi, agli intervalli previsti
dal piano di manutenzione, alla R
ASSISTENZA FERRARI per le opportune
verifiche.
Qualora si sia costretti a far
eseguire riparazioni in emergenza si consiglia, appena possibile,
di far controllare la vettura presso
la R
ETE ASSISTENZA FERRARI.
ETE
Chassis
The chassis is wholly in aluminium.
If the chassis is damaged after
an accident, refer only to the
F
ERRARI SERVICE NETWORK.
The use of non-genuine spare parts
and servicing made by non-skilled
staff can seriously damage the car.
In standard utilization conditions, the
chassis doesn’t require any maintenance; anyway, it is advisable to have
the car checked at regular intervals
according to the maintenance schedule by the F
again by the F
WORK as soon s possible.
ERRARI SERVICE NETWORK.
If emergency repairs are required, have the car checked
ERRARI SERVICE NET-
Chassis
Cette voiture utilise un châssis entièrement réalisé en aluminium.
Au cas où le châssis serait endommagé suite à un accident,
s’adresser exclusivement aux C
TRES AGRÉÉS FERRARI.
L’emploi de parties de rechange pas
d’origine et les interventions exécutées par du personnel non spécialisé
peuvent entraîner de graves conséquences pour la voiture.
Dans des conditions d’utilisation normales, le châssis ne demande aucune opération d’entretien ; il est toutefois conseillé,
aux intervalles prévus par le plan d’entretien, de s’adresser aux C
FERRARI pour les contrôles nécessaires.
En cas de réparations d’urgence,
il est conseillé de faire contrôler
la voiture dans les C
RARI dès que possible.
ENTRES A GRÉÉS
ENTRES A GRÉÉS FER-
EN-
Chassis
Das Chassis des Fahrzeuges besteht
vollständig aus Aluminium.
Im Falle einer Beschädigung des
Rahmens infolge eines Autounfalls wende man sich für die Instandsetzung ausschließlich an eine F
TRAGSWERKSTATT.
Der Einsatz von nicht originalen Ersatzteilen oder nicht fachgerecht ausgeführten Reparaturen kann zu schwerwiegenden Schäden am Fahrzeug führen.
Das Chassis bedarf bei normalem
Einsatz keiner besonderen Wartung.
Es ist jedoch empfehlenswert, sich
zu den im Wartungsplan vorgeschriebenen Wartungsabständen für die
Kontrollarbeiten an eine F
TRAGSWERKSTATT zu wenden.
In Notfällen, wenn es nicht mög-
lich sein sollte, Reparaturen von
einer F
ERRARI-VERTRAGSWERKSTATT durch-
führen zu lassen, lassen Sie das Fahrzeug sobald wie möglich von einem
F
ERRARI-Fachmann nachprüfen.
ERRARI-VER-
ERRARI-VER-
1
2
3
4
5
6
7
8
7

Indice
Summary
Sommaire
Inhaltsverzeichnis
8

Dati di Identificazione
Dati di Identificazione
Identification Data
Identification Data
Données d’Identification
Données d’Identification
Identifikationsdaten
Identifikationsdaten
Conoscenza della Vettura
Conoscenza della Vettura
Controls Running Instructions
Controls Running Instructions
Utilisation de la Voiture
Utilisation de la Voiture
Gebrauch des Fahrzeugs
Gebrauch des Fahrzeugs
Guida della Vettura
Guida della Vettura
Car Driving
Conduite de la Voiture
Conduite de la Voiture
Procédure de Secours
Procédure de Secours
Données Techniques
Données Techniques
Car Driving
Fahren
Fahren
Emergenza
Emergenza
Emergency
Emergency
Notfälle
Notfälle
Manutenzione
Manutenzione
Maintenance
Maintenance
Entretien
Entretien
Wartung
Wartung
Dati Tecnici
Dati Tecnici
Technical Data
Technical Data
Technische Daten
Technische Daten
1
2
3
4
5
6
Informazioni Tecniche
Informazioni Tecniche
Technical Information
Technical Information
Informations Techniques
Informations Techniques
Technische Informationen
Technische Informationen
Indice degli Argomenti
Indice degli Argomenti
Table of Contents
Table of Contents
Table des Matières
Table des Matières
Inhaltsverzeichnis
Inhaltsverzeichnis
7
8
9

10

Dati di Identificazione
Identification Data
Données
d’Identification
Identifikationsdaten
1
Targhette di Omologazione 1.2
Targhette di Istruzione 1.3
Homologation Plates 1.2
Instruction Plates 1.3
Plaquettes d’Homologation 1.2
Plaquettes d’Instruction 1.3
Zulassungskennschilder 1.2
Hinweisschilder 1.3
2
3
4
5
6
7
1.1
8
5
6
7
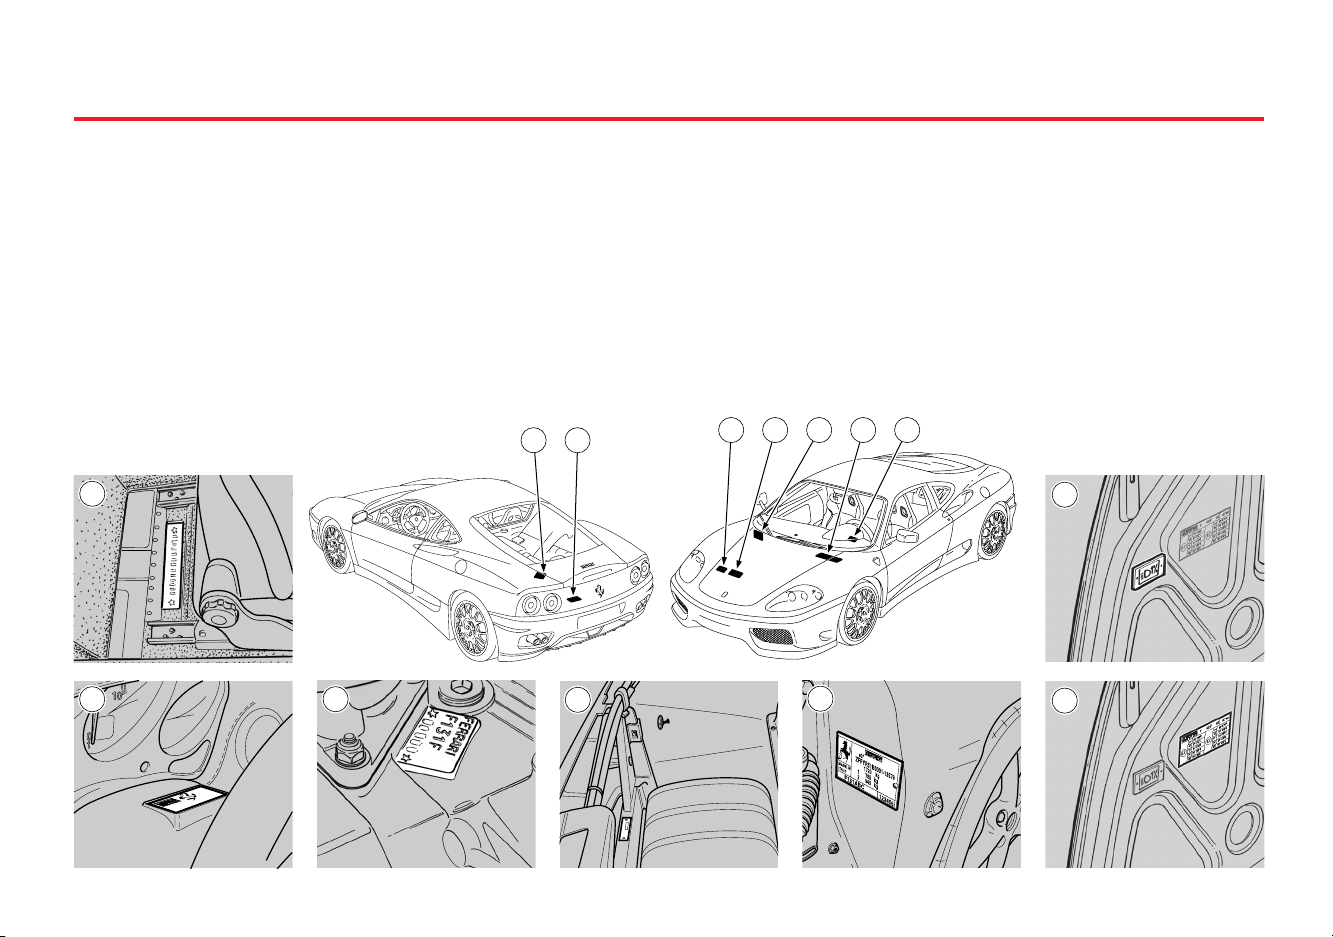
Targhette di Omologazione
Homologation Plates
Plaquettes
d’Homologation
Zulassungskennschilder
Dati di riconoscimento:
1 Punzonatura numero di telaio.
2 Targhetta riepilogativa tipo e nu-
mero di telaio.
3 Punzonatura tipo e numero di mo-
tore.
4 Targhetta assembly number.
Targhette di omologazione:
5 Identificazione vettura.
6 Omologazione ECE.
7 Omologazione fari abbaglianti.
1
2
3
Identification plates:
1 Punched chassis number.
2 Chassis type and number plate.
3 Punched engine type and number.
4 Assembly number plate.
Homologation plates:
5 Car identification.
6 ECE approval.
7 High beam-type approval.
3 4
4
Données d’identification:
1 Gravage numéro de châssis
2 Plaquette récapitulative type et nu-
méro de châssis.
3 Gravage type et numéro de mo-
teur.
4 Plaquette numéro d’assemblage.
Plaquette d’homologation:
5 Identification de la voiture.
6 Homologation CEE.
7 Homologation feux de croisement.
6 1 27 5
Fahrzeugdaten:
1 Aufgeprägte Fahrgestellnummer.
2 Typ und Fahrgestellnummer.
3 Aufgeprägte Typen- und Motor-
nummer.
4 Assembly-Nr.-Schild.
Zulassungsschilder:
5 Fahrzeugkennschild.
6 ECE-Zulassung.
7 Zulassung Fernlichter.
1.2
13
11
12
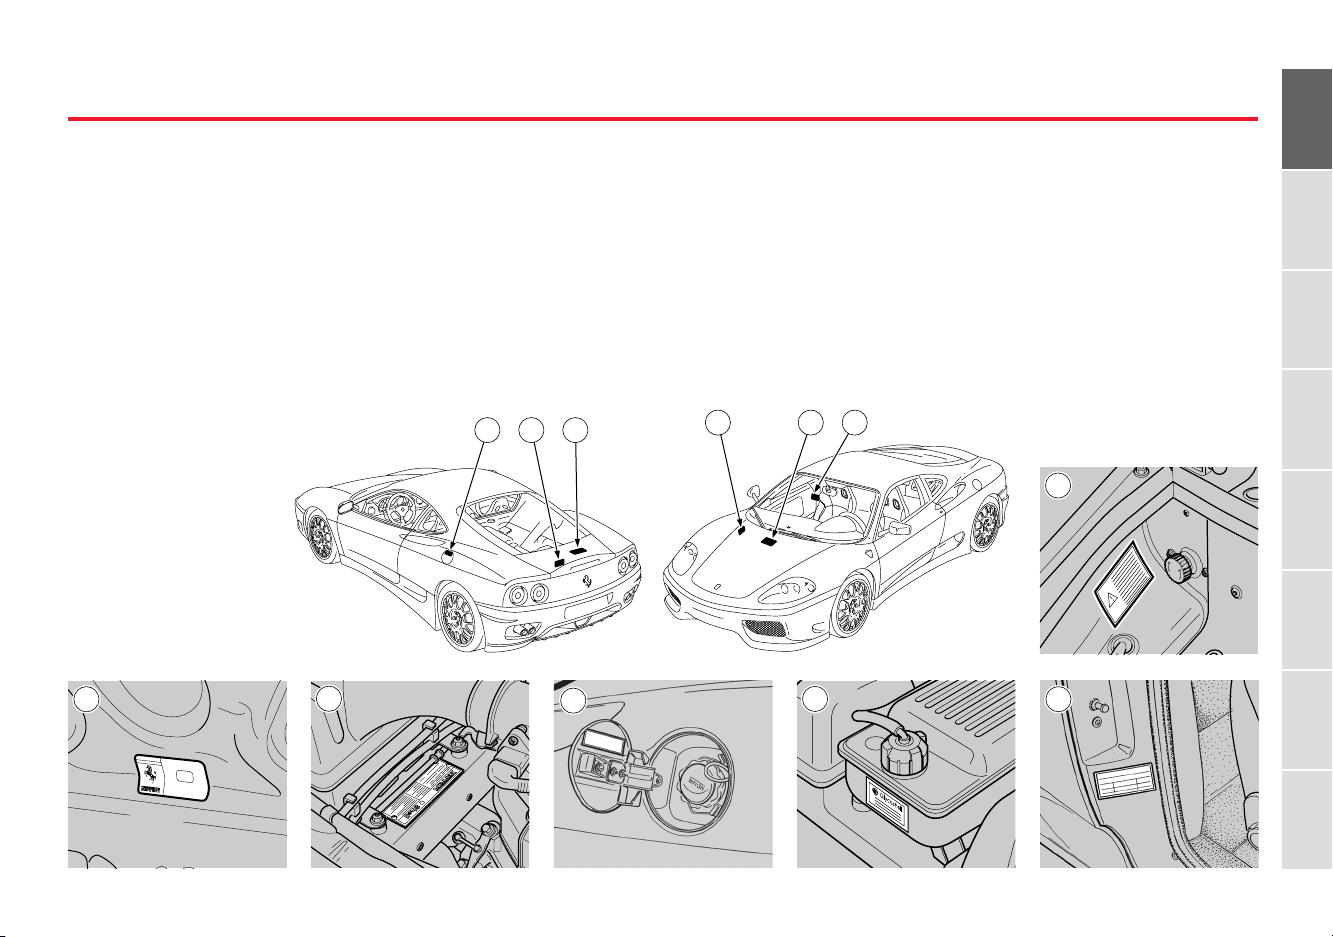
Targhette di Istruzione
Instruction Plates
Plaquettes
d’Instruction
Hinweisschilder
1
Targhette di istruzione:
8 Targhetta vernice.
9 Targhetta lubrificanti.
10 Targhetta combustibile.
11 Targhetta anticongelante.
12 Targhetta pressione pneumatici.
13 Targhetta uso stacca batteria.
8
Instruction plates:
8 Paint plate.
9 Lubricant plate.
10 Fuel plate.
11 Anti-freeze plate.
12 Tyre pressure plate.
13 Battery master switch instruction
plate.
11 910
9
10
Plaquettes d’instruction:
8 Plaquette référence peinture.
9 Plaquette lubrifiants.
10 Plaquette combustible.
11 Plaquette liquide de refroidisse-
ment.
12 Plaquette pression des pneus.
13 Plaquette instructions coupe-bat-
teri.
8 1213
Hinweisschilder:
8 Lack
9 Schmiermittel
10 Kraftstoff
11 Frostschutzmittel
12 Reifendrücke
13 Hinweisschild für den Batterie-
trennschalter.
2
3
4
5
6
7
8
1.3

1.4

Conoscenza della Vettura
Controls Running Instructions
Utilisation de la Voiture
Gebrauch des Fahrzeugs
1
Chiavi 2.2
Sistema Antifurto 2.3
Plancia Strumenti e Comandi 2.4
Dispositivo di avviamento 2.7
Leve al Volante 2.9
Quadro Strumenti 2.13
Spie di Controllo 2.19
Multispia 2.23
Interruttori di Comando 2.28
Porte 2.35
Alzacristalli 2.38
Sedili “Racing” 2.41
Regolazione del Volante 2.42
Specchi Retrovisori 2.43
Sicurezza 2.44
Cinture di Sicurezza 2.50
Airbag 2.59
Alette Parasole 2.64
Orologio 2.65
Illuminazione Interna 2.66
Presa 12 Volts 2.67
Cofano Motore 2.68
Cofano Vano Bagagli 2.69
Tappo Serbatoio Carburante 2.71
Leva Freno a Mano 2.73
Climatizzazione 2.74
Impianto Hi-FI (a richiesta) 2.80
Sistema Radio-Navigazione
Satellitare (a richiesta) 2.82
Keys 2.2
Alarm System 2.3
Dashboard Instruments
and Controls 2.4
Ignition Device 2.7
Steering Wheel levers 2.9
Instrument Panel 2.13
Warning Lights 2.19
Multi-function Warning
Lights 2.23
Control Switches 2.28
Doors 2.35
Electric Power Windows 2.38
“Racing” Seats 2.41
Adjusting the Steering Wheel 2.42
Outside and Inside
Rear-view Mirrors 2.43
Safety 2.44
Seatbelts 2.50
Airbag 2.59
Sun Visors 2.64
Clock 2.65
Internal Lighting 2.66
12 Volt socket 2.67
Engine Compartment Lid 2.68
Luggage Compartment Bonnet 2.69
Fuel Tank Cap 2.71
Hand Brake Lever 2.73
Air Conditioning 2.74
Hi-FI system (optional) 2.80
Satellite Radio-Navigation
System (optional) 2.82
Clés de la Voiture 2.2
Système Antivol 2.3
Planche de Bord et Commandes 2.4
Dispositif de Démarrage 2.7
Leviers de Volant 2.9
Tableau de Bord 2.13
Témoins de Contrôle 2.19
Voyeur à fonctions Multiples 2.23
Interrupteurs de Commande 2.28
Portes 2.35
Lève-glaces 2.38
Sièges “Racing” 2.41
Réglage du Volant 2.42
Rétroviseurs 2.43
Sécurité 2.44
Ceintures de Sécurité 2.50
Airbag 2.59
Pare-soleil 2.64
Montre 2.65
Eclairage Intérieur 2.66
Prise de 12 volts 2.67
Capot Moteur 2.68
Capot Compartiment
à Bagages 2.69
Bouchon Réservoir à Essence 2.71
Levier Frein à Main 2.73
Air Conditionné 2.74
Système Hi-FI (sur demande) 2.80
Système Radio-Navigation
Satellitaire (en option) 2.82
Schlüssel 2.2
Diebstahl-sicherungssystem 2.3
Instrumenten- und Schalttafel 2.4
Anlassvorrichtung 2.7
Bedienhebel am Lenkrad 2.9
Instrumententafel 2.13
Kontrollleuchten 2.19
Multifunktions-Anzeige 2.23
Bedienungsschalter 2.28
Fahrzeugtüren 2.35
Fensterheber 2.38
Sitze “Racing” 2.41
Einstellen des Lenkrads 2.42
Rück- und Außenspiegel 2.43
Sicherheit 2.44
Sicherheitsgurte 2.50
Airbag 2.59
Sonnenblenden 2.64
Uhr 2.65
Innenbeleuchtung 2.66
12-Volt-Steckdose 2.67
Motorhaube 2.68
Kofferraumhaube 2.69
Tankklappe 2.71
Handbremshebel 2.73
Klimaanlage 2.74
Hi-FI-Anlage (auf Wunsch) 2.80
Satelliten-Radionavigations-
system (optional) 2.82
2.1
2
3
4
5
6
7
8
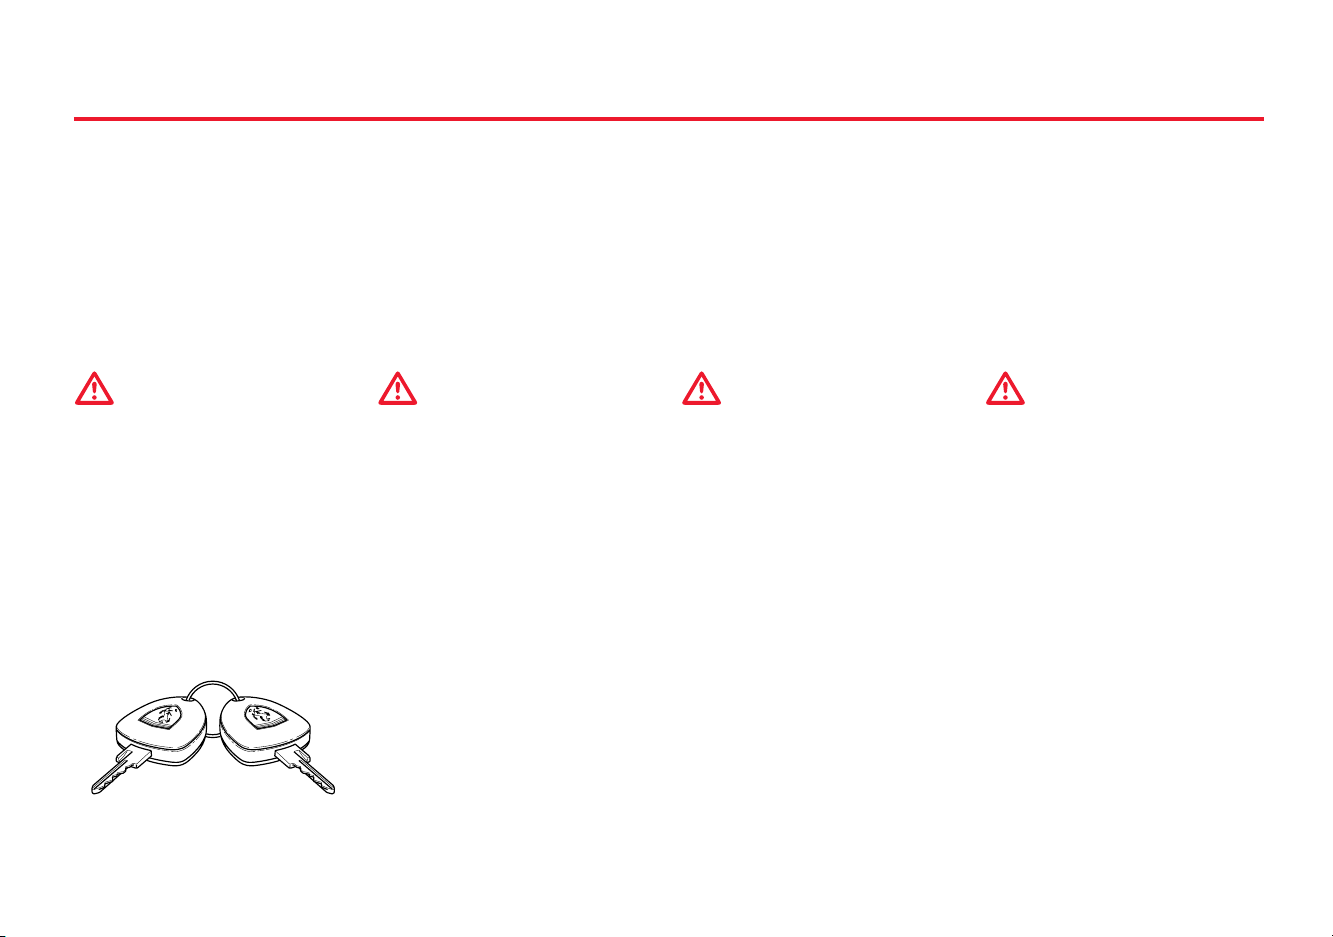
Chiavi
Keys
Clés de la Voiture
Schlüssel
Alla consegna della vettura vengono
fornite due chiavi uguali che servono
per:
•chiusura centralizzata porte;
•avviamento della vettura;
•disarmo del sistema antifurto;
Insieme alle chiavi viene fornito un
talloncino sul quale è riportato il numero di identificazione della chiave.
Aver cura di riportare il nu-
mero di codice della chiave,
nell’apposito spazio sulla tessera di
garanzia.
E’ possibile richiedere un duplicato
delle chiavi comunicandone il numero di identificazione alla R
STENZA FERRARI.
ETE ASSI-
Your Ferrari is delivered with two
identical keys. These operate:
•the central door locking system;
•the ignition;
•alarm system disabling function;
The keys are supplied with a label
attached on which the key identification number is written.
Remember to write the key
code number in the relevant
space on the guarantee card.
If the key is lost at any time, you can
ask for a duplicate from the F
ASSISTANCE NETWORK, remembering to
quote the identification number.
ERRARI
La voiture est livrée avec deux clés
identiques qu’on utilise pour:
• le verrouillage centralisé des portes;
• le démarrage de la voiture;
• le désarmement du système antivol;
Une plaquette sur laquelle est reporté
le numéro d’identification des clés
est attachée aux clés de la voiture.
Veiller à reporter le numéro
de code de la clé à l’emplacement prévu sur le carnet de garantie.
Il est possible de demander un double des clés en communiquant le numéro d’identification au RESEAU D’AS-
SISTANCE FERRARI.
Bei Übergabe des Fahrzeugs werden
zwei gleiche Schlüssel ausgehändigt,
die zu folgendem Gebrauch dienen:
•Zentralverriegelung der Türen;
•Anlassen des Fahrzeugs;
• Abschalten des Diebstahlsicherungssystems;
Zusammen mit den Schlüsseln wird
ein Anhänger mit der Identifikationsnummer des Schlüssels ausgehändigt.
Die Codenummer des Schlüssels in das entsprechende Feld
auf der Garantiekarte eintragen.
Ein Duplikat des Schlüssels kann
unter Angabe der Identifikationsnummer beim F
gefordert werden.
ERRARI KUNDENDIENST an-
2.2
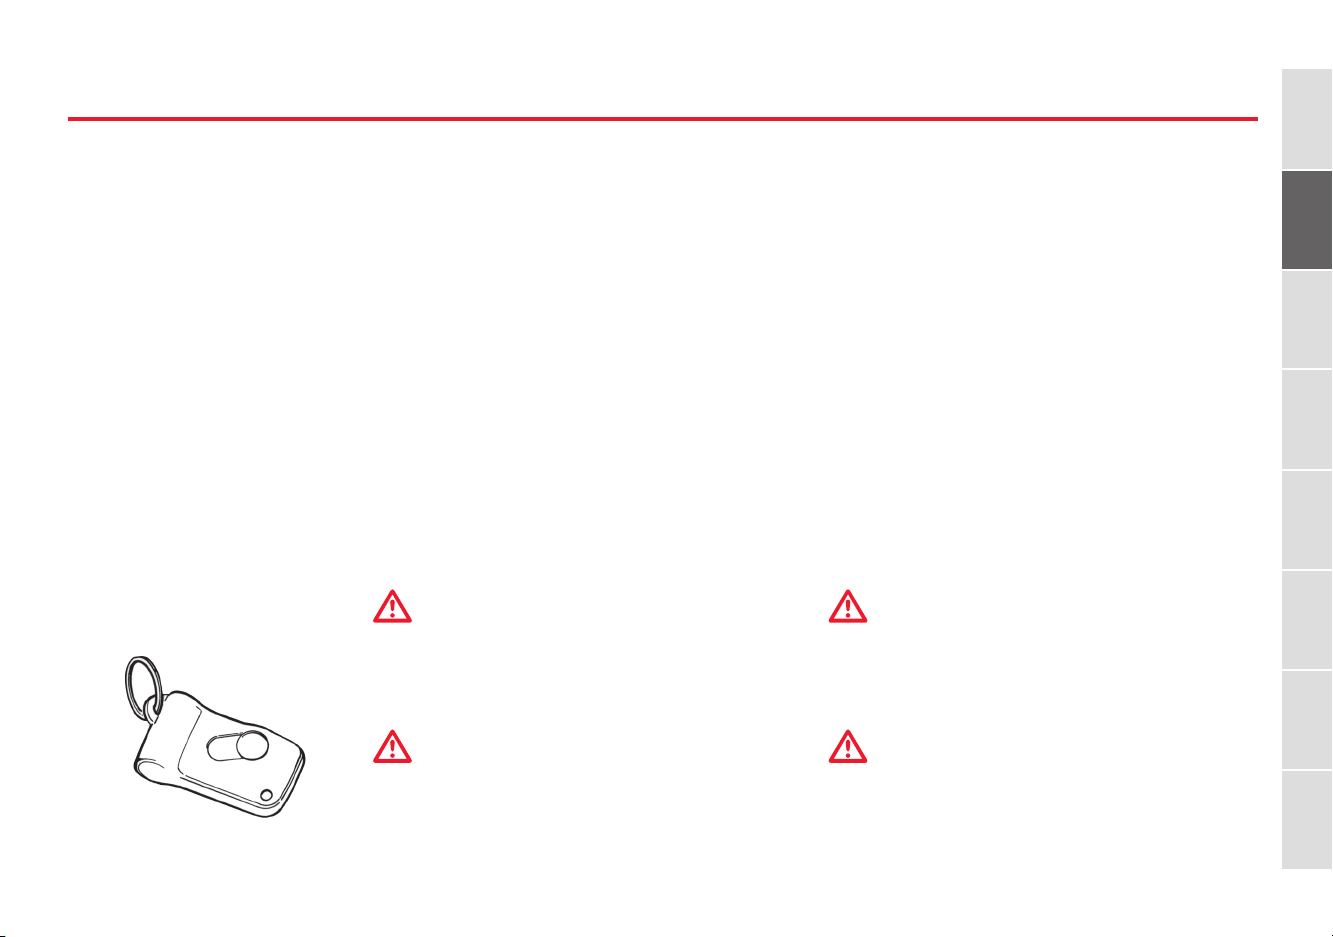
Sistema Antifurto
Alarm System
Système Antivol
Diebstahlsicherungssystem
1
Oltre alle chiavi vengono forniti:
• un radiocomando di colore rosso
(master);
• due radiocomandi di colore nero
(sleve) di normale uso.
Si consiglia di conservare il “master”
in luogo sicuro (non in vettura), e
utilizzarlo solo in casi eccezionali.
I radiocomandi servono per:
• attivare/disattivare il sistema antifurto;
• azionare a distanza l’apertura/chiusura delle porte.
Oltre alle informazioni qui riportate, aver cura di leggere attentamente
il libretto “S
nito con la vettura, per il corretto
utilizzo del sistema.
ISTEMA ANTIFURTO” for-
In addition to the keys, the car is
supplied with the following items:
•one red master remote control;
•two black slave remote controls for
use in the usual way.
You are advised to keep the “mas-
ter” remote control in a safe place
(not in the car), and only use in emergencies.
The remote controls:
•enable/disable the alarm system;
• enable the door locking/unlocking
system from a distance.
To use the system correctly remember to read the “A
let supplied with the car, as well as
the information above.
Il mancato funzionamento del sistema tramite il
radiocomando, può in alcuni casi essere provocato
da interferenze dovute alla vicinanza di antenne radio/
trasmettitori che disturbano le frequenze di trasmissione.
Per far in modo che il sistema riprenda le sue funzioni,
occorre spostare la vettura di alcune decine di metri.
The remote control system may sometimes fail to
work correctly if there are radio aerials or transmitters in the vicinity which could disturb the transmission frequency. To make the system work, simply move
the car about 10m away.
LARM SYSTEM” book-
Avec les clés, sont fournis:
• une commande à distance de couleur rouge (maîtresse);
• deux commandes à distance de couleur noire (esclaves) à usage normal.
Il est conseillé de conserver la commande à distance “maîtresse” en lieu
sûr (non dans la voiture), et de l’utiliser uniquement en cas exceptionnels.
Les commandes à distance servent à:
• activer/désactiver le système antivol;
•commander à distance le verrouillage/déverrouillage des portes.
Outre les informations reportées ici,
pour un bon usage du système, veiller
à lire attentivement le livret concernant le fourni avec la voiture.
Zusätzlich zu den Schlüsseln wird
folgendes übergeben:
•Eine rote Fernsteuerung (Master);
•Zwei schwarze Fernsteuerungen
(Slave) für den normalen Gebrauch.
Es wird empfohlen, den “master” an
einem sicheren Ort aufzubewahren
(nicht im Fahrzeug), und ihn nur in
Ausnahmefällen zu verwenden.
Die Fernsteuerungen dienen zur:
• Aktivierung/Deaktivierung des Diebstahlsicherungssystems;
•Fernbedienung zum Entriegeln/Verriegeln der Fahrzeugtüren.
Zur richtigen Anwendung des Systems
sollte, zusätzlich zu den hier gegebenen Informationen, die zusammen mit
dem Fahrzeug gelieferte Betriebsanleitung “D
aufmerksam gelesen werden.
Un mauvais fonctionnement du système de com-
mande à distance peut, dans certains cas, être provoqué par des interférences dues à la proximité d’antennes
radio/émetteurs qui troublent les ondes de transmission.
Pour permettre au système de fonctionner à nouveau, il faut
déplacer la voiture d’une dizaine de mètres.
Das Nicht-Funktionieren des Systems per Fern-
steuerung kann in einigen Fällen auf Störungen
der Übertragungsfrequenzen durch Interferenzen von
Radioantennen oder -sendern in der näheren Umgebung zurückzuführen sein. Damit das System seine Funktionsfähigkeit wiedererlangt, muß das Fahrzeug um
mindestens zwanzig Meter versetzt werden.
IEBSTAHLSICHERUNGSSYSTEM”
2
3
4
5
6
7
8
2.3
Plancia Strumenti e Comandi
30 31 32 33 1 2
Dashboard Instruments and Controls
3 1
4 5 6
Planche de Bord et Commandes
87 2 10 7 2 13 29
Instrumentenund Schalttafel
12
14
2.4
14
22 21 20 19 16
23 11
24
25
26
27
28
18 29 17
3415 35

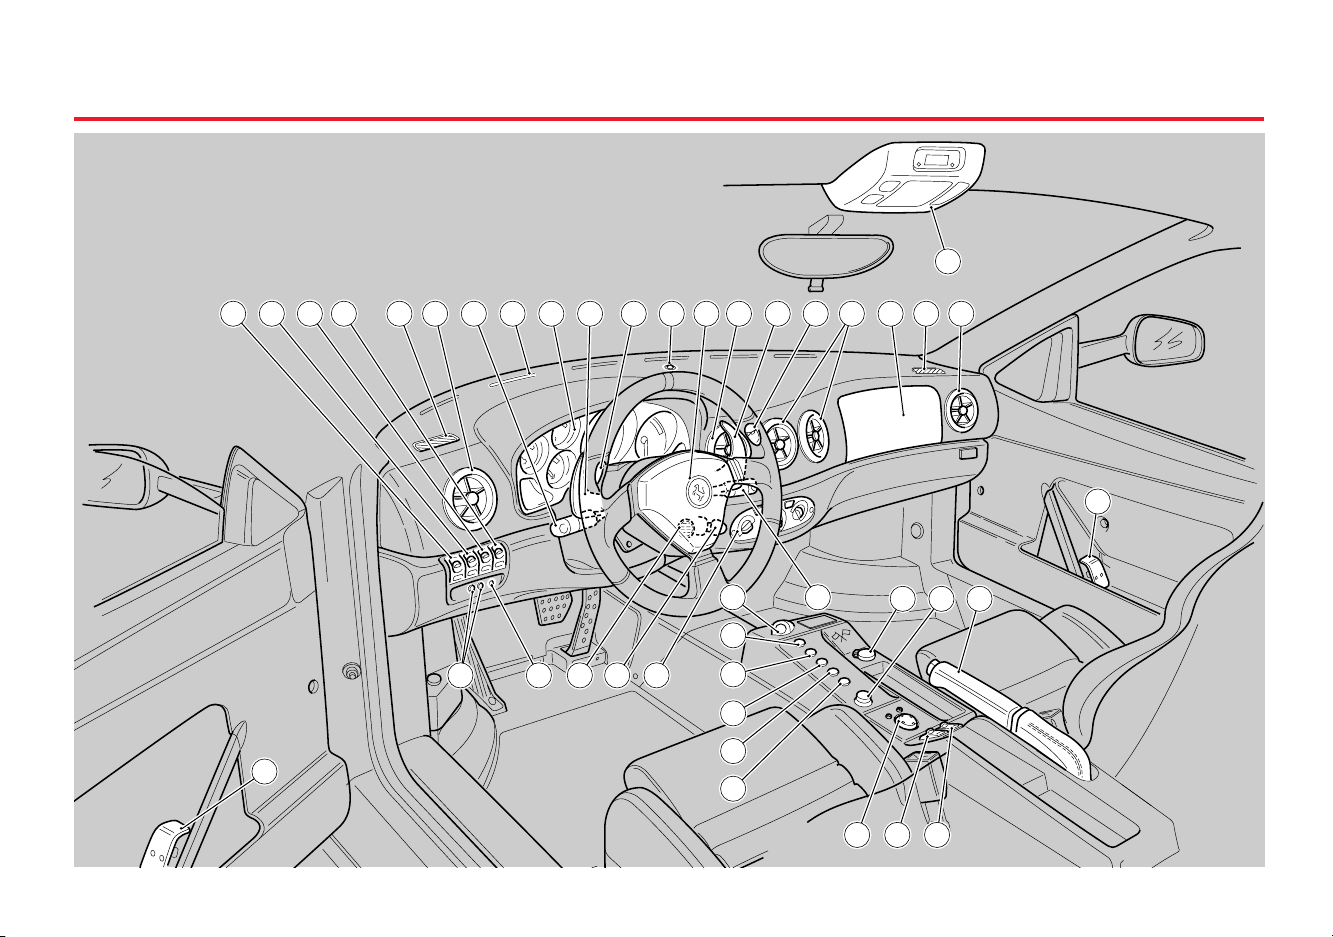
1
1 Diffusori per ventilazione cristalli
laterali
2 Bocchette orientabili per ventila-
zione
3 Leva comando luci esterne e indi-
catori di direzione
4 Diffusore ventilazione parabrezza
5 Quadro strumenti
6 Leva comando cambio “DOWN”
7 Comando avvisatore acustico
8 Sensore irraggiamento solare
IRBAG lato pilota
9 A
10 Leva comando cambio “UP”
11 Leva comando tergi/lavacristallo
12 Plafoniera luci spot e orologio
IRBAG lato passeggero
13 A
14 Maniglia interna apertura porta
15 Comando regolazione specchi
esterni
16 Comandi climatizzazione
17 Leva freno a mano
18 Presa 12 Volt
19 Commutatore a chiave
20 Sensore temperatura abitacolo
21 Led segnalazione antifurto
22 Comando regolazione strumenti
23 Pulsante retromarcia
24 Interruttore luci di emergenza
25 Pulsante blocco porte
26 Pulsante attivazione/disattivazione
modalità “RACE”
1 Door window ventilation outlets
2 Adjustable air vents
3 Headlights and indicator control
lever
4 Windscreen ventilation diffuser
5 Instrument panel
6 Gear change “DOWN” control
lever
7 Horn
8 Sunlight sensor
9 Driver’s side
10 Gear change “UP” control lever
11 Windscreen wiper control lever
12 Ceiling spot light and clock
13 Passenger side AIRBAG
14 Internal door handle
15 Wing mirror adjuster
16 Air conditioning controls
17 Hand brake
18 12-Volt socket
19 Ignition switch
20 Interior compartment temperature
sensor
21 Alarm system LED
22 Instrument adjuster
23 Reverse gear button
24 Hazard lights button
25 Door lock button
26 “RACE” mode activation/deacti-
vation button
AIRBAG
1 Buses de ventilation des glaces
latérales
2 Buses orientables de ventilation
3 Levier de commande feux exté-
rieurs et clignotants
4 Buse de ventilation pare-brise
5 Tableau de bord
6 Levier de changement de vitesse
“DOWN”
7 Avertisseur sonore
8 Capteur de rayonnement solaire
IRBAG côté pilote
9 A
10 Levier de changement de vitesse “UP”
11 Levier de commande essuie/lave-
glaces
12 Plafonnier avec spots et montre
IRBAG côté passager
13 A
14 Levier intérieur déverrouillage de
porte
15 Bouton d’orientation rétroviseurs
extérieurs
16 Climatisation
17 Levier frein à main
18 Prise 12 Volts
19 Commutateur à clé
20 Capteur de température de l’habitacle
21 DEL d’antivol
22 Réglage des instruments
23 Bouton de marche arrière
24 Bouton de feux de détresse
25 Bouton de verrouillage des portes
26 Bouton de validation/invalidation
de la modalité “RACE”
1 Belüftungsdüsen Seitenscheiben
2 Verstellbare Belüftungsdüsen
3 Bedienhebel für Richtungsanzeiger
und Schalter für Außenbeleuchtung
4 Windschutzscheiben-Belüftungsdüse
5 Instrumententafel
6 Getriebeschalthebel “DOWN”
7 Betätigung Hupe
8 Sensor Sonneneinstrahlung
IRBAG Fahrerseite
9 A
10 Getriebeschalthebel “UP”
11 Bedienhebel Scheibenwisch- und -
waschanlage
Deckenleuchte mit Punktstrahler und
12
Uhr
13 AIRBAG Beifahrerseite
14 Innerer Griff Türöffnung
15 Bedienung Außenspiegeleinstellung
16 Bedienelemente Klimaanlage
17 Handbremshebel
18 Steckdose 12 Volt
19 Zündschloß
20 Innenraumtemperaturfühler
21 Signal-LED Diebstahlsicherung
22 Bedienung Instrumenteneinstellung
23 Taste Rückwärtsgang
24 Warnblinkerschalter
25 Türverriegelungstaste
26 Taste Ein-/Asschalten “RACE”-
Modus
2
3
4
5
6
7
8
2.5

27 Pulsante disattivazione sistema
ASR
28 Pulsante attivazione/disattivazione
strategia “LAUNCH CONTROL”
29 Pulsante avviamento
30 Pulsante apertura bagagliaio
31 Pulsante luci retronebbia
32 Pulsante apertura tappo benzina
33 Interruttore luci di parcheggio
34 Comando alzacristallo lato pilota
35 Comando alzacristallo lato pas-
seggero
27 ASR system cut-out button
LAUNCH CONTROL” mode activa-
28 “
tion/deactivation button
29 Start button
30 Luggage compartment opening
button
31 Rear fog-light button
32 Fuel tank cap opening button
33 Parking lights switch
34 Driver’s side window control
35 Passenger side window control
27 Bouton d’invalidation du système
ASR
28 Bouton de validation/invalidation
de la modalité “
LAUNCH CONTROL”
29 Bouton de démarrage
30 Bouton d’ouverture du coffre à
bagages
31 Bouton des feux de brouillard ar-
rière
32 Bouton d’ouverture du bouchon à
essence
33 Bouton de feux de stationnement
34 Lève-glaces côté pilot
35 Lève-glaces côté passager
27 Taste zum Abschalten des ASR-
Systems
28 Taste Ein-/Asschalten “
CONTROL”-Modus
LAUNCH
29 Starttaste
30 Taste für die Öffnung des Koffer-
raums
31 Taste Nebelschlußleuchte
32 Taste für die Öffnung des Tank-
deckels
33 Parklichtschalter
34 Bedienung Fensterheber Fahrerseite
35 Bedienung Fensterheber Beifahrer-
seite
2.6
Dispositivo di avviamento
Ignition Device
Dispositif de Démarrage
Anlassvorrichtung
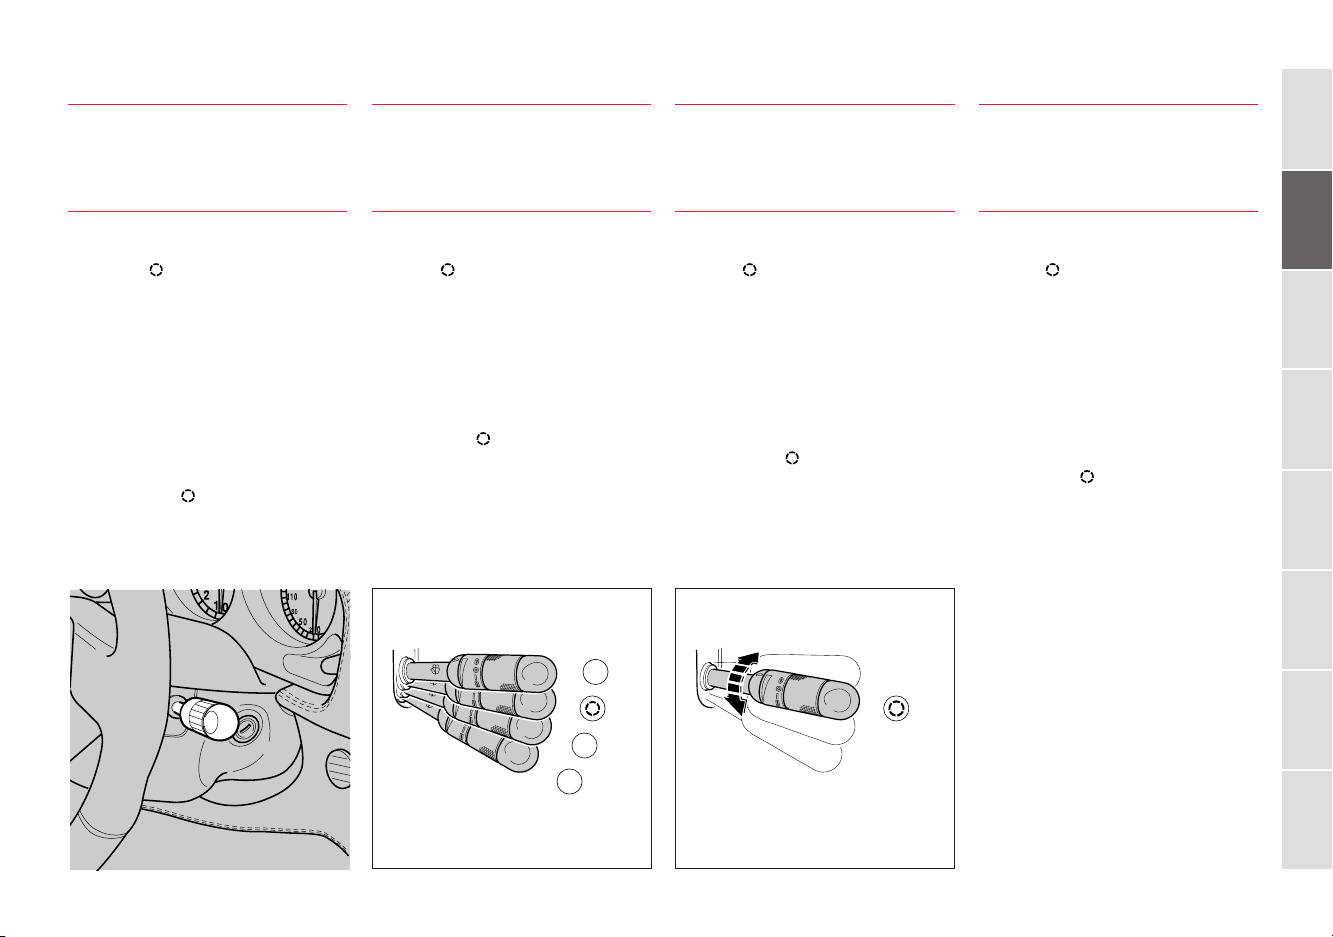
1
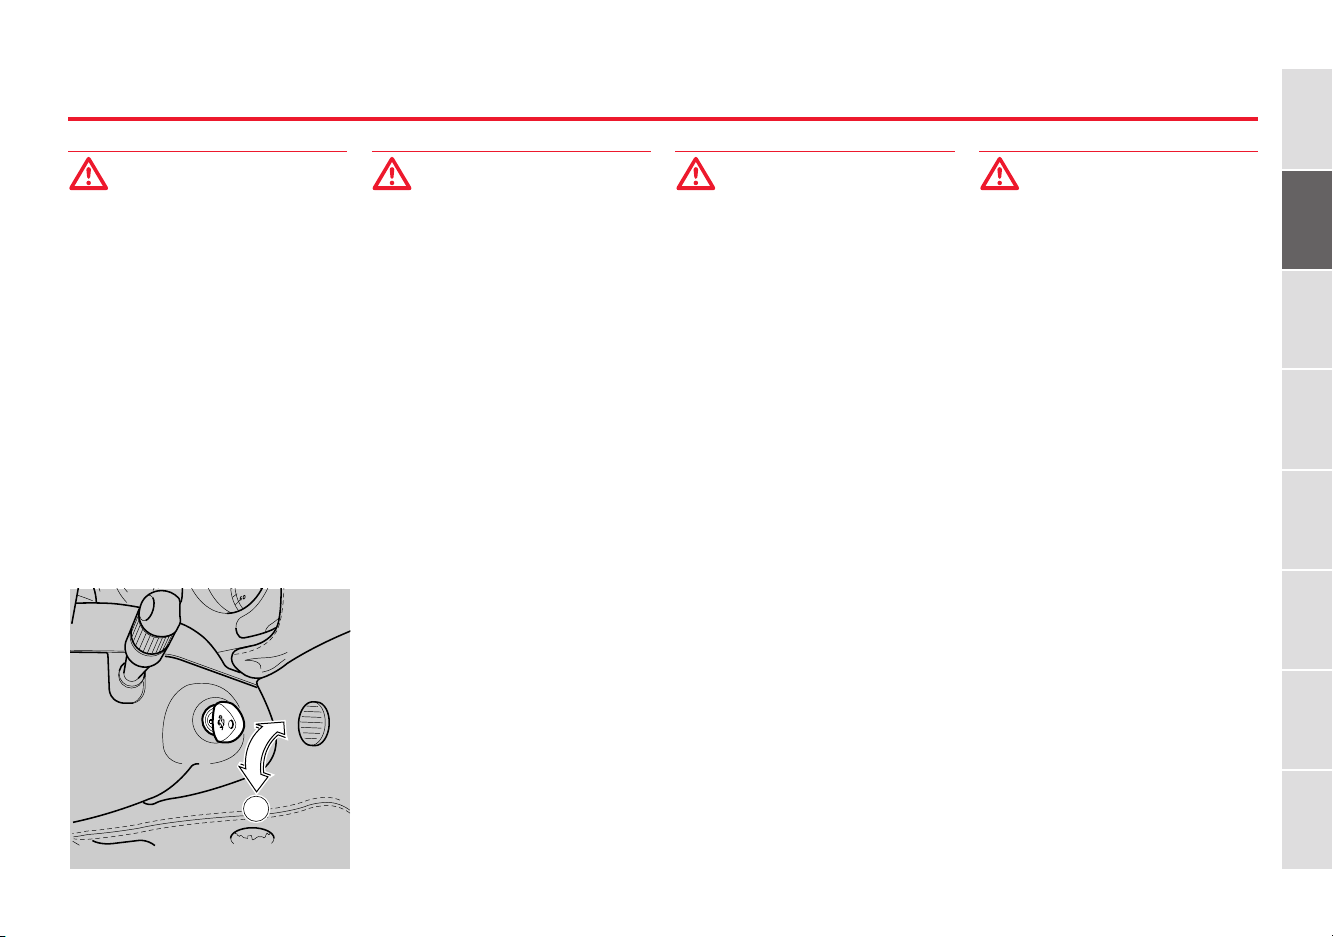
Commutatore a Chiave
Non estrarre mai la chiave con
vettura in movimento!
Il volante si bloccherà alla prima
sterzata.
La chiave di avviamento può ruotare
in 2 posizioni:
Posizione 0 - Stop
Motore spento, chiave estraibile.
A chiave estratta anche parzialmen-
te, lo sterzo è bloccato.
Possono essere accese le luci di emer-
genza e parcheggio.
Per facilitare lo sbloccaggio dello ster-
zo, mentre si effettua la rotazione
della chiave, ruotare leggermente nei
due sensi il volante di guida.
Ignition
Never remove the key while
the car is moving!
The steering wheel will lock the first
time it is turn.
The ignition key can be turned to
two positions:
Position 0 - Stopped
Engine off, key extractable.
If the key is even only partially ex-
tracted the steering will lock.
The hazard and parking lights can
be turned on.
To release the steering lock, move
the steering wheel gently in both directions while turning the key.
Commutateur à Clé
Ne jamais retirer la clé quand
la voiture roule!
Le volant se bloquera au premier
braquage.
La clé de contact peut tourner sur 2
positions:
Position 0 - Stop
Le moteur coupé, on peut retirer la clé.
Lorsqu’on retire la clé même partielle-
ment, la colonne de direction reste bloquée.
On peut allumer les feux de détresse
et de stationnement.
Pour débloquer facilement la direction,
manoeuvrer la clé en tournant légèrement le volant dans les deux sens.
Zündschloß
Den Schlüssel niemals während
der Fahrt aus dem Zündschloss
ziehen!
Das Lenkrad blockiert bei der ersten
Drehung.
Der Zündschlüssel kann in 2 Positionen gedreht werden:
Position 0 - Stop
Motor ist abgestellt, Schlüssel herausziehbar.
Auch bei nur teilweise herausgezogenem Schlüssel ist die Lenkung blockiert.
Die Warnblinkanlage und das Parklicht können eingeschaltet bleiben.
Um das Öffnen des Lenkradschlosses
zu erleichtern, das Lenkrad leicht hin
und her bewegen, während der Schlüssel im Zündschloß gedreht wird.
2
3
4
5
6
7
0
8
2.7
Posizione II - Avviamento
Portando la chiave in questa posizione, il sistema esegue il controllo dei
segnali provenienti dagli impianti
montati in vettura. Se non riscontra
anomalie si illumina la scritta “
CK OK”, ed è possibile l’avviamento
CHE-
del motore.
Scendendo dalla vettura, to-
gliere sempre la chiave dal
blocchetto di avviamento!
Non lasciare mai bambini sulla vettura incustodita.
Position II – Ignition
By turning the key to this position,
the system will check all the signals
coming from the car’s systems. If no
faults are found the message “
OK” will light up and it will be pos-
CHECK
sible to start the engine.
When leaving the car, always
remove the key from the ignition!
Never leave children unattended in
the car.
Position II - Démarrage
En mettant la clé dans cette position,
le système contrôle les signaux émis
par les systèmes qui équipent la voiture. S’il ne détecte aucune anomalie, le témoin “
CHECK OK” s’éclaire et
le moteur peut être fait démarrer.
En cas d’abandon de la voi-
ture, enlever toujours la clé du
bloc de démarrage!
Ne jamais laisser d’enfants seuls dans
la voiture.
Position II - Anlassen
Wenn der Schlüssel in diese Position
gedreht wird, kontrolliert das System
alle Signale, die von der Fahrzeugelektronik geliefert werden. Stellt es
keine Störungen fest, leuchtet der
Schriftzug “
CHECK OK” auf und der
Motor kann angelassen werden.
Bei Verlassen des Fahrzeugs den
Schlüssel aus dem Zündschloß
ziehen!
Kinder nicht unbeaufsichtigt im Fahrzeug lassen.
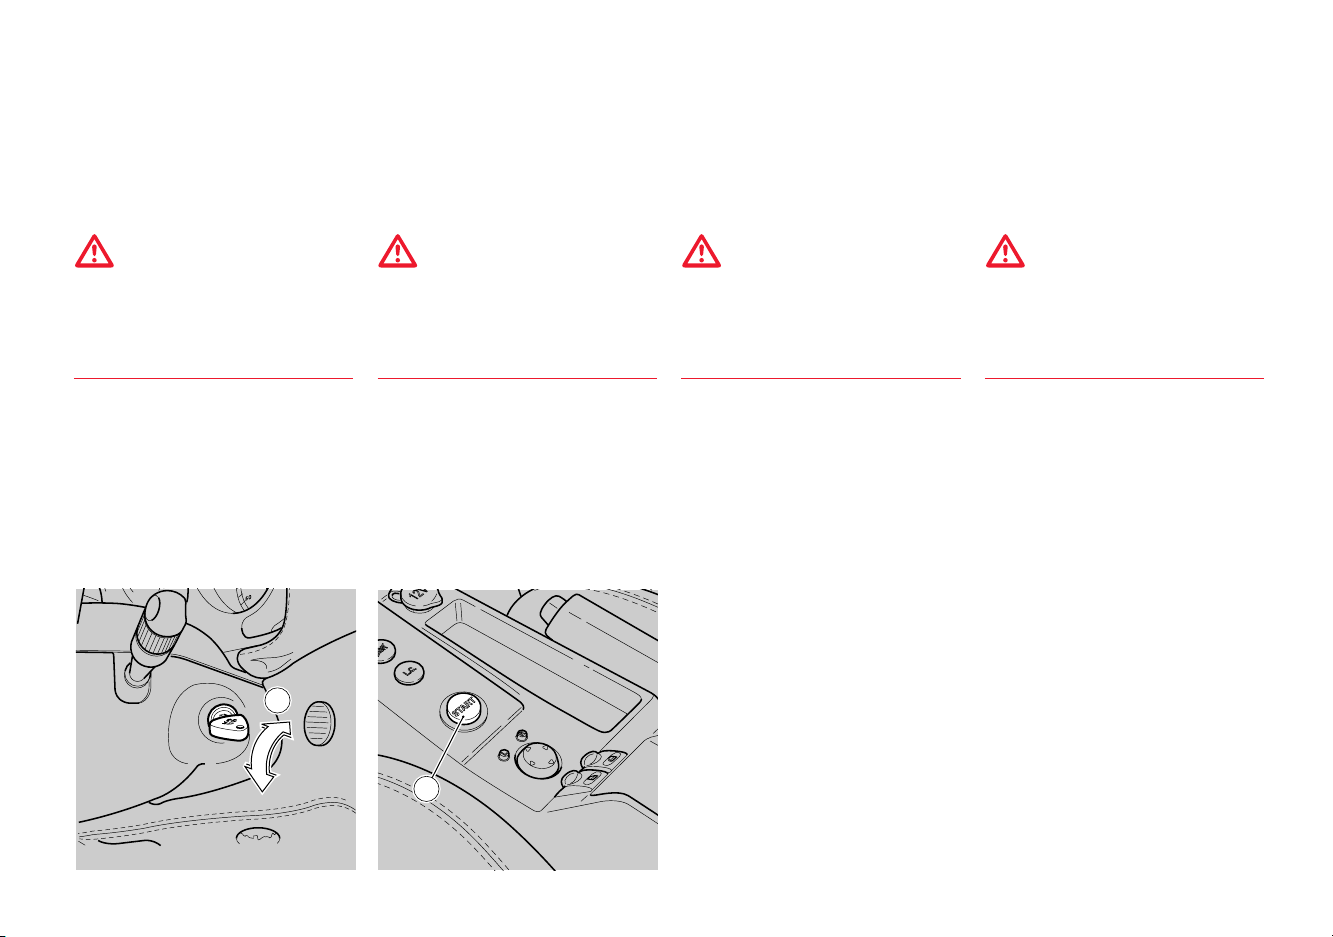
Pulsante di avviamento
Premendo il pulsante “START” (A)
si avvia il motore.
A motore avviato rilasciare il pulsante “START”.
Evitare di premere sul pulsante
“START” per un tempo prolungato.
Per la procedura di avviamento vedi
“Partenza e guida della vettura” a
pag. 3.5.
II
2.8
Start button
Press the “START” button (A) to
start the engine.
When the engine has started, release
the “START” button.
Avoid keeping the “START” button
pressed for a prolonged length of time.
For the starting procedure, see “Departure and driving the vehicle” on
page 3.5.
A
Bouton de démarrage
En appuyant sur le bouton “STARTDEMARRAGE” (A), le moteur démarre.
Après le démarrage, relâcher le bouton “START”.
Ne pas maintenir le bouton “START”
appuyé pendant longtemps: Pour la
procédure de démarrage, voir le paragraphe “Démarrage et conduite de
la voiture” à la page 3.5.
Anlasstaste
Durch Drücken der Taste “START”
(A) wird der Motor angelassen.
Bei angelassenem Motor die
“START”-Taste loslassen.
Die “START”-Taste nicht für einen
längeren Zeitraum drücken: Für das
Startverfahren siehe “Starten und
Fahren des Fahrzeugs” auf S. 3.5.

Leve al Volante
Steering Wheel Levers
Leviers de Volant
Bedienhebel am Lenkrad
1
Le luci esterne e gli indicatori di direzione possono funzionare solo con
chiave di avviamento in posizione
“II”.
Luci Esterne
Posizione 0:
Luci disinserite.
Posizione 1 (leva ruotata di uno scatto):
Luci di posizione e luci targa accese
(si illumina la relativa spia di controllo), quadro strumenti illuminato.
Posizione 2 (leva ruotata di due scatti):
Luci anabbaglianti accese.
Posizione 3 (leva spinta in avanti):
Luci abbaglianti accese (si illumina
la relativa spia di controllo).
L’accensione delle luci abbaglianti può
avvenire solo con leva in posizione
“2”.
The headlights and direction indicators can only function when the key
is in the ignition in position “II”.
External Lights
Position 0:
Lights disconnected.
Position 1 (lever turned one click):
Position lights and number plate lights
(the relative control lamp lights up),
illuminated control panel.
Position 2 (lever turned two clicks):
Low beams on.
Position 3 (lever pushed forward):
high beams on (the relative control
lamp lights up),
The high beams can only be turned
on with the lever in position “2”.
0
Les feux extérieurs et les clignotants
ne peuvent fonctionner qu’avec la clé
de contact en position “II”.
Feux Extérieurs
Position 0:
Feux éteints.
Position 1 (levier tourné d’un cran):
Feux de position et feux de plaque
d’immatriculation allumés (le témoin
de contrôle relatif s’allume), tableau
de bord éclairé.
Position 2 (levier tourné de deux
crans):
Feux de croisement allumés.
Position 3 (levier poussé en avant):
Feux de route allumés (le témoin de
contrôle correspondant s’éclaire).
L’éclairage des feux de route peut
s’effectuer uniquement lorsque le levier est en position “2”.
2
Die Außenbeleuchtung und die Richtungsanzeiger funktionieren nur, wenn
sich der Zündschlüssel in Position “II”
befindet.
Außenbeleuchtung
Drehschalter in Rastposition 0
Beleuchtung ausgeschaltet.
Drehschalter in Rastposition 1:
Standlicht und Kennzeichenbeleuchtung eingeschaltet (die entsprechende
Kontrollleuchte schaltet sich ein), Instrumententafel erleuchtet.
Drehschalter in Rastposition 2:
Abblendlicht eingeschaltet.
Drehschalter in Rastposition 3 (Bedienhebel nach vorn gedrückt):
Fernlicht eingeschaltet (die entsprechende Kontrollleuchte schaltet sich ein).
Das Fernlicht kann nur mit Drehschalter in Position “2” eingeschaltet werden.
2
3
4
5
6
7
1
3
8
2.9
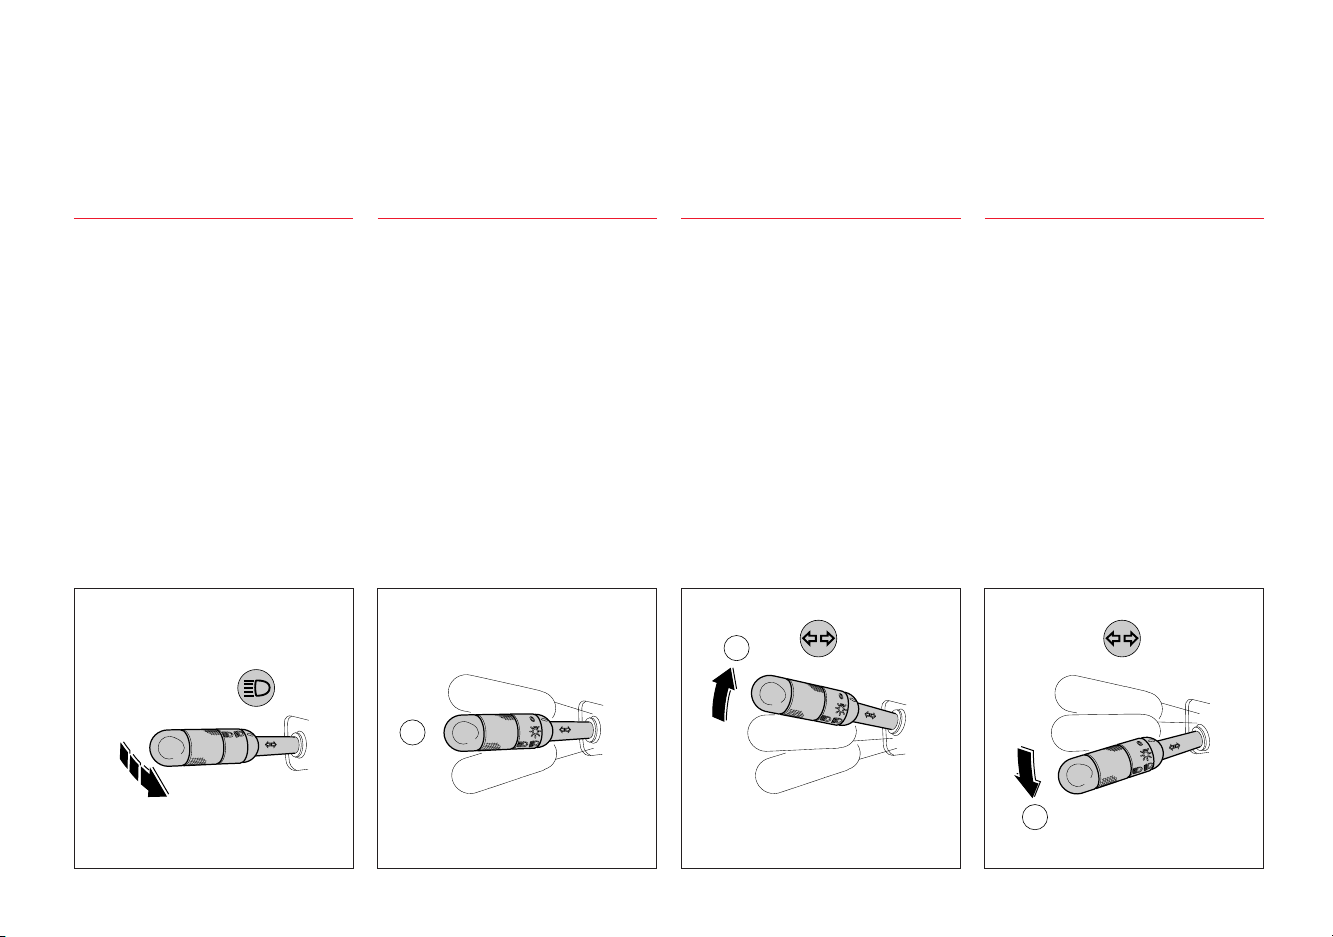
C
Lampeggio:
Avviene con le luci abbaglianti; si
attiva tirando la leva verso il volante
(la funzione può avvenire con la leva
in ogni posizione).
To flash the external lights:
(the high beams must be turned on)
pull the lever towards the steering
wheel (this function can be performed
with the lever in all positions).
Appels de phare:
Ils s’effectuent grâce aux feux de
route; on les active en tirant le levier
vers le volant (qu’importe la position du levier).
Lichthupe:
Erfolgt mit den Fernlichtern; den
Schalthebel zum Lenkrad ziehen (diese
Funktion kann bei jeder Position des
Schalthebels benutzt werden).
Indicatori di Direzione
Gli indicatori di direzione funzionano solo con chiave di accensione in
posizione “II”.
Contemporaneamente all’azionamento
della leva, nel quadro strumenti si illumina ad intermittenza la relativa spia.
Il ritorno della leva nella posizione
centrale si ottiene riportando il volante in posizione di marcia rettilinea.
Posizione A (leva a riposo):
Indicatori di direzione spenti.
Posizione B (leva in alto):
Indicatori lato destro.
Posizione C (leva in basso):
Indicatori lato sinistro.
Direction Indicators
The direction indicators only work
when the key in the ignition block is
in position “II”.
While the lever is in use the respective light on the instrument panel
will flash intermittently.
The lever will return to the central
position when the steering wheel is
straightened up.
Position A (lever at rest):
Direction indicators turned off.
Position B (lever up):
Right-hand indicator.
Position C (lever down):
Left-hand indicator.
A
Clignotants
Les clignotants ne fonctionnent que
lorsque la clé de contact est en position “II”.
Dès que l’on actionne le levier, les
témoins relatifs clignotent sur le tableau de bord.
Le levier revient en position centrale
lorsque l’on tourne le volant pour
effectuer une conduite en ligne droite.
Position A (levier au repos):
Clignotants éteints.
Position B (levier levé):
Clignotant côté droit.
Position C (levier abaissé):
Clignotant côté gauche.
B
Richtungsanzeiger
Die Richtungsanzeiger funktionieren
nur mit Zündschlüssel in Position
“II”.
Bei Betätigung des Bedienhebels blinken die entsprechende Kontrollleuchte
auf der Instrumententafel im Intervall.
Die Rückführung des Hebels in die
zentrale Position erfolgt, sobald das
Lenkrad in die gerade Fahrtrichtungsposition gebracht wird.
Position A (Bedienhebel in NeutralStellung):
Richtungsanzeiger ausgeschaltet.
Position B (Bedienhebel oben):
Richtungsanzeiger rechts.
Position C (Bedienhebel unten):
Richtungsanzeiger links.
2.10
Leva di comando Tergicristallo e Lavacristallo
Il tergicristallo e il lavacristallo funzionano solo con chiave di avviamento
in posizione “II”.
Tergicristallo
Posizione 0:
Tergicristallo fermo.
Posizione
mo scatto):
Funzionamento intermittente regolabile.
Posizione I (leva abbassata al secondo scatto):
Funzionamento continuo lento.
Posizione II (leva abbassata al terzo
scatto):
Funzionamento continuo veloce.
Regolazione intermittenza:
In posizione “
varia la frequenza dell’intermittenza
(senso orario = intermittenza + lenta; senso antiorario = intermittenza
+ veloce).
(leva abbassata al pri-
”, ruotando la leva
Windscreen Washer
and Wiper Lever
The windscreen wipers and washer
only work when the key in the ignition block is in position “II”.
Windscreen Wiper
Position 0:
Windscreen wiper still.
Position
Adjustable intermittent mode.
Position I (lever lowered two clicks):
Slow constant mode.
Position II (lever lowered three
clicks):
Rapid constant mode.
Adjusting the intermittence:
In position “
will vary the intermittence frequency
(clockwise = slower intermittence;
anticlockwise = faster intermittence).
(lever lowered one click):
”, rotating the lever
Levier de Commande
Essuie-glaces et Lave-glaces
L’essuie-glace et le lave-glace ne fonctionnent que lorsque la clé de contact est en position “II”.
Essuie-glace
Position 0:
Essuie-glace à l’arrêt.
Position
Réglage du battement intermittent
Position I (levier abaissé de deux
crans):
Battement continu lent.
Position II (levier abaissé au troisième cran):
Battement continu rapide.
Réglage de l’intermittence:
En position “
la bague du levier, on modifie la fréquence de l’intermittence (sens des
aiguilles d’une montre = intermittence
+ lente; sens contraire des aiguilles
d’une montre = intermittence + rapide).
(levier abaissé d’un cran):
”, lorsqu’on tourne
Bedienhebel Scheibenwischund -waschanlage
Der Scheibenwischer und die Scheibenwaschanlage funktionieren nur,
wenn sich der Zündschlüssel in Position “II” befindet.
Scheibenwischer
Position 0:
Scheibenwischer ausgeschaltet.
Position
nach unten):
Regulierbare Intervallfunktion.
Position I (Bedienhebel zwei Schritte nach unten):
Langsame Dauerwischfunktion.
Position II (Bedienhebel drei Schritte nach unten):
Schnelle Dauerwischfunktion.
Regulierung der Intervallfunktion:
In Position “
des Bedienhebels die Intervallfrequenz
variiert (im Uhrzeigersinn = längeres
Intervall; im Gegenuhrzeigersinn =
kürzeres Intervall).
(Bedienhebel einen Schritt
” wird durch Drehen
1
2
3
4
5
6
0
7
I
II
8
2.11
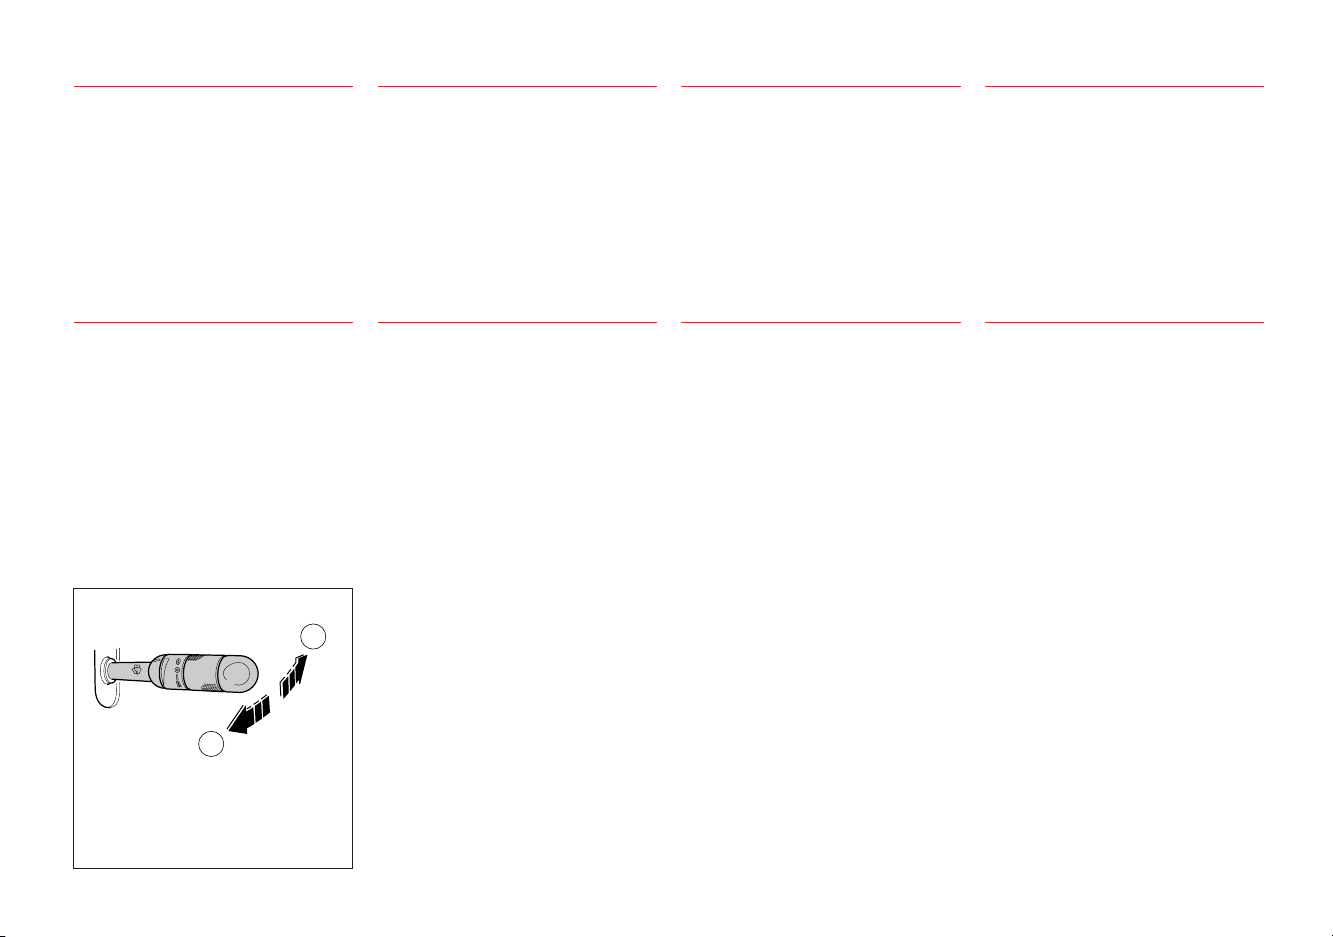
Lavacristallo
Tirando la leva verso il volante (A)
viene azionato il lavacristallo e contemporaneamente il tergicristallo.
Rilasciando la leva il lavacristallo si
arresta mentre il tergicristallo compirà ancora alcune corse.
Windscreen Washer
Pulling the lever towards the steering wheel (A) will activate the windscreen washer at the same time as
the windscreen wiper.
Releasing the lever will stop the windscreen washer while the windscreen
wiper will continue to work for a
few more strokes.
Lave-glace
En poussant le levier vers le volant
(A), on actionne l’essuie-glace en
même temps que le lave-glace.
En relâchant le levier, le lave-glaces
s’arrête alors que l’essuie-glace effectue encore quelques battements.
Scheibenwaschanlage
Durch Ziehen des Bedienhebels zum
Lenkrad (A) wird die Scheibenwaschanlage und gleichzeitig der Scheibenwischer betätigt.
Bei Loslassen des Bedienhebels stoppt
die Scheibenwaschanlage, der Scheibenwischer führt hingegen noch einige weitere Takte aus.
Lavafari
(dove previsto)
Premendo la leva in direzione opposta al volante (B) vengono azionati i
lavafari. Al rilascio, gli spruzzatori
rientreranno nelle sedi.
Per ottenere un’azione detergente più
efficace, si consiglia di azionare i lavafari a velocità inferiore ai 130 km/
h.
B
A
Head Light Washer
(where provided)
Pushing the lever away from the steering wheel (B) will activate the headlight washers. On releasing the lever
the spraying nozzles will retract into
their housing.
To obtain a better cleaning action,
we recommend to operate the headlight washers when the car speed is
below 130 km/h.
Lave-phares
(si prévu)
En tirant le levier vers soi (B), on
actionne les lave-phares. Lorsqu’on
relâche le levier, les gicleurs s’arrêtent.
Pour obtenir une action nettoyante
plus efficace, il est conseillé d’actionner les lave-phares à des vitesses inférieures à 130 km/h.
Scheinwerferwaschanlage
(falls vorhanden)
Durch Wegdrücken des Bedienhebels
vom Lenkrad (B) wird die Scheibenwerferwaschanlage betätigt. Bei Loslassen kehren die Spritzdüsen an ihren Sitz zurück.
Für ein wirksameres Reinigen ist es
ratsam, die Scheinwerferwaschanlage bei einer Fahrgeschwindigkeit unter 130 km/h zu betätigen.
2.12
Quadro Strumenti
Instrument Panel
Tableau de Bord
Instrumententafel
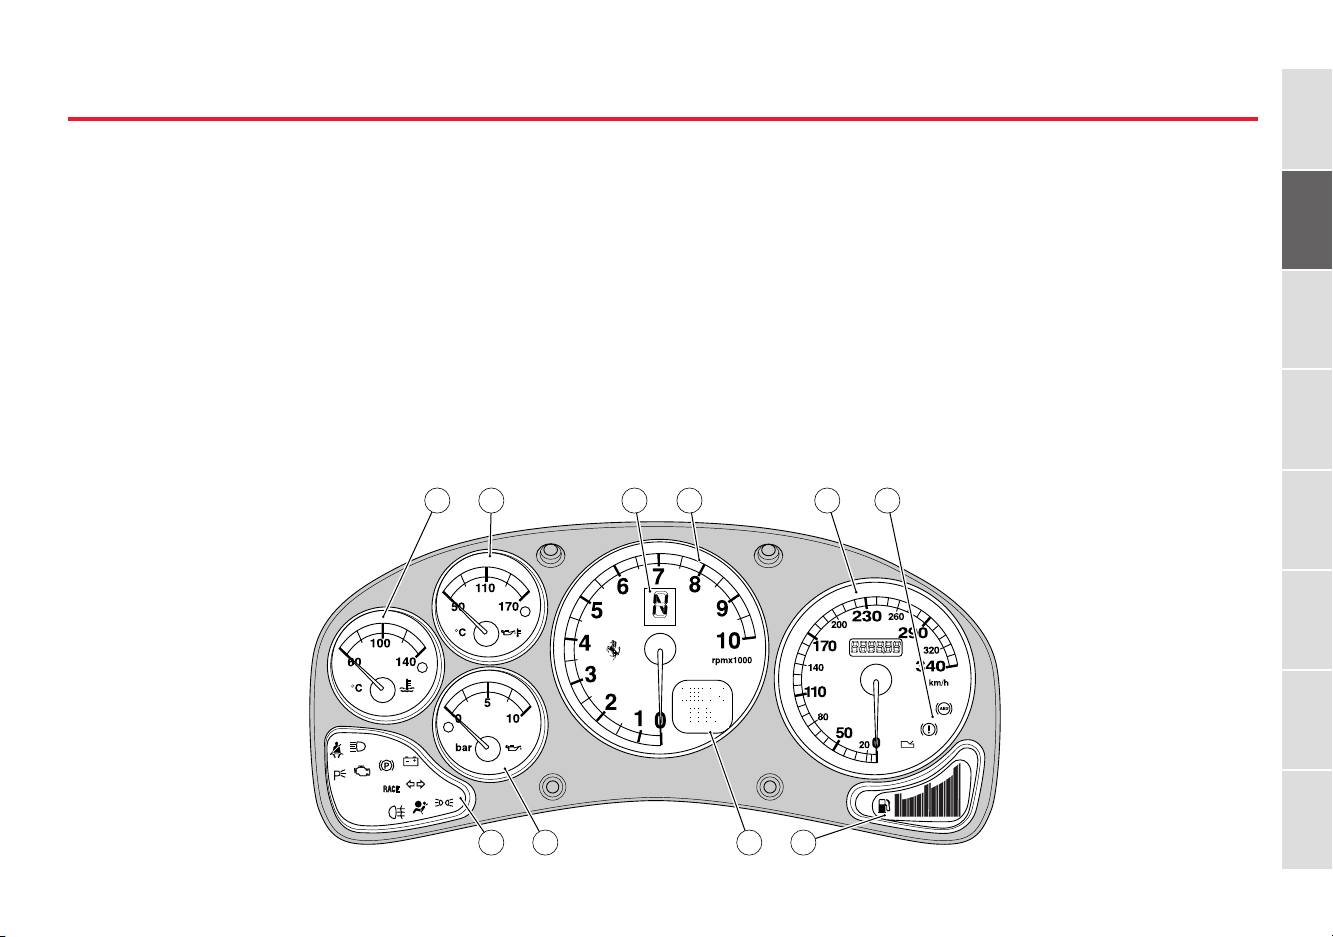
1
1 Tachimetro elettronico
2 Contagiri
3 Indicatore pressione olio
4 Indicatore temperatura olio
5 Indicatore temperatura acqua
6 Indicatore livello carburante
7 Visualizzazione marcia inserita
8 Display spie
9 Display multispia
1 Electronic speedometer
2 Revolution counter
3 Oil pressure gauge
4 Oil temperature gauge
5 Water temperature gauge
6 Fuel level gauge
7 Gear-shift engaged display
8 Warning lights display
9 Multi-function display
5 4
1 Tachymètre électronique
2 Compte-tours
3 Indicateur de pression d’huile
4 Indicateur de température d’huile
5 Indicateur de température d’eau
6 Indicateur de niveau de carburant
7 Témoin de visualisation vitesse en-
clenchée
8 Afficheur de témoins
9 Afficheur à fonction multiple
7 2 1 8
1 Elektronischer Tachometer
2 Drehzahlmesser
3 Öldruckanzeiger
4 Öltemperaturanzeiger
5 Wassertemperaturanzeiger
6 Kraftstoffpegelanzeiger
7 Anzeige eingelegter Gang
8 Kontrollleuchtendisplay
9 Multifunktionsdisplay
2
3
4
5
6
7
8 3 9 6
8
2.13
2
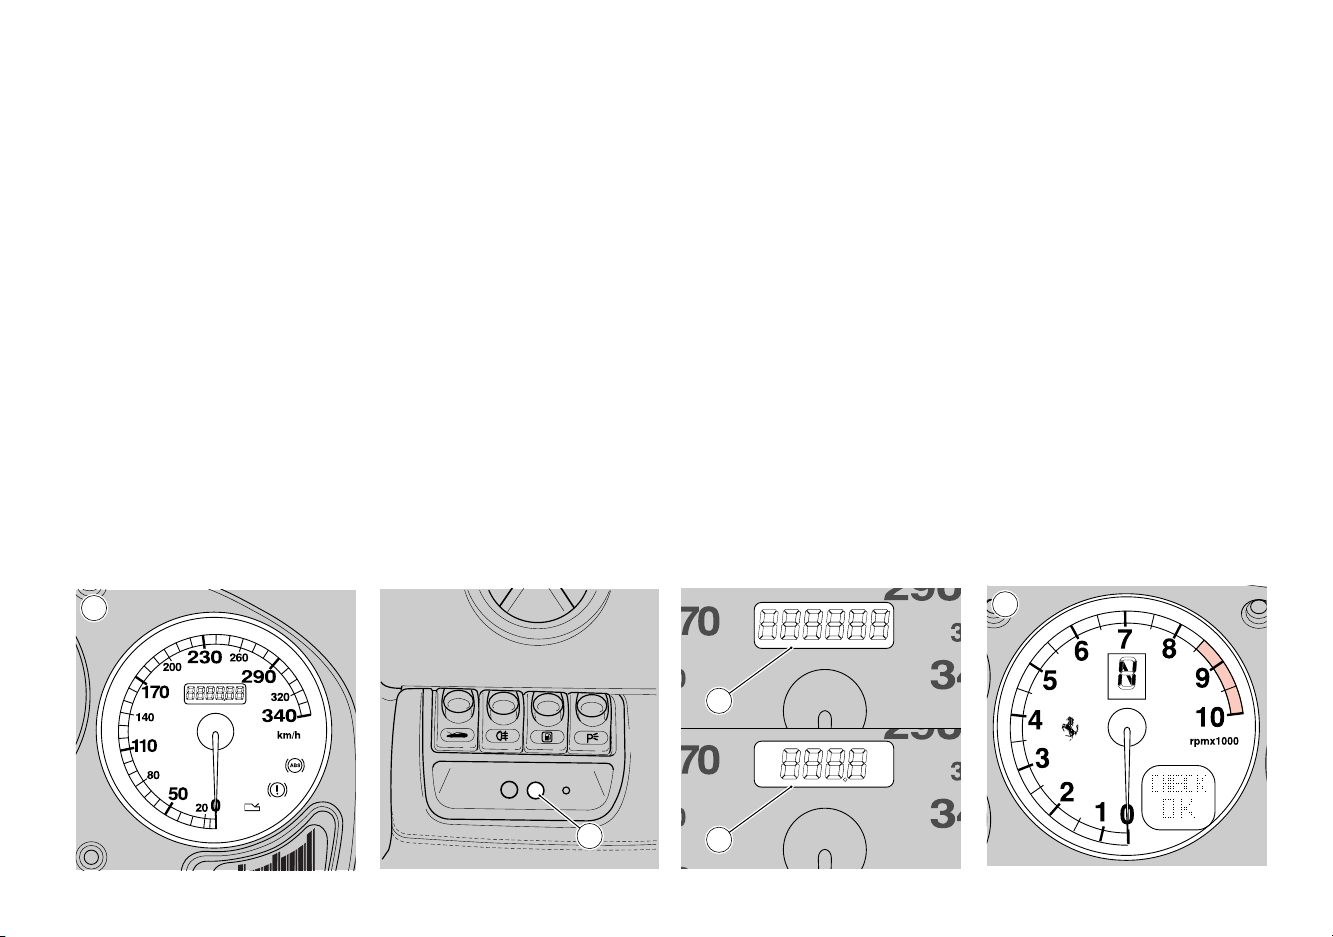
1 - Tachimetro elettronico
Indica la velocità di marcia.
Contachilometri:
Premendo il pulsante (A) viene visualizzata sullo strumento, la percorrenza totale (B) o parziale (C).
Per azzerare i chilometri parziali tenere premuto il pulsante (A) per almeno 2 secondi.
2 - Contagiri
Indica il regime di rotazione del motore.
Evitare regimi di rotazione compresi
nel settore rosso.
Nel caso vengano superati tali regimi, la centralina accensione/iniezione interrompe momentaneamente
l’alimentazione.
1
1 - Electronic speedometer
Indicates the running speed.
Kilometre counter:
When button (A) is pressed the total
distance covered (B) or partial distance (C) will be displayed.
To reset the trip odometer press the
button (A) continually for at least 2
seconds.
2 - Revolution counter
This indicates the engine revolution
speed.
Avoid letting the engine revolution
speed enter the red zone.
If the revolution speed is excessively
high, the ignition/injection ECU will
interrupt the fuel flow momentarily.
1 - Tachymètre électronique
Indique la vitesse de marche.
Compteur kilométrique:
En appuyant sur le bouton (A), le
compteur affiche le parcours total
(B) ou partiel (C).
Pour remettre à zéro l’affichage du
parcours kilométrique partiel, appuyer sur le bouton (A) pendant au
moins 2 secondes.
2 - Compte-tours
Il indique le régime de rotation moteur.
Eviter tout régime de rotation signalé
dans la zone rouge.
Au cas de dépassement des régimes,
le boîtier électronique d’allumage/
injection coupe momentanément l’alimentation.
1 - Elektronischer Tachometer
Gibt die Fahrgeschwindigkeit an.
Kilometerzähler:
Wenn die Drucktaste (A) betätigt
wird, erscheint auf dem Instrument
die Anzeige der Gesamtkilometerzahl
(B) oder der Teilstreckenkilometerzahl (C).
Zur Nullstellung des Teilstreckenzählers die Taste (A) mindestens 2 Sekunden lang gedrückt halten.
2 - Drehzahlmesser
Gibt die Drehzahl des Motors an.
Den roten Drehzahlbereich meiden.
Bei Überschreiten der zulässigen
Drehzahl unterbricht das Zündungs/Einspritzsteuergerät kurzfristig die
Kraftstoffzufuhr.
B
A
C
2.14
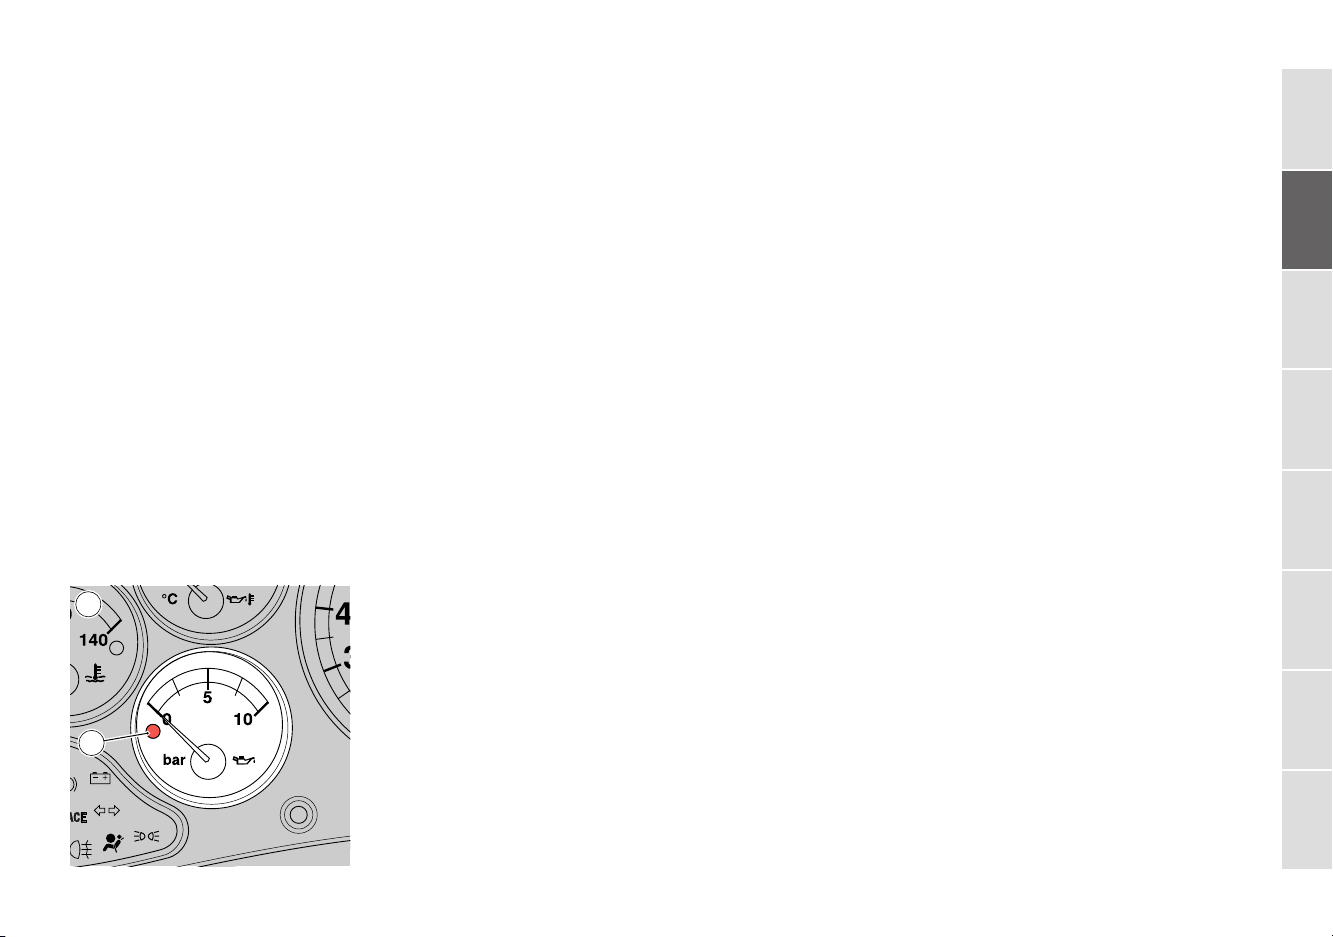
3 - Indicatore pressione olio motore
La spia di colore rosso (D), indica
pressione insufficiente.
In condizioni normali, si illumina
prima dell’avviamento per autocontrollo.
In condizioni di avaria, si illumina
quando, con motore avviato, la pressione è insufficiente. In tal caso spegnere immediatamente il motore ed
effettuare le necessarie verifiche.
Se il problema persiste rivolgersi alla
ETE ASSISTENZA FERRARI.
R
3 - Engine oil pressure gauge
The red light (D), indicates insufficient pressure.
In normal conditions this will light
up before ignition to perform an automatic check.
In the event of a failure, it will light
up if the pressure is insufficient when
the engine is running. In such a case
turn the engine off immediately and
carry out the necessary checks.
If the problem persists, contact the
ERRARI ASSISTANCE NETWORK.
F
3 - Indicateur de pression d’huile
moteur
Le témoin de couleur rouge (D) indique une pression suffisante.
Dans des conditions normales, il s’allume avant le démarrage par contrôle automatique.
En cas de fonctionnement défectueux,
il s’allume quand, le moteur en marche, la pression est insuffisante. Dans
ce cas, couper immédiatement le
moteur et effectuer les contrôles nécessaires.
Si ce problème persiste, s’adresser au
R
ESEAU D’ASSISTANCE FERRARI.
3 - Motoröldruckanzeiger
Die rote Kontrollleuchte (D) zeigt
einen nicht ausreichenden Druck an.
Unter normalen Bedingungen schaltet sie sich vor dem Starten des Fahrzeugs kurz zur Selbstkontrolle ein.
Im Störungsfall leuchtet sie auf, wenn
der Druck bei eingeschaltetem Motor nicht ausreichend ist. In diesem
Fall sofort den Motor abstellen, und
die notwendigen Kontrollen durchführen.
Wenn das Problem weiterbesteht,
wenden Sie sich bitte an den F
KUNDENDIENST.
ERRARI
1
2
3
4
5
3
6
7
D
8
2.15
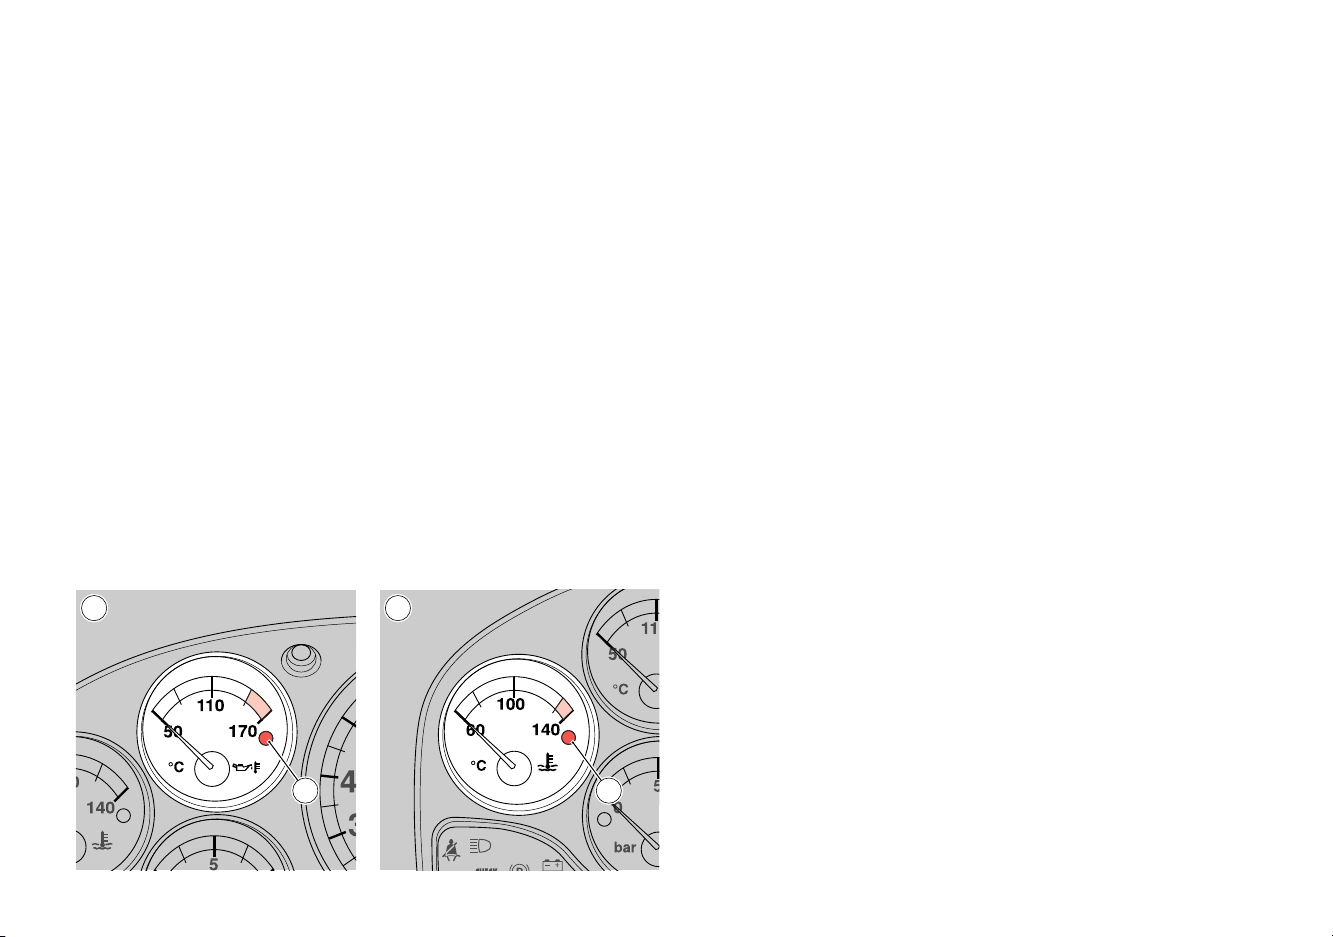
4 - Indicatore temperatura olio motore
L’accensione della spia di colore rosso (E), indica una temperatura troppo elevata; avviene quando la temperatura supera i 155 °C. In questo
caso ridurre immediatamente il regime di rotazione del motore; se tale
temperatura persiste spegnere il motore e rivolgersi alla R
ETE ASSISTENZA
FERRARI.
5 - Indicatore temperatura acqua
Indica la temperatura del liquido di
raffreddamento.
L’accensione della spia di colore rosso (F) indica una temperatura troppo elevata.
Si illumina quando la temperatura
supera 125 °C. In questo caso ridurre immediatamente il regime di
rotazione del motore; se tale temperatura persiste spegnere il motore e
rivolgersi alla R
ETE ASSISTENZA
FERRARI.
4 - Engine oil temperature gauge
When the red light (E) is on, this
indicates that the temperature is too
high; this happens when the temperature exceeds 155 °C. If this should
occur, reduce the engine revolution
speed immediately; if the said high
temperature persists, turn off the
engine and contact the F
SISTANCE NETWORK.
ERRARI AS-
5 - Water temperature gauge
This indicates the temperature of the
coolant.
When the red light (F) is on, this
indicates that the temperature is too
high.
It lights up when the temperature
exceeds 125 °C. In such a case reduce the engine rotation speed immediately; if the said high temperature persists, turn off the engine and
contact the FERRARI ASSISTANCE NET-
WORK.
4 - Indicateur de température d’huile
moteur
L’éclairage du témoin de couleur
rouge (E) indique une température
trop élevée; il s’allume lorsque la température dépasse 155 °C. Dans ce
cas, réduire immédiatement le régime
de rotation moteur; si cette température persiste, couper le moteur et
s’adresser au R
ESEAU D’ASSISTANCE
FERRARI.
5 - Indicateur de température d’eau
Il indique la température du liquide
de refroidissement.
L’éclairage du témoin de couleur
rouge (F) indique une température
trop élevée.
Le témoin s’éclaire lorsque la température dépasse 125 °C. Dans ce cas,
réduire immédiatement le régime
moteur; si cette température se maintient, couper le moteur et s’adresser
au R
ESEAU D’ASSISTANCE FERRARI.
4 - Motoröltemperaturanzeiger
Das Aufleuchten der roten Kontrollleuchte (E) zeigt eine zu hohe Temperatur an; dies tritt ein, wenn die
Temperatur 155 °C überschreitet. In
diesem Fall sofort die Motordrehzahl
verringern; wenn die Temperatur
nicht sinkt, stellen Sie den Motor ab,
und wenden Sie sich an den F
ERRARI
KUNDENDIENST.
5 - Wassertemperaturanzeiger
Gibt die Temperatur der Kühlflüssigkeit an.
Das Aufleuchten der roten Kontrollleuchte (F) zeigt eine zu hohe Temperatur an.
Sie leuchtet auf, wenn die Temperatur 125 °C überschreitet. In diesem
Fall umgehend die Motordrehzahl
reduzieren; sollte die Temperatur
weiterhin zu hoch bleiben, stellen Sie
den Motor ab, und wenden Sie sich
an den F
ERRARI KUNDENDIENST.
4
2.16
5
E
F
 Loading...