

Page 1
Model 24, 24H Mortuary Cots
R
Users’ Manual
February 2018
Pub. No. 234-0008-09
Read this Manual and Retain
for Future Reference
Page 2
Ferno Customer Relations
For ordering assistance or general information:
CANADA AND THE U.S.A.
Telephone (Toll-free) 1.877.733.0911
Telephone 1.937.382.1451
Fax (Toll-free) 1.888.388.1349
Fax 1.937.382.1191
Internet www.ferno.com
ALL OTHER LOCATIONS
For assistance or information, please contact your Ferno distributor. If
you do not have a Ferno distributor, please contact Ferno Customer
Relations:
Ferno-Washington, Inc., 70 Weil Way
Wilmington, Ohio 45177-9371, U.S.A.
Telephone Country Code +1.937.382.1451
Fax Country Code +1.937.382.6569
Internet www.ferno.com
USERS’ MANUALS
To request additional free users’ manuals,
contact Ferno Customer Relations, your Ferno
distributor, or www.ferno.com.
Serial Number
Disclaimer
This manual contains general instructions for the use, operation
and care of this product. The instructions are not all-inclusive. Safe
and proper use of this product is solely at the discretion of the user.
Safety information is included as a service to the user. All other safety
measures taken by the user should be within and under consideration
of applicable regulations and local protocol. Training on the proper use
of this product must be provided before using this product in an actual
situation.
Retain this manual for future reference. Include it with the product in
the event of transfer to new users. Additional free copies are available
upon request from Customer Relations.
Proprietary Notice
The information disclosed in this manual is the property of FernoWashington, Inc., Wilmington, Ohio, USA. Ferno-Washington, Inc.
reserves all intellectual property rights, proprietary design rights,
manufacturing rights, reproduction use rights, and sales use rights
thereto, and to any article disclosed therein except to the extent those
rights are expressly granted to others or where not applicable to vendor
proprietary parts.
Limited Warranty Statement
The products sold by Ferno are covered by a limited warranty, which
is printed on all Ferno invoices. The complete terms and conditions of
the limited warranty, and the limitations of liability and disclaimers,
are also available upon request by calling Ferno at 1.800.733.3766 or
1.937.382.1451.
1.937.382.1451
44 (0) 1274 851999
2
© Ferno-Washington, Inc. / 234-0008-09 / February 2018
Page 3

TABLE OF CONTENTS
Section Page Section Page
Ferno Customer Relations ________________________________ 2
1 - Safety Information _____________________________________ 4
1.1 Warning __________________________________________ 4
1.2 Notice ___________________________________________ 4
1.3 Tip ______________________________________________ 4
1.4 Bloodborne Disease Notice __________________________ 4
1.5 Fastening System Compatibility ______________________ 4
1.6 Symbol Glossary ___________________________________ 5
1.7 Safety and Instruction Labels _________________________ 5
2 - Operator Focus ________________________________________ 6
2.1 Operator Training __________________________________ 6
2.2 Operator Height and Strength ________________________ 6
2.3 Daily Operator Duties _______________________________ 6
2.4 Using Additional Help_______________________________ 7
3 - About the Cot __________________________________________ 8
3.1 Description _______________________________________ 8
3.2 General Specications ______________________________ 8
3.3 Components (Models 24 and 24H) ____________________ 9
4 - Setup ________________________________________________ 10
4.1 Vehicle Information _______________________________ 10
4.2 Installing the Foot Support _________________________ 10
4.3 Mattress and Restraints ____________________________ 10
5 - Using the Cot _________________________________________ 11
5.1 Before Placing the Cot in Service _____________________ 11
5.2 General Guidelines for Use __________________________ 11
5.3 Changing Cot Levels _______________________________ 12
5.4 Transferring the Body to the Cot ____________________ 13
5.5 Rolling the Cot ___________________________________ 13
5.6 Maneuvering the Cot In a Conned Area ______________ 14
5.7 Loading the Cot __________________________________ 15
5.8 Unloading the Cot ________________________________ 16
6 - Maintenance _________________________________________ 17
6.1 Maintenance Schedule _____________________________ 17
6.2 Disinfecting and Cleaning the Body Restraints __________ 17
6.3 Disinfecting and Cleaning the Mattress ________________ 17
6.4 Disinfecting the Cot _______________________________ 17
6.5 Cleaning the Cot __________________________________ 17
6.6 Waxing the Cot ___________________________________ 17
6.7 Inspecting the Cot ________________________________ 18
6.8 Lubricating the Cot ________________________________ 19
7 - Parts and Service ______________________________________ 20
7.1 U.S.A. and Canada _________________________________ 20
7.2 Worldwide _______________________________________ 20
7.3 Parts Diagrams ___________________________________ 20
8 - Accessories ___________________________________________ 21
Training Record__________________________________________ 22
Maintenance Record _____________________________________ 23
© Ferno-Washington, Inc. / 234-0008-09 / February 2018
3
Page 4

Safety Information
1 SAFETY INFORMATION
1.1 Warning
Warning safety alerts indicate a potentially hazardous situation that, if
not avoided, could result in injury or death.
WARNING
Untrained operators can cause injury or be injured.
Permit only trained personnel to operate the cot.
Helpers can cause injury or be injured. Maintain control
of the cot, operate the controls, and direct all helpers.
Improper use of the cot can cause injury. Use the cot only
for the purpose described in this manual.
Attaching improper items to the cot can cause injury. Use
only Ferno-approved items on the cot.
Improper operation can cause injury. Operate the cot
only as described in this manual.
An unrestrained body can fall o the cot. Use restraints to
secure the body on the cot.
Rolling the Model 24H cot in the loading position can
cause it to tip. Use a rolling position when rolling the cot.
Rolling the cot sideways or in the loading position can
cause it to tip and injure the operator(s). Roll the cot only
in a level (Rolling) position and with the loading end or
control end rst.
Improper maintenance can cause injury. Maintain the cot
only as described in this manual.
Improper parts and service can cause injury. Use only
Ferno parts and Ferno-approved service on the cot.
Modifying the cot can cause injury and damage. Use the
cot only as designed by Ferno.
1.2 Notice
Notices emphasize important, but not hazard-related information.
Failure to follow Notices could result in product or property damage.
NOTICE
1.3 Tip
Tips provide recommendations for easier use of the product.
1.4 Bloodborne Disease Notice
To reduce the risk of exposure to blood or other potentially infectious
materials when using the cot, follow the disinfecting and cleaning
instructions in this manual.
1.5 Fastening System Compatibility
Combining dierent manufacturers’ products such as a Ferno cot/
transport system with a non-Ferno fastening system can increase the
user’s risk of injury and damage.
Ferno-Washington, Inc. products are designed for use only with Fernomanufactured fastening systems. Use of a Ferno cot/transport system
with a non-Ferno fastening system is misuse of the Ferno product. The
user assumes responsibility for the outcome of known, intentional
misuse.
4
© Ferno-Washington, Inc. / 234-0008-09 / February 2018
Page 5

Safety Information
1.6 Symbol Glossary
The symbols dened at right are used on the cot and/or in this’
manual. Ferno uses symbols recognized by the International Standards
Organization (ISO), American National Standards Institute (ANSI) and
the mortuary services industry.
General Warning of
Potential Injury
Pinch Point:
Keep Hands Clear
Read the Users’ Manual
400 lb
181 kg
28.5 st
Load Capacity
(Safe Working Load in
pounds, kilograms, stone)
Manufacturer Authorized Representative in the
Operation Requires
Two Trained Operators
Product meets
European Union Standards
Do Not
Lubricate
European Community
LubricateUnlocked Locked
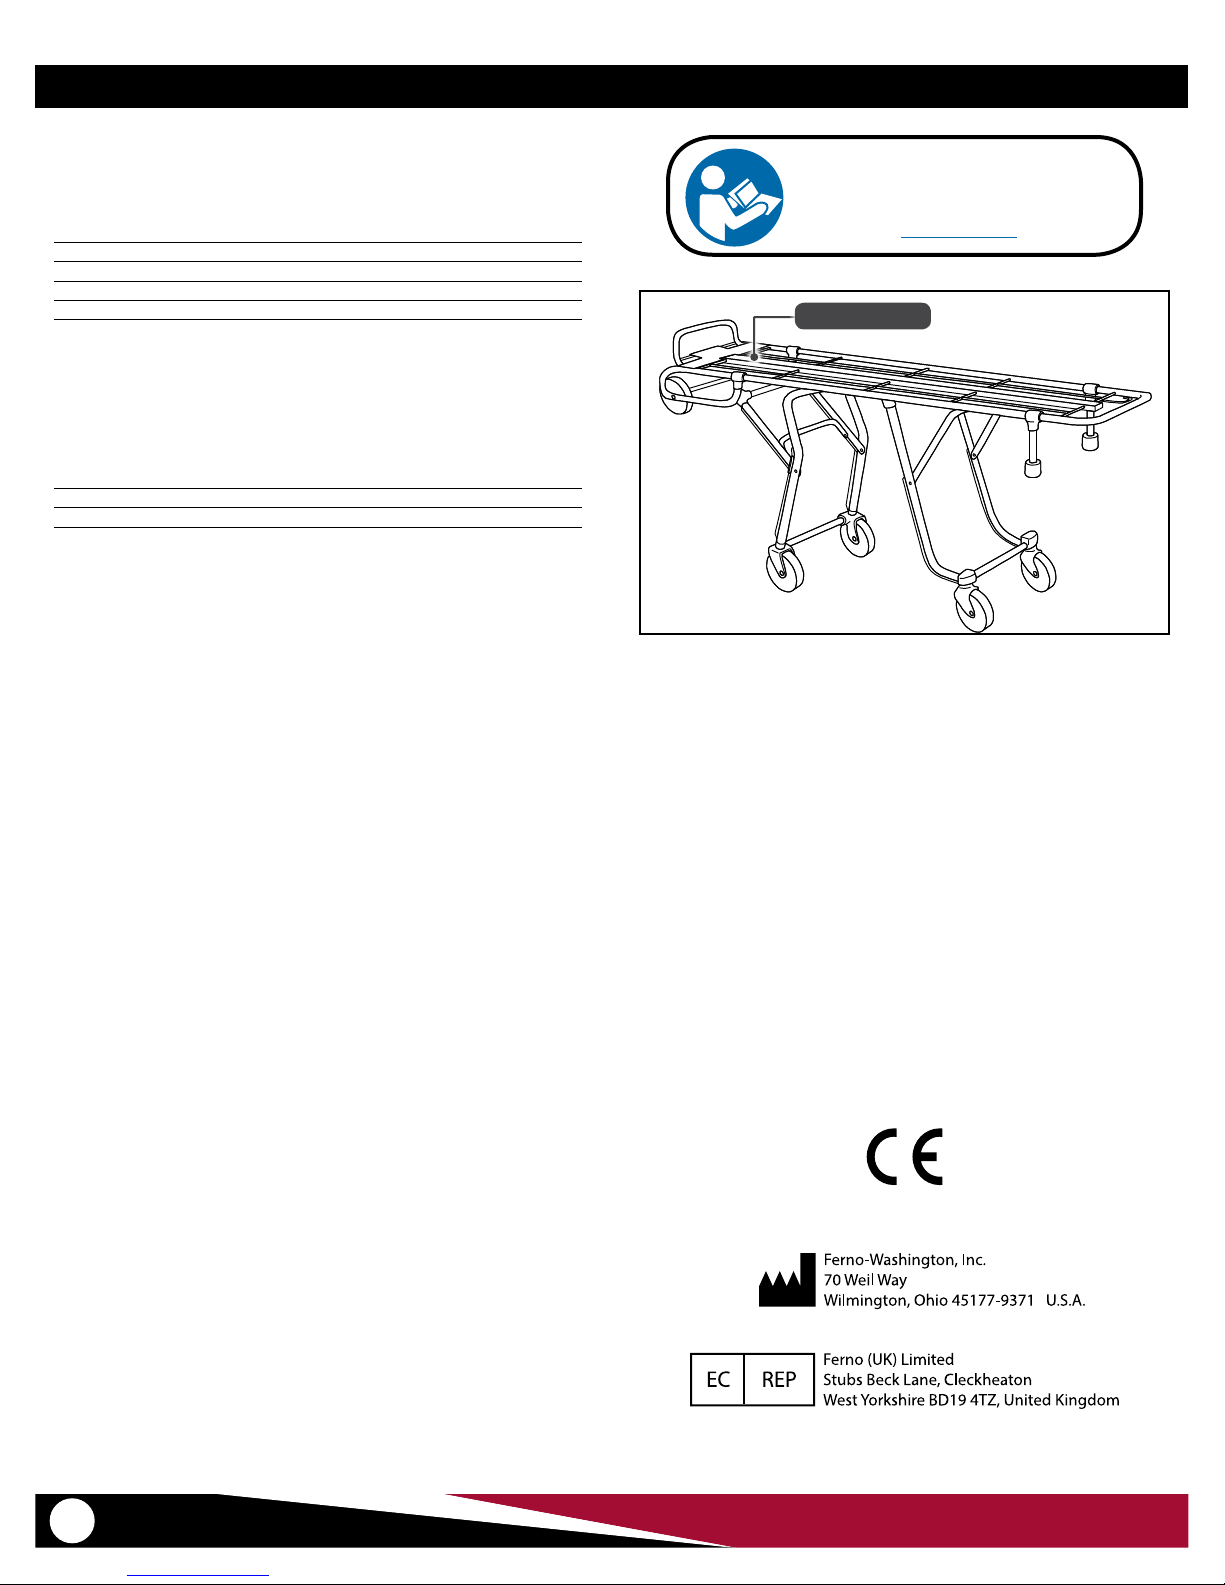
1.7 Safety and Instruction Labels
Safety and instruction labels place important information from the
users’ manual on the cot. Read and follow label instructions. Replace
worn or damaged labels immediately.
Loading-end Label: Identies the
function of the loading-end control
handle.
24, 24H Series
Operator-end Label: Identies the cot, provides safety and load capacity information, and identies the function of the control-end control handle.
© Ferno-Washington, Inc. / 234-0008-09 / February 2018
5
Page 6
Operator Focus
2 OPERATOR FOCUS
2.1 Operator Training
Operator using the cot:
● must read and understand this manual.
● must have training on proper use of the cot.
● must have a training on mortuary-service procedures.
● must have the physical ability to operate the cot.
● must practice with the cot before using it in regular service.
● must keep training records. For a sample training record sheet, see
“Training Record” on page 22.
2.2 Operator Height and Strength
When unloading the cot from a vehicle, the operator must be able to
hold the cot high enough for both sets of legs to remain clear of the
ground so they can unfold completely and lock into place.
Supporting this weight requires greater strength from short operators
than from tall operators because short operators must raise their arms
higher in relation to their shoulders (Figure 1).
If the vehicle is parked on an uneven surface, the Operator-end operator
(and any helpers) may need to lift the cot higher than normal to allow
the legs to unfold completely and lock.
Note: Use additional help as needed to lift the weight of the cot, body and
equipment. See “Using Additional Help” on page 7.
WARNING
Untrained operators can cause injury or be injured.
Permit only trained personnel to operate the cot.
Clearance from Ground
1
2.3 Daily Operator Duties
It is good practice for operators to check equipment at the start of each
work shift. To check the cot prior to use, follow the procedures described
in this manual:
● Unload the cot from the vehicle.
● Fold the cot to the oor or ground.
● Raise the cot to a suitable rolling height.
● Visually inspect the cot for readiness. See “Inspecting the Cot” on
page 18.
● Rotate the cot in a circle to verify it rolls easily.
● Load the cot into vehicle and secure it in the fastening system, if
present.
6
© Ferno-Washington, Inc. / 234-0008-09 / February 2018
Page 7
Operator Focus
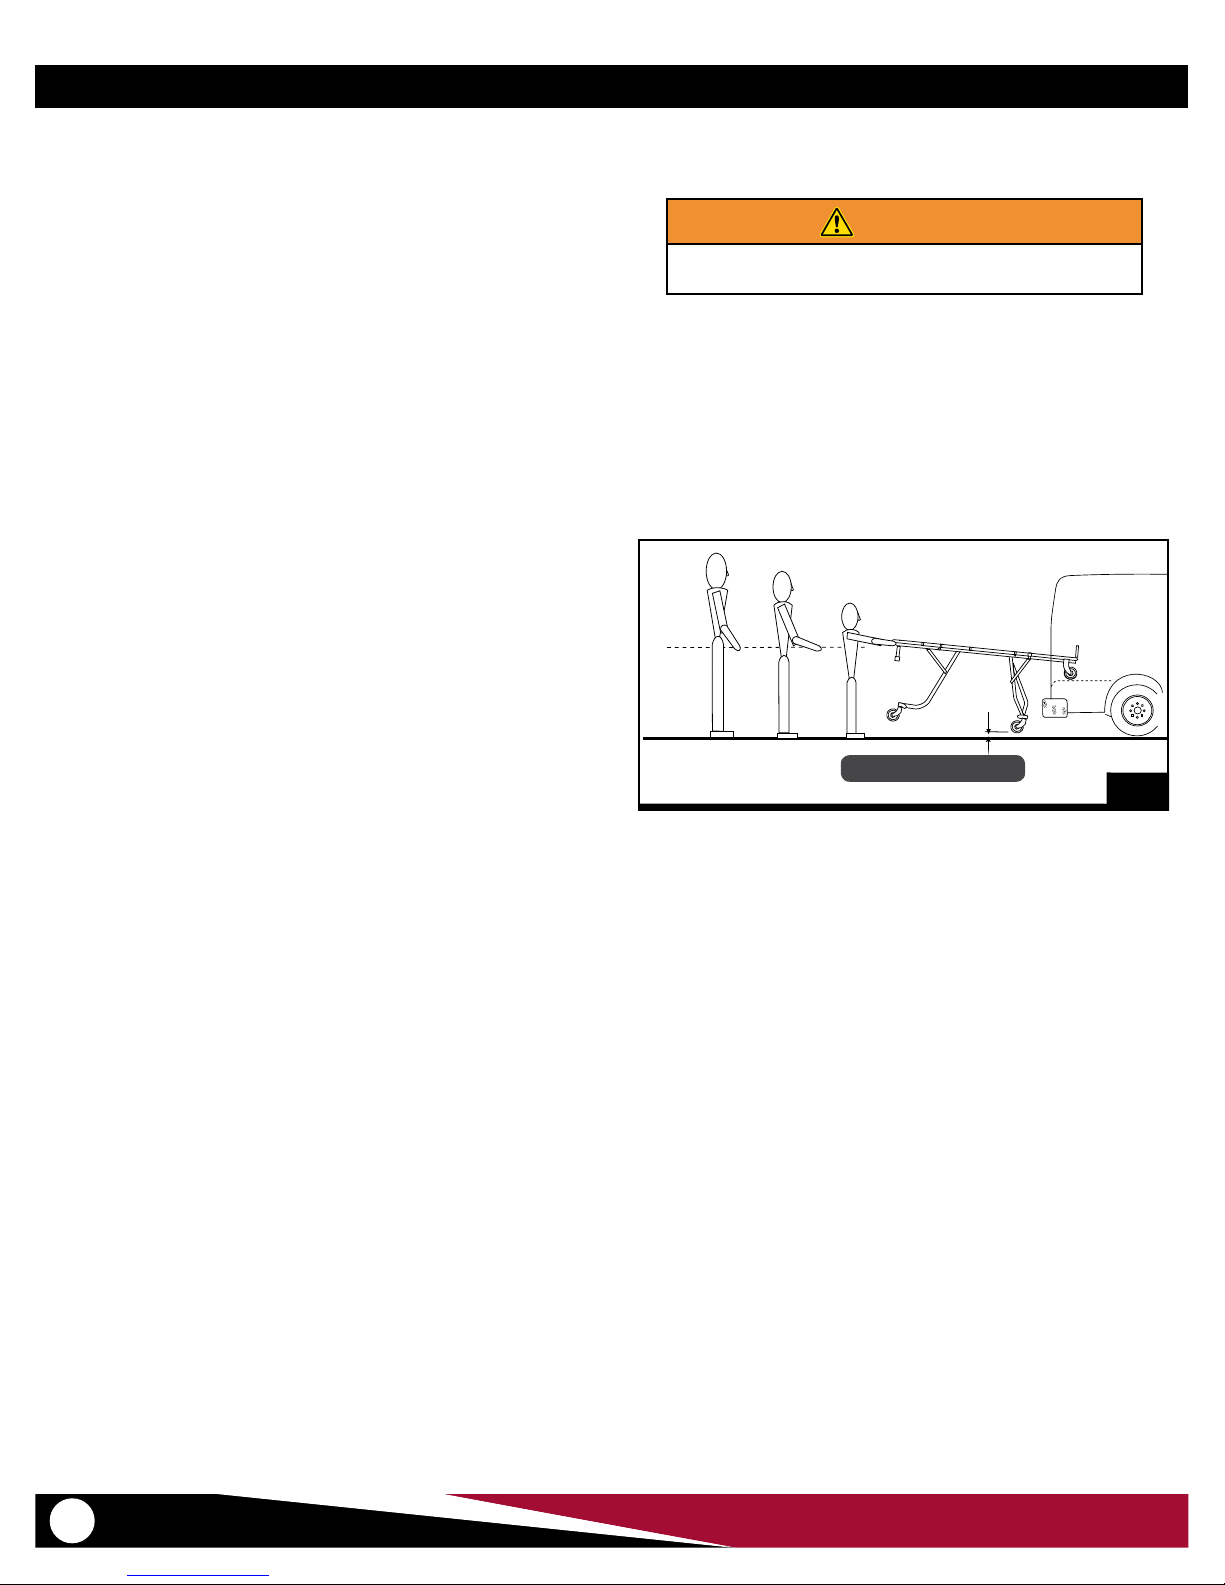
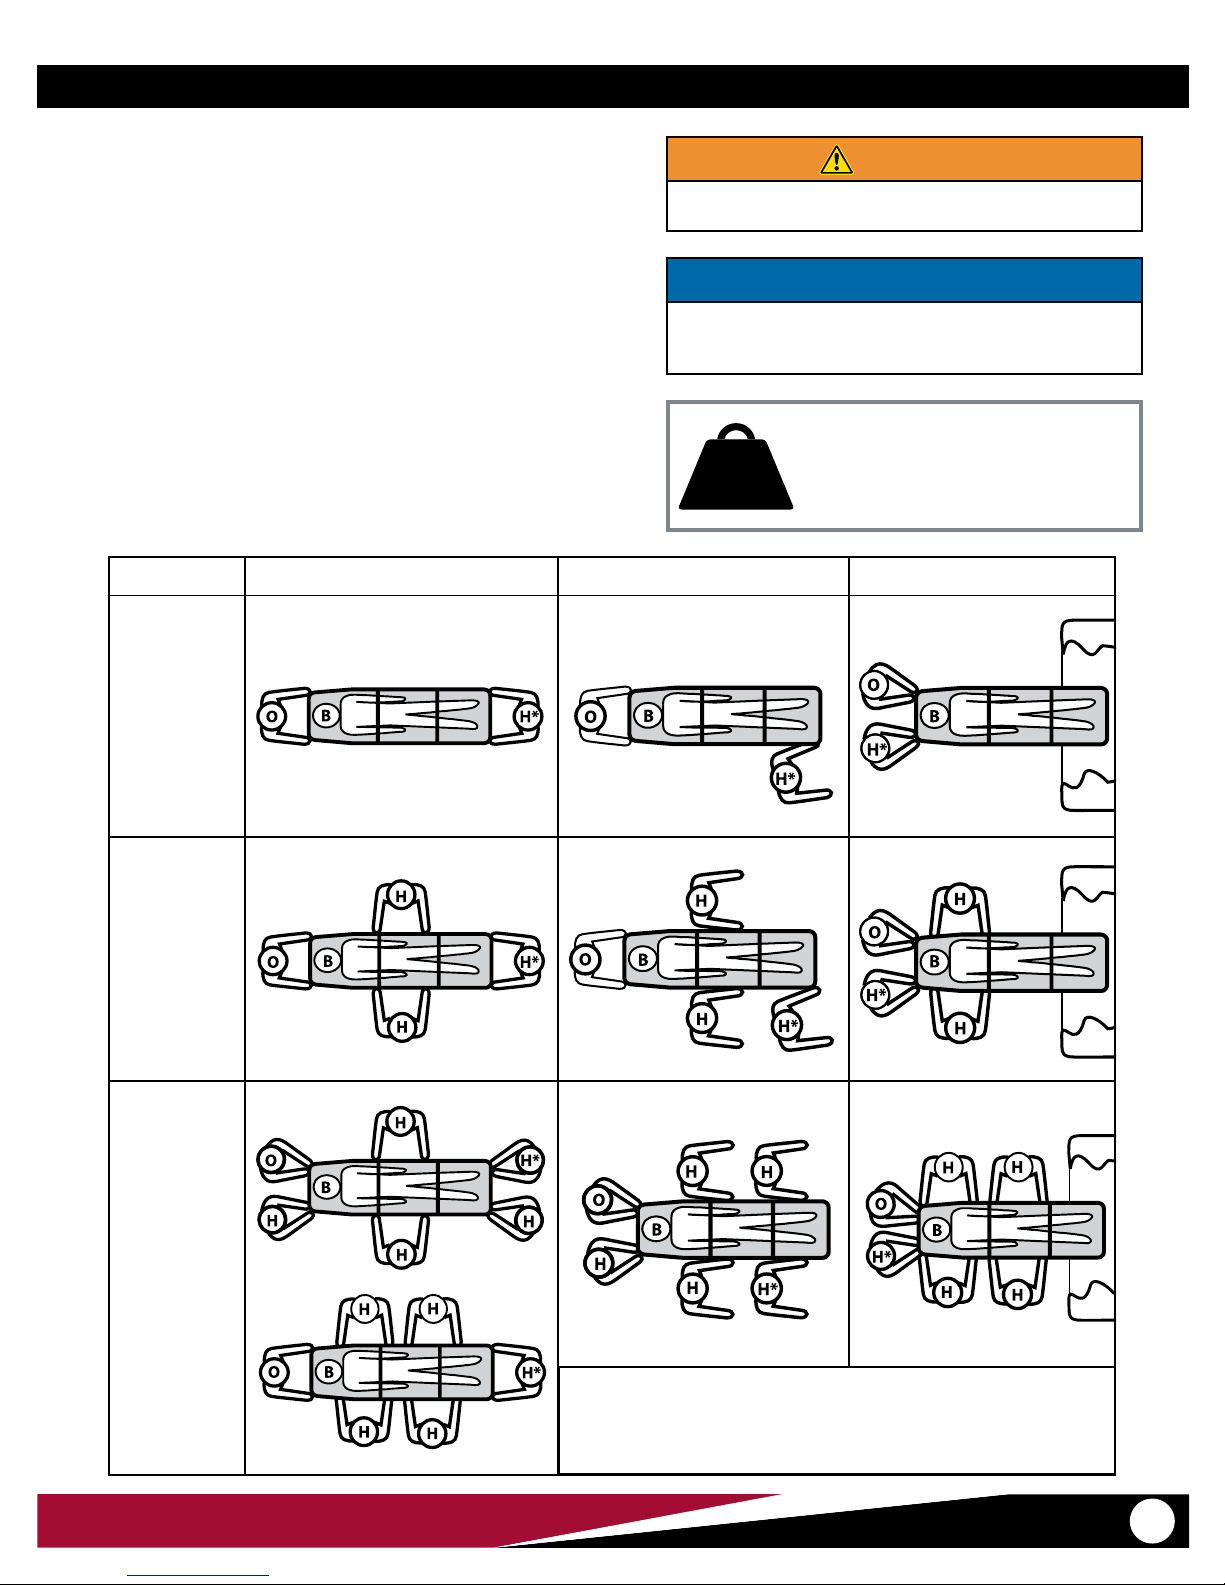
2.4 Using Additional Help
Operating the cot requires a minimum of one trained operator. The
operator may need additional help when working with heavy loads.
The operator should remain at the Operator end of the cot, operate the
controls, and direct all helpers.
Ferno recommends that helpers work in pairs to help maintain
cot balance. Side helpers may need to walk sideways under some
circumstances. Follow local protocols.
Refer to the chart for suggested placement for operators and helpers.
Helpers Loading/UnloadingRolling
One
Operator
+
One
Helper
Changing Levels
WARNING
Helpers can cause injury. Maintain control of the cot,
operate the controls, and direct all helpers.
NOTICE
The trained operator position stay at the Operator end of the
cot and operate the controls. Show helpers where to stand
and how to grasp the cot.
400 lb
181 kg
28.5 st
Inspect the cot if the load capacity has
been exceeded. See “Inspecting the Cot”
on page 18.
Load Capacity
One
Operator
+
Three
Helpers
One
Operator
+
Five
Helpers
Key: O = Operator H = Helper B = Body
H* = Second Trained Operator if present
© Ferno-Washington, Inc. / 234-0008-09 / February 2018
7
Page 8

About the Cot
3 ABOUT THE COT
3.1 Description
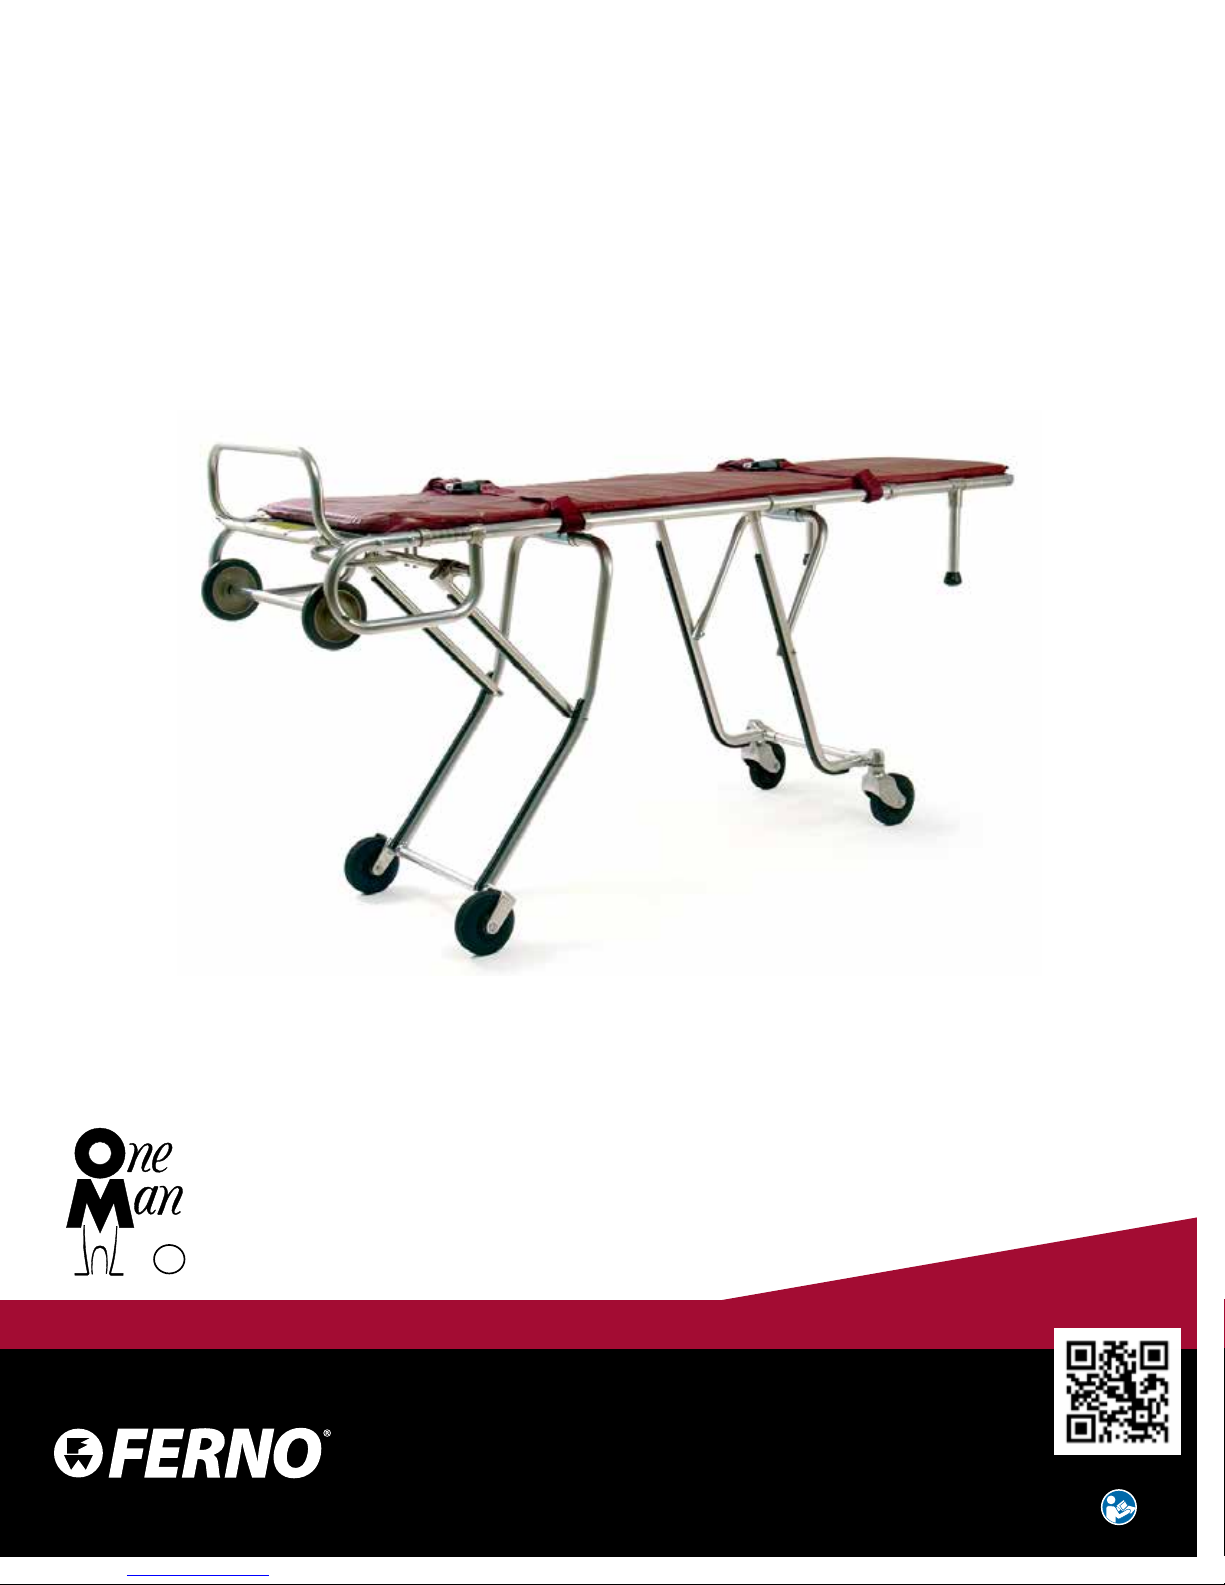
The Ferno® Model 24 and 24H Series Multi-Level Mortuary Cots is a
mortuary-service device designed to transport a body. The cot is for
professional use by one or more trained operators. It is designed for
roll-in loading to help reduce the risk of back injury to mortuary service
personnel.
A mattress and a set of chest and leg restraints are included with each
cot. Both Model 24 and Model 24H are referred to as the “cot” in this
manual where features are identical. Where features dier, the model
name is specied.
Features:
● Footrest
● Loading wheels
● Loading posts
● (Model 24) 7-level positioning
● (Model 24H) An eighth level is provided at the loading end only for
use with high-oored vehicles.
Options:
● Operator-end transport wheels swivel locks
● Side rails
WARNING
Improper use of the cot can cause injury. Use the cot only
for the purpose described in this manual.
400 lb
181 kg
28.5 st
Specications Imperial Metric
Load Capacity 400 lb 181 kg
Load Capacity (UK) 28.5 st
Weight (Model 24) 51 lb 23 kg
Weight (Model 24H) 51 lb 23 kg
Construction Tubular aluminum
Wheel Bearings Sealed/greaseless
Inspect the cot if the load capacity has
been exceeded. See “Inspecting the Cot”
on page 18.
Load Capacity
3.2 General Specications
Specications for the cot are shown in the tables at right. General
specications are rounded. Metric conversions are calculated before
rounding the Imperial measurement.
Ferno reserves the right to change specications without notice. For
more information, contact Ferno Customer Relations or your Ferno
distributor (page 2).
● Height measurements are as follows:
○ Loading Position is the distance from the ground to the bottom
of the loading wheel.
○ Bed Position is the distance from the ground to the bed surface,
measured at the casting in the center of the bed surface.
● Weight is without mattress, restraints and optional features.
● All Ferno® mattresses are fully-sealed.
Dimensions Imperial Metric
Width Overall 20.5 in 521 mm
Length Overall 77 in 1960 mm
Wheels (Diameter x Width) 5x1 in 127x25 mm
Model 24 Height*
Bed Surface Maximum 33.5 in 850 mm
Loading Height 26 in 655 mm
Bed Surface Minimum 11 in 290 mm
Model 24H Height*
Bed Surface Maximum 36 in 925 mm
Loading Height 31 in 780 mm
Bed Surface Minimum 11 in 290 mm
Note: The footrest adds 7 inches (178 mm) to the overall height.
8
© Ferno-Washington, Inc. / 234-0008-09 / February 2018
Page 9

3.3 Components (Models 24 and 24H)
About the Cot
LOADING END
Foot Support
Loading Wheel (2)
Loading-End Leg Control handle
(Not Visible)
Main Frame
OPERATOR END
Mattress
Operator-end Leg Control handle
Loading Post (2)
Fixed Transport Wheel (2)
Swivel Transport Wheel (2)
© Ferno-Washington, Inc. / 234-0008-09 / February 2018
9
Page 10

Setup
4 SETUP
4.1 Vehicle Information
The vehicle bumper extension should not exceed 14 inches (356 mm).
The compartment should have a level oor large enough for the folded
cot, and a compatible Ferno cot fastener installed.
4.2 Installing the Foot Support
The foot support is shipped disassembled from the cot. To attach:
1. Orient the foot support facing up. (Figure 2). Align the pre-drilled
holes in the foot support with those in the cot frame.
2. Insert the carriage bolts (provided) through the cot frame and
foot support (Figure 2). Repeat on the opposite side of the cot.
3. If needed, use the rubber mallet to tap the carriage bolts until the
at underside surface of the carriage bolt head is ush against the
main frame tube.
4. Apply the lock nuts and tighten. Do not over-tighten.
WARNING
Attaching improper items to the cot can cause injury. Use
only Ferno-approved items on the cot.
NOTICE
Loose items and debris on the vehicle oor can interfere with
the operation of the cot with the fastening system. Keep the
vehicle oor clear.
Foot Support
Self-Locking Nut (2/Side)
Carriage Bolt (2/Side)
Component Quantity
Foot support 1
1/4-20 x 2-1/4” Carriage Bolt 4
1/4-20 Lock Nut 4
4.3 Mattress and Restraints
Before placing the cot in service, assign appropriate personnel to install
the mattress and restraints (Figure 3).
MATTRESS: The mattress has four hook-and-loop straps attached to
one side. To attach the mattress to the cot, lay the mattress on the cot
with the hook-and-loop strips down. Fasten the straps around adjacent
frame tubes. To remove, separate the hook and loop straps.
RESTRAINTS: A set of two, two-piece restraints is provided. Attach the
restraints only to the cot main frame. Attach the restraints at points
on the cot frame appropriate for securing torso and legs. Follow the
instructions in the restraint users’ manuals (supplied).
Keep restraint users’ manuals with this manual for future reference. For
additional, free manuals, contact Ferno Customer Service (page 2).
Cot Frame
2
2-Piece Restraint (2)
Mattress
10
3
© Ferno-Washington, Inc. / 234-0008-09 / February 2018
Page 11

Using the Cot
5 USING THE COT
5.1 Before Placing the Cot in Service
● Before use, personnel who will work with the cot must read and
understand this manual. Appropriate skills and training are also
required. See “Operator Focus” on page 6.
● Set up the cot, following the instructions in “Setup” on page 10.
● Conrm that the cot operates properly. See “Inspecting the Cot” on
page 18.
● The vehicle must have a Ferno
®
fastening system installed.
5.2 General Guidelines for Use
● A minimum of one trained operator is required.
● The cot can be operated and maneuvered by one operator
if necessary, but operates and maneuvers more easily when
controlled by two operators.
● Follow standard mortuary-service procedures when operating the
cot.
● Stay with the cot at all times when a body is on the cot.
● Always use restraints to secure the body on the cot.
● Lift only the weight you can safely handle. Use additional help when
working with heavy loads (body and equipment). For placement of
helpers, see “Using Additional Help” on page 7.
● When changing cot positions or loading/unloading, verify that the
leg has locked into the new position.
● If a fastening system is used in the vehicle, read the fastening system
users’ manual for instructions on using the fastening system.
● (Model 24H) Always roll the cot using a rolling position. Use the
loading position(s) only when loading the cot into, or unloading it
from, an vehicle.
WARNING
Improper operation can cause injury. Operate the cot
only as described in this manual.
An unrestrained body can fall o the cot. Use restraints to
secure the body on the cot.
Rolling the Model 24H cot in the loading position can
cause it to tip. Use a rolling position when rolling the cot.
Rolling the cot sideways or in the loading position can
cause it to tip and injure the operator(s). Roll the cot only
in a level (Rolling) position and with the loading end or
control end rst.
© Ferno-Washington, Inc. / 234-0008-09 / February 2018
11
Page 12

Using the Cot
5.3 Changing Cot Levels
To change cot levels with one trained operator, raise or lower the cot in
stages. Raise or lower one end of the cot a small amount, then raise or
lower the other end. Placing the cot at a severe angle could cause the
body to slide o the cot.
LOWERING WITH ONE OPERATOR
1. Beginning at the loading end of the cot, grasp the main frame
corners with an underhand grip (Figure 4).
2. Squeeze the loading-end leg control handle and lower the cot
until it nears the desired height. Release the handle and continue
lowering until the loading-end legs lock at the new position.
3. Move to the operator end of the cot. Grasp the main frame corners
with an underhand grip (Figure 5).
4. Squeeze the operator-end leg control handle and lower the cot
until it is nearly level, or one or two positions lower than the
loading end. Release the handle and continue lowering until the
operator-end legs lock at the new position.
5. Repeat Steps 1-4 until the cot is level and at the desired height.
RAISING WITH ONE OPERATOR
1. Beginning at the operator-end of the cot, grasp the main frame
corners with an underhand grip (Figure 5).
2. Squeeze the operator-end-leg control handle and raise the cot
until it nears the desired height. Release the handle and continue
raising until the operator-end legs lock at the new position.
3. Move to the loading end of the cot. Grasp the main frame corners
with an underhand grip (Figure 4).
4. Squeeze the loading-end leg control handle and raise the cot
until it is nearly level, or one or two positions higher than the
operator end. Release the handle and continue raising until the
loading-end legs lock at the new position.
5. Repeat Steps 1-4 until the cot is level and at the desired height.
NOTICE
Operators should expect and be prepared to control the
normal downward movement of the cot which occurs when a
control handle is squeezed.
When a body is on the cot, adjust the cot level in stages.
Placing the cot at a severe angle could cause the body to slide
o the cot.
When lowering: lower the loading end of the cot rst, before
lowering the operator end.
When raising: Raise the operator end of the cot rst, before
raising the loading end.
Loading End Leg
Control Handle
4
LOWERING WITH TWO OPERATORS
1. Operators stand at opposite ends of the cot, facing each other.
Grasp the main frame corners using an underhand grip.
2. Loading-end Operator: Squeeze the loading-end leg control
handle and lower the cot until it nears the desired height. Release
the control handle and continue lowering until the loading-end
legs lock at the new position.
3. Operator-end Operator: Squeeze the operator-end leg control
handle and lower the cot until it nears the desired height. Release
the control handle and continue lowering until the operator-end
legs lock at the new position.
RAISING WITH TWO OPERATORS
1. Operators stand or kneel at opposite ends of the cot, facing each
other. Grasp the main frame corners using an underhand grip.
2. Operator-end Operator: Squeeze the operator-end leg control
handle and raise the cot until it nears the desired height. Release
the handle and continue raising until the operator-end legs lock
at the new position.
3. Loading-end Operator: Squeeze the loading-end leg control
handle and raise the cot until it nears the desired height. Release
the handle and continues raising until the loading-end legs lock
at the new position.
12
Control End Leg
Control Handle
5
© Ferno-Washington, Inc. / 234-0008-09 / February 2018
Page 13

Using the Cot
5.4 Transferring the Body to the Cot
1. Roll the cot as close to the body as possible.
2. Raise or lower the cot so it is level with the body.
3. Unfasten the restraints.
4. Place the body in a body pouch or use an accessory such as a
transfer board to ease transferring the body onto the cot. See
“Accessories” on page 21.
Note: Ferno recommends that you position the body with the head at the
operator end of the cot, if possible. This orientation will place the body in a
“heads up” position if you need to tilt the cot in a conned area.
5. Transfer the body onto cot and fasten the restraints. Cover the
body with a cover if desired.
6. Raise the cot to the highest level position before rolling.
5.5 Rolling the Cot
GENERAL GUIDELINES
● Maintain control of the cot at all times.
● Rolling a Model 24H in the loading position can increase the
chance for the cot to tip. Use only a rolling position to roll the cot.
● Roll the cot on smooth, unobstructed surfaces whenever possible.
● To cross a low obstacle such as door sills, lift the cot slightly to take
the weight o the wheels so the wheels roll smoothly over the
obstacle.
● Two or more operators/helpers lift and carry the cot over a high
obstacle such as a curb. Do not apply downward force on one end
of the cot in order to raise the other end of the cot.
● Use help as needed to safely control the weight of the body and
cot. See “Using Additional Help” on page 7.
● When rolling over rough terrain, two operators are suggested.
Operator(s) and helpers should grasp the cot with both hands.
6
ROLLING THE COT
1. Verify that the restraints are securely fastened around the body.
2. Raise the cot to the highest level position.
Model 24H: Do not use the loading position to roll the cot. Use a
level position.
3. Grasp the main frame at the operator end of the cot and push and
steer the cot (Figure 6).
If two or more operators or helpers are present, position helpers
in pairs to maintain cot balance and control. See “Using Additional
Help” on page 7 for recommended placement of operators and
helpers.
Note: Although the swivel wheels are only at the operator end, steering
may be easier from the loading end, depending on circumstances. Follow
your mortuary protocols.
© Ferno-Washington, Inc. / 234-0008-09 / February 2018
13
Page 14

Using the Cot
5.6 Maneuvering the Cot
In a Conned Area
The cot can be rolled in a tilted position for easier maneuvering in
conned spaces such as narrow hallways, elevators, or stairways (Figure
7). Maintain control of the cot at all times.
To roll the cot in a tilted position:
1. Fasten and adjust the restraints to secure the body on the cot.
Use additional restraints if necessary, following your mortuary
protocols.
2. Lower the cot to the lowest position. Lower the loading end
rst, then the operator end, so the legs will lock into place in the
conguration shown.
3. Stand at the operator end of the cot, grasp the main-frame and
lift the cot onto its loading wheels and front transport wheels. Roll
the cot in this position (Figure 7).
4. Use additional help as needed to lift, hold, and push the cot. See
“Using Additional Help” on page 7.
7
14
© Ferno-Washington, Inc. / 234-0008-09 / February 2018
Page 15

Using the Cot
5.7 Loading the Cot
Use additional help as needed to load a cot into a vehicle when the cot
is carrying a body. See “Using Additional Help” on page 7. Maintain
control of the cot at all times.
To load the cot into a vehicle:
1. Model 24H only: After the cot has been rolled near the vehicle
rear door, raise the loading end of the cot to the loading position
(Figure 8).
Note: When in the loading position, the bed surface, the Model 24 cot is
level, while the Model 24H cot is inclined.
2. Grasp the corners of the main frame with an underhand grip and
roll both loading wheels onto the vehicle oor (Figure 9).
3. Push the cot into the vehicle until both loading-end legs contact
the vehicle bumper (Figure 9).
4. While supporting the cot, squeeze and hold the operator-end leg
control handle and push forward. Both legs will fold as the cot
enters the vehicle(Figure 10).
5. Continue supporting the cot and push it completely inside the
vehicle. Rest the operator end of the cot on the posts, then release
the control handle (Figure 11).
6. If the cot must be repositioned, lift the operator end and move it.
Do not drag the cot posts on the vehicle oor.
7. Secure the cot in the vehicle with a Ferno-approved cot fastener.
Loading Wheels On Floor
Legs Touching Bumper
9
24H Loading Height
24 Loading Height
8
NOTICE
If the cot must be repositioned, lift the operator end and move
it. Do not drag the cot posts on the vehicle oor. Dragging the
cot can damage the loading posts.
10
11
© Ferno-Washington, Inc. / 234-0008-09 / February 2018
15
Page 16

Using the Cot
5.8 Unloading the Cot
Use additional help as needed to unload a cot from a vehicle when
the cot is carrying a body. See “Using Additional Help” on page 7.
Maintain control of the cot at all times.
1. Disengage the cot fastener.
2. Grasp the corners of the cot main frame with an underhand grip
and support the cot.
3. Squeeze and hold the operator-end leg control handle and
begin pulling the cot from the vehicle.
4. Hold the cot high enough to allow the operator-end legs to unfold
completely and lock into place. You may need to lift the operator
end higher than normal when:
○ the vehicle is on an incline.
○ the cot is carrying an extremely heavy body. (This may compress
the vehicle shocks, making the vehicle lower to the ground than
normal.)
5. Release the control handle after the operator-end legs have
locked into place. Set the operator-end transport wheels on the
ground.
6. Before continuing to Step 7: keep the loading wheels inside the
vehicle until you verify that the loading-end legs have locked.
7. Continue pulling the cot out of the vehicle until the loading-end
legs unfold completely and lock into place (Figure 12).
To test if the loading-end legs have locked, attempt to push the
cot inside the vehicle. If the loading-end legs f-old, they are not
locked.
If the vehicle is on an incline, you may need to lift the cot
completely o the ground to provide clearance for the loadingend legs to unfold completely and lock into place. Use additional
help if needed. See “Operator Height and Strength” and “Using
Additional Help” on page 7.
8. Lower the cot until all four transport wheels are on the ground.
9. Roll the cot out of the vehicle.
10. Model 24H: After the cot has been unloaded from the vehicle,
lower the loading end of the cot to a level rolling position.
NOTICE
Always keep the loading wheels on the vehicle oor until
both sets of legs have completely unfolded and locked into
place.
The weight of an extremely heavy body may compress
the vehicle shocks, lowering the vehicle and requiring the
operator and helpers to lift the cot higher than normal in
order to allow the legs to lock.
If the vehicle is parked facing downhill, you will need to hold
the cot higher than normal to provide sucient ground
clearance for the legs to unfold completely and lock into place.
Keep Loading Wheels Inside
Vehicle Until You Conrm the
Legs Have Locked
12
16
© Ferno-Washington, Inc. / 234-0008-09 / February 2018
Page 17

Maintenance
6 MAINTENANCE
6.1 Maintenance Schedule
The cot requires regular maintenance. Set up and follow a maintenance
schedule. The table at right represents minimum intervals for
maintenance. Keep maintenance records. For a sample record sheet, see
“Maintenance Record” on page 23.
When using maintenance products, follow the manufacturers’ directions
and read the manufacturers’ material safety data sheets.
6.2 Disinfecting and Cleaning
the Restraints
Remove the restraints from the cot. Disinfect and clean only as directed
in the users’ manuals provided with the restraints. Additional, free users’
manuals can be obtained from Ferno. See “Ferno Customer Relations”
on page 2.
6.3 Disinfecting and Cleaning
the Mattress
Replace the mattress if it is ripped, punctured or damaged.
1. Remove the mattress from the cot.
2. To disinfect: Apply disinfectant to the mattress, following the
disinfectant manufacturer’s instructions for application method
and contact time.
3. To clean: Wash the mattress with warm, soapy water and a soft
cloth. Rinse the mattress with clear water. Hang the mattress to
dry, or dry it with a towel.
6.4 Disinfecting the Cot
Wipe all surfaces with disinfectant. Follow the disinfectant manufacturer’s
instructions for application method and contact time. Ferno recommends
you inspect the cot for damage as you disinfect it.
WARNING
Improper maintenance can cause injury. Maintain the cot
only as described in this manual.
Minimum
Maintenance Each Use As Needed Monthly
Disinfecting (this page)
Cleaning (this page)
Waxing (this page)
Inspecting (page 18)
Lubricating (page 18)
•
•
•
• •
•
NOTICE
Disinfectants and cleaners containing bleach, phenolics, or
iodines can cause damage. Do not use products containing
these chemicals.
Water under high pressure, or steam, can penetrate joints,
ush away lubricant, and cause corrosion. Use caution when
cleaning moving parts such as joints and hinges, and reapply
lubricant if needed. See “Lubricating the Cot” on page 19.
Using abrasive cleaning compounds or applicators on the
cot can cause damage. Do not use abrasive materials to
clean the cot.
6.5 Cleaning the Cot
1. Remove the restraints and mattress from the cot.
2. Hand clean all surfaces of the cot with warm water and a mild
detergent.
3. Rinse with warm, clear water. Dry the cot with a towel or allow it
to air-dry.
6.6 Waxing the Cot
While it is not necessary to wax this cot, waxing the aluminum main
frame or legs will not damage them, and will help maintain the cot’s
appearance.
Disinfect and clean the cot before applying wax. Use an automotive wax
as directed by the wax manufacturer.
© Ferno-Washington, Inc. / 234-0008-09 / February 2018
17
Page 18

Maintenance
6.7 Inspecting the Cot
Have your service’s equipment maintenance personnel inspect the cot
regularly. Follow the checklist at right and operate the cot through all its
functions as described in this manual.
If inspection shows damage or excessive wear, remove the cot from
service until repair is made. See “Parts and Service” on page 20.
Inspection Checklist
● Are all components present?
● Is the cot free of excessive wear?
● Are all screws, nuts, bolts, rivets, and roll pins securely
in place?
● Do all moving parts operate smoothly and properly?
● Does the cot lock properly into each position?
● Does the cot load and unload properly?
● Does the auxiliary lock function properly?
● Does the cot roll smoothly?
● Do the wheels have some tread?
● Are the restraints properly installed?
● Is restraint webbing in good condition with no cuts or
frayed edges?
● Are restraint buckles free of visible damage and do they
operate properly?
● Is the vehicle properly prepared for the cot with an
approved Ferno fastening system installed?
● Is the mattress in good condition?
18
© Ferno-Washington, Inc. / 234-0008-09 / February 2018
Page 19

Maintenance
6.8 Lubricating the Cot
Disinfect and clean the cot before applying lubricant. Use the lubricants
designated below to lubricate the cot. Do not lubricate points marked
with the “do not lubricate” symbol.
LUBRICATION POINTS
1. Undercarriage frame joint SAE 30-weight oil or EZ-1 (1-2 drops)
2. Control handle hinge SAE 30-weight oil or EZ-1 (1-2 drops)
3. I-beam* SAE 30-weight oil or EZ-1 (1-2 drops)
Note: The I-beam runs the length of the cot. To lubricate, tip the stretcher
on end.
LUBRICATIONFREE ITEMS
Wheel bearings (sealed) Do not lubricate
NOTICE
Lubricating parts that should not be lubricated allows dirt and
foreign particles to collect on those parts, resulting in damage.
Lubricate only the numbered reference points shown.
Applying Lubricant
Use a small amount of lubricant (one or two
drops). Lubricate identical points on each
side of the cot. After applying lubricant, wipe
o excess.
Do Not Lubricate Lubricate
1
3
2 2 2
© Ferno-Washington, Inc. / 234-0008-09 / February 2018
19
Page 20

Parts and Service
7 PARTS AND SERVICE
7.1 U.S.A. and Canada
In the United States and Canada, to order parts or for professional
repair, contact EMSAR® – the only agent authorized by Ferno to manage,
service, and repair Ferno products.
Telephone (Toll-Free) 1.800.73.EMSAR
Telephone 1.937.383.1052
Fax +1.937.383.1051
Internet www.EMSAR.com
7.2 Worldwide
To order Ferno parts, and for professional repair, contact your Ferno
distributor. Your distributor is the only agent authorized by Ferno to
manage, service, and repair Ferno products.
7.3 Parts Diagrams
WARNING
Improper parts and service can cause injury. Use only
Ferno parts and Ferno-approved service on the cot.
Modifying the cot can cause injury and damage. Use the
cot only as designed by Ferno.
PARTS LIST
No. Description Kit Number
1 5” wheel with 3/8” bearings, axle, bolt, and nut 090-0060
2 Wheel fork with bearings and shank pin (no wheel) 090-0070
3 5” swivel caster only 090-0080
n/s* 5” swivel caster with wheel lock assembly complete 090-0081
n/s Wheel caster with wheel lock 190-1203
n/s 5/16” wheel bearing (pair) 090-4278
4 #20 crutch tip (pr.)/inserts 090-0560
5 Load-end control handle 090-0953
6 Operator end control handle 090-0954
7 Ratchet bar return spring 090-0983
8 Footrest assy w/hardware 090-3214
9 Loading-wheel axle with cover 190-1058
10 5” load wheel with sleeve, bearing 090-4054
11 Transport wheel axle bolt and nut 190-1027
*n/s = not shown
10
8
9
4
2
1
1
3
11 11
6
7
5
20
© Ferno-Washington, Inc. / 234-0008-09 / February 2018
Page 21

Accessories
8 ACCESSORIES
Ferno oers a full line of accessories approved for use with the cot.
Follow all instructions in accessory users’ manuals. Keep the instructions
with this manual.
When using accessories, be aware of any special considerations such as
doorway heights and widths, or other factors which may be aected by
the addition of the accessory/accessories to the cot.
Contact Ferno Customer Relations (page 2) or your Ferno distributor for
product information.
WARNING
Attaching improper items to the cot can cause injury. Use
only Ferno-approved items on the cot.
ACCESSORIES LIST
Description Part Number
Model 5 Cot Fastener 056-5000
Model 533 Wheel Cup (each) 081-5334
Model 534 Recessed Post Cup (pair) 081-5340
Model 535 Raised Post Cup (pair) 081-5350
Model 372 Mattress, burgundy 031-1360
Model 156 Roller System 056-3909
Restraints, Model 414-OL Over-the-Lap, burgundy 031-3090
Restraints, Model 414-OL Over-the-Lap, orange 031-2320
Restraints, Model 414-R Wrist, burgundy 031-3090
Restraints, Model 414-R Wrist, orange 031-2310
Restraints, Model 415-AR Ankle, burgundy 031-3089
Restraints, Model 415-AR Ankle, orange 031-2330
Side Lift Handles 082-1998
Telescoping Handles 008-7150
Transfer Board 010-7992
The following items are available in a variety of colors or materials. Call
for options.
● Model 320 First Call Cover
● Model 321 First Call Cover
● Model 330 First Call Cover
● Model 335 First Call Pouch
● Model 335-R First Call Pouch
Model 430 (Metal Buckle) Restraint
Style Black Orange
2 pc., 5’ (1524 mm) 031-3892 031-3891
2 pc., 7’ (2134 mm) 031-3911 031-3912
2 pc., 9’ (2743 mm) 031-3305 031-4013
1 pc., 7’ (2134 mm) 031-3910 031-3887
1 pc., 9’ (2743 mm) 031-3899 031-3889
© Ferno-Washington, Inc. / 234-0008-09 / February 2018
21
Page 22

Training Record
TRAINING RECORD
Date Printed Name Signature
Training Method
Read
Manual
Video/
Online
Hands-On
Trainer
Initials
22
© Ferno-Washington, Inc. / 234-0008-09 / February 2018
Page 23

Maintenance Record
MAINTENANCE RECORD
Date Maintenance Performed By
© Ferno-Washington, Inc. / 234-0008-09 / February 2018
23
Page 24

© Ferno-Washington, Inc. / 234-0008-09 / February 2018
 Loading...