

Page 1
ENGLISH
USER & INSTALLER’S MANUAL
WAY KIT
Page 2
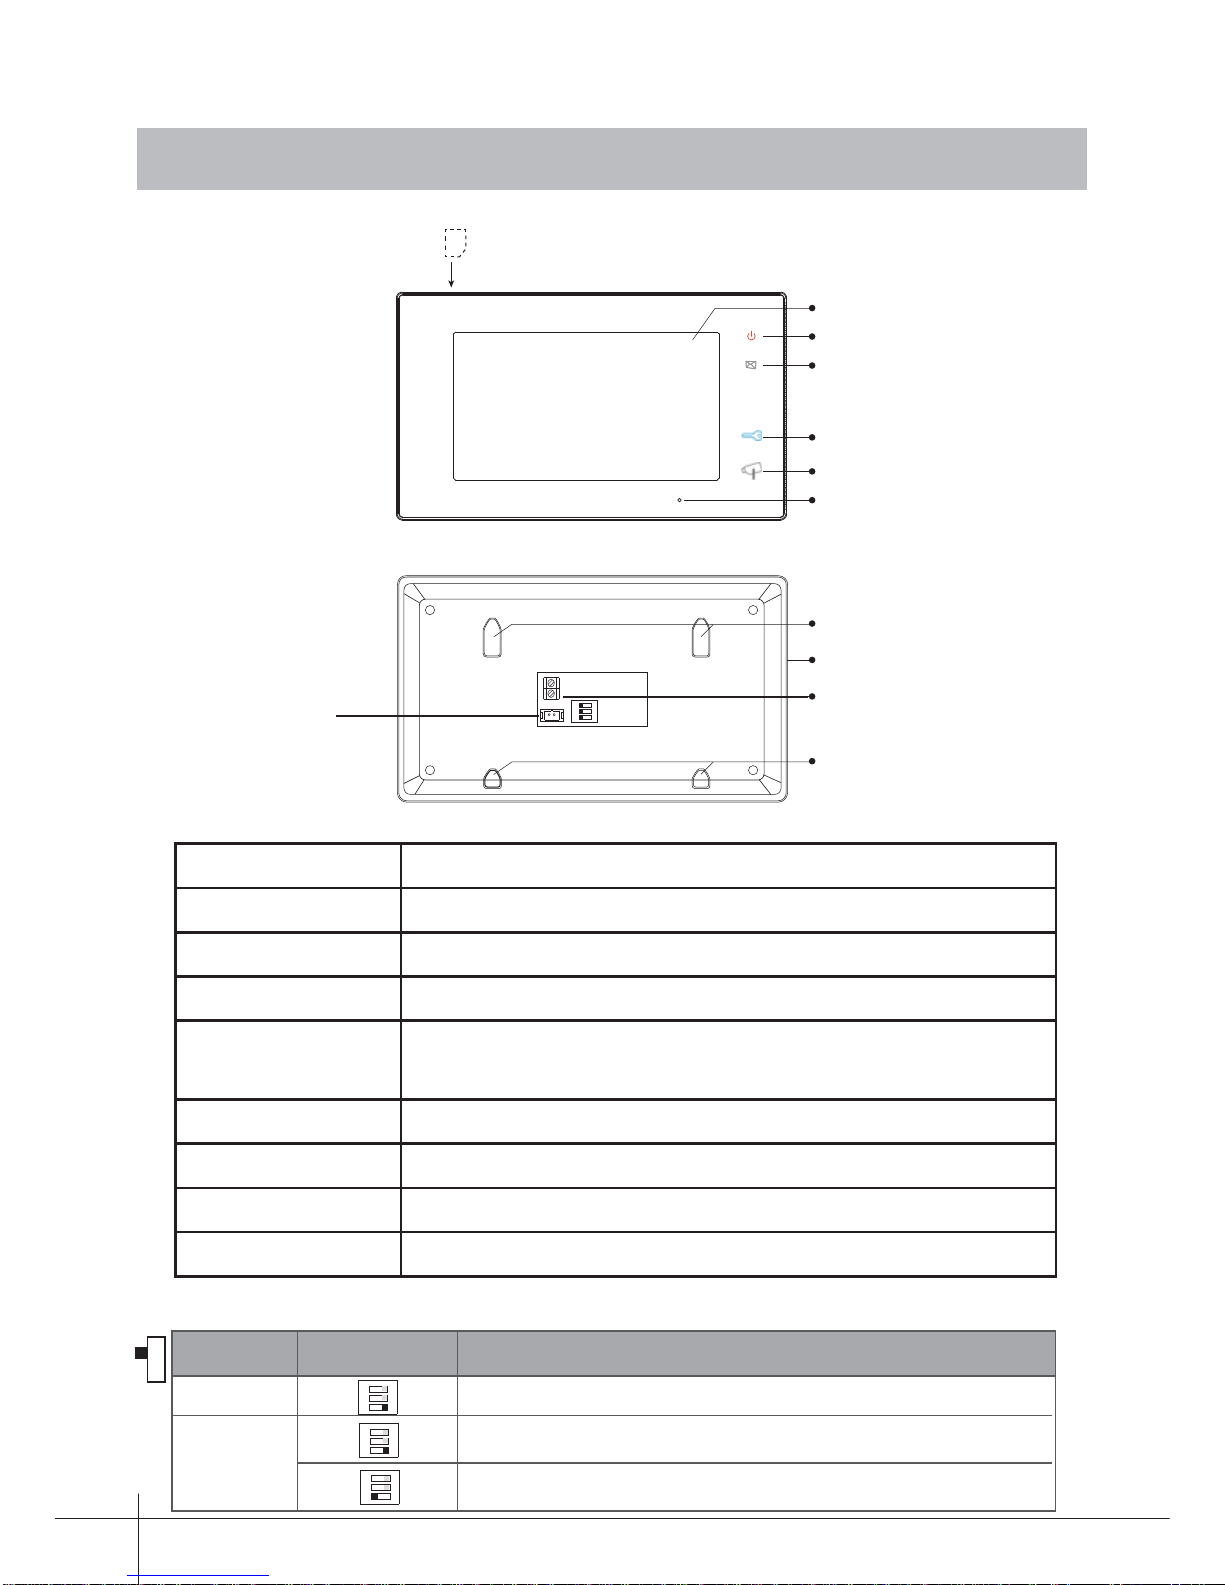
Parts and Functions
Digital TFT LCD Screen
UNLOCK Button
TALK/MON Button
Microphone
Connection Port
Speaker
Mounting Hook
Mounting Hook
1 2 3
ON
DIPS
L1
L2
ON/OFF Button
Message Indicator
SD card
LCD screen Display the visitors' image
ON/OFF Button Press to open/close screen
Message indicator It will light when the monitor received the unread record
Unlock button Press to release the door
Talk/Mon button Press to communicate hands free with visitor
Press to view the outdoor condition in standby mode
Microphone Receive voice from the user
Mounting hook Use to hang up the monitor
Connection port Bus terminal, Doorbell button terminal, DIP Switches
Speaker Send out vioce from the visitor
Key functions
-1-
DIP Settings
123
ON
Bit
DIP1&2
Reserved. left to default.
Set to OFF. When the monitor is in the middle of the line in daisy chain connection.
Bit State Description
DIP3
123
ON
123
ON
Set to ON. When the montior is at the end of the line or connected to a DBC4S.
1. Indoor Monitor
COD. 97767IKg V09_16
.
Door bell
THIS KIT IS NOT COMPATIBLE WITH VERSION V1.0
1 23
ON
1 23
ON
1 23
ON
1 23
ON
ON
OFF.
Page 3

-2-
2. Outdoor Station
Camera Lens
Speaker
Nameplate
Call Button
Microphone
Night Light
Rainy Cover
23 mm
90 mm
145 mm
Parts and Functions
Terminal Descriptions
1 2 3
JP/LK
PL
S+
S-
Main Connect Port
BUS
•JP/LK: Lock control jumper, to select the lock type (see 13.2.1 , 13.2.2).
•Main Connect Port: To connect the bus line and the electronic locks.
•BUS: Connect to the bus line, no polarity.
•PL: External lock power input, connect to the power positive (power +).
•S+: Lock power (+) output.
•S-: Lock power (-) output, do not connect in case of using external power supply
for the door lock.
Note: For details related to door openers, see chapters 13.2.1 and 13.2.2.
1
23
Page 4
-3-
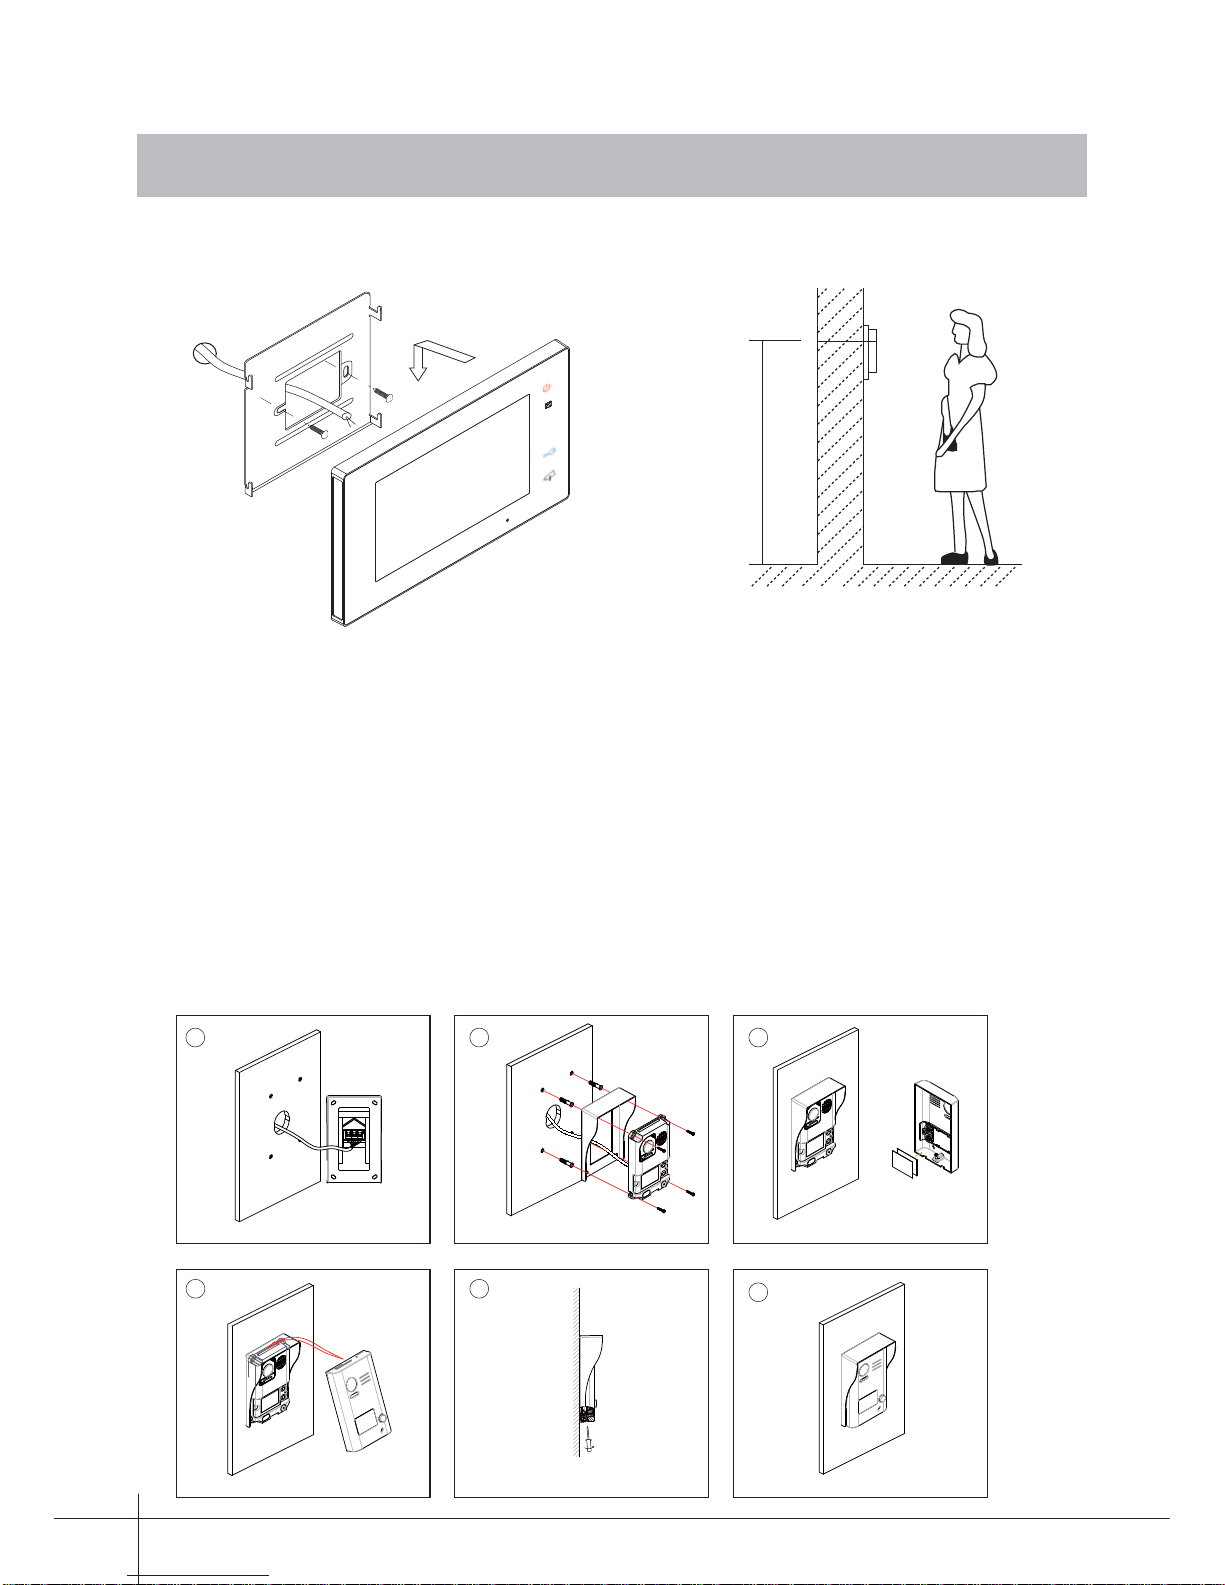
3.1 Monitor Mounting
145~160 cm
1. Use the screws to fi x the Mounting Bracket on the wall, (fi tting accesories includes
a Bracket. Two pieces of 4X25 screws are needed for fastening the Mounting
Bracket).
2. Connect the system correctly (see the later connection chapter) then hang the
Monitor into the Mounting Bracket.
3. Mounting
3.2 Outdoor Panel Mounting
The base unit is installed
on the wall.
Connect the cable correctly.
Placing name label.
The front cover is installed
onto the base unit.
Use the screw to fix the front cover.
Installation is complete.
1.Mounting the Rain Cover
Page 5

-4-
4. Placing Name Label
Remove the plastic cover to open the transparent name label cover, insert a name
label, then put the plastic cover back to the panel.
STEP 1
Unscrew the screws.
STEP 2
Replace name label.
Page 6
-5-
5.
Operation Instructions
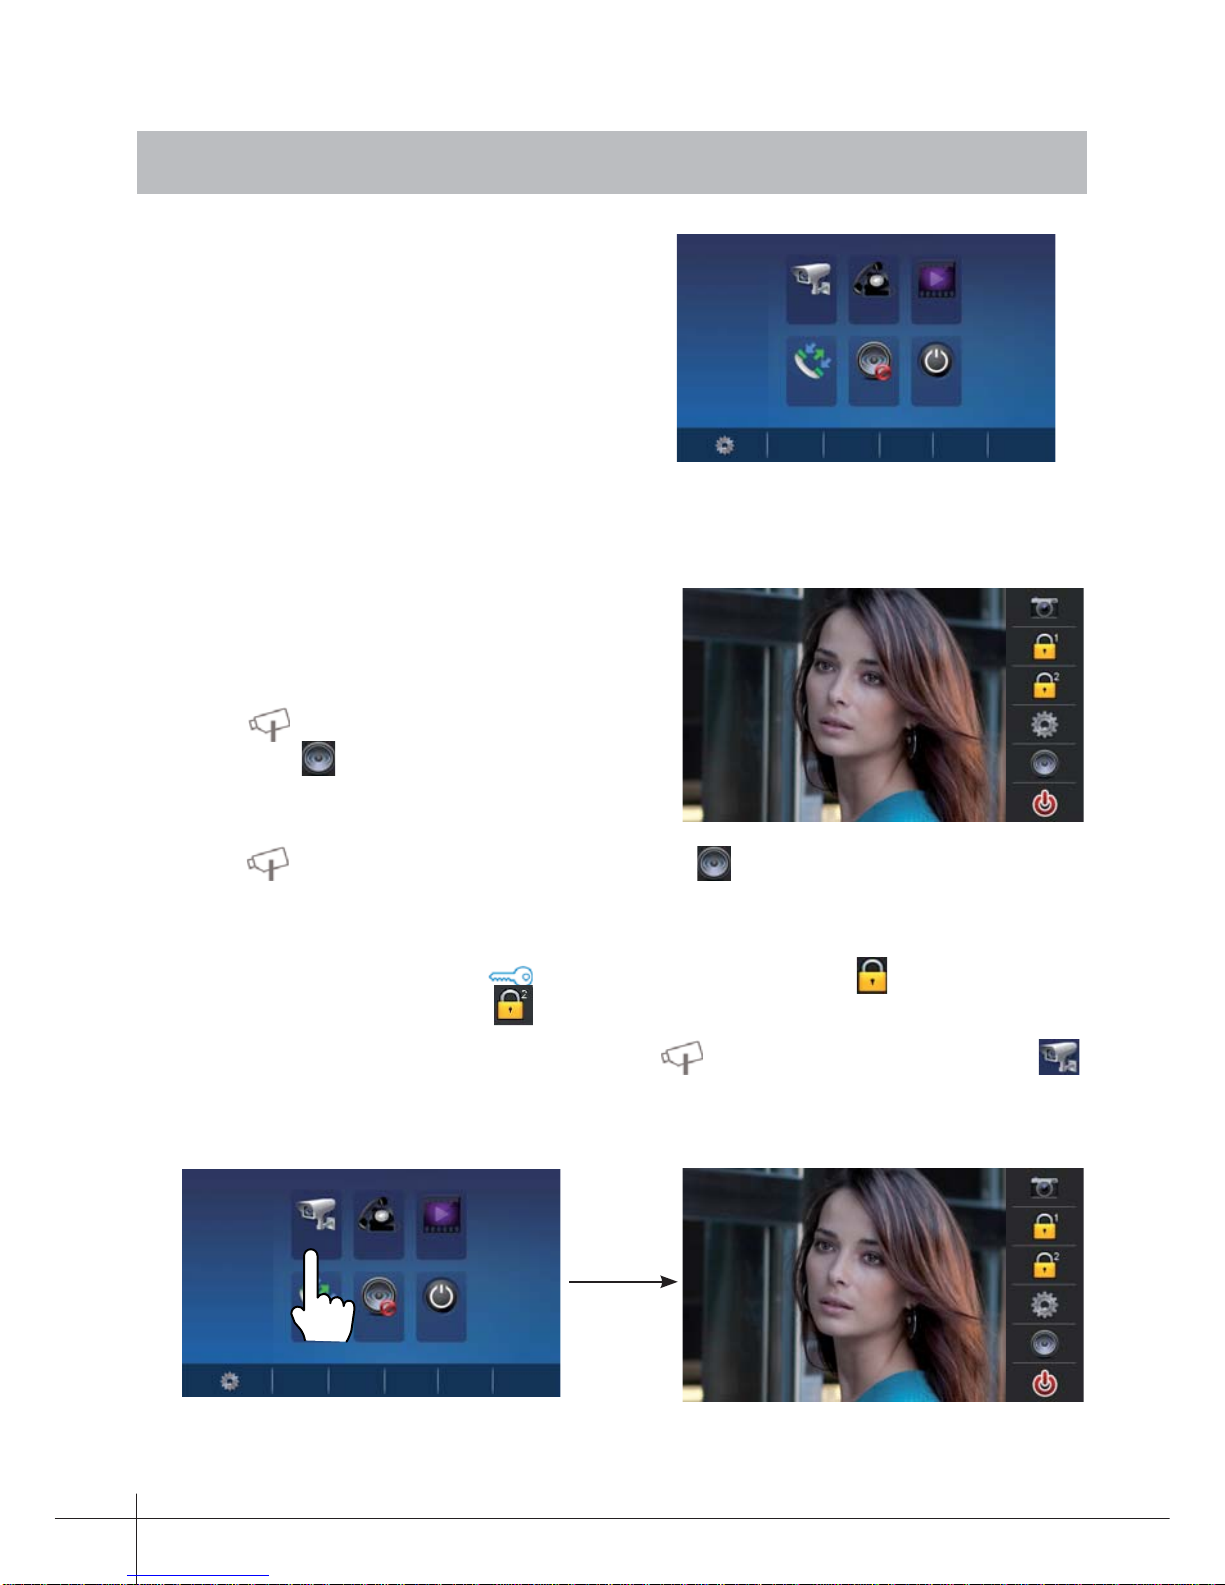
5.1 Main Menu
Touch the screen anywhere on monitor
in standby mode, the main menu page
will be shown as follows:
5.2 Basic Door Release Operation
1. Press CALL button on outdoor station, the
Monitor rings, at the same time, the screen
displays the visitors' image.
2. Press TALK/MON Button on monitor
or touch icon on screen, you can
communicate hands free with the visitor for
90 seconds. After fi nishing communication,
press TALK/MON button again or touch icon to end the communication.
If nobody answers the phone, the screen will be turned off automatically after 30
seconds.
1. During talking state, Press UNLOCK Button or touch icon to open the
door for the visitor. The icon release a relay in the bus.
2. When the monitor is in standby mode, press TALK/MON Button or touch
Monitor icon on main menu, the screen can display the view of outside.
3.
4.
Monitor Intercom
Playback
Call Record
Do not
Disturb
Close
06:32 PM
Wed.
02/11/2015
Monitor Intercom
Playback
Call Record
Do not
Disturb
Close
06:32 PM
Wed.
02/11/2015
Page 7
-6-
1.
Inner Broadcast
: If multi slave monitors are installed in the same apartment, select
Inner Broadcast, all the other monitors will mandatory receive broadcast content at
the same time, whichever slave monitor doesn't need to answer the broadcast, and
whichever slave monitor also doesn't need to open the screen.
2.
Inner Call
: If multi slave monitors are installed in the same apartment, select Inner
Call, all the other Monitors will ring at the same time, whichever Monitor answers
the call, conversation is started and the other monitors will stop ringing at the same
time.
3.
Name List Call (External Call)
: To do an external call to the other apartment in
2 way kits. When selecting this option, apartment 1 can call apartment 2, and
viceversa.
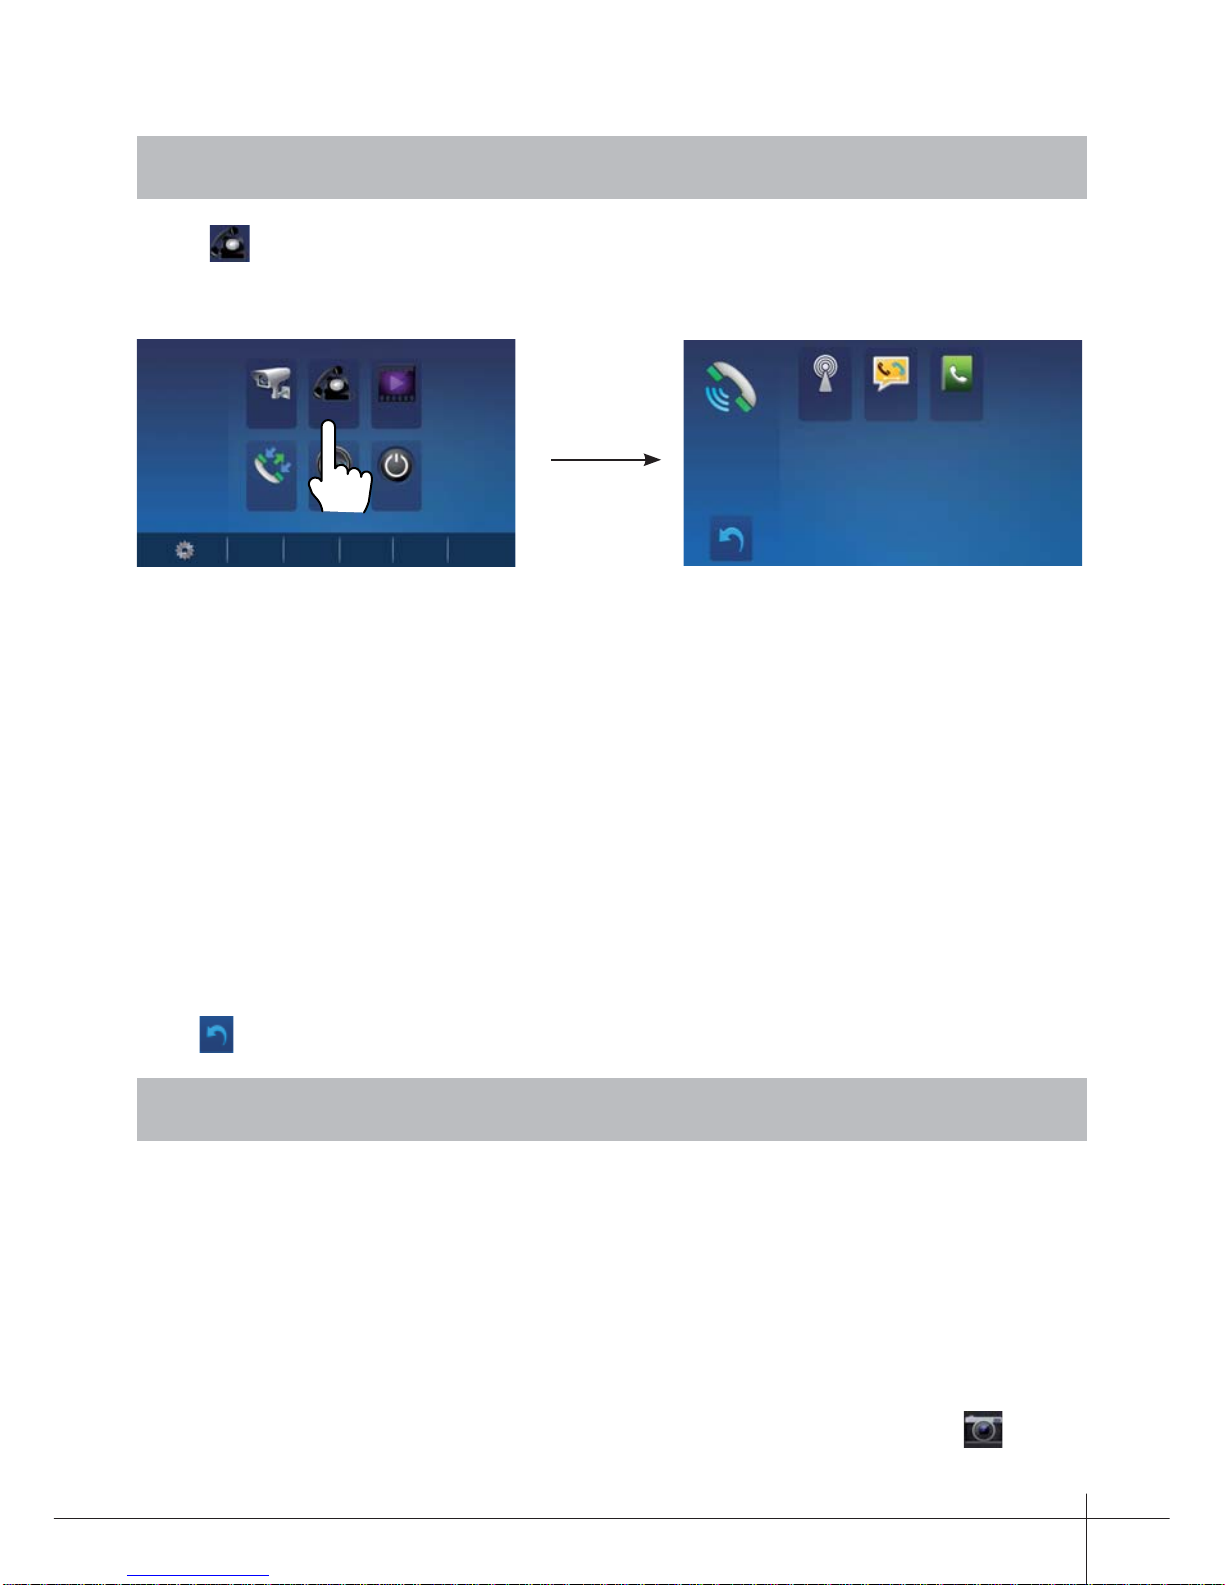
Touch
Intercom icon on main menu to get into the intercom mode, you have 3 items
to select: Inner Broadcast, Inner Call and Name List Call (External Call).
6. Intercom Function
Video/Picture Recording
Both Auto-Recording and Manual-Recording are available. And Auto-Recording is
default. If receive a call , after 3s, the monitor will record one video (with SD card)/
picture (without SD card) for each calling automatically. Or you can touch icon to
record the visitor's video/image manually when the monitor is in monitoring or calling.
Note: 1. The video/picture memory function is built into the monitor.
2. SD card must be formatted before use by monitor.
3. SD card is excluded in the kit.
7. V ideo/Pictur e Memory
Monitor Intercom
Playback
Call Record
Do not
Disturb
Close
06:32 PM
Wed.
02/11/2015
Inner
Broadcast
Inner
Call
Name List
Call
Press icon to exit and enter main menu page.
Page 8
-7-
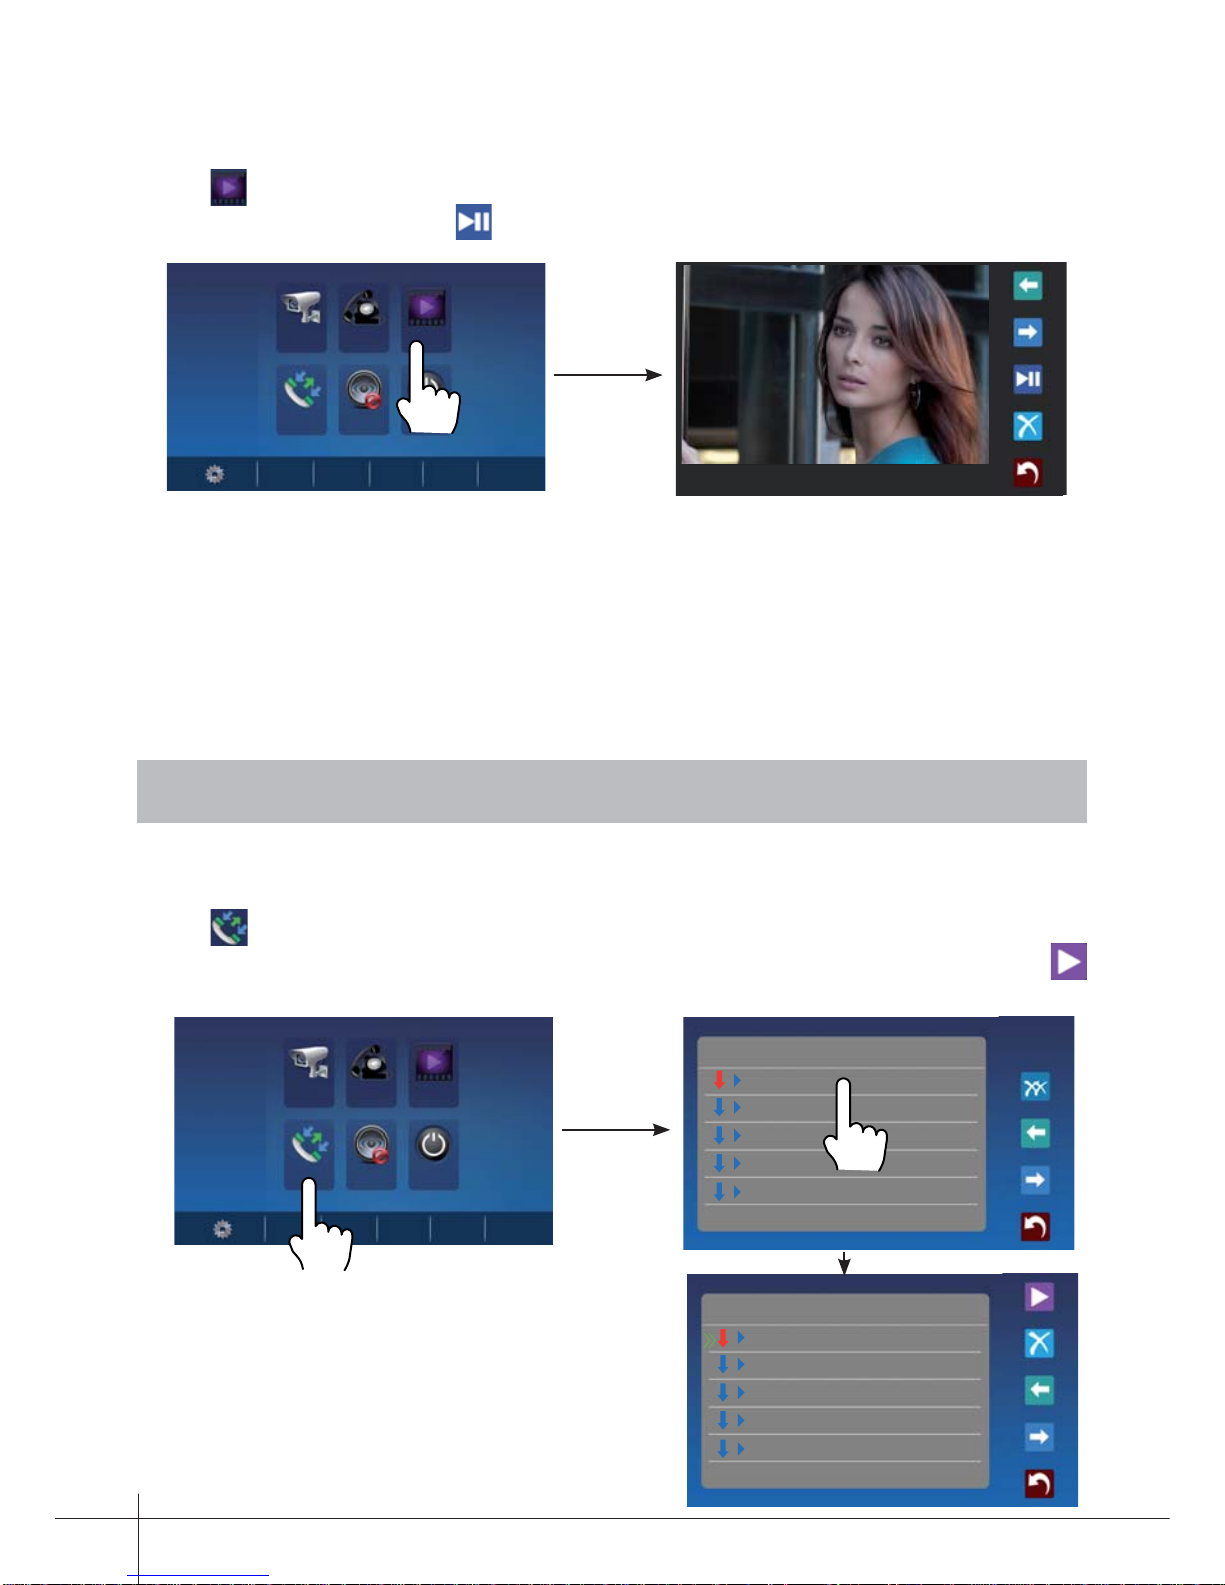
Video/Picture Playback
Touch Playback icon on main menu, the recorded videos/pictures will be played on
screen, please note that touch icon to Start/Pause the videos recorded.
Note: When the system without SD card: 1. 118 pictures in inner memory
2. Manage each picture
3. Can be transfered to SD card.
When the system with SD card: 1. Up to 32G Micro SD card
2. Video & Audio record
3. Manage each video clips
4. Can be copied
8. Call Record Function
Monitor Intercom
Playback
Call Record
Do not
Disturb
Close
06:32 PM
Wed.
02/11/2015
Image: 008/008 2015/02/11 19:23:28
Monitor Intercom
Playback
Call Record
Do not
Disturb
Close
06:32 PM
Wed.
02/11/2015
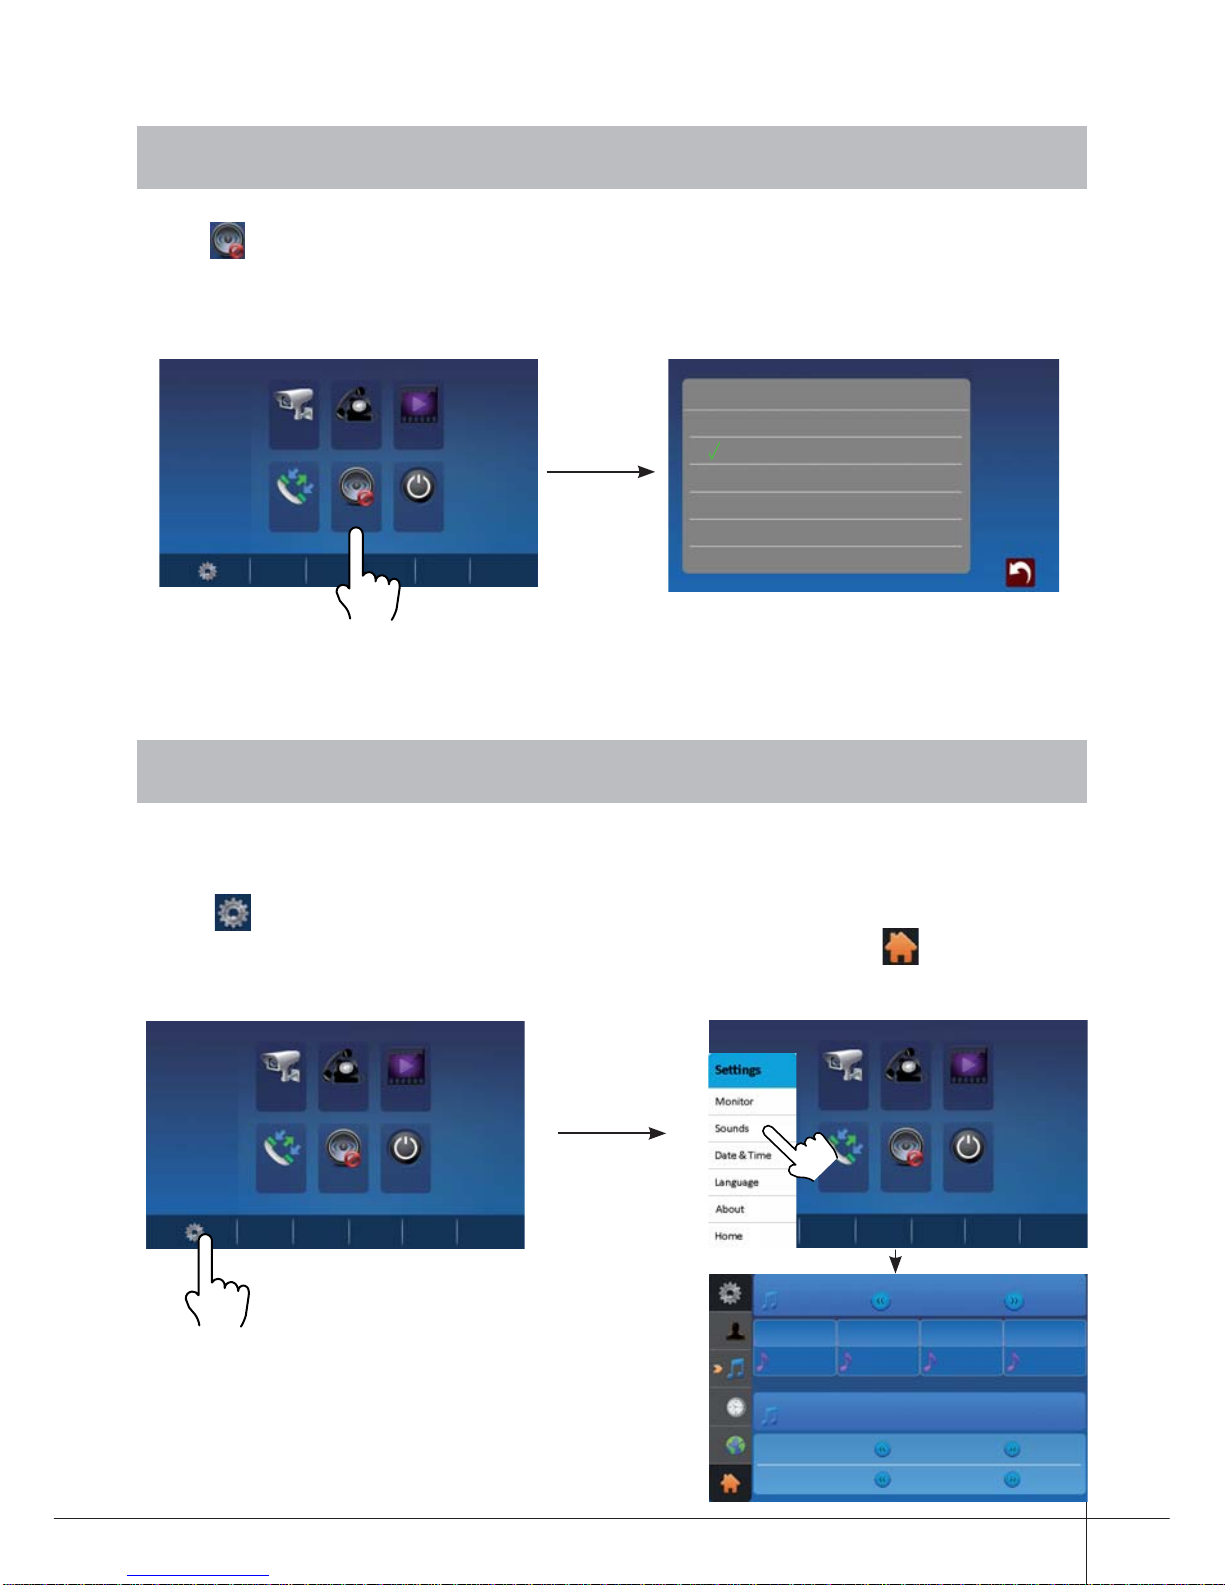
Call Record: All the calls concerning the montior, including Door-station-to-monitor call,
monitor-to-monitor call, will be recored and can be reviewed afterwards.
Touch Call Record icon on main menu to get into the call record mode.When there
are unread call records, arrow color red. Press the unread call record, and then touch
icon to play it.
Call Record
02/11
06-12 11:06 Rafa Nadal
05-27 21:43 Yaga Seelan
04-20 13:33 Yaga Seelan
02-11 15:22 Rafa Nadal
02-117 20:54 Yaga Seelan
Call Record
02/11
06-12 11:06 Rafa Nadal
05-27 21:43 Yaga Seelan
04-20 13:33 Yaga Seelan
02-11 15:22 Rafa Nadal
02-117 20:54 Yaga Seelan
Note:
When there are several call records, the new
ones delete automatically the oldest ones, so
it is not necessary to delete them manually.
Page 9
-8-
9. Do Not Disturb Function
Touch Do Not Disturb icon on main menu to get into the don't disturb mode, you
have 4 item to select: Normal, for 1 Hour, for 8 Hours and Always. You can select the
appropriate item according to your needs.
Note: When you select "for 1 Hour" or "for 8 Hours", bottom of the screen will display
the remaining time.
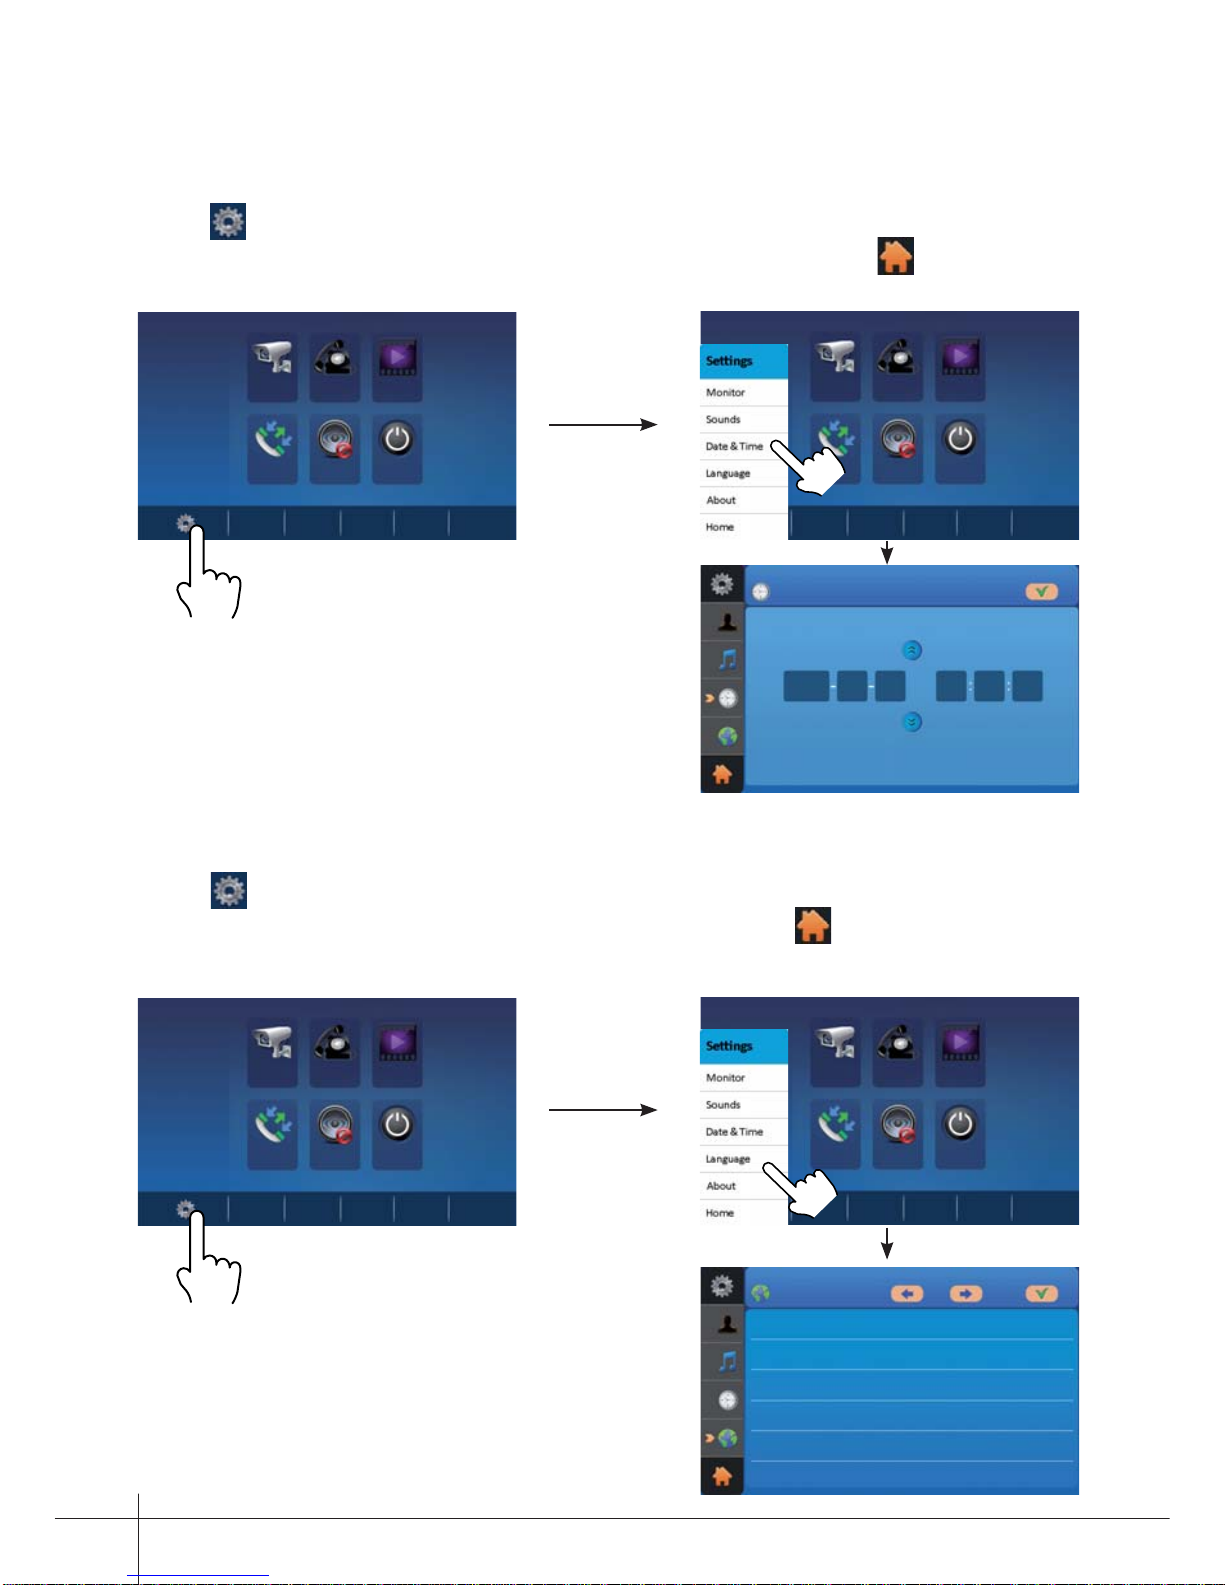
10.1 Sounds Settings
Touch icon on main menu page, then select "Sounds" item to enter the sounds
settings page. You can set a variety of ring tones on this page, (touch icon to exit the
setting and return main menu page).
10. Basic Setup Instructions
Monitor Intercom
Playback
Call Record
Do not
Disturb
Close
06:32 PM
Wed.
02/11/2015
Do not Disturb
for 8 Hours
Normal
for 1 Hour
Always
Time Remaining: 00:58:32
Monitor Intercom
Playback
Call Record
Do not
Disturb
Close
06:32 PM
Wed.
02/11/2015
Monitor Intercom
Playback
Call Record
Do not
Disturb
Close
Ring Tune
Intercom
Bell
Door 1 Alert
19 T elRing
Volume
Day
Night
19 15 12 10
06
04
Note:
Volume is related to the volume of the ringtone in
the monitor.
Day: ringtone volume from 6:00 to 18:00 hours.
Night: remaining hours.
Page 10
-9-
10.2 Date & Time Settings
Touch icon on main menu page, then select "Date & Time" item to enter the date &
time settings page.You can set the date & time on this page, (touch icon to exit the
setting and return main menu page).
Note: Synchronization function is not available
in this version.
10.3 Language Settings
Touch icon on main menu page, then select "Language" item to enter the language
settings page.You can set the language on this page, (touch icon to exit the setting
and return main menu page).
Note: There are 16 different languages available
in the monitor: English, Finnish, Hebrew,
German, Arabic, Hungarian, Czech, Polish,
Nederlands, Norwegian, French, Hindi, Turkish,
Spanish, Italian and Portuguese.
Monitor Intercom
Playback
Call Record
Do not
Disturb
Close
06:32 PM
Wed.
02/11/2015
Monitor Intercom
Playback
Call Record
Do not
Disturb
Close
Date&Time
2015 1102 15 28 10
Monitor Intercom
Playback
Call Record
Do not
Disturb
Close
06:32 PM
Wed.
02/11/2015
Monitor Intercom
Playback
Call Record
Do not
Disturb
Close
Language
English
Finnish
Hebrew
German
Arabic
Hungarian
Page 11
Door Station Rename
DS-1
Monitor Time Set
30 sec
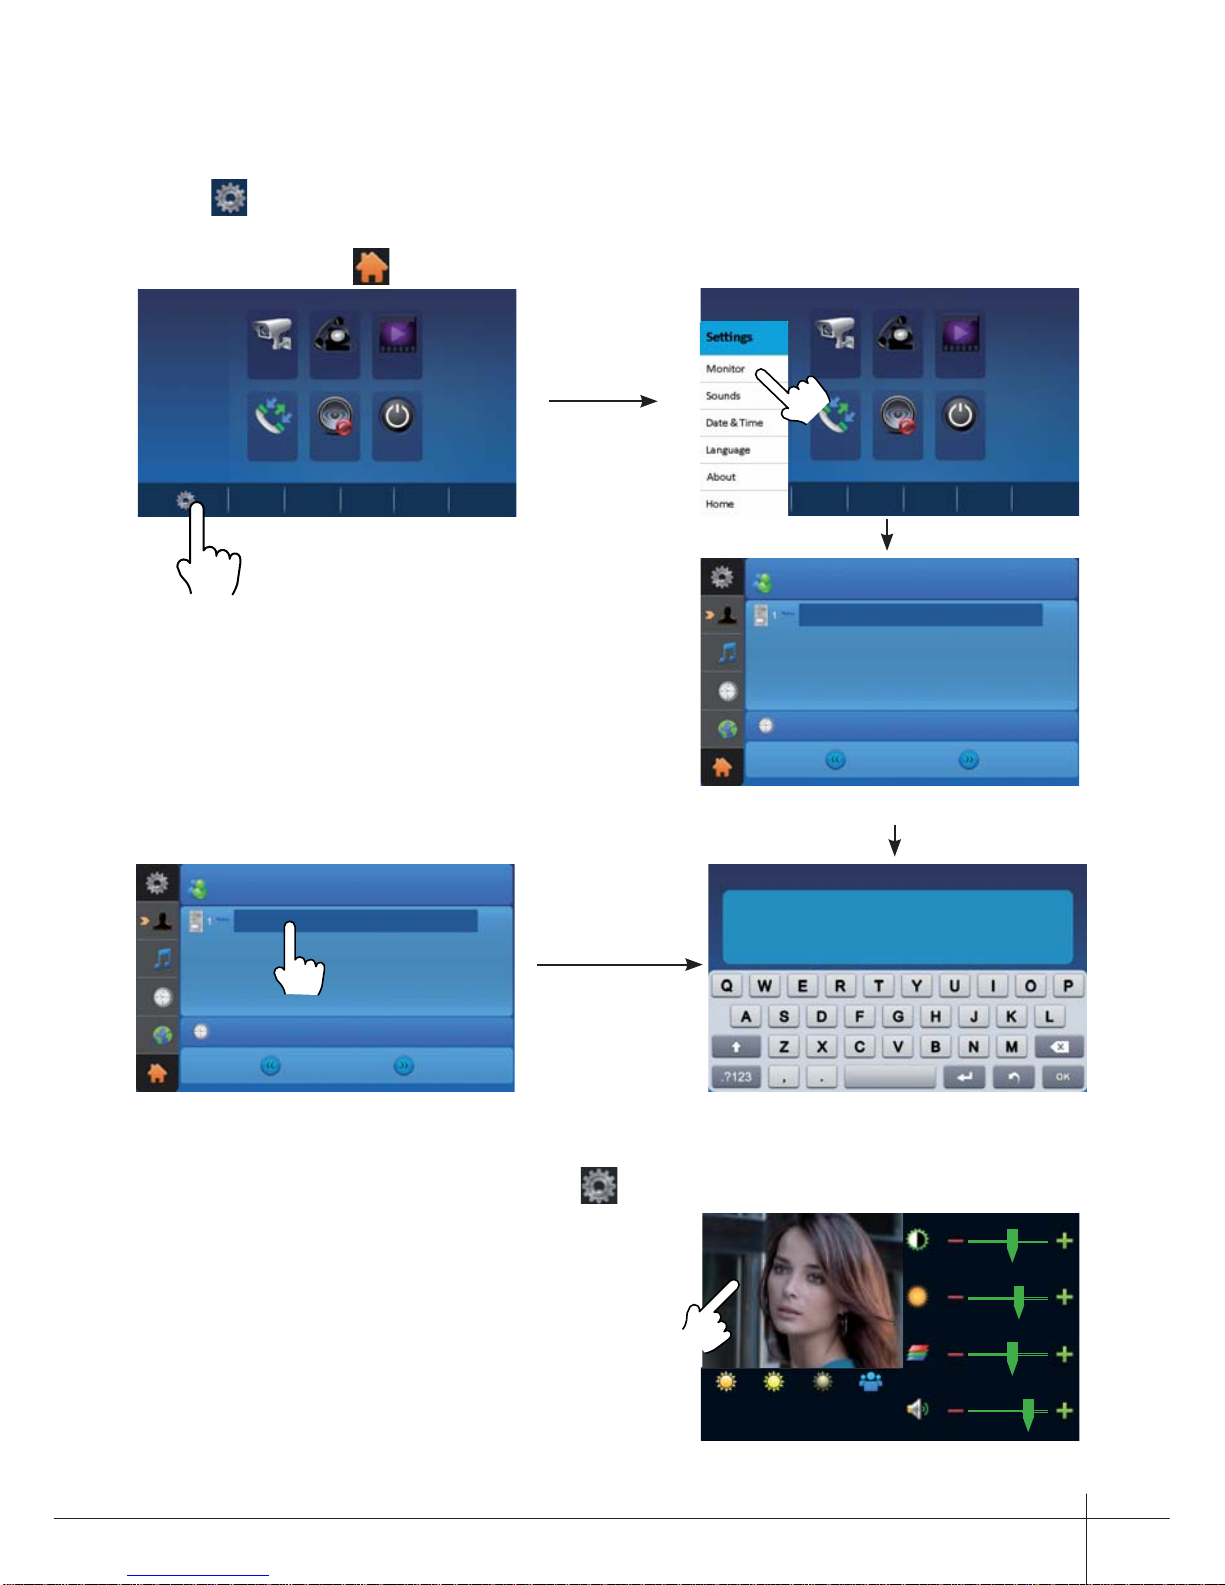
10.4 Monitor
(Rename the outdoor panel & the Monitor Time Settings)
Touch
icon on main menu page, then select "Monitor" item to enter the rename &
monitor time settings page.You can set door station rename and "Auto-on" duration (time)
on this page, (touch icon to exit the setting and return main menu page).
-10-
Note: If you want to rename, please touch the place of name, then it will turn keypad
page, you can input your new name in this page.
During monitoring or talking state, touch icon, the Adjust page will be displayed.
1. The Scene mode selection: Total 4 screen
modes can be selected in sequence:
Normal,
Brightly, Soft
and
User. When color, bright
and contrast is modifi ed, the scene will change
automatically the scene mode at User.
2. Note that all the modifi cations will be performed immediately after the operation.
Touch the window of image to exit the adjust page.
10.5 Screen and Volume Adjustment
Monitor Intercom
Playback
Call Record
Do not
Disturb
Close
06:32 PM
Wed.
02/11/2015
Monitor Intercom
Playback
Call Record
Do not
Disturb
Close
Door Station Rename
DS-1
Monitor Time Set
30 sec
DOOR1 RENAME
DS-1
abc
Normal
5
Brightly Soft User
6
5
7
Page 12
-11-
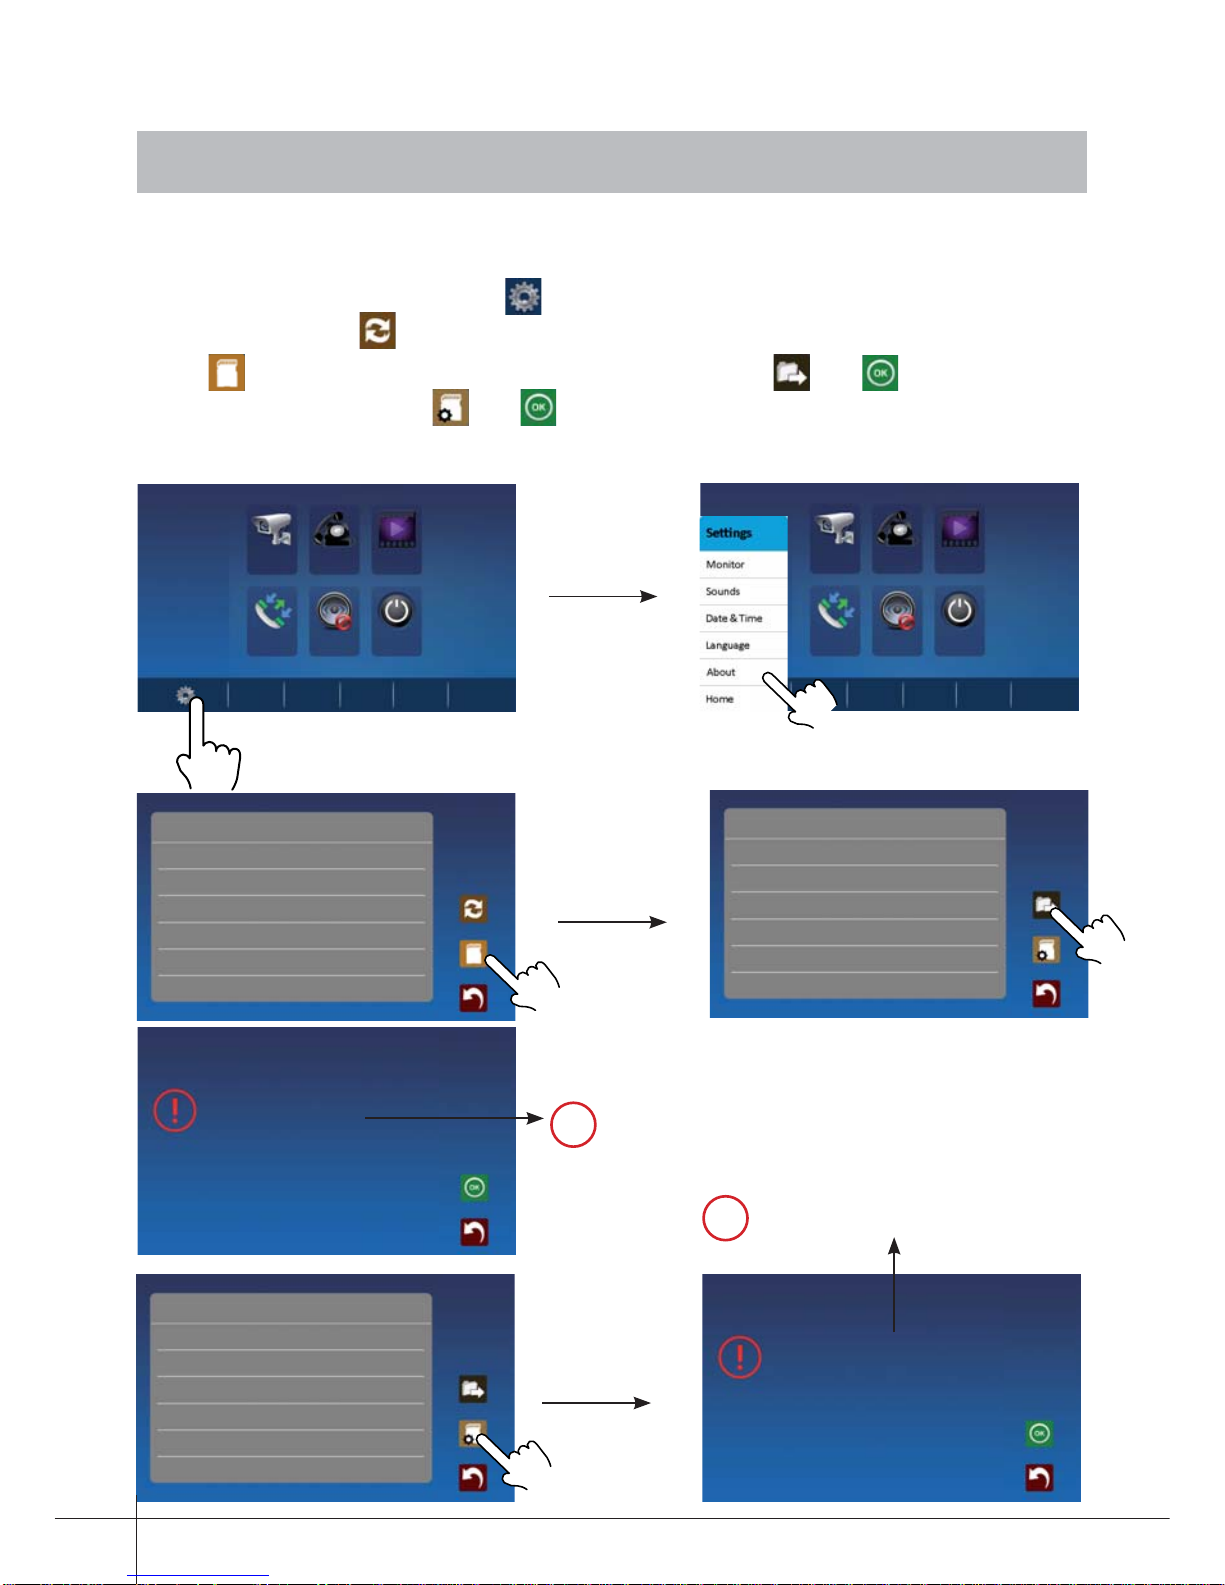
The restore to default function allows the user to recover the settings to factory setting.
Note that the restore to default operation will not change any setting.
Enter main menu page and touch
icon, then select "About" item to enter the about
settings page, touch icon, the default settings will be loaded.
touch icon to enter the Memo Information page, touch and icon to copy the
pictures to SD card. Touch and icon to format SD card and restart.
11. Restore to Default (About)
Monitor Intercom
Playback
Call Record
Do not
Disturb
Close
06:32 PM
Wed.
02/11/2015
Monitor Intercom
Playback
Call Record
Do not
Disturb
Close
About
Local Address
00.00
Video Standard
System Version
Display Driver
Font
UI
AUTO
00.02.09
1.3
1.0
1.0
Memo Information
SD Card
-
Video Capacity
Video Usage
Flash
Image Capacity
Image Usage
-
-
0118
0024
Copy Pictures To SD ?
Memo Information
SD Card
-
Video Capacity
Video Usage
Flash
Image Capacity
Image Usage
-
-
0118
0024
Format SD Card And Restart ?
!
Copy Pictures To SD?
Format SD Card And Restart?
!
Page 13

1. Touch icon on main menu
page, then select "About" item.
2. Touch UNLOCK button
and hold for 2s.
12.1 How to enter the installation setting page
12. Monitor Parameter Setting
-12-
Monitor Intercom
Playback
Call Record
Do not
Disturb
Close
About
Local Address
00.00
Video Standard
System Version
Display Driver
Font
UI
AUTO
00.02.09
1.3
1.0
1.0
INSTALLER SETUP
123
The system offers two methods of date and time.
The code number of 8008 is used to set the date format as month/date/year.
The code number of 8009 is used to set the date format as date/month/year.
The code number of 8012 is used to set the time format as 12 hour system.
The code number of 8013 is used to set the time format as 24 hour system.
12.2 How to set date and time format
The unlock time can be changed by yourself at any time.it can be set from 1 to 99
seconds.
The code number from 8401 to 8499 are used to set the unlock time to 1~ 99 seconds.
Unlock time:
12.3 How to set the unlock parameter
Door-lock type:
3. Access to a new screen that has a keypad to
introduce the wished data. In following chapters
the available and possile settings will be
explained.
There are two working modes:
1. Door opener of Normal working: Unblocking mode = 0 (by default). The door remains
open while the door opener is supplied.
2. Door opener of Inverted working: Unblocking mode = 1.
The door remains open while the door opener is not supplied.
Introducing the number 8010 the unblocking mode 0 is established.
Introducing the number 8011 the unblocking mode 1 is established.
Page 14

-13-
13. System Wiring and Connections
BUS(IM) BUS(DS)
PC6
AC~
-
+
L1 L2 PL S+ S-
Doorbell Button
Switch
1 2 3
ON
DIPS
13.1.1 One Way Connection
13.1.2 Two Ways Connection
BUS(IM) BUS(DS)
PC6
AC~
-
+
L1 L2 PL S+ S-
Doorbell Button
Switch
1 2 3
ON
DIPS
Doorbell Button
Switch
1 2 3
ON
DIPS
BUS (M)
Monitor
BUS (DS)
Panel
BUS (M)
Monitor
BUS (DS)
Panel
Lock
Lock
Page 15

-14
13.2.2 Door Lock Controlled with potential free relay
Note:
1. Use an external power supply (PSU)
according tothe electrical lock's
consumption.
2. The jumper must be taken off before
connecting.
3. Setup the Unlock Mode of the
Monitor for different lock types.
•Normal open realay type:
Unlock Mode = 0 (by default).
•Normal closed relay type:
Unlock Mode = 1.
LOCK
Take off the Jum per
POWER
SUPPLY
BUS PL S+S-
13.2 Electric Lock Connection
Note:
1. Electronic lock fail secure type
should be used.
2. The door lock is limited to
12Vdc, and holding current must
be less than 250mA.
3. The door lock control is not timed
from the Exit Button (EB).
4. The Unlock Mode Parameter
of Monitor must be set to 0 (by
default). See chapter 12.3.
5. When connect in Electronic lock,
put the jumper in position in 1-2.
EB
*
LOCK
PL S+S-
connect Electronic lock, the jumper position in 2-3.
BUS
1 2 3
13.2.1 Door Lock Controlled with Internal Power
Exit
Button
1
23
1
23
EB
*
LOCK
PL S+S-
connect Electronic lock, the jumper position in 2-3.
BUS
1 2 3
relay
Exit
Button
An intermediate relay should be
connected for equal or higher
voltages of 20V , otherwise the panel
will be damaged.
1
23
_ _ _ _ _ _ _ _ _ _ _ _ _ _ _ _ _ _ _ _ _ _ _ _ _ _
1-2.
For installations with a motorized door, please
follow this method of connection.
Page 16

14. Setup
-15-
14.1 Unlock Time Setting
backlight indicator
beep + beep
Power up within 5 seconds,
press and hold the "B"
button for 3 seconds, this
will enter the setting menu.
Within 5 seconds, press and hold the
"A" button for 3 seconds, this will
enter the lock time settings.
(blinking)
backlight indicator
Press and hold the "B" button for the
time required. The length of the press
will equal the door release time (range
1~99s).
(off)
beep
Note:1. There are two ways to set the unlock time:
a) From monitor: explained in section 12.3 of the manual.
b) From doorpanel: explained in section 14.1 of the manual.
2. During timing, the backlight indicator blinking once per second, tone beeps
once per second. Less than one second by one second calculation.
backlight indicator
(blinking once per second)
beep once per second
A
A
B
Note: For 1 way doorstation, open front
cover to fi nd button B.
Page 17

-16-
14.2 Call confi rmation
backlight indicator
beep + beep
Power up and within 5
seconds, press and hold the
"B" button for 3 seconds,
this will enter the setting
menu.
Within 5 seconds, press and hold the
"B" button for 3 seconds, this will
enter the ringtone settings.
(blinking)
backlight indicator
(off)
beep
Press the "B" button once, this will
select ringtone one, press the "B"
button again to select continuous
and a third time for silent.
beep
(one ringtone: blinking once)
(continuous ringtone: blinking twice)
(silent: blinking three times)
beep,beep
backlight indicator
Note: The ringback tone will circulate at one ringtone continuous ringtone silent.
beep,beep,beep
Page 18

-17-
15. Cables Requirements
The maximum distance of the wiring is limited. Using different cables will affect the
maximum distance which the system can reach.
Cable Usage A B
Twisted cable 2x0.75 mm
2
60 60
Twisted cable 2x1 mm
2
80 80
B
A
BUS(IM) BUS(DS)
PC6
AC~
monitor
monitor
Page 19

-18-
●Power supply: 26Vdc +/- 2
●Power consumption: Standby 12mA; Working 350mA (for monitor);
● Standby 33mA; Working status 110mA (for door station).
●Monitor screen: 7 Inch digital color LCD
●Display Resolutions: 800*3(R, G, B) x 480 pixels
●Video signal: 1Vp-p, 75Ω, CCIR standard
●Wiring: 2 wires, non-polarity
●Lock Power supply: 12Vdc, 250mA (Internal Power);
●Unlocking time: 1~99s (Default 3s);
●Working temperature: -15ºC ~ 55ºC;
●Dimension for monitor: 131(H)×225(W)×18(D)mm
●Dimension for door station: 145(H)×90(W)×23(D)mm (Without rain cover).
1) All components should be protected from violence vibration. And not allow to be
impacted, knocked and dropped.
2) Please do the cleanness with soft cotton cloth, please do not use the organic
impregnant or chemical clean agent. If necessary, please use a little pure water or
dilute soap water to clean the dust.
3) Image distortion may occur if the video monitor is mounted too close to magnetic fi eld
e. g. Microwaves, TV, computer etc.
4) Please keep away the monitor from wet, high temperature, dust, caustic and oxidation
gas in order to avoid any unpredictable damage.
5) Must use the right adaptor which is supplied by the manufacturer or approved by the
manufacturer.
6) Pay attention to the high voltage inside the products, please refer service only to a
trained and qualifi ed professional.
16. Specifi cation
17. Precautions
Page 20

Technical document published for information purposes by FERMAX ELECTRÓNICA.
FERMAX, in a policy of ongoing improvement, reserves the right to modify the contents
of this document and the feature of the products referred to herein at any time and with
no prior notice.
Any such modifi cations shall be refl ected in subsequent editions of this document.
18. Batteries (Important notice)
This equipment contains a lithium button cell CR1120 3V 40mAH welded
to the circuit. This button cell must be removed by a qualifi ed professional
and taken to the proper disposal site.
Page 21

Page 22

123
ON
Bit
DIP1&2
Reserved. left to default.
Set to OFF. When the monitor is in the middle of the line in daisy chain connection.
Bit State Description
DIP3
123
ON
123
ON
Set to ON. When the montior is at the end of the line or connected to a DBC4S.
LCD ﺔﺷﺎﺷ.ﺔﺣﻭﻠﻟﺍ ﺍﺭﻳﻣﺎﻛ ﻑﺭﻁ ﻥﻣ ﺔﻁﻘﺗﻠُﻣﻟﺍ ﻭﻳﺩﻳﻔﻟﺍ ﺓﺭﻭﺻ ﺭﻬﻅُﺗ
(ءﺎﻔﻁﻹﺍ/ﻝﻳﻐﺷﺗﻟﺍ) ON/OFF ﺭﺯ
.(ﺕﺍﺭﺎﻳﺧﻟﺍ ﺔﻣﺋﺎﻗ) ﺔﺷﺎﺷﻟﺍ ءﺎﻔﻁﺇ/ﻝﻳﻐﺷﺗ ﻡﺗﻳ ،ﻪﻳﻠﻋ ﻁﻐﺿﻟﺍ ﺩﻧﻋ
ﺔﻟﺎﺳﺭ ﻰﻟﺇ ﺭﻳﺷﺗ ﺔﻧﻭﻘﻳﺃ.ﺩﻌﺑ ﺎﻬﺗءﺍﺭﻗ
ّ
ﻡﺗﺗ ﻡﻟ ﺔﻟﺎﺳﺭ ﻲّﻘﻠﺗ ﺔﻟﺎﺣ ﻲﻓ ءﺎﺿُﺗ
ﺏﺍﻭﺑﻷﺍ ﺢﺗﺎﻓ ﺭﺯ .ﺏﺎﺑﻟﺍ ﺢﺗﻔﻟ ﻪﻳﻠﻋ ﻁﻐﺿﺍ
ﺭﺯ
ﻲﺗﺍﺫﻟﺍ ﻝﻳﻐﺷﺗﻟﺍ
.ﻥﻳﺩﻳﻟﺍ ﺭﺣ ﻊﺿﻭ ﻰﻠﻋ ﺭﺋﺍﺯﻟﺎﺑ ﻝﺎﺻﺗﻼﻟ ﻪﻳﻠﻋ ﻁﻐﺿﺍ
.ﻉﺭﺎﺷﻟﺍ ﺔﺣﻭﻟ ﺍﺭﻳﻣﺎﻛﻟ ﻲﺗﺍﺫﻟﺍ ﻝﻳﻐﺷﺗﻟﺎﺑ ﻡﺎﻳﻘﻠﻟ ﻪﻳﻠﻋ ﻁﻐﺿﺍ ،ﺭﺎﻅﺗﻧﻻﺍ ﻊﺿﻭ ﻲﻓ ﺔﺷﺎﺷﻟﺍ ﺩﻭﺟﻭ ﺩﻧﻋ
ﻥﻭﻓﻭﺭﻛﻳﻣ.ﻡﺩﺧﺗﺳﻣﻟﺍ ﺕﻭﺻ ﻰّﻘﻠﺗﻳ
ﻕﻼﻏﻹﺍ ﺭﺯ.ﺽﺭﻌﻟﺍ ﺯﺎﻬﺟ ﻝﺎﺻﺗﺍ ءﺎﻬﻧﻹ ﻡﺩﺧﺗﺳُﻳ
ﺕﻼﺻﻭﻣ.ﺵﺗﻳﻭﺳ ﺏﻳﺩﻟﺍﻭ ﺏﺎﺑﻟﺍ ﺱﺭﺟ ،ﻝﻗﺎﻧﻟﺍ ﻑﺍﺭﻁﺃ
ﺕﻭﺻﻟﺍ ﺭﺑﻛﻣ.ﺔﺣﻭﻠﻟﺍﻭ ﺽﺭﻌﻟﺍ ﺯﺎﻬﺟ ﻥﻳﺑ ﺕﻭﺻ ﺓﺎﻧﻗ
-۱-
Digital TFT LCD Screen
UNLOCK Button
TALK/MON Button
Microphone
Connection Port
Speaker
Mounting Hook
Mounting Hook
1 2 3
ON
DIPS
L1
L2
ON/OFF Button
Message Indicator
SD card
.ﺔﻳﺿﺍﺭﺗﻓﻻﺍ ﺔﻳﻌﺿﻭﻟﺍ ﻲﻓ ﻪﻛﺭﺗﺍ .ﻅﻭﻔﺣﻣ
.ﺔﻁﻳﺳﻭ ﺔﻳﻌﺿﻭ ﻲﻓ ﺽﺭﻌﻟﺍ ﺯﺎﻬﺟ ﺏﻳﻛﺭﺗ ﺩﻧﻋ .OFF ﻊﺿﻭ
.(ﺭﻳﺧﻷﺍ) ﺏﻳﻛﺭﺗﻟﺍ ﺔﻳﺎﻬﻧ ﻲﻓ ﺽﺭﻌﻟﺍ ﺯﺎﻬﺟ ﺏﻳﻛﺭﺗ ﺩﻧﻋ .ON ﻊﺿﻭ
ﻑﺻﻭ
ﻥﻳﻭﻛﺗ ﺵﺗﻳﻭﺳ ﺏﻳﺩ
DIP1&2
DIP3
123
ON
123
ON
123
ON
ﺝﺭﺱ ﺍﻝﺏﺍﺏ
V01_16
COD. 97767IKg V09_16
1 23
ON
1 23
ON
1 23
ON
1 23
ON
Page 23

-۲-
ﺔﺣﻭﻠﻟﺍ .۲
1 2 3
JP/LK
PL
S+
S-
Main Connect Port
BUS
JP/LK
ﺔﻳﺳﻳﺋﺭﻟﺍ ﻥﺎﻧﺳﻷﺍ ﻁﺑﺭ
Camera Lens
Speaker
Nameplate
Call Button
Microphone
Night Light
Rainy Cover
23 mm
90 mm
145 mm
ﺍﺭﻳﻣﺎﻛ
ﺔﻗﺎﻁﺑﻟﺍ ﻝﻣﺎﺣ
ﺔﻳﺋﺎﻧﺛ ﺕﺎﻣﺎﻣﺻ
ﺔّﻳﻠﻳﻟ
ﺓءﺎﺿﺇ
ﺕﻭﺻﻟﺍ ﺭﺑﻛﻣ
ﺔﻣﻟﺎﻛﻣ
ﻥﻭﻓﻭﺭﻛﻳﻣ
ﺏﺟﺎﺣ
(ﺭﻁﻣﻟﺍ ﺩﺿ ﺔﻳﺎﻣﺣ)
Page 24

-۳-
ﺏﻳﻛﺭﺗﻟﺍ .۳
The base unit is installed
on the wall.
Connect the cable correctly.
Placing name label.
The front cover is installed
onto the base unit.
Use the screw to fix the front cover.
Installation is complete.
.ﻡﻳﻠﺳ ﻝﻛﺷﺑ ﻙﻠﺳﻟﺍ ﻁﺑﺭﺑ ﻡﻗ .ﺭﺍﺩﺟﻟﺍ ﻰﻠﻋ ﺱﺎﺳﻷﺍ ﺓﺩﺣﻭﻟﺍ ﺏﻛﺭ
.ﺔﻗﺎﻁﺑﻟﺍ ﻝﻣﺎﺣ ﻲﻓ ﺔﻘﺻﻼﻟﺍ ﻊﺿ
.ﺱﺎﺳﻷﺍ ﺓﺩﺣﻭﻟﺍ ﻰﻠﻋ ﻲﻣﺎﻣﻷﺍ ءﺎﻁﻐﻟﺍ ﺏﻛﺭ
.ﻲﻣﺎﻣﻷﺍ ءﺎﻁﻐﻟﺍ ﺕﻳﺑﺛﺗﻟ ﻲﻏﺭﺑﻟﺍ ﻝﻣﻌﺗﺳﺍ
.ﺏﻳﻛﺭﺗﻟﺍ ﺔﻳﺎﻬﻧ
145~160 cm
Page 25

-٤-
ﺔﻗﺎﻁﺑﻟﺍ ﻝﻣﺎﺣ ﻲﻓ ﺔﻘﺻﻼﻟﺍ ﻊﺿ .٤
STEP 1
Unscrew the screws.
STEP 2
Replace name label.
Page 26

-٥-
ﻝﻳﻐﺷﺗﻟﺍ ﺕﺍﺩﺎﺷﺭﺇ .٥
ﺔﻳﺳﻳﺋﺭﻟﺍ ﺔﻣﺋﺎﻘﻟﺍ ۱-٥
،ﺭﺎﻅﺗﻧﻻﺍ ﻊﺿﻭ ﻲﻓ ﺽﺭﻌﻟﺍ ﺯﺎﻬﺟ ﺩﻭﺟﻭ ﺩﻧﻋ
ﺭﻬﻅﺗﺳﻭ ﺯﺎﻬﺟﻟﺍ ﺔﺷﺎﺷ ﻥﻣ ﻥﺎﻛﻣ ﻱﺃ ﻰﻠﻋ ﻁﻐﺿﺍ
.ﺓﺭﻭﺻﻟﺍ ﻰﻠﻋ ﻥّﻳﺑُﻣ ﻭﻫ ﺎﻣﻛ ﺔﻳﺳﻳﺋﺭﻟﺍ ﺔﻣﺋﺎﻘﻟﺍ
ﺏﺍﻭﺑﻷﺍ ﺢﺗﺎﻔﻟ ﻲﺳﺎﺳﻷﺍ ﻝﻳﻐﺷﺗﻟﺍ ۲-٥
۱ . ،ﻉﺭﺎﺷﻟﺍ ﺔﺣﻭﻟ ﻰﻠﻋ ﺩﻭﺟﻭﻣﻟﺍ ﺔﻣﻟﺎﻛﻣ ﺭﺯ ﻰﻠﻋ ﻁﻐﺿﻟﺍ ﺩﻧﻋ
ﺯﺎﻬﺟ ﻭ ﻉﺭﺎﺷﻟﺍ ﺔﺣﻭﻟ ﻥﻣ ﻝﻛ ﻲﻓ ﺔﻣﻟﺎﻛﻣ ﻥﻳﻧﺭ ﺩﻳﻟﻭﺗ ﻡﺗﻳ
.ﻝﺎﻌﺗﺷﻻﺎﺑ ﺔﺷﺎﺷﻟﺍ ﻡﻭﻘﺗﻭ ،ﺽﺭﻌﻟﺍ
۲ . ﺯﺎﻬﺟ ﻰﻠﻋ ﺩﻭﺟﻭﻣﻟﺍ ﻲﺗﺍﺫﻟﺍ ﻝﻳﻐﺷﺗﻟﺍ ﺭﺯ ﻰﻠﻋ ﻁﻐﺿﺍ
ﻊﻣ ﺙﻳﺩﺣﻠﻟ ﺔﺷﺎﺷﻟﺍ ﻰﻠﻋ ﺔﻧﻭﻘﻳﻷﺍ ﺭﻘﻧﺍ ﻭﺃ ﺽﺭﻌﻟﺍ
ﻊﺿﻭ ﻰﻠﻋ ﻝﻳﻐﺷﺗﻟﺍ ﻥﻭﻛﻳﻭ ،ﺕﻭﺻﻟﺍ ﺓﺎﻧﻗ ﺢﺗﻓ ﻡﺗﻳ .ﺭﺋﺍﺯﻟﺍ
ﺭﻭﺭﻣ ﺩﻌﺑ ﻲﻟﺁ ﻝﻛﺷﺑ ﻝﺎﺻﺗﻻﺍ ءﺎﻬﻧﺍ ﻡﺗﻳ .ﻥﻳﺩﻳﻟﺍ ﺭﺣ
ﺔﺣﻭﻟ ﻊﻣ ﻝﺎﺻﺗﺍ ﺙﻭﺩﺣ ﻡﺩﻋ ﺔﻟﺎﺣ ﻲﻓ .ﻲﺗﺍﺫﻟﺍ ﻝﻳﻐﺷﺗﻟﺍ ﺭﺯ ﻰﻠﻋ ﻁﻐﺿﻟﺍ ﺩﻧﻋ ﺕﻗﻭ ﻱﺃ ﻲﻓ ﻭﺃ ﺔﻳﻧﺎﺛ ۹۰
.ﺔﻳﻧﺎﺛ ۳۰ ﺭﻭﺭﻣ ﺩﻌﺑ ﻲﻟﺁ ﻝﻛﺷﺑ ءﺎﻔﻁﻧﻻﺎﺑ ﺽﺭﻌﻟﺍ ﺯﺎﻬﺟ ﻡﻭﻘﻳ ،ﻉﺭﺎﺷﻟﺍ
۳ . ﺏﺍﻭﺑﻷﺍ ﺢﺗﺎﻓ ﺭﺯ ﻰﻠﻋ ﻁﻐﺿﻟﺎﺑ ،ﺕﻗﻭ ﻱﺃ ﻲﻓ ﺏﺎﺑﻟﺍ ﺢﺗﻓ ﻥﻛﻣُﻳ ،ﻉﺭﺎﺷﻟﺍ ﺔﺣﻭﻟ ﻥﻣ ﺎﻗﻼﻁﻧﺍ ﺔﻣﻟﺎﻛﻣ ﻲّﻘﻠﺗ ﺩﻧﻋ
ﻝﻳﺣﺭﺗﻟ ﺔﻠﻓﺎﺣ ﺯﻣﺭ. ﺔﻧﻭﻘﻳﻷﺍ ﻰﻠﻋ ﺭﻘﻧﻟﺍ ﻭﺃ
٤ . ﺯﺎﻬﺟﻟﺍ ﺔﻧﻭﻘﻳﺃ ﺭﻘﻧﺍ ﻭﺃ ﻲﺗﺍﺫﻟﺍ ﻝﻳﻐﺷﺗﻟﺍ ﺭﺯ ﻰﻠﻋ ﻁﻐﺿﺍ ،ﺭﺎﻅﺗﻧﻻﺍ ﻊﺿﻭ ﻲﻓ ﺽﺭﻌﻟﺍ ﺯﺎﻬﺟ ﺩﻭﺟﻭ ﺩﻧﻋ
.ﺎﻳﻟﺁ ﺭﻭﻬﻅﻟﺎﺑ ﺍﺭﻳﻣﺎﻛﻟﺍ ﺓﺭﻭﺻ ﻡﻭﻘﺗ ﺎﻫﺩﻧﻋﻭ ،ﺔﻳﺳﻳﺋﺭﻟﺍ ﺔﻣﺋﺎﻘﻟﺍ ﺔﺷﺎﺷ ﻰﻠﻋ
ﺽﺭﻌﻟﺍ ﺯﺎﻬﺟ
ﻲﻠﺧﺍﺩﻟﺍ ﻝﺎﺻﺗﻻﺍ ﺯﺎﻬﺟ
ﻝﻳﻐﺷﺗ
ﻝﺟﺳ
ﺕﺎﻣﻟﺎﻛﻣﻟﺍ
ﻡﺩﻋ
ﺝﺎﻋﺯﻹﺍ
ﻕﻼﻏﺇ
ءﺎﺳﻣ ۰٦:۳۲
ءﺎﻌﺑﺭﻷﺍ
۲۰۱٥/۱۱/۰۲
ﺽﺭﻌﻟﺍ ﺯﺎﻬﺟ
ﻲﻠﺧﺍﺩﻟﺍ ﻝﺎﺻﺗﻻﺍ ﺯﺎﻬﺟ
ﻝﻳﻐﺷﺗ
ﻝﺟﺳ
ﺕﺎﻣﻟﺎﻛﻣﻟﺍ
ﻡﺩﻋ
ﺝﺎﻋﺯﻹﺍ
ﻕﻼﻏﺇ
ءﺎﺳﻣ ۰٦:۳۲
ءﺎﻌﺑﺭﻷﺍ
۲۰۱٥/۱۱/۰۲
Page 27

-٦-
۱ . ﻡﻭﻘﺗ ،ﺭﺎﻳﺧﻟﺍ ﺍﺫﻫ ﻥﻳﻳﻌﺗ ﺩﻧﻋ ،ﻝﺯﻧﻣﻟﺍ ﺱﻔﻧ ﻲﻓ ﺔﺑﻛﺭﻣﻟﺍ ﺽﺭﻌﻟﺍ ﺓﺯﻬﺟﺃ ﻥﻣ ﺩﻳﺩﻌﻟﺍ ﺩﻭﺟﻭ ﺔﻟﺎﺣ ﻲﻓ :ﺔﻳﻠﺧﺍﺩ ﺔﻋﺍﺫﺇ
.ﺕﻭﺻﻟﺍ ﺕﺍﺭﺑﻛﻣ ﺭﺑﻋ ﺔﻋﺯﻭﻣﻟﺍ ﺔﻟﺎﺳﺭﻟﺍ ﻰﻟﺇ ﻉﺎﻣﺗﺳﻻﺍ ﻡﺗﻳﻭ ﺕﻗﻭﻟﺍ ﺱﻔﻧ ﻲﻓ ﺕﻭﺻﻟﺍ ﺭﺑﻛﻣ ﻝﻳﻐﺷﺗﺑ ﺓﺯﻬﺟﻷﺍ ﻊﻳﻣﺟ
.ﺔﺷﺎﺷﻟﺍ ﻝﻳﻌﻔﺗ ﻡﺗﻳ ﻻﻭ ﺔﺑﺎﺟﻹﺍ ﺽﺭﻌﻟﺍ ﺓﺯﻬﺟﺃ ﻰﻠﻋ ﺏﺟﻳ ﻻ
۲ . ﻡﻭﻘﺗ ،ﺭﺎﻳﺧﻟﺍ ﺍﺫﻫ ﻥﻳﻳﻌﺗ ﺩﻧﻋ ،ﻝﺯﻧﻣﻟﺍ ﺱﻔﻧ ﻲﻓ ﺔﺑﻛﺭﻣﻟﺍ ﺽﺭﻌﻟﺍ ﺓﺯﻬﺟﺃ ﻥﻣ ﺩﻳﺩﻌﻟﺍ ﺩﻭﺟﻭ ﺔﻟﺎﺣ ﻲﻓ :ﺔﻳﻠﺧﺍﺩ ﺔﻣﻟﺎﻛﻣ
،ﺓﺯﻬﺟﻷﺍ ﺩﺣﺃ ﺔﺑﺎﺟﺇ ﺔﻟﺎﺣ ﻲﻓ .ﺔﻣﻟﺎﻛﻣﻟﺍ ﻰﻠﻋ ﺔﺑﺎﺟﻹﺍ ﺎﻬﻧﻣ ﻱﻷ ﻥﻛﻣ
ُ
ﻳﻭ ﺕﻗﻭﻟﺍ ﺱﻔﻧ ﻲﻓ ﻥﻳﻧﺭﻟﺎﺑ ﺓﺯﻬﺟﻷﺍ ﻊﻳﻣﺟ
.ﻥﻳﻧﺭﻟﺍ ﻥﻋ ﻯﺭﺧﻷﺍ ﺓﺯﻬﺟﻷﺍ ﻑﻗﻭﺗﺗ
۳ . ،ﺭﺎﻳﺧﻟﺍ ﺍﺫﻫ ﻥﻳﻳﻌﺗ ﺩﻧﻋ .ﻥﻳﻧﺛﺇ ﻥﻳ
ّ
ﻁﺧ ﻰﻠﻋ ﻡﻘﻁﻟﺍ ﺭّﻓﻭﺗ ﺩﻧﻋ ﺭﺧﻵﺍ ﻝﺯﻧﻣﻟﺍ ﻰﻟﺇ ﺔﻳﺟﺭﺎﺧ ﺔﻣﻟﺎﻛﻣﺑ ﻡﺎﻳﻘﻠﻟ
:ﺔﻳﺟﺭﺎﺧ ﺔﻣﻟﺎﻛﻣ
.ﻙﻟﺫﻛ ﺱﻛﻌﻟﺍﻭ ،۲ ﻝﺯﻧﻣﻟﺎﺑ ﻝﺎﺻﺗﻻﺍ ۱ ﻝﺯﻧﻣﻠﻟ ﻥﻛﻣُﻳ
:ﺕﺍﺭﺎﻳﺧ 3 ﺔﻔﻳﻅﻭﻟﺍ ﻩﺫﻬﻟﻭ .ﻡﻛﺭﺗﻧﺇ ﺔﻔﻳﻅﻭ ﻰﻟﺇ ﻝﻭﺻﻭﻠﻟ ﺔﻳﺳﻳﺋﺭﻟﺍ ﺔﻣﺋﺎﻘﻟﺍ ﻰﻠﻋ ﺓﺩﻭﺟﻭﻣﻟﺍ ﻡﻛﺭﺗﻧﺇ ﺔﻧﻭﻘﻳﺃ ﻰﻠﻋ ﻁﻐﺿﺍ
.ﺔﻳﺟﺭﺎﺧ ﺔﻣﻟﺎﻛﻣ ﻭ ﺔﻳﻠﺧﺍﺩ ﺔﻣﻟﺎﻛﻣ ،ﺎﻳﻠﺧﺍﺩ ﺔﻋﺍﺫﻹﺍ
ﻡﻛﺭﺗﻧﺇ ﺔﻔﻳﻅﻭ .٦
ﺭﻭﺻﻟﺍ/ﻭﻳﺩﻳﻔﻟﺍ ﻝﻳﺟﺳﺗ
ﻲﻓ ﺎﺿﻳﺃ ﺕﻭﺻﻟﺍ ﻝﻳﺟﺳﺗ ﻡﺗﻳﻭ ﺔﻳﻧﺎﺛ ۱٥ ﻝﻳﺟﺳﺗﻟﺍ ﻡﻭﺩﻳ ،ﻥﻳﺗﻟﺎﺣﻟﺍ ﻥﻣ ﻱﺃ ﻲﻓ) ﻱﻭﺩﻳﻟﺍﻭ ﻲﻟﻵﺍ ﻝﻳﺟﺳﺗﻟﺍ ﺕﺍﺭﺎﻳﺧ ﺭّﻓﻭﺗﺗ
ﺯﺎﻬﺟﻟﺍ ﻡﻭﻘﻳ ،ﻲﻧﺍﻭﺛ ۳ ﺭﻭﺭﻣ ﺩﻌﺑ ،ﺔﻣﻟﺎﻛﻣ ﻲّﻘﻠﺗ ﺩﻧﻋ .ﻲﺿﺍﺭﺗﻓﺍ ﻝﻛﺷﺑ ﻲﻟﻵﺍ ﻝﻳﺟﺳﺗﻟﺍ ﻡﺗﻳ .(ﻼّﻌﻔُﻣ ﻥﺎﻛ ﻥﺇ ﻥﻳﻫﺎﺟّﺗﻻﺍ ﻰﻠﻛ
ﻡﻭﻘﻳ ﺎﻣﺩﻧﻋ .(SD ﺔﻗﺎﻁﺑ ﺭّﻓﻭﺗ ﻡﺩﻋ ﺔﻟﺎﺣ ﻲﻓ)
ﺓﺭﻭﺻ ﺫﺧﺄﺑ ﻭﺃ (SD ﺔﻗﺎﻁﺑ ﺭّﻓﻭﺗ ﺔﻟﺎﺣ ﻲﻓ) ﻲﻟﺁ ﻝﻛﺷﺑ ﻭﻳﺩﻳﻔﻟﺍ ﻝﻳﺟﺳﺗﻳ
.ﺭﺋﺍﺯﻠﻟ ﺓﺭﻭﺻ ﺫﺧﺃ ﻭﺃ ﻭﻳﺩﻳﻓ ﻝﻳﺟﺳﺗﻟ
ﺔﻧﻭﻘﻳﺃ ﻰﻠﻋ ﺭﻘﻧﻟﺍ ﺎﺿﻳﺃ ﻥﻛﻣُﻳ ،ﺓﺭﻭﺻ ﺭﺎﻬﻅﺈﺑ ﻭﺃ ﻥﻳﻧﺭﻟﺎﺑ ﺯﺎﻬﺟﻟﺍ
.ﺯﺎﻬﺟﻟﺍ ﻲﻓ ﺔﺟﻣﺩُﻣ ﺭﻭﺻﻟﺍﻭ ﻭﻳﺩﻳﻔﻟﺍ ﺓﺭﻛﺍﺫ ﺔﻔﻳﻅﻭ ﻥﺇ .۱ :ﺔﻅﺣﻼﻣ
.ﺽﺭﻌﻟﺍ ﺯﺎﻬﺟ ﻰﻠﻋ ﺎﻬﻟﺎﻣﻌﺗﺳﺍ ﻝﺑﻗ SD ﺔﻗﺎﻁﺑ ﻕﻳﺳﻧﺗ ﺓﺩﺎﻋﺇ ﺏﺟﻳ .۲
.ﻡﻘﻁﻟﺍ ﻲﻓ ﺓﺭﻓﻭﺗُﻣ ﺭﻳﻏ SD ﺔﻗﺎﻁﺑ ﻥﺇ .۳
ﺭﻭﺻ/ﻭﻳﺩﻳﻓ ﺓﺭﻛﺍﺫ .۷
ﺔﻳﻠﺧﺍﺩ ﺔﻋﺍﺫﺇ ﺔﻳﻠﺧﺍﺩ ﺔﻣﻟﺎﻛﻣ ﺔﻳﺟﺭﺎﺧ ﺔﻣﻟﺎﻛﻣ
.ﺔﻳﺳﻳﺋﺭﻟﺍ ﺔﻣﺋﺎﻘﻟﺍ ﺔﺷﺎﺷ ﻰﻟﺇ ﻝﻭﺻﻭﻟﺍﻭ ﺔﻔﻳﻅﻭﻟﺍ ﻩﺫﻫ ﻥﻣ ﺝﻭﺭﺧﻠﻟ ﺔﻧﻭﻘﻳﻷﺍ ﺭﻘﻧﺍ
ﺽﺭﻌﻟﺍ ﺯﺎﻬﺟ
ﻲﻠﺧﺍﺩﻟﺍ ﻝﺎﺻﺗﻻﺍ ﺯﺎﻬﺟ
ﻝﻳﻐﺷﺗ
ﻝﺟﺳ
ﺕﺎﻣﻟﺎﻛﻣﻟﺍ
ﻡﺩﻋ
ﺝﺎﻋﺯﻹﺍ
ﻕﻼﻏﺇ
ءﺎﺳﻣ ۰٦:۳۲
ءﺎﻌﺑﺭﻷﺍ
۲۰۱٥/۱۱/۰۲
Page 28

-۷-
ﺭﻭﺻﻟﺍ/ﻭﻳﺩﻳﻔﻟﺍ ﻝﻳﻐﺷﺗ
.ﺯﺎﻬﺟﻟﺍ ﺔﺷﺎﺷ ﻰﻠﻋ ﺎﻬﺗﻳﺅﺭ ﻡﺗﺗﻭ ،ﺭﻭﺻﻟﺍ/ﻭﻳﺩﻳﻔﻟﺍ ﺽﺭﻌﻟ ﺔﻳﺳﻳﺋﺭﻟﺍ ﺔﻣﺋﺎﻘﻟﺍ ﻲﻓ ﺓﺩﻭﺟﻭﻣﻟﺍ ﻝﻳﻐﺷﺗ ﺔﻧﻭﻘﻳﺃ ﺭﻘﻧﺍ
.ﻭﻳﺩﻳﻔﻟﺍ ﺽﺭﻋ ﻡﺗﻳ ﻑﻗﻭﺗ/ءﺩﺑ ﺔﻧﻭﻘﻳﻷﺍ ﻰﻠﻋ ﺭﻘﻧﻟﺍ ﺩﻧﻋ .ﺎﻬﻳﻓ ﻡﻛﺣﺗﻠﻟ ﺓﺩﻳﺩﻋ ﺕﺎﻧﻭﻘﻳﺃ ﻰﻠﻋ ﺔﺷﺎﺷﻟﺍ ﻱﻭﺗﺣﺗﻭ
.ﺔﻳﻠﺧﺍﺩﻟﺍ ﺓﺭﻛﺍﺫﻟﺍ ﻲﻓ ﺓﺭﻭﺻ ۱۱۸ .۱ :SD ﺔﻗﺎﻁﺑ ﻥﻭﺩﺑ :ﺔﻅﺣﻼﻣ
.ﺭﻭﺻﻟﺍ ﻲﻓ ﻡﻛﺣﺗﻟﺍ .۲
.SD ﺔﻗﺎﻁﺑ ﻰﻟﺇ ﺎﻬﻠﻳﻭﺣﺗ ﻥﻛﻣﻳ .۳
.ﺕﻳﺎﺑﺎﺟﻳﺟ ۳۲ ﺕﺍﺫ Micro SD ﺕﺎﻗﺎﻁﺑ ﺔﻳﺎﻏ ﻰﻟﺇ .۱ :SD ﺔﻗﺎﻁﺑ ﺩﻭﺟﻭﺑ
.ﺕﻭﺻﻟﺍﻭ ﻭﻳﺩﻳﻔﻟﺍ ﻝﻳﻐﺷﺗ .۲
.ﺕﺎﻫﻭﻳﺩﻳﻔﻟﺍ ﻲﻓ ﻡﻛﺣﺗﻟﺍ .۳
.ﺎﻬﺧﺳﻧ ﻥﻛﻣﻳ .٤
ﺕﺎﻣﻟﺎﻛﻣﻟﺍ ﻝﻳﺟﺳﺗ ﺔﻔﻳﻅﻭ .۸
:ﺔﻅﺣﻼﻣ
ﻭﺣﻣﺑ ﺎﻬﺛﺩﺣﺃ ﻡﻭﻘﺗ ،ﺔﻠّﺟﺳﻣﻟﺍ ﺕﺎﻣﻟﺎﻛﻣﻟﺍ ﻥﻣ ﺩﻳﺩﻌﻟﺍ ﺩﻭﺟﻭ ﺩﻧﻋ
.ﻝﺟﺳﻟﺍ ﻭﺣﻣ ﻡﺯﻼﻟﺍ ﺭﻳﻏ ﻥﻣ ،ﻲﻟﺎﺗﻟﺎﺑﻭ ،ﻡﺩﻗﻷﺍ ﻙﻠﺗ
ﻥﻣﻭ ﺯﺎﻬﺟﻟﺍ ﻰﻟﺇ ﺔﺣﻭﻠﻟﺍ ﻥﻣ ﺔﻣﻟﺎﻛﻣﻟﺍ ﻙﻟﺫ ﻲﻓ ﺎﻣﺑ ،ﺽﺭﻌﻟﺍ ﺯﺎﻬﺟﻟ ﺔﻌﺑﺎﺗﻟﺍ ﺕﺎﻣﻟﺎﻛﻣﻟﺍ ﻝﻛ ﻝﻳﺟﺳﺗ ﻡﺗﻳ :ﺕﺎﻣﻟﺎﻛﻣﻟﺍ ﻝﻳﺟﺳﺗ
.ﺎﻘﺣﻻ ﺎﻬﺗﻌﺟﺍﺭﻣ ﻥﻛﻣﻳﻭ ،ﺯﺎﻬﺟ ﻰﻟﺇ ﺯﺎﻬﺟ
ﺕﻼﻳﺟﺳﺗ ﺩﻭﺟﻭ ﺩﻧﻋ .ﺔﻔﻳﻅﻭﻟﺍ ﻩﺫﻫ ﻰﻟﺇ ﻝﻭﺻﻭﻠﻟ ﺔﻳﺳﻳﺋﺭﻟﺍ ﺔﻣﺋﺎﻘﻟﺍ ﻰﻠﻋ ﺓﺩﻭﺟﻭﻣﻟﺍ ﺕﺎﻣﻟﺎﻛﻣﻟﺍ ﻝﻳﺟﺳﺗ ﺔﻧﻭﻘﻳﺃ ﺭﻘﻧﺍ
ﺭﻘﻧﺍﻭ ﺎﻬﺗءﺍﺭﻗ ﻡﺗﺗ ﻡﻟ ﻲﺗﻟﺍ ﺔﻣﻟﺎﻛﻣﻟﺍ ﻝﺟﺳ ﺭﺗﺧﺍ .ﻥﻭﻠﻟﺍ ﺭﻣﺣﺃ ﻡﻬﺳ ﺭﺑﻋ ﻙﻟﺫ ﻰﻟﺇ ﺓﺭﺎﺷﻹﺍ ﻡﺗﻳ ،ﺎﻬﺗءﺍﺭﻗ ﻡﺗﺗ ﻡﻟ ﺕﺎﻣﻟﺎﻛﻣ
.ﻪﻠﻳﻐﺷﺗﻟ ﺔﻧﻭﻘﻳﻷﺍ
۱۱/۰۲ ﺕﺎﻣﻟﺎﻛﻣﻟﺍ ﻝﺟﺳ
ﻝﺍﺩﻧ ﺎﻓﺍﺭ ۱۱:۰٦ ۱۲-۰٦
ﻥﻼﻳﺳ ﺎﻏﺎﻳ ۲۱:٤۳ ۲۷-۰٥
ﻥﻼﻳﺳ ﺎﻏﺎﻳ ۱۳:۳۳ ۲۰-۰٤
ﻝﺍﺩﻧ ﺎﻓﺍﺭ ۱٥:۲۲ ۱۱-۰۲
ﻥﻼﻳﺳ ﺎﻏﺎﻳ ۲۰:٥٤ ۱۱۷-۰۲
۱۱/۰۲ ﺕﺎﻣﻟﺎﻛﻣﻟﺍ ﻝﺟﺳ
ﻝﺍﺩﻧ ﺎﻓﺍﺭ ۱۱:۰٦ ۱۲-۰٦
ﻥﻼﻳﺳ ﺎﻏﺎﻳ ۲۱:٤۳ ۲۷-۰٥
ﻥﻼﻳﺳ ﺎﻏﺎﻳ ۱۳:۳۳ ۲۰-۰٤
ﻝﺍﺩﻧ ﺎﻓﺍﺭ ۱٥:۲۲ ۱۱-۰۲
ﻥﻼﻳﺳ ﺎﻏﺎﻳ ۲۰:٥٤ ۱۱۷-۰۲
ﻝﺟﺳ
ﺕﺎﻣﻟﺎﻛﻣﻟﺍ
ﻕﻼﻏﺇ
۱۹:۲۳:۲۸ ۱۱/۰۲/۲۰۱٥ ۰۰۸/۰۰۸ :ﺓﺭﻭﺻ
ﺽﺭﻌﻟﺍ ﺯﺎﻬﺟ
ﻲﻠﺧﺍﺩﻟﺍ ﻝﺎﺻﺗﻻﺍ ﺯﺎﻬﺟ
ﻝﻳﻐﺷﺗ
ﻡﺩﻋ
ﺝﺎﻋﺯﻹﺍ
ﻕﻼﻏﺇ
ءﺎﺳﻣ ۰٦:۳۲
ءﺎﻌﺑﺭﻷﺍ
۲۰۱٥/۱۱/۰۲
ﻝﺟﺳ
ﺕﺎﻣﻟﺎﻛﻣﻟﺍ
ﺽﺭﻌﻟﺍ ﺯﺎﻬﺟ
ﻲﻠﺧﺍﺩﻟﺍ ﻝﺎﺻﺗﻻﺍ ﺯﺎﻬﺟ
ﻝﻳﻐﺷﺗ
ﻡﺩﻋ
ﺝﺎﻋﺯﻹﺍ
ﻕﻼﻏﺇ
ءﺎﺳﻣ ۰٦:۳۲
ءﺎﻌﺑﺭﻷﺍ
۲۰۱٥/۱۱/۰۲
Page 29

-۸-
ﺝﺎﻋﺯﻹﺍ ﻡﺩﻋ ﺔﻔﻳﻅﻭ .۹
ﺔﻔﻳﻅﻭﻟﺍ ﻩﺫﻬﻟﻭ .ﺝﺎﻋﺯﻹﺍ ﻡﺩﻋ ﺔﻔﻳﻅﻭ ﻰﻟﺇ ﻝﻭﺻﻭﻠﻟ ﺔﻳﺳﻳﺋﺭﻟﺍ ﺔﻣﺋﺎﻘﻟﺍ ﻰﻠﻋ ﺓﺩﻭﺟﻭﻣﻟﺍ ﺝﺎﻋﺯﻹﺍ ﻡﺩﻋ ﺔﻧﻭﻘﻳﺃ ﻰﻠﻋ ﺭﻘﻧﺍ
.ﻙﺗﺎﻳﺟﺎﺣﻟ ﺎﻘﻓﻭ ﻡﺋﻼﻣﻟﺍ ﺭﺎﻳﺧﻟﺍ ﻥّﻳﻋ .ﺎﻣﺋﺍﺩ ﻭ ﺕﺎﻋﺎﺳ ۸ ﻝﻼﺧ ،۱ ﺔﻋﺎﺳ ﻝﻼﺧ ،ﻱﺩﺎﻋ :ﺕﺍﺭﺎﻳﺧ ٤
.ﺔﺷﺎﺷﻟﺍ ﻝﻔﺳﺃ ﻰﻠﻋ ﻲﻗﺎﺑﻟﺍ ﺕﻗﻭﻟﺍ ﺭﺎﻬﻅﺇ ﻡﺗﻳ ،"ﺕﺎﻋﺎﺳ ۸ ﻝﻼﺧ" ﻭﺃ "۱ ﺔﻋﺎﺳ ﻝﻼﺧ" ﻥﻳﻳﻌﺗ ﺩﻧﻋ :ﺔﻅﺣﻼﻣ
ﺕﻭﺻﻟﺍ ﺕﺍﺩﺍﺩﻋﺇ ۱-۱۰
ﻝﻭﺻﻭﻠﻟ "ﺕﺍﻭﺻﺃ" ﺭﺎﻳﺧﻟﺍ ﻥ
ّ
ﻳﻋ .ﺕﺍﺩﺍﺩﻋﻹﺍ ﺔﻣﺋﺎﻗ ﻰﻟﺇ ﻝﻭﺻﻭﻟﺍ ﻡﺗﻳ ،ﺔﻳﺳﻳﺋﺭﻟﺍ ﺔﻣﺋﺎﻘﻟﺍ ﻥﻣ
ﺔﻧﻭﻘﻳﻷﺍ ﻰﻠﻋ ﺭﻘﻧﻟﺍ ﺩﻧﻋ
ﻩﺫﻫ ﻥﻣ ﺝﻭﺭﺧﻠﻟ ﺔﻧﻭﻘﻳﺃ ﻰﻠﻋ ﺭﻘﻧﺍ) ﻡﻟﺎﻌﻣﻟﺍ ﻥﻣ ﺭﻳﺑﻛ ﺩﺩﻋ ﻁﺑﺿ ﻥﻛﻣﻳ ،ﺭﺎﻳﺧﻟﺍ ﺍﺫﻫ ﻲﻓ .ﺕﻭﺻﻟﺍ ﺕﺍﺩﺍﺩﻋﺇ ﻰﻟﺇ
.(ﺔﻳﺳﻳﺋﺭﻟﺍ ﺔﻣﺋﺎﻘﻟﺍ ﺔﺷﺎﺷ ﻰﻟﺇ ﺓﺩﻭﻌﻟﺍﻭ ﺔﺷﺎﺷﻟﺍ
ﻲﺳﺎﺳﻷﺍ ﻥﻳﻭﻛﺗﻟﺍ ﺕﺎﻣﻳﻠﻌﺗ .۱۰
ﺝﺎﻋﺯﻹﺍ ﻡﺩﻋ
ﺕﺎﻋﺎﺳ ۸ ﻝﻼﺧ
ﻱﺩﺎﻋ
۱ ﺔﻋﺎﺳ ﻝﻼﺧ
ﺎﻣﺋﺍﺩ
۰۰:٥۸:۳۲ :ﺔﺑﺎﺟﺇ ﻥﻭﺩﺑ
ﺔﻣﻐﻧﻟﺍ
ﻝﺎﺻﺗﻻﺍ ﺯﺎﻬﺟ
ﺱﺭﺟﻟﺍ
۱ ﺏﺎﺑﻟﺍ ﻪﻳﺑﻧﺗ
TelRing 19
ﺕﻭﺻﻟﺍ ﻡﺟﺣ
ﺭﺎﻬﻧ
ﻝﻳﻟ
۱۹ ۱٥ ۱۲ ۱۰
۰٦
۰٤
ﻕﻼﻏﺇ
:ﺔﻅﺣﻼﻣ
.ﺽﺭﻌﻟﺍ ﺯﺎﻬﺟ ﻰﻠﻋ ﺔﻣﻟﺎﻛﻣﻟﺍ ﺔﻣﻐﻧ ﺕﻭﺻ ﻡﺟﺣ ﻲﻧﻌﻳ ،ﻡﺟﺣﻟﺍ
ﺔﻋﺎﺳﻟﺍ ﻰﻟﺇ ﺎﺣﺎﺑﺻ ٦ ﺔﻋﺎﺳﻟﺍ ﻥﻣ ﺔﻣﻟﺎﻛﻣﻟﺍ ﺔﻣﻐﻧ ﺕﻭﺻ ﻡﺟﺣ :ﺭﺎﻬﻧ
.ءﺎﺳﻣ ٦
.ﺕﺎﻋﺎﺳﻟﺍ ﺔﻳﻘﺑ :ﻝﻳﻟ
ﻝﺟﺳ
ﺕﺎﻣﻟﺎﻛﻣﻟﺍ
ﺽﺭﻌﻟﺍ ﺯﺎﻬﺟ
ﻲﻠﺧﺍﺩﻟﺍ ﻝﺎﺻﺗﻻﺍ ﺯﺎﻬﺟ
ﻝﻳﻐﺷﺗ
ﻡﺩﻋ
ﺝﺎﻋﺯﻹﺍ
ءﺎﺳﻣ ۰٦:۳۲
ءﺎﻌﺑﺭﻷﺍ
۲۰۱٥/۱۱/۰۲
ﻕﻼﻏﺇ
ﻝﺟﺳ
ﺕﺎﻣﻟﺎﻛﻣﻟﺍ
ﺽﺭﻌﻟﺍ ﺯﺎﻬﺟ
ﻲﻠﺧﺍﺩﻟﺍ ﻝﺎﺻﺗﻻﺍ ﺯﺎﻬﺟ
ﻝﻳﻐﺷﺗ
ﻡﺩﻋ
ﺝﺎﻋﺯﻹﺍ
ءﺎﺳﻣ ۰٦:۳۲
ءﺎﻌﺑﺭﻷﺍ
۲۰۱٥/۱۱/۰۲
ﻕﻼﻏﺇ
ﻝﺟﺳ
ﺕﺎﻣﻟﺎﻛﻣﻟﺍ
ﺽﺭﻌﻟﺍ ﺯﺎﻬﺟ
ﻲﻠﺧﺍﺩﻟﺍ ﻝﺎﺻﺗﻻﺍ ﺯﺎﻬﺟ
ﻝﻳﻐﺷﺗ
ﻡﺩﻋ
ﺝﺎﻋﺯﻹﺍ
ءﺎﺳﻣ ۰٦:۳۲
ءﺎﻌﺑﺭﻷﺍ
۲۰۱٥/۱۱/۰۲
Page 30

-۹-
ﺔﻋﺎﺳﻟﺍﻭ ﺦﻳﺭﺎﺗﻟﺍ ﺕﺍﺩﺍﺩﻋﺇ ۲-۱۰
.ﺔﺧﺳﻧﻟﺍ ﻩﺫﻫ ﻲﻓ ﺓﺭﻓﻭﺗﻣ ﺭﻳﻏ ﺔﻧﻣﺍﺯﻣﻟﺍ ﺔﻔﻳﻅﻭ :ﺔﻅﺣﻼﻣ
ﺔﻐﻠﻟﺍ ﺕﺍﺩﺍﺩﻋﺇ ۳-۱۰
ﻰﻟﺇ ﻝﻭﺻﻭﻠﻟ "ﺔﻐﻠﻟﺍ" ﺭﺎﻳﺧ ﻥّﻳﻋ .ﻥﻳﻭﻛﺗﻟﺍ ﺔﻣﺋﺎﻗ ﻰﻟﺇ ﻝﻭﺻﻭﻟﺍ ﻡﺗﻳ ،ﺔﻳﺳﻳﺋﺭﻟﺍ ﺔﻣﺋﺎﻘﻟﺍ ﻥﻣ ﺔﻧﻭﻘﻳﻷﺍ ﻰﻠﻋ ﺭﻘﻧﻟﺍ ﺩﻧﻋ
ﺔﺷﺎﺷ ﻰﻟﺇ ﺓﺩﻭﻌﻟﺍﻭ ﺔﺷﺎﺷﻟﺍ ﻩﺫﻫ ﻥﻣ ﺝﻭﺭﺧﻠﻟ ﺔﻧﻭﻘﻳﺃ ﻰﻠﻋ ﺭﻘﻧﺍ) ﺔﺑﻭﻏﺭﻣﻟﺍ ﻙﻠﺗ ﺭﺗﺧﺍ ،ﺓﺭﻓﻭﺗﻣﻟﺍ ﺕﺎﻐﻠﻟﺍ ﻑﻠﺗﺧﻣ
.(ﺔﻳﺳﻳﺋﺭﻟﺍ ﺔﻣﺋﺎﻘﻟﺍ
،ﺔﻳﺩﻧﻠﻧﻔﻟﺍ ،ﺔﻳﺯﻳﻠﺟﻧﻹﺍ :ﺔﻐﻟ ۱٦ ﻰﻠﻋ ﺯﺎﻬﺟﻟﺍ ﺭﻓﻭﺗﻳ :ﺔﻅﺣﻼﻣ
،ﺔﻳﺩﻧﻟﻭﺑﻟﺍ ،ﺔﻳﻛﻳﺷﺗﻟﺍ ،ﺔﻳﺭﺟﻣﻟﺍ ،ﺔﻳﺑﺭﻌﻟﺍ ،ﺔﻳﻧﺎﻣﻟﻷﺍ ،ﺔﻳﺭﺑﻌﻟﺍ
،ﺔﻳﻧﺎﺑﺳﻹﺍ ،ﺔﻳﻛﺭﺗﻟﺍ ،ﺔﻳﺩﻧﻬﻟﺍ ،ﺔﻳﺳﻧﺭﻔﻟﺍ ،ﺔﻳﺟﻳﻭﺭﻧﻟﺍ ،ﺔﻳﺩﻧﻟﻭﻬﻟﺍ
.ﺔﻳﻟﺎﻐﺗﺭﺑﻟﺍﻭ ﺔﻳﺳﻭﺭﻟﺍ
"ﺔﻋﺎﺳﻟﺍﻭ ﺦﻳﺭﺎﺗﻟﺍ" ﺭﺎﻳﺧﻟﺍ ﻥّﻳﻋ .ﻥﻳﻭﻛﺗﻟﺍ ﺔﻣﺋﺎﻗ ﻰﻟﺇ ﻝﻭﺻﻭﻟﺍ ﻡﺗﻳ ،ﺔﻳﺳﻳﺋﺭﻟﺍ ﺔﻣﺋﺎﻘﻟﺍ ﻥﻣ ﺔﻧﻭﻘﻳﻷﺍ ﻰﻠﻋ ﺭﻘﻧﻟﺍ ﺩﻧﻋ
ﻥﻣ ﺝﻭﺭﺧﻠﻟ ﺔﻧﻭﻘﻳﺃ ﻰﻠﻋ ﻁﻐﺿﺍ) ﺔﻋﺎﺳﻟﺍﻭ ﺦﻳﺭﺎﺗﻟﺍ ﻁﺑﺿ ﻥﻛﻣﻳ ،ﺭﺎﻳﺧﻟﺍ ﺍﺫﻫ ﻲﻓ .ﺔﻋﺎﺳﻟﺍ ﺕﺍﺩﺍﺩﻋﺇ ﻰﻟﺇ ﻝﻭﺻﻭﻠﻟ
.(ﺔﻳﺳﻳﺋﺭﻟﺍ ﺔﻣﺋﺎﻘﻟﺍ ﺔﺷﺎﺷ ﻰﻟﺇ ﺓﺩﻭﻌﻟﺍﻭ ﺔﺷﺎﺷﻟﺍ ﻩﺫﻫ
ءﺎﺳﻣ 06:32
ءﺎﻌﺑﺭﻷﺍ
02/11/2015
ﺔﻋﺎﺳﻟﺍﻭ ﺦﻳﺭﺎﺗﻟﺍ
۲۰۱٥ ۱۱۰۲ ۱٥ ۲۸ ۱۰
ءﺎﺳﻣ 06:32
ءﺎﻌﺑﺭﻷﺍ
02/11/2015
ﺔﻐﻠﻟﺍ
ﺔﻳﺯﻳﻠﺟﻧﺇ
ﺔﻳﺩﻧﻠﻧﻓ
ﺔﻳﺭﺑﻋ
ﺔﻳﻧﺎﻣﻟﺃ
ﺔﻳﺑﺭﻋ
ﺔﻳﺭﺟﻣ
ﻝﺟﺳ
ﺕﺎﻣﻟﺎﻛﻣﻟﺍ
ﺽﺭﻌﻟﺍ ﺯﺎﻬﺟ
ﻲﻠﺧﺍﺩﻟﺍ ﻝﺎﺻﺗﻻﺍ ﺯﺎﻬﺟ
ﻝﻳﻐﺷﺗ
ﻡﺩﻋ
ﺝﺎﻋﺯﻹﺍ
ﻕﻼﻏﺇ
ءﺎﺳﻣ ۰٦:۳۲
ءﺎﻌﺑﺭﻷﺍ
۲۰۱٥/۱۱/۰۲
ﻝﺟﺳ
ﺕﺎﻣﻟﺎﻛﻣﻟﺍ
ﺽﺭﻌﻟﺍ ﺯﺎﻬﺟ
ﻲﻠﺧﺍﺩﻟﺍ ﻝﺎﺻﺗﻻﺍ ﺯﺎﻬﺟ
ﻝﻳﻐﺷﺗ
ﻡﺩﻋ
ﺝﺎﻋﺯﻹﺍ
ﻕﻼﻏﺇ
ءﺎﺳﻣ ۰٦:۳۲
ءﺎﻌﺑﺭﻷﺍ
۲۰۱٥/۱۱/۰۲
ﻝﺟﺳ
ﺕﺎﻣﻟﺎﻛﻣﻟﺍ
ﺽﺭﻌﻟﺍ ﺯﺎﻬﺟ
ﻲﻠﺧﺍﺩﻟﺍ ﻝﺎﺻﺗﻻﺍ ﺯﺎﻬﺟ
ﻝﻳﻐﺷﺗ
ﻡﺩﻋ
ﺝﺎﻋﺯﻹﺍ
ﻕﻼﻏﺇ
ﻝﺟﺳ
ﺕﺎﻣﻟﺎﻛﻣﻟﺍ
ﺽﺭﻌﻟﺍ ﺯﺎﻬﺟ
ﻲﻠﺧﺍﺩﻟﺍ ﻝﺎﺻﺗﻻﺍ ﺯﺎﻬﺟ
ﻝﻳﻐﺷﺗ
ﻡﺩﻋ
ﺝﺎﻋﺯﻹﺍ
ﻕﻼﻏﺇ
ﺍﻝﺇﻱﻁﺍﻝﻱ
Page 31

(ﺽﺭﻌﻟﺍ ﺯﺎﻬﺟﻟ ﻊﺑﺎﺗﻟﺍ ﺕﻗﻭﻟﺍ ﺕﺍﺩﺍﺩﻋﺇﻭ ﺔﺣﻭﻠﻟﺍ ﺔﻳﻣﺳﺗ ﺓﺩﺎﻋﺇ) ﺯﺎﻬﺟﻟﺍ ٤-۱۰
ﻲﻓ ."ﺽﺭﻌﻟﺍ ﺯﺎﻬﺟ" ﺭﺎﻳﺧ ﻥّﻳﻋ .ﻥﻳﻭﻛﺗﻟﺍ ﺔﻣﺋﺎﻗ ﻰﻟﺇ ﻝﻭﺻﻭﻟﺍ ﻡﺗﻳ ،ﺔﻳﺳﻳﺋﺭﻟﺍ ﺔﻣﺋﺎﻘﻟﺍ ﻥﻣ ﺔﻧﻭﻘﻳﻷﺍ ﻰﻠﻋ ﺭﻘﻧﻟﺍ ﺩﻧﻋ
ﺝﻭﺭﺧﻠﻟ ﺔﻧﻭﻘﻳﺃ ﻰﻠﻋ ﻁﻐﺿﺍ) ﺽﺭﻌﻟﺍ ﺯﺎﻬﺟﻟ ﻲﺗﺍﺫﻟﺍ ﻝﻳﻐﺷﺗﻟﺍ ﺓﺩﻣ ﻁﺑﺿﻭ ﺔﺣﻭﻠﻟﺍ ﺔﻳﻣﺳﺗ ﺓﺩﺎﻋﺇ ﻥﻛﻣﻳ ،ﺭﺎﻳﺧﻟﺍ ﺍﺫﻫ
.(ﺔﻳﺳﻳﺋﺭﻟﺍ ﺔﻣﺋﺎﻘﻟﺍ ﺔﺷﺎﺷ ﻰﻟﺇ ﺓﺩﻭﻌﻟﺍﻭ ﺔﺷﺎﺷﻟﺍ ﻩﺫﻫ ﻥﻣ
-۱۰-
ﺔﺣﻭﻟ ﻊﻣ ﺓﺩﻳﺩﺟ ﺔﺷﺎﺷ ﺭﻭﻬﻅ ﺎﻫﺩﻧﻋ ﻡﺗﻳ .ﺔﺣﻭﻠﻟﺍ ﺔﻘﺻﻻ ﻰﻠﻋ ﻁﻐﺿﺍ ،ﺔﺣﻭﻠﻟﺍ ﺔﻳﻣﺳﺗ ﺓﺩﺎﻋﺇ ﻲﻓ ﺔﺑﻏﺭﻟﺍ ﺔﻟﺎﺣ ﻲﻓ :ﺔﻅﺣﻼﻣ
.ﺕﺎﻧﺎﻳﺑﻟﺍ ﻝﺎﺧﺩﺇ ﻥﻣ ﻥﻛﻣﺗﻠﻟ ﺢﻳﺗﺎﻔﻣ
ﺏﺎﺑﻟﺍ ﺓﺭﻭﺻﻘﻣ ﺔﻳﻣﺳﺗ ﺓﺩﺎﻋﺇ
DS-1
ﺽﺭﻌﻟﺍ ﺯﺎﻬﺟ ﺕﻗﻭ ﻁﺑﺿ
ﺔﻳﻧﺎﺛ ۳۰
.ﺕﻭﺻﻟﺍ ﻡﺟﺣﻭ ﻭﻳﺩﻳﻔﻟﺍ ﺓﺭﻭﺻ ﺕﻼﻳﺩﻌﺗﺑ ﺔﺻﺎﺧﻟﺍ ﺔﺷﺎﺷﻟﺍ ﺔﻳﺅﺭﻟ ﺔﻧﻭﻘﻳﺃ ﺭﻘﻧﺍ ،ﺔﺣﻭﻠﻟﺍ ﻊﻣ ﺔﺛﺩﺎﺣﻣﻟﺍ ﻭﺃ ﺔﻣﻟﺎﻛﻣﻟﺍ ﻝﻼﺧ
۱ .
،ﻱﺩﺎﻋ
:ﺕﺍﺭﺎﻳﺧ ٤ ﻰﻠﻋ ﺩﻬﺷﻣﻟﺍ ﻊﺿﻭ ﻥﻳﻳﻌﺗ ﺔﻔﻳﻅﻭ ﺭﻓﻭﺗﺗ
،ﻥﻳﺎﺑﺗﻟﺍ
ﻭﺃ
ﻥﺎﻌﻣﻠﻟﺍ ،ﻥﻭﻠﻟﺍ
ﻝﻳﺩﻌﺗ ﺩﻧﻋ
.ﻡﺩﺧﺗﺳﻣﻭ ﺕﻓﺎﺧ ،ﻊﻁﺎﺳ
.ﻡﺩﺧﺗﺳﻣﻟﺍ
ﺩﻬﺷﻣ ﻊﺿﻭ ﻰﻟﺇ ﺎﻳﻟﺁ ﺭﻳﻐﺗﻟﺎﺑ ﺩﻬﺷﻣﻟﺍ ﻡﻭﻘﻳ
۲ . ﻰﻠﻋ ﻁﻐﺿﺍ .ﺔﻳﻠﻣﻌﻟﺍ ﺩﻌﺑ ﺓﺭﺷﺎﺑﻣ ﺕﺍﺭﻳﻳﻐﺗﻟﺍ ﻝﻛﺑ ﻡﺎﻳﻘﻟﺍ ﻡﺗﻳ
.ﺕﻼﻳﺩﻌﺗﻟﺍ ﺔﺷﺎﺷ ﻥﻣ ﺝﻭﺭﺧﻠﻟ ﺓﺭﻭﺻﻟﺍ ﺓﺫﻓﺎﻧ
ﺕﻭﺻﻟﺍ ﻡﺟﺣﻭ ﺔﺷﺎﺷﻟﺍ ﺕﺍﺩﺍﺩﻋﺇ ٥-۱۰
۱ ﺏﺎﺑﻟﺍ ﺔﻳﻣﺳﺗ ﺓﺩﺎﻋﺇ
DS-1
abc
ﺔﺣﻭﻠﻟﺍ ﺔﻳﻣﺳﺗ ﺓﺩﺎﻋﺇ
DS-1
ﺽﺭﻌﻟﺍ ﺯﺎﻬﺟ ﺕﻗﻭ
ﺔﻳﻧﺎﺛ ۳۰
ءﺎﺳﻣ 06:32
ءﺎﻌﺑﺭﻷﺍ
02/11/2015
٥
٦
ﻱﺩﺎﻋ
ﻊﻁﺎﺳ ﺕﻓﺎﺧ ﻡﺩﺧﺗﺳﻣ
٥
۷
ﻝﺟﺳ
ﺕﺎﻣﻟﺎﻛﻣﻟﺍ
ﺽﺭﻌﻟﺍ ﺯﺎﻬﺟ
ﻲﻠﺧﺍﺩﻟﺍ ﻝﺎﺻﺗﻻﺍ ﺯﺎﻬﺟ
ﻝﻳﻐﺷﺗ
ﻡﺩﻋ
ﺝﺎﻋﺯﻹﺍ
ﻕﻼﻏﺇ
ءﺎﺳﻣ ۰٦:۳۲
ءﺎﻌﺑﺭﻷﺍ
۲۰۱٥/۱۱/۰۲
ﻝﺟﺳ
ﺕﺎﻣﻟﺎﻛﻣﻟﺍ
ﺽﺭﻌﻟﺍ ﺯﺎﻬﺟ
ﻲﻠﺧﺍﺩﻟﺍ ﻝﺎﺻﺗﻻﺍ ﺯﺎﻬﺟ
ﻝﻳﻐﺷﺗ
ﻡﺩﻋ
ﺝﺎﻋﺯﻹﺍ
ﻕﻼﻏﺇ
Page 32

ﺔﻳﻠﻣﻋ ."ﻝﻭﺣ" ﺭﺎﻳﺧ ﻥﻳﻳﻌﺗ ﻝﻼﺧ ﻥﻣ ،ﺔﻳﺿﺍﺭﺗﻓﻹﺍ ﻊﻧﺻﻣﻟﺍ ﻡﻳﻗ ﻰﻟﺇ ﺽﺭﻌﻟﺍ ﺯﺎﻬﺟ ﻡﻟﺎﻌﻣ ﻥﻳﻳﻌﺗ ﺓﺩﺎﻋﺇ ﺔﻳﻧﺎﻛﻣﺇ ﺭﻓﻭﺗﺗ
.ﺕﺎﻧﺎﻳﺑﻟﺍﻭ ﺕﻼﻳﺩﻌﺗﻟﺍ ﺭﻳﻐُﺗ ﻥﻟ ﺔﻳﺿﺍﺭﺗﻓﻹﺍ ﻡﻟﺎﻌﻣﻟﺍ ﻰﻟﺇ ﺓﺩﻭﻌﻟﺍ
ﻰﻟﺇ ﻝﻭﺻﻭﻠﻟ "ﻝﻭﺣ" ﺭﺎﻳﺧ ﻥّﻳﻋ .ﻥﻳﻭﻛﺗﻟﺍ ﺔﻣﺋﺎﻗ ﻰﻟﺇ ﻝﻭﺻﻭﻟﺍ ﻡﺗﻳ ،ﺔﻳﺳﻳﺋﺭﻟﺍ ﺔﻣﺋﺎﻘﻟﺍ ﻥﻣ ﺔﻧﻭﻘﻳﻷﺍ ﻰﻠﻋ ﺭﻘﻧﻟﺍ ﺩﻧﻋ
.ﺔﻳﺿﺍﺭﺗﻓﻹﺍ ﺕﺍﺩﺍﺩﻋﻹﺍ ﻝﻳﻣﺣﺗ ﺎﻫﺩﻧﻋ ﻡﺗﻳﺳﻭ ﺔﻧﻭﻘﻳﻷﺍ ﻰﻠﻋ ﺭﻘﻧﻟﺎﺑ ﻡﻗ ،ﺕﻼﻳﺩﻌﺗﻟﺍ ﺕﺎﺷﺎﺷ ﻑﻠﺗﺧﻣ
ﺔﻗﺎﻁﺑ ﻰﻠﻋ ﺭﻭﺻﻟﺍ ﺦﺳﻧﻟ ﻭ ﺕﺎﻧﻭﻘﻳﺃ ﺭﻘﻧﺍ .ﺓﺭﻛﺍﺫﻟﺎﺑ ﺔﺻﺎﺧﻟﺍ ﺕﺎﻣﻭﻠﻌﻣﻟﺍ ﻰﻟﺇ ﻝﻭﺻﻭﻠﻟ ﺔﻧﻭﻘﻳﺃ ﻰﻠﻋ ﺭﻘﻧﺍ
.ﻝﻳﻐﺷﺗﻟﺍ ﻑﺎﻧﺋﺗﺳﺍﻭ SD ﺔﻗﺎﻁﺑ ﻕﻳﺳﻧﺗ ﺓﺩﺎﻋﻹ ﻭ ﺕﺎﻧﻭﻘﻳﺃ ﺭﻘﻧﺍ .SD
(ﻝﻭﺣ) ﺔﻳﺿﺍﺭﺗﻓﻹﺍ ﻡﻳﻘﻟﺍ ﻥﻳﻳﻌﺗ ﺓﺩﺎﻋﺇ .۱۱
ﺓﺭﻛﺍﺫﻟﺍ ﻥﻋ ﺕﺎﻣﻭﻠﻌﻣ
SD ﺔﻗﺎﻁﺑ
-
ﻭﻳﺩﻳﻔﻟﺍ ﺔﻌﺳ
ﻭﻳﺩﻳﻔﻟﺍ ﻡﺍﺩﺧﺗﺳﺍ
ﺵﻼﻓ
ﺭﻭﺻﻟﺍ ﺔﻌﺳ
ﺭﻭﺻﻟﺍ ﻡﺍﺩﺧﺗﺳﺍ
-
-
۰۱۱۸
۰۰۲٤
ﻝﻭﺣ
ﻲﻠﺣﻣﻟﺍ ﻥﺍﻭﻧﻌﻟﺍ
۰۰٫۰۰
ﻲﺳﺎﻳﻗ ﻭﻳﺩﻳﻓ
ﻡﺎﻅﻧﻟﺍ ﺔﺧﺳﻧ
ﺔﺷﺎﺷﻟﺍ ﻝﻐﺷﻣ
ﺭﺩﺻﻣﻟﺍ
ﻡﺩﺧﺗﺳﻣﻟﺍ ﺔﻬﺟﺍﻭ
ﻲﺗﺍﺫ
۰۰٫۰۲٫۰۹
۱٫۳
۱٫۰
۱٫۰
؟SD ﺔﻗﺎﻁﺑ ﻰﻠﻋ ﺭﻭﺻﻟﺍ ﺦﺳﻧ
ﺓﺭﻛﺍﺫﻟﺍ ﻥﻋ ﺕﺎﻣﻭﻠﻌﻣ
SD ﺔﻗﺎﻁﺑ
-
ﻭﻳﺩﻳﻔﻟﺍ ﺔﻌﺳ
ﻭﻳﺩﻳﻔﻟﺍ ﻡﺍﺩﺧﺗﺳﺍ
ﺵﻼﻓ
ﺭﻭﺻﻟﺍ ﺔﻌﺳ
ﺭﻭﺻﻟﺍ ﻡﺍﺩﺧﺗﺳﺍ
-
-
۰۱۱۸
۰۰۲٤
-۱۱-
؟SD ﺔﻗﺎﻁﺑ ﻰﻠﻋ ﺭﻭﺻﻟﺍ ﺦﺳﻧ
!
؟ﻝﻳﻐﺷﺗﻟﺍ ﻑﺎﻧﺋﺗﺳﺍﻭ SD ﺔﻗﺎﻁﺑ ﻕﻳﺳﻧﺗ ﺓﺩﺎﻋﺇ
؟ﻝﻳﻐﺷﺗﻟﺍ ﻑﺎﻧﺋﺗﺳﺍﻭ SD ﺔﻗﺎﻁﺑ ﻕﻳﺳﻧﺗ ﺓﺩﺎﻋﺇ
!
ﻝﺟﺳ
ﺕﺎﻣﻟﺎﻛﻣﻟﺍ
ﺽﺭﻌﻟﺍ ﺯﺎﻬﺟ
ﻲﻠﺧﺍﺩﻟﺍ ﻝﺎﺻﺗﻻﺍ ﺯﺎﻬﺟ
ﻝﻳﻐﺷﺗ
ﻡﺩﻋ
ﺝﺎﻋﺯﻹﺍ
ﻕﻼﻏﺇ
ءﺎﺳﻣ ۰٦:۳۲
ءﺎﻌﺑﺭﻷﺍ
۲۰۱٥/۱۱/۰۲
ﻝﺟﺳ
ﺕﺎﻣﻟﺎﻛﻣﻟﺍ
ﺽﺭﻌﻟﺍ ﺯﺎﻬﺟ
ﻲﻠﺧﺍﺩﻟﺍ ﻝﺎﺻﺗﻻﺍ ﺯﺎﻬﺟ
ﻝﻳﻐﺷﺗ
ﻡﺩﻋ
ﺝﺎﻋﺯﻹﺍ
ﻕﻼﻏﺇ
Page 33

ﺔﻣﺋﺎﻘﻟﺍ ﻰﻠﻋ ﺓﺩﻭﺟﻭﻣﻟﺍ ﺔﻧﻭﻘﻳﺃ ﻰﻠﻋ ﺭﻘﻧﺍ .۱
."ﻝﻭﺣ" ﺭﺗﺧﺍﻭ ﺔﻳﺳﻳﺋﺭﻟﺍ
ﺏﺍﻭﺑﻷﺍ ﺢﺗﻓ ﺭﺯ ﻰﻠﻋ ﻁﻐﺿﺍ .۲
.۲ ﻥﻳﺗﻳﻧﺎﺛ ﺓﺩﻣﻟ
ﻝﺎﺧﺩﻹ ﺢﻳﺗﺎﻔﻣ ﺔﺣﻭﻟ ﺎﻬﻟ ﺓﺩﻳﺩﺟ ﺔﺷﺎﺷ ﻰﻟﺇ ﻝﻭﺻﻭﻟﺍ ﻡﺗﻳ .۳
ﻥﻳﻳﺑﺗ ﻡﺗﻳ ،ﺔﻳﻟﺎﺗﻟﺍ ﻝﻭﺻﻔﻟﺍ ﻲﻓ .ﺎﻬﻠﻳﺩﻌﺗ ﻲﻓ ﺏﻏﺭﺗ ﻲﺗﻟﺍ ﺕﺎﻧﺎﻳﺑﻟﺍ
.ﺔﻧﻛﻣﻣﻟﺍ ﺕﺎﻧﻳﻭﻛﺗﻟﺍ
ﺏﻳﻛﺭﺗﻟﺍ ﻥﻳﻭﻛﺗ ﺔﺣﻔﺻ ﻰﻟﺇ ﻝﻭﺧﺩﻟﺍ ﺔﻳﻔﻳﻛ ۱-۱۲
ﺽﺭﻌﻟﺍ ﺯﺎﻬﺟ ﻡﻟﺎﻌﻣ ﺕﺍﺩﺍﺩﻋﺇ .۱۲
-۱۲-
.ﺔﻋﺎﺳﻟﺍﻭ ﺦﻳﺭﺎﺗﻠﻟ ﺔﺑﺳﻧﻟﺎﺑ ﻥﺎﻘﻳﺳﻧﺗ ﻡﺎﻅﻧﻟﺍ ﺭّﻓﻭُﻳ
.ﺔﻧﺳ/ﻡﻭﻳ/ﺭﻬﺷ :ﻲﻟﺎﺗﻟﺍ ﻭﺣﻧﻟﺍ ﻰﻠﻋ ﺦﻳﺭﺎﺗﻟﺍ ﻕﻳﺳﻧﺗ ﺩﻳﺩﺣﺗ ﻡﺗﻳ ،۸۰۰۸ ﻡﻗﺭ ﻝﺎﺧﺩﺇ ﺔﻟﺎﺣ ﻲﻓ
.ﺔﻧﺳ/ﺭﻬﺷ/ﻡﻭﻳ :ﻲﻟﺎﺗﻟﺍ ﻭﺣﻧﻟﺍ ﻰﻠﻋ ﺦﻳﺭﺎﺗﻟﺍ ﻕﻳﺳﻧﺗ ﺩﻳﺩﺣﺗ ﻡﺗﻳ ،۸۰۰۹ ﻡﻗﺭ ﻝﺎﺧﺩﺇ ﺔﻟﺎﺣ ﻲﻓ
.ﺔﻋﺎﺳ ۱۲ ﻡﺎﻅﻧﻟ ﺎﻘﻓﻭ ﺔﻋﺎﺳﻟﺍ ﻕﻳﺳﻧﺗ ﺩﻳﺩﺣﺗ ﻡﺗﻳ ،۸۰۱۲ ﻡﻗﺭ ﻝﺎﺧﺩﺇ ﺔﻟﺎﺣ ﻲﻓ
.ﺔﻋﺎﺳ ۲٤ ﻡﺎﻅﻧﻟ ﺎﻘﻓﻭ ﺔﻋﺎﺳﻟﺍ ﻕﻳﺳﻧﺗ ﺩﻳﺩﺣﺗ ﻡﺗﻳ ،۸۰۱۳ ﻡﻗﺭ ﻝﺎﺧﺩﺇ ﺔﻟﺎﺣ ﻲﻓ
ﺔﻋﺎﺳﻟﺍﻭ ﺦﻳﺭﺎﺗﻟﺍ ﻕﻳﺳﻧﺗ ﻝﻳﺩﻌﺗ ﺔﻳﻔﻳﻛ ۲-۱۲
.ﺔﻳﻧﺎﺛ ۹۹ ﻰﻟﺇ ۱ ﺔﻳﻧﺎﺛ ﻥﻣ ﺎﻬﻁﺑﺿ ﻥﻛﻣﻳ .ﺕﻗﻭ ﻱﺃ ﻲﻓ ﺏﺍﻭﺑﻷﺍ ﺢﺗﺎﻓ ﻝﻳﻌﻔﺗ ﺓﺩﻣ ﺭﻳﻳﻐﺗ ﻥﻛﻣُﻳ
.ﺔﻳﻧﺎﺛ ۹۹ ﻰﻟﺇ ۱ ﺔﻳﻧﺎﺛ ﻥﻣ ﺓﺩﻣﻟﺍ ﻁﺑﺿﺑ ۸٤۹۹ ﻰﻟﺇ ۸٤۰۱ ﻡﺎﻗﺭﻷﺍ ﺢﻣﺳﺗ
:ﺏﺍﻭﺑﻷﺍ ﺢﺗﺎﻓ ﻝﻳﻌﻔﺗ ﺓﺩﻣ
ﻝﻳﻌﻔﺗﻟﺍ ﺕﻗﻭﻭ ﺏﺍﻭﺑﻷﺍ ﺢﺗﺎﻓ ﻉﻭﻧ ﻝﺎﺧﺩﺇ ﺔﻳﻔﻳﻛ ۳-۱۲
:ﻝﻳﻐﺷﺗ ﺎﻋﻭﻧ ﻙﺎﻧﻫ
ﻝﻳﻐﺷﺗ ﺕﻗﻭ ﻝﻼﺧ ﺏﺎﺑﻟﺍ ﺢﺗﻔﺑ ﺢﻣﺳﻳ .(ﻲﺿﺍﺭﺗﻓﺍ ﻝﻛﺷﺑ) ۰ = ﺭﻳﺭﺣﺗﻟﺍ ﻊﺿﻭ :ﻱﺩﺎﻋ ﻝﻳﻐﺷﺗ ﻭﺫ ﺏﺍﻭﺑﺃ ﺢﺗﺎﻓ .۱
.ﺏﺍﻭﺑﻷﺍ ﺢﺗﺎﻓ
.۱ = ﺭﻳﺭﺣﺗﻟﺍ ﻊﺿﻭ :ﺱﻭﻛﻌﻣ ﻝﻳﻐﺷﺗ ﻭﺫ ﺏﺍﻭﺑﺃ ﺢﺗﺎﻓ .۲
.ﺏﺍﻭﺑﻷﺍ ﺢﺗﺎﻔﻟ ﺔﻗﺎﻁﻟﺍ ﺭﻳﻓﻭﺗ ﻥﻋ ﻑﻗﻭﺗﻟﺍ ﺕﻗﻭ ﻝﻼﺧ ﺏﺎﺑﻟﺍ ﺢﺗﻔﺑ ﺢﻣﺳﻳ
.۰ ﺭﻳﺭﺣﺗﻟﺍ ﻊﺿﻭ ءﺎﺷﻧﺇ ﻡﺗﻳ ،۸۰۱۰ ﻡﻗﺭ ﻝﺎﺧﺩﺇ ﺔﻟﺎﺣ ﻲﻓ
.۱ ﺭﻳﺭﺣﺗﻟﺍ ﻊﺿﻭ ءﺎﺷﻧﺇ ﻡﺗﻳ ،۸۰۱۱ ﻡﻗﺭ ﻝﺎﺧﺩﺇ ﺔﻟﺎﺣ ﻲﻓ
:ﻝﻳﻐﺷﺗﻟﺍﻭ ﺏﺍﻭﺑﻷﺍ ﺢﺗﺎﻓ ﻉﻭﻧ
ﺕﺑﺛﻣﻟﺍ ﺩﺍﺩﻋﺇ
123
ﻝﻭﺣ
ﻲﻠﺣﻣﻟﺍ ﻥﺍﻭﻧﻌﻟﺍ
۰۰٫۰۰
ﻲﺳﺎﻳﻗ ﻭﻳﺩﻳﻓ
ﻡﺎﻅﻧﻟﺍ ﺔﺧﺳﻧ
ﺔﺷﺎﺷﻟﺍ ﻝﻐﺷﻣ
ﺭﺩﺻﻣﻟﺍ
ﻡﺩﺧﺗﺳﻣﻟﺍ ﺔﻬﺟﺍﻭ
ﻲﺗﺍﺫ
۰۰٫۰۲٫۰۹
۱٫۳
۱٫۰
۱٫۰
Page 34

BUS(IM) BUS(DS)
PC6
AC~
-
+
L1 L2 PL S+ S-
Doorbell Button
Switch
1 2 3
ON
DIPS
Doorbell Button
Switch
1 2 3
ON
DIPS
BUS(IM) BUS(DS)
PC6
AC~
-
+
L1 L2 PL S+ S-
Doorbell Button
Switch
1 2 3
ON
DIPS
ﺏﻳﻛﺭﺗﻟﺍ ﺕﺎﻁﻁﺧﻣ .۱۳
۱ ﻁﺧ ﻡﻘﻁ ۱-۱-۱۳
۲ ﻥﻳﻁﺧ ﻡﻘﻁ ۲-۱-۱۳
ﺱﺭﺟ
ﺏﺎﺑﻟﺍ
ﺱﺭﺟ
ﺏﺎﺑﻟﺍ
ﺱﺭﺟ
ﺏﺎﺑﻟﺍ
(M) ﻝﻗﺎﻧ
ﺽﺭﻌﻟﺍ ﺯﺎﻬﺟ
(DS ﺔﻗﺎﻁﺑ) ﻝﻗﺎﻧ
ﺔﺣﻭﻠﻟﺍ
(M) ﻝﻗﺎﻧ
ﺽﺭﻌﻟﺍ ﺯﺎﻬﺟ
(DS ﺔﻗﺎﻁﺑ) ﻝﻗﺎﻧ
ﺔﺣﻭﻠﻟﺍ
-۱۳-
Page 35

LOCK
Take off the Jumper
POWER
SUPPLY
BUS PL S+S-
ﺭﺩﺻﻣ
ﺔﻗﺎﻁﻟﺍ
ﺏﺍﻭﺑﻷﺍ ﺢﺗﺎﻓ
EB
*
LOCK
PL S+S-
connect Electronic lock, the jumper position in 2-3.
BUS
1 2 3
-۱٤-
ﺔﻗﺎﻁ ﻥﻭﺩﺑ ﻝﻗﺎﻧ ﺭﺑﻋ ﺏﺍﻭﺑﻷﺍ ﺢﺗﺎﻓ ﻁﺑﺭ ۲-۲-۱۳
:ﺔﻅﺣﻼﻣ
۱ . ﻙﻼﻬﺗﺳﻻ ﺎﻘﻓﻭ ﻲﺟﺭﺎﺧ ﺭﺩﺻﻣ ﺭﺑﻋ ﻪﻁﺑﺭ ﺏﺟﻳ
.ﻩﺭﺎﻳﺗﺧﺍ ﻡﺗ ﻱﺫﻟﺍ ﺏﺍﻭﺑﻷﺍ ﺢﺗﺎﻓ
۲ . ﺍﺫﻬﺑ ﻡﺎﻳﻘﻟﺍ ﻝﺑﻗ JP/LK ﺔﺣﻭﻠﻟﺍ ﺔﻠﺻﻭ ﺔﻟﺍﺯﺇ ﺏﺟﻳ
.ﻁﺑﺭﻟﺍ ﻥﻣ ﻉﻭﻧﻟﺍ
۳ . ﺎﻁﻭﺑﺭﻣ ﺏﺍﻭﺑﻷﺍ ﺢﺗﺎﻓ ﻊﺿﻭ ءﺎﺷﻧﺇ
:(۳-۱۲ ﻝﺻﻔﻟﺍ ﺭﻅﻧﺍ)
• ۰ = ﺭﻳﺭﺣﺗﻟﺍ ﻊﺿﻭ :ﻱﺩﺎﻋ ﻝﻳﻐﺷﺗ ﻭﺫ ﺏﺍﻭﺑﺃ ﺢﺗﺎﻓ
.(ﻲﺿﺍﺭﺗﻓﺍ ﻝﻛﺷﺑ)
• .۱ = ﺭﻳﺭﺣﺗﻟﺍ ﻊﺿﻭ :ﺱﻭﻛﻌﻣ ﻝﻳﻐﺷﺗ ﻭﺫ ﺏﺍﻭﺑﺃ ﺢﺗﺎﻓ
ﺏﺍﻭﺑﻷﺍ ﺢﺗﺎﻓ ﻁﺑﺭ ۲-۱۳
:ﺔﻅﺣﻼﻣ
۱ ..ﻱﺩﺎﻋ ﻝﻳﻐﺷﺗ ﻱﺫ ﺏﺍﻭﺑﺃ ﺢﺗﺎﻓ ﻁﺑﺭ ﺏﺟﻳ
۲ . ﺭﺎﻳﺗ ﺕﻟﻭﻓ ۱۲ ـﺑ ﻝﻳﻐﺷﺗﻟﺍ ﺏﺍﻭﺑﻷﺍ ﺢﺗﺎﻓ ﻰﻠﻋ ﺏﺟﻳ
.250 mA ﻎﻠﺑﻳ ﻰﺻﻗﺃ ﻙﻼﻬﺗﺳﺍ ﻊﻣ ﺭﺷﺎﺑﻣ
۳ ..(EB) ﺕﻳﻗﻭﺗﻟ ﻊﺿﺎﺧ ﺭﻳﻏ ﺝﻭﺭﺧﻟﺍ ﺭﺯ
٤ . ﺎﺟﻣﺭﺑ
ُ
ﻣ ﻥﻭﻛﻳ ﻥﺃ ﺏﺍﻭﺑﻷﺍ ﺢﺗﺎﻓ ﻊﺿﻭ ﻰﻠﻋ ﺏﺟﻳ
ﺭﻅﻧﺍ .(ﻲﺿﺍﺭﺗﻓﺍ ﻝﻛﺷﺑ) ۰ = ﺭﻳﺭﺣﺗﻟﺍ ﻊﺿﻭﻛ
.۳-۱۲ ﻝﺻﻔﻟﺍ
٥ . ﺔﻠﻣﻌﺗﺳﻣﻟﺍ JP/LK ﺔﺣﻭﻠﻟﺍ ﺔﻠﺻﻭ ﻰﻠﻋ ﺏﺟﻳ
ﻉﻭﻧﻟﺍ ﺍﺫﻫ ﻁﺑﺭ ﺩﻧﻋ ،ﺏﺍﻭﺑﻷﺍ ﺢﺗﺎﻓ ﻑﻧﺻ ﺭﺎﻳﺗﺧﻻ
ﻥﻭﻛﺗ ﻥﺃ ،ﻁﺑﺭﻟﺍ ﻥﻣ ﻉﻭﻧﻟﺍ ﺍﺫﻬﺑﻭ ﺏﺍﻭﺑﻷﺍ ﺢﺗﺎﻓ ﻥﻣ
.۳ - ۲ ﻊﺿﻭ ﻲﻓ
ﻡﻘﻁﻟﺍ ﻲﻓ ﺞﻣﺩﻣﻟﺍ ﺭﺩﺻﻣﻟﺎﺑ ﺏﺍﻭﺑﻷﺍ ﺢﺗﺎﻓ ﻁﺑﺭ ۱-۲-۱۳
ﺏﺍﻭﺑﻷﺍ ﺢﺗﺎﻓ
ﺭﺯ
ﺝﻭﺭﺧﻟﺍ
ﻰﻠﻋ ﺔﻠﺻﻭﻟﺍ ﻊﺿﻭ ﻰﻠﻋ ﺏﺟﻳ .ﺏﺍﻭﺑﻷﺍ ﺢﺗﺎﻓ ﻁﺑﺭ
.۳ - ۲ ﻥﻭﻛﻳ ﻥﺃ ﺔﺣﻭﻠﻟﺍ
ﺔﻠﺻﻭﻟﺍ ﺔﻟﺍﺯﺈﺑ ﻡﻗ .ﺏﺍﻭﺑﻷﺍ ﺢﺗﺎﻓ ﻁﺑﺭ
ﺔﺣﻭﻠﻟﺍ ﻥﻣ
Page 36

ﻝﻳﻐﺷﺗﻟﺍ .۱٤
-۱٥-
ﺏﺍﻭﺑﻷﺍ ﺢﺗﺎﻓ ﺕﻗﻭ ﻁﺑﺿ ۱-۱٤
ﺔﻗﺎﻁﺑﻟﺍ ﻝﻣﺎﺣ ﺕﺎﻣﻳﻠﻌﺗ
ﺔﻳﺗﻭﺻ ﺓﺭﺎﺷﺇ + ﺔﻳﺗﻭﺻ ﺓﺭﺎﺷﺇ
،ﻲﻧﺍﻭﺛ ٥ ﺭﻭﺭﻣ ﻝﺑﻗﻭ ﻪﻠﻳﻐﺷﺗﺑ ﻡﻗ
۳ ﺓﺩﻣﻟ "B" ﺭﺯﻟﺍ ﻰﻠﻋ ﻁﻐﺿﺍ
ﻰﻟﺇ ﺎﻫﺩﻧﻋ ﻝﻭﺻﻭﻟﺍ ﻡﺗﻳ .ﻲﻧﺍﻭﺛ
.ﺔﺟﻣﺭﺑﻟﺍ ﻊﺿﻭ
ﺓﺩﻣﻟ "A" ﺭﺯﻟﺍ ﻰﻠﻋ ﻁﻐﺿﺍ ،ﺔﺟﻣﺭﺑﻟﺍ ﻊﺿﻭ ﻲﻓ
ﻁﺑﺿ ﻊﺿﻭ ﻰﻟﺇ ﺎﻫﺩﻧﻋ ﻝﻭﺻﻭﻟﺍ ﻡﺗﻳ .ﻲﻧﺍﻭﺛ ۳
.ﺏﺍﻭﺑﻷﺍ ﺢﺗﺎﻓ ﺕﻗﻭ
(ﺽﻳﻣﻭ)
ﺔﻗﺎﻁﺑﻟﺍ ﻝﻣﺎﺣ ﺕﺎﻣﻳﻠﻌﺗ
ﻊﻓﺭ ﻥﻭﺩ "B" ﺭﺯﻟﺍ ﻰﻠﻋ ﻁﻐﺿﺍ ،ﻙﻟﺫ ﺩﻧﻋ
ﻊﻓﺭﺍ .ﺕﻗﻭﻟﺍ ﺱﺎﻳﻘﻣ ﺎﻫﺩﻧﻋ ﺃﺩﺑﻳﻭ ،ﻙﻌﺑﺻﺇ
ﻱﺫﻟﺍ ﺕﻗﻭﻟﺍ .ﺕﻗﻭﻟﺍ ءﺎﻬﻧﻹ "B" ﺭﺯ ﻥﻋ ﻙﻌﺑﺻﺇ
ﺱﻔﻧ ﻭﻫ "B" ﺭﺯ ﻰﻠﻋ ﻁﻐﺿﻟﺍ ﻪﻟﻼﺧ ﻡﻭﺩﻳ
۹۹ ﻰﻟﺇ ۱ ﺔﻳﻧﺎﺛ ﻥﻣ ﻑﻧﺻﻟﺍ) .ﺞﻣﺭﺑُﻣﻟﺍ ﺕﻗﻭﻟﺍ
.(ﺔﻳﻧﺎﺛ
(ءﺎﻔﻁﺇ)
ﺔﻳﺗﻭﺻ ﺓﺭﺎﺷﺇ
:ﺏﺍﻭﺑﻷﺍ ﺢﺗﺎﻓ ﺕﻗﻭ ﺔﺟﻣﺭﺑﻟ ﻥﺎﺗﻘﻳﺭﻁ ﻙﺎﻧﻫ .۱ :ﺕﺎﻅﺣﻼﻣ
.ﻝﻳﻟﺩﻟﺍ ﻥﻣ ۳-۱۲ ﻝﺻﻔﻟﺍ ﻲﻓ ﺓﺭّﺳﻔُﻣ :ﺯﺎﻬﺟﻟﺍ ﻥﻣ ﺎﻗﻼﻁﻧﺍ (ﺃ
.ﻝﻳﻟﺩﻟﺍ ﻥﻣ ۱-۱٤ ﻝﺻﻔﻟﺍ ﻲﻓ ﺓﺭّﺳﻔُﻣ :ﻉﺭﺎﺷﻟﺍ ﺔﺣﻭﻟ ﻥﻣ ﺎﻗﻼﻁﻧﺍ (ﺏ
ﺔﻳﺗﻭﺻ ﺕﺍﺭﺎﺷﺇ ﻰﻟﺇ ﻉﺎﻣﺗﺳﻻﺍ ﻡﺗﻳﻭ ﺽﻳﻣﻭﻟﺎﺑ ﺔﻗﺎﻁﺑﻟﺍ ﻝﻣﺎﺣ ﻡﻭﻘﻳ ،ﺕﻳﻗﻭﺗﻟﺍ ﻁﺑﺿ ﻝﻼﺧ .۲
.ﺔﻳﻧﺎﺛﻟﺍ ﻲﻓ ﺓﺭﻣ
ﺔﻗﺎﻁﺑﻟﺍ ﻝﻣﺎﺣ ﺕﺎﻣﻳﻠﻌﺗ
(ﺔﻳﻧﺎﺛﻟﺍ ﻲﻓ ﺓﺭﻣ ﺽﻳﻣﻭ)
ﺔﻳﻧﺎﺛﻟﺍ ﻲﻓ ﺓﺭﻣ ﺔﻳﺗﻭﺻ ﺓﺭﺎﺷﺇ
ﻲﻣﺎﻣﻷﺍ ءﺎﻁﻐﻟﺍ ﺢﺗﻓﺍ ،۱ ﺭﺯ ﺕﺍﺫ ﺔﺣﻭﻠﻟﺍ ﻊﻣ :ﺔﻅﺣﻼﻣ
.B ﺭﺯﻟﺍ ﻥﻋ ﺙﺣﺑﻠﻟ
B
A
A
A
A
B
Page 37

-۱٦-
ﺔﺣﻭﻠﻟﺍ ﻯﻭﺗﺳﻣ ﻰﻠﻋ ﺔﻣﻟﺎﻛﻣﻟﺍ ﺔﻣﻐﻧ ﺩﻳﻛﺄﺗ ﻁﺑﺿ ۲-۱٤
ﺔﻗﺎﻁﺑﻟﺍ ﻝﻣﺎﺣ ﺕﺎﻣﻳﻠﻌﺗ
ﺔﻳﺗﻭﺻ ﺓﺭﺎﺷﺇ + ﺔﻳﺗﻭﺻ ﺓﺭﺎﺷﺇ
،ﻲﻧﺍﻭﺛ ٥ ﺭﻭﺭﻣ ﻝﺑﻗﻭ ﻪﻠﻳﻐﺷﺗﺑ ﻡﻗ
۳ ﺓﺩﻣﻟ "B" ﺭﺯﻟﺍ ﻰﻠﻋ ﻁﻐﺿﺍ
ﻰﻟﺇ ﺎﻫﺩﻧﻋ ﻝﻭﺻﻭﻟﺍ ﻡﺗﻳ .ﻲﻧﺍﻭﺛ
.ﺔﺟﻣﺭﺑﻟﺍ ﻊﺿﻭ
ﺓﺩﻣﻟ "B" ﺭﺯﻟﺍ ﻰﻠﻋ ﻁﻐﺿﺍ ،ﺔﺟﻣﺭﺑﻟﺍ ﻊﺿﻭ ﻲﻓ
ﺩﻳﻛﺄﺗ ﻊﺿﻭ ﻰﻟﺇ ﺎﻫﺩﻧﻋ ﻝﻭﺻﻭﻟﺍ ﻡﺗﻳ .ﻲﻧﺍﻭﺛ ۳
.ﺔﻣﻟﺎﻛﻣﻟﺍ ﺔﻣﻐﻧ
(ﺽﻳﻣﻭ)
ﺔﻗﺎﻁﺑﻟﺍ ﻝﻣﺎﺣ ﺕﺎﻣﻳﻠﻌﺗ
(ءﺎﻔﻁﺇ)
ﺔﻳﺗﻭﺻ ﺓﺭﺎﺷﺇ
،ﺓﺩﺣﺍﻭ ﺓﺭﻣ "B" ﺭﺯ ﻰﻠﻋ ﻁﻐﺿﻟﺎﺑ ﻡﻗ ،ﺎﻫﺩﻧﻋ
ﻁﻐﺿﻟﺍ ﺩﻧﻋ .ﺩﺣﺍﻭ ﺔﻣﻟﺎﻛﻣ ﻥﻳﻧﺭ ءﺎﺷﻧﺇ ﻡﺗﻳﺳﻭ
ﻥﻳﻧﺭ ءﺎﺷﻧﺇ ﻡﺗﻳ ،"B" ﺭﺯﻟﺍ ﻰﻠﻋ ﻯﺭﺧﺃ ﺓﺭﻣ
ﻰﻠﻋ ﺔﺛﻟﺎﺛ ﺓﺭﻣ ﻁﻐﺿﻟﺍ ﺩﻧﻋ .ﻝﺻﺍﻭﺗﻣ ﺔﻣﻟﺎﻛﻣ
.ﺩﻳﻛﺄﺗ ﻥﻳﻧﺭ ﻥﻭﺩ ﺔﻣﻟﺎﻛﻣ ءﺎﺷﻧﺇ ﻡﺗﻳ ،"B" ﺭﺯﻟﺍ
ﺔﻳﺗﻭﺻ ﺓﺭﺎﺷﺇ
(ﺓﺩﺣﺍﻭ ﺓﺭﻣ ﺽﻳﻣﻭ :ﻥﻳﻧﺭ)
(ﻥﻳﺗﺭﻣ ﺽﻳﻣﻭ :ﻝﺻﺍﻭﺗﻣ ﻥﻳﻧﺭ)
(ﺕﺍﺭﻣ ﺙﻼﺛ ﺽﻳﻣﻭ :ﻥﻳﻧﺭ ﻥﻭﺩﺑ)
ﺔﻳﺗﻭﺻ ﺓﺭﺎﺷﺇ ،ﺔﻳﺗﻭﺻ ﺓﺭﺎﺷﺇ
ﺔﻗﺎﻁﺑﻟﺍ ﻝﻣﺎﺣ ﺕﺎﻣﻳﻠﻌﺗ
ﻝﺻﺍﻭﺗﻣ ﻥﻳﻧﺭ ﺩﺣﺍﻭ ﻥﻳﻧﺭ :ﻲﻟﺎﺗﻟﺍ ﻝﺳﻠﺳﺗﻟﺍ ﺔﻣﻟﺎﻛﻣﻟﺍ ﺔﻣﻐﻧ ﺩﻳﻛﺄﺗ ﻊﺑّﺗﻳ :ﺔﻅﺣﻼﻣ
ﺩﻳﻛﺄﺗ ﻥﻳﻧﺭ ﻥﻭﺩﺑ
،ﺔﻳﺗﻭﺻ ﺓﺭﺎﺷﺇ ،ﺔﻳﺗﻭﺻ ﺓﺭﺎﺷﺇ
ﺔﻳﺗﻭﺻ ﺓﺭﺎﺷﺇ
Page 38

ﻙﻼﺳﻷﺍ ﻁﻭﺭﺷ .۱٥
.(ﺩﺭﻔﻣﻟﺍ ﻲﺋﺎﺑﺭﻬﻛﻟﺍ ﻁﺧﻠﻟ ﻲﻧﺎﻳﺑﻟﺍ ﻡﺳﺭﻟﺍﻭ ﺕﺎﻓﺎﺳﻣﻟﺍ - ﻊﻁﺎﻘﻣﻟﺍ ﻝﻭﺩﺟ ﺭﻅﻧﺍ) ﻡﺎﻅﻧﻟﺍ ﻲﻓ ﺓﺩﺩﺣﻣ ﻯﻭﺻﻘﻟﺍ ﺔﻓﺎﺳﻣﻟﺍ ﻥﺇ
ﺕﺎﻓﺎﺳﻣﻟﺍ /ﻊﻁﺎﻘﻣﻟﺍAB
۲
ﻡﻣ ۰٫۷٥ x ۲
ﺭﻭﻔﺿﻣ ﻙﻠﺳ
٦۰ ٦۰
۲
ﻡﻣ ۱ x ۲
ﺭﻭﻔﺿﻣ ﻙﻠﺳ
۸۰ ۸۰
ﺩﺭﻔﻣﻟﺍ ﻲﺋﺎﺑﺭﻬﻛﻟﺍ ﻁﺧﻠﻟ ﻲﻧﺎﻳﺑﻟﺍ ﻡﺳﺭﻟﺍ
ﺕﺎﻓﺎﺳﻣﻟﺍ /ﻊﻁﺎﻘﻣﻟﺍ ﻝﻭﺩﺟ
B
A
BUS(IM) BUS(DS)
PC6
AC~
monitor
monitor
-۱۷-
Page 39

-۱۸-
● ۲ -/+ ﺭﺷﺎﺑﻣ ﺭﺎﻳﺗ ﺕﻟﻭﻓ ۲٦ :ﺔﻗﺎﻁﻟﺍ
● ؛(ﺽﺭﻌﻟﺍ ﺯﺎﻬﺟ) 350 mA ﻝﻳﻌﻔﺗ ؛12 mA ﺭﺎﻅﺗﻧﻻﺍ ﻊﺿﻭ :ﻙﻼﻬﺗﺳﻻﺍ
● .(ﺔﺣﻭﻠﻟﺍ) 110 mA ﻝﻳﻌﻔﺗ ؛33 mA ﺭﺎﻅﺗﻧﻻﺍ ﻊﺿﻭ
● ﻥﺍﻭﻟﺃ ﺔﻳﻣﻗﺭ LCD ﺕﺎﺻﻭﺑ ۷ :ﺽﺭﻌﻟﺍ ﺯﺎﻬﺟ ﺔﺷﺎﺷ
● ﻝﺳﻛﻳﺑ ٤۸۰ x (B ،G ،R) ۳ * ۸۰۰ :ﺽﺭﻌﻟﺍ ﺔﻗﺩ
● ﺔﻳﺑﺭﻐﻟﺍ ﺎﺑﻭﺭﻭﻷ ﻱﺯﺎﻔﻠﺗﻟﺍ ﻡﺎﻅﻧﻟﺍ ﺭﺎﻳﻌﻣ ،75Ω ،1Vp-p :ﻭﻳﺩﻳﻔﻟﺍ ﺓﺭﺎﺷ
●
ﺔﻳﺑﻁﻗ ﻥﻭﺩ ۲ ﻥﻳﻁﻳﺧ :ﻙﻼﺳﻷﺍ
● (ﻡﻘﻁﻟﺍ ﻲﻓ ﺞﻣﺩﻣﻟﺍ ﺭﺩﺻﻣﻟﺍ ﻊﻣ) 250 mA ،ﺭﺷﺎﺑﻣ ﺭﺎﻳﺗ ﺕﻟﻭﻓ ۱۲ :ﺏﺍﻭﺑﻷﺍ ﺢﺗﺎﻓ ﺔﻗﺎﻁ
● (ﻲﺿﺍﺭﺗﻓﺍ ﻝﻛﺷﺑ ﻲﻧﺍﻭﺛ ۳) ﺔﻳﻧﺎﺛ ۹۹ ﻰﻟﺇ ۱ ﺔﻳﻧﺎﺛ ﻥﻣ :ﺏﺍﻭﺑﻷﺍ ﺢﺗﺎﻓ ﻝﻳﻌﻔﺗ ﺓﺩﻣ
● ؛ﺔﻳﻭﺋﻣ ﺔﺟﺭﺩ ٥٥ ﻰﻟﺇ ﺔﻳﻭﺋﻣ ﺔﺟﺭﺩ -۱٥- :ﻝﻳﻐﺷﺗﻟﺍ ﺓﺭﺍﺭﺣ ﺔﺟﺭﺩ
● .ﻡﻣ (ﻕﻣﻋ) ۱۸ × (ﺽﺭﻋ) ۲۲٥ × (ﻉﺎﻔﺗﺭﺍ) ۱۳۱ :ﺯﺎﻬﺟﻟﺍ ﺕﺎﺳﺎﻳﻗ
● (ﺏﺟﺎﺣ ﻥﻭﺩﺑ) ﻡﻣ (ﻕﻣﻋ) ۲۳ × (ﺽﺭﻋ) ۹۰ × (ﻉﺎﻔﺗﺭﺍ) ۱٤٥ :ﺔﺣﻭﻠﻟﺍ ﺕﺎﺳﺎﻳﻗ
ﺕﺎﺑﺭﺿﻟﺍﻭ ،ﺕﺎﻣﺍﺩﻁﺻﻻﺍ ﻰﻟﺇ ﺎﻬﺿﻳﺭﻌﺗ ﺏﺟﻳ ﻻﻭ ،ﺔﻔﻳﻧﻌﻟﺍ ﺕﺍﺯﺍﺯﺗﻫﻻﺍ ﺩﺿ ﻡﻘﻁﻟﺍ ﺭﺻﺎﻧﻋ ﻝﻛ ﺔﻳﺎﻣﺣ ﺏﺟﻳ (۱
.ﻁﻭﻘﺳﻟﺍ ﻭﺃ
ﻝﺑ ﺓﺭﻭﺭﺿ ﺔﻟﺎﺣ ﻲﻓ .ﺔﻁﺷﺎﻛ ﻭﺃ ﺔﻳﺋﺎﻳﻣﻳﻛ ﺩﺍﻭﻣ ﻱﺃ ﻝﺎﻣﻌﺗﺳﺍ ﺏﺟﻳ ﻻ .ﻡﻋﺎﻧ ﻲﻧﻁﻗ ﻝﻳﺩﻧﻣ ﻝﺎﻣﻌﺗﺳﺎﺑ ﻑﻅﻧُﻳ (۲
.ﺥﺎﺳﻭﻷﺍﻭ ﺭﺎﺑﻐﻟﺍ ﻑﻳﻅﻧﺗﻟ ﻥﻭﺑﺎﺻﻟﺍ ﺽﻌﺑ ﻊﻣ ءﺎﻣﻟﺍ ﻭﺃ ءﺎﻣﻟﺍ ﻁﻘﻓ ﻝﻣﻌﺗﺳﺍ ،ﻝﻳﺩﻧﻣﻟﺍ
ﻝﺛﻣ ﺔﻳﺳﻳﻁﺎﻧﻐﻣ ﻝﻭﻘﺣ ﻥﻣ ﺏﺭﻘﻟﺎﺑ ﺯﺎﻬﺟﻟﺍ ﺏﻳﻛﺭﺗ ﺔﻟﺎﺣ ﻲﻓ ﻭﻳﺩﻳﻔﻟﺍ ﺓﺭﻭﺻ ﻯﻭﺗﺳﻣ ﻝﻋ ﻩﻭﺷﺗ ﺙﻭﺩﺣ ﻥﻛﻣﻳ (۳
.ﺦﻟﺇ ،ﺭﺗﻭﻳﺑﻣﻛﻟﺍ ،ﺯﺎﻔﻠﺗﻟﺍ ،ﻑﻳﻭ ﻭﺭﻛﻳﺎﻣﻟﺍ
ﻭﺃ ،ﺭﺎﺑﻐﻟﺍ ﻭﺃ ،ﺔﻗﺭﺎﺣﻟﺍ ﻭﺃ ،ﺔﻠﻠﺑﻣﻟﺍ ﻁﺎﺳﻭﻷﺍ ﻥﻋ ﺍﺩﻳﻌﺑ ﺯﺎﻬﺟﻟﺍ ﻰﻠﻋ ﻅﻓﺎﺣ ،ﻊﻗﻭﺗﻣ ﺭﻳﻏ ﺏﻁﻋ ﻱﺃ ﺏﻧﺟﺗ ﻑﺩﻬﺑ (٤
.ﺦﻟﺇ ،ﺔﻳﻟﺎﻌﻟﺍ ﺓﺭﺍﺭﺣﻟﺍ ﺕﺎﺟﺭﺩ ﻭﺃ ،ﺓﺩﺳﻛﺅﻣﻟﺍ ﺕﺍﺯﺎﻐﻟﺍ
.ﻡﻘﻁﻟﺍ ﻲﻓ ﺭﻓﻭُﻣﻟﺍ ﺭﺩﺻﻣﻟﺍ
ﻝﺎﻣﻌﺗﺳﺍ ﺏﺟﻳ ،ﺔﻗﺎﻁﻟﺎﺑ ﺓﺯﻬﺟﻷﺍ ﺩﻳﻭﺯﺗﻟ (٥
.ﻥﻳﺻﺗﺧﻣﻟﺍﻭ ﻥﻳﻠﻫﺅﻣﻟﺍ ﻥﻳﻳﻧﻔﻟﺍ ﺭﺷﺗﺳﺍ ،ﺓﺯﻬﺟﻷﺍ ﻝﺧﺍﺩ ﻝﺎﻋ ﺩﻬﺟ ﺩﻭﺟﻭ ﺔﻟﺎﺣ ﻲﻓ :ﺭﻳﺫﺣﺗ (٦
ﺔﻳﻧﻔﻟﺍ ﺕﺎﻔﺻﺍﻭﻣﻟﺍ .۱٦
ﺕﺍﺭﻳﺫﺣﺗ .۱۷
Page 40

.FERMAX ELECTRÓNICA ﺔﻛﺭﺷ ﺎﻫﺭﺩﺻﺗ ﻲﻣﻼﻋﺇ ﻑﺩﻫ ﺕﺍﺫ ﺔﻳﻧﻓ ﺔﻳﺭﺷﻧ
ﺔﻘﻳﺛﻭﻟﺍ ﻩﺫﻫ ﻯﻭﺗﺣﻣ ﻝﻳﺩﻌﺗ ﻲﻓ ﺎﻬﻘﺣﺑ FERMAX ﺔﻛﺭﺷ ﻅﻔﺗﺣﺗ ،ﺎﻬﻟ ﺔﻌﺑﺎﺗﻟﺍ ﻝﺻﺍﻭﺗﻣﻟﺍ ﻥﻳﺳﺣﺗﻟﺍ ﺔﺳﺎﻳﺳ ﺭﺎﻁﺇ ﻲﻓ
.ﻡﻼﻋﻹﺍ ﻕﺑﺎﺳ ﻥﻭﺩﻭ ﺕﻗﻭ ﻱﺃ ﻲﻓ ﺎﻬﻳﻓ ﺓﺭﻭﻛﺫﻣﻟﺍ ﺕﺎﺟﺗﻧﻣﻟﺍ ﺕﺎﻳﺻﺎﺧ ﻙﻟﺫﻛﻭ
.ﺔﻘﻳﺛﻭﻟﺍ ﻩﺫﻬﻟ ﺔﻘﺣﻼﻟﺍ ﺕﺍﺭﺷﻧﻟﺍ ﻲﻓ ﺕﻼﻳﺩﻌﺗﻟﺍ ﻝﻛ ﻝﺎﺧﺩﺇ ﻡﺗﻳﺳﻭ
(ﺔﻣﻬﻣ ﺔﻅﺣﻼﻣ) ﺕﺎﻳﺭﺎﻁﺑ .۱۸
ﻰﻠﻋ ﺔﺗﺑﺛﻣ CR1120 3V 40mAH ﺔﻋﺎﺳ ﺔﻳﺭﺎﻁﺑ ﻝﻛﺷ ﻰﻠﻋ ﻡﻭﻳﺛﻳﻟ ﺔﻳﺭﺎﻁﺑ ﻰﻠﻋ ﺯﺎﻬﺟﻟﺍ ﻱﻭﺗﺣﻳ
ﻲﻓ ﺎﻬﻋﺍﺩﻳﺇﻭ ﺹﺗﺧﻣ ﻲﻓﺭﺣ ﻝﺑﻗ ﻥﻣ ﺔﻳﺭﺎﻁﺑﻟﺍ ﻩﺫﻫ ﺝﺍﺭﺧﺗﺳﺍ ﻥﻛﻣﻳﻭ .ﻡﺎﺣﻠﻟﺍ ﺭﺑﻋ ﺔﻳﺋﺎﺑﺭﻬﻛﻟﺍ ﺓﺭﺍﺩﻟﺍ
.ﻙﻟ ﻊﺑﺎﺗﻟﺍ ﻲﺋﺎﻘﺗﻧﻻﺍ ﻊﻳﻣﺟﺗﻟﺍ ﺔﻁﻘﻧ
 Loading...