

Page 1
VDS SMILE MONITOR
USER’S MANUAL
ENGLISH
Cod. 97729bIUSR V08_15
Page 2

SMILE VDSSMILE VDS
SMILE VDSSMILE VDS
SMILE VDS
SMILE VDS
SMILE VDSSMILE VDS
SMILE VDSSMILE VDS
Section II - User Manual
Congratulations on purchasing this quality product!
The Smile Video Door Entry System is hands-free and with a full colour screen
that allows you to communicate with the entry panel, see the caller and open the
entrance door if you wish.
Thanks to its on-screen menu new features are included for configuring the
monitor´s parameters.
We hope you enjoy its range of functions.
www.fermax.com
Page 33
Page 3
SMILE VDSSMILE VDS
SMILE VDSSMILE VDS
SMILE VDS
SMILE VDS
SMILE VDSSMILE VDS
SMILE VDSSMILE VDS
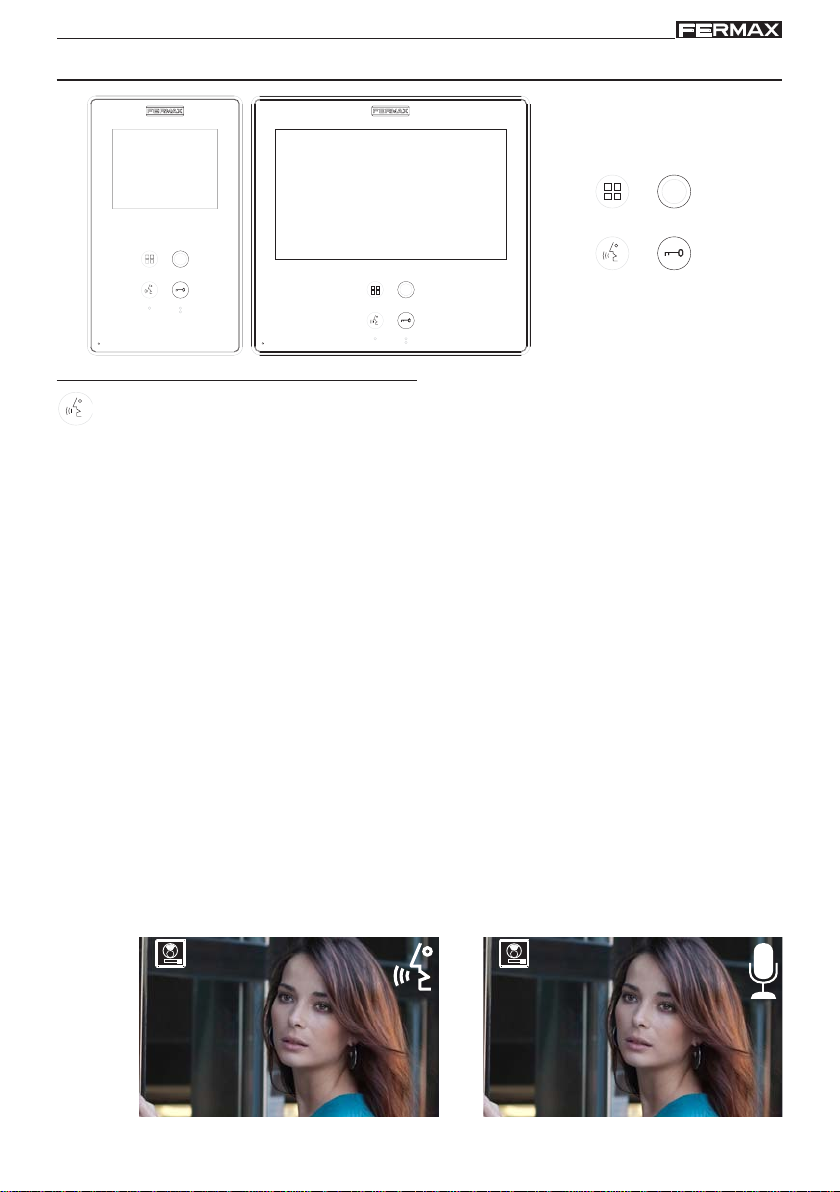
SMILE MONITOR
Buttons
Audio and Hang-up Activation Button.
· Upon receiving a call,
During this time the blue led audio button will blink to report a pending call to answer),
press this button to talk to the guest. The audio channel is opened from street to
residence, (the blue led on the audio button lights up steadily to indicate that it is
in a conversation with the street and anything said will be heard here), this
works with handsfree.
· Press to complete the communication,
turns off again). The monitor´s default internal timer is 90 seconds.
Notes:
- The conversation is private, no other terminal can hear it.
- "Handsfree" mode is default mode.
- While the audio channel is open the input audio can be regulated. See the
corresponding chapter on: "Audio Adjustments."
- If the monitor is configured with the conversation in "simplex mode," press the
audio button to talk and release it to listen,
audio button will blink to report a pending call to answer), uonce we open the channel
we will have audio in the monitor direction (the blue led audio will remain lit), cuando
pulsamos el botón de audio cambiaremos el sentido de la comunicación. when
we press the audio button we will change the communication direction. The icon
will indicate the channel we have activated at each moment (upper right corner of
the monitor). The input channel volume is always adjustable during the
conversation.
Menu
Audio
(the user has 30" seconds to answer before returning to standby.
(upon completion the blue led audio light
Wildcard
Lockreleases
(upon receiving the call, the blue led
Page 34
1 1
Page 4
SMILE VDSSMILE VDS
SMILE VDSSMILE VDS
SMILE VDS
SMILE VDS
SMILE VDSSMILE VDS
SMILE VDSSMILE VDS
- There is a function configured by the installer to activate the audio channel
automatically upon receiving the call. In this mode the conversation will finish
as usual by pressing the AUDIO button or after 90’’.
Note:
- Function assigned by the installer. Consult the installer.
Wildcard button: Auto-start / Main-secondary camera selection.
· With the monitor on standby, press and hold the wildcard for 1 second to
switch the monitor on manually. To activate the audio button, press the audio
activation button
· With video, press and hold this button for 2 seconds to sequentially select
between the main camera and the secondary camera (where one exists).
Notes:
- The wildcard button by default is for autostart, (even though you can
program it with another function, ask your installer.
- If the channel is busy an error tone "BEEP" will be generated and auto-start
will not activate, nor will the call to the guard.
- The auto-start function is always used on the main panel except where a call
is received on the secondary panel. Once the conversation is over autostart will activate on the secondary panel for 30 seconds. After this time it will
activate on the main panel.
- In this case auto-start can be performed by the:
o Wirdcard button
o By pressing the shortcut button or
o By selecting the icon of the auto-start function on the menu.
.
or
Via the MENU.
(Pressing "Menu" for 3 seconds ).
Button Menu: Adjustments and configuration.
· In order to access the Administrator menu, from which you can configure the
monitor, according to the installation’s needs and the user menu, from which
you can access the user´s customised settings.
With shortcut buttons.
(Short press "Menu" ).
Page 35
Page 5

SMILE VDSSMILE VDS
SMILE VDSSMILE VDS
SMILE VDS
SMILE VDS
SMILE VDSSMILE VDS
SMILE VDSSMILE VDS
Lock Releases / Call Guard Unit Button.
· Pressing this button whilst communicating with the Entry Panel will activate the lock
release.
Note: The icon will indicate the channel activated at each moment (upper right
corner of the monitor).
1
· Pressing this button whilst the monitor is on standby will result in a call being made
to the guard unit (where one exists).
Note: If the channel is busy an error tone "BEEP" will be generated and the call to
the guard will not be made.
· The option of activating an output terminal (F2), once the lock-release is activated.
This output remains active while pressing the button.
Note:
- Function assigned by the installer. Consult the installer.
Buttons for Additional Functions.
F1-F2
Note:
Function assigned by the installer. Consult the installer.
-
- They can be activated:
o By pressing the shortcut button or
o By selecting the icon of the auto-start function on the menu..
Operation
1
Page 36
Door lock-release
When a call is received from the entry panel, you
can open the door at any time, by pressing the
button
.
Page 6

SMILE VDSSMILE VDS
SMILE VDSSMILE VDS
SMILE VDS
SMILE VDS
SMILE VDSSMILE VDS
SMILE VDSSMILE VDS
1
Answering a call:
"Handsfree" mode:
When the call button on the Entry panel is
pressed a call tone is produced both on the
panel and on the monitor, causing the screen
to start up.
Press the button
audio channel between the street and the home will
be opened, operating in hands-free mode. The
communication facility will automatically terminate
after 90 seconds, or at any time by pressing the
button
The led will remain on (blue) for the duration of
the conversation.
If communication is not established with the entry
panel, the monitor will automatically go off after
30 seconds.
While in simplex conversation mode (press
the button to speak and release to listen).
1
When the call button on the Entry panel is
pressed a call tone is produced both on the
panel and on the monitor, causing the screen
to start up. Press the button
visitor, leaving the upload audio channel activated.
From this point every time you press the button
the output audio channel will activate and upon
releasing it the input audio channel is
reactivated, the operation is in simplex mode. The
communication will automatically end after 90
seconds, or at any time by pressing the button
.
to speak with the visitor. The
to speak to the
1
. The icon will indicate the channel we have
activated at each moment (upper right corner ot the
monitor).
If communication is not established with the entry
panel, the monitor will automatically go off after 30
seconds.
Page 37
Page 7

SMILE VDSSMILE VDS
SMILE VDSSMILE VDS
SMILE VDS
SMILE VDS
SMILE VDSSMILE VDS
SMILE VDSSMILE VDS
1
Manual Monitor Activation (Auto-Start)
With the monitor on standby, press and hold the
wildcard
manually. to sequentially select between the main
camera and the secondary camera (where one exists),
press and hold the wildcard button
To activate the audio and speak to the visitor or open
the door, follow the steps above.
If communication is not established with the entry panel, the monitor will automatically go off after 30
seconds.
Notes:
for 1 second to switch the monitor on
for 2 seconds.
- The wirldcard button by default is for
autostart, (even though you can program it
with another function, ask your installer.
- Auto-start can be performed:
o Wildcard button
o By pressing the shortcut button or
o By selecting the icon of the auto-start
function on the menu.
or
Via the MENU.
(Pressing "Menu" for 3 seconds ).
Note: When communicating or only with video, pressing the Menu button twice displays
the shortcut buttons.
Page 38
With shortcut buttons.
(Short press "Menu" ).
Page 8

SMILE VDSSMILE VDS
SMILE VDSSMILE VDS
SMILE VDS
SMILE VDS
SMILE VDSSMILE VDS
SMILE VDSSMILE VDS
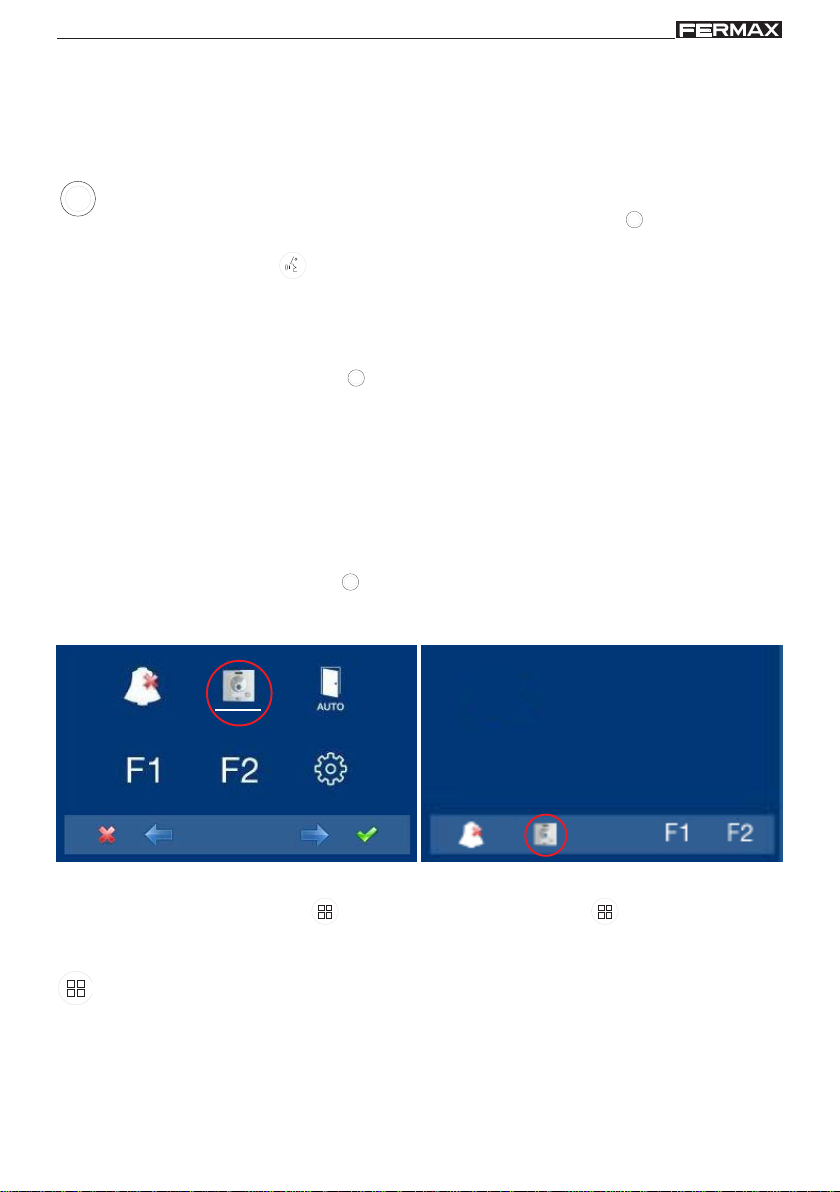
PROGRAMMING: USER Menu
Access the user menu
Note:
- Navigation buttons and capacitive buttons
Navigation buttons
The icons viewed on the screen
(navigation buttons:
, , y ), are
managed with the corresponding
capacitive buttons located on the monitor.
Capacitive buttons
: Return to the previous screen or stand-by.
: Select the previous menu option.
: Mark the following menu option.
: Confirm the selection and activate the function.
1º. To access the USER menu. Press "Menu" for 3 seconds . The following screen is
viewed, The do not disturb option appears by default (white line under the icon), select
the tool icon via the cursors to access the User menu screen. The selected option is
displayed with the white line under the icon. Press , and a screen appears to access
the User menu.
a b
c
to access the screen
CONFIGURATION menu
3º. Once the installer has accessed the
configuration menu screen, the screen
options appear, (use the cursor to move
them).
d
Page 39
Page 9

SMILE VDSSMILE VDS
SMILE VDSSMILE VDS
SMILE VDS
SMILE VDS
SMILE VDSSMILE VDS
SMILE VDSSMILE VDS
a) Ringtones
Within the menu, the monitor allows you to select an independent ringtone for the call
from:
- a1) Main street panel.
- a2) Secondary street panel.
- a3) Doorbell.
You can select that the ringtone rings three times (continuous mode). We can also adjust
the volume.
a1
a2
a3
1. Select the origin of the call with the cursors
, (panel 1, panel 2 or door bell). For
example panel 1 (white line under the
icon). Press , you access the ringtone.
1
1
1
2
1
1
1
1
1
2. Within the ringtone (white line under the
icon), if you press , you change and
listen to the different ringtone.
3. For example we press , and hear
ringtone 2 and we see that the ringtone
number has changed to number 2. This
is then the newly selected ringtone.
Page 40
2
1
4. If you want the ringtone to ring three times
(continuous mode), press , to select
continuous mode (white line under the
icon).
1
Page 10

SMILE VDSSMILE VDS
SMILE VDSSMILE VDS
SMILE VDS
SMILE VDS
SMILE VDSSMILE VDS
SMILE VDSSMILE VDS
2
1
5. Having selected continuous mode, press
to select it. In order to remove the
selection you also press .
To go to the next options press .
1
continuos mode selected: the ringtone is placed 3
times
Audio adjustments
To regulate the volume.
1. Select the audio adjustments option via
the cursors (white line under the icon) and
press . The following screen appears:
Note:
- You will exit the audio adjustments option after 60 seconds.
Page 41
Page 11

SMILE VDSSMILE VDS
SMILE VDSSMILE VDS
SMILE VDS
SMILE VDS
SMILE VDSSMILE VDS
SMILE VDSSMILE VDS
Description of functions
1. Do not disturb mode (cancel call tone)
Within the user menu, you can select the Do Not Disturb mode. Function for deactivating
the ringtone. When we select this function for the first time, the screen shows the nontimed default option (- - : - -) and the user can confirm or change the value to the desired
hours and minutes. For more details see chapter: e1) Do not disturb mode (cancel
ringtone).
The do not disturb function is by default assigned to a shortcut button and is also
displayed in the menu. A short press on the menu button
, shows the corresponding
icons to the selected short button. By pressing the shortcut button we activate / deactivate
the do not disturb mode, (for programs with timers: hours / minutes or indefinite).
With Shortcut buttons.
(Short press "Menu"
).
Do not
disturb
mode
activated
The same operation can also be performed via the menu´s icon.
Via the MENU.
(Pressing "Menu" for 3 seconds ).
Page 42
Page 12

SMILE VDSSMILE VDS
SMILE VDSSMILE VDS
SMILE VDS
SMILE VDS
SMILE VDSSMILE VDS
SMILE VDSSMILE VDS
If you want to select this mode indefinitely
(- - : - -), upon entering in this screen the
first number is blinking, press + until you
_ _ : _ _
view the cursor -, press , the remaining
digits automatically turn into cursors
(- - : - -), therefore the indefinite mode is
on. Continue pressing
, until you reach
the desired menu or you exit programming.
Note: Once you configured the time value, it is the default time until changed to a new
value via the configuration.
Having selected the do not disturb mode
by pressing , we disable the selection
(the red led bell disappears). In order to
select it again, re-press .
Do not
disturb
mode
activated
Do not
disturb
mode
deactivated
2. Doorbell
The monitor has two terminals (-,T) to connect an external button so that when a short
occurs between them an identification call tone is generated.
As previously discussed, the door´s ringtone can be configured within the ringtone
menu: a3) The doorbell.
Note:
- Function assigned by the installer. Consult the installer.
Page 43
 Loading...