

Page 1
INST ALLA TION AND USER MANUAL
ENGLISH
BASIC SMILE VDS MONITOR
Page 2

Page 2
SMILE VDSSMILE VDS
SMILE VDSSMILE VDS
SMILE VDS
SMILE VDSSMILE VDS
SMILE VDSSMILE VDS
SMILE VDS
CONGRA TULATIONS ON PURCHASING A QUALITY PRODUCT!
Fermax electronics develops and manufactures renown systems that meet the highest
design and technology standards.
Your FERMAX video door entry system will allow you to communicate with the entry panel,
see who is calling you and open the front door if you wish.
We hope you enjoy its range of functions.
www.fermax.com.
BASIC SMILE VDS Monitor
Code 97711Ib V10_14
Page 3

Page 3
SMILE VDSSMILE VDS
SMILE VDSSMILE VDS
SMILE VDS
SMILE VDSSMILE VDS
SMILE VDSSMILE VDS
SMILE VDS
SMILE MONITOR ......................................................................................................... 4
Measurements: built-in/surface monitor ....................................................... 4
Installing the Monitor ....................................................................................... 5
Wiring................................................................................................................ 8
Available Functions ......................................................................................... 10
Buttons.............................................................................................................. 11
Technical Characteristics ............................................................................... 13
Programming the monitor............................................................................... 14
- Option 1: From Panel + Monitor ........................................................... 14
- Option 2: From the Monitor ................................................................... 16
Programming: Administrator Menu ................................................................ 17
- Access the Administrator menu .......................................................... 17
* a) Code options ............................................................................. 18
* b) Configuring conversation mode ............................................. 24
* c) Images ....................................................................................... 25
* d) Date and Time .......................................................................... 25
* e) Functions................................................................................... 25
* f) Parameters ................................................................................ 37
* g) Resetting parameters .............................................................. 39
Adjustments: Video and Audio ...................................................................... 41
- Video: Brightness - Contrast - Colour................................................. 41
- Audio ....................................................................................................... 43
Programming: User Menu .............................................................................. 44
* a) Tone ........................................................................................... 4 5
* b) Configuring alarms .................................................................. 47
* c) Date and Time .......................................................................... 47
* d) Administrator Menu ................................................................... 47
- Description of functions ......................................................................... 47
* 1. Do not disturb mode (cancel call tone) .................................. 47
* 2. Door bell .................................................................................... 48
SMILE Monitor .................................................................................................. 49
- Buttons ................................................................................................... 49
- Operation ................................................................................................ 52
INDICE - INDEX
Page 4
Page 4
SMILE VDSSMILE VDS
SMILE VDSSMILE VDS
SMILE VDS
SMILE VDSSMILE VDS
SMILE VDSSMILE VDS
SMILE VDS
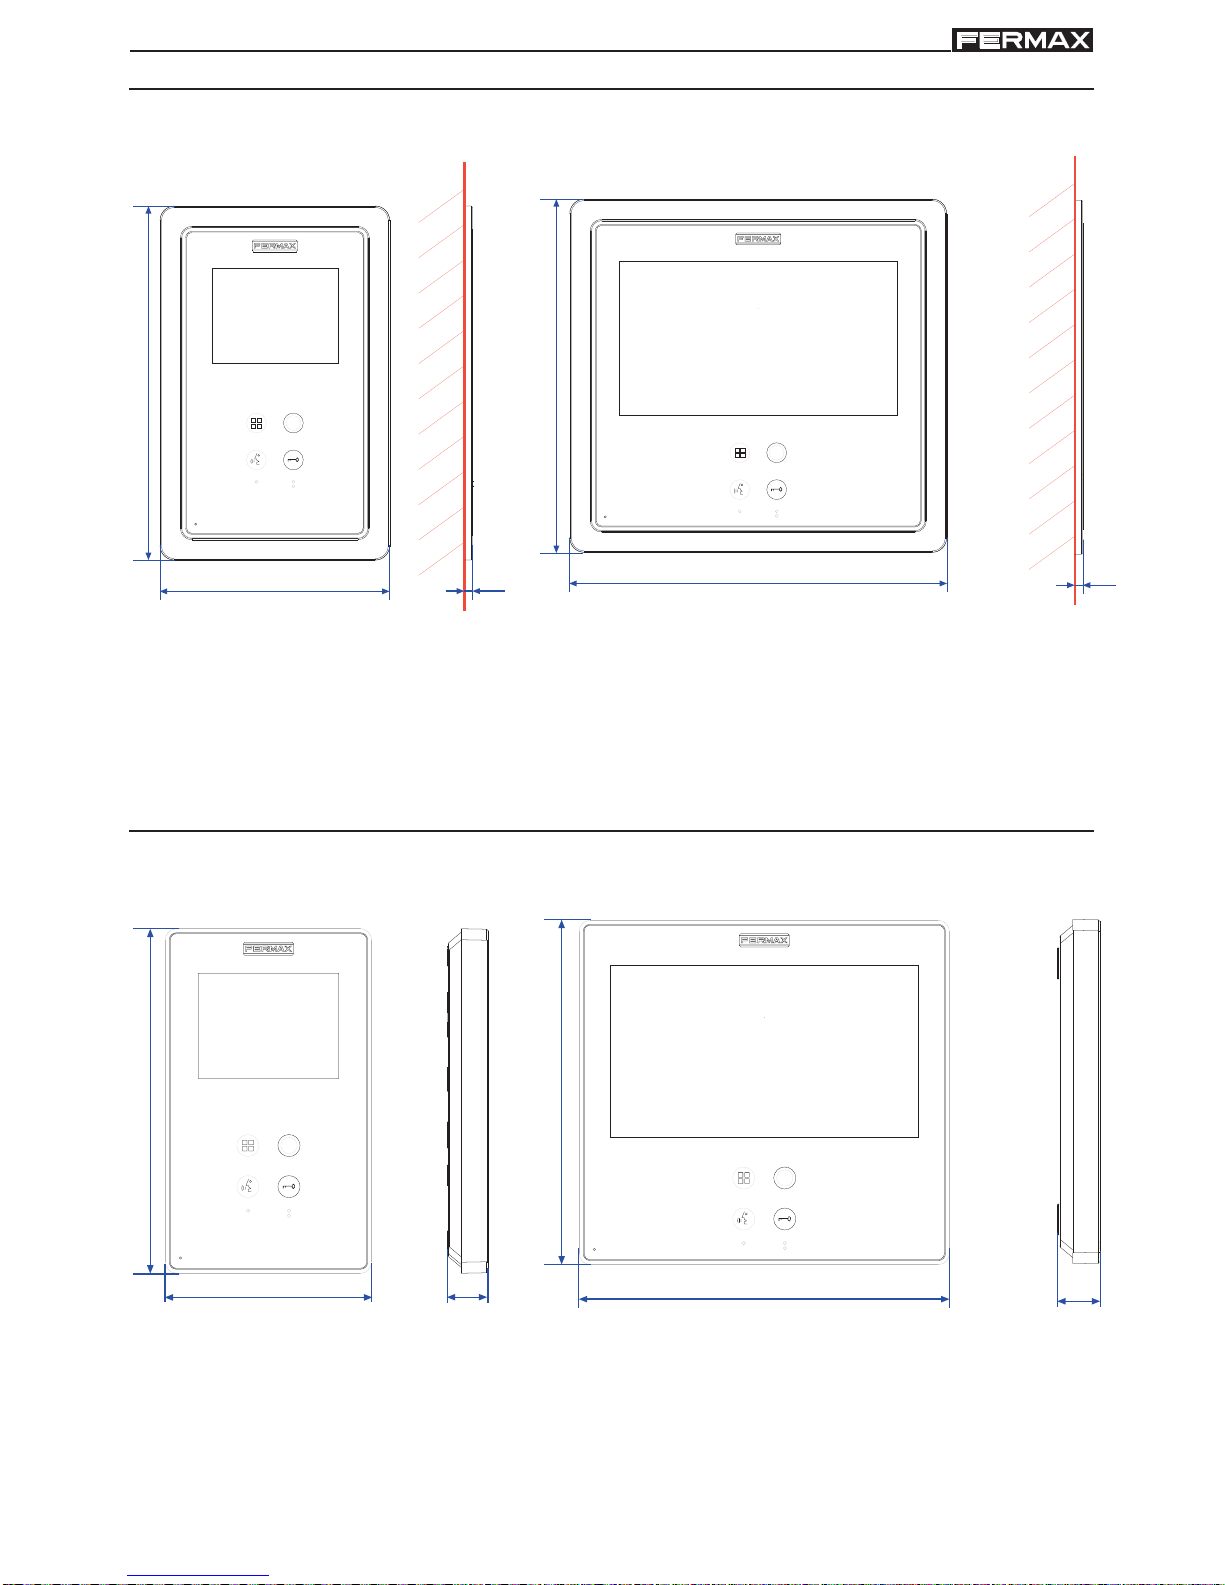
MONITOR MEASUREMENTS: BUIL T-IN
127
196
4,5
Measurements in mm.
SMILE 3.5” Monitor
196
4,5
209
SMILE 7” Monitor
Fermax built-in 3.5” monitor ref. 6546 (Height x Width x Depth.):
186 x 1 16 x 46 mm
Fermax built-in 7” monitor ref. 6551 (Height x Width x Depth.):
186 x 198 x 46 mm
SURFACE MONIT OR MEASUREMENTS
Measurements in mm.
103
172
20
185
172
21
SMILE 3.5” Monitor SMILE 7” Monitor
Note:
Does not require a decorative frame. See installation.
Page 5
Page 5
SMILE VDSSMILE VDS
SMILE VDSSMILE VDS
SMILE VDS
SMILE VDSSMILE VDS
SMILE VDSSMILE VDS
SMILE VDS
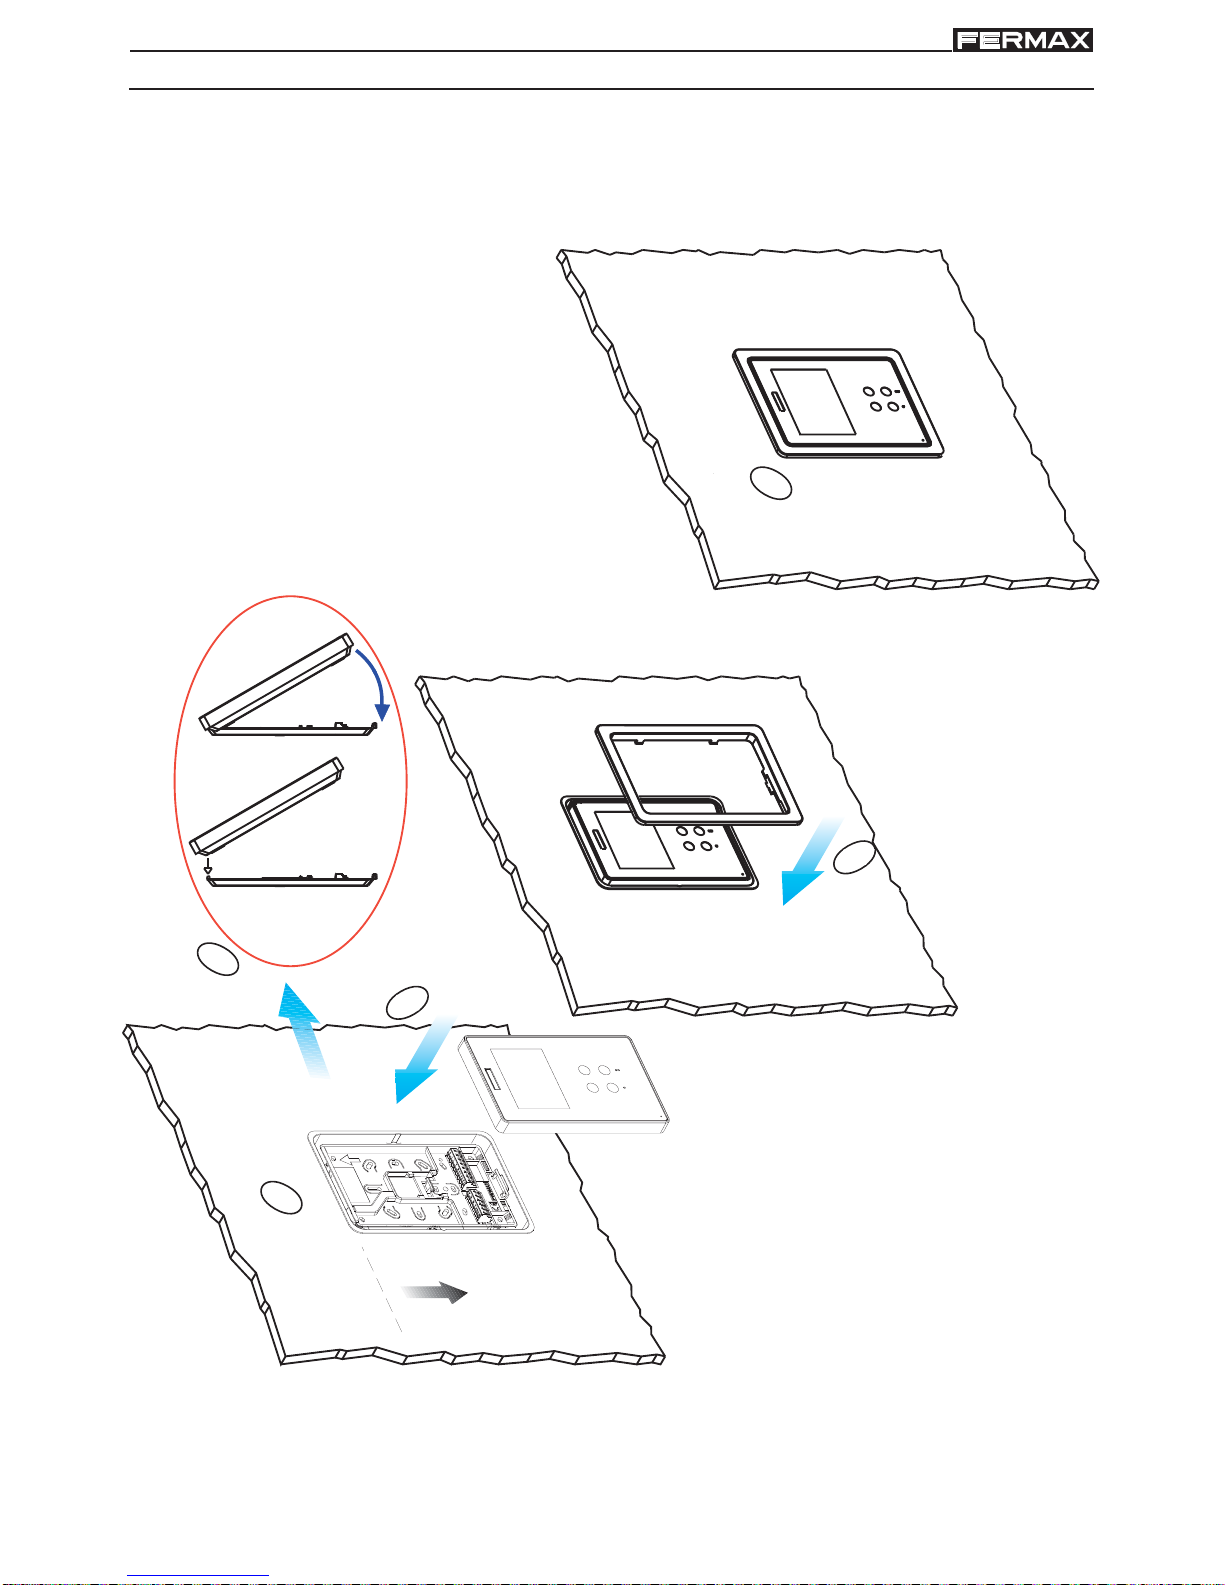
INST ALLING THE BUIL T-IN MONITOR
2
1
3,5"
3
1.60m
5.25 feet
4
5
SMILE 3.5” Monitor
Page 6

Page 6
SMILE VDSSMILE VDS
SMILE VDSSMILE VDS
SMILE VDS
SMILE VDSSMILE VDS
SMILE VDSSMILE VDS
SMILE VDS
2
1
7"
3
4
5
1.60m
5.25 feet
SMILE 7” Monitor
Page 7
Page 7
SMILE VDSSMILE VDS
SMILE VDSSMILE VDS
SMILE VDS
SMILE VDSSMILE VDS
SMILE VDSSMILE VDS
SMILE VDS
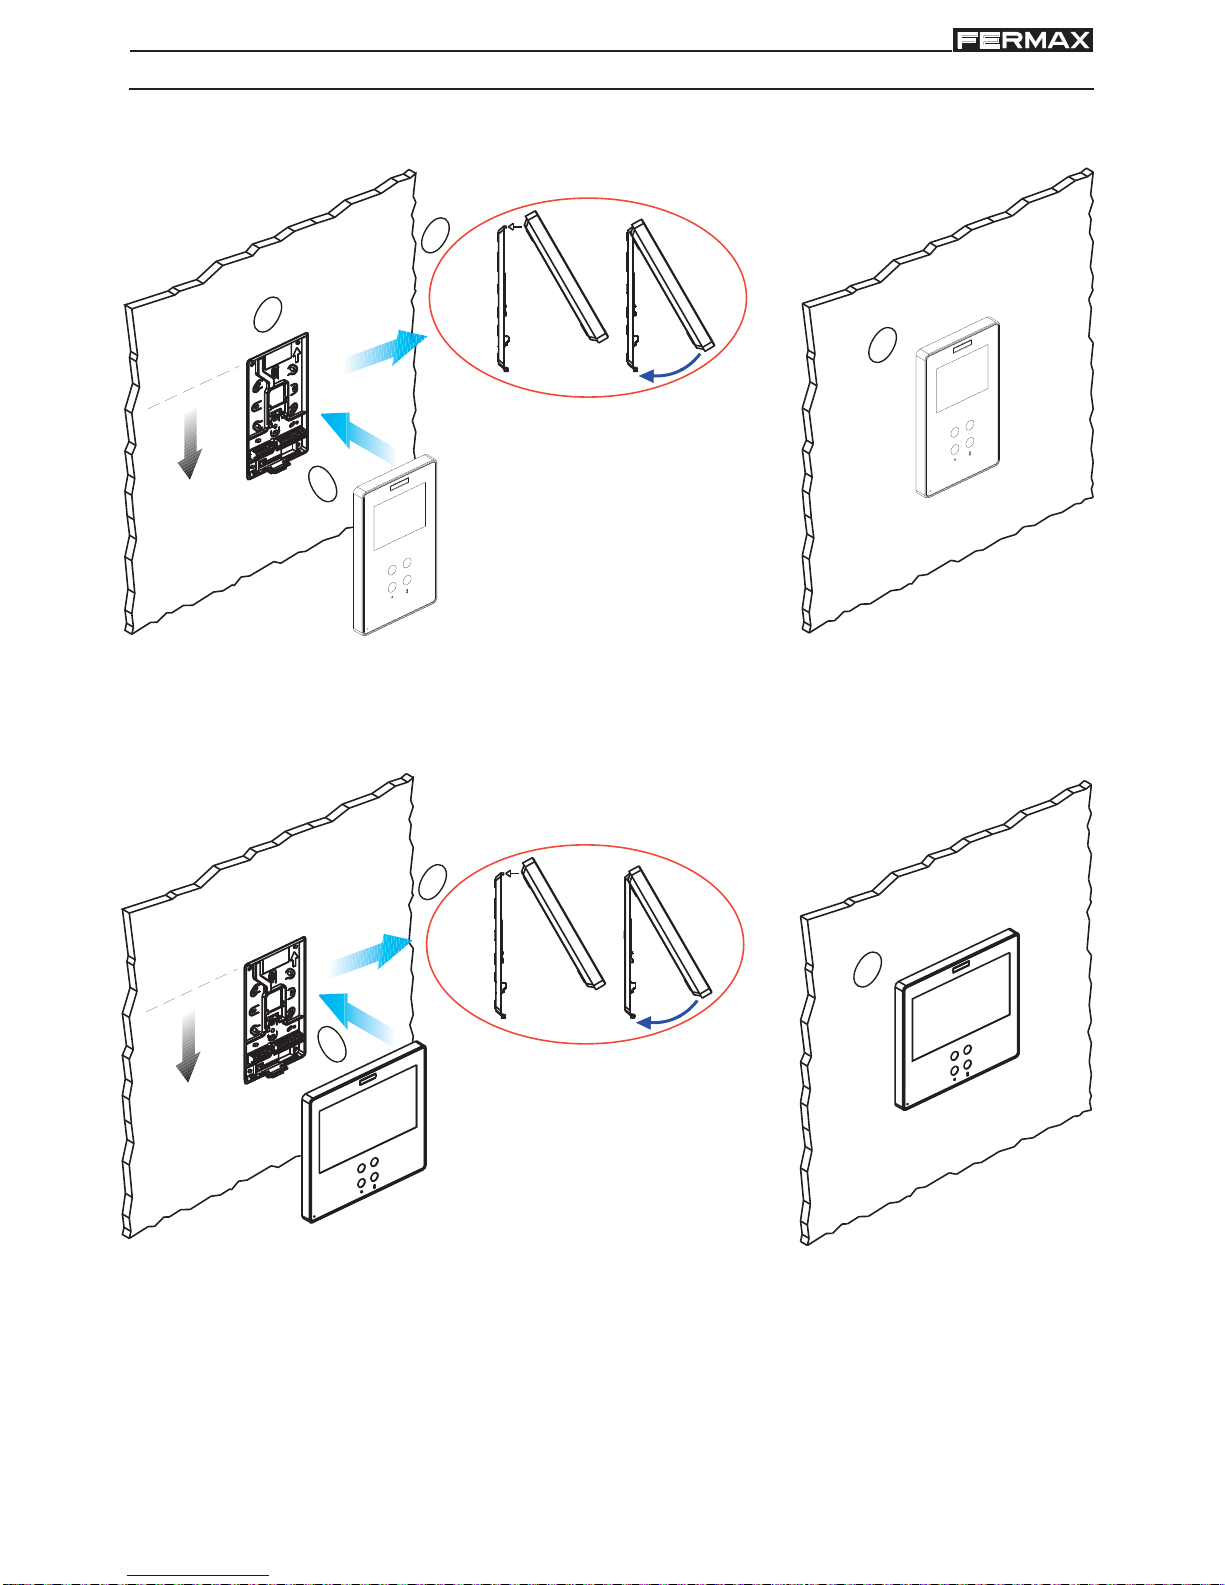
INST ALLING THE SURFACE MONITOR
1
3
2
4
3,5"
1.60m
5.25 feet
SMILE 3.5” Monitor
SMILE 7” Monitor
1.60m
5.25 feet
3
2
4
7"
Page 8
Page 8
SMILE VDSSMILE VDS
SMILE VDSSMILE VDS
SMILE VDS
SMILE VDSSMILE VDS
SMILE VDSSMILE VDS
SMILE VDS
L
+
-
+F2
T
+
A
L-F1 CT
VMMVMV
AUX
75 Ohm
COAX
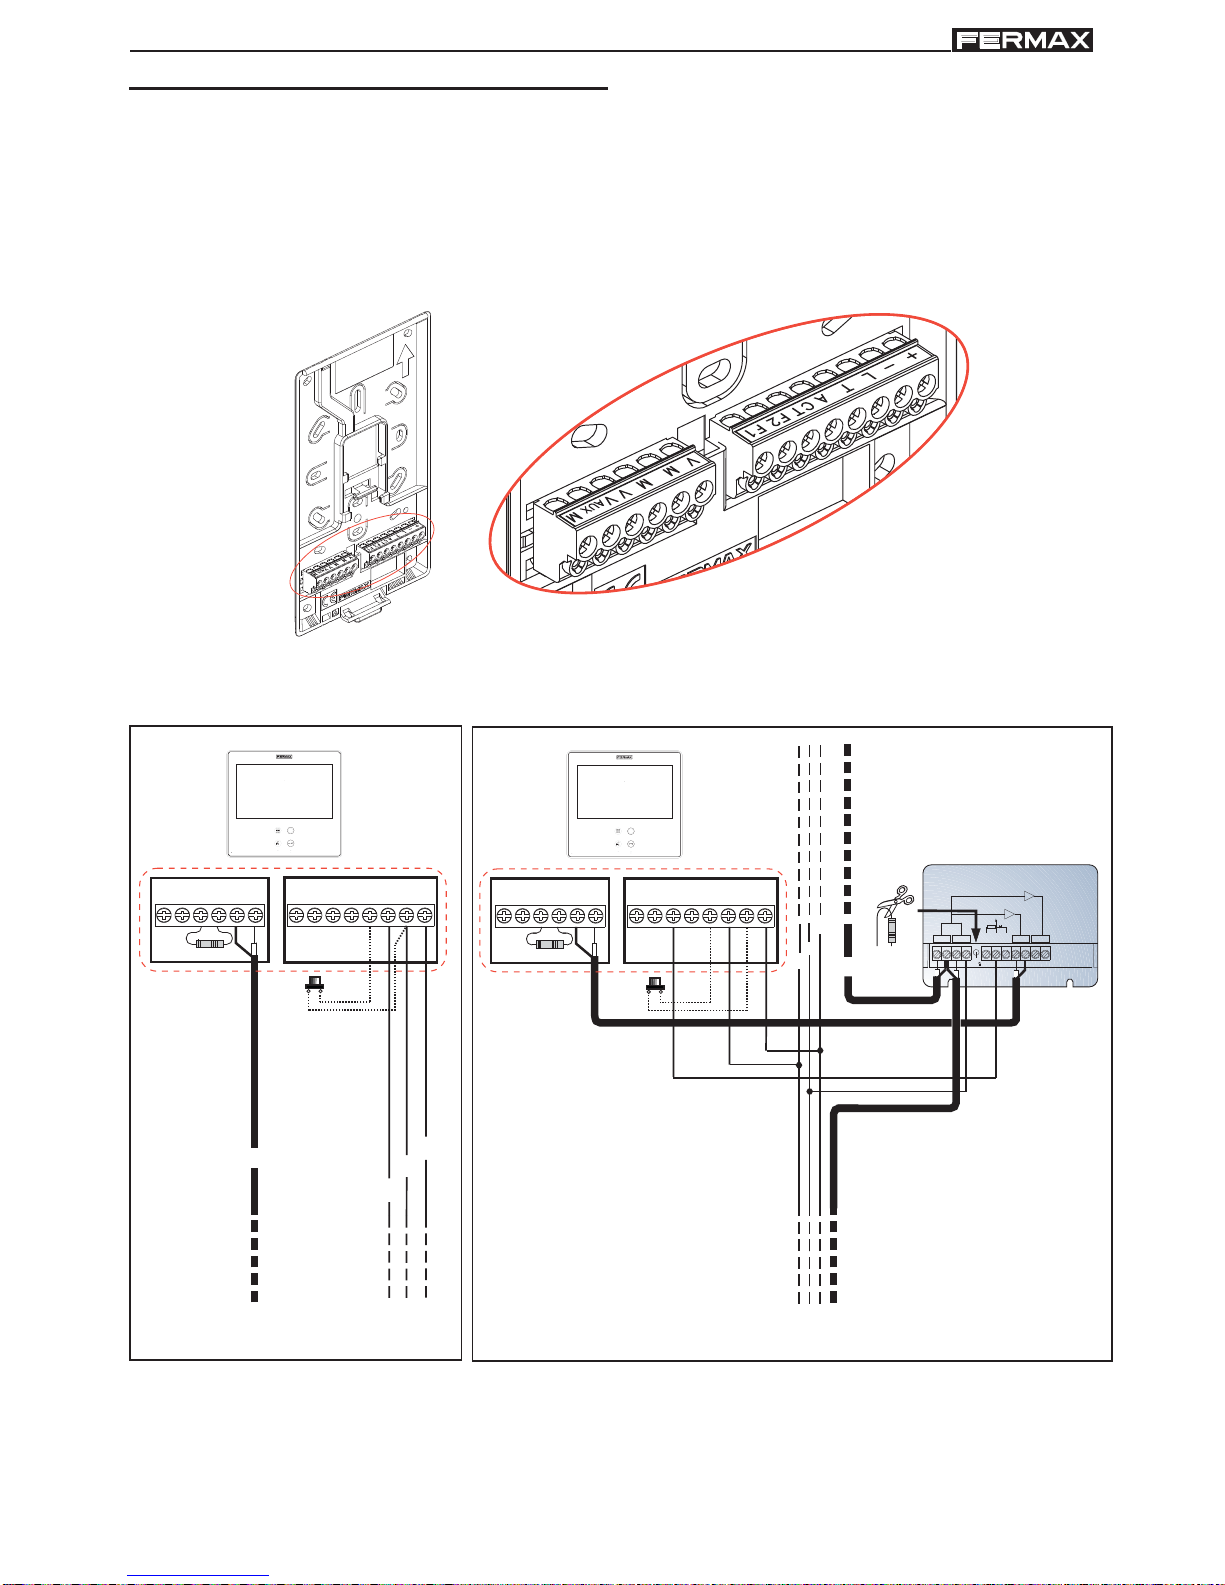
• Connection T erminals:
+, -: 18 Vdc power supply.
L: data bus.
F1, F2: additional functions. See programming chapter .
T, - : call button connection for residential door (P1)
+A, -: call extension connection ref. 2040, light and bell
activator ref. 2438, etc...
• Video terminals:
V: live
M: mesh
CT: camera Activation (12 Vdc).
VAUX: auxiliary video input (CCTV
camera connection).
Connection
Monitor Connector
P1
2 OUTPUTS VIDEO DISTRIBUTOR
DISTRIBUIDOR VIDEO 2 SALIDAS
V5V1M
+18
75
M
R1
34
+
V
2
REF.2448
6
VM M
(-)
L
+
-
R
+F2
T
+
A
L-F1 CT
VMMVMV
AUX
75 Ohm
COAX
P1
Page 9
Page 9
SMILE VDSSMILE VDS
SMILE VDSSMILE VDS
SMILE VDS
SMILE VDSSMILE VDS
SMILE VDSSMILE VDS
SMILE VDS
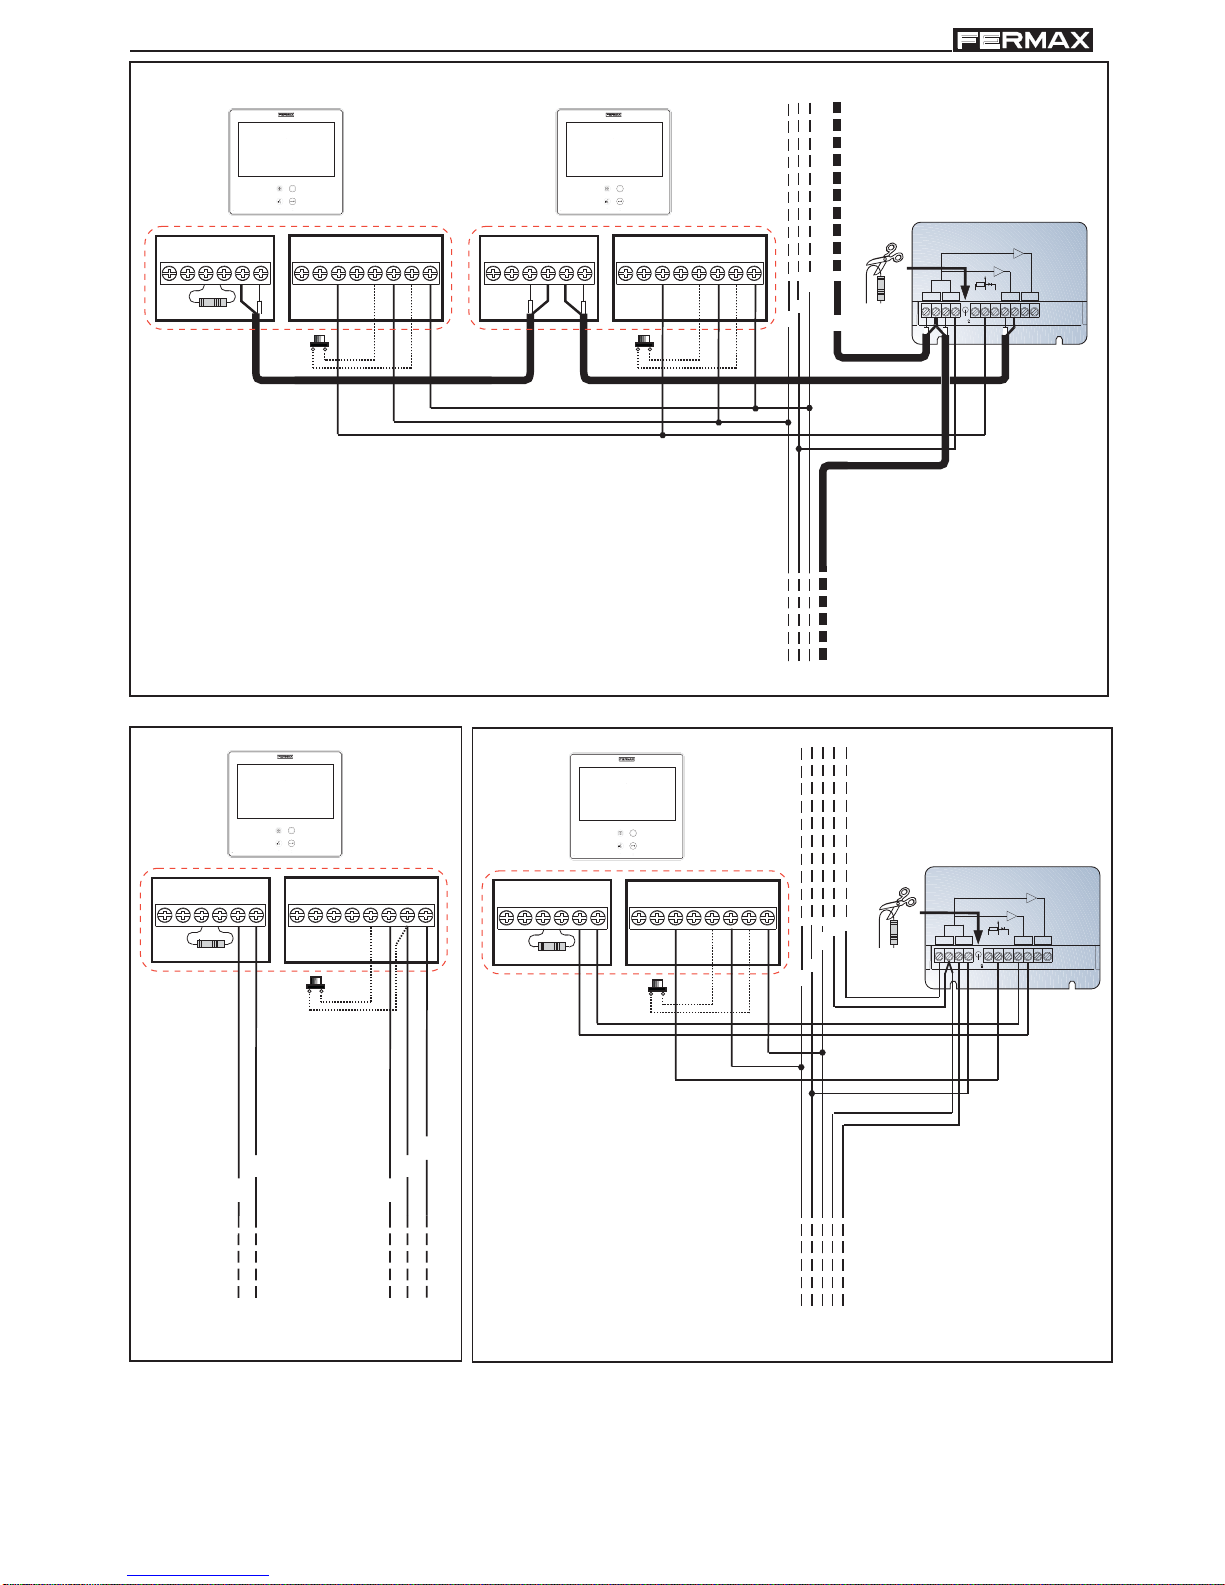
2 OUTPUTS VIDEO DISTRIBUTOR
DISTRIBUIDOR VIDEO 2 SALIDAS
V5V1M
+18
75
M
R1
34
+
V
2
REF.2448
6
VM M
(-)
L
+
-
R
+F2
T
+
A
L-F1 CT
VMMVMV
AUX
+F2
T
+
A
L-F1 CT
VMMV
75 Ohm
MV
AUX
COAX
+
+F2
T
+
A
L-F1 CT
VMMVMV
AUX
75 Ohm
L
-
M
V
2 OUTPUTS VIDEO DISTRIBUTOR
DISTRIBUIDOR VIDEO 2 SALIDAS
V5V1M
+18
75
M
R1
34
+
V
2
REF.2448
6
VM M
(-)
L
+
-
R
+F2
T
+
A
L-F1 CT
VMMVMV
AUX
75 Ohm
M
V
P1P1
P1 P1
Page 10
Page 10
SMILE VDSSMILE VDS
SMILE VDSSMILE VDS
SMILE VDS
SMILE VDSSMILE VDS
SMILE VDSSMILE VDS
SMILE VDS
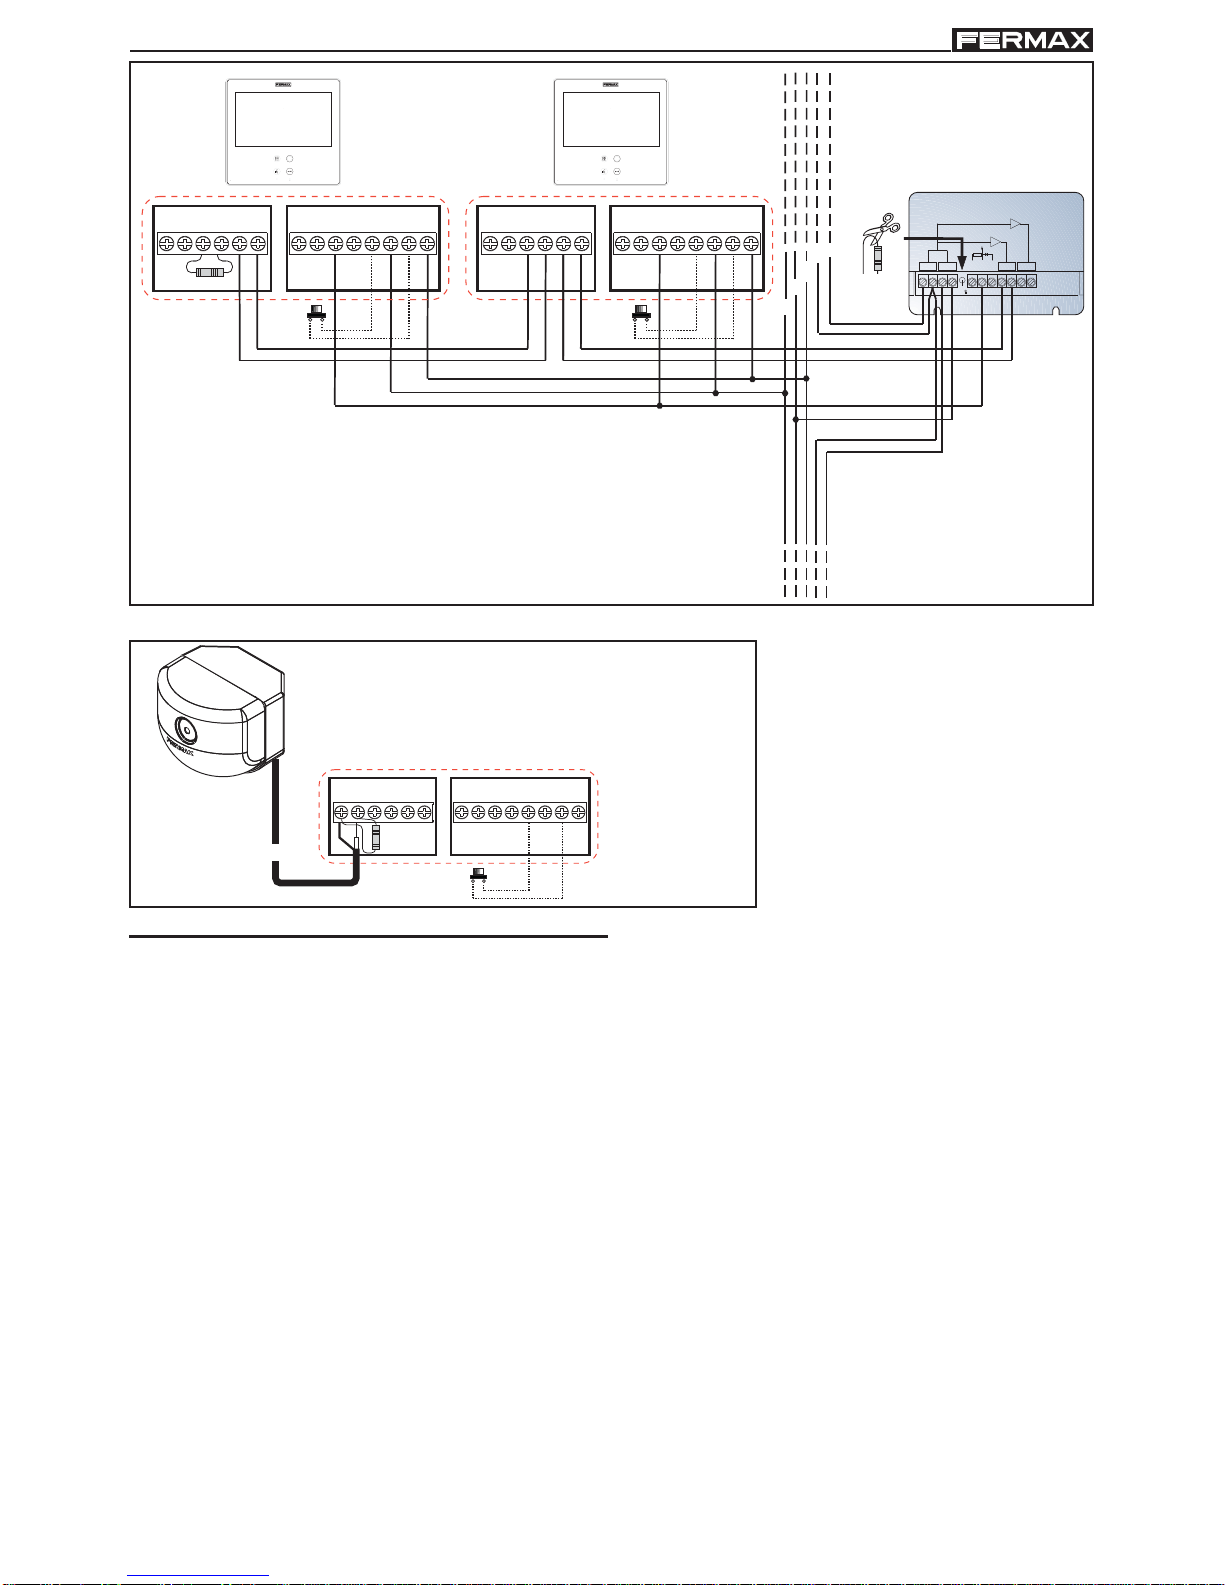
Auxiliary video input
2 OUTPUTS VIDEO DISTRIBUTOR
DISTRIBUIDOR VIDEO 2 SALIDAS
V5V1M
+18
75
M
R1
34
+
V
2
REF.2448
6
VM M
(-)
L
+
-
R
+F2
T
+
A
L-F1 CT
VMMVMV
AUX
+F2
T
+
A
L-F1 CT
VMMV
75 Ohm
MV
AUX
M
V
+F2
T
+A
L-F1 CT
VMMV
75 Ohm
MV
AUX
COAX
The functions available on the Smile VDS Basic Monitor are summarised in the following list:
- It has capacitive buttons.
- Open door.
- Call to guard.
- Call Volume Regulation.
- Call disconnection (Do not Disturb).
- Ringtone Selection (5 options).
- Doorbell.
- Programming via the terminal and via the entry panel.
- Audio Volume Regulation
- Configuration of Parameters via screen menu (OSD).
- Lift Control.
- Brightness, contrast and colour settings.
- Auxiliary video input (CCTV camera connection).
- Programmable shortcut buttons. The idea is to provide temporary additional buttons,
not visible, in order to access direct functions. These functions can be configured by
the installer and are displayed on the TFT.
- Induction loop depending on model.
Available functions
P1P1
P1
Page 11
Page 11
SMILE VDSSMILE VDS
SMILE VDSSMILE VDS
SMILE VDS
SMILE VDSSMILE VDS
SMILE VDSSMILE VDS
SMILE VDS
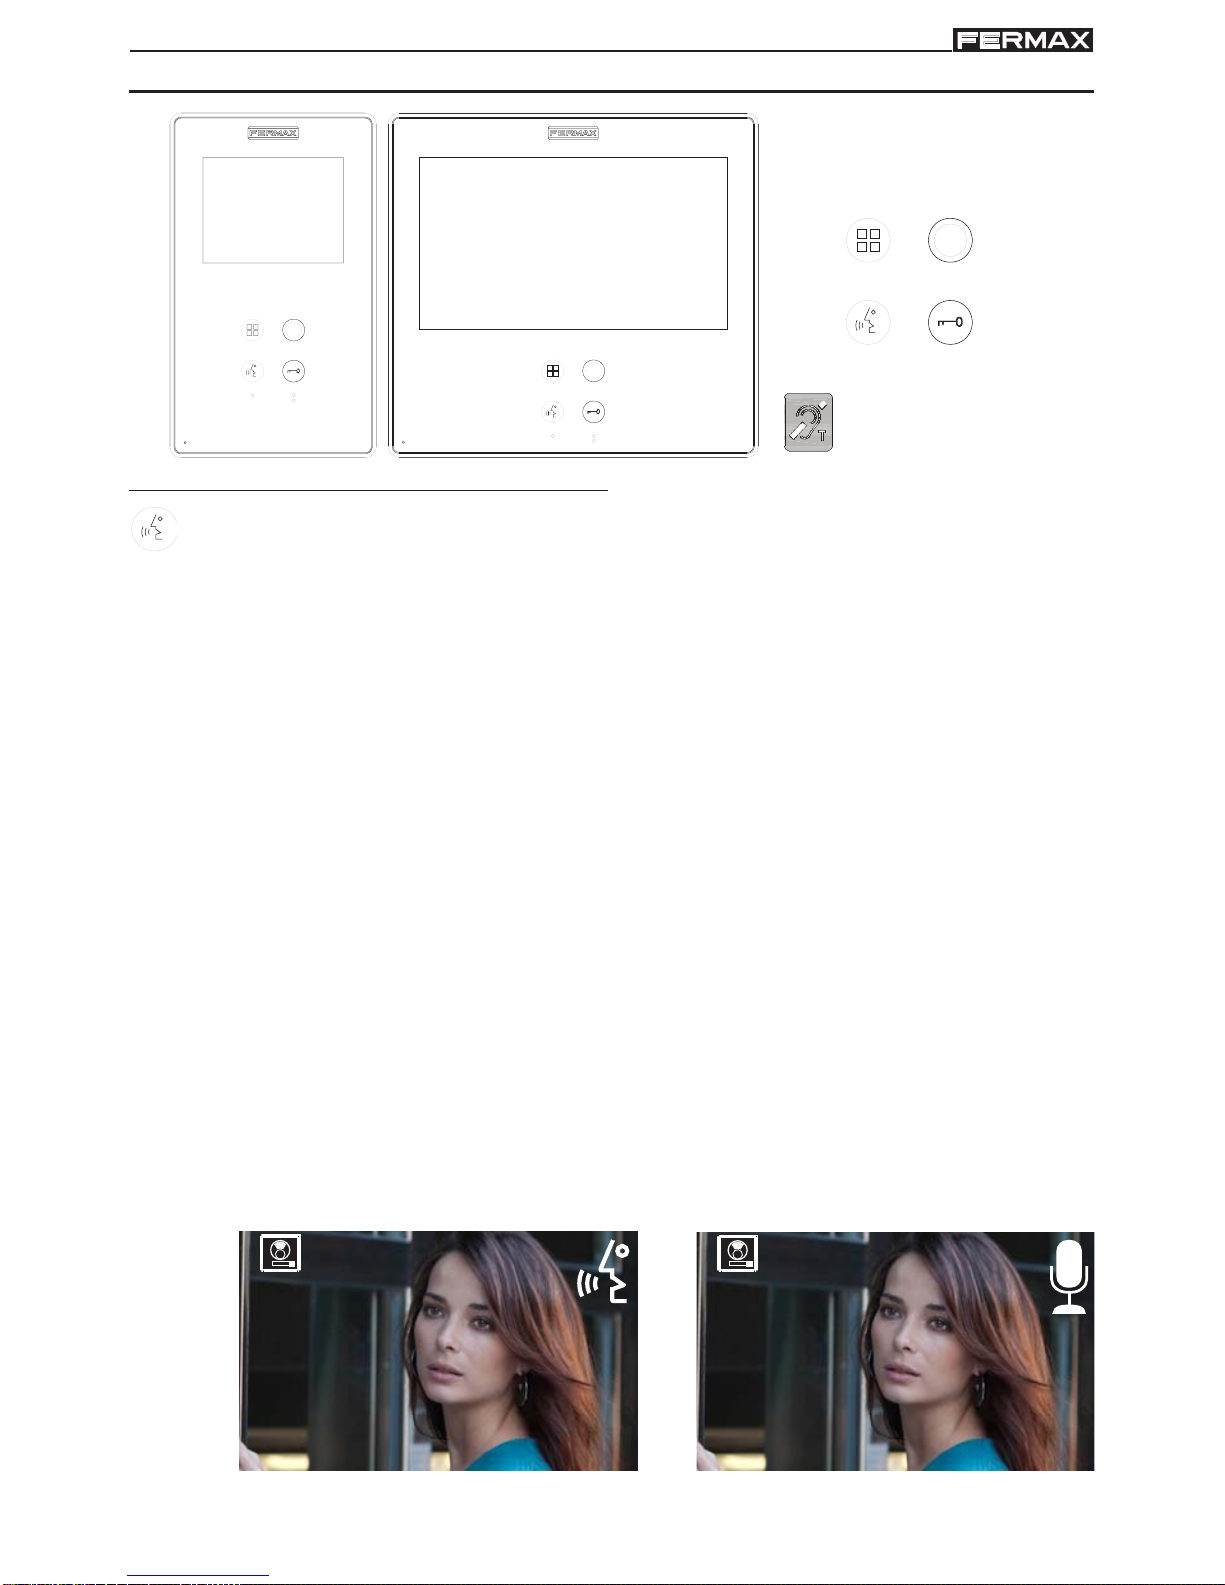
SMILE MONITOR
Buttons
Audio and Hang-up Activation Button
· On receiving a call
(the user has 30" seconds to answer before returning to standby.
During this time the blue led audio button will blink to report a pending call to answer),
press this button to talk to the guest. The audio channel is opened from street to
residence, (the blue led on the audio button lights up steadily to indicate that it is in a
conversation with the street and anything said will be heard here), this works with
handsfree.
· Press to complete the communication,
(upon completion the blue led audio light
turns off again). The monitor´s default internal timer is 90 seconds).
Notes:
- The conversation is private, no other terminal can hear it.
- "Handsfree" mode is the default mode.
- While the audio channel is open the input audio can be regulated. See the
corresponding chapter on: "Audio Adjustments."
- If the monitor is configured with the conversation in "simplex mode," press the
audio button to talk and release it to listen,
(upon receiving the call, the blue led
audio button will blink to report a pending call to answer), once we open the channel
we will have audio in the monitor direction (the blue led audio will remain lit), when
we press the audio button we will change the communication direction. The icon
will indicate the channel we have activated at each moment (upper right corner of
the monitor). The input channel volume is always adjustable during the
conversation.
wildcard
menu.
lockreleases
audio
1 1
Label of induction loop
Page 12
Page 12
SMILE VDSSMILE VDS
SMILE VDSSMILE VDS
SMILE VDS
SMILE VDSSMILE VDS
SMILE VDSSMILE VDS
SMILE VDS
- There is a function configured by the installer to activate the audio channel
automatically upon receiving the call. See chapter b) Configuring conversation
mode. In this mode the conversation will finish as usual by pressing the AUDIO
button or after 90’’.
Wildcard button: Auto-Start / Main-Secondary Camera Selection.
· With the monitor on standby, press and hold the wildcard for 1 second to
switch the monitor on manually. To activate the audio, press the audio activation
button .
· With video, press and hold this button for 2 seconds to sequentially select
between the main camera and the secondary camera (where one exists).
Notes:
- The wildcard button by default is for autostart, (even though you can
program it with another function, see chapter: e) Functions.
- If the channel is busy an error tone “BEEP” will be generated and auto-start
will not activate, nor will the call to the guard.
- The auto-start function is always used on the main panel except where a call
is received on the secondary panel. Once the conversation is over, auto-start
will activate on the secondary panel for 30 seconds. After this time it will
activate on the main panel.
- If we enter into the functions menu for the first time, the auto-start button will
appear as a shortcut button, however, this function is also available on the
wildcard button . If we exit without changing anything, we lose the autostart function on this button since in normal mode we can not assign the
same function as a shortcut button and a wildcard button
. So having
auto-start in both is an exception for recently manufactured monitors. In this
case auto-start can be performed by the:
o Wildcard button
or
o By pressing the shortcut button or
o By selecting the icon of the auto-start function on the menu.
By the MENU.
(Pressing "Menu" for 3 seconds.
).
by Shortcut buttons
(Short press "Menu" ).
Page 13
Page 13
SMILE VDSSMILE VDS
SMILE VDSSMILE VDS
SMILE VDS
SMILE VDSSMILE VDS
SMILE VDSSMILE VDS
SMILE VDS
Lock Release / Call Guard Unit Button.
· Pressing this button whilst communicating
with the Entry Panel will activate the lock
release.
Note: The icon will indicate the channel
activated at each moment
(upper right
corner of the monitor).
1
· Pressing this button whilst the monitor is on standby will result in a call being made
to the guard unit (where one exists).
Note: If the channel is busy an error tone "BEEP" will be generated and the call to
the guard will not be made.
· The option of activating an output terminal (F2), once the lock-release is activated.
Note: Optionally, you can activate an output terminal (F2), if configured by the
inst
aller, once the lock-release is activated. This output remains active
while pressing the button. See chapter: e5) Auxiliary unction F2).
Button Menu: Adjustments and configuration.
· In order to access the Administrator menu, from which you can configure the
monitor according to the installation´s needs, and the user menu, from which
you can access the user´s customised settings.
TECHNICAL FEA TURES
33 mA
272mA
400 mA
900mA
Power Supply
Consumption
Operating Temperature
OSD screen
Resolution
18 Vdc
standby
video
audio + video
audio + video with induction loop
[-5, +40 °C]
3.5" TFT
Video signal: Compound signal 1 Vpp 75 Ω, 7 Mhz
Humidity
[5% - 95%]
7" TFT
Hor.: 320 Line TV
Ver.: 240 Line TV
Hor.: 800 Line TV
Ver.: 480 Line TV
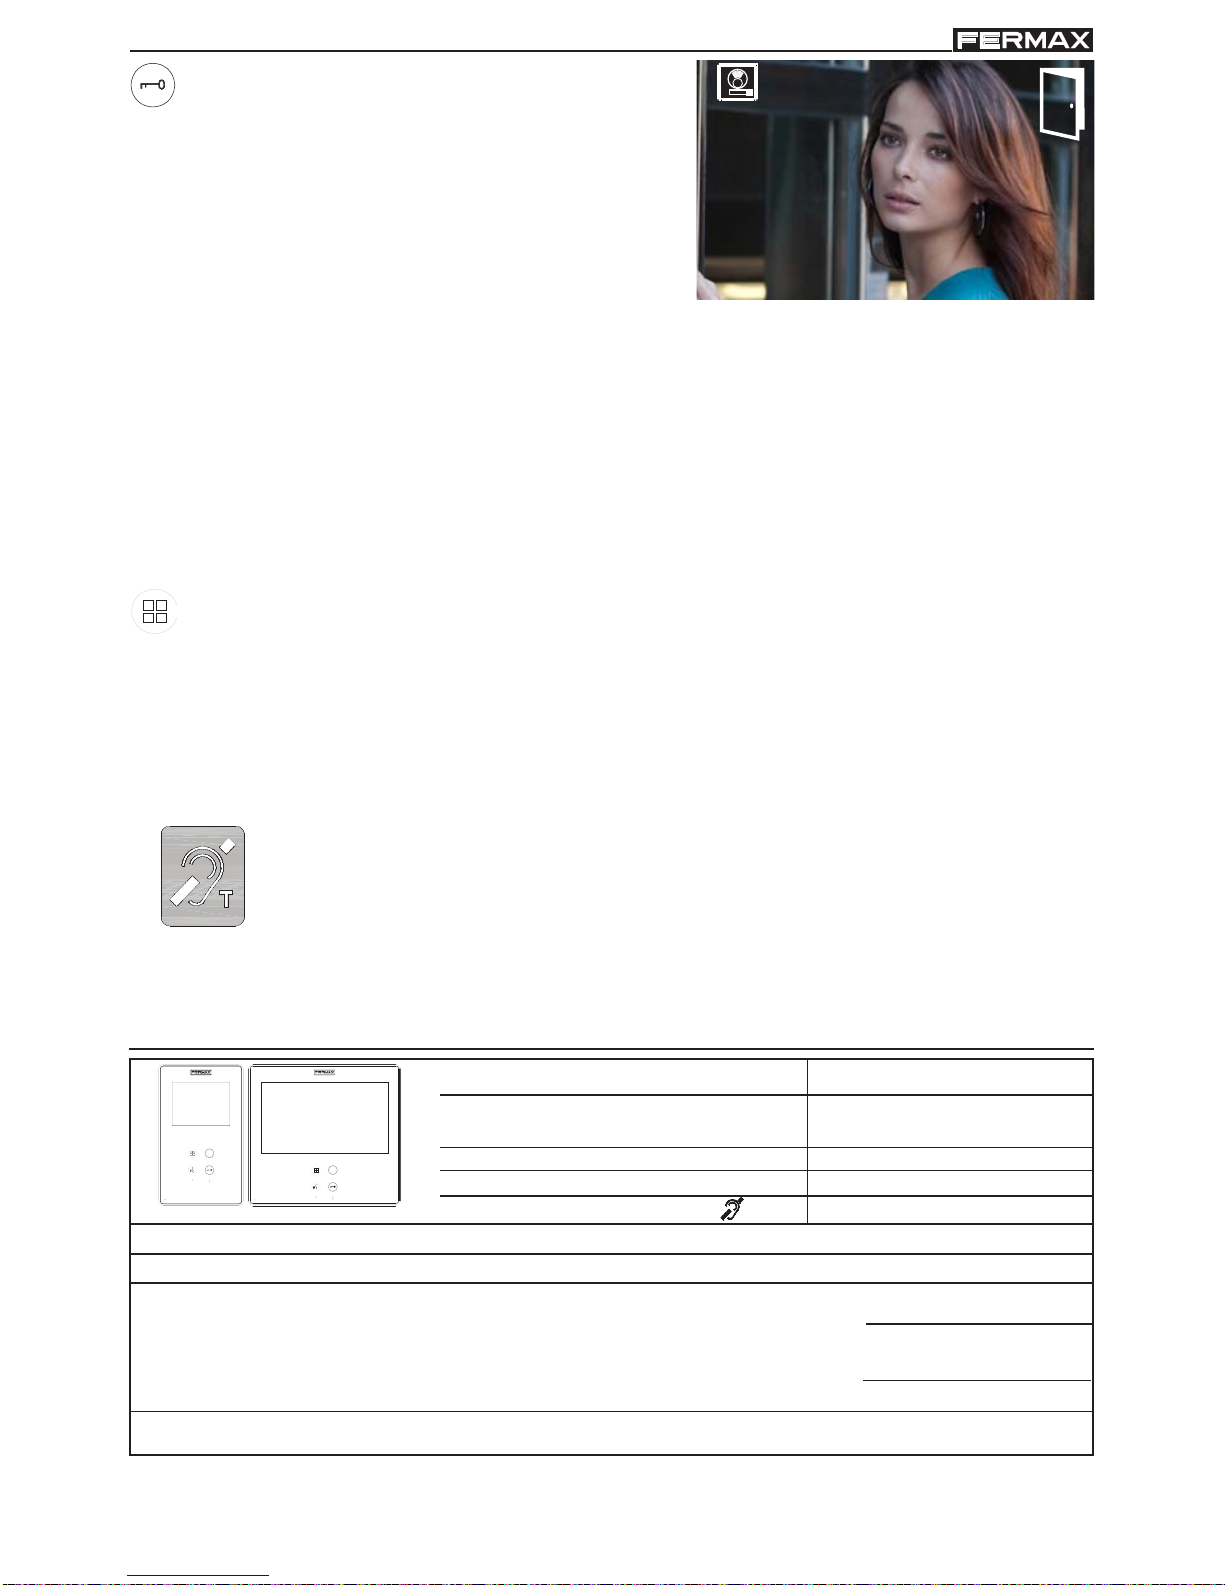
Induction loop
This function is available on depending model.
Including induction loop. There are identified with a label.
· Includes an induction loop which interacts with audio devices used by
the hearing impaired.
· Note: In manual audio devices Digital Mode should be configured.
Page 14
Page 14
SMILE VDSSMILE VDS
SMILE VDSSMILE VDS
SMILE VDS
SMILE VDSSMILE VDS
SMILE VDSSMILE VDS
SMILE VDS
PROGRAMMING THE SMILE MONITOR
Option 1: from Panel + Monitor
The monitor will not function until it has been programmed!
There are two monitor programming options:
Option 1: from Panel + Monitor
Option 2: from the Monitor.
Notes:
- The wildcard button
blinking (red) indicates that the monitor has not been programmed.
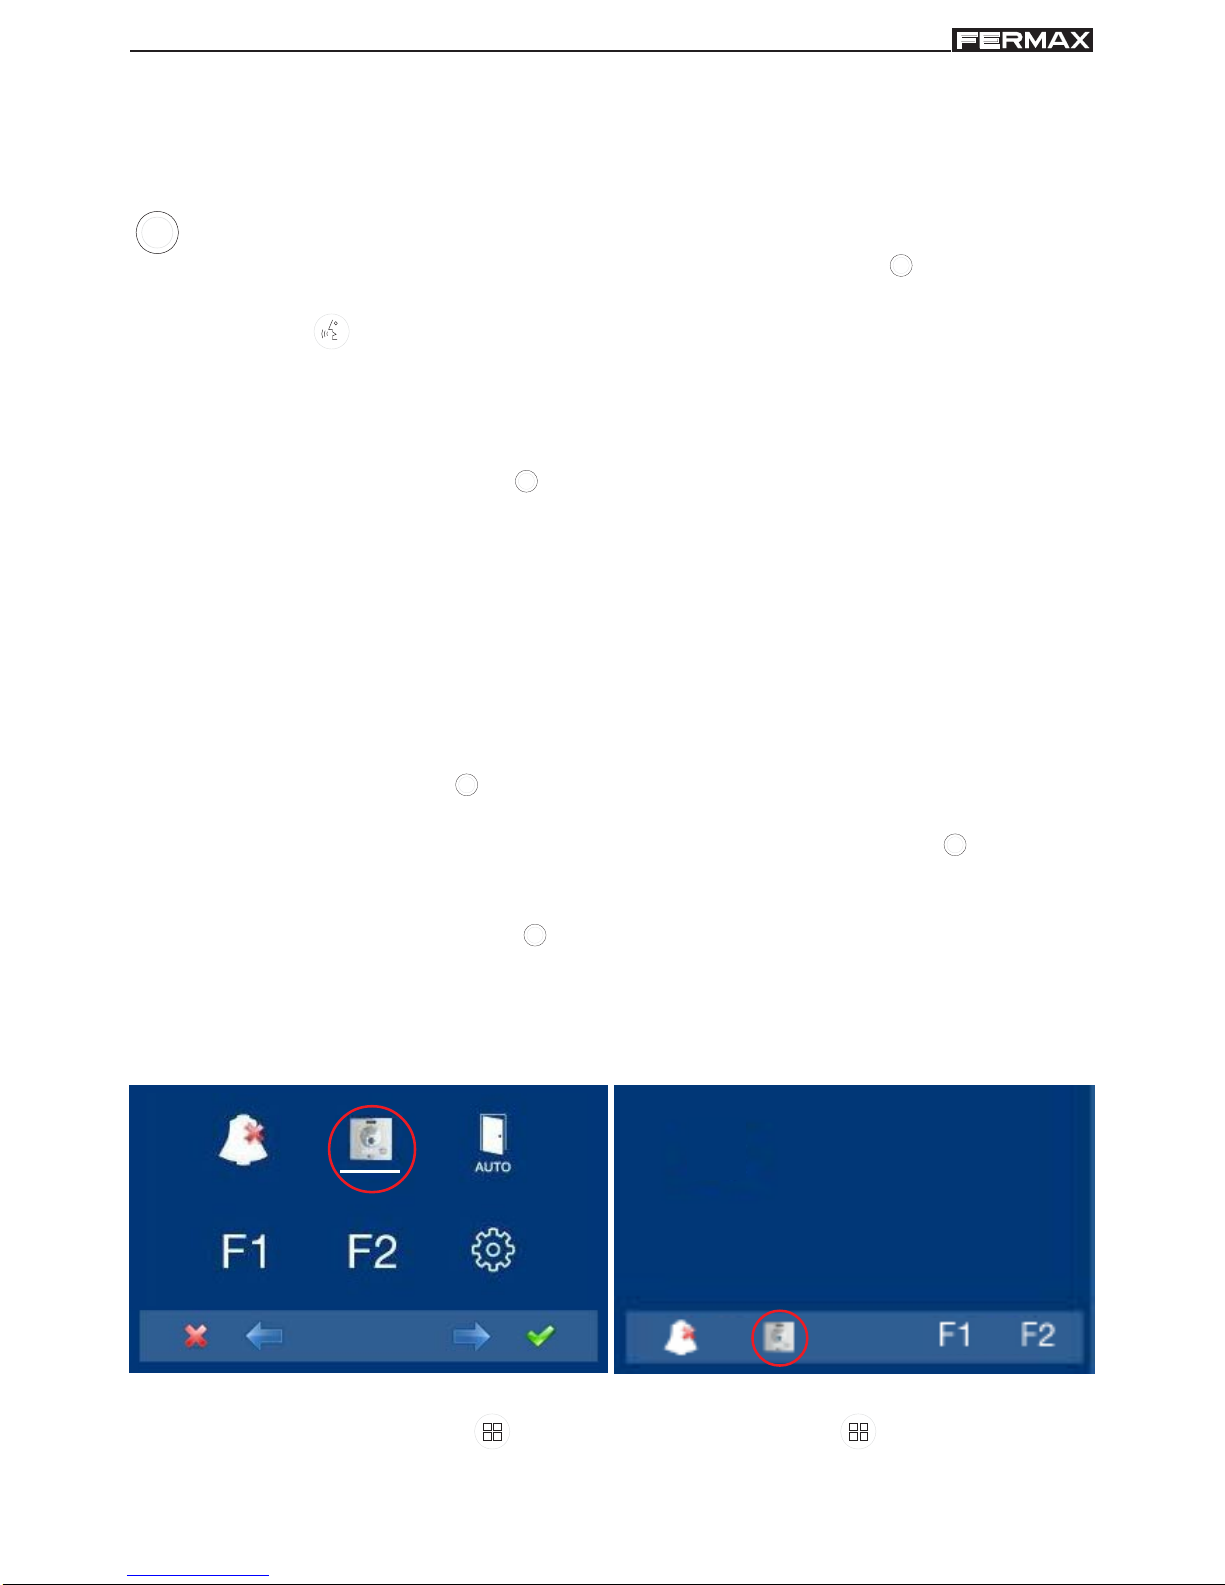
When the monitor has not been programmed.
The icons viewed on the screen
(navigation buttons: , , and ), are
managed with the corresponding
capacitive buttons located on the monitor
capacitive buttons
Navigation buttons
: Return to the previous screen or stand-by.
: Select the previous menu option.
: Mark the following menu option.
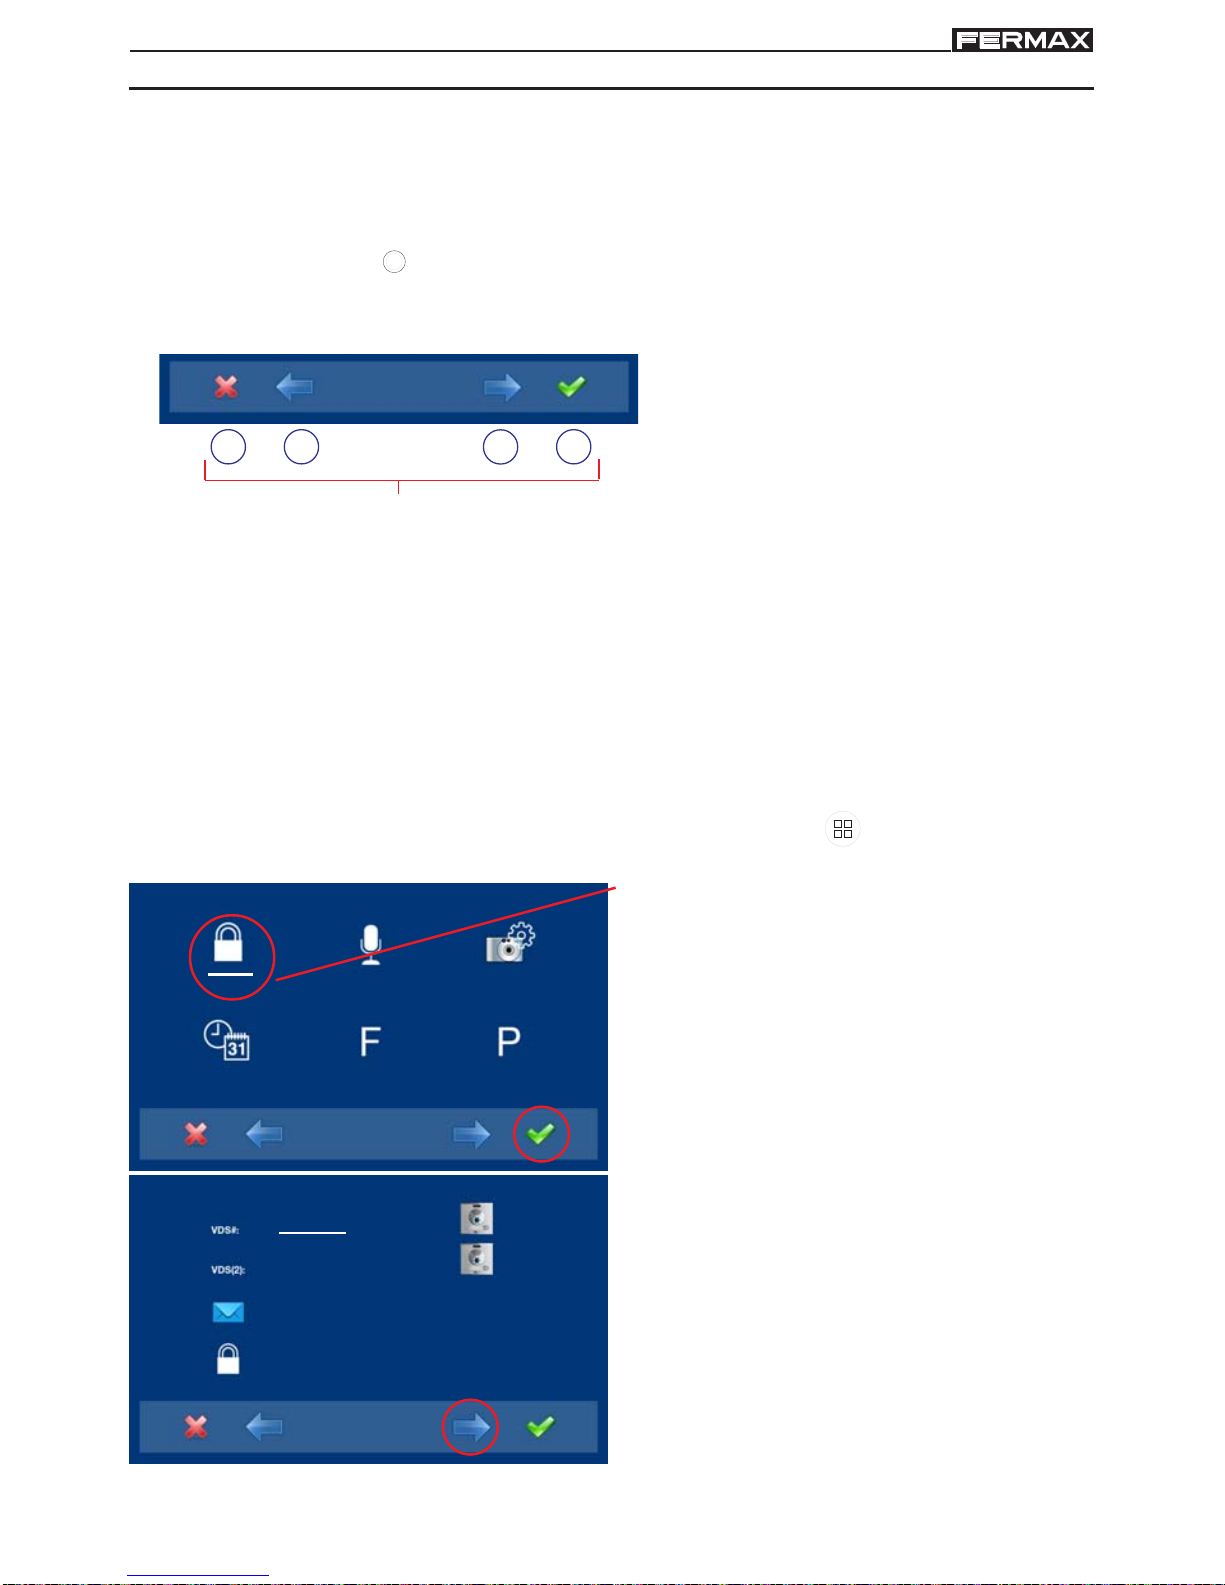
: Confirm the selection and activate the function.
- Navigation buttons and capacitive buttons
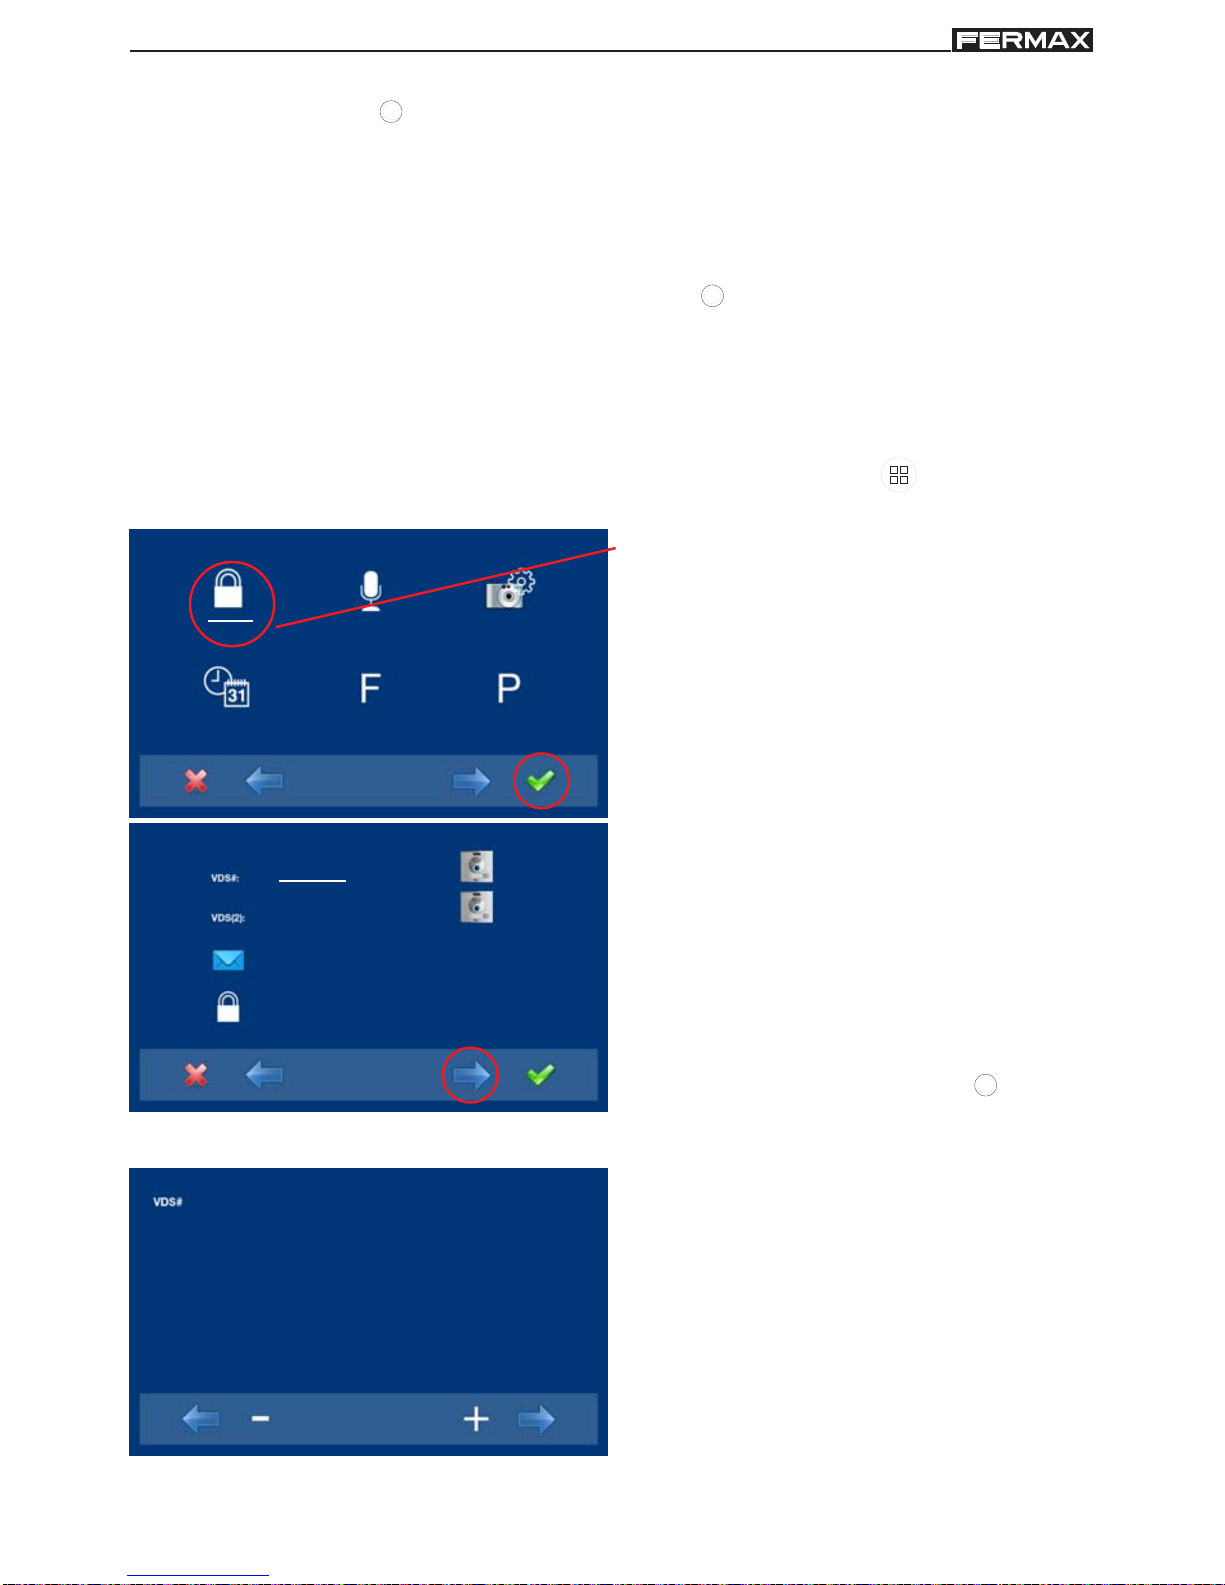
2. The administrator code option is selected
as default (white line under the icon).
Press . The following screen will appear
1. Access the ADMINISTRA T OR menu Press "Menu" for 3 seconds.
. The following screen
appears
_ _ _
_ _ _
2222
4444
3. In order to select programming from the
panel, select the panel from the VDS # line
with the right arrow.
Page 15
Page 15
SMILE VDSSMILE VDS
SMILE VDSSMILE VDS
SMILE VDS
SMILE VDSSMILE VDS
SMILE VDSSMILE VDS
SMILE VDS
4. The selected option is displayed on the white line under the icon. Press , and a screen
appears confirming the selected option: programming from the panel and you hear a
beep on the monitor.
_ _ _
_ _ _
2222
4444
1
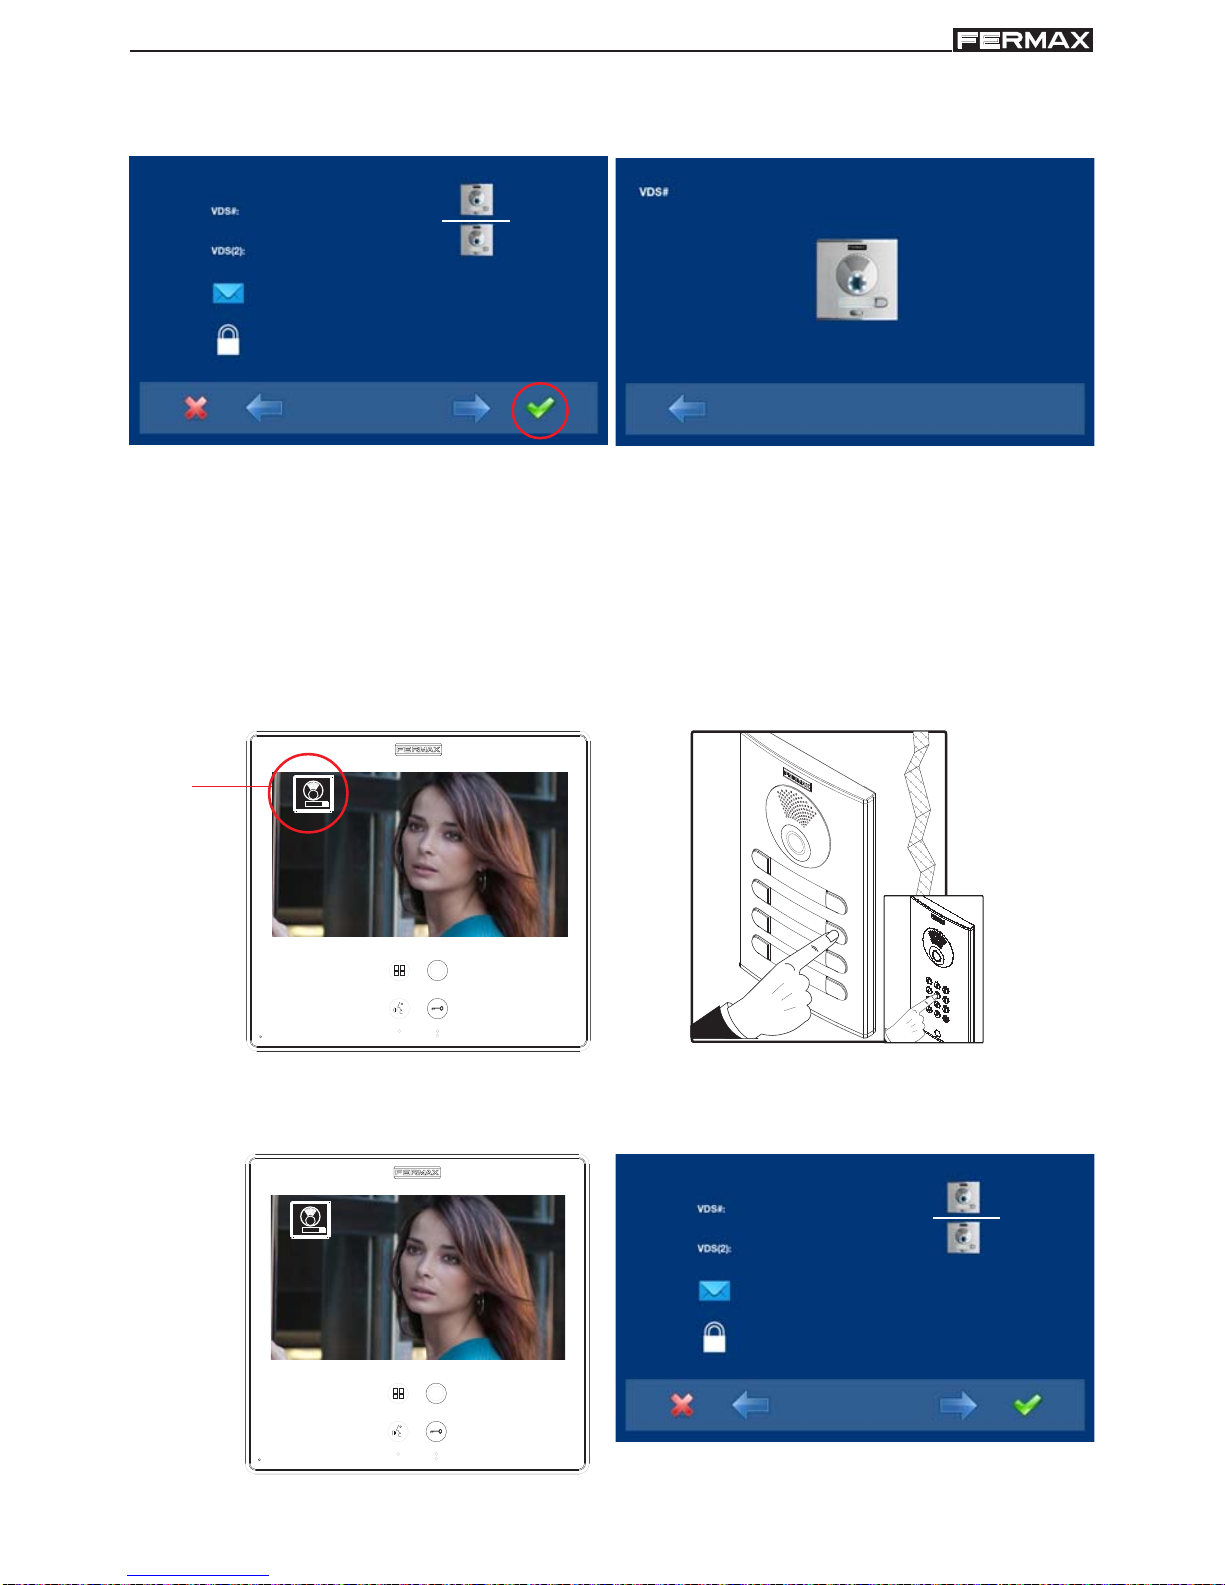
5. The monitor automatically connects to the street panel, activating the camera (this
shows a panel icon in the upper left corner of the monitor). Enter the calling code for this
monitor from the panel. Depending on the type of panel installed:
- pressing the corresponding button or
- by entering the code + bell.
Notes:
- The time between steps 4 and 5 must be less than 2 and half minutes.
- Programming is always done from the panel activated as the main panel.
A different calling tone is produced, confirming the monitor´s programming, continuing
to view the camera´s image and
after a few seconds the monitor returns to the
programming screen.
4444
Panel
icon
0 2 8
_ _ _
2222
4444
1
Page 16
Page 16
SMILE VDSSMILE VDS
SMILE VDSSMILE VDS
SMILE VDS
SMILE VDSSMILE VDS
SMILE VDSSMILE VDS
SMILE VDS
6. Exit Programming: When you press you exit to the previous programming menu.
Continue pressing until you exit programming. The monitor will also automatically
exit programming mode after 60 seconds of inactivity.
Note:
- Upon exiting programming, the wildcard button stops blinking, indicating that the
monitor is programmed.
When the monitor has not been programmed.
2. The administrator code option is selected
as default (white line under the icon).
Press . The following screen will appear
1. Access the ADMINISTRATOR menu Press "Menu" for 3 seconds.
. The following
screen appears
3. This option programmed by the VDS #
monitor is selected as default. The
selected option is displayed on the white
line under the icon.
The first thing the monitor then does is
indicate the number of the current monitor
on the SCREEN. If it is not programmed, it
will show the following: - - -
Notice: The wildcard button blinking
(red) indicates that the monitor has not
been programmed.
Option 2: from the Monitor Monitors can be programmed on the screen menu.
_ _ _
_ _ _
2222
4444
Notice:
- The wildcard button will continue blinking (red) until having exited programming.
4. Program the call number: Press on the
previous screen and access the screen
to program the residence´s number.
The first number is blinking, each time you
press + or - it increases or decreases this
number.
When the corresponding number has
been programmed you reach the previous
menu via the back arrow.
0 0 1
Page 17
Page 17
SMILE VDSSMILE VDS
SMILE VDSSMILE VDS
SMILE VDS
SMILE VDSSMILE VDS
SMILE VDSSMILE VDS
SMILE VDS
- : Decrease button selected with the cursor.
+ : Increase button selected with the cursor.
: This moves to the following digit.
: It restarts with the first digit.
5. Exit Programming: When you press you exit to the previous programming menu.
Continue pressing
until you exit programming. The monitor will also automatically
exit programming mode after 60 seconds of inactivity.
Note:
- Upon exiting programming, the wildcard button stops blinking, indicating that the
monitor is programmed.
0 2 8
_ _ _
2222
4444
0 2 8
PROGRAMMING: ADMINISTRATOR Menu
Access the Administrator menu
When the monitor has already been programmed.
1. To access the ADMINISTRATOR menu. Press "Menu" for 3 seconds.
. The following
screen is viewed, the do not disturb option appears by default (white line under the icon),
select the tool icon via the cursors to access the Administrator menu screen. The
selected option is displayed with the white line under the icon. Press , and a screen
appears to access the administrator menu, select the option.
to access the screen
CONFIGURATION menu
Page 18

Page 18
SMILE VDSSMILE VDS
SMILE VDSSMILE VDS
SMILE VDS
SMILE VDSSMILE VDS
SMILE VDSSMILE VDS
SMILE VDS
To access the ADMINISTRATOR menu
0 0 0 0
2. Enter the administrator code, which by
default is 4444 (it may be changed).
The first number is blinking, each time you
press + or - it increases or decreases this
number.
When the administrator code has been
entered you access the configuration
menu screen appears.
- : Decrease button selected with the cursor.
+ : Increase button selected with the cursor.
: This moves to the next digit and replaces the previous one with *.
: It restarts with the first digit.
Notes:
- After entering 3 continuous erroneous codes the monitor will be blocked for 5 minutes.
- RESET the Administrator code.
If the installer has changed the code and does not
remember it, you may restore the default code. Enter the default code 3 times (4444),
even if an error appears (showing the digits in red).
3. Once the installer has accessed the configuration menu screen, the screen options
appear, (use the cursor to move them). The firmware version appears in the right
corner of the screen:
.
Default selection:
a) codes option (white line under the icon). Press . The following screen will appear:
FW v1.0FW v1.0
e
g
f
a
b c
d
Page 19

Page 19
SMILE VDSSMILE VDS
SMILE VDSSMILE VDS
SMILE VDS
SMILE VDSSMILE VDS
SMILE VDSSMILE VDS
SMILE VDS
0 2 8
_ _ _
2222
4444
a.1) Programming the monitor from the
monitor itself.
Explained in previous pages, see
"Programming the smile monitor", option
1.
a.2) Programming the monitor from the panel.
Explained in previous pages, see
"Programming the smile monitor," option 2.
Call forward.
There is the option to configure the call forward to another residence, in order to be able to
attend to the call from another location. It must be pre-enabled by the installer and selected
by the user. The call is received in both monitors and the first to answer does not allow the
other to intercept the communication. The monitor being forwarded to displays an icon on
the screen indicating that the call is a forwarded call.
a.3) Programming a call forward. Option 1: from the Monitor.
1. Select the programming option from the
monitor VDS (2). The selected option is
displayed with the white line under the
icon.
The first thing the monitor then does is
indicate the number of the current monitor
on the SCREEN. If it is not programmed, it
will show the following: - - -
2. Program the call number: Press on the
previous screen and access the screen
to program the residence´s number.
The first number is blinking, each time you
press + or - it increases or decreases this
number.
When the corresponding number has
been programmed you reach the previous
menu via the back arrow.
0 2 8
_ _ _
2222
4444
0 0 1
- : Decrease button selected with the cursor.
+ : Increase button selected with the cursor.
: This moves to the following digit.
: It restarts with the first digit.
a5
a2
a1
a3 a4
a6
Page 20

Page 20
SMILE VDSSMILE VDS
SMILE VDSSMILE VDS
SMILE VDS
SMILE VDSSMILE VDS
SMILE VDSSMILE VDS
SMILE VDS
0 2 8
0 7 1
2222
4444
0 7 1
3rd. Exit Programming: When you press you exit to the previous programming menu.
Continue pressing until you exit programming. The monitor will also automatically
exit programming mode after 60 seconds of inactivity.
a.4) Programming a call forward. Option 2: from Panel + Monitor
1. In order to select programming from the
panel, select the panel from the VDS (2)
line with the right arrow.
0 2 8
_ _ _
2222
4444
2. The selected option is displayed with the white line under the icon. Press , and a
screen appears confirming the selected option: programming from the panel and you
hear a beep on the monitor.
_ _ _
_ _ _
2222
4444
3. The monitor automatically connects to the street panel, activating the camera (this
shows a panel icon in the upper left corner of the monitor). Enter the calling code for this
monitor from the panel. Depending on the type of panel installed:
- pressing the corresponding button or
- by entering the code + bell.
Page 21

Page 21
SMILE VDSSMILE VDS
SMILE VDSSMILE VDS
SMILE VDS
SMILE VDSSMILE VDS
SMILE VDSSMILE VDS
SMILE VDS
Notes:
- The time between steps 4 and 5 must be less than 2 and half minutes.
- Programming is always done from the panel activated as the main panel.
1
A different calling tone is produced, confirming the monitor´s programming, continuing
to view the camera´s image and
after a few seconds the monitor returns to the
programming screen.
Panel
icon
0 2 8
0 7 1
2222
4444
1
4. Exit Programming: When you press you exit to the previous programming menu.
Continue pressing until you exit programming. The monitor will also automatically
exit programming mode after 60 seconds of inactivity.
Enable/Select Call forward.
Call forwarding to another residence does not work until the option has been enabled by the
installer and selected by the user.
Enable Call forward.
While in the Administrator menu screen, select F and press.
xxxxM
Page 22

Page 22
SMILE VDSSMILE VDS
SMILE VDSSMILE VDS
SMILE VDS
SMILE VDSSMILE VDS
SMILE VDSSMILE VDS
SMILE VDS
1. In order to enable the call forward option,
go to the corresponding icon with the
cursors.
xxxxM
2. Pressing , select the desired access
mode, in this case the menu M has been
selected. The selected option is displayed
with the white line blinking under the icon.
xxxxM
M
xxxxM
M
3. Pressing , select the desired access
mode, in the selected option. Activation is
confirmed since the white line stops blinking
and remains constant.
4. Press , to exit to the previous menu.
Continue pressing
until you reach the
desired menu or you exit programming.
Select call forward.
With the monitor in standby, Press "Menu" for 3 seconds.
, you access the configuration
menu, the screen options appear, (use the cursors to move them). On the second screen
you see that the call forward function is enabled by the menu.
Notes:
- For this function to be saved on the monitor , you must exit the menu. With the monitor
in standby, this option is then saved. All capacitive buttons are lit sequentially.
Whenall
capacitive buttons have been lit, this option is saved.
Page 23

Page 23
SMILE VDSSMILE VDS
SMILE VDSSMILE VDS
SMILE VDS
SMILE VDSSMILE VDS
SMILE VDSSMILE VDS
SMILE VDS
1. In order to enable the call forward option,
go to the corresponding icon with the
cursors, (white line under the icon).
2. By pressing , you select the call forward,
and confirm the selection, since it is
indicated by the white point on the screen
next to the call forward icon. In order to remove
the selection re-press .
When a call is made to the monitor (with call
forward activated), on the monitor being called,
an icon appears on the screen indicating that
the call is from a call forward.
a.5) Messages.
This option is not available in the basic model.
a.6) Administrator code change.
1. Select the change administrator code
option via the cursors(white line under the
icon) and press . The following screen will
appear.
0 2 8
_ _ _
2222
4444
1
call
forwarded
Page 24

Page 24
SMILE VDSSMILE VDS
SMILE VDSSMILE VDS
SMILE VDS
SMILE VDSSMILE VDS
SMILE VDSSMILE VDS
SMILE VDS
2. Enter the administrator code you wish to
change.
The first number is blinking, each time you
press + or - it increases or decreases this
number.
When the administrator code has been
entered you access the configuration
menu screen appears.
- : Decrease button selected with the cursor.
+ : Increase button selected with the cursor.
: This moves to the next digit and replaces the previous one with *.
: It restarts with the first digit.
0 0 0 0
1 8 1 8
0 2 8
_ _ _
2222
1818
b) Configuring conversation mode
Within the conversation menu we can select between Simplex and Handsfree mode. By
default handsfree mode is selected.
Simplex mode: press to talk and release to listen to the audio activation button
.
1. Once the installer accesses the
configuration menu screen,
select the
conversation mode option with the cursors
(white line under the icon) and press . The
following screen will appear.
2. By default handsfree mode is selected.
Page 25

Page 25
SMILE VDSSMILE VDS
SMILE VDSSMILE VDS
SMILE VDS
SMILE VDSSMILE VDS
SMILE VDSSMILE VDS
SMILE VDS
hands free
3. With the cursors, select the icon of the
desired conversation mode. Press , to
select the conversation mode. On the
selected mode you will see a.
simplex
the feature to automatically open audio after receiving a call
4. For example, if you select simplex mode
with automatic audio connection upon
receiving the call. With this option selected
with the cursors (white line under the
cursor), press , if you want to remove the
selection, you also press . Press
, to
exit to the previous menu and confirm the
selected options. Continue pressing
until
you reach the desired menu or you exit
programming.
c) Images - d) Date/Time.
These options are not available in the basic model.
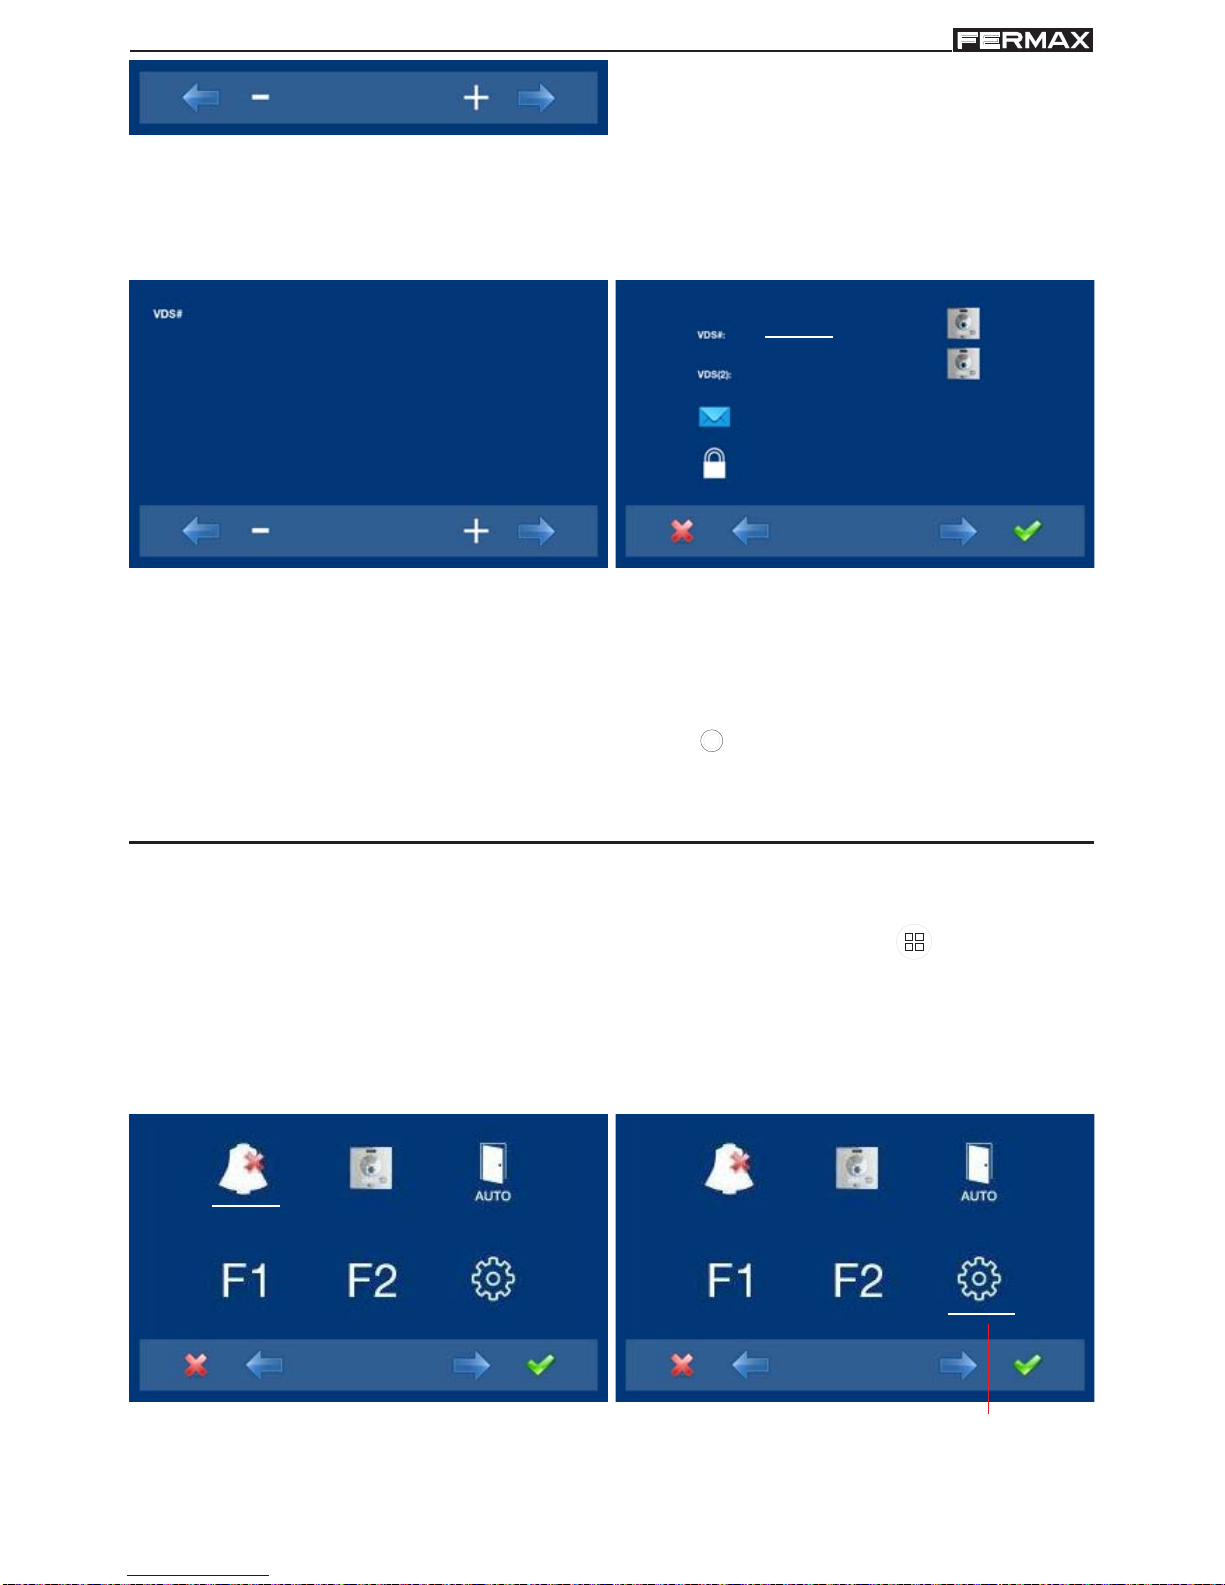
e) Functions
The installer may enable determined functions that are not enabled by default.
1. Once the installer accesses the
administrator menu screen,
select the
functions option with the cursors (white line
under the icon) and press . The following
screen will appear.
Note: If there are several monitors in
the same apartment, only one of
them can have this feature active.
Page 26

Page 26
SMILE VDSSMILE VDS
SMILE VDSSMILE VDS
SMILE VDS
SMILE VDSSMILE VDS
SMILE VDSSMILE VDS
SMILE VDS
xxxxM
xxxxM
2. By default the functions are enabled as
the screen shows.
The functions that appear with:
- x: are enabled with a shortcut button and
also appear in the menu.
- : is enabled as a wildcard and also
appears in the menu. .
- M: are enabled for the menu.
Notes:
- The default functions assigned to
shortcut buttons are:
o
F1
o
F2
o
Do not disturb mode.
o
Auto-start.
- A short press on the menu button , shows the corresponding icons to these
selected shortcut buttons.
- The wildcard button by default is also automatically started.
- If we enter into the functions menu for the first time, the auto-start button will appear as
a shortcut button, however, this function is also available on the wildcard button
(wildcard). If we exit without changing anything, we lose the auto-start function on this
button since in normal mode we can not assign the same function as a shortcut button
and a wildcard button
. So having auto-start in both is an exception for recently
manufactured monitors.
3. The icons from left to right, correspond to
functions that are detailed below with
their availability in the basic model:
o e1)Do not disturb mode: available
o e2) Images: not available
o e3) Call to guard: available
o e4) Auto-start: available
o e5) Doormatic: according to configuration.
o e6) F1: available
o e7) F2: available
o e8) Auxiliary video input: available
o e9) Panic alarm: available
o e10) Lift Control: available.
o e11) Messages: not available
o e12) Automatisation: not available
o e13) Alarms D1: not available
o e14) Call forward: available.
Notice:
- All available functions may be enabled in
any mode:
- x: Shortcut buttons (max. 4 buttons)
- : wildcard button (only 1 function)
- M: enabled for the menu (all functions)
Page 27

Page 27
SMILE VDSSMILE VDS
SMILE VDSSMILE VDS
SMILE VDS
SMILE VDSSMILE VDS
SMILE VDSSMILE VDS
SMILE VDS
4. In order to configure the function´s access
mode, go to the corresponding icon with
the cursors, (white line under the icon).
Pressing , you select the desired access
mode, in this case the menu M has been
selected. While selecting the option, the
white line is blinking under the icon.
xxxxM
5. Pressing , select the desired access
mode, in the selected option. Activation is
confirmed since the white line stops blinking
and remains constant.
6. Press , to exit to the previous menu.
Continue pressing until you reach the
desired menu or you exit programming.
M
xxxxM
M
7. For these function/s to be saved on the monitor, you must exit the menu. With the
monitor in standby, this option is then saved. All capacitive buttons are lit sequentially.
Whenall capacitive buttons have been lit, this option is saved.
8th. With the monitor in standby , Press "Menu" for 3 seconds. , you access the configuration
menu, the screen options appear, (use the cursors to move them). You see that it is
enabled by the video input function menu (CCTV).
Page 28

Page 28
SMILE VDSSMILE VDS
SMILE VDSSMILE VDS
SMILE VDS
SMILE VDSSMILE VDS
SMILE VDSSMILE VDS
SMILE VDS
xxxxM
Via the MENU.
(Pressing "Menu" for 3 seconds. ).
9. These are the default programmed
functions in the monitor as shortcuts and
that therefore appear as both shortcuts and
in the menu.
For Shortcut buttons.
(Short press "Menu"
).
Description of the functions
e1) Do not disturb mode (cancel ringtone)
Function fordeactivating the ringtone. When we select this function for the first time, the
screen shows the non-timed default option (- - : - -) and the user can confirm or change
the value to the desired hours and minutes.
_ _ : _ _
2. Enter the hours and minutes you want to
activate the do not disturb function.
The first cursor is blinking, each time you
press + or - it increases or decreases this
number. To go to the next digit press .
When you have entered the desired time
press , or exit the screen with
.
- : Decrease button selected with the cursor.
+ : Increase button selected with the cursor.
: Confirm the selection and activate the function.
: Return to the previous screen or stand-by.
1. Select the change administrator code
option via the cursors(white line under the
icon) and press . The following screen will
appear.
Page 29

Page 29
SMILE VDSSMILE VDS
SMILE VDSSMILE VDS
SMILE VDS
SMILE VDSSMILE VDS
SMILE VDSSMILE VDS
SMILE VDS
0 3 : 1 5
3. For example, we enter 03:15, so the
function will be activated for 3 hours and
15 minutes. Going to the previous screen
you will view the red led bell, indicating
that the function is activated.
Do not
disturb
mode
activated
4. Having selected the do not disturb mode
by pressing , we disable the selection
(the red led bell disappears). In order to
re-select them we must start the process
form the 1st point.
_ _ : _ _
5. If you want to select this mode indefinitely
(- - : - -), upon entering in this screen the
first number is blinking, press + until you
view the cursor - , press , the remaining
digits automatically turn into cursors (- - : -
-), therefore the indefinite mode is on.
Continue pressing
, until you reach the
desired menu or you exit programming.
Notice:
- The do not disturb function is default assigned to a shortcut button. A short press on the menu
button , shows the corresponding icons to the selected short button. By pressing the
shortcut button you can activate / deactivate the do not disturb mode, (for programs with timers:
hours / minutes or indefinite).
do not
disturb
mode
activated
Page 30

Page 30
SMILE VDSSMILE VDS
SMILE VDSSMILE VDS
SMILE VDS
SMILE VDSSMILE VDS
SMILE VDSSMILE VDS
SMILE VDS
Just as previously stated, we exit the do not disturb mode:
- When the programmed time has passed.
- by pressing the shortcut button or
- by selecting the do not disturb icon on the menu.
Notice:
- We can configure the call extension, light and ringtone activator...etc, for this to be
enabled in this mode when the monitor receives a call. For this we must activate within
the Parameters in Activate auxiliary devices, see the corresponding chapter
f) Parameters.
e3) Calling a guard unit
In installations with a Guard unit, we can
make a call to this via the lock-release
button
(default configuration), when
the monitor is in standby. When we make
a call and it is confirmed by the Guard unit,
an image is activated indicating that the
call is in process.
If after 15’’ there is no response from the
Guard Unit, the monitor will show a
message indicating that the Guard Unit is
busy, that it has registered the call and it
will answer it.
Notice:
- You can assign a different button for the Guard Unit: shortcut button, wildcard button
or access via the menu icon. If you have programmed the shortcut or wildcard
button, the LOCK RELEASE button, it will never call the Guard Unit.
e2) Images
This function is not available in the basic model.
Page 31

Page 31
SMILE VDSSMILE VDS
SMILE VDSSMILE VDS
SMILE VDS
SMILE VDSSMILE VDS
SMILE VDSSMILE VDS
SMILE VDS
xx xxM
Via the MENU.
(Pressing "Menu" for 3 seconds.
).
For Shortcut buttons.
(Short press "Menu" ).
For example, Call the Guard Unit as a
shortcut button (x). This function is enabled
as a shortcut button and also appears in the
menu.
e4) Auto-start
With the monitor on standby,
press and hold the wildcard for 1 second to switch the
monitor on manually. To activate the audio, press the audio activation button
With video, press and hold this button for 2 seconds to sequentially select between the
main camera and the secondary camera (where one exists).
Notes:
- If the channel is busy an error tone "BEEP" will be generated and auto-start will not
activate, nor will the call to the guard.
- The auto-start function is always used on the main panel except where a call is re-
ceived on the secondary panel. Once the conversation is over auto-start will activate
on the secondary panel for 30 seconds. After this time it will activate on the main
panel.
- The
wildcard button by default is for auto-start.
- If we enter into the functions menu for the first time, the auto-start button will appear
as a shortcut button, however, this function is also available on the wildcard button
(wildcard). If we exit without changing anything, we lose the auto-start function on
this button since in normal mode we can not assign the same function as a shortcut
button and a wildcard button
. So having auto-start in both is an exception for
recently manufactured monitors. In this case auto-start can be performed by the:
o Wildcard button
or
o By pressing the shortcut button or
o By selecting the icon of the auto-start function on the menu.
e5) Doormatic
Function as configured.
Page 32

Page 32
SMILE VDSSMILE VDS
SMILE VDSSMILE VDS
SMILE VDS
SMILE VDSSMILE VDS
SMILE VDSSMILE VDS
SMILE VDS
The auto-start function is enabled as a
shortcut button and also appears in the
menu.
xxxxM
Via the MENU.
(Pressing "Menu" for 3 seconds. ).
For Shortcut buttons.
(Short press "Menu"
).
e6) Auxiliary function F1
The function F1 and F1 terminal have the option of being configured. You can select
between Sending a negative (output) and Panic call to the MDS Guard Unit (input).
It is initially configured, by default, as an output and sends a negative. This output
remains active while pressing the button. The screen notifies of the action: F1 OK. The
function is enabled as a shortcut button and also appears in the menu.
via the menu
shortcut buttons
This output remains active while
pressing the button.
Page 33

Page 33
SMILE VDSSMILE VDS
SMILE VDSSMILE VDS
SMILE VDS
SMILE VDSSMILE VDS
SMILE VDSSMILE VDS
SMILE VDS
For example, Panic alarm as a shortcut
buttons (x). This function is enabled as a
shortcut button and also appears in the
menu.
x
The F1 terminal acts as an input connecting a button on it for the Panic call to the MDS
Guard Unit function (input). In combination with a MDS/VDS decoder version V10.26 or
above, you can make a panic call to the MDS guard unit. When you press the button
"Panic Alarm" button, the corresponding command is sent through the bus. You must
first activate the "Panic Alarm" function as follows:
o Wildcard button
(in this mode it lights up red) or
o By pressing the shortcut button or
o By selecting the icon of the auto-start function on the menu.
Via the MENU.
(Pressing "Menu" for 3 seconds. ).
For Shortcut buttons.
(Short press "Menu" ).
xxxM
x
When you press the relevant button from the
monitor: Panic alarm, the corresponding
command is transmitted by the bus, you hear
a "beep" on the monitor and it appears on the
screen.
Notes:
- These options are exclusive, either the F1 option or the Panic Alarm option. They can
not work simultaneously.
- The panic button is connected between the terminals F1 and -
Page 34

Page 34
SMILE VDSSMILE VDS
SMILE VDSSMILE VDS
SMILE VDS
SMILE VDSSMILE VDS
SMILE VDSSMILE VDS
SMILE VDS
e7) Auxiliary function F2
The F2 function mainly acts as an output and sends a negative. This output remains active
while pressing the button. The screen notifies of the action: F2 OK. The function is
enabled as a shortcut button and also appears in the menu.
via the menu
shortcut buttons
This output remains active while
pressing the button.
The F2 terminal can also be configured, giving a negative when the lock-release
command is sent, during a call or conversation. For this we must activate within the
Parameters in Activation F2 with the lock-release, see the corresponding chapter
f) Parameters.
Page 35

Page 35
SMILE VDSSMILE VDS
SMILE VDSSMILE VDS
SMILE VDS
SMILE VDSSMILE VDS
SMILE VDSSMILE VDS
SMILE VDS
e8) Auxiliary video input (CCTV)
There is the option to connect an external analogic camera to the monitor and use it as
a CCTV image. This camera´s image appears on the monitor when we select the
CCTV option on the Menu.
For example, CCTV as a shortcut button (x).
This function is enabled as a shortcut button
and also appears in the menu.
x
xxMxM
x
Via the MENU.
(Pressing "Menu" for 3 seconds. ).
With Shortcut buttons.
(Short press "Menu"
).
CCTV
When the auxiliary video input is activated,
the CCTV icon is displayed on the monitor´s
screen indicating that it is the CCTV.
It can also be configured for when a call is made by the doorbell, the auxiliary video
input is automatically activated. This is activated within the Auxiliary video devices
with doorbell, see the corresponding chapter f) Parameters.
Page 36

Page 36
SMILE VDSSMILE VDS
SMILE VDSSMILE VDS
SMILE VDS
SMILE VDSSMILE VDS
SMILE VDSSMILE VDS
SMILE VDS
We can disable the CCTV function by pressing
o "Menu" button (between 1 and 3 seconds) or
o By pressing the shortcut button or
o By selecting the icon of CCTV function on the menu.
e9) Panic Alarm
Explained in option: e6) Auxiliary function F1.
Notes:
- If you have a motion detector, this can be connected to the doorbell so that anytime
the camera detects a person it generates a ringtone and activates the video.
- We suggest deactivating the Auxiliary video with door bell function during long
absences (vacations), in order to avoid the monitor screen permanently remaining on
when a call is made from the panel.
Via the MENU.
(Pressing "Menu" for 3 seconds.
).
For Shortcut buttons.
(Short press "Menu" ).
For example, Lift Control as a shortcut
buttons (x). This function is enabled as a
shortcut button and also appears in the
menu.
x
xxxxM
x
e10) Lift Control
Upon pressing the LIFT icon (shortcut or all-purpose) a command is sent to the MDSVDS decoder ref. 2409, this command will be interpreted by the decoder (in future
versions). Not available on current decoders.
The decoder will send an activation sensor command to the MDS central unit.
The activation sensor generates an activation message to the Central Unit, which may
set off various actions depending on the CU configuration: activation of relays, message
to guard, etc... This function is generally used to activate relays, and often for the lift
control.
Page 37

Page 37
SMILE VDSSMILE VDS
SMILE VDSSMILE VDS
SMILE VDS
SMILE VDSSMILE VDS
SMILE VDSSMILE VDS
SMILE VDS
e13) Call forward
There is the option to connect the call forward to another residence, in order to be able to
attend to the call from another location. It must be pre-enabled by the installer and
selected by the user. The call is received in both monitors and the first to answer does
not allow the other to intercept the communication. The monitor being forwarded to
displays an icon on the screen indicating that the call is a forwarded call.
Explained in detail in option:
- a.3) Programming a call forward. Option 1: from the Monitor.
- a.4) Programming a call forward. Option 2: from Panel + Monitor
- Enable Call forward.
- Select Call forward.
f) Parameters
The installer may enable determined parameters that are not enabled by default.
1. Once the installer accesses the
administrator menu screen,
select the
parameters option with the cursors (white
line under the icon) and press . The
following screen will appear.
2. By default the following option is activated:
f2) Display call origin.
With the cursors we select the
corresponding icon (white line under the
icon).
Press , to select the selected mode. On
the selected mode you will see a. In order
to remove the selection also press .
f1
f2
f3
f4
f5
e11) Messages - e12) Automatisation- e13) Alarms
These options are not available in the basic model.
When you press the relevant button from the
monitor: Lift Control, the corresponding
command is transmitted by the bus, and it
appears on the monitor.
Page 38

Page 38
SMILE VDSSMILE VDS
SMILE VDSSMILE VDS
SMILE VDS
SMILE VDSSMILE VDS
SMILE VDSSMILE VDS
SMILE VDS
f1) Activation F2 with door opening
The F2 terminal can also be configured, giving a negative when the lock-release
command is sent, while the lock-release button is down, during a call or conversation.
See Details: e5) Auxiliary function F2.
f2) Display call origin.
By default this option is activated, displaying the call origin on the monitor´s screen.
1
panel icon
indicating
the panel
number
f3) Induction ear loop
This function is available on depending model.
f4) Auxiliary video with doorbell
It can be configured so that when a call is made by the doorbell, the auxiliary video input
is automatically activated. See Details: e6) Auxiliary video input (CCTV)
Including induction loop. There are identified with a label.
· Includes an induction loop which interacts with audio devices used by
the hearing impaired.
· Note: In manual audio devices Digital Mode should be configured.
Page 39

Page 39
SMILE VDSSMILE VDS
SMILE VDSSMILE VDS
SMILE VDS
SMILE VDSSMILE VDS
SMILE VDSSMILE VDS
SMILE VDS
Notes:
- If you have a motion detector, this can be connected to the doorbell so that anytime
the camera detects a person it generates a ringtone and activates the video.
- We suggest deactivating the Auxiliary video with door bell function during long
absences (vacations), in order to avoid the monitor screen permanently remaining on
when a call is made from the panel.
f5) Activate auxiliary devices
The following may be configured: call extension, light and ringtone activator...etc, for
this to be enabled, even if the do not disturb mode is selected when the monitor
receives a call. See Details: e1) Do not disturb mode (cancel ringtone)
g) Resetting parameters
The installer may reset some parameters to their default positions.
g1
g2
g3
g1) User information
This function is not available in the basic model.
g2) Default parameters
This re-establishes the monitor with the default configuration, but does not delete the
programmed monitor´s address.
CCTV icon
on the
screen
when the
auxiliary
video is
activated
do not
disturb
mode
activated
Page 40

Page 40
SMILE VDSSMILE VDS
SMILE VDSSMILE VDS
SMILE VDS
SMILE VDSSMILE VDS
SMILE VDSSMILE VDS
SMILE VDS
1. Select the default parameters option via
the cursors (white line under the icon) and
press. The monitor exits the menu and
starts to save the selected option. This status
is displayed, since it sequentially goes
through all capacitive buttons, indicating that
the reset is being performed.
2. When all capacitive buttons
have been lit, this option is
saved.
g3) Factory Configuration
This leaves the monitor with the default configuration, (and even deletes the programmed
monitor´s address)
1. Select the default parameters option via
the cursors (white line under the icon) and
press. The monitor exits the menu and
starts to save the selected option. This status is displayed, since it sequentially goes
through all capacitive buttons, indicating
that the reset is being performed.
Page 41

Page 41
SMILE VDSSMILE VDS
SMILE VDSSMILE VDS
SMILE VDS
SMILE VDSSMILE VDS
SMILE VDSSMILE VDS
SMILE VDS
2. When all capacitive buttons
have been lit, this option is
saved. Since it deletes the
programmed monitor´s
address, the wildcard
button blinks red, indicating
that the monitor is not
programmed.
ADJUSTMENTS: Video and Audio
Video adjustments: Brightness - Contrast - Colour
The monitor allows you to adjust brightness, contrast and colour while you have received
a call or performed an auto-start. Short-press the "MENU" button
and a menu appears
on the screen to adjust the image´s brightness.
1
Video
adjustments
1. Select the video adjustments option with
the corresponding capacitive button.
Brightness, contrast and colour settings
appear.
contrastbrightness colour
Page 42

Page 42
SMILE VDSSMILE VDS
SMILE VDSSMILE VDS
SMILE VDS
SMILE VDSSMILE VDS
SMILE VDSSMILE VDS
SMILE VDS
contrast
brightness
colour
1
1
1
2. Select the desired option and increase or decrease the video adjustments according to
the selected option.
- : Button to decrease.
+ : Button to increase.
: Return to the previous screen and confirm the selection..
Page 43

Page 43
SMILE VDSSMILE VDS
SMILE VDSSMILE VDS
SMILE VDS
SMILE VDSSMILE VDS
SMILE VDSSMILE VDS
SMILE VDS
Audio Adjustments
While the audio channel is open the audio´s volume can be regulated via a contextual
menu on the screen. Short-press the "MENU" button
and a menu appears on the
screen to adjust the audio.
adjustments
audio
1. Select the audio adjustments option with
the corresponding capacitive button.
1
1
Capacitive
button to
decrease
audio
Capacitive
button to
increase
audio
2. While in audio adjustments,
use the capacitive buttons to
obtain the desired settings.
mute function: activate/deactivate the
corresponding capacitive button. Mute function.
When activated, the icon will disappear from the
upper right of the screen.
Notice:
- You will exit the audio adjustments option after 60 seconds.
Page 44

Page 44
SMILE VDSSMILE VDS
SMILE VDSSMILE VDS
SMILE VDS
SMILE VDSSMILE VDS
SMILE VDSSMILE VDS
SMILE VDS
PROGRAMMING: USER Menu
Access the user menu
1. To access the USER menu. Press "Menu" for 3 seconds. . The following screen is
viewed, The do not disturb option appears by default (white line under the icon), select the
tool icon via the cursors to access the User menu screen. The selected option is
displayed with the white line under the icon. Press , and a screen appears to access
the User menu.
to access the screen
CONFIGURATION menu
The icons viewed on the screen
(navigation buttons:
, , and ), are
managed with the corresponding
capacitive buttons located on the monitor
capacitive buttons
navigation buttons
: Return to the previous screen or stand-by.
: Select the previous menu option.
: Mark the following menu option.
: Confirm the selection and activate the function.
- Navigation buttons and capacitive buttons
Notice:
a b
c
d
3rd. Once the installer has accessed the
configuration menu screen, the screen
options appear, (use the cursor to move
them).
Page 45

Page 45
SMILE VDSSMILE VDS
SMILE VDSSMILE VDS
SMILE VDS
SMILE VDSSMILE VDS
SMILE VDSSMILE VDS
SMILE VDS
a) Ringtones
Within the menu, the monitor allows you to select an independent ringtone for the call
from:
- a1) Main street panel
- a2) Secondary street panel
- a3) Doorbell
You can select that the ringtone rings three times (continuous mode). We can also adjust
the volume.
1. Select the origin of the call with the cursors
, (panel 1, panel 2 or door bell). For
example, panel 1 (white line under the
icon). Press , you access the ringtone.
2. Within the ringtone (white line under the
icon), if you press , you change and
listen to the different ringtones, (when a
ringtone sounds in demo mode, the
monitor´s screen is turned off).
1
1
1
1
1
1
2
1
1
3. For example, we press , and hear
ringtone 2 (screen off), once completed,
the new ringtones screen appears and
we see that the ringtone number has
changed to number 2. This is then the
newly selected ringtone.
2
1
1
4. If you want the ringtone to ring three times
(continuous mode), press , to select
continuous mode (white line under the
icon).
a1
a2
a3
Page 46

Page 46
SMILE VDSSMILE VDS
SMILE VDSSMILE VDS
SMILE VDS
SMILE VDSSMILE VDS
SMILE VDSSMILE VDS
SMILE VDS
2
1
1
5. Having selected continuous mode,
Press, to select it. In order to remove
the selection you also press .
To go to the next options press .
continuos mode is selected: the ringtone is placed
3 times
Audio Adjustments
To regulate the volume.
1. Select the audio adjustments option via
the cursors(white line under the icon) and
press . The following screen appears:
Capacitive
button to
decrease
audio
Capacitive
button to
increase
audio
2. While in audio adjustments,
use the capacitive buttons to
obtain the desired settings.
Notice:
- You will exit the audio adjustments option after 60 seconds.
Page 47

Page 47
SMILE VDSSMILE VDS
SMILE VDSSMILE VDS
SMILE VDS
SMILE VDSSMILE VDS
SMILE VDSSMILE VDS
SMILE VDS
b) Configuring alarms
This function is not available in the basic model.
c) Date and Time
This function is not available in the basic model.
d) Administrator Menu
Menu for the installer to configure the monitor according the the installation´s needs.
1. Do not disturb mode (cancel the ringtone)
Within the user menu, you can select the Do Not Disturb mode. Function for deactivating
the ringtone. When we select this function for the first time, the screen shows the nontimed default option (- - : - -) and the user can confirm or change the value to the desired
hours and minutes. For more details see chapter: e1) Do not disturb mode (cancel
ringtone)
The do not disturb function is by default assigned to a shortcut button and is also
displayed in the menu. A short press on the menu button
, shows the corresponding
icons to these selected buttons. By pressing the shortcut button we activate / deactivate
the do not disturb mode, (for programs with timers: hours / minutes or indefinite).
With Shortcut buttons.
(Short press "Menu"
).
do not
disturb
mode
activated
Description of functions
Page 48

Page 48
SMILE VDSSMILE VDS
SMILE VDSSMILE VDS
SMILE VDS
SMILE VDSSMILE VDS
SMILE VDSSMILE VDS
SMILE VDS
2. Doorbell
The monitor has two terminals (-,T) to connect an external button so that when a short
occurs between them an identification call tone is generated.
As previously discussed, the door´s ringtone can be configured within the ringtone
menu: a3) The doorbell.
Notice:
- Function assigned by the installer. Consult the installer.
Via the MENU.
(Pressing "Menu" for 3 seconds. ).
The same operation can also be performed via the menu´s icon.
If you want to select this mode indefinitely
(- - : - -), upon entering in this screen the
first number is blinking, press + until you
view the cursor - , press , the remaining
digits automatically turn into cursors
(- - : - -), therefore the indefinite mode is
on. Continue pressing
, until you reach
the desired menu or you exit programming.
_ _ : _ _
do not
disturb
mode
activated
Having selected the do not disturb mode
by pressing , we disable the selection
(the red led bell disappears). In order to
select it again, re-press .
do not
disturb
mode
deactivated
Page 49

Page 49
SMILE VDSSMILE VDS
SMILE VDSSMILE VDS
SMILE VDS
SMILE VDSSMILE VDS
SMILE VDSSMILE VDS
SMILE VDS
SMILE MONITOR
Buttons
Audio and Hang-up Activation Button.
· Upon receiving a call
(the user has 30" seconds to answer before returning to standby.
During this time the blue led audio button will blink to report a pending call to answer),
press this button to talk to the visitor. The audio channel is opened from street to
residence, (the blue led on the audio button lights up steadily to indicate that it is in a
conversation with the street and anything said will be heard here), this works with
handsfree.
· Press to complete the communication,
(upon completion the blue led audio light
turns off again). The monitor´s default internal timer is 90 seconds).
Notes:
- The conversation is private, no other terminal can hear it.
- "Handsfree" mode is the default mode.
- While the audio channel is open the input audio can be regulated. See the
corresponding chapter on: "Audio Adjustments."
- If the monitor is configured with the conversation in "simplex mode," press the
audio button to talk and release it to listen,
(upon receiving the call, the blue led
audio button will blink to report a pending call to answer), once we open the channel
we will have audio in the monitor direction (the blue led audio will remain lit), when
we press the audio button we will change the communication direction. The icon
will indicate the channel we have activated at each moment (upper right corner of
the monitor). The input channel volume is always adjustable during the
conversation.
wildcard
menu.
lockreleases
audio
1 1
Label of induction loop
Page 50

Page 50
SMILE VDSSMILE VDS
SMILE VDSSMILE VDS
SMILE VDS
SMILE VDSSMILE VDS
SMILE VDSSMILE VDS
SMILE VDS
Wildcard button: Auto-Start / Main-Secondary Camera Selection.
· With the monitor on standby, press and hold the wildcard for 1 second to
switch the monitor on manually. To activate the audio, press the audio activation
button
· With video, press and hold this button for 2 seconds to sequentially select
between the main camera and the secondary camera (where one exists).
Notes:
- The wildcard button by default is for autostart, (even though you can
program it with another function, ask your installer.)
- If the channel is busy an error tone “BEEP” will be generated and auto-start
will not activate, nor will the call to the guard.
- The auto-start function is always used on the main panel except where a call
is received on the secondary panel. Once the conversation is over auto-start
will activate on the secondary panel for 30 seconds. After this time it will
activate on the main panel.
-
In this case auto-start can be performed by the:
o Wildcard button
or
o By pressing the shortcut button or
o By selecting the icon of the auto-start function on the menu.
Via the MENU.
(Pressing "Menu" for 3 seconds.
).
With Shortcut buttons.
(Short press "Menu" ).
- There is a function configured by the installer to activate the audio channel
automatically upon receiving the call. In this mode the conversation will finish
as usual by pressing the AUDIO button or after 90’’.
Notice:
- Function assigned by the installer. Consult the installer.
Button Menu: Adjustments and configuration.
· In order to access the Administrator menu, from which you can configure the
monitor, according to the installation´s needs and the user menu, from which
you can access the user´s customised settings.
Page 51

Page 51
SMILE VDSSMILE VDS
SMILE VDSSMILE VDS
SMILE VDS
SMILE VDSSMILE VDS
SMILE VDSSMILE VDS
SMILE VDS
Lock Releases / Call Guard Unit Button.
· Pressing this button whilst communicating with the Entry Panel will activate the lock
release.
Note: The icon will indicate the channel activated at each moment (upper right
corner of the monitor).
1
· Pressing this button whilst the monitor is on standby will result in a call being made
to the guard unit (where one exists).
Note: If the channel is busy an error tone "BEEP" will be generated and the call to
the guard will not be made.
· The option of activating an output terminal (F2), once the lock-release is activated.
This output remains active while pressing the button.
Notice:
- Function assigned by the installer. Consult the installer.
NOTE: The monitor screen goes on once the call from the panel has ended.
Buttons for Additional Functions.
Notice:
- Function assigned by the installer. Consult the installer.
- They can be activated:
o By pressing the shortcut button or
o By selecting the icon of the auto-start function on the menu.
F1-F2
Induction loop
This function is available on depending model.
Including induction loop. There are identified with a label.
· Includes an induction loop which interacts with audio devices used by
the hearing impaired.
· Note: In manual audio devices Digital Mode should be configured.
Page 52

Page 52
SMILE VDSSMILE VDS
SMILE VDSSMILE VDS
SMILE VDS
SMILE VDSSMILE VDS
SMILE VDSSMILE VDS
SMILE VDS
Answering a call:
"Handsfree" Mode:
When the call button on the Entry Panel is
pressed a call tone is produced both on the
panel and on the monitor, causing the screen
to start up.
Press the button
to speak with the visitor.
The audio channel between the street and the
home will be opened; operating in hands-free
mode. The communication will automatically end
after 90 seconds, or at any time by pressing the
button
.
The led will remain on (blue) for the duration of
the conversation.
If communication is not established with the entry
panel, the monitor will automatically go off after
30 seconds.
While in simplex conversation mode (press
the button to speak and release to listen).
When the call button on the Entry Panel is
pressed a call tone is produced both on the panel
and on the monitor, causing the screen to start
up. Press the button
to speak to the visitor,
leaving the upload audio channel activated.
From this point every time you press the
button, the output audio channel will activate and
upon releasing it the input audio channel is reactivated, the operation is in simplex mode.
The communication will automatically end after
90 seconds, or at any time by short-pressing the
button
. The icon will indicate the channel
we have activated at each moment (upper right
corner of the monitor).
If communication is not established with the entry panel, the monitor will automatically switch
off after 30 seconds.
1
1
1
Operation
Page 53

Page 53
SMILE VDSSMILE VDS
SMILE VDSSMILE VDS
SMILE VDS
SMILE VDSSMILE VDS
SMILE VDSSMILE VDS
SMILE VDS
Manual Monitor Activation (Auto-Start)
With the monitor on standby, press and hold the
wildcard for 1 second to switch the monitor on
manually. To sequentially select between the main
camera and the secondary camera (where one exists),
press and hold the wildcard button
for 2 seconds.
To activate the audio and speak to the visitor or open
the door, follow the steps above.
If communication is not established with the entry panel,
the monitor will automatically switch off after 30
seconds.
Notes:
- The
wildcard button by default is for
autostart, (even though you can program it
with another function, ask your installer.)
- Auto-start can be performed :
o
Wildcard button or
o
By pressing the shortcut button or
o
By selecting the icon of the auto-start func-
tion on the menu.
1
Via the MENU.
(Pressing "Menu" for 3 seconds. ).
With Shortcut buttons.
(Short press "Menu" ).
Page 54

Page 54
SMILE VDSSMILE VDS
SMILE VDSSMILE VDS
SMILE VDS
SMILE VDSSMILE VDS
SMILE VDSSMILE VDS
SMILE VDS
Opening the Door
When a call is received from the entry panel, you
can open the door at any time, by pressing the
button
.
1
Page 55

Page 55
SMILE VDSSMILE VDS
SMILE VDSSMILE VDS
SMILE VDS
SMILE VDSSMILE VDS
SMILE VDSSMILE VDS
SMILE VDS
 Loading...