

Page 1
VDS / BUS2
TECLADO DIRECT
DIRECT KEYPAD
CLAVIER DIRECT
TASTATUR DIRECT
321
654
987
0
A
321
654
987
0
A
MANUAL DE INSTALADOR Y PROGRAMACIÓN
INSTALLATION AND PROGRAMMING MANUAL
MANUEL D'INSTALLATION ET DE PROGRAMMATION
INSTALLATIONS- UND PROGRAMMIERHANDBUCH
VDS / BUS2
TECLADO DIRECT
DIRECT KEYPAD
CLAVIER DIRECT
TASTATUR DIRECT
A
321
654
987
0
skyline
ESPAÑOL
ENGLISH
FRANÇAIS
DEUTSCH
321
654
987
0
A
MANUAL DE INSTALADOR Y PROGRAMACIÓN
INSTALLATION AND PROGRAMMING MANUAL
MANUEL D'INSTALLATION ET DE PROGRAMMATION
INSTALLATIONS- UND PROGRAMMIERHANDBUCH
skyline
ESPAÑOL
ENGLISH
FRANÇAIS
DEUTSCH
Page 2

DIRECT DIRECT
DIRECT
DIRECT DIRECT
DIRECT DIRECT
DIRECT
DIRECT DIRECT
E
EN
F
D
Cod. 97574 V01_11
Pag 2
VDS - BVDS - B
VDS - B
VDS - BVDS - B
VDS - BVDS - B
VDS - B
VDS - BVDS - B
¡ NHORABUENA POR DISPONER DE UN PRODUCTO DE CALIDAD!
Fermax electrónica desarrolla y fabrica equipos de prestigio que cumplen los más
altos estándares de diseño y tecnología. Esperamos disfrute de sus funcionalidades.
CONGRATULATIONS ON PURCHASING THIS QUALITY PRODUCT!
Fermax Electronics develops and manufactures reputable equipment which fulfils the
highest design and technology standards.We hope you enjoy its range of functions.
FÉLICITATIONS ! VOUS VENEZ D’ACQUÉRIR UN VÉRITABLE PRODUIT DE QUALITÉ !
Fermax Electrónica développe et fabrique des équipements de prestige qui répondent
aux normes de design et technologie les plus développées.Nous espérons que vous
profiterez pleinement de toutes ses fonctions.
WIR GRATULIEREN IHNEN ZUM KAUF DIESES QUALITÄTSPRODUKTS!
Fermax Electrónica entwickelt und fabriziert hochwertige Anlagen, die den höchsten
Technologie- und Designstandards entsprechen. Überzeugende Funktionalität für Ihr
Eigenheim!
US2US2
US2
US2US2
US2US2
US2
US2US2
DIRECT DIRECT
DIRECT
DIRECT DIRECT
DIRECT DIRECT
DIRECT
DIRECT DIRECT
E
EN
F
D
Cod. 97574 V01_11
Pag 2
VDS - BVDS - B
VDS - B
VDS - BVDS - B
VDS - BVDS - B
VDS - B
VDS - BVDS - B
¡ENHORABUENA POR DISPONER DE UN PRODUCTO DE CALIDAD!
Fermax electrónica desarrolla y fabrica equipos de prestigio que cumplen los más
altos estándares de diseño y tecnología. Esperamos disfrute de sus funcionalidades.
CONGRATULATIONS ON PURCHASING THIS QUALITY PRODUCT!
Fermax Electronics develops and manufactures reputable equipment which fulfils the
highest design and technology standards.We hope you enjoy its range of functions.
FÉLICITATIONS ! VOUS VENEZ D’ACQUÉRIR UN VÉRITABLE PRODUIT DE QUALITÉ !
Fermax Electrónica développe et fabrique des équipements de prestige qui répondent
aux normes de design et technologie les plus développées.Nous espérons que vous
profiterez pleinement de toutes ses fonctions.
WIR GRATULIEREN IHNEN ZUM KAUF DIESES QUALITÄTSPRODUKTS!
Fermax Electrónica entwickelt und fabriziert hochwertige Anlagen, die den höchsten
Technologie- und Designstandards entsprechen. Überzeugende Funktionalität für Ihr
Eigenheim!
US2US2
US2
US2US2
US2US2
US2
US2US2
Page 3

DIRECT DIRECT
DIRECT
DIRECT DIRECT
DIRECT DIRECT
DIRECT
DIRECT DIRECT
VDS - BVDS - B
VDS - B
VDS - BVDS - B
VDS - BVDS - B
VDS - B
VDS - BVDS - B
US2US2
US2
US2US2
US2US2
US2
US2US2
INDICE - INDEX - SOMMAIRE - INHALT
E
PLACA DIRECT VDS/BUS2 ................................................................... 4
Instalación .................................................................................. 4
Precableado interno VDS - BUS2 ........................................... 5
Guía de Porgramación .............................................................. 8
EN
VDS/BUS2 DIRECT PANEL ................................................................... 4
Installation.................................................................................. 4
VDS - BUS2 Internal Pre-Wiring............................................... 5
Programming Guide .................................................................. 10
F
PLATINE DIRECT VDS/BUS2 ................................................................ 4
Installation.................................................................................. 4
Précâblage interne VDS - BUS2 .............................................. 5
Guide de programmation .........................................................12
D
TÜRSTATION DIRECT VDS/BUS2 ......................................................... 4
Installation.................................................................................. 4
Interne Vorverkabelung VDS - BUS2 ....................................... 5
Programmieranleitung .............................................................. 14
Pag 3
DIRECT DIRECT
DIRECT
DIRECT DIRECT
DIRECT DIRECT
DIRECT
DIRECT DIRECT
VDS - BVDS - B
VDS - B
VDS - BVDS - B
VDS - BVDS - B
VDS - B
VDS - BVDS - B
US2US2
US2
US2US2
US2US2
US2
US2US2
INDICE - INDEX - SOMMAIRE - INHALT
E
PLACA DIRECT VDS/BUS2 ................................................................... 4
Instalación .................................................................................. 4
Precableado interno VDS - BUS2 ........................................... 5
Guía de Porgramación .............................................................. 8
EN
VDS/BUS2 DIRECT PANEL ................................................................... 4
Installation.................................................................................. 4
VDS - BUS2 Internal Pre-Wiring............................................... 5
Programming Guide .................................................................. 10
F
PLATINE DIRECT VDS/BUS2 ................................................................ 4
Installation.................................................................................. 4
Précâblage interne VDS - BUS2 .............................................. 5
Guide de programmation .........................................................12
D
TÜRSTATION DIRECT VDS/BUS2 ......................................................... 4
Installation.................................................................................. 4
Interne Vorverkabelung VDS - BUS2 ....................................... 5
Programmieranleitung .............................................................. 14
Pag 3
Page 4
DIRECT DIRECT
DIRECT
DIRECT DIRECT
DIRECT DIRECT
DIRECT
DIRECT DIRECT
E
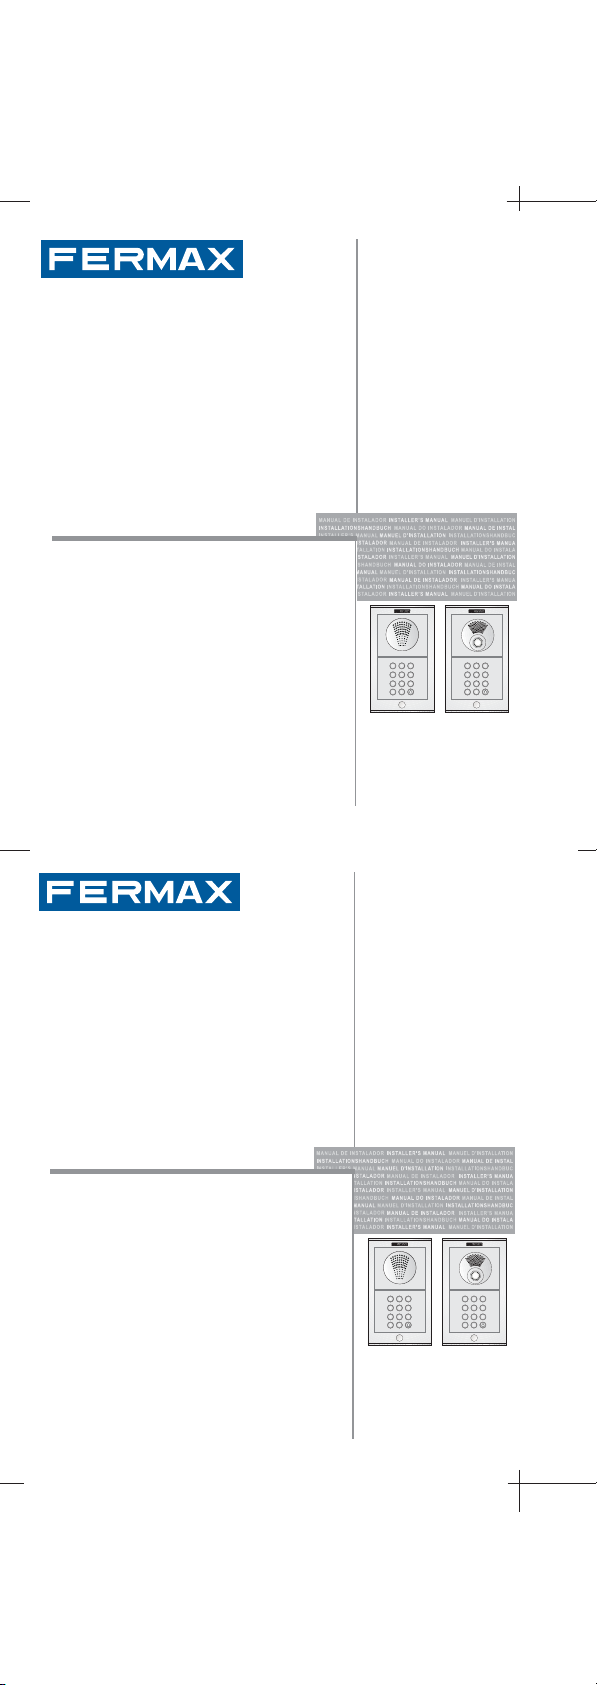
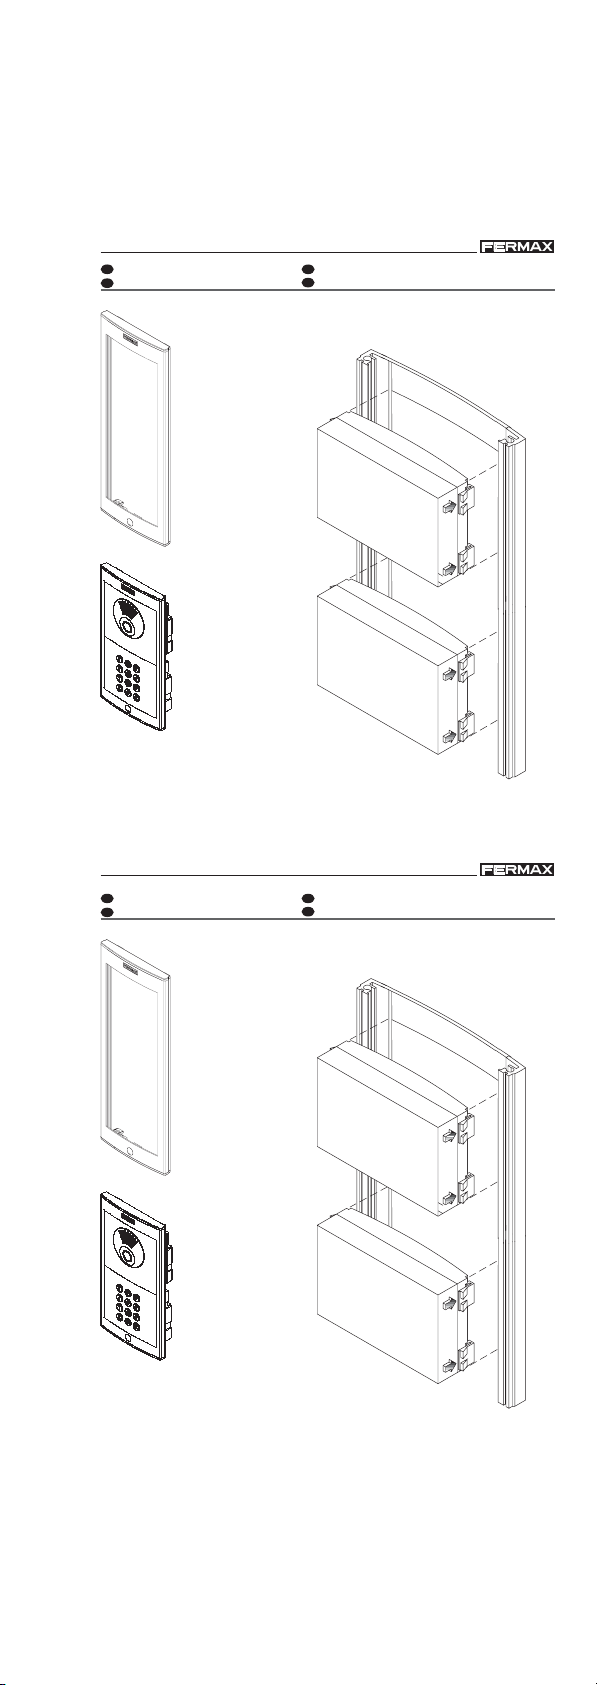
INSTALACIÓN
F
INSTALLATION
Pag 4
VDS - BVDS - B
VDS - B
VDS - BVDS - B
VDS - BVDS - B
VDS - B
VDS - BVDS - B
US2US2
US2
US2US2
US2US2
US2
US2US2
EN
INSTALLATION
D
INSTALLATION
DIRECT DIRECT
DIRECT
DIRECT DIRECT
DIRECT DIRECT
DIRECT
DIRECT DIRECT
E
INSTALACIÓN
F
INSTALLATION
VDS - BVDS - B
VDS - B
VDS - BVDS - B
VDS - BVDS - B
VDS - B
VDS - BVDS - B
US2US2
US2
US2US2
US2US2
US2
US2US2
EN
INSTALLATION
D
INSTALLATION
Pag 4
Page 5
DIRECT DIRECT
DIRECT
DIRECT DIRECT
DIRECT DIRECT
DIRECT
DIRECT DIRECT
E
F
VDS - BVDS - B
VDS - B
VDS - BVDS - B
VDS - BVDS - B
VDS - B
VDS - BVDS - B
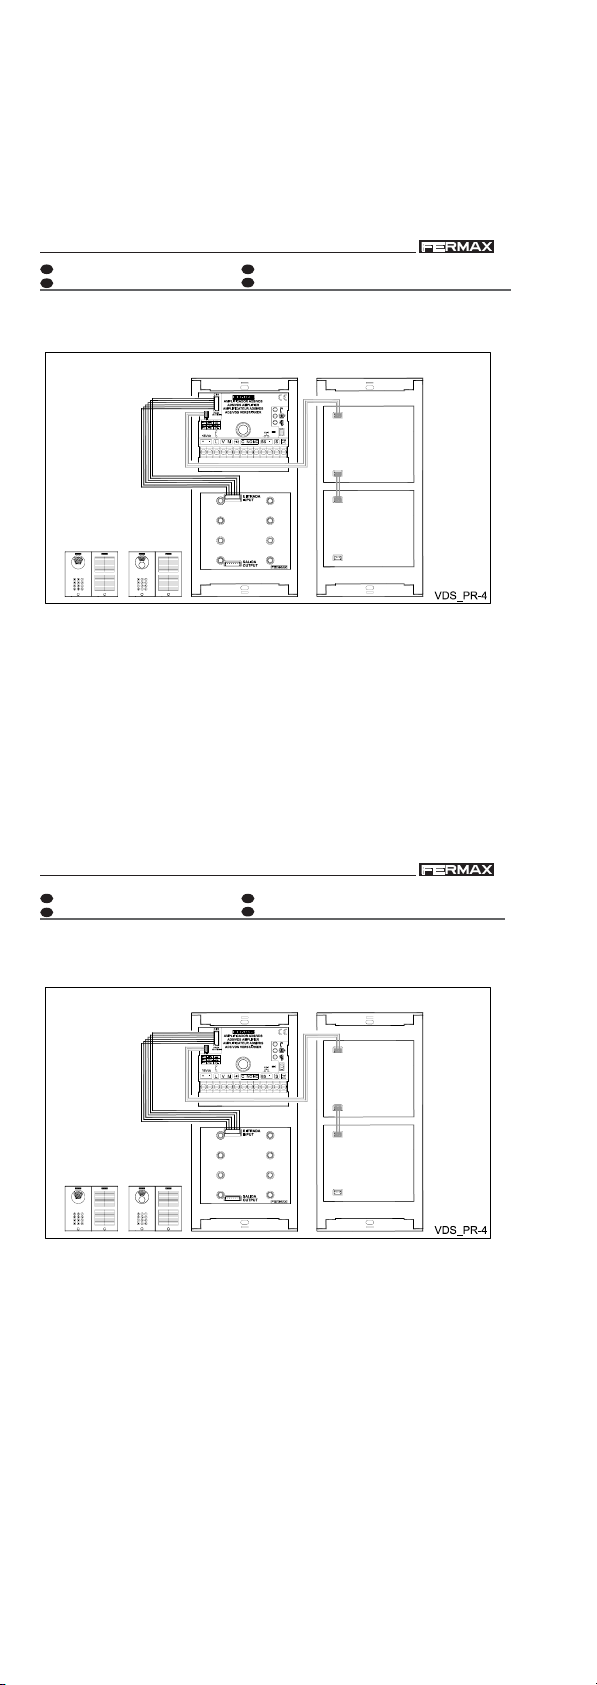
PRECABLEADO INTERNO PLACAEN INTERNAL PANEL PRE-WIRING
PRÉCÂBLAGE INTERNE PLATINED INTERNE VORVERKABELUNG FÜR TÜRSTATION
US2US2
US2
US2US2
US2US2
US2
US2US2
VDS
Pag 5
DIRECT DIRECT
DIRECT
DIRECT DIRECT
DIRECT DIRECT
DIRECT
DIRECT DIRECT
E
F
VDS - BVDS - B
VDS - B
VDS - BVDS - B
VDS - BVDS - B
VDS - B
VDS - BVDS - B
PRECABLEADO INTERNO PLACAEN INTERNAL PANEL PRE-WIRING
PRÉCÂBLAGE INTERNE PLATINED INTERNE VORVERKABELUNG FÜR TÜRSTATION
US2US2
US2
US2US2
US2US2
US2
US2US2
VDS
Pag 5
Page 6

DIRECT DIRECT
DIRECT
DIRECT DIRECT
DIRECT DIRECT
DIRECT
DIRECT DIRECT
BUS2
Pag 6
VDS - BVDS - B
VDS - B
VDS - BVDS - B
VDS - BVDS - B
VDS - B
VDS - BVDS - B
US2US2
US2
US2US2
US2US2
US2
US2US2
DIRECT DIRECT
DIRECT
DIRECT DIRECT
DIRECT DIRECT
DIRECT
DIRECT DIRECT
BUS2
VDS - BVDS - B
VDS - B
VDS - BVDS - B
VDS - BVDS - B
VDS - B
VDS - BVDS - B
US2US2
US2
US2US2
US2US2
US2
US2US2
Pag 6
Page 7

DIRECT DIRECT
DIRECT
DIRECT DIRECT
DIRECT DIRECT
DIRECT
DIRECT DIRECT
VDS - BVDS - B
VDS - B
VDS - BVDS - B
VDS - BVDS - B
VDS - B
VDS - BVDS - B
US2US2
US2
US2US2
US2US2
US2
US2US2
DIRECT DIRECT
DIRECT
DIRECT DIRECT
DIRECT DIRECT
DIRECT
DIRECT DIRECT
Guía de Programación
Programming Guide
Guide de programmation
Programmieranleitung
VDS - BVDS - B
VDS - B
VDS - BVDS - B
VDS - BVDS - B
VDS - B
VDS - BVDS - B
US2US2
US2
US2US2
US2US2
US2
US2US2
Guía de Programación
Programming Guide
Guide de programmation
E
EN
F
D
Pag 7
E
EN
F
Programmieranleitung
D
Pag 7
Page 8

DIRECT DIRECT
DIRECT
DIRECT DIRECT
DIRECT DIRECT
DIRECT
DIRECT DIRECT
E
VDS - BVDS - B
VDS - B
VDS - BVDS - B
VDS - BVDS - B
VDS - B
VDS - BVDS - B
GUÍA DE PROGRAMACIÓN
US2US2
US2
US2US2
US2US2
US2
US2US2
1.1.- Código de apertura
Todos los modelos de Placas Direct permiten la apertura de la puerta desde
la placa de calle mediante la marcación de un código de 4 dígitos.
Secuencia de activación del código de apertura
1.- Con la alimentación desconectada, realice un cortocircuito entre las
bornas “BS” y “-” del amplificador (o pulse el botón de apertura si está instalado).
2.- Manteniendo el cortocircuito anterior conecte la alimentación del sistema
(ya no será necesario mantener el cortocircuito ni el pulsador presionado).
Dispondrá de un minuto para habilitar el código de apertura como se describe en el siguiente punto.
3.- Marque el código de programación 3 1 4 1 (este código no se puede
cambiar) e introduzca las cuatro cifras del código que desea emplear para
abrir la puerta seguido de la tecla .
Cambio de código
Para poder cambiar el código de apertura es necesario conocer el anterior.
En caso de no conocer el anterior código de apertura, es necesario realizar
la secuencia descrita en el apartado anterior.
La secuencia de cambio de código es la siguiente:
1.- Teclee el código de programación: 3 1 4 1.
2.- Introduzca el código de apertura actual.
3.- Introduzca el nuevo código (de cuatro dígitos) y pulse la tecla .
NOTAS:
Emplee la tecla ‘A’ para borrar o reiniciar la secuencia de marcado.
No olvide deshacer el cortocircuito entre «BS» y «-» en el amplificador
de la placa después de realizar las maniobras necesarias.
Pag 8
DIRECT DIRECT
DIRECT
DIRECT DIRECT
DIRECT DIRECT
DIRECT
DIRECT DIRECT
E
VDS - BVDS - B
VDS - B
VDS - BVDS - B
VDS - BVDS - B
VDS - B
VDS - BVDS - B
GUÍA DE PROGRAMACIÓN
US2US2
US2
US2US2
US2US2
US2
US2US2
1.1.- Código de apertura
Todos los modelos de Placas Direct permiten la apertura de la puerta desde
la placa de calle mediante la marcación de un código de 4 dígitos.
Secuencia de activación del código de apertura
1.- Con la alimentación desconectada, realice un cortocircuito entre las
bornas “BS” y “-” del amplificador (o pulse el botón de apertura si está instalado).
2.- Manteniendo el cortocircuito anterior conecte la alimentación del sistema
(ya no será necesario mantener el cortocircuito ni el pulsador presionado).
Dispondrá de un minuto para habilitar el código de apertura como se describe en el siguiente punto.
3.- Marque el código de programación 3 1 4 1 (este código no se puede
cambiar) e introduzca las cuatro cifras del código que desea emplear para
abrir la puerta seguido de la tecla .
Cambio de código
Para poder cambiar el código de apertura es necesario conocer el anterior.
En caso de no conocer el anterior código de apertura, es necesario realizar
la secuencia descrita en el apartado anterior.
La secuencia de cambio de código es la siguiente:
1.- Teclee el código de programación: 3 1 4 1.
2.- Introduzca el código de apertura actual.
3.- Introduzca el nuevo código (de cuatro dígitos) y pulse la tecla .
NOTAS:
Emplee la tecla ‘A’ para borrar o reiniciar la secuencia de marcado.
No olvide deshacer el cortocircuito entre «BS» y «-» en el amplificador
de la placa después de realizar las maniobras necesarias.
Pag 8
Page 9

DIRECT DIRECT
DIRECT
DIRECT DIRECT
DIRECT DIRECT
DIRECT
DIRECT DIRECT
VDS - BVDS - B
VDS - B
VDS - BVDS - B
VDS - BVDS - B
VDS - B
VDS - BVDS - B
US2US2
US2
US2US2
US2US2
US2
US2US2
1.2.- Tiempos de activación del abrepuertas
Todos los modelos de Placas Direct permiten la programación de los tiempos de activación del abrepuertas.
Los tiempos de activación programables son dos:
- Tiempo de apertura de puerta desde la vivienda y desde el teclado
de la placa (mediante el código de apertura);
- Tiempo de apertura correspondiente al botón situado en el interior
del recinto y que servirá para activar el abrepuertas (en caso de
tenerlo instalado).
La secuencia de programación es la siguiente:
1.- Desconectar la alimentación y volver a conectarla. Se dispone
aproximadamente de un minuto para realizar los pasos siguientes
de la secuencia.
2.-Teclee el código de programación 3 1 4 1 seguida de 4 cifras y
pulse la tecla . De estas 4 cifras, las dos primeras corresponden
con el tiempo de apertura desde la vivienda y las dos últimas con
el tiempo de apertura desde el botón instalado en el zaguán.
NOTAS:
Los valores posibles de los tiempos son entre 01 y 99 segundos.
Cualquier tiempo menor de 10 segundos deberá ser precedido del dígito
‘0’.
En caso de error durante la programación de los tiempos (o si se desean
hacer modificaciones) es necesario reiniciar la secuencia desde el punto
1.
Pag 9
DIRECT DIRECT
DIRECT
DIRECT DIRECT
DIRECT DIRECT
DIRECT
DIRECT DIRECT
VDS - BVDS - B
VDS - B
VDS - BVDS - B
VDS - BVDS - B
VDS - B
VDS - BVDS - B
US2US2
US2
US2US2
US2US2
US2
US2US2
1.2.- Tiempos de activación del abrepuertas
Todos los modelos de Placas Direct permiten la programación de los tiempos de activación del abrepuertas.
Los tiempos de activación programables son dos:
- Tiempo de apertura de puerta desde la vivienda y desde el teclado
de la placa (mediante el código de apertura);
- Tiempo de apertura correspondiente al botón situado en el interior
del recinto y que servirá para activar el abrepuertas (en caso de
tenerlo instalado).
La secuencia de programación es la siguiente:
1.- Desconectar la alimentación y volver a conectarla. Se dispone
aproximadamente de un minuto para realizar los pasos siguientes
de la secuencia.
2.-Teclee el código de programación 3 1 4 1 seguida de 4 cifras y
pulse la tecla . De estas 4 cifras, las dos primeras corresponden
con el tiempo de apertura desde la vivienda y las dos últimas con
el tiempo de apertura desde el botón instalado en el zaguán.
NOTAS:
Los valores posibles de los tiempos son entre 01 y 99 segundos.
Cualquier tiempo menor de 10 segundos deberá ser precedido del dígito
‘0’.
En caso de error durante la programación de los tiempos (o si se desean
hacer modificaciones) es necesario reiniciar la secuencia desde el punto
1.
Pag 9
Page 10

DIRECT DIRECT
DIRECT
DIRECT DIRECT
DIRECT DIRECT
DIRECT
DIRECT DIRECT
EN
VDS - BVDS - B
VDS - B
VDS - BVDS - B
VDS - BVDS - B
VDS - B
VDS - BVDS - B
PROGRAMMING GUIDE
US2US2
US2
US2US2
US2US2
US2
US2US2
1.1.- ACCESS CONTROL
Every panels with keypad, includes a basic access control function allowing
users open the door by entering a 4 digits code.
In order to use this function it must have been previously enabled and once in
use there is no way to disable the function (this means that there will always be
a door opening code, known by users or not).
Activation sequence
1.-Power down the system and make a short between “BS” and “-” terminals
of the amplifier (or press the indoor opening pushbutton if installed).
2.-Power up the system and remove the short. There is only a single minute
to enable the opening code.
3.-Dial programming code 3 1 4 1 (this code cannot be modified) and dial the
desired code (four digit code) to open the door and press .
Changing the code
Previous code must be known in order to change it (when unknown, the activation
sequence must be repeated to store the new one).
The sequence:
1.- dial the programming code: 3 1 4 1
2.- dial the opening code to change
3.- dial the new opening code and press .
REMARKS:
Dial ‘a’ to erase or restart the dialling sequence
Ensure the short between “BS” and “-” has been removed before closing the
outdoor panel
Pag 10
DIRECT DIRECT
DIRECT
DIRECT DIRECT
DIRECT DIRECT
DIRECT
DIRECT DIRECT
EN
VDS - BVDS - B
VDS - B
VDS - BVDS - B
VDS - BVDS - B
VDS - B
VDS - BVDS - B
PROGRAMMING GUIDE
US2US2
US2
US2US2
US2US2
US2
US2US2
1.1.- ACCESS CONTROL
Every panels with keypad, includes a basic access control function allowing
users open the door by entering a 4 digits code.
In order to use this function it must have been previously enabled and once in
use there is no way to disable the function (this means that there will always be
a door opening code, known by users or not).
Activation sequence
1.-Power down the system and make a short between “BS” and “-” terminals
of the amplifier (or press the indoor opening pushbutton if installed).
2.-Power up the system and remove the short. There is only a single minute
to enable the opening code.
3.-Dial programming code 3 1 4 1 (this code cannot be modified) and dial the
desired code (four digit code) to open the door and press .
Changing the code
Previous code must be known in order to change it (when unknown, the activation
sequence must be repeated to store the new one).
The sequence:
1.- dial the programming code: 3 1 4 1
2.- dial the opening code to change
3.- dial the new opening code and press .
REMARKS:
Dial ‘a’ to erase or restart the dialling sequence
Ensure the short between “BS” and “-” has been removed before closing the
outdoor panel
Pag 10
Page 11

DIRECT DIRECT
DIRECT
DIRECT DIRECT
DIRECT DIRECT
DIRECT
DIRECT DIRECT
VDS - BVDS - B
VDS - B
VDS - BVDS - B
VDS - BVDS - B
VDS - B
VDS - BVDS - B
US2US2
US2
US2US2
US2US2
US2
US2US2
1.2.- ELECTRIC LOCK ACTIVATION TIME
This parameter can be set up by software programming using the panel
keypad (there is no need to open the outdoor panel).
System allows two different electric lock activation times:
- Door activation from house terminal (monitor and telephone) and the
outdoor panel (using the access control feature):
- Another one related to the door open pushbutton (inside the building) if
it is installed.
There are two simple steps to program the electric lock activation time:
1.- Power down and up the system (warm boot). There is only a minute to
do the following steps.
2.- Enter programming code (3 1 4 1) to enable programming mode and
four digits:
a. First two digits to set up the activation time related to the dwellings
and outdoor panel.
b. Last two to set up the activation time related to the indoor open
pushbutton.
REMARKS:
Activation time range is 1-99 seconds.
Each time is defined by 2 digits, so every time less than 10 seconds must be
entered preceded by a ‘0’.
On error(-s) in programming process, sequence must be restarted from the
beginning (step 1).
Pag 11
DIRECT DIRECT
DIRECT
DIRECT DIRECT
DIRECT DIRECT
DIRECT
DIRECT DIRECT
VDS - BVDS - B
VDS - B
VDS - BVDS - B
VDS - BVDS - B
VDS - B
VDS - BVDS - B
US2US2
US2
US2US2
US2US2
US2
US2US2
1.2.- ELECTRIC LOCK ACTIVATION TIME
This parameter can be set up by software programming using the panel
keypad (there is no need to open the outdoor panel).
System allows two different electric lock activation times:
- Door activation from house terminal (monitor and telephone) and the
outdoor panel (using the access control feature):
- Another one related to the door open pushbutton (inside the building) if
it is installed.
There are two simple steps to program the electric lock activation time:
1.- Power down and up the system (warm boot). There is only a minute to
do the following steps.
2.- Enter programming code (3 1 4 1) to enable programming mode and
four digits:
a. First two digits to set up the activation time related to the dwellings
and outdoor panel.
b. Last two to set up the activation time related to the indoor open
pushbutton.
REMARKS:
Activation time range is 1-99 seconds.
Each time is defined by 2 digits, so every time less than 10 seconds must be
entered preceded by a ‘0’.
On error(-s) in programming process, sequence must be restarted from the
beginning (step 1).
Pag 11
Page 12

DIRECT DIRECT
DIRECT
DIRECT DIRECT
DIRECT DIRECT
DIRECT
DIRECT DIRECT
F
VDS - BVDS - B
VDS - B
VDS - BVDS - B
VDS - BVDS - B
VDS - B
VDS - BVDS - B
GUIDE DE PROGRAMMATION
US2US2
US2
US2US2
US2US2
US2
US2US2
1.1.- Code d’ouverture
Tous les modèles de platine avec affichage permettent l’ouverture de la porte
à partir de la platine de rue en composant un code à 4 chiffres.
Mode d’activation du code d’ouverture
1.- Coupez l’alimentation électrique, court-circuitez les bornes « BS » et
« - » de l’amplificateur (ou appuyez sur le bouton d’ouverture de porte s’il
est installé).
2.- Tout en maintenant le court-circuit, branchez l’alimentation du système
(vous n’aurez alors plus besoin de maintenir le court-circuit, ni d’appuyer
sur le bouton). Vous disposerez d’une minute pour activer le code
d’ouverture, comme expliqué dans le point suivant.
3.- Indiquez le code de programmation 3 1 4 1 (ce code ne peut être
modifié) et introduisez les quatre chiffres du code que vous souhaitez
utiliser pour ouvrir la porte, puis appuyez sur la touche .
Changement de code
Pour modifier le code d’ouverture, il est nécessaire de connaître le code
précédent. Si vous ne connaissez pas l’ancien code d’ouverture, il vous faut
suivre les étapes décrites dans le paragraphe précédent.
La manière de modifier le code est la suivante :
1.- Composez le code de programmation : 3 1 4 1.
2.- Introduisez le code d’ouverture actuel.
3.- Introduisez le nouveau code (à quatre chiffres) et appuyez sur la
touche .
REMARQUES:
Utilisez la touche ‘A’ pour effacer ou recommencer la séquence de numérotation.
Après avoir réalisé les opérations nécessaires, n’oubliez pas de supprimer le
court-circuit entre « BS » et « - » sur l’amplificateur de la platine.
Pag 12
DIRECT DIRECT
DIRECT
DIRECT DIRECT
DIRECT DIRECT
DIRECT
DIRECT DIRECT
F
VDS - BVDS - B
VDS - B
VDS - BVDS - B
VDS - BVDS - B
VDS - B
VDS - BVDS - B
GUIDE DE PROGRAMMATION
US2US2
US2
US2US2
US2US2
US2
US2US2
1.1.- Code d’ouverture
Tous les modèles de platine avec affichage permettent l’ouverture de la porte
à partir de la platine de rue en composant un code à 4 chiffres.
Mode d’activation du code d’ouverture
1.- Coupez l’alimentation électrique, court-circuitez les bornes « BS » et
« - » de l’amplificateur (ou appuyez sur le bouton d’ouverture de porte s’il
est installé).
2.- Tout en maintenant le court-circuit, branchez l’alimentation du système
(vous n’aurez alors plus besoin de maintenir le court-circuit, ni d’appuyer
sur le bouton). Vous disposerez d’une minute pour activer le code
d’ouverture, comme expliqué dans le point suivant.
3.- Indiquez le code de programmation 3 1 4 1 (ce code ne peut être
modifié) et introduisez les quatre chiffres du code que vous souhaitez
utiliser pour ouvrir la porte, puis appuyez sur la touche .
Changement de code
Pour modifier le code d’ouverture, il est nécessaire de connaître le code
précédent. Si vous ne connaissez pas l’ancien code d’ouverture, il vous faut
suivre les étapes décrites dans le paragraphe précédent.
La manière de modifier le code est la suivante :
1.- Composez le code de programmation : 3 1 4 1.
2.- Introduisez le code d’ouverture actuel.
3.- Introduisez le nouveau code (à quatre chiffres) et appuyez sur la
touche .
REMARQUES:
Utilisez la touche ‘A’ pour effacer ou recommencer la séquence de
numérotation.
Après avoir réalisé les opérations nécessaires, n’oubliez pas de supprimer
le court-circuit entre « BS » et « - » sur l’amplificateur de la platine.
Pag 12
Page 13

DIRECT DIRECT
DIRECT
DIRECT DIRECT
DIRECT DIRECT
DIRECT
DIRECT DIRECT
VDS - BVDS - B
VDS - B
VDS - BVDS - B
VDS - BVDS - B
VDS - B
VDS - BVDS - B
US2US2
US2
US2US2
US2US2
US2
US2US2
1.2.- Temps d’activation de la gâche
Tous les modèles d’amplificateur permettent la programmation des temps
d’activation de l’ouverture de la gâche.
Il existe deux temps d’activation programmables :
-Temps d’ouverture de porte à partir du logement et à partir du clavier
de la platine (à l’aide du code d’ouverture).
- Temps d’ouverture correspondant au bouton situé à l’intérieur de
l’enceinte et qui servira à activer l’ouverture de la gâche (s’il est
installé).
Le mode de programmation est le suivant :
1.-Débranchez l’alimentation, puis la rebrancher. Vous disposez
d’environ une minute pour réaliser les étapes suivantes.
2.-Tapez le code de programmation 3 1 4 1 suivi de 4 chiffres et
appuyez sur la touche . Sur ces 4 chiffres, les deux premiers
correspondent au temps d’ouverture à partir du logement, et les
deux derniers au temps d’ouverture à partir du bouton installé dans
le vestibule.
REMARQUES:
Les temps doivent être compris entre 1 et 99 secondes.
Les temps inférieurs à 10 secondes devront être précédés du chiffre ‘0’.
En cas d’erreur au cours de la programmation des temps (ou si vous
souhaitez effectuer des modifications), recommencez l’opération depuis
le début.
Pag 13
DIRECT DIRECT
DIRECT
DIRECT DIRECT
DIRECT DIRECT
DIRECT
DIRECT DIRECT
VDS - BVDS - B
VDS - B
VDS - BVDS - B
VDS - BVDS - B
VDS - B
VDS - BVDS - B
US2US2
US2
US2US2
US2US2
US2
US2US2
1.2.- Temps d’activation de la gâche
Tous les modèles d’amplificateur permettent la programmation des temps
d’activation de l’ouverture de la gâche.
Il existe deux temps d’activation programmables :
-Temps d’ouverture de porte à partir du logement et à partir du clavier
de la platine (à l’aide du code d’ouverture).
- Temps d’ouverture correspondant au bouton situé à l’intérieur de
l’enceinte et qui servira à activer l’ouverture de la gâche (s’il est
installé).
Le mode de programmation est le suivant :
1.-Débranchez l’alimentation, puis la rebrancher. Vous disposez
d’environ une minute pour réaliser les étapes suivantes.
2.-Tapez le code de programmation 3 1 4 1 suivi de 4 chiffres et
appuyez sur la touche . Sur ces 4 chiffres, les deux premiers
correspondent au temps d’ouverture à partir du logement, et les
deux derniers au temps d’ouverture à partir du bouton installé dans
le vestibule.
REMARQUES:
Les temps doivent être compris entre 1 et 99 secondes.
Les temps inférieurs à 10 secondes devront être précédés du chiffre ‘0’.
En cas d’erreur au cours de la programmation des temps (ou si vous
souhaitez effectuer des modifications), recommencez l’opération depuis
le début.
Pag 13
Page 14

DIRECT DIRECT
DIRECT
DIRECT DIRECT
DIRECT DIRECT
DIRECT
DIRECT DIRECT
D
VDS - BVDS - B
VDS - B
VDS - BVDS - B
VDS - BVDS - B
VDS - B
VDS - BVDS - B
PROGRAMMIERANLEITUNG
US2US2
US2
US2US2
US2US2
US2
US2US2
1.1.- Türöffungscode
Alle Modelle der DIRECT Türstationen erlauben die Türöffnung von der
Türstation aus durch Eingabe eines 4-stelligen Codes.
Aktivierungssequenz des Türöffungscodes
1.- Führen Sie bei ausgestecktem Netzteil einen Kurzschluss durch zwischen
den Klemmen “BS” und “-” des Lautsprechers (oder drücken Sie die
Türöffnertaste, falls diese installiert worden ist).
2.- Schließen Sie unter Aufrechterhaltung des bestehenden Kurzschlusses das
Netzteil des Systems an. (Danach muss weder der Kurzschluss aufrechterhalten
noch die Taste gedrückt bleiben.) Anschließend müssen Sie innerhalb von einer
Minute den Türöffnungscode aktivieren, so wie nachfolgend beschrieben wird.
3.- Geben Sie den Programmiercode 3 1 4 1 ein (dieser Code kann nicht
geändert werden), und geben Sie den gewünschten 4-stelligen Code für die
Türöffnung ein. Bestätigen Sie diesen Vorgang anschließend durch Drücken der
Klingeltaste .
Codeänderung
Um den Code zu ändern, muss der aktuelle Code bekannt sein. Falls der
aktuelle Türöffnungscode nicht vorliegt, ist es erforderlich, wie im
vorliegenden Abschnitt vorzugehen.
Reihenfolge für die Codeänderung:
1.- Programmiercode eingeben: 3 1 4 1;
2.- Aktuellen Türöffnungscode eingeben;
3.- Neuen Türöffnungscode eingeben (4-stellig) und Bestätigen durch
Drücken der Klingeltaste .
HINWEISE:
Drücken Sie die Taste „A“, um die Eingabesequenz zu löschen oder eine
neue einzugeben.
Vergessen Sie nicht den Kurzschluss zwischen den Klemmen „BS“ und „-“
am Lautsprecher der Türstation nach Abschluss der Arbeiten an der Anlage
zu beseitigen.
Pag 14
DIRECT DIRECT
DIRECT
DIRECT DIRECT
DIRECT DIRECT
DIRECT
DIRECT DIRECT
D
VDS - BVDS - B
VDS - B
VDS - BVDS - B
VDS - BVDS - B
VDS - B
VDS - BVDS - B
PROGRAMMIERANLEITUNG
US2US2
US2
US2US2
US2US2
US2
US2US2
1.1.- Türöffungscode
Alle Modelle der DIRECT Türstationen erlauben die Türöffnung von der
Türstation aus durch Eingabe eines 4-stelligen Codes.
Aktivierungssequenz des Türöffungscodes
1.- Führen Sie bei ausgestecktem Netzteil einen Kurzschluss durch zwischen
den Klemmen “BS” und “-” des Lautsprechers (oder drücken Sie die
Türöffnertaste, falls diese installiert worden ist).
2.- Schließen Sie unter Aufrechterhaltung des bestehenden Kurzschlusses das
Netzteil des Systems an. (Danach muss weder der Kurzschluss aufrechterhalten
noch die Taste gedrückt bleiben.) Anschließend müssen Sie innerhalb von einer
Minute den Türöffnungscode aktivieren, so wie nachfolgend beschrieben wird.
3.- Geben Sie den Programmiercode 3 1 4 1 ein (dieser Code kann nicht
geändert werden), und geben Sie den gewünschten 4-stelligen Code für die
Türöffnung ein. Bestätigen Sie diesen Vorgang anschließend durch Drücken der
Klingeltaste .
Codeänderung
Um den Code zu ändern, muss der aktuelle Code bekannt sein. Falls der
aktuelle Türöffnungscode nicht vorliegt, ist es erforderlich, wie im
vorliegenden Abschnitt vorzugehen.
Reihenfolge für die Codeänderung:
1.- Programmiercode eingeben: 3 1 4 1;
2.- Aktuellen Türöffnungscode eingeben;
3.- Neuen Türöffnungscode eingeben (4-stellig) und Bestätigen durch
Drücken der Klingeltaste .
HINWEISE:
Drücken Sie die Taste „A“, um die Eingabesequenz zu löschen oder eine
neue einzugeben.
Vergessen Sie nicht den Kurzschluss zwischen den Klemmen „BS“ und „-“
am Lautsprecher der Türstation nach Abschluss der Arbeiten an der Anlage
zu beseitigen.
Pag 14
Page 15

DIRECT DIRECT
DIRECT
DIRECT DIRECT
DIRECT DIRECT
DIRECT
DIRECT DIRECT
VDS - BVDS - B
VDS - B
VDS - BVDS - B
VDS - BVDS - B
VDS - B
VDS - BVDS - B
US2US2
US2
US2US2
US2US2
US2
US2US2
1.2.- Aktivierungszeit des Türöffners
Alle Modelle des DIRECT Türstationen erlauben die Programmierung
der Aktivierungszeit des Türöffners.
Folgende zwei Aktivierungszeiten können programmiert werden.
- Türöffnungszeit bei einer Aktivierung über die Wohnung und über die
Tastatur der Türstation (mit dem Türöffnungscode);
-Türöffnungszeit bei einer Aktivierung des Türöffners über die
Türöffnertaste im Inneren der Wohnsiedlung (sofern eine
Türöffnertaste installiert worden ist).
Die Programmiersequenz sieht dabei folgendermaßen aus:
1.-Netzteil ausstecken und wieder anschließen. Alle weiteren
Programmschritte müssen innerhalb einer Minute vorgenommen
werden.
2.-Geben Sie den 4-stelligen Programmiercode 3 1 4 1 ein, und
Drücken Sie die Klingeltaste
entsprechen die ersten zwei der Türöffnungszeit bei Aktivierung
über die Wohnung und die letzten beiden der Türöffnungszeit bei
der Aktivierung über den Flur.
. Von diesen vier Ziffern
HINWEISE:
Die erlaubten Werte müssen zwischen 1 und 99 Sekunden liegen.
Allen Zeitwerten, die unter 10 Sekunden liegen, muss eine „0“
vorangestellt werden.
Bei fehlerhafter Programmierung der Zeitwerte (oder falls Änderungen
vorgenommen werden sollen) ist es notwendig, erneut bei Schritt 1 zu
beginnen.
Pag 15
DIRECT DIRECT
DIRECT
DIRECT DIRECT
DIRECT DIRECT
DIRECT
DIRECT DIRECT
VDS - BVDS - B
VDS - B
VDS - BVDS - B
VDS - BVDS - B
VDS - B
VDS - BVDS - B
US2US2
US2
US2US2
US2US2
US2
US2US2
1.2.- Aktivierungszeit des Türöffners
Alle Modelle des DIRECT Türstationen erlauben die Programmierung
der Aktivierungszeit des Türöffners.
Folgende zwei Aktivierungszeiten können programmiert werden.
- Türöffnungszeit bei einer Aktivierung über die Wohnung und über die
Tastatur der Türstation (mit dem Türöffnungscode);
-Türöffnungszeit bei einer Aktivierung des Türöffners über die
Türöffnertaste im Inneren der Wohnsiedlung (sofern eine
Türöffnertaste installiert worden ist).
Die Programmiersequenz sieht dabei folgendermaßen aus:
1.-Netzteil ausstecken und wieder anschließen. Alle weiteren
Programmschritte müssen innerhalb einer Minute vorgenommen
werden.
2.-Geben Sie den 4-stelligen Programmiercode 3 1 4 1 ein, und
Drücken Sie die Klingeltaste
entsprechen die ersten zwei der Türöffnungszeit bei Aktivierung
über die Wohnung und die letzten beiden der Türöffnungszeit bei
der Aktivierung über den Flur.
. Von diesen vier Ziffern
HINWEISE:
Die erlaubten Werte müssen zwischen 1 und 99 Sekunden liegen.
Allen Zeitwerten, die unter 10 Sekunden liegen, muss eine „0“
vorangestellt werden.
Bei fehlerhafter Programmierung der Zeitwerte (oder falls Änderungen
vorgenommen werden sollen) ist es notwendig, erneut bei Schritt 1 zu
beginnen.
Pag 15
Page 16

 Loading...