

Page 1

Application user manual
FERMAX BLUETOOTH
PC - PDA
Software version V1.08
Code 97589I V07_10
Page 2

Code 97589I, V07_10
Technical information booklet published by FERMAX ELECTRONICA S.A.E.
As part of its policy of constant improvement, FERMAX ELECTRONICA S.A.E. reserves the
right to modify the content of this document and the characteristics of the products referred to in
it at any time and without prior notice.
Any modification will be reflected in subsequent editions of this document.
2
Page 3

Table of contents
Prerequisites ..................................................................................................... 4
Installation ........................................................................................................ 4
Introduction ...................................................................................................... 6
Main Menu ......................................................................................................... 7
Putting the receiver into configuration mode ...................................................... 9
Find receiver ..................................................................................................... 10
Parameters ...................................................................................................... 12
Mode ................................................................................................................ 13
Power ............................................................................................................... 14
Opening time .................................................................................................... 14
Repeating period .............................................................................................. 14
User PIN ........................................................................................................... 14
Administrator PIN ............................................................................................. 15
Receiver Name ................................................................................................. 16
User management .......................................................................................... 17
Add ................................................................................................................... 18
Modify ............................................................................................................... 19
ReadBK / WriteBK ............................................................................................ 20
Read File .......................................................................................................... 20
Save File .......................................................................................................... 21
Delete ............................................................................................................... 22
Empty List......................................................................................................... 22
Search dev. ...................................................................................................... 22
*Class II-III ....................................................................................................... 25
Start Search ..................................................................................................... 25
Delete Device ................................................................................................... 26
Modify Device ................................................................................................... 26
Empty List......................................................................................................... 26
Export list.......................................................................................................... 26
NOTE: Clase II-III: Opciones no disponibles en PDA.
3
Page 4

Prerequisites and Installation 0
Prerequisites
■ PC equipped with Bluetooth connection.
■ With Microsoft or Widcomm Bluetooth stack.
■ With Microsoft® Windows XP or higher operating system.
Note: If your PC does not have a Microsoft or Widcomm Bluetooth stack, ask the manufacturer
how to update the Bluetooth stack to that of Microsoft or Widcomm.
Note: This program can only be used to operate on Bluetooth 1.30 and later receivers.
Installation
The application is installed using the standard Microsoft procedure for installation of
applications on computers.
A file is used to install the application:
“setup_bluekey_pc.exe”
Simply deposit this file in any of the PC’s subdirectories and double click on it for the installation
process to start automatically.
If at this point in the installation of the application you are asked to install Microsoft’s “.NET
Framework 2.0“ you can either download it from the Microsoft website or use the installable
included in the CD called “dotnetfx.exe” to then launch “setup_bluekey_pc.exe” again.
When the installation process has finished:
9 The “BluekeyPC” subdirectory will have been created in the specified location during the
installation process (by default (C:\Program Files\Fermax\). This subdirectory stores all the
files necessary to execute the program (the executable file FermaxPC.exe, the xml
programming language files, any additional user lists, etc).
9 A direct access will have been created on the PC desktop to launch the FermaxPC
application.
4
Page 5
Introduction 1
Introduction
Welcome to Bluekey Fermax PC. Fermax PC Bluekey (BFPC) is an application that enables the
user to administrate the Bluekey receiver for Fermax from a computer. The BFPC will help the
administrator precisely configure the receiver using a series of simple, intuitive menus.
Note that you don’t need to reconfigure the receiver if you want to work with the ex-factory
default configuration.
Note about this manual
The images on the screens shown in the manual correspond to the PC application. The
appearance of screens in the Fermax Bluetooth application varies, depending on the type of
equipment used, PC or PDA. Nonetheless, the information shown, the visible text labels and the
order of the data fields are the same in both cases.
Example:
PC application screen PDA application screen
The general layout of the menus throughout the application will be as follows:
Title of current
menu.
0. General layout of menus.
Exit menu. Menu options.
Menu operating
Menu operating
zone
zone.
5
Page 6
Main Menu 2
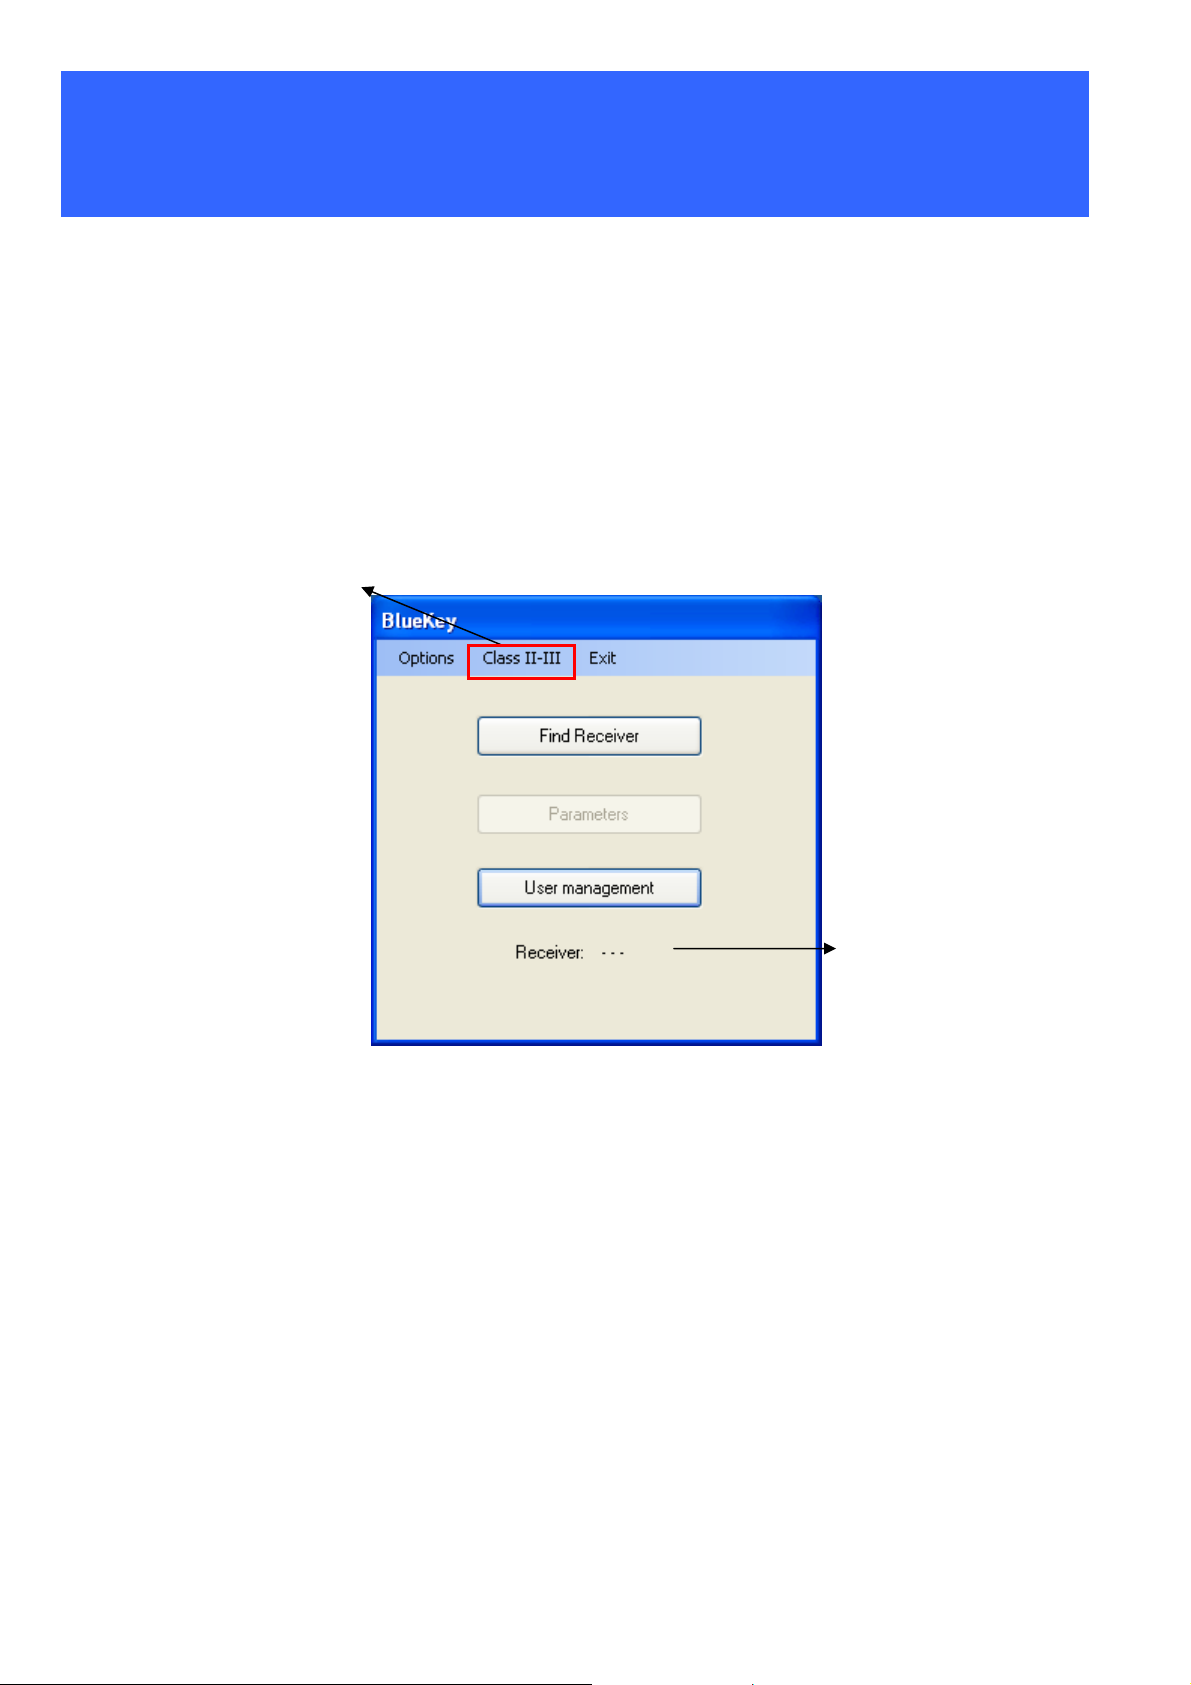
Main Menu
The main BFPC menu includes the following functions:
• Find receiver: enables you to create a Bluetooth connection with the desired receiver
device in order to subsequently be able to operate on it.
• Parameters: enables you to manage the operating parameters of the receiver device.
• User management: enables you to manage user lists, create new ones from different
sources, and also upload or update them from the receiver.
The option “Clase
The “Clase II” option - II I”
II – III is not
is not available in
available in PDA
PDA
Active receiver
FERMAX
1. Main Menu
indicator.
The menu also provides additional information on which receiver is active at this moment. When
you initially execute the application, the “Parameters” button is disabled and the receiver
indicates that there are none active. The “Parameters” button will remain disabled until a
connection is made to the receiver.
6
Page 7

Search Receiver Menu 3
Putting the receiver into configuration mode
There are three ways to go into configuration mode:
1. Switch off the receiver. On a telephone, PDA or PC, enter the Bluetooth name
“ADMMAN” and switch the receiver on again. After correctly entering the administrator
PIN, the action will be executed to force the receiver to go from standard mode into
configuration mode.
2. With the receiver operating in standard mode, and without having to turn it off, with a
pencil or ballpoint pen press on a small push button on the board underneath the leds.
The receiver comes out of standard mode and goes into configuration mode while a
short sound indicator is emitted in the buzzer.
3. If the PC or PDA with which you wish to configure the reader also did this the previous
time, if you have the Bluetooth connection on the reader will automatically request the
administrator PIN code and if it is correct will go into configuration mode. Note: it is
very important, if the configuration PC is in the vicinity of the reader, to
disconnect or suspend its Bluetooth interface to avoid the reader continuously
requesting the administrator PIN and failing to respond to user phones while
awaiting the PIN code.
To return to standard operation mode, there are three alternatives:
1. With the receiver operating in configuration mode, and without needing to switch it off,
press the push button we described above. The receiver goes from configuration mode
into standard mode. At this moment a longer sound indicator is emitted in the buzzer
than in the previous case.
2. If the receiver is in configuration mode and five minutes pass from the last configuration
action executed, it will automatically switch back over to standard mode.
3. When the application ends a command is automatically sent to the receiver which takes
it out of configuration mode and back into standard mode.
Find receiver
¾ Important: in order to be able to find and operate on the receiver, it must be in
configuration mode.
This menu enables the device to search for the receiver on which it is going to operate. To do
this, it carries out a search for the available ones.
When the search has ended and the device has been located, the administrator must be paired
with the receiver. For this, the administration PIN is used as a pairing code (by default "4444"). If
this operation is successful, a connection will be established between the two, which will enable
it to operate on the destination. This action will avoid future pairings, unless certain special
circumstances occur later (receiver reboot, five-minute timeout consumed, pressing the button,
changing the administrator PIN).
7
Page 8
Selectable receivers
list.
2. Find receiver menu
Operation information
panel.
• The Search /More button: enables the administrator to search for the receiver. Those
detected will be added to the list of selectable receivers.
• The Select button: enables the administrator to establish a connection between the
source device and the receiver to subsequently be able to operate on it.
8
Page 9

Parameters Menu 4
Parameters
This menu enables the administrator to get an overall view of the receiver’s operating
parameters. The menu has 7 basic parameters: the operating mode, the power, the opening
time (in seconds), the repeat time (the time is in tens of seconds), the management of the
administrator PIN and the name of the receiver. Each one of them is totally configurable and
determines the behaviour of the receiver.
Operation
information panel.
3. Parameters
• The Read BK button recovers the receiver’s current operating parameters and enables
them to be viewed in the different elements of the menu.
• The Mode drop-down menu enables us to change the current value of the operating
mode.
• The Power drop-down menu enables us to change the current value of the power.
• The Opening arrows enable us to increase or reduce the value of the opening time.
9
Page 10

• The Repeats arrows enable us to increase or reduce the value of the repeat time. By
10-second intervals.
• The User PIN and Administration PIN buttons enable us to change the current values
of the PINs.
• The Receiver Name button enables us to change the name of the receiver.
• The Write BK button enables us to permanently transfer the parameter configuration
information to the receiver.
Mode
The Mode drop-down menu enables the administrator to adjust the current operating mode
value. In this menu, you can choose from among 6 values:
a) With list, Automatic: this mode defines the existence of a list of authorised users, but without
requiring PINs (automatic opening).
b) With list, with confirmation PIN: this mode defines a, b and c are only for Class I, the
existence of an authorised users list and executes the opening using a key (“1”) as the
password.
c) With list, with PIN: This mode defines the existence of a list of authorised users, and opens
using the specified 4-digit PIN as the password.
c) Without list, with PIN: In this mode, there is no list of authorised users and a 4-digit PIN is not
used as a password.
e) Without list, with confirmation: This mode is only valid in class II/III. A confirmation will be
requested from all phones in order to send it to the door controller.
c) Without list, with PIN: This mode is only valid in class II/III. The PIN code will be requested
from all phones and if correct will be sent to the door controller.
Power
This drop-down menu enables us to adjust the range of coverage for the power, choosing from
among three coverage range:
a) Short: This mode defines a coverage range of approximately a couple of metres.
b) Medium: This mode defines a coverage range of approximately ten metres.
c) High: This mode defines a coverage range of more than approximately ten metres.
Opening time
Drop-down menu that enables us to define the time the door remains open. It is defined as a
numerical value from 1 to 99.
Repeating period
Dropdown menu that enables us to define the value of the repeating period. It is defined as a
numerical value from 10 to 90 (in tens). There is no point in defining intermediate values (15,
23) because the precision is very limited.
User PIN
This menu appears when we press the “User PIN” button in the Parameters menu. To change
the PIN, enter the new PIN in the corresponding field. Remember that the PIN entered must
have exactly 4 digits (0-9).
10
Page 11

4. User PIN
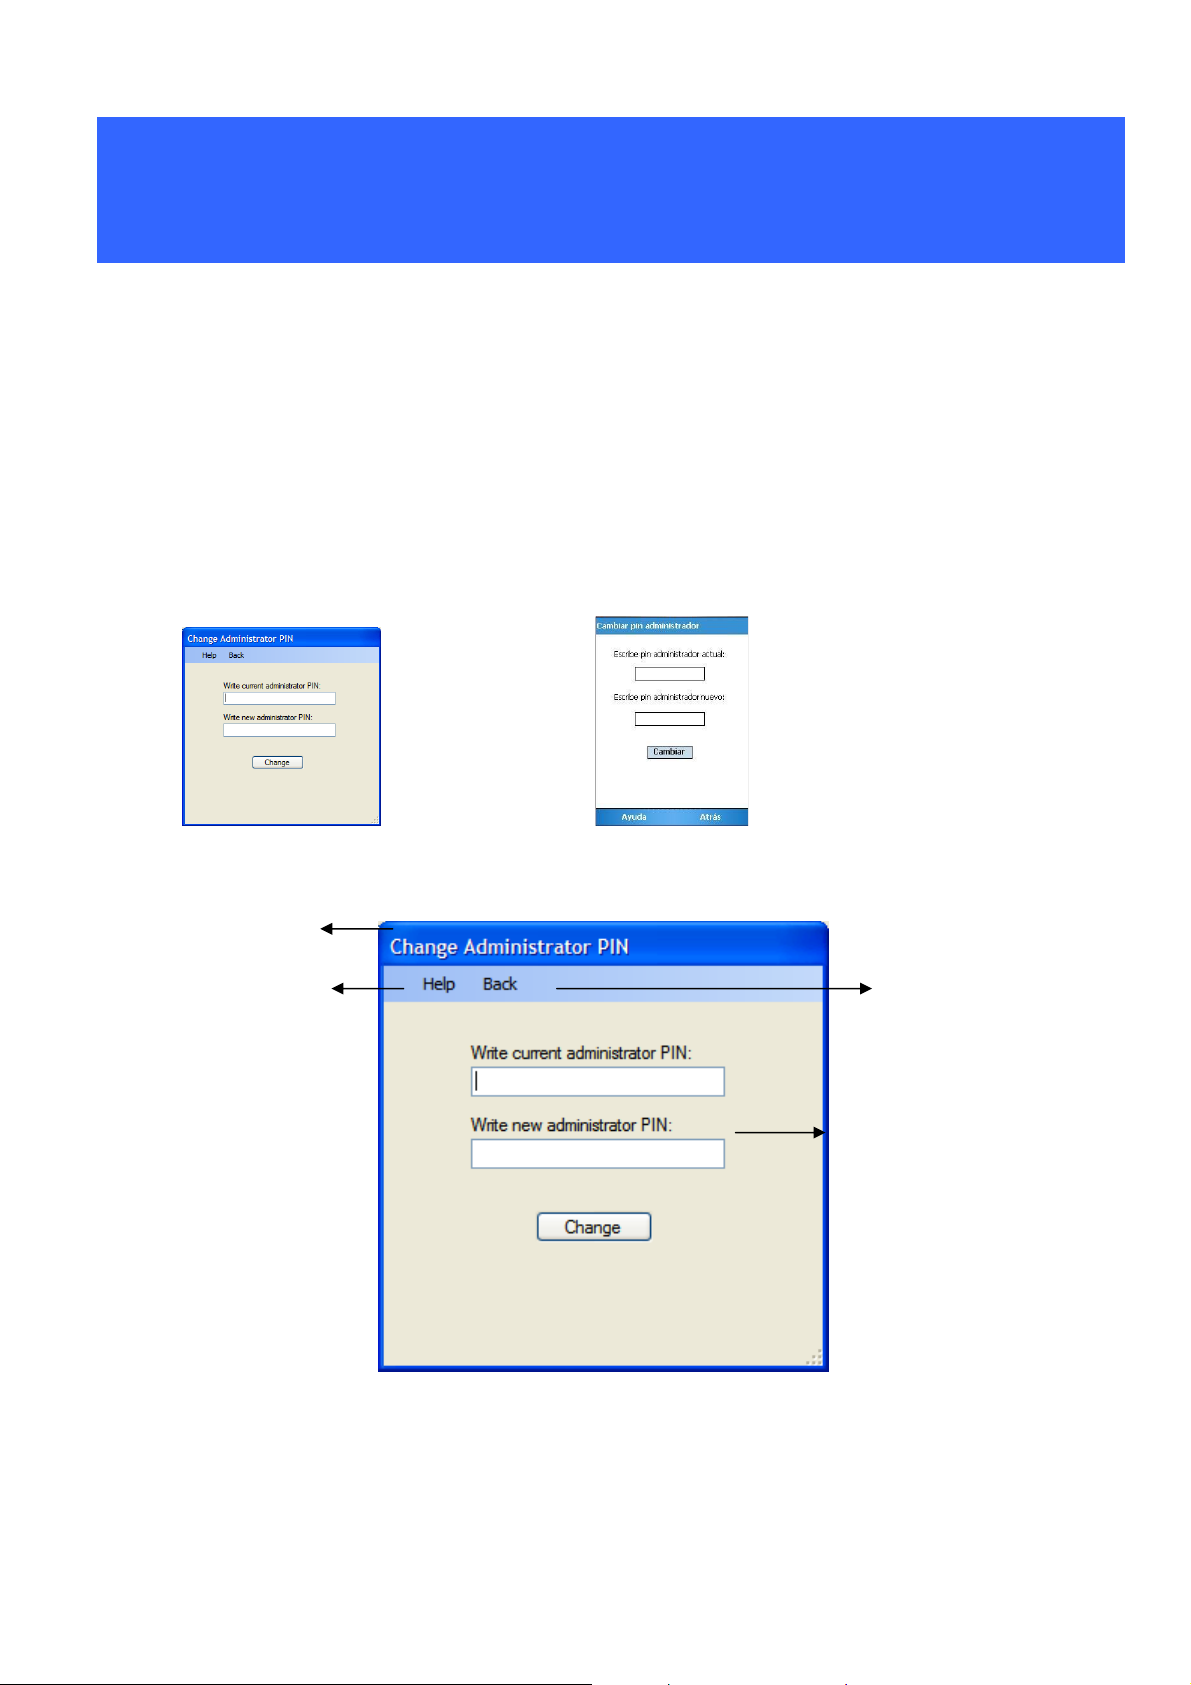
Administrator PIN
This menu appears when we press the “Administrator PIN” button in the Parameters menu. To
change the Administrator PIN, enter the current Administrator PIN in the corresponding field.
Then, enter the new Administrator PIN, which must have exactly 4 digits (0-9).
4. Administrator PIN
11
Page 12

Receiver Name
To change the current name of the receiver, enter the new name in the corresponding field. This
name must have a maximum of 10 characters and must not contain any blank spaces. Nor are
accentuated characters or the letter ñ permitted.
Note:
Due to the internal management of Bluetooth links carried out by the different operating
systems of the devices (PC, PDA, mobiles), it may happen that, if a device was paired with a
receiver and then the name of the receiver is changed, in the next connection with the receiver
the old name may appear, even though it has been changed correctly on the receiver. In
general, this only happens the first time after the change of name. If you wish, you can avoid
this by deleting the old link on the device after the change of name on the receiver.
6. Receiver name
12
Page 13

User Management Menu 5
User management
This menu enables the administrator to manage the list of users accepted by the receiver, up to
a maximum of 40 users.
7. User management
Note that the list maintenance operations, with the exception of ReadBK and WriteBK, are
local actions on the PC and will only become effective if they are transferred to the receiver
using the WriteBK button.
• The ReadBK and WriteBK buttons on the receiver enable us to receive or send the list
of authorised users from/to the receiver respectively.
• The Read File / Save File buttons are used for the management of files in this menu.
• The Search phone devices button is used to search devices in the vicinity.
• The Add/Delete/Modify buttons are used to manage users in the list.
• The Empty List button enables us to delete all the users in the list.
• Currently unoccupied receiver positions will be described with the word “[Empty]”.
13
Page 14

Add
This menu enables us to add new users to the list of those accepted. To add a new user, enter
the new name in the corresponding field. The chain entered must be a maximum of 16
characters.
Proceed in the same way with the Bluetooth address of the user to be added. The address must
be a maximum of 12 hexadecimal characters. Once you have entered this data press the
“Accept” button to validate the data and if correct include them on the first available space on
the list.
8. Add user
Modify
This menu, practically identical to the previous screen, enables us to change the name of an
existing user in the authorised users list. If you, as administrator, wish to modify a user, select
the user. Then all you have to do is fill in your name in the text field containing the current user
name to be modified. The new text entered must have a maximum of 16 characters. You can
also modify the Bluetooth address, which has 12 hexadecimal characters. To validate the
changes and execute the modification press “Modify”.
14
Page 15

9. Modifying a user
ReadBK / WriteBK
The “Read BK” operation enables us to transfer the list of authorised users from the receiver to
the application and work on it locally. “Write BK” sends this local user list to the receiver in order
to save them permanently.
¾ Important: when carrying out the action “Write BK”, the list previously existing
on the receiver is deleted and replaced with the application’s local list.
Read File
The Read File operation enables us to transfer the list contained in the file to the local list of the
application and thus be able to work on it.
This operation will facilitate the task of applying the same list of authorised users on several
receivers. To read a file, it is necessary to specify the name of the file so that this can be
uploaded.
This menu will also enable us to delete the existing files in the file directory.
On reading the file the users are added to those already existing on the local list.
15
Page 16

10. Reading a file
Save File
The Save File operation enables us to transfer or record the local list in a file in order to save it.
11. Saving a file
As with the previous one, this operation will facilitate the task of applying the same list of
authorised users on several receivers. To write a file, it is necessary to specify the name the file
is going to be saved with. This menu will also enable us to delete the existing files in the file
directory.
16
Page 17

Delete
Delete is an operation that is applied on the local list of users. To delete a user from the list,
select the user you want to remove and then click on the delete button.
Empty List
Empty list will delete all the users in the local list of the application.
Search dev.
Search dev. enables you to find new users (nearby Bluetooth devices) that you wish to add to
the local list.
17
Page 18

Options Menu
This menu has the options we have already seen (Reader Detection, Parameters and User
Management) plus the following options:
Conversion
This option enables us to translate a phone’s code to the Wiegand or Data Clock format
selected, when the reader is working in Class II/III mode.
These codes are the ones that will be registered in the MDS (WincomPlus Software) or CAC
(CAC Software) application.
Language
6
This option enables us to change the application’s language.
18
Page 19

Class II-III Menu
Class II-III (Options not available in PDA).
This menu enables the administrator to manage the list of detected devices in order to then
transfer it to the class II and III management applications. It also provides us with the phones’
bluetooth addresses in order to register them via Management.
7
12. Fermax detection
Start Search
The start search option enables you to find new users (nearby Bluetooth devices) that you wish
to add to the local list.
Delete Device
The delete device operation is applied to the local list of devices encountered. To delete a
device from the list, select the device to be deleted and press the “Delete Device” button. The
device will then be deleted.
Modify Device
This menu enables us to change the name of an existing user in the encountered devices list. If
you, as administrator, wish to change the name, all you have to do is fill in this change in the
text field showing the current name of the device to be modified. The new text entered must
have a maximum of 16 characters. You can also modify the Bluetooth address, which has 12
hexadecimal characters. To validate the changes and execute the modification press “Modify”.
19
Page 20

13. Saving a file
Empty List
Empty list will delete all the devices available in the application’s local list.
Export list
The export list enables us to save the local list’s Wiegand or Dataclock names and addresses in
a text file for their keeping. The first step is to select the type of addresses to which you want to
export the file. Then, select the location of the file you are going to export the data to.
14. Select protocol
This operation will facilitate data management for you as administrator, as it gives you the
power to transport the data obtained through this operation to other programs (Wincom+ or
CAC).
20
Page 21

Page 22

Page 23

Page 24

Audio and Video Door Entry Systems
www.fermax.com fermax@fermax.com
 Loading...