

Page 1
X
E
MANUAL KIT VIDEO OLYMPO ADS
EN
OLYMPO ADS VIDEO KIT MANUAL
F
MANUEL DU KIT OLYMPO ADS
D
HANDBUCH OLYMPO ADS VIDEO-SET
P
MANUAL KIT VIDEO OLYMPO ADS
Page 2

Kit VIDEO OLYMPO ADS
Kit VIDEO OLYMPO ADS
«KIT VIDEO OLYMPO ADS»
E
EN
«OLYMPO ADS VIDEO KIT MANUAL»
«MANUEL DU KIT OLYMPO ADS»
F
D
«HANDBUCH DIGITAL VIDEO-SET»
«MANUAL KIT VIDEO OLYMPO ADS»
P
- Kit 1 Línea - Kit 1 Way - Kit 1 Ligne - Einfamilienhaus-Set - Kit 1 Linha
Cod. 97298 V03_07
Pag 2
Page 3

Kit VIDEO OLYMPO ADS
Kit VIDEO OLYMPO ADS
INDICE - INDEX - SOMMAIRE
SECCION I - MANUAL DEL INSTALADOR .................................................................. 5
E
Instalación del Alimentador ............................................................................ 6
Instalación de la placa de calle ..................................................................... 6
Ajustes finales de placa ................................................................................. 7
Instalación del monitor ................................................................................... 8
Programación del monitor.............................................................................. 8
Características Técnicas ................................................................................ 9
Esquemas de cableado.................................................................................. 10
Ampliaciones ................................................................................................... 12
Conexión de abrepuertas de corriente contínua y pulsador zaguán ......... 13
Tabla de incidencias y soluciones ................................................................ 16
SECCION II - MANUAL DE USUARIO ......................................................................... 21
Controles .......................................................................................................... 22
Funcionamiento ............................................................................................... 22
SECTION I - INSTALLER MANUAL ............................................................................. 5
EN
Power Supply installation ............................................................................... 6
Outdoor Panel installation .............................................................................. 6
Panel adjustment ............................................................................................ 7
Monitor Installation .......................................................................................... 8
Monitor programming ...................................................................................... 8
Technical Features .......................................................................................... 9
Wiring diagrams .............................................................................................. 10
Enlargements .................................................................................................. 13
DC door-opener and hallway button connection .......................................... 14
Events and solutions table ............................................................................. 17
SECTION II - USER MANUAL ...................................................................................... 21
Controls ............................................................................................................ 24
Operation .......................................................................................................... 24
SECTION I - MANUEL D’INSTALLATION .................................................................... 5
F
Installation de l’alimentation .......................................................................... 6
Installation de la platine de rue ..................................................................... 6
Reglages de la platine.................................................................................... 7
Installation du moniteur .................................................................................. 8
Programmation du moniteur .......................................................................... 8
Caracteristiques Techniques ......................................................................... 9
Schéma de câblage ........................................................................................ 10
Extension des terminaux ................................................................................ 13
Raccordement de la gâche à courant continu et du bouton-poussoir du vestibule .. 14
Tableau de depannage ................................................................................... 18
SECTION II - MANUEL D’UTILISATION ...................................................................... 21
Controles .......................................................................................................... 26
Fonctionnement ............................................................................................... 26
Pag 3
Page 4

Kit VIDEO OLYMPO ADS
Kit VIDEO OLYMPO ADS
INHALT - INDICE
D
TEIL I – INSTALLATIONSANLEITUNG ........................................................................ 5
Installation des Netzgeräts ............................................................................ 6
Installation der Türstation .............................................................................. 6
Konfiguration und Einstellungen der Türstation .......................................... 7
Befestigung des Monitors............................................................................... 8
Programmierung des Monitors ...................................................................... 8
Technische Eigenschaften ............................................................................. 9
Verkabelungsschema ..................................................................................... 10
Erweiterungen .................................................................................................. 13
Anschluss des Gleichstromtüröffners und der Türöffnungstaste des Flurs ...... 14
Ereignistabelle und Lösungen ...................................................................... 19
TEIL II - BEDIENUNGSANLEITUNG ............................................................................. 21
Bedienung ........................................................................................................ 28
Funktionselemente.......................................................................................... 28
P
SECÇÃO I - MANUAL DO INSTALADOR .................................................................... 5
Instalação do transformador .......................................................................... 6
Instalação da Placa de Rua ........................................................................... 6
Ajustes da placa .............................................................................................. 7
Instalação do Monitor ...................................................................................... 8
Programação Monitor. ..................................................................................... 8
Características Técnicas ................................................................................ 9
Esquemas cablagem...................................................................................... 10
Ampliaçães....................................................................................................... 13
Ligação do trinco de corrente contínua e botão do vestíbulo ..................... 14
Tabela de incidências e soluções ................................................................. 20
SECÇÃO II - MANUAL DO UTILIZADOR ..................................................................... 21
Comandos........................................................................................................ 30
Funcionamento ................................................................................................ 30
Pag 4
Page 5

Kit VIDEO OLYMPO ADS
Kit VIDEO OLYMPO ADS
Sección I - Manual del Instalador
Section I - Installer Manual
Section I - Manuel d’installation
Teil I - Installationsanleitung
Secção I - Manual do instalador
E
EN
F
D
P
Pag 5
Page 6
Kit VIDEO OLYMPO ADS
H
I
G
H
R
E
S
O
L
U
T
I
O
N
C
C
D
C
A
M
E
R
A
A
N
&
T
I
L
Kit VIDEO OLYMPO ADS
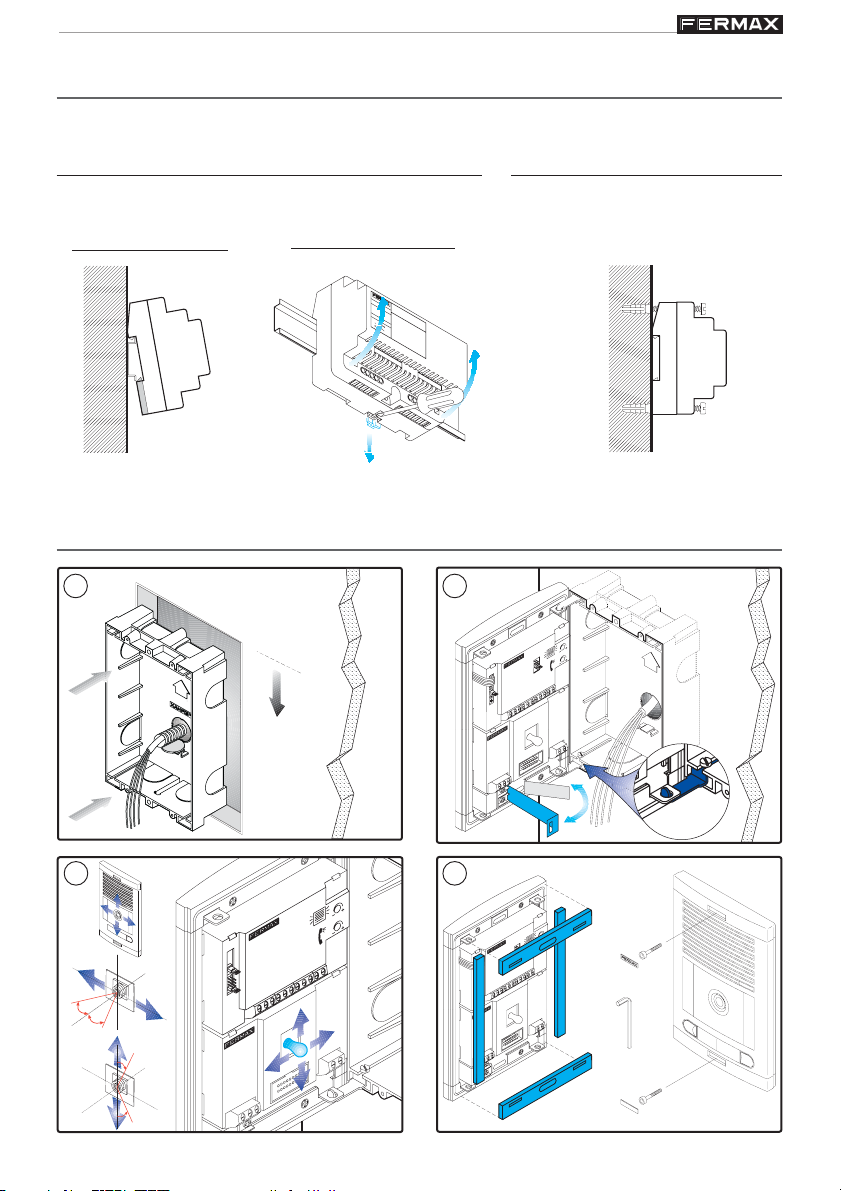
INSTALACIÓN DEL ALIMENTADOR - POWER SUPPLY INSTALLATION - INSTALLATION DE
L’ALIMENTATION - INSTALLATION DES NETZGERÄTS - INSTALAÇÃO DO TRANSFORMADOR
Instalación en carril DIN - DIN rail Installation
Installation sur rail DIN - DIN-Schiene Installation
Instalação em carril DIN
Montaje - Assembly
Montage - Einbau
Montagem
Desmontaje - Disassembly
Démontage - Ansbau
Desmontagem
M
A
D
E
I
N
S
50
-60
H
z
. 5
0
VA
+18V 1.5A
12V 1A
P
A
I
N
M
A
F
X.
U
E
N
T
E
A
L
IM
K
IT
E
N
T
D
A
I
C
G
IO
IT
N
A
L
Fijación con tornillos - Fixing with screws
Fixation au moyen de vis - Befestigung
mit Schrauben - Fixação com parafusos
INSTALACIÓN PLACA DE CALLE - OUTDOOR PANEL INSTALLATION - INSTALLATION DE
LA PLATINE DE RUE - INSTALLATION DER TÜRSTATION - INSTALAÇÃO DA PLACA DE RUA
1 2
1.70m
5.57 feet
3 4
C
C
D
C
A
M
E
PA
R
N
A
&
T
I
L
T
10º
10º
10º
10º
Pag 6
MARIA
A
C
R
O
L
H
IG
H RE
C
SO
C
D CAM
LUTIO
N
ER
P
A
N
A
&
T
I
L
T
Page 7
Kit VIDEO OLYMPO ADS
H
I
G
H
R
E
S
O
L
U
T
I
O
N
C
C
D
C
A
M
E
R
A
AN
& TIL
Kit VIDEO OLYMPO ADS
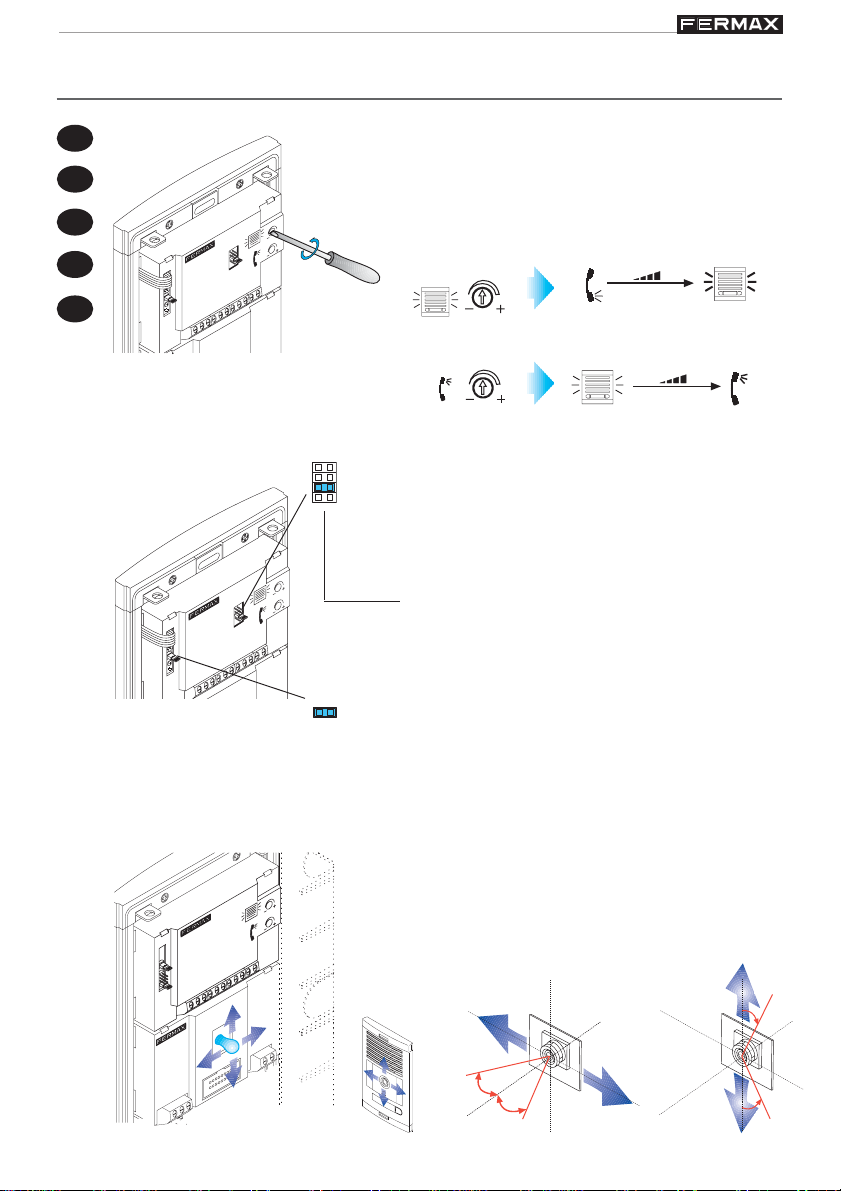
AJUSTES DE LA PLACA - PANEL ADJUSTMENT - RÉGLAGES DE LA PLATINE EINSTELLUNGEN DER TÜRSTATION - AJUSTES DA PLACA
E
EN
F
D
P
JP2
- Ajuste audio
99
9
99
- Adjust the audio
- Réglez le volume
- Audioeinstellung
- Ajuste o áudio
EXT.
PLACA
INT.
TELEFONO
A
- Selección del idioma del mensaje de «puerta abierta».
B
99
9
99
C
- Select language for «open door» message.
D
- Sélection de la langue du message «porte ouverte».
- Sprachwahl der Meldung «Tür offen».
- Selecção da língua da mensagem de «porta aberta».
Según modelo kit.
Depending on model of kit.
Selon modèle kit.
Gemäß Modell des Sets.
Conforme o modelo do kit.
JP2: No quitar.
99
9
99
JP2: Do not remove.
JP2: Ne pas retirer.
JP2: Nicht entfernen.
JP2: Não tirar.
- Enfoque la telecámara
99
9
99
- Focus the camera
- Réglez la caméra vidéo
- Richten Sie die Kamera
- Focar a telecâmara.
Pan&Tilt (±10º)
10º
C
C
D
C
A
M
E
P
R
AN
A
&
T
IL
T
10º
10º
10º
Pag 7
Page 8
Kit VIDEO OLYMPO ADS
Kit VIDEO OLYMPO ADS
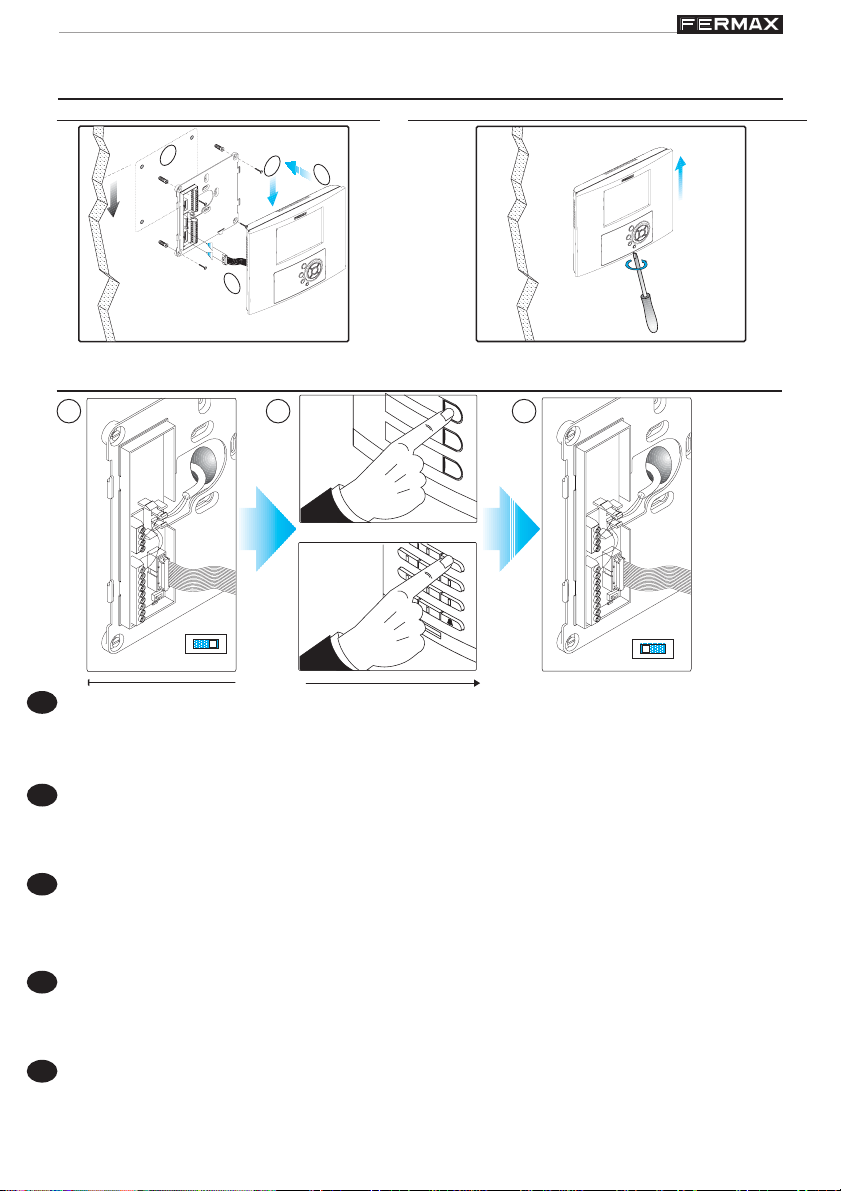
INSTALACIÓN MONITOR - MONITOR INSTALLATION - INSTALLATION DU MONITEUR
BEFESTIGUNG DES MONITORS - INSTALAÇÃO DO MONITOR
Desmontaje - Disassembly - Démontage - Ansbau - DesmontagemMontaje - Assembly - Montage - Einbau - Montagem
1
1.60m
4
3
90º
2
PROGRAMACIÓN MONITOR - PROGRAMMING THE MONITOR - PROGRAMNATION DU
MONITEURS MONITORPROGRAMMIERUNG - PROGRAMAÇÃO DOS MONITORES
21 3
2
4
3
5
7
6
8
A
9
J1
PRG
i
0
J1
PRG
< 2 min
1.Con el monitor conectado coloque el interruptor J1 en la posición PRG. Se oirá un sonido de confirmación.
E
2.Pulse el botón de llamada a vivienda. De nuevo se produce confirmación.
3.Inserte el interruptor en su posición original y coloque el Monitor.
* El monitor no funcionará mientras no haya sido programado.
1.With the monitor connected, put the switch J1 to the PRG position. You will hear a confirmation tone.
EN
2. Press the house call button. Confirmation tone is heard again.
3. Put back the switch to its original position and hang up the monitor.
* The monitor will not work until it has been programmed.
1.
Une fois le moniteur branché, placez le conmutateur J1 sur la position PRG. Une tonalité de confirmation sera émise.
F
2.Appuyez sur le bouton qui doit identifier le Moniteur. Une nouveau tonalité de confirmation sera émise.
3.Replacez le commutateur en position initiale et posez correctement le moniteur.
* Le moniteur ne fonctionne pas tant qu’il n’a pas été programmé.
1.
Bei angeschlossenem Monitor, stecken Sie den Schalter J1 in Position PRG, der Signalton bestätigt den Programmiermoduls.
D
2.
Bei der Türstation drücken Sie den Ruftaster, der dem Monitor (Innenstelle) zugeordnet ist. Der Signalton wird nochmal hörbar
3.
Bringen Sie den Schalter J1 in die originalstellung und montieren Sie den Monitor.
* Der Monitor ist nicht betriebsbereit, wenn er zuvor nicht programmiert wurde.
1. Com o monitor ligado, coloque o comutador J1 em PRG. Escuta-se um som de confirmação.
P
2.Carregue no botão de chamada da vivenda. Ouve-se um "bip" de confirmação.
3.Coloque o interruptor na sua posição original e coloque.
* O monitor não funciona enquanto não tiver sido programado.
Pag 8
.
Page 9
Kit VIDEO OLYMPO ADS
Kit VIDEO OLYMPO ADS
CARACTERÍSTICAS TÉCNICAS - TECHNICAL FEATURES - CARACTERISTIQUES
TECHNIQUES - TECHNISCHE EIGENSCHAFTEN - CARACTERÍSTICAS TÉCNICAS
Alimentación - Power Supply - Alimentation - Stromversorgung - Alimentação
18 Vdc
Consumo - Consumption - Consommation - Stromverbrauch - Consumo
en reposo - in standby - au repos - Im Bereitschaftsmodus - em repouso
audio activo - audio active - avec audio - Betriebszustand Audio - áudio activo
cámara - camera - caméra - Kamera - câmara
IP43
iluminación - lighting - éclairage - Beleuchtung - iluminação
Temperatura de funcionamiento - Operating Temperature
Température de fonctionnement - Betriebstemperatur
Temperatura de funcionamento
40 mA
250 mA
150 mA
70 mA
[0 , +60 °C]
[32 , +140 °F]
Potencia audio sentido vivienda-calle - Audio power from the apartment to the panel
Piussance de l’audio sens poste-platine - Audio-Leistung in Richtung Türstation
1 W
Potência áudio sentido rua
Potencia audio sentido calle-vivienda - Audio power from the panel to the apartment
Piussance de l’audio sens platine-poste - Audio-Leistung in Richtung Telefon
0,25 W
Potência áudio sentido telefone
Volumen regulable en ambos sentidos - Adjustable volume both ways
Volume réglable dans les deux sens - Regulierbare Lautstärke in beiden Richtungen
Volume regulável em ambos sentidos
Alimentación - Power Source - Alimentation -
Stromversorgung
X
18 Vdc
Consumo - Consumption - Consommation - Stromversorgung
Alimentação
en reposo - in standby - au repos - Im Bereitschaftsmodus - em repouso
audio + video
con llamada - during call - avec appel - Mit Rufton - com chamada
Temperatura de funcionamiento, Humedad
Operating Temperature, Humidity
Température de fonctionnement, humidité
20 mA
400 mA
400 mA
[-10 , +55°C]
[14 , +131°F]
Betriebstemperatur, relative Luftfeuchtigkeit
Temperatura de funcionamento, Humidade
[45~95%]
Tubo de imagen - Image Tube -Tube cathodique - Bildröhre - Tubo de imagem: TFT
5”
Señal de video - Video signal - Signal vidéo - Videosignal - Sinal de vídeo TFT 5”
Señal compuesta 1 Vpp 75 Ω, 7 Mhz . - Composed signal 1 Vpp 75
Signal composé 1 Vpp 75Ω, 7 Mhz. - Zusammengesetztes signal 1 Vpp 75
Ω,
7 Mhz.
Ω
, 7 Mhz.
Sinal composto 1 Vpp 75 Ω, 7 Mhz.
Resolución - Resolution - Résolution - Auflösung -Resolução
320 Lineas/Lines
Dimensiones - Dimensions - Dimensions - Abmessungen - Dimensões
Alto x Ancho x Prof. - Height x Width x Depth.
Hauteur x largeur x prof - Höhe x Breite x Tiefe.
Altura x Largura x Prof.
278x200x45 (mm)
10,9” x 7,8” x 1,7”
Pag 9
Page 10
Kit VIDEO OLYMPO ADS
Kit VIDEO OLYMPO ADS
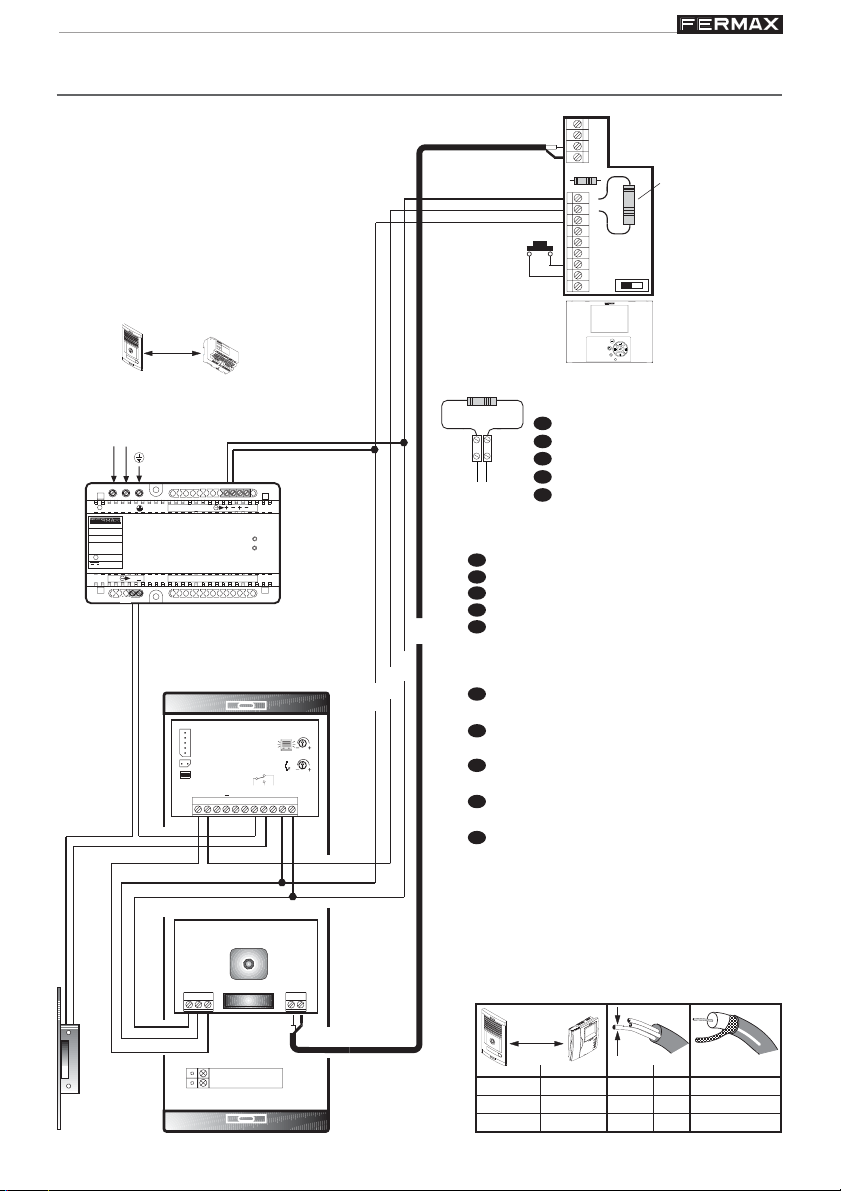
ESQUEMA DE CABLEADO - WIRING DIAGRAM - SCHEMA DE CABLAGE
VERKABELUNGSSCHEMA - ESQUEMA DE CABLAGEM
- KIT 1 L
Vac
~
~
INPUT
230V ; 0,6 A
~
50-60 Hz
OUTPUT
18 V ; 1,5 A
12 V ; 1,5 A
~
D. max.
30 m
90 pies/feet
230V
12 Vac + 18 Vdc
~~
M
V
V
P1
M
+
L
Ct
P1
+A
-A
T
T
LE
M
A
D
E
I
N
S
P
A
I
N
5
0
6
0
H
z
.
5
0
V
A
M
A
F
X
+
.
U
1
8
E
V
N
T
1
E
1
2
V
A
.
5
L
A
I
K
M
1
IT
E
A
N
T
D
A
IG
C
I
O
I
T
N
A
L
10 Kohm
J1 PRG
X
(*)
(*) IMPORTANTE - IMPORTANT - WICHTIG
10 Kohm
+ L
ON
OVERLOAD
COAX
+
L
-
EXT.
PLAC
TELEFONO
INT.
JP2
C
Ct
L
B
S
+-
+12
Nc
No
B
P1:
E
EN
F
D
P
LE / [+A, -A]:
E
EN
F
D
P
10 Khoms:
entre los bornes + y L del último monitor.
E
EN
between terminals + and L in the last monitor.
F
entre les bornes + et L du moniteur.
D
Zwischen Klemmen ”+“ und ”L“ des Monitors.
P
os terminais + e L do último monitor.
Pulsador de llamada puerta vivienda.
Call pushbutton at the apartment’s door.
Poussoir d’appel sur la porte du logement.
Ruftaste an der Wohnungstür.
Botão de chamada na porta do apartamento.
La función LE y [+A, -A], no están disponibles en
este monitor.
The functions LE and [+A, -A] are not available on
this monitor.
Les fonctions LE et [+A, -A] ne sont pas disponibles
sur ce moniteur.
Die Funktion LE und [+A, -A] sind bei diesem
Monitor nicht verfügbar.
As funções LE e [+A, -A] não estão disponíveis
neste monitor.
12 Vac
Pag 10
+-
CT
..........
..........
M
V
....
....
metros / metres
1 - 50
50 - 100
100 - 200
D
pies / feet
3 - 150
150 - 300
300 - 600
S
2
AWG
mm
2
mm
1
2
mm
1,5
2
mm2,5
75 Ohm
17
75 Ohm
15
75 Ohm
13
Page 11
Kit VIDEO OLYMPO ADS
Kit VIDEO OLYMPO ADS
CABLEADO INTERNO DE LA PLACA / INTERNAL CABLING OF THE PANEL / CÂBLAGE
INTERNE DE LA PLATINE / INTERNE VERKABELUNG DER TÜRSTATION / CABLAGEM
INTERNA DA PLACA
Las placa de calle sale de fábrica precableada. El sistema no puede funcionar
E
si se eliminan o alteran estas conexiones. Por lo tanto, cuando Ud. abroche
algún cable en los terminales precableados debe conservar el cableado ya
existente.
The outdoor panel is supplied internally wired, as shown below. The system can
EN
not work if these internal wires are removed or altered. Therefore, if you connect
any wire to a terminal already wired (from factory) be sure that none of these are
removed.
La platine de rue sort de l’usine munie d’une préinstallation de câbles. Le système
F
ne pourra pas fonctionner si ces connexions sont éliminées ou détériorées.
Ainsi, lorsque vous engagerez un câble dans les terminaux précablés, il vous
faudra conserver le câblage préexistant.
Die Verkabelung der Türstation wird werkseitig vorgenommen. Das System kann
D
nicht funktionieren, wenn diese Schaltungen entfernt oder verändert werden.
Daher müssen Sie die bestehende Verkabelung beibehalten, wenn Sie ein Kabel
an den vorverkabelten Polschuhen anschließen.
P
A placa de rua é fornecida de fábrica com a pré-cablagem. O sistema não pode
funcionar se se eliminarem ou alterarem estas ligações. Portanto, quando ligar
algum cabo aos terminais pré-cablados deve conservar a cablagem já existente.
EXT.
PLACA
TELEFONO
INT.
JP2
Ct
+ -
LL1
Cp
CT
L
S
1
+12
B
B
..........
..........
C
+-
Nc
No
MV
....
....
Pag 11
Page 12

Kit VIDEO OLYMPO ADS
Kit VIDEO OLYMPO ADS
AMPLIACIONES - ENLARGEMENTS - EXTENSIONS - ERWEITERUNGEN - AMPLIAÇÕES
El equipamiento básico por vivienda puede ser ampliado con 2 teléfonos o 1
E
monitor adicional sin necesidad de añadir fuentes de alimentación.
The basic home equipment can be expanded with 2 telephones or 1 monitor without
EN
adding a second power supply.
F
L’équipement de base peux être étendu avec deux postes ou un moniteur sans
ajouter une seconde source d’alimentation dans le .
Die in jeder Wohnung vorhandene Grundanlage kann im Falle des
D
EINFAMILIENHAUS-SETs um 2 zusätzliche Telefone oder um einen Monitor erweitert
werden, ohne dass weitere Netzgeräte eingeselzt werden müssen.
O equipamento básico por vivenda pode ser ampliado com 2 telefones ou 1 monitor
P
adicional sem necessidade de acrescentar transformadores.
COAX
M
V
V
M
R
+
L
-
Ct
+A
-A
T
J1 PRG
T
LE
X X
L
-
+
M
V
V
M
+
L
Ct
+A
-A
T
J1 PRG
T
LE
X
L
- +
PROG
M
V
V
M
R
+
L
10 K
Ct
+A
-A
T
J1 PRG
T
LE
10 K
L
PROG
- +
COAX
Pag 12
L
-
+
Page 13

Kit VIDEO OLYMPO ADS
Kit VIDEO OLYMPO ADS
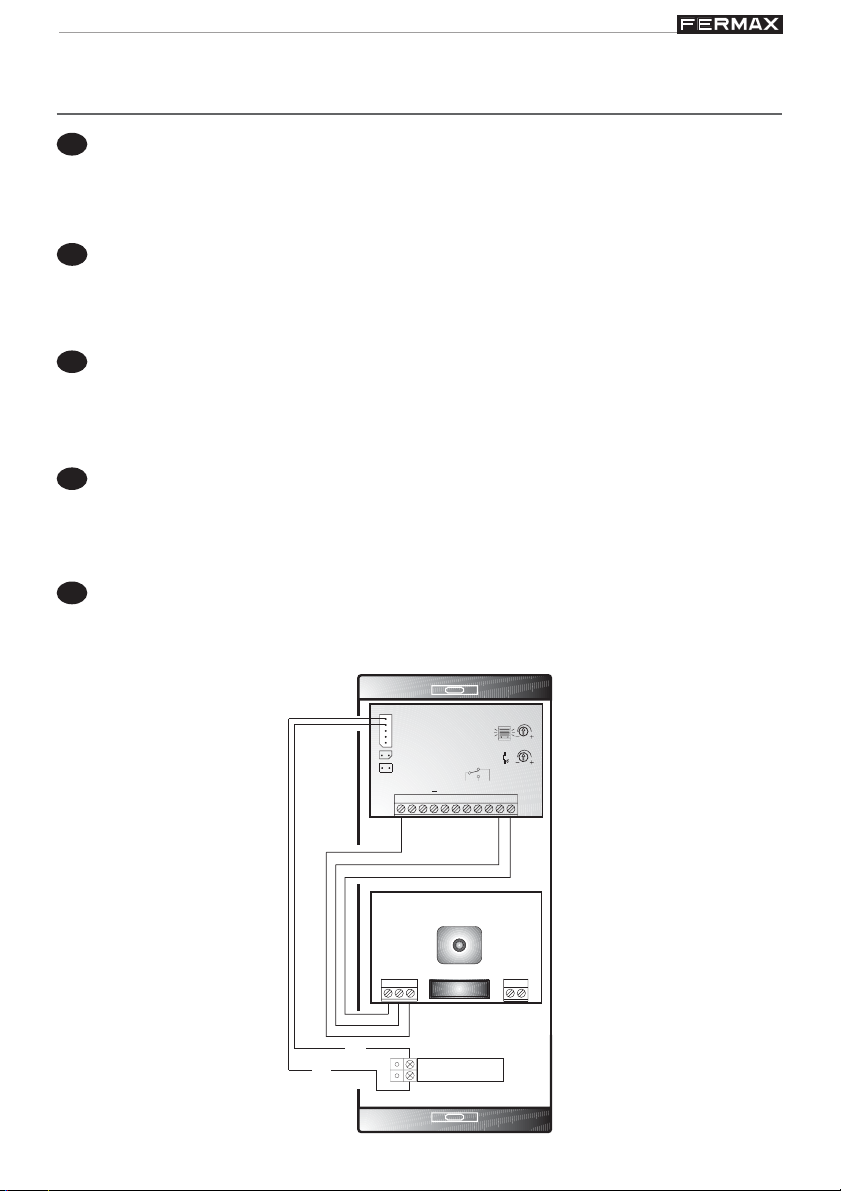
CONEXION DE ABREPUERTAS DE CORRIENTE CONTÍNUA - DC DOOR-OPENER
CONNECTION - RACCORDEMENT DE LA GÂCHE À COURANT CONTINU - ANSCHLUSS DES
GLEICHSTROMTÜRÖFFNERS - LIGAÇÃO DO TRINCO DE CORRENTE CONTÍNUA
EXT.
PLAC
TELEFONO
INT.
JP2
Ct
C
+12
L
B
B
S
+-
Nc
No
Vac
-+-+
18 Vdc
12 Vdc
CONEXION DE L PULSADOR DE APERTURA DESDE INTERIOR DEL ZAGUAN CCONNECTION OF L BUTTON FOR OPENING FROM INSIDE THE HALLWAY RACCORDEMENT DU BOUTON-POUSSOIR PERMETTANT L’OUVERTURE DES PORTES
DEPUIS L’INTÉRIEUR DU VESTIBULE - ANSCHLUSS DES TÜRÖFFNERS DES FLURS LIGAÇÃO DO BOTÃO DE ABERTURA A PARTIR DO INTERIOR DO VESTÍBULO
EXT.
PLAC
TELEFONO
INT.
JP2
Ct
C
+12
L
B
B
S
+-
Nc
No
Pag 13
Page 14

Kit VIDEO OLYMPO ADS
Kit VIDEO OLYMPO ADS
Pag 14
Page 15

Kit VIDEO OLYMPO ADS
Kit VIDEO OLYMPO ADS
Anexo
Attachment
Annexe
Anhang
Apêndice
E
EN
F
D
P
Pag 15
Page 16

Kit VIDEO OLYMPO ADS
Kit VIDEO OLYMPO ADS
E
TABLA INCIDENCIAS Y SOLUCIONES
SINTOMA PUNTOS A VERIFICAR
• No entra en programación.
• Autoencendido no funciona.
• No entra en programación.
• Autoencendido si funciona.
• No hay llamada, pero si hay
monitorización en la placa.
• Al pulsar el botón de llamada, el
LED de Diagnóstico NO se enciende en absoluto.
• No hay llamada, pero si hay
monitorización en la placa.
• Al pulsar el botón de llamada, el
LED de Diagnóstico emite unos
destellos cortos.
• La placa emite continuamente
una serie de pitidos cortos.
- Sección del negativo. Aumentar.
- Distancia entre placa y monitor. Aumentar sección o
añadir fuente adicional.
- Ubicación del alimentador. Distancia máxima a la placa: 30
metros / 90 pies. Aumentar sección o añadir fuente adicional.
- Resistencia de 10 KOhms.
- Distancia entre placa y monitor. Aumentar sección o
añadir fuente adicional.
- Comprobar que el Puente JP1 está puesto en la placa.
- Comprobar que el monitor está encendido.
- Comprobar cable «L».
- Monitor mal programado. Volver a programar.
- Cortocircuito entre «L» y «+».
- Cortocircuito entre «L» y «-».
• Sonido de audio muy débil, o aco-
ples que no se pueden eliminar
con los potenciometros de ajuste de audio.
• No funciona bien el abrepuertas.
FUENTE DE ALIMENTACION (Leds)
O
O
N
V
M
E
A
D
E
I
N
S
R
P
A
I
N
L
O
5
0
-6
0
H
A
z.
5
0
V
A
M
A
F
X
+
.
D
U
1
8
E
V
N
T
E
1
A
.
5
L
A
I
K
M
I
E
T
N
T
D
A
I
C
G
I
O
I
T
N
A
L
O
N
O
V
E
R
L
O
A
D
ON
Led de encendido
Led ON + OVERLOAD parpadeando indica cortocircuito.
Pag 16
- Resistencia de 10 KOhms. Sólo ha de haber 1 resistencia en el monitor más alejado.
- Abrepuertas de 12 Vdc con la fuente de 18 Vdc-1.5A:
*Asegúrese de estar utilizando un abrepuertas de
12 Vdc (corriente contínua), 0.3 A. máx.
*Aumentar sección del negativo.
*Distancia entre placa y monitor. Aumentar sección o
añadir fuente adicional.
- Abrepuertas de 12 Vac con la fuente de 12 Vac-1A:
*Asegúrese de estar utilizando un abrepuertas de
12 Vac (corriente alterna), 0.8 A. máx.
OVERLOAD
Led indicador máxima corriente excedida. Disminuir carga.
Page 17

Kit VIDEO OLYMPO ADS
Kit VIDEO OLYMPO ADS
EVENTS AND SOLUTIONS TABLE
EN
SYMPTOM POINTS BE CHECKED
• It does not enter programming
mode.
• Auto-on does not work.
• It does not enter programming
mode.
• Auto-on works.
• There is no call, but there is panel
call monitoring.
• When the call button is pressed,
the Diagnostic LED does NOT
ligth at all.
• There is no call, but there is panel
monitoring.
• When the call button is pressed,
the Diagnostic LED emits short
flashes.
• The panel emits a continuous se-
ries of short beeps.
- Negative wire cross-section. Increase.
- Distance between panel and monitor. Increase cross-section
or add additional power supplies.
- Power supply position. Maximum distance to panel: 30 metres/
90 feet. Increase section or add additional power supply.
- Resistor 10 KOhms.
- Distance between panel and monitor. Increase crosssection or add additional power supplies.
- Check that Jumper JP1 is set in the panel.
- Check that the monitor is switched on.
- Check cable «L».
- Monitor wrongly programmed. Program it again.
- Short circuit between «L» and «+».
- Short circuit between «L» and «-».
• Very weak audio sound, or fee-
dback that cannot be eliminated
with the audio adjustment
potentiometers.
• The door lock release/electric lock
is not working properly.
POWER SUPPLY (Leds)
O
O
V
N
M
E
A
D
E
I
N
S
R
P
A
I
N
L
O
5
0
6
0
H
A
z
.
5
0
V
A
M
A
F
X
+
.
D
U
1
8
E
V
N
T
E
1
A
.
5
L
A
I
K
M
I
E
T
N
T
D
A
I
C
G
I
O
I
T
N
A
L
O
N
O
V
E
R
L
O
A
D
Led ON
ON
LED indicating maximum current limit exceeded. Reduce the load.
LED ON + OVERLOAD blinking indicates short circuit.
- Resistor 10 KOhms. There must be only 1 resistor, in
the furthest monitor.
- 12 Vdc door-opener with the 18 Vdc-1.5A power supply:
*Make sure you are using a 12 Vdc (direct current)
door-opener, max. 0.3 A.
* Increase the cross-section of the negative.
* Distance between panel and monitor. Increase the cross section or add additional power supply..
- 12 Vac door-opener with the 12 Vac-1A power supply:
* Make sure you are using a 12 Vac (alternating current) door opener, max. 0.8 A.
OVERLOAD
Pag 17
Page 18

Kit VIDEO OLYMPO ADS
Kit VIDEO OLYMPO ADS
F
TABLEAU DE DEPANNAGE
SYMPTOME POINTS A VERIFIER
• Pas de programmation possible.
• L’allumage automatique ne
fonctionne pas.
• Pas de programmation possible.
• L’allumage automatique fonctionne
bien.
• L’appel ne se laisse pas entendre
au logement mais se laisse
entendre sur la platine.
• En appuyant sur le bouton-poussoir
d’appel, la DEL de diagnose ne
s’allume pas du tout.
• L’appel ne se laisse pas entendre
au logement mais se laisse
entendre sur la platine.
• En appuyant sur le bouton-
poussoir d’appel, la DEL de
diagnose émet de courts
clignotements.
• La platine émet une série de petits
sifflements en continu.
• Volume très faible ou grésillements qui
ne peuvent être éliminés par les
potentiomètres de réglage du volume.
• La gâche électrique ne fonctionne
pas bien.
- Section du fil négatif. Augmenter section.
- Distance entre la platine et le moniteur. Augmenter la section
ou ajouter une alimentation supplémentaire.
- Emplacement de l’alimentation. Distance maximale
alimentation-platine : 30 mètres. Augmenter la section ou
ajouter une alimentation supplémentaire.
- Résistance de 10 kOhm.
- Distance entre la platine et le moniteur. Augmenter la
section ou ajouter une alimentation supplémentaire.
- Vérifiez que le pontet JP1 est bien mis sur la platine.
- Vérifiez que le moniteur soit allumé.
- Vérifiez le fil « L ».
- Moniteur mal programmé. Recommencez la
programmation.
- Court-circuit entre « L » et « + ».
- Court-circuit entre « L » et « - ».
- Résistance de 10 kOhm. 1 seule résistance doit être
placée sur le moniteur le plus éloigné.
- Gâche électrique de 12 Vcc avec une source
d’alimentation de 18 Vcc-1,5 A :
* S’assurer que la gâche électrique utilisée ait une
tension de 12 Vcc (courant continu), 0,3 A max.
* Augmenter la section du fil négatif.
* Distance entre la platine et le moniteur. Augmenter la section
ou ajouter une alimentation supplémentaire.
- Gâche électrique de 12 Vca avec une source
d’alimentation de 12 Vca-1 A :
* S’assurer que la gâche électrique utilisée ait une tension de
12 Vca (courant alternatif), 0,8 A max.
Pag 18
SOURCE D’ALIMENTATION (DEL)
O
O
N
V
M
E
A
D
E
I
N
S
R
P
A
I
N
L
O
5
0
-6
0
H
A
z.
5
0
V
A
M
A
F
X
+
.
D
U
1
8
E
V
N
T
E
1
A
.
5
L
A
I
K
M
I
E
T
N
T
D
A
I
C
G
I
O
I
T
N
A
L
O
N
O
V
E
R
L
O
A
D
DEL de marche
ON
DEL indicant le dépassement du courant maximum
OVERLOAD
DEL de marche et courant maximum dépassé clignotant indique court circuit.
. Réduisez la charge.
Page 19

Kit VIDEO OLYMPO ADS
Kit VIDEO OLYMPO ADS
EREIGNISTABELLE UND LÖSUNGEN
D
SYMPTOM ZU PRÜFENDE PUNKTE
• Kein Zugang in den Programmier-
modus.
• Eigenstart funktioniert nicht.
• Kein Zugang in den Programmier-
modus.
• Eigenstart funktioniert.
• Es erfolgt kein Rufton, der
Quittierungston an der Türstation
erfolgt jedoch.
• Beim Drücken der Ruftaste leuchtet
die Diagnose-LED NICHT auf.
• Es erfolgt kein Rufton, der
Quittierungston an der Türstation
erfolgt jedoch.
• Beim Drücken der Ruftaste, blinkt die
Diagnose-LED mehrmals kurz auf.
• Di e Türstation gibt dabei fortlaufend
kurze Piepstöne aus.
• Das Audiosignal ist sehr
schwach oder Rückkoppelungen lassen sich mit den AudioPotentiometern nicht beseitigen.
- Querschnitt des Minuskabels vergrössern.
- Abstand zwischen Türstation und Monitor. Erhöhen Sie den
Querschnitt oder installieren Sie ein zusätzliches Netzgerät.
- Einbauort des Netzgeräts. Maximaler Abstand zur Türstation:
30 Meter. Vergrössern Sie den Querschnitt oder installieren
Sie ein zusätzliches Netzgerät.
- Widerstand von 10 kOhm.
- Abstand zwischen Türstation und Monitor. Vergrössern Sie
den Querschnitt oder installieren Sie ein zusätzliches
Netzgerät.
- Prüfen Sie, ob an der Türstation die Steckbrüicke JP1
eingesteckt ist.
- Prüfen Sie, ob der Monitor eingeschaltet ist.
- Prüfen Sie das Kabel "L".
- Der Monitor ist falsch programmiert worden.
Programmieren Sie den Monitor erneut.
- Vorhandener Kurzschluss zwischen "L" und "+".
- Vorhandener Kurzschluss zwischen "L" und "-".
- Widerstand von 10 kOhm. Es darf nur ein Widerstand
am weitesten entfernt montierten Monitor angelegt sein.
• Der Türöffner funktioniert nicht
richtig.
NETZGERÄT (Leds)
O
O
V
N
M
E
A
D
E
I
N
S
R
P
A
I
N
L
O
5
0
6
0
H
A
z
.
5
0
V
A
M
A
F
X
+
.
D
U
1
8
E
V
N
T
E
1
A
.
5
L
A
I
K
M
I
E
T
N
T
D
A
I
C
G
I
O
I
T
N
A
L
O
N
O
V
E
R
L
O
A
D
ON
Einschalt-LED
Anzeige-LED für das Überschreiten der maximale Stromstärke. Last vermindern.
Blinkendes ON+OVERLOAD LED bedeutet Kurzschluss.
- 12 V Gleichstromtüröffner mit 18 V 1,5 A Gleichstromnetzgerät:
* Prüfen Sie, ob Sie einen Türöffner für 12 V (Gleichstrom)
und max. 0,3 A benutzen.
* Vergrößern Sie den Querschnitt des Minuskabels.
* Abstand zwischen Türstation und Monitor.Vergrößern Sie
den Querschnitt oder installieren Sie ein zusätzliches
Netzgerät.
- 12 V Gleichstromtüröffner mit 12 V 1 A Gleichstromnetzgerät:
* Prüfen Sie, ob Sie einen Türöffner für 12 V (Wechselstrom)
und max. 0,8 A benutzen.
OVERLOAD
Pag 19
Page 20

Kit VIDEO OLYMPO ADS
Kit VIDEO OLYMPO ADS
P
TABELA DE INCIDÊNCIAS E SOLUÇÕES
SINTOMA PONTOS A VERIFICAR
- Secção do negativo. Aumentar.
• Não entra em programação.
• A ligação automática não funciona.
- Distância entre placa e monitor. Aumentar secção ou
- Localização do alimentador Distância máxima à placa: 30
metros. Aumentar secção ou acrescentar fonte adicional.
acrescentar fonte adicional.
• Não entra em programação.
• A ligação automática funciona.
• Não há chamada, mas há
monitorização na placa.
• Ao carregar no botão de chamada,
o LED de Diagnóstico NÃO se
acende de nenhuma forma.
• Não há chamada, mas há
monitorização na placa.
• Ao carregar no botão de chamada,
o LED de Diagnóstico emite umas
luzes a piscar breves.
• A placa emite continuamente uma
série de apitos curtos.
• Som de áudio muito fraco, ou junções
que não se podem eliminar com os
potenciómetros de ajuste de áudio.
• O trinco não funciona bem.
- Resistência de 10 KOhms.
- Distância entre placa e monitor. Aumentar secção ou
acrescentar fonte adicional.
- Verificar se a jumper JP1 está colocada na placa.
- Verificar se o monitor está ligado.
- Verificar cabo "L".
- Monitor mal programado. Voltar a programar.
- Curto-circuito entre "L" e "+".
- Curto-circuito entre "L" e "-".
- Resistência de 10 KOhms. Só deve haver 1 resistência
no monitor mais afastado.
- Trinco de 12 Vdc com fonte de 18 Vdc-1,5 A:
* Assegure-se de estar a utilizar um trinco de12 Vdc
(corrente contínua), 0.3 A máx.
* Aumentar a secção do negativo.
* Distância entre placa e monitor. Aumentar secção ou
acrescentar fonte adicional.
- Trinco de 12 Vac com fonte de 12 Vac-1 A:
* Assegure-se de estar a utilizar um trinco de12 Vac
(corrente alterna), 0,8 A máx.
Pag 20
FONTE DE ALIMENTAÇÃO (Leds)
O
O
N
V
M
E
A
D
E
I
N
S
R
P
A
I
N
L
O
5
0
6
0
H
A
z
. 5
0
VA
M
A
F
X
+
.
D
U
1
8
E
V
N
T
E
1
A
.
5
L
A
I
K
M
I
E
T
N
T
D
A
I
C
G
I
O
I
T
N
A
L
O
N
O
V
E
R
L
O
A
D
ON
Led aceso
Led indicador de máxima corrente excedida. Diminuir carga
Led ON + OVERLOAD piscando indica curto-circuito
OVERLOAD
Page 21

Kit VIDEO OLYMPO ADS
Kit VIDEO OLYMPO ADS
Sección II - Manual del Usuario
Section II - User’s Manual
Section II - Manuel d’’utilisation
Teil II - Bedienungsanleitung
Secção II - Manual do utilizador
E
EN
F
D
P
Pag 21
Page 22

Kit VIDEO OLYMPO ADS
ESPAÑOL
Kit VIDEO OLYMPO ADS
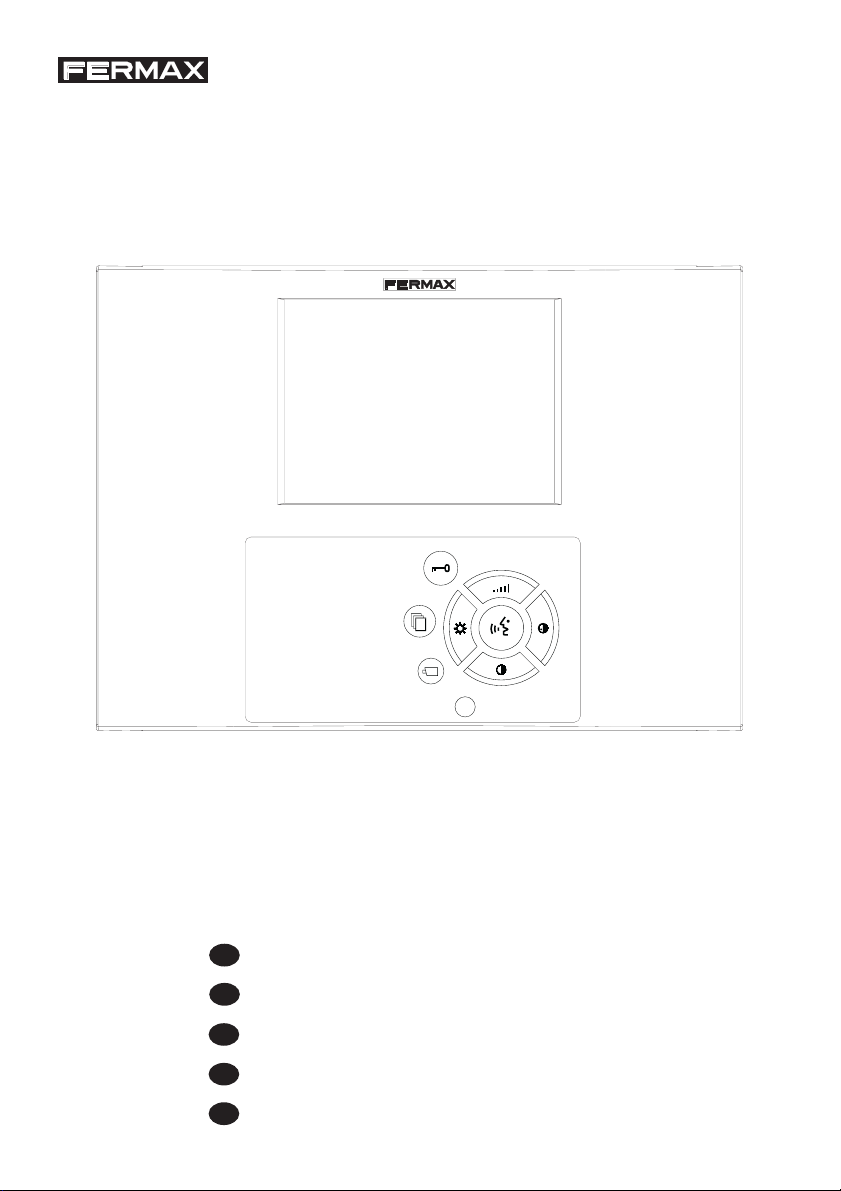
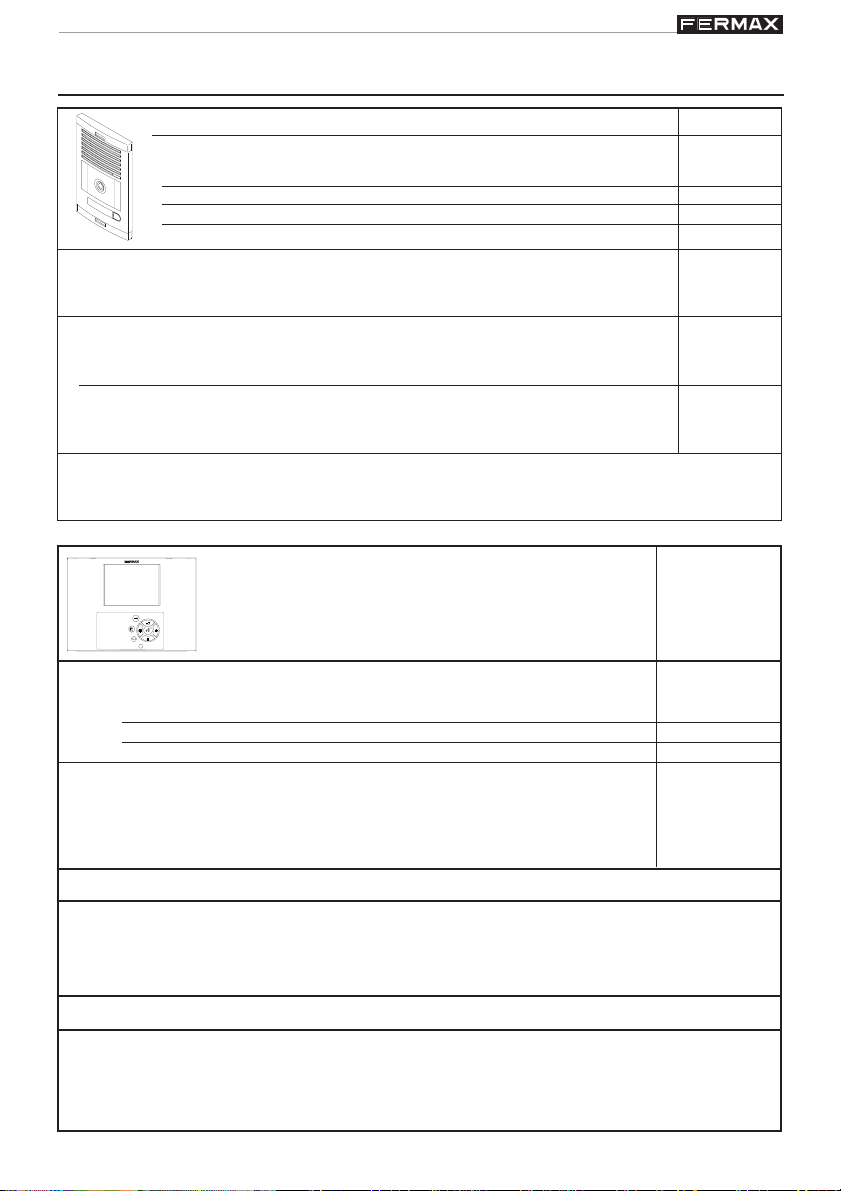
MONITOR OLYMPO ADS BASIC
Altavoces con sonido envolvente.
Funcionamiento de manos libres total.
CONTROLES
X
Pantalla TFT color 5”.
Botón de abrepuertas
y llamada a conserje
Botón SIN FUNCION
Autoencendido
Selección cámara
principal/secundaria
(función disponible según
tipo de instalación)
FUNCIONAMIENTO
X
Regulación volumen
Activar comunicación
Control brillo ( ), contraste ( ) y color ( )
Apagado
X
(Audio + Video)
Llamada
* Al presionar el pulsador de llamada en la Placa de Calle se produce un
tono de llamada tanto en la placa de calle como en el monitor, encendiéndose la pantalla.
Si hay equipos adicionales en la vivienda éstos tambien sonarán. Si no
se atiende la llamada los equipos se desconectarán automáticamente
transcurridos 90 segundos.
Atender la llamada
* Descolgar pulsando el botón « » para establecer comunicación con el
visitante. La iluminación del botón se enciende informando que la comuni-
Pag 22
X
cación está activa « ».
La duración de la comunicación está limitada a 90 segundos.
Si durante la comunicación se pulsa el botón «X» la comunicación finaliza y la pantalla se apaga.
Page 23

Kit VIDEO OLYMPO ADS
Kit VIDEO OLYMPO ADS
Abrir la puerta al visitante
* Estando en comunicación con el visitante es posible abrir la puerta pulsan-
do el botón « ».
X
Activación manual del monitor (autoencendido)
* Con el monitor en reposo:
· Pulsar el botón « » para activar únicamente la pantalla.
Nota: Sin audio el monitor permanecerá encendido durante 30 segundos.
X
· Pulsar el botón « » para establecer comunicación, se iluminará « »
Nota: Una vez activada la comunicación, Audio + Video permanecerán activos
durante 90 segundos, tras los cuales se desconectarán automáticamente.
Durante este tiempo es posible abrir la puerta pulsando el botón «
· Pulsar el botón « », (desaparece la iluminación « » en éste), para
desconectar el audio y observar a la visita sin ser escuchado.
· Podrá desactivar la pantalla y la comunicación pulsando el botón «X».
Nota importante: Ver ejemplos de funcionamiento al final de este manual.
Ajuste de brillo ( ), contraste ( ) y color ( )
* Con la pantalla encendida pulsar el botón correspondiente para realizar los
ajustes deseados. Dispone de cuatro niveles de ajuste seleccionables
cíclicamente, con aviso acústico cuando se llega al valor máximo.
X
».
Ajuste volumen
Volumen de Audio (conversación)
* Estando en comunicación con la placa de calle pulsar el botón « » para ajustar el
volumen de conversación. Dispone de cuatro niveles de ajuste seleccionables
X
ciclicamente con aviso acústico cuando se llega al valor máximo.
Volumen de Llamada (timbre de llamada)
* Estando el monitor en reposo:
· Pulsar el botón « » una vez, y se desactiva el timbre de llamada.
Nota: El botón « » parpadea para indicar que se ha desactivado el timbre de
llamada.
· Pulsando secuencialmente el botón « », pasaríamos del nivel mínimo al máximo.
Nota: Dispone de 3 Niveles de Ajuste (mínimo, medio y máximo). Se escucha
rá en cada momento un tono con el volumen elegido.
Llamada a Conserje (según instalación)
* En instalaciones con conserjería pulsar el botón de abrepuertas ( ), con
el monitor en reposo, para generar una llamada al conserje.
X
Pag 23
Page 24

Kit VIDEO OLYMPO ADS
ENGLISH
Kit VIDEO OLYMPO ADS
OLYMPO ADS BASIC MONITOR
Loudspeaker with surround sound.
Complete hands-free functioning.
CONTROLS
X
TFT colour 5” screen.
Door-opening
and call to reception
centre button
Button WITHOUT
FUNCTION
Auto-start
Main/secondary camera
selection (function
available depending on
type of installation)
FUNCTIONING
X
X
Pag 24
Volume adjustment
Activate communication
Brightness ( ), contrast ( ) and colour ( ) control
X
Off
(Audio + Video)
Call
* When the call button on the Outdoor Panel is pressed, a call tone is
emitted both at the outdoor panel and at the monitor, and the screen
goes on.
If there are additional devices in the home, these will also emit a call
tone. If the call is not answered, the device will automatically disconnect
after 90 seconds.
Answering a call
* Press the « » button to establish communication with the visitor. The button
lights up, indicating that the communication is active « ».
Communication is limited to 90 seconds.
If the «X» button is pressed, the communication is ended and the screen
goes off.
Page 25

Kit VIDEO OLYMPO ADS
Kit VIDEO OLYMPO ADS
Opening the door for the visitor
* When you are in communication with the visitor, it is possible to open the
door by pressing the « » button.
X
Manual activation of the monitor (auto-start)
* With the monitor on standby:
· Press the « » button to activate only the screen.
X
Note: Without audio, the monitor will remain on for 30 seconds.
· Press the « » button to establish communication; « » will light up.
Note: Once the communication has been activated, Audio + Video will remain
active for 90 seconds, after which they will automatically disconnect.
During this time, it is possible to open the door by pressing the «» button.
· Press the « » button, (the light « » on this will go out), to disconnect
the audio and see the visitor without being heard.
· You can deactivate the screen and the communication by pressing the «X»
button.
Important note: See examples of functioning at the end of this manual.
Brightness ( ), contrast ( ) and colour ( ) adjustment
* With the screen on, press the corresponding button to make the desired
adjustments. There are four levels of adjustment, which can be selected
cyclically, with a warning sound when the highest value is reached.
X
Volume adjustment
Audio (conversation) Volume
* When you are in communication with the outdoor panel, press the « » button to
adjust the volume of the conversation. There are four levels of adjustment, which
X
can be selected cyclically, with a warning sound when the highest level is
reached.
Call Volume (call tone)
* With the monitor on standby:
· Press the « » button once and the call tone is deactivated.
Note: The « » button blinks to indicate that the call tone has been deactivated.
· By sequentially pressing the « » button, you will go from the lowest to the highest
level.
Note: There are 3 levels of adjustment (minimum, medium and maximum). A
tone of the selected volume will be heard each time.
Call to Reception Centre (depending on installation)
* In installations with reception centres, press the door-opening button, ( ),
with the monitor on standby, to generate a call to the reception centre.
X
Pag 25
Page 26

Kit VIDEO OLYMPO ADS
Kit VIDEO OLYMPO ADS
MONITEUR OLYMPO ADS BASIC
Ecran TFT couleur 5 pouces.
Haut-parleurs avec son d’ambiance.
Fonctionnement mains libres.
CONTRÔLES
X
Bouton-poussoir de la
gâche électrique
et appel au concierge
Bouton SANS
FONCTION
Allumage automatique
Sélection caméra
principale/secondaire
(fonction disponible selon
le type d’installation)
FONCTIONNEMENT
X
Réglage du volume
Activer communication
Contrôle luminosité ( ), contraste ( ) et couleur ( )
Eteint
X
(son + image)
Appel
* En appuyant sur le bouton-poussoir d’appel sur la platine de rue, il se
produit une tonalité d’appel aussi bien au niveau de la platine de rue
que du moniteur ; l’écran s’allume.
S’il existe des équipements supplémentaires dans le logement, ils
sonneront également. Si personne ne répond à l’appel, les équipements
se déconnectent automatiquement au bout de 90 secondes.
Réception de l’appel
* Décrochez en appuyant sur le bouton « » pour établir la communication
avec le visiteur. L’éclairage du bouton s’allume indiquant de la sorte que la
Pag 26
X
communication est activée « ».
La durée de la communication est limitée à 90 secondes.
Si, lors de la communication, vous appuyez sur le bouton «X», la
communication se termine et l’écran s’éteint.
FRANÇAIS
Page 27

Kit VIDEO OLYMPO ADS
Kit VIDEO OLYMPO ADS
Ouverture de la porte au visiteur
* Il est possible d’ouvrir la porte en appuyant sur le bouton « » tout en
étant en communication avec le visiteur.
X
Activation manuelle du moniteur (allumage automatique)
* Quand le moniteur est en veille :
· Appuyez sur le bouton « » pour n’activer que l’écran.
Remarque : le moniteur restera allumé pendant 30 secondes sans son.
X
· Appuyez sur le bouton « » pour établir la communication ; « » s’éclairera.
Remarque : une fois la communication activée, le son + l’image resteront
activés pendant 90 secondes à la suite desquelles ils se
déconnecteront automatiquement. Pendant ce temps, il est possible
d’ouvrir la porte en appuyant sur le bouton «
· Appuyez sur le bouton « » (l’éclairage de « » disparaît) pour
déconnecter le son et observer le visiteur sans être entendu.
· Vous pourrez désactiver la communication en appuyant sur le bouton «X».
Remarque importante : voir exemples de fonctionnement en fin de manuel.
Réglage de la luminosité ( ), du contraste ( ) et de la couleur ( )
* Lorsque l’écran est allumé, appuyez sur le bouton correspondant pour
effectuer les réglages nécessaires. Vous disposez de quatre niveaux de
réglage pouvant être sélectionnés de manière cyclique. Un avertissement
X
sonore se produit lorsque le cycle atteint sa valeur maximale.
».
Régler le volume
Volume du son (conversation)
* Lors d’une communication avec la platine de rue, appuyez sur le bouton « » afin
de régler le volume de la conversation. Vous disposez de quatre niveaux de réglage
X
pouvant être sélectionnés de manière cyclique. Un avertissement sonore se
produit lorsque le cycle atteint sa valeur maximale.
Volume d’appel (sonnerie)
* Quand le moniteur est en veille :
· Appuyez sur le bouton « » une fois ; la sonnerie d’appel est désactivée.
Remarque : le bouton « » clignote afin d’indiquer que la sonnerie a été
désactivée.
· En appuyant plusieurs fois sur le bouton « », l’on passe du niveau minimal au
niveau maximal.
Remarque : dispose de 3 niveaux de réglage (minimal, moyen, maximal). L’on
entendra à tout moment la tonalité du volume choisi.
Appel au concierge (selon installation)
* Sur les installations avec conciergerie, appuyez sur le bouton de la gâche
électrique ( ), le moniteur sera en veille, pour réaliser un appel au
X
concierge.
Pag 27
Page 28

Kit VIDEO OLYMPO ADS
Kit VIDEO OLYMPO ADS
MONITOR OLYMPO ADS BASIC
Lautsprecher mit Sourround-Effekt.
Kompletter Freisprechbetrieb.
FUNKTIONSTASTEN
X
5" Farb-TFT-Bildschirm.
Türöffnungsund Portierruftaste
Taste OHNE
FUNKTION
Eigenstart
Auswahl Haupt-/
Nebenkamera (Funktion je
nach Anlagentyp
verfügbar)
FUNKTIONSWEISE
X
X
Lautstärkeregelung
Sprechverbindung aktivieren
Helligkeitskontrolle ( ), Kontrast ( ) und Farbe ( )
Ausgeschaltet
X
(Audio + Video)
Anruf
* Durch Drücken der Ruftaste an der Türstation wird ein Rufton sowohl
an der Türstation als auch am Monitor ausgelöst und der Bildschirm
schaltet sich ein.
Der Rufton wird dabei auch von eventuell in der Wohnung vorhandenen
zusätzlichen Sprechstellen ausgegeben. Wird der Anruf nicht
entgegengenommen, schalten sich die Geräte nach 90 Sekunden
automatisch ab.
Anrufentgegennahme
* Durch Drücken der Taste « » stellen Sie eine Sprechverbindung mit dem
Besucher her. Die Tastenbeleuchtung schaltet sich ein und zeigt an, dass
eine Sprechverbindung herstellt worden ist « ».
Die Sprechdauer ist auf 90 Sekunden begrenzt.
Wenn während der Sprechverbindung die Taste «X» gedrückt wird, wird
die Sprechverbindung beendet und das Display schaltet sich ab.
Pag 28
DEUTSCH
Page 29

Kit VIDEO OLYMPO ADS
Kit VIDEO OLYMPO ADS
Türöffnung für Besucher
* Während des Gesprächs mit dem Besucher kann die Tür durch Drücken
der Taste « » geöffnet werden.
X
Manuelle Aktivierung des Monitors (Eigenstart)
* Mit Monitor im Bereitschaftsmodus:
· Drücken Sie die Taste « », um nur das Display zu aktivieren.
Hinweis: Ohne Audioverbindung bleibt der Monitor 30 Sekunden lang
eingeschaltet.
· Drücken Sie die Taste « », um eine Sprechverbindung herzustellen, dabei
X
leuchtet « » auf.
Hinweis: Nach der Aktivierung der Sprechfunktion bleibt die Audio- und
Videofunktion 90 Sekunden lang aktiviert und schaltet sich danach automatisch
aus. Während diesem Zeitraum kann die Tür durch Drücken der Taste «
geöffnet werden.
»
· Drücken Sie die Taste « » (dadurch schaltet sich die Beleuchtung
« » aus, um die Audiofunktion abzuschalten und die Besucher sehen
zu können, ohne dabei selbst gesehen zu werden.
· Sie können die Sprechverbindung und den Monitor deaktivieren,
indem Sie die Taste «X» drücken.
Wichtiger Hinweis: Siehe Funktionsbeispiele am Ende dieses Handbuchs.
Einstellung von Helligkeit ( ), Kontrast ( ) und Farbe ( )
X
* Drücken Sie bei eingeschaltetem Monitor die entsprechende Taste, um die
gewünschten Einstellungen durchzuführen. Es stehen vier durchlaufend
auswählbare Einstellstufen zur Verfügung, wobei beim Erreichen des
Maximalwerts ein Signalton ausgegeben wird.
Einstellen der Lautstärke
Audio-Lautstärke (Gespräch)
* Drücken Sie die Taste « » bei bestehender Sprechverbindung zur Türstation, um
X
die Lautstärke der Sprachwiedergabe einzustellen. Es stehen vier durchlaufend
auswählbare Einstellstufen zur Verfügung, wobei beim Erreichen des
Maximalwerts ein Signalton ausgegeben wird.
Klingellautstärke (Klingelton)
* Mit Monitor im Bereitschaftsmodus:
· Drücken Sie die Taste « » einmal und deaktivieren Sie den Rufton.
Hinweis: Die Taste « » blinkt, um anzuzeigen, dass der Rufton deaktiviert
worden ist.
· Drücken Sie abwechselnd die Taste « », um von der geringsten zur höchsten
Lautstärke zu gelangen.
Hinweis: Es stehen Ihnen insgesamt 3 Einstellstufen zur Verfügung (tief, mittel,
hoch). Bei jeder Einstellstufe ertönt ein dementsprechender Ton.
Portierruf (gemäß Anlage)
* Bei Installationen mit Portierzentrale drücken Sie den Türöffner ( ) während
sich der Monitor im Bereitschaftsmodus befindet, um einen Portierruf
X
auszulösen.
Pag 29
Page 30

Kit VIDEO OLYMPO ADS
Kit VIDEO OLYMPO ADS
MONITOR OLYMPO ADS BASIC
Colunas com som envolvente.
Funcionamento de mãos-livres total.
COMANDOS
X
Ecrã TFT de 5” a cores.
Botão de trinco
e chamada ao porteiro
Botão SEM FUNÇÃO
Ligar automático
Selecção da câmara
principal/secundária
(função disponível
consoante o tipo de
instalação)
FUNCIONAMENTO
X
Regulação do volume
Activar comunicação
Controlo do brilho ( ), contraste ( ) e cor ( )
Apagado
X
(Áudio + Vídeo)
Chamada
* Ao carregar no botão de chamada na Placa de Rua, ouve-se um tom
de chamada tanto na placa de rua como no monitor, acendendo-se o
visor.
Se houver equipamentos adicionais na vivenda, estes também tocam.
Se não se atender a chamada, os equipamentos desligam-se
automaticamente passados 90 segundos.
Atender a chamada
* Atender carregando no botão « » para estabelecer a comunicação com
o visitante. A iluminação do botão acende-se informando que a comunicação
Pag 30
X
está activa« ».
A duração da comunicação é limitada a 90 segundos.
Se, durante a comunicação, se carregar no botão «X», a comunicação
termina e o visor apaga-se.
PORTUGUÊS
Page 31

Kit VIDEO OLYMPO ADS
Kit VIDEO OLYMPO ADS
Abrir a porta ao visitante
* Estando em comunicação com o visitante é possível abrir a porta carregando
no botão « ».
X
Activação manual do monitor (ligação automática)
* Com o monitor em repouso:
· Carregar no botão « » para activar apenas o visor.
Nota: Sem áudio, o monitor permanecerá ligado durante 30 segundos.
X
· Carregar no botão « » para estabelecer a comunicação, acender-se-á « ».
Nota: Uma vez activada a comunicação, Áudio + Vídeo permanecerão activos
durante 90 segundos, desligando-se automaticamente em seguida.
Durante este tempo é possível abrir a porta se se carregar no botão «
· Premir o botão « », (desaparece a iluminação « » neste), para desligar o
áudio e observar a visita sem se ser ouvido.
· Poderá desactivar o ecrã e a comunicação, carregando no botão «X».
Nota importante: Ver exemplos de funcionamento no final deste manual.
Ajuste de brilho ( ), contraste ( ) e cor ( )
* Com o visor ligado, carregar no botão correspondente para fazer os ajustes
desejados. Dispõe de quatro níveis de ajuste seleccionáveis ciclicamente,
X
com aviso acústico ao chegar ao valor máximo.
».
Ajuste do volume
Volume de Áudio (conversação)
* Estando em comunicação com a placa de rua, premir o botão « », para ajustar o
volume da conversação. Dispõe de quatro níveis de ajuste seleccionáveis
X
ciclicamente, com aviso acústico ao chegar ao valor máximo.
Volume de Chamada (toque de chamada)
* Estando o monitor em repouso:
· Premir o botão « » uma vez, desactiva-se o toque de chamada.
Nota: O botão « » pisca, para indicar que se desactivou o toque de cha
mada.
· Premindo sequencialmente o botão « », passa-se do nível mínimo para o nível
máximo.
Nota: Dispõe de 3 Níveis de Ajuste (mínimo, médio e máximo). Ouvir-se-á
em cada momento um som com o volume escolhido.
Chamada ao porteiro (conforme a instalação)
* Em instalações com portaria, deve-se carregar no botão de trinco ( )
com o monitor em repouso, para fazer uma chamada ao porteiro.
X
Pag 31
Page 32

HIGH RESOLUTION
CCD CAMERA
PAN &TILT
HIGH RESOLUTION
CCD CAMERA
PAN &TILT
HIGH RESOLUTION
CCD CAMERA
PAN &TILT
CAM 1
HIGH RESOLUTION
CCD CAMERA
PAN &TILT
HIGH RESOLUTION
CCD CAMERA
PAN &TILT
HIGH RESOLUTION
CCD CAMERA
PAN &TILT
EN
E F D P
Ejemplo 1 - Example 1 - Exemple 1 - Beispiel 1 - Exemplo 1
Activación CÁMARA 1 - Activación CÁMARA 2 - Activación CÁMARA 1 - Activación CÁMARA 2 ...
Activation of CAMERA 1 – Activation of CAMERA 2 – Activation of CAMERA 1 – Activation of CAMERA 2 ...
Activation CAMÉRA 1 - activation CAMÉRA 2 - activation CAMÉRA 1 - activation CAMÉRA 2 ...
Aktivierung KAMERA 1 - Aktivierung KAMERA 2 - Aktivierung KAMERA 1 - Aktivierung KAMERA 2 ...
Activação CÂMARA 1 - Activação CÂMARA 2 - Activação CÂMARA 1 - Activação CÂMARA 2 ...
CAM 2CAM 1
1º
1 Seg./Sec./Sek.
¸
HIGH RESOLUTION
CCD CAMERA
PAN &TILT
CAM 1
CAM 1
HIGH RESOLUTION
CCD CAMERA
PAN &TILT
CAM 2
2º
1 Seg./Sec./Sek.
¸
CAM 2
3º
1 Seg./Sec./Sek.
¸
CAM 1
4º
1 Seg./Sec./Sek.
¸
Ejemplo 2: Activación CAMARA 1 + activación AUDIO + Activación CAMARA 2
Example 2: Activation of CAMERA 1 + activation of AUDIO + Activation of CAMERA 2
Exemple 2 : activation CAMÉRA 1 + activation SON + activation CAMÉRA 2
Beispiel 2: Aktivierung KAMERA 1 + Aktivierung AUDIO + Aktvierung KAMERA 2
Exemplo 2: Activação CÂMARA 1 + activação ÁUDIO + Activação CÂMARA 2
• Instalación con 2 Placas de Video
Installation with 2 Video Panels
Installation avec 2 platines vidéo
Installation mit 2 Videotürstationen
HIGH RESOLUTION
CCD CAMERA
Instalação com 2 Placas de Vídeo
PAN &TILT
CAM 1
CAM 2
CAM 2
. . .
HIGH RESOLUTION
CCD CAMERA
PAN &TILT
• Activación manual de la pantalla (autoencendido)
Manual activation of the screen (auto-start)
Activation manuelle de l’écran (allumage automatique)
Manuelle Aktivierung Video (Eigenstart)
Activação manual do ecrã (ligação automática)
Page 33

CAM 2
EN
E F D P
• Activación manual del audio (autoencendido)
Manual activation of audio (auto-start)
Activation manuelle du son (allumage automatique)
Manuelle Aktivierung Audio (Eigenstart)
Activação manual do áudio (ligação automática)
AUDIO
2 31
bla bla
bla ...
H
IG
H
R
E
C
S
C
O
D
L
C
U
T
A
IO
M
N
E
P
R
A
N
A
&
T
I
L
T
bla bla
bla ...
OFF
audio no activado audio not activated son non activé -
« » sans éclairage
Audio nicht aktiviert áudio não activado -
1
« » sin iluminación
« » not lit up
« » ohne Beleuchtung
« » sem iluminação
2 3
ON
pulsar
press
appuyez sur
drücken
premir
audio activado audio activated son activé Audio aktiviert áudio activado -
« » iluminado
« » lit up
« » éclairage
« » mit Beleuchtung
« » iluminado
• A continuación se realiza Autoencendido de CAMARA 2
CAMERA 2 then automatically goes on
Par la suite, l’allumage automatique de la CAMÉRA 2 s’effectue
Nachfolgend wird ein Eigenstart der KAMERA 2 durchgeführt
Em seguida, efectua-se a Ligação Automática da CÂMARA 2
Nota: Cuando se cambia de cámara el audio se desconecta y por tanto la tecla « » se queda sin iluminación.
Note: When you change cameras, the audio is disconnected and therefore the «
Remarque : lorsque l’on change de caméra, le son est déconnecté et, par conséquent, la touche «
Hinweis: Wenn Sie auf eine andere Kamera wechseln, wird die Audioverbindung unterbrochen und die Taste «
bleibt ohne Beleuchtung.
Nota: Quando se troca de câmara, o áudio desliga-se e, portanto a tecla « » fica sem iluminação.
» sbutton is not lit up.
» reste sans éclairage.
»
Page 34

Audio and Video Door Entry Systems
Publicación técnica de caracter informativo editada por FERMAX ELECTRONICA S.A.E.
E
FERMAX ELECTRONICA S.A.E., en su política de mejora constante, se reserva el derecho a
modificar el contenido de este documento así como las características de los productos que en él
se refieren en cualquier momento y sin previo aviso.
Cualquier modificación será reflejada en posteriores ediciones de este documento.
Technical document published for information purposes by FERMAX ELECTRONICA S.A.E.
EN
FERMAX ELECTRONICA S.A.E., in a policy of ongoing improvement, reserves the right to modify
the contents of this document and the features of the products referred to herein at any time and
with no prior notice. Any such modifications shall be reflected in subsequent editions of this document.
Publication technique à caractère informatif éditée par FERMAX ELECTRONICA S.A.E.
Conformément à sa politique de perfectionnement continu, FERMAX ELECTRONICA, S.A.E. se
F
réserve le droit de modifier, à tout moment et sans préavis, le contenu de ce document ainsi que les
caractéristiques des produits auxquels il fait référence. Toutes les modifications seront indiquées
dans les éditions suivantes.
Technische Veröffentlichung zu Informationszwecken; Herausgeber: FERMAX ELECTRONICA S.A.E.
D
FERMAX ELECTRONICA S.A.E, behält sich das Recht vor, den Inhalt dieses Dokuments sowie die
technischen Eigenschaften der erwähnten Produkte ohne vorherige Ankündigung zu ändern, um
dadurch den ständigen Weiterentwicklungen und den damit in Verbindung stehenden Verbesserungen
Rechnung zu tragen. Alle Änderungen finden Aufnahme in den Neuauflagen dieses Dokuments.
Publicação técnica de carácter informativo editada por FERMAX ELECTRONICA S.A.E.A FERMAX
ELECTRONICA S.A.E., na sua política de melhoramento constante, reserva-se o direito de modi-
P
ficar o conteúdo deste documento assim como as características dos produtos que nele são referidos a qualquer momento e sem aviso prévio.
Qualquer modificação será apresentada em edições posteriores deste documento.
Avda. Tres Cruces, 133 • 46017 Valencia (España)
Telf. 96 317 80 00 • Fax 96 377 07 50
Telf. Export: 00 34 96 317 80 02
www.fermax.com• fermax@fermax.com
 Loading...