

Page 1

PORTADA
Page 2

Este documento técnico lo edita FERMAX ELECTRONICA S.A.E. con caracter informativo, y
se reserva el derecho a modificar características de los productos que en él se refieren en
cualquier momento y sin previo aviso. Estos cambios vendrán reflejados en posteriores
ediciones del mismo.
ESPAÑOL
Pág 2
Page 3

CENTRAL DE CONSERJERIA MDS DIRECT
REF. 2532
MANUAL DE USUARIO
INDICE
CONTROLES .................................................................................................. 4
Descripción de los controles................................................................4
Descripción de la información de la pantalla...................................5
MANEJO DE LA CENTRAL DE CONSERJERÍA............................................6
Responder una llamada ........................................................................7
Realizar una llamada ............................................................................ 7
Manejo de la cola de llamadas ............................................................9
Poner en comunicación a dos viviendas.......................................10
Pasar una llamada de placa de calle a una vivienda.......................10
Repetir automáticamente la última comunicación realizada............10
Reset de comunicaciones y anulación de cola de llamadas............11
Cod. 94870b V 02_10
Pag 3
Page 4
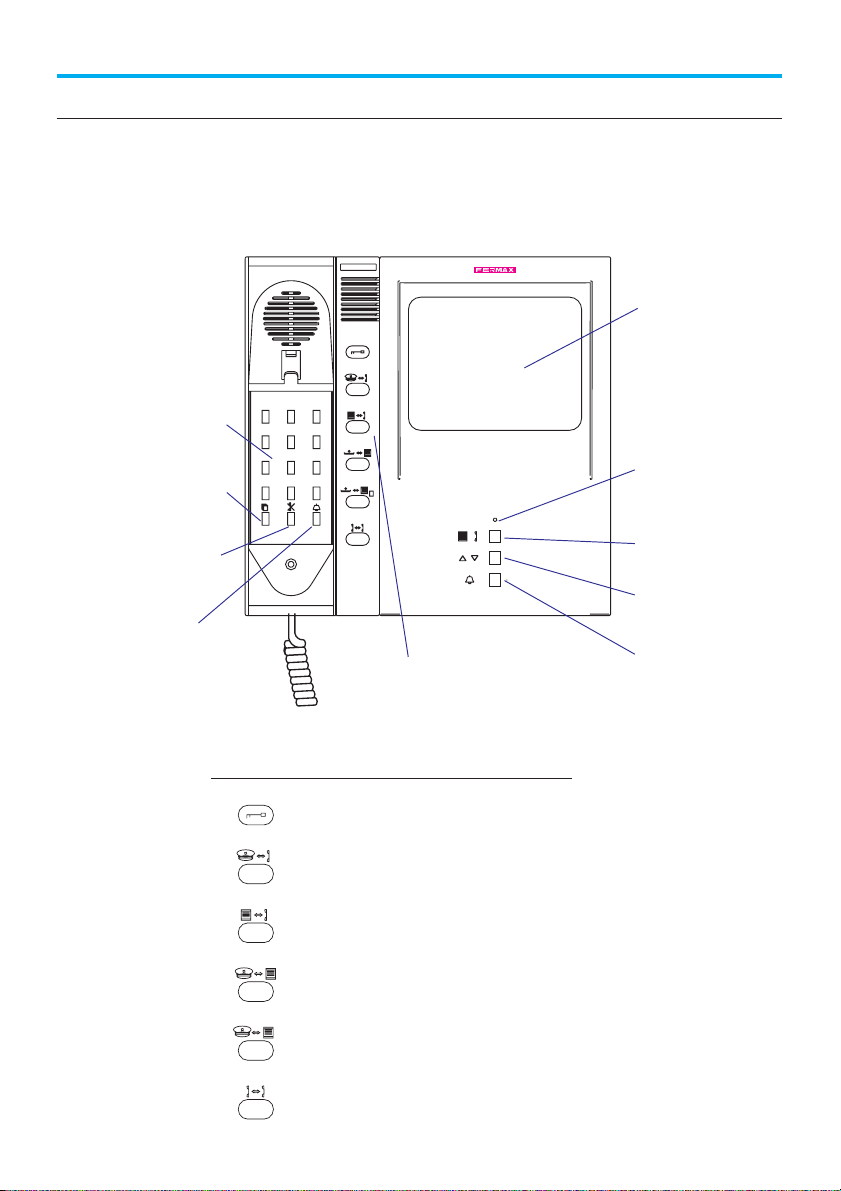
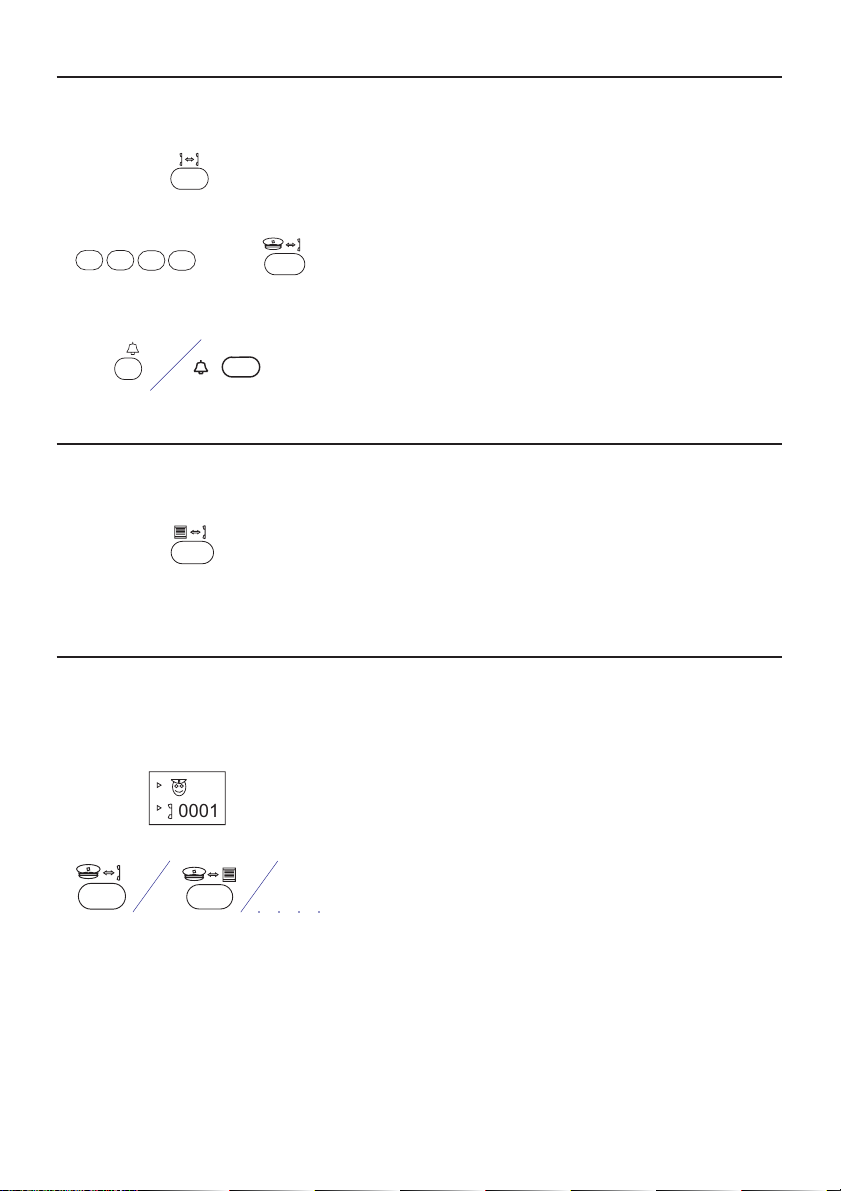
CONTROLES
Descripción de los controles
El siguiente dibujo muestra la ubicación y funcionalidad de las distintas teclas y
botones de la Central de Conserjería. Consulte en las páginas siguientes el modo
de operación detallado de cada una de ellas.
Pantalla
de información
Teclado de marcación
Led de encendido
Mostrar colas ON/OFF
D
/ llamada
Anular/ Finalizar
llamada
Realizar llamada
Botones de
comunicación
Botonera central de funciones de comunicación
Abrir puerta
Comunicación Conserje<-->Vivienda
Comunicación Placa de Calle<-->Vivienda
Comunicación Conserje<-->Placa de calle
D
Comunicación Conserje<-->Placa de intercomunicación
Comunicación Vivienda<-->Vivienda
Selección de cola
Selección de llamada
Realizar llamada
Pág 4
Page 5
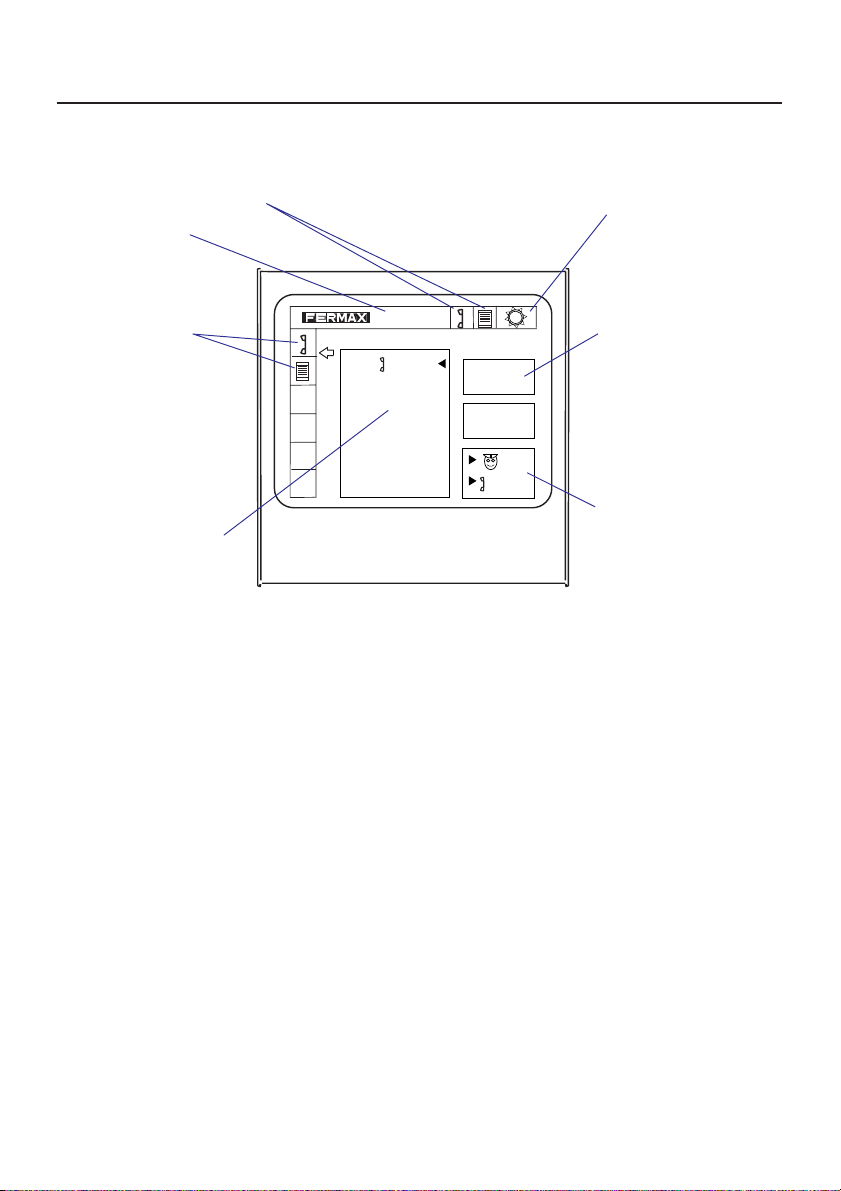
Descripción de la información de la pantalla
Tipo de Central
Tipo de Cola
de llamadas
Cola de llamadas
Tipo de la llamada recibida
01
Modo de funcionamiento
(Día, Noche o Mixto)
MDS
Entrada de datos
0001
0001
Ultima comunicación
registrada
Pag 5
Page 6

MANEJO DE LA CENTRAL DE CONSERJERÍA
En líneas generales la Central de Conserjería de sobremesa MDS-CITY/DIRECT dispone de 3 modos de funcionamiento: Modo Día, Modo Mixto y Modo Noche.
• modo DIA
• modo MIXTO
• modo NOCHE
• Es posible llamar al conserje desde las vivien-
y desde las placas de calle.
• El conserje puede llamar a cualquier vivienda
o placa.
• Las llamadas desde la placa de calle hacia
las viviendas son interceptadas por la conser jería.
• Es posible llamar al conserje desde las vivien-
das y desde las placas de calle (pulsando sim plemente la tecla campana).
• El conserje puede llamar a cualquier vivienda
o placa.
• Las llamadas desde la placa de calle hacia
las viviendas no son interceptadas por la con serjería.
• No se puede recibir ningún tipo de llamada.
• Se pueden realizar llamadas hacia las vivien-
das.
Para seleccionar el modo de funcionamiento:
1. Pulsar ‘0’.
2. Entrar el código de cambio de modo ‘A33333’.
3. Seleccionar el modo deseado con el botón .
4. Validar pulsando la tecla <B>.
Pág 6
Page 7
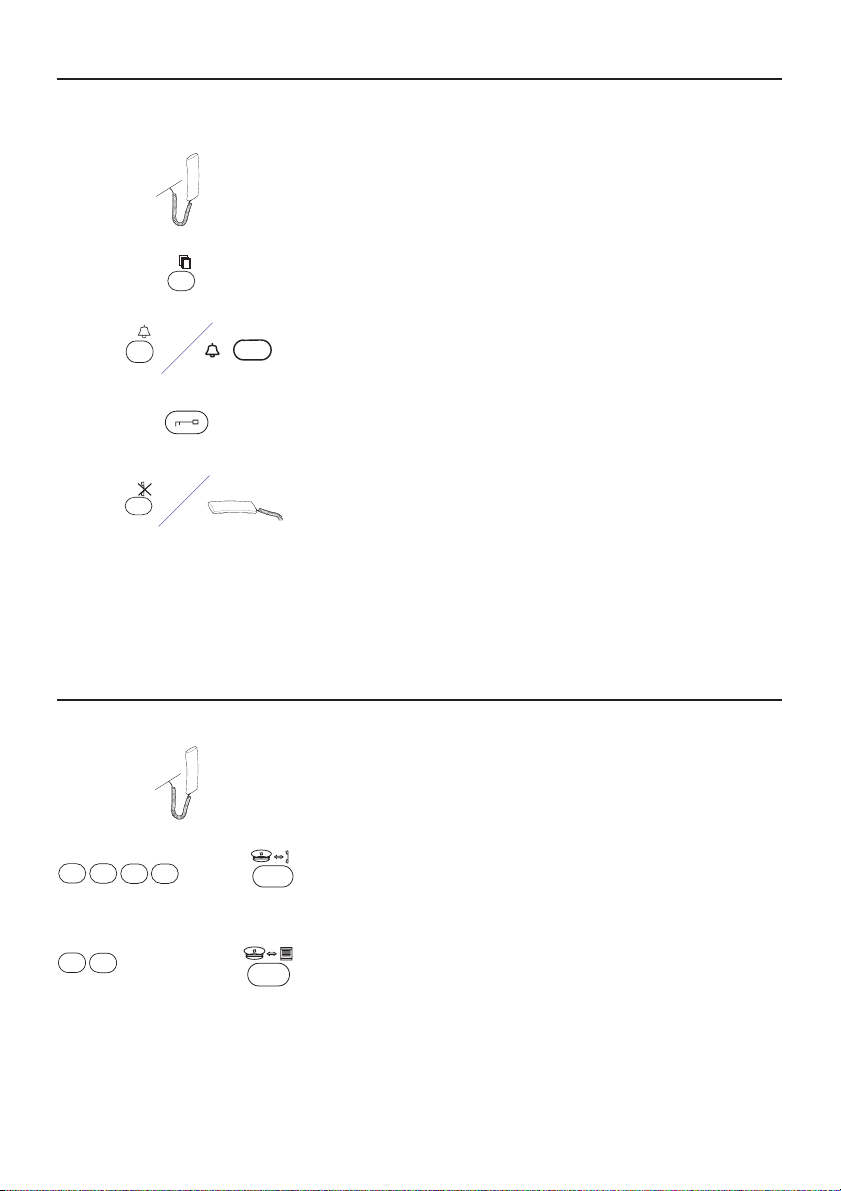
Responder una llamada
Al producirse una llamada, se emite un ‘bip’ durante 30 segundos y el LED rojo se pone
a parpadear. Para responderla realice los pasos siguientes:
1.- Descuelgue el brazo telefónico.
A
C
pantalla.
3.- Pulse la tecla <C> o el botón de campana para
contestar a dicha llamada.
4.- En caso de necesitar abrir la puerta pulse el botón
azul.
5.- Para finalizar la comunicación, pulse la tecla <B>
2.- Pulse la tecla <A> para visualizar la llamada en la
B
o bien cuelgue el brazo telefónico.
NOTA: Dependiendo del origen de la llamada, placa o vivienda, aparecerá un icono de placa
o de teléfono parpadeando en la parte superior derecha de la pantalla.
Realizar una llamada
Para realizar una llamada a cualquier placa o vivienda, proceda como sigue:
1.- Descuelgue el brazo telefónico.
2.a- Llamada a una vivienda
x
x
x x
entre 1 y 9999
+
Marque el número de la vivienda con la que desee
establecer comunicación y pulse el botón de co municación CONSERJE <--> VIVIENDA.
1
N
+
2.b- Comunicación con placa de Entrada General
Marque el número de la placa de calle de Entrada
N entre 0 y 9
General (10..19) y pulse el botón de comunica ción CONSERJE<-->PLACA de CALLE.
NOTA: En caso de llamada a una vivienda también se puede llamar pulsando el botón de cam pana o la tecla <C>.
Pag 7
Page 8
B
B
N N
BB entre 1 y 99
NN entre 01 y 09
N
N N
NNN entre 1 y 999
+
+
2.c- Comunicación con placa interior
Marque el número de la placa de Bloque Interior
(101..9909) y pulse el botón de comunicación
CONSERJE<-->PLACA de CALLE.
2.d- Comunicación con placa de intercomunicación
D
Marque el número de la placa de intercomunica ción (1..999) y pulse el botón de comunicación
CONSERJE<-->PLACA de INTERCOM.
3.- En caso de necesitar abrir la puerta pulse el botón
azul.
4.- Para finalizar la comunicación, pulse <B> o bien
B
: En el caso de una placa de bloque interior, se marcará la combinación BBNN donde 'BB'
NOTA
simplemente cuelgue el brazo telefónico.
es el número de bloque y 'NN' el número e placa. En el caso de que 'BB' sea inferior a
10, no introducir un 0 delante sino el digito directamante (Ej: 1 en vez de 01). Proceder
de la misma manera para las placas de Intercomunicación (el número introducido
nunca debe empezar por 0).
Pág 8
Page 9

Manejo de la Cola de Llamadas
Las llamadas no atendidas se van almacenando en la cola de llamadas. Para poder
atenderlas siga los pasos indicados :
1.- Descuelgue el brazo telefónico.
2.- Pulse la tecla <A> para visualizar la cola de llama-
A
das en la pantalla.
3.- Mediante el botón de selección de tipo de cola
0001
01
0005
02
0012
03
seleccione el tipo de llamada que quiera atender
(placa o vivienda).
4.- Seleccione la llamada con ayuda del botón de
selección de llamada.
5.- Pulse la tecla <C> o el botón de campana para
C
llamar a la vivienda o para establecer comunica ción con placa (la comunicación en curso queda
registrada en el recuadro de la parte inferior dere cha).
6.- En caso de necesitar abrir la puerta pulse el botón
azul.
7.- Para finalizar la comunicación, pulse la tecla <B>
B
o bien cuelge el brazo telefónico.
8.- Repita los pasos desde el punto 1 para continuar
con el proceso de atender las llamadas.
NOTA:En modo dia o mixto, se almacenan las últimas 20 llamadas no atendidas en la cola
de llamadas, aunque solo se mostrarán las 10 llamadas más antiguas, agrupadas
en la Cola de Llamadas.
Pag 9
Page 10
Poner en comunicación a dos viviendas
Estando en comunicación con una vivienda, realizar los siguientes pasos:
1.- Pulse el botón de comunicación
VIVIENDA <--> VIVIENDA
x
x
x x
+
2.- Introduzca el número de la segunda vivienda.
entre 1 y 9999
3.- Pulse la tecla <C> o el botón de campana para
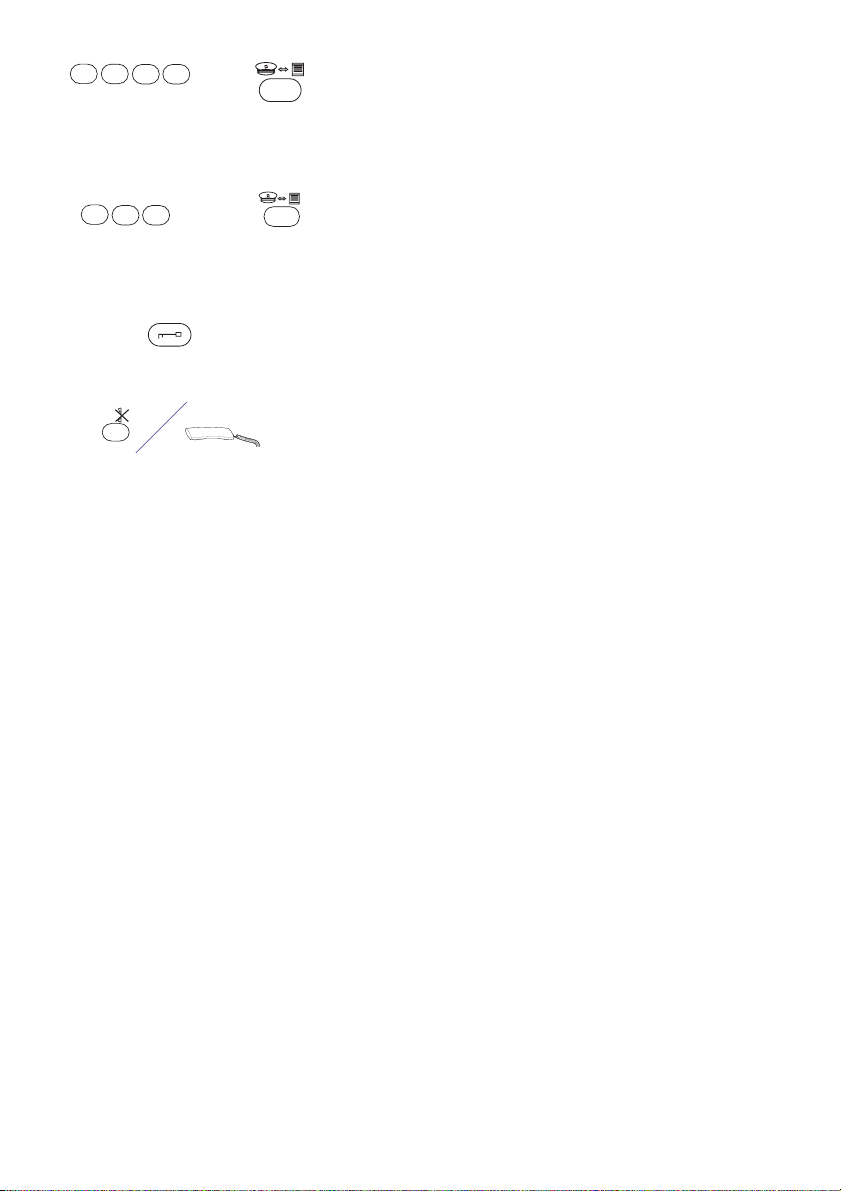
C
generar la llamada a este último.
Pasar una llamada de placa de calle a una vivienda
Estando en comunicación con la placa de calle, realice una llamada a la vivienda en
cuestión. Una vez en comunicación con la vivienda, realice lo siguiente:
• Pulse el botón de comunicación
PLACA de CALLE <--> VIVIENDA.
Repetir automáticamente la última comunicación realizada
Al producirse una comunicación, esta queda registrada en la pantalla de la Conserjería
por lo que podremos repetirla de manera automática si es necesario siguiendo estos
pasos :
1.- Mire en el recuadro la última comunicación realiza-
0001
da (parte inferior derecha de la pantalla).
2.- Pulse el botón de comunicación correspondiente
○○○○
(ver pág. 5) para activar la comunicación.
NOTAS: Las comunicaciones VIVIENDA <--> VIVIENDA no se podrán repetir de manera automá tica.
Pág 10
Page 11
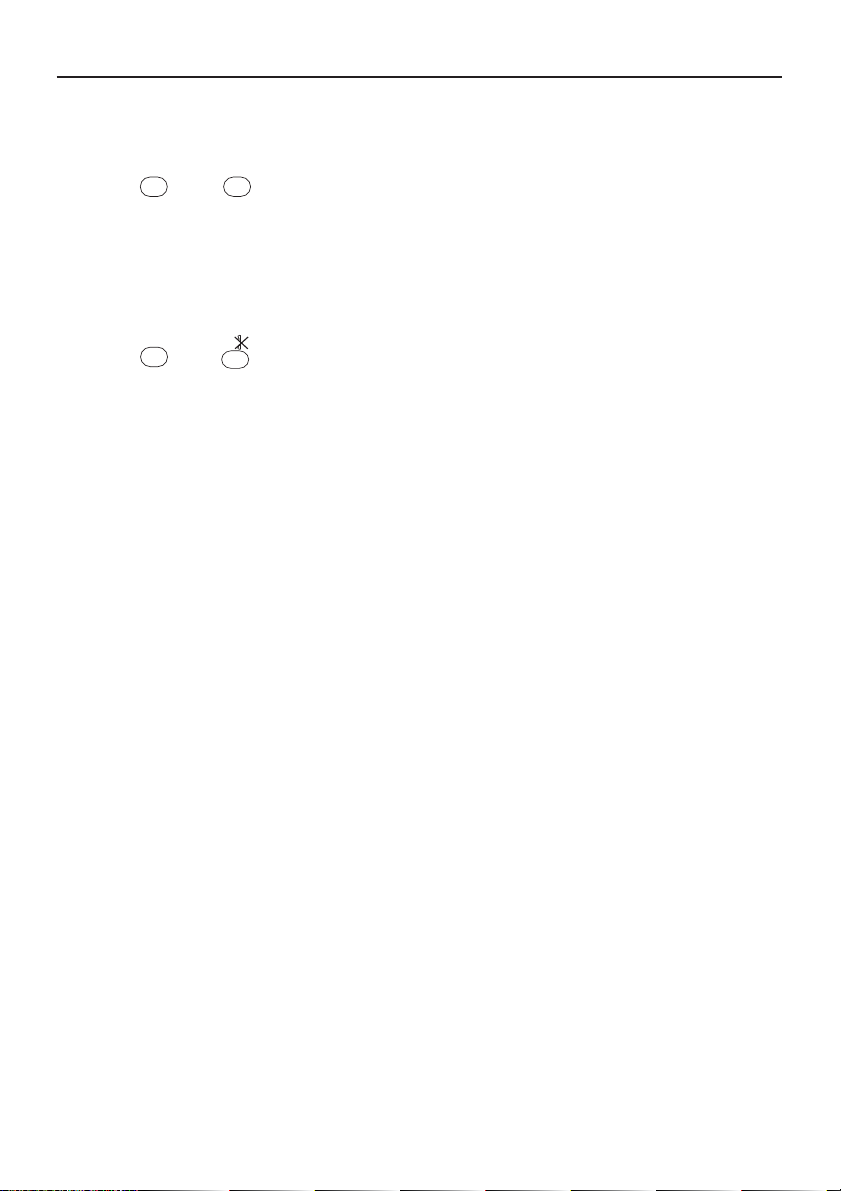
Reset de comunicaciones y anulación de cola de llamadas
Existe la posibilidad de realizar un RESET general de comunicaciones, que finaliza
todas las comunicaciones en curso y elimina del registro la última.
*
También existe la posibilidad de anular y borrar todas las llamadas que se encuentren
en la cola de llamadas.
*
NOTAS:
#
B
• Para realizar dicha acción pulse simultáneamente
las teclas <*> y <#>.
• Para realizar dicha acción se requiere la pulsación
simultánea de las teclas <*> y <B>.
• La opción de RESET también se puede utilizar para borrar el registro de la última llama-
da realizada cuando no se está en comunicación.
• La comunicación entre 2 viviendas o entre placa y vivienda no podrá ser escuchada
desde la conserjeria aunque si que se podrá finalizar dicha comunicación realizando
un RESET.
Pag 11
Page 12
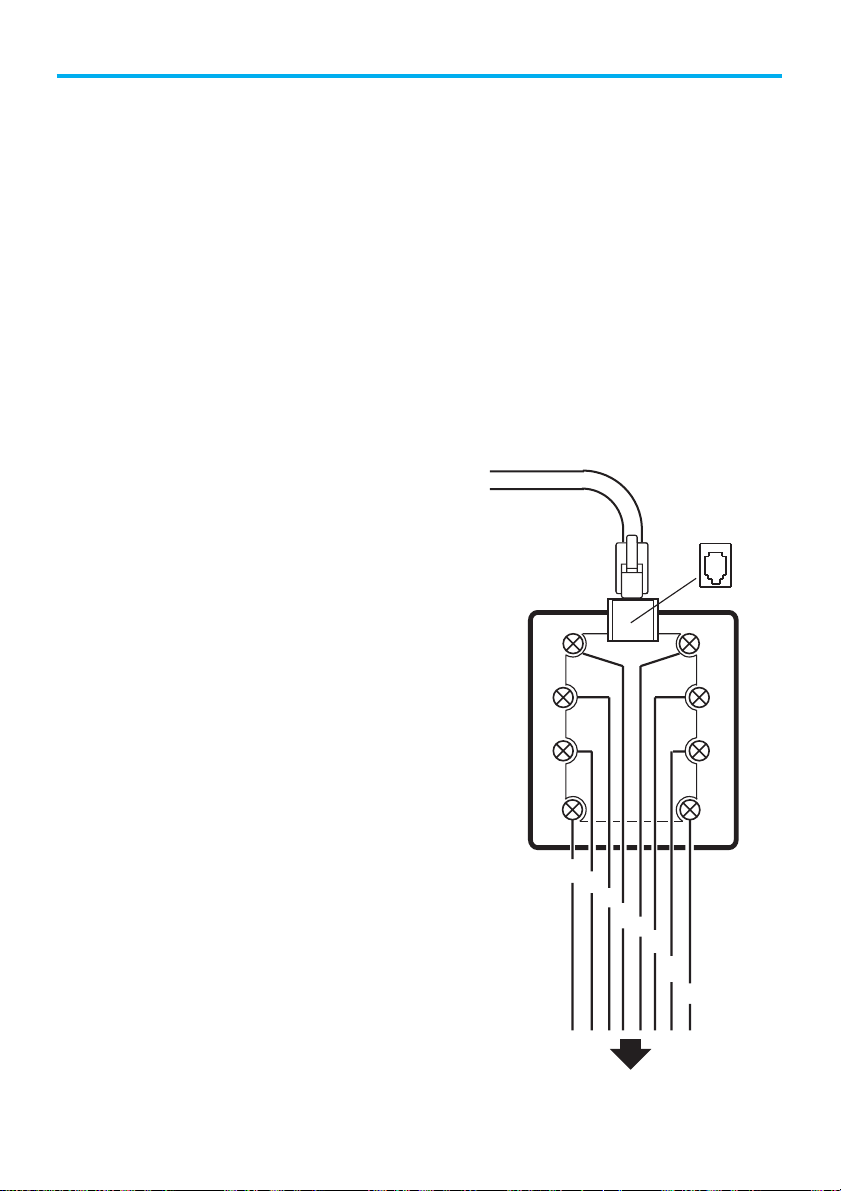
CARACTERISTICAS TECNICAS
Alimentación: 12VDC ± 10% / 250mA
Temperatura de funcionamiento: 10 ~ 60 ºC
Módulo de conexiones de la CC :
‘+’ alimentación (+12VDC)
‘-’ alimentación (GND)
’Sa' RS-485 (par trenzado de datos)
‘Sb’ RS-485 (par trenzado de datos)
‘2’ audio viviendas --> placas
'6' audio placas --> viviendas
'Alt' Salida hacia altavoz
'-' negativo de altavoz (GND)
Conector tipo telefónico de pared :
[BL] : ‘+’ alimentación (+12VDC)
[OR] : ‘-’ alimentación (GND)
[BK] : ’Sa' RS-485 (par trenzado de datos)
[RD] : ‘Sb’ RS-485 (par trenzado de datos)
[WH] : ‘2’ audio viviendas --> placas
[BR] : '6' audio placas --> viviendas
[YL] : 'Alt' Salida hacia altavoz
[GR] : '-' negativo de altavoz (GND)
+
Sa
Sb
B
L
O
-
R
BKB
K
R
D
W
2
H
B
6
R
Y
Alt
L
-
G
R
Pág 12
Sb
Sa
+
2
6
Alt
-
A la instalación
Page 13

Pag 13
Page 14

This technical document of an informative nature is published by FERMAX ELECTRONICA
S.A.E., which reserves the right to modify characteristics of the products referred to herein
at any time and without prior notice. These changes will be reflected in subsequent editions
of this document.
ENGLISH
Page 2
Page 15

MDS DIRECT GUARD UNIT
REF. 2532
USER MANUAL
INDEX
CONTROLS .....................................................................................................4
Description of controls.......................................................................... 4
Description of the information on the screen...................................5
OPERATING THE GUARD UNIT .....................................................................6
Answering a call ................................................................................... 7
Making a call ........................................................................................ 7
Handling the call queue ........................................................................ 9
Establishing communication between two apartments................... 10
Transferring a call from the outdoor panel to an apartment.............10
Automatically repeating the last communication made................... 10
Resetting communications and deleting the call queue................... 11
Code 94870b V02_10
Page 3
Page 16

CONTROLS
Description of controls
The diagram below shows the location and functioning of the different keys and buttons
of the Guard Unit. For the detailed operation of each one of these, consult the following
pages.
Information
screen
Keypad
On / Call Led
Show queues ON/OFF
Cancel/ End call
Call button
D
Queue
selection
Call
selection
Page 4
Communication buttons
Releasing the Door
Guard Unit <—> Apartment communication
Outdoor Panel <—> Apartment communication
Guard Unit <—> Outdoor panel communication
D
Guard Unit<—>Intercom Panel communication
Apartment<—>Apartment communication
Communication buttons
Making a call
Page 17

Description of the information on the screen
Type of call received
Type of Guard Unit
Type of Call
Queue
Call queue
01
Operation Mode
(Day, Night or Mixed)
MDS
Data entry
0001
0001
Last communication
registered
Page 5
Page 18

OPERATING THE CALL RECEPTION CENTRE
In general terms, the MDS-CITY/DIRECT Guard Unit has three operating modes: Day
Mode, Mixed Mode and Night Mode.
• DAY mode
• MIXED mode
• NIGHT mode
• It is possible to call the Guard Unit from
apartments and from the outdoor panels.
• The Guard Unit can call any apartment or pa-
nel.
• Calls from the outdoor panel to apartment are
intercepted by the call Guard Unit.
• It is possible to call the Guard Unit from
apartments and from outdoor panels (simply
by pressing the bell button).
• The Guard Unit can call any apartment or pa -
nel.
• Calls from the outdoor panel to apartments are
not intercepted by the call Guard Unit.
• No type of call can be received.
• Calls can be made to apartment.
To select the operation mode:
1. Press ‘0’.
2. Enter to change the mode code ‘A33333’.
3. Select the desired mode with the button
4. Validate by pressing the <B> button.
Page 6
Page 19

Answering a call
When a call is received, a ‘beep’ is emitted for 30 seconds and the red LED starts
flashing. To answer it, proceed as follows:
1.- Lift up the handset.
2.- Press the <A> key to view the call on the screen
A
3.- Press the <C> key or the bell button to answer this
call.
C
4.- If you need to open the door, press the blue
button.
5.- To end the call, press the <B> key or hang up the
handset.
B
NOTE: Depending on the origin of the call, panel or apartment, a panel or telephone icon will
appear, flashing at the top right of the screen.
Making a call
To make a call to any panel or apartment, proceed as follows:
1.- Pick up the handset.
2.a- Calling an apartment
x
x
x x
+
between 1 and 9999
1
N
+
N between 0 and 9
Dial the number of the apartment with which you
wish to talk to and press the GUARD UNIT <-->
APARTMENT communication button.
2.b- Communication with the General Entry Panel
Dial the number of the General Entry Panel (0..9)
and press the GUARD UNIT <—> OUTDOOR
PANEL communication button.
NOTE: You can also make a call to an apartment by pressing the bell button or the
<C> key.
Page 7
Page 20

B
B
N N
+
BB between 1and 99
NN between 01 and 09
2.c- Communication with the indoor panel
Dial the number of the Indoor Block Panel
(101..9909) and press the GUARD UNIT <—
>OUTDOOR PANEL communication button.
2.d- Communication with the Intercommunication
D
N
N N
+
NNN between 1 and 999
Panel
Dial the number of the Intercommunication Panel
(1..999) and press the GUARD UNIT
<—>INTERCOM PANEL communication button.
3.- If you need to open the door, press the blue button.
4.- To end the call, press the <B> key or simply hang
up the handset.
B
NOTE: In the case of an indoor block panel, dial the combination BBNN,
where 'BB' is the block number and 'NN' the panel number. If 'BB' is
lower than 10, do not enter 0 before the number (E.g.: 1 rather than
01). Proceed in the same way for Intercommunication Panels (the
number entered must never start with 0).
Page 8
Page 21

Handling the Call Queue
Unanswered calls are stored in the call queue. To answer them, proceed as follows:
1.- Pick up the handset.
2.- Press the <A> key to view the call queue on the
A
screen.
3.- Using the type of queue selection button, select
the type of call you wish to answer (panel or
0001
01
0005
02
0012
03
apartment).
4.- Select the call using the call selection button.
5.- Press the <C> key or the bell button to call the
apartment or establish communication with the
panel (the current communication is registered in
C
the box at bottom right).
6.- If you need to open the door, press the blue button.
7.- To end the call, press the <B> key or hang up the
handset.
8.- Repeat these steps from point 1 to continue with
the process of answering calls.
B
NOTE: In day or mixed mode, the last 20 unanswered calls are stored in
the call queue, though only the 10 oldest calls will be shown, grouped
together in the Call Queue.
Page 9
Page 22

Establishing communication between two apartments
When in communication with an apartment, proceed as follows:
1.- Press the APARTMENT <—> APARTMENT
communication button
x
x
x x
+
2.- Enter the number of the second apartment.
between 1 and 9999
3.- Press the <C> key or the bell button to call this
C
second home.
Transferring a call from the outdoor panel to an apartment
When you are in communication with the outdoor panel, make a call to the apartment you
want. Once you are in communication with that apartment, proceed as follows:
• Press the OUTDOOR PANEL <—>APARTMENT
communication button.
Automatically repeating the last communication made
When a communication is established, this is registered on the screen of the Guard Unit,
and so it is possible to repeat it automatically by following these steps:
1.- In the box, view the last communication made
0001
(bottom right of the screen).
2.- Press the corresponding communication button
○○○○
(see page 4) to activate the communication.
NOTES: APARTMENT <--> APARTMENT communications cannot be repeated automatically.
Page 10
Page 23

Resetting communications and deleting the call queue
The possibility exists of carrying out a general RESET of communications, which ends all
current communications and deletes the last one from the register.
*
It is also possible to cancell and erase all calls in the call queue.
*
NOTES:
#
B
• To do this, simultaneously press the <*> and <#>
keys.
• To do this, you need to simultaneously press the
<*<> and <B> keys.
• The RESET option can also be used to delete the register of the last call
made when you are not in communication.
• Communications between 2 apartments or between panel and apartment cannot
be heard from the call reception centre, though this communication
can be ended by carrying out a RESET.
Page 11
Page 24

TECHNICAL FEATURES
Power supply: 12VDC ± 10% / 250mA
Operating temperature: 10 ~ 60 ºC
Guard Unit connections module:
‘+’ power supply (+12VDC)
‘-’ power supply (GND)
’Sa’ RS-485 (twisted data pair)
‘Sb’ RS-485 (twisted data pair)
‘2’ audio from apartments
‘6’ audio to apartments
‘Alt’ Output to loudspeaker
‘-’ loudspeaker negative (GND)
Wall telephone-type connector:
[BL] : ‘+’ power supply (+12VDC)
[OR] : ‘-’ power supply (GND)
[BK] : ’Sa’ RS-485 (twisted data pair)
[RD] : ‘Sb’ RS-485 (twisted data pair)
[WH] : ‘2’ audio from apartments
[BR] : ‘6’ audio to apartments
[YL] : ‘Alt’ Output to loudspeaker
[GR] : ‘-’ loudspeaker negative (GND)
+
Sa
Sb
B
L
O
-
R
BKB
K
R
D
W
G
R
2
H
B
6
R
Y
Alt
L
-
Page 12
Sb
Sa
+
2
6
Alt
-
To the installation
Page 25

Page 13
Page 26

Ce document technique à caractère informatif est édité par FERMAX ELECTRONICA S.A.E.,
qui se réserve le droit de modifier, à tout moment et sans avertissement préalable, les
caractéristiques des produits auxquels il est fait référence. Ces changements apparaîtront
dans les éditions suivantes.
FRANÇAIS
Page 2
Page 27

CENTRALE DE CONCIERGERIE MDS DIRECT
REF. 2532
MANUEL D’UTILISATION
SOMMAIRE
CONTRÔLES .................................................................................................. 4
Contrôles : Description ......................................................................... 4
Informations sur l'écran : Description…...........................................5
MANIPULATION DE LA CENTRALE DE CONCIERGERIE ............................ 6
Répondre à un appel.............................................................................7
Effectuer un appel................................................................................. 7
Gestion des appels en attente .............................................................9
Mettre deux logements en communication................................... 10
Passer un appel de la platine de rue à un logement.......................10
Répéter automatiquement la dernière communication réalisée........ 10
Remise à zéro des communications et annulation des appels en attente...11
Code 94870b V 02_10
Page 3
Page 28

CONTROLES
Contrôles : Description
Place et fonctions des différents boutons-poussoirs et touches de la centrale de
conciergerie : voir schéma suivant. Pour connaître en détail le mode d’utilisation de
chaque touche, veuillez consulter les pages suivantes.
Ecran
d’informations
Clavier de numérotation
Témoin d’allumage
Afficher la liste
d’attente ON/OFF
Annuler/terminer
l’appel
Effectuer un appel
D
/appel
Sélection de la liste
des appels en
attente
Sélection de l’appel
Page 4
Boutons de
communication
Boîte à boutons-poussoirs centrale des fonctions de communication
Ouvrir la porte
Communication sens concierge<—>logement
Communication sens platine de rue<—>logement
Communication sens concierge<—>platine de rue
D
Communication sens concierge<—>platine d’intercommunication
Communication sens logement<—>logement
Effectuer un appel
Page 29

Informations sur écran : Description
Type de l’appel reçu
Type de centrale
Type des appels
en attente
Appels en attente
01
Mode de fonctionnement
(jour, nuit ou mixte)
MDS
Entrée de données
0001
0001
Dernière communication
enregistrée
Page 5
Page 30

MANIPULATION DE LA CENTRALE DE CONCIERGERIE
La centrale de conciergerie de table MDS-CITY/DIRECT dispose de 3 modes de
fonctionnement : mode jour, mode mixte et mode nuit.
• mode JOUR
• mode MIXTE
• mode NUIT
• Il est possible de contacter le concierge à par
tir d’un logement ou depuis une platine de rue.
• Le concierge peut appeler tout logement
ou platine.
• Les appels effectués de la platine de rue aux
logements peuvent être interceptés par la
conciergerie.
• Il est possible de contacter le concierge à par
tir d’un logement ou à partir d’une platine de
rue (en appuyant sur la touche « cloche »).
• Le concierge peut appeler tout logement ou
platine.
• Les appels effectués de la platine de rue vers
les logements ne peuvent pas être interceptés
par la conciergerie.
• Aucun appel ne peut être reçu.
• Il est possible d’effectuer des appels vers les
logements.
Pour sélectionner le mode de fonctionnement :
1. Composez le ‘0’.
2. Composez le code pour changer de mode ‘A33333’
3. Sélectionnez le mode désiré avec la touche
4. Validez en appuyant sur la touche <B>
Page 6
Page 31

Répondre à un appel
Si un appel est effectué, un « bip » est émis durant 30 secondes et le voyant rouge se met
à clignoter. Pour y répondre, il suffit d’effectuer les étapes suivantes :
1.- Décrochez le combiné.
A
C
sur l’écran.
3.- Appuyez sur la touche <C> ou le bouton « cloche »
afin de répondre à l’appel.
4.- Pour ouvrir la porte, appuyez sur la touche bleue.
5.- Pour terminer la communication, appuyez sur la
touche <B> ou bien raccrochez le combiné.
B
REMARQUE : selon la provenance de l'appel (platine ou logement), un symbole
représentant la platine ou le poste se met à clignoter sur la partie
supérieure droite de l'écran.
Effectuer un appel
Pour effectuer un appel vers une platine ou un logement, suivez la démarche suivante :
1.- Décrochez le combiné.
2.a- Appel vers un logement
Composez le numéro du logement que vous
2.- Appuyez sur la touche <A> pour visualiser l’appel
x
x
x x
+
souhaitez contacter et appuyez sur le bouton
de communication CONCIERGE <—> LOGEMENT.
entre 1 et 9999
2.b- Communication avec la platine d’entrée
1
N
N entre 0 et 9
+
générale
Composez le numéro de la platine de rue d’entrée
générale (10..19) et appuyez sur le bouton de
communication sens CONCIERGE<—>PLATINE
de RUE.
REMARQUE : s'il s'agit d'un appel vers un logement, il est également possible <C>
d'appeler en appuyant sur le bouton « cloche » ou sur la touche.
Page 7
Page 32

B
B
N N
BB entre 1 et 99
NN entre 01 et 99
N
N N
NNN entre 1et 999
B
+
2.c- Communication avec la platine intérieure
Composez le numéro de la platine du bloc intérieur
(101..9999) et appuyez sur le bouton de
communication CONCIERGE<—>PLATINE de RUE.
2.d- Communication avec la platine d’intercommunication
D
+
Composez le numéro de la platine d’inter communication (1..999) et appuyez sur le bouton
de communication CONCIERGE<—>PLATINE
d’INTERCOM.
3.- Pour ouvrir la porte, appuyez sur la touche bleue.
4.- Pour terminer la communication, appuyez sur <B>
ou bien raccrochez tout simplement le combiné.
REMARQUE
: s'il s'agit d'une platine de bloc intérieur, il faudra entrer la
combinaison BBNN dans laquelle « BB » est le numéro de bloc
et « NN » le numéro de platine. Si « BB » est inférieur à 10,
composez le chiffre souhaité directement sans le faire précéder
d'un 0 (ex : 1 au lieu de 01). Réalisez la même démarche pour
les platines d'intercommunication (le numéro composé ne doit
jamais être précédé d'un 0).
Page 8
Page 33

Gestion des appels en attente
Les appels en absence sont emmagasinés dans une liste d’attente. Pour répondre à
ces appels, veuillez suivre les étapes suivantes :
1.- Décrochez le combiné.
2.- Appuyez sur la touche <A> pour visualiser la liste
A
d’attente sur l’écran.
3.- A l’aide du bouton de sélection du type d’attente,
sélectionnez le type d’appel auquel vous souhaitez
0001
01
0005
02
0012
03
répondre (platine ou logement).
4.- Sélectionnez l’appel à l’aide du bouton de
sélection d’appel.
5.- Appuyez sur la touche <C> ou le bouton « cloche »
C
afin de réaliser un appel vers le logement ou pour
établir une communication avec la platine établir
une communication avec la platine.
(La communication en cours est enregistrée sur
le panneau de la partie inférieure droite).
6.- Pour ouvrir la porte, appuyez sur la touche bleue.
7.- Pour terminer la communication, appuyez sur la
touche <B> ou bien raccrochez le combiné.
B
8.- Effectuez à nouveau les étapes à partir du point 1
pour continuer à répondre aux appels.
REMARQUE : en mode jour ou mixte, les 20 derniers appels en absence
sont emmaganisés dans la liste d'attente, même si seuls les
10 premiers appels s'affichent.
Page 9
Page 34

Mettre deux logements en communication
Lorsque vous êtes en communication avec un logement, effectuez les étapes suivantes :
1.- Appuyez sur le bouton de communication
LOGEMENT <—> LOGEMENT
x
x
x x
+
2.- Composez le numéro du second logement.
entre 1et 9999
3.- Appuyez sur la touche <C> ou le bouton « cloche »
C
afin de réaliser un appel vers celui-ci.
Passer un appel de la platine de rue à un logement
Lorsque vous êtes en communication avec la platine de rue, effectuez un appel vers le
logement en question. Lorsque vous êtes en communication avec le logement souhaité,
réalisez les démarches suivantes :
• Appuyez sur le bouton de communication
PLATINE de RUE <—> LOGEMENT.
Répétez automatiquement la dernière communication réalisée.
Lorsqu’une communication est établie, celle-ci reste affichée sur l’écran de conciergerie.
Par conséquent, il est possible de répéter automatiquement cet appel en effectuant les
étapes suivantes :
1.- Regardez sur le panneau la dernière
0001
communication réalisée (partie inférieure droite
de l’écran).
2.- Appuyez sur le bouton de communication
○○○○
correspondant (voir page 5) pour commencer
la communication.
REMARQUES : les communications sens LOGEMENT <-> LOGEMENT ne peuvent pas être
répétées automatiquement.
Page 10
Page 35

Remise à zéro des communications et annulation des appels en attente
Il est possible de remettre à zéro l’ensemble des communications. Cette manipulation
permet de mettre fin à toutes les communications en cours et d’éliminer la dernière de la
liste d’enregistrement.
*
Il est également possible d’annuler et d’effacer tous les appels se trouvant dans la liste
d’attente.
*
REMARQUES :
#
B
• Pour réaliser cette manipulation, appuyez
simultanément sur les touches <*> et <# >.
• Pour réaliser cette manipulation, il est nécessaire
d’appuyer simultanément sur les touches <*> et
<B>.
• La remise à zéro peut aussi être utilisée pour effacer de la liste
d'enregistrement le dernier appel réalisé lorsqu'il n'y a pas de
communication en cours.
• La communication entre 2 logements ou entre une platine et un
logement ne peut pas être écoutée depuis la conciergerie, même s'il est
possible de mettre fin à cette communication en effectuant une remise à zéro.
Page 11
Page 36

CARACTÉRISTIQUES TECHNIQUES
Alimentation : 12VDC ± 10% / 250mA
Température de fonctionnement :10 ~ 60 ºC
Module de connexions de la CC :
‘+’ alimentation (+12VDC)
‘-’ alimentation (GND)
’Sa’ RS-485 (BUS de données)
‘Sb’ RS-485 (BUS de données)
‘2’ audio logements —> platines
‘6’ audio platines —> logements
‘Alt’ sortie vers haut-parleur
‘-’ terminal négatif du haut-parleur (GND)
Connecteur type connecteur de poste mural :
[BL] : ‘+’ alimentation (+12VDC)
[OR] : ‘-’ alimentation (GND)
[BK] : ’Sa’ RS-485 (BUS de données)
[RD] : ‘Sb’ RS-485 (BUS de données)
[WH] : ‘2’ audio logements —> platines
[BR] : ‘6’ audio platines —> logements
[YL] : ‘Alt’ sortie vers haut-parleur
[GR] : ‘-’ terminal négatif du haut-parleur (GND)
Page 12
+
Sa
Sb
B
L
O
-
R
BKB
K
R
D
Sb
Sa
+
2
W
2
H
B
6
R
Y
Alt
L
-
G
R
6
Alt
-
À l' installation
Page 37

Page 13
Page 38

Diese technische Anleitung dient zu Informationszwecken und wird von FERMAX ELECTRONICA S.A.E. herausgegeben. Fermax behält sich dabei das Recht vor, die
Eigenschaften der aufgeführten Produkte jederzeit und ohne vorherige Ankündigung zu
ändern. Die Änderungen werden in den nachfolgenden Auflagen berücksichtigt.
DEUTSCH
Seite 2
Page 39

MDS DIRECT PORTIERZENTRALE
REF. 2532
BENUTZERHANDBUCH
INHALTSVERZEICHNIS
BETRIEBS- UND FUNKTIONSANZEIGEN ..................................................... 4
Beschreibung der Betriebs- und Funktionsanzeigen ...........................4
Beschreibung der Bildschirminformation........................................5
BEDIENUNG DER PORTIERZENTRALE ....................................................... 6
Beantwortung eines Anrufs...................................................................7
Durchführung eines Anrufs ................................................................... 7
Bedienung der Warteschleife der Anrufe ..............................................9
Sprechverbindung zwischen zwei Wohnungen...............................10
Durchstellen eines Anrufs von der Türstation in eine Wohnung........10
Automatische Anrufwiederholung der letzten Sprechverbindung.......10
Nullstellung der Sprechverbindungen und Aufheben der Warteschleife...11
Code 94870b V 02_10
Seite 3
Page 40

BETRIEBS UND FUNKTIONSANZEIGEN
Beschreibung der Betriebs- und Funktionsanzeigen
Die folgende Abbildung zeigt die Position und Funktionseigenschaften der
verschiedenen Tasten und Knöpfe der Portierzentrale. Auf den folgenden Seiten wird
die Funktionsweise jeder einzelnen Taste ausführlich beschrieben.
Informationsbildschirm
Wähltastatur
Warteschleifen
anzeigen EIN/AUS
Anruf/beenden
Anruf durchführen
D
Sprechtasten
Zentrales Tastenfeld der Sprechfunktionen
Tür öffnen
Sprechverbindung Portier <—> Wohnung
Sprechverbindung Türstation <—> Wohnung
Sprechverbindung Portier <—> Türstation
D
Sprechverbindung Portier <—> Sprechstation
LEDBetriebsanzeige
/ Anruf
Auswahl der
Warteschleife
Auswahl des
Anrufs
Anruf
durchführen
Seite 4
Sprechverbindung Wohnung <—> Wohnung
Page 41

Beschreibung der Bildschirminformation
Art des empfangenen Anrufs
Zentralenmodell
Warteschleifentyp
Warteschleifen
01
Betriebsmodus
(Tag, Nacht oder gemischt)
MDS
Dateneingabe
0001
0001
zuletzte registrierte
Sprechverbindung
Seite 5
Page 42

BEDIENUNG DER PORTIERZENTRALE
Im Allgemeinen kann gesagt werden, dass das MDS-CITY/DIRECT Tischmodell der
Portierzentrale über drei Funktionsmodi verfügt: Tagesmodus, gemischter Modus und
Nachtmodus.
• Sie können den Portier von den Wohnungen
• TAG-Modus
und den Türstationen aus anrufen.
• Der Portier kann jede beliebige Wohnung oder
Türstation anrufen.
• Die Anrufe von der Türstation hin zu den
Wohnungen, werden von der Portierzentrale
entgegengenommen.
• Der Portier kann von den Wohnungen und von
• GEMISCHTER-Modus
den Türstationen (lediglich durch Drücken auf
die Klingeltaste) angerufen werden.
• Der Portier kann jede beliebige Wohnung oder
Türstation anrufen.
• Die Anrufe von der Türstation zu den
Wohnungen werden vom Portier nicht entgegen genommen.
• Es kann kein Anruf empfangen werden.
• NACHT-Modus
• Es können Anrufe in die Wohnungen
durchgeführt werden.
Auswahl des Betriebsmodus:
1. Drücken Sie die Taste ‘0’.
2. Geben Sie den Code ‘A33333’ für den Moduswechsel ein.
3. Wählen Sie den gewünschten Modus mit der Taste aus.
4. Bestätigen Sie den Vorgang, durch Drücken der Taste <B>.
Seite 6
Page 43

Beantwortung eines Anrufs
Wenn ein Anruf eingeht, wird 30 Sekunden lang ein Summton ausgelöst und die rote
LED-Anzeige beginnt zu blinken. Um den Anruf zu beantworten, führen Sie folgende Schritte
durch:
1.- Heben Sie den Telefonhörer ab.
A
Bildschirm einzublenden.
3.- Drücken Sie die Taste <C> oder die Klingeltaste,
2.- Drücken Sie die Taste <A>, um den Anruf auf dem
C
um den Anruf entgegenzunehmen.
4.- Falls Sie die Tür öffnen wollen, drücken Sie die
blaue Taste.
5.- Um das Gespräch zu beenden, drücken Sie die
Taste <B> oder legen den Hörer auf.
B
HINWEIS: In Abhängigkeit, von wo aus der Anruf durchgeführt wird, Türstation
oder Wohnung, wird ein blinkendes Symbol (Türstation oder Telefon)
am oberen rechten Bildschirmrand eingeblendet.
Durchführung eines Anrufs
Um einen Anruf von einer beliebigen Türstation oder Wohnung aus durchzuführen, gehen
Sie wie folgt vor:
1.- Heben Sie den Telefonhörers ab.
2.a- Anruf in eine Wohnung
Wählen Sie die Nummer der Wohnung, mit der
x
x
x x
+
zwischen 1 und 9999.
Sie eine Sprechverbindung herstellen wollen und
drücken Sie die Sprechtaste PORTIER <—>
WOHNUNG.
1
N
N zwischen 0 und 9
+
2.b- Sprechverbindung mit der Türstation des
Haupteingangs
Wählen Sie die Nummer der Türstation des
Haupteingangs (10…19) und drücken Sie danach
die Sprechtaste PORTIER<—>TÜRSTATION.
HINWEIS: Wenn ein Anruf in eine andere Wohnung durchgeführt wird, kann
der Anruf auch durch Drücken der Klingeltaste oder der Taste
<C>durchgeführt werden.
Seite 7
Page 44

B
B
N N
+
BB zwischen 1 und 99
NN zwischen 01 und 99
N
N N
+
NNN zwischen 1 und 999
2.c- Sprechverbindung mit der Türstation des
Wohnblocks
Wählen Sie die Nummer der Türstation des
Wohnblocks (101..9999) und drücken Sie
anschließend die Sprechtaste PORTIER
<—>TÜRSTATION.
D
2.d- Sprechverbindung mit der Gegensprechstation
Wählen Sie die Nummer der Gegensprechstation
(1..999) und drücken Sie die Sprechtaste
PORTIER<—>GEGENSPRECHSTATION.
3.- Falls Sie die Tür öffnen wollen, drücken Sie die
blaue Taste.
B
HINWEIS
: Wenn es sich um eine Türstation eines Wohnblocks handelt, so ist
4.- Um das Gespräch zu beenden, drücken Sie die Taste
<B> oder legen Sie einfach den Telefonhörer auf.
die Nummernkombination BBNN einzugeben, 'BB' steht dabei für die
Wohnblocknummer und 'NN' für die Nummer der Türstation. Falls
Nummer 'BB' kleiner als 10 ist, geben Sie davor keine 0 ein, sondern
direkt die gewünschte Nummer (Bsp.: 1 statt 01). Fahren Sie in der gleichen
Art und Weise mit den Gegensprechstationen fort (die eingegebene
Nummer darf niemals mit 0 beginnen).
Seite 8
Page 45

Bedienung der Warteschleife
Die nicht entgegengenommenen Anrufe werden in der Warteschleife gespeichert.
Um die Anrufe entgegenzunehmen, führen Sie folgende Schritte aus:
1.- Heben Sie den Telefonhörer ab.
2.- Drücken Sie die Taste <A>, um die Warteschleife
A
auf dem Bildschirm einzublenden.
3.- Wählen Sie mit der Taste Auswahl Warteschleife
den Anruf, den Sie entgegennehmen wollen.
0001
01
0005
02
0012
03
(Türstation oder Wohnung).
4.- Wählen Sie den Anruf mit Hilfe der Anrufwähltaste
aus.
5.- Drücken Sie die Taste <C> oder die Klingeltaste,
C
um die Wohnung anzurufen oder eine
Sprechverbindung mit der Türstation herzustellen
(das aktuelle Gespräch wird im rechten unteren
Anzeigefeld aufgezeichnet).
6.- Falls Sie die Tür öffnen wollen, drücken Sie die
blaue Taste.
7.- Um das Gespräch zu beenden, drücken Sie die
Taste <B> oder legen Sie den Telefonhörer auf.
B
8.- Wiederholen Sie die Schritte ab Punkt 1, um mit
dem Entgegennehmen der Anrufe fortzufahren.
HINWEIS: Im Tag oder gemischten Modus werden die letzten 20 nicht
entgegengenommenen Anrufe in der Warteschleife aufgezeichnet, auch
wenn lediglich die ältesten zehn Anrufe, die sich in der Warteschleife
befinden, angezeigt werden.
Seite 9
Page 46

Herstellen einer Sprechverbindung zwischen zwei Wohnungen
Wenn Sie die Sprechverbindung mit einer Wohnung hergestellt haben, führen Sie folgende
Schritte aus:
1.- Drücken Sie die Sprechtaste
WOHNUNG <—> WOHNUNG
x
x
x x
+
2.- Geben Sie die Nummer der zweiten Wohnung ein.
zwischen 1 und 9999
3.- Drücken Sie die Taste <C> oder die Klingeltaste,
C
um einen Anruf in die zweite Wohnung
durchzuführen.
Durchstellen eines Anrufs von der Türstation zur Wohnung
Wenn Sie mit der Türstation verbunden sind, führen Sie einen Anruf in die betreffende
Wohnung durch. Wenn Sie die Sprechverbindung mit der Wohnung hergestellt haben,
gehen Sie wie folgt vor:
• Drücken Sie die Sprechtaste
TÜRSTATION <—> WOHNUNG.
Wiederholen Sie automatisch die zuletzt hergestellte Sprechverbindung
Wenn eine Sprechverbindung erfolgt, wird diese auf dem Bildschirm der Portierzentrale
registriert und kann dadurch automatisch wiederholt werden, indem Sie folgende Schritte
ausführen:
1.- Prüfen Sie im Anzeigefeld die zuletzt hergestellte
0001
Sprechverbindung (unterer rechter Bildschirmrand).
2.- Drücken Sie die entsprechende Sprechtaste
(siehe Seite 5), um die Sprechverbindung
○○○○
herzustellen.
HINWEISE: Die Sprechverbindungen zwischen WOHNUNG <--> WOHNUNG
können nicht automatisch wiederhergestellt werden.
Seite 10
Page 47

Nullstellung der Sprechverbindungen und Aufheben der Warteschleife
Es besteht die Möglichkeit eine Nullstellung (RESET) aller Sprechverbindungen
durchzuführen, die alle laufenden Gespräche unterbricht und die Registereinträge löscht.
*
Es besteht auch die Möglichkeit, alle Anrufe zu annullieren und zu löschen, die sich in der
Warteschleife befinden.
*
HINWEISE:
#
B
• Um diesen Vorgang durchzuführen, drücken Sie
gleichzeitig die Tasten <*> und<#>.
• Um diesen Vorgang durchzuführen, drücken Sie
gleichzeitig die Tasten <*> und <B>.
• Die Option RESET (Nullstellung) kann auch dazu benutzt werden, um
den Eintrag des zuletzt durchgeführten Anrufes zu löschen, wenn keine
Sprechverbindung vorliegt.
• Die Sprechverbindung zwischen zwei Wohnungen oder zwischen der
Türstation und der Wohnung kann nicht von der Portierzentrale aus
mitgehört werden. Das Gespräch kann jedoch durch eine Nullstellung
(RESET)beendet werden.
Seite 11
Page 48

TECHNISCHE EIGENSCHAFTEN
Stromversorgung: 12 V Gleichstrom ± 10% / 250 mA
Betriebstemperatur: 10 ~ 60 ºC
Verbindungsmodul der Portierzentrale:
‘+’ Stromversorgung (+12 V Gleichstrom)
‘-’ Stromversorgung (GND)
’Sa’ RS-485 (gedrilltes Paar)
‘Sb’ RS-485 (gedrilltes Paar)
‘2’ Audioverbindung Wohnungen --> Türstationen
‘6’ Audioverbindung Türstation --> Wohnungen
‘Alt’ Ausgang zu den Lautsprechern
‘-’ Negativpol des Lautsprechers (GND)
Telefonwandsteckdose:
[BL]: ‘+’ Stromversorgung (+12 V Gleichstrom)
[OR]: ‘-’ Stromversorgung (GND)
[BK]: ’Sa’ RS-485 (gedrilltes Paar)
[RD]: ‘Sb’ RS-485 (gedrilltes Paar)
[WH]: ‘2’ Audioverbindung Wohnungen--> Türstationen
[BR]: ‘6’ Audioverbindung Türstation --> Wohnungen
[YL]: ‘Alt’ Ausgang zu den Lautsprechern
[GR]: ‘-’ Negativpol des Lautsprechers (GND)
+
Sa
Sb
B
L
O
-
R
BKB
K
R
D
W
G
R
2
H
B
6
R
Y
Alt
L
-
Seite 12
Sb
Sa
+
2
6
Alt
-
Zu der Installation
Page 49

Seite 13
 Loading...