

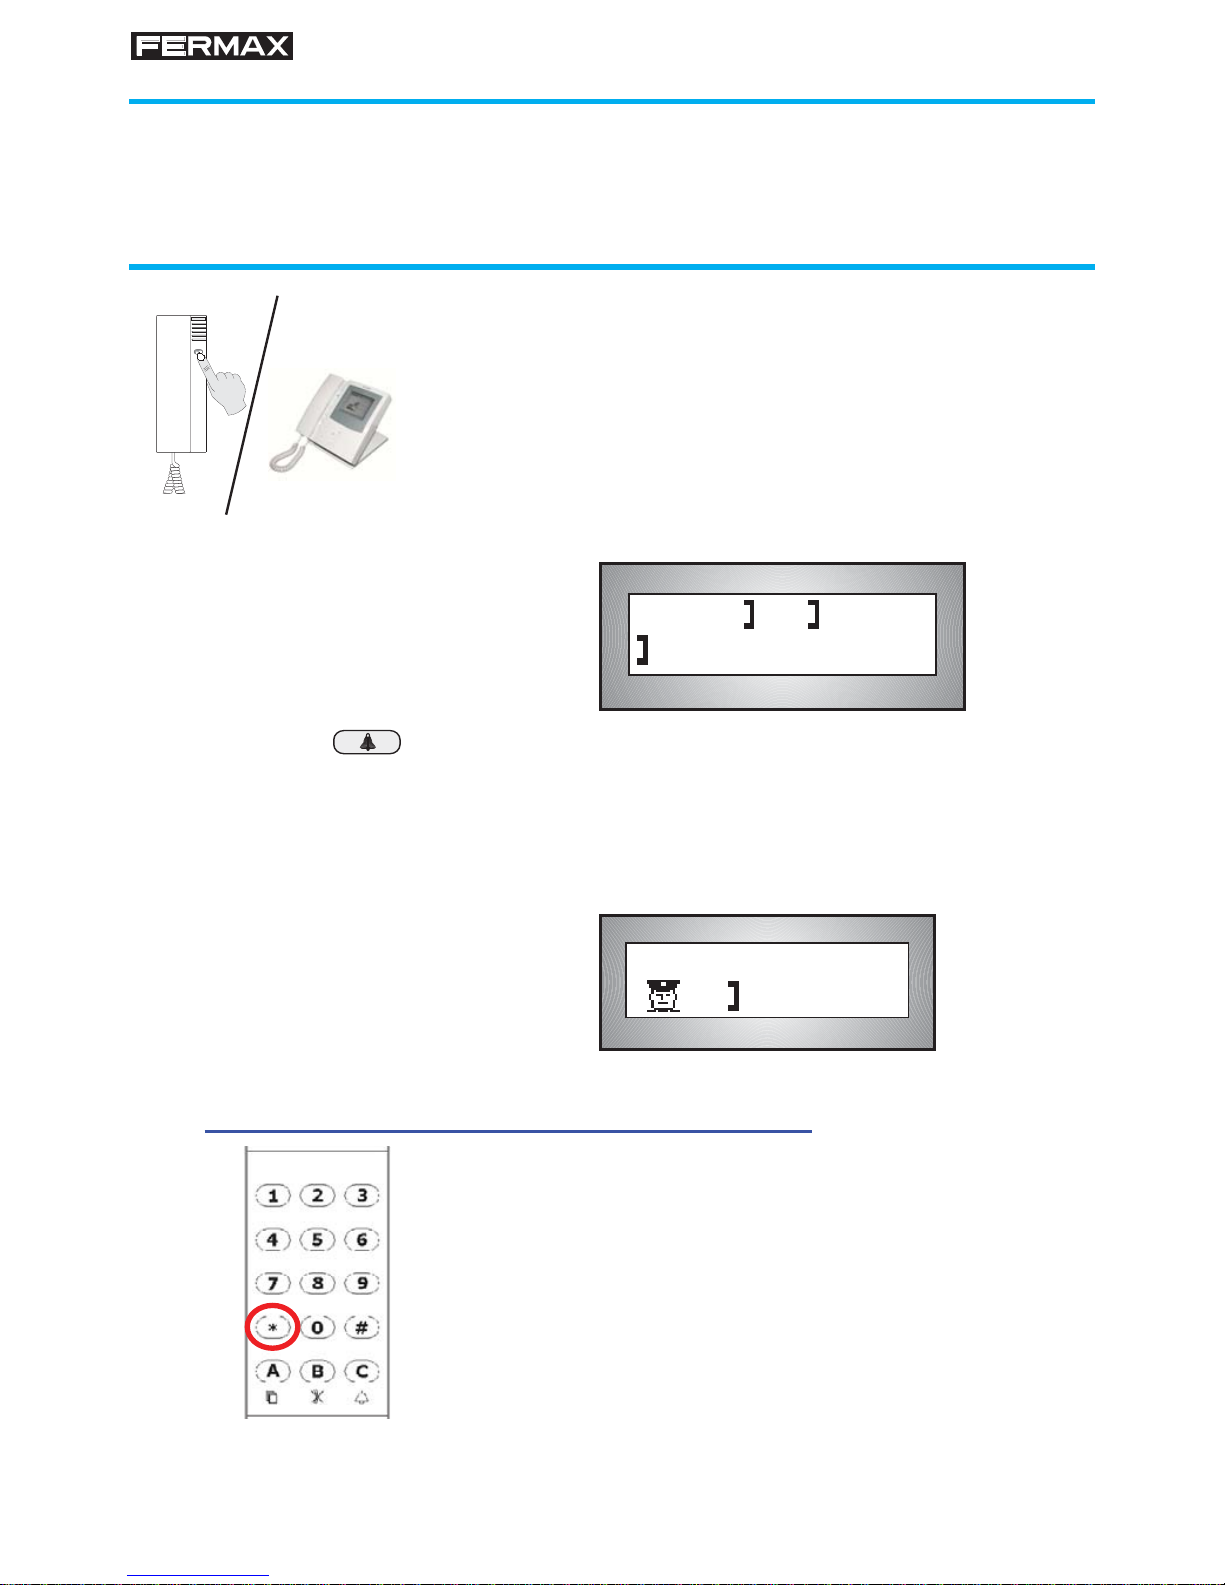
Page 1
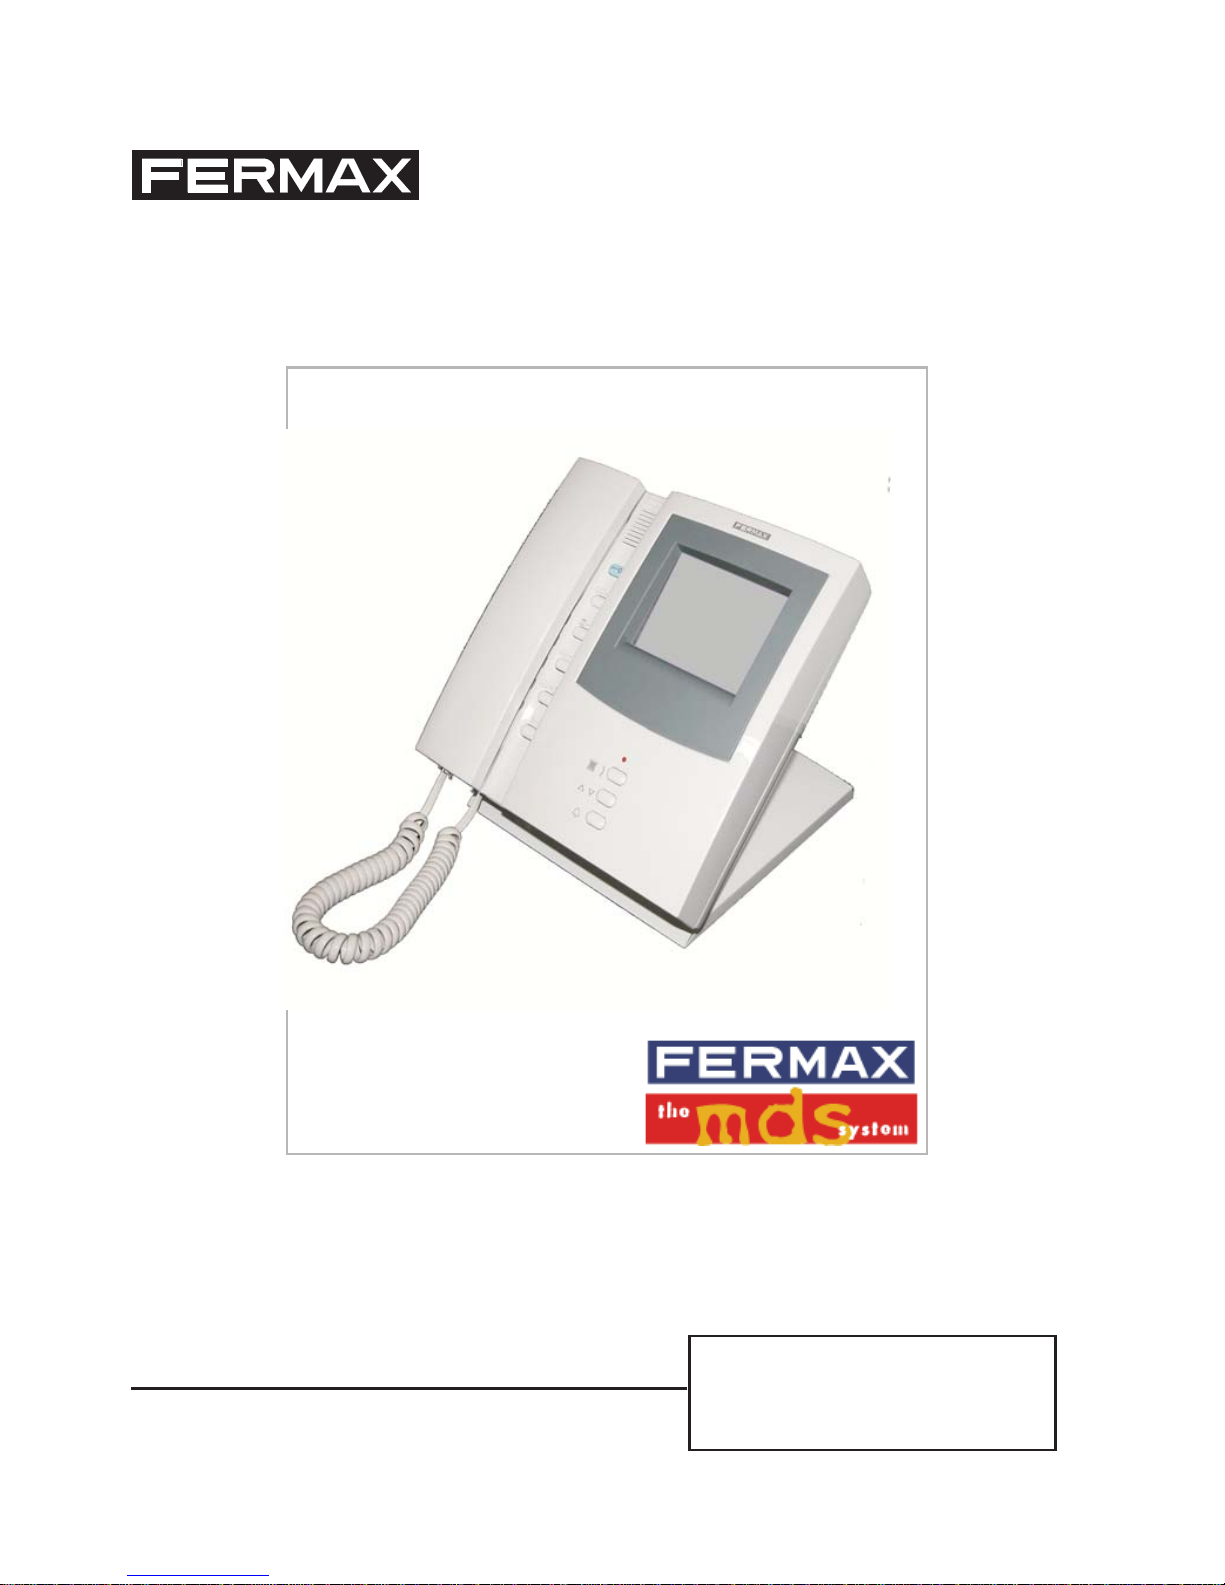
Central de Conserjería
Guard Unit
Page 2

Pag 2
ESPAÑOL
MANUAL CONSERJERIA MDS DIGITAL SOBREMESA
Este documento técnico lo edita FERMAX ELECTRONICA S.A.E. con caracter informativo,
y se reserva el derecho a modifi car características de los productos que en él se refi eren
en cualquier momento y sin previo aviso. Estos cambios vendrán refl ejados en posteriores
ediciones del mismo.
Page 3

Pag 3
INDICE
INTRODUCCION ................................................................ ......... ................... 4
Controles de la Central de Conserjería de Sobremesa .......................... 6
MODOS DE FUNCIONAMIENTO BASICOS .................................................. 8
MODOS DE FUNCIONAMIENTO AVANZADOS ............................................ 9
Selección del modo de funcionamiento ..................................................11
Desvío de llamada ..................................................................................12
DISPLAY ......................................... ................................................................13
Selección del contraste ............. ............................................................15
Display Principal MDS ............... ............................................................16
FUNCIONAMIENTO .........................................................................................19
Atender llamada desde vivienda ............................. ..............................19
Atender llamada desde placa de calle....................................................20
Interceptar una llamada de placa de calle a teléfono .............................21
Atender llamada de una placa interior (decoder de placas) ...................23
Comunicar con una placa interior ........................... ...............................25
Llamar a una vivienda ............................................................................25
Intercomunicar dos teléfonos.................................... ............................ 25
Llamar a otra Conserjería ......................................................................26
COLAS DE LLAMADAS ..................................................................................28
Cómo contestar llamadas memorizadas ................... ........... ........ ..30
ANEXO
FUNCIONAMIENTO DE LA CENTRAL DE CONSERJERÍA
COMO CENTRAL DE RECEPCIÓN DE ALARMAS DE PÁNICO
MODOS DE FUNCIONAMIENTO ....................................................................33
Selección del modo de funcionamiento ..................................................34
FUNCIONAMIENTO .........................................................................................36
Atender una llamada de pánico en el momento que se produce ...........36
Atender llamadas de pánico memorizadas ............................................37
Atender una llamada de pánico de una placa interior (dec. placas) ......38
Recepción de alarmas por sensor......................... ............................. ...39
Activación de relés............................................ .................................. ..39
GUIA RAPIDA CENTRAL DE CONSERJERIA MDS ......................................40
CARACTERISTICAS TECNICAS ........................... ........................................44
COD. 94891EId V04/14
Page 4
Pag 4
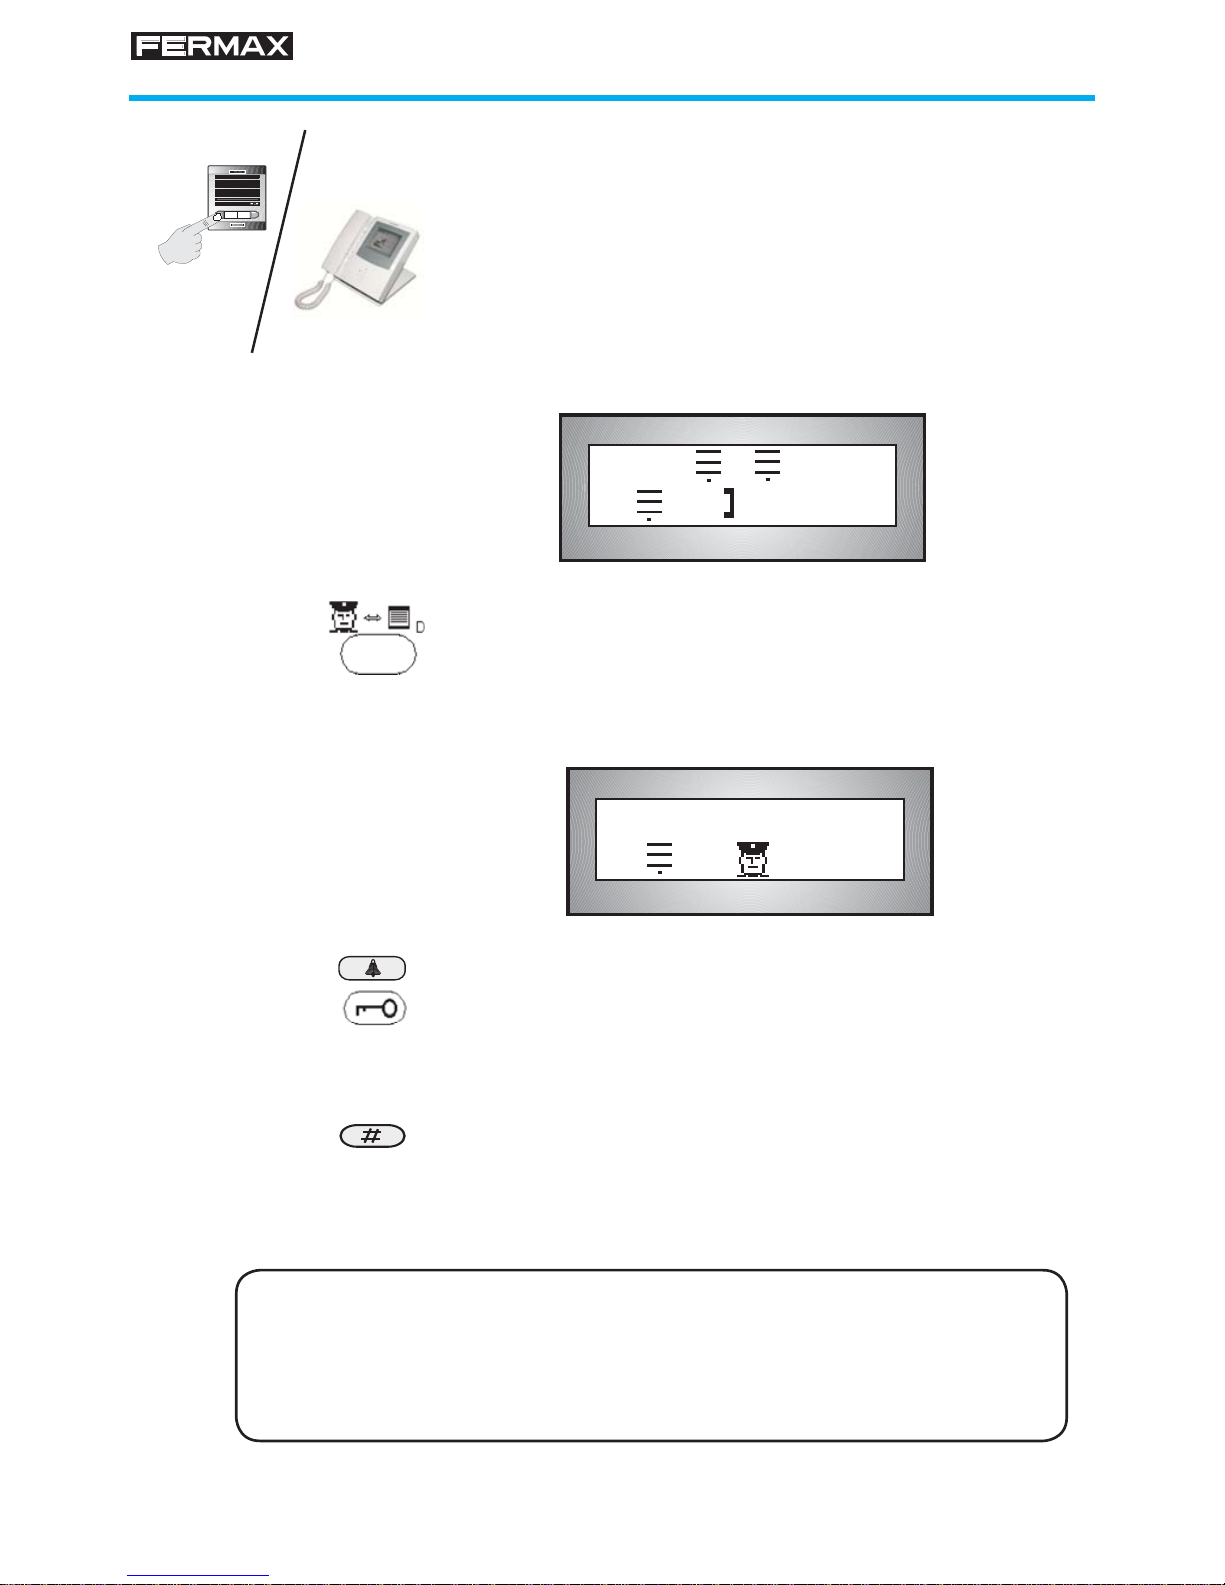
INTRODUCCION
La Central de Conserjería MDS Digital hace de "fi ltro" entre los visitantes
a un edifi cio y los vecinos del mismo.
En modo DIA, las llamadas que se hacen desde cualquier acceso al edifi cio
son recibidas en la Central de Conserjería, pudiendo el Conserje anunciar la visita
al correspondiente vecino, pasarle la llamada o bien atenderla personalmente.
La Central de Conserjería puede trabajar en modo MIXTO, en el que las
llamadas de los visitantes son recibidas directamente en la vivienda correspondiente.
Aún así, es posible también llamar directamente al Conserje desde las placas de
calle, pulsando la tecla campana.
Tanto en modo DIA como en modo MIXTO, en la Central de Conserjería se
reciben llamadas de los vecinos que deseen hablar con el Conserje.
Si en el momento que alguien llama a Conserjería, el Conserje está ausente,
las llamadas quedan memorizadas en las correspondientes colas de llamada (hasta
un total de 20 llamadas de cada tipo, vivienda y placa) pudiendo contestarlas el
Conserje a su regreso.
El Conserje puede también intercomunicar dos viviendas, a petición de una
de ellas.
Como función adicional, y utilizando teléfonos provistos de botón de páni-
co (PANIC), la Central de Conserjería puede funcionar, también, como Central de
Recepción de Alarmas de Pánico. Este tipo de alarma se produciría en el momento
en que algún vecino pulse el botón de pánico de su teléfono, con el fi n de alertar al
Conserje o a la persona encargada de la vigilancia del recinto.
NOTAS:
Todos los teléfonos tienen asignados un número que es, generalmente, el
mismo número asignado a la vivienda (consulte al personal de mantenimiento
qué número de teléfono se ha asignado a cada vivienda)
Es posible que en un mismo edifi cio o bloque exista más de una Central de
Conserjería. Sólamente una de ellas recibirá las llamadas de vivienda y placas
de calle, aquella que haya seleccionado la última el modo de funcionamiento
DIA o MIXTO.
Page 5
Pag 5
NOT A 1: La Central de Conserjería, en el momento de alimentar
la instalación MDS de la que forma parte, requiere de un tiempo
para inicializarse correctamente y que la Central MDS la detecte
y confi gure como Conserjería.
NOTA 2: La Central de Conserjería tiene asignado un número,
que debe corresponder al número de cambiador MDS donde
esté físicamente conectada (0..9). Para cambiar este número,
que por defecto es 0, mantendremos pulsada la tecla # hasta
que aparezca un signo de interrogación en el display. Introduciremos el número de Central de Conserjería deseado, tras lo
que el sistema contestará con OK. Una vez cambiado el número
de Conserjería, se debe reiniciar el sistema para que la Central
MDS la reconozca.
NOTAS IMPORTANTES SOBRE LA PUESTA EN FUNCIONAMIENTO
ADVERTENCIA:
Tras generarse una llamada a conserje, comenzarán a generarse los pitidos acústicos de llamada por el propio auricular del
teléfono de la conserjeria.
Dado que estos pitidos tienen un nivel considerable, es recomendable no acercar el aricular al oido antes de pulsar el botón
de contestar la llamada.
Page 6
Pag 6
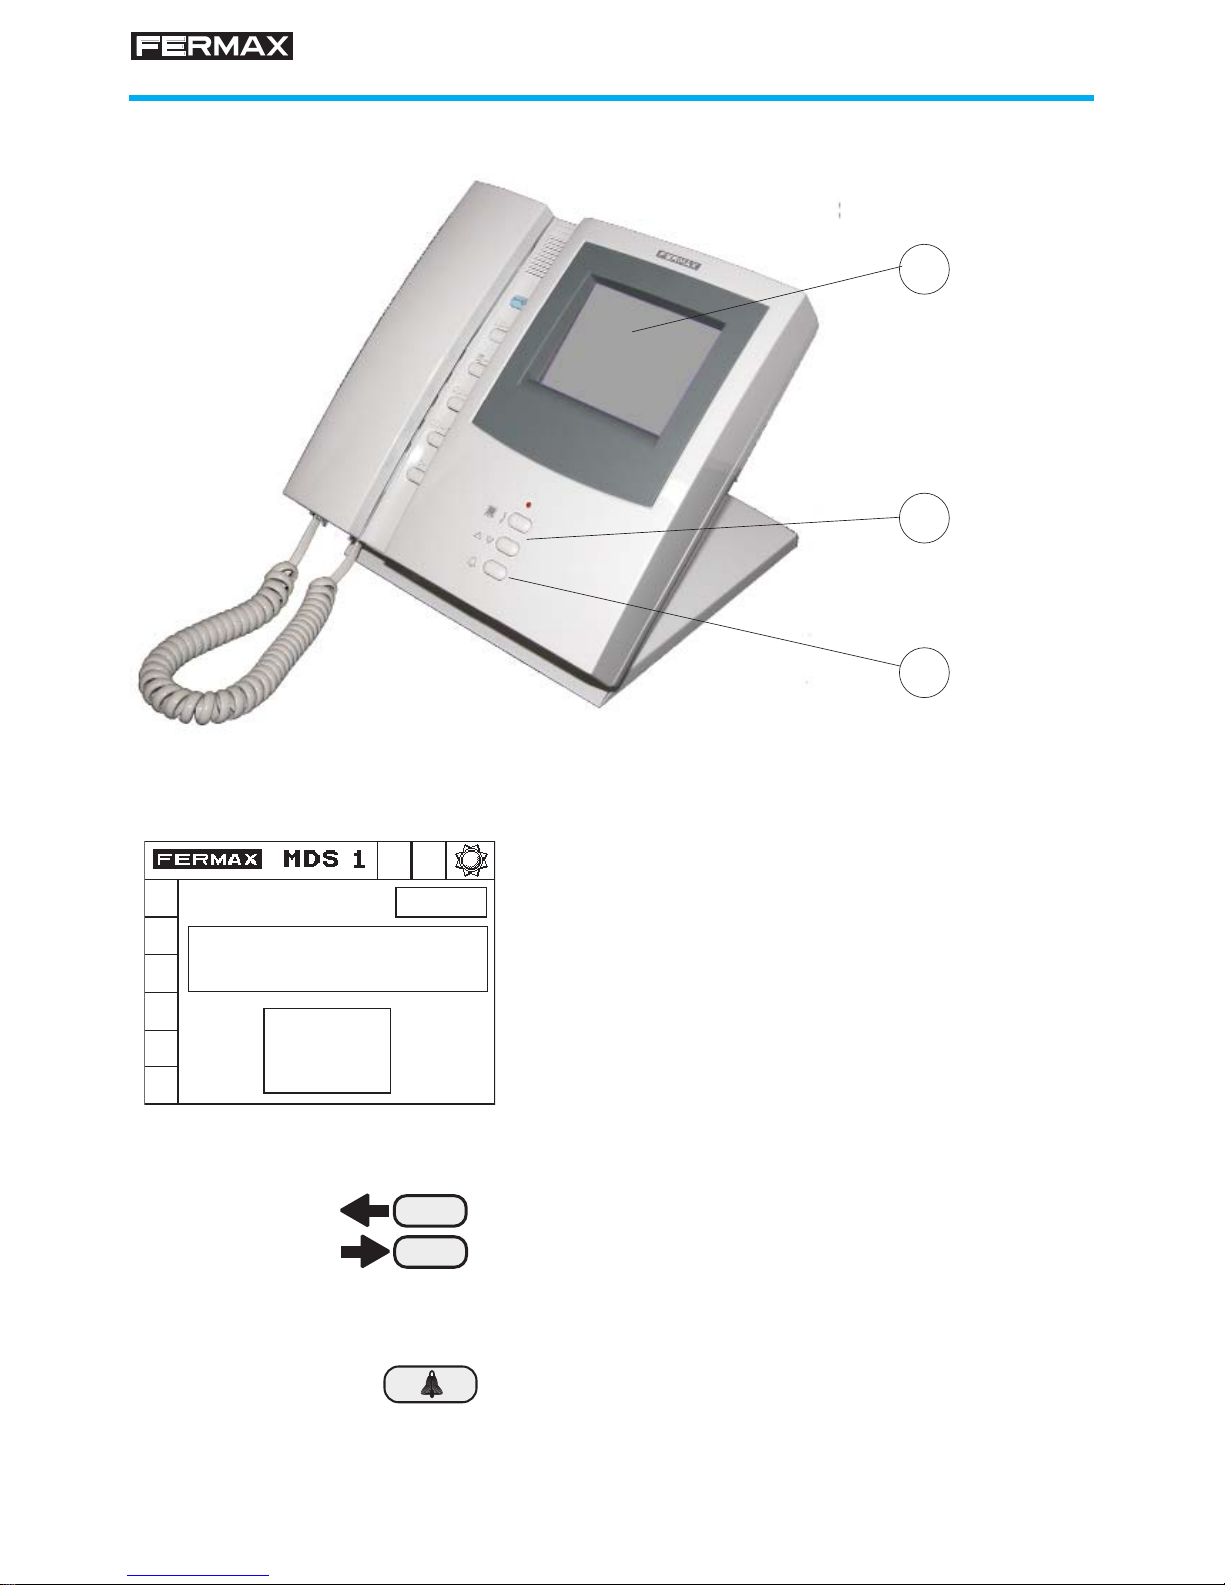
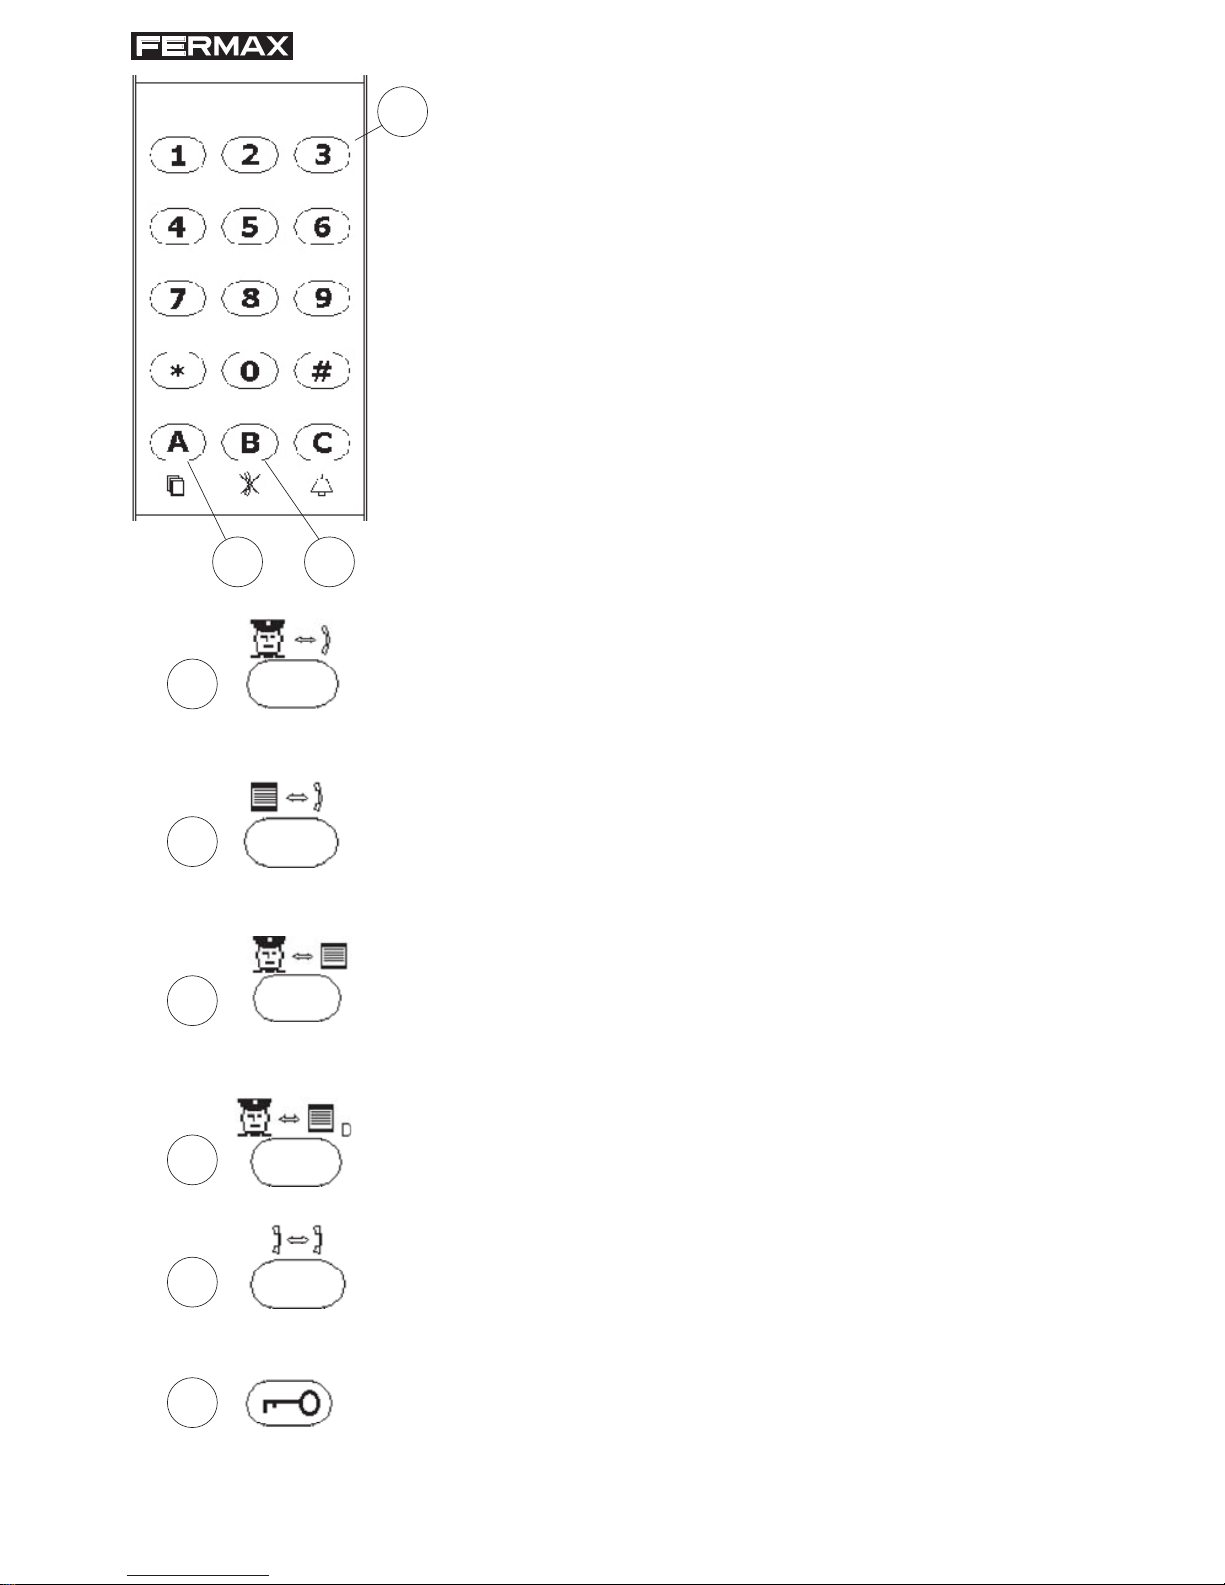
Controles de la Central de Conserjería de Sobremesa
1. DISPLAY
Ofrece diversas informaciones durante el
manejo de la Central de Conserjería.
2. TECLAS DE BUSQUEDA (FLECHAS)
Pulsar estas fl echas para localizar el nom-
bre del vecino al que se desea llamar. La
búsqueda debe empezar siempre presionando la fl echa derecha.
3. LLAMADA (CAMPANA)
Para llamar a los teléfonos de las viviendas
u otras Conserjerías
1
3
2
Page 7
Pag 7
4. TECLADO DE MARCACION
Se localiza debajo del brazo del teléfono. Sirve para
introducir el número de teléfono de la vivienda, número
de placa y datos en general.
5. SELECCIÓN DE LLAMADAS EN MEMORIA
Se utiliza para elegir la cola de llamadas en espera a
tratar: teléfonos o placas de calle.
6. CONFIRMACION / BORRADO
Pulsar esta tecla para confi rmar los datos introducidos
por el teclado de marcación y para borrar llamadas
memorizadas.
7. COMUNICACION CONSERJE-TELEFONO
Selecciona el canal de comunicación CONSERJERIATELEFONO. Comunica con el último teléfono que se
ha llamado.
8. COMUNICACION PLACA-TELEFONO
Activa el canal de comunicación PLACA-TELEFONO.
Comunica última placa con último teléfono llamado.
9. COMUNICACION CONSERJE-PLACA
Selecciona el canal de comunicación CONSERJERÍAPLACA. Comunica con la última placa con la que se
ha conversado.
10. COMUNICACION CONSERJE-DECODER PLACAS
Se emplea para seleccionar el canal de comunicación
CONSERJERÍA-DECODER de PLACA.
11. COMUNICACION VIVIENDA-VIVIENDA
Activa el canal de comunicación VIVIENDA-VIVIENDA.
12. ABREPUERT AS
Tecla de accionamiento de abrepuertas.
4
11
65
7
8
9
10
12
Page 8
Pag 8
987
654
321
A
B
0
MODO DÍA
* La Central de Conserjería puede llamar y recibir lla-
madas de los teléfonos.
* Las placas de calle no pueden llamar directamente a
los teléfonos.
* Las llamadas desde placa de calle hacia teléfonos son
interceptadas por la Central de Conserjería, que puede
transferirlas al teléfono llamado o a cualquier otro.
* El conserje puede poner 2 teléfonos en comunicación.
MODO MIXTO
* La Central de Conserjería puede llamar y recibir lla-
madas de los teléfonos.
* Las placas de calle pueden llamar directamente a los
teléfonos, y también al conserje. El conserje puede
transferir una llamada a cualquier teléfono.
* El conserje puede poner 2 teléfonos en comunicación.
MODO NOCHE
* La Central de Conserjería no atiende llamadas de los
teléfonos ni de las placas de calle. Funciona como si
fuese una placa de calle más.
* Las placas de calle pueden llamar directamente a los
teléfonos.
MODOS DE FUNCIONAMIENTO BASICOS
Las características de los distintos modos de funcionamiento para edifi -
caciones con una sola Central de Conserjería son:
987
654
321
A
B
0
987
654
321
A
B
0
SI
SI
NO
SI
SI
SI
SI
NO
NO
SI
Page 9
Pag 9
MODO MASTER-DÍA
* La Central de Conserjería recibe las llamadas de te-
léfonos e intercepta las llamadas de placas de calle
pertenecientes a todas las demás Unidades Centrales
que estén en MODO NOCHE en ese momento.
* En lo que respecta a las viviendas que dependen di-
rectamente de esta Central, funciona como si estuviese
en MODO DÍA.
MODO MASTER-MIXTO
* La Central de Conserjería recibe las llamadas de te-
léfonos pertenecientes a todas las demás unidades
centrales que estén en MODO NOCHE en ese momento.
* En lo que respecta a las viviendas que dependen di-
rectamente de ésta Central, funciona como si estuviese en MODO MIXTO.
987
654
321
A
B
0
987
654
321
A
B
0
NOTA
Cada bloque o edifi cio está gestionado por una Unidad Central y puede
contener una o varias Centrales de Conserjería. Se distingue por tanto
entre número de edifi cio o bloque (codifi cado en la Unidad Central en
el momento de la instalación) y número de Central de Conserjería.
SI
SI
NO
SI
SI
SI
MODOS DE FUNCIONAMIENTO AVANZADOS
En edifi caciones con más de un bloque existe, además:
Page 10
Pag 10
MODO TRANSFER-DÍA
* Desvía las llamadas de los teléfonos que dependen de
ella hacia la Central de Conserjería designada.
* Intercepta las llamadas de las placas de calle que depen-
den de ella y las desvía hacia la Unidad Central designada.
MODO TRANSFER-MIXTO
* Desvía las llamadas de los teléfonos que dependen de
ella hacia la Central de Conserjería designada.
* Las llamadas desde las placas de calle que dependen- de
ella van directamente al teléfono llamado.
NOTA:
987
654
321
A
B
0
SI
SI
NO
Todas las Centrales de Conserjería pueden llamar a cualquier teléfono
de la urbanización (aunque sea de otro bloque o sector), independientemente del modo en que se encuentren.
987
654
321
A
B
0
SI
SI
SI
Page 11
Pag 11
Selección del MODO de funcionamiento
La forma de seleccionar el MODO de funcionamiento es:
1. Pulsar "0"
El display mostrará una serie de guiones, ( a excepción
modo de llamada con 0 en ON, ver página 45).
2. Introducir "A" seguida de "3" repetidamente hasta
completar los guiones.
3. Utilizar las tecla de fl echa adelante (bajo el display)
para seleccionar el MODO deseado:
NOCHE
MIXTO
DIA
MASTER-DIA (*)
MASTER-MIXTO (*)
TRANSFER-DIA (*)
TRANSFER-MIXTO (*)
(*) Sólo disponible en instalaciones con más de una
Unidad Central. Ver NOTA en la página siguiente.
4. Pulse la "B" cuando el MODO deseado aparezca en el
display.
0
A
3
3
B
+
.
.
.
A333_ _
El display presentará el MODO actual:
Modo Actual:
Dia
Page 12
Pag 12
1.Introduzca el código de cambio de modo y seleccione TRANSFERDÍA
Tras confi rmar, el sistema le pedirá que le indique el número de
Central a la que se van a desviar las llamadas.
2.Marque el número de bloque al que se van a transferir las llamadas. Introducir siempre 2 dígitos.
En el caso del ejemplo "04".
5. Si se acepta, pulsando "B", nos preguntará el código de llamada
a donde desviará las llamadas a Conserje.
6. Una vez seleccionado el código pulse "B".
B
NOTA: No se aceptará este modo si el bloque seleccionado no tiene una
Conserjería activa, (DIA, MIXTO, MASTER DIA, MASTER MIXTO)
Desvío de llamada
Si el MODO elegido es un modo activo (DIA, MIXTO, MASTER-DIA o MASTERMIXTO), existe la posibilidad de confi gurar el desvío de llamada a una vivienda,
para así poder atenderlas desde otra ubicación.
Ejemplo: Se va a seleccionar el modo TRANSFER-DIA para que las llamadas sean
desviadas al bloque nº 4:
N. central: 04
Desvio conserje?
(A)-No. (B)-Si.
Codigo llamada:
0000
NOTA: En las versiones de Central MDS 4.x, tras seleccionar el
modo se pregunta automáticamente si se desea activar el desvío,
mientras que en las versiones 5.x
o superior se debe introducir
el código 0 + 333333 para esta función. Para V 7.4 ver NOTA
IMPORTANTE en pag. 45.
NOTA: En el caso en que el modo escogido sea TRANSFER-DIA o
TRANSFER-MIXTO, será preciso indicar a qué bloque se van a transferir
las llamadas. Las llamadas las recibirá la Central de Conserjería que esté
activa en dicho bloque.
3
3
.
.
0
+
Page 13
Pag 13
DISPLAY
La Central de Conserjería cuenta con un display gráfi co de alta resolución
(320x240 puntos) en el que se muestra la información al usuario. Se pueden distinguir varias zonas en la pantalla, como muestra la fi gura:
1
TIPO DE CENTRAL DE CONSERJERIA Y NUMERO
Indica que se trata de una Central de Conserjería MDS y, en este
caso, la número 1.
INDICACION DE LLAMADAS EN MEMORIA
Si aparecen los iconos de teléfono o placa, indica que hay llamadas
pendientes de tratar.
MODO DE FUNCIONAMIENTO
Según el icono mostrado indica el MODO en que está la Conserjería.
1
3
2
5
6
7
4
2
3
Modo NOCHE
Modo DIA
Page 14
Pag 14
Modo MIXTO
Modo MASTER MIXTO
Modo MASTER DIA
DESVIO de llamadas activo
MENU LATERAL
Muestra qué cola de llamadas se está atendiendo (teléfonos o placas)
RELOJ
Presenta en tamaño ampliado la hora actual.
DISPLAY PRINCIPAL MDS
Muestra la información de modo totalmente compatible con la anterior
Central de Conserjería MDS de sobremesa.
COMUNICACIÓN EN CURSO
Informa de la comunicación que hay actualmente seleccionada.
4
5
6
7
Page 15
Pag 15
Selección del contraste
El contraste del display gráfi co de la Central de Conserjería se puede ajustar
para una óptima visualización. La forma de proceder es la siguiente:
1. Introducir el código A55555
Para ello, introduciremos la secuencia: 0 A 5 5 5 5 5
Nota: el número de dígitos '5' que debemos introducir (3, 4 ó 5) dependerá de la longitud de código de acceso que esté confi gurada en
el sistema (4, 5 ó 6)
2. Seleccionar el contraste mediante las fl echas
3. Validar pulsando 'B'
El valor de contraste seleccionado se almacenará en una memoria no volátil
por lo que, aún quitando alimentación, se mantendrá en el valor establecido.
4. Seleccionar el tono de llamada mediante las fl echas
El tono seleccionado se almacenará en una memoria no volátil por lo que,
aún quitando alimentación, se mantendrá en el tono establecido.
5. Validar pulsando 'B'
B EXIT
CONTRAST
-> +
<- -
DIGITAL
V 7.4
B EXIT
RING TONE
SELECTION
-> +
<- -
DIGITAL
V 7.4
Page 16
Pag 16
Display Principal MDS
El Display Principal MDS de la Central de Conserjería (zona 6) ofrece diversa
información tal como número de teléfono que está llamando, número de llamadas
memorizadas, etc. Se divide en 5 secciones:
SECCION C:
Indica el tipo de llamada que se está visualizando en la SECCION D de
la línea inferior . Junto al símbolo de tipo de llamada se indica el total de llamadas
pendientes de contestar (t t) y el número de orden (n n) correspondiente a la que
se está visualizando, es decir, la primera, segunda, tercera, etc., de entre el total
de las que se recibieron.
A B C
D E
SECCION A:
Indica el MODO de funcionamiento:
(sin indicación) Modo Noche
D Modo Día
X Modo Mixto
MD Modo Master Día
MX Modo Master Mixto
Dv Desvío de llamada activo
NOTA: esta información se presenta gráfi camente en la zona 3
SECCIÓN B:
Indica si hay llamadas pendientes de contestar y de qué tipo.
Los símbolos que puede presentar son:
* Llamadas de placa pendientes de contestar.
* Llamadas de teléfono pendientes de contestar.
* Avisos de alarma de pánico pendientes de atender (Ver
ANEXO al fi nal de este manual). Icono según versión de
conserjería.
NOTA: esta información se muestra gráfi camente en la zona 2
!
Page 17
Pag 17
Esta información se presenta de la siguiente manera:
* Llamada desde una placa de calle. Hay un total de "t t"
llamadas de placa de calle pendientes de contestar y ésta
corresponde a la número "n n".
* Llamada desde un teléfono. Hay un total de
"t t" llamadas de teléfono pendientes de contestar y ésta
corresponde a la número "n n".
NOTAS: Vea en el apartado COLAS DE LLAMADA la forma de seleccionar,
contestar o borrar éstas llamadas.
La cola seleccionada se indica gráfi camente en la zona 4.
SECCIÓN D:
Este apartado ofrece los datos de la llamada visualizada (que aparece
en la SECCION C).
La información que puede aparecer es:
* La llamada visualizada es de la placa de calle nº p p
hacial el teléfono nº t t t t y ha sido interceptada por la
Central de Conserjería.
* La llamada seleccionada es de la placa de calle nº p p
hacia la misma Central de Conserjería.
* Es una llamada de teléfono nº t t t t.
* La llamada visualizada es de una placa interior
nº p p p hacia la propia central de conserjería.
* Esta opción sólo será válida en grandes urbanizaciones con varios bloques o sectores y sistema de llama-
da larga, (*). La llamada seleccionada corresponde
a la placa nº p p del bloque nº b b hacia el teléfono
nº t t t t .
(*) Ver NOTAS MUY IMPORTANTES en la página 27.
: n n/t t
: n n/t t
p p/ t t t t
p p/
t t t t
p p p
b b p p/ t t t t
Page 18
Pag 18
SECCIÓN E:
Estando en reposo indica la hora actual. Cuando se está visualizando alguna
llamada, indica la hora a la que llamaron. De esta forma, si se ausenta el Conserje
por un tiempo, puede saber a que hora ha sido llamado.
NOTA IMPORTANTE:
Los números de teléfono, números de placa, números de bloque y números de conserjería fueron asignados durante la instalación del
sistema. Contacte con el personal de mantenimiento para más detalles.
Durante la conversación, la SECCION D puede ofrecer las siguientes
informaciones (encerradas entre corchetes):
* Está seleccionado el canal de comunicación PLACACONSERJERÍA.
Ejemplo: placa nº 3 con Conserjería nº 1.
* Está activo el canal de comunicación PLACA-TELÉFONO.
Ejemplo: placa nº 3 con teléfono nº 37.
* Se encuentra seleccionado el canal de comunicación
CONSERJERÍA-TELÉFONO.
Ejemplo: Conserjería nº 1 con teléfono nº 120.
* Está seleccionado el canal de comunicación CONSERJERÍA-CONSERJERÍA. Sólo en instalaciones con más
de una Central de Conserjería.
Ejemplo: Conserjería nº 1 con Conserjería nº 4.
* Se ha seleccionado el canal de comunicación TELÉFONO-TELÉFONO.
Ejemplo: teléfono nº 146 con teléfono nº 120.
* Está activo el canal de comunicación PLACA-CONSERJERÍA.
Ejemplo: Placa nº 3 del bloque nº 1 con la Conserjería
nº 2.
NOTA: esta información se muestra ampliada en la zona 7
NOTA: la hora se muestra ampliada en la zona 5
01/ 04
[ ]
0146/ 0120
[ ]
[ ]
01 03/ 02
03/ 01
[ ]
03/ 0037
[ ]
01/ 0120
[ ]
Page 19
Pag 19
FUNCIONAMIENTO DE LA CENTRAL DE CONSERJERIA
La Central de Conserjería puede realizar diversas funciones: atender
llamadas desde viviendas y placas, llamar a teléfonos, intercomunicar dos teléfonos, llamar a otras Conserjerías, etc.
Atender llamada desde vivenda
1. Un vecino llama al Conserje. La Central de Conserjería comenzará a emitir unos "bips", indicando que están
llamando. Además, parpadeará el LED de la Conserjería
y el icono correspondiente en la zona 2.
El display indica el número de teléfono desde el que
están llamando.
Ejemplo: Llamada desde el teléfono nº 127.
2. Para contestar la llamada descuelgue y pulse la tecla
Bip
Bip...
!
CAMPANA.
El display indicará comunicación CONSERJERÍATELÉFONO.
Ejemplo: Conserjería nº 1 con teléfono nº 127.
Mostrar el nombre en la recepción de la llamada
Se podrá conocer el nombre de la persona o piso el
cual ha efectuado la llamada con sólo pulsar la tecla '*'
del teclado de la Central de Conserjería. Esto sólo será
válido si ese teléfono está asignado en la lista de usuarios. Esta información se muestra durante 2 segundos.
D :01/01
0127 18:15
[ ]
01/ 0127
Page 20
Pag 20
Atender llamada desde placa de calle
1. La visita llama desde una placa de calle pulsando la
tecla "CAMPANA". La Central de Conserjería comenzará a emitir "bips" y parpadearán el LED y el icono de
la zona 2.
El display indica el número de placa y bloque desde
la que están llamando.
Ejemplo: están llamando de la placa nº 3 del bloque nº 1.
2. Para contestar la llamada, descuelgue y pulse la tecla
Bip
Bip...
!
132
465
798
A
B0
Conserje-Placa.
3. Si desea abrir la puerta, pulse la tecla CAMPANA,
mientras "comunicación PLACA-CONSERJE" aparece
en el display (Si no aparece, pulse de nuevo Conserje-
Placa)
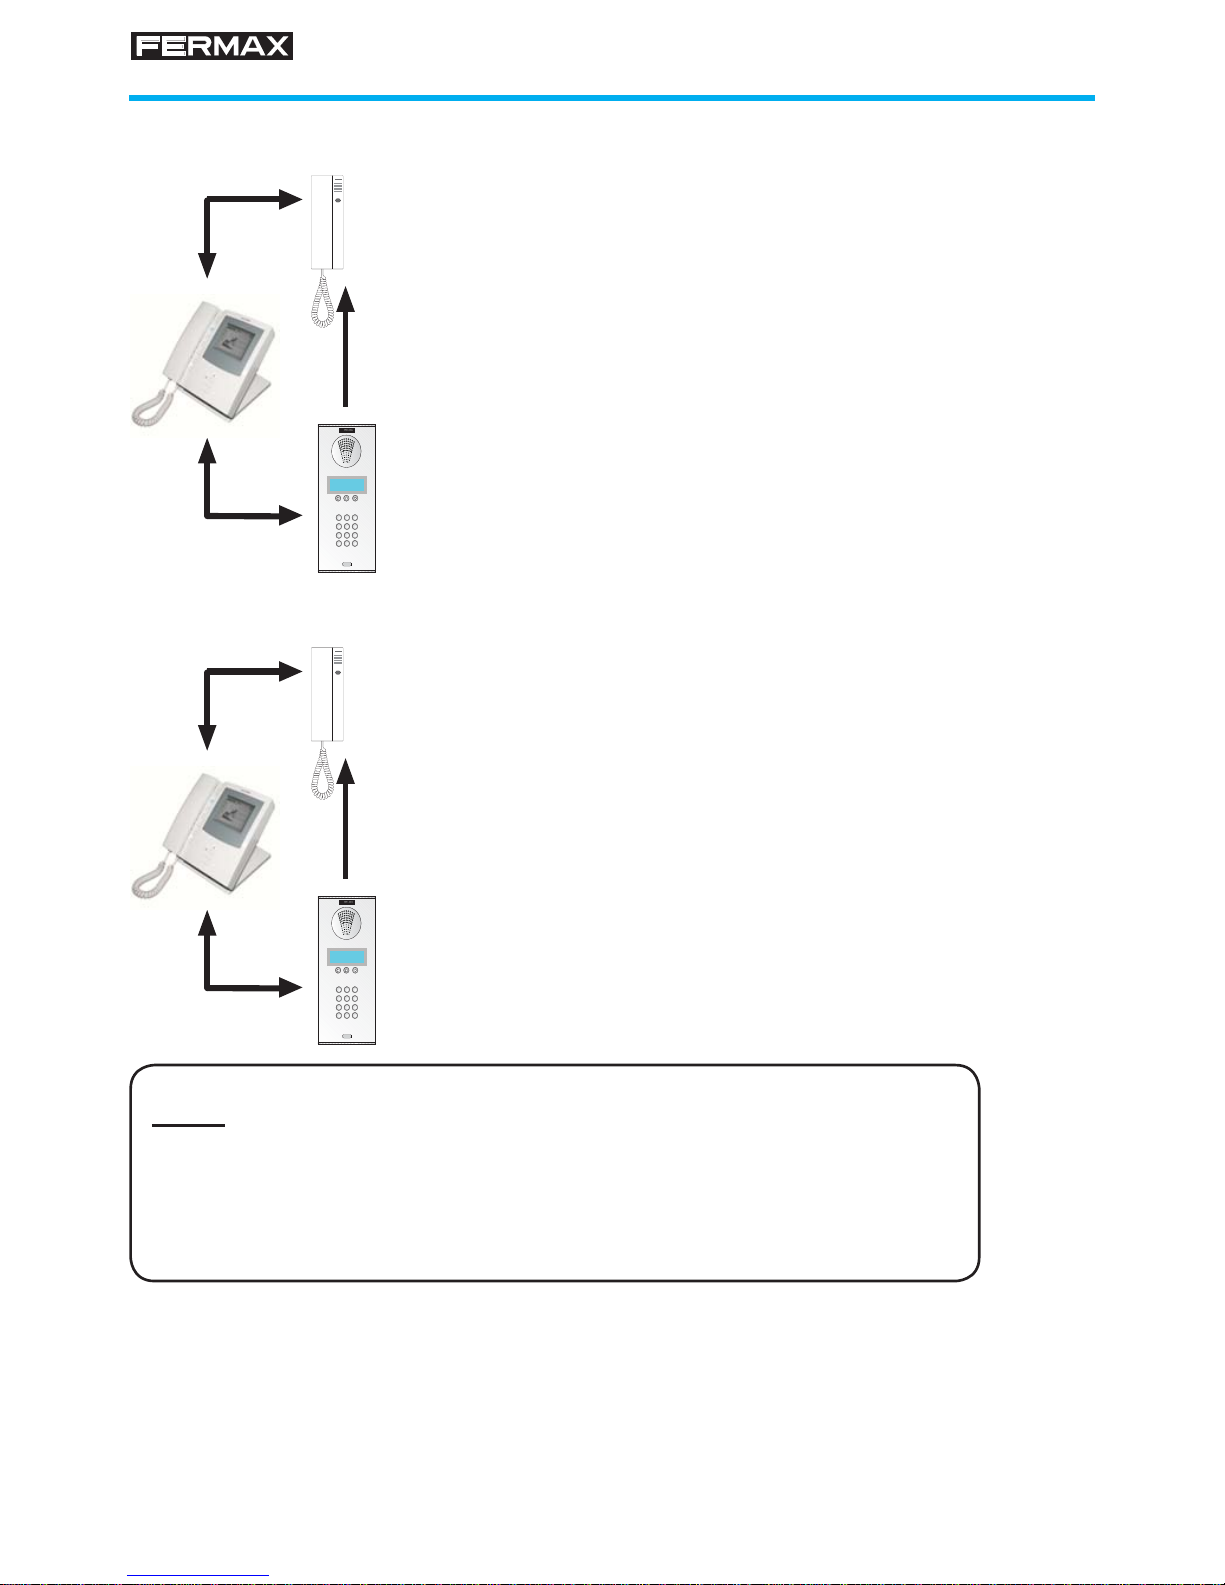
1. Desde una placa de calle llaman a un teléfono. La
D :01/01
01 03 18:15
[ ]
01 03/ 01
Page 21
Pag 21
Central de Conserjería comenzará a emitir "bips", parpadeará el LED y el icono correspondiente.
El display indica el número de placa y bloque desde
la que están llamando y el número de teléfono al que
llaman (sólo en modos DIA y MASTER-DIA).
Ejemplo: llamada de la placa nº 1, bloque 3 al teléfono
nº 32.
Bip
Bip...
!
132
465
798
A
B0
2. Para contestar la llamada, descuelgue el brazo del teléfono y pulse el botón Conserje-Placa.
3. Transferir la llamada a la vivienda llamada
3.1 Pulse la tecla Conserje-Teléfono para establecer co-
municación CONSERJERÍA-TELÉFONO.
3.2 Pulse la tecla CAMPANA para llamar a la vivienda.
3.3 Pulse el botón Placa-Teléfono para establecer comu-
nicación PLACA-TELÉFONO.
Cuelgue el teléfono. La visita podrá hablar con la vivienda,
y ésta abrir la puerta si lo desea.
D :01/01
01 03 0032 18:15
[ ]
01 03 0032
Interceptar una llamada de placa de calle a teléfono
[ ]
01 03/ 01
[ ]
01/ 0032
Page 22
Pag 22
4. Transferir la llamada a una vivienda distinta a la que han llamado
4.1 Marque el número de teléfono de la vivenda a la que
va a transferir la llamada o busque el nombre del vecino.
Ejemplo: va a transferir la llamada al teléfono 120.
4.2 Pulse la tecla CAMPANA para llamar.
El display indicará comunicación CONSERJERÍATELÉFONO.
Puede esperar contestación para informar de la visita o
puede colgar sin más.
4.3 Pulse el botón Placa-Teléfono para establecer co-
municación:
5. Recuperar la llamada de la placa
5.1 Descuelgue el brazo del teléfono y pulse la tecla
Conserje-Placa para establecer comunicación:
6. Conectarse a voluntad con una placa de calle
6.1 Marque nº de placa (primero el nº de bloque si perte-
nece a otro distinto).
6.2 Pulse el botón Conserje-Placa.
6.3 Si desea abrir la puerta, pulse la tecla Abrepuertas,
mientras "comunicación PLACA-CONSERJE" aparece
en el display (Si no aparece, pulse de nuevo el botón
Conserje-Placa)
03 0120
01/ 0120
[ ]
03/ 01
[ ]
4.4 Para fi nalizar la comunicación con la placa, pulse la
tecla Almohadilla
Page 23
Pag 23
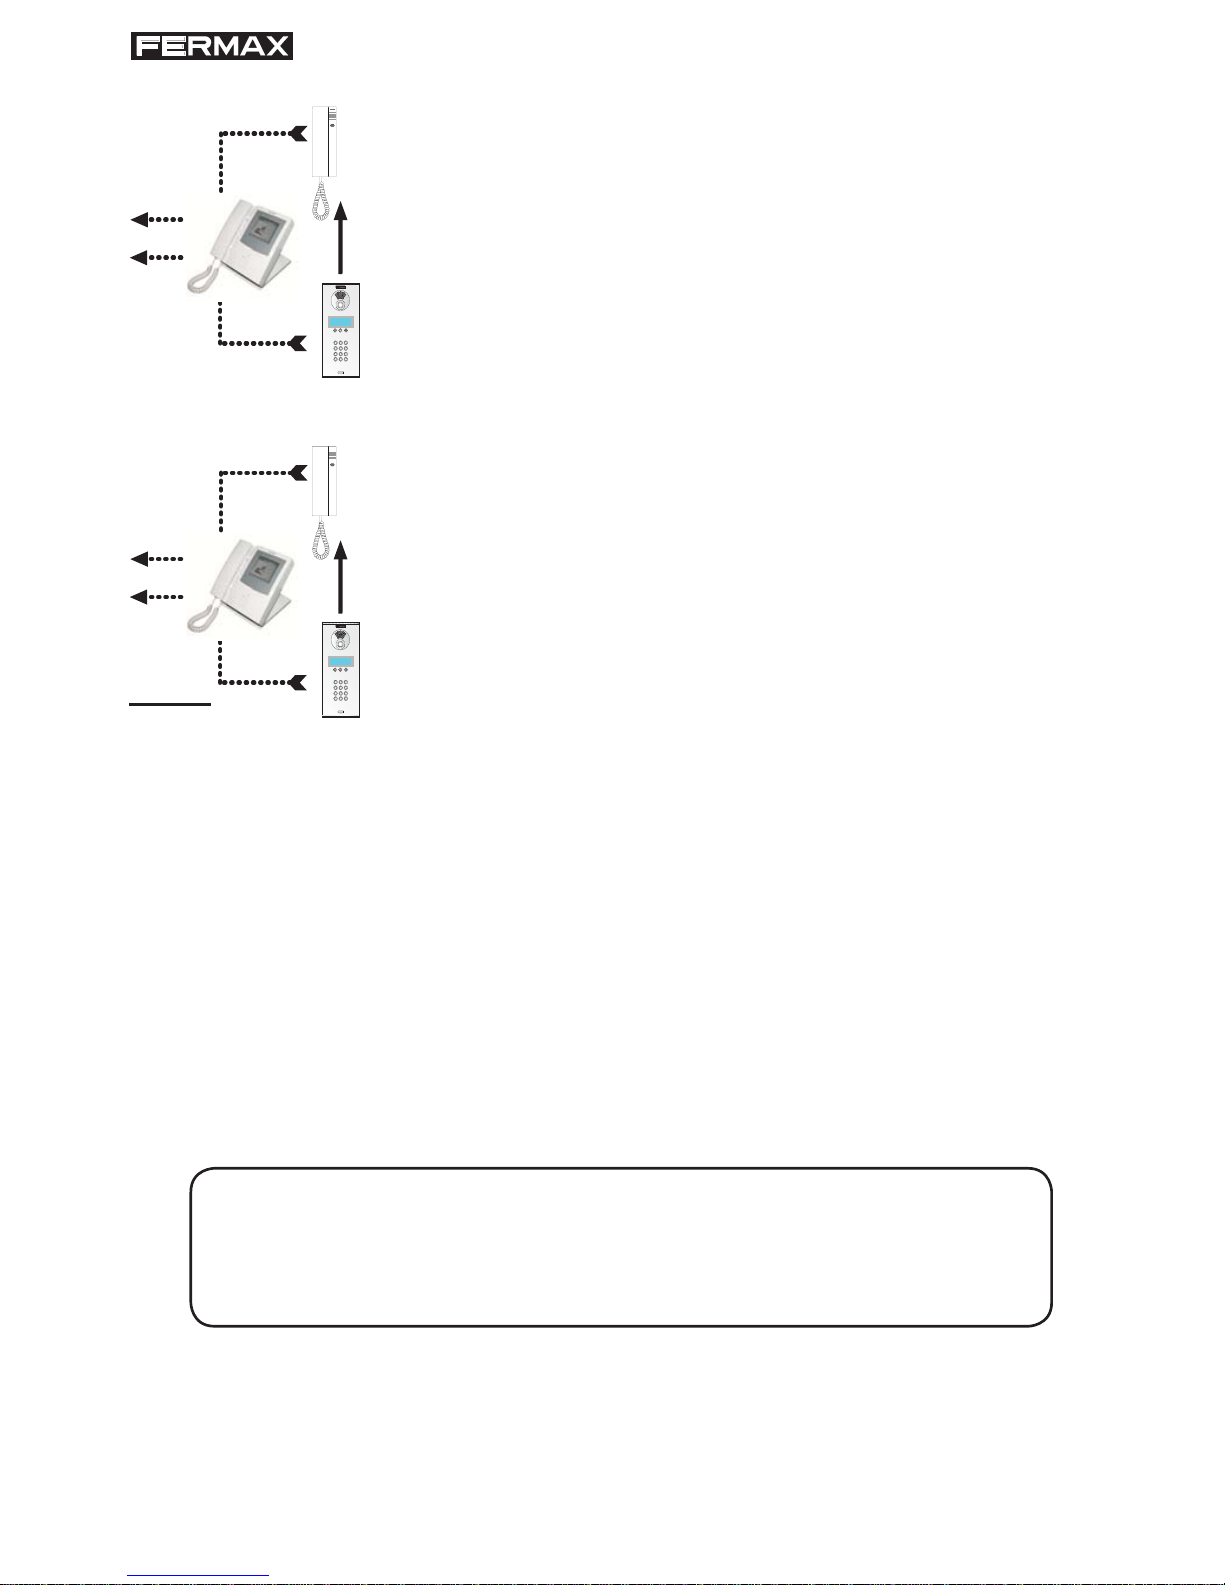
Atender llamada de una placa interior (decoder de placas)
1. Llaman desde una placa pulsando la tecla "CONSERJE". La Central de conserjería comenzará a emitir unos
"bips" y parpadearán el LED y el icono.
El display indica mediante tres dígitos el número de
placa y bloque desde la que están llamando.
Ejemplo: están llamando de la placa nº 2 del bloque nº 4.
2. Para contestar la llamada, descuelgue y pulse el botón
Conserje-Placa decoder.
El display indicará comunicación PLACA-CONSERJERÍA.
CP
Bip
Bip...
!
3. Si desea abrir la puerta, pulse la tecla Abrepuertas,
mientras "comunicación PLACA-CONSERJE" aparece
en el display (Si no aparece, pulse de nuevo el botón
Conserje-Placa decoder)
D :01/01
04 002 18:15
NOTA: si hay más de una llamada del mismo tipo pendiente de contestar , tanto de teléfono como de placa, el sistema las almacena en
las correspondientes colas de llamadas. Su manejo se explica en el
apartado COLAS DE LLAMADAS
[ ]
04 002/ 01
4. Para fi nalizar la comunicación con la placa, pulse la
tecla Almohadilla
Page 24
Pag 24
2. Pulse la tecla Conserje-Placas decoder
El display indica el número de bloque y placa con la
que está comunicando.
Ejemplo: está comunicando con la placa nº 2 del bloque
nº 4.
3. Si desea abrir la puerta, pulse la tecla Abrepuertas.
Llamar a una vivienda
1. Marque el número del teléfono de la vivienda o busque
el nombre del vecino.
2. Pulse la tecla CAMPANA para llamar.
El display indicará comunicación CONSERJERÍA-TELÉFONO.
Ejemplo: La Conserjería nº 1 llamando al teléfono nº 7.
Comunicar con una placa interior
1. Marque el número de bloque seguido del número de
placa. (Si la placa pertenece al mismo bloque que la
Conserjería no es necesario marcar el nº de bloque).
Ejemplo: 4 0 0 2 (Bloque 4, Placa 2).
[ ]
04 002/ 01
01/ 0007
[ ]
Page 25
Pag 25
Intercomunicar dos teléfonos
1. Desde una vivienda le solicitan le ponga en comunicación
con otra vivenda.
Ejemplo: desde el teléfono nº 125 solicitan le ponga en comunicación con el teléfono 140.
2. Pulse el botón Campana
3. Pulse el botón Teléfono-Teléfono
4. Marque el número de teléfono de la otra vivienda.
El nº 140, en el caso del ejemplo.
5. Pulse la tecla CAMPANA.
Se generará una llamada al teléfono de la vivienda. El display
indicará comunicación VIVIENDA-VIVIENDA.
6. Cuelgue el teléfono.
Los vecinos podrán mantener una conversación entre ellos.
01/ 0125
[ ]
01/ 0140
[ ]
Page 26
Pag 26
Llamar a otra Conserjería.
1. Marque el número de bloque o sector dónde esté
instalada la Conserjería. Si pertenece al mismo bloque
no es necesario.
2. Marque el código 9A.
3. Marque el número de Conserjería a llamar . Utilice dos
dígitos.
Ejemplo: Si Ud. están en la conserjería nº 1 y va a llamar
a la conserjería nº 3 marcaría "03".
4. Pulse la tecla CAMPANA.
La Conserjería llamada comenzará a emitir unos "bips"
y el display indicará conversación CONSERJERÍACONSERJERÍA.
01/ 03
[ ]
Page 27
Pag 27
NOTAS MUY IMPORTANTES
* El sistema asigna un tiempo de conversación, programado (entre 15 y 45
segundos) durante el que dicha conversación no podrá ser interrumpida. Una vez
transcurrido este tiempo, cualquier otra llamada cortará la comunicación en curso.
En cualquier caso, transcurrido un tiempo máximo, también programado en el
sistema (entre 30 y 250 segundos), la llamada también se cortará. Pregunte al
personal de mantenimiento qué tiempo de conversación y qué tiempo máximo
hay asignado, o pida que se los modifi que si lo considera necesario.
* En urbanizaciones en las que existe varios bloques o sectores y con el fi n de
diferenciar los números de teléfono, que se repetirían, se utiliza el modo de llama-
da larga, en el que es preciso, para llamar a algún teléfono, indicar previamente
el número de bloque y seguidamente el número de teléfono, con 4 dígitos.
En el display aparecería el número de bloque seguido del número de teléfono:
b b - t t t t, en lugar de sólo teléfono: t t t t.
1. Marque el número de bloque seguido del número
de teléfono.
Para el número de teléfono es preciso introducir
siempre 4 dígitos.
El número a marcar sería pues 50023.
NOTA: Los números de teléfono, números de placa, números de bloque
y números de Conserjería fueron programados durante la instalación del
sistema. Contacte con el personal de mantenimiento para más detalles.
2. Pulse la tecla CAMPANA para llamar.
El display indicará comunicación CONSERJERÍATELÉFONO, y el número de bloque (05) del teléfono
llamado.
Ejemplo: Se va a llamar al teléfono nº 23 del bloque 5
[ ]
01/05 0023
Page 28

Pag 28
COLAS DE LLAMADAS
La Central de Conserjería dispone de una memoria donde almacena las 20
últimas llamadas recibidas desde placas de calle, las 20 últimas llamadas recibidas desde los teléfonos y las 20 últimas llamadas de pánico que están pendientes
de contestar. Estas llamadas podrán ser atendidas posteriormente, o podrán ser
anuladas individualmente. Las llamadas reincidentes desde un mismo punto sólo
se contabilizan una vez.
La Central de Conserjería indica que tiene llamadas memorizadas mediante
unos símbolos que se pueden presentar en la SECCION B del Display Principal,
así como en la zona 2.
En el caso de que aparezcan varios símbolos indica que hay pendientes de
contestar llamadas de distinto tipo.
En la SECCION C se indicaría el orden de llegada de la llamada que se está
visualizando en la SECCION D.
Esta información, tal y como se explicó previamente, se presenta de la siguiente
manera:
Los símbolos que se pueden mostrar son:
A B C
D E
* Indica que hay llamadas de placa de calle pendientes de
contestar.
* Indica que hay llamadas de vivienda pendientes de contestar.
* Hay avisos de pánico pendientes de atender (ver ANEXO al
fi nal de este manual)
* Llamada de una placa de calle. Hay un total de "t t"
llamadas de placa de calle pendientes de contestar y
ésta corresponde a la número "n n".
* Llamada desde un teléfono. Hay un total de "t t"
llamadas de teléfono pendientes de contestar y ésta
corresponde a la número "n n".
: n n/t t
: n n/t t
!
Page 29

Pag 29
La forma de seleccionar las llamadas memorizadas es:
1. Pulse ésta tecla para seleccionar qué tipo de llamadas desea
contestar: llamadas de placa o llamadas de teléfono.
Si ya se visualiza no es necesario pulsarla.
2. Una vez seleccionado el tipo de llamadas, utilice ésta tecla
para visualizar las llamadas en espera y para seleccionar la que
desea contestar.
3. V ea el apartado Cómo contestar llamadas memorizadas, de
la página siguiente.
La SECCION D indica el número de placa o el número de teléfono desde
donde llamaron, o si la llamada fue interceptada por la Central de Conserjería.
La información que puede aparecer es:
A
p p/ t t t t
t t t t
b b p p/ t t t t
p p/
* La llamada visualizada es de la placa de calle
nº p p hacia el teléfono nº t t t t y ha sido interceptada
por la Central de Conserjería.
* La llamada seleccionada es de la placa de calle nº
p p hacia la misma Central de Conserjería.
* Es una llamada de teléfono nº t t t t.
* La llamada visualizada es de una placa interior
nº p p p hacia la propia central de conserjería.
* Esta opción sólo será válida en grandes urbaniza-
ciones con varios bloques o sectores y sistema de
llamada larga (*). La llamada proviene de la placa
pp del bloque nº b b hacia el teléfono nº t t t t
(*) Ver NOTAS MUY IMPORTANTES en la página 27.
En la SECCION E se indica la hora a la que se recibió la llamada.
Las llamadas no se atienden hasta que se pulse la tecla (para teléfonos)
o la tecla (para placas).
p p p
Page 30

Pag 30
Cómo contestar llamadas memorizadas
1. La Central de Conserjería está emitiendo unos "bips", par-
padeando el LED y el icono en la zona 2, indicando que hay
llamadas pendientes de contestar.
El display muestra la primera llamada recibida.
2. En el caso que la SECCION B indique que hay llamadas
de varios tipos, seleccione el tipo de llamada que desee
contestar primero.
El display muestra la primera llamada recibida del tipo selec-
cionado.
Según el tipo de llamada, procederemos como se explica a continuación:
3. Llamada desde placa de calle
3.1 Seleccione la llamada que desee contestar primero.
(En el caso que haya varias).
3.2 Descuelgue y pulse el botón Conserje-Placa .
El display indicará comunicación PLACA-CONSERJERÍA.
3.3 Si desea abrir la puerta, pulse la tecla Abrepuertas.
Bip
Bip...
!
132
465
798
A
B0
A
[ ]
01 01/ 01
Page 31

Pag 31
4. Llamada desde teléfono
4.1 Seleccione la llamada que desee contestar primero.
(En el caso que haya varias).
4.2 Descuelgue y pulse la tecla CAMPANA.
El display indicará comunicación CONSERJERÍA-
TELÉFONO.
5. Llamada desde placa interior
5.1 Seleccione la llamada que desee contestar primero.
(En el caso que haya varias).
5.2 Descuelgue y pulse la tecla Conserje-Placa
El display indicará comunicación PLACA-CONSER-
JERÍA.
5.3 Si desea abrir la puerta, pulse la tecla Abrepuertas.
6. Anular la llamada sin contestarla
6.1 Pulse la "B".
La llamada se borrará, apareciendo en el display la
llamada recibida a continuación de ésta (si hay).
B
[ ]
01/ 0032
[ ]
01 001/ 01
Page 32

Pag 32
ANEXO
FUNCIONAMIENTO DE LA CENTRAL DE CONSERJERIA
COMO CENTRAL DE RECEPCION DE ALARMAS DE PANICO
NOTA MUY IMPORTANTE:
La función de Central de Recepción de Alarmas de Pánico
sólo es efectiva en instalaciones especiales, en las que los
teléfonos o monitores son del tipo «con botón de pánico» y se
emplean ISODECODERS.
Page 33

Pag 33
MODOS DE FUNCIONAMIENTO
Las características de los distintos modos de funcionamiento, para edifi ca-
ciones con una sóla Central de Recepción de Alarmas de Pánico son:
MODO NOCHE
* La Central de Recepción de Alarmas de Pánico NO atiende
llamadas de pánico de los teléfonos.
MODO DÍA
* La Central de Recepción de Alarmas de Pánico atiende lla-
madas de pánico de los teléfonos.
En el caso de urbanizaciones con más de una Unidad Central, se dispone
además:
MODO TRANSFER
* Desvía las alarmas de pánico a la Central de Recepción de
Alarmas de Pánico designada.
MODO MASTER
* Recibe llamadas de pánico de todas las demás Centrales de
Recepción de Alarmas que estén en MODO NOCHE.
Page 34

Pag 34
Selección del modo de funcionamiento
La forma de confi gurar una Central de Conserjería como Central de Recep-
ción de Alarmas de Pánico, y seleccionar el modo de recepción de alarmas es:
1. Entrar en programación marcando el "0".
El display mostrará una serie de guiones.
2. Pulse la "B" y el "3" repetidamente hasta completar los guiones y el display presente el modo de funcionamiento actual.
3. Utilice las teclas de fl echa para seleccionar el modo de
funcionamiento deseado.
NOCHE
DIA
TRANSFER (*)
MASTER(*)
(*)Sólo disponible en edifi caciones con varias Unidades
Centrales (bloques). Ver NOTA en la página siguiente.
4.Pulse la "B" cuando el modo de funcionamiento deseado
aparezca en el display.
0
3
3
B
+
.
.
.
B
B333_ _
NOTA:
En el caso en que el modo escogido sea: TRANSFER, será preciso
indicar a qué número de bloque se van a transferir las llamadas. El
número de cada Central fue asignado en el momento de la instalación.
Page 35

Pag 35
Ejemplo: Se va a seleccionar el modo TRANSFER para que las llamadas de pánico
sean desviadas a la Conserjería del bloque nº 4.
1.Entre en programación y seleccione el modo TRANSFER
mediante las teclas de fl echa, tal y como se explica en la
página anterior.
Tras confi rmar, el sistema le pedirá que le indique el número
de Unidad Central (bloque) a la que se van a desviar las
llamadas.
2. Marque el número del bloque donde se encuentra la Central de Conserjería a la que se van a transferir las llamadas,
utilizando siempre 2 dígitos.
En el caso del ejemplo "04".
El display volverá a la posición de reposo.
NOTA:
La unidad central designada debe tener una Conserjería en modo pánico
activa (modo pánico DIA o MASTER DIA)
N. central: 04
BUSQUE NOMBRE
Y PULSE
N. central:
Page 36

Pag 36
FUNCIONAMIENTO
Desde una Central de Recepción de Alarmas de Pánico, se pueden atender llamadas de pánico desde teléfonos o placas interiores, bien al instante o bien
memorizadas.
Atender una llamada de pánico en el momento que se produce
1.Un vecino pulsa el botón de pánico de su teléfono. La central
de conserjería comenzará a emitir unos "bips".
El display indica el número de teléfono desde el que pul-
saron el botón de pánico.
Ejemplo: Llamada de pánico desde el teléfono nº 127.
Si la llamada proviene de un teléfono de otro bloque, ésto
vendrá indicado en el display.
Ejemplo: Llamada de pánico desde el teléfono nº 127 del
bloque nº 3.
2.Pulse la tecla CAMPANA si desea comunicarse con el
vecino que ha pulsado el botón de alarma.
El display indica el número de teléfono desde el que pulsaron
el botón de pánico.
Ejemplo: Llamada de pánico desde el teléfono nº 108 del
bloque 3.
3.Para anular la llamada sin atenderla pulse la tecla "B".
B
Bip
Bip...
!
D :01/01
0127 18:15
D :01/01
03 0127 18:15
D :01/01
03 0108 18:20
Page 37

Pag 37
Atender llamadas de pánico memorizadas
1.La Central de Conserjería está emitiendo unos «bips», indicando que hay llamadas pendientes de contestar.
El display muestra la primera llamada recibida.
Ejemplo: Hay 3 llamadas de pánico pendientes. El display
muestra la primera, que la hizo el teléfono nº 34.
2.Seleccione la llamada que desee contestar primero.
(En el caso que haya varias).
3.Pulse la tecla CAMPANA si desea comunicarse con el vecino
que pulsó el botón de alarma.
En el caso de que haya más llamadas pendientes, el display
muestra la siguiente. Puede atenderla de la misma forma
explicada.
4.Pulse la tecla "B" si desea anular la llamada sin atenderla.
Bip
Bip...
!
B
NOTA:
Las llamadas de pánico tienen preferencia frente a cualquier otro tipo
de llamada, por lo que, si hay llamadas de pánico pendientes de contestar, no podrán seleccionarse las de otros tipos. Aunque un vecino
llame repetidas veces, sólo se contabilizará una vez su llamada en la
cola de recepción.
D :01/03
0034 18:15
D :01/02
0105 18:20
Page 38

Pag 38
Atender una llamada de una placa interior (decoder de placas)
1. Llaman desde una placa pulsando la tecla "P ANIC". La
Central de Conserjería comenzará a emitir unos "bips",
indicando que están llamando.
El display indica mediante "D" + tres dígitos el número de
placa y el bloque desde el que están llamando.
Si la llamada de dicha placa se realiza desde el mismo
bloque (donde está conectada la placa), el display indicará
sólo el número de placa.
Ejemplo: están llamando de la placa nº 2 del bloque nº
4 (la placa está conectada en otro bloque).
2. Para contestar la llamada, descuelgue y pulse la tecla
CAMPANA
El display indicará comunicación PLACA-CONSERJERÍA
3. Si desea abrir la puerta, pulse la tecla Abrepuertas,
mientras exista comunicación PLACA-CONSERJE.
- están llamando de la placa nº 2 del bloque donde la
placa está conectada.
CP
M :01/01
04 D002 18:15
D :01/01
D002 18:20
M
04 D002 18:15
4. Para fi nalizar la comunicación con la placa, pulse la
tecla Almohadilla
Page 39

Pag 39
El Conserje podrá activar desde el teclado de la conserjería cualquier relé codifi cado en la instalación, (si se ha habilitado esta opción en la confi guración de la
Unidad Central).
La activación de un relé se realiza marcando el número de relé [000..999] y a
continuación la tecla
Activación de relés
D1
D2
2
6
C
C
NC
NC
C
NC
NC
C
NC
NC
NC
NC
RELAYS DECODER
DECODER DE RELES
R
ELE
S / RE
LA
YS
V
BUS
PGM
BUS
1
FERM
AX
REF. 2430
DECODER Nº:
M
A
D
E
I
N
S
P
A
I
N
5
3
6
2
7
4
8
NOTAS: La Central de Conserjería que reciba la llamada será fi jada
mediante el instalador o personal de mantenimiento, siendo una Central
fi ja, o la Central activa en ese momento.
Se puede activar un relé adicional para avisar al Conserje mediante una
sirena o una luz.
Recepción de alarmas por sensor
1. La alarma generada por un sensor se muestra en la
pantalla de la Central de Conserjería mediante un aviso
de pánico y el número del correspondiente sensor. Mediante la programación del sistema puede ser enviado un
mensaje adicional al Conserje, referente al sensor que se
ha activado.
2. Para eliminar el mensaje de pánico en la pantalla de la
Central de Conserjería pulse la tecla "B".
B
2
D1
D2
6
S
-
S
-
S
-
S
-
SENSORS DECODER
DECODER DE SENSORES
DECODER Nº:
5
BUS
FERMAX
REF. 2429
PGM
BUS
M
A
D
E
I
N
S
P
A
IN
8
SENSORES / SENSORS
1
6
2
7
3
4
Alarma de incendios
100 18:15
NOTA: A partir de la versión 5.1 de Central MDS, en lugar de número de relé
se utiliza la codifi cación BB RRR E siendo BB número de bloque [1..63],
RRR relé [000..999] y E estado [0 ó 1]
Page 40

Pag 40
GUIA RAPIDA CENTRAL DE CONSERJERIA MDS
Las principales funciones de la Central de Conserjería MDS son:
* Atender llamadas de Placas de Calle
* Atender llamadas de Teléfonos o Monitores
* Intercomunicar Teléfonos
* Comunicar con Placas de Calle
* Comunicar con Teléfonos o Monitores
Para efectuar estas operaciones, es preciso haber confi gurado la Central
de Conserjería en un modo adecuado a las funciones a realizar.
Los modos básicos de funcionamiento son NOCHE, DIA y MIXTO. Las
llamadas de Placas de Calle sólo se capturarán si el modo es DIA, mientras que
las de Teléfonos o Monitores se reciben en DIA y MIXTO. En modo NOCHE, la
Conserjería actúa como una placa más.
Modos básicos de operación
Selección del modo de operación
El modo de trabajo de la Conserjería se selecciona introduciendo la secuencia 0 A 3 3 3 3 3 y pulsando seguidamente las fl echas de búsqueda para elegir el
modo deseado:
B
Selección de modo
Validación de la selección
Introducir 0 A 3 3 3 3 3
Page 41

Pag 41
Atender llamadas
Si la Conserjería está en modo DIA o MIXTO, se recibirán llamadas de
placas (sólo en modo DIA) y de teléfonos (ambos modos)
Llamada desde PLACA
Para comunicar con la placa, pulsaremos:
Para comunicar con el teléfono o
monitor llamado, pulsaremos:
Si fi nalmente deseamos transferir la
llamada, pulsaremos:
En caso de no desear transferir la
comunicación, pulsaríamos de nuevo:
o bien anularíamos con
B
Para abrir la puerta, pulsaremos:
+
Llamada desde placa
Hora de recepción de la llamada
Cola de placas seleccionada
Llamada desde Placa 1 a Teléfono 2501
Page 42

Pag 42
Intercomunicar TELEFONOS
Tras recibir una llamada de Teléfono, el Conserje puede intercomunicar
éste último teléfono con cualquier otro de la instalación. Para ello, una vez en comunicación con el primer teléfono, pulsaremos:
Ejemplo: se recibe llamada del teléfono 35.
Para intercomunicarlo con el teléfono 24
pulsaremos:
Llamada desde TELEFONO o MONITOR
Para comunicar con el Teléfono, pulsaremos:
Si queremos repetir la llamada al
último Teléfono, pulsaremos:
+
+ 2 4 +
+ NNNN +
Llamada desde teléfono o monitor
Hora de recepción de la llamada
Cola de teléfonos seleccionada
Llamada desde Teléfono 2501
Page 43

Pag 43
Comunicar con PLACAS
Si el Conserje desea establecer comunicación con cualquier Placa, sin
haber sido llamado previamente, debe marcar:
Ejemplo: para comunicar con la placa 1 del
bloque 2, pulsaríamos:
Para abrir la puerta, pulsaremos:
Comunicar con Placas y Teléfonos
Si la Conserjería está en modo DIA o MIXT O, el Conserje puede comunicar ,
de iniciativa propia, con cualquier Placa o Teléfono de la instalación.
BBPP +
2 0 1 +
Comunicar con TELEFONOS o MONITORES
Para establecer comunicación con cualquier Teléfono o Monitor , sin mediar
llamada previa, se debe marcar:
Ejemplo: para llamar al teléfono 35 pulsaremos:
3 5 +
NNNN +
Para fi nalizar la comunicación con la placa, pulse la tecla
Almohadilla
Page 44

Pag 44
CARACTERISTICAS TECNICAS
Alimentación: 12VDC ± 10% / 250mA
Temperatura de funcionamiento: 10 ~ 60 ºC
Módulo de conexiones de la CC :
‘+’ alimentación (+12VDC)
‘-’ alimentación (GND)
’Sa' RS-485 (par trenzado de datos)
‘Sb’ RS-485 (par trenzado de datos)
‘2’ audio viviendas --> placas
'6' audio placas --> viviendas
'Alt' Salida hacia altavoz
'-' negativo de altavoz (GND)
Conector tipo telefónico de pared :
[BL] : ‘+’ alimentación (+12VDC)
[OR] : ‘-’ alimentación (GND)
[BK] : ’Sa' RS-485 (par trenzado de datos)
[RD] : ‘Sb’ RS-485 (par trenzado de datos)
[WH] : ‘2’ audio viviendas --> placas
[BR] : '6' audio placas --> viviendas
[YL] : 'Alt' Salida hacia altavoz
[GR] : '-' negativo de altavoz (GND)
-
Sa
6
Alt
-
2
A la instalación
+
Sb
B
L
O
R
BKB
K
R
D
W
H
G
R
B
R
Y
L
Sb
Sa
+
6
Alt
-
2
Page 45

Pag 45
NOVEDADES INCLUIDAS EN SOFTWARE V7.4
NUEVO MODO DE FUNCIONAMIENTO:
LLAMADA A VIVIENDAS CON CERO DELANTE SIN ENTRAR EN PROGRAMACION
Al igual que hace la placa debe poder habilitarse un modo en el que se puedan
marcar números de vivienda con ceros delante sin entrar en programación.
1.Habilitación:
Una pulsación prolongada del cero activa/desactiva este modo.
Cada pulsación cambia el estado de este modo:
(activado -> desactivado, desactivado -> activado).
Cuando se produce el cambio aparece un mensaje en pantalla que informa del cambio («0
OFF», «0 ON»)
NOTA: ignora lo que aparezca en el display al pulsar el ‘0’.
- en modo «0 OFF» aparecerá la línea de guiones «--»
- en modo «0 ON» aparecerá un ‘0’.
Mantener pulsado el cero hasta que aparezca el correspondiente mensaje.
2.Funcionamiento:
En modo «0 ON», cada vez que se pulse el 0 se borrará el contenido previo de la pantalla
y aparecerá un ‘0’.
a) Si la siguiente tecla que se pulsa es un numero, aparecerá el mensaje «Codigo
de llamada» y en la línea inferior el numero pulsado con el 0 a su izquierda.
b) Si la siguiente tecla es ‘A’ o ‘B’, aparecerá la línea de guiones *—— característica
de la entrada en programación con el primer asterico marcado ya se pueden pulsar
varios ceros a la izquierda
NOTA IMPORTANTE
Para activar el desvio de llamada, será preciso desactivar primero el modo "LLAMADA A
VIVIENDAS CON CERO DELANTE", si este estuviera activado.
No olvidar, en este caso, volver a activar de nuevo el modo LLAMADA A VIVIENDAS CON
CERO DELANTE.
Page 46

Pag 2
ENGLISH
MDS DIGITAL DESKTOP GUARD UNIT MANUAL
This technical document, of an informative nature, is published by FERMAX ELECTRONICA
S.A.E. The company reserves the right to modify the contents of this document and the
features of the products referred to herein at any time and with no prior notice. Any such
modifi cations shall be refl ected in subsequent editions of this document.
Page 47

Pag 3
INDEX
INTRODUCTION .................................................................................. .......... 4
Desktop Guard Unit Controls.................................................................. 6
BASIC OPERATING MODES ......................................................................... 8
ADVANCED OPERATING MODES ................................................................ 9
Select Operating Mode ...........................................................................11
Call Divert ...............................................................................................12
DISPLAY ..........................................................................................................13
Select Contrast .......................................................................................15
MDS Main Display .......... .......................................................................16
OPERATION ....................................................................................................19
Answer call from house ..........................................................................19
Answer call from outdoor panel ..............................................................20
Intercept call from outdoor panel to telephone .......................................21
Answer call from indoor panel (panel decoder) ......................................23
Communicate with indoor panel .............................................................24
Call a house............................................................................................25
Intercommunicate two telephones .........................................................25
Call another Guard Unit .........................................................................26
CALL QUEUES ................................................................................................28
How to answer memorised calls .......................................................30
APPENDIX
GUARD UNIT OPERATION
AS PANIC ALARMS RECEPTION CENTRE
OPERATING MODES ......................................................................................33
Select Operating Mode ...........................................................................34
OPERATION ....................................................................................................36
Answer a panic call when it is made.......................................................36
Answer memorised panic calls ...............................................................37
Answer a panic call from and indoor panel (panel dec.) ........................38
Alarms reception by sensor... .................................................................39
Relay activation................ ......................................................................39
MDS GUARD UNIT FAST GUIDE ...................................................................40
TECHNICAL FEATURES .......... ......................................................................44
COD. 94891EId V04/14
Page 48

Pag 4
INTRODUCTION
The MDS Digital Guard Unit acts as a "fi lter" between visitors to a building
and its residents.
In DAY mode, calls made from any access to the building are received in the
Guard Unit, so the Concierge can announce the visit to the corresponding resident,
put the call through or attend it personally.
The Guard Unit can work in MIXED mode. In this case calls from visitors
are received directly in the corresponding house. Even so, it is also possible to call
the Concierge directly from the outdoor panels, by pressing the bell key.
Both in DAY mode and MIXED mode, the Guard Unit receives calls from
residents who want to speak to the Concierge.
If the Concierge is away when the Guard Unit receives a call, the calls are
memorised in the corresponding call queues (up to a total of 20 calls of each type,
home and panel), so the Concierge can answer them when he/she returns .
The Concierge can also intercommunicate two homes, at the request of one
of them.
As an additional function, and using telephones fi tted with a panic button
(PANIC), the Guard Unit can also operate as a Panic Alarms Reception Centre. This
type of alarm is made when a resident presses the panic button on his/her phone,
to alert the Concierge or the person in charge of surveillance in the building.
NOTES:
All the telephones have a number assigned, which is generally the same number
as the house (ask the maintenance staff which numbers have been assigned
to each home).
It is possible that there may be more than one Guard Unit in the same building
or block. Only the last one to be selected as DA Y or MIXED function mode will
receive the calls from homes and outdoor panels.
Page 49

Pag 5
NOTE 1: The Guard Unit, when powering the MDS installation of
which it is part, needs time to initialise correctly and for the MDS
Central Unit to detect and confi gure it as a Guard Unit.
NOTE 2: The Guard Unit has a number assigned, which must
correspond to the number of the MDS switcher where it is physically connected. (0..9). To change this number, which is 0 by
default, keep the # key pressed until a question mark appears
on the display. Enter the number of the desired Guard Unit, to
which the system will respond with OK. Once the Guard Unit
number has been changed, the system must be rebooted so that
the MDS Central Unit can recognise it.
IMPORTANT NOTES ABOUT STARTUP
WARNING:
After calling the Guard Unit, the call beeps are heard in the guard
unit's phone receiver.
Given that these beeps are fairly loud, we don't recommend
putting the receiver to your ear before pressing the answer call
button.
Page 50

Pag 6
Desktop Guard Unit Controls
1. DISPLAY
Provides different types of information about
handling the Guard Unit.
2. SEARCH KEYS (ARROWS)
Press these keys to fi nd the name of the
resident you wish to call. The search must
always start by pressing the right hand key .
3. CALL (BELL)
To call house phones or other Guard Units
1
3
2
Page 51

Pag 7
4. DIALLING KEYPAD
Located beneath the phone handset. Used to enter
the house phone number, panel number and data in
general.
5. CALL MEMORY SELECTION
Used to choose which call waiting queues to deal with:
telephones or outdoor panels.
6. CONFIRMATION / DELETE
Press this key to confi rm the data entered with the
keypad and to delete memorised calls.
7. GUARD UNIT-TELEPHONE COMMUNICATION
Selects the GUARD UNIT -TELEPHONE communication
channel. Communicates with the last telephone called.
8. PANEL-TELEPHONE COMMUNICATION
Activates the PANEL-TELEPHONE communication
channel. Communicates the last panel with the last
telephone called.
9. GUARD UNIT-PANEL COMMUNICATION
Selects the GUARD UNIT-PANEL communication
channel
. Communicates with the last panel spoken to.
10. GUARD UNIT-PANEL DECODER
COMMUNICATION
Used to select the GUARD UNIT-PANEL DECODER
communication channel.
11. HOUSE-HOUSE COMMUNICATION
Activates the HOUSE-HOUSE communication channel.
12. DOOR LOCK
Door release action key
4
11
6
5
7
8
9
10
12
Page 52

Pag 8
987
654
321
A
B
0
987
654
321
A
B
0
987
654
321
A
B
0
BASIC OPERATING MODES
The different operating mode features for facilities with only one Guard
Unit are:
DAY MODE
* The Guard Unit can make and receive calls to/from the
telephones.
* Outdoor panels cannot call the telephones directly.
* Calls from outdoor panels to phones are intercepted by
the Guard Unit, from which they may be transferred to the
phone called or any other.
* The Concierge can place 2 telephones in communication.
MIXED MODE
* The Guard Unit can make and receive calls to/from the
telephones.
* Outdoor panels can call the telephones directly, as well
as the concierge. The Concierge can transfer a call to
any phone.
* The Concierge can place 2 telephones in communication.
NIGHT MODE
* The Guard Unit does not take calls from the phones or
outdoor panels. It works as if it were just another outdoor
panel.
* Outdoor panels can call the telephones directly.
YES
YES
NO
YES
YES
YES
YES
NO
NO
YES
Page 53

Pag 9
987
654
321
A
B
0
987
654
321
A
B
0
MASTER-DAY MODE
* The Guard Unit receives calls from the phones and in-
tercepts the calls from outdoor panels belonging to other
Central Units that are in NIGHT MODE at this time.
* As for those homes depending directly upon this Guard
Unit, it runs as in DAY MODE.
MASTER-MIXED MODE
* The Guard Unit receives calls from the phones belonging
to all the other Central Units that are in NIGHT MODE
at this time.
* As for those homes depending directly upon this Guard
Unit, it runs as in MIXED MODE
NOTE
Each block or building is managed by a Central Unit and may contain
one or several Guard Units. A distinction is therefore made between
building or block number (coded in the Central Unit at the moment of
installation) and Guard Unit number.
YES
YES
NO
YES
YES
YES
ADVANCED OPERATING MODES
In facilities with more than one block, there is also:
Page 54

Pag 10
987
654
321
A
B
0
987
654
321
A
B
0
TRANSFER-DAY MODE
* Diverts calls from its dependent telephones towards the
designated Guard Unit.
* Intercepts calls from its dependent outdoor panels and
diverts them to the designated Central Unit.
TRANSFER-MIXED MODE
* Diverts calls from its dependent telephones towards the
designated Guard Unit.
* Calls from outdoor panels that depend on it go straight
through to the telephone called.
YES
YES
NO
YES
YES
YES
NOTE:
All the Guard Units can call any other telephone in the facility ( even in
another block or sector) regardless of the mode they are in.
Page 55

Pag 11
Select Operating MODE
How to select Operating MODE:
1. Press "0"
The display will show a series of dashes (except in the
call mode with 0 in ON, see page 45).
2. Enter "A" followed by "3" repeatedly until the dashes
3. Use the arrow keys (below display) to select the
desired MODE:
NIGHT
MIXED
DAY
MASTER-DAY (*)
MASTER-MIXED (*)
TRANSFER-DAY (*)
TRANSFER-MIXED (*)
(*) Only available in installations with a Central Unit. See
NOTE on previous page.
4. Press "B" when the desired MODE comes up on the
display.
0
A
3
3
B
+
.
.
.
A333_ _
The display presents the current MODE
Current Mode:
Day
Page 56

Pag 12
NOTE:
If the chosen modes are: TRANSFER-DAY or TRANSFER-MIXED, it will be ne-
cessary to indicate to which block the calls are to be transferred. The calls will be
received by the Guard Unit that is active in that block.
1. Enter the mode change code and select TRANSFER-DAY
After confi rmation, the system asks you to indicate the number
of the Guard Unit the calls are to be diverted to.
2. Key in the number of the block the calls are to be transferred to.
Always enter 2 digits.
In the example, "04".
Call Code:
0000
5. If accepted, press "B" and it will ask for the call code to divert the
calls from the Concierge to.
6. Once the code is selected, press "B".
B
NOTE: This mode will not be accepted if the block selected does not
have an active Guard Unit, (DAY, MIXED, MASTER DAY, MASTER MIXED)
The display goes back to standby mode.
Divert Concierge?
(A)-No (B)-Yes
Call Divert
If the selected MODE is an active one (DA Y, MIXED, MASTER-DAY or MASTERMIXED), the Guard Unit asks if you wish to divert the call to a house, so you can
answer it from elsewhere.
Example: We are going to select TRANSFER-DAY mode so that the calls are
diverted to block nº 4:
Guard Unit: 04
NOTE: In the Central MDS4.x versions, after selecting the
mode you are automatically asked if you want to activate the
call forward, while in versions 5.x or above you must enter the
code 0 + 333333 for this function. For V 7.4 see "IMPOR T ANT"
on page 45.
3
3
.
.
0
+
Page 57

Pag 13
DISPLAY
The Guard Unit has a high resolution (320x240 points) graphic display
showing user information. Several zones can be distinguished on screen, as shown
in the fi gure:
GUARD UNIT TYPE AND NUMBER
Indicates that it is an MDS Guard Unit, and in this case, number 1.
CALLS IN MEMORY INDICATOR
If the telephone or panel icons appear , it indicates that there are calls
waiting to be answered.
OPERATING MODE
By means of the shown icon, the Guard Unit mode is indicated.
1
2
3
NIGHT mode
DAY mode
1
3
2
5
6
7
4
Page 58

Pag 14
MIXED Mode
MASTER MIXED Mode
MASTER DAY Mode
Call DIVERT Active
SIDE MENU
Shows which call queue is being attended to (telephones or panels).
CLOCK
Gives the current time in expanded size.
MDS MAIN DISPLAY
Shows information in a form totally compatible with the previous MDS
Desktop Guard Unit.
COMMUNICATION IN PROGRESS
Informs of the communication currently selected.
4
5
6
7
Page 59

Pag 15
Select Contrast
The contrast of the Guard Unit graphic display can be adjusted for optimum
viewing. To do so, proceed as follows:
1. Enter code A55555
To do so, enter the sequence: 0 A 5 5 5 5 5
Note: The number of '5' digits that we have to enter (3, 4 or 5) will depend
on the length of the access code confi gured in the system (4, 5 or 6)
2. Use the arrows to select contrast
3. Press 'B' to validate
The contrast value selected is stored in a non-volatile memory, so that even
when the power is off, the set value will be kept.
4. Select the call tone with the arrows
The selected tone is stored in a non-volatile memory so that even if the power
is lost, the established tone is maintained.
5. Validate by pressing 'B'
B EXIT
CONTRAST
-> +
<- -
DIGITAL
V 7.4
B EXIT
RING TONE
SELECTION
-> +
<- -
DIGITAL
V 7.4
Page 60

Pag 16
MDS Main Display
The Guard Unit MDS Main Display (zone 6) provides diverse information such
as telephone number that is calling, number of calls memorised, etc. It is divided
into 5 sections:
SECTION C:
Indicates the call type on view in SECTION D of the lower line. Alongside
the call type symbol, the total number of calls waiting (t t) is shown, and the order
number (n n) corresponding to the one on view, i. e., the fi rst, second, third, etc.,
from among the total received.
A B C
D E
SECTION A:
Indicates the operating MODE:
(No indication) Night Mode
D Day Mode
X Mixed Mode
MD Master Day Mode
MX Master Mixed mode
Dv Call Divert Active
NOTE: This information is shown in graphic form in zone 3
SECTION B:
Indicates if there are any calls waiting to be answered and what type.
The symbols that may appear are:
* Panel call waiting to be answered.
* Telephone calls waiting to be answered.
* Panic alarm alerts awaiting a response (See APPENDIX
at the end of this Manual). The icon depends on the guard
unit version.
NOTE: This information is shown in graphic form in zone 2
!
Page 61

Pag 17
This information is shown as follows:
* Call from an outdoor panel. There is a total of "t t" outdoor
panel calls awaiting a response and this one corresponds
to number "n n".
* Call from a telephone. There is a total of
"t t" telephone calls waiting for an answer and this one
corresponds to number "n n".
NOTES: See the CALL QUEUES section for how to select, answer or delete
these calls.
The queue selected is indicated in graphic form in zone 4.
SECTION D:
This section lets you see the call data (that appear in SECTION C).
The information that may come up is:
* The call on view is from outdoor panel nº p p to telephone
nº t t t t and has been intercepted by the GUARD UNIT.
* The call selected is from outdoor panel nº p p to the
same GUARD UNIT.
* The call is from telephone nº t t t t.
* The call on view is from indoor panel
nº p p p to the GUARD UNIT.
* This option will only be valid in large facilities with several
blocks or sectors and long call system (*).
The call selected corresponds to panel nº p p of block nº
b b to telephone nº t t t t
(*) See VERY IMPORTANT NOTES on page 27
: n n/t t
: n n/t t
p p/ t t t t
p p/
t t t t
p p p
b b p p/ t t t t
Page 62

Pag 18
SECTION E:
Indicates the current time when in standby . When a call is on view, indicates
the time the call was received. This way, if the Concierge is away for a while, they
will know what time the call was made.
IMPORTANT NOTE:
The telephone numbers, panel numbers, block numbers and
guard unit numbers were assigned during installation of the system. Please
contact the maintenance staff for more details.
During the conversation, SECTION D may offer the following information
(in brackets):
* The PANEL-GUARD UNIT communication channel is
selected.
Example: Panel nº 3 with GUARD UNIT nº 1.
* The PANEL-TELEPHONE communication channel is
active.
Example: Panel nº 3 with telephone nº 37.
* The GUARD UNIT -TELEPHONE communication channel is selected.
Example: GUARD UNIT nº 1 with telephone nº 120.
* The GUARD UNIT -GUARD UNIT communication channel is selected. Only in installations with more than
one GUARD UNIT.
Example: GUARD UNIT nº 1 with GUARD UNIT nº 4.
* The TELEPHONE-TELEPHONE communication channel is selected.
Example: Telephone nº 146 with telephone nº 120.
* The PANEL-GUARD UNIT communication channel is
active.
Example: Panel nº 3 from block nº 1 with GUARD UNIT
nº 2.
NOTE: This information is shown in expanded form in zone 7
NOTE: The time is shown in expanded form in zone 5
01/ 04
[ ]
0146/ 0120
[ ]
[ ]
01 03/ 02
03/ 01
[ ]
03/ 0037
[ ]
01/ 0120
[ ]
Page 63

Pag 19
GUARD UNIT OPERATION
The Guard Unit can carry out different functions: answer calls from homes
and panels, call telephones, intercommunicate two telephones, call other Guard
units, etc.
Answer call from house
1. A resident calls the Concierge. The Guard Unit starts
to emit "beeps", indicating that a call is coming in. The
Guard Unit LED also blinks, so does the corresponding
icon in zone 2.
The display indicates the telephone number the call
is being made from.
Example: Call from telephone nº 127.
2. To answer the call, just pick up the handset and
Bip
Bip...
!
press the BELL key.
The display will indicate GUARD UNIT-TELEPHONE
communication.
Example: Guard unit nº 1 with telephone nº 127.
Show name in call reception
Y ou can know the name or number of the person or fl at
that has made the call simply by pressing the '*' key of
the Guard Unit keypad. This will only be valid if this
telephone is assigned to the users list. This information
will be shown for 2 seconds.
D :01/01
0127 18:15
[ ]
01/ 0127
Page 64

Pag 20
Answer a call from outdoor panel
1. The visitor calls from an outdoor panel, pressing the
"BELL" key. The Guard Unit starts to "beep", while the
LED and icon blink in zone 2.
The display indicates the panel and block number the
call is being made from.
Example:The call comes from panel nº 3 in block nº 1
Bip
Bip...
!
132
465
798
A
B0
2. To answer the call, pick up the handset and press
Concierge-Panel.
3. If you want to open the door, press the BELL key,
while "P ANEL-CONCIERGE communication" comes up
on the display (If it does not appear, press Concierge-
Panel again).
D :01/01
01 03 18:15
[ ]
01 03/ 01
Page 65

Pag 21
1. A call is made from an outdoor panel to a telephone.
The Guard Unit starts to "beep", the LED and corresponding icon blink.
The display indicates the panel and block number from
which call is made and the telephone number being
called (only in DAY and MASTER-DAY ).
Example: Call from panel nº 1, block 3 to telephone
nº 32.
Bip
Bip...
!
132
465
798
A
B0
2. To answer the call, pick up the handset and press the
Concierge-Panel button.
3. Transfer call to house called
3.1 Press the Concierge-Telephone key to establish
GUARD UNIT-TELEPHONE communication.
3.2 Press the BELL key to call the house.
3.3 Press the Panel-Telephone key to set up PANEL-
TELEPHONE communication .
Hang up the telephone. The visitor can talk to the resident,
who can open the door to them if wished.
D :01/01
01 03 0032 18:15
[ ]
01 03 0032
Intercept a call from outdoor panel to telephone
[ ]
01 03/ 01
[ ]
01/ 0032
Page 66

Pag 22
4. Transfer the call to a house other than the one called
4.1 Key in the telephone number of the house the call is
to be transferred to, or look for the resident's name.
Example: To transfer the call to telephone 120.
4.2 Press the BELL key to call.
The display will indicate GUARD UNIT-TELEPHONE
communication.
You can wait for an answer to notify the visit, or simply
hang up.
4.3 Press the Panel-Telephone button to set up com-
munication.
5. Recover call from panel
5.1 Unhook the telephone handset and press the Con-
cierge-Panel key to set up communication.
6. Connect with an outdoor panel
6.1 Key in the panel nº (fi rst the block nº if in another one).
6.2 Press the Concierge-Panel button.
6.3 If you want to open the door , press the Door Lock key
while "PANEL-CONCIERGE communication" appears on
the display (If it does not appear, press the Concierge-
Panel button again)
03 0120
01/ 0120
[ ]
03/ 01
[ ]
4.4 To end communciation with the panel, press the
Hash button.
Page 67

Pag 23
Answer call from an indoor panel (panel decoder )
1. The visitor calls from the panel by pressing the "CONCIERGE" key . The Guard Unit starts to "beep" and the
LED and icon blink.
Three digits on the display indicate the panel and
block number the call is made from.
Example: Call made from nº 2 in block nº 4.
2. To answer the call, pick up the handset and press
the Concierge-Panel Decoder button.
The display indicates PANEL-GUARD UNIT communication.
CP
Bip
Bip...
!
3. If you want to open the door , press the Door Lock key ,
while "P ANEL-CONCIERGE communication" appears on
the display (If it does not appear , press the Concierge-
Panel Decoder button again)
D :01/01
04 002 18:15
NOTE: If there is more than one of the same type of call pending an
answer , from either telephone or panel, the system stores them in the
corresponding call queues. Management is explained in the section:
"CALL QUEUES ".
[ ]
04 002/ 01
4. To end communciation with the panel, press the Hash
button.
Page 68

Pag 24
2. Press the Concierge-Panel Decoder key
The display indicates the block and panel number you
are communicating with.
Example: Communication with panel nº 2 in block nº 4.
3. If you want to open the door , press the Door Lock key .
Call a house
1. Enter the telephone number of the house or look for
the resident's name.
2. Press the BELL key to call.
The display indicates GUARD UNIT-TELEPHONE communication.
Example: Guard Unit nº 1 calling telephone nº 7.
Communicate with an indoor panel
1. Key in the block number followed by the panel number
(If the panel belongs to the same block as the Guard Unit,
you do not need to enter the block nº ).
Example: 4 0 0 2 (Block 4, Panel 2).
[ ]
04 002/ 01
01/ 0007
[ ]
Page 69

Pag 25
Intercommunicate two telephones
1. From a house, they ask to be put through to another house.
Example: From telephone nº 125, they ask to be put through
to telephone 140.
3. Press the Telephone-Telephone button.
4. Enter the number of the telephone of the other house.
Nº 140, in the example.
5. Press the BELL key.
A call is made to the house telephone. The display indicates
HOUSE-HOUSE communication.
6. Hang up the telephone.
The residents can have their conversation..
01/ 0125
[ ]
01/ 0140
[ ]
2. Press the Bell button
Page 70

Pag 26
Call another Guard Unit
1. Key in the number of the block or sector where the
Guard Unit is installed. Not necessary if it belongs to
the same block.
2. Enter code 9A
.
3. Key in the number of the Guard Unit to be called. Use
two digits.
Example: If you are in Guard Unit nº 1 and wish to call
Guard Unit nº 3, key in "03".
4. Press the BELL key.
The Guard Unit called starts to "beep" and the display
indicates GUARD UNIT-GUARD UNIT communication.
01/ 03
[ ]
Page 71

Pag 27
VERY IMPORTANT NOTES
* The system assigns a set talking time, (between 15 and 45 seconds) during
which the conversation cannot be interrupted. Once this time is up, any other
call will cut off the communication in course.
In any case, after a maximum time, also programmed in the system (between
30 and 250 seconds), the call will also be cut off. Ask the maintenance staff what
talking time and maximum time have been assigned, or get them modifi ed if
necessary.
* In residential facilities with several blocks or sectors, with the aim of differentia-
ting the telephone numbers, which will be repeated, the long call mode is used,
where in order to call a telephone it is necessary to previously indicate the block
number and then the telephone number, with 4 digits.
The block number will come on screen, followed by the telephone number:
b b - t t t t, instead of telephone only: t t t t.
1. Enter the block number followed by the telephone
number.
For the telephone number, you must always enter
4 digits.
The number to dial would then be 50023.
2. Press the BELL key to call.
The display indicates GUARD UNIT-TELEPHONE
communication, and the block number (05) of the
telephone called.
Example: You want to call telephone nº 23 in block 5
[ ]
01/05 0023
NOTE: The telephone number , panel numbers, block numbers and Guard
Unit numbers were programmed during installation of the system. Please
contact the maintenance staff for further details.
Page 72

Pag 28
CALL QUEUES
The Guard Unit has a memory where it stores the last 20 calls received from
outdoor panels, the last 20 calls received from telephones and the last 20 panic calls
awaiting a response. These calls can be dealt with later, or cancelled individually.
Repeated calls from the same point are counted once only.
The Guard Unit indicates that it has calls memorised by means of symbols that
may appear in SECTION B of the Main Display, as well as in zone 2.
If several symbols appear , it means that there are different types of calls waiting
to be answered.
In SECTION C, the call arrival order is indicated, as viewed in SECTION D.
This information, as explained above, is presented as follows:
How to select memorised calls:
The symbols that may come up are:
A B C
D E
* Indicates that there are calls from outdoor panels pending a
response.
* Indicates that there are house calls waiting for an answer.
* There are panic alerts waiting to be attended to (see APPEN-
DIX at the end of this Manual).
* Call from an outdoor panel. There is a total of "t t"
outdoor panel calls waiting to be answered, and this one
corresponds to number "n n".
* Call from a telephone. There is a total of "t t" telephone calls waiting to be answered, and this one
corresponds to number "n n".
: n n/t t
: n n/t t
!
Page 73

Pag 29
1. Press this key to select which type of calls you wish to answer:
panel calls or telephone calls.
If you can already see it, you do not need to press the key.
2. Once the call type has been selected, use this key to view the
calls waiting and to select the one you want to answer.
3. See the section How to answer memorised calls, on the
following page.
SECTION D indicates the number of the panel or telephone the call is made
from, or whether the call was intercepted by the Guard Unit.
The information that may appear is:
* The call viewed is from the outdoor panel
A
p p/ t t t t
t t t t
b b p p/ t t t t
p p/
nº p p to telephone nº t t t t and has been intercepted
by the Guard Unit.
* The call selected is from outdoor panel nº p p to
the Guard Unit.
* A call from telephone nº t t t t
* The call on display is from an indoor panel
nº p p p to the Guard Unit.
* This option will only be valid in large facilities with
several blocks or sectors and a long call system, (*).
The call selected is from a panel in block nº b b to
telephone nº t t t t.
p p p
(*) See VERY IMPORTANT NOTES on page 27.
In SECTION E, the time the call was received is indicated.
The calls are not answered until the key (for telephones) or the
key (for panels) is pressed.
Page 74

Pag 30
How to answer memorised calls
1. The Guard Unit is "beeping" and the LED and icon in zone
2 are blinking, indicating there are calls waiting.
The display shows the fi rst call received.
2. If SECTION B indicates that there are calls of several types,
select the type of call you wish to answer fi rst.
The display shows the fi rst call of the selected type received.
Depending on the call type, we proceed as follows:
3. Call from outdoor panel
3.1 Select the call you want to answer fi rst.
(If there are several).
3.2 Unhook the phone and press the Concierge-Panel button .
The display indicates P ANEL-GUARD UNIT communication.
3.3 If you want to open the door, press the Door Lock key.
Bip
Bip...
!
132
465
798
A
B0
A
[ ]
01 01/ 01
Page 75

Pag 31
4. Call from a telephone
4.1 Select the call you wish to answer fi rst.
(If there are more than one).
4.2 Unhook the phone handset and press the BELL key.
The display indicates GUARD UNIT-TELEPHONE
communication.
5. Call from an indoor panel
5.1 Select the call you want to answer fi rst
(If there are
more than one).
5.2 Unhook the handset and press the Concierge-Panel
key.
The display indicates PANEL-GUARD UNIT commu-
nication.
5.3 If you want to open the door , press the Door Lock key
6. Cancel the call without answering
6.1 Press "B".
The call is erased, and the next call received after this
one (if there are any) appears on display .
B
[ ]
01/ 0032
[ ]
01 001/ 01
Page 76

Pag 32
APPENDIX
GUARD UNIT OPERATION
AS PANIC ALARMS RECEPTION CENTRE
VERY IMPORTANT NOTE:
The Panic Alarms Reception Centre function is only effective
in special installations, where the telephones or installations
are «panic button» type and ISODECODERS are used.
Page 77

Pag 33
OPERATING MODES
The features of the different operating modes, for buildings with only one
Panic Alarms Reception Centre are:
NIGHT MODE
* The Panic Alarms Reception Centre does NOT answer panic
calls from the telephones.
DAY MODE
* The Panic Alarms Reception Centre answers panic calls from
the telephones.
In facilities with more than one Central Unit, there is also:
TRANSFER MODE
* Diverts panic alarms to the designated Panic Alarms Recep-
tion Centre.
MASTER MODE
* Receives panic calls from all the other Panic Alarms Reception
Centres that are in NIGHT MODE.
Page 78

Pag 34
Select operating mode
To confi gure a Guard Unit as Panic Alarms Reception Centre, and select
the alarm reception mode:
1. Key in "0" to enter programming mode.
The display shows a series of dashes.
2. Press "B" and "3" repeatedly , until the dashes are completed
and the display shows the current operating mode.
3. Use the arrow keys to select the desired operating mode.
NIGHT
DAY
TRANSFER (*)
MASTER(*)
(*) Only available in facilities with several Central Units (blocks).
See NOTE on the following page.
4. Press "B" when the desired operating mode comes up on
the display.
0
3
3
B
+
.
.
.
B
B333_ _
NOTE:
If the chosen mode is: TRANSFER, you will need to indicate which
block number the calls are to be transferred to. The number of each
Guard Unit was installed at the moment of installation.
Page 79

Pag 35
Example: We are going to select TRANSFER mode so that the panic calls are
transferred to the Guard Unit in block nº 4.
1. Enter programming and select TRANSFER mode with the
arrow keys, as explained on the previous page.
After confi rming, the system will ask for the number of the
Central Unit (block) the calls are to be diverted to.
2. Key in the number of the block where the Guard Unit the
calls are to be transferred to, using 2 digits at all times.
In the example, "04".
The display goes back to the standby position.
NOTE:
The central unit designated must have a Guard Unit in panic mode active
(DAY or MASTER DAY panic mode)
N. central: 04
FIND NAME AND
PRESS
N. central:
Page 80

Pag 36
OPERATION
From a Panic Alarms Reception Centre, you can answer panic calls from
telephones or indoor panels, either immediately or from memory.
Answer a panic call when it comes in
1. A resident presses the panic button on his/her telephone.
The Guard Unit starts to "beep".
The display indicates the telephone number from which the
panic button was presed.
Example: Panic call from telephone nº 127.
If the call comes from a telephone in another block, it will be
indicated on the display.
Example: Panic call from telephone nº 127 in block nº 3.
2. Press the BELL key if you want to talk to the resident who
has pressed the alarm button.
The display indicates the telephone number where the panic
button was pressed.
Example: Panic call from telephone nº 108 in block 3.
3. To cancel the call without answering, press the "B" key.
B
Bip
Bip...
!
D :01/01
0127 18:15
D :01/01
03 0127 18:15
D :01/01
03 0108 18:20
Page 81

Pag 37
Answer memorised panic calls
1. The Guard Unit is «beeping», indicating there are calls
waiting.
The display shows the fi rst call received.
Example: There are 3 panic calls waiting. The display shows
the fi rst one, made from telephone nº 34.
2. Select the call you wish to answer fi rst.
(If there are more than one).
3. Press the BELL key if you want to talk to the resident who
pressed the alarm button.
If there are more calls waiting, the display shows the next
one. You can answer it as shown.
4. Press the "B" key if you want to cancel the call without
answering it.
Bip
Bip...
!
B
NOTE:
Panic calls take preference over all other types of call, so if there are
panic calls waiting to be answered, the other types cannot be selected.
Even though a resident calls several times, their call will only be counted
once in the reception queue.
D :01/03
0034 18:15
D :01/02
0105 18:20
Page 82

Pag 38
Answer a call from an indoor panel (panel decoder )
1. Someone calls from a panel, pressing the "PANIC"
key . The Guard Unit starts to "beep", indicating that a call
is coming in.
The display indicates the number of the panel and block
the call is made from with a "D" + three digits .
If the call from the panel is made from the same block
(where the panel is connected), the display indicates only
the panel number.
Example: The call is from panel nº 2 in block nº 4 (the
panel is connected in another block).
2. To answer the call, pick up the handset and press the
BELL key
The display indicates PANEL-GUARD UNIT communication.
- The call is from panel nº 2 in the block where the
panel is connected.
CP
M :01/01
04 D002 18:15
D :01/01
D002 18:20
M
04 D002 18:15
4. To end communication with the panel, press the Hash
key
3. If you want to open the door , press the Door Lock key
while P ANEL-CONCIERGE communication is in progress.
Page 83

Pag 39
The Concierge can activate any relay coded in the installation from the Guard
Unit keypad (if this option is enabled in the Central Unit confi guration).
Relay activation is done by entering the relay number [000..999] and then the key .
Relay activation
D1
D2
2
6
C
C
NC
NC
C
NC
NC
C
NC
NC
NC
NC
R
E
L
A
Y
S
D
E
C
O
D
E
R
D
E
C
O
D
E
R
D
E
R
E
L
E
S
RELES / RELAYS
V
BUS
PGM
BUS
1
FE
RM
AX
R
EF. 2430
D
E
C
O
D
E
R
N
º:
M
A
D
E
IN
S
P
A
IN
5
3
6
2
7
4
8
NOTES: The Guard Unit that receives the call will be set by the installer
or maintenance staff, being a Fixed Guard Unit, or the active Central
at this time.
An additional relay can be activated to warn the Concierge by a siren or
light.
Alarms reception by sensor
1. The alarm generated by a sensor is shown on the Guard
Unit screen by a panic alert and the number of the corresponding sensor. By system programming, an additional
message may be sent to the Concierge, referring to the
sensor activated.
2. To delete the panic message on the Guard Unit screen,
press the "B" key.
B
2
D1
D2
6
S
-
S
-
S
-
S
-
SENSORS DECODER
DECODER DE SENSORES
DECODER Nº:
5
BUS
FERMAX
REF. 2429
PGM
BUS
M
A
D
E
I
N
S
P
A
IN
8
SENSORES / SENSORS
1
6
2
7
3
4
Fire Alarm
100 18:15
REMARK: From MDS version 5.1 and up, instead of just relay number we will
use BB RRR S, being BB block number [1..63], RRR relay number [000..999]
and S status [0 or 1]
Page 84

Pag 40
MDS GUARD UNIT FAST GUIDE
The main functions of the MDS Guard Unit are:
* Answer calls from Outdoor Panels
* Answer calls from Telephones or Monitors
* Intercommunicate Telephones
* Communicate with Outdoor Panels
* Communicate with Telephones or Monitors
T o carry out these operations, the Guard Unit must be confi gured in a suitable
mode for the operations to be performed.
The basic operating modes are: NIGHT, DAY and MIXED. Calls from
Outdoor Panels are only accepted if in DAY mode, whereas those from Telephones
or Monitors are received in DAY and MIXED mode. In NIGHT mode, the Guard Unit
simply acts as just another panel.
Basic operating modes
Select operating mode
The Guard Unit operating mode is selected by entering the sequence 0 A
3 3 3 3 3 then pressing the search arrows to select the desired mode:
B
Select mode
Validate selection
Enter 0 A 3 3 3 3 3
CURRENT MODE
DAY
Page 85

Pag 41
Answer calls
If the Guard Unit is in DAY or MIXED mode, calls from panels will be received
(only in DAY mode) as well as telephones (both modes).
Call from a PANEL
T o communicate with the panel, press:
To communicate with the telephone
or monitor called, press:
If you fi nally want to transfer the call,
press:
If you do NOT want to transfer the
communication, press again:
or use to cancel.
B
To open the door, press:
+
Call from panel
Time the call is received
Selected panels queue
A call from Panel 1 to Telephone 2501
Page 86

Pag 42
Intercommunicate TELEPHONES
After receiving a Telephone call, the Concierge can intercommunicate the
last telephone with any other in the installation. To do so, once in communication
with the fi rst telephone, press:
Example: A call is received from telephone
35. To intercommunicate it with telephone
number 24, press:
Call from TELEPHONE or MONITOR
To communicate with the Telephone,
press:
If you want to repeat the call to the
last Telephone, press:
+
+ 2 4 +
+ NNNN +
A call from a telephone or monitor
Time the call is received
Selected telephone's queue
A call from Telephone 2501
Page 87

Pag 43
Communicate with PANELS
If the Concierge wants to set up communication with any panel, without
being called beforehand, he/she must key in:
Example: To communicate with panel 1 in
block 2, press:
To open the door, press:
Communicate with Panels and Telephones
If the Guard Unit is in DAY or MIXED mode, the Concierge can communicate
with any Panel or Telephone in the installation at will.
BBPP +
2 0 1 +
Communicate withTELEPHONES or MONITORS
To to set up communication with a Telephone or Monitor, with no previous
call, they must key in:
Example: To call Telephone 35, press:
3 5 +
NNNN +
To end communciation with the panel, press the Hash button.
Page 88

Pag 44
TECHNICAL FEATURES
Power supply: 12VDC ± 10% / 250mA
Operating temperature: 10 ~ 60 ºC
Guard Unit connections module:
‘+’ power supply (+12VDC)
‘-’ power supply (GND)
’Sa’ RS-485 (twisted data pair)
‘Sb’ RS-485 (twisted data pair)
‘2’ audio from apartments
‘6’ audio to apartments
‘Alt’ Output to loudspeaker
‘-’ loudspeaker negative (GND)
Wall telephone-type connector:
[BL] : ‘+’ power supply (+12VDC)
[OR] : ‘-’ power supply (GND)
[BK] : ’Sa’ RS-485 (twisted data pair)
[RD] : ‘Sb’ RS-485 (twisted data pair)
[WH] : ‘2’ audio from apartments
[BR] : ‘6’ audio to apartments
[YL] : ‘Alt’ Output to loudspeaker
[GR] : ‘-’ loudspeaker negative (GND)
-
Sa
6
Alt
-
2
To the installation
+
Sb
B
L
O
R
BKB
K
R
D
W
H
G
R
B
R
Y
L
Sb
Sa
+
6
Alt
-
2
Page 89

Pag 45
NEW FEATURES IN SOFTWARE V7.4
NEW OPERATING MODE:
CALL TO HOMES WITH A ZERO FIST, WITHOUT ENTERING IN PROGRAMMING
Just like the panel does, a mode can be enabled in which residence numbers with
zeros as the fi rst digit can be called without having to enter in programming.
1.Enabling:
A long press of zero activates/deactivates this mode.
Each press changes this mode's status:
(activated -> deactivated, deactivated -> activated).
When the change is produced, a message appears on the screen that informs you of the
change ("0 OFF", "0 ON")
NOTE: ignore what is on the display when pressing `0´.
- in mode "0 OFF" the script line appears "--"
- in mode "0 ON" a `0´appears.
Maintain zero pressed until the corresponding message appears.
2.Operation:
In "0 ON" mode, each time you press 0 the previous screen content is deleted and a '0'
appears.
a) If the next key pressed is a number, the message "Call code" appears and in the
lower line appears the number pressed with a 0 to the left of it.
b) If the next key is an 'A' or 'B', a line of dashes appears *-- typical of programming
entries with the fi rst asterisk already marked, then several zeros can be pressed to
the left.
IMPORTANT NOTE
In order to activate the call forwarding, you must fi rst deactivate the "CALL WITH A ZERO
FIRST" mode, if it was activated.
Do not forget that in this case you must then reactivate the "CALL WITH A ZERO FIRST".
 Loading...