

Page 1
KITS AUDIO VDS MARINE 1-2 LÍNEAS
1-2 WAY VDS MARINE AUDIO KITS
KITS AUDIO VDS MARINE 1-2 LIGNES
VIDEO-SETS VDS MARINE 1-2 WE
KITS ÁUDIO VDS MARINE 1-2 LÍNHAS
MANUAL DE INSTALADOR Y USUARIO
USER& INSTALLER’S MANUAL
MANUEL D´INSTALLATION ET UTILISATION
INSTALLATIONS-und BENUTZERHANDBUCH
MANUAL DO INSTALADOR E USUÁRIO
ESPAÑOL
ENGLISH
FRANÇAIS
DEUTSCH
PORTUGUÊS
Page 2

Kit Audio MARINE VDS
E
EN
F
D
P
Kit Audio MARINE VDS
«KIT AUDIO MARINE VDS»
«MARINE VDS AUDIO KIT MANUAL»
«MANUEL DU KIT AUDIO MARINE VDS»
«HANDBUCH MARINE DIGITAL AUDIO-SET»
«MANUAL KIT AUDIO MARINE VDS»
- Kit 1 Línea - Kit 1 Way - Kit 1 Ligne - Einfamilienhaus-Set - Kit 1 Linha
- Kit 2 Líneas - Kit 2 Ways - Kit 2 Lignes - Zweifamilienhaus-Set - Kit 2 Linhas
Cod. 97637c V07_14
Pag 2
Page 3

Kit Audio MARINE VDS
E
EN
F
D
P
Kit Audio MARINE VDS
ENHORABUENA POR DISPONER DE UN PRODUCTO DE CALIDAD!
Fermax electrónica desarrolla y fabrica equipos de prestigio que cumplen los más altos
estándares de diseño y tecnología.
Su teléfono FERMAX le permitirá comunicarse con la placa de calle y abrir la puerta
de entrada si así lo desea.
Esperamos disfrute de sus funcionalidades.
www.fermax.com
CONGRATULATIONS ON THE PURCHASE OF THIS QUALITY PRODUCT
Fermax Electronics develops and manufactures reputable equipment which fulfi ls the
highest design and technology standards.
Your FERMAX video door entry system will allow you to communicate with the entry
panel, see who is calling you and open the front door if you wish.
We hope you enjoy its range of functions.
www.fermax.com
FÉLICITATIONS ! VOUS VENEZ D’ACQUÉRIR UN VÉRITABLE PRODUIT DE
QUALITÉ.
Fermax Electrónica développe et fabrique des équipements de prestige qui répondent
aux normes de design et technologie les plus développées.
V otre poste FERMAX vous permettra de communiquer avec la platine de rue ainsi que
d’ouvrir la porte d’entrée si vous le souhaitez.
Nous espérons que vous profi terez pleinement de toutes ses fonctions.
www.fermax.com
WIR GRATULIEREN IHNEN ZUM KAUF DIESES QUALITÄTSPRODUKTES!
Fermax entwickelt und fabriziert hochwertige Anlagen, die den höchsten Technologieund Designstandards entsprechen.
Das Fermax-Telefon ermöglicht es Ihnen, mit der Türstation zu kommunizieren und im
Bedarfsfalle die Eingangstür zu öffnen.
Überzeugende Funktionalität für Ihr Eigenheim.
www.fermax.com
PARABÉNS POR DISPOR DE UM PRODUTO DE QUALIDADE!
A Fermax Electrónica desenvolve e fabrica equipamentos de prestígio que cumprem
os mais elevados padrões de design e tecnologia.
O seu telefone FERMAX permitir-lhe-á comunicar com a placa de rua e abrir a porta
de entrada, se assim o desejar.
Esperamos que desfrute das suas funcionalidades.
www.fermax.com
Pag 3
Page 4

Kit Audio MARINE VDS
Kit Audio MARINE VDS
Pag 4
Page 5

Kit Audio MARINE VDS
E
EN
F
Kit Audio MARINE VDS
INDICE - INDEX - SOMMAIRE
SECCION I - MANUAL DEL INSTALADOR .................................................................. 7
Instalación del Alimentador ................................................................................. 8
Instalación de la placa de calle ........................................................................... 8
Ajustes fi nales de placa .......................................................................................10
Instalación del teléfono ........................................................................................18
Programación del teléfono ..................................................................................18
Esquemas de cableado .......................................................................................19
Características Técnicas ....................................................................................21
Ampliaciones .................................................................... .................................22
Conexión de abrepuertas de corriente contínua ................................................22
Tabla de incidencias y soluciones .......................................................................24
SECCION II - MANUAL DE USUARIO ..........................................................................29
Controles .............................................................................................................30
Funcionamiento ...................................................................................................31
SECTION I - INSTALLER MANUAL .............................................................................. 7
Power Supply installation ........................................................................ .......... 8
Outdoor Panel installation ....................................................................... .......... 8
Panel adjustment .................................................................................................10
Telephone Installation ..........................................................................................18
Telephone programming ......................................................................................18
Wiring diagrams ..................................................................................................19
Technical Features .............................................................................................21
Enlargements ........................................................ ............................................22
DC door-opener ..................................................................................................22
Events and solutions table ..................................................................................25
SECTION II - USER MANUAL .......................................................................................29
Controls ...............................................................................................................30
Operation ............................. ...............................................................................31
SECTION I - MANUEL D’INSTALLATION ..................................................................... 7
Installation de l’alimentation ................................................................................ 8
Installation de la platine de rue ............................................................................ 8
Reglages de la platine .........................................................................................10
Installation du poste ............................................................................................18
Programmation du poste .....................................................................................18
Schéma de câblage .............................................................................................19
Caracteristiques Techniques ...............................................................................21
Extension des terminaux ....................................................................................22
Raccordement de la gâche à courant continu ....................................................22
Tableau de depannage ........................................................................................26
SECTION II - MANUEL D’UTILISATION .......................................................................29
Controles .............................................................................................................30
Fonctionnement ...................................................................................................31
Pag 5
Page 6

Kit Audio MARINE VDS
D
P
Kit Audio MARINE VDS
INHALT - INDICE
TEIL I – INSTALLATIONSANLEITUNG ......................................................................... 7
Installation des Netzgeräts .................................................................................. 8
Installation der Türstation .................................................................................... 8
Konfi guration und Einstellungen der Türstation ..................................................10
Befestigung des Telefons ....................................................................................18
Programmierung des Telefons ............................................................................18
Verkabelungsschema .........................................................................................19
Technische Eigenschaften ...................................................................................21
Erweiterungen .......... .................................................................. .....................22
Anschluss des Gleichstromtüröffners ..................................................................22
Ereignistabelle und Lösungen .............................................................................27
TEIL II - BEDIENUNGSANLEITUNG .............................................................................29
Bedienung ...........................................................................................................30
Funktionselemente ..............................................................................................31
SECÇÃO I - MANUAL DO INSTALADOR ..................................................................... 7
Instalação do transformador ................................................................................ 8
Instalação da Placa de Rua ................................................................................ 8
Ajustes da placa ..................................................................................................10
Instalação do telefone .........................................................................................18
Programação do telefone ....................................................................................18
Esquemas cablagem ...........................................................................................19
Características Técnicas ....................................................................................21
Ampliaçães ... .................................................................. .................................22
Ligação do trinco de corrente contínua ..............................................................22
Tabela de incidências e soluções ........................................................................28
SECÇÃO II - MANUAL DO UTILIZADOR .....................................................................29
Comandos ...........................................................................................................30
Funcionamento .................... ...............................................................................31
Pag 6
Page 7

Kit Audio MARINE VDS
E
EN
F
D
P
Kit Audio MARINE VDS
Sección I - Manual del Instalador
Section I - Installer Manual
Section I - Manuel d’installation
Teil I - Installationsanleitung
Secção I - Manual do instalador
Pag 7
Page 8
Kit Audio MARINE VDS
E
EN
F
D
P
E
EN
F
D
P
Kit Audio MARINE VDS
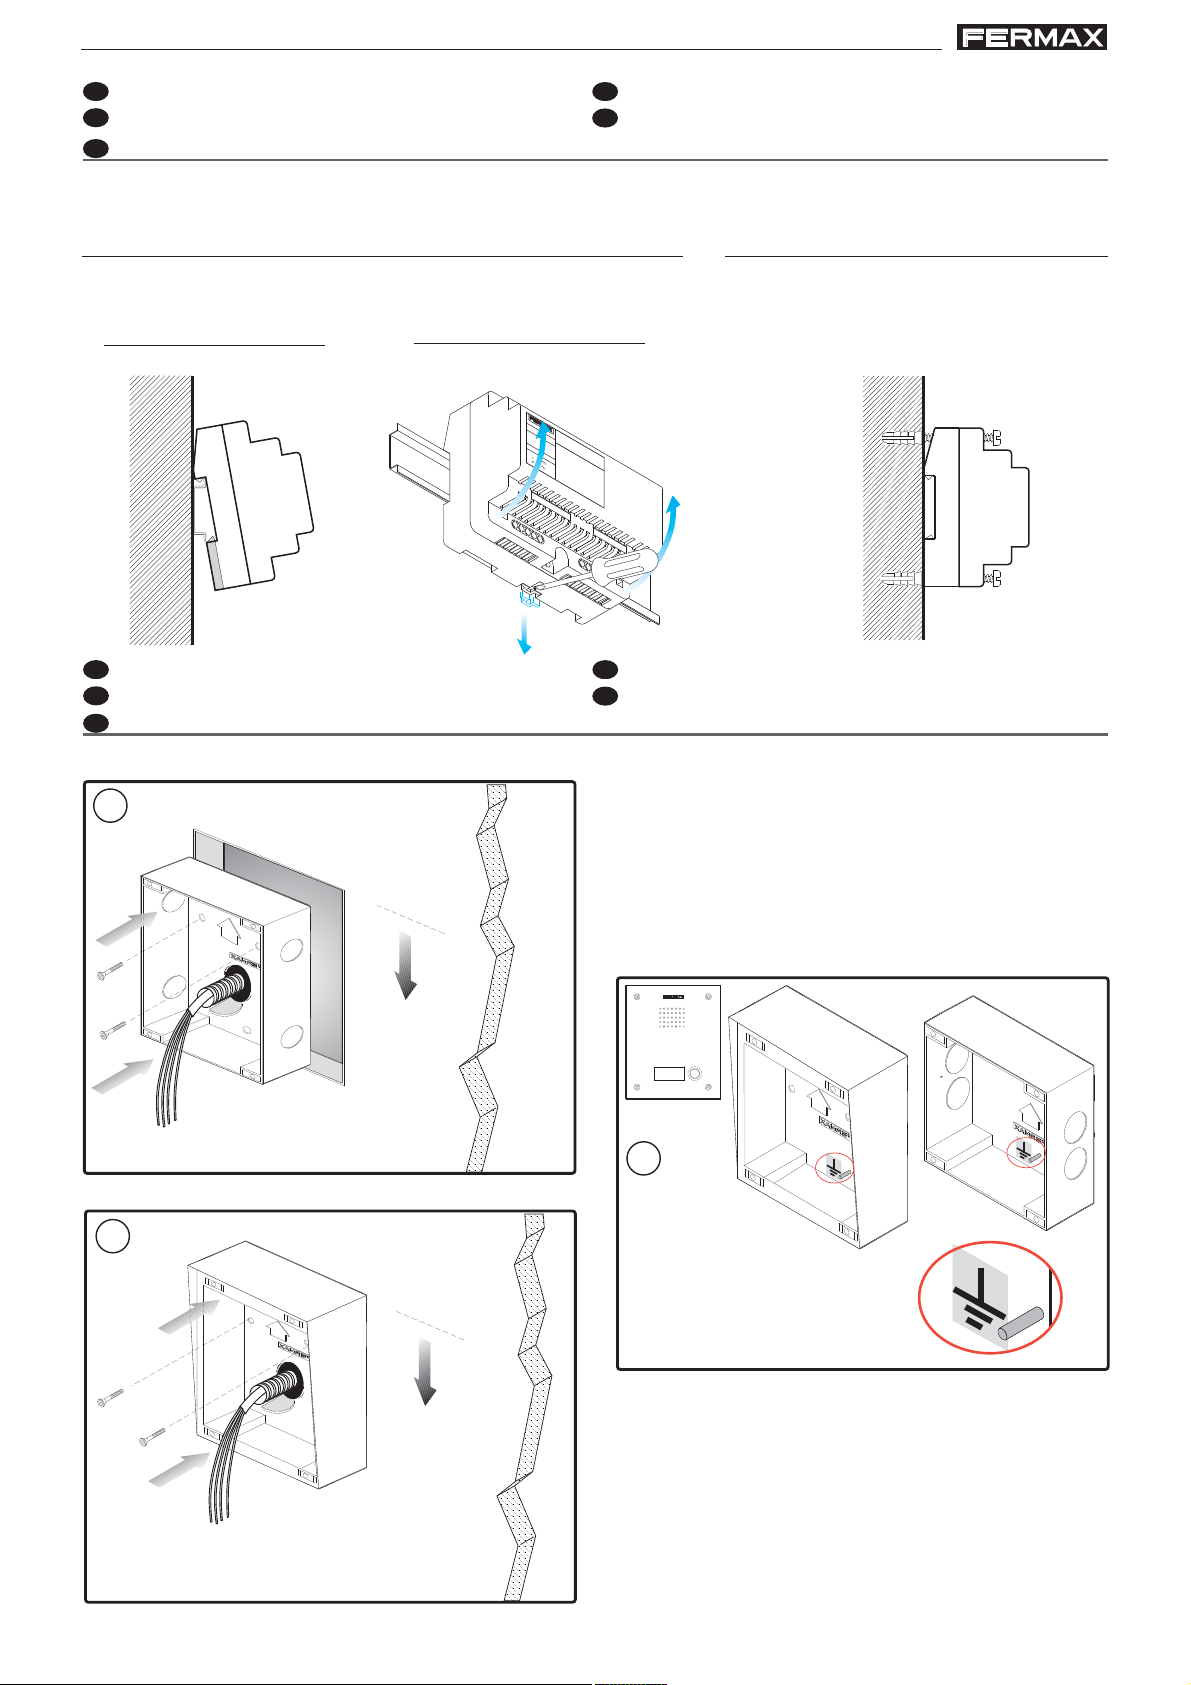
INSTALACIÓN DEL ALIMENTADOR
INSTALLATION DE L’ALIMENTATION
INSTALAÇÃO DO TRANSFORMADOR
Instalación en carril DIN - DIN rail Installation
Installation sur rail DIN - DIN-Schiene Installation
Instalação em carril DIN
Montaje - Assembly
Montage - Einbau
Montagem
Desmontaje - Disassembly Démontage - Ansbau
Desmontagem
M
A
D
E
I
N
S
P
A
I
N
5
0
6
0
H
z
.
5
0
V
A
M
A
FUENTE ALIMENTACION
X
+18V 1.5A
.
12V 1A
KIT D
IGITAL
INSTALACIÓN PLACA DE CALLE
INSTALLATION DE LA PLATINE DE RUE
INSTALAÇÃO DA PLACA DE RUA
POWER SUPPLY INSTALLATION
INSTALLATION DES NETZGERÄTS
Fijación con tornillos - Fixing with screws
Fixation au moyen de vis - Befestigung
mit Schrauben - Fixação com parafusos
OUTDOOR PANEL INSTALLATION
INSTALLATION DER TÜRSTATION
1a
1b
1.70m
5.57 feet
- Instalación con CAJA de EMPOTRAR
- Installation with FLUSH-MOUNTED BOX
- Installation avec BOÎTIER ENCASTRABLE
- Installation mit UNTERPUTZKASTEN
- Instalação com CAIXA de ENCASTRAR
1c
- Conectar a tierra
- To connect to ground
- Fair la connexion a terre
Zur Erdungsklemme verbinden
-
- Conectar à terra ou aterramento
Pag 8
1.70m
5.57 feet
- Instalación con CAJA de SUPERFICIE
- Installation with SURFACE-MOUNTED BOX
- Installation avec BOÎTIER EN SAILLIE
- Installation mit AUFPUTZKASTEN
- Instalação com CAIXA de SUPERFÍCIE
Page 9
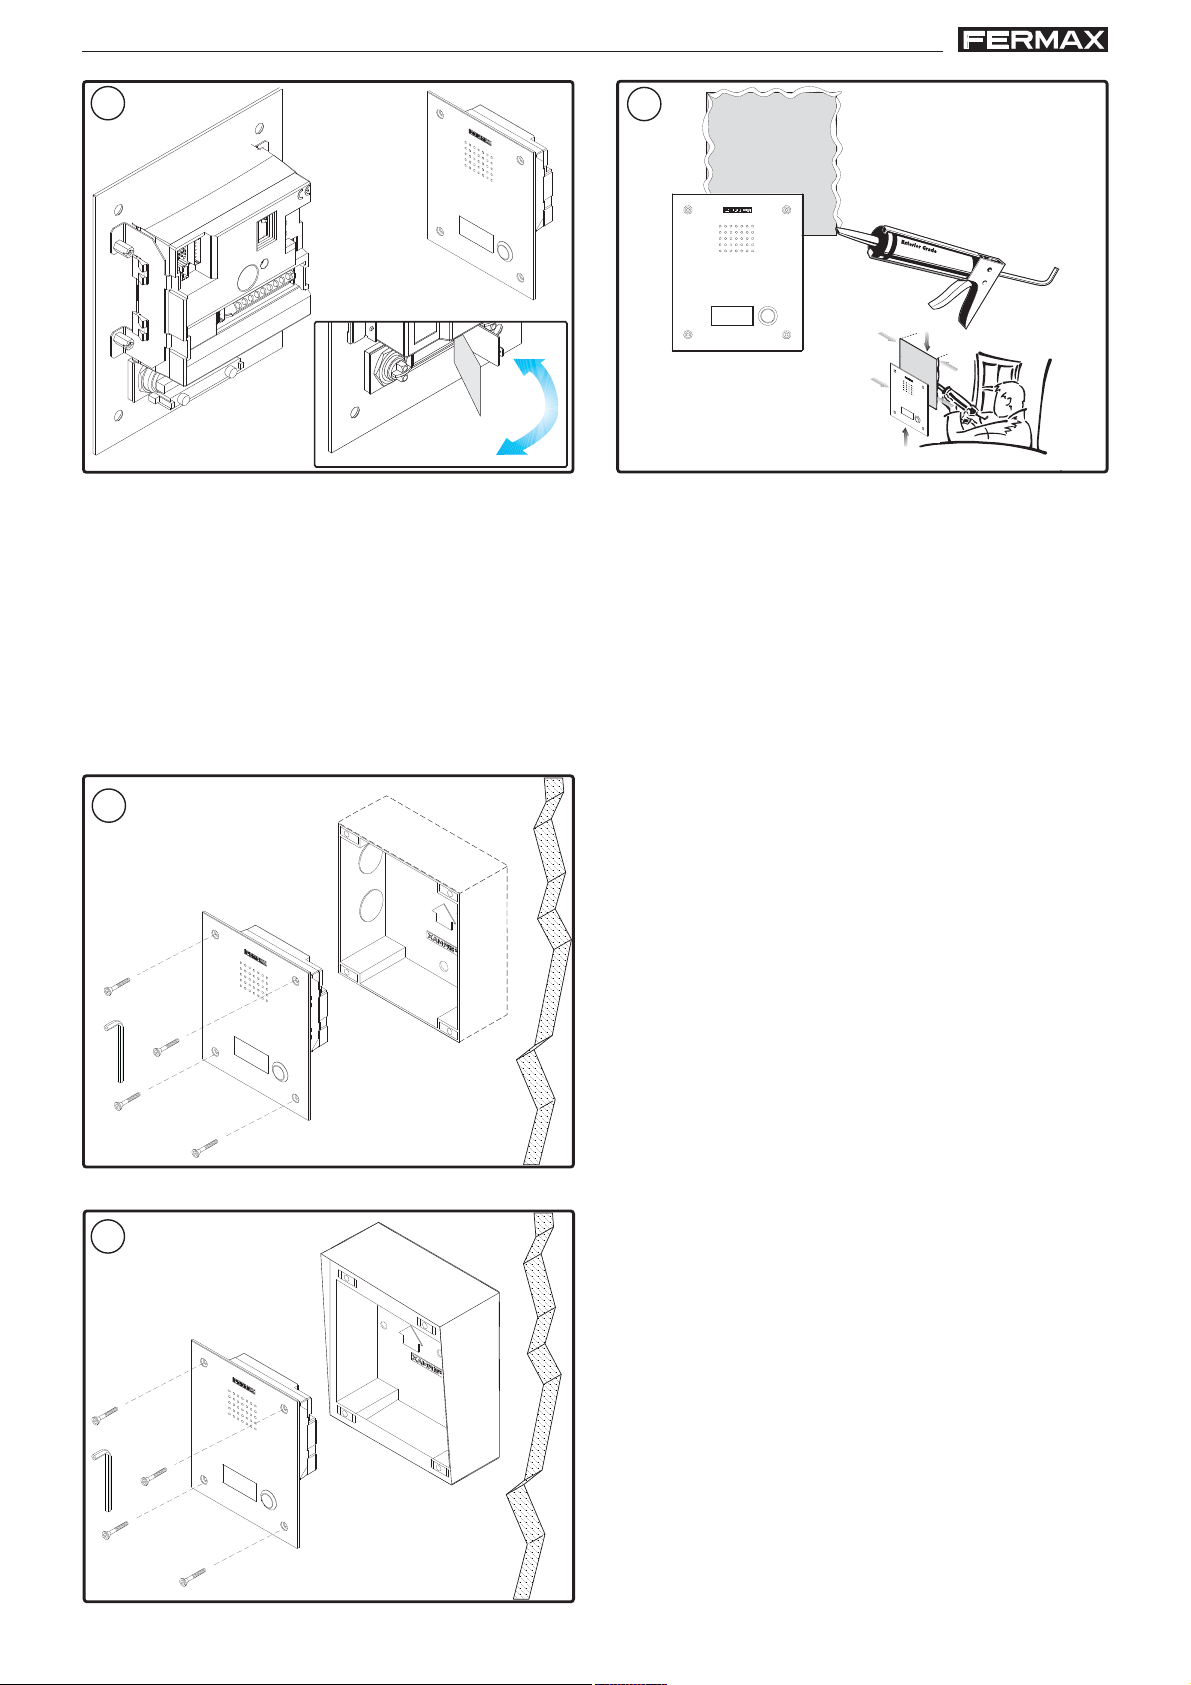
Kit Audio MARINE VDS
Kit Audio MARINE VDS
2
MARIA
LORCA
3
Acosejamos sellar la placa con un cordón de silicona para asegurar una mejor estanqueidad
de ésta.
We advise you to seal the panel with silicon to ensure watertightness.
Nous vous conseillons de fi xer la platine à l’aide d’un joint de silicone afi n d’en garantir la
parfaite étanchéité.
Wir empfehlen, die Türstation mit einem Silikonrand zu versehen, um eine höhere
Wasserundurchlässigkeit zu gewährleisten.
Aconselhamos a fi xar a placa com um cordão de silicone, para assegurar uma melhor es-
tanqueidade.
4a
4b
- Cierre de placa con CAJA de EMPOTRAR
- Cover for panel with FLUSH-MOUNTED BOX
- Couvercle de platine avec BOÎTIER
ENCASTRABLE
- Abdichtung der Türstation mit
UNTERPUTZKASTEN
- Fecho de placa com CAIXA de ENCASTRAR
- Cierre de placa con CAJA de SUPERFICIE
- Cover for panel with SURFACE-MOUNTED
BOX
- Couvercle de platine avec BOÎTIER EN
SAILLIE
- Abdichtung der Türstation mit
AUFPUTZKASTEN
- Fecho de placa com CAIXA de SUPERFÍCIE
Pag 9
Page 10
Kit Audio MARINE VDS
E
EN
F
D
P
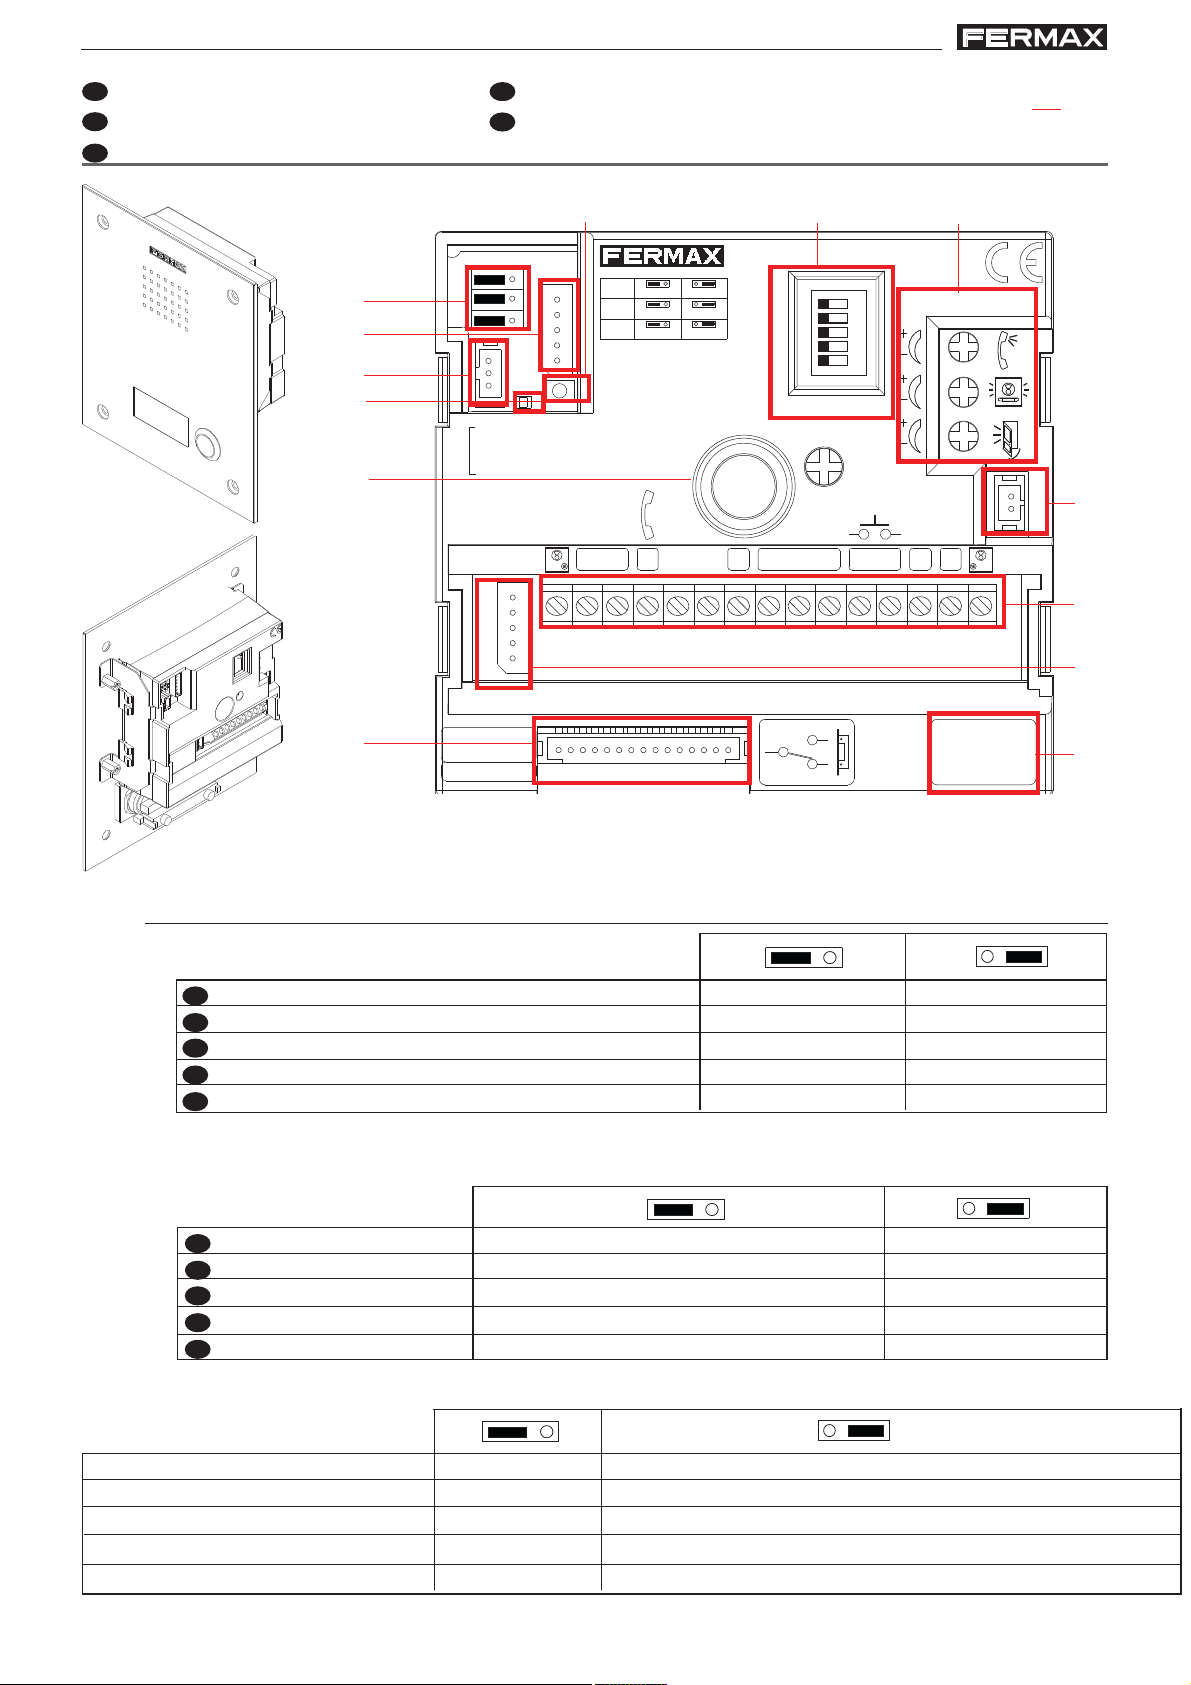
VDS
PACK EXTENSION
CN1
AMPLIFICATEUR - AMPLIFIER
AMPLIFICADOR - VERSTÄRKER
PROG
SW1
CN3
STATUS
EXIT
NO
NC
C
JP3
JP2
LANGUAGE
IDIOMA
L
+
-
+12
C
NCNO
-
BS
S
CT
ALIMENTACION
POWER SUPPLY
18 Vdc
-+
JP4
LEDS ON
SLAVE
MASTER
LEDS OFF
18V
DC
MONITOR TEST
CN7
CN1
DL2
CN2
SW1
CN3
MIC
AUDIO
JP2
JP3
JP4
CT OUT CT IN
B
D
A
C
E
ON
CN2
TARJETERO
TAG HOLDER
DL2
VERSION
:
E
EN
F
D
P
E
EN
F
D
P
Kit Audio MARINE VDS
AJUSTES DE LA PLACA
RÉGLAGES DE LA PLATINE
AJUSTES DA PLACA
A)
B)
C)
D)
E)
PANEL ADJUSTMENT
EINSTELLUNGEN DER TÜRSTATION
G)
H)
I )
J )
K )
L )
F)
A)
(*)
JP2
Selección Placa Principal / Placa Secundaria
Main Panel/Secondary Panel Selection
Sélection de la platine principale / platine secondaire
Auswahl Haupttürstation / Nebentürstation
Selecção de Placa Principal / Placa Secundária
(*) Confi guración por defecto: Placa Principal - Default Confi guration: Main Panel - Confi guration par défaut :
platine principale - Standardkonfi guration: Haupttürstation - Confi guração por defeito: Placa Principal
JP3
Leds cámara
Camera LEDs
DEL de la caméra
Leuchtdioden der Kamera
Leds de câmara
encendidos cuando la camara está activada
ON when the camera is active
ON quand la caméra est activée
ON wenn die Kamera aktiv ist
ON quando a câmara está activada.
Placa Principal
Main Panel
Platine principale
Haupttürstation
Placa Principal
Placa Secundaria
Secondary Panel
Platine secondaire
Nebentürstation
Placa Secundária
apagados siempre
always off
toujours éteintes
immer ausgeschaltet
sempre apagados
M)
JP4
CT: Activación cámara/salida auxiliar
CT: Camera activation/auxiliary output
CT : Activation caméra / sortie auxiliaire
CT: Kameraaktivierung/Nebenausgang
CT: Activação da câmara/saída auxiliar
Pag 10
CT: salida 11 Vdc
CT: 11 Vdc output
CT : sortie11 Vcc
CT: 11 VDC Ausgang
CT: saída de 11 VDC
CT: entrada. Conectar 12 Vdc para activar permanentemente cámara+ leds
CT: input
CT : entrée
CT: Eingang. 12 VDC NG anschließen um Kamera und LEDs permanent zu aktivieren
CT: entrada. Ligar 12 VDC para activar permanentemente a câmara+ LEDS
:. Connect 12 Vdc to permanently activate camera + LEDs
. Connecter 12 Vcc pour activer en permanence caméra + leds
Page 11
Kit Audio MARINE VDS
E
EN
F
D
P
E
EN
F
D
P
E
EN
F
D
P
E
EN
F
D
P
E
EN
F
D
P
E
EN
F
D
P
E
EN
F
D
P
Kit Audio MARINE VDS
B)
CN1
Conexión Módulo de extensión de llamadas o hasta 3 pulsadores
Call extension or up to 3 pushbuttons
Conexion module d’extension d’appels ou jusqu’à 3 boutons-poussoirs
Anschluss Anruferweiterungsmodul oder bis zu 3 Tasten
Ligação do Módulo de extensão de chamadas ou até 3 botões
C)
CN2
Conexión Pulsadores
Button Connection
Connexion
boutons-poussoirs
Anschluss Tasten
Ligação dos Botões
D)
DL2
Led Diagnóstico
Diagnostic Led
Diagnostic Del
Diagnose-LED
Led diagnóstico
Si existe un cortocircuito entre + y L, al llamar desde placa emite una serie de destellos cortos
If there is a short circuit between + and l, when a call is made from the panel, it emits a series of short fl ashes
S’il existe un court-circuit entre + e L lors d’un appel de la platine, elle émet una série de brefs clignotements
Falls ein Kurzschluss zwischen + und L bei der Durchführung eines Anrufs, blinkt diese mehrmals kurz auf
Se existir um curto-circuito entre + e L, ao realizar uma chamada a partir da placa emite luz intermitente rápida
L+ / L- CP
Luz tarjetero pulsador
Cardholder Backlight
Lumière porte-étiquettes
bouton-poussoir
Beleuchtung Taste Infomodul
Luz do porta-cartões do botão
Común de pulsadores
Common Button Wire
Connecteur commun de
boutons-poussoirs
Gemeinsamer Draht der Klingeltasten
Comum de botões
E)
Kit Audio (sin cámara - sin función de video)
Audio Kit (no camera - no video function)
Kit Audio (sans caméra - sans fonction vidéo)
Audio Set (ohne Kamera - ohne Videofunktion)
Kit Áudio (sem câmara - sem funçao de vídeo)
F)
CN7
Video Test monitor
Video test monitor
Écran de Test Vidéo
Video Testmonitor
Video Test monitor
Conector de test y programación de monitores / teléfonos
Test and monitor / telephones programming connector
Connecteur de test et programmation d’moniteurs / postes
Testanschluss und Monitor-Telefonprogrammierung
Conector de teste e programação de monitores / telefones
G)
SW1
Mapeado: botón para entrar en modo programación de pulsadores. Ver manual “Mapeado”
Mapping: button to enter button programming mode. See manual ‘Mapping’
Mappage: bouton pour entrer en mode programmation de boutons-poussoirs. Voir manuel « Mappage»
Mapping: Programmiertaste der Klingeltasten Siehe Handbuch“Mapping”
Mapeamento: botão para aceder ao modo de programação de botões. Ver o manual “Mapeamento”
H)
A
B
C
D
E
ON
Selección del idioma del mensaje de «puerta abierta».
Select language for «open door» message.
Sélection de la langue du message « porte ouverte ».
Sprachwahl der Meldung «Tür offen».
Selecção da língua da mensagem de «porta aberta».
Ver CODIFICACIÓN al fi nal de este manual. See CODIFICA TION at the end of this manual. V oir CODIFICA TION à
la fi n de ce manuel. Siehe KODIERUNG am Ende dieses Handbuchs. Ver CODIFICAÇÃO no fi nal deste manual.
Pag 11
Page 12

Kit Audio MARINE VDS
E
EN
F
D
P
E
EN
F
D
P
E
EN
F
D
P
EN
E
D
F
Kit Audio MARINE VDS
I)
Ajuste audio
Adjust the audio
Réglez le volume
Audioeinstellung
Ajuste o áudio
J)
MIC
Conexión micrófono (micrófono ubicado en el perfi l inferior de la placa)
Microphone connection (microphone located in the lower panel profi le)
Connexion microphone (microphone placé sur le profi l inférieur de la platine)
Mikrofonanschluss (Mikrofon befi ndet sich am unteren Profi l der Türstation)
Ligação do microfone (microfone localizado no perfi l inferior da placa)
K)
“puerta abierta”
“open door”
« porte ouverte »
“Tür offen”
“porta aberta”
Conectores Placa:
• Bornas de video, (coaxial).
V: vivo
M: malla
Ct: activación telecamara (11 Vdc)
• Bornas de Conexión del sistema:
+, -: alimentación (18 Vdc).
L: bus de datos.
+12: salida12 Vdc (0,4 A. max).
C, NO, NC: contactos relé
(conexión abrepuertas)
BS, -: pulsador zaguán.
S: activación del cambiador
: conexión pulsador/es
Connecteurs platine:
Bornes vidéo (câble coaxial).
•
V : vif
M : maille
Ct : activation caméra (11 Vdc)
• Bornes de raccordement du système.
+, - : alimentation (18 Vcc).
L : bus de données.
+12: 12 Vcc
C, NO (no), NC (nf) : contacts relais
(connexion gâche électrique)
BS, - : bouton-poussoir vestibule.
S : activation de l’échangeur.
Panel Connectors:
Video terminals (coaxial):
•
V: live
M: shield
Ct: camera activation (11 Vdc)
• System connection terminals:
+, -: power supply (18 Vdc).
+12: 12 Vdc output.
L: data bus.
C, NO, NC: relay contacts
(door-opener connection)
BS, -: entrance hall button.
S: activation of the exchanger.
: Button/s connection.
Anschlüsse Türstation:
Video-Klemmen (Koaxial)
•
V: Kern
M: Schirm
Ct: Aktivierung der Kamera (11 VDC)
• Anschlussklemmen des Systems:
+, - : Stromversorgung (18 VDC)
L: Daten-Bus
+12: 12 V Gleichstrom
C, NO, NC: Relais-Kontakte
(V erbindung Türöf fner)
BS, -: Drucktaste Flur
S: Aktivierung des Umschalters.
Pag 12
: raccordement bouton-
poussoir/s.
: Anschluss T aste.
Page 13

Kit Audio MARINE VDS
P
E
EN
F
D
P
E
EN
F
D
P
Kit Audio MARINE VDS
Conectores de Placa:
Terminais de vídeo (coaxial).
•
V: vivo
M: malha
Ct: activação telecâmara (11 Vdc)
• Terminais de ligação do sistema:
+, - : alimentação (18 Vdc).
L: bus de dados.
+12: 12 Vdc
C, NA, NC: contactos de relé
(ligação do trinco)
BS, -: botão para abrir a porta do
vestíbulo
.
S: activação do comutador.
: ligação do botão/s.
L)
CN3: Conexión leds de estado. De gran utilidad para personas discapacitadas, permite
conectar leds que informan del estado de la comunicación.
L2, L3, L4: entregan un negativo cuando se realiza la acción correspondiente,
activando el led conectado entre “Lx” y “+”:
CN3: Connection Status Leds Very useful for disabled people, allowing leds to be
connected which provide information on communication status.
L2, L3, L4: generates a negative signal when the corresponding action is taken,
activating the led connected between “Lx” and “+”:
CN3 : connexion DEL d’état. T rès utile pour les personnes handicapées, il permet de
raccorder des DEL indiquant l’état de la communication.
L2, L3, L4 : transmettent un négatif lorsque l’action correspondante est effectuée,
en activant la DEL raccordée entre « Lx » et « + ».
CN3: Anschluss LED-Statusanzeige Von großem Nutzen für behinderte Personen;
ermöglicht das Anschließen von LEDs, die über den Zustand der Verbindung
informieren.
L2, L3, L4: übermitteln einen Negativstrom, wenn der entsprechende Vorgang
ausgelöst wird, worauf die angeschlossene LED zwischen “Lx” und “+” aktiviert wird:
CN3: Ligação dos LEDS de estado. De grande utilidade para pessoas defi cientes,
permite defi cientes que informam do estado da comunicação.
L2, L3, L4: entregam um negativo quando se realiza a acção correspondente,
activando o led ligado entre «Lx» y «+»:
L2 L3 L4
L1
L2
L3
+
L4
L4
Led de comunicación Led de llamada Led apertura de puerta
Communication Led Call Led Lock Release Led
DEL de communication DEL d’appel DEL ouverture des portes
M)
LED Sprechverbindung LED Anruf LED Türöffnung
LED de comunicacão LED de chamada LED abertura de porta
Versión del amplifi cador
Version de l’amplifi cateur
Versão do amplifi cador
Amplifi er version
Lautsprecherversion
Pag 13
Page 14

Kit Audio MARINE VDS
E
EN
Kit Audio MARINE VDS
PROGRAMACIÓN AVANZADA: Tiempo de abrepuertas
Los tiempos de activación de abrepuerta programables son dos:
- Tiempo de apertura de puerta desde vivienda
- Tiempo de apertura de puerta desde botón de salida (conectado a bornas «BS» y «-»).
Realizar los siguientes pasos:
1.- Con la alimentación desconectada, realice un cortocircuito entre las bornas «Bs» y «-»
(negativo) del amplifi cador
(o pulsar el botón de salida, si existe).
2.- Manteniendo el cortocircuito anterior conecte la alimentación del sistema (ya no será
necesario mantener el cortocircuito o el pulsador presionado).
Se produce una confi rmación acustica de en entrada en programación.
3.- Tras la confi rmación acústica se indica, mediante pitidos intercalados 0.5 segundos, el
tiempo de apertura desde vivienda programado actualmente.
4.-Una vez fi nalizada la indicación acústica del tiempo actual, o antes de que fi nalice, pulsar
cualquier pulsador de la placa tantas veces como segundos se desee programar (de 1
a 99 segundos).
Para programar el tiempo de apertura desde el pulsador de salida, estando en modo
programación de tiempos, (fi nalizada la indicación acústica o la programación de tiempo
de apertura desde vivienda), permancer 5 segundos sin realizar ninguna acción.
5.- En este momento sonará una nueva confi rmación acústica indicando el cambio al modo
de programación de tiempo de apertura de zaguán, y seguidamente mediante los
pitidos anteriormente comentados se indicará el tiempo programado.
6.- Una vez fi nalizada la indicación acústica del tiempo actual programado, o antes de que
fi nalice, pulsar cualquier pulsador de la placa tantas veces como segundos se desee
programar (de 1 a 99 segundos).
Para salir de programación, permanecer 5 segundos sin pulsar ninguna tecla. Sonará un
tono ‘MUOK’ indicando la salida de programación de tiempos.
Si se produce la entrada en programación de tiempos y no se pulsa ninguna tecla, a los 30
segundos automáticamente se saldrá de programación.
ADVANCED PROGRAMMING: Lock-Release Timing
There are two programmable lock-release activation times:
- Lock-release time set from the residence.
- Lock-release time set from the exit button (connected to the ”BS” and “-” terminals).
Carry out the following steps:
1.- With the power supply disconnected, short circuit the ”Bs” and “-” (negative) amplifi er
terminals (or press the exit button where one exists).
2.- Maintaining the short-circuit induced above connect the system’s power supply (at this point
it will no longer be necessary to maintain the short circuit or hold down the exit button).
A confi rmation tone will sound once you enter programming mode.
3.- Following the confi rmation tone, the lock-release time as currently programmed from
the residence will be indicated by way of a number of beeps at 0.5 second intervals.
Pag 14
Page 15

Kit Audio MARINE VDS
Kit Audio MARINE VDS
4.- Once these indicator tones have concluded, or before they conclude, press any button
on the panel, with one press for each second to be programmed (from 1 to 99 seconds).
from the residence or following the indicator tones), wait 5 seconds before taking any
other action.
To programme the lock-release time from the exit button, while in time programming
mode, (having fi nished programming the lock-release time from the residence or following
the indicator tones), wait 5 seconds before taking any other action.
5.- At this time a new confi rmation tone will sound indicating the change to entrance hall
lock-release programming mode, then subsequently emitting the aforementioned beeps
detailing the time programmed.
6.- Once the current time indicator tones have concluded, or before they conclude, press
any button on the panel, with one press for each second to be programmed (from 1 to
99 seconds).
To exit programming mode, wait 5 seconds without pressing any key. A “MUOK” sound will
be emitted indicating that you have exited time programming mode.
If you enter time programming mode and do not press any key, this mode will automatically
be exited after 30 seconds.
F PROGRAMMA TION AV ANCÉE : temps d’activation de la gâche
Il existe deux durées d’activation programmables pour la gâche électrique :
- Temps d’ouverture des portes à partir du logement.
- Temps d’ouverture des portes à partir du bouton de sortie (raccordé aux bornes « BS »
et « - »).
Suivre les étapes suivantes :
1.- Après avoir coupé l’alimentation électrique, réalisez un court-circuit entre les bornes « Bs
» et « - » (négatif) de l’amplifi cateur (ou appuyez sur le bouton de sortie s’il y en a un).
2.- Tout en maintenant le court-circuit, alimentez le système (vous n’aurez alors plus besoin
de maintenir le court-circuit ni d’appuyer sur le bouton-poussoir).
Un avertissement sonore confi rme l’entrée en mode programmation.
3.- A la suite de l’avertissement sonore, est indiqué, par le biais de bips espacés de 0,5
seconde, le temps d’ouverture à partir du logement actuellement programmé.
4.- A la fi n de l’avertissement sonore indiquant la durée actuelle, ou avant, appuyez sur
n’importe quel bouton-poussoir de la platine autant de fois que de secondes devant être
programmées (de 1 à 99 secondes).
Pour programmer la durée d’ouverture à partir du bouton-poussoir de sortie, tout en
étant en mode programmation des durées, ne rien faire (une fois l’avertissement sonore
ou la programmation de la durée d’ouverture du logement terminé) pendant 5 secondes.
5.- A ce moment, un nouvel avertissement sonore est émis ; il indique le passage au mode
programmation de la durée d’ouverture du hall et, à la suite des bips mentionnés
antérieurement, la durée programmée sera indiquée.
6.- A la fi n de l’avertissement sonore indiquant la durée actuellement programmée, ou avant,
appuyez sur n’importe quel bouton-poussoir de la platine autant de fois que de secondes
devant être programmées (de 1 à 99 secondes).
Pour programmer la durée d’ouverture à partir du bouton-poussoir de sortie, tout en
étant en mode programmation des durées, ne rien faire (une fois l’avertissement sonore
ou la programmation de la durée d’ouverture du logement terminé) pendant 5 secondes.
Pag 15
Page 16

Kit Audio MARINE VDS
P
Kit Audio MARINE VDS
Si l’on entre en mode programmation des durées et que l’on n’appuie sur aucune touche,
l’on quitte ce mode au bout de 30 secondes.
D FORTGESCHRITTENE PROGRAMMIERUNG: Türöffnungszeit
Folgende zwei Aktivierungszeiten können programmiert werden:
- Türöffnungszeit bei Auslösung von einer Wohnung
- Türöffnungszeit bei Auslösung über den Schalter im Flur (angeschlossen an die Klemmen “BS” und “-”).
Führen Sie folgende Schritte aus:
1.- Führen Sie bei ausgeschalteter Stromversorgung eine Unterbrechung zwischen den
Klemmen “Bs” und ”-” (Negativkabel) des Lautsprechers durch
(oder drücken Sie, falls
installiert, die Türöffnungstaste).
2.- Schließen Sie unter Aufrechterhaltung der bestehenden Unterbrechung das Netzgerät
des Systems an. (Danach muss weder die Unterbrechung (Kurzschluss) aufrechterhalten
noch die Taste gedrückt bleiben.)
Dabei wird ein akustisches Signal ausgegeben, das den Zugang in den Programmiermodus signalisiert.
3.- Nach dem akustischen Signal wird durch Signaltöne in einem Intervall von 0,5 Sekunden
angegeben, wie lange die aktuell einprogrammierte Türöffnungszeit bei Auslösung in
einer Wohnung eingestellt ist.
4.- Sie können bei der akustischen Anzeige der eingestellten Zeit eine beliebige Taste der
Türstation so viele Male drücken, wie Sie Sekunden einprogrammieren wollen (von 1
bis 99 Sekunden).
Zur Programmierung der Türöffnungszeit bei Auslösung durch den Schalter im Flur
müssen Sie fünf Sekunden im Programmiermodus verweilen, ohne eine Eingabe vorzunehmen (nach erfolgter akustischen Anzeige bzw . Einprogrammierung der Türöffnungszeit
bei Auslösung in einer Wohnung).
5.- Es ertönt ein akustisches Signal, das den neuen Programmiermodus anzeigt, um die
Türöffnungszeit über den Schalter im Flur zu programmieren. Im Anschluss daran
erfolgt wie zuvor erwähnt ein akustisches Signal, das die einprogrammierte Türöffnungszeit angibt.
6.- Sie können nach oder während des akustischen Signals der aktuell eingestellten Zeit eine
beliebige Taste der Türstation so viel Male drücken, wie Sie Sekunden einprogrammieren
wollen (von 1 bis 99 Sekunden).
Sie verlassen den Programmiermodus automatisch, indem Sie fünf Sekunden lang keine
T aste drücken. Ein Signalton “MUOK”·zeigt an, dass der Programmiermodus verlassen wurde.
Falls der Zeitprogrammiermodus aufgerufen wird und 30 Sekunden lang keine Eingabe erfolgt,
verlässt das System den Programmiermodus automatisch.
PROGRAMAÇÃO AVANÇADA: Tempo do trinco
Os tempos da activação do trinco programáveis são dois:
- Tempo de abertura da porta desde a vivenda
- Tempo de abertura da porta desde o botão de saída (conectado a bornas «BS» y «-»).
Realizar os seguintes passos:
1.- Com a alimentação desconectada, realize um curto-circuito entre as bornas «Bs» e «-»
(negativo) do amplifi cador
Pag 16
(ou premir o botão de saída, se existir).
Page 17

Kit Audio MARINE VDS
Kit Audio MARINE VDS
2.- Mantendo o curto-circuito anterior conecte a alimentação do sistema (já não será
necessário manter o curto-circuito ou botão pressionado).
Se produze uma confi rmaão acústica de entrada na programação.
3.- Após a confi rmação acústica se indica, mediante avisos sonoros intercalados 0.5
segundos, o tempo da abertura desde a vivenda programado actualmente.
4.-Uma vez fi nalizada a indicação acústica do tempo actual ou antes de que termine, premir
qualquer botão da placa quantas vezes como segundos se deseja programar (de 1 até
99 segundos).
Para programar el tiempo de apertura desde el pulsador de salida, estando en modo
programación de tiempos, (fi nalizada la indicación acústica o la programación de tiempo
de apertura desde vivienda), permancer 5 segundos sem realizar nenhuma acção.
5.- Neste momento soará uma nova confi rmação acústica indicando a troca ao modo de
programação do tempo da abertura do Hall da entrada, e seguidamente mediante
os sons anteriormente comentados se indicará o tempo programado.
6.- Uma vez fi nalizada a indicação acústica do tempo actual programado ou antes de que
termine, pressionar qualquer botão da placa quantas vezes como segundos se deseja
programar (de 1 até 99 segundos).
Para sair da programação, permanecer 5 segundos sem premir tecla alguma. Escutarás um
som ‘MUOK’ indicando a saída da programação de tempos.
Se é produzida a entrada na programação de tempos e não se prime nenhuma tecla, aos
30 segundos automaticamente se sairá da programação.
Pag 17
Page 18

Kit Audio MARINE VDS
E
EN
F
D
P
E
D
E
EN
F
D
P
Kit Audio MARINE VDS
INSTALACIÓN TELÉFONO EN TELEPHONE INSTALLATION F INST ALLATION POSTE
BEFESTIGUNG DES TELEFONS P INSTALAÇÃO DO TELEFONE
1
PROGRAMACIÓN
PROGRAMMIERUNG
PROGRAMMING
PROGRAMAÇÃO
53 42
PROGRAMMATION
21
i
< 2 min
1. Con el teléfono conectado pulse el botón de programación. Se oirá un sonido de confi rmación.
2. Pulse el botón de llamada a vivienda. De nuevo se produce confi rmación.
* El teléfono no funcionará mientras no haya sido programado
1. With the telephone connected, press the programming button. You will hear a confi rmation tone.
2. Press the house call button. Confi rmation tone is heard again.
* The telephone will not work until it has been programmed.
1. Une fois le poste branché, appuyez sur le bouton de programmation. Une tonalité de confi r-
mation sera émise.
2. Pressez le le bouton d’appel à l’appartement . Une tonalité de confi rmation est à nouveau émise.
* Le poste ne fonctionne pas tant qu’il n’a pas été programmé.
1. Drücken Sie die Programmiertaste bei angeschlossenem telefon. Der V organg wird durch einen
Signalton bestätigt.
2. Drücken Sie die Ruftaste zur Wohnung. Der V or-gang wird erneut durch einen Signalton bestätigt.
* Der telefon ist nicht betriebsbereit, wenn er zuvor nicht programmiert wurde.
1. Com o telefone ligado carregue no botão de programação. Ouve-se um som de confi rmação.
2. Carregue no botão de chamada da vivenda. Ouve-se um “bip” de confi rmação.
* O telefone não funciona enquanto não tiver sido programado.
Pag 18
Page 19

Kit Audio MARINE VDS
E
EN
F
D
P
E
EN
F
D
P
10 Kohm
E
EN
D
P
Kit Audio MARINE VDS
ESQUEMA DE CABLEADO
VERKABELUNGSSCHEMA
- KIT 1 L
(*) IMPORTANTE - IMPORTANT - WICHTIG
10 Khoms:
entre los bornes + y L del último monitor.
between terminals + and L in the last
monitor.
+ L
Vac
entre les bornes + et L du moniteur.
Zwischen Klemmen ”+“ und ”L“ des
Monitors.
os terminais + e L do último monitor.
M
A
D
E
I
N
S
P
A
I
N
5
0
6
0
H
z
. 50V
A
MA
F
X
+
.
U
1
8V
E
N
T
1
E
2
1.5A
A
V
L
I
K
M
1A
I
E
T
N
T
D
A
I
C
G
IO
I
T
N
A
D. max.
L
30 m
90 pies/feet
WIRING DIAGRAM F SCHEMA DE CABLAGE
ESQUEMA DE CABLAGEM
P1
F1F2
-
+L
10 Kohm
A
T
(*)
P1
Pulsador de llamada puerta vivienda.
Call pushbutton apartment’s door.
Poussoir d’appel porte du logement.
Ruftaste an der Wohnungstür.
Botão chamada porta do aparta-
mento.
SW1
~
~
~
~
230V
INPUT
18 Vdc +12 Vac
230V ; 0,6 A
50-60 Hz
OUTPUT
18 V ; 1,5 A
12 V ; 1,5 A
~ ~
JP2
JP3
JP4
CN2
CN2
TARJETERO
TAG HOLDER
CN3
CN3
STATUS
DL2
ON
OVERLOAD
+
L
AMPLIFICADOR - VERSTÄRKER
SLAVE
LEDS OFF
VDS
AMPLIFICATEUR - AMPLIFIER
A
B
C
D
E
IDIOMA
LANGUAGE
+12
NCNO
C
ON
AUDIO
EXIT
BS
CT
-
S
MIC
CN1
JP2
MASTER
JP3
LEDS ON
JP4
CT OUT CT IN
PACK EXTENSION
CN1
PROG
SW1
DL2
SW1
18V
DC
-
+
L
-
12 Vac
ALIMENTACION
POWER SUPPLY
-+
18 Vdc
CN7
MONITOR TEST
NO
C
NC
VERSION
:
D
S
1 - 50
50 - 100
100 - 200
1
1,5
mm
mm
mm2,5
2
2
2
Pag 19
Page 20

Kit Audio MARINE VDS
E
EN
F
D
P
E
EN
F
D
P
10 Kohm
Kit Audio MARINE VDS
- KIT 2 L
(*) IMPORTANTE - IMPORTANT - WICHTIG
10 Khoms:
entre los bornes + y L del último monitor.
between terminals + and L in the last
monitor.
+ L
Vac
entre les bornes + et L du moniteur.
Zwischen Klemmen ”+“ und ”L“ des
Monitors.
os terminais + e L do último monitor.
M
A
D
E
IN
S
P
A
I
N
5
0
6
0
H
z.
5
0
VA
M
A
FU
X
+
.
1
8
EN
V
T
1
E A
2
1
V
.
5
LIME
A
KIT D
1
A
NTACION
IGIT
D. max.
AL
30 m
90 pies/feet
F1F2
F1F2
-
+L
10 Kohm
(*)
SW1
-
+L
P1
A
T
P1
A
T
~
~
230V
INPUT
230V ; 0,6 A
~
~
18 Vdc +12 Vac
50-60 Hz
OUTPUT
18 V ; 1,5 A
12 V ; 1,5 A
ON
OVERLOAD
SW1
~ ~
P1:
Pulsador de llamada puerta vivienda.
Call pushbutton apartment’s door.
Poussoir d’appel porte du logement.
Ruftaste an der Wohnungstür.
Botão chamada porta do aparta-
mento.
JP2
JP3
JP4
CN2
CN2
TARJETERO
TAG HOLDER
CN3
CN3
STATUS
+
AMPLIFICADOR - VERSTÄRKER
MASTER
LEDS OFF
CT OUT CT IN
CAM
L
V
SLAVE
PAN & TILT
M
VDS
10
+12
AMPLIFICATEUR - AMPLIFIER
ON
A
B
C
D
E
IDIOMA
LANGUAGE
EXIT
NCNO
BS
C
-
S
AUDIO
MIC
CT
CN1
JP2
JP3
LEDS ON
JP4
PACK EXTENSION
CN1
PROG
SW1
DL2
SW1
DL2
18V
DC
-
+
L
-
Pag 20
12 Vac
ALIMENTACION
POWER SUPPLY
-+
18 Vdc
CN7
MONITOR TEST
NO
C
NC
VERSION
:
D
S
1 - 50
50 - 100
100 - 200
1
1,5
mm
mm
mm2,5
2
2
2
Page 21

Kit Audio MARINE VDS
E
EN
F
D
P
Kit Audio MARINE VDS
CARACTERÍSTICAS TÉCNICAS
CARACTERISTIQUES TECHNIQUES
TECHNICAL FEATURES
TECHNISCHE EIGENSCHAFTEN
CARACTERÍSTICAS TÉCNICAS
Alimentación - Power Supply - Alimentation - Stromversorgung -
Consumo - Consumption - Consommation - Stromverbrauch - Consumo
en reposo - in standby - au repos - Im Bereitschaftsmodus - em repouso
audio activo - audio active - avec audio - Audioverbindung - áudio activo
cámara - camera - caméra - Kamera - câmara
iluminación - lighting - éclairage - Beleuchtung - iluminação
Temperatura de funcionamiento - Operating Temperature
Température de fonctionnement - Betriebstemperatur
Temperatura de funcionamento
Potencia audio sentido vivienda-calle - Audio power from the apartment to the panel
Piussance de l’audio sens poste-platine - Audio-Leistung in Richtung Türstation
Potência áudio sentido rua
Potencia audio sentido calle-vivienda - Audio power from the panel to the apartment
Piussance de l’audio sens platine-poste - Audio-Leistung in Richtung Telefon
Potência áudio sentido telefone
18 Vdc
57 mA
210 mA
100 mA
35 mA
[-10 , +60 °C]
[14, 140ºF]
1 W
0,15 W
Volumen regulable en ambos sentidos - Adjustable volume both ways
Volume réglable dans les deux sens - Regulierbare Lautstärke in beiden Richtungen
Volume regulável em ambos sentidos
Alimentación - Power Supply - Alimentation
Stromversorgung - Alimentação
Consumo - Consumption - Consommation
Stromverbrauch - Consumo
en reposo - in standby - au repos - Im Bereitschaftsmodus - em repouso
llamada - call - appel - Ruf - chamada
audio activo - audio active -son activé - bei Sprechverkehr -áudio activo
Temperatura de funcionamiento - Operating Temperature
Température de fonctionnement - Betriebstemperatur
Temperatura de funcionamento
Llamada Electrónica - Electronic call - Appel Electronique
Elektronischer Anruf - Chamata Eletrônica
18 Vdc
6 mA
215 mA
11 mA
[-10, +60 °C]
[14, +140 °F]
8 ¸ 12 Vpp
Altavoz - Speaker - Haut-parleur - Lautsprecher - Altifalante
Micrófono - Microphone - Microphone - Mikrofon - Microfone: Electret
Resist. dinámica 50 Ω - Dinamic Resist. 50 Ω - Resist. dinamique 50 Ω
Dynamischer Widerstand 50 Ω − Resisência Dinâmica 50 Ω.
1.75” 16 W
Pag 21
Page 22

Kit Audio MARINE VDS
E
F
D
P
E
EN
D
P
E
EN
F
D
P
Kit Audio MARINE VDS
AMPLIACIONES
ERWEITERUNGEN
ENLARGEMENTS F EXTENSIONS
AMPLIAÇÕES
+
-
L
-
+L
+
SW1 SW1 SW1
-
+L
-
+L
10 Kohm
L
Kits de 1 y 2 LÍNEAS: el equipamiento básico por vivienda puede ser ampliado con 2
teléfonos sin necesidad de añadir fuentes de alimentación adicionales.
1 and 2 LINE kits: the basic home equipment can be expanded with 2 telephones or 1
monitor without adding a second power supply.
Kits de 1, 2 : l’équipement de base peux être étendu avec deux postes sans ajouter une
seconde source d’alimentation dans le .
Sets mit 1 und 2 LEITUNGEN: Die in jeder Wohnung vorhandene Grundanlage kann im
Falle des EINF AMILIENHAUS-SETs um 2 zusätzliche Telefone erweitert werden, ohne
dass weitere Netzgeräte eingeselzt werden müssen.
Kits de 1 e 2 LINHAS: o equipamento básico por vivenda pode ser ampliado com 2
telefones sem necessidade de acrescentar transformadores adicionais.
CONEXION ABREPUERTAS CORRIENTE CONTÍNUA EN DC DOOR-OPENER CONNECTION
RACCORDEMENT DE LA GÂCHE À COURANT CONTINU
ANSCHLUSS DES GLEICHSTROMTÜRÖFFNERS
LIGAÇÃO DO TRINCO DE CORRENTE CONTÍNUA
Vac
~
~
230V
~
~
230V ; 0,6 A
INPUT
50-60 Hz
OUTPUT
18 V ; 1,5 A
12 V ; 1,5 A
18 Vdc
~~
OVERLOAD
ON
AMPLIFICADOR - VERSTÄRKER
18V
DC
+
JP2
JP3
JP4
CN1
SW1
-
SLAVE
MASTER
LEDS ON
LEDS OFF
CT OUT CT IN
PACK EXTENSION
PROG
PAN & TILT
CAM
L
M
V
VDS
AMPLIFICATEUR - AMPLIFIER
A
B
C
D
E
IDIOMA
LANGUAGE
10
+12
NCNO
C
ON
AUDIO
EXIT
BS
MIC
CT
-
S
JP2
JP3
JP4
CN2
CN2
TARJETERO
TAG HOLDER
CN3
STATUS
CN1
DL2
SW1
DL2
+
L
-
Pag 22
12 Vdc
CN3
ALIMENTACION
POWER SUPPLY
-+
18 Vdc
CN7
MONITOR TEST
NO
VERSION
C
NC
:
Page 23

Kit Audio MARINE VDS
E
EN
F
D
P
Kit Audio MARINE VDS
Tabla incidencias y soluciones
Events and solutions table
Tableau de depannage
Ereignistabelle und Lösungen
Tabela de incidências e soluçoes
Pag 23
Page 24

Kit Audio MARINE VDS
E
Kit Audio MARINE VDS
TABLA INCIDENCIAS Y SOLUCIONES
SINTOMA PUNTOS A VERIFICAR
- Sección del negativo. Aumentar.
- Distancia entre placa y teléfono. Aumentar sección o añadir
fuente adicional.
• No entra en programación.
• No hay llamada, pero si hay moni-
torización en la placa.
• Al pulsar el botón de llamada, el LED
de Diagnóstico NO se enciende
en absoluto.
• No hay llamada, pero si hay monitorización en la placa.
• Al pulsar el botón de llamada, el
LED de Diagnóstico emite unos
destellos cortos.
• La placa emite continuamente una
serie de pitidos cortos.
- Ubicación del alimentador. Distancia máxima a la placa: 30
metros / 90 pies. Aumentar sección o añadir fuente adicional.
- Resistencia de 10 KOhms.
- Comprobar que el Puente JP2 está puesto en la placa.
- Comprobar que el monitor está encendido.
- Comprobar cable «L».
- Monitor mal programado. Volver a programar.
- Cortocircuito entre «L» y «+».
- Cortocircuito entre «L» y «-».
• Sonido de audio muy débil, o acoples que no se pueden eliminar
con los potenciometros de ajuste
de audio.
• No funciona bien el abrepuertas.
OVERLOAD
M
A
D
E
I
N
S
P
A
I
N
50-60 Hz. 50VA MAX.
FUENTE ALIMENT
+18V 1.5A
K
FUENTE DE ALIMENTACION (Leds)
ON
IT
D
ACION
IG
IT
A
L
O
N
OVERLOAD
ON
Led de encendido
Led indicador máxima corriente excedida. Disminuir carga.
Led ON + OVERLOAD parpadeando indica cortocircuito.
- Resistencia de 10 KOhms. Sólo ha de haber 1 resistencia
en el monitor más alejado.
- Abrepuertas de 12 Vdc con la fuente de 18 Vdc-1.5A:
* Asegúrese de estar utilizando un abrepuertas de
12 Vdc (corriente contínua), 0.3 A. máx.
* Aumentar sección del negativo.
* Distancia entre placa y monitor. Aumentar sección o
añadir fuente adicional.
- Abrepuertas de 12 Vac con la fuente de 12 Vac-1A:
* Asegúrese de estar utilizando un abrepuertas de
12 Vac (corriente alterna), 0.8 A. máx.
OVERLOAD
Pag 24
Page 25

Kit Audio MARINE VDS
EN
Kit Audio MARINE VDS
EVENTS AND SOLUTIONS TABLE
SYMPTOM POINTS BE CHECKED
• It does not enter programming
mode.
• There is no call, but there is panel
call monitoring.
• When the call button is pressed,
the Diagnostic LED does NOT
ligth at all.
• There is no call, but there is panel
monitoring.
• When the call button is pressed,
the Diagnostic LED emits short
fl ashes.
- Negative wire cross-section. Increase.
- Distance between panel and telephone. Increase crosssection or add additional power supplies.
- Power supply position. Maximum distance to panel: 30 me-
tres/ 90 feet. Increase section or add additional power supply .
- Resistor 10 KOhms.
- Check that Jumper JP2 is set in the panel.
- Check that the monitor is switched on.
- Check cable «L».
- Monitor wrongly programmed. Program it again.
- Short circuit between «L» and «+».
• The panel emits a continuous series
of short beeps.
• V ery weak audio sound, or feedback
that cannot be eliminated with the
audio adjustment potentiometers.
• The door lock release/electric lock
is not working properly.
POWER SUPPLY (Leds)
ON
OVERLOAD
M
A
D
E
I
N
S
P
A
I
N
50-60 H
z. 50VA MAX.
FUE
+18V 1.5A
NTE ALIME
K
IT
NT
D
IG
ACION
IT
A
L
O
N
OVERLOAD
Led ON
ON
LED indicating maximum current limit exceeded. Reduce the load.
LED ON + OVERLOAD blinking indicates short circuit.
- Short circuit between «L» and «-».
- Resistor 10 KOhms. There must be only 1 resistor, in the
furthest monitor.
- 12 Vdc door-opener with the 18 Vdc-1.5A power
supply:
* Make sure you are using a 12 Vdc (direct current) dooropener, max. 0.3 A.
* Increase the cross-section of the negative.
* Distance between panel and monitor. Increase the crosssection or add additional power supply..
- 12 Vac door-opener with the 12 Vac-1A power supply:
* Make sure you are using a 12 Vac (alternating current)
door- opener, max. 0.8 A.
OVERLOAD
Pag 25
Page 26

Kit Audio MARINE VDS
F
Kit Audio MARINE VDS
TABLEAU DE DEPANNAGE
SYMPTOME POINTS A VERIFIER
- Section du fi l négatif. Augmenter section.
- Distance entre la platine et le poste. Augmenter la section ou
ajouter une alimentation supplémentaire.
• Pas de programmation possible.
• L ’appel ne se laisse pas entendre au
logement mais se laisse entendre
sur la platine.
• En appuyant sur le bouton-poussoir
d’appel, la DEL de diagnose ne
s’allume pas du tout.
• L ’appel ne se laisse pas entendre au
logement mais se laisse entendre
sur la platine.
• En appuyant sur le bouton-poussoir
d’appel, la DEL de diagnose émet
de courts clignotements.
- Emplacement de l’alimentation. Distance maximale alimentation-platine : 30 mètres. Augmenter la section ou ajouter
une alimentation supplémentaire.
- Résistance de 10 kOhm.
- Vérifi ez que le pontet JP2 est bien mis sur la platine.
- Vérifi ez que le moniteur soit allumé.
- Vérifi ez le fi l « L ».
- Moniteur mal programmé. Recommencez la programmation.
- Court-circuit entre « L » et « + ».
• La platine émet une série de petits
siffl ements en continu.
• Volume très faible ou grésillements
qui ne peuvent être éliminés par
les potentiomètres de réglage du
volume.
• La gâche électrique ne fonctionne
pas bien.
OVERLOAD
M
A
D
E
I
N
S
P
A
I
N
50-60 Hz. 50VA MAX.
FUENTE ALIMENT
+18V 1.5A
K
SOURCE D’ALIMENTATION (DEL)
ON
IT
D
ACION
IG
IT
A
L
O
N
OVERLOAD
ON
DEL de marche
DEL indicant le dépassement du courant maximum
DEL de marche et courant maximum dépassé clignotant indique court circuit.
- Court-circuit entre « L » et « - ».
- Résistance de 10 kOhm. 1 seule résistance doit être placée
sur le moniteur le plus éloigné.
- Gâche électrique de 12 Vcc avec une
source d’alimentation de 18 Vcc-1,5 A :
* S’assurer que la gâche électrique utilisée ait une
tension de 12 Vcc (courant continu), 0,3 A max.
* Augmenter la section du fi l négatif.
* Distance entre la platine et le moniteur. Augmenter la section
ou ajouter une alimentation supplémentaire.
- Gâche électrique de 12 Vca avec une source d’alimentation
de 12 Vca-1 A :
* S’assurer que la gâche électrique utilisée ait une tension de
12 Vca (courant alternatif), 0,8 A max.
OVERLOAD
. Réduisez la charge.
Pag 26
Page 27

Kit Audio MARINE VDS
D
Kit Audio MARINE VDS
EREIGNISTABELLE UND LÖSUNGEN
SYMPTOM ZU PRÜFENDE PUNKTE
- Querschnitt des Minuskabels vergrössern.
- Abstand zwischen Türstation und Telefon. Erhöhen Sie den
Querschnitt oder installieren Sie ein zusätzliches Netzgerät.
• Kein Zugang in den Programmiermodus.
• Es erfolgt kein Rufton, der Quittierungston an der Türstation erfolgt
jedoch.
• Beim Drücken der Ruftaste leuchtet
die Diagnose-LED NICHT auf.
• Es erfolgt kein Rufton, der Quittierungston an der Türstation erfolgt
jedoch.
• Beim Drücken der Ruftaste, blinkt
die Diagnose-LED mehrmals
kurz auf.
• Die Türstation gibt dabei fortlaufend
kurze Piepstöne aus.
- Einbauort des Netzgeräts. Maximaler Abstand zur Türstation:
30 Meter. Vergrössern Sie den Querschnitt oder installieren
Sie ein zusätzliches Netzgerät.
- Widerstand von 10 kOhm.
- Prüfen Sie, ob an der Türstation die Steckbrüicke JP2
eingesteckt ist.
- Prüfen Sie, ob der Monitor eingeschaltet ist.
- Prüfen Sie das Kabel “L”.
- Der Monitor ist falsch programmiert worden. Programmieren
Sie den Monitor erneut.
- Vorhandener Kurzschluss zwischen “L” und “+”.
- Vorhandener Kurzschluss zwischen “L” und “-”.
• Das Audiosignal ist sehr schwach
oder Rückkoppelun-gen lassen
sich mit den Audio-Potentiometern
nicht beseitigen.
• Der Türöffner funktioniert nicht
richtig.
NETZGERÄT (Leds)
ON
OVERLOAD
M
A
D
E
I
N
S
P
A
I
N
50-60 H
z. 50VA MAX.
FUE
+18V 1.5A
NTE ALIME
K
IT
NT
D
ACION
IG
IT
A
L
O
N
OVERLOAD
Einschalt-LED
ON
Anzeige-LED für das Überschreiten der maximale Stromstärke. Last vermindern.
Blinkendes ON+OVERLOAD LED bedeutet Kurzschluss.
- Widerstand von 10 kOhm. Es darf nur ein Widerstand am
weitesten entfernt montierten Monitor angelegt sein.
- 12 V Gleichstromtüröffner mit 18 V 1,5 A Gleich stromnetzgerät:
* Prüfen Sie, ob Sie einen Türöffner für 12 V (Gleichstrom)
und max. 0,3 A benutzen.
* Vergrößern Sie den Querschnitt des Minuskabels.
* Abstand zwischen Türstation und Monitor.Vergrößern Sie
den Querschnitt oder installieren Sie ein zusätzliches
Netzgerät.
- 12 V Gleichstromtüröffner mit 12 V 1 A Gleich stromnetzgerät:
* Prüfen Sie, ob Sie einen Türöffner für 12 V (Wechselstrom) und max. 0,8 A benutzen.
OVERLOAD
Pag 27
Page 28

Kit Audio MARINE VDS
P
Kit Audio MARINE VDS
TABELA DE INCIDÊNCIAS E SOLUÇÕES
SINTOMA PONTOS A VERIFICAR
- Secção do negativo. Aumentar.
- Distância entre placa e telefone. Aumentar secção ou acres-
• Não entra em programação..
- Localização do alimentador Distância máxima à placa: 30
- Resistência de 10 KOhms.
- Verifi car se a jumper JP1 está colocada na placa.
centar fonte adicional.
metros. Aumentar secção ou acrescentar fonte adicional.
• Não há chamada, mas há monitorização na placa.
• Ao carregar no botão de chamada,
o LED de Diagnóstico NÃO se
acende de nenhuma forma.
• Não há chamada, mas há monitorização na placa.
• Ao carregar no botão de chamada,
o LED de Diagnóstico emite umas
luzes a piscar breves.
• A placa emite continuamente uma
série de apitos curtos.
• Som de áudio muito fraco, ou
junções que não se podem eliminar
com os potenciómetros de ajuste
de áudio.
- Verifi car se o monitor está ligado.
- Verifi car cabo “L”.
- Monitor mal programado. Voltar a programar.
- Curto-circuito entre “L” e “+”.
- Curto-circuito entre “L” e “-”.
- Resistência de 10 KOhms. Só deve haver 1 resistência no
monitor mais afastado.
- Trinco de 12 Vdc com fonte de 18 Vdc-1,5 A:
* Assegure-se de estar a utilizar um trinco de12 Vdc (co-
rrente contínua), 0.3 A máx.
• O trinco não funciona bem.
* Aumentar a secção do negativo.
* Distância entre placa e monitor. Aumentar secção ou
acrescentar fonte adicional.
- Trinco de 12 Vac com fonte de 12 Vac-1 A:
* Assegure-se de estar a utilizar um trinco de12 Vac
(corrente alterna), 0,8 A máx.
OVERLOAD
M
A
D
E
I
N
S
P
A
I
N
50-60 H
z. 50VA MAX.
FU
+18V 1.5A
ENTE A
K
FONTE DE ALIMENTAÇÃO (Leds)
ON
LIMENT
IT
D
A
IG
CION
IT
A
L
ON
OVERLOAD
ON
Led aceso
OVERLOAD
Led indicador de máxima corrente excedida. Diminuir carga
Led ON + OVERLOAD piscando indica curto-circuito
Pag 28
Page 29

Kit Audio MARINE VDS
E
EN
F
D
P
Kit Audio MARINE VDS
Sección II - Manual del Usuario
Enhorabuena por disponer de un producto de calidad!
Su teléfono FERMAX le permitirá comunicarse con la placa de calle y abrir la puerta
de entrada si así lo desea. Esperamos disfrute de sus funcionalidades.
Section II - User’s Manual
Congratulations on purchasing this quality product!
Your FERMAX door entry system will allow you to communicate with the entry panel
and open the front door if you wish. We hope you enjoy its range of functions.
Section II - Manuel d’’utilisation
Félicitations ! Vous venez d’acquérir un véritable produit de qualité !
Votre poste FERMAX vous permettra de communiquer avec la platine de rue ainsi
que d’ouvrir la porte d’entrée si vous le souhaite
pleinement de toutes ses fonctions.
z. Nous espérons que vous profi terez
Teil II - Bedienungsanleitung
Wir gratulieren Ihnen zum Kauf dieses Qualitätsprodukts!
Das Fermax-T elefon ermöglicht es Ihnen, mit der Türstation zu kommunizieren und im
Bedarfsfalle die Eingangstür zu öffnen. Überzeugende Funktionalität für Ihr Eigenheim.
Secção II - Manual do utilizador
Parabéns por dispor de um produto de qualidade!
O seu telefone FERMAX permitir-lhe-á comunicar com a placa de rua e abrir a porta
de entrada, se assim o desejar. Esperamos que desfrute das suas funcionalidades.
Pag 29
Page 30

Kit Audio MARINE VDS
E
EN
F
D
P
E
EN
F
D
P
E
Kit Audio MARINE VDS
LOFT
TELÉFONO - TELEPHONE - POSTE - TELEFON - TELEFONE
LED
BOTONES EN BUTTONS F BOUTONS D TASTE P BOTÃOS
Botón de abrepuertas
· Estando en conversación con la Placa de Calle, al pulsar este botón se activa el
abrepuertas.
Lock release button
· When talking to the Outdoor Panel, press this button to activate the electric lock.
Bouton-poussoir de la gâche électrique
· Lors d’une communication avec la platine de rue, la gâche électrique est activée en
appuyant sur ce bouton.
Türöffnungstaste
· Bei hergestellter Sprachverbindung mit der Türstation wird durch Drücken dieser
Taste die Türöffnung ausgelöst.
Botão do trinco
· Estando em conversação com a Placa da Rua, ao carregar neste botão activa-se o
trinco.
F1,F2: Funciones Adicionales. (Asignadas por el instalador).
F1,F2: Additional Functions. (Assigned by Installer).
F1,F2: Fonctions supplémentaires. (Assignées par l’installateur)
F1,F2: Zusatzfunktionen. (Festgelegt durch den Installateur).
F1,F2: Funções Adicionais. (Atribuídas pelo instalador).
F1:___________________________________________________________
F2:___________________________________________________________
Pag 30
Page 31

Kit Audio MARINE VDS
E
EN
F
D
P
E
EN
F
D
P
E
EN
F
D
P
¸
max. 30
Seg./Sec./Sek.
E
EN
F
D
P
Kit Audio MARINE VDS
On-Off
Apagado
Off
Arrêt
Ausgeschaltet
Apagado
Encendido con volumen medio
On, low call volume
Marche, volume d’appel moyen
Eingeschaltet/ mittlere Lautstärke
Aceso com volume médio
Encendido con volumen alto
On, full volume
Marche volume élevé
Eingeschaltet/ maximale Lautstärke
Aceso com volume alto
Encendido
LED
Selección tono de llamada
Selection call tone
Selection de la tonalite d’appel
Wahl des Ruftons
Seleçao do tom de chamata
FUNCIONAMIENTO - OPERATION - FONCTIONNEMENT - FUNKTIONSELEMENTE FUNCIONAMENTO
On
Marche
Eingeschaltet
Aceso
Llamada
Call
Appel
LED
Tono de llamada 1
Call tone 1
Tonalite d’appel 1
Ruftons 1
Tom de chamata 1
Apagado
Off
Arrêt
Ausgeschaltet
Apagado
Tono de llamada 2
Call tone 2
Tonalite d’appel 2
Ruftons 2
Tom de chamata 2
Ruf
Chamada
Atender la llamada
Answer the call
Réception de l’appel
Rufbeantwortung
Atender a chamada
Abrir la puerta al visitante
Open the door to the visitor
Ouverture de la porte au visiteur
Türöffnung für Besucher
Abrir a porta ao visitante
bla bla
bla ...
max. 90 Seg./Sec./Sek.
¸
bla bla
bla ...
Pag 31
Page 32

Kit Audio MARINE VDS
E
12
ON
4
5
3
3130
3
5
4
ON
21
2928272625
3
5
4
ON
21
3
5
4
ON
21
3
5
4
ON
21
3
5
4
ON
21
3
5
4
ON
21
24
3
5
4
ON
21
22 23
12
ON
4
5
3
2120
3
5
4
ON
21
3
5
4
ON
21
3
5
4
ON
21
19181716
3
5
4
ON
21
3
5
4
ON
21
3
5
4
ON
21
3
5
4
ON
21
15
12
ON
4
5
3
1413121110
3
5
4
ON
21
3
5
4
ON
21
3
5
4
ON
21
3
5
4
ON
21
3
5
4
ON
21
98
3
5
4
ON
21
3
5
4
ON
21
12
ON
4
5
3
12
ON
4
5
3
12
ON
4
5
3
12
ON
4
5
3
12
ON
4
5
3
01 23
4
98
3
5
4
ON
21
3
5
4
ON
21
12
ON
4
5
3
12
ON
4
5
3
5
6
7
3
5
4
ON
2112
ON
4
5
3
12
ON
4
5
3
5
6
7
3
5
4
ON
21
ON
Kit Audio MARINE VDS
SINTETIZADOR DE VOZ EN VOICE SYNTHESIZER
CODIFICACIÓN IDIOMAS (Ver tabla)
LANGUAGE CODING (see table)
Pag 32
Page 33

Kit Audio MARINE VDS
E
EN
Kit Audio MARINE VDS
CODE
0
1
2
holandés/fl amenco
3
4
5
6
7
8
9
ESPAÑOL
castellano
inglés
francés
alemán
catalán
valenciano
balear
portugués
euskera
ENGLISH
Spanish
English
French
Dutch/Flemish
German
Catalan
Valencian
Balearic
Portuguese
Basque
CODE
16
17
18
19
20
21
22
23
24
25
ESPAÑOL
chino
persa/farsi
árabe
noruego
fi nés
sueco
danés
islandés
ruso
italiano
ENGLISH
Chinese
Persian/Farsi
Arabic
Norwegian
Finnish
Swedish
Danish
Icelandic
Russian
Italian
10
11
12
13
14
15
(*) IMPORTANTE - IMPORTANT - WICHTIG
Futuras actualizaciones de idiomas, consultar web Fermax.
For Future language updates, consult Fermax web.
gallego
griego
polaco
checo
eslovaco
turco
Galician
Greek
Polish
Czech
Slovak
Turkish
26
27
28
29
30
31
hindi
húngaro
hebreo
Campana
DESACTIVADO
Hindi
Hungarian
Hebrew
Bell
DEACTIVATED
Pag 33
Page 34

Kit Audio MARINE VDS
Kit Audio MARINE VDS
Pag 34
Page 35

Kit Audio MARINE VDS
Kit Audio MARINE VDS
Pag 35
Page 36

Kit Audio MARINE VDS
E
EN
F
D
P
Kit Audio MARINE VDS
Publicación técnica de caracter informativo editada por FERMAX ELECTRONICA.
FERMAX ELECTRONICA, en su política de mejora constante, se reserva el derecho a modifi car el
contenido de este documento así como las características de los productos que en él se refi eren
en cualquier momento y sin previo aviso.
Cualquier modifi cación será refl ejada en posteriores ediciones de este documento.
Technical document published for information purposes by FERMAX ELECTRONICA.
FERMAX ELECTRONICA, in a policy of ongoing improvement, reserves the right to modify the
contents of this document and the features of the products referred to herein at any time and with
no prior notice. Any such modifi cations shall be refl ected in subsequent editions of this document.
Publication technique à caractère informatif éditée par FERMAX ELECTRONICA.
Conformément à sa politique de perfectionnement continu, FERMAX ELECTRONICA, se réserve le droit de modifi er, à tout moment et sans préavis, le contenu de ce document ainsi que les
caractéristiques des produits auxquels il fait référence. Toutes les modifi cations seront indiquées
dans les éditions suivantes.
Technische Veröffentlichung zu Informationszwecken; Herausgeber: FERMAX ELECTRONICA.
FERMAX ELECTRONICA, behält sich das Recht vor, den Inhalt dieses Dokuments sowie die
technischen Eigenschaften der erwähnten Produkte ohne vorherige Ankündigung zu ändern, um
dadurch den ständigen Weiterentwicklungen und den damit in V erbindung stehenden Verbesserungen Rechnung zu tragen. Alle Änderungen fi nden Aufnahme in den Neuaufl agen dieses Dokuments.
Publicação técnica de carácter informativo editada por FERMAX ELECTRONICA.
A FERMAX ELECTRONICA, na sua política de melhoramento constante, reserva-se o direito de
modifi car o conteúdo deste documento assim como as características dos produtos que nele são
referidos a qualquer momento e sem aviso prévio.
Qualquer modifi cação será apresentada em edições posteriores deste documento.
www.fermax.com
Pag 36
 Loading...