

Page 1
VDS System
MONITOR LOFT COMPACT
LOFT COMPACT MONITOR
MONITEUR LOFT COMPACT
MONITOR LOFT COMPACT
MONITOR LOFT COMPACT
MANUAL DE INSTALADOR Y USUARIO
USER& INSTALLER’S MANUAL
MANUEL D´INSTALLATION ET UTILISATION
INSTALLATIONS-und BENUTZERHANDBUCH
MANUAL DO INSTALADOR E USUÁRIO
COLOR
COLOUR
COULEUR
FARBE
COR
B/N
B/W
N/B
S/W
P/B
ESPAÑOL
ENGLISH
FRANÇAIS
DEUTSCH
PORTUGÛES
Page 2

Loft Compact VDSLoft Compact VDS
Loft Compact VDSLoft Compact VDS
Loft Compact VDS
Loft Compact VDS
Loft Compact VDSLoft Compact VDS
Loft Compact VDSLoft Compact VDS
LOFT COMPACT VDS
Cod. 97093c V03_10
2
Page 3

Loft Compact VDSLoft Compact VDS
Loft Compact VDSLoft Compact VDS
Loft Compact VDS
Loft Compact VDS
Loft Compact VDSLoft Compact VDS
Loft Compact VDSLoft Compact VDS
ENHORABUENA POR DISPONER DE UN PRODUCTO DE CALIDAD!
E
Fermax electrónica desarrolla y fabrica equipos de prestigio que cumplen los más
altos estándares de diseño y tecnología.
Su monitor de videoportero FERMAX le permitirá comunicarse con la placa de calle,
ver la persona que le está llamando y abrirle la puerta de entrada si así lo desea.
Esperamos disfrute de sus funcionalidades.
www.fermax.com
CONGRATULATIONS ON PURCHASING THIS QUALITY PRODUCT!
EN
Fermax Electronics develops and manufactures reputable equipment which fulfils
the highest design and technology standards.
Your FERMAX video door entry system allows you to communicate with the entry
panel, to see who is calling and to open the door if you wish.
We hope you enjoy its range of functions.
www.fermax.com
FÉLICITATIONS ! VOUS VENEZ D’ACQUÉRIR UN VÉRITABLE PRODUIT DE QUALITÉ!
F
Fermax Electrónica développe et fabrique des équipements de prestige qui répondent
aux normes de design et technologie les plus développées.
Votre moniteur pour portier vidéo FERMAX vous permettra de communiquer avec la
platine de rue, de voir la personne qui vous appelle et d’ouvrir la porte d’entrée si
vous le souhaitez.
Nous espérons que vous profiterez pleinement de toutes ses fonctions.
www.fermax.com
D
WIR GRATULIEREN IHNEN ZUM KAUF DIESES QUALITÄTSPRODUKTS!
Fermax Electrónica entwickelt und fabriziert hochwertige Anlagen, die den höchsten
Technologie- und Designstandards entsprechen.
Der Monitor der Videotürsprechanlage von FERMAX ermöglicht Ihnen eine
Sprechverbindung mit der Türstation herzustellen, die Person, mit der Sie sprechen
auf dem Bildschirm zu betrachten und bei Bedarf die Tür zu öffnen.
Überzeugende Funktionalität für Ihr Eigenheim!
www.fermax.com
PARABÉNS POR DISPOR DE UM PRODUTO DE QUALIDADE!
P
Fermax electrónica desenvolve e fabrica equipas de prestígio que cumprem com
os mais altos estándars de desenho e tecnologia.
O seu monitor de vídeo-porteiro FERMAX lhe permitirá comunicar-se com a placa
da rua, ver a pessoa que lhe está a chamar e abrir-lhe a porta de entrada se assim
o deseja.
Esperamos que aproveites as suas funcionalidades.
www.fermax.com
3
Page 4

Loft Compact VDSLoft Compact VDS
Loft Compact VDSLoft Compact VDS
Loft Compact VDS
Loft Compact VDS
Loft Compact VDSLoft Compact VDS
Loft Compact VDSLoft Compact VDS
E
Monitor Loft Compact COLOR
EN
COLOUR Loft Compact monitor
F
Moniteur Loft Compact COULEUR
D
FARBE Monitor Loft Compact
P
Monitor Loft Compact COR
4
Monitor Loft Compact B/N
B/W Loft Compact monitor
Moniteur Loft Compact N/B
S/W Monitor Loft Compact
Monitor Loft Compact P/B
Page 5

Loft Compact VDSLoft Compact VDS
Loft Compact VDSLoft Compact VDS
Loft Compact VDS
Loft Compact VDS
Loft Compact VDSLoft Compact VDS
Loft Compact VDSLoft Compact VDS
INDICE - INDEX - SOMMAIRE
INHALT - INDICE
LOFT COMPACT .......................................................................................................... 6
E
EN
F
Funcionamiento ............................................................................................... 6
Ajustes del Monitor .......................................................................................... 7
Instalación y Conexionado ............................................................................. 8
Programación del monitor.............................................................................. 9
Características Técnicas ................................................................................ 26
LOFT COMPACT .......................................................................................................... 10
Operation .......................................................................................................... 10
Monitor settings ............................................................................................... 11
Installation and connections .......................................................................... 12
Monitor programming ...................................................................................... 13
Technical features ........................................................................................... 26
LOFT COMPACT .......................................................................................................... 14
Fonctionnement ............................................................................................... 14
Réglages du moniteur .................................................................................... 15
Installation et connexions ............................................................................... 16
Programmation du moniteur .......................................................................... 17
Caractéristiques techniques .......................................................................... 26
D
LOFT COMPACT .......................................................................................................... 18
Funktionselemente.......................................................................................... 18
Monitoreinstellungen ...................................................................................... 19
Installation und Verkabelung.......................................................................... 20
Programmierung des Monitors ...................................................................... 21
Technische Eigenschaften ............................................................................. 26
P
LOFT COMPACT .......................................................................................................... 22
Funcionamento ................................................................................................ 22
Ajustes do Monitor ........................................................................................... 23
Instalação e Ligações..................................................................................... 24
Programação Monitor. ..................................................................................... 25
Características Técnicas ................................................................................ 26
5
Page 6
Loft Compact VDSLoft Compact VDS
ESPAÑOL
Loft Compact VDSLoft Compact VDS
Loft Compact VDS
Loft Compact VDS
Loft Compact VDSLoft Compact VDS
Loft Compact VDSLoft Compact VDS
Color
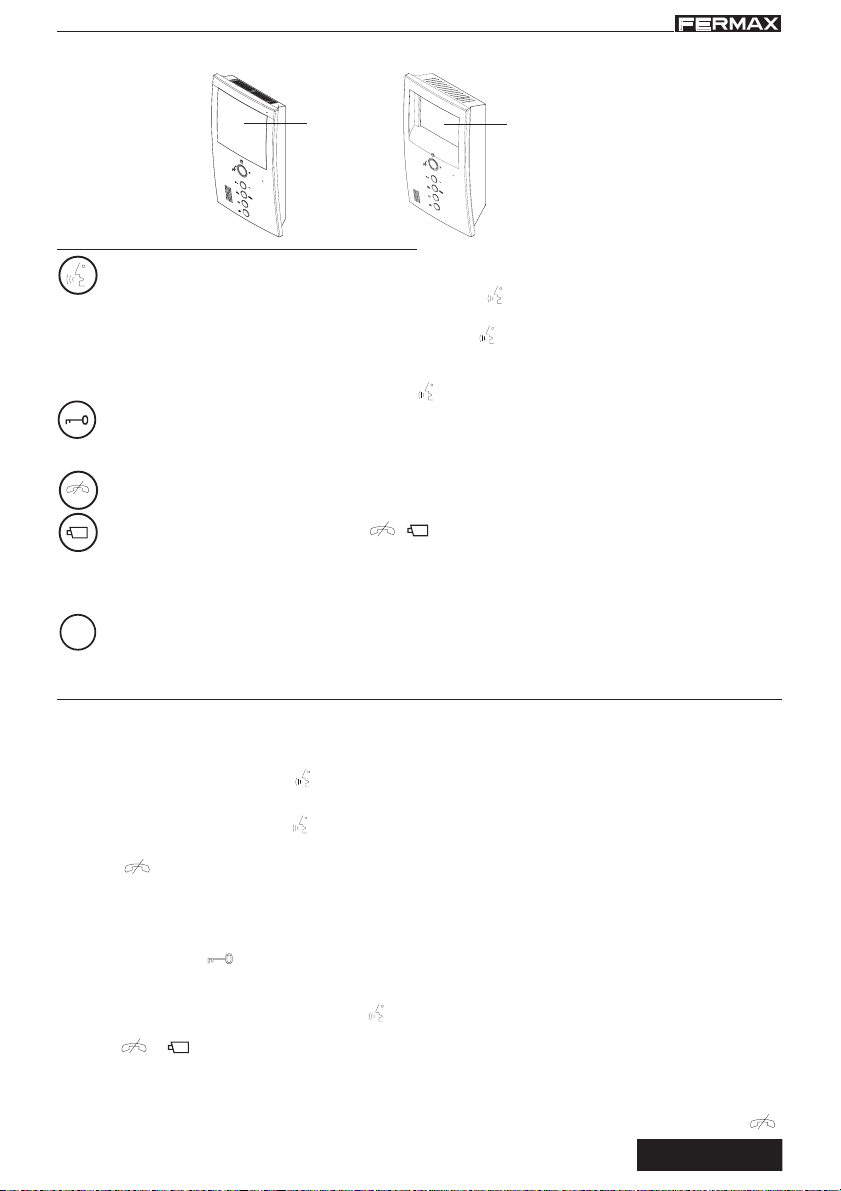
BOTONES
Botón Activación de Audio y Autoencendido
· Monitor Color: Al recibir una llamada pulsar el botón para hablar con el visitante. Se abre el
canal de audio en sentido calle y vivienda, el funcionamiento es en modo manos libres.
· Monitor B/N: Al recibir una llamada pulsar el botón para hablar con el visitante y soltar para
escuchar.
Con el monitor en reposo, pulsar este botón durante 1 segundo para encender manualmente el
monitor (sólo video). Volver a pulsar el botón para coger audio.
Botón de abrepuertas / llamada a conserje.
· Estando activado el monitor, al pulsar este botón se activa el abrepuertas.
· Con el monitor en reposo, al pulsar este botón se realiza una llamada al conserje (si existe conserjería).
Botón de colgado / Selección cámara principal-secundaria / Menú.
· Pulsar para finalizar la comunicación.
· Con video, mantener pulsado el botón / durante 2 segundos para seleccionar secuencialmente
entre la camara principal y secundaria (si existe).
· Con el monitor en reposo pulsar durante 2 segundos para entrar en modo configuración del monitor.
Ver apartado «Ajustes del monitor».
F1 y F2: Botones para Funciones Adicionales.
F1
(Asignadas por el instalador).
FUNCIONAMIENTO
Atender una llamada
Al presionar el pulsador de llamada, en la Placa de Calle se produce un tono de llamada tanto
en la placa de calle como en el monitor, encendiéndose la pantalla.
· Monitor Color: Pulsar el botón para hablar con el visitante. Se abre el canal de audio en sentido calle y
vivienda, el funcionamiento es en modo manos libres.
· Monitor B/N: Pulsar el botón para hablar con el visitante y soltar para escuchar.
La comunicación finalizará automáticamente a los 90 segundos o en cualquier momento al pulsar el
botón . El led permanecerá apagado durante el tiempo que dure la conversación.
Si no se establece comunicación con la placa de calle, el monitor se apaga automáticamente pasados 30 seg.
Apertura de puerta
Al recibir una llamada desde la placa de calle, es posible abrir la puerta en cualquier momento,
pulsado el botón .
Activación Manual del Monitor (Autoencendido)
Con el monitor en reposo pulsar este botón durante 1 segundo para encender manualmente el monitor.
Para seleccionar secuencialmente entre la camara principal y secundaria (si existe) mantener pulsado el
botón / durante 2 segundos.
Para activar el audio y hablar con el visitante o abrir la puerta realizar los pasos descritos anteriormente.
Si no se establece comunicación con la placa de calle, el monitor se apaga automáticamente pasados 30
seg. Si se establece comunicación, ésta finalizará automáticamente a los 90 seg. o al pulsar el botón .
6
B/N
NOTA:
La pantalla del monitor
se enciende una vez
finalizada la llamada
desde placa.
F1: _____________________________________
F2: _____________________________________
Page 7
Loft Compact VDSLoft Compact VDS
Loft Compact VDSLoft Compact VDS
Loft Compact VDS
Loft Compact VDS
Loft Compact VDSLoft Compact VDS
Loft Compact VDSLoft Compact VDS
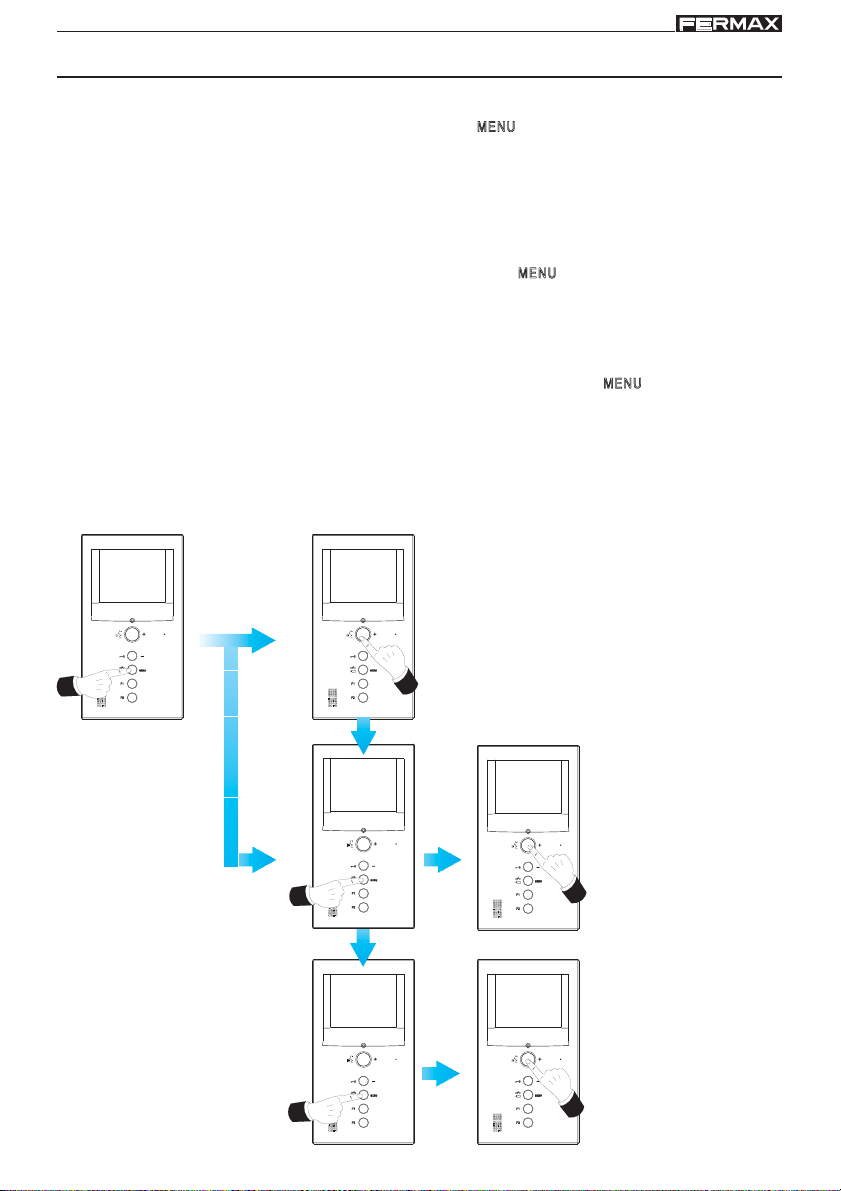
AJUSTES DEL MONITOR
Para ajustar los diferentes parámetros del monitor es necesario acceder al modo configuración.
Para acceder al modo configuración, pulsar el botón « » 5 segundos. El led parpadea 1 vez
por segundo y se escucha un sonido de confirmación.
Ajuste Volumen de Llamada
Estando en modo configuración pulsar el botón «+» para seleccionar un volumen alto o «-» para
seleccionar un volumen bajo.
Selección Tono de llamada y Cancelación de llamada
Estando en modo configuración pulsar de nuevo el botón « ».
A continuación, pulsar el botón «+» para cambiar el tono de llamada del monitor.
Pulsar «-» para activar la Cancelación de llamada.
El led del monitor parpadea en color rojo indicando el modo «no molestar».
Configuración de la Imagen
Estando en modo selección tono de llamada pulsar de nuevo el botón . El led parpadea 1
vez cada dos segundos, indicando que el monitor se encuentra en modo configuración de imagen.
El monitor dispone de 4 configuraciones preestablecidas con un determinado nivel de brillo,
contraste y color.
Pulsar el botón «+» para cambiar secuencialmente entre las diferentes configuraciones de
brillo y contraste. (Una vez se llega a la primera o última configuración se escucha un tono de aviso).
Pulsar el botón «-» para cambiar secuencialmente entre las diferentes configuraciones de
color (monitor color).
(5 seg.)
Entrar en
modo
configuración
Ajuste Volumen de llamada
Selección tono de llamada
y cancelación llamada
Configuración de la imagen
7
Page 8
Loft Compact VDSLoft Compact VDS
Loft Compact VDSLoft Compact VDS
Loft Compact VDS
Loft Compact VDS
Loft Compact VDSLoft Compact VDS
Loft Compact VDSLoft Compact VDS
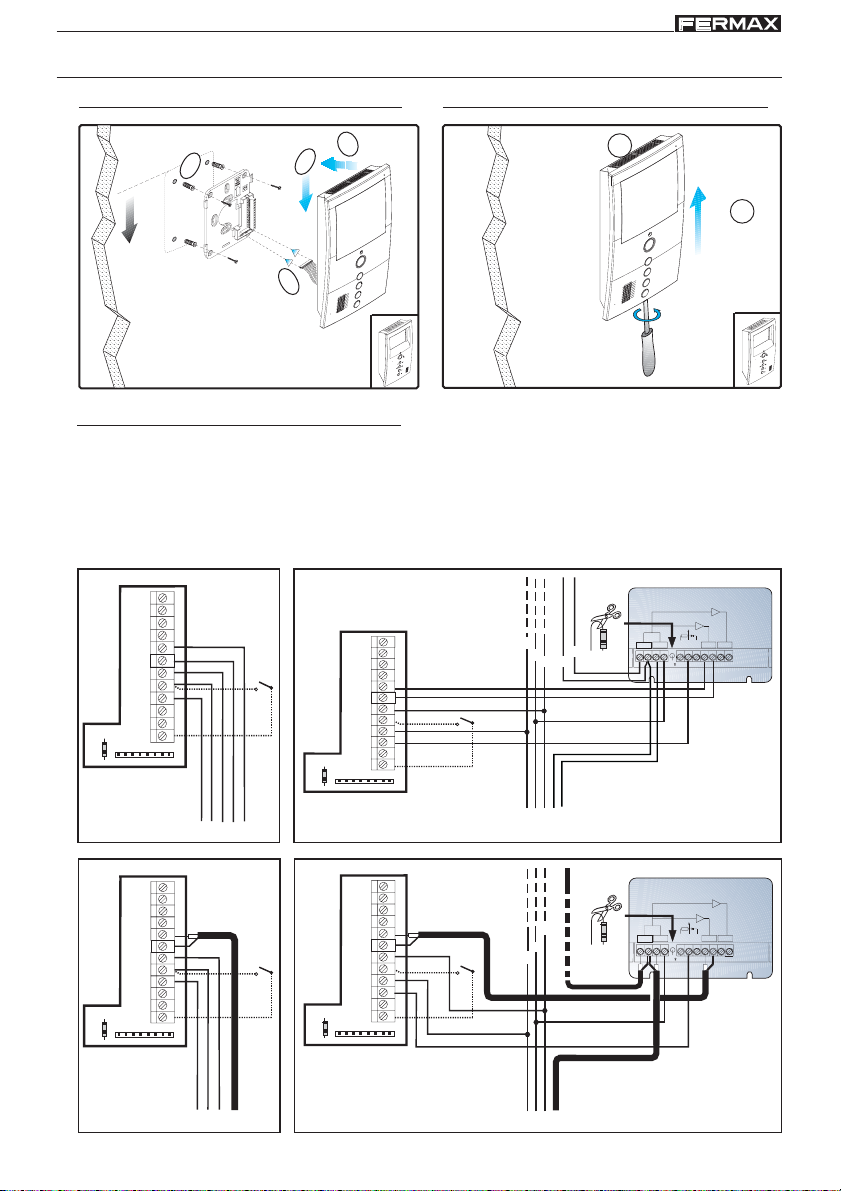
INSTALACIÓN Y CONEXIONADO
DesmontajeMontaje
1
4
1.60m
5.25 feet
2
Conexionado
L: datos y audio.
+, -: alimentación (18 Vdc).
V: vivo (coaxial - video).
M: malla (coaxial - video).
Ct: activación telecamara (10 Vdc).
F1
F2
M
V
V
CT
M
+
-
L
A
T
P1
3
1
T, -: pulsador de llamada puerta vivienda (P1).
A, +: conexión Prolongador de llamada ref 2040,...
F1, F2: Funciones adicionales (salida negativo «-»).
Corriente máxima por pulsador F1,F2: 50mA a 12Vdc.
REF.2448
F1
F2
M
V
V
M
+
-
L
CT
A
T
P1
L
+
R
V
M
90º
DISTRIBUIDOR VIDEO 2 SALIDAS
2 OUTPUTS VIDEO DISTRIBUTOR
+
(-)
2
+18
V5V1M
M
V
34
R1
75
2
6
VM M
M
V
-
L
-
L
MV
+
F1
F2
M
V
V
M
+
-
L
CT
A
T
L
8
P1 P1
-
+
F1
CT
F2
M
V
V
M
+
-
L
A
T
+
DISTRIBUIDOR VIDEO 2 SALIDAS
REF.2448
2 OUTPUTS VIDEO DISTRIBUTOR
+
+
-
L
-
L
+
(-)
2
R
V5V1M
6
+18
M
V
VM M
34
R1
75
Page 9
Loft Compact VDSLoft Compact VDS
Loft Compact VDSLoft Compact VDS
Loft Compact VDS
Loft Compact VDS
Loft Compact VDSLoft Compact VDS
Loft Compact VDSLoft Compact VDS
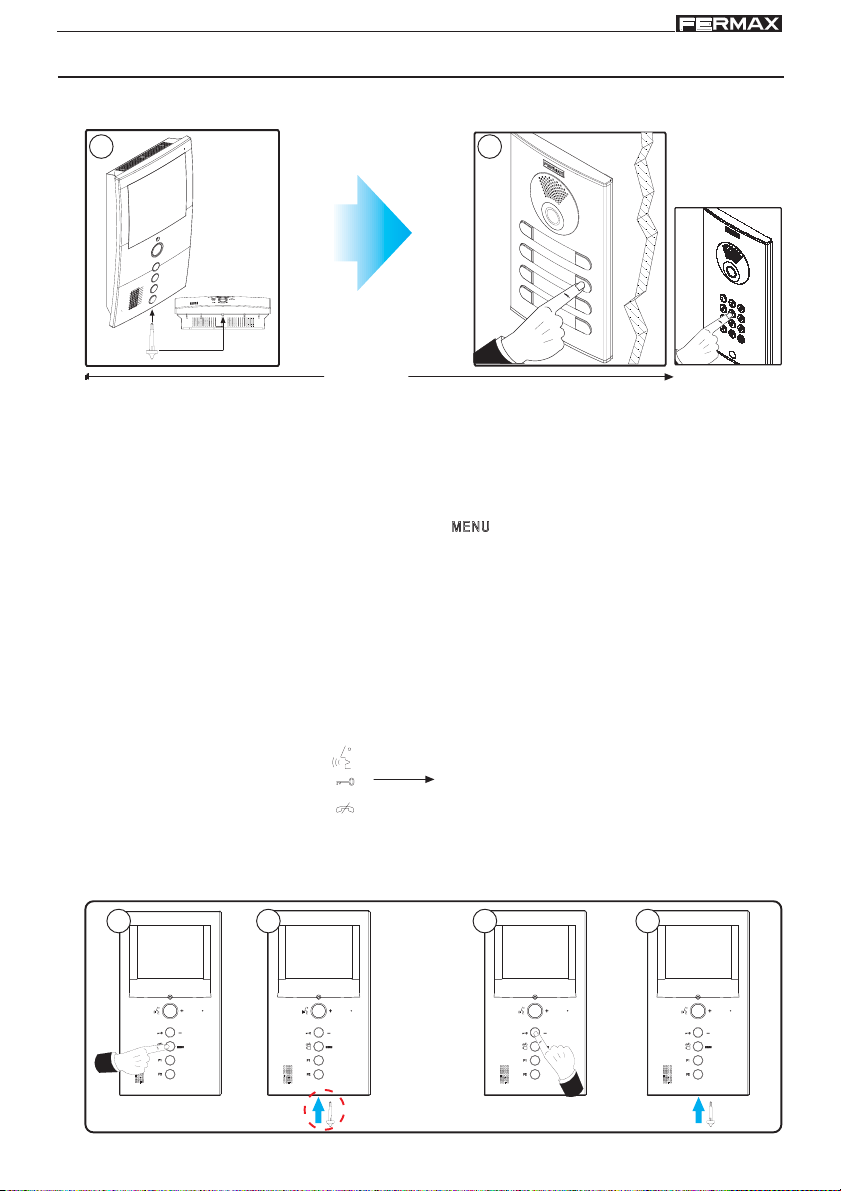
PROGRAMACIÓN MONITOR
Opción 1: Desde Placa + Monitor
1 2
i
< 2 min
1º. Con el monitor conectado pulse el botón de programación. Se oirá un sonido de confirmación.
2º. Pulse el botón de llamada a vivienda. De nuevo se produce confirmación.
* El monitor no funcionará mientras no haya sido programado.
Opción 2: Desde Monitor
1º. Entrar en modo configuración: Pulsar el botón 5 segundos. El led parpadea 1 vez por
segundo y se escucha un sonido de confirmación.
2º. Poner el monitor en programación: Con el monitor conectado pulsar el botón de programación
durante 1 segundo.
En ese momento, mediante tonos agudos se indica el número de llamada programado actualmente:
primero se indican las Centenas, después las Decenas y por último las Unidades.
Para separar cada unidad se enciende el led y se escucha un tono más grave.
3º. Programar el número de llamada: Cada vez que se presiona el botón correspondiente a centenas,
decenas o unidades se incrementa una cifra.
Centenas: Pulsar el botón
Decenas: Pulsar el botón
Unidades: Pulsar el botón
4º. Salir de programación: Pulsar el botón de programación o esperar 30 segundos sin pulsar ningún botón.
Al salir de programación se almacena el número indicado. Si es correcto (entre 1 y 199) se escucha un sonido de confirmación, si no es correcto se escuhca un sonido de error.
Una vez se llega al 9 y se vuelve a presionar
se emite un tono de error. La siguiente
pulsación comienza desde el número 1.
1º 2º 3º 4º
Nº actual:12
0
moc
bip
bip
moc
2
(5 seg.)
moc1bip
9
Page 10

Loft Compact VDSLoft Compact VDS
ENGLISH
Loft Compact VDSLoft Compact VDS
Loft Compact VDS
Loft Compact VDS
Loft Compact VDSLoft Compact VDS
Loft Compact VDSLoft Compact VDS
Colour
BUTTONS
Audio Activation Button and Autostart
· Colour Monitor: When a call is received, press this button to speak to the visitor. The audio channel
between the entry panel and the residence is open; operating in hands-free mode.
· B/W Monitor: When a call is received, press the button to talk to the visitor and release it to listen.
With the monitor on standby, hold down this button for 1 second to switch the monitor on manually (video
only). Press the button again to get audio.
Lock Release / Call Guard Unit Button
· The lock-release is activated by pressing the button with the monitor activated.
· Pressing this button whilst the monitor is on standby will result in a call being made to the
guard unit (where one exists).
Hang-Up Button / Main-Secondary Camera Selection / Menu
· Press to terminate communication.
· With video, hold this button / down for 2 seconds to sequentially select between
the main camera and the secondary camera (where one exists).
· With the monitor on standby, hold down this button for 2 seconds to go into monitor
configuration mode. See the “Monitor Settings” section.
F1
F1 and F2: Buttons for Additional Functions
(assigned by the installer).
OPERATION
Answering a call
When the call button on the Entry Panel is pressed a call tone is emitted both from the panel and
on the monitor, causing the screen to start up.
· Colour Monitor: Press the button to speak to the visitor. The audio channel between the entry
panel and the residence is open; operating in hands-free mode.
· B/W Monitor: Press the button to talk to the visitor and release it to listen.
The communication facility will automatically terminate after 90 seconds, or at any time
by pressing the button
If communication is not established with the street panel, the monitor will automatically go off after
30 seconds.
Opening the door
When a call is received from the entry panel, it is possible to open the door at any time, by
pressing the button .
Manual Activation of the Monitor (Auto-start)
With the monitor on standby, hold down this button for 1 second to switch the monitor on
manually. To sequentially select between the main camera and the secondary camera (where one
exists), hold the button / down for 2 seconds.
To activate audio and talk to your visitor or open the door, take the steps described above.
If communication is not established with the entry panel, the monitor will automatically go off after
30 seconds. The communication facility will automatically terminate after 90 seconds, or at any
time by pressing the button .
10
. The LED will remain off whilst the conversation is underway.
NOTE:
B/W
The monitor screen
goes on once the call
from the panel has
ended.
F1: _____________________________________
F2: _____________________________________
Page 11

Loft Compact VDSLoft Compact VDS
Loft Compact VDSLoft Compact VDS
Loft Compact VDS
Loft Compact VDS
Loft Compact VDSLoft Compact VDS
Loft Compact VDSLoft Compact VDS
MONITOR SETTINGS
To set up the different monitor parameters, it is necessary to access the configuration mode.
To access configuration mode, press the « » for 5 seconds. The LED blinks once per
second and a confirmation tone is heard.
Call Volume Setting
When in configuration mode, press the «+» button to select high volume or «-» to select low
volume.
Call Tone Selection and Call Cancellation
When in configuration mode, press the « » button again.
Now, press the «+» button to change the monitor call tone.
Press «-» to activate Call Cancellation.
The monitor led blinks on red to indicate «do not disturb» mode.
Image Configuration
Press the button againin tone selection . The LED flashes once every two seconds,
indicating that the monitor is in image configuration mode.
The monitor has 4 pre-established configurations with a certain level of shine, contrast and
colour.
Press the button «+» to alternate sequentially between the different shine and contrast
configurations. (When you reach the first or last configuration option a warning tone will sound).
Press the button «-» to alternate sequentially between the different colour configurations.
(5 sec.)
Enter
configuration
mode
Set call volume
Select call tone and call
cancellation
Image configuration
11
Page 12

Loft Compact VDSLoft Compact VDS
Loft Compact VDSLoft Compact VDS
Loft Compact VDS
Loft Compact VDS
Loft Compact VDSLoft Compact VDS
Loft Compact VDSLoft Compact VDS
INSTALLATION AND WIRING
DisassemblyAssembly
1
1.60m
5.25 feet
Connections
L: data & audio.
+, -: power supply (18 Vdc).
V: live (coaxial - video).
M: shield (coaxial - video).
Ct: camera activation (10 Vdc).
F1
F2
M
V
V
M
+
-
L
CT
A
T
2
P1
3
1
4
90º
T, -: call pushbutton at the apartment’s door (P1).
A, +: extension Call connection ref. 2040,...
F1, F2:Additional functions (negative output).
Maximum current per pussbutton F1, F2: 50mA with 12Vdc.
DISTRIBUIDOR VIDEO 2 SALIDAS
REF.2448
2 OUTPUTS VIDEO DISTRIBUTOR
(-)
F1
F2
M
V
V
M
+
-
L
CT
A
T
P1
L
+
R
V5V1M
M
V
M
R1
75
2
+
2
6
+18
V
VM M
34
M
V
-
L
-
L
MV
+
F1
F2
M
V
V
M
+
-
L
CT
A
T
L
12
P1 P1
-
+
F1
CT
F2
M
V
V
M
+
-
L
A
T
+
DISTRIBUIDOR VIDEO 2 SALIDAS
REF.2448
2 OUTPUTS VIDEO DISTRIBUTOR
+
+
-
L
-
L
+
(-)
2
R
V5V1M
6
+18
M
V
VM M
34
R1
75
Page 13

Loft Compact VDSLoft Compact VDS
Loft Compact VDSLoft Compact VDS
Loft Compact VDS
Loft Compact VDS
Loft Compact VDSLoft Compact VDS
Loft Compact VDSLoft Compact VDS
MONITOR PROGRAMMING
Option 1: From Panel + Monitor
1 2
i
< 2 min
1º. With the monitor connected, press the programming button. A confirmation tone is heard.
2º. Press the house call button. Another confirmation tone is heard.
* The monitor will not work unless it has been programmed.
Option 2: From the Monitor
1. Enter configuration mode: Press the button for 5 seconds. The LED blinks once per second
and a confirmation tone is heard.
2. Set the monitor in programming mode: With the monitor connected, press the programming button
for 1 second.
At this point, the call number currently programmed is indicated by means of high-pitched tones. First,
the Hundreds, then Tens, and finally the Units.
To separate each unit, the LED comes on and a lower tone is heard.
3. Program the call number: Every time the button corresponding to hundreds, tens or units is
pressed, the figure increases by one.
Hundreds: Press the button
Tens: Press the button
Units: Press the button
4. Exit programming: Press the programming button or wait for 30 seconds without pressing any buttons.
When you exit prgramming mode, the number indicated is stored. If it is correct (between 1 and
199), a confirmation tone is heard. If it is not correct, an error tone is heard.
If 9 is reached and the button is pressed
again, an error tone is heard. The next
button pressed starts off from number1.
1 2 3 4
Current no:12
0
moc
beep
beep
moc
2
(5 sec.)
moc1beep
13
Page 14

Loft Compact VDSLoft Compact VDS
FRANÇAIS
Loft Compact VDSLoft Compact VDS
Loft Compact VDS
Loft Compact VDS
Loft Compact VDSLoft Compact VDS
Loft Compact VDSLoft Compact VDS
Couleur
BOUTONS-POUSSOIRS
Bouton d’activation du son et allumage automatique
· Moniteur couleur: Si vous recevez un appel, appuyez sur la touche pour parler au visiteur. Le
canal audio sens rue-logement s’active et le tout fonctionne en mode mains libres.
· Moniteur N/B: Si vous recevez un appel, appuyez sur la touche pour parler avec le
visiteur et relâchez-la pour écouter.
Si le moniteur est en veille, appuyez sur cette touche pendant 1 seconde pour allumer manuellement
le moniteur (vidéo uniquement). Appuyez de nouveau sur la touche pour obtenir le son.
Bouton-poussoir de la gâche électrique / appel au concierge.
· Le moniteur étant activé, la gâche électrique est activée en appuyant sur ce bouton.
· Lorsque le moniteur est en veille, en appuyant sur ce bouton, un appel au concierge est effectué (s’il
y a une conciergerie).
Bouton de raccrochage / sélection caméra principale-secondaire / menu.
· Cliquez sur pour couper la communication.
· Avec vidéo, pour sélectionner la caméra principale ou la caméra secondaire (s’il y en a une)
l’une à la suite de l’autre, appuyez sur la touche / et maintenez-la enfoncée /
pendant 2 secondes.
· Si le moniteur est en veille, appuyez dessus pendant 2 secondes pour entrer en mode
configuration du moniteur. Voir rubrique « Réglages du moniteur ».
F1 et F2 : boutons pour fonctions supplémentaires
F1
(assignées par l’installateur).
FONCTIONNEMENT
Prendre un appel
En appuyant sur le bouton-poussoir d’appel sur la platine de rue, il se produit une tonalité d’appel aussi bien
au niveau de la platine de rue que du moniteur ; l’écran s’allume.
· Moniteur couleur: Appuyez sur la touche pour parler au visiteur. Le canal audio sens rue-logement
s’active et le tout fonctionne en mode mains libres.
· Moniteur N/B: Appuyez sur la touche pour parler avec le visiteur et relâchez-la pour écouter.
La communication est automatiquement coupée au bout de 90 secondes ou auparavant en appuyant sur le
bouton . La DEL reste éteinte pendant la durée de la conversation.
Si aucune communication n’est établie avec la platine de rue, le moniteur s’éteindra automatiquement au bout
de 30 s.
Ouverture de la porte
Si vous recevez un appel depuis la platine de rue, il est possible d’ouvrir la porte à tout moment
en appuyant sur le bouton .
Activation manuelle du moniteur (allumage automatique)
Si le moniteur est en veille, appuyez sur cette touche pendant 1 seconde pour allumer manuellement le
moniteur. Pour sélectionner la caméra principale ou la caméra secondaire (s’il y en a une) l’une à la suite de
l’autre, appuyez sur la touche / et maintenez-la enfoncée / pendant 2 secondes.
Pour activer le son, parler avec le visiteur ou ouvrir la porte, effectuez les étapes décrites antérieurement.
Si aucune communication n’est établie avec la platine de rue, le moniteur s’éteindra automatiquement au bout
de 30 s. Si la communication est établie, celle-ci sera coupée automatiquement au bout de 90 secondes ou
en appuyant sur la touche .
14
REMARQUE :
N/B
L’écran du moniteur
s’allume une fois
l’appel en provenance
de la platine terminé.
F1: ________________________________
F2: ________________________________
Page 15

Loft Compact VDSLoft Compact VDS
Loft Compact VDSLoft Compact VDS
Loft Compact VDS
Loft Compact VDS
Loft Compact VDSLoft Compact VDS
Loft Compact VDSLoft Compact VDS
RÉGLAGES DU MONITEUR
Pour régler les différents paramètres du moniteur, il faut accéder au mode de configuration.
Pour accéder au mode de configuration, appuyez sur la touche « » durant 5 secondes.
La DEL clignote 1 fois par seconde et une tonalité de confirmation est émise.
Réglage volume d’appel
Une fois en mode configuration, appuyez sur la touche « + » pour sélectionner un volume élevé
ou « - » pour sélectionner un volume faible.
Sélection de la tonalité d’appel et annulation de l’appel
Une fois en mode de configuration, appuyez de nouveau sur la touche « ».
Appuyez ensuite sur la touche « + » pour modifier la tonalité d’appel du moniteur.
Appuyez sur « - » pour activer l’annulation de l’appel.
La DEL du moniteur clignote en rouge, ce qui indique le mode « ne pas déranger ».
Configuration de l’image
Une fois en mode de sélection de la tonalité d’appel, appuyez de nouveau sur la touche .
La DEL clignote 1 fois toutes les deux secondes, indiquant de la sorte que le moniteur se trouve
en mode configuration de l’image.
Le moniteur dispose de 4 configurations préétablies avec un niveau de luminosité, de contraste et
de couleur déterminé.
Appuyez sur le bouton « + » pour modifier les unes à la suite des autres les différentes
configurations de luminosité et contraste (une fois que l’on parvient à la première ou à la dernière
configuration, une tonalité d’avertissement est émise).
Appuyez sur la touche « - » pour modifier les unes à la suite des autres les différentes
configurations de couleur.
(5s.)
Entrer en
mode de
configuration
Réglage volume d’appel
Sélection de la tonalité
d’appel et annulation de
l’appel
Configuration de l’image
15
Page 16

Loft Compact VDSLoft Compact VDS
Loft Compact VDSLoft Compact VDS
Loft Compact VDS
Loft Compact VDS
Loft Compact VDSLoft Compact VDS
Loft Compact VDSLoft Compact VDS
INSTALLATION ET CONNEXIONS
DémontageMontage
1
1.60m
5.25 feet
Connexions
L: données et audio.
+, - : alimentation (18 Vcc).
V: vif (coaxial - video).
M: maille (coaxial - video).
Ct: activation caméra (10 Vdc).
F1
F2
M
V
V
M
+
-
L
CT
A
T
2
P1
3
1
4
2
90º
T, -: poussoir d’appel sur la porte du logement (P1).
A, +: connexion Prolongateur d'appel ref 2040,...
F1, F2: Fonctions supplémentaires (sortie négatif).
Courrant maximum du bouton-poussoir F1,F2: 50mA a
12Vdc.
DISTRIBUIDOR VIDEO 2 SALIDAS
REF.2448
2 OUTPUTS VIDEO DISTRIBUTOR
+
(-)
2
F1
F2
M
V
V
M
+
-
L
CT
A
T
P1
L
+
R
V
M
V5V1M
6
+18
M
V
VM M
34
R1
75
M
V
-
L
-
L
MV
+
F1
F2
M
V
V
M
+
-
L
CT
A
T
L
16
P1 P1
-
+
F1
CT
F2
M
V
V
M
+
-
L
A
T
+
DISTRIBUIDOR VIDEO 2 SALIDAS
REF.2448
2 OUTPUTS VIDEO DISTRIBUTOR
+
+
-
L
-
L
+
(-)
2
R
V5V1M
6
+18
M
V
VM M
34
R1
75
Page 17

Loft Compact VDSLoft Compact VDS
Loft Compact VDSLoft Compact VDS
Loft Compact VDS
Loft Compact VDS
Loft Compact VDSLoft Compact VDS
Loft Compact VDSLoft Compact VDS
PROGRAMMATION DU MONITEUR
Option 1 : à partir de la platine + moniteur
1 2
i
< 2 min
1º. Une fois le moniteur connecté, appuyez sur le bouton de programmation. Une tonalité de confirmation
est émise.
2º.Appuyez sur le bouton-poussoir d’appel vers le logement. Une tonalité de confirmation est à
nouveau émise.
* Le moniteur ne fonctionnera pas tant qu’il n’aura pas été programmé.
Option 2 : à partir du moniteur
1º. Entrer en mode de configuration : appuyez sur le bouton pendant 5 secondes. La DEL
clignote 1 fois par seconde et une tonalité de confirmation est émise.
2º. Mettre le moniteur en mode programmation : une fois le moniteur connecté, appuyez sur le bouton
de programmation pendant 1 seconde.
A partir de ce moment, par le biais de tonalités aiguës, le numéro d’appel actuellement programmé est
indiqué : l’on indique en premier les centaines, puis les dizaines et enfin les unités.
Pour séparer chaque unité, la DEL s’allume et une tonalité plus grave est émise.
3º. Programmer le numéro d’appel : chaque fois que vous appuierez sur le bouton correspondant
aux centaines, dizaines ou unités, le nombre augmentera d’un chiffre.
Centaines : appuyez sur le bouton
Dizaines : appuyez sur le bouton
Unités : appuyez sur le bouton
Une fois arrivé au 9 et si vous appuyez une
fois de plus sur cette touche, une tonalité
d’erreur sera émise. En appuyant une fois de
plus, la numérotation reprend au numéro 1.
4º. Quitter la programmation : appuyez sur le bouton de programmation ou attendez 30 secondes sans
appuyer sur aucune touche.
En quittant la programmation, le numéro indiqué est stocké. S’il est correct (entre 1 et 199), une
tonalité de confirmation sera émise. S’il n’est pas correct, une tonalité d’erreur sera émise.
1º 2º 3º 4º
(5 s.)
Nº actuel :12
moc
2
1
0
bip
bip
bip
moc
moc
17
Page 18

Loft Compact VDSLoft Compact VDS
DEUTSCH
Loft Compact VDSLoft Compact VDS
Loft Compact VDS
Loft Compact VDS
Loft Compact VDSLoft Compact VDS
Loft Compact VDSLoft Compact VDS
Farbe
TASTEN
Taste Audioaktivierung und Eigenstart
· Farbe Monitor: Drücken Sie beim Empfang eines Anrufs auf die Taste , um die Sprechfunktion
zu aktivieren. Der Audiokanal wird in Richtung Türstation und Wohnung geöffnet und auf
Freisprechbetrieb geschaltet.
· S/W Monitor: Nach der Aktivierung müssen Sie die Taste drücken, um mit der Person zu
sprechen und sie loslassen, um den Anrufer zu hören.
Falls der Monitor sich im Bereitschaftsmodus befindet, halten Sie diese Taste eine Sekunde
lang gedrückt, um ihn manuell einzuschalten (nur Videoübertragung). Drücken Sie erneut ,
um auch die Audioübertragung zu aktivieren.
Türöffnungstaste / Portierruf
· Bei aktiviertem Monitor wird durch Drücken dieser Taste der Türöffner ausgelöst.
· Bei aufgelegtem Telefonhörer wird durch Drücken dieser Taste eine Verbindung zur Portierzentrale
hergestellt (falls vorhanden).
Auflegtaste / Wähltaste Haupt-/Zusatzkamera / Menü
· Drücken Sie die Taste, um die Verbindung zu beenden.
· Um zwischen der Haupt- und der Zusatzkamera (falls vorhanden) hin- und herzuschalten,
müssen Sie die Taste / zwei Sekunden lang gedrückt halten.
· Wenn sich der Monitor im Bereitschaftsmodus befindet, können Sie die Taste zwei Sekunden
lang gedrückt halten, um in den Konfigurationsmodus des Monitors zu gelangen.
Siehe Abschnitt “Einstellungen des Monitors”.
F1 und F2: Tasten für Zusatzfunktionen
F1
(Festgelegt durch den Installateur).
FUNKTIONSWEISE
Anrufannahme
Durch Drücken der Ruftaste an der Türstation wird ein Rufton an der Türstation und am
Monitor ausgelöst und der Bildschirm schaltet sich ein.
· Farbe Monitor: Drücken Sie die Taste , um mit dem Besucher zu sprechen. Der Audiokanal wird in
Richtung Türstation und Wohnung geöffnet und auf Freisprechbetrieb geschaltet.
· S/W Monitor: Drücken Sie die Taste , , um mit dem Besucher zu sprechen und lassen Sie sie
los, um ihn zu hören.
Das Gespräch wird nach Ablauf von 90 Sekunden automatisch beendet oder durch Drücken der
Taste abgebrochen. Die LED bleibt während des Sprechverkehrs ausgeschaltet.
Falls keine Sprechverbindung mit der Türstation hergestellt wird, schaltet sich der Monitor nach Ablauf von
30 Sekunden automatisch aus.
Türöffnung
Wenn ein Anruf von der Türstation empfangen wird, kann die Tür zu jedem beliebigen Zeitpunkt durch
Drücken der Taste geöffnet werden.
Manuelle Aktivierung des Monitors (Eigenstart)
Falls der Monitor sich im Bereitschaftsmodus befindet, halten Sie diese Taste eine Sekunde lang gedrückt, um
ihn manuell einzuschalten. Um zwischen der Haupt- und der Zusatzkamera (falls vorhanden) hin- und
herzuschalten, halten Sie die Taste / zwei Sekunden lang gedrückt.
Um die Audiofunktion zu aktivieren und mit dem Besucher zu sprechen, müssen Sie die zuvor
beschriebenen Schritte ausführen.
Falls keine Sprechverbindung mit der Türstation hergestellt wird, schaltet sich der Monitor nach Ablauf von
30 Sekunden automatisch aus. Falls eine Sprechverbindung hergestellt wird, wird diese nach Ablauf von 90
Sekunden oder beim Drücken der Taste automatisch unterbrochen.
18
HINWEIS:
S/W
Der Bildschirm des
Monitors schaltet sich
ein, nachdem das
Gespräch über die
Türstation beendet
worden ist.
F1: _____________________________________
F2: _____________________________________
Page 19

Loft Compact VDSLoft Compact VDS
Loft Compact VDSLoft Compact VDS
Loft Compact VDS
Loft Compact VDS
Loft Compact VDSLoft Compact VDS
Loft Compact VDSLoft Compact VDS
MONITOREINSTELLUNGEN
Zur Einstellung der unterschiedlichen Monitorparameter ist es notwendig, den Konfigurationsmodus
aufzurufen.
Um in den Konfigurationsmodus zu gelangen, drücken Sie 5 Sekunden lang die Taste " ".
Die LED blinkt ein Mal pro Sekunde und es wird ein Bestätigungston ausgegeben.
Lautstärkeregelung
Drücken Sie im Konfigurationsmodus die Taste "+", um die Lautstärke zu erhöhen oder die Taste
"-", um die Lautstärke zu verringern.
Auswahl des Ruftons und der Anrufunterbrechung
Drücken Sie im Konfigurationsmodus erneut die Taste " ".
Drücken Sie anschließend die Taste "+", um den Rufton am Monitor zu ändern.
Drücken Sie die Taste "-", um eine Anrufunterbrechung durchzuführen.
Die LED des Monitors blinkt in Rot und zeigt dadurch den Modus «Nicht stören» an.
Bildeinstellungen
Drücken Sie im Modus Ruftonauswahl erneut die Taste . Die LED blinkt im 2-Sekundenintervall
und zeigt an, dass sich der Monitor im Bildeinstellungsmodus befindet.
Der Monitor verfügt über vier Voreinstellungen (Helligkeit, Kontrast und Farbe) der Bildwiedergabe.
Drücken Sie die Taste «+» , um zwischen den Voreinstellungen von Helligkeit und Kontrast
hin- und herzuschalten. Nachdem Sie die erste oder letzte Voreinstellung erreicht haben, ertönt ein
Signalton.
Drücken Sie die Taste «-» , um zwischen den unterschiedlichen Farbvoreinstellungen zu
wechseln.
(5 Sekunden)
Aufrufen des
Konfigurationsmodus
Lautstärkeregelung
Auswahl des Ruftons
und Anrufunterbrechung
Bildeinstellungen
19
Page 20

Loft Compact VDSLoft Compact VDS
Loft Compact VDSLoft Compact VDS
Loft Compact VDS
Loft Compact VDS
Loft Compact VDSLoft Compact VDS
Loft Compact VDSLoft Compact VDS
INSTALLATION UND VERKABELUNG
DemontageMontage
1
4
1.60m
5.25 feet
2
Verkabelung
L: Daten und Audio.
+, - : Stromversorgung (18 Vdc).
V: Kern (Koaxial - video).
M: Schirm (koaxial - video).
Ct: Aktivierung der Kamera (10 Vdc).
F1
F2
M
V
V
CT
M
+
-
L
A
T
P1
3
1
2
90º
T, -: Ruftaste an der Wohnungstür (P1).
A, +:Anschluss Anruferweiterungsmodul.
F1, F2: Zusatzfunktionen (Negativausgang).
Maximale Strömmung pro Taster F1, F2: 50mA mit
12Vdc.
DISTRIBUIDOR VIDEO 2 SALIDAS
REF.2448
2 OUTPUTS VIDEO DISTRIBUTOR
+
(-)
2
F1
F2
M
V
V
M
+
-
L
CT
A
T
P1
L
+
R
V
M
V5V1M
6
+18
M
V
VM M
34
R1
75
M
V
-
L
-
L
MV
+
F1
F2
M
V
V
M
+
-
L
CT
A
T
L
20
P1 P1
-
+
F1
CT
F2
M
V
V
M
+
-
L
A
T
+
DISTRIBUIDOR VIDEO 2 SALIDAS
REF.2448
2 OUTPUTS VIDEO DISTRIBUTOR
+
+
-
L
-
L
+
(-)
2
R
V5V1M
6
+18
M
V
VM M
34
R1
75
Page 21

Loft Compact VDSLoft Compact VDS
Loft Compact VDSLoft Compact VDS
Loft Compact VDS
Loft Compact VDS
Loft Compact VDSLoft Compact VDS
Loft Compact VDSLoft Compact VDS
PROGRAMMIERUNG DES MONITORS
Option 1: Über Türstation + Monitor
1 2
i
< 2 Min.
1. Drücken Sie bei eingeschaltetem Monitor die Programmiertaste. Der Vorgang wird durch einen
Signalton bestätigt.
2. Drücken Sie die Ruftaste der Wohnung. Der Vorgang wird erneut durch einen Signalton bestätigt.
* Der Monitor ist nicht betriebsbereit, wenn er nicht programmiert wurde.
Option 2: Über Monitor
1. Aufrufen des Konfigurationsmodus: Drücken Sie die Taste 5 Sekunden lang. Die LED blinkt
ein Mal pro Sekunde und es wird ein Bestätigungston ausgegeben.
2. Aufrufen des Programmiermodus: Drücken Sie die Programmiertaste bei eingeschaltetem Monitor
eine Sekunde lang.
In diesem Moment wird über hochfrequente Töne die aktuell einprogrammierte Rufnummer angegeben:
Zuerst wird die Hundertereinheit, dann die Zehnereinheit und zum Schluss die Einereinheit angezeigt.
Um jede der Einheiten zu trennen, leuchtet die LED auf und es wird ein tieferer Signalton ausgegeben.
3. Programmierung der Rufnummer: Jedes Mal, wenn die die entsprechende Taste gedrückt wird,
erhöht sich die Hunderter-, Zehner- bzw. Einereinheit.
Hundertereinheit: Drücken Sie die Taste
Zehnereinheit Drücken Sie die Taste
Einereinheit: Drücken Sie die Taste
4. Verlassen des Programmiermodus: Drücken Sie die Programmiertaste oder warten Sie 30 Sekunden
lang, ohne dabei eine Taste zu drücken.
Beim Verlassen des Programmiermodus wird die angezeigte Nummer gespeichert. Falls sie richtig
ist (zwischen 1 und 199), ertönt ein Bestätigungston und bei falscher Eingabe ein Fehlerton.
Beim Erreichen von 9 und erneutem
Drücken, ertönt ein Fehlerton. Bei erneutem
Drücken beginnt die Anzeige wieder bei 1.
1. 2. 3. 4.
(5 Sekunden)
Aktuelle Nr.:12
0
moc1bip
moc
bip
bip
moc
2
21
Page 22

Loft Compact VDSLoft Compact VDS
Loft Compact VDSLoft Compact VDS
Loft Compact VDS
Loft Compact VDS
Loft Compact VDSLoft Compact VDS
Loft Compact VDSLoft Compact VDS
Cor
BOTÕES
Botão de Activação Áudio e Ligação Automática
· Monitor cor: Ao receber uma chamada, premir o botão para falar com o visitante. Abre-se
o canal de áudio no sentido rua e vivenda, o funcionamento é em modo mãos livres.
· Monitor P/B: Ao receber uma chamada, prima o botão para falar com o visitante, e solte-o para
escutar.
Com o monitor em repouso, prima este botão durante 1 segundo para ligar o monitor manualmente (só
vídeo). Voltar a pressionar o botão para obter áudio.
Botão do trinco / chamada ao porteiro
· Estando activado o monitor, ao premir este botão, activa-se o trinco.
· Com o monitor em repouso, ao premir este botão, realiza-se uma chamada ao porteiro (se existir
portaria).
Botão de desligar / Selecção da câmara principal-secundária / Menu
· Premir para terminar a comunicação.
· Com vídeo, manter o botão / durante 2 segundos para escolher sequencialmente entre a
câmara principal e a secundária (se existir).
· Com o monitor em repouso, premir durante 2 segundos para entrar no modo de configuração do
monitor. Ver a secção «Ajustes do monitor».
F1
F1 e F2: Botões para Funções Adicionais
(Atribuídas pelo instalador).
F1: _____________________________________
F2: _____________________________________
P/B
NOTA:
O ecrã do monitor
acende-se, uma vez
terminada a chamada
a partir da placa.
FUNCIONAMENTO
Atender uma chamada
Ao pressionar o botão de chamada na Placa de Rua, ouve-se um som de chamada tanto na
placa de rua como no monitor, acendendo-se o ecrã.
· Monitor cor: Premir o botão para falar com o visitante. Abre-se o canal de áudio no sentido rua e
vivenda, o funcionamento é em modo mãos livres.
· Monitor P/B: Prima o botão para falar com o visitante, e solte-o para escutar.
A comunicação terminará automaticamente após 90 segundos ou em qualquer momento, ao premir
o botão . O LED permanecerá apagado enquanto durar a conversação.
Se não se estabelecer comunicação com a placa de rua, o monitor desliga-se automaticamente passados
30 seg.
Abertura da porta
Ao receber uma chamada a partir da placa de rua, é possível abrir a porta em qualquer momento,
premindo o botão .
Activação Manual do Monitor (Ligação automática)
Com o monitor em repouso, premir este botão durante 1 segundo, para ligar manualmente o monitor. Para
escolher sequencialmente entre a câmara principal e a secundária (se existir), manter o botão /
premido durante 2 segundos.
Para activar o áudio e falar com o visitante ou abrir a porta, seguir os passos descritos anteriormente.
Se não se estabelecer comunicação com a placa de rua, o monitor desliga-se automaticamente passados
30 seg. Se se estabelecer comunicação, esta terminará automaticamente após 90 seg. ou ao premir o botão
.
22
PORTUGUÊS
Page 23

Loft Compact VDSLoft Compact VDS
Loft Compact VDSLoft Compact VDS
Loft Compact VDS
Loft Compact VDS
Loft Compact VDSLoft Compact VDS
Loft Compact VDSLoft Compact VDS
AJUSTES DO MONITOR
Para acertar os diferentes parâmetros do monitor, é necessário aceder ao modo de configuração.
Para aceder ao modo de configuração, prima o botão « » durante 5 segundos. O LED pisca
1 vez por segundo e ouve-se um som de confirmação.
Ajuste do Volume da Chamada
Estando no modo de configuração, prima o botão «+», para seleccionar um volume alto ou «-»,
para seleccionar um volume baixo.
Selecção do Som de chamada e Cancelamento de chamada
Estando no modo de configuração, prima de novo o botão « ».
Seguidamente, prima o botão «+», para mudar o som de chamada do monitor.
Prima «-» para activar o Cancelamento de chamada.
O LED do monitor pisca a vermelho, indicando o modo «não incomodar».
Configuração da Imagem
Estando em modo selecção do som de chamada, premir novamente o botão . O LED pisca
1 vez cada dois segundos, indicando que o monitor se encontra no modo de configuração de
imagem.
O monitor dispõe de 4 configurações pré-definidas com um determinado nível de brilho, contraste
e cor.
Pressionar o botão «+» para trocar sequencialmente as diferentes configurações de brilho
e contraste. (Quando se chega à primeira ou à ultima configuração, ouve-se um som de aviso).
Premir o botão «-» para trocar sequencialmente as diferentes configurações de cor.
(5 seg.)
Entrar no modo de
configuração
Ajuste do Volume da chamada
Selecção do som de chamada
e cancelamento da chamada
Configuração da imagem
23
Page 24

Loft Compact VDSLoft Compact VDS
Loft Compact VDSLoft Compact VDS
Loft Compact VDS
Loft Compact VDS
Loft Compact VDSLoft Compact VDS
Loft Compact VDSLoft Compact VDS
INSTALAÇÃO E LIGAÇÃO
DesmontagemMontagem
1
4
1.60m
5.25 feet
2
Ligações
L: dados e áudio.
+, - : alimentação (18 Vdc).
V: vivo (coaxial - video)
M: malha (coaxial - video)
Ct: activação telecâmara (10 Vdc).
F1
F2
M
V
V
CT
M
+
-
L
A
T
P1
3
1
2
90º
T,-: botão de chamada na porta do apartamento (P1).
A,+: ligaçao Prolongador de chamada ref 2040...
F1, F2: Funções adicionais (saída negativo «-»).
Corrente máxima por botão F1,F2: 50mA a 12Vdc.
DISTRIBUIDOR VIDEO 2 SALIDAS
REF.2448
2 OUTPUTS VIDEO DISTRIBUTOR
+
(-)
2
F1
F2
M
V
V
M
+
-
L
CT
A
T
P1
L
+
R
V
M
V5V1M
6
+18
M
V
VM M
34
R1
75
M
V
-
L
-
L
MV
+
F1
F2
M
V
V
M
+
-
L
CT
A
T
L
24
P1 P1
-
+
F1
CT
F2
M
V
V
M
+
-
L
A
T
+
DISTRIBUIDOR VIDEO 2 SALIDAS
REF.2448
2 OUTPUTS VIDEO DISTRIBUTOR
+
+
-
L
-
L
+
(-)
2
R
V5V1M
6
+18
M
V
VM M
34
R1
75
Page 25

Loft Compact VDSLoft Compact VDS
Loft Compact VDSLoft Compact VDS
Loft Compact VDS
Loft Compact VDS
Loft Compact VDSLoft Compact VDS
Loft Compact VDSLoft Compact VDS
PROGRAMAÇÃO DO MONITOR
Opção 1: A partir da Placa + Monitor
1 2
i
< 2 Min.
1º. Com o monitor ligado, prima o botão de programação. Ouve-se um som de confirmação.
2º. Prima o botão de chamada da vivenda. Ouve-se novamente a confirmação.
* O monitor não funciona enquanto não tiver sido programado.
Opção 2: A partir do Monitor
1º. Entrar no modo de configuração: Prima o botão por 5 segundos. O LED pisca 1 vez por
segundo e ouve-se um som de confirmação.
2º. Coloque o monitor em programação: Com o monitor ligado, prima o botão de programação durante
1 segundo.
Nesse momento, indica-se o número de chamada actualmente programado, através de sons agudos:
primeiro, indicam-se as centenas, depois as dezenas e, por último, as unidades.
Para separar cada unidade, o LED acende-se e escuta-se um som mais grave.
3º. Programar o número de chamada: Cada vez que se prime o botão correspondente às centenas,
dezenas ou unidades, aumenta-se um número.
Centenas: Prima o botão
Dezenas: Prima o botão
Unidades: Prima o botão
Se, ao chegar ao 9, voltar a premir, ouvese um som de erro. A activação seguinte
começa no número 1.
4º. Sair da programação: Prima o botão de programação, ou aguarde 30 segundos sem premir qualquer
botão.
Ao sair da programação, fica guardado o número indicado. Se estiver correcto (entre 1 e 199),
escuta-se um som de confirmação, mas se não estiver correcto, ouve-se um som de erro.
1º 2º 3º 4º
(5 seg.)
Nº actual: 12
moc1bip
2
0
bip
bip
moc
moc
25
Page 26

Loft Compact VDSLoft Compact VDS
Loft Compact VDSLoft Compact VDS
Loft Compact VDS
Loft Compact VDS
Loft Compact VDSLoft Compact VDS
Loft Compact VDSLoft Compact VDS
E
CARACTERÍSTICAS TÉCNICAS
F
CARACTERISTIQUES TECHNIQUES
P
CARACTERÍSTICAS TÉCNICAS
EN
TECHNICAL FEATURES
D
TECHNISCHE EIGENSCHAFTEN
Alimentación - Power Supply - Alimentation
Stromversorgung - Alimentação
Consumo - Consumption - Consommation
Stromverbrauch - Consumo
reposo - standby - repos - Bereitschaftsmodus - repouso
llamada - call - appel - anruf - chamada
video
audio + video
Temperatura de funcionamiento - Operating Temperature
Température de fonctionnement - Betriebstemperatur
Temperatura de funcionamento
Humedad - Humidity - Humidité - relative Luftfeuchtigkeit - Humidade
Tubo de imagen - Image Tube -Tube cathodique - Bildröhre - Tubo de imagem
B/N - B/W
N/B - S/W
Color - Colour Couleur - Farbe - Cor
Resolución - Resolution - Résolution
Pantalla Plana . 4" Diagonal (100 mm) - Flat screen. 4" Diagonal (100 mm)
Écran plat. 4 pouces diagonal (100 mm) - Flachbildschirm 4 Zoll Diagonale (100 mm)
Ecrã Plano. 4" Diagonal (100 mm)
TFT 3.5”
B/N - B/W
N/B - S/W - P/B
Auflösung -Resolução
Color - Colour
Couleur - Farbe - Cor
B/N - B/W
N/B - S/W
P/B
12 mA
750 mA
380 mA
400 mA
[41, +104 °F]
18 Vdc
Color - Colour
Couleur - Farbe
Cor
30mA
400 mA
330 mA
400 mA
[5, +40 °C]
[0,90%]
Hor.: 450 Line TV
Ver.: 250 Line TV
Hor.: 480 Line TV
Ver.: 234 Line TV
Señal de video - Video signal - Signal vidéo - Videosignal - Sinal de vídeo
Señal compuesta 1 Vpp 75 Ω, 7 Mhz . - Composed signal 1 Vpp 75
Signal composé 1 Vpp 75Ω, 7 Mhz. - Zusammengesetztes signal 1 Vpp 75 Ω, 7 Mhz.
Sinal composto 1 Vpp 75 Ω, 7 Mhz.
Dimensiones - Dimensions - Dimensions - Massangaben - Dimensões:
B/N - B/W
N/B - S/W - P/B
Color - Colour
Couleur - Farbe - Cor
(Alto x Ancho x Prof - Height x Width x Depth - Hauteur x largeur x prof
Höhe x Breite x Tiefe - Altura x Largura x Prof)
26
241 x 133 x 53 mm
9,5” x 5.3” x 2,1”
241 x 133 x 39 mm
9,5” x 5.3” x 1,5”
Ω,
7 Mhz.
Page 27

Loft Compact VDSLoft Compact VDS
Loft Compact VDSLoft Compact VDS
Loft Compact VDS
Loft Compact VDS
Loft Compact VDSLoft Compact VDS
Loft Compact VDSLoft Compact VDS
27
Page 28

Publicación técnica de caracter informativo editada por FERMAX ELECTRONICA S.A.E.
E
FERMAX ELECTRONICA S.A.E., en su política de mejora constante, se reserva el derecho a
modificar el contenido de este documento así como las características de los productos que en él
se refieren en cualquier momento y sin previo aviso.
Cualquier modificación será reflejada en posteriores ediciones de este documento.
Technical document published for information purposes by FERMAX ELECTRONICA S.A.E.
EN
FERMAX ELECTRONICA S.A.E., in a policy of ongoing improvement, reserves the right to modify
the contents of this document and the features of the products referred to herein at any time and
with no prior notice. Any such modifications shall be reflected in subsequent editions of this
document.
Publication technique à caractère informatif éditée par FERMAX ELECTRONICA S.A.E.
F
Conformément à sa politique de perfectionnement continu, FERMAX ELECTRONICA, S.A.E. se
réserve le droit de modifier, à tout moment et sans préavis, le contenu de ce document ainsi que les
caractéristiques des produits auxquels il fait référence. Toutes les modifications seront indiquées
dans les éditions suivantes.
Technische Veröffentlichung zu Informationszwecken; Herausgeber: FERMAX ELECTRONICA S.A.E.
D
FERMAX ELECTRONICA S.A.E, behält sich das Recht vor, den Inhalt dieses Dokuments sowie die
technischen Eigenschaften der erwähnten Produkte ohne vorherige Ankündigung zu ändern, um
dadurch den ständigen Weiterentwicklungen und den damit in Verbindung stehenden
Verbesserungen Rechnung zu tragen. Alle Änderungen finden Aufnahme in den Neuauflagen
dieses Dokuments.
P
Publicação técnica de carácter informativo editada por FERMAX ELECTRONICA S.A.E.A FERMAX
ELECTRONICA S.A.E., na sua política de melhoramento constante, reserva-se o direito de modificar o conteúdo deste documento assim como as características dos produtos que nele são
referidos a qualquer momento e sem aviso prévio.
Qualquer modificação será apresentada em edições posteriores deste documento.
www.fermax.com
 Loading...