

Page 1
4+n System
MONITOR LOFT COMPACT COLOR
LOFT COMPACT COLOUR MONITOR
MONITEUR LOFT COMPACT COULEUR
COLOR LOFT COMPACT MONITOR
MONITOR LOFT COMPACT COLOR
ЦВЕТНОЙ МОНИТОР LOFT COMPACT
MANUAL DE INSTALADOR Y USUARIO
USER& INSTALLER’S MANUAL
MANUEL D´INSTALLATION ET UTILISATION
INSTALLATIONS-UND BENUTZERHANDBUCH
MANUAL DO INSTALADOR E USUÁRIO
РУКОВОДСТВО ПО УСТАНОВКЕ И ПОЛЬЗОВАТЕЛЯ
ESPAÑOL
ENGLISH
FRANÇAIS
DEUTSCH
PORTUGÛES
РУССКИЙ
Page 2

LOFT COMPACT COLOR 4+N
LOFT COMPACT 4+N COLOUR
LOFT COMPACT 4+N COULEUR
LOFT COMPACT COLOR 4+N
LOFT COMPACT COLOR 4+N
LOFT COMPACT ЦВЕТНОЙ 4+N
Cod. 97363c V07_10
Pag 2
Page 3

ENHORABUENA POR DISPONER DE UN PRODUCTO DE CALIDAD!
E
Fermax electrónica desarrolla y fabrica equipos de prestigio que cumplen los más
altos estándares de diseño y tecnología.
Su monitor de videoportero FERMAX le permitirá comunicarse con la placa de calle,
ver la persona que le está llamando y abrirle la puerta de entrada si así lo desea.
Esperamos disfrute de sus funcionalidades.
www.fermax.com
CONGRATULATIONS ON PURCHASING THIS QUALITY PRODUCT!
EN
Fermax Electronics develops and manufactures reputable equipment which fulfils
the highest design and technology standards.
Your FERMAX video door entry system allows you to communicate with the entry
panel, to see who is calling and to open the door if you wish.
We hope you enjoy its range of functions.
www.fermax.com
FÉLICITATIONS ! VOUS VENEZ D’ACQUÉRIR UN VÉRITABLE PRODUIT DE QUALITÉ!
F
Fermax Electrónica développe et fabrique des équipements de prestige qui répondent
aux normes de design et technologie les plus développées.
Votre moniteur pour portier vidéo FERMAX vous permettra de communiquer avec la
platine de rue, de voir la personne qui vous appelle et d’ouvrir la porte d’entrée si
vous le souhaitez.
Nous espérons que vous profiterez pleinement de toutes ses fonctions.
www.fermax.com
D
WIR GRATULIEREN IHNEN ZUM KAUF DIESES QUALITÄTSPRODUKTS!
Fermax Electrónica entwickelt und fabriziert hochwertige Anlagen, die den höchsten
Technologie- und Designstandards entsprechen.
Der Monitor der Videotürsprechanlage von FERMAX ermöglicht Ihnen eine
Sprechverbindung mit der Türstation herzustellen, die Person, mit der Sie sprechen
auf dem Bildschirm zu betrachten und bei Bedarf die Tür zu öffnen.
Überzeugende Funktionalität für Ihr Eigenheim!
www.fermax.com
PARABÉNS POR DISPOR DE UM PRODUTO DE QUALIDADE!
P
Fermax electrónica desenvolve e fabrica equipas de prestígio que cumprem com
os mais altos estándars de desenho e tecnologia.
O seu monitor de vídeo-porteiro FERMAX lhe permitirá comunicar-se com a placa
da rua, ver a pessoa que lhe está a chamar e abrir-lhe a porta de entrada se assim
o deseja.
Esperamos que aproveites as suas funcionalidades.
www.fermax.com
ПОЗДРАВЛЯЕМ ВАС С ПРИОБРЕТЕНИЕМ ИЗДЕЛИЯ ВЫСОКОГО КАЧЕСТВА!
R
Fermax electronica разрабатывает и изготавливает оборудование,
отличающееся большой надежностью и качеством, которое соответствует
самым высоким стандартам дизайна и технологии.
Монитор видеодомофона FERMAX позволит Вам устанавливать связь с
наружной вызывной панелью, видеть посетителя и при необходимости
открывать ему входную дверь.
Надеемся, что Вы будете полностью удовлетворены его функциональными
возможностями.
www.fermax.com
Pag 3
Page 4

Pag 4
Page 5

INDICE - INDEX - SOMMAIRE
INHALT - INDICE - СОДЕРЖАНИЕ
LOFT COMPACT .......................................................................................................... 6
E
EN
F
D
Funcionamiento ............................................................................................... 6
Ajustes del Monitor .......................................................................................... 7
Instalación y Conexionado ............................................................................. 8
Características Técnicas ................................................................................ 11
LOFT COMPACT .......................................................................................................... 12
Operation .......................................................................................................... 12
Monitor settings ............................................................................................... 13
Installation and Connections ......................................................................... 14
Technical Features .......................................................................................... 17
LOFT COMPACT .......................................................................................................... 18
Fonctionnement ............................................................................................... 18
Réglages du moniteur .................................................................................... 19
Installation et connexions ............................................................................... 20
Caractéristiques techniques .......................................................................... 23
LOFT COMPACT .......................................................................................................... 24
Funktionselemente.......................................................................................... 24
Monitoreinstellungen ...................................................................................... 25
Installation und Verkabelung.......................................................................... 26
Technische Eigenschaften ............................................................................. 29
P
LOFT COMPACT .......................................................................................................... 30
Funcionamento ................................................................................................ 30
Ajustes do Monitor ........................................................................................... 31
Instalação e Ligações..................................................................................... 32
Características Técnicas ................................................................................ 35
LOFT COMPACT.......................................................................................................... 36
R
Порядок работы ............................................................................................. 36
Настройка монитора..................................................................................... 37
Установка и подключение ........................................................................... 38
Технические характеристики ...................................................................... 41
Pag 5
Page 6

ESPAÑOL
LOFT COMPACT 4+N
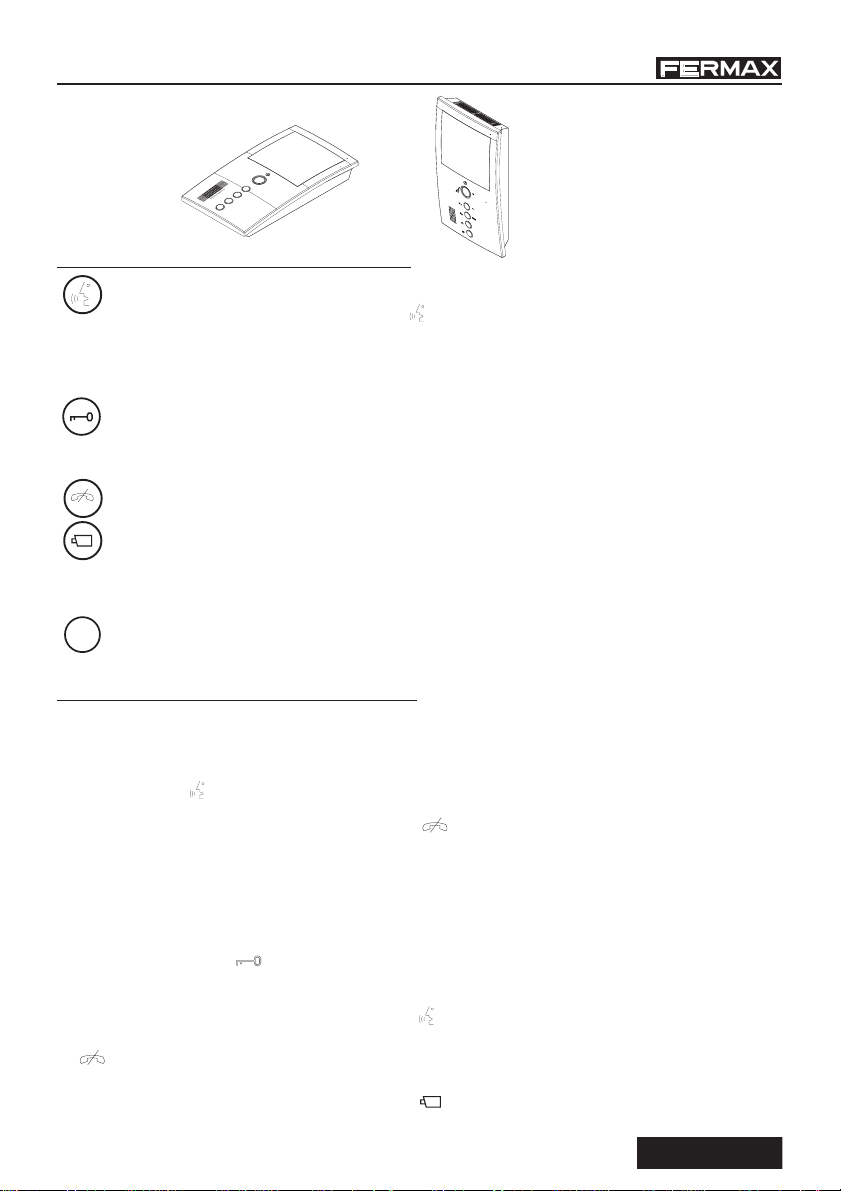
BOTONES
Botón Activación de Audio y Autoencendido
· Al recibir una llamada pulsar el botón para hablar con el visitante. Se abre el canal de audio en
sentido calle y vivienda, el funcionamiento es en modo manos libres.
· Con el monitor en reposo, pulsar este botón durante 1 segundo para encender manualmente el
monitor (audio + video).
Botón de abrepuertas / llamada a conserje.
· Estando en conversación con la Placa de Calle, al pulsar este botón se activa el abrepuertas.
· Con el monitor en reposo, al pulsar este botón se realiza una llamada al conserje (si existe conserjería).
Botón de colgado / Menú.
· Pulsar para finalizar la comunicación.
· Autoencendido (sin audio).
· Con el monitor en reposo pulsar durante 2 segundos para entrar en modo configuración del monitor.
Ver apartado «Ajustes del monitor».
F1 y F2: Botones para Funciones Adicionales.
F1
(Asignadas por el instalador).
NOTA:
La pantalla del monitor
se enciende una vez
finalizada la llamada
desde placa.
F1: _____________________________________
F2: _____________________________________
FUNCIONAMIENTO
Atender una llamada
Al presionar el pulsador de llamada, en la Placa de Calle se produce un tono de llamada
tanto en la placa de calle como en el monitor, encendiéndose la pantalla.
Pulsar el botón para hablar con el visitante. Se abre el canal de audio en sentido calle y vivienda, el
funcionamiento es en modo manos libres. La comunicación finalizará automáticamente a los 90
segundos o en cualquier momento al pulsar el botón . El led permanecerá apagado durante el
tiempo que dure la conversación.
Si no se establece comunicación con la placa de calle, el monitor se apaga automáticamente pasados 30
seg.
Apertura de puerta
Al recibir una llamada desde la placa de calle, es posible abrir la puerta en cualquier momento,
pulsado el botón .
Activación Manual del Monitor (Autoencendido audio+video)
Con el monitor en reposo pulsar este botón durante 1 segundo para encender manualmente el monitor.
La comunicación finalizará automáticamente a los 90 seg. o al pulsar el botón .
Activación Manual del Monitor (Autoencendido sólo video)
Con el monitor en reposo pulsar este botón durante 1 segundo para encender manualmente el monitor.
El monitor se apaga automáticamente pasados 30 seg.
Pag 6
Page 7
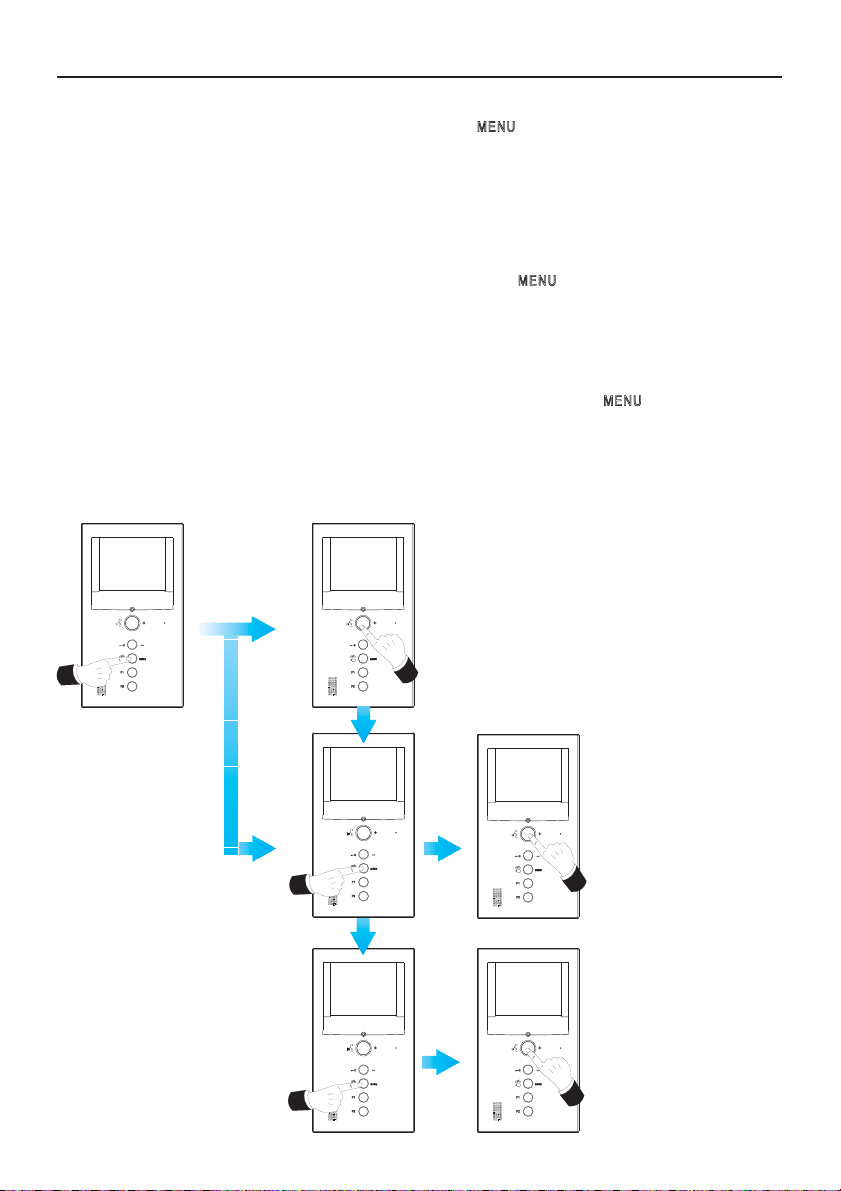
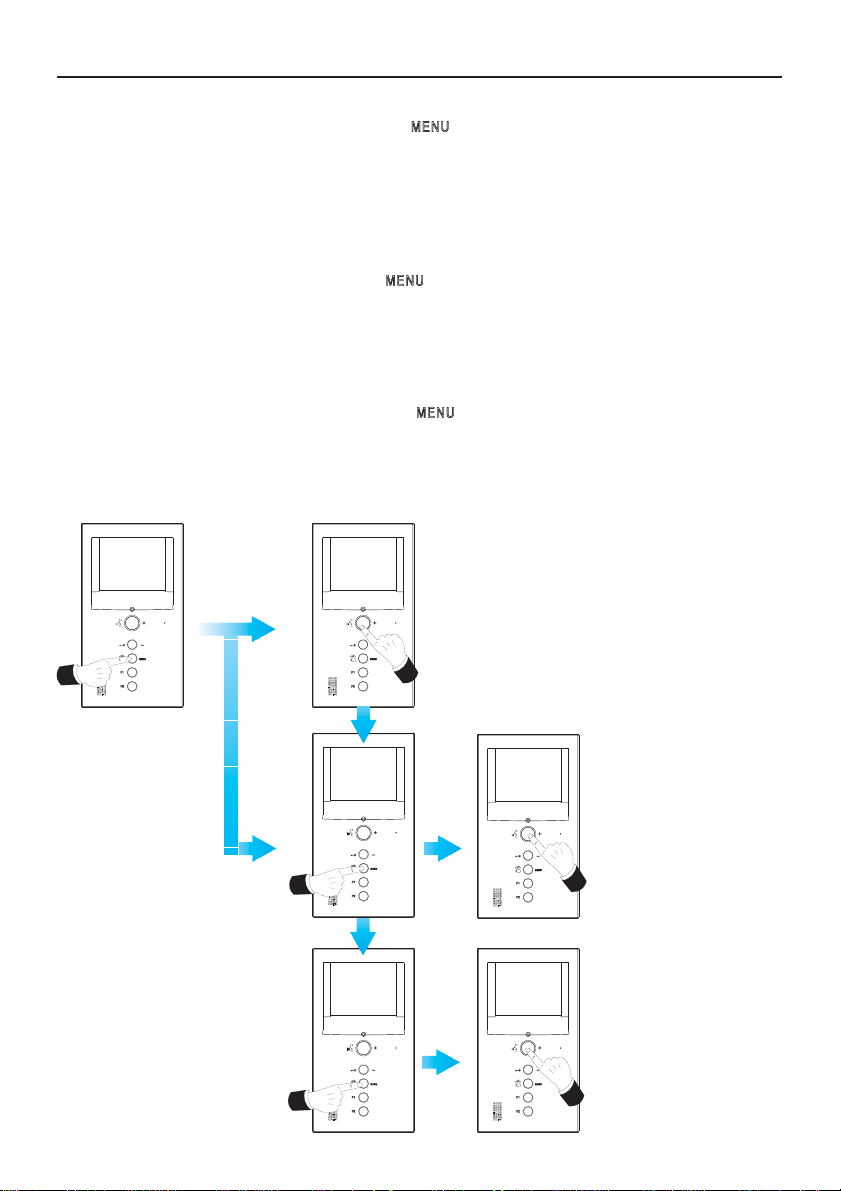
AJUSTES DEL MONITOR
Para ajustar los diferentes parámetros del monitor es necesario acceder al modo configuración.
Para acceder al modo configuración, pulsar el botón « » 5 segundos. El led parpadea 1 vez
por segundo y se escucha un sonido de confirmación.
Ajuste Volumen de Llamada
Estando en modo configuración pulsar el botón «+» para seleccionar un volumen alto o «-» para
seleccionar un volumen bajo.
Selección Tono de llamada y Cancelación de llamada
Estando en modo configuración pulsar de nuevo el botón « ».
A continuación, pulsar el botón «+» para cambiar el tono de llamada del monitor.
Pulsar «-» para activar la Cancelación de llamada.
El led del monitor parpadea en color rojo indicando el modo «no molestar».
Configuración de la Imagen
Estando en modo selección tono de llamada pulsar de nuevo el botón . El led parpadea 1
vez cada dos segundos, indicando que el monitor se encuentra en modo configuración de imagen.
El monitor dispone de 4 configuraciones preestablecidas con un determinado nivel de brillo,
contraste y color.
Pulsar el botón «+» o «-» para cambiar secuencialmente entre las diferentes configuraciones
de brillo y contraste. (Una vez se llega a la primera o última configuración se escucha un tono de aviso)
Ajuste Volumen de llamada
(5 seg.)
Entrar en modo
configuración
Selección tono de llamada
y cancelación llamada
Configuración de la imagen
Pag 7
Page 8
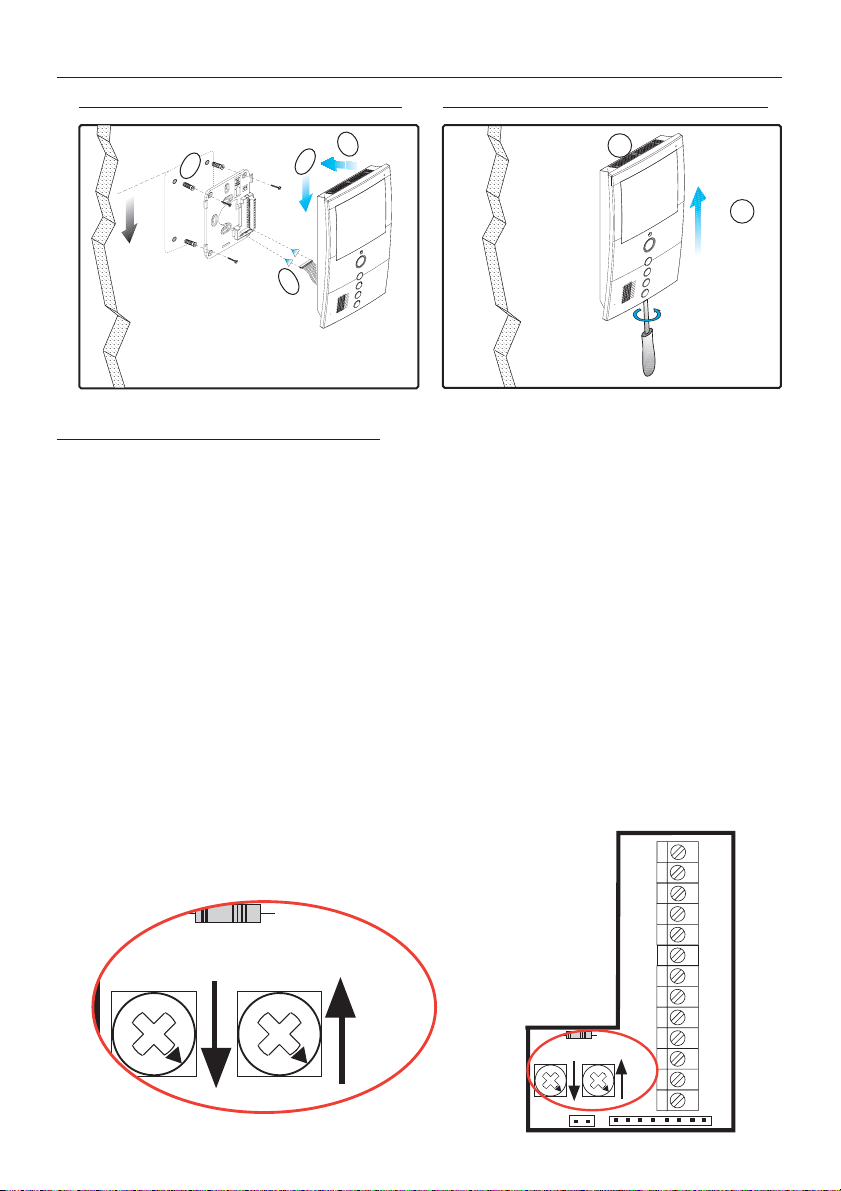
INSTALACIÓN Y CONEXIONADO
Ct
V
F2
F1
P6P2
DesmontajeMontaje
3
1
1.60m
5.25 feet
Conector del monitor
Características:
El modulo de conexiones del monitor incorpora 2 potenciómetros para el ajuste de los
niveles de audio de la instalación.
Funcionamiento:
Por defecto, el conector saldrá de fábrica con los potenciómetros proporcionando el
nivel máximo tanto para el audio de subida como para el audio de bajada,
(potenciómetros girados al máximo en el sentido de las agujas del reloj).
Para reducir los posibles acoples acústicos los dos potenciómetros permiten bajar el
nivel de audio en ambos sentidos , (se reduce volumen girando los potenciómetros
en el sentido contrario de las agujas del reloj):
4
2
1
90º
· P2: ajuste del nivel del audio de bajada.
· P6: ajuste del nivel de audio de subida.
2
Pag 8
1
2
3
4
6
+
-
TA
V
M
V
P6P2
Ct
F1
F2
Page 9
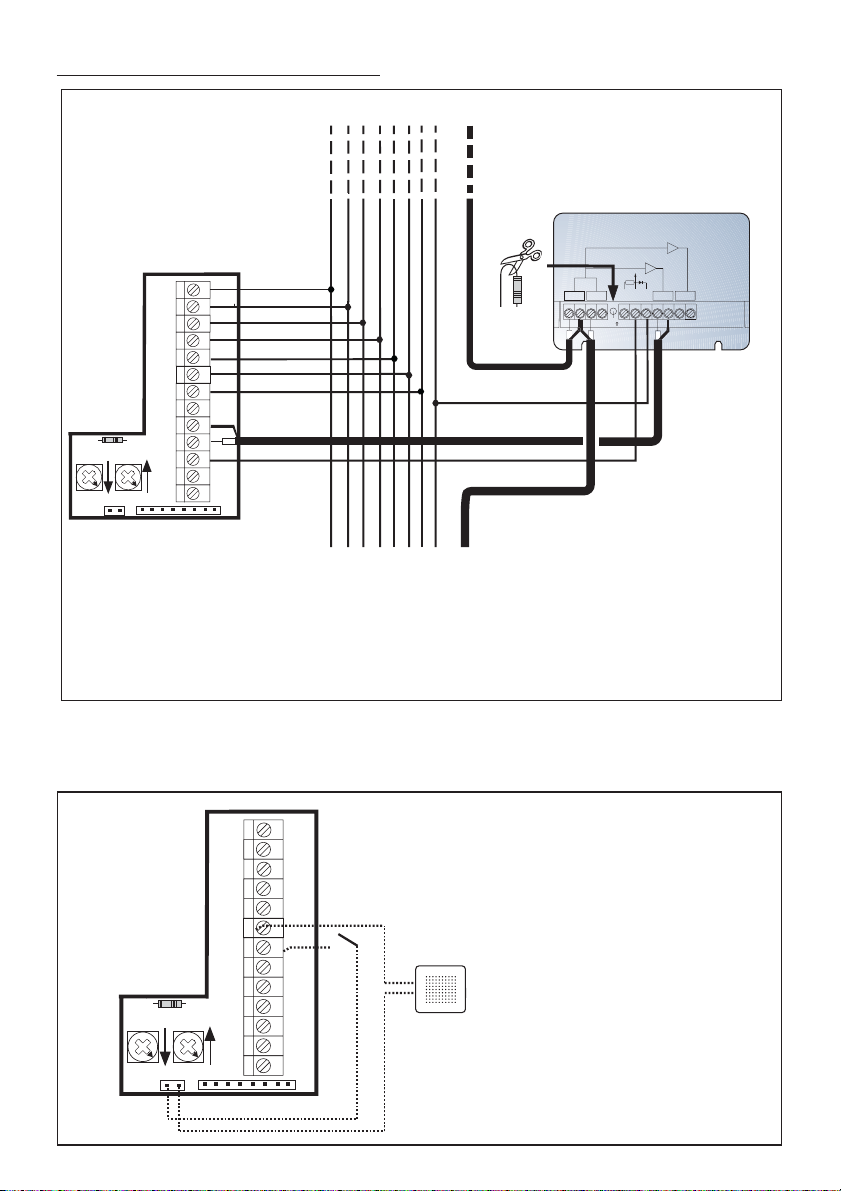
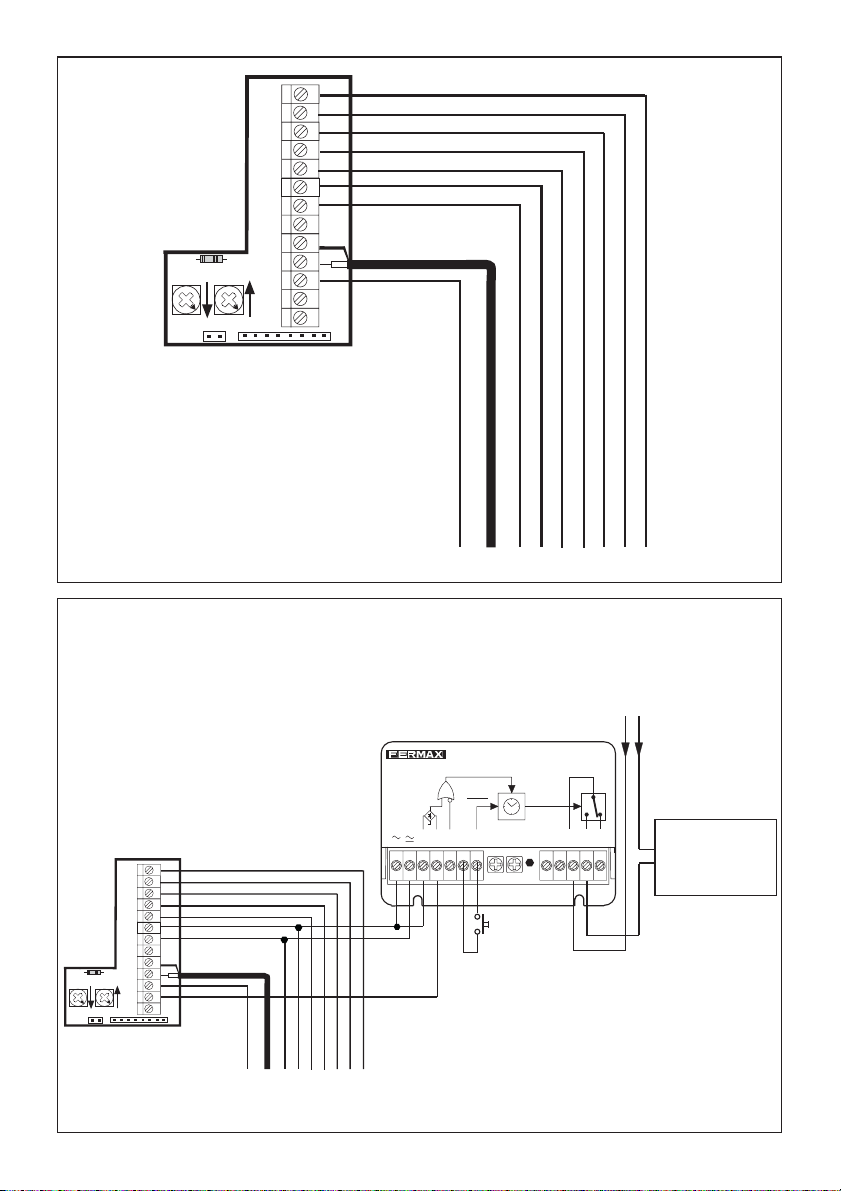
Conexionado
P6P2
TA
1
2
3
4
6
+
V
M
V
Ct
F1
F2
DISTRIBUIDOR VIDEO 2 SALIDAS
REF.2448
2 OUTPUTS VIDEO DISTRIBUTOR
+
(-)
2
R
V5V1M
M
R1
75
6
+18
V
VM M
34
-
-
+
6
2
43
1
CT COAX
1,2,3,6: comunes de audio.
4: hilo de llamada.
+, -: alimentación (18 Vdc).
V: vivo (coaxial - video)
M: malla (coaxial - video)
Ct: activación telecamara (10 Vdc)
A, +: Prolongador de llamada.
T, - : Pulsador de llamada puerta vivienda.
F1, F2: Funciones adicionales (salida negativo «-»).
Corriente máxima por pulsador F1,F2: 50mA a 12Vdc.
NOTAS:
- Sólo se pueden instalar un máximo de 100 monitores en una instalación 4+n.
- Para conectar un monitor adicional en la misma vivienda es necesario añadir un
Multiplicador de llamada Ref. 2340.
1
2
3
4
6
+
-
P1
Prolongador de llamada.
P1 (T, - ): Pulsador de llamada puerta
vivienda.
A, +: Prolongador de llamada.
TA
V
M
V
P6P2
Ct
F1
F2
Pag 9
Page 10
TA
1
2
3
4
6
+
-
V
M
V
P6P2
Ct
F1
F2
Ct
COAX
+-
2
1
364
Activación dispositivo auxiliar
El temporizador (Ref. 29001) se utiliza para accionar un dispositivo externo o controlar la
apertura de una segunda puerta mediante la pulsación del botón «F1» del Monitor.
Se podría realizar con otro Temporizador la misma instalación para el botón F2 del monitor
utilizando la borna F2 del conector.
Vac
TEMPORIZADOR
9 ÷ 14 Vac
11 ÷ 18 Vdc
TIMER
SET
RESET
I2 S
MIN. SEC.
R
-
F1
P1 P 2
RESET
F2
-
Ab
CNoNc
DL1
I1
TIME
ON
Circuito a
controlar con
Temporización
alimentado a Vac
TA
REF. 29001
1
2
3
4
6
+
-
V
M
V
P6P2
Ct
F1
F2
-
Ct
COAX
2
+
1
364
F1, F2: Funciones adicionales (salida negativo «-»).
Corriente máxima por pulsador F1,F2: 50mA a 12Vdc.
Pag 10
Page 11

CARACTERÍSTICAS TÉCNICAS
Alimentación
Consumo
en reposo
en llamada
con video
con audio y video
Temperatura de funcionamiento
Humedad
18 Vdc
30 mA
400 mA
330 mA
400 mA
[5 , +40 °C] - [41, +104 ºF]
[0 - 90%]
TFT 3,5”
Resolución: Horizontal: 480 Line TV - Vertical: 234 Line TV
Señal de video: Señal compuesta 1 Vpp 75 Ω, 7 Mhz
Dimensiones (Alto x Ancho x Prof.): 241 x 133 x 39 mm - 9,5” x 5,3” x 1,5”
Pag 11
Page 12
ENGLISH
COMPACT LOFT 4+N
NOTE:
The monitor screen
goes on once the call
from the panel has
ended.
BUTTONS
Audio Activation Button and Autostart
· When a call is received, press this button to speak to the visitor. The audio channel between the
entry panel and the residence is opened; operating in hands-free mode.
With the monitor on standby, hold down this button for 1 second to switch the monitor on
manually (audio + video).
Lock Release / Call Guard Unit Button
· Pressing this button whilst communicating with the Entry Panel will activate the lock release.
· Pressing this button whilst the monitor is on standby will result in a call being made to the guard unit
(where one exists).
Terminate Call Button / Menu
· Press to terminate communication.
. Autostart (no audio).
- With the monitor on standby, hold down this button for 2 seconds to go into monitor
configuration mode.
See the “Monitor Settings” section.
F1 and F2: Buttons for Additional Functions.
F1
(Assigned by the installer).
F1: _____________________________________
F2: _____________________________________
OPERATION
Answering a call.
When the call button on the Entry Panel is pressed a call tone is emitted both from the panel
and on the monitor, causing the screen to start up.
Press the button to speak to the visitor. The audio channel between the entry panel and the residence is
open; operating in hands-free mode. The communication facility will automatically terminate after
90 seconds, or at any time by pressing the button . The LED will remain off whilst the conversation
is underway.
If communication is not established with the street panel, the monitor will automatically go off after 30
seconds.
Opening the door
When a call is received from the entry panel, it is possible to open the door at any time, by
pressing the button .
Manual Activation of the Monitor (Audio + Video Auto-Start)
With the monitor on standby, hold down this button for 1 second to switch the monitor on manually.
The communication facility will automatically terminate after 90 seconds, or at any time by pressing the button
.
Manual Activation of the Monitor (Video Auto-Start)
With the monitor on standby, hold down this button for 1 second to switch the monitor on manually.
The monitor turns itself off automatically after 30 seconds.
Pag 12
Page 13
MONITOR SETTINGS
To set up the different monitor parameters, it is necessary to access the configuration mode.
To access configuration mode, press the « » for 5 seconds. The LED blinks once per
second and a confirmation tone is heard.
Call Volume Setting
When in configuration mode, press the «+» button to select high volume or «-» to select low
volume.
Call Tone Selection and Call Cancellation
When in configuration mode, press the « » button again.
Now, press the «+» button to change the monitor call tone.
Press «-» to activate Call Cancellation.
The monitor led blinks on red to indicate «do not disturb» mode.
Image Configuration
When in call tone selection mode, press the button again. The LED blinks once every 2
seconds, indicating that the monitor is in image configuration mode.
The monitor has 4 preset configurations with a set brightness and contrast level.
Press the «+» or «-» button to change between the different brightness, contrast and colour
settings in sequence. (When the first or last configuration is reached, an alert tone is heard).
Set call volume
(5 seg.)
Enter
configuration
mode
Select call tone and call
cancellation
Image configuration
Pag 13
Page 14

INSTALLATION AND WIRING
Ct
V
F2
F1
P6P2
DisassemblyAssembly
3
1
1.60m
5.25 feet
Monitor Connector
Features:
The monitor’s connections module incorporates 2 potentiometers to adjust the
system’s audio levels.
Operation:
The connector will leave the factory with the potentiometers set to the maximum levels
by default, both in terms of high and low audio settings (the clock hands on the
potentiometers set to maximum levels).
To reduce possible acoustic overlaps the two potentiometers allow you to reduce the
audio levels in both directions (the volume is reduced turning the potentiometers anticlockwise).
4
2
1
90º
· P2: adjust low volume levels
· P6: adjust high volume levels
2
Pag 14
1
2
3
4
6
+
-
TA
V
M
V
P6P2
Ct
F1
F2
Page 15

Wiring
TA
DISTRIBUIDOR VIDEO 2 SALIDAS
REF.2448
2 OUTPUTS VIDEO DISTRIBUTOR
+
(-)
2
1
2
3
R
V5V1M
M
R1
75
6
+18
V
VM M
34
4
6
+
-
V
M
V
P6P2
Ct
F1
F2
-
+
6
2
43
1
CT COAX
1,2,3,6: common audio wires
4: call wire
+, -: power supply (18 Vdc)
V: live (coaxial - video)
M: mesh (coaxial - video)
Ct: Camera Activation (10 Vdc)
A, +: Call Extension
T, - : Residence Call Button
F1, F2: Additional Functions (negative output «-»)
Maximum current per F1 and F2 buttons: 50mA at 12Vdc
NOTES:
- A maximum of 100 monitors can be installed on a 4+N system.
- To connect an additional monitor in the same residence a call multiplier must be
added Ref. 2340.
1
2
3
4
6
+
-
P1
Call Extension
P1 (T, - ): Residence Call
Button
A, +: Call Extension
Pag 15
TA
V
M
V
P6P2
Ct
F1
F2
Page 16

TA
1
2
3
4
6
+
-
V
M
V
P6P2
Ct
F1
F2
Ct
COAX
+-
2
1
364
Auxiliary device activation
The timer (Ref. 29001) is used to activate an external device and control the opening functions
for the second door by pressing the F1 button on the Monitor.
The same system can be used with another timer for the monitor’s F2 button using the
connector’s F2 terminal.
1
2
3
4
6
+
-
V
M
V
P6P2
Ct
F1
F2
TA
TEMPORIZADOR
REF. 29001
-
Ct
COAX
2
+
1
364
TIMER
SET
RESET
9 ÷ 14 Vac
11 ÷ 18 Vdc
I1
I2 S
TIME
ON
MIN. SEC.
R
-
F1
P1 P 2
RESET
F2
-
Ab
DL1
F1, F2: Additional Functions (negative output «-»).
CNoNc
Vac
Circuit is
controlled with a
timer powered with
Vac.
Maximum current per FL and F2 buttons: 50mA at
12Vdc.
Pag 16
Page 17

TECHNICAL FEATURES
Power Supply
Consumption
Operating Temperature
Humidity
standby
making a call
with video
with audio and video
18 Vdc
30mA
400 mA
330 mA
400 mA
[5 , +40 °C] - [41, +104 ºF]
[0 - 90%]
TFT Flat Screen. 4" Diagonal
Resolution: Horizontal: 480 Line TV - Vertical: 234 Line TV
Video Signal: Compound signal 1 Vpp 75 Ω, 7 Mhz
Dimensions (Height x Width x Depth): 241 x 133 x 39 mm - 9,5” x 5.3” x 1,5”
Pag 17
Page 18

FRANÇAIS
LOFT COMPACT 4+N
BOUTONS-POUSSOIRS
Bouton d’activation du son et auto-insertion
· Si vous recevez un appel, appuyez sur la touche pour parler au visiteur. Le canal audio sens
rue-logement s’active et le tout fonctionne en mode mains libres.
· Si le moniteur est en veille, appuyez sur cette touche pendant 1 seconde pour allumer
manuellement le moniteur (audio + vidéo).
Bouton-poussoir de la gâche électrique / appel au concierge.
· Lors d’une communication avec la platine de rue, la gâche électrique est activée en appuyant
sur ce bouton.
· Lorsque le moniteur est en veille, en appuyant sur ce bouton, un appel au concierge est effectué
(s’il y a une conciergerie).
Bouton pour raccrocher / menu
· Cliquez pour couper la communication.
· Allumage automatique (sans son).
· Si le moniteur est en veille, appuyez dessus pendant 2 secondes pour entrer en mode
configuration du moniteur.
Voir rubrique « Réglages du moniteur ».
F1 et F2 : boutons pour fonctions supplé-
F1
mentaires (assignées par l’installateur).
FONCTIONNEMENT
Prendre un appel
En appuyant sur le bouton-poussoir d’appel sur la platine de rue, il se produit une tonalité
d’appel aussi bien au niveau de la platine de rue que du moniteur ; l’écran s’allume.
Appuyez sur la touche pour parler au visiteur. Le canal audio sens rue-logement s’active et le tout
fonctionne en mode mains libres. La communication est automatiquement coupée au bout de 90
secondes ou auparavant en appuyant sur le bouton . La DEL reste éteinte pendant la durée de
la conversation.
Si aucune communication n’est établie avec la platine de rue, le moniteur s’éteindra automatiquement au bout
de 30 s.
Ouverture de la porte
Si vous recevez un appel depuis la platine de rue, il est possible d’ouvrir la porte à tout moment
en appuyant sur le bouton .
Activation manuelle du moniteur (allumage automatique audio+vidéo)
Si le moniteur est en veille, appuyez sur cette touche pendant 1 seconde pour allumer manuellement le
moniteur.
La communication est automatiquement coupée au bout de 90 s. ou en appuyant sur la touche .
Activation manuelle du moniteur (allumage automatique vidéo uniquement)
Si le moniteur est en veille, appuyez sur cette touche pendant 1 seconde pour allumer manuellement le
moniteur.
Le moniteur s’éteint automatiquement au bout de 30 secondes.
Pag 18
F1 : _____________________________________
F2 : _____________________________________
REMARQUE :
L’écran du moniteur
s’allume une fois l’appel
en provenance de la
platine terminé.
Page 19

RÉGLAGES DU MONITEUR
Pour régler les différents paramètres du moniteur, il faut accéder au mode de configuration.
Pour accéder au mode de configuration, appuyez sur la touche « » durant 5 secondes.
La DEL clignote 1 fois par seconde et une tonalité de confirmation est émise.
Réglage volume d’appel
Une fois en mode configuration, appuyez sur la touche « + » pour sélectionner un volume élevé
ou « - » pour sélectionner un volume faible.
Sélection de la tonalité d’appel et annulation de l’appel
Une fois en mode de configuration, appuyez de nouveau sur la touche « ».
Appuyez ensuite sur la touche « + » pour modifier la tonalité d’appel du moniteur.
Appuyez sur « - » pour activer l’annulation de l’appel.
La DEL du moniteur clignote en rouge, ce qui indique le mode « ne pas déranger ».
Configuration de l’image
Une fois en mode de sélection de la tonalité d’appel, appuyez de nouveau sur cette touche . La DEL
clignote 1 fois toutes les deux secondes, indiquant de la sorte que le moniteur se trouve en mode
configuration de l’image.
Le moniteur dispose de 4 configurations préétablies avec un niveau de luminosité, de contraste et de
couleur déterminé.
Appuyez sur le bouton « + » ou « - » pour modifier les unes à la suite des autres les
différentes configurations de luminosité et contraste (une fois que l’on parvient à la première ou à
la dernière configuration, une tonalité d’avertissement est émise).
Réglage volume d’appel
(5s.)
Entrer en
mode de
configuration
Sélection de la tonalité
d’appel et annulation de
l’appel
Configuration de l’image
Pag 19
Page 20

INSTALLATION ET CONNEXIONS
Ct
V
F2
F1
P6P2
DémontageMontage
3
1
1.60m
5.25 feet
Connecteur du moniteur
Caractéristiques :
Le module de connexions du moniteur intègre 2 potentiomètres pour le réglage des
niveaux du son de l’installation.
Fonctionnement :
Par défaut, le connecteur comporte des potentiomètres fournissant le niveau maximum
aussi bien pour le son montant que pour le son descendant (potentiomètres tournés
au maximum dans le sens des aiguilles d’une montre).
Afin de réduire les éventuelles interférences acoustiques, les deux potentiomètres
permettent de baisser le niveau du son dans les deux sens (on réduit le volume en
tournant les potentiomètres dans le sens contraire des auiguilles d’une montre) :
4
2
1
90º
· P2 : réglage du niveau du son descendant.
· P6 : réglage du niveau du son montant.
2
Pag 20
1
2
3
4
6
+
-
TA
V
M
V
P6P2
Ct
F1
F2
Page 21

Connexions
DISTRIBUIDOR VIDEO 2 SALIDAS
REF.2448
2 OUTPUTS VIDEO DISTRIBUTOR
+
(-)
2
1
2
3
R
V5V1M
M
R1
75
6
+18
V
VM M
34
4
6
+
-
V
M
V
P6P2
Ct
F1
F2
TA
-
+
6
2
43
1,2,3,6 : fils communs audio.
1
4 : fil d’appel.
+, - : alimentation (18 Vcc).
V : conducteur intérieur (coaxial - vidéo).
M : maille - conducteur extérieur
(coaxial - vidéo).
REMARQUES :
- Il ne peut y avoir que 100 moniteurs maximum dans une installation 4+n.
- Afin de raccorder un moniteur supplémentaire dans le même logement, il faut
ajouter un multiplicateur d’appel réf. 2340.
CT COAX
Ct : activation caméra vidéo (10 Vcc).
A, + : prolongateur d’appel.
T, - : bouton-poussoir d’appel de la porte du logement.
F1, F2 : fonctions supplémentaires (sortie négatif « -
»).
Courant maximal par bouton-poussoir F1,F2 : 50 mA à 12
Vcc.
TA
1
2
3
4
6
+
-
V
M
V
P6P2
Ct
F1
F2
P1
Prolongateur d’appel
P1 (T, - ) : bouton-poussoir d’appel porte
logement.
A, + : prolongateur d’appel.
Pag 21
Page 22

TA
1
2
3
4
6
+
-
V
M
V
P6P2
Ct
F1
F2
Ct
COAX
+-
2
1
364
Activation d’un dispositif auxiliaire
Le programmateur (réf. 29001) sert à actionner un dispositif externe ou à contrôler l’ouverture
d’une seconde porte en appuyant sur le bouton « F1 » du moniteur.
La même installation peut être réalisée avec un autre programmateur pour le bouton F2 du
moniteur ; il suffit d’utiliser la borne F2 du connecteur.
Vac
TEMPORIZADOR
9 ÷ 14 Vac
11 ÷ 18 Vdc
TIMER
SET
RESET
I2 S
MIN. SEC.
R
-
F1
P1 P 2
RESET
F2
-
Ab
CNoNc
DL1
I1
TIME
ON
Circuit à contrôler
avec temporisation, alimenté en
Vca
TA
REF. 29001
1
2
3
4
6
+
-
V
M
V
P6P2
Ct
F1
F2
F1, F2 : fonctions supplémentaires
-
Ct
COAX
+
364
(sortie négatif « - »).
2
1
Courant maximal par bouton-poussoir F1,F2 : 50 mA à
12 Vcc.
Pag 22
Page 23

CARACTÉRISTIQUES TECHNIQUES
Alimentation
Consommation
Température de fonctionnement
Humidité
en veille
lors d’un appel
avec image
avec son et image
18 Vdc
30 mA
400 mA
330 mA
400 mA
[5 , +40 °C] - [41, +104 ºF]
[0 - 90%]
TFT 3,5”
Résolution : Horizontale : 480 Line TV / Verticale : 234 Line TV
Signal vidéo : Signal composite 1 Vpp 75 Ω, 7 Mhz
Dimensions (hauteur x largeur x prof.) : 241 x 133 x 39 mm - 9,5” x 5,3” x 1,5”
Pag 23
Page 24

DEUTSCH
LOFT COMPACT 4+N
TASTEN
Taste Audioaktivierung und Eigenstart
· Bei eingehendem Anruf Taste drücken, um mit dem Besucher zu sprechen. Der Audiokanal
wird in Richtung Türstation und Wohnung freigegeben und auf Freisprechbetrieb geschaltet.
· Falls der Monitor sich im Bereitschaftsmodus befindet, halten Sie diese Taste eine Sekunde
lang gedrückt, um ihn manuell einzuschalten (Audio + Video).
Türöffnungstaste / Portierruf
· Bei bestehender Sprechverbindung mit der Türstation, kann durch Drücken dieser Taste der
Türöffner ausgelöst werden..
- Ist der Monitor im Bereitschaftsmodus, wird durch Drücken dieser Taste ein Anruf zur Portierzentrale
hergestellt (falls eine Portierzentrale vorhanden ist).
Auflegtaste / Menü
· Drücken, um die Verbindung zu beenden.
· Eigenstart (ohne Audio)
· Wenn sich der Monitor im Bereitschaftsmodus befindet, können Sie die Taste zwei
Sekunden lang gedrückt halten, um in den Konfigurationsmodus des Monitors zu gelangen.
Siehe Abschnitt “Einstellungen des Monitors”
F1
F1 und F2: Tasten für Zusatzfunktionen.
(Festgelegt durch den Installateur)
Anrufannahme
Durch Drücken der Ruftaste an der Türstation wird ein Rufton an der Türstation und am
Monitor ausgelöst und der Bildschirm schaltet sich ein.
Drücken Sie die Taste um mit dem Besucher zu sprechen. Der Audiokanal wird in Richtung Türstation und
Wohnung geöffnet und auf Freisprechbetrieb geschaltet. Das Gespräch wird nach Ablauf von 90
Sekunden automatisch beendet oder dann abgebrochen, wenn Sie die Taste . Die LED bleibt
während des Sprechverkehrs ausgeschaltet.
Falls keine Sprechverbindung mit der Türstation hergestellt wird, schaltet sich der Monitor nach Ablauf von
30 Sekunden automatisch aus.
FUNKTIONSWEISE
Türöffnung
Wenn ein Anruf von der Türstation empfangen wird, kann die Tür zu jedem beliebigen Zeitpunkt
geöffnet werden, indem Sie die Taste drücken.
Manuelle Aktivierung des Monitors (Eigenstart Audio + Video)
Halten Sie diese Taste eine Sekunde lang gedrückt, falls der Monitor sich im Bereitschaftsmodus befindet,
um ihn manuell einzuschalten.
Das Gespräch wird nach Ablauf von 90 Sekunden automatisch beendet oder dann abgebrochen, wenn Sie
die Taste drücken.
Manuelle Aktivierung des Monitors (Eigenstart nur Video)
Halten Sie diese Taste eine Sekunde lang gedrückt, falls der Monitor sich im Bereitschaftsmodus befindet,
um ihn manuell einzuschalten.
Der Monitor schaltet sich nach Ablauf von 30 Sekunden automatisch aus.
Pag 24
HINWEIS:
Der Bildschirm des
Monitors schaltet sich
ein, nachdem das
Gespräch über die
Türstation beendet
worden ist.
F1: _____________________________________
F2: _____________________________________
Page 25

MONITOREINSTELLUNGEN
Zur Einstellung der unterschiedlichen Monitorparameter ist es notwendig, den Konfigurationsmodus
aufzurufen.
Um in den Konfigurationsmodus zu gelangen, drücken Sie 5 Sekunden lang die Taste " ".
Die LED blinkt ein Mal pro Sekunde und es wird ein Bestätigungston ausgegeben.
Lautstärkeregelung
Drücken Sie im Konfigurationsmodus die Taste "+", um die Lautstärke zu erhöhen oder die Taste
"-", um die Lautstärke zu verringern.
Auswahl des Ruftons und der Anrufunterbrechung
Drücken Sie im Konfigurationsmodus erneut die Taste " ".
Drücken Sie anschließend die Taste "+", um den Rufton am Monitor zu ändern.
Drücken Sie die Taste "-", um eine Anrufunterbrechung durchzuführen.
Die LED des Monitors blinkt in Rot und zeigt dadurch den Modus «Nicht stören» an.
Bildeinstellungen
Drücken Sie im Modus Ruftonauswahl erneut die Taste . Die LED blinkt ein Mal alle zwei
Sekunden und zeigt an, dass sich der Monitor im Bildeinstellungsmodus befindet.
Der Monitor verfügt über vier Voreinstellungen der Bildwiedergabe (Kontrast/Helligkeit und Farbe).
Drücken Sie die Taste "+" oder "-", um zwischen den Voreinstellungen hin- und herzuschalten
Nach dem Sie die erste oder letzte Voreinstellung erreicht haben, ertönt ein Signalton.
Lautstärkeregelung
(5 Sekunden).
Aufrufen des
Konfigurationsmodus
Auswahl des Ruftons
und Anrufunterbrechung
Bildeinstellungen
Pag 25
Page 26

INSTALLATION UND VERKABELUNG
Ct
V
F2
F1
P6P2
DemontageInstallation
3
1
1.60m
5.25 feet
Monitoranschluss
Eigenschaften:
Das Anschlussmodul des Monitors ist mit zwei Drehreglern zur Audioeinstellung der
Anlage ausgestattet.
Betrieb:
Standardmäßig ist sind die Drehregler auf maximale Lautstärke eingestellt, sowohl
für den Empfang an den Türstationen als auch in den Wohnungen (Drehregler im
Uhrzeigersinn auf Maximallautstärke gedreht).
Zur Verringerung von eventuellen akustischen Rückkoppelungen kann die Lautstärke
mittels der Drehregler in beiden Richtungen reduziert werden (Drehung im
Gegenuhrzeigersinn):
4
2
1
90º
· P2: Einstellung der Lautstärke in Richtung Türstation.
· P6: Einstellung der Lautstärke in Richtung Wohnungen.
2
Pag 26
1
2
3
4
6
+
-
TA
V
M
V
P6P2
Ct
F1
F2
Page 27

Verkabelung
P6P2
TA
1
2
3
4
6
+
V
M
V
Ct
F1
F2
DISTRIBUIDOR VIDEO 2 SALIDAS
REF.2448
2 OUTPUTS VIDEO DISTRIBUTOR
+
(-)
2
R
V5V1M
M
R1
75
6
+18
V
VM M
34
-
-
+
6
2
43
1
CT COAX
1,2,3,6: Gemeinsame Audiokabel
4: Rufdraht
+, -: Stromversorgung (18 VDC)
V: Kern (Koaxial - Video)
M: Schirm (Koaxial - Video)
Ct: Aktivierung Kamera (10 VDC)
A, +: Anruferweiterungsmodul
T, - : Ruftaste Wohnungstür.
F1, F2: Zusatzfunktionen (Negativausgang «-»).
Maximalstrom an den Tasten F1, F2: 50 mA bei 12 VDC.
HINWEISE:
- Bei einer 4+N Installation dürfen höchstens 100 Monitore angeschlossen werden.
- Um in derselben Wohnung einen Zusatzmonitor anzuschließen, ist es erforderlich,
einen Signalvervielfacher, Ref. 2340, zu installieren.
1
2
3
4
6
+
-
P1
Anruferweiterungsmodul
P1 (T, - ): Ruftaste Wohnungstür
A, +: Anruferweiterungsmodul
Pag 27
TA
V
M
V
P6P2
Ct
F1
F2
Page 28

TA
1
2
3
4
6
+
-
V
M
V
P6P2
Ct
F1
F2
Ct
COAX
+-
2
1
364
Aktivierung Zusatzgerät
Der Zeitschalter (Ref. 29001) wird für die Aktivierung eines externen Gerätes oder zur
Steuerung der Türöffnung einer zweiten Tür verwendet und durch Drücken der Taste «F1»
am Monitor betätigt..
Mit einem anderen Zeitschalter kann auch die Taste F2 durch Verwendung der Anschlussklemme
F2 belegt werden.
TEMPORIZADOR
TIMER
SET
RESET
9 ÷ 14 Vac
11 ÷ 18 Vdc
I1
I2 S
TIME
ON
MIN. SEC.
R
-
F1
P1 P 2
RESET
F2
-
Ab
DL1
F1, F2: Zusatzfunktionen (Negativausgang «-»).
TA
REF. 29001
1
2
3
4
6
+
-
V
M
V
P6P2
Ct
F1
F2
-
Ct
COAX
2
+
1
364
CNoNc
Vac
Wechselstrombetrie-
bener und durch
Zeitschaltung
gesteuerter
Schaltkreis
Maximalstrom an den Tasten F1, F2: 50 mA bei 12 VDC.
Pag 28
Page 29

TECHNISCHE EIGENSCHAFTEN
Stromversorgung
Stromverbrauch
Betriebstemperatur
Relative Luftfeuchtigkeit
im Bereitschaftsmodus
bei Anruf
bei Videoübertragung
bei Audio- und Videoübertragung
18 Vdc
30 mA
400 mA
330 mA
400 mA
[5 , +40 °C] - [41, +104 ºF]
[0 - 90%]
TFT 3,5”
Auflösung: Horizontal: 480 Bildpunkte - Vertikal: 234 Bildpunkte
Videosignal: Gemischtes Signal 1 Vpp 75 Ω, 7 MHz
Abmessungen (Höhe x Breite x Tiefe): 241 x 133 x 39 mm - 9,5” x 5,3” x 1,5”
Pag 29
Page 30

LOFT COMPACT 4+N
NOTA:
O ecrã do monitor
acende-se, uma vez
terminada a chamada a
partir da placa.
BOTÕES
Botão Activação de Áudio e Auto-Ligação
· Ao receber uma chamada, premir o botão para falar com o visitante. Abre-se o canal de áudio
no sentido rua e vivenda, o funcionamento é em modo mãos livres.
· Com o monitor em repouso, prima este botão durante 1 segundo para ligar o monitor
manualmente (áudio + vídeo).
Botão do trinco / chamada ao porteiro.
· Estando em conversação com a Placa de Rua, ao premir este botão, activa-se o trinco.
· Com o monitor em repouso, ao premir este botão faz-se uma chamada ao porteiro (se existir
portaria).
Botão de desligar / Menu
· Premir para terminar a comunicação.
· Ligação automática (sem áudio).
· Com o monitor em repouso, premir durante 2 segundos para entrar no modo de configuração
do monitor.
Ver a secção «Ajustes do monitor».
F1 e F2: Botões para Funções Adicionais.
F1
(Atribuídas pelo instalador).
FUNCIONAMENTO
Atender uma chamada
Ao pressionar o botão de chamada na Placa de Rua, ouve-se um som de chamada tanto na
placa de rua como no monitor, acendendo-se o ecrã.
Premir o botão para falar com o visitante. Abre-se o canal de áudio no sentido rua e vivenda, o
funcionamento é em modo mãos livres. A comunicação terminará automaticamente após 90
segundos ou em qualquer momento, ao premir o botão . O LED permanecerá apagado enquanto
durar a conversação.
Se não se estabelecer comunicação com a placa de rua, o monitor desliga-se automaticamente passados
30 seg.
Abertura da porta
Ao receber uma chamada a partir da placa de rua, é possível abrir a porta em qualquer momento,
premindo o botão .
Activação Manual do Monitor (Ligação automática áudio+vídeo)
Com o monitor em repouso, premir este botão durante 1 segundo, para ligar manualmente o monitor.
A comunicação terminará automaticamente após 90 seg., ou premindo o botão .
Activação Manual do Monitor (Ligação automática, só vídeo)
Com o monitor em repouso, premir este botão durante 1 segundo, para ligar manualmente o monitor.
O monitor desliga-se automaticamente passados 30 seg.
Pag 30
F1: _____________________________________
F2: _____________________________________
PORTUGUÊS
Page 31

AJUSTES DO MONITOR
Para acertar os diferentes parâmetros do monitor, é necessário aceder ao modo de configuração.
Para aceder ao modo de configuração, prima o botão « » durante 5 segundos. O LED pisca
1 vez por segundo e ouve-se um som de confirmação.
Ajuste do Volume da Chamada
Estando no modo de configuração, prima o botão «+», para seleccionar um volume alto ou «-»,
para seleccionar um volume baixo.
Selecção do Som de chamada e Cancelamento de chamada
Estando no modo de configuração, prima de novo o botão « ».
Seguidamente, prima o botão «+», para mudar o som de chamada do monitor.
Prima «-» para activar o Cancelamento de chamada.
O LED do monitor pisca a vermelho, indicando o modo «não incomodar».
Configuração da Imagem
Estando no modo selecção do som de chamada, prima de novo o botão . O LED pisca 1 vez
cada dois segundos, indicando que o monitor se encontra no modo de configuração de imagem.
O monitor dispõe de 4 configurações pré-definidas com um determinado nível de brilho e contraste e
cor.
Prima o botão «+» ou «-» para alterar sequencialmente as diferentes configurações de
brilho e contraste. (Quando se chega à primeira ou à ultima configuração, ouve-se um som de aviso)
Ajuste do Volume da chamada
(5 seg.)
Entrar no modo de
configuração
Selecção do som de chamada
e cancelamento da chamada
Configuração da imagem
Pag 31
Page 32

INSTALAÇÃO E LIGAÇÃO
Ct
V
F2
F1
P6P2
DesmontagemMontagem
3
1
1.60m
5.25 feet
Conector do monitor
Características:
O módulo de ligações do monitor incorpora 2 potenciómetros para regulação dos
níveis de áudio da instalação.
Funcionamento:
Por defeito, o conector sai da fábrica com os potenciómetros proporcionando o nível
máximo tanto para o áudio de subida, como para o áudio de descida (potenciómetros
rodados para o máximo no sentido dos ponteiros do relógio).
Para reduzir os eventuais acoplamentos acústicos, os dois potenciómetros permitem
baixar o nível de áudio em ambos os sentidos (diminui-se o volume, rodando os
potenciómetros no sentido contrário ao dos ponteiros do relógio):
4
2
1
90º
· P2: ajuste do nível de áudio de descida.
· P6: ajuste do nível de áudio de subida.
2
Pag 32
1
2
3
4
6
+
-
TA
V
M
V
P6P2
Ct
F1
F2
Page 33

Ligações
TA
DISTRIBUIDOR VIDEO 2 SALIDAS
REF.2448
2 OUTPUTS VIDEO DISTRIBUTOR
+
(-)
2
1
2
3
R
V5V1M
M
R1
75
6
+18
V
VM M
34
4
6
+
-
V
M
V
P6P2
Ct
F1
F2
-
+
6
2
43
1
CT COAX
1,2,3,6: comuns de áudio.
4: fio de chamada.
+, -: alimentação (18 Vdc).
V: vivo (coaxial - vídeo)
M: malha (coaxial - vídeo)
Ct: activação da telecâmara (10 Vdc)
A, +: Prolongador de chamada.
T, - : Botão de chamada da porta da vivenda.
F1, F2: Funções adicionais (saída do negativo «-»).
Corrente máxima por botão F1, F2: 50 mA a 12 Vdc.
NOTAS:
- Numa instalação 4+n só podem instalar-se, no máximo, 100 monitores.
- Para ligar um monitor adicional na mesma vivenda, é necessário acrescentar um
Multiplicador de chamadas Ref. 2340.
1
2
3
4
6
+
-
P1
Prolongador de chamada
P1 (T, - ): Botão de chamada na porta
habitação
A, +: Prolongador de chamada
Pag 33
TA
V
M
V
P6P2
Ct
F1
F2
Page 34

TA
1
2
3
4
6
+
-
V
M
V
P6P2
Ct
F1
F2
Ct
COAX
+-
2
1
364
Activação do dispositivo auxiliar
O temporizador (Ref. 29001) é utilizado para accionar um dispositivo externo ou controlar a
abertura de uma segunda porta, quando se prime o botão «F1» do Monitor.
É possível realizar a mesma instalação com outro Temporizador para o botão F2 do monitor,
utilizando o terminal F2 do conector.
Vac
TEMPORIZADOR
9 ÷ 14 Vac
11 ÷ 18 Vdc
TIMER
SET
RESET
I2 S
MIN. SEC.
R
-
F1
P1 P 2
RESET
F2
-
Ab
CNoNc
DL1
I1
TIME
ON
Circuito de
controlo com
Temporização,
alimentado a Vac
TA
REF. 29001
1
2
3
4
6
+
-
V
M
V
P6P2
Ct
F1
F2
-
Ct
COAX
2
+
1
364
F1, F2: Funções adicionais (saída do negativo «-»).
Corrente máxima por botão F1, F2: 50 mA a 12Vdc.
Pag 34
Page 35

CARACTERÍSTICAS TÉCNICAS
Alimentação
Consumo
em repouso
em chamada
com vídeo
Com áudio e vídeo
Temperatura de funcionamento
Humidade
TFT 3,5”
Resolução: Horizontal: 480 Linhas TV - Vertical: 234 Linhas TV
18 Vdc
30mA
400 mA
330 mA
400 mA
[5 , +40 °C] - [41, +104 ºF]
[0 - 90%]
Sinal de vídeo: Sinal composto 1 Vpp 75 Ω, 7 Mhz
Dimensões (Altura x Largura x Prof.): 241 x 133 x 39 mm - 9,5” x 5,3” x 1,5”
Pag 35
Page 36

LOFT COMPACT 4+N
ПРИМЕЧАНИЕ:
Экран монитора
включается при
поступлении сигнала
вызова с вызывной
КНОПКИ
Кнопка включения аудио и автовключения
· При получении вызова нажмите кнопку
Устанавливается звуковой канал в направлении улицы и квартиры, который
работает в режиме громкой связи.
, чтобы начать разговор с посетителем.
панели.
· При нахождении монитора в режиме ожидания удерживайте эту кнопку нажатой
в течение 1 секунды, чтобы включить монитор вручную (аудио + видео).
Кнопка открытия замка / вызова консьержа.
· Во время разговора с посетителем, находящимся у вызывной панели, нажатие
этой кнопки открывает замок.
· При нахождении монитора в режиме ожидания нажатие этой кнопки делает вызов
консьержу (при наличии комнаты консьержа).
Кнопка прекращения разговора / Меню.
· Нажмите эту кнопку, чтобы завершить разговор.
· Автовключение (без аудио).
· При нахождении монитора в режиме ожидания удерживайте кнопку нажатой в
течение 2 секунд, чтобы войти в режим настройки монитора.
См. раздел “Настройка монитора”.
F1 и F2: Кнопки дополнительных
F1
функций.(Задаются при установке).
F1: _____________________________________
F2: _____________________________________
ПОРЯДОК РАБОТЫ
Ответ на вызов
При нажатии кнопки вызова на вызывной панели раздается сигнал вызова как на
вызывной панели, так и на мониторе, и загорается дисплей.
Нажмите кнопку
направлении улицы и квартиры, который работает в режиме громкой связи. Связь прервется
автоматически через 90 секунд или в любой момент при нажатии кнопки
разговора светодиод не горит.
Если связь с вызывной панелью не будет установлена, монитор автоматически выключится
через 30 секунд.
Открытие двери
При получении вызова с вызывной панели можно в любой момент открыть дверь, нажав
кнопку
Ручное включение монитора (автовключение аудио+видео)
При нахождении монитора в режиме ожидания удерживайте кнопку
секунды, чтобы включить монитор вручную.
Связь прервется автоматически через 90 секунд или при нажатии кнопки
Ручное включение монитора (автовключение, только видео)
При нахождении монитора в режиме ожидания удерживайте кнопку нажатой
в течение 1 секунды, чтобы включить монитор вручную.
Монитор автоматически выключится через 30 сек.
Pag 36
, чтобы начать разговор с посетителем. Устанавливается канал аудио в
. Во время
.
нажатой в течение 1
.
РУССКИЙ
Page 37

НАСТРОЙКА МОНИТОРА
Для регулировки различных параметров монитора необходимо войти в режим настройки.
Для входа в режим настройки нажмите и удерживайте кнопку «
секунд. Светодиод начнет мигать с частотой 1 раз в секунду, и раздастся сигнал
подтверждения.
Регулировка громкости вызова
Находясь в режиме настройки, нажмите кнопку «+», чтобы увеличить громкость, или
«-», чтобы уменьшить ее.
Выбор тона вызова и отмена вызова
Находясь в режиме настройки, снова нажмите кнопку «
».
После этого нажмите кнопку «+», чтобы изменить тон вызова монитора.
Нажмите «-», чтобы включить отмену вызова.
Светодиод монитора будет мигать красным цветом, указывая на включение
режима «не беспокоить».
Настройка изображения
Находясь в режиме выбора тона вызова, снова нажмите кнопку
мигать каждые две секунды, указывая на то, что монитор находится в режиме настройки
изображения.
В мониторе предусмотрены 4 заводские настройки с определенным уровнем яркости,
контрастности и цвета.
Нажмите кнопку «+» или «-», чтобы последовательно переключаться между
различными настройками яркости и контрастности. (При достижении первой и последней
настройки раздается звуковой сигнал).
» в течение двух
. Светодиод будет
(5 сек.)
Вход в режим
настройки
Регулировка громкости
вызова
Выбор тона вызова
и отмена вызова
Настройка изображения
Pag 37
Page 38

УСТАНОВКА И ПОДКЛЮЧЕНИЕ
Ct
V
F2
F1
P6P2
ДемонтажМонтаж
3
1
1.60m
5.25 feet
Характеристики:
Модуль подключения монитора содержит 2 потенциометра, которые
позволяют выполнять настройки уровня звука системы.
Регулировка:
По умолчанию в потенциометрах модуля подключения установлен
максимальный уровень входящего и исходящего звука (потенциометры
повернуты по часовой стрелке до отказа).
Чтобы уменьшить нелинейные искажения звукового сигнала, можно
уменьшить уровень звука в обоих направлениях (для уменьшения громкости
нужно повернуть потенциометр против часовой стрелки):
4
2
1
90º
· P2: регулировка уровня исходящего звука.
· P6: регулировка уровня входящего звука.
2
Pag 38
1
2
3
4
6
+
-
TA
V
M
V
P6P2
Ct
F1
F2
Page 39

Схема подключения
1
2
3
4
6
+
-
V
M
V
P6
P2
Ct
F1
F2
TA
1,2,3,6: общие выводы аудио.
4: провод вызова.
+, -: питание (18 В пост. тока).
V: центральная жила (коаксиал
- видео).
M: оплетка (коаксиал - видео).
DISTRIBUIDOR VIDEO 2 SALIDAS
REF.2448
2 OUTPUTS VIDEO DISTRIBUTOR
+
(-)
5
1
R
-
+
6
43
2
1
Ct: включение видеокамеры (10 В пост. тока).
A, +: Удлинитель звонка.
T, - : Кнопка вызова квартиры.
F1, F2: Дополнительные функции (отрицательный вывод
«-»).
Максимальный ток на кнопку F1,F2: 50 мА при 12 В пост.
тока.
CT
COAX
V
V
M
2
6
+18
M
V
3
4
R1
75
VM
M
ПРИМЕЧАНИЯ:
- В системе 4+n могут устанавливаться максимум 100 мониторов.
1
2
3
4
6
+
-
P1
Удлинитель звонка
P1 (T, - ): Кнопка вызова
A, +: Удлинитель звонка
P2
TA
P6
V
M
V
Ct
F1
F2
Pag 39
Page 40

TA
1
2
3
4
6
+
-
V
M
V
P6P2
Ct
F1
F2
Ct
COAX
+-
2
1
364
Включение дополнительного устройства
Таймер (арт. 29001) используется для включения внешнего устройства или
открытия двери второго входа с помощью кнопки «F1», предусмотренной для
этого на мониторе.
Такая же схема может быть использована для кнопки F2 путем подключения
еще одного таймера к клемме F2 соединительного модуля.
TEMPORIZADOR
9 ÷ 14 Vac
11 ÷ 18 Vdc
TIMER
SET
RESET
TIME
ON
I2 S
MIN. SEC.
R
-
F1
P1 P 2
RESET
F2
-
Ab
DL1
I1
TA
REF. 29001
1
2
3
4
6
+
-
V
M
V
P6P2
Ct
F1
F2
CNoNc
Vac
Цепь,
управляемая
таймером с
питанием от
источника перем.
тока.
F1, F2: Дополнительные функции
-
Ct
COAX
+
364
(отрицательный вывод «-»).
2
1
Максимальный ток на кнопку F1,F2: 50 мА при
12 В пост. тока.
Pag 40
Page 41

ТЕХНИчЕСКИЕ ХАРАКТЕРИСТИКИ
Питание
Потребляемая мощность
Рабочая температура
Влажность
в режиме ожидания
при вызове
с видео
с аудио и видео
18 В пост. тока
30 мA
400 мА
330 мА
400 мА
[5 , +40 °C] - [41, +104 ºF]
[0 - 90%]
TFT 3,5”
Разрешение: Горизонтальное: 480 строк ТВ - Вертикальное: 234 строки ТВ
Видеосигнал: Композитный видеосигнал 1 Vpp 75 Ω, 7 7 МГц
Габариты (высота х ширина х глубина):241 x 133 x 39 мм - 9,5” x 5,3” x 1,5”
Pag 41
Page 42

Audio and Video Door Entry Systems
Publicación técnica de caracter informativo editada por FERMAX ELECTRONICA S.A.E.
E
FERMAX ELECTRONICA S.A.E., en su política de mejora constante, se reserva el derecho a
modificar el contenido de este documento así como las características de los productos que en él
se refieren en cualquier momento y sin previo aviso.
Cualquier modificación será reflejada en posteriores ediciones de este documento.
Technical document published for information purposes by FERMAX ELECTRONICA S.A.E.
EN
FERMAX ELECTRONICA S.A.E., in a policy of ongoing improvement, reserves the right to modify
the contents of this document and the features of the products referred to herein at any time and
with no prior notice. Any such modifications shall be reflected in subsequent editions of this
document.
Publication technique à caractère informatif éditée par FERMAX ELECTRONICA S.A.E.
F
Conformément à sa politique de perfectionnement continu, FERMAX ELECTRONICA, S.A.E. se
réserve le droit de modifier, à tout moment et sans préavis, le contenu de ce document ainsi que les
caractéristiques des produits auxquels il fait référence. Toutes les modifications seront indiquées
dans les éditions suivantes.
Technische Veröffentlichung zu Informationszwecken; Herausgeber: FERMAX ELECTRONICA S.A.E.
D
FERMAX ELECTRONICA S.A.E, behält sich das Recht vor, den Inhalt dieses Dokuments sowie die
technischen Eigenschaften der erwähnten Produkte ohne vorherige Ankündigung zu ändern, um
dadurch den ständigen Weiterentwicklungen und den damit in Verbindung stehenden
Verbesserungen Rechnung zu tragen. Alle Änderungen finden Aufnahme in den Neuauflagen
dieses Dokuments.
P
Publicação técnica de carácter informativo editada por FERMAX ELECTRONICA S.A.E.A FERMAX
ELECTRONICA S.A.E., na sua política de melhoramento constante, reserva-se o direito de modificar o conteúdo deste documento assim como as características dos produtos que nele são
referidos a qualquer momento e sem aviso prévio.
Qualquer modificação será apresentada em edições posteriores deste documento.
Техническая публикация информативного характера, подготовленная FERMAX
R
ELECTRONICA S.A.E.
FERMAX ELECTRONICA S.A.E. постоянно работает над совершенствованием своих
изделий; компания оставляет за собой право вносить любые изменения в содержание
настоящего документа и изменять технические характеристики приводимых в нем
продуктов без предварительного уведомления.
Все изменения будут вноситься в последующие издания настоящего документа.
Pag 42
 Loading...