

Page 1
E
MONITOR iLOFT
EN
iLOFT MONITOR
F
MONITEUR iLOFT
D
iLOFT MONITOR
P
MONITOR iLOFT
4+N & MDS System
Page 2

Monitor iLoft 4+NMonitor iLoft 4+N
Monitor iLoft 4+NMonitor iLoft 4+N
Monitor iLoft 4+N
Monitor iLoft 4+N
Monitor iLoft 4+NMonitor iLoft 4+N
Monitor iLoft 4+NMonitor iLoft 4+N
Monitor iLOFT 4+N
Cod. 97419 V02_09
Pag 2
Page 3

Monitor iLoft 4+NMonitor iLoft 4+N
Monitor iLoft 4+NMonitor iLoft 4+N
Monitor iLoft 4+N
Monitor iLoft 4+N
Monitor iLoft 4+NMonitor iLoft 4+N
Monitor iLoft 4+NMonitor iLoft 4+N
INDICE - INDEX
SOMMAIRE - INHALT - INDICE
MONITOR iLOFT 4+N .................................................................................................. 4
E
Instalación Monitor .......................................................................................... 5
Conexionado .................................................................................................... 6
Características Técnicas ................................................................................ 7
Mantenimiento (limpieza) ............................................................................... 7
Funcionamiento ............................................................................................... 8
Ajustes del monitor ......................................................................................... 10
MONITOR iLOFT .......................................................................................................... 12
EN
Installing the Monitor ....................................................................................... 13
Wiring ................................................................................................................ 14
Technical Characteristics ............................................................................... 15
Maintenance (cleaning) .................................................................................... 15
Operation .......................................................................................................... 16
Monitor settings ............................................................................................... 18
MONITEUR iLOFT ........................................................................................................ 20
F
Installation moniteur ....................................................................................... 21
Connexions ...................................................................................................... 22
Caractéristiques techniques .......................................................................... 23
Maintenance (nettoyage) .................................................................................. 23
Fonctionnement ............................................................................................... 24
Réglages du moniteur .................................................................................... 26
D
iLOFT MONITOR .......................................................................................................... 28
Installation des Monitors ................................................................................ 29
Verkabelung...................................................................................................... 30
Technische Eigenschaften ............................................................................. 31
Wartung (Reinigung) ........................................................................................ 31
Funktionsweise................................................................................................ 32
Monitoreinstellungen....................................................................................... 34
P
MONITOR iLOFT .......................................................................................................... 36
Instalação do Monitor ...................................................................................... 37
Ligações ........................................................................................................... 38
Características Técnicas ................................................................................ 39
Manutenção (limpeza) ...................................................................................... 39
Funcionamento ................................................................................................ 40
Ajustes do monitor .......................................................................................... 42
Pag 3
Page 4

Monitor iLoft 4+NMonitor iLoft 4+N
Monitor iLoft 4+NMonitor iLoft 4+N
Monitor iLoft 4+N
Monitor iLoft 4+N
Monitor iLoft 4+NMonitor iLoft 4+N
Monitor iLoft 4+NMonitor iLoft 4+N
¡ENHORABUENA POR DISPONER DE UN PRODUCTO DE CALIDAD!
Fermax electrónica desarrolla y fabrica equipos de prestigio que cumplen los más altos
estándares de diseño y tecnología.
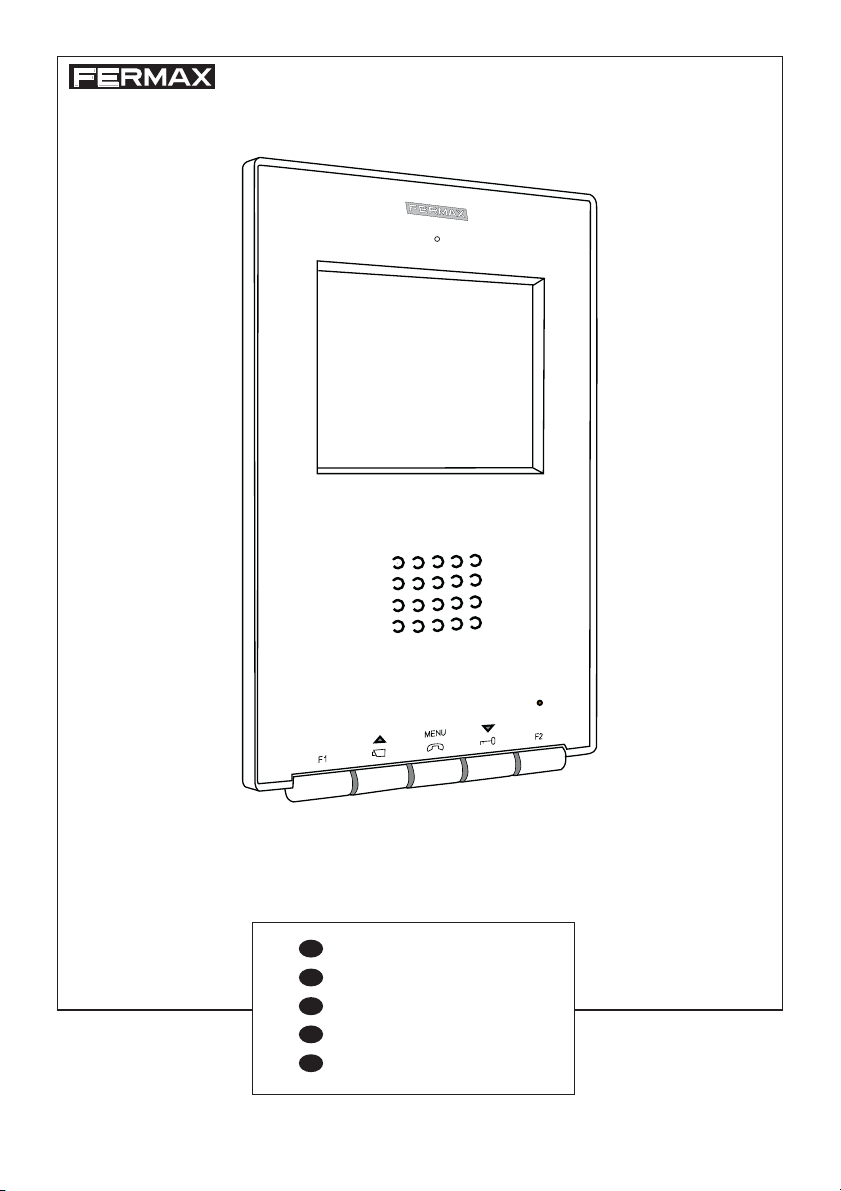
Su monitor de videoportero FERMAX «iLoft», manos libres y con pantalla a todo color le
permitirá comunicarse con la placa de calle, ver la persona que le está llamando y abrirle
la puerta de entrada si así lo desea.
Esperamos disfrute de sus funcionalidades.
www.fermax.com
Publicación técnica de carácter informativo editada por FERMAX ELECTRÓNICA S.A.E.
FERMAX ELECTRÓNICA S.A.E., en su política de mejora constante, se reserva el derecho a modificar
el contenido de este documento así como las características de los productos que en él se refieren en
cualquier momento y sin previo aviso.
Cualquier modificación será reflejada en posteriores ediciones de este documento.
ESPAÑOL
Pag 4
Page 5
Monitor iLoft 4+NMonitor iLoft 4+N
Monitor iLoft 4+NMonitor iLoft 4+N
Monitor iLoft 4+N
Monitor iLoft 4+N
Monitor iLoft 4+NMonitor iLoft 4+N
Monitor iLoft 4+NMonitor iLoft 4+N
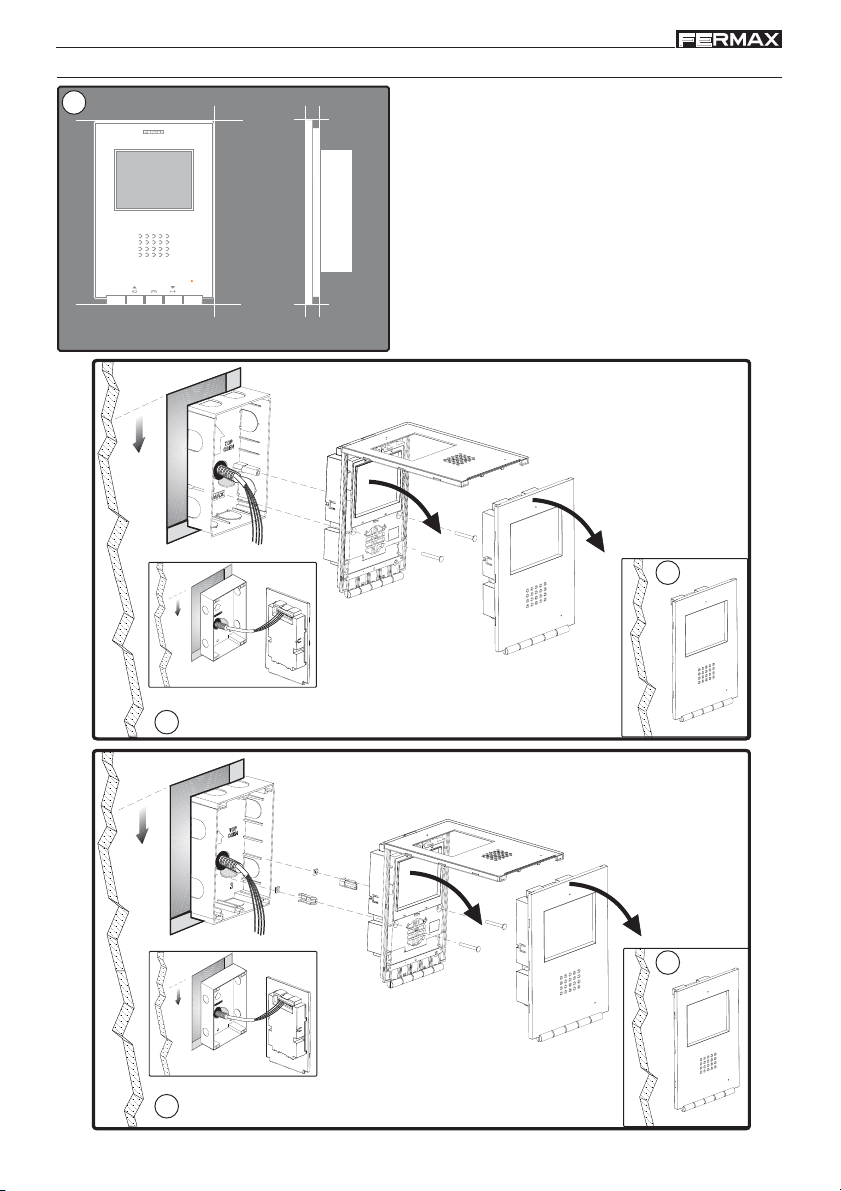
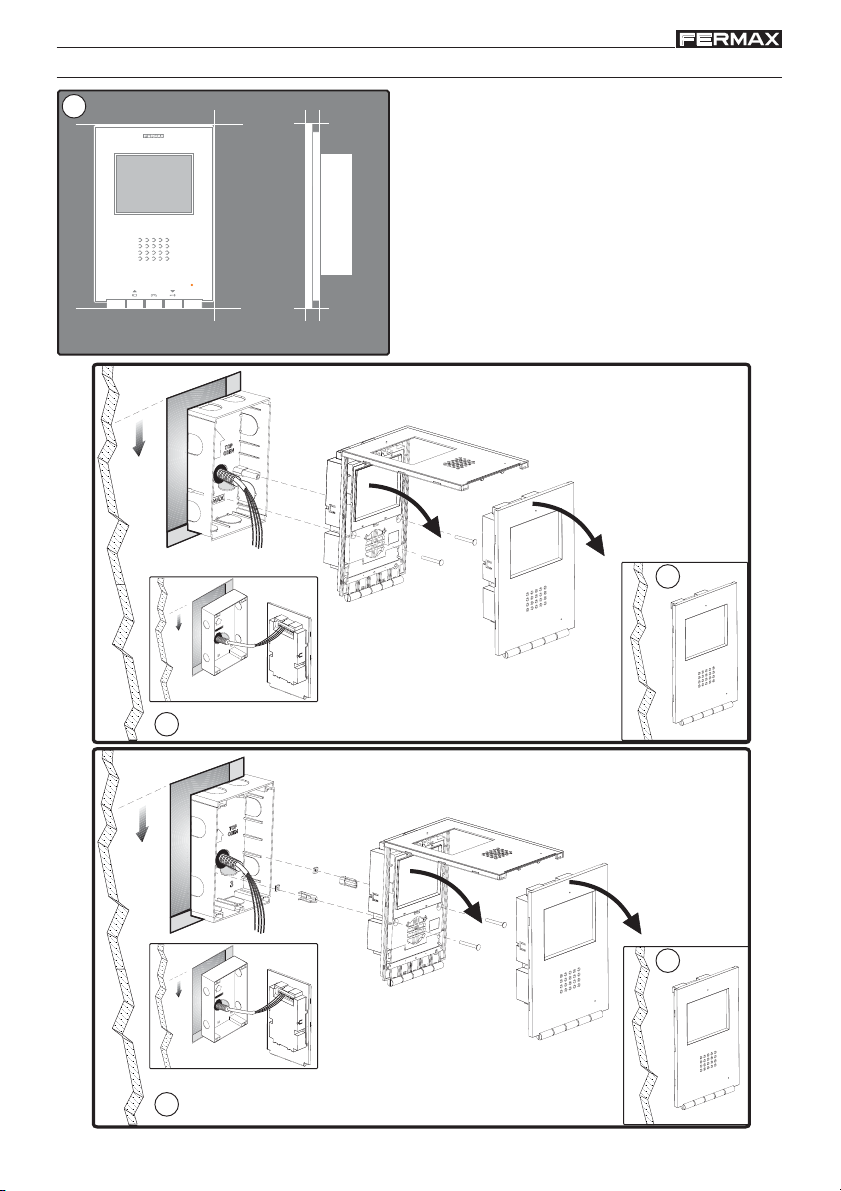
INSTALACIÓN MONITOR
1
Dimensiones monitor (Alto x Ancho x Prof *.):
197 x 131 x 60 mm / 7,7” x 5,1” x 2,3”
Dimensiones caja Fermax (Alto x Ancho x Prof.):
158 x 108 x 45 mm / 6,2” x 4,2” x 1,7”
MENU
F1 F2
131mm
1.60m
5.25 feet
6
.
1
5
2
.
5
2a
197mm
XXmm
14mm
F
2
F
1
T
A
+
C
t
L-
m
0
t
e
e
f
Instalación con CAJA FERMAX
+MVMV
Dimensiones caja universal (Alto x Ancho x Prof.):
174 x 114 x 50 mm / 6.8” x 4,5” x 2”
Notas:
- este monitor se puede instalar en una caja universal.
- Prof * : la profundidad del Monitor se ha considerado con
caja Fermax
(*) Quitar la etiqueta electrostática de protección.
(*)
(*)
3
(*) Quitar la etiqueta electrostática de protección.
1.60m
5.25 feet
F2
T
A+ LC
t
1.60m
5.25 feet
Instalación con CAJA UNIVERSAL
2b
+MVMVF1
(*)
(*)
3
Pag 5
Page 6
Monitor iLoft 4+NMonitor iLoft 4+N
75
Monitor iLoft 4+NMonitor iLoft 4+N
Monitor iLoft 4+N
Monitor iLoft 4+N
Monitor iLoft 4+NMonitor iLoft 4+N
Monitor iLoft 4+NMonitor iLoft 4+N
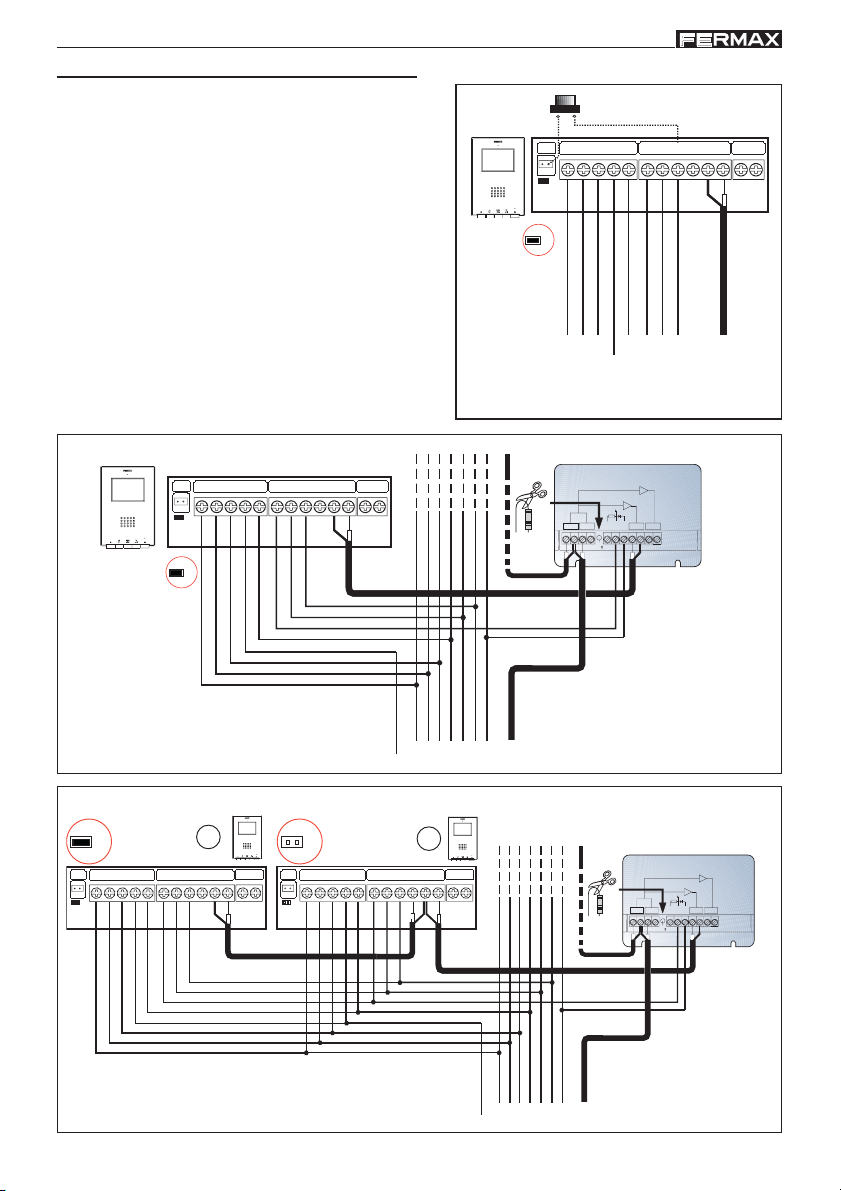
Conexionado
• Bornas de video, (coaxial).
V: vivo
M: malla
Ct: activación telecamara (10 Vdc)
• Bornas de Conexión:
+, -: alimentación (18 Vdc).
1,2,3,6: comunes de audio.
4: llamada.
• Bornas funciones adicionales:
F1, F2: funciones adicionales (salida negativo «-»).
Corriente máxima por pulsador F1, F2: 50 mA a 12 Vdc.
T, -: Conexión pulsador de llamada puerta vivienda (P1).
A, +: Conexión prolongador de llamada ref.2040,
activador luces y timbres ref. 2438, etc...
A
75 Ohms
P1
T
75
4
de la instalación
o placa de calle
-
6+VMVF14
Ct
Ct
6132+-
COAX
(llamada)
F2321
Con distribuidor
T
A
75
75
75 Ohms
Monitor adicional
75 Ohms
T
A
75
-
6+VMVF14
Ct
DISTRIBUIDOR VIDEO 2 SALIDAS
REF.2448
-
6+VMVF14
Ct
F2321
R
2 OUTPUTS VIDEO DISTRIBUTOR
+
(-)
2
+18
V5V1M
M
V
34
R1
75
6
VM M
de la instalación
o placa de calle
Ct
(llamada)
2
F2321
7575
T
A
75
6+VMVF14
Ct
6132 +-
4
1
DISTRIBUIDOR VIDEO 2 SALIDAS
REF.2448
R
2 OUTPUTS VIDEO DISTRIBUTOR
+
(-)
2
+18
V5V1M
M
V
34
R1
75
6
VM M
-
F2321
Ct
6132 +-
4
llamada
Pag 6
Page 7
Monitor iLoft 4+NMonitor iLoft 4+N
Monitor iLoft 4+NMonitor iLoft 4+N
Monitor iLoft 4+N
Monitor iLoft 4+N
Monitor iLoft 4+NMonitor iLoft 4+N
Monitor iLoft 4+NMonitor iLoft 4+N
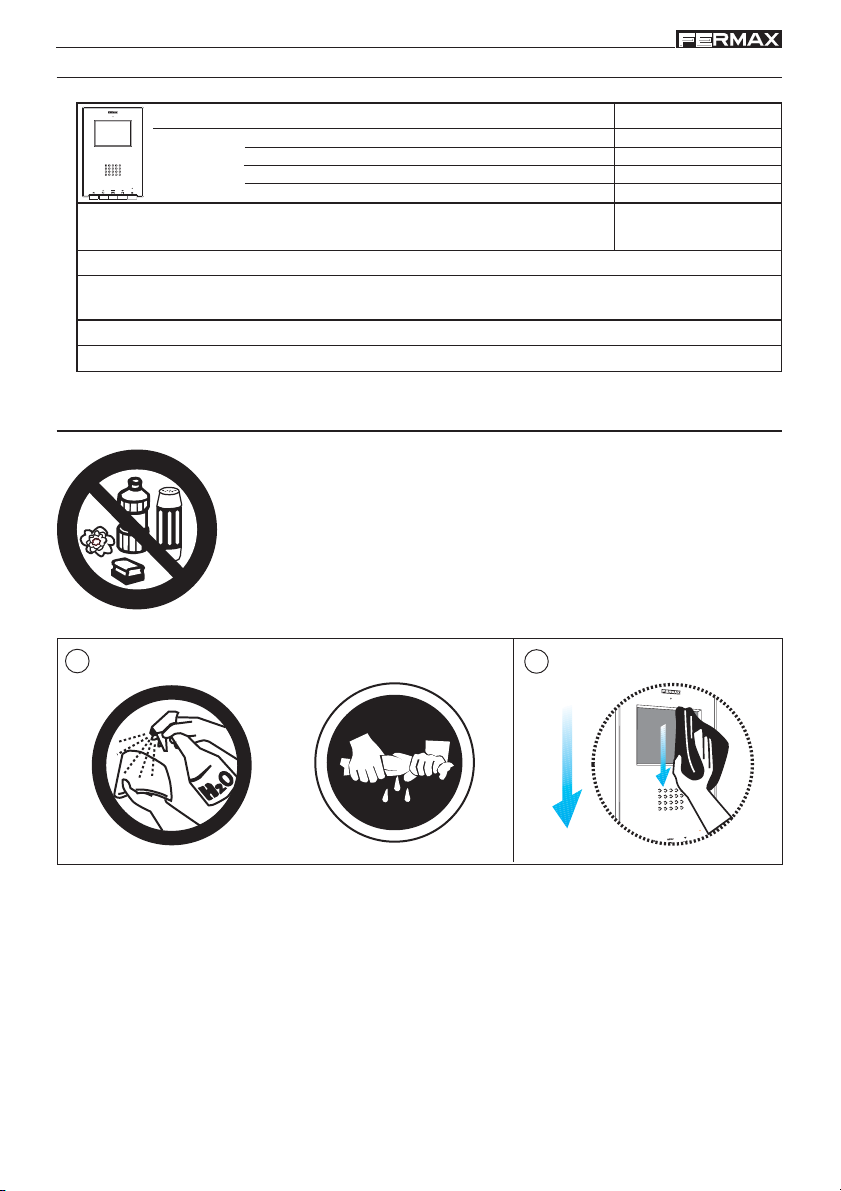
CARACTERÍSTICAS TÉCNICAS
Alimentación
Consumo
Temperatura de funcionamiento
Humedad
TFT Pantalla Plana . 3,5" Diagonal
Resolución: Horizontal: 480 Line TV - Vertical: 234 Line TV
Señal de video: Señal compuesta 1 Vpp 75 Ω, 7 Mhz
Dimensiones monitor (Alto x Ancho x Prof *.): 197 x 131 x 60 mm / 7,7” x 5,1” x 2,3”
en reposo
en llamada
con video
con audio y video
[41, +104 ºF]
MANTENIMIENTO (LIMPEZA)
No utilizar productos de limpieza que contengan ácidos, vinagre o que sean
abrasivos.
1
2
18 Vdc
50 mA
350 mA
255 mA
415 mA
[5 , +40 °C]
[0 - 90%]
1º. Utilizar trapo húmedo.
2º. Páselo sobre el monitor siempre en la misma dirección.
Después de limpiar el monitor séquelo cuidadosamente para eliminar la hu-
medad.
Pag 7
Page 8

Monitor iLoft 4+NMonitor iLoft 4+N
Monitor iLoft 4+NMonitor iLoft 4+N
Monitor iLoft 4+N
Monitor iLoft 4+N
Monitor iLoft 4+NMonitor iLoft 4+N
Monitor iLoft 4+NMonitor iLoft 4+N
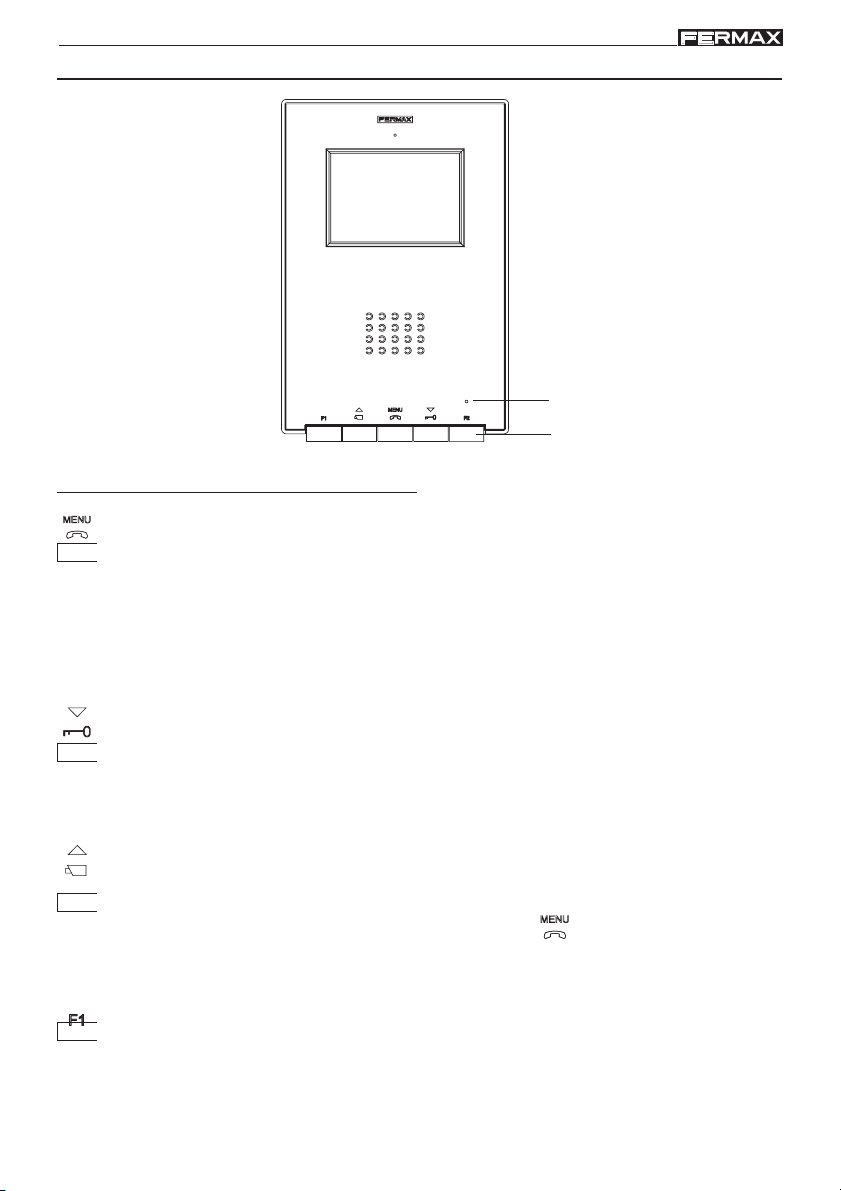
MONITOR iLOFT 4+N
Led
Botones
Botones
Botón Activación de Audio, Colgado y Ajustes configuración (menú).
· Al recibir una llamada pulsar este botón para hablar con el visitante. Se abre el
canal de audio en sentido calle y vivienda, el funcionamiento es en modo manos libres.
· Pulsar al finalizar la comunicación.
· Con el monitor en reposo, pulsar este botón durante 2 segundos para entrar en
modo configuración del monitor. Ver apartado «Ajustes del Monitor».
Botón de abrepuertas / llamada a conserje.
· Estando en conversación con la Placa de Calle, pulsar este botón para activar el
abrepuertas.
· En instalaciones con Conserjería, con el monitor en reposo, pulsar este botón para
realizar una llamada al conserje.
Botón de Autoencendido (función disponible según tipo de instalación)
· Con el monitor en reposo pulsar este botón durante 1 segundo para encender
manualmente el monitor. Para activar audio pulsar el botón
· Con video, mantener pulsado este botón durante 2 segundos para seleccionar
secuencialmente la siguiente camara (si existe).
F1 y F2: Botones para Funciones Adicionales. (Asignadas por el instalador).
F1:________________________________________
F2:________________________________________
NOTA: La pantalla del monitor se enciende una vez finalizado el tono de llamada.
Pag 8
.
Page 9
Monitor iLoft 4+NMonitor iLoft 4+N
Monitor iLoft 4+NMonitor iLoft 4+N
Monitor iLoft 4+N
Monitor iLoft 4+N
Monitor iLoft 4+NMonitor iLoft 4+N
Monitor iLoft 4+NMonitor iLoft 4+N
Funcionamiento
Atender una llamada
Al presionar el pulsador de llamada, en la Placa de Calle se
produce un tono de llamada tanto en la placa de calle como en
el monitor, encendiéndose la pantalla.
Pulsar el botón
en sentido calle y vivienda, el funcionamiento es en modo manos libres.
La comunicación finalizará automáticamente a los 90 segundos o
en cualquier momento al pulsar el botón .
El led permanecerá encendido (azul) durante el tiempo que dure la
conversación.
Si no se establece comunicación con la placa de calle, el monitor se
apaga automáticamente pasados 30 seg.
Apertura de puerta
Al recibir una llamada desde la placa de calle, es posible abrir la
puerta en cualquier momento, pulsado el botón
para hablar con el visitante Se abre el canal de audio
Activación Manual del Monitor (Autoencendido)
(función disponible según tipo de instalación)
Con el monitor en reposo pulsar este botón
encender manualmente el monitor. Para visualizar la imagen proceden-
te del resto de cámaras (si existe más de una) mantener pulsado el
botón
Para activar el audio y hablar con el visitante o abrir la puerta realizar los
pasos descritos anteriormente.
Si no se establece comunicación con la placa de calle, el monitor se
apaga automáticamente pasados 30 seg.
durante 2 segundos.
durante 1 segundo para
Pag 9
Page 10
Monitor iLoft 4+NMonitor iLoft 4+N
Monitor iLoft 4+NMonitor iLoft 4+N
Monitor iLoft 4+N
Monitor iLoft 4+N
Monitor iLoft 4+NMonitor iLoft 4+N
Monitor iLoft 4+NMonitor iLoft 4+N
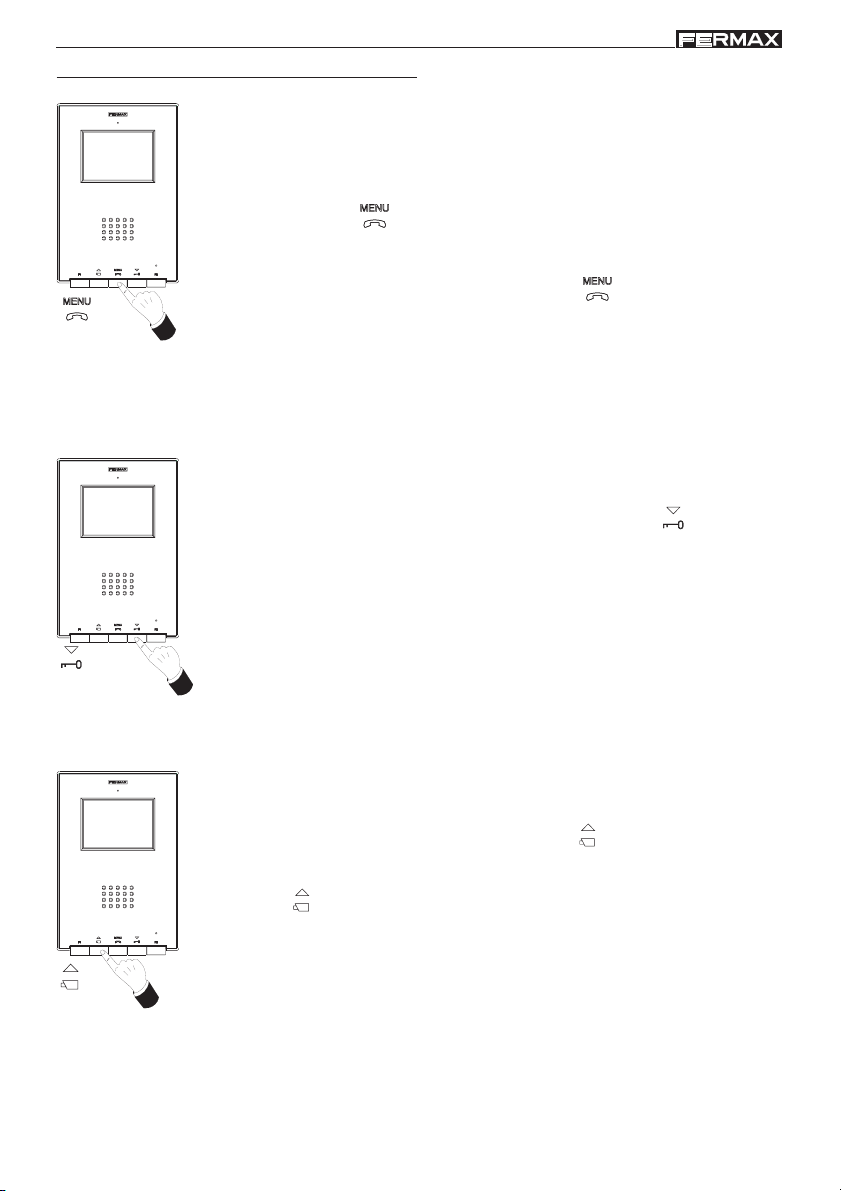
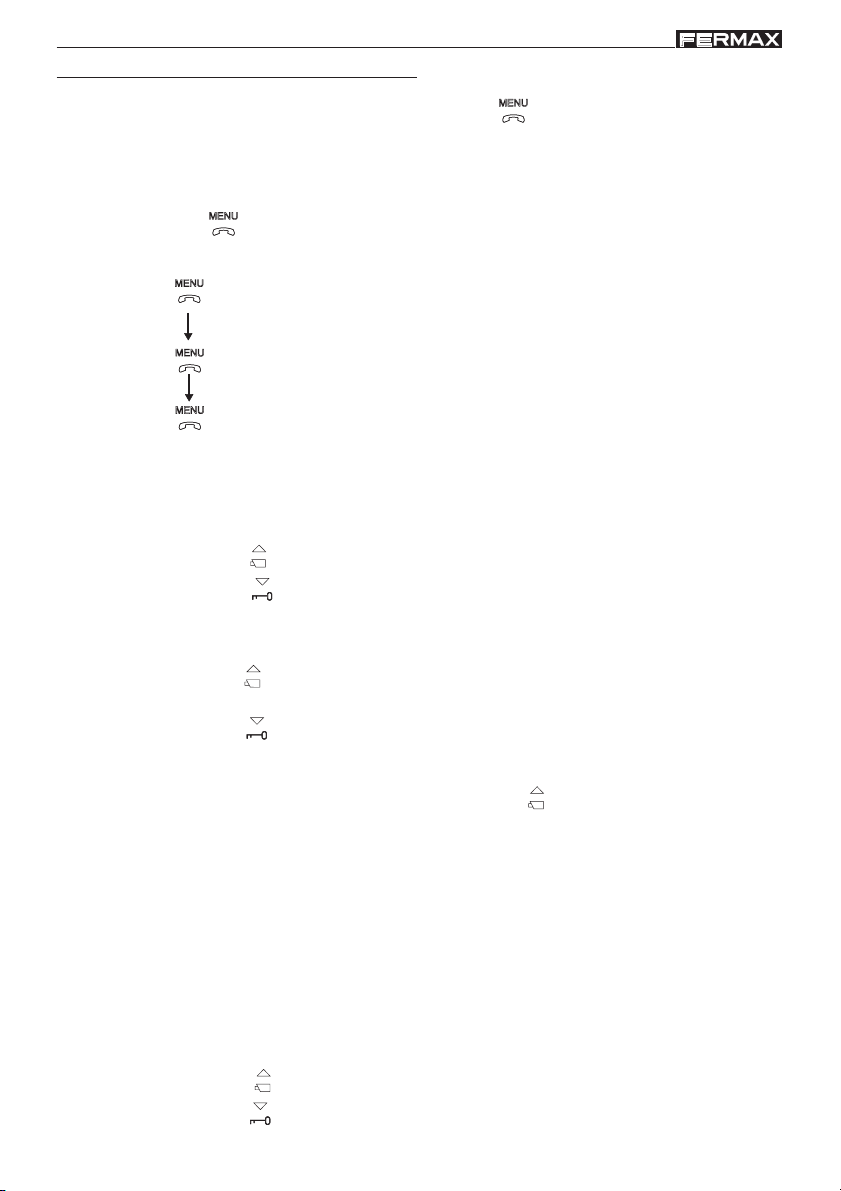
Ajustes del monitor iLoft
Para acceder al modo configuración, pulsar el botón
dos segundos (el led parpadea
1 vez por segundo y se escucha un sonido de confirmación).
Al acceder al modo configuración, el monitor entra en modo ajuste de volumen.
Pulsar el botón para desplazarse secuencialmente entre las opciones de
configuración:
(2 seg.)
: Ajuste de volumen.
: Selecciónde Melodía.
:Ajuste de imágen.
Para ajustar las diferentes opcines de configuración, estando en la opción deseada
realizar los pasos siguientes:
Ajuste Volumen del timbre de Llamada
- pulsar el botón
- pulsar el botón
para seleccionar un volumen alto o
para seleccionar un volumen bajo.
Melodía de llamada (timbre) y Cancelación de llamada (modo no molestar)
- pulsar el botón
para seleccionar la melodía de llamada. De forma cíclica van
pasando las melodías que incorpora.
- pulsar el botón
El led del monitor parpadea en color rojo indicando el modo «no molestar»
para activar la Cancelación de llamada (modo no molestar);
Para activar de nuevo la llamada, pulsar el botón .
Configuración de la Imagen (Brillo-Contraste y Color)
En modo configuración de imagen, el led parpadea 1 vez cada dos segundos, indicando que el
monitor se encuentra en este modo.
El monitor dispone de 4 escenas preestablecidas con un determinado nivel de brillo
y contraste y 4 niveles de color.
Al pulsar el botón correspondiente se selecciona de forma cíclica la escena de brillo/
contraste o nivel de color.
Una vez se llega a la última opción suena un tono de error y vuelve a empezar el ciclo.
- pulsar el botón
- pulsar el botón
Pag 10
para seleccionar la escena de brillo y contraste.
para configurar el color.
Page 11
Monitor iLoft 4+NMonitor iLoft 4+N
Monitor iLoft 4+NMonitor iLoft 4+N
Monitor iLoft 4+N
Monitor iLoft 4+N
Monitor iLoft 4+NMonitor iLoft 4+N
Monitor iLoft 4+NMonitor iLoft 4+N
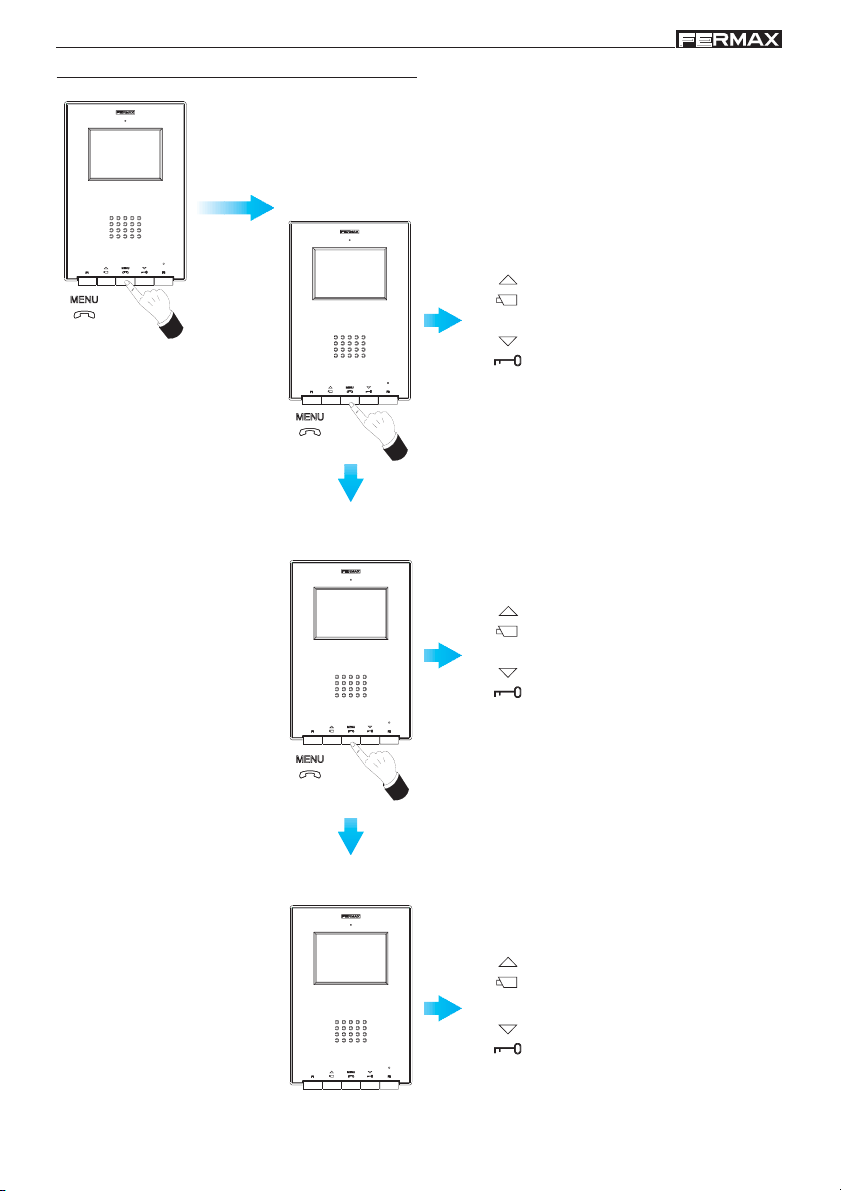
Ajustes del monitor iLoft - Guía rápida
Ajuste Volumen de llamada
(2 seg.)
Volumen ALTO
Entrar en
modo
configuración
Volumen BAJO
Selección de Melodía y cancelación llamada
Selección de
MELODÍA DE LLAMADA
CANCELACION LLAMADA
Configuración de la imagen
BRILLO-CONTRASTE
COLOR
Pag 11
Page 12

Monitor iLoft 4+NMonitor iLoft 4+N
Monitor iLoft 4+NMonitor iLoft 4+N
Monitor iLoft 4+N
Monitor iLoft 4+N
Monitor iLoft 4+NMonitor iLoft 4+N
Monitor iLoft 4+NMonitor iLoft 4+N
CONGRATULATIONS ON PURCHASING THIS QUALITY PRODUCT!
Fermax electronics manufactures and develops top class equipment which fulfil the highest
design and technology standards.
Your «iLoft» Fermax video video door entry monitor, hands free and full colour screen
allows you to communicate with the entry panel, see the caller and open the entrance door
if you wish.
We hope you enjoy its range of functions.
www.fermax.com
Technical publication for informative purposes, edited by FERMAX ELECTRÓNICA S.A.E.
FERMAX ELECTRÓNICA S.A.E., in a policy of ongoing improvement, reserves the right to modify the
contents of this document and the features of the products cited herein at any time and with no prior
notice.
Any modification shall be reflected in subsequent of this document.
ENGLISH
Pag 12
Page 13

Monitor iLoft 4+NMonitor iLoft 4+N
Monitor iLoft 4+NMonitor iLoft 4+N
Monitor iLoft 4+N
Monitor iLoft 4+N
Monitor iLoft 4+NMonitor iLoft 4+N
Monitor iLoft 4+NMonitor iLoft 4+N
INSTALLING THE MONITOR
1
Dimensions of monitor (Height x Width x Depth*.):
197 x 131 x 60 mm / 7.7” x 5.1” x 2.3”
Dimensions of Fermax box (Height x Width x Depth):
158 x 108 x 45 mm / 6.2” x 4.2” x 1.7”
MENU
F1 F2
131mm
0m
t
e
.6
1
fe
5
.2
5
1.60m
5.25 feet
2a
197mm
XXmm
14mm
2
F
1
T
A
+
C
t
L-F
+MV
MV
Installation with FERMAX BOX
Dimensions of universal box (Height x Width x Depth):
174 x 114 x 50 mm / 6.8” x 4.5” x 2”
Notes:
- this monitor can be installed in a universal box.
- Depth * : the Monitor depth given here is with Fermax box
(*) Remove electrostatic protective tag.
(*)
(*)
3
(*) Remove electrostatic protective tag.
1.60m
5.25 feet
F1
T
A+ L-F2
C
t+ MV
1.60m
5.25 feet
Installation with UNIVERSAL BOX
2b
MV
(*)
(*)
3
Pag 13
Page 14

Monitor iLoft 4+NMonitor iLoft 4+N
75
Monitor iLoft 4+NMonitor iLoft 4+N
Monitor iLoft 4+N
Monitor iLoft 4+N
Monitor iLoft 4+NMonitor iLoft 4+N
Monitor iLoft 4+NMonitor iLoft 4+N
Wiring
• Video terminals (coaxial):
V: live
M: shield
Ct: camera activation (10 Vdc)
• Connection Terminals:
+, -: 18 Vdc power supply.
1,2,3,6: audio common.
4: call.
• A dditional functions terminals:
F1, F2: additional functions (negative output «-»).
Maximum current per pushbutton F!, F»: 50 mA with 12 Vdc
T, -: Call Button Connection for Door of Residence (P1).
A, +: Call extension connection ref. 2040, light and
bell activator ref. 2438, etc...
P1
T
A
75
75 Ohms
from the installation
or outdoor panel
-
6+VMVF14
Ct
Ct
6132+-
4
(call)
F2321
COAX
With distribuiuor
T
A
75
75
75 Ohms
Additional monitor
75 Ohms
T
A
75
2
-
6+VMVF14
Ct
DISTRIBUIDOR VIDEO 2 SALIDAS
REF.2448
-
6+VMVF14
Ct
F2321
R
2 OUTPUTS VIDEO DISTRIBUTOR
+
(-)
2
+18
V5V1M
M
V
34
R1
75
6
VM M
from the installation
or outdoor panel
Ct
(call)
7575
T
A
F2321
75
6+VMVF14
Ct
6132 +-
4
1
DISTRIBUIDOR VIDEO 2 SALIDAS
REF.2448
R
2 OUTPUTS VIDEO DISTRIBUTOR
+
(-)
2
+18
V5V1M
M
V
34
R1
75
6
VM M
-
F2321
Ct
6132 +-
4
(call)
Pag 14
Page 15

Monitor iLoft 4+NMonitor iLoft 4+N
Monitor iLoft 4+NMonitor iLoft 4+N
Monitor iLoft 4+N
Monitor iLoft 4+N
Monitor iLoft 4+NMonitor iLoft 4+N
Monitor iLoft 4+NMonitor iLoft 4+N
TECHNICAL CHARACTERISTICS
Power Supply
Consumption
Operating temperature
Humidity
TFT Flat Screen. 3.5" Diagonal
Resolution: Horizontal: 480 Line TV - Vertical: 234 Line TV
Video signal: Compound signal 1 Vpp 75 Ω, 7 Mhz
Dimensions of monitor (Height x Width x Depth*.): 197 x 131 x 60 mm / 7.7” x 5.1” x 2.3”
on standby
making a call
with video
with audio and video
[41, +104 ºF]
MAINTENANCE (CLEANING)
Do not use cleaning products which contain acids, vinegar or are
abrasive in nature.
1
2
18 Vdc
50 mA
350 mA
255 mA
415 mA
[5 , +40 °C]
[0 - 90%]
1º. Use a damp cloth.
2º. Wipe it over the monitor always following the same direction.
After cleaning the monitor dry it carefully to avoid moisture damage.
Pag 15
Page 16

Monitor iLoft 4+NMonitor iLoft 4+N
Monitor iLoft 4+NMonitor iLoft 4+N
Monitor iLoft 4+N
Monitor iLoft 4+N
Monitor iLoft 4+NMonitor iLoft 4+N
Monitor iLoft 4+NMonitor iLoft 4+N
4+N iLOFT MONITOR
Led
Buttons
Buttons
Audio Activation, Hanging-up and Configuration-adjustment Button (menu).
· When a call is received, press this button to speak to the visitor. The audio
channel between the street and the home is opened; operation is in hands-free
mode.
· Press to end the communication.
· With the monitor on standby, press this button for 2 second to go into monitor
configuration mode. See the «Monitor Settings» section.
Door-opener / call to reception button.
· When you are in conversation with the Street Panel, pressing this button will
activate the door-opener.
· Installations with guard unit, with the monitor in default position, press this
button to realise a call to the guard unit.
Auto-start button (function availability depends on the type of installation)
· With the monitor on standby, press this button for 1 second to switch the monitor
on manually. To activate the audio, press the button .
· With video, maintain pressing this button for 2 seconds to select the following
camera sequentially (if it exists).
F1 and F2: Buttons for Additional Functions (assigned by the installer).
F1:________________________________________
F2:________________________________________
NOTE: The monitor screen goes on once the call from the panel has ended.
Pag 16
Page 17

Monitor iLoft 4+NMonitor iLoft 4+N
Monitor iLoft 4+NMonitor iLoft 4+N
Monitor iLoft 4+N
Monitor iLoft 4+N
Monitor iLoft 4+NMonitor iLoft 4+N
Monitor iLoft 4+NMonitor iLoft 4+N
Operation
Answering a call
When the call button on the Street Panel is pressed a call tone is emitted
both at the panel and on the monitor, and the screen goes on.
Press the button to speak with the visitor. The audio channel between
the street and the home will be opened; operation is in hands-free mode.
The communication will automatically end after 90 seconds, or at any
time by pressing the button
conversation lasts.
If communication is not established with the street panel, the monitor will
automatically go off after 30 seconds.
Opening the door
When a call is received from the street panel, it is possible to open
the door at any time, by pressing the button
. The LED will remain on (blue) while the
Manual Activation of the Monitor (Auto-start)
(function availability depends on the type of installation)
With the monitor on standby, press this button
the monitor on manually.
In order to view the image from the rest of cameras (if it exists
more than one), maintain pressing the button
To activate the audio and speak to the visitor or open the door, carry out the
steps described above.
If communication is not established with the street panel, the monitor will
automatically go off after 30 seconds.
NOTE: If there is more than one iLoft monitor in the system and a call is made to a
monitor, the rest of the monitors will show a blue led warning that the channel is busy.
for 1 second to switch
for 2 seconds.
Pag 17
Page 18

Monitor iLoft 4+NMonitor iLoft 4+N
Monitor iLoft 4+NMonitor iLoft 4+N
Monitor iLoft 4+N
Monitor iLoft 4+N
Monitor iLoft 4+NMonitor iLoft 4+N
Monitor iLoft 4+NMonitor iLoft 4+N
Monitor settings
To access configuration mode, press the button
down for two seconds (the led will
blink once a second and a confirmation tone will be emitted).
On accessing configuration mode, the monitor will go into volume settings mode.
Press the button to move through the configuration options in order:
(2 sec.)
: Volume Settings.
: Tone Selection.
: Image Settings.
To adjust the different configuration options, while in the required option, follow these
steps:
Set Call Bell Volume
- press the button
- press the button
to select a high volume or
to select a low volume.
Call Tone and Call Cancellation (do not disturb mode)
- press the button
to select the call tone. You will go through all the brightness-
contrast configurations it incorporates.
- press the button
The monitor led blinks on red to indicate «do not disturb» mode
to activate the call cancellation function (do not disturb mode);
To reactivate call functions, press the button .
Image Settings (Brightness-Contrast and Colour)
In image configuration mode, the led blinks once every two seconds, indicating that the monitor
is in this mode.
The monitor has 4 pre-established settings with a specific level of brightness and
contrast and 4 colour levels.
On pressing the corresponding button you can select the brightness/contrast level or
colour setting.
When you come to the last option, an error tone is emitted and it returns to the first one.
- press the button to select brightness and contrast.
- press the button
Pag 18
to configure colour.
Page 19

Monitor iLoft 4+NMonitor iLoft 4+N
Monitor iLoft 4+NMonitor iLoft 4+N
Monitor iLoft 4+N
Monitor iLoft 4+N
Monitor iLoft 4+NMonitor iLoft 4+N
Monitor iLoft 4+NMonitor iLoft 4+N
iLoft Monitor Settings - Quick Guide
Call Volume Settings
(2 sec.)
HIGH Volume
Go into
configuration
mode
LOW Volume
Melody Selection and call cancellation
CALL TONE
Selection
CALL CANCELATION
Image Configuration
BRIGHTNESS-CONTRAST
COLOUR
Pag 19
Page 20

Monitor iLoft 4+NMonitor iLoft 4+N
FRANÇAIS
Monitor iLoft 4+NMonitor iLoft 4+N
Monitor iLoft 4+N
Monitor iLoft 4+N
Monitor iLoft 4+NMonitor iLoft 4+N
Monitor iLoft 4+NMonitor iLoft 4+N
FÉLICIT ATIONS ! VOUS VENEZ D’ACQUÉRIR UN
VÉRITABLE PRODUIT DE QUALITÉ
Fermax Electrónica développe et fabrique des équipements de prestige qui répondent
aux normes de design et technologie les plus développées.
Votre moniteur pour portier vidéo FERMAX «iLoft» (fonction mains libres et avec écran
couleur) vous permettra de communiquer avec la platine de rue, de voir la personne qui
vous appelle et d’ouvrir la porte d’entrée si vous le souhaitez.
Nous espérons que vous profiterez pleinement de toutes ses fonctions.
www.fermax.com
Publication technique à caractère informatif éditée par FERMAX ELECTRONICA, S.A.E.
Conformément à sa politique de perfectionnement continu, FERMAX ELECTRÓNICA, S.A.E. se réserve
le droit de modifier, à tout moment et sans préavis, le contenu de ce document ainsi que les
caractéristiques des produits auxquels il est fait référence.
Toutes les modifications apparaîtront dans les éditions suivantes.
Pag 20
Page 21
Monitor iLoft 4+NMonitor iLoft 4+N
Monitor iLoft 4+NMonitor iLoft 4+N
Monitor iLoft 4+N
Monitor iLoft 4+N
Monitor iLoft 4+NMonitor iLoft 4+N
Monitor iLoft 4+NMonitor iLoft 4+N
INST ALLATION MONITEUR
1
Dimensions moniteur (hauteur x largeur x prof*) :
197 x 131 x 60 mm / 7,7” x 5,1” x 2,3”
Dimensions boîtier Fermax (hauteur x largeur x prof*) :
158 x 108 x 45 mm / 6,2” x 4,2” x 1,7”
MENU
F1 F2
131mm
0m
t
e
.6
1
fe
5
.2
5
1.60m
5.25 feet
2a
197mm
XXmm
14mm
(*)Retirer l’étiquette électrostatique de protection.
2
F
1
T
A
+
C
t
L-F
+MV
MV
Installation avec BOÎTIER FERMAX
(*)Retirer l’étiquette électrostatique de protection.
Dimensions boîtier universel (hauteur x largeur x prof*) :
174 x 114 x 50 mm / 6,8” x 4,5” x 2”
Remarques :
- Ce moniteur peut être installé dans un boîtier universel.
- Prof * : la profondeur du moniteur est prise en compte
avec le boîtier Fermax.
(*)
(*)
3
1.60m
5.25 feet
F1
T
A+ L-F2
C
t+ MV
1.60m
5.25 feet
Installation avec BOÎTIER UNIVERSEL
2b
MV
(*)
(*)
3
Pag 21
Page 22

Monitor iLoft 4+NMonitor iLoft 4+N
75
Monitor iLoft 4+NMonitor iLoft 4+N
Monitor iLoft 4+N
Monitor iLoft 4+N
Monitor iLoft 4+NMonitor iLoft 4+N
Monitor iLoft 4+NMonitor iLoft 4+N
Connexions
• Bornes vidéo (câble coaxial).
V : vif
M : maille
Ct : activation caméra (10 Vdc)
• Bornes de raccordement :
+, - : alimentation (18 Vcc).
1,2,3,6: communs d’ audio.
4: appel
• Bornes de fonctions supplémentaires:
F1, F2 : fonctions supplémentaires (sortie négatif « - »).
Courrant maximum du bouton poussoir F1, F2: 50 mA a
12 Vdc.
T, - : raccordement bouton-poussoir d’appel de la porte
du logement (P1).
A, + : raccordement prolongateur d’appel réf. 2040,
activateur et sonneries réf. 2438, etc.
T
A
75
75 Ohms
de l’installation
ou platine de rue
P1
6+VMVF14
Ct
Ct
6132+-
4
(appel)
-
F2321
COAX
Avec répartiteur
T
A
75
75
75 Ohms
Moniteur spplémentaire
75 Ohms
T
A
75
2
-
6+VMVF14
Ct
F2321
DISTRIBUIDOR VIDEO 2 SALIDAS
REF.2448
-
6+VMVF14
Ct
F2321
R
2 OUTPUTS VIDEO DISTRIBUTOR
+
(-)
2
+18
V5V1M
M
V
34
R1
75
6
VM M
de l’installation
ou platine de rue
Ct
(appel)
7575
T
A
75
6+VMVF14
Ct
6132 +-
4
1
DISTRIBUIDOR VIDEO 2 SALIDAS
REF.2448
R
2 OUTPUTS VIDEO DISTRIBUTOR
+
(-)
2
+18
V5V1M
M
V
34
R1
75
6
VM M
-
F2321
Ct
6132 +-
4
(appel)
Pag 22
Page 23

Monitor iLoft 4+NMonitor iLoft 4+N
Monitor iLoft 4+NMonitor iLoft 4+N
Monitor iLoft 4+N
Monitor iLoft 4+N
Monitor iLoft 4+NMonitor iLoft 4+N
Monitor iLoft 4+NMonitor iLoft 4+N
CARACTÉRISTIQUES TECHNIQUES
Alimentation
Consommation
Température de fonctionnement
Humidité
TFT Ecran plat. 3,5" diagonal
Résolution : Horizontale : 480 Line TV / Verticale : 234 Line TV
Signal vidéo : Signal composite 1 Vpp 75 Ω, 7 Mhz
Dimensions moniteur (hauteur x largeur x prof*) : 197 x 131 x 60 mm / 7,7” x 5,1” x 2,3”
MAINTENANCE (NETTOY AGE)
1
en veille
lors d’un appel
avec image
avec son et image
[41, +104 ºF]
Ne pas utiliser de produits nettoyants contenant de l’acide, du vinaigre ou
d’autres substances abrasives.
2
18 Vdc
50 mA
350 mA
255 mA
415 mA
[5 , +40 °C]
[0 - 90%]
1º. Utiliser un chiffon humide.
2º. Le passer sur le moniteur toujours dans le même sens.
Après avoir nettoyé le moniteur, le sécher soigneusement afin d’éliminer l’humidité.
Pag 23
Page 24

Monitor iLoft 4+NMonitor iLoft 4+N
Monitor iLoft 4+NMonitor iLoft 4+N
Monitor iLoft 4+N
Monitor iLoft 4+N
Monitor iLoft 4+NMonitor iLoft 4+N
Monitor iLoft 4+NMonitor iLoft 4+N
MONITEUR iLOFT 4+N
Del
Boutons
Boutons-poussoirs
Bouton pour l’activation du son, pour raccrocher et pour les réglages de la
configuration (menu).
· Si vous recevez un appel, appuyez sur la touche pour parler avec le visiteur. Le canal
audio sens rue-logement s’active et le tout fonctionne en mode mains libres.
· Cliquez pour couper la communication.
· Si le moniteur est en veille, appuyez sur le bouton pendant 2 secondes pour
entrer en mode configuration du moniteur. Voir rubrique «Réglages du moniteur».
Bouton-poussoir de la gâche électrique / appel au concierge.
· Lors d’une communication avec la platine de rue, la gâche électrique est activée
en appuyant sur ce bouton.
· Dans les installations avec Conciergerie, avec le moniteur au repos, pressez ce
bouton pour réaliser un appel au concierge.
Bouton d’allumage automatique (fonction disponible selon l’installation)
· Si le moniteur est en veille, appuyez sur la touche pendant 1 seconde pour
allumer manuellement le moniteur. Afin d’activer le son, appuyez sur la touche
· Avec vidéo, pressez le bouton pendant 2 secondes pour choisir séquentiellement
la caméra suivante (si elle existe)
F1 et F2 : boutons pour fonctions supplémentaires (assignées par l’installateur).
F1:________________________________________
F2:________________________________________
REMARQUE: l’écran du moniteur s’allume une fois l’appel en provenance de la platine terminé.
Pag 24
.
Page 25

Monitor iLoft 4+NMonitor iLoft 4+N
Monitor iLoft 4+NMonitor iLoft 4+N
Monitor iLoft 4+N
Monitor iLoft 4+N
Monitor iLoft 4+NMonitor iLoft 4+N
Monitor iLoft 4+NMonitor iLoft 4+N
Fonctionnement
Prendre un appel
En appuyant sur le bouton-poussoir d’appel sur la platine de
rue, il se produit une tonalité d’appel aussi bien au niveau de la
platine de rue que du moniteur ; l’écran s’allume.
Appuyez sur la touche
audio sens rue-logement s’active et le tout fonctionne en mode mains
libres. La communication est automatiquement coupée au bout de
90 secondes ou auparavant en appuyant sur le bouton . La
DEL restera allumée (en bleu) pendant la durée de la conversation.
Si aucune communication n’est établie avec la platine de rue, le moniteur
s’éteindra automatiquement au bout de 30 s.
Ouverture de la porte
Si vous recevez un appel depuis la platine de rue, il est possible
d’ouvrir la porte à tout moment en appuyant sur le bouton
afin de pouvoir parler avec le visiteur. La canal
.
Activation manuelle du moniteur (allumage automatique)
(fonction disponible selon l’installation)
Si le moniteur est en veille, appuyez sur la touche
pour allumer manuellement le moniteur.
Pour montrer l’image provenante du reste des caméras (s’il en
existent plus d’une), pressez le bouton
Pour activer le son, parler avec le visiteur ou ouvrir la porte, effectuez les
étapes décrites antérieurement.
Si aucune communication n’est établie avec la platine de rue, le moniteur
s’éteindra automatiquement au bout de 30 s.
pendant 1 seconde
pendant 2 secondes.
Pag 25
Page 26

Monitor iLoft 4+NMonitor iLoft 4+N
Monitor iLoft 4+NMonitor iLoft 4+N
Monitor iLoft 4+N
Monitor iLoft 4+N
Monitor iLoft 4+NMonitor iLoft 4+N
Monitor iLoft 4+NMonitor iLoft 4+N
Paramètres du moniteur
Pour accéder au mode de configuration, appuyez sur le bouton
pendant deux
secondes (la DEL clignote 1 fois par seconde et une tonalité de confirmation est émise).
En accédant au mode de configuration, le moniteur entre en mode de réglage du volume.
Appuyez sur la touche
(2 s.)
pour passer d’une option de configuration à une autre :
: réglage du volume.
: sélection de la mélodie.
: réglage de l’image.
Pour ajuster les différentes options de configuration, il suffit de suivre, une fois dans
l’option souhaitée, les étapes suivantes :
Réglage du volume de la sonnerie d’appel
- appuyez sur la touche
pour sélectionner un volume élevé ou
- appuyez sur la touche pour sélectionner un volume faible.
Mélodie d’appel (sonnerie) et annulation de l’appel (mode ne pas déranger)
- Appuyez sur la touche pour sélectionner la mélodie d’appel. Toutes les
mélodies disponibles passeront les unes à la suite des autres.
- Appuyez sur la touche
déranger).
pas déranger »
La DEL du moniteur clignote en rouge, ce qui indique le mode « ne
pour activer l’annulation de l’appel (mode ne pas
Afin d’activer de nouveau l’appel, appuyez sur le bouton .
Configuration de l’image (luminosité-contraste et couleur)
La DEL clignote 1 fois toutes les deux secondes, indiquant de la sorte que le moniteur se trouve
en mode configuration de l’image.
Le moniteur dispose de 4 degrés préétablis avec un niveau de luminosité et contraste
déterminé et 4 niveaux de couleur.
En appuyant sur le bouton correspondant, l’on sélectionne de manière cyclique le
degré de luminosité/contraste ou niveau de couleur.
Une fois parvenu à la dernière option, une tonalité d’erreur est émise et l’on revient au
premier cycle.
- Appuyez sur la touche
- Appuyez sur la touche
Pag 26
pour sélectionner la luminosité et le contraste.
pour configurer la couleur.
Page 27

Monitor iLoft 4+NMonitor iLoft 4+N
Monitor iLoft 4+NMonitor iLoft 4+N
Monitor iLoft 4+N
Monitor iLoft 4+N
Monitor iLoft 4+NMonitor iLoft 4+N
Monitor iLoft 4+NMonitor iLoft 4+N
Réglages du moniteur iLoft - Guide rapide
Réglage volume d’appel
(2 sec.)
Volume ÉLEVÉ
Entrer en
mode de
configuration
Volume FAIBLE
Sélection de la mélodie et annulation de l’appel
Sélection de la
MÉLODIE D’APPEL
ANNULATION DE L ’APPEL
Configuration de l’image
LUMINOSITÉ-CONTRASTE
COULEUR
Pag 27
Page 28

Monitor iLoft 4+NMonitor iLoft 4+N
Monitor iLoft 4+NMonitor iLoft 4+N
Monitor iLoft 4+N
Monitor iLoft 4+N
Monitor iLoft 4+NMonitor iLoft 4+N
Monitor iLoft 4+NMonitor iLoft 4+N
WIR GRATULIEREN IHNEN ZUM KAUF DIESES QUALITÄTSPRODUKTS!
Fermax entwickelt und fabriziert hochwertige Anlagen, die den höchsten Technologieund Designstandards entsprechen.
Der Farbmonitor der Videotürsprechanlage von FERMAX iLoft mit Freisprechbetrieb,
ermöglicht Ihnen eine Sprechverbindung mit der Türstation herzustellen, die Person, mit
der Sie sprechen auf dem Bildschirm zu betrachten und bei Bedarf die Tür zu öffnen.
Überzeugende Funktionalität für Ihr Eigenheim!
www.fermax.com
Technische Veröffentlichung zu Informationszwecken - Herausgeber: FERMAX ELECTRONICA S.A.E.
FERMAX ELECTRONICA S.A.E, behält sich das Recht vor, den Inhalt dieses Dokuments sowie die
technischen Eigenschaften der erwähnten Produkte ohne vorherige Ankündigung zu ändern, um
dadurch den ständigen Weiterentwicklungen und den damit in Verbindung stehenden Verbesserungen
Rechnung zu tragen.
Alle Änderungen finden Aufnahme in den Neuauflagen dieses Dokuments.
DEUTSCH
Pag 28
Page 29

Monitor iLoft 4+NMonitor iLoft 4+N
Monitor iLoft 4+NMonitor iLoft 4+N
Monitor iLoft 4+N
Monitor iLoft 4+N
Monitor iLoft 4+NMonitor iLoft 4+N
Monitor iLoft 4+NMonitor iLoft 4+N
INSTALLATION DES MONITORS
1
197mm
Abmessungen Monitor (Höhe x Breite x Tiefe*):
197 x 131 x 60 mm / 7,7” x 5,1” x 2,3”
Abmessungen des Fermax-Unterputzkastens
(Höhe x Breite x Tiefe):
158 x 108 x 45 mm / 6,2” x 4,2” x 1,7”
Abmessungen Universalkasten (Höhe x Breite x Tiefe):
174 x 114 x 50 mm / 6,8” x 4,5” x 2”
MENU
F1 F2
131mm
0m
t
e
.6
1
fe
5
.2
5
1.60m
5.25 feet
2a
XXmm
- Dieser Monitor kann in einem Universalkasten installiert
werden.
Hinweise:
14mm
- Tiefe*: Die Tiefe des Monitors ist auf den Fermax-
Unterputzkasten abgestimmt.
(*) Elektromagnetischen Schutzaufkleber entfernen.
(*)
2
F
1
T
A
+
C
t
L-F
+MV
MV
Installation mit FERMAX-UNTERPUTZKASTEN
(*) Elektromagnetischen Schutzaufkleber entfernen.
(*)
3
1.60m
5.25 feet
F1
T
A+ L-F2
C
t+ MV
1.60m
5.25 feet
Installation mit UNIVERSALKASTEN
2b
MV
(*)
(*)
3
Pag 29
Page 30

Monitor iLoft 4+NMonitor iLoft 4+N
75
Monitor iLoft 4+NMonitor iLoft 4+N
Monitor iLoft 4+N
Monitor iLoft 4+N
Monitor iLoft 4+NMonitor iLoft 4+N
Monitor iLoft 4+NMonitor iLoft 4+N
Verkabelung
• Video-Klemmen (Koaxial)
V: Kern
M: Schirm
Ct: Aktivierung der Kamera (10 VDC)
• Anschlussklemmen:
+, -: Stromversorgung (18 VDC).
1,2,3,6: gemeinsame Audiokabeln.
4: Anruf.
• Klemmen fur zusätzlichen Funktione:
F1, F2: Zusatzfunktionen (Negativausgang "-").
Maximale Strömmung pro Taster F1, F2: 50 mA mit 12
Vdc.
T, -: Anschluss Ruftaste Wohnungstür (P1).
A, +: Anschluss Anruferweiterungsmodul, Ref.
2040, Aktivierung Beleuchtung und Klingeltasten,
Ref. 2438 usw....
P1
T
A
75
75 Ohms
von der Anlage oder
von der Türstation
-
6+VMVF14
Ct
Ct
6132+-
4
(Anruf)
F2321
COAX
Mit Verteiler
T
A
75
75
75 Ohms
zusätzlicher Monitor
75 Ohms
T
A
75
2
-
6+VMVF14
Ct
DISTRIBUIDOR VIDEO 2 SALIDAS
REF.2448
-
6+VMVF14
Ct
F2321
R
2 OUTPUTS VIDEO DISTRIBUTOR
+
(-)
2
+18
V5V1M
M
V
34
R1
75
6
VM M
von der Anlage oder
von der Türstation
Ct
(anruf)
7575
T
A
F2321
75
6+VMVF14
Ct
6132 +-
4
1
DISTRIBUIDOR VIDEO 2 SALIDAS
REF.2448
R
2 OUTPUTS VIDEO DISTRIBUTOR
+
(-)
2
+18
V5V1M
M
V
34
R1
75
6
VM M
-
F2321
Ct
6132 +-
4
(anruf)
Pag 30
Page 31

Monitor iLoft 4+NMonitor iLoft 4+N
Monitor iLoft 4+NMonitor iLoft 4+N
Monitor iLoft 4+N
Monitor iLoft 4+N
Monitor iLoft 4+NMonitor iLoft 4+N
Monitor iLoft 4+NMonitor iLoft 4+N
TECHNISCHE EIGENSCHAFTEN
Stromversorgung
Stromverbrauch
Betriebstemperatur
Relative Luftfeuchtigkeit
TFT Flachbildschirm 3,5" Diagonale
Auflösung: Horizontal: 480 Bildpunkte - Vertikal: 234 Bildpunkte
Videosignal: Gemischtes Signal 1 Vpp 75 Ω, 7 MHz
Abmessungen Monitor (Höhe x Breite x Tiefe*): 197 x 131 x 60 mm / 7,7” x 5,1” x 2,3”
im Bereitschaftsmodus
bei Sprechverbindung
bei Videoübertragung
bei Audio- und Videoübertragung
18 Vdc
50mA
350 mA
255 mA
415 mA
[5 , +40 °C]
[41, +104 ºF]
[0 - 90%]
WARTUNG (REINIGUNG)
Verwenden Sie niemals säurehaltige oder scheuernde Reinigungsmittel.
1
2
1º. Benutzen Sie ein feuchtes Reinigungstuch.
2º. Fahren Sie immer in gleicher Richtung über den Monitor.
Nach der Monitorreinigung diesen vorsichtig trocken reiben.
Pag 31
Page 32
Monitor iLoft 4+NMonitor iLoft 4+N
Monitor iLoft 4+NMonitor iLoft 4+N
Monitor iLoft 4+N
Monitor iLoft 4+N
Monitor iLoft 4+NMonitor iLoft 4+N
Monitor iLoft 4+NMonitor iLoft 4+N
4+N iLOFT MONITOR
Tasten
Taste Audioaktivierung, Aufhängen und Einstellungen (Menü)
· Drücken Sie beim Empfang eines Anrufs auf diese Taste, um die Sprechfunktion zu
aktivieren. Der Audiokanal wird in Richtung Türstation und Wohnung geöffnet und auf
Freisprechbetrieb geschaltet.
· Drücken Sie diese Taste, um die Verbindung zu beenden.
· Drücken Sie die Taste zwei Sekunden lang, um in den Konfigurationsmodus des Monitors
zu gelangen. Siehe Abschnitt "Einstellungen des Monitors"
Led
Tasten
Türöffnungstaste / Portierruf
· Bei bestehender Sprechverbindung zur Türstation wird durch Drücken dieser
TastederTüröffneraktiviert.
· In Anlage mit Portierzentrale, mit Monitor im Ruhezustand, diese Taste zu drücken,
um Portierzentral anzurufen.
Eigenstarttaste (verfügbare Funktion gemäß des Anlagestyps)
· Halten Sie diese Taste eine Sekunde lang gedrückt, falls der Monitor sich im
Bereitschafts-modus befindet, um ihn manuell einzuschalten. Um die
Audiofunktion zu aktivieren, drücken Sie die Taste .
· Mit Video, diese Taste während 2 Sekunden beizubehalten, um die folgende
Kamera der Reihe vorzuwählen (wenn es mehr als eine gibt).
F1 und F2: Tasten für Zusatzfunktionen (Festgelegt durch den Installateur).
F1:________________________________________
F2:________________________________________
HINWEIS: Der Bildschirm des Monitors schaltet sich ein, nachdem das Gespräch über die
Türstation beendet worden ist.
Pag 32
Page 33

Monitor iLoft 4+NMonitor iLoft 4+N
Monitor iLoft 4+NMonitor iLoft 4+N
Monitor iLoft 4+N
Monitor iLoft 4+N
Monitor iLoft 4+NMonitor iLoft 4+N
Monitor iLoft 4+NMonitor iLoft 4+N
Funktionsweise
Anrufannahme
Durch Drücken der Ruftaste an der Türstation wird ein Rufton
an der Türstation und am Monitor ausgelöst und der Bildschirm
schaltet sich ein.
Drücken Sie die Taste
Audiokanal wird in Richtung Türstation und Wohnung geöffnet und es
wird auf Freisprechbetrieb umgeschaltet. Das Gespräch wird nach
Ablauf von 90 Sekunden automatisch beendet oder abgebrochen,
wenn Sie die Taste drücken. Die LED (blau) bleibt während
des Sprechverkehrs eingeschaltet.
Falls keine Sprechverbindung mit der Türstation hergestellt wird, schaltet
sich der Monitor nach Ablauf von 30 Sekunden automatisch aus.
Türöffnung
Wenn ein Anruf von der Türstation empfangen wird, kann die Tür zu
jedem beliebigen Zeitpunkt geöffnet werden, indem Sie die
Taste
, um mit dem Besucher zu sprechen. Der
drücken.
Manuelle Aktivierung des Monitors (Eigenstart)
(verfügbare Funktion gemäß des Anlagestyps)
Halten Sie diese Taste
sich im Bereitschaftsmodus befindet, um ihn manuell einzuschalten.
Die Taste während 2 Sekunden beizubehalten, um das Bild
von den restlichen Kameras zu sehen (wenn es mehr als eine
gibt).
Um die Audiofunktion zu aktivieren und mit dem Besucher zu sprechen,
müssen Sie die zuvor beschriebenen Schritte ausführen.
Falls keine Sprechverbindung mit der Türstation hergestellt wird, schaltet
sich der Monitor nach Ablauf von 30 Sekunden automatisch aus.
eine Sekunde lang gedrückt, falls der Monitor
Pag 33
Page 34

Monitor iLoft 4+NMonitor iLoft 4+N
Monitor iLoft 4+NMonitor iLoft 4+N
Monitor iLoft 4+N
Monitor iLoft 4+N
Monitor iLoft 4+NMonitor iLoft 4+N
Monitor iLoft 4+NMonitor iLoft 4+N
Monitoreinstellungen
Um in den Konfigurationsmodus zu gelangen, müssen Sie die Taste
zwei Sekunden
lang gedrückt halten (die LED blinkt im Sekundenintervall und ein Bestätigungston wird
ausgegeben).
Beim Aufrufen des Konfigurationsmodus, schaltet der Monitor um in den Modus Lautstärkeregelung.
Drücken Sie die Taste , um die einzelnen Einstellungsoptionen nacheinander
aufzurufen:
(2 s.)
: Lautstärkeregelung.
: Melodiewahl.
: Bildeinstellung.
Um die unterschiedlichen Konfigurationsoptionen einzustellen, gehen Sie wie folgt vor,
sobald Sie die gewünschte Option ausgewählt haben:
Einstellung Lautstärke Rufton
- Drücken Sie die Taste
- Drücken Sie die Taste
um die Lautstärke zu erhöhen oder
um die Lautstärke zu verringern.
Klingelton (Klingel) und Unterbrechung des Ruftons (Modus Stummschaltung)
- Drücken Sie die Taste
um die gewünschte Klingelmelodie auszuwählen.
Nacheinander werden die vorhandenen Klingelmelodien angezeigt.
- Drücken Sie die Taste
stören);
"Nicht stören" an.
Die LED des Monitors blinkt in Rot und zeigt dadurch den Modus
um die Stummschaltung zu aktivieren (Modus Nicht
Drücken Sie die Taste erneut, um die Stummschaltung aufzuheben.
Bildeinstellungen (Helligkeit - Kontrast - Farbe)
Im Modus Bildeinstellungen blinkt die LED im Sekundenintervall und zeigt an, dass der Monitor in
diesen Modus umgeschaltet hat.
Der Monitor verfügt über vier Voreinstellungen für Helligkeit und Kontrast und 4
Voreinstellungen für Farbe.
Beim Drücken der entsprechenden Taste werden die verschiedenen Voreinstellungen
von Helligkeit/Kontrast bzw. Farbe aufeinanderfolgend angezeigt.
Nachdem die letzte erreicht ist, ertönt ein Fehlerton und es wird erneut mit der ersten
Einstellung begonnen.
- Drücken Sie die Taste , um die gewünschte Helligkeit und Kontrast auszuwählen.
- Drücken Sie die Taste
Pag 34
, um die Farbeinstellung zu konfigurieren.
Page 35

Monitor iLoft 4+NMonitor iLoft 4+N
Monitor iLoft 4+NMonitor iLoft 4+N
Monitor iLoft 4+N
Monitor iLoft 4+N
Monitor iLoft 4+NMonitor iLoft 4+N
Monitor iLoft 4+NMonitor iLoft 4+N
iLoft Monitoreinstellungen - Schnellanleitung
Lautstärkeregelung
(2 sec.)
Lautstärke LAUT
Aufrufen des
Konfigurationsmodus
Lautstärke LEISE
Auswahl Klingelmelodie und Stummschaltung
Auswahl der
KLINGELMELODIE
UNTERBRECHUNG DES ANRUFS
Bildeinstellung
HELLIGKEIT-KONTRAST
FARBE
Pag 35
Page 36

Monitor iLoft 4+NMonitor iLoft 4+N
Monitor iLoft 4+NMonitor iLoft 4+N
Monitor iLoft 4+N
Monitor iLoft 4+N
Monitor iLoft 4+NMonitor iLoft 4+N
Monitor iLoft 4+NMonitor iLoft 4+N
PARABÉNS POR DISPOR DE UM PRODUTO DE QUALIDADE!
A Fermax Electrónica desenvolve e fabrica equipamentos de prestígio que cumprem os
mais elevados padrões de design e tecnologia.
O seu monitor de vídeo-porteiro FERMAX iLoft, com opção de mãos livres e ecrã de todas
as cores, lhe permitirá comunicar-se com a placa da rua, ver a pessoa que lhe está a
chamar e abrir-lhe a porta de entrada se assim o deseja.
Esperamos que desfrute das suas funcionalidades.
www.fermax.com
Publicação técnica de carácter informativo editada por FERMAX ELECTRONICA S.A.E.
A FERMAX ELECTRÓNICA S.A.E., na sua política de melhoramento constante, reserva-se o direito de
modificar o conteúdo deste documento assim como as características dos produtos que nele são
referidos a qualquer momento e sem aviso prévio.
Qualquer modificação será apresentada em edições posteriores deste documento.
PORTUGUÊS
Pag 36
Page 37

Monitor iLoft 4+NMonitor iLoft 4+N
Monitor iLoft 4+NMonitor iLoft 4+N
Monitor iLoft 4+N
Monitor iLoft 4+N
Monitor iLoft 4+NMonitor iLoft 4+N
Monitor iLoft 4+NMonitor iLoft 4+N
INSTALAÇÃO DO MONITOR
1
197mm
Dimensões do monitor (Altura x Largura x Prof *.):
197 x 131 x 60 mm / 7,7” x 5,1” x 2,3”
Dimensões da caixa Fermax (Altura x Largura x Prof.):
158 x 108 x 45 mm / 6,2” x 4,2” x 1,7”
Dimensões da caixa universal (Altura x Largura x Prof.):
174 x 114 x 50 mm / 6,8” x 4,5” x 2”
MENU
F1 F2
131mm
1.60m
5.25 feet
6
.
1
5
2
.
5
2a
XXmm
14mm
F
2
F
1
T
A
+
C
t
L-
m
0
t
e
e
f
Instalação com CAIXA FERMAX
+MVMV
Notas:
- este monitor pode ser instalado numa caixa universal.
- Prof * : considerou-se a profundidade do Monitor com
caixa Fermax
(*) Retirar etiqueta de protecção electroestática.
(*)
(*)
3
(*) Retirar etiqueta de protecção electroestática.
1.60m
5.25 feet
F2
T
A+ LC
t
1.60m
5.25 feet
2b
Instalação com CAIXA UNIVERSAL
+MVMVF1
(*)
(*)
3
Pag 37
Page 38

Monitor iLoft 4+NMonitor iLoft 4+N
75
Monitor iLoft 4+NMonitor iLoft 4+N
Monitor iLoft 4+N
Monitor iLoft 4+N
Monitor iLoft 4+NMonitor iLoft 4+N
Monitor iLoft 4+NMonitor iLoft 4+N
Conexionado
• Terminais de vídeo (coaxial).
V: vivo
M: malha
Ct: activação telecâmara (10 Vdc)
• Terminais de Ligação:
+, -: alimentação (18 Vdc).
1,2,3,6: comuns de áudio.
4: chamada.
• Terminais de funções adicionais:
F1, F2: funções adicionais (saída negativo «-»).
Corrente máxima por boão F1, F2: 50 mA a 12 Vdc.
T, -: ligação do botão de chamada da porta da
vivenda (P1).
A, +: ligação do prolongador de chamada, ref.2040,
activador de luzes e campaínhas, ref. 2438, etc...
A
75 Ohms
P1
T
75
-
6+VMVF14
Ct
Ct
6132+-
4
(chamada)
da instalacão
o placa de rua
F2321
COAX
Con distribuidor
T
A
75
75
75 Ohms
Monitor adicional
75 Ohms
T
A
75
-
6+VMVF14
Ct
DISTRIBUIDOR VIDEO 2 SALIDAS
REF.2448
-
6+VMVF14
Ct
F2321
R
2 OUTPUTS VIDEO DISTRIBUTOR
+
(-)
2
+18
V5V1M
M
V
34
R1
75
6
VM M
da instalacão
o placa de rua
Ct
(chamada)
2
F2321
7575
T
A
75
6+VMVF14
Ct
6132 +-
4
1
DISTRIBUIDOR VIDEO 2 SALIDAS
REF.2448
R
2 OUTPUTS VIDEO DISTRIBUTOR
+
(-)
2
+18
V5V1M
M
V
34
R1
75
6
VM M
-
F2321
Ct
6132 +-
4
(chamada)
Pag 38
Page 39

Monitor iLoft 4+NMonitor iLoft 4+N
Monitor iLoft 4+NMonitor iLoft 4+N
Monitor iLoft 4+N
Monitor iLoft 4+N
Monitor iLoft 4+NMonitor iLoft 4+N
Monitor iLoft 4+NMonitor iLoft 4+N
CARACTERÍSTICAS TÉCNICAS
Alimentação
Consumo
Temperatura de funcionamento
Humidade
TFT Ecrã Plano . 3,5" Diagonal
Resolução: Horizontal: 480 Linhas TV - Vertical: 234 Linhas TV
Sinal de vídeo: Sinal composto 1 Vpp 75 Ω, 7 MHz
Dimensões do monitor (Altura x Largura x Prof *.): 197 x 131 x 60 mm / 7,7” x 5,1” x 2,3”
em repouso
em chamada
com vídeo
com áudio e vídeo
[41, +104 ºF]
MANUTENÇÃO (LIMPEZA)
Não utilizar produtos de limpeza que contenham ácidos, vinagre, ou que
sejam abrasivos.
18 Vdc
50 mA
350 mA
255 mA
415 mA
[5 , +40 °C]
[0 - 90%]
1
1º. Utilizar um pano húmido.
2º. Passe-o no monitor sempre na mesma direcção.
Após limpar o monitor, seque-o cuidadosamente, para eliminar a humidade.
2
Pag 39
Page 40

Monitor iLoft 4+NMonitor iLoft 4+N
Monitor iLoft 4+NMonitor iLoft 4+N
Monitor iLoft 4+N
Monitor iLoft 4+N
Monitor iLoft 4+NMonitor iLoft 4+N
Monitor iLoft 4+NMonitor iLoft 4+N
MONITOR iLOFT 4+N
Led
Botões
Botões
Botão de Activação de Áudio, Desligar e Ajustes da Configuração (menu).
· Ao receber uma chamada, prima este botão para falar com o visitante. Abre-se o canal de
áudio no sentido rua e vivenda, o funcionamento é em modo mãos livres.
· Premir para terminar a comunicação.
· Com o monitor em repouso, premir este botão durante 2 segundos para entrar no modo
de configuração do monitor. Ver a secção “Ajustes do Monitor”.
Botão do trinco / chamada ao porteiro.
· Estando em conversação com a Placa de Rua, ao premir este botão, activa-se o
trinco.
· Nas instalações com portaria, com o monitor em repouso, primir este botão
para realizar uma chamada ao porteiro.
Botão de Ligação Automática (função disponível conforme o tipo de instalação)
· Com o monitor em repouso, prima este botão durante 1 segundo para ligar o
monitor manualmente. Para activar o áudio, prima o botão
· Com vídeo, manter pressionado este botão durante 2 segundos para seleccionar
sequencialmente a seguinte câmara (se houver).
F1 e F2: Botões para Funções Adicionais. (Atribuídas pelo instalador).
F1:________________________________________
F2:________________________________________
NOTA: O ecrã do monitor acende-se, uma vez terminada a chamada a partir da placa.
Pag 40
.
Page 41

Monitor iLoft 4+NMonitor iLoft 4+N
Monitor iLoft 4+NMonitor iLoft 4+N
Monitor iLoft 4+N
Monitor iLoft 4+N
Monitor iLoft 4+NMonitor iLoft 4+N
Monitor iLoft 4+NMonitor iLoft 4+N
Funcionamento
Atender uma chamada
Ao carregar no botão de chamada, na Placa de Rua ouve-se
um tom de chamada tanto na placa de rua como no monitor,
acendendo-se o visor.
Premir o botão
sentido rua e vivenda, o funcionamento é em modo mãos livres. A
comunicação terminará automaticamente após 90 segundos, ou
em qualquer momento, premindo o botão . O LED permanecerá aceso (azul) enquanto durar a conversação.
Se não se estabelecer comunicação com a placa de rua, o monitor
desliga-se automaticamente passados 30 seg.
Abertura da porta
Recebendo uma chamada da placa de rua, é possível abrir a
porta em qualquer momento, premindo o botão
para falar com o visitante. Abre-se o canal de áudio no
.
Activação Manual do Monitor (Ligação Automática)
(função disponível conforme o tipo de instalação)
Com o monitor em repouso, prima este botão
para ligar o monitor manualmente.
Para ver a imagem procedente das demás câmaras (se houver
mas de uma) manter pressionado o botão
segundos.
Para activar o áudio e falar com o visitante ou abrir a porta, seguir os
passos descritos anteriormente.
Se não se estabelecer comunicação com a placa de rua, o monitor
desliga-se automaticamente passados 30 seg.
durante 1 segundo
durante 2
Pag 41
Page 42

Monitor iLoft 4+NMonitor iLoft 4+N
Monitor iLoft 4+NMonitor iLoft 4+N
Monitor iLoft 4+N
Monitor iLoft 4+N
Monitor iLoft 4+NMonitor iLoft 4+N
Monitor iLoft 4+NMonitor iLoft 4+N
Configurações do monitor
Para aceder ao modo de configuração, pressionar o botão
por dois segundos (o
LED pisca 1 vez por segundo e ouve-se um som de confirmação).
Ao aceder ao modo de configuração, o monitor entra em modo de ajuste de volume.
Pressionar o botão
para se deslocar sequencialmente entre as opções de
configuração:
(2 seg.)
: Ajuste de volume.
: Selecção de Melodia.
:Ajuste de imagem.
Para ajustar as diferentes opções de configuração, estando na opção desejada,
realizar os passos seguintes:
Ajuste de Volume do toque de Chamada
- premir o botão
- premir o botão
para seleccionar um volume alto ou
para seleccionar um volume baixo.
Melodia de chamada (toque) e Cancelamento de chamada (modo não incomodar)
- premir o botão para seleccionar a melodia de chamada. De forma cíclica, vão
passando todas as melodias disponíveis.
- premir o botão
O LED do monitor pisca a vermelho, indicando o modo «não incomodar»
para activar o Cancelamento de Chamada (modo não incomodar;
Para activar novamente a chamada, premir o botão .
Configuração da Imagem (Brilho-Contraste e Cor)
No modo de configuração de imagem, o LED pisca 1 vez cada dois segundos, indicando que o
monitor se encontra nesse modo.
O monitor dispõe de 4 cenários pré-definidos com um determinado nível de brilho e
contraste e 4 níveis de cor.
Clicando no botão correspondente, é seleccionado ciclicamente o cenário de brilho/
contraste ou o nível de cor..
Ao chegar-se à última opção, ouve-se um som de erro e volta a começar no primeiro.
- pressionar o botão para seleccionar o cenário de brilho e contraste.
- pressionar o botão
Pag 42
para configurar a cor.
Page 43

Monitor iLoft 4+NMonitor iLoft 4+N
Monitor iLoft 4+NMonitor iLoft 4+N
Monitor iLoft 4+N
Monitor iLoft 4+N
Monitor iLoft 4+NMonitor iLoft 4+N
Monitor iLoft 4+NMonitor iLoft 4+N
Ajustes do monitor iLoft - Guia rápido
Ajuste de Volume da chamada
(2 seg.)
Volume ALTO
Entrar no
modo de
configuração
Volumen BAIXO
Selecção de Melodia e cancelamento da chamada
Selecção da
MELODIA DE CHAMADA
CANCELAMENTO CHAMADA
Configuração da imagem
BRILHO-CONTRASTE
COR
Pag 43
 Loading...