

Page 1

PROGRAMADOR DUOX
DUOX PROGRAMMER
PROGRAMMATEUR DUOX
DUOX PROGRAMMIERVORRICHTUNG
1 2 3
4 5 6
7 8 9
ESC
0
ON
OFF
OK
MANUAL DE INST ALADOR
INSTALLER’S MANUAL
MANUEL D´INST ALLA TION
INSTALLATIONSHANDBUCH
ESPAÑOL
ENGLISH
FRANÇAIS
DEUTSCH
Page 2

Publicación técnica de caracter informativo editada por FERMAX ELECTRONICA S.A.U.
E
FERMAX ELECTRONICA S.A.U., en su política de mejora constante, se reserva el derecho a
modificar el contenido de este documento así como las características de los productos que en él
se refieren en cualquier momento y sin previo aviso.
Cualquier modificación será reflejada en posteriores ediciones de este documento.
Technical document published for information purposes by FERMAX ELECTRONICA S.A.U.
EN
FERMAX ELECTRONICA S.A.U., in a policy of ongoing improvement, reserves the right to modify
the contents of this document and the features of the products referred to herein at any time and
with no prior notice. Any such modifications shall be reflected in subsequent editions of this
document.
Publication technique à caractère informatif éditée par FERMAX ELECTRONICA S.A.U.
F
Conformément à sa politique de perfectionnement continu, FERMAX ELECTRONICA, S.A.U. se
réserve le droit de modifier, à tout moment et sans préavis, le contenu de ce document ainsi que les
caractéristiques des produits auxquels il fait référence. Toutes les modifications seront indiquées
dans les éditions suivantes.
T echnische V eröffentlichung zu Informationszwecken; Herausgeber: FERMAX ELECTRONICA S.A.U.
D
FERMAX ELECTRONICA S.A.U, behält sich das Recht vor, den Inhalt dieses Dokuments sowie die
technischen Eigenschaften der erwähnten Produkte ohne vorherige Ankündigung zu ändern, um
dadurch den ständigen Weiterentwicklungen und den damit in Verbindung stehenden
Verbesserungen Rechnung zu tragen. Alle Änderungen finden Aufnahme in den Neuauflagen
dieses Dokuments.
«PROGRAMADOR DUOX REF . 3254»
E
EN
«DUOX PROGRAMMER REF . 3254»
«PROGRAMMATEUR DUOX REF. 3254»
F
D
«DUOX PROGRAMMIERVORRICHTUNG REF . 3254»
Cod. 97731 V02_14
Page 3

¡ENHORABUENA POR DISPONER DE UN PRODUCTO DE CALIDAD!
E
Fermax electrónica desarrolla y fabrica equipos de prestigio que cumplen los más
altos estándares de diseño y tecnología.
Esperamos disfrute de sus funcionalidades.
www.fermax.com
CONGRATULA TIONS ON PURCHASING THIS QUALITY PRODUCT!
EN
Fermax Electronics develops and manufactures reputable equipment which fulfils the
highest design and technology standards.
We hope you enjoy its range of functions.
www.fermax.com
FÉLICITA TIONS ! VOUS VENEZ D’ACQUÉRIR UN VÉRIT ABLE PRODUIT DE QUALITÉ!
F
Fermax Electrónica développe et fabrique des équipements de prestige qui répondent
aux normes de design et technologie les plus développées.
Nous espérons que vous profiterez pleinement de toutes ses fonctions.
www.fermax.com
D
WIR GRATULIEREN IHNEN ZUM KAUF DIESES QUALITÄTSPRODUKTS!
Fermax Electrónica entwickelt und fabriziert hochwertige Anlagen, die den höchsten
Technologie- und Designstandards entsprechen.
Überzeugende Funktionalität für Ihr Eigenheim!
www.fermax.com
Page 4

PROGRAMADOR DUOX REF. 3254
COD.: 97731 V02/14
Esta herramienta permite realizar trabajos de programación de dispositivos e investigación
de incidencias en instalaciones del sistema DUOX de FERMAX.
Dispone de 2 modos de funcionamiento:
MODO CONSOLA
Permite la programación y comprobación del estado de la programación de dispositivos
del sistema DUOX, ya sea en la propia instalación en funcionamiento o ya sea en el banco
de trabajo.
En éste último caso, es preciso proveer al programador DUOX alimentación a través del
puerto USB que incorpora.
MODO ANALIZADOR DE INSTALACIONES
Permite el análisis de incidencias (análisis te comandos, tramas de datos y niveles de
tensión de las mismas) y verificación de componentes en una determinada instalación,
ya en marcha.
Se alimenta, en este caso, de la propia instalación.
DESCRIPCIÓN
1
2
3
1 2 3
4 5 6
7 8 9
ESC
0
ON
OFF
OK
6
7
8
4
5
1. Display alfanumérico
2. Teclado numérico
3. Tecla "escape", para retroceder en
algún paso de la programación
4. Tecla ´"conexión"
5. Teclas "adelante" y "atrás"
6. Tecla "confirmación"
9
10
7. Conector para cable rizo del teléfono a
programar
8. Conector USB para alimentación del
programador en modo CONSOLA.
9. Conector 3 vías para conectar a BUS
DUOX (utilizar los dos pines de los
extremos),
10.Conector de 6 vías (para conectar al
amplificador a programar en modo
CONSOLA).
Page 5

MODO CONSOLA (M.C.)
Este modo de funcionamiento permite realizar operaciones de programación y verificación
de los parámetros programados en cualquier dispositivo de la familia DUOX, es decir,
teléfonos, amplificadores y relés DUOX (cuando estén disponibles), y de forma individual.
Es necesario alimentar tanto el dispositivo a verificar/programar como el propio programador
DUOX.
Esto puede realizarse de diferentes formas:
Alimentando el programador desde el dispositivo a programar
Esta opción es útil cuando tenemos el teléfono a programar instalado y alimentado de la
propia instalación.(Excepto teléfonos EXTRA, que no proporcionan corriente para el
comprobador).
El programador se alimentará a través del cable de conexión al teléfono (puede ser el cable
rizado del teléfono, que se conectará entre el cuerpo del teléfono y el conector RJ11 del
programador, o puede ser a través del conector de 3 vías situado en la parte trasera del
programador, utilizando un cable plano y conectando los 2 hilos de los extremos al conector
del teléfono o directamente al bus)
Alimentando el programador localmente
Esta opción es útil cuando tenemos el dispositivo fuera de la instalación o en el banco del
taller.
Alimentaremos el programador a través del conector USB, utilizando un alimentador US
Tanto en un caso como en otro, para terminar con la programación de un dispositivo,
simplemente habrá que desconectarlo de la alimentación y presionar la tecla ON/OFF
durante al menos 2 segundos.
CONNECTION OFF
NOTAS
Este modo de funcionamiento, y mas concretamente las opciones disponibles, dependerá
del dispositivo (y versión del mismo) a programar, por lo que pueden variar ligeramente
con respecto a las indicadas de estas instrucciones técnicas.
A fecha de publicación de éstas instrucciones técnicas (Enero 2014), este modo solo está
disponible para los modelos:
- Loft Extra
- Loft Basic Plus
Se comunicará oportunamente la disponibilidad para nuevos dispositivos.
Si el equipo está sin utilizar mas de un minuto, se apagará
automáticamente, teniendo que desconectarlo y reconectarlo
nuevamente de la corriente, para que siga funcionando, tras lo
cual habrá que pulsar nuevamente la tecla ON/OFF durante 2
segundos.
Page 6

PROGRAMACIÓN DE TELÉFONOS (M.C.)
Para utilizar ésta función es posible, indistintamente, conectar el teléfono a programar
de cualquier de esta formas, según indicaciones explicadas en el apartado anterior.
ALIMENTADO DE LA INSTALACIÓN (*)
Asegurarse que el teléfono está en
reposo, con el brazo colgado o
manteniendo pulsada la tecla de
colgado.
TEL. EXTRA V1.0
1. ADRESS
000001
2. TONE PANEL
4
ALIMENTADO LOCALMENTE
Asegurarse que el teléfono está en
reposo y con el brazo colgado.
ON
OFF
Aparece los datos de tipo de teléfono
y versión.
Opción programación de la
dirección del teléfono.
Opción programación de la
melodía de llamada desde
placa
2. TONE GUARD
3
4. GUARD UNIT
B: 10 N: 0
5. GUARD PANIC
DISABLE
6. DOORMATIC
DISABLE
* No es posible en teléfonos EXTRA
Opción programación de la
melodía de llamada desde
conserjería
Opción habilitar al teléfono el uso de la
central de conserjería.
Opción habilitar al teléfono uso de la
central de conserjería de pánico.
Opción para habilitar al teléfono función
"apertura de puerta automática al llamar"
Page 7

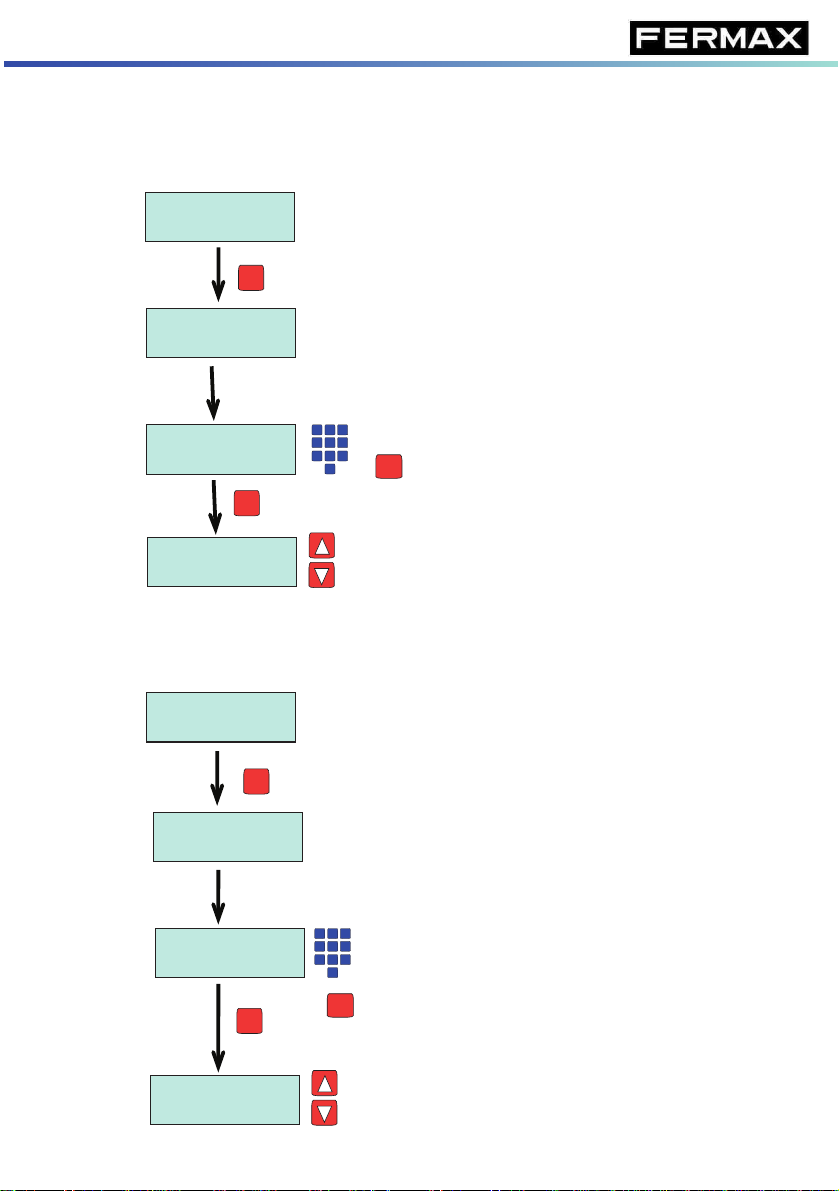
PROGRAMACIÓN DE TELÉFONOS (M.C.)
Se detallan a continuación los pasos a seguir tras haber escogido la opción a programar:
Opción de programación de la dirección de teléfono:
1. ADRESS
000001
OK
1. ADRESS ?
000001
1. ADRESS ?
020325
Partimos de la opción programación de direcciones del menú
principal
El programador está listo para
introducir la dirección requerida
1 2 3
4 5 6
7 8 9
Introducir los 6 dígitos de la dirección
ESC
ESC
0
anular número introducido y dejar el que había
previamente.
OK
1. ADRESS
020325
Termina la programación, quedando a disposición
de escoger cualquier otra opción de programación
mediante las teclas de flecha.
Opción de programación de la melodía de llamada desde placa
2. TONE PANEL
4
Partimos de la opción selección de melodía de placa del menú
principal.
OK
2. TONE PANEL ?
4
2. TONE PANEL
1
OK
2. TONE PANEL
1
El programador está listo para introducir el número de
melodía deseada.
1 2 3
Introducir en número de melodía deseada disponible
4 5 6
7 8 9
(según modelo).
ESC
0
También es posible utilizar las teclas de flecha.
ESC
anular número introducido y dejar el que había
previamente.
Termina la programación, quedando a disposición
de escoger cualquier otra opción de programación
mediante las teclas de flecha.
Page 8

PROGRAMACIÓN DE TELÉFONOS (M.C.)
Se detallan a continuación los pasos a seguir tras haber escogido la opción a programar:
Opción de programación de la melodía de llamada desde conserjería
3. TONE GUARD
2
3. TONE GUARD ?
2
3. TONE GUARD ?
5
OK
3. TONE GUARD
5
Partimos de la opción selección de melodía de llamada desde
conserjería del menú principal.
OK
El programador está listo para introducir el número de
melodía deseada.
1 2 3
introducir en número de melodía deseada ,entre
4 5 6
1 y 5, dependiendo del modelo.
7 8 9
ESC
También es posible utilizar las teclas de flecha.
0
ESC
anular número introducido y dejar el que había
Termina la programación, quedando a disposición
de escoger cualquier otra opción de programación
mediante las teclas de flecha.
Opción de habilitación de conserjería
4. GUARD UNIT
B: 10 N: 0
OK
Partimos de la opción de habilitar conerjería del menú principal
4. GUARD UNIT ?
B: 10 N: 0
4. GUARD UNIT ?
DISABLE
OK
4. GUARD UNIT ?
B: 05 N: 3
4. GUARD UNIT
B: 05 N: 3
OK
4. GUARD UNIT
DISABLE
OK
Introducir número de bloque (2 dígitos) +
1 2 3
Número de Panel (1 dígito) correspondiente
4 5 6
7 8 9
a la conserjería que va a atender éste
ESC
0
teléfono.
anular número introducido y dejar el
ESC
que había previamente.
El programados queda a disposición de
escoger cualquier otra opción mediante las
teclas de flecha.
Seleccionar DISABLE si éste teléfono si éste
teléfono no va a estar atendido por ninguna
conserjería.
El programados queda a disposición de
escoger cualquier otra opción mediante las
teclas de flecha
Page 9

PROGRAMACIÓN DE TELÉFONOS (M.C.)
Opción de habilitación de conserjería de pánico
5. GUARD PANIC
Partimos de la opción habilitación de conserjería de pánico del menú principal
B: 10 N: 0
OK
5. GUARD PANIC?
B: 10 N: 0
OK
5. GUARD PANIC ?
B: 05 N: 3
OK
1 2 3
4 5 6
7 8 9
0
ESC
ESC
4. GUARD PANIC
B: 05 N: 3
OK
5. GUARD PANIC?
DISABLE
5. GUARD PANIC
DISABLE
Opción de habilitación de la función doormatic
6. DOORMATIC
DISABLE
Partimos de la opción de habilitación de la funión doormatic (abrir la puerta
automáticamente cuando se llame a éste teléfono)
Introducir número de bloque (2 dígitos) +
Número de Panel (1 dígito) correspondiente
a la conserjería de pánico que va a atender
éste teléfono.
anular número introducido y dejar
el que había previamente.
El programador queda a disposición de
escoger cualquier otra opción mediante las
teclas de flecha.
Seleccionar DISABLE si éste teléfono no va
a estar atendido por ninguna conserjería de
pánico.
El programador queda a disposición de
escoger cualquier otra opción mediante las
teclas de flecha.
OK
6. DOORMATIC ?
DISABLE
6. DOORMATIC ?
OFF
6. DOORMATIC ?
ON
OK
OK
OK
6. DOORMATIC
DISABLE
6. DOORMATIC
OFF
6. DOORMATIC
ON
Seleccionar DISABLELE para inhabilitar ésta
función en el teléfono.
El programador queda a disposición de
escoger cualquier otra opción mediante las
teclas de flecha.
Seleccionar OFF para dejar la función
doormatic habilitada pero desactivada
El programador queda a disposición de
escoger cualquier otra opción mediante las
teclas de flecha.
Seleccionar ON para dejar la función
doormatic habilitada y activada.
El programador queda a disposición de
escoger cualquier otra opción mediante las
teclas de flecha.
Page 10

PROGRAMACIÓN DE AMPLIFICADORES (M.C.)
A fecha de publicación de éste manual técnico, éste función no está disponible para
ninguna versión de amplificador existente.
En el momento en que esté disponible, se comunicará por los canales técnicos habituales.
y se actualizará ésta documentación.
Page 11

PROGRAMACIÓN DE RELÉS (M.C.)
A fecha de publicación de éste manual técnico, ésta función no está disponible en éste
dispositivo.
En el momento en que esté disponible, se comunicará por los canales técnicos habituales.
y se actualizará ésta documentación.
Page 12

MODO INSTALACIÓN (M.I.)
Desde el MENU PRINCIPAL, podremos acceder a todas las funcionalidades de programador
DUOX, en lo que respecta a la detección de dispositivos ya instalados en una determinada
instalación, al análisis de la calidad de las tramas digitales en un determinado punto de
la instalación, a la verificación de los diferentes comandos que son transmitidos por
cualquier dispositivo de la instalación, y a la transmisión a un PC de esos comandos,
transmitidos durante un determinado periodo de tiempo, para su registro y posterior envío
a fábrica en el eventual caso en que se necesite analizar en profundidad algún problema
técnico existente en una instalación.
Las funcionalidades disponibles son:
- Detección de componentes (teléfonos, relés, placas o conserjerías)
- Análisis de comandos transmitidos por los diferentes dispositivos.
-Medición de la calidad (nivel) de las tramas digitales
- - Monitorización y registro en un PC de los comandos transmitidos.
Se accede al MENU principal según se indica en el siguiente croquis, y una vez conectado
el programador en algún punto del BUS en la instalación a través del conector de 3 vias
(ver apartado DESCRIPCIÓN).
ON
OFF
DUOX ANALYZER
V.1.0
1. DETECTOR
2. ANALYZER
Aparece mensaje de bienvenida, indicando la versión
del software del programador DUOX.
OK
OK
Se accede a al menú de DETECCIÓN DE
DISPOSITIVOS
OK
Se accede a al menú de ANALISIS DE
COMANDOS
OK
3. METER
4. SNIFFER PC
ON
Pulsar ON/OFF durante 2 segundos, para apagar el programador..
OFF
Se accede a al menú de MEDICIÓN NIVEL DE
TRAMAS.
OK
Se accede a al menú de REGISTRO DE
TRAMAS EN UN PC
Page 13

DETECCIÓN DE DISPOSITIVOS (M.I.)
Este menú permite seleccionar el dispositivo o rango de dispositivos que queremos detectar.
Un dispositivo se detectará siempre que esté correctamente instalado en cualquier punto
de la instalación en la que se conecta el programador, y correctamente programada su
dirección, en el caso en el dispositivo así lo requiera.
Los dispositivos detectables son:
-Teléfonos
- Relés
- Placas, ya sea de entrada general, de bloque o de sub-bloque
- Conserjerías, ya sea de entrada general o de bloque.
Partiendo del MENU PRINCIPAL, seguir el siguiente croquis para acceder al tipo de
dispositivo que se quiere detectar.
1. DETECTOR
OK
1. DETECTOR
TELEPHONE
1. DETECTOR
RELAYS
1. DETECTOR
PANELS
1. DETECTOR
GUARD UNIT
Partimos de la selección DETECTOR, del MENU
PRINCIPAL
OK
Se accede a la funcionalidad de
DETECCIÓN DE TELÉFONOS
OK
Se accede a la funcionalidad de
DETECCIÓN DE RELÉS
OK
Se accede a la funcionalidad de
DETECCIÓN DE PLACAS
OK
Se accede a la funcionalidad de
DETECCIÓN DE CONSERJERÍAS
ESC
Salir de ésta selección y volver al MENU PRINCIPAL.
Page 14

DETECCIÓN DE TELÉFONOS (M.I.)
Esta funcionalidad permite verificar la existencia en la instalación de uno o varios teléfonos,
programados dentro de un rango de direcciones indicado.
El valor máximo del rango a testear es de 1000 direcciones contiguas y pertenecientes
a un mismo bloque.
1. DETECTOR
TELEPHONE
OK
1. DETECTOR
BLOCK: 00
OK
1. DETECTOR
START: 0000
OK
1. DETECTOR
END: 0000
OK
TELEPHONE
000000
T erminado el escaneo, se puede presentar una de estos 3 result ados:
Se han
detectado solo
algunos teléfonos
Partimos de la opción DETECTOR-TELEFONOS del menú
principal
1 2 3
Introducir el número de bloque al que pertenecen los
4 5 6
teléfonos a verificar.
7 8 9
ESC
0
Valores admitidos 00 al 09
1 2 3
Introducir la dirección del primer teléfono del rango.
4 5 6
7 8 9
ESC
0
1 2 3
Introducir la dirección del último teléfono del rango.
4 5 6
(este número ha de ser mayor que el primero del
7 8 9
ESC
0
rango)
Comienza el escaneo, visualizándose el avance del mismo.
TEST RESULT: ?
DETECTED
OK
TELEPHONE OK
00101
Se muestran los
teléfonos detectados
No se ha
detectado
ningún
teléfono
TEST RESULT:
NO TELEPHONES
ESC
Salir de esta funcionalidad y volver al menú DETECCION DE DISPOSITIVOS
TEST RESULT:
ALL TELEPHONES
Se han
detectado
todos los
teléfonos
TEST RESULT: ?
NO DETECTED
OK
TELEPHONE OK
0201
Se muestran los
teléfonos NO detectados
Page 15

DETECCIÓN DE RELÉS (M.I.)
Esta funcionalidad permite verificar la existencia en la instalación de uno o varios reles,
programados dentro de un rango de números de relé indicado y pertenecientes a un
mismo bloque, incluidos los relés configurados como F1 y F2.
1. DETECTOR
RELE
OK
1. DETECTOR
BLOCK: 00
OK
1. DETECTOR
START: 0000
OK
1. DETECTOR
END: 0000
OK
RELAYS
00 000
T erminado el escaneo, se puede presentar una de estos 3 result ados:
Se han
detectado solo
algunos relés
Partimos de la opción DETECCIIÓN DE RELÉS del menú
DETECCIÓN DE DISPOSITIVOS
1 2 3
Introducir el número de bloque al que pertenecen los
4 5 6
relés a verificar.
7 8 9
ESC
0
Valores admitidos 00 al 09
1 2 3
Introducir el número del primer relé del rango
4 5 6
7 8 9
ESC
0
1 2 3
Introducir la dirección del último relé del rango.
4 5 6
(este número ha de ser mayor que el primero del
7 8 9
ESC
0
rango)
Comienza el test, visualizándose el avance del mismo.
El grupo de dos dígitos de la izquierda indica el número de
bloque y los tres de la derecha el número de relé que se
está verificando.
TEST RESULT: ?
DETECTED
OK
RELAY OK
0003
Se muestran los
relés detectados
No se ha
detectado
ningún
relé
TEST RESULT:
NO RELAYS
ESC
Salir de esta funcionalidad y volver al menú DETECCION DE DISPOSITIVOS
TEST RESULT:
Se han
detectado
todos los
relés
ALL RELAYS
TEST RESULT: ?
NO DETECTED
OK
RELAY NO OK
0020
Se muestran los
relés NO detectados
Page 16

MENU DETECCION DE PLACAS (M.I.)
Esta funcionalidad permite la detección de cualquier tipo de placa instalada en la instalación
donde tenemos conectado el programador DUOX.
No obstante, hay que indicarle de qué tipo es la placa que queremos detectar, entre:
- Placa configurada como acceso a BLOQUE
- Placa configurada como acceso a SUB-BLOQUE
-Placa configurada como ENTRADA GENERAL
Partiendo del MENU PRINCIPAL, seguir el siguiente croquis para acceder al tipo de
dispositivo que se quiere detectar.
1. DETECTOR
PANELS
OK
1. DETECTOR
BLOCK PANEL
1. DETECTOR
SUBBLOCK PANEL
1. DETECTOR
Partimos de la opción DETECCIIÓN DE PLACAS del
menú DETECCIÓN DE DISPOSITIVOS
GENERAL ENTRANCE
OK
Se accede a la funcionalidad de
DETECCIÓN DE PLACAS DE BLOQUE
OK
Se accede a la funcionalidad de
DETECCIÓN DE PLACAS DE SUB-BLOQUE
OK
Se accede a la funcionalidad de
DETECCIÓN DE PLACAS DE ENTRADA
GENERAL
Salir de esta funcionalidad y volver al menú DETECCION DE DISPOSITIVOS
ESC
Page 17

DETECCION DE PLACAS DE BLOQUE (M.I.)
Esta funcionalidad permitirá detectar la existencia en la instalación placas configuradas
como ENTRADA DE BLOQUE, y el número de placa de las mismas.
Para ello, seguir los pasos indicados en el siguiente croquis:
1. DETECTOR
BLOCK PANEL
OK
1. DETECTOR
BLOCK: 00
OK
PANELS
00 00
T erminado el escaneo, se puede presentan una de estos 3 resultados:
Se han
detectado
las 10 placas
posibles
Partimos de la opción DETECCIÓN DE PLACAS DE
BLOQUE del menú DETECCIÓN DE PLACAS
1 2 3
Introducir el número de bloque que queremos testear.
4 5 6
Valores admitidos de 00 a 99.
7 8 9
ESC
0
Comienza el testeo los 10 posibles número de placas que
pueden existir en el bloque indicado.
Los dos dígitos de la izquierda indican el número de bloque
que se está testeando, mientras que los dos dígitos de la
derecha van indicando el número de placa.
TEST RESULT:
ALL PANELS
Se han detectado algunas placas.
Escoger si queremos visualizar las detectadas o
las no detectadas
No se ha
Detectado ningún
placa
TEST RESULT: ?
DETECTED
OK
PANEL OK:
TEST RESULT:
NO PANELS
TEST RESULT: ?
OK
PANEL NOK:
NO DETECTED
ESC
ESC
Salir de esta funcionalidad y volver al menú DETECCION DE PLACAS
00 07
00 04
Se muestran
las placas
detectadas
Se muestran
las placas NO
detectadas
Page 18

DETECCION DE PLACAS DE SUBBLOQUE (M.I.)
Esta funcionalidad permitirá detectar la existencia en la instalación placas configuradas
como ENTRADA DE SUB-BLOQUE, y el número de placa de las mismas.
Para ello, seguir los pasos indicados en el siguiente croquis:
1. DETECTOR
SUBBLOCK PANEL
OK
1. DETECTOR
BLOCK: 00
OK
1. DETECTOR
SUBBLOCK: 00
OK
PANELS
00 00
T erminado el escaneo, se puede presentar uno de estos 3 result ados:
Se han
detectado
las 10 placas
posibles
TEST RESULT:
ALL PANELS
Partimos de la opción DETECCIÓN DE PLACAS DE SUBBLOQUE del menú DETECCIÓN DE PLACAS
1 2 3
Introducir el número de bloque.
4 5 6
Valores admitidos de 00 a 99.
7 8 9
ESC
0
1 2 3
Introducir el número de sub-bloque que queremos
4 5 6
testear.
7 8 9
Valores admitidos de 00 a 99.
ESC
0
Comienza el testeo los 10 posibles número de placas que pueden
existir en el sub-bloque indicado.
Los dos dígitos de la izquierda indican el número de subbloque
que se está testeando, mientras que los dos dígitos de la derecha
van indicando el número de placa.
Se han detectado algunas placas.
Escoger si queremos visualizar las detectadas o
las no detectadas
No se ha
detectado ningún
placa
TEST RESULT: ?
DETECTED
OK
TEST RESULT:
NO PANELS
TEST RESULT: ?
OK
NO DETECTED
ESC
Salir de esta funcionalidad y volver al menú DETECCION DE PLACAS
PANEL OK:
00 07
PANEL NOK:
00 04
Se muestran
las placas
detectadas
Se muestran
las placas NO
detectadas
Page 19

DETECCION DE PLACAS DE E. GENERAL (M.I.)
Esta funcionalidad permitirá detectar la existencia en la instalación placas configuradas
como ENTRADA GENERAL y el número de placa de las mismas.
Para ello, seguir los pasos indicados en el siguiente croquis:
1. DETECTOR
GENERAL ENTRANCE
OK
PANELS
00
Partimos de la opción DETECCIÓN DE PLACAS DE
ENTRADA GENERAL del menú DETECCIÓN DE PLACAS
Comienza el testeo los 10 posibles número de placas que
pueden existir como entrada general.
Los dígitos muestran el número de placa que se está testeando.
T erminado el escaneo, se puede presentar uno de estos 3 result ados:
Se han
detectado
las 10 placas
posibles
TEST RESULT:
ALL PANELS
Se han detectado algunas placas.
No se ha
detectado ningún
Escoger si queremos visualizar las detectadas o
las no detectadas
placa
TEST RESULT:
NO PANELS
ESC
Salir de esta funcionalidad y volver al menú DETECCION DE PLACAS
TEST RESULT: ?
DETECTED
TEST RESULT: ?
NO DETECTED
OK
OK
PANEL OK:
07
PANEL NOK:
04
Se muestran
las placas
detectadas
Se muestran
las placas NO
detectadas
Page 20

MENU DETECCION DE CONSERJERIAS (M.I.)
Esta funcionalidad permite detectar las coserjerías que hayan en la instalación:
Es preciso discernir si se trata de conserjerías de bloque o conserjerías de entrada general.
Para ello, seguir los pasos indicados en el siguiente croquis:
1. DETECTOR
GUARD UNIT
1. DETECTOR
BLOCK GUARD UNIT
Permite detectar las
conserjerías que estén
configuradas como
CONSERJERIA DE BLOQUE
Partimos de la opción DETECCIÓN DE
CONSERJERIAS del menú DETECCIÓN
DE DISPOSITIVOS
OK
1. DETECTOR
GENERAL GUARD U.
Permite detectar las
conserjerías que estén
configuradas como
CONSERJERIA DE
ENTRADA GENERAL
Salir de esta funcionalidad y volver al menú DETECCION DE DISPOSITIVOS
ESC
Page 21

DETECCION DE CONSERJ. DE BLOQUE (M.I.)
Esta funcionalidad permitirá detectar la existencia en la instalación conserjerías configuradas
como CONSERJERIA DE BLOQUE y el número asignado a las mismas.
Para ello, seguir los pasos indicados en el siguiente croquis:
1. DETECTOR
BLOCK PANEL
OK
1. DETECTOR
BLOCK: 00
OK
GUARD UNIT
00 00
T erminado el escaneo, se puede presentan una de estos 3 resultados:
Se han
detectado las 10
conserjerías
posibles
Partimos de la opción DETECCIÓN DE CONSERJERIAS
DE BLOQUE del menú DETECCIÓN DE CONSERJERIAS
1 2 3
Introducir el número de bloque que queremos testear.
4 5 6
Valores admitidos de 00 a 99.
7 8 9
ESC
0
Comienza el testeo los 10 posibles número de conserjería e
pueden existir en el bloque indicado.
Los dos dígitos de la izquierda indican el número de bloque
que se está testeando, mientras que los dos dígitos de la
derecha van indicando el número de conserjería.
TEST RESULT:
ALL GUARD UNITS
Se han detectado algunas conserjerías.
Escoger si queremos visualizar las detectadas o
las no detectadas
No se ha
detectado ningún
conserjería
TEST RESULT: ?
DETECTED
OK
GUARD UNIT OK:
TEST RESULT:
NO GUARD UNITS
OK
TEST RESULT: ?
GUARD UNIT NOK:
NO DETECTED
ESC
ESC
ESC
Salir de esta funcionalidad y volver al menú DETECCION DE CONSERJERÍAS
00 07
00 04
Se muestran
las conserjerías
detectadas
Se muestran
las conserjerías
NO detectadas
Page 22

DETECCION DE CONSERJERIAS DE E.G. (M.I.)
Esta funcionalidad permitirá detectar la existencia en la instalación conserjerías configuradas
como CONSERJERIA DE ENTRADA GENERAL y el número asignado a las mismas.
Para ello, seguir los pasos indicados en el siguiente croquis:
1. DETECTOR
GENERAL GUARD U.
OK
GUARD UNNIT
00
T erminado el escaneo, se puede presentan una de estos 3 resultados:
Se han
detectado las 10
conserjerías
posibles
TEST RESULT:
ALL GUARD UNITS
Partimos de la opción DETECCIÓN DE CONSERJERÍAS DE
ENTRADA GENERAL del menu DETECCIÓN DE
CONSERJERIAS
Comienza el testeo los 10 posibles número de conserjerías
que pueden existir como entrada general.
Los dígitos muestran el número de placa que se está testeando.
Se han detectado algunas conserjerías.
No se ha
detectado ninguna
Escoger si queremos visualizar las detectadas o
las no detectadas
conserjería
TEST RESULT:
NO GUARD UNITS
ESC
ESC
Salir de esta funcionalidad y volver al menú DETECCION DE CONSERJERÍAS
TEST RESULT: ?
DETECTED
TEST RESULT: ?
NO DETECTED
OK
GUARD UNIT OK:
OK
GUARD UNIT NOK:
07
04
Se muestran
las conserjerías
detectadas
Se muestran
las conserjerías
NO detectadas
Page 23

MODO ANALIZADOR DE COMANDOS (M.I.)
Esta funcionalildad permite la visualización de cualquier comando DUOX que sea transmitido
por cualquier dispositivo de la instalación.
Estos comandos son almacenados en una memoria interna del programador, hasta un
máximo de 100 registros.
Para la captura de los comandos, seguir las indicaciones del siguiente croquis:
2. ANALYZER
WAIT COMMAND
DISABL-CHANNEL 1
00F010 - FFF0FF
Se origina un nuevo
comando
MEMORY FULL
Partimos de la selección 2 .ANALYZER, del MENU
PRINCIPAL
OK
* * * * *
El dispositivo queda en disposición de recibir comandos.
WAIT COMMAND parpadea.
Se origina un comando...
El comando aparece en la linea superior del display y se
guarda en memoria.
En la línea inferior aparecen las direcciones de origen y
destino, respectivamente.
OK
Memoria llena
(100 comandos)
DISABL-CHANNEL 1
00F010 - FFF0FF
Revisar comando
registrados mediante
las flechas
OK
DISABL-CHANNEL 1
00F010 - FFF0FF
Revisar comando
registrados mediante
las flechas
Al revisar los registros almacenados, aparecerá primero el último comando registrado.
Algunos comandos son enviados varias veces seguidas, como medida de seguridad
frente a pérdida de datos, quedando registrados todos ellos.
Los comandos repetidos contiguos se mostrarán alternando guión (-) y asterisco (*)
ESC
Vuelve al menú principal
Page 24

MODO MEDIDOR DE TRAMAS (M.I.)
Esta funcionalildad permite la medición, en un determinado punto (donde coloquemos
el programador), del nivel te las tramas que son enviadas por los diferentes dispositivos
de la instalación.
De esta manera, podremos analizar problemas en una instalación, debido a atenuaciones
en la señal debido a la distancia, sección del cable, alimentación etc., sin mas que
comparar las medidas del programador en diferentes puntos de la instalación.
Se ofrecen 3 tipos de información:
POWER: 18.52V
POWER: 18.52V
Dirección del dispositivo
que origina la trama
POWER: 18.52V
0000000: 03.14V
0000000: 03.14V
0000000: 03.14V
Voltaje de CC en el bus
Voltaje promediado de los
picos positivos de la trama
de datos
Para utilizar ésta función seguiremos los pasos indicados en este croquis:
3. METER
OK
3. METER
ALL
3. METER
AUDIO UPLINK
3. METER
AUDIO DOWN LINK
Partimos de la selección 3 .METER,
del MENU PRINCIPAL
OK
OK
OK
POWER: 18.52V
0000000: 03.14V
POWER: 18.52V
0000000: 03.14V
POWER: 18.52V
0000000: 03.14V
Medición de las
TRAMAS DE DATOS
Medición de las
TRAMAS DE AUDIO SUBIDA
del canal 1
Medición de las
TRAMAS DE AUDIO BAJADA
del canal 1
En cualquiera de las tres mediciones, la información presentada puede estar incompleta,
debido a que en el momento de la medición no se dispone de toda la información
necesaria, por alguno de los siguientes motivos:
POWER: 18.52V
SIGNAL: - -.- -V
POWER: 18.52V
SIGNAL: 03.14 V
ESC
Salir de ésta selección y volver al MENU PRINCIPAL.
No se ha producido todavía una trama del tipo seleccionado.
La información aparecerá automáticamente en el momento en que se
genere.
Se están monitorizando las tramas (hay audio en el sentido seleccionado),
pero no se ha podido identificar el dispositivo del cual provienen.
La información se completará en el momento en que algún dispositivo
comience el envio de dicha trama, ya que es justo en éste momento cuando
el dispositivo se identifica.
Page 25

MODO REGISTRO DE TRAMAS EN PC (M.I.)
Esta función avanzada del programador DUOX permite almacenar el registro de todos los
comandos generados en una instalación durante un periodo ilimitado de tiempo.
Es útil, por ejemplo, para el caso de que existen problemas en una instalación que no sea
posible analizar y descubrir la causa "in situ", y sea requerido por parte del personal del
Departamento Técnico de fábrica, el registro de actividad de todos los comandos generados
durante un determinado tiempo.
Se requiere un PC al que habrá que dejar conectado el programador durante todo el
tiempo, y sobre el que se irá guardando el registro de todos estos comandos.
En el caso en que fuera necesario utilizar ésta función, el personal técnico de Fermax
le indicaría los detalles necesarios para ést a operación, así como enviarle los drivers
y utilidades necesarios.
Para la conexión será preciso asignar el puerto COM creado al conectar el dispositivo, y
configurar los parámetros de este puerto de la siguiente manera:
-Baud Rate: 115200
-Parity: none
-Data bits: 8
-Stop bits: 1
-Sin control paridad
Una vez el PC preparado, para utilizar ésta función seguiremos los pasos indicados en
este croquis:
4. SNIFFER PC
OK
4. SNIFFER PC
N.CMD RX: 00000
Partimos de la selección 4 .SNIFFER PC,
del MENU PRINCIPAL
En la fila inferior se indican el número de
comandos que ya se han transmitido al PC
Page 26

ACTUALIZACIÓN DE FIRMWARE
El programador DUOX permite la actualización de su firmware, cuando la aparición de
nuevos dispositivos o nuevas versiones de los actuales así lo requiera.
Cuando aparezca una nueva versión, será publicado en las secciones técnicas de la web
de Fermax, así como las indicaciones puntuales para realizar correctamente la actualización.
En cualquier caso, ésta actualización se realizará mediante el uso de un PC, conectándolo
a través del puerto USB del programador
La versión actual (Noviembre 2013) es la V.1.0.
Page 27

ESPECIFICACIONES TÉCNICAS
Alimentación: 18 Vdc (de la propia instalación) ó
5 V (a través del conector USB) ó
9 V (a través del conector telefónico)
Consumo (+/- 10%): Alimentado por BUS DUOX
77 mA en standby
85 mA en activo y navegación por menús
100 mA en activo y bus TX/RX activo
Alimentado porUSB
245 mA en standby
240 mA en activoy teléfono DUOX conectado
Cond. Ambientales: Temperatura de funcionamiento: -5º C a +40º C
Humedad relativa: 5-95 %
Grado de protección IP: 30
En éstas instrucciones técnicas se ha utilizado la siguiente simbología:
OK
Pulsar la tecla OK para continuar:
ON
Pulsar la tecla ON/OFF para continuar:
OFF
Seleccionar la opción deseada pulsando instistintamente las teflechas
"adelante" o "atras".
Pulsar la tecla "adelante" para avanzar en la operación
1 2 3
4 5 6
Utilizar el teclado numérico para intruducir el dato requerido.
7 8 9
0
ESC
Pulsar la tecla ESC para volver al menú anterior.
OK
Page 28

DUOX PROGRAMMER REF. 3254
COD.: 97731 V02/14
This tool allows you to perform programming tasks and search for incidents in installations
with the DUOX system by FERMAX.
It has 2 operating modes:
CONSOLE MODE
This allows for the programming and programming status check of the DUOX system
devices, whether in the installation itself or at the workshop.
In the latter, the DUOX programmer must provide power via its USB port.
INSTALLATION ANALYSER MODE
This allows for the analysis of incidents (analysis of commands, data frames and their level
of tension) and verify the components in a specific, already running installation.
This is powered by the installation itself.
DESCRIPTION
1
2
3
1 2 3
4 5 6
7 8 9
ESC
0
ON
OFF
OK
6
7
8
4
5
1. Alphanumerical Display
2. Numerical Keypad
3. Escape key to go back a step in
programming
4. Connection key
5. Forward and back keys
6. Confirmation key
9
10
7. Connector for coiled cable of the
telephone to be programmed.
8. USB connector for the programmers
power supply in CONSOLE mode.
9. 3 way connector for connecting to the
BUS DUOX (use both end pins),
10.6 way connector (to connect to the
amplifier to program in CONSOLE
mode).
Page 29

CONSOLE MODE (CM)
This operating mode allows for carrying out programming operations and verifying the
programmed parameters in any device from the DUOX family , that is, telephones, amplifiers
and DUOX relays (when available), and individually.
You have to power the device to verify/program and the DUOX programmer.
It can be done in two ways:
Powering the programmer from the device to be programmed.
This option is useful when we have the telephone to program installed and powered from
the installation itself. (Except EXTRA telephones, that don't have power for the verifier).
The programmer is powered via the telephone connection cable (This can be the telephone's
coiled cable, which is connected between the telephone body and the programmers RJ11
connector, or it can be via the 3 way connectors located on the back of the programmer,
using a flat cable and connecting the 2 wires on the ends to the telephone connector or
directly to the bus)
Locally powering the programmer
This option is useful when we have the device out of the installation or in the workshop
bench.
We will power the programmer via the USB connector, using a USB power supply.
In either case, to complete the programming of a device, simply disconnect it from the power
and press the ON/OFF key for at least 2 seconds.
If the equipment is not used for more than a minute, it will
automatically turn off, having to be disconnected and reconnected
CONNECTION OFF
NOTES
This operating mode, and specifically the available options, will depend on the device (and
its version) to program, so they may vary slightly with respect to those indicated in these
technical instructions.
As of the date of publication for these technical instructions (January 2014), this mode is
only available for the following models:
- Loft Extra
- Loft Basic Plus
The availability for new devices will be reported once available.
to the power for it to continue working, after which you have to
press the ON/OFF key again for 2 seconds.
Page 30

PROGRAMMING TELEPHONES (CM)
To use this function you can connect the telephone to program via any of these methods,
as indicated in the previous section.
POWERING THE INSTALLATION
Make sure the telephone is in
standby and hung-up or with the
hang-up button pressed.
TEL. EXTRA V1.0
1. ADRESS
000001
2. TONE PANEL
4
LOCALLY POWERED
Make sure the telephone is in standby
and hung-up
ON
OFF
The telephone type and version
appears.
Programming the telephone
address option
Programming the ring tone melody
from the panel option
2. TONE GUARD
3
4. GUARD UNIT
B: 10 N: 0
5. GUARD PANIC
DISABLE
6. DOORMATIC
DISABLE
Programming the ring tone melody
from the guard unit
Enable the telephone the use of the
central guard unit option.
Enable the telephone the use of the
central guard unit panic option.
Enable the telephone the use of "open
door automatically upon calling" option.
Page 31

PROGRAMMING TELEPHONES (CM)
Below are the steps to follow after having chosen the programming option:
Programming the telephone address option:
1. ADRESS
000001
OK
1. ADRESS ?
000001
1. ADRESS ?
020325
OK
1. ADRESS
020325
We start from the programming addresses option from the
main menu
The programmer is ready to enter
the required address
1 2 3
4 5 6
7 8 9
Enter the 6 digits of the address
delete the number entered and leave the previous
ESC
ESC
0
one
Complete programming, being able to choose any
other programming option via the arrow keys.
Programming the ring tone melody from the panel option
2. TONE PANEL
4
We start from the melody from the panel selection on the main
menu:
OK
2. TONE PANEL ?
4
2. TONE PANEL
1
OK
2. TONE PANEL
1
The programmer is ready to enter the desired melody
1 2 3
Enter the available melody number desired (by
4 5 6
model). You can also use the arrow keys.
7 8 9
ESC
0
delete the number entered and leave the previous
ESC
one
Complete programming, being able to choose any
other programming option via the arrow keys.
Page 32

PROGRAMMING TELEPHONES (CM)
Below are the steps to follow after having chosen the programming option:
Programming the ring tone melody from the panel guard unit
3. TONE GUARD
2
OK
3. TONE GUARD ?
2
3. TONE GUARD ?
5
OK
3. TONE GUARD
5
Enabling the guard unit option
4. GUARD UNIT
B: 10 N: 0
OK
4. GUARD UNIT ?
B: 10 N: 0
We start from the enabling the guard unit option from the main
menu
OK
4. GUARD UNIT ?
B: 05 N: 3
We start from the melody ring tone from the guard unit selection
on the main menu.
The programmer is ready to enter the desired melody
Enter the available melody number desired, from 1
1 2 3
4 5 6
to 5, depending on the model. You can also use the
7 8 9
arrow keys.
ESC
0
Delete the number entered and leave the previous
ESC
one
Complete programming, being able to choose any
other programming option via the arrow keys.
Enter the block number (2 digits) + Panel
1 2 3
Number (1 digit) of the guard unit
4 5 6
corresponding to this telephone.
7 8 9
ESC
0
Deletes the number entered and leave the
OK
ESC
previous one
4. GUARD UNIT ?
DISABLE
4. GUARD UNIT
B: 05 N: 3
OK
4. GUARD UNIT
DISABLE
Being able to choose any other option via
the arrow keys.
Select DISABLE if this telephone will not be
attended by a guard unit.
The programmer is able to choose any other
option via the arrow keys.
Page 33

PROGRAMMING TELEPHONES (CM)
Enabling the guard unit panic option
5. GUARD PANIC
We start from the enabling the guard unit panic option from the main menu
B: 10 N: 0
OK
OK
5. GUARD PANIC?
B: 10 N: 0
5. GUARD PANIC ?
B: 05 N: 3
4. GUARD PANIC
B: 05 N: 3
OK
5. GUARD PANIC?
DISABLE
5. GUARD PANIC
DISABLE
Enabling the doormatic option
6. DOORMATIC
DISABLE
We start with the option for enabling the doormatic function (opens the door
automatically when this telephone is called)
OK
Enter the block number (2 digits) + Panel
1 2 3
Number (1 digit) of the guard unit panic
4 5 6
corresponding to this telephone.
7 8 9
ESC
0
Deletes the number entered and leave the
ESC
previous one
The programmer is able to choose any other
option via the arrow keys.
Select DISABLE if this telephone will not be
attended by a panic guard unit.
The programmer is able to choose any other
option via the arrow keys.
OK
6. DOORMATIC ?
DISABLE
6. DOORMATIC ?
OFF
6. DOORMATIC ?
ON
OK
OK
OK
6. DOORMATIC
DISABLE
6. DOORMATIC
OFF
6. DOORMATIC
ON
Select DISABLE to disable this function on
the telephone.
The programmer is able to choose any other
option via the arrow keys.
Select OFF to leave the doormatic function
enabled but deactivated
The programmer is able to choose any other
option via the arrow keys.
Select ON to leave the doormatic function
enabled and activated
The programmer is able to choose any other
option via the arrow keys.
Page 34

PROGRAMMING AMPLIFIERS (CM)
As of this date of publication for these technical manual this function is not available for
any existing amplifier version.
When available, we will report it via the usual technical media and update this documentation.
Page 35

PROGRAMMING RELAYS (CM)
As of this date of publication for these technical manual this function is not available for
this device.
When available, we will report it via the usual technical media and update this documentation.
Page 36

INSTALLATION MODE (IM)
From the MAIN MENU, you can access all of the DUOX programmer's functions with
regards to the detection of already installed devices in a specific installation, analyse the
quality of digital frames in a specific point of the installation, verify the different commands
that are transmitted by any device on the installation, and the transmission to a PC of
these commands, transmitted for a determined period of time to be registered and then
sent to the factory if required in-depth analysis for some technical problem in the installation.
The available functions are:
- Component detection (telephones, relays, panels or guard units).
- Analysis of commands transmitted by the different devices.
- Measuring the quality (level) of the digital frames.
- Monitoring and registering a PC of the transmitted commands.
This is accessed via the main MENU as indicated in the following diagram and once the
programmer is connected to a BUS within the installation via the 3 way connector (see
the DESCRIPTION section).
ON
OFF
DUOX ANALYZER
V.1.0
1. DETECTOR
2. ANALYZER
3. METER
4. SNIFFER PC
ON
Press ON/OFF for 2 seconds to turn the programmer off.
OFF
A welcome message appears indicating the DUOX´s
programmer software version.
OK
OK
Access the DEVICE DETECTION menu
OK
Access the COMMAND ANALYSIS menu
OK
Access the MEASURE FRAME LEVEL menu
OK
Access the REGISTERING FRAMES ON A PC
menu
Page 37

DETECTING DEVICES (IM)
This menu allows you to select the device or range of devices that we want to detect.
A device is detected as long as it is properly installed in any point of the inst allation in which
the programmer is connected, and with its address properly programmed, for the case in
which the device requires it.
The detectable devices are:
- Telephones
- Relays
- Panels, either general entrance, block or sub-block
- Guard units, whether for the general entrance or block
Starting from the MAIN MENU, continue the following diagram to access the device type
you want to detect.
1. DETECTOR
OK
1. DETECTOR
TELEPHONE
1. DETECTOR
RELAYS
1. DETECTOR
PANELS
1. DETECTOR
GUARD UNIT
We start from DETECTOR selection from the main
menu:
OK
OK
OK
OK
Access the DETECTING TELEPHONES function
Access the DETECTING RELAYS function
Access the DETECTING PANELS function
Access the DETECTING GUARD UNITS function
Exit this selection and return to the MAIN MENU.
ESC
Page 38

DETECTING TELEPHONES (IM)
This function allows you to verify the existence of one or various telephones in the installation,
programmed within a range of indicated addresses. The maximum range value to test is
1000 contiguous addresses belonging to the same block.
1. DETECTOR
TELEPHONE
OK
1. DETECTOR
BLOCK: 00
OK
1. DETECTOR
START: 0000
OK
1. DETECTOR
END: 0000
OK
TELEPHONE
000000
After having completed the scan, you can present one of these 3
Only some
telephones have
been detected
We start from the TELEPHONE DETECTOR option from
the main menu:
1 2 3
Enter the Block number that the telephones belong
4 5 6
to verify.
7 8 9
ESC
0
Values admitted: 00 to 09
1 2 3
Enter the number of the first telephone in the range.
4 5 6
7 8 9
ESC
0
1 2 3
Enter the address of the last telephone in the range.
4 5 6
(this number must be greater than the first number
7 8 9
ESC
0
in the range)
Start scanning, viewing it as it goes..
TEST RESULT: ?
DETECTED
OK
TELEPHONE OK
00101
The telephones detected
are displayed
No telephone
has been
detected
TEST RESULT:
NO TELEPHONES
Exit this function and return to the DEVICE DETECTION MENU
ESC
TEST RESULT:
ALL TELEPHONES
All
telephones
have been
detected
TEST RESULT: ?
NO DETECTED
OK
TELEPHONE OK
0201
The telephones NOT
detected are displayed
Page 39

DETECTING RELAYS (IM)
This function allows you to verify the existence of one or various relays in the installation,
programmed within a range of indicated relay numbers and as part of the same block,
including the relays configured as F1 and F2.
1. DETECTOR
RELE
OK
1. DETECTOR
BLOCK: 00
OK
1. DETECTOR
START: 0000
OK
1. DETECTOR
END: 0000
OK
RELAYS
00 000
After having completed the scan, you can present one of these 3
results:
Only some relays
have been detected
We start from the DETECTING RELAYS option from the
DEVICE DETECTION menu
1 2 3
Enter the Block number that the relays to verify belong
4 5 6
to.
7 8 9
ESC
0
Values admitted: 00 to 09
1 2 3
Enter the number of the first relay in the range.
4 5 6
7 8 9
ESC
0
1 2 3
Enter the address of the last relay in the range.
4 5 6
(this number must be greater than the first number
7 8 9
ESC
in the range)
0
Start scanning, viewing it as it goes.
The group with two digits to the left indicates the block
number and the three right ones is the relay number being
verified.
TEST RESULT: ?
DETECTED
OK
RELAY OK
0003
The relays detected are
displayed
No relays have
been detected
All relays
have been
detected
TEST RESULT: ?
NO DETECTED
TEST RESULT:
NO RELAYS
Exit this function and return to the DEVICE DETECTION menu
ESC
TEST RESULT:
ALL RELAYS
OK
RELAY NO OK
0020
The relays NOT detected
are displayed
Page 40

DETECTING PANELS MENU (IM)
This function allows for the detection of any type of panel installed in the installations where
we have connected the DUOX programmer.
However, we must indicate what type of panel we want to detect, between:
- A panel configured as a BLOCK entrance.
- A panel configured as a SUB-BLOCK entrance.
- A panel configured as a GENERAL
Starting from the MAIN MENU, continue the following diagram to access the device type
you want to detect.
1. DETECTOR
PANELS
OK
1. DETECTOR
BLOCK PANEL
1. DETECTOR
SUBBLOCK PANEL
1. DETECTOR
GENERAL ENTRANCE
We start from the PANEL DETECTION option from the
DEVICE DETECTION menu
OK
Access the BLOCK PANEL DETECTION
OK
Access the SUB-BLOCK PANEL DETECTION
OK
You access the GENERAL ENTRANCE PANEL
DETECTION
Exit this function and return to the DEVICE DETECTION menu
ESC
Page 41

DETECTING BLOCK PANELS (IM)
This function allows you to detect the existence of panels configured as BLOCK ENTRANCE
within the installation, along with the panel number.
For this, follow these steps indicated in the diagram:
1. DETECTOR
BLOCK PANEL
OK
1. DETECTOR
BLOCK: 00
OK
PANELS
00 00
After having completed the scan, you can view one of these 3 results:
All 10 panels have
been detected
We start from the BLOCK PANEL DETECTION option on
the PANEL DETECTION menu:
1 2 3
Enter the block number you wish to test.
4 5 6
Values admitted: 00 to 09
7 8 9
ESC
0
Start testing the 10 possible panel numbers that may exist in
the indicated block.
The two digits to the left indicate the block number being tested,
and the two right ones the panel number.
TEST RESULT:
ALL PANELS
No panels have been
detected
TEST RESULT: ?
Only some panels have been detected.
Choose if you want to view the detected or
undetected ones.
DETECTED
TEST RESULT:
NO PANELS
TEST RESULT: ?
NO DETECTED
ESC
ESC
Exit this function and return to the PANEL DETECTION menu
OK
OK
PANEL OK:
00 07
PANEL NOK:
00 04
The panels
detected are
displayed
The panels NOT
detected are
displayed
Page 42

DETECTING SUB-BLOCK PANELS (IM)
This function allows you to detect the existence of panels configured as SUB-BLOCK
ENTRANCE within the installation, along with the panel number.
For this, follow these steps indicated in the diagram:
1. DETECTOR
SUBBLOCK PANEL
OK
1. DETECTOR
BLOCK: 00
OK
1. DETECTOR
SUBBLOCK: 00
OK
PANELS
00 00
After having completed the scan, you can view one of these 3 results:
All 10 panels have
been detected
We start from the SUB-BLOCK P ANEL DETECTION option
on the PANEL DETECTION menu:
1 2 3
Enter the block number.
4 5 6
Values admitted: 00 to 09
7 8 9
ESC
0
Enter the sub-block number you wish to test.
1 2 3
4 5 6
Values admitted: 00 to 09
7 8 9
ESC
0
Start testing the 10 possible panel numbers that may exist in the
indicated block.
The two digits to the left indicate the sub-block number being
tested and the two right ones the panel number.
TEST RESULT:
ALL PANELS
No panels have been
detected
TEST RESULT: ?
Choose if you want to view the detected or
undetected ones.
DETECTED
TEST RESULT:
NO PANELS
TEST RESULT: ?
NO DETECTED
ESC
Exit this function and return to the PANEL DETECTION menu
Only some panels have been detected.
OK
OK
PANEL OK:
00 07
PANEL NOK:
00 04
The panels
detected are
displayed
The panels NOT
detected are
displayed
Page 43

DETECTING GENERAL ENT. PANELS (IM)
This function allows you to detect the existence of panels configured as GENERAL
ENTRANCE within the installation, along with the panel number.
For this, follow these steps indicated in the diagram:
1. DETECTOR
GENERAL ENTRANCE
OK
PANELS
00
We start from the GENERAL ENTRANCE PANEL
DETECTION option on the PANEL DETECTION menu:
Start testing the 10 possible panel numbers that may exist as
general entrance.
The digits display the panel number being tested.
After having completed the scan, you can present one of these 3
results:
All 10 panels have
been detected
TEST RESULT:
ALL PANELS
Only some panels have been detected.
No panels have been
detected
TEST RESULT:
NO PANELS
ESC
Exit this function and return to the PANEL DETECTION menu
TEST RESULT: ?
TEST RESULT: ?
NO DETECTED
Choose if you want to view the detected or
undetected ones.
DETECTED
OK
OK
PANEL OK:
07
PANEL NOK:
04
The panels
detected are
displayed
The panels NOT
detected are
displayed
Page 44

DETECTING GUARD UNIT PANELS (IM)
This function allows you to detect the guard units in the installation:
You must discern if it is a block guard unit or general entrance guard unit.
For this, follow these steps indicated in the diagram:
1. DETECTOR
GUARD UNIT
1. DETECTOR
BLOCK GUARD UNIT
This allows you to detect the
guard units that are configured
as BLOCK GUARD UNITS
We start from the GUARD UNIT
DETECTION option on the DEVICE
DETECTION menu:
OK
1. DETECTOR
GENERAL GUARD U.
This allows you to detect the
guard units that are configured
as GENERAL ENTRANCE
GUARD UNITS
Exit this function and return to the DEVICE DETECTION menu
ESC
Page 45

BLOCK GUARD UNIT DETECTION (IM)
This function allows you to detect the existence of guard units configured as BLOCK GUARD
UNIT within the installation, along with their number.
For this, follow these steps indicated in the diagram:
1. DETECTOR
BLOCK PANEL
OK
1. DETECTOR
BLOCK: 00
OK
GUARD UNIT
00 00
After having completed the scan, you can present one of these 3
results:
All 10 guard units
have been
detected
We start from the BLOCK GUARD UNIT DETECTION
option on the GUARD UNIT DETECTION menu:
Enter the block number you wish to test.
1 2 3
4 5 6
Values admitted: 00 to 09
7 8 9
ESC
0
Start testing the 10 possible guard unit numbers that may exist
in the indicated block.
The two digits to the left indicate the block number being tested,
and the two right ones the panel number.
TEST RESULT:
NO GUARD UNITS
ESC
ESC
Exit this function and return to the GUARD UNIT DETECTION menu
TEST RESULT:
ALL GUARD UNITS
No guard units have
been detected
Only some guard units have been detected.
Choose if you want to view the detected or
undetected ones.
TEST RESULT: ?
DETECTED
TEST RESULT: ?
NO DETECTED
OK
GUARD UNIT OK:
OK
GUARD UNIT NOK:
00 07
00 04
The guard units
detected are
displayed
The guard units
NOT detected
are displayed
Page 46

DETECTING G.E. GUARD UNITS (IM)
This function allows you to detect the existence of guard units configured as GENERAL
ENTRANCE GUARD UNIT within the installation, along with their number.
For this, follow these steps indicated in the diagram:
1. DETECTOR
GENERAL GUARD U.
OK
GUARD UNNIT
00
After having completed the scan, you can present one of these 3
results:
All 10 guard units
have been
detected
TEST RESULT:
ALL GUARD UNITS
We start from the GENERAL ENTRANCE GUARD UNIT
DETECTION option on the GUARD UNIT DETECTION menu:
Start testing the 10 possible guard unit numbers that may exist
as general entrance.
The digits display the panel number being tested.
Only some guard units have been detected.
No guard units have
been detected
TEST RESULT:
NO GUARD UNITS
ESC
Exit this function and return to the GUARD UNIT DETECTION menu
TEST RESULT: ?
TEST RESULT: ?
NO DETECTED
Choose if you want to view the detected or
undetected ones.
OK
DETECTED
OK
GUARD UNIT OK:
07
GUARD UNIT NOK:
04
The guard units
detected are
displayed
The guard units
NOT detected
are displayed
Page 47

COMMAND ANALYSER MODE (IM)
This function allows you to view any DUOX command transmitted by any device on the
installation.
These commands are stored in the programmer's internal memory, up to a maximum of
100 entries.
To capture the commands, follow these steps indicated in the diagram:
2. ANALYZER
WAIT COMMAND
DISABL-CHANNEL 1
00F010 - FFF0FF
A new command is
made
MEMORY FULL
OK
* * * * *
A command is made…
OK
Full memory (100
commands)
We start from option 2 ANALYSER from the MAIN
MENU
The device remains available to receive commands.
WAIT COMMAND blinks.
The command appears on the display and is saved in the
memory.
In the bottom linte the origin and destination adresses
appear, sespectively.
DISABL-CHANNEL 1
00F010 - FFF0FF
Review the
commands registered
via the arrows
OK
DISABL-CHANNEL 1
00F010 - FFF0FF
Review the
commands registered
via the arrows
Upon reviewing the stored entries, the last command registered appears first.
Some commands are sent several times a day as a security measure up against a loss
of data, all remaining registered.
The contiguously repeated commands are shown alternating a dash (-) and asterisk (*)
ESC
Return to the main menu.
Page 48

FRAME MEASUREMENT MODE (M.I.)
This function allows for the measurement of a specific point (where we place the
programmer), of the level of frames sent by the different devices within the installation.
This way we can analyse problems within the installation, due to attenuations in the signal
due to the distance, cable section, power supply, etc., without having to compare the
programmer's measurements in different points of the installation.
Three types of data are offered.
DC Voltage in the bus
Address of the device
where the branch
originates
For this, follow these steps indicated in the diagram:
POWER: 18.52V
POWER: 18.52V
POWER: 18.52V
0000000: 03.14V
0000000: 03.14V
0000000: 03.14V
Average voltage of the
positive peaks in the data
frame
3. METER
OK
3. METER
ALL
3. METER
AUDIO UPLINK
3. METER
AUDIO DOWN LINK
We start in option 3. METER from the MAIN MENU
OK
OK
OK
POWER: 18.52V
0000000: 03.14V
POWER: 18.52V
0000000: 03.14V
POWER: 18.52V
0000000: 03.14V
Measuring the
DATA FRAME
Measuring UPLOAD AUDIO
FRAMES from channel 1
Measuring DOWNLOAD AUDIO
FRAMES from channel 1
In any of the three measurements, the information presented may be incomplete due to
the fact that at the moment of measurement not all of the information is available for one
of the following reasons:
POWER: 18.52V
SIGNAL: - -.- -V
POWER: 18.52V
SIGNAL: 03.14 V
None of the selected types of frames have been produced yet.
The information will automatically appear the moment it is generated.
The frames are being monitored (there is audio in the selected direction),
but the device it is coming from could not be identified.
The information will be completed the moment in which a device begins
sending said frame, since this is the moment when the device is identified.
ESC
Exit this selection and return to the MAIN MENU
Page 49

REGISTERING FRAMES IN PC MODE (IM)
This advanced DUOX programmer function allows the registering of all commands generated
in an installation for an unlimited period of time.
Its useful, for example, if there are problems in an installation that can not be analysed and
discovered on-sight, and requires the registry of all activity of all commands generated for
a determined amount of time for the personnel from the Technical Department in the factory.
This requires a PC to which the programmer must remain connected to during this time,
and where all these commands will be registered.
If this function is necessary, Fermax´ technical support will indicate the necessary
details for this operation, along with sending the drivers and necessary utilities.
For this connection you must assign the COM port created upon connecting the device,
and configure the parameters of this port as follows:
-Baud Rate: 115200
-Parity: none
-Data bits: 8
-Stop bits: 1
-No parity control
Once the PC is prepared, to use this function follow these steps indicated in the diagram:
4. SNIFFER PC
OK
4. SNIFFER PC
N.CMD RX: 00000
We start from option 4,
SNIFFER PC, from the MAIN MENU
The lower row indicates the number of
commands that have been transmitted
to the PC
Page 50

UPDATING FIRMWARE
The DUOX programmer allows for the updating of firmware, when new devices or versions
of them require it.
When a new version appears, they will be published in the technical sections of Fermax´
website, along with the specific indications for properly updating it.
Either way, this update will be done via the use of a PC, connecting it via the programmer's
USB port.
The current version (November 2013) is V.1.0.
Page 51

TECHNICAL SPECIFICATIONS
Power Supply: 18 Vdc (taken from the installation) or
5 V (via the USB connector)
9 V (via the telephone connector)
Consumption (+/- 10%): Powered by DUOX Bus
77 mA in standby
85 mA when active and navigating through the menus
100 mA when active and the TX/RX bus is active.
Powered by USB.
245 mA in standby
240 mA in active and with the DUOX telephone connected
Environmental conditions: Operating Temperature: -5º C to +40º C
Relative Humidity: 5-95 %
Level of IP protection: 30
In these technical instructions the following symbols have been used:
Press the OK key to continue
OK
ON
Press the ON/OFF key to continue
OFF
Select the desired option by pressing either "forward" or "back"
Press the "forward" key to advance in the operation
1 2 3
Use the numerical key to enter the required data
4 5 6
7 8 9
0
Press the ESC key to return to the previous menu
ESC
OK
Page 52

PROGRAMMA TEUR DUOX RÉF. 3254
CODE : 97731 V02/14
Cet outil permet d'effectuer diverses tâches de programmation sur les différents dispositifs
ainsi que de recherche des incidents ayant eu lieu sur les installations du système DUOX
de FERMAX.
Il comporte 2 modes de fonctionnement :
MODE CONSOLE
Il permet de programmer et de contrôler le statut de la programmation des dispositifs du
système DUOX, soit sur l'installation en service soit sur l'établi.
Pour ce dernier cas, il faut alimenter le programmateur DUOX via le port USB intégré.
MODE ANALYSEUR DES INSTALLATIONS
Il permet d'analyser les incidents (analyse des commandes, trames de données et niveaux
de tension correspondants) et de vérifier les composants sur une installation déterminée
déjà en marche.
Dans ce cas, il est alimenté par l'installation elle-même.
DESCRIPTION
1
2
3
1 2 3
4 5 6
7 8 9
ESC
0
ON
OFF
OK
6
7
8
4
5
1. Écran alphanumérique
2. Clavier numérique
3. Touche « Échap » (esc) pour revenir
à l'une des étapes de la programmation
4. Touche « connexion »
5. Touches « Suiv » et « Préc »
6. Touche « validation »
9
10
7. Connecteur pour cordon téléphonique
torsadé à programmer
8. Connecteur USB pour l'alimentation du
programmateur en mode CONSOLE
9. Connecteur 3 voies à connecter à un
BUS DUOX (utiliser les deux broches
des extrémités)
10.Connecteur 6 voies (à raccorder à
l'amplificateur à programmer en mode
CONSOLE)
Page 53

MODE CONSOLE (MC)
Ce mode de fonctionnement permet de réaliser différentes opérations de programmation
et de contrôle des paramètres programmés sur n'importe quel dispositif de la famille DUOX,
c'est-à-dire postes, amplificateurs et relais DUOX (le cas échéant), et ce au cas par cas.
Il faut alimenter aussi bien le dispositif à contrôler/programmer que le programmateur DUOX.
L'alimentation peut être effectuée de plusieurs façons :
En alimentant le programmateur à partir du dispositif à programmer
Cette option est utile lorsque le poste à programmer est installé et alimenté à partir de
l'installation (à l'exception des postes EXTRA qui ne fournissent p as de courant au système
de vérification).
Le programmateur est alimenté via le câble de raccordement au poste (il peut s'agir du
cordon téléphonique torsadé, qui est raccordé entre la base du poste et le connecteur RJ11
du programmateur ou du connecteur 3 voies placé à l'arrière du programmateur en se
servant d'un câble plat et en raccordant les 2 fils des extrémités au connecteur du poste
ou directement au bus).
En alimentant le programmateur localement
Cette option est utile lorsque le dispositif ne se trouve pas dans l'installation ni sur l'établi
de l'atelier.
On alimente le programmateur via le connecteur USB, en utilisant une alimentation US.
Dans un cas comme dans l'autre, en vue de finaliser la programmation d'un dispositif, il
suffit de le déconnecter de l'alimentation et d'appuyer sur la touche ON/OFF pendant au
moins 2 secondes.
Si le matériel n'est pas utilisé pendant plus d'une minute, il s'éteint
CONNECTION OFF
automatiquement. Il faudra alors de débrancher, puis le rebrancher
pour qu'il fonctionne de nouveau. Il faudra alors appuyer une fois
de plus sur la touche ON/OFF pendant 2 secondes.
REMARQUES
Ce mode de fonctionnement, et plus concrètement les options disponibles, dépend du
dispositif (et de sa version) à programmer. Par conséquent, il est possible que les options
varient quelque peu par rapport à celles indiquées dans les présentes instructions techniques.
Au moment de la publication de ces instructions techniques (janvier 2014), ce mode n’est
disponible que pour les modèles suivants :
- Loft Extra
- Loft Basic Plus
Nous communiquerons, le moment venu, s'il est disponible pour d'autres dispositifs.
Page 54

PROGRAMMATION DES POSTES (MC)
Pour utiliser cette fonction, il est possible de raccorder le poste à programmer de l'une
de ces façons (indifféremment), conformément aux indications de la rubrique précédente.
ALIMENTATION DE L'INSTALLATION
Vérifiez que le poste est en veille, soit
avec le combiné raccroché soit en
maintenant la touche servant à
raccrocher enfoncée.
.
TEL. EXTRA V1.0
1. ADRESS
000001
2. TONE PANEL
4
ALIMENTATION LOCALE
S'assurer que le poste est en veille et
que le combiné est raccroché.
ON
OFF
Les données concernant le type et la
version du poste apparaissent
Option programmation de l'adresse
du poste
Option programmation de la
mélodie d'appel en provenance
de la platine
2. TONE GUARD
3
4. GUARD UNIT
B: 10 N: 0
5. GUARD PANIC
DISABLE
6. DOORMATIC
DISABLE
Option programmation de la
mélodie d'appel en provenance de
la conciergerie
Option pour activer sur le poste l'emploi
de la centrale de la conciergerie
Option pour activer sur le poste l'emploi
de la centrale de la conciergerie d'urgence
Option pour activer sur le poste la
fonction « ouverture automatique de la
porte lors de l'appel »
Page 55
PROGRAMMATION DES POSTES (MC)
Les étapes à suivre après avoir choisi l'option à programmer sont décrites ci-après :
Option de programmation de l'adresse du poste :
1. ADRESS
000001
OK
1. ADRESS ?
000001
1. ADRESS ?
020325
OK
1. ADRESS
020325
L'on commence par l'option programmation des adresses du
menu principal
Le programmateur est prêt à saisir
l'adresse requise
1 2 3
4 5 6
7 8 9
Saisir les 6 chiffres de l'adresse
ESC
ESC
0
annuler le numéro saisi et laisser le précédent
La programmation est finie, on a la possibilité de
choisir toute autre option de programmation à l'aide
des touches fléchées
Option de programmation de la mélodie d'appel en provenance de la platine
2. TONE PANEL
4
OK
L'on commence par l'option sélection de la mélodie de la
platine du menu principal
2. TONE PANEL ?
4
2. TONE PANEL
1
OK
2. TONE PANEL
1
Le programmateur est prêt à saisir le numéro de la mélodie
souhaitée
1 2 3
Saisir le numéro de la mélodie souhaitée disponible
4 5 6
7 8 9
(en fonction du modèle). Il est également possible
ESC
0
d'utiliser les touches fléchées
ESC
annuler le numéro saisi et laisser le précédent
La programmation est finie, on a la possibilité de
choisir toute autre option de programmation à l'aide
des touches fléchées
Page 56

PROGRAMMATION DES POSTES (MC)
Les étapes à suivre après avoir choisi l'option à programmer sont décrites ci-après :
Option de programmation de la mélodie d'appel en provenance de la conciergerie
3. TONE GUARD
2
3. TONE GUARD ?
2
3. TONE GUARD ?
5
OK
3. TONE GUARD
5
L'on commence par l'option sélection de la mélodie d'appel
en provenance de la conciergerie du menu principal
OK
Le programmateur est prêt à saisir le numéro de la mélodie
souhaitée
Saisir le numéro de la mélodie souhaitée, compris
1 2 3
entre 1 et 5, en fonction du modèle.
4 5 6
Il est également possible d'utiliser les touches
7 8 9
ESC
0
fléchées
annuler le numéro saisi et laisser le précédent
ESC
La programmation est finie, on a la possibilité de
choisir toute autre option de programmation à l'aide
des touches fléchées
Option d'activation de la conciergerie
4. GUARD UNIT
B: 10 N: 0
OK
4. GUARD UNIT ?
B: 10 N: 0
L'on commence par l'option d'activation de la conciergerie du
menu principal
OK
4. GUARD UNIT ?
B: 05 N: 3
OK
Saisir le numéro du bâtiment (2 chiffres) +
1 2 3
le numéro du panneau (1 chiffre)
4 5 6
correspondant à la conciergerie qui va
7 8 9
ESC
0
prendre en charge ce poste
annuler le numéro saisi et laisser le
ESC
précédent.
4. GUARD UNIT ?
DISABLE
4. GUARD UNIT
B: 05 N: 3
OK
4. GUARD UNIT
DISABLE
Le programmateur reste à disposition en
vue de choisir toute autre option à l'aide des
touches fléchées
Sélectionner DISABLE si ce poste ne va pas
être pris en charge par l'une des
conciergeries.
Le programmateur reste à disposition en vue
de choisir toute autre option à l'aide des
touches fléchées
Page 57

PROGRAMMATION DES POSTES (MC)
Option d'activation de la conciergerie d'urgence
5. GUARD PANIC
B: 10 N: 0
OK
5. GUARD PANIC?
B: 10 N: 0
L'on commence par l'option d'activation de la conciergerie d'urgence du menu
principal
OK
5. GUARD PANIC ?
B: 05 N: 3
OK
4. GUARD PANIC
B: 05 N: 3
OK
5. GUARD PANIC?
DISABLE
5. GUARD PANIC
DISABLE
Option d'activation de la fonction doormatic
6. DOORMATIC
DISABLE
L'on commence par l'option d'activation de la fonction doormatic (ouverture
automatique des portes lorsqu'il y a appel à destination de ce poste)
Saisir le numéro du bâtiment (2 chiffres) +
1 2 3
le numéro du panneau (1 chiffre)
4 5 6
correspondant à la conciergerie d'urgence
7 8 9
ESC
0
qui va prendre en charge ce poste
annuler le numéro saisi et laisser le
ESC
précédent
Le programmateur reste à disposition en
vue de choisir toute autre option à l'aide des
touches fléchées
Sélectionner DISABLE si ce poste ne va pas
être pris en charge par l'une des conciergeries
d'urgence
Le programmateur reste à disposition en vue
de choisir toute autre option à l'aide des
touches fléchées
OK
6. DOORMATIC ?
DISABLE
6. DOORMATIC ?
OFF
6. DOORMATIC ?
ON
OK
OK
OK
6. DOORMATIC
DISABLE
6. DOORMATIC
OFF
6. DOORMATIC
ON
Sélectionner DISABLE afin de mettre cette
fonction hors service au niveau du poste.
Le programmateur reste à disposition en vue
de choisir toute autre option à l'aide des
touches fléchées
Sélectionner OFF pour que la fonction
doormatic soit mise en service, mais
désactivée
Le programmateur reste à disposition en vue
de choisir toute autre option à l'aide des
touches fléchées
Sélectionner ON pour que la fonction
doormatic soit mise en service et activée
Le programmateur reste à disposition en vue
de choisir toute autre option à l'aide des
touches fléchées
Page 58

PROGRAMMATION DES AMPLIFICATEURS (MC)
Au moment de la publication de ce manuel technique, cette fonction n'est pas disponible
quelle que soit la version de l'amplificateur.
Quand elle sera disponible, la communication correspondante en sera faite par les différents
canaux techniques et cette documentation sera mise à jour.
Page 59

PROGRAMMATION DES RELAIS (MC)
Au moment de la publication de ce manuel technique, cette fonction n'est pas disponible
sur ce dispositif.
Quand elle sera disponible, la communication correspondante en sera faite par les différents
canaux techniques et cette documentation sera mise à jour.
Page 60

MODE INSTALLATION (MI)
À partir du MENU PRINCIPAL, il est possible d'accéder à toutes les fonctions du
programmateur DUOX en ce qui concerne la détection des dispositifs déjà installés sur
une installation en particulier, l'analyse de la qualité des trames numériques à un endroit
concret de l'installation, le contrôle des différentes commandes qui sont transmises par
tout dispositif de l'installation, la transmission de ces commandes (transmises pendant
une période concrète) à un PC afin de les enregistrer et envoyer ultérieurement à l'usine
au cas où il faudrait analyser dans le détail un problème technique de l'installation.
Les fonctions disponibles sont les suivantes :
- Détection des composants (postes, relais, platines ou conciergeries)
- Analyses des commandes transmises par les différents dispositifs
- Mesure de la qualité (niveau) des trames numériques
- Contrôle et enregistrement sur un PC des commandes transmises
L'on accède au MENU principal en fonction de ce qui est indiqué sur le croquis suivant
et après avoir raccordé le programmateur à l'un des emplacements du BUS de l'installation
via le connecteur 3 voies (voir rubrique DESCRIPTION).
ON
OFF
DUOX ANALYZER
V.1.0
1. DETECTOR
2. ANALYZER
Un message de bienvenue, indiquant la version du
logiciel du programmateur DUOX, apparaît
OK
OK
L'on accède au menu de DÉTECTION DES
DISPOSITIFS
OK
L'on accède au menu d'ANALYSE DES
COMMANDES
OK
3. METER
4. SNIFFER PC
ON
Appuyer sur ON/OFF pendant 2 secondes afin d'éteindre le programmateur
OFF
L'on accède au menu de MESURE DU NIVEAU
DES TRAMES
OK
L'on accède au menu d'ENREGISTREMENT
DES TRAMES SUR UN PC
Page 61

DÉTECTION DES DISPOSITIFS (MI)
Ce menu permet de sélectionner le dispositif ou la plage de dispositifs à détecter.
Un dispositif correctement installé à un endroit quelconque de l'installation (à laquelle le
programmateur sera raccordé) et dont l'adresse est correctement programmée (si le
dispositif le requiert) sera toujours détecté.
Les dispositifs pouvant être détectés sont les suivants :
- Postes
- Relais
- Platines, qu'il s'agisse d'une platine d'entrée générale, de bâtiment ou de
sous-bâtiment
- Conciergeries, qu'elles soient situées à l'entrée générale ou dans un bâtiment.
En partant du MENU PRINCIPAL, suivre le schéma suivant pour accéder au type de
dispositif à détecter.
1. DETECTOR
OK
1. DETECTOR
TELEPHONE
1. DETECTOR
RELAYS
1. DETECTOR
PANELS
1. DETECTOR
GUARD UNIT
L'on commence par la sélection de DÉTECTEUR
dans le MENU PRINCIPAL
OK
L'on accède à la fonction
DÉTECTION DES POSTES
OK
L'on accède à la fonction
DÉTECTION DES RELAIS
OK
L'on accède à la fonction
DÉTECTION DES PLATINES
OK
L'on accède à la fonction
DÉTECTION DES CONCIERGERIES
ESC
Quitter cette sélection et retourner au MENU PRINCIPAL
Page 62

DÉTECTION DES POSTES (MI)
Cette fonction permet de contrôler la présence, sur l'installation, d'un ou plusieurs postes
programmés selon la fourchette d'adresses indiquée.
La valeur maximale de la fourchette à tester est de 1 000 adresses contiguës et appartenant
à un même bâtiment.
1. DETECTOR
TELEPHONE
OK
1. DETECTOR
BLOCK: 00
OK
1. DETECTOR
START: 0000
OK
1. DETECTOR
END: 0000
OK
L'on commence par l'option DÉTECTEUR-POSTES du
menu principal
1 2 3
Saisir le numéro du bâtiment auquel appartiennent
4 5 6
les postes à contrôler.
7 8 9
ESC
0
Valeurs admises : de 00 à 99
1 2 3
Saisir l'adresse du premier poste de la fourchette
4 5 6
7 8 9
ESC
0
1 2 3
Saisir l'adresse du dernier poste de la fourchette
4 5 6
(ce numéro doit être supérieur au premier de la
7 8 9
ESC
0
fourchette)
TELEPHONE
000000
Le scannage commence. On peut observer la
progressionde ce dernier
Une fois le scannage terminé, on peut avoir l'un de ces 3 résultats :
TEST RESULT: ?
Seuls quelques
DETECTED
postes ont été
détectés
Aucun poste
n'a été détecté
Tous les
postes ont
été
détectés
TEST RESULT:
NO TELEPHONES
Quitter cette fonction et retourner au menu DÉTECTION DES DISPOSITIFS
ESC
TEST RESULT:
ALL TELEPHONES
TEST RESULT: ?
NO DETECTED
OK
TELEPHONE OK
00101
Les postes détectés
apparaissent
OK
TELEPHONE OK
0201
Les postes NON détectés
apparaissent
Page 63

DÉTECTION DES RELAIS (MI)
Cette fonction permet de vérifier la présence, sur l'installation, d'un ou plusieurs relais
programmés dans la fourchette de numéros de relais indiquée et appartenant à un même
bâtiment, y compris les relais configurés en tant que F1 et F2.
1. DETECTOR
RELE
OK
1. DETECTOR
BLOCK: 00
OK
1. DETECTOR
START: 0000
OK
1. DETECTOR
END: 0000
OK
RELAYS
00 000
Une fois le test terminé, on peut avoir l'un de ces 3 résultats :
Seuls quelques
relais ont été
détectés
L'on commence par l'option DÉTECTION DES RELAIS
du menu DÉTECTION DES DISPOSITIFS
Saisir le numéro du bâtiment auquel appartiennent
1 2 3
4 5 6
les relais à contrôler.
7 8 9
Valeurs admises : de 00 à 99
ESC
0
1 2 3
Saisir le numéro du premier relais de la fourchette
4 5 6
7 8 9
ESC
0
Saisir le numéro du dernier relais de la fourchette
1 2 3
4 5 6
(ce numéro doit être supérieur au premier de la
7 8 9
fourchette)
ESC
0
Le test commence. On peut observer la progression de ce
dernier.
Les deux chiffres de gauche indiquent le numéro du bâtiment
et les trois de droite le numéro de relais actuellement
contrôlé.
.
TEST RESULT: ?
DETECTED
OK
RELAY OK
0003
Les relais détectés
apparaissent
Aucun relais
n'a été détecté
Tous les
relais ont
été
détectés
TEST RESULT: ?
OK
NO DETECTED
TEST RESULT:
NO RELAYS
Quitter cette fonction et retourner au menu DÉTECTION DES DISPOSITIFS
ESC
TEST RESULT:
ALL RELAYS
RELAY NO OK
0020
Les relais NON détectés
apparaissent
Page 64

MENU DÉTECTION DES PLATINES (MI)
Cette fonction permet de détecter tout type de platine installée sur l'installation où le
programmateur DUOX est raccordé.
Il faut toutefois indiquer le type de la platine à détecter :
- Platine configurée en tant qu'accès à un BÂTIMENT
- Platine configurée en tant qu'accès à un SOUS-BÂTIMENT
- Platine configurée en tant qu'ENTRÉE GÉNÉRALE
En partant du MENU PRINCIPAL, suivre le schéma suivant pour accéder au type de
dispositif à détecter.
1. DETECTOR
PANELS
OK
1. DETECTOR
BLOCK PANEL
1. DETECTOR
SUBBLOCK PANEL
1. DETECTOR
L'on commence par l'option DÉTECTION DES PLA TINES
du menu DÉTECTION DES DISPOSITIFS
GENERAL ENTRANCE
OK
L'on accède à la fonction
DÉTECTION DES PLATINES DE BÂTIMENT
OK
L'on accède à la fonction
DÉTECTION DES PLATINES DE
SOUS-BÂTIMENT
OK
L'on accède à la fonction
DÉTECTION DES PLATINES D'ENTRÉE
GÉNÉRALE
Quitter cette fonction et retourner au menu DÉTECTION DES DISPOSITIFS
ESC
Page 65

DÉTECTION DES PLATINES DE BÂTIMENT (MI)
Cette fonction permet de détecter la présence, sur l'installation, de platines configurées en
tant qu'ENTRÉE DE BÂTIMENT, ainsi que le numéro de la platine.
Pour ce faire, suivre les étapes indiquées sur le schéma suivant :
1. DETECTOR
BLOCK PANEL
OK
1. DETECTOR
BLOCK: 00
OK
PANELS
00 00
Une fois le test terminé, on peut avoir l'un de ces 3 résultats :
Les 10 platines ont
été détectées
L'on part de l'option DÉTECTION DES PLATINES DE
BÂTIMENT du menu DÉTECTION DES PLATINES
1 2 3
4 5 6
Saisir le numéro du bâtiment à tester.
7 8 9
ESC
0
Valeurs admises : de 00 à 99
Le test concernant les 10 éventuels numéros de platines
pouvant être présentes dans le bâtiment indiqué commence.
Les deux chiffres de gauche indiquent le numéro de bâtiment
actuellement testé et les deux chiffres de droite représentent
le numéro de la platine.
TEST RESULT:
ALL PANELS
Certaines platines ont été détectées.
Choisir si l'on souhaite visualiser les platines
détectées ou les non détectées
Aucune platine n'a été
détectée
TEST RESULT: ?
DETECTED
OK
PANEL OK:
TEST RESULT:
NO PANELS
TEST RESULT: ?
OK
PANEL NOK:
NO DETECTED
ESC
Quitter cette fonction et retourner au menu DÉTECTION DES PLATINES
ESC
00 07
00 04
Les platines
détectées
apparaissent
Les platines
NON détectées
apparaissent
Page 66

DÉTECTION DES PLA TINES DE SOUS-BÂTIMENT (MI)
Cette fonction permet de détecter la présence, sur l'installation, de platines configurées en
tant qu'ENTRÉE DE SOUS-BÂTIMENT, ainsi que le numéro de la platine.
Pour ce faire, suivre les étapes indiquées sur le schéma suivant :
1. DETECTOR
SUBBLOCK PANEL
OK
1. DETECTOR
BLOCK: 00
OK
1. DETECTOR
SUBBLOCK: 00
OK
PANELS
00 00
Une fois le test terminé, on peut avoir l'un de ces 3 résultats :
Les 10 platines
ont été détectées
L'on part de l'option DÉTECTION DES PLATINES DE
SOUS-BÂTIMENT du menu DÉTECTION DES PLATINES
Introduire le numéro du bâtiment.
1 2 3
4 5 6
Valeurs admises : de 00 à 99
7 8 9
ESC
0
Saisir le numéro du sous-bâtiment à tester.
1 2 3
Valeurs admises : de 00 à 99
4 5 6
7 8 9
ESC
0
Le test concernant les 10 éventuels numéros de platines pouvant
être présentes dans le sous-bâtiment indiqué commence.
Les deux chiffres de gauche indiquent le numéro de sous-bâtiment
actuellement testé et les deux chiffres de droite représentent le
numéro de la platine.
Certaines platines ont été détectées.
TEST RESULT:
ALL PANELS
Aucune platine n'a
été détectée
TEST RESULT: ?
Choisir si l'on souhaite visualiser les platines
détectées ou les non détectées
OK
DETECTED
PANEL OK:
TEST RESULT:
NO PANELS
TEST RESULT: ?
OK
PANEL NOK:
NO DETECTED
ESC
Quitter cette fonction et retourner au menu DÉTECTION DES PLATINES
00 07
00 04
Les platines
détectées
apparaissent
Les platines
NON détectées
apparaissent
Page 67

DÉTECTION DES PLATINES D'ENTRÉE GÉNÉRALE (MI)
Cette fonction permet de détecter la présence, sur l'installation, de platines configurées en
tant qu'ENTRÉE GÉNÉRALE, ainsi que le numéro de la platine.
Pour ce faire, suivre les étapes indiquées sur le schéma suivant :
1. DETECTOR
GENERAL ENTRANCE
OK
L'on part de l'option DÉTECTION DES PLATINES
D'ENTRÉE GÉNÉRALE du menu DÉTECTION DES
PLATINES
Le test concernant les 10 éventuels numéros de platines
PANELS
00
pouvant être présentes à l'entrée générale commence.
Les chiffres indiquent le numéro de la platine actuellement
testée
Une fois le test terminé, on peut avoir l'un de ces 3 résultats :
Les 10 platines
ont été détectées
TEST RESULT:
ALL PANELS
Certaines platines ont été détectées.
Aucune platine n'a
été détectée
TEST RESULT:
NO PANELS
Quitter cette fonction et retourner au menu DÉTECTION DES PLATINES
ESC
TEST RESULT: ?
TEST RESULT: ?
NO DETECTED
Choisir si l'on souhaite visualiser les platines
détectées ou les non détectées
OK
DETECTED
OK
PANEL OK:
PANEL NOK:
07
04
Les platines
détectées
apparaissent
Les platines
NON détectées
apparaissent
Page 68

MENU DÉTECTION DES CONCIERGERIES (MI)
Cette fonction permet de détecter les conciergeries présentes dans l'installation.
Il faut savoir s'il s'agit de conciergeries de bâtiment ou de conciergeries d'entrée générale.
Pour ce faire, suivre les étapes indiquées sur le schéma suivant :
1. DETECTOR
GUARD UNIT
1. DETECTOR
BLOCK GUARD UNIT
Il permet de détecter les
conciergeries configurées en
tant que CONCIERGERIE DE
BÂTIMENT
L'on commence par l'option DÉTECTION
DES CONCIERGERIES du menu
DÉTECTION DES DISPOSITIFS
OK
1. DETECTOR
GENERAL GUARD U.
Il permet de détecter les
conciergeries configurées en
tant que CONCIERGERIE
D'ENTRÉE GÉNÉRALE
Quitter cette fonction et retourner au menu DÉTECTION DES DISPOSITIFS
ESC
Page 69

DÉTECTION DE CONCIERGERIES DE BÂTIMENT (MI)
Cette fonction permet de détecter la présence, sur l'installation, de conciergeries configurées
en tant que CONCIERGERIE DE BÂTIMENT, ainsi que le numéro qui leur est assigné.
Pour ce faire, suivre les étapes indiquées sur le schéma suivant :
L'on part de l'option DÉTECTION DES CONCIERGERIES
1. DETECTOR
BLOCK PANEL
OK
1. DETECTOR
BLOCK: 00
OK
GUARD UNIT
00 00
Une fois le test terminé, on peut avoir l'un de ces 3 résultats :
DE BÂTIMENT du menu DÉTECTION DES
CONCIERGERIES
Saisir le numéro du bâtiment à tester.
1 2 3
Valeurs admises : de 00 à 99
4 5 6
7 8 9
ESC
0
Le test concernant les 10 éventuels numéros de conciergeries
pouvant être présentes dans le bâtiment indiqué commence.
Les deux chiffres de gauche indiquent le numéro de bâtiment
actuellement testé et les deux chiffres de droite représentent
le numéro de la conciergerie.
TEST RESULT:
NO GUARD UNITS
Quitter cette fonction et retourner au menu DÉTECTION DES CONCIERGERIES
ESC
ESC
Les 10 conciergeries
ont été détectées
TEST RESULT:
ALL GUARD UNITS
Aucune conciergerie
n'a été détectée
Certaines conciergeries ont été détectées.
Choisir si l'on souhaite visualiser les conciergeries
détectées ou les non détectées
TEST RESULT: ?
DETECTED
TEST RESULT: ?
NO DETECTED
OK
GUARD UNIT OK:
OK
GUARD UNIT NOK:
00 07
00 04
Les
conciergeries
détectées
apparaissent
Les
conciergeries
NON détectées
apparaissent
Page 70

DÉTECTION DES CONCIERGERIES D'EG (MI)
Cette fonction permet de détecter la présence, sur l'installation, de conciergeries configurées
en tant que CONCIERGERIE D'ENTRÉE GÉNÉRALE, ainsi que le numéro qui leur est
assigné.
Pour ce faire, suivre les étapes indiquées sur le schéma suivant :
1. DETECTOR
GENERAL GUARD U.
OK
GUARD UNNIT
00
Une fois le test terminé, on peut avoir l'un de ces 3 résultats :
Les 10 conciergeries
ont été détectées
L'on part de l'option DÉTECTION DES CONCIERGERIES
D'ENTRÉE GÉNÉRALE du menu DÉTECTION DES
CONCIERGERIES
Le test concernant les 10 éventuels numéros de conciergeries
pouvant être présentes à l'entrée générale commence.
Les chiffres indiquent le numéro de la conciergerie actuellement
testée
TEST RESULT:
ALL GUARD UNITS
Certaines conciergeries ont été détectées.
Aucune conciergerie
n'a été détectée
TEST RESULT:
NO GUARD UNITS
ESC
Quitter cette fonction et retourner au menu DÉTECTION DES CONCIERGERIES
TEST RESULT: ?
TEST RESULT: ?
NO DETECTED
Choisir si l'on souhaite visualiser les conciergeries
détectées ou les non détectées
OK
DETECTED
GUARD UNIT OK:
OK
GUARD UNIT NOK:
07
04
Les
conciergeries
détectées
apparaissent
Les
conciergeries
NON détectées
apparaissent
Page 71

MODE ANALYSEUR DE COMMANDES (MI)
Cette fonction permet de visualiser toute commande DUOX transmise par l'un des dispositifs
de l'installation.
Ces commandes sont stockées dans une mémoire interne du programmateur (jusqu'à 100
enregistrements maximum).
Afin de capturer les commandes, suivre les indications du croquis suivant :
2. ANALYZER
WAIT COMMAND
DISABL-CHANNEL 1
00F010 - FFF0FF
Une nouvelle
commande est
générée
MEMORY FULL
L'on commence avec la sélection 2 .ANALYZER du
MENU PRINCIPAL
OK
* * * * *
Le dispositif attend de recevoir des commandes.
WAIT COMMAND se met à clignoter
Une commande est générée...
La commande apparaît sur l'affichage et est enregistrée
dans la mémoire.
Les adresses source et cible respectivement apparaissent
sur la ligne inférieure.
OK
Mémoire pleine
(100 commandes)
DISABL-CHANNEL 1
00F010 - FFF0FF
Revoir les
commandes
enregistrées à l'aide
des flèches
OK
Revoir les
DISABL-CHANNEL 1
00F010 - FFF0FF
commandes
enregistrées à l'aide
des flèches
En contrôlant les enregistrements stockés, la dernière commande enregistrée apparaît
en premier.
Certaines commandes sont envoyées plusieurs fois de suite en tant que mesure de
sécurité face à la perte de données, toutes sont enregistrées.
Les commandes répétées contiguës sont affichées en alternant un tiret (-) et un
astérisque (*).
Retour au menu principal
ESC
Page 72

MODE MESUREUR DE TRAMES (MI)
Cette fonction permet de mesurer à un endroit quelconque (là où est placé le
programmateur) le niveau des trames qui sont envoyées par les différents dispositifs de
l'installation.
Il est ainsi possible d'analyser les problèmes d'une installation en raison des affaiblissements
du signal pour cause de distance, section de câble, alimentation, etc., en comparant
uniquement les mesures du programmateur sur les différents points de l'installation.
3 types d'informations sont proposés :
Tension CC au niveau du bus
Adresse du dispositif
créée par la trame
POWER: 18.52V
POWER: 18.52V
POWER: 18.52V
0000000: 03.14V
0000000: 03.14V
0000000: 03.14V
Tension moyenne des
pics positifs de la trame
de données
Afin d'utiliser cette fonction, il faut suivre les étapes indiquées sur ce schéma :
3. METER
OK
3. METER
ALL
3. METER
AUDIO UPLINK
3. METER
AUDIO DOWN LINK
L'on commence avec la sélection 3
METER du MENU PRINCIPAL
OK
OK
OK
POWER: 18.52V
0000000: 03.14V
POWER: 18.52V
0000000: 03.14V
POWER: 18.52V
0000000: 03.14V
Mesure des
TRAMES DE DONNÉES
Mesure des
TRAMES DU SON MONTANT
du canal 1
Mesure des
TRAMES DU SON DESCENDANT
du canal 1
Pour chacune des trois mesures, les informations présentées peuvent être incomplètes
étant donné que, au moment de la mesure, l'on ne dispose pas de tous les renseignements
pour l'un des motifs suivants :
POWER: 18.52V
SIGNAL: - -.- -V
POWER: 18.52V
SIGNAL: 03.14 V
ESC
Quitter cette sélection et retourner au MENU PRINCIPAL
Il n'y a pas encore eu de trame du type sélectionné.
Les informations apparaissent automatiquement au moment de leur création
Les trames sont en cours de contrôle (pas de son dans le sens sélectionné),
mais il n'a pas été possible d'identifier le dispositif dont elles proviennent.
Les informations seront complétées lorsque l'un des dispositifs commencera
à envoyer ladite trame, car c'est à ce moment précis que le dispositif sera
identifié.
Page 73

MODE ENREGISTREMENT DES TRAMES SUR PC (MI)
Cette fonction avancée du programmateur DUOX permet de stocker l'enregistrement de
toutes les commandes générées sur une installation pendant une période de temps illimitée.
Cela se révèle utile, par exemple, au cas où il y aurait des problèmes sur une installation
impossible à analyser et pour en découvrir la raison « in situ » et, si cela est requis par le
personnel du département technique de l'usine, pour l'enregistrement de l'activité de toutes
les commandes créées pendant une période déterminée.
Il faut un PC qu'il faudra raccorder au programmateur pendant toute la période concernée
et sur lequel se fera l'enregistrement de toutes ces commandes.
S'il fallait utiliser cette fonction, le personnel technique de Fermax indiquerait les
détails requis pour cette opération et enverrait également les pilotes et utilitaires
nécessaires.
Pour la connexion, il faut assigner le port COM créé lors de la connexion du dispositif et
configurer les paramètres de ce port de la manière suivante :
-Débit en bauds : 115200
-Parité : aucune
-Bits de données : 8
-Bits d'arrêt : 1
-Sans contrôle de parité
Une fois le PC prêt, il faut suivre les étapes indiquées sur ce schéma afin d'utiliser cette
fonction :
4. SNIFFER PC
OK
4. SNIFFER PC
N.CMD RX: 00000
L'on commence avec la sélection 4
SNIFFER PC du MENU PRINCIPAL
Le nombre de commandes transmises au
PC est indiqué sur la ligne inférieure
Page 74

MISE À JOUR DU MICROGICIEL
Le programmateur DUOX permet de mettre à jour le microgiciel lorsque cela est requis
par la parution de nouveaux dispositifs ou de nouvelles versions.
Lors de la parution d'une nouvelle version, cette dernière sera publiée dans les rubriques
techniques de la page web de Fermax. Des indications ponctuelles permettant de réaliser
correctement la mise à jour seront également proposées.
Dans tous les cas, cette mise à jour sera effectuée via l'emploi d'un PC en le raccordant
au programmateur à l'aide de son port USB.
La version actuelle (novembre 2013) est la version 1.0.
Page 75

CARACTÉRISTIQUES TECHNIQUES
Alimentation : 18 Vcc (de l'installation elle-même) ou
5 V (via connecteur USB) ou
9 V (via connecteur téléphonique)
Consommation (+/- 10%) : Alimentation par BUS DUOX
77 mA en veille
85 mA activé et navigation par menus
100 mA activé et bus TX/RX activé
Alimentation par connecteur USB
245 mA en veille
240 mA activé et poste DUOX raccordé
Conditions ambiantes : Température de service : de - 5 ºC à + 40 ºC
Humidité relative : 5-95 %
Classe de protection IP : 30
Les symboles suivants ont été utilisés dans les présentes instructions techniques :
OK
Appuyer sur la touche OK pour continuer
ON
Appuyer sur la touche ON/OFF pour continuer
OFF
Sélectionner l'option souhaitée en appuyant indistinctement sur les flèches
OK
« suiv » ou « préc »
Appuyer sur la touche « suiv » pour avancer dans l'opération
1 2 3
4 5 6
Utiliser le pavé numérique pour saisir les données souhaitées
7 8 9
0
ESC
Appuyer sur la touche ESC pour revenir au menu précédent
Page 76

DUOX-PROGRAMMIERVORRICHTUNG,
COD.: 97731 V02/14
Dieses Werkzeug ermöglicht die Durchführung der Geräteprogrammierung und die
Fehlererkennung beim Auftreten von Störfällen der DUOX-Systeme von FERMAX.
Es gibt 2 Betriebsmodi:
KONSOLENMODUS
Ermöglicht die Programmierung und Überprüfung des Status der Programmierung der
DUOX-Systemgeräte, entweder über die sich in Betrieb befindende Anlage selbst oder
über die Werkbank.
In letzterem Fall muss die DUOX-Programmiervorrichtung über die integrierte USBSchnittstelle mit Strom versorgt werden.
ANLAGENANALYSIER-MODUS
Ermöglicht die Analyse von Störfällen (Befehlsanalyse, Datenraster und dort auftretende
Spannungspegel) sowie die Komponentenprüfung einer konkreten, bereits in Betrieb
stehenden Anlage.
Die Stromzufuhr erfolgt über die Anlage selbst.
BESCHREIBUNG
REF. 3254
1
2
3
1 2 3
4 5 6
7 8 9
ESC
0
ON
OFF
OK
4
5
1. Alphanumerisches Display
2. Numerische Tastatur
3. Abbrechen-Taste, um zu einem
vorherigen Programmierschritt
zurückzukehren.
4. Verbindungstaste
5. Vorwärts- und Zurück-Taste
6. Bestätigungstaste
9
6
10
7
8
7. Anschluss für das Ringelkabel des zu
programmierenden Telefons
8. USB-Anschluss für die Stromversorgung
der Programmiervorrichtung im
KONSOLEN-Modus.
9. 3-Weg-Anschluss für den DUOX-BUS
(Verwendung der beiden äußeren Pins).
10. 6-Weg-Anschluss (Verstärkeranschluss
für die Programmierung im KONSOLENModus).
Page 77

KONSOLENMODUS (M.C.)
Dieser Funktionsmodus ermöglicht die individuelle Durchführung von Programmierbefehlen
und Prüfungen der programmierten Parameter für jedes Gerät der Serie DUOX: Telefone,
Verstärker und Relais (falls verfügbar).
Es ist notwendig, sowohl das zu prüfende/programmierende Gerät als auch die DUOXProgrammiervorrichtung mit Strom zu versorgen.
Dieser Vorgang kann auf unterschiedliche Art und Weise durchgeführt werden:
Stromversorgung der Programmiervorrichtung über die zu programmierende Einheit
Diese Option ist dann nützlich, wenn das zu programmierende Telefon installiert ist und
über die Anlage mit Strom versorgt wird. (Ausgenommen Telefone der Serie EXTRA, die
dem Tester keinen Strom übermitteln können).
Die Programmiervorrichtung wird über das Verbindungskabel des Telefons mit Strom gespeist
(entweder über das gedrillte Kabel des Telefons, das zwischen dem Telefon und dem RJ11Anschluss angeschlossen wird oder über den 3-Weg-Anschluss auf der Rückseite der
Programmiervorrichtung, unter Verwendung eines Flachkabels und Anschluss der beiden
Drahtenden an den Telefonanschluss bzw. an den Bus)
Lokale Stromzufuhr der Programmiervorrichtung
Diese Option ist dann nützlich, wenn das Gerät nicht an der Anlage angeschlossen oder
auf der Werkbank ist.
Der Programmiervorrichtung wird über den USB-Anschluss mittels US-Adapter mit Strom
versorgt.
In beiden Fällen muss zur Beendigung der Programmierung eines Geräts eine Unterbrechung
der Stromversorgung herbeigeführt werden und die EIN/AUS Taste mindestens 2 Sekunden
lang gedrückt werden.
CONNECTION OFF
HINWEISE
Dieser Betriebsmodus und die verfügbaren Optionen hängen vom Gerät (und der
entsprechenden Version) ab, das zu programmieren ist und können infolgedessen leicht
von den in dieser technischen Anleitung aufgeführten Daten abweichen.
Zum Zeitpunkt der Veröffentlichung dieser technischen Anleitung (Januar 2014) ist dieser
Modus nur für folgende Modelle erhältlich:
- Loft Extra
- Loft Basic Plus
Die Verfügbarkeit für neue Geräte wird rechtzeitig bekannt gegeben.
Falls das Gerät mehr als eine Minute lang nicht benutzt wird,
schaltet es sich automatisch aus. Zur erneuten Inbetriebnahme
muss es vom Strom genommen und erneut angeschlossen werden,
anschließend ist die EIN/AUS Taste erneut 2 Sekunden lang zu
drücken.
Page 78

TELEFONPROGRAMMIERUNG (M.C.)
Um diese Funktion zu benutzen, ist es erforderlich, das zu programmierende Telefon
auf eine der Arten anzuschließen, die im vorherigen Kapitel beschrieben werden.
STROMVERSORGUNG DER ANLAGE
Sicherstellen, dass sich das Telefon
mit aufgelegtem Hörer im
Bereitschaftsmodus befindet oder die
Auflegtaste gedrückt halten.
TEL. EXTRA V1.0
1. ADRESS
000001
LOKALE STROMVERSORGUNG
Sicherstellen, dass das Telefon
aufgelegt ist und sich im
Bereitschaftsmodus befindet.
ON
OFF
2. TONE PANEL
4
2. TONE GUARD
3
4. GUARD UNIT
B: 10 N: 0
5. GUARD PANIC
DISABLE
6. DOORMATIC
DISABLE
Page 79

TELEFONPROGRAMMIERUNG (M.C.)
Nachfolgend werden folgende Schritte beschrieben, die nach Auswahl der
Programmieroption zu befolgen sind:
Programmieroption der Telefonadresse:
1. ADRESS
000001
OK
1. ADRESS ?
000001
1. ADRESS ?
020325
OK
1. ADRESS
020325
Ausgehend von der Option Adressprogrammierung des
Hauptmenüs
Die Programmiervorrichtung ist
bereit, die erforderliche Adresse
einzugeben
1 2 3
4 5 6
7 8 9
Die 6 Ziffern der Adresse eingeben
eingegebene Nummer annullieren und bestehende
ESC
ESC
0
Nummer belassen.
Beendet die Programmierung, worauf mittels
Pfeiltasten eine beliebige andere Programmieroption
ausgewählt werden kann.
Programmieroption der Klingelmelodie über die Türstation
2. TONE PANEL
4
Ausgangspunkt ist die Auswahl der Klingelmelodie für die
Türstation im Hauptmenü.
OK
2. TONE PANEL ?
4
2. TONE PANEL
1
OK
2. TONE PANEL
1
Die Programmiervorrichtung ist bereit, die gewünschte
Klingelnummer einzugeben.
1 2 3
Die Nummer der gewünschten und verfügbaren
4 5 6
Melodie eingeben (modellabhängig). Die Pfeiltasten
7 8 9
ESC
0
können auch verwendet werden.
Die eingegeben Nummer annullieren und die
ESC
bestehende Nummer beibehalten
Beendet die Programmierung, worauf mittels
Pfeiltasten eine beliebige andere Programmieroption
ausgewählt werden kann.
Page 80

TELEFONPROGRAMMIERUNG (M.C.)
Nachfolgend werden die nach der Auswahl der Programmierfunktion zu befolgenden
Schritte beschrieben:
Programmieroption der Klingelmelodie über die Portierzentrale
3. TONE GUARD
2
3. TONE GUARD ?
2
3. TONE GUARD ?
5
OK
3. TONE GUARD
5
Ausgangspunkt ist die Auswahl der Klingelmelodie für die
Portierzentrale im Hauptmenü.
OK
Die Programmiervorrichtung ist bereit, die gewünschte
Melodienummer einzugeben.
Die gewünschte Nummer zwischen 1 und 5 der
1 2 3
4 5 6
Klingelmelodie eingeben (modellabhängig). Die
7 8 9
Pfeiltasten können auch verwendet werden.
ESC
0
Eingegebene Nummer annullieren und die
ESC
bestehende Nummer belassen
Beendet die Programmierung, worauf mittels
Pfeiltasten eine beliebige andere Programmieroption
ausgewählt werden kann.
Option zur Aktivierung der Portierzentrale
4. GUARD UNIT
B: 10 N: 0
OK
4. GUARD UNIT ?
B: 10 N: 0
Ausgangspunkt ist die Option zur Aktivierung der Portierzentrale
im Hauptmenü
OK
4. GUARD UNIT ?
B: 05 N: 3
OK
Die Blocknummer eingeben (2 Ziffern) +
1 2 3
Nummer Türstation (1 Ziffer), die der
4 5 6
Portierzentrale entspricht, die diesen Anruf
7 8 9
ESC
0
entgegen nimmt.
Eingegebene Nummer annullieren und die
ESC
bestehende Nummer beibehalten.
4. GUARD UNIT ?
DISABLE
4. GUARD UNIT
B: 05 N: 3
OK
4. GUARD UNIT
DISABLE
Der Programmierer kann jederzeit mittels
Pfeiltasten eine andere Option auswählen
DEAKTIVIEREN auswählen, falls dieses
Telefon nicht durch eine Portierzentrale
bedient wird.
Der Programmierer kann jederzeit mittels
Pfeiltasten eine andere Option auswählen
Page 81

TELEFONPROGRAMMIERUNG (M.C.)
Option zur Aktivierung der Notrufzentrale
5. GUARD PANIC
Ausgangspunkt ist die Option zur Aktivierung der Notrufzentrale im Hauptmenü
B: 10 N: 0
OK
5. GUARD PANIC?
B: 10 N: 0
5. GUARD PANIC?
DISABLE
OK
5. GUARD PANIC ?
B: 05 N: 3
4. GUARD PANIC
B: 05 N: 3
OK
5. GUARD PANIC
DISABLE
OK
Die Blocknummer eingeben (2 Ziffern) +
1 2 3
Nummer Türstation (1 Ziffer), die der
4 5 6
Notrufzentrale entspricht, die diesen Anruf
7 8 9
ESC
0
entgegen nimmt.
Eingegebene Nummer annullieren und die
ESC
bestehende Nummer beibehalten.
Die Programmiervorrichtung kann jederzeit
mittels Pfeiltasten eine andere Option
auswählen.
DEAKTIVIEREN auswählen, falls dieses
Telefon an keine Notfallzentrale
angeschlossen ist.
Der Programmierer kann jederzeit mittels
Pfeiltasten eine andere Option auswählen.
Option zur Aktivierung der Funktion Automatische Türöffnung (Doormatic)
6. DOORMATIC
DISABLE
Ausgehend von der Option Aktivierung der Doormatic-Funktion (automatisches
Öffnen der Tür, wenn an diesem Telefon ein Anruf eingeht).
OK
6. DOORMATIC ?
DISABLE
6. DOORMATIC ?
OFF
6. DOORMATIC ?
ON
OK
OK
OK
6. DOORMATIC
DISABLE
6. DOORMATIC
OFF
6. DOORMATIC
ON
DEAKTIVIEREN auswählen, um diese
Funktion am Telefon zu deaktivieren.
Der Programmierer kann jederzeit mittels
Pfeiltasten eine andere Option auswählen.
AUS auswählen, um die Funktion Doormatic
aktiviert zu lassen, jedoch auszuschalten.
Der Programmierer kann jederzeit mittels
Pfeiltasten eine andere Option auswählen.
EIN auswählen, um die Funktion Doormatic
zu aktivieren und einzuschalten.
Der Programmierer kann jederzeit mittels
Pfeiltasten eine andere Option auswählen.
Page 82

VERSTÄRKERPROGRAMMIERUNG (M.C.)
Zum Zeitpunkt der Veröffentlichung dieses technischen Handbuchs ist diese Funktion für
keinen der bestehenden Verstärker verfügbar.
Bei Verfügbarkeit wird über die zur Verfügung stehenden technischen Kanäle darüber
informiert und die Dokumentation entsprechend aktualisiert.
Page 83

RELAISPROGRAMMIERUNG (M.C.)
Zum Zeitpunkt der Veröffentlichung dieses technischen Handbuchs ist diese Funktion für
dieses Gerät nicht verfügbar.
Bei Verfügbarkeit wird über die zur Verfügung stehenden technischen Kanäle darüber
informiert und die Dokumentation entsprechend aktualisiert.
Page 84

INSTALLATIONSMODUS (M.I.)
Über das HAUPTMENÜ kann auf sämtliche Funktionen der DUOX-Programmiervorrichtung
zugegriffen werden, die Folgendes umfassen: Erkennung von bereits installierten Geräten
einer bestimmten Anlage, Qualitätsanalyse der digitalen Raster für einen bestimmten
Bereich der Anlage, Prüfung der unterschiedlichen Befehle, die über ein beliebiges Gerät
der Anlage übermittelt werden, Übertragung dieser Befehle, die während einem bestimmten
Zeitraum übertragen werden, auf einen PC, zur Speicherung und nachträglichen Übermittlung
an den Hersteller, für den Fall, dass ein technisches Problem in der Anlage vorliegt und
näher untersucht werden muss.
Folgende Funktionen sind verfügbar:
- Erkennung von Komponenten (Telefone, Relais, Türstationen oder
Portierzentralen)
- Analyse der Befehle, die von den verschiedenen Geräten übertragen werden.
- Qualitätsmessung (Stufe) der digitalen Raster
- PC-Überwachung und -Aufzeichnung der übermittelten Befehle.
Auf das Hauptmenü kann zugegriffen werden, wie auf folgender Skizze beschrieben wird,
wenn die Programmiervorrichtung an einem Bus-Anschluss über den 3-Weg-Anschluss
(siehe Abschnitt Beschreibung) an die Anlage angeschlossen worden ist.
ON
OFF
DUOX ANALYZER
V.1.0
1. DETECTOR
2. ANALYZER
3. METER
4. SNIFFER PC
ON
2 Sekunden lang AUS/EIN drücken, um die Programmiervorrichtung auszuschalten.
OFF
Auf dem Display erscheint eine Willkommensmeldung,
die darüber hinaus die Software-Version die DUOXProgrammiervorrichtung anzeigt.
OK
OK
Zugang zum Menü GERÄTEERKENNUNG
OK
Zugang zum Menü BEFEHLSANALYSE
OK
Zugang zum Menü MESSUNG DER
RASTEREBENE
OK
Zugang zum Menü RASTERAUFZEICHNUNG
IN EINEM PC
Page 85

GERÄTEERKENNUNG (M.I.)
In diesem Menü kann das zu erkennende Gerät bzw. der Gerätebereich ausgewählt werden.
Ein Gerät wird immer dann erkannt, wenn es richtig in der Anlage installiert und seine
Adresse richtig programmiert wurde, falls letzteres erforderlich ist.
Folgende Geräte werden erkannt:
- Telefone
- Relais
- Türstationen am Haupt-, Block- und Nebenblockeingang
- Portierzentralen am Haupt- oder Blockeingang.
Ausgehend vom HAUPTMENÜ folgende Skizze befolgen, um das Gerät auszuwählen, das
erkannt werden soll.
1. DETECTOR
OK
1. DETECTOR
TELEPHONE
1. DETECTOR
RELAYS
1. DETECTOR
PANELS
1. DETECTOR
GUARD UNIT
Ausgehend von der Auswahl DETEKTOR des
HAUPTMENÜS
OK
OK
OK
Zugriff auf die Funktion TELEFONERKENNUNG
Zugriff auf die Funktion RELAISERKENNUNG
Zugriff auf die Funktion
TÜRSTATIONERKENNUNG
OK
Zugriff auf die Funktion
PORTIERZENTRALENERKENNUNG
Auswahl verlassen und zum HAUPTMENÜ zurückkehren.
ESC
Page 86

TELEFONERKENNUNG (M.I.)
Diese Funktion ermöglicht es, das Vorhandensein eines oder mehrerer Telefone in der Anlage
zu prüfen, die innerhalb eines bestimmten Adressbereichs programmiert wurden.
Der maximal zulässige Wert des zu testenden Bereichs liegt bei 1000 aufeinanderfolgenden
Adressen, die zum selben Block gehören.
1. DETECTOR
TELEPHONE
OK
1. DETECTOR
BLOCK: 00
OK
1. DETECTOR
START: 0000
OK
1. DETECTOR
END: 0000
OK
Ausgehend von der Option TELEFONERKENNUNG des
Hauptmenüs
1 2 3
Blocknummer eingeben, dessen zugehörige T elefone
4 5 6
geprüft werden sollen.
7 8 9
ESC
Zulässige Werte von 00 bis 09
0
1 2 3
Eingabe der Adresse des ersten T elefons des Bereichs
4 5 6
7 8 9
ESC
0
1 2 3
Eingabe der Adresse des letzten T elefons des Bereichs
4 5 6
(diese Zahl muss größer als die erste des Bereichs
7 8 9
ESC
sein)
0
TELEPHONE
Start des Scann-Vorgangs und Anzeige des Verlaufs.
000000
Nach Abschluss des Scann-Vorgangs kann eines dieser drei Result ate
angezeigt werden:
TEST RESULT: ?
Es wurden nur
DETECTED
einige Telefone
erkannt
Es wurde kein
Telefon
erkannt
Es wurden
sämtliche
Telefone
erkannt
TEST RESULT: ?
OK
NO DETECTED
TEST RESULT:
NO TELEPHONES
Diese Funktion verlassen und zum Menü GERÄTERKENNUNG zurückkehren.
ESC
TEST RESULT:
ALL TELEPHONES
OK
TELEPHONE OK
00101
Die erkannten Telefone
werden angezeigt
TELEPHONE OK
0201
Die NICHT erkannten
T elefone werden angezeigt
Page 87

RELAISERKENNUNG (M.I.)
Diese Funktion ermöglicht die Prüfung, ob in der Anlage eines oder mehrere Relais
vorhanden sind, die innerhalb eines bestimmten Bereichs von Relaisnummern programmiert
wurden und zum selben Block gehören. Davon erfasst werden auch die Relais die für
F1 und F2 konfiguriert wurden.
1. DETECTOR
RELE
OK
1. DETECTOR
BLOCK: 00
OK
1. DETECTOR
START: 0000
OK
1. DETECTOR
END: 0000
OK
RELAYS
00 000
Nach Abschluss des Scann-Vorgangs kann eines dieser drei Result ate
angezeigt werden:
Es wurden nur
einige Relais
erkannt
Ausgehend von der Option RELAISERKENNUNG des
Menüs GERÄTEERKENNUNG
1 2 3
Blocknummer eingeben, dessen zugehörige Relais
4 5 6
geprüft werden sollen.
7 8 9
ESC
0
Zulässige Werte von 00 bis 09
1 2 3
Die Nummer des ersten Relais des Bereichs eingeben
4 5 6
7 8 9
ESC
0
1 2 3
Nummer des letzten Relais des Bereichs eingeben.
4 5 6
(diese Zahl muss größer als die erste des Bereichs
7 8 9
ESC
0
sein)
Start des Tests und Anzeige des Testverlaufs.
Die Gruppe mit 2 Ziffern links gibt die Blocknummer an und
die 3 Ziffern rechts das Relais, das geprüft wird.
TEST RESULT: ?
DETECTED
OK
RELAY OK
0003
Die erkannten Relais
werden angezeigt
Es wurde
kein Relais
erkannt
Es wurden
alle Relais
erkannt
TEST RESULT: ?
OK
NO DETECTED
TEST RESULT:
NO RELAYS
ESC
Diese Funktion verlassen und zum Menü GERÄTERKENNUNG zurückkehren.
TEST RESULT:
ALL RELAYS
Die NICHT erkannten Relais
werden angezeigt
RELAY NO OK
0020
Page 88

MENÜ TÜRSTATIONERKENNUNG (M.I.)
Diese Funktion ermöglicht die Erkennung einer beliebigen Türstation, die in der Anlage
Anlage installiert wurde, an die die DUOX-Programmiervorrichtung angeschlossen ist.
Es muss auf jeden Fall der Türstationtyp angegeben werden, der erkannt werden soll:
- Türstation als BLOCK-Eingang konfiguriert
- Türstation als NEBENBLOCK-Eingang konfiguriert
- Türstation las HAUPTEINGANG konfiguriert
Ausgehend vom HAUPTMENÜ folgende Skizze befolgen, um das Gerät auszuwählen, das
erkannt werden soll.
1. DETECTOR
PANELS
OK
1. DETECTOR
BLOCK PANEL
1. DETECTOR
SUBBLOCK PANEL
1. DETECTOR
GENERAL ENTRANCE
Ausgehend von der Option TÜRSTATIONERKENNUNG
des Menüs GERÄTEERKENNUNG
OK
Zugriff auf die Funktion
TÜRSTATIONERKENNUNG DES BLOCKS
OK
Zugriff auf die Funktion
TÜRSTATIONERKENNUNG DES
NEBENBLOCKS
OK
Zugriff auf die Funktion
TÜRSTATIONERKENNUNG DES
HAUPTEINGANGS
Diese Funktion verlassen und zum Menü GERÄTERKENNUNG zurückkehren.
ESC
Page 89

TÜRSTATIONERKENNUNG DES BLOCKS (M.I.)
Dieses Funktion ermöglicht die Erkennung von Türstationen und deren Nummer, die als
BLOCKEINGANG registriert sind.
Dazu die angegebenen Schritte folgender Skizze befolgen:
1. DETECTOR
BLOCK PANEL
OK
1. DETECTOR
BLOCK: 00
OK
PANELS
00 00
Nach Abschluss des Scann-Vorgangs kann eines dieser drei Result ate
angezeigt werden:
Es wurden 10
mögliche
Türstationen
erkannt
Ausgehend von der Option TÜRSTATIONERKENNUNG
DES BLOCKS des Menüs TÜRSTATIONERKENNUNG
1 2 3
Die Nummer des zu testenden Blocks eingeben.
4 5 6
Zulässige Werte von 00 bis 99
7 8 9
ESC
0
Beginn des Prüfvorgangs der 10 möglichen Türstationnummern,
die beim angegebenen Block vorhanden sein können.
Die beiden Ziffern auf der linken Seite geben die Blocknummer,
die getestet wird, an, während die beiden Ziffern auf der rechten
Seite die Türstationnummer angeben.
TEST RESULT:
ALL PANELS
Es wurde keine
Türstation erkannt
TEST RESULT: ?
Es wurden einige Türstationen erkannt.
Auswählen, ob die erkannten oder nicht erkannten
Türstationen angezeigt werden sollen
OK
DETECTED
PANEL OK:
00 07
TEST RESULT:
NO PANELS
TEST RESULT: ?
OK
NO DETECTED
ESC
ESC
Diese Funktion verlassen und zum Menü TÜRSTATIONERKENNUNG zurückkehren
PANEL NOK:
00 04
Die erkannten
Türstationen
werden angezeigt
Die NICHT
erkannten
Türstationen
werden
angezeigt
Page 90

ERKENNUNG DER TÜRSTATIONEN DES
NEBENBLOCKS (M.I.)
Diese Funktion ermöglicht das Erkennen von konfigurierten Türstationen und deren Nummer
als NEBENBLOCK-EINGANG innerhalb der Anlage.
Dazu die angegebenen Schritte folgender Skizze befolgen:
1. DETECTOR
SUBBLOCK PANEL
OK
1. DETECTOR
BLOCK: 00
OK
1. DETECTOR
SUBBLOCK: 00
OK
PANELS
00 00
Nach Abschluss des Scann-Vorgangs, kann eines dieser drei Result ate
angezeigt werden:
Es wurden 10
mögliche
Türstationen
erkannt
TEST RESULT:
ALL PANELS
Ausgehend von der Option TÜRSTATIONERKENNUNG
DES NEBENBLOCKS des Menüs
TÜRSTATIONERKENNUNG
1 2 3
Blocknummer eingeben.
4 5 6
Zulässige Werte von 00 bis 99
7 8 9
ESC
0
Die Nummer des zu testenden Nebenblocks eingeben.
1 2 3
4 5 6
Zulässige Werte von 00 bis 99
7 8 9
ESC
0
Start des Test der 10 möglichen Türstationnummern, die am
angegebenen Nebenblock vorhanden sein können.
Die beiden Ziffern links bezeichnen die Nummer des Nebenblocks,
der getestet wird, während die beiden Ziffern rechts die
Türstationnummer bezeichnen.
Es wurden einige Türstationen erkannt.
Auswählen, ob die erkannten oder nicht erkannten
Türstationen angezeigt werden sollen
Es wurde keine
Türstation
erkannt
TEST RESULT: ?
DETECTED
OK
PANEL OK:
00 07
TEST RESULT:
NO PANELS
TEST RESULT: ?
OK
NO DETECTED
ESC
Diese Funktion verlassen und zum Menü TÜRSTATIONERKENNUNG zurückkehren
PANEL NOK:
00 04
Die erkannten
Türstationen
werden angezeigt
Die NICHT
erkannten
Türstationen
werden
angezeigt
Page 91

TÜRSTATIONERKENNUNG AM HAUPTEINGANG (M.I.)
Diese Funktion ermöglicht das Erkennen von konfigurierten Türstationen und deren Nummer
als HAUPTEINGANG innerhalb der Anlage.
Dazu die angegebenen Schritte folgender Skizze befolgen:
1. DETECTOR
GENERAL ENTRANCE
OK
PANELS
00
Ausgehend von der Option TÜRSTATIONERKENNUNG
HAUPTEINGANG des Menüs TÜRSTATIONERKENNUNG
Start des Tests der 10 möglichen Türstationnummern, die als
Haupteingang vorhanden sein können.
Die Ziffern zeigen die Türstationnummer an, die getestet wird.
Nach Abschluss des Scann-Vorgangs kann eines dieser drei Result ate
angezeigt werden:
Es wurden 10
mögliche
Türstationen
erkannt
TEST RESULT:
ALL PANELS
Es wurden einige Türstationen erkannt.
Es wurde keine
Türstation
Auswählen, ob die erkannten oder nicht erkannten
Türstationen angezeigt werden sollen
erkannt
TEST RESULT:
NO PANELS
ESC
Diese Funktion verlassen und zum Menü TÜRSTATIONERKENNUNG zurückkehren
TEST RESULT: ?
DETECTED
TEST RESULT: ?
NO DETECTED
OK
OK
PANEL OK:
07
PANEL NOK:
04
Die erkannten
Türstationen
werden angezeigt
Die NICHT
erkannten
Türstationen
werden
angezeigt
Page 92

MENÜ ERKENNUNG VON PORTIERZENTRALEN (M.I.)
Diese Funktion ermöglicht die Erkennung von Portierzentralen, die in der Anlage vorhanden
sind:
Es muss zwischen den Portierzentralen des Blocks und des Haupteingangs unterschieden
werden.
Dazu die angegebenen Schritte folgender Skizze befolgen:
1. DETECTOR
GUARD UNIT
1. DETECTOR
BLOCK GUARD UNIT
Ermöglicht die Erkennung der
Portierzentralen, die als
BLOCK-PORTIERZENTRALE
konfiguriert wurden
Ausgehend von der Option
PORTIERZENTRALENERKENNUNG des
Menüs GERÄTEERKENNUNG
OK
1. DETECTOR
GENERAL GUARD U.
Ermöglicht die Erkennung der
Portierzentralen, die als
PORTIERZENTRALEHAUPTEINGANG konfiguriert
wurden
Diese Funktion verlassen und zum Menü GERÄTERKENNUNG zurückkehren.
ESC
Page 93

ERKENNUNG DER PORTIERZENTRALEN DES BLOCKS (M.I.)
Diese Funktion ermöglicht die Erkennung von vorhandenen Portierzentralen der Anlage,
die als BLOCK-PORTIERZENTRALE konfiguriert wurden sowie der Nummer, die denselben
zugewiesen wurde.
Dazu die angegebenen Schritte folgender Skizze befolgen:
1. DETECTOR
BLOCK PANEL
OK
1. DETECTOR
BLOCK: 00
OK
Ausgehend von der Option
PORTIERZENTRALENERKENNUNG DES BLOCKS des
Menüs PORTIERZENTRALENERKENNUNG
1 2 3
Die Nummer des zu testenden Blocks eingeben.
4 5 6
Zulässige Werte von 00 bis 99
7 8 9
ESC
0
TEST RESULT:
NO GUARD UNITS
ESC
ESC
Diese Funktion verlassen und zum Menü PORTIERZENTRALENERKENNUNG zurückkehren
GUARD UNIT
00 00
Nach Abschluss des Scann-Vorgangs kann eines dieser drei Result ate
angezeigt werden:
Es wurden 10
mögliche
Portierzentralen
erkannt
TEST RESULT:
ALL GUARD UNITS
Es wurde keine
Portierzentrale
erkannt
Beginn des T estvorgangs der 10 möglichen Türstationnummern,
die in diesem Block vorhanden sein können.
Die beiden Ziffern auf der linken Seite geben die Blocknummer,
die getestet wird, an, während die beiden Ziffern auf der rechten
Seite die Portierzentralennummer angeben.
Es wurden einige Portierzentralen erkannt.
Auswählen, ob die erkannten oder nicht erkannten
Türstationen angezeigt werden sollen
TEST RESULT: ?
DETECTED
OK
GUARD UNIT OK:
00 07
Die erkannten
Portierzentralen
werden
angezeigt
TEST RESULT: ?
NO DETECTED
OK
GUARD UNIT NOK:
00 04
Die NICHT
erkannten
Portierzentralen
werden
angezeigt
Page 94

ERKENNUNG DER PORTIERZENTRALEN
DES HAUPTEINGANGS (M.I.)
Diese Funktion ermöglicht die Erkennung der Portierzentralen und der zugehörigen Nummer,
die in der Anlage als PORTIERZENTRALE DES HAUPTEINGANGS konfiguriert sind.
Dazu die angegebenen Schritte folgender Skizze befolgen.
1. DETECTOR
GENERAL GUARD U.
OK
GUARD UNNIT
00
Nach Abschluss des Scann-Vorgangs kann eines dieser drei Result ate
angezeigt werden:
Es wurden 10
mögliche
Portierzentralen
erkannt
TEST RESULT:
ALL GUARD UNITS
Ausgehend von der Option
PORTIERZENTRALENERKENNUNG AM HAUTPEINGANG
des Menüs PORTIERZENTRALENERKENNUNG
Start des Tests der 10 möglichen Portierzentralennummern,
die als Haupteingang vorhanden sein können.
Die Ziffern zeigen die Türstationnummer an, die getestet wird.
Es wurden einige Portierzentralen erkannt.
Es wurde keine
Portierzentrale
Auswählen, ob die erkannten oder nicht erkannten
Türstationen angezeigt werden sollen
erkannt
Die erkannten
Portierzentralen
werden
angezeigt
Die NICHT
erkannten
Portierzentralen
TEST RESULT:
NO GUARD UNITS
TEST RESULT: ?
DETECTED
TEST RESULT: ?
NO DETECTED
OK
GUARD UNIT OK:
OK
GUARD UNIT NOK:
07
04
werden
angezeigt
ESC
Diese Funktion verlassen und zum Menü PORTIERZENTRALENERKENNUNG zurückkehren
Page 95
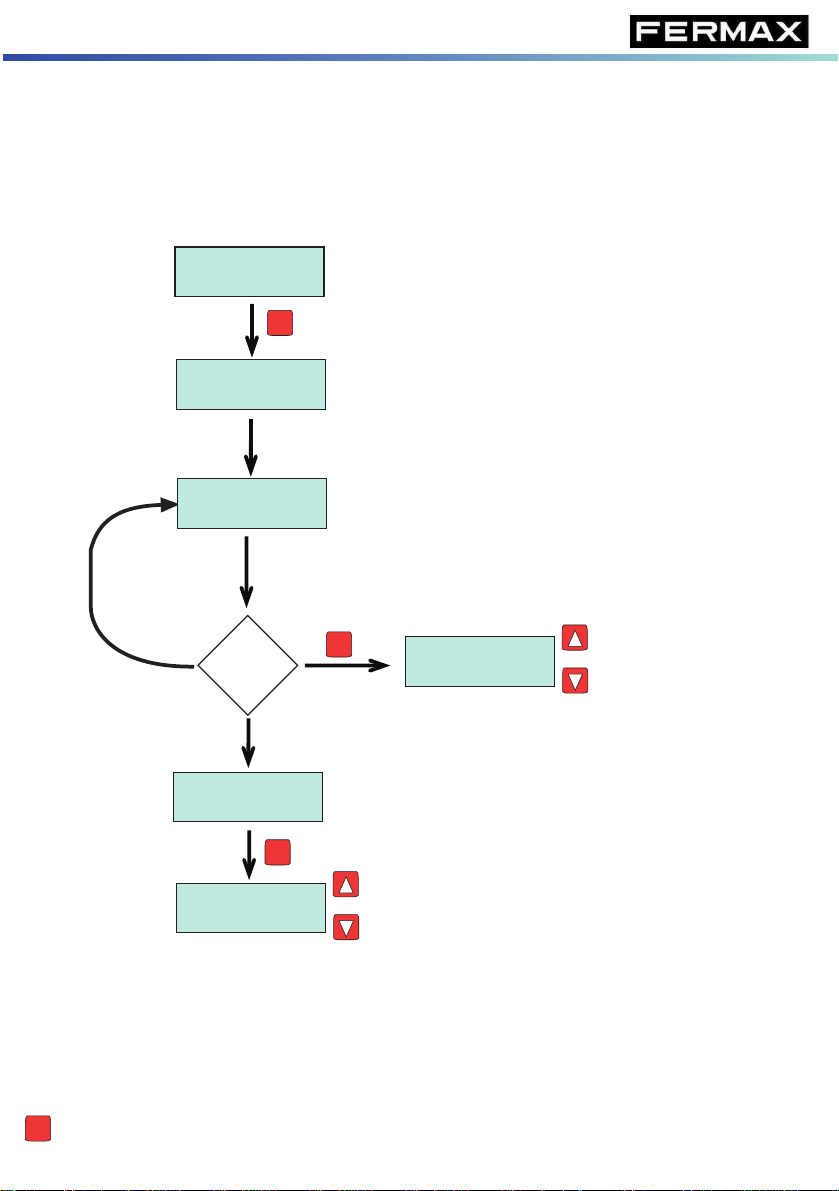
MODUS BEFEHLSANALYSIERER (M.I.)
Diese Funktion ermöglicht die Anzeige jedes DUOX-Befehls, der von einem beliebigen
Gerät der Anlage übertragen wird.
Diese Befehle werden in einem internen Speicher der Programmiervorrichtung gespeichert,
der bis zu 100 Register speichern kann.
Um die Befehle zu erfassen, die Angaben der folgenden Skizze befolgen:
2. ANALYZER
WAIT COMMAND
DISABL-CHANNEL 1
00F010 - FFF0FF
Ein neuer Befehl wird
generiert
MEMORY FULL
Ausgehend von Auswahl 2. ANALYZER des
HAUPTMENÜS
OK
* * * * *
Das Gerät ist bereit, Befehle zu empfangen.
WAIT COMMAND blinkt.
Es wird ein Befehl generiert...
Der Befehl wird auf dem Display angezeigt und
gespeichert.
In der unteren Zeile werden jeweils die Herkunfts- und
Zieladresse angezeigt.
OK
Speicher voll
(100 Befehle)
DISABL-CHANNEL 1
00F010 - FFF0FF
Registrierte Befehle
mittels Pfeiltasten
revidieren
OK
Registrierte Befehle
DISABL-CHANNEL 1
00F010 - FFF0FF
mittels Pfeiltasten
revidieren
Beim Überprüfen der gespeicherten Register erscheint der erste und zuletzt registrierte
Befehl.
Einige Befehle werden als Sicherheitsmaßnahme mehrere Male nacheinander gesendet
und registriert.
Die angrenzenden sich wiederholenden Befehle werden durch abwechselnde Darstellung
von Bindestrich (-) und Stern (*) angezeigt.
ESC
Zurück zum Hauptmenü
Page 96

RASTERMESSMODUL (M.I.)
Diese Funktion ermöglicht die Messung an einem bestimmten Punkt (an dem die
Programmvorrichtung angebracht wird) und ermittelt den Rasterpegel, der von den
verschiedenen Geräten der Anlage ausgeht.
Auf diese Art und Weise können die Probleme auf Grund einer Signalabschwächung in
der Anlage analysiert werden, die durch eine Vergrößerung des Abstandes, den
Kabeldurchmesser, die Stromversorgung usw. verursacht wird. Dazu ist lediglich ein
Vergleich der Messungen der Programmvorrichtung an unterschiedlichen Punkten der
Anlage erforderlich.
Es stehen drei Informationsarten zur Verfügung:
Adresse - des Geräts, das
den Vorgang auslöst
POWER: 18.52V
POWER: 18.52V
POWER: 18.52V
0000000: 03.14V
0000000: 03.14V
0000000: 03.14V
Um diese Funktion zu benutzen, die auf der Skizze dargelegten Schritte befolgen:
Gleichstromspannung am Bus
Durchschnittliche Spannung
der Spannungsspitzen des
Datenrasters
3. METER
OK
3. METER
ALL
3. METER
AUDIO UPLINK
Ausgehend von Auswahl 3. METER des
HAUPTMENÜS
OK
OK
POWER: 18.52V
0000000: 03.14V
POWER: 18.52V
0000000: 03.14V
Messung des
DATENRASTERS
Messung des AUDIORASTERS
IN RICHTUNG WOHNUNG von
Kanal 1
3. METER
AUDIO DOWN LINK
OK
POWER: 18.52V
0000000: 03.14V
Messung des AUDIORASTERS
IN RICHTUNG TÜRSTATION von
Kanal 1
Bei jeder der drei Messungen kann die dargestellte Information unvollständig sein, weil
zum Zeitpunkt der Messung aus folgenden Gründen nicht die gesamte Information zur
Verfügung steht:
POWER: 18.52V
SIGNAL: - -.- -V
POWER: 18.52V
SIGNAL: 03.14 V
Es hat sich bis jetzt noch kein Raster des ausgewählten Typs ereignet.
Die Information erscheint automatisch, wenn sie generiert wird.
Die Raster werden überwacht (Audio in der ausgewählten Richtung), aber
das Gerät, von dem sie ausgehen, wurde nicht geortet.
Die Information wird in dem Moment vervollständigt, in dem das Gerät mit
der Rasterübertragung beginnt, denn genau zu diesem Zeitpunkt identifiziert
es sich im System.
Auswahl verlassen und zum HAUPTMENÜ zurückkehren.
ESC
Page 97

RASTERREGISTERMODUS IM PC (M.I.)
Diese fortgeschrittene Funktion der DUOX-Programmiervorrichtung erlaubt die Speicherung
von sämtlichen generierten Befehlen einer Anlage während unbestimmter Zeit.
Dies ist dann geeignet, wenn Probleme bei einer Anlage vorhanden sind und diese nicht
vor Ort analysiert und gefunden werden können. Deshalb ist die Technische Abteilung des
Herstellers dazu gezwungen, die Aktivität sämtlicher generierter Befehle während eines
bestimmten Zeitraums zu prüfen.
Es ist ein PC erforderlich, der während der ganzen Zeit an die Programmiervorrichtung
angeschlossen werden muss und sämtliche Befehle registriert.
Falls diese Funktion benutzt werden muss, erläutern die technischen Mitarbeiter von
Fermax die erforderlichen Einzelheiten dieses Vorgangs und senden die passenden
Treiber und notwendigen Werkzeuge zu.
Für den Anschluss ist es notwendig, die COM-Schnittstelle, die für den Anschluss des
Geräts eingerichtet wurde, zuzuweisen und die Parameter dieser Schnittstelle wie folgt zu
konfigurieren:
- Baud-Rate: 115200
- Parität: keine
- Data-Bits: 8
- Stop-Bits: 1
- Ohne Paritätskontrolle
Wenn der PC bereit ist, diese Funktion zu nutzen, sind die Schritte dieser Skizze zu
befolgen:
4. SNIFFER PC
OK
4. SNIFFER PC
N.CMD RX: 00000
Ausgehend von Auswahl 4. SNIFFER-PC des
HAUPTMENÜS
In der unteren Zeile werden die Befehle
angezeigt, die an den PC übermittelt wurden
Page 98

AKTUALISIERUNG DER FIRMWARE
Die DUOX-Programmiervorrichtung ermöglicht die Aktualisierung der Firmware, wenn
neue Geräte oder neue Versionen bestehender Modelle auf den Markt kommen.
Wenn eine neue Version herauskommt, wird diese im technischen Bereich der FermaxWebseite mit den entsprechenden Einzelheiten veröffentlicht, damit eine korrekte
Aktualisierung durchgeführt werden kann.
Auf jeden Fall erfolgt diese Aktualisierung mittels Verwendung eines PCs, der über die
USB-Schnittstelle der Programmiervorrichtung anzuschließen ist.
Aktuelle Version: V. 1.0 (November 2013)
Page 99

TECHNISCHE SPEZIFIZIERUNGEN
Stromversorgung: 18 VDC (der Anlage) oder
5 V (über den USB-Anschluss) oder
9 V (über den Telefonanschluss)
Verbrauch (+/- 10 %): Stromversorgung über den DUOX-BUS
77 mA im Bereitschaftsmodus
85 mA im Betriebsmodus und bei Menünavigation
100 mA im Betriebsmodus und bei aktivem TX/RX Bus
USB-Stromversorgung
245 mA im Bereitschaftsmodus
240 mA im Betriebsmodus und bei eingeschaltetem
DUOX-Telefon
Betriebsbedingungen: Betriebstemperatur: - 5º C bis + 40º C
Relative Luftfeuchtigkeit: 5 - 95 %
IP-Schutzgrad: 30
In dieser technischen Anleitung wurden folgenden Symbole verwendet:
Auf OK klicken, um fortzufahren
OK
ON
Auf EIN/AUS klicken, um fortzufahren
OFF
Die gewünschte Option durch Drücken der Pfeiltasten "Vorwärts" oder
"Zurück" auswählen
Taste "Vorwärts" drücken, um fortzufahren
1 2 3
4 5 6
Numerische Tastatur verwenden, um die erforderlichen Daten einzugeben
7 8 9
0
ESC-Taste drücken, um zum vorherigen Menü zurückzukehren
ESC
OK
 Loading...