

Page 1

REC
E
MONITOR LOFT 4+N CON MELODIAS Y MEMORIAS
EN
4+N LOFT MONITOR WITH RINGTONES AND MEMORY
F
MONITEUR LOFT 4+N AVEC MÉLODIES ET MÉMOIRES
D
MONITOR LOFT 4+N MIT KLINGELMELODIEN UND SPEICHER
Page 2

E
MONITOR LOFT 4+N CON MELODIAS Y MEMORIAS
EN
4+N LOFT MONITOR WITH RINGTONES AND MEMORY
F
MONITEUR LOFT 4+N AVEC MÉLODIES ET MÉMOIRES
D
MONITOR LOFT 4+N MIT KLINGELMELODIEN UND SPEICHER
Cod. 97504 V04_09
2
Page 3

ENHORABUENA POR DISPONER DE UN PRODUCTO DE CALIDAD!
E
Fermax electrónica desarrolla y fabrica equipos de prestigio que cumplen los más
altos estándares de diseño y tecnología.
Su monitor de videoportero FERMAX le permitirá comunicarse con la placa de calle,
ver la persona que le está llamando y abrirle la puerta de entrada si así lo desea.
Esperamos disfrute de sus funcionalidades.
www.fermax.com
CONGRATULATIONS ON PURCHASING THIS QUALITY PRODUCT!
EN
Fermax Electronics develops and manufactures reputable equipment which fulfils
the highest design and technology standards.
Your FERMAX video door entry system allows you to communicate with the entry
panel, to see who is calling and to open the door if you wish.
We hope you enjoy its range of functions.
www.fermax.com
FÉLICITATIONS ! VOUS VENEZ D’ACQUÉRIR UN VÉRITABLE PRODUIT DE QUALITÉ !
F
Fermax Electrónica développe et fabrique des équipements de prestige qui répondent
aux normes de design et technologie les plus développées.
Votre moniteur pour portier vidéo FERMAX vous permettra de communiquer avec la
platine de rue, de voir la personne qui vous appelle et d’ouvrir la porte d’entrée si
vous le souhaitez.
Nous espérons que vous profiterez pleinement de toutes ses fonctions.
www.fermax.com
D
WIR GRATULIEREN IHNEN ZUM KAUF DIESES QUALITÄTSPRODUKTS!
Fermax Electrónica entwickelt und fabriziert hochwertige Anlagen, die den höchsten
Technologie- und Designstandards entsprechen.
Der Monitor der Videotürsprechanlage von FERMAX ermöglicht Ihnen eine
Sprechverbindung mit der Türstation herzustellen, die Person, mit der Sie sprechen
auf dem Bildschirm zu betrachten und bei Bedarf die Tür zu öffnen.
Überzeugende Funktionalität für Ihr Eigenheim!
www.fermax.com
3
Page 4

4
Page 5

INDICE - INDEX - SOMMAIRE - INHALT
LOFT CON MELODÍAS Y MEMORIAS ......................................................................... 6
E
EN
F
Botones............................................................................................................. 6
Funcionamiento ............................................................................................... 7
Instalación y Conexionado ............................................................................. 8
Selección de Melodías.................................................................................... 9
Características Técnicas ................................................................................ 10
Funciones de memoria .................................................................................. 11
LOFT WITH RINGTONES AND MEMORY ................................................................... 6
Buttons .............................................................................................................. 6
Operation .......................................................................................................... 7
Installation and Connections ......................................................................... 8
Ringtone Selection .......................................................................................... 9
Technical Features .......................................................................................... 10
Memory Functions ........................................................................................... 19
LOFT AVEC MÉLODIES ET MÉMOIRES ..................................................................... 6
Bouton............................................................................................................... 6
Fonctionnement ............................................................................................... 7
Installation et connexions ............................................................................... 8
Sélection des mélodies .................................................................................. 9
Caractéristiques techniques .......................................................................... 10
Fonctions de mémoire ..................................................................................... 2 7 9
D
LOFT MIT KLINGELMELODIEN UND SPEICHER ........................................................ 6
Taste.................................................................................................................. 6
Funktionselemente.......................................................................................... 7
Installation und Verkabelung.......................................................................... 8
Melodieauswahl ............................................................................................... 9
Technische Eigenschaften ............................................................................. 10
Speicherfunktion .............................................................................................. 35
5
Page 6
Español
E
English
EN
Français
F
Deutsch
D
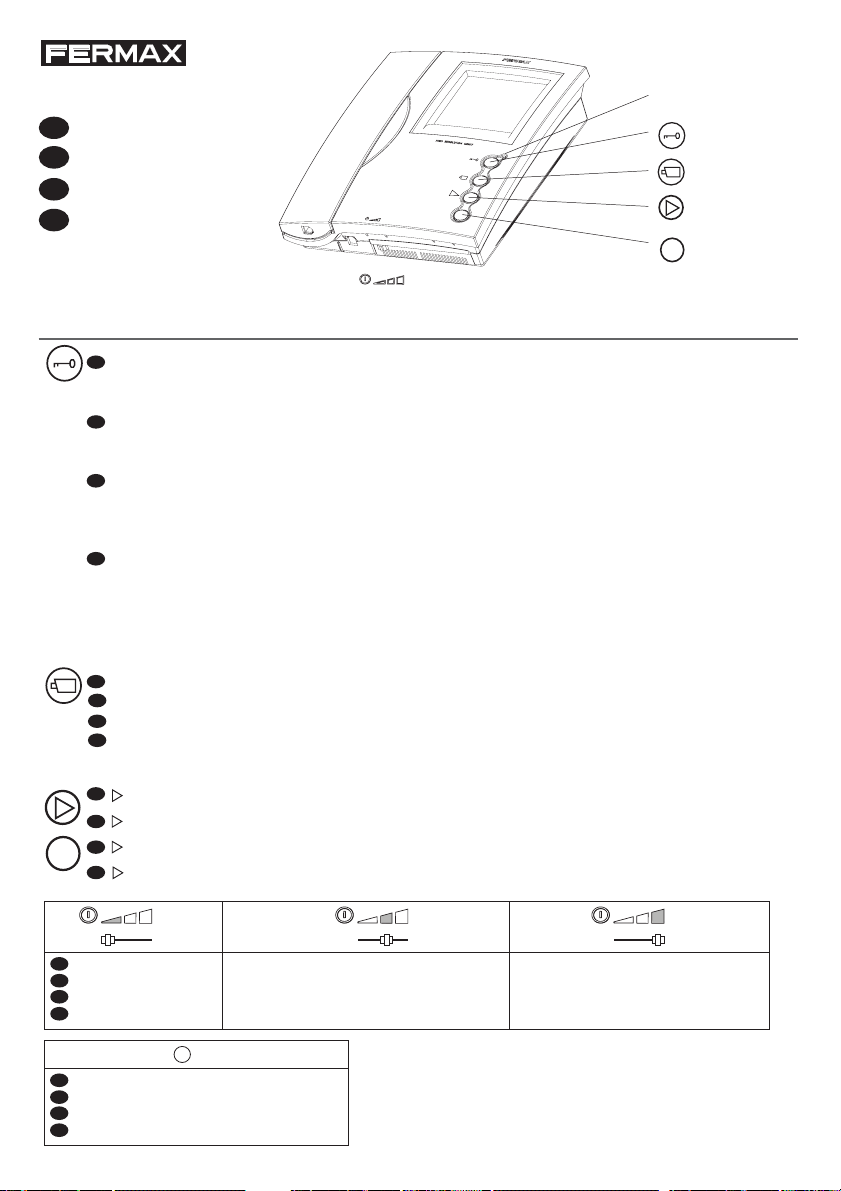
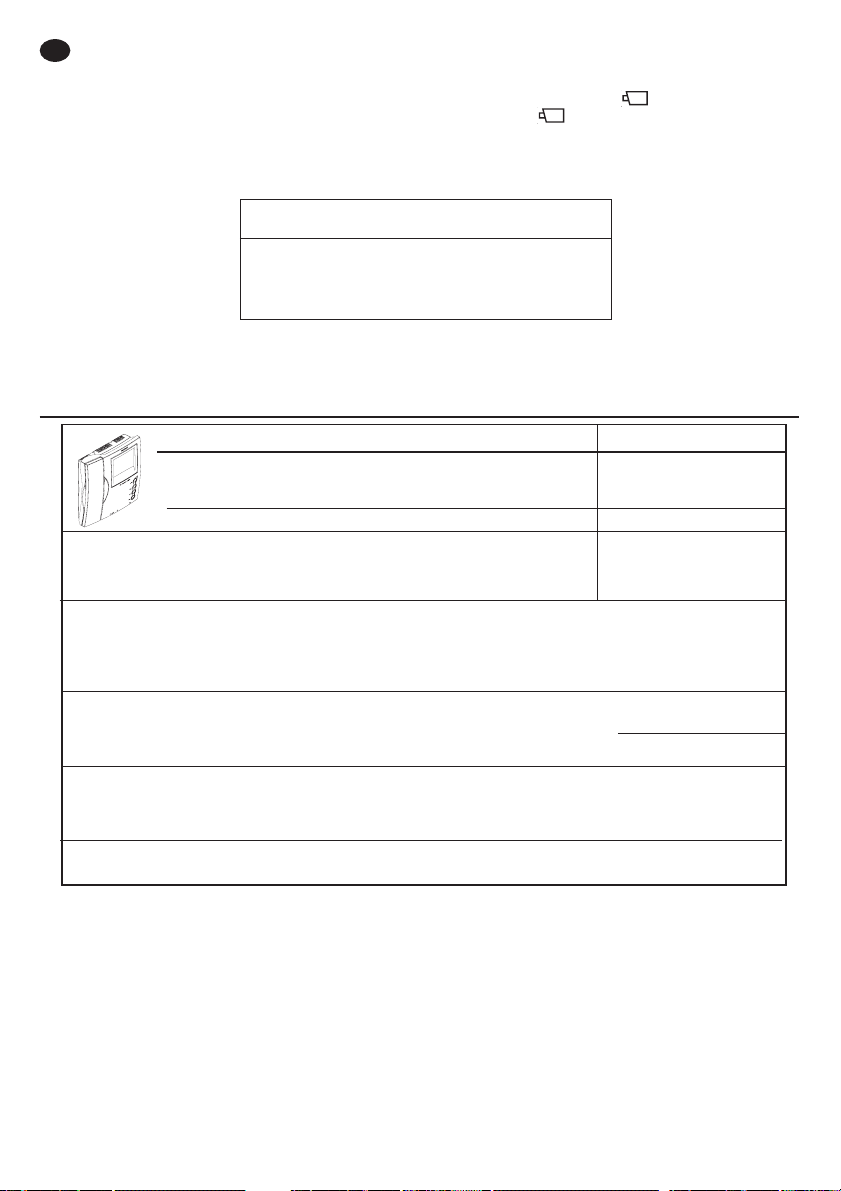
BOTONES - BUTTONS - BOUTON - TASTE
E
Botón de abrepuertas / llamada a conserje.
· Estando en conversación con la Placa de Calle, al pulsar este botón se activa el abrepuertas.
· Con el teléfono colgado, al pulsar este botón se realiza una llamada al conserje (si existe conserjería).
EN
Lock release button / Call guard unit.
· When talking to the Outdoor Panel, press this button to activate the electric lock.
· With the handset hung up, press this button to make a call to the guard unit (if there is one).
F
Bouton-poussoir de la gâche électrique / appel au concierge.
· Lors d’une communication avec la platine de rue, la gâche électrique est activée en appuyant sur ce bouton.
· Lorsque le combiné est raccroché, en appuyant sur ce bouton, un appel au concierge (s’il existe une
conciergerie) est effectué.
D
Türöffnungstaste / Portierruf:
· Bei hergestellter Sprachverbindung mit der Türstation wird durch Drücken dieser Taste die Türöffnung
ausgelöst.
· Bei aufgelegtem Hörer erfolgt durch Drücken dieser Taste ein Portierruf (falls eine Portierzentrale vorhanden
ist).
LED
REC
REC
E
Autoencendido (función disponible según tipo de instalación).
EN
Manual On Switch (function available depending on the installation’s type)
F
Autoinsertion (fonction disponible selon le type d’installation)
D
Eigenstart Auswahl Hauptkamera (Funktion verfügbar je nach Installationstyp)
E
REC
y
: Botones para Funciones de Memoria.
REC
and
et
und
: Buttons for Memory Functions.
REC
: boutons pour fonctions de mémoire.
REC
: Speicherfunktionstasten.
REC
E
EN
F
D
EN
F
D
Apagado
Off
Arrêt
Ausgeschaltet
LED
E
Led Indicador monitor encendido
EN
Powered monitor indicator LED
F
Voyant lumineux moniteur en marche
D
LED-Anzeige Monitor eingeschaltet
6
Encendido con volumen Medio
On, low call volume
Marche, volume d’appel moyen
Eingeschaltet/ mittlere Lautstärke
Encendido con volumen Alto
On, full volume
Marche volume complet
Eingeschaltet/ maximale Lautstärke
Page 7
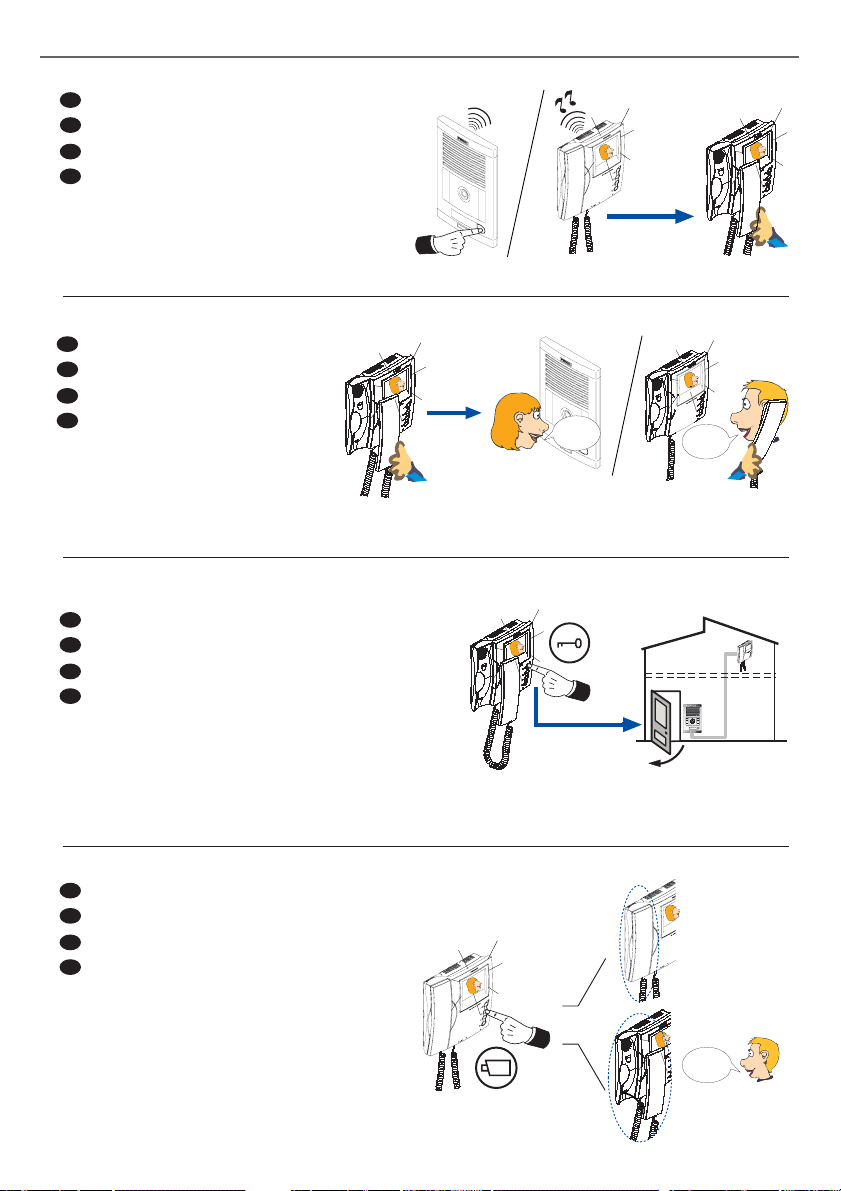
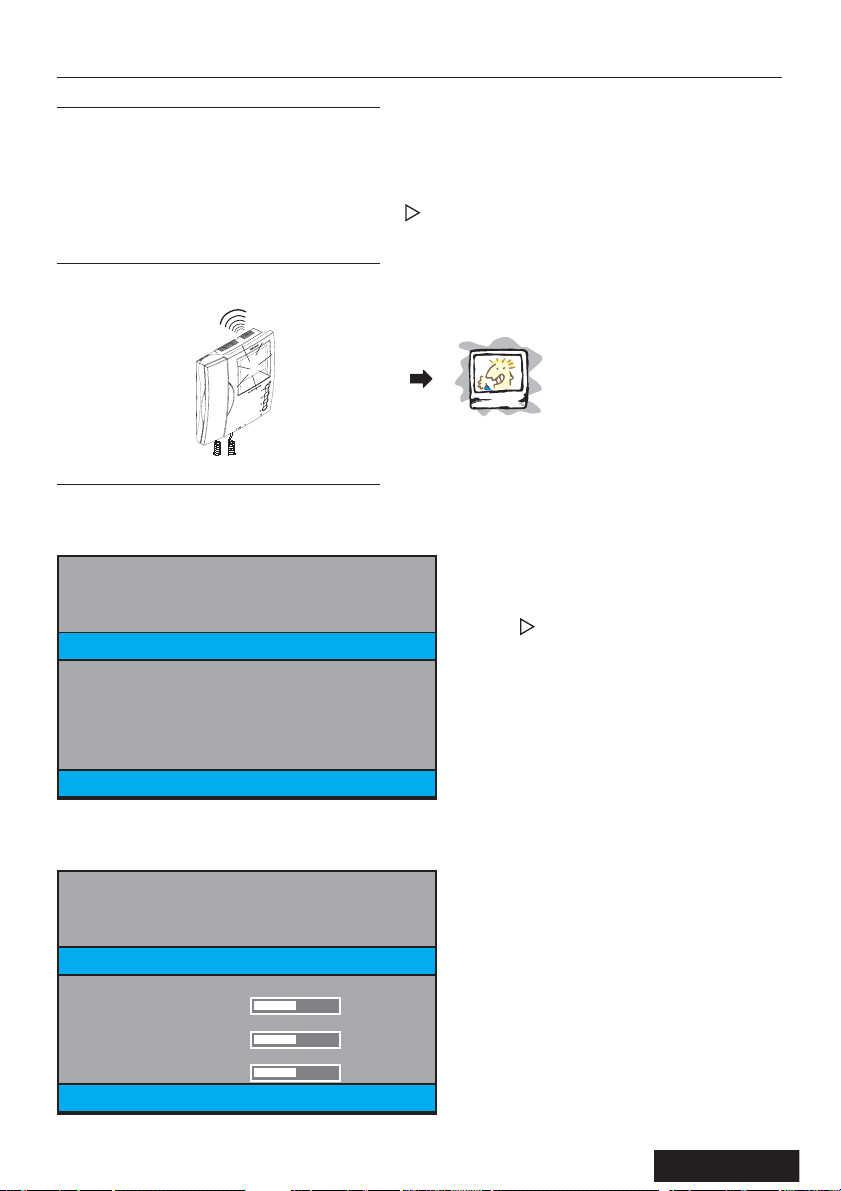
FUNCIONAMIENTO - OPERATION - FONCTIONNEMENT - FUNKTIONSELEMENTE - FUNCIONAMENTO
E
• Llamada
EN
Call
F
Appel
D
Ruf
E
• Atender la llamada
EN
Answer the call
F
Réception de l’appel
D
Rufbeantwortung
E
• Abrir la puerta al visitante
EN
Open the door to the visitor
F
Ouverture de la porte au visiteur
D
Türöffnung für Besucher
H
I
G
H
R
E
C
S
C
O
D
L
U
C
T
A
I
M
O
N
E
P
R
A
N
A
&
T
I
L
T
max. 30
¸
Seg./Sec./Sek.
HIGH RESOLUTION
CCD CAMERA
P
A
N
&
bla bla
T
I
L
T
bla ...
max. 90 Seg./Sec./Sek.
¸
bla bla
bla ...
HIGH RESOLUTION
CCD CAMERA
PAN &TILT
E
• Activación manual del monitor (autoencendido)
EN
Manual monitor activation (auto-on)
F
Activation manuelle du moniteur (auto-insertion)
D
Manuelle Aktivierung des Monitors
1 Seg./Sec./Sek.
¸
30 Seg./Sec./Sek.
¸
bla bla
bla ...
max. 90
¸
Seg./Sec./Sek.
7
Page 8
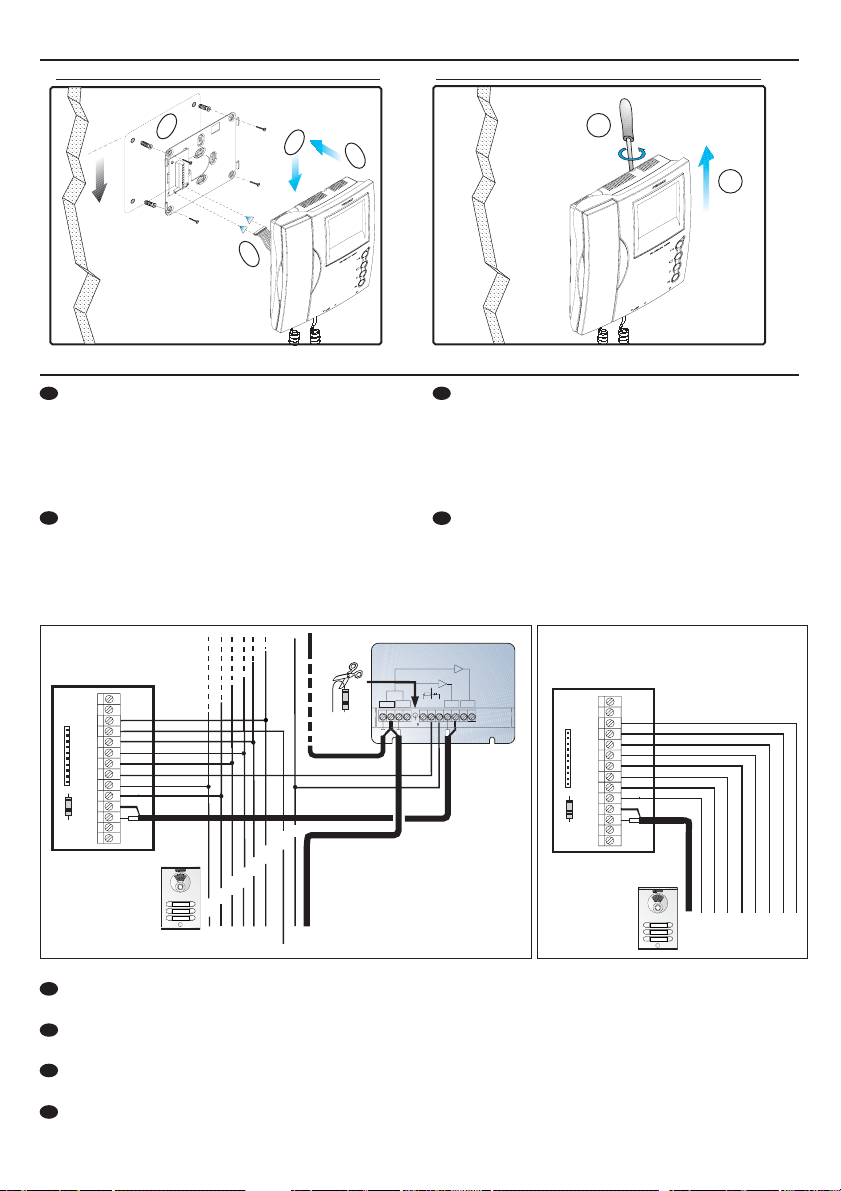
INSTALACIÓN - INSTALLATION - INSTALLATION - BEFESTIGUNG
Montaje - Assembly - Montage - Einbau Desmontaje - Disassembly - Démontage - Ansbau
1
1.60m
5.25 feet
4
3
2
CONEXIONES - CONNECTIONS - CONNEXIONS - VERBINDUNGEN
E
1,2,3,6: comunes de audio.
4: hilo de llamada.
+, -: alimentación (18 Vdc).
V: vivo (coaxial - video)
M: malla (coaxial - video)
Ct: activación telecamara (10 Vdc)
F
1,2,3,6: fils communs audio.
4: Fil d'appel.
+, - : alimentation (18 Vcc).
V: vif (coaxial - video).
M: maille (coaxial - video)
Ct: activation caméra (10 Vdc)
VIA_PADSTACKVIA_PADSTACKVIA_PADSTACKVIA_PADSTACKVIA_PADSTACKVIA_PADSTACKVIA_PADSTACKVIA_PADSTACKVIA_PADSTACKVIA_PADSTACKVIA_PADSTACKVIA_PADSTACKVIA_PADSTACKVIA_PADSTACKVIA_PADSTACKVIA_PADSTACKVIA_PADSTACKVIA_PADSTACK
F1
F2
CN1
6
4
3
2
1
CT
+
M
V
V
M
VIA_PADSTACKVIA_PADSTACKVIA_PADSTACKVIA_PADSTACKVIA_PADSTACKVIA_PADSTACKVIA_PADSTACKVIA_PADSTACKVIA_PADSTACKVIA_PADSTACKVIA_PADSTACKVIA_PADSTACKVIA_PADSTACKVIA_PADSTACKVIA_PADSTACKVIA_PADSTACKVIA_PADSTACKVIA_PADSTACK
6
3
2
1
-
+
REF.2448
R
CT
4
Llamada - Call - Appel - Anruf
EN
1,2,3,6: common audio.
4: call Wire.
+, -: power supply (18 Vdc).
V: live (coaxial - video)
M: shield (coaxial - video)
Ct: camera activation (10 Vdc)
D
1,2,3,6: Gemeinsames Audiokabel.
4: Rufkabel.
+, - : Stromversorgung (18 Vdc).
V: Kern (Koaxial - video).
M: Schirm (koaxial - video).
Ct: Aktivierung der Kamera (10 Vdc).
DISTRIBUIDOR VIDEO 2 SALIDAS
2 OUTPUTS VIDEO DISTRIBUTOR
+
(-)
2
6
+18
V5V1M
M
V
VM M
34
R1
75
VIA_PADSTACKVIA_PADSTACKVIA_PADSTACKVIA_PADSTACKVIA_PADSTACKVIA_PADSTACKVIA_PADSTACKVIA_PADSTACKVIA_PADSTACKVIA_PADSTACKVIA_PADSTACKVIA_PADSTACKVIA_PADSTACKVIA_PADSTACKVIA_PADSTACKVIA_PADSTACKVIA_PADSTACKVIA_PADSTACK
1
90º
2
VIA_PADSTACKVIA_PADSTACKVIA_PADSTACKVIA_PADSTACKVIA_PADSTACKVIA_PADSTACKVIA_PADSTACKVIA_PADSTACKVIA_PADSTACKVIA_PADSTACKVIA_PADSTACKVIA_PADSTACKVIA_PADSTACKVIA_PADSTACKVIA_PADSTACKVIA_PADSTACKVIA_PADSTACKVIA_PADSTACK
F1
F2
CN1
6
4
3
2
1
CT
+
-
M
V
V
M
VIA_PADSTACKVIA_PADSTACKVIA_PADSTACKVIA_PADSTACKVIA_PADSTACKVIA_PADSTACKVIA_PADSTACKVIA_PADSTACKVIA_PADSTACKVIA_PADSTACKVIA_PADSTACKVIA_PADSTACKVIA_PADSTACKVIA_PADSTACKVIA_PADSTACKVIA_PADSTACKVIA_PADSTACKVIA_PADSTACK
23 64CT
1+-
E
NOTA IMPORTANTE: En el caso de instalar más de 2 monitores en la misma vivienda es necesario
añadir un Multiplicador de Llamada Ref. 2340. Ver Instrucciones Cod. 94119.
EN
IMPORTANT NOTE: When installing more than 2 monitors in the same property, a call multiplier ref.
2340 must be added. Please see Instructions Code 94119.
F
REMARQUE IMPORTANTE : Si 2 moniteurs ou plus sont installés dans le même logement, il est
nécessaire d’ajouter un Multiplicateur d’Appel Réf. 2340. Voir Instructions Code 94119.
D
WICHTIGER HINWEIS: Falls mehr als zwei Monitore in derselben Wohnung installiert werden, ist es
erforderlich, einen Multiplizierer, Ref. 2340, zu installieren. Siehe Anleitung, Kode 94119.
8
Page 9
SELECCIÓN MELODÍAS - RINGTONE SELECTION - SÉLECTION MÉLODIES - MELODIEAUSWAHL
21
E
1. Con el monitor conectado pulsar el botón de programación (se oirá un tono de confirmación).
2. Una vez en modo programación, pulsar el botón « » para seleccionar secuencialmente las
melodías disponibles. Cada vez que se pulsa el botón « », se escucha la melodía seleccionada.
Una vez seleccionada la melodía de llamada, presionar el botón de programación o dejar el
monitor en reposo y transcurridos 10 segundos sale de programación.
MELODÍA seleccionada
Melodía 1
Melodía 2
DING DONG
DING DONG DANG
Llamada desde placa
Melodía 1 rápida
Melodía 2 rápida
Ding Dong Ding Dong
Ding Dong Dang
EN
1.With the monitor connected, press the programming button. You will hear a confirmation tone.
2. Once in programming mode, press the « » button to sequentially select the available tones.
Each time the « » button is pressed, the selected tone is heard.
Once the call tone has been selected, leave the monitor on standby and, after 10 seconds, exit
programming mode.
RINGTONE selected
Ringtone 1
Ringtone 2
DING DONG
DING DONG DANG
F
1. Une fois le moniteur branché, appuyez sur le bouton de programmation. Une tonalité de
Call from Panel
Quick Ringtone 1
Quick Ringtone 2
Ding Dong Ding Dong
Ding Dong Dang
confirmation sera émise.
2. Une fois en mode programmation, appuyez sur la touche « » afin de sélectionner une par
une les tonalités disponibles. Chaque fois que vous appuierez sur la touche « », vous
pourrez entendre la tonalité sélectionnée.
Après avoir sélectionné la tonalité d’appel, laissez le moniteur en veille. Au bout de 10 secondes,
il quittera le mode programmation.
MÉLODIE sélectionnée
Mélodie 1
Mélodie 2
DING DONG
DING DONG DANG
Appel depuis la platine
Mélodie 1 rapide
Mélodie 2 rapide
Ding Dong Ding Dong
Ding Dong Dang
9
Page 10
D
1. Drücken Sie die Programmiertaste bei angeschlossenem Monitor. Der Vorgang wird durch
einen Signalton bestätigt.
2. Wenn Sie sich im Programmiermodus befinden, drücken Sie die Taste « » um die verfügbaren
Töne nacheinander auszuwählen. Drücken Sie die Taste « », um den gerade ausgewählten
Ton ausgegeben.
Sobald Sie einen Rufton ausgewählt haben, lassen Sie den Monitor im Bereitschaftsmodus und
verlassen nach zehn Sekunden den Programmiermodus.
Ausgewählte Melodie
Anruf von der TÜRSTATION
Melodie 1
Melodie 2
DING DONG
DING DONG DANG
Schnelle Melodie 1
Schnelle Melodie 2
Ding Dong Ding Dong
Ding Dong Dang
CARACTERÍSTICAS TÉCNICAS - TECHNICAL FEATURES - CARACTERISTIQUES TECHNIQUES
TECHNISCHE EIGENSCHAFTEN
Alimentación - Power Supply - Alimentation - Stromversorgung
Consumo - Consumption - Consommation - Stromverbrauch
en reposo - in standby - au repos - Im Bereitschaftsmodus
audio + video
Temperatura de funcionamiento - Operating Temperature
Température de fonctionnement - Betriebstemperatur
Humedad - Humidity - Humidité - relative Luftfeuchtigkeit
Color - Colour - Couleur - Farbe
Resolución - Resolution - Résolution - Auflösung
TFT 3,5”
Color - Colour
Couleur - Farbe
18 Vdc
Color - Colour
Couleur - Farbe
120 mA
450 mA
[5 , +60 °C]
[41, +140ºF]
[0,90%]
Hor.: 480 Line TV
Ver.: 234 Line TV
Señal de video - Video signal - Signal vidéo - Videosignal - Sinal de vídeo
Señal compuesta 1 Vpp 75 Ω, 7 Mhz . - Composed signal 1 Vpp 75
Signal composite 1 Vpp 75Ω, 7 Mhz. - Zusammengesetztes signal 1 Vpp 75
Ω,
7 Mhz.
Ω
, 7 Mhz.
Dimensiones - Dimensions - Dimensions - Massangaben:
(Alto x Ancho x Prof. - Height x Width x Depth - Hauteur x largeur x prof - Höhe x Breite x Tiefe)
10
221x203x61 (mm)
8,7” x 7,9” x 2,4”
Page 11

Funciones de Memoria
E
11
Page 12
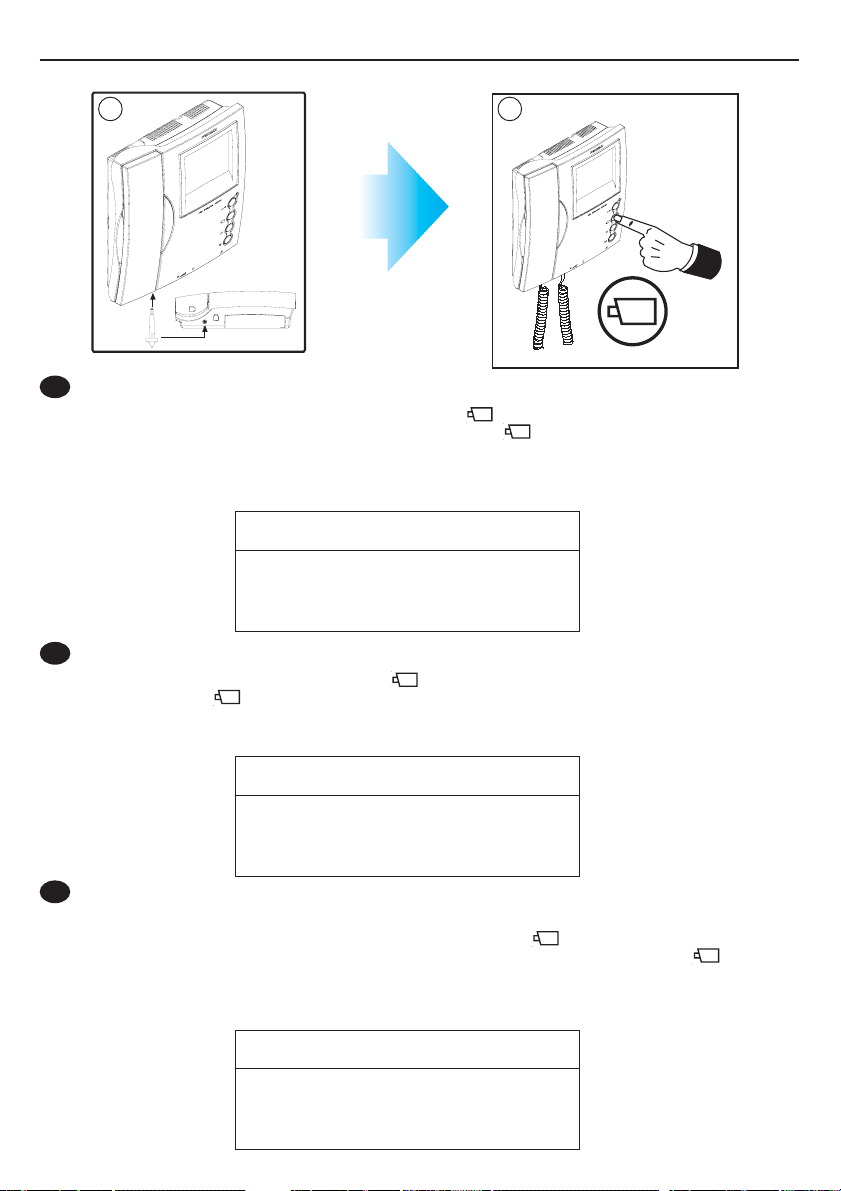
FUNCIONES DE MEMORIA
ESPAÑOL
Función de memorización de imagenes
Estando el monitor Memory en «modo espera» permite la memorización automática de las 127 últimas
imágenes captadas por la telecámara al producirse llamadas. Estas imágenes podrán visualizarse
posteriormente, indicándose la fecha y hora en la que fueron captadas.
El monitor puede funcionar en alguno de los modos representados a continuación, y que se selecciona
mediante los botones de función de memorias ( y
Modo ESPERA
El monitor se encuentra siempre en este modo esperando recibir una llamada de calle. Al recibir una
llamada el monitor realizará tras tres segundos automáticamente una foto.
REC
).
+ 3
seg./sec./sek.
Modo Ajuste del Monitor
Para ajustar los controles del monitor: BRILLO, CONTRASTE y COLOR.
Estando el Monitor en modo ESPERA (reposo, pantalla monitor apagada), presionar
segundos y visualizaremos la siguiente pantalla:
Presionar para desplazarse entre las opcio-
MENU
DISPLAY
TIME
nes. Desplazamiento secuencial: DISPLAY, TIME,
EXIT, DISPLAY, TIME... (el color del texto cambia
a amarillo en la opción donde nos encontramos).
Presionar
(texto rojo).
para seleccionar la opción
REC
REC
más de 2
EXIT 23.01.2008 12:37
Presionando
MENU
DISPLAY
TIME
EXIT 23.01.2008 12:37
12
, seleccionamos la opción DISPLAY (texto rojo).
REC
BRIGHTNESS
CONTRAST
COLOR
50
50
50
Page 13
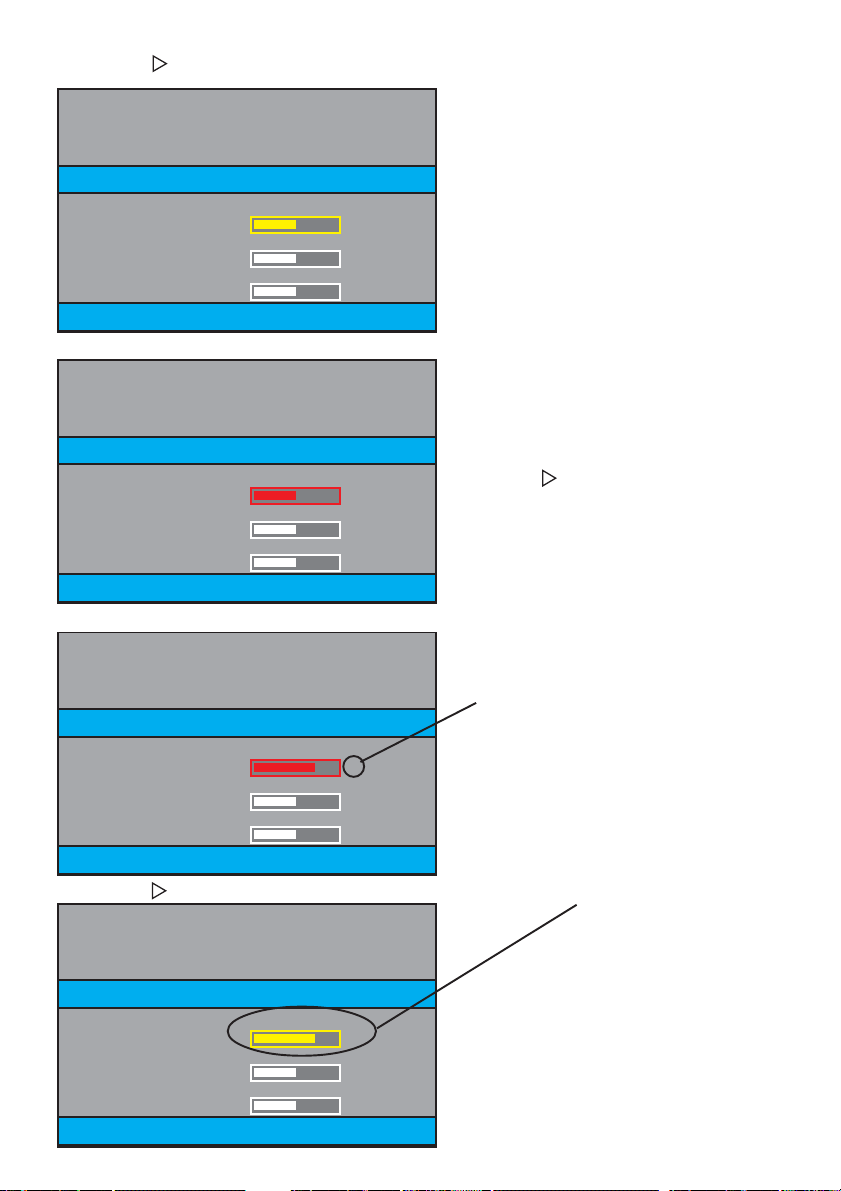
Presionando , nos desplazamos entre las opciones secuencialmente: BRIGHTNESS, CONTRAST,
COLOR, EXIT, BRIGHTNESS, CONTRAST, COLOR... (texto amarillo).
MENU
DISPLAY
TIME
BRIGHTNESS
50
CONTRAST
50
COLOR
50
EXIT 23.01.2008 12:37
Estando sobre la opción (texto en amarillo), presionando
se selecciona la opción (texto rojo).
REC
MENU
DISPLAY
TIME
BRIGHTNESS
50
CONTRAST
50
COLOR
50
Presionando decrementa (pulsación corta)
Presionando
incrementa (pulsación corta)
REC
EXIT 23.01.2008 12:37
Por ejemplo, vamos a incrementar el BRIGHTNESS (BRILLO), presionando
(pulsaciones cortas).
REC
MENU
DISPLAY
TIME
BRIGHTNESS
70
CONTRAST
50
COLOR
50
EXIT 23.01.2008 12:37
Presionando o
más de 2 segundos se sale de la opción (vuelve el texto a color amarillo).
REC
MENU
DISPLAY
TIME
BRIGHTNESS
70
CONTRAST
50
COLOR
50
EXIT 23.01.2008 12:37
Se observa que se indica
también numericamente
13
Page 14
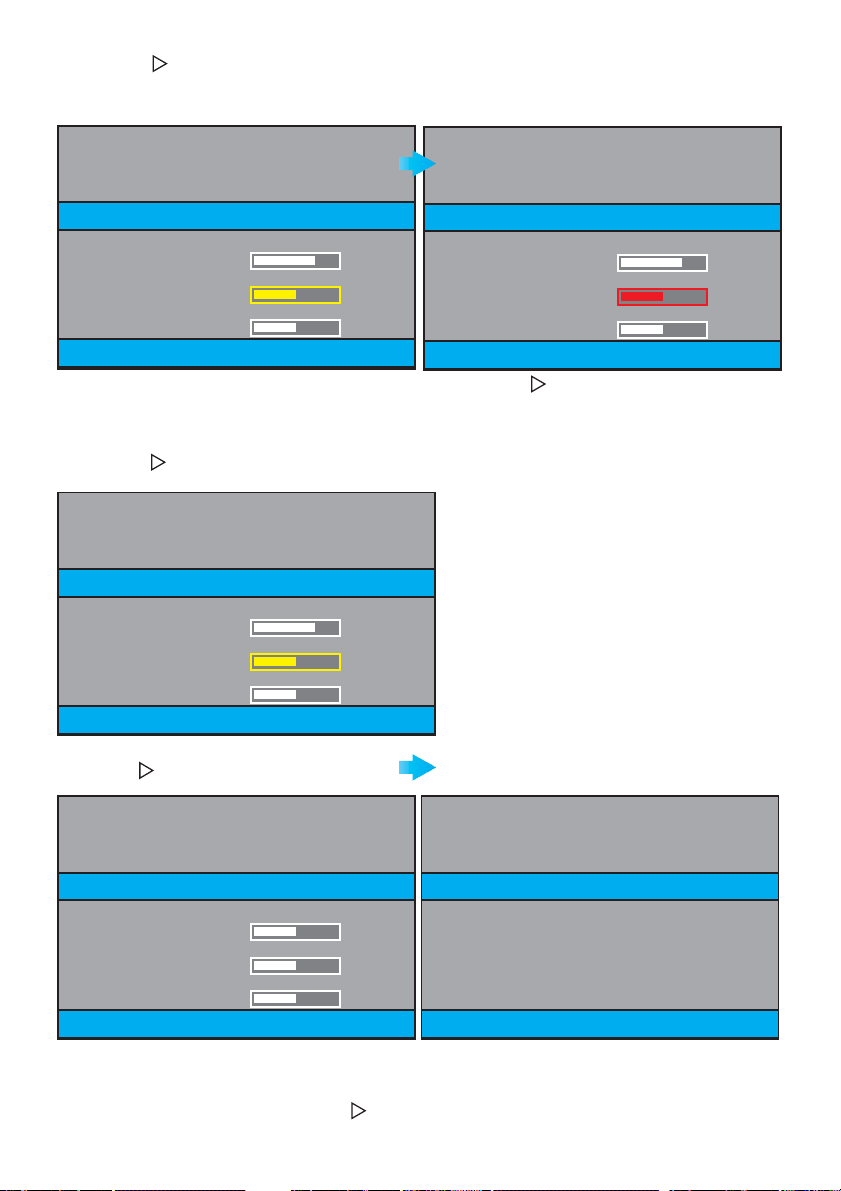
Presionando , nos desplazamos entre las opciones secuencialmente: BRIGHTNESS, CONTRAST,
COLOR, EXIT, BRIGHTNESS, CONTRAST, COLOR... (texto amarillo).
Estando sobre la opción (texto en amarillo), presionando
se selecciona la opción (texto rojo).
REC
MENU
DISPLAY
TIME
BRIGHTNESS
70
CONTRAST
50
COLOR
50
EXIT 23.01.2008 12:37
Presionando o
texto a color amarillo.
más de 2 segundos se sale de la opción CONTRAST (CONTRASTE), vuelve el
REC
MENU
DISPLAY
TIME
BRIGHTNESS
70
CONTRAST
50
COLOR
50
EXIT 23.01.2008 12:37
Presionar hasta desplazarnos a EXIT,
(texto a color amarillo).
MENU
DISPLAY
TIME
BRIGHTNESS
70
CONTRAST
50
COLOR
50
EXIT 23.01.2008 12:37
Presionando decrementa (pulsación corta)
Presionando
Presionar
incrementa (pulsación corta)
REC
y se sale a la pantalla anterior
REC
MENU
DISPLAY
TIME
BRIGHTNESS
50
CONTRAST
50
COLOR
50
EXIT 23.01.2008 12:37
Presionando de nuevo
vuelve al Modo ESPERA (REPOSO).
REC
Transcurridos 30 segundos sin presionar o
14
MENU
DISPLAY
TIME
EXIT 23.01.2008 12:37
, también vuelve al Modo ESPERA (REPOSO).
REC
Page 15

Modo HORA
Para ajustar la fecha y hora en el monitor.
Estando el Monitor en modo ESPERA (reposo, pantalla monitor apagada), presionar
segundos y visualizaremos la siguiente pantalla:
Presionar para desplazarse entre las opcio-
MENU
DISPLAY
nes. Desplazamiento secuencial: DISPLAY, TIME,
EXIT, DISPLAY, TIME... (el color del texto cambia
a amarillo en la opción donde nos encontramos).
TIME
EXIT 23.01.2008 12:37
REC
más de 2
Presionando nos desplazamos hasta TIME
(texto amarillo)
MENU
DISPLAY
TIME
EXIT 23.01.2008 12:37
Presionar
ción (texto rojo).
para seleccionar la op-
REC
MENU
DISPLAY
TIME
DAY 2 3
MONTH 01
YEAR 08
HOUR 12
MINUTE 37
EXIT 23.01.2008 12:37
DAY día
MONTH mes
YEAR añ o
HOUR horas
MINUTE minutos
Los datos introducidos
coinciden con los que se
visualizan
Presionando , nos desplazamos entre las opciones secuencialmente: DAY, MONTH, YEAR, HOUR,
MINUTE, EXIT, DAY, MONTH ... (texto amarillo).
MENU
DISPLAY
TIME
DAY 2 3
MONTH 01
YEAR 08
HOUR 12
MINUTE 37
EXIT 23.01.2008 12:37
15
Page 16

Estando sobre la opción (texto en amarillo), presionando
se selecciona la opción (texto rojo).
REC
MENU
DISPLAY
TIME
DAY 2 3
MONTH 01
YEAR 08
HOUR 12
MINUTE 37
EXIT 23.01.2008 12:37
Por ejemplo cambiamos pulsando
MONTH 09
REC
:
MENU
DISPLAY
TIME
DAY 2 3
MONTH 09
YEAR 08
HOUR 12
MINUTE 37
EXIT 23.09.2008 12:37
MENU
DISPLAY
TIME
DAY 2 3
MONTH 01
YEAR 08
HOUR 12
MINUTE 37
EXIT 23.01.2008 12:37
Presionando decrementa (pulsación corta)
Presionando
Presionando o
sale de la opción CONTRAST (CONTRASTE), vuel-
incrementa (pulsación corta)
REC
más de 2 segundos se
REC
ve el texto a color amarillo.
MENU
DISPLAY
TIME
DAY 2 3
MONTH 09
YEAR 08
HOUR 12
MINUTE 37
EXIT 23.09.2008 12:37
Presionar hasta desplazarnos a EXIT,
(texto a color amarillo).
MENU
DISPLAY
TIME
DAY 2 3
MONTH 09
YEAR 08
HOUR 12
MINUTE 37
EXIT 23.09.2008 12:37
Presionando de nuevo
vuelve al Modo ESPERA (REPOSO).
REC
Transcurridos 30 segundos sin presionar o
16
Presionar
y se sale a la pantalla anterior
REC
MENU
DISPLAY
TIME
EXIT 23.01.2008 12:37
, también vuelve al Modo ESPERA (REPOSO).
REC
Page 17

Modo GRABACIÓN
Para grabar una imagen manualmente.
En Modo Grabación, el Monitor debe estar encendido con imagen (porque han llamado o porque
se ha activado el autoencendido).
Foto grabada
Total de Fotos realizadas
Llamada
menos de 2 segundos
para grabar la imagen
Autoencendido
Repetir este punto tantas veces como fotos
se deseen grabar
Modo REPRODUCCIÓN (FORWARD / REWIND)
Para visualizar las imágenes grabadas.
38/43
REC
Pulsar
deseada
24/09/2008 12:37
REC
Fecha
de la grabación
. . . . . .
43/43
Presionar este
pulsador, si se
desea que vuelva
Hora
grabación
Foto que se está visualizando
Total de Fotos realizadas
el Monitor al modo
ESPERA (reposo,
pantalla monitor
apagada)
31/43
22/09/2008 12:37
Pulsando
Pulsando
muestra imagen anterior
muestra imagen posterior
REC
35/43
REC
REC
23/09/2008 13:01
Nota:
Por ejemplo, si se está visualizando la Foto 43/43 y pulsamos
. . . . .
21/09/2008 19:22
41/43
REC
23/09/2008 18:12
Fecha de la grabación Hora grabación
, la imagen siguiente es 1/43
REC
17
Page 18

Modo BORRAR una Foto
Para borrar una foto (imagen).
En Modo Borrar, el Monitor debe estar encendido con imagen.
ULTIMA Foto grabada
Total de Fotos realizadas
Pulsando
muestra imagen anterior
43/43
. . . .
REC
Presenta la última
imagen grabada
Autoencendido
Pulsación corta
24/09/2008 12:37
Pulsando
muestra imagen posterior
Foto borrada
22/09/2008 10:11
REC
35/43
Pulsar
más de 2 segundos
35/43
34/42
OK?
22/09/2008 10:11
Modo BORRADO Completo
Para borrar todas las fotos (imagenes) almacenadas.
En Modo Borrar, el Monitor debe estar encendido con imagen.
Pulsación
corta
43/43
21/09/2008 20:21
43/43
OK?
24/09/2008 12:37
Presenta la última
imagen grabada
Autoencendido
Pulsación corta
24/09/2008 12:37
Pulsar
más de 2 segundos
Presionar este
pulsador, si se
REC
Pulsar
más de 2 segundos
hasta ver la pantalla sin
desea que vuelva
el Monitor al modo
ESPERA (reposo,
pantalla monitor
apagada)
imagen
(en negro).
Borra todas
18
Page 19

Memory Functions
EN
19
Page 20

MEMORY FUNCTIONS
ENGLISH
Image Saving Function
Keeping the Memory monitor in «standby mode» allows the automatic storage of the last 127 images
taken by the video camera on receiving calls. These images can be viewed subsequently, indicating
the date and time on which they were taken.
The monitor can function in either of the modes displayed below, and which are selected using the
memory function buttons ( and
STANDBY Mode
The monitor remains in this mode, awaiting a call from the entry panel. On receiving a call the monitor
will wait three seconds and then take a photo.
Monitor Adjustment Mode
To adjust the monitor controls: SHINE, CONTRAST AND COLOUR.
With the Monitor in STANDBY mode (standby, monitor screen off), hold down the
seconds and you will see the following screen:
MENU
DISPLAY
REC
+ 3
seg./sec./sek.
).
button for 2
REC
Press to move between the different options.
Sequential Order: DISPLAY, TIME, EXIT, DISPLAY,
TIME... (the colour of the text will change to
yellow to indicate the option we are currently
in).
TIME
EXIT 23.01.2008 12:37
Pressing
MENU
DISPLAY
TIME
EXIT 23.01.2008 12:37
20
, we select the DISPLAY option (red text).
REC
BRIGHTNESS
CONTRAST
COLOR
Press
(red text).
50
50
50
to the select the option
REC
Page 21

Pressing , we move between the options in order: BRIGHTNESS, CONTRAST, COLOUR, EXIT,
BRIGHTNESS, CONTRAST, COLOUR... (yellow text).
MENU
DISPLAY
TIME
BRIGHTNESS
50
CONTRAST
50
COLOR
50
EXIT 23.01.2008 12:37
Whilst in the option (yellow text), press
to select that option (red text).
REC
MENU
DISPLAY
TIME
BRIGHTNESS
50
CONTRAST
50
COLOR
50
Pressing decreases (short press)
Pressing
increases (short press)
REC
EXIT 23.01.2008 12:37
For example, we can increase the BRIGHTNESS, pressing
(short presses).
REC
MENU
DISPLAY
TIME
BRIGHTNESS
70
CONTRAST
50
COLOR
50
EXIT 23.01.2008 12:37
Pressing and holding or
for more than 2 seconds, you exit the option (the text goes yellow again).
REC
MENU
DISPLAY
TIME
BRIGHTNESS
70
CONTRAST
50
COLOR
50
EXIT 23.01.2008 12:37
As we can see it is also
indicated numerically.
21
Page 22

Pressing , we move between the options in order: BRIGHTNESS, CONTRAST, COLOUR, EXIT,
BRIGHTNESS, CONTRAST, COLOUR... (yellow text).
Whilst in the option (yellow text), press
to select that option (red text).
REC
MENU
DISPLAY
TIME
BRIGHTNESS
70
CONTRAST
50
COLOR
50
EXIT 23.01.2008 12:37
Pressing and holding or
yellow again).
for more than 2 seconds, you exit the CONTRAST option (the text goes
REC
MENU
DISPLAY
TIME
BRIGHTNESS
70
CONTRAST
50
COLOR
50
EXIT 23.01.2008 12:37
Press until EXIT appears,
(yellow text).
MENU
DISPLAY
TIME
BRIGHTNESS
70
CONTRAST
50
COLOR
50
EXIT 23.01.2008 12:37
Pressing decreases (short press)
Pressing
Press
increases (short press)
REC
and exit the previous screen
REC
MENU
DISPLAY
TIME
BRIGHTNESS
50
CONTRAST
50
COLOR
50
EXIT 23.01.2008 12:37
Pressing
again, we return to STANDBY Mode.
REC
30 seconds having elapsed without pressing or
22
MENU
DISPLAY
TIME
EXIT 23.01.2008 12:37
we also return to STANDBY mode.
REC
Page 23

TIME Mode
To adjust the monitor’s date and time.
With the Monitor in STANDBY mode (standby, monitor screen off), hold down the
seconds and you will see the following screen:
Press to move between the different options.
MENU
DISPLAY
Sequential Order: DISPLAY, TIME, EXIT, DISPLAY,
TIME... (the colour of the text will change to
yellow to indicate the option we are currently
in).
TIME
EXIT 23.01.2008 12:37
button for 2
REC
Pressing we select TIME (yellow text)
MENU
DISPLAY
TIME
EXIT 23.01.2008 12:37
Pressing
text).
we select the option (red
REC
MENU
DISPLAY
TIME
DAY 2 3
MONTH 01
YEAR 08
HOUR 12
MINUTE 37
EXIT 23.01.2008 12:37
DAY . day
MONTH . month
YEAR . year
HOURS . hours
MINUTES. minutes
The data entered agrees
to that seen on the
screen.
Pressing we move between the options in order: DAY, MONTH, YEAR, HOURS, MINUTES, EXIT, DAY,
MONTH ... (yellow text).
MENU
DISPLAY
TIME
DAY 2 3
MONTH 01
YEAR 08
HOUR 12
MINUTE 37
EXIT 23.01.2008 12:37
23
Page 24

Whilst in the option (yellow text), press
to select that option (red text).
REC
MENU
DISPLAY
TIME
DAY 2 3
MONTH 01
YEAR 08
HOUR 12
MINUTE 37
EXIT 23.01.2008 12:37
For example we change pressing:
MONTH 09
REC
MENU
DISPLAY
TIME
DAY 2 3
MONTH 09
YEAR 08
HOUR 12
MINUTE 37
EXIT 23.09.2008 12:37
MENU
DISPLAY
TIME
DAY 2 3
MONTH 01
YEAR 08
HOUR 12
MINUTE 37
EXIT 23.01.2008 12:37
Pressing decreases (short press)
Pressing
Pressing and holding or
seconds, you exit the CONTRAST option (the text
increases (short press)
REC
REC
for more than 2
goes yellow again).
MENU
DISPLAY
TIME
DAY 2 3
MONTH 09
YEAR 08
HOUR 12
MINUTE 37
EXIT 23.09.2008 12:37
Press until EXIT appears,
(yellow text).
MENU
DISPLAY
TIME
DAY 2 3
MONTH 09
YEAR 08
HOUR 12
MINUTE 37
EXIT 23.09.2008 12:37
Pressing
again, we return to STANDBY Mode.
REC
30 seconds having elapsed without pressing or
24
Press
and exit the previous screen
REC
MENU
DISPLAY
TIME
EXIT 23.01.2008 12:37
we also return to STANDBY mode.
REC
Page 25

RECORDING Mode
To record the image manually.
In recording mode, the Monitor should be on with the images shown (because a call has been
made or the auto-start option has been selected).
Photo Saved
Total Photos Taken
Call
Auto-Start
Repeat this step for each photo you want to
PLAY Mode (FORWARD/REWIND)
To see the images saved.
38/43
REC
Press
for under 2 seconds
to record the required
REC
image
save
. . . . . .
43/43
24/09/2008 12:37
Save
Time
Save
Date
Photo being viewed
Total Photos Taken
Press this button
if you want the
Monitor to return to
the STANDBY
mode (standby,
monitor screen
off)
31/43
22/09/2008 12:37
Pressing
Pressing
shows the previous image
shows the next image
REC
35/43
REC
REC
23/09/2008 13:01
Note:
For example, if you are viewing Photo 43/43 and you press
. . . . .
REC
, the next image is 1/43
REC
21/09/2008 19:22
41/43
23/09/2008 18:12
Save Date Save Time
25
Page 26

Photo DELETE Mode
To delete a photo (image).
In Delete Mode, the monitor should be on and showing images.
LAST Photo saved
Total Photos Taken
Pressing
shows the previous image
43/43
. . . .
REC
22/09/2008 10:11
REC
Auto-Start
Short press
Shows the last
24/09/2008 12:37
image saved.
Pressing
shows the next image
Photo deleted
35/43
35/43
34/42
OK?
22/09/2008 10:11
DELETE Mode Complete
To delete all the photos (images) saved.
In Delete Mode, the monitor should be on and showing images.
Short
press
43/43
21/09/2008 20:21
43/43
OK?
24/09/2008 12:37
seconds until the screen
Auto-Start
Short press
24/09/2008 12:37
Shows the last
image saved.
for longer than 2 seconds
Press
Press this button if
you want the
REC
Press and hold
for longer than 2
goes black
Monitor to return to
the STANDBY
mode (standby,
monitor screen off)
.
Delete All
26
Page 27

Fonctions de mémoire
F
27
Page 28

FONCTIONS DE MÉMOIRE
FRANÇAIS
Fonction de mémorisation des images
Lorsque le moniteur Memory est en « mode attente », il permet de mémoriser automatiquement les
127 dernières images prises par la caméra vidéo lors des appels. Ces images peuvent être visualisées
ultérieurement (la date et l’heure de la prise sont indiquées).
Le moniteur peut fonctionner dans l’un des modes représentés par la suite, sélectionné à l’aide des
boutons de fonctions de mémoire ( et
Mode ATTENTE
Le moniteur est toujours dans ce mode lorsqu’il attend la réception d’un appel en provenance de la rue.
Lors de la réception d’un appel, le moniteur prend automatiquement une photo après trois secondes.
+ 3
seg./sec./sek.
Mode Réglage du moniteur
Pour régler les commandes du moniteur : LUMINOSITÉ, CONTRASTE et COULEUR.
Lorsque le moniteur est en mode ATTENTE (veille, écran moniteur éteint), appuyer sur
2 secondes et l’on verra l’écran suivant :
MENU
DISPLAY
TIME
REC
).
plus de
REC
Appuyer sur pour se déplacer entre les
options. Déplacement séquentiel : DISPLAY,
TIME, EXIT, DISPLAY, TIME... (le texte de l’option
où l’on se trouve devient jaune).
Appuyer sur
(texte rouge).
pour sélectionner l’option
REC
EXIT 23.01.2008 12:37
En appuyant sur
MENU
DISPLAY
TIME
EXIT 23.01.2008 12:37
28
, on sélectionne l’option DISPLAY (texte rouge).
REC
BRIGHTNESS
CONTRAST
COLOR
50
50
50
Page 29

En appuyant sur , on se déplace parmi les options de manière séquentielle : BRIGHTNESS, CONTRAST,
COLOR, EXIT, BRIGHTNESS, CONTRAST, COLOR... (texte jaune).
MENU
DISPLAY
TIME
BRIGHTNESS
50
CONTRAST
50
COLOR
50
EXIT 23.01.2008 12:37
Lorsqu’on est sur l’option (texte en jaune), en appuyant sur
, on la sélectionne (texte rouge).
REC
MENU
DISPLAY
TIME
BRIGHTNESS
50
CONTRAST
50
COLOR
50
En appuyant sur , l’on descend (frappe brève).
En appuyant sur
, l’on monte (frappe brève).
REC
EXIT 23.01.2008 12:37
On peut par exemple augmenter la luminosité (BRIGHTNESS) en appuyant sur
(frappes brèves).
REC
MENU
DISPLAY
TIME
BRIGHTNESS
70
CONTRAST
50
COLOR
50
EXIT 23.01.2008 12:37
En appuyant sur ou
plus de 2 secondes, on quitte l’option (le texte redevient jaune).
REC
MENU
DISPLAY
TIME
BRIGHTNESS
70
CONTRAST
50
COLOR
50
EXIT 23.01.2008 12:37
Les indications sont également
données numériquement.
29
Page 30

En appuyant sur , on se déplace parmi les options de manière séquentielle : BRIGHTNESS, CONTRAST,
COLOR, EXIT, BRIGHTNESS, CONTRAST, COLOR... (texte jaune).
Lorsqu’on est sur l’option (texte en jaune), en appuyant sur
, on la sélectionne (texte rouge).
REC
MENU
DISPLAY
TIME
BRIGHTNESS
70
CONTRAST
50
COLOR
50
EXIT 23.01.2008 12:37
En appuyant sur ou
redevient jaune.
plus de 2 secondes, on quitte l’option CONTRAST (CONTRASTE) ; le texte
REC
MENU
DISPLAY
TIME
BRIGHTNESS
70
CONTRAST
50
COLOR
50
EXIT 23.01.2008 12:37
Appuyer sur jusqu’à atteindre EXIT
(texte jaune).
MENU
DISPLAY
TIME
BRIGHTNESS
70
CONTRAST
50
COLOR
50
EXIT 23.01.2008 12:37
En appuyant sur
En appuyant sur
Appuyer sur
précédent.
, l’on descend (frappe brève).
REC
, l’on monte (frappe brève).
REC
pour revenir à l’écran
REC
MENU
DISPLAY
TIME
BRIGHTNESS
50
CONTRAST
50
COLOR
50
EXIT 23.01.2008 12:37
En appuyant de nouveau sur
, on revient au mode ATTENTE (VEILLE).
REC
Après 30 secondes sans avoir appuyé ni sur ni sur
(VEILLE).
30
MENU
DISPLAY
TIME
EXIT 23.01.2008 12:37
, on revient également au mode ATTENTE
REC
Page 31

Mode HEURE
Pour régler la date et l’heure du moniteur.
Lorsque le moniteur est en mode ATTENTE (veille, écran moniteur éteint), appuyer sur
2 secondes et l’on verra l’écran suivant :
REC
plus de
MENU
DISPLAY
TIME
EXIT 23.01.2008 12:37
En appuyant sur , l’on se déplace jusqu’à
TIME (texte jaune).
MENU
DISPLAY
TIME
EXIT 23.01.2008 12:37
Appuyer sur
options. Déplacement séquentiel : DISPLAY,
pour se déplacer entre les
REC
TIME, EXIT, DISPLAY, TIME... (le texte de l’option
où l’on se trouve devient jaune).
En appuyant sur
l’option DISPLAY (texte rouge).
, on sélectionne
REC
MENU
DISPLAY
TIME
DAY 2 3
MONTH 01
YEAR 08
HOUR 12
MINUTE 37
EXIT 23.01.2008 12:37
DAY jour
MONTH mois
YEAR année
HOUR heures
MINUTE minutes
Les données saisies
coïncident avec celles
qui sont visualisées.
En appuyant sur , on se déplace parmi les options de manière séquentielle : DAY, MONTH, YEAR,
HOUR, MINUTE, EXIT, DAY, MONTH... (texte jaune).
MENU
DISPLAY
TIME
DAY 2 3
MONTH 01
YEAR 08
HOUR 12
MINUTE 37
EXIT 23.01.2008 12:37
31
Page 32

Lorsqu’on est sur l’option (texte en jaune), en appuyant sur
, on la sélectionne (texte rouge).
REC
MENU
DISPLAY
TIME
DAY 2 3
MONTH 01
YEAR 08
HOUR 12
MINUTE 37
EXIT 23.01.2008 12:37
Par exemple, l’on change en appuyant sur
MONTH 09
REC
MENU
DISPLAY
TIME
DAY 2 3
MONTH 09
YEAR 08
HOUR 12
MINUTE 37
EXIT 23.09.2008 12:37
MENU
DISPLAY
TIME
DAY 2 3
MONTH 01
YEAR 08
HOUR 12
MINUTE 37
EXIT 23.01.2008 12:37
En appuyant sur , l’on descend (frappe brève).
En appuyant sur
:
En appuyant sur ou
on quitte l’option CONTRAST (CONTRASTE) ; le
, l’on monte (frappe brève).
REC
plus de 2 secondes,
REC
texte redevient jaune.
MENU
DISPLAY
TIME
DAY 2 3
MONTH 09
YEAR 08
HOUR 12
MINUTE 37
EXIT 23.09.2008 12:37
Appuyer sur jusqu’à atteindre EXIT
(texte jaune).
MENU
DISPLAY
TIME
DAY 2 3
MONTH 09
YEAR 08
HOUR 12
MINUTE 37
EXIT 23.09.2008 12:37
En appuyant de nouveau sur
, on revient au mode ATTENTE (VEILLE).
REC
MENU
DISPLAY
TIME
EXIT 23.01.2008 12:37
Après 30 secondes sans avoir appuyé ni sur ni sur
(VEILLE).
32
Appuyer sur
précédent.
, on revient également au mode ATTENTE
REC
pour revenir à l’écran
REC
Page 33

Mode ENREGISTREMENT
Pour enregistrer une image manuellement.
En mode Enregistrement, le moniteur doit être allumé avec l’image (parce qu’il y a eu appel ou
parce que l’allumage automatique s’est activé).
Photo enregistrée
Total de photos prises
Appel
Allumage
automatique
Répéter ce point autant de fois qu’il y a de
Mode LECTURE (FORWARD / REWIND)
Pour visualiser les images enregistrées.
38/43
REC
24/09/2008 12:37
Appuyer sur
moins de 2 secondes
pour enregistrer l’image
souhaitée.
REC
photos à enregistrer.
. . . . . .
43/43
:
Date
de l’enregistrement
Heure
enregistrement
Photo en cours de visualisation
Total de photos prises
Appuyer sur ce
bouton-poussoir si
vous souhaitez
que le moniteur
revienne au mode
ATTENTE (veille,
écran moniteur
éteint).
31/43
22/09/2008 12:37
En appuyant sur
En appuyant sur
, l’image précédente apparaît.
, l’image suivante apparaît.
REC
35/43
REC
REC
23/09/2008 13:01
Remarque :
Par exemple, si l’on visualise la photo 43/43 et que l’on appuie sur
. . . . .
Date de l’enregistrement Heure
21/09/2008 19:22
REC
23/09/2008 18:12
, l’image suivante est la 1/43.
REC
41/43
enregistrement
33
Page 34

Mode SUPPRIMER une photo
Pour supprimer une photo (image).
En mode SUPPRIMER, le moniteur doit être allumé avec image.
DERNIÈRE photo enregistrée
Total de photos prises
En appuyant sur
l’image précédente
43/43
apparaît.
. . . .
REC
Présente la dernière
image enregistrée
Allumage automatique
Frappe brève
24/09/2008 12:37
En appuyant sur ,
l’image suivante apparaît.
Photo supprimée
,
35/43
22/09/2008 10:11
35/43
34/42
OK?
22/09/2008 10:11
Mode SUPPRESSION complète
Pour supprimer toutes les photos (images) stockées.
En mode SUPPRIMER, le moniteur doit être allumé avec image.
Frappe
brève
43/43
21/09/2008 20:21
OK?
24/09/2008 12:37
Présente la dernière
image enregistrée
Allumage automatique
Frappe brève
Appuyer sur
plus de 2 secondes
24/09/2008 12:37
:
Appuyer sur ce
bouton-poussoir si
REC
vous souhaitez
que le moniteur
revienne au mode
ATTENTE (veille,
écran moniteur
éteint).
43/43
Appuyer sur
plus de 2 secondes
jusqu’à ce que l’on voie
l’écran sans image
(en noir).
:
Les supprime toutes
34
Page 35

Speicherfunktionen
D
35
Page 36

SPEICHERFUNKTIONEN
DEUTSCH
Bildspeicherfunktion
Wenn sich der Monitor Memory im «Bereitschaftsmodus» befindet, lässt er die automatische
Speicherung der letzten 127 Bilder zu, die von der Kamera bei der Betätigung der Ruftaste aufgenommen
wurden. Diese Bilder können später betrachtet werden, wobei Datum und Uhrzeit der Aufnahme
eingeblendet werden.
Der Monitor funktioniert in den im Folgenden aufgelisteten Modi, die über die Speicherfunktionstasten
ausgewählt werden ( und
WARTEMODUS
Der Monitor befindet sich stets im Bereitschaftsmodus und aktiviert sich, wenn ein Anruf erfolgt. Erfolgt
ein Anruf, nimmt der Monitor nach drei Sekunden automatisch ein Bild auf.
Modus Monitoreinstellungen
Bildeinstelltasten: HELLIGKEIT, KONTRAST und FARBE
Wenn sich der Monitor im BEREITSCHAFTSMODUS befindet (Standby, Monitor aus)
Sekunden drücken, um zum nächsten Programmfenster zu gelangen.
MENU
DISPLAY
TIME
REC
).
+ 3
seg./sec./sek.
länger als 2
REC
drücken, um zwischen den Optionen hin- und
herzuschalten. Scrollleiste: DISPLAY, TIME, EXIT,
DISPLAY, TIME... (die Textfarbe der
ausgewählten Option wechselt auf gelb)
drücken, um die Option auszuwählen.
REC
(roter Text).
EXIT 23.01.2008 12:37
Durch Drücken von
MENU
DISPLAY
TIME
EXIT 23.01.2008 12:37
36
, können Sie die Option DISPLAY (roterText) auswählen.
REC
BRIGHTNESS
CONTRAST
COLOR
50
50
50
Page 37

Durch Drücken von scrollen Sie zu den nachfolgenden Optionen: BRIGHTNESS, CONTRAST, COLOR,
EXIT, BRIGHTNESS, CONTRAST, COLOR... (gelber Text).
MENU
DISPLAY
TIME
BRIGHTNESS
50
CONTRAST
50
COLOR
50
EXIT 23.01.2008 12:37
Wenn man zur Option (gelber Text) scrollt und
drückt, wird diese ausgewählt (roter Text).
REC
MENU
DISPLAY
TIME
BRIGHTNESS
50
CONTRAST
50
COLOR
50
Druch Drücken von werden die Werte
verringert (kurzes Antippen).
Durch Drücken von
(kurzes Antippen).
erhöhen sich die Werte
REC
EXIT 23.01.2008 12:37
So erhöhen Sie beispielsweise die Helligkeit, indem Sie
drücken (kurzes Antippen).
REC
MENU
DISPLAY
TIME
BRIGHTNESS
70
CONTRAST
50
COLOR
50
EXIT 23.01.2008 12:37
Durch Drücken von oder
(länger als 2 Sekunden) verlässt man diese Option (gelberText).
REC
MENU
DISPLAY
TIME
BRIGHTNESS
70
CONTRAST
50
COLOR
50
EXIT 23.01.2008 12:37
Die Werte werden auch eingeblendet.
37
Page 38

Durch Drücken von scrollen Sie zu den nachfolgenden Optionen: BRIGHTNESS, CONTRAST, COLOR,
EXIT, BRIGHTNESS, CONTRAST, COLOR... (gelber Text).
Wenn man zur Option (gelber Text) scrollt und
drückt, wird diese ausgewählt (roter Text).
REC
MENU
DISPLAY
TIME
BRIGHTNESS
70
CONTRAST
50
COLOR
50
EXIT 23.01.2008 12:37
Durch Drücken von oder
(KONTRAST), worauf der gelbe Text angezeigt wird.
(länger als 2 Sekunden), verlässt man die Option CONTRAST
REC
MENU
DISPLAY
TIME
BRIGHTNESS
70
CONTRAST
50
COLOR
50
EXIT 23.01.2008 12:37
drücken, bis Sie zu EXIT gelangen.
(gelber Text).
MENU
DISPLAY
TIME
BRIGHTNESS
70
CONTRAST
50
COLOR
50
EXIT 23.01.2008 12:37
Durch Drücken von verringert sich der Wert
(kurzes Antippen).
Durch Drücken von
(kurzes Antippen).
Durch erneutes Drücken von
zum vorigen Fenster zurück.
erhöht sich der Wert
REC
REC
kehrt man
MENU
DISPLAY
TIME
BRIGHTNESS
50
CONTRAST
50
COLOR
50
EXIT 23.01.2008 12:37
Durch erneutes Drücken von
, kehren Sie in den BEREITSCHAFTSMODUS zurück.
REC
Wenn im Verlauf von 30 Sekunden nicht oder
BEREITSCHAFTSMODUS zurück .
38
MENU
DISPLAY
TIME
EXIT 23.01.2008 12:37
gedrückt werden, gelangen Sie ebenfalls in den
REC
Page 39

Modus STUNDE
Einstellung von Datum und Uhrzeit am Monitor.
Wenn sich der Monitor im BEREITSCHAFTSMODUS befindet (Standby, Monitor aus)
Sekunden drücken, um zum nächsten Programmfenster zu gelangen.
drücken, um zwischen den Optionen hin- und
MENU
DISPLAY
herzuschalten. Scrollleiste: DISPLAY, TIME, EXIT,
DISPLAY, TIME... (Die ausgewählte Option wird
gelb angezeigt).
TIME
EXIT 23.01.2008 12:37
länger als 2
REC
Durch Drücken von zu TIME (Zeit) scrollen
(gelber Text).
MENU
DISPLAY
TIME
EXIT 23.01.2008 12:37
Durch Drücken von
die Option (roterText) auswählen.
, können Sie
REC
MENU
DISPLAY
TIME
DAY 2 3
MONTH 01
YEAR 08
HOUR 12
MINUTE 37
EXIT 23.01.2008 12:37
DAY Ta g
MONTH Monat
YEAR Jahr
HOUR Stunden
MINUTE Minuten
Die eingegebenen Daten
stimmen mit den
angezeigten überein.
Durch Drücken von scrollen Sie zu den nachfolgenden Optionen: DAY, MONTH, YEAR, HOUR,
MINUTE, EXIT, DAY, MONTH ... (gelber Text).
MENU
DISPLAY
TIME
DAY 2 3
MONTH 01
YEAR 08
HOUR 12
MINUTE 37
EXIT 23.01.2008 12:37
39
Page 40

Wenn man zur Option (gelber Text) scrollt und
drückt, wird diese ausgewählt (roter Text).
REC
MENU
DISPLAY
TIME
DAY 2 3
MONTH 01
YEAR 08
HOUR 12
MINUTE 37
EXIT 23.01.2008 12:37
Eingabe einer Änderung durch Drücken von:
MONTH 09
MENU
DISPLAY
TIME
DAY 2 3
MONTH 09
YEAR 08
HOUR 12
MINUTE 37
EXIT 23.09.2008 12:37
MENU
DISPLAY
TIME
DAY 2 3
MONTH 01
YEAR 08
HOUR 12
MINUTE 37
EXIT 23.01.2008 12:37
Durch Drücken von verringert sich der Wert
(kurzes Antippen)
Durch Drücken von
(kurzes Antippen).
Durch Drücken von oder
Sekunden), verlässt man die Option CONTRAST
erhöht sich der Wert
REC
(länger als 2
REC
(KONTRAST), worauf der gelbe Text angezeigt wird.
MENU
DISPLAY
TIME
DAY 2 3
MONTH 09
YEAR 08
HOUR 12
MINUTE 37
EXIT 23.09.2008 12:37
drücken, bis Sie zu EXIT gelangen.
(gelber Text).
MENU
DISPLAY
TIME
DAY 2 3
MONTH 09
YEAR 08
HOUR 12
MINUTE 37
EXIT 23.09.2008 12:37
Durch erneutes Drücken
, kehren Sie in den BEREITSCHAFTSMODUS (STANDBY) zurück.
REC
Wenn im Verlauf von 30 Sekunden nicht oder
BEREITSCHAFTSMODUS zurück.
40
Durch erneutes Drücken von
zum vorigen Fenster zurück.
REC
kehrt man
MENU
DISPLAY
TIME
EXIT 23.01.2008 12:37
gedrückt werden, gelangen Sie ebenfalls in den
REC
Page 41

AUFNAHMEMODUS
Manuelle Speicherung von Bildern.
Im Aufnahmemodus muss der Monitor eingeschaltet sein und ein Bild anzeigen (Anrufauslösung
oder Aktivierung der Eigenstartfunktion).
Bildaufnahme
Anzahl aufgenommener
Bilder
Anruf
Drücken Sie
weniger als 2 Sekunden,
um das gewünschte Bild
Eigenstart
Wiederholen Sie diesen Schritt entsprechend
der Anzahl von Bildern, die Sie speichern
WIEDERGABEMODUS (FORWARD / REWIND)
Um die aufgenommenen Bilder anzuzeigen.
38/43
REC
aufzunehmen.
möchten
. . . . . .
24/09/2008 12:37
REC
der Aufnahme
Datum
der Aufnahme
Anzahl aufgenommener Bilder
43/43
Drücken Sie diese
Taste, um in den
BEREITSCHAFTS-
Uhrzeit
MODUS zu
gelangen
(Standby, Monitor
ausgeschaltet)
Angezeigtes Bild
31/43
22/09/2008 12:37
Durch Drücken von
Durch Drücken von
gelangt man zur vorigen Bildaufnahme
gelangt man zur nächsten Bildaufnahme
REC
21/09/2008 19:22
35/43
REC
REC
. . . . .
23/09/2008 13:01
Hinweis:
Wenn beispielsweise die Aufnahme 43/43 angezeigt wird, erscheint durch Drücken von
Bildaufnahme 1/43
REC
23/09/2008 18:12
Aufnahmedatum Uhrzeit der
41/43
Aufnahme
REC
die
41
Page 42

Modus: Bild LÖSCHEN
Bild löschen (Aufnahme).
Im Modus Löschen, muss der Monitor eingeschaltet sein und ein Bild anzeigen.
ZULETZT gespeichertes Bild
Alle aufgenommenen Bilder
Durch Drücken von
vorige Bild angezeigt
43/43
, wird das
35/43
. . . .
REC
Anzeigen des zuletzt
gespeicherten Bildes
Eigenstart
Kurzes Drücken von
24/09/2008 12:37
Dürch das Drücken von
wird das folgende Bild angezeigt
Bild gelöscht
22/09/2008 10:11
,
REC
35/43
OK?
22/09/2008 10:11
kurzes Drücken
von
21/09/2008 20:21
34/42
REC
Durch Drücken
dieser Taste kehrt
der Monitor in den
BEREITSCHAFTSMODUS zurück
(Standby, Monitor
ausgeschaltet).
Modus LÖSCHEN Alle Bilder
Alle gespeicherten Bilder (Aufnahmen) löschen.
Im Modus Löschen muss der Monitor eingeschaltet sein und ein Bild anzeigen.
43/43
43/43
OK?
24/09/2008 12:37
Drücken Sie
mindestens 2 Sekunden
bis auf dem Bildschirm kein
Bild erscheint.
(in schwarz)
Vollständige Löschung
Zeigt das zuletzt
aufgenommene Bild
Eigenstart
Kurzes Drücken von
24/09/2008 12:37
an
mindestens 2 Sekunden
Drücken Sie
42
Page 43

43
Page 44

Audio and Video Door Entry Systems
Publicación técnica de caracter informativo editada por FERMAX ELECTRONICA S.A.E.
E
FERMAX ELECTRONICA S.A.E., en su política de mejora constante, se reserva el derecho a
modificar el contenido de este documento así como las características de los productos que en él
se refieren en cualquier momento y sin previo aviso.
Cualquier modificación será reflejada en posteriores ediciones de este documento.
Technical document published for information purposes by FERMAX ELECTRONICA S.A.E.
EN
FERMAX ELECTRONICA S.A.E., in a policy of ongoing improvement, reserves the right to modify
the contents of this document and the features of the products referred to herein at any time and
with no prior notice. Any such modifications shall be reflected in subsequent editions of this
document.
Publication technique à caractère informatif éditée par FERMAX ELECTRONICA S.A.E.
F
Conformément à sa politique de perfectionnement continu, FERMAX ELECTRONICA, S.A.E. se
réserve le droit de modifier, à tout moment et sans préavis, le contenu de ce document ainsi que les
caractéristiques des produits auxquels il fait référence. Toutes les modifications seront indiquées
dans les éditions suivantes.
Technische Veröffentlichung zu Informationszwecken; Herausgeber: FERMAX ELECTRONICA S.A.E.
D
FERMAX ELECTRONICA S.A.E, behält sich das Recht vor, den Inhalt dieses Dokuments sowie die
technischen Eigenschaften der erwähnten Produkte ohne vorherige Ankündigung zu ändern, um
dadurch den ständigen Weiterentwicklungen und den damit in Verbindung stehenden
Verbesserungen Rechnung zu tragen. Alle Änderungen finden Aufnahme in den Neuauflagen
dieses Dokuments.
44
 Loading...