

Page 1
Cod.94638b V10/05
S
E
S
E
+
TELEFONO PALACE BUS 3 Ref. 8084 y Ref. 8086 (INTERCOM)
BUS 3 PALACE TELEPHONES Ref. 8084 and Ref. 8086 (INTERCOM)
TELEFONOS PALACE BUS 3
MULTIWAY 3 PALACE TELEPHONES
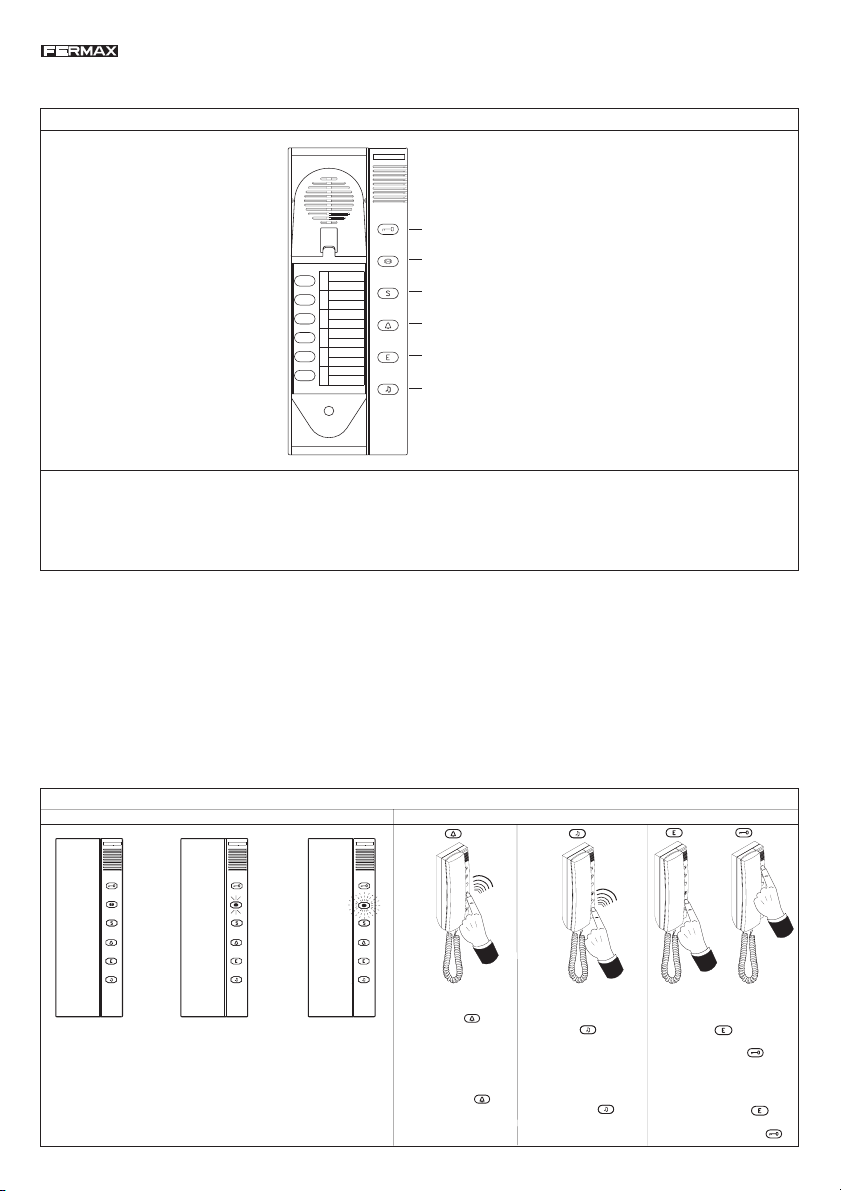
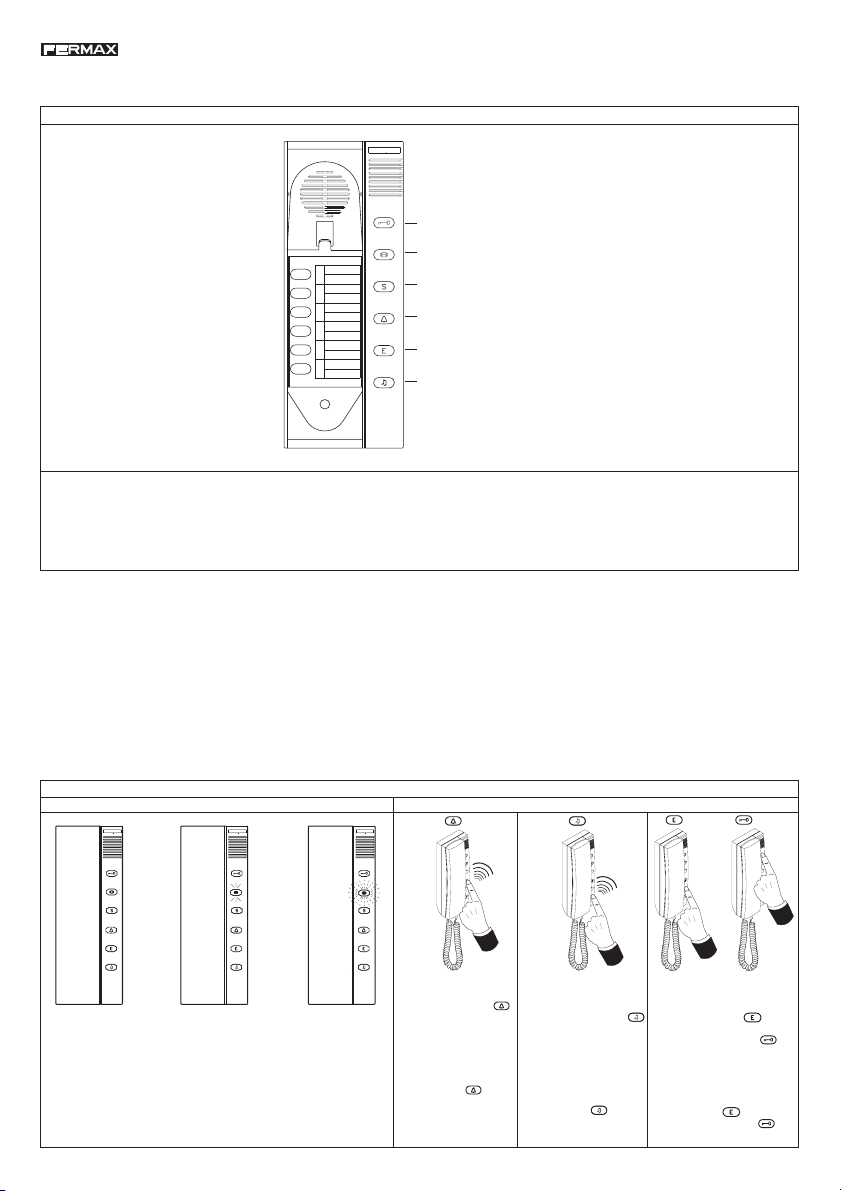
DESCRIPCIÓN DE LOS CONTROLES - PUSHBUTTONS DESCRIPTION
PULSADOR ABREPUERTAS
DOOR RELEASE PUSHBUTTON
LED INDICADOR / INDICATOR LED
- APAGADO / OFF: Reposo / standby
- ENCENDIDO/ ON: Línea ocupada / line is busy
PULSADORESLLAMADA
A TELÉFONOS
INTERCOM CALL
PUSHBUTTONS
1
2
3
4
5
6
- INTERMITENTE / BLINKING : Indicaciones varias / Several indications
PULSADOR DE LLAMADA A TELF. SECUNDARIOS
SECONDARY GROUP TELEPHONE SELECTION
PULSADOR LLAMADA A CONSERJE (*)
CALL TO GUARD UINT (*)
PULSADOR CONEXIÓN CON PLACA DE CALLE (*)
CONNECT TO THE OUTDOOR PANEL (*)
PULSADOR CONEXIÓN/DESCONEXIÓN DE LLAMADAS EXTERIORES
ENABLE/DISABLE CALLS FROM THE OUTDOOR
PANEL (*)
(*) Este pulsador no existe en el Teléfono Ref. 8086
(*) Telephone Ref. 8086 has not this pushbutton.
Para instalaciones con comunicación interior se utilizarán
los teléfonos Ref. 8084 y 8086. con el cambiador Ref. 88039.
Para instalaciones con comunicación interior y comunicación exterior (con placa de calle), se utilizarán los teléfonos
Ref. 8084 con el cambiador Ref. 9017.
Recuerde que debe programar los teléfonos, tal y como se explica en la «SECUENCIA DE PROGRAMACION».
Se permiten hasta 12 extensiones por vivienda, 6 «principales» y 6 «secundarios».
Las comunicaciones son siempre secretas. Solo podrán estar en comunicación la placa de calle y un teléfono o dos teléfonos
interiores de forma simultánea.
Los tonos de llamada son distintos según su procedencia, interior o exterior.
Es posible restringir las comunicaciones entre teléfonos secundarios, es decir que no puedan realizarse llamadas entre ellos.
Telephones must be programmed, as explained in: «PROGRAMMING».
It is posibble to connect up to 12 extensions in each dwelling, 6 «main» and 6 «secondary» ones.
It is possible to restrict the communication between secondary telephones. This is to say: disallow calls between them.
Telephones are full privacy.
The call tones are different depending on where the call is comming from: intercom call or outdoor panel call.
In installations with internal communication, use telephones
ref. 8084 and 8086 with switcher ref. 88039.
In installations with internal communication and external
communication (with outdoor panel), use telephones ref. 8084
and switcher ref. 9017.
FUNCIONAMIENTO EN REPOSO (El teléfono debe permanecer colgado). - STANDBY OPERATION (The telephone must be hung up).
LED APAGADO
Línea interior libre
LED OFF
Intercom line free
INDICACIONES - INDICATIONS
LED ENCENDIDO
Línea interior ocupada
LED ON
Intercom line busy
LED INTERMITENTE
El teléfono tiene desconectada la llamada exterior.
LED BLINKING
The telephone has
disabled the external call
(outdoor panel call).
LLAMAR al CONSERJE
Pulsar la tecla
La respuesta de la Conserjería, si existe (MDS), se
monitoriza con un «bip».
CALL to GUARD UNIT
Press the button
If there were a MDS Guard
Unit, a «bip» would sound in
the telephone.
FUNCIONES - FUNCTIONS
bip
S
E
CONECTAR / DESCONEC-
TAR llamada exterior
.
Pulsar la tecla
mente para conectar/desconectar la llamada.
ENABLE / DISABLE
.
Press the button
alternately to enable/disable
the call.
S
E
alternativa-
external call
bip
ABRIR la PUERTA sin
Pulsar la tecla
car con la placa de calle y a
continuación la tecla
OPEN the DOOR without
hanging up the handset
.
Press the button
communicate with the outdoor
panel and then the button
descolgar
para comuni-
.
to
Page 2
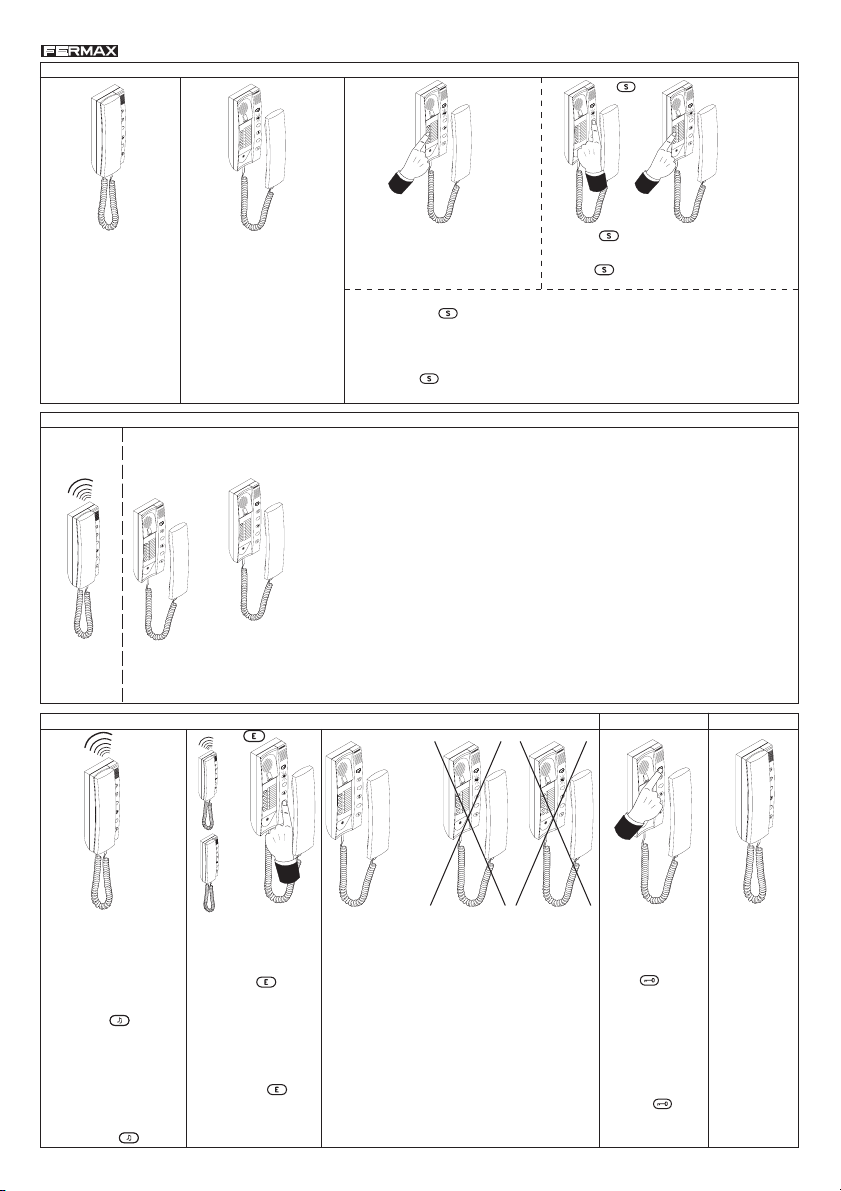
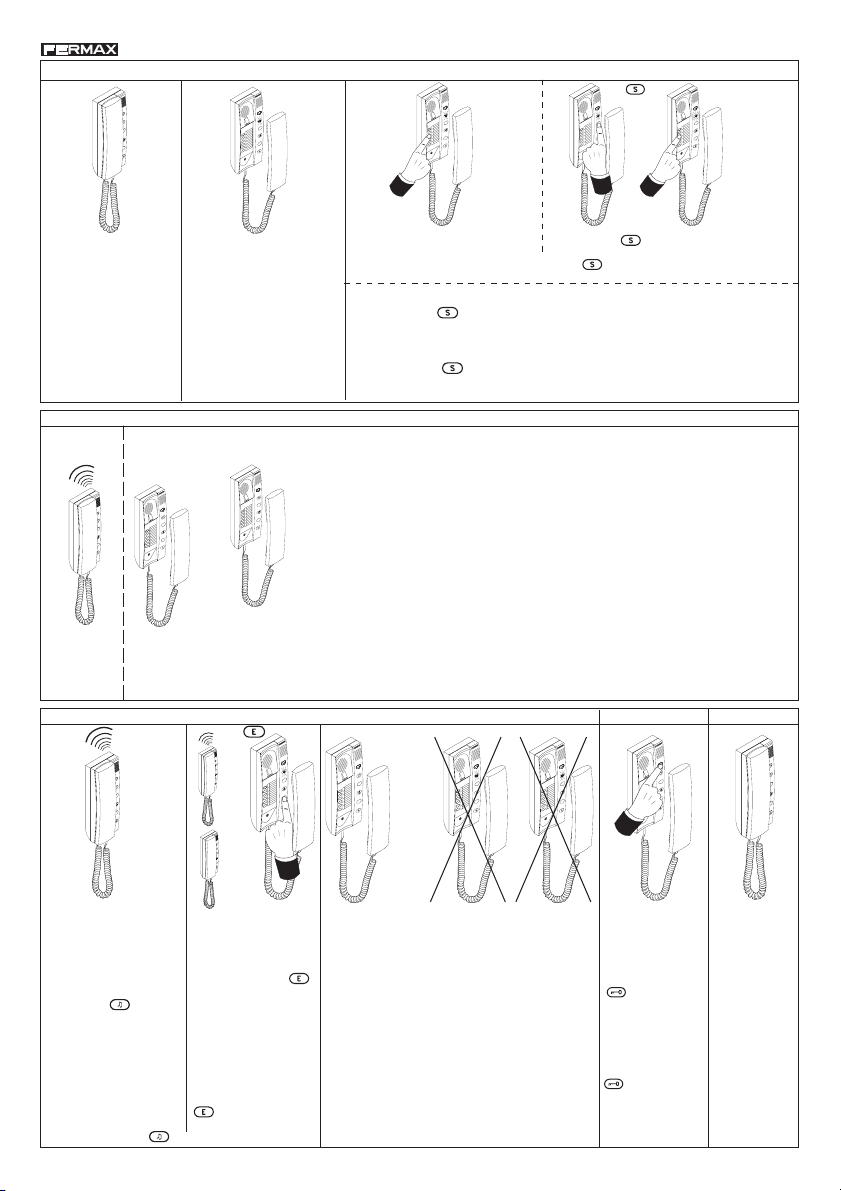
REALIZAR LLAMADA INTERIOR - TO MAKE AN INTERCOM CALL
S
E
S
1
2
3
4
E
5
6
1º
S
1
2
3
4
E
5
6
S
1
2
3
4
E
5
6
2º Número de
teléf. secundario
Secondary
S
1
telephone number
2
3
4
E
5
6
Comprobar que la línea interna no está ocupada (el
led indicador apagado).
Check that the audio channel
is not busy (indicator led is
OFF).
Para realizar una comunicación
descolgar el brazo del teléfono. El led indicador se enciende.
Pick up the handset. The indicator
led turns ON.
Marcar directamente el número de
teléfono «principal».
Press the «main» telephone number
directly.
* Al pulsar un número de teléfono el led indicador se apaga.
* Después de pulsar
pulsación.
* Si transcurridos 40 segundos no se ha atendido la llamada, el sistema pasará a reposo.
* When a telephone number is pressed the indicator led turns off.
* After pressing
* If the call is unattended, the system goes to the standby status in 40 seconds.
ATENDER LLAMADA INTERIOR - TO ATTEND AN INTERCOM CALL
El teléfono llamado emitirá un tono de llamada. Una vez establecida la comunicación entre ambos teléfonos, la línea
interna queda ocupada (secreto de comunicación). El led indicador estará en todos los teléfonos encendido, menos
en los que están en comunicación.
* Si transcurridos 40 segundos no se ha descolgado el otro teléfono, el sistema pasará a reposo.
* El tiempo máximo de conversación está limitado a 4 minutos o hasta que se cuelgue uno de los teléfonos.
S
1
2
3
* Si alguno de los teléfonos se queda descolgado, el led permanecerá encendido como recordatorio.
4
E
5
S
1
S
2
3
4
E
5
6
E
6
* La llamada a un teléfono descolgado conecta el audio sin producir tono de llamada.
* Si mientras se está en comunicación interna se produce una llamada externa, se oirá un leve tono de
llamada en el auricular.
The telephone called emits a calling sound. Both telephones can establish a private conversation. The indicator led
turns on in all the telephones except in the ones that are having communication.
* If the call is unattended, the system goes to a standby status in 40 seconds.
* The conversation time is limited to 4 minutes until one of the telephones has been hung up.
* If any of the telephones stay off the hook, the indicator led remains ON to warn it.
* If a telephone off the hook is called, no call sound is generated but audio is connected anyway.
* If an external call is made during an intercom conversation, a soft tone can be heard.
ATENDER LLAMADA EXTERIOR - TO ATTEND AN EXTERNAL CALL
S
E
S
E
S
1
2
3
4
E
5
6
S
1
2
3
4
E
5
6
Marcar + el número de teléfono «secundario».
Press
+ «secondary» telephone number.
el led lucirá intermitentemente durante 5 segundos, reclamando la siguiente
the indicator led blinks during 5 seconds, asking for slave telephone number.
S
1
2
3
4
E
5
6
S
1
2
3
4
E
5
6
S
1
2
3
4
E
5
6
S
E
La llamada desde la placa de
calle generará un tono de llamada, distinto al generado por
una llamada interior.
Se escuchará en los teléfonos
que no tengan desconectada la
llamada. Tecla .
A call from the outdoor panel will
generate a call tone that is
different than the internal call
tone.
It will be heard in the telephones
with the external call tone not
disabled. Button
.
S
E
La atención a esta llamada
puede realizarse desde cualquier teléfono, haya sonado o no, descolgando y pulsando la tecla
This call can be attended
from any telephone. Just
hung up the telephone and
press the button
.
.
Una vez que un teléfono se conecta con la placa de calle, la
línea queda ocupada, por lo que ningún otro teléfono tiene
acceso a la conversación.
When a telephone is connected to the outdoor panel the line
is busy. Other telephones can not hear the conversation.
Mientras dura la conversación puede activarse la apertura
de puerta pulsando
la tecla.
During the
conversation the
door release can be
activated pressing
the button
.
La comunicación
finaliza al colgar el
teléfono o transcurrido un tiempo de
90 segundos.
The conversation
time is limited to
90 seconds or until
the telephone is on
hook.
Page 3
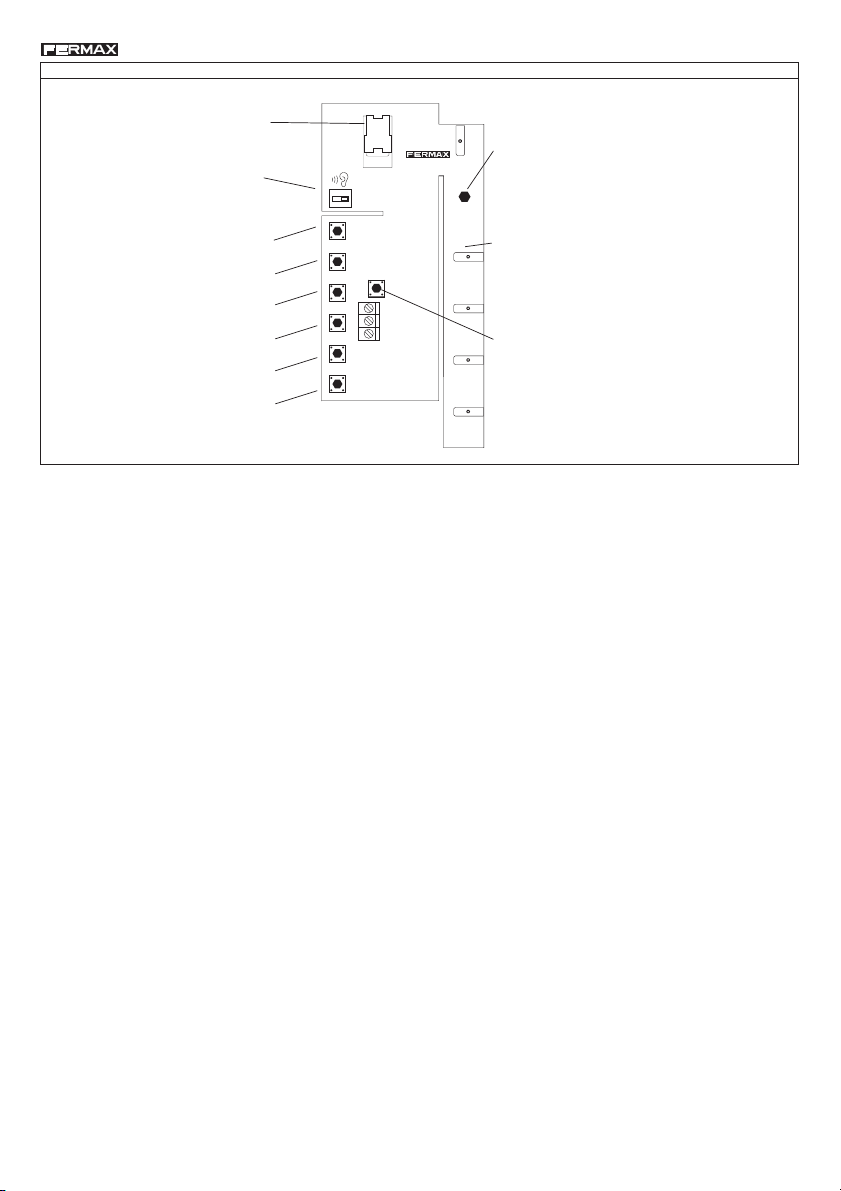
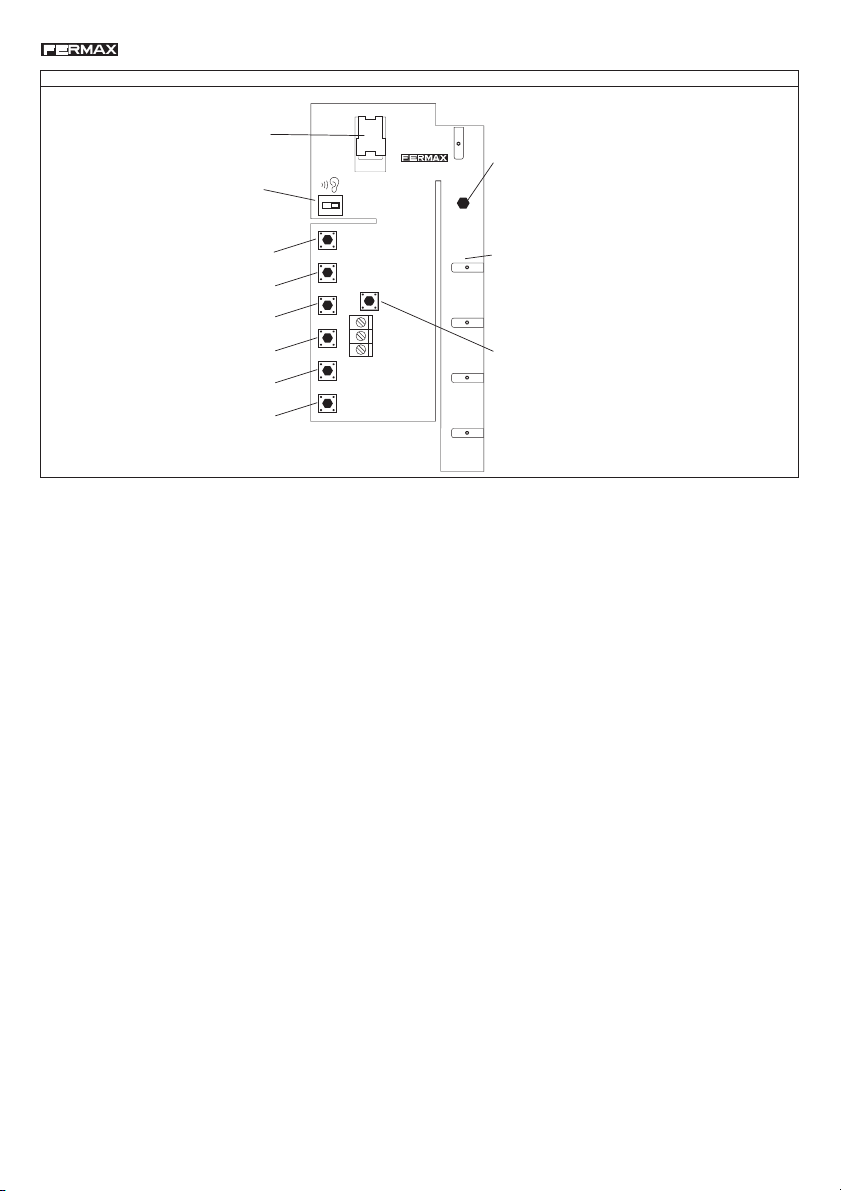
SECUENCIA DE PROGRAMACION - PROGRAMMING
Switch de colgado
HookSwitch
Volumen de audio
- : normal
+: extra
Audio Volume
- : normal
+: extra
Botones correspondientes a cada pulsador.
Buttons corresponding to
pushbutton
1
2
3
4
5
-
SW4
SW5
SW6
SW1
SW2
SW3
6
SW8
12202CI01A
+
SW14
SW7
S
+
LED indicador
LED indicator
Lámina
correspondiente a la tecla S
S
Metallic contact corresponding to
SW11
the S pushbutton
CO
SW9
Botón de Programación SW7
Programming Pushbutton SW7
E
SW10
NM
SW12
1. Abrir la tapa del teléfono, mantener presionado el switch
de colgado y pulsar el botón de programación SW7.
El brazo del teléfono debe estar enchufado para escuchar los
sonidos de confirmación cuando se programen los teléfonos.
Después de esto, el teléfono se puede programar.
El led indicador comenzará a parpadear (intermitente rápido). En
este momento se dispone de 10 segundos para completar la programación del teléfono.
2. Si el teléfono se va a programar como:
* «principal», pulsar el botón correspondiente a su número.
* «secundario», pulsar la lámina correspondiente a la tecla «S».
El led pasará a intermitente lento.
A continuación pulsar el botón correspondiente a su número
de teléfono secundario.
El brazo emite dos «bips» consecutivos indicando la aceptación de la programación, el led se apaga y el teléfono pasa
a reposo.
3. Soltar el switch de colgado y cerrar la tapa del teléfono.
* El número programado se mantiene de forma indefinida aunque se
corte la alimentación.
* El teléfono se puede reprogramar de nuevo siguiendo los pasos
comentados arriba.
* Para restringir las comunicaciones entre teléfonos secundarios debe
sustituirse el muelle de la tecla «S», por el casquillo de bloqueo, el
cual se puede solicitar a Fermax.
* Es posible aumentar el nivel de audio por medio del switch SW14.
1. Open the telephone cover, keep pressed the hook switch
and press the programming pushbutton once (SW7).
The handset has to be plugged into the telephone to hear the
confirmation sound when the telephone is programmed.
After this, the telephone can be programmed.
The indicator led starts to blink quickly. There are 10 seconds
from now to program the telephone.
2. If the telephone is going to be programmed as a:
* «mainl», press the corresponding pushbutton number.
* «secondary», press the metallic contact of the «S»
pushbutton.
The led now blinks slowly.
And then press the corresponding pushbutton number.
In any case, the handset emits two confirmation «bips», the
led turns OFF and the telephone goes to the standby status.
3. Realese the hook switch and place the telephone cover.
* The programmed number remains even if the telephone is
disconnected or the power supply is off.
* The telephone can be reprogrammed following the previous
steps.
* To restrict the communications between secondary telephones it is
necessary to replace the spring of the «S» button by a
blocking sleeve. It can be request to Fermax.
* It is possible to increase the audio level through switch SW14.
Page 4
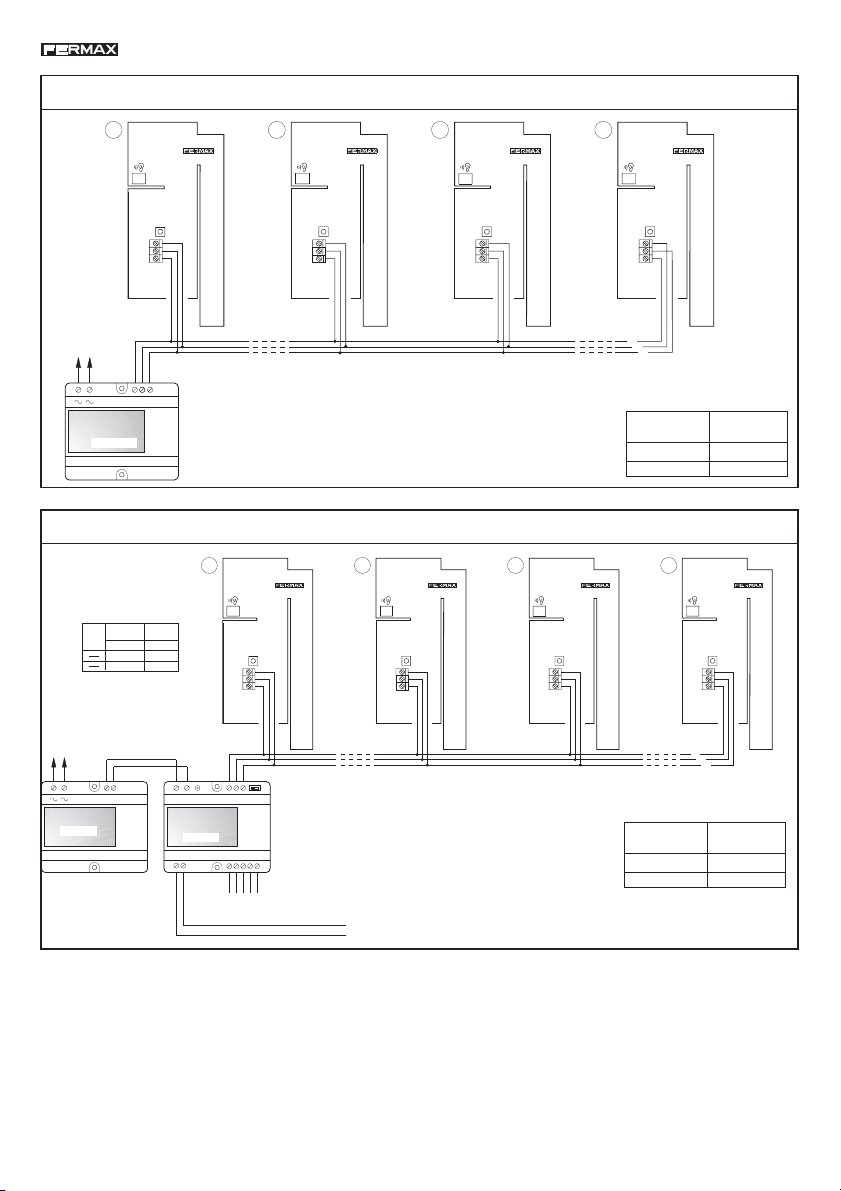
ESQUEMA DE INSTALACION CON COMUNICACIÓN INTERIOR
INSTALLATION DIAGRAM FOR INTERNAL COMMUNICATION
1
12202CI01A
+
-
SW14
12202CI01A
-6+
SW14
S1
12202CI01A
- +
SW14
S6
12202CI01A
+-
SW14
S
+
Ref. 8086
+
Distancia Máxima
Maximum Distance
Distancia Máxima
Maximum Distance
SW7
S
0 - 50 m
50 - 100 m
0 - 50 m
50 - 100 m
S6
+
Ref. 8086
SW7
S
+
TELÉFONO BUS 3
S
+
TELÉFONO BUS 3
Ref. 8086
Ref. 8086
SW7
S
+
TELÉFONO BUS 3
SW7
TELÉFONO BUS 3
Vcc
-
+
S
ALIMENTACIÓN
BUS 3
Ref. 88039
REF. 88039 / 9013
INSTALLATION DIAGRAM FOR INTERNAL AND EXTERNAL COMMUNICATION
USAEUROPE
mm2
AWG
1.0
18
0.5
20
TELEFONO BUS 3 TELEFONO BUS 3 TELEFONO BUS 3
220 Vac
18 V
+-
ALIMENTADOR
Ref. 8815
REF. 6062
* Se distinguen dos grupos de teléfonos: PRINCIPAL y SECUNDARIO, los cuales pueden tener 6 teléfonos cada uno.
* Para llamar a los teléfonos del grupo SECUNDARIO, hay que pulsar el pulsador S, y después el número de teléfono a llamar.
* There are 2 groups of telephones: MAIN and SECONDARY. Every group can have up to 6 telephones.
* To call to the telephones of SECONDARY Group, it is necesary to press «S» button, and then the required telephone number.
CAMBIADOR
Ref. 9017
C+ C-
BUS 3
Teléfonos Ref. 8084 y 8086 con cambiador Ref. 88039
Telephones ref. 8084 and 8086 with switcher ref. 88039
ESQUEMA DE INSTALACION CON COMUNICACIÓN INTERIOR Y EXTERIOR
1
12202CI01A
+
-
SW14
SW7
S
+
TELEFONO BUS 3
BAL
PN
-S+-+
12202CI01A
-6+
SW14
SW7
S
+
S1
12202CI01A
- +
SW14
SW7
S
+
Teléfonos ref. 8084 con cambiador ref. 9017
63412
21364
A CUALQUIER INSTALACION SISTEMA 4+N
Telephones ref. 8084 with switcher ref. 9017
A CUALQUIER INSTALACIÓN 4+N
TO 4+N SYSTEM
LLAMADA CONSERJE POR NEGATIVO (Conserjería MDS)
LLAMADA CONSERJE POR NEGATIVO (Conserjería MDS) /CALL TO GUARD UNIT USING NEGATIVE SIGNAL (MDS Guard Unit)
LLAMADA CONSERJE POR POSITIVO (Conserjería CITYCOM III con RETENCION de llamada)
LLAMADA CONSERJE POR POSITIVO(Conserjería CITYCOM III) / CALL TO GUARD UNIT USING POSITIVE SIGNAL (CITYCOM III)
Distancia Min.
Minimum Section
0.5 mm
1 mm
12202CI01A
+-
SW14
SW7
S
+
S
-
Distancia Min.
Minimum Section
0.5 mm
1 mm
2
2
2
2
Page 5
POSTE PALACE BUS 3 Ref. 8084 et 8086 (INTERCOM)
S
E
S
E
+
TELEFON PALACE BUS 3 Art.-Nr. 8084 - Art.-Nr. 8086 (INTERCOM)
POSTES PALACE BUS 3
TELEFON PALACE BUS 3
DESCRIPTION DES CONTRÔLER - BESCHREIBUNG DER REGLER
POUSSOIR OUVREPORTES
DRUCKKNOPF TÜRÖFFNER
LED INDICATEUR/ AMZIEGE-LED
- ÁTEINT / AUS: Repos / standby
POUSSOIRS D’APPEL
AUX POSTES
DRUCKKNOPF ANRUF
AN TELEFONE
1
2
3
4
5
6
- ALLUME/ AN: Ligne occupée ocupada / leitung besetzt
- CLIGNOTANT/ BLINKEND : Indications variées / programmiermodus
POUSSOIR D’APPEL AUX POSTES SECONDAIRES
DRUCKKNOPF ANRUF AN 2 GRUPPEN NEBENTELEFONENE
POUSSOIR D’APPEL AU CONCIERGE (*)
DRUCKKNOPF ANRUF AN TELEFONE (*)
POUSSOIR CONNEXION AVEC (PLATINE DE RUE) (*)
DRUCKKNOPF VERBINDUNG NACH AUBEN (FRONT PLATINE) (*)
POUSSOIR CONNEXION/DÉCONNEXION DES
APPELS EXTÉRIEURS (*)
DRUCKKNOPF AKTIVIERUNG/DEAKTIVIERUNG
VON EXTERNEN ANRUFEN (*)
(*) Ce poussoir n’existe pas dans le Poste Ref. 8086
(*) Dieser Druckknopf ist beimTelefon Art.-Nr.8086 nicht
vorhanden.
Dans les installations avec communication intérieure on utilisera
les postes réf. 8084 et 8086 et le commutateur réf. 88039.
Dans les installations avec communication intérieure et
extérieure (avec platine de rue), on utilisera les postes réf. 8084
le et commutateur réf. 9017.
Tous les postes doivent être programmés suivant la procédure décrite: «SÉQUENCE DE PROGRAMMATION».
Il est possible d’installer jusqu’à 12 extensions par logement, 6 «principales» et 6 «secondaires».
Il est possible de restreindre la communication entre postes secondaires, c’est à dire: interdire certains postes d’effectuer des appels
entre eux.
Las communications sont toujours secrètes.
Les tonalités des appels sont différents selon la provenance, intérieure ou extérieure.
Achten Sie darauf, dass die Telefone so zu programmieren sind, wie es auf der «PROGRAMMIERSEQUENZ» beschrieben wird.
Es sind bis zu 12 Telefone pro Wohnung zulässig, 6 «Haupttelefon» und 6 «Nebentelefon».
Es ist möglich, die Verbindungen zwischen den NebenTelefonen einzuschränken, d.h. dass zwischen ihnen keine Anrufe möglich sind.
Die Gesprächsverbindungen sind immer geheim.
Die Ruftöne sind je nach ihrer Herkunft, extern oder intern, unterschiedlich.
Kompatibel mit Empfangszentralen City Line, CityCom und MDS.
FONCTIONNEMENT EN MODE REPOS (Le Poste doit rester raccroché) - STANDBY-BETRIEB (Der Telefonhörer muss aufgelegt sein).
LED ÉTEINT
Ligne intérieure
libre
LED AUS
Innenleitung frei
INDICATIONS - ANZEIGEN FONCTIONS - FUNKTIONEN
LED ALLUMÉ
Ligne intérieure occupée
LED AN
Innenleitung besetzt
LED CLIGNOTANT
Le poste n’a pas activé
l’appel extérieur.
LED BLINKEND
Der Außenanruf des
Telefons ist deaktiviert.
Für Anlagen mit interner Sprechverbindung werden die Telefone
Ref. 8084 und 8086 mit dem Umschalter Ref. 88039 benutzt.
Für Anlagen mit interner und externer Sprechverbindung (mit
Türstation) werden die Telefone Ref. 8084 mit dem Umschalter
Ref. 9017 benutzt.
bip
S
E
APPELER le CONCIERGE
Appuyer sur la touche
La réponse de la Conciergerie, si elle existe (MDS), est
monitorisée avec un «bip».
ANRUF an EMPFANG
Drücken Sie die
Die Antwort des Empfangs,
falls vorhanden (MDS), wird
mit einem «beep» angezeigt.
-Taste
CONNECTER / DECON-
NECTER l’appel extérieur
.
Appuyer sur la touche
alternativement pour connecter/déconnecter l’appel.
AKTIVIERUNG /
DEAKTIVIERUNG
Drücken Sie die -Taste,
um den Anruf wahlweise zu
aktivieren bzw. deaktivieren.
S
E
Außenanruf
bip
OUVRIR la PORTE sans
Appuyer la touche
communiquer avec la platine de
rue et ensuite la touche
Öffnen der Türe ohne
Drücken Sie die
anschließend die Taste
décrocher
pour
abzunehmen
-Taste und
.
.
Page 6
RÉALISER UN APPEL INTÉRIEUR - INTERNEN ANRUF AUSFÜHREN
S
E
S
1
2
3
4
E
5
6
1
2
3
4
5
6
S
E
2º Numéro du
poste secondaire
Nummer des
Slave-Telefons
1º
S
1
2
3
4
E
5
6
S
1
2
3
4
E
5
6
Vérifier que la ligne interne
n’est pas occupée (le led indicateur est éteint).
Überprüfen Sie, ob die
Innenleitung nicht besetzt ist
(LED-Anzeige aus).
Pour effectuer un appel décrocher
le combiné du poste. Le led indicateur s’éteint.
Um eine Gesprächsverbindung
herzustellen, nehmen Sie den
Telefonhörer ab. LED-Anzeige
leuchtet auf.
S’OCCUPER D’UN APPEL INTÉRIEUR
S
1
S
2
3
4
E
5
6
E
S’OCCUPER D’UN APPEL EXTÉRIEUR
S
S
E
E
Composer directement le numéro du
poste «principal».
Direkt die Nummer des MasterTelefons wählen.
* Quand on compose un numéro de poste le led indicateur s’éteint.
* Après avoir tapé
* Si après 40 secondes l’appel n’a pas été répondu, le système passera au repos.
* Beim Wählen einer Telefonnummer erlischt die LED-Anzeige.
* Nach dem Wählen
* Ist der Anruf nach 40 Sekunden noch nicht beantwortet worden, schaltet das System in Standby-
Modus.
Le poste appelé émet un signal d’appel. Une fois établie la communication entre les deux postes, la ligne interne
reste occupée (secret de communication). Le led indicateur restera allumé dans tous les postes connectés, sauf
dans ceux qui sont en communication.
* Si après 40 secondes l’autre poste n’a pas été décroché, le système passe au repos.
* Le temps maximum de conversation est limité à 4 minutes ou jusqu’au raccroché.
S
* Si l’un des postes reste décroché, le led restera allumé comme rappel.
1
2
3
4
* L’appel à un poste décroché connecte l’audio sans produire un ton d’appel.
E
5
6
* Pendant une communication interne, si un appel externe se produit, une légère tonalité d’appel se fait entendre.
Das angerufene Telefon sendet ein Rufzeichen aus. Nach Herstellung der Verbindung zwischen beiden Telefonen bleibt
die interne Leitung besetzt (Vertraulichkeit der Verbindung). Die LED-Anzeige leuchtet bei allen Telefonen, mit Ausnahme
derer, die gerade miteinander verbunden sind.
* Wenn der Hörer des anderen Telefons nach 40 Sekunden nicht abgenommen wurde, geht das System in Standby-
Modus über.
* Die Gesprächsdauer ist auf höchstens 4 Minuten begrenzt oder endet dann, wenn eines der Telefone aufgelegt wird.
* Wenn bei einem der Telefone der Hörer nicht aufgelegt wurde, bleibt die LED-Anzeige zum Zeichen dafür erleuchtet.
* Der Anruf an ein Telefon, dessen Hörer nicht aufgelegt wurde, aktiviert das Audio, ohne dass dabei ein Rufzeichen
ertönt.
* Wenn ein externer Anruf eingeht, während man eine Innenverbindung unterhält, hört man einen leisen Ton im Hörer.
S
1
2
3
4
E
5
6
S
1
2
3
4
E
5
6
, le led clignotera pendant 5 secondes, en réclamant la suivante pulsation.
blinkt das LED während 5 Sekunden und fordert zum nächsten Tastendruck auf.
S
1
2
3
4
E
5
6
Appuyer + le numéro du poste «secondaire».
+ Nummer des Nebentelefons wählen.
S
1
2
3
4
E
5
6
S
1
2
3
4
E
5
6
S
E
L’appel de la platine de rue va
générer un signla d’appel, différent
à celui qui est engendré par un
appel intérieur.
L’appel est entendu par tous les
postes qui ne sont pas deconnectés
avec la touche
Ein von der Frontplatte aus
getätigter Anruf lässt ein
Rufzeichen ertönen, das von dem
verschienden ist, welches ein
interner Anruf hervorruft.
Er ertönt bei jenen Telefonen, bei
denen die Anruffunktion nicht
deaktiviert wurde. Taste
S
E
La réponse à cet appel peut
se faire par n’importe quel
poste, que celui-ci ai sonné
ou non, en décrochant et en
appuyant sur la touche
Die Entgegennahme eines
solchen Anrufs kann von
jedem beliebigen Telefon aus
geschehen, ob es geläutet hat
oder nicht, indem der Hörer
abgenommen und die Taste
gedrückt wird.
Une fois que le poste est connecté avec la platine de rue, la
ligne reste occupée, de tel sorte qu’aucun autre poste ne peut
avoir accès à la conversation.
.
Nachdem ein Telefon mit der Frontplatte verbunden ist, bleibt die
Leitung besetzt, so dass kein anderes Telefon an der
Gesprächsverbindung teilnehmen kann.
Pendant que la
conversation se
déroule on peut activer
l’ouverture de la port en
appuyant sur la touche
.
Während der Dauer des
Gesprächs kann die
Öffnung der Türe durch
Drücken der Taste
betätigt werden.
La communication
se termine quand
on raccroche le
poste ou après 90
secondes de
conversation.
Die Verbindung
endet bei Auflegung
des Hörers oder
nach Ablauf von 90
Sekunden.
Page 7
SEQUÉNCE DE PROGRAMMATION - PROGRAMMIERSEQUENZ
Switch de raccroché
Auflegeschalter
Volume de audio
- : normal
+: extra
Lautstärke Audio
- : normal
+: extra
Bouttons correspondants
aux poussoirs:
Knöpfe, die Druckknöpfen
entsprechen:
1
2
3
4
5
+
-
SW14
SW4
SW5
SW7
SW6
-
SW1
S
+
SW2
SW3
6
1. Ouvrir le couvercle du poste, maintenir pressé le switch de
raccroché et appuyer le bouton de programmation SW7.
Le combiné doit être branché pour écouter les tonalités de
confirmation pendant la programmation.
Ensuite, le poste peut être programmé.
Le led indicateur commencera à clignoter (intermittent rapide).
Dès lors on dispose de 10 secondes pour compléter la
programmation du poste.
2. Si le poste va être programmé comme:
* «principal», appuyer le bouton correspondant à son numéro.
* «secondaire», appuyer sur la lame correspondant à la touche
marquée avec «S».
Le led passe à un clignotement lent.
Ensuite appuyer le bouton correspondant à son numéro de
poste secondaire.
Le combiné émet deux «bips» consécutifs qui indiquent que la
programmation a été acceptée, le led s’éteint et le poste reste en
repos.
3. Lâcher le switch de raccroché et fermer le couvercle du poste.
SW8
12202CI01A
1. Deckplatte des Telefons abnehmen, Auflegeschalter gedrückt
LED indicateur
LED-Anzeige
Lame
correspondante à la touche S
S
Plättchen, das der Taste S
SW11
entspricht.
CO
SW9
Bouton de ProgrammationSW7
Programmiertaste SW7
E
SW10
NM
SW12
halten und die Programmiertaste SW7 drücken.
Der Hörer des Telefons muss eingesteckt sein, um die
Bestátigungszeichen bei der Programmierung der Telefone
hören zu können.
Danach kann das Telefon programmiert werden.
Die LED-Anzeige beginnt zu blinken (schnelles Blinkzeichen).
Von da an verfügt man über 10 Sekunden, um die
Programmierung des Telefons auszuführen.
2. Will man das Telefon als:
* «Haupttelefon» programmieren, muss man den seiner
Nummer entsprechenden Knopf drücken.
* «Nebentelefon» programmieren, muss man das der Taste
«S» entsprechende Plättchen drücken.
Die LED-Anzeige geht zu einem langsamen Blinken über.
Anschließend muss der der NebenTelefonen-Nummer
entsprechende Knopf gedrückt werden.
Der Hörer sendet zwei aufeinanderfolgende Pieptöne aus, um
anzuzeigen, dass die Programmierung angenommen wurde, die
LED-Anzeige erlischt und das Telefon geht in Standbymodus über.
3. Auflegeschalter loslassen und Deckplatte des Telefons
wieder schließen.
* Le poste programmé se maintient indéfiniment même si
l’alimentation est coupée.
* Le poste peut être reprogrammé à nouveau en suivant les points
expliqués ci-dessus.
* Pour restreindre les communicatins entre postes secondaires on
doit remplacer le ressort de la touche «S», par la douille de blocage,
laquelle peut être sollicité à Fermax.
* Il est possible d’augmenter le niveau audio au moyen du
switch SW14.
* Die programmierte Nummer wird für unbegrenzte Zeit beibehalten,
auch wenn die Stromversorgung unterbrochen wird.
* Das Telefon kann wieder umprogrammiert werden, indem man die
oben beschriebenen Schritte ausführt.
* Um die Verbindungen zwischen NebenTelefonen zu unterbinden,
muss die Feder der Taste «S» durch die Blockierhülse ersetzt werden,
die bei Fermax erhältlich ist.
* Die Lautstärke kann mit dem Schalter SW14 erhöht werden.
Page 8
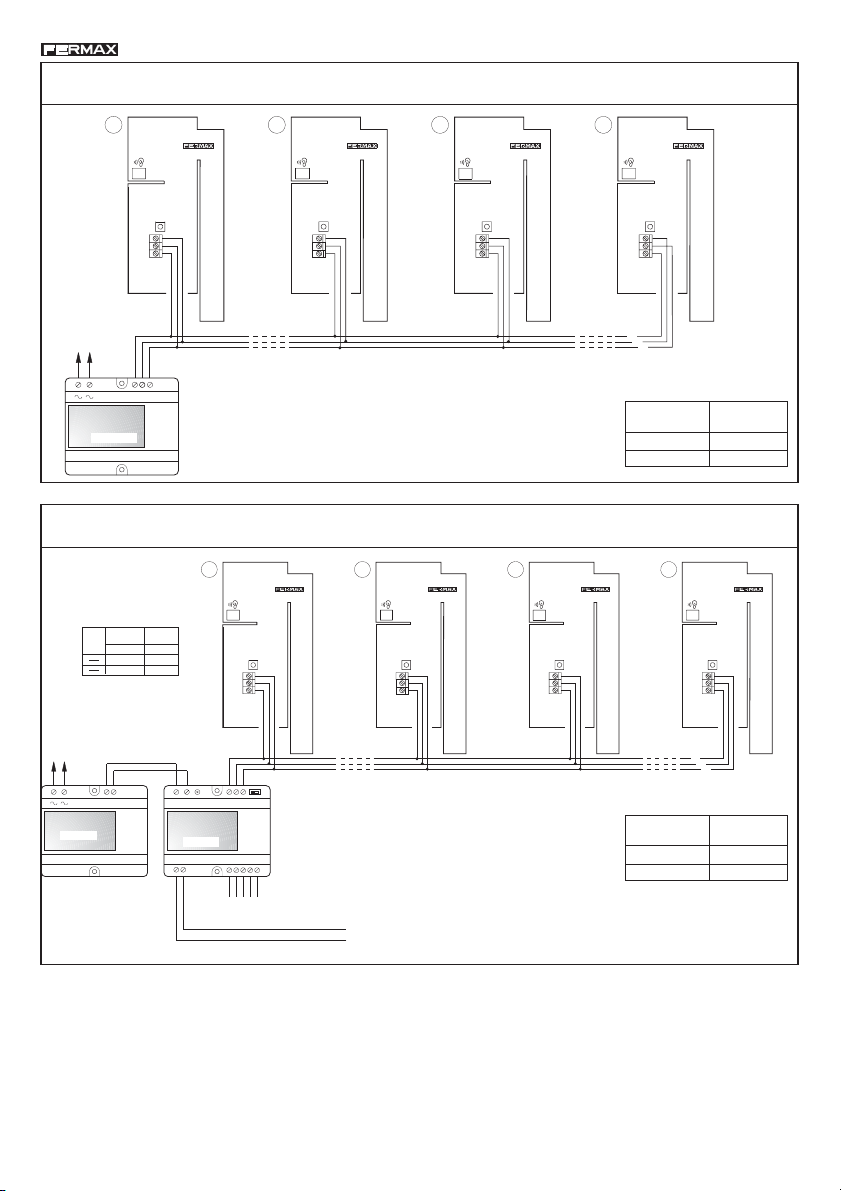
SCHÉMA D’INSTALLATION AVEC COMMUNICATION INTÉRIEURE
SCHALTPLAN FÜR ANLAGEN MIT INTERNER SPRECHVERBINDUNG
1
12202CI01A
+
-
SW14
12202CI01A
-6+
SW14
S1
12202CI01A
- +
SW14
S6
12202CI01A
+-
SW14
220 Vac
TELÉFONO BUS 3
Ref. 8086
Vcc
ALIMENTACIÓN
BUS 3
Ref. 88039
REF. 88039 / 9013
mm2
1.0
0.5
Ref. 8086
SW7
S
+
TELÉFONO BUS 3
SW7
-
S
+
TELÉFONO BUS 3
-
+
S
Ref. 8086
SW7
S
+
TELÉFONO BUS 3
Ref. 8086
Distance Maximum
Max. Entfernung
Postes réf. 8084 et 8086 avec commutateur réf. 88039
Telefone, Ref. 8084 und 8086 mit dem Umschalter, Ref. 88039
SCHÉMA D’INSTALLATION AVEC COMMUNICATION INTÉRIEURE ET EXTÉRIEURE
SCHALTPLAN FÜR ANLAGEN MIT INTERNER UND EXTERNER SPRECHVERBINDUNG
1
12202CI01A
+
-
SW14
USAEUROPE
AWG
18
20
TELEFONO BUS 3 TELEFONO BUS 3 TELEFONO BUS 3
SW7
S
+
TELEFONO BUS 3
12202CI01A
-6+
SW14
SW7
S
+
S1
12202CI01A
- +
SW14
SW7
S
+
SW7
S
+
+
S
50 - 100 m
0 - 50 m
S6
Section Minimum
Min. Querschnitt
+-
SW14
SW7
-
S
+
+
S
-
0.5 mm
1 mm
12202CI01A
2
2
18 V
+-
ALIMENTADOR
Ref. 8815
REF. 6062
* On peut distinguer deux groupes de postes: PRINCIPALES et SECONDAIRES, on peut installer 6 postes de chaque type.
* Pour appeler aux postes du groupe SECONDAIRES, il faut d’abord appuyer sur la touche S, puis sur la touche du numéro du poste.
* Man unterscheidet zwischen 2 Gruppen von Telefonen: HAUPTGRUPPEN und NEBENGRUPPEN die beide jeweils 6 Telefone beinhalten können.
* Um die Telefone der NEBENGRUPPEN anzurufen, muss der Druckknopf S gedrückt und dann die gewünschte Telefonnummer gewählt werden.
BAL
CAMBIADOR
BUS 3
Ref. 9017
C+ C-
A CUALQUIER INSTALACION SISTEMA 4+N
PN
-S+-+
63412
A N’IMPORTE QUEL SYSTÈME 4+N
21364
TO 4+N SYSTEM
Postes réf. 8084 avec commutateur réf. 9017
Telefone Ref. 8084 mit dem Umschalter Ref. 9017
LLAMADA CONSERJE POR NEGATIVO (Conserjería MDS)
APPEL AU CONCIERGE PAR NEGATIF (Conciergerie MDS) / CALL TO GUARD UNIT USING NEGATIVE SIGNAL (MDS Guard Unit)
APPEL AU CONCIERGE PAR POSSITIF (CITYCOM III) / CALL TO GUARD UNIT USING POSITIVE SIGNAL (CITYCOM III)
LLAMADA CONSERJE POR POSITIVO (Conserjería CITYCOM III con RETENCION de llamada)
Distance Maximum
Max. Entfernung
0 - 50 m
50 - 100 m
Section Minimum
Min. Querschnitt
0.5 mm
1 mm
2
2
 Loading...